AURORA Iridium WiFi Terminal - redportglobal.com · Ship to shore network management solutions are...
34
AURORA Iridium WiFi Terminal Onsite Administrator's Guide
Transcript of AURORA Iridium WiFi Terminal - redportglobal.com · Ship to shore network management solutions are...
AURORA Iridium WiFi Terminal
Onsite Administrator's Guide

Aurora Onsite Admin Guide v1.0 Page 2 of 34 Copyright © Global Marine Networks, LLC
Table of Contents 1.0 About this guide . . . . . . . . . 05
2.0 Introduction to Aurora . . . . . . . . 06
2.1 Key Features . . . . . . . . 06
2.2 Services Included . . . . . . . . 07
2.3 Premium Services Available . . . . . . 07
3.0 Things to Know Before Getting Started . . . . . 08
3.1 Designed Use of the Aurora . . . . . . 08
3.1.1 Single User Environment . . . . . 08
3.1.2 Multi-User Environment . . . . . . 08
3.2 How It Works At First Launch (Out of the Box) . . . . 09
3.2 Navigating the User Interface . . . . . . 10
4.0 Getting Started - User Interface Access . . . . . 10
4.1 Email Access. . . . . . . . . 12
4.2 Email Management. . . . . . . . 13
4.2.1 Create & Manage Crew Email Accounts. . . . 13
4.2.1.1 Add Crew/Sub Accounts. . . . . 13
4.2.1.2 Edit Crew/Sub Accounts. . . . . 14
4.2.1.3 Delete Crew/Sub Accounts. . . . . 14
4.2.2 Retreive, Delete, Drop BigMail. . . . . . 14
4.2.3 Perform Common Email Tasks . . . . . 15
4.2.3.1 Control Panel. . . . . . . 15
4.2.3.2 Broadcast Message. . . . . . 16
4.2.3.3 Delete Crew Accounts. . . . . 17
4.2.3.4 Import Crew Accounts. . . . . 17
4.2.3.5 Backup Configuration . . . . . 18
4.2.3.6 Restore Configuration. . . . . 18

Aurora Onsite Admin Guide v1.0 Page 3 of 34 Copyright © Global Marine Networks, LLC
4.3 System Status. . . . . . . . . 19
4.3.1 System Status Overview. . . . . . 19
4.3.2 Realtime Bandwidth Usage. . . . . . 20
4.3.3 Historic Bandwidth Usage. . . . . . 20
4.3.4 System Message Log. . . . . . . 21
4.4 Local WiFi Setup. . . . . . . . . 22
4.4.1 Rename the Wireless Network. . . . . . 23
4.4.2 Restrict Wireless Network Access. . . . . 23
4.5 Remote Support. . . . . . . . . 24
4.6 System. . . . . . . . . . 25
4.6.1 Router Password. . . . . . . 25
4.6.2 Reboot Router. . . . . . . . 25
4.7 Aurora/MCG-101 Tab . . . . . . . 26
5.0 Services - Network Shares . . . . . . . 27
5.1 Create a Shared Directory , . . . . . 27
5.2 Add Users . . . . . . . . 28
5.3 How to Access the Shared Directory & Path Folders . . . 29
5.3.1 From a Mac PC . . . . . . . 29
5.3.2 From a Windows PC . . . . . . 30
6.0 Status . . . . . . . . . . 32
7.0 Statistics . . . . . . . . . . 33

Aurora Onsite Admin Guide v1.0 Page 4 of 34 Copyright © Global Marine Networks, LLC
Aurora Onsite Administrator Guide
Revision History
Date Revision Author
October 11, 2016
Initial Release
D. Brickhouse

Aurora Onsite Admin Guide v1.0 Page 5 of 34 Copyright © Global Marine Networks, LLC
1.0 About this Guide This guide is intended for onboard/onsite administrators of the RedPort Aurora Iridium WiFi Terminal. It features only those sections of the user interface required for normal daily operation. If you require more technical information, please see the RedPort Aurora Advanced User Guide designed for use by installers and network administrators. For information regarding the installation of the hardware, please see the RedPort Aurora QuickStart Guide. For detailed information about the setup and use of RedPort Email, please see the Optimizer RedPort Email Guide.

Aurora Onsite Admin Guide v1.0 Page 6 of 34 Copyright © Global Marine Networks, LLC
2.0 Introduction to Aurora Global Marine Networks (GMN), the leaders in advancing satellite data speeds and services, helps Fixed and Mobile Satellite Services providers and their customers by offering the industry’s fastest, most reliable and easy-to-use email, web, VoIP and other hardware and software services to maritime, oil and gas, first responder and business continuity users. Ship to shore network management solutions are sold by GMN under the RedPort Global brand name at www.redportglobal.com and as white-label solutions for the world’s premier satellite data service service providers. Aurora is an Iridium satellite WiFi terminal, with a built-in RedPort Optimizer router, that provides satellite voice, data and tracking services all under one dome. No need to install below-decks equipment. Aurora requires only an ethernet cable from the unit to the small POE Injector. It is designed so you can make voice calls and check email with devices you already have - your smartphone, tablet or computer.
2.1 Key Features Designed specifically for use with Iridium satellite service:
• Built-in RedPort Optimizer router for integrated voice, data and tracking. • Preconfigured for voice calls using your iOS or Android smartphone. • Supports voice calling and SMS messages using smartphones connected to the local
network. • GSM Compatibility with optional GSM modem and your own SIM card. • GPS NMEA Repeater broadcasts the built-in GPS coordinates via WiFi to share with
your onboard marine electronics. • Supports GPS tracking. • Logging/Reporting to keep track of usage. • Wi-Fi hotspot makes setup and use easy for crew with compatible computers, tablets
and smartphones. • Supports RedPort Email Service. • Data optimization powered by RedPort Optimizer hardware. • Powerful firewall accommodates virtually any common installation scenario, with
features including block or allow any range of port, IP address and protocols.

Aurora Onsite Admin Guide v1.0 Page 7 of 34 Copyright © Global Marine Networks, LLC
2.2 Services Included The following services are included: Voice PBX - allows smartphones to send/receive calls to others on the local area network for free, or over the satellite link at standard satellite airtime rates. See Aurora Advanced User Guide for details. SMS Messaging - allows smartphones to send sms messages to others on the local area network for free, or over the satellite link at standard satellite airtime rates See Aurora Advanced User Guide for details. GPS NMEA Repeater – allows other devices onboard/on-site to read your GPS location. See Aurora Advanced User Guide for details. GSM Compatibility - allows Internet connectivity via your GSM modem or cell phone with your own SIM card. See Aurora Advanced User Guide for details. File Sharing - Network Shares allows the sharing of files among Windows and Mac computers via WiFi, without the requirement of a wired local network of computers. See Chapter 5.0.
2.3 Premium Services Available The following additional services are available. Contact your RedPort dealer to purchase. RedPort Email – is a multi-user satellite email service. Crew and/or passengers can access their RedPort Email account via smartphones, tablets or computers. See Chapter 4.2. See the Optimizer RedPort Email Guide for more information about this service. GPS Tracking - Using a GPS-enabled device, submit position reports to a central database for viewing on the tracking website. See Aurora Advanced User Guide Chapter 5.3.

Aurora Onsite Admin Guide v1.0 Page 8 of 34 Copyright © Global Marine Networks, LLC
3.0 Things to Know Before Getting Started
3.1 Designed Use of the Aurora This terminal is suitable for two distinctly different audiences:
3.1.1 Single User Environment For the single user that wants the convenience of BYOD (bring your own device) for email, web browsing, SMS and phone calls. All that is required is a RedPort-certified compression email account like XGate and/or compression web-browsing service like XWeb. By adding the XGate Phone app, a smartphone can be used to place and receive voice calls and/or SMS messages over the satellite network.
3.1.2 Multi-User Environment The Aurora includes a RedPort Optimizer router that can be configured for use in a multi-user environment. Best Practice is to have a knowledge technician (someone who understands networks and routers) generate a custom configuration, using the guidelines in the Aurora Advanced User Guide. Once installed, the onsite administrator will log in and land on the Home page. The Home page has the common tasks that will be used locally such as creating and managing crew email accounts; all of which is covered in this document.
3.2 How It Works At First Launch (Out of the Box) We ship the Aurora ready for use with a RedPort-certified compression email and/or web browsing account. This default setup allows anyone with a RedPort-certified email or web account (with a Primary Account username and password) to use the terminal as is, to send and receive email and to browse the Internet. This out-of-the-box configuration works well for single users.

Aurora Onsite Admin Guide v1.0 Page 9 of 34 Copyright © Global Marine Networks, LLC
This configuration is also suitable for the multi-user environment where each person has a separate primary email and/or web browsing account.. Best Practice is to have a knowledgeable technician generate a custom configuration. In a fleet environment, this custom configuration can be recorded and used on other RedPort Aurora terminals within the organization. See the Aurora Advanced User Guide for more information and details.
3.3 Navigating the User Interface The user interface is divided into sections; use the tabs to access the required service or information. On most pages in the user interface you will see three buttons in the lower right corner:
Reset: returns the page to its previous saved state. Save: saves the changes, but does not yet apply the changes. Save & Apply: saves the changes and applies them to the router configuration. In some cases, the router must reboot to apply the change. If reboot is required, it will be noted on the page.

Aurora Onsite Admin Guide v1.0 Page 10 of 34 Copyright © Global Marine Networks, LLC
4.0 Getting Started – Access the Home Page/Tasks In a typical situation, the Aurora has already been installed and configured. As the onboard/onsite administrator you may have frequent interaction with the Home Page of the router under normal operating conditions. From this page you can access the optional RedPort email service and manage email accounts (if email service is enabled), and monitor the usage of the satellite link. To access the router’s Home page you must login to the router. This can be accomplished in several ways however the most popular method is to: 1. Connect to the WiFi Hotspot created by the Aurora using a PC. Connect to the WiFi Hotspot just like you would any other WiFi connection: On a Windows PC, go to: Windows Start > Control Panel > Network Connections On a MAC, go to: Apple > System Preferences > Network The Network Name will look something like: ‘wxa-171-XXXX where ‘XXXX’ is the last four digits of the Aurora Mac address. Select the wireless network name. 2. Open any web browser on the computer and enter the URL: http://192.168.10.1 3. Login with the username and password given to you by the System Administrator. The default login is username = admin, password = webxaccess

Aurora Onsite Admin Guide v1.0 Page 11 of 34 Copyright © Global Marine Networks, LLC
Once logged in, you will see the router’s Home page, your gateway to the most used features. Email Access - When RedPort Email Service is enabled, use this section to access the webmail login page. See Chapter 4.1 for information. See the Optimizer RedPort Email Guide for more details. Email Management - When RedPort Email Service is enabled, use this section to manage the email service. See Chapter 4.2 for information. See the Optimizer RedPort Email Guide for more details. System Status - Use this section to monitor system usage. See Chapter 4.3 for details. Local WiFi Setup - Use this section to change the wireless network name or password. See Chapter 4.4 for details. Remote Support - Use this section to allow remote access to the router. See Chapter 4.5 for details. System - Use this section to change the router password or reboot the router. See Chapter 4.6 for details.

Aurora Onsite Admin Guide v1.0 Page 12 of 34 Copyright © Global Marine Networks, LLC
4.1 Email Access This section provides a shortcut to the optional Optimizer RedPort Email interface.
Select <Go to webmail> to access the email login page.
See the Optimizer RedPort Email Guide for details on using the email service.

Aurora Onsite Admin Guide v1.0 Page 13 of 34 Copyright © Global Marine Networks, LLC
4.2 Email Management This section contains shortcuts to the most commonly used functions of email management.
4.2.1 Create and Manage Crew Email Accounts Use this section to add, edit and delete sub accounts.
4.2.1.1 Add Crew/Sub Accounts Select <Add> and enter the required information:
Primary User: Select from the drop-down list the Primary User account that controls the filtering rules for this sub account. Username: Enter the Username for this account. Password: Enter the Password for this account. Description: Optional - enter a description for this account.

Aurora Onsite Admin Guide v1.0 Page 14 of 34 Copyright © Global Marine Networks, LLC
Select <Save> to enter more subaccounts or <Save & Apply> when all subaccounts are entered. Wait for the message "Configuration Applied". See the Optimizer RedPort Email Guide for more information about Crew/Sub Email Accounts.
4.2.1.2 Edit Crew/Sub Accounts To edit an account, enter the desired changes. Select <Save & Apply>. Wait for confirmation message "Configuration Applied". See the Optimizer RedPort Email Guide for more information about Crew/Sub Email Accounts.
4.2.1.3 Delete Crew/Sub Accounts To delete an account, identify the account to be deleted and select the <Delete> button. CAUTION: This Action CANNOT be Undone! See the Optimizer RedPort Email Guide for details on using the RedPort Email Service.
4.2.2 Retrieve, delete or drop large emails (BigMail) quarantined on the server The BigMail page allows you to manage large email that is quarantined on the main mail server before downloading it to the router. This mail has not yet been downloaded as it exceeds the Inbound Cutoff filter setting.
A list of all the pending BigMail is displayed in this window. You can take action on a single BigMail or you can take action on only selected BigMail or on all BigMail.

Aurora Onsite Admin Guide v1.0 Page 15 of 34 Copyright © Global Marine Networks, LLC
Select email for action by clicking on the checkbox in the "Select" column.
Select All Emails to select every email that appears in the list. Un-Select All Emails to reverse the selection of all emails in the list. Retrieve All Selected prepares a message for the main mail server that these selected emails are to be downloaded on the next email connection. Drop All Selected to remove the selected emails from this list. The mail will still be held on the main mail server. Delete All Selected prepares a message for the main mail server that these selected emails are to be deleted from the main mail server. The BigMail will be deleted from the mail server during the next email connection. CAUTION: This Action CANNOT be Undone!
See the Optimizer RedPort Email Guide for details on using the RedPort Email Service.
4.2.3 Perform Common Email Tasks This is a shortcut to the RedPort Email Tools page.
4.2.3.1 Control Panel
Start: This initiates an email session immediately, bypassing the Update Interval setting found in the General Settings.

Aurora Onsite Admin Guide v1.0 Page 16 of 34 Copyright © Global Marine Networks, LLC
Stop: Terminates an email session in progress. It does not close the connection. Break: Closes any email and/or web browsing sessions and terminates the connection. Purge: Removes any partially transferred files from the queue. Restart: Under normal conditions there should never be a need to use this button. If, however, for some reason, RedPort Email becomes unresponsive click this button to stop and restart service in lieu of having to reboot the router. Log Rotate: Clears the current logs to start a new log rotation.
4.2.3.2 Broadcast Message Use Broadcast Message to send a blanket email to all users on the local service or only to the crew/sub accounts tied to a specific primary account.
Primary Account: Use this drop down menu to select the accounts to receive the message. Subject: Enter the subject line for the message to be sent. Message: Enter the text of the message. Broadcast Message: Click this button to send the email message.

Aurora Onsite Admin Guide v1.0 Page 17 of 34 Copyright © Global Marine Networks, LLC
4.2.3.3 Delete Crew Accounts Use Delete Crew Accounts to delete all crew/sub accounts that exist on the router; or only those crew/sub accounts tied to a specific primary account.
Primary Account: Use the drop down menu to select the crew/sub accounts to be deleted. Delete Sub Accounts: Click to complete the Delete action.
4.2.3.4 Import Crew Accounts Use Import Sub Accounts to avoid the data entry steps of adding each crew/sub account individually.
The import file must be in .csv format. It must have three columns: Username, Password, User's Real Name.
Primary Account: Use the drop down list to select the primary account that will host these crew/sub accounts. Remove Header: If the .csv file includes a header row with column names, check this box to remove the first row (header row) before import. Filename: Browse to the correct .csv file to be imported. Import Crew Accounts: Click to complete the import. Wait for confirmation that the sub accounts have been imported into the primary account. To verify the import select Email Management <Create & Manage Crew Email Accounts>.

Aurora Onsite Admin Guide v1.0 Page 18 of 34 Copyright © Global Marine Networks, LLC
4.2.3.5 Backup Configuration Use this to save the current configuration settings of the email service. All email in the Spool will be saved in the backup as well.
Enter Filename: Accept the default filename or enter the filename of your choice. Note: the filename MUST be in *.tgz format. Download Configuration: Click to save the current settings and the spool folder. Save this backup file locally.
4.2.3.6 Restore Configuration Use this to restore the configuration and the mail spool folder from a previous backup.
Filename: Browse to where the backup file is stored. Restore Configuration: Click to load the backup file. This action may take several minutes. Wait for confirmation that the configuration has been restored.
See the Optimizer RedPort Email Guide for details on using the RedPort Email Service.

Aurora Onsite Admin Guide v1.0 Page 19 of 34 Copyright © Global Marine Networks, LLC
4.3 System Status This section contains shortcuts to system information helpful for monitoring usage of the satellite link.
4.3.1 System Status Overview This button is a shortcut to the Status > Overview page.
All Status information is READ ONLY. Status Information provided includes: --How much memory the router is currently using. --Who is currently connected via wifi. --Error messages will display in the System Log and can be useful when troubleshooting connection issues. --Realtime Graphs report how much data is being used by the different interfaces. This section includes other technical information that may be required by support stafff when troubleshooting an issue.

Aurora Onsite Admin Guide v1.0 Page 20 of 34 Copyright © Global Marine Networks, LLC
4.3.2 Realtime Bandwidth Usage Over Satellite Link The Traffic page allows you to monitor current Inbound and Outbound usage of the satellite link.
4.3.3 Historic Bandwidth Usage Over Satellite Link
Similar to the Realtime Graphs above, this page shows usage over a specific timespan. To modify the timespan use the down arrow next to <Display timespan>.

Aurora Onsite Admin Guide v1.0 Page 21 of 34 Copyright © Global Marine Networks, LLC
4.3.4 System Message Log This log contains detailled information of the router's performance.

Aurora Onsite Admin Guide v1.0 Page 22 of 34 Copyright © Global Marine Networks, LLC
4.4 Local WiFi Setup
Selecting <WiFi Setup> shows the current status of the wireless hotspot created by the Aurora.
You can also modify the Local WiFi name and password.

Aurora Onsite Admin Guide v1.0 Page 23 of 34 Copyright © Global Marine Networks, LLC
4.4.1 Rename the Wireless Network The default name of the Aurora wireless network is wXa-171-xxxx where the xxxx represents a unique number. This is the name of the wireless network that you connect to using your computer or iOS or Android device. It is possible to change the name of your wireless network. Enter the new wireless network name in the ESSID field. Click <Save & Apply>. This procedure changes the name for the WiFi hotspot only. When connecting your computer, iOS or Android device to the wireless network, this is the network name that will appear in the wireless network list. This name does not change the router admin name when logging in to access the Optimizer user interface.
4.4.2 Restrict Wireless Network Access When in public locations, for example, a busy port, you may want to restrict access to your WiFi hotspot. You can password protect it so others cannot use it.
1. Select the Wireless Security tab. 2. Select the Encryption mode from the drop down menu.
3. Enter your desired password in the Key field. 4. Click <Save & Apply. This procedure adds/changes the password for the WiFi hotspot only. When connecting your computer, iOS or Android device to the wireless network, this is the password you will use. This password does not change the router admin password when logging in to access the Optimizer user interface.
Aurora Onsite Admin Guide v1.0 Page 24 of 34 Copyright © Global Marine Networks, LLC
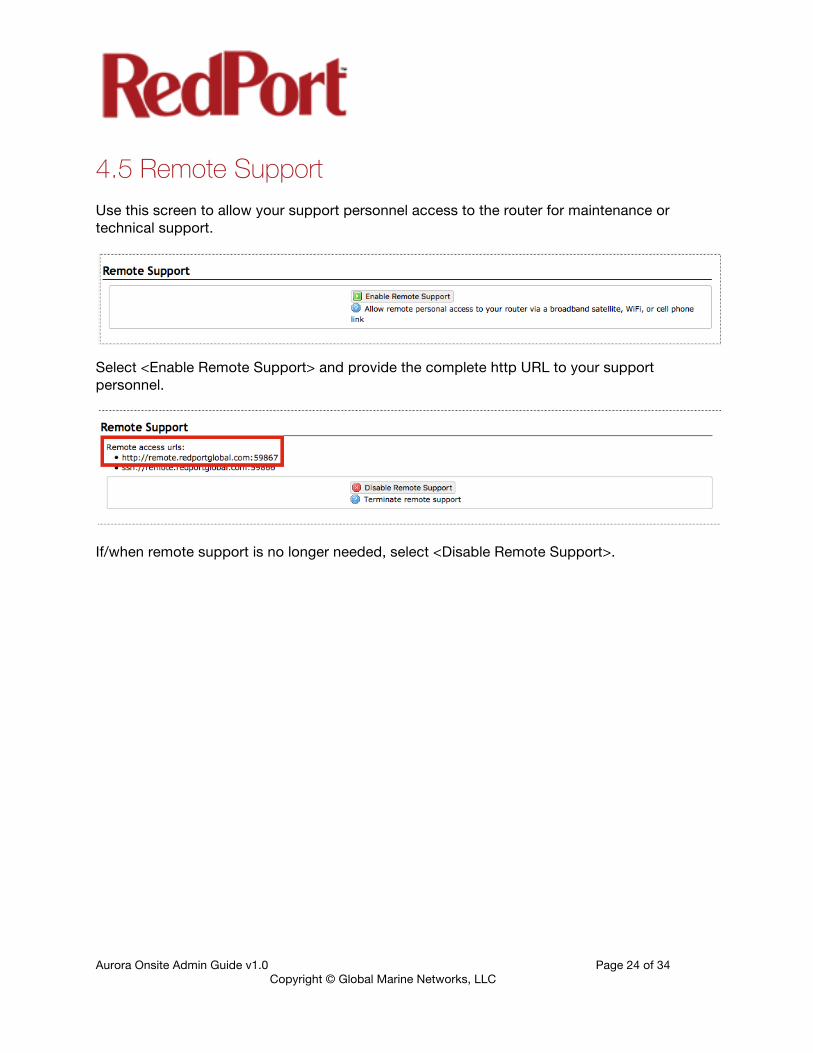
4.5 Remote Support Use this screen to allow your support personnel access to the router for maintenance or technical support.
Select <Enable Remote Support> and provide the complete http URL to your support personnel.
If/when remote support is no longer needed, select <Disable Remote Support>.

Aurora Onsite Admin Guide v1.0 Page 25 of 34 Copyright © Global Marine Networks, LLC
4.6 System This section contains shortcuts to some important router controls.
4.6.1 Router Password
Use this to change the router password. Enter the new password in the Password text box and again in the Confirmation text box. Click <Save & Apply>. Wait for confirmation of the change.
4.6.2 Reboot Router This provides a way to reboot the router without disconnecting power.

Aurora Onsite Admin Guide v1.0 Page 26 of 34 Copyright © Global Marine Networks, LLC
4.7 Aurora/MCG101 Modem This page provides some current status information of the satellite link and a way to restart the modem without disconnecting power.

Aurora Onsite Admin Guide v1.0 Page 27 of 34 Copyright © Global Marine Networks, LLC
5.0 Services - Network Shares Network Shares allows the sharing of files without the requirement of a wired local network of computers. The Aurora Optimizer can be configured with one or more Shared Directories that are available, with or without password protection, to any Windows or Mac PC that has access to the Aurora's WiFi Hotspot. Network Shares also allows the ability to automatically transfer files via inbound and outbound email (see Optimizer-RedPort Email Guide > Appendix F: File Transfer for details of this premium service).
5.1 Create a Shared Directory
Select <Add> to create a new Shared Directory:

Aurora Onsite Admin Guide v1.0 Page 28 of 34 Copyright © Global Marine Networks, LLC
Name: This is the Share Name that is visible on the network. It is the 'volume' name that you will use when connecting to the shared directory. Path: This is the name of the Folder that appears on the Aurora Optimizer that will be used to store files. Allowed users: You can limit the users that have access to the files in the Path Folder by assigning usernames and passwords to selected individuals (see Add Users below). Enter the usernames here, separated by a comma if more than one user will have access to the files. Read-only: Use this checkbox to protect the files in the Path Folder from being changed. Allow guests: Use this checkbox to make the files available to anyone with network access. With this box checked, users will not be prompted to enter a username and password when accessing the Path Folder. Delete: Use this to delete the Shared Directory. Select <Save & Apply>.
5.2 Add Users If you want to password protect access to the Shared Directories, you can assign usernames and passwords to each directory.
Select <Add> to add a new username and password.

Aurora Onsite Admin Guide v1.0 Page 29 of 34 Copyright © Global Marine Networks, LLC
Select <Save & Apply>.
5.3 How to Access the Shared Directory and Path Folders:
5.3.1 From a Mac PC Go to Finder > Go > Connect to Server Enter the Server Address as the LAN address for the Aurora Optimizer / plus the Path Folder. Select <Connect>
If the Shared Directory is restricted (i.e. does not Allow Guests) you must enter a username and password to access the files.

Aurora Onsite Admin Guide v1.0 Page 30 of 34 Copyright © Global Marine Networks, LLC
If the Shared Directory is not restricted (i.e. Allow Guests is checked in Network Shares) you can connect as a Guest without entering a username and password.
A Finder window opens to the selected Folder for access to the transferred file(s).
5.3.2 From a Windows PC Map a Network drive to the appropriate location. Go to Start Menu > Computer > Map Network Drive In the Folder box, following the Example, enter \\the LAN address for the Aurora Optimizer\the Path Folder. Select <Finish>.

Aurora Onsite Admin Guide v1.0 Page 31 of 34 Copyright © Global Marine Networks, LLC
If the Shared Directory is restricted (i.e. does not Allow Guests) you must enter a username and password to access the files.
If the Shared Directory is not restricted (i.e. Allow Guests is checked in Network Shares) you can connect as a Guest without entering a username and password.
An Explorer window opens to the selected Folder for access to the transferred file(s).

Aurora Onsite Admin Guide v1.0 Page 32 of 34 Copyright © Global Marine Networks, LLC
6.0 Status Use the Status tab to display current information of the router's performance.
Some of the information provided here includes:
• How much memory the router is currently using • Who is currently connected via wifi • Error messages reported in the System Log and can be useful when troubleshooting
connection issues. • Realtime Graphs report how much data is being used by the different interfaces.
All Status information is READ ONLY.

Aurora Onsite Admin Guide v1.0 Page 33 of 34 Copyright © Global Marine Networks, LLC
7.0 Statistics Similar to the Realtime Graphs in the Status tab, Statistics Graphs shows usage over a specific timespan.
To modify the timespan use the down arrow next to <Display timespan>, then select <Display timespan> to view the graph.

Aurora Onsite Admin Guide v1.0 Page 34 of 34 Copyright © Global Marine Networks, LLC
If you have questions that are not answered here, please email your service provider for assistance or you can contact us at: [email protected] and we will direct your inquiry to your service provider. This concludes the RedPort Aurora Onsite Administrator's Guide. If you have a question that is not addressed in this Guide or if you have recommendations to improve the usefulness of this Guide, please contact us at: [email protected]


![· SHIM SACD Dire Straits rLove Over Gold] (Private Investigations) ' Clear Cygnus SACD ' , IRIDIUM , IRIDIUM , IRIDIUM 11.5 AWG , , PFA 3455R IRIDIUM Clear Cygnus , 5 Trigon Exxpert](https://static.fdocuments.in/doc/165x107/60d04de1d6909b691a4f38e7/shim-sacd-dire-straits-rlove-over-gold-private-investigations-clear-cygnus.jpg)