Audi B7 A4 2.0T Timing Belt Kit...
48
Audi B7 A4 2.0T Timing Belt Kit Installation Proper service and repair procedures are vital to the safe, reliable operation of all motor vehicles as well as the personal safety of those performing the repairs. Standard safety procedures and precautions (including use of safety goggles and proper tools and equipment) should be followed at all times to eliminate the possibility of personal injury or improper service which could damage the vehicle or compromise its safety.
-
Upload
vuongkhanh -
Category
Documents
-
view
228 -
download
0
Transcript of Audi B7 A4 2.0T Timing Belt Kit...

Audi B7 A4 2.0TTiming Belt Kit Installation
Proper service and repair procedures are vital to the safe, reliable operation of all motor vehicles as well as the personal safety of those performing the repairs. Standard safety procedures and precautions (including use of safety goggles and proper tools and equipment) should be followed at all times to eliminate the possibility of personal injury or improper service which could damage the vehicle or compromise its safety.

ES#1876844 ES#1876845ES#2581229 ES#2581230
ECS TUNING 1000 SEVILLE RD. WADSWORTH, OH 44281 1.800.924.5172 WWW.ECSTUNING.COM 2
AUDI B7 A4 2.0T TIMING BELT KIT INSTALLATION®
Table of Contents
INTRODUCTION
Timing Belt service is imperative to ensure the longevity of the engine in your Audi B7 A4 2.0T. An experienced technician will be able to complete this repair in a weekend, plan accordingly based on your experience level. Before you begin, read and familiarize yourself with these instructions and make sure you have all the required tools on hand. Thank you for purchasing our Audi B7 A4 2.0T Timing Belt Kit, we appreciate your business!
The Audi B7 A4 2.0T Timing Belt Kits are assembled by the experts at ECS Tuning in order to include everything you need.• “Ultimate” Kits include: - Timing and Accessory Belts, Camshaft Seal, Idler Pulleys, Water Pump, and all necessary hardware• “Ultimate Plus” Kits include: - Everything in the “Ultimate Kit” plus 3 Liters of G13 Coolant - “Ultimate Plus” kits can also be purchased with or without our ECS Tuning Lightweight Underdrive Crank Pulley
Audi B7 A4 2.0T Timing B elt Kits :
ECS Difficulty Gauge
I I I I I I I I I
I I I I
I I I
I I I I I
I I I I I I I I I I I I I I I I I I I I I I
1
2 4
3
Advanced - 3
Pro - 4
2 - Moderate
1 - Easy

ES#1876844 ES#1876845ES#2581229 ES#2581230
ECS TUNING 1000 SEVILLE RD. WADSWORTH, OH 44281 1.800.924.5172 WWW.ECSTUNING.COM 3
AUDI B7 A4 2.0T TIMING BELT KIT INSTALLATION®
Table of Contents
TABLE OF CONTENTSKit Contents .....................................................................................................................pg.4
Required Tools and Equipment ................................................................................pg.6
Shop Supplies and Materials .....................................................................................pg.6
Installation and Safety Notes ....................................................................................pg.7
Drive Belt Routing Diagram .......................................................................................pg.8
Timing Belt Routing Diagram ...................................................................................pg.9
Front Lock Carrier - Service Position .......................................................................pg.10
Removing the Original Timing Belt .........................................................................pg.20
Replacing the Camshaft Seal ....................................................................................pg.30
Installing the New Timing Belt .................................................................................pg.33
Bleeding the Cooling System ....................................................................................pg.41
Using The VAG Connector Tool .................................................................................pg.45
Torquing Tips ..................................................................................................................pg.46
Schwaben Tools .............................................................................................................pg.47
For this PDF we will be installing the Timing Belt Ultimate Plus Kit with the ECS Tuning Lightweight Underdrive Crank Pulley.
Symbols:
The following symbols may be used throughout these instructions indicating special attention:
YIELD
FORK IN THE ROAD: When there are different options within any given kit, we will direct you to the proper page and step to continue.
YIELD: Pause for a moment to double check component installation before you continue. Ignoring this can cost you time later during the installation.
STOP: The upcoming steps require specific preparation and/or assistance in the interest of safety. Please read ahead in the instructions and prepare before continuing.
STOP
CAUTION: Pay close attention to these warnings and instructions. Difficult installation, personal injury or component damage may occur if ignored.
TECH TIP: Tips and tricks to make the job go much easier.
NOTE: Additional information that may be useful to the installation depending on your application.NOTE
NOTE
ES#1876844 ES#1876845ES#2581229 ES#2581230
ECS TUNING 1000 SEVILLE RD. WADSWORTH, OH 44281 1.800.924.5172 WWW.ECSTUNING.COM 4
AUDI B7 A4 2.0T TIMING BELT KIT INSTALLATION®
Table of Contents
KIT CONTENTS
Timing Belt Lower Idler Pulley
Timing Belt
Tensioner and Idler Hardware
Water Pump Timing Belt Tensioner Camshaft Gear Bolt
Camshaft Seal Timing Belt Upper Idler Pulley
Crank Pulley Hardware
Timing Belt Ultimate Kit: ES#1876844
Accessory Belt
ES#1876844 ES#1876845ES#2581229 ES#2581230
ECS TUNING 1000 SEVILLE RD. WADSWORTH, OH 44281 1.800.924.5172 WWW.ECSTUNING.COM 5
AUDI B7 A4 2.0T TIMING BELT KIT INSTALLATION®
Table of Contents
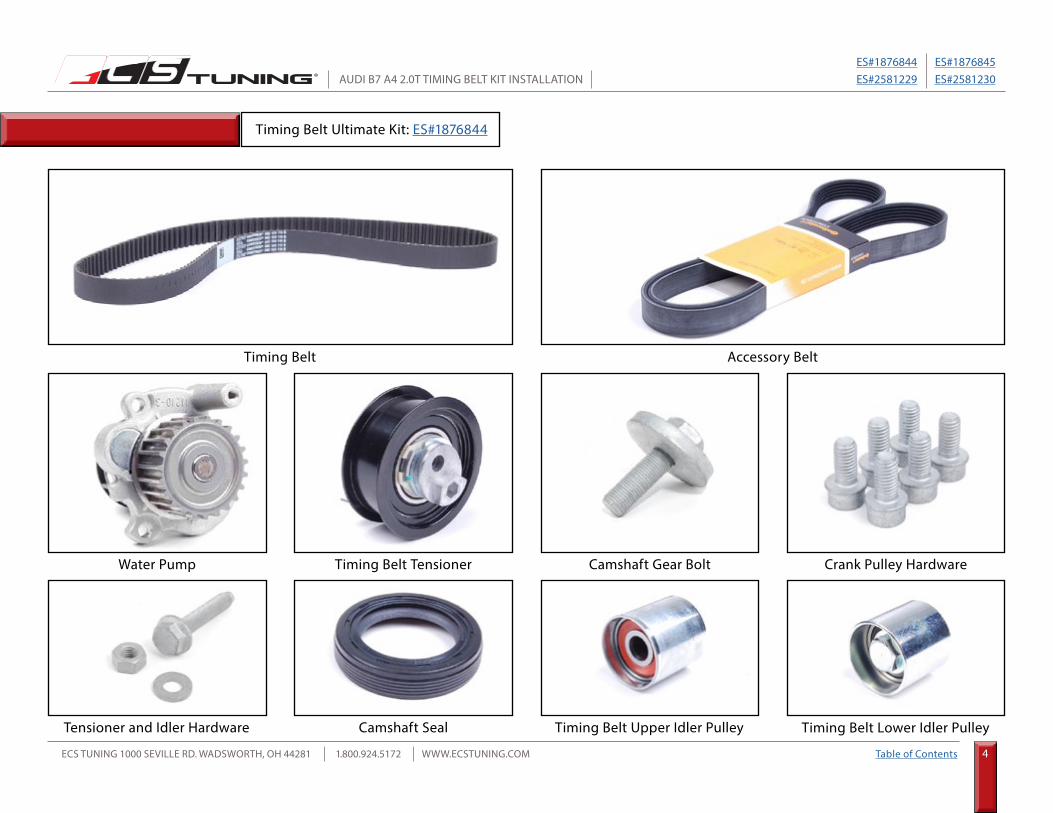
Timing Belt Ultimate Kit
Timing Belt Ultimate Plus Kits: ES#1876845, ES#2581229, ES#2581230
Lightweight Underdrive Crank Pulley
• Black Pulley included in: - ES#2581229• Silver Pulley included in: - ES#2581230
G13 Coolant - 1.5 Liter (2x)
• Included in Kits: - ES#1876845 - ES#2581229 - ES#2581230
KIT CONTENTS

ES#1876844 ES#1876845ES#2581229 ES#2581230
ECS TUNING 1000 SEVILLE RD. WADSWORTH, OH 44281 1.800.924.5172 WWW.ECSTUNING.COM 6
AUDI B7 A4 2.0T TIMING BELT KIT INSTALLATION®
Table of Contents
• Hand Cleaner/Degreaser ..................................................................................... Available at ecstuning.com .................................................................ES#2167336• Aerosol Brake Cleaner .......................................................................................... Available at your local auto parts store• Shop Rags ............................................................................................................... Available at your local auto parts store• Aerosol Spray Lubricant/Penetrating Oil ........................................................ Available at your local auto parts store
Note: The tools required for each step will be listed by the step number throughout these instructions.REQUIRED TOOLS
SHOP SUPPLIES AND MATERIALS
• 1/4” Drive Ratchet ................................................................................ES#2093757• 1/4” Drive Extensions• 3/8” Drive Ratchet ....................................................................... ES#2765902• 3/8” Drive Torque Wrench......................................................... ES#2221245• 3/8” Drive Sockets: 10mm, 12mm, 13mm ............................. ES#2763772• 3/8” Drive Extensions• 3/8” Drive Deep Sockets: 13mm• Spark Plug Socket: 5/8” ............................................................. ES#9340• 1/2” Drive Ratchet• 1/2” Drive Breaker Bar ................................................................ ES#2776653• 1/2” Drive 12-Point Socket: 19mm• 1/2” Drive 6-Point Sockets: 13mm, 16mm• Torx Bit Sockets: T20, T25, T30 .........................................................ES#11418• Triple Square Bit Socket: M10................................................... ES#1910125• Hammer
• Hex Bit (Allen) Socket: 6mm .............................................................ES#11420• Hex Bit (Allen) Wrench: 8mm• Open/Boxed End Wrenches: 13mm, 17mm .......................... ES#2765907• Screwdrivers: Flat Blade & Phillips Head ......................................ES#2225921• Torx Screwdrivers: T20, T25 ...............................................................ES#11417• Camshaft Locking Tool .............................................................. ES#1844103• Camshaft Puller Kit ..................................................................... ES#1844102• Ignition Coil Puller Kit ................................................................ ES#2643082• VAG Connector Tool ................................................................... ES#2628676• Coolant Evacuation Tool Kit ..................................................... ES#2712734• Locking Hose Clamp Pliers ....................................................... ES#2702616• Lock Carrier Tool Set .................................................................. ES#2710836• Pliers• Seal Puller and Seal Driver• Paint Marker
Below is a list of the tools we used to install the timing belt and ECS lightweight crank pulley kit onto our Audi B7 A4 2.0T FSI. Additional tools may be required for any issues that arise during installation such as rust, corrosion, or broken and stripped fasteners. Tools with a part number listed are available on our website - click on their ES# link to view them.
ES#1876844 ES#1876845ES#2581229 ES#2581230
ECS TUNING 1000 SEVILLE RD. WADSWORTH, OH 44281 1.800.924.5172 WWW.ECSTUNING.COM 7
AUDI B7 A4 2.0T TIMING BELT KIT INSTALLATION®
Table of Contents
INSTALLATION NOTES
GENERAL PREPARATION AND SAFETY INFORMATION
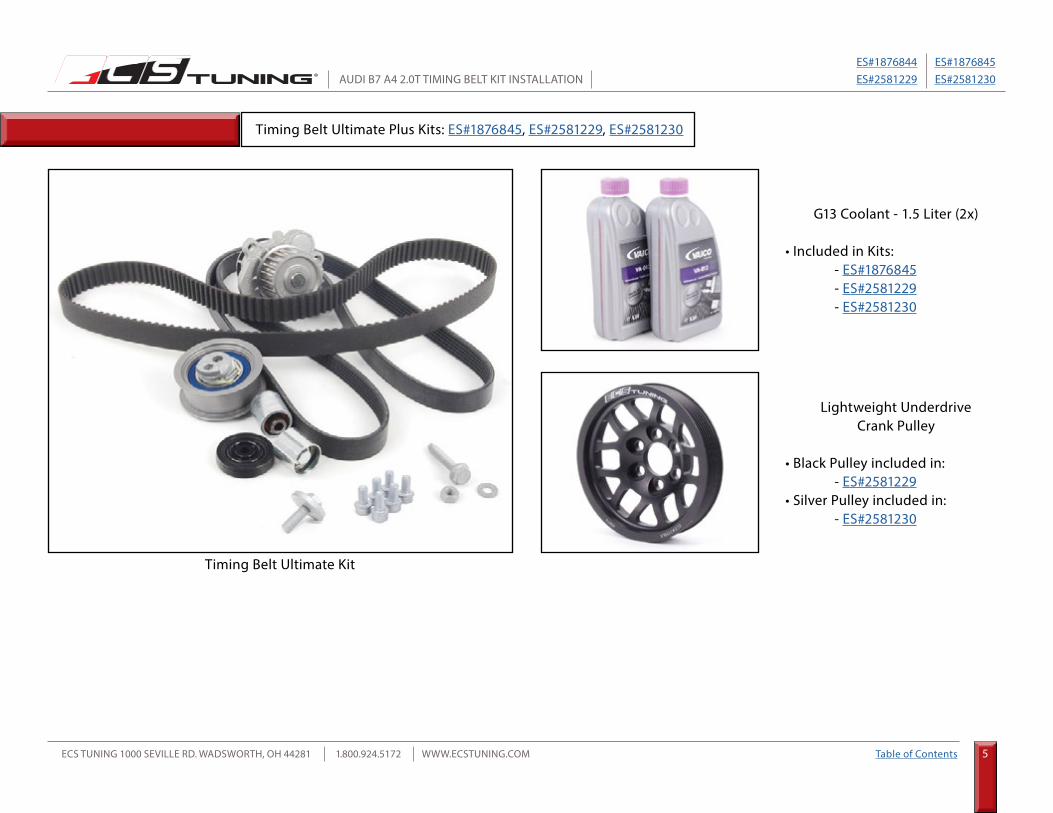
• RH refers to the passenger side of the vehicle.• LH refers to the driver side of the vehicle.• Always use the proper torque specifications.• If applicable to this installation, torque specifications will be listed throughout the document and at the end as well.• Please read all of these instructions and familiarize yourself with the complete process BEFORE you begin.
• Park your car in a safe, well lit, level area.• Shut the engine off and remove the key from the ignition switch.• Make sure any remote start devices are properly disabled.• ALWAYS wear safety glasses.• Make sure the parking brake is applied until the vehicle is safely lifted and supported.• If using an automotive lift, be sure and utilize the factory specified lift points. Lifting a vehicle in an incorrect location can cause damage to the• suspension/running gear.• When lifting a vehicle using a jack, always utilize the factory specified lift points. Lifting a vehicle in an incorrect location can cause• damage to the suspension/running gear. ALWAYS support the vehicle with jack stands.• ALWAYS read and follow all safety information and warnings for the equipment you are using.
ECS Tuning cares about your health and safety. Please read the following safety information. This information pertains to automotive service in general, and while it may not pertain to every job you do, please remember and share these important safety tips.
Never get underneath a vehicle that is supported only by a jack. Always make sure that the vehicle is securely supported on jack stands.

ES#1876844 ES#1876845ES#2581229 ES#2581230
ECS TUNING 1000 SEVILLE RD. WADSWORTH, OH 44281 1.800.924.5172 WWW.ECSTUNING.COM 8
AUDI B7 A4 2.0T TIMING BELT KIT INSTALLATION®
Table of Contents
DRIVE BELT ROUTING DIAGRAM
Clockwise To Loosen Tensioner
Accessory BeltTensioner
Alternator
A/CCompressor
CrankPulley
IdlerPulley
Power SteeringPump
ES#1876844 ES#1876845ES#2581229 ES#2581230
ECS TUNING 1000 SEVILLE RD. WADSWORTH, OH 44281 1.800.924.5172 WWW.ECSTUNING.COM 9
AUDI B7 A4 2.0T TIMING BELT KIT INSTALLATION®
Table of Contents
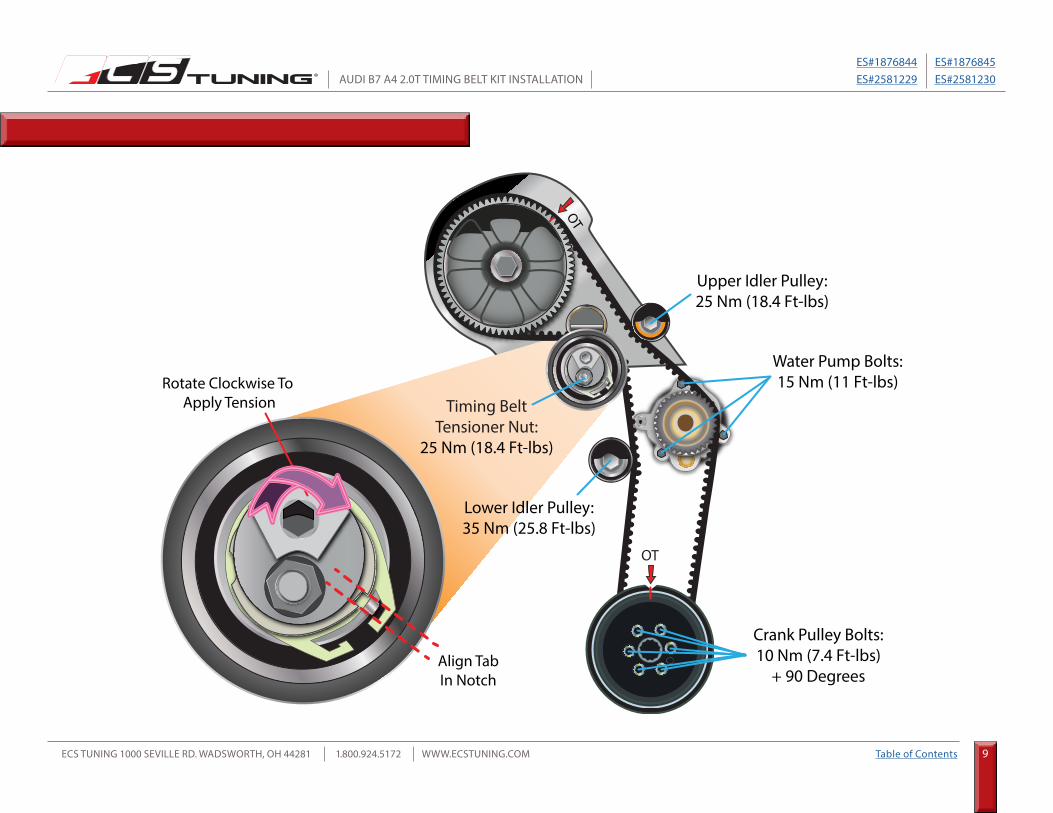
camshaftUpper Idler Pulley:25 Nm (18.4 Ft-lbs)
Lower Idler Pulley:35 Nm (25.8 Ft-lbs)
Water Pump Bolts:15 Nm (11 Ft-lbs)
Crank Pulley Bolts:10 Nm (7.4 Ft-lbs)
+ 90 Degrees
Timing BeltTensioner Nut:
25 Nm (18.4 Ft-lbs)
Align TabIn Notch
OT
OT
Rotate Clockwise To Apply Tension
TIMING BELT ROUTING DIAGRAM

ES#1876844 ES#1876845ES#2581229 ES#2581230
ECS TUNING 1000 SEVILLE RD. WADSWORTH, OH 44281 1.800.924.5172 WWW.ECSTUNING.COM 10
AUDI B7 A4 2.0T TIMING BELT KIT INSTALLATION®
Table of Contents
FRONT LOCK CARRIER - SERVICE POSITIONStep 1:
Step 2:
T20 Torx Bit Socket & Ratchet - OR - Phillips Screwdriver
The following instructions show how to place a B7 A4 lock carrier into “service position”, your vehicle may differ slightly.
Locate the two air scoop mounting screws and remove them. Dependingon production date will you find that you may have either torx or phillipshead fasteners.
Pull up on the intake duct at the location shown to separate it from theair box, then pull it rearward to pull the air scoop out of the front coresupport and remove it from the vehicle.
Pull upat this
location

ES#1876844 ES#1876845ES#2581229 ES#2581230
ECS TUNING 1000 SEVILLE RD. WADSWORTH, OH 44281 1.800.924.5172 WWW.ECSTUNING.COM 11
AUDI B7 A4 2.0T TIMING BELT KIT INSTALLATION®
Table of Contents
Step 3:
Step 4: T30 Torx Bit Socket & Ratchet
Remove the hood seal (highlighted in RED) from the front vehicle and set it aside.
Remove the four bolts securing the lock carrier to the chassis, there are two on each side.
FRONT LOCK CARRIER - SERVICE POSITION

ES#1876844 ES#1876845ES#2581229 ES#2581230
ECS TUNING 1000 SEVILLE RD. WADSWORTH, OH 44281 1.800.924.5172 WWW.ECSTUNING.COM 12
AUDI B7 A4 2.0T TIMING BELT KIT INSTALLATION®
Table of Contents
Step 5:
Step 6:
T30 Torx Bit Socket & Ratchet
Flat Blade Screwdriver
Remove the three bolts which secure the top of front bumper cover to the vehicle (ORANGE arrows), then loosen but do not remove the two bolts inside the bumper cover (YELLOW arrows).
Safely lift and support the vehicle, then remove the ten (10) 1/4 turn screws and remove the belly pan from the vehicle.
#1#1
#1
#2#2
FRONT LOCK CARRIER - SERVICE POSITION
ES#1876844 ES#1876845ES#2581229 ES#2581230
ECS TUNING 1000 SEVILLE RD. WADSWORTH, OH 44281 1.800.924.5172 WWW.ECSTUNING.COM 13
AUDI B7 A4 2.0T TIMING BELT KIT INSTALLATION®
Table of Contents
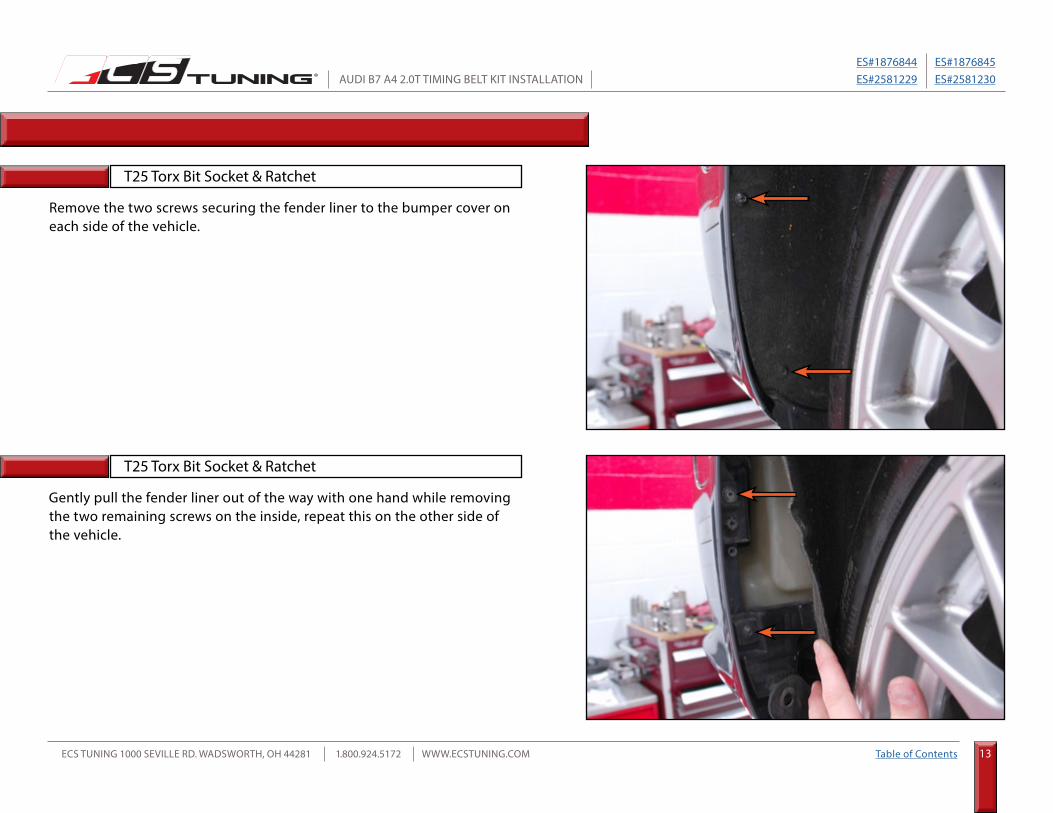
Step 7:
Step 8:
T25 Torx Bit Socket & Ratchet
T25 Torx Bit Socket & Ratchet
Remove the two screws securing the fender liner to the bumper cover on each side of the vehicle.
Gently pull the fender liner out of the way with one hand while removing the two remaining screws on the inside, repeat this on the other side of the vehicle.
FRONT LOCK CARRIER - SERVICE POSITION
ES#1876844 ES#1876845ES#2581229 ES#2581230
ECS TUNING 1000 SEVILLE RD. WADSWORTH, OH 44281 1.800.924.5172 WWW.ECSTUNING.COM 14
AUDI B7 A4 2.0T TIMING BELT KIT INSTALLATION®
Table of Contents
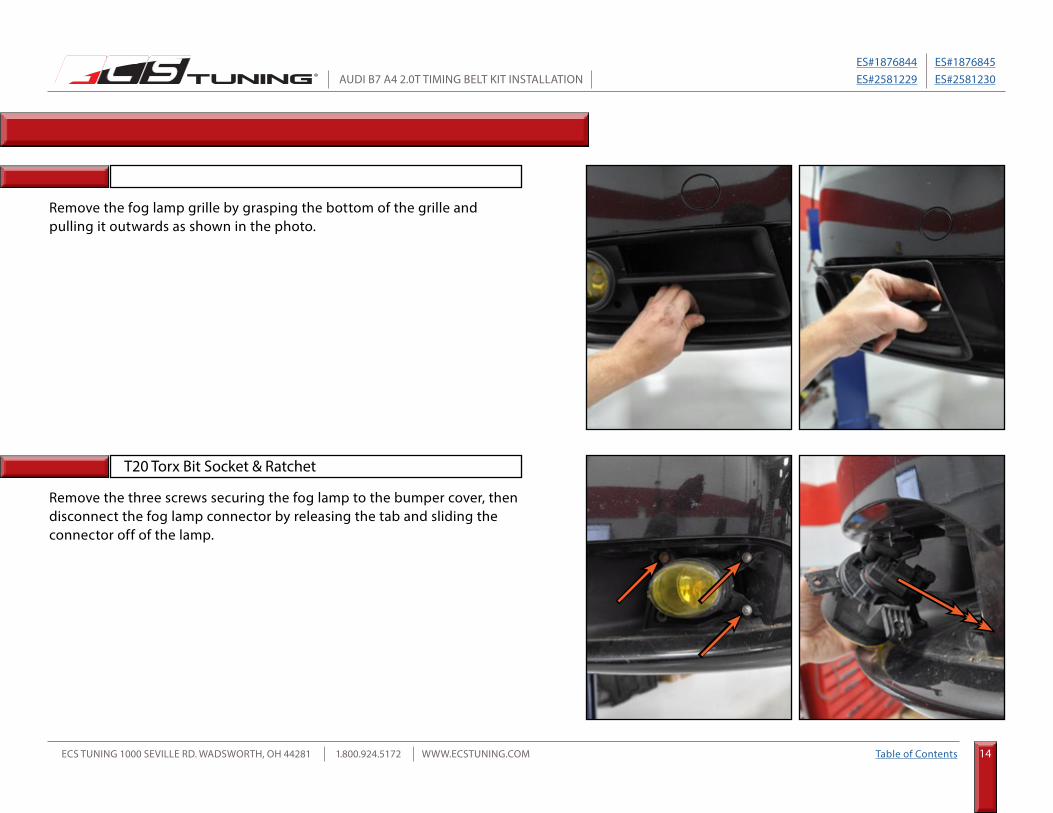
Step 9:
Step 10: T20 Torx Bit Socket & Ratchet
Remove the fog lamp grille by grasping the bottom of the grille and pulling it outwards as shown in the photo.
Remove the three screws securing the fog lamp to the bumper cover, then disconnect the fog lamp connector by releasing the tab and sliding the connector off of the lamp.
FRONT LOCK CARRIER - SERVICE POSITION

ES#1876844 ES#1876845ES#2581229 ES#2581230
ECS TUNING 1000 SEVILLE RD. WADSWORTH, OH 44281 1.800.924.5172 WWW.ECSTUNING.COM 15
AUDI B7 A4 2.0T TIMING BELT KIT INSTALLATION®
Table of Contents
Step 11:
Step 12:
10mm Socket & Ratchet
Pull the fender liner back in order to access and remove the four nuts which secure the front bumper cover to the fender. Reference the photo shown on the right for the location of the nuts.
Enlist the help of a friend, then gently pull outwards on each side of the bumper cover as shown to release the locking tabs (#1). Once both sides of the bumper cover have been released, pull the bumper cover forward slowly approximately three to six inches, using extreme caution to not damage on any connectors which may still be attached.
Nuts
#1
#2
The bumper cover is NOT completely removed during this step, please continue to step 13 to remove it from the vehicle.
FRONT LOCK CARRIER - SERVICE POSITION
NOTE

ES#1876844 ES#1876845ES#2581229 ES#2581230
ECS TUNING 1000 SEVILLE RD. WADSWORTH, OH 44281 1.800.924.5172 WWW.ECSTUNING.COM 16
AUDI B7 A4 2.0T TIMING BELT KIT INSTALLATION®
Table of Contents
Step 13:
Step 14:
VAG Connector Tool, Small Flat Blade Screwdriver
VAG Connector Tool
Disconnect the two wiring harness connectors in the Front LH of the bumper cover, and disconnect the headlight washer hose if your vehicle is equipped with that option. Remove the bumper cover from the vehicle and set it aside.
Disconnect the fan harnesses located on the LH of the engine compartment.
11
For tips on using the VAG Connector Tool, please refer to Page 45 for detailed photos and procedures.
FRONT LOCK CARRIER - SERVICE POSITION
ES#1876844 ES#1876845ES#2581229 ES#2581230
ECS TUNING 1000 SEVILLE RD. WADSWORTH, OH 44281 1.800.924.5172 WWW.ECSTUNING.COM 17
AUDI B7 A4 2.0T TIMING BELT KIT INSTALLATION®
Table of Contents
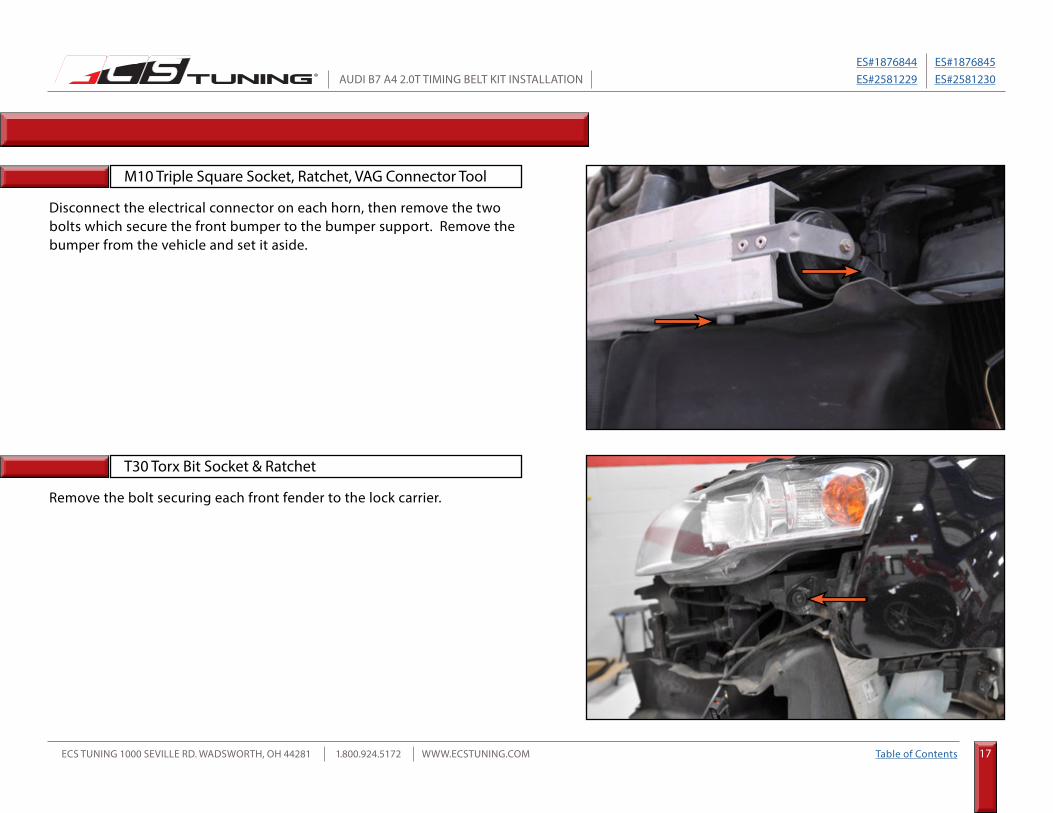
Step 15:
Step 16:
M10 Triple Square Socket, Ratchet, VAG Connector Tool
T30 Torx Bit Socket & Ratchet
Disconnect the electrical connector on each horn, then remove the two bolts which secure the front bumper to the bumper support. Remove the bumper from the vehicle and set it aside.
Remove the bolt securing each front fender to the lock carrier.
FRONT LOCK CARRIER - SERVICE POSITION

ES#1876844 ES#1876845ES#2581229 ES#2581230
ECS TUNING 1000 SEVILLE RD. WADSWORTH, OH 44281 1.800.924.5172 WWW.ECSTUNING.COM 18
AUDI B7 A4 2.0T TIMING BELT KIT INSTALLATION®
Table of Contents
Step 17:
Step 18:
10mm & 13mm Sockets, Ratchet
Lock Carrier Tool, 13mm Socket & Ratchet
Remove the two bolts and one nut from the front bumper support as shown in the photo, DO NOT remove the remaining bolt at this time. Repeat this on the other side of the vehicle.
Install a lock carrier tool into the bolt location as shown in the photo (1), repeat this on the other side of the vehicle. You can now remove the last bolt securing the bumper support (2) and remove it from the vehicle.
(1)
(2)
FRONT LOCK CARRIER - SERVICE POSITION

ES#1876844 ES#1876845ES#2581229 ES#2581230
ECS TUNING 1000 SEVILLE RD. WADSWORTH, OH 44281 1.800.924.5172 WWW.ECSTUNING.COM 19
AUDI B7 A4 2.0T TIMING BELT KIT INSTALLATION®
Table of Contents
Step 19:
Step 20: T30 Torx Bit Socket & Ratchet
Pull the lock carrier forward approximately two inches, anything more than that will risk damaging wiring harnesses and hoses to the front end components.
You can secure the lock carrier in place by loosely reinstalling one of the bolts into the outer hole as shown in the photo. This will prevent the lock carrier from being able to shift while performing any repairs or service.
Note the gap here
FRONT LOCK CARRIER - SERVICE POSITION

ES#1876844 ES#1876845ES#2581229 ES#2581230
ECS TUNING 1000 SEVILLE RD. WADSWORTH, OH 44281 1.800.924.5172 WWW.ECSTUNING.COM 20
AUDI B7 A4 2.0T TIMING BELT KIT INSTALLATION®
Table of Contents
REMOVING THE ORIGINAL TIMING BELTStep 1:
Step 2:
Remove the coolant reservoir cap, then place a large drain pan underneath the front LH corner of the vehicle.
Working from underneath the vehicle, loosen the drain valve on the lower LH corner of the radiator by rotating it counter clockwise, then allow the coolant to drain into the drain pan.
Pliers
Allow the engine to completely cool BEFORE performing this step, this will eliminate the risk of burns to the skin.
We recommend that you close the drain valve once the coolant has been drained, this will eliminate the risk of forgetting to close it later.NOTE

ES#1876844 ES#1876845ES#2581229 ES#2581230
ECS TUNING 1000 SEVILLE RD. WADSWORTH, OH 44281 1.800.924.5172 WWW.ECSTUNING.COM 21
AUDI B7 A4 2.0T TIMING BELT KIT INSTALLATION®
Table of Contents
Clockwise To Loosen Tensioner
Accessory BeltTensioner
Alternator
A/CCompressor
CrankPulley
IdlerPulley
Power SteeringPump
Using an open end wrench to engage the tensioner as shown in the photo, rotate the accessory belt tensioner clockwise until the tension has been released on the belt, remove the belt from the engine, then gently allow the tensioner to rotate back to its rest position (DO NOT let the tensioner snap back).
Loosen and remove the three bolts which secure the accessory belt tensioner to the engine, then lift the tensioner out of the engine compartment and set it aside.
Step 3:
Step 4:
17mm Combination Wrench
13mm Socket & Ratchet
Bolts
Please refer to the full size diagram of the accessory belt which is located on Page 8.
REMOVING THE ORIGINAL TIMING BELT

ES#1876844 ES#1876845ES#2581229 ES#2581230
ECS TUNING 1000 SEVILLE RD. WADSWORTH, OH 44281 1.800.924.5172 WWW.ECSTUNING.COM 22
AUDI B7 A4 2.0T TIMING BELT KIT INSTALLATION®
Table of Contents
Locate the coolant hose in front of the timing cover. Loosen the hose clamp and slide it down the hose approximately two inches.
Remove the hose by twisting and pulling it as shown in the left photo, then secure the hose off to the side with a zip-tie.
Step 5:
Step 6:
Locking Hose Clamp Pliers
Some coolant will drain from the hose during removal, tying the hose off to the side should minimize the spill.
REMOVING THE ORIGINAL TIMING BELT
NOTE
ES#1876844 ES#1876845ES#2581229 ES#2581230
ECS TUNING 1000 SEVILLE RD. WADSWORTH, OH 44281 1.800.924.5172 WWW.ECSTUNING.COM 23
AUDI B7 A4 2.0T TIMING BELT KIT INSTALLATION®
Table of Contents
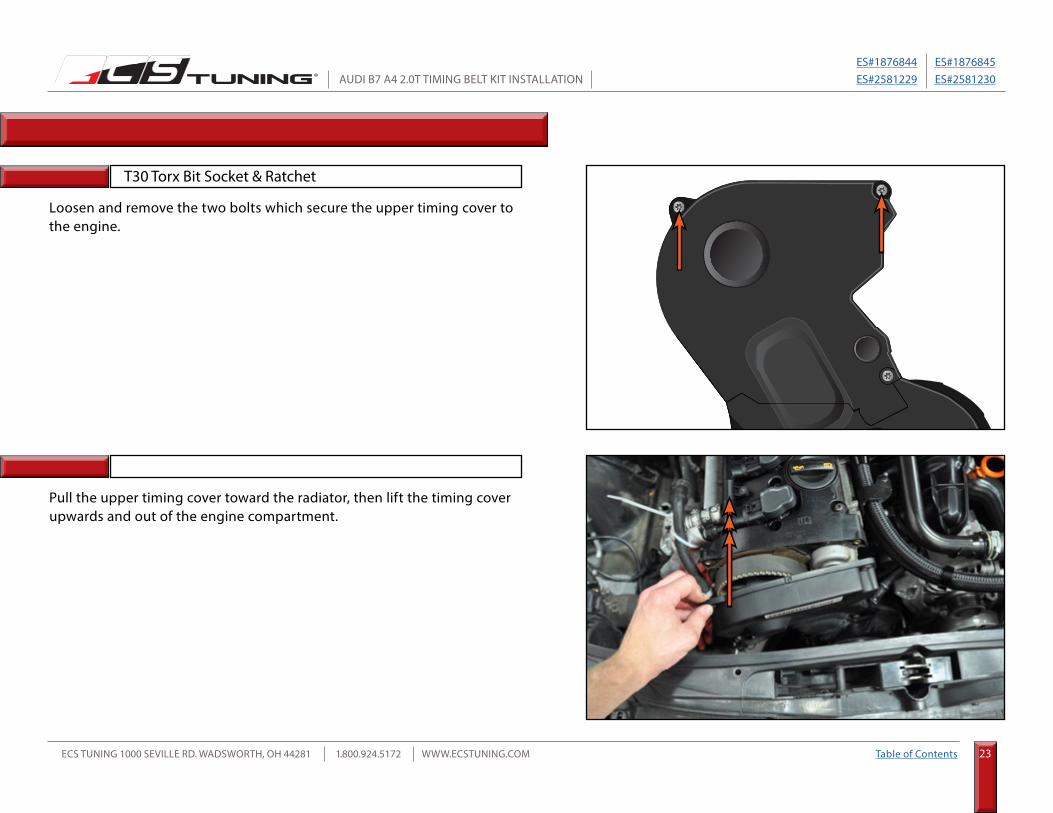
Loosen and remove the two bolts which secure the upper timing cover to the engine.
Pull the upper timing cover toward the radiator, then lift the timing cover upwards and out of the engine compartment.
Step 7:
Step 8:
T30 Torx Bit Socket & Ratchet
OT
REMOVING THE ORIGINAL TIMING BELT
ES#1876844 ES#1876845ES#2581229 ES#2581230
ECS TUNING 1000 SEVILLE RD. WADSWORTH, OH 44281 1.800.924.5172 WWW.ECSTUNING.COM 24
AUDI B7 A4 2.0T TIMING BELT KIT INSTALLATION®
Table of Contents
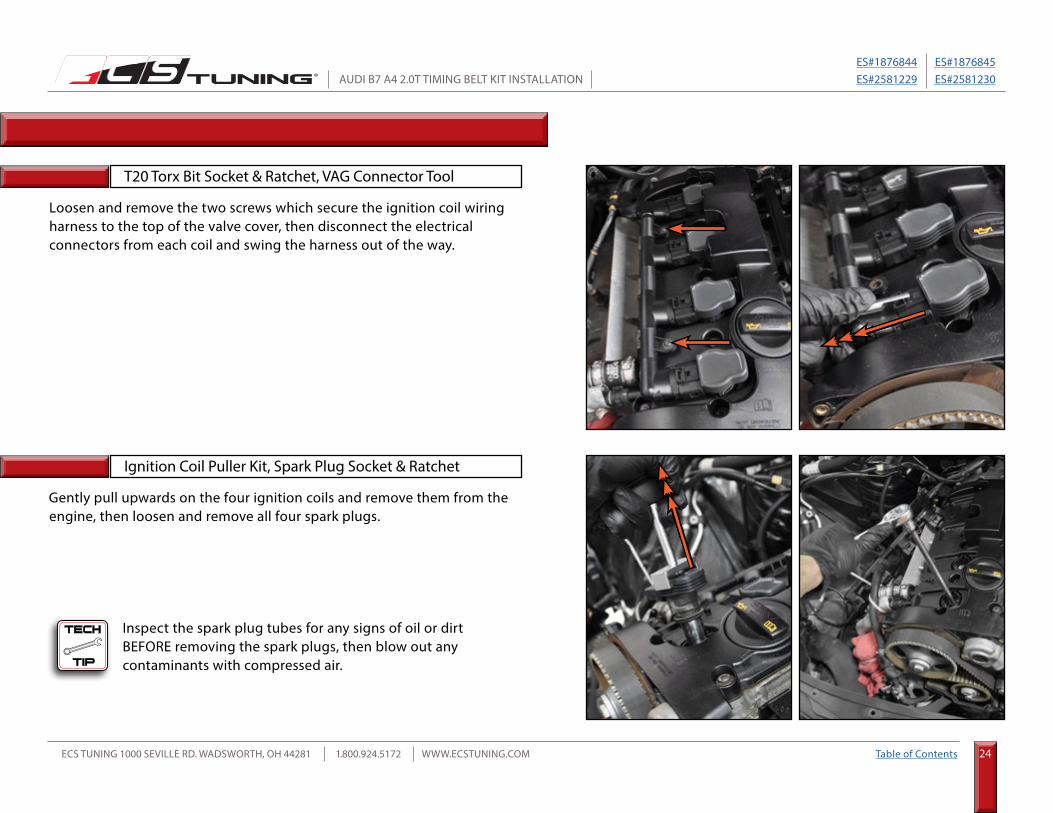
Loosen and remove the two screws which secure the ignition coil wiring harness to the top of the valve cover, then disconnect the electrical connectors from each coil and swing the harness out of the way.
Gently pull upwards on the four ignition coils and remove them from the engine, then loosen and remove all four spark plugs.
Step 9:
Step 10:
T20 Torx Bit Socket & Ratchet, VAG Connector Tool
Ignition Coil Puller Kit, Spark Plug Socket & Ratchet
Inspect the spark plug tubes for any signs of oil or dirt BEFORE removing the spark plugs, then blow out any contaminants with compressed air.
REMOVING THE ORIGINAL TIMING BELT

ES#1876844 ES#1876845ES#2581229 ES#2581230
ECS TUNING 1000 SEVILLE RD. WADSWORTH, OH 44281 1.800.924.5172 WWW.ECSTUNING.COM 25
AUDI B7 A4 2.0T TIMING BELT KIT INSTALLATION®
Table of Contents
Using a socket and ratchet on the CRANKSHAFT BOLT, rotate the crankshaft CLOCKWISE until the camshaft and crankshaft timing marks are BOTH aligned, this tells us that the piston in cylinder #1 is at “Top Dead Center” (TDC). Please refer to the diagram shown on the right for a detailed layout of the timing belt and timing marks.
Step 11: 19mm Twelve Point Socket & Ratchet
camshaftOT
OT
REMOVING THE ORIGINAL TIMING BELT

ES#1876844 ES#1876845ES#2581229 ES#2581230
ECS TUNING 1000 SEVILLE RD. WADSWORTH, OH 44281 1.800.924.5172 WWW.ECSTUNING.COM 26
AUDI B7 A4 2.0T TIMING BELT KIT INSTALLATION®
Table of Contents
Enlist the help of a friend, have that friend insert a screwdriver through the access hole located where the transmission meets the engine, and use the blade of the screwdriver to hold the flywheel in place.
While the flywheel is being held, loosen but DO NOT remove the bolts which secure the crank pulley to the crankshaft. Once all six bolts are loose, double check your cam and crank timing marks to ensure the engine is still at #1 TDC. Once the timing marks are confirmed to be aligned, remove the crank pulley bolts, then remove the crank pulley by wiggling it back and forth while pulling it off the end of the crankshaft.
Step 12:
Step 13:
Large Flat Blade Screwdriver
M10 Triple Square/6mm Allen Bit Socket & Ratchet
Depending on your vehicles manufacturing date these bolts may be M10 Triple Square or 6mm Allen, use a mirror and a flashlight in order to determine which tool is required for your application.
REMOVING THE ORIGINAL TIMING BELT

ES#1876844 ES#1876845ES#2581229 ES#2581230
ECS TUNING 1000 SEVILLE RD. WADSWORTH, OH 44281 1.800.924.5172 WWW.ECSTUNING.COM 27
AUDI B7 A4 2.0T TIMING BELT KIT INSTALLATION®
Table of Contents
camshaft
OT
OT
Lower Timing Cover Bolts
Loosen and remove the seven bolts which secure the lower timing cover to the engine, then remove the lower timing cover from the vehicle.
Step 14: T30 Torx Bit Socket & Ratchet
The bolts in the lower timing cover are slightly shorter than the two we removed from the upper timing cover. Do not mix up these bolts.
REMOVING THE ORIGINAL TIMING BELT
ES#1876844 ES#1876845ES#2581229 ES#2581230
ECS TUNING 1000 SEVILLE RD. WADSWORTH, OH 44281 1.800.924.5172 WWW.ECSTUNING.COM 28
AUDI B7 A4 2.0T TIMING BELT KIT INSTALLATION®
Table of Contents
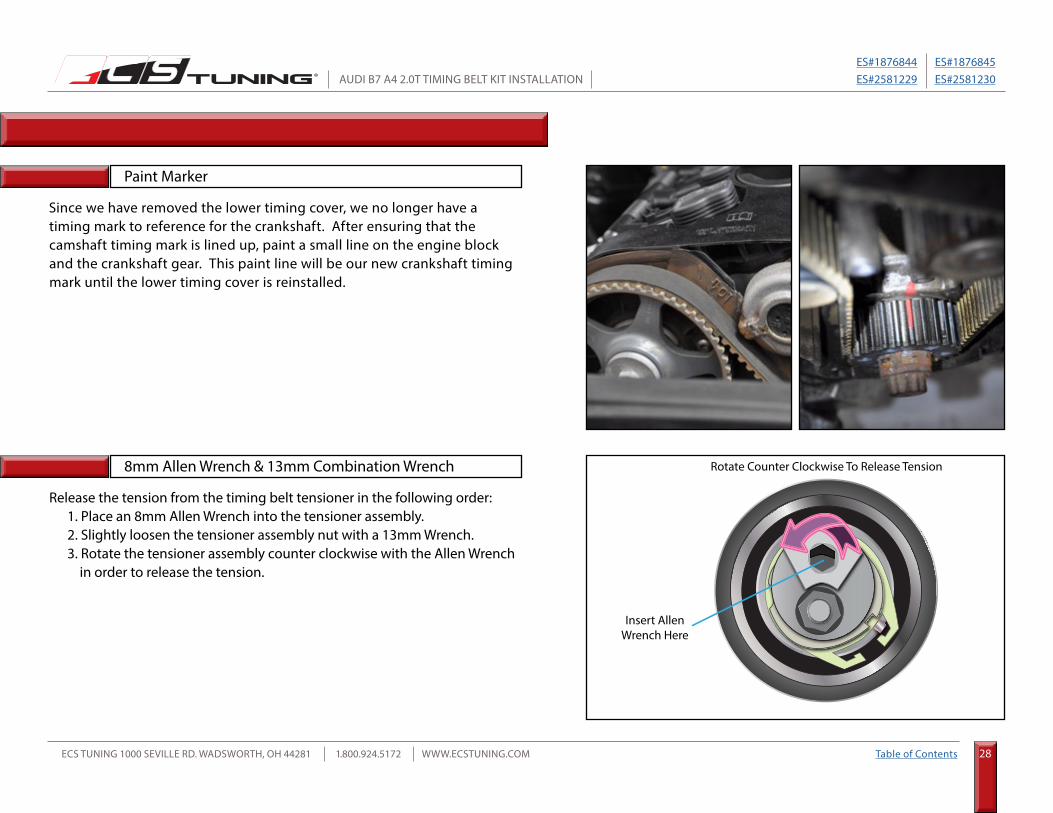
Rotate Counter Clockwise To Release Tension
Insert AllenWrench Here
Since we have removed the lower timing cover, we no longer have a timing mark to reference for the crankshaft. After ensuring that the camshaft timing mark is lined up, paint a small line on the engine block and the crankshaft gear. This paint line will be our new crankshaft timing mark until the lower timing cover is reinstalled.
Release the tension from the timing belt tensioner in the following order: 1. Place an 8mm Allen Wrench into the tensioner assembly. 2. Slightly loosen the tensioner assembly nut with a 13mm Wrench. 3. Rotate the tensioner assembly counter clockwise with the Allen Wrench in order to release the tension.
Step 15:
Step 16:
Paint Marker
8mm Allen Wrench & 13mm Combination Wrench
REMOVING THE ORIGINAL TIMING BELT

ES#1876844 ES#1876845ES#2581229 ES#2581230
ECS TUNING 1000 SEVILLE RD. WADSWORTH, OH 44281 1.800.924.5172 WWW.ECSTUNING.COM 29
AUDI B7 A4 2.0T TIMING BELT KIT INSTALLATION®
Table of Contents
camshaftOT
Upper IdlerPulley
Lower IdlerPulley
Timing BeltTensioner
Water PumpBolts
Remove the timing belt components in the following order:
Step 17:
Remove the tensioner assembly (13mm Wrench).
Remove the timing belt.
Remove the upper and lower idler pulleys (12mm & 13mm Sockets, Ratchet).
Remove the water pump bolts (10mm Socket & Ratchet).
Remove the water pump from the engine block.
REMOVING THE ORIGINAL TIMING BELT
ES#1876844 ES#1876845ES#2581229 ES#2581230
ECS TUNING 1000 SEVILLE RD. WADSWORTH, OH 44281 1.800.924.5172 WWW.ECSTUNING.COM 30
AUDI B7 A4 2.0T TIMING BELT KIT INSTALLATION®
Table of Contents
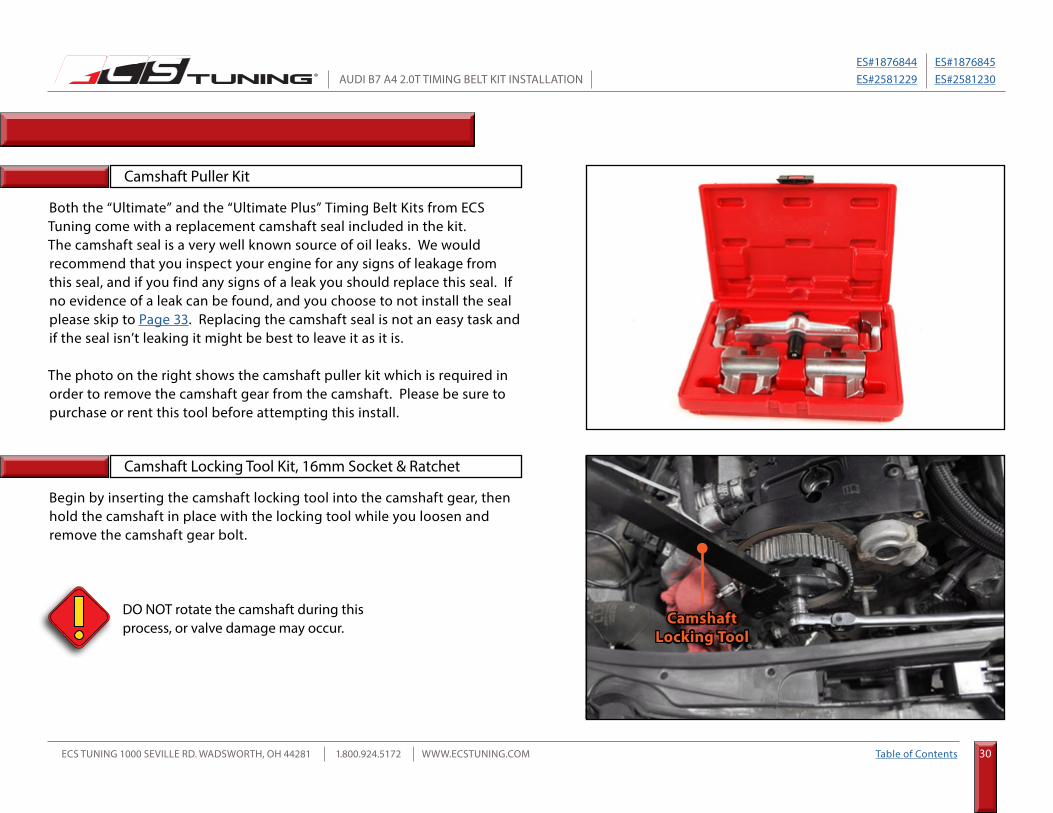
Both the “Ultimate” and the “Ultimate Plus” Timing Belt Kits from ECS Tuning come with a replacement camshaft seal included in the kit. The camshaft seal is a very well known source of oil leaks. We would recommend that you inspect your engine for any signs of leakage from this seal, and if you find any signs of a leak you should replace this seal. If no evidence of a leak can be found, and you choose to not install the seal please skip to Page 33. Replacing the camshaft seal is not an easy task and if the seal isn’t leaking it might be best to leave it as it is.
The photo on the right shows the camshaft puller kit which is required in order to remove the camshaft gear from the camshaft. Please be sure to purchase or rent this tool before attempting this install.
Begin by inserting the camshaft locking tool into the camshaft gear, then hold the camshaft in place with the locking tool while you loosen and remove the camshaft gear bolt.
Step 1:
Step 2:
Camshaft Puller Kit
Camshaft Locking Tool Kit, 16mm Socket & Ratchet
REPLACING THE CAMSHAFT SEAL
CamshaftLocking Tool
DO NOT rotate the camshaft during this process, or valve damage may occur.

ES#1876844 ES#1876845ES#2581229 ES#2581230
ECS TUNING 1000 SEVILLE RD. WADSWORTH, OH 44281 1.800.924.5172 WWW.ECSTUNING.COM 31
AUDI B7 A4 2.0T TIMING BELT KIT INSTALLATION®
Table of Contents
Install the camshaft puller T40001 onto the camshaft gear using claw numbers T40001/7 and T40001/6. Thread the bolt inwards to apply pressure against the camshaft in order to remove the gear.
Carefully remove the camshaft seal from the engine, use extreme caution to prevent damaging/scratching the surface of the camshaft where the seal rides. Clean the sealing surface of the camshaft with a lint free towel and a mild cleaner.
Step 3:
Step 4:
Camshaft Gear Puller Kit
Seal Puller
CamGear
GearPuller
Gear Puller
REPLACING THE CAMSHAFT SEAL
ES#1876844 ES#1876845ES#2581229 ES#2581230
ECS TUNING 1000 SEVILLE RD. WADSWORTH, OH 44281 1.800.924.5172 WWW.ECSTUNING.COM 32
AUDI B7 A4 2.0T TIMING BELT KIT INSTALLATION®
Table of Contents
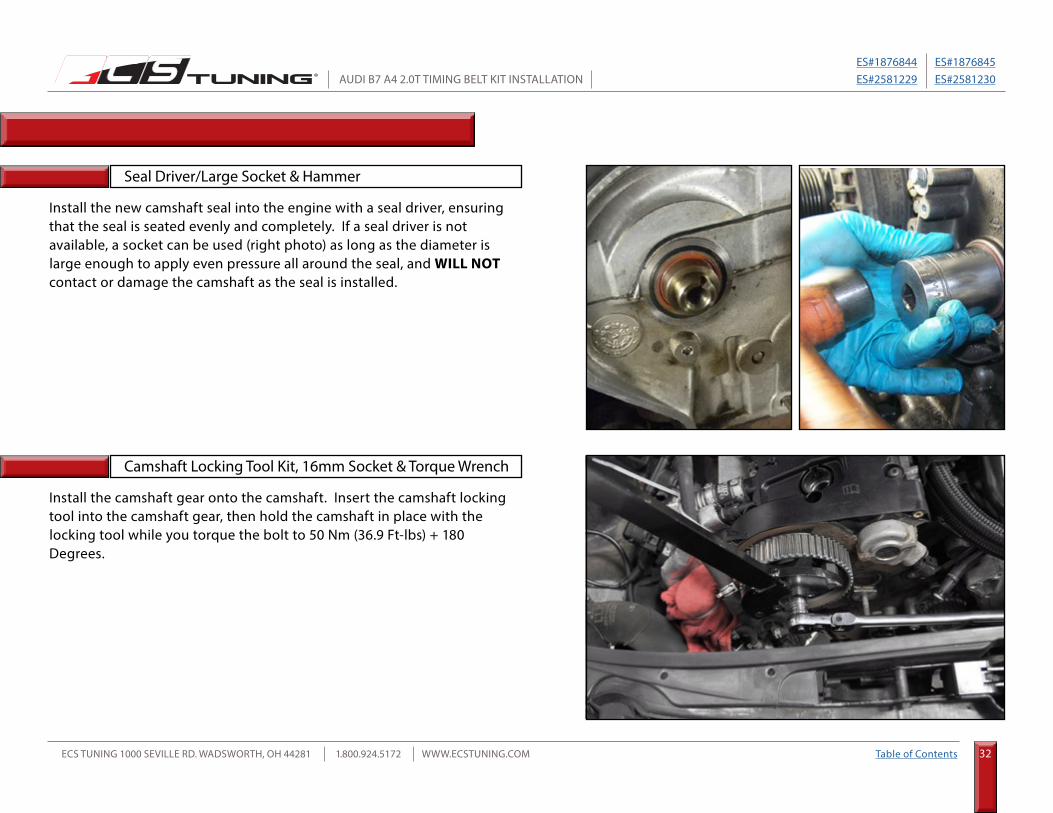
Install the new camshaft seal into the engine with a seal driver, ensuring that the seal is seated evenly and completely. If a seal driver is not available, a socket can be used (right photo) as long as the diameter is large enough to apply even pressure all around the seal, and WILL NOT contact or damage the camshaft as the seal is installed.
Install the camshaft gear onto the camshaft. Insert the camshaft locking tool into the camshaft gear, then hold the camshaft in place with the locking tool while you torque the bolt to 50 Nm (36.9 Ft-lbs) + 180 Degrees.
Step 5:
Step 6:
Seal Driver/Large Socket & Hammer
Camshaft Locking Tool Kit, 16mm Socket & Torque Wrench
REPLACING THE CAMSHAFT SEAL

ES#1876844 ES#1876845ES#2581229 ES#2581230
ECS TUNING 1000 SEVILLE RD. WADSWORTH, OH 44281 1.800.924.5172 WWW.ECSTUNING.COM 33
AUDI B7 A4 2.0T TIMING BELT KIT INSTALLATION®
Table of Contents
Thoroughly clean the water pump gasket surface on the engine block, including the beveled edge where the water pump o-ring sits.
Lubricate the water pump o-ring seal with a small amount of fresh coolant, then install the water pump by inserting it into the engine block. Torque the water pump bolts to 15 Nm (11 Ft-lbs).
Step 1:
Step 2: 10mm Socket & Torque Wrench
INSTALLING THE NEW TIMING BELT
Clean Here
ES#1876844 ES#1876845ES#2581229 ES#2581230
ECS TUNING 1000 SEVILLE RD. WADSWORTH, OH 44281 1.800.924.5172 WWW.ECSTUNING.COM 34
AUDI B7 A4 2.0T TIMING BELT KIT INSTALLATION®
Table of Contents
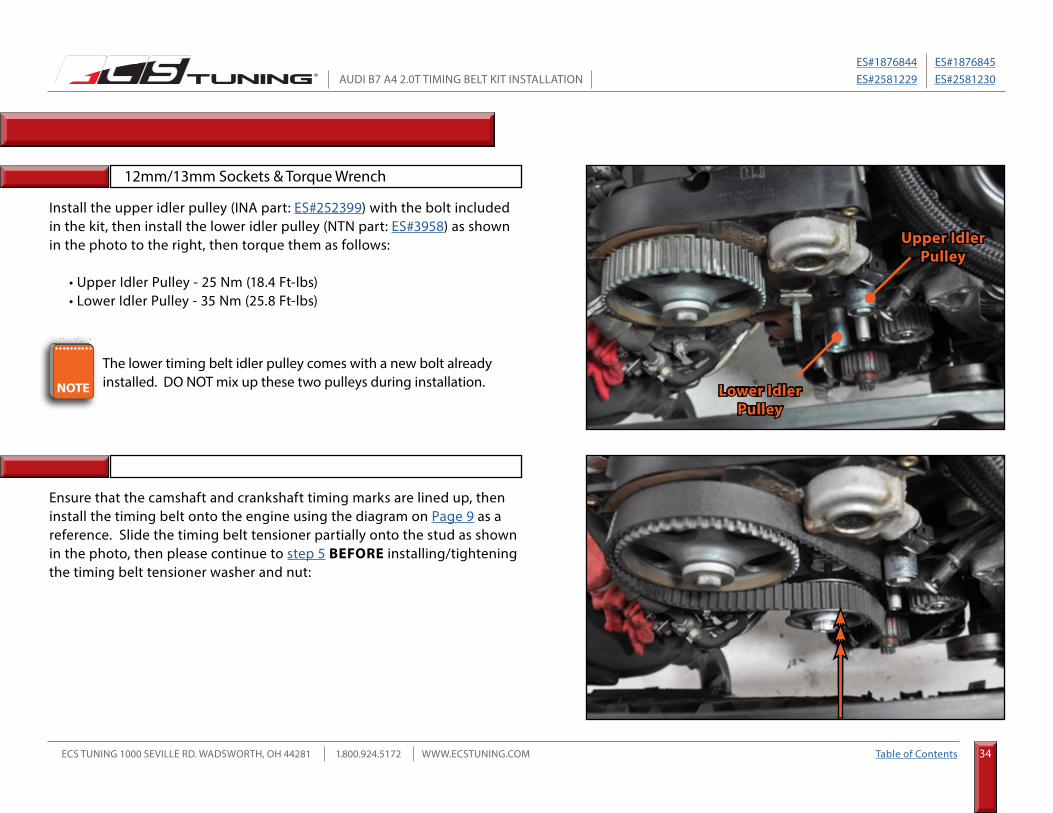
Install the upper idler pulley (INA part: ES#252399) with the bolt included in the kit, then install the lower idler pulley (NTN part: ES#3958) as shown in the photo to the right, then torque them as follows:
• Upper Idler Pulley - 25 Nm (18.4 Ft-lbs) • Lower Idler Pulley - 35 Nm (25.8 Ft-lbs)
Ensure that the camshaft and crankshaft timing marks are lined up, then install the timing belt onto the engine using the diagram on Page 9 as a reference. Slide the timing belt tensioner partially onto the stud as shown in the photo, then please continue to step 5 BEFORE installing/tightening the timing belt tensioner washer and nut:
Step 3:
Step 4:
12mm/13mm Sockets & Torque Wrench
Upper Idler Pulley
Lower Idler Pulley
The lower timing belt idler pulley comes with a new bolt already installed. DO NOT mix up these two pulleys during installation.
INSTALLING THE NEW TIMING BELT
NOTE

ES#1876844 ES#1876845ES#2581229 ES#2581230
ECS TUNING 1000 SEVILLE RD. WADSWORTH, OH 44281 1.800.924.5172 WWW.ECSTUNING.COM 35
AUDI B7 A4 2.0T TIMING BELT KIT INSTALLATION®
Table of Contents
It is EXTREMELY important that the locking tab on the back of the tensioner assembly is inserted into the freeze plug located on the front of the cylinder head. DO NOT attempt to tighten the timing belt tensioner into place until the locking tab is in position as shown in the photo, or damage to the tensioner will likely occur, and you will be unable to apply the necessary tension onto the timing belt.
Apply tension to the timing belt tensioner in the following order: 1. Place an 8mm Allen Wrench into the tensioner assembly. 2. Install the new nut and washer which are included in the kit onto the tensioner assembly. 3. SLIGHTLY tighten the tensioner assembly nut, it must be loose enough to allow the tensioner to rotate while applying tension, but tight enough to prevent the tensioner from snapping back once it is in position. 4. Rotate the tensioner assembly clockwise with the Allen Wrench until the alignment tab is in line with the notch in the tensioner as shown in the diagram on the right. 5. Torque the tensioner nut to 25 Nm (18.4 Ft-lbs).
Step 5:
Step 6: 8mm Allen Wrench, 13mm Socket & Torque Wrench
Rotate ClockwiseTo Apply Tension
Align TabIn Notch
Locking Tab InsertedInto Freeze Plug
Tensioner Nut:25 Nm (18.4 Ft-lbs)
Freeze Plug
Locking Tab
INSTALLING THE NEW TIMING BELT
ES#1876844 ES#1876845ES#2581229 ES#2581230
ECS TUNING 1000 SEVILLE RD. WADSWORTH, OH 44281 1.800.924.5172 WWW.ECSTUNING.COM 36
AUDI B7 A4 2.0T TIMING BELT KIT INSTALLATION®
Table of Contents
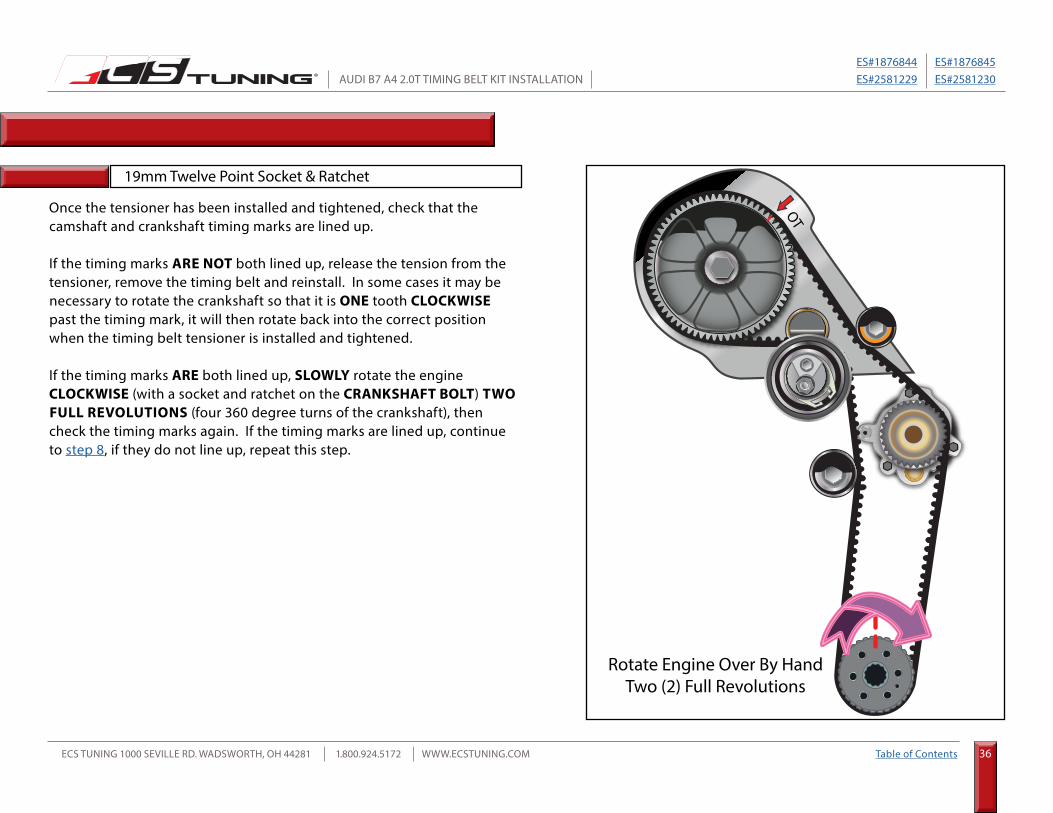
Once the tensioner has been installed and tightened, check that the camshaft and crankshaft timing marks are lined up.
If the timing marks ARE NOT both lined up, release the tension from the tensioner, remove the timing belt and reinstall. In some cases it may be necessary to rotate the crankshaft so that it is ONE tooth CLOCKWISE past the timing mark, it will then rotate back into the correct position when the timing belt tensioner is installed and tightened.
If the timing marks ARE both lined up, SLOWLY rotate the engine CLOCKWISE (with a socket and ratchet on the CRANKSHAFT BOLT) TWO FULL REVOLUTIONS (four 360 degree turns of the crankshaft), then check the timing marks again. If the timing marks are lined up, continue to step 8, if they do not line up, repeat this step.
Step 7: 19mm Twelve Point Socket & Ratchet
camshaft
OT
Rotate Engine Over By HandTwo (2) Full Revolutions
INSTALLING THE NEW TIMING BELT

ES#1876844 ES#1876845ES#2581229 ES#2581230
ECS TUNING 1000 SEVILLE RD. WADSWORTH, OH 44281 1.800.924.5172 WWW.ECSTUNING.COM 37
AUDI B7 A4 2.0T TIMING BELT KIT INSTALLATION®
Table of Contents
Install the seven (7) bolts which secure the lower timing belt cover to the engine, then torque them to 10 Nm (7.4 Ft-lbs).
Step 8: T30 Torx Bit Socket & Torque Wrench
camshaft
OT
OTLower Timing
Cover Bolts:10 Nm (7.4 Ft-lbs)
The bolts in the lower timing cover are slightly shorter than the two we removed from the upper timing cover, do not mix up these bolts.
INSTALLING THE NEW TIMING BELT
ES#1876844 ES#1876845ES#2581229 ES#2581230
ECS TUNING 1000 SEVILLE RD. WADSWORTH, OH 44281 1.800.924.5172 WWW.ECSTUNING.COM 38
AUDI B7 A4 2.0T TIMING BELT KIT INSTALLATION®
Table of Contents
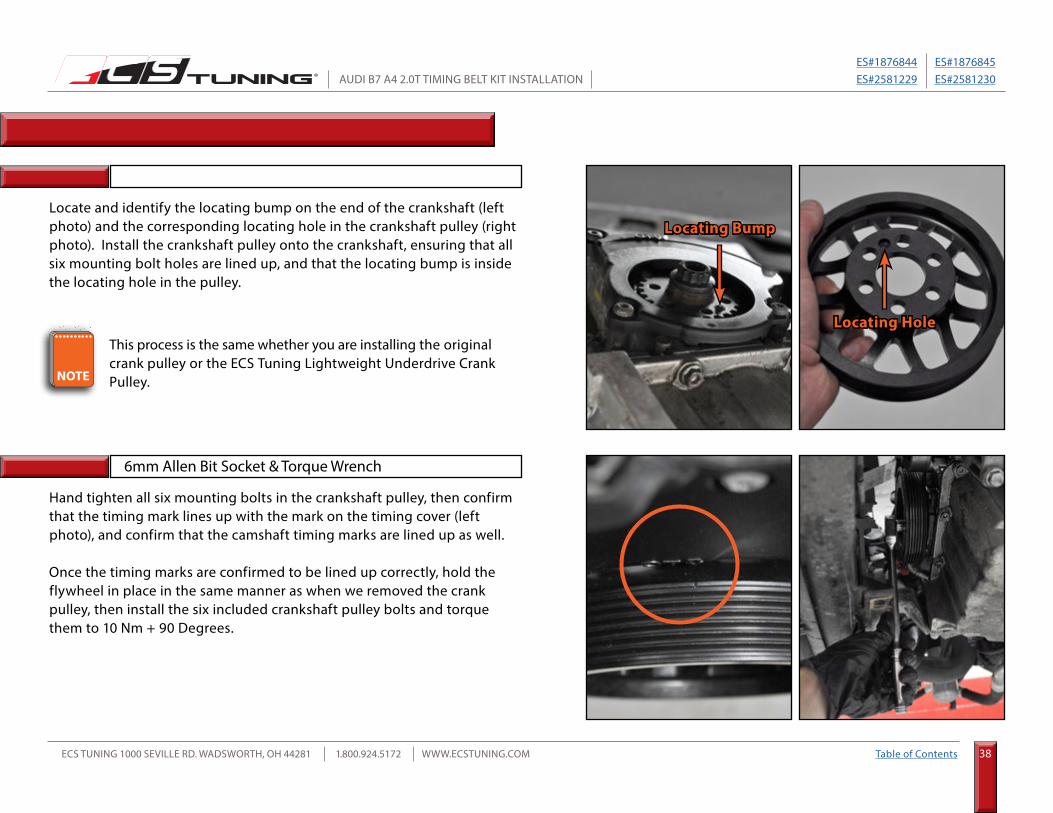
Locate and identify the locating bump on the end of the crankshaft (left photo) and the corresponding locating hole in the crankshaft pulley (right photo). Install the crankshaft pulley onto the crankshaft, ensuring that all six mounting bolt holes are lined up, and that the locating bump is inside the locating hole in the pulley.
Step 9:
Hand tighten all six mounting bolts in the crankshaft pulley, then confirm that the timing mark lines up with the mark on the timing cover (left photo), and confirm that the camshaft timing marks are lined up as well.
Once the timing marks are confirmed to be lined up correctly, hold the flywheel in place in the same manner as when we removed the crank pulley, then install the six included crankshaft pulley bolts and torque them to 10 Nm + 90 Degrees.
Step 10: 6mm Allen Bit Socket & Torque Wrench
This process is the same whether you are installing the original crank pulley or the ECS Tuning Lightweight Underdrive Crank Pulley.
Locating Bump
Locating Hole
INSTALLING THE NEW TIMING BELT
NOTE
ES#1876844 ES#1876845ES#2581229 ES#2581230
ECS TUNING 1000 SEVILLE RD. WADSWORTH, OH 44281 1.800.924.5172 WWW.ECSTUNING.COM 39
AUDI B7 A4 2.0T TIMING BELT KIT INSTALLATION®
Table of Contents
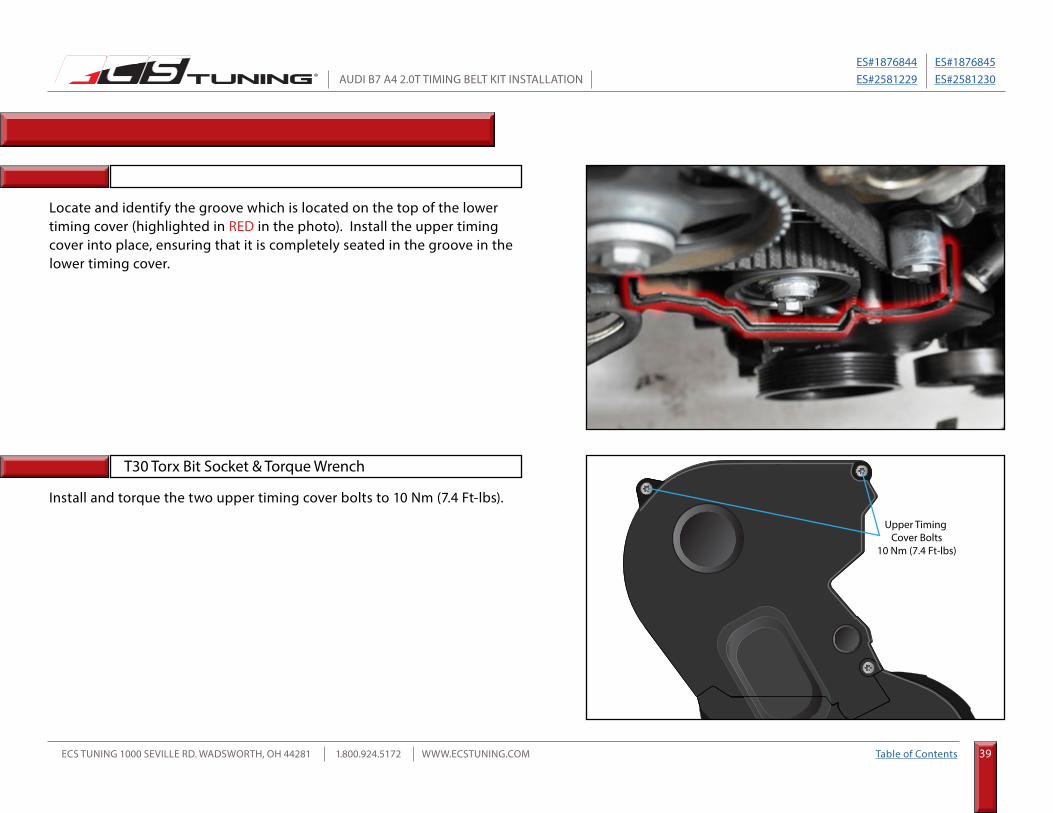
Locate and identify the groove which is located on the top of the lower timing cover (highlighted in RED in the photo). Install the upper timing cover into place, ensuring that it is completely seated in the groove in the lower timing cover.
Install and torque the two upper timing cover bolts to 10 Nm (7.4 Ft-lbs).
Step 11:
Step 12: T30 Torx Bit Socket & Torque Wrench
OT
Upper Timing Cover Bolts
10 Nm (7.4 Ft-lbs)
INSTALLING THE NEW TIMING BELT

ES#1876844 ES#1876845ES#2581229 ES#2581230
ECS TUNING 1000 SEVILLE RD. WADSWORTH, OH 44281 1.800.924.5172 WWW.ECSTUNING.COM 40
AUDI B7 A4 2.0T TIMING BELT KIT INSTALLATION®
Table of Contents
Reconnect the coolant hose located in front of the timing cover.
Reinstall the accessory belt tensioner and torque the tensioner bolts to 23 Nm (17 Ft-lbs). Reinstall the accessory belt, refer to the diagram on Page 8 for belt routing instructions.
Step 13:
Step 14:
Locking Hose Clamp Pliers
17mm Combination Wrench, 13mm Socket & Torque Wrench
Reinstall the spark plugs and ignition coils.
Reinstall the lock carrier in reverse order of removal.
Reinstall the intake duct.
Reinstall the belly pan.
INSTALLING THE NEW TIMING BELT

ES#1876844 ES#1876845ES#2581229 ES#2581230
ECS TUNING 1000 SEVILLE RD. WADSWORTH, OH 44281 1.800.924.5172 WWW.ECSTUNING.COM 41
AUDI B7 A4 2.0T TIMING BELT KIT INSTALLATION®
Table of Contents
The complexity and component location of these cooling systems causes air to become trapped, which can cause overheating and engine damage. For this reason, bleeding the air from the system is extremely important. The picture on the right shows the air bleed hose for the reservoir and the bleed screw in the upper coolant pipe. During regular cooling system operation, the air bleed hose will allow small amounts of air to rise to the high point of the reservoir, and subsequently be replaced in the system with coolant. It is not able, however, to bleed air quickly enough in a system that has ingested a large amount of air (such as during a repair). Air will naturally rise to the top, but in this system there are two points in which it will become trapped because they are higher than the coolant level in the reservoir; the upper coolant pipe and the heater core inlet.
The cooling system must be filled using a 50/50 mix of distilled water and G13 coolant. One method of filling the cooling system is to use our Schwaben Coolant Evacuation Tool Kit. This tool kit uses compressed air to draw a vacuum on the entire cooling system, then that vacuum is used to draw in fresh coolant into the system without any air pockets.
For detailed instructions on how to use this tool, please click HERE.
Step 1:
Step 2: Schwaben Coolant Evacuation Tool Kit
BLEEDING THE COOLING SYSTEM
Air Bleed Hose
Bleed Screw
ES#1876844 ES#1876845ES#2581229 ES#2581230
ECS TUNING 1000 SEVILLE RD. WADSWORTH, OH 44281 1.800.924.5172 WWW.ECSTUNING.COM 42
AUDI B7 A4 2.0T TIMING BELT KIT INSTALLATION®
Table of Contents
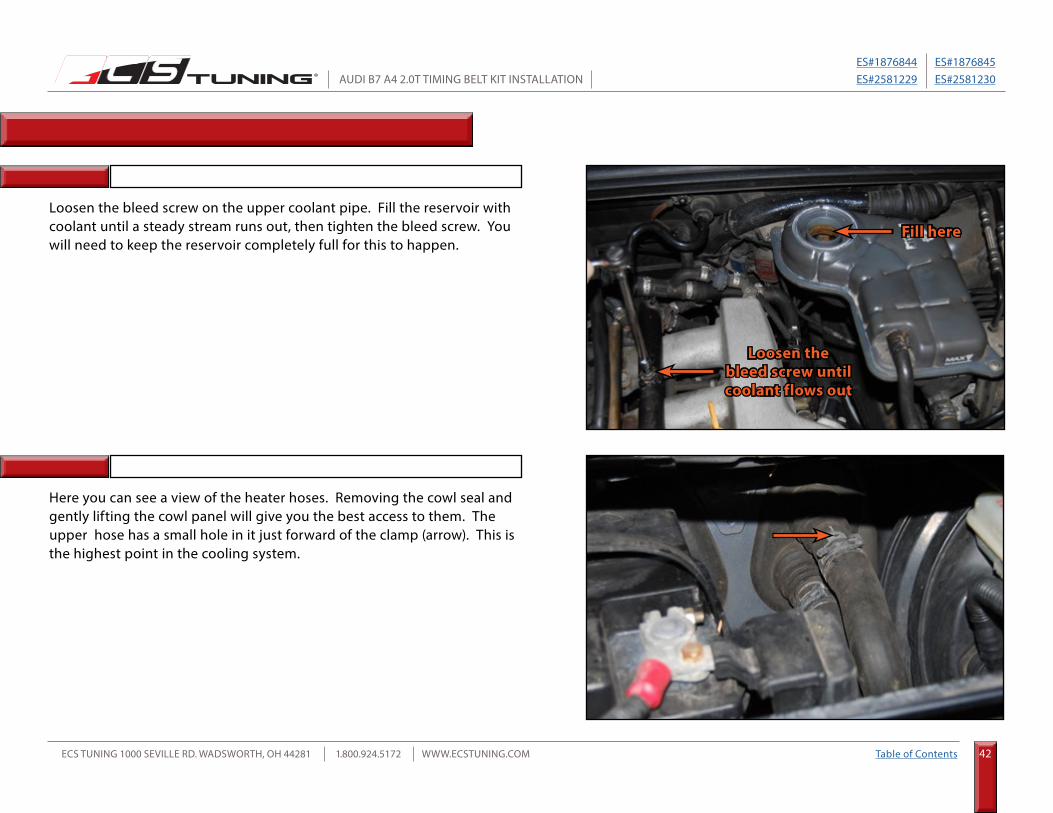
Loosen the bleed screw on the upper coolant pipe. Fill the reservoir with coolant until a steady stream runs out, then tighten the bleed screw. You will need to keep the reservoir completely full for this to happen.
Here you can see a view of the heater hoses. Removing the cowl seal and gently lifting the cowl panel will give you the best access to them. The upper hose has a small hole in it just forward of the clamp (arrow). This is the highest point in the cooling system.
Step 3:
Step 4:
Fill here
Loosen the bleed screw until coolant flows out
BLEEDING THE COOLING SYSTEM
ES#1876844 ES#1876845ES#2581229 ES#2581230
ECS TUNING 1000 SEVILLE RD. WADSWORTH, OH 44281 1.800.924.5172 WWW.ECSTUNING.COM 43
AUDI B7 A4 2.0T TIMING BELT KIT INSTALLATION®
Table of Contents
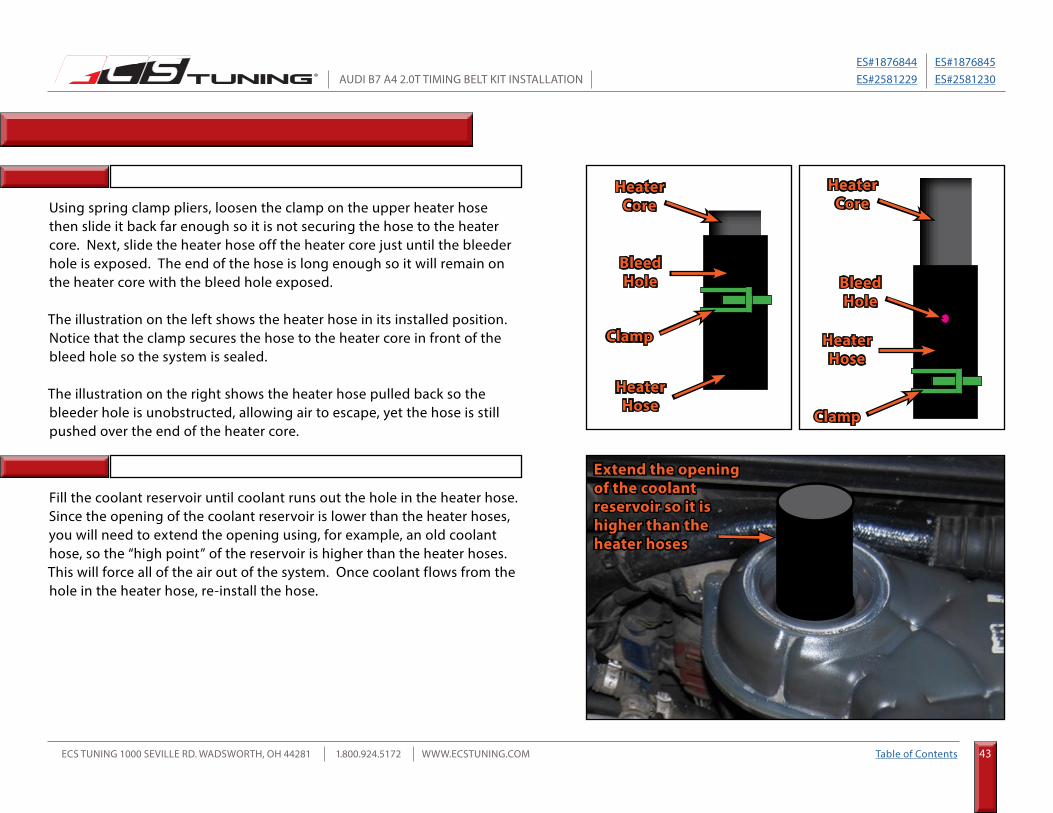
Using spring clamp pliers, loosen the clamp on the upper heater hose then slide it back far enough so it is not securing the hose to the heater core. Next, slide the heater hose off the heater core just until the bleeder hole is exposed. The end of the hose is long enough so it will remain on the heater core with the bleed hole exposed.
The illustration on the left shows the heater hose in its installed position. Notice that the clamp secures the hose to the heater core in front of the bleed hole so the system is sealed.
The illustration on the right shows the heater hose pulled back so the bleeder hole is unobstructed, allowing air to escape, yet the hose is still pushed over the end of the heater core.
Fill the coolant reservoir until coolant runs out the hole in the heater hose. Since the opening of the coolant reservoir is lower than the heater hoses, you will need to extend the opening using, for example, an old coolant hose, so the “high point” of the reservoir is higher than the heater hoses. This will force all of the air out of the system. Once coolant flows from the hole in the heater hose, re-install the hose.
Step 5:
Step 6:
Bleed Hole
Heater Core
Heater Hose
Clamp
Extend the opening of the coolant reservoir so it is higher than the heater hoses
Heater Core
Clamp
Bleed Hole
Heater Hose
BLEEDING THE COOLING SYSTEM

ES#1876844 ES#1876845ES#2581229 ES#2581230
ECS TUNING 1000 SEVILLE RD. WADSWORTH, OH 44281 1.800.924.5172 WWW.ECSTUNING.COM 44
AUDI B7 A4 2.0T TIMING BELT KIT INSTALLATION®
Table of Contents
Step 7:
Reinstall the radiator cap, then start the engine and allow it to warm up to operating temperature. Closely inspect the entire system for any coolant leaks.
Remove the coolant reservoir “extension”.
Install the coolant reservoir cap.
Start the engine and run it at 2000 RPM for 3 minutes.
Allow the engine to idle until it reaches operating temperature (both the upper and lower radiator hoses will be hot).
Visually inspect the cooling system and check for any leaks.
Shut the engine off and allow it completely cool.
Top off the coolant reservoir.
Your Audi B7 A4 2.0T Timing Belt Kit installation is complete!
BLEEDING THE COOLING SYSTEM

ES#1876844 ES#1876845ES#2581229 ES#2581230
ECS TUNING 1000 SEVILLE RD. WADSWORTH, OH 44281 1.800.924.5172 WWW.ECSTUNING.COM 45
AUDI B7 A4 2.0T TIMING BELT KIT INSTALLATION®
Table of Contents
Step 1:
Step 2: VAG Connector Tool
USING THE VAG CONNECTOR TOOL
These connectors are commonly referred to as “Push and Pull” connectors,in reference to the method used to disconnect them.
To disconnect one of these connectors, follow this procedure:
1. Engage the connector release tool into the connector housing.2. Push inward gently on the connector.3. While holding pressure inward on the connector, pull up on thehandle of the release tool.4. Pull the connector off of the component.
(1)(2)
(3)
To return to the Lock Carrier Service Position Instructions, simply click HERE.

ES#1876844 ES#1876845ES#2581229 ES#2581230
ECS TUNING 1000 SEVILLE RD. WADSWORTH, OH 44281 1.800.924.5172 WWW.ECSTUNING.COM 46
AUDI B7 A4 2.0T TIMING BELT KIT INSTALLATION®
Table of Contents
Torque to Yield or “Stretch” Bolts
A ribbed bolt is identified by the ribs on the contact surface
A non-ribbed bolt is identifiedby the smooth contact surface
Ribbed vs. Non-Ribbed Bolts
Many bolts will have a torque specification listed in the format - xx Nm (xx Ft-lbs) + xx degrees. These bolts are torque to yield bolts, commonly referred to as “stretch” bolts. The correct procedure for torquing these bolts is:
Stage One - Torque the bolt(s) to the initial Nm or Ft-lb specification. If there is more than one, be sure to torque them in the correct sequence.Stage Two - Tighten or “stretch” the bolt(s) the additional specified number of degrees. If there is more than one, be sure to follow the correct sequence.
Note - Some bolts may have two or more stages of torquing before the final stage of “stretching” the bolts.
When tightening more than one bolt in a specified sequence, be sure to mark each fastener with paint immediately after performing the final stage or “stretching” of the bolts. This will ensure that you keep track of which bolts have already been “stretched”.
All Torque to Yield bolts should only be used once and should be replaced each time they are removed. If they are reused, they will not be able to achieve the proper clamping force with the specified torque.
Lubrication
Torque specifications are always listed for a dry fastener (no lubrication) unless specified otherwise.
Some fasteners require lubrication on the threads -or- on the contact surface while torquing. These fasteners will be listed with the specific location and type of lubrication required. Always follow manufacturers recommendations exactly.
Lubricating a fastener that is intended to be installed dry and then torquing it to factory specifications will increase the clamping force and stress on the fastener and components, which can result in damage or failure.
Do not lubricate the threads of any fastener unless it is specifically recommended by the manufacturer.
Ribbed and Non-Ribbed bolts in the same location generally require a different torque specification.
TORQUING TIPS

ES#1876844 ES#1876845ES#2581229 ES#2581230
ECS TUNING 1000 SEVILLE RD. WADSWORTH, OH 44281 1.800.924.5172 WWW.ECSTUNING.COM 47
AUDI B7 A4 2.0T TIMING BELT KIT INSTALLATION®
Table of Contents
At ECS Tuning, we carry a line of high quality Schwaben Tools and Equipment to help you build your ultimate tool collection. Never before has affordability and quality been so closely related. Our entire Schwaben line is subjected to strict in house testing for strength and durability. See what we have to offer and equip your garage without breaking the bank.
SCHWABEN - BUILD THE ULTIMATE TOOL COLLECTION
Engine Bars
Pressure BleedersLighting
Breaker BarCreepers
Pry Bars
Gloves
Screwdrivers
Coil Spring CompressorsCamber Gauge
Hose Pinch PliersWheel Bolt Pattern Gauge
Ball Joint SeparatorVanos Solenoid Socket
Exhaust Hanger Pliers
Scraper, Hook, & Pick SetCamshaft Tools
Fan Clutch WrenchesTie Rod Tools
Brake Fluid Catch BottleTubing Cutter
Booster CablesOil Filter ToolsService Carts
Battery ChargerStethoscope
Battery Terminal BrushWheel Chocks
E-Drive SocketsSockets
Jack Stands
Ratchets
Torx Sockets
Circuit Tester
Torx DriversCar Ramps
Bubble Flaring ToolThread Chaser
Drain PansWrenches
Impact SocketsTorque Wrenches
Your Audi B7 A4 2.0T Timing Belt Kit installation is complete!
These instructions are provided as a courtesy by ECS TuningProper service and repair procedures are vital to the safe, reliable operation of all motor vehicles as well as the personal safety of those performing the repairs. Standard safety procedures and precautions (including use of safety goggles and proper tools and equipment) should be followed at all times to eliminate the possibility of personal injury or improper service which could damage the vehicle or compromise its safety.
Although this material has been prepared with the intent to provide reliable information, no warranty (express or implied) is made as to its accuracy or completeness. Neither is any liability assumed for loss or damage resulting from reliance on this material. SPECIFICALLY, NO WARRANTY OF MERCHANTABILITY, FITNESS FOR A PARTICULAR PURPOSE OR ANY OTHER WARRANTY IS MADE OR TO BE IMPLIED WITH RESPECT TO THIS MATERIAL. In no event will ECS Tuning, Incorporated or its affiliates be liable for any damages, direct or indirect, consequential or compensatory, arising out of the use of this material.