AT&T NetBond User Guide · © 2016 AT&T Intellectual Property. All rights reserved. AT&T and the...
30
© 2016 AT&T Intellectual Property. All rights reserved. AT&T and the AT&T logo are trademarks of AT&T Intellectual Property. AT&T NetBond ® User Guide AWS Public and Private Publication Date: 1/11/2016 Revision: 1.0
-
Upload
vuongthuan -
Category
Documents
-
view
234 -
download
3
Transcript of AT&T NetBond User Guide · © 2016 AT&T Intellectual Property. All rights reserved. AT&T and the...
© 2016 AT&T Intellectual Property. All rights reserved. AT&T and the AT&T logo are trademarks of AT&T Intellectual Property.
AT&T NetBond® User Guide AWS Public and Private
Publication Date: 1/11/2016
Revision: 1.0
Legal Disclaimer
© 2016 AT&T Intellectual Property. All rights reserved. AT&T and the AT&T logo are trademarks of AT&T Intellectual Property.
i
Copyright AT&T Intellectual Property. All rights reserved. AT&T, the AT&T logo and all other AT&T marks
contained herein are trademarks of AT&T Intellectual Property and/or AT&T affiliated companies.
All other marks contained herein are the property of their respective owners. This document is not an
offer, commitment, representation or warranty by AT&T and is subject to change.
The information contained in this document should not be duplicated, transmitted, or disclosed, in whole
or in part without the expressed written consent of AT&T. Information in this document is subject to
change without notice. AT&T assumes no responsibility for any errors or omissions in this document. Use
of this document and the information is pursuant to the terms and conditions of your service agreement
with AT&T.
"The Amazon Web Services name and logos are trademarks and service marks of AWS (collectively the
“AWS Trademarks”)"
Table of Contents
© 2016 AT&T Intellectual Property. All rights reserved. AT&T and the AT&T logo are trademarks of AT&T Intellectual Property.
ii
1 About AT&T NetBond® .......................................................................................................................... 1
2 Ordering AT&T NetBond ....................................................................................................................... 1
2.1 Contract......................................................................................................................................... 1
2.2 Activating Your AT&T Cloud Solutions Account ............................................................................ 2
3 Provisioning Amazon Web Services Service.......................................................................................... 2
4 Provisioning AT&T NetBond .................................................................................................................. 2
4.1 Provisioning AT&T NetBond – Configure Service.......................................................................... 4
4.2 Provisioning AT&T NetBond – Payment Info ................................................................................ 5
4.3 Provisioning AT&T NetBond – Confirm Order .............................................................................. 6
5 Configuring AT&T NetBond with Amazon Web Services ...................................................................... 8
6 Managing AT&T NetBond with Amazon Web Services ....................................................................... 14
6.1 Managing Your Minimum Bandwidth Commitment .................................................................. 14
6.2 Managing Subaccount Disconnects ............................................................................................ 18
7 Troubleshooting and Support ............................................................................................................. 19
7.1 Ping from an Endpoint on MPLS Network .................................................................................. 20
7.1.1 If the Ping is Successful ....................................................................................................... 20
7.1.2 If the Ping is Not Successful ................................................................................................ 20
7.2 Technical Support ....................................................................................................................... 21
7.3 Support Plan Details .................................................................................................................... 24
7.3.1 Base Support ....................................................................................................................... 24
7.3.2 Enhanced Support ............................................................................................................... 24
Table of Images
© 2016 AT&T Intellectual Property. All rights reserved. AT&T and the AT&T logo are trademarks of AT&T Intellectual Property.
iii
Figure 4-1: Product Options on the AT&T Cloud Solutions Portal ..................................................... 3
Figure 4-2: Configure Service Screen on the AT&T Cloud Solutions Portal ..................................... 4
Figure 4-3: Payment Confirmation Screen ............................................................................................. 5
Figure 4-4: Confirm Order ......................................................................................................................... 6
Figure 4-5: Order Confirmation Screen .................................................................................................. 7
Figure 5-1: Manage Service Option ........................................................................................................ 8
Figure 5-2: Create VNC ............................................................................................................................. 8
Figure 5-3: VNC Information ..................................................................................................................... 9
Figure 5-4: Assign VLAN Button ............................................................................................................ 10
Figure 5-5: Assign a VLAN Screen........................................................................................................ 11
Figure 5-6: Manage AT&T NetBond – Assigning a VLAN ................................................................. 12
Figure 6-1: Shortcuts in the My Dashboard View of the My Account Screen ................................. 14
Figure 6-2: Accessing Reports for Your Account ................................................................................ 15
Figure 6-3: Daily Reports ........................................................................................................................ 15
Figure 6-4: Monthly Reports ................................................................................................................... 15
Figure 6-5: MBC Settings ........................................................................................................................ 16
Figure 6-6: Adjusting the MBC ............................................................................................................... 17
Figure 6-7: Manage Subaccount ........................................................................................................... 18
Figure 6-8: Delete Subaccount .............................................................................................................. 18
Figure 6-9: Subaccount Status ............................................................................................................... 19
Figure 7-1: Private Troubleshooting Diagram ...................................................................................... 19
Figure 7-2: Public Troubleshooting Diagram ....................................................................................... 20
Figure 7-3: My Services: Technical Support – Chat Now .................................................................. 21
Figure 7-4: Submitting a Service Ticket Step Two .............................................................................. 22
Figure 7-5: Open a Service Ticket Detail Screenshot ........................................................................ 23
Figure 7-6: Manage/Edit Profile ............................................................................................................. 24
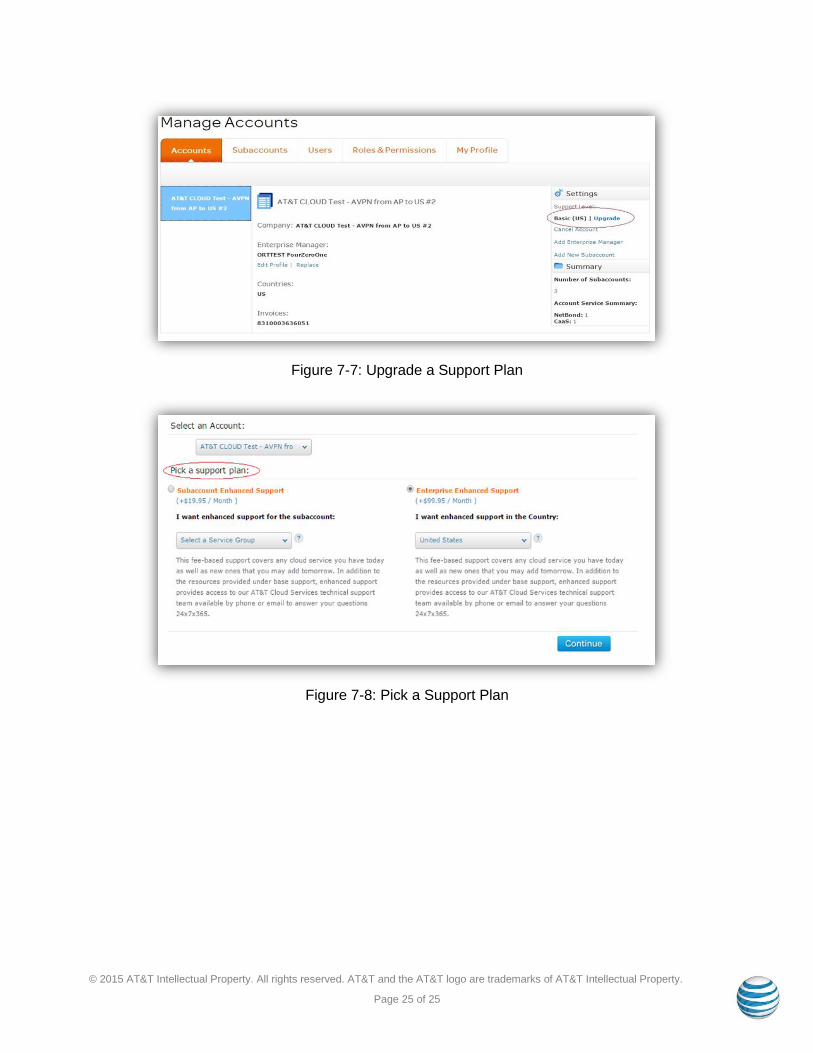
Figure 7-7: Upgrade a Support Plan ..................................................................................................... 25
Figure 7-8: Pick a Support Plan ............................................................................................................. 25
Table of Tables
© 2016 AT&T Intellectual Property. All rights reserved. AT&T and the AT&T logo are trademarks of AT&T Intellectual Property.
iv
Table 4-1: Order NetBond ......................................................................................................................... 5
Table 5-1: VNC Creation ......................................................................................................................... 10
Table 5-2: VLAN Creation ....................................................................................................................... 11
Table 7-1: Priority Levels for Service Tickets ...................................................................................... 22
© 2015 AT&T Intellectual Property. All rights reserved. AT&T and the AT&T logo are trademarks of AT&T Intellectual Property.
Page 1 of 25
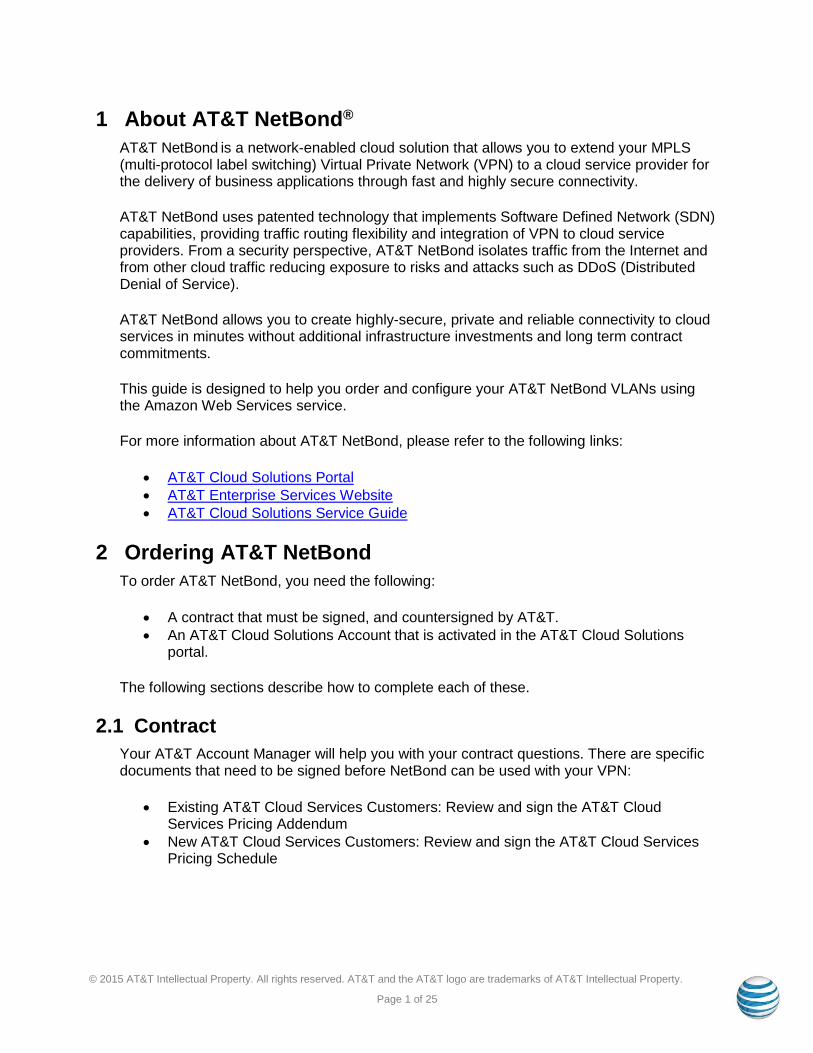
1 About AT&T NetBond®
AT&T NetBond is a network-enabled cloud solution that allows you to extend your MPLS (multi-protocol label switching) Virtual Private Network (VPN) to a cloud service provider for the delivery of business applications through fast and highly secure connectivity.
AT&T NetBond uses patented technology that implements Software Defined Network (SDN) capabilities, providing traffic routing flexibility and integration of VPN to cloud service providers. From a security perspective, AT&T NetBond isolates traffic from the Internet and from other cloud traffic reducing exposure to risks and attacks such as DDoS (Distributed Denial of Service).
AT&T NetBond allows you to create highly-secure, private and reliable connectivity to cloud services in minutes without additional infrastructure investments and long term contract commitments.
This guide is designed to help you order and configure your AT&T NetBond VLANs using the Amazon Web Services service.
For more information about AT&T NetBond, please refer to the following links:
AT&T Cloud Solutions Portal
AT&T Enterprise Services Website
AT&T Cloud Solutions Service Guide
2 Ordering AT&T NetBond
To order AT&T NetBond, you need the following:
A contract that must be signed, and countersigned by AT&T.
An AT&T Cloud Solutions Account that is activated in the AT&T Cloud Solutions portal.
The following sections describe how to complete each of these.
2.1 Contract
Your AT&T Account Manager will help you with your contract questions. There are specific documents that need to be signed before NetBond can be used with your VPN:
Existing AT&T Cloud Services Customers: Review and sign the AT&T Cloud Services Pricing Addendum
New AT&T Cloud Services Customers: Review and sign the AT&T Cloud Services Pricing Schedule
© 2015 AT&T Intellectual Property. All rights reserved. AT&T and the AT&T logo are trademarks of AT&T Intellectual Property.
Page 2 of 25
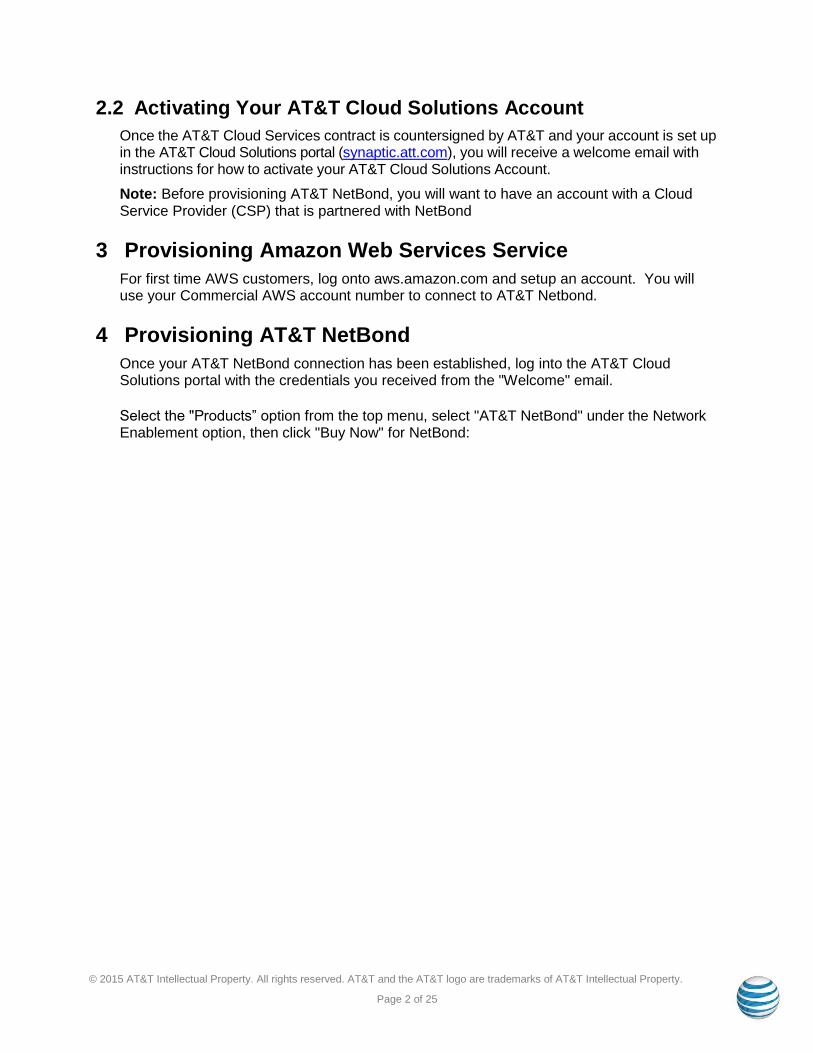
2.2 Activating Your AT&T Cloud Solutions Account
Once the AT&T Cloud Services contract is countersigned by AT&T and your account is set up in the AT&T Cloud Solutions portal (synaptic.att.com), you will receive a welcome email with instructions for how to activate your AT&T Cloud Solutions Account.
Note: Before provisioning AT&T NetBond, you will want to have an account with a Cloud Service Provider (CSP) that is partnered with NetBond
3 Provisioning Amazon Web Services Service
For first time AWS customers, log onto aws.amazon.com and setup an account. You will use your Commercial AWS account number to connect to AT&T Netbond.
4 Provisioning AT&T NetBond
Once your AT&T NetBond connection has been established, log into the AT&T Cloud Solutions portal with the credentials you received from the "Welcome" email.
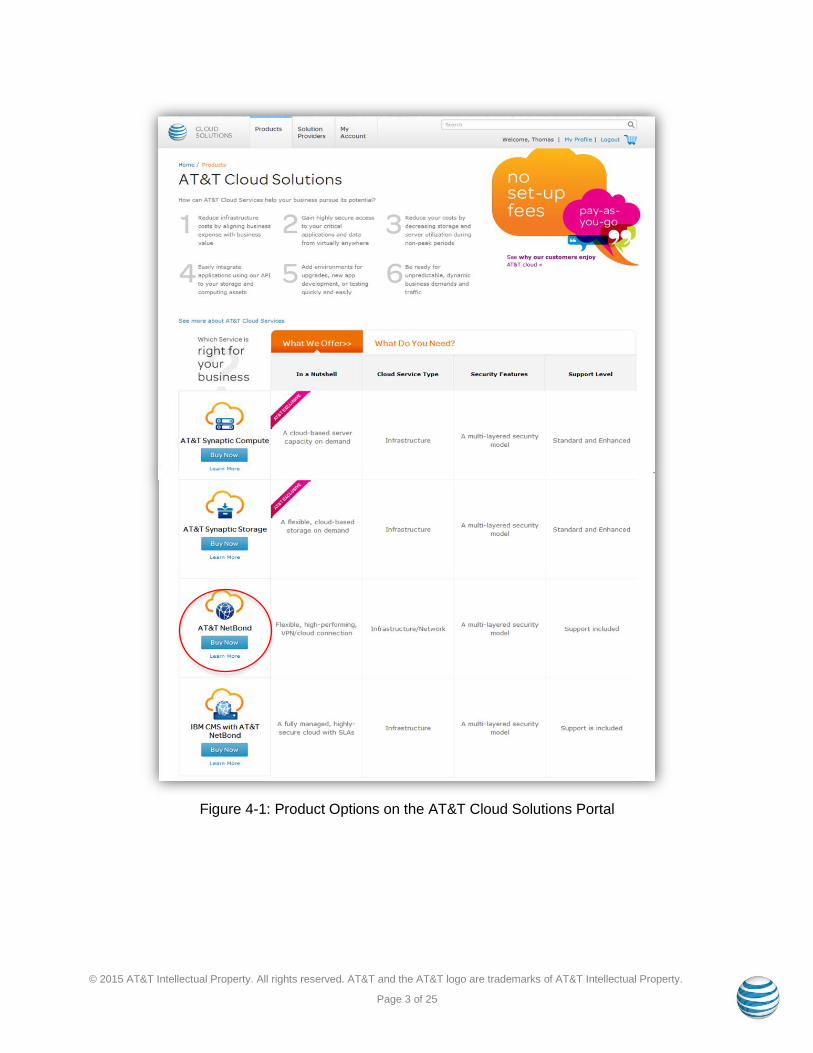
Select the "Products” option from the top menu, select "AT&T NetBond" under the Network Enablement option, then click "Buy Now" for NetBond:
© 2015 AT&T Intellectual Property. All rights reserved. AT&T and the AT&T logo are trademarks of AT&T Intellectual Property.
Page 3 of 25
Figure 4-1: Product Options on the AT&T Cloud Solutions Portal
© 2015 AT&T Intellectual Property. All rights reserved. AT&T and the AT&T logo are trademarks of AT&T Intellectual Property.
Page 4 of 25
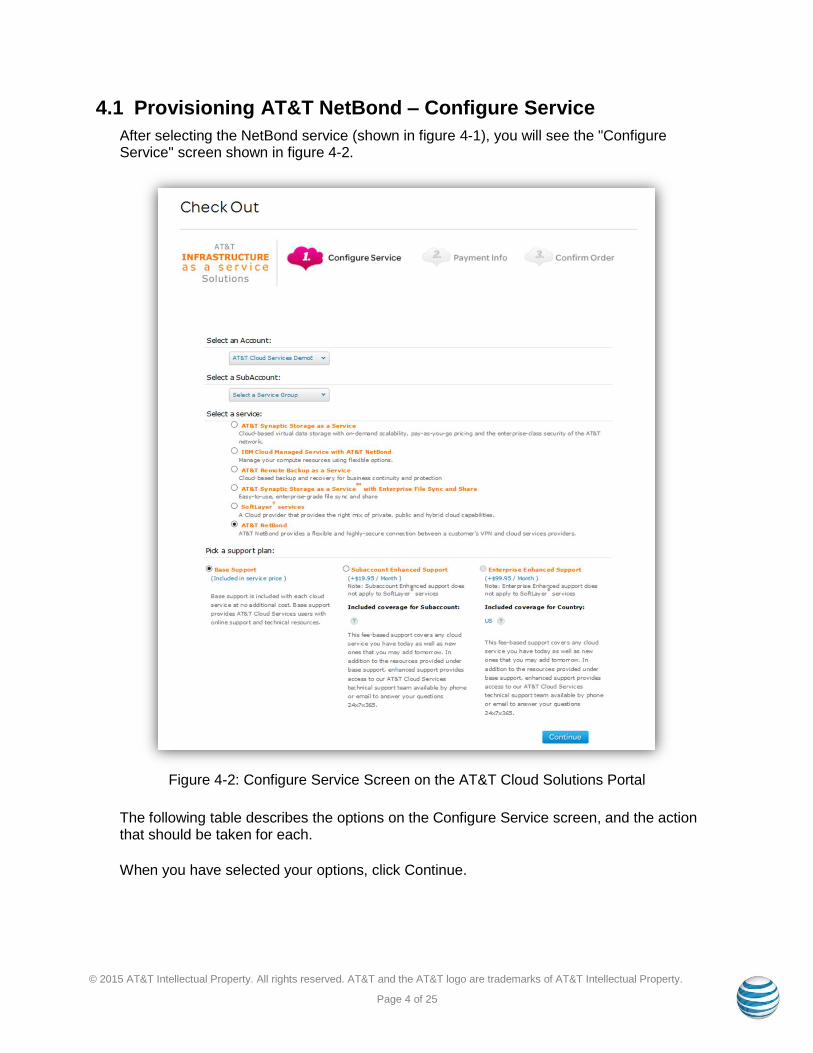
4.1 Provisioning AT&T NetBond – Configure Service
After selecting the NetBond service (shown in figure 4-1), you will see the "Configure Service" screen shown in figure 4-2.
Figure 4-2: Configure Service Screen on the AT&T Cloud Solutions Portal
The following table describes the options on the Configure Service screen, and the action that should be taken for each.
When you have selected your options, click Continue.

© 2015 AT&T Intellectual Property. All rights reserved. AT&T and the AT&T logo are trademarks of AT&T Intellectual Property.
Page 5 of 25
Option Action
Account Select an account from the dropdown
SubAccount Select a subaccount from the dropdown
Service Select AT&T NetBond
Pick a Support Plan – For additional details on support, see section 7.0
Select one of the following plans: Base Support (Included with each cloud service at no
additional cost) Subaccount Enhanced Support (+$19.95 / month) Enterprise Enhance Support (+$99.95 / month)
Table 4-1: Order NetBond
4.2 Provisioning AT&T NetBond – Payment Info
Click "Continue" when you see the Payment Confirmation screen:
Note: NetBond services are contract-based so "Invoice" will be the only selection.
Figure 4-3: Payment Confirmation Screen

© 2015 AT&T Intellectual Property. All rights reserved. AT&T and the AT&T logo are trademarks of AT&T Intellectual Property.
Page 6 of 25
4.3 Provisioning AT&T NetBond – Confirm Order
The Confirm Order Screen (figure 4-5) will allow you to:
Review a summary of your service purchase. Check box to acknowledge that you are purchasing AT&T NetBond. Enter a promotional code. If your AT&T account team has provided you with a
promotional code, enter it into the "Promotion" box and click "Update Total". Submit your order by clicking the "Place My Order" button.
Figure 4-4: Confirm Order
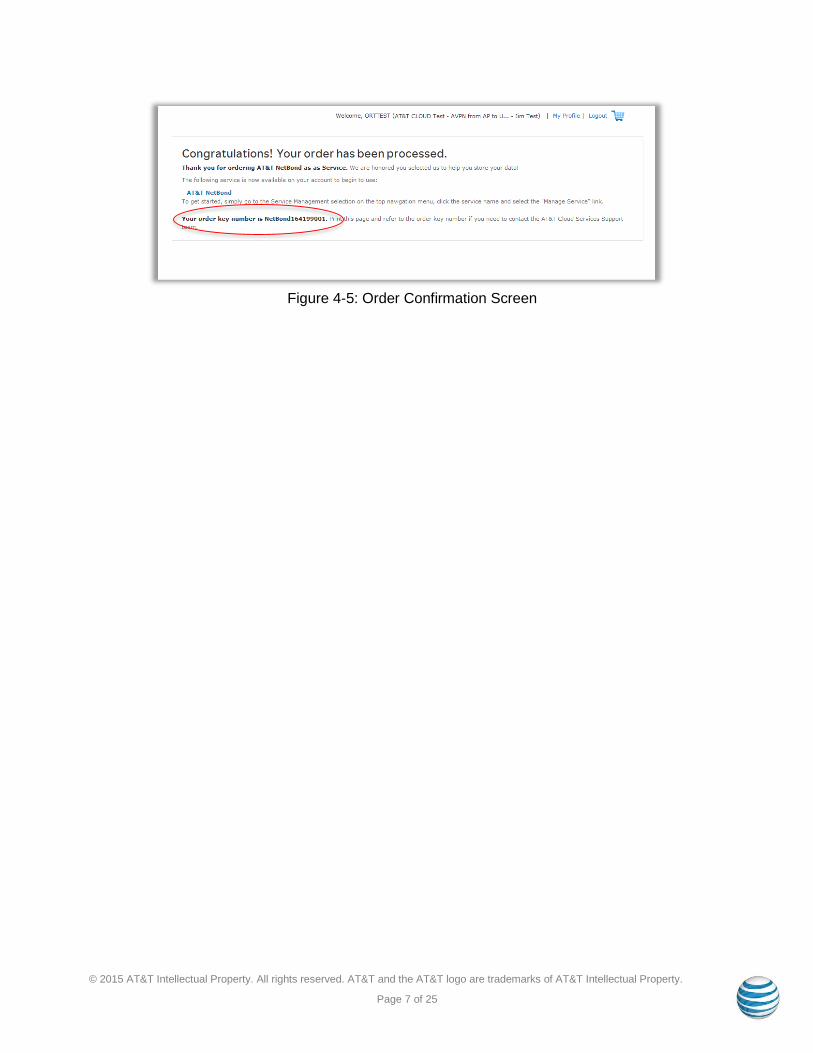
Once you click on "Place My Order", the order confirmation message should appear (Fig. 4-5) which includes your order key number. Save this page and refer to the order key number if you need to contact the AT&T Cloud Solutions Support team.
© 2015 AT&T Intellectual Property. All rights reserved. AT&T and the AT&T logo are trademarks of AT&T Intellectual Property.
Page 7 of 25
Figure 4-5: Order Confirmation Screen
© 2015 AT&T Intellectual Property. All rights reserved. AT&T and the AT&T logo are trademarks of AT&T Intellectual Property.
Page 8 of 25
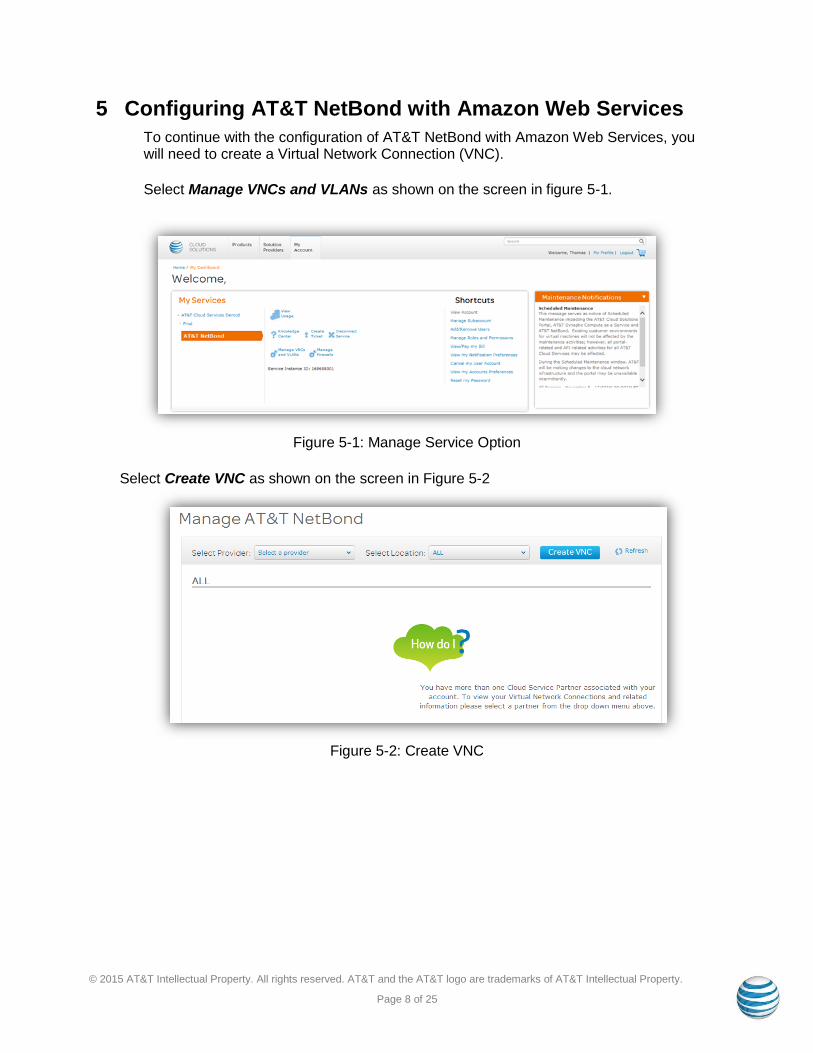
5 Configuring AT&T NetBond with Amazon Web Services
To continue with the configuration of AT&T NetBond with Amazon Web Services, you will need to create a Virtual Network Connection (VNC).
Select Manage VNCs and VLANs as shown on the screen in figure 5-1.
Figure 5-1: Manage Service Option
Select Create VNC as shown on the screen in Figure 5-2
Figure 5-2: Create VNC
© 2015 AT&T Intellectual Property. All rights reserved. AT&T and the AT&T logo are trademarks of AT&T Intellectual Property.
Page 9 of 25
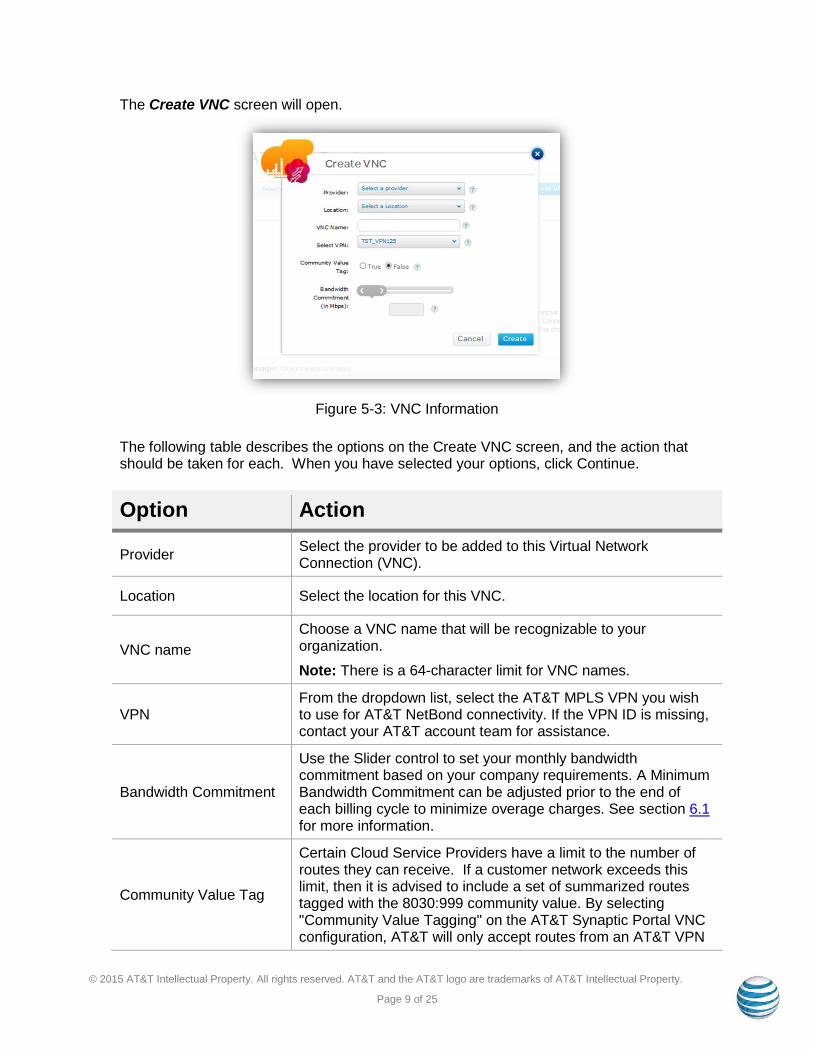
The Create VNC screen will open.
Figure 5-3: VNC Information
The following table describes the options on the Create VNC screen, and the action that should be taken for each. When you have selected your options, click Continue.
Option Action
Provider Select the provider to be added to this Virtual Network Connection (VNC).
Location Select the location for this VNC.
VNC name
Choose a VNC name that will be recognizable to your organization.
Note: There is a 64-character limit for VNC names.
VPN From the dropdown list, select the AT&T MPLS VPN you wish to use for AT&T NetBond connectivity. If the VPN ID is missing, contact your AT&T account team for assistance.
Bandwidth Commitment
Use the Slider control to set your monthly bandwidth commitment based on your company requirements. A Minimum Bandwidth Commitment can be adjusted prior to the end of each billing cycle to minimize overage charges. See section 6.1 for more information.
Community Value Tag
Certain Cloud Service Providers have a limit to the number of routes they can receive. If a customer network exceeds this limit, then it is advised to include a set of summarized routes tagged with the 8030:999 community value. By selecting "Community Value Tagging" on the AT&T Synaptic Portal VNC configuration, AT&T will only accept routes from an AT&T VPN
© 2015 AT&T Intellectual Property. All rights reserved. AT&T and the AT&T logo are trademarks of AT&T Intellectual Property.
Page 10 of 25
Option Action
that has this community value.
The options for Community Value Tagging are "True" or "False".
Note: For Amazon Web Services this will always be "False".
Table 5-1: VNC Creation
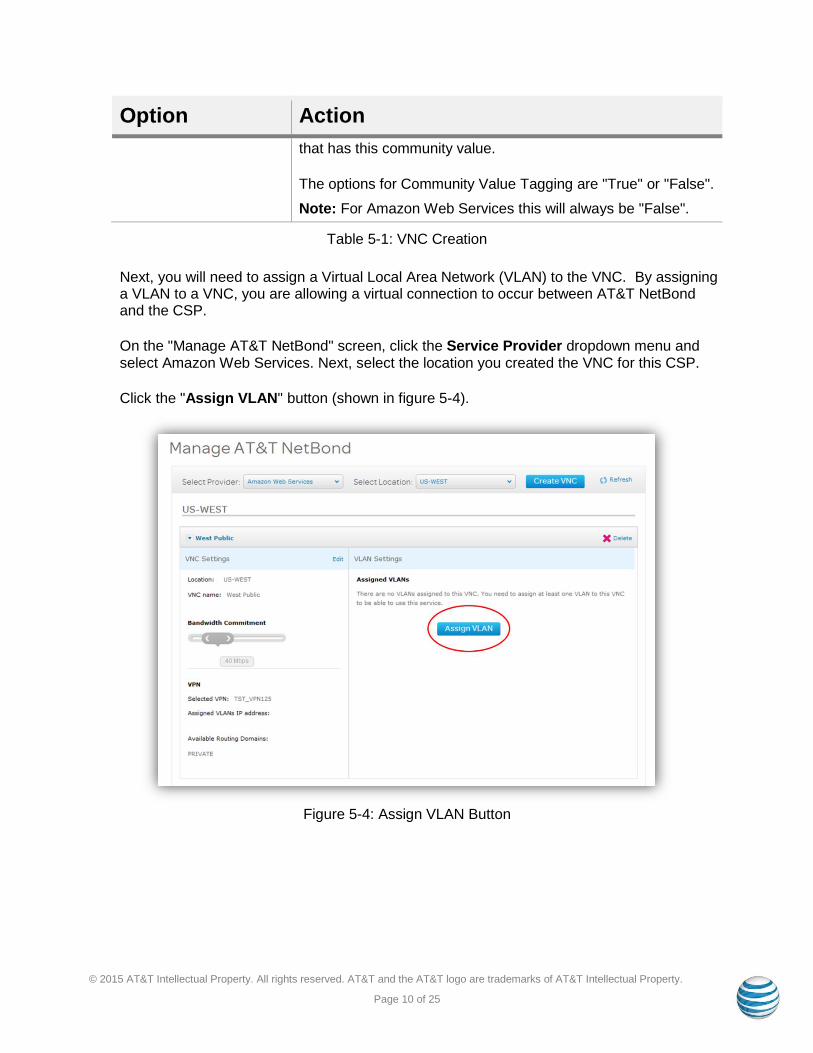
Next, you will need to assign a Virtual Local Area Network (VLAN) to the VNC. By assigning a VLAN to a VNC, you are allowing a virtual connection to occur between AT&T NetBond and the CSP.
On the "Manage AT&T NetBond" screen, click the Service Provider dropdown menu and select Amazon Web Services. Next, select the location you created the VNC for this CSP.
Click the "Assign VLAN" button (shown in figure 5-4).
Figure 5-4: Assign VLAN Button
© 2015 AT&T Intellectual Property. All rights reserved. AT&T and the AT&T logo are trademarks of AT&T Intellectual Property.
Page 11 of 25
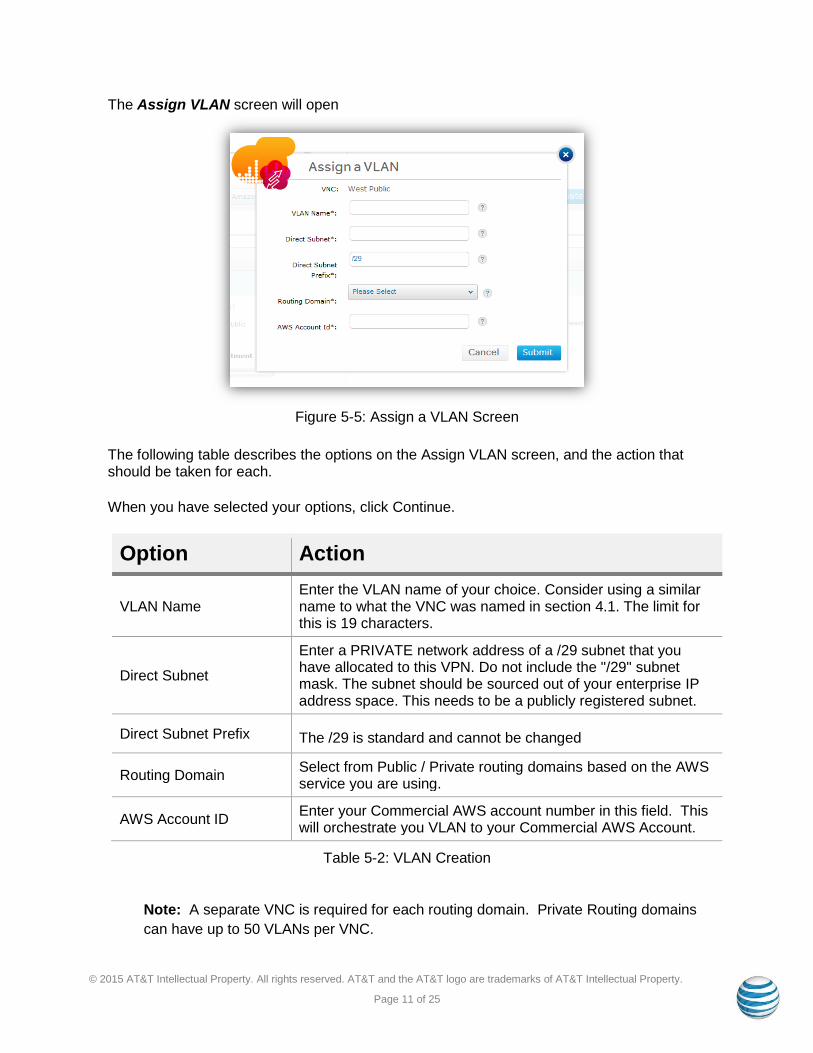
The Assign VLAN screen will open
Figure 5-5: Assign a VLAN Screen
The following table describes the options on the Assign VLAN screen, and the action that should be taken for each.
When you have selected your options, click Continue.
Option Action
VLAN Name Enter the VLAN name of your choice. Consider using a similar name to what the VNC was named in section 4.1. The limit for this is 19 characters.
Direct Subnet
Enter a PRIVATE network address of a /29 subnet that you have allocated to this VPN. Do not include the "/29" subnet mask. The subnet should be sourced out of your enterprise IP address space. This needs to be a publicly registered subnet.
Direct Subnet Prefix The /29 is standard and cannot be changed
Routing Domain Select from Public / Private routing domains based on the AWS service you are using.
AWS Account ID Enter your Commercial AWS account number in this field. This will orchestrate you VLAN to your Commercial AWS Account.
Table 5-2: VLAN Creation
Note: A separate VNC is required for each routing domain. Private Routing domains
can have up to 50 VLANs per VNC.
© 2015 AT&T Intellectual Property. All rights reserved. AT&T and the AT&T logo are trademarks of AT&T Intellectual Property.
Page 12 of 25
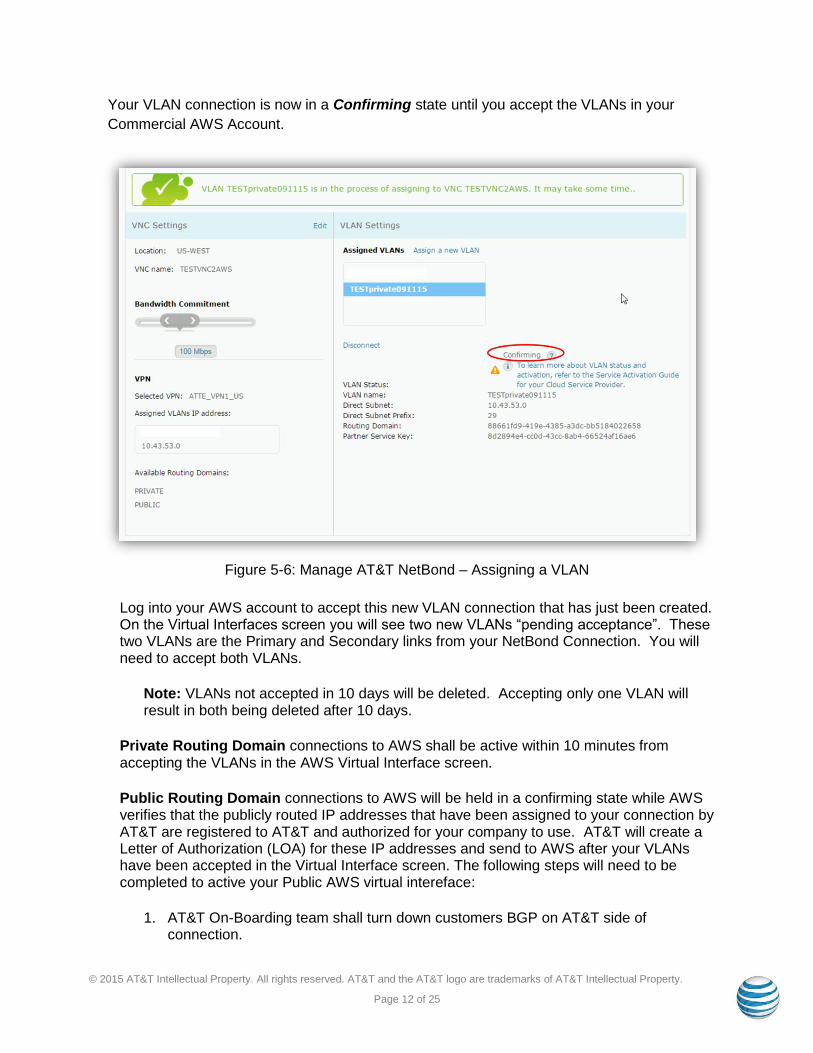
Your VLAN connection is now in a Confirming state until you accept the VLANs in your
Commercial AWS Account.
Figure 5-6: Manage AT&T NetBond – Assigning a VLAN
Log into your AWS account to accept this new VLAN connection that has just been created. On the Virtual Interfaces screen you will see two new VLANs “pending acceptance”. These two VLANs are the Primary and Secondary links from your NetBond Connection. You will need to accept both VLANs.
Note: VLANs not accepted in 10 days will be deleted. Accepting only one VLAN will result in both being deleted after 10 days.
Private Routing Domain connections to AWS shall be active within 10 minutes from accepting the VLANs in the AWS Virtual Interface screen.
Public Routing Domain connections to AWS will be held in a confirming state while AWS verifies that the publicly routed IP addresses that have been assigned to your connection by AT&T are registered to AT&T and authorized for your company to use. AT&T will create a Letter of Authorization (LOA) for these IP addresses and send to AWS after your VLANs have been accepted in the Virtual Interface screen. The following steps will need to be completed to active your Public AWS virtual intereface:
1. AT&T On-Boarding team shall turn down customers BGP on AT&T side of connection.
© 2015 AT&T Intellectual Property. All rights reserved. AT&T and the AT&T logo are trademarks of AT&T Intellectual Property.
Page 13 of 25
2. AT&T shall collect the following information from your Public AWS connection.
BGP ASN
AT&T Peer IP address
Amazon Peer IP address
NATed IP address
Customer VIF (ID) 3. AT&T On-boarding team shall add the information listed in step 1 to a Letter of
Authorization (LOA) and send to AWS at [email protected] 4. AWS DirectConnect Service team shall verify the IP address are authorized for use
for the customer by AT&T. 5. Upon verification, AWS shall activate the Virtual Interfaces. This takes up to 72
hours from the time that the LOA is submitted to AWS. 6. Customer shall notify AT&T On-Boarding team that their Virtual Interface connection
is active 7. AT&T On-Boarding Team shall bring up customers BGP session
Note: During which time a status screen shown in Figure 5-6 will have a Confirming status shown. There is a Refresh button in the upper and lower-right corners that can be clicked to check provisioning status.
Note: Accepted VLANs to AWS Public services will stay in “pending” status on your AWS Virtual Interfaces screen for 72 hours while AWS completes a verification process. Please reference the AWS guide to AWS Direct Connect for question with AWS Virtual Interfaces.
The VLAN status shown in Figure 5-6 will change to Active once AWS has verified that the IP Addresses are registered to AT&T and your company is authorized to use them.
At this point, connectivity has been established between your AT&T MPLS VPN and your newly created Commercial AWS account.
© 2015 AT&T Intellectual Property. All rights reserved. AT&T and the AT&T logo are trademarks of AT&T Intellectual Property.
Page 14 of 25
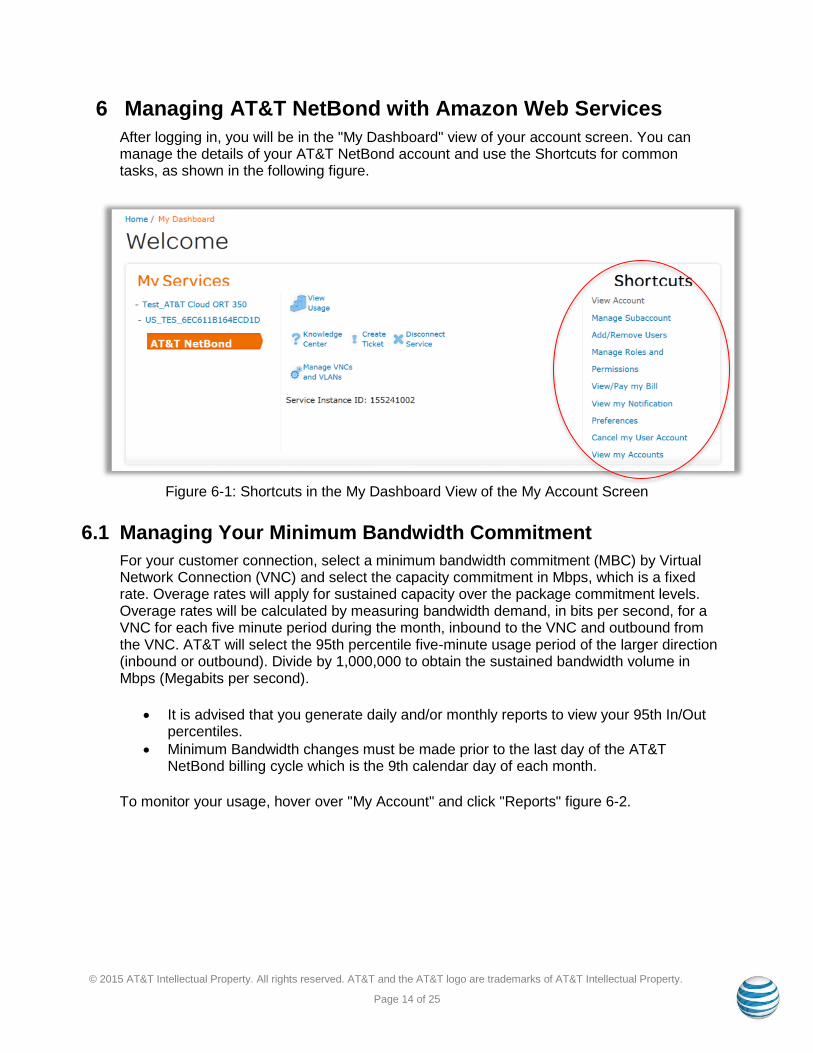
6 Managing AT&T NetBond with Amazon Web Services
After logging in, you will be in the "My Dashboard" view of your account screen. You can manage the details of your AT&T NetBond account and use the Shortcuts for common tasks, as shown in the following figure.
Figure 6-1: Shortcuts in the My Dashboard View of the My Account Screen
6.1 Managing Your Minimum Bandwidth Commitment
For your customer connection, select a minimum bandwidth commitment (MBC) by Virtual Network Connection (VNC) and select the capacity commitment in Mbps, which is a fixed rate. Overage rates will apply for sustained capacity over the package commitment levels. Overage rates will be calculated by measuring bandwidth demand, in bits per second, for a VNC for each five minute period during the month, inbound to the VNC and outbound from the VNC. AT&T will select the 95th percentile five-minute usage period of the larger direction (inbound or outbound). Divide by 1,000,000 to obtain the sustained bandwidth volume in Mbps (Megabits per second).
It is advised that you generate daily and/or monthly reports to view your 95th In/Out percentiles.
Minimum Bandwidth changes must be made prior to the last day of the AT&T NetBond billing cycle which is the 9th calendar day of each month.
To monitor your usage, hover over "My Account" and click "Reports" figure 6-2.
© 2015 AT&T Intellectual Property. All rights reserved. AT&T and the AT&T logo are trademarks of AT&T Intellectual Property.
Page 15 of 25
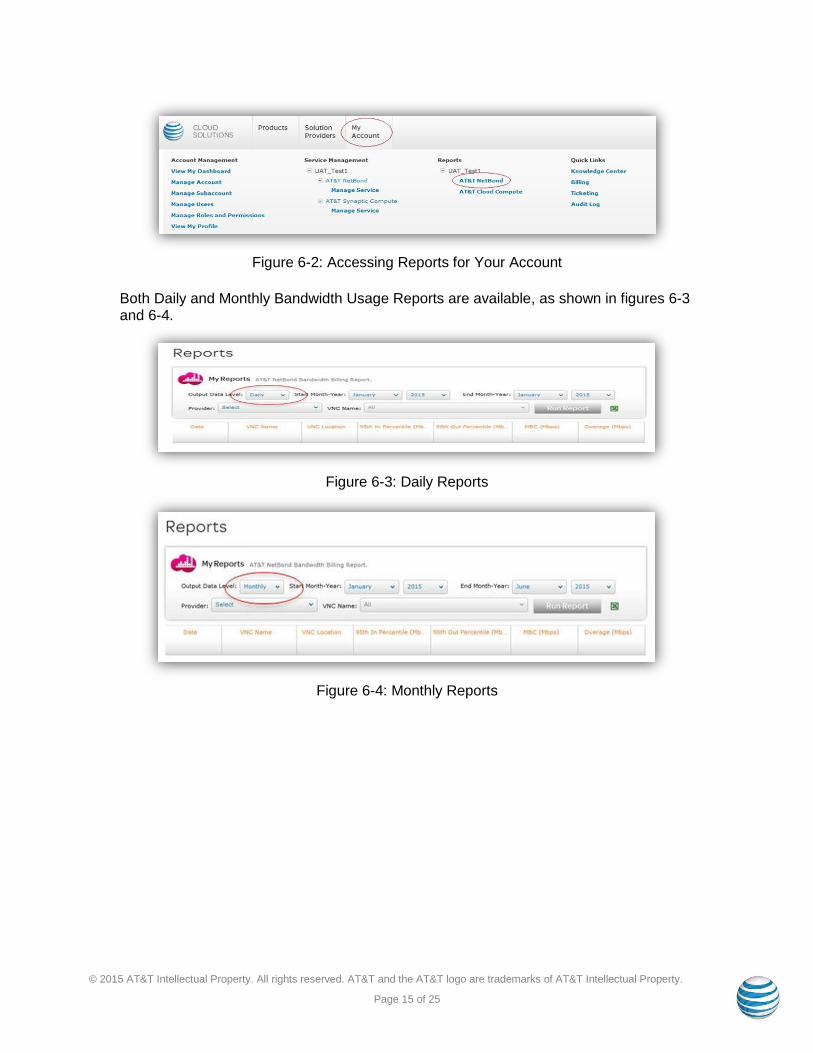
Figure 6-2: Accessing Reports for Your Account
Both Daily and Monthly Bandwidth Usage Reports are available, as shown in figures 6-3 and 6-4.
Figure 6-3: Daily Reports
Figure 6-4: Monthly Reports
© 2015 AT&T Intellectual Property. All rights reserved. AT&T and the AT&T logo are trademarks of AT&T Intellectual Property.
Page 16 of 25
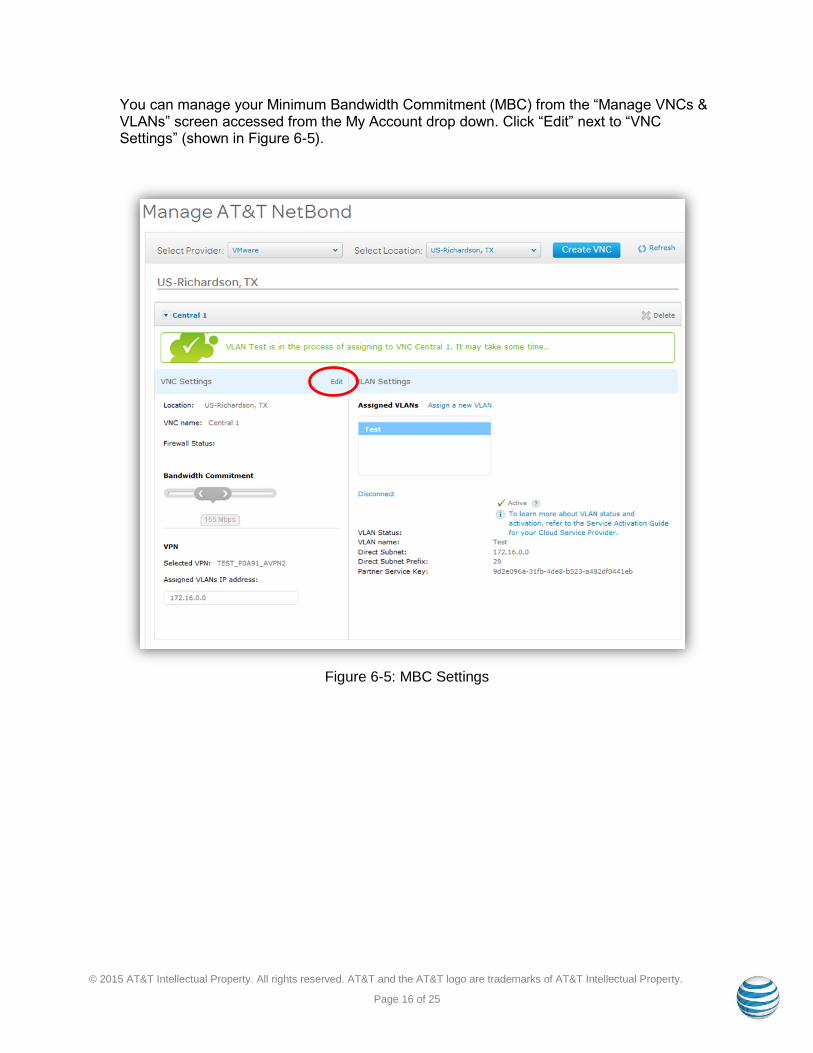
You can manage your Minimum Bandwidth Commitment (MBC) from the “Manage VNCs & VLANs” screen accessed from the My Account drop down. Click “Edit” next to “VNC Settings” (shown in Figure 6-5).
Figure 6-5: MBC Settings
© 2015 AT&T Intellectual Property. All rights reserved. AT&T and the AT&T logo are trademarks of AT&T Intellectual Property.
Page 17 of 25
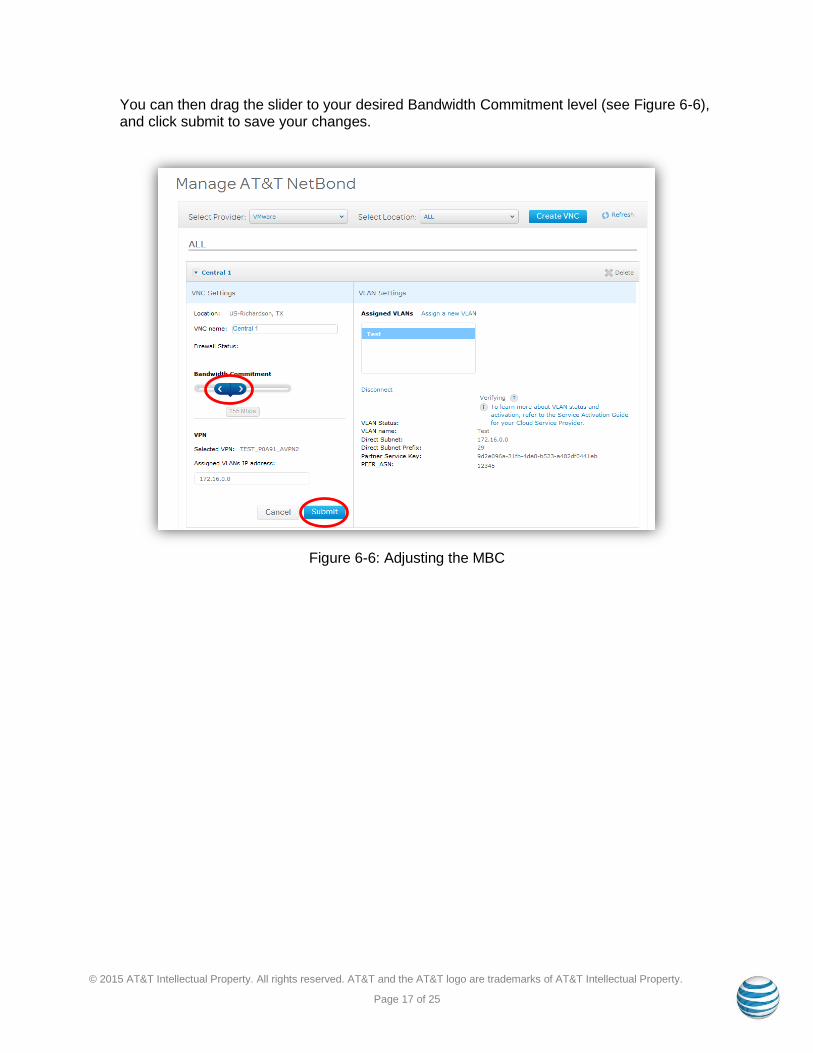
You can then drag the slider to your desired Bandwidth Commitment level (see Figure 6-6), and click submit to save your changes.
Figure 6-6: Adjusting the MBC
© 2015 AT&T Intellectual Property. All rights reserved. AT&T and the AT&T logo are trademarks of AT&T Intellectual Property.
Page 18 of 25
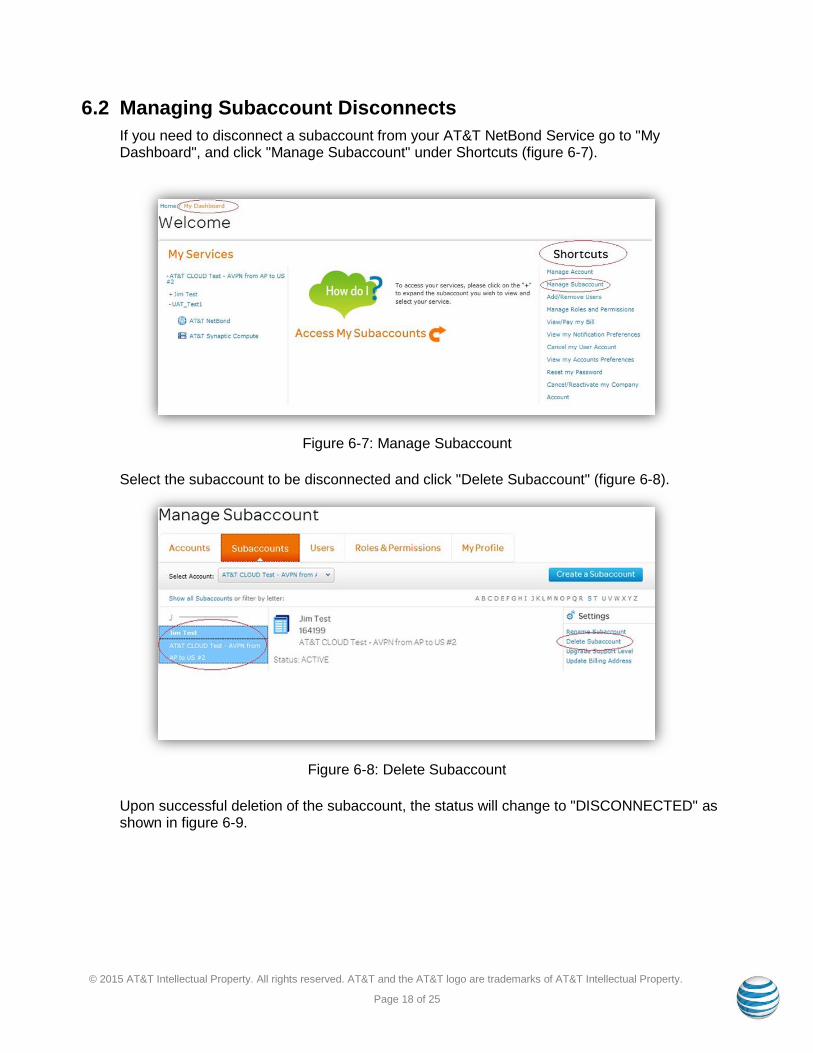
6.2 Managing Subaccount Disconnects
If you need to disconnect a subaccount from your AT&T NetBond Service go to "My Dashboard", and click "Manage Subaccount" under Shortcuts (figure 6-7).
Figure 6-7: Manage Subaccount
Select the subaccount to be disconnected and click "Delete Subaccount" (figure 6-8).
Figure 6-8: Delete Subaccount
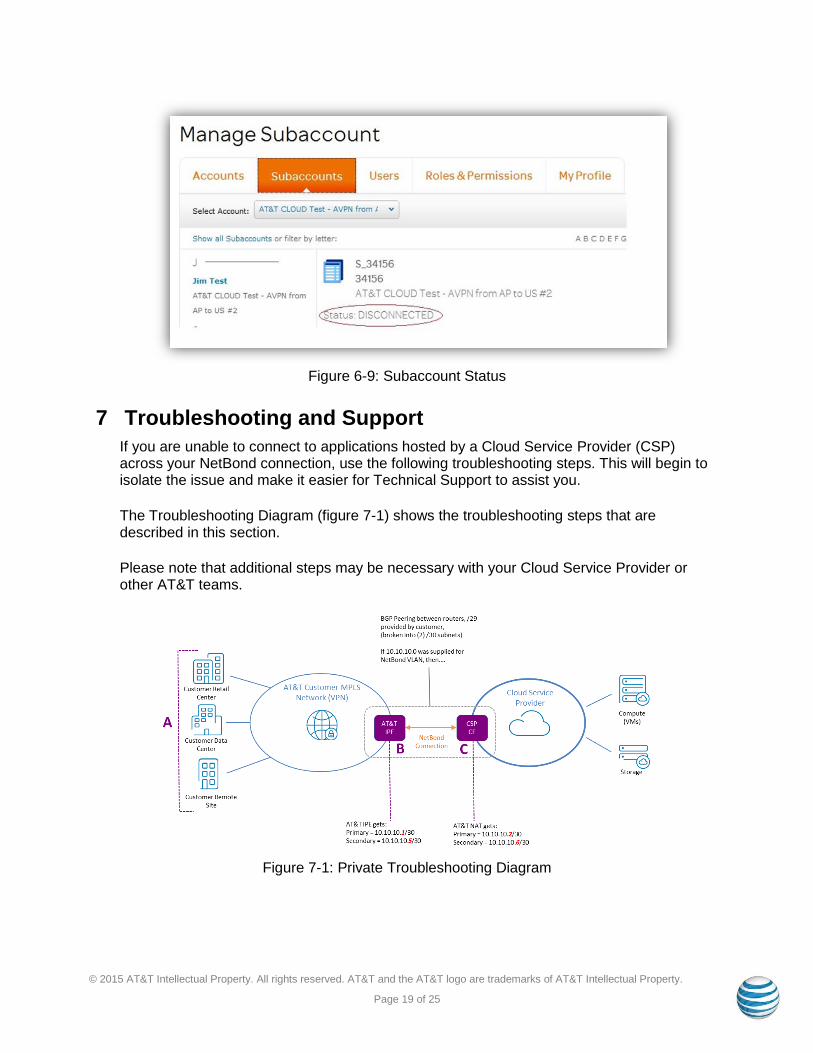
Upon successful deletion of the subaccount, the status will change to "DISCONNECTED" as shown in figure 6-9.
© 2015 AT&T Intellectual Property. All rights reserved. AT&T and the AT&T logo are trademarks of AT&T Intellectual Property.
Page 19 of 25
Figure 6-9: Subaccount Status
7 Troubleshooting and Support
If you are unable to connect to applications hosted by a Cloud Service Provider (CSP) across your NetBond connection, use the following troubleshooting steps. This will begin to isolate the issue and make it easier for Technical Support to assist you.
The Troubleshooting Diagram (figure 7-1) shows the troubleshooting steps that are described in this section.
Please note that additional steps may be necessary with your Cloud Service Provider or other AT&T teams.
Figure 7-1: Private Troubleshooting Diagram
© 2015 AT&T Intellectual Property. All rights reserved. AT&T and the AT&T logo are trademarks of AT&T Intellectual Property.
Page 20 of 25
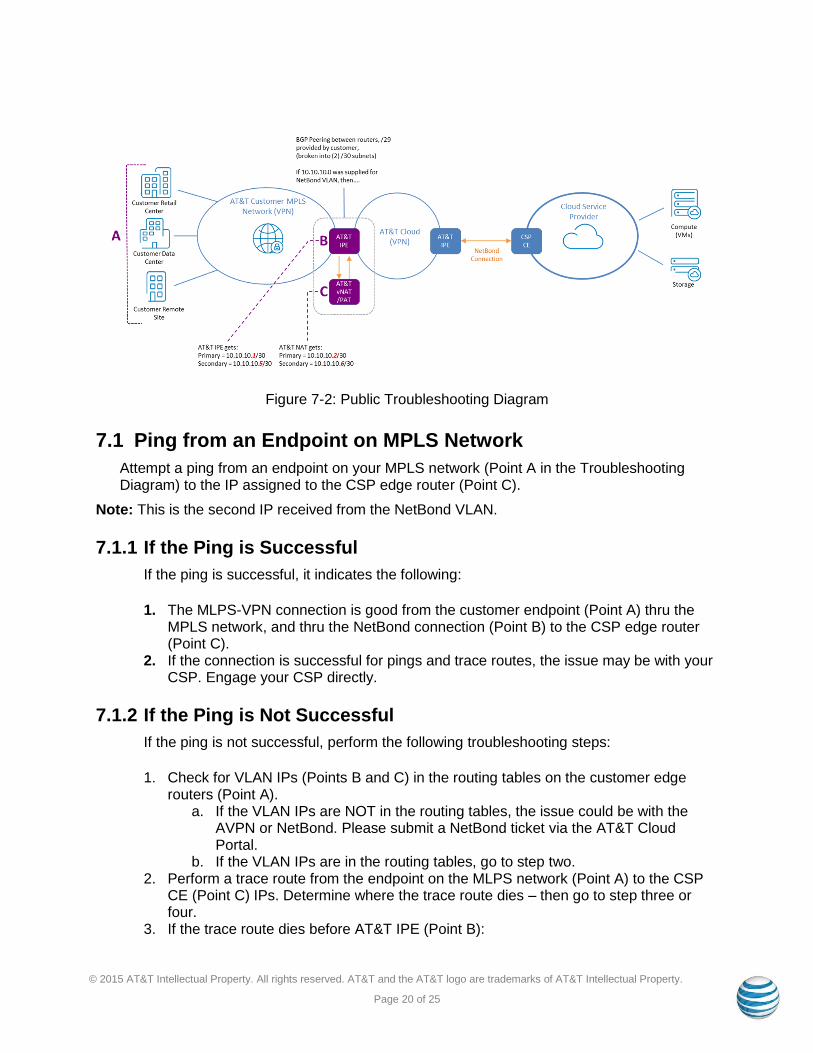
Figure 7-2: Public Troubleshooting Diagram
7.1 Ping from an Endpoint on MPLS Network
Attempt a ping from an endpoint on your MPLS network (Point A in the Troubleshooting Diagram) to the IP assigned to the CSP edge router (Point C).
Note: This is the second IP received from the NetBond VLAN.
7.1.1 If the Ping is Successful
If the ping is successful, it indicates the following:
1. The MLPS-VPN connection is good from the customer endpoint (Point A) thru the MPLS network, and thru the NetBond connection (Point B) to the CSP edge router (Point C).
2. If the connection is successful for pings and trace routes, the issue may be with your CSP. Engage your CSP directly.
7.1.2 If the Ping is Not Successful
If the ping is not successful, perform the following troubleshooting steps:
1. Check for VLAN IPs (Points B and C) in the routing tables on the customer edge routers (Point A).
a. If the VLAN IPs are NOT in the routing tables, the issue could be with the AVPN or NetBond. Please submit a NetBond ticket via the AT&T Cloud Portal.
b. If the VLAN IPs are in the routing tables, go to step two. 2. Perform a trace route from the endpoint on the MLPS network (Point A) to the CSP
CE (Point C) IPs. Determine where the trace route dies – then go to step three or four.
3. If the trace route dies before AT&T IPE (Point B):
© 2015 AT&T Intellectual Property. All rights reserved. AT&T and the AT&T logo are trademarks of AT&T Intellectual Property.
Page 21 of 25
a. Check with your internal network engineer to verify network connectivity across the customer network.
b. If all connectivity tasks in the customer network are good, there could be a problem in the AT&T MPLSVPN (AVPN) network. Please submit a trouble ticket with the AT&T VPN Care team.
4. If the trace route dies at the AT&T IPE (point B), there could be a problem in the NetBond connection. Please submit a NetBond ticket via the AT&T Cloud Portal.
7.2 Technical Support
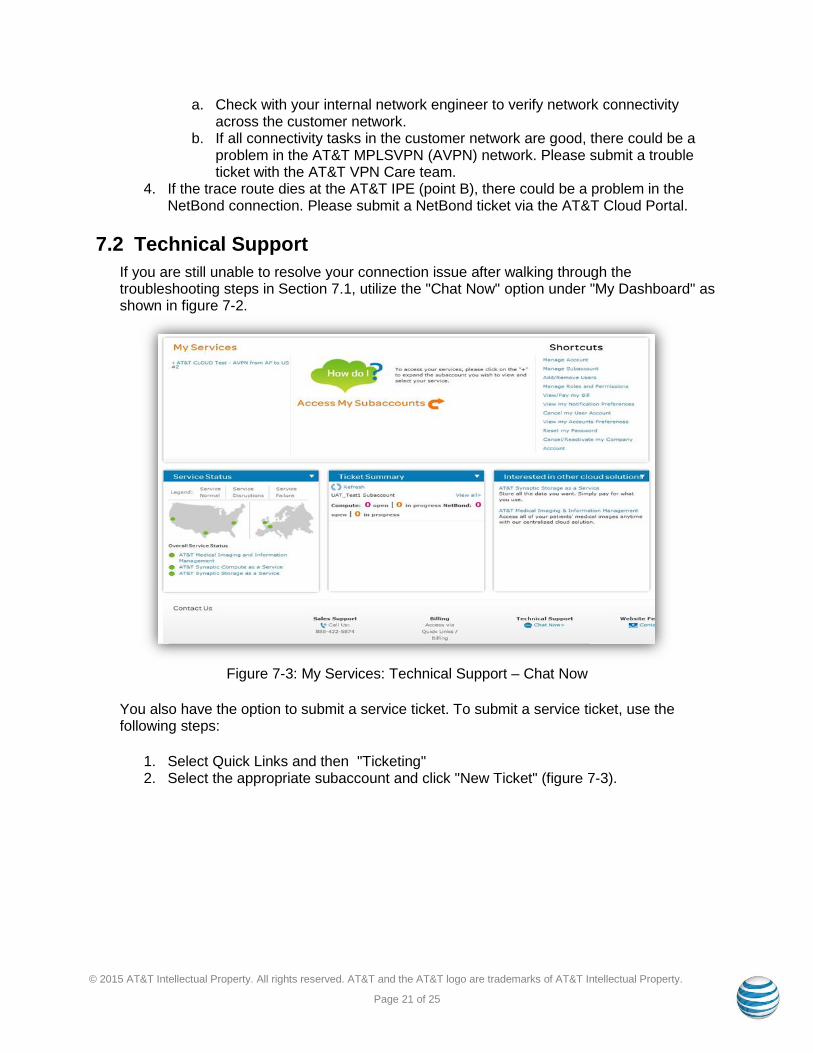
If you are still unable to resolve your connection issue after walking through the troubleshooting steps in Section 7.1, utilize the "Chat Now" option under "My Dashboard" as shown in figure 7-2.
Figure 7-3: My Services: Technical Support – Chat Now
You also have the option to submit a service ticket. To submit a service ticket, use the following steps:
1. Select Quick Links and then "Ticketing" 2. Select the appropriate subaccount and click "New Ticket" (figure 7-3).
© 2015 AT&T Intellectual Property. All rights reserved. AT&T and the AT&T logo are trademarks of AT&T Intellectual Property.
Page 22 of 25
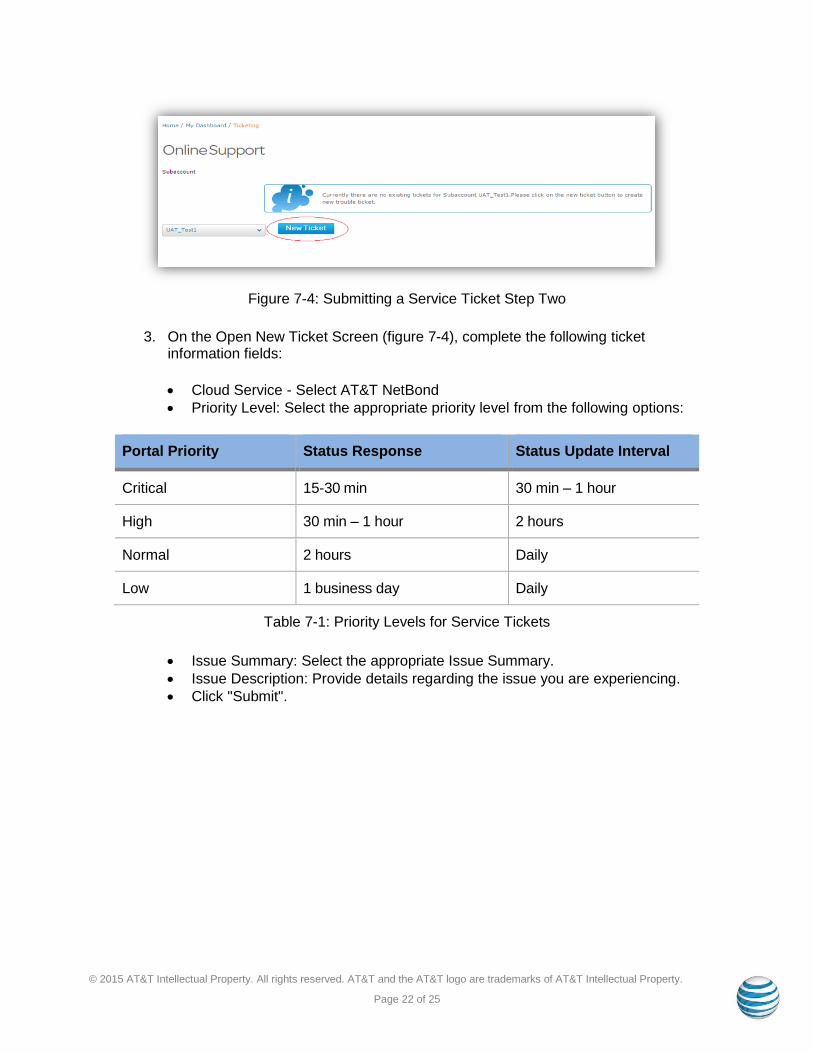
Figure 7-4: Submitting a Service Ticket Step Two
3. On the Open New Ticket Screen (figure 7-4), complete the following ticket information fields:
Cloud Service - Select AT&T NetBond
Priority Level: Select the appropriate priority level from the following options:
Portal Priority Status Response Status Update Interval
Critical 15-30 min 30 min – 1 hour
High 30 min – 1 hour 2 hours
Normal 2 hours Daily
Low 1 business day Daily
Table 7-1: Priority Levels for Service Tickets
Issue Summary: Select the appropriate Issue Summary.
Issue Description: Provide details regarding the issue you are experiencing.
Click "Submit".
© 2015 AT&T Intellectual Property. All rights reserved. AT&T and the AT&T logo are trademarks of AT&T Intellectual Property.
Page 23 of 25
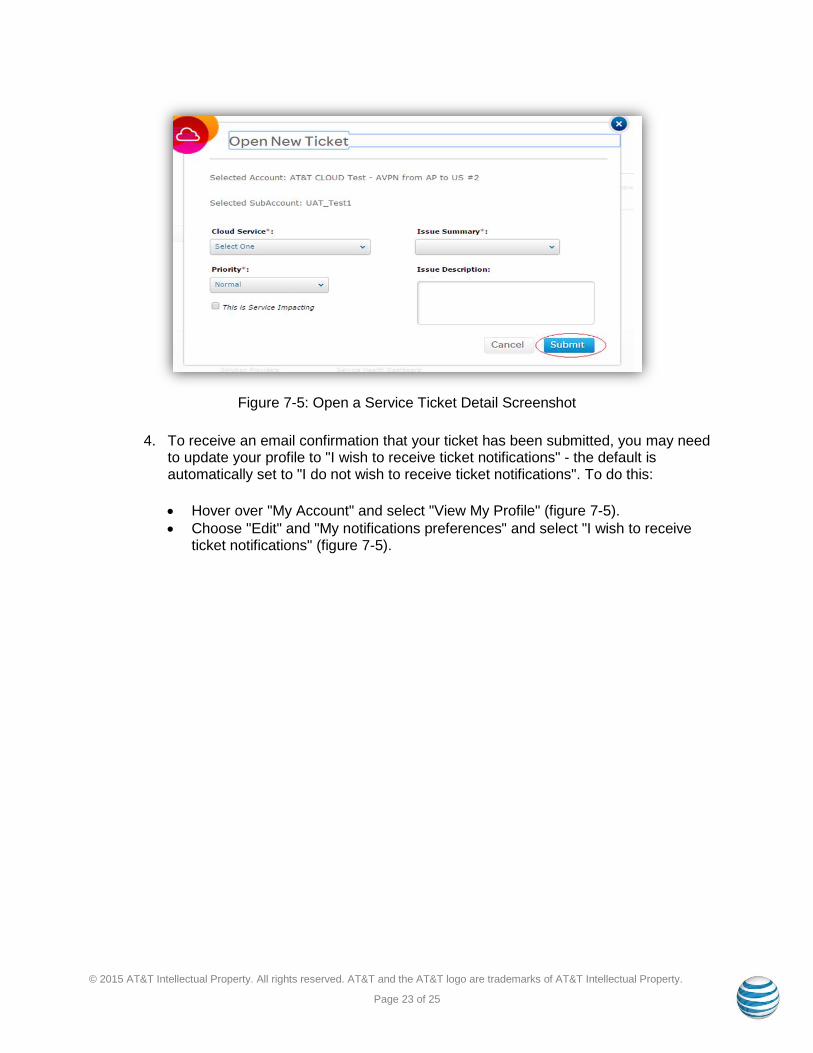
Figure 7-5: Open a Service Ticket Detail Screenshot
4. To receive an email confirmation that your ticket has been submitted, you may need to update your profile to "I wish to receive ticket notifications" - the default is automatically set to "I do not wish to receive ticket notifications". To do this:
Hover over "My Account" and select "View My Profile" (figure 7-5).
Choose "Edit" and "My notifications preferences" and select "I wish to receive ticket notifications" (figure 7-5).
© 2015 AT&T Intellectual Property. All rights reserved. AT&T and the AT&T logo are trademarks of AT&T Intellectual Property.
Page 24 of 25
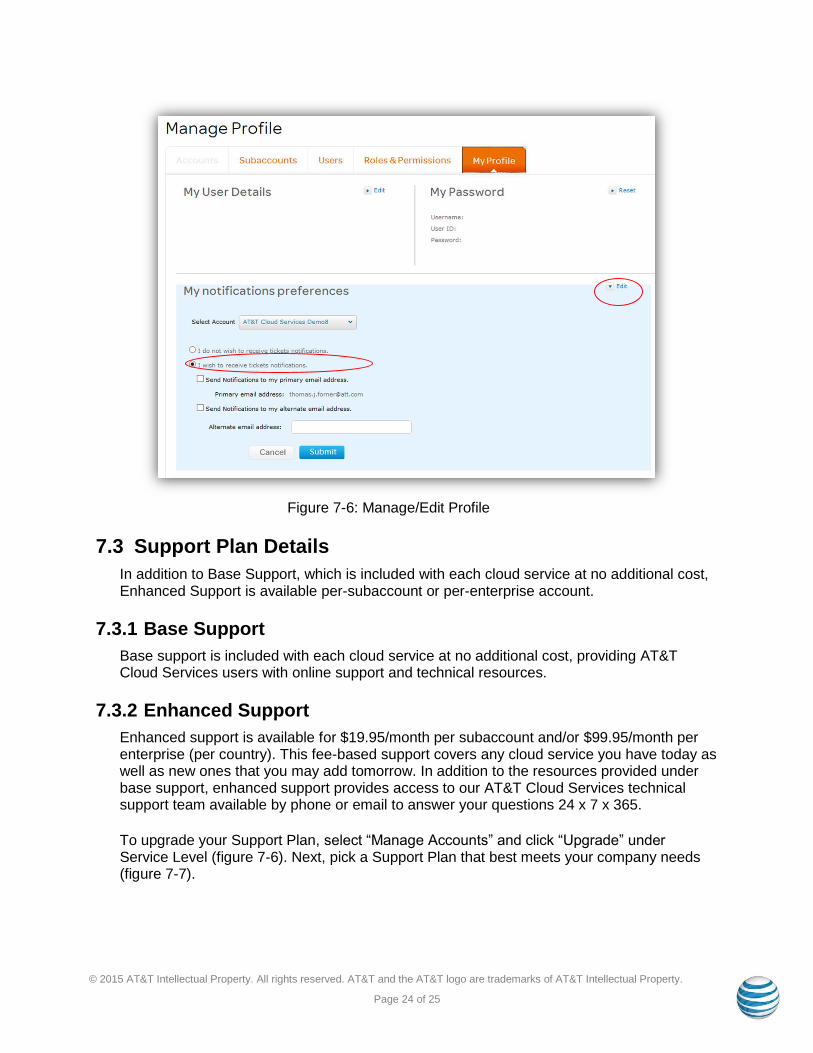
Figure 7-6: Manage/Edit Profile
7.3 Support Plan Details
In addition to Base Support, which is included with each cloud service at no additional cost, Enhanced Support is available per-subaccount or per-enterprise account.
7.3.1 Base Support
Base support is included with each cloud service at no additional cost, providing AT&T Cloud Services users with online support and technical resources.
7.3.2 Enhanced Support
Enhanced support is available for $19.95/month per subaccount and/or $99.95/month per enterprise (per country). This fee-based support covers any cloud service you have today as well as new ones that you may add tomorrow. In addition to the resources provided under base support, enhanced support provides access to our AT&T Cloud Services technical support team available by phone or email to answer your questions 24 x 7 x 365.
To upgrade your Support Plan, select “Manage Accounts” and click “Upgrade” under Service Level (figure 7-6). Next, pick a Support Plan that best meets your company needs (figure 7-7).
© 2015 AT&T Intellectual Property. All rights reserved. AT&T and the AT&T logo are trademarks of AT&T Intellectual Property.
Page 25 of 25
Figure 7-7: Upgrade a Support Plan
Figure 7-8: Pick a Support Plan