Atellica® Solution Essentials
70
Atellica® Solution Essentials Virtual Training Workbook
Transcript of Atellica® Solution Essentials

Atellica® Solution
EssentialsVirtual Training Workbook


i Atellica Solution T18001.044 Effective Date: 04/19/21
Siemens Healthineers
Atellica Solution Essentials Virtual Training Workbook

ii Atellica Solution
©2021 Siemens Healthineers. All rights reserved.


Welcome
Atellica Solution 1-1
1 Welcome
Welcome to Training
Siemens Healthineers would like to welcome you to training on the Atellica® Solution. This course is designed
to teach you the skills needed to operate and maintain the Atellica Solution. Our staff welcomes the
opportunity to present this training program to you.
Training Material
This training workbook includes an agenda, learning objectives, and practical exercises.

Welcome
1-2 Atellica Solution
Atellica Solution Essentials Virtual Training
Course Objectives
Upon completion of the class, you will be able to:
• Identify the system components and their functions
• Navigate the software
• Utilize the Maintenance Schedule
• Manage supplies, system fluids and reagents
• Utilize the instrument Online Help, PEPconnect, and Document Library
• Monitor sample status
• Determine the QC material needs
• Describe how the system utilizes reagent lot and pack calibration intervals to determine calibration frequency
• Determine the calibration material that need to be loaded on the system
• Review calibration results
• Utilize the Operator Event Log

Welcome
Atellica Solution 1-3
Atellica Solution Essentials Virtual Training
Agenda
• Hardware and Software Overview
• Maintenance Overview
• Reagent and Supply Management
• Document Library and PEPconnect
• Monitoring Samples and Quality Control
• Calibration
• Troubleshooting

Welcome
1-4 Atellica Solution
Atellica® Solution Essentials Virtual Training
Course Validation Checklist The participant places a checkmark beside the competency when it is completed. When all competencies are checked, the instructor and participant sign and date below as record of completion.
Instructor: ________________________________________________________________________
Participant: ________________________________________________________________________
Date: ________________________________________________________________________
What was most helpful to you during this program?
How can we improve this program to make it more meaningful to you?
Topics Competencies Completed
System Components Identify the system components and their functions
Software Navigate the Command Bar, Workspace, and Status Bar
Sign into and out of the User Interface and Operator Tablet
Access PEPconnect and Document Library
Utilize On-Line Help
View and acknowledge System Alerts
Check System Health
Maintenance Utilize the Maintenance Schedule
Reagent and Supply Management
Monitor the status of the supply and reagent inventories
Loading Samples and Quality Control
Monitor Sample Status
Determine Quality Control materials needed
Calibration Describe how the system utilizes reagent lot and pack calibration intervals to determine calibration frequency
Determine the calibration material that needs to be loaded on the system
Review calibration results
Troubleshooting Utilize the Operator Event Log
System Components
Atellica Solution 2-1
2 System Components

System Components
2-2 Atellica Solution
System Components
Resources • Online Help
• PEPconnect
Objective Upon completion of this exercise you will be able to identify the system components and their functions for the:
• Sample Handler (SH)
• Chemistry module (CH)
• Immunoassay module (IM)

System Components
Atellica Solution 2-3
SH System Components
1. Identify the following SH components in the image below
__A__ Visual status light __D___ Lock/unlock drawer buttons
__B__Monitor, keyboard, and mouse __E___ Sample drawers
__C__ System front cover __ F___ Process Center Computer (PCC)
A
C
B D
E
F

System Components
2-4 Atellica Solution
SH System Components
2. Identify the following SH system components in the images below
__A__ Robotic arm
__B__ Cal-QC Storage area
__C__ Tube Characterization System (TCS)
__D__ Carrier
__E__ Atellica MaglineTM Transport
D
A C
B
E
System Components
Atellica Solution 2-5
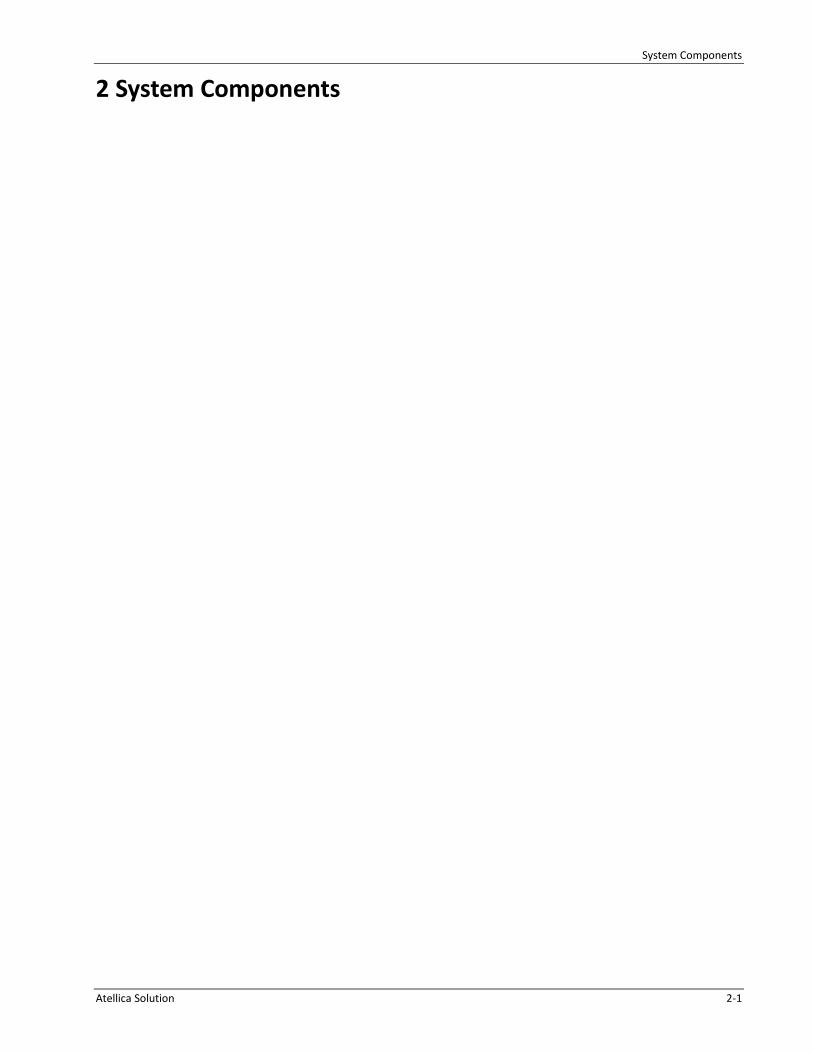
CH System Components
3. Identify the following CH system components in the image below
__A__ System front cover
__B__ IMT (integrated multisensor technology) fluids lid
__C__ Reagent tray lid
__D__ Module Display
__E__ Atellica Magline™ Transport
__F__ System fluid drawer
__G__ Water and liquid waste
D E
F G
B C
A

System Components
2-6 Atellica Solution
CH System Components
4. Identify the following CH system components in the image below
__A__ IMT __D__ Reagent probes 1 and 2
__B__ Sample Probe __E__ Reagent compartment
__C__ Reaction ring __F__ Reagent tray
__G__ Dilution Probe
__H__ Dilution Ring
__I__ Dilution Mixer
__J__ Dilution Washer
A
D
C
B
E
F
G
I
H
J

System Components
Atellica Solution 2-7
IM System Components 5. Identify the following IM system components in the image below
__A__ System front cover
__B__ Sample tip loading lid
__C__ Cuvette bin lid
__D__ Reagent drawer
__E__ Water and liquid waste drawer
__F__ System fluid drawer
__G__ Solid waste drawer
A
E G
D
B
C
F

System Components
2-8 Atellica Solution
IM System Components 6. Identify the following IM system components (front) in the image below
__A__ Sample tip loader
__B__ Wash ring
__C__ Luminometer
__D__ Cuvette bin
D
C
A
B

System Components
Atellica Solution 2-9
7. Identify the following IM system components (rear) in the images below
__A__ Reagent Loader __D__ Reagent probes
__B__ Reagent Compartment __E__ Sample probe
__C__ Incubation ring
E
D
C B
A

System Components
2-10 Atellica Solution
Notes

Software
Atellica Solution 3-1
3 Software

Software
Atellica Solution 3-2
Software
Resources • Online Help
• PEPconnect
• Atellica Solution PEP to Go Key Tasks for Basic Operation
Objectives Upon completion of this exercise you will be able to:
• Navigate the Command Bar, Workspace, and Status Bar
• Sign out and sign into the System
• Access PEPconnect
• Utilize Online Help
• View and acknowledge System Alerts
• Check System Health
Software
Atellica Solution 3-3
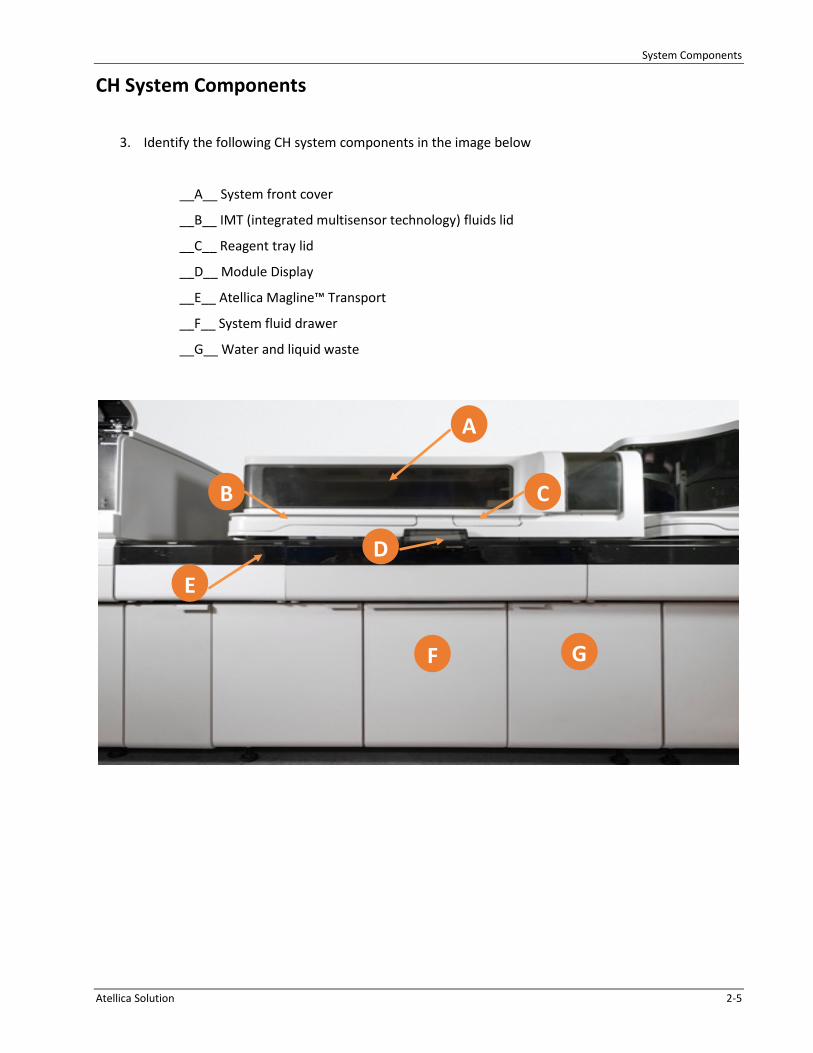
Navigate the Software
The software uses three areas of the screen to access system functions and information:
1. Command Bar • Allows the operator to perform and manage laboratory activities
2. Workspace
• Contains task buttons and displays sample and system information
3. Status Bar • Reports current system information and has selectable icons for quick access to system
functions
1
2
3

Software
Atellica Solution 3-4
Signing out of the System/Signing into the system To control the user security level, it is recommended that the operator signs out when walking away from the system, and then the next operator signs in with their credentials. Signing out and back in helps the software to run smoothly by refreshing all screens. Signing out of the System
1. On the Status bar, select the sign out icon 2. Select Sign Out 3. Select Yes
Signing into the System 1. At the sign in window, enter the operator ID and password 2. Select Sign In

Software
Atellica Solution 3-5
PEPconnect The e-learning experience, PEPconnect, enables the operator to access product-specific content for initial training and ongoing operations. Accessing PEPconnect in the Atellica Solution software:
1. On the Status bar, select the PEPconnect icon 2. PEPconnect will open in a separate window 3. To access the Atellica Solution content in PEPconnect, either
a. Enter search words in the Search Content and Groups field at the top of the screen
or
b. Navigate to Explore PEPconnect > Laboratory Diagnostics > Integrated Systems >
Atellica Solution

Software
Atellica Solution 3-6
Atellica Solution Online Help
The Online Help (OLH) icon on the status bar is accessible from every screen.
OLH provides links to help topics specific to the screen currently displayed and provides access to the table of contents where the entire Online Help package can be accessed.
The Search, Library, and Quicklinks functions provide the operator with quick access to information.

Software
Atellica Solution 3-7
System Alerts
The Alert Module displays all active module and system alerts. The color of the Alert Module designates the status of system alerts and defines them as system errors or warnings.
Each tab and subtab of the Command Bar that has an associated alert will display red or yellow until the alert is resolved.
A
B
C
D
A. Solid red tab - there are one or more unacknowledged errors
B. Black tab with a red outline - errors have been acknowledged but error condition(s) still exist
C. Solid yellow tab - there are one or more unacknowledged warnings
D. Black tab with a yellow outline - warnings have been acknowledged but warning condition(s) still exist

Software
Atellica Solution 3-8
Viewing and Acknowledging System Alerts The operator can view the Alert Module to display all active Module and system Alerts. To View and acknowledge system Alerts:
1. Above the Command bar, select the red or yellow tab
2. To Filter the alert list, select a Module or Category
3. To acknowledge individual alerts, select the hand symbol to the right of the alert
4. To acknowledge all alerts, select the Acknowledge Alerts button Note: Selecting Acknowledge Alerts does not resolve the system alerts. Action must be taken on the system
5. Suppresses all future notifications of this alert. Only suppress alerts that you do not want to be notified of again NOTE: Caution, if an alert is suppressed, the system will never notify you of this type of alert if the same situation recurs.

Software
Atellica Solution 3-9
Atellica Solution Checking System Health (Status)
To check the status of each module:
1. On the Command bar, select System
2. Select Status
3. Review the status for each module
a. Current State
b. Capabilities c. Alerts

Software
Atellica Solution 3-10
Hands-on Exercise: Explore the Software
Sign into the System (if needed)
Navigate to the Command Bar, Select the Samples Tab. (View page 59 in PEP to Go Key Tasks for Basic Operation book if Atellica software is unavailable)
1. Which 2 subtabs are available to view samples?
____________________________________________________________________
Navigate to the Command Bar, Select the Inventory Tab (View page 25 in PEP to Go Key Tasks for Basic Operation book if Atellica software is unavailable)
2. Which subtab would you select to view the supplies status?
_____________________________________________________________________
Select the identified subtab to view the supplies status
3. What is the status of IM Base (#11)?
_____________________________________________________________________
4. What is the status of the IM Cleaner (#9)?
_____________________________________________________________________
Checking your System Health (Status) 5. Identify the pictured module and list the status of each module on your system. (View page 10 in PEP to
Go Key Tasks for Basic Operation book if Atellica software is unavailable)
a. _____________________________________________
b. ____________________________________________
c. _____________________________________________
d. _____________________________________________

Software
Atellica Solution 3-11
Notes

Maintenance
Atellica Solution 4-1
4 Maintenance
Maintenance
4-2 Atellica Solution
Maintenance
Resources • Online Help
• PEPconnect
• Atellica Solution PEP to Go Key Tasks for Basic Operation
Objectives Upon completion of this exercise you will be able to:
• Utilize the Maintenance Schedule

Maintenance
Atellica Solution 4-3
At the Command Bar, select Maintenance > Schedule

Maintenance
4-4 Atellica Solution
Hands on Exercises: Maintenance At the Command Bar, select Maintenance > Schedule. (View page 16 in PEP to Go Key Tasks for Basic Operation book if Atellica software is unavailable)
1. How do you verify automated maintenance procedure passed?
______________________________________________________________________________
2. Circle the glyph below that indicates an Automated maintenance activity.
a. b. c. d.

Maintenance
Atellica Solution 4-5
Notes

Reagent and Supply Management
Atellica Solution 5-1
5 Reagent and Supply Management

Reagent and Supply Management
5-2 Atellica Solution
Reagent and Supply Management
Resources • Online Help
• PEPconnect
• Atellica Solution PEP to Go Key Tasks for Basic Operation
Objectives Upon completion of this exercise you will be able to:
• Monitor the status of the supply and reagent inventories

Reagent and Supply Management
Atellica Solution 5-3
Reagent Needs At the Command Bar, Select Inventory > Reagent Needs
The reasons for a posted need include the following:
Predictive: Suggested need based on the number of tests per day defined by the operator or system historic assay utilization*
Below Threshold: The reagent inventory level is below the operator defined alert threshold
Pending Orders: There are existing orders in the Worklist and no reagent is onboard for the assay
A need is red when the current inventory drops below a threshold defined by the operator on the Reagent Requirements Settings screen or when there are pending orders with no reagent available
*NOTE: The predictive forecast and alert threshold are both configured in the Reagent Requirements Settings screen.
*NOTE: The reagent needs for IM diluents and IM/CH wash fluids are posted based only on the Threshold criteria, not based on the prediction.

Reagent and Supply Management
5-4 Atellica Solution
Reviewing the Reagent Overview Screen
At the Command Bar, select Inventory > Reagent Overview > IM

Reagent and Supply Management
Atellica Solution 5-5
At the Command Bar, select Inventory > Reagent Overview > CH

Reagent and Supply Management
5-6 Atellica Solution
IM Reagents
Example of an immunoassay primary and ancillary reagent
Chemistry Reagents
Example of a chemistry reagent with paired pack
Example of A1c_E reagent and Pretreatment

Reagent and Supply Management
Atellica Solution 5-7
Supplies Overview
IM Supplies
At the Command Bar, select Inventory > Supplies Overview > IM
Scanning an IM System Fluid at the Module Display
Reagent and Supply Management
5-8 Atellica Solution

Reagent and Supply Management
Atellica Solution 5-9
CH Supplies
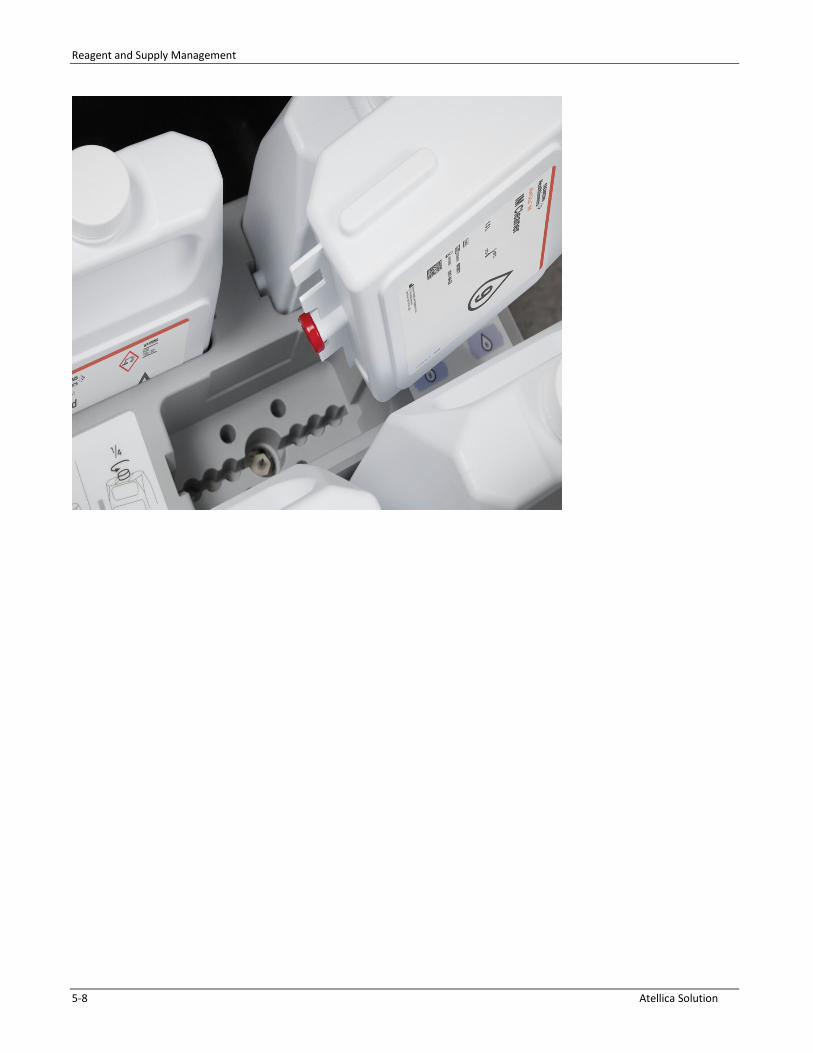
CH System Fluids
At the Command Bar, select Inventory > Supplies Overview > CH

Reagent and Supply Management
5-10 Atellica Solution
Chemistry System Fluids
Chemistry System Fluid Drawer

Reagent and Supply Management
Atellica Solution 5-11
Hands-on Exercise: Reagents and Supplies
At the Command Bar, Select Inventory > Reagent Needs. (View page 22 in PEP to Go Key Tasks for Basic Operation book if Atellica software is unavailable)
1. In the Reagent Needs, are there any reagents listed? _____________________________________________
2. Select one reagent, what is the Reason listed? _____________________________________________
3. How many packs do you need to load for that reagent? ______________________________________________
Supplies Overview
At the Command Bar, Select Inventory > Supplies Overview > IM. (View page 25 in PEP to Go Key Tasks for Basic Operation book if Atellica software is unavailable)
4. What is the OBS of the IM Cleaner number 9?
_______________________________________________
5. How many containers of IM Wash are on board?
______________________________________________

Reagent and Supply Management
5-12 Atellica Solution
Notes

Monitoring Samples and Quality Control
Atellica Solution 6-1
6 Monitoring Samples and Quality Control
Monitoring Samples and Quality Control
6-2 Atellica Solution
Monitoring Samples and Quality Control
Resources • Online Help
• PEPconnect
• Atellica Solution PEP to Go Key Tasks for Basic Operation
Objectives Upon completion of this exercise you will be able to:
• Monitor sample status
• Determine the QC material needs

Monitoring Samples and Quality Control
Atellica Solution 6-3
Monitoring Sample Status At the Command Bar, select Samples > Sample Handler
The Sample Handler tab provides an overview of the status of the SH, sample drawers, and all racks and sample containers in the sample drawers.
The system displays a colored glyph for each sample container position in every rack in the sample drawers and descriptive text beside each glyph.
Example:
A round glyph identifies a patient sample container
A square glyph identifies a calibrator or QC container

Monitoring Samples and Quality Control
6-4 Atellica Solution
Quality Control: Determining QC Needs At the Command Bar, select Inventory > QC Needs
The QC Needs subtab is located under the Inventory command tab. A QC need is created for a QC material based on the following situations:
• The QC Scheduler is set up to create an order before the end of the current day. • A QC order was placed and QC material is not onboard.
NOTE: If the All checkbox at the bottom of the screen is not checked, only needs for which the QC material is not available will display. This is the default setting.

Monitoring Samples and Quality Control
Atellica Solution 6-5
Monitoring QC Test Orders and Results At the Command Bar, select Worklist > Worklist Overview
The Worklist Overview screen can be used to view the status of test orders and results for calibration, QC, and patient orders. Once you have placed an order, navigate to Worklist > Worklist Overview to verify the sample has started processing.

Monitoring Samples and Quality Control
6-6 Atellica Solution
At the Command Bar, select Worklist > Worklist Overview
To view results, select the checkbox associated with a result and select Edit/View and/or click on the test hyperlink. Click on glyphs associated with a result to get additional result information.

Monitoring Samples and Quality Control
Atellica Solution 6-7
Hands-on Exercise: Monitoring Samples
At the Command Bar, select Samples and select the Sample Handler subtab. (View page 59 in PEP to Go Key Tasks for Basic Operation book if Atellica software is unavailable)
1. How do you determine when a sample has been aspirated?
________________________________________________________________________
Hands-on Exercise: Quality Control
At the Command Bar, select Inventory > QC Needs. (View page 48 in PEP to Go Key Tasks for Basic Operation book if Atellica software is unavailable)
2. Review the QC Needs workspace to answer the following questions:
a. Are there any QC materials listed that need to be loaded displayed in the screen? ___________________________________________________________________
b. What column is highlighted in RED? ___________________________________________________________________

Monitoring Samples and Quality Control
6-8 Atellica Solution
Notes

Calibration
Atellica Solution 7-1
7 Calibration

Calibration
7-2 Atellica Solution
Calibration
Resources • Online Help
• PEPconnect
• Atellica Solution PEP to Go Key Tasks for Basic Operation
Objectives Upon completion of this exercise you will be able to:
• Describe how the system utilizes reagent lot and pack calibration intervals to determine calibration frequency
• Determine the calibration material that need to be loaded on the system
• Review calibration results
Calibration
Atellica Solution 7-3
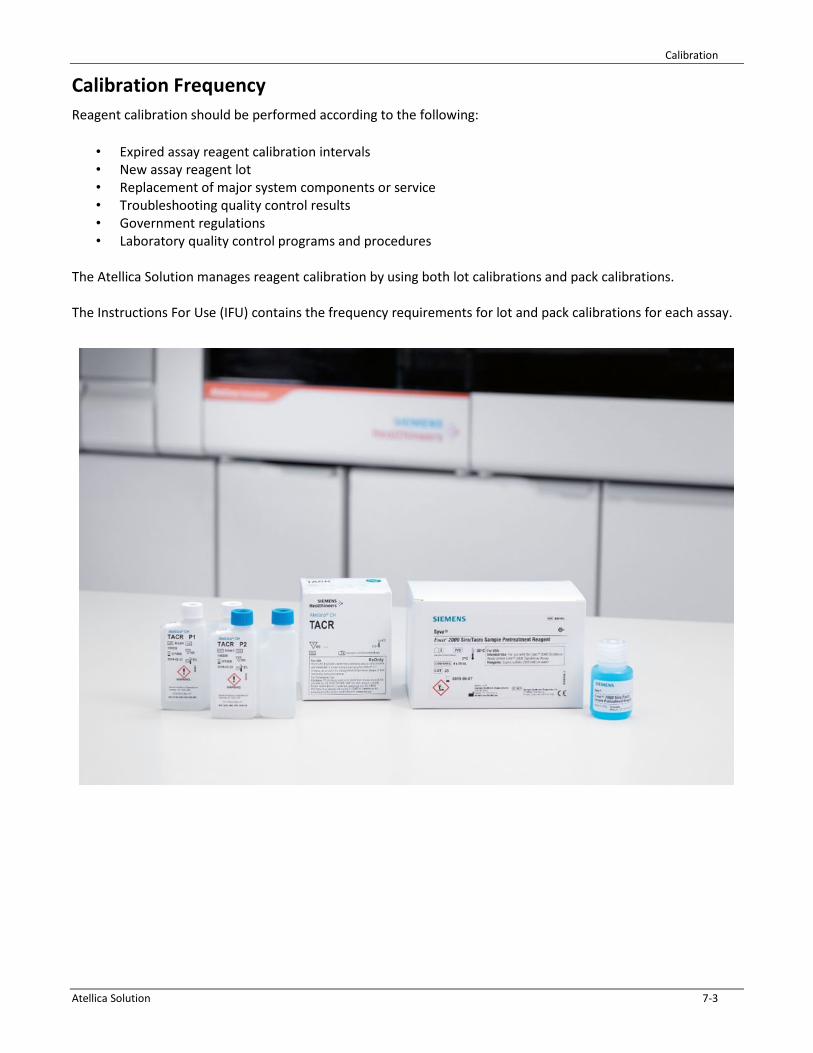
Calibration Frequency Reagent calibration should be performed according to the following:
• Expired assay reagent calibration intervals • New assay reagent lot • Replacement of major system components or service • Troubleshooting quality control results • Government regulations • Laboratory quality control programs and procedures
The Atellica Solution manages reagent calibration by using both lot calibrations and pack calibrations. The Instructions For Use (IFU) contains the frequency requirements for lot and pack calibrations for each assay.

Calibration
7-4 Atellica Solution
Lot and Pack Calibration Intervals The system utilizes both reagent lot and reagent pack calibration intervals to determine when a reagent needs to be calibrated:
Lot Calibration Interval • Starts when a reagent pack with a new lot is calibrated within 24 hours after it is loaded on the system
for IM reagents, or 24 hours after the well is pierced for CH reagents
• The lot calibration will be valid for any pack with the same lot that is loaded on the system until the lot calibration interval expires
• A reagent pack that uses lot calibration to calculate results for the duration of the Pack calibration
interval or Lot expiration, whichever comes first
Pack Calibration Interval: • On the CH analyzer, a pack calibration is actually a well calibration. There are 2 wells in most CH packs,
which are treated as separate reagents by the system
• The pack/well calibration interval is valid for an individual pack for IM or well for CH, and not used for subsequent packs/wells placed on the system
• Useful for labs that perform a low volume of tests because they can avoid disposing of reagent packs
due to the QC shifts seen when calibrating aged packs
Example of a CH reagent Example of an IM Reagent
The system tracks lot and pack calibration and displays reminders when calibration or recalibration of an assay reagent pack is due.
NOTE: In order for a calibration to qualify as a lot calibration, the calibration must be done within 24 hours after a new IM pack is loaded on the system or 24 hours after a CH well is pierced. If a new pack/well is not calibrated within 24 hours, the calibration will be a pack calibration.

Calibration
Atellica Solution 7-5
Reviewing Calibration Needs The Calibration Needs provides a prediction of the calibrations that need to be performed by the end of the day* based on system settings.
A calibration need is created if one of following applies:
1. A pack or lot calibration will be ordered (based on the Test Definition settings) before the current day ends 2. There is a pending calibration order in the Worklist
A need will also be created if a lot calibration is required and no fresh packs are available. In this case, the Comment field will display “No valid pack onboard”.
On the Command Bar, select Inventory > Calibration Needs
Calibration expiration: Expiration date and time of the current calibration interval
• If the Calibration Expiration is RED, it indicates that the order will be generated within the threshold configured on the Alert Settings screen. The Reagent Overview screen, however, may display a green status for the well/pack in use at this time (Reagent Overview only shows the current status and is not a prediction).
Load the calibrator material on the system for any needs that are in RED and do not have usable calibrator material currently on board.
NOTE: The ‘end of day’ can be configured using the Day Setting on the Settings > System Configuration > Reagent Requirements Settings screen.
NOTE: If the All checkbox at the bottom of the screen is not checked, only needs for which the calibrator material is not available will display. This is the default setting.

Calibration
7-6 Atellica Solution
Review Calibration Results: Worklist Overview Screen
On the Command Bar, select Worklist > Worklist Overview
To view more details on results, navigate to the Calibration Results screen To view Calibration Results Details, select either the SID or Test Name for that order, OR select the order and then select the Edit/View button

Calibration
Atellica Solution 7-7
Calibration Results Screen- Details
QC Performed with Calibration – Provides a summary of QC results, when the system automatically performed QC with calibration
Acceptance Criteria – Displays the criteria used by the system to evaluate the calibration, and indicates whether each criteria failed or passed for the selected calibration
Comments – To enter a new comment, select the Edit button
Graph– Only displayed for CH. Graph of the results as Expected Concentration/System Response

Calibration
7-8 Atellica Solution
Hands-on Exercises: Calibration
On the Command Bar, select Inventory > Calibration Needs. (View page 37 in PEP to Go Key Tasks for Basic Operation book if Atellica software is unavailable)
1. Are there any Calibrations displayed that need to be performed by the end of the day?
___________________________________________________________________________
View one calibration listed and answer the following questions.
2. What calibration material and/or reagent pack would need to be loaded to satisfy the need?
___________________________________________________________________________
Calibration
Atellica Solution 7-9
Notes
Troubleshooting
Atellica Solution 8-1
8 Troubleshooting

Troubleshooting
8-2 Atellica Solution
Troubleshooting
Resources • Online Help
• PEPconnect
• Atellica Solution PEP to Go Key Tasks for Basic Operation
Objectives Upon completion of this exercise you will be able to:
• Utilize the Operator Event Log

Troubleshooting
Atellica Solution 8-3
Troubleshooting
At the Command Bar, select System > Logs > Operator Event Log

Troubleshooting
8-4 Atellica Solution
Operator Event Log
• Displays system events as the events occur • Can be filtered based on time, module, error/warning • An event can be selected, the detailed information will display at the bottom of the workspace • Event Help enables you to review the event, possible causes, corrective actions, and corrective action
procedures • Comments can be added to an event
Corrective Actions
Events marked with the corrective action symbol must be resolved by the operator. After resolving, the event can be marked completed Unacknowledged Events
Events marked with the unacknowledged symbol can be acknowledged by the operator. To acknowledge an event: a. Select the event b. Either select the unacknowledged symbol for an event, or select Acknowledge All to acknowledge all
events

Troubleshooting
Atellica Solution 8-5
Hands-on Exercises: Troubleshooting
Review the Operator Event Log
1. How can you differentiate between an error and a warning?
________________________________________________________________________________________

Troubleshooting
8-6 Atellica Solution
Notes