AT MODULE – ANALYSIS & TASKS · AT MODULE ANALYSIS & TASKS User Guide for Client Corporation...
52
AT MODULE – ANALYSIS & TASKS User Guide for Client Corporation
Transcript of AT MODULE – ANALYSIS & TASKS · AT MODULE ANALYSIS & TASKS User Guide for Client Corporation...

AT MODULE – ANALYSIS & TASKSUser Guide for Client Corporation

AT MODULE – ANALYSIS & TASKSUser Guide for Client Corporation
Revised on July 17, 2019 Page 1 of 51
TABLE OF CONTENTS
1. OVERVIEW ........................................................................................................................................ 3
2. DASHBOARD SECTION .....................................................................................................................4
2.1 GRAPH – MY ONGOING TASKS AND PROJECTS ............................................................................ 4
2.2 GRAPH – ACTIVE TASKS STATUS ................................................................................................... 5
2.3 GRAPH – COMPLIANCE PERCENTAGE ........................................................................................... 6
2.4 GRAPH – TASKS WITH FEW SPECIFICATIONS ............................................................................... 6
2.5 MANAGING THE WIDGETS ...............................................................................................................7
2.5.1 DISPLAY ..............................................................................................................................7
2.5.2 HIDE .....................................................................................................................................7
2.5.3 MOVE ...................................................................................................................................7
2.5.4 MODIFY THE SIZE ...............................................................................................................7
3. TASKS SECTION ............................................................................................................................... 8
3.1 CREATE A TASK ............................................................................................................................... 9
3.2 THE DETAILS OF A TASK ................................................................................................................10
3.2.1 THE INTERFACE ................................................................................................................10
3.2.2 THE ACTION BUTTONS ......................................................................................................11
3.2.2.1 EDIT, DELETE, DUPLICATE AND CLOSE ..............................................................................11
3.2.2.2 EXPORT ...................................................................................................................................11
3.2.2.3 EVALUATE .............................................................................................................................. 12
3.2.3 TABS ..................................................................................................................................12
3.2.3.1 DEFINE THE SPECIFICATIONS ............................................................................................ 12
3.2.3.2 CONSULT THE REQUIREMENTS ......................................................................................... 14
3.2.3.3 VERIFY EMPLOYEE CONFIRMITY ....................................................................................... 15
3.2.3.4 ATTACH REFERENCE DOCUMENTS ................................................................................... 18
3.2.3.5 CREATE A SUBTASK ............................................................................................................. 19
3.2.3.6 ELABORATE ON A WORK PLAN .......................................................................................... 21
3.2.3.7 PRE-WORK ........................................................................................................................... 22
3.2.3.8 AUTHORIZE A TASK ..............................................................................................................23
3.2.4 DRAFT, PUBLISHED AND LOCKED STATUSES ................................................................ 24
3.2.4.1 PUBLISHING A TASK.............................................................................................................24
3.2.4.2 LOCKING A TASK ...................................................................................................................24
3.3 FILTER THE TASK LIST .................................................................................................................. 25
3.4 EXPORT THE TASK LIST .................................................................................................................27
4. PROJECTS SECTION .......................................................................................................................28
4.1 CREATE A PROJECT ...................................................................................................................... 28
4.2 EDIT A PROJECT ............................................................................................................................ 29

AT MODULE – ANALYSIS & TASKSUser Guide for Client Corporation
Revised on July 17, 2019 Page 2 of 51
4.3 EXPORT THE LIST OF EXISTING PROJECTS ................................................................................ 30
4.4 ADD AND REMOVE TASKS FROM A PROJECT .............................................................................. 30
5. MATRIX MANAGER SECTION .......................................................................................................... 32
5.1 SPECIFICATIONS, REQUIREMENTS AND CLEARANCES TABS ....................................................33
5.1.3 CLEARANCES ....................................................................................................................33
5.1.1 SPECIFICATIONS ..............................................................................................................33
5.1.2 REQUIREMENTS ...............................................................................................................33
5.2 ANALYSIS TAB ............................................................................................................................... 34
5.3 CATEGORIES AND ITEMS .............................................................................................................. 35
5.3.1 MANAGING CATEGORIES AND ITEMS ............................................................................. 36
5.4 ASSOCIATIONS ..............................................................................................................................37
5.5 RESET ............................................................................................................................................ 38
5.6 EXPORT ......................................................................................................................................... 39
ANNEX I : LIST OF PROJECTS (.XLSX) ................................................................................................................................40
ANNEX II : LIST OF TASKS (.XLSX) .......................................................................................................................................41
ANNEX III : COMPLETED TASKS (.PDF) ...............................................................................................................................42
ANNEX IV : LIST OF EMPLOYEES (.PDF) ............................................................................................................................. 43
ANNEX V : WORK PLAN (.PDF) .............................................................................................................................................44
ANNEX VI : WORK PERMITS (.PDF) .....................................................................................................................................45
ANNEX VII : EMPLOYEE TRAINING (.XLSX) ....................................................................................................................... 47
ANNEX VIII : EMPLOYEE PROFESSIONAL QUALIFICATIONS (.XLSX) .........................................................................48
ANNEX IX : MATRIX DRAFT (.XLSX) ....................................................................................................................................49
ANNEX X : IMPACTED TASKS (.XLSX) .................................................................................................................................50
TABLE OF CONTENTS (continued)
AT MODULE – ANALYSIS & TASKSUser Guide for Client Corporation
Revised on July 17, 2019 Page 3 of 51
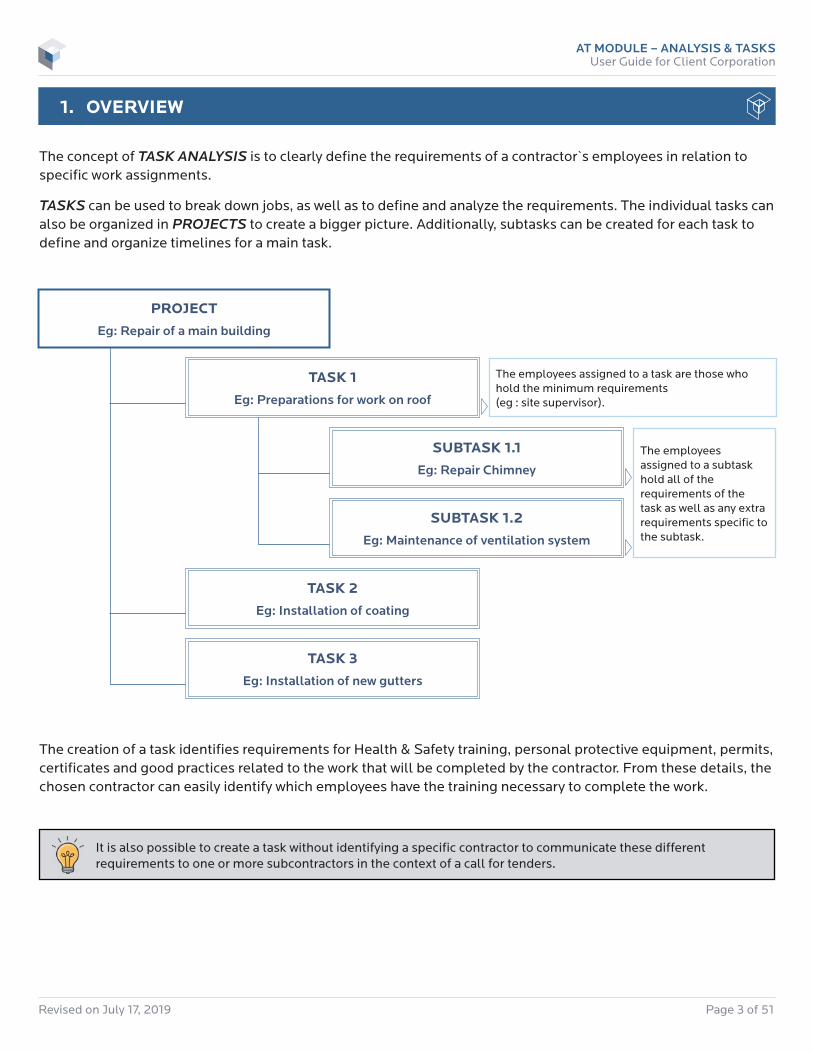
The concept of TASK ANALYSIS is to clearly define the requirements of a contractor`s employees in relation to specific work assignments.
TASKS can be used to break down jobs, as well as to define and analyze the requirements. The individual tasks can also be organized in PROJECTS to create a bigger picture. Additionally, subtasks can be created for each task to define and organize timelines for a main task.
1. OVERVIEW
The creation of a task identifies requirements for Health & Safety training, personal protective equipment, permits, certificates and good practices related to the work that will be completed by the contractor. From these details, the chosen contractor can easily identify which employees have the training necessary to complete the work.
It is also possible to create a task without identifying a specific contractor to communicate these different requirements to one or more subcontractors in the context of a call for tenders.
TASK 1
Eg: Preparations for work on roof
The employees assigned to a task are those who hold the minimum requirements (eg : site supervisor).
The employees assigned to a subtask hold all of the requirements of the task as well as any extra requirements specific to the subtask.
SUBTASK 1.1
Eg: Repair Chimney
TASK 2
Eg: Installation of coating
SUBTASK 1.2
Eg: Maintenance of ventilation system
TASK 3
Eg: Installation of new gutters
PROJECT
Eg: Repair of a main building

AT MODULE – ANALYSIS & TASKSUser Guide for Client Corporation
Revised on July 17, 2019 Page 4 of 51
2. DASHBOARD SECTION
The Dashboard section is made up of widgets designed to offer an overview of projects and tasks.
2.1 GRAPH – MY ONGOING TASKS AND PROJECTS
This Gantt chart provides an overview of the projects and tasks being created by the current user. A task can be clicked to view further details. See section 3.2 for more information.

AT MODULE – ANALYSIS & TASKSUser Guide for Client Corporation
Revised on July 17, 2019 Page 5 of 51
2.2 GRAPH – ACTIVE TASKS STATUS
This graph displays the distribution of active tasks according to their status. To see the number of tasks that correspond with each status, a user may hover over each section of the graph or refer to the legend on the right
See section 3.2.4 to learn more about the different statuses.
Clicking on part of the graph allows the user to view details of the corresponding tasks.
Click on View all results to see a list of all tasks. Tasks can also be filtered based on multiple criteria, such as status, requirements or the duration of the task. Consult section 3 for more information about tasks.
AT MODULE – ANALYSIS & TASKSUser Guide for Client Corporation
Revised on July 17, 2019 Page 6 of 51
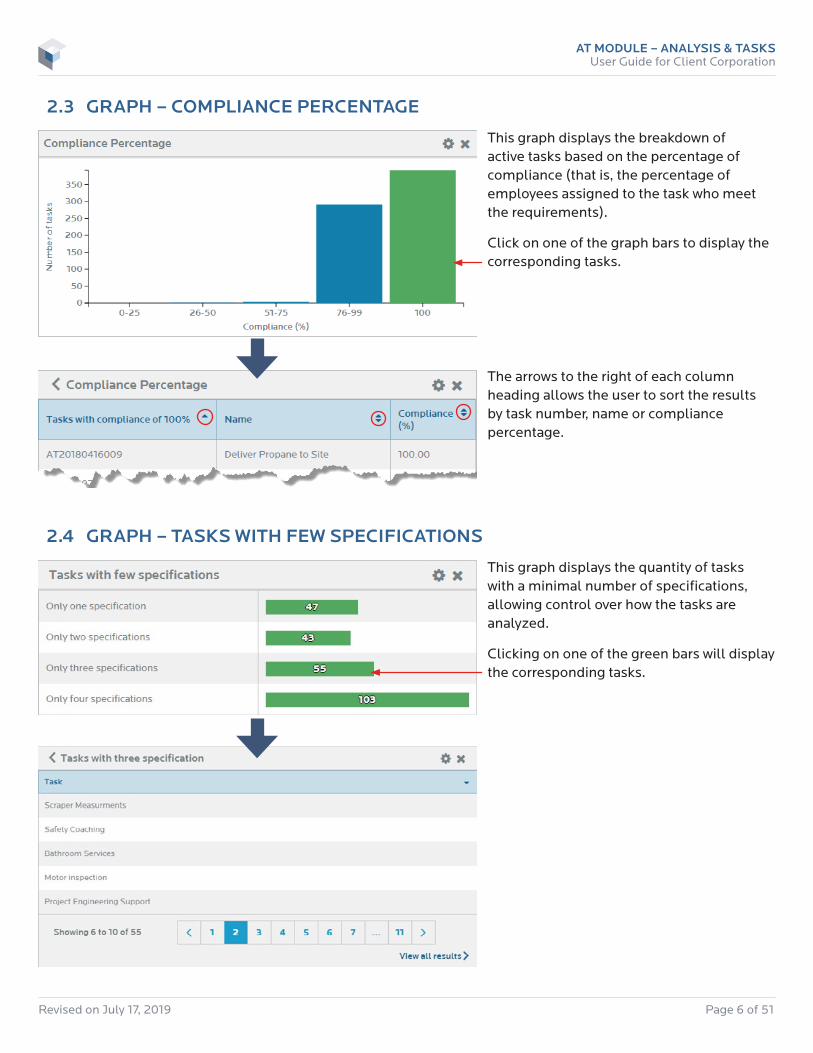
This graph displays the breakdown of active tasks based on the percentage of compliance (that is, the percentage of employees assigned to the task who meet the requirements).
Click on one of the graph bars to display the corresponding tasks.
2.3 GRAPH – COMPLIANCE PERCENTAGE
The arrows to the right of each column heading allows the user to sort the results by task number, name or compliance percentage.
This graph displays the quantity of tasks with a minimal number of specifications, allowing control over how the tasks are analyzed.
Clicking on one of the green bars will display the corresponding tasks.
2.4 GRAPH – TASKS WITH FEW SPECIFICATIONS
AT MODULE – ANALYSIS & TASKSUser Guide for Client Corporation
Revised on July 17, 2019 Page 7 of 51
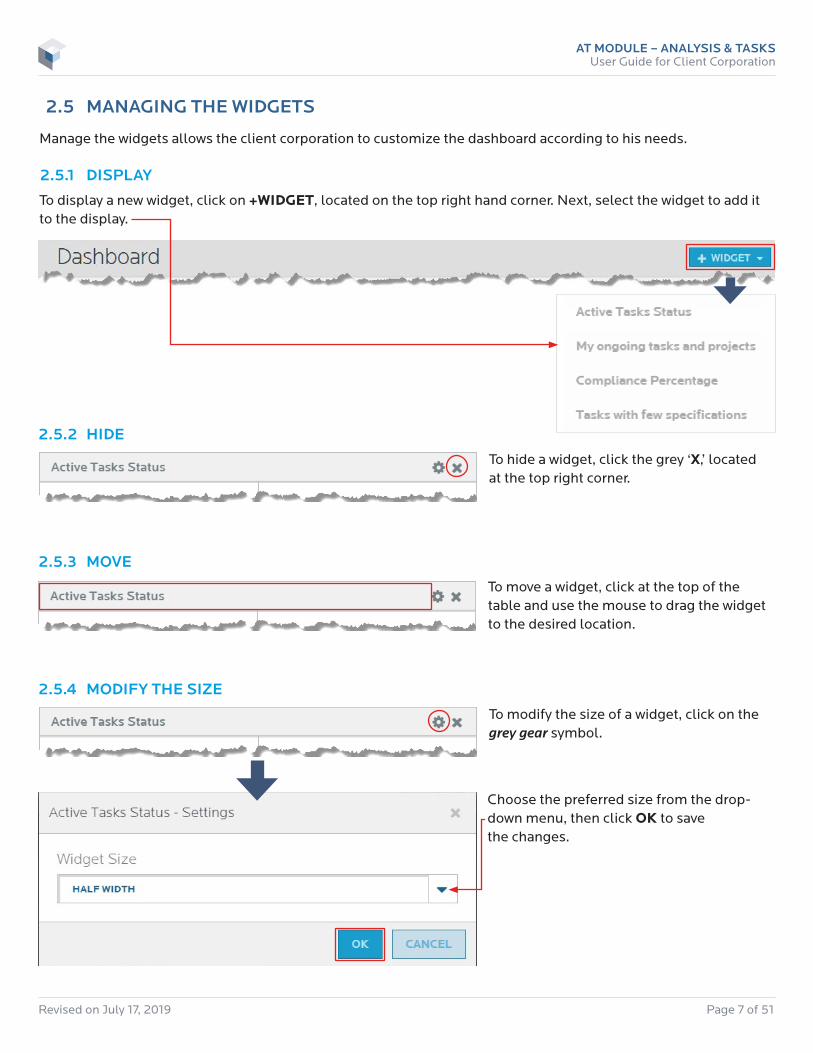
2.5 MANAGING THE WIDGETS
Manage the widgets allows the client corporation to customize the dashboard according to his needs.
2.5.1 DISPLAY
To display a new widget, click on +WIDGET, located on the top right hand corner. Next, select the widget to add it to the display.
2.5.2 HIDE
To hide a widget, click the grey ‘X,’ located at the top right corner.
2.5.3 MOVE
To move a widget, click at the top of the table and use the mouse to drag the widget to the desired location.
2.5.4 MODIFY THE SIZE
To modify the size of a widget, click on the grey gear symbol.
Choose the preferred size from the drop-down menu, then click OK to save the changes.
AT MODULE – ANALYSIS & TASKSUser Guide for Client Corporation
Revised on July 17, 2019 Page 8 of 51
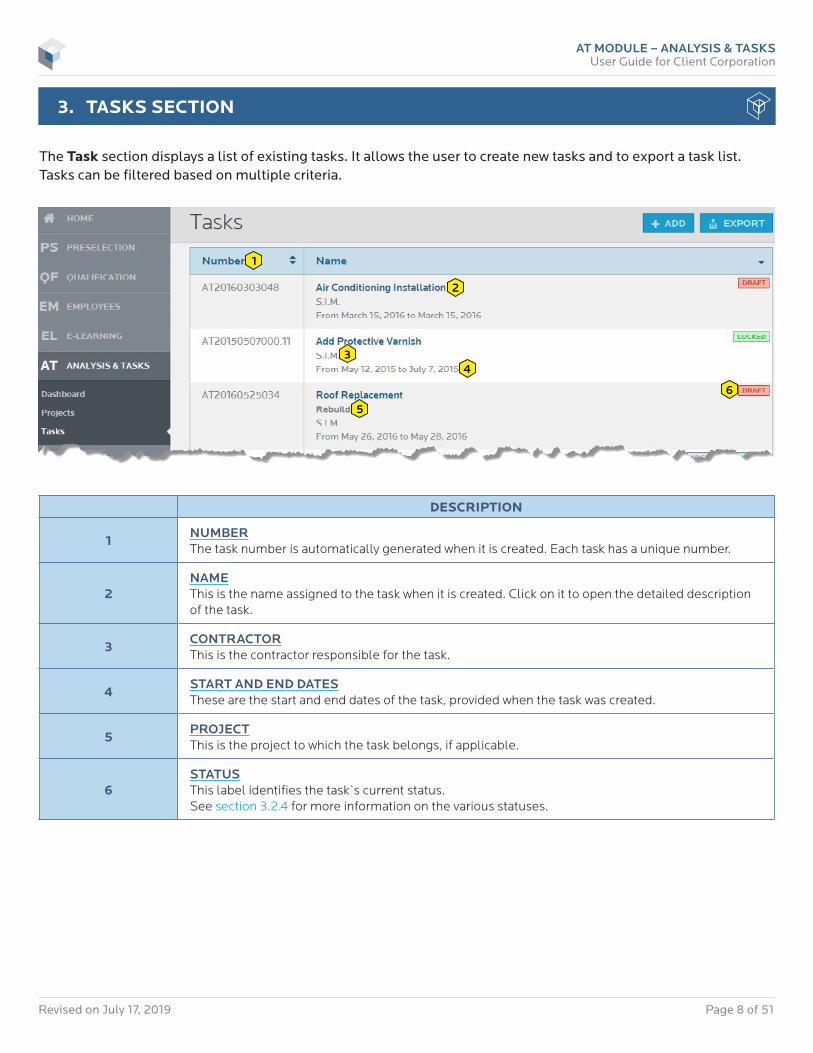
3. TASKS SECTION
The Task section displays a list of existing tasks. It allows the user to create new tasks and to export a task list. Tasks can be filtered based on multiple criteria.
1
2
3 4
5
6
DESCRIPTION
1NUMBERThe task number is automatically generated when it is created. Each task has a unique number.
2NAME This is the name assigned to the task when it is created. Click on it to open the detailed description of the task.
3CONTRACTORThis is the contractor responsible for the task.
4START AND END DATESThese are the start and end dates of the task, provided when the task was created.
5PROJECTThis is the project to which the task belongs, if applicable.
6STATUSThis label identifies the task`s current status. See section 3.2.4 for more information on the various statuses.
AT MODULE – ANALYSIS & TASKSUser Guide for Client Corporation
Revised on July 17, 2019 Page 9 of 51
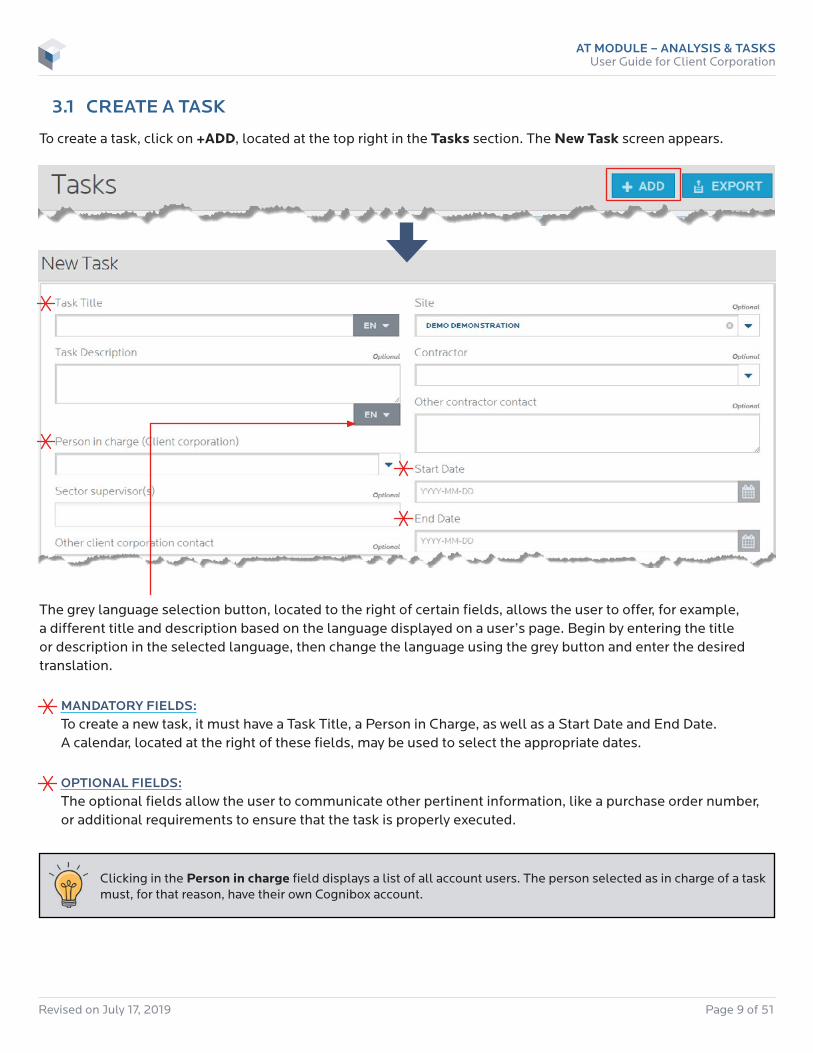
3.1 CREATE A TASK
To create a task, click on +ADD, located at the top right in the Tasks section. The New Task screen appears.
The grey language selection button, located to the right of certain fields, allows the user to offer, for example, a different title and description based on the language displayed on a user’s page. Begin by entering the title or description in the selected language, then change the language using the grey button and enter the desired translation.
MANDATORY FIELDS:To create a new task, it must have a Task Title, a Person in Charge, as well as a Start Date and End Date. A calendar, located at the right of these fields, may be used to select the appropriate dates.
OPTIONAL FIELDS:The optional fields allow the user to communicate other pertinent information, like a purchase order number, or additional requirements to ensure that the task is properly executed.
Clicking in the Person in charge field displays a list of all account users. The person selected as in charge of a task must, for that reason, have their own Cognibox account.
AT MODULE – ANALYSIS & TASKSUser Guide for Client Corporation
Revised on July 17, 2019 Page 10 of 51
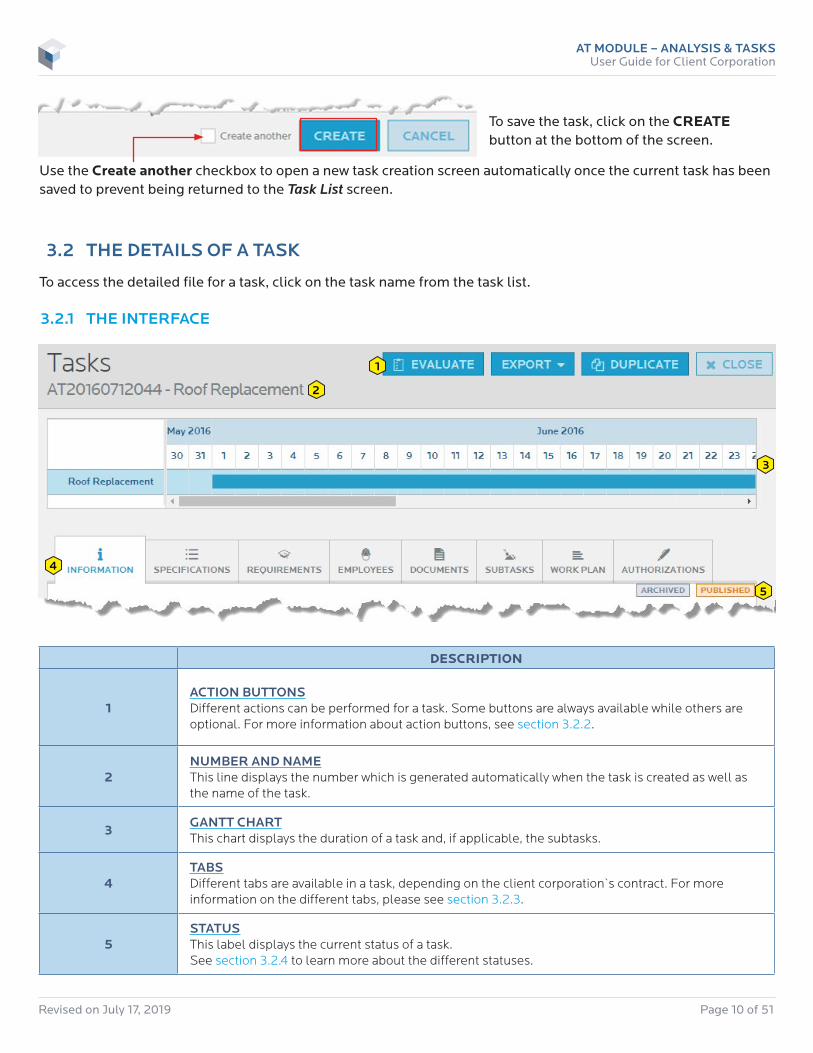
To save the task, click on the CREATE button at the bottom of the screen.
Use the Create another checkbox to open a new task creation screen automatically once the current task has been saved to prevent being returned to the Task List screen.
3.2 THE DETAILS OF A TASK
To access the detailed file for a task, click on the task name from the task list.
3.2.1 THE INTERFACE
DESCRIPTION
1ACTION BUTTONS Different actions can be performed for a task. Some buttons are always available while others are optional. For more information about action buttons, see section 3.2.2.
2NUMBER AND NAMEThis line displays the number which is generated automatically when the task is created as well as the name of the task.
3GANTT CHARTThis chart displays the duration of a task and, if applicable, the subtasks.
4TABSDifferent tabs are available in a task, depending on the client corporation`s contract. For more information on the different tabs, please see section 3.2.3.
5STATUSThis label displays the current status of a task. See section 3.2.4 to learn more about the different statuses.
1
2
3
4
5
AT MODULE – ANALYSIS & TASKSUser Guide for Client Corporation
Revised on July 17, 2019 Page 11 of 51
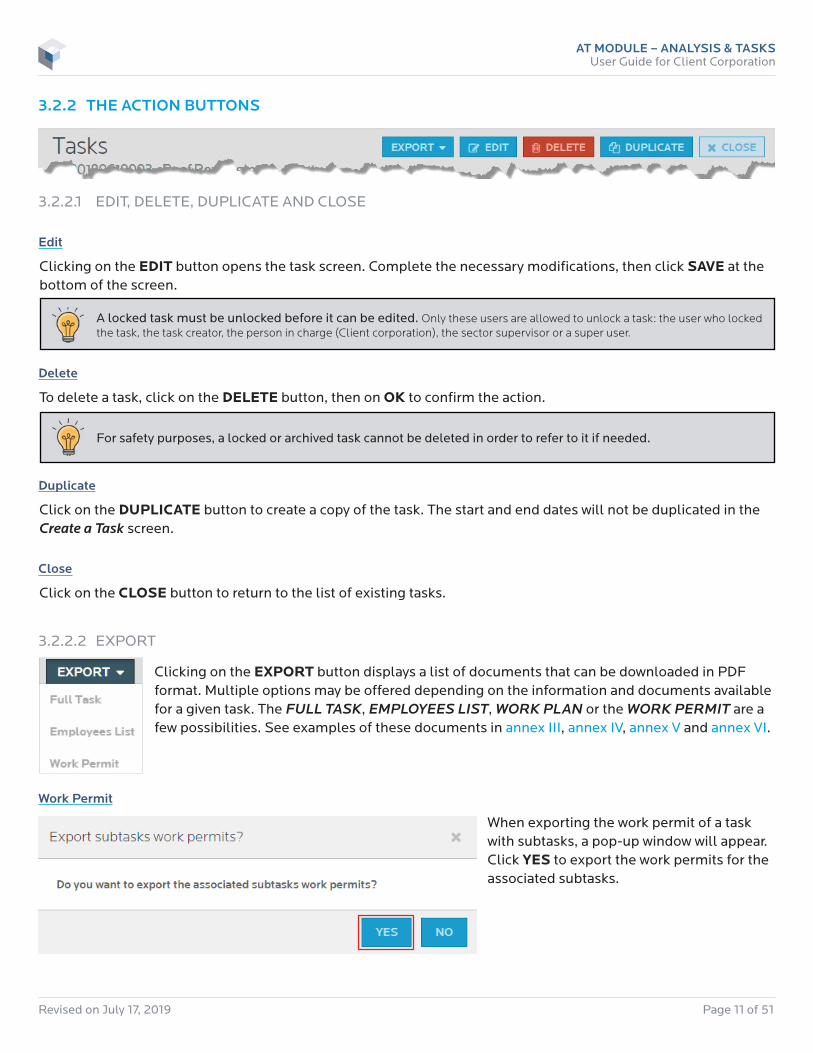
3.2.2 THE ACTION BUTTONS
3.2.2.1 EDIT, DELETE, DUPLICATE AND CLOSE
Edit
Clicking on the EDIT button opens the task screen. Complete the necessary modifications, then click SAVE at the bottom of the screen.
Delete
To delete a task, click on the DELETE button, then on OK to confirm the action.
Duplicate
Click on the DUPLICATE button to create a copy of the task. The start and end dates will not be duplicated in the Create a Task screen.
Close
Click on the CLOSE button to return to the list of existing tasks.
3.2.2.2 EXPORT
Clicking on the EXPORT button displays a list of documents that can be downloaded in PDF format. Multiple options may be offered depending on the information and documents available for a given task. The FULL TASK, EMPLOYEES LIST, WORK PLAN or the WORK PERMIT are a few possibilities. See examples of these documents in annex III, annex IV, annex V and annex VI.
Work Permit
A locked task must be unlocked before it can be edited. Only these users are allowed to unlock a task: the user who locked the task, the task creator, the person in charge (Client corporation), the sector supervisor or a super user.
For safety purposes, a locked or archived task cannot be deleted in order to refer to it if needed.
When exporting the work permit of a task with subtasks, a pop-up window will appear. Click YES to export the work permits for the associated subtasks.
AT MODULE – ANALYSIS & TASKSUser Guide for Client Corporation
Revised on July 17, 2019 Page 12 of 51
3.2.2.3 EVALUATE
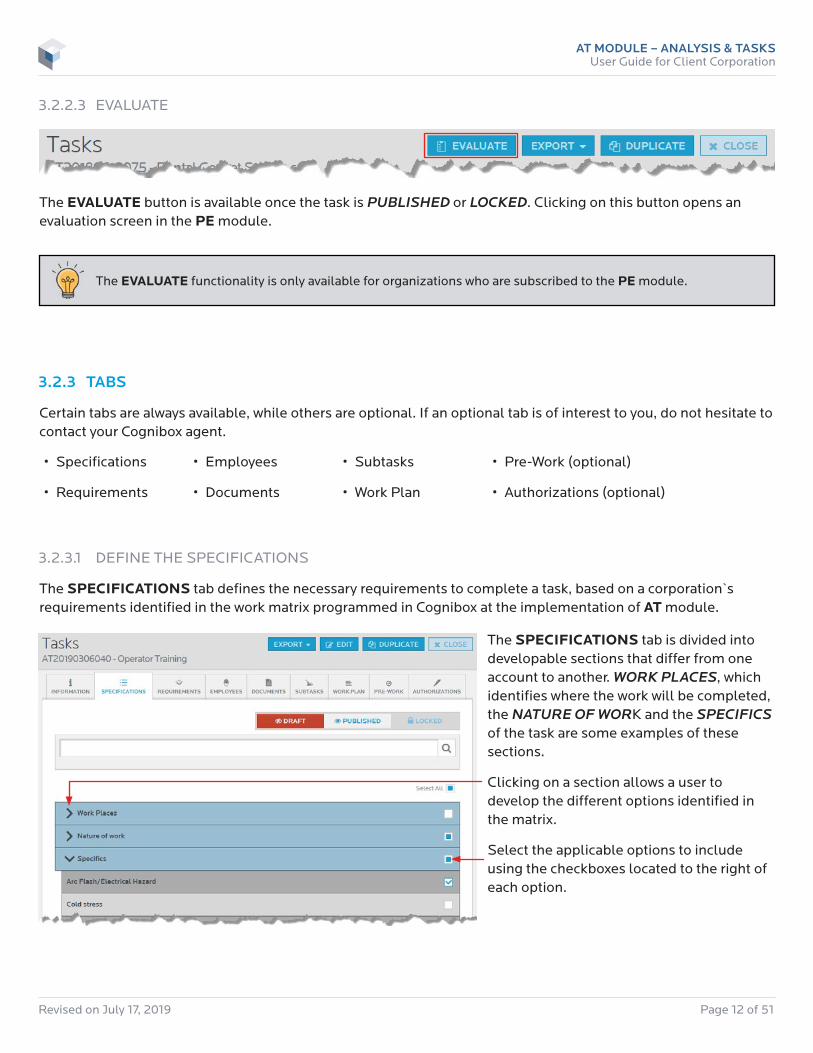
3.2.3.1 DEFINE THE SPECIFICATIONS
The SPECIFICATIONS tab defines the necessary requirements to complete a task, based on a corporation`s requirements identified in the work matrix programmed in Cognibox at the implementation of AT module.
The EVALUATE button is available once the task is PUBLISHED or LOCKED. Clicking on this button opens an evaluation screen in the PE module.
3.2.3 TABS
Certain tabs are always available, while others are optional. If an optional tab is of interest to you, do not hesitate to contact your Cognibox agent.
The EVALUATE functionality is only available for organizations who are subscribed to the PE module.
• Specifications
• Requirements
• Employees
• Documents
• Subtasks
• Work Plan
• Pre-Work (optional)
• Authorizations (optional)
The SPECIFICATIONS tab is divided into developable sections that differ from one account to another. WORK PLACES, which identifies where the work will be completed, the NATURE OF WORK and the SPECIFICS of the task are some examples of these sections.
Clicking on a section allows a user to develop the different options identified in the matrix.
Select the applicable options to include using the checkboxes located to the right of each option.
AT MODULE – ANALYSIS & TASKSUser Guide for Client Corporation
Revised on July 17, 2019 Page 13 of 51
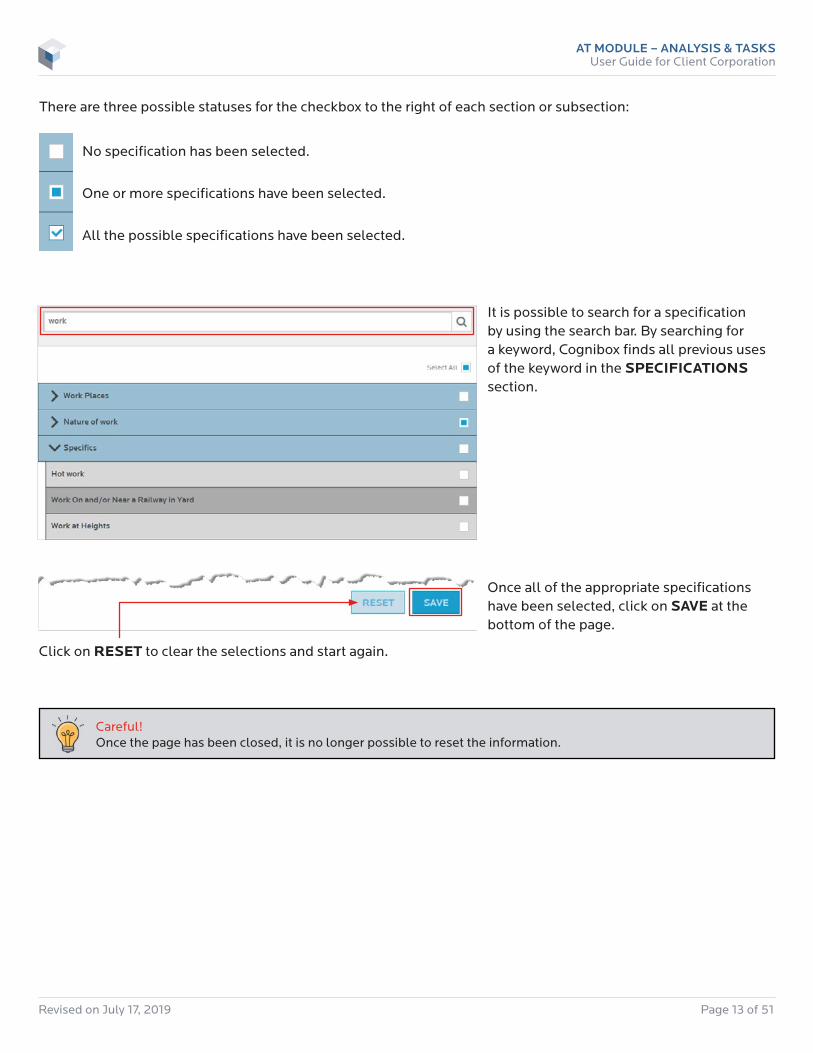
There are three possible statuses for the checkbox to the right of each section or subsection:
No specification has been selected.
One or more specifications have been selected.
All the possible specifications have been selected.
It is possible to search for a specification by using the search bar. By searching for a keyword, Cognibox finds all previous uses of the keyword in the SPECIFICATIONS section.
Once all of the appropriate specifications have been selected, click on SAVE at the bottom of the page.
Click on RESET to clear the selections and start again.
Careful! Once the page has been closed, it is no longer possible to reset the information.

AT MODULE – ANALYSIS & TASKSUser Guide for Client Corporation
Revised on July 17, 2019 Page 14 of 51
3.2.3.2 CONSULT THE REQUIREMENTS
The REQUIREMENTS tab displays a task`s requirements, which are generated by the selected specifications.
The REQUIREMENTS tab is divided into developable sections that differ from one account to another. For example:
• Required health and safety TRAINING for the contractor`s employees who will be completing the work;
• The necessary PERMITS AND CERTIFICATES that must be obtained by the contractor before beginning the work;
• The different Personal Protective Equipment (PPE) required;
• GOOD PRACTICES related to the work which must be explained to the contractor`s employees before the work begins.
In the same way as with the specifications, it is possible to search for a requirement by using the search bar.
By searching for a key word, Cognibox finds all previous uses of the keyword in the REQUIREMENTS section.

AT MODULE – ANALYSIS & TASKSUser Guide for Client Corporation
Revised on July 17, 2019 Page 15 of 51
3.2.3.3 VERIFY EMPLOYEE CONFIRMITY
The EMPLOYEES tab contains a list of the contractor`s employees who have been assigned to the task in the INFORMATION tab.
DESCRIPTION
1EMPLOYEE SELECTIONCheck the box to the left of an employee to assign them to a task. Save the selection using the button at the bottom of the page.
2EMPLOYEE NAMEThis is the employee`s last name, followed by their first name.
3AUTHORIZATION FORMThis line indicates if the authorization form was accepted.
4COGNIBOX EMPLOYEE NUMBERThis is the employee number which has been automatically generated by Cognibox.
5QUALIFICATION STATUS ICONThis icon indicates the qualification status of the contractor for the client corporation. The contractor does not see this information.
6CONTRACTORSThis indicates the names of the contractors for which the employee works.
7STATUSThis column indicates the percentage of required training that the employee currently holds. For more information on statuses, please see section 3.2.3.3.1.
8ACTIONSClick on the ellipsis to see the available actions. For more information, see section 3.2.3.3.2.
1
2 3
4
5 6 7
8
AT MODULE – ANALYSIS & TASKSUser Guide for Client Corporation
Revised on July 17, 2019 Page 16 of 51
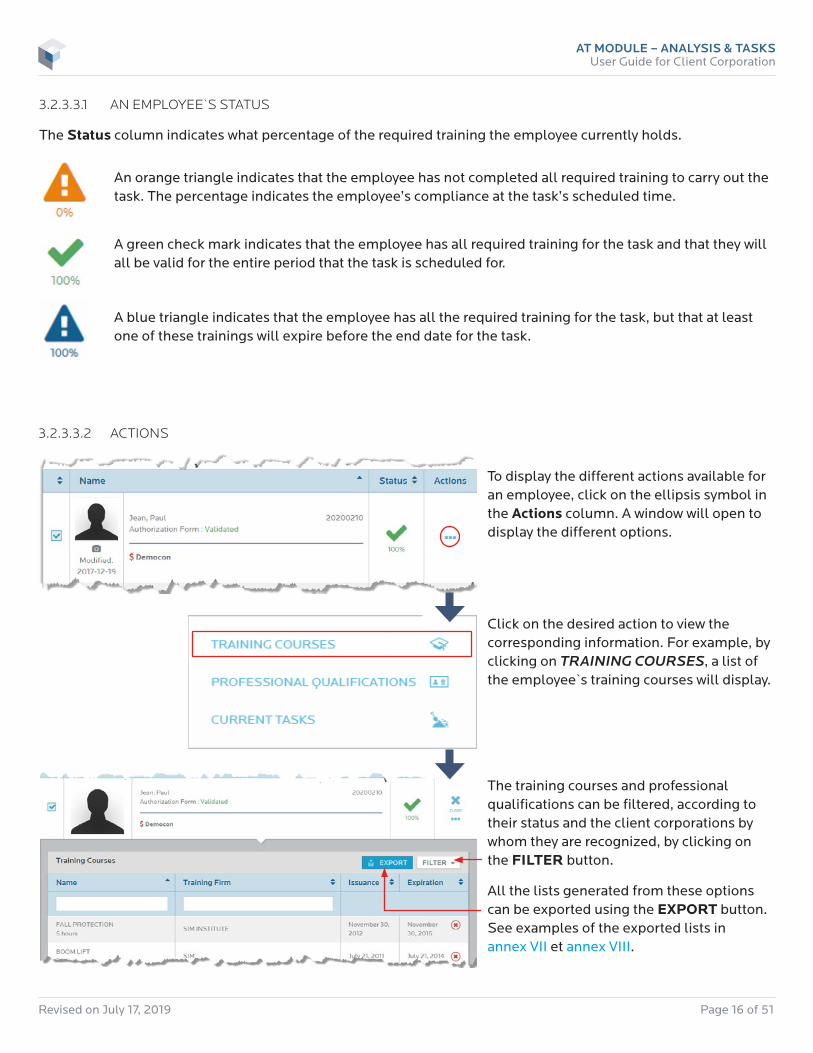
3.2.3.3.1 AN EMPLOYEE`S STATUS
The Status column indicates what percentage of the required training the employee currently holds.
3.2.3.3.2 ACTIONS
An orange triangle indicates that the employee has not completed all required training to carry out the task. The percentage indicates the employee’s compliance at the task’s scheduled time.
A green check mark indicates that the employee has all required training for the task and that they will all be valid for the entire period that the task is scheduled for.
A blue triangle indicates that the employee has all the required training for the task, but that at least one of these trainings will expire before the end date for the task.
To display the different actions available for an employee, click on the ellipsis symbol in the Actions column. A window will open to display the different options.
Click on the desired action to view the corresponding information. For example, by clicking on TRAINING COURSES, a list of the employee`s training courses will display.
The training courses and professional qualifications can be filtered, according to their status and the client corporations by whom they are recognized, by clicking on the FILTER button.
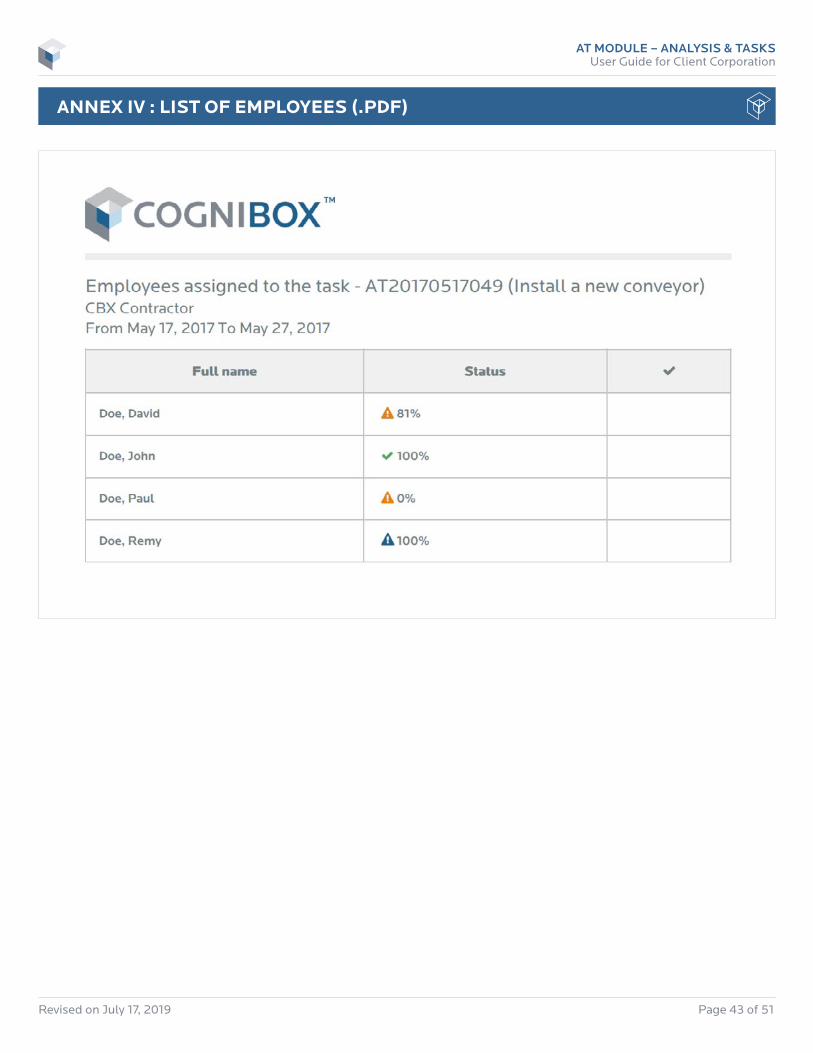
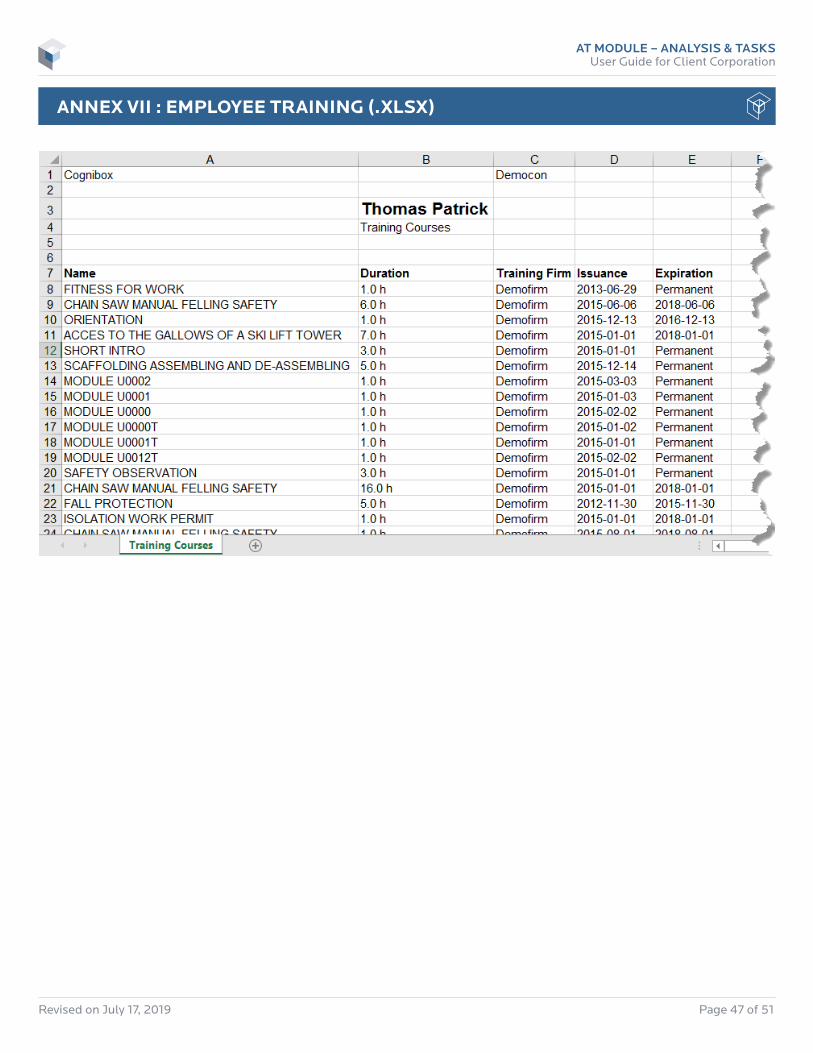
All the lists generated from these options can be exported using the EXPORT button. See examples of the exported lists in annex VII et annex VIII.

AT MODULE – ANALYSIS & TASKSUser Guide for Client Corporation
Revised on July 17, 2019 Page 17 of 51
3.2.3.3.3 ASSIGN AN EMPLOYEE TO A TASK
Employees can be assigned to a task as long as the task’s status is DRAFT, PUBLISHED or LOCKED.
To assign an employee to a task, check the check box to the left and click on the SAVE button situated at the bottom of the page to save the selection.
Maximum number of employees
The SAVE button is only available if the maximum number of employees is respected.
To set a limit of employees, use the Maximum number of employees field when the task is created (see section 3.1) or modified.
Adding or removing an employee is considered a modification of the task, which generates corresponding notifications and emails.
If the number of employees of a task is limited, Maximum number of employees will appear in the INFORMATION tab of the detailed task file, indicating the maximum number authorized.

AT MODULE – ANALYSIS & TASKSUser Guide for Client Corporation
Revised on July 17, 2019 Page 18 of 51
3.2.3.4 ATTACH REFERENCE DOCUMENTS
It is possible to attach multiple reference documents to a task, such as plans or photos. File types which are accepted are pdf, jpg, jpeg, gif, tiff, tif, png, bmp, doc, docx, xls, xlsx, dwg, dxf.
Search for and select a file from the computer using the CHOOSE A FILE button, or drag and drop the document directly into the dotted area.
Enter the name of the document for easy reference, then click on the CREATE button.
The document will then be added to the list of documents.
To attach a document, click on the +ADD button located in the DOCUMENTS tab. A pop-up window will appear allowing the user to select the document to be downloaded and attached to the task.

AT MODULE – ANALYSIS & TASKSUser Guide for Client Corporation
Revised on July 17, 2019 Page 19 of 51
To delete a document, select the checkbox to the left of the document in the list, then click DELETE.
3.2.3.5 CREATE A SUBTASK
Subtasks allow a user to add training requirements specifically for an individual or group of individuals for a specific portion of the work to be completed, within the main task. The subtask related to a main task inherits the training requirements of the main task. Adding specifics to a subtask can require an individual or a group of individuals to complete a specific training requirement. These individuals must be compliant with the main task requirements as well as to those that are added to the subtask.
A document preview thumbnail will display the first page of the document for each of the listed documents. Caution! Allow a certain delay for the creation of the thumbnail.
A document cannot be deleted from a locked or archived task.
TASK 1
Eg: Preparations for work on roof
SUBTASK 1.1
Eg: Repair Chimney
Requirements of Task 1 +Requirements of Subtask 1.1
Requirements of Task 1
AT MODULE – ANALYSIS & TASKSUser Guide for Client Corporation
Revised on July 17, 2019 Page 20 of 51
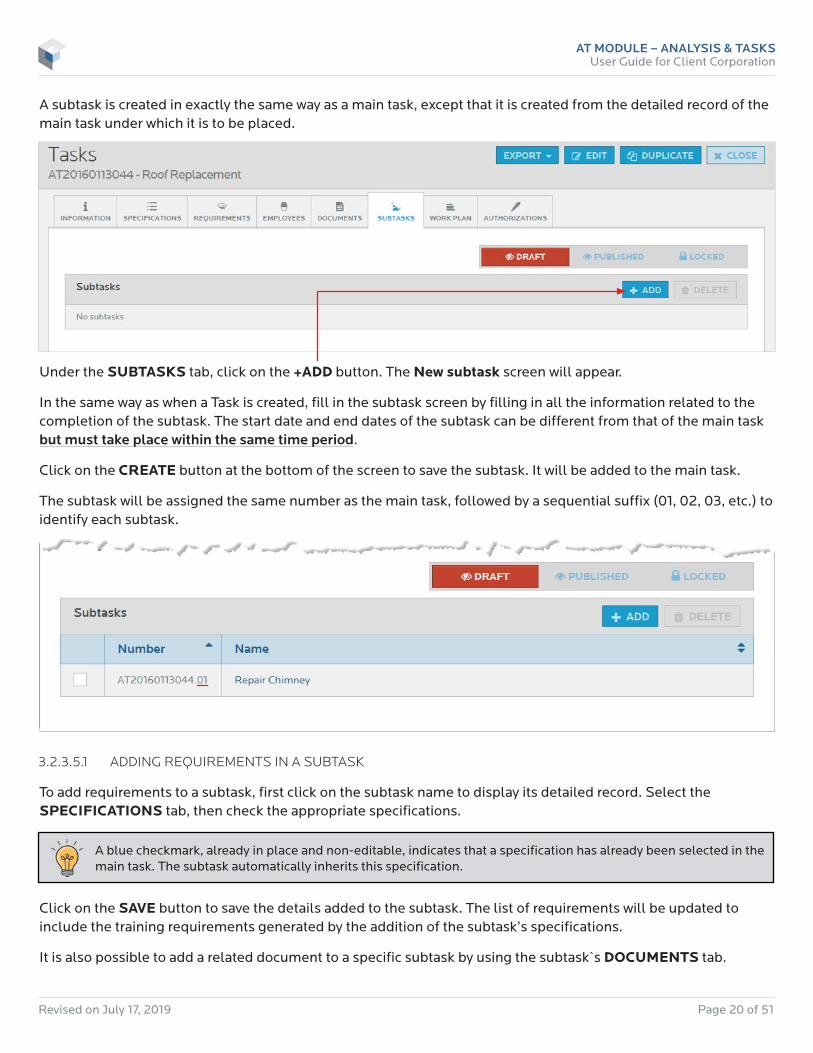
A subtask is created in exactly the same way as a main task, except that it is created from the detailed record of the main task under which it is to be placed.
Under the SUBTASKS tab, click on the +ADD button. The New subtask screen will appear.
In the same way as when a Task is created, fill in the subtask screen by filling in all the information related to the completion of the subtask. The start date and end dates of the subtask can be different from that of the main task but must take place within the same time period.
Click on the CREATE button at the bottom of the screen to save the subtask. It will be added to the main task.
The subtask will be assigned the same number as the main task, followed by a sequential suffix (01, 02, 03, etc.) to identify each subtask.
3.2.3.5.1 ADDING REQUIREMENTS IN A SUBTASK
To add requirements to a subtask, first click on the subtask name to display its detailed record. Select the SPECIFICATIONS tab, then check the appropriate specifications.
Click on the SAVE button to save the details added to the subtask. The list of requirements will be updated to include the training requirements generated by the addition of the subtask’s specifications.
It is also possible to add a related document to a specific subtask by using the subtask`s DOCUMENTS tab.
A blue checkmark, already in place and non-editable, indicates that a specification has already been selected in the main task. The subtask automatically inherits this specification.

AT MODULE – ANALYSIS & TASKSUser Guide for Client Corporation
Revised on July 17, 2019 Page 21 of 51
3.2.3.6 ELABORATE ON A WORK PLAN
The WORK PLAN tab makes it possible to establish risks, as well as the control mean and the stopping criterion associated with the different stages of work to be executed. This allows the client corporation and contractors to ask all necessary questions before the beginning of the project as well as to better manage the associated risks.
DESCRIPTION
1NUMBER AND NAME OF STEPThis is the number of the step followed by a field for the name of the step.
2RISK FIELD Enter the risk in this field.
3RISK DELETIONClick on the trash can icon to delete the corresponding risk.
4ADD A RISKClick on the +RISK button to add a new risk to the step.
5CONTROL MEAN FIELDEnter the Control Mean in this field.
6ADD CONTROL MEAN FIELDClick on the +CONTROL MEAN button to add a new control means to the risk.
7ADD A STOPPING CRITERIONClick on the +STOPPING CRITERION button to add a new stopping criterion to the step.
8ADD STEPClick on +ADD STEP to add a new step to the Work Plan
9RESETClick on RESET to erase all data and start again.
10SAVEClick on the SAVE button to save the Work Plan.
11WORK PLAN EXPORTDownload the Work Plan using the EXPORT button, found at the top right of the detailed task screen. See an example of an exported Work Plan in annex V.
1
2 3
4
5
6
7
8
9 10
11
AT MODULE – ANALYSIS & TASKSUser Guide for Client Corporation
Revised on July 17, 2019 Page 22 of 51
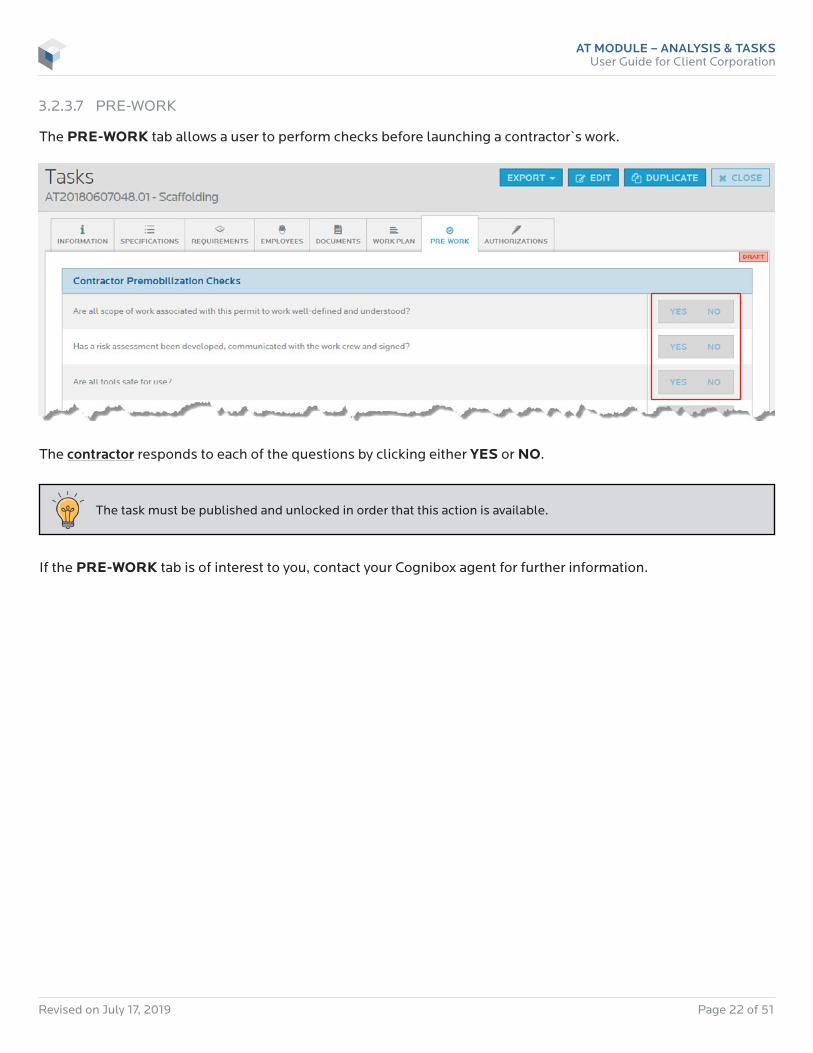
3.2.3.7 PRE-WORK
The PRE-WORK tab allows a user to perform checks before launching a contractor`s work.
The contractor responds to each of the questions by clicking either YES or NO.
If the PRE-WORK tab is of interest to you, contact your Cognibox agent for further information.
The task must be published and unlocked in order that this action is available.
AT MODULE – ANALYSIS & TASKSUser Guide for Client Corporation
Revised on July 17, 2019 Page 23 of 51
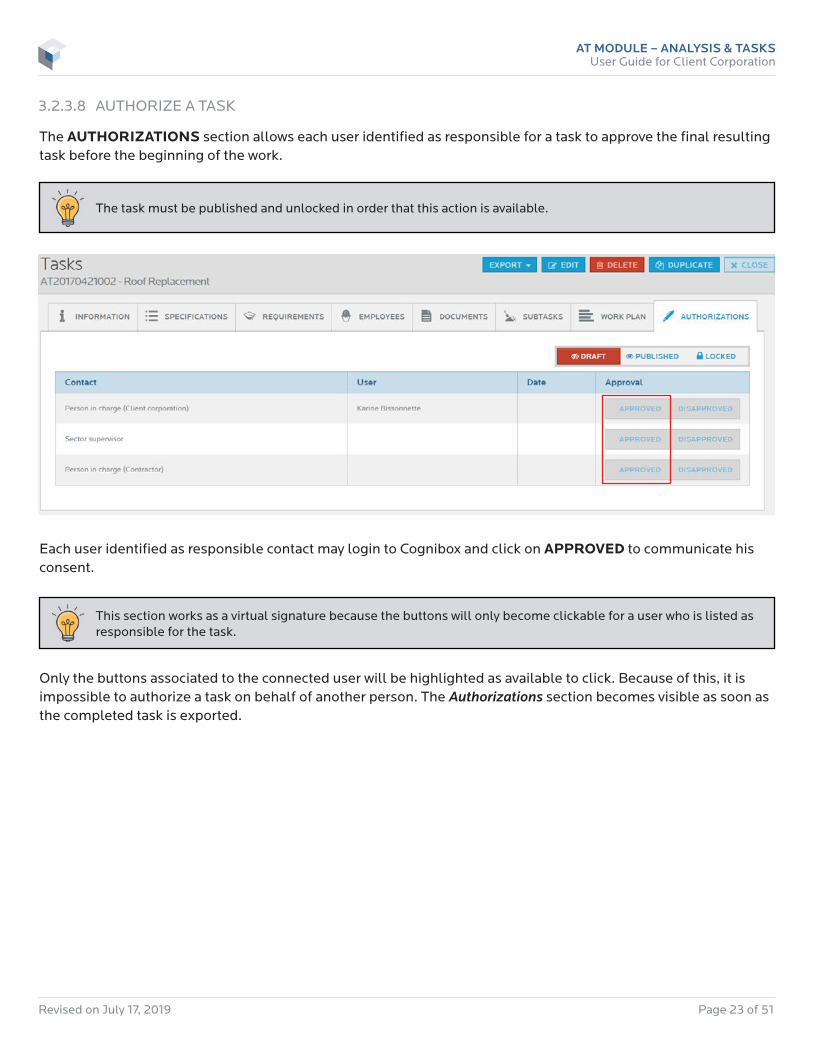
3.2.3.8 AUTHORIZE A TASK
The AUTHORIZATIONS section allows each user identified as responsible for a task to approve the final resulting task before the beginning of the work.
Each user identified as responsible contact may login to Cognibox and click on APPROVED to communicate his consent.
Only the buttons associated to the connected user will be highlighted as available to click. Because of this, it is impossible to authorize a task on behalf of another person. The Authorizations section becomes visible as soon as the completed task is exported.
The task must be published and unlocked in order that this action is available.
This section works as a virtual signature because the buttons will only become clickable for a user who is listed as responsible for the task.

AT MODULE – ANALYSIS & TASKSUser Guide for Client Corporation
Revised on July 17, 2019 Page 24 of 51
3.2.4 DRAFT, PUBLISHED AND LOCKED STATUSES
A task may have one of three statuses:
DRAFT
The task has been created but has not yet been communicated with those who will manage the work, the Client Corporation and the contractor identified in the Information section of the task screen.
PUBLISHED
Once a task has been published, those managing the work, both on the Client Corporation and the contractor`s side who are identified in the Information section will be advised by mail and by a notification directly in Cognibox that a task has been created for them. The publication of a task automatically publishes any associated subtasks.
LOCKED
When a task is compliant and the contractor`s employees have been selected to complete the work, the contractor`s manager locks the task to confirm the work. Locking a task automatically locks any associated subtasks.
3.2.4.1 PUBLISHING A TASK
A notification is sent for each modification applied to a published or locked task.
CAREFUL! A published task can never be reverted to a draft!
To publish a task, access the task details and click on PUBLISHED. At least one specific must have been previously selected for a task to be published.
3.2.4.2 LOCKING A TASK
To lock a task, go to the detailed screen and click on LOCKED.
No further modifications can be made once a task is locked. The Client Corporation contact responsible for the task must first unlock it to allow modifications to be made to the task and its subtasks. If the Client Corporation uses Cognibox`s LG – LINK TO GATE module, which links the AT module to the site`s physical gate, locking the task will activate the link between the task and the site`s gate.

AT MODULE – ANALYSIS & TASKSUser Guide for Client Corporation
Revised on July 17, 2019 Page 25 of 51
3.3 FILTER THE TASK LIST
To search for a task in the list, enter a keyword in the search bar, then click on the magnifying glass icon or press ‘Enter’ on the keyboard. All tasks who`s names contain the specified keyword will be displayed.
Multiple filters can be applied to the same search, as needed. The appropriate filters must simply be selected individually. Filters which relate to different categories will display side by side and may be customized to include ‘AND’ filters. Filters which relate to the same category will display in the same place and may be customized to include ‘OR’ filters. Refer to the example featured on the page 26.
Multiple search filters are available. To use one, click on the FILTER button, then select the filter to be used from the list.
The chosen filter will display beneath the search bar, followed by the corresponding options.
For example, by selecting the Status filter and selecting the Published checkbox, only the published tasks will appear.
AT MODULE – ANALYSIS & TASKSUser Guide for Client Corporation
Revised on July 17, 2019 Page 26 of 51
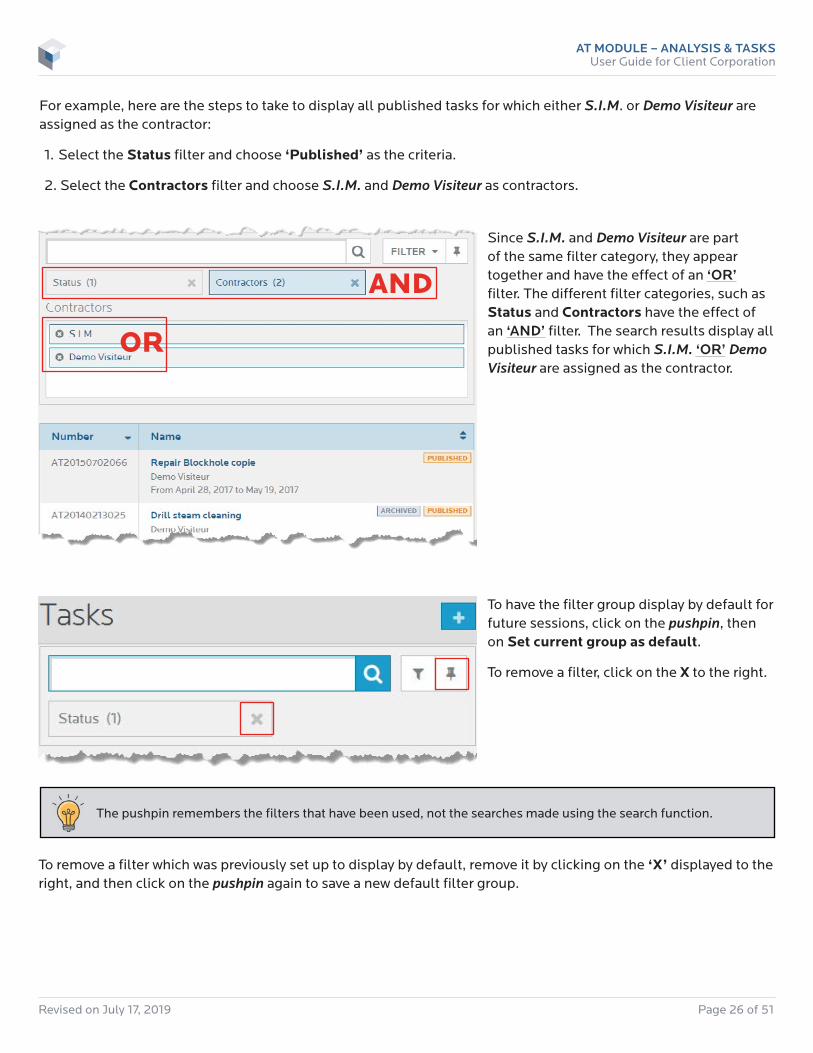
For example, here are the steps to take to display all published tasks for which either S.I.M. or Demo Visiteur are assigned as the contractor:
1. Select the Status filter and choose ‘Published’ as the criteria.
2. Select the Contractors filter and choose S.I.M. and Demo Visiteur as contractors.
Since S.I.M. and Demo Visiteur are part of the same filter category, they appear together and have the effect of an ‘OR’ filter. The different filter categories, such as Status and Contractors have the effect of an ‘AND’ filter. The search results display all published tasks for which S.I.M. ‘OR’ Demo Visiteur are assigned as the contractor.
To have the filter group display by default for future sessions, click on the pushpin, then on Set current group as default.
To remove a filter, click on the X to the right.
The pushpin remembers the filters that have been used, not the searches made using the search function.
To remove a filter which was previously set up to display by default, remove it by clicking on the ‘X’ displayed to the right, and then click on the pushpin again to save a new default filter group.

AT MODULE – ANALYSIS & TASKSUser Guide for Client Corporation
Revised on July 17, 2019 Page 27 of 51
3.4 EXPORT THE TASK LIST
To export the task list, click on the EXPORT button, located in the top right hand corner of the Tasks section.
A pop-up window will open, allowing the user to select the fields to export.
Select the required options.
To select all fields, click (Select All), located to the right of the pop-up window title at the top of the screen.
Next, click on the EXPORT button, located at the bottom of the pop-up window, to complete the export.
The task will be exported in .xlsx format. See an example in annex II.
Because of limitations in Microsoft Excel, the EXPORT button is deactivated once the selected options exceed the capabilities of the exportable spreadsheet.

AT MODULE – ANALYSIS & TASKSUser Guide for Client Corporation
Revised on July 17, 2019 Page 28 of 51
In order to better manage tasks and subtasks, they can be regrouped into projects.
The Projects section displays a list of existing projects. This feature allows the user to create new projects and to export a list. In the same way as tasks, these projects can be filtered using multiple criteria.
4. PROJECTS SECTION
4.1 CREATE A PROJECT
To create a project, click on the +ADD button located in the top right corner of the Projects section.
The New Project screen will appear.
Enter the project title and, if needed, a brief description in the following field.
Click on the CREATE button to create the new project and return to the list of existing projects.
By checking the Create another checkbox before clicking on the CREATE button, a new project creation form will open, instead of requiring the user to return to the project list.

AT MODULE – ANALYSIS & TASKSUser Guide for Client Corporation
Revised on July 17, 2019 Page 29 of 51
4.2 EDIT A PROJECT
Click on the name of a project in the list of existing projects to access the detailed information. Click on the EDIT button, located near the top right-hand corner of the detailed screen to open the Edit Project screen.
Complete the necessary modifications, then click on the SAVE button at the bottom of the screen to save the modifications.
It is also possible to create translations by using the language buttons on this screen.

AT MODULE – ANALYSIS & TASKSUser Guide for Client Corporation
Revised on July 17, 2019 Page 30 of 51
4.3 EXPORT THE LIST OF EXISTING PROJECTS
To export the list of projects, click on the EXPORT button, located in the top right-hand corner of the Projects section.
4.4 ADD AND REMOVE TASKS FROM A PROJECT
To add a task to a project, select it from the list of existing tasks in the Tasks section. After accessing the task`s detailed information, click on the EDIT button, located in the top right-hand corner The Edit screen will be displayed.
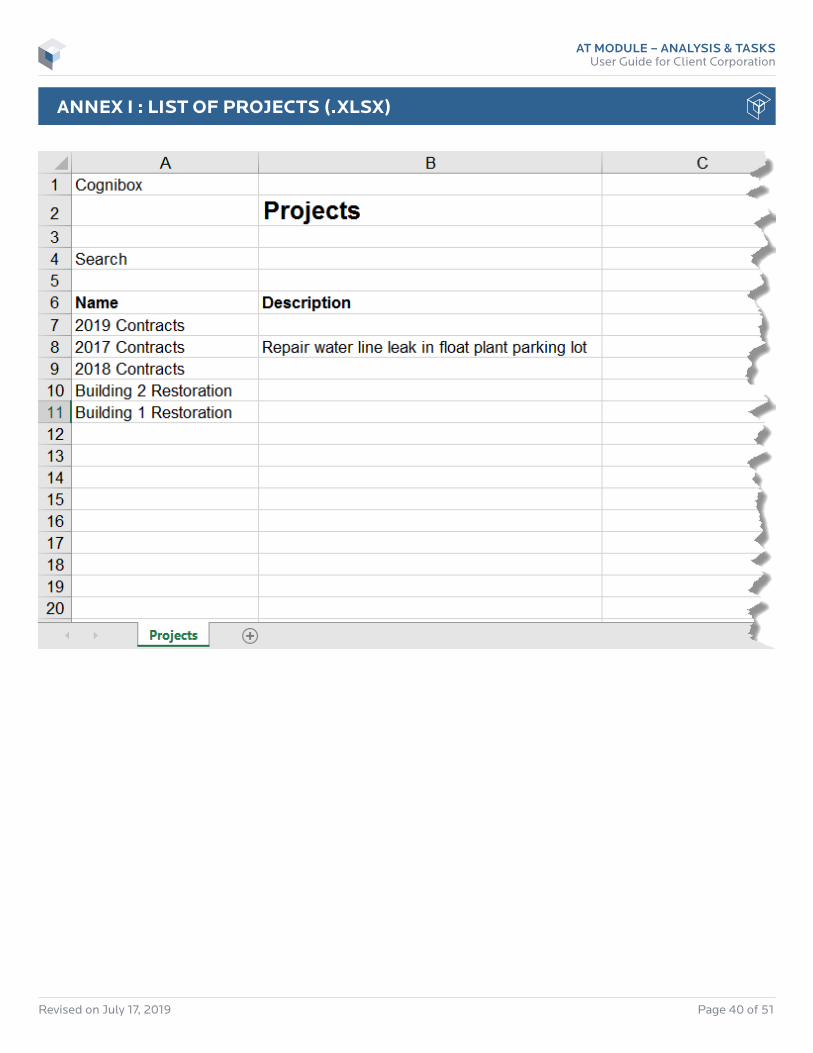
The list of projects will be downloaded in .xlsx format. See an example in annex I.
Click in the Project field to display a drop-down list of all available projects. Select the appropriate project from the list, then click on SAVE at the bottom of the screen to save the modification.

AT MODULE – ANALYSIS & TASKSUser Guide for Client Corporation
Revised on July 17, 2019 Page 31 of 51
It is also possible to create a new task directly in a project.
From within a project`s detailed information, click on TASKS, where a list of all tasks associated to the project can be found. Click on the +ADD button.
The New Task screen appears. Fill in all mandatory fields and any optional fields that apply, then click on CREATE at the bottom of the screen. The task will be automatically associated to the project.
To remove a task from a project, select the checkbox located to the left and click on –REMOVE.
Confirm the action by clicking on the OK button.
The task will remain in the list of tasks, but will no longer be associated to the project.
As previously mentioned, an archived task can not be removed from a project.
AT MODULE – ANALYSIS & TASKSUser Guide for Client Corporation
Revised on July 17, 2019 Page 32 of 51
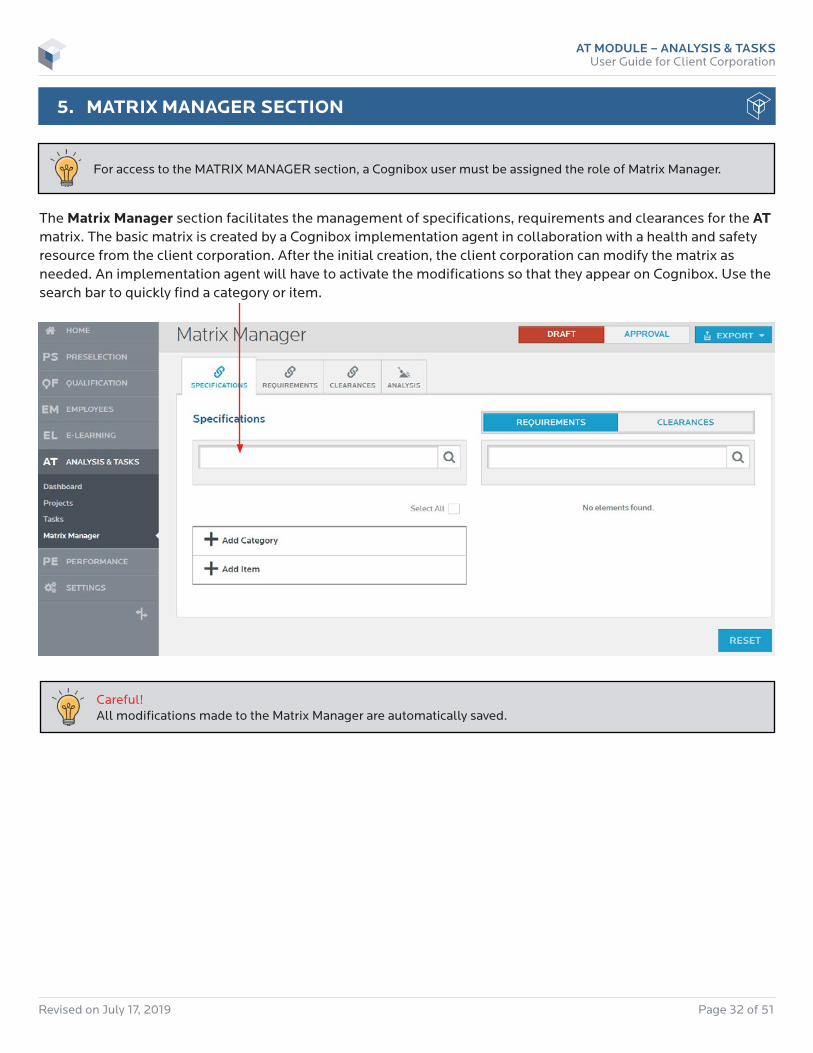
The Matrix Manager section facilitates the management of specifications, requirements and clearances for the AT matrix. The basic matrix is created by a Cognibox implementation agent in collaboration with a health and safety resource from the client corporation. After the initial creation, the client corporation can modify the matrix as needed. An implementation agent will have to activate the modifications so that they appear on Cognibox. Use the search bar to quickly find a category or item.
5. MATRIX MANAGER SECTION
For access to the MATRIX MANAGER section, a Cognibox user must be assigned the role of Matrix Manager.
Careful! All modifications made to the Matrix Manager are automatically saved.
AT MODULE – ANALYSIS & TASKSUser Guide for Client Corporation
Revised on July 17, 2019 Page 33 of 51
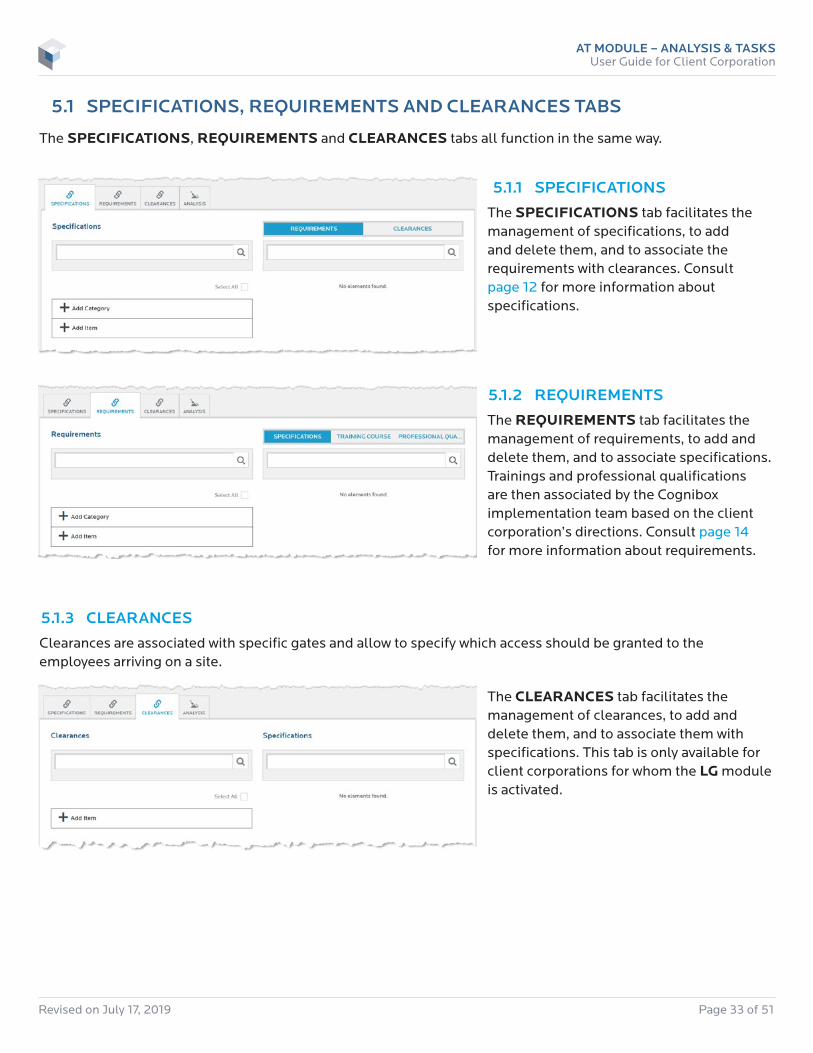
5.1 SPECIFICATIONS, REQUIREMENTS AND CLEARANCES TABS
The SPECIFICATIONS, REQUIREMENTS and CLEARANCES tabs all function in the same way.
5.1.1 SPECIFICATIONS
The SPECIFICATIONS tab facilitates the management of specifications, to add and delete them, and to associate the requirements with clearances. Consult page 12 for more information about specifications.
5.1.2 REQUIREMENTS
The REQUIREMENTS tab facilitates the management of requirements, to add and delete them, and to associate specifications. Trainings and professional qualifications are then associated by the Cognibox implementation team based on the client corporation’s directions. Consult page 14 for more information about requirements.
5.1.3 CLEARANCES
Clearances are associated with specific gates and allow to specify which access should be granted to the employees arriving on a site.
The CLEARANCES tab facilitates the management of clearances, to add and delete them, and to associate them with specifications. This tab is only available for client corporations for whom the LG module is activated.
AT MODULE – ANALYSIS & TASKSUser Guide for Client Corporation
Revised on July 17, 2019 Page 34 of 51
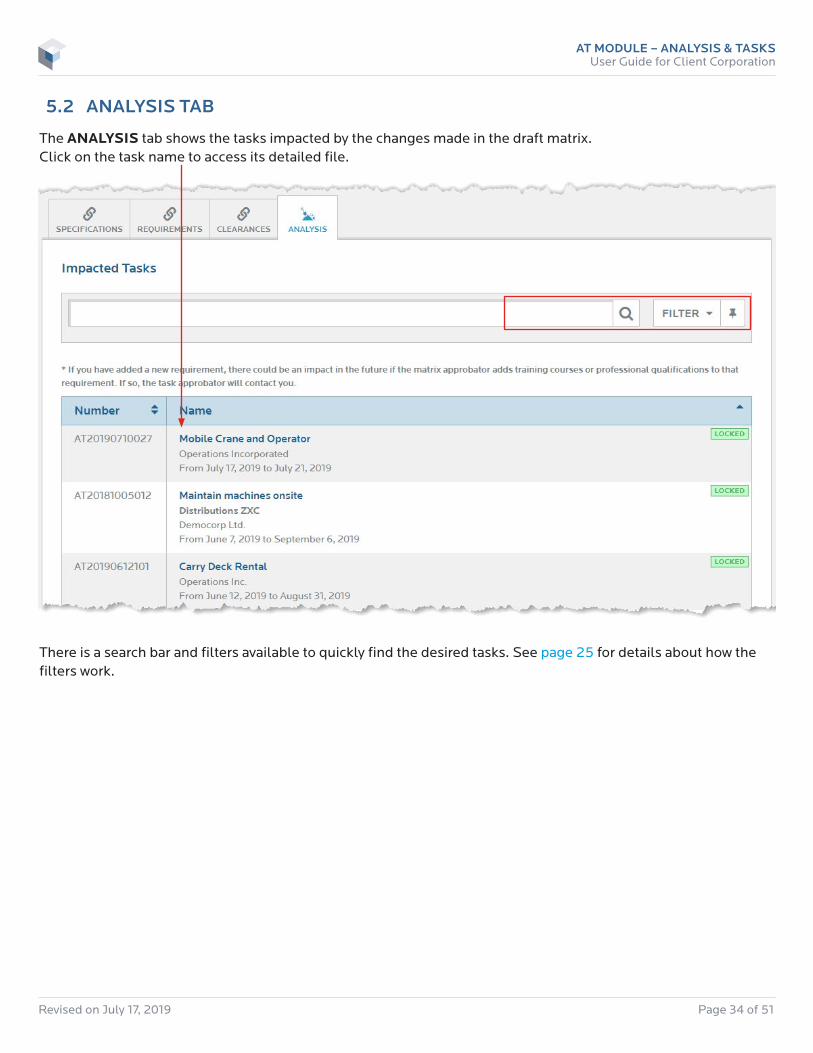
5.2 ANALYSIS TAB
The ANALYSIS tab shows the tasks impacted by the changes made in the draft matrix. Click on the task name to access its detailed file.
There is a search bar and filters available to quickly find the desired tasks. See page 25 for details about how the filters work.

AT MODULE – ANALYSIS & TASKSUser Guide for Client Corporation
Revised on July 17, 2019 Page 35 of 51
5.3 CATEGORIES AND ITEMS
A category is a file which includes one or more items. A category can also contain other categories. The number of levels is unlimited.
To create a new category or item, click on + Add category or on + Add item.
A green rectangle will appear above the add button that was clicked.
After using the language drop-down menu found to the right of the text field to select the desired language, enter the name of the category or item in the text field. Click on the SAVE button to confirm the addition.

AT MODULE – ANALYSIS & TASKSUser Guide for Client Corporation
Revised on July 17, 2019 Page 36 of 51
5.3.1 MANAGING CATEGORIES AND ITEMS
Categories are identified in blue, while items are identified in grey.
The Four arrow icon allows the user to change the level of the category or item.
The Two arrow icon allows the user to change the order of the categories or items.
The Pencil icon allows the user to rename the category or item.
The Trash bin icon allows the user to delete a category or item.
Careful! Deleting a category also deletes all the categories and items contained within it.
AT MODULE – ANALYSIS & TASKSUser Guide for Client Corporation
Revised on July 17, 2019 Page 37 of 51
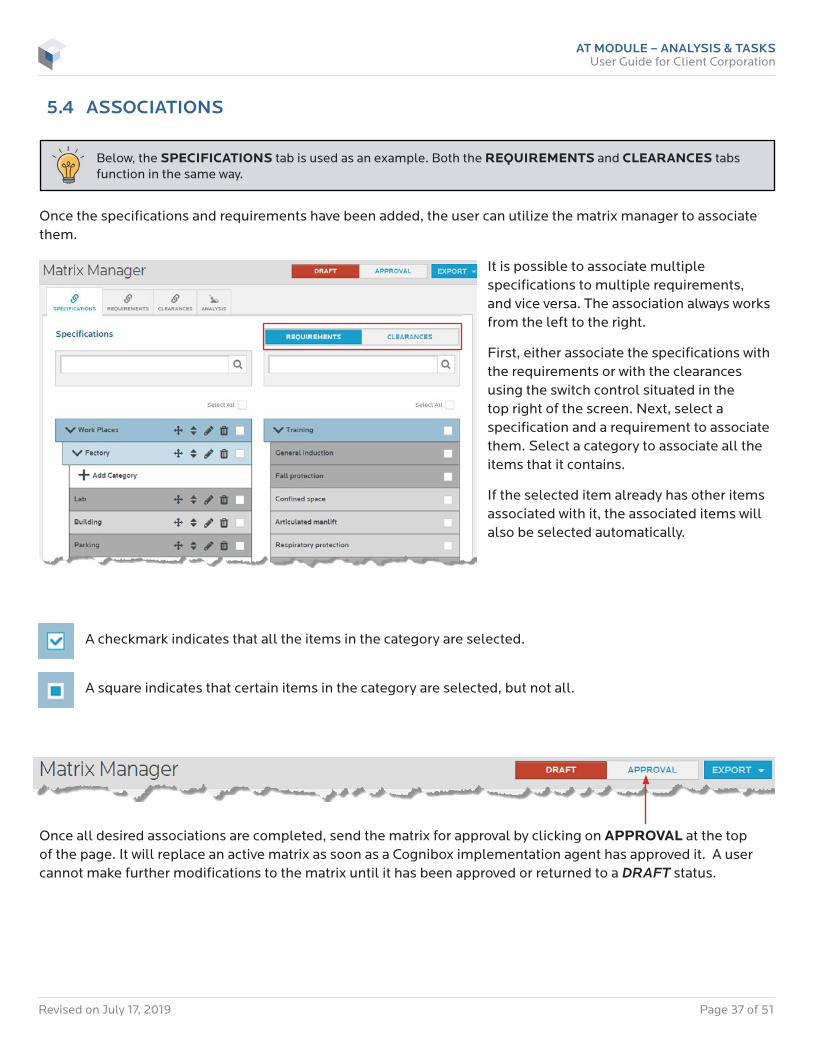
Once the specifications and requirements have been added, the user can utilize the matrix manager to associate them.
5.4 ASSOCIATIONS
Below, the SPECIFICATIONS tab is used as an example. Both the REQUIREMENTS and CLEARANCES tabs function in the same way.
It is possible to associate multiple specifications to multiple requirements, and vice versa. The association always works from the left to the right.
First, either associate the specifications with the requirements or with the clearances using the switch control situated in the top right of the screen. Next, select a specification and a requirement to associate them. Select a category to associate all the items that it contains.
If the selected item already has other items associated with it, the associated items will also be selected automatically.
A checkmark indicates that all the items in the category are selected.
A square indicates that certain items in the category are selected, but not all.
Once all desired associations are completed, send the matrix for approval by clicking on APPROVAL at the top of the page. It will replace an active matrix as soon as a Cognibox implementation agent has approved it. A user cannot make further modifications to the matrix until it has been approved or returned to a DRAFT status.
AT MODULE – ANALYSIS & TASKSUser Guide for Client Corporation
Revised on July 17, 2019 Page 38 of 51
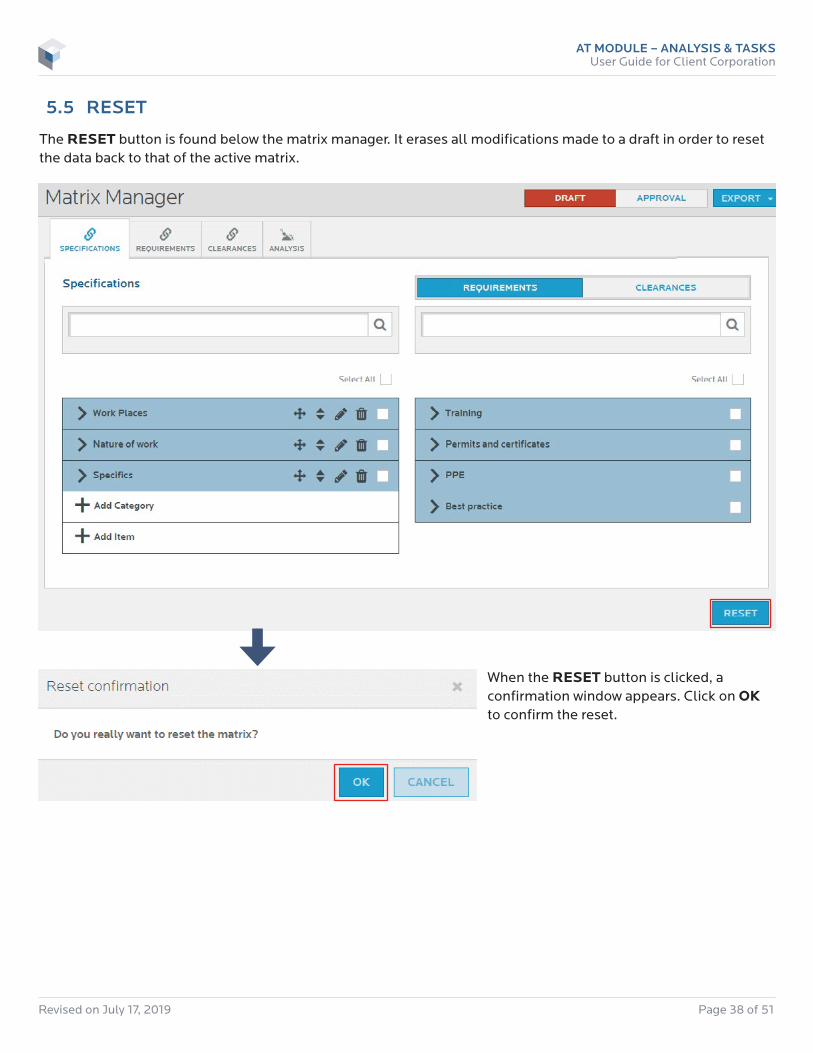
5.5 RESET
The RESET button is found below the matrix manager. It erases all modifications made to a draft in order to reset the data back to that of the active matrix.
When the RESET button is clicked, a confirmation window appears. Click on OK to confirm the reset.
AT MODULE – ANALYSIS & TASKSUser Guide for Client Corporation
Revised on July 17, 2019 Page 39 of 51
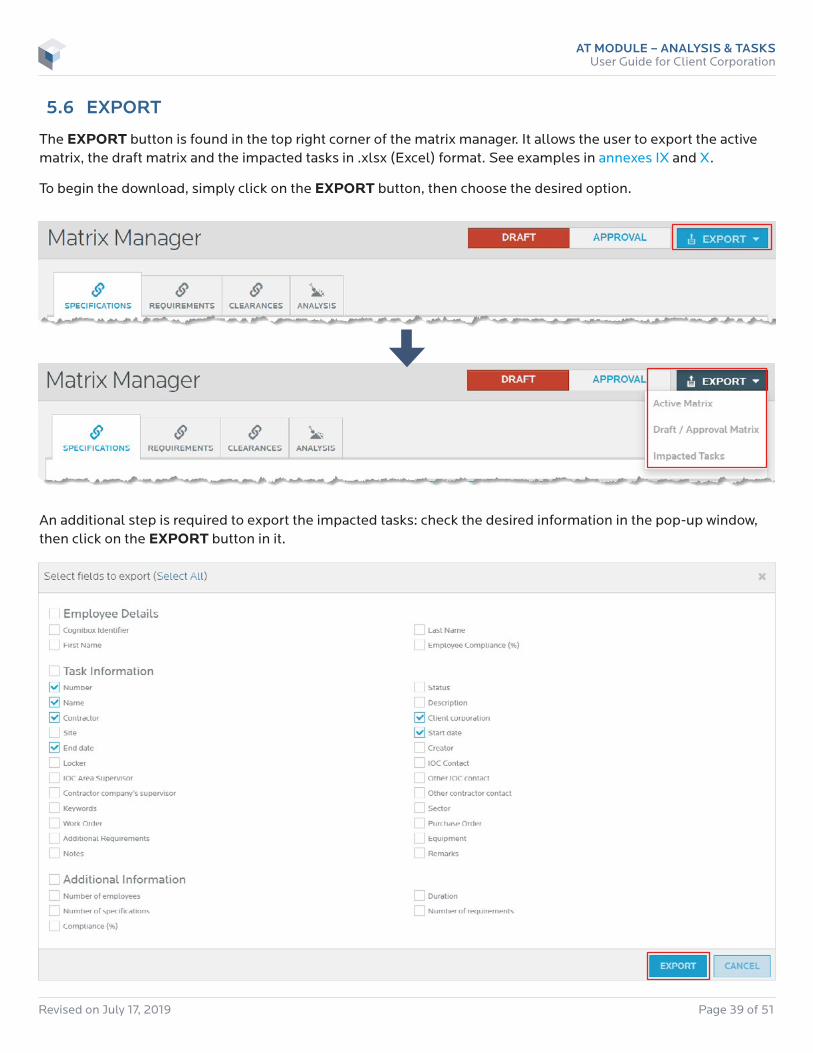
5.6 EXPORT
The EXPORT button is found in the top right corner of the matrix manager. It allows the user to export the active matrix, the draft matrix and the impacted tasks in .xlsx (Excel) format. See examples in annexes IX and X.
To begin the download, simply click on the EXPORT button, then choose the desired option.
An additional step is required to export the impacted tasks: check the desired information in the pop-up window, then click on the EXPORT button in it.
AT MODULE – ANALYSIS & TASKSUser Guide for Client Corporation
Revised on July 17, 2019 Page 40 of 51
ANNEX I : LIST OF PROJECTS (.XLSX)

AT MODULE – ANALYSIS & TASKSUser Guide for Client Corporation
Revised on July 17, 2019 Page 41 of 51
ANNEX II : LIST OF TASKS (.XLSX)

AT MODULE – ANALYSIS & TASKSUser Guide for Client Corporation
Revised on July 17, 2019 Page 42 of 51
ANNEX III : COMPLETED TASKS (.PDF)
Example of completed tasks (page 1) Example of completed tasks (page 2)
AT MODULE – ANALYSIS & TASKSUser Guide for Client Corporation
Revised on July 17, 2019 Page 43 of 51
ANNEX IV : LIST OF EMPLOYEES (.PDF)

AT MODULE – ANALYSIS & TASKSUser Guide for Client Corporation
Revised on July 17, 2019 Page 44 of 51
ANNEX V : WORK PLAN (.PDF)
AT MODULE – ANALYSIS & TASKSUser Guide for Client Corporation
Revised on July 17, 2019 Page 45 of 51
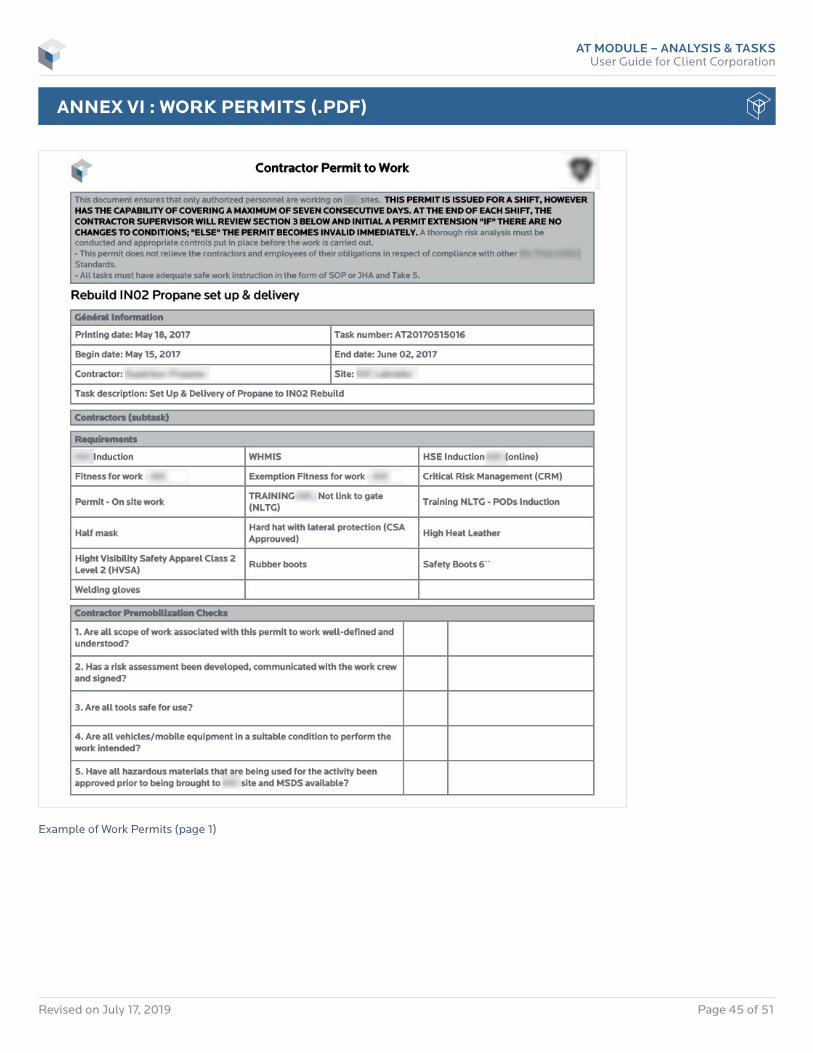
ANNEX VI : WORK PERMITS (.PDF)
Example of Work Permits (page 1)
AT MODULE – ANALYSIS & TASKSUser Guide for Client Corporation
Revised on July 17, 2019 Page 46 of 51
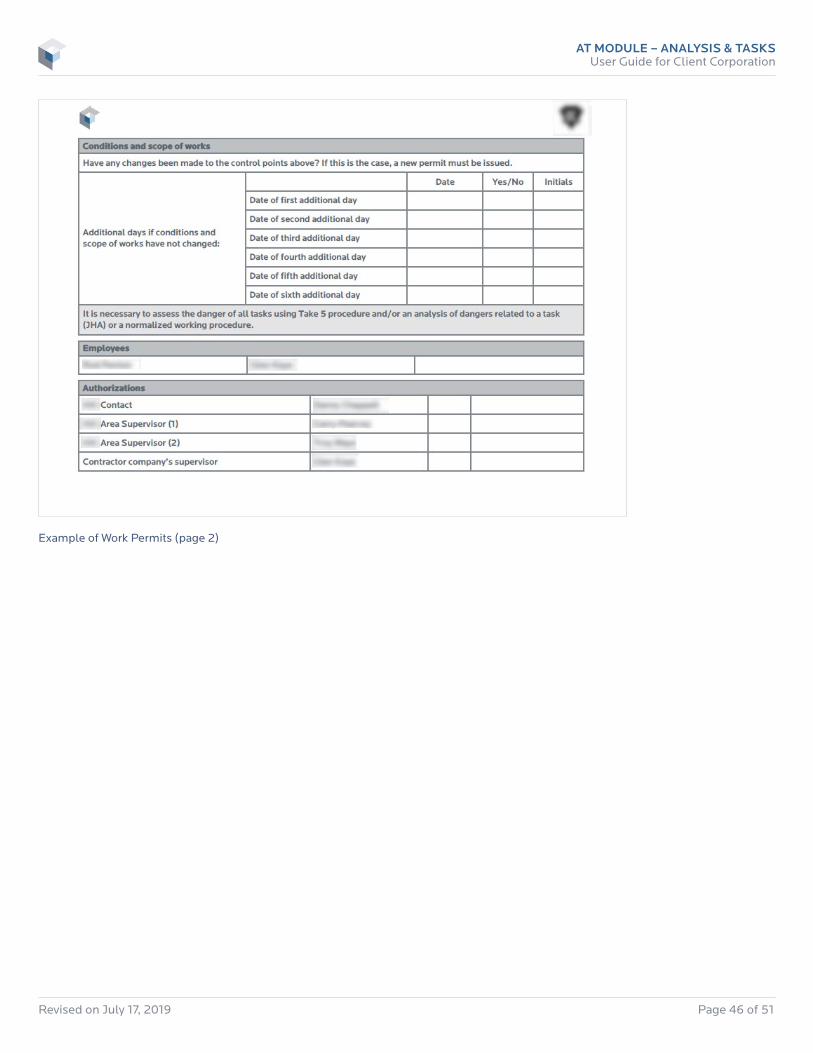
Example of Work Permits (page 2)
AT MODULE – ANALYSIS & TASKSUser Guide for Client Corporation
Revised on July 17, 2019 Page 47 of 51
ANNEX VII : EMPLOYEE TRAINING (.XLSX)

AT MODULE – ANALYSIS & TASKSUser Guide for Client Corporation
Revised on July 17, 2019 Page 48 of 51
ANNEX VIII : EMPLOYEE PROFESSIONAL QUALIFICATIONS (.XLSX)

AT MODULE – ANALYSIS & TASKSUser Guide for Client Corporation
Revised on July 17, 2019 Page 49 of 51
ANNEX IX : MATRIX DRAFT (.XLSX)
A red cell indicates that the item was removed.
A yellow cell indicates that the item was renamed.
A green cell indicates that the item was added.
A blue cell indicates that the position of the item was modified.
Here is the meaning of the displayed colors:

AT MODULE – ANALYSIS & TASKSUser Guide for Client Corporation
Revised on July 17, 2019 Page 50 of 51
ANNEX X : IMPACTED TASKS (.XLSX)

FOR MORE INFORMATION, PLEASE CONTACT OUR CUSTOMER SERVICE:
1 877 746-5653 | [email protected]
528, 5e rue de la Pointe Shawinigan (Québec) G9N 1E8
100, King Street West, Suite 5600 Toronto (Ontario) M5X 1C9