Associated Connect
29
Page 1 of 29 Associated Connect ® Reference Guide: Administration
Transcript of Associated Connect

Page 1 of 29
Associated Connect®
Reference Guide: Administration
Page 2 of 29
Table of Contents Portal Access ..........................................................................................................................................................3
Associated Connect Portal ...................................................................................................................................4
My Profile ..........................................................................................................................................................5
Company Administrator (Company Admin) in Associated Connect Portal ..............................................................6
Company Administration in Account Details and Services.....................................................................................7
Administration Menu ..........................................................................................................................................7
Create New User.....................................................................................................................................................9
Part 1: Adding a User to the Associated Connect Portal .........................................................................................9
Part 2: Registering and Assigning Tokens in the Portal ........................................................................................12
Part 3: Entitling Products and Services to a User in Account Details and Services .................................................15
Managing Users....................................................................................................................................................26
De-Registering and Un-assigning Tokens (Company Administrator) ....................................................................27
Account Preferences..........................................................................................................................................29

Page 3 of 29
Portal Access
The Associated Connect portal allows users access to all Associated Connect services through an easy-to-use single
sign-in. To access the portal, sign in to Associated Connect directly from Associated Bank’s website at
AssociatedBank.com/Business or AssociatedBank.com/Commercial. The portal has been divided into three sections:
Category Icon Definition
Banking
Account Details and Services (Includes Account Balances, Account Transfers, ACH Origination, Check Inquiry, Image Search Transaction Activity, Positive Pay, Stop Payments and Wire Transfers.)
Account Summary Page (Includes Ledger Balance, Available Balance, Collected Available Balance, Float Next Business Day, Float 2+ Days and Transactions and Details for each account)
ACH Filter
Bill Pay
Cash Management
Lockbox
Remote Deposit
Checkview
FX Manager
Cash Ordering
Trade Services
Transmission and
Reporting
Export
Document Center
File Transfer

Page 4 of 29
To access Associated Connect, you will be required to verify your identity through one of two methods:
1. For clients who have access to high-risk products and services such as Bill Pay, ACH and Wire Transfers, you will
sign in with your username and password, and then will be required to verify your identity through multi-factor
authentication. Associated Connect users will be required to enter a unique access code generated by either a
mobile or physical token to gain access to the portal. Additional information about how to setup, use and obtain a
token from Associated Bank can be found in the Multi-Factor Authentication and Password Management Guide or
by contacting Customer Care at 800-728-3501.
2. For clients who only have low-risk products and services, you will sign in with your username and password.
Periodically, you will be asked a series of challenge questions to confirm your identity.
Associated Connect Portal
The Associated Connect Portal is the first screen you will see after signing in. This provides access to all of your online
banking products and services.

Page 5 of 29
My Profile
To access your user profile, select My Profile located in your user profile.
In My Profile you can view information specific to your profile. You can also add Account Alerts or configure your
Message Center Alerts.

Page 6 of 29
Company Administrator (Company Admin) in Associated Connect Portal
Company Administrators (Company Admin) can setup and manage users for access to Associated Connect through the
Associated Connect Portal. To access Company Admin, select Company Admin located in your user profile.
Note: Users cannot be created or managed within the Associated Connect Mobile Application.
Under Company Admin, you can view users within your company, as well as manage the accounts your company has
with Associated Bank. To view additional details on each user or account, select the User Name or Account Number in
green.

Page 7 of 29
The Company Admin portal provides Company Admins to add users in Associated Connect and manage existing users. Note: Please see the Add User section on how to add a new user.
Company Administration in Account Details and Services
The Administration menu in Associated Connect gives Administrators (Company Admins) the ability to add and
manage users within the Account Details and Services section of Associated Connect.
Note: Users cannot be managed or added within the Associated Connect Mobile Application.
Administration Menu
The Administration Menu is located in the Dashboard Navigation. Your products and services will depend on your user
entitlements, selected by your organization.

Page 8 of 29
You can edit your Administration Menu by selecting the Edit icon . Here you can edit the menu by moving sections
around utilizing the Move icon .
You can also edit what will appear in your menu by checking or unchecking the box next to the service. Select the Save
icon to save your preferences.
To restore your Administration Menu select the Restore icon . Please know that selecting restore will reset all of
your previously selected customizations. Select the Save icon when complete.

Page 9 of 29
Create New User
Part 1: Adding a User to the Associated Connect Portal
To create a new user, the Company Admin must enter information in two separate administrator sections in the system.
First the user must be setup in the Associated Connect Portal, and then the Admin will have to also setup the user’s
entitlements under the Account Details and Services section in order to complete the process.
Note: Users cannot be created within the Associated Connect Mobile Application.
1. For the first part of the process, in the Associated Connect Portal, select Company Admin.
2. Under Manage Users, select Add User.
Page 10 of 29
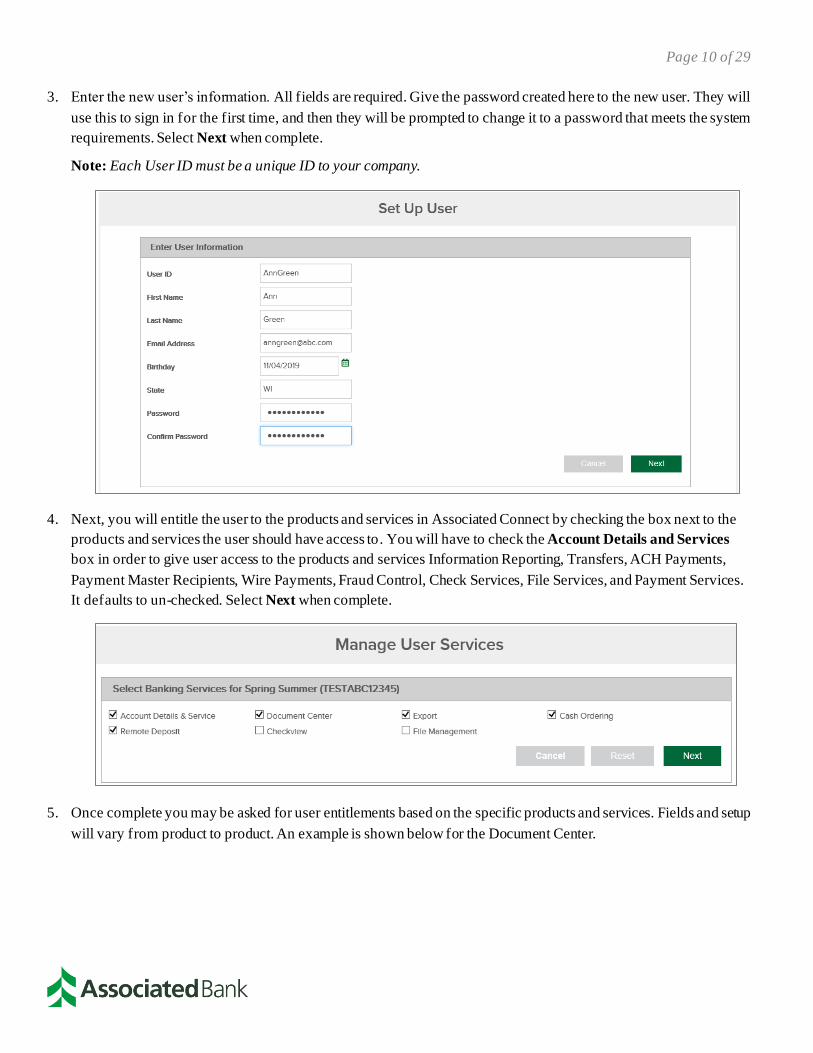
3. Enter the new user’s information. All fields are required. Give the password created here to the new user. They will
use this to sign in for the first time, and then they will be prompted to change it to a password that meets the system
requirements. Select Next when complete.
Note: Each User ID must be a unique ID to your company.
4. Next, you will entitle the user to the products and services in Associated Connect by checking the box next to the
products and services the user should have access to. You will have to check the Account Details and Services
box in order to give user access to the products and services Information Reporting, Transfers, ACH Payments,
Payment Master Recipients, Wire Payments, Fraud Control, Check Services, File Services, and Payment Services.
It defaults to un-checked. Select Next when complete.
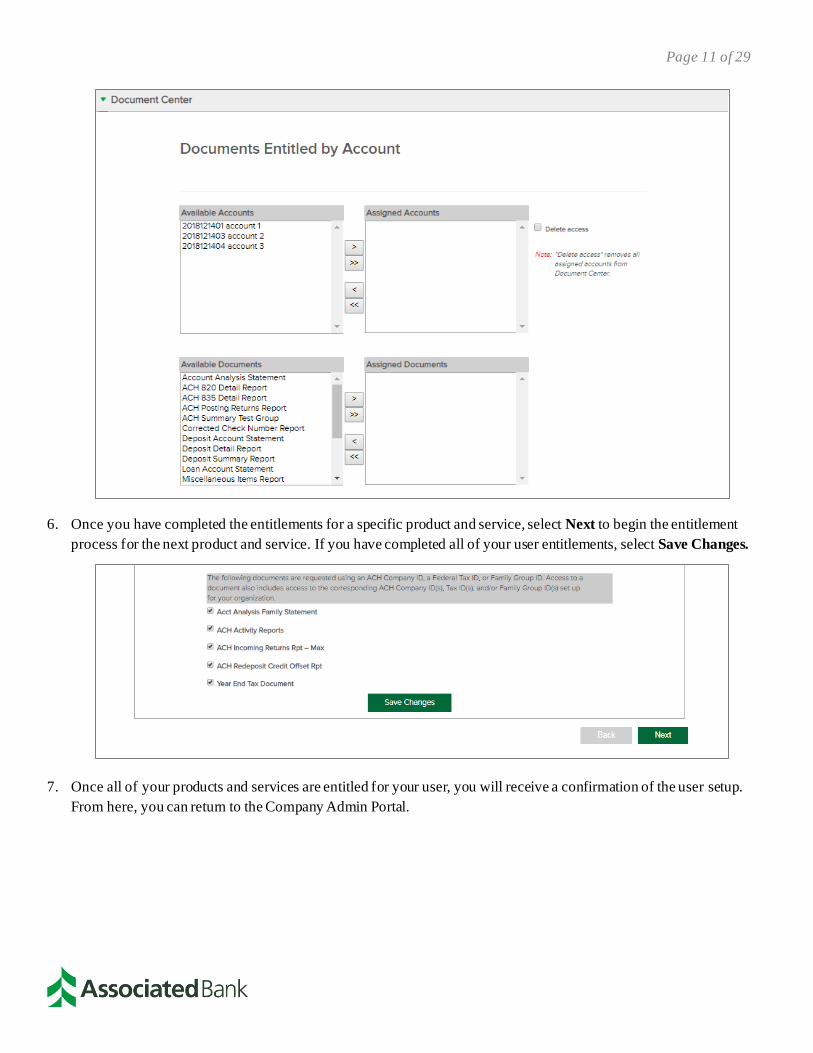
5. Once complete you may be asked for user entitlements based on the specific products and services. Fields and setup
will vary from product to product. An example is shown below for the Document Center.
Page 11 of 29
6. Once you have completed the entitlements for a specific product and service, select Next to begin the entitlement
process for the next product and service. If you have completed all of your user entitlements, select Save Changes.
7. Once all of your products and services are entitled for your user, you will receive a confirmation of the user setup.
From here, you can return to the Company Admin Portal.

Page 12 of 29
Note: For users being entitled to Remote Deposit, a role will need to be selected for each user. Remote Deposit roles
include Depositor, Reviewer and Supervisor. Bill Pay roles include Level 1 (Administrator), Level 2 (manage their
information and level 3 users) and Level 3 (only manage their own information). Additional detail on each role can be
found in the corresponding product guide.
Part 2: Registering and Assigning Tokens in the Portal
The Company Administrator will be required to register each user for either a physical or mobile token if the company
profile has access to high-risk products and services.
1. From the Associated Connect portal, select your name in the upper right-hand corner and then select Company
Admin.

Page 13 of 29
2. The Company Admin screen will be displayed. Select the User you would like to assign a token to.
3. Select the MFA Token link noted under the Manage User Profile Information section.

Page 14 of 29
4. The MFA – User Setup screen will display.
5. Select the type of token to be assigned to the user; either a Physical Token or a Mobile Token. Click Register.
Note: If a user already has a token registered in the system, you must de-register that token before registering a new
token or switching to a different token type. Directions on how to de-register a token can be found in the Managing
Users section of this guide.
Note: For physical tokens only, enter the Token Code serial number shown on the bottom of the physical token device
to be assigned to the user. The number will be formatted as “99-9999999-9” and can be found between the bar code
and the label “DIGIPASS Go7.” Do not include the dashes when registering your physical token. Select Register
and a message indicating a successful registration should be displayed.

Page 15 of 29
6. The registration will be confirmed. You will be prompted to go to Manager Users page which can be selected if you
choose to review the user setup or you may close the page. From the main portal window you will go to Account
Details and Services to entitle products and services such as Transfers, ACH, Wires and Fraud Services to the user.
Part 3: Entitling Products and Services to a User in Account Details and Services
1. To complete the new user setup in Account Details and Services, select the Administration Menu and click on
Users under the Manage heading.
2. You will notice that the user you created is visible in the Portal. Select the drop-down box in the Action column and
select Edit User.
Page 16 of 29
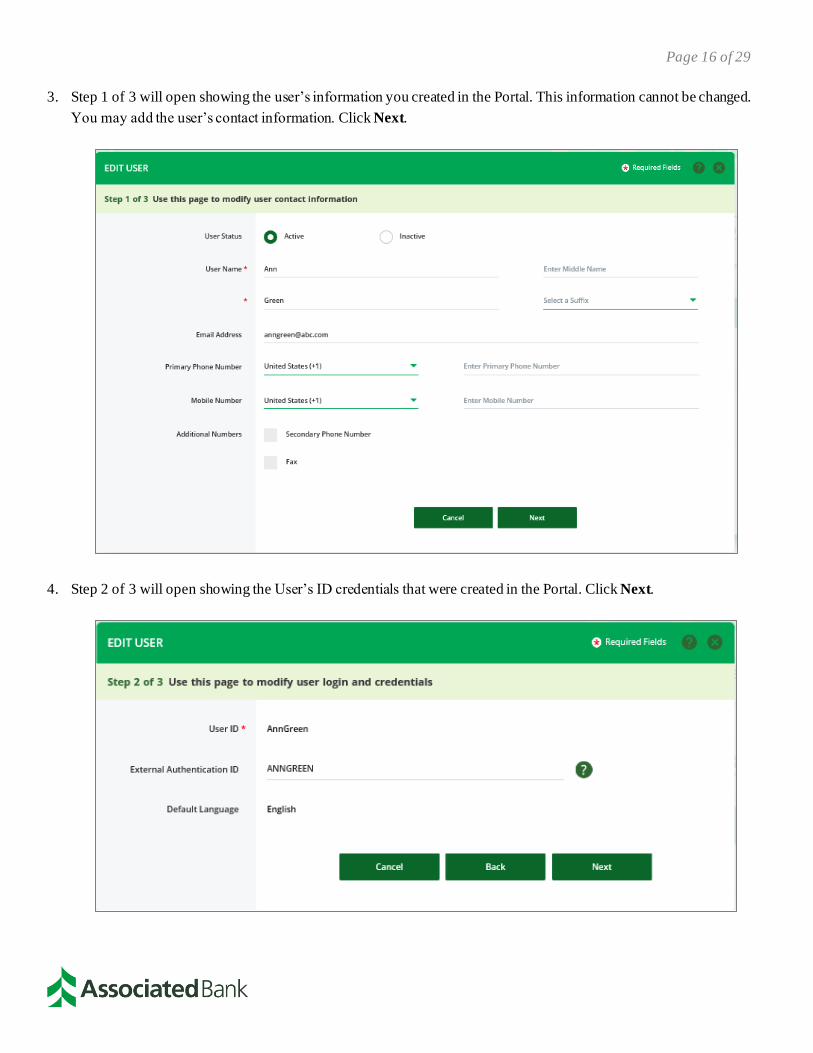
3. Step 1 of 3 will open showing the user’s information you created in the Portal. This information cannot be changed.
You may add the user’s contact information. Click Next.
4. Step 2 of 3 will open showing the User’s ID credentials that were created in the Portal. Click Next.
Page 17 of 29
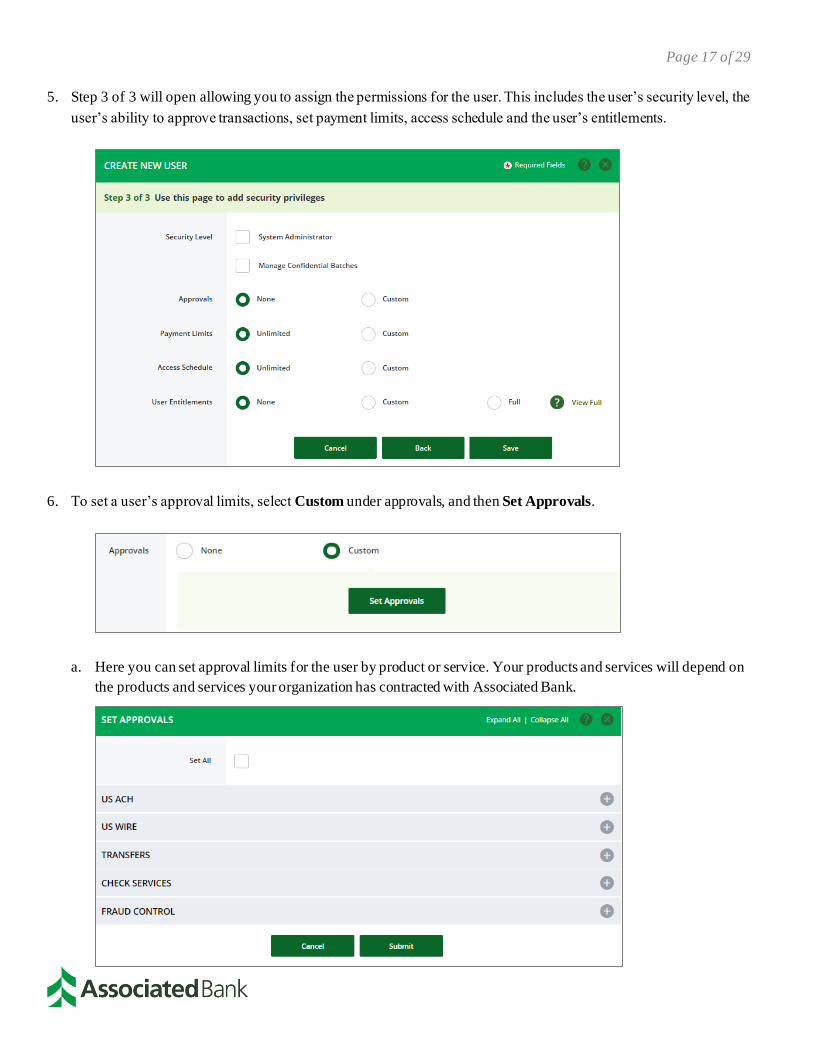
5. Step 3 of 3 will open allowing you to assign the permissions for the user. This includes the user’s security level, the
user’s ability to approve transactions, set payment limits, access schedule and the user’s entitlements.
6. To set a user’s approval limits, select Custom under approvals, and then Set Approvals.
a. Here you can set approval limits for the user by product or service. Your products and services will depend on
the products and services your organization has contracted with Associated Bank.

Page 18 of 29
b. To grant a new user access to full approval on all items, select Set All and the user will be granted approval
rights to all products and services.
c. To customize approval rights for a user, select the product and service and expand the menu to see all approval
options for your organization. Select the check box for the approval rights to be assigned to the user. Once all
products and services have been selected with the approval rights for the user, select Submit.

Page 19 of 29
7. To set a user’s payment limits select Custom under payment limits, and then Set Limits.
a. Here you can set payment limits for the user by product and service. Your products and services will depend on
the product and services your organization has contracted with Associated Bank. To set custom limits for a user
select the product or service and expand the menu to see all of the transaction limit options for your
organization. Enter the amount for the user in each column.
Note: If a user does not have a payment limit, leave the line blank. If the user has no authority, enter .01.
b. To set the same limit for the entire column, you can utilize the Set / Remove All row at the top.

Page 20 of 29
c. Once all products and services have been selected with the custom limits for the user, select Submit.
8. An admin can also set an access schedule for a user, limiting access on specific days or specific times. To set a
user’s specific access schedule select Custom under access schedule, and then Set Access.
a. Here admins can define user access by days of the week or by specific times.
b. To eliminate access for a user for a specific day, select No Access.
c. To grant access to a user only during a specific timeframe, select Access and then define the specific times
where the user will be able to access the system by utilizing the Clock icon . Here you will be able to enter
the time the user will be able to access the system.
Note: All time will need to be entered in a 24-hour format, for example 1 pm will need to be entered as 13:00 CT.

Page 21 of 29
d. Users can also be placed on a temporary hold by an admin. To do so, check the box next to Place Temporary
Hold and enter the start and end time for the hold.
e. Once you have set all your time access, select Save.
9. Set your user’s entitlements for either None, Custom or Full based on the access required for the user. None means
the user will have view only access. No task can be performed. Full means the user will have access to all products
and services within the Account Details and Services section.
a. To set custom user entitlements select Custom and then Save. You will then be given the option to custom
entitlements in the Successful Submit notification. Select Custom to continue.
b. Once you select Custom, you will be able to edit account access for the selected user. Here you can set custom
access for accounts, functional access and data services. To set custom access for your accounts, select Set
Account Access.
Page 22 of 29
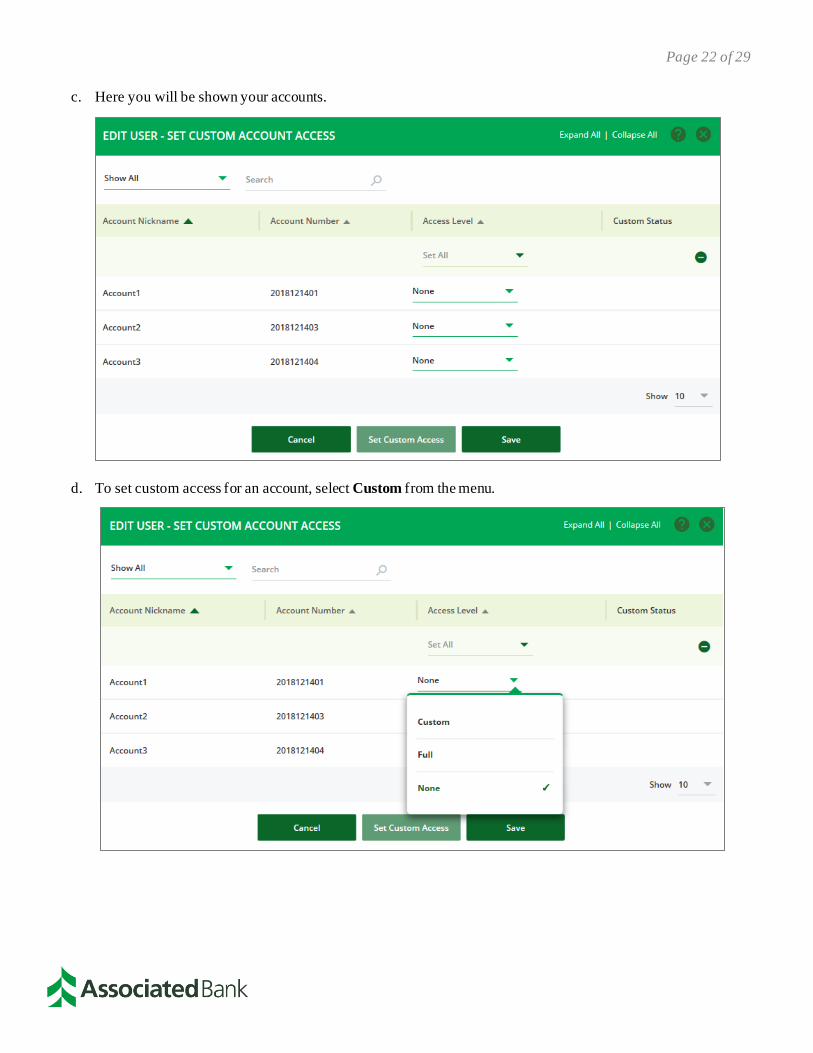
c. Here you will be shown your accounts.
d. To set custom access for an account, select Custom from the menu.

Page 23 of 29
e. You’ll receive a notification saying that custom access is not set. To set your custom access, select Set Custom
Access.
f. Once you select Set Custom Access, you will be able to set access for each individual product or service within that account. Select Save when complete.
Page 24 of 29
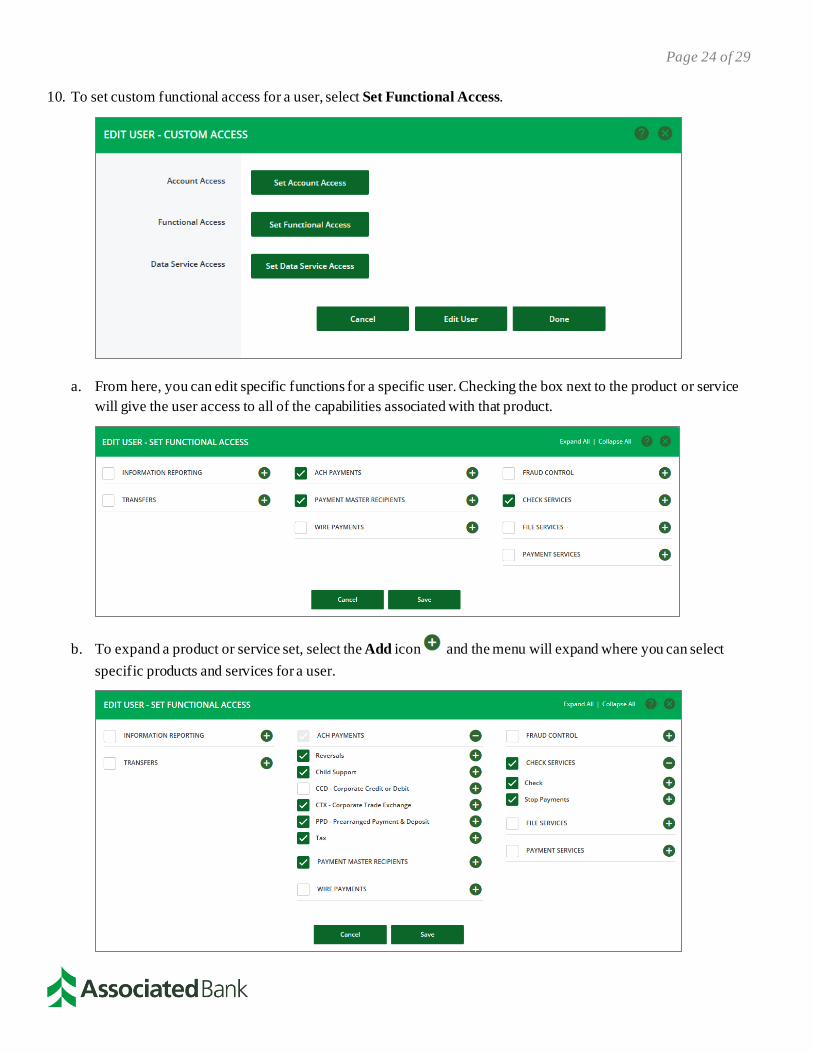
10. To set custom functional access for a user, select Set Functional Access.
a. From here, you can edit specific functions for a specific user. Checking the box next to the product or service
will give the user access to all of the capabilities associated with that product.
b. To expand a product or service set, select the Add icon and the menu will expand where you can select
specific products and services for a user.

Page 25 of 29
c. Select Save when complete and your preferences for that user will be saved.
11. To set custom data service access for a user, select Set Data Service Access.
a. Here you can define preference for data service access for a specific user.
b. Select Save when complete and your preferences for that user will be saved.

Page 26 of 29
Managing Users
To manage your organization’s users select Users from the Manage section of the Admin Menu. Here all of your
organization’s users will be shown in alphabetical order by last name.
You can search for an individual user by utilizing the search function. You can search for a user by Last Name, First
Name, or User ID.
Admins can complete actions for an individual user profile by selecting the Action Drop Down icon . Actions
include:
• View User: Allows you to view additional details on an existing user including User Information, Access Level,
Entitlements and Additional Information
• Edit User: Allows you to edit details on an existing user including the user’s Status, Name, Email Address and
Phone Number
• Copy to New User: Allows you to copy an existing user’s Access Level and Entitlements to a new user
• Copy to Existing User: Allows you to copy an existing user’s Access Level and Entitlements to another existing
user
• Delete User: Deletes the selected user from the system

Page 27 of 29
De-Registering and Un-assigning Tokens (Company Administrator)
Company Administrators may need to de-register tokens in the event that users require replacement tokens, change
roles or leave the organization.
1. From the Associated Connect portal, select your name in the upper right hand corner and then select Company
Admin.
2. The Company Admin screen will be displayed. Select the user name you would like to de-register a token for.

Page 28 of 29
3. Select the MFA Token link under Manage User Profile Information.
4. The MFA – User Setup screen will display. Select the De-Register button.
5. A message indicating a successful de-registration will be displayed.

Page 29 of 29
Account Preferences
Each user can set account preferences based on which accounts they would like to be shown. To access your account
preferences, select Account Preferences from the Admin Menu.
Here you will be able to see a listing of all of your accounts and have the option to select which accounts will display.
To remove an account, simply de-check the box next to the selected account.
If you cannot locate a specific account, you can search for that account by utilizing the search function. Accounts can
be searched for by either the Account Name or the Account Number.
Once all of your account preferences have been set, select Submit Preferences to save.
All trademarks, service marks and trade names referenced in this material are the property of their respective owners. Member FDIC. (4/21)