ASSEMBLY Assault rifle 1
16
ASSEMBLY INSTRUCTIONS Entropía Universe Fan Art Papercraft Assault Rifle model 1 By Gustav “Malasuerte” Sagitta Mountain Fold Valley Fold Cut
Transcript of ASSEMBLY Assault rifle 1

ASSEMBLY INSTRUCTIONS
Entropía Universe Fan Art Papercraft
Assault Rifle model 1
By Gustav “Malasuerte” Sagitta
Mountain Fold
Valley Fold
Cut

The Assault rifle model 1 is divided in 30 sections. If at some point you find it difficult to apply pressure while glueing 2 sections feel
free to cut holes in the faces textured whith “glue glue glue” and use this holes to introduce your fingers or a stick to help you reach the
problematic section. The assembled rifle measures aprox. 80 centimeters.
You don’t have to do everything in the same way or the same order I’m doing it here. If you find an easier or more convenient way of
doing things please let me know.
Section 1.
Make the 1a into a cilinder preshaping it first as shown in this video:
http://www.youtube.com/watch?v=8hCwL4HW12w
Then glue 1b and 1c. Remember that 1c goes in the front of the gun
Section 2.
Glue 2b to 2a starting by the tab and face marked with *. Then glue 2c to 2a/2b starting by the
tab and side marked with **. Leave the face circled in red unglued for now.
Section 3.
Assemble in the same way as section 1.
Section 4.
Section 5.
Tricky part. The idea is to pass the section 3 thru the holes in section 5a and glueing them togheter using
the tabs marked with *. Also preshape the sections 5b and 5c to make them almost half a cilinder each.
After section 5a is glued to section 3, glue sections 5b and 5c in position.
It is done this way because it’s a pain to glue section 3 to section 5 if the later is fully assembled first :)

Join section 2 with section 5, then close the face you left open when assembling section 2.
Attach sections 1 and 4 to section 3. Make sure section 1 is rotated in the right position.
Section 6.
Assemble 6a, 6b and 6c.
Glue 6b to 6a starting by the tab/face marked *. Glue 6c to 6a starting by the
tab/face marked **.
Section 7.
Glue section 7 to section 6.
*
*
**
**
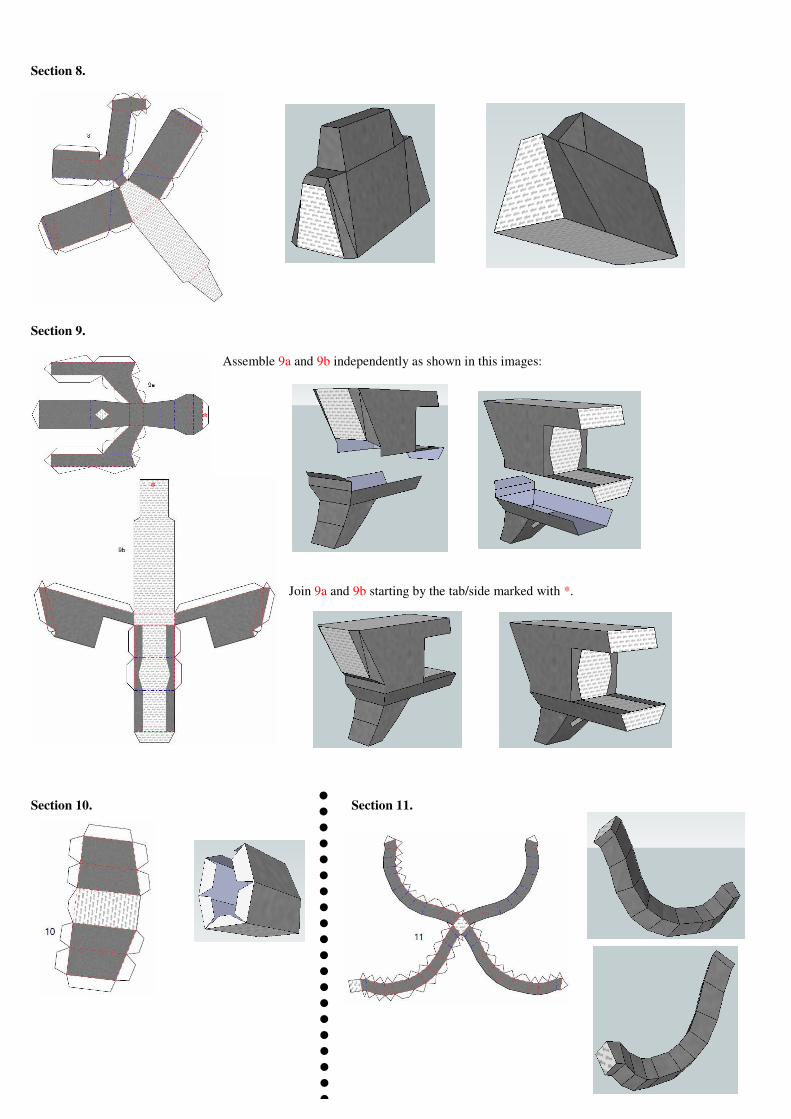
Section 8.
Section 9.
Assemble 9a and 9b independently as shown in this images:
Join 9a and 9b starting by the tab/side marked with *.
Section 10. Section 11.
*
*

Glue section 10 to section 9. Then glue section 8 on section 9. Leave section 11 unglued until final assembly.
Section 12.
Assemble 12a. Glue 12b to 12a.
Section 13.
Section 14. Section 15.
Assemble this little piece and store it
somwhere safe until final assembly.

Section 16.
Section 17.
Glue section 13 to section 12. Glue section 17 to section 12.
Glue section 16 to sections 12, 13 and 17. Glue section 15 on section 13.

Section 18.
Section 19.
Section 20.
Assemble 20a and 20b independently as shown in this images:
Join 20a and 20b starting by the tab/side marked with *.
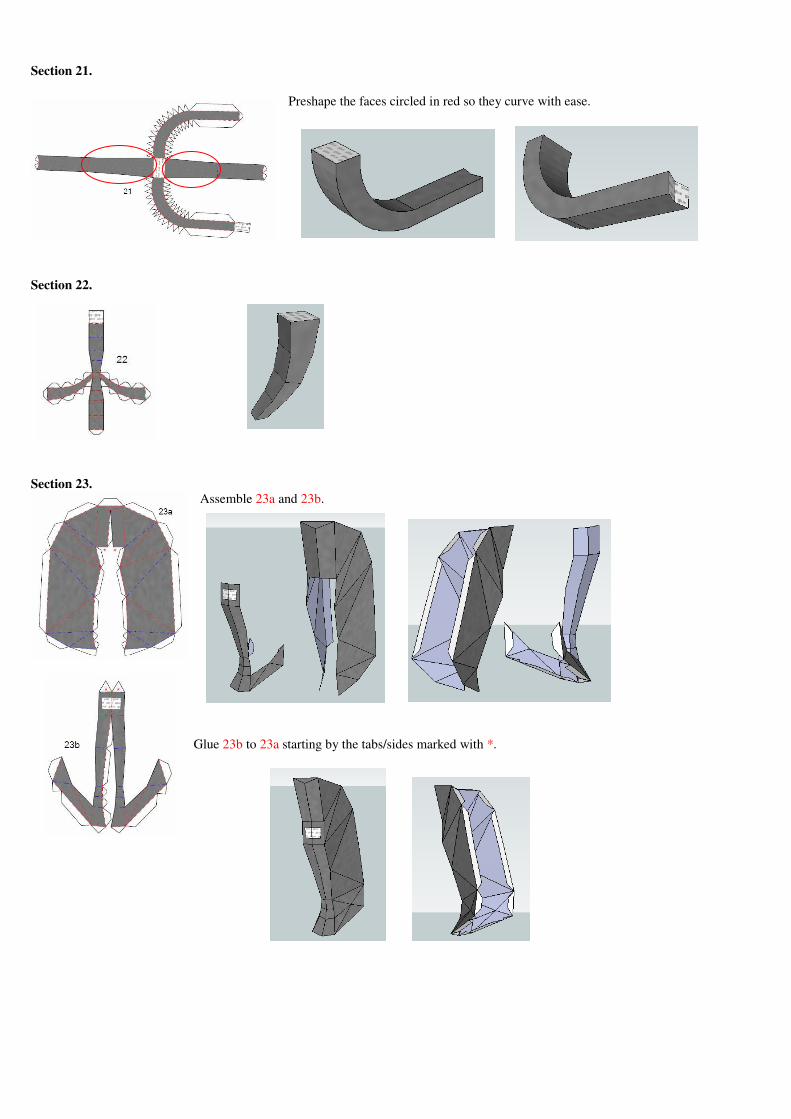
Section 21.
Preshape the faces circled in red so they curve with ease.
Section 22.
Section 23.
Assemble 23a and 23b.
Glue 23b to 23a starting by the tabs/sides marked with *.

Section 24.
Assemble 24a.
Glue 24b to 24a starting by the tab/side marked *. Glue 24c to 24a/24b starting by the tab/face marked **.
24a
24a

Glue section 19 to section 20.
Glue section 18 to sections 19 and 20. It can be hard to
diferentiate front side from back side. If so, wait until final
assembly to glue this section.
Glue section 23 to section 24. Glue section 24 to section 20.
Glue section 22 to section 20. Glue section 21 to sections 20 and 23.

Section 25.
Section 26.
Section 27.
Section 28.
Glue 28a to 28b. Glue 28c to 28b.

Section 29.
Assemble 29b and 29f.
Glue 29b to 29a.
Glue 29c, 29d, 29e and 29f to 29a in the order and position they appear
in the blueprint.
29b
29f

Section 30.
Assemble 30a. Glue 30b and 30c to 30a.
Glue 30d starting by the flap/face marked with *.

Glue section 25 to section 26. Apply good pressure for a minute or so, give these two sections a few minutes to dry before continuing.
Glue section 29 to section 30. Glue section 26 to section 30.
Glue section 27 to sections 26, 29 and 30. Use the * and ** marks to place it in the right position.
Glue section 28 to sections 26, 29 and 30. Use the * and ** marks to place it in the right position.

FINAL ASSEMBLY:
Glue section 25 to section 24. Leave this whole piece sit for a while in a place where it can dry in the right position.
Glue sections 2 and 3 to section 6.
Glue sections 8 and 9 to section 6. Remember that you can make holes to the “glue glue” faces if you need access to apply more
pressure.
Glue section 12 to sections 8, 9 and 10.

Glue section 20 to sections 13, 16 and 17. Then, if you haven’t done it yet, glue section 18 to sections 13, 19 and 20.
Almost done...
Glue section 11 to sections 9 and 12. Finally, if you haven’t lost it as I did :), glue section 14 to section 13.
DONE!


![35481168 Soviet AKM 47 Assault Rifle Manual Kalashnikov 1970[1]](https://static.fdocuments.in/doc/165x107/547818dfb4af9f6e108b4b62/35481168-soviet-akm-47-assault-rifle-manual-kalashnikov-19701.jpg)