Ascribe Pharmacy System User Guide Rx Pharmacy... · 1 Ascribe Pharmacy System User Guide...
60
i Ascribe Pharmacy System User Guide Ascribe Pharmacy System User Guide
Transcript of Ascribe Pharmacy System User Guide Rx Pharmacy... · 1 Ascribe Pharmacy System User Guide...
i Ascribe Pharmacy System User Guide
Ascribe Pharmacy System
User Guide
ii Ascribe Pharmacy System User Guide
Contents Introduction .................................................................................................................................................. 1
Terminology .............................................................................................................................................. 1
Navigation ................................................................................................................................................. 1
Hot keys .................................................................................................................................................... 2
Required fields .......................................................................................................................................... 2
Resetting a forgotten password ................................................................................................................ 2
Wildcard functionality ............................................................................................................................... 3
File Menu ...................................................................................................................................................... 4
Accessing the OnSiteRx® Resource Center ............................................................................................... 4
Changing your password ........................................................................................................................... 4
Preferences ............................................................................................................................................... 5
Login .......................................................................................................................................................... 5
Logout ....................................................................................................................................................... 5
Exit............................................................................................................................................................. 6
Can Mgmt & Pharmacy Menu Overview ...................................................................................................... 7
OPS canister states .................................................................................................................................... 7
ODS canister states ................................................................................................................................... 7
Can Mgmt Menu ........................................................................................................................................... 8
Creating build labels.................................................................................................................................. 8
Initializing canisters ................................................................................................................................... 9
Shipping canisters to a pharmacy ........................................................................................................... 10
Destroying canisters ................................................................................................................................ 11
Pharmacy Menu .......................................................................................................................................... 13
Receiving canisters at a pharmacy .......................................................................................................... 13
Reclaiming canisters ............................................................................................................................... 14
Filling canisters ........................................................................................................................................ 15
Shipping canisters to a facility ................................................................................................................ 21
Reclaiming medications .......................................................................................................................... 22
Creating canister picklists ....................................................................................................................... 24
Reinitializing canisters ............................................................................................................................. 24
Records Menu ............................................................................................................................................. 26
iii Ascribe Pharmacy System User Guide
Builds ....................................................................................................................................................... 29
Searching builds .................................................................................................................................. 29
Adding, viewing, and editing builds .................................................................................................... 29
Canisters .................................................................................................................................................. 30
Searching canisters ............................................................................................................................. 30
Viewing canisters ................................................................................................................................ 30
Corporations ........................................................................................................................................... 30
Searching corporations ....................................................................................................................... 30
Adding, viewing, and editing corporations ......................................................................................... 31
Facilities .................................................................................................................................................. 31
Searching facilities .............................................................................................................................. 31
Adding, viewing, and editing facilities ................................................................................................ 31
Install Formularies................................................................................................................................... 34
Searching install formularies ............................................................................................................... 35
Viewing and editing install formularies .............................................................................................. 35
Installs ..................................................................................................................................................... 37
Searching installs ................................................................................................................................. 37
Adding, viewing, and editing installs ................................................................................................... 37
Medication Groups ................................................................................................................................. 38
Searching medication groups .............................................................................................................. 39
Viewing and editing medication groups ............................................................................................. 39
Medications ............................................................................................................................................ 42
Searching medications ........................................................................................................................ 42
Adding, viewing, and editing medications .......................................................................................... 43
Parts ........................................................................................................................................................ 47
Searching parts.................................................................................................................................... 47
Adding, viewing, and editing parts ..................................................................................................... 48
Pharmacies .............................................................................................................................................. 48
Searching pharmacies ......................................................................................................................... 48
Adding, viewing, and editing pharmacies ........................................................................................... 48
Security Templates .................................................................................................................................. 50
Searching security templates .............................................................................................................. 50
iv Ascribe Pharmacy System User Guide
Viewing security templates ................................................................................................................. 51
Users ....................................................................................................................................................... 51
Searching users ................................................................................................................................... 51
Adding, viewing, and editing users ..................................................................................................... 51
Reports Menu ............................................................................................................................................. 56
Manifest (Facility) ................................................................................................................................... 56
Manifest (Pharmacy) ............................................................................................................................... 56
1 Ascribe Pharmacy System User Guide
Introduction
The Ascribe RX® Pharmacy System is the central system for canister, facility management, and pharmacy
management activities. The Ascribe RX® Pharmacy System (OPS) provides you with the capability to initialize
canister chips, fill and ship canisters, maintain users, and customize the Ascribe RX® Dispensing System by facility.
This guide contains step-by-step setup processing instructions for the Ascribe RX® Pharmacy System.
Terminology Below is a list of terms used throughout this guide and in the system Help.
Activity: A task that is performed on a regular basis such as filling and shipping canisters. Activity tasks are
located under the Can Mgmt and Pharmacy menus.
Record: A component of data. For example, a facility name, address, and phone number create a “facility
record.” Records are located under the Records menu.
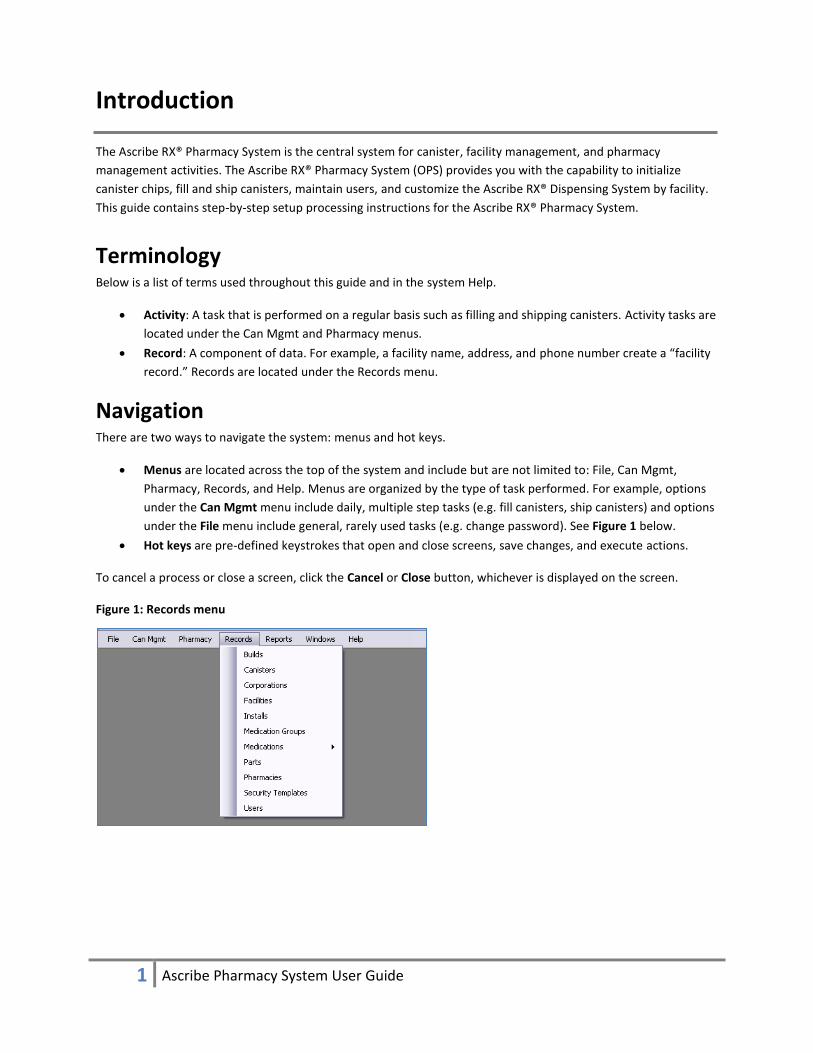
Navigation There are two ways to navigate the system: menus and hot keys.
Menus are located across the top of the system and include but are not limited to: File, Can Mgmt,
Pharmacy, Records, and Help. Menus are organized by the type of task performed. For example, options
under the Can Mgmt menu include daily, multiple step tasks (e.g. fill canisters, ship canisters) and options
under the File menu include general, rarely used tasks (e.g. change password). See Figure 1 below.
Hot keys are pre-defined keystrokes that open and close screens, save changes, and execute actions.
To cancel a process or close a screen, click the Cancel or Close button, whichever is displayed on the screen.
Figure 1: Records menu
2 Ascribe Pharmacy System User Guide
Hot keys A handful of hot keys are available for use throughout the system. Hot keys are identified by an underlined
character. Press the Alt key to prompt the system to display underlined characters. For example, File. After the
underlined characters are displayed, simply press the underlined letter of the desired option and the screen for
that option will open.
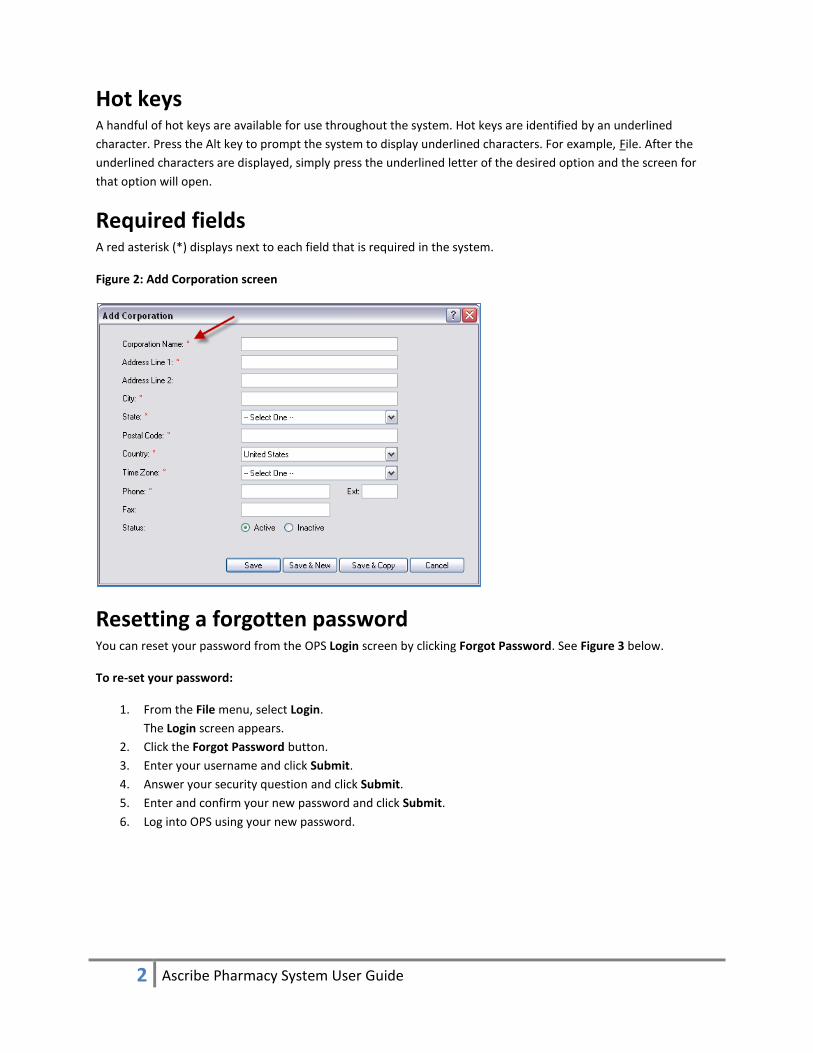
Required fields A red asterisk (*) displays next to each field that is required in the system.
Figure 2: Add Corporation screen
Resetting a forgotten password You can reset your password from the OPS Login screen by clicking Forgot Password. See Figure 3 below.
To re-set your password:
1. From the File menu, select Login.
The Login screen appears.
2. Click the Forgot Password button.
3. Enter your username and click Submit.
4. Answer your security question and click Submit.
5. Enter and confirm your new password and click Submit.
6. Log into OPS using your new password.

3 Ascribe Pharmacy System User Guide
Figure 3: Login screen
Wildcard functionality The asterisk symbol functions as a wildcard when searching records. For example, when searching pharmacies, you
can enter * in the Pharmacy Name field and all pharmacies you have access to will display.
Figure 4: Pharmacies search
Note: If you enter a character in addition to the asterisk, the system will search for an exact match to what was
entered. For example, if you enter Gra*, the system searches for a pharmacy name of “Gra*” which likely does not
exist. The asterisk must be used by itself in order for it to function as a wildcard.

4 Ascribe Pharmacy System User Guide
File Menu
The File menu serves as a location where general tasks are executed like changing a password, accessing the ORC,
and logging out.
Accessing the OnSiteRx® Resource Center You can access the the OnSiteRx® Resource Center login page, by selecting Access ORC from the File menu. Or you
can access the ORC manually be typing https://orc.onsiterx.net as the URL in your browser.
Changing your password You can change your password at any time by selecting Change Password from the File menu. You will be
prompted to enter your current password and enter and confirm your new password. Your new password must
meet the following password requirements:
Passwords must be at least six characters long but no more than twelve characters.
Passwords must contain at least one number and one letter.
Passwords cannot contain the OPS/ORC username or ODS/MAR username.
Note: The new password is applied to the OnSiteRx® Dispensing System, OnSiteRx® Pharmacy System, and
OnSiteRx® Resource Center immediately.
To change your password:
1. From the File menu, select Change Password.
The Change Password screen appears.
2. Enter your current password.
3. Enter your new password.
4. Confirm your new password.
5. Click Save to complete the change password process.
Figure 5: Change Password screen

5 Ascribe Pharmacy System User Guide
Preferences You can change the default report and label printers at any time by selecting Preferences from the File menu. The
following fields display on the Preferences screen.
Figure 6: Preference screen
Note: Required fields appear in bold, black text.
Report Printer: Select an option from the drop-down list. The system will use the default printer for the
workstation if a report printer is not selected.
Label Printer: Select an option from the drop-down list.
Canister Manifest (to Pharmacy): This is a read-only field based on the entry made in Records >
Pharmacies and is not editable through Preferences.
Canister Manifest (to Facility): This is a read-only value field on the entry made in Records > Pharmacies
and is not editable through Preferences.
Login You can log into the system by selecting Login from the File menu. The Login option will be disabled if a user is
currently logged into the system on that workstation.
Logout You can log out of the system by selecting Log Out from the File menu. Upon confirming you want to log out of
system, the Login screen will display.
6 Ascribe Pharmacy System User Guide
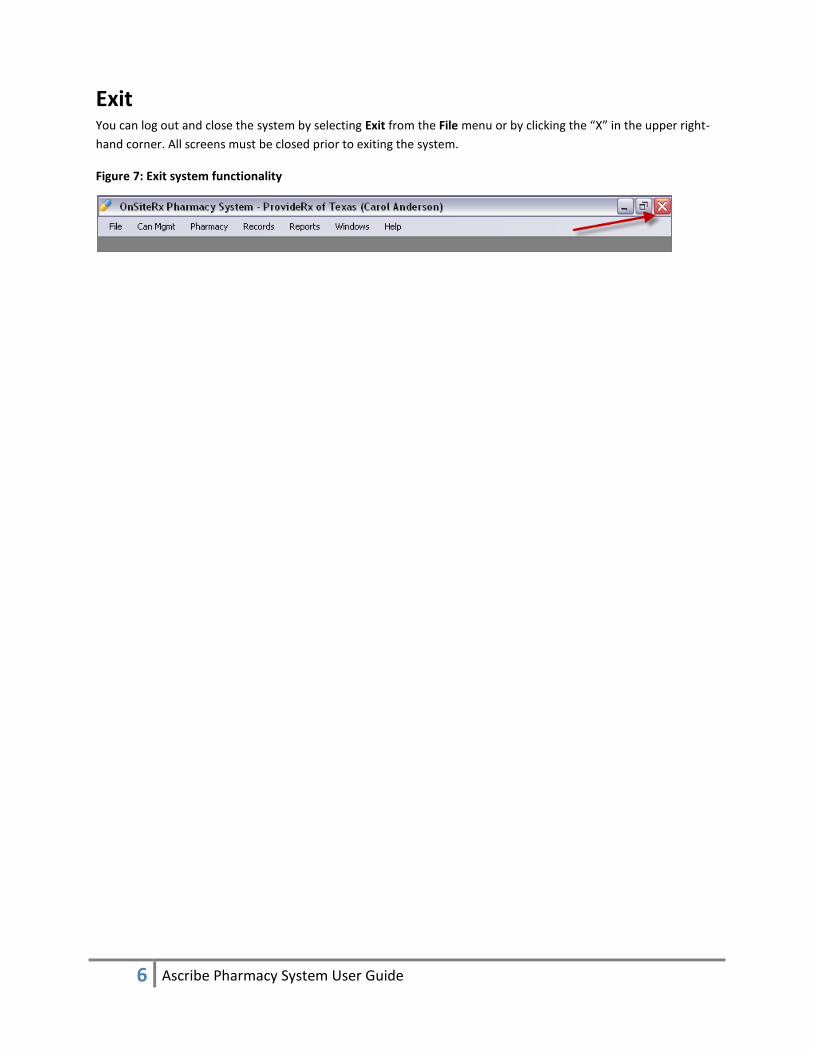
Exit You can log out and close the system by selecting Exit from the File menu or by clicking the “X” in the upper right-
hand corner. All screens must be closed prior to exiting the system.
Figure 7: Exit system functionality
7 Ascribe Pharmacy System User Guide
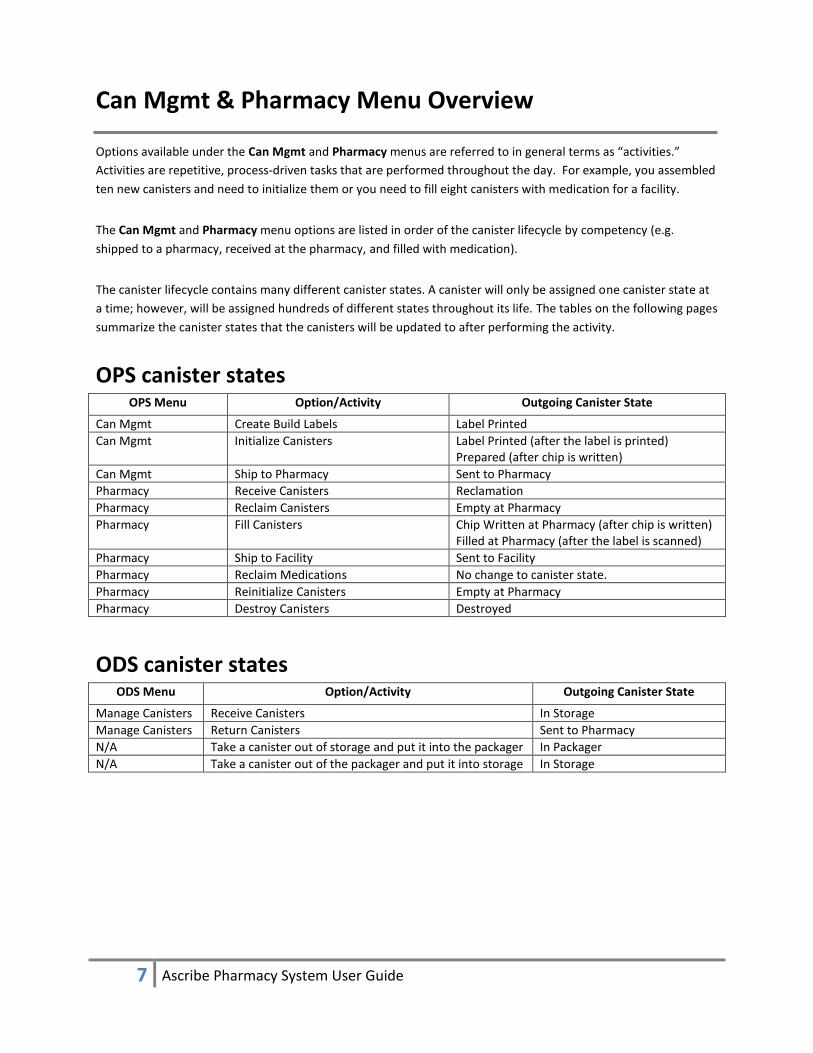
Can Mgmt & Pharmacy Menu Overview
Options available under the Can Mgmt and Pharmacy menus are referred to in general terms as “activities.”
Activities are repetitive, process-driven tasks that are performed throughout the day. For example, you assembled
ten new canisters and need to initialize them or you need to fill eight canisters with medication for a facility.
The Can Mgmt and Pharmacy menu options are listed in order of the canister lifecycle by competency (e.g.
shipped to a pharmacy, received at the pharmacy, and filled with medication).
The canister lifecycle contains many different canister states. A canister will only be assigned one canister state at
a time; however, will be assigned hundreds of different states throughout its life. The tables on the following pages
summarize the canister states that the canisters will be updated to after performing the activity.
OPS canister states OPS Menu Option/Activity Outgoing Canister State
Can Mgmt Create Build Labels Label Printed
Can Mgmt Initialize Canisters Label Printed (after the label is printed) Prepared (after chip is written)
Can Mgmt Ship to Pharmacy Sent to Pharmacy
Pharmacy Receive Canisters Reclamation
Pharmacy Reclaim Canisters Empty at Pharmacy
Pharmacy Fill Canisters Chip Written at Pharmacy (after chip is written) Filled at Pharmacy (after the label is scanned)
Pharmacy Ship to Facility Sent to Facility
Pharmacy Reclaim Medications No change to canister state.
Pharmacy Reinitialize Canisters Empty at Pharmacy
Pharmacy Destroy Canisters Destroyed
ODS canister states ODS Menu Option/Activity Outgoing Canister State
Manage Canisters Receive Canisters In Storage
Manage Canisters Return Canisters Sent to Pharmacy
N/A Take a canister out of storage and put it into the packager In Packager
N/A Take a canister out of the packager and put it into storage In Storage
8 Ascribe Pharmacy System User Guide
Can Mgmt Menu
The Can Mgmt menu includes all activities related to the maintenance of canisters.
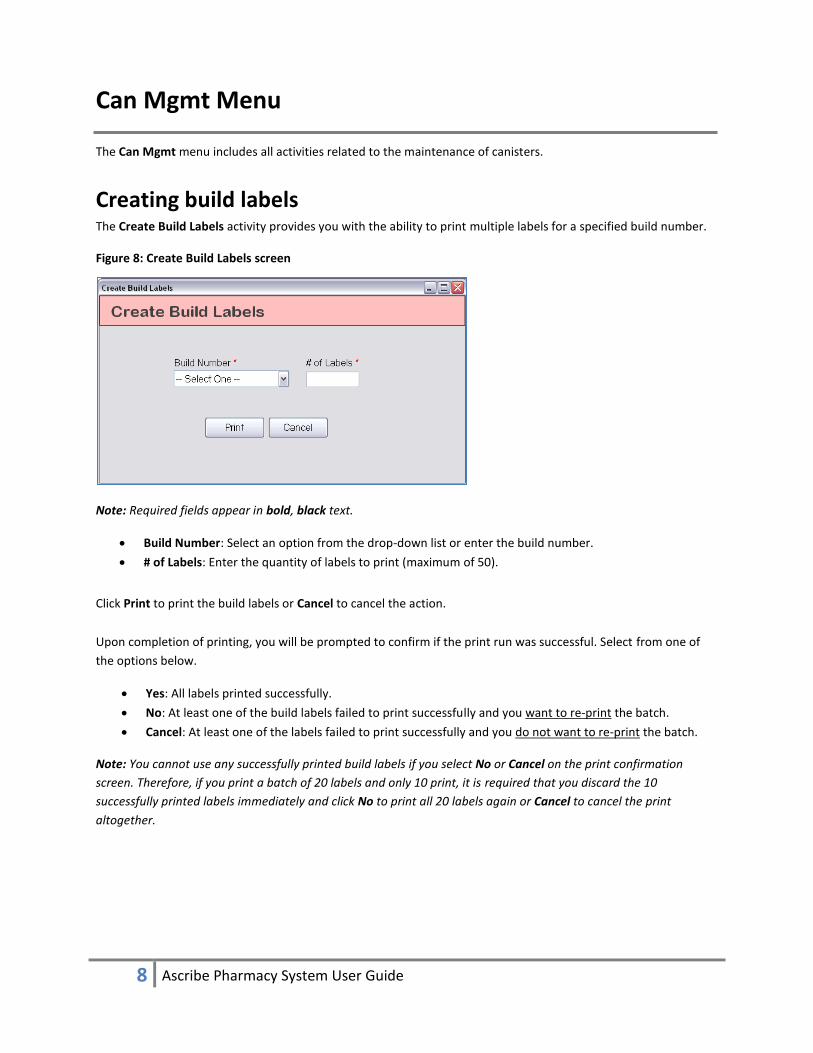
Creating build labels The Create Build Labels activity provides you with the ability to print multiple labels for a specified build number.
Figure 8: Create Build Labels screen
Note: Required fields appear in bold, black text.
Build Number: Select an option from the drop-down list or enter the build number.
# of Labels: Enter the quantity of labels to print (maximum of 50).
Click Print to print the build labels or Cancel to cancel the action.
Upon completion of printing, you will be prompted to confirm if the print run was successful. Select from one of
the options below.
Yes: All labels printed successfully.
No: At least one of the build labels failed to print successfully and you want to re-print the batch.
Cancel: At least one of the labels failed to print successfully and you do not want to re-print the batch.
Note: You cannot use any successfully printed build labels if you select No or Cancel on the print confirmation
screen. Therefore, if you print a batch of 20 labels and only 10 print, it is required that you discard the 10
successfully printed labels immediately and click No to print all 20 labels again or Cancel to cancel the print
altogether.
9 Ascribe Pharmacy System User Guide
Initializing canisters Initializing a canister chip is a multiple step process that differs based on whether the canister has a build label or
not.
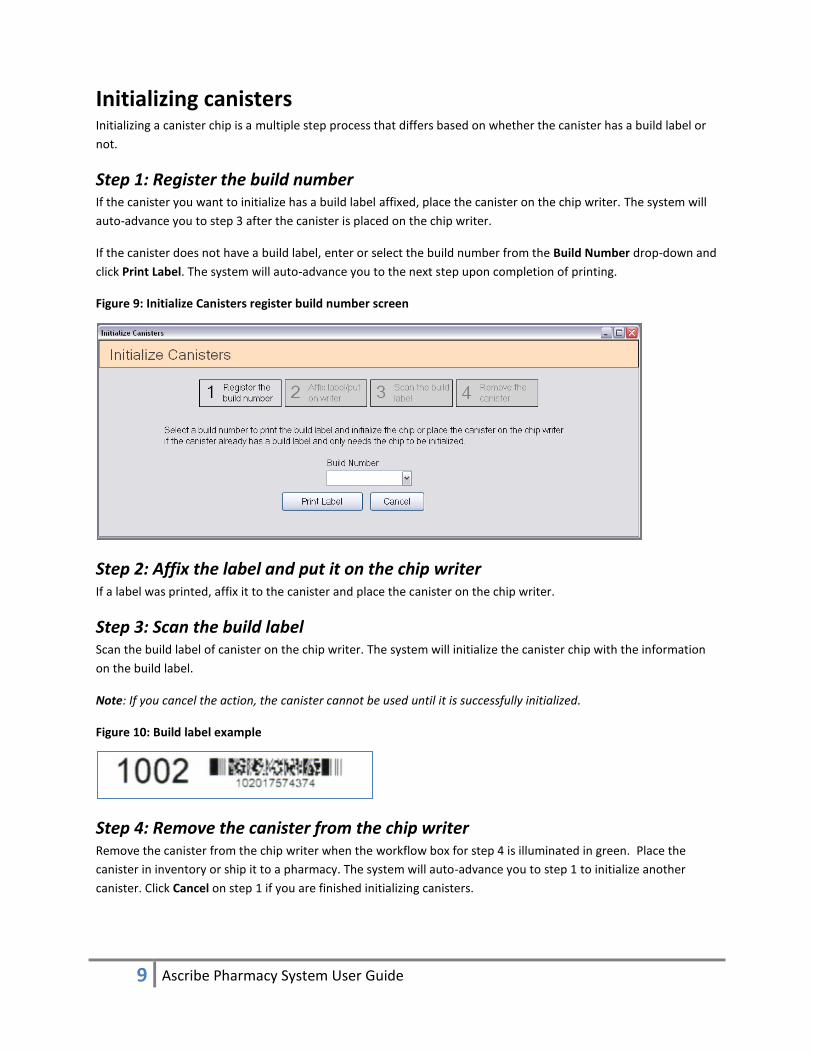
Step 1: Register the build number If the canister you want to initialize has a build label affixed, place the canister on the chip writer. The system will
auto-advance you to step 3 after the canister is placed on the chip writer.
If the canister does not have a build label, enter or select the build number from the Build Number drop-down and
click Print Label. The system will auto-advance you to the next step upon completion of printing.
Figure 9: Initialize Canisters register build number screen
Step 2: Affix the label and put it on the chip writer If a label was printed, affix it to the canister and place the canister on the chip writer.
Step 3: Scan the build label Scan the build label of canister on the chip writer. The system will initialize the canister chip with the information
on the build label.
Note: If you cancel the action, the canister cannot be used until it is successfully initialized.
Figure 10: Build label example
Step 4: Remove the canister from the chip writer Remove the canister from the chip writer when the workflow box for step 4 is illuminated in green. Place the
canister in inventory or ship it to a pharmacy. The system will auto-advance you to step 1 to initialize another
canister. Click Cancel on step 1 if you are finished initializing canisters.
10 Ascribe Pharmacy System User Guide
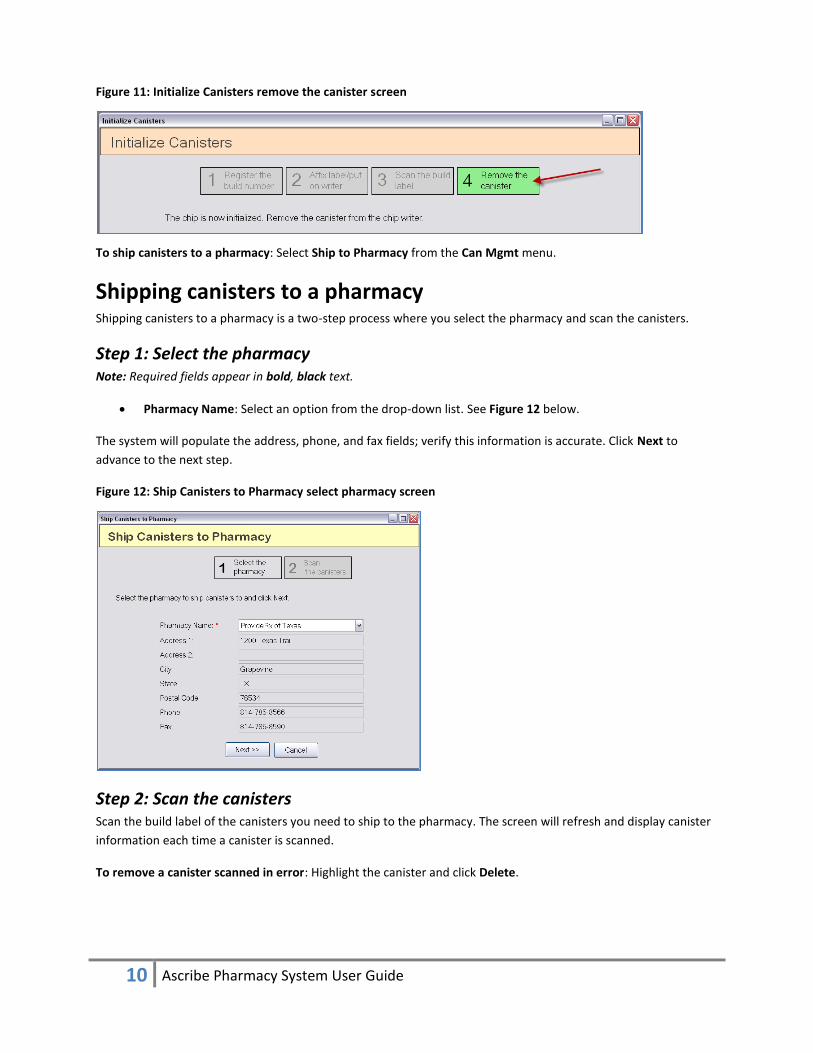
Figure 11: Initialize Canisters remove the canister screen
To ship canisters to a pharmacy: Select Ship to Pharmacy from the Can Mgmt menu.
Shipping canisters to a pharmacy Shipping canisters to a pharmacy is a two-step process where you select the pharmacy and scan the canisters.
Step 1: Select the pharmacy Note: Required fields appear in bold, black text.
Pharmacy Name: Select an option from the drop-down list. See Figure 12 below.
The system will populate the address, phone, and fax fields; verify this information is accurate. Click Next to
advance to the next step.
Figure 12: Ship Canisters to Pharmacy select pharmacy screen
Step 2: Scan the canisters Scan the build label of the canisters you need to ship to the pharmacy. The screen will refresh and display canister
information each time a canister is scanned.
To remove a canister scanned in error: Highlight the canister and click Delete.
11 Ascribe Pharmacy System User Guide
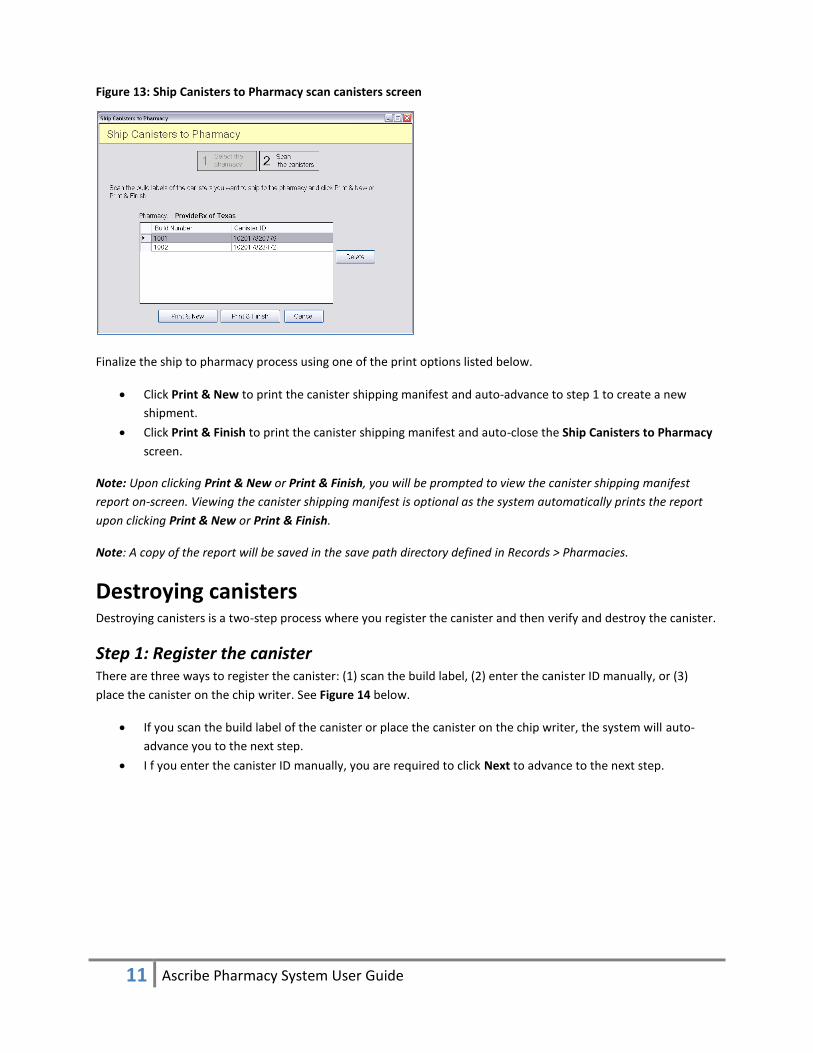
Figure 13: Ship Canisters to Pharmacy scan canisters screen
Finalize the ship to pharmacy process using one of the print options listed below.
Click Print & New to print the canister shipping manifest and auto-advance to step 1 to create a new
shipment.
Click Print & Finish to print the canister shipping manifest and auto-close the Ship Canisters to Pharmacy
screen.
Note: Upon clicking Print & New or Print & Finish, you will be prompted to view the canister shipping manifest
report on-screen. Viewing the canister shipping manifest is optional as the system automatically prints the report
upon clicking Print & New or Print & Finish.
Note: A copy of the report will be saved in the save path directory defined in Records > Pharmacies.
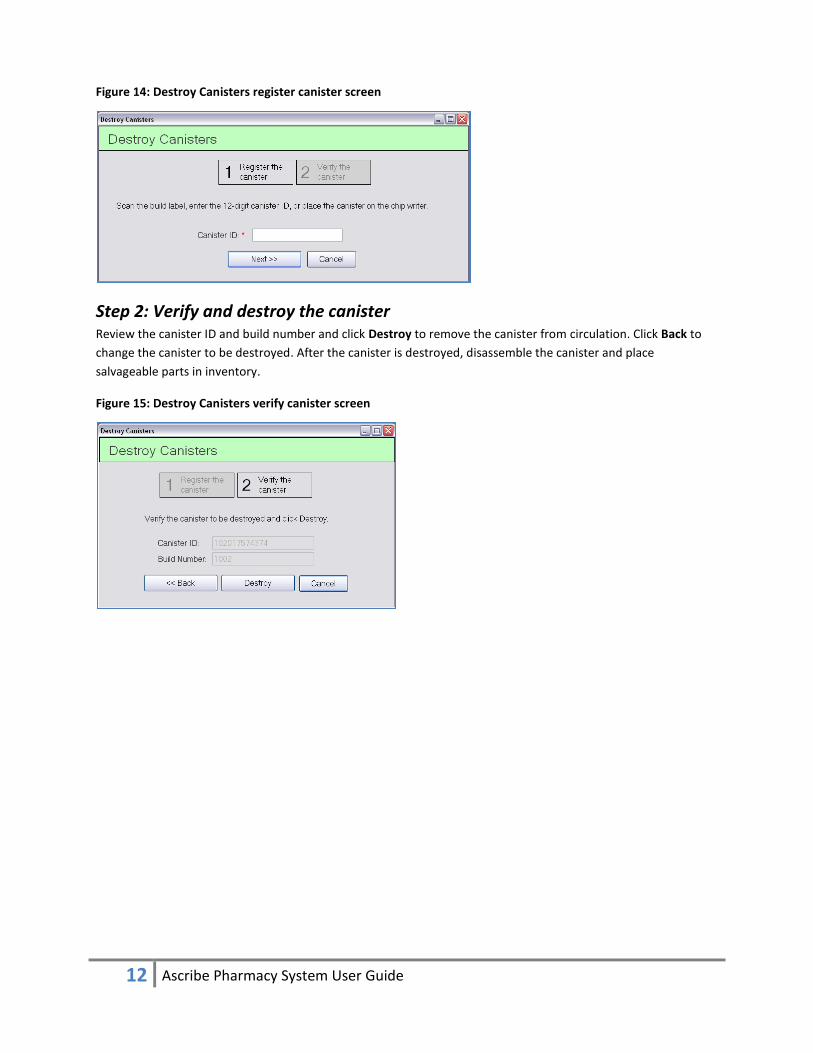
Destroying canisters Destroying canisters is a two-step process where you register the canister and then verify and destroy the canister.
Step 1: Register the canister There are three ways to register the canister: (1) scan the build label, (2) enter the canister ID manually, or (3)
place the canister on the chip writer. See Figure 14 below.
If you scan the build label of the canister or place the canister on the chip writer, the system will auto-
advance you to the next step.
I f you enter the canister ID manually, you are required to click Next to advance to the next step.
12 Ascribe Pharmacy System User Guide
Figure 14: Destroy Canisters register canister screen
Step 2: Verify and destroy the canister Review the canister ID and build number and click Destroy to remove the canister from circulation. Click Back to
change the canister to be destroyed. After the canister is destroyed, disassemble the canister and place
salvageable parts in inventory.
Figure 15: Destroy Canisters verify canister screen

13 Ascribe Pharmacy System User Guide
Pharmacy Menu
The Pharmacy menu includes all activities related to handling medications and canisters at a pharmacy.
Receiving canisters at a pharmacy Scan the build label of the canisters received at the pharmacy. The screen will refresh and display canister
information each time a canister is scanned. Click Save to confirm receipt of the canisters.
To remove a canister scanned in error: Highlight the canister and click Delete.
Figure 16: Receive Canisters screen
Handling empty canisters If the canister is empty, the next steps are to:
Clean the canister.
Remove the medication fill label.
Inspect the canister for broken and/or missing parts.
Upon completion of the cleaning and inspection process, select Reclaim Canisters from the Pharmacy menu and
complete the process to certify the canister is ready to be filled with medication. Refer to the Reclaiming canisters
guidelines for more information.
Handling canisters with remaining medication If the canister has remaining medication, the next steps are to:
Package the remaining medication in a zipper storage bag or container.
Print a reclaim medication label for the zipper storage bag or container.
Clean the canister.
Remove the medication fill label from the canister lid.
Inspect the canister for broken and/or missing parts.

14 Ascribe Pharmacy System User Guide
To reclaim medications: Select Reclaim Medications from the Pharmacy menu. Refer to the Reclaiming
medications guidelines for more information. Upon completion of the reclaim medications process, the next step is
to reclaim the canisters.
Reclaiming canisters Reclaiming canisters is a multiple step process where you clean and inspect the canisters, scan the canisters, and
certify the canisters are ready to be filled. The canister must be empty prior to performing this process. Refer to
the Reclaiming medications guidelines for more information on handling canisters with remaining medication.
Step 1: Clean and inspect the canisters Clean the canister, remove the medication fill label located on the canister lid, and inspect the canister for broken
and/or missing parts.
Step 2: Scan the canisters Scan the build label of the canisters that have been emptied, cleaned, and inspected. The screen will refresh and
display canister information each time a canister is scanned.
A warning pop-up will display if you have scanned a canister containing a controlled substance is scanned where
the quantity remaining in the database is greater than zero. Upon receiving the warning, verify that physical
quantity remaining in the canister equals the quantity cited in the warning message. If the physical quantity
remaining does not equal the quantity cited in the warning message, notify a pharmacist immediately as this may
be a sign of possible diversion.
To remove a canister scanned in error: Highlight the canister and click Delete.
Figure 17: Reclaim Canisters screen
Step 3: Certify the canisters Click Certify to confirm the canisters have been emptied, cleaned (washed and medication fill label removed),
inspected, and are ready to be filled with medication. Place the canisters in inventory or fill them with medication.

15 Ascribe Pharmacy System User Guide
Filling canisters Prior to filling canisters, create the canister picklist to assist you in gathering canisters for medications you need to
fill. Refer to the Creating canister picklists guidelines for more information on creating a canister picklist.
Filling canisters is a multiple step process where you place the canister on the chip writer, enter the fill details,
print the medication fill label, encode the canister chip, and verify the medication fill label and canister chip are in
sync.
Step 1: Place the canister on the chip writer Place the canister on the chip writer. The system will verify the canister chip is valid and auto-advance you to the
next step.
Step 2: Register the NDC There are two ways to register the NDC: (1) scan the NDC barcode on the medication bottle or (2) enter the NDC
number manually.
Scanning the NDC barcode Scan the NDC barcode located on the medication bottle. The system will verify the medication does or does
not exist in the system and auto-advance you to the next step if the medication exists. If the medication does
not exist, the system will prompt you with instructions on how to add the medication to the system.
Note: When an NDC barcode is scanned for the first time, the system will prompt you to enter the NDC exactly
as it appears on the medication bottle, including dashes. When this occurs, enter the NDC number and click
Continue.
Entering the NDC number manually In the event you do not have the medication bottle or the NDC barcode is damaged, click the Enter NDC
button and enter the NDC number manually.
Figure 18: Enter NDC screen
Note: Required fields appear in bold, black text.
NDC: Enter the NDC number exactly as it appears on the medication bottle including all three segments
and dashes. Do not manually insert additional numbers such as leading zeros.
Click Continue to advance to the next step.
16 Ascribe Pharmacy System User Guide
Handling medications that do not exist in the system Select Medications > By Name from the Records menu and click Add on the Medications screen that appears.
Refer to the Adding, viewing, and editing medications guidelines for more information.
Step 3: Enter the fill details The screen contains left and right sections; the left section contains the medication attribute details (e.g. shape,
color, photo) and the right section contains general medication information (e.g. NDC number, pill quantity,
pharmacist).
First, select the medication attribute set or click the Add Attribute button to enter a new attribute set. Next, enter
the fill details including: pill quantity, lot number(s), expiration date(s), and pharmacist. Finally, click Print &
Encode to print the medication fill label and encode the canister chip.
Selecting the medication attribute set A “medication attribute set” is a collection of the physical characteristics of the medication including but not
limited to: form, shape, color, length, width, and thickness. A medication can have multiple attribute sets. For
example, Medication LMN recently changed from a round/brown pill to an oblong/orange pill with no change
to the NDC number. While this scenario is rare, it is imperative that you select the correct attribute set when
filling canisters as canister builds are approved for individual medication attribute sets.
All attribute sets for the medication will display in the list box in the left-hand section. Select the appropriate
attribute set by highlighting it in the list box. The selected attribute set is used to:
Determine if the canister build is approved to be filled with the medication attribute set.
Print the medication attribute characteristics on the medication fill label.
Print the medication attribute characteristics on the packet when dispensed.
Adding a new attribute set If the attribute set of the medication you are filling in the canister does not exist (does not display in the list
box), click the Add Attribute button to add a new attribute set.
17 Ascribe Pharmacy System User Guide
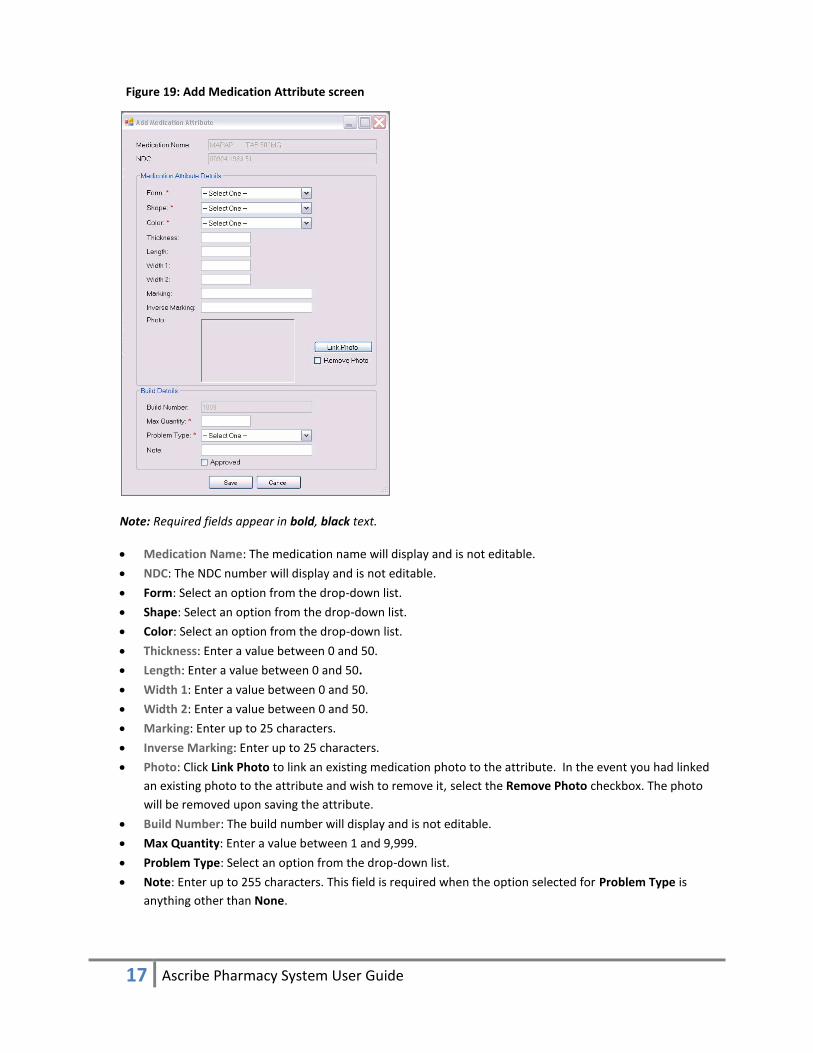
Figure 19: Add Medication Attribute screen
Note: Required fields appear in bold, black text.
Medication Name: The medication name will display and is not editable.
NDC: The NDC number will display and is not editable.
Form: Select an option from the drop-down list.
Shape: Select an option from the drop-down list.
Color: Select an option from the drop-down list.
Thickness: Enter a value between 0 and 50.
Length: Enter a value between 0 and 50.
Width 1: Enter a value between 0 and 50.
Width 2: Enter a value between 0 and 50.
Marking: Enter up to 25 characters.
Inverse Marking: Enter up to 25 characters.
Photo: Click Link Photo to link an existing medication photo to the attribute. In the event you had linked
an existing photo to the attribute and wish to remove it, select the Remove Photo checkbox. The photo
will be removed upon saving the attribute.
Build Number: The build number will display and is not editable.
Max Quantity: Enter a value between 1 and 9,999.
Problem Type: Select an option from the drop-down list.
Note: Enter up to 255 characters. This field is required when the option selected for Problem Type is
anything other than None.
18 Ascribe Pharmacy System User Guide
Approved: Select the checkbox if the build has been approved for use with the medication attribute set or
leave the checkbox de-selected if the medication is still pending approval.
Click Save to add the attribute set.
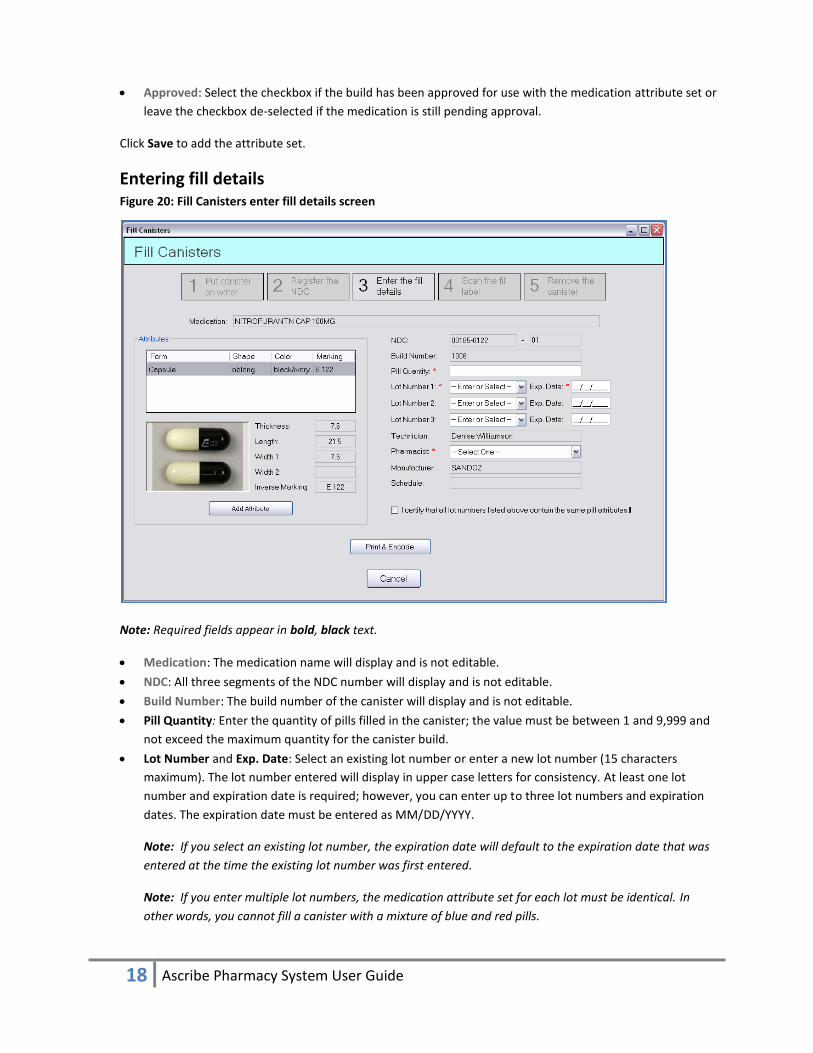
Entering fill details Figure 20: Fill Canisters enter fill details screen
Note: Required fields appear in bold, black text.
Medication: The medication name will display and is not editable.
NDC: All three segments of the NDC number will display and is not editable.
Build Number: The build number of the canister will display and is not editable.
Pill Quantity: Enter the quantity of pills filled in the canister; the value must be between 1 and 9,999 and
not exceed the maximum quantity for the canister build.
Lot Number and Exp. Date: Select an existing lot number or enter a new lot number (15 characters
maximum). The lot number entered will display in upper case letters for consistency. At least one lot
number and expiration date is required; however, you can enter up to three lot numbers and expiration
dates. The expiration date must be entered as MM/DD/YYYY.
Note: If you select an existing lot number, the expiration date will default to the expiration date that was
entered at the time the existing lot number was first entered.
Note: If you enter multiple lot numbers, the medication attribute set for each lot must be identical. In
other words, you cannot fill a canister with a mixture of blue and red pills.
19 Ascribe Pharmacy System User Guide
Note: If you are filling the canister with medication that had previously been reclaimed, enter the fill
expiration date located on the reclaim medication label and do not use the expiration date that defaults
after you have selected or entered the lot number.
Technician: The name of the user currently logged in will display and is not editable.
Pharmacist: Select an option from the drop-down list.
Manufacturer: The name of the manufacturer derived from the NDC number will display and is not
editable.
Schedule: The schedule defined for the medication will display and is not editable.
Certification: Select the certification checkbox when more than one lot number has been
selected/entered.
Click Print & Encode after you have selected a medication attribute set and entered the fill details. The system will
print the medication fill label and encode the canister chip.
Handling medications that are not approved for the build If a medication attribute set is not approved for the canister build, the system will display a message and you
or someone with security rights to override medication fills can approve the canister build to be filled with the
medication.
If you have security rights to override the medication fill, you will be prompted to enter details of the
medication override.
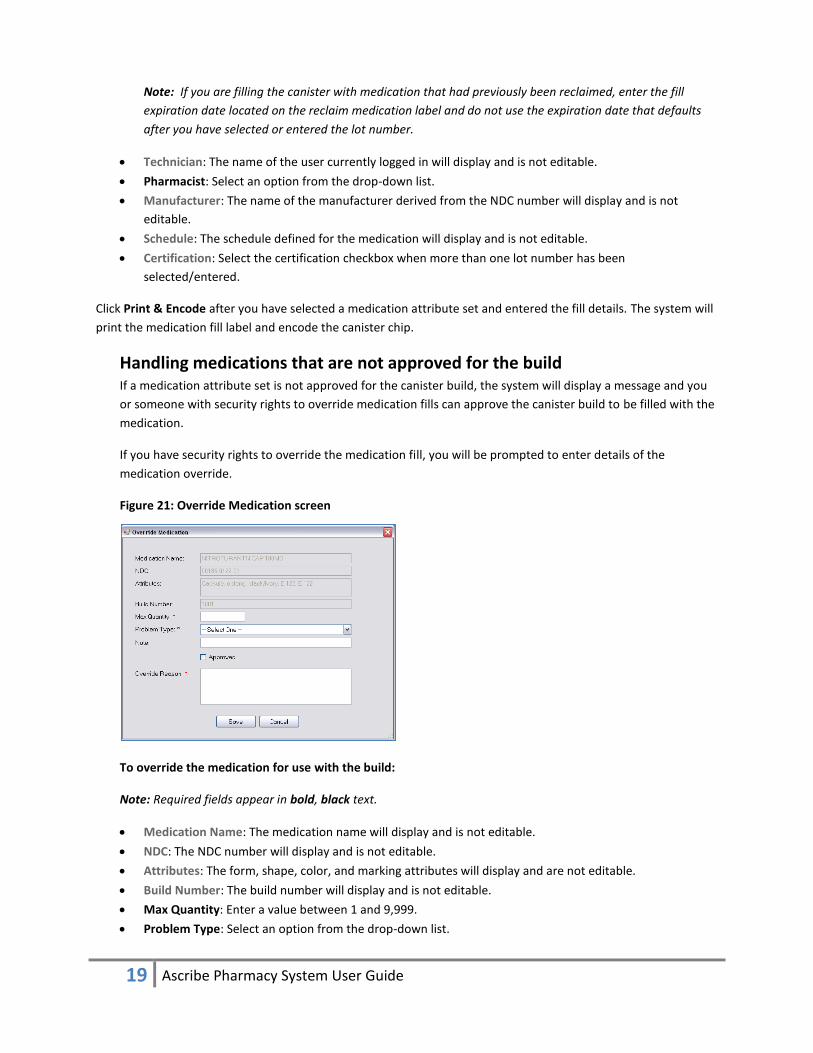
Figure 21: Override Medication screen
To override the medication for use with the build:
Note: Required fields appear in bold, black text.
Medication Name: The medication name will display and is not editable.
NDC: The NDC number will display and is not editable.
Attributes: The form, shape, color, and marking attributes will display and are not editable.
Build Number: The build number will display and is not editable.
Max Quantity: Enter a value between 1 and 9,999.
Problem Type: Select an option from the drop-down list.
20 Ascribe Pharmacy System User Guide
Note: Enter up to 255 characters. This field is required when the option selected for Problem Type is
anything other than None.
Approved: Select the checkbox if the build has been approved for use with the medication or leave the
checkbox de-selected if the medication is still pending approval.
Override Reason: Enter up to 255 characters.
Click Save to approve the canister build to be filled with the medication.
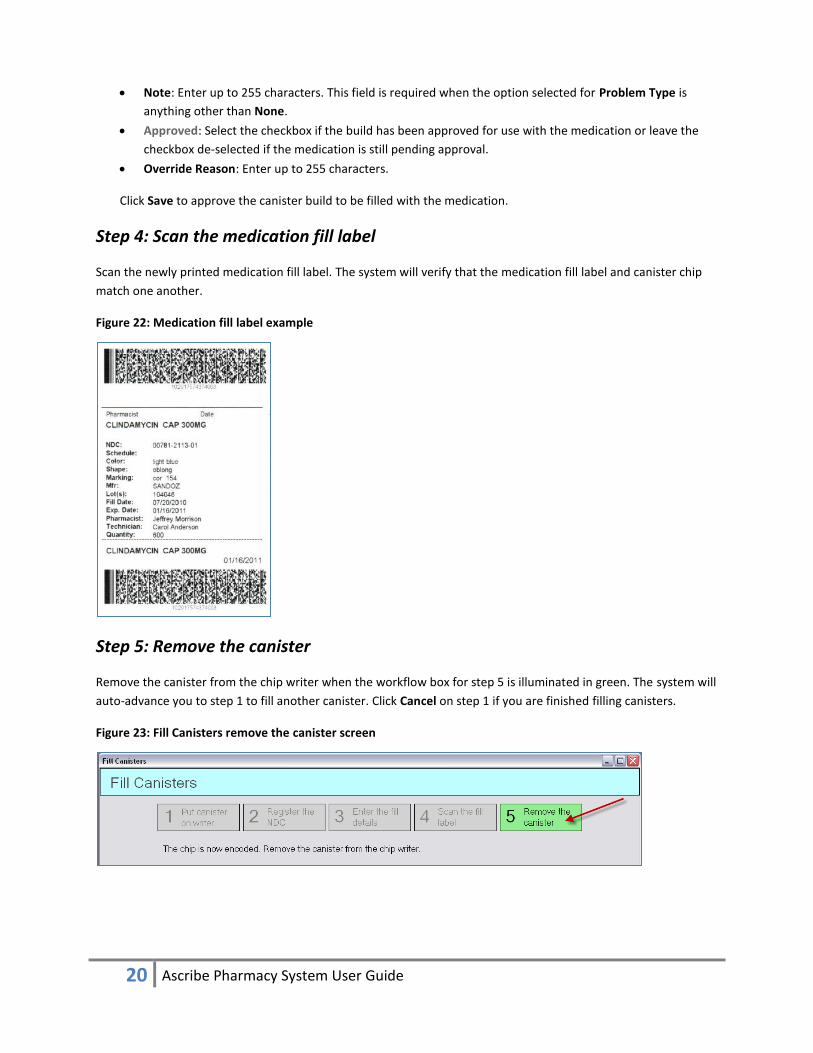
Step 4: Scan the medication fill label
Scan the newly printed medication fill label. The system will verify that the medication fill label and canister chip
match one another.
Figure 22: Medication fill label example
Step 5: Remove the canister
Remove the canister from the chip writer when the workflow box for step 5 is illuminated in green. The system will
auto-advance you to step 1 to fill another canister. Click Cancel on step 1 if you are finished filling canisters.
Figure 23: Fill Canisters remove the canister screen
21 Ascribe Pharmacy System User Guide
Shipping canisters to a facility Shipping canisters to a facility is a two-step process where you select the facility and packager and scan the
canisters to ship.
If you are shipping canisters to a central fill packager, the Facility Name selection is required; however, you can
select any of the facilities that are assigned to the central fill packager. For example, if Dallas Continuing Care and
Waco Elderly Care Center are both assigned to the central fill, either facility can be selected in the Facility Name
drop-down.
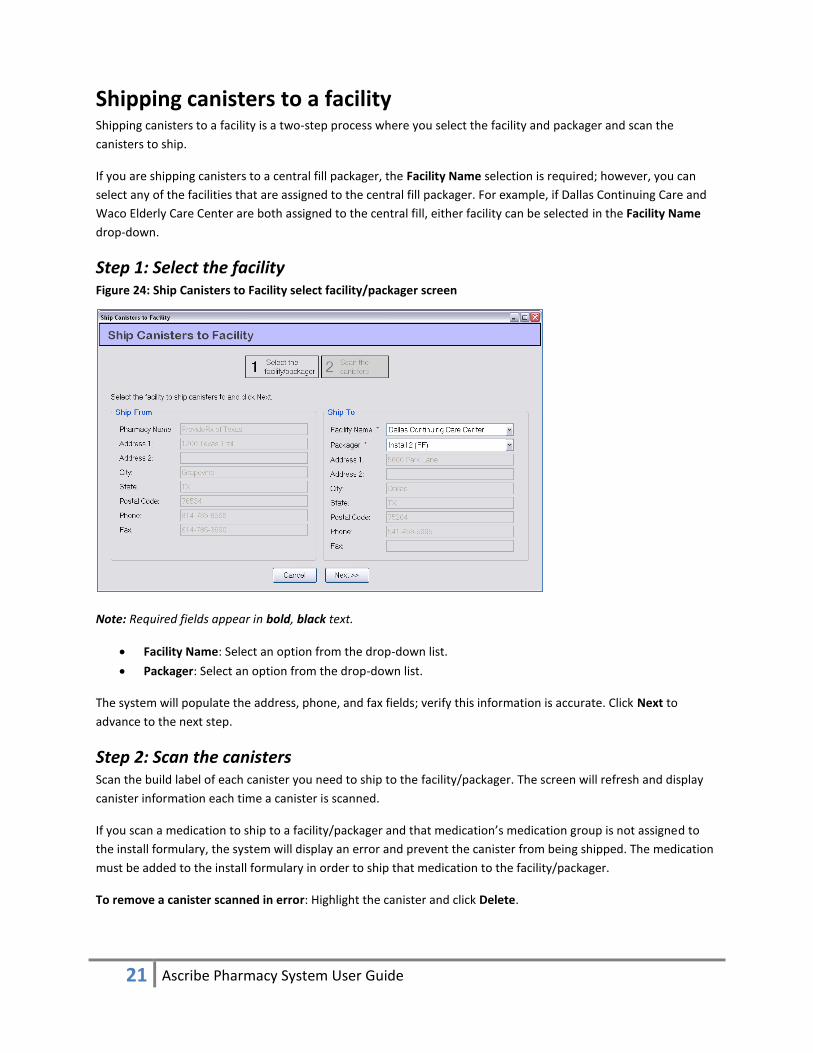
Step 1: Select the facility Figure 24: Ship Canisters to Facility select facility/packager screen
Note: Required fields appear in bold, black text.
Facility Name: Select an option from the drop-down list.
Packager: Select an option from the drop-down list.
The system will populate the address, phone, and fax fields; verify this information is accurate. Click Next to
advance to the next step.
Step 2: Scan the canisters Scan the build label of each canister you need to ship to the facility/packager. The screen will refresh and display
canister information each time a canister is scanned.
If you scan a medication to ship to a facility/packager and that medication’s medication group is not assigned to
the install formulary, the system will display an error and prevent the canister from being shipped. The medication
must be added to the install formulary in order to ship that medication to the facility/packager.
To remove a canister scanned in error: Highlight the canister and click Delete.
22 Ascribe Pharmacy System User Guide
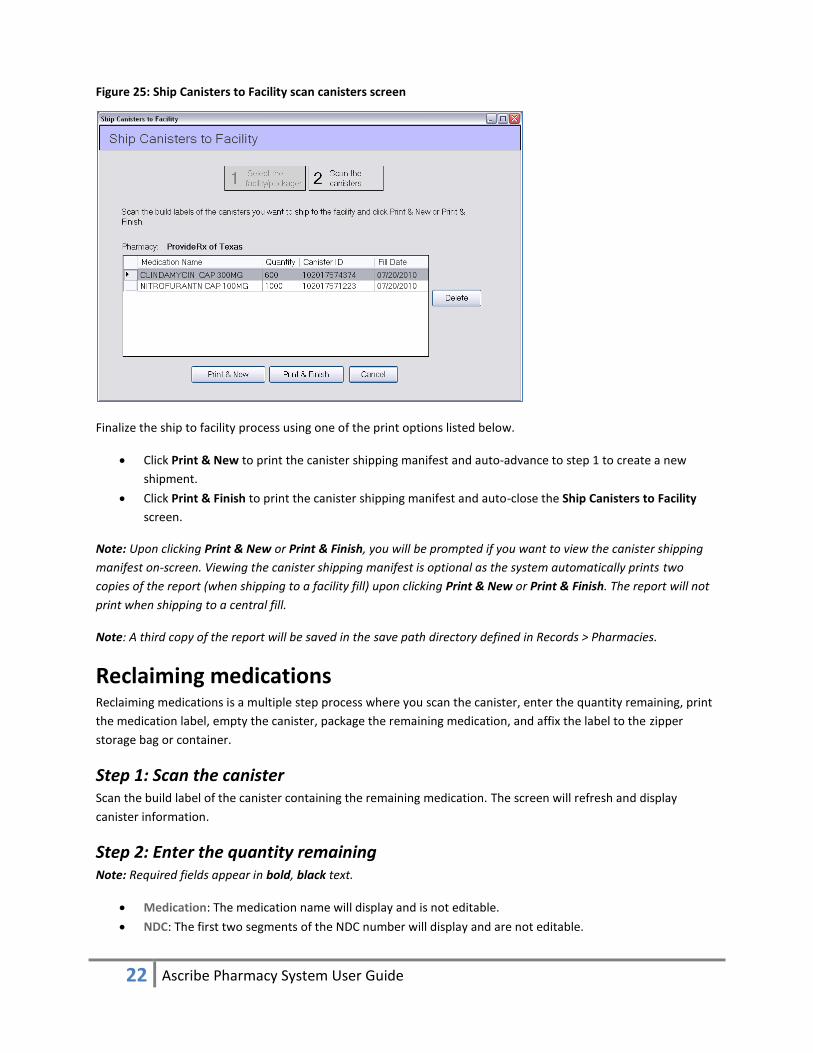
Figure 25: Ship Canisters to Facility scan canisters screen
Finalize the ship to facility process using one of the print options listed below.
Click Print & New to print the canister shipping manifest and auto-advance to step 1 to create a new
shipment.
Click Print & Finish to print the canister shipping manifest and auto-close the Ship Canisters to Facility
screen.
Note: Upon clicking Print & New or Print & Finish, you will be prompted if you want to view the canister shipping
manifest on-screen. Viewing the canister shipping manifest is optional as the system automatically prints two
copies of the report (when shipping to a facility fill) upon clicking Print & New or Print & Finish. The report will not
print when shipping to a central fill.
Note: A third copy of the report will be saved in the save path directory defined in Records > Pharmacies.
Reclaiming medications Reclaiming medications is a multiple step process where you scan the canister, enter the quantity remaining, print
the medication label, empty the canister, package the remaining medication, and affix the label to the zipper
storage bag or container.
Step 1: Scan the canister Scan the build label of the canister containing the remaining medication. The screen will refresh and display
canister information.
Step 2: Enter the quantity remaining Note: Required fields appear in bold, black text.
Medication: The medication name will display and is not editable.
NDC: The first two segments of the NDC number will display and are not editable.

23 Ascribe Pharmacy System User Guide
Current Quantity: The current quantity per the database will display and is not editable.
Quantity Remaining: Enter the quantity of medication remaining. Compare this quantity to the value in
the Current Quantity field. If the two quantities are not equal or relatively close to one another, notify a
pharmacist immediately as this is a sign of possible diversion.
Finalize the reclaim medications process using one of the print options listed below. See Figure 26 below.
Click Print & New to finalize the process, print the medication label, and auto-advance to step 1 to
reclaim additional medications.
Click Print & Finish to finalize the process, print the medication label, and auto-close the Reclaim
Medications screen.
Figure 26: Reclaim Medications enter quantity screen
Step 3: Empty the canister and affix the label Empty the remaining medication into a zipper storage bag or container and affix the reclaim medication label to
the bag or container.
Figure 27: Reclaim medication label example (without NDC barcode)
24 Ascribe Pharmacy System User Guide
Upon completion of the medication reclamation process, select Reclaim Canisters from the Pharmacy menu and
complete the process to certify the canister is ready to be filled with medication. Refer to the Reclaiming canisters
guidelines for more information.
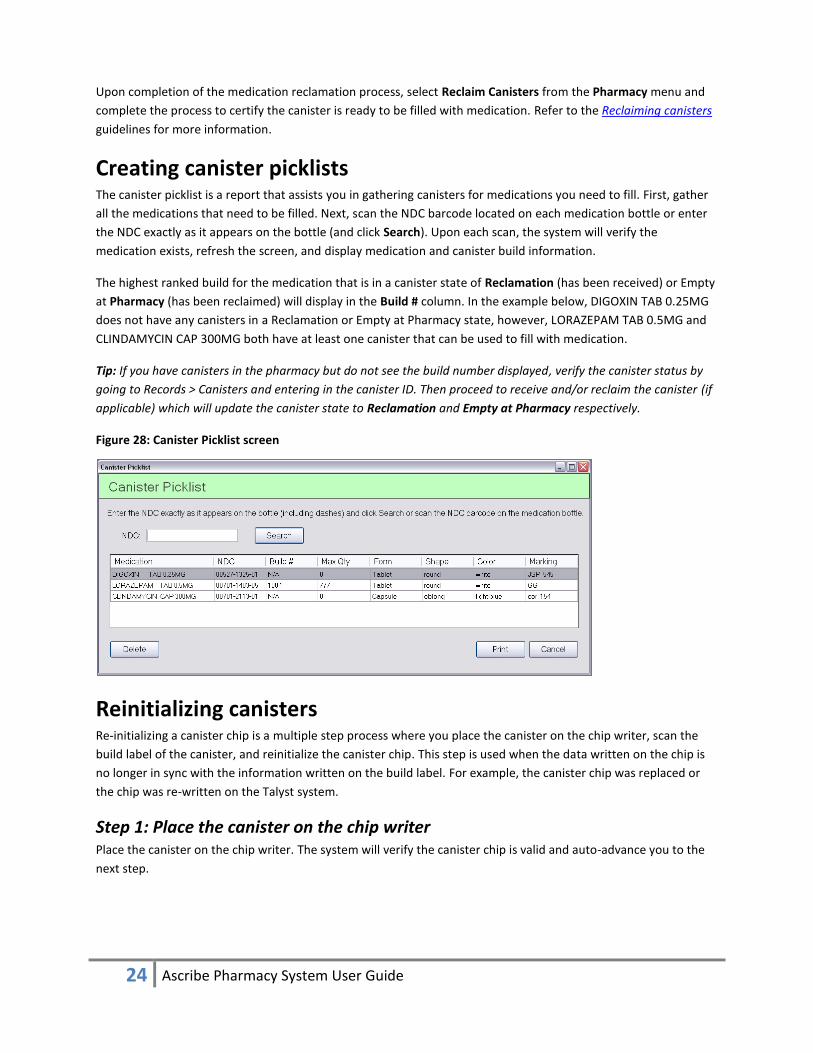
Creating canister picklists The canister picklist is a report that assists you in gathering canisters for medications you need to fill. First, gather
all the medications that need to be filled. Next, scan the NDC barcode located on each medication bottle or enter
the NDC exactly as it appears on the bottle (and click Search). Upon each scan, the system will verify the
medication exists, refresh the screen, and display medication and canister build information.
The highest ranked build for the medication that is in a canister state of Reclamation (has been received) or Empty
at Pharmacy (has been reclaimed) will display in the Build # column. In the example below, DIGOXIN TAB 0.25MG
does not have any canisters in a Reclamation or Empty at Pharmacy state, however, LORAZEPAM TAB 0.5MG and
CLINDAMYCIN CAP 300MG both have at least one canister that can be used to fill with medication.
Tip: If you have canisters in the pharmacy but do not see the build number displayed, verify the canister status by
going to Records > Canisters and entering in the canister ID. Then proceed to receive and/or reclaim the canister (if
applicable) which will update the canister state to Reclamation and Empty at Pharmacy respectively.
Figure 28: Canister Picklist screen
Reinitializing canisters Re-initializing a canister chip is a multiple step process where you place the canister on the chip writer, scan the
build label of the canister, and reinitialize the canister chip. This step is used when the data written on the chip is
no longer in sync with the information written on the build label. For example, the canister chip was replaced or
the chip was re-written on the Talyst system.
Step 1: Place the canister on the chip writer Place the canister on the chip writer. The system will verify the canister chip is valid and auto-advance you to the
next step.
25 Ascribe Pharmacy System User Guide
Step 2: Scan the build label Scan the build label of canister on the chip writer. The system will reinitialize the canister chip with the information
on the label and set the canister state to Empty at Pharmacy.
Note: If you cancel the action, the canister cannot be used (e.g. filled, shipped) until it is successfully re-initialized.
Step 3: Remove the canister from the chip writer Remove the canister from the chip writer. After the canister is removed from the chip writer, you can fill the
canister with medication.
Note: If the canister was filled with medication and then re-initialized, you will need to repeat the Fill Canisters
process. Doing so will update the canister state to Filled at Pharmacy and allow the canister to be shipped to a
facility. A common scenario where this would occur would be if you filled a canister and then scanned the canisters
to be shipped to an incorrect facility.
26 Ascribe Pharmacy System User Guide
Records Menu
Records are comprised sets of data that represent an entity (e.g. facility, pharmacy). For example, the “facility”
record is comprised of the facility name, address, and phone number. There are many types of records in the
system and depending on the record type and your security access, you may be able to add new records and
view/edit existing records.
All record screens are designed and function identically to one another. When selecting any of the options from
the Records menu, you will be brought to a screen commonly referred to as the “search” screen. The nickname
accurately depicts the function of the screen; however, the screen offers much more than search capabilities. From
the search screen, you can add, view, and edit records.
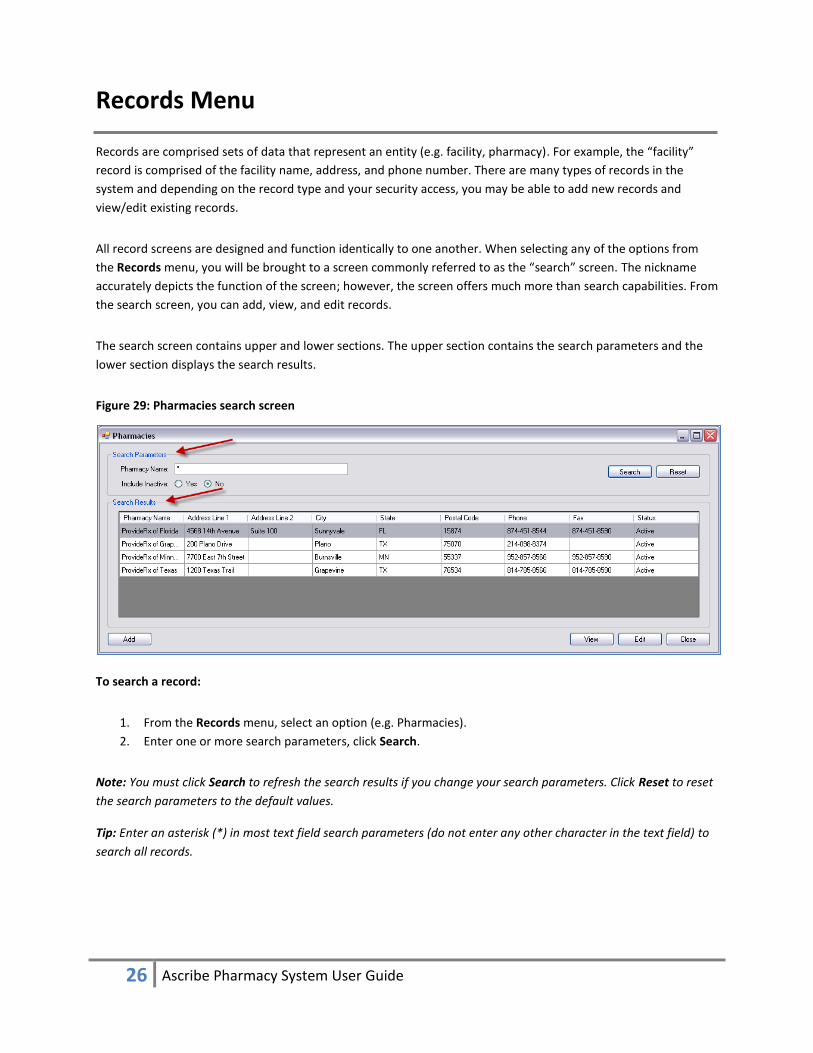
The search screen contains upper and lower sections. The upper section contains the search parameters and the
lower section displays the search results.
Figure 29: Pharmacies search screen
To search a record:
1. From the Records menu, select an option (e.g. Pharmacies).
2. Enter one or more search parameters, click Search.
Note: You must click Search to refresh the search results if you change your search parameters. Click Reset to reset
the search parameters to the default values.
Tip: Enter an asterisk (*) in most text field search parameters (do not enter any other character in the text field) to
search all records.
27 Ascribe Pharmacy System User Guide
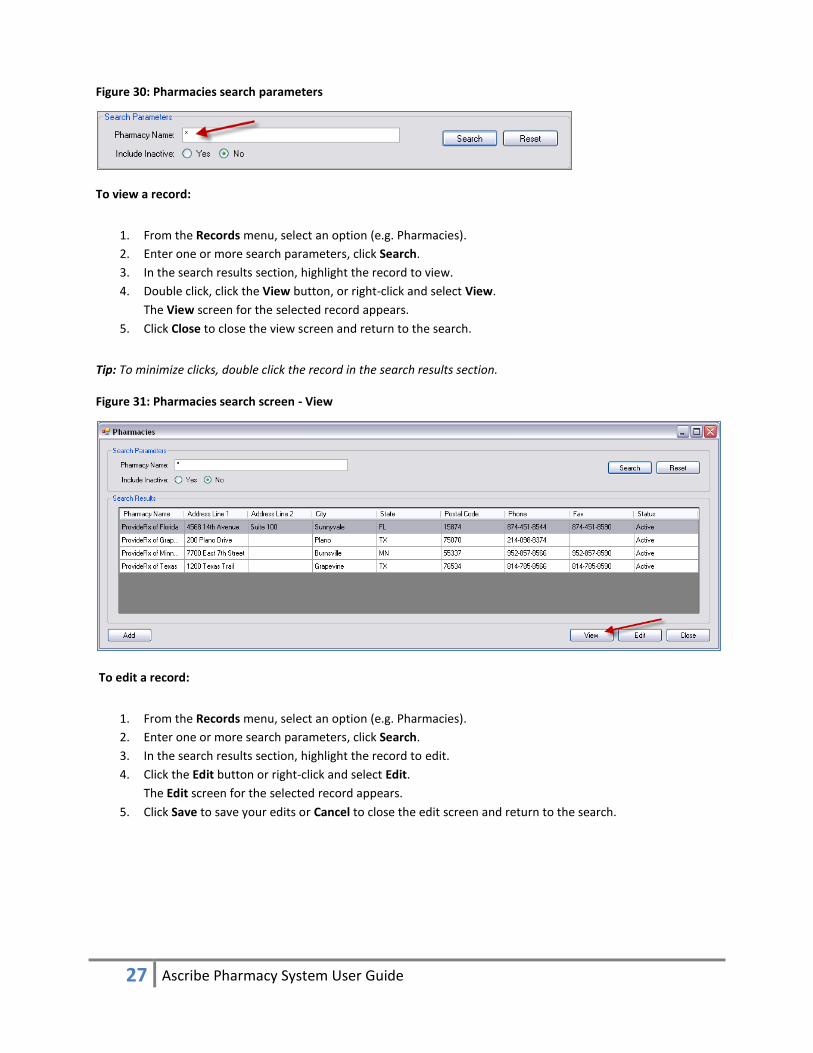
Figure 30: Pharmacies search parameters
To view a record:
1. From the Records menu, select an option (e.g. Pharmacies).
2. Enter one or more search parameters, click Search.
3. In the search results section, highlight the record to view.
4. Double click, click the View button, or right-click and select View.
The View screen for the selected record appears.
5. Click Close to close the view screen and return to the search.
Tip: To minimize clicks, double click the record in the search results section.
Figure 31: Pharmacies search screen - View
To edit a record:
1. From the Records menu, select an option (e.g. Pharmacies).
2. Enter one or more search parameters, click Search.
3. In the search results section, highlight the record to edit.
4. Click the Edit button or right-click and select Edit.
The Edit screen for the selected record appears.
5. Click Save to save your edits or Cancel to close the edit screen and return to the search.
28 Ascribe Pharmacy System User Guide
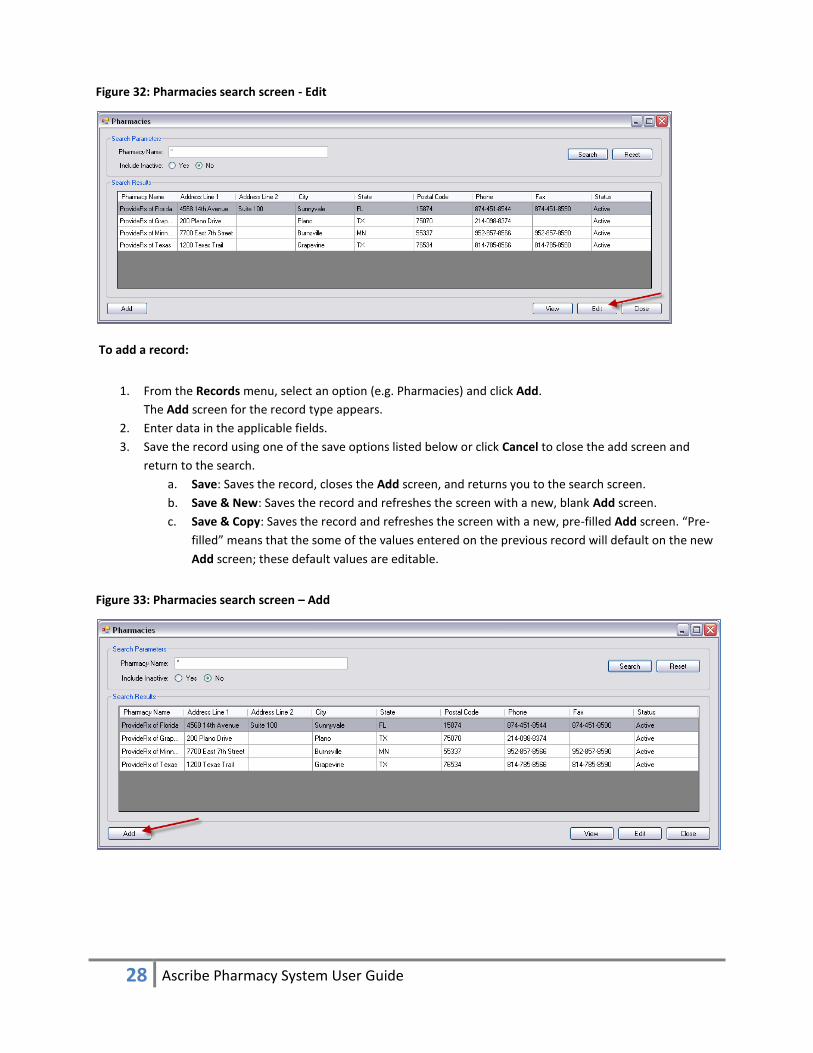
Figure 32: Pharmacies search screen - Edit
To add a record:
1. From the Records menu, select an option (e.g. Pharmacies) and click Add.
The Add screen for the record type appears.
2. Enter data in the applicable fields.
3. Save the record using one of the save options listed below or click Cancel to close the add screen and
return to the search.
a. Save: Saves the record, closes the Add screen, and returns you to the search screen.
b. Save & New: Saves the record and refreshes the screen with a new, blank Add screen.
c. Save & Copy: Saves the record and refreshes the screen with a new, pre-filled Add screen. “Pre-
filled” means that the some of the values entered on the previous record will default on the new
Add screen; these default values are editable.
Figure 33: Pharmacies search screen – Add

29 Ascribe Pharmacy System User Guide
Builds A “build” is a set of individual canister parts that when assembled, create a canister. A “build number” is an
identifier assigned to the canister based on its canister parts. Many canisters can be assigned the same build
number but a single canister can only have one build number at any given time. The build number is used
throughout the system when initializing, filling, and ordering canisters.
Searching builds Before viewing or editing a build, you must select the build you want to view or edit. The following search
parameters are available when searching builds.
Note: Required fields appear in bold, black text. Although all parameters are optional, you must enter or select at
least one search parameter.
Build Number: Enter one or more characters of the build number. The search results will include all
canister builds with a build number containing the characters entered.
Vendor Part Number: Enter one or more characters of the vendor part number. The search results will
include all canister builds with a vendor part number containing the characters entered.
Include Inactive: Select No to search active canisters builds only or select Yes to search active and inactive
canister builds.
The search results will sort by the Build Number column by default. Click any of the column headers to re-sort the
results.
Adding, viewing, and editing builds The following fields display when adding, viewing, and editing a build unless otherwise noted.
Note: Required fields appear in bold, black text.
Build Number: This is a system generated value when a build is added and is not editable.
Main Body: Select an option from the drop-down list.
Partition Position: Select an option from the drop-down list.
Division Block: Select an option from the drop-down list.
Guide Block: Select an option from the drop-down list.
Partition: Select an option from the drop-down list.
Fix Block: Select an option from the drop-down list.
Handle: Select an option from the drop-down list.
Extension: Select an option from the drop-down list.
Vendor Name: Select an option from the drop-down list.
Vendor Part Name: Enter up to 50 characters.
Vendor Part Number: Enter up to 10 characters.
Note: Enter up to 255 characters.
Status: Select Active or Inactive.

30 Ascribe Pharmacy System User Guide
Canisters Canisters are all the canisters that exist in the system (currently in circulation and out of circulation).
Searching canisters Before viewing a canister, you must select the canister you want to view. The following search parameters are
available when searching canisters.
Note: Required fields appear in bold, black text. Although all parameters are optional, you must enter or select at
least one search parameter.
Canister ID: Enter one or more characters of the canister ID. The search results will include all canisters
with a canister ID containing the characters entered.
Canister State: Select an option from the drop-down list. The search results will include all canisters with
the selected canister state.
Pharmacy Name: Enter one or more characters of the pharmacy name. The search results will include all
canisters currently assigned to pharmacies with a pharmacy name containing the characters entered.
Build Number: Enter one or more characters of the build number. The search results will include all
canister builds with a build number containing the characters entered.
Install Description: Enter one or more characters of the install description. The search results will include
all canisters assigned to an install with an install description containing the characters entered.
The search results will sort by the Canister ID column by default. Click any of the column headers to re-sort the
results.
Viewing canisters The following fields display when viewing a canister: Canister ID, Canister State, Pharmacy Name (if applicable),
Build Number, Install Description (if applicable), and Applicable Activities. Applicable Activities are tasks you can
perform against the canister given its current canister state, depending on your security rights.
Corporations A “corporation” is the owning entity of one or more facilities. A facility’s corporation must exist in the system
before the facility can be added. Many facilities can be assigned the same corporation but a single facility can only
have one corporation. Corporations are used for reporting and screen display purposes only.
Searching corporations Before viewing or editing a corporation, you must select the corporation you want to view or edit. The following
search parameters are available when searching corporations.
Note: Required fields appear in bold, black text.
Corporation Name: Enter one or more characters of the corporation name. The search results will include
all corporations with a corporation name containing the characters entered. At least one character is
required to perform the search.
Include Inactive: Select No to search active corporations only or select Yes to search active and inactive
corporations.
31 Ascribe Pharmacy System User Guide
The search results will sort by the Corporation Name column by default. Click any of the column headers to re-sort
the results with the exception of the Phone and Fax columns.
Adding, viewing, and editing corporations The following fields display when adding, viewing, and editing a corporation unless otherwise noted.
Note: Required fields appear in bold, black text.
Corporation Name: Enter up to 50 characters; must be a unique value.
Address Lines 1 and 2: Enter up to 255 characters for each line.
City: Enter up to 255 characters.
State: Select an option from the drop-down list.
Postal Code: Enter up to 15 characters.
Country: Select an option from the drop-down list.
Time Zone: Select an option from the drop-down list.
Phone and Extension: Enter up to 20 characters for the phone number and 10 characters for the
extension.
Fax: Enter up to 20 characters.
Status: Select Active or Inactive.
Facilities Facilities are LTC facilities dispensing medications from the OnSiteRx® Dispensing System.
Searching facilities Before viewing or editing a facility, you must select the facility you want to view or edit. The following search
parameters are available when searching facilities.
Note: Required fields appear in bold, black text.
Facility Name: Enter one or more characters of the facility name. The search results will include all
facilities with a facility name containing the characters entered. At least one character is required to
perform the search.
Include Inactive: Select No to search active facilities only or select Yes to search active and inactive
facilities.
The search results will sort by the Facility Name column by default. Click any of the column headers to re-sort the
results with the exception of the Phone and Fax columns.
Adding, viewing, and editing facilities The following fields display when adding, viewing, and editing a facility unless otherwise noted.
Note: Required fields appear in bold, black text.
General information tab Corporation Name: Select an option from the drop-down list.
Facility Name: Enter up to 50 characters; must be a unique value within the selected corporation.
32 Ascribe Pharmacy System User Guide
Pharmacy Name: Select an option from the drop-down list.
Pharmacy System: This is a system defaulted value derived from the Pharmacy System selection for the
pharmacy that the facility is assigned to. A couple things to note:
o The Pharmacy System selection on the facility record is editable only by users who have the
System Admin security right.
o Editing the Pharmacy System selection on the pharmacy record will not trigger an update to the
Pharmacy System selection of the facilities that are assigned to that pharmacy.
o Editing the pharmacy assigned to a facility will trigger an update to the Pharmacy System
selection for that facility to match the pharmacy system of the newly assigned pharmacy.
NPI: Enter up to 10 characters; must be a unique value.
Facility Code: Enter up to 6 characters; must be a unique value.
Address Lines 1 and 2: Enter up to 255 characters for each line.
City: Enter up to 255 characters.
State: Select an option from the drop-down list.
Postal Code: Enter up to 15 characters.
Country: Select an option from the drop-down list.
Time Zone: Select an option from the drop-down list.
Phone and Ext.: Enter up to 20 characters for the phone number and 10 characters for the extension.
Fax: Enter up to 20 characters.
Activation Key: An activation key will generate upon Save.
Last Known IP Address: This is a system generated value and is not editable.
Status: Select Active or Inactive.
Display settings tab Name Display: Select Corporation-Facility to display the corporation name followed by the facility name
(e.g. Long Term Nursing Chain – Nursing Home ABC). Select Facility to display the facility name only (e.g.
Nursing Home XYZ).
Time Display: Select 12 Hour (11:56 PM) or 24 Hour (23:56).
ODS/MAR User Session Timeout: Select an option from the drop-down list. This is the grace period that
the user can be inactive for before being automatically locked out of the OnSiteRx® Dispensing System.
Administration Window: Select an option from the drop-down list. This is the grace period beyond the
hour of administration when the dose will remain available to dispense. For example, if the hour of
administration is 13:00 and the administration window is 2 hours, then the dose will be available to
dispense until 15:00.
Note: The administration window is hard-coded to be four hours for facilities that are assigned to a central
fill packager. For example, if you have two facilities assigned, Dallas Continuing Care and Waco Elderly
Center and administration window for Dallas is set to three hours and the administration window for
Waco is set to two hours, the system overrides the administration window settings and applied a four hour
administration window for both facilities.
Next Day Doses Available At: Select an option from the hour, minute, and AM/PM drop-down lists. This
option dictates the time of day at which doses for the following day will become available to dispense for
facilities receiving a daily batch file. For example, if today is 07/01/2011 and 6:00 PM is selected, then
doses for 07/02/2011 will become available to dispense at 6:00PM on 07/01/2011.
33 Ascribe Pharmacy System User Guide
MRN is Required: Select the checkbox to require the resident medical record number be included in the
resident message received from the pharmacy system. When selected, the system will reject resident
messages that do not contain a MRN.
Packet settings tab HOA Display: Select HOA Time to display the actual HOA or Patient Directed to display the phrase
“PATIENT DIRECTED” in place of the actual HOA. This setting designates the value that will print on the
packet. It does not affect reports.
Primary, Secondary, and Tertiary Routine Dispense Packet Sort Order: Select an option from the drop-
down lists. The sort order defined is applied to the packet sort order within the packet strip.
Primary, Secondary, and Tertiary Controlled Substance Packet Sort Order: Select an option from the
drop-down lists. The sort order defined is applied to the packet sort order within the packet strip.
Print Ctrld Sub Count Sheet: Select Always to print the Controlled Substance Count Sheet every time a
controlled medication is dispensed. Select Never to prevent the system from printing the Controlled
Substance Count Sheet or select Routine Only to print the Controlled Substance Count Sheet only when a
controlled medication is dispensed as part of a routine daily dispense.
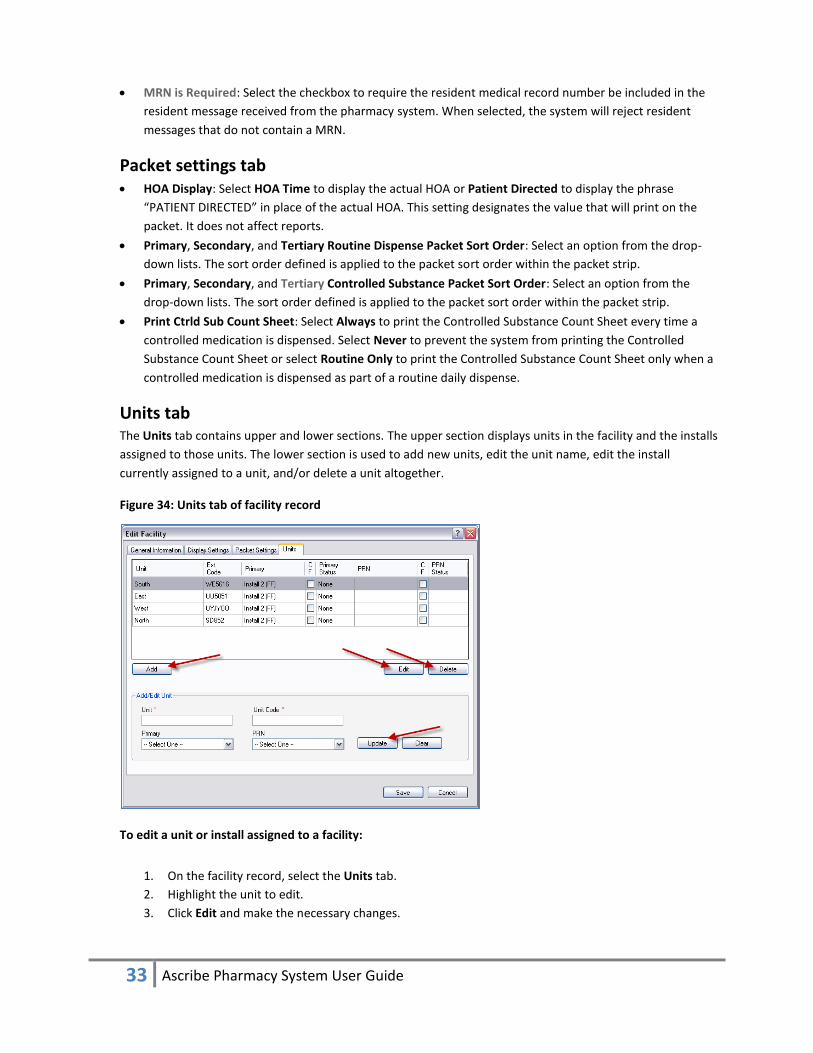
Units tab The Units tab contains upper and lower sections. The upper section displays units in the facility and the installs
assigned to those units. The lower section is used to add new units, edit the unit name, edit the install
currently assigned to a unit, and/or delete a unit altogether.
Figure 34: Units tab of facility record
To edit a unit or install assigned to a facility:
1. On the facility record, select the Units tab.
2. Highlight the unit to edit.
3. Click Edit and make the necessary changes.
34 Ascribe Pharmacy System User Guide
4. Click Update.
5. Click Save when all changes have been completed.
To delete a unit assigned to a facility:
1. On the facility record, select the Units tab.
2. Highlight the unit to delete.
3. Click Delete.
4. Click Save when all changes have been completed.
To add a unit to a facility:
Note: A pharmacy must be selected on the General Information tab prior to adding a unit.
1. On the facility record, select the Units tab.
2. Click Add.
3. Enter data in the applicable fields.
a. Unit: Enter up to 50 characters; must be a unique value within the facility.
b. Unit Code: Enter up to 6 characters; must be a unique value within the facility.
c. Primary: Select an option from the drop-down list.
d. PRN: PRN installs are currently not supported.
4. Click Update.
5. Click Save when all changes have been completed.
Click Clear to cancel editing or adding a unit.
Install Formularies Install formularies are master lists of medications that should be in the specific packager inventory at all times.
Each time an install is added to the system (Records > Installs), a corresponding install formulary record is added.
The install formulary is utilized when (1) shipping canisters to a facility, (2) displaying canister statuses on reports
and in ODS, and (3) gathering data for the Canister Replacement report.
The system will prevent a canister from being shipped to a facility/packager when the medication group of the
medication attempting to be shipped is not assigned to the install formulary. If you scan a medication to ship to a
facility/packager and that medication’s medication group is not assigned to the install formulary, the system will
display an error and prevent the shipping of that canister. The medication must be added to the install formulary in
order to ship that medication to the facility/packager.
Canisters will display with a Monitor status when the medication is assigned to the facility/packager (in the
packager, in the storage unit, sent to the facility, and sent to the pharmacy) but the medication’s medication group
is not assigned to the install formulary.
The system utilizes the install formulary in two ways when gathering data to display on the Canister Replacement
report.
35 Ascribe Pharmacy System User Guide
Medications that are assigned to the facility/packager (in the packager, in the storage unit, and sent to
the facility) but are not assigned to the install formulary will NEVER display on the Canister Replacement
report. For example, there is a canister of METOPROLOL TAB 25MG ER in the packager with a quantity
remaining of 3. METOPROLOL TAB 25MG ER’s medication group is not assigned to the install formulary.
Since this medication group is not assigned to the install formulary, it will not display on the Canister
Replacement report even though the quantity is less than or equal to 10. If the medication group was
assigned to the install formulary, the medication would display on the Canister Replacement report.
Medication groups that are assigned to the install formulary but no canisters are currently assigned to the
facility/packager (in the packager, in the storage unit, or sent to the facility) will display on the Canister
Replacement report with a QoH of 0 and a Replace Date of the current date.
Searching install formularies Before viewing or editing an install formulary, you must select the install formulary you want to view or edit. The
following search parameters are available when searching install formularies.
Note: Required fields appear in bold, black text.
Install Description: Enter one or more characters of the install description. The search results will include
all installs with an install description containing the characters entered.
The search results will sort by the Description column by default. Click any of the column headers to re-sort the
results.
Viewing and editing install formularies The view and edit install formulary screens contain upper and lower sections. The upper section displays
medications currently assigned to the install formulary and the lower section is used to add and remove existing
medications to and from the install formulary.
36 Ascribe Pharmacy System User Guide
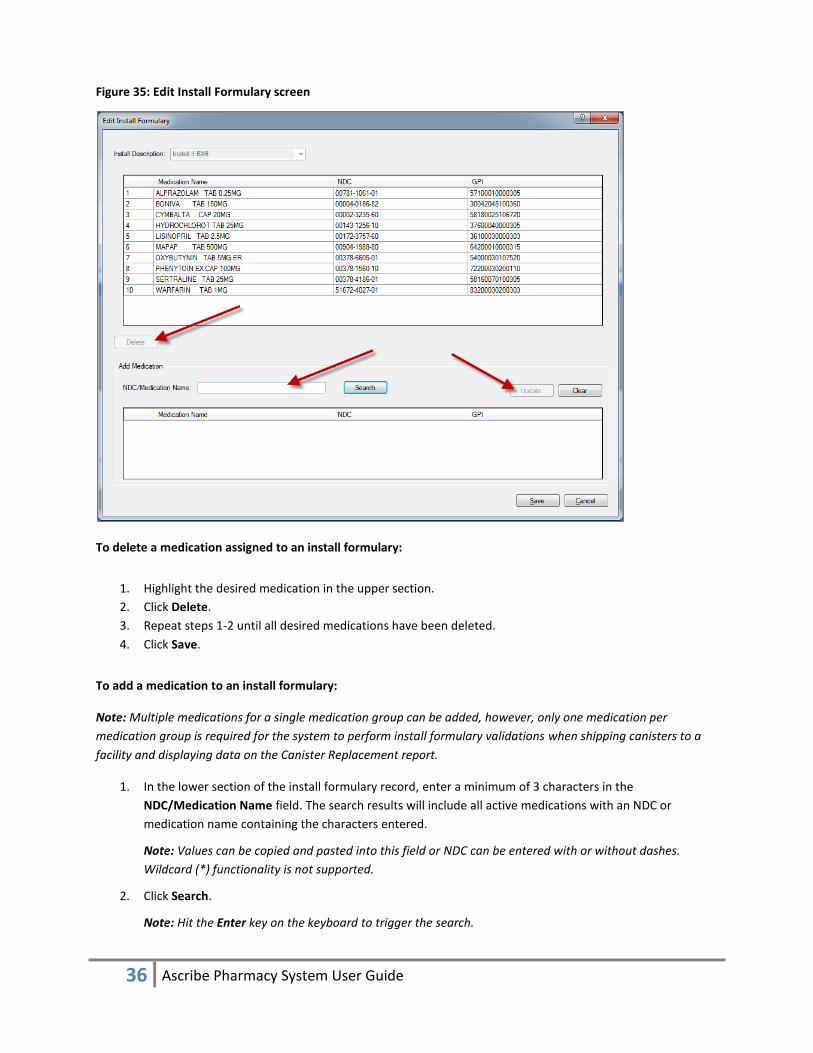
Figure 35: Edit Install Formulary screen
To delete a medication assigned to an install formulary:
1. Highlight the desired medication in the upper section.
2. Click Delete.
3. Repeat steps 1-2 until all desired medications have been deleted.
4. Click Save.
To add a medication to an install formulary:
Note: Multiple medications for a single medication group can be added, however, only one medication per
medication group is required for the system to perform install formulary validations when shipping canisters to a
facility and displaying data on the Canister Replacement report.
1. In the lower section of the install formulary record, enter a minimum of 3 characters in the
NDC/Medication Name field. The search results will include all active medications with an NDC or
medication name containing the characters entered.
Note: Values can be copied and pasted into this field or NDC can be entered with or without dashes.
Wildcard (*) functionality is not supported.
2. Click Search.
Note: Hit the Enter key on the keyboard to trigger the search.
37 Ascribe Pharmacy System User Guide
3. Highlight the medication to add.
4. Click Update.
5. Repeat steps 1-4 until all desired medications have been added.
6. Click Save.
Click Clear to reset the search parameters to the default values.
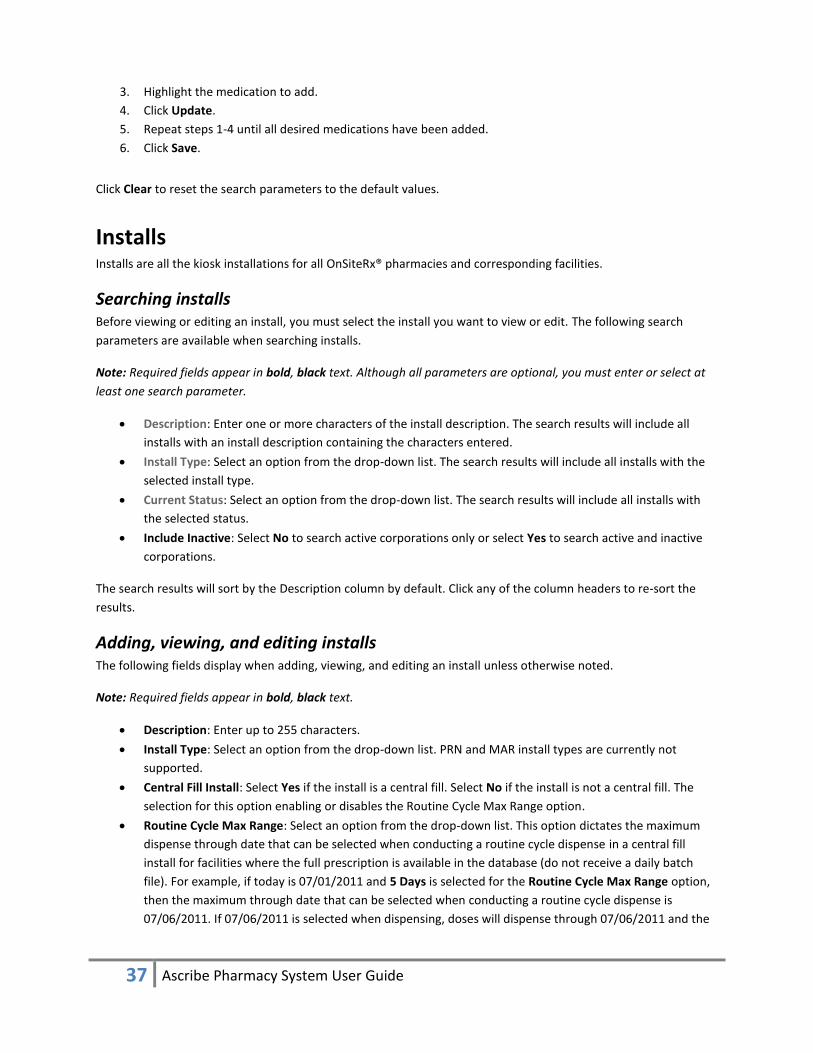
Installs Installs are all the kiosk installations for all OnSiteRx® pharmacies and corresponding facilities.
Searching installs Before viewing or editing an install, you must select the install you want to view or edit. The following search
parameters are available when searching installs.
Note: Required fields appear in bold, black text. Although all parameters are optional, you must enter or select at
least one search parameter.
Description: Enter one or more characters of the install description. The search results will include all
installs with an install description containing the characters entered.
Install Type: Select an option from the drop-down list. The search results will include all installs with the
selected install type.
Current Status: Select an option from the drop-down list. The search results will include all installs with
the selected status.
Include Inactive: Select No to search active corporations only or select Yes to search active and inactive
corporations.
The search results will sort by the Description column by default. Click any of the column headers to re-sort the
results.
Adding, viewing, and editing installs The following fields display when adding, viewing, and editing an install unless otherwise noted.
Note: Required fields appear in bold, black text.
Description: Enter up to 255 characters.
Install Type: Select an option from the drop-down list. PRN and MAR install types are currently not
supported.
Central Fill Install: Select Yes if the install is a central fill. Select No if the install is not a central fill. The
selection for this option enabling or disables the Routine Cycle Max Range option.
Routine Cycle Max Range: Select an option from the drop-down list. This option dictates the maximum
dispense through date that can be selected when conducting a routine cycle dispense in a central fill
install for facilities where the full prescription is available in the database (do not receive a daily batch
file). For example, if today is 07/01/2011 and 5 Days is selected for the Routine Cycle Max Range option,
then the maximum through date that can be selected when conducting a routine cycle dispense is
07/06/2011. If 07/06/2011 is selected when dispensing, doses will dispense through 07/06/2011 and the
38 Ascribe Pharmacy System User Guide
system will prevent dates prior to 07/06/2011 from being selected for all subsequent routine cycle
dispenses for that facility.
Note: Enter up to 255 characters.
Status: Select Active or Inactive.
Packager information section The following fields are enabled when Primary is selected for the Install Type.
Serial Number: Enter up to 255 characters.
Model Number: Enter up to 50 characters.
IP Address: Enter a value.
Port Number: Enter a value between 1 and 65,535.
Packet Shipping Manifest: Enter a properly formatted local or network path. A copy of each Packet
Shipping Manifest will save to the directory entered here.
Ctrld Sub Count Sheet: Enter a properly formatted local or network path. A copy of each Controlled
Substance Count Sheet will save to the directory entered here.
Install Name: This is a system generated value and is not editable.
Activation Key: An activation key will generate upon Save.
Software Version: This is a system generated value and is not editable.
Current Status: This is a system generated value and is not editable.
Packet formats section The following fields are enabled when Primary is selected for the Install Type.
Dispense Start: Select an option from the drop-down list.
New Unit: Select an option from the drop-down list.
Routine Dispense: Select an option from the drop-down list.
Controlled Substance Start: Select an option from the drop-down list.
Controlled Substance Dispense: Select an option from the drop-down list.
Blank: Select an option from the drop-down list.
Destroy: Select an option from the drop-down list.
Dispense Complete: Select an option from the drop-down list.
Medication Groups A “medication group” (aka pharmacy formulary) is a group of one or more medications with the same GPI that can
be administered interchangeably for resident care and billing. Medication groups are copied from a designated
pharmacy at the time a new pharmacy is added. Medication groups can be edited thereafter.
There are four medication group types:
Main: Can include medications that have a trade type of brand (B), branded generic (BG), and generic (G).
Brand: Includes medications that have trade type of brand (B) only.
Branded Generic: Includes medications that have a trade type of branded generic (BG) only.
Generic: Includes medications that have a trade type of generic (G) only.

39 Ascribe Pharmacy System User Guide
The “medication group number” is a system generated value beginning with the GPI of the medication and is not
editable. Every GPI will have a “main” medication group. The main medication group can be sub-grouped based on
trade type. Each time a medication group is sub-grouped, a unique medication group number is generated,
appending B, BG, or G to the GPI. These primary sub-groups can be further sub-grouped as needed.
Note: The GPI is a 14-digit number, however, is referenced as a 5-digit number in the example below for simplicity.
For example, the GPI for a medication is 12345 and is sub-grouped based on trade type creating three additional
medication groups: 12345-B, 12345-BG, and 12345-G. The generic medication group of this medication is sub-
grouped creating two additional medication groups: 12345-G2 and 12345-G3. In this example, the pharmacy will
have the following medication groups for the medication: 12345, 12345-B, 12345-BG, 12345-G, 12345-G2, and
12345-G3.
Searching medication groups Before viewing or editing a medication group, you must select the medication group you want to view or edit. The
following search parameters are available when searching installs.
Note: Required fields appear in bold, black text. Although all parameters are optional, you must enter or select at
least one search parameter.
NDC: Enter one or more characters of the three segment NDC number including leading zeros but not
dashes. The search results will include all medications with a NDC number containing the characters
entered.
Medication Name: Enter one or more characters of the medication name. The search results will include
all medications with a medication name containing the characters entered.
GPI: Enter one or more characters of the GPI. The search results will include all medications with a GPI
containing the characters entered.
The search results will sort by the GPI column by default. Click any of the column headers to re-sort the results.
Viewing and editing medication groups Medication groups will display in a hierarchical tree view. Additional medication details display to the right of the
tree view when the medication name is highlighted. Right-click functionality provides the capability to move
medications between groups, remove medication groups, and create new medication groups.
Medications can be moved between groups or to a new group at any time; however they are restricted to specific
groups based on the trade type. The Main medication group is the only group that allows medications with
different trade types to co-exist. For example, a medication with a trade type of “generic” cannot be moved to a
medication group containing medications with a trade type of “brand.”
40 Ascribe Pharmacy System User Guide
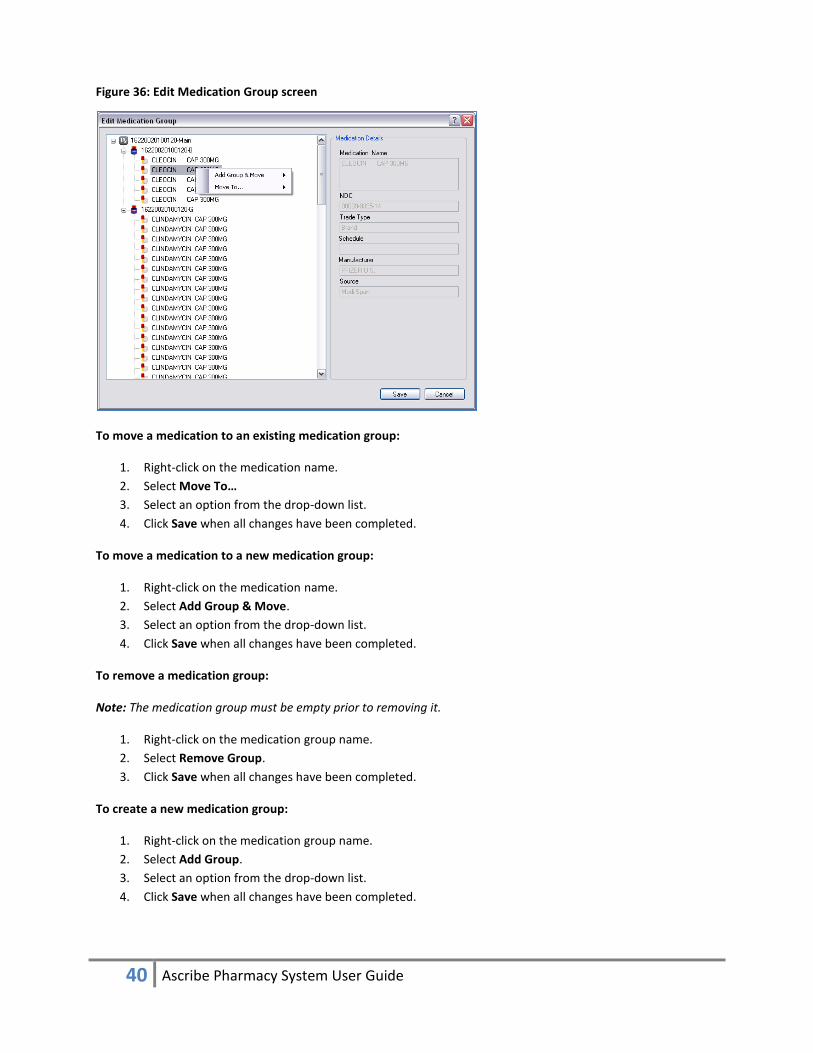
Figure 36: Edit Medication Group screen
To move a medication to an existing medication group:
1. Right-click on the medication name.
2. Select Move To…
3. Select an option from the drop-down list.
4. Click Save when all changes have been completed.
To move a medication to a new medication group:
1. Right-click on the medication name.
2. Select Add Group & Move.
3. Select an option from the drop-down list.
4. Click Save when all changes have been completed.
To remove a medication group:
Note: The medication group must be empty prior to removing it.
1. Right-click on the medication group name.
2. Select Remove Group.
3. Click Save when all changes have been completed.
To create a new medication group:
1. Right-click on the medication group name.
2. Select Add Group.
3. Select an option from the drop-down list.
4. Click Save when all changes have been completed.
41 Ascribe Pharmacy System User Guide
Example: Creating new medication groups Four medications are assigned the same GPI (for example, 12345) and have a mixture of trade types.
Medication A (brand)
Medication B (branded generic)
Medication C (branded generic)
Medication D (generic)
For example purposes, all four medications are currently assigned to the Main medication group (12345) but they
need to be sub-grouped because all four medications are not covered by insurance even though they all treat the
resident’s condition equally. No subgroups exist currently.
Let’s begin editing the medication groups in the following order:
1. Right-click on Medication A (brand) and one option appears in the drop-down list: Add Group & Move.
Select Add Group & Move and then select Brand. The system:
a. Removes Medication A from medication group 12345-Main.
b. Creates and assigns Medication A to medication group 12345-B.
2. Right-click on Medication B (branded generic) and one option appears in the drop-down list: Add Group &
Move. The sub-group created in step 1 does not display in the drop-down as an existing group to move
Medication B into because Medication A has a trade type of brand whereas Medication B has a trade type
of branded generic. Select Add Group & Move and then select Branded Generic. The system:
a. Removes Medication B from medication group 12345-Main.
b. Creates and assigns Medication B to medication group 12345-BG.
3. Right-click on Medication C (branded generic) and two options appear in the drop-down list: Add Group &
Move and Move To. Select Move To and then select 12345-BG. The system:
a. Removes Medication C from medication group 12345-Main.
b. Assigns Medication C to medication group 12345-BG. Medication group 12345-BG now contains
two medications: Medication B and Medication C.
4. Right-click on Medication D (generic) and one option appears in the drop-down list: Add Group & Move.
Select Add Group & Move and then select Generic. The system:
a. Removes Medication D from 12345-Main.
b. Creates and assigns Medication D to medication group 12345-G.
A few months pass and Medication B and C can no longer be administered interchangeably due to billing changes
and need to be broken into their own sub-groups.
5. Right-click on Medication B and two options appear in the drop-down list: Add Group & Move and Move
To. Select Add Group & Move and then select Branded Generic. The system:
a. Removes Medication B from 12345-BG. Medication group 12345-BG now contains Medication C
only.
b. Creates and assigns Medication B to medication group 12345-BG2.
Note: If you right-click on Medication C, two options appear in the drop-down list: Add Group & Move and
Move To. If you select Move To, two options appear in the drop-down list: 12345-Main and 12345-BG2.

42 Ascribe Pharmacy System User Guide
The steps above result in the following medication groups:
12345-Main does not contain any medications.
12345-B includes Medication A only.
12345-BG includes Medication C only.
12345-BG2 includes Medication B only.
12345-G includes Medication D only.
Medications Medications are all the medications that exist in all pharmacies setup in the OnSiteRx® Pharmacy System (one
master list). Edits made to medications by one pharmacy will affect all other pharmacies.
Searching medications Before viewing or editing a medication, you must select the medication you want to view or edit. There are three
medication searches: By Attribute(s), By Name, and By NDC(s). The following search parameters are available
when searching medications.
By Name Medication Name: Enter one or more characters of the medication name. The search results will include
all medications with a medication name containing the characters entered. At least one character is
required to perform the search.
The search results will sort by the Medication Name column by default. Click any of the column headers to re-
sort the results.
By Attribute(s) Note: Required fields appear in bold, black text. Although all parameters are optional, you must enter or select
at least one search parameter.
Thickness and Variance (+/-): Enter one or more characters of the thickness measurement in the
Thickness field and enter a numeric value in the +/- field to search for a range of thicknesses. The search
results will include all medications with the specified thickness or within the specified thickness range,
depending on if you entered a variance. For example, if you enter 5 for the thickness and enter 2 for the
variance (+/-), the search results will include all medications with a thickness between 3 and 7.
Length and Variance (+/-): Enter one or more characters of the length measurement in the Length field
and enter a numeric value in the +/- field to search for a range of lengths.
Width 1 and Variance (+/-): Enter one or more characters of the width measurement in the Width 1 field
and enter a numeric value in the +/- field to search for a range of widths.
Width 2 and Variance (+/-): Refer to the Width 1 & Variance (+/-) parameter.
Form: Select an option from the drop-down list.
Shape: Select an option from the drop-down list.
Color: Select an option from the drop-down list.
Marking: Enter one or more characters of the medication marking. The search results will include all
medications with markings containing the characters entered.
43 Ascribe Pharmacy System User Guide
Note: A valid marking may be “Logo” or a variation of “Logo” to indicate that the logo is on the
medication.
Include Meds w/o Builds: Select No to search medications that are attached to at least one canister build
or Yes to search all medications, regardless if the medication is attached to a canister build.
Only Include Meds w/Unapproved Builds: Select No to search medications that are attached to at least
one canister build (regardless of approval status) or Yes to search medications that are attached to at
least one canister build and at least one canister build is not approved for the medication.
The search results will sort by the Medication Name column by default. Click any of the column headers to re-
sort the results.
By NDC(s) NDC(s): Enter one or more characters of the three segment NDC number including leading zeros but not
dashes; separate multiple NDC numbers by a comma. The search results will include all medications with a
NDC number containing the characters entered. At least one character is required to perform the search.
Note: The comma delimited list may have spaces before and/or after the comma or no spaces at all; all
are acceptable formats.
The search results will sort by the Medication Name column by default. Click any of the column headers to re-
sort the results.
Adding, viewing, and editing medications The following fields display when adding, viewing, and editing a medication unless otherwise noted.
Note: Required fields appear in bold, black text.
General information tab Medication Name: Enter up to 60 characters. The value entered will display in upper case letters for
consistency.
Medication Display Name: Enter up to 25 characters. The value entered will display in upper case letters
for consistency. This value displays throughout ODS, OPS, and ORC.
NDC: Enter the NDC number exactly as it appears on the medication bottle, including dashes. Do not
manually insert additional numbers such as leading zeros. Acceptable formats include but are not limited
to: #####-####-#, #####-###-##, and ####-####-##.
GPI: Enter 14 characters.
Manufacturer: Select an option from the drop-down list.
Trade Type: Select an option from the drop-down list.
Source: This is a system generated value when a medication is added and is used to differentiate
medications from Medi-Span and medications that are manually entered. This field is not editable.
Schedule: Select an option from the drop-down list. Select the “blank” option from the drop-down if the
medication is a legend medication.
Pack Alone: Select Yes if the medication must be packaged in a separate packet (cannot be combined
with other medications) or No if the medication can be packaged in a packet with other medications.
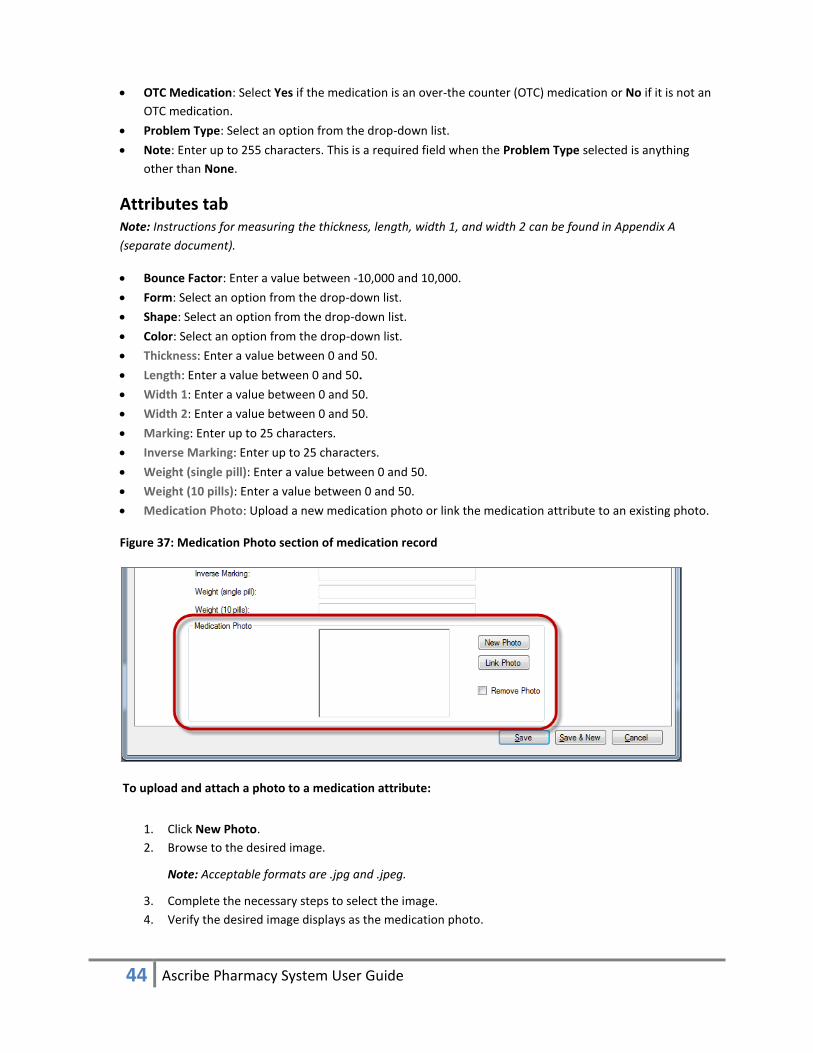
44 Ascribe Pharmacy System User Guide
OTC Medication: Select Yes if the medication is an over-the counter (OTC) medication or No if it is not an
OTC medication.
Problem Type: Select an option from the drop-down list.
Note: Enter up to 255 characters. This is a required field when the Problem Type selected is anything
other than None.
Attributes tab Note: Instructions for measuring the thickness, length, width 1, and width 2 can be found in Appendix A
(separate document).
Bounce Factor: Enter a value between -10,000 and 10,000.
Form: Select an option from the drop-down list.
Shape: Select an option from the drop-down list.
Color: Select an option from the drop-down list.
Thickness: Enter a value between 0 and 50.
Length: Enter a value between 0 and 50.
Width 1: Enter a value between 0 and 50.
Width 2: Enter a value between 0 and 50.
Marking: Enter up to 25 characters.
Inverse Marking: Enter up to 25 characters.
Weight (single pill): Enter a value between 0 and 50.
Weight (10 pills): Enter a value between 0 and 50.
Medication Photo: Upload a new medication photo or link the medication attribute to an existing photo.
Figure 37: Medication Photo section of medication record
To upload and attach a photo to a medication attribute:
1. Click New Photo.
2. Browse to the desired image.
Note: Acceptable formats are .jpg and .jpeg.
3. Complete the necessary steps to select the image.
4. Verify the desired image displays as the medication photo.
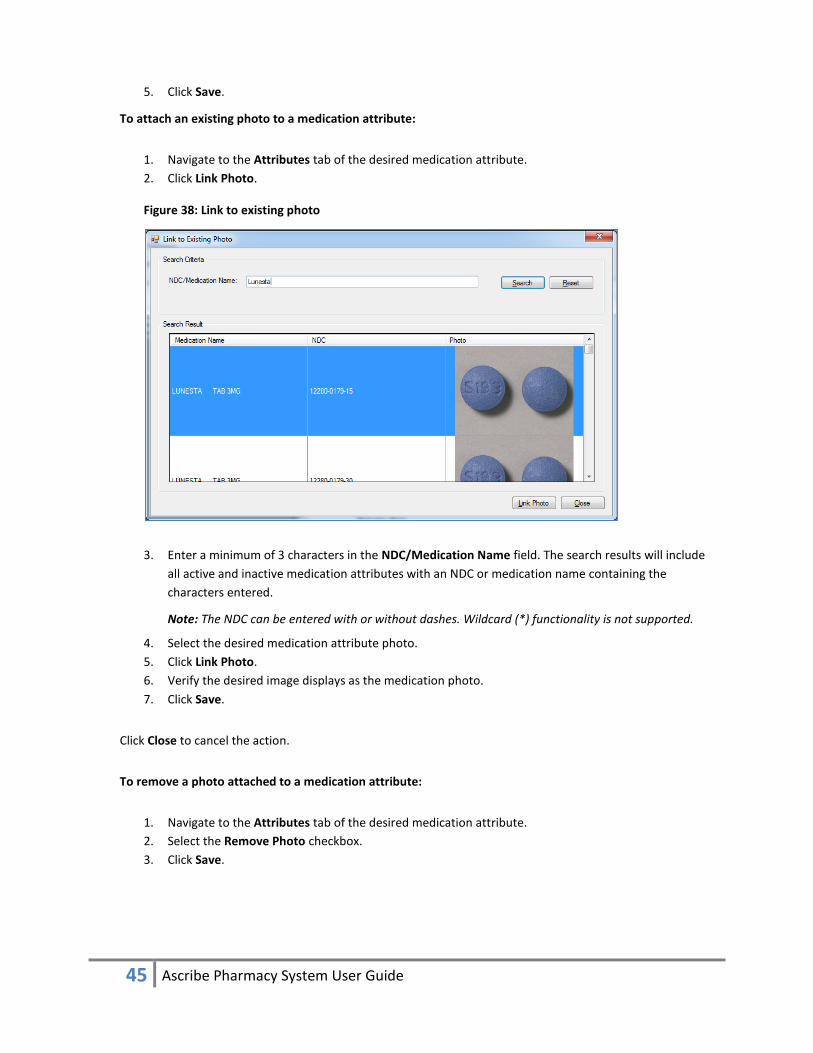
45 Ascribe Pharmacy System User Guide
5. Click Save.
To attach an existing photo to a medication attribute:
1. Navigate to the Attributes tab of the desired medication attribute.
2. Click Link Photo.
Figure 38: Link to existing photo
3. Enter a minimum of 3 characters in the NDC/Medication Name field. The search results will include
all active and inactive medication attributes with an NDC or medication name containing the
characters entered.
Note: The NDC can be entered with or without dashes. Wildcard (*) functionality is not supported.
4. Select the desired medication attribute photo.
5. Click Link Photo.
6. Verify the desired image displays as the medication photo.
7. Click Save.
Click Close to cancel the action.
To remove a photo attached to a medication attribute:
1. Navigate to the Attributes tab of the desired medication attribute.
2. Select the Remove Photo checkbox.
3. Click Save.

46 Ascribe Pharmacy System User Guide
Build sequence tab The Build Sequence tab contains upper and lower sections. The upper section displays builds currently
assigned to the medication in rank/sequence order with the lowest ranked build (#1) being the most
compatible to the medication. The lower section is used to add new builds and edit builds currently assigned
to the medication (e.g. change max quantity or problem type).
Figure 39: Build Sequence tab of medication record
To modify the rank of assigned builds:
1. On the medication record, select the Build Sequence tab.
2. Highlight the build to re-sequence.
3. Click Move Up or Move Down until the build is ranked as desired.
4. Click Save when all changes have been completed.
To edit a build assigned to a medication:
1. On the medication record, select the Build Sequence tab.
2. Highlight the build to edit.
3. Click Edit and make the necessary changes.
4. Click Update.
5. Click Save when all changes have been completed.
To delete a build assigned to a medication:
1. On the medication record, select the Build Sequence tab.
2. Highlight the build to delete.
3. Click Delete.
4. Click Save when all changes have been completed.
47 Ascribe Pharmacy System User Guide
To add a build to a medication:
1. On the medication record, select the Build Sequence tab.
2. Click Add.
3. Enter data in the applicable fields outlined below.
a. Rank: Select an option from the drop-down list. If there are four builds already assigned and
you select a rank of 3, the new build will be ranked as #3 and the build previously sequenced
as #3 will now be ranked as #4.
b. Build Number: Enter or select an option from the drop-down.
c. Max Qty: Enter a value between 1 and 9,999.
d. Problem Type: Select an option from the drop-down list.
e. Note: Enter up to 255 characters. This field is required when the option selected for Problem
Type is anything other than None.
f. Approved: Select the checkbox if the build has been approved for use with the medication
or leave the checkbox de-selected if the medication is still pending approval.
4. Click Update.
5. Click Save when all changes have been completed.
Click Clear to cancel editing or adding a build.
Parts Parts are selected when adding and editing canister builds. Parts include canister parts as well as consumables (e.g.
paper, ribbon).
Searching parts Before viewing a part, you must select the part you want to view. The following search parameters are available
when searching parts.
Note: Required fields appear in bold, black text. Although all parameters are optional, you must enter or select at
least one search parameter.
Part Name: Enter one or more characters of the part name. The search results will include all parts with a
part name containing the characters entered.
Part Number: Enter one or more characters of the part number. The search results will include all parts
with a part number containing the characters entered.
Part Type: Select an option from the drop-down list. The search results will include all parts with the
selected part type.
Vendor Part Name: Enter one or more characters of the vendor part name. The search results will include
all parts with a vendor part name containing the characters entered.
Vendor Part Number: Enter one or more characters of vendor part number. The search results will
include all parts with a vendor part number containing the characters entered.
The search results will sort by the Part Number column by default. Click any of the column headers to re-sort the
results.
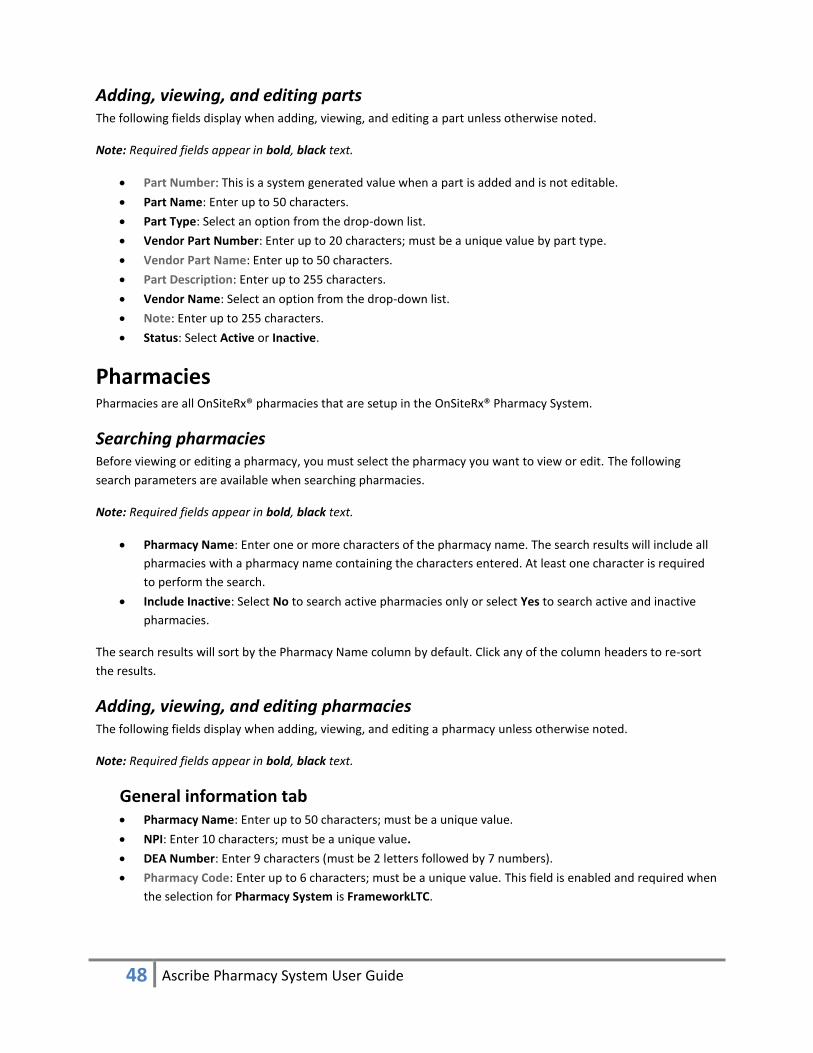
48 Ascribe Pharmacy System User Guide
Adding, viewing, and editing parts The following fields display when adding, viewing, and editing a part unless otherwise noted.
Note: Required fields appear in bold, black text.
Part Number: This is a system generated value when a part is added and is not editable.
Part Name: Enter up to 50 characters.
Part Type: Select an option from the drop-down list.
Vendor Part Number: Enter up to 20 characters; must be a unique value by part type.
Vendor Part Name: Enter up to 50 characters.
Part Description: Enter up to 255 characters.
Vendor Name: Select an option from the drop-down list.
Note: Enter up to 255 characters.
Status: Select Active or Inactive.
Pharmacies Pharmacies are all OnSiteRx® pharmacies that are setup in the OnSiteRx® Pharmacy System.
Searching pharmacies Before viewing or editing a pharmacy, you must select the pharmacy you want to view or edit. The following
search parameters are available when searching pharmacies.
Note: Required fields appear in bold, black text.
Pharmacy Name: Enter one or more characters of the pharmacy name. The search results will include all
pharmacies with a pharmacy name containing the characters entered. At least one character is required
to perform the search.
Include Inactive: Select No to search active pharmacies only or select Yes to search active and inactive
pharmacies.
The search results will sort by the Pharmacy Name column by default. Click any of the column headers to re-sort
the results.
Adding, viewing, and editing pharmacies The following fields display when adding, viewing, and editing a pharmacy unless otherwise noted.
Note: Required fields appear in bold, black text.
General information tab Pharmacy Name: Enter up to 50 characters; must be a unique value.
NPI: Enter 10 characters; must be a unique value.
DEA Number: Enter 9 characters (must be 2 letters followed by 7 numbers).
Pharmacy Code: Enter up to 6 characters; must be a unique value. This field is enabled and required when
the selection for Pharmacy System is FrameworkLTC.

49 Ascribe Pharmacy System User Guide
Pharmacy System: Select an option from the drop-down list. This option is used to default the Pharmacy
System selection on facilities that are assigned to this pharmacy and to enable/disable the Pharmacy
Code field. A couple things to note:
o The Pharmacy System selection on the facility record is editable only by users who have the
System Admin security right.
o Editing the Pharmacy System selection on the pharmacy record will not trigger an update to the
Pharmacy System selection of the facilities that are assigned to that pharmacy.
o Editing the pharmacy assigned to a facility will trigger an update to the Pharmacy System
selection for that facility to match the pharmacy system of the newly assigned pharmacy.
Address Lines 1 and 2: Enter up to 255 characters for each line.
City: Enter up to 255 characters.
State: Select an option from the drop-down list.
Postal Code: Enter up to 15 characters.
Country: Select an option from the drop-down list.
Time Zone: Select an option from the drop-down list.
Phone: Enter up to 20 characters.
Fax: Enter up to 20 characters.
Medication Group Template: Select an option from the drop-down list.
Note: Medication groups can be customized for the pharmacy after they are copied.
Fill Exp. Date Calculation: Select an option from the drop-down list. Calculations for each option are
defined below.
Lot Exp: Gather the earliest lot expiration date entered (up to 3 can be entered per canister fill) and
designate it as the canister fill expiration date.
Lot Exp or 60 Days: Gather the earliest lot expiration date entered (up to 3 can be entered per canister
fill) and compare it with the current date+60 days. Take the earlier of the lot expiration date or current
date+60 days and designate it as the canister fill expiration date.
Lot Exp or 90 Days: Gather the earliest lot expiration date entered (up to 3 can be entered per canister
fill) and compare it with the current date+90 days. Take the earlier of the lot expiration date or current
date+90 days and designate it as the canister fill expiration date.
Lot Exp or 180 Days: Gather the earliest lot expiration date entered (up to 3 can be entered per canister
fill) and compare it with the current date+180 days. Take the earlier of the lot expiration date or current
date+180 days and designate it as the canister fill expiration date.
Lot Exp or 365 Days: Gather the earliest lot expiration date entered (up to 3 can be entered per canister
fill) and compare it with the current date+365 days. Take the earlier of the lot expiration date or current
date+365 days and designate it as the canister fill expiration date.
Canister Shipping Manifest (to Pharmacy): Enter a properly formatted local or network path. A copy of
each Canister Shipping Manifest to Pharmacy will save to the directory entered here.
Canister Shipping Manifest (to Facility): Enter a properly formatted local or network path. A copy of each
Canister Shipping Manifest to Facility will save to the directory entered here.
Activation Key: An activation key will generate upon Save and is used when installing OPS at a pharmacy.
Status: Select Active or Inactive.
50 Ascribe Pharmacy System User Guide
Installs tab The Installs tab contains upper and lower sections. The upper section displays installs currently assigned to the
pharmacy. The lower section is used to add new installs, edit installs currently assigned, and/or delete an
install altogether.
To edit an install assigned to a pharmacy:
1. On the pharmacy record, select the Installs tab.
2. Highlight the install to edit.
3. Click Edit and make the necessary changes.
4. Click Update.
5. Click Save when all changes have been completed.
To delete an install assigned to a pharmacy:
1. On the pharmacy record, select the Installs tab.
2. Highlight the install to delete.
3. Click Delete.
4. Click Save when all changes have been completed.
To add an install to a pharmacy:
1. On the pharmacy record, select the Installs tab.
2. Click Add.
3. Enter data in the applicable fields.
a. Install: Select an option from the drop-down list.
b. Serial Number: The serial number from the install record will display and is not editable.
c. Activation Key: The activation key from the install record will display and is not editable. The
activation key is used when installing ODS.
4. Click Update.
5. Click Save when all changes have been completed.
Click Clear to cancel editing or adding an install.
Security Templates Security templates are pre-defined groups of security rights for the ODS, OPS, and ORC. Security templates are
based on the user’s role (e.g. Pharmacy Technician, Med Aide).
Searching security templates Before viewing a security template, you must select the template you want to view. The following search
parameters are available when searching templates.
Note: Required fields appear in bold, black text.

51 Ascribe Pharmacy System User Guide
Template Name: Select an option from the drop-down list.
The search results will sort by the Template Name column by default. Click any of the column headers to re-sort
the results.
Viewing security templates All security rights will display when viewing templates. Selected (checked) security rights are rights the template
will grant access to the user. De-selected (not checked) security rights are rights the template will not grant access
to the user.
A list of security rights and descriptions can be found in Appendix B (separate document).
Note: You can only grant and deny security right access when adding and editing users for security rights that you
have been granted access to. For example, if you do not have security rights to fill canisters, then you cannot grant
or deny the Fill Canisters security right when adding or editing users.
Users Users for all three systems (ODS, OPS, and ORC) are setup and maintained the OnSiteRx® Pharmacy System.
Searching users Before viewing or editing a user, you must select the user you want to view or edit. The following search
parameters are available when searching users.
Note: Required fields appear in bold, black text. Although all parameters are optional, you must enter or select at
least one search parameter.
ODS/MAR Username: Enter one or more characters of the ODS/MAR username. The search results will
include all users with an ODS/MAR username containing the characters entered.
OPS/ORC Username: Enter one or more characters of the OPS/ORC username. The search results will
include all users with an OPS/ORC username containing the characters entered.
Include Inactive: Select No to search active users only or select Yes to search active and inactive users.
The search results will sort by the First Name column by default. Click any of the column headers to re-sort the
results.
Adding, viewing, and editing users The following fields display when adding, viewing, and editing a user unless otherwise noted.
Note: Required fields appear in bold, black text.
General information tab Prefix: Enter up to 25 characters.
First, Middle, and Last Names: Enter up to 50 characters for each name.
Suffix: Enter up to 25 characters.
ODS/MAR Username: This is a system generated value when a user is added and is not editable. It is
derived from the values entered in the first, middle, and last name fields. For example, if Jane and Doe
52 Ascribe Pharmacy System User Guide
were entered in the first and last name fields, the username would be Jane Doe. If Jane, Beth, and Doe
were entered in the first, middle, and last name fields, the username would be Jane Beth Doe.
OPS/ORC Username: Enter up to 20 characters; the system will default the username with the first
character of the first name followed by the first 19 characters of the last name.
User Type: Select Facility when the user will not have access to the OnSiteRx® Pharmacy System. Select
Pharmacy when the user will have access to the OPS (e.g. billing department, pharmacy staff, support,
etc). The selection for this option drives the display of the Facility or Pharmacy Associations tab,
enabling/disabling pharmacist centric fields, and enabling/disabling security rights.
Pharmacist: Select Yes if the user is a pharmacist. Select No if the user is not a pharmacist.
Pharmacist Initials: Enter 3 characters. This field is required when the selection for Pharmacist is Yes. This
value is used to match the pharmacist initials on orders received from RNA Pharmacy Solutions (RNA).
FW RPh NPI: Enter up to 10 characters; must be a unique value. This value is used to link the OPS user to
the pharmacist in the pharmacy system.
Source: This is a system generated value when a user is added and is used to differentiate users from the
pharmacy system and users that are manually entered. This field is not editable.
Change Password: Select the checkbox to change the user’s password only when editing a user. When
adding a new user, this checkbox will be disabled. Simply enter the user’s password into the Password
and Confirm Password fields.
Password: Enter up to 12 characters. The password is applied to the OnSiteRx® Pharmacy (OPS) and
OnSiteRx® Dispensing (ODS) systems, and OnSiteRx® Resource Center (ORC). The password requirements
are:
o Passwords must be at least six characters long but no more than twelve characters.
o Passwords must contain at least one number and one letter.
o Passwords cannot contain the OPS/ORC username or ODS/MAR username.
Confirm Password: Enter up to 12 characters; the value entered must match the value entered for the
Password field.
Title: Enter up to 50 characters.
Security Question: Enter up to 50 characters. This value displays when Forgot Password is clicked on the
login screen.
Security Question Answer: Enter up to 20 characters. This value is used to verify the answer provided
when you click Forgot Password on the login screen.
Business Phone and Extension: Enter up to 20 characters for the phone field and 10 characters for the
extension field.
Other Phone and Extension: Enter up to 20 characters for the phone field and 10 characters for the
extension field.
Cell Phone: Enter up to 20 characters.
Email: Enter up to 255 characters and must be in an acceptable email address format (e.g. include “@”).
Status: Select Active or Inactive.
Locked Out: The system will set this field to Yes when a user has unsuccessfully attempted to log into the
system 5 or more times in a 24 hour period.
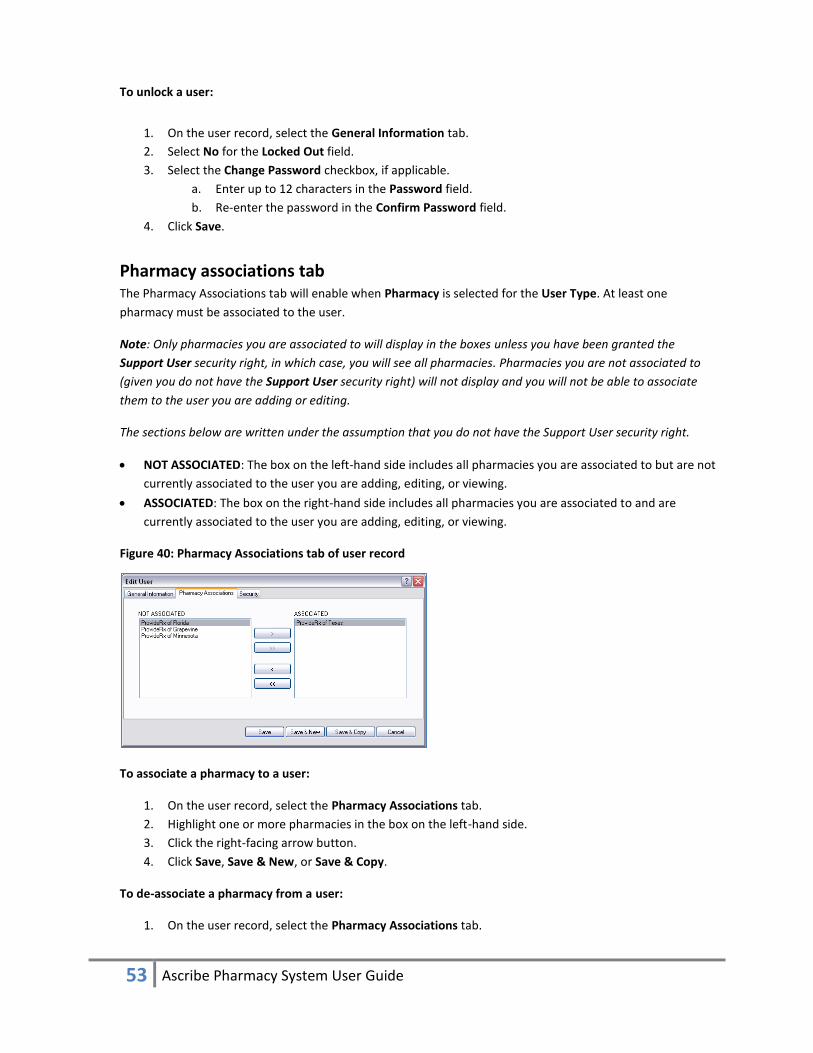
53 Ascribe Pharmacy System User Guide
To unlock a user:
1. On the user record, select the General Information tab.
2. Select No for the Locked Out field.
3. Select the Change Password checkbox, if applicable.
a. Enter up to 12 characters in the Password field.
b. Re-enter the password in the Confirm Password field.
4. Click Save.
Pharmacy associations tab The Pharmacy Associations tab will enable when Pharmacy is selected for the User Type. At least one
pharmacy must be associated to the user.
Note: Only pharmacies you are associated to will display in the boxes unless you have been granted the
Support User security right, in which case, you will see all pharmacies. Pharmacies you are not associated to
(given you do not have the Support User security right) will not display and you will not be able to associate
them to the user you are adding or editing.
The sections below are written under the assumption that you do not have the Support User security right.
NOT ASSOCIATED: The box on the left-hand side includes all pharmacies you are associated to but are not
currently associated to the user you are adding, editing, or viewing.
ASSOCIATED: The box on the right-hand side includes all pharmacies you are associated to and are
currently associated to the user you are adding, editing, or viewing.
Figure 40: Pharmacy Associations tab of user record
To associate a pharmacy to a user:
1. On the user record, select the Pharmacy Associations tab.
2. Highlight one or more pharmacies in the box on the left-hand side.
3. Click the right-facing arrow button.
4. Click Save, Save & New, or Save & Copy.
To de-associate a pharmacy from a user:
1. On the user record, select the Pharmacy Associations tab.
54 Ascribe Pharmacy System User Guide
2. Highlight one or more pharmacies in the box on the right-hand side.
3. Click the left-facing arrow button.
4. Click Save, Save & New, or Save & Copy.
Tip: Highlight multiple pharmacies by clicking with the mouse while holding down the Ctrl key on your
keyboard. All highlighted pharmacies will move to the adjacent box when you click the appropriate button.
Facility associations tab The Facility Associations tab will enable when Facility is selected for the User Type. At least one facility must
be associated to the user.
Note: Only facilities assigned to the pharmacies you are associated to will display in the boxes unless you have
been granted the Support User security right, in which case, you will see all facilities. Facilities assigned to
pharmacies you are not associated to (given you do not have the Support User security right) will not display
and you will not be able to associate them to the user you are adding or editing.
The sections below are written under the assumption that you do not have the Support User security right.
NOT ASSOCIATED: The box on the left-hand side includes all facilities assigned to the pharmacies you are
associated to but are not currently associated to the user you are adding, editing, or viewing.
ASSOCIATED: The box on the right-hand side includes all facilities associated to the pharmacies you are
associated to and are currently associated to the user you are adding, editing, or viewing.
To associate a facility to a user:
1. On the user record, select the Facility Associations tab
2. From the Corporation Name drop-down, select the corporation or select All.
3. Highlight one or more facilities in the box on the left-hand side.
4. Click the right-facing arrow button.
5. Click Save, Save & New, or Save & Copy.
To de-associate a facility from a user:
1. On the user record, select the Facility Associations tab
2. From the Corporation Name drop-down, select the corporation or select All.
3. Highlight one or more facilities in the box on the right-hand side.
4. Click the left-facing arrow button.
5. Click Save, Save & New, or Save & Copy.
Tip: Highlight multiple facilities by clicking with the mouse while holding down the Ctrl key on your keyboard.
All highlighted facilities will move to the adjacent box when you click the appropriate button.
Security tab Security templates are pre-defined groups of security rights for the ODS, OPS, and ORC. Security templates are
based on the user’s role (e.g. Pharmacy Technician, Med Aide). You can assign security rights to a user by
selecting a security template (and customizing as needed) or selecting each security right manually (without
first selecting a security template to populate the security rights).
55 Ascribe Pharmacy System User Guide
To apply a security template to a user:
1. On the user record, select the Security tab.
2. Select an option from the Template Name drop-down.
3. Click Update.
4. Click Save, Save & New, or Save & Copy.
To customize security rights for a user:
1. On the user record, select the Security tab.
2. Select (grant) and/or de-select (deny) the desired security rights.
3. Click Save, Save & New, or Save & Copy.
Note: You can only grant and deny security right access when adding and editing users for security rights that
you have been granted access to. For example, if you do not have security rights to fill canisters, then you
cannot grant or deny the Fill Canisters security right when adding or editing users.
56 Ascribe Pharmacy System User Guide
Reports Menu
All data driven reports (dispense, system access, setup, etc) are accessed through the ORC. Reports that are
generated and automatically saved in OPS will display under the OPS > Reports menu.
Manifest (Facility) The system will open a Windows Explorer window to the save path directory of the Canister Shipping Manifest (to
facility).
Manifest (Pharmacy) The system will open a Windows Explorer window to the save path directory of the Canister Shipping Manifest (to
pharmacy).