
as_chap3
14
23 3 Freehand Sketching Sections • 3.1 Why Freehand Sketches? • 3.2 Freehand Sketching Fundamentals • 3.3 Basic Freehand Sketching • 3.4 Advanced Freehand Sketching • Key Terms Objectives • Explain why freehand sketching is important in design • Freehand sketch lines and circles • Sketch an oblique 3-D projection • Sketch an isometric 3-D projection • Sketch an orthographic multiview projection
-
Upload
usamaelkomy -
Category
Documents
-
view
219 -
download
0
Transcript of as_chap3

8/6/2019 as_chap3
http://slidepdf.com/reader/full/aschap3 1/14
23
3Freehand Sketching
Sections
• 3.1 Why Freehand Sketches?• 3.2 Freehand Sketching Fundamentals• 3.3 Basic Freehand Sketching• 3.4 Advanced Freehand Sketching• Key Terms
Objectives
• Explain why freehand sketching is important in design• Freehand sketch lines and circles• Sketch an oblique 3-D projection
• Sketch an isometric 3-D projection• Sketch an orthographic multiview projection

8/6/2019 as_chap3
http://slidepdf.com/reader/full/aschap3 2/14
24 Chapter 3 Freehand Sketching
Overview
In this chapter you will learn useful techniques for freehand sketching to create both
two-dimensional orthographic sketches and three-dimensional pictorial sketches. You
will learn how to quickly make rough sketches to convey a concept and how to make
more refined sketches of objects that are more complex.
3.1 WHY FREEHAND SKETCHES?
An integral part of the creative design process is ideation, the generation of concepts orideas to solve a design problem. Often freehand sketching can be used to explore andcommunicate mental concepts that come about in the mind’s eye. The process of sketching can solidify and fill out rough concepts. Furthermore, sketching captures theideas in a permanent form that can be used to communicate the concept to others. Inthis way, sketches often act as stepping stones to refine and detail the original concept or
generate new ideas. Many great design ideas are first sketched on the back of an enve-lope or in a lab notebook, such as the freehand sketch of one of helicopter inventor IgorSikorsky’s designs, (Figure 3.1).
While computers are the workhorses for engineering graphics, initially generatingideas on a computer screen is very rare. A more common scenario is sketching an ideaon paper and subsequently refining the concept on paper using more rough sketches.This often occurs simply because all that is needed for a freehand sketch is a pencil anda paper. Freehand sketching quickly translates the image of the concept in the mind’seye to paper. Engineers often communicate via rough freehand sketches to refine andimprove the design. Sketches are much more useful than detailed CAD drawings early in the design process, because they are informal, quickly and easily changed, and lessrestrictive. It is only after clarifying the design concept by iterating through several free-hand sketches that it is possible to draw the object using computer graphics. In fact,often an engineer will sit down to create a CAD drawing of an object using a freehandsketch as a guide.
This chapter focuses on the rudimentary elements of freehand technical sketch-ing, because in many ways freehand sketching is the first step in CAD.
3.2 FREEHAND SKETCHING FUNDAMENTALS
Freehand sketching requires few tools: just a pencil and paper. It may be tempting touse straight-edged triangles or rulers for drawing straight lines and a compass to drawcircles. But these instruments often slow down the process and distract from the pur-pose of sketching, which is to create a quick, rough graphical representation of theimage in the mind’s eye. Generally sketching has three steps, although the steps areusually subconscious. First, the sketch is planned by visualizing it in the mind includingthe size of the sketch on the paper, the orientation of the object, and the amount of detail to be included in the sketch. Second, the sketch is outlined using very light linesto establish the orientation, proportion, and major features of the sketch. Finally, sharp-ening and darkening object lines and adding details develops the sketch.
All sketches are made up of a series of arcs and lines, so the ability to draw circlesand straight lines is necessary. A straight line is sketched in the following way. First,sketch the endpoints of the line as dots or small crosses. Then place your pencil on the

8/6/2019 as_chap3
http://slidepdf.com/reader/full/aschap3 3/14

8/6/2019 as_chap3
http://slidepdf.com/reader/full/aschap3 4/14
26 Chapter 3 Freehand Sketching
design engineers are the ones who can sketch an idea clearly in a minute or so. The goalof the sketch in this case is not to show the details of the part, but to provide anotherperson with a clear concept of the idea. For example, a design engineer may need to
show a sketch to a manufacturing engineer to get input on the manufacturability of apart. If the concept is at an early phase, CAD drawings would not have been created yet. So the design engineer needs to use a freehand sketch of the part.
The sketch of Sikorsky’s helicopter in Figure 3.1 exemplifies the power of free-hand sketching. A brief glance at this sketch provides immediate insight to the conceptthat is being shown. One does not need to study the sketch to know what is beingsketched, even if the viewer has never seen the concept before. These quick ideationsketches are not difficult to draw and require no artistic talent, just some practice.
Two types of pictorial sketches are used frequently in freehand sketching: obliqueand isometric. The oblique projection places the principal face of the object parallel tothe plane of the paper. The isometric projection tilts the part so that no surface of thepart is in the plane of the paper. The advantage of the oblique projection is that details
in the front face of the object retain their true shape. This often makes oblique freehandsketching easier than isometric sketching, where no plane is parallel to the paper. Thedisadvantage of the oblique projection is that it does not appear as “photorealistic” as anisometric projection. In other words, an isometric projection is similar to what a photo-graph of the object would look like.
3.3.1 Oblique Sketching
Often freehand sketching begins with light thin lines called construction lines thatdefine enclosing boxes for the shape that is being sketched. Construction lines are usedin several ways. First, the construction lines become the path for the final straight linesof the sketch. Second, the intersection of construction lines specify the length of thefinal lines. Third, points marked by the intersection of construction lines guide the
sketching of circles and arcs. And finally, construction lines guide the proportions of thesketch. This last item is of crucial importance if the sketch is to clearly represent theobject. For example, if an object is twice as wide as it is high, the proportions in thesketch must reflect this. Proper proportions of the boxes defined by the constructionlines will result in proper proportions of the sketch.
An oblique freehand sketch is easy, since it begins with a two-dimensional repre-sentation of the face of the object. Figure 3.4 shows the steps in quickly sketching a part with a circular hole.
Figure 3.3

8/6/2019 as_chap3
http://slidepdf.com/reader/full/aschap3 5/14
Section 3.3 Basic Freehand Sketching 27
Step 1: Horizontal and vertical construction lines are lightly drawn to outline thebasic shape of the main face of the part. This is known as blocking-in the sketch. If you are using a pencil or felt-tip marker, press lightly when drawing the construc-tion lines to produce a thin or light line. If you are using a ball-point pen, draw asingle, light line.
Step 2: Sketch in the face of the part using the construction lines as a guide. How you sketch the outline of the part depends on the type of pen or pencil that youare using. The idea is to thicken the lines of the part compared to the constructionlines. If you are using a pencil or a felt-tip marker, pressing hard for the outline of the part will result in heavy or dark lines. If you are using a ball-point pen, the line width does not depend much on how hard you press. In this case, the outline of the part is sketched with a back and forth motion of the pen to thicken the lines of the part compared to the construction lines as shown in Figure 3.4. The straightlines are usually sketched first, followed by the arcs. The circle for the hole in thepart is added last to complete the face of the part.
Step 3: Sketch receding construction lines (lines into the plane of the paperlabeled a) at a convenient angle. All of the receding lines must be parallel to eachother and are usually at an angle of 30° to 45°. The receding lines end at theappropriate depth for the object. Then vertical and horizontal lines at the backplane of the part are added (lines labeled b). This blocks in the three-dimensional
box enclosing the object.Step 4: Sketch in and darken the lines outlining the part. Again it is usually easiestto sketch in the straight lines first, then the arcs, and finally any details. Becausethe construction lines are light compared to the outline of the part, they are noterased.
The final sketch, while rough and lacking detail, clearly shows the design intentfor the part.
Figure 3.4
8/6/2019 as_chap3
http://slidepdf.com/reader/full/aschap3 6/14
28 Chapter 3 Freehand Sketching
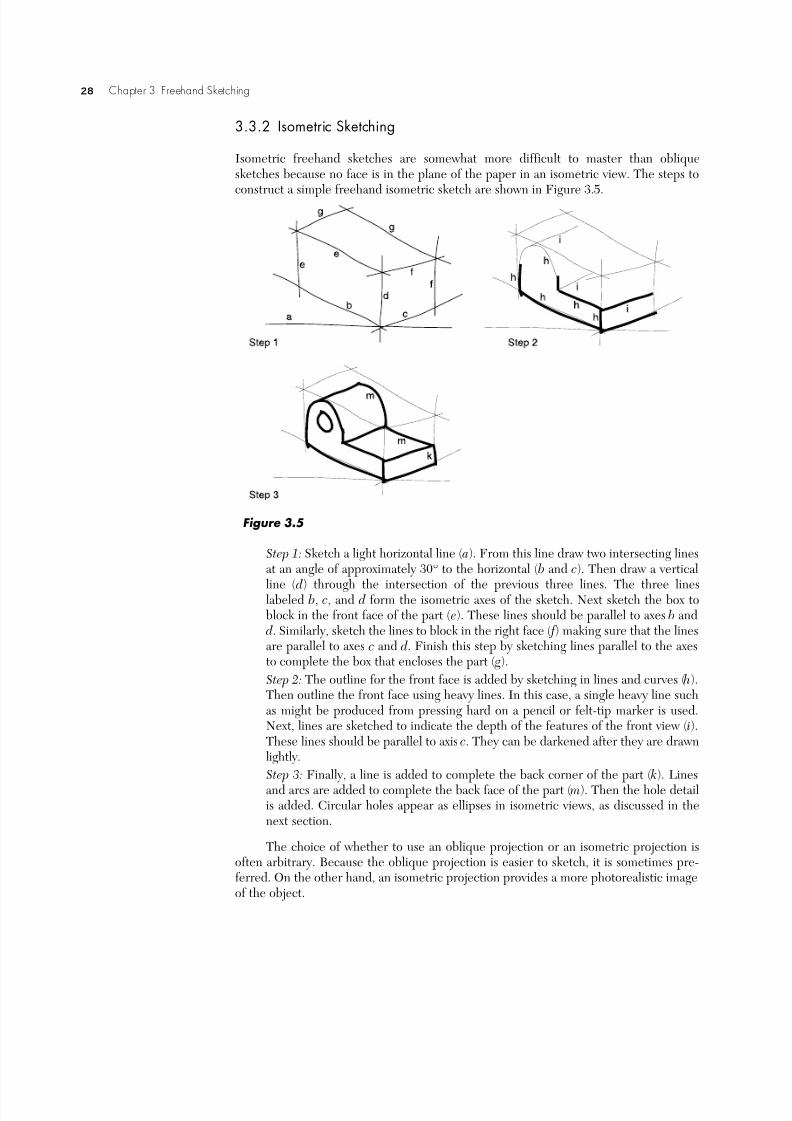
3.3.2 Isometric Sketching
Isometric freehand sketches are somewhat more difficult to master than obliquesketches because no face is in the plane of the paper in an isometric view. The steps to
construct a simple freehand isometric sketch are shown in Figure 3.5.
Step 1: Sketch a light horizontal line (a). From this line draw two intersecting linesat an angle of approximately 30° to the horizontal ( b and c). Then draw a vertical
line ( d) through the intersection of the previous three lines. The three lineslabeled b, c, and d form the isometric axes of the sketch. Next sketch the box toblock in the front face of the part (e). These lines should be parallel to axes b and d. Similarly, sketch the lines to block in the right face ( f ) making sure that the linesare parallel to axes c and d. Finish this step by sketching lines parallel to the axesto complete the box that encloses the part ( g).
Step 2: The outline for the front face is added by sketching in lines and curves (h).Then outline the front face using heavy lines. In this case, a single heavy line suchas might be produced from pressing hard on a pencil or felt-tip marker is used.Next, lines are sketched to indicate the depth of the features of the front view ( i).These lines should be parallel to axis c. They can be darkened after they are drawnlightly.
Step 3: Finally, a line is added to complete the back corner of the part (k). Linesand arcs are added to complete the back face of the part ( m). Then the hole detailis added. Circular holes appear as ellipses in isometric views, as discussed in thenext section.
The choice of whether to use an oblique projection or an isometric projection isoften arbitrary. Because the oblique projection is easier to sketch, it is sometimes pre-ferred. On the other hand, an isometric projection provides a more photorealistic imageof the object.
Figure 3.5

8/6/2019 as_chap3
http://slidepdf.com/reader/full/aschap3 7/14
Section 3.4 Advanced Freehand Sketching 29
3.4 ADVANCED FREEHAND SKETCHING
The sketching methods described in the previous section were focused on sketches in which the face of the object is in a single plane. Freehand sketching is somewhat moredifficult when the face of the object is not in a single plane. The difficulty here is accu-rately depicting the depth of the object. Oblique and isometric projections are still use-ful, though somewhat more complicated than those in the previous section. In addition,orthographic projections are also valuable.
3.4.1 Freehand Oblique Sketching
An example of the steps leading to an oblique freehand sketch of a complicated objectare shown in Figure 3.6. Because the face of the base of the object and the face of theupper portion of the object are in different planes, it is necessary to begin with a boxthat encloses the entire object before sketching either face. Some of the constructionlines are removed after they are used in this example. This was done here to make thesketch more clear. However, this is not necessary in practice, if the construction linesare drawn as light lines.
Step 1: To begin, construction lines to form a box that encloses the object aredrawn to block-in the sketch. Notice that the front and back faces of the box arerectangular with horizontal and vertical sides. The receding construction lines areparallel and at an angle of 30° to 45° to horizontal. The easiest way to draw thisbox is to first draw the front rectangle (a). Then draw an identical second rectan-gle above and to the right of the first rectangle ( b). Finally connect the corners with receding construction lines (c).
Step 2: Now the front face of the base of the object can be sketched in the frontrectangle. The lines are appropriately darkened.
Step 3: Certain features of the front face of the base extend backward along or
parallel to the receding construction lines. For example, the lines ( d) forming thechamfer (angled cut on the right side of the base) can be sketched parallel toreceding lines. Likewise the receding line for the upper left corner of the base canbe sketched (e). Then the base can be finished with a horizontal line on the backface ( f ). Now it is possible to block in the upper rounded portion of the object tocreate a box ( g) that encloses the upper protrusion within the larger box thatencloses the entire object.
Step 4: The front face of the upper portion of the object can be sketched in thisbox. Then receding lines corresponding to the chamfer and the left edge of thebase can be darkened. In addition, the lines forming the back face can besketched. Note that the line forming the back edge of the chamfer is parallel tothe line forming the front edge of the chamfer. Construction lines (h) on the frontface of the upper portion are drawn to center of the circle for the hole.
Step 5: A receding construction line ( i) extending from the peak of the front faceto the plane of the back face is sketched to aid in aligning the curved outline of theback of the upper portion. The back face is identical to the front face except that itis shifted upward and to the right. This results in the left side of the back facebeing hidden. A darkened receding line (k) finishes the left side of the upper por-tion of the object. Finally, four construction lines ( m) are sketched to block in thecircle for the hole.

8/6/2019 as_chap3
http://slidepdf.com/reader/full/aschap3 8/14
30 Chapter 3 Freehand Sketching
Step 6: Now the hole can be sketched in and darkened. The back edge of the holeis also added to complete the sketch. The construction lines may be erased, butusually the construction lines are retained if they are made properly as light lines.
Oblique sketching is often aided by the use of graph paper with a light, squaregrid. The process is identical to that shown in Figure 3.6, but it is easier to keep the pro-
portions correct by counting the number of boxes in the grid to correspond to theapproximate dimensions of the part. Graph paper further improves the sketch by help-ing keep lines straight as well as more accurately horizontal or vertical.
3.4.2 Isometric Sketching
Isometric freehand sketches of more complex objects start with an isometric box toblock in the sketch. Then faces are sketched and additional features are blocked in.
Figure 3.6

8/6/2019 as_chap3
http://slidepdf.com/reader/full/aschap3 9/14
Section 3.4 Advanced Freehand Sketching 31
Finally details are added. The steps to construct an isometric sketch are shown in Fig-ure 3.7 Some of the construction lines are removed after they are used, to make thesketch more clear in this figure. Normally, removing construction lines is not necessary.
Step 1: To begin, sketch a light horizontal line (a). From this line draw two inter-
secting lines at an angle of approximately 30° to the horizontal ( b and c) and a ver-tical line ( d) through the intersection of the previous three lines to form theisometric axes of the sketch. Finish blocking in by sketching lines (e) to completethe box so that it will completely enclose the object. Unlike the oblique sketch, itis often better not to sketch hidden construction lines when blocking in.
Step 2: Block in the front face of the part ( f ) so that the construction line is parallelto the isometric axis. Similarly, sketch the line to block in the right face ( g).
Step 3: Sketch the left face and the right face and darken the lines. This completesthe faces that are in the front planes of the box. Now sketch in three lines ( h) par-allel to the isometric axis (c). The left line (h) is the top edge of the base. The mid-dle line (h) finishes the chamfer. The right line (h) is used to aid in sketching aconstruction line for the back edge of the base ( i), which is sketched next.
Step 4: Now the face of the chamfer can be darkened and the angled line at theback edge of the chamfer can be added. This completes the angled face of thechamfer. Next the protrusion above the base can be blocked in with seven lines(k).
Step 5: The front face of the upper protrusion is sketched first using light lines.Construction lines ( m) are added to help identify the location of the endpoints of the arc of the front and back faces of the protrusion. The rounded rear face ( n) issketched lightly to be identical to the front face, except that part of it is not visible.The line at the top left edge of protrusion (o) is added. Then all lines forming theupper portion of the object are darkened In addition, the line forming the topedge of the base on the back side is darkened.
Step 6: The details related to the hole are added next. Circles in isometric projec-
tions are difficult to draw because they appear as ellipses with their major axes atan angle to horizontal. The center of the hole is where two lines (m) intersect onthe front face of the upper portion of the object. The lines (p) forming the paral-lelogram to enclose the ellipse for the hole are added. Each side of the parallelo-gram should be parallel to one of the isometric axes. The sides should be equal inlength to one another.
Step 7: To help in sketching the ellipse, construction lines forming the diagonals of the parallelogram (r ) are added.
Step 8: Now the ellipse that represents the circular hole can be sketched. A fewsimple points help in sketching ellipses more easily. The major axis and minor axisof the ellipse are perpendicular to one another. The major and minor axes alsocoincide with the diagonals of the parallelogram enclosing the ellipse (r ). Theellipse touches the parallelogram at the midpoints of the sides of the parallelo-
gram. Start drawing the hole by sketching short elliptical arcs between the mid-points of the parallelogram on either side of the minor axis. Finish the hole by sketching sharply curved elliptical arcs between the midpoints of the parallelo-gram on either side of the major axis of the hole. Finally, darken and make heavy the lines outlining the hole and any remaining edges of the part.
Isometric sketching is made substantially easier by the use of isometric grid paper.This paper has a grid of lines at horizontal and 30° to horizontal (corresponding to lines

8/6/2019 as_chap3
http://slidepdf.com/reader/full/aschap3 10/14

8/6/2019 as_chap3
http://slidepdf.com/reader/full/aschap3 11/14
Section 3.4 Advanced Freehand Sketching 33
The process for sketching three orthographic views of the object in the previous two fig-ures is shown in Figure 3.8.
Step 1: Begin by blocking in the front, top, and side views of the object using theoverall width, height, and depth. The construction lines extend between views toproperly align the views and maintain the same dimension in different views. Forinstance, line (a) represents the bottom edge and line ( b) represents the top edgein both the front view and the right-side view. The distance between lines (a) and( b) is the height dimension in both views. The space between the views should belarge enough so that the drawing does not look crowded and should be the samebetween all views.
Step 2: In the second step the upper protrusion is blocked in. Note that line (c)extends across the top and front views, to assure that the width of the protrusion isconsistent in both views. Likewise, line ( d) extends across the front and right-side views.
Step 3: The outline of the object is darkened to clearly show the shape of theobject in all three views. Care must be taken in darkening lines. For instance, theright corner of the front view should not be darkened, because the detail of thechamfer has not yet been added.
Step 4: Construction lines for the holes and other details are added next. The cen-ter of the hole is positioned with construction lines ( e). Then construction linesthat block in the hole ( f ) are drawn. These construction lines extend between
views to project the hole to the top view and to the right-side view. Constructionlines extending between views ( g ) are also added for the chamfer.
Step 5: Now the hole and chamfer are sketched and darkened to show the com-pleted object.
Step 6: Finally, centerlines (long-dash, short-dash) that indicate the center of thehole are added. Hidden lines (dashed lines) that indicate lines hidden behind asurface are also added. Construction lines may be erased as was done in this fig-ure, but this is not usually necessary.
Figure 3.8

8/6/2019 as_chap3
http://slidepdf.com/reader/full/aschap3 12/14

8/6/2019 as_chap3
http://slidepdf.com/reader/full/aschap3 13/14

8/6/2019 as_chap3
http://slidepdf.com/reader/full/aschap3 14/14
36 Chapter 3 Freehand Sketching
9. Create freehand orthographic sketches of the objects in Figure 3.10. (The objects are shown
as isometric projections.)
Figure 3.11


