
ascade 220® Fingering rimson Trace Vest - Cascade...
9
© 2014 Cascade Yarns - All Rights Reserved. Cascade 220® Fingering Crimson Trace Vest FW188 Designed by Varian Brandon
Transcript of ascade 220® Fingering rimson Trace Vest - Cascade...

© 2014 Cascade Yarns - All Rights Reserved.
Cascade 220® Fingering
Crimson Trace Vest
FW188
Designed by
Varian Brandon

© 2014 Cascade Yarns - All Rights Reserved.
Crimson Trace By Varian Brandon / Brandon Knitting Designs
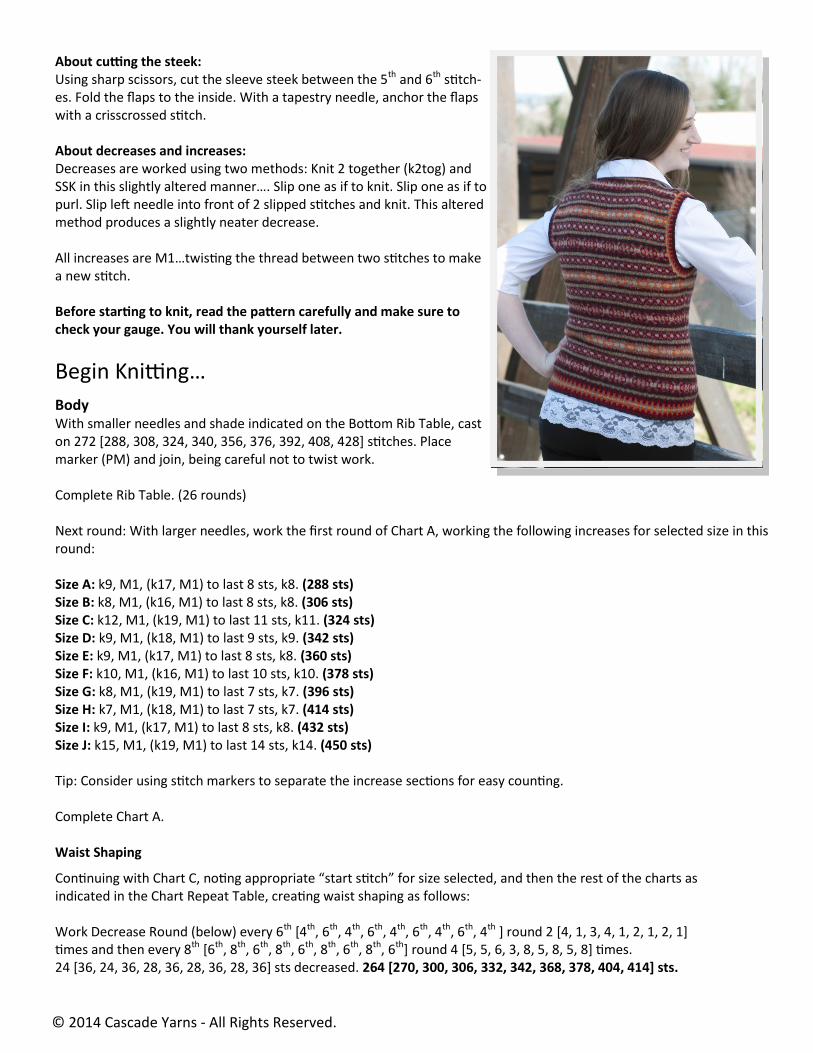
Things to start with… This sleeveless V-necked pullover is knitted in the round with steeks at the armhole and neck openings. Waist shaping, worked over increases and decreases at the side “seams”, is included for a closer fit. Armhole and neck shaping are worked at same time. The shoulders are sloped us-ing smaller sized needles so the sweater shoulders do not stand away from natural shoulder and the pattern is not lost in decreases or short rows.
Sizes
A:32.91 in [B:34.97 in, C:37.03 in, D:39.09 in, E:41.14 in, F:43.20 in, G:45.26 in, H:47.31 in, I:49.37 in, J:51.43 in]
A:83.59 cm [B:88.82 cm, C:94.06 cm, D:99.29 cm, E:104.5 cm, F:109.73 cm, G:114.96 cm, H:120.17 cm, I:125.4 cm, J:130.63 cm]
About sizing: Sizes listed are finished garment chest measurements . Fit depends on the amount of ease desired beyond actual chest size. For a close fit, add 1-2in (2.5–5cm); for a standard fit, add 2-4in (5–10cm); for a loose fit, 4-6in (10–15cm); and for an oversized, 6in (15cm) or more.
Information is given for the first size with larger sizes provided in square brackets [ ]. Where only one figure is given, the instruction applies to all sizes. You may find it helpful to circle all figures relating to your size with a colored pencil.
Traditionally, an even number of stitch repeats per round is included in garments of this kind…creating symmetry front to back. This practice also means the circumference increases by two stitch repeats from one size to the next (12 re-peats to 14 repeats). With a stitch repeat of 18 stitches, this can mean an increase of 36 stitches (or over 4” with a gauge of 8.75 sts per inch).
In order to provide more size choices, odd numbered stitch repeats per round are included in this pattern. To maintain centered motifs in these sizes, the round begins on a different stitch than the even repeats. The different “start stitches” are noted on the Pattern Chart. The motif alignment is the same with both the even and odd repeat sizes. Be sure to read your knitting and make sure all motifs are aligned as indicated in charts.
Gauge: 4 in. (10. cm) = 35 sts and 36 rnds using larger needle in color work pattern.
Note: Obtaining both stitch and row gauge is ideal; however, if you have to make a choice, try to get row gauge. Stitch gauge can be achieved through blocking if you are not too far off. Also, try using wooden needles which have more grip on the yarn.
Materials: Yarn: Cascade 220 Fingering, 100% Peruvian Highland Wool, 273 yards/ 50 grams Shade A (7822 Van Dyke Brown): 124 [150, 175, 175, 175, 200, 225, 225, 225, 250] yrds. Shade B (8013 Walnut Heather): 325 [350, 375, 400, 425, 475, 500, 525, 550, 575] yrds. Shade C (8012 Doeskin Heather): 125 [125, 125, 150, 150, 175, 175, 175, 200, 200] yrds. Shade D (2401 Burgundy): 175 [200, 200, 225, 250, 275, 275, 300, 325, 325] yrds. Shade E (9404 Ruby): 150 [175, 200, 225, 225, 250, 250, 275, 300, 300] yrds. Shade F (7824 Jack o’ Lantern): 75 [75, 75, 75, 100. 100, 100, 100, 125, 125] yrds. Shade G (7825 Orange Sherbet): 50 [50, 50, 50, 75, 75, 75, 75, 75, 100] yrds.

© 2014 Cascade Yarns - All Rights Reserved.
Needles: 2 - US 2 (2.75 mm) 24 in. circular needles, 2 - US 0 (2.0 mm) 24 in. circular needles OR appropriate needles to obtain gauge.
Stitch markers, stitch holders (waste yarn works fine), tapestry needle, row counter (optional, but helpful)Abbreviations:
k – knit k2tog – knit together M1 – make 1 p – purl PM – place marker rnd(s) – round, rounds SSK – slip, slip, knit st (s) – stitch, stitches
Before starting to knit, read the pattern carefully and make sure to check your gauge. You will thank yourself later.
About knitting from charts: Charts are designed to be knitted from right to left, bottom to top. This means starting at the bottom right corner of the chart and working to the left and up. Be sure to note how the stitches relate to each other. An easy/low tech way to knit from a chart is to use a page-sized metal tablet with magnets. Place the magnet above the round you are working on and move it up revealing the next round as you progress through the chart. This way, the round you are working on is right below the magnet and you can see the relationship to the completed rounds below. Color changes in the charts provided in these instructions are indicated on the right of the pattern chart. A good prac-tice is to check these changes as you start each round.
About design tables: Tables provided in these instructions are designed to be worked from the bottom up. About sweater construction: This sweater is worked in the round with the use of steek stitches as placeholders for both the armhole and neck openings. These placeholder stitches are cut open before armhole and neck ribbings are worked. As in all sweaters of this type, the alignment of motifs can be lost as armhole and neck shaping begins. Be sure to look at your knitting and line up the motifs when beginning a shortened round due to decreases. About securing steeks before cutting: Steeks stitches can be secured by machine or hand sewing a line of stitches in the middle of both the 5th and 6th stitches of the steek. Another method is to use a crochet hook and scrap yarn and make a chain stitch connecting one leg of the 4th stitch to the adjacent leg of the 5th stitch. A second chain connects one leg of the 6th stitch with the adjacent leg of the 7th stitch. If you are working with 100% wool (not washable), you may not need to secure the stitches as wool will felt with use and therefore not unravel.
© 2014 Cascade Yarns - All Rights Reserved.
About cutting the steek: Using sharp scissors, cut the sleeve steek between the 5th and 6th stitch-es. Fold the flaps to the inside. With a tapestry needle, anchor the flaps with a crisscrossed stitch. About decreases and increases: Decreases are worked using two methods: Knit 2 together (k2tog) and SSK in this slightly altered manner…. Slip one as if to knit. Slip one as if to purl. Slip left needle into front of 2 slipped stitches and knit. This altered method produces a slightly neater decrease. All increases are M1…twisting the thread between two stitches to make a new stitch. Before starting to knit, read the pattern carefully and make sure to check your gauge. You will thank yourself later.
Begin Knitting…
Body With smaller needles and shade indicated on the Bottom Rib Table, cast on 272 [288, 308, 324, 340, 356, 376, 392, 408, 428] stitches. Place marker (PM) and join, being careful not to twist work. Complete Rib Table. (26 rounds) Next round: With larger needles, work the first round of Chart A, working the following increases for selected size in this round: Size A: k9, M1, (k17, M1) to last 8 sts, k8. (288 sts) Size B: k8, M1, (k16, M1) to last 8 sts, k8. (306 sts) Size C: k12, M1, (k19, M1) to last 11 sts, k11. (324 sts) Size D: k9, M1, (k18, M1) to last 9 sts, k9. (342 sts) Size E: k9, M1, (k17, M1) to last 8 sts, k8. (360 sts) Size F: k10, M1, (k16, M1) to last 10 sts, k10. (378 sts) Size G: k8, M1, (k19, M1) to last 7 sts, k7. (396 sts) Size H: k7, M1, (k18, M1) to last 7 sts, k7. (414 sts) Size I: k9, M1, (k17, M1) to last 8 sts, k8. (432 sts) Size J: k15, M1, (k19, M1) to last 14 sts, k14. (450 sts) Tip: Consider using stitch markers to separate the increase sections for easy counting. Complete Chart A. Waist Shaping
Continuing with Chart C, noting appropriate “start stitch” for size selected, and then the rest of the charts as indicated in the Chart Repeat Table, creating waist shaping as follows: Work Decrease Round (below) every 6th [4th, 6th, 4th, 6th, 4th, 6th, 4th, 6th, 4th ] round 2 [4, 1, 3, 4, 1, 2, 1, 2, 1] times and then every 8th [6th, 8th, 6th, 8th, 6th, 8th, 6th, 8th, 6th] round 4 [5, 5, 6, 3, 8, 5, 8, 5, 8] times. 24 [36, 24, 36, 28, 36, 28, 36, 28, 36] sts decreased. 264 [270, 300, 306, 332, 342, 368, 378, 404, 414] sts.

© 2014 Cascade Yarns - All Rights Reserved.
Decrease Round: k2tog, work to 2 sts before marker, SSK, SM, k2tog, work to 2 sts before end of round, SSK. Increase 1 st on either side of side makers every 6th [4th, 8th, 4th, 6th, 4th, 6th, 4th, 6th, 4th] round 1 [3, 6, 2, 3, 1, 2, 1, 2, 1] times and then every 8th [6th, 0, 6th, 8th, 6th, 8th, 6th, 8th, 6th] round 5 [6, 0, 7, 4, 8, 5, 8, 5, 8] times. 24 [36, 24, 36, 28, 36, 28, 36, 28, 36] sts increased. 288 [306, 324, 342, 360, 378, 396, 414, 432, 450] sts. Work charts as established until chart indicated for armhole shaping in the Chart Repeat Table. Break yarns. Tip: You may find it helpful to also place markers between the individual motif repeats. Armhole and Neck Shaping Place the first 11 [10, 12, 12, 14, 15, 16, 17, 18, 20] sts on scrap yarn. Next round (sizes A-C: first round of chart A, sizes D-E: first round of Chart B, sizes F-J: first round of chart A): With appropriate shade for round, using a backwards loop cast on, cast on 5 steek stitches as the start of the place holder for the left armhole opening. PM. Work 51 [56, 58, 61, 63, 65, 68, 70, 72, 72] sts and place the next st on a safety pin. PM. Cast on 10 steek stitches as a place holder for front neck opening. PM. Then work to within 10 [10, 11, 12, 13, 15, 15, 17, 17, 20] sts of right side marker. Place the next 21 [20, 21, 24, 27, 30, 31, 34, 35, 40] sts on a holder. PM. Cast on 10 steek stitches as a place holder for the right armhole opening. PM. Work across back to within 10 [10, 11, 12, 13, 15, 15, 17, 17, 20] sts of the end of the round. Place these sts on a scrap of yarn. PM. Cast on 5 steek stitches to complete the place holder for the left armhole opening and the round. PM. Steek stitches: These stitches are worked as follows: P1 using background color, K8 with alternating colors when appropriate, P1 using background color. (10 sts.) Following established pattern and taking into account the stitches now on holders, continue with Chart Repeat Table, making the following neck and armhole shaping decreases: Work Decrease Round (below) every other round at each armhole edge 10 [10, 11, 12, 13, 14, 15, 16, 18, 20] times AND each front neck edge until 28 [33, 32, 36, 35, 36, 38, 43, 42, 57] sts remain for each front shoulder. Then continue with decreases on the front neck edge only on every 4th rnd until 26 [28, 28, 31, 31, 32, 33, 35, 35, 37] sts remain for each front shoulder. Decrease Round: Work 5 left side steek sts, SM, k2tog, work to 2 sts before marker, SSK, SM, work front neck steek sts, SM, k2tog. Work to 2 sts before next marker, SSK, SM, work right side steek sts, SM, k2tog. Work to 2 sts before end of round, SSK. SM. Work remaining 5 sts of left side steek. Continue without shaping until 3 rounds remain of the chart noted for end. Back Neck Shaping and Shoulder Slope Shaping Next rnd [sizes A-C, F, I: rnd 1 of Chart A; sizes D-E: rnd 6 of Chart B; sizes G-H: rnd 11 of Chart D; size J: rnd 13 of Chart C]: Using one of the smaller needles, work 5 steek sts and the first 8 [9, 9, 10, 10, 10, 11, 11, 11, 12] sts of the round. Using the larger needle, continue the round to within 8 [9, 9, 10, 10, 10, 11, 11, 11, 12] sts from right steek. Change to 2nd smaller sized needle. Knit these stitches, the right side steek, and 8 [9, 9, 10, 10, 10, 11, 11, 11, 12] sts across back.

© 2014 Cascade Yarns - All Rights Reserved.
Change to second larger needle and work 19 [20, 20, 22, 22, 22, 23, 24, 24, 25] sts. Place the next 49 [55, 59, 59, 63, 65, 69, 69, 73, 71] sts on a holder. PM. Cast on 10 steek stitches. PM. Knit 19 [20, 20, 22, 22, 23, 23, 25, 25, 26] sts. Using the original smaller needle, knit the remaining 8 [9, 9, 10, 10, 10, 11, 11, 11, 12] sts before the left steek and the remaining left steek stitches to complete the round. See Shoulder Shaping Needle Placement Diagram. Next rnd: Continue with the smaller needle, work the sts on that needle and 9 [9, 9, 10, 10, 11, 11, 12, 12, 12] sts from the front large needle. Continue with the large needle until there are 9 [9, 9, 10, 10, 11, 11, 12, 12, 12] sts remaining. Work these sts with the right side smaller needle. Continue with smaller needle and work 9 [9, 9, 10, 10, 11, 11, 12, 12, 12] sts across back. Change to back larger needle and work to 2 sts before back neck steek. SSK. SM. Work back neck steek. SM. K2tog and work until there are 9 [9, 9, 10, 10, 11, 11, 12, 12, 12] sts left on the needle. Change to the smaller needle and work these sts and complete the round. There should be 26 [28, 28, 31, 31, 32, 33, 35, 35, 37] sts for each back shoulder. Next round: Work as established, casting off all remaining steeks. Cut neck steeks between 5th and 6th stitches and secure in preferred method. Weave shoulder seam together or join in preferred method using background color. (You may also cut steeks open but not secure them until you have worked neck band.) Neck Rib: Starting at back left (at the end of the back neck sts on holder), using smaller circular needles with Shade B, pick up and knit 86 [86, 86, 90, 90, 86, 98, 978 102, 126] sts over the left shoulder and along left side of neck. PM. Knit stitch from safety pin. PM. Pick up and knit 86 [86, 86, 90, 90, 86, 98, 978 102, 126] sts along right side of neck and over right shoulder. Knit stitch-es on back neck holder, decreasing 2 [4, 4, 4, 4, 6, 6, 6, 6, 6] sts evenly. Place marker to indicate beginning of round. 221 [225, 229, 237, 241, 233, 261, 261, 273, 317] sts. Starting with p2, work rib as indicated on Neck and Armhole Rib table to one stitch before center markers. Remove marker and slip next 2 stitches (next stitch and one from safety pin) knit-wise to right needle. Remove marker. Knit the next stitch (in shade indicated for knitted stitches) and pass 2 slipped stitches over worked stitch one at a time. Place safety pin in work to mark center front. Complete round, making sure to work rib sts in a mirrored image on both sides of the neck. Complete rib table, continuing to decrease at center neck as established. Cast off in rib using Shade A. Armhole Rib: Cut armhole steeks between 5th and 6th stitches and secure in preferred method. (You can also cut steeks open, but not secure them until you have completed the neck and armhole ribs.) Start in center of the underarm stitches on holder, using smaller circular needles with Shade B, knit 10 [10, 11, 12, 13, 15, 15, 17, 17, 20] stitches from the left side of the holder. Pick up and knit 1 st between sts on holder and end of steek. (You may need to twist the thread between underarm and steek.) Then knit 83 [84, 84, 88, 88, 83, 94, 95, 98, 122] sts to shoulder. Pick up and knit 1 stitch at top of shoulder. Then 83 [84, 84, 80, 88, 83, 94, 95, 98, 122] sts from shoulder to underarm, and pick up and knit 1 stitch between stitches on end of steek and the holder.

© 2014 Cascade Yarns - All Rights Reserved.
Crimson Trace Tables and Charts
Finally, the remaining stitches 11 [10, 12, 12, 14, 15, 16, 17, 18, 20] sts on holder. PM. 190 [191, 194, 201, 206, 199, 222, 227, 234, 287] sts. Note: Marker indicates beginning of round.
Next rnd (1st rnd of Neck and Armhole Rib Table): Work 9 [9, 10, 11, 12, 14, 14, 16, 16, 19] sts. Work next 2 stitches to-gether (1 st from those originally on the holder and the first picked up st). Continue until 12 [11, 13, 13, 15, 16, 17, 18, 19, 21] sts. remain in round. Work next 2 stitches together (the last picked up st and 1 st from those originally on the holder). Sizes B, D, F, H, J: Purl last 2 sts in round together. 188 [188, 192, 200, 204, 196, 220, 224, 232, 284] sts. Complete Rib Table. Cast off in rib using Shade A. Finishing Weave in all ends and block.

© 2014 Cascade Yarns - All Rights Reserved.
Shoulder Shaping Needle Diagram

© 2014 Cascade Yarns - All Rights Reserved.