aSAP! User Guide - hib. · PDF fileaSAP! User Guide Presented By . 2 ... My SAP Referrals ......
34
1 aSAP! User Guide Presented By
Transcript of aSAP! User Guide - hib. · PDF fileaSAP! User Guide Presented By . 2 ... My SAP Referrals ......

1
aSAP! User Guide
Presented By

2
Educational Development Software (EDS) is a full-service software development company specializing in rapid
software development for school districts and educational institutions of all sizes. EDS is dedicated to providing cutting
edge solutions that satisfy all of your educational software needs. EDS also offers competitive services to build and
maintain your school's technical infrastructure.
The information contained in this guide is subject to change without notice and does not represent a guarantee or
commitment on behalf of Educational Development Software in any way. All updates or additional information relating
to the contents of this guide will be posted on the HIBster web site, located at hibreporting.com. Access to the software
is provided to you on a subscription basis. Copying or distributing any part of the software including screen shots and
this guide to any potential or existing competitors is strictly prohibited. No part of this manual may be reproduced,
distributed, or transmitted in any form or for any purpose without the express written consent of Educational
Development Software.
Copyright © 2010-2014. Educational Development Software.
HIBster Software Copyright © 2010-2014, Educational Development Software. All rights reserved
For additional information, contact Educational Software Development at:
Educational Development Software
PO Box 914
Johnstown, PA 15907
Phone 866.315.2306
Fax 814.262.7410

3
Table of Contents
Introduction 4
Staff Referrals 5
Menu Bar Information 6
Managing Your SAP Referral Page 7
SAP COORDINATOR LOGIN INFORMATION 11
SAP Teacher Referral Menu 16
SAP PLANS 16
Conclusion 32

4
INTRODUCTION
Specifically designed to expedite the Student Assistance Program process in Pennsylvania schools, aSAP! is a complete software package that allows district coordinators to efficiently handle the work from initial referral to final state reporting. Some of the highlights included the following:
Completely electronic – no more paperwork
Ability to request/collect observations
Able to compile staff observations
Can develop SAP team recommendations
Ability to assign staff to the SAP process
Coordinate with SAP team members through case notes
Final submission through PDE Form 4092 to the state
Applicable functions of aSAP! include the submission of initial staff referrals, parent notification, collection of
observations, development of an intervention plan and submission of state reports. Although aSAP! is quite easy to
use, it is important that all users have this user guide on hand to use as a reference in the event that a particular
function is not completely clear. It is better for users to become familiar with how the system works before they use it
for the first time. Jumping in with both feet is possible with this software, but it is better to be prepared with a complete
understanding of the program.
As you read through this user guide, you will notice some words are bolded. These words typically highlight a term
that is used as a button or link in the program. For example, if the guide instructs you to click Submit, then you should
look for a Submit button or link on the screen.
Screenshots throughout this guide are used to illustrate what your screen should look like while using a particular
function. They ensure that you are in the correct place in the software.
Important things to be aware of are highlighted by red bold print.
Again, thank you for choosing the aSAP! software program to handle all of your SAP procedures. This manual will
highlight the program and walk you through the menu bar and the steps for initial staff referral and the steps a SAP
coordinator can complete as well. If you should have any questions, please don’t hesitate to contact our support team
at 866-315-2306 or [email protected].

5
Staff Referrals
Staff Logins
There are two logins for this program – one for a staff member to make an initial referral to the SAP team and one for
the district’s SAP coordinator. However, the URL for this program is pa.hibster.com is the same for both. Type
pa.hibster.com into your search bar at the top (Chrome works best). Once you type pa.hibster.com into the search
bar, hit enter. Your screen should look like this:
To login:
1. Enter a username and the corresponding password in the text boxes located in the center of the screen.
2. Click the Submit button.
3. If the username and password were correct, users will be directed to the Manage Your SAP Referral page.
4. If this is your first time logging in, the user will be directed to a page where you will need to accept the user
license agreement. The user will then be required to change their password to a password of their choice.
Hit ENTER and your screen should look like this for a staff referral (SAP coordinator page will look different and we will
get to that soon). This will take you to the Manage Your SAP Referrals Page.

6
District staff will have access to 3 parts:
Create SAP Referral – this allows the staff member to create and submit a referral to the SAP team.
My SAP Referrals – this section allows the staff member to keep a history of the referrals they created.
My Submitted Referrals – this section sees all submitted SAP referrals.
MENU BAR INFORMATION
NOTE: Please see the menu bar that is outlined in red on the screen shot above. Let’s go over each icon.
This exclamation mark will let you know if any changes to the system were made. If you click on it, the icon will
let you know of any bug fixes or upcoming deployments.
This is a system message for changes or creations of an intervention.
This is your System Settings box. You will be able to change your Username and Password in this section.
This is a Feedback box. Clicking on and opening it will allow you to send suggestions for improvement to our
Support Team.
This is a Resource icon. Clicking on and opening this icon will send you to another page of resources for the Pa
SAP process.
The Question mark icon will take you to a section that includes instructional manuals for this program. We highly
recommend using this before contacting us for assistance. Many of your answers can be found here.

7
The Logout icon will do just that. Clicking on this will take you out of the program.

8
MANAGING YOUR SAP REFERRALS PAGE
Step 1 Create SAP Referral
Information: Any staff member (administrator, nurse, teacher, etc) who has been given access to the system can create
a SAP referral. The SAP coordinator can determine who can submit a referral. The aSAP! program integrates easily
with your Student Information System (SIS). This will allow for emails between the SAP team and staff and also allow
for easy searching of students that may be referred by a staff member.
So, click on the button Create SAP Referral. You will see this screen.
General Tab:

9
It is a rather lengthy page so information on the student can be shared with the SAP team. Be sure when completing
the information that you scroll down completely to see the menu options at the bottom. Notice there are two tabs that
may be completed. (General and Documents)
Let’s take a look at the General tab you see above. You see the part where student information name will be completed.
There are two icons and icon. You also see a box that says Additional Information. You may type information
here that is not noted in the Observation Checklist.
CAUTION: Be very clear, concise and professional with your comments if you choose to use this box.
Before submitting a referral, you will need to add the student to the site. Click on icon and your screen will look
like this.
You can enter a student’s name two ways. The easiest way is to hit the “Search” button and a list of students will be
displayed. Simply click on the student you want referred and it will fill in the Student Name blanks. Or you can enter
manually a student’s name by hitting the icon. Your screen will look like this.

10
Simply, complete the information and hit the Save & Close tab. You will then be returned to the Referral page.
Complete the Observation Checklist by clicking the concerns related to the student. If you are completed with the
referral, scroll to the bottom of the page and hit the Save and Continue button. If completed with the referral, you may
hit the Submit Referral button. Your referral will automatically sent to the SAP District Coordinator.
NOTE: If you want to add more information such as pictures and text, you will need to click the Save and Continue tab
then the Documents tab before submitting the referral. Your screen will look like this.
Documents Tab:

11
Once you are on the above screen, click on the and the system will request you to upload the saved file from your
computer. Once completed, you may hit the Save and Continue button or the Submit Referral button and all information
will be forwarded to the District SAP coordinator.
Conclusion:
The initial referral is completed. You can log out of the system by clicking this icon located in the margin bar at the
top of the screen.
SAP COORDINATOR LOGIN INFORMATION Logging in to the system. Go to pa.hibster.com and you will see this screen.
To login:
1. Enter a username and the corresponding password in the text boxes located in the center of the screen.
2. Click the Submit button.
3. If the username and password were correct, users will be directed to the Modules page.
4. If this is your first time logging in, the user will be directed to a page where you will need to accept the user
license agreement. The user will then be required to change their password to a password of their choice.
12
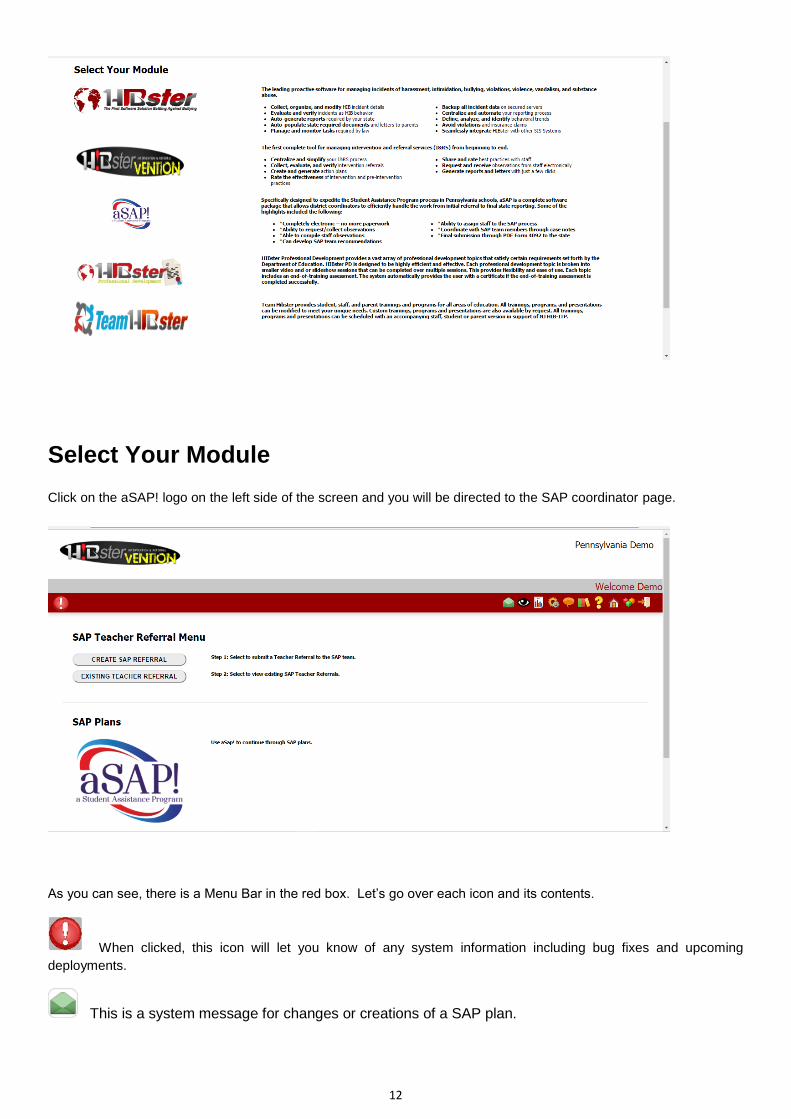
Select Your Module
Click on the aSAP! logo on the left side of the screen and you will be directed to the SAP coordinator page.
As you can see, there is a Menu Bar in the red box. Let’s go over each icon and its contents.
When clicked, this icon will let you know of any system information including bug fixes and upcoming
deployments.
This is a system message for changes or creations of a SAP plan.

13
This icon is our Additional Documents icon. We will store (or you can store) samples of parent
permission forms, observation forms, etc.
This shows the observations that have been assigned to the current user.
This is the Reports icon. When opened, it allows the SAP coordinator to develop and submit required
state reports. When the icon is clicked, this screen will appear on your desktop.
Just use the drop down menu and select the type of report, district or school and the type of report needed. Then click
on the Run Report button and an excel document will be downloaded. For this system, the system will run Form 4092
which is required yearly by the DOE.
This is an important icon called the Settings icon. As the district SAP coordinator, this contains information that
helps you set up the system and allows different users to see referrals. By clicking on the icon, you will see this screen.

14
Please don’t hesitate to contact our Support Desk for setting up your school(s) and/or user(s) or for additional information
on the tabs in this section.
This is our Feedback icon. If you click on it, you can provide us about bugs or suggestions for improving our
program.
Clicking on this Resource icon will take you to websites that contain information from PDE and other state
agencies.
If you need to review manuals or watch instructional videos for help, clicking on our Help icon will take you to this
page. We hope to have instructional videos on this page by the fall of 2017.

15
This is Logout icon. Clicking on this will allow you to leave the program. (Please make sure you hit save and
close/continue before you logout.)
Now, let’s return to the SAP coordinator homepage……remember, this is what it looks like:
You can see there are two sections: SAP Teacher Referral Menu and SAP Plans. Let’s go over both of these.
SAP Teacher Referral Menu
In this section, there are two tabs. As the SAP coordinator, you can create your own referral by clicking the
CREATE SAP REFERRAL. Opening this tab will bring you to this page.

16
You will create the referral in the same manner as any other staff member. To save the referral, just
remember to hit the Save and Continue or Save and Close tabs at the bottom of the screen.
The other tab in this section is the EXISTING TEACHER REFERRAL tab. Clicking on and opening this tab
will allow you to see the student referrals you created and saved. If you enter this page, you can click on any
student and retrieve, add or delete information.
Now let’s go to the main section for the SAP Coordinator – SAP PLANS.
To login:
5. Enter a username and the corresponding password in the text boxes located in the center of the screen.
6. Click the Submit button.
7. If the username and password were correct, users will be directed to the Modules page.
8. If this is your first time logging in, the user will be directed to a page where you will need to accept the user
license agreement. The user will then be required to change their password to a password of their choice.
SAP PLANS
Simply, click on the aSAP! icon.

17
You will be taken to this page.
As you can see, there are six tabs. There are also 3 icons located under the menu bar. Clicking on this one
will allow you to see a historical account of the records of SAP referrals. Clicking on this one will
let you conduct a search for a particular student referral. The last icon permits you to create a new
student referral.
You can open and close any tab and see the student information including the status of each.
However, let’s open a particular referral and walk through the SAP coordinator’s steps. From the screen
above, we are going to click on the first student. When you open this referral, you will see this page
As you can see, there are a number of tabs across the page. Let’s review each of them.

18
General TAB
This page provides basic background information on the student. The information is retrieved from your SIS.
If help or an intervention is imminent, you may click on the Quick Referral icon noted as Assigned To: Quick
Referral. This allows for a referral to be handled immediately and by a specific SAP team member. Clicking
on this will bring up this page:
You may conduct a search for a staff member and add the pertinent information as to why this staff member
needs to handle the referral immediately. Once you are completed with your message, be sure to click the
box at the bottom and then hit the ASSIGN tab. That staff member will then receive notification.

19
STUDENT INFORMATION TAB
Clicking on this tab takes you to this page:
This page provides all of the background information including the address and parent/guardian contact
information. At the bottom of the screen, you can see any previous teacher referrals that were provided. You
do have the option on clicking on any of the previous referrals for additional insight on the student.
INITIAL REFERRAL
Opening this tab takes you to the original referral.
COORDINATOR TASKS
Perhaps the most important tab for the SAP coordinator, when opened it provides a suggested “to do” list for
the coordinator. Depending on your school’s practices, procedures and policies and the urgency of the
referral, the SAP can complete all of the tasks or pick and choose which is appropriate to complete. When
completed, the SAP coordinator has the ability to share what steps were taken with each referral. The page
looks like this:

20
Let’s review each of them.
Parental Consent
In Pennsylvania, parent/guardian permission is required for a student to be part of the SAP process. This
area allows the SAP coordinator to make note and keep record of when the parent permission form was
emailed and/or mailed to the parent guardian. The page looks like this:
The SAP coordinator can type in notes under the “New Note” section and review past notes if applicable.
When completed adding notes, be sure to click on the green plus sign in the box. Also, check the Complete
box in the lower left of the box. You may then hit Save or Save and Close if you want to continue through
the steps.

21
NOTE: For each coordinator step, when completed, you will need to click on the green plus sign and check
the Complete box. If you do not, it will not be noted as complete on the Coordinator’s Task page. When you
complete this, a green check mark will appear beside the task.
Request Observations
Clicking on this task allows you to send out observation requests to different staff members (nurse, counselor,
etc) and also the parent/guardian. It does not send the observation; it only marks information on when and
who the observation(s) were sent to. Complete the box by inputting the information and then clicking the
green plus sign and checking the Complete box.
Summary of Observations
If numerous observation requests were sent out, this box allows that information to be noted. Handle it as
you did the other boxes. We will get to the area on actually sending out the Observation Requests shortly.
Case Notes
This area allows for the SAP coordinator to indicate if additional information was received from a school social
worker, case worker or other school official or school affiliated individual.
Report/Review Data
Depending on the depth of the referral, it may be necessary to continually update information on a referral.
This allows that information to be stored here.
Recommendations
If the SAP coordinator and/or team made a recommendation for a referral, that material can be noted in this
section.
Confidentiality Releases
If the parent/guardian allows for the release of pertinent student data to the SAP team or outside agency,
that information can be noted in this section.
Case Details
This is another box to use if additional information is received perhaps throughout the school year.

22
Input Student Information into Form 4092
As you know, each SAP referral, if allowed by the parent/guardian, must be noted on PDE Form 4092. This
box indicates when information was added to the form for each case.
NOTE: We understand that each referral may be different in interventions and duration. We highly
recommend completing, or at least beginning, Form 4092 when a referral is made. You can easily start
compiling the information rather than waiting to the end of the school year.
When completed with this task, be sure to scroll down and hit the Save and Continue or Save and Close
button.
Now, let’s move on to the other Menu Bar Items
OBSERVATIONS
The aSAP! allows the SAP coordinator or assigned staff to electronically send out Observation forms to
certain staff members and or parents/guardians. When you open this tab, this page will appear:
To send out an observation request, click on the icon. This page will now appear and let you choose
what school staff or parent/guardian is to receive the request.

23
Each observation form is different for different school personnel. Once the staff member or parent/guardian
is selected, click on the “Two People” icon and a list of staff members will appear. Click on the staff you want
to receive the observation then hit the Submit Request tab. Your screen will then look like this:
The staff member or parent/guardian will receive an email with an observation to complete.
If multiple staff members receive the same observation form, the system can compile the information so the
SAP team does not have to go through each individually. Clicking on the will allow the observation
responses to compiled neatly. Once you click on it, simply go through the steps.

24
You can also send out multiple emails by loading up the staff on the page and hitting this icon . The
system will send them all at once.
ADD STAFF TO PLAN
If the SAP coordinator or SAP Team would like to add staff to a particular referral, you can use this tab to
complete the task. Click on the tab and this page will appear.
If you want to add more staff to the plan, click on the green plus icon in the upper right. If you do, your page
will look like this:
Now you can select a user by clicking on the two person icon or add a group by scrolling down under the
Select Group area on the page.

25
REMEMBER: You should always periodically hit the Save and Continue or Save and Close tabs to insure
your work is saved!
SAP TEAM RECOMMENDATION
For record keeping purposes and creating a plan, this page allows the SAP coordinator to complete both.
The page looks like this and the SAP coordinator can type in a narrative and hit the Save and Continue and/or
Save and Close button at the bottom. If the team creates a specific intervention, you may open the Download
Blank SAP Document tab.
Opening that tab, will provide you with a customized word document that can provided any staff members
with interventions the SAP team is recommending. Additionally, anything you type in the SAP Team
Recommendation box will appear on the form as well. You may use the form that comes with the system or
upload your own blank SAP document. Ours looks like this:

26
Case Manager: Admin, Demo
SAP Team Recommendations
Pennsylvania Demo
Student: James, Jim Grade: In Attendance:
Meeting Date: Follow-up Meeting Date: Distributed To:
Goal
Intervention (Measurable Person Responsible Outcomes
strategies)

27
Additional Information:

List student's strengths and/or assets (e.g., leadership, artistic talent, technical Skills):
Identify the priority area of concern (Academic, Behavior, Health, and Attendance):
Brainstorm possible interventions:
Choose appropriate strategies identified from above to incorporate into the Action Plan:
NOTE: You may customize your own plan or open up the red folder icon in the top menu bar to find samples of other plans.
QUICK CHECK TAB
As you know, some student referrals are short or long in duration depending on the specific student case. Opening this tab allows for you to update the student’s grades, behavior and attendance records. The page will look like this; mark in the appropriate material by scrolling down through each part of the page.

29
DOCUMENTS
By clicking on the Documents tab, you will be taken to this page:
Here is where you will find stored documents including a sample parent permission form and Form 4092. You can add your own documents as well by clicking on the green plus sign icon and uploading your forms to the system. Any document can be uploaded from observation forms, parent letters, internal SAP letters, etc.
If you want to send out the SAP Parent Permission Form, click on the green email box. The page will look like this:

30
Input the email addresses and hit the Send tab and the letter will be sent to the parent/guardian.
SAP TEAM NOTES
Again, some student SAP cases can be quite in depth. This page allows for additional information
to be inputted and stored. The SAP coordinator and/or the SAP Team can provide additional
information in the Additional Information box or under the Case Notes section. If you are adding
information under the Case Notes section, you will have to hit the green plus sign icon to allow
you to type in the information.
Then, if necessary, you can download and print the document as well.
Again, remember, as you move through the Coordinator tabs, you should be using the
Save and Continue and Save and Close tabs frequently.
PDE FORM 4092
As required each year by the state, this tab allows for you to input information for each case in an
Excel spreadsheet. Clicking on this tab will open Form 4092 for each case. It is built as a “bubble”
to be checked for each statement. Click on each statement and hit Save and Continue or Save
and Close at the bottom.
When you save the document, the system will save the information in an Excel spreadsheet.
When you have all the cases entered, you can upload the document to the state or we can handle
it for you.
When you are ready to send to the state, click on the (reports) icon at the top of the page.
Your page will look like this:

31
Scroll through each box and complete for the respective year. Hitting the Run Report tab will
have the completed Form 4092 Excel spreadsheet downloaded to your computer.
AUDIT
The aSAP! system allows for a complete historical log of everything that was completed for each
student referral. This is a nice feature to use because it tracks all steps by “time and date
stamping” each action on each case. Opening this tab will show exactly what and when each
step was done. Here is a sample of it:

32
Conclusion
That’s it! You made it through the manual! However, if you should have any additional questions,
please don’t hesitate to contact our support staff via telephone or email. Here is the contact
information for our support team:
Telephone: 866-315-2306
Email: [email protected].

33

34


![ASAP: Prioritizing Attention via Time Series · PDF fileASAP: Prioritizing Attention via Time Series Smoothing Kexin Rong, Peter Bailis Stanford InfoLab ... Ganglia [3], Graphite [5],](https://static.fdocuments.in/doc/165x107/5a9f97717f8b9a7f178d035e/asap-prioritizing-attention-via-time-series-prioritizing-attention-via-time-series.jpg)