ASA Version 9.x SSH and Telnet on the Inside and Outside ... · PDF fileASA Version 9.x SSH...
14
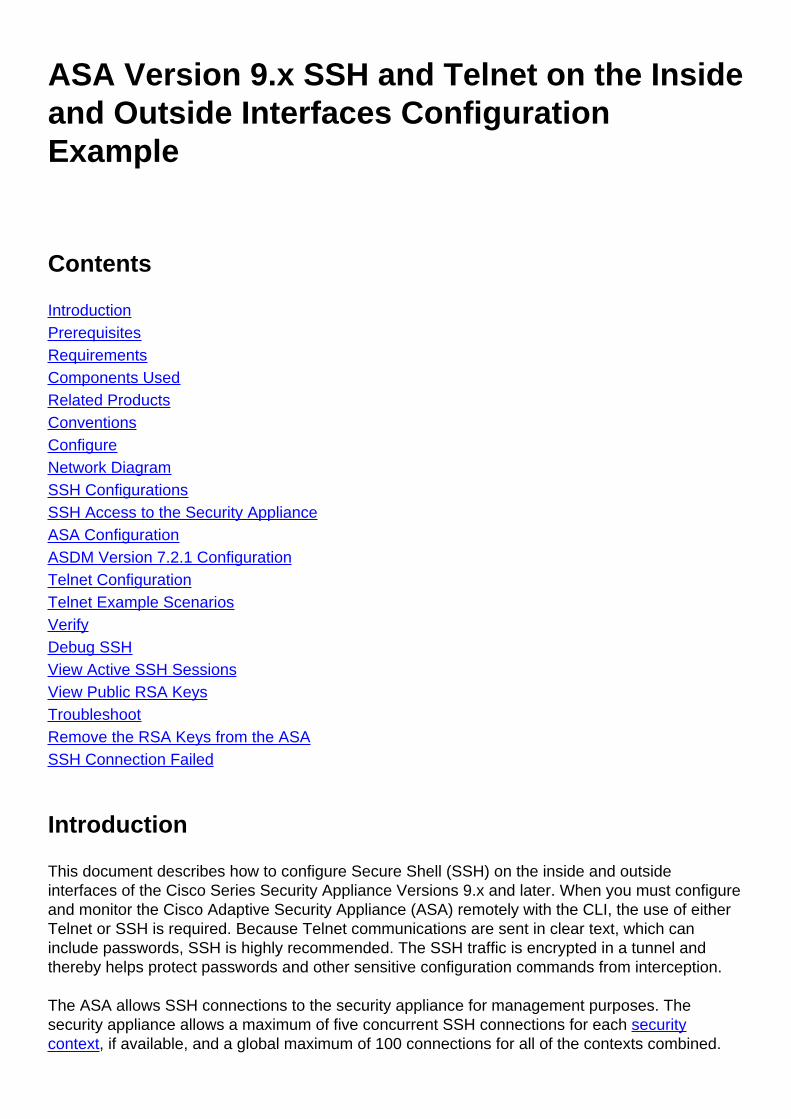
ASA Version 9.x SSH and Telnet on the Inside and Outside Interfaces Configuration Example Contents Introduction Prerequisites Requirements Components Used Related Products Conventions Configure Network Diagram SSH Configurations SSH Access to the Security Appliance ASA Configuration ASDM Version 7.2.1 Configuration Telnet Configuration Telnet Example Scenarios Verify Debug SSH View Active SSH Sessions View Public RSA Keys Troubleshoot Remove the RSA Keys from the ASA SSH Connection Failed Introduction This document describes how to configure Secure Shell (SSH) on the inside and outside interfaces of the Cisco Series Security Appliance Versions 9.x and later. When you must configure and monitor the Cisco Adaptive Security Appliance (ASA) remotely with the CLI, the use of either Telnet or SSH is required. Because Telnet communications are sent in clear text, which can include passwords, SSH is highly recommended. The SSH traffic is encrypted in a tunnel and thereby helps protect passwords and other sensitive configuration commands from interception. The ASA allows SSH connections to the security appliance for management purposes. The security appliance allows a maximum of five concurrent SSH connections for each security context, if available, and a global maximum of 100 connections for all of the contexts combined.
Transcript of ASA Version 9.x SSH and Telnet on the Inside and Outside ... · PDF fileASA Version 9.x SSH...
ASA Version 9.x SSH and Telnet on the Insideand Outside Interfaces ConfigurationExample
Contents
IntroductionPrerequisitesRequirementsComponents UsedRelated ProductsConventionsConfigureNetwork DiagramSSH ConfigurationsSSH Access to the Security ApplianceASA ConfigurationASDM Version 7.2.1 ConfigurationTelnet ConfigurationTelnet Example ScenariosVerifyDebug SSHView Active SSH SessionsView Public RSA KeysTroubleshootRemove the RSA Keys from the ASASSH Connection Failed
Introduction
This document describes how to configure Secure Shell (SSH) on the inside and outsideinterfaces of the Cisco Series Security Appliance Versions 9.x and later. When you must configureand monitor the Cisco Adaptive Security Appliance (ASA) remotely with the CLI, the use of eitherTelnet or SSH is required. Because Telnet communications are sent in clear text, which caninclude passwords, SSH is highly recommended. The SSH traffic is encrypted in a tunnel andthereby helps protect passwords and other sensitive configuration commands from interception.
The ASA allows SSH connections to the security appliance for management purposes. Thesecurity appliance allows a maximum of five concurrent SSH connections for each securitycontext, if available, and a global maximum of 100 connections for all of the contexts combined.
Prerequisites
Requirements
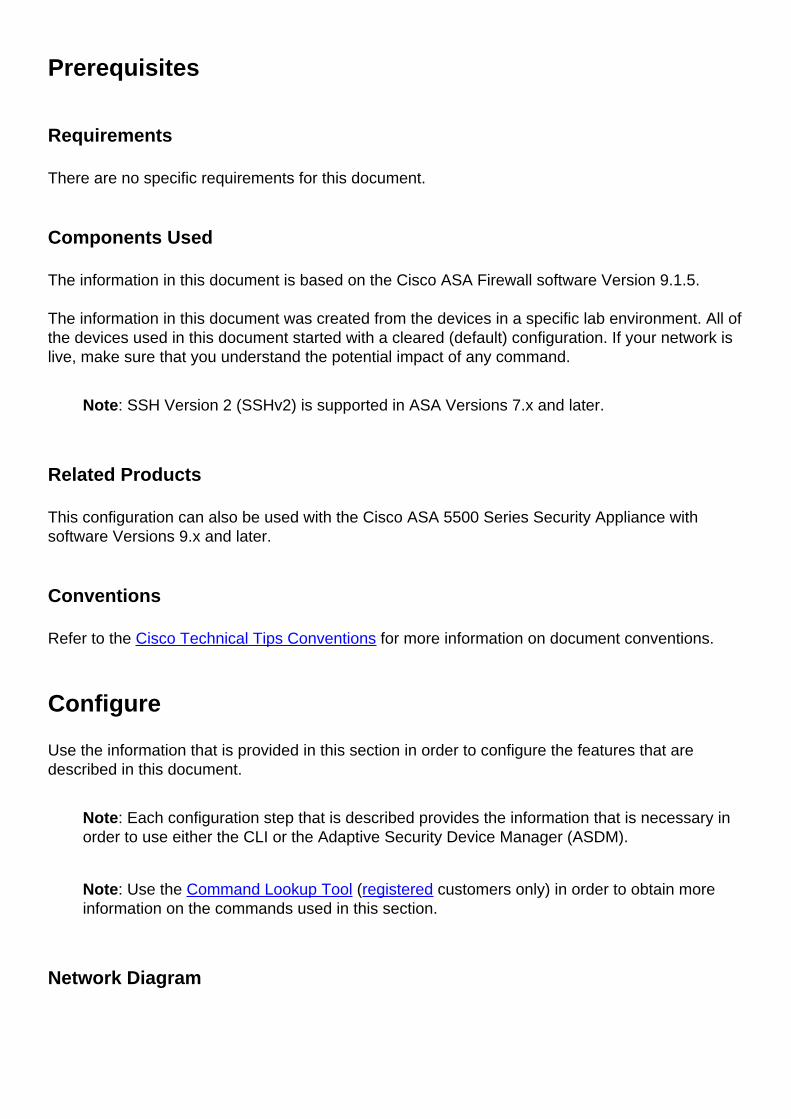
There are no specific requirements for this document.
Components Used
The information in this document is based on the Cisco ASA Firewall software Version 9.1.5.
The information in this document was created from the devices in a specific lab environment. All ofthe devices used in this document started with a cleared (default) configuration. If your network islive, make sure that you understand the potential impact of any command.
Note: SSH Version 2 (SSHv2) is supported in ASA Versions 7.x and later.
Related Products
This configuration can also be used with the Cisco ASA 5500 Series Security Appliance withsoftware Versions 9.x and later.
Conventions
Refer to the Cisco Technical Tips Conventions for more information on document conventions.
Configure
Use the information that is provided in this section in order to configure the features that aredescribed in this document.
Note: Each configuration step that is described provides the information that is necessary inorder to use either the CLI or the Adaptive Security Device Manager (ASDM).
Note: Use the Command Lookup Tool (registered customers only) in order to obtain moreinformation on the commands used in this section.
Network Diagram
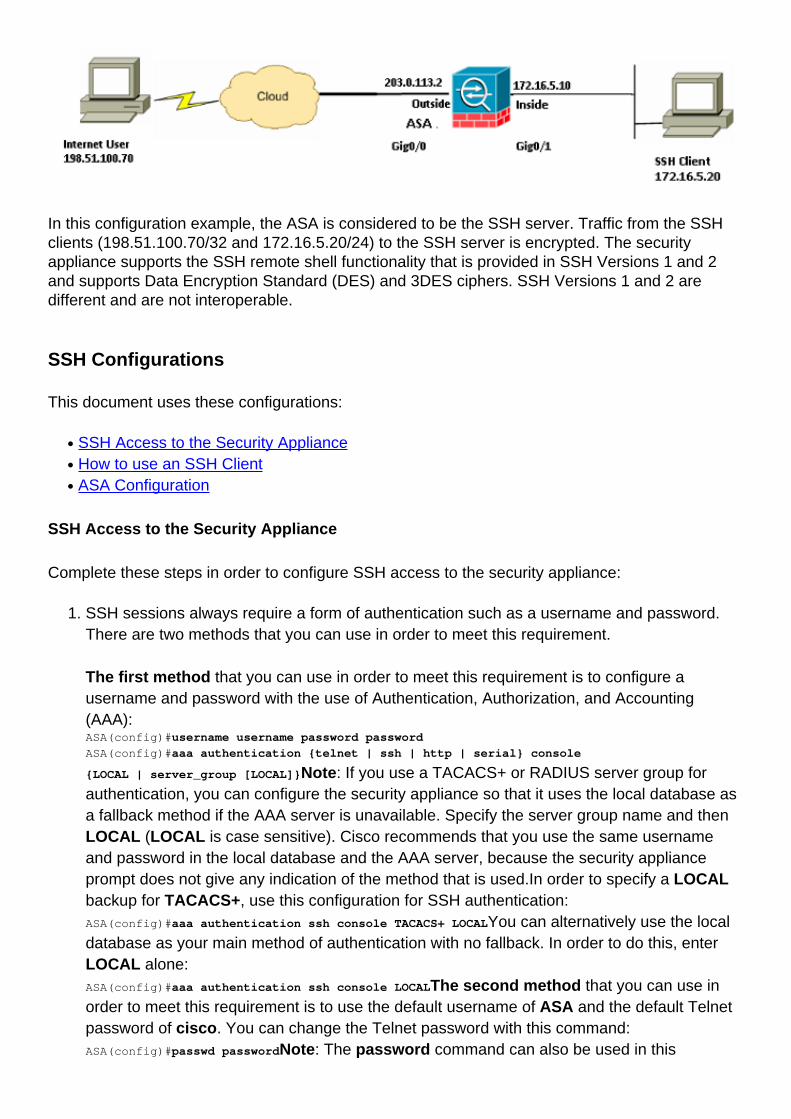
In this configuration example, the ASA is considered to be the SSH server. Traffic from the SSHclients (198.51.100.70/32 and 172.16.5.20/24) to the SSH server is encrypted. The securityappliance supports the SSH remote shell functionality that is provided in SSH Versions 1 and 2and supports Data Encryption Standard (DES) and 3DES ciphers. SSH Versions 1 and 2 aredifferent and are not interoperable.
SSH Configurations
This document uses these configurations:
SSH Access to the Security Appliance●
How to use an SSH Client●
ASA Configuration●
SSH Access to the Security Appliance
Complete these steps in order to configure SSH access to the security appliance:
SSH sessions always require a form of authentication such as a username and password.There are two methods that you can use in order to meet this requirement.
The first method that you can use in order to meet this requirement is to configure ausername and password with the use of Authentication, Authorization, and Accounting(AAA):ASA(config)#username username password password
ASA(config)#aaa authentication {telnet | ssh | http | serial} console
{LOCAL | server_group [LOCAL]}Note: If you use a TACACS+ or RADIUS server group forauthentication, you can configure the security appliance so that it uses the local database asa fallback method if the AAA server is unavailable. Specify the server group name and thenLOCAL (LOCAL is case sensitive). Cisco recommends that you use the same usernameand password in the local database and the AAA server, because the security applianceprompt does not give any indication of the method that is used.In order to specify a LOCALbackup for TACACS+, use this configuration for SSH authentication:ASA(config)#aaa authentication ssh console TACACS+ LOCALYou can alternatively use the localdatabase as your main method of authentication with no fallback. In order to do this, enterLOCAL alone:ASA(config)#aaa authentication ssh console LOCALThe second method that you can use inorder to meet this requirement is to use the default username of ASA and the default Telnetpassword of cisco. You can change the Telnet password with this command:ASA(config)#passwd passwordNote: The password command can also be used in this
1.
situation, as both of the commands function similarly.Generate an RSA key pair for the ASA Firewall, which is required for SSH:ASA(config)#crypto key generate rsa modulus modulus_sizeNote: The modulus_size (in bits)can be 512, 768, 1024, or 2048. The larger the key modulus size you specify, the longer ittakes to generate the RSA key pair. A value of 2048 is recommended. The command that isused in order to generate an RSA key pair is different for ASA software versions earlier thanVersion 7.x. In earlier versions, a domain name must be set before you can create thekeys. In multiple context mode, you must generate the RSA keys for every context.
2.
Specify the hosts that are allowed to connect to the security appliance. This commandspecifies the source address, netmask, and interface of the host(s) that is allowed to connectwith SSH. It can be entered multiple times for multiple hosts, networks, or interfaces. In thisexample, one host on the inside and one host on the outside are permitted:ASA(config)#ssh 172.16.5.20 255.255.255.255 inside
ASA(config)#ssh 198.51.10.70 255.255.255.255 outside
3.
This step is optional. By default, the security appliance allows both SSH Version 1 andVersion 2. Enter this command in order to restrict the connections to a specific version:ASA(config)# ssh version <version_number>Note: The version_number can be either 1 or 2.
4.
This step is optional. By default, the SSH sessions are closed after five minutes of inactivity.This timeout can be configured to last between 1 and 60 minutes:ASA(config)#ssh timeout minutes
5.
ASA Configuration
Use this information in order to configure the ASA:
ASA Version 9.1(5)2
!
hostname ASA
domain-name cisco.com
interface GigabitEthernet0/0
nameif inside
security-level 100
ip address 172.16.5.10 255.255.255.0
!
interface GigabitEthernet0/1
nameif outside
security-level 0
ip address 203.0.113.2 255.255.255.0
!--- AAA for the SSH configuration
username ciscouser password 3USUcOPFUiMCO4Jk encrypted
aaa authentication ssh console LOCAL
http server enable
http 172.16.5.0 255.255.255.0 inside
no snmp-server location
no snmp-server contact
snmp-server enable traps snmp authentication linkup linkdown coldstar
telnet timeout 5
!--- Enter this command for each address or subnet
!--- to identify the IP addresses from which
!--- the security appliance accepts connections.
!--- The security appliance accepts SSH connections from all interfaces.
ssh 172.16.5.20 255.255.255.255 inside
ssh 198.51.100.70 255.255.255.255 outside
!--- Allows the users on the host 172.16.5.20 on inside
!--- Allows SSH access to the user on internet 198.51.100.70 on outside
!--- to access the security appliance
!--- on the inside interface.
ssh 172.16.5.20 255.255.255.255 inside
!--- Sets the duration from 1 to 60 minutes
!--- (default 5 minutes) that the SSH session can be idle,
!--- before the security appliance disconnects the session.
ssh timeout 60
console timeout 0
!
class-map inspection_default
match default-inspection-traffic
!
!
policy-map global_policy
class inspection_default
inspect dns maximum-length 512
inspect ftp
inspect h323 h225
inspect h323 ras
inspect netbios
inspect rsh
inspect rtsp
inspect skinny
inspect esmtp
inspect sqlnet
inspect sunrpc
inspect tftp
inspect sip
inspect xdmcp
!
service-policy global_policy global
ASDM Version 7.2.1 Configuration
Complete these steps in order to configure the ASDM Version 7.2.1:
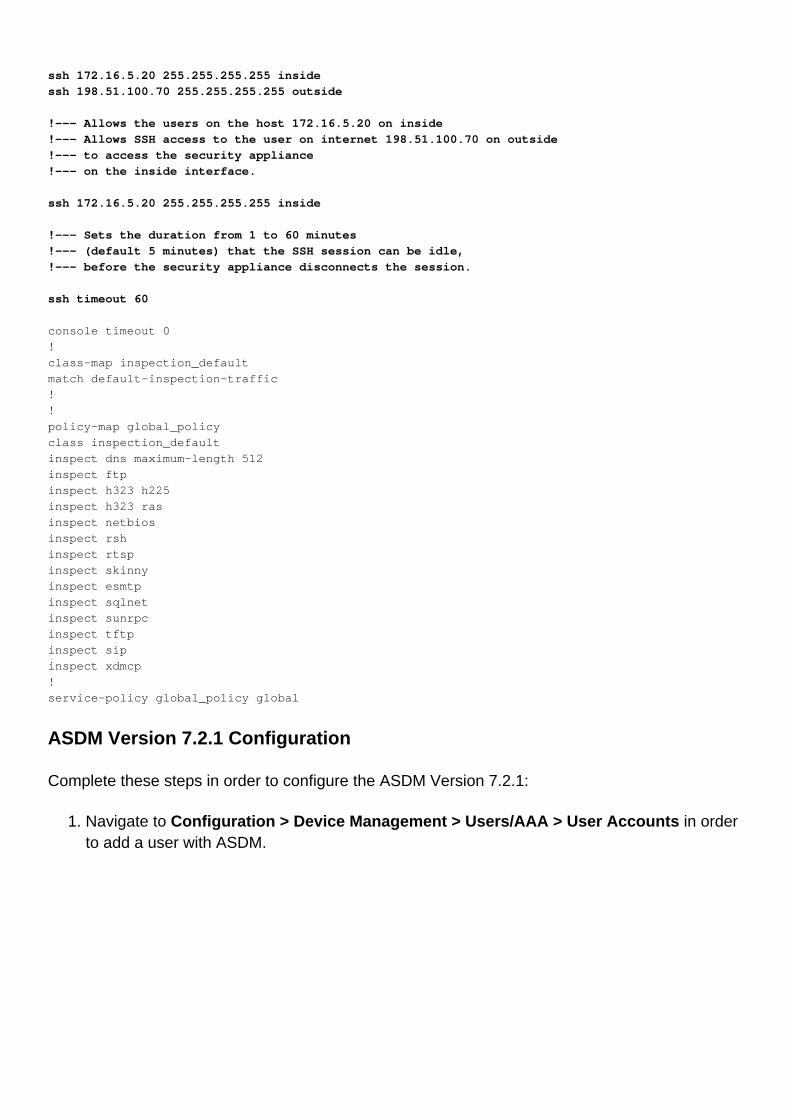
Navigate to Configuration > Device Management > Users/AAA > User Accounts in orderto add a user with ASDM.
1.
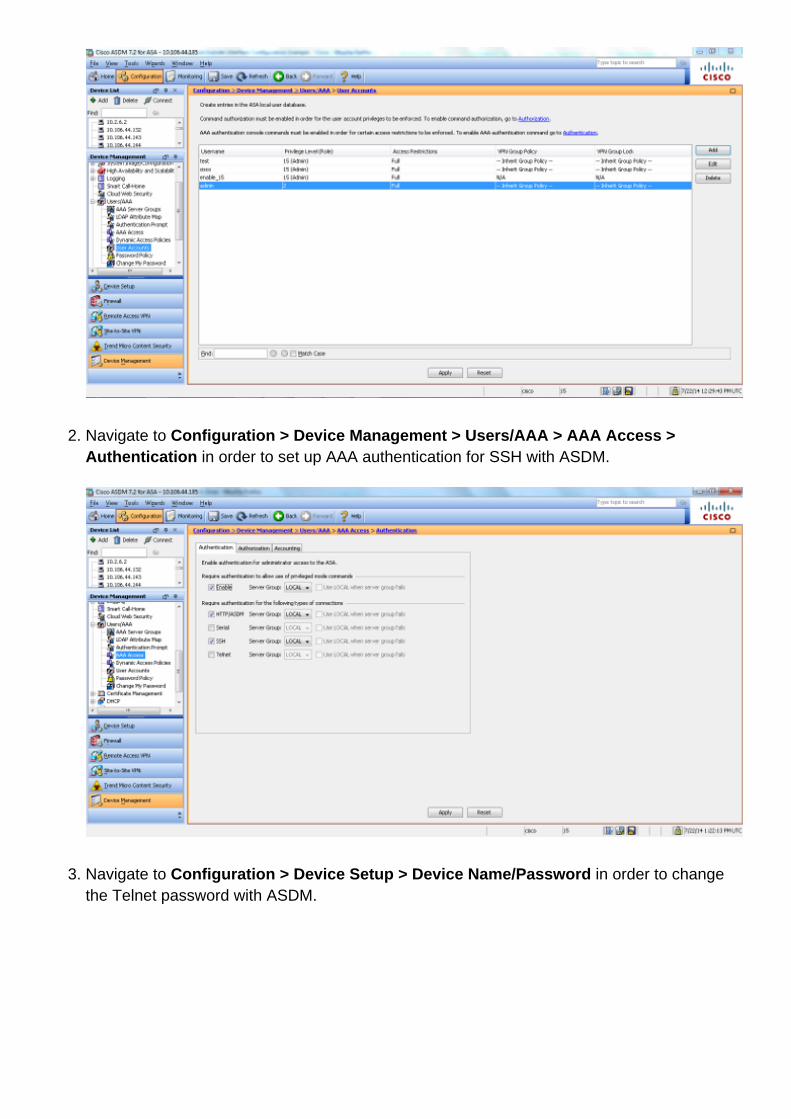
Navigate to Configuration > Device Management > Users/AAA > AAA Access >Authentication in order to set up AAA authentication for SSH with ASDM.
2.
Navigate to Configuration > Device Setup > Device Name/Password in order to changethe Telnet password with ASDM.
3.
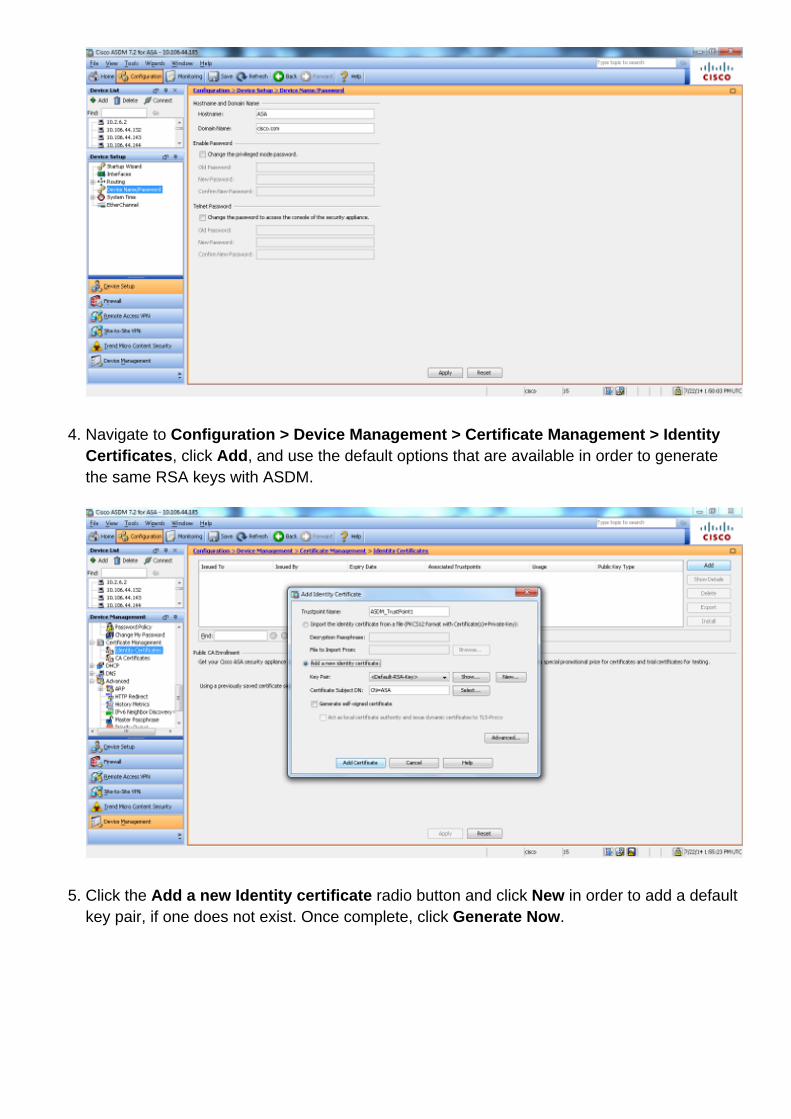
Navigate to Configuration > Device Management > Certificate Management > IdentityCertificates, click Add, and use the default options that are available in order to generatethe same RSA keys with ASDM.
4.
Click the Add a new Identity certificate radio button and click New in order to add a defaultkey pair, if one does not exist. Once complete, click Generate Now.
5.
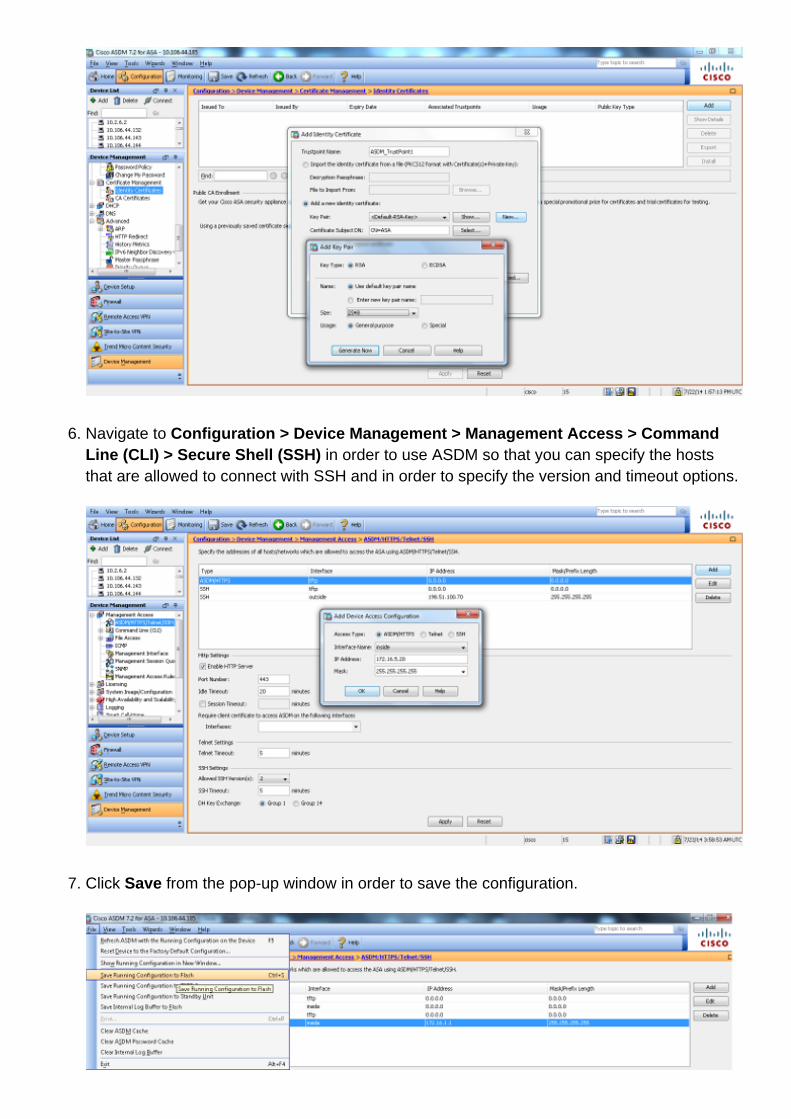
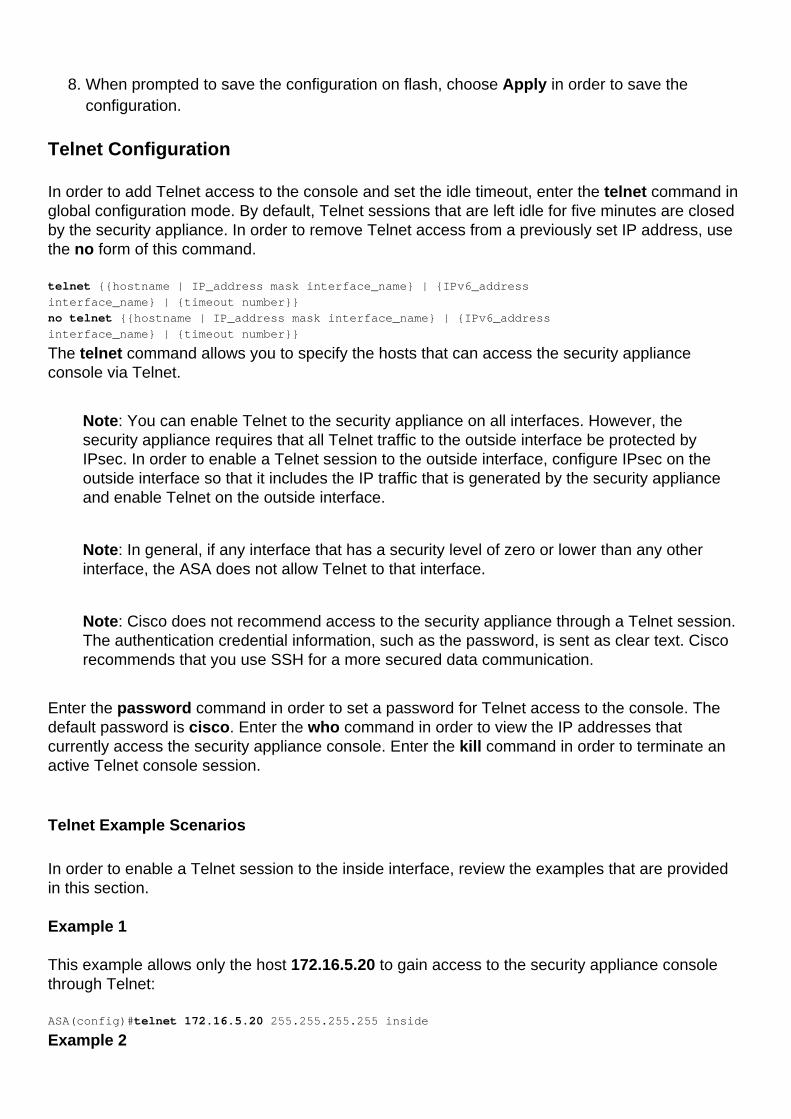
Navigate to Configuration > Device Management > Management Access > CommandLine (CLI) > Secure Shell (SSH) in order to use ASDM so that you can specify the hoststhat are allowed to connect with SSH and in order to specify the version and timeout options.
6.
Click Save from the pop-up window in order to save the configuration.7.
When prompted to save the configuration on flash, choose Apply in order to save theconfiguration.
8.
Telnet Configuration
In order to add Telnet access to the console and set the idle timeout, enter the telnet command inglobal configuration mode. By default, Telnet sessions that are left idle for five minutes are closedby the security appliance. In order to remove Telnet access from a previously set IP address, usethe no form of this command.
telnet {{hostname | IP_address mask interface_name} | {IPv6_address
interface_name} | {timeout number}}
no telnet {{hostname | IP_address mask interface_name} | {IPv6_address
interface_name} | {timeout number}}
The telnet command allows you to specify the hosts that can access the security applianceconsole via Telnet.
Note: You can enable Telnet to the security appliance on all interfaces. However, thesecurity appliance requires that all Telnet traffic to the outside interface be protected byIPsec. In order to enable a Telnet session to the outside interface, configure IPsec on theoutside interface so that it includes the IP traffic that is generated by the security applianceand enable Telnet on the outside interface.
Note: In general, if any interface that has a security level of zero or lower than any otherinterface, the ASA does not allow Telnet to that interface.
Note: Cisco does not recommend access to the security appliance through a Telnet session.The authentication credential information, such as the password, is sent as clear text. Ciscorecommends that you use SSH for a more secured data communication.
Enter the password command in order to set a password for Telnet access to the console. Thedefault password is cisco. Enter the who command in order to view the IP addresses thatcurrently access the security appliance console. Enter the kill command in order to terminate anactive Telnet console session.
Telnet Example Scenarios
In order to enable a Telnet session to the inside interface, review the examples that are providedin this section.
Example 1
This example allows only the host 172.16.5.20 to gain access to the security appliance consolethrough Telnet:
ASA(config)#telnet 172.16.5.20 255.255.255.255 inside
Example 2
This example allows only the network 172.16.5.0/24 to gain access to the security applianceconsole through Telnet:
ASA(config)#telnet 172.16.5.0 255.255.255.0 inside
Example 3
This example allows all of the networks to gain access to the security appliance console throughTelnet:
ASA(config)#telnet 0.0.0.0 0.0.0.0 inside
If you use the aaa command with the console keyword, the Telnet console access must beauthenticated with an authentication server.
Note: If you configure the aaa command in order to require authentication for the securityappliance and the Telnet console access, and the console login request times out, you cangain access to the security appliance from the serial console. In order to do this, enter thesecurity appliance username and the password that is set with the enable passwordcommand.
Issue the telnet timeout command in order to set the maximum time that a console Telnetsession can be idle before it is logged off by the security appliance. You cannot use the no telnetcommand with the telnet timeout command.
This example shows how to change the maximum session idle duration:
hostname(config)#telnet timeout 10
hostname(config)#show running-config telnet timeout
telnet timeout 10 minutes
Verify
Use this section in order to confirm that your configuration works properly.
Note: The Output Interpreter Tool (registered customers only) (OIT) supports certain showcommands. Use the OIT in order to view an analysis of show command output.
Debug SSH
Enter the debug ssh command in order to enable SSH debugging:
ASA(config)#debug ssh
SSH debugging on
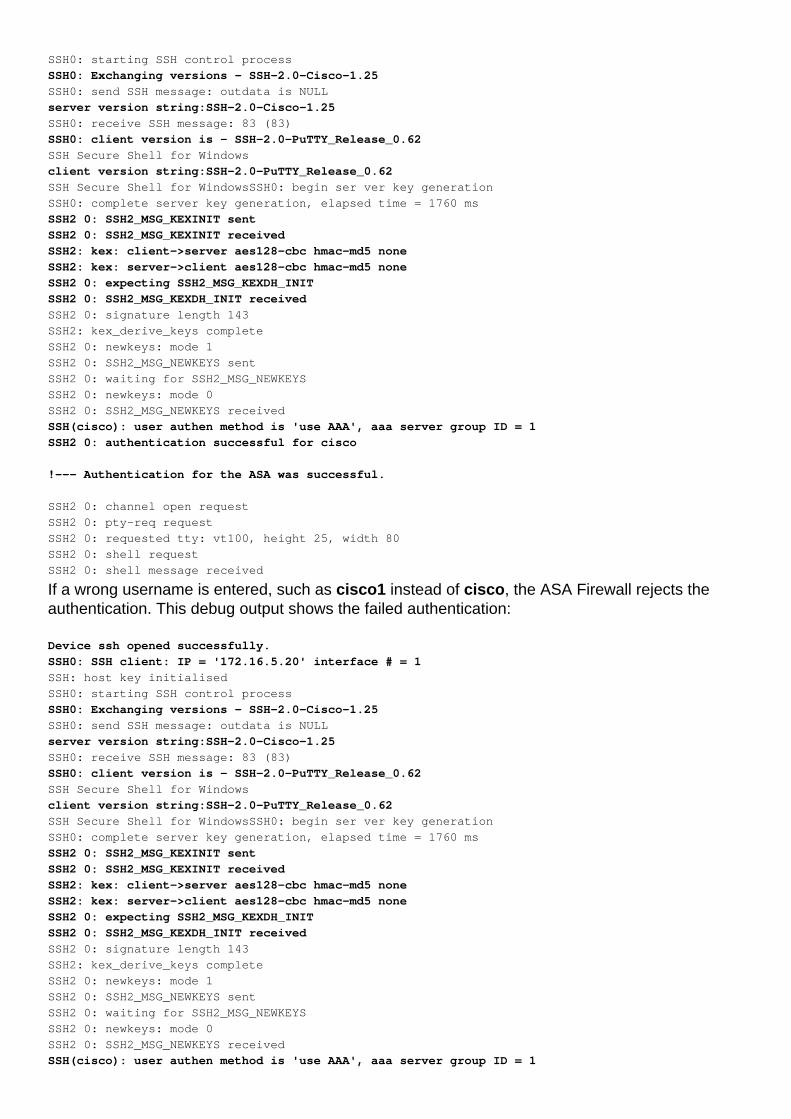
This output shows an SSH attempt from an inside IP address (172.16.5.20) to the inside interfaceof the ASA. These debugs depict a successful connection and authentication:
Device ssh opened successfully.
SSH0: SSH client: IP = '172.16.5.20' interface # = 1
SSH: host key initialised
SSH0: starting SSH control process
SSH0: Exchanging versions - SSH-2.0-Cisco-1.25
SSH0: send SSH message: outdata is NULL
server version string:SSH-2.0-Cisco-1.25
SSH0: receive SSH message: 83 (83)
SSH0: client version is - SSH-2.0-PuTTY_Release_0.62
SSH Secure Shell for Windows
client version string:SSH-2.0-PuTTY_Release_0.62
SSH Secure Shell for WindowsSSH0: begin ser ver key generation
SSH0: complete server key generation, elapsed time = 1760 ms
SSH2 0: SSH2_MSG_KEXINIT sent
SSH2 0: SSH2_MSG_KEXINIT received
SSH2: kex: client->server aes128-cbc hmac-md5 none
SSH2: kex: server->client aes128-cbc hmac-md5 none
SSH2 0: expecting SSH2_MSG_KEXDH_INIT
SSH2 0: SSH2_MSG_KEXDH_INIT received
SSH2 0: signature length 143
SSH2: kex_derive_keys complete
SSH2 0: newkeys: mode 1
SSH2 0: SSH2_MSG_NEWKEYS sent
SSH2 0: waiting for SSH2_MSG_NEWKEYS
SSH2 0: newkeys: mode 0
SSH2 0: SSH2_MSG_NEWKEYS received
SSH(cisco): user authen method is 'use AAA', aaa server group ID = 1
SSH2 0: authentication successful for cisco
!--- Authentication for the ASA was successful.
SSH2 0: channel open request
SSH2 0: pty-req request
SSH2 0: requested tty: vt100, height 25, width 80
SSH2 0: shell request
SSH2 0: shell message received
If a wrong username is entered, such as cisco1 instead of cisco, the ASA Firewall rejects theauthentication. This debug output shows the failed authentication:
Device ssh opened successfully.
SSH0: SSH client: IP = '172.16.5.20' interface # = 1
SSH: host key initialised
SSH0: starting SSH control process
SSH0: Exchanging versions - SSH-2.0-Cisco-1.25
SSH0: send SSH message: outdata is NULL
server version string:SSH-2.0-Cisco-1.25
SSH0: receive SSH message: 83 (83)
SSH0: client version is - SSH-2.0-PuTTY_Release_0.62
SSH Secure Shell for Windows
client version string:SSH-2.0-PuTTY_Release_0.62
SSH Secure Shell for WindowsSSH0: begin ser ver key generation
SSH0: complete server key generation, elapsed time = 1760 ms
SSH2 0: SSH2_MSG_KEXINIT sent
SSH2 0: SSH2_MSG_KEXINIT received
SSH2: kex: client->server aes128-cbc hmac-md5 none
SSH2: kex: server->client aes128-cbc hmac-md5 none
SSH2 0: expecting SSH2_MSG_KEXDH_INIT
SSH2 0: SSH2_MSG_KEXDH_INIT received
SSH2 0: signature length 143
SSH2: kex_derive_keys complete
SSH2 0: newkeys: mode 1
SSH2 0: SSH2_MSG_NEWKEYS sent
SSH2 0: waiting for SSH2_MSG_NEWKEYS
SSH2 0: newkeys: mode 0
SSH2 0: SSH2_MSG_NEWKEYS received
SSH(cisco): user authen method is 'use AAA', aaa server group ID = 1
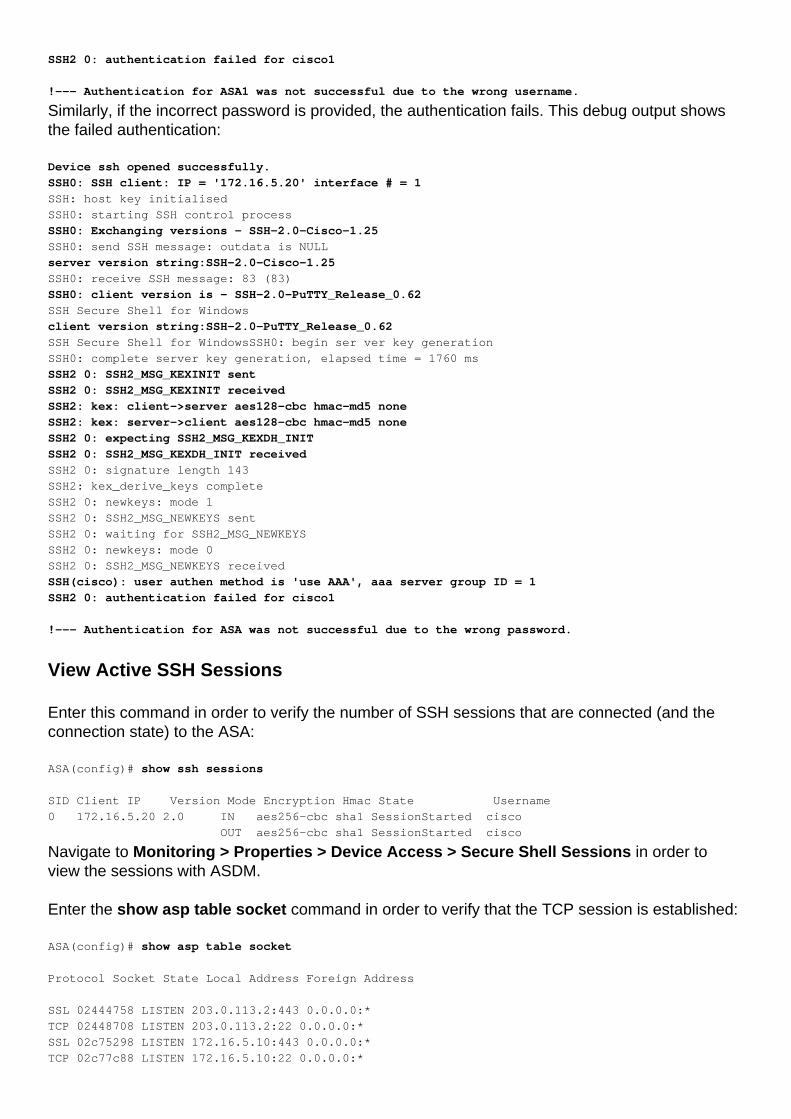
SSH2 0: authentication failed for cisco1
!--- Authentication for ASA1 was not successful due to the wrong username.
Similarly, if the incorrect password is provided, the authentication fails. This debug output showsthe failed authentication:
Device ssh opened successfully.
SSH0: SSH client: IP = '172.16.5.20' interface # = 1
SSH: host key initialised
SSH0: starting SSH control process
SSH0: Exchanging versions - SSH-2.0-Cisco-1.25
SSH0: send SSH message: outdata is NULL
server version string:SSH-2.0-Cisco-1.25
SSH0: receive SSH message: 83 (83)
SSH0: client version is - SSH-2.0-PuTTY_Release_0.62
SSH Secure Shell for Windows
client version string:SSH-2.0-PuTTY_Release_0.62
SSH Secure Shell for WindowsSSH0: begin ser ver key generation
SSH0: complete server key generation, elapsed time = 1760 ms
SSH2 0: SSH2_MSG_KEXINIT sent
SSH2 0: SSH2_MSG_KEXINIT received
SSH2: kex: client->server aes128-cbc hmac-md5 none
SSH2: kex: server->client aes128-cbc hmac-md5 none
SSH2 0: expecting SSH2_MSG_KEXDH_INIT
SSH2 0: SSH2_MSG_KEXDH_INIT received
SSH2 0: signature length 143
SSH2: kex_derive_keys complete
SSH2 0: newkeys: mode 1
SSH2 0: SSH2_MSG_NEWKEYS sent
SSH2 0: waiting for SSH2_MSG_NEWKEYS
SSH2 0: newkeys: mode 0
SSH2 0: SSH2_MSG_NEWKEYS received
SSH(cisco): user authen method is 'use AAA', aaa server group ID = 1
SSH2 0: authentication failed for cisco1
!--- Authentication for ASA was not successful due to the wrong password.
View Active SSH Sessions
Enter this command in order to verify the number of SSH sessions that are connected (and theconnection state) to the ASA:
ASA(config)# show ssh sessions
SID Client IP Version Mode Encryption Hmac State Username
0 172.16.5.20 2.0 IN aes256-cbc sha1 SessionStarted cisco
OUT aes256-cbc sha1 SessionStarted cisco
Navigate to Monitoring > Properties > Device Access > Secure Shell Sessions in order toview the sessions with ASDM.
Enter the show asp table socket command in order to verify that the TCP session is established:
ASA(config)# show asp table socket
Protocol Socket State Local Address Foreign Address
SSL 02444758 LISTEN 203.0.113.2:443 0.0.0.0:*
TCP 02448708 LISTEN 203.0.113.2:22 0.0.0.0:*
SSL 02c75298 LISTEN 172.16.5.10:443 0.0.0.0:*
TCP 02c77c88 LISTEN 172.16.5.10:22 0.0.0.0:*
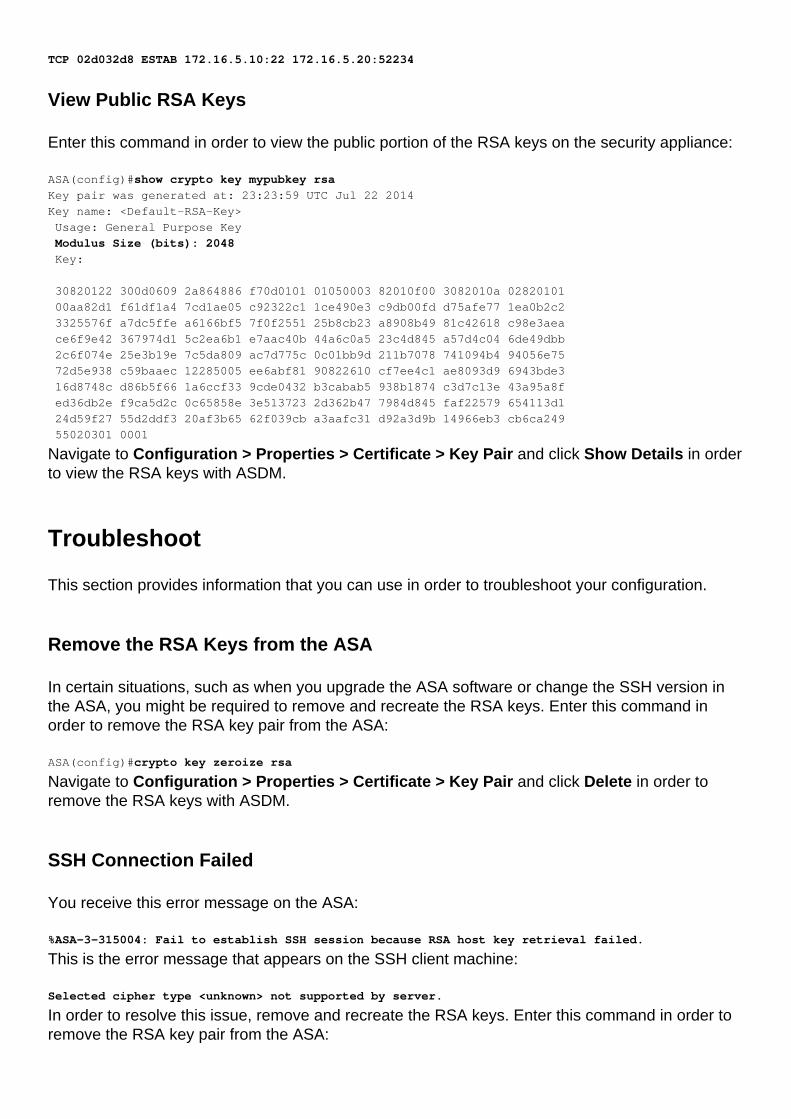
TCP 02d032d8 ESTAB 172.16.5.10:22 172.16.5.20:52234
View Public RSA Keys
Enter this command in order to view the public portion of the RSA keys on the security appliance:
ASA(config)#show crypto key mypubkey rsa
Key pair was generated at: 23:23:59 UTC Jul 22 2014
Key name: <Default-RSA-Key>
Usage: General Purpose Key
Modulus Size (bits): 2048
Key:
30820122 300d0609 2a864886 f70d0101 01050003 82010f00 3082010a 02820101
00aa82d1 f61df1a4 7cd1ae05 c92322c1 1ce490e3 c9db00fd d75afe77 1ea0b2c2
3325576f a7dc5ffe a6166bf5 7f0f2551 25b8cb23 a8908b49 81c42618 c98e3aea
ce6f9e42 367974d1 5c2ea6b1 e7aac40b 44a6c0a5 23c4d845 a57d4c04 6de49dbb
2c6f074e 25e3b19e 7c5da809 ac7d775c 0c01bb9d 211b7078 741094b4 94056e75
72d5e938 c59baaec 12285005 ee6abf81 90822610 cf7ee4c1 ae8093d9 6943bde3
16d8748c d86b5f66 1a6ccf33 9cde0432 b3cabab5 938b1874 c3d7c13e 43a95a8f
ed36db2e f9ca5d2c 0c65858e 3e513723 2d362b47 7984d845 faf22579 654113d1
24d59f27 55d2ddf3 20af3b65 62f039cb a3aafc31 d92a3d9b 14966eb3 cb6ca249
55020301 0001
Navigate to Configuration > Properties > Certificate > Key Pair and click Show Details in orderto view the RSA keys with ASDM.
Troubleshoot
This section provides information that you can use in order to troubleshoot your configuration.
Remove the RSA Keys from the ASA
In certain situations, such as when you upgrade the ASA software or change the SSH version inthe ASA, you might be required to remove and recreate the RSA keys. Enter this command inorder to remove the RSA key pair from the ASA:
ASA(config)#crypto key zeroize rsa
Navigate to Configuration > Properties > Certificate > Key Pair and click Delete in order toremove the RSA keys with ASDM.
SSH Connection Failed
You receive this error message on the ASA:
%ASA-3-315004: Fail to establish SSH session because RSA host key retrieval failed.
This is the error message that appears on the SSH client machine:
Selected cipher type <unknown> not supported by server.
In order to resolve this issue, remove and recreate the RSA keys. Enter this command in order toremove the RSA key pair from the ASA:
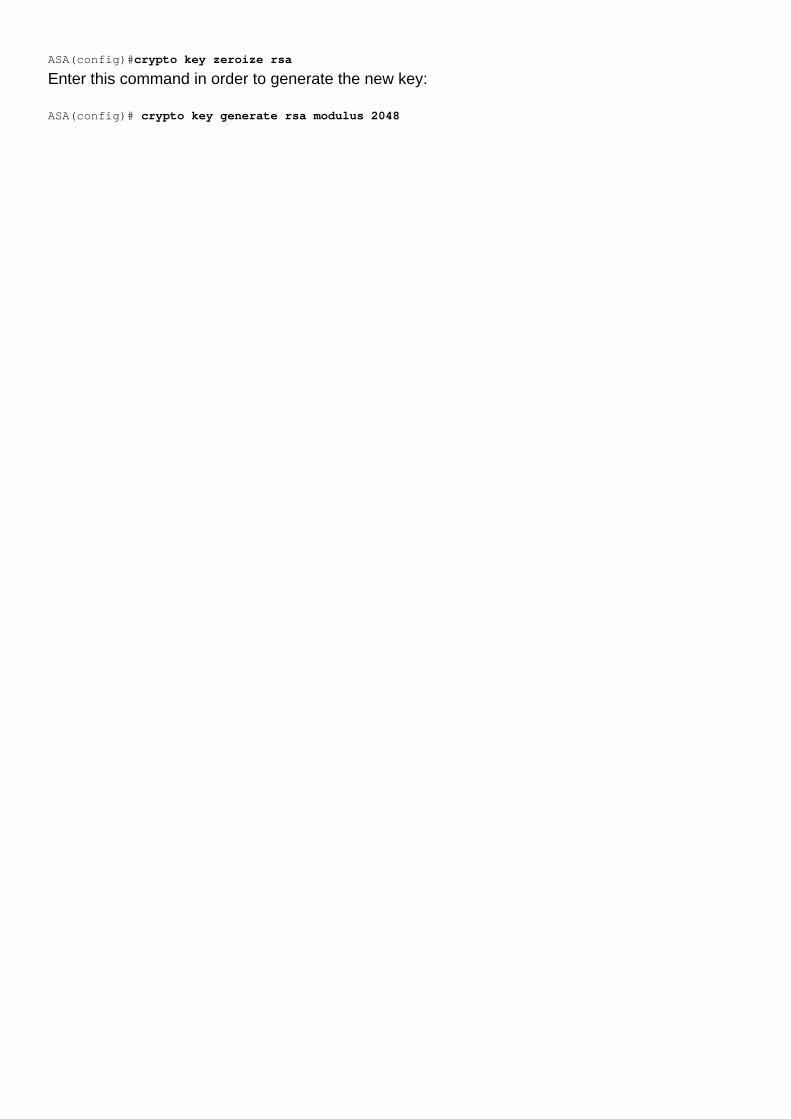
ASA(config)#crypto key zeroize rsa
Enter this command in order to generate the new key:
ASA(config)# crypto key generate rsa modulus 2048