Arts & Communication DRAWING AND PAINTING · Arts & Communication ... Techniques in watercolor ......
26
DRAWING AND PAINTING Member Guide Pub. No. 4H169 Arts & Communication WISCONSIN 4-H PUBLICATION HEAD HEART HANDS HEALTH
-
Upload
nguyenkiet -
Category
Documents
-
view
227 -
download
0
Transcript of Arts & Communication DRAWING AND PAINTING · Arts & Communication ... Techniques in watercolor ......
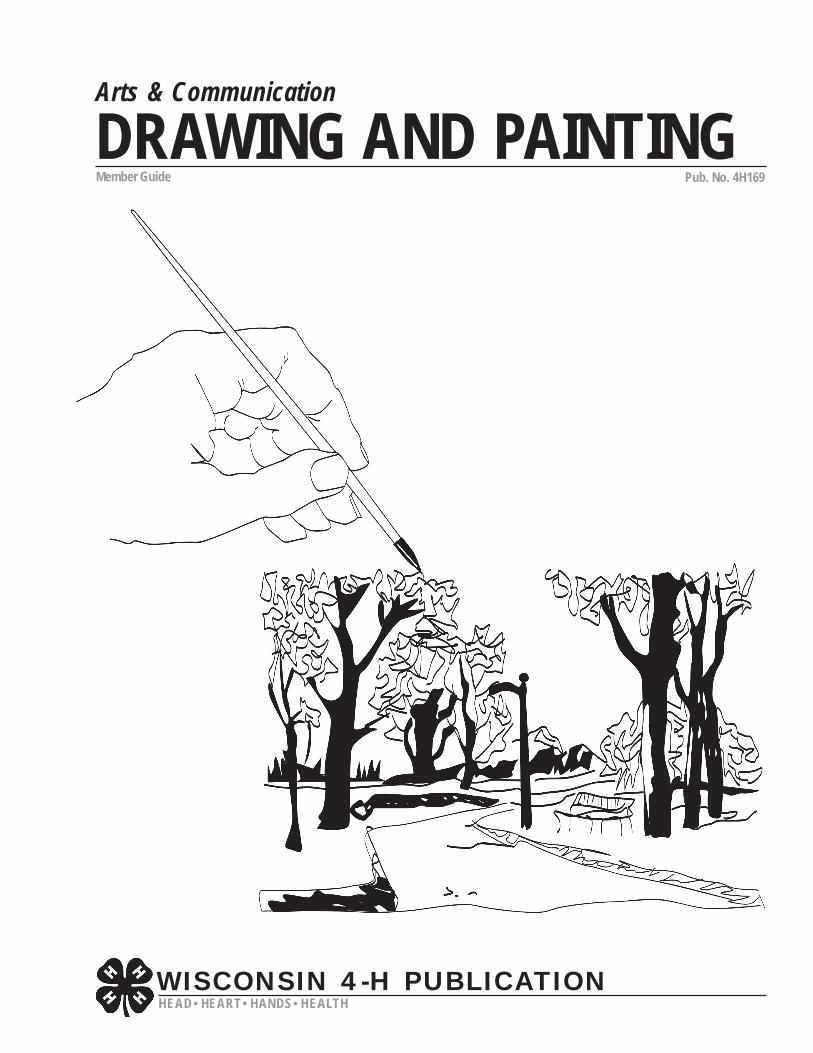
DRAWING AND PAINTINGMember Guide Pub. No. 4H169
Arts & Communication
WISCONSIN 4-H PUBLICATIONHEAD HEART HANDS HEALTH

WISCONSIN 4-H
Watercolor painting...............................................Becoming acquainted with materials..................................Becoming acquainted with watercolors.............................Beginning to watercolor.......................................................Increasing your imaginative powers..................................Skylines and rooftops in watercolor...................................Techniques in watercolor.....................................................
Painting with acrylics............................................Selecting acrylic paints........................................................Brushes..................................................................................Palette.....................................................................................Easel........................................................................................Painting surfaces..................................................................
Painting on solid form surfaces.............................Colors to use.........................................................................Advanced project.................................................................
Painting ideas.......................................................A viewfinder for seeing........................................................Ideas from imagination.........................................................
16161717171819
202020212121
212222
222223
2
2
3
45
6
67
1111
1213
14
15
Contents
A note to parents.....................................................
Introduction.............................................................
Ideas about drawing and sketching........................
Contour drawing.....................................................Portraits of yourself and others............................................
Gesture or speed drawing.......................................
Drawing human figures...........................................Figure drawing exercises.......................................................
Dots to create images.............................................Work problems.......................................................................
Understanding color...............................................Exercises in color...................................................................
Two-dimensional art...............................................
Starting to paint.....................................................
Pub. No. 4H169, Pg. 1
WISCONSIN 4-H
A note to parentsYou are the most important and influential person in yourchildren’s lives. You can nurture and cultivate their interest inthis project by guiding them in their planning, assisting themin carrying out their project and by recognizing them for a jobwell done.
The information in this guide can provide significant learningexperiences for your children. Planning the things they willlearn and do and assessing their progress based on theirplans will help make their experiences more worthwhile. Thisplanning and evaluating individually with your children maybe done by their project leader. However, if this is notpossible, you can fulfill this need.
Following are some things you as a parent can do to helpyour children get the most out of this project:
Become familiar with the material in this member guide.
Help your children select project goals they can likelyachieve. These should be recorded on the MemberPlanning and Evaluation Form (MPE).
Help them decide what tools, equipment and suppliesthey will need and what they can realistically expect tohave.
Help them understand and learn how to do the tasks theymust do to carry out their plans. Do no do their work forthem.
Assist them in scheduling their time.
Discuss their progress with them from time to time.
Help them recognize a good job from a poor one.
Commend them on things they have done well. (As themost important person in their lives, a pat on the backfrom you is one of the highest rewards they can receive.)
Help them understand where they need to improve.
Help them to know themselves, their strengths andweaknesses, and to compete with their own abilities.
Help them to evaluate what they have done and whatthey have learned on the basis of the goals they have setthemselves. Do not compare their progress with others.Each is unique and needs to be treated individually.
IntroductionThis guide is for those young people who have alwayswished they could draw or paint. Let us agree first that youare an artist. Your interest in drawing and painting canbecome an outward expression of the thoughts and feelingsin your mind. The practice of art is to enable you to under-
stand, to become more aware of the world you live in, and todiscover the joy in creating. Art is an activity every one canparticipate in, at whatever level of ability he or she may have.
Everybody has tried to express ideas with a pencil or brush.You may have said to yourself, “I never had any lessons indrawing or painting. I wouldn’t even know where to begin.There must be some way to start.” The first and mostimportant step is to begin drawing and painting for fun.Never mind how awkward or clumsy your first attempts are;they are yours. You made them, and nobody else hadanything else to do with them. Don’t be discouraged bycomparing your drawings or paintings with others.
Everyone creates differently. Enjoy the fact you are express-ing yourself in your own personal way. By doing that, youare as creative as any artist.
Have fun following the suggestions in this guide. They willhelp you learn to describe more clearly on paper or boardthings you have seen or imagined. The aim of the activities isto encourage a sense of discovery and to learn the disciplineof handling drawing and painting materials. Your ability toobserve and to imagine will grow through the fun of drawingand painting.
There are three stages in developing you art ability.1. The first stage begins with practice to acquire techniques,
to become acquainted with your materials and tools, andto discover an independent attitude toward art.
2. The second stage is one of experimenting, in which youmust search to find what you want to express and topractice with intense interest to improve your way ofexpression. As a young child you may not have beenconcerned about how to draw or what to draw. Yousimply drew because it was fun. You had an idea and youproceeded to draw. Develop a similar attitude as youexperiment with ideas.
The ideas outlined in this guide are to get you started, togive you some ways to draw or paint, and to have funworking at them. It is not necessary to have a lot ofinstruction, just a few approaches to get you started.Then, draw or paint wherever and whenever you can.
Don’t judge your work too soon or be over- critical ofyour efforts. Draw and paint many times in many ways sothat you can compare what you have done and see howyou have improved.
3. The third stage comes to those who have drawn orpainted enough to acquire technical control and canfreely communicate what they know in their art.
Pub. No. 4H169, Pg. 2
WISCONSIN 4-H
Of these three stages only the first can be taught. You canlearn about procedures in techniques and methods oforganizing your ideas. However, after this, you are on yourown to search around you, to use your imagination, and toexpress yourself.
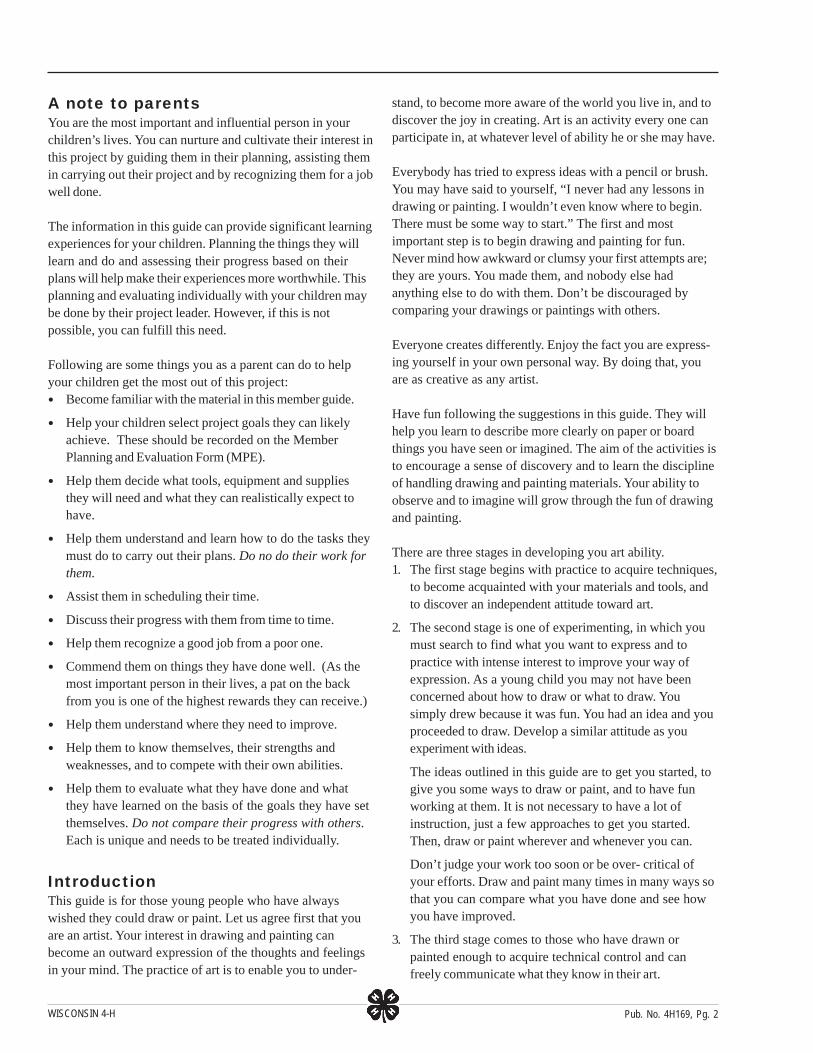
We all have the ability to express ourselves through the arts.We must not be discouraged by the difficulties we meetalong the way. (See Image 1.)
Drawing materialsSoft lead pencils - 2B or 3B
Charcoal pencils - 4B (The numbers stamped on thepencils indicate degree of softness. 4B is softer than 3B.)
Nylon and felt-tip pens in black and colored inks
Watercolors with a medium size watercolor box
Fine point steel pen
Bottle of India ink
Drawing surfacesVarious hard finish papers suitable for drawing in pencil,watercolor painting, and ink drawing
Good quality writing or typing paper
White shelf paper
White bristol board from an art shop
All-purpose white drawing and sketching pads in 9" x 12"or 12" x 15" sizes
It is not necessary to sharpen drawing pencils to a fine point.A single-edge razor blade can be used to cut away the wood,exposing about one-half inch of graphite or lead.
A fine, delicate line can be made by slightly turning the pencilas you move it across the paper. Only a slight amount ofpressure is needed for thin lines; use heavier pressure forbroad dark lines.
Ideas about drawing and sketchingToday we are exposed to many visual images found in books,magazines, photographs, newspapers, television, and theInternet. As a result we are well acquainted with the experi-ence of using our eyes to look but we seldom realize the needto consciously see.
Looking is a common experience. It is casual, indefinite anduntrained. It helps us get around safely through doors, walkacross a street, go up stairs, etc. We have little consciousawareness of the miracle of sight and what a gift it is to reallysee.
Seeing is an act of observing - an intense, concentratedexperience in observing with our eyes. Let’s use an example.Look at the open palm of your hand. See with a consciouseffort the many creases and folds in your hand. With thatbrief but deliberate effort in seeing, you become consciouslyaware of the many details that are present in front of youreyes but that you have not always recognized.
This kind of seeing is valuable and important in manyactivities. The hunter in the field must use his eyes forselective seeing where generalized looking would miss manythings. The baseball or the football player needs preciseseeing to throw, catch or hit a ball. Looking is not enough.
To realize fully this marvelous experience of seeing, we mustmake a conscious effort at concentrated seeing. In art, seeingis closely associated with the process of creating images andsymbols, based on observing our environment.
We communicate to ourselves what we see through adelineating process called drawing.
Drawing is a natural experience for all of us. When we werevery young we enjoyed drawing with a pencil or a crayon.Our drawings were freely created from our memory orimagination. Now we realize that our eyes can give us muchmore information about what we see at the moment ofdrawing. It opens a new world of expressing ideas.
How important for any kind of an expression is the ability todraw? Artists and craftspeople give form to their ideasthrough a variety of drawing techniques and materials. Allthese are done by marking, scratching, stroking, smudging orrubbing on a surface using a pencil, pen and ink, brush,crayon or chalk. Frequently the artist uses tools other than
Image 1: We communicate to ourselves what we seethrough drawing.
Pub. No. 4H169, Pg. 3
WISCONSIN 4-H
those associated with drawing - a scriber in enamel powder, astick on the side of a clay pot, or thread in a stitchery.
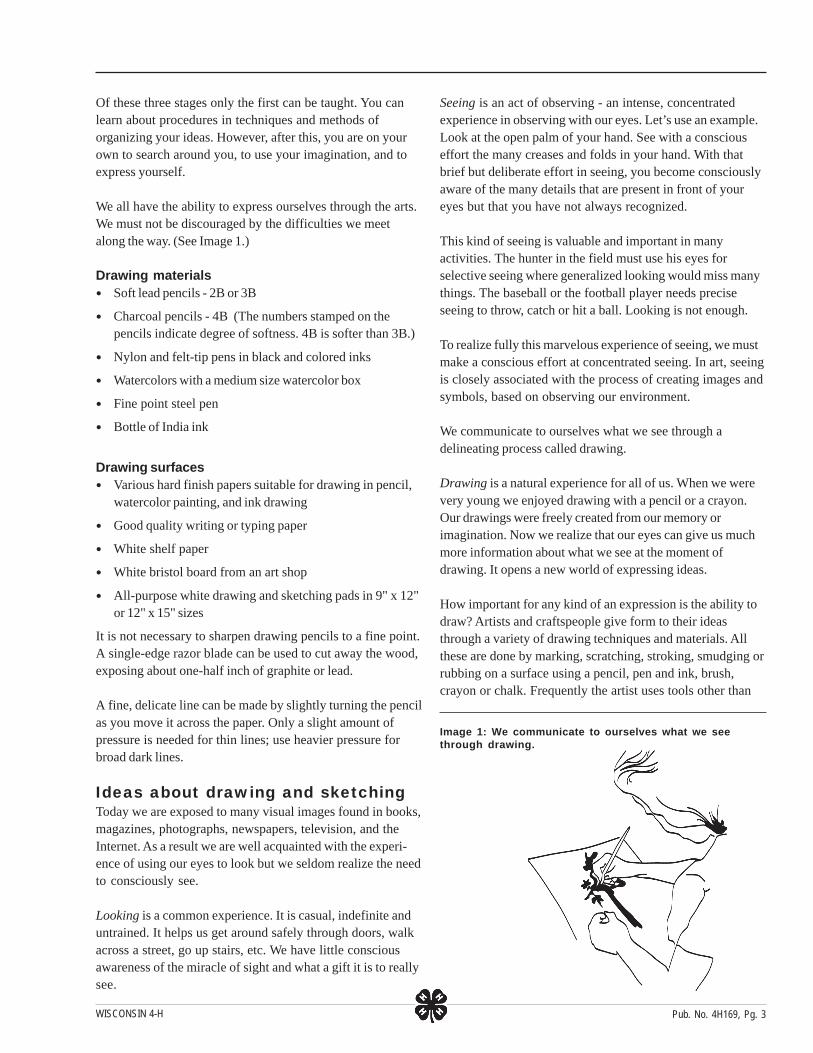
Drawing is a means of recording what we see with greaterclarity. (See Image 2.) This information and detail helps usorganize our ideas for painting in oil, watercolor or acrylics.Above all, drawing can be enjoyed as a creative experience indefining vague ideas from our imagination or memory intovisual statements. We can alter, modify, revise and changethese ideas as they come forth until we are pleased with theresults.
Contour drawingThis is an exploration with a method of drawing that stressesthe coordination of hand and eye. The objective is to haveour eyes observe and carefully follow the edge or contour ofan object and at the same time draw a corresponding line witha pencil, recording this eye path.
With a soft drawing pencil and white drawing paper 9" x 12"or 12" x 18", try a series of contour drawings. The first objectto draw will be your hand. Place your left hand in an interest-ing relaxed position. It can rest on the paper, holding it inplace on the table.
Focus your eye on some point or place on the object (anypoint will do) along the contour of the object. Contour isconsidered to be the outermost edge of the object as you seeit. Imagine that the tip of your pencil is touching the objectinstead of the paper. Without taking your eye off the model,proceed to draw a continuous line corresponding to the samekind of contour your eye is following.
Remember to consciously move your eyes along the contour.At the same time draw a line on paper which records your eyepath. Avoid looking at the drawing paper and concentrateintently on the “seeing” experience. This activity is verysimilar to the method of practicing at the piano or thetypewriter. In these examples the eye concentrates on readingthe notes or words and permits the hands or fingers tocontact the keys by touch.
Keep firmly in mind the idea that the pencil point is actuallytouching the contour. Be guided by the sense of touch ratherthan sight. This means that you must draw without looking atthe paper, continuously looking at the object.
Exactly coordinate the pencil with the eye. Your eye may betempted at first to move faster than your pencil, but do not letit get ahead. Consider only the point at which you areworking without regard for any other part of the object.
At times you will find that the contour you see will leadinside the object area. When this happens, glance down atthe paper to determine a new starting point. Locate this newstarting point with your pencil and determine from that pointwhere the contour turned inwards.
You may glance down at the paper several times during thedrawing experience but do not draw while you are looking atthe paper.
There will be other contours lying within the outer edges ofthe object. Draw these in the same manner as the outercontour edges. Make yourself think that your eye is actuallytouching the object.
This experiment should be done slowly, searchingly andsensitively. Take time; don’t be impatient or quick. A contourstudy does not have to be finished because it is a selectedseeing experience, to be continued as long as you have thepatience.
You may indeed find it difficult to break a long habit oflooking at the paper as you draw. Resist and make it a game.Contour drawing is different from outline drawing. You“think” of the contact with the object as going into theshadow or coming out in the light by varying the pressure onthe pencil. This will give a thick or thin line.
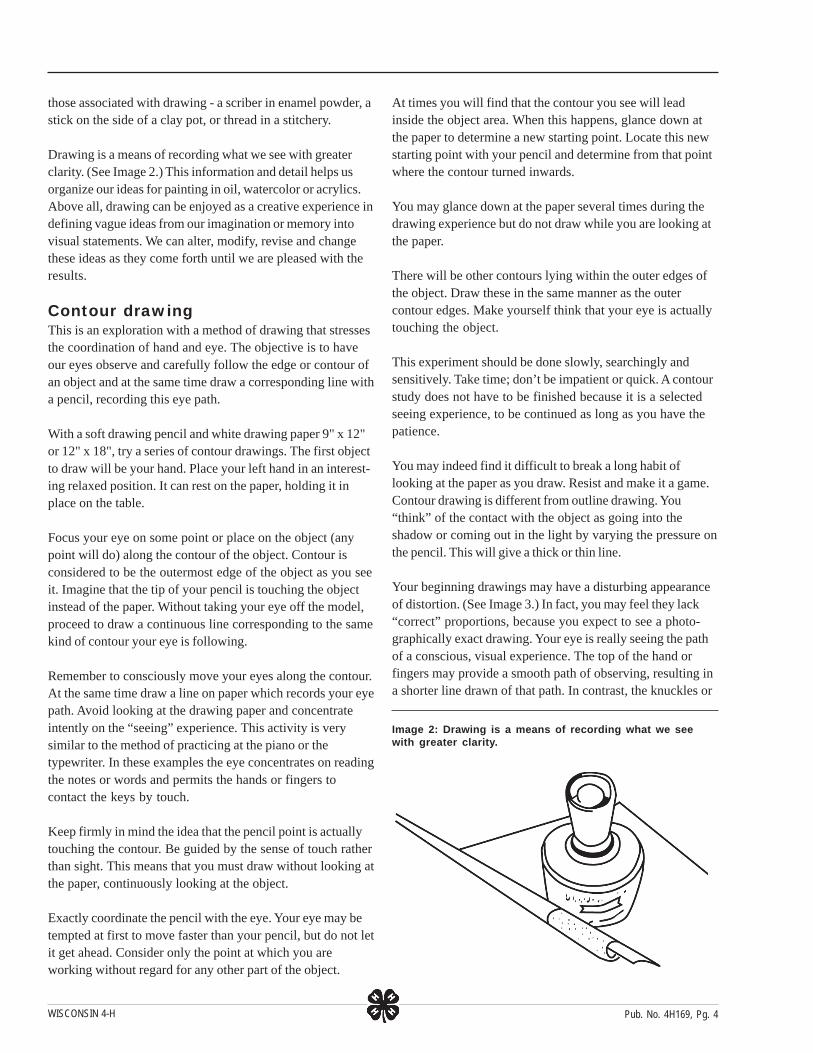
Your beginning drawings may have a disturbing appearanceof distortion. (See Image 3.) In fact, you may feel they lack“correct” proportions, because you expect to see a photo-graphically exact drawing. Your eye is really seeing the pathof a conscious, visual experience. The top of the hand orfingers may provide a smooth path of observing, resulting ina shorter line drawn of that path. In contrast, the knuckles or
Image 2: Drawing is a means of recording what we seewith greater clarity.
Pub. No. 4H169, Pg. 4
WISCONSIN 4-H
folds of the finger provide a fascinating path of indentationwhich the eye can explore more carefully and slowly. Thisresults in an enlargement in the drawing of that part of thehand.
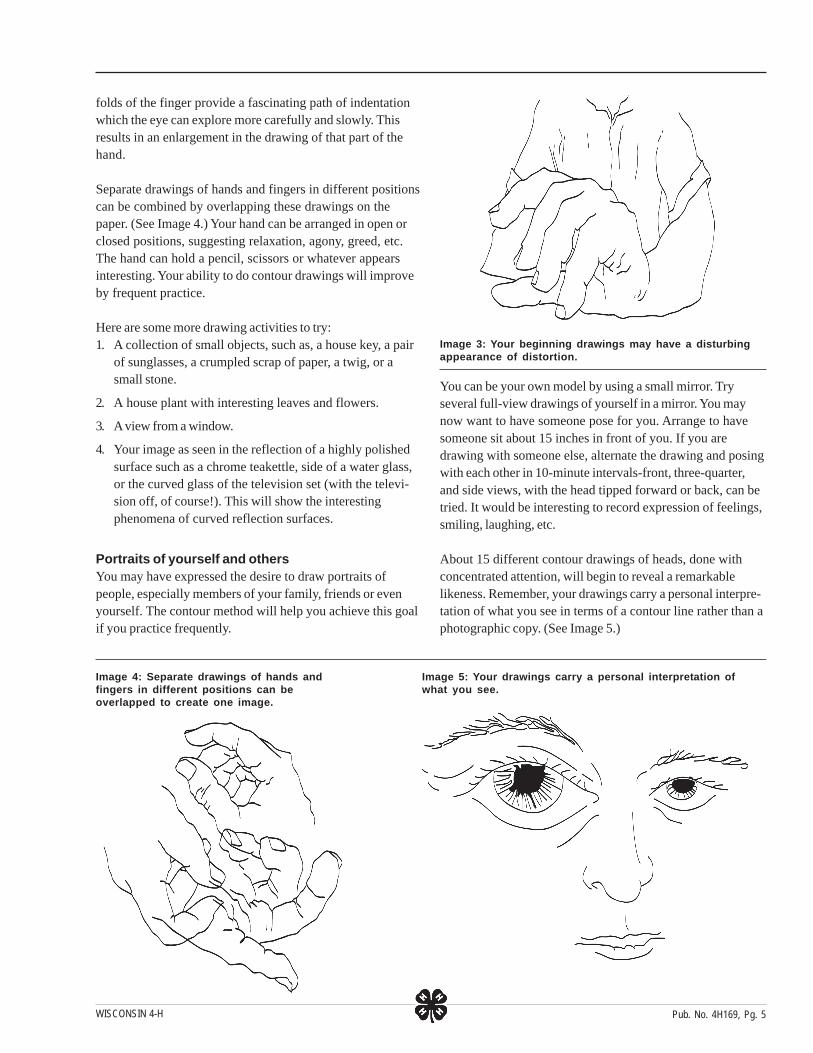
Separate drawings of hands and fingers in different positionscan be combined by overlapping these drawings on thepaper. (See Image 4.) Your hand can be arranged in open orclosed positions, suggesting relaxation, agony, greed, etc.The hand can hold a pencil, scissors or whatever appearsinteresting. Your ability to do contour drawings will improveby frequent practice.
Here are some more drawing activities to try:1. A collection of small objects, such as, a house key, a pair
of sunglasses, a crumpled scrap of paper, a twig, or asmall stone.
2. A house plant with interesting leaves and flowers.
3. A view from a window.
4. Your image as seen in the reflection of a highly polishedsurface such as a chrome teakettle, side of a water glass,or the curved glass of the television set (with the televi-sion off, of course!). This will show the interestingphenomena of curved reflection surfaces.
Portraits of yourself and othersYou may have expressed the desire to draw portraits ofpeople, especially members of your family, friends or evenyourself. The contour method will help you achieve this goalif you practice frequently.
Image 4: Separate drawings of hands andfingers in different positions can beoverlapped to create one image.
Image 5: Your drawings carry a personal interpretation ofwhat you see.
Image 3: Your beginning drawings may have a disturbingappearance of distortion.
You can be your own model by using a small mirror. Tryseveral full-view drawings of yourself in a mirror. You maynow want to have someone pose for you. Arrange to havesomeone sit about 15 inches in front of you. If you aredrawing with someone else, alternate the drawing and posingwith each other in 10-minute intervals-front, three-quarter,and side views, with the head tipped forward or back, can betried. It would be interesting to record expression of feelings,smiling, laughing, etc.
About 15 different contour drawings of heads, done withconcentrated attention, will begin to reveal a remarkablelikeness. Remember, your drawings carry a personal interpre-tation of what you see in terms of a contour line rather than aphotographic copy. (See Image 5.)
Pub. No. 4H169, Pg. 5
WISCONSIN 4-H
Your local or area library may have art books showingdrawings by famous artists. They will reveal the unhesitatingcoordination of hand and eye as a visual touching experi-ence. Some of these artists are Raphael, Albrecht Durer, HansHolbein, Edgar Degas, Jean-Auguste Ingres, Pieter Brueghel,Rembrandt, Andrew Wyeth, Ben Shahn and Rico Lebrun.
You will find many examples of contour drawing in currentmagazines and newspapers.
Gesture or speed drawingThese experiments are suggested to improve your “seeing”rather than simply looking, and to reinforce your confidencein the skill you have but haven’t been using. Don’t hurry tojudge your work too soon.1. Make this a game for yourself or the group. The begin-
ning experiments are not directed to achieve perfectlikeness but to capture the overall movement and maindirections of the observed object.
Set up a collection of objects in the center of the room. Anold chair or rocker, draped coat or cloth, and a small tablearranged close together will serve. Make an arrangementfrom what you have at hand. A collection of objects canbe arranged on a table to make an interesting group(cups, saucers, pitcher, open book). If you are in a group,arrange yourselves comfortably to allow full arm swing indrawing.
Start drawing to capture only the direction or impliedmovement of the major parts in the arrangement. Takeonly three minutes to get everything important drawn.Scribble in vigorously the main essentials by “feeling”the direction of the object with your eyes. Don’t get hungup on details within the three minutes. The major objec-tive is to get the impression of the essentials marked onpaper.
2. Vary the position of the arrangement or take a newposition and continue with these three-minute “gesture”drawings for one hour. With a few minutes rest inbetween each drawing you should have a collection ofabout 15 drawings. Take time to lay them on the floor tosee what happened between the first and last drawing.
Several individual sessions or group meetings in this kindof activity are suggested. Begin each session or drawingsession meeting with a series of gesture drawings toloosen up the coordination of hand movement.
3 In a group, have the members take turns posing indifferent positions for three minutes, i. e., kneeling,squatting or leaning, while the others make drawings ofthe posed positions.
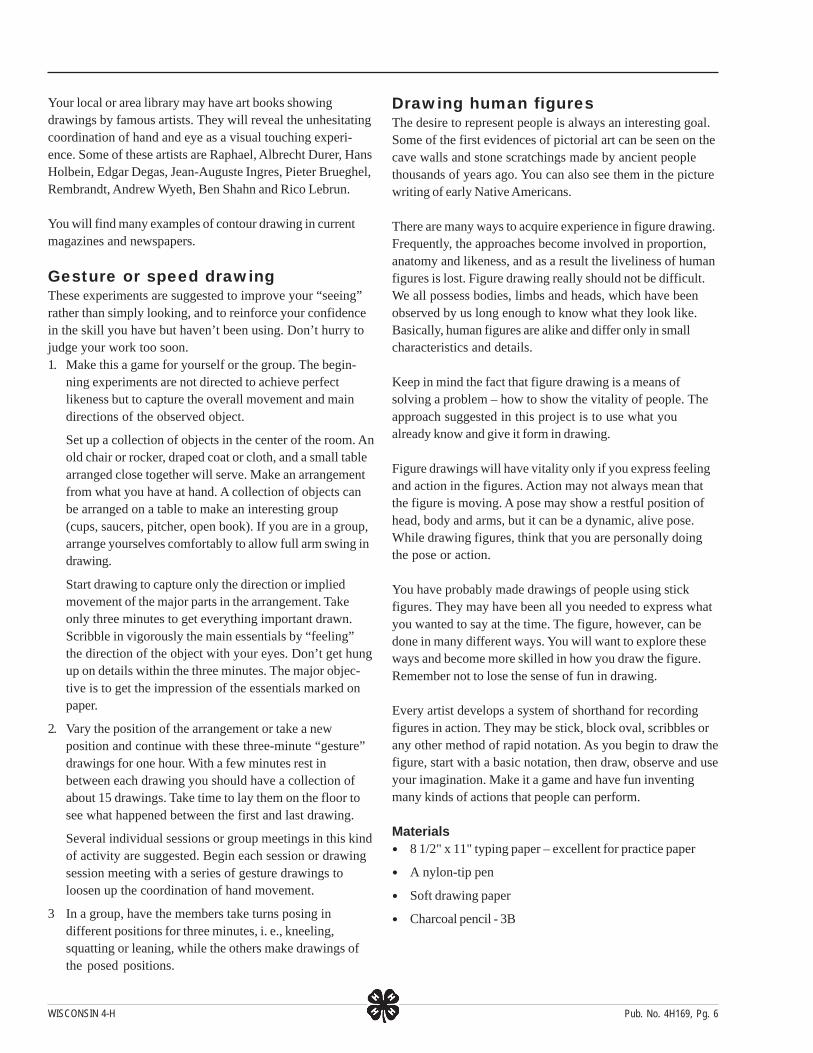
Drawing human figuresThe desire to represent people is always an interesting goal.Some of the first evidences of pictorial art can be seen on thecave walls and stone scratchings made by ancient peoplethousands of years ago. You can also see them in the picturewriting of early Native Americans.
There are many ways to acquire experience in figure drawing.Frequently, the approaches become involved in proportion,anatomy and likeness, and as a result the liveliness of humanfigures is lost. Figure drawing really should not be difficult.We all possess bodies, limbs and heads, which have beenobserved by us long enough to know what they look like.Basically, human figures are alike and differ only in smallcharacteristics and details.
Keep in mind the fact that figure drawing is a means ofsolving a problem – how to show the vitality of people. Theapproach suggested in this project is to use what youalready know and give it form in drawing.
Figure drawings will have vitality only if you express feelingand action in the figures. Action may not always mean thatthe figure is moving. A pose may show a restful position ofhead, body and arms, but it can be a dynamic, alive pose.While drawing figures, think that you are personally doingthe pose or action.
You have probably made drawings of people using stickfigures. They may have been all you needed to express whatyou wanted to say at the time. The figure, however, can bedone in many different ways. You will want to explore theseways and become more skilled in how you draw the figure.Remember not to lose the sense of fun in drawing.
Every artist develops a system of shorthand for recordingfigures in action. They may be stick, block oval, scribbles orany other method of rapid notation. As you begin to draw thefigure, start with a basic notation, then draw, observe and useyour imagination. Make it a game and have fun inventingmany kinds of actions that people can perform.
Materials8 1/2" x 11" typing paper – excellent for practice paper
A nylon-tip pen
Soft drawing paper
Charcoal pencil - 3B
Pub. No. 4H169, Pg. 6
WISCONSIN 4-H
Use all the drawing pens and pencils. Interchanging the penwill give you a fine line. The charcoal permits a wide range ofblending or smudging.
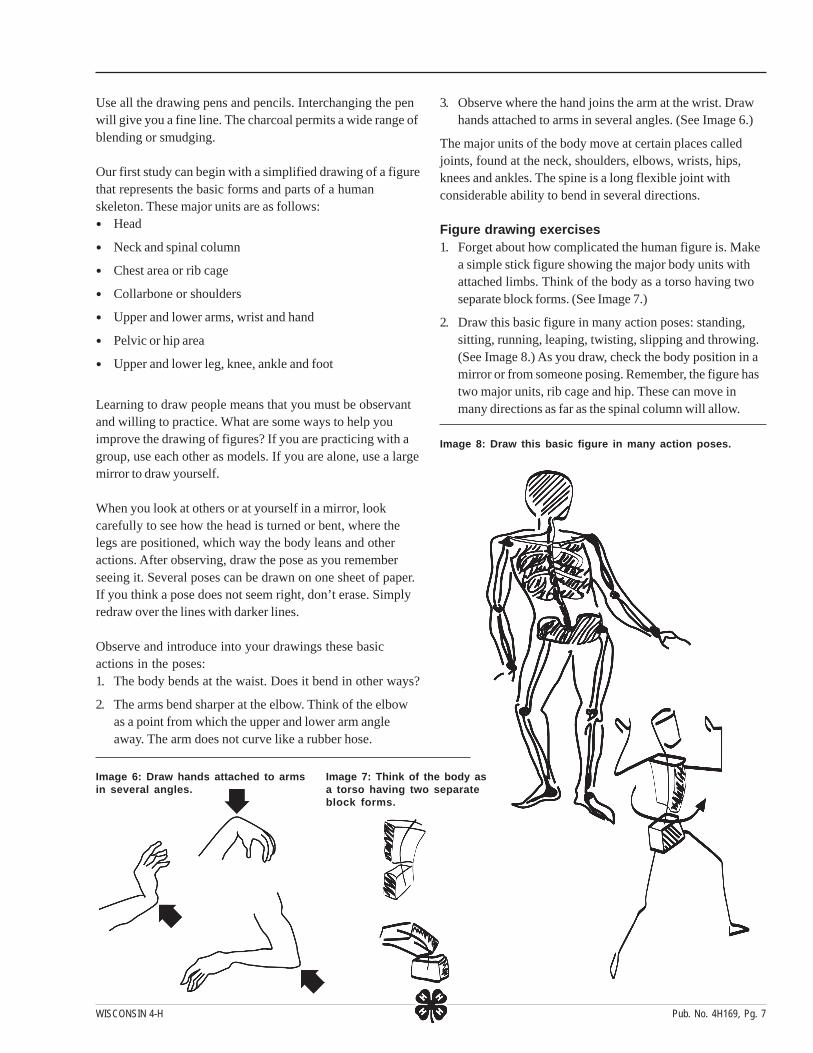
Our first study can begin with a simplified drawing of a figurethat represents the basic forms and parts of a humanskeleton. These major units are as follows:
Head
Neck and spinal column
Chest area or rib cage
Collarbone or shoulders
Upper and lower arms, wrist and hand
Pelvic or hip area
Upper and lower leg, knee, ankle and foot
Learning to draw people means that you must be observantand willing to practice. What are some ways to help youimprove the drawing of figures? If you are practicing with agroup, use each other as models. If you are alone, use a largemirror to draw yourself.
When you look at others or at yourself in a mirror, lookcarefully to see how the head is turned or bent, where thelegs are positioned, which way the body leans and otheractions. After observing, draw the pose as you rememberseeing it. Several poses can be drawn on one sheet of paper.If you think a pose does not seem right, don’t erase. Simplyredraw over the lines with darker lines.
Observe and introduce into your drawings these basicactions in the poses:1. The body bends at the waist. Does it bend in other ways?
2. The arms bend sharper at the elbow. Think of the elbowas a point from which the upper and lower arm angleaway. The arm does not curve like a rubber hose.
Image 6: Draw hands attached to armsin several angles.
3. Observe where the hand joins the arm at the wrist. Drawhands attached to arms in several angles. (See Image 6.)
The major units of the body move at certain places calledjoints, found at the neck, shoulders, elbows, wrists, hips,knees and ankles. The spine is a long flexible joint withconsiderable ability to bend in several directions.
Figure drawing exercises1. Forget about how complicated the human figure is. Make
a simple stick figure showing the major body units withattached limbs. Think of the body as a torso having twoseparate block forms. (See Image 7.)
2. Draw this basic figure in many action poses: standing,sitting, running, leaping, twisting, slipping and throwing.(See Image 8.) As you draw, check the body position in amirror or from someone posing. Remember, the figure hastwo major units, rib cage and hip. These can move inmany directions as far as the spinal column will allow.
Image 8: Draw this basic figure in many action poses.
Image 7: Think of the body asa torso having two separateblock forms.
Pub. No. 4H169, Pg. 7

WISCONSIN 4-H
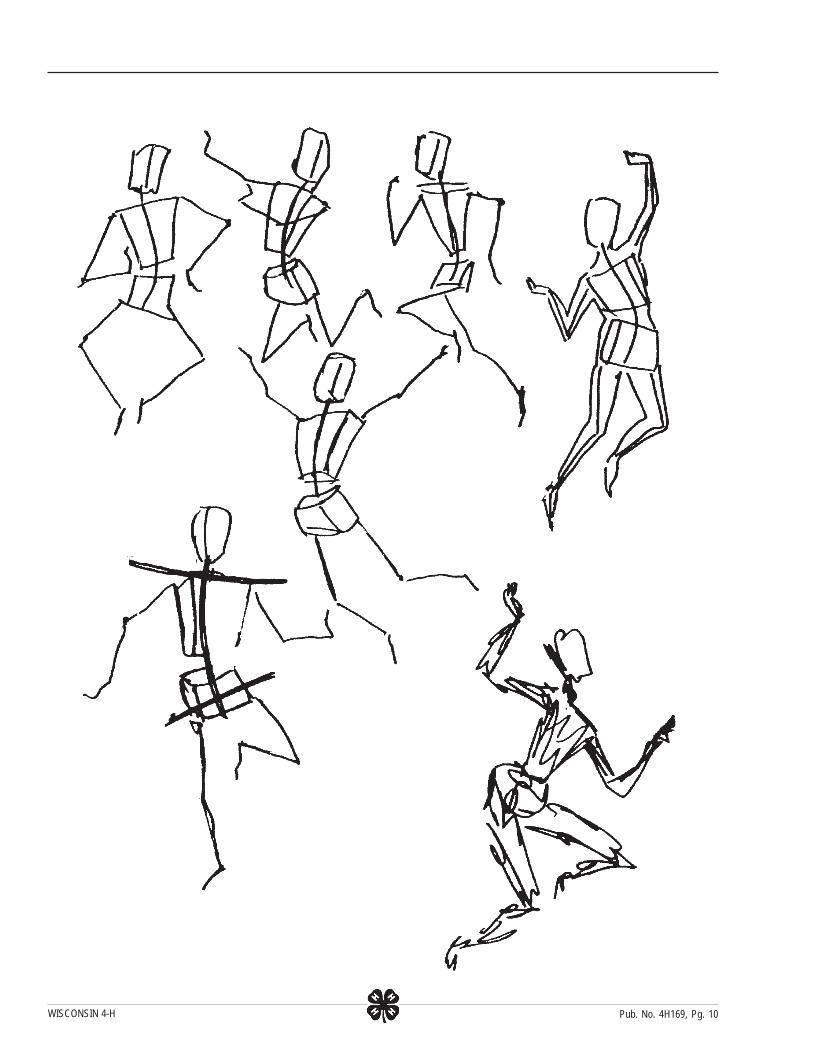
3. Cut out photographs from the sport and fashion sectionsof newspapers. Study and draw basic, box-trunked stickfigures from these clippings. (See Image 10.)
4. As you acquire experience and speed in drawing actionfigures, try adding the outer skin to them. Use a lightlydrawn pencil line for the stick figure and black chalk forthe solid part of the figure. Lightly blend the chalk to givea solid mass to the figure. (See Image 9.)
5. After you have tried all these approaches, work out a setof action positions. Each member can take turns atposing. (See Image 11.) The poses should always benatural. Relax, lean against a wall, pick up a book, slouchon a chair. Each pose can last for only one minute. Drawthe main body essentials first, then follow with moredetails as you wish.
6. If you have a large mirror at home, pose and immediatelydraw from what you remember.
As you progress, check your drawings with photographs ofpeople boxing, wrestling, swimming, diving, skiing, running,etc. Use these photographs as an aid to your knowledge.Never make copying an end, only a means toward developingyour drawing ability.
Image 9: Lightly blend the chalk to give a solid mass to thefigure.
Image 10: Study and draw basic, box-trunked stick figuresfrom these clippings.
After each practice session, choose the best poses. Bycomparing all your work, you will strengthen your ability tojudge. Gradually increase the size of your figures. Joinseveral figures together into combined activity.
7. Study the drawings and sketches of outstanding artistssuch as Degas, Cassatt, Daumier, Leonardo, Rembrandtand many others from art books in your library.
8. Try drawing stick figures with added details to showsomething happening – an idea expressed.
a. People at work
b. Sitting around a table
c. A ball game
d. Dancing
e. At the swimming pool
Gradually your confidence will increase and you will be ableto draw the figure showing the basic body parts in actionwithout the stick figure structure. This will come with practiceand practice. Have fun doing figure drawing!
Pub. No. 4H169, Pg. 8

WISCONSIN 4-H
Image 11: Work out a set of action positions. Each member can take turns at posing.
Pub. No. 4H169, Pg. 9
WISCONSIN 4-H Pub. No. 4H169, Pg. 10

WISCONSIN 4-H
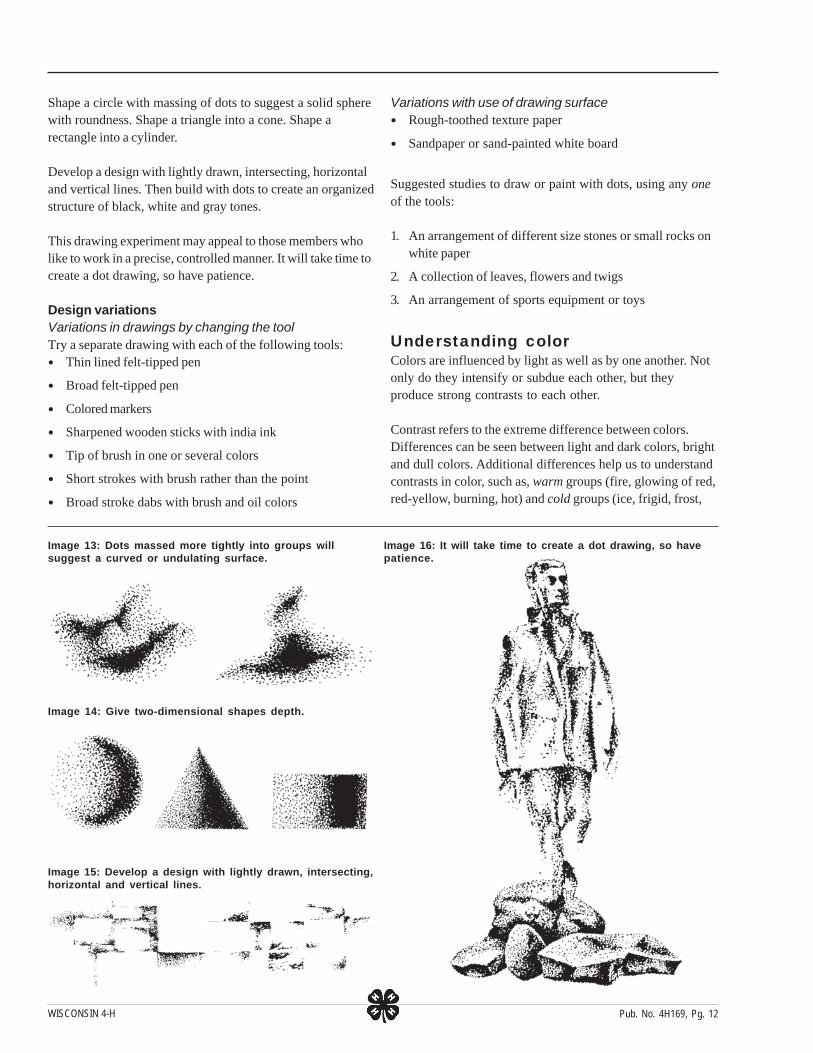
Dots to create imagesWe see images as a whole rather than as separate pieces.This can be observed when looking at a newspaper photo-graph. All grays and blacks are made of many small blackdots. Some dots are grouped close together, others furtherapart, thus creating an appearance of black, gray or whiteareas.
Our eyes fuse these dots of varying density into solid-appearing grays. The greater the density of dots, the darkerthe area. The more scattered the dots, the grayer the areaappears to the eye. (See Images 12-16.)
We also find this phenomenon occurring when we observepaintings. Some paintings, when viewed close up, may seemto have crude and meaningless daubs of colors. However, aswe stand back from the painting, we may see these daubsfuse together into a recognizable image. The French Impres-sionist artists Monet, Seurat and Marissot applied many dotsor dabs of pigment close together on the canvas.
Image 12: Some dots are grouped close together, others further apart, thus creating an appearance of black, gray, orwhite areas.
Beginning artists often work too close to their painting.When viewed at a normal distance of 3 to 6 feet, this workappears too finely grained in texture to be of visual interest.Plan to work with the idea that your drawing will be viewedfrom 3 to 6 feet away.
Plan to start within a rectangular area of about 3" x 4".
Tools and materials:A thin lined felt-tipped pen or sharpened or pointedwooden stick and bottle of india ink
White drawing paper
Work problemsArrange a cluster of dots starting from a concentratedmassing in a central area and gradually opening up to fewerdots at the outer edges.
Dots massed more tightly into groups will suggest a curvedor undulating surface.
Pub. No. 4H169, Pg. 11
WISCONSIN 4-H
Shape a circle with massing of dots to suggest a solid spherewith roundness. Shape a triangle into a cone. Shape arectangle into a cylinder.
Develop a design with lightly drawn, intersecting, horizontaland vertical lines. Then build with dots to create an organizedstructure of black, white and gray tones.
This drawing experiment may appeal to those members wholike to work in a precise, controlled manner. It will take time tocreate a dot drawing, so have patience.
Design variationsVariations in drawings by changing the toolTry a separate drawing with each of the following tools:
Thin lined felt-tipped pen
Broad felt-tipped pen
Colored markers
Sharpened wooden sticks with india ink
Tip of brush in one or several colors
Short strokes with brush rather than the point
Broad stroke dabs with brush and oil colors
Image 13: Dots massed more tightly into groups willsuggest a curved or undulating surface.
Image 14: Give two-dimensional shapes depth.
Image 15: Develop a design with lightly drawn, intersecting,horizontal and vertical lines.
Variations with use of drawing surfaceRough-toothed texture paper
Sandpaper or sand-painted white board
Suggested studies to draw or paint with dots, using any oneof the tools:
1. An arrangement of different size stones or small rocks onwhite paper
2. A collection of leaves, flowers and twigs
3. An arrangement of sports equipment or toys
Understanding colorColors are influenced by light as well as by one another. Notonly do they intensify or subdue each other, but theyproduce strong contrasts to each other.
Contrast refers to the extreme difference between colors.Differences can be seen between light and dark colors, brightand dull colors. Additional differences help us to understandcontrasts in color, such as, warm groups (fire, glowing of red,red-yellow, burning, hot) and cold groups (ice, frigid, frost,
Image 16: It will take time to create a dot drawing, so havepatience.
Pub. No. 4H169, Pg. 12
WISCONSIN 4-H
freezing). You can make additional lists of color groups basedon these contrasts.
The colors you use in art or crafts have a personal meaning.The colors you select depend more on how you feel aboutcolor than on rules or formulas.
There is no mystery in how to use colors in a craft. It simplyis a matter of choosing those colors you like and arrangingthem together in any way you wish. As you work more withcolors, developing a greater sensitivity to their relationshipto each other, your sense of color choice will improve.
There are three qualities of color that help you determinetheir use:1. Hue - This refers to the name given to a particular color –
red, green, blue-green, etc.
2. Value - This refers to the lightness or darkness of aparticular color – light red, light blue, dark green, darkbrown. Red in its pure state is a dark color; yellow is alight color. A color can be tested by comparing it to white,which is the lightest of all colors, or black, which is thedarkest of all colors.
3. Intensity - This refers to the brightness or dullness of acolor. Some colors in a group will appear brighter thanothers, and some will appear duller. This can be notedonly by comparison.
Exercises in colorThese exercises are a preparation for color usage in most artand craft media: painting, textile painting, applique-stitchery,mosaics, weaving, etc. To be more aware of the major colorrelationships, the following exercises are suggested fordesign experimentation.
1. Collect all sorts of colored advertising pages frommagazines (Time, Life, House Beautiful, Better Homes
and Gardens). From these pages, cut out many smallsquares with a scissors. The squares can be about 1/2" or3/4" in size. Spread them out in front of you. Begin thegame of sorting out the squares in groups of major colors:yellow, blue, red, green, white, black and gray.
Even this sorting will raise a problem of classifying theminto a definite color group. Some squares will tend to fallinto the green pile from the blue group, some may even fitinto the blue from the red. You may find it necessary tomake groups of in-between colors, e. g., blue-green,yellow-green. Have plenty of squares of each color;accurately cut squares are not an essential factor.
2. On a separate sheet of white paper about 6" x 9" in size,paste a small mosaic selection of colored squares fromeach group. Arrange them in rows close enough so thatno white paper shows between the squares.
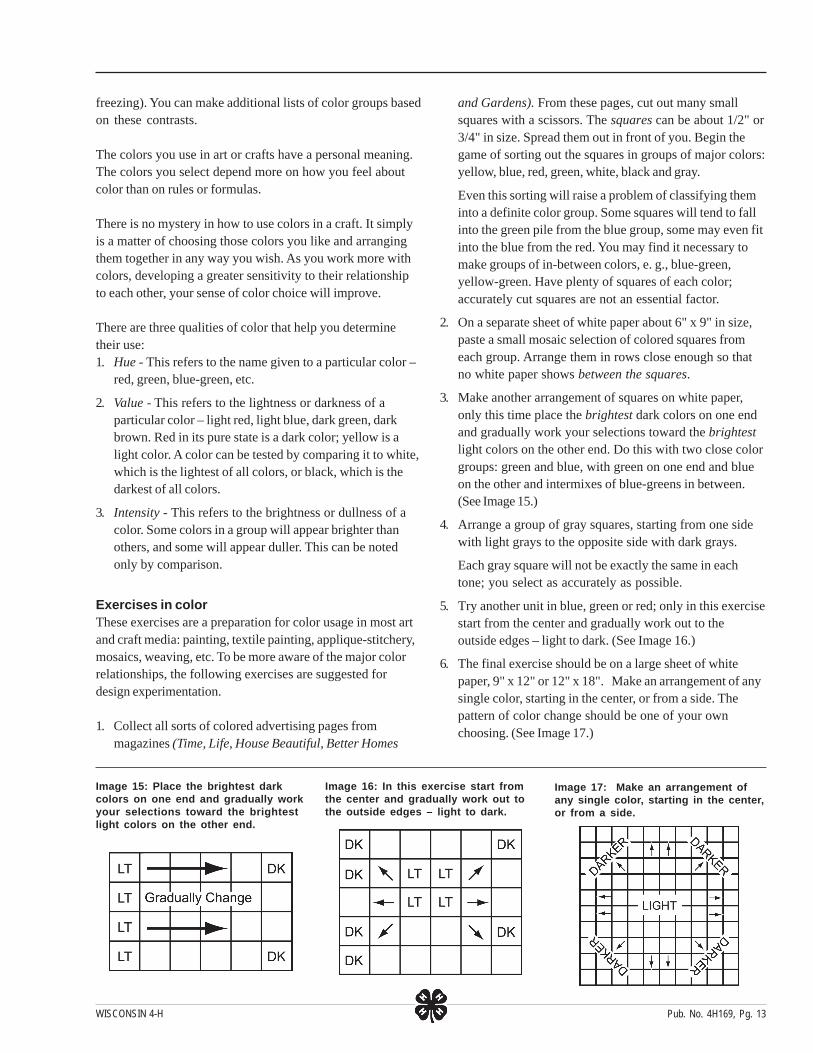
3. Make another arrangement of squares on white paper,only this time place the brightest dark colors on one endand gradually work your selections toward the brightestlight colors on the other end. Do this with two close colorgroups: green and blue, with green on one end and blueon the other and intermixes of blue-greens in between.(See Image 15.)
4. Arrange a group of gray squares, starting from one sidewith light grays to the opposite side with dark grays.
Each gray square will not be exactly the same in eachtone; you select as accurately as possible.
5. Try another unit in blue, green or red; only in this exercisestart from the center and gradually work out to theoutside edges – light to dark. (See Image 16.)
6. The final exercise should be on a large sheet of whitepaper, 9" x 12" or 12" x 18". Make an arrangement of anysingle color, starting in the center, or from a side. Thepattern of color change should be one of your ownchoosing. (See Image 17.)
Image 15: Place the brightest darkcolors on one end and gradually workyour selections toward the brightestlight colors on the other end.
Image 16: In this exercise start fromthe center and gradually work out tothe outside edges – light to dark.
Image 17: Make an arrangement ofany single color, starting in the center,or from a side.
Pub. No. 4H169, Pg. 13
WISCONSIN 4-H
The purpose behind these color exercises is to give youexperience in recognizing and handling a variety of colors.The subtle relationships of color are most easily learned bydirect manipulation and seeing.
These easily obtained color squares offer ready contact withcolor awareness, without the time consuming mixing ofpaints. Later exercises should include the ways of intermixingcolors to achieve specific tones.
Two-dimensional artAn understanding of 20th century painting begins with anawareness of the organization of shapes and space on a flatsurface in terms of color, value and texture.
In Western civilization, beginning with the early Renaissance,artists conveyed impressions of their cultures in an illusionis-tic manner. The flat panel was given the appearance ofsolidity, light, shadow and depth exceptionally well. Early inthe 20th century, painters rejected this traditional approachthat had existed for about 400 years.
Today we are quite familiar with the illusion of form andspace on a flat surface as seen by photographs and motionpictures. The camera records in an instant all that the 16thcentury painter worked at in paint. This is not to say that youshould give up illusionistic painting or drawing with its lightand shadow techniques, but you will find it helpful to beacquainted with the approaches in creative expression of ourage. New directions in art have made us aware of the manypossibilities for expressing ideas in color, flat shapes andtextures without resorting to illusionistic painting techniques.
The following experiments will help you discover theimportance of designing in a two-dimensional space.
MaterialsWhite paper (9" x 12" or 12" x 18")
Newspapers
Scissors
Watercolor box and brush
Poster paints (small jars) - white, black, red, blue, yellow
Procedure1. Divide the white paper into five interesting spaces or
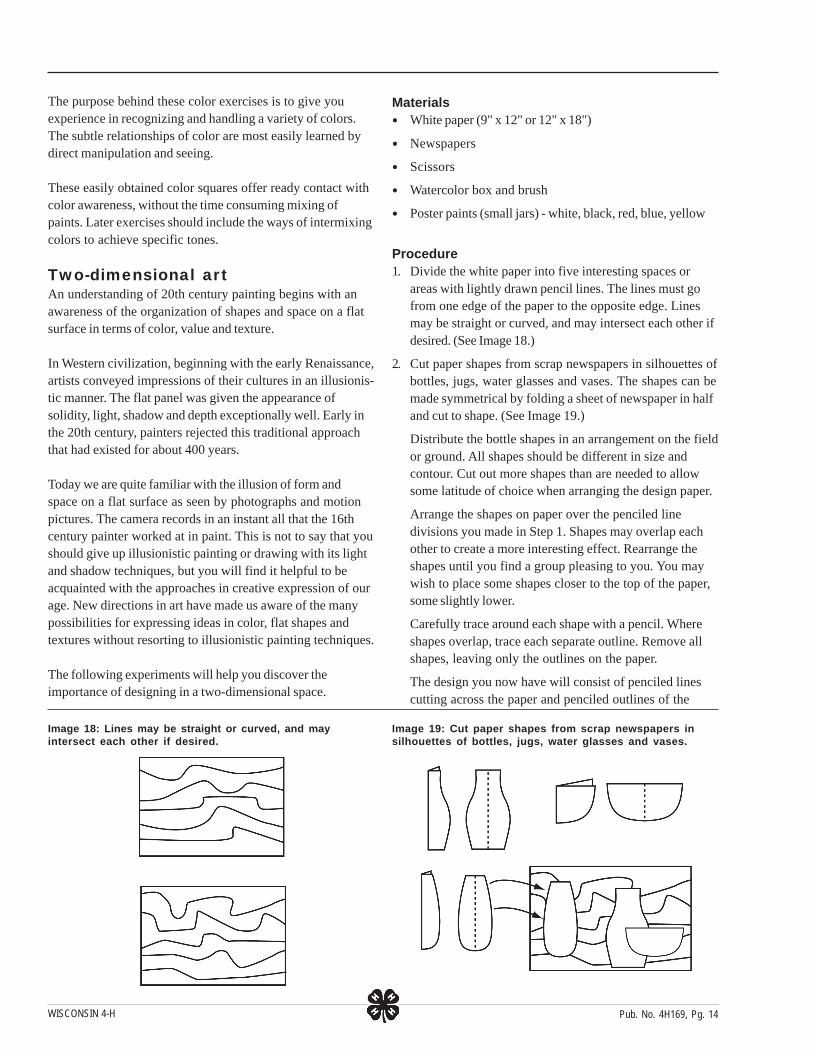
areas with lightly drawn pencil lines. The lines must gofrom one edge of the paper to the opposite edge. Linesmay be straight or curved, and may intersect each other ifdesired. (See Image 18.)
2. Cut paper shapes from scrap newspapers in silhouettes ofbottles, jugs, water glasses and vases. The shapes can bemade symmetrical by folding a sheet of newspaper in halfand cut to shape. (See Image 19.)
Distribute the bottle shapes in an arrangement on the fieldor ground. All shapes should be different in size andcontour. Cut out more shapes than are needed to allowsome latitude of choice when arranging the design paper.
Arrange the shapes on paper over the penciled linedivisions you made in Step 1. Shapes may overlap eachother to create a more interesting effect. Rearrange theshapes until you find a group pleasing to you. You maywish to place some shapes closer to the top of the paper,some slightly lower.
Carefully trace around each shape with a pencil. Whereshapes overlap, trace each separate outline. Remove allshapes, leaving only the outlines on the paper.
The design you now have will consist of penciled linescutting across the paper and penciled outlines of the
Image 18: Lines may be straight or curved, and mayintersect each other if desired.
Image 19: Cut paper shapes from scrap newspapers insilhouettes of bottles, jugs, water glasses and vases.
Pub. No. 4H169, Pg. 14

WISCONSIN 4-H
paper shapes. The design arrangement of these shapes iscalled the figure. The relationship of the shapes to thebackground is called figure and ground.
3. The third step is to develop a pattern of color which joinsthe figure and ground areas into a unified design. Thisbecomes a new way of creating. We are creating a systemof arranged shapes and spaces on a flat surface. Thepattern or design becomes the major element rather thanthe depicting of objects.
Keeping this in mind, our painting can begin with adistribution of color in all areas to achieve a light and darkcolor balance.
Any light color and any dark color of your own choosingcan be selected. Also, you can intermix the light and darkcolors to get an intermediate color. An equal mix of eachcolor will produce a third color.
Begin anywhere along the outer edge of the paper and fillin an area with your dark color. Where the corner or pointof that area touches the point of another, fill in that area.This establishes a path of dark areas. In areas where thesides of two dark areas run into each other, use anintermix or middle value of light and dark color. Thealternating areas next to the dark areas can be filled withthe light color.
Maintain a balance of light colors next to dark through theentire design with occasional middle color areas. (SeeImage 20.)
As you work at the color distribution, you may wish toemphasize the jug and bottle shapes by slightly altering
Image 20: Maintain a balance of light colors next to darkthrough the entire design with occasional middle colorareas.
the color in these areas. Do this by making the mixeslighter or darker than the other color areas of the ground.
As in all painting, once you start work, there will be manychoices and decisions to be made in color placement. Youmake them as they come up; they can’t always beanticipated. This is the most interesting part of all creativework. You will have many opportunities to determine whatdesign and color arrangement is desired.
The first experiment imposes a set of limitations ofshapes, specific colors and arrangements. After becomingfamiliar with the process of designing for a flat surface,you may want to try variations.
Suggestions for other themes in preparingcutout shapes1. Shapes from chemistry-test tubes, flasks, beakers, retorts
2. Shapes of birds in flight or on the ground
3. Shapes from the kitchen – knives, forks, spoons, plates,bowls
4. Shapes in a room – tables, chairs, sofas, lamps
5. Shapes from out-of-doors – houses, buildings, signs
Study some of the works of these artists who created manyoutstanding examples in this direction: Wassily Kandinsky,Lyonel Feininger, Georgia O’Keefe and Charles Demuth.
Starting to paintPainting is a combination of many kinds of colors, mixed bythe artist’s personal choice, and joined together with brushstrokes in any way to reveal an idea that the artist begins tosee coming out on the board. It is different from making acolored drawing.
A good way to begin to paint is to experiment with “smear-ing” or brushing paint on the surface of a board. You cangain the feeling of paint, mixing colors, and using brushstrokes on a large 16" x 20" or 18" x 24" white gesso panel.Cover the entire white board with a thin, smeary mixture ofany color you like at that moment. Be sure it is spread overthe entire board in a cloudy, irregular mixture.
With a thin brush and slightly darker color, divide the panelinto irregular, horizontal and vertical lines from edge to edge.Starting in the center of the panel in the areas of the inter-secting lines, brush in a color taken from your palette.
Move out from these colors and add intermixtures of colorsin the surrounding areas. There are many combinations
Pub. No. 4H169, Pg. 15

WISCONSIN 4-H
possible. Your experimenting will show you the way. Keep inmind that each color you mix and brush on will be dark orlight, bright or dull. You really can’t tell until you compare itto other colors on the board. Two or more colors can easilybe mixed together to make another color. How much of eachis a choice you make. Also, remember white and black can beadded to any colors. White will make them lighter; we call theresults tints. Black will darken and dull the colors. Thesemixtures, along with many others, may look odd to you.
There are very few pure colors found in our natural environ-ment, but an infinite number of mixtures. So experiment withcolor mixtures before you try to paint a subject. Artists don’tpaint pictures; they make paintings. This means that you seethe paint, brush strokes, texture and colors first, then theideas or subject. When you paint, you will begin to under-stand how painting is different from a drawing or even acolored photograph.
Watercolor paintingWatercolor painting offers many ways to become acquaintedwith the use of colors, textures, lines and shapes needed toexpress ideas. It is inexpensive and requires a minimum ofmaterials. The beginner can become acquainted with unusualways of manipulating the brush and paints to obtain a widevariety of interesting effects.
Perhaps you have already used watercolors or poster paint inyour school or home. The suggestions in this guide areoffered to help you experiment with ideas you never had timeto do. There are many things to paint, from your imaginationor memory as well as from what you see as you paint. Themost important fact to remember is that you can paint; it isn’tnecessary to know a lot about painting. As you begin, newideas and new ways to use your paint will come to mind. Ifyou enjoy the experience, you will learn and improve, withpractice.
Becoming acquainted with materialsYou need these materials:1. A box of good quality watercolors, either 8-pan or 16-pan
colors. The 16-pan color box will give you a widerselection of colors without losing too much time mixingspecial colors.
2. A medium size hairbrush. Usually such a brush comeswith the box. The brush should come to a fine point whendipped in water and gently snapped. The brush is aflexible tool, which permits a wide range of uses. It shouldbe capable of giving you a very fine line of color whenthe tip is moved in a vertical position over the paper. Thebrush should also be capable of holding considerable
amounts of paint to apply color quickly over a wide areaof the paper. You may want to have one extra largehairbrush on hand just to cover large amounts of paperwith color. This is often called a watercolor wash brush.
3. A scrap of cloth, about 12" in size, serves as a cleaningand drying tool, as well as a painting tool similar to thebrush. Painting can also be done with other kinds of toolsbesides a brush. Interesting effects are achieved byblotting, dabbing or rubbing with a cloth or a smallsponge.
4. Paper. Several kinds of paper may be used in paintingwatercolors. The most common is the white schooldrawing paper. Many stores will have this paper inseparate sheets, 9" x 12" or 12" x 18", or in pads of similarsize.
This paper is somewhat heavier and has a softer surfacethan writing or typing paper. In the beginning, use theleast expensive paper. You want to feel free to try manyideas without worrying about wasting your materials.Learning to paint can be done only by practicing in manydifferent ways, so have lots of paper on hand. A roll ofheavy white shelf-paper with a dull finish may serve as agood painting surface. The roll can be cut into separatesheets of different sizes. Often we forget that ideas wewant to express can be painted or drawn on a long,narrow sheet of paper used horizontally or vertically. Howwould you use the paper if you wanted to paint a tall pinetree against a summer sky? Or how would you use thepaper to show skylines and roof tops seen in the lateafternoon when the sun is setting? We have become soaccustomed to standard-sized papers that we forget touse other sizes.
Image 21: The open cover of the boxshould be nearest you.
Pub. No. 4H169, Pg. 16

WISCONSIN 4-H
5. A large water container. A coffee can or plastic can (largeenough to wash easily and clean your brushes) can beused.
Becoming acquainted with watercolorsWhen you begin painting, it may be helpful to follow a fewsimple procedures in setting up your materials. Try to set upyour materials in the same manner every time you startpainting. An arrangement of materials set up the same wayeach time you paint makes it easier to concentrate on thepainting process.
Watercolor painting can be done on a table or the floor. Placethe paper in front of you with the open watercolor box closeto the right side of the paper (if you are left handed, on theleft side). The open cover of the box should be nearest you.This serves as an area for mixing special colors or preparing aquantity of color for a large painted area. (See Image 21.)
Place the cloth scrap immediately below the watercolor boxso that the brush can be cleaned in water and wiped dry forthe color to be used. In some cases you may prefer to holdthe cloth in your left hand. This permits you to blot up anyexcess color on the paper or to use it directly in painting.After the painting materials have been set into position,immediately add a few drops of clear water to each color inthe box. This will soften each color to a rich, full intensity,ready to use in heavy colored or diluted with water asneeded. Do this every time before you start painting.
Beginning to watercolorPractice using the watercolor brush in many ways. Ideas forparticular paintings may come to mind. Go ahead, try themout. The experiments are principally offered to acquaint youwith the tools and what they can do.
Can you express an idea using brush lines when listening toyour favorite music? Sounds and colors suggest similarfeelings, moods and emotions. How does the music make youfeel? Choose colors and intermix them on paper to suggestthat feeling. Perhaps the music may suggest images ofpeople, places or things. Some people simply feel only theintermingling of colors without any appearance of visualforms. Try both ways many times. Compare all your paint-ings. Which one seems to please you the most? Why? Selectthe one you like and cut out a two-inch wide paper mat to fitaround the painting. Place it on the wall of your room or theliving room and enjoy it. That is what art is for.
Increasing your imaginative powersWe create ideas from two major sources:1. Ideas that come from what we see, what we remembered
or what we imagined.
2. Planned or accidental markings made on paper or board,which upon study, reveal ideas not recognized at first.
Have you ever observed shadows on a wall, cast by a nearbylamp, that suggested images of strange animals, faces ormonsters? You saw those images only when the shadowswere there. Suppose you made accidental marks and shapeson paper with your watercolors. Could you find ideas in thesame manner? When you recognize them, use your paintsand brush to make them more distinct with additional colorsmatching those already there.
Experiments in imagination1. Cover the entire surface of watercolor paper with clear
water, either by brush strokes or with a wet sponge. Addbrush strokes of various colors to the wet paper; thecolors will intermingle to form a colored background.When the paper is thoroughly dry, shake four or fivedrops of thick paint from the brush onto the paper.Immediately blow these blobs of colors out over thepaper. The paint will spread into thin tendrils of paint indifferent directions. Now observe and study the acciden-tal pattern. Can you discover unusual images, figures,and things in these markings? Add whatever details youfind necessary to make your ideas complete. (See Image22.)
2. Wet the paper again with clear water. Add brush strokesof heavy colors in short and long strokes, either horizon-tally or vertically. While the paper is still wet, carefullycrumple the sheet into a close ball. Gently open the ball ofpaper, smooth and spread out to dry. Study the accidental
Image 22: Study the accidental configurations to discovershapes, figures and forms that suggest ideas.
Pub. No. 4H169, Pg. 17
WISCONSIN 4-H
configurations to discover shapes, figures and forms thatsuggest ideas. Perhaps only a small part of an image canbe identified or several disconnected ideas seen. Bringthem together by further painting over the original colorswith matching colors. You may see strange heads,fantastic creatures, unusual landscapes, etc. All theseshapes can be “a figment of your imagination.”
During this experiment you may discover the need for finelines for details. Use the top of your brush held in avertical position and carefully “draw” with the brush.Wipe your brush dry on the cloth to remove any excesswater; then pick up a touch of rich thick color with the tipof the brush and draw. During this experiment, you mayfind that some color areas are quite dark. Light lines orshapes can be painted over these dry areas by usingwhite poster paint added to your brush. The addition ofwhite poster paint makes any color opaque. This meansthe paint is thicker and will cover any color underneath.In this manner dark green, blue, red or black areas can bepainted over in fine lines, using a mixture of white posterpaint with the color.
3. Watercolors combined with india ink help to stimulate ourimagination. Many artists have started paintings fromaccidental mixtures or interminglings of paint, resulting inconfigurations that suggested images not recognized atfirst.
In this experiment cover the paper with lots of water. Dropin colors of your own choosing by shaking the brushover the paper. Lift the paper up and tilt it in differentpositions to cause the colors to run and mix together.
While the paper is still wet, add a few drops of india inkover the paper. Observe how the ink spreads rapidly overthe surface, creating unusual arrangements. Tilt the paperto increase the mingling of ink and color. Set the paperaside to dry. Several other paintings can be set up in thesame manner, so that little time is lost in waiting for thepapers to dry.
Now carefully study the accidental configurations orminglings of colors and ink. Observe the paper from allsides. Can you see any resemblance to images or thingsyou’ve seen? Perhaps you might see a face, part of ahand, part of an animal. Take time to observe and dis-cover before going further.
When you discover one or more images, bring these ideasmore clearly together by using your brush and colors.Paint in all the needed details with colors that closelymatch the colors already there. Some of the images maynot relate to each other in a logical fashion. Our imagina-
tion isn’t always logical, so feel free to create a fantasy ofyour own. It is most important to take advantage of thoseaccidental interminglings and skillfully blend themtogether with ideas of your own.
Max Ernst, an American artist, used this approach formany of his paintings. Other artists start paintings in asimilar manner by rubbing and smearing their canvas withmany colors. They then let the color blendings suggestwhat to do next. Try it.
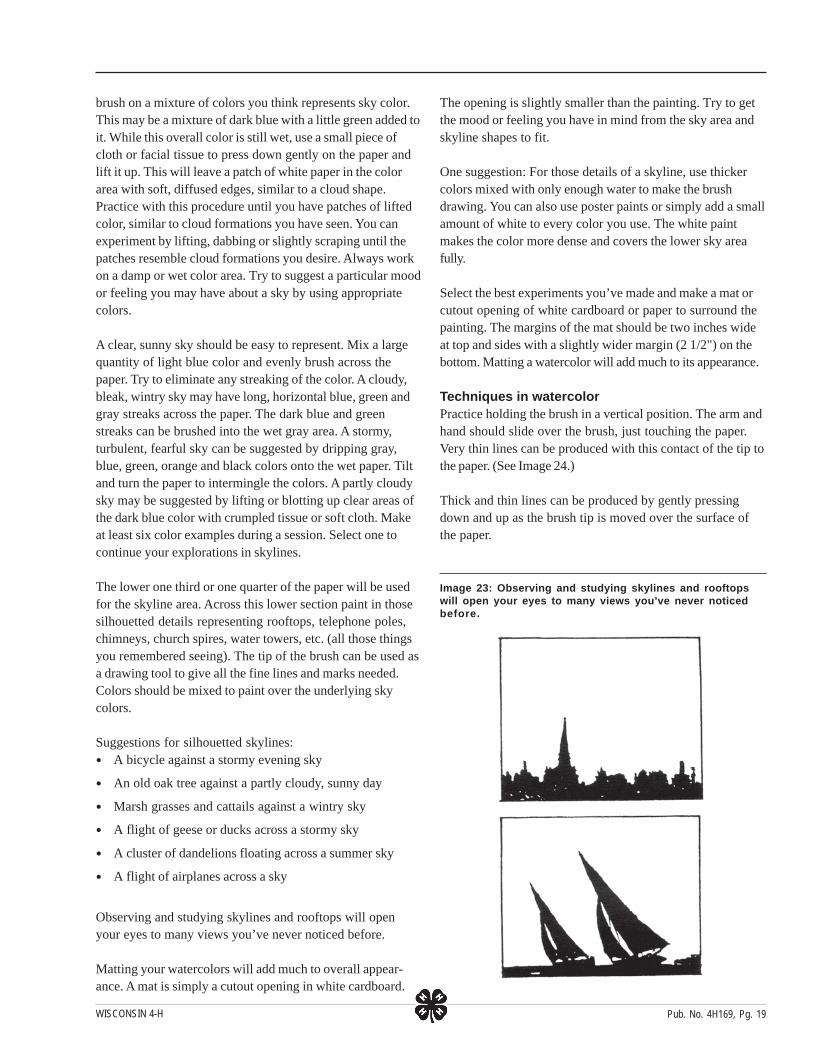
Skylines and rooftops in watercolorHave you ever observed the tops of buildings or trees asthey appear against a skyline? Have you studied carefullythe interesting silhouettes on buildings, chimneys, trees,telephone poles, steeples, rooftops or silos against a coloredsky in the evening or morning? Have you really looked at theinteresting clouds that sweep across a skyline of rooftops orwoods? (See Image 23.)
Some of the most interesting ideas for water-color paintingcan be discovered by looking at skylines. Artists have used asimple observation technique to see the silhouette patternagainst a sky by squinting at the view with eyes half-closed.Most of the details are somewhat darkened and only theoutlines of objects as a mass will be seen against the lightsky. This is particularly true when observing an earlymorning sunrise or a late afternoon sunset. During thesetimes the skyline is dramatically lighted by the sun.Let us examine some ideas about sky and clouds as apreparation for painting. Skies have always suggestedpersonal moods or feelings, depending on the particularcloud formations and colors. The sky is constantly changingthroughout the day, sometimes filled with clouds or none at all.
Make a collection of skies collected from pictures in maga-zines. These pictures will show many kinds of clouds, somewhite with colored grays on the undersides, with patches oflight blue sky between. Other pictures will show masses ofgray clouds closely bunched together on a bleak, stormy orrainy day.
You will recognize different shapes of clouds. Some arerounded, others long and stretched out, stringy or wispy.From these references we can try to use these ideas inwatercolor painting.
Starting skyline paintingsWet a sheet of watercolor paper thoroughly with a sponge.Keep the paper horizontal on the table. On the damp paper,
Pub. No. 4H169, Pg. 18
WISCONSIN 4-H
brush on a mixture of colors you think represents sky color.This may be a mixture of dark blue with a little green added toit. While this overall color is still wet, use a small piece ofcloth or facial tissue to press down gently on the paper andlift it up. This will leave a patch of white paper in the colorarea with soft, diffused edges, similar to a cloud shape.Practice with this procedure until you have patches of liftedcolor, similar to cloud formations you have seen. You canexperiment by lifting, dabbing or slightly scraping until thepatches resemble cloud formations you desire. Always workon a damp or wet color area. Try to suggest a particular moodor feeling you may have about a sky by using appropriatecolors.
A clear, sunny sky should be easy to represent. Mix a largequantity of light blue color and evenly brush across thepaper. Try to eliminate any streaking of the color. A cloudy,bleak, wintry sky may have long, horizontal blue, green andgray streaks across the paper. The dark blue and greenstreaks can be brushed into the wet gray area. A stormy,turbulent, fearful sky can be suggested by dripping gray,blue, green, orange and black colors onto the wet paper. Tiltand turn the paper to intermingle the colors. A partly cloudysky may be suggested by lifting or blotting up clear areas ofthe dark blue color with crumpled tissue or soft cloth. Makeat least six color examples during a session. Select one tocontinue your explorations in skylines.
The lower one third or one quarter of the paper will be usedfor the skyline area. Across this lower section paint in thosesilhouetted details representing rooftops, telephone poles,chimneys, church spires, water towers, etc. (all those thingsyou remembered seeing). The tip of the brush can be used asa drawing tool to give all the fine lines and marks needed.Colors should be mixed to paint over the underlying skycolors.
Suggestions for silhouetted skylines:A bicycle against a stormy evening sky
An old oak tree against a partly cloudy, sunny day
Marsh grasses and cattails against a wintry sky
A flight of geese or ducks across a stormy sky
A cluster of dandelions floating across a summer sky
A flight of airplanes across a sky
Observing and studying skylines and rooftops will openyour eyes to many views you’ve never noticed before.
Matting your watercolors will add much to overall appear-ance. A mat is simply a cutout opening in white cardboard.
The opening is slightly smaller than the painting. Try to getthe mood or feeling you have in mind from the sky area andskyline shapes to fit.
One suggestion: For those details of a skyline, use thickercolors mixed with only enough water to make the brushdrawing. You can also use poster paints or simply add a smallamount of white to every color you use. The white paintmakes the color more dense and covers the lower sky areafully.
Select the best experiments you’ve made and make a mat orcutout opening of white cardboard or paper to surround thepainting. The margins of the mat should be two inches wideat top and sides with a slightly wider margin (2 1/2") on thebottom. Matting a watercolor will add much to its appearance.
Techniques in watercolorPractice holding the brush in a vertical position. The arm andhand should slide over the brush, just touching the paper.Very thin lines can be produced with this contact of the tip tothe paper. (See Image 24.)
Thick and thin lines can be produced by gently pressingdown and up as the brush tip is moved over the surface ofthe paper.
Image 23: Observing and studying skylines and rooftopswill open your eyes to many views you’ve never noticedbefore.
Pub. No. 4H169, Pg. 19

WISCONSIN 4-H
Practice brush strokes in a variety of directions. Thesestrokes used separately or in combinations will suggest manyeffects descriptive of forms and details in nature. (See Image25.)
Painting with acrylicsAcrylic paints have become an important painting mediumbecause of the many ways these paints can be used. Acrylicsare used in exactly the same manner as oil paints or watercol-ors, with one important difference: they will dry in a shortperiod of time. This has always been a problem for thosepainting with oil. Another important feature is the fact thatacrylics can be thinned with water, which permits a widerange of techniques, similar to watercolors and poster paint.Acrylic colors are very durable, permanent and easy to use.
Acrylics require only one major consideration in handling.The colors, when applied to any surface, will dry perma-nently. They cannot be intermixed after drying. Also, allbrushes must be thoroughly rinsed in clear water. Acrylicpaint left to dry on the bristles is very difficult to remove.
Selecting acrylic paintsA collection of colors used for painting is often called apalette of colors. A basic palette of colors recommended forbeginners should not be too expensive. As you becomefamiliar with handling the paints, your palette can be ex-panded with additional colors, suitable to your way ofpainting. Large studio tubes are best to buy for beginningwork. Most art stores will have these colors under variousbrand names. Do not mix different brand name tubes.
1 tube cadmium yellow, light
1 tube yellow ochre
1 tube cadmium red, light
1 tube alizarin crimson
Image 24: Practice holding the brushin a vertical position.
Image 25: Practice brush strokes in a variety of directions.
1 tube burnt sienna
1 tube thalo blue
1 tube ultramarine blue
1 tube thalo green
1 tube raw umber
1 tube black
1 double-size tube of titanium white (This is an importantcolor that is added to most colors to get the many tintsand shades desired in painting.)
1 quart of gesso (This is a white base paint, thinned withwater to serve as a background covering for paintingpanels. Interior latex paint makes an inexpensive substi-tute.)
1 tube of polymer medium (This is a moderately thickmilky-white liquid. When allowed to dry, the milkyappearance will disappear, leaving a completely clearplastic film. The polymer medium can be added to eachcolor to make it brush and flow more easily. It also gives asoft sheen to each color. A large amount of medium addedto a color will make that color transparent. When appliedto the paper or board, it is called a glaze. Many overlaysof glazes will produce an unusually transparent coloreffect, where each color is seen through the top color.)
BrushesAny oil painting brushes can be used. This can includeinexpensive, narrow house-paint, varnish or sash brushes, aswell as enamel brushes. Most important, remember to keepyour brushes soaking in a large water container as you paint.After a painting session, wash each brush in soap and water,shape the bristles and dry. Remember that acrylic or polymerpaints, when dry, cannot be dissolved.
Pub. No. 4H169, Pg. 20

WISCONSIN 4-H
Sizes of brushesThe beginner can start with these brushes:
2 - 1/4" flat nylon brushes
2 - 1/2" flat nylon brushes
1 - 3/4" flat nylon brush
1 - 2" nylon-tip house-paint brush
1 sabeline medium-size watercolor brush
1 brush for fine details
Practice will determine what kinds of brushes are best suitedfor you.
PaletteThis is the surface on which to mix your colors. A slab ofplate glass or heavy window glass, 16" x 20", makes the bestpalette as the surface is easily scraped and cleaned. A whitepaper or cardboard under the glass will help you to note thedifferent colors for mixing. Apply adhesive or masking tapealong the edges of the glass for safety. Other palettes couldbe a shallow, white enamel butcher tray or very large whitechina platter. Acrylic or polymer paints are the same as themany plastics we find around the house; when the colors dry,they form a thin plastic sheet, similar to these plastics. Also,have several large scraps of cloth or paper toweling to wipeyour brushes and a bucket or can of water for rinsing yourbrushes.
EaselThis is simply some type of rack or stand to hold yourpainting board in a vertical position. Strips of 1" x 2" lumbercan be nailed together to make an inexpensive easel. Manypainters will work on a flat table and prop the panel upvertically when needed.
Painting surfacesPaintings can be made on a variety of surfaces, ranging fromcardboard to canvas. The least expensive are panels cut fromsides of cardboard packing boxes. A coat of white gesso willcover any panel. For making a start, a good source can bepanels cut from 4" x 8" sheets of Upson board (a 3/16"pressed card-board) or 3/16" masonite. A lumber companywill cut a 4' x 8' sheet down to 16" x 20" or 18" x 24" unit sizes.Each panel should then be given several coats of gessowhite.
Canvas board is another type of painting panel. Most artistsupply stores will have these in various sizes. Preparedcanvas can be purchased in lengths, stretched and tackedaround a set of four wooden stretchers. There are four
wooden wedges supplied with the stretcher set that aretapped in place at each corner to stretch the canvas taut.
Watercolor boards and illustration boards having a smoothsurface can be used with acrylics. It is advisable to usepainting panels at least 16" x 20", or larger, in size. Thisprovides sufficient surface to become acquainted with theuse of brush and paint as painting and not drawing. Use theexercises in “Becoming acquainted with water colors” toexperiment with the acrylics.
Painting on solid form surfacesDid you ever decorate an egg for Easter, using watercolors orcrayons? Easter egg painting was an old and traditional artform in Europe. The egg has a continuous curved plane onwhich any designs painted on its surface can be joinedtogether without an ending.
This project is a painting experience on a curved surface,similar to a decorated egg. The object suggested in thisproject is very permanent. In fact, you may want to keep it onyour table or dresser for its pleasing design as a paperweight, or give it to someone as a present.
The object to be painted is a stone – not any kind of stoneor rock, but a stone you can find in your backyard or garden.You may also discover stones of many shapes, patterns andcolors in a gravel pit or along the bank of a stream or river.Look for one that has a smooth, rounded surface and ispleasant to feel. Pass your hand over the surface. Perhapsyou may prefer a stone with angular sides. The size shouldbe about 3" or 4". However, in later experiments you maywish to select a larger size or elongated shape.
Before you select a particular stone, carefully look over avariety of stones, including pebbles, to observe the interest-ing natural patterns on the surface. Some stones will have avariegated color pattern; others will have spots scatteredover the surface; still others will have stripes or bands ofdifferent colors. Nature provides many examples of color for
Image 26: Sometimes the spaces between two curvededges become more interesting with an angular shape.
Pub. No. 4H169, Pg. 21
WISCONSIN 4-H
following any pattern in our painting experiments. We mustlook with more attention than usual to see and discover thesequalities in our environment. With this experience in mind, letus try creating a design with painting on the surface of astone.
Start your design directly with brush and paint, making acontinuous flowing band around the entire surface of thestone. The band should have graceful curves of thick andthin edges. Paint additional bands adjacent to the first. Thesemay have angular edges, as well as curved, to offer a varietyin the total design.
Sometimes the spaces between two curved edges becomemore interesting with an angular shape; rounded or ovalshapes might be best between two angular edges. (See Image26.) You will have to choose what is most pleasing andinteresting to you. Frequent practice will help you developyour own sense of what looks best. Most important is tocreate a design of shapes and bands that flow gracefully andcontinuously around the entire surface of the stone.
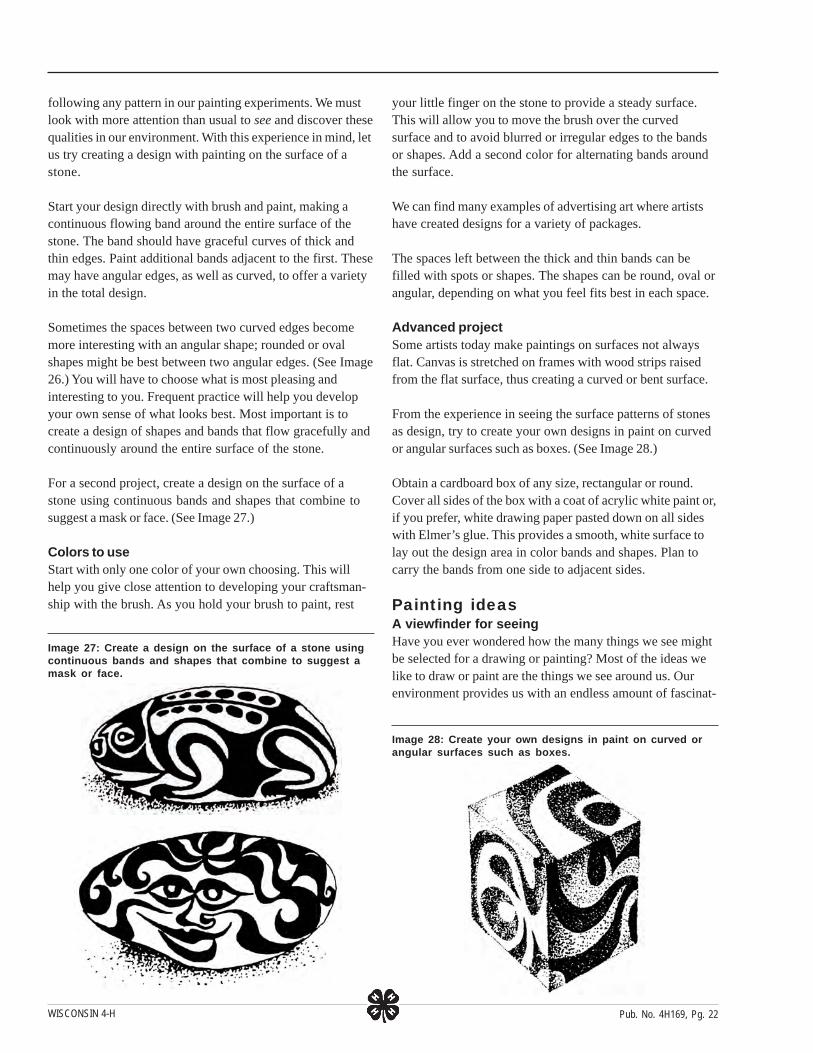
For a second project, create a design on the surface of astone using continuous bands and shapes that combine tosuggest a mask or face. (See Image 27.)
Colors to useStart with only one color of your own choosing. This willhelp you give close attention to developing your craftsman-ship with the brush. As you hold your brush to paint, rest
Image 27: Create a design on the surface of a stone usingcontinuous bands and shapes that combine to suggest amask or face.
your little finger on the stone to provide a steady surface.This will allow you to move the brush over the curvedsurface and to avoid blurred or irregular edges to the bandsor shapes. Add a second color for alternating bands aroundthe surface.
We can find many examples of advertising art where artistshave created designs for a variety of packages.
The spaces left between the thick and thin bands can befilled with spots or shapes. The shapes can be round, oval orangular, depending on what you feel fits best in each space.
Advanced projectSome artists today make paintings on surfaces not alwaysflat. Canvas is stretched on frames with wood strips raisedfrom the flat surface, thus creating a curved or bent surface.
From the experience in seeing the surface patterns of stonesas design, try to create your own designs in paint on curvedor angular surfaces such as boxes. (See Image 28.)
Obtain a cardboard box of any size, rectangular or round.Cover all sides of the box with a coat of acrylic white paint or,if you prefer, white drawing paper pasted down on all sideswith Elmer’s glue. This provides a smooth, white surface tolay out the design area in color bands and shapes. Plan tocarry the bands from one side to adjacent sides.
Painting ideasA viewfinder for seeingHave you ever wondered how the many things we see mightbe selected for a drawing or painting? Most of the ideas welike to draw or paint are the things we see around us. Ourenvironment provides us with an endless amount of fascinat-
Image 28: Create your own designs in paint on curved orangular surfaces such as boxes.
Pub. No. 4H169, Pg. 22

WISCONSIN 4-H
ing things to use for creative expression. Unfortunately, it isoften very difficult to choose because we see too much or wecan’t decide what to use.
A simple device can be made to help you become moreselective in observing and choosing what to draw or paint.You are probably familiar with the use of a viewfinder on acamera for selecting the best view to photograph. For ourpurposes we can make a similar viewfinder from thin card-board. Cut a small rectangular opening, about 1" x 2" in size,in the center of a 6" x 9" cardboard. At the middle of eachside of the opening mark a short pencil line on the board.These marks will serve as reference points in transferringwhat we see through the opening to our drawing on paper.
Hold the cardboard viewfinder close to your eye. The viewyou see through the opening gives a wide survey. Now movethe viewer slightly away from your eye. Observe how theamount of area you now see is reduced. Most often, begin-ners in art will choose too many things or too much of a viewto use in a painting. Actually the most interesting views arethose seen through the finder held farther away from youreye. (See Image 29.)
Now observe all the major horizontal and vertical lines seenthrough the viewer. These may be lines representing theedges and roofs of buildings, telephone poles, fence posts,etc., which cut across the view horizontally or vertically. Alsoobserve the major diagonal lines from edges of roofs, curbs,etc., that cut across the view. The edges of viewfinderopenings will correspond with the larger edges or sides ofyour drawing paper or painting panel. The pencil marks in themiddle of each side will help to judge where a horizontal,vertical or diagonal line touches at the opening.Now, with a pencil draw the corresponding lines on yourpaper that are similar to the directional lines in your viewer.Add and connect these lines to complete the drawing.
The viewfinder is an aid in locating and carefully selectingthose things you want to draw or paint. With practice you
will increase your ability to arrange and organize thoseinteresting visual experiences that make a strong drawing orpainting.
Take your viewfinder with you on a walk through the woods,on an open field, near a river or around your neighborhood.See whether you can isolate areas of interest that can beused for drawing or sketching.
Ideas from imaginationThese are ideas we seem to make up without directlyobserving. Actually, they come from places or things we’veseen before or fragments of ideas from our memory, puttogether in new or unusual arrangements.
If you like to paint or draw from your imagination, use thefollowing ideas for a start. Add or change your idea in anyway you wish. Remember that your drawing or painting willreveal to you what you have in mind, but can’t see until it isdrawn or painted.
If you don’t like what is created, change it until you aresatisfied. No one else can determine that. When you finallyput down on board or paper what you like, stop and enjoy it.
Themes to draw or paintmy favorite sport
hard work
an auto race
after a hard day
the realities of war
being rich
what friendship means
hard luck
industry
myself
justice
being poor
machines in our lives
people I admire
skylines and rooftops in the evening
speed in our lives
the awful accident
the sea
Image 29: The most interesting views are those seenthrough the finder held farther away from your eye.
Pub. No. 4H169, Pg. 23
WISCONSIN 4-H
Subjectspeople
self-portraits
members of the family
friends
important leaders in history
great events
People, sports, recreationrunning
skiing
lifting
skating
jumping
hiking
climbing
swimming
throwing
tenting
pushing
stretching
People at worksawmill attendants
machine operators
drivers
welders
farmers
models
weavers
babysitters
carpenters
laborers
Moods and feelings from ordinaryexperiences
a storm - sleet, rain, snow, wind,violence
a hot summer day
bitter cold in the woods
a peaceful day
night lights
the street lights
on the lake at night
sadness
happy feeling
when I was really mad
Nature and environmentwhat the river looks like
the crowded street – trafficspeeding on the road
how downtown looks
the wide countryside
farm buildings
close-up of rocks, shells, plants, treeleaves, flowers, animals at rest,birds, fish, insects; direct observa-tion of landscape, cityscapes,important buildings in town,architectural details of houses,roadside mailboxes
Mechanical devicespainting and drawing tools
industrial objects – cars, planes,ships
precise drawings and paintings
Other ideasstill life – grouping of commonrelated objects
models and nature specimens
at the zoo
out-of-doors
ideas from listening to music (listenand then draw or paint the mood)
ideas from imagination or fantasy(events and stories from history)
songs, poems, films, books
Pub. No. 4H169, Pg. 24

“An EEO/AA employer,University of Wisconsin-Extension provides equal
opportunities in employment and programming, including Title IX andAmerican with Disabilities (ADA) requirements.”
© 2004 by the Board of Regents of the University of Wisconsin System.Developed by the Wisconsin 4-H Office, 431 Lowell Hall, 610 LangdonSt., Madison, WI 53703. The 4-H name and emblem are federallyprotected under Title 18 US Code 707.
Created by Ken Kuemmerlein, former Extension Youth Arts Specialist.Layout and design revised by Gretchen Krause, 4-H Youth DevelopmentGraphic Artist, April 2004.
To order multiple copies of this publication, call toll free:1-877-WIS-PUBS (947-7827). To see more CooperativeExtension Information, visit our web site: http://cecommerce.uwex.edu.