Art, Technique and Technology in Motion Picture Production ...
22
www.fdtimes.com Jon Fauer ASC Special Report Oct 2021 Art, Technique and Technology in Motion Picture Production Worldwide DJI Ronin 4D
Transcript of Art, Technique and Technology in Motion Picture Production ...
www.fdtimes.comJon Fauer ASC Special ReportOct 2021
Art, Technique and Technology in Motion Picture Production Worldwide
DJI Ronin 4D

2 DJI Ronin 4D • Oct 2021
DJI Ronin 4DThis is one of the most captivating cinema cameras since, well, the birth of cinema.
I hear howls calling for superlative deleted, but please indulge this attention-grabbing opening line for a few moments.
The DJI Ronin 4D is like a polymath of primordial portable 1895 Lumière Brothers Cinématographe, mixed with 1970s Aaton LTR, styled by a dreamed-up team of DaVinci, Gaudí and Ive, commingled with stabilizers, Lidar, integrated wireless video and wireless control, inspired by Inspire 2, Zenmuses and ancestral Ronins. It is an astonishly seamless cinematographic system.
The DJI Ronin 4D launched today, October 20, 2021. It is a Full Frame cine camera system consisting of 4-axis stabilizer, Lidar focus assist, integrated video TX and RX, onboard and wirelessly connected monitors, dual handgrips with efficient local and re-mote camera and lens control.
There are two models. Ronin 4D with 8K sensor will record 8K 8192x4320 (17:9) up to 60 fps 12-bit at a maximum data rate of 506 MB/s. The Ronin 4D 6K sensor will record up to 6K 6008x3168 (17:9) up to 48 fps at a maximum data rate of 326 MB/s.
There’s a convenient slot on the lower camera left side for an in-ternal, slide-in DJI PROSSD 1TB SSD that connects via USB-C connector directly to the camera, without cables. You can also connect external SSDs with a USB-C cable. Or, remove the SSD slot and replace it with a CFexpress 2.0 Type B module.
Recording format choices include Apple ProRes RAW HQ/Ap-ple ProRes RAW, Apple ProRes 422 HQ/Apple ProRes 422; and H.264 (4:2:0 10-bit).
Overall weight with lens, media, Lidar, onboard battery, monitor, top handle, video transmitter and side handgrips is about 10.3 lb / 4.6 7 kg.
Two articulating handgrips beg you to try countless ways of dancing and gliding across your locations and sets. Push the silver levers forward to adjust the grips horizontally and gently rest the camera against your torso for tummy-resting mid-level shots. Grab the Ronin 4D by its top handle to follow footsteps, run after rabbits, or emulate the low angle shot of Danny on his tricycle in The Shining.
Remove the handgrips and handle to reconfigure Ronin 4D as a remote head. Put it on the end of the crane or remote arm. Mount it on the hood of a truck to smooth out bumpy roads. Attach Ronin 4D on the nose of a camera car for POV driving shots. Pair it with DJI Master Wheels or Remote Controller.
When you’re bumping along in the back of a pickup, tracking the good guys on horseback wondering “who are those guys,” Ronin 4D
3Oct 2021 • DJI Ronin 4D
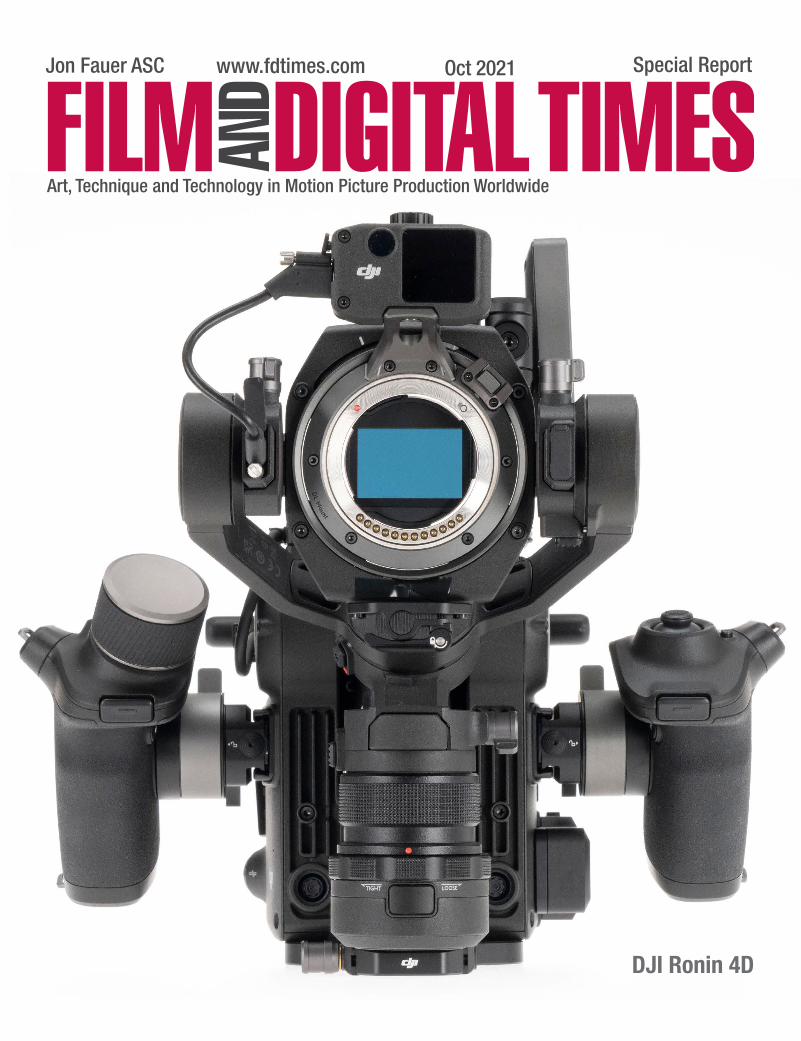
DJI Ronin 4Dis a self-contained, self-centering, bump-removal system. Bounc-ing around on a rigid-inflatable Coast Guard boat in heavy seas, Ronin 4D will even out the chop. Although it’s IP53 rated, you’ll still want to protect the Ronin 4D system from salt water spray.
A tiny Lidar module attaches above the lens. It can remain there indefinitely. It is unobtrusive and keeps your shots in astonish-ingly accurate focus most of the time. Lidar (Light Detection and Ranging) uses eye-safe laser beams to measure distance with 43,200 ranging points. As it tracks focus, the rubberized focus wheel of the right handgrip spins into position. If you’ve engaged Automated Manual Focus, you can take over focus control ac-cordingly. The onboard monitor guides you with a distance scale and Lidar map.
Out of the box, it’s not set up for cat-on-the-shoulder cinéma vérité style shooting. The Ronin 4D encourages entirely new discoveries in styles of shooting. You might add a handgrip extender on each
side, an arm to move the monitor forward on top, and a shoul-der pad on the bottom for hours of shoulder-resting. Edgar Mo-rin and Jean Rouch would have adored this camera to chronicle their summer of 1961, reveling in a device capable of enhancing camera moves that would have challenged even their prototype KMT Coutant-Mathot Éclair. Drew and Pennebaker might have preferred a Ronin 4D to their heavy Mitch Bogdanowicz-modified Auricons on Primary in 1960. And Haskell Wexler, ever the pro-ponent of tools that influenced style, surely would have been first in line had Ronin 4D been ready for Medium Cool in 1969.
Why? Ronin 4D’s pan-tilt-roll gimbals and Z-axis up-down stabi-lizer arm can smooth out every footstep and wobble as you race over uneven ground, filming nonstop. And when you do come to a stop, your stabilized camera is steady as a tripod in the sky.
A prototype Ronin 4D landed at FDT a couple of weeks ago. The following pages are notes on how we used it. Ronin 4D is a versatile, integrated, plug-and-play camera system that will surely delight every cinematographer and filmmaker—from blockbuster-budgeted features to commercials, documentaries, corporate films and solo independent projects.
Ronin 4D gets us ever closer to the magic intersection of imagination and production—that once elusive place where you can dream up incredible scenes and then be able to elegantly capture those dreams.

4 DJI Ronin 4D • Oct 2021
In the months leading up to launch, Film and Digital Times dis-cussed the Ronin 4D with DJI Product Managers, Planners and Engineers.
Product ConceptWhen and how did the concept for this camera first come about?
The Ronin 4D builds on our Ronin and Inspire series. It came about after numerous product demos and focus groups with many cinematographers around the globe.
What was the original goal? Did those ideas change over time?
DJI is driven by its engineers who continually focus on innova-tion and user experience. We help users break down the barriers of professional gimbal technology and make it easy-to-use, reli-able and accessible to almost anyone.
Who are the potential customers and users of Ronin 4D?
DJI strives to bring professional grade equipment to almost any-one with a creative drive. Back in 2014, we brought to market the Ronin, a 3-axis stabilized gimbal. This was different from anything that had come before and it opened up cinematically smooth video for those looking to achieve “Hollywood” quality.
The new Ronin 4D meets studio requirements and also the de-sires of cinematographers who wish to push their own filmmak-ing boundaries. These were key considerations in the design of this camera system. We hope and believe that it will be embraced
by everyone with a serious interest in creating professional grade productions.
Product Development
Please discuss the developments that went into some of the new technologies in Ronin 4D.
Our three most innovative features of the new product are 4-Axis Stabilization, Wireless Transmission and the Focusing System.
Were lenses specifically designed for this camera?
We first entered the Super35 market with our Zenmuse X7 cam-era and DL-Mount lenses (16.84 mm Flange Focal Depth; 58 mm ID). This was a popular system with the professional Inspire 2 drone. The 16mm F2.8 DL lens covers Super35 only. The other three DL lenses cover Full Frame: 24mm F2.8, 35mm F2.8 and 50mm F2.8. Today’s new camera allows these lenses to be utilized on the ground.
Are you only producing DL prime lenses or do you have plans to broaden the selection by incorporating third party lenses?
We encourage other manufacturers to produce lenses that fit the DJI system and increase the selection for users.
A good example can be seen from the lens company Laowa who made an ultra-wide angle lens for the Inspire 2. This lens (9mm f/2.8 DL Zero-D) was greatly appreciated by Inspire 2 cinema-tographers who were able to achieve a new look for their scenes.
DJI Ronin 4D

5Oct 2021 • DJI Ronin 4D
We’ll also share a new zoom lens plan for compatibility with third parties through interchangeable lens mounts.
What were some of the challenges in designing and building the Ronin 4D camera system?
One big challenge was the ability to bring 9 physical ND filters into such a small gimbal camera, with only 16.84 mm between the sensor and the lens mount, and how we successfully accom-plished it in the end.
Why does Ronin 4D go against the current trend of making lighter and smaller cameras?
The main reason for Ronin 4D’s additional weight is the innovative Z axis. This was not an easy decision to make but we believe that its benefits to the user far outweigh having a slightly lighter cam-era. It’s also important to consider that the full system is actually lighter than combined individual components available before.
Product Impact
What is the relationship between Ronin 4D and DJI Ronin gimbals? Will Ronin 4D be a replacement?
No, Ronin 4D is not a replacement. They are different systems to satisfy the needs of different customers. We’ll continue to upgrade our handheld gimbals, and we’ll provide even more expansion ac-cessories for them to improve customers’ experiences. You might say this is a hint of our future accessory project plans.
Are you launching Ronin 4D to compete with other camera
manufacturers such as ARRI, Sony, Canon, RED, etc.?
No, Ronin 4D is not a direct competitor to these established mar-ket leaders as it offers something unique that wasn’t previously available. We want to introduce a new system to the filmmak-ing industry that provides users with additional choices to create their content.
Thoughts about Future
What are DJI’s ambitions in the professional camera market?
Ever since we introduced the Ronin gimbal back in 2014 as an innovative product that brought professional grade stabilization for everyone in the content industry, the desires and needs of this market have been very important to us.
Over the past seven years, we’ve worked closely with cinematog-raphers around the world to create products that fulfil their re-quirements and make the production process as easy as possible. These are relationships that we value and will grow stronger mov-ing ahead.
Do you think AutoFucus, ActiveTrack and other intelligent tools will replace manual focusing and gimbal control in the future?
Our technology is designed to help and improve current working practices. It is not designed to replace, but rather to augment the content capture process. Robots should be in the service of hu-man beings, not a replacement.
DJI Ronin 4D

6 DJI Ronin 4D • Oct 2021
1. You might pack your Ronin 4D in a backpack foamed case like this.
In this example, all three axes are unlocked and the gimbal is stored in a “contorted” position to keep the profile thin.
If you’ve worked with a Ronin RS 2, you’re familiar with the fundamentals of the Ronin 4D gimbal system.
Storing the Ronin 4D in a ready-to-shoot configuration certainly could save time from storage to shooting.
Let’s set up a Ronin 4D
3. Unlock the Tilt, Roll and Pan switch-style locks to get Ronin 4D ready. The switches are color-coded. When you see red, the gimbal axis is locked. (Red = locked. Black = unlocked.)
2. Gently pull the Ronin 4D from its case.
Pan LockRoll Lock
Tilt Lock
Z axis Lock—protects up-down 4D stabilizer arm during shipping and to lock it off on stunts and extra bumpy rides.
ship with locks on or off?
7Oct 2021 • DJI Ronin 4D
Tilt Lock
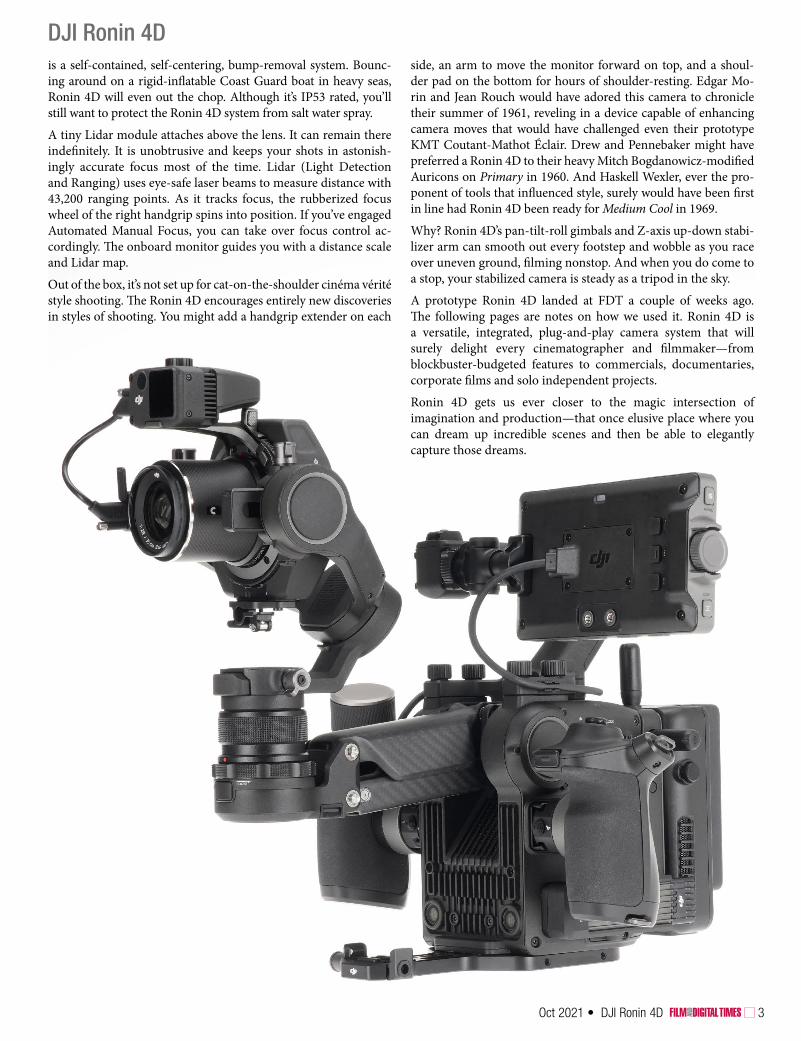
5. You could attach the Lidar and lens with the gimbals loose.But it is easier to lock all 3 locks. The Lidar is a great device for focus. Let’s assume you’re using a DJI DL or Autofocus E-mount lens. (We’ll get to focus motors later.)
Attach the Lidar unit to the bracket above the lens and connect its short USB-C to USB-C cable. (The cable has screw-in safeties at each end.)
Remove the lens cap.
6. Mount the lens.When you unlock the gimbal locks, gently hold the lens to keep it from crashing down. Careful! Lens and Lidar can be very top-heavy. Balancing is discussed on the next page.
Yes, it is much easier to keep things in balance with lens alone, no Lidar. But we like Lidar a lot, so it remains onboard.
Tilt Balance Knob
Tilt Balance
Knob
Lidar
Lidar USB-C cable
4. This is how Ronin 4D looks when pan, tilt and roll gimbals are all unlocked and adjusted in a ready-to-shoot position.
As mentioned earlier, if you’re familiar with a Ronin RS 2, this is like muscle memory.
Pan Balance Lock
Attaching Lens and Lidar on Ronin 4D
Be sure the knurled gimbal release ring is
tight.

8 DJI Ronin 4D • Oct 2021
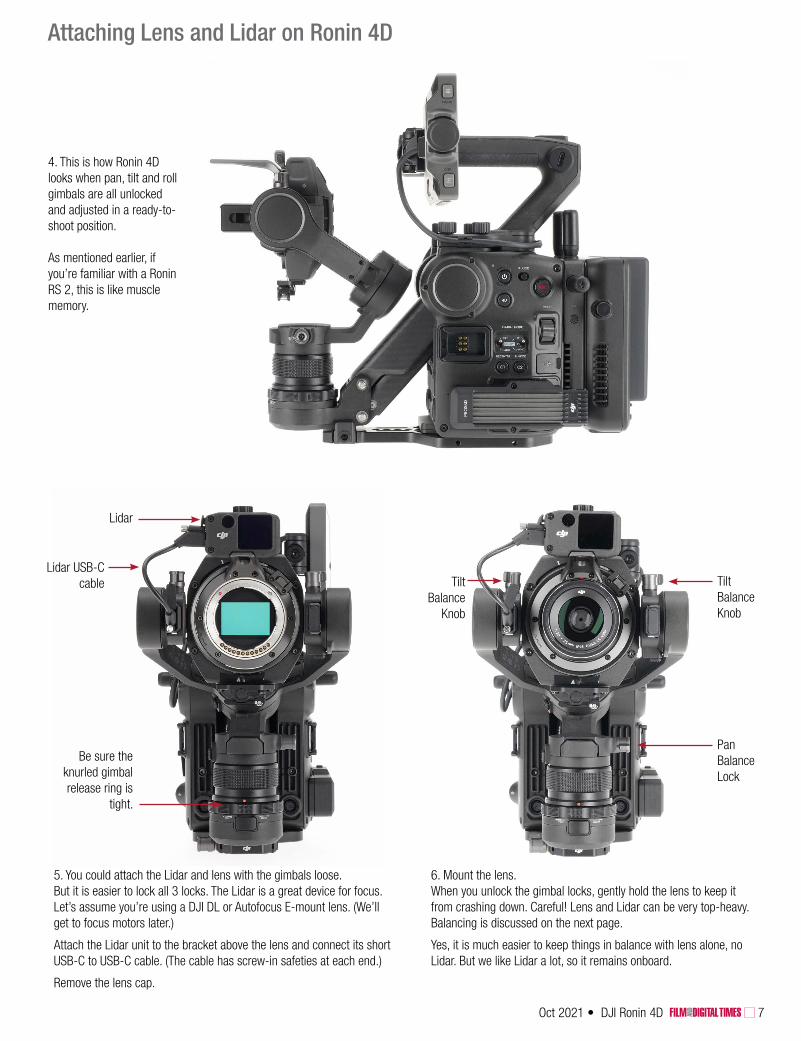
Balance Pan and Tilt
Balance the Tilt Axis• Put the Ronin 4D on a level surface.• Unlock the Tilt slide switch lock. • Unlock the Tilt Balance Knobs on both sides of the lens. • If it is front-heavy, move the camera backward. • If back-heavy, move the camera forward.• Tighten the two Tilt axis knobs. • Lock the Tilt axis slide switch.
Balance the Pan Axis• Unlock the Pan slide switch style lock.• Unlock the Pan Balance knob.• Turn the Ronin 4D so you’re facing the camera left
side.• Holding the top handle, tilt Ronin 4D to its left
(camera left) about 30 degrees. • If the lens pans to the left, push the pan axis arm
towards the rear of Ronin 4D. • If the lens rotates to the right, push the pan axis arm
toward the front of the camera. • Tighten the Pan axis knob.• Lock the Pan axis slide switch.
Pan Lock
Roll Lock
Tilt Lock
Z axis LockZ axis protective & anti-tip baseplate
Tilt Lock
Tilt Balance Knob
Tilt Balance Knob
Pan Balance Knob
Pan Axis Arm
Tilt Axis Arm
1. Tilt top handle toward camera left. 2. If the lens pans to the left...3. Push the pan axis arm toward the rear of the camera.
1
2
3

9Oct 2021 • DJI Ronin 4D
DJI TB50 Battery slides down from top. 4280 mAh; 97.58 Wh; 22.8 V.
Battery Release
Four Tx (transmitter) antennas: 2 on top and one on each side.
DJI PROSSD 1TB SSD
You can unscrew the SSD media holder and replace it with 4D’s CFexpress media holder.
Z axis Arm smooths out up-down shake and unsteadiness to a much greater degree than tilt or OIS (Optical Image Stablization) can achieve.
It is not a weightless-in-space spring-balanced system. Instead, the Z axis is controlled by gyro stablization, steadied in position by downward-facingToF (Time of Flight) sensors at the bottom of the camera that measure distance from base to ground.
Power Ronin 4D On
1. To prepare the Z axis arm, loosen the Z axis safety knob. Unlock all 3 slide switches: pan, tilt and roll.
2. Push the main Power Button for 1 second to turn the camera ON. Hold the button for 3 to 5 seconds to power OFF.
3. While holding the lens, set the left GIMBAL MODE switch from OFF to FOLLOW or LOCK. It takes about 5 seconds for the brushless motors to take over and keep the camera and lens assembly stablized in place.
4. Of course, you want to benefit from the Z axis. So, push the 4D (Z axis) button. The arm gracefully ascends. It should be more or less horizontal. If not, adjust the knob marked “+ –” at the rear of the Z axis arm.
Power Button
• OFF - FOLLOW - LOCK Switch.
• OFF means Gimbals are not engaged.
• FOLLOW means the camera follows the direction you move the top handle.
• LOCK means the camera remains “locked” or fixed on the last position you aimed at, no matter where you point the handle.

10 DJI Ronin 4D • Oct 2021
1. Navigate to the Stabilizer tab.
3. Confirm to begin Auto Tuning. Hang on to the top handle.
2. Go to the 3rd Stabilizer page. Touch or select AUTO TUNE.
4. Stay calm and continue. The camera will shake, grind and vibrate.
MENU button
Playback button
Select / Set dial (alternative to touchscreen)
Auto Tune Ronin 4D
You should Auto Tune Ronin 4D at the start of each day, with each major new setup, and each time you change lenses.
To begin the calibration process, push the MENU button of the onboard High-Bright Main Monitor.
4 menu selection buttons on bottom
4 menu selection buttons on top

11Oct 2021 • DJI Ronin 4D
Menus
3. Go to Display page 3 for framelines, center marker, monitor LUT, etc.
1. The Home tab is for RECORDING settings. There are 3 pages.
5. You have to press the red center circle for 3 seconds to format.
7. AMF (Automated Manual Focus under the Lens tab is good. It lets you override autofocus. Imperial or Metric is for the on-screen focus display. ROI is Region of Interest for focus area. Choices are Smart, Spot or Wide.
4. Time remaining and Format Media is under the Storage tab.
2. Go to Display page 2 and turn Lidar Waveform ON.
6. Factory Reset is under the System tab. When all else fails, it’s here.
8. Push Pan and Push Tilt, under the Stabilizer tab, let you manually adjust the pan and tilt direction of the lens—even while the stabilizers are active.
The following menu settings are things we liked. There are many flavors of Van Leeuwen ice cream. Your mileage may vary.

12 DJI Ronin 4D • Oct 2021
3. You probably want Shutter Angle to remain on manual control.
1. Most camera settings are available at the touch of the touchscreen or the push of a button above each item. Select with a finger swipe or by turning the monitor dial. The EI button selects from 200 - 12,800.
5. Tap or touch FPS for frame rate.
On-Screen Settings
7. Select internal NDs from Clear to ND.3 (1 stop) to ND2.7 (9 stops).
4. If Shutter displays speed, like 1/60, you can change to Shutter Angle. Press and hold the Shutter button or icon for a second or two to select.
2. If you choose AUTO IRIS, be sure to select 0 EV if you do not want exposure compensation. Manual IRIS takes control of electronically enabled lense via the lens and camera camera pogo pin contacts.
6. Press SLO and you see Project (playback) and Sensor (shooting) speeds. If you select 120 fps here, it prompts you that it will be in S35.
8. Press and hold White Balance to measure WB or add custom settings.

13Oct 2021 • DJI Ronin 4D
Top view Bottom view
Ronin 4D
Front view

14 DJI Ronin 4D • Oct 2021
Dual Handgrips with Controls
Joystick lock
Handgrip position adjustment lever
Left Handgrip
SPORT Mode for fast scenes
EXPOSURE Assist: press to see or hide Zebra Stripes, Waveform or False Color. PEAK (Focus Peaking) on
or off. Can be remapped in MENU > DISPLAY > Page 2 > FOCUS BUTTON FUNCTIONto toggle TOF (Time of Flight) Lidar displayor FocusMag 2x / 4x magnifi-cation of monitor display.
Joystick to pan and tilt the gimbal.
ActiveTrack Button: press for 1 second
to enable or stop ActiveTrack. Press
again and the subject is confirmed
with a green box.
Lever to lock Handgrip to camera
Pogo pin connectors—no wires
Handgrip safety release
Focus, ND, EI, or Iris Control:
selected by MODE button
AF selects Autofocus
/ AMF (Automated
Manual Focus) or full Manual Focus control using the top
knob.
MODE Button
RECORD Start/Stop
Right Handgrip
Right Trigger. Press twice to
enable or retract Z axis.
Left Trigger. Get to know this very important button. • Press twice to center the subject when ActiveTrack is enabled. • Press and hold to start ActiveTrack when in Smart mode. (Smart mode is selected in Menu > Lens > ROI Mode > Smart.)• Press and hold to switch between Follow and Lock mode when not in Smart mode.• Press twice to recenter the gimbal when not in ActiveTrack.
ActiveTrack Button
Attach the left and right handgrips for solo operator full control of the Ronin 4D
15Oct 2021 • DJI Ronin 4D
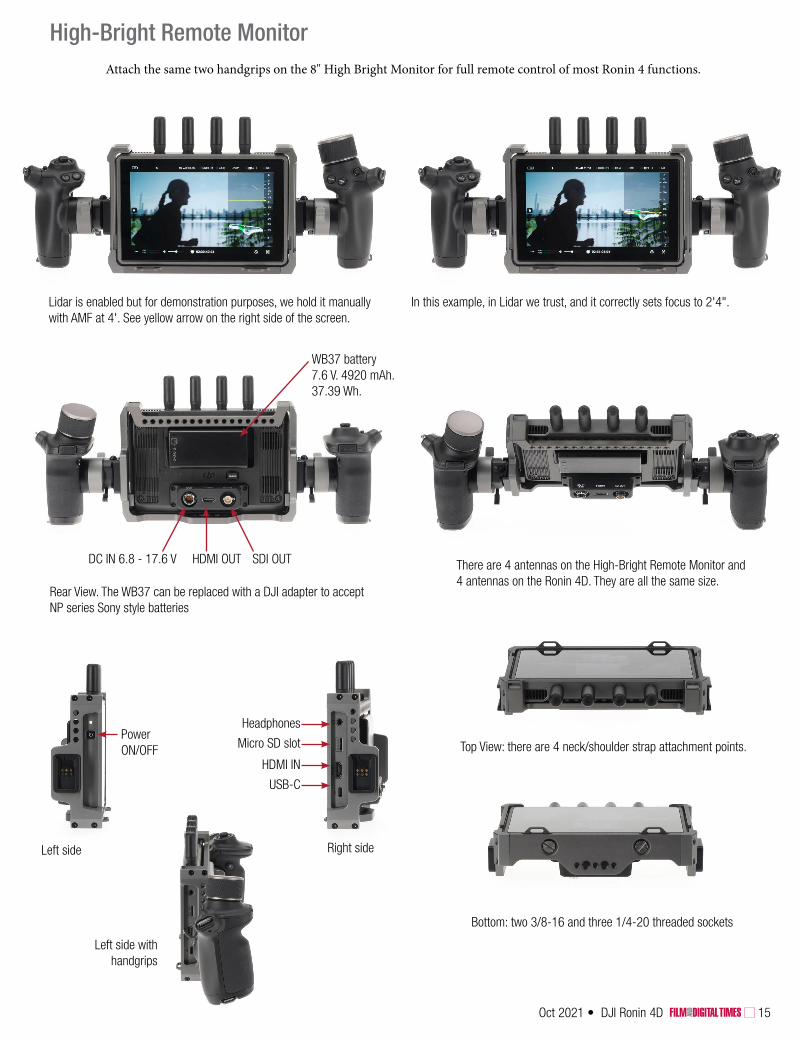
High-Bright Remote Monitor
Rear View. The WB37 can be replaced with a DJI adapter to acceptNP series Sony style batteries
Lidar is enabled but for demonstration purposes, we hold it manually with AMF at 4'. See yellow arrow on the right side of the screen.
In this example, in Lidar we trust, and it correctly sets focus to 2'4".
Bottom: two 3/8-16 and three 1/4-20 threaded sockets
Attach the same two handgrips on the 8" High Bright Monitor for full remote control of most Ronin 4 functions.
There are 4 antennas on the High-Bright Remote Monitor and 4 antennas on the Ronin 4D. They are all the same size.
Power ON/OFF
WB37 battery7.6 V. 4920 mAh.37.39 Wh.
DC IN 6.8 - 17.6 V HDMI OUT SDI OUT
Top View: there are 4 neck/shoulder strap attachment points.
Left side
Headphones
Micro SD slot
HDMI IN
USB-C
Right side
Left side with handgrips
16 DJI Ronin 4D • Oct 2021
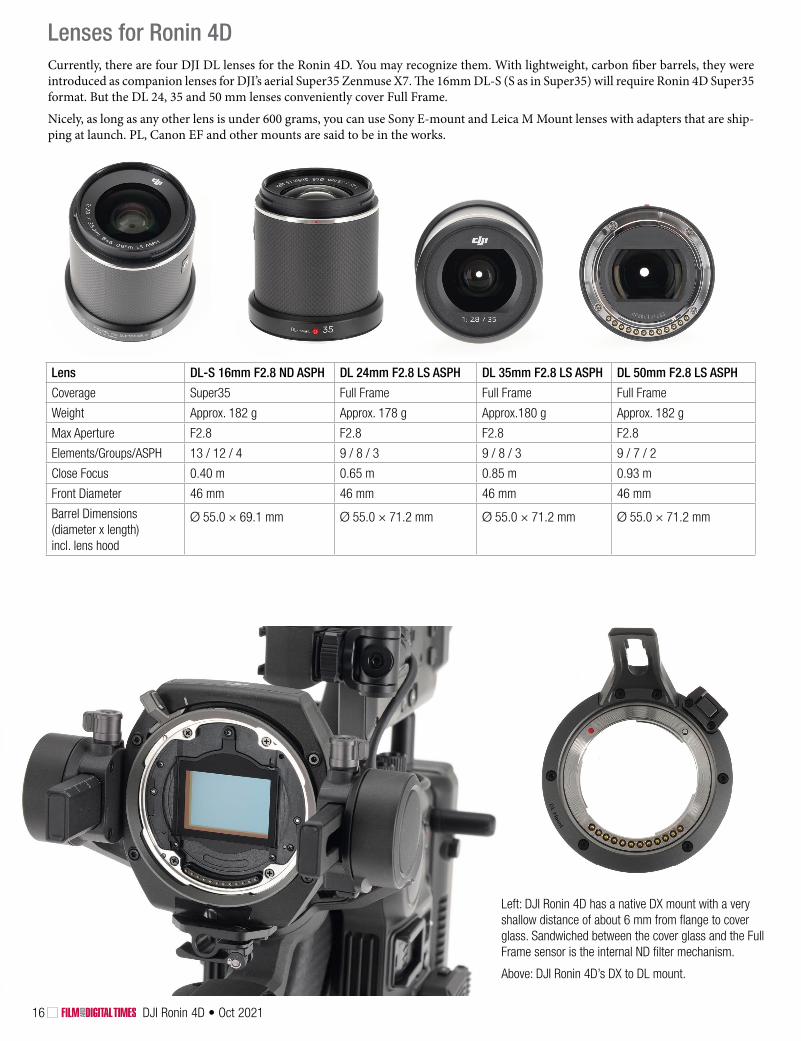
Left: DJI Ronin 4D has a native DX mount with a very shallow distance of about 6 mm from flange to cover glass. Sandwiched between the cover glass and the Full Frame sensor is the internal ND filter mechanism.
Above: DJI Ronin 4D’s DX to DL mount.
Lens DL-S 16mm F2.8 ND ASPH DL 24mm F2.8 LS ASPH DL 35mm F2.8 LS ASPH DL 50mm F2.8 LS ASPH
Coverage Super35 Full Frame Full Frame Full Frame
Weight Approx. 182 g Approx. 178 g Approx.180 g Approx. 182 g
Max Aperture F2.8 F2.8 F2.8 F2.8
Elements/Groups/ASPH 13 / 12 / 4 9 / 8 / 3 9 / 8 / 3 9 / 7 / 2
Close Focus 0.40 m 0.65 m 0.85 m 0.93 m
Front Diameter 46 mm 46 mm 46 mm 46 mm
Barrel Dimensions (diameter x length)incl. lens hood
Ø 55.0 × 69.1 mm Ø 55.0 × 71.2 mm Ø 55.0 × 71.2 mm Ø 55.0 × 71.2 mm
Lenses for Ronin 4DCurrently, there are four DJI DL lenses for the Ronin 4D. You may recognize them. With lightweight, carbon fiber barrels, they were introduced as companion lenses for DJI’s aerial Super35 Zenmuse X7. The 16mm DL-S (S as in Super35) will require Ronin 4D Super35 format. But the DL 24, 35 and 50 mm lenses conveniently cover Full Frame.
Nicely, as long as any other lens is under 600 grams, you can use Sony E-mount and Leica M Mount lenses with adapters that are ship-ping at launch. PL, Canon EF and other mounts are said to be in the works.
17Oct 2021 • DJI Ronin 4D
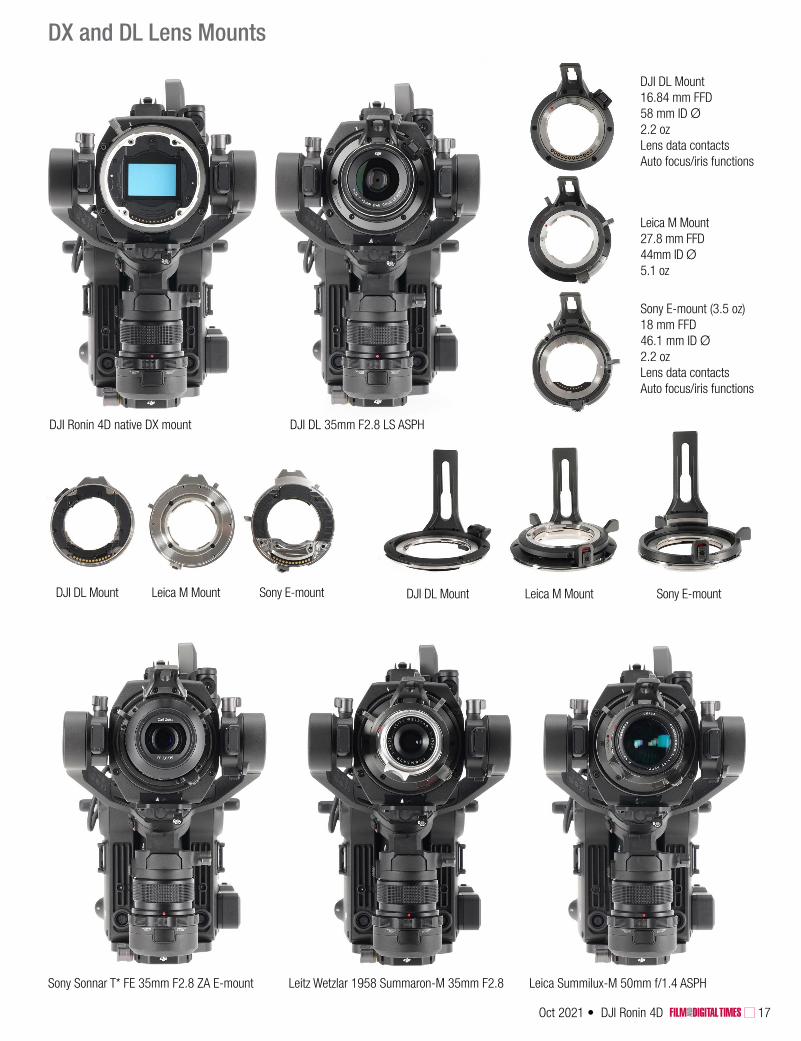
DX and DL Lens Mounts
Sony Sonnar T* FE 35mm F2.8 ZA E-mount
DJI DL Mount Leica M Mount Sony E-mount
Leitz Wetzlar 1958 Summaron-M 35mm F2.8 Leica Summilux-M 50mm f/1.4 ASPH
DJI Ronin 4D native DX mount DJI DL 35mm F2.8 LS ASPH
DJI DL Mount 16.84 mm FFD58 mm ID Ø2.2 ozLens data contactsAuto focus/iris functions
Leica M Mount 27.8 mm FFD44mm ID Ø5.1 oz
Sony E-mount (3.5 oz) 18 mm FFD46.1 mm ID Ø2.2 ozLens data contactsAuto focus/iris functions
DJI DL Mount Leica M Mount Sony E-mount

18 DJI Ronin 4D • Oct 2021
Main Body Dims (l×w×h) 235×115×160 mm
Dimensions (l×w×h) 309×290×277 mm. (Measured when 6K Combo is fully set up with the main monitor attached and Z-Axis off.)
Gimbal / Main Body Weight Approx. 1.04 kg / Approx. 1.45 kg
Overall Weight Approx. 4.67 kg (after installing all modules in the combo, excluding lens and storage card)
Maximum Operating Time Approx. 150 mins. (Measured with a fully charged TB50 Battery and Ronin 4D with the gimbal balanced, the Z-axis inactive, and continuously recording in RAW. Gimbal movements or use of the Z-axis will reduce operating time.)
Intelligent Features ActiveTrack Pro, Autofocus (supports human face/body recognition and framing)
Sensor / Dynamic Range Full Frame 36 x 24 mm (approx) CMOS sensor / 14+ stops
Base Lens Mount / Supported Lens Mounts DX Mount / DL Mount (standard), M Mount, and E-mount
White Balance Manual 2,000-11,000 K and tint adjustment. Also AWB
Gamma D-Log, Rec.709, HLG
EI Range X9 8K: EI 200-12800, Dual Native ISO 800/4000 X9 6K: EI 200-12800, Dual Native ISO 800/5000
Shutter Speed Electronic Rolling Shutter 1/24s-1/8000s
ND Internal 9-stops of ND filters: Clear, ND.3, ND.6, ND.9, ND1.2, ND1.5, ND1.8, ND2.1, ND2.4, ND2.7
Focus Control Autofocus, Manual Focus, Automated Manual Focus (AMF).Autofocus on manual lenses requires DJI Zenmuse X9 Focus Motor.
X9 6K Max Bit Rate 6008×3168, 48fps. RAW 326MB/s.
X9 8K Max Bit Rate 8192×4320, 60fps. RAW 506MB/s
Supported File System exFAT
DJI PROSSD 1TBRecording Formats
Apple ProRes RAW HQ / Apple ProRes RAW Apple ProRes 422 HQ / Apple ProRes 422 (future firmware update) H.264 (4:2:0 10-bit), etc.
Storage Media DJI PROSSD 1TB, CFexpress 2.0 Type B, USB-C SSD. Unlimited recording time with PROSSD 1TB
CFexpress 2.0 Type B Recording Formatswith recommended Cfexpress cards.
ProRes 422 HQ: 6K: 23.976/24/25/29.97/30fps C4K: 23.976/24/25/29.97/30/48/50/59.94/60/72/96/100/120 fps 2K: 23.976/24/25/29.97/30/48/50/59.94/60/72/96/100/120 fps H.264: C4K: 23.976/24/25/29.97/30/48/50/59.94/60/72/96/100/120 fps 2K: 23.976/24/25/29.97/30/48/50/59.94/60/72/96/100/120 fps
USB-C External SSD Recording Formats with recommended SSDs.
ProRes 422 HQ: C4K: 23.976/24/25/29.97/30/48/50/59.94/60 fps 2K: 23.976/24/25/29.97/30/48/50/59.94/60 fps H.264: C4K: 23.976/24/25/29.97/30/48/50/59.94/60 fps 2K: 23.976/24/25/29.97/30/48/50/59.94/60 fps
Built-in Mic / Audio Format Built-in 2-ch stereo / LPCM 2-ch, 24-bit 48kHz
X9 Camera
General
Main MonitorScreen Size / Resolution / Refresh Rate 5.5 inches (diagonal) / 1920×1080 / 60Hz
Screen / Max Brightness LCD touchscreen. Can flip image 180 degrees (upside-down) / 1000 cd/m²
BatteryBattery TB50 Intelligent Battery. 4280 mAh. 97.58 Wh. 22.8 V.
Max Charging Voltage / Charging Time 26.1 V. 180 W. / Approx. 1.5 hours (with standard 65W power adapter)
The following specifications are unofficial, not final, and may change.
Ronin 4D Preliminary Specs

19Oct 2021 • DJI Ronin 4D
Gimbal
Mechanical Range Pan: ±330°. Tilt: -75° to 175°. Roll: -90° to 230°.
Z Axis Range approx 130mm up-down. Stabilization range of the Z-axis is subject to change based on Z-axis modes and usage scenarios and may be smaller than the mechanical range.
Controllable Range Pan: ±285°. Tilt: -55° to +155°. Roll: ±35°
Max Control Speed (°/s) DJI Master Wheels or DJI Force Pro: Tilt: 360°/s. Roll: 360°/s. Pan: 360°/s. Ronin 4D Hand Grip: Tilt: 120°/s. Roll: 120°/s. Pan: 120°/s.
Maximum Z-axis Payload 2000 g (including 1040 g gimbal)
Angular Vibration Range ±0.01°
Lidar Range Finder
Weight 88 g
Dimensions (length×width×height) 71×47×34 mm
LiDAR Range Measurement Precision 0.3-1m (±1%) and 1-10m (±1.5%)FOV (Field of View) 30cm to 3m @ >18% reflectivity 60° (horizontal) × 45° (vertical)
30cm to 10m @ >18% reflectivity 60° (horizontal) × 7° (vertical)
Safety Rating Class 1 (IEC 60825-1:2014) (safe for human eyes)
Operating Environment Use in environments with diffuse reflective surfaces (>10%, such as walls, trees, people, etc.) Do not use in environments with dense fog or aim it at, or through, glass surfaces.
Laser Wavelength 940 nm
Single Pulse Width Two types of pulses emitted: 5ns and 33.4ns.
Max Laser Power 6 W
DJI O3 Pro Video Transmission
Max Transmission Distance 20,000 ft (approx. 6km), when unobstructed, free of interference. FCC-compliant
Max Transmission Resolution and Frame Rate 1920×1080 @60fps
Minimum End-to-End Latency 100 ms measured at 4K / 24 fps. 68 ms at 4K / 24 fps
Wireless Frequencies. Some frequency bands may not be available depending on policies of the region in which the monitor was activated.
Non DFS frequency band: 2.400-2.483 GHz / 5.150-5.250 GHz / 5.725-5.850 GHz
DFS Frequency Band: 5.250-5.350 GHz / 5.470-5.600 GHz / 5.650-5.725 GHz
Transmitter Power (EIRP) 2.400-2.4835 GHz: 33 dBm (FCC); ≤20 dBm (SRRC/CE/MIC) 5.150-5.250 GHz: <23 dBm (FCC/SRRC/CE/MIC) 5.250-5.350 GHz: <30 dBm (FCC); <23 dBm (SRRC/CE/MIC) 5.470-5.600 GHz, 5.650-5.725 GHz: <30 dBm (FCC);<23 dBm (CE/MIC) 5.725-5.850 GHz: <33 dBm (FCC); <14 dBm (CE); <23 dBm (SRRC)”
Max Bandwidth / Max Bitrate 40 MHz / 50 Mbps
ConnectionsMain Body 3.5mm TRS Stereo Input Jack × 1 (supports mic, plug-in power mic, and line inputs) / 3.5mm Stereo Output Jack × 1
USB3.1 Type-C Data Port × 1
6-pin 1B DC-IN (DC 12-30 V) × 1 / Battery Mount Power Port (female) × 1
4D Expansion Plate Data Port (female) × 1
High-Bright Main Monitor Port × 1
Hand Grips Port × 2 / Top Handle Port × 1
HDMI Type-A Video Output Port × 1 (Currently supports HDMI 1.4 and will support HDMI 2.0 in a future firmware update.)
X9 Gimbal Lidar Range Finder/ Focus Motor Port × 2
TB50 Battery Mount Battery Mount Power Port (male) × 1. TB50 Battery Port × 1.
Ronin 4D Preliminary Specs
20 DJI Ronin 4D • Oct 2021
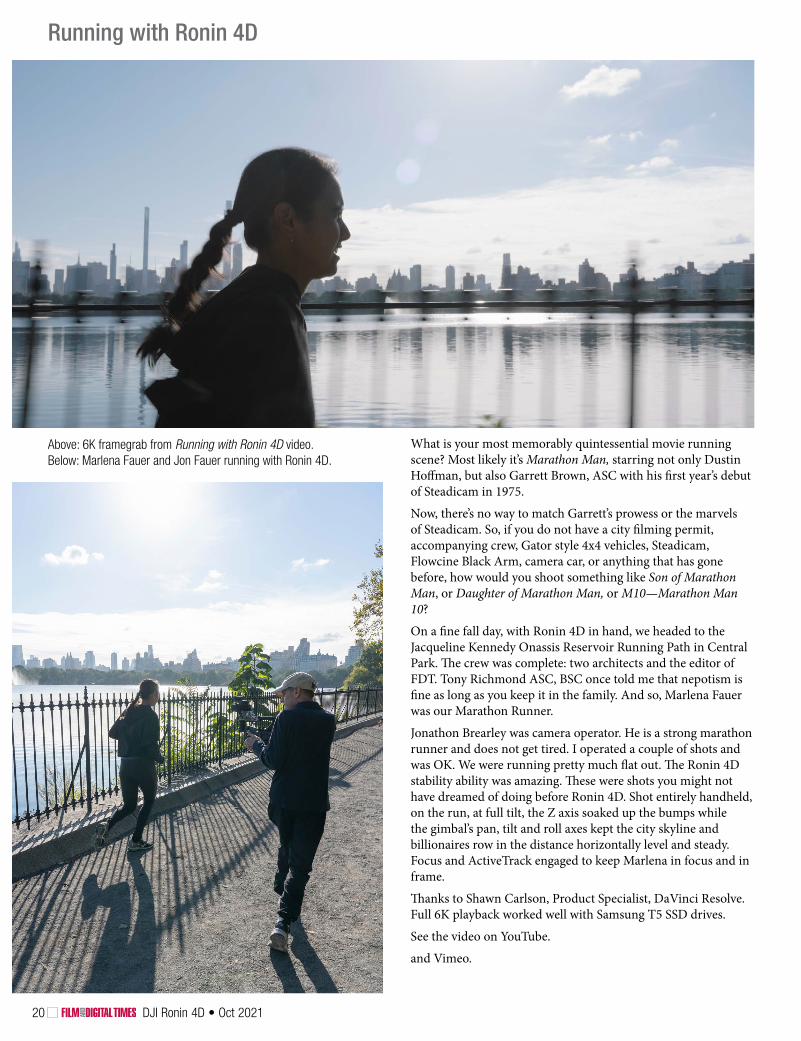
Running with Ronin 4D
What is your most memorably quintessential movie running scene? Most likely it’s Marathon Man, starring not only Dustin Hoffman, but also Garrett Brown, ASC with his first year’s debut of Steadicam in 1975.
Now, there’s no way to match Garrett’s prowess or the marvels of Steadicam. So, if you do not have a city filming permit, accompanying crew, Gator style 4x4 vehicles, Steadicam, Flowcine Black Arm, camera car, or anything that has gone before, how would you shoot something like Son of Marathon Man, or Daughter of Marathon Man, or M10—Marathon Man 10?
On a fine fall day, with Ronin 4D in hand, we headed to the Jacqueline Kennedy Onassis Reservoir Running Path in Central Park. The crew was complete: two architects and the editor of FDT. Tony Richmond ASC, BSC once told me that nepotism is fine as long as you keep it in the family. And so, Marlena Fauer was our Marathon Runner.
Jonathon Brearley was camera operator. He is a strong marathon runner and does not get tired. I operated a couple of shots and was OK. We were running pretty much flat out. The Ronin 4D stability ability was amazing. These were shots you might not have dreamed of doing before Ronin 4D. Shot entirely handheld, on the run, at full tilt, the Z axis soaked up the bumps while the gimbal’s pan, tilt and roll axes kept the city skyline and billionaires row in the distance horizontally level and steady. Focus and ActiveTrack engaged to keep Marlena in focus and in frame.
Thanks to Shawn Carlson, Product Specialist, DaVinci Resolve. Full 6K playback worked well with Samsung T5 SSD drives.
See the video on YouTube.
and Vimeo.
Above: 6K framegrab from Running with Ronin 4D video.Below: Marlena Fauer and Jon Fauer running with Ronin 4D.

21Oct 2021 • DJI Ronin 4D
Jacqueline Kennedy Onassis Reservoir Running Path in Central Park. Marlena Fauer running. Jonathon Brearley also running—with Ronin 4D.
Running with Ronin 4D

Special Report by Jon Fauer, ASC© Film and Digital Times 2021
www.fdtimes.com