Art Bot: Build a Wobbly Robot Friend That Creates...
23
9/26/2015 Art Bot: Build a Wobbly Robot Friend That Creates Art http://www.sciencebuddies.org/sciencefairprojects/project_ideas/Robotics_p014.shtml 1/23 Art Bot: Build a Wobbly Robot Friend That Creates Art Difficulty Time Required Average (610 days) Prerequisites None Material Availability This project requires specialty robotics parts. A Science Buddies kit is available (project time includes shipping for the kit). See the Materials and Equipment list for details. Cost Low ($20 $50) Safety Adult supervision is required when using a hobby knife. Abstract Do you like drawing or painting? What if you could build a robot friend that creates its own art? In this project you will create your own Art Bot, a robot with markers for "legs" that wobbles across a piece of paper, creating drawings as it moves. You can then customize your robot to change how it draws. This is a beginnerlevel project with no robotics experience necessary, so if you have wanted to try building your own robot, this is a great place to start! Objective Build an Art Bot and investigate how changing the robot's design affects how it draws. Credits Ben Finio, Ph.D., Science Buddies This project is based on the following: Ceceri, K. (2012). How to Build an Art Bot. Robotics: Discover the Science and Technology of the Future with 20 Projects (http://www.amazon.com/gp/product/B009093LZS/ref=as_li_ss_tl?ie=UTF8&tag=sciencebuddie 20&linkCode=as2&camp=1789&creative=390957&creativeASIN=B009093LZS). Nomad Press. Cite This Page MLA Style Science Buddies Staff. "Art Bot: Build a Wobbly Robot Friend That Creates Art" Science Buddies. Science Buddies, 16 Apr. 2015. Web. 26 Sep. 2015 <http://www.sciencebuddies.org/sciencefair projects/project_ideas/Robotics_p014.shtml> APA Style
Transcript of Art Bot: Build a Wobbly Robot Friend That Creates...

9/26/2015 Art Bot: Build a Wobbly Robot Friend That Creates Art
http://www.sciencebuddies.org/sciencefairprojects/project_ideas/Robotics_p014.shtml 1/23
Art Bot: Build a Wobbly Robot Friend That Creates Art
Difficulty
Time Required Average (610 days)
Prerequisites None
Material AvailabilityThis project requires specialty robotics parts. A Science Buddies kit is available (projecttime includes shipping for the kit). See the Materials and Equipment list for details.
Cost Low ($20 $50)
Safety Adult supervision is required when using a hobby knife.
Abstract
Do you like drawing or painting? What if you could build a robot friend that creates its own art? In this project you willcreate your own Art Bot, a robot with markers for "legs" that wobbles across a piece of paper, creating drawings as itmoves. You can then customize your robot to change how it draws. This is a beginnerlevel project with no roboticsexperience necessary, so if you have wanted to try building your own robot, this is a great place to start!
Objective
Build an Art Bot and investigate how changing the robot's design affects how it draws.
Credits
Ben Finio, Ph.D., Science Buddies
This project is based on the following:
Ceceri, K. (2012). How to Build an Art Bot. Robotics: Discover the Science and Technology of the Future with 20Projects (http://www.amazon.com/gp/product/B009093LZS/ref=as_li_ss_tl?ie=UTF8&tag=sciencebuddie20&linkCode=as2&camp=1789&creative=390957&creativeASIN=B009093LZS). Nomad Press.
Cite This Page
MLA Style
Science Buddies Staff. "Art Bot: Build a Wobbly Robot Friend That Creates Art" Science Buddies. Science Buddies, 16Apr. 2015. Web. 26 Sep. 2015 <http://www.sciencebuddies.org/sciencefairprojects/project_ideas/Robotics_p014.shtml>
APA Style

9/26/2015 Art Bot: Build a Wobbly Robot Friend That Creates Art
http://www.sciencebuddies.org/sciencefairprojects/project_ideas/Robotics_p014.shtml 2/23
Science Buddies Staff. (2015, April 16). Art Bot: Build a Wobbly Robot Friend That Creates Art. Retrieved September26, 2015 from http://www.sciencebuddies.org/sciencefairprojects/project_ideas/Robotics_p014.shtml
Last edit date: 20150416
Introduction
Do you like to draw pictures and make art? Do you think it would be fun to build a friendly robot that can draw withyou? In this project, you will build a robot called an Art Bot, like the one shown in Figure 1, below.
Figure 1. An example of an Art Bot.
The Art Bot uses a small electric motor to move. In order to power the motor, the robot also needs a battery. Whenyou connect the battery to the motor, you complete an electrical circuit, and this allows the motor to spin. If you wantto learn more about electricity, you can read the Science Buddies Electricity, Magnetism, & Electromagnetism Tutorial(http://www.sciencebuddies.org/sciencefairprojects/electricitymagnetismelectromagnetismtutorial).
The motor has an offcenter weight attached to it (the popsicle stick in Figure 1), which causes the motor to vibrate.When the motor vibrates, it causes the robot to wobble across the paper. This is the same technology that makesvideo game controllers and cell phones vibrate; on the inside, they have little spinning motors with weights attached.Your Art Bot will also have markers for "legs", so it will draw on paper as it moves.
9/26/2015 Art Bot: Build a Wobbly Robot Friend That Creates Art
http://www.sciencebuddies.org/sciencefairprojects/project_ideas/Robotics_p014.shtml 3/23
In this science project, you will find out how the weight attached to the motor affects the robot's movement. Whathappens if the popsicle stick is perfectly centered? What happens when it is way offcenter? Move on to the Materials(#materials) tab to see the list of supplies you will need to build your own Art Bot, and the Procedure (#procedure) tab forinstructions on how to build one and do the experiment.
Terms and Concepts
RobotMotorBatteryCircuitVibrate
Optional terms:
Computeraided design (CAD)3D printing
Questions
What causes the robot's motor to vibrate?How does the motor make the robot move across the paper?What is an electrical circuit?What do you think will happen when the popsicle stick is perfectly centered on the motor?What do you think will happen when the popsicle stick is completely offcenter?
Bibliography
This project is based on the Art Bot project from this book:
Ceceri, K. (2012). How to Build an Art Bot. Robotics: Discover the Science and Technology of the Future with 20Projects (http://www.amazon.com/gp/product/B009093LZS/ref=as_li_ss_tl?ie=UTF8&tag=sciencebuddie20&linkCode=as2&camp=1789&creative=390957&creativeASIN=B009093LZS). Nomad Press.
If you want to learn more about some of the concepts in this project, like circuits and vibrational motion, check outthese references:
Henderson, T. (n.d.). Vibrational Motion. The Physics Classroom. Retrieved August 6, 2014, fromhttp://www.physicsclassroom.com/Class/waves/u10l0a.cfm (http://www.physicsclassroom.com/Class/waves/u10l0a.cfm)
Grusin, M. (n.d.). What is a Circuit? SparkFun Electronics. Retrieved July 31, 2014, fromhttps://learn.sparkfun.com/tutorials/whatisacircuit (https://learn.sparkfun.com/tutorials/whatisacircuit)
If you want to learn about reallife robots powered by vibrational motion, read about these robots developed at HarvardUniversity:
Rubenstein, R., Ahler, C., and Nagpal, R. (n.d.). The Kilobot project. SelfOrganizing Systems Research Group,Harvard University. Retrieved March 14, 2013, fromhttp://www.eecs.harvard.edu/ssr/projects/progSA/kilobot.html (http://www.eecs.harvard.edu/ssr/projects/progSA/kilobot.html)
Materials and Equipment (https://store.sciencebuddies.org/JAM6100KIT/BristlebotRobotsKit.aspx)
9/26/2015 Art Bot: Build a Wobbly Robot Friend That Creates Art
http://www.sciencebuddies.org/sciencefairprojects/project_ideas/Robotics_p014.shtml 4/23
These specialty items can be purchased from the Science Buddies Store (https://store.sciencebuddies.org/JAM6100KIT/BristlebotRobotsKit.aspx):
Bristlebot kit (1). You will need these items from the kit:9 volt (V) battery (1)9 V battery holder (1)9 V DC motor (1)Note: the kit also contains enough electronics pieces to make two other types of small robots. See the kitinstructions (http://www.sciencebuddies.org/sciencekitsinstructions?sku=JAM6100KIT) page for details.
You will also need the following items, available at a local supermarket or arts and crafts store:
Plastic cup, 16 oz. (1)Alternative: Instead of using a plastic cup for the "body" of your robot, you can use a computeraideddesign (CAD) program and 3D printing to design and make your own robot. You do not need previousexperience with CAD or access to a 3D printer to do this. See the 3Dprinting section (#3Dprinting) at the endof the Procedure for more information.
Cork (1)Popsicle stick (1)Thinsize washable markers (3)Large googly eyes (2)White posterboards (3)Doublesided foam tapeElectrical tapeHobby knifeScissorsSmall Phillips head screwdriverStopwatchLab notebookOptional: Other arts and crafts materials to decorate your robot (pipe cleaners, etc.)Optional: Digital camera to take pictures of your posterboardsVolunteer to help you run your experiments
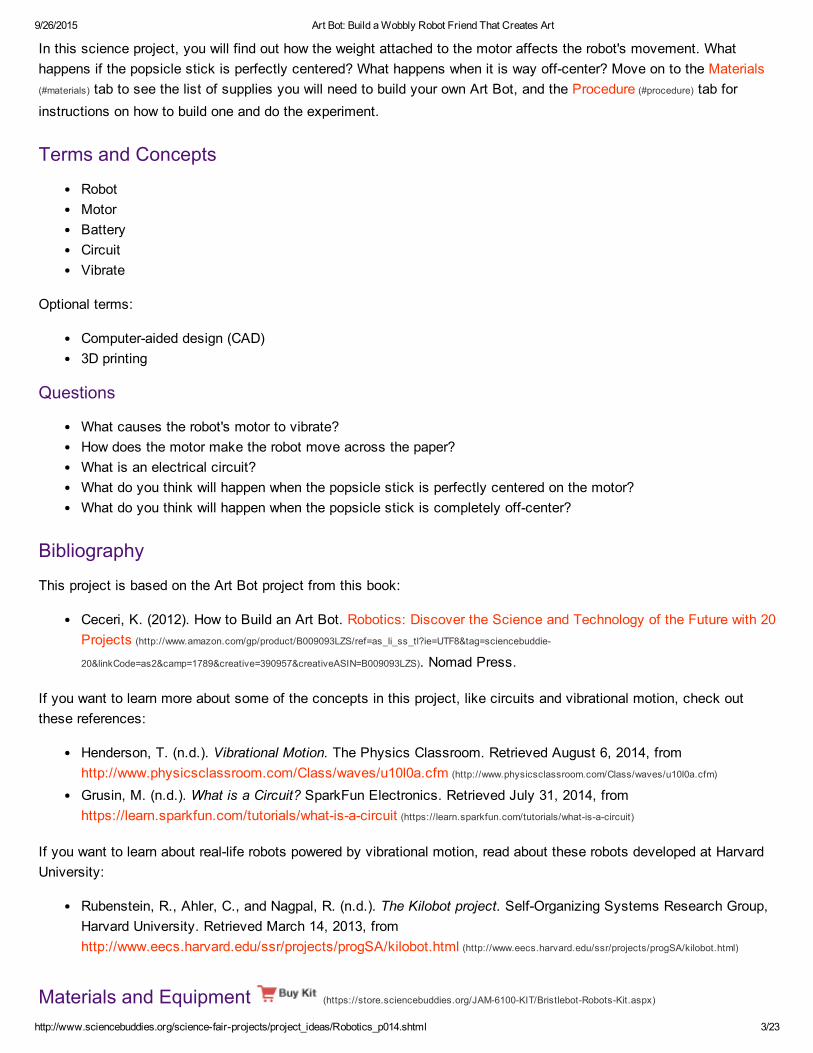
Order Product Supplies
Project Kit: $34.95
Experimental Procedure
9/26/2015 Art Bot: Build a Wobbly Robot Friend That Creates Art
http://www.sciencebuddies.org/sciencefairprojects/project_ideas/Robotics_p014.shtml 5/23
Experimental Procedure
Build Your Art Bot
Note: Remember to ask an adult if you need help with any of these steps. Adult supervision is required when using ahobby knife; they are very sharp!
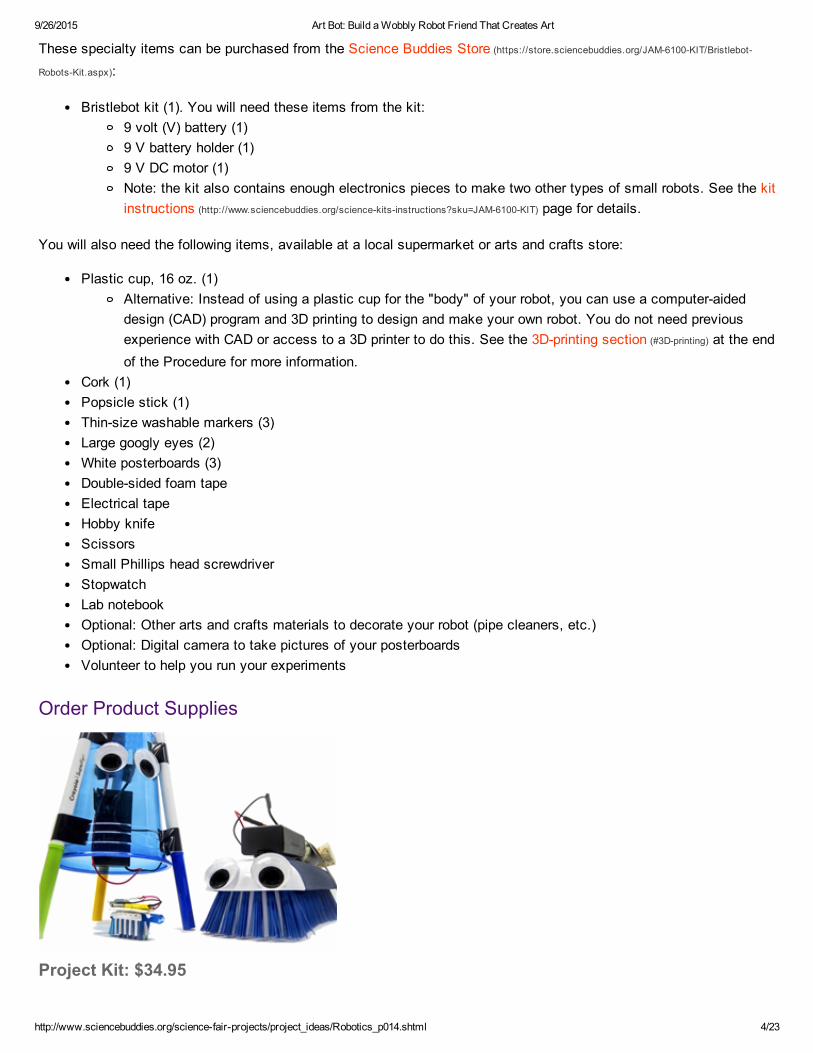
1. Gather all the materials and tools you will need to build your Art Bot, shown in Figure 2, below. See the Materials(#materials) tab for a detailed list of parts.
a. If you want to use a 3Dprinted robot body instead of a plastic cup, see the 3Dprinting section (#printing) atthe end of the Procedure.
Figure 2. All the supplies you will need to build one Art Bot.
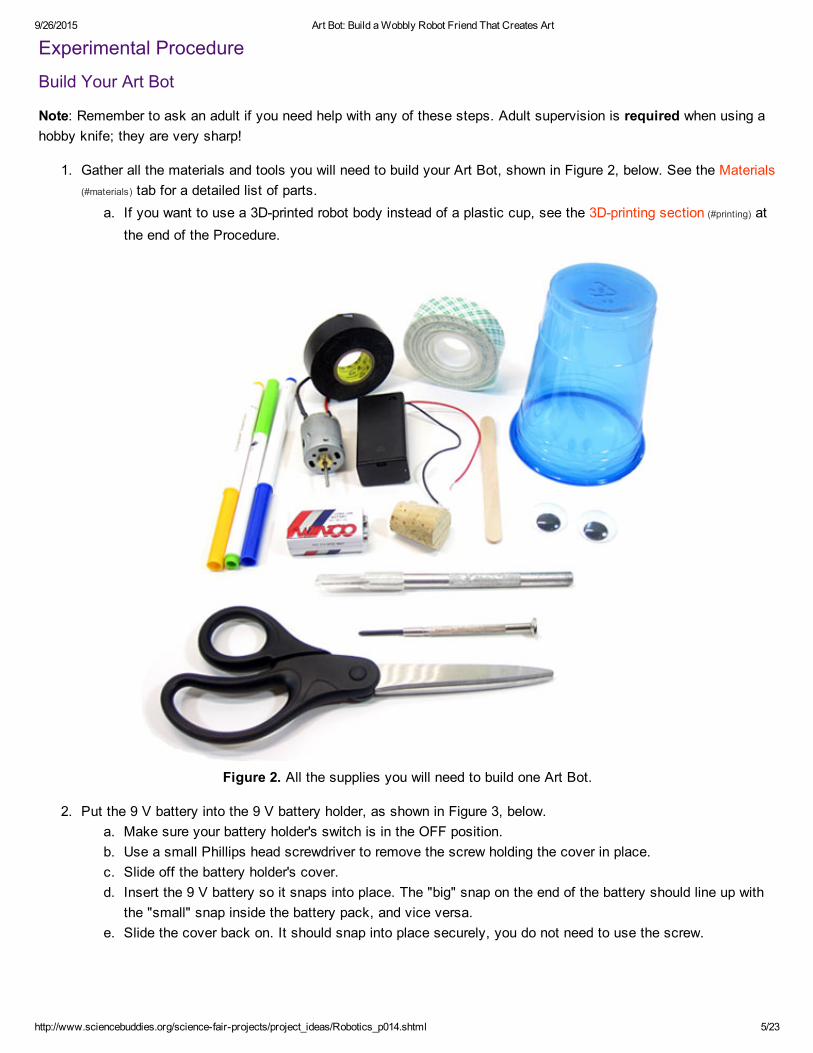
2. Put the 9 V battery into the 9 V battery holder, as shown in Figure 3, below.a. Make sure your battery holder's switch is in the OFF position.b. Use a small Phillips head screwdriver to remove the screw holding the cover in place.c. Slide off the battery holder's cover.d. Insert the 9 V battery so it snaps into place. The "big" snap on the end of the battery should line up with
the "small" snap inside the battery pack, and vice versa.e. Slide the cover back on. It should snap into place securely, you do not need to use the screw.

9/26/2015 Art Bot: Build a Wobbly Robot Friend That Creates Art
http://www.sciencebuddies.org/sciencefairprojects/project_ideas/Robotics_p014.shtml 6/23
Figure 3. Steps to insert the battery into the battery holder.
3. Press the cork onto the motor's shaft, as shown in Figure 4, below.a. The motor's shaft is the long metal part sticking out of one end.b. Line up the cork so it is centered horizontally (lengthwise) on the shaft, and press it firmly onto the shaft.c. Make sure you leave a small space between the bottom of the cork and the body of the motor. If you
press the cork all the way up against the motor, it will get stuck when it tries to spin.
Figure 4. Press the cork onto the motor's shaft.
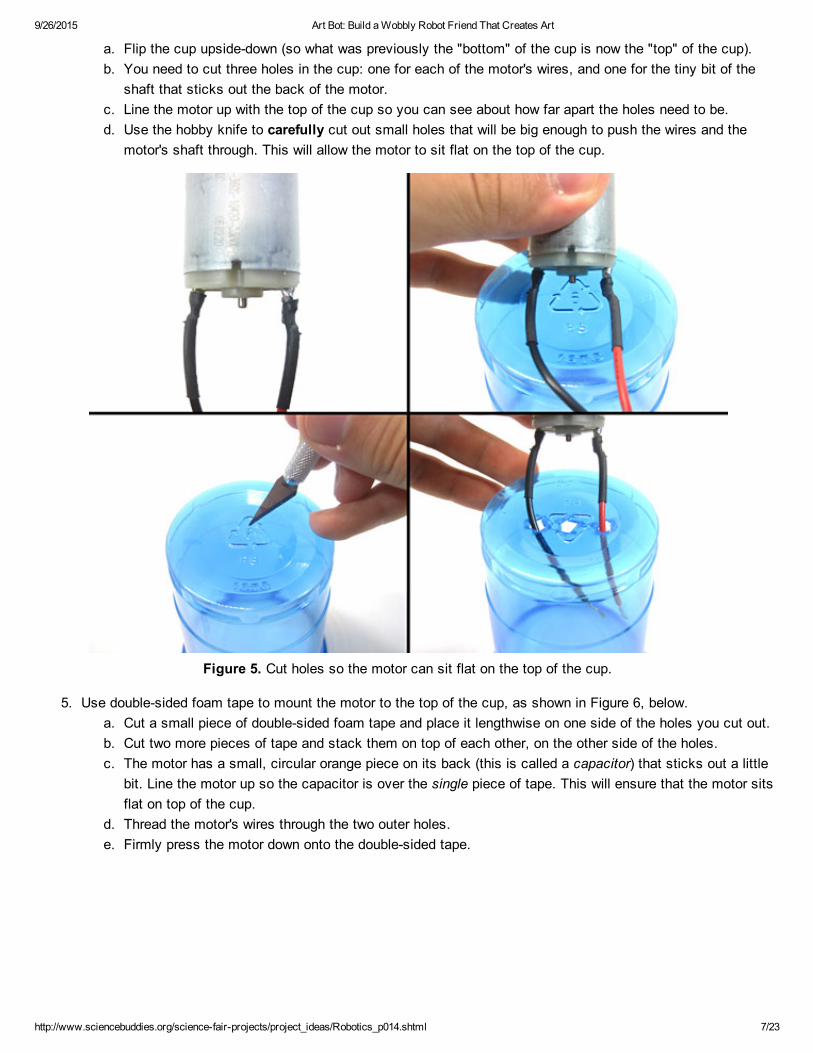
4. Important: Adult supervision is required for this step. Cut holes in the cup for mounting the motor, as shown inFigure 5, below.
9/26/2015 Art Bot: Build a Wobbly Robot Friend That Creates Art
http://www.sciencebuddies.org/sciencefairprojects/project_ideas/Robotics_p014.shtml 7/23
a. Flip the cup upsidedown (so what was previously the "bottom" of the cup is now the "top" of the cup).b. You need to cut three holes in the cup: one for each of the motor's wires, and one for the tiny bit of the
shaft that sticks out the back of the motor.c. Line the motor up with the top of the cup so you can see about how far apart the holes need to be.d. Use the hobby knife to carefully cut out small holes that will be big enough to push the wires and the
motor's shaft through. This will allow the motor to sit flat on the top of the cup.
Figure 5. Cut holes so the motor can sit flat on the top of the cup.
5. Use doublesided foam tape to mount the motor to the top of the cup, as shown in Figure 6, below.a. Cut a small piece of doublesided foam tape and place it lengthwise on one side of the holes you cut out.b. Cut two more pieces of tape and stack them on top of each other, on the other side of the holes.c. The motor has a small, circular orange piece on its back (this is called a capacitor) that sticks out a little
bit. Line the motor up so the capacitor is over the single piece of tape. This will ensure that the motor sitsflat on top of the cup.
d. Thread the motor's wires through the two outer holes.e. Firmly press the motor down onto the doublesided tape.

9/26/2015 Art Bot: Build a Wobbly Robot Friend That Creates Art
http://www.sciencebuddies.org/sciencefairprojects/project_ideas/Robotics_p014.shtml 8/23
Figure 6. Use doublesided foam tape to attach the motor to the cup. Note how there is only one piece of tape on oneside (to the left of the holes in the photo), and there are two stacked pieces of tape on the other side (to the right of theholes in the photo). The motor is mounted such that the small orange circle on the back (the capacitor) sits on the side
with only one piece of tape (to the left in the photo).
6. Use doublesided foam tape to mount the battery holder inside the cup, as shown in Figure 7, below.a. Put a piece of doublesided foam tape on the back of the battery holder (the side without the power
switch).b. Firmly press the battery holder against the inside wall of the cup, with the power switch toward the bottom
(this will ensure that it is easy to reach inside to turn the robot on and off).

9/26/2015 Art Bot: Build a Wobbly Robot Friend That Creates Art
http://www.sciencebuddies.org/sciencefairprojects/project_ideas/Robotics_p014.shtml 9/23
Figure 7. Using doublesided foam tape, mount the battery holder inside the cup, with the power switch facing down.
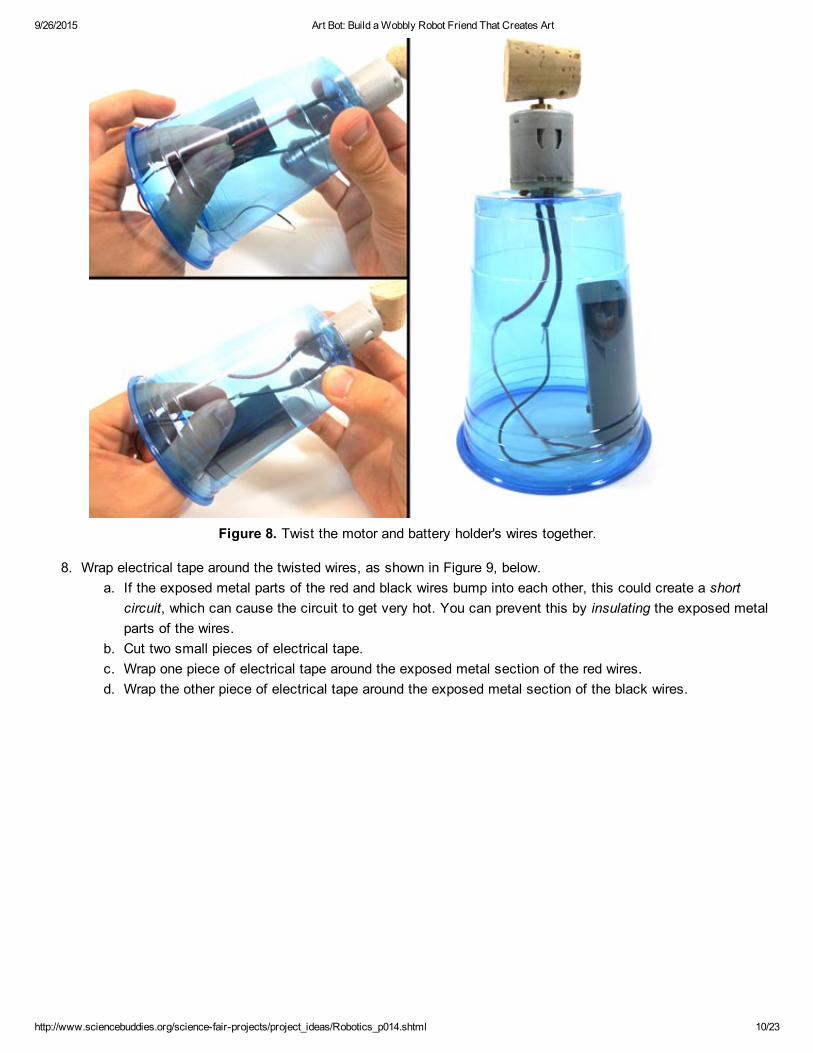
7. Twist the motor and battery holder's wires together, as shown in Figure 8, below.a. Important: Make sure your battery holder's switch is still in the OFF position before you proceed with this
step.b. Reach inside the cup (this step will be easier for kids, since you have smaller hands) and twist together
the exposed metal ends of the red wires (one from the battery holder, and one from the motor).c. Reach inside the cup and twist together the exposed metal ends of the black wires (one from the battery
holder, and one from the motor).d. The wires should be twisted together well enough that if you tug on them gently, they do not come loose.
9/26/2015 Art Bot: Build a Wobbly Robot Friend That Creates Art
http://www.sciencebuddies.org/sciencefairprojects/project_ideas/Robotics_p014.shtml 10/23
Figure 8. Twist the motor and battery holder's wires together.
8. Wrap electrical tape around the twisted wires, as shown in Figure 9, below.a. If the exposed metal parts of the red and black wires bump into each other, this could create a short
circuit, which can cause the circuit to get very hot. You can prevent this by insulating the exposed metalparts of the wires.
b. Cut two small pieces of electrical tape.c. Wrap one piece of electrical tape around the exposed metal section of the red wires.d. Wrap the other piece of electrical tape around the exposed metal section of the black wires.

9/26/2015 Art Bot: Build a Wobbly Robot Friend That Creates Art
http://www.sciencebuddies.org/sciencefairprojects/project_ideas/Robotics_p014.shtml 11/23
Figure 9. Wrap electrical tape around the exposed metal sections of the wires.
9. Test your circuit.a. At this point, you should have a complete circuit, because you have connected both wires from the
battery holder to the motor.b. Hold the cup with one hand, and turn the battery holder's switch to the ON position. The cork should start
spinning right away. If it does, turn the switch back to OFF, and move on to step 10.c. If your cork did not spin, check the following:
i. Make sure your wires are firmly twisted together. If the ends of the wires are not twisted togetherproperly, there will be no electrical connection. Peel off the electrical tape to doublecheck if youneed to.
ii. Make sure that you did not press the cork so far onto the motor shaft that it is stuck up against thebody of the motor. This may prevent the shaft from spinning.
iii. Make sure that you properly inserted the battery into the battery holder (you will have to removethe battery holder from inside the cup to check).
10. Attach markers to your robot as "legs," as shown in Figure 10, below.a. Use two pieces of electrical tape to attach a marker vertically to the outside of the cup, with the tip facing
down.b. Repeat this process for the other two markers, so they are evenly spaced around the outside of the cup
(forming a tripod).c. Keep the caps on your markers for now, so your Art Bot does not accidentally draw on any furniture or
other surfaces.

9/26/2015 Art Bot: Build a Wobbly Robot Friend That Creates Art
http://www.sciencebuddies.org/sciencefairprojects/project_ideas/Robotics_p014.shtml 12/23
Figure 10. Use electrical tape to attach three markers to the Art Bot.
11. Decorate your Art Bot!a. How you do this step is up to you. You can add googly eyes to your Art Bot as shown in Figure 11, below
(using doublesided tape), or decorate it in any other way you want.b. Make sure that any decorations you add do not interfere with the spinning of the motor.

9/26/2015 Art Bot: Build a Wobbly Robot Friend That Creates Art
http://www.sciencebuddies.org/sciencefairprojects/project_ideas/Robotics_p014.shtml 13/23
Figure 11. An Art Bot with googly eyes for decoration.
12. Attach the popsicle stick to the cork, as shown in Figure 12, below.a. Use electrical tape to tightly wrap one end of the popsicle stick to the cork (so the popsicle stick is "off
center"). It is important to attach it securely, so it does not fly off when the motor is spinning!
Figure 12. Securely attach the popsicle stick to the cork with electrical tape.
Test Your Art Bot

9/26/2015 Art Bot: Build a Wobbly Robot Friend That Creates Art
http://www.sciencebuddies.org/sciencefairprojects/project_ideas/Robotics_p014.shtml 14/23
1. After all that hard work, it is time to test your Art Bot! Get your lab notebook, pieces of posterboard, andstopwatch ready. This is a summary of what you will do in steps 2–9.
a. To test the Art Bot, you will start it in the middle of a piece of white posterboard, and let it run for 10seconds. You will repeat this twice, for a total of three trials.
b. Then, you will adjust the popsicle stick so it is only slightly offcenter, and run three more trials on a newpiece of posterboard.
c. Finally, you will adjust the popsicle stick so it is exactly centered on the cork, and run three more trials ona new piece of posterboard.
d. When you are done, you can compare your three posterboards to see how moving the popsicle stickaffected the way the Art Bot moved.
2. Put a piece of white posterboard down on the floor, or on a tabletop.a. Important: Depending on the surface you are working on, you may need to be ready to catch your Art Bot
before it goes off the posterboard. For example, you do not want it to fall off a table, or to get marker onsurrounding carpet.
3. Take the marker caps off your Art Bot, and place it in the center of the posterboard, as shown in Figure 13,below.
a. Use a marker to label one corner of the posterboard "popsicle stick offcenter," so you can keep tracklater.
Figure 13. An Art Bot in the center of a posterboard, ready for testing.
4. Have your volunteer get the stopwatch ready.a. Lift the Art Bot up and turn the battery holder's switch to ON. Be carefully that the spinning popsicle stick
does not hit your hand!b. Place the Art Bot down in the center of the posterboard. As soon as you put it down, your volunteer
should start the stopwatch.

9/26/2015 Art Bot: Build a Wobbly Robot Friend That Creates Art
http://www.sciencebuddies.org/sciencefairprojects/project_ideas/Robotics_p014.shtml 15/23
c. The volunteer should say "Stop!" as soon as the stopwatch reaches 10 seconds. As soon as they say"stop," pick the Art Bot up and turn it off.
d. If the Art Bot goes of the posterboard before 10 seconds is up, pick it up and turn it off.e. Can you make any observations about the Art Bot's motion? For example, does it seem very jerky and
wobbly, or does it move smoothly? Does it move fast or slow? Record any observations you make in yourlab notebook.
f. If any part of your robot breaks during testing (for example, if a marker falls off), stop testing, fix yourrobot, and then redo that trial.
5. Repeat step 4 two more times, on the same piece of posterboard, for a total of three trials.6. Now, retape the popsicle stick to the cork so it is only partially offcenter, as shown in Figure 14, below.
Figure 14. Popsicle stick attached to the cork so it is only partially offcenter.
7. Repeat steps 4–5 with a new piece of posterboard. Label the new posterboard "popsicle stick partially offcenter."
8. Retape the popsicle stick so it is centered on the cork, as shown in Figure 15, below.
Figure 15. Popsicle stick centered on the cork.
9. Repeat steps 4–5 with a new piece of posterboard. Label the new posterboard "popsicle stick centered."10. Analyze your results by looking at your three posterboards sidebyside, along with the observations you
recorded in your lab notebook.a. Which popsicle stick position made the robot move the fastest? Which one made it move the slowest?b. Which popsicle stick position made the robot end up farthest from its starting point within 10 seconds?

9/26/2015 Art Bot: Build a Wobbly Robot Friend That Creates Art
http://www.sciencebuddies.org/sciencefairprojects/project_ideas/Robotics_p014.shtml 16/23
What about staying the closest to the middle of the posterboard?c. Organize your results in a data table like Table 1, below.d. Make graphs of your data.
i. Make a bar graph with popsicle stick position on the xaxis (horizontal axis) and robot speed on theyaxis (vertical axis).
ii. Make a graph with the popsicle stick position on the xaxis (horizontal axis) and final distance fromstarting point on the yaxis (vertical axis).
e. Do your results match your predictions about how the popsicle stick would affect the Art Bot'smovement?
Popsicle StickPosition
Robot's Speed(fastest/medium/slowest)
Final Distance from Starting Point(farthest/medium/closest)
Offcenter
Partially offcenter
Centered
Table 1. Data table for keeping track of how popsicle stick position affects the robot's motion.
Optional: 3DPrinting Your Own Robot Design
Instead of using arts and crafts materials (like a plastic cup) for the body of your robot, you can design and make yourvery own robot using computeraided design (CAD) software and 3D printing. You do not need any experience withCAD programs or access to a 3D printer to do this! Figure 16, below, shows a screenshot of a robot design in a CADprogram and a 3D printed version of the robot.

9/26/2015 Art Bot: Build a Wobbly Robot Friend That Creates Art
http://www.sciencebuddies.org/sciencefairprojects/project_ideas/Robotics_p014.shtml 17/23
Figure 16. A robot design in a CAD program and a 3D printed version of the robot. You can design and 3Dprint a robotlike this yourself!
To design your own robot, you can use a free, beginnerfriendly CAD program called Tinkercad, made by the companyAutodesk. You can run Tinkercad in your web browser at tinkercad.com (https://www.tinkercad.com/?
utm_source=ScienceBuddies&utm_medium=Robotics_p014&utm_campaign=Science%20Buddies%20Marketing%20Campaign) (requires signing up for a freeAutodesk account). Once you have created an account, log in and click the "Learn" button at the top of the page. Thiswill bring you to a page with a series of tutorials that will show you the basics of how to use Tinkercad. Work throughthe tutorials one by one to learn how to use the software. Once you are comfortable using Tinkercad, try using it todesign an Art Bot. You will need to think about where to attach the motor, battery pack, and markers to your Art Bot.
When you are finished, you can order a copy of your robot from an online company that will print it out and mail it toyou. In Tinkercad, you can do this by selecting "Design" in the upper left, then "Order a 3D print," and follow the onscreen instructions. If you have access to a 3D printer, you can also print your own. Download the file by selecting"Design" then "Download for 3D printing." Even if you do not have a 3D printer at home, you may be able to get accessto a 3D printer through a local school or library. You could also check for a "makerspace," which is a type of communitycenter that teaches technology classes and provides access to tools like laser cutters and 3D printers. Ask an adult tohelp you look for a 3D printer you can use in your area.
Note: Online 3D printing companies charge by the volume of plastic used to print a part. So, the bigger your robot isand the more material it takes to create, the more expensive it will be. Try to avoid making any parts of your robotunnecessarily thick or large. You can also use the hole feature in Tinkercad to subtract material from your robot tomake it lighter.
Explore More!
Enhance your project with Autodesk— Design, Create, and Test with Autodesk Free Engineering Software(http://www.sciencebuddies.org/AutoDesk)

9/26/2015 Art Bot: Build a Wobbly Robot Friend That Creates Art
http://www.sciencebuddies.org/sciencefairprojects/project_ideas/Robotics_p014.shtml 18/23
(mailto:[email protected]?subject=My%20Autodesk%20science%20project)
Variations
The Art Bot you built in this project is a tripod, meaning it has three legs. What happens if you build an Art Botthat is a quadruped (has four legs) or a hexapod (has six legs)?Can you design an Art Bot that uses something other than a plastic cup for the robot's body? For example, canyou build a body out of popsicle sticks?Can you design an Art Bot that goes straight, instead of wobbling around randomly?If you are ready for a moreadvanced robotics project, check out Build a LightTracking Bristlebot(http://www.sciencebuddies.org/sciencefairprojects/project_ideas/Robotics_p012.shtml).
Explore More!
Enhance your project with Autodesk— Design, Create, and Test with Autodesk Free Engineering Software(http://www.sciencebuddies.org/AutoDesk)
Frequently Asked Questions (FAQ)
If you are having trouble with this project, please read the FAQ below. You may find the answer to your question.
Q: Why does my motor fall off my Art Bot?A: In order for it to stick, the motor needs to sit flat on top of your plastic cup and be firmly pressed against the doublesided tape. Have an adult help you with steps 4 and 5 (#step4) of the Procedure if you have trouble getting your motor tostick.
Q: Why does my cork fall off the motor shaft?A: Make sure the cork is pressed firmly, almost all the way onto the motor shaft. If you only press the cork partiallyonto the shaft, it may fly off when the motor starts spinning.
Q: Why does my motor not spin at all?A: If your motor does not spin at all when you turn your battery holder on, several things could be wrong. Check each ofthe following:
You might not have fully snapped the battery into the battery holder. Open the battery holder and make sure thesnaps on the end of the 9 V battery are firmly pushed into the snaps inside the battery holder.You might have pressed the cork too far onto the motor shaft. There should be a tiny bit of space between theedge of the cork and the face of the motor. If the cork is pushed all the way up against the motor, the frictionmight prevent the motor from spinning.You might not have completely twisted the motor and battery holder's wires together. Check to make sure the

9/26/2015 Art Bot: Build a Wobbly Robot Friend That Creates Art
http://www.sciencebuddies.org/sciencefairprojects/project_ideas/Robotics_p014.shtml 19/23
wires from the motor and battery are tightly twisted together.
Q: Why does my Art Bot fall over?A: There are a few things that could make your Art Bot fall over. Check for each of the following:
Your marker "legs" are loose, and not firmly taped to the plastic cup.The markers are not evenly spaced around the cup, causing the robot to tilt to one side.The popsicle stick is too far off center, causing the robot to wobble excessively and fall over.
Q: Why does my Art Bot slow down when I use it for a long time?A: Your Art Bot's motor uses a lot of electricity. After a few minutes of continuous use, it will start to drain the batteryand you may notice the robot slow down. If this happens, you can turn the Art Bot off to let the battery "rest" for a fewminutes and then turn it on again.
Ask an Expert
The Ask an Expert Forum is intended to be a place where students can go to find answers to science questions thatthey have been unable to find using other resources. If you have specific questions about your science fair project orscience fair, our team of volunteer scientists can help. Our Experts won't do the work for you, but they will makesuggestions, offer guidance, and help you troubleshoot.
Ask an Expert (http://www.sciencebuddies.org/sciencefairprojects/ask_an_expert_intro.shtml)
Contact Us
If you have purchased a kit for this project from Science Buddies, we are pleased to answer any question notaddressed by the FAQ above.
In your email, please follow these instructions:
1. What is your Science Buddies kit order number?2. Please describe how you need help as thoroughly as possible:
Examples
Good Question I'm trying to do Experimental Procedure step #5, "Scrape the insulation from the wire. . ." Howdo I know when I've scraped enough?Good Question I'm at Experimental Procedure step #7, "Move the magnet back and forth . . ." and the LED isnot lighting up.Bad Question I don't understand the instructions. Help!Good Question I am purchasing my materials. Can I substitute a 1N34 diode for the 1N25 diode called for in thematerial list?Bad Question Can I use a different part?
Contact Us (mailto:[email protected]?subject=Art%20Bot:%20Build%20a%20Wobbly%20Robot%20Friend%20That%20Creates%20Art)
Related Links

9/26/2015 Art Bot: Build a Wobbly Robot Friend That Creates Art
http://www.sciencebuddies.org/sciencefairprojects/project_ideas/Robotics_p014.shtml 20/23
Science Fair Project Guide (http://www.sciencebuddies.org/sciencefairprojects/project_guide_index.shtml)Other Ideas Like This (http://www.sciencebuddies.org/sciencefairprojects/search.shtml?v=solt&pi=Robotics_p014)Robotics Project Ideas (http://www.sciencebuddies.org/sciencefairprojects/recommender_interest_area.php?ia=Robotics)My Favorites (http://www.sciencebuddies.org/sciencefairprojects/recommender_show_favorites.php)
If you like this project, you might enjoy exploring these related careers:
Robotics Engineer
Have you watched "The Transformers" cartoon series or seen the "Transformers"movies? Both shows are about how good and evil robots fight each other and thehumans who get in the middle. Many TV shows and movies show robots and humansinteracting with each other. While this is, at present, fantasy, in real life robots play ahelpful role. Robots do jobs that can be dangerous for humans. For example, some
robots defuse landmines in warstricken countries; others work in harsh environments like the bottom of the ocean andon the planet Mars. At the heart of every robot is a robotics engineer who thinks about what a robot needs to do andworks with several engineering disciplines to design and put together the perfect piece of equipment. Read more(http://www.sciencebuddies.org/scienceengineeringcareers/engineering/roboticsengineer)
Mechanical Engineer
Mechanical engineers are part of your everyday life, designing the spoon you used toeat your breakfast, your breakfast's packaging, the fliptop cap on your toothpastetube, the zipper on your jacket, the car, bike, or bus you took to school, the chair yousat in, the door handle you grasped and the hinges it opened on, and the ballpoint penyou used to take your test. Virtually every object that you see around you has passedthrough the hands of a mechanical engineer. Consequently, their skills are in demand
to design millions of different products in almost every type of industry. Read more (http://www.sciencebuddies.org/scienceengineeringcareers/engineering/mechanicalengineer)
Electrical & Electronics Engineer
Just as a potter forms clay, or a steel worker molds molten steel, electrical andelectronics engineers gather and shape electricity and use it to make products thattransmit power or transmit information. Electrical and electronics engineers mayspecialize in one of the millions of products that make or use electricity, like cellphones, electric motors, microwaves, medical instruments, airline navigation system,
or handheld games. Read more (http://www.sciencebuddies.org/scienceengineeringcareers/engineering/electricalelectronicsengineer)

9/26/2015 Art Bot: Build a Wobbly Robot Friend That Creates Art
http://www.sciencebuddies.org/sciencefairprojects/project_ideas/Robotics_p014.shtml 21/23
Robotics Technician
Robots are no longer futuristic machines. Robots are here and now and are used inmanufacturing, health care, service industries, and military applications. They performtasks that are repetitive and hazardous—things that humans don't want to do or areunsafe to do. But robots are still machines, which means they require humans tobuild, maintain, program, and keep them functioning efficiently. Robotics technicians
work with robotics engineers to build and test robots. They are responsible for installing and maintaining robots andkeeping them in working order for their employers. If you are interested in working with robots, your future is here andnow. Read more (http://www.sciencebuddies.org/scienceengineeringcareers/engineering/roboticstechnician)
News Feed on This Topic
Building a Halloween Brushbot: Family Robotics (http://www.sciencebuddies.org/news/article?id=93750),Science Buddies Blog, October 21, 2014
Students 3D Design and Print Their Own Robots with Autodesk TinkerCAD(http://www.sciencebuddies.org/news/article?id=125935), Science Buddies Blog, April 10, 2015
Building a Solarpowered Bristlebot (http://www.sciencebuddies.org/news/article?id=127786), Science BuddiesBlog, April 17, 2015
Note: A computerized matching algorithm suggests the above articles. It's not as smart as you are, and it mayoccasionally give humorous, ridiculous, or even annoying results! Learn more about the News Feed(http://www.sciencebuddies.org/news/learnmore)
Looking for more science fun?
Try one of our science activities for quick, anytime science explorations. The perfect thing to liven up a rainy day,school vacation, or moment of boredom.
Find an Activity (http://www.sciencebuddies.org/scienceactivities)

9/26/2015 Art Bot: Build a Wobbly Robot Friend That Creates Art
http://www.sciencebuddies.org/sciencefairprojects/project_ideas/Robotics_p014.shtml 22/23
You can find this page online at: http://www.sciencebuddies.org/sciencefairprojects/project_ideas/Robotics_p014.shtml
9/26/2015 Art Bot: Build a Wobbly Robot Friend That Creates Art
http://www.sciencebuddies.org/sciencefairprojects/project_ideas/Robotics_p014.shtml 23/23
You may print and distribute up to 200 copies of this document annually, at no charge, for personal and classroomeducational use. When printing this document, you may NOT modify it in any way. For any other use, please contactScience Buddies.
Copyright © 20022015 Science Buddies. All rights reserved. Reproduction of material from this website without writtenpermission is strictly prohibited.
Use of this site constitutes acceptance of our Terms and Conditions of Fair Use (http://www.sciencebuddies.org/sciencefairprojects/terms_conditions.shtml).