ARRIS AM525 - FCC ID · ... 7 2. Product Overview ... MoCA Connect your coaxial cable line to this...
84
ARRIS AM525 User Guide PN xxxxxxx DRAFT Revision 1.0 August 2016
Transcript of ARRIS AM525 - FCC ID · ... 7 2. Product Overview ... MoCA Connect your coaxial cable line to this...

ARRIS AM525
User Guide
PN xxxxxxx
DRAFT Revision 1.0
August 2016
MT01165
Draft
Copyrights and Trademarks for AASM
This is a generic topic that is brought into your book upon importing. Please duplicate it, update and use it to replace the generic version in your book.
Add in book properties 3.0.5 Deployment Guide
DRAFT Revision 1.0 PN xxxxxxx
ARRIS Copyrights and Trademarks ©ARRIS Enterprises, Inc. 2016 All rights reserved. No part of this publication may be reproduced in any form or by any means or used to make any derivative work (such as translation, transformation, or adaptation) without written permission from ARRIS Enterprises, Inc. (“ARRIS”). ARRIS reserves the right to revise this publication and to make changes in content from time to time without obligation on the part of ARRIS to provide notification of such revision or change.
ARRIS and the ARRIS logo are all trademarks of ARRIS Enterprises, Inc. Other trademarks and trade names may be used in this document to refer to either the entities claiming the marks and the names of their products. ARRIS disclaims proprietary interest in the marks and names of others.
ARRIS provides this guide without warranty of any kind, implied or expressed, including, but not limited to, the implied warranties of merchantability and fitness for a particular purpose. ARRIS may make improvements or changes in the product(s) described in this manual at any time.
The capabilities, system requirements and/or compatibility with third-party products described herein are subject to change without notice.
Revision History
Revision Date Reason For Change
September 2015 Created a user guide with Charter requirements.

DRAFT Revision 4.0 Add in book properties Release Rel. 3.5 User Guide Copyright ARRIS Enterprises, Inc. 2016. All Rights Reserved. 3
Table of Contents
1. Getting Started ......................................................................................................... 6
About This Document ...................................................................................................... 6
Intended Audience .......................................................................................................... 6
Related Documents ......................................................................................................... 7
Contact Information ......................................................................................................... 7
2. Product Overview ..................................................................................................... 8
Features and Benefits ........................................................................................................ 8
Understanding MoCA Bridge Panels, Connections, and LEDs ........................................... 8
Front Panel ........................................................................................................................ 9
Rear Panel ........................................................................................................................ 11
Side Panel ........................................................................................................................ 12
3. Restoring or Rebooting the MoCA Bridge................................................................ 14
Resetting or Rebooting the MoCA Bridge ....................................................................... 14
Rebooting the MoCA Bridge ............................................................................................ 14
Restoring Factory Defaults .............................................................................................. 14
4. At-a-Glance Installation and Operation ................................................................... 16
What Else You Need ........................................................................................................ 16
Finding a Suitable Location .............................................................................................. 16
Wireless Placement Considerations ................................................................................ 17
Connecting to the Device ................................................................................................ 17
Reviewing MoCA Bridge Connections ............................................................................. 18
Device Modes .................................................................................................................. 18
Powering on the MoCA Bridge ........................................................................................ 20
Preparing for Wireless Operation .................................................................................... 20
MoCA Bridge Wireless Settings .............................................................................. 21
Enabling or Disabling Wireless Operation .............................................................. 21
Setting Up the MoCA Bridge for Wi-Fi Operation ........................................................... 21
Manual Wi-Fi Setup ................................................................................................ 22
Using WPS Wireless Setup ...................................................................................... 23
Using the WPS Button ............................................................................................. 23
Using a PIN .............................................................................................................. 24
Access Control by MAC Address ............................................................................. 25
5. Configuring the MoCA Bridge .................................................................................. 26
Understanding the Web Management Interface ............................................................ 26

DRAFT Revision 4.0 Add in book properties Release Rel. 3.5 User Guide Copyright ARRIS Enterprises, Inc. 2016. All Rights Reserved. 4
Launching the Web Management Interface .................................................................... 27
Web Management Interface Pages ................................................................................. 27
Status Options ................................................................................................................. 28
Device Status ........................................................................................................... 29
Wireless Status........................................................................................................ 29
Network Status ....................................................................................................... 32
MoCA Status ........................................................................................................... 32
5G Wi-Fi Options .............................................................................................................. 36
5 GHz Wi-Fi Settings ................................................................................................ 36
5 GHz Wi-Fi WPS Settings ....................................................................................... 41
5 GHz Wi-Fi MAC Filter Settings .............................................................................. 43
2.4G Wi-Fi Options ........................................................................................................... 46
2.4 GHz Wi-Fi Settings ............................................................................................. 46
2.4 GHz Wi-Fi WPS Settings .................................................................................... 49
2.4 GHz Wi-Fi MAC Filter Settings ........................................................................... 51
System Options ................................................................................................................ 53
• Password — changes the login password to web management interface. See “ 53
MoCA Settings ......................................................................................................... 53
System Repeater Settings ....................................................................................... 55
Network Settings .................................................................................................... 58
Log Settings ............................................................................................................. 59
Password Settings ................................................................................................... 60
Restore Settings ...................................................................................................... 61
Time Settings .......................................................................................................... 61
Tools Options ................................................................................................................... 62
Upgrade Settings ..................................................................................................... 63
Reboot Settings ....................................................................................................... 64
6. Troubleshooting ..................................................................................................... 65
Basic Troubleshooting Procedures .................................................................................. 65
Basic Functions ................................................................................................................ 65
LED Troubleshooting........................................................................................................ 66
Cannot Access the MoCA Bridge Web Management Interface .............................. 67
Cannot Access the Internet ..................................................................................... 67
Slow Web Browsing ......................................................................................................... 68
Advanced Troubleshooting Procedures .......................................................................... 69
Troubleshooting Physical Network Problems ......................................................... 69
MoCA Bridge Disconnects From the Internet ......................................................... 69
Wireless Troubleshooting ............................................................................................... 71

DRAFT Revision 4.0 Add in book properties Release Rel. 3.5 User Guide Copyright ARRIS Enterprises, Inc. 2016. All Rights Reserved. 5
7. Specifications .......................................................................................................... 75
Hardware Specifications ................................................................................................ 75
Software Specifications .................................................................................................. 75
Wireless LAN Specifications ............................................................................................. 75
User Interface Specifications ........................................................................................... 76
Mechanical Specifications ............................................................................................... 76
Environmental Specifications .......................................................................................... 76
Electrical Requirements ................................................................................................ 77
Compliances ..................................................................................................................... 78
8. Glossary .................................................................................................................. 79
9. ARRIS Contacts ....................................................................................................... 83

DRAFT Revision 4.0 Add in book properties Release Rel. 3.5 User Guide Copyright ARRIS Enterprises, Inc. 2016. All Rights Reserved. 6
Chapter 1
Getting Started
Congratulations on your purchase of your AM525 MoCA Bridge. The MoCA Bridge is a high-performance device that combines a wireless access point and MoCA™ in a single device, providing a cost-effective voice and networking solution for both the home and office.
About This Document
This document serves the following purposes:
Provides instructions on how to install, connect and operate the MoCA Bridge.
Provides directions for accessing the Web user interface (UI) for configuration and management of the device.
Defines all relevant device-compliance standards and physical specifications.
Provides a glossary that defines the technical terms and abbreviations in this guide.
Intended Audience
This guide is intended for installers, service providers, and home subscribers. This document assumes you have basic-to-intermediate computer and Internet skills.
If this is the first time you will be working with this MoCA Bridge, read Product Overview. Installers should read:
Installing the MoCA Bridge
Configuring the MoCA Bridge
If the MoCA Bridge will be used in a wireless network, pay particular attention to the section “Preparing for Wireless Operation” on page 20.
In the unlikely event you encounter a problem with the MoCA Bridge, refer to the suggestions in “Troubleshooting” on page 65 to identify and resolve the problem.

Chapter 1: Getting Started
DRAFT Revision 4.0 Add in book properties Release Rel. 3.5 User Guide Copyright ARRIS Enterprises, Inc. 2016. All Rights Reserved. 7
Related Documents
M525 Wireless MoCA Bridge Quick Start Guide
Contact Information
For more information about ARRIS Americas’ products and support, visit our website at http://www.ARRIS.com/americas/

DRAFT Revision 4.0 Add in book properties Release Rel. 3.5 User Guide Copyright ARRIS Enterprises, Inc. 2016. All Rights Reserved. 8
Chapter 2
Product Overview
Features and Benefits
The following list summarizes the features and benefits of the MoCA Bridge:
Provides the ability to extend wireless range of the home network
Can be used to add Wi-Fi to a MoCA-connected non-Wi-Fi modem
Can be used to add 5 GHz Wi-Fi to a 2.4 GHz only modem or gateway
Provides a method for whole home coverage for non-Wi-Fi networks
Provides multiple SSIDs per band that allow for isolation of the internal home network
Provides a repeater mode that can be used with existing SSIDs to extend product range
Incorporates a TR-069 agent to allow for network manageability and troubleshooting
Dual-band concurrent design provides for 4x4 5 GHz 802.11ac with 4 spatial streams and 2x2 802.11n with 2 spatial streams
Can be operated with or without MoCA
Understanding MoCA Bridge Panels, Connections, and LEDs
The following sections describe the MoCA Bridge hardware.
Chapter 2: Product Overview
DRAFT Revision 4.0 Add in book properties Release Rel. 3.5 User Guide Copyright ARRIS Enterprises, Inc. 2016. All Rights Reserved. 9
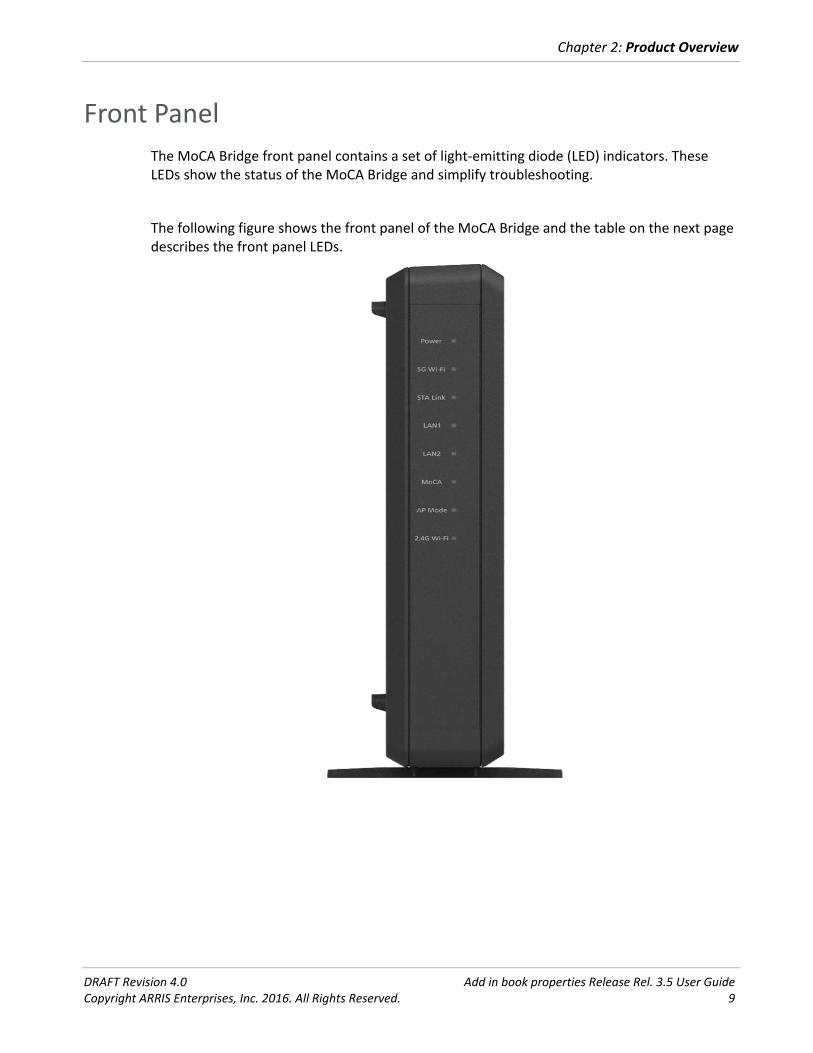
Front Panel
The MoCA Bridge front panel contains a set of light-emitting diode (LED) indicators. These LEDs show the status of the MoCA Bridge and simplify troubleshooting.
The following figure shows the front panel of the MoCA Bridge and the table on the next page describes the front panel LEDs.

Chapter 2: Product Overview
DRAFT Revision 4.0 Add in book properties Release Rel. 3.5 User Guide Copyright ARRIS Enterprises, Inc. 2016. All Rights Reserved. 10
Table 1. Front Panel LEDs
LED Color Description
Power Green ON = power is supplied to the MoCA Bridge.
OFF = power is not supplied to the MoCA Bridge.
5G Wi-Fi Green/Yellow
Green ON = 5 GHz WLAN interface enabled.
Green Flashing = WLAN traffic is being sent or received.
Yellow Flashing = WPS process in progress.
OFF = 5 GHz WLAN interface disabled.
STA Link Green
ON = Wi-Fi signal is excellent (link rate up to 100Mbps).
Flashing = Wi-Fi signal is normal (link rate up to 30Mbps).
OFF = Wi-Fi signal is poor or not associated or the 5 GHz Wi-Fi is in AP mode.
LAN1 Green
Flashing = data is being transmitted or received via the LAN1 connection. ON = connection is available via the LAN1 connection.
OFF = data is not being transmitted or received via the LAN1 connection.
LAN2 Green
Flashing = data is being transmitted or received via the LAN2 connection. ON = connection is available via the LAN2 connection.
OFF = data is not being transmitted or received via the LAN2 connection.
AP Mode Green
ON = 5 GHz WLAN is in access point or repeater mode.
OFF = 5 GHz WLAN is in station mode.
Flashing = the firmware is being upgraded.
2.4G WiFi Green/Yellow
Green ON = 2.4 GHz WLAN interface enabled.
Green Flashing = WLAN traffic is being sent or received.
Yellow Flashing = WPS process in progress.
OFF = 2.4 GHz WLAN interface disabled.

Chapter 2: Product Overview
DRAFT Revision 4.0 Add in book properties Release Rel. 3.5 User Guide Copyright ARRIS Enterprises, Inc. 2016. All Rights Reserved. 11
Rear Panel
The rear panel contains buttons, and ports for attaching the supplied power adapter and other connections. The following figure shows the rear panel of the MoCA Bridge and the table following it describes the rear panel.
WPS Button
Reset Button
STA/AP Button
LAN 1 and LAN 2
On/Off Button
Power
Chapter 2: Product Overview
DRAFT Revision 4.0 Add in book properties Release Rel. 3.5 User Guide Copyright ARRIS Enterprises, Inc. 2016. All Rights Reserved. 12
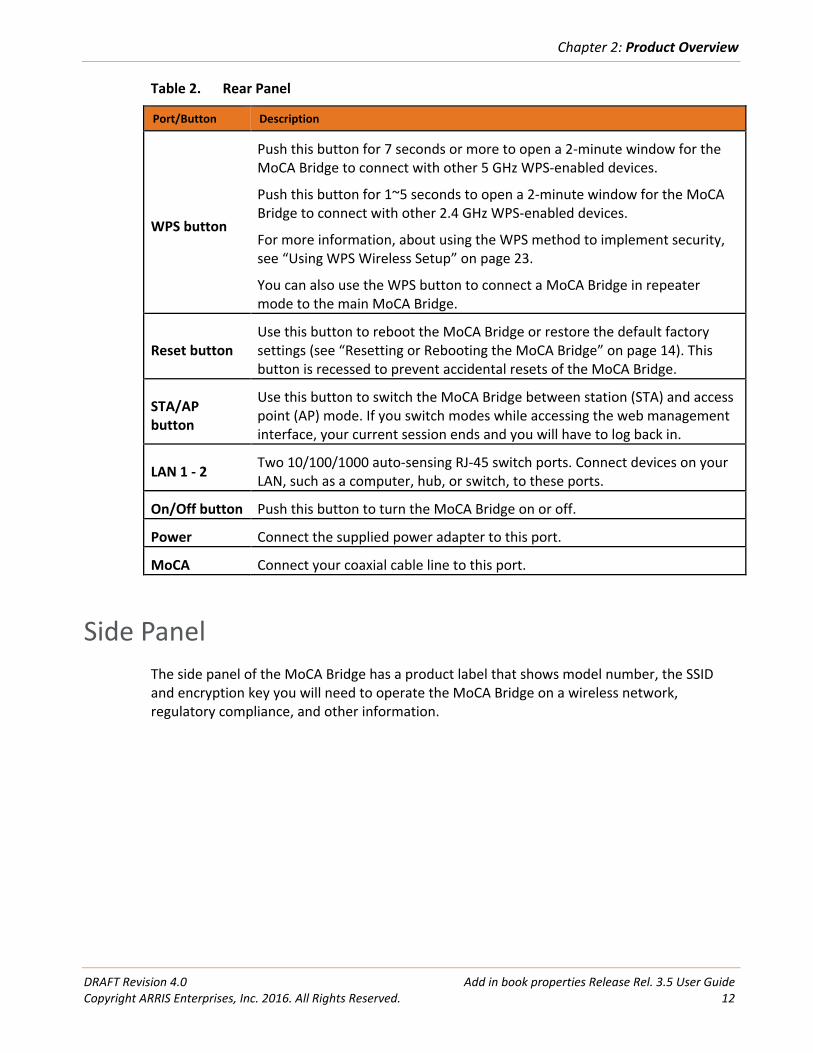
Table 2. Rear Panel
Port/Button Description
WPS button
Push this button for 7 seconds or more to open a 2-minute window for the MoCA Bridge to connect with other 5 GHz WPS-enabled devices.
Push this button for 1~5 seconds to open a 2-minute window for the MoCA Bridge to connect with other 2.4 GHz WPS-enabled devices.
For more information, about using the WPS method to implement security, see “Using WPS Wireless Setup” on page 23.
You can also use the WPS button to connect a MoCA Bridge in repeater mode to the main MoCA Bridge.
Reset button Use this button to reboot the MoCA Bridge or restore the default factory settings (see “Resetting or Rebooting the MoCA Bridge” on page 14). This button is recessed to prevent accidental resets of the MoCA Bridge.
STA/AP button
Use this button to switch the MoCA Bridge between station (STA) and access point (AP) mode. If you switch modes while accessing the web management interface, your current session ends and you will have to log back in.
LAN 1 - 2 Two 10/100/1000 auto-sensing RJ-45 switch ports. Connect devices on your LAN, such as a computer, hub, or switch, to these ports.
On/Off button Push this button to turn the MoCA Bridge on or off.
Power Connect the supplied power adapter to this port.
MoCA Connect your coaxial cable line to this port.
Side Panel
The side panel of the MoCA Bridge has a product label that shows model number, the SSID and encryption key you will need to operate the MoCA Bridge on a wireless network, regulatory compliance, and other information.

Chapter 2: Product Overview
DRAFT Revision 4.0 Add in book properties Release Rel. 3.5 User Guide Copyright ARRIS Enterprises, Inc. 2016. All Rights Reserved. 13

DRAFT Revision 4.0 Add in book properties Release Rel. 3.5 User Guide Copyright ARRIS Enterprises, Inc. 2016. All Rights Reserved. 14
Chapter 3
Restoring or Rebooting the MoCA Bridge
Resetting or Rebooting the MoCA Bridge
You can use the Reset button on the MoCA Bridge rear panel to power cycle the MoCA Bridge or reset the MoCA Bridge to its original factory default settings. Alternatively, you can reset or reboot the MoCA Bridge using the web management interface.
Rebooting the MoCA Bridge
Besides using the on/off button or unplugging the power you can also use the following methods to reboot the MoCA Bridge and keep any customized overrides you made to the default settings:
• Using the Reset button on the MoCA Bridge rear panel (described below).
• Using the Tools > Reboot page (see “Reboot Settings” on page 64). To reboot the MoCA Bridge using the Reset button:
1. Leave power plugged into the MoCA Bridge.
2. Press and hold the Reset button on the MoCA Bridge rear panel for 1~4 seconds, then release the Reset button.
3. Wait for the MoCA Bridge to reboot.
Restoring Factory Defaults
When you restore the MoCA Bridge to its factory default settings, you will remove all overrides you made to the configuration, including changes made to the system password and IP settings. There are two ways to restore the MoCA Bridge to its factory default settings:
• Using the Reset button on the MoCA Bridge rear panel (described below).
• Using the System > Restore page (see “Restore Settings” on page 61). To restore factory default settings using the Reset button:
1. Leave power plugged into the MoCA Bridge.
2. Press and hold the Reset button on the MoCA Bridge rear panel for more than 5 seconds, then release the Reset button.

Chapter 3: Restoring or Rebooting the MoCA Bridge
DRAFT Revision 4.0 Add in book properties Release Rel. 3.5 User Guide Copyright ARRIS Enterprises, Inc. 2016. All Rights Reserved. 15
3. Wait for the MoCA Bridge to reboot with factory default settings.
Note: The System > Restore page also allows you to restore configuration files to
default settings and reboot the MoCA Bridge while retaining IP settings.
For more information, see “Restore Settings” on page 61).

DRAFT Revision 4.0 Add in book properties Release Rel. 3.5 User Guide Copyright ARRIS Enterprises, Inc. 2016. All Rights Reserved. 16
Chapter 4
At-a-Glance Installation and Operation
Unpack the items and confirm that no items are missing or damaged. Your package should include:
• AM525 Cable MoCA Bridge(s)
• Power adapter(s)
• One set of user documents
If any items are missing or damaged, please contact your place of purchase. Keep the carton, including the original packing material, in case you need to store the product or return it.
What Else You Need
To complete your installation, you will need the following items:
• Provisioned Internet access on a service provider. If you are unsure of what this means, please ask your data service provider
• A computer with a wired network adapter with TCP/IP installed.
• A Java-enabled Web browser, such as Microsoft Internet Explorer 6 or later.
Finding a Suitable Location
You can install the MoCA Bridge in any location with access to the cable network. All of the cables connect to the rear panel of the MoCA Bridge for better organization and utility. The LED indicators on the front panel are easily visible to provide you with information about network activity and status.
For optimum performance, the location you choose should:
• Be close to a working AC power outlet.
• Allow the MoCA Bridge to be mounted vertically for optimized wireless performance.
• Allow sufficient air flow around the MoCA Bridge to keep the device as cool as possible.
• Not expose the MoCA Bridge to a dusty or wet environment.

Chapter 4: At-a-Glance Installation and Operation
DRAFT Revision 4.0 Add in book properties Release Rel. 3.5 User Guide Copyright ARRIS Enterprises, Inc. 2016. All Rights Reserved. 17
Wireless Placement Considerations
If you will be operating the MoCA Bridge on a wireless network, note that the range of your wireless connection can vary significantly based on the physical placement of the MoCA Bridge. The latency, data throughput performance, and power consumption of wireless adapters also vary, depending on your configuration choices. For best results, place the MoCA Bridge:
• In an elevated location such as a high shelf, keeping the number of walls and ceilings between the MoCA Bridge and your other devices to a minimum.
• Away from electrical devices that are potential sources of interference, such as ceiling fans, home security systems, microwaves, or the base for a cordless phone.
• Away from any large metal surfaces, such as a solid metal door or aluminum studs. Large expanses of other materials such as glass, insulated walls, fish tanks, mirrors, brick, and concrete can also affect your wireless signal.
Connecting to the Device
Using an Ethernet LAN cable, you can connect the MoCA Bridge to a desktop computer, notebook, hub, or switch. The MoCA Bridge supports auto-MDI/ MDIX, so you can use either a standard straight-through or crossover Ethernet cable.
1. Connect one end of an Ethernet cable to one of the two LAN ports on the rear panel of the MoCA Bridge.
2. Connect the other end of the cable to your computer’s network-interface card (NIC) or to another network device.
To connect the MoCA interface:
1. Connect a coaxial cable from a cable port in your home or office to the port labeled MoCA on the rear panel of the MoCA Bridge (see page 11). Use only manufactured coaxial patch cables with F-type connectors at both ends for all connections.
2. Hand-tighten the connectors to secure the connection.

Chapter 4: At-a-Glance Installation and Operation
DRAFT Revision 4.0 Add in book properties Release Rel. 3.5 User Guide Copyright ARRIS Enterprises, Inc. 2016. All Rights Reserved. 18
Reviewing MoCA Bridge Connections
Before proceeding, be sure all devices are attached to the MoCA Bridge. The following figure summarizes the connections that can be made to the MoCA Bridge.
Device Modes
The MoCA Bridge can operate in access point (AP), station (STA), or repeater mode.
In AP mode, the MoCA Bridge behaves like a wireless central connection for your wireless LAN clients. It has a wired Ethernet connection to a router, modem, or gateway. To prepare the MoCA Bridge for access point, move the STA/AP switch on the rear of the MoCA Bridge to AP (see “Understanding MoCA Bridge Panels, Connections, and LEDs” on page 8).
Chapter 4: At-a-Glance Installation and Operation
DRAFT Revision 4.0 Add in book properties Release Rel. 3.5 User Guide Copyright ARRIS Enterprises, Inc. 2016. All Rights Reserved. 19
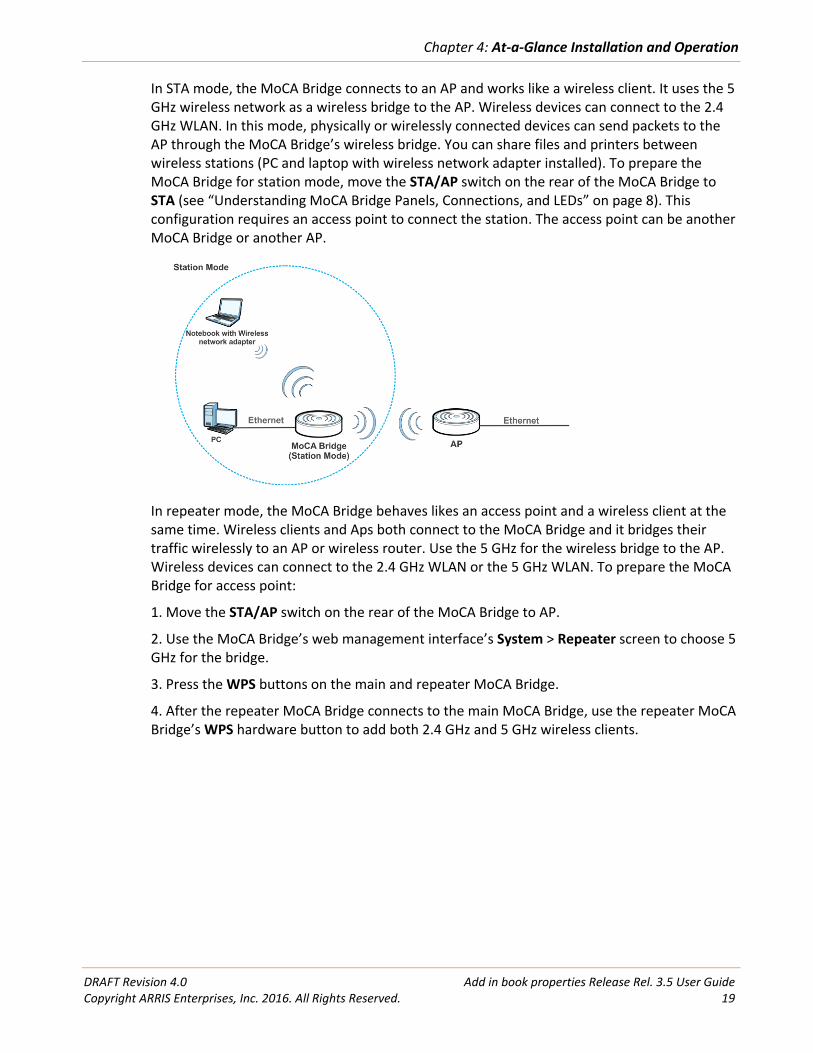
In STA mode, the MoCA Bridge connects to an AP and works like a wireless client. It uses the 5 GHz wireless network as a wireless bridge to the AP. Wireless devices can connect to the 2.4 GHz WLAN. In this mode, physically or wirelessly connected devices can send packets to the AP through the MoCA Bridge’s wireless bridge. You can share files and printers between wireless stations (PC and laptop with wireless network adapter installed). To prepare the MoCA Bridge for station mode, move the STA/AP switch on the rear of the MoCA Bridge to STA (see “Understanding MoCA Bridge Panels, Connections, and LEDs” on page 8). This configuration requires an access point to connect the station. The access point can be another MoCA Bridge or another AP.
In repeater mode, the MoCA Bridge behaves likes an access point and a wireless client at the same time. Wireless clients and Aps both connect to the MoCA Bridge and it bridges their traffic wirelessly to an AP or wireless router. Use the 5 GHz for the wireless bridge to the AP. Wireless devices can connect to the 2.4 GHz WLAN or the 5 GHz WLAN. To prepare the MoCA Bridge for access point:
1. Move the STA/AP switch on the rear of the MoCA Bridge to AP.
2. Use the MoCA Bridge’s web management interface’s System > Repeater screen to choose 5 GHz for the bridge.
3. Press the WPS buttons on the main and repeater MoCA Bridge.
4. After the repeater MoCA Bridge connects to the main MoCA Bridge, use the repeater MoCA Bridge’s WPS hardware button to add both 2.4 GHz and 5 GHz wireless clients.

Chapter 4: At-a-Glance Installation and Operation
DRAFT Revision 4.0 Add in book properties Release Rel. 3.5 User Guide Copyright ARRIS Enterprises, Inc. 2016. All Rights Reserved. 20
Powering on the MoCA Bridge
After making your LAN and WAN connections, use the following procedure to power on the MoCA Bridge:
1. Connect the supplied power adapter to the port labeled Power on the rear panel of the MoCA Bridge (see page 11).
WARNING! Use only the power adapter supplied with the MoCA Bridge. Using a different power adapter can damage the MoCA Bridge and void the warranty.
2. Connect the plug end of the power adapter to a working power outlet. The outlet should not be controlled by a wall switch to avoid someone unknowingly turning off power to the outlet. The MoCA Bridge powers on automatically. The Power LED on the front panel goes ON and the other front panel LEDs show the MoCA Bridge’s status (see page 8).
Preparing for Wireless Operation
If you will use the MoCA Bridge in a wireless network, configure its wireless settings using the web management interface. These procedures are described in Chapter 3, “Configuring the MoCA Bridge” on page 26. You can then operate the MoCA Bridge wirelessly using your wireless network.

Chapter 4: At-a-Glance Installation and Operation
DRAFT Revision 4.0 Add in book properties Release Rel. 3.5 User Guide Copyright ARRIS Enterprises, Inc. 2016. All Rights Reserved. 21
MoCA Bridge Wireless Settings The MoCA Bridge’s wireless configuration settings are organized in the following menus.
Table 3. MoCA Bridge’s Wireless Configuration Settings
Menu Description
Status Shows the status of the MoCA Bridge wireless interfaces and the associated access points.
5G Wi-Fi Allows you to configure basic and standard wireless settings, WPS settings, filter connected devices by MAC address, and specify WDS, MBSS, and WDM settings.
2.4G Wi-Fi Allows you to configure basic and standard wireless settings, WPS settings, filter connected devices by MAC address, and specify MBSS settings.
After the MoCA Bridge is installed and configured, the MoCA Bridge can connect with wireless devices using Wi-Fi Protected Setup (WPS), described in “Using WPS Wireless Setup” on page 23. To connect to the MoCA Bridge wirelessly, a computer or wireless device must be configured with the same wireless settings as the MoCA Bridge.
• The MoCA Bridge has two default wireless network names (SSIDs): one for 2.4 GHz (default name is ARRISnnnn2.4G) and one for 5 GHz (default name is ARRISnnnn_5G), where nnnn is a 4-digit value. You configure SSIDs in the 2.4G Wi-Fi > MBSS and 5G Wi-Fi > MBSS pages. We recommend that you change these default SSIDs for better wireless security and to make it easier to recognize your networks when you want to connect to them wirelessly.
• By default, the MoCA Bridge works with WPA2-AES or WPA2 + WPA wireless security. The default passphrase can be viewed on the 2.4G Wi-Fi > Settings and 5G Wi-Fi > Settings pages.
Enabling or Disabling Wireless Operation 5 GHz operation is always enabled on the MoCA Bridge. However, you can enable or disable 2.4 GHz operation by checking or unchecking the Enable check box on the 2.4G Wi-Fi > Settings page. For more information, see “2.4 GHz Wi-Fi Settings” on page 46.
Setting Up the MoCA Bridge for Wi-Fi Operation
There are two ways to set up the MoCA Bridge for wireless operation:
• Manually — see “Manual Wi-Fi Setup” below.
• Automatically — see “Using WPS Wireless Setup” below.

Chapter 4: At-a-Glance Installation and Operation
DRAFT Revision 4.0 Add in book properties Release Rel. 3.5 User Guide Copyright ARRIS Enterprises, Inc. 2016. All Rights Reserved. 22
Manual Wi-Fi Setup To prepare the MoCA Bridge for wireless operation manually:
1. Find the label on the side of the MoCA Bridge.
2. Record the SSID 2.4 GHz, SSID 5 GHz, WPA key, and PIN below. You’ll need this information to connect to your wireless network.
SSID 2.4 GHz:
SSID 5.0 GHz:
WPA Key:
PIN:
3. On your Wi-Fi device, confirm that Wi-Fi is turned on and view available wireless networks.
4. Select an SSID from the list of available networks. If you see both the 2.4 GHz and 5 GHz SSIDs, connect to either one. Otherwise, connect to the 2.4 GHz SSID.
When deciding between 2.4 GHz and 5 GHz SSIDs, consider the following:
• Select 2.4 GHz if wireless range is a priority.
• Select 5 GHz if network speed is a priority. There generally are fewer Wi-Fi devices and less interference in the 5 GHz band.
5. In the Network Security Key field (Windows) or Password field (Mac), enter the case-sensitive Encryption Key you recorded in Step 2.
6. Click the OK, Connect, Join, or Apply button. Your device should now connect to the Internet.

Chapter 4: At-a-Glance Installation and Operation
DRAFT Revision 4.0 Add in book properties Release Rel. 3.5 User Guide Copyright ARRIS Enterprises, Inc. 2016. All Rights Reserved. 23
7. Launch a web browser and enter a valid URL (for example, www.google.com) to confirm your connection.
Using WPS Wireless Setup WPS is a quick way to set up the MoCA Bridge’s wireless network automatically and set up your wireless computer to connect to it at the same time. WPS, also called Wi-Fi Protected Setup, is relatively new technology, so before you decide to use it, check to make sure your wireless computers and devices support WPS. Look for the following symbol on all the computers that will connect wirelessly to the MoCA Bridge:
If you do not see this symbol on all the computers that will connect to the wireless network, manually set up your network first (see “MoCA Bridge Wireless Settings” on page 21). After that, you can still use WPS to set up the wireless connection for the computers that support WPS.
Note: All WPS-capable products should be compatible with the MoCA Bridge. For more information about the WPS standard, see http://www.wi-fi.org.
There are two WPS connection methods, pushbutton and personal identification number (PIN).
• Push button
• PIN
Using the WPS Button The MoCA Bridge supports WPS, a quick and easy way to set up a secure Wi-Fi network. However, your laptops, tablets, and mobile devices must be WPS-compatible to do so.
If you are not sure whether your devices support WPS, check them for the WPS label:
If you cannot find it, the device most likely does not support WPS and you will have to use the manual setup method. If your device does support WPS:
1. Press the WPS button on your device (refer to the device’s manual).
2. Within two minutes, press the WPS button on the rear panel of the MoCA Bridge:

Chapter 4: At-a-Glance Installation and Operation
DRAFT Revision 4.0 Add in book properties Release Rel. 3.5 User Guide Copyright ARRIS Enterprises, Inc. 2016. All Rights Reserved. 24
A message appears when the connection succeeds. If it fails, wait a few minutes, and then connect another device using WPS.
Using a PIN 1. Be sure you know how WPS works on your computer or wireless device. If it works with WPS, it has a WPS utility. Use this utility to determine the PIN for your wireless computer or device.
2. Log in to the MoCA Bridge’s web management interface (see “Launching the Web Management Interface” on page 27).
3. Go to 5G Wi-Fi > WPS or 2.4G Wi-Fi > WPS.
4. Using the WPS State drop-down list at the top of the page, click WPS Enabled (Pin-method).
5. Click in the WPS PIN field and enter the PIN you located in step 1.
WPS Button

Chapter 4: At-a-Glance Installation and Operation
DRAFT Revision 4.0 Add in book properties Release Rel. 3.5 User Guide Copyright ARRIS Enterprises, Inc. 2016. All Rights Reserved. 25
6. Click the WPS PIN button. The MoCA Bridge tries to communicate with the wireless computer or device for approximately 2 minutes. When the computer or device connects to the wireless network, the MoCA Bridge sends its SSID and WPA-PSK or WPA2- PSK configuration to that computer or device.
7. On the computer or device that just joined the wireless network, see whether you can connect to the Internet. Move the mouse over the Internet link at the top of the web management interface to confirm that an Internet connection is in use.
Access Control by MAC Address You can use access control to specify which wireless computers or devices can connect to the MoCA Bridge based on their MAC addresses. If you do not set up access control, any wireless computer or device that is configured with the correct SSID and wireless security settings will be allowed to access to your wireless network. For more information, see “5 GHz Wi-Fi MAC Filter Settings” on page 43 and “2.4 GHz Wi-Fi MAC Filter Settings” on page 51.
Note: If you configure the MoCA Bridge from a wireless computer, add your
computer’s MAC address to the Access List. Otherwise you will lose your wireless
connection when you click Apply. You must then access the MoCA Bridge from a wired
computer, or from a wireless computer that is on the access control list, to make any
further changes.

DRAFT Revision 4.0 Add in book properties Release Rel. 3.5 User Guide Copyright ARRIS Enterprises, Inc. 2016. All Rights Reserved. 26
Chapter 5
Configuring the MoCA Bridge
After you connect a computer to the MoCA Bridge, configure the MoCA Bridge using its web management interface.
Understanding the Web Management Interface
The MoCA Bridge’s web management interface is a web-based application that runs on any device (mobile phone, tablet, or PC) running a browser. When you launch the web management interface from a PC, the left pane displays blue menus, with submenus displayed below them. In the following figure, for example, clicking Status > Device displays the Status - Device page. This is also the first page that appears when you launch the web management interface.

Chapter 5: Configuring the MoCA Bridge
DRAFT Revision 4.0 Add in book properties Release Rel. 3.5 User Guide Copyright ARRIS Enterprises, Inc. 2016. All Rights Reserved. 27
Launching the Web Management Interface
To launch the MoCA Bridge’s web management interface, perform the following procedure using the computer connected to the MoCA Bridge.
1. Launch a Web browser.
Note: Your computer does not have to be online to configure the MoCA Bridge.
2. In the browser address bar, type http://192.168.1.100 and press the Enter key.
3. In the Login screen, type the default user name arris and password arris. Both are case sensitive.
4. Click the Login button. The Status - Device page of the web management interface appears.
Note: After you log in to the web management interface, we recommend you change the default password on the System > Password page (see page 60).
Web Management Interface Pages
The following table describes the menus and submenus in the web management interface.
Note: Some web management interface submenus and configuration options are common to both station (STA) and access point (AP) modes, while others are available for one mode only. These differences are identified in the table below and in the following sections.
Table 4. Web Management Interface Menus
Menu > Submenu Description Mode
Status > Device Shows the device name, software version, uptime, device mode, and current partition.
AP and STA
Status > Wireless Shows wireless status and associated access points for the MoCA Bridge 2.4 GHz and 5 GHz wireless interfaces.
AP and STA
Status > Network Shows the MoCA Bridge IP address, netmask, Ethernet MAC addresses, and Wi- Fi 2.4 GHz and 5 GHz BSSIDs.
AP and STA
Status > MoCA Shows MoCA node, interface, and statistical information. AP and STA

Chapter 5: Configuring the MoCA Bridge
DRAFT Revision 4.0 Add in book properties Release Rel. 3.5 User Guide Copyright ARRIS Enterprises, Inc. 2016. All Rights Reserved. 28
5G Wi-Fi > Settings Configures basic and advanced 5 GHz wireless settings. AP and STA
5G Wi-Fi > WPS Sets WPS PBC and PIN settings for connecting 5 GHz devices to the MoCA Bridge.
AP and STA
5G Wi-Fi > MAC Filter
Defines a list of 5 GHz devices allowed to access the MoCA Bridge based on the device’s MAC address.
AP only
2.4G Wi-Fi > Settings
Configures basic and advanced 2.4 GHz wireless settings. AP and STA
2.4G Wi-Fi > WPS Sets WPS PBC and PIN settings for connecting 2.4 GHz devices to the MoCA Bridge.
AP and STA
2.4G Wi-Fi > MAC Filter
Defines a list of 2.4 GHz devices allowed to access the MoCA Bridge based on the device’s MAC address.
AP and STA
System > MoCA Configures the MoCA settings for your MoCA Bridge. AP and STA
System > Repeater Configures the MoCA Bridge’s internal system repeater. AP only
System > Network Configures the MoCA Bridge for a Dynamic Host Configuration Protocol (DHCP) or static IP address.
AP and STA
System > Log Displays the MoCA Bridge system log. AP and STA
System > Password Changes the login password to the web management interface.
AP and STA
System > Restore Provides restore options for rebooting the MoCA Bridge. AP and STA
System > Time Configures the MoCA Bridge’s time settings. AP and STA
Tools > Upgrade Upgrades the MoCA Bridge firmware. AP and STA
Tools > Reboot Reboots the MoCA Bridge wireless extender. AP and STA
Status Options
The Status menu allows you to configure the following options. Some menus are available in AP mode only.
• Device — shows the device name, software version, uptime, device mode, and current partition. See “Device Status” on page 29.
• Wireless — shows wireless status and associated access points for the MoCA Bridge 2.4 GHz and 5 GHz wireless interfaces. See “Wireless Status” on page 29.
• Network — shows the MoCA Bridge IP address, netmask, Ethernet MAC addresses, and Wi-Fi 2.4 GHz and 5 GHz BSSIDs. See “Network Status” on page 32.
• MoCA — shows MoCA node, interface, and statistical information. See “MoCA Status” on page 32.

Chapter 5: Configuring the MoCA Bridge
DRAFT Revision 4.0 Add in book properties Release Rel. 3.5 User Guide Copyright ARRIS Enterprises, Inc. 2016. All Rights Reserved. 29
Device Status Path: Status > Device
Mode: AP and STA
The Status - Device page is a read-only page that shows information about the MoCA Bridge.
Table 5. Status > Device (AP, STA mode)
Field/Button Description
Device Name Name of the MoCA Bridge.
Software Version General software version of the MoCA Bridge.
Uptime Amount of time that the MoCA Bridge has been connected.
Device Mode MoCA Bridge mode (Access Point, Station, or Repeater).
Refresh button Click this button to update the information on this page.
Wireless Status Path: Status > Wireless
Mode: AP and STA
The Status - Wireless page allows you to view the MoCA Bridge’s wireless status and associated access points on its 2.4 GHz and 5 GHz wireless interfaces.
Note: The figure below is for AP mode. In STA mode, the Associated Devices Count field changes to Association Status and the RSSI field appears below Association Status.

Chapter 5: Configuring the MoCA Bridge
DRAFT Revision 4.0 Add in book properties Release Rel. 3.5 User Guide Copyright ARRIS Enterprises, Inc. 2016. All Rights Reserved. 30
Table 6. Status > Wireless (AP, STA mode)
Field/Button Description Default
Wi-Fi Interface
Use this drop-down list to select between MoCA Bridge’s 2.4 GHz or 5 GHz interface. The remaining fields show the relevant information for the interface selected.
ARRISnnnn_5G
Device Mode MoCA Bridge mode, either Access Point (AP) or Station (STA).
Access Point (AP)
Wireless Band Wireless band standard being used by the MoCA Bridge.
802.11ac
Bandwidth Bandwidth being used by the MoCA Bridge. 80 MHz
AP Mac Address
Basic Service Set Identifier (BSSID) of the MoCA Bridge.
See the web management interface
Channel Channel frequency that the MoCA Bridge deploys to the wireless network.
Associated Devices Count
(AP mode) Number of wireless clients (including access points) associated with the MoCA Bridge.
Association Status
(STA mode) Shows whether the MoCA Bridge is associated with access points.

Chapter 5: Configuring the MoCA Bridge
DRAFT Revision 4.0 Add in book properties Release Rel. 3.5 User Guide Copyright ARRIS Enterprises, Inc. 2016. All Rights Reserved. 31
Association Table button
Opens a page that shows the following detailed information about the MoCA Bridge's wireless connections:
• Access point — access point ID. (AP mode only)
• Station — access point ID. (STA mode only)
• SSID — unique wireless network name of the access point. (AP mode only)
• RSSI — received signal strength of the wireless access points in range of the MoCA Bridge. Low negative numbers (for example, 1 to 65) indicate the access point is closer. Greater negative numbers (for example, 66 to 95) indicate the access point is farther away.
• Rx Bytes — total number of bytes received by the access point.
• Tx Bytes — total number of bytes transmitted by the access point.
• Bw — channel bandwidth of the access point.
• Time Associated —length of time that the access point has associated with the
MoCA Bridge.
A Refresh button allows you to update the information displayed on the Association Table page.
RSSI
(STA mode) Received signal strength of the wireless access points in range of the MoCA Bridge. Low negative numbers (for example, -1 to -65) indicate the access point is closer. Greater negative numbers (for example, -66 to -95) indicate the access point is farther away.
Packets Received Successfully
Number of packets that the MoCA Bridge has received successfully.
Bytes Received Total number of bytes received by the MoCA Bridge.
Packets Transmitted Successfully
Number of packets that the MoCA Bridge has transmitted successfully.
Bytes Transmitted
Total number of bytes transmitted by the MoCA Bridge.

Chapter 5: Configuring the MoCA Bridge
DRAFT Revision 4.0 Add in book properties Release Rel. 3.5 User Guide Copyright ARRIS Enterprises, Inc. 2016. All Rights Reserved. 32
Refresh button Click this button to update the information on this page.
—
Network Status Path: Status > Network
Mode: AP and STA
The Status - Network page is a read-only screen that shows the following network information about the MoCA Bridge:
• IP address
• Netmask
• MAC address for the two LAN ports (Ethernet 0 and Ethernet 1)
• Wi-Fi 5 GHz MAC address and BSSID
• Wi-Fi 2.4 GHz MAC address and BSSID
A Refresh button allows you to update the information on this page.
MoCA Status Path: Status > MoCA
Mode: AP and STA
The Status - MoCA page is a read-only screen that shows MoCA status information related to the MoCA Bridge. The information is organized into three sections.

Chapter 5: Configuring the MoCA Bridge
DRAFT Revision 4.0 Add in book properties Release Rel. 3.5 User Guide Copyright ARRIS Enterprises, Inc. 2016. All Rights Reserved. 33

Chapter 5: Configuring the MoCA Bridge
DRAFT Revision 4.0 Add in book properties Release Rel. 3.5 User Guide Copyright ARRIS Enterprises, Inc. 2016. All Rights Reserved. 34
Table 7. Status > MoCA (AP, STA mode)
Field/Button Description
Node Summary
• Node ID — local node ID.
• Enable — shows whether MoCA is enabled.
• Broadcast PHY Rate — data rate used for packets broadcast to all other nodes.
• QAM Signal Level — Quadrature amplitude modulation (QAM) signal level of the highest frequency QAM channel.
• LOF — last operational frequency (in MHz). This typically is equal to the RF channel.
• Preferred NC — determines whether the node is configured to be a preferred network coordinator.
• MAC address — MAC address of the MoCA interface.
• Status — status of the MoCA network.
• Up Time — length of time that the Status has been at link up. For example: 3h 10m 6s.
• Number of nodes — number of nodes present on the MoCA network.
• RF Channel — channel center frequency of the MoCA network (in MHz).
• NC Node Id — node ID of the network coordinator.
Interface Info
• TX Packets — number of Ethernet packets transmitted by this node since MoCA link up.
• TX Packets dropped — number of transmitted Ethernet packets dropped by this node since MoCA link up.
• RX Packets — number of Ethernet packets received by this node since MoCA link up.
• RX Packets Corrected — number of Ethernet packets with errors corrected by this node since MoCA link up.
• RX Packets dropped — number of Ethernet packets with errors dropped by this node since MoCA link up.

Chapter 5: Configuring the MoCA Bridge
DRAFT Revision 4.0 Add in book properties Release Rel. 3.5 User Guide Copyright ARRIS Enterprises, Inc. 2016. All Rights Reserved. 35
Statistics
• Tx PHY Rate (Mbps) — transmit rate from the local node to each other node in the network (in Mbps). Preferred value is ≥ 180 Mbps. Wait at least 30 seconds after Link Up is achieved.
• Broadcast PHY Rate (Mbps) — broadcast PHY rate of each remote node, other than this node, in the MoCA network (in Mbps). Preferred value is ≥ 150 Mbps.
• Local Node Rx Level (dBm) — receives level from each other node to the local node (in dBm).
• Approximate Path Loss (dBm) — approximate loss from each node to the local node (in dB). Losses greater than
54 dB can indicate a problem with the home wiring.

Chapter 5: Configuring the MoCA Bridge
DRAFT Revision 4.0 Add in book properties Release Rel. 3.5 User Guide Copyright ARRIS Enterprises, Inc. 2016. All Rights Reserved. 36
5G Wi-Fi Options
The 5G Wi-Fi menu allows you to configure the following options. Some menus are available in AP mode only.
• Settings — sets basic and advanced 5 GHz wireless settings. See “5 GHz Wi-Fi Settings” on page 36.
• WPS — sets WPS PBC and PIN settings for 5 GHz connecting devices to the MoCA Bridge. See “5 GHz Wi-Fi WPS Settings” on page 41.
• MAC Filter — (AP mode) specifies the 5 GHz devices allowed to access the MoCA Bridge based on the device’s MAC address. See “5 GHz Wi-Fi MAC Filter Settings” on page 43.
5 GHz Wi-Fi Settings Path: 5G Wi-Fi > Settings
Mode: AP and STA
The 5G Wi-Fi - WPS page provides two tabs, one that contains basic settings and another that contains advanced settings. Each tab has its own Save and Cancel buttons.
Basic Settings The Basic tab allows you to change the following parameters. Some options vary between AP and STA modes.

Chapter 5: Configuring the MoCA Bridge
DRAFT Revision 4.0 Add in book properties Release Rel. 3.5 User Guide Copyright ARRIS Enterprises, Inc. 2016. All Rights Reserved. 37
5G Wi-Fi - Settings - AP Mode
5G Wi-Fi - Settings - STA Mode
Table 8. 5G Wi-Fi > Settings- Basic (AP, STA mode)
Field/Button Description Default
ESSID Name used to identify the MoCA Bridge (up to 32 alphanumerical characters). The ESSID is case sensitive.
ARRISnnnn_5G

Chapter 5: Configuring the MoCA Bridge
DRAFT Revision 4.0 Add in book properties Release Rel. 3.5 User Guide Copyright ARRIS Enterprises, Inc. 2016. All Rights Reserved. 38
Scan AP button (STA mode) Allows the MoCA Bridge to scan for access points. Clicking this button opens an Access Point List window similar to the one below that shows the access points detected by the MoCA Bridge. To connect to an access point, click it, enter the passphrase in the Passphrase field, and click Connect. If you do not find a desirable access point, click Rescan to rescan for other access points.
—
Broadcast SSID (AP mode) Determines whether the MoCA Bridge broadcasts its 5 GHz SSID wirelessly. The default setting allows broadcast. If you uncheck this option, the SSID is hidden and wireless clients must be configured manually to use the SSID.
Checked
Channel Select a channel frequency for your 5 GHz wireless network. All devices on this wireless network must be on the same channel. If you’re unsure which channel to select, keep the default setting of Auto. The current channel appears below this field.
Auto
Encryption Select an encryption mode for this wireless link. Choices are:
• NONE - OPEN = no encryption is used. Because this selection does not offer data security, avoid this selection in normal conditions.
• WPA2-AES = Wi-Fi Protected Access 2 (WPA2) with Advanced Encryption Standard (AES). This encryption mode is compatible with most of the Wi-Fi devices and offers an excellent level of security.
• WPA2 + WPA (mixed mode) - aes = WPA2 with WPA and AES. Use in mixed environments where devices are configured for WPA2, WPA, or AES.
NONE - OPEN
Passphrase (AP mode) If you set encryption, enter a passphrase (network key) from 8 to 63 characters. All wireless stations have to use the same passphrase.
See the web management interface
Group Key interval (in sec.)
(AP mode) Number of seconds between automatic changes of the group key shared by all devices on the wireless network. Changing the group key protects your network against intrusion, as the would- be intruder must cope with an ever-changing secret key.
0
Save button Click this button to save the changes made to this tab.
—

Chapter 5: Configuring the MoCA Bridge
DRAFT Revision 4.0 Add in book properties Release Rel. 3.5 User Guide Copyright ARRIS Enterprises, Inc. 2016. All Rights Reserved. 39
Cancel button Click this button to cancel changes made to this tab.
—
Advanced Settings The Advanced tab allows you to change the following parameters. Some options vary between AP and STA modes.
5G Wi-Fi - Settings - AP Mode

Chapter 5: Configuring the MoCA Bridge
DRAFT Revision 4.0 Add in book properties Release Rel. 3.5 User Guide Copyright ARRIS Enterprises, Inc. 2016. All Rights Reserved. 40
5G Wi-Fi - Settings - STA Mode
Table 9. 5G Wi-Fi > Settings- Advanced (AP, STA mode)
Field/Button Description Default
Wireless Band Wireless band you want to use. By selecting different band settings, you can allow or deny wireless clients using certain bands. For example, if you select 802.11an, only
802.11an wireless clients will be able to connect to the MoCA bridge.
802.11ac
Bandwidth Select the width of the frequency band the MoCA Bridge uses to communicate with your wireless devices. A wider band enables higher transmission rates although the wireless clients must also support the setting.
80 MHz
NSS If Wireless Band is set to 802.11ac, use this option to set the number of spatial streams.
Auto
TX Rate If Wireless Band is set to 802.11ac or 802.11an, this option configures the MoCA Bridge to adjust its transmission rate automatically on its 5 GHz wireless interface. This selection cannot be changed.
Auto
Priority (AP mode) Select the priority for 5 GHz operation. The higher the number, the higher the priority.
0

Chapter 5: Configuring the MoCA Bridge
DRAFT Revision 4.0 Add in book properties Release Rel. 3.5 User Guide Copyright ARRIS Enterprises, Inc. 2016. All Rights Reserved. 41
Beacon Interval (in ms)
(AP mode) Specifies the beacon interval from 100 to 65535 milliseconds. This value indicates the frequency interval of the beacon. A beacon is a packet that the MoCA Bridge broadcasts to keep the network synchronized. A beacon includes information regarding the wireless networks service area, the access point address, the broadcast destination addresses, a time stamp, delivery traffic indicator maps, and the Traffic Indicator Message (TIM).
100
DTIM Period (AP mode) Specifies the DTIM interval from 3 to 255 milliseconds. This value indicates how often the MoCA Bridge sends a Delivery Traffic Indication Message (DTIM). Lower settings result in more efficient networking, while preventing your wireless clients from dropping into power-saving sleep mode. Higher settings allow your wireless clients to enter sleep mode, which saves power but can interfere with wireless transmissions.
2
Short GI Select this option to set the MoCA Bridge to use a reduced guard interval. This increases throughput at the cost of an increased error rate in certain network environments with greater radio interference.
Checked
Save button Click this button to save the changes made to this tab.
—
Cancel button Click this button to cancel changes made to this tab.
—
5 GHz Wi-Fi WPS Settings Path: 5G Wi-Fi > WPS
Mode: AP and STA
There are two ways to create a secure 5 GHz wireless connection within a Wi-Fi Protected Setup (WPS) environment:
• Push-button configuration (PBC). In some WPS networks, you can connect multiple devices to the network and enable data encryption by pushing a button. The rear of your MoCA Bridge has a WPS button (see “Understanding MoCA Bridge Panels, Connections, and LEDs” on page 8), and other devices may have a physical or software-based button. Be aware that during the 2-minute setup period that follows the push of the button, unintended devices could join the network if they are in range.

Chapter 5: Configuring the MoCA Bridge
DRAFT Revision 4.0 Add in book properties Release Rel. 3.5 User Guide Copyright ARRIS Enterprises, Inc. 2016. All Rights Reserved. 42
• PIN entry. In all WPS networks, a unique PIN is required for each device to join the network. A fixed PIN label or sticker may be placed on a device (such as on the side of your MoCA Bridge), or a dynamic PIN can be generated and shown on the device’s display (for example, a TV screen or monitor). The PIN ensures that the intended device is added to the network being set up and helps avoid accidental or malicious attempts to add unintended devices to the network.
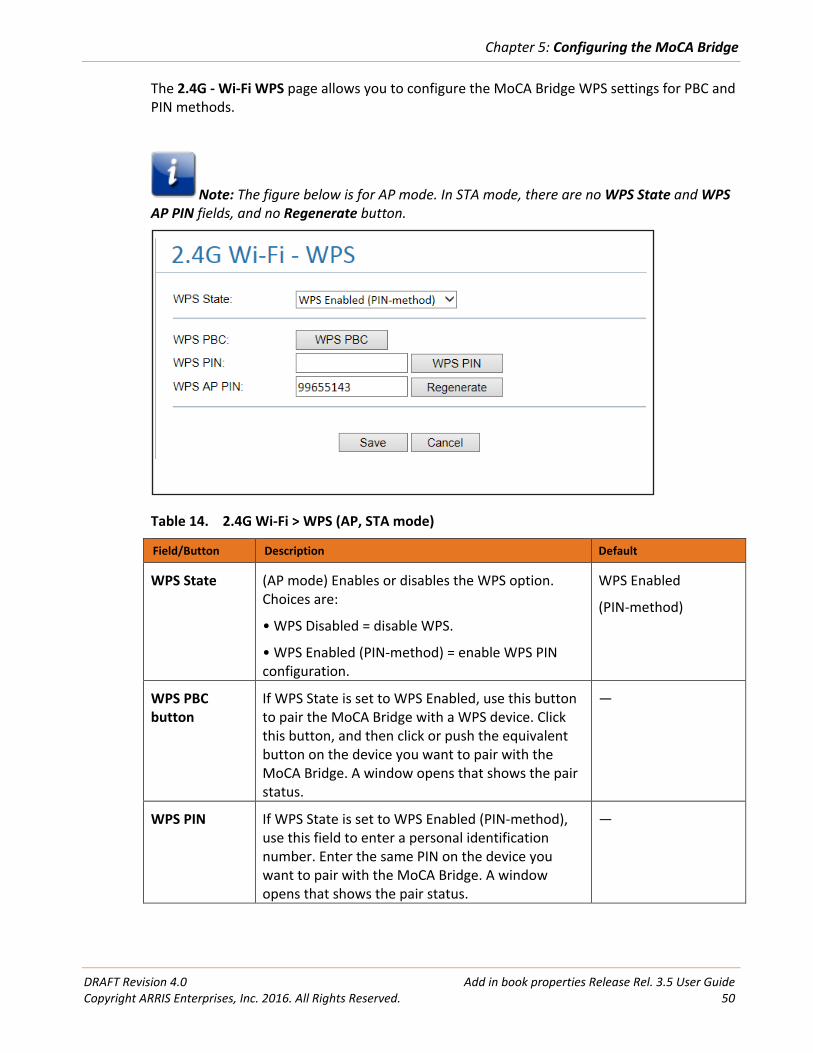
The 5G - Wi-Fi WPS page allows you to configure the MoCA Bridge WPS settings for PBC and PIN methods.
Note: The figure below is for AP mode. In STA mode, there are no WPS State and WPS AP PIN fields, and no Regenerate button.
Table 10. 5G Wi-Fi > WPS (AP, STA mode)
Field/Button Description Default
WPS State (AP mode) Enables or disables the WPS option. Choices are:
• WPS Disabled = disable WPS.
• WPS Enabled (PIN-method) = enable WPS PIN configuration.
WPS Enabled
WPS PBC button
If WPS State is set to WPS Enabled, use this button to pair the MoCA Bridge with a WPS device. Click this button and then click or push the equivalent button on the device you want to pair with the MoCA Bridge. A window opens that shows the pair status.
—

Chapter 5: Configuring the MoCA Bridge
DRAFT Revision 4.0 Add in book properties Release Rel. 3.5 User Guide Copyright ARRIS Enterprises, Inc. 2016. All Rights Reserved. 43
WPS PIN If WPS State is set to WPS Enabled (PIN-method), use this field to enter a personal identification number. Enter the same PIN on the device you want to pair with the MoCA Bridge. A window opens that shows the pair status.
—
WPS PIN button
If WPS State is set to WPS Enabled (PIN-method), click this button after entering a PIN in the WPS PIN field. Do the same at the device you want to pair with the MoCA Bridge.
—
WPS AP PIN (AP mode) Read-only field that shows the current PIN used by the MoCA Bridge. Wireless clients have to match this PIN to associate with the MoCA Bridge. If you click the Regenerate button, the new PIN appears in this field.
See the web management interface
Regenerate button
(AP mode) Click this button to generate a new PIN. The new PIN appears in the WPS AP PIN field. Wireless clients have to match this PIN to associate with the MoCA Bridge.
—
Save button Click this button to save the changes made to this tab.
—
Cancel button Click this button to cancel changes made to this tab.
—
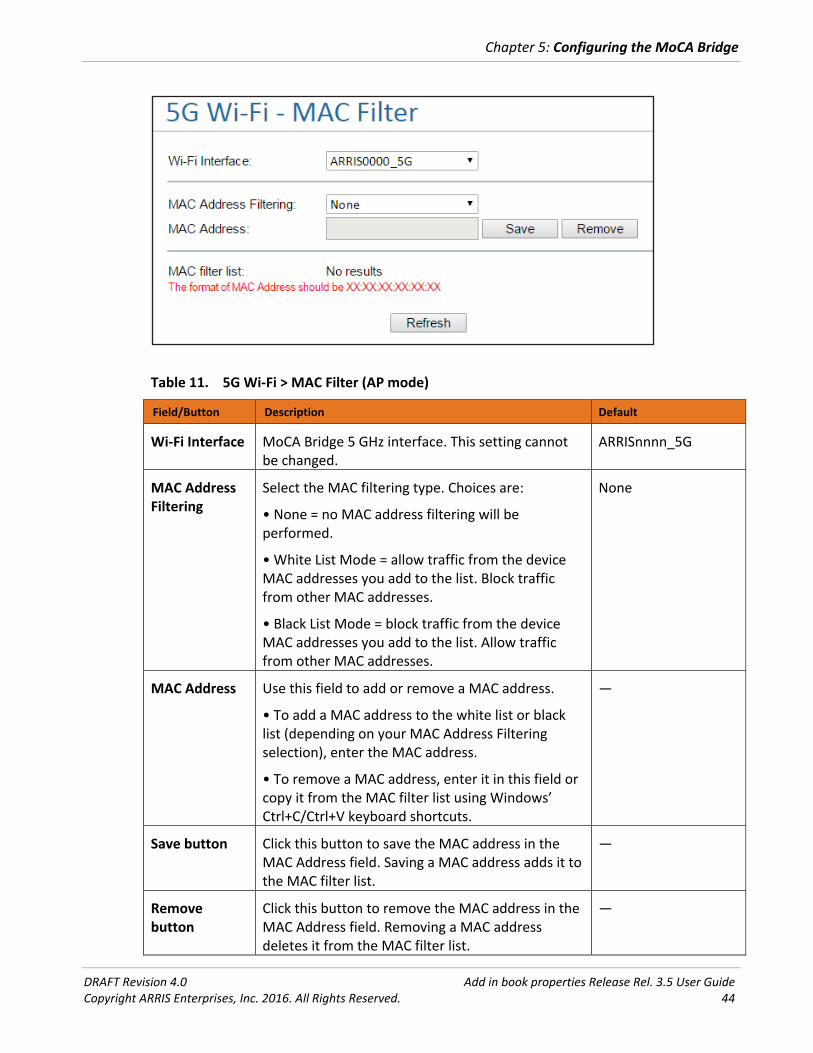
5 GHz Wi-Fi MAC Filter Settings Path: 5G Wi-Fi > MAC Filter
Mode: AP
MAC filtering is a security access control method that defines a list of devices allowed or allowed to access the MoCA Bridge based on the device’s MAC address. Using the 5G - Wi-Fi MAC Filter page, you can restrict MAC addresses using a blacklist or whitelist. Whitelisted MAC addresses are allowed through the 5G - Wi-Fi on the MoCA Bridge, while blacklisted MAC addresses are blocked on the 5G - Wi-Fi.
Chapter 5: Configuring the MoCA Bridge
DRAFT Revision 4.0 Add in book properties Release Rel. 3.5 User Guide Copyright ARRIS Enterprises, Inc. 2016. All Rights Reserved. 44
Table 11. 5G Wi-Fi > MAC Filter (AP mode)
Field/Button Description Default
Wi-Fi Interface MoCA Bridge 5 GHz interface. This setting cannot be changed.
ARRISnnnn_5G
MAC Address Filtering
Select the MAC filtering type. Choices are:
• None = no MAC address filtering will be performed.
• White List Mode = allow traffic from the device MAC addresses you add to the list. Block traffic from other MAC addresses.
• Black List Mode = block traffic from the device MAC addresses you add to the list. Allow traffic from other MAC addresses.
None
MAC Address Use this field to add or remove a MAC address.
• To add a MAC address to the white list or black list (depending on your MAC Address Filtering selection), enter the MAC address.
• To remove a MAC address, enter it in this field or copy it from the MAC filter list using Windows’ Ctrl+C/Ctrl+V keyboard shortcuts.
—
Save button Click this button to save the MAC address in the MAC Address field. Saving a MAC address adds it to the MAC filter list.
—
Remove button
Click this button to remove the MAC address in the MAC Address field. Removing a MAC address deletes it from the MAC filter list.
—

Chapter 5: Configuring the MoCA Bridge
DRAFT Revision 4.0 Add in book properties Release Rel. 3.5 User Guide Copyright ARRIS Enterprises, Inc. 2016. All Rights Reserved. 45
MAC filter list Shows the MAC address added to the white list or black list, depending on the selection in the MAC Address Filtering field.
—
Refresh button Click this button to update the information on this page.
—

Chapter 5: Configuring the MoCA Bridge
DRAFT Revision 4.0 Add in book properties Release Rel. 3.5 User Guide Copyright ARRIS Enterprises, Inc. 2016. All Rights Reserved. 46
2.4G Wi-Fi Options
The 2.4G Wi-Fi menu allows you to configure the following options.
• Settings — sets basic and advanced 2.4 GHz wireless settings. See “2.4 GHz Wi-Fi Settings” on page 46.
• WPS — sets WPS PBC and PIN settings for 2.4 GHz connecting devices to the MoCA Bridge. See “2.4 GHz Wi-Fi WPS Settings” on page 49.
• MAC Filter — specifies the 2.4 GHz devices allowed to access the MoCA Bridge based on the device’s MAC address. See “2.4 GHz Wi-Fi MAC Filter Settings” on page 51.
2.4 GHz Wi-Fi Settings Path: 2.4G Wi-Fi > Settings
Mode: AP and STA
The 2.4G Wi-Fi - WPS page provides two tabs, one that contains basic settings and another that contains advanced settings. Each tab has its own Save and Cancel buttons.
Basic Settings The Basic tab allows you to change the following parameters.

Chapter 5: Configuring the MoCA Bridge
DRAFT Revision 4.0 Add in book properties Release Rel. 3.5 User Guide Copyright ARRIS Enterprises, Inc. 2016. All Rights Reserved. 47
Table 12. 2.4G Wi-Fi > Settings- Basic (AP, STA mode)
Field/Button Description Default
Enable Enables (checked) or disables (unchecked) the MoCA Bridge’s 2.4 GHz radio.
Checked
ESSID Name used to identify the MoCA Bridge (up to 32 alphanumerical characters). The ESSID is case sensitive.
ARRISnnnn_2.4G
Broadcast SSID Determines whether the MoCA Bridge broadcasts its 2.4 GHz SSID wirelessly. The default setting allows broadcast. If you uncheck this option, the SSID is hidden and wireless clients must be configured manually to use the SSID.
Checked
Channel Select a channel frequency for your 2.4 GHz wireless network. All devices on this wireless network must be on the same channel. If you’re unsure which channel to select, keep the default setting of Auto. The current channel appears below this field.
Auto
Encryption Select an encryption mode for this wireless link. Choices are:
• NONE - OPEN = no encryption is used. Because this selection does not offer data security, avoid this selection in normal conditions.
• WPA2-AES = Wi-Fi Protected Access 2 (WPA2) with Advanced Encryption Standard (AES). This encryption mode is compatible with most of the Wi-Fi devices and offers an excellent level of security.
• WPA2 + WPA (mixed mode) - aes = WPA2 with WPA and AES. Use in mixed environments where devices are configured for WPA2, WPA, or AES.
WPA2-AES
Passphrase (AP mode) If you set encryption, enter a passphrase (network key) from 8 to 63 characters. All wireless stations have to use the same passphrase.
See the web management interface
Group Key interval (in sec.)
(AP mode) Number of seconds between automatic changes of the group key shared by all devices on the wireless network. Changing the group key protects your network against intrusion, as the would-be intruder must cope with an ever-changing secret key.
See the web management interface

Chapter 5: Configuring the MoCA Bridge
DRAFT Revision 4.0 Add in book properties Release Rel. 3.5 User Guide Copyright ARRIS Enterprises, Inc. 2016. All Rights Reserved. 48
Save button Click this button to save the changes made to this page.
—
Cancel button Click this button to cancel changes made to this page.
—
Advanced Settings The Advanced tab allows you to change the following parameters.
Table 13. 2.4G Wi-Fi > Settings- Advanced (AP, STA mode)
Field/Button Description Default
Wireless Band Wireless band you want to use. By selecting different band settings, you can allow or deny wireless clients using certain bands. For example, if you select 802.11an, only
802.11an wireless clients will be able to connect to the MoCA Bridge.
802.11ac
Bandwidth Frequency the MoCA Bridge will use to communicate with your wireless devices.
80 MHz
WMM Enables (On) or disables (Off) the MoCA Bridge’s WMM operation. WMM can improve the quality of service (QoS) for voice, video, and audio streaming over Wi-Fi by prioritizing these data streams.
On

Chapter 5: Configuring the MoCA Bridge
DRAFT Revision 4.0 Add in book properties Release Rel. 3.5 User Guide Copyright ARRIS Enterprises, Inc. 2016. All Rights Reserved. 49
WMM Power Save
Enables (On) or disables (Off) the MoCA Bridge’s WMM Power Save feature. WMM Power Save can improve battery life on mobile Wi-Fi devices such as smart phones and tablets by fine-tuning power consumption.
Off
DTIM Period Specifies the DTIM interval from 3 to 255 milliseconds. This value indicates how often the MoCA Bridge sends a Delivery Traffic Indication Message (DTIM). Lower settings result in more efficient networking, while preventing your wireless clients from dropping into power-saving sleep mode. Higher settings allow your wireless clients to enter sleep mode, which saves power but can interfere with wireless transmissions.
1
Short GI Select this option to use a reduced guard interval. This increases throughput at the cost of an increased error rate in certain network environments with greater radio interference.
Checked
Save button Click this button to save the changes made to this page.
—
Cancel button Click this button to cancel changes made to this page.
—
2.4 GHz Wi-Fi WPS Settings Path: 2.4G Wi-Fi > WPS
Mode: AP and STA
There are two ways to create a secure 2.4 GHz wireless connection within a Wi-Fi Protected Setup (WPS) environment:
• Push-button configuration (PBC). In some WPS networks, you can connect multiple devices to the network and enable data encryption by pushing a button. The side of your MoCA Bridge has a WPS button (see “Understanding MoCA Bridge panels, connections, and LEDs” on page 6), and other devices may have a physical or software-based button. Be aware that during the 2-minute setup period that follows the push of the button, unintended devices could join the network if they are in range.
• PIN entry. In all WPS networks, a unique PIN is required for each device to join the network. A fixed PIN label or sticker may be placed on a device (such as on the side of your MoCA Bridge), or a dynamic PIN can be generated and shown on the device’s display (for example, a TV screen or monitor). The PIN ensures that the intended device is added to the network being set up and helps avoid accidental or malicious attempts to add unintended devices to the network.
Chapter 5: Configuring the MoCA Bridge
DRAFT Revision 4.0 Add in book properties Release Rel. 3.5 User Guide Copyright ARRIS Enterprises, Inc. 2016. All Rights Reserved. 50
The 2.4G - Wi-Fi WPS page allows you to configure the MoCA Bridge WPS settings for PBC and PIN methods.
Note: The figure below is for AP mode. In STA mode, there are no WPS State and WPS AP PIN fields, and no Regenerate button.
Table 14. 2.4G Wi-Fi > WPS (AP, STA mode)
Field/Button Description Default
WPS State (AP mode) Enables or disables the WPS option. Choices are:
• WPS Disabled = disable WPS.
• WPS Enabled (PIN-method) = enable WPS PIN configuration.
WPS Enabled
(PIN-method)
WPS PBC button
If WPS State is set to WPS Enabled, use this button to pair the MoCA Bridge with a WPS device. Click this button, and then click or push the equivalent button on the device you want to pair with the MoCA Bridge. A window opens that shows the pair status.
—
WPS PIN If WPS State is set to WPS Enabled (PIN-method), use this field to enter a personal identification number. Enter the same PIN on the device you want to pair with the MoCA Bridge. A window opens that shows the pair status.
—

Chapter 5: Configuring the MoCA Bridge
DRAFT Revision 4.0 Add in book properties Release Rel. 3.5 User Guide Copyright ARRIS Enterprises, Inc. 2016. All Rights Reserved. 51
WPS PIN button
If WPS State is set to WPS Enabled (PIN-method), click this button after entering a PIN in the WPS PIN field. Do the same at the device you want to pair with the MoCA Bridge.
—
WPS AP PIN (AP mode) Read-only field that shows the current PIN used by the MoCA Bridge. Access points have to match this PIN to associate with the MoCA Bridge. If you click the Regenerate button, the new PIN appears in this field.
See the web management interface
Regenerate button
(AP mode) Click this button to generate a new PIN. The new PIN appears in the WPS AP PIN field. Access points have to match this PIN to associate with the MoCA Bridge.
—
Save button Click this button to save the changes made to this page.
—
Cancel button Click this button to cancel changes made to this page.
—
2.4 GHz Wi-Fi MAC Filter Settings Path: 2.4G Wi-Fi > MAC Filter
Mode: AP and STA
MAC filtering is a security access control method that defines a list of devices allowed or allowed to access the MoCA Bridge based on the device’s MAC address. Using the 2.4G - Wi-Fi MAC Filter page, you can restrict MAC addresses using a blacklist or whitelist. Whitelisted MAC addresses are allowed through the 2.4G - Wi-Fi on the MoCA Bridge, while blacklisted MAC addresses are blocked on the 2.4G - Wi-Fi.

Chapter 5: Configuring the MoCA Bridge
DRAFT Revision 4.0 Add in book properties Release Rel. 3.5 User Guide Copyright ARRIS Enterprises, Inc. 2016. All Rights Reserved. 52
Table 15. 2.4G Wi-Fi > MAC Filter (AP, STA mode)
Field/Button Description Default
Wi-Fi Interface MoCA Bridge 2.4 GHz interface. This setting cannot be changed.
ARRISnnnn_2.4G
MAC Address Filtering
Select the MAC filtering type. Choices are:
• None = no MAC address filtering will be performed.
• White List Mode = allow traffic from the device MAC addresses you add to the list.
Block traffic from other MAC addresses.
• Black List Mode = block traffic from the device MAC addresses you add to the list.
Allow traffic from other MAC addresses.
None
MAC Address Use this field to add or remove a MAC address.
• To add a MAC address to the white list or black list (depending on your MAC Address Filtering selection), enter the MAC address.
• To remove a MAC address, enter it in this field or copy it from the MAC filter list using Windows’ Ctrl+C/Ctrl+V keyboard shortcuts.
—
Save button Click this button to save the MAC address in the MAC Address field. Saving a MAC address adds it to the MAC filter list.
—
Remove button
Click this button to remove the MAC address in the MAC Address field. Removing a MAC address deletes it from the MAC filter list.
—
MAC filter list Shows the MAC address added to the white list or black list, depending on the selection in the MAC Address Filtering field.
—

Chapter 5: Configuring the MoCA Bridge
DRAFT Revision 4.0 Add in book properties Release Rel. 3.5 User Guide Copyright ARRIS Enterprises, Inc. 2016. All Rights Reserved. 53
System Options
The System menu allows you to configure the following options.
• MoCA — configures the MoCA settings for your MoCA Bridge. See “MoCA Settings” on page 53.
• Repeater — (AP mode) configures the MoCA Bridge’s internal system repeater. See “System Repeater Settings” on page 55.
• Network — configures the MoCA Bridge for a DHCP or static IP address. See “Network Settings” on page 58.
• Log — displays the MoCA Bridge system log. See “Log Settings” on page 59.
• Password — changes the login password to web management interface. See “
Password Settings” on page 60.
• Restore — provides restore options for rebooting the MoCA Bridge. See “Restore Settings” on page 61.
• Time — configures the MoCA Bridge’s time settings. See “61” on page 61.
MoCA Settings Path: System > MoCA
Mode: AP and STA
MoCA has the ability to work in different radio-frequency (RF) bands to avoid interfering with the bands that may already be in use on the same coax cable for cable or satellite TV service. American cable TV operators generally use from 5 MHz to 1002 MHz (~1 GHz). Devices designed to coexist with cable TV. The System - MoCA page allows you to configure the MoCA settings for your MoCA Bridge.

Chapter 5: Configuring the MoCA Bridge
DRAFT Revision 4.0 Add in book properties Release Rel. 3.5 User Guide Copyright ARRIS Enterprises, Inc. 2016. All Rights Reserved. 54
Table 16. System > MoCA (AP, STA mode)
Field/Button Description Default
Mode Select whether the MoCA interface uses single channel mode or channel bonding mode. Channel bonding mode offers better MoCA performance.
Auto
Channel Selection
Select an available channel frequency for MoCA operation. If you’re unsure which channel to select, keep the default setting of Auto.
Auto
Diplexer Mode Your MoCA Bridge is certified to operate within the D band. Select the appropriate diplexer mode. Choices are:
• D Band Low = allows channel frequency range of 1150 MHz to 1200 MHz.
• D Band High = allows channel frequency range of from 1400 MHz to 1600 MHz.
• All Pass = allows channel frequency range from 1150 MHz to 1600 MHz. This selection does not allow TV service if you have devices connected by the MoCA connection on your MoCA Bridge. If you select this mode, these devices will not receive the cable TV signal from the MoCA Bridge.
All Pass
Privacy Status Enables or disables privacy status. Enable
Chapter 5: Configuring the MoCA Bridge
DRAFT Revision 4.0 Add in book properties Release Rel. 3.5 User Guide Copyright ARRIS Enterprises, Inc. 2016. All Rights Reserved. 55
Privacy Password
Enter the password to use for the network (from 12 to 17 numeric characters). The password must be the same for all nodes on the coaxial network to ensure connectivity.
—
Reset to default button
Click this button to restore the settings on this page to factory default.
—
Save button Click this button to save the changes made to this page.
—
Cancel button Click this button to cancel changes made to this page.
—
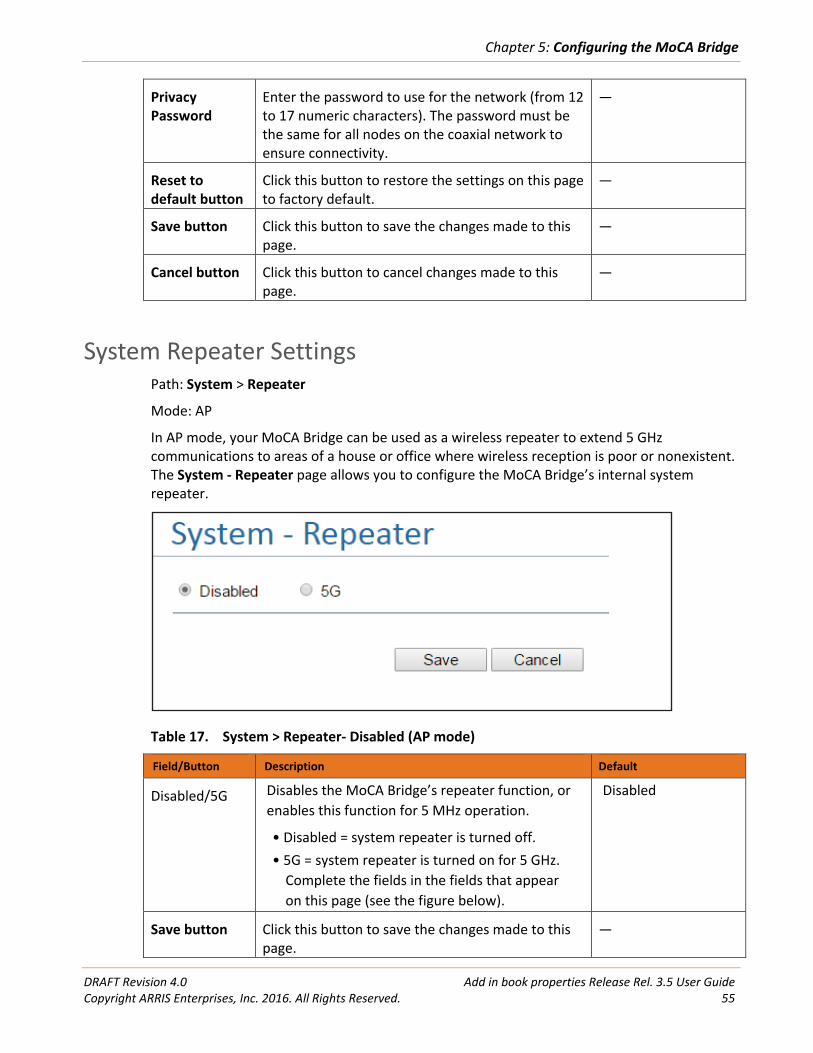
System Repeater Settings Path: System > Repeater
Mode: AP
In AP mode, your MoCA Bridge can be used as a wireless repeater to extend 5 GHz communications to areas of a house or office where wireless reception is poor or nonexistent. The System - Repeater page allows you to configure the MoCA Bridge’s internal system repeater.
Table 17. System > Repeater- Disabled (AP mode)
Field/Button Description Default
Disabled/5G Disables the MoCA Bridge’s repeater function, or
enables this function for 5 MHz operation.
• Disabled = system repeater is turned off.
• 5G = system repeater is turned on for 5 GHz.
Complete the fields in the fields that appear
on this page (see the figure below).
Disabled
Save button Click this button to save the changes made to this page.
—

Chapter 5: Configuring the MoCA Bridge
DRAFT Revision 4.0 Add in book properties Release Rel. 3.5 User Guide Copyright ARRIS Enterprises, Inc. 2016. All Rights Reserved. 56
Cancel button Click this button to cancel changes made to this page.
—
Table 18. System > Repeater- 5G (AP mode)
Field/Button Description Default
ESSID Name used to identify the MoCA Bridge (up to 32 alphanumerical characters). The ESSID is case sensitive.
Disabled
Scan AP button Allows the MoCA Bridge to scan for access points. Clicking this button opens an Access Point List window similar to the one below that shows the access points detected by the MoCA Bridge. To connect to an access point, click it, enter the passphrase in the Passphrase field, and click Connect. If you do not find a desirable access point, click Rescan to rescan for other access points.
—

Chapter 5: Configuring the MoCA Bridge
DRAFT Revision 4.0 Add in book properties Release Rel. 3.5 User Guide Copyright ARRIS Enterprises, Inc. 2016. All Rights Reserved. 57
Encryption Select an encryption mode for this wireless link. Choices are:
• NONE - OPEN = no encryption is used. Because this selection does not offer data security, avoid this selection in normal conditions.
• WPA2-AES = Wi-Fi Protected Access 2 (WPA2) with Advanced Encryption Standard (AES). This encryption mode is compatible with most of the Wi-Fi devices and offers an excellent level of security.
• WPA2 + WPA (mixed mode) = WPA2 with WPA. Use in mixed environments where devices are configured for WPA2 or WPA.
WPA2-AES
Passphrase WPA and WPA2 use a passphrase or PSK that you enter in this field and on all other wireless devices on the network to set up security. To use WPA/WPA2, all of the wireless devices on your network must support either encryption method. If you know that all your devices support the more secure WPA2, you can enable WPA2 only instead of both WPA and WPA2.
—
Save button Click this button to save the changes made to this page.
—
Cancel button Click this button to cancel changes made to this page.
—

Chapter 5: Configuring the MoCA Bridge
DRAFT Revision 4.0 Add in book properties Release Rel. 3.5 User Guide Copyright ARRIS Enterprises, Inc. 2016. All Rights Reserved. 58
Network Settings Path: System > Network
Mode: AP and STA
The System - Network page allows you to configure the MoCA Bridge for a DHCP or static IP address. If you select a static IP address, you can enter the static IP address and netmask on this page as well.
Table 19. System > Network (AP, STA mode)
Field/Button Description Default
DHCP/Static IP Configures the MoCA Bridge for a DHCP or static IP address.
• DHCP = has the MoCA Bridge’s get a dynamically allocated IP address from a DHCP server.
• Static IP = the MoCA Bridge will use the static IP address and netmask you enter in those fields on this page. If you selection this option, provision the devices on the wireless network carefully so that each device has its own address, with no overlap.
DHCP
IP Address If you selected a static IP address, enter the IP address for the MoCA Bridge to use.
Disabled
Netmask If you selected a static IP address, enter the netmask for the MoCA Bridge to use.
Disabled

Chapter 5: Configuring the MoCA Bridge
DRAFT Revision 4.0 Add in book properties Release Rel. 3.5 User Guide Copyright ARRIS Enterprises, Inc. 2016. All Rights Reserved. 59
Ethernet MAC Address
Read-only field that shows the MAC address of the Ethernet interfaces.
See the web management interface
MoCA MAC Address
Read-only field that shows the MAC address of the MoCA interface.
Wi-Fi 5GHz MAC address
Read-only field that shows the MAC address of the 5 GHz wireless interface.
Wi-Fi 2.4GHz MAC address
Read-only field that shows the MAC address of the 2.4 GHz wireless interface.
Save button Click this button to save the changes made to this page.
—
Cancel button Click this button to cancel changes made to this page.
—
Log Settings Path: System > Log
Mode: AP and STA
Clicking System > Log displays the MoCA Bridge system log. You can use the log to troubleshoot issues and to identify potential security risks. The most recent log entries appear at the bottom of the log. As the page fills with entries, the oldest logged entries at the top will roll off.
Table 20. System > Log (AP, STA mode)
Field/Button Description Default
Start/Refresh Click this button to start and refresh log —

Chapter 5: Configuring the MoCA Bridge
DRAFT Revision 4.0 Add in book properties Release Rel. 3.5 User Guide Copyright ARRIS Enterprises, Inc. 2016. All Rights Reserved. 60
button tracking. The log refreshes automatically every 5 seconds.
Stop/Clear button
Click this button to stop log tracking and clear log entries.
—
Password Settings Path: System > Password
Mode: AP and STA
The System - Password field allows you to change the login password to the MoCA Bridge web management interface. By changing the default password, you’ll secure the management of your MoCA Bridge. You’ll need this personalized password to log in to the web management interface in the future.
Table 21. System > Password (AP, STA mode)
Field/Button Description Default
User Name Read-only field that shows the user name. This name cannot be changed.
arris
Current Password
Enter the current case-sensitive administrator password. The default password is not shown for security purposes.
—
New Password
Enter the new case-sensitive password you want to enter at the Login screen. A password can contain alphanumeric characters and spaces.
—

Chapter 5: Configuring the MoCA Bridge
DRAFT Revision 4.0 Add in book properties Release Rel. 3.5 User Guide Copyright ARRIS Enterprises, Inc. 2016. All Rights Reserved. 61
Confirm New Password
Enter the same case-sensitive password you typed in the New Password field.
—
Save button Click this button to save the changes made to this page.
—
Restore Settings Path: System > Restore
Mode: AP and STA
The System - Restore page provides two restore options:
• The top option reboots the MoCA Bridge and restores all configuration files to their factory default configuration settings.
• The bottom option reboots the MoCA Bridge, restores all configuration files to their factory default configuration settings, but retains IP settings. After you select the desired option, click the YES button next to your selection to perform the desired task.
Note: If you want to reboot the MoCA Bridge without changing the configuration settings, see “Reboot Settings” on page 64.
Time Settings Path: System > Time
Mode: AP and STA
The System - Time page configures the MoCA Bridge’s system time.

Chapter 5: Configuring the MoCA Bridge
DRAFT Revision 4.0 Add in book properties Release Rel. 3.5 User Guide Copyright ARRIS Enterprises, Inc. 2016. All Rights Reserved. 62
Table 22. System > Time (AP, STA mode)
Field/Button Description Default
NTP Enable Select this to have the GPON Device get the time from the specified Internet time servers.
checked
Time Zone Choose the time zone of your location. GMT
Server 1 IP or Domain name
Enter the primary time server’s IP address or URL.
time.nist.gov
Server 2 IP or Domain name
Enter the secondary time server’s IP address or URL.
—
Daylight Saving Enable
Select this option if you set your clocks ahead by an hour during late spring to early fall.
unchecked
Save button Click this button to save the changes made to this page.
—
Cancel button Click this button to cancel changes made to this page.
—
Tools Options
The Tools menu allows you to configure the following options.
• Upgrade — upgrades the MoCA Bridge firmware. See “Upgrade Settings” on page 63.
• Reboot — reboots the MoCA Bridge wireless extender. See “Reboot Settings” on page 64.

Chapter 5: Configuring the MoCA Bridge
DRAFT Revision 4.0 Add in book properties Release Rel. 3.5 User Guide Copyright ARRIS Enterprises, Inc. 2016. All Rights Reserved. 63
Upgrade Settings Path: Tools > Upgrade
Mode: AP and STA
ARRIS works hard to constantly improve the operation and performance of your MoCA Bridge. When improvements are available, they are offered to customers as upgraded firmware. We recommend you check that your MoCA Bridge has the latest firmware on a regular basis, and upgrade to the latest firmware as it becomes available. You perform firmware upgrades using the Tools - Upgrade page.
Table 23. Tools > Upgrade (AP, STA mode)
Field/Button Description Default
Choose a file Shows the name of the firmware package. —
Browse button
After you download the latest firmware, click this button. In the Choose File to Upload dialog box, go to the location where the firmware file is located, and then click the firmware file and click Open.
—
Upgrade button
Click this button to upgrade the firmware with the selected firmware file.
—

Chapter 5: Configuring the MoCA Bridge
DRAFT Revision 4.0 Add in book properties Release Rel. 3.5 User Guide Copyright ARRIS Enterprises, Inc. 2016. All Rights Reserved. 64
Reboot Settings Path: Tools > Reboot
Mode: AP and STA
Using the Tools - Reboot page, you can reboot the MoCA Bridge wireless extender by clicking the YES button. Clicking this button disconnects the MoCA Bridge temporarily from the wireless devices connected to it.

DRAFT Revision 4.0 Add in book properties Release Rel. 3.5 User Guide Copyright ARRIS Enterprises, Inc. 2016. All Rights Reserved. 65
Chapter 6
Troubleshooting
Basic Troubleshooting Procedures
For the basic problems listed, go to the section indicated.
• Have I connected the MoCA Bridge properly? Go to “Basic Functions” below.
• I cannot access the MoCA Bridge web management interface with my browser. Go to “Cannot Access the MoCA Bridge Web Management Interface” on page 67.
• I configured the MoCA Bridge, but cannot access the Internet. Go to “Cannot Access the Internet” on page 67.
• I forgot the MoCA Bridge’s password or I want to clear the configuration and start over again. Go to “Restoring Factory Defaults” on page 14.
Basic Functions
After you turn on power to the MoCA Bridge, you should do the following:
1. Check that the Power LED is on.
2. If connected to the cable interface in the home for MoCA, confirm that the MoCA LED is ON. If connected as a video bridge, check that the LAN LED is ON.
3. Confirm that the Power LED is ON.
4. If the MoCA Bridge is connected as a video bridge and NOT using MoCA, check that the LAN1 or LAN2 is ON. If using the LAN forts to connect to a laptop or set-top box, these LEDs will also be ON.

Chapter 6: Troubleshooting
DRAFT Revision 4.0 Add in book properties Release Rel. 3.5 User Guide Copyright ARRIS Enterprises, Inc. 2016. All Rights Reserved. 66
LED Troubleshooting
The following table provides help when using the LEDs for troubleshooting.
Table 24. LED Troubleshooting
If… Perform This Procedure…
All LEDs are OFF when the MoCA Bridge is plugged into an AC outlet.
1. Turn off the MoCA Bridge and then turn it on again to see whether the problem is resolved.
2. Check that you are using the power adapter supplied with the MoCA Bridge.
3. Be sure the power adapter is connected to the MoCA Bridge and to a functioning power outlet.
4. Plug a working device, such as a lamp, into the power outlet to confirm that the outlet is working.
5. Be sure the power outlet is not controlled by a wall switch that can inadvertently remove power from the outlet.
6. If the error persists, contact technical support.
All LEDs Stay ON 1. Clear the MoCA Bridge’s configuration to factory defaults (see “Restoring Factory Defaults” on page 14). This will set the MoCA Bridge’s IP address to 192.168.1.100.
2. If the error persists, contact technical support.
LAN Link LED is OFF for a port with an Ethernet connection.
1. Be sure the Ethernet cable connections are secure at the MoCA Bridge and at the hub or computer.
2. Be sure power is turned on at the connected hub or computer.
3. Be sure the Ethernet cable you are using is not defective. Replace the cable with a known working cable.
The LAN1 and LAN2 LEDs are OFF.
1. Be sure the Ethernet cable connections are secure at the MoCA Bridge and at the computer.
2. Be sure that power is turned on to the computer connected to the MoCA Bridge.
3. Be sure the Ethernet cable you are using is not defective. Replace the cable with a known working cable.
The 5G Wi-Fi and/or 2.4G Wi-Fi LED is OFF.
See “Checking the MoCA Bridge’s Wireless Connection” on page 71.

Chapter 6: Troubleshooting
DRAFT Revision 4.0 Add in book properties Release Rel. 3.5 User Guide Copyright ARRIS Enterprises, Inc. 2016. All Rights Reserved. 67
Cannot Access the MoCA Bridge Web Management Interface If you are unable to access the MoCA Bridge’s web management interface from a computer on your local network, check the following:
1. Check the Ethernet connection between the computer and the MoCA Bridge.
2. Be sure that your computer’s IP address is on the same subnet as the MoCA Bridge.
3. If the MoCA Bridge’s IP address has been changed and you don’t know the current IP address, restore the MoCA Bridge’s configuration to factory defaults (see “Restoring Factory Defaults” on page 14). This will set the MoCA Bridge’s IP address to 192.168.1.100.
4. Be sure your browser has Java, JavaScript, or ActiveX enabled. If you use Internet Explorer, click Refresh to be sure the Java applet is loaded.
5. Quit the browser and launch it again.
6. Be sure you are using the correct login information. The default username arris and password arris are lower-case (Caps Lock should be off).
7. If the MoCA Bridge does not save changes you make in the web management interface, check the following:
• When entering configuration settings, click the Apply button before moving to another screen, or your changes are lost.
• Click the Refresh or Reload button in the web browser. The changes may have occurred, but the browser may be caching the old configuration.
Cannot Access the Internet If the MoCA Bridge cannot access the Internet, it could be due to several reasons, such as a failed Internet connection or misconfigured MoCA Bridge or NIC.
1. At the top of the web management interface, mouse over the Internet icon. If your status shows no local network connection and/or no clients connected, proceed to the next step.
2. Unplug the MoCA Bridge.
Note: If the MoCA Bridge is located where you cannot easily unplug it, restart it using the using the Tools > Reboot page (see page 64).
3. Turn off the MoCA Bridge for three minutes, and then turn off all computers attached to your network.
4. Plug in the MoCA Bridge first, turn it on, and let it boot.
5. After the MoCA Bridge completes its connection to the ISP, restart your computer.

Chapter 6: Troubleshooting
DRAFT Revision 4.0 Add in book properties Release Rel. 3.5 User Guide Copyright ARRIS Enterprises, Inc. 2016. All Rights Reserved. 68
6. Check that the LAN1 and/or LAN2 LEDs are ON. If they are OFF, replace the coaxial cable connecting the MoCA Bridge to the cable service or the Ethernet cable connecting the MoCA Bridge to a computer or other device. If the LEDs do not go ON after the MoCA Bridge has been powered up for several minutes, contact your cable provider to confirm that the service is active.
8. If you have more than one network port available on the MoCA Bridge, plug the cable into a different port. If the network connection works, the original port on the MoCA Bridge is faulty. However, you can continue to use the other ports.
9. Close any network applications that you might have opened, especially file-sharing and peer-to-peer applications. These applications can consume large amounts of bandwidth, which can prevent you from being able to browse the Web.
10. Ping a location on the Internet from the MoCA Bridge.
11. Ping a location on the Internet directly from your computer. For example, ping www.yahoo.com. If the ping succeeds, proceed to the next step. If the ping fails:
• Your web browser may be misconfigured. Be sure you do not have an incorrect proxy server setting in your browser.
• If your computer is running a Microsoft Windows operating system, check whether the computer has a corrupt winsock registry entry (refer to your Windows documentation).
• The site might be down. Try to ping another site.
• If your additional pings fail, please contact technical support.
12. Check your computer’s operating system to see whether the computer has connectivity (refer to the documentation for your operating system). If it doesn’t, try using another computer and NIC attached to the MoCA Bridge to connect to the Internet.
13. Try accessing the Internet with a different browser. If you succeed, the problem exists with the previous browser you used.
Slow Web Browsing
If you experience slow Web browsing with the MoCA Bridge:
1. Check for possible intrusion by spyware and viruses.
2. Clear browser settings and cache (refer to the documentation for your Web browser).
3. Stop other programs running in the background that are consuming bandwidth.
4. A specific site may be suffering from server issues, try another site.

Chapter 6: Troubleshooting
DRAFT Revision 4.0 Add in book properties Release Rel. 3.5 User Guide Copyright ARRIS Enterprises, Inc. 2016. All Rights Reserved. 69
Advanced Troubleshooting Procedures
Troubleshooting Physical Network Problems If you experience network troubles, start by checking the physical network devices and connections. These problems are the most easily fixed and include:
• Performing a thorough physical inspection of your network.
• Checking that all hardware devices, including the MoCA Bridge, are plugged in and physically connected to the network.
• Making sure all network cables are in good condition and well seated. Often, reseating the cable into a connector may be all that is required to ensure a firm connection.
MoCA Bridge Disconnects From the Internet If the MoCA Bridge has been connected to the Internet for an extended period and holds an IP address (DHCP lease) for a longer period of time than your ISP allows, it is not uncommon for the MoCA Bridge to disconnect from the Internet. This is normal and does not indicate any issue with the MoCA Bridge.
1. Unplug the power to the MoCA Bridge, then reconnect power.
Note: If the MoCA Bridge is located where you cannot easily unplug it, you can restart
it using the using the Tools > Reboot page (see page 64).
2. Connect a computer to one of the MoCA Bridge’s LAN ports.
3. Restart your computer.
4. Reset the MoCA Bridge to its factory default settings using either the Reset button (see “Restoring Factory Defaults” on page 14) or the System > Restore page (see page 61).
Note: This step removes all overrides made to the MoCA Bridge’s default settings and returns the MoCA Bridge to its original factory default settings.
In certain network scenarios, it may be helpful to turn off all the equipment on your network, and then turn the equipment all back on. Leaving some devices unplugged for up to five minutes can also help.

Chapter 6: Troubleshooting
DRAFT Revision 4.0 Add in book properties Release Rel. 3.5 User Guide Copyright ARRIS Enterprises, Inc. 2016. All Rights Reserved. 70
If the disconnections are limited to wired clients only
Check your NIC settings and all cable routing, connections, and power supplies.
If the disconnections are limited to wireless clients only
Focus on factors that affect wireless clients, such as:
• Network selection and security
• Hardware access control
• Client TCP/IP settings
• Signal strength
• Sources of interference
Can You Connect to the Internet Directly? 1. Connect your computer to the modem or gateway in the house. Confirm that you can get to the Internet.
2. Confirm that the MoCA Bridge is connected to the router/gateway by accessing the MoCA Bridge web management interface.
3. If you cannot connect to the Internet, contact your ISP for assistance.
Unable to Configure Port Forwarding If you are not able to configure port forwarding for software applications, external servers or gaming:
• Ascertain the port(s) that the application or game calls for.
• Some ISPs block ports, such as ports 20, 21, and 80. Check with ISP to confirm whether it is blocking ports.
• Disable firewalls and stateful packet inspection (SPI) applications.
• Create a dynamic DNS (DynDNS) account for dynamic IP addresses from the ISP.
• Update the MoCA Bridge firmware.

Chapter 6: Troubleshooting
DRAFT Revision 4.0 Add in book properties Release Rel. 3.5 User Guide Copyright ARRIS Enterprises, Inc. 2016. All Rights Reserved. 71
Wireless Troubleshooting
The following sections cover troubleshooting procedures for wireless networking.
Checking the MoCA Bridge’s Wireless Connection If you experience a problem with the MoCA Bridge’s wireless operation, log in to the MoCA Bridge’s web management interface and verify the wireless settings. In particular, the MoCA Bridge’s Wireless Network Names (SSIDs) and security settings must match the wireless computer settings exactly.
1. Use an Ethernet cable to connect a computer to the MoCA Bridge.
2. Open a Web browser on the computer and log in to the MoCA Bridge’s web management interface.
3. Go to the 5G Wi-Fi > Settings page and check the ESSID (see page 36), and then do the same in the 2.4G Wi-Fi > Settings page (see page 46). The ESSID is case-sensitive and must match the SSID of the other wireless devices in your wireless network. For example, hOME is not the same as home or Home.
4. Check the other settings in the 5G Wi-Fi menu (see page 36) and 2G Wi-Fi menu (see page 46).
Wireless Range is Low If you wireless range is very low, or if your wireless computer cannot connect to your wireless network, use the following procedure to improve the wireless range of the MoCA Bridge.
1. Review “Guidelines for Improving Your Wireless Network” on page 72.
2. Change the wireless channel of the MoCA Bridge. Just like one radio station may be clear while another suffers from interference, sometimes one wireless channel is clearer than others. To change channels:
a. Open a Web browser on the computer.
b. Log in to the MoCA Bridge’s web management interface.
c. Go to 5G Wi-Fi > Settings and check the Channel control setting (see page 36). Then do the same on the 2.4G Wi-Fi page (see page 46).
Note: You do not have to change your computer’s configuration, because it automatically detects the new channel.

Chapter 6: Troubleshooting
DRAFT Revision 4.0 Add in book properties Release Rel. 3.5 User Guide Copyright ARRIS Enterprises, Inc. 2016. All Rights Reserved. 72
Achieving Optimal Wireless Performance To achieve optimal wireless performance with the MoCA Bridge, perform the following procedure.
1. Right-click My Computer and select Properties.
2. Click the Hardware tab and click Device Manager.
3. Under Network adapters list, double-click your wireless NIC.
4. Click the Advanced tab. Under the Property field, select Wireless mode.
5. Select the highest value your NIC is capable of performing.
6. Click OK and try the new settings.
Guidelines for Improving Your Wireless Network The following guidelines describe how to improve and secure your wireless network.
• Position the MoCA Bridge and wireless access point(s) in a central location. If the MoCA Bridge and access point(s) are located against an outside wall of your home or office, the signal will be weak on the other side of your home or office.
• Move the MoCA Bridge away from the floor, walls, and metal objects such as metal file cabinets. Floors, walls, and metal interfere with the MoCA Bridge’s wireless signals. The closer the MoCA Bridge is to these obstructions, the more severe the interference, and the weaker your connection will be.
• Wireless repeaters extend your wireless network range, without requiring you to add wiring. Place the wireless repeater halfway between your wireless access point and your computer to boost to your wireless signal strength.
• Wireless devices can broadcast on several different channels, similar to the way radio stations use different channels. In the United States and Canada, these channels are 1, 6, and 11. Just like you’ll sometimes hear interference on one radio station while another is perfectly clear, sometimes one wireless channel is clearer than others. If you encounter interference, change the MoCA Bridge’s channels using the Channel setting on the 5G Wi-Fi > Settings page (see page 36) and 2.4G Wi-Fi > Settings page (see page 46). You do not need to change your computer’s configuration, because it will automatically detect the new channel.
• If you have cordless phones or other wireless electronics in your home or office, your computer might not be able to “hear” the MoCA Bridge over the noise from the other wireless devices. To quiet the noise, avoid wireless electronics that use the 2.4 GHz frequency. Instead, look for cordless phones that use the 5.8 GHz or 900 MHz frequencies.
• Update firmware and drivers for your wireless networking devices. Device manufacturers regularly provide firmware for their devices that improve performance. To obtain the latest firmware and driver updates for your devices, visit the vendor’s Web site.

Chapter 6: Troubleshooting
DRAFT Revision 4.0 Add in book properties Release Rel. 3.5 User Guide Copyright ARRIS Enterprises, Inc. 2016. All Rights Reserved. 73
• To improve the security of your wireless network, change the SSID to a different name from the default. You can access the MoCA Bridge’s SSID setting using the ESSID setting on the 5G Wi-Fi > Settings page (see page 36) and 2.4G Wi-Fi > Settings page (see page 46). An SSID can be changed at any time, as long as the change is also made on all wireless clients.
• By default, most wireless access points broadcast the SSID to all wireless devices. While this feature of Wi-Fi network protocols is intended to allow clients to discover dynamically and roam between wireless networks, it also allows anyone with a wireless NIC to detect the SSID you use to gain access to your wireless network. Therefore, you may want to consider disabling this feature. For more information, refer to the documentation for your wireless access points.
• MAC filtering is the process of configuring a wireless access point with a list of MAC addresses that will be allowed or not allowed to gain access to the rest of the network via that access point. Only MAC addresses that are registered with the wireless access point can gain access to the wireless network. The MoCA Bridge provides a similar feature with the 5G Wi-Fi > MAC Filter page (see page 43) and the 2.4G Wi-Fi > MAC Filter page (see page 51) to limit connections to certain MAC addresses.
Wireless IEEE 802.11n Guidelines The wireless IEEE 802.11n standard is an extension to the 802.11 specification for wireless LAN (WLAN) technology. 802.11n builds upon previous 802.11 standards by adding multiple-input multiple-output (MIMO). The additional transmitter and receiver antennas allow for increased data throughput, at speeds up to 100 Mbps, which is 4-to-5 times faster than 802.11g. 802.11n also offers a better operating distance than current networks. If you use or are considering using 802.11n in your wireless network, observe the following guidelines:
• If your maximum data rate is 54 Mbps or lower, confirm your NIC is an 802.11n adapter and not an older 802.11g adapter. Although 802.11g NICs can connect to the newer 802.11n devices, high speeds and performance are possible only on connections between a wireless N device (such as the MoCA Bridge) or access point and a wireless N adapter. Therefore, you may need to upgrade your older wireless equipment to achieve faster speed and performance.
• While devices certified by the Wi-Fi Alliance are designed to work together regardless of manufacturer, some proprietary features require compatible equipment to work. Additionally, there may be interoperability issues with wireless 802.11n devices because the official standard is not complete. Therefore, manufacturers are releasing “draft” products. To prevent potential problems, use devices from the same manufacturer for your wireless network.
• Because the wireless 802.11n standard does not support WEP encryption, 802.11n connections using WEP are limited to maximum wireless 802.11g speeds of 54 Mbps, even on mixed 802.11/GN networks. Moreover, the first WPA version does not provide maximum wireless performance on 802.11n networks. For these reasons, either:

Chapter 6: Troubleshooting
DRAFT Revision 4.0 Add in book properties Release Rel. 3.5 User Guide Copyright ARRIS Enterprises, Inc. 2016. All Rights Reserved. 74
– Upgrade your 802.11g equipment for 802.11n devices, or
– Configure the devices on your wireless network to use strict security. See the encryption settings on the 5G Wi-Fi > Settings page (see page 36) and 2.4G Wi-Fi > Settings page (see page 46). For old 802.11g devices that support WEP encryption only, check the vendor’s web site for updated drivers.

DRAFT Revision 4.0 Add in book properties Release Rel. 3.5 User Guide Copyright ARRIS Enterprises, Inc. 2016. All Rights Reserved. 75
Chapter 7
Specifications
Hardware Specifications
Specification Description
WAN Interfaces: 1 x RF Type-F Female Connector
Frequency: Upstream 5 MHz to 42 MHz
Downstream 54 MHz to 1002 MHz
MoCA: 1125 MHz to 1650 MHz
2.0 Standard (optional no-fit)
System processor/memory:
1600 DMIPS ViPER CPU
2400 DMIPS Apps CPU
128 MB DRAM
32 MB SPI Flash
Rear panel: 2 x 10/100/1000 Ethernet Ports with activity and link LEDs
DC power Input
Reset button (recessed)
Software Specifications
Diagnostic protocols: TR-069
Wireless LAN Specifications
Dual-band concurrent design provides for 4x4 5 GHz 802.11ac with 4 spatial streams and 2x2 802.11n with 2 spatial streams
High Power Output (400 mW)
Support up to 16 SSID per frequency band
Independent configuration by SSID

Chapter 7: Specifications
DRAFT Revision 4.0 Add in book properties Release Rel. 3.5 User Guide Copyright ARRIS Enterprises, Inc. 2016. All Rights Reserved. 76
20/40/80 MHz channels
Wi-Fi encryption: WEP-64/128, WPA-PSK, WPA2-PSK (AES) WPS
PIN: 8 digits randomly generated – not part of the MAC address QoS
WMM/ WMM U-APSD
Optional radio configurations (future)
User Interface Specifications
Home Network
Guest Access
Device List
Traffic Manager Wi-Fi
Wi-Fi
Diagnostics
Administrator
MoCA
Mechanical Specifications
WPS button: Rear of unit
Dimensions: 9.0” x 8.3” x 2.2” ( D x H x W) (3.7” @ base)
230 mm x 212 mm x 56 mm (94 mm @ base)
Weight: 1.2 kg (2.65 lbs.)
Environmental Specifications
Operating Temperature:
0° C (32° F) ~ 45° C (113° F)
Operating Humidity: 10% ~ 90% (Non-Condensing)
Storage Temperature: -40° C (-40° F) ~ 70° C (158° F)
Surge Protection: RF Input & Ethernet (RJ-45): >6 kV

Chapter 7: Specifications
DRAFT Revision 4.0 Add in book properties Release Rel. 3.5 User Guide Copyright ARRIS Enterprises, Inc. 2016. All Rights Reserved. 77
Power Consumption: 40 W max
Electrical Requirements
External Power Supply:
AC Input: 100-240 VAC – 47/63 Hz
DC output: 12V/1.5A Max. Load
US Plug (other country-specific power adapters available upon request)

Chapter 7: Specifications
DRAFT Revision 4.0 Add in book properties Release Rel. 3.5 User Guide Copyright ARRIS Enterprises, Inc. 2016. All Rights Reserved. 78
Compliances
• FCC
• Wi-Fi Alliance
• UL
• MoCA 2.0
• WPS 2.0
• RoHS

DRAFT Revision 4.0 Add in book properties Release Rel. 3.5 User Guide Copyright ARRIS Enterprises, Inc. 2016. All Rights Reserved. 79
Chapter 8
Glossary
Term Definition
Access point A device that allows wireless devices to connect to a wired network using Wi-Fi, or related standards.
Broadcast A packet sent to all devices on a network.
Basic Service Set Identifier (BSSID)
The BSSID uniquely identifies a specific access point and is in the same format as a MAC address.
Dynamic Host Configuration Protocol (DHCP)
A protocol that centrally automates the assignment of IP addresses in a network. Using the Internet’s set of protocols (TCP/IP), each machine that can connect to the Internet needs a unique IP address. For example, when the service provider sets up computer users with a connection to the Internet, an IP address is assigned to each machine. DHCP lets the service provider distribute IP addresses and automatically sends a new IP address when a computer is plugged in to the high-speed Internet network. DHCP uses the concept of a “lease” or amount of time an IP address is valid for a computer. Lease times can vary.
Domain A subnetwork comprised of a group of clients and servers under the control of one security database.
Domain Name A descriptive name for an address or group of addresses on the Internet. Domain names are in the form of a registered entity name plus one of a number of predefined top-level suffixes, such as .com, .edu, and .org.
Domain Name System (DNS)
An Internet service that locates and translates domain names into IP addresses. Because domain names are alphabetic, they are easier to remember. However, the Internet is based on IP addresses. Every time you use a domain name, a DNS service translates the name into the corresponding IP address. The DNS system is actually its own network. If one DNS server does not know how to translate a particular domain name, it asks another one, and so on, until the correct IP address is returned.
Downstream A term to describe the direction of data from the network service provider to the customer.
Delivery Traffic Indication Message (DTIM)
Informs clients about the presence of buffered broadcast data on the access point.

Chapter 8: Glossary
DRAFT Revision 4.0 Add in book properties Release Rel. 3.5 User Guide Copyright ARRIS Enterprises, Inc. 2015. All Rights Reserved. 80
Dynamic Host Configuration Protocol (DHCP)
A client/server protocol that automatically provides an Internet Protocol (IP) host with its IP address and other related configuration information such as the subnet mask and default gateway.
Encryption Conversion of electronic data into another form, called ciphertext, which cannot be easily understood by anyone except authorized parties.
Extended Service Set Identification (ESSID)
One of two types of Service Set Identification (SSID). In an ad hoc wireless network with no access points, the Basic Service Set Identification (BSSID) is used. In an infrastructure wireless network that includes an access point, the ESSID is used, but may still be referred to as SSID. An SSID is a 32-character (maximum) alphanumeric key identifying the name of the wireless local area network. For the wireless devices in a network to communicate with each other, all devices must be configured with the same ESSID.
Ethernet A standard network protocol that specifies how data is placed on and retrieved from a common transmission medium. It forms the underlying transport vehicle used by several upper-level protocols, including TCP/IP, HTTP, and FTP.
Firewall A highly effective method to block unsolicited traffic from outside the connected computers in the MoCA Bridge and local network.
Internet Protocol (IP) The method or protocol by which data is sent from one computer to another on the Internet. It is a standard set of rules, procedures, or conventions relating to the format and timing of data transmission between two computers that they must accept and use to understand each other. Used in conjunction with the Transfer Control Protocol (TCP) to form TCP/IP.
IP Address In the most widely installed level of the IP today, an IP address is a 32-bit binary digit number that identifies each sender or receiver of information that is sent in packet form across the Internet. When you request a Web page or send an e-mail, the IP part of TCP/IP includes your IP address.
IP sends your IP address to the IP address obtained by looking up the domain name in the URL you requested or in the e-mail address to which you are sending a note. A dynamic IP address is an IP address that is automatically assigned to a client station in a TCP/IP network, typically by a DHCP server.
Internet Service Provider (ISP)
A company that provides individuals and companies access to the Internet and other related services.
Local Area Network (LAN) A group of computers and associated devices such as printers and servers that share a common communication line and other resources within a small geographic area.
MAC filtering A security access control method whereby the 48-bit address assigned to a network device is used to determine access to the network.

Chapter 8: Glossary
DRAFT Revision 4.0 Add in book properties Release Rel. 3.5 User Guide Copyright ARRIS Enterprises, Inc. 2015. All Rights Reserved. 81
MBSS Short for mesh basic service set. A basic service set that forms a self- contained network of mesh stations that establish peer-to-peer wireless links and transfer messages mutually.
Media Access Control Address (MAC)
A unique number assigned by the manufacturer to any Ethernet networking device, such as a network adapter, that allows the network to identify it at the hardware level. Usually written in the form 01:23:45:67:89:ab.
Megabits per Second (Mbps)
A unit of measurement for data transmission that represents one million bits per second.
MoCA Short for Multimedia over Coax Alliance, MoCA is a standards organization that supports a technology to provide the backbone for home digital entertainment networks. For the end-consumer, a MoCA solution includes a retail set-top box solution that works where your TV works and enables you to link entertainment devices in multiple rooms using existing wiring.
Packet A block of information sent over a network. A packet typically contains a source and destination network address, some protocol and length information, a block of data, and a checksum.
Passphrase A sequence of words or other text used to control access to a computer system, program or data. A passphrase is similar to a password in usage, but is generally longer for added security.
Router A device that forwards data between networks. An IP router forwards data based on IP source and destination addresses.
Received Signal Strength Indicator (RSSI)
A measurement of the power present in a received radio signal. Lower negative numbers (for example, -1 to -65) indicate the access point is close. Greater negative numbers (for example, -66 to -95) indicate the access point is far. RSSI is optimal between 0 dBm and -64 dBm.
Service Set Identifier (SSID)
A sequence of characters that uniquely names a wireless local area network (WLAN). The SSID allows stations to connect to the desired network when multiple independent networks are operating in the same physical area. Some vendors refer to the SSID as the network name. For the wireless devices in a network to communicate with each other, all devices must be configured with the same SSID.
Subnet A portion of a network that shares a common address component. On TCP/IP networks, subnets are defined as all devices whose IP addresses have the same prefix. For example, all devices with IP addresses that start with 10.1.10 would be part of the same subnet. IP networks are divided using a subnet mask.

Chapter 8: Glossary
DRAFT Revision 4.0 Add in book properties Release Rel. 3.5 User Guide Copyright ARRIS Enterprises, Inc. 2015. All Rights Reserved. 82
Transmission Control Protocol (TCP)
A protocol used with the IP to send data in the form of message units (datagrams) between network devices over a LAN or WAN. While IP handles the actual delivery of the data (routing), TCP keeps track of the individual units of data (packets) that a message is divided into for efficient delivery over the network. TCP requires the receiver of a packet to return an acknowledgment of receipt to the sender of the packet.
Transmission Control Protocol/Internet Protocol (TCP/IP)
The basic communication language or set of protocols to communicate over a network (developed specifically for the Internet). TCP/IP defines a suite or group of protocols.
TR-069 A technical specification that defines an application layer protocol for remote management of end-user devices. It was published by the Broadband Forum and entitled CPE WAN Management Protocol (CWMP).
Upstream A term to describe the direction of data from the customer to the network service provider.
Uniform Resource Locator (URL)
A uniform resource identifier (URI) that specifies where a known resource is available and how to retrieve it.
Wide Area Network (WAN)
A long-distance link or computer network that spans a relatively large geographical area that connects remotely located LANs. Typically, a WAN consists of two or more LANs. The Internet is a large WAN.
Wi-Fi A local-area wireless computer networking technology that allows electronic devices to connect to the network, mainly using the 2.4 gigahertz and 5 gigahertz (radio bands.
Wi-Fi Protected Access (WPA)
A security protocol for wireless networks offering improvements over the WEP protocol in the way it handles security keys and the way users are authorized.
Wi-Fi Protected Setup (WPS)
A security protocol for wireless home networks. Created by the Wi-Fi Alliance, this protocol allows home users to easily set up wireless security and add new devices without needing to enter long passwords.
Wireless Local Area Network (WLAN)
A communications network that uses high frequency radio signals to allow wireless devices to communicate with each other within a limited geographic area.

DRAFT Revision 4.0 Add in book properties Release Rel. 3.5 User Guide Copyright ARRIS Enterprises, Inc. 2016. All Rights Reserved. 83
Chapter 9
ARRIS Contacts
Technical Services
For technical support on ARRIS products you can contact us by phone or on the web.
By Telephone The Technical Assistance Center can be reached at:
1-888-944-HELP (4357)
On the Web The Ask ARRIS web site gives you web access to service and support tools. You will need to register using your support contract ID and email address. Ask ARRIS is located at: http://www.arris.com/support
There you will be able to access:
Support Contact Information for all products
Knowledge Base Information (also known as Solutions)
User Documentation
Current open support cases
Ability to create a new support case (for technical support or repair and return)
Training Webcast
By Email Email addresses for ARRIS products will be provided with your account at Ask ARRIS.
Technical Training
For more information about our Global Knowledge Services Department and the programs we offer, e-mail us at:

Corporate Headquarters
ARRIS · Suwanee · Georgia · 30024 · USA
T: 1-678-473-2000 F: 1-678-473-8470
www.arris.com