Array Mbira User Guide Disk - bestservice.defiles5.bestservice.de/demo_files/00005558.pdf ·...
24
Transcript of Array Mbira User Guide Disk - bestservice.defiles5.bestservice.de/demo_files/00005558.pdf ·...

SONICCOUTURE
ARRAY MBIRACONTENTS :
INSTALLATION
THE ARRAY MBIRA
SAMPLING THE MBIRA
THE KONTAKT INSTRUMENTS
THE PRESETS
SUPPORT
E.U.L.A
SONICCOUTURE ARRAY MBIRA USER GUIDE
www.soniccouture.com email :[email protected]

INSTALLATION1.Insert the Array Mbira disk you received from Soniccouture.
2. Copy the folder “SC Array Mbira” to a safe place on your hard drive.
If you do not own Kontakt, you will need to download and install the free
Kontakt player which you can do here ; Kontakt Player Download Link
TO ADD THE LIBRARY AND AUTHORIZE IN KONTAKT
1. In Kontakt or Kontakt Player open the Browser on the left (the folder Icon
at the top).
2. In the Libraries tab at the top of the Browser go to "Add Library"
3. Click and use the dialogue window to navigate to and point Kontakt to the
location of the Array Mbira Library folder. This will add it to the Kontakt
Library list AND to the Service Center.
4. If Kontakt asks you to Activate the library, the NI Service Center program
will launch and you will need your serial number to authorize the Mbira.
If Kontakt doesn't ask you to authorize, you can force it to by clicking the
little "Activate" button in the upper right corner of our Mbira Library logo, in
the Browser/Libraries list. It will then prompt you to launch the Service
Center.
(You will find your serial number in the email you were sent when you
purchased. If for some reason you haven't received this yet, you can run your
library in demo mode until it arrives.)
N.B : After authorization, you should restart Kontakt.
SONICCOUTURE ARRAY MBIRA USER GUIDE
www.soniccouture.com email :[email protected]
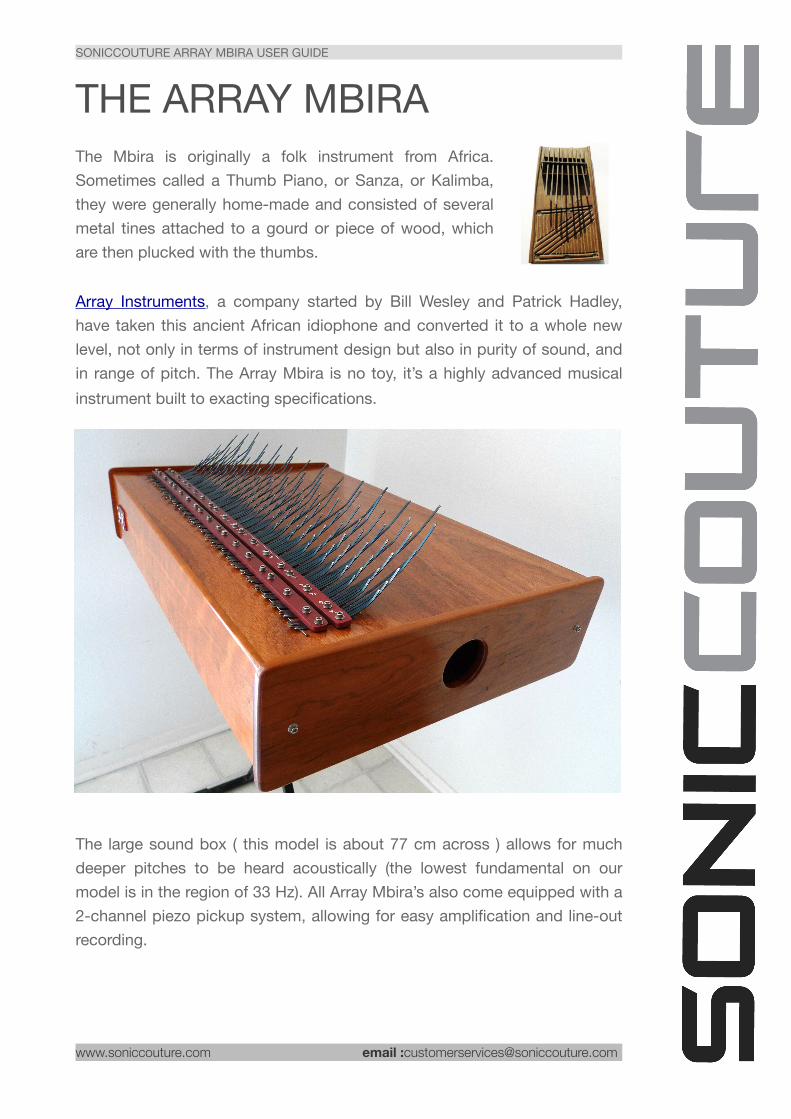
THE ARRAY MBIRAThe Mbira is originally a folk instrument from Africa.
Sometimes called a Thumb Piano, or Sanza, or Kalimba,
they were generally home-made and consisted of several
metal tines attached to a gourd or piece of wood, which
are then plucked with the thumbs.
Array Instruments, a company started by Bill Wesley and Patrick Hadley,
have taken this ancient African idiophone and converted it to a whole new
level, not only in terms of instrument design but also in purity of sound, and
in range of pitch. The Array Mbira is no toy, it’s a highly advanced musical
instrument built to exacting specifications.
The large sound box ( this model is about 77 cm across ) allows for much
deeper pitches to be heard acoustically (the lowest fundamental on our
model is in the region of 33 Hz). All Array Mbira’s also come equipped with a
2-channel piezo pickup system, allowing for easy amplification and line-out
recording.
SONICCOUTURE ARRAY MBIRA USER GUIDE
www.soniccouture.com email :[email protected]

All Array instruments are designed with a unique note arrangement, invented
by Bill Wesley to facilitate playing harmonically. Whereas a chromatic
keyboard places harmonic notes at some distance from each other, the
Array system places the most harmonic notes beside one another. The
Array note system looks like this:
This also means that all octaves of a single note are beside one another,
allowing for octave “strumming” or doubling, which would be much more
difficult on a chromatic note layout.
Our Kontakt instrument is of course mapped chromatically. If you want to
experience the Array harmonic system first-hand you would need to get a
hold of one of the instruments themselves, or else use one of Bill’s Array
MBoard MIDI controllers.
SONICCOUTURE ARRAY MBIRA USER GUIDE
www.soniccouture.com email :[email protected]

The Array Instrument that we ordered was the largest model they make, the
5 octave chromatic Mbira, which has a range from C1 to B5 (actually the
fundamentals are one octave below that, but for ease of use we mapped it
for a standard 61 note keyboard). We chose the American Cherry model,
which is noted for its purity of tone and long sustain.
This is the Mbira that ate Manhattan.
You can find more information about Array Instruments, Bill and Patrick, at:
http://www.thearraymbira.com
Some well known users of the Array Mbira include Ry Cooder, Emil
Richards, and Imogen Heap.
SONICCOUTURE ARRAY MBIRA USER GUIDE
www.soniccouture.com email :[email protected]

SAMPLING THE MBIRA
Since the Mbira contains stereo pickups, we decided to record it with
microphones and pickups at the same time. This recording was then mixed
down to a 4 channel file for each note, preserving the phase relationship
between the pickups and microphone channels throughout the entire
recording and editing process.
In the Kontakt instrument these 4 channels are available for each and every
sample. They are aligned no matter which robin or velocity zone happens to
be triggered. This allows you to mix the Mic and Pickup signals in Kontakt
as if you were mixing the instrument in the studio yourself.
Since the pickup signal arrives sooner than the acoustic signal, we provide a
control for you to delay the Pickup signal to alter its phase relationship to the
Mic signal. We find that about 1.3 ms aligns the transients, but you can
adjust this yourself and hear how the timbre and stereo image change.
This Mbira covers a range of 5 octaves, mapped from C1 to B5. We
sampled each pitch at 8 velocity levels, 3 times for round robin. We also
sampled the damping sound of each pitch 8 times for each note ( a small
clunk sound when the ringing note is stopped).
SONICCOUTURE ARRAY MBIRA USER GUIDE
www.soniccouture.com email :[email protected]

The Array system of note layout makes it possible to strum a single pitch
through all 5 octaves. We sampled strums for each pitch at 4 velocity levels
3 times each for round robin. These strums appear on your MIDI keyboard
at C6 to B6.
This gives a total of 4,112 samples, in stereo, at 24 bit / 44.1kHz.
The uncompressed version of the library utilizes approximately 9.5 GB of
disk space. Kontakt 4’s sample compression allowed us to reduce this
considerably.
SONICCOUTURE ARRAY MBIRA USER GUIDE
www.soniccouture.com email :[email protected]

THE KONTAKTINSTRUMENTThere are three main pages or ‘tabs’ for the Mbira, which appear below the
instrument in Kontakt: Performance, Instrument, and Effects. In this section
we’ll go through the functionality of each.
THE PERFORMANCE TAB
This page allows you to set up various options that affect how the Mbira
responds to your actions. In this section we’ll explain what each of these
does.
STRUMMER
The Strummer is a KSP script that allows you to use a MIDI controller (CC)
to virtually strum the instrument. By default this controller is set to be the
Mod Wheel (CC1), but you can change this to any controller you like.
Rather than strumming every note of the instrument, the Strummer algorithm
chooses only the pitches you hold down on the keyboard at that time.
SONICCOUTURE ARRAY MBIRA USER GUIDE
www.soniccouture.com email :[email protected]
For example, if you hold down a C major chord (C, E, and G), and move the
strum controller you will generate a strum that includes all the Cs, Es, and
Gs that the instrument contains, across the entire range. It doesn’t matter
what octave you hold down on your keyboard, the strummer will include all
octaves of any pitch being held.
The Strummer is switched on and off with the little blue LED at the top of the
STRUMMER section. The remaining controls are as follows:
• The STRUM wheel is both a display of the current state of your Strum Controller, and will generate a strum if you use the mouse to turn it.
• RANDOM will introduce random velocity variation into your strum. The last note you play provides a default velocity for the strummer effect. But this can sound a bit artificial if your strum has a constant velocity. Introducing a bit of randomicity to the strummer the result is more natural and organic sounding. RANDOM controls the range of randomicity to be introduced.
• RANDOM only subtracts from the velocity it last receives, it will never add to it. This means you can be confident that the velocity you played your chord at is the loudest the strum will generate, and any variation will be lower than that. The range of the RANDOM velocity knob is 0 to 100.
• MIDI CC is the the controller that you define for the STRUMMER effect. This defaults to 1, but you can change it to any other MIDI controller if you prefer, and save the instrument with your own preference.
• INVERT inverts the direction of the strum. By default, the STRUMMER will map the CC from low to high. If you choose INVERT, then the STRUMMER will map the CC from high to low.
• MUTE INPUT allows you to mute the incoming MIDI so that only the STRUMMER is heard. In other words, it mutes the notes you play, but not the output of the STRUMMER.
DAMPING
The DAMPING section gives you options to control ways of stopping the
Mbira sound. Since the Mbira rings so long, and common technique while
playing is to damp the notes with your hand. This results in a little buzz or
chunk sound, as well as cutting the note that’s ringing.
This little sound helps the realism, but you can turn DAMPING on and off
using the little blue LED at the top of the section.
SONICCOUTURE ARRAY MBIRA USER GUIDE
www.soniccouture.com email :[email protected]

You can also adjust the LEVEL of the DAMPING sound with the main knob in
this section. (Note that this DAMPING level is an offset to the main Mix
level set in the Instrument section, not an absolute level.)
The DAMPING in our Kontakt version can be triggered by both a note and a
MIDI controller (CC). You can set the MIDI KEY and MIDI CC in this section.
By default these are set to MIDI note 35 (B0 , which is the note just below
the lowest note of the Mbira) and MIDI CC 64, which is the Sustain pedal on
most MIDI keyboards. When the MIDI CC is received at a value higher than
65 it results in the damping being triggered.
CC INVERT allows you to invert the behaviour of the MIDI CC so that
DAMPING is triggered if the MIDI CC is received below a value of 64.
Note that even if DAMPING is off, the MIDI KEY and MIDI CC will still cause
damping of the ringing notes, they just won’t generate any DAMPING
sounds and won’t use any extra polyphony.
PURGE
The PURGE can be set to on or off. Purge is ON when the blue LED is lit.
If PURGE is on, then turning off the Mic or Pickup channel in the Mix page
will remove the samples from memory.
This can be useful if you’re working with a system where RAM is at a
premium and only need, say, the Mic channel sound or the Pickup sound in
a given piece of music.
SONICCOUTURE ARRAY MBIRA USER GUIDE
www.soniccouture.com email :[email protected]

THE INSTRUMENT TAB
This page contains three sub-tabs of its own (along the top right) and is the
main editor for the Mbira instrument. In this section we’ll explain the controls
available in each of those tabs.
Note that for all the knobs in this section, a numeric value appears at the top
right of the screen (above the tabs) while you’re adjusting the knob. This
can be useful for precise settings.
Also remember that every control in Mbira has a mouse-hover help attached
to it. If you turn on the ‘Show Info’ pane in Kontakt, then you will see a
reminder of each control’s function at the bottom of the screen when the
mouse is hovered over a control.
SONICCOUTURE ARRAY MBIRA USER GUIDE
www.soniccouture.com email :[email protected]

Finally, as in many of our instruments, Command-click (or Control-click) will
reset a knob to its default value.
THE MIX TAB
The MIX tab is the main page of the Instrument section. This allows you to
control the relative LEVEL of the PICKUP and MICS signal.
LEVEL is controlled by the
two large knobs for each
channel.
You can turn either signal
on or off using the blue
LED switches. (If PURGE is
enabled in the Performance
s e c t i o n , t h e n t h e s e
samples will be removed
from memory when turned
off).
For both the PICKUP and
MICS channel you have
cont ro l o f the s te reo
WIDTH. It’s important to
remember that WIDTH is normal when set to 0. When WIDTH is greater than
0, the signal is being artificially widened, and when it’s less than 0 you are
bringing the stereo pair inwards toward mono. Mono is in fact a value of
-100.
The PICKUP channel naturally has a very wide stereo image, each note
being almost hard panned left or right. (There are two pickups in the
instrument, placed on either side.) We often find that bringing the PICKUP
WIDTH in a bit improves the stereo image if being mixed with the MICS
channel, and especially if being used in very low registers. However, WIDTH
at 0 is the natural response of the PICKUP output, so it’s up to you how you
would like to manage this.
PAN of course controls the panning of each channel.
SONICCOUTURE ARRAY MBIRA USER GUIDE
www.soniccouture.com email :[email protected]

PICKUP PHASE is a tiny amount of delay introduced to the PICKUP
channel. Since sound travels faster through copper than through air, the
PICKUP signal is naturally slightly ahead of the MICS channel. This knob
allows you to compensate for this. You’ll find that the transient quality,
overall EQ, and stereo image change as this PHASE is offset. We made 1.3
ms our default value since this seems to be approximately where the
transients line up most of the time.
THUMB
THUMB controls the start position of the sample.
When THUMB is at 0, the sample is played from the beginning of the
transient. But a thumb piano has a bit of noise before the transient that is
quite integral to its sound quality, this is the THUMB noise, or pluck sound.
The green line in this picture shows the modulation area of THUMB.
When THUMB is at maximum, or 100 ms, then 100 ms of sound before the
transient is heard. This results in a more natural attack.
However, it also results in the sound being 100 ms late!
So, using the THUMB control you can do one of two things.
1- You can use it to find a comfortable medium in which the sound is natural
enough for your purposes but responds relatively quickly (often 30 ms or so
is fine for this).
2- You can be very exact and program your sequence so that the rhythm is
precise when THUMB is set to 0. Then change the THUMB to 100 ms,
SONICCOUTURE ARRAY MBIRA USER GUIDE
www.soniccouture.com email :[email protected]

slide your MIDI part 100 ms earlier in your track, and the result will both
sound natural and be in time.
THE MICS AND PICKUP TABS
These two tabs provide access to some of Kontakts editing features. The
MICS and PICKUPS tabs are essentially the same, they just provide control
over those two channels separately. So we’ll just cover the controls once.
The first control to take note of is the LINK button at the bottom right. If this
is lit, then whatever you are doing to MICS channel you are also doing to the
PICKUPS channel, and vice versa. Often, this is what you want, but if you
want to be creative and have different filter settings on the PICKUP than on
the MICS channel, for example, then make sure LINK is turned off.
FILTER
The FILTER section above the LINK button provides access to the main filter
controls. The large knob in the middle is CUTOFF, and this adjusts the main
cutoff frequency of the 12 db Low Pass Filter.
SONICCOUTURE ARRAY MBIRA USER GUIDE
www.soniccouture.com email :[email protected]

To the left of CUTOFF you have RES, which is control of the Resonance of
this main filter. To the right of CUTOFF you have ENV, which is control of
the Filter Envelope Depth to that filter. (Note that ENV is bipolar, 0 is at the
top.)
Below CUTOFF you have VEL, which provides control of the velocity to
cutoff depth. Again, this control is bipolar. To its right you have TRACK,
which controls the slope of the filter cutoff keyboard tracking. And to the
left you have HPF, which is a 6 db High Pass Filter. The HPF is not dynamic
and is not affected by the filter envelope, the tracking, or the velocity.
You can bypass the FILTER section entirely with the blue LED at the top of
that section.
EFFECT SENDS
On the left of the FILTER section you have the EFFECT SENDS. There are
three sends, one for each DELAY, REVERB, and PHASER. You can have
different send levels for each of PICKUP or MICS channels so long as the
LINK button is unchecked. (The controls of the effects themselves are on
the EFFECT Tab, which we’ll cover in the next section of this manual.)
You can disable all the sends at once with the blue LED at the top of that
section.
ENVELOPE
The ENVELOPE section controls the Attack, Decay, Sustain, Release, and
Velocity sensitivity of the envelopes. Using the FEG LED you can access
the same controls for the Filter Envelope.
Note that when in FEG (Filter Envelope Generator) mode, the Velocity
Sensitivity is bipolar.
Also note that velocity to FEG depth is not the same as velocity to cutoff.
They have a similar result, but velocity to Cutoff changes the base frequency
of the filter, velocity to FEG depth changes the DEPTH of the filter from the
same base frequency.
SONICCOUTURE ARRAY MBIRA USER GUIDE
www.soniccouture.com email :[email protected]
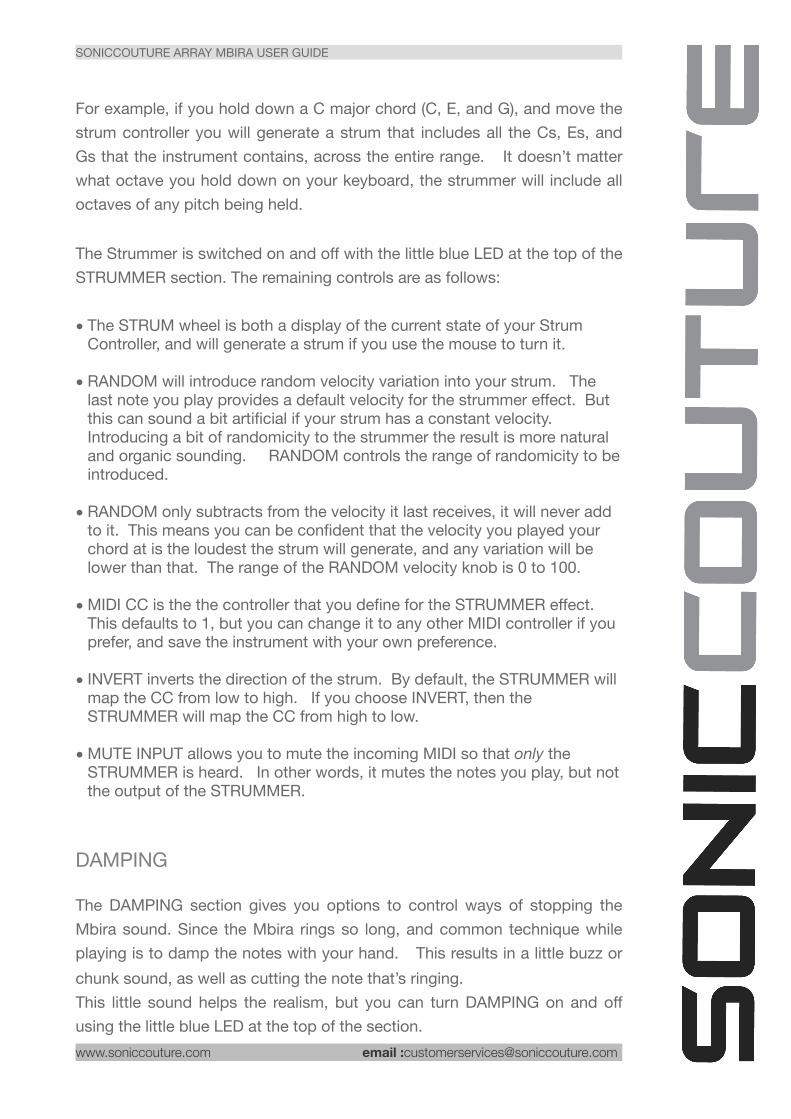
THE EFFECTS TAB
Select the Kontakt tab below the main panel, and the view will change to the
effects panel. All of these effects can be turned on and off with the blue LED
at the top right of their section. N.B. This will save CPU if you turn them
off, especially in the case of the REVERB since we’re using the
Convolution effect.
Again, watch the top right of the panel for a display of numeric values of
settings you make with knobs in this section.
On the next page we’ll run through the functionality of each effect processor.
SONICCOUTURE ARRAY MBIRA USER GUIDE
www.soniccouture.com email :[email protected]

TAPE
TAPE actually is a combination of effects.
DRIVE, the big knob, provides a tape saturation
effect.
COMP provides a little bit of subtle compression,
and the threshold of this compressor is brought
lower as you increase the value of COMP. BASS
is a gain control for a low end EQ.
TAPE WOW, is a subtle (usually) pitch wobbling
effect aimed at simulating an old tape recorder.
The WOW knob gives you control of the depth of
pitch movement, and SPEED gives you control of
the speed of this pitch drifting.
PHASER
The large knob is the RETURN level, since this
Phaser is used as a send. (The send levels are in
the Instrument tab on the MICS and PICKUP
pages.)
You have four smaller knobs to control the
SPEED, DEPTH, FEEDBACK, and PHASE of the
PHASER effect.
If you experience clipped or ‘hot’ levels from the
Mbira instrument, trim down any effects RETURN
knobs that may be active. When all four effects
are running, it can increase the overall gain quite
a lot.
SONICCOUTURE ARRAY MBIRA USER GUIDE
www.soniccouture.com email :[email protected]

DELAY
The large knob is the RETURN level.
You have four smaller knobs to control the TIME,
DAMPING, FEEDBACK, and PAN of the DELAY
effect.
There is also a switch to change between SYNC
delay and free delay.
If you are in SYNC mode, the TIME knob displays
sixteenth note values.
REVERB
The large knob is the RETURN level.
You have two smaller knobs to control the SIZE
and HPF (High Pass Filter) of the REVERB.
The drop down menu gives you a selection of
some of our favourite impulse responses. These
are divided into ‘Rooms’ and ‘SFX’ - the later for
more creative, sound design effects.
If your CPU seems strained when using Mbira,
please turn off REVERB first. The Convolution
effect is the most CPU intensive aspect of the
Mbira instrument. The longer the REVERB
impulse response, the more CPU will be used to process it.
SONICCOUTURE ARRAY MBIRA USER GUIDE
www.soniccouture.com email :[email protected]

THE PRESETSThe Array Mbira Library contains 2 different preset folders ; Natural and
Sound Design. The former contains, as you might expect, different timbres
and combinations of pickups and mic channels, as well as versions
optimised for use as basses, and patches with some subtle reverb and
effects.
The latter, Sound Design, contains some much more unusual, creative
sounds, using the full synthesis functions available in the instrument.
NATURAL
• Array Mbira Natural - FX1.nki• Array Mbira Natural - FX2 Tight.nki• Array Mbira Natural - FX3 Soft.nki• Array Mbira Natural - FX3 Warm.nki• Array Mbira Natural - FX4 Vel Space.nki• Array Mbira Natural (Combi 1).nki• Array Mbira Natural (Combi 2).nki• Array Mbira Natural (Combi 3).nki• Array Mbira Natural (Combi 4).nki• Array Mbira Natural (Mics).nki• Array Mbira Natural (Pickups).nki• Bass ( Combi ).nki• Bass ( Mics ).nki• Bass ( Pickups ).nki• Mbira Mics Natural.nki• Mbira Pickup Natural.nki
SOUND DESIGN
• Abandoned Fairground.nki• Bayaka Arpeggiator.nki• Brian's Church.nki• Chesil Beach 11am.nki• Deep Tank Bass.nki• Double Speed.nki• Dub No Bass With My Thumb Man.nki• Floating Overhead.nki• Half Speed No Release.nki• In Reverse.nki• Karachi Roche.nki• Long Way From Africa.nki
SONICCOUTURE ARRAY MBIRA USER GUIDE
www.soniccouture.com email :[email protected]

• mBira Filters - Lo Mello.nki• mBira Filters - Silver Apple Tree.nki• Night Pulses.nki• Porpoise.nki• Prepared Thumb Piano.nki• Release Pitch Glide.nki• Reversed Samples (Warning 4 GB RAM).nki• Scotts Keyboard.nki• Smeared Bells.nki• Strums Everywhere.nki• Triple Speed.nki
SONICCOUTURE ARRAY MBIRA USER GUIDE
www.soniccouture.com email :[email protected]

SUPPORTIf you have any problems or questions relating to the use of this product,
please feel free to contact us. You can either email us at :
or we have a support forum within the KVR Audio community, which can be
found here :
Soniccouture Support Forum
We will always endeavour to reply to any enquiry within 12 hours, but do
bear in mind the differences in time zones, so please be patient!
SONICCOUTURE ARRAY MBIRA USER GUIDE
www.soniccouture.com email :[email protected]

E.U.L.A.END USER LICENSE AGREEMENT
PREFACE: This End-User License Agreement ("EULA") is a legal agreement
between you and Soniccouture LTD for the Soniccouture product
accompanying this EULA, which includes computer software and may
include associated media, printed materials, and online or electronic
documentation ("Software"). By installing, copying, or using the software,
you agree to be bound by the terms of this EULA. If you do not agree to the
terms of this EULA, you may not use the software.
The software is protected by copyright laws and international copyright
treaties, as well as other intellectual property laws and treaties. The software
is licensed, not sold.
Soniccouture Ltd grants the Owner of a Soniccouture product the right to
create finished musical works and performances using the sounds and
software that comprise the Soniccouture product.
The making of sample libraries in any form, commercial or otherwise,
using Soniccouture audio or software (be they single hits, loops, fully
mixed audio clips, or scripts) is STRICTLY FORBIDDEN without express
written agreement of Soniccouture Ltd, and violations will be prosecuted
to the full extent of international and local copyright law.
The ownership of all title and copyrights in and to the Software (including
but not limited to any images, photographs, animations, video, audio, music,
text, and "applets" incorporated into the Software ) is fully asserted by
Soniccouture Ltd.
The Owner may only install and use Soniccouture libraries and software
on multiple computers strictly under the following conditions: where
multiple computers comprise part of a single composition workstation for
a composer; or where the Owner has two non-concurrent sites of work,
for example a studio desktop and a laptop for live performance.
SONICCOUTURE ARRAY MBIRA USER GUIDE
www.soniccouture.com email :[email protected]

The Owner may not transfer, modify, rent, lease, loan, resell, distribute,
network, electronically transmit or merge the Software.
DISCLAIMER OF WARRANTY: The software is provided "as is" and without
warranty of any kind. The entire risk arising out of the use or performance of
the software and documentation remains with user. To the maximum extent
permitted by applicable law, Soniccouture further disclaims all warranties,
either express or implied, including, but not limited to, implied warranties of
merchantability and fitness for a particular purpose, with regard to the
software, and any accompanying hardware. To the maximum extent
permitted by applicable law, in no event shall Soniccouture be liable for any
consequential, incidental, direct, indirect, special, punitive, or other damages
whatsoever (including, without limitation, damages for loss of business
profits, business interruption, loss of business information, or other
pecuniary loss) arising out of this EULA or the use of or inability to use the
software, even if Soniccouture has been advised of the possibility of such
damages.
SONICCOUTURE ARRAY MBIRA USER GUIDE
www.soniccouture.com email :[email protected]


![Soulbuddies Altdorf · 2019-05-22 · Kalimba, auch Array Mbira genannt, die in Afrika ihren crsprung hat, ES sei ihr Traum gewesen, die KÄ]imba einem Publikum vorzustellen. er-](https://static.fdocuments.in/doc/165x107/5f0f0d497e708231d4424016/soulbuddies-altdorf-2019-05-22-kalimba-auch-array-mbira-genannt-die-in-afrika.jpg)