arm cross development guide -...
27
ARM cross development with GNU Toolchain and Eclipse Version 1.1 embedded development tools
Transcript of arm cross development guide -...
ARM cross development with GNU Toolchain and Eclipse
Version 1.1
embedded development tools
Acknowledgements
ARM cross development www.ronetix.at
2
Ronetix GmbH Waidhausenstrasse 13/5 1140 Vienna Austria Tel: +43-720-500315 +43-1962-720 500315 Fax: +43-1- 8174 955 3464 Internet: www.ronetix.at E-Mail [email protected] Acknowledgments: ARM, ARM7, ARM9, and Thumb are trademarks of ARM Ltd. Windows, Win32, Windows CE are trademarks of Microsoft Corporation. Ethernet is a trademark of XEROX. All other trademarks are trademarks of their respective companies. © 2005-2008 RONETIX All rights reserved.
Change log
ARM cross development www.ronetix.at
3
Change log May 2007 - Updated download links November 2006 - First release
Contents
ARM cross development www.ronetix.at
4
1 INTRODUCTION ..................................................................................................................5
2 PEEDI JTAG EMULATOR INSTALLATION........................................................................6
3 TOOLSET INSTALLATION ON LINUX ...............................................................................7
4 TOOLSET INSTALLATION ON WINDOWS......................................................................11
5 WORKING WITH ECLIPSE................................................................................................12
5.1 Adding a project ...........................................................................................................12
5.2 Configuring and working with the Eclipse built-in debugger ..................................17
5.3 Using Insight debugger as an Eclipse external tool .................................................24
Introduction
ARM cross development www.ronetix.at
5
1 Introduction
This User Manual will show you how to install the GNU Toolchain and Eclipse, how to compile and
debug a simple example using the Ronetix Evaluation board EB9261 with an Atmel AT91SAM9261
and PEEDI JTAG Emulator and Flash Programmer.
The necessary software components for an ARM cross development are:
- GNU toolchain (compiler, linker, gdb)
- Eclipse IDE including Zylin CDT Plug-in for C/C++ development
- Java Runtime
To enable a quick start in the ARM cross development Ronetix provides pre-built packages for Linux
and Windows hosts.
The necessary files for a Linux host are:
- The GNU toolchain:
http://download.ronetix.info/toolchains/arm/ronetix-gnutools-arm-elf-4.1.1-linux.tar.bz2
- The Eclipse IDE: http://download.ronetix.info/eclipse/eclipse.tar.bz2
- A simple example:http://download.ronetix.info/examples/at91sam9261_example_mmu.tar.gz
The necessary file for a Windows host is:
http://download.ronetix.info/toolchains/arm/ronetix-toolset-arm.exe
This is a Windows installer which installs the GNU toolchain, Eclipse IDE + Zylin CDT and Java.
Installation on Linux
ARM cross development www.ronetix.at
6
2 PEEDI JTAG Emulator Installation PEEDI (Powerful Embedded Ethernet Debug Interface) is an EmbeddedICE solution that enables you
to debug software running on ARM processor cores via the JTAG port.
In order to debug you need to configure PEEDI JTAG Emulator. The configuration of PEEDI is
common for both toolchains for Linux and Windows.
You can find detailed information about PEEDI in the PEEDI’s User Manual:
http://download.ronetix.info/peedi/doc/peedi_rev.A_manual.pdf
- Connect PEEDI to a free port of your LAN switch/hub using the supplied UTP patch cable.
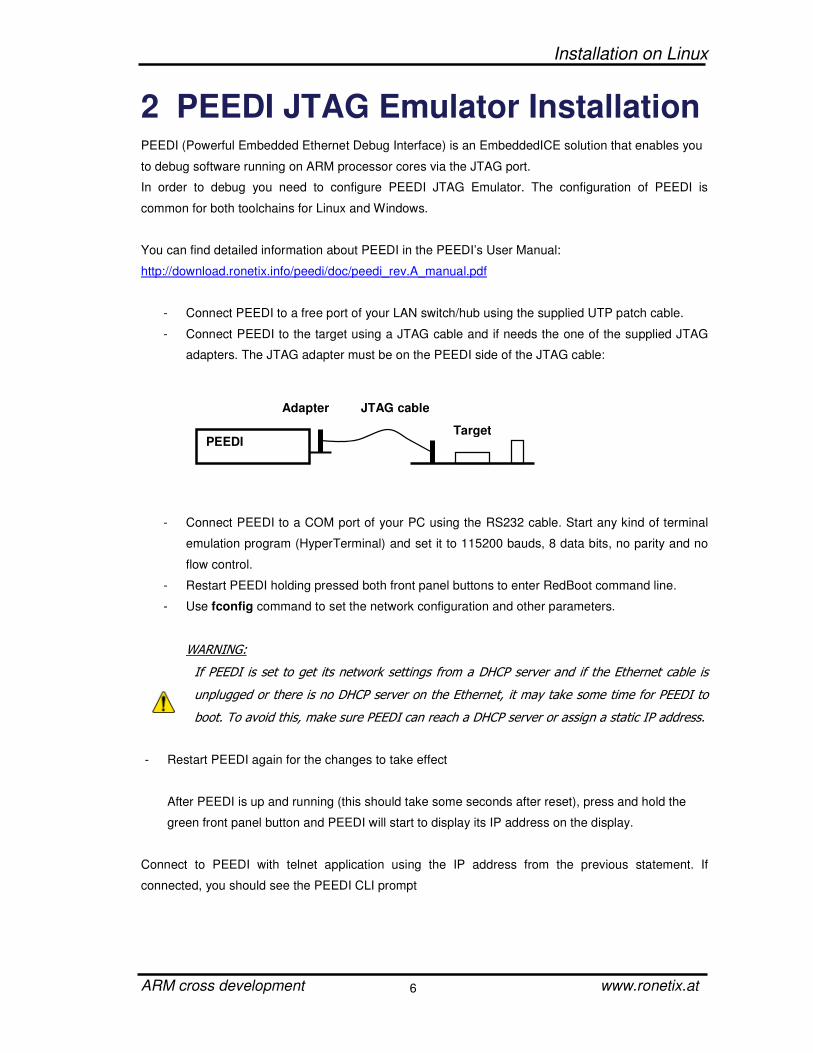
- Connect PEEDI to the target using a JTAG cable and if needs the one of the supplied JTAG
adapters. The JTAG adapter must be on the PEEDI side of the JTAG cable:
- Connect PEEDI to a COM port of your PC using the RS232 cable. Start any kind of terminal
emulation program (HyperTerminal) and set it to 115200 bauds, 8 data bits, no parity and no
flow control.
- Restart PEEDI holding pressed both front panel buttons to enter RedBoot command line.
- Use fconfig command to set the network configuration and other parameters.
WARNING:
If PEEDI is set to get its network settings from a DHCP server and if the Ethernet cable is
unplugged or there is no DHCP server on the Ethernet, it may take some time for PEEDI to
boot. To avoid this, make sure PEEDI can reach a DHCP server or assign a static IP address.
- Restart PEEDI again for the changes to take effect
After PEEDI is up and running (this should take some seconds after reset), press and hold the
green front panel button and PEEDI will start to display its IP address on the display.
Connect to PEEDI with telnet application using the IP address from the previous statement. If
connected, you should see the PEEDI CLI prompt
PEEDI Target
Adapter JTAG cable
Installation on Linux
ARM cross development www.ronetix.at
7
3 Toolset installation on Linux To install the pre-built from Ronetix GNU cross-development tools:
Download the GNU tools form here:
http://download.ronetix.info/toolchains/arm/ronetix-gnutools-arm-elf-4.1.1-linux.tar.bz2
or get it from the CD.
Uncompress the archive Cd / tar xvfj ronetix-gnutools-arm-elf-4.1.1-linux.tar.bz2
The toolchain will be installed in the /usr/cross/arm directory. If want to install the toolset in another
directory make sure you have a symbolic link in the /usr/cross
1. Set a path to the /usr/cross/arm/bin: in the .bashrc file add the following: export PATH=$PATH:/usr/cross/arm/bin
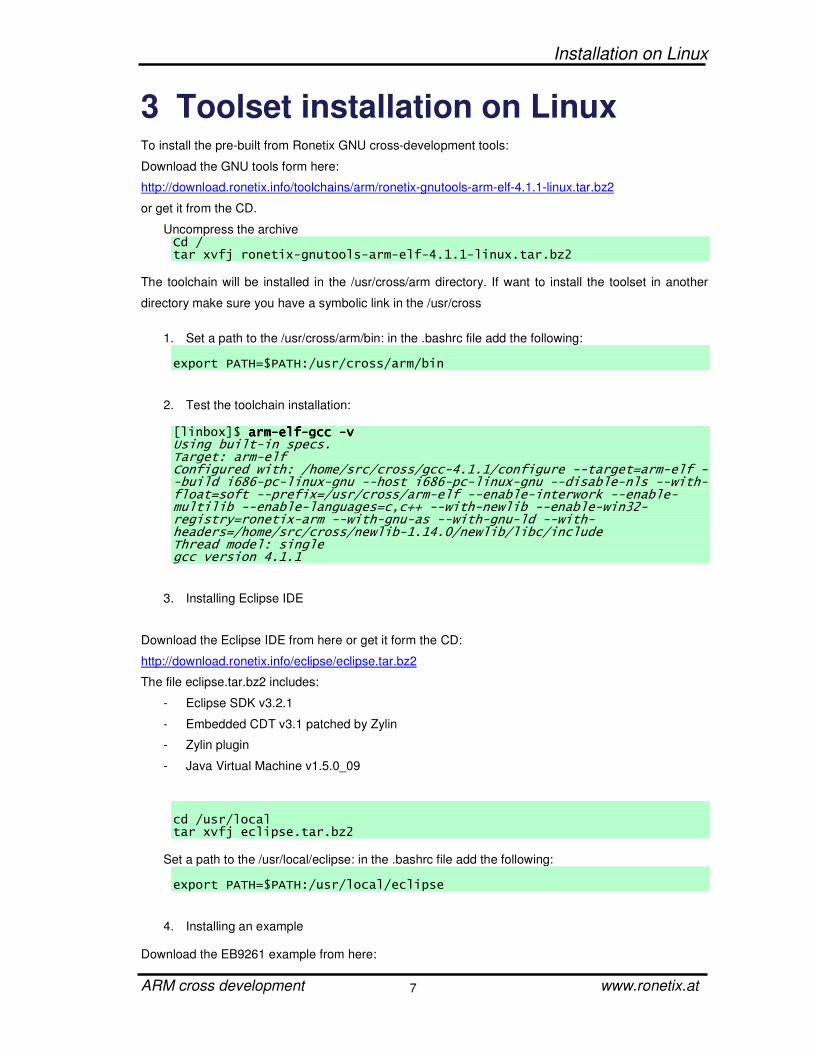
2. Test the toolchain installation:
[linbox]$ armarmarmarm----elfelfelfelf----gcc gcc gcc gcc ----vvvv Using built-in specs. Target: arm-elf Configured with: /home/src/cross/gcc-4.1.1/configure --target=arm-elf --build i686-pc-linux-gnu --host i686-pc-linux-gnu --disable-nls --with-float=soft --prefix=/usr/cross/arm-elf --enable-interwork --enable-multilib --enable-languages=c,c++ --with-newlib --enable-win32-registry=ronetix-arm --with-gnu-as --with-gnu-ld --with-headers=/home/src/cross/newlib-1.14.0/newlib/libc/include Thread model: single gcc version 4.1.1
3. Installing Eclipse IDE
Download the Eclipse IDE from here or get it form the CD:
http://download.ronetix.info/eclipse/eclipse.tar.bz2
The file eclipse.tar.bz2 includes:
- Eclipse SDK v3.2.1
- Embedded CDT v3.1 patched by Zylin
- Zylin plugin
- Java Virtual Machine v1.5.0_09
cd /usr/local tar xvfj eclipse.tar.bz2
Set a path to the /usr/local/eclipse: in the .bashrc file add the following: export PATH=$PATH:/usr/local/eclipse
4. Installing an example Download the EB9261 example from here:
Installation on Linux
ARM cross development www.ronetix.at
8
http://download.ronetix.info/examples/at91sam9261_example_mmu.tar.gz
or get it from the CD.
Cd mkdir work cd work tar xvfz at91sam9261_example_MMU.tar.gz
At this point you should be able to build, debug and run applications on embedded ARM targets.
You can compile and debug the example manual, from the shell prompt or using Eclipse. The working
with Eclipse is explained in “Section 5: Working with Eclipse” from this manual.
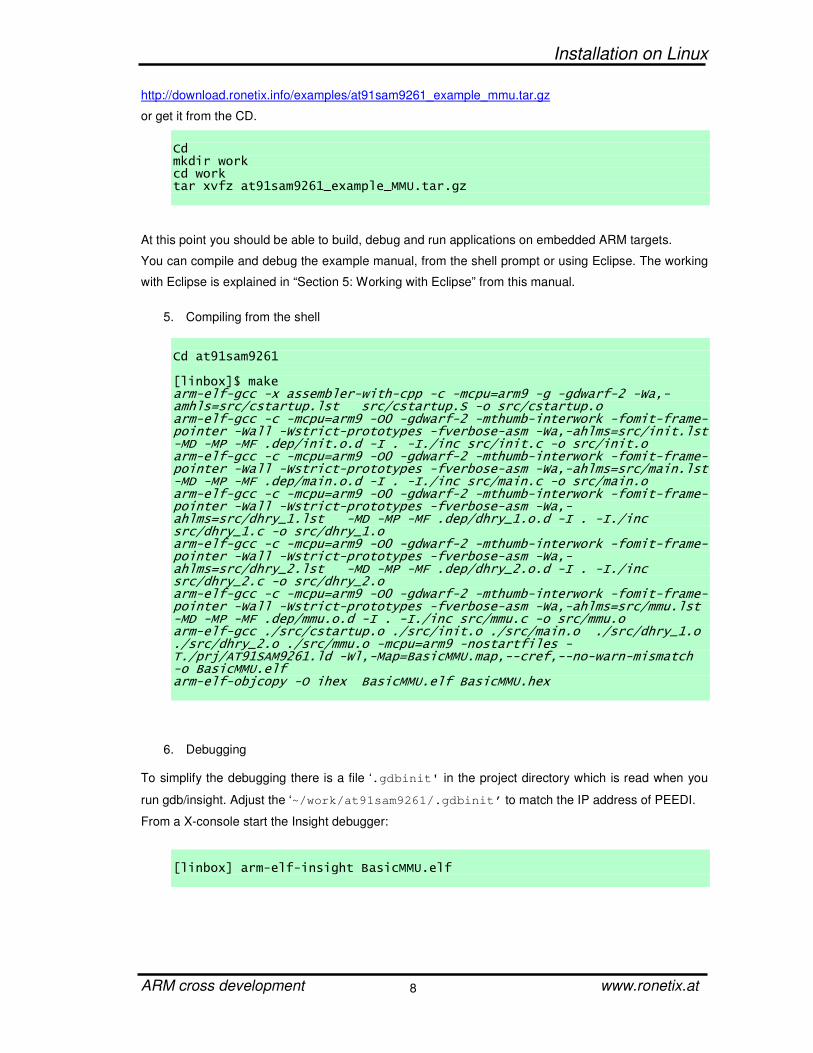
5. Compiling from the shell Cd at91sam9261 [linbox]$ make arm-elf-gcc -x assembler-with-cpp -c -mcpu=arm9 -g -gdwarf-2 -Wa,-amhls=src/cstartup.lst src/cstartup.S -o src/cstartup.o arm-elf-gcc -c -mcpu=arm9 -O0 -gdwarf-2 -mthumb-interwork -fomit-frame-pointer -Wall -Wstrict-prototypes -fverbose-asm -Wa,-ahlms=src/init.lst -MD -MP -MF .dep/init.o.d -I . -I./inc src/init.c -o src/init.o arm-elf-gcc -c -mcpu=arm9 -O0 -gdwarf-2 -mthumb-interwork -fomit-frame-pointer -Wall -Wstrict-prototypes -fverbose-asm -Wa,-ahlms=src/main.lst -MD -MP -MF .dep/main.o.d -I . -I./inc src/main.c -o src/main.o arm-elf-gcc -c -mcpu=arm9 -O0 -gdwarf-2 -mthumb-interwork -fomit-frame-pointer -Wall -Wstrict-prototypes -fverbose-asm -Wa,-ahlms=src/dhry_1.lst -MD -MP -MF .dep/dhry_1.o.d -I . -I./inc src/dhry_1.c -o src/dhry_1.o arm-elf-gcc -c -mcpu=arm9 -O0 -gdwarf-2 -mthumb-interwork -fomit-frame-pointer -Wall -Wstrict-prototypes -fverbose-asm -Wa,-ahlms=src/dhry_2.lst -MD -MP -MF .dep/dhry_2.o.d -I . -I./inc src/dhry_2.c -o src/dhry_2.o arm-elf-gcc -c -mcpu=arm9 -O0 -gdwarf-2 -mthumb-interwork -fomit-frame-pointer -Wall -Wstrict-prototypes -fverbose-asm -Wa,-ahlms=src/mmu.lst -MD -MP -MF .dep/mmu.o.d -I . -I./inc src/mmu.c -o src/mmu.o arm-elf-gcc ./src/cstartup.o ./src/init.o ./src/main.o ./src/dhry_1.o ./src/dhry_2.o ./src/mmu.o -mcpu=arm9 -nostartfiles -T./prj/AT91SAM9261.ld -Wl,-Map=BasicMMU.map,--cref,--no-warn-mismatch -o BasicMMU.elf arm-elf-objcopy -O ihex BasicMMU.elf BasicMMU.hex
6. Debugging
To simplify the debugging there is a file ‘.gdbinit' in the project directory which is read when you
run gdb/insight. Adjust the ‘~/work/at91sam9261/.gdbinit’ to match the IP address of PEEDI.
From a X-console start the Insight debugger:
[linbox] arm-elf-insight BasicMMU.elf
Installation on Linux
ARM cross development www.ronetix.at
9
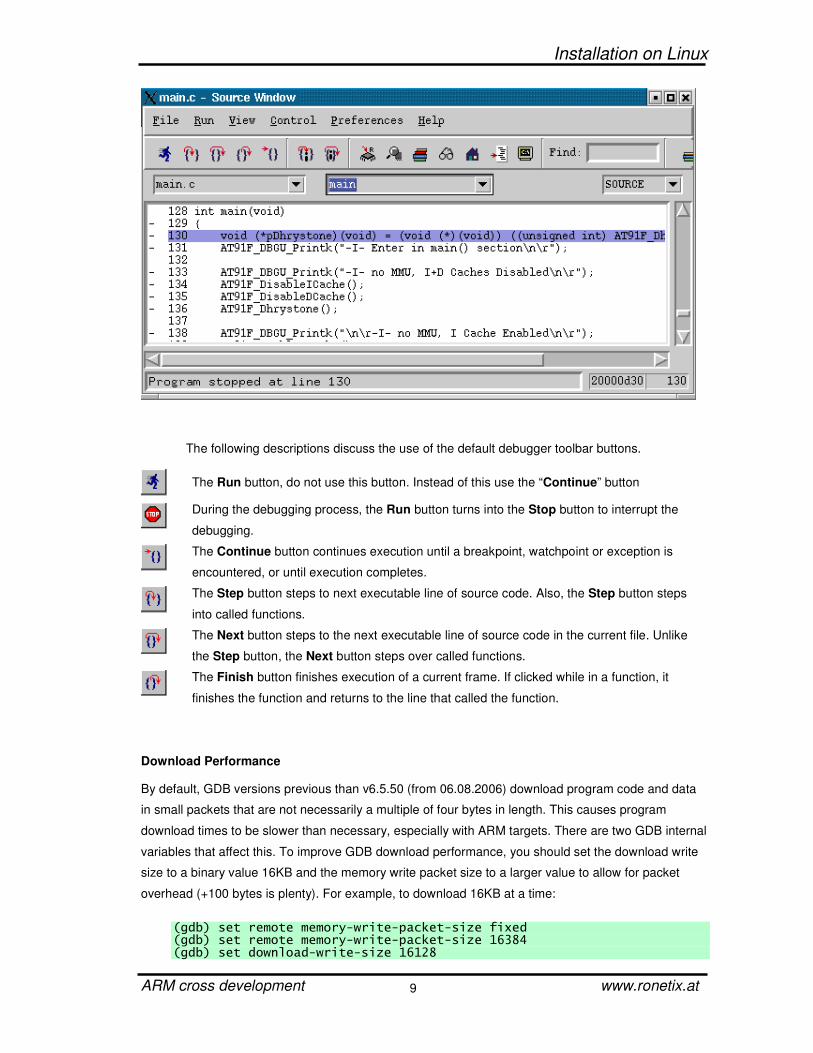
The following descriptions discuss the use of the default debugger toolbar buttons.
The Run button, do not use this button. Instead of this use the “Continue” button
During the debugging process, the Run button turns into the Stop button to interrupt the
debugging.
The Continue button continues execution until a breakpoint, watchpoint or exception is
encountered, or until execution completes.
The Step button steps to next executable line of source code. Also, the Step button steps
into called functions.
The Next button steps to the next executable line of source code in the current file. Unlike
the Step button, the Next button steps over called functions.
The Finish button finishes execution of a current frame. If clicked while in a function, it
finishes the function and returns to the line that called the function.
Download Performance By default, GDB versions previous than v6.5.50 (from 06.08.2006) download program code and data
in small packets that are not necessarily a multiple of four bytes in length. This causes program
download times to be slower than necessary, especially with ARM targets. There are two GDB internal
variables that affect this. To improve GDB download performance, you should set the download write
size to a binary value 16KB and the memory write packet size to a larger value to allow for packet
overhead (+100 bytes is plenty). For example, to download 16KB at a time:
(gdb) set remote memory-write-packet-size fixed (gdb) set remote memory-write-packet-size 16384 (gdb) set download-write-size 16128
Installation on Linux
ARM cross development www.ronetix.at
10
Note:
No error is returned to GDB in case of an invalid 4 byte memory read access during
a period defined by GDB_READ_INGNORE_TIME in the target configuration
file. This is because GDB refuses to connect to the target if it gets an error during
this connection sequence. GDB tries to read the stack frame during the connection
sequence and this may lead to invalid memory access.
Installation on Windows
ARM cross development www.ronetix.at
11
4 Toolset installation on Windows
Please download the GNU toolchain installer from our web site, launch it and follow the instructions.
http://download.ronetix.info/toolchains/arm/ronetix-toolset-arm.exe
The setup will install:
By default, the installer provided by Ronetix installs everything necessary for developing. This
includes:
• arm-elf GNU tools (compiler, linker, and debugger)
• Eclipse IDE v3.2.1 and Zylin CDT plug-in
• Java run-time environment for the Eclipse
• ready-to-build examples
• a free TFTP server
Working with Eclipse
ARM cross development www.ronetix.at
12
5 Working with Eclipse
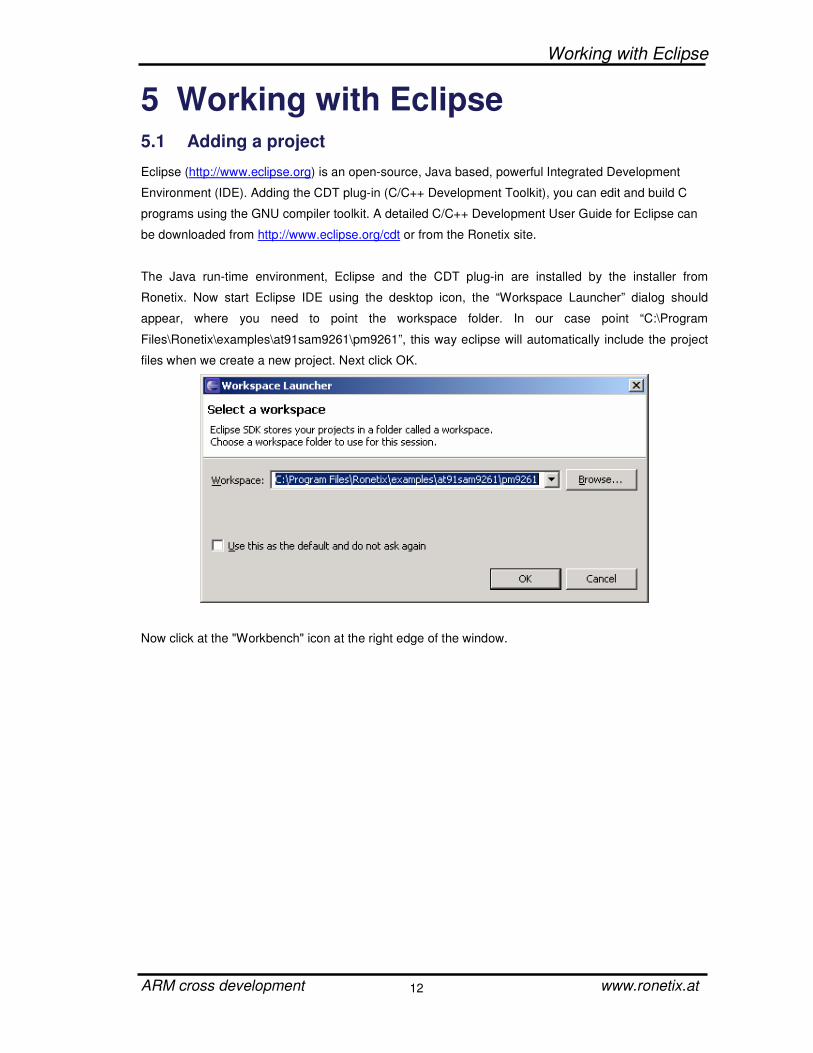
5.1 Adding a project Eclipse (http://www.eclipse.org) is an open-source, Java based, powerful Integrated Development
Environment (IDE). Adding the CDT plug-in (C/C++ Development Toolkit), you can edit and build C
programs using the GNU compiler toolkit. A detailed C/C++ Development User Guide for Eclipse can
be downloaded from http://www.eclipse.org/cdt or from the Ronetix site.
The Java run-time environment, Eclipse and the CDT plug-in are installed by the installer from
Ronetix. Now start Eclipse IDE using the desktop icon, the “Workspace Launcher” dialog should
appear, where you need to point the workspace folder. In our case point “C:\Program
Files\Ronetix\examples\at91sam9261\pm9261”, this way eclipse will automatically include the project
files when we create a new project. Next click OK.
Now click at the "Workbench" icon at the right edge of the window.

Working with Eclipse
ARM cross development www.ronetix.at
13
The next window will look like:
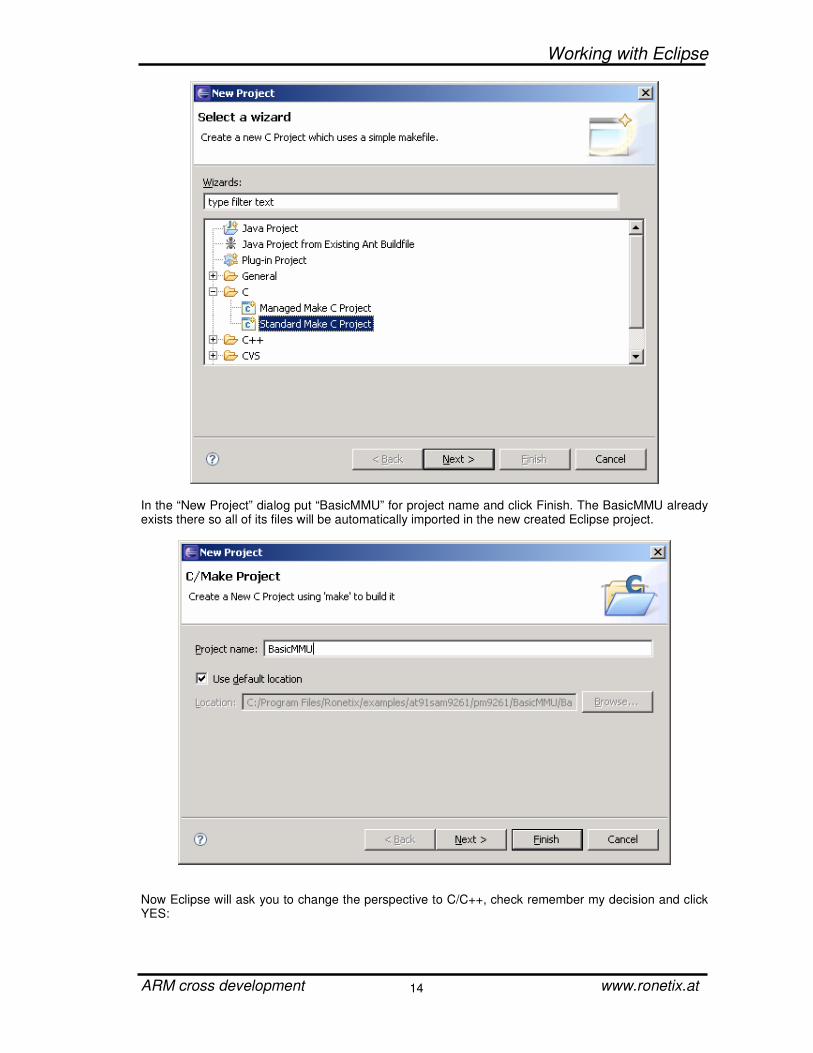
Now you need to add as projects the pm9261 example. Click File->New->Project. In the New Project dialog select Standard Make C Project and click Next:
Working with Eclipse
ARM cross development www.ronetix.at
14
In the “New Project” dialog put “BasicMMU” for project name and click Finish. The BasicMMU already exists there so all of its files will be automatically imported in the new created Eclipse project.
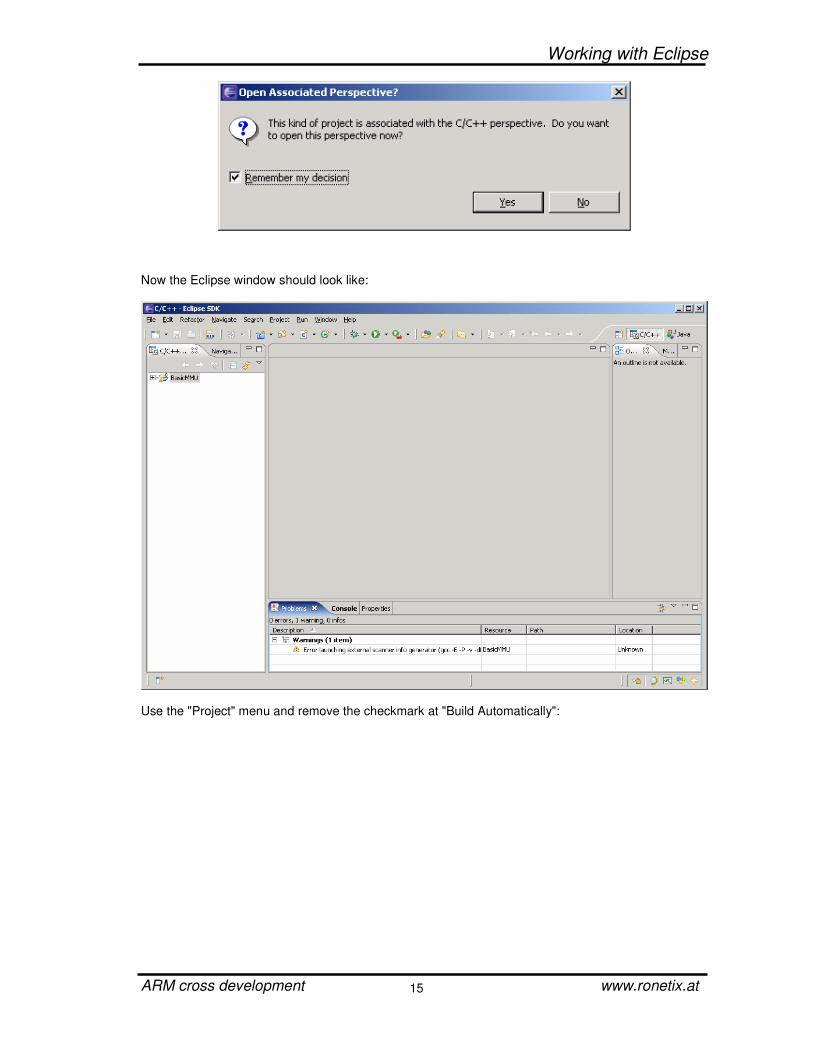
Now Eclipse will ask you to change the perspective to C/C++, check remember my decision and click YES:
Working with Eclipse
ARM cross development www.ronetix.at
15
Now the Eclipse window should look like:
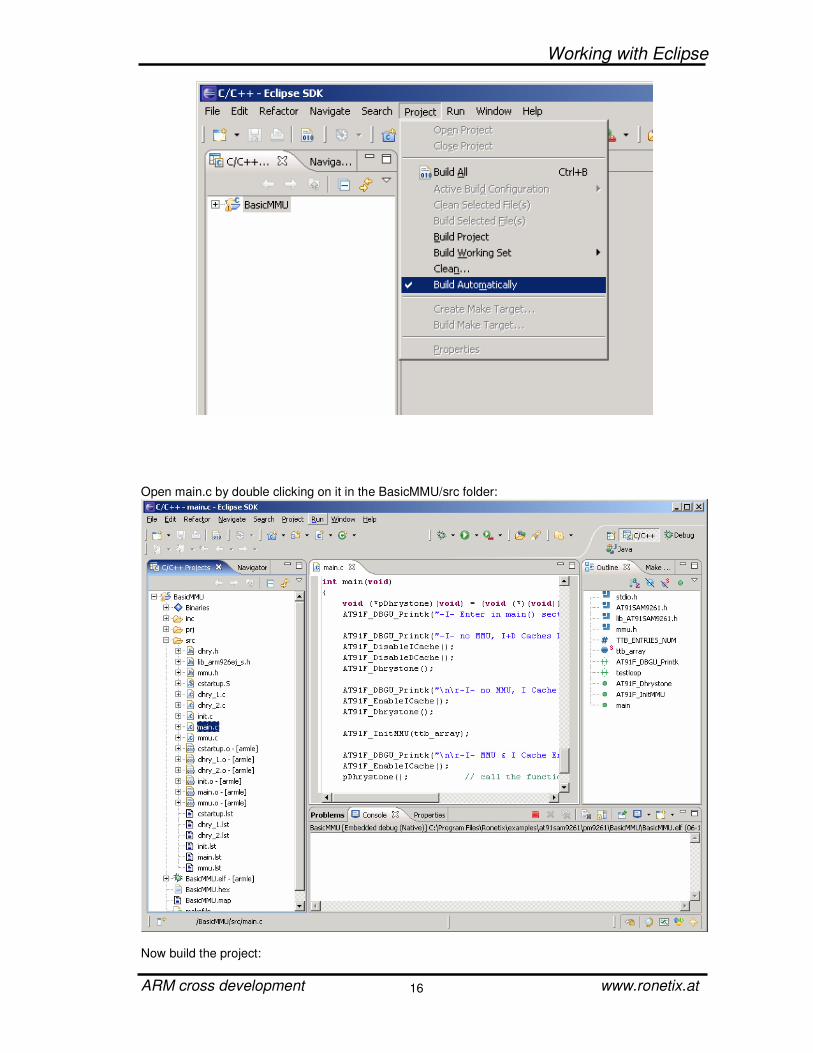
Use the "Project" menu and remove the checkmark at "Build Automatically":
Working with Eclipse
ARM cross development www.ronetix.at
16
Open main.c by double clicking on it in the BasicMMU/src folder:
Now build the project:
Working with Eclipse
ARM cross development www.ronetix.at
17
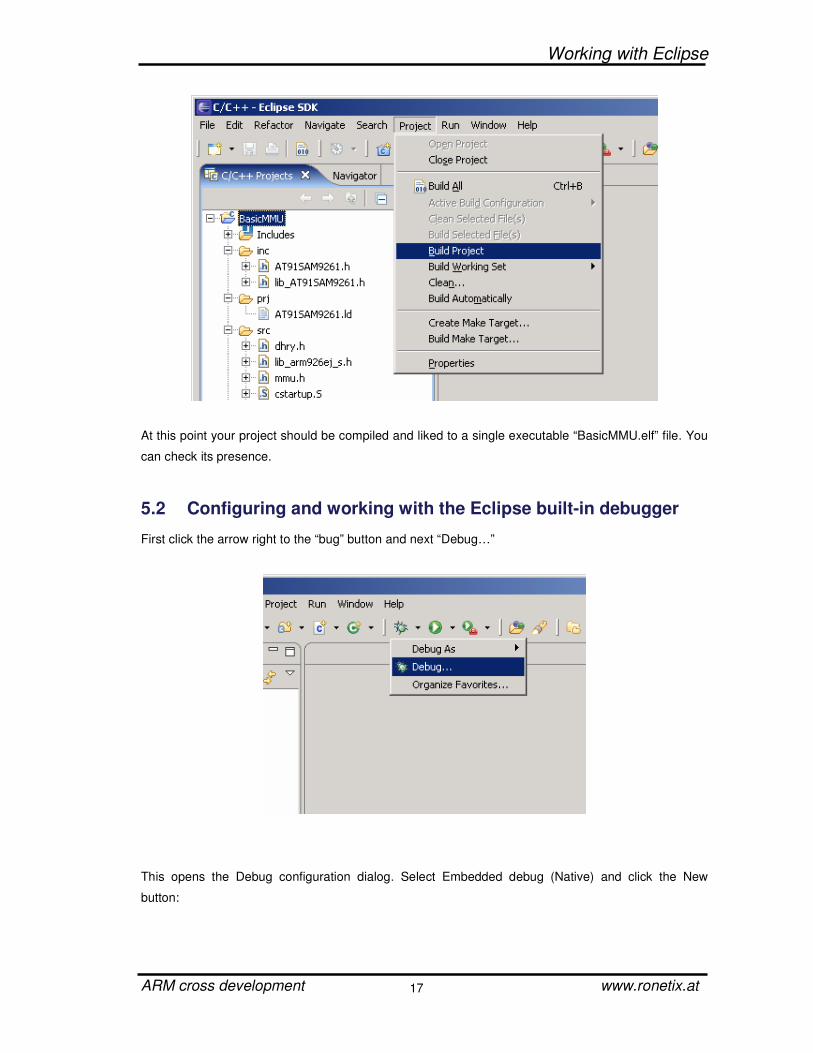
At this point your project should be compiled and liked to a single executable “BasicMMU.elf” file. You
can check its presence.
5.2 Configuring and working with the Eclipse built-in debugger First click the arrow right to the “bug” button and next “Debug…”
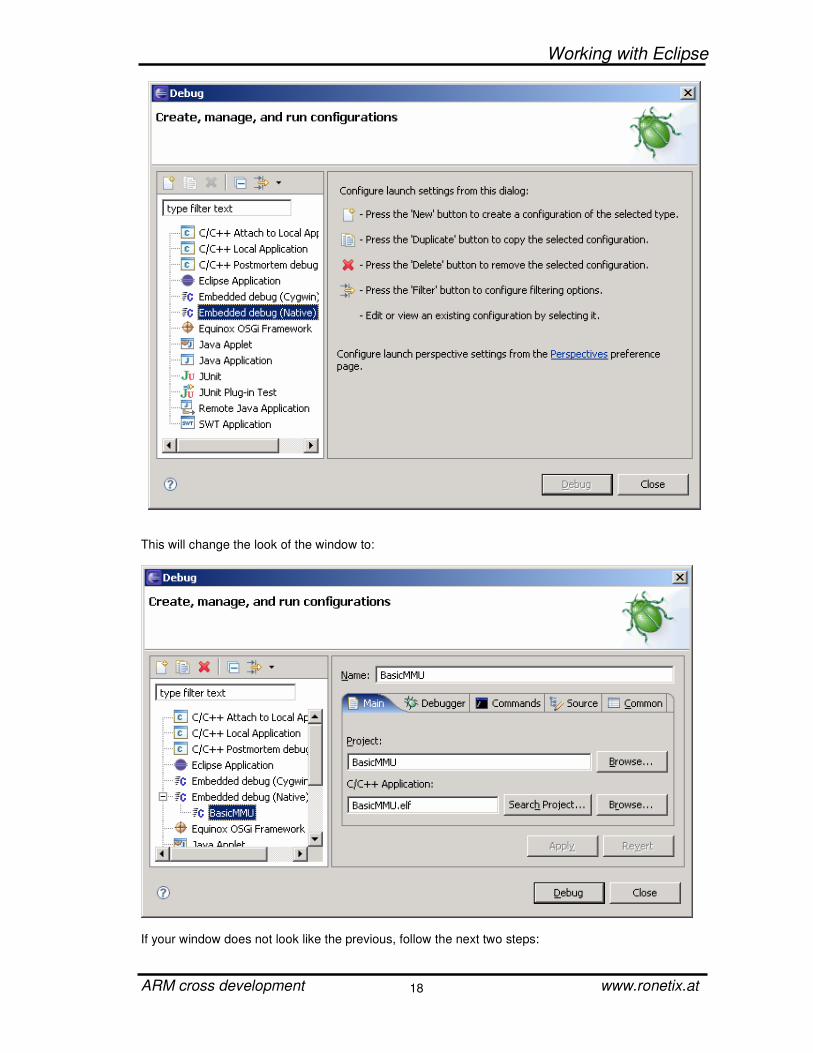
This opens the Debug configuration dialog. Select Embedded debug (Native) and click the New
button:
Working with Eclipse
ARM cross development www.ronetix.at
18
This will change the look of the window to:
If your window does not look like the previous, follow the next two steps:
Working with Eclipse
ARM cross development www.ronetix.at
19
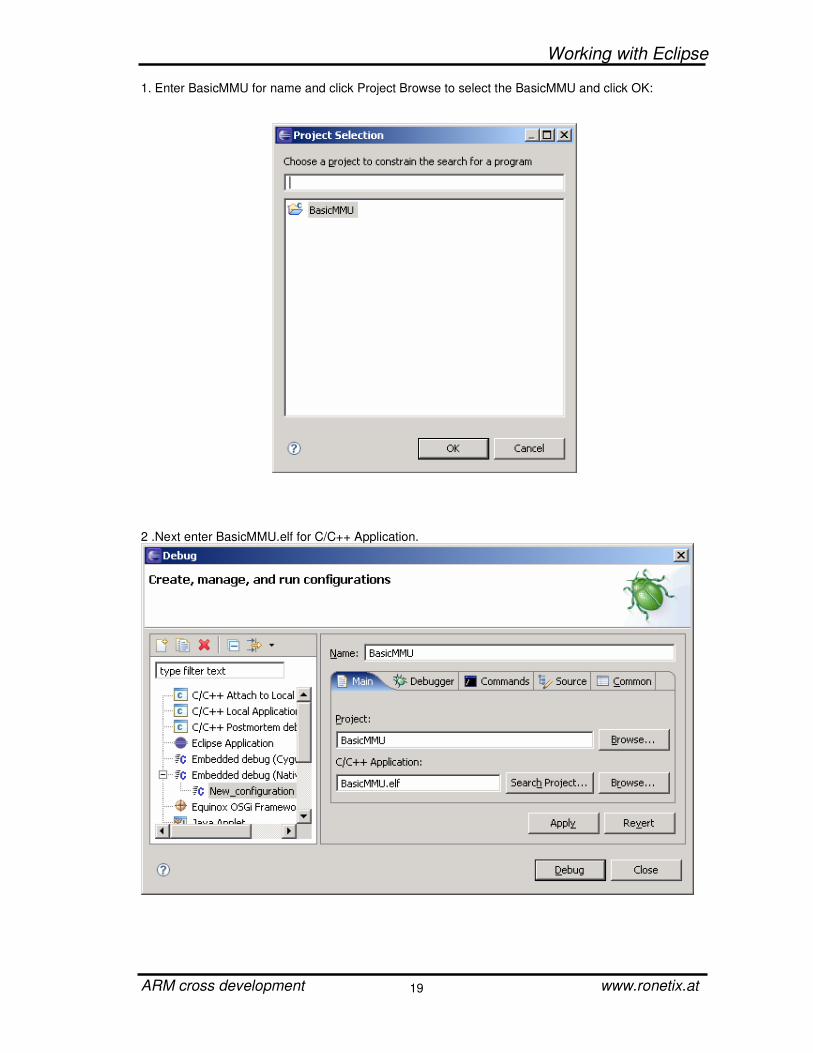
1. Enter BasicMMU for name and click Project Browse to select the BasicMMU and click OK:
2 .Next enter BasicMMU.elf for C/C++ Application.
Working with Eclipse
ARM cross development www.ronetix.at
20
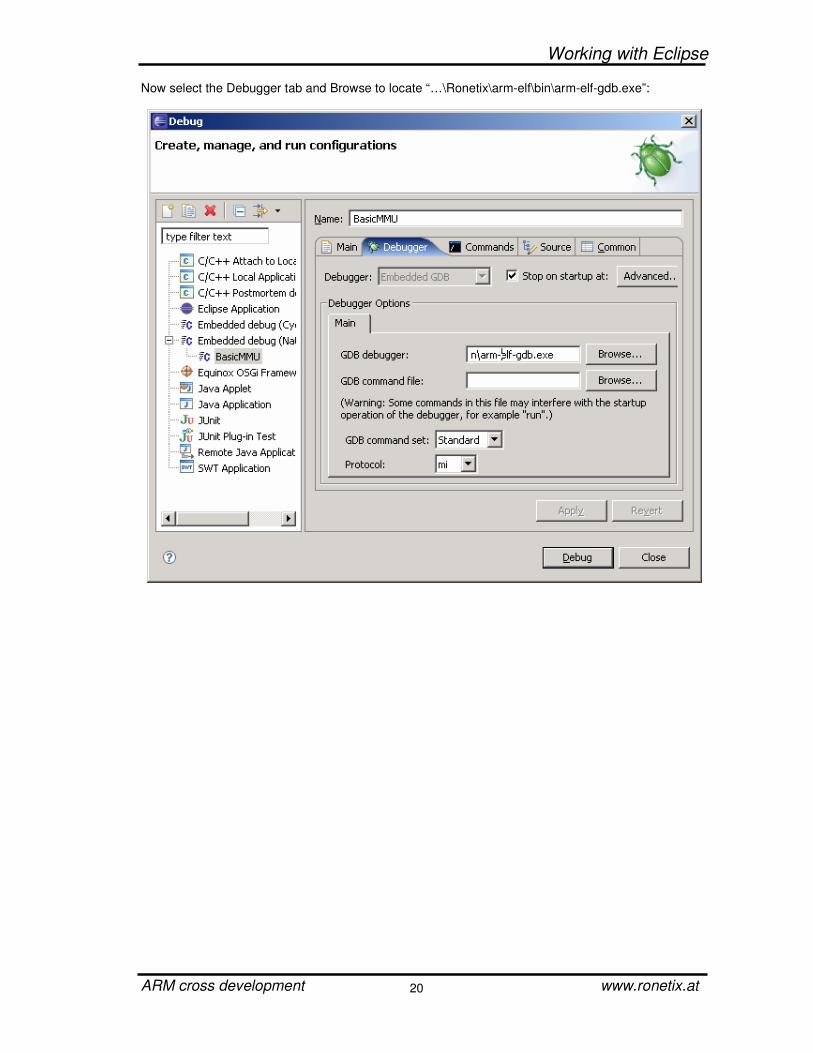
Now select the Debugger tab and Browse to locate “…\Ronetix\arm-elf\bin\arm-elf-gdb.exe”:
Working with Eclipse
ARM cross development www.ronetix.at
21
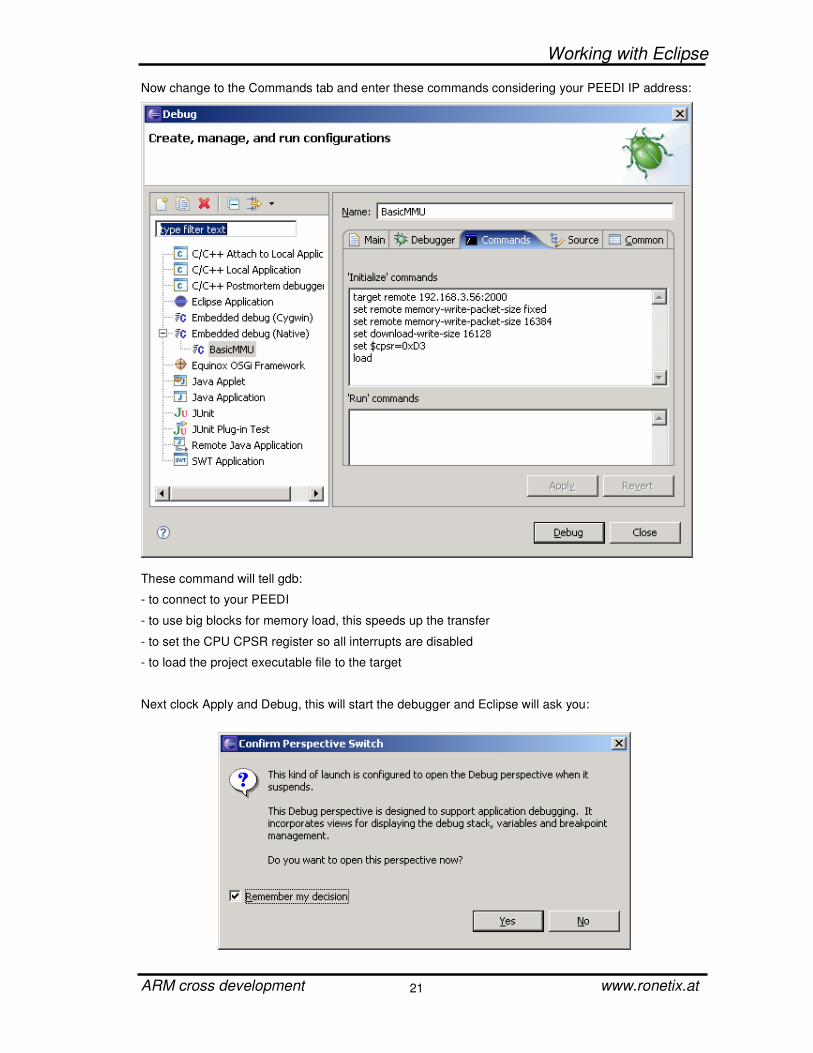
Now change to the Commands tab and enter these commands considering your PEEDI IP address:
These command will tell gdb:
- to connect to your PEEDI
- to use big blocks for memory load, this speeds up the transfer
- to set the CPU CPSR register so all interrupts are disabled
- to load the project executable file to the target
Next clock Apply and Debug, this will start the debugger and Eclipse will ask you:
Working with Eclipse
ARM cross development www.ronetix.at
22
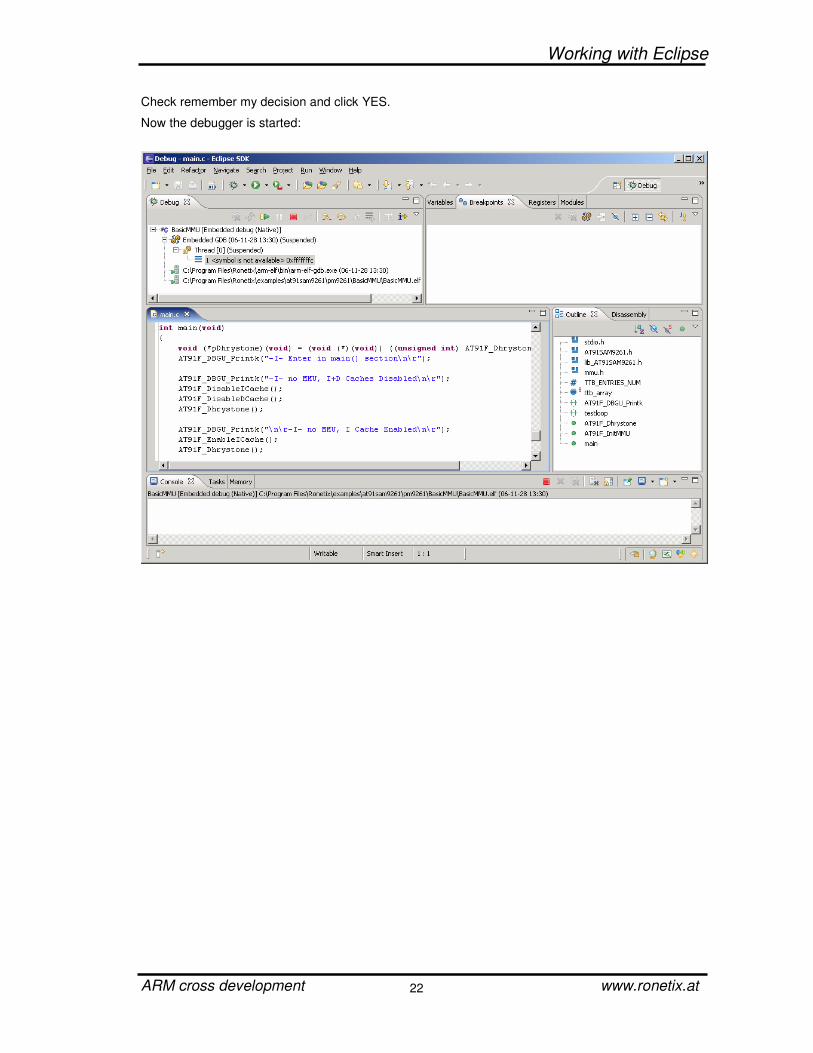
Check remember my decision and click YES.
Now the debugger is started:
Working with Eclipse
ARM cross development www.ronetix.at
23
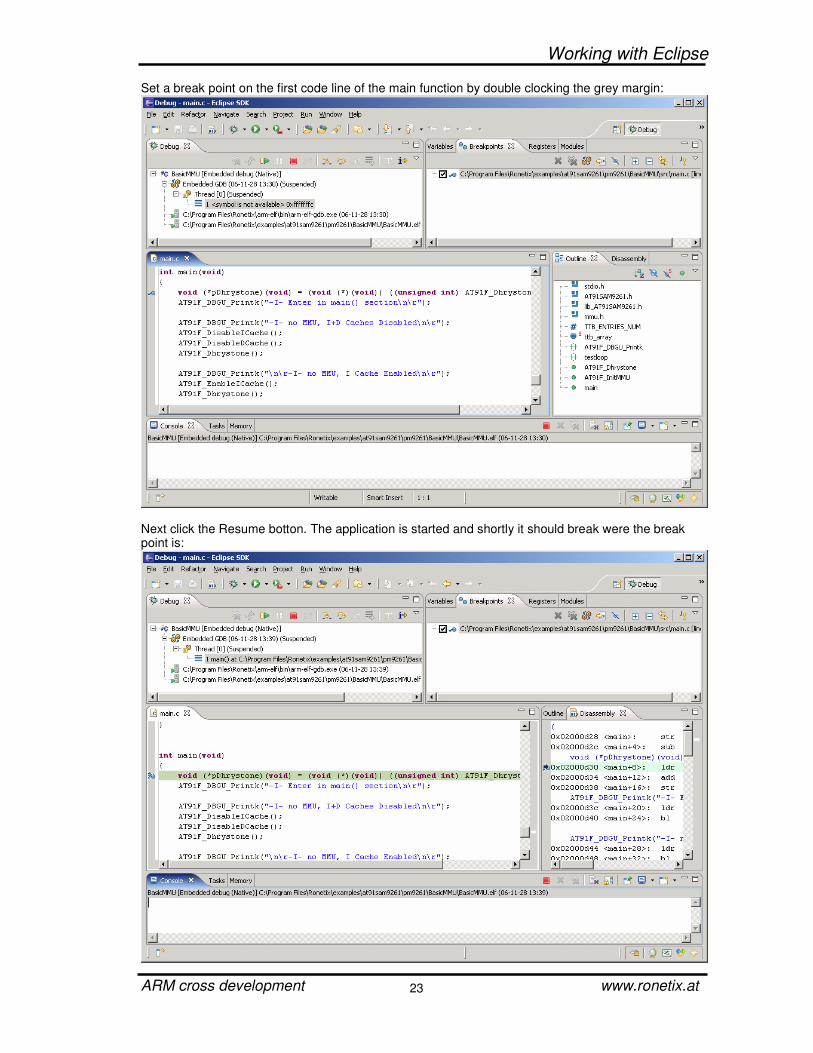
Set a break point on the first code line of the main function by double clocking the grey margin:
Next click the Resume botton. The application is started and shortly it should break were the break point is:
Working with Eclipse
ARM cross development www.ronetix.at
24
At this point you can continue debugging, i.e. step, put breaks, resume, etc.
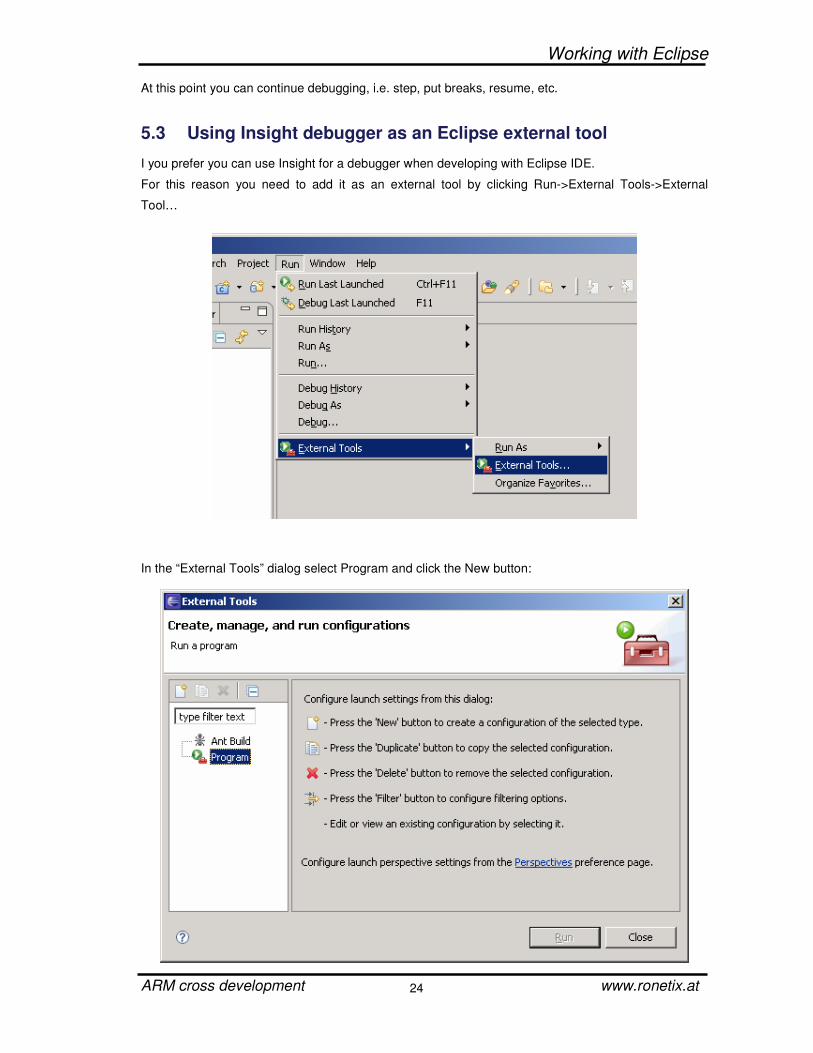
5.3 Using Insight debugger as an Eclipse external tool I you prefer you can use Insight for a debugger when developing with Eclipse IDE.
For this reason you need to add it as an external tool by clicking Run->External Tools->External
Tool…
In the “External Tools” dialog select Program and click the New button:
Working with Eclipse
ARM cross development www.ronetix.at
25
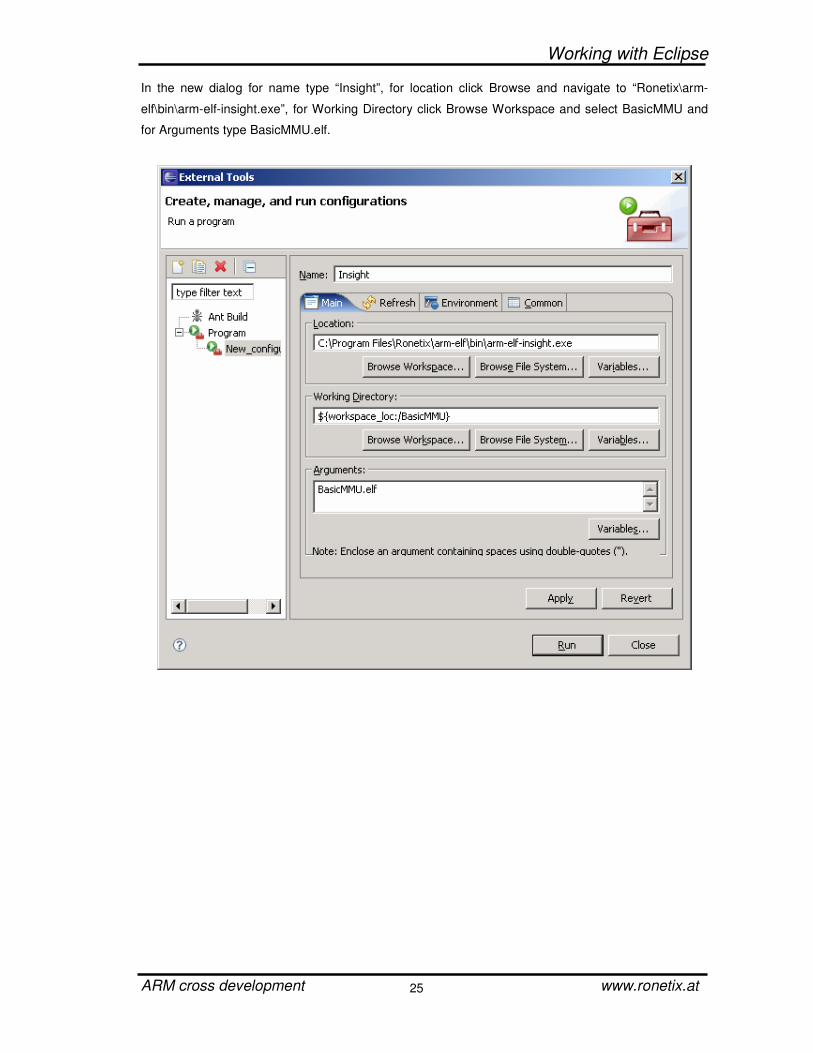
In the new dialog for name type “Insight”, for location click Browse and navigate to “Ronetix\arm-
elf\bin\arm-elf-insight.exe”, for Working Directory click Browse Workspace and select BasicMMU and
for Arguments type BasicMMU.elf.
Working with Eclipse
ARM cross development www.ronetix.at
26
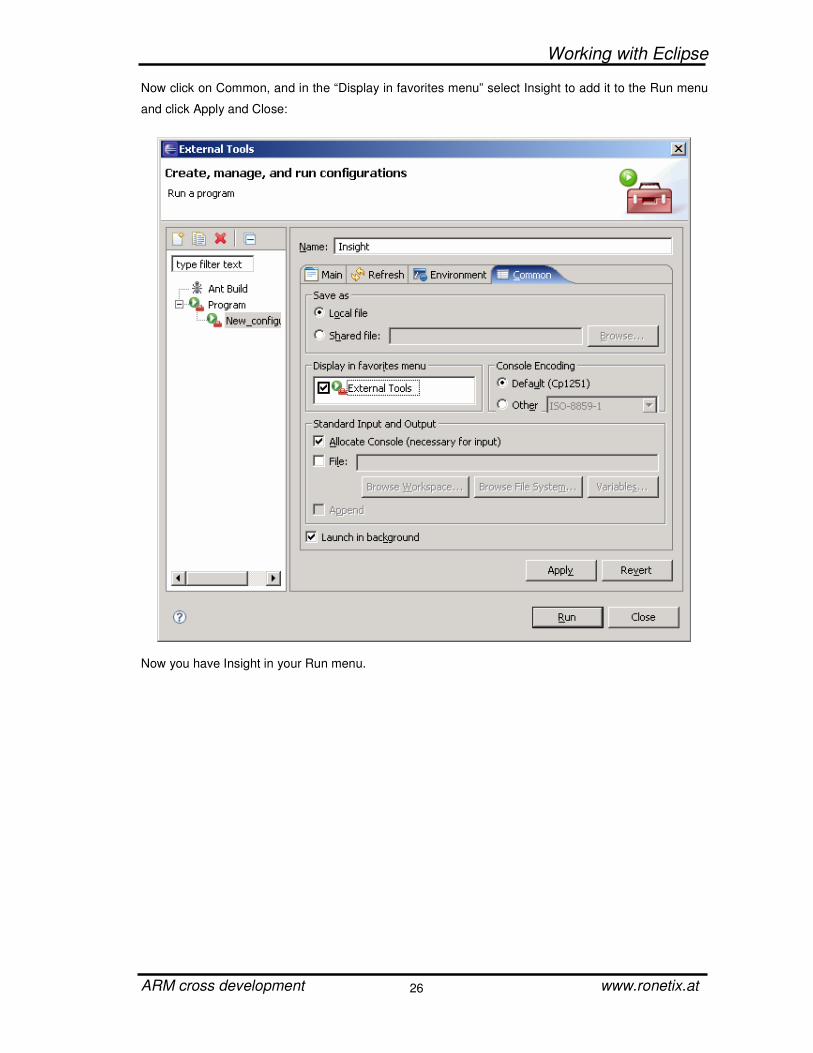
Now click on Common, and in the “Display in favorites menu” select Insight to add it to the Run menu
and click Apply and Close:
Now you have Insight in your Run menu.
Working with Eclipse
ARM cross development www.ronetix.at
27
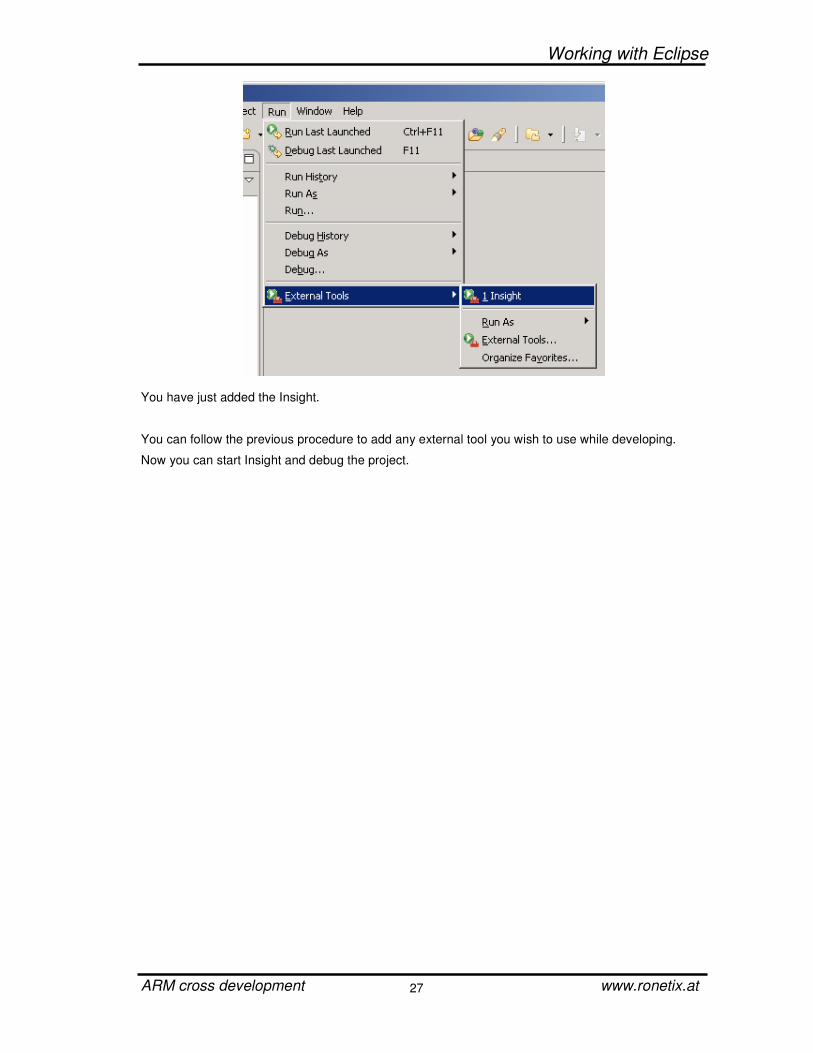
You have just added the Insight.
You can follow the previous procedure to add any external tool you wish to use while developing.
Now you can start Insight and debug the project.