Arduino Manager - · PDF fileArduino Manager is an app to control your Arduino board and...
74
Transcript of Arduino Manager - · PDF fileArduino Manager is an app to control your Arduino board and...

Arduino Manager Fabrizio Boco
Version: 1.9.1 2/74
Disclaimer
IOSController library, IOSControllerWiFi library, IOSControllerBLE library (“The Software”) and the related documentation (“The Documentation”) are supplied to you by the Author in consideration of your agreement to the following terms, and your use or installation of The Software and the use of The Documentation constitutes acceptance of these terms. If you do not agree with these terms, please do not use or install The Software. The Author grants you a personal, non-exclusive license, under author's copyrights in this original software, to use The Software. Except as expressly stated in this notice, no other rights or licenses, express or implied, are granted by the Author, including but not limited to any patent rights that may be infringed by your derivative works or by other works in which The Software may be incorporated.
The Software and the Documentation are provided by the Author on an "AS IS" basis. THE AUTHOR MAKES NO WARRANTIES, EXPRESS OR IMPLIED, INCLUDING WITHOUT LIMITATION THE IMPLIED WARRANTIES OF NON-INFRINGEMENT, MERCHANTABILITY AND FITNESS FOR A PARTICULAR PURPOSE, REGARDING THE SOFTWARE OR ITS USE AND OPERATION ALONE OR IN COMBINATION WITH YOUR PRODUCTS.
IN NO EVENT SHALL THE AUTHOR BE LIABLE FOR ANY SPECIAL, INDIRECT, INCIDENTAL OR CONSEQUENTIAL DAMAGES (INCLUDING, BUT NOT LIMITED TO, PROCUREMENT OF SUBSTITUTE GOODS OR SERVICES; LOSS OF USE, DATA, OR PROFITS; OR BUSINESS INTERRUPTION) ARISING IN ANY WAY OUT OF THE USE, REPRODUCTION AND MODIFICATION OF THE SOFTWARE AND OR OF THE DOCUMENTATION, HOWEVER CAUSED AND WHETHER UNDER THEORY OF CONTRACT, TORT (INCLUDING NEGLIGENCE), STRICT LIABILITY OR OTHERWISE, EVEN IF THE AUTHOR HAS BEEN ADVISED OF THE POSSIBILITY OF SUCH DAMAGE.
Credits
Arduino Manager uses the following additional software:
• LGViewHUD (https://github.com/y0n3l/LGViewHUD)
• DCControls (https://github.com/domesticcatsoftware/DCControls)
• GCDAsyncSocket (https://github.com/robbiehanson/CocoaAsyncSocket)
Sound from Mike Koenig (http://soundbible.com) under Attribution 3.0 license.
Many thanks to the authors for the valuable work they did.

Version: 2.0 3/74
Index
1 What is Arduino Manager ............................................................................................................................... 6 1.1 SD Management changes from version 2.0 ................................................................................................ 8 1.2 Display Widget – How to use it ................................................................................................................... 9 1.3 Led Widget – How to use it ....................................................................................................................... 10 1.4 Switch & LED Widget – How to use it ....................................................................................................... 10 1.5 Graph Widget – How to use it ................................................................................................................... 11 1.6 Logged Data Graph Widget – How to use it ............................................................................................. 12 1.7 Alarm Widget – How to use it .................................................................................................................... 15 1.8 Threshold Widget – How to use it ............................................................................................................. 16 1.9 Alarm Sound Widget – How to use it ........................................................................................................ 17 1.10 Rover Controller Widget – How to use it ................................................................................................. 18 1.11 Console Widget – How to use it .............................................................................................................. 19 1.12 Sharing Widget Configuration ................................................................................................................. 19
2 Arduino Manager and Ethernet Shield for impatient ................................................................................. 21 2.1 Step 1 - Test Circuit .................................................................................................................................. 21 2.2 Step 2 – Install IOSController Library ....................................................................................................... 23 2.3 Step 3 – Arduino Ethernet Shield .............................................................................................................. 25 2.4 Step 4 – Install the test sketch .................................................................................................................. 25 2.5 Step 5 – Connect Arduino Manager to the board ..................................................................................... 26 2.6 Step 6 – Configure Arduino Manager ....................................................................................................... 26 2.7 Step 7 – Move a Widget ............................................................................................................................ 27 2.8 Step 8 – Delete a Widget .......................................................................................................................... 28
3 Arduino Manager and WiFi Shield for impatient ........................................................................................ 29 3.1 Step 1 - Test Circuit .................................................................................................................................. 29 3.2 Step 2 - Install WiFi Library ....................................................................................................................... 29 3.3 Step 3 - Install IOSControllerWiFi Library ................................................................................................. 30 3.4 Step 4 – Arduino WiFi Shield .................................................................................................................... 31 3.5 Step 5 - Install the test sketch ................................................................................................................... 31 3.6 Step 6 – Other steps ................................................................................................................................. 32
4 Arduino Manager and RedBearLab BLE Shield for impatient .................................................................. 33 4.1 Step 1 – Test Circuit ................................................................................................................................. 33 4.2 Step 2 – Install BLE Library ...................................................................................................................... 35 4.3 Step 3 – Install IOSControllerBLE Library ................................................................................................. 36 4.4 Step 4 – RedBearLab BLE Shield ............................................................................................................. 36

Version: 2.0 4/74
4.5 Step 5 – Install the test sketch .................................................................................................................. 37 4.6 Step 6 - Connect Arduino Manager to the board ...................................................................................... 37 4.7 Step 7 – Configure Arduino Manager ....................................................................................................... 37 4.8 Step 8 – Move a Widget ............................................................................................................................ 38 4.9 Step 9 - Delete a Widget ........................................................................................................................... 38
5 Development Manual IOSController ............................................................................................................ 39 5.1 IOSController Library ................................................................................................................................ 39 5.2 How to reduce Library memory occupation .............................................................................................. 39 5.3 Available Functions ................................................................................................................................... 40
5.3.1 IOSController .............................................................................................................................................. 40 5.3.2 IOSController .............................................................................................................................................. 41 5.3.3 loop ............................................................................................................................................................. 42 5.3.4 writeMessage .............................................................................................................................................. 42 5.3.5 writeTxtMessage ......................................................................................................................................... 43 5.3.6 temporaryDigitalWrite ................................................................................................................................. 43 5.3.7 sendFileList ................................................................................................................................................. 43 5.3.8 sendFile ...................................................................................................................................................... 44 5.3.9 setNTPServerAddress ................................................................................................................................ 44 5.3.10 log .............................................................................................................................................................. 44 5.3.11 logLn .......................................................................................................................................................... 45 5.3.12 sdLogLabels ............................................................................................................................................... 45 5.3.13 sdLog ......................................................................................................................................................... 47 5.3.14 now ............................................................................................................................................................ 48
5.4 Sketch skeleton for IOSController support ................................................................................................ 49 6 Development Manual IOSControllerWiFi .................................................................................................... 53
6.1 IOSControllerWiFi Library ......................................................................................................................... 53 6.2 How to reduce Library memory occupation .............................................................................................. 53 6.3 Available Functions ................................................................................................................................... 54
6.3.1 IOSControllerWiFi ....................................................................................................................................... 54 6.3.2 IOSControllerWiFi ....................................................................................................................................... 55 6.3.3 loop ............................................................................................................................................................. 56 6.3.4 writeMessage .............................................................................................................................................. 56 6.3.5 writeTxtMessage ......................................................................................................................................... 56 6.3.6 temporaryDigitalWrite ................................................................................................................................. 56 6.3.7 sendFileList ................................................................................................................................................. 56 6.3.8 sendFile ...................................................................................................................................................... 57 6.3.9 setNTPServerAddress ................................................................................................................................ 57 6.3.10 log .............................................................................................................................................................. 57 6.3.11 logLn .......................................................................................................................................................... 57 6.3.12 sdLogLabels ............................................................................................................................................... 57 6.3.13 sdLog ......................................................................................................................................................... 57 6.3.14 now ............................................................................................................................................................ 58
6.4 Sketch skeleton for IOSControllerWiFi support ........................................................................................ 58 6.5 Code example for controlling a Rover Robot ............................................................................................ 62
7 Development Manual IOSControllerBLE ..................................................................................................... 64 7.1 IOSControllerBLE Library ......................................................................................................................... 64

Version: 2.0 5/74
7.2 Widget not supported ................................................................................................................................ 64 7.3 How to reduce Library memory occupation .............................................................................................. 65 7.4 Available Functions ................................................................................................................................... 65
7.4.1 IOSControllerBLE ....................................................................................................................................... 65 7.4.2 IOSControllerBLE ....................................................................................................................................... 66 7.4.3 loop ............................................................................................................................................................. 67 7.4.4 writeMessage .............................................................................................................................................. 67 7.4.5 writeTxtMessage ......................................................................................................................................... 67 7.4.6 temporaryDigitalWrite ................................................................................................................................. 67 7.4.7 log ............................................................................................................................................................... 67 7.4.8 logLn ........................................................................................................................................................... 67 7.4.9 now ............................................................................................................................................................. 68
7.5 Sketch skeleton for IOSControllerBLE support ......................................................................................... 68 8 Code Generator ............................................................................................................................................. 71 9 Frequent Asked Questions .......................................................................................................................... 72 10 Revision History ........................................................................................................................................... 73 11 Comments and Support ............................................................................................................................... 74

Version: 2.0 6/74
Arduino Manager is an app to control your Arduino board and receive information from it through Ethernet Shield.
The app shows a grid and tapping on it you can insert specialized widgets to send and receive information from Arduino.
Display Widget: This widget shows values coming from your Arduino (i.e. Temperature). It can show numbers with 0,1,2,3 decimal digits or rolling text. Double tap on it to choose to show text or change the precision.
LED Widget: This widget shows a LED that can be turned on and off through digital values from Arduino. Double tap on the LED Widget to change LED’s color.
Switch Widget: This widget sets a digital value to Arduino.
Switch & LED Widget: This widget is the combination of the two previous widgets, to save space when they are used together with the same variable. Double tap on the LED Widget to change LED’s color. The LED is turned on and off with messages from the board to show exactly the status of a digital value on the board.
1 What is Arduino Manager
Version: 2.0 7/74
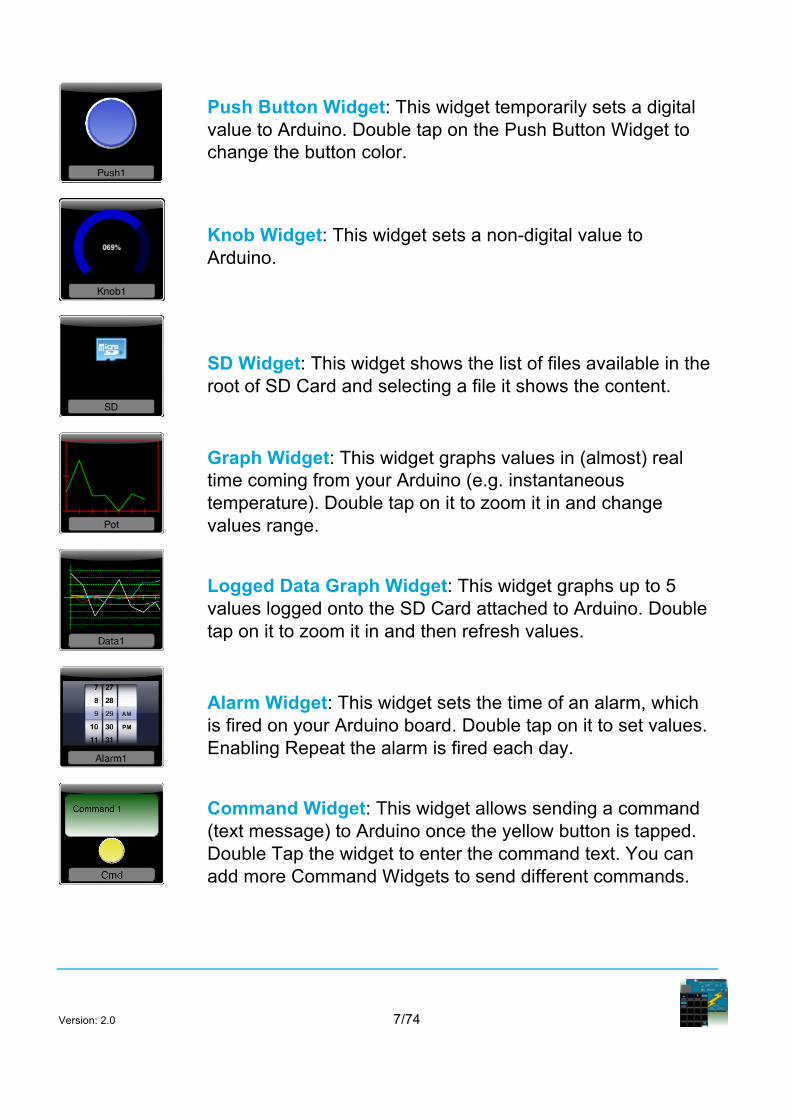
Push Button Widget: This widget temporarily sets a digital value to Arduino. Double tap on the Push Button Widget to change the button color.
Knob Widget: This widget sets a non-digital value to Arduino.
SD Widget: This widget shows the list of files available in the root of SD Card and selecting a file it shows the content.
Graph Widget: This widget graphs values in (almost) real time coming from your Arduino (e.g. instantaneous temperature). Double tap on it to zoom it in and change values range.
Logged Data Graph Widget: This widget graphs up to 5 values logged onto the SD Card attached to Arduino. Double tap on it to zoom it in and then refresh values.
Alarm Widget: This widget sets the time of an alarm, which is fired on your Arduino board. Double tap on it to set values. Enabling Repeat the alarm is fired each day.
Command Widget: This widget allows sending a command (text message) to Arduino once the yellow button is tapped. Double Tap the widget to enter the command text. You can add more Command Widgets to send different commands.

Version: 2.0 8/74
Rover Controller Widget: This widget allows driving a rover robot just rotating the device.
Sound Alarm Widget: This widget sounds an alarm each time the associated condition is verified. Double tap it to configure the condition and the alarm to sound.
Threshold Widget: This widget allows setting a threshold to the Arduino board (e.g. the room temperature under which the board has to start an heater). Double tap on it to set the threshold’s range and its actual value.
Console Widget: This widget helps the user to debug the Arduino code, receiving and displaying debugging messages.
Each widget is associated with a variable (i.e. T), which is either written or read by the sketch on the board. In this way the iOS app can receive information from the Arduino board or control it.
IOSController or IOSControllerWiFi library allows integrating Arduino Manager with your own sketches (see Chapter 3).
1.1 SD Management changes from version 2.0
From version 2.0 of Arduino Manager the file list and download of file from SD Card is directly managed from the IOSController or IOSControllerWiFi library.
User doesn’t have to worry about it and these following lines must be removed from your sketch in the processingIncomingMessages:

Version: 2.0 9/74
#ifdef SD_SUPPORT if (strcmp(variable,"SD")==0) {
iosController.sendFileList(); } if (strcmp(variable,"SDDL")==0) {
iosController.sendFile(value); } #endif
1.2 Display Widget – How to use it
This widget shows values coming from your Arduino (i.e. Temperature). It can show numbers with 0,1,2,3 decimal digits or rolling text.
Double tapping the Widget, you can configure it.
If the Widget can show on text, tap on the Text switch.
When the Widget displays only numbers, you can choose the number of decimal digit to show, tapping on
• . for 0 decimal digits
• .# for 1 decimal digit
• .## for 2 decimal digits
• .### for 3 decimal digits.
When the Widget displays numbers, you can enable or disable it from the Arduino code sending respectively these messages:
iosController.writeTxtMessage("variable","On"); iosController.writeTxtMessage("variable","Off"); Where variable is the label assigned to the Widget.

Version: 2.0 10/74
1.3 Led Widget – How to use it
This widget shows a LED that can be turned on and off through digital values from Arduino.
Double tapping on the LED Widget you can change LED’s color.
To change the LED’s color from the Arduino code you can send one of these messages:
iosController.writeTxtMessage("variable","Red"); iosController.writeTxtMessage("variable","Blue"); iosController.writeTxtMessage("variable","Green"); iosController.writeTxtMessage("variable","Yellow"); Where variable is the label assigned to the Widget.
1.4 Switch & LED Widget – How to use it
This widget is the combination of the Switch Widget and Led Widget, to save space when they are used together with the same variable.
Double tapping on the LED Widget you can change LED’s color.
Tapping the switch a message is received into the processIncomingMessages and can be managed there as for the Switch Widget
void processIncomingMessages(char variable, char *value) { … if (strcmp(variable,"variable") == 0) { …. } … }
Where variable is the label assigned to the Widget.
The LED can be turned on and off sending respectively the following messages:
iosController.writeMessage("variable",HIGH); iosController.writeMessage("variable",LOW);

Version: 2.0 11/74
To change the LED’s color from the Arduino code you can send one of these messages:
iosController.writeTxtMessage("variable","Red"); iosController.writeTxtMessage("variable","Blue"); iosController.writeTxtMessage("variable","Green"); iosController.writeTxtMessage("variable","Yellow");
1.5 Graph Widget – How to use it
This widget graphs values coming from your Arduino (i.e. Temperature). Double tap on it to zoom it in and change values range.
To show the graph at best, you can enter the expected Minimum Value and Maximum Value of the received data.
The Ethernet Shield sends data continuously and with a minimum delay (not considering any heavy traffic on the network). On the contrary, the WiFi Shield sends packets of data, then a delay is present between packets.
To get better performances, at least with the Ethernet Shield, you should set WiFi Shield if data is received through the WiFi Shield.

Version: 2.0 12/74
1.6 Logged Data Graph Widget – How to use it
This widget graphs up to 5 values logged into Arduino SD. Double tap on it to zoom it in and refresh values.
Widget downloads data from a file stored into the SD card of the Arduino board, which has to called with the same name of the widget.
The first row of the file, which contains the label of each graph, has to be formatted as in this example:
-;V1;V2;V3;V4;V5
In case, you need only few graphs, the respective label has to be replaced by -. For example for only two graphs:
-;V1;V2;-;-;-
All the other lines contain data followed by a new line. First value is the time when the sample has been get.
1371546000;110.00;12;2;9;11
Time is expressed as Unix epoch: the number of seconds that have elapsed since January 1, 1970 (midnight UTC/GMT). Missing values are replaced by -:
1371546000;110.00;22.3;-;-;-
IOSController and IOSControllerWiFi make available some help functions to format the data as required and to get current time, see paragraph 5.3 or 6.3.
The best way to write to the log file is using a timer and an interrupt handler. In the following example, Timer1 is used.

Version: 2.0 13/74
Once you have decided the desired interrupt frequency, the value of the match register may be calculated using this formula:
OCR1A = [16,000,000Hz/ (prescaler * desired_interrupt_frequency)] – 1 Prescaler allowed values: 1, 8, 64, 256, and 1024
Then add this code to the setup function to configure and start Timer1.
/** Configure and start Timer1 **/ cli();//stop interrupts TCCR1A = 0; // set entire TCCR1A register to 0 TCCR1B = 0; // same for TCCR1B TCNT1 = 0; //initialize counter value to 0 // set compare match register OCR1A = 62499; // = (16*10^6) / (0.25*1024) - 1 (must be <65536) TCCR1B |= (1 << WGM12); // turn on CTC mode TCCR1B |= (1 << CS12) | (1 << CS10); // Set CS10 and CS12 bits for 1024 prescaler TIMSK1 |= (1 << OCIE1A); // enable timer compare interrupt sei();//allow interrupts samplingCounter = 0; currentNumberOfSamples = MAXNUMBEROFSAMPLES; gettingSample = false; Then, add these functions to your code:
/*** Interrupt Handler
***/ ISR(TIMER1_COMPA_vect) { if (samplingCounter == SAMPLEINTERVAL*60/4) { gettingSample = true; samplingCounter = 0; } else { samplingCounter++; }

Version: 2.0 14/74
} /*** Function to write samples to file ***/ void getSample(char *variable, unsigned long now1) { if(currentNumberOfSamples == MAXNUMBEROFSAMPLES) { SD.remove(variable); iosController.sdLogLabels(variable,"Temp1","Temp2","Temp3","Temp4","Temp5"); currentNumberOfSamples = 0; } iosController.sdLog(variable, now1, temp1, temp2, temp3, temp4, temp5); currentNumberOfSamples += 1; } Eventually add this code to the doWork function:
… if (gettingSample) { unsigned long now = iosController.now(); cli(); getSample("DATA",now); // DATA is the name of the Logged Data Graph Widget sei(); gettingSample = false; } …

Version: 2.0 15/74
1.7 Alarm Widget – How to use it
To set a new Alarm, double tap the widget and it will zoom in.
Then, you can change the time using the time picker.
Please, note that:
• if you set the alarm time later than the current time, the Alarm will be scheduled for the current day at the chosen time
• if you set the alarm time earlier than the current time, the Alarm will be scheduled for the next day at the chosen time.
The label Next Alarm gives you the exact date and time at which the alarm will be fired.
If Repeat is not set, once the alarm has been fired, it will be deleted from the Arduino board and then it will not be fired anymore.
Please note that:
1. The internal clock on the Arduino board is set via NTP Server when the board is powered on. So the board needs to be connected to Internet at the power on, otherwise the clock will not be set.
2. Alarms are stored into EEPROM on the board, so they are retained also when the board is turned off and they are rescheduled at the power on.
3. Alarms are stored into EEPROM in UTC (Coordinated Universal Time) time.
4. The accuracy of alarms is per minute, so it is possible that they can be activated with several seconds of delay.
5. Alarm widgets may be deleted only when the iOS device is connected to the board.

Version: 2.0 16/74
Since the Arduino WiFi library doesn’t support UDP messages, the board gets the current time from the iOS device.
For that reason, when you power Arduino on, you have to connect to it from an iOS device, in order to allow the board to get the current time.
Then you can disconnect.
1.8 Threshold Widget – How to use it
Double tap on the Widget to configure it and setting threshold value.
The threshold can be set tapping on – and +.
Pressing and holding one of its buttons increments or decrements the threshold’s value repeatedly.
The threshold can be a value between Minimum Value and Maximum Value with increment of Step Value.
In order to set the threshold on the Arduino board you have to add something like the following into the processIncomingMessages:
void processIncomingMessages(char variable, char *value) { … if (strcmp(variable,”Temperature”) == 0) { temperature = atof(variable); } … } For more details see paragraph 5.1 (IOSController Library) or 6.1 (IOSControllerWiFi Library).

Version: 2.0 17/74
Please, note that the message is sent to the Arduino board:
1) each time the iOS application connects to the board;
2) each time the user changes the threshold value.
1.9 Alarm Sound Widget – How to use it
Double tap on the Widget to configure it.
Touch the first selection picker to select one of the conditions.
On top of the Widget’s variable, you can see the condition (e.g. Distance > 400.00)
Then touch the second selection picker to choose the alarm to sound when the condition is verified.
You can tap on Test button to listen to selected sound.
In order to make the Sound Alarm Widget to work, you have to add something like the following into the
processOutgoingMessages:
void processOutgoingMessages() { … iosController.writeMessage("Distance",distance); … }

Version: 2.0 18/74
For more details see paragraph 5.1 (IOSController Library) or 6.1 (IOSControllerWiFi Library).
Please, note that the Sound Alarm is played only when the Arduino Manager is connected to the Arduino board and when the app is in foreground
1.10 Rover Controller Widget – How to use it
This widget allows driving a rover robot just rotating the device. To start driving the robot, double tap on the widget.
Once double tapped, the widget zoom in and more controls area available, as shown in the following picture.
On the left there is the Drive / Reverse switch. Each time you change from Drive to Reverse or vice versa the throttle is reset to zero.
On the right there is the Throttle slider. Move it up or down to increase or decrease the rover speed.
To control rover direction just tilt the iOS device right or left. The steering wheel follows the device movements.
The following table shows commands that are send to the Arduino board.
Variable Value Range Description RC_T 0 - 100 Throttle position
RC_F - Drive forward
RC_B - Drive backward
RC_R 0 - 100 Turn right
RC_L 0 – 100 Turn left

Version: 2.0 19/74
In case your robot stops for some reason (i.e. an obstacle), you can send a text message to the Widget to reset the throttle. The variable is “Rover Controller” and the value is “Brake”.
See paragraph 6.5 for a code sample.
Please, note that this Widget works with both Ethernet Shield and WiFi Shield but for controlling a robot the last is more suitable.
1.11 Console Widget – How to use it
The console widget helps the user to debug its own Arduino code receiving and displaying debugging messages.
User can change the size of the Widget double clicking on it.
In order to show debugging messages on the Console Widget, insert one of these functions into your Arduino code:
• log
• logLn
See library documentation for more details.
1.12 Sharing Widget Configuration
You can share your widget configuration between your devices and other users, through an email message.
Tap on this button to start sharing:
When you receive a mail message with an Arduino Manager configuration, you can load it just tapping on it.

Version: 2.0 20/74
Please note that:
• Due to loading of a new configuration, the previous one is deleted;
• iPad, iPhone 4 and iPhone 5 have different number of Widgets, then moving a configuration from one device to another may cause lost of widgets.

Version: 2.0 21/74
To start with Arduino Manager you can follow the steps described in this section, anyway section 4 contains more technical details.
This section applies if you are using an Ethernet Shield compatible with the Arduino Ethernet library. If you are using the WiFi Shield go to section 3, if you are using the RedBear Bluetooth Shield go to section 4.
2.1 Step 1 - Test Circuit
The test circuit is shown in the following picture.
2 Arduino Manager and Ethernet Shield for impatient

Version: 2.0 22/74
The board measures Temperature (TMP 36) and Light and then sends them to the iOS device.
The iOS device sends commands to turn on and off LED 1 (yellow) and commands to move Servo.
LED 2 (Red) shows when the iOS device is connected to the board.
Please, note that if you have not TMP36 and / or Photo-resistor you can replace them with a trimmer of 10 K and manually change the values.
This is the circuit layout.

Version: 2.0 23/74
Once your circuit is ready, jump to the next step.
2.2 Step 2 – Install IOSController Library
• Download the IOSController library from here:
http://sites.google.com/site/lurvill
• Locate the Sketchbook location, in the Arduino 1.x IDE preferences
• Check that a folder called Libraries exists in Sketchbook location, if not create it
• Copy the downloaded file into the libraries directory
• Extract the content into the folder Libraries
Please, at the end of library installation procedure, check that the directory structure is like this:
<Sketchbook location>/Libraries/IOSController/IOSController.h
<Sketchbook location>/Libraries/IOSController/IOSController.cpp
<Sketchbook location>/Libraries/IOSController/keywords.txt

Version: 2.0 24/74
If you are using UNO, you may need to disable some features in order to run the test sketch.
1. Locate the Libraries directory
2. Locate the IOSController directory
3. Locate the IOSController.h into the directory of previous point 2
4. Edit IOSController.h commenting the following line:
#define SDLOGGEDATAGRAPH_SUPPORT
which becomes:
// #define SDLOGGEDATAGRAPH_SUPPORT
Now the test sketch can be uploaded but the Logged Data Graph Widget will not be able to work.
If you are using Leonardo, since it has a smaller memory available to the user, you need to disable some features in order to run the test sketch.
1. Locate the Libraries directory
2. Locate the IOSController directory
3. Locate the IOSController.h into the directory of previous point 2
4. Edit IOSController.h commenting the following lines:
#define SDLOGGEDATAGRAPH_SUPPORT
#define SD_SUPPORT
which become:
// #define SDLOGGEDATAGRAPH_SUPPORT
// #define SD_SUPPORT

Version: 2.0 25/74
Now the test sketch can be uploaded to Leonardo but the Logged Data Graph Widget will not be able to work and the SD Widget will not be able to work.
Please, see chapter 5.2 or 6.2
2.3 Step 3 – Arduino Ethernet Shield
• Insert your Arduino Ethernet Shield on your Arduino board
• Connect the Arduino Ethernet Shield to the network
2.4 Step 4 – Install the test sketch
• Download the test sketch for Ethernet Shield from here:
http://sites.google.com/site/lurvill
• Extract the content into your Sketchbook location
• Load the sketch into Arduino IDE (the sketch is compatible with Arduino 1.x)
• Edit IP parameters adapting them to your network
• Choose the right Arduino board that you have (Tools->Board->…)
• Choose the right USB port where your Arduino board is connected (for more information visit the Arduino site: http://www.Arduino.cc)
• Upload the sketch to your board

Version: 2.0 26/74
If you get this error during the compilation phase:
processing.app.debug.RunnerException: Sketch too big; see …
please, see paragraph 5.2 or 6.2
2.5 Step 5 – Connect Arduino Manager to the board
• Start Arduino Manager on your iPad / iPhone
• Tap on Configuration button and enter the board IP Address and the IP port that you have previously configured into the sketch
• Tap on the Arduino Board image, few seconds later the image should change to green. The two devices are now connected. At the same time, the red LED on the board should turn on.
2.6 Step 6 – Configure Arduino Manager
• Tap somewhere and insert a Display Widget
• Tap on field just down the display and enter: T
• Now you should be able to read the temperature measured by TEMP 36
• Add another Display Widget and enter: L
• Now you should be able to read the light measured by the Photo-resistor
• Add a Switch Display and enter S1
• Now, tapping on the switch, you should be able to turn the yellow LED on and off

Version: 2.0 27/74
• Add a LED Widget and enter Led13
• The LED should follows the yellow LED on the board
• Double tapping on the LED Widget you can choose the preferred color
• Add a Knob Widget and enter Knob1
• Moving the dial, the servo motor should change its position
• Add an SD Widget
• Double tapping on it you should be able to see the list of files in the root directory of the SD Card and open the files.
• Add a Push Button Widget and enter Push1
• Pushing the button, the red LED should turn off for few milliseconds and then turn back on
• Double tapping on the Push Button you can choose the preferred color
• Add a Graph Widget and enter Pot
• Turning the potentiometer on the breadboard a graph should appear.
You can see a tutorial video here:
http://youtube.com/watch?v=Zwe7pHJJUzU
but please note that it may be not updated.
2.7 Step 7 – Move a Widget
To select a widget, long tap on it until the border becomes red.
Once selected, you can change the widget position dragging it into the desired position.

Version: 2.0 28/74
2.8 Step 8 – Delete a Widget
To delete a widget, long tap on it until the border becomes red then swipe it down.
Alarm widgets may be deleted only when the iOS device is connected to the board.

Version: 2.0 29/74
3 Arduino Manager and WiFi Shield for impatient
To start with Arduino Manager you can follow the steps described in this section, anyway section 6 contains more technical details.
This section applies if you are using a WiFi Shield compatible with the Arduino WiFi library. If you are using the Ethernet Shield go to section 2, if you are using BLE Shield go to section 4.
3.1 Step 1 - Test Circuit
Please, see chapter 2.1.
3.2 Step 2 - Install WiFi Library
If you are using Arduino 1.0.2 or higher, please, jump to paragraph Step 3 - Install IOSControllerWiFi Library.
• Download WiFi official library here:
http://arduino.cc/en/Main/ArduinoWiFiShield
http://arduino.cc/en/uploads/Main/WiFiShield_library.zip
• Locate the Sketchbook location, in the Arduino 1.x IDE preferences
• Check that a folder called Libraries exists in Sketchbook location, if not create it
• Copy the downloaded file into the libraries directory

Version: 2.0 30/74
• Extract the content into the folder libraries
3.3 Step 3 - Install IOSControllerWiFi Library
• Download the IOSControllerWiFi library from here:
http://sites.google.com/site/lurvill
• Locate the Sketchbook location, in the Arduino 1.x IDE preferences
• Check that a folder called Libraries exists in Sketchbook location, if not create it
• Copy the downloaded file into the libraries directory
• Extract the content into the folder Libraries
Please, at the end of library installation procedure, check that the directory structure is like this:
<Sketchbook location>/Libraries/IOSControllerWiFi/IOSControllerWiFi.h
<Sketchbook location>/Libraries/IOSControllerWiFi/IOSControllerWiFi.cpp
<Sketchbook location>/Libraries/IOSControllerWiFi/keywords.txt

Version: 2.0 31/74
If you are using Leonardo, since it has a smaller memory available to the user, you need to disable some features in order to run the test sketch.
1. Locate the Libraries directory
2. Locate the IOSControllerWiFi directory
3. Locate the IOSControllerWiFi.h into the directory of previous point 2
4. Edit IOSControllerWiFi.h commenting the following line:
#define SD_SUPPORT
which becames:
// #define SD_SUPPORT
Now the test sketch can be uploaded to Leonardo but the SD Widget will not be able to work.
3.4 Step 4 – Arduino WiFi Shield
• Insert your Arduino WiFi Shield on your Arduino board
3.5 Step 5 - Install the test sketch
• Download the test sketch for WiFi Shield from here:
http://sites.google.com/site/lurvill
• Extract the content into your Sketchbook location
• Load the sketch into Arduino IDE (the sketch is compatible with Arduino 1.x)
• Edit YOUR_SSID/YOU_PASSWORD adapting them to your network

Version: 2.0 32/74
• Choose the right Arduino board that you have (Tools->Board->…)
• Choose the right USB port where your Arduino board is connected (for more information visit the Arduino site: http://www.Arduino.cc)
• Upload the sketch to your board
3.6 Step 6 – Other steps
Now on you can follows the steps from chapter 2.5 through chapter 2.8.

Version: 2.0 33/74
4 Arduino Manager and RedBearLab BLE Shield for impatient
To start with Arduino Manager you can follow the steps described in this section, anyway section 4 contains more technical details.
This section applies if you are using a RedBearLab BLE Shield.
BLE Shield stands for Bluetooth Low Energy (BLE) Shield. It is designed to work with Arduino boards, including Arduino Uno, Mega and Leonardo. BLE shield could operate under 3.3V or 5V, therefore it should work with a lot of Arduino compatibles too.
http://redbearlab.com/bleshield/
If you are using Ethernet Shield go to section, If you are using the WiFi Shield go to section 3.
4.1 Step 1 – Test Circuit
The test circuit is shown in the following picture.

Version: 2.0 34/74
The board measures Temperature (TMP 36) and Light and then sends them to the iOS device.
The iOS device sends commands to turn on and off LED 1 (yellow) and commands to move Servo.
LED 2 (Red) shows when the iOS device is connected to the board.
Please, note that if you have not TMP36 and / or Photo-resistor you can replace them with a trimmer of 10 K and manually change the values.
This is the circuit layout.

Version: 2.0 35/74
Once your circuit is ready, jump to the next step.
4.2 Step 2 – Install BLE Library
• Download the IOSController library from here
https://github.com/RedBearLab/Release/raw/master/BLEShield/BLEShield_Library_v1.0.2.zip
• Locate the Sketchbook location, in the Arduino 1.x IDE preferences
• Check that a folder called Libraries exists in Sketchbook location, if not create it
• Copy the downloaded file into the libraries directory

Version: 2.0 36/74
• Extract the content into the folder Libraries
4.3 Step 3 – Install IOSControllerBLE Library
• Download the IOSController library from here:
http://sites.google.com/site/lurvill
• Locate the Sketchbook location, in the Arduino 1.x IDE preferences
• Check that a folder called Libraries exists in Sketchbook location, if not create it
• Copy the downloaded file into the libraries directory
• Extract the content into the folder Libraries
Please, at the end of library installation procedure, check that the directory structure is like this:
<Sketchbook location>/Libraries/IOSControllerBLE/IOSControllerBLE.h
<Sketchbook location>/Libraries/IOSControllerBLE/IOSControllerBLE.cpp
<Sketchbook location>/Libraries/IOSControllerBLE/keywords.txt
4.4 Step 4 – RedBearLab BLE Shield
• Insert your RedBearLab BLE Shield on your Arduino board

Version: 2.0 37/74
4.5 Step 5 – Install the test sketch
• Download the test sketch for Bluetooth Shield from here:
http://sites.google.com/site/lurvill
• Extract the content into your Sketchbook location
• Load the sketch into Arduino IDE
• Choose the right Arduino board that you have (Tools->Board->…)
• Choose the right USB port where your Arduino board is connected (for more information visit the Arduino site: http://www.Arduino.cc)
• Upload the sketch to your board.
4.6 Step 6 - Connect Arduino Manager to the board
• Start Arduino Manager on your iPad / iPhone
• Tap on Configuration button and then Tap on Scan BLE. If any Bluetooth shield is available, it appears in the list of configurations
• Tap on it. Few seconds later the Arduino Board image should change to green. The two devices are now connected. At the same time, the red LED on the Arduino board should turn on.
4.7 Step 7 – Configure Arduino Manager
See chapter 2.6.

Version: 2.0 38/74
4.8 Step 8 – Move a Widget
See chapter 2.7.
4.9 Step 9 - Delete a Widget
See chapter 2.8.
Version: 2.0 39/74
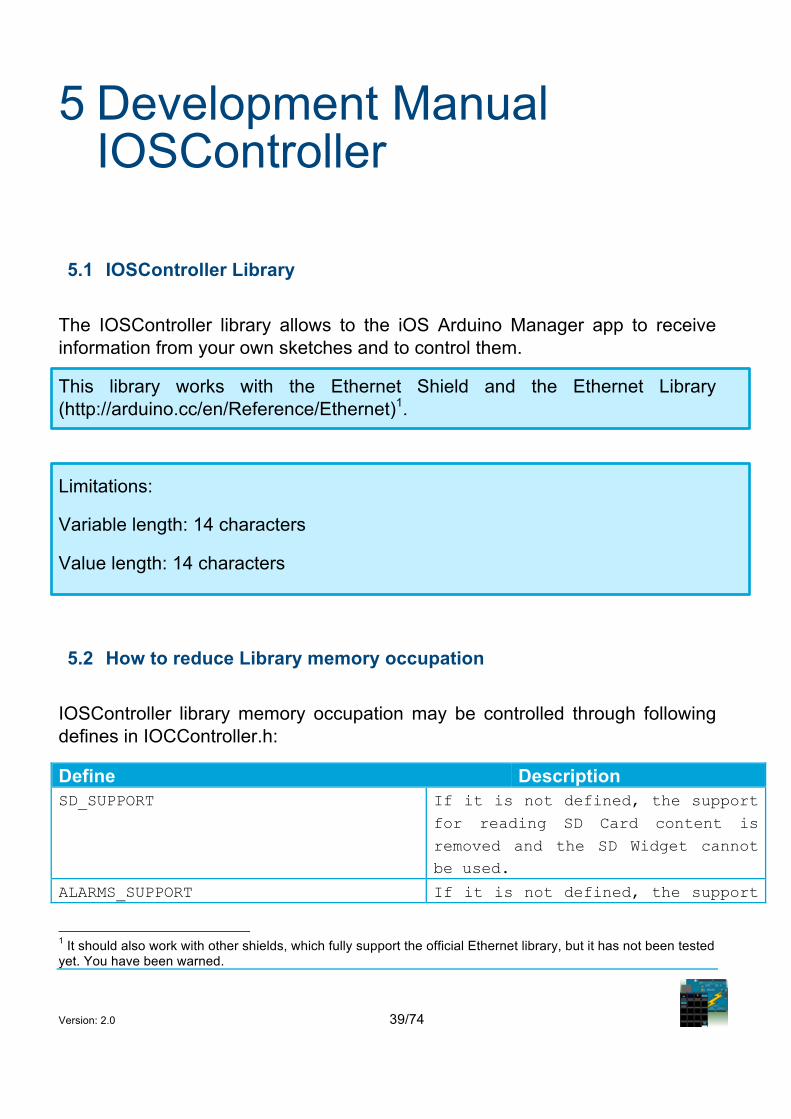
5 Development Manual IOSController
5.1 IOSController Library
The IOSController library allows to the iOS Arduino Manager app to receive information from your own sketches and to control them.
This library works with the Ethernet Shield and the Ethernet Library (http://arduino.cc/en/Reference/Ethernet)1.
Limitations:
Variable length: 14 characters
Value length: 14 characters
5.2 How to reduce Library memory occupation
IOSController library memory occupation may be controlled through following defines in IOCController.h:
Define Description SD_SUPPORT If it is not defined, the support
for reading SD Card content is removed and the SD Widget cannot be used.
ALARMS_SUPPORT If it is not defined, the support
1 It should also work with other shields, which fully support the official Ethernet library, but it has not been tested yet. You have been warned.

Version: 2.0 40/74
for Alarms is removed and the Alarm Widget cannot be used.
SDLOGGEDATAGRAPH_SUPPORT If it is not defined, the support for reading accessing logged data is removed and the Logged Data Graph Widget cannot be used.
5.3 Available Functions
5.3.1 IOSController
Initialize an instance of class IOSController that doesn’t process alarms.
Parameter Description EthernetServer *server Instance of Ethernet Server
class.
void (*doWork)(void) Callback function which replace the standard loop() in the sketch.
void (*doSync)(char *variable) Callback function called when the ios device needs to synchronize switches and knobs positions with the board.
void (*processIncomingMessages)(char *variable, char *value)
Callback function called when the board receives a message. This means that variable has a value. Variable has value SD if the iOS device needs the list of files in the SD Card. Variable has value SDDL if the iOS device needs to download the file which name is defined by value.
void (*processOutgoingMessages)(void) Callback function called when the board is ready to send messages

Version: 2.0 41/74
to the ios device.
void (*deviceConnected)(void) Callback function called when the ios device connects to the board. May be NULL.
void (*deviceDisconnected)(void) Callback function called when the ios device is disconnects from the device. May be NULL.
5.3.2 IOSController
Initialize an instance of class IOSController that process alarms.
Parameter Description EthernetServer *server Instance of Ethernet Server
class.
void (*doWork)(void) Callback function which replace the standard loop() in the sketch.
void (*doSync)(char *variable) Callback function called when the ios device needs to synchronize switches and knobs positions with the board.
void (*processIncomingMessages)(char *variable, char *value)
Callback function called when the board receives a message. This means that variable has a value. Variable has value SD if the iOS device needs the list of files in the SD Card. Variable has value SDDL if the iOS device needs to download the file which name is defined by value.
void (*processOutgoingMessages)(void) Callback function called when the board is ready to send messages to the ios device.
void (*processAlarms)(char *alarm), Callback function called when an alarm has been fired. May be

Version: 2.0 42/74
NULL.
void (*deviceConnected)(void) Callback function called when the ios device connects to the board. May be NULL.
void (*deviceDisconnected)(void) Callback function called when the ios device is disconnects from the device. May be NULL.
5.3.3 loop
This function has to be called into the standard sketch loop.
Parameter Description unsigned long delay Delay in processing incoming and
out coming messages. Delay is in milliseconds. Lower the delay, faster the messages are processed.
For compatibility reasons loop function, without parameters, is still available with a default delay of 500 milliseconds.
5.3.4 writeMessage
This function sends a message to the connected iOS device.
Let’s suppose that the iOS device has a Display Widget called ‘T’. Periodically the callback function processOutgoingMessages is called and inside this function the iOS Widget is updated calling:
writeMessage(“T”,123);
Parameter Description char *variable Name of the variable
float value Value of the variable

Version: 2.0 43/74
5.3.5 writeTxtMessage
This function sends a message to the connected iOS device.
writeTxtMessage(“T”,”Hello”);
Parameter Description char *variable Name of the variable
char *value Value of the variable
5.3.6 temporaryDigitalWrite
This function write the value to the pin for some time then set the previous values.
temporaryDigitalWrite(pin13,HIGH,50); If pin13 is LOW, this brings pin13 to HIGH for 50ms and then pin13 goes back to LOW. If pin13 is LOW, it is unchanged.
Parameter Description uint8_t pin The pin number
uint8_t value HIGH or LOW
unsigned long ms Duration of pin’s value change
5.3.7 sendFileList
This function sends a message to the connected iOS device with the list of files available in the root directory of the SD Card.
Deprecated – You don’t need this function anymore.

Version: 2.0 44/74
5.3.8 sendFile
This function sends a message to the connected iOS device with the content of the requested file.
Deprecated – You don’t need this function anymore.
Parameter Description char * fileName Name of the file to send
5.3.9 setNTPServerAddress
This function set the address of the NTP Server used to synchronize time of the clock for firing alarms.
The default NTP Server is: 64.90.182.55
Parameter Description IPAddress address IPAddress of NTP Server
5.3.10 log
This function allows writing a text message or an integer on the Console Widget.
Parameter Description char *msg character message to write on the
Console Widget
Parameter Description int *msg Integer value to write on the
Console Widget

Version: 2.0 45/74
5.3.11 logLn
This function allows writing a text message or an integer on the Console Widget followed by a new line (‘\n’).
Parameter Description char *msg character message to write on the
Console Widget
Parameter Description int *msg integer value to write on the
Console Widget
Parameter Description long *msg long value to write on the
Console Widget
Parameter Description unsigned long *msg Unsigned long value to write on
the Console Widget
5.3.12 sdLogLabels
This function writes the labels to the log file.
Parameter Description char *variable Name of the Logged Data Widget
for which file is written
char *label1 First label

Version: 2.0 46/74
Parameter Description char *variable Name of the Logged Data Widget
for which file is written
char *label1 First label
char *label2 Second label
Parameter Description char *variable Name of the Logged Data Widget
for which file is written
char *label1 First label
char *label2 Second label
char *label3 Third label
Parameter Description char *variable Name of the Logged Data Widget
for which file is written
char *label1 First label
char *label2 Second label
char *label3 Third label
char *label4 Forth label
Parameter Description char *variable Name of the Logged Data Widget
for which file is written
char *label1 First label
char *label2 Second label
char *label3 Third label
char *label4 Forth label
char *label5 Fifth label

Version: 2.0 47/74
5.3.13 sdLog
This function writes the values to the log file.
Parameter Description char *variable Name of the Logged Data Widget
for which file is written
unsigned long time current time as Unix epoch
float value1 First value
Parameter Description char *variable Name of the Logged Data Widget
for which file is written
unsigned long time current time as Unix epoch
float value1 First value
float value2 Second value
Parameter Description char *variable Name of the Logged Data Widget
for which file is written
unsigned long time current time as Unix epoch
float value1 First value
float value2 Second value
float value3 Third value
Parameter Description char *variable Name of the Logged Data Widget
for which file is written
unsigned long time current time as Unix epoch
float value1 First value
float value2 Second value
float value3 Third value
float value4 Forth value

Version: 2.0 48/74
Parameter Description char *variable Name of the Logged Data Widget
for which file is written
unsigned long time current time as Unix epoch
float value1 First value
float value2 Second value
float value3 Third value
float value4 Forth value
float value5 Fifth value
5.3.14 now
This function returns the current time as Unix epoch.

Version: 2.0 49/74
5.4 Sketch skeleton for IOSController support
The typical sketch layout has to be revisited for IOSController integration. Basically, what you had written in the loop() function have to be moved to the function doWork and you have to implement four functions:
• processIncomingMessages: when this callback function is called, a message from the ios device is received and your sketch has to react to it.
• processOutgoingMessages: when this callback function is called, your sketch may send information to the iOS device.
• doSync: when this callback function is called, the iOS device is just connected and it needs to initialize the position of switches and knobs.
• processAlarms: when this callback function is called, an alarm has fired and it can be processed as needed.
So take a look to the typical Sketch for IOSController.
#include <SPI.h> #include <Ethernet.h> #include <SD.h> #include <Servo.h> #include <IOSController.h> /* * * Ethernet Library configuration * */ byte mac[] = { 0xDE, 0xAD, 0xBE, 0xEF, 0xFE, 0xED }; // MAC Address assigned to the board /* * * IP info * * Using DHCP these parameters are not needed */ IPAddress ip(192,168,1, 220); IPAddress gateway(192,168,1,1); IPAddress subnet(255,255,255,0); // Initialize the Ethernet server library // EthernetServer server(80); // Messages received on port 80

Version: 2.0 50/74
// Other initializations int yellowLedPin = 8; int yellowLed; … … /* * * Prototypes of IOSController’s callbacks * * */ void doWork(); void doSync(char *variable); void processIncomingMessages(char *variable, char *value); void processOutgoingMessages(); void deviceConnected(); void deviceDisconnected(); /* * * IOSController Library initialization * */ IOSController iosController(&server,&doWork,&doSync,&processIncomingMessages,&processOutgoingMessages,&processAlarms,&deviceConnected,&deviceDisconnected); void setup() { /* * Start the Ethernet connection and the server * ATTENTION: Ethernet Library provided with Arduino 1.0 has the subnet and gateway swapped respect to the documentation * */ server.begin(); // Do your initialization here … … delay(500); } void loop() { // Only this function is called iosController.loop(450); }

Version: 2.0 51/74
/** * * * This function is called periodically and its equivalent to the standard loop() function * */ void doWork() { // Here the actual work is performed temperature = analogRead(…); digitalWrite(yellowLedPin,yellowLed); … … } /** * * * This function is called when a new message is received from the iOS device * */ void processIncomingMessages(char *variable, char *value) { if (strcmp(variable,"S1")==0) { yellowLed = atoi(value); s1 = yellowLed; } if (strcmp(variable,"Knob1")==0) { servoPos = atoi(value); } if (strcmp(variable,"Push1") == 0){ iosController.temporaryDigitalWrite(connectionLedPin,LOW,500); } } /** * * * This function is called periodically and messages can be sent to the iOS device * */ void processOutgoingMessages() { iosController.writeMessage("T",temperature);

Version: 2.0 52/74
... iosController.writeMessage("Led13",yellowLed); } /** * * * This function is called when the ios device connects and needs to initialize the position of switches and knobs * */ void doSync (char *variable) { … … if (strcmp(variable,"S1")==0) { // Switch called S1 has to be set at the value of yellowLed iosController.writeMessage(variable, yellowLed)); } } /** * * * This function is called when a Alarm is fired * */ void processAlarms(char *alarm) { … } /** * * * This function is called when the iOS device connects * */ void deviceConnected () { … } /** * * This function is called when the iOS device disconnects * */ void deviceDisconnected () { … }

Version: 2.0 53/74
6 Development Manual IOSControllerWiFi
6.1 IOSControllerWiFi Library
The IOSControllerWiFi library allows to the iOS Arduino Manager app to receive information from your own sketches and to control them.
This library works with the official WiFi Shield (http://arduino.cc/en/Main/ArduinoWiFiShield) and the official WiFi library (http://arduino.cc/en/Reference/WiFi)2.
Limitations:
Variable length: 14 characters
Value length: 14 characters
6.2 How to reduce Library memory occupation
IOSControllerWiFi library memory occupation may be controlled through following defines in IOCControllerWiFi.h:
Define Description SD_SUPPORT If it is not defined, the support
for reading SD Card content is removed and the SD Widget cannot be used.
ALARMS_SUPPORT If it is not defined, the support 2 It should also work with other shields, which fully support the official WiFi library, but it has not been tested yet. You have been warned.
Version: 2.0 54/74
for Alarms is removed and the Alarm Widget cannot be used.
SDLOGGEDATAGRAPH_SUPPORT If it is not defined, the support for reading accessing logged data is removed and the Logged Data Graph Widget cannot be used.
6.3 Available Functions
6.3.1 IOSControllerWiFi
Initialize an instance of class IOSControllerWiFi which doesn’t process alarms.
Parameter Description WiFiServer *server Instance of Ethernet Server
class.
void (*doWork)(void) Callback function which replace the standard loop() in the sketch.
void (*doSync)(char *variable) Callback function called when the ios device needs to synchronize switches and knobs positions with the board.
void (*processIncomingMessages)(char *variable, char *value)
Callback function called when the board receives a message. This means that variable has a value. Variable has value SD if the iOS device needs the list of files in the SD Card. Variable has value SDDL if the iOS device needs to download the file which name is defined by value.
void (*processOutgoingMessages)(void) Callback function called when the

Version: 2.0 55/74
board is ready to send messages to the ios device.
void (*deviceConnected)(void) Callback function called when the ios device connects to the board. May be NULL.
void (*deviceDisconnected)(void) Callback function called when the ios device is disconnects from the device. May be NULL.
6.3.2 IOSControllerWiFi
Initialize an instance of class IOSControllerWiFi that process alarms.
Parameter WiFiServer *server Instance of Ethernet Server
class.
void (*doWork)(void) Callback function which replace the standard loop() in the sketch.
void (*doSync)(char *variable) Callback function called when the ios device needs to synchronize switches and knobs positions with the board.
void (*processIncomingMessages)(char *variable, char *value)
Callback function called when the board receives a message. This means that variable has a value. Variable has value SD if the iOS device needs the list of files in the SD Card. Variable has value SDDL if the iOS device needs to download the file which name is defined by value.
void (*processOutgoingMessages)(void) Callback function called when the board is ready to send messages to the ios device.
void (*processAlarms)(char *alarm), Callback function called when an

Version: 2.0 56/74
alarm has been fired. May be NULL.
void (*deviceConnected)(void) Callback function called when the ios device connects to the board. May be NULL.
void (*deviceDisconnected)(void) Callback function called when the ios device is disconnects from the device. May be NULL.
6.3.3 loop
See paragraph 5.3.3.
6.3.4 writeMessage
See paragraph 5.3.4.
6.3.5 writeTxtMessage
See paragraph 5.3.5.
6.3.6 temporaryDigitalWrite
See paragraph 5.3.6.
6.3.7 sendFileList
See paragraph 5.3.7.
Deprecated – You don’t need this function anymore.

Version: 2.0 57/74
6.3.8 sendFile
See paragraph 5.3.8.
Deprecated – You don’t need this function anymore.
6.3.9 setNTPServerAddress
At the moment, this function does nothing.
Deprecated – You don’t need this function anymore.
6.3.10 log
See paragraph 5.3.10.
6.3.11 logLn
See paragraph 5.3.11.
6.3.12 sdLogLabels
See paragraph 5.3.12.
6.3.13 sdLog
See paragraph 5.3.13.

Version: 2.0 58/74
6.3.14 now
This function returns the current time as Unix epoch.
Since the Arduino synchronize it time only when the iOS device is connected, this function may return wrong values.
6.4 Sketch skeleton for IOSControllerWiFi support
The typical sketch layout has to be revisited for IOSControllerWiFi integration. Basically, what you had written in the loop() function have to be moved to the function doWork and you have to implement four functions:
• processIncomingMessages: when this callback function is called, a message from the ios device is received and your sketch has to react to it.
• processOutgoingMessages: when this callback function is called, your sketch may send information to the iOS device.
• doSync: when this callback function is called, the iOS device is just connected and it needs to initialize the position of switches and knobs.
• processAlarms: when this callback function is called, an alarm has fired and it can be processed as needed.
So take a look to the typical Sketch for IOSControllerWiFi.
#include <SPI.h> #include <WiFi.h> #include <SD.h> #include <Servo.h> #include <IOSControllerWiFi.h> /* * * WiFI Library configuration * */ char ssid[] = "YOUR_SSID"; // your network SSID (name) char pass[] = "YOUR_PASSWORD"; // your network password int keyIndex = 0; // your network key Index number (needed only for WEP)

Version: 2.0 59/74
int status = WL_IDLE_STATUS; WiFiServer server(80); // Initialize the Ethernet server library // EthernetServer server(80); // Messages received on port 80 // Other initializations int yellowLedPin = 8; int yellowLed; … … /* * * Prototypes of IOSController’s callbacks * * */ void doWork(); void doSync(char *variable); void processIncomingMessages(char *variable, char *value); void processOutgoingMessages(); void deviceConnected(); void deviceDisconnected(); /* * * IOSController Library initialization * */ IOSControllerWiFi iosControllerWiFi(&server,&doWork,&doSync,&processIncomingMessages,&processOutgoingMessages,&processAlarms,&deviceConnected,&deviceDisconnected); void setup() { //attempt to connect to Wifi network: while ( status != WL_CONNECTED) { Serial.print("Attempting to connect to SSID: "); Serial.println(ssid); // Connect to WPA/WPA2 network. Change this line if using open or WEP network: status = WiFi.begin(ssid, pass); // wait 10 seconds for connection: delay(10000); } // print your WiFi shield's IP address: IPAddress ip = WiFi.localIP(); Serial.print("IP Address: "); Serial.println(ip);

Version: 2.0 60/74
server.begin(); // Do your initialization here … … delay(500); } void loop() { // Only this function is called iosControllerWiFi.loop(450); } /** * * * This function is called periodically and its equivalent to the standard loop() function * */ void doWork() { // Here the actual work is performed temperature = analogRead(…); digitalWrite(yellowLedPin,yellowLed); … … } /** * * * This function is called when a new message is received from the iOS device * */ void processIncomingMessages(char *variable, char *value) { if (strcmp(variable,"S1")==0) { yellowLed = atoi(value); s1 = yellowLed; } if (strcmp(variable,"Knob1")==0) { servoPos = atoi(value); } if (strcmp(variable,"Push1") == 0){ iosControllerWiFi.temporaryDigitalWrite(connectionLedPin,LOW,500); } }

Version: 2.0 61/74
/** * * * This function is called periodically and messages can be sent to the iOS device * */ void processOutgoingMessages() { iosControllerWiFi.writeMessage("T",temperature); ... iosControllerWiFi.writeMessage("Led13",yellowLed); } /** * * * This function is called when the ios device connects and needs to initialize the position of switches and knobs * */ void doSync (char *variable) { … … if (strcmp(variable,"S1")==0) { // Switch called S1 has to be set at the value of yellowLed iosControllerWiFi.writeMessage(variable, yellowLed)); } } /** * * * This function is called when a Alarm is fired * */ void processAlarms(char *alarm) { … } /** * * * This function is called when the iOS device connects * */ void deviceConnected () { …

Version: 2.0 62/74
} /** * * * This function is called when the iOS device disconnects * */ void deviceDisconnected () { … }
6.5 Code example for controlling a Rover Robot
/** * * * This function is called when a new message is received from the iOS device * */ void processIncomingMessages(char *variable, char *value) { if (strcmp(variable,"RC_T") == 0) { currentSpeed = map(atoi(value),0,100,0,255); throttle(currentSpeed); // You have to provide this function } if (strcmp(variable,"RC_F") == 0) { forward(currentSpeed); // You have to provide this function } if (strcmp(variable,"RC_B") == 0) { backward(currentSpeed); // You have to provide this function } if (strcmp(variable,"RC_R") == 0) { int rotationSpeed = map(atoi(value),0,100,0,255); turnRight(currentSpeed,rotationSpeed); // You have to provide this function } if (strcmp(variable,"RC_L") == 0) { int rotationSpeed = map(atoi(value),0,100,0,255); turnLeft(currentSpeed,rotationSpeed); // You have to provide this function

Version: 2.0 63/74
} }

Version: 2.0 64/74
7 Development Manual IOSControllerBLE
7.1 IOSControllerBLE Library
The IOSControllerBLE library allows to the iOS Arduino Manager app to receive information from your own sketches and to control them.
Limitations:
Variable length: 14 characters
Value length: 14 characters
7.2 Widget not supported
The IOSControllerBLE doesn’t support the following Widget which then cannot be used with the BLE Shield.
• SD Widget
• Logged Data Graph.
Version: 2.0 65/74
7.3 How to reduce Library memory occupation
IOSControllerBLE library memory occupation may be controlled through following define in IOCControllerBLE.h:
Define Description ALARMS_SUPPORT If it is not defined, the support
for Alarms is removed and the Alarm Widget cannot be used.
7.4 Available Functions
7.4.1 IOSControllerBLE
Initialize an instance of class IOSControllerBLE that doesn’t process alarms.
Parameter Description void (*doWork)(void) Callback function which replace
the standard loop() in the sketch.
void (*doSync)(char *variable) Callback function called when the ios device needs to synchronize switches and knobs positions with the board.
void (*processIncomingMessages)(char *variable, char *value)
Callback function called when the board receives a message. This means that variable has a value. Variable has value SD if the iOS device needs the list of files in the SD Card. Variable has value SDDL if the iOS device needs to download the file which name is defined by value.

Version: 2.0 66/74
void (*processOutgoingMessages)(void) Callback function called when the board is ready to send messages to the ios device.
void (*deviceConnected)(void) Callback function called when the ios device connects to the board. May be NULL.
void (*deviceDisconnected)(void) Callback function called when the ios device is disconnects from the device. May be NULL.
7.4.2 IOSControllerBLE
Initialize an instance of class IOSControllerBLE that process alarms.
Parameter Description void (*doWork)(void) Callback function which replace
the standard loop() in the sketch.
void (*doSync)(char *variable) Callback function called when the ios device needs to synchronize switches and knobs positions with the board.
void (*processIncomingMessages)(char *variable, char *value)
Callback function called when the board receives a message. This means that variable has a value. Variable has value SD if the iOS device needs the list of files in the SD Card. Variable has value SDDL if the iOS device needs to download the file which name is defined by value.
void (*processOutgoingMessages)(void) Callback function called when the board is ready to send messages to the ios device.
void (*processAlarms)(char *alarm), Callback function called when an alarm has been fired. May be

Version: 2.0 67/74
NULL.
void (*deviceConnected)(void) Callback function called when the ios device connects to the board. May be NULL.
void (*deviceDisconnected)(void) Callback function called when the ios device is disconnects from the device. May be NULL.
7.4.3 loop
This function has to be called into the standard sketch loop.
7.4.4 writeMessage
See chapter 5.3.4.
7.4.5 writeTxtMessage
See chapter 5.3.5.
7.4.6 temporaryDigitalWrite
See chapter 5.3.6.
7.4.7 log
See chapter 5.3.10.
7.4.8 logLn
See chapter 5.3.11.

Version: 2.0 68/74
7.4.9 now
See chapter 5.3.14.
7.5 Sketch skeleton for IOSControllerBLE support
The typical sketch layout has to be revisited for IOSControllerBLE integration. Basically, what you had written in the loop() function have to be moved to the function doWork and you have to implement four functions:
• processIncomingMessages: when this callback function is called, a message from the ios device is received and your sketch has to react to it.
• processOutgoingMessages: when this callback function is called, your sketch may send information to the iOS device.
• doSync: when this callback function is called, the iOS device is just connected and it needs to initialize the position of switches and knobs.
• processAlarms: when this callback function is called, an alarm has fired and it can be processed as needed.
So take a look to the typical Sketch for IOSControllerBLE.
#include <Arduino.h> #include <SPI.h> #include <Servo.h> #include "ble.h" #include <IOSControllerBLE.h> #define YELLOWLEDPIN 6 #define CONNECTIONPIN 7 #define TEMPERATUREPIN 0 #define LIGHTPIN 1 #define POTENTIOMETERPIN 2 #define SERVOPIN 5 boolean Led13; int light; int pot;

Version: 2.0 69/74
float temperature; Servo servo; int servoPos; #ifdef ALARMS_SUPPORT IOSControllerBLE iosController(&doWork,&doSync,&processIncomingMessages,&processOutgoingMessages,&processAlarms,&deviceConnected,&deviceDisconnected); #else IOSControllerBLE iosController(&doWork,&doSync,&processIncomingMessages,&processOutgoingMessages,&deviceConnected,&deviceDisconnected); #endif void setup() { SPI.setDataMode(SPI_MODE0); SPI.setBitOrder(LSBFIRST); SPI.setClockDivider(SPI_CLOCK_DIV16); SPI.begin(); ble_begin(); Serial.begin(115200); ….. Serial.println("Setup Completed"); } void loop() { iosController.loop(); } void doWork() { temperature = getVoltage(TEMPERATUREPIN); //getting the voltage reading from the temperature sensor temperature = (temperature - 0.5) * 100; // converting from 10 mv per degree with 500 mV offset … } void doSync (char *variable) { if (strcmp(variable,"S1")==0) { iosController.writeMessage(variable,digitalRead(YELLOWLEDPIN)); } … }

Version: 2.0 70/74
void processIncomingMessages(char *variable, char *value) { if (strcmp(variable,"S1")==0) { Led13 = atoi(value); digitalWrite(6,Led13); } … } void processOutgoingMessages() { iosController.writeMessage("Led13",Led13); iosController.writeMessage("T",temperature); iosController.writeMessage("L",light); iosController.writeMessage("Pot",pot); } void deviceConnected () { digitalWrite(CONNECTIONPIN,HIGH); } void deviceDisconnected () { digitalWrite(CONNECTIONPIN,LOW); } #ifdef ALARMS_SUPPORT /** * * * This function is called when a Alarm is fired * */ void processAlarms(char *alarm) { iosController.log("Alarm fired: "); iosController.logLn(alarm); } #endif

Version: 2.0 71/74
8 Code Generator
Code Generator allows the user to generate the communication infrastructure between the Arduino board and iOS device and generate the code for each chosen widget in order to simplify the programming effort on Arduino board.
Code Generator is available as In App purchase.
To start the Code Generator, tap on . If you have not purchased the Code Generator yet, you will be asked to buy it.
To access the documentation, tap on , if you have not purchased the Code Generator yet, you will be asked to buy it. Otherwise you will be instructed how to access the documentation.
To restore your Code Generation purchase on a new device, tap on .

Version: 2.0 72/74
9 Frequent Asked Questions
In this section you can find the solution to the most frequent problems. Anyway, you can always write to [email protected] for further support.
Question Answer I get compilation errors uploading the Test sketch. Likely, you have not properly installed the one of
these libraries: IOSController, IOSControllerWiFi, IOSControllerBLE. Please, see paragraph 2.2 or 3.3 or 4.3
I get the following compilation error: iosController was not declared in this scope or iosControllerWiFi was not declared in this scope or iosControllerBLE was not declared in this scope
Likely, you have not properly installed the one of these libraries: IOSController, IOSControllerWiFi, IOSControllerBLE. Please, see paragraph 2.2 or 3.3 or 4.3
I get the following error uploading the Test sketch: processing.app.debug.RunnerException: Sketch too big;…
Different boards have different program memory available. See one of these paragraphs 5.2, 6.2, 7.3 to understand how to reduce the memory required from the iOSController library you are using.
I get the following error uploading the Test sketch: avrdude: stk500_recv(): programmer is not responding
Likely, you have selected a wrong board. In the Arduino IDE go to Tools->Board and select the right board

Version: 2.0 73/74
10 Revision History
Date Document Version
Notes
08/21/2013 2.0 Bluetooth Shield support How to enable or disable the Display Widget from Arduino How to change the LED’s color in the LED Widget How to change the LED’s color in the Switch & LED Widget Rover Control Widget: RC_Throttle changed into RC_T FAQ chapter added
07/29/2013 1.9.1 Switch & LED Widget 06/16/2013 1.9 Logged Data Graph documentation
Console Widget documentation Log Functions
03/02/2013 1.8 Sound Alarm Widget documentation Threshold Widget documentation
01/30/2013 1.7 Rover Control Widget documentation Graph Widget using details Sharing configuration details
01/09/2013 1.6.1 Added information on max length for variable and value
12/01/2012 1.6 Command Widget description. Directory structure after installing IOSController library and IOSControllerWiFi library (useful to check that libraries are correctly installed)
11/07/2012 1.5.1 Limitations deleting Alarm Widget 09/08/2012 1.5 Alarm Widget.
IOSControllerWiFi Support for Arduino Leonardo

Version: 2.0 74/74
11 Comments and Support
You may send your comments and support requests to [email protected].