ApplicationXtender Workflow Accounts Payable - Dell EMC · PDF fileCLARalert, CLARiiON,...
61
EMC Corporation Corporate Headquarters Hopkinton, MA 01748-9103 1-508-435-1000 www.emc.com ApplicationXtender Workflow Accounts Payable 1.20 USER’S GUIDE
Transcript of ApplicationXtender Workflow Accounts Payable - Dell EMC · PDF fileCLARalert, CLARiiON,...

EMC Corporation Corporate Headquarters
Hopkinton, MA 01748-9103 1-508-435-1000
www.emc.com
ApplicationXtender Workflow Accounts Payable
1.20
USER’S GUIDE

ii
ApplicationXtender Workflow Accounts Payable User’s Guide
Copyright © 1994 - 2005 EMC Corporation. All rights reserved.
Printed December 9, 2005
EMC believes the information in this publication is accurate as of its publication date. The information is subject to change without notice.
THE INFORMATION IN THIS PUBLICATION IS PROVIDED "AS IS." EMC CORPORATION MAKES NO REPRESENTATIONS OR WARRANTIES OF ANY KIND WITH RESPECT TO THE INFORMATION IN THIS PUBLICATION, AND SPECIFICALLY DISCLAIMS IMPLIED WARRANTIES OF MERCHANTABILITY OR FITNESS FOR A PARTICULAR PURPOSE.
Use, copying, and distribution of any EMC software described in this publication requires an applicable software license.
Portions of the software are copyrighted by Verity, Inc. 1988 - 2005.
Powered by ABBYY® FineReader®.
ABBYY® FineReader® OCR© 1993-2005 by ABBYY Software House. All rights reserved.
ABBYY, FineReader are trademarks of ABBYY Software House.
Adobe, Acrobat and the Acrobat logo are trademarks of Adobe Systems Incorporated.
Includes Adobe® PDF Library technology.
Portions contain an implementation of the LZW algorithm licensed under U.S. Patent 4,558,002.
Trademark Information
EMC2, EMC, EMC ControlCenter, AlphaStor, ApplicationXtender, Catalog Solution, Celerra, CentraStar, CLARalert, CLARiiON, ClientPak, Connectrix, Co-StandbyServer, Dantz, Direct Matrix Architecture, DiskXtender, Documentum, EmailXtender, EmailXtract, HighRoad, Legato, Legato NetWorker, Navisphere, OpenScale, PowerPath, RepliStor, ResourcePak, Retrospect, Smarts, SnapShotServer, SnapView/IP, SRDF, Symmetrix, TimeFinder, VisualSAN, VSAM Assist, Xtender, Xtender Solutions, and where information lives are registered trademarks and EMC Developers Program, EMC OnCourse, EMC Proven, EMC Snap, EMC Storage Administrator, Access Logix, ArchiveXtender, Authentic Problems, Automated Resource Manager, AutoStart, AutoSwap, AVALONidm, C-Clip, Celerra Replicator, Centera, CLARevent, Codebook Correlation Technology, Common Information Model, CopyCross, CopyPoint, DatabaseXtender, Direct Matrix, DiskXtender 2000, EDM, E-Lab, EmailXaminer, Enginuity, eRoom, FarPoint, FLARE, FullTime, Graphic Visualization, InfoMover, Invista, MirrorView, NetWin, NetWorker, OnAlert, Powerlink, PowerSnap, RepliCare, SafeLine, SAN Advisor, SAN Copy, SAN Manager, SDMS, SnapImage, SnapSure, SnapView, StorageScope, SupportMate, SymmAPI, SymmEnabler, Symmetrix DMX, UltraPoint, Viewlets, VisualSRM, and ApplicationXtender Web Access are trademarks of EMC Corporation. All other trademarks used herein are the property of their respective owners.

i
Table of Contents
Preface...............................................................................................................................iii Introduction ...................................................................................................................... 1
An Overview of the AP Business Process....................................................................................................... 1 Initiating the AP Business Process .............................................................................................................. 4 Pre-Processing Automated Task (Optional) .............................................................................................. 4 Processor Role ................................................................................................................................................ 5 Approver Role................................................................................................................................................ 6 Post-Processing Automated Task................................................................................................................ 6
Getting Started Using the Work On Dialog Box ............................................................................................ 6 Processing an Invoice ...................................................................................................... 8
Processing an Invoice ........................................................................................................................................ 8 Adding Invoice Information........................................................................................................................... 10 Saving Your Changes ...................................................................................................................................... 11 Cost Distribution Information........................................................................................................................ 11 Adding Cost Distribution Line Items............................................................................................................ 13 Modifying Cost Distribution Line Items....................................................................................................... 16 Deleting Cost Distribution Line Items........................................................................................................... 18 Activity Information ........................................................................................................................................ 18
Approving an Invoice as a Processor........................................................................................................ 19 Routing an Invoice to an Approver .......................................................................................................... 19 Rejecting an Invoice .................................................................................................................................... 21
Re-Processing a Returned Invoice ................................................................................................................. 21 Approving an Invoice.................................................................................................... 23
Approval Process ............................................................................................................................................. 23 Approving Line Items on the Invoice............................................................................................................ 25
Clearing an Approval ................................................................................................................................. 26 Activity Information for an Approver .......................................................................................................... 27
Approving an Invoice as an Approver..................................................................................................... 27 Routing an Invoice for Further Approval ................................................................................................ 28 Returning an Invoice to the Processor...................................................................................................... 28
Updating ApplicationXtender........................................................................................................................ 29

ii
Table of Contents
ApplicationXtender Workflow Accounts Payable User’s Guide
Processing an Invoice Using AppXtender Workflow Web...................................... 30 Processing an Invoice .......................................................................................................................................30 Adding Invoice Information ...........................................................................................................................32 Saving Your Changes .......................................................................................................................................33 Cost Distribution Information ........................................................................................................................34 Adding Cost Distribution Line Items ............................................................................................................35 Modifying Cost Distribution Line Items .......................................................................................................38 Deleting Cost Distribution Line Items ...........................................................................................................39 Activity Information.........................................................................................................................................39
Approving an Invoice as a Processor ........................................................................................................39 Routing an Invoice to an Approver...........................................................................................................40 Rejecting an Invoice .....................................................................................................................................42
Re-Processing a Returned Invoice ..................................................................................................................42 Approving an Invoice Using AppXtender Workflow Web ..................................... 44
Approval Process..............................................................................................................................................44 Approving Line Items on the Invoice ............................................................................................................46
Clearing an Approval ..................................................................................................................................47 Activity Information for an Approver ...........................................................................................................47
Approving an Invoice as an Approver .....................................................................................................48 Routing an Invoice for Further Approval.................................................................................................48 Returning an Invoice to the Processor.......................................................................................................49
Updating ApplicationXtender ........................................................................................................................49 Index................................................................................................................................. 51

iii
Preface
This guide provides an overview of the ApplicationXtender Workflow Accounts Payable ® (AppXtender Workflow AP) business process, as well as concepts and procedures on how to perform invoice processing and approval tasks through ApplicationXtender Workflow.
As part of an effort to improve and enhance the performance and capabilities of its product line, EMC from time to time releases revisions of its hardware and software. Therefore, some functions described in this ApplicationXtender Workflow Accounts Payable User’s Guide may not be supported by all revisions of the software or hardware currently in use. For the most up-to-date information on product features, refer to your product release notes. If a product does not function properly or does not function as described in this ApplicationXtender Workflow Accounts Payable User’s Guide, please contact your EMC representative.
Audience
This guide is intended for users of the ApplicationXtender Workflow Accounts Payable business process.
Organization
Here is a list of where information is located in this guide.
Title Description
Chapter 1, "Introduction" Provides an overview of the ApplicationXtender Workflow Accounts Payable business process and an overview of the procedure for getting started processing or approving invoices through ApplicationXtender Workflow.
Chapter 2, "Processing an Invoice"
Provides information necessary to process an invoice using ApplicationXtender Workflow Accounts Payable.
Chapter 3, "Approving an Invoice" Provides information necessary to approve an invoice using ApplicationXtender Workflow Accounts Payable.

iv
Preface
ApplicationXtender Workflow Accounts Payable User’s Guide
Related Documentations
Related ApplicationXtender Workflow Accounts Payable documents include:
ApplicationXtender Workflow Accounts Payable Integration Guide
ApplicationXtender Workflow Accounts Payable User’s Quick Reference
Related ApplicationXtender Workflow documents include:
ApplicationXtender Workflow User’s Guide
ApplicationXtender Workflow Administrator’s Guide
ApplicationXtender Workflow Process Builder Guide
ApplicationXtender Workflow Basic Language Guide
ApplicationXtender Workflow User’s Quick Reference
ApplicationXtender Workflow Administrator’s Quick Reference
Most of these documents can be found in the Documentation directory on the product CD-ROM. All documents are in Adobe Acrobat Portable Document Format (PDF), and can be viewed by downloading and installing the Adobe Acrobat Reader. The Reader is available on the EMC® ApplicationXtender/ApplicationXtender Web Access CD-ROM, or directly from Adobe at www.adobe.com. To install and use the Reader on the preferred platform, refer to the instructions on the Adobe web site.
Conventions Used in This Guide
EMC uses the following conventions for notes, cautions, warnings, and danger notices.
A note presents information that is important, but not hazard-related.
A caution contains information essential to avoid data loss or damage to the system or equipment. The caution may apply to hardware or software.
Where to Get Help
For questions about technical support, call your local sales office or service provider.
If you have a valid EMC service contract, contact EMC Customer Support at:
North America, Canada, and Latin America: 1-877-534-2867
Europe, Middle East, and Africa: +800-EMC2-EMC2 (+800-3622-3622)*

v
Preface
North America, Canada, and Latin America: 1-877-534-2867
Asia Pacific and Japan: +800-EMC2-EMC2 (+800-3622-3622)
* See dialing instructions on the EMC web site at:
customernet.documentum.com/support/access_numbers.htm
Follow the voice menu prompts to open a service call and select the applicable product support.


1
1 Introduction
The ApplicationXtender (AppXtender) Workflow Accounts Payable (AP) business process allows you to verify and approve invoices received from vendors, so that they can be processed and paid. Every invoice that is added to the AP application in AppXtender or AppXtender Web Access (by a user who is logged into AppXtender Workflow) goes through the AP business process. When an invoice is approved, a report indicating the details of the approval is added to the invoice document in ApplicationXtender.
An Overview of the AP Business Process
The AP business process begins when an invoice is added to AppXtender or AppXtender Web Access. By default, new invoices are routed to a Processor. Once the Processor enters data about the invoice, the Processor can route the invoice to an Approver for authorization. In some cases, the Processor can approve the invoice if it is less than or equal to a specific dollar amount. The Processor can also reject the invoice for various reasons.
A processed invoice routed for approval goes to the Approver’s Inbox. If an invoice is ready for approval, the Approver can approve the invoice. The Approver can also send the processed invoice back to the Processor for corrections or to be routed to a more appropriate Approver if needed.
If line-item approval is not enabled for your system, the Processor selects a single Approver. The Approver can either approve the invoice or return it to the Processor for corrections or re-routing to another Approver.

2
An Overview of the AP Business Process
ApplicationXtender Workflow Accounts Payable User’s Guide
If line items on the invoice need to be approved by another Approver, the invoice can be routed to that Approver. If identity-based routing and line-item approval are configured for your system, the Approver manually routes the invoice to the next Approver. In the identity-based routing scenario, the Approver to whom the Processor routed the invoice, approves the appropriate line items and then routes the invoice to the appropriate Approver for the remaining line items. Approvers can also return the invoice to the Processor for corrections or re-routing to another Approver.
If location-based routing and line-item approval are enabled, the Processor selects the Approver for each line item during processing. In the location-based scenario, after the Approver for the first line item approves the appropriate line items and approves the invoice, the invoice is automatically routed to the Approver of the next unapproved line item until the invoice is completely approved. Approved invoices are stored in AppXtender, along with a report indicating the approval of the invoice, by an automated task. Approvers can also return the invoice to the Processor for corrections or re-routing to another Approver.

3
An Overview of the AP Business Process
The following diagram represents the flow of the AP business process.
Figure 1 AP Business Process

4
An Overview of the AP Business Process
ApplicationXtender Workflow Accounts Payable User’s Guide
Your system administrator may have set up an automated task that will automatically process and approve invoices that meet specific criteria. When an invoice is automatically processed and approved, a report is added as a page in the invoice document in AppXtender or AppXtender Web Access.
For more information, see the following sections:
Initiating the AP Business Process on page 1 Pre-Processing Automated Task (Optional) on page 4 Processor Role on page 5 Approver Role on page 6 Post-Processing Automated Task on page 6
Initiating the AP Business Process
The AP business process starts when an invoice is added to the AP application in AppXtender or AppXtender Web Access. Once an invoice is added, the SCAN DATE index field is the only required field, and it is automatically populated. All other index fields are optional.
For a new business process instance to be automatically initiated, the user adding the document must be logged into AppXtender Workflow.
Once an invoice is added to the AP application, the AP business process instance is automatically initiated. The invoice is routed to either the Pre-Processing Automated Task or to a Processor.
An invoice can be automatically processed and approved or sent directly a Processor for processing.
For an overview of the procedure for logging into AppXtender Workflow, see Getting Started Using the Work On Dialog Box on page 6. For more information about the use of AppXtender Workflow and a more detailed procedure for logging into AppXtender and AppXtender Workflow, refer to the ApplicationXtender Workflow User’s Guide. If you have questions about login account information for AppXtender or AppXtender Workflow, contact your system administrator.
For more information about adding documents to AppXtender, refer to the ApplicationXtender User’s Guide.
Pre-Processing Automated Task (Optional)
The pre-processing automated task can be used to automatically process and approve an invoice without requiring manual intervention. This

5
An Overview of the AP Business Process
feature allows for a greater number of invoices to be processed in a smaller amount of time. Your system administrator determines whether this task is used for your system, and defines the functionality of the task. For example, your system administrator may set up a script to automatically process and approve invoices with invoice totals less than $100.
If the pre-processing task is enabled and the invoice qualifies for automatic processing and approval, the business process instance is queued directly to the post-processing automated task, which adds a report containing approval information to the invoice document in AppXtender or AppXtender Web Access. If the pre-processing automated task is disabled or if the invoice does not qualify for automatic processing and approval, the item appears in the Processor’s Groupbox.
Processor Role
Processors are able to pull the items from the Processors’ Groupbox into their individual Inbox. The system can also be configured to automatically push items directly into the Processor’s Inbox. For more information on the Groupbox and the Inbox, refer to the ApplicationXtender Workflow User Guide.
Once a Processor enters the invoice information, he can then save the changes to process later or select an act to perform. The acts that a Processor can perform include the following:
The Approve the Invoice act allows the Processor to complete the processing of an invoice with an approved status without seeking approval from the Approver. This act can be performed if an invoice is below a specific amount, which is configurable during installation. For more information on how to configure this act, refer to the ApplicationXtender Workflow Accounts Payable Integration Guide.
The Route to an Approver act allows the Processor to forward an invoice to the Approver for authorization. The Processor selects the Approver from a drop-down list of valid Approvers; or, if location-based routing is enabled for the business process, the Processor selects the Location and Department for the Approver from drop-down lists of valid Locations and Departments.
The Reject the Invoice act allows the Processor to reject an invoice if it doesn’t satisfy some customer specific criteria. For example, the Processor can choose this option if the invoice was not scanned successfully or it is a duplicate invoice. A Processor must select a reason for rejection from the drop-down list. Choosing the Reject the

6
Getting Started Using the Work On Dialog Box
ApplicationXtender Workflow Accounts Payable User’s Guide
Invoice act does not update indexes within AppXtender or AppXtender Web Access.
Approver Role
If further authorization is required, items are sent to the Approver. If line-item approval is enabled for a system, an Approver approves those items for which she is responsible for while scrolling through each line of the cost distribution section of an invoice, then approves the invoice. If line-item approval is not configured for the system, the Approver approves the entire invoice.
The Approver can perform the following acts:
The Approve the Invoice act allows the Approver to complete processing of the information with an approved status.
The Route to an Approver act allows the Approver to route the item to another Approver for approval of remaining line items. If identity-based routing and line-item approval are enabled, this act is available to allow the Approver to route the invoice to another Approver.
The Return to the Processor act allows the Approver to route the invoice back to the Processor for additional processing. This act might be taken, for example, if the Approver wants to let the Processor know that there are account-coding errors that must be corrected or if an invoice was incorrectly routed to an Approver.
Post-Processing Automated Task
Once an invoice has finished the process/approval phase, the post-processing automated task updates the AP application in AppXtender with the data that was entered from the invoice. The automated task also generates a report that includes customer specific information and the name of the Approver. This report is then added to the invoice document in the AP application in AppXtender or AppXtender Web Access.
Getting Started Using the Work On Dialog Box
To access items in the Work On dialog box, you need to be logged into ApplicationXtender Workflow. We recommend that you familiarize yourself with the ApplicationXtender (AppXtender) and AppXtender Workflow user documentation prior to working with the Work On dialog box:
For more information regarding AppXtender, refer to the ApplicationXtender User’s Guide.

7
Getting Started Using the Work On Dialog Box
For more information regarding AppXtender Workflow, refer to the ApplicationXtender Workflow User’s Guide.
For information regarding the logon type and user name and password you should use for AppXtender and AppXtender Workflow, see your system administrator.
For more information on using the AP business process, see:
Chapter 2, "Processing an Invoice" Chapter 3, "Approving an Invoice" Chapter 4, "Processing an Invoice on the Web"
Chapter 5, "Approving an Invoice on the Web"

8
2 Processing an Invoice
This chapter describes how to process an invoice with ApplicationXtender (AppXtender) Workflow Accounts Payable (AP).
Processing an Invoice
Once an invoice is added to the AP application, a new business process instance is automatically initiated. When the business process instance is initiated, it is sent to the Processors’ Groupbox, from which Processors are able to pull the invoices into their Inbox. Your AppXtender Workflow system may also be configured to automatically push invoices into your Inbox. For more information, refer to the ApplicationXtender Workflow User’s Guide.
A Processor processes invoices using the Work On dialog box. To process an invoice, you need to fill out the information requested for that invoice in the Work On dialog box.
The Work On dialog box allows you to work on the invoices assigned to you for processing.
9
Processing an Invoice
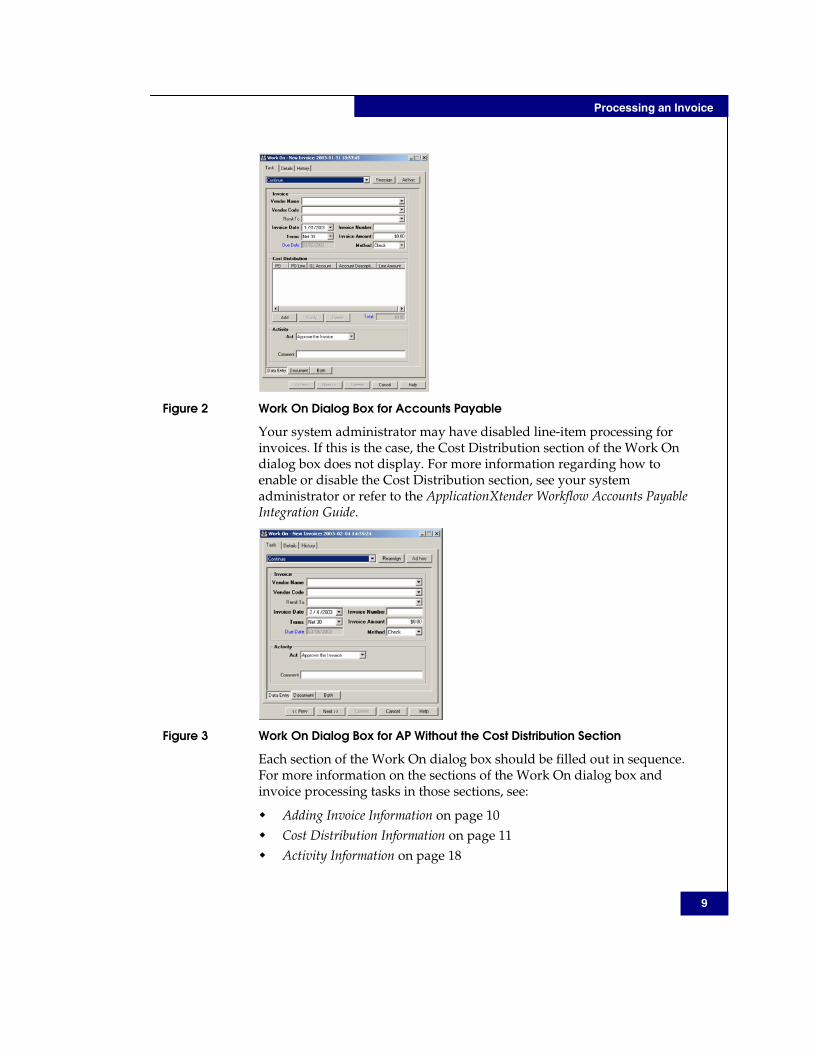
Figure 2 Work On Dialog Box for Accounts Payable
Your system administrator may have disabled line-item processing for invoices. If this is the case, the Cost Distribution section of the Work On dialog box does not display. For more information regarding how to enable or disable the Cost Distribution section, see your system administrator or refer to the ApplicationXtender Workflow Accounts Payable Integration Guide.
Figure 3 Work On Dialog Box for AP Without the Cost Distribution Section
Each section of the Work On dialog box should be filled out in sequence. For more information on the sections of the Work On dialog box and invoice processing tasks in those sections, see:
Adding Invoice Information on page 10 Cost Distribution Information on page 11 Activity Information on page 18

10
Adding Invoice Information
ApplicationXtender Workflow Accounts Payable User’s Guide
Re-Processing a Returned Invoice on page 21
If you are not yet logged into AppXtender and AppXtender Workflow, refer to the ApplicationXtender Workflow User’s Guide for detailed instructions or see Chapter 1, section, "Getting Started Using the Work On Dialog Box" for an overview of the procedure for logging in and opening the dialog box.
Adding Invoice Information
The first section of the Work On dialog box that you, as the Processor, fill out is the Invoice section. This is where the information about the invoice is entered, including the vendor name and code, the invoice date, number and amount, and the payment terms and method.
Figure 4 Work On Dialog Box - Invoice Section
To process the invoice information:
1. Select the Vendor Name from the drop-down list.
2. Select a Vendor Code from the drop-down list. Only the valid vendor codes for the specified vendor name are provided in the Vendor Code drop-down list.
3. Select the name of the person or department for whom the invoice information is intended from the Remit To drop-down list. This is not a required field.
4. Enter the invoice date. You can enter the date manually or select the date from the drop-down calendar. The system does not allow you to enter or select an invoice date that is later than today’s date.
5. Enter the invoice number in the Invoice Number text box. This is an alphanumeric text box.
6. Select the payment terms from the Terms drop-down list.
7. The Due Date text box is read-only and is populated automatically based on the selection in the Terms drop-down list.

11
Saving Your Changes
8. Enter the total invoice dollar amount in the Invoice Amount text box. To approve or route the invoice for approval, the dollar amount must be greater than zero (0).
9. Select a payment method from the Method drop-down list.
Saving Your Changes
Once you enter the invoice information, you can then save the changes to process later. For example, if you begin to process the invoice and realize that you need more information before you continue, you can save your changes to the invoice and move on to other invoices until you are able to obtain the information you need.
To save invoice changes for later processing:
1. Select Save Invoice Changes from the Action drop-down list, located above the Invoice section.
Figure 5 Action Drop-Down List – Save Invoice Changes
2. Once you have populated at least the required information in the Invoice section, commit the invoice to complete the processing later. For more information, see Adding Invoice Information on page 10.
For information on how to commit an item, see the ApplicationXtender Workflow User’s Guide.
Cost Distribution Information
The Cost Distribution section of the Work On dialog box allows the Processor to add the individual line items that make up the total amount of the invoice.
The Cost Distribution section is optional. If the Cost Distribution section is not required, it can be disabled during the AppXtender Workflow AP installation. For more information regarding how to enable or disable the Cost Distribution section, refer to the ApplicationXtender Workflow Accounts Payable Integration Guide.

12
Cost Distribution Information
ApplicationXtender Workflow Accounts Payable User’s Guide
Figure 6 Work On Dialog Box – Cost Distribution Section
The columns that appear in the Cost Distribution list are configurable. You can configure which columns are displayed as well as how wide the columns are. To change the column width, click and drag the side of the appropriate column heading.
The changes you make to the columns are persistent, meaning, they remain the same until you change them again.
To configure columns to be displayed:
3. Click on any of the displayed column headings. The Settings dialog box appears.
Figure 7 Settings Dialog Box
The following table provides a description of each of the columns that can be displayed in the Cost Distribution section of the Work On dialog box. The information displayed in each of the columns, except Approver and Manager, is entered using the Cost Distribution Line Info dialog box. For more information, see Adding Cost Distribution Line Item on page 13.
Table 1 Cost Distribution List - Column Descriptions Column Description
Approver Displays the Approver’s user name, once that line item has been approved.
PO Displays the purchase order number that corresponds with the invoice.
PO Line Displays the purchase order line number.
GL Account Displays the general ledger account code.

13
Adding Cost Distribution Line Items
Column Description
Account Description Displays the general ledger account description that corresponds with the general ledger account code.
Line Amount Displays the dollar amount for the selected line item of the invoice. Note • The combined line amounts must add up to the total invoice amount.
Location If location-based routing is enabled, displays the location that you chose to route that line item to for approval.
Department If location-based routing is enabled, displays the department that you chose to route that line item to for approval.
Manager If location-based routing is enabled, displays the approver automatically assigned by the system based on the location and department selected.
4. You have the following options:
To display a column, enable the check box next to the corresponding column heading.
To hide a column, disable the check box next to the corresponding column heading.
5. Click the close button () to implement your changes.
Adding Cost Distribution Line Items
Cost distribution line items are added one-by-one by the Processor using the Cost Distribution Line Info dialog box. All line items must be entered and the total for all line amounts must match the invoice amount. Until the total invoice amount and the total cost distribution amount match, you cannot commit the invoice. If location-based routing is enabled for your system, you select the location and department responsible for approval of each line item. (If identity-based routing is enabled, you route the entire invoice to the Approver who should approve the first item (s) and that Approver routes to other line-item Approvers as appropriate.)
Your system administrator may have disabled line-item processing for invoices. If this is the case, the Cost Distribution section of the Work On dialog box does not display. For more information regarding how to enable or disable the Cost Distribution section, see your system administrator or refer to the ApplicationXtender Workflow Accounts Payable Integration Guide.
To add cost distribution line items:
14
Adding Cost Distribution Line Items
ApplicationXtender Workflow Accounts Payable User’s Guide
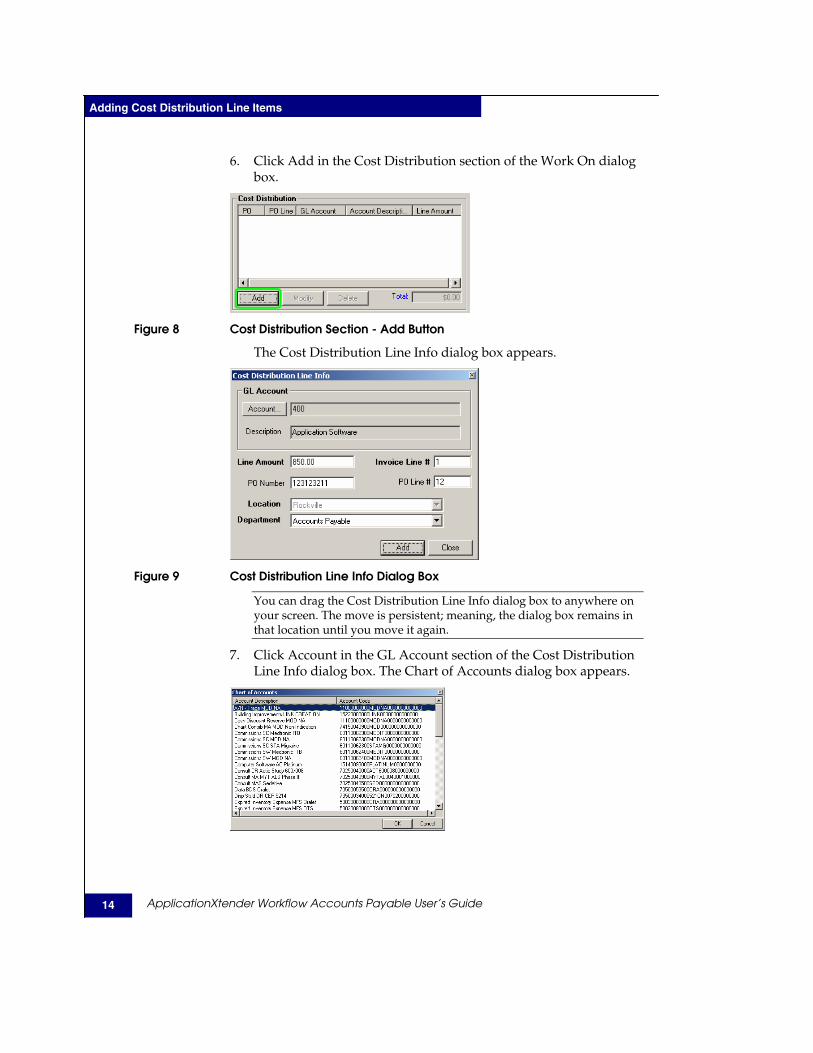
6. Click Add in the Cost Distribution section of the Work On dialog box.
Figure 8 Cost Distribution Section - Add Button
The Cost Distribution Line Info dialog box appears.
Figure 9 Cost Distribution Line Info Dialog Box
You can drag the Cost Distribution Line Info dialog box to anywhere on your screen. The move is persistent; meaning, the dialog box remains in that location until you move it again.
7. Click Account in the GL Account section of the Cost Distribution Line Info dialog box. The Chart of Accounts dialog box appears.

15
Adding Cost Distribution Line Items
Figure 10 Chart of Accounts Dialog Box
You can drag the Chart of Accounts dialog box to anywhere on your screen, adjust the size of the dialog box, as well as adjust the width of the columns in the dialog box. The changes made are persistent; meaning, the adjustments remain the same until changed again.
8. From the Chart of Accounts dialog box, select the appropriate account for the line item being entered and click OK. The Account and Description text boxes are populated in the Cost Distribution Line Info dialog box.
Once you have selected an account, the account and description information are the same for the following line items until you select another account.
9. Enter the dollar amount for the line item in the Line Amount text box. The combined total of all of the line items must add up to the total invoice amount. The sum of the line item amounts is calculated automatically in the Total text box of the Cost Distribution section. The Total text box is read only.
Figure 11 Cost Distribution Section - Total Text Box
10. Enter the line number for this line item in the Invoice Line # text box. The system defaults to line number 1 and automatically increments for each line item added. However, you may enter the line number manually and override the default.
11. Optionally, enter the purchase order number that corresponds with the specified invoice line item in the PO Number text box.
12. Optionally, enter the purchase order line number for this line item in the PO Line # text box.
13. If routing by Location and Department are enabled for your AppXtender Workflow AP system, select the location you would like to route the line-item approval to from the Location drop-down list, then select the appropriate department for that location from the Department drop-down list.

16
Modifying Cost Distribution Line Items
ApplicationXtender Workflow Accounts Payable User’s Guide
If you assign different location-department routing combinations for different line items, AppXtender Workflow AP routes first to an Approver at the location and department for the first line item. After that Approver approves the assigned line item(s), AppXtender Workflow AP automatically routes to an Approver at the location and department for the next remaining item.
The Location and Department drop-down list will only display here if location-based routing is enabled for your AppXtender Workflow AP system. If identity-based routing is enabled, you select an Approver for the entire invoice after completing the Cost Distribution section, and that Approver routes the invoice to an additional line-item Approver if needed.
14. Click Add to save your changes or click Close to exit the Cost Distribution Line Info dialog box without saving your changes.
15. If you are using location-based routing and there are multiple Approvers for the location and department you selected, a prompt appears. Select the appropriate Approver from the drop-down list, and click OK.
Clicking Add (or OK if you are prompted to select an Approver) populates that line of the Cost Distribution section. However, the Cost Distribution Line Info dialog box remains on your screen until all necessary line items have been entered and the total cost distribution amount adds up to the total invoice amount specified in the Invoice section of the Work On dialog box. You can close the Cost Distribution Line Info dialog box manually, but you cannot commit the invoice until all line items have been entered.
Modifying Cost Distribution Line Items
If you make an error while entering line items, you can go back and modify the line items to correct the error.
To modify a cost distribution line item:
16. From the Cost Distribution list, select the line item you want to change and click Modify.

17
Modifying Cost Distribution Line Items
Figure 12 Cost Distribution Section - Modify Button
The Cost Distribution Line Info dialog box appears.
You may select more than one line item by pressing <SHIFT> + click from the top to the bottom of items in a sequential list or you can press <CTRL> + click for each item you would like to modify. The items appear starting with the top of the list.
Figure 13 Cost Distribution Line Info Dialog Box – Modify
17. Change the line item information as needed. A Processor is authorized to change all items in the Cost Distribution Line Info dialog box.
18. Click OK to exit the Cost Distribution Line Info dialog box and save your changes.
19. If you are using location-based routing, there are multiple Approvers for the location and department you selected, and you have not yet selected a specific Approver for the line item you are modifying, a prompt appears. Select the appropriate Approver from the drop-down list, and click OK.

18
Deleting Cost Distribution Line Items
ApplicationXtender Workflow Accounts Payable User’s Guide
Deleting Cost Distribution Line Items
You may delete line items from the Cost Distribution list, keeping in mind that the total cost distribution amount must match the total invoice amount before you can commit the invoice.
To delete cost distribution line items:
20. From the Cost Distribution list, select the line item(s) you want to delete and click Delete.
Figure 14 Cost Distribution Section - Delete Button
A confirmation message appears.
21. Click Yes to delete or No to cancel without deleting the line item(s).
Activity Information
The Activity section of the Work On dialog box allows you to select an act to be performed on the invoice before committing.
Figure 15 Work On Dialog Box - Activity Section
The options available in the Act drop-down list vary depending on the system configuration and the invoice information. For more information on system configuration, contact your system administrator or refer to the ApplicationXtender Workflow Accounts Payable Integration Guide.
For more information on the Acts available for selection, see:
Approving an Invoice as a Processor on page 19 Routing an Invoice to an Approver on page 19 Rejecting an Invoice on page 21

19
Activity Information
Approving an Invoice as a Processor
The system can be configured to allow Processors to approve and complete an invoice if it is equal to or less than a specific dollar amount. This allows for quicker processing because no further approvals are necessary. Once the Processor approves the invoice, it is submitted for payment.
The Approve the Invoice option may not be available in the Act drop-down list if your system has not been configured to use this option. For more information, contact your system administrator or refer to the ApplicationXtender Workflow Accounts Payable Integration Guide.
To approve an invoice:
22. Select Approve the Invoice from the Act drop-down list.
23. Commit the invoice. If you close the invoice without committing, your changes to the Invoice section are lost. However, the cost distribution list remains as entered.
For detailed instructions on committing an item, refer to the ApplicationXtender Workflow User Guide.
Once an invoice has gone through the complete process/approval phase, the system updates the AppXtender index fields associated with the invoice using the Invoice and Cost Distribution information that was entered by the Processor.
Routing an Invoice to an Approver
If the invoice amount is above the allowed approval amount for Processors or if the Approve the Invoice option has not been enabled, the Processor must route the invoice to the appropriate Approver. The method for selecting the approver may vary based on your AppXtender Workflow AP system configuration:
If the Activity section of your Work On dialog box contains an Approver drop-down list, see Routing to an Approver based on Identity on page 20.
If the Activity section of your Work On dialog box contains Location and Department drop-down lists, see Routing to an Approver based on Location on page 20.
If the Activity section of your Work On dialog box contains neither an Approver drop-down list nor Location and Department drop-down lists, you have already selected the appropriate approvers when adding line-item approval items and do not need to select an

20
Activity Information
ApplicationXtender Workflow Accounts Payable User’s Guide
approver here. Commit the invoice. If you close the invoice without committing, your changes to the Invoice section are lost. However, the cost distribution list remains as entered.
Routing to an Approver based on Identity
To route to an Approver based on Identity:
24. Select Route to an Approver from the Act drop-down list. The Approver drop-down list appears containing all valid Approvers.
Figure 16 Activity Section - Approver Drop-Down List
25. Select the appropriate Approver for the invoice from the Approver drop-down list.
26. Commit the invoice. If you close the invoice without committing, your changes to the Invoice section are lost. However, the cost distribution list remains as entered.
For instructions on committing an item, refer to the ApplicationXtender Workflow User’s Guide.
Routing to an Approver based on Location
To route to an Approver based on Location:
27. Select Route to an Approver from the Act drop-down list. The Location and Department drop-down lists appear containing all valid Locations and the corresponding departments.
Figure 17 Activity Section - Approver Drop-Down List
28. Select the appropriate Location from the Location drop-down list. (If only one location is available, the drop-down list displays that location grayed out and you cannot change the selection.)
29. Select the appropriate Department from the Department drop-down list. Only departments corresponding to the selected location are available. (If only one department is available, the drop-down list

21
Re-Processing a Returned Invoice
displays that department grayed out and you cannot change the selection.)
30. Commit the invoice. If you close the invoice without committing, your changes to the Invoice section are lost. However, the cost distribution list remains as entered.
31. If there are multiple Approvers for the location and department you selected, a prompt appears. Select the appropriate Approver from the drop-down list, and click OK.
For further instructions on committing an item, refer to the ApplicationXtender Workflow User’s Guide.
Rejecting an Invoice
The Processor can reject an invoice if it doesn’t satisfy some customer-specific criteria. For example, the Processor can choose this option if the invoice was not scanned successfully or it is a duplicate invoice.
To reject an invoice:
32. Select Reject the Invoice from the Act drop-down list. The Reason drop-down list appears.
Figure 18 Activity Section - Reason Drop-Down List
33. Select a reason for rejection from the Reason drop-down list.
34. Commit the invoice. If you close the invoice without committing, your changes to the invoice section are lost.
For more information on committing an item, refer to the ApplicationXtender Workflow User’s Guide.
If you choose to reject the invoice, the system does not update indexes within AppXtender.
Re-Processing a Returned Invoice
An Approver has the option of returning an invoice to a Processor for any reason. For example, if the Approver noticed an account-coding error. The Approver may choose to insert a comment referencing what needs to be changed.

22
Re-Processing a Returned Invoice
ApplicationXtender Workflow Accounts Payable User’s Guide
If an invoice is returned to you, you must make the necessary changes and resubmit the invoice. You are able to change any information in the Invoice section and modify most line items. The only exception is if the Approver has already approved any of the line items, those items cannot be modified or deleted.
For more information, see:
Adding Invoice Information on page 10. Cost Distribution Information on page 11. Activity Information on page 18.

23
3 Approving an Invoice
This chapter describes how to approve an invoice using ApplicationXtender Workflow Accounts Payable (AppXtender Workflow AP).
Approval Process
Most invoices are processed and then routed to an Approver for final approval. You, as the Approver, take the invoice from your Inbox, approve the items you are authorized to approve, and either route it to another Approver (if identity-based routing is enabled and there are not line items marked as not applicable for your approval) or approve the invoice to submit it for payment.

24
Approval Process
ApplicationXtender Workflow Accounts Payable User’s Guide
Figure 19 Work On Dialog Box – Approver
Your system administrator may have disabled line-item approval for invoices. If this is the case, the Cost Distribution section of the Work On dialog box does not display. For more information regarding how to enable or disable the Cost Distribution section, see your system administrator or refer to the ApplicationXtender Workflow Accounts Payable Integration Guide.
Figure 20 Work On Dialog Box Without the Cost Distribution Section - Approver
When an Approver opens an invoice, the Invoice section of the Work On dialog box is read-only. The Approver uses the Cost Distribution section of the Work On dialog box, if that section was enabled, to approve line items of an invoice. In the Activity section, the Approver chooses whether to approve the invoice, return it to the Processor for corrections or re-routing to another Approver, or (if location-based routing is not

25
Approving Line Items on the Invoice
enabled) route to another Approver for approval of remaining line items. For information on opening and using the Work On dialog box, refer to the ApplicationXtender Workflow User’s Guide.
Figure 21 Work On Dialog Box - Invoice Section for the Approver
Approving Line Items on the Invoice
The Cost Distribution section of the Work On dialog box lists each of the line items of an invoice, entered by a Processor. You approve the items you are responsible for and either approve the invoice to submit it for payment or route the invoice to another Approver for further line-item approvals.
Your system administrator may have disabled line-item approval for invoices. If this is the case, the Cost Distribution section of the Work On dialog box does not display. For more information regarding how to enable or disable the Cost Distribution section, see your system administrator or refer to the ApplicationXtender Workflow Accounts Payable Integration Guide.
Figure 22 Work On Dialog Box - Cost Distribution Section for the Approver
If you notice a coding error of some kind, you can return the invoice to the Processor to make the necessary corrections. For more information, see Returning an Invoice to the Processor on page 28.
To approve line items:
In the Cost Distribution list, highlight the line item(s) you want to approve and click Approve.

26
Approving Line Items on the Invoice
ApplicationXtender Workflow Accounts Payable User’s Guide
You may select more than one line item by pressing <SHIFT> + click from the top to the bottom of items in a sequential list or you can press <CTRL> + click for each item you would like to modify. The items appear starting with the top of the list.
Figure 23 Cost Distribution Section - Approve Button
Your user name appears in the Approver column of the Cost Distribution list for each line item you approve. If “N/A” displays in the Approver column, that line item is pre-assigned to another Approver and cannot be approved by you. The columns that are displayed in the Cost Distribution list are configurable. For more information, see Chapter 2, section, "Cost Distribution Information."
Clearing an Approval
If you mistakenly approve an item that should not be approved, or you do not have the authorization to approve, you can clear that approval. You are only able to clear the approvals that you authorized. If the invoice has already gone through another Approver before you, you cannot clear the approvals that Approver authorized.
To clear an approval:
In the Cost Distribution list, highlight the approved line items you want to clear the approval for and click Clear.
You may select more than one line item by pressing <SHIFT> + click from the top to the bottom of items in a sequential list. You can also press <CTRL> + click for each item you would like to modify. The items appear starting with the top of the list.
However, if the items you select are a combination of approved and non-approved items, you cannot approve or clear any of those items. If you select multiple approved or multiple non-approved items, you can clear or approve all of those at one time.

27
Activity Information for an Approver
Figure 24 Cost Distribution Section - Clear Button
Activity Information for an Approver
The Activity section of the Work On dialog box allows you to select an act to be performed on the invoice before committing. The options available in the Act drop-down list vary depending on the current state of the invoice.
For more information, see:
Approving an Invoice as an Approver, below Routing an Invoice for Further Approval on page 28 Returning an Invoice to the Processor on page 28
Approving an Invoice as an Approver
You can use the Approve the Invoice act approve to the invoice and submit it for payment if any of the following are true:
You have invoice approval for an entire invoice. You approved all line items that you are responsible for approving
and all other line items are already approved. You approved all line items that you are responsible for approving
and the Route to an Approver act is not available (indicating that your system uses location-based routing and the invoice routes automatically to the Approver for the remaining line items).
To approve an invoice:
35. Select Approve the Invoice from the Act drop-down list.
36. Commit the invoice. If you cancel without committing, all of your approvals are lost.
For instructions on committing an item, refer to the ApplicationXtender Workflow User’s Guide.

28
Activity Information for an Approver
ApplicationXtender Workflow Accounts Payable User’s Guide
Once an invoice has gone through the complete process/approval phase, the system updates the AppXtender index fields associated with the invoice using the Invoice information that was entered by the Processor.
Routing an Invoice for Further Approval
If you are not authorized to approve all of the line items on an invoice, you must route the invoice to another Approver for approval of the remaining line items, if the Route to an Approver act is available. (If the Route to Approver act is not available and there are remaining line items to be approved, location-based routing is enabled and the invoice routes automatically to the next Approver after you approve the invoice using the Approve the Invoice act. For more information on approving the invoice, see Approving an Invoice as an Approver on page 27.)
To route the invoice for further approval:
37. Select Route to an Approver from the Act drop-down list. The Approver drop-down list appears.
Figure 25 Activity Section - Approver Text Box
Select the appropriate Approver from the Approver drop-down list.
38. Commit the invoice. If you cancel without committing, all of your approvals are lost.
For instructions on committing an item, refer to the ApplicationXtender Workflow User’s Guide.
Returning an Invoice to the Processor
You can choose to return an invoice to the Processor for additional processing. For example, if you receive an invoice that contains errors for the invoice or cost distribution information, you can choose not to approve any of the line items and return it to the Processor for correction.
To return an invoice to the Processor:
39. Select Return to the Processor from the Act drop-down list.
40. To specify the error(s) to be corrected, type your comments in the Comment text box.

29
Updating ApplicationXtender
41. Commit the invoice. The invoice is returned to the Inbox of the Processor who routed it to you.
For instructions on committing an item, refer to the ApplicationXtender Workflow User’s Guide.
Updating ApplicationXtender
After the process/approval phase is complete, the invoice is queued for the post-processing automated task. This task is responsible for updating the ApplicationXtender (AppXtender) index fields, generating an HTML report, and adding the report to the AppXtender application. Once the automated task is complete, you can execute a query in AppXtender to find the updated indexes and the HTML report. For more information on executing a query in AppXtender, refer to the ApplicationXtender User’s Guide.

30
4 Processing an Invoice
Using AppXtender Workflow Web
This chapter describes how to process an invoice with ApplicationXtender (AppXtender) Workflow for Accounts Payable (AP) Web Access.
Processing an Invoice................................................... Error! Bookmark not defined. Adding Invoice Information....................................... Error! Bookmark not defined. Saving Your Changes................................................... Error! Bookmark not defined. Cost Distribution Information .................................... Error! Bookmark not defined. Adding Cost Distribution Line Items........................ Error! Bookmark not defined. Modifying Cost Distribution Line Items................... Error! Bookmark not defined. Deleting Cost Distribution Line Items....................... Error! Bookmark not defined. Activity Information .................................................... Error! Bookmark not defined. Re-Processing a Returned Invoice ............................. Error! Bookmark not defined.
Processing an Invoice
Once an invoice is added to the AP application, a new business process instance is automatically initiated. When the business process instance is initiated, it is sent to the Processors’ Groupbox, from which Processors are able to pull the invoices into their Inbox. Your ApplicationXtender Workflow (AppXtender Workflow) system may also be configured to automatically push invoices into your Inbox. For more information refer to the AppXtender Workflow User’s Guide.
An AP Processor processes invoices using the Work On window. To process an invoice, you need to fill out the information requested for that invoice in the Work On window.

31
Processing an Invoice
The Work On window allows you to work on the invoices assigned to you for processing.
Figure 26 Work On Window for Accounts Payable Web
Your system administrator may have disabled line-item processing for invoices. If this is the case, the Cost Distribution section of the Work On window does not display. For more information regarding how to enable or disable the Cost Distribution section, see your system administrator or refer to the ApplicationXtender Workflow Accounts Payable Integration Guide.

32
Adding Invoice Information
ApplicationXtender Workflow Accounts Payable User’s Guide
Figure 27 Work On Window for AP Without the Cost Distribution Section
Each section of the Work On window should be filled out in sequence. For more information on the sections of the Work On window and invoice processing tasks in those sections, see:
Adding Invoice Information on page 10 Cost Distribution Information on page 11 Activity Information on page 18 Re-Processing a Returned Invoice on page 21
Adding Invoice Information
The first section of the Work On window that you, as the Processor, fill out is the Invoice section. This is where the information about the invoice is entered, including the vendor name and code, the invoice date, number and amount, and the payment terms and method.

33
Saving Your Changes
Figure 28 Work On Window - Invoice Section
To process the invoice information:
42. Select the Vendor Name from the drop-down list.
43. Select a Vendor Code from the drop-down list. Only the valid vendor codes for the specified vendor name are provided in the Vendor Code drop-down list.
44. Optionally, select the name of the person or department for whom the invoice information is intended from the Remit To drop-down list. This is not a required field.
45. Enter the Invoice Date in the text box. You enter the date by selecting the date from the drop-down calendar.
46. Enter the Invoice Number in the text box. This is an alphanumeric text box.
47. Select the payment terms from the Terms drop-down list.
48. The Due Date text box is read-only and is populated automatically based on the selection in the Terms drop-down list.
49. Enter the total invoice dollar amount in the Invoice Amount text box. To approve or route the invoice for approval, the dollar amount must be greater than zero (0).
50. Select a payment method from the Method drop-down list.
Saving Your Changes
Once you enter the invoice information, you can then save the changes to process later. For example, if you begin to process the invoice and realize that you need more information before you continue, you can save your changes to the invoice and move on to other invoices until you are able to obtain the information you need.
To save invoice changes for later processing:
51. Select Save Invoice Changes from the Acts drop-down list, located above the Invoice section.
Figure 29 Acts Drop-Down List – Save Invoice Changes
52. Once you have populated at least the required information in the Invoice section, commit the invoice to complete the processing later. For more information, see Adding Invoice Information on page 10.

34
Cost Distribution Information
ApplicationXtender Workflow Accounts Payable User’s Guide
For information on how to commit an item, see the ApplicationXtender Workflow User’s Guide.
Cost Distribution Information
The Cost Distribution section of the Work On window allows the Processor to add the individual line items that make up the total amount of the invoice.
The Cost Distribution section is optional. If the Cost Distribution section is not required, it can be disabled during installation. For more information regarding how to enable or disable the Cost Distribution section, refer to the ApplicationXtender Workflow Accounts Payable Integration Guide.
Figure 30 Work On Window – Cost Distribution Section
The following table provides a description of each of the columns that is displayed in the Cost Distribution section of the Work On window. The information displayed in each of the columns, except Approver and Manager, is entered using the Cost Distribution Line Info window. For more information, see Adding Cost Distribution Line Item on page 13.
Table 2 Cost Distribution List - Column Descriptions Column Description
PO Displays the purchase order number that corresponds with the invoice.
PO Line Displays the purchase order line number.
GL Account Displays the general ledger account code.
Account Description Displays the general ledger account description that corresponds with the general ledger account code.
Line Amount Displays the dollar amount for the selected line item of the invoice.
Location If location-based routing is enabled, displays the location to which you chose to route that line item for approval.
Department If location-based routing is enabled, displays the department to which you chose to route that line item for approval.

35
Adding Cost Distribution Line Items
Column Description
Manager If location-based routing is enabled, displays the approver automatically assigned by the AppXtender Workflow system based on the location and department selected.
Adding Cost Distribution Line Items
Cost distribution line items are added one-by-one by the Processor using the Cost Distribution window. All line items must be entered and the total for all line amounts must match the invoice amount. Until the total invoice amount and the total cost distribution amount match, you cannot commit the invoice. If location-based routing is enabled for your system, you select the location and department responsible for approval of each line item. (If identity-based routing is enabled, you route the entire invoice to the Approver who should approve the first item (s) and that Approver routes to other line-item Approvers as appropriate.)
Your system administrator may have disabled line-item processing for invoices. If this is the case, the Cost Distribution section of the Work On window does not display. For more information regarding how to enable or disable the Cost Distribution section, see your system administrator or refer to the ApplicationXtender Workflow Accounts Payable Integration Guide.
To add cost distribution line items:
53. Click Add in the Cost Distribution section of the Work On window.
Figure 31 Cost Distribution Section - Add Button
The Cost Distribution window appears.

36
Adding Cost Distribution Line Items
ApplicationXtender Workflow Accounts Payable User’s Guide
Figure 32 Cost Distribution Window
54. Click Account. The Chart of Accounts window appears.
Figure 33 Chart of Accounts Dialog Box
You can sort either of the columns in the GL Chart of Accounts by clicking the column header. The column sorts in either ascending or descending order and an arrow appears to the right of the header indicating what order it’s in.
55. From the GL Chart of Accounts window, find the appropriate account for the line item being entered and click Select. The Account and Description text boxes are populated in the Cost Distribution window.
Once you have selected an account, the account and description information are the same for the following line items until you select another account (or until you close the Cost Distribution window).

37
Adding Cost Distribution Line Items
56. Enter the dollar amount for the line item in the Line Amount text box. The combined total of all of the line items must add up to the total invoice amount. The sum of the line item amounts is calculated automatically in the Total text box of the Cost Distribution section. The Total text box is read only.
Figure 34 Cost Distribution Section - Total Text Box
57. In the Invoice Line # text box, the system defaults to line number 1 and automatically increments for each line item added. However, you may enter the line number manually and override the default.
58. Optionally, enter the purchase order number that corresponds with the specified invoice line item in the PO Number text box.
59. Optionally, enter the purchase order line number for this line item in the PO Line # text box.
60. If routing by Location and Department are enabled, select the location you would like to route the line-item approval to from the Location drop-down list, then select the appropriate department for that location from the Department drop-down list.
If you assign different location-department routing combinations for different line items, the system routes first to an Approver at the location and department for the first line item. After that Approver approves the assigned line item(s), the system will then automatically route to an Approver at the location and department for the next item.
The Location and Department drop-down list will only display here if location-based routing is enabled. If identity-based routing is enabled, you select an Approver for the entire invoice after completing the Cost Distribution section, and that Approver routes the invoice to an additional line-item Approver if needed.
61. Click OK to save your changes or click Cancel to exit the Cost Distribution window.
62. If you are using location-based routing and there are multiple Approvers for the location and department you selected. Select the appropriate Approver from the drop-down list.
Clicking OK populates that line of the Cost Distribution section. However, the Cost Distribution window remains on your screen until all necessary line items have been entered and the total cost distribution amount adds up to the total invoice amount specified in

38
Modifying Cost Distribution Line Items
ApplicationXtender Workflow Accounts Payable User’s Guide
the Invoice section of the Work On window. You can close the Cost Distribution Line Info window manually, but you cannot commit the invoice until all line items have been entered.
Modifying Cost Distribution Line Items
If you make an error while entering line items, you can go back and modify the line items to correct the error.
To modify a cost distribution line item:
63. From the Cost Distribution list, select the line item you want to change and double-click that item.
The Cost Distribution Line Info window appears.
Figure 35 Cost Distribution Line Info Dialog Box – Modify
64. Change the line item information as needed. A Processor is authorized to change all items in the Cost Distribution window.
65. Click OK to exit the Cost Distribution window and save your changes.
66. If you are using location-based routing, there are multiple Approvers for the location and department you selected, and you have not yet selected a specific Approver for the line item you are modifying, select the appropriate Approver from the drop-down list.

39
Deleting Cost Distribution Line Items
Deleting Cost Distribution Line Items
You may delete line items from the Cost Distribution list, keeping in mind that the total cost distribution amount must match the total invoice amount before you can commit the invoice.
To delete cost distribution line items:
67. From the Cost Distribution list, select the line item(s) you want to delete and click Delete, the red X to the left of each line item.
Figure 36 Cost Distribution Section - Delete Button
A confirmation message appears.
68. Click Yes to delete or No to cancel.
Activity Information
The Activity section of the Work On window allows you to select an act to be performed on the invoice before committing.
Figure 37 Work On Dialog Box - Activity Section
The options available in the Act drop-down list vary depending on the system configuration and the invoice information. For more information on system configuration, contact your system administrator or refer to the ApplicationXtender Workflow Accounts Payable Integration Guide.
For more information on the Acts available for selection, see:
Approving an Invoice as a Processor on page 19 Routing an Invoice to an Approver on page 19 Rejecting an Invoice on page 21
Approving an Invoice as a Processor
The system can be configured to allow Processors to approve and complete an invoice if it is equal to or less than a specific dollar amount. This allows for quicker processing because no further approvals are

40
Activity Information
ApplicationXtender Workflow Accounts Payable User’s Guide
necessary. Once the Processor approves the invoice, it is submitted for payment.
The Approve the Invoice option may not be available in the Act drop-down list if your system has not been configured to use this option. For more information, contact your system administrator or refer to the ApplicationXtender Workflow Accounts Payable Integration Guide.
To approve an invoice:
69. Select Approve the Invoice from the Act drop-down list.
70. Commit the invoice.
For detailed instructions on committing an item, refer to the ApplicationXtender Workflow User’s Guide.
Once an invoice has gone through the complete process/approval phase, the system updates the AppXtender index fields associated with the invoice using the Invoice and Cost Distribution information that was entered by the Processor.
Routing an Invoice to an Approver
If the invoice amount is above the allowed approval amount for Processors or if the Approve the Invoice option has not been enabled, the Processor must route the invoice to the appropriate Approver. The method for selecting the approver may vary based on your AppXtender Workflow AP system configuration:
If the Activity section of your Work On window contains an Approver drop-down list, see Routing to an Approver based on Identity on page 20.
If the Activity section of your Work On window contains Location and Department drop-down lists, see Routing to an Approver based on Location on page 20.
If the Activity section of your Work On window contains neither an Approver drop-down list nor Location and Department drop-down lists, you have already selected the appropriate approvers when adding line-item approval items and do not need to select an approver here. Commit the invoice.
Routing to an Approver based on Identity
To route to an Approver based on Identity:
71. Select Route to an Approver from the Act drop-down list. The Approver drop-down list appears containing all valid Approvers.

41
Activity Information
Figure 38 Activity Section - Approver Drop-Down List
72. Select the appropriate Approver for the invoice from the Approver drop-down list.
73. Optionally, enter any comments in the text box.
74. Commit the invoice. If you close the invoice without committing, your changes to the Invoice section are lost. However, the cost distribution list remains as entered.
For instructions on committing an item, refer to the ApplicationXtender Workflow User’s Guide.
Routing to an Approver based on Location
To route to an Approver based on Location:
75. Select Route to an Approver from the Act drop-down list. The Location and Department drop-down lists appear containing all valid Locations and the corresponding departments.
Figure 39 Activity Section - Approver Drop-Down List
76. Select the appropriate Location from the Location drop-down list. (If only one location is available, the drop-down list displays that location grayed out and you cannot change the selection.)
77. Select the appropriate Department from the Department drop-down list. Only departments corresponding to the selected location are available. (If only one department is available, the drop-down list displays that department grayed out and you cannot change the selection.)
78. Commit the invoice.
79. If there are multiple Approvers for the location and department you selected. Select the appropriate Approver from the drop-down list.

42
Re-Processing a Returned Invoice
ApplicationXtender Workflow Accounts Payable User’s Guide
For further instructions on committing an item, refer to the ApplicationXtender Workflow User’s Guide.
Rejecting an Invoice
The Processor can reject an invoice if it doesn’t satisfy some customer-specific criteria. For example, the Processor can choose this option if the invoice was not scanned successfully or it is a duplicate invoice.
To reject an invoice:
80. Select Reject the Invoice from the Act drop-down list. The Reason drop-down list appears.
Figure 40 Activity Section - Reason Drop-Down List
81. Select a reason for rejection from the Reason drop-down list.
82. Commit the invoice. If you close the invoice without committing, your changes to the invoice section are lost.
For more information on committing an item, refer to the ApplicationXtender Workflow User’s Guide.
If you choose to reject the invoice, the system does not update indexes within AppXtender.
Re-Processing a Returned Invoice
An Approver has the option of returning an invoice to a Processor for any reason. For example, if the Approver noticed an account-coding error. The Approver may choose to insert a comment referencing what needs to be changed.
If an invoice is returned to you, you must make the necessary changes and resubmit the invoice. You are able to change any information in the Invoice section and modify most line items. The only exception is if the Approver has already approved any of the line items, those items cannot be modified or deleted.
For more information, see:
Adding Invoice Information on page 10. Cost Distribution Information on page 11.

43
Re-Processing a Returned Invoice
Activity Information on page 18.
44
5 Approving an Invoice
Using AppXtender Workflow Web
This chapter describes how to approve an invoice using ApplicationXtender (AppXtender) Workflow for Accounts Payable (AP).
Approval Process.......................................................... Error! Bookmark not defined. Approving Line Items on the Invoice........................ Error! Bookmark not defined. Activity Information for an Approver ...................... Error! Bookmark not defined. Updating ApplicationXtender.................................... Error! Bookmark not defined.
Approval Process
Most invoices are processed and then routed to an Approver for final approval. You, as the Approver, take the invoice from your Inbox, approve the items you are authorized to approve, and either route it to another Approver (if identity-based routing is enabled and there are not line items marked as not applicable for your approval) or approve the invoice to submit it for payment.

45
Approval Process
Figure 41 Work On Window – Approver
Your system administrator may have disabled line-item approval for invoices. If this is the case, the Cost Distribution section of the Work On window does not display. For more information regarding how to enable or disable the Cost Distribution section, see your system administrator or refer to the ApplicationXtender Workflow Accounts Payable Integration Guide.

46
Approving Line Items on the Invoice
ApplicationXtender Workflow Accounts Payable User’s Guide
Figure 42 Work On Window Without the Cost Distribution Section - Approver
When an Approver opens an invoice, the Invoice section of the Work On window is read-only. The Approver uses the Cost Distribution section of the Work On window, if that section was enabled, to approve line items of an invoice. In the Activity section, the Approver chooses whether to approve the invoice, return it to the Processor for corrections or re-routing to another Approver, or (if location-based routing is not enabled) route to another Approver for approval of remaining line items. For information on opening and using the Work On window, refer to the ApplicationXtender Workflow User’s Guide.
Figure 43 Work On Window - Invoice Section for the Approver
Approving Line Items on the Invoice
The Cost Distribution section of the Work On window lists each of the line items of an invoice, entered by a Processor. You review the items you are responsible for and either approve the invoice to submit it for payment or route the invoice to another Approver for further line-item approvals.
Your system administrator may have disabled line-item approval for invoices. If this is the case, the Cost Distribution section of the Work On window does not display. For more information regarding how to enable or disable the Cost Distribution section, see your system administrator or refer to the ApplicationXtender Workflow Accounts Payable Integration Guide.

47
Activity Information for an Approver
Figure 44 Work On Window - Cost Distribution Section for the Approver
If you notice a coding error of some kind, you can return the invoice to the Processor to make the necessary corrections. For more information, see Returning an Invoice to the Processor on page 28.
To approve line items:
In the Cost Distribution list, find the line item you want to approve and click the Approve button to the left of the line item.
Figure 45 Cost Distribution Section - Approve Button
Your user name appears in the Approver column of the Cost Distribution list for each line item you approve (and the approve button changes from black to red). If the approval button is disabled, that line item is pre-assigned to another Approver and cannot be approved by you.
Clearing an Approval
If you mistakenly approve an item that should not be approved, or you do not have the authorization to approve, you can clear that approval. You are only able to clear the approvals that you authorized. If the invoice has already gone through another Approver before you, you cannot clear the approvals that Approver authorized.
To clear an approval:
In the Cost Distribution list, find the approved line items you want to clear the approval for and click the approve button again.
Activity Information for an Approver
The Activity section of the Work On window allows you to select an act to be performed on the invoice before committing. The options available in the Act drop-down list vary depending on the current state of the invoice.
For more information, see:
Approving an Invoice as an Approver, above Routing an Invoice for Further Approval on page 28 Returning an Invoice to the Processor on page 28

48
Activity Information for an Approver
ApplicationXtender Workflow Accounts Payable User’s Guide
Approving an Invoice as an Approver
You can use the Approve the Invoice act to approve the invoice and submit it for payment if any of the following are true:
You have invoice approval for an entire invoice. You approved all line items that you are responsible for approving
and all other line items are already approved. You approved all line items that you are responsible for approving
and the Route to an Approver act is not available (indicating that your system uses location-based routing and the invoice routes automatically to the Approver for the remaining line items).
To approve an invoice:
83. Select Approve the Invoice from the Act drop-down list.
Figure 46 Activity Section – Approve the Invoice Act
84. Optionally, enter a comment in the text box.
85. Commit the invoice.
For instructions on committing an item, refer to the ApplicationXtender Workflow User’s Guide.
Once an invoice has gone through the complete process/approval phase, the system updates the AppXtender index fields associated with the invoice using the Invoice information that was entered by the Processor.
Routing an Invoice for Further Approval
If you are not authorized to approve all of the line items on an invoice, you must route the invoice to another Approver for the remaining line items, if the Route to an Approver act is available. (If the Route to Approver act is not available and there are remaining line items to be approved, location-based routing is enabled and the invoice routes automatically to the next Approver after you approve the invoice using the Approve the Invoice act. For more information on approving the invoice, see Approving an Invoice as an Approver on page 27.)
To route the invoice for further approval:
86. Select Route to an Approver from the Act drop-down list. The Approver drop-down list appears.

49
Updating ApplicationXtender
Figure 47 Activity Section – Route to an Approver Act
87. Select the appropriate Approver from the Approver drop-down list.
88. Optionally, enter a comment in the text box.
89. Commit the invoice.
For instructions on committing an item, refer to the ApplicationXtender Workflow User’s Guide.
Returning an Invoice to the Processor
You can choose to return an invoice back to the Processor for additional processing. For example, if you receive an invoice that contains errors for the invoice or cost distribution information, you can choose not to approve any of the line items and return it to the Processor for correction.
To return an invoice to the Processor:
90. Select Return to the Processor from the Act drop-down list.
Figure 48 Activity Section – Return to the Processor
91. To specify the error(s) to be corrected, type your comments in the Comment text box.
92. Commit the invoice. The invoice is returned to the Inbox of the Processor who routed it to you.
For instructions on committing an item, refer to the ApplicationXtender Workflow User’s Guide.
Updating ApplicationXtender
After the process/approval phase is complete, the invoice is queued for the post-processing automated task. This task is responsible for updating

50
Updating ApplicationXtender
ApplicationXtender Workflow Accounts Payable User’s Guide
the AppXtender index fields, generating an HTML report, and adding the report to the AppXtender application. Once the automated task is complete, you can execute a query in AppXtender to find the updated indexes and the HTML report. For more information on executing a query, refer to the ApplicationXtender User’s Guide.

51
Index
A
activity information, 2-15 activity informationSee acts, 2-15 acts
approve the invoice, 1-5, 1-6, 2-15, 3-6 reject the invoice, 1-5, 2-17 return to the Processor, 1-6, 3-7 route to an Approver, 1-5, 1-6, 2-16, 3-6
adding cost distribution line items, 2-8 AP business process
flowchart, 1-3 overview, 1-1
AP business Process initiate, 1-4
Approver role, 1-6 approve the invoice, 1-6, 3-6 return to the Processor, 1-6, 3-7 route to an Approver, 1-6, 3-6
approving an invoice, 2-15, 3-2 approving line items, 3-4 automated tasks
post-processing, 1-6 pre-processing, 1-5
B
business process
Accounts Payable, 1-1
C clearing an approval, 3-5 cost distribution information, 2-6
adding line items, 2-8 approving line items, 3-4 clearing an approval, 3-5 deleting line items, 2-14 modifying line items, 2-12
D
deleting cost distribution line items, 2-
14
I
initiating the business process, 1-4 invoice
approving, 3-2 processing, 2-2
invoice information, 2-4 Approver, 3-3 Processor, 2-4
M

52
Index
ApplcatonXtender Worflow Accounts Payable User’s Guide
modifying cost distribution line items, 2-12

53
Updating ApplicationXtender
P post-processing automated task, 1-6 pre-processing automated task, 1-5
processing an invoice, 2-2 Processor role, 1-5
approve the invoice, 1-5, 2-15 reject the invoice, 1-5, 2-17 route to an Approver, 1-5, 2-16
R rejecting the invoice, 2-17 returned invoices, 2-19 roles
Approver, 1-6 Processor, 1-5
routing to an Approver, 2-16
W
Work On dialog box, 2-2
activity section, 2-15 cost distribution section, 2-6, 3-4 invoice section, 2-4, 3-3