Application Server Administration Guide - SAS What’s New Overview The SAS Intelligence Platform:...
200
SAS ® 9.1.3 Intelligence Platform Application Server Administration Guide
Transcript of Application Server Administration Guide - SAS What’s New Overview The SAS Intelligence Platform:...

SAS® 9.1.3 Intelligence PlatformApplication Server Administration Guide

The correct bibliographic citation for this manual is as follows: SAS Institute Inc. 2006.SAS ® 9.1.3 Intelligence Platform: Application Server Administration Guide. Cary, NC:SAS Institute Inc.
SAS® 9.1.3 Intelligence Platform: Application Server Administration GuideCopyright © 2002–2006, SAS Institute Inc., Cary, NC, USAISBN 978-1-59994-286-5All rights reserved. Produced in the United States of America.For a hard-copy book: No part of this publication may be reproduced, stored in aretrieval system, or transmitted, in any form or by any means, electronic, mechanical,photocopying, or otherwise, without the prior written permission of the publisher, SASInstitute Inc.For a Web download or e-book: Your use of this publication shall be governed by theterms established by the vendor at the time you acquire this publication.U.S. Government Restricted Rights Notice. Use, duplication, or disclosure of thissoftware and related documentation by the U.S. government is subject to the Agreementwith SAS Institute and the restrictions set forth in FAR 52.227–19 Commercial ComputerSoftware-Restricted Rights (June 1987).SAS Institute Inc., SAS Campus Drive, Cary, North Carolina 27513.February 2007SAS Publishing provides a complete selection of books and electronic products to helpcustomers use SAS software to its fullest potential. For more information about oure-books, e-learning products, CDs, and hard-copy books, visit the SAS Publishing Web siteat support.sas.com/pubs or call 1-800-727-3228.SAS® and all other SAS Institute Inc. product or service names are registered trademarksor trademarks of SAS Institute Inc. in the USA and other countries. ® indicates USAregistration.Other brand and product names are registered trademarks or trademarks of theirrespective companies.

Contents
What’s New vii
Overview vii
Documentation Enhancements vii
Chapter 1 � Before You Begin 1Introduction to This Guide 1
Accessibility Features in the SAS Intelligence Platform Products 1
Chapter 2 � The SAS Application Server 3What Is a SAS Application Server? 3
The Structure of a SAS Application Server 4
Defining Multiple Application Servers 6
Chapter 3 � Workspace Server and Stored Process Server Concepts 11Overview of Workspace Servers and Stored Process Servers 12
Overview of Pooling 14
Planning and Configuring Pooling 16
Overview of Load Balancing 19
Planning and Configuring a Load-Balancing Cluster 23
Planning the Load-Balancing Algorithm Properties 26
Chapter 4 � Reconfiguring or Clustering Workspace Servers or Stored ProcessServers 33Changing a Workspace Server’s Launch Command 34
Convert a Workspace Server to Pooling 36
Configure a Pooling Workspace Server to Enforce Row-Level Security 46
Convert a Workspace Server to Load Balancing 53
Overview of the Initial Load Balancing Setup for Stored Process Servers 59
Configure a Load-Balancing Cluster of Stored Process Servers 60
Updating a Windows Spawner Service 67
Data and Catalogs for Servers on Multiple Machines 67
Chapter 5 � Moving Workspace Servers or Stored Process Servers 71Moving the SAS Workspace Server 71
Moving the SAS Stored Process Server 73
Moving Both the SAS Stored Process Server and SAS Workspace Server to the SameNew Machine 76
Moving the SAS Stored Process Server and SAS Workspace Server to SeparateMachines 79
Chapter 6 � Administering SAS OLAP Servers 83Overview of SAS OLAP Servers 83
Overview of Administrative Tasks for SAS OLAP Servers 85
Overview of SAS OLAP Server Installation and Configuration 85

iv
Software Requirements for SAS OLAP Servers 86
Configure the Java Virtual Machine on SAS OLAP Servers 86
Change the Properties of SAS OLAP Servers 86
Configure Storage for Temporary Cube Build Files on SAS Workspace Servers 87
Control, Monitor, and Log SAS OLAP Servers 88
Optimize SAS OLAP Servers 88
About the Cube Cache 88
About the Data Cache 89
About the Subquery Caches 89
About the Query Thread Pool 89
Change the Number of Cubes in the Cube Cache 90
Refresh Calculated Members and Named Sets in the Cube Cache 90
Tune the Data Cache 91
Tune the Subquery Cache 91
Tune the Query Thread Pool 91
Add a SAS OLAP Server to a SAS Metadata Repository 92
Chapter 7 � SAS/CONNECT Servers 93Overview of SAS/CONNECT and the SAS Intelligence Platform 93
Introduction to SAS/CONNECT 94
The Uses of SAS/CONNECT in the SAS Intelligence Platform 95
Initial Configuration of the SAS/CONNECT Server 98
Chapter 8 � The Batch Servers 105Overview of SAS Batch Servers 105
The SAS Data Step Batch Server 106
The SAS Java Batch Server 107
For Further Information 108
Chapter 9 � SAS Grid Server 109The Role of the SAS Grid Server in the SAS Intelligence Platform 109
The Initial Configuration of the SAS Grid Server 109
Chapter 10 � Supporting Grid Computing 113Overview of Supporting Grid Computing 115
Installing and Configuring the Required Software 117
Basic Configuration of the Grid 121
Verifying That the Grid Is Working 123
Advanced Configuration Tasks 123
Troubleshooting 128
Improving Performance 130
Grid Manager Plug-in 132
Appendix 1 � Reference Information: Workspace and Stored Process Servers 135Object Server Parameters 135
Fields for the Server Definition 141
Fields for the Pooled Logical Server and Puddle Definitions 145

v
Fields for the Load-Balancing Logical Server Definition 146
Fields for the Spawner Definition 148
Spawner Invocation Options 150
Spawner Error Messages 152
Using Telnet to Administer the Spawner 172
Appendix 2 � Recommended Reading 175Recommended Reading 175
Glossary 177
Index 183

vi

vii
What’s New
Overview
The SAS Intelligence Platform: Application Server Administration Guide explainshow to administer a SAS Application Server. It contains information that waspreviously in these documents:
� SAS Intelligence Platform: Administration Guide
� SAS Integration Technologies: Server Administrator’s Guide
� SAS OLAP Server: Administrator’s Guide
This document also contains new material.
Documentation Enhancements
This document now includes the following:
� It integrates information about SAS Application Servers, SAS Workspace Servers,and SAS Stored Process Servers that was in the SAS Intelligence Platform:Administration Guide and in the SAS Integration Technologies: ServerAdministrator’s Guide.
� It includes information about administering a SAS OLAP Server that waspreviously in the SAS OLAP Server: Administrator’s Guide.
� It includes information about grid computing from the SAS Intelligence Platform:Administration Guide.
This document also contains new material on the following subjects:
� processing remote data and moving data between machines using theSAS/CONNECT Server
� defining jobs to be run in batch mode using the SAS batch servers
� specifying in a SAS Grid Server the command to be run on the machines in acomputing grid

viii What’s New

1
C H A P T E R
1Before You Begin
Introduction to This Guide 1Accessibility Features in the SAS Intelligence Platform Products 1
Introduction to This Guide
This guide covers the administration of the SAS Application Server, which is a logicalentity that represents the SAS server tier in the SAS Intelligence Platform. Thisapplication server contains a set of actual servers. For example, it almost alwayscontains a workspace server and a stored process server, both of which are introducedin the SAS Intelligence Platform: Overview, and it may contain an OLAP server, whichis discussed in that document as well. In addition, an application server may containone of more of the following servers:
SAS/CONNECTServer
enables clients to execute code on a remote host, or to move databetween client and server machines.
SAS batchservers
which are part of the SAS scheduling system.
SAS Grid Server which plays a role in environments that include a grid of computingnodes.
This guide explains how to administer all of these server components, and theapplication server as a whole.
The guide consolidates information that was previously located in the SASIntelligence Platform: Administration Guide, the SAS Integration Technologies: ServerAdministrator’s Guide, and the SAS OLAP Server: Administrator’s Guide. It alsocontains several chapters of new information.
This guide assumes that you are familiar with the concepts and terminology that areintroduced in the SAS Intelligence Platform: Overview document. For a list of all of thedocuments that SAS publishes to support administration of the SAS IntelligencePlatform, see http://support.sas.com/913administration.
Accessibility Features in the SAS Intelligence Platform Products
For information about accessibility for any of the products mentioned in this book,see the documentation for that product. If you have questions or concerns about theaccessibility of SAS products, send e-mail to [email protected].

2

3
C H A P T E R
2The SAS Application Server
What Is a SAS Application Server? 3SASMain or SASApp 3
A Collection of Server Components 3
A Server Context 4
The Structure of a SAS Application Server 4
The SAS Application Server’s Server Components 4The Hierarchy of Metadata Objects Used to Define a SAS Application Server 6
Defining Multiple Application Servers 6
Define a Second SAS Application Server 6
Scenario 1: Using SAS Data Integration Studio to Access Remote Data 7
Scenario 2: Using Multiple Application Servers with SAS Web Report Studio 9
What Is a SAS Application Server?
SASMain or SASAppWhen the SAS Intelligence Platform was installed at your site, a metadata object
that represents the SAS server tier in your environment was defined. In the SASManagement Console interface, this type of object is called a SAS Application Server. Ifyou have a SAS server, such as a SAS Workspace Server, on the same machine as yourSAS Metadata Server, the application server object is named SASMain; otherwise, it isnamed SASApp. You can view the properties of this object by using the Server Managerplug-in to SAS Management Console. Expand the Server Manager tree node; then,right-click the SASMain or SASApp node, and select Properties from the pop-upmenu. You can also see the server components that make up the application server bycompletely expanding the SASMain or SASApp node in the Server Manager tree.
In addition to this metadata object, a SASMain or SASApp directory was created oneach machine that hosts a SAS server (in the directory SAS-config-dir\Lev1). Thisdirectory contains important files that you will use in the management of your SASApplication Server. In particular, it contains a file called sasv9.cfg, a configuration filethat is used in the startup of most SAS servers.
A Collection of Server ComponentsA SAS Application Server is not an actual server that can execute SAS code
submitted by clients. Rather, it is a logical container for a set of application servercomponents, which do execute code—typically SAS code, although some components canexecute Java code or MDX queries. For example, a SAS Application Server might

4 A Server Context � Chapter 2
contain a workspace server, which can execute SAS code that is generated by clientssuch as SAS Data Integration Studio or SAS Web Report Studio. A SAS ApplicationServer might also contain a stored process server, which executes SAS Stored Processes,and a SAS/CONNECT Server, which can upload or download data and execute SAScode submitted from a remote machine.
For a complete list of application server components, see “The SAS ApplicationServer’s Server Components” on page 4.
A Server ContextA SAS Application Server has an awareness of its server context (the context in
which it is being used) and makes decisions based on that awareness. For instance, aclient such as SAS Data Integration Studio is assigned a default SAS ApplicationServer, and when it generates code, it submits the code to that application server. Theapplication server determines what type of code is being submitted and directs it to thecorrect physical server. That is, if the code is typical SAS code that could be run in theSAS Display Manager, the code is executed by the application server’s workspace server.
In addition, data-related objects such as SAS libraries, database libraries, and OLAPschemas can be assigned to a SAS application server. Once this assignment is made, ifa client needs to access data in a particular library or OLAP schema, it uses a servercomponent belonging to the application server to which the library or schema has beenassigned.
The Structure of a SAS Application Server
The SAS Application Server’s Server ComponentsAs mentioned in “A Collection of Server Components” on page 3, a SAS Application
Server is a logical entity that encompasses a set of actual servers. A number of types ofservers might belong to an application server. These servers are listed below:
� SAS Workspace Server - The SAS Workspace Server is provided with SASIntegration Technologies and is accessed through the Integrated Object Model(IOM) workspace interface. This interface provides access to Foundation SASfeatures such as the SAS language, SAS libraries, the server file system, resultscontent, and formatting services. A SAS workspace represents a session with theSAS system and is functionally equivalent to a SAS Display Manager session orthe execution of the SAS System as a batch job.
� Stored Process Server - The Stored Process Server is also part of SAS IntegrationTechnologies. It retrieves SAS Stored Processes from a repository and executesthem.
A stored process is a SAS program that is stored on a server and can beexecuted as required by requesting applications. You can use stored processes forWeb reporting, analytics, building Web applications, delivering packages to clientsor to the middle tier, and publishing results to channels or repositories. Storedprocesses can also access any SAS data source or external file and create new datasets, files, or other data targets supported by SAS.
� SAS OLAP Server - Similar to the way in which a database management system(DBMS) can read a SQL query and return data from a database, the SAS OLAPServer processes MDX queries and returns data from OLAP cubes.

� The SAS Application Server’s Server Components 5
An OLAP server has a close relationship with a workspace server, and the twogenerally run on the same machine. The workspace server is used to build OLAPcubes, and, as mentioned above, the OLAP server is used to query the cubes.
� SAS/CONNECT Server - The SAS/CONNECT server has several generalcapabilities:
� First, SAS/CONNECT provides compute services. A SAS/CONNECT clientrunning on one machine can submit code to one or more remote SAS/CONNECT servers, which execute the code.
� SAS/CONNECT also provides Remote Library Services (RLS). These servicesenable SAS code to read, write, and update remote data as if it were residenton the client host. RLS can be used to access SAS data sets across machinesthat have different architectures.
� Finally, SAS/CONNECT provides a set of Data Transfer Services. A SAS/CONNECT client can download data from a remote host where a SAS/CONNECT server is running, or the client can upload data to the server host.The client and server host do not need to be running the same operatingsystem.
In addition, the SAS/CONNECT server has an important role in several featuresthat are unique to the SAS Intelligence Platform:
� It plays an important role in grid computing. In this case, SAS/CONNECTservers run on all of the nodes in the compute grid. Together, the serversexecute SAS Data Integration Studio and Enterprise Miner jobs that useparallel algorithms.
� SAS Data Integration Studio can also use a SAS/CONNECT server forregular jobs. The application can generate code that uses the SAS/CONNECTserver to upload data to a remote machine, download data from a remotemachine, or execute the code for one or more transformations.
� A SAS/CONNECT server is also required in order to use the SAS Promotionand Replication Wizards to promote or replicate metadata.
� Batch Servers - A batch server gives you another way to execute SAS (or Java)code. But it is really a metadata object that associates a program with the host onwhich it is to be executed and possibly a log file. This program is used to executescheduled jobs.
Different types of batch servers are available for different types of code: a SASData Step Batch Server, a SAS Java Batch Server, and a SAS Generic BatchServer. For further information about these subtypes of the batch server, seeChapter 8, “The Batch Servers,” on page 105.
� SAS Grid Server - The SAS Grid Server is similar to the batch server in that itstores a command. In this case, the server stores the command that Platform LSFwill use to start SAS/CONNECT sessions on the nodes in the grid. For moreinformation about the architecture of a system that supports grid computing, seeChapter 10, “Supporting Grid Computing,” on page 113.
� SAS Metadata Server - The metadata object that represents the metadata serverin your current environment (the metadata server that you are actually using on aregular basis) is not part of a SAS Application Server. You add a metadata serverto an application server only in the case where you want to use the SAS Promotionor Replication Wizard to move the contents of a metadata repository in a sourceenvironment to a target environment. In this case, while working in anadministrative environment, you add two metadata servers to that environment’sSAS Application Server, one representing the metadata server in the sourceenvironment and one representing the metadata server in the target environment.

6 The Hierarchy of Metadata Objects Used to Define a SAS Application Server � Chapter 2
For details about the setup required to run these wizards, see “Using thePromotion and Replication Wizards to Copy an Entire Repository” in the SASIntelligence Platform: System Administration Guide.
The Hierarchy of Metadata Objects Used to Define a SAS ApplicationServer
When your system was first installed, an application server was created when thefirst server—perhaps a workspace server—was defined. Defining the application serverinvolved creating three objects:
� an application server
� a logical server (for example, a logical workspace server)
� a server (for example, a workspace server)
If you look at the Server Manager plug-in to SAS Management Console, you will seea tree structure similar to the one shown in the following display:
The SASMain (or SASApp) tree node represents the SAS Application Server. Youassign resources such as libraries and OLAP schemas to this object. The result is thatwhen an application such as SAS Web Report Studio needs to access a particularresource, it will use a server, such as a workspace server, belonging to this applicationserver.
The object named SAS Main - Logical Workspace Server is a logical server. Anapplication server such as SASMain may contain one logical server for each type ofserver listed in the section “The SAS Application Server’s Server Components” on page4. Generally, each logical server can contain one or more servers of the appropriate type.However logical OLAP Servers and logical Grid Servers can contain only a single server.
The logical server level in the hierarchy enables you not only to group related serverstogether, but to control the behavior of the set of servers belonging to the logical server.For example, if you have two workspace servers in a logical workspace server, you usethe logical workspace server to indicate that you want to balance the workload going tothese two servers. A logical server also gives you a place at which to use metadataaccess controls to secure all servers of a particular type in the same way.
The object named SASMain - Workspace Server represents the server that executesSAS code. In the case of a workspace server, this object contains information about themachine that the server runs on, the command used to start it, and the port on which itlistens for requests.
Defining Multiple Application Servers
Define a Second SAS Application ServerWhen you deploy your initial system, you generally create a single SAS Application
Server. However, you can create additional application servers later.

� Scenario 1: Using SAS Data Integration Studio to Access Remote Data 7
To create a new SAS Application Server, you perform these steps:
1 In SAS Management Console, right-click the Server Manager and select NewServer from the pop-up menu. The New Server Wizard starts.
2 On the wizard’s type-of-server page, select SAS Application Server (which is inthe SAS Servers folder), and click Next.
3 On the wizard’s name-and-description page, specify a name for the applicationserver in the Name text box, and click Next.
4 On the wizard’s server-properties page, click Next.
5 On the wizard’s type-of-server-component page, select a server component andclick Next.
Note that you cannot create an empty application server. You must add oneserver to it at the time of creation. In all, three metadata definitions will becreated: one for the SAS Application Server, one for a logical server of the type youselect in this step, and one for the server.
6 Specify whatever configuration information is required for the type of server thatyou requested in the previous step. The information that you must supply variesdepending on the server type. Use the wizard’s online help if necessary.
7 On the wizard’s last page, review the information that you have supplied, andclick Finish.
There are a number of reasons why you might want to create a second applicationserver. A couple of these reasons are discussed in the following sections.
Scenario 1: Using SAS Data Integration Studio to Access Remote DataImagine that you are using SAS Data Integration Studio to process a large amount of
data that resides on a machine different from the workspace server to which theapplication submits its code, as shown in the figure below.

8 Scenario 1: Using SAS Data Integration Studio to Access Remote Data � Chapter 2
Figure 2.1 Application Server and Data on Different Machines
Client Machine Workspace ServerMachine
SAS Application Server(SASMain)
Remote Machine
Workspace Server
Data
SAS Data IntegrationStudio
One way to execute such a job efficiently is to define two application servers. One isthe default application server for SAS Data Integration Studio and contains theworkspace server to which the application will submit its generated code. The otherapplication server contains a SAS/CONNECT server (which is collocated with the data)and the library of data to be processed is assigned to this application server. See thefigure below.
Figure 2.2 Create an Application Server That Is Collocated with the Data
Client Machine Workspace ServerMachine
SAS Application Server(SASMain)
Second SAS ApplicationServer
Remote Machine
Workspace Server/SAS/CONNECT Client
SAS/CONNECT Server
SAS Data IntegrationStudio
Data
If you choose for the transformations in the job to be executed on the remote host,SAS Data Integration Studio generates the code necessary for the transformations to beexecuted by the SAS/CONNECT server. The overall job is submitted to the workspaceserver; however, the workspace server then submits the code for each transformation tothe remote server.
The generation of this type of code is made possible by the definitions of the twoapplication servers, one of which is the default application server for SAS Data
� Scenario 2: Using Multiple Application Servers with SAS Web Report Studio 9
Integration Studio and the other the application server to which the data library isassigned.
Note: For details about setting up this scenario, see “Setting Up Multi-TierEnvironments” in the chapter “Administering SAS Data Integration Studio”. in theSAS Intelligence Platform: Desktop Application Administration Guide. �
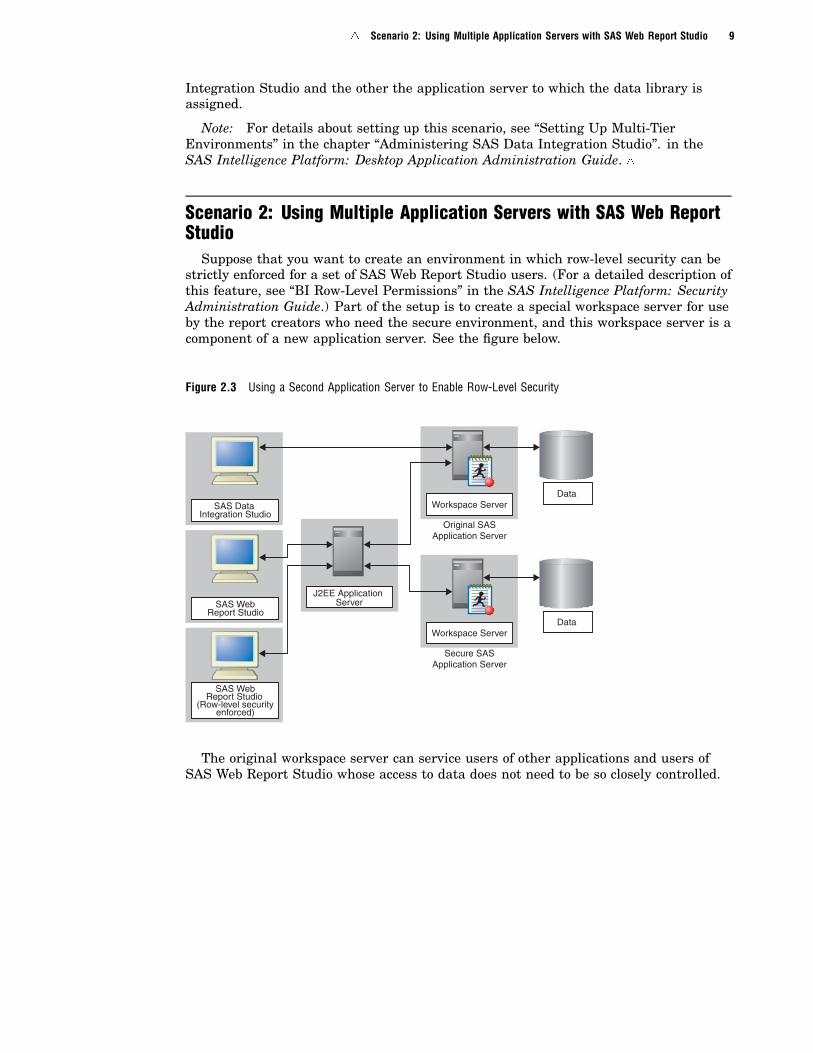
Scenario 2: Using Multiple Application Servers with SAS Web ReportStudio
Suppose that you want to create an environment in which row-level security can bestrictly enforced for a set of SAS Web Report Studio users. (For a detailed description ofthis feature, see “BI Row-Level Permissions” in the SAS Intelligence Platform: SecurityAdministration Guide.) Part of the setup is to create a special workspace server for useby the report creators who need the secure environment, and this workspace server is acomponent of a new application server. See the figure below.
Figure 2.3 Using a Second Application Server to Enable Row-Level Security
Workspace Server
J2EE Application Server
SAS Data Integration Studio
SAS WebReport Studio
SAS WebReport Studio
(Row-level securityenforced)
Data
DataWorkspace Server
Original SASApplication Server
Secure SASApplication Server
The original workspace server can service users of other applications and users ofSAS Web Report Studio whose access to data does not need to be so closely controlled.

10

11
C H A P T E R
3Workspace Server and StoredProcess Server Concepts
Overview of Workspace Servers and Stored Process Servers 12What are Workspace Servers and Stored Process Servers? 12
SAS Workspace Servers 12
SAS Stored Process Servers 12
The Default Workspace Server and Stored Process Server 13
The SAS Object Spawner 13Overview of the SAS Object Spawner 13
Metadata Configuration File 14
Spawner Tasks 14
Overview of Pooling 14
What Is Pooling? 14
How Pooling Works 15Understanding the Connection Process 15
Planning and Configuring Pooling 16
Overview of Planning and Configuring Pooling 16
Step 1: Plan the Pooling Security 16
Step 2: Plan the Pooled Logical Server and Puddles 17Step 3: Plan the Pooled Servers 17
Step 4: Set up Pooling Security 17
Step 5: Set up Pooled Logical Servers 18
Step 6: Set up Pooled Servers 18
Overview of Load Balancing 19What Is Load Balancing? 19
How Load Balancing Works 19
MultiBridge Connections (SAS Stored Process Servers Only) 21
Security 22
Administration (SAS Stored Process Servers Only) 22
Algorithms 22Setting up Load Balancing 22
Planning and Configuring a Load-Balancing Cluster 23
Overview of Planning and Configuring a Load-Balancing Cluster 23
Step 1: Plan the Logins (For Load Balancing across Multiple Machines) 23
Step 2: Plan a Load-Balancing Logical Server 23Step 3: Plan the Load-Balancing Servers 24
Step 4: Plan the Load-Balancing Spawners 24
Step 5: Set Up Logins (When Load Balancing Across Multiple Machines) 25
Step 6: Set Up a Load-Balancing Logical Server 25
Step 7: Set Up Load-Balancing Servers 25Step 8: Set Up Load-Balancing Spawners 26
Planning the Load-Balancing Algorithm Properties 26
Overview of Load-Balancing Algorithms 26

12 Overview of Workspace Servers and Stored Process Servers � Chapter 3
Cost Algorithm: Overview 27Cost Algorithm: Parameters 27
Cost Algorithm: SAS Workspace Server Example 28
Cost Algorithm: SAS Stored Process Server Example 29
Response Time Algorithm (SAS Stored Process Server only) 31
Overview of Workspace Servers and Stored Process Servers
What are Workspace Servers and Stored Process Servers?Workspace servers and stored process servers are crucial elements of the SAS
Intelligence Platform that enable clients to perform SAS processing and accessFoundation SAS resources.
SAS Workspace ServersSAS Workspace Servers interact with SAS by creating a server process for each client
connection. Each server process (workspace) represents a Foundation SAS session, sothat client programs can access SAS libraries, perform tasks by using the SASlanguage, and retrieve the results.
In the default configuration (standard workspace server), a new server process iscreated each time that a client requests a connection. To improve performance, youmight want to configure pooling or load balancing for the server.
In a pooling configuration, a set of server processes are reused to avoid theprocessing time that is associated with starting a new process for each connection. Apooling configuration can also be shared across multiple machines. Pooling isrecommended if your server supports SAS Web Report Studio and other Webapplications. For more information, see “Overview of Pooling” on page 14.
In a load-balancing configuration, your workspace server processes are distributedbetween multiple machines. Load balancing is recommended if your server supportsapplications that submit large jobs, such as SAS Data Integration Studio. For moreinformation, see “Overview of Load Balancing” on page 19.
SAS Stored Process ServersSAS Stored Process Servers interact with SAS by submitting stored processes, SAS
programs that are stored and can be executed by client applications. You can use storedprocesses to perform complex tasks such as analyzing data and creating reports, andthen return the results to the client or publish the results to a channel or repository.
Each stored process server process handles multiple users, and by default eachserver uses multiple server processes. A load-balancing algorithm distributes clientrequests between the server processes. For more information about load balancing, see“Overview of Load Balancing” on page 19.
To increase the capacity of a stored process server, you might want to add additionalserver processes to your server definition. Each server process is defined as aMultiBridge connection in SAS Management Console.
You can also increase the capacity of your stored process server by adding additionalservers to form a load-balancing cluster. For more information, see “Configure aLoad-Balancing Cluster of Stored Process Servers” on page 60.

Server Concepts � The SAS Object Spawner 13
The Default Workspace Server and Stored Process ServerWhen the installer at your site runs the SAS Configuration Wizard, that person
defines metadata for a SAS application server.
Usually, your application server contains a workspace server and a stored processserver.
The initial workspace server is configured as a standard workspace server namedSASMain - Workspace Server or SASApp - Workspace Server.
The initial stored process server is configured as a load-balancing server namedSASMain - Stored Process Server or SASApp - Stored Process Server. Bydefault, the stored process server definition includes three MultiBridge connections.
The SAS Object Spawner
Overview of the SAS Object Spawner
Workspace servers and stored process servers are initialized by the SAS ObjectSpawner. An object spawner runs on each machine where you want to run a workspaceserver or stored process server, listens for requests, and launches the servers asnecessary.
The object spawner uses a metadata configuration file that contains information foraccessing the metadata server. When you invoke the spawner, the spawner works asshown in Display 3.1 on page 13:
Display 3.1 How the Spawner Obtains Metadata

14 Overview of Pooling � Chapter 3
1 accesses the metadata configuration file for information about how to connect tothe SAS Metadata Server.
2 connects to the SAS Metadata Server for configuration information.
The spawner can then listen for requests for various spawner tasks. See “SpawnerTasks” on page 14.
Metadata Configuration FileA metadata configuration file contains information for accessing a metadata server.
The spawner uses the information contained in the configuration file to connect to ametadata server and read the appropriate server definitions.
The default metadata configuration file is omrconfig.xml, located in the SASMain/ObjectSpawner subdirectory of your SAS configuration directory.
Spawner TasksWhen a request is received, the spawner accepts the connection and performs the
action that is associated with the port or service on which the connection was made. Aconnection to a spawner can do the following:
� request a server. When a connection is made on a port or service that is associatedwith a Server object, the spawner authenticates the client connection against thehost authentication provider for the server’s machine. The spawner then launchesa server for use by the connecting client. To launch the server, the spawner locatesthe associated server definitions on the SAS Metadata Server. When you define aserver in SAS Management Console, you must specify a command that thespawner uses to start the server. For details about the server command, see “AddSystem Options to the Workspace Server Launch Command” on page 35. For SASStored Process Servers, on the server definition, you must also configurecredentials for the spawner to use to start a multi-user server. Every connection tothe server is authenticated (against the host authentication provider for theserver’s machine) with the credentials of the client; depending on the type ofserver, the process then runs under the following credentials:
� for SAS Workspace Servers, the credentials of the client.� for SAS Stored Process Servers, the multi-user login credentials that are
specified in the stored process server definition.
� initiate the operator interface. When a connection is made on the port or servicethat is identified as the operator port or operator service in the spawner definition,the spawner initiates the administration interface. Only one administrator can beactive at a given time. For more information about the administration interface,see “Using Telnet to Administer the Spawner” on page 172 .
In addition, the spawner can balance the server workload between server processesby using load balancing. See “Overview of Load Balancing” on page 19.
Overview of Pooling
What Is Pooling?Pooling is a feature of SAS clients that increases the efficiency of connections to SAS.
Pooling is available only for SAS Workspace Servers.

Server Concepts � Understanding the Connection Process 15
How Pooling WorksWhen a SAS client application is configured to access a pooled workspace server, the
client application maintains a collection of reusable workspace server processes called apool. By reusing server processes, pooling avoids the processing that is associated withcreating a new process for each connection. If your client application uses frequent,quick connections to SAS, pooling might greatly improve your server performance.
The server processes within a pool are divided into one or more puddles. A puddle isa group of server processes that are accessible to a specific user group and that connectto SAS by using a single set of credentials called the puddle login.
The metadata administrator might choose to create several puddles to control thedata that users are authorized to access. Because the SAS server uses the puddle loginboth to connect to the metadata and to run the server process, this authorization(access control) can be applied in the metadata or on the physical data (using filesystem authorization).
For example, the metadata administrator might give one puddle read and writeaccess to a table on an IOM server, while giving another puddle only read access.
Understanding the Connection ProcessDisplay 3.2 on page 15 shows a connection to a pooled workspace server:
Display 3.2 The Connection Process for a Pooled Server
The following process describes how a user retrieves and uses a pooled connection:1 A user accesses a SAS client application, and the client requests a connection to
SAS for the user.2 The client application uses a special user called the pool administrator to connect
to the SAS Metadata Server and to read the pool metadata. The pooladministrator must be able to view the metadata for all the logins (puddle logins)that are used to make connections for the pool. By default, the SAS Trusted Useris the default pool administrator.
Note: The pool administrator does not need to be able to view the logindefinition for the requesting user ID. �
3 For each puddle, if the Minimum Number of Servers and Minimum AvailableServers are not met, the client application uses the appropriate puddle logincredentials to launch new server processes.

16 Planning and Configuring Pooling � Chapter 3
4 The pool determines which puddle the requesting user ID can access. The poolselects a puddle where one of the following is true:
� The requesting user ID is a member of the group that is granted access to thepuddle.
� The requesting user ID matches the puddle login’s user ID, or is owned bythe same user or group that owns the puddle login’s user ID.
For example, in the preceding diagram UserB is a member of the Puddle2Accessgroup. The Puddle2Access group has access to the Puddle2 puddle, so UserB willaccess Puddle2.
5 The pool returns a server connection from the selected puddle as follows:� If a server process is available, then the pool returns a connection to the
requesting user.� If there are no available server processes, and the maximum number of
server processes has not been met, the pool uses the puddle login to create anew server process and then returns a connection to the requesting user.
� If there are no available server processes and the maximum number of serverprocesses has been met, then the requesting user must wait for a serverprocess to become available. When a process becomes available, the poolreturns a connection to the requesting user.
Note: For Java client applications, the pool balances the number ofconnections for each puddle among the server machines. For Windows clientapplications, all of the connections are assigned to the first server machine, untilthe maximum number of connections for that machine is met. �
6 The user accesses resources and services on the SAS server. Authorization forcontent on the SAS server is performed using the puddle login.
7 When the user has finished using the server connection, the server process isreturned to the pool, and it can be reused by other users.
Planning and Configuring Pooling
Overview of Planning and Configuring PoolingTo define a pooled logical server, you convert an existing standard logical server. By
default, you should already a logical workspace server.To set up a pool, you must plan and set up additional metadata as described in the
following topics.
Step 1: Plan the Pooling SecurityTo plan the pooling security, you must determine the user metadata identities, and
the logins for the group metadata identities, that can access the puddles in the pool.For puddle access to the pool, there are three types of logins that you can define:
� a login that is used to establish the connection to the server for this puddle. Allusers of the puddle use this login when connecting to the SAS server. This loginmust be accessible to pool administrators. (Pool users are not required to haveaccess to this login).
Server Concepts � Step 4: Set up Pooling Security 17
� logins for the pool administrator in the metadata configuration file that is usedwith the Windows Object Manager. For an Advanced or Personal installation, thepool administrator is the SAS Trusted User. Important Note: DO NOT specify anunrestricted user for the user ID of the pool administrator.
� logins for user or group metadata identities within the group that you grant accessto the puddle.
Step 2: Plan the Pooled Logical Server and PuddlesTo plan a pooled logical server, you need to determine how many puddles you want to
use and which logins will be used to access each of the puddles. When you convert thelogical server to a pooled logical server, you can then divide the pool into one or morepuddles that associate the appropriate login definition and group metadata identity touse for access to the pool. The login for each puddle will be used to access the server.
The following user and group metadata identities can access the servers in a puddle:� the members of the group metadata identity that are granted access to the puddle� the user or group metadata identity that owns the puddle login
Determine the following parameters for each puddle associated with the pooledlogical server definition:
� the Name of the puddle� the Minimum Available Servers for the puddle� the Minimum Number of Servers for the puddlet� the puddle Login
� the SAS user group that has access to the puddle (Grant Access to Group)
Note: You cannot specify a login for a COM server. �
For more information about these properties, see “Fields for the Pooled LogicalServer and Puddle Definitions” on page 145.
Step 3: Plan the Pooled ServersThe pooling properties are specified on the server definition’s properties in SAS
Management Console (Options � Advanced Options � Pooling Properties).For each server in the pooled logical server, determine the following pooling
properties as appropriate:� the Maximum Clients for the each puddle on the server� the Recycle Activation Limit for the server� the Inactivity Timeout for server connections
For more information about these properties, see “Fields for the Server Definition” onpage 141.
Step 4: Set up Pooling SecurityTo set up pooling security, follow these steps:1 Set up your user, group, and login definitions for the users and groups that will
access the pool. For details, see the "User and Group Management" chapter in theSAS Intelligence Platform: Security Administration Guide.
2 Implement authorization (access control) for the group metadata identity that isgranted access to the puddle. You must control access for whoever is authorized to

18 Step 5: Set up Pooled Logical Servers � Chapter 3
update the group that is granted access to each puddle. To control who can updatethe group that is granted access to the puddle, in SAS Management Console, afteryou set up the group, you must use the Authorization tab for the group to do bothof the following:� Deny "WriteMetadata" permission to the Public group.� Grant "WriteMetadata" permission to your metadata administrator.
3 Implement authorization (access control) for the logical server that will beconverted to a pooled logical server. You must control access for who is authorizedto update the logical server. To control who can update the logical server, in SASManagement Console, you must use the Authorization tab for the logical server todo both of the following:� Deny "WriteMetadata" permission to the Public group.� Grant "WriteMetadata" permission to your metadata administrator.
4 Implement authorization (access control) for data on the server.
For details about setting up authorization (access controls), see the AuthorizationManager Help in SAS Management Console.
Step 5: Set up Pooled Logical ServersTo convert a logical server to a pooled logical server and to define puddles:1 In SAS Management Console, expand the Server Manager to locate the logical
server that you want to convert to pooling.2 Select the logical server, and then select Actions Convert to Pooling from the
menu bar. Confirm that you want to continue.3 In the Pooling Options dialog box, click New to create a new puddle.4 In the New Puddle dialog box, enter the values that you planned in Step 2:
� the Name of the puddle� the Minimum Available Servers for the puddle� the Minimum Number of Servers for the puddlet� the puddle Login
� the SAS user group that has access to the puddle (Grant Access to Group)
When you have finished entering the puddle parameters, click OK to return tothe Pooling Options dialog box.
5 Optionally, repeat the previous step to create additional puddles.6 When you have finished creating puddles, click OK.
Note: To edit the properties for an existing pooled logical server, select the logicalserver and then select File Properties. In the Properties dialog box, select the Poolingtab to modify the puddles for the pool. �
Step 6: Set up Pooled ServersFor each server in the pool, set up the pooling properties. To set up the pooling
properties for a server:1 In SAS Management Console, expand the Server Manager to locate the server
definition that you want to modify.2 Select the server, and then select File Properties from the menu bar.

Server Concepts � How Load Balancing Works 19
3 On the Options tab of the Properties dialog box, click Advanced Options.4 On the Pooling Properties tab of the Advanced Options dialog box, enter the
values that you planned in Step 3:� the Maximum Clients for the each puddle on the server� the Recycle Activation Limit for the server� the Inactivity Timeout for server connections
When you have finished entering the pooling properties, click OK.
Overview of Load Balancing
What Is Load Balancing?Load balancing is a feature of the object spawner that balances workloads across
server processes and across server machines. When a logical SAS Workspace Server ora logical SAS Stored Process Server is configured as a load-balancing cluster, clientrequests to any of the servers in the cluster are directed to the server that has the leastload. The amount of load on a server is determined by a load-balancing algorithm.
� SAS 8.2 (and earlier) clients cannot connect to a SAS 9 or later load-balancingserver.
� Load balancing is not supported for COM and DCOM connections.
How Load Balancing WorksFor SAS Workspace Servers, load balancing distributes work equally across server
machines.For SAS Stored Process Servers, load balancing distributes work equally across
server processes. These server processes can exist on the same machine or acrossmultiple machines.
Load balancing occurs within a group of servers called a cluster. Each machine in thecluster runs an object spawner that handles client requests for connections. All of thespawners in the cluster are connected together, and they share their server loadinformation. A load balancer routine runs in each object spawner and directs clientrequests to the server or server process that is least loaded at the time the client requestis made. Subsequent calls are performed as direct calls between the client and SAS.
Note: Each client’s credentials must be able to authenticate against any server inthe load-balancing cluster. Therefore, when you define server connections within aload-balancing cluster, you must use the same authentication domain for eachconnection. �
When you launch a load-balancing spawner, you must specify a metadataconfiguration file that contains information for accessing a SAS Metadata Server. Thespawner processes information as shown in Display 3.3 on page 20:

20 How Load Balancing Works � Chapter 3
Display 3.3 How the Load-Balancing Spawner Obtains Metadata
1 Each spawner accesses a metadata configuration file to obtain information abouthow to access the SAS Metadata Server.
2 Each spawner connects to and reads metadata from the metadata server todetermine which machines or ports are in the cluster.
3 Each spawner then attempts to establish an IOM connection to each spawner inthe cluster.
Each spawner then has the server metadata in order to launch new server processesfor client requests. If one machine in the cluster becomes unavailable, then the othermachines in the cluster detect that the machine is unavailable and continue to run andprocess any client requests.
Note: You can launch load-balancing spawners at any time, as follows: �
� If you start a spawner that is already defined as part of the load-balancing cluster,then the spawner is immediately included in the cluster.
� If you start a spawner that is new to the load-balancing cluster, then you mustrestart the other spawners in the cluster.
Note: Because a client can connect to any machine, client programs should notdepend on being able to reconnect to the same server. �
See the following example:

Server Concepts � MultiBridge Connections (SAS Stored Process Servers Only) 21
The following scenario assumes a load-balancing cluster that contains two servermachines. The spawner on each machine is running, and each spawner has startedthree server processes.
A Web application connects to SAS as follows:
1 A Web application receives a request from the browser.2 The Web application requests a connection to an IOM server.3 The object spawner redirects the connection to the server that has the least load.4 The Web application reconnects to the least-loaded server, and the load value for
that server is increased.
When the Web application disconnects from the server, the load for that serverreturns to its previous value.
MultiBridge Connections (SAS Stored Process Servers Only)When you configure load balancing for SAS Stored Process Servers, you must define
at least one MultiBridge connection for each server in the cluster. Each MultiBridgeconnection represents a separate server process within a Stored Process Serverdefinition, and each MultiBridge connection runs on a specific port.
The Bridge connection for a stored process server is used only for the initial serverrequest. After the spawner determines which server process has the least load, theclient is redirected to the appropriate MultiBridge connection. That is, a client requeststhe bridge connection for a stored process server, and then the spawner redirects theclient to the appropriate MultiBridge connection.
Note: MultiBridge connections use the server’s multi-user login credentials. Whenusing MultiBridge connections, you must specify multi-user login credentials on theserver definition. �
22 Security � Chapter 3
SecurityWith load balancing, every connection to the server is authenticated with the
credentials of the client. However, the credentials that the server runs under depend onthe type of server:
� SAS Workspace Servers run under the credentials of the client.
� SAS Stored Process Servers run under the multi-user login credentials that arespecified in the stored process server definition. The multi-user login credentialsshould be defined as a group login for a group that all of the client users aremembers of.
Note: Because the load-balancing stored process server runs under themulti-user login credentials, the operating system account for these credentialsmust have access to any operating system resources used by stored processes thatare hosted on the stored process server. �
You can use normal server security mechanisms to protect sensitive data.
Administration (SAS Stored Process Servers Only)For SAS Stored Process Servers, you can log on to the object spawner and use the
cluster reset command to shut down load-balancing servers in a cluster. For details,see “Using Telnet to Administer the Spawner” on page 172 .
Note: The cluster reset command affects only servers that were launched fromthe spawner to which you are currently connected. �
AlgorithmsLoad balancing supports two different types of load-balancing algorithms:
Cost (SASWorkspaceServers andSAS StoredProcess Servers)
The cost algorithm assigns a cost value (determined by theadministrator) to each client that connects to the server. Thealgorithm can also assign cost values to servers that have notstarted yet. When a new client requests a connection, load balancingredirects the client to whichever server is determined to have thelowest cost.
Response Time(SAS StoredProcess Serversonly)
Each spawner’s load balancer maintains an ordered list of machinesand their response times. Load balancing updates this listperiodically, at an interval that is specified by the administrator.When a new client requests a connection, load balancing redirectsthe client request to the machine at the top of the list.
For more details about load-balancing algorithms, see “Planning the Load-BalancingAlgorithm Properties” on page 26.
Setting up Load BalancingTo plan and set up load balancing, see “Planning and Configuring a Load-Balancing
Cluster” on page 23.
Server Concepts � Step 2: Plan a Load-Balancing Logical Server 23
Planning and Configuring a Load-Balancing Cluster
Overview of Planning and Configuring a Load-Balancing ClusterTo define a load-balancing cluster (load-balancing logical server), you convert an
existing standard logical server. By default, you should have a logical workspace server,a load-balancing logical stored process server.
To configure load balancing:
� Plan for the number of servers and server connections in the load-balancing cluster.� For SAS Workspace Servers and SAS Stored Process Servers, add multiple
servers to a load-balancing logical server.� For SAS Stored Process Servers, add multiple connections to each stored
process server within a load-balancing logical stored process server.
� Create the standard server metadata. For each server within your load-balancinglogical server, plan and set up the standard server, spawner, and login definitions.When you set up your standard server metadata, you must define the serverswithin the same logical server definition (that will be converted to a load-balancinglogical server). You must then define spawners and associate each server with aspawner in order for the server to participate in load balancing. If you installedand configured with SAS Configuration Wizard, then you will already have alogical workspace server or logical stored process server.
Important Note: Each client’s credentials must be able to be authenticated onany server in the load-balancing logical server (cluster). Therefore, when you defineservers within a load-balancing logical server (cluster), you must use the sameauthentication domain for each server. When you set up servers for load-balancing,in the server definition, you can specify either a port or a service for the server.
To set up load balancing, you must plan and set up additional metadata as describedin the following steps.
Step 1: Plan the Logins (For Load Balancing across MultipleMachines)
To enable load balancing between spawners, follow these steps:1 Plan the logical server credentials login. This login is used for connections
between the spawners in the load-balancing cluster so that the load balancinginformation can be shared. Each spawner in the cluster must be able to access thelogin, and the login must be valid on each machine in the cluster.
2 Plan to grant the Administer permission, on the definition for the logical servercredentials login, to the user or group that owns the login.
Step 2: Plan a Load-Balancing Logical ServerTo plan a load-balancing logical server, determine the following load-balancing
properties for the load-balancing logical server definition. These load-balancingproperties are specified on the Load Balancing tab of the load-balancing logical serverdefinition’s properties in SAS Management Console. For more information about theload balancing algorithm, see “Planning the Load-Balancing Algorithm Properties” onpage 26.
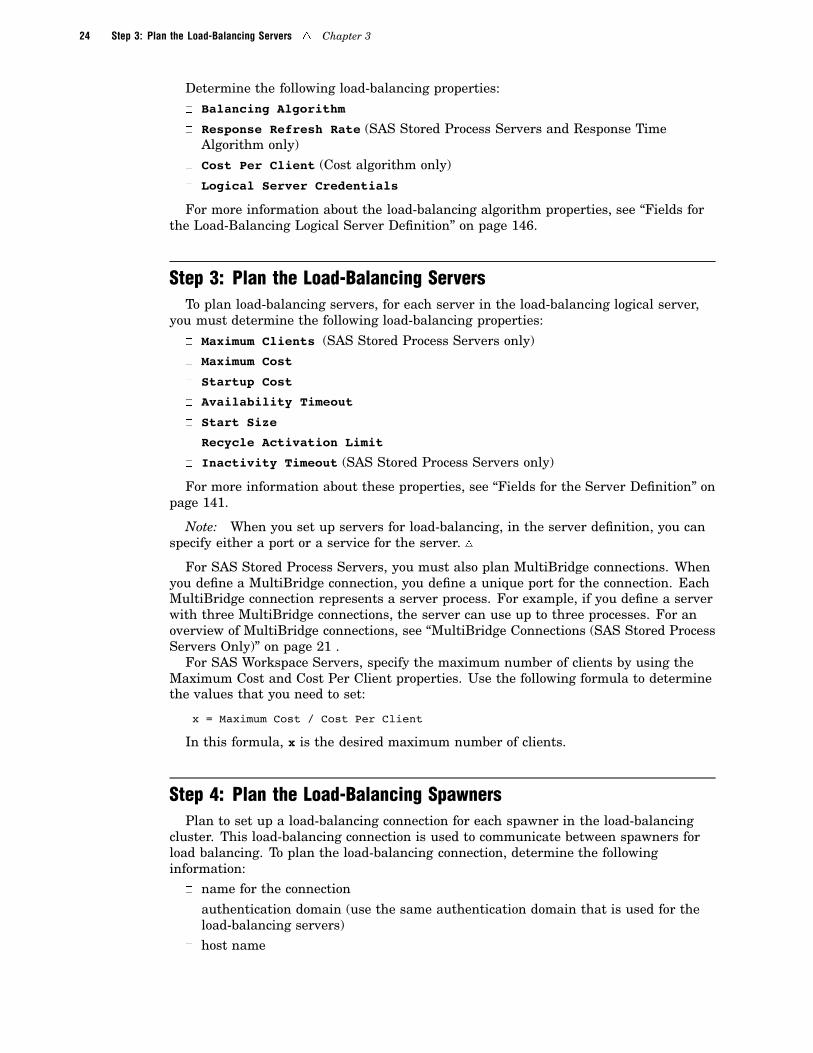
24 Step 3: Plan the Load-Balancing Servers � Chapter 3
Determine the following load-balancing properties:� Balancing Algorithm
� Response Refresh Rate (SAS Stored Process Servers and Response TimeAlgorithm only)
� Cost Per Client (Cost algorithm only)
� Logical Server Credentials
For more information about the load-balancing algorithm properties, see “Fields forthe Load-Balancing Logical Server Definition” on page 146.
Step 3: Plan the Load-Balancing ServersTo plan load-balancing servers, for each server in the load-balancing logical server,
you must determine the following load-balancing properties:
� Maximum Clients (SAS Stored Process Servers only)� Maximum Cost
� Startup Cost
� Availability Timeout
� Start Size
� Recycle Activation Limit
� Inactivity Timeout (SAS Stored Process Servers only)
For more information about these properties, see “Fields for the Server Definition” onpage 141.
Note: When you set up servers for load-balancing, in the server definition, you canspecify either a port or a service for the server. �
For SAS Stored Process Servers, you must also plan MultiBridge connections. Whenyou define a MultiBridge connection, you define a unique port for the connection. EachMultiBridge connection represents a server process. For example, if you define a serverwith three MultiBridge connections, the server can use up to three processes. For anoverview of MultiBridge connections, see “MultiBridge Connections (SAS Stored ProcessServers Only)” on page 21 .
For SAS Workspace Servers, specify the maximum number of clients by using theMaximum Cost and Cost Per Client properties. Use the following formula to determinethe values that you need to set:
x = Maximum Cost / Cost Per Client
In this formula, x is the desired maximum number of clients.
Step 4: Plan the Load-Balancing SpawnersPlan to set up a load-balancing connection for each spawner in the load-balancing
cluster. This load-balancing connection is used to communicate between spawners forload balancing. To plan the load-balancing connection, determine the followinginformation:
� name for the connection
� authentication domain (use the same authentication domain that is used for theload-balancing servers)
� host name
Server Concepts � Step 7: Set Up Load-Balancing Servers 25
� port number (default is 8571)
For detailed information about the fields that are included in the metadata for aspawner, see “Fields for the Spawner Definition” on page 148.
Step 5: Set Up Logins (When Load Balancing Across MultipleMachines)
If you are load-balancing between spawners, then follow these steps:1 In SAS Management Console, set up the login (logical server credentials) for the
load-balancing logical server. To understand user, group, and login definitions, andmodify a user and its associated logins, see the “User and Group Management”chapter .
2 In SAS Management Console, on the Authorization tab of the load-balancinglogical server definition, grant the Administer permission to the user or groupmetadata identity that owns the login for the logical server credentials.
Step 6: Set Up a Load-Balancing Logical ServerTo set up the load-balancing logical server:1 In SAS Management Console, select and expand the Server Manager to locate the
standard logical server that you want to convert to load balancing.2 Select the logical server, and then select Actions Convert to Load Balancing
from the menu bar. Confirm that you want to continue.3 In the Load Balancing Options dialog box, enter the values that you planned in
Step 2:� Balancing Algorithm
� Response Refresh Rate (SAS Stored Process Servers and Response TimeAlgorithm only)
� Cost Per Client (Cost algorithm only)� Logical Server Credentials
When you have finished entering the load-balancing parameters, click OK.
Note: To modify an existing load-balancing logical server, select the logicalserver and then select File Properties from the menu bar. Select the LoadBalancing tab to edit the load balancing options for the logical server. �
Step 7: Set Up Load-Balancing ServersFor each server in the load-balancing logical server, you must set up load-balancing
properties for the server. To set up load-balancing servers, follow these steps:1 Use SAS Management Console to specify load-balancing properties:
a In SAS Management Console, expand the Server Manager to locate the serverdefinition.
b Select the server and then select File Properties from the menu bar.c On the Options tab of the Server Properties dialog box, click Advanced Options.d On the Load Balancing Properties tab of the Advanced Options dialog box,
enter the values that you planned in Step 3:� Maximum Clients (SAS Stored Process Servers only)

26 Step 8: Set Up Load-Balancing Spawners � Chapter 3
� Maximum Cost
� Startup Cost
� Availability Timeout
� Start Size
� Recycle Activation Limit
� Inactivity Timeout (SAS Stored Process Servers only)
When you have finished entering the load-balancing parameters, click OK.2 If you are setting up a SAS Stored Process server, you must set up one or more
MultiBridge connections. To add a MultiBridge connection:
a In SAS Management Console, expand the Server Manager to locate theserver definition that you want to add a connection to.
b Select and expand the server definition, and then select Actions AddConnection from the menu bar. The New Connection Wizard appears.
c Select MultiBridge Connection and then click Next.d Specify a Name and optionally a Description for the new connection, and
then click Next.e Specify the Authentication Domain, Host Name, and Port for the new
connection. When you are finished entering information in the fields, clickNext. The parameters for the new connection will be displayed.
f Click Finish to define the connection and return to the SAS ManagementConsole main window.
Step 8: Set Up Load-Balancing SpawnersFor each spawner in the load-balancing cluster, you must set up a load-balancing
connection.To add a load-balancing connection:1 In SAS Management Console, expand the Server Manager to locate the spawner
definition that you want to add a connection to.2 Select the spawner definition, and then select Actions Add Connection from the
menu bar. The New Connection Wizard appears.3 Select Load Balancing, and then click Next.4 Enter a name and description for the connection. Click Next.5 Specify the Authentication Domain, Host Name, and Port for the new
connection. When you are finished entering information in the fields, click Next.The parameters for the new connection will be displayed.
6 Click Finish to define the connection and return to the SAS Management Consolemain window.
Planning the Load-Balancing Algorithm Properties
Overview of Load-Balancing AlgorithmsSAS 9.1 Integration Technologies supports the following load-balancing algorithms:� Cost Algorithm� Response Time Algorithm

Server Concepts � Cost Algorithm: Parameters 27
Note: The Cost algorithm is recommended for both SAS Workspace Servers andSAS Stored Process Servers. �
Cost Algorithm: OverviewThe Cost algorithm uses a cost value to represent the workload that is assigned to
each server (or server process) in the load-balancing cluster. Each time a client connectsor a stored process is executed, the load-balancing spawner updates the cost value forthe appropriate server. When a client requests a connection to the load-balancingcluster, the spawner examines the cost values for all of the servers in the cluster, andthen redirects the client to the server that has the lowest cost value.
The Cost algorithm works differently for SAS Workspace Servers and SAS StoredProcess Servers:
� SAS Workspace Servers. When a new client requests a connection, theload-balancing spawner redirects the client to the server that has the lowest costvalue. When the client connects to the designated server, the spawner willincrement that server’s cost by a specified value (cost per client). When that clientdisconnects, the spawner will decrement that server’s cost by the same value (costper client).
� SAS 9.1.3 Stored Process Servers. When a new client requests a connection, theload-balancing spawner redirects the client to the server process that has thelowest cost value. When the client connects to the designated server process, thespawner will decrement the cost for that process by the same value (cost per client).
Additionally, the stored process server process dynamically adjusts its cost by afixed value (101) each time it begins or finishes running a stored process.
� SAS 9.1.2 (and earlier) Stored Process Servers. When a new client requests aconnection, the load-balancing spawner redirects the client to the server processthat has the lowest cost value. When the client connects to the designated serverprocess, the spawner will increment the cost for that process by a specified value(cost per client). Load balancing does not decrement the cost when the clientdisconnects. The stored process server dynamically updates its cost each time itbegins or finishes running a stored process, so that the cost is equal to the numberof stored processes that are running, multiplied by 101. This updated cost is notaffected by the number of clients.
Cost Algorithm: ParametersThe Cost algorithm uses the following cost parameters, which are treated as
weighted values:
Cost Per Client(field on theload-balancinglogical serverdefinition)
specifies the default amount of weight (cost) that each client adds(when it connects) or subtracts (when it disconnects) to the total costof the server.
Startup Cost(field on theserverdefinition)
specifies the startup cost of the server. When a request is made tothe load-balancing spawner, the spawner assigns this startup costvalue to inactive servers. A new server is not started unless it isdetermined that its cost (the startup cost) is less than that of therest of the servers in the cluster. This field enables theadministrator to control the order in which servers are started.After a server is started, the cost value is 0. When a client connectsto the server, the server’s cost value is increased.
28 Cost Algorithm: SAS Workspace Server Example � Chapter 3
Maximum Cost(field on theserverdefinition)
specifies the maximum cost value that each server can have. After aserver reaches maximum cost, the load-balancing spawner will notredirect any more clients to the server until its cost value decreases.
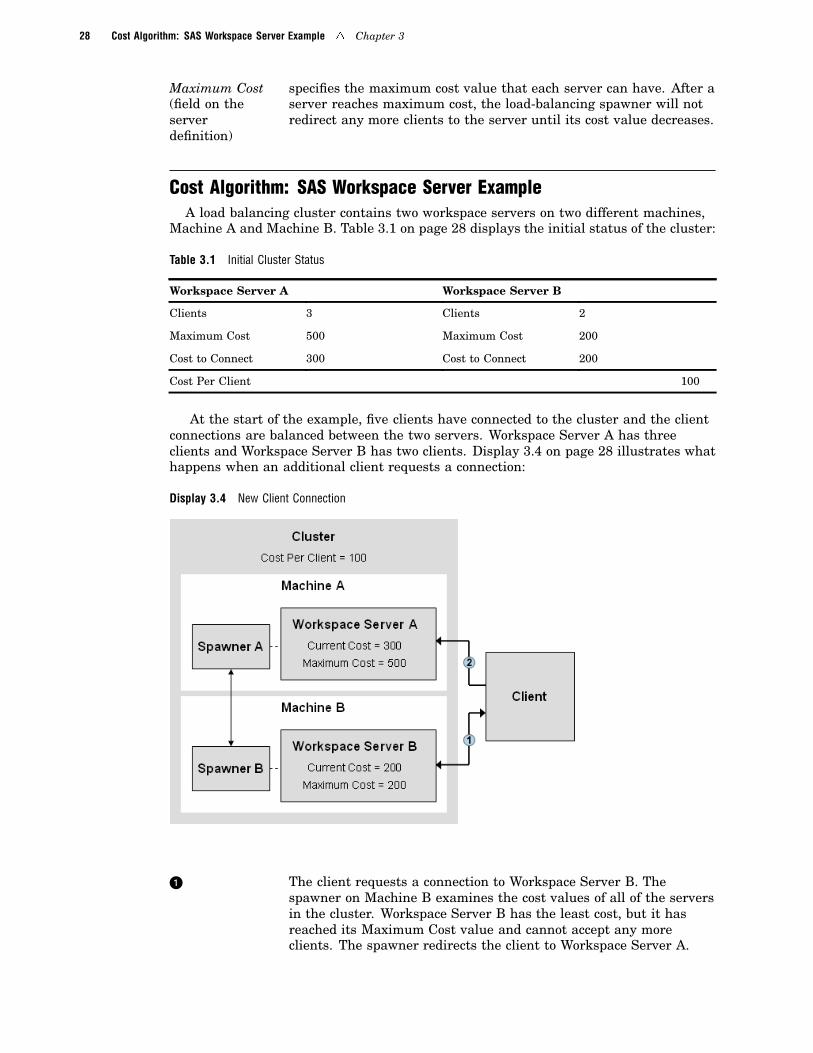
Cost Algorithm: SAS Workspace Server ExampleA load balancing cluster contains two workspace servers on two different machines,
Machine A and Machine B. Table 3.1 on page 28 displays the initial status of the cluster:
Table 3.1 Initial Cluster Status
Workspace Server A Workspace Server B
Clients 3 Clients 2
Maximum Cost 500 Maximum Cost 200
Cost to Connect 300 Cost to Connect 200
Cost Per Client 100
At the start of the example, five clients have connected to the cluster and the clientconnections are balanced between the two servers. Workspace Server A has threeclients and Workspace Server B has two clients. Display 3.4 on page 28 illustrates whathappens when an additional client requests a connection:
Display 3.4 New Client Connection
u The client requests a connection to Workspace Server B. Thespawner on Machine B examines the cost values of all of the serversin the cluster. Workspace Server B has the least cost, but it hasreached its Maximum Cost value and cannot accept any moreclients. The spawner redirects the client to Workspace Server A.

Server Concepts � Cost Algorithm: SAS Stored Process Server Example 29
v The client requests a connection to Workspace Server A. Thespawner on Machine A creates a server connection for the client,and then increments the cost value for Workspace Server A by thecluster’s Cost Per Client value (100).
Table 3.2 on page 29 displays the final status of the cluster:
Table 3.2 Final Cluster Status
Workspace Server A Workspace Server B
Clients 4 Clients 2
Maximum Cost 500 Maximum Cost 200
Cost to Connect 400 Cost to Connect 200
Cost Per Client 100
At the end of the example, the cost to connect to Workspace Server A is 400, becausethere are four clients and the Cost Per Client value is 100.
Cost Algorithm: SAS Stored Process Server ExampleA load balancing cluster contains one stored process server with two server processes
(MultiBridge connections), Server Process A and Server Process B. Table 3.3 on page 29displays the initial status of the cluster:
Table 3.3 Initial Cluster Status
Server Process A Server Process B
Status Running Status Not Running
Clients 2 Clients 0
Stored Processes 2 Stored Processes 0
Startup Cost 300 Startup Cost 300
Cost to Connect 402 Cost to Connect 300
Cost Per Client 100
At the start of the example, Server Process A is running, and has two clients. Eachclient on Server Process A is running one stored process, so the current cost for ServerA is 402 (2 clients * 100 + 2 processes running * 101). Server Process B has not startedyet, so the cost to connect to Server Process B is the Startup Cost (300). Display 3.5 onpage 30 illustrates what happens when an additional client connects:

30 Cost Algorithm: SAS Stored Process Server Example � Chapter 3
Display 3.5 New Client Connection
u The client requests a connection to the stored process server. Theload-balancing spawner examines the cost values of all of the serversin the cluster, and determines that Server Process B has the lowestcost. The spawner redirects the client to Server Process B.
v The client requests a connection to Server Process B. The spawnerstarts the server process, and then provides a connection to theclient. The spawner increments the cost value for Server Process Bby the cluster’s Cost Per Client value (100).
Table 3.4 on page 30 displays the final status of the cluster:
Table 3.4 Final Cluster Status
Server Process A Server Process B
Status Running Status Running
Clients 2 Clients 1
Stored Processes 2 Stored Processes 0
Startup Cost 300 Startup Cost 300
Cost to Connect 402 Cost to Connect 100
Cost Per Client 100
At the end of the example, the cost for Server Process B is 100, because there is oneclient and the Cost Per Client value is 100. There are no stored processes running, andthe Startup Cost value does not apply because the server process has been started. Ifthe client submits a stored process, the cost will increase by 101 (the standard cost perstored process).

Server Concepts � Response Time Algorithm (SAS Stored Process Server only) 31
Response Time Algorithm (SAS Stored Process Server only)The Response Time algorithm uses a list of server response times in order to
determine which server process has the least load. For each server process in theload-balancing cluster, the load-balancing spawner maintains an ordered list of serversand their average response times. Each time the spawner receives a client request, itredirects the client to the server process at the top of the list. The spawner updates theserver response times periodically. You can specify the update frequency for theresponse time (Response Refresh Time) in the metadata for the load-balancing cluster.
The Response Time algorithm uses the following parameters:
Response Refresh Rate (field on the load-balancing logical server definition for SASStored Process Servers only)
specifies the length of the period in milliseconds that the load-balancing spawnerwill use the current response times. At the end of this period the spawner updatesthe response times for all of the servers in the cluster, and then reorders the list ofservers.
Note: If this field is set to 0, the load-balancing spawner does not use theresponse time list to redirect clients to servers; instead, the spawner redirectsclients to servers sequentially, in the order that the servers are defined in themetadata. �
Max Clients (field on the server definition for SAS Stored Process Servers only)specifies the maximum number of clients that a server can have. After a serverreaches its maximum number of clients, the spawner will not redirect any moreclients to the server until a client disconnects.

32

33
C H A P T E R
4Reconfiguring or ClusteringWorkspace Servers or StoredProcess Servers
Changing a Workspace Server’s Launch Command 34Tuning a Workspace Server for Best Performance 34
Configuring the Workspace Server for the Hebrew Locale 35
Add System Options to the Workspace Server Launch Command 35
Convert a Workspace Server to Pooling 36
Configuring the Workspace Server and Pool 38Converting the Workspace Server to Pooling 38
Setting Configuration Options for the Pool 39
Adding an Authentication Domain to the SAS Trusted User’s Login 40
Configuring the Foundation Services Manager User Service for Web Report Studio 42
Verifying That Connection Pooling is Working for SAS Web Report Studio 43
Configuring Pooling Across Multiple Machines 44Configure a Pooling Workspace Server to Enforce Row-Level Security 46
Define the Necessary Users and Groups 47
User Accounts 47
User and Group Objects 47
Create a Restricted Workspace Server Pool 48Assign Libraries to the New Server 51
Create a Second SAS Web Report Studio Deployment 51
Secure Sensitive Data Resources 53
Convert a Workspace Server to Load Balancing 53
Installing the Software 54Configuring the Workspace Server and Object Spawner 54
Start the SAS Management Console 55
Defining Your Application Server and Workspace Server 55
Define Your Object Spawner 56
Start the Object Spawner 56
Converting the Logical Workspace Server to Load Balancing 56Setting Load Balancing Parameters for Each Workspace Server 57
Overview of the Initial Load Balancing Setup for Stored Process Servers 59
Configure a Load-Balancing Cluster of Stored Process Servers 60
Installing the Software 61
Configuring the Stored Process Server and Object Spawner 61Start the SAS Management Console 62
Defining Your Application Server and Workspace Server 62
Define Your Stored Process Server 62
Define Your Object Spawner 62
Load SAS Stored Process Samples 63Start the Object Spawner 63
Setting Logical Stored Process Server Properties 63
Setting the Load Balancing Properties for Each Stored Process Server 65

34 Changing a Workspace Server’s Launch Command � Chapter 4
Updating a Windows Spawner Service 67Data and Catalogs for Servers on Multiple Machines 67
Updating SAS Libraries 68
Updating References to User-Defined Formats 68
Accessing Data in Database Management Systems 68
Changing a Workspace Server’s Launch Command
Tuning a Workspace Server for Best PerformanceTo obtain the best performance from your SAS Web applications, you should tune the
workspace server that is being used by that product as described in this section. Thechanges you should make include specifying the following:
� an appropriate work folder
� a buffer size for writing files to the work area
� a limit on the total amount of memory that SAS uses at any one time
Note: In addition to tuning your workspace server by following the directions in thissection, you should convert your workspace server to pooling as discussed in “Convert aWorkspace Server to Pooling” on page 36. �
The following table lists the system options that you should set and recommendsvalues to use with those options. “Add System Options to the Workspace Server LaunchCommand” on page 35 explains how to add the system options to the command thatstarts the workspace server.
The arguments to the system options that are shown in the table are values that areuseful on a system with the following characteristics:
� four CPUs, 2.0 GHz
� 3.5 GB RAM
� Windows Server 2003
Table 4.1 System Options for the Workspace Server
System Option Explanation
-RSASUSER Opens the SASUSER library in read-only mode. Declaring thislibrary read only makes the workspace server much faster forSAS Web Report Studio.
-work work-folder Specifies the pathname for the directory that contains the Workdata library. This directory should reside on a disk thatemphasizes fast write performance (not, for example, on aRAID-5 device).
-ubufsize 64K Specifies a buffer size for writing files to the work area.
-memsize 192M Specifies a limit on the total amount of memory that SAS uses atany one time.
-realmemsize 128M Indicates the amount of RAM available to a process before itbegins to page. Keeping this number low limits the amount ofRAM consumed by a SAS server in order to reduce pagingactivity.

Reconfiguring or Clustering Servers � Add System Options to the Workspace Server Launch Command 35
System Option Explanation
-sortsize 800M Limits the amount of memory that can be used temporarily forsorting. Larger sort sizes reduce the use of the work folder, butincrease the possibility of paging.
-cpucount 2 Specifies the number of processors that thread-enabledapplications should assume will be available for concurrentprocessing. This setting maximizes the effectiveness of the SASWeb Report Studio sorting algorithm.
Note that the arguments to these options will be site and job specific. Take care inchoosing these values, and consult a SAS representative if necessary.
Configuring the Workspace Server for the Hebrew LocaleWhen SAS Web Report Studio is configured to run under the Hebrew locale, the
workspace server is started incorrectly. Because of this issue, if you intend to provideSAS Web Report Studio in Hebrew, it is recommended that you add the-nosyntaxcheck option to the start-up command for the workspace server. “AddSystem Options to the Workspace Server Launch Command” on page 35 explains howto add system options to the start-up command.
Note: Alternatively, you can create a new SAS Application Server (parallel toSASMain) and a new workspace server within the new application server context. Youcan then change the command (using the -nosyntaxcheck option) for the newworkspace server, without affecting the workspace server under SASMain. You canthen assign selected libraries to the new application server, including any libraries thatyou intend to query for reports. See “Configure a Pooling Workspace Server to EnforceRow-Level Security” on page 46 for information about creating a new SAS ApplicationServer and workspace server. �
Add System Options to the Workspace Server Launch CommandAfter you have determined the system options that you want to use to start your
workspace server, follow the directions in this section to edit the sas command thatstarts the server.
1 In SAS Management Console, expand the Server Manager node, then expand theSASMain---Logical Workspace Server node. You will see a tree node thatrepresents the physical workspace server.
2 Right-click the icon for the physical workspace server, and select Properties fromthe pop-up menu. A Workspace Server Properties dialog box appears.
3 Click the Options tab. You will see the information that is shown in the followingdisplay.

36 Convert a Workspace Server to Pooling � Chapter 4
4 Edit the text in the Command text box, which by default is set to
sas -config "path-to-config-dir\Lev1\SASMain\sasv9.cfg"
For example, here is a command with options that improve performance:
sas -config "path-to-config-dir\Lev1\SASMain\sasv9.cfg" -rsasuser-work work-folder -ubufsize 64K -memsize 192M -realmemsize 128M-sortsize 800M -cpucount 2
CAUTION:Do not add the options to the SASMain\sasv9.cfg. Setting values inLev1\SASMain\sasv9.cfg affects every server launched. This includes themetadata server, the OLAP server, and every workspace server and storedprocess server. �
5 Click OK in the Workspace Server Properties dialog box.
Note: At the end of this procedure, you will have optimized your workspace serverfor use with SAS Web Report Studio. If you are using other applications and theseapplications can benefit from a workspace server configured differently, you must createa new logical workspace server (under SASMain) and add a workspace server to it. �
Convert a Workspace Server to Pooling
This section explains how to set up pooling for your workspace server for use withSAS Web Report Studio and SAS Information Delivery Portal. The result of this

Reconfiguring or Clustering Servers � Convert a Workspace Server to Pooling 37
configuration is that the users of these Web applications will see much betterperformance than they would if they were connecting to a standard workspace server.
Before we explain how to perform this configuration, it is important that youunderstand a couple of concepts. For example, what does it mean to set up a poolingworkspace server? If a workspace server has not been converted to pooling, each time aSAS Web Report Studio or SAS Information Delivery Portal user starts a session, aworkspace server process must be created and the user must establish a connection tothis process. This can be a time-consuming sequence of events. When you set up apooling workspace server, a pool (or set) of connections to workspace servers are openedwhen SAS Web Report Studio or SAS Information Delivery Portal makes its firstrequest for a workspace server. A user can then obtain a preexisting connection fromthe pool instead of having to establish the connection.
Another important concept is that of a puddle. A puddle is a subset of theconnections in a pool. Setting up puddles enables you to associate a different set ofusers with different puddles. Typically, the reason for setting up different groups ofusers is to give the different groups different levels of access.
One of the advantages of using a pooling workspace server is to enable SAS WebReport Studio or SAS Information Delivery Portal users to obtain an existingconnection to a workspace server. Other advantages include the following:
� You can limit the number of clients that can connect to workspace serverssimultaneously. As a result, you can ensure acceptable response times for allconnected clients.
� You can add server hosts to the pool to accommodate increased demand.� You can grant certain groups greater access to the pool than others.� You can divide the pool into puddles of connections that have unique login
credentials and access to server-side resources.
Note: In this section, we assume that you are starting with a standard workspaceserver. The instructions are applicable both in the case where the users of your Webapplications are being authenticated by the metadata server (the default) and in thecase where you Java application server is authenticating those users (Webauthentication). If you plan to use Web authentication, you should set that up beforeconfiguring your workspace server for pooling. For information on how to set up Webauthentication, see "Changing to Trusted Web Authentication" in the “Setting up andManaging Middle-Tier Security” chapter of SAS Intelligence Platform: Web ApplicationAdministration Guide. �
To set up your pooling workspace server for use with SAS Web Report Studio, followthe directions in these sections:
� “Configuring the Workspace Server and Pool” on page 38� “Adding an Authentication Domain to the SAS Trusted User’s Login” on page 40� “Configuring the Foundation Services Manager User Service for Web Report
Studio” on page 42
Note: If you have configured SAS Web Report Studio to use Web authentication, youcan skip the second of these sections. In this case, the SAS Trusted User is not used asthe pool administrator, as this user is when you are using host authentication. �
To set up your pooling workspace server for use with SAS Information Delivery Portal,follow the directions in these sections:
� “Configuring the Workspace Server and Pool” on page 38� “Adding an Authentication Domain to the SAS Trusted User’s Login” on page 40
It is not necessary to perform the steps in “Configuring the Foundation ServicesManager User Service for Web Report Studio” on page 42 because the User Service that

38 Configuring the Workspace Server and Pool � Chapter 4
is employed by the portal application is configured by default in a way that will workwith a pool of workspace servers.
Finally, to verify that connection pooling is working, see “Verifying That ConnectionPooling is Working for SAS Web Report Studio” on page 43.
Configuring the Workspace Server and PoolThe first step in configuring connection pooling is to convert your logical workspace
server to a pooling configuration and to configure a pool and puddle for this server.Follow the directions in the next two subsections.
Converting the Workspace Server to PoolingTo convert your workspace server to pooling and to define a puddle, perform these
steps:1 Log on to SAS Management Console as the SAS Administrator (sasadm).2 In SAS Management Console, expand the Server Manager tree node and the node
for the SASMain application server. One of the tree nodes under SASMain isSASMain—Logical Workspace Server.
3 Right-click the icon for the logical workspace server, and select Convert To �Pooling. You will see an Information dialog box that asks if you want to continuewith the conversion. Click Yes. The Pooling Options dialog box appears.
4 In the Pooling Options dialog box, click New to indicate that you want to define apuddle. The New Puddle dialog box appears.
5 Fill out the fields in the dialog box as shown in the previous display. The followingtable explains what the values in the dialog box mean.
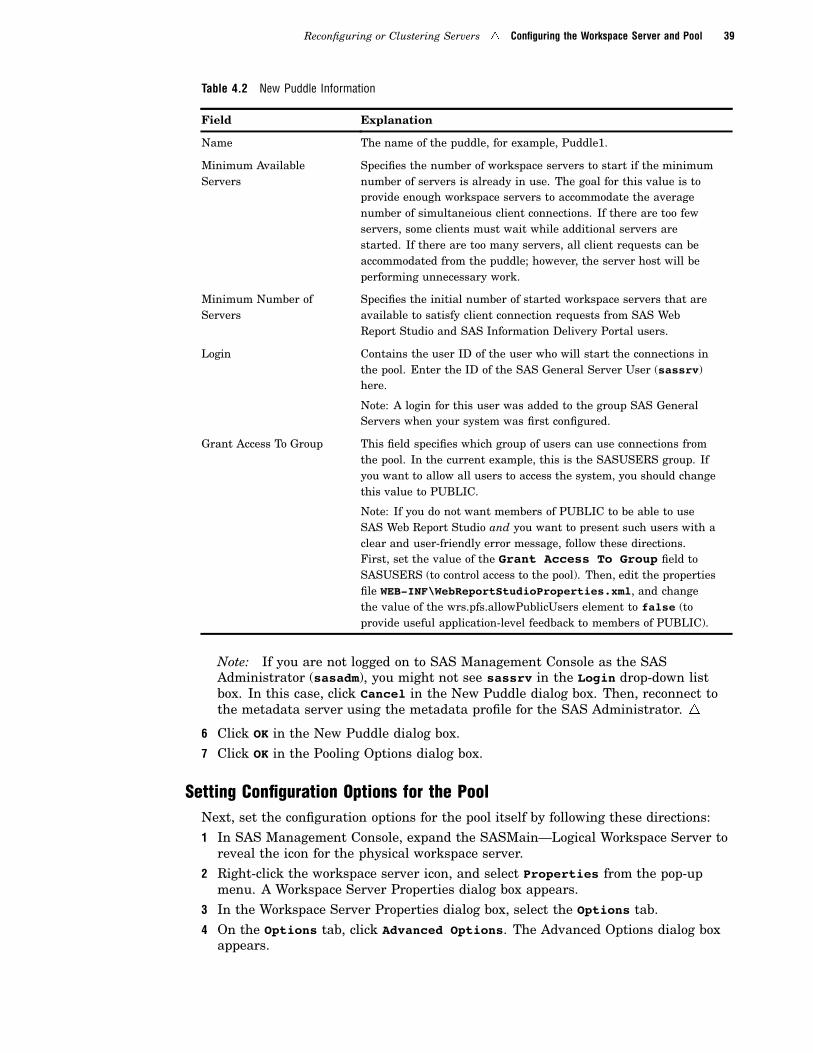
Reconfiguring or Clustering Servers � Configuring the Workspace Server and Pool 39
Table 4.2 New Puddle Information
Field Explanation
Name The name of the puddle, for example, Puddle1.
Minimum AvailableServers
Specifies the number of workspace servers to start if the minimumnumber of servers is already in use. The goal for this value is toprovide enough workspace servers to accommodate the averagenumber of simultaneious client connections. If there are too fewservers, some clients must wait while additional servers arestarted. If there are too many servers, all client requests can beaccommodated from the puddle; however, the server host will beperforming unnecessary work.
Minimum Number ofServers
Specifies the initial number of started workspace servers that areavailable to satisfy client connection requests from SAS WebReport Studio and SAS Information Delivery Portal users.
Login Contains the user ID of the user who will start the connections inthe pool. Enter the ID of the SAS General Server User (sassrv)here.
Note: A login for this user was added to the group SAS GeneralServers when your system was first configured.
Grant Access To Group This field specifies which group of users can use connections fromthe pool. In the current example, this is the SASUSERS group. Ifyou want to allow all users to access the system, you should changethis value to PUBLIC.
Note: If you do not want members of PUBLIC to be able to useSAS Web Report Studio and you want to present such users with aclear and user-friendly error message, follow these directions.First, set the value of the Grant Access To Group field toSASUSERS (to control access to the pool). Then, edit the propertiesfile WEB-INF\WebReportStudioProperties.xml, and changethe value of the wrs.pfs.allowPublicUsers element to false (toprovide useful application-level feedback to members of PUBLIC).
Note: If you are not logged on to SAS Management Console as the SASAdministrator (sasadm), you might not see sassrv in the Login drop-down listbox. In this case, click Cancel in the New Puddle dialog box. Then, reconnect tothe metadata server using the metadata profile for the SAS Administrator. �
6 Click OK in the New Puddle dialog box.7 Click OK in the Pooling Options dialog box.
Setting Configuration Options for the PoolNext, set the configuration options for the pool itself by following these directions:1 In SAS Management Console, expand the SASMain—Logical Workspace Server to
reveal the icon for the physical workspace server.2 Right-click the workspace server icon, and select Properties from the pop-up
menu. A Workspace Server Properties dialog box appears.3 In the Workspace Server Properties dialog box, select the Options tab.4 On the Options tab, click Advanced Options. The Advanced Options dialog box
appears.

40 Adding an Authentication Domain to the SAS Trusted User’s Login � Chapter 4
5 In the Advanced Options dialog box, select the Pooling Properties tab.
6 Fill the fields in the dialog box as shown in the previous display. The followingtable explains the meaning of each value.
Table 4.3 Pooling Properties
Field Explanation
Recycle Activation Limit Places a limit on how often workspace server processes are reusedto satisfy puddle connections.
Maximum Clients Each client requires a workspace server process on the workspaceserver host. These processes constitute the pool that will beavailable to SAS Web Report Studio and SAS Information DeliveryPortal. Each process requires approximately 150 MB for efficientoperation. As a guide, we recommend two processes per CPU. Ifthe server is not also acting as the metadata server, you can addone or two to this maximum. If you have long-running queries, youcan add one or two servers. This will make the system seem moreresponsive to short-running queries, at the expense of totalthroughput. A typical setting is between 4 and 6. Applicationsshould not share the same pooled workspace configuration as thiscreates duplicate pools, one for each application, and anunexpectedly high workload for the server host.
Inactivity Timeout A workspace server process can have an inactivity timeout. Havinga short timeout reduces the workload on the server host, but mightreduce response time for client connection requests.
7 Click OK in the Advanced Options dialog box.8 Click OK in the Workspace Server Properties dialog box.
Adding an Authentication Domain to the SAS Trusted User’s LoginWhen you configure the Foundation Services Manager User Service, as described in
the next section, you are asked to specify a pool administrator, and the configurationinstructions tell you to specify the SAS Trusted User (sastrust) as this user. In orderfor the SAS Trusted User to be used as the pool administrator, you must add the properauthentication domain to that user’s login.

Reconfiguring or Clustering Servers � Adding an Authentication Domain to the SAS Trusted User’s Login 41
To define an authentication domain for the SAS Trusted User, perform the followingsteps in SAS Management Console:
1 Select the icon for the User Manager plug-in so that a list of users and groupsappears in the console.
2 Double-click the entry for the SAS Trusted User. A SAS Trusted User Propertiesdialog box appears.
3 In this dialog box, select the Logins tab.
4 Select the existing login, and click Modify. An Edit Login Properties dialogappears.
Notice that no authentication domain has been specified.5 Select DefaultAuth from the Authentication Domain drop-down list, and click
OK. The login for the SAS Trusted User is updated in the SAS Trusted UserProperties dialog box.

42 Configuring the Foundation Services Manager User Service for Web Report Studio � Chapter 4
6 Click OK in the SAS Trusted User Properties dialog box.
Configuring the Foundation Services Manager User Service for WebReport Studio
SAS Web Report Studio uses the Platform User Service, which is one of the SASQuery and Reporting Services. Configure this service so that it knows about the pooladministrator by following these directions.
Note: The analogous step was performed for SAS Information Delivery Portalduring the installation of that product. �
1 In SAS Management Console, expand the Foundation Services Manager. (SASFoundation Services should have been installed when your system was first setup.) Most likely, you will see nodes for ID Portal Local Services and RemoteServices. If this is the case, continue with step 2 to create the necessaryquery-and-reporting service deployment. (If you already have a Query andReporting node, you can skip to step 6.)
2 Right-click the Foundation Services Manager icon, and select Import ServiceDeployment from the pop-up menu. An Import Service Deployment dialog boxappears.
3 In the Import Service Deployment dialog box, click Add. An Open dialog box (afile-system browser) appears.
4 The service-deployment file that you need to select resides on the host where SASWeb Report Studio or SAS Web Report Viewer is deployed. Look in your J2EEapplication server’s deployment area for the appropriate application. From there,the path to the file isWEB-INF\pfsconfig\config\host-name_sas_pfs_queryandreporting.xml.Select this file and click Open. The name of the file will display in the ImportService Deployment dialog box.
5 Click OK in the Import Service Deployment dialog box. The service deployment willbe imported, and if you fully expand the Query and Reporting node, you should seethe following tree nodes.
6 Right-click the Platform User Service icon, and select Properties from the pop-upmenu. A Platform User Service Properties dialog box appears.
7 In the Platform User Service Properties dialog box, select the ServiceConfiguration tab.
8 On the Service Configuration tab, click Edit Configuration. A User ServiceConfiguration dialog box appears.
9 In the User Service Configuration dialog box, select the Users tab.

Reconfiguring or Clustering Servers � Verifying That Connection Pooling Is Working 43
10 On the Users tab, click Add. A New User dialog box appears. This is where youspecify the user ID of the pool administrator..
Note: For information about the pool administrator and how applications employthis user’s ID, see “Planning the Pooling Security (IOM Bridge only)” in the SASIntegration Technologies: Server Administrator’s Guide, which is available athttp://support.sas.com/rnd/itech/doc9/admin_oma. �
11 If SAS Web Report Studio is configured to use host authentication, specifyinformation about the SAS Trusted User (sastrust) in the New User dialog, asshown in the preceding display. Change the domain qualifier for the user ID asnecessary, and note that the user ID is case sensitive. The value that you specifyfor ID must match exactly the value forwrs.logonManager.poolAdministratorID that is stored inWebReportStudioProperties.xml. This file is located in the WEB-INFsubdirectory of your deployed Web Report Studio application.
If the application is configured to use Web authentication, perform the followingsteps:
a Use SAS Management Console’s User Manager to create a new user calledPool Administrator. Create a login for this user with a user ID of pooladmand an authentication domain of web. No password is necessary.
b Enter information about the Pool Administrator in the New User dialog.Leave the password fields blank.
12 Click OK in the New User dialog.
13 Click OK in the User Service Configuration dialog box.14 Click OK in the Platform User Service Properties dialog box.
Note: After making these changes, you should make sure that only the SAS WebAdministrator (saswbadm) and the IT staff have ReadMetadata access to the PlatformUser Service. For details about this subject, see “Minimizing the Availability ofAccounts” in the chapter “Securing a Deployment” in the SAS Intelligence Platform:Security Administration Guide. �
Verifying That Connection Pooling is Working for SAS Web ReportStudio
If you have not configured connection pooling correctly, SAS Web Report Studio willcontinue to work; however, it will not be able to take advantage of a connection pool.Therefore, it is important that you verify that your system is configured correctly. Youcan verify this by temporarily changing the logging level for connections, viewing a SASWeb Report Studio report, and then checking the contents of the SAS Web ReportStudio log file. Detailed instructions follow:

44 Configuring Pooling Across Multiple Machines � Chapter 4
1 Change the logging level for connections by adding the following element to the fileJ2EE-server-deployment-area\WEB-INF\DefaultLoggerProperties.xml.
<LoggingContext name = "com.sas.services.connection"priority = "INFO"chained = "false">
<OutputRef outputID = "WRS" /></LoggingContext>
You can add this element directly below the existing LoggingContext element inthe file.
CAUTION:We recommend that you create a back-up copy of this XML file before editing it. Anerror in the XML syntax in this file can prevent SAS Web Report Studio fromstarting up properly. �
2 Start SAS Web Report Studio and log on.
3 View a report that accesses relational data (for example, a SAS table).
4 View the SAS Web Report Studio log file (path-to-config-dir\Lev1\web\Deployments\WebReportStudio\logs\WebReportStudio.log). Ifpooling is working, you will see information that is similar to this informationabout the connection to the workspace server:
privileged user name: D9588\sastrustpd#0: putting cx#8 on the available queuerq#0 routed to pd#0
If pooling is not working correctly, you will see a message similar to this message:
request served by unshared connection #9
After you have confirmed that connection pooling is working, you can undo thechanges that you made to DefaultLoggerProperties.xml.
Configuring Pooling Across Multiple MachinesIf your deployment requires more than one host for pooled workspace servers, then
you can configure pooling across multiple machines.An important aspect of multi-machine workspace pooling involves the puddle login
ID that you supplied in the section “Converting the Workspace Server to Pooling” onpage 38. In order to implement multi-machine pooling, this login must be valid for allmachines in the pool.
This topic describes a basic configuration where the pool has only one puddle. Forthis basic implementation, the account that you use for the login ID must be able toauthenticate on every machine in the puddle. This means that the login ID must be anetwork account, and it must be associated with a single authentication domain inmetadata (for example, NTDomain). In the section “Converting the Workspace Serverto Pooling,” we recommended that you use the SAS General Server User (sassrv) forthis account. For most deployments, sassrv is configured as a network account.
If you require a workspace pool that consists of host servers in differentauthentication domains (for example, Windows and UNIX), then you would configure apool with a separate puddle for each host. Each puddle would have its own login ID asappropriate for the host’s authentication domain (for example, NTDomain orUnixAuth). Each login ID must be able to authenticate on every machine in itsrespective puddle. With this configuration, the pool manager software can identify

Reconfiguring or Clustering Servers � Configuring Pooling Across Multiple Machines 45
which machine is used for a given process based on the puddles that are defined for thepool, and it uses the appropriate login to make a connection.
The following instructions explain how to configure workspace pooling across twomachines in the same authenticaiton domain, both supporting the same puddle. Repeatthese instructions as appropriate for each additional machine that you want toconfigure for that same puddle.
Note: These instructions assume that you have already set up and verified poolingon a single machine, as explained in the previous sections. �
To configure pooling across two machines:
1 Log on to SAS Management Console as the SAS Administrator (sasadm).
2 If the puddle login ID is not accessible to all machines in the pooling cluster, thenyou must create a new user. Follow these steps:
a On the host, identify or create a network account (preferably sassrv). Forexample, on Windows the user name might be NTDomain\sassrv. The usermust authenticate against each machine in this puddle.
If creating the account on Windows, grant the "Log on as a batch job"permission/policy for the account on each Windows machine in the cluster.
b In the SAS Metadata Console User Manager plug-in, add a login to the SASGeneral Servers group with the user ID and password of the user that you justcreated. (You might now have two login IDs defined for this group, one that is anetwork account, and one that is a local account.)
This login should be associated with the server’s authentication domain (forexample, DefaultAuth or ServerAuth), even if you are using middle-tier trustedauthentication. The login is used to start processes on the server machinerather than to authenticate against the metadata server.
c Change the login ID that is used for the puddle to this newly established loginID. Make this change in the Edit puddle dialog box, which is accessed from thePooled Workspace Server–Logical Workspace Server properties window underthe Server Manager plug-in. For details, see “Configuring the Workspace Serverand Pool” on page 38.
3 In the SAS Metadata Console Server Manager plug-in, add a pooled workspaceserver definition for the machine that you are adding to the pool. Follow thesesteps:
a Expand the SASMain application server, then right-click Pooled WorkspaceServer—Logical Workspace Server and select Add Server from the pop-upmenu. A New Server wizard appears.
b In the wizard, specify the host name for the machine being added to the pool.c In the wizard, click Advanced Options, and then select the Pooling tab.d In the Pooling tab, set the pooling options for this machine. The maximum
number of clients can vary for each server included in the pool, and should beconfigured based upon the capacity of each physical server being used. Fordetails, see “Setting Configuration Options for the Pool” on page 39.
4 In the Server Manager plug-in, define a new object spawner. Following are thesteps:
a Right-click the Server Manager and select Add Server from the pop-up menu.The New Server Wizard appears.
b In the wizard, choose Object Spawner as the type of server, then click Next.c Provide information in the wizard as appropriate, using these guidelines: The
Associated Machine should be the host name of the server being added to thepool. The Operator Login can be left as (None). Select the newly createdpooled workspace server as the server to be spawned by this object spawner.

46 Configure a Pooling Workspace Server to Enforce Row-Level Security � Chapter 4
5 Under SASMain, expand the logical pooled workspace server, and verify that bothphysical workspace servers appear under the logical pooled workspace server.
6 Install the necessary SAS software on the machine that is being added to the pool.At a minimum, you should install Base SAS, the SAS Workspace Server, and theSAS Object Spawner. The object spawner should be configured to run as a service,and should be started automatically. When configuring the object spawner, be surethat the object spawner can connect to the metadata server (running on anothermachine). If the spawner cannot access the metadata server, then the objectspawner can not be started.
7 Verify that pooling works for SAS Web Report Studio. To do this, first start themetadata server. Then start the object spawner on the machine being added to thepool. Finally, start or restart the middle-tier components. See “Verifying ThatConnection Pooling is Working for SAS Web Report Studio” on page 43.
Note: Because the pool administrator did not change, there is no need to changethe middle-tier configuration. Recall that the pool administrator (typicallysastrust) is used by the middle-tier application to process pooling requests. Youconfigured the pool administrator previously in the section “Configuring theFoundation Services Manager User Service for Web Report Studio” on page 42. �
Depending on the puddle configuration and the maximum number of clientsallowed for each server under the logical pooled workspace server, the number ofpooled workspace server processes that show up on each machine will vary.
As mentioned earlier in this section, if you require a workspace pool that consists ofhost servers in different authentication domains, then you would add more puddles tothe pool. For each puddle, provide a login ID that is able to authenticate against allmachines in the puddle.
The data sets to be accessed by the pooled workspace server processes must either bereplicated on each machine that will execute the pooled workspace server processes oraccessed via a shared location using a common shared path—for example, a UNC orNFS path. For more information about putting the data in a shared location, see “Dataand Catalogs for Servers on Multiple Machines” on page 67. Alternatively, theworkspace server processes can access data using some other sharing mechanism, suchas a SAS/CONNECT server. All LIBNAME assignments will use the same pathinformation, regardless of which physical machine the process runs on.
The object spawner process on the machine that has been added to the pool cannot bestarted until the metadata server is up and running. If the object spawner is configuredto run as a service that starts automatically, this dependency can not be enforced viathe Windows services configuration.
Configure a Pooling Workspace Server to Enforce Row-Level SecurityAfter the initial installation and configuration of the SAS Intelligence Platform, most
sites have a single workspace server, which is part of the default SAS ApplicationServer, SASMain (or SASApp). By default, this workspace server is a standardworkspace server, which means that workspace server processes are spawned on anas-needed basis. If you are running SAS Web Report Studio at your site, most likelythis workspace server has been converted to pooling. After this conversion, a pool ofworkspace server processes are available for use by SAS Web Report Studio sessions.This setup provides a big boost in performance for the users of this application.
This section explains how to create a second pooling workspace server that you canuse as part of an environment in which row-level security is enforced. For moreinformation about this environment, see “How to Create a Secure Environment for BI

Reconfiguring or Clustering Servers � Define the Necessary Users and Groups 47
Row-Level Permissions” in the chapter “BI Row-Level Permissions” in the SASIntelligence Platform: Security Administration Guide.
Define the Necessary Users and GroupsThe first step in setting up the new pooling workspace server is to define two
accounts for users who must be authenticated by the operating system on theworkspace server host, and several user and group metadata objects.
User AccountsCreate user accounts that will enable the operating system on the workspace server
host to authenticate the following users. On Windows systems, these accounts can bedomain accounts or local accounts:
� rpooladm - This account is for the pool administrator, the user who handlesrequests for processes in the workspace server pool. The password for this accountshould be unique.
� rpoolsrv - This is the puddle login account. Each SAS Web Report Studio user whohas access to the pool must belong to a group that has a login that contains thisuser ID and the associated password.
On Windows systems, grant both of these users the Log on as a batch job right. Ifyou created a SAS Server Users group when you first installed the SAS IntelligencePlatform, you can give these users this right by adding them to that group.
Once you have created these user accounts, you should create the metadata objectsdescribed in the next section.
User and Group ObjectsIn SAS Management Console, use the User Manager to create one user and two
groups:
� User: Restricted Pool Administrator
� Group: Restricted Pool Puddle Login
� Group: Restricted Pool Puddle Access
To define the Restricted Pool Administrator:
1 Right-click User Manager, and select New � User from the pop-up menu.
2 In the New User Properties dialog box, on the General tab, enter the nameRestricted Pool Administrator in the Name box.
3 In the same dialog box, select the Logins tab.
4 Add a login to the user object by selecting New and entering the appropriateinformation in the New Login Properties dialog box. In the Name box, enter thename rpooladm. If the operating system account for this user is a Windowsaccount, qualify the name with a domain or machine name and a backslash. Thenselect the authentication domain for your workspace server from theAuthentication Domain drop-down list. It is preferable, for security reasons, notto put the password in the metadata. Click OK at the bottom of the dialog box.
5 Click OK in the New User Properties dialog box.
To define the Restricted Pool Puddle Login group:
1 Right-click User Manager, and select New � Group from the pop-up menu. ANew Group Properties dialog box appears.

48 Create a Restricted Workspace Server Pool � Chapter 4
2 On the General tab, enter the name Restricted Pool Puddle Login in theName box.
3 On the Members tab, select the Restricted Pool Administrator, and click theright-arrow button to move the user to the Current Members list.
4 On the Logins tab, create a new login that contains the credentials for rpoolsrvand the authentication domain of the workspace server. (See step 4 in thepreceding paragraph for details about how to create this login.)
5 Click OK in the New Group Properties dialog box.
Create a second group named Restricted Pool Puddle Access. Add any users orgroups that you want to be able to use the restricted pool as members of this group. Nologins are necessary.
Create a Restricted Workspace Server PoolTo create the restricted pooling workspace server, perform these steps:1 In the directory SAS-config-dir\Lev1\SASMain—or SASApp—create a directory
called RestrictedPool. Then, in the RestrictedPool directory, create a logsdirectory.
2 In the directory SAS-config-dir\Lev1\SASMain\RestrictedPool, create aconfiguration file that will be used when the restricted workspace server is started.The way in which you perform this step depends on whether the workspace serverwill run on a Windows or a UNIX host. See the appropriate instructions below:
WindowsIn the directory SAS-config-dir\Lev1\SASMain\RestrictedPool, create afile named sasv9.cfg, and enter the following lines in the file:
-config "SAS-config-dir\Lev1\SASMain\sasv9.cfg"/* -log "SAS-config-dir\Lev1\SASMain\RestrictedPool\logs\
WorkspaceServer_%v.log" *//* -logparm "rollover=session open=replaceold write=immediate" */
UNIXIn the directory, SAS-config-dir/Lev1/SASMain/RestrictedPool, create afile named workspaceServer.cfg, and enter the following lines in the file:
-config !SASROOT/sasv9.cfg-config sasv9.cfg/* -log RestrictedPool/logs/WorkspaceServer_%v.log *//* -logparm "rollover=session open=replaceold write=immediate" */
Later in the procedure, you will test the connection to the workspace server. If thetest fails, you can remove the comments from the lines related to logging in orderto enable logging. You can then repeat the test and check the workspace server logfile for error messages.
3 Choose one of the following authentication methods for the workspace servers touse in connecting to the metadata server. Also, perform any tasks associated withthe method that you choose.� If you use the TRUSTSASPEER object server parameter in your metadata
server’s configuration file (the default), you can rely on that mechanism forworkspace server authentication. The restricted pool workspace servers willconnect to the metadata server under the rpoolsrv identity when launched bySAS Web Report Studio and will connect under the end user’s identity whenlaunched by a desktop application. In this mode, if you are working with an
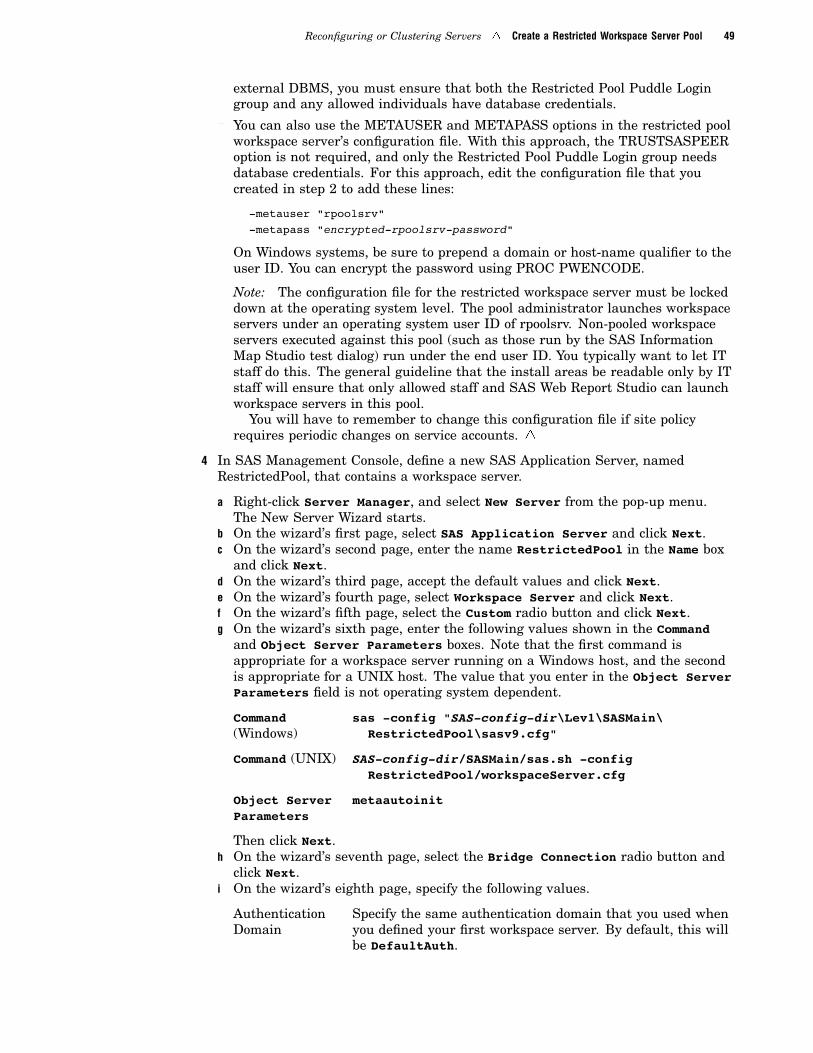
Reconfiguring or Clustering Servers � Create a Restricted Workspace Server Pool 49
external DBMS, you must ensure that both the Restricted Pool Puddle Logingroup and any allowed individuals have database credentials.
� You can also use the METAUSER and METAPASS options in the restricted poolworkspace server’s configuration file. With this approach, the TRUSTSASPEERoption is not required, and only the Restricted Pool Puddle Login group needsdatabase credentials. For this approach, edit the configuration file that youcreated in step 2 to add these lines:
-metauser "rpoolsrv"-metapass "encrypted-rpoolsrv-password"
On Windows systems, be sure to prepend a domain or host-name qualifier to theuser ID. You can encrypt the password using PROC PWENCODE.
Note: The configuration file for the restricted workspace server must be lockeddown at the operating system level. The pool administrator launches workspaceservers under an operating system user ID of rpoolsrv. Non-pooled workspaceservers executed against this pool (such as those run by the SAS InformationMap Studio test dialog) run under the end user ID. You typically want to let ITstaff do this. The general guideline that the install areas be readable only by ITstaff will ensure that only allowed staff and SAS Web Report Studio can launchworkspace servers in this pool.
You will have to remember to change this configuration file if site policyrequires periodic changes on service accounts. �
4 In SAS Management Console, define a new SAS Application Server, namedRestrictedPool, that contains a workspace server.
a Right-click Server Manager, and select New Server from the pop-up menu.The New Server Wizard starts.
b On the wizard’s first page, select SAS Application Server and click Next.c On the wizard’s second page, enter the name RestrictedPool in the Name box
and click Next.d On the wizard’s third page, accept the default values and click Next.e On the wizard’s fourth page, select Workspace Server and click Next.f On the wizard’s fifth page, select the Custom radio button and click Next.g On the wizard’s sixth page, enter the following values shown in the Command
and Object Server Parameters boxes. Note that the first command isappropriate for a workspace server running on a Windows host, and the secondis appropriate for a UNIX host. The value that you enter in the Object ServerParameters field is not operating system dependent.
Command(Windows)
sas -config "SAS-config-dir\Lev1\SASMain\RestrictedPool\sasv9.cfg"
Command (UNIX) SAS-config-dir/SASMain/sas.sh -configRestrictedPool/workspaceServer.cfg
Object ServerParameters
metaautoinit
Then click Next.h On the wizard’s seventh page, select the Bridge Connection radio button and
click Next.i On the wizard’s eighth page, specify the following values.
AuthenticationDomain
Specify the same authentication domain that you used whenyou defined your first workspace server. By default, this willbe DefaultAuth.

50 Create a Restricted Workspace Server Pool � Chapter 4
Host Name Specify the fully qualified name of the host on which the newworkspace server will run. (This should be the same namethat you used in the definition of your original workspaceserver.)
Port Number Change the default value, 8591, to the number of anunassigned port, such as 9591.
j On the wizard’s ninth page, click Finish.
Note: Do not select the Test Connection button in order to test your ability toconnect to the new workspace server. You can perform this test after performingthe following step. �
5 Update the metadata definition of your object spawner (SASMain - Spawner) toindicate that the spawner should start processes for the new workspace server.
a Right-click the icon representing the spawner, and select Properties from thepop-up menu. A SASMain - Spawner Properties dialog box appears.
b Select the Servers tab.c Move RestrictedPool - Workspace Server from the list of Available
servers to the list of Selected servers.d Click OK.e Restart your object spawner.
6 Test the connection to your new workspace server.
a In the left pane of SAS Management Console, select RestrictedPool -Workspace Server. Information about a connection appears in the right pane.
b Right-click the icon representing the connection, and select Test Connectionfrom the pop-up menu.
c If you are logged in to SAS Management Console as an unrestricted user, suchas sasadm, you will be prompted for the credentials of a user who can start aworkspace server. Enter the credentials for a user such as sasdemo. You shouldsee a message indicating that the test was successful.
If the connection test fails, look at the log files for the object spawner and thenew workspace server. The most likely cause of the problem is that you made amistake in editing the configuration file for the new workspace server—theconfiguration file in the RestrictedPool directory.
7 Convert the new workspace server to pooling.
a Right-click RestrictedPool - Logical Workspace Server, and selectConvert To � Pooling from the pop-up menu.
b You are asked whether you want to continue. Click Yes. The Pooling Optionsdialog box appears.
c In this dialog box, click New to bring up the New Puddle dialog box.d In the New Puddle dialog box, supply the following values:
Table 4.4 Defining a New Puddle
Field Value
Name restrictedPoolPuddle
Minimum Available Server 0
Minimum Number of Servers 0

Reconfiguring or Clustering Servers � Create a Second SAS Web Report Studio Deployment 51
Field Value
Login rpoolsrv
Grant Access to Group Restricted Pool Puddle Access
Then click OK.e Click OK in the Pooling Options dialog box.
Assign Libraries to the New ServerYou must assign each library that you plan to access from the locked-down instance
of SAS Web Report Studio to the server RestrictedPool. For each such library, performthe following steps.
1 Right-click the icon for the library, and select Edit Assignments from the pop-upmenu. The Edit Assignments dialog box appears.
2 Hold down the CTRL key and click the list entry for RestrictedPool. (Thisaction should select RestrictedPool and leave any already selected items in aselected state.) Then click OK.
3 Right-click the library again, and select Properties from the pop-up menu. TheLibrary-name Properties dialog box appears.
4 Select the Options tab.5 Click the Advanced Options button. The Advanced Options dialog box appears.6 Select the Library is pre-assigned option, and click OK.7 Click OK in the properties dialog box.
In the future, when you create information maps that you want to access from thelocked-down instance of SAS Web Report Studio, make sure that you locate relationaldata sources using the RestrictedPool server. Also, save these maps in a separatefolder: /BIP Tree/ReportStudio/RestrictedData/Maps.
Create a Second SAS Web Report Studio DeploymentTo deploy a second instance of SAS Web Report Studio, named
RestrictedDataReporting, perform these steps:1 Configure the Platform User Service in the Query and Reporting service
deployment in order to add a user, the pool administrator, for the restricted pool.
a In SAS Management Console, expand Foundation Services Manager, theQuery and Reporting node, and BIP Core Services. You see a list ofservices that includes the Platform User Service.
b Right-click Platform User Service, and select Properties from the pop-upmenu. The Platform User Service Properties dialog box appears.
c Select the Service Configuration tab.d Click Edit Configuration. The User Service Configuration dialog box opens.e Select the Users tab.f Click Add. The New User dialog box appears.g In the New User dialog box, enter the user ID and password for the pool
administrator (rpooladm). If this is a Windows account, be sure to qualify theID with a domain or host name. Also, enter the authentication domainassociated with these credentials (DefaultAuth by default). Then click OK.
h Click OK in the User Service Configuration dialog box.i Click OK in the Platform User Service Properties dialog box.
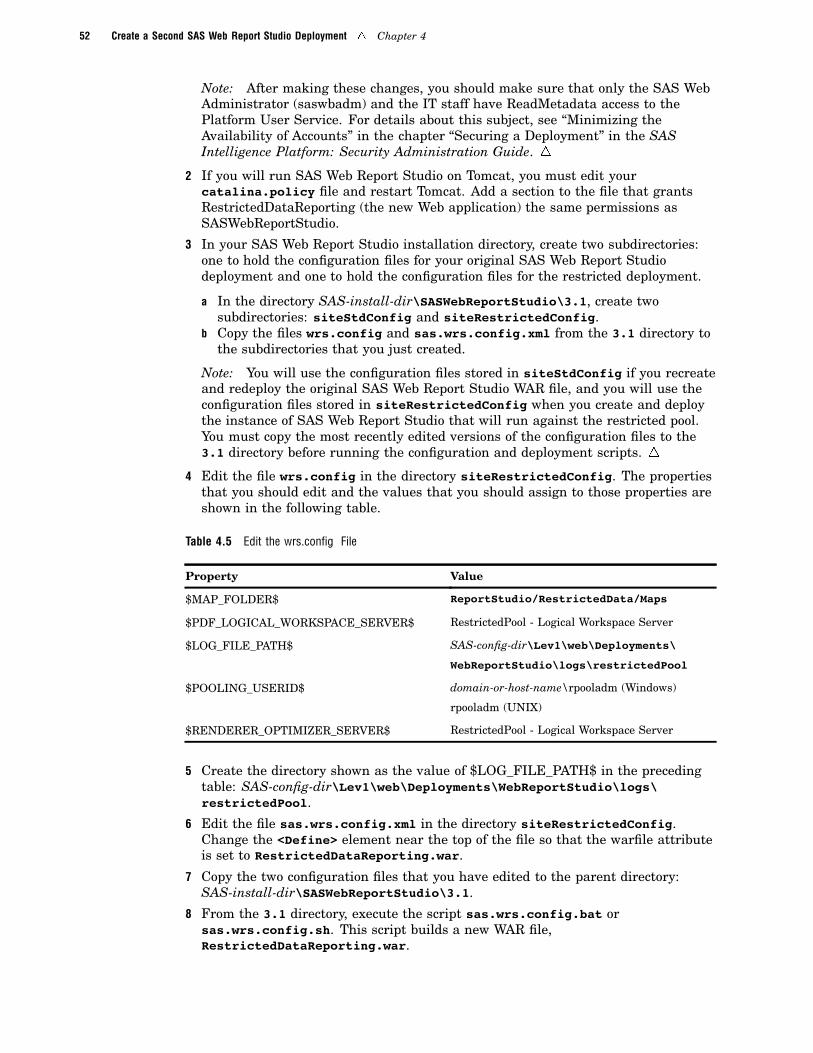
52 Create a Second SAS Web Report Studio Deployment � Chapter 4
Note: After making these changes, you should make sure that only the SAS WebAdministrator (saswbadm) and the IT staff have ReadMetadata access to thePlatform User Service. For details about this subject, see “Minimizing theAvailability of Accounts” in the chapter “Securing a Deployment” in the SASIntelligence Platform: Security Administration Guide. �
2 If you will run SAS Web Report Studio on Tomcat, you must edit yourcatalina.policy file and restart Tomcat. Add a section to the file that grantsRestrictedDataReporting (the new Web application) the same permissions asSASWebReportStudio.
3 In your SAS Web Report Studio installation directory, create two subdirectories:one to hold the configuration files for your original SAS Web Report Studiodeployment and one to hold the configuration files for the restricted deployment.
a In the directory SAS-install-dir\SASWebReportStudio\3.1, create twosubdirectories: siteStdConfig and siteRestrictedConfig.
b Copy the files wrs.config and sas.wrs.config.xml from the 3.1 directory tothe subdirectories that you just created.
Note: You will use the configuration files stored in siteStdConfig if you recreateand redeploy the original SAS Web Report Studio WAR file, and you will use theconfiguration files stored in siteRestrictedConfig when you create and deploythe instance of SAS Web Report Studio that will run against the restricted pool.You must copy the most recently edited versions of the configuration files to the3.1 directory before running the configuration and deployment scripts. �
4 Edit the file wrs.config in the directory siteRestrictedConfig. The propertiesthat you should edit and the values that you should assign to those properties areshown in the following table.
Table 4.5 Edit the wrs.config File
Property Value
$MAP_FOLDER$ ReportStudio/RestrictedData/Maps
$PDF_LOGICAL_WORKSPACE_SERVER$ RestrictedPool - Logical Workspace Server
$LOG_FILE_PATH$ SAS-config-dir\Lev1\web\Deployments\
WebReportStudio\logs\restrictedPool
$POOLING_USERID$ domain-or-host-name\rpooladm (Windows)
rpooladm (UNIX)
$RENDERER_OPTIMIZER_SERVER$ RestrictedPool - Logical Workspace Server
5 Create the directory shown as the value of $LOG_FILE_PATH$ in the precedingtable: SAS-config-dir\Lev1\web\Deployments\WebReportStudio\logs\restrictedPool.
6 Edit the file sas.wrs.config.xml in the directory siteRestrictedConfig.Change the <Define> element near the top of the file so that the warfile attributeis set to RestrictedDataReporting.war.
7 Copy the two configuration files that you have edited to the parent directory:SAS-install-dir\SASWebReportStudio\3.1.
8 From the 3.1 directory, execute the script sas.wrs.config.bat orsas.wrs.config.sh. This script builds a new WAR file,RestrictedDataReporting.war.
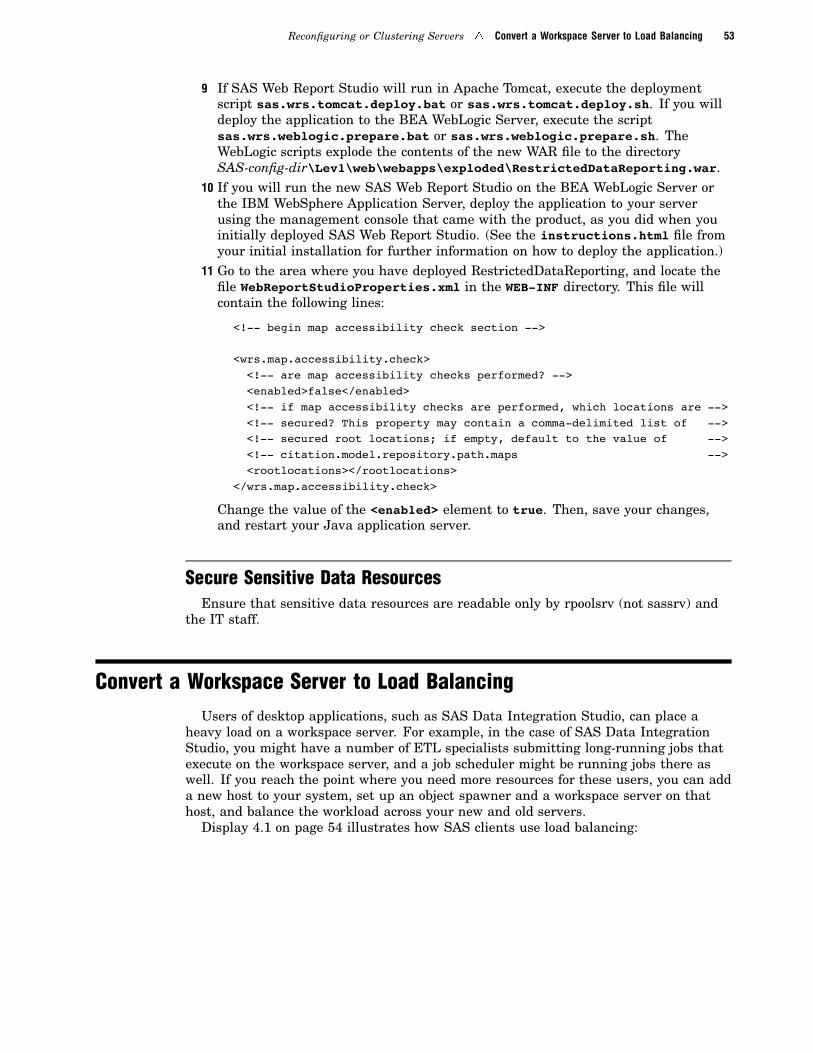
Reconfiguring or Clustering Servers � Convert a Workspace Server to Load Balancing 53
9 If SAS Web Report Studio will run in Apache Tomcat, execute the deploymentscript sas.wrs.tomcat.deploy.bat or sas.wrs.tomcat.deploy.sh. If you willdeploy the application to the BEA WebLogic Server, execute the scriptsas.wrs.weblogic.prepare.bat or sas.wrs.weblogic.prepare.sh. TheWebLogic scripts explode the contents of the new WAR file to the directorySAS-config-dir\Lev1\web\webapps\exploded\RestrictedDataReporting.war.
10 If you will run the new SAS Web Report Studio on the BEA WebLogic Server orthe IBM WebSphere Application Server, deploy the application to your serverusing the management console that came with the product, as you did when youinitially deployed SAS Web Report Studio. (See the instructions.html file fromyour initial installation for further information on how to deploy the application.)
11 Go to the area where you have deployed RestrictedDataReporting, and locate thefile WebReportStudioProperties.xml in the WEB-INF directory. This file willcontain the following lines:
<!-- begin map accessibility check section -->
<wrs.map.accessibility.check><!-- are map accessibility checks performed? --><enabled>false</enabled><!-- if map accessibility checks are performed, which locations are --><!-- secured? This property may contain a comma-delimited list of --><!-- secured root locations; if empty, default to the value of --><!-- citation.model.repository.path.maps --><rootlocations></rootlocations>
</wrs.map.accessibility.check>
Change the value of the <enabled> element to true. Then, save your changes,and restart your Java application server.
Secure Sensitive Data ResourcesEnsure that sensitive data resources are readable only by rpoolsrv (not sassrv) and
the IT staff.
Convert a Workspace Server to Load BalancingUsers of desktop applications, such as SAS Data Integration Studio, can place a
heavy load on a workspace server. For example, in the case of SAS Data IntegrationStudio, you might have a number of ETL specialists submitting long-running jobs thatexecute on the workspace server, and a job scheduler might be running jobs there aswell. If you reach the point where you need more resources for these users, you can adda new host to your system, set up an object spawner and a workspace server on thathost, and balance the workload across your new and old servers.
Display 4.1 on page 54 illustrates how SAS clients use load balancing:

54 Installing the Software � Chapter 4
Display 4.1 Load Balancing Example
Each machine involved runs an object spawner that handles client requests forconnections. A load balancing routine runs in the object spawners and directs clientrequests to the machine that is least loaded at the time that the client request is made.All the object spawners know about each other once they start up and read informationfrom the metadata server.
Installing the SoftwareAs when you first set up your system, you use the SAS Software Navigator to install
your software. Just let your SAS representative know that you want to add a new hostto your intelligence system and that you want to run a second workspace server on thathost. Your SAS representative will be able to get you the software that you need—SASFoundation, including SAS Integration Technologies, and SAS ManagementConsole—and to prepare the planning file that you need for the installation.
Configuring the Workspace Server and Object SpawnerAfter you have installed SAS Foundation and SAS Management Console, you should
run the SAS Configuration Wizard on the new host. The wizard will prompt you forinformation about a configuration directory and about the credentials for certain users.Because you are not installing a metadata server on this machine, the wizard will alsoprompt you for an application server as shown in the following display.

Reconfiguring or Clustering Servers � Configuring the Workspace Server and Object Spawner 55
Display 4.2 Enter SAS Application Server Information Window
The assumption behind this prompt is that your workspace server will be part of anew application server. In the case we are considering, however, this assumption isincorrect; you want to add the new server to an existing logical workspace server, whichis part of an existing application server (probably called SASMain). The best practice isto enter the name of your new host computer when you are prompted for an applicationserver. This will not have any effect, except on the HTML instructions that the SASConfiguration Wizard generates. The remaining instructions in this section assumethat you have followed this best practice.
Note: After you have provided the SAS Configuration Wizard with all of the inputthat it needs, it will create a configuration directory and generate a set of HTMLinstructions that you should follow to complete the configuration. However, theinstructions will not be 100 percent correct because of the assumption mentionedpreviously. See the following sections for information on where you need to deviate fromthe generated instructions. �
Note: The section titles that follow match section names in the instructions.htmlfile. �
Start the SAS Management Console
SAS Management Console should start automatically. If it does not, start it byfollowing the instructions that were generated by the SAS Configuration Wizard. Youwill need to use this application to define your workspace server and object spawner inthe metadata.
Defining Your Application Server and Workspace Server
Do not follow the HTML instructions in the section “Defining Your Application Serverand Workspace Server.” You have already defined an application server in yourmetadata, when you first installed your system, so you do not need to define one now.You need to define your new workspace server in a manner different from the onedescribed in instructions.html.

56 Converting the Logical Workspace Server to Load Balancing � Chapter 4
Note: Although you are not going to follow all of the directions in this section ofinstructions.html, you can cut and paste some responses from this section in orderto prevent typographical errors. �
Follow these instructions instead:
1 Expand the Server Manager node. Fully expand all three levels of SASMain.
2 Highlight SASMain - Logical Workspace Server. Using the right mousebutton, select Add Server. The New Server Wizard starts.
3 In the wizard’s first screen, enter the name “host-name - Workspace Server,” andclick Next.
4 In the wizard’s second screen, set the Command to sas -config"SAS-config-dir\Lev1\host-name\sasv9.cfg" and click Next.
5 In the wizard’s third screen, select the Bridge Connection radio button, and clickNext.
6 In the wizard’s fourth screen, enter the following information:
� Authentication Domain: DefaultAuth
� Host Name: new-workspace-server-host
� Port Number: 8591
7 In the wizard’s fifth and final screen, review the information that you havesupplied, and click Finish. A new workspace-server icon now appears in SASManagement Console.
Define Your Object SpawnerFollow HTML the directions in this section to define an object spawner on the new
host. These directions will be correct. (If the instructions indicate that a script isavailable to define the object spawner, you can simply run that script instead.)
Start the Object SpawnerThe HTML directions in this section will be correct as well. However, you should not
start your object spawner until after you have performed the configuration steps thatare detailed in the sections “Converting the Logical Workspace Server to LoadBalancing” on page 56 and “Setting Load Balancing Parameters for Each WorkspaceServer” on page 57.
Converting the Logical Workspace Server to Load BalancingAfter you have defined your new workspace server and object spawner in the
metadata, you can use SAS Management Console to convert your logical workspaceserver to load balancing. During this process, you set some options that apply to all ofthe physical workspace servers in the logical workspace server.
Note: If you do not convert the logical workspace server to use load balancing,clients will be able to use only the first physical workspace server in the logicalworkspace server. �
To convert the logical workspace server to load balancing, perform these steps:
1 Right-click SASMain - Logical Workspace Server, and select Convert To �Load Balancing. You will be asked whether you want to continue. Click Yes.The Load Balancing Options dialog box appears.

Reconfiguring or Clustering Servers � Setting Load Balancing Parameters for Each Workspace Server 57
2 Set the parameters in this dialog box using the explanations in the following table,and click OK.
Table 4.6 Load Balancing Options
Parameter Explanation
Balancing Algorithm Specifies the algorithm that the object spawners should use tocontrol load balancing. The only valid choice when you are loadbalancing workspace servers is Cost. The Cost algorithm specifiesthat client requests are processed based on the current server costand the start-up cost of a new server. The clients’ costs are addedto and subtracted from the server cost as they connect anddisconnect. For more information on the Cost algorithm, see“Planning the Load-Balancing Algorithm Properties” on page 26.
Cost Per Client Specifies the default amount of weight (cost) that each client addsto (on connection) or subtracts from (on disconnection) the totalcost of the server.
Logical Server Credentials Shows the credentials that the object spawners on the two hostswill use to communicate about load balancing. We recommend thatyou use the SAS General Servers group login (sassrv) for thispurpose. This account will be used in both directions, so it must bea network account that will be valid on both spawner hosts.
Setting Load Balancing Parameters for Each Workspace ServerThere are also some load-balancing properties that you set for each of your physical
workspace servers. To set these properties, perform these steps:1 In SAS Management Console, right-click the icon for the physical server, and
select Properties from the pop-up menu. A Properties dialog box appears.2 Select the Options tab.3 Click Advanced Options. An Advanced Options dialog box appears.
58 Setting Load Balancing Parameters for Each Workspace Server � Chapter 4
Select the Load Balancing Properties tab if it is not already selected.4 Set the load-balancing properties using the information in the following table;
then, click OK.
Table 4.7 Load Balancing Properties
Property Explanation
Availability Timeout (msec) Specifies the number of milliseconds to wait for an available server.The wait can be caused by the time that is required for a server tostart or the time that is required for a running server to becomeavailable.
Maximum Cost Specifies the maximum cost allowed on the server before requeststo the server are denied. Use the value of the Cost Per Client fieldon the logical server to determine this value based on the numberof client connections allowed.
Startup Cost Specifies the start-up cost of the server. When a request is made tothe load balancer, the load balancer assigns this start-up cost valueto inactive servers. A new server is not started unless it isdetermined that its cost (the start-up cost) is less than the cost ofthe rest of the servers in the cluster. This field enables theadministrator to control the order in which servers are started.After a server is started, the cost value is 0. When a clientconnects to the server, the server’s cost value is increased.
5 Click OK in the Properties dialog box.
You can now start your new object spawner. You should also restart your originalobject spawner. At this point, the load balancing that you have set up will be in effect.
Note: For information about how to make sure that your workspace servers canaccess your data sources as you scale your system up, see “Data and Catalogs forServers on Multiple Machines” on page 67. �

Reconfiguring or Clustering Servers � Overview of the Initial Load Balancing Setup for Stored Process Servers 59
Overview of the Initial Load Balancing Setup for Stored Process ServersIn the initial load balancing SAS Stored Process Server configuration, three
MultiBridge connections are set up for the stored process server so that the objectspawner can start up to three stored process server processes. The object spawnerbalances the workload across these processes. The object spawner runs on the serverhost, listens for client requests, and connects clients to the appropriate server process.
The metadata server’s foundation repository contains the spawner, server, andsecurity metadata for the load balancing stored process server configuration. The objectspawner must connect to the metadata server, and the metadata must be configuredappropriately, in order for the spawner to start the load balancing stored process serverprocesses. The following figure shows the initial security setup for the load balancingstored process server and spawner configuration.
Figure 4.1 Security Metadata for a Load Balanced Stored Process Server
Note: On Windows, all user IDs would be host or domain qualified, for example,domain-name\sastrust. �
In the preceding figure, the object spawner obtains the metadata that it needs tostart a load balancing stored process server as follows:
1 When the spawner is started, it reads a metadata configuration file namedomrconfig.xml that contains information required to access the metadata server.This metadata configuration file specifies
� the location of the metadata server� the user ID that the spawner will use to connect to the metadata server
By default, the omrconfig.xml file contains the user ID sastrust, which isowned by the SAS Trusted User (in the metadata).
2 The object spawner connects to the metadata server using the user ID specified inomrconfig.xml. This user’s credentials are authenticated by the metadataserver’s authentication provider (usually the operating system).
3 On the metadata server, the connection from the object spawner is associated withthe user that owns the sastrust user ID, SAS Trusted User. The spawner, as theSAS Trusted User, reads the metadata for the server and spawner configuration.
Note: The SAS Trusted User can view the stored process server’s multi-user logincredentials (sassrv) because the SAS Trusted User is a member of the SAS
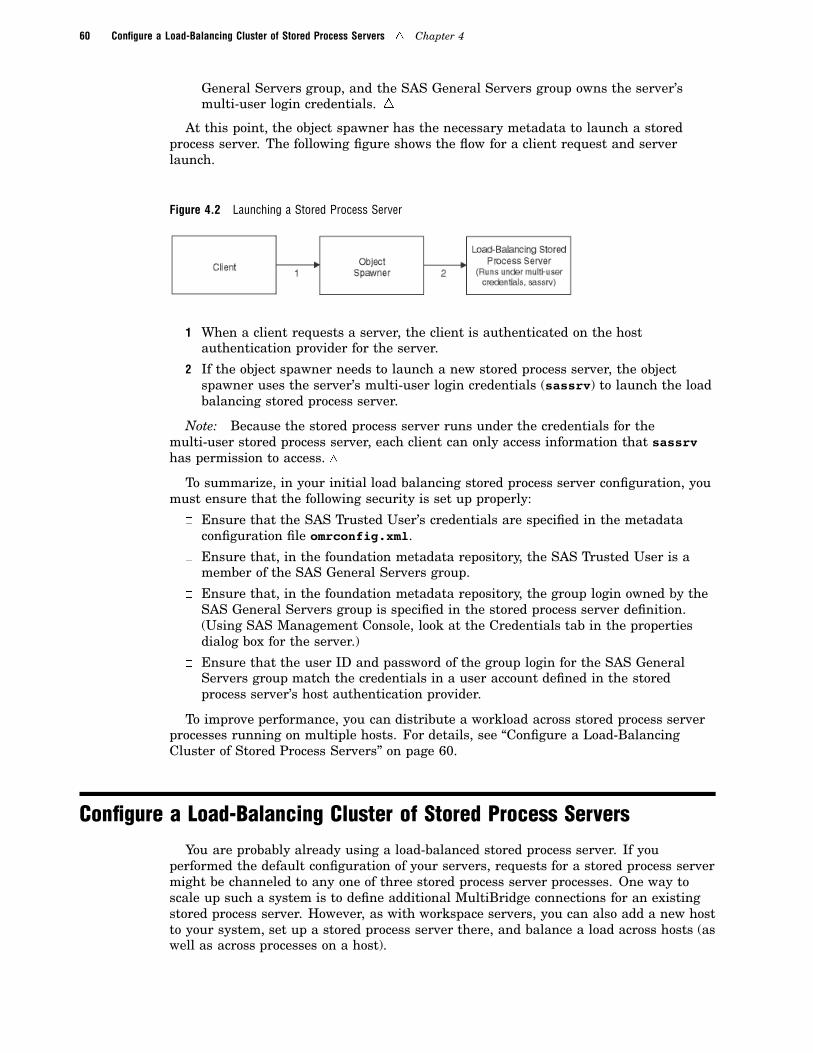
60 Configure a Load-Balancing Cluster of Stored Process Servers � Chapter 4
General Servers group, and the SAS General Servers group owns the server’smulti-user login credentials. �
At this point, the object spawner has the necessary metadata to launch a storedprocess server. The following figure shows the flow for a client request and serverlaunch.
Figure 4.2 Launching a Stored Process Server
1 When a client requests a server, the client is authenticated on the hostauthentication provider for the server.
2 If the object spawner needs to launch a new stored process server, the objectspawner uses the server’s multi-user login credentials (sassrv) to launch the loadbalancing stored process server.
Note: Because the stored process server runs under the credentials for themulti-user stored process server, each client can only access information that sassrvhas permission to access. �
To summarize, in your initial load balancing stored process server configuration, youmust ensure that the following security is set up properly:
� Ensure that the SAS Trusted User’s credentials are specified in the metadataconfiguration file omrconfig.xml.
� Ensure that, in the foundation metadata repository, the SAS Trusted User is amember of the SAS General Servers group.
� Ensure that, in the foundation metadata repository, the group login owned by theSAS General Servers group is specified in the stored process server definition.(Using SAS Management Console, look at the Credentials tab in the propertiesdialog box for the server.)
� Ensure that the user ID and password of the group login for the SAS GeneralServers group match the credentials in a user account defined in the storedprocess server’s host authentication provider.
To improve performance, you can distribute a workload across stored process serverprocesses running on multiple hosts. For details, see “Configure a Load-BalancingCluster of Stored Process Servers” on page 60.
Configure a Load-Balancing Cluster of Stored Process Servers
You are probably already using a load-balanced stored process server. If youperformed the default configuration of your servers, requests for a stored process servermight be channeled to any one of three stored process server processes. One way toscale up such a system is to define additional MultiBridge connections for an existingstored process server. However, as with workspace servers, you can also add a new hostto your system, set up a stored process server there, and balance a load across hosts (aswell as across processes on a host).

Reconfiguring or Clustering Servers � Configuring the Stored Process Server and Object Spawner 61
Installing the SoftwareInstalling the software is easy. Let your SAS representative know that you want to
add a new host to your intelligence platform and that you want to run a second storedprocess server on that host. Your SAS representative will be able to get you thesoftware that you need—SAS Foundation and SAS Management Console—and toprepare the planning file that you need for the installation
Configuring the Stored Process Server and Object SpawnerAfter you have installed SAS Foundation software and SAS Management Console
software, you should run the SAS Configuration Wizard on the new host. The wizardwill prompt you for information about a configuration directory and about thecredentials for certain users. Because you are not installing a metadata server on thismachine, the wizard will also prompt you for an application server as shown in thefollowing display.
Display 4.3 Enter SAS Application Server Information Window
The assumption behind this prompt is that your stored process server will be part ofa new application server. In the case we are considering, this assumption is incorrect.You want to add the new server to an existing logical stored process server, which ispart of an existing application server (probably called SASMain). The best practice is toenter the name of your new host when you are prompted for an application server. Thiswill not have any effect, except on the HTML instructions that the SAS ConfigurationWizard generates.
Note: After you have provided the SAS Configuration Wizard with all of the inputthat it needs, it will create a configuration directory and generate a set of HTMLinstructions that you should follow to complete the configuration. However, theinstructions will not be 100 percent correct because of the assumption mentionedpreviously. See the following sections for information on where you need to deviate fromthe generated instructions. �
Note: The section titles that follow match section names in the instructions.htmlfile. �
62 Configuring the Stored Process Server and Object Spawner � Chapter 4
Start the SAS Management ConsoleSAS Management Console should start automatically. If it does not start
automatically, start the application by following the HTML instructions in this section.You will need this application to define your stored process server and object spawner inthe metadata.
Defining Your Application Server and Workspace ServerSkip the HTML instructions in the sections “Defining Your Application Server and
Workspace Server” and “Edit the SAS Command for the Workspace Server.” You havealready defined an application server in your metadata when you first installed yoursystem, and you are not adding a workspace server.
Define Your Stored Process ServerAlso, skip the HTML instructions in the sections “Define Your Stored Process Server”
and “Define the Stored Process Server as Supporting Load Balancing.” We areassuming that you have already defined a logical stored process server called SASMain- Logical Stored Process Server and that you have configured that logical serverfor load balancing.
Note: Although you are not going to follow all of the directions in these sections ofinstructions.html, you can cut and paste some responses from these sections inorder to prevent typographical errors. �
In the section “Edit the Properties of the Stored Process Server Component,” replacesteps 1 to 4 with the following instructions:
1 Expand the Server Manager node. Fully expand all three levels of SASMain.2 Highlight SASMain - Logical Stored Process Server. Using the right mouse
button, select Add Server. The New Server Wizard starts.3 In the wizard’s first screen, enter the name “host-name – Stored Process
server,” and click Next.4 In the wizard’s second screen, set the Command to sas -config "path-to-config-
dir\Lev1\host-name\StoredProcessServer\sasv9_StorProcSrv.cfg" and clickNext.
5 In the wizard’s third screen, select the Bridge Connection radio button, and clickNext.
6 In the wizard’s fourth screen, enter the following information:� Authentication Domain: DefaultAuth� Host Name: new-stored-process-server-host
� Port Number: 8601
7 In the wizard’s fifth and final screen, review the information that you havesupplied, and click Finish. A new stored process server icon new appears in SASManagement Console.
From this point, you can follow the directions generated by the SAS ConfigurationWizard for adding MultiBridge connections to the stored process server.
Define Your Object SpawnerFollow the HTML instructions in this section to create an object spawner on your
new host, with one exception. Remove the bulleted item “host-name–WorkspaceServer” from step 6. You have not defined a workspace server on this host.

Reconfiguring or Clustering Servers � Setting Logical Stored Process Server Properties 63
Load SAS Stored Process SamplesSkip the HTML instructions in this section because you should have loaded the
metadata for these samples during your initial installation.
Start the Object SpawnerThe HTML directions in this section will be correct. However, you should not start
your object spawner until after you have performed the configuration steps detailed inthe sections “Setting Logical Stored Process Server Properties” on page 63 and “Settingthe Load Balancing Properties for Each Stored Process Server” on page 65.
Setting Logical Stored Process Server PropertiesAfter you have defined your new stored process server and object spawner in the
metadata, you can use SAS Management Console to set certain parameters for thelogical stored process server that affect how the load balancing will work. To set theseparameters:
1 If necessary, create a network user account that the object spawners on the twohosts will use to communicate. If you defined the SAS General Server User(sassrv) as a network account during pre-installation, you can skip this step.
a Create a network account for the SAS General Server User (sassrv). If you arecreating a Windows domain account, be sure to grant the user the user right“Log on a batch job.”
b In the metadata, add a new login to the group SAS General Servers. (If there isan existing login for a local sassrv account, remove it.) The object spawnerswill use the network account for sassrv to communicate with one another.
Note: Because (1) the object spawners communicate with the metadata serverusing the sastrust account and (2) sastrust is a member of the SAS GeneralServers group, the object spawners are able to read the password for the sassrvaccount. �
2 Right-click the icon for your logical stored process server, and select Propertiesfrom the pop-up menu. A properties dialog box appears.
3 Select the Load Balancing tab. This tab contains the parameters that you can set.

64 Setting Logical Stored Process Server Properties � Chapter 4
4 Set these parameters using the explanations in the following table, and click OK.
Table 4.8 Load Balancing Parameters
Parameter Explanation
Balancing Algorithm Specifies the algorithm that the load balancer should use to controlload balancing. Valid values are Cost and Response Time.Selecting the Cost algorithm specifies that client requests areprocessed based on the current server cost and the start-up cost ofa new server. The clients’ costs are added to or subtracted from theserver cost as they connect and disconnect. Selecting ResponseTime specifies that client requests are allocated based on serverresponse times. For more information about these load balancingalgorithms, see the “Planning the Load-Balancing AlgorithmProperties” on page 26.
Response Refresh Rate Specifies how often the server response times are checked. Youenter a value in this field only if you selected Response Time in theBalancing Algorithm field, and the value should always beset to -1.

Reconfiguring or Clustering Servers � Setting the Load Balancing Properties for Each Stored Process Server 65
Parameter Explanation
Cost Per Client Specifies the default amount of weight (cost) that each client addsto (on connection) or subtracts from (on disconnection) the totalcost of the server. (Cost algorithm only)
Logical Server Credentials Shows the credentials that the object spawners on the two hostswill use to communicate about load balancing. We recommend thatyou use the SAS General Servers group login (sassrv) for thispurpose. This account will be used in both directions, so it must bea network account that will be valid on both spawner hosts.
Setting the Load Balancing Properties for Each Stored Process ServerThere are also some load balancing properties that you should set for each of your
physical stored process servers. Follow these steps to set these properties:
1 In SAS Management Console, right-click the icon for the stored process server, andselect Properties from the pop-up menu that appears. A Properties dialog boxappears.
2 Select the Options tab.
3 Click Advanced Options. An Advanced Options dialog box appears, and theCredentials tab displays.
4 From the Login list box, select the account that will be used to start storedprocess servers. We recommend that you use the SAS General Servers group login(sassrv) for this purpose.
Note: This should be a network account so that the stored process servers will beable to access data resources on file servers on the network. �
5 Select the Load Balancing Properties tab.

66 Setting the Load Balancing Properties for Each Stored Process Server � Chapter 4
6 Set the load balancing properties using the information in the following table;then, click OK.
Table 4.9 Load Balancing Properties
Property Explanation
Maximum Clients The maximum number of simultaneous clients connected to thisserver. (Response Time algorithm only)
Maximum Cost The maximum cost allowed on each server before requests to theserver are denied. (Cost algorithm only)
Startup Cost The cost of starting a server. (Cost algorithm only)
Availability Timeout(msec)
The number of milliseconds to wait for a load balancing server tobecome available. This parameter is used (1) when all servers haveallocated the maximum number of clients per server and (2) whenthe load balancer is waiting for a server to start and becomeavailable for its first client.
Start Size The number of MultiBridge connections to start when the spawnerstarts.
Recycle Activation Limit The number of times a connection to the server will be reusedbefore it is disconnected ("recycled"). If the value is 0, then therewill be no limit on the number of times a connection to the servercan be reused. This property is optional. The default value is 0.

Reconfiguring or Clustering Servers � Data and Catalogs for Servers on Multiple Machines 67
Property Explanation
Shutdown InactiveServers?
Indicates what you want a server to do when it is not currentlyserving a client. Select this check box to indicate that you want theprocess to terminate; otherwise, the server will remain active.
Inactivity Timeout (mins) If you elected to shut down inactive servers, this field specifies howmany minutes of inactivity must pass before the server terminates.
7 Click OK in the Properties dialog box.
You can start your object spawner now.
Note: For information about how to make sure that your stored process servers canaccess your data sources as you scale your system up, see “Data and Catalogs forServers on Multiple Machines” on page 67. �
Updating a Windows Spawner ServiceTo update an existing Windows service for the spawner (for example, to change the
path to your metadata configuration file), you must remove the service and create a newone.
1 Stop the spawner service by using the Stop SAS Object Spawner shortcut in theWindows Start menu.
2 Deinstall the spawner service by invoking ObjectSpawner.bat -deinstall. Thisfile is located in the SASMain\ObjectSpawner subdirectory of your SASConfiguration Directory. For example,C:\SAS\MyDeployment\Lev1\SASMain\ObjectSpawner.
3 Open the ObjectSpawner.bat file in an editor, and then add your options to theinstall and start commands.
4 Save the file.5 Reinstall the spawner service by using the command ObjectSpawner.bat
-install.
Data and Catalogs for Servers on Multiple MachinesIn several sections of this chapter, we have discussed situations in which your
original system had one server of a particular type and your scaled-up system has aserver of that type on two or more machines. In particular, we have talked about:
� creating a pool of workspace servers that spans machines� placing load-balanced workspace servers on multiple machines� placing load-balanced stored process servers on multiple machies
After scaling your system in any of these ways, you need to ensure that the new servercan access the data, and possibly format catalogs, that the original server was workingwith. For example, suppose that your original server was using a library of SAS datasets and that the metadata object representing that library contains the pathC:\SAS\configuration-directory\Lev1\SASMain\Data. Your new server will not be ableto access this library at its original location. One possible solution to this problem is tomove a copy of the data to the new server and place it at the location stored in thelibrary metadata object. However, this strategy might introduce data-synchronization
68 Updating SAS Libraries � Chapter 4
problems. A preferable solution is to make sure that both servers can access a singlecopy of the data by providing a network path to the library.
Updating SAS LibrariesAs mentioned previously, when you scale your system, you need to update any SAS
libraries that are being referenced using a local path. The following procedure explainshow to update the definition of a library on a Windows machine that currently containsthe path C:\SAS\configuration-directory\Lev1\SASMain\Data:
1 In SAS Managment Console, expand the Data Library Manager and the SASLibraries folder so that you see the icon reprenting your SAS library.
2 Right-click the library and select Properties from the pop-up menu that appears.A properties dialog appears.
3 In the properties dialog, select the Options tab.4 Deselect the currently selected path by highlighting it in the Selected items list
and clicking the left-arrow button.5 Create a new path, and select it, by performing these steps:
a Click the New button to bring up the New Path Specification dialog.b In the Name text box, enter the UNC path to the library—for example,
\\D1234\SAS\EntBIServer\Lev1\SASMain\Data. (Different machines on theLAN can use this same path to access the library.)
c Click OK.6 Click OK in the properties dialog.
Updating References to User-Defined FormatsLike SAS data sets, existing user-defined format catalogs might be available only to
servers running on your original SAS-server host. It is common for a server to look forsuch catalogs in the configuration directory on the original server host in the directorySAS-config-dir\Lev1\SASMain\SASEnvironment\SASFormats. It is also possible tospecify the location of the catalog in a configuration file, as explained in "EstablishingConnectivity to a Library of SAS Data Sets" in the "Connecting to Common DataSources" chapter of the SAS Intelligence Platform: Data Administration Guide.However, the path recorded in such a file is often a local path.
One solution to this problem is to replicate the catalog on all server hosts, but thiscan be less than ideal if the catalog is subject to change. A better solution is to specifythe location of the catalog in SAS-config-dir\Lev1\SASMain\sasv9.cfg and to makesure that the path to catalog is a network path. For example, you might change
-set fmtlib1 "C:\SAS\configuration-directory\Lev1\SASMain\Data\orformat"-fmtsearch (fmtlib1.orionfmt)
to
-set fmtlib1 "\\D1234\SAS\configuration-directory\Lev1\SASMain\Data\orformat"-fmtsearch (fmtlib1.orionfmt)
Accessing Data in Database Management SystemsIf your new workspace or stored-process server needs to access data in a DBMS, you
might need to do some administrative work on the new server host before such access ispossible. For example, you might need to:

Reconfiguring or Clustering Servers � Accessing Data in Database Management Systems 69
� install a SAS/ACCESS product
� install database client software
� install a database driver
� configure a data source name
The simplest way to explain this is that you need to repeat whatever steps you took onthe original SAS-server host on the newly added server.

70

71
C H A P T E R
5Moving Workspace Servers orStored Process Servers
Moving the SAS Workspace Server 71Moving the SAS Stored Process Server 73
Moving Both the SAS Stored Process Server and SAS Workspace Server to the Same New Machine 76
Moving the SAS Stored Process Server and SAS Workspace Server to Separate Machines 79
Moving the SAS Workspace ServerIf you have installed the SAS Workspace Server on a machine separate from the SAS
Stored Process Server, you can use the instructions in this section to move the server toa new machine.
Important Note: In addition to changing the machine name (and optionally, portnumber), if you move a server to a machine with a different operating system or to amachine with an operating system other than Windows, you might need to reconfigurethe following:
� accounts for authentication. You might need to define accounts on theauthentication provider for the new server machine.
� metadata on the SAS Metadata Server. The following metadata definitions mightrequire reconfiguration or additional configuration:
� server definition. On the server definition, you might need to use the ServerManager plug-in to SAS Management Console to change the followingparameters:
� SAS startup command. You might need to change the startup commandfor the new operating system.
� authentication domain. When you move a server, you might need to setup an additional authentication domain.
� login definitions. For the login definitions that access the server and the logindefinitions that are used in the load-balancing configuration (for example, theSAS Guest user’s login, if you performed an Advanced or Personalinstallation), you might need to use the User Manager plug-in to SASManagement Console to do one or more of the following:� define a new login definition. When you move a server, you might need to
create a new login definition for the new authentication domain.� define a new login definition for a different authentication process. When
you move a server, you might need to create a new login definition withcredentials to access a server in a different operating system within thedefault authentication domain.
� change the format of the user ID in the login definition. When you move aserver, you might need to change the fully-qualified user ID for any logincredentials used to access that server.

72 Moving the SAS Workspace Server � Chapter 5
� stored process definitions. You might need to use BI Manager to specify anew location for your source code repository.
� spawner startup command. If you change operating systems when you movemachines, you might need to change the spawner startup command.
To move the SAS Workspace Server to a different machine, follow these steps:1 Use SAS Management Console to reconfigure the SAS Workspace Server definition
for the new machine:
a Open SAS Management Console and connect to a metadata repository.b In the SAS Management Console navigation tree, locate and select the server
object (for example, Main - Workspace Server) that you want to modify.c In the Display area, for each server connection, follow these steps:
i Select and right-click the connection definition, then select Propertiesfrom the pop-up menu.
ii Select the Options tab.iii Change the Host Name field to the host name of the new machine for your
server.iv If you are changing the port, change the Port field to the port of the new
port for your server.v If you need to change the authentication domain, click New and define the
new Authentication Domain field for your server.vi Click OK.
d If you need to change the server startup command, select and right-click theserver object, then select Properties from the pop-up menu. Select theOptions tab and change the Command field.
e Click OK to save the new configuration to the metadata repository.2 Use SAS Management Console to reconfigure the spawner definition for the new
machine:
a In the SAS Management Console navigation tree, locate and select thespawner definition, then right-click and select Properties from the pop-upmenu.
b If your spawner name contains the machine name, change the Name field tospecify the name of the new machine.
c Select the Options tab.d Change the Host Name field to the host name of the new machine for your
server.e Click OK.f If you have any other servers associated with the spawner, select the Servers
tab. In the Selected servers list box, select the other servers and movethem to the Available servers list box. Click OK. You must then define anew spawner for these servers.
g If you are changing the port of either the operator connection orload-balancing connection, in the Display area, select the connection, thenright-click and select Properties from the pop-up menu. Select the Optionstab and change the Port field to the new port for your spawner connection. Ifyou changed the server’s authentication domain, select the same newAuthentication Domain field for your spawner.
h Click OK to save the new configuration to the metadata repository.3 Edit the policy files for any applications that need to access the new server
machine. (For details about editing policy files for the portal Web application andits components, see "Adding Permissions to Policy Files" in the "Setting Up andManaging Middle-Tier Security" chapter of the SAS Intelligence Platform: WebApplication Administration Guide).
Moving Servers � Moving the SAS Stored Process Server 73
4 Install SAS 9.1 or later and SAS Integration Technologies on the new machine.5 Copy your metadata configuration file (XML file) and spawner startup script from
your spawner configuration directory to the same directory on the new machine. Ifnecessary, change the spawner startup script for the new machine.
6 Ensure that the spawner invoker (for example, the SAS user installation) canauthenticate against the host authentication provider for the machine.
7 Ensure that users who need to access the server are defined for the machine’s hostauthentication provider.
When you are finished modifying the server and spawner definitions:� If you have added a new authentication domain for the machine, use the User
Manager plug-in to SAS Management Console to add a login definition for accessto the server.
� If you have changed operating systems and need to modify user credentials, usethe User Manager plug-in to SAS Management Console to modify user and grouplogin definition for the new user ID credentials of the new machine.
� If you need to move the stored process source code repositories to a differentdirectory, use BI Manager to modify the stored process definition and change theSource Code Repository field on the Execution tab of the Stored ProcessProperties dialog box.
� If your stored process definitions reference content on the old stored process orworkspace server machine, you must add the content to the directory you definedin the stored process definition.
Moving the SAS Stored Process ServerIf you have installed the SAS Stored Process Server on a separate machine from the
SAS Workspace Server, then you can use the instructions in this section to move theserver to a new machine.
Important Note: In addition to changing the machine name (and optionally, portnumber), if you move a server to a machine with a different operating system or to amachine with an operating system other than Windows, you might need to reconfigurethe following:
� accounts for authentication. You might need to define accounts on theauthentication provider for the new server machine.
� metadata on the SAS Metadata Server. The following metadata definitions mightrequire reconfiguration or additional configuration:
� server definition. On the server definition, you might need to use the ServerManager plug-in to SAS Management Console to change the followingparameters:
� SAS startup command. You might need to change the startup commandfor the new operating system.
� authentication domain. When you move a server, you might need to setup an additional authentication domain.
� login definitions. For the login definitions that access the server and the logindefinitions that are used in the load-balancing configuration (for example, theSAS Guest user’s login, if you performed an Advanced or Personalinstallation), you might need to use the User Manager plug-in to SASManagement Console to do one or more of the following:� Define a new login definition. When you move a server, you might need to
create a new login definition for the new authentication domain.

74 Moving the SAS Stored Process Server � Chapter 5
� Define a new login definition for a different authentication process. Whenyou move a server, you might need to create a new login definition withcredentials to access a server in a different operating system within thedefault authentication domain.
� Change the format of the user ID in the login definition. When you move aserver, you might need to change the fully-qualified user ID for any logincredentials used to access that server.
� stored process definitions. You might need to use BI Manager to specify anew location for your source code repository.
� spawner startup command. If you change operating systems when you movemachines, you might need to change the spawner startup command.
To move the SAS Stored Process Server to a different machine, follow these steps:
1 Use SAS Management Console to reconfigure the server definition for the newmachine:
a Open SAS Management Console and connect to a metadata repository.b In the SAS Management Console navigation tree, locate and select the server
object (for example, Main - Stored Process Server) that you want to modify.c In the Display area, for each server connection, follow these steps:
i Select and right-click the connection definition, then select Properties fromthe pop-up menu.
ii Select the Options tab.iii Change the Host Name field to the host name of the new machine for your
server.iv If you are changing the port, change the Port field to the new port for your
server.v If you need to change the authentication domain, click New and define the
new Authentication Domain field for your server.vi Click OK.
d If you need to change the server startup command, select and right-click theserver object, then select Properties from the pop-up menu. Select theOptions tab and change the Command field.
e Click OK to save the new configuration to the metadata repository.
2 Use SAS Management Console to reconfigure the spawner definition for the newmachine:
a In the SAS Management Console navigation tree, locate the spawner object,then right-click the spawner definition, and select Properties from thepop-up menu.
b If your spawner name contains the machine name, change the Name field tospecify the name of the new machine.
c Select the Options tab.d Change the Associated Machine field to the host name of the new machine
for your server.e If you have any other servers associated with the spawner, select the
Servers tab. In the Selected servers list box, select the other servers andmove them to the Available servers list box. Click OK. You must thendefine a new spawner for these servers.
f If you are changing the port of either the operator connection orload-balancing connection, in the Display area, select the connection, thenright-click and select Properties from the pop-up menu. Select the Optionstab and change the Port field to the new port for your spawner connection. If

Moving Servers � Moving the SAS Stored Process Server 75
you changed the server’s authentication domain, select the same newAuthentication Domain field for your spawner.
g Click OK to save the new configuration to the metadata repository.
3 Edit the policy files for any applications that need to access the new servermachine. (For details about editing policy files for the portal Web application andits components, see “Adding Permissions to Policy Files” in the “Setting Up andManaging Middle-Tier Security” chapter of the SAS Intelligence Platform: WebApplication Administration Guide).
4 Install SAS 9.1 or later and SAS Integration Technologies on the new machine.
5 Copy your metadata configuration file (XML file) and spawner startup script fromyour spawner configuration directory to the same directory on the new machine. Ifnecessary, change the spawner startup script for the new machine.
6 Create a directory for stored process server log files. The recommended directoryname is STPDemo, and the recommended location is the server home location thatyou specified when you ran the install program (for example, C:\ProgramFiles\SAS\Servers\STPDemo.) If you do not remember the server home location,see the $STP_HOME$ property in the install.properties file.
7 Ensure that the multi-user login (specified in the Advanced Options for the StoredProcess Server definition) can authenticate against the host authenticationprovider for the SAS Stored Process Server’s machine. (If you installed thesoftware using the Personal or Advanced installation type, then this login isowned by the SAS General Server group.) On Windows NT and Windows 2000,give this account the Act as part of the Operating System user right.
8 Give the shared account for the multi-user login (for example, the SAS GeneralServer group login) “Write” permission to the stored process log directory.
9 Ensure that the spawner invoker (for example, the SAS user, if you performed anAdvanced or Personal installation) can authenticate against the hostauthentication provider for the machine.
10 Ensure that users who need to access the server are defined for the machine’s hostauthentication provider.
When you are finished modifying the server and spawner definitions, do the following:
� If you have added a new authentication domain for the machine, do both of thefollowing:
� Use the User Manager plug-in to SAS Management Console to add a logindefinition for access to the server.
� Use the User Manager plug-in to SAS Management Console to modify thelogin definition for the multi-user login (for example, the SAS General Servergroup login, if you performed an Advanced or Personal installation). Modifythe login definition to specify the new authentication, and, if required, thenew user ID credentials.
� If you have changed operating systems and need to modify user credentials, usethe User Manager plug-in to SAS Management Console to modify user and grouplogin definition for the new user ID credentials of the new machine.
� If you need to move the stored process source code repositories to a differentdirectory, use BI Manager to modify the stored process definition and change theSource Code Repository field on the Execution tab of the Stored ProcessProperties dialog box.
� If your stored process definitions reference content on the old stored process orworkspace server machine, you must add the content to the directory you definedin the stored process definition.

76 Moving Both the SAS Stored Process Server and SAS Workspace Server to the Same New Machine � Chapter 5
Moving Both the SAS Stored Process Server and SAS Workspace Serverto the Same New Machine
If you have installed the SAS Stored Process Server and SAS Workspace Server onthe same machine, then you can use the instructions in this section to move the serversto another machine.
Important Note: In addition to changing the machine name (and optionally, the portnumber), if you move a server to a machine with a different operating system or to amachine with an operating system other than Windows, you might need to reconfigurethe following:
� accounts for authentication. You might need to define accounts on theauthentication provider for the new server machine.
� metadata on the SAS Metadata Server. The following metadata definitions mightrequire reconfiguration, or additional configuration:
� server definition. On the server definition, you might need to use the ServerManager plug-in to SAS Management Console to change the followingparameters:
� SAS startup command. You might need to change the startup commandfor the new operating system.
� authentication domain. When you move a server, you might need to setup an additional authentication domain.
� login definitions. For the login definitions that access the server and the logindefinitions that are used in the load-balancing configuration (for example, theSAS Guest user’s login), you might need to use the User Manager plug-in toSAS Management Console to do one or more of the following:� Define a new login definition. When you move a server, you might need to
create a new login definition for the new authentication domain.� Define a new login definition for a different authentication process. When
you move a server, you might need to create a new login definition withcredentials to access a server in a different operating system within thedefault authentication domain.
� Change the format of the user ID in the login definition. When you move aserver, you might need to change the fully-qualified user ID for any logincredentials used to access that server.
� stored process definitions. You might need to use BI Manager to specify anew location for your source code repository.
� spawner startup command. If you change operating systems when you movemachines, you might need to change the spawner startup command
To move both the SAS Stored Process Server and SAS Workspace Server to a newmachine, follow these steps:
1 Use SAS Management Console to reconfigure the SAS Workspace Server definitionfor the new machine:
a Open SAS Management Console and connect to a metadata repository.b In the SAS Management Console navigation tree, locate and select the server
object (for example, Main - Workspace Server) that you want to modify.c In the Display area, for each server connection, follow these steps:
i Select and right-click the connection definition, then select Propertiesfrom the pop-up menu.

Moving Servers � Moving Both the SAS Stored Process Server and SAS Workspace Server to the Same New Machine 77
ii Select the Options tab.iii Change the Host Name field to the host name of the new machine for your
server.iv If you are changing the port, change the Port field to the port of the new
port for your server.v If you need to change the authentication domain, click New and define the
new Authentication Domain field for your server.vi Click OK.
d If you need to change the server startup command, select and right-click theserver object, then select Properties from the pop-up menu. Select theOptions tab and change the Command field.
e Click OK to save the new configuration to the metadata repository.2 Use SAS Management Console to reconfigure the SAS Stored Process Server
definition for the new machine:
a Open SAS Management Console and connect to a metadata repository.b In the SAS Management Console navigation tree, locate and select the server
object (for example, Main - Stored Process Server) that you want to modify.c In the Display area, for each server connection, follow these steps:
i Select and right-click the connection definition, then select Propertiesfrom the pop-up menu.
ii Select the Options tab.iii Change the Host Name field to the host name of the new machine for your
server.iv If you are changing the port, change the Port field to the port of the new
port for your server.v If you need to change the authentication domain, click New and define the
new Authentication Domain for your server.vi Click OK.
d If you need to change the server startup command, select and right-click theserver object, then select Properties from the pop-up menu. Select theOptions tab and change the Command field.
e Click OK to save the new configuration to the metadata repository.3 Use SAS Management Console to reconfigure the spawner definition for the new
machine:
a In the SAS Management Console navigation tree, locate and select thespawner definition, then right-click and select Properties from the pop-upmenu.
b If your spawner name contains the machine name, change the Name field tospecify the name of the new machine.
c Select the Options tab.d Click OK.e Change the Associated Machine field to the host name of the new machine
for your server.f Click OK.g If you have any other servers associated with the spawner, select the
Servers tab. In the Selected servers list box, select the other servers andmove them to the Available servers list box. Click OK. You must thendefine a new spawner for these servers.
h If you are changing the port of either the operator connection orload-balancing connection, in the Display area, select the connection, thenright-click and select Properties from the pop-up menu. Select the Optionstab and change the Port field to the new port for your spawner connection. If

78 Moving Both the SAS Stored Process Server and SAS Workspace Server to the Same New Machine � Chapter 5
you changed the server’s authentication domain, select the same newAuthentication Domain field for your spawner.
i Click OK to save the new configuration to the metadata repository.4 Edit the policy files for any applications that need to access the new server
machine. (For details about editing policy files for the portal Web application andits components, see "Adding Permissions to Policy Files" in the "Setting Up andManaging Middle-Tier Security" chapter of the SAS Intelligence Platform: WebApplication Administration Guide).
5 On the new machine, install SAS 9.1 or later and SAS Integration Technologies.6 Copy your metadata configuration file (XML file) and spawner startup script from
your spawner configuration directory to the same directory on the new machine. Ifnecessary, change the spawner startup script for the new machine.
7 Create a directory for stored process server log files. The recommended directoryname is STPDemo, and the recommended location is the server home location thatyou specified when you ran the installation program (for example, C:\ProgramFiles\SAS\Servers\STPDemo). If you do not remember the server home location,see the $STP_HOME$ property in the install.properties file.
8 Ensure that the multi-user login (specified in the Advanced Options for the SASStored Process Server definition) can authenticate against the host authenticationprovider for the SAS Stored Process Server’s machine. (If you installed thesoftware using the Personal or Advanced installation type, then this login isowned by the SAS General Server group.) On Windows NT and Windows 2000,give this account the Act as part of the Operating System user right.
9 Give the shared account for the multi-user login (for example, the SAS GeneralServer group login, if you performed an Advanced or Personal installation) “Write”permission to the stored process log directory.
10 Ensure that the spawner invoker (for example, the SAS user, if you performed anAdvanced or Personal installation) can authenticate against the hostauthentication provider for each machine.
11 Ensure that users who need to access the server are defined for the machine’s hostauthentication provider.
When you are finished modifying the server and spawner definitions, do the following:� If you have added a new authentication domain for the machine, do both of the
following:� Use the User Manager plug-in to SAS Management Console to add a login
definition for access to the server.� Use the User Manager plug-in to SAS Management Console to modify the
login definition for the multi-user login (for example, the SAS General Servergroup login, if you performed an Advanced or Personal installation). Modifythe login definition to specify the new authentication, and, if required, thenew user ID credentials.
� If you have changed operating systems and need to modify user credentials, usethe User Manager plug-in to SAS Management Console to modify user and grouplogin definition for the new user ID credentials of the new machine.
� If you need to move the stored process source code repositories to a differentdirectory, use BI Manager to modify the stored process definition and change theSource Code Repository field on the Execution tab of the Stored ProcessProperties dialog box.
� If your stored process definitions reference content on the old stored process orworkspace server machine, you must add the content to the directory you definedin the stored process definition.

Moving Servers � Moving the SAS Stored Process Server and SAS Workspace Server to Separate Machines 79
Moving the SAS Stored Process Server and SAS Workspace Server toSeparate Machines
If you have installed the SAS Stored Process Server and SAS Workspace Server onthe same machine, you can use the instructions in this section to move the servers tonew (and separate) machines.
Important Note: In addition to changing the machine name (and optionally, the portnumber), if you move a server to a machine with a different operating system or to amachine with an operating system other than Windows, you might need to reconfigurethe following:
� accounts for authentication. You might need to define accounts on theauthentication provider for the new server machine.
� metadata on the SAS Metadata Server. The following metadata definitions mightrequire reconfiguration or additional configuration:� server definition. On the server definition, you might need to use the Server
Manager plug-in to SAS Management Console to change the followingparameters:� SAS startup command. You might need to change the startup command for
the new operating system.� authentication domain. When you move a server, you might need to set up an
additional authentication domain.
� login definitions. For the login definitions that access the server and the logindefinitions that are used in the load-balancing configuration (for example, theSAS Guest user’s login, if you performed an Advanced or Personal installation),you might need to use the User Manager plug-in to SAS Management Consoleto do one or more of the following:� Define a new login definition. When you move a server, you might need to
create a new login definition for the new authentication domain.� Define a new login definition for a different authentication process. When you
move a server, you might need to create a new login definition withcredentials to access a server in a different operating system within thedefault authentication domain.
� Change the format of the user ID in the login definition. When you move aserver, you might need to change the fully-qualified user ID for any logincredentials used to access that server.
� stored process definitions. You might need to use BI Manager to specify a newlocation for your source code repository.
� spawner startup command.
To move both the SAS Stored Process Server and the SAS Workspace Server toseparate machines, follow these steps:
1 Use SAS Management Console to reconfigure the SAS Stored Process Serverdefinition for the new machine:
a Open SAS Management Console and connect to a metadata repository.b In the SAS Management Console navigation tree, locate and select the server
object that you want to modify.c In the Display area, for each server connection, follow these steps:
i Select and right-click the connection definition, then select Propertiesfrom the pop-up menu.
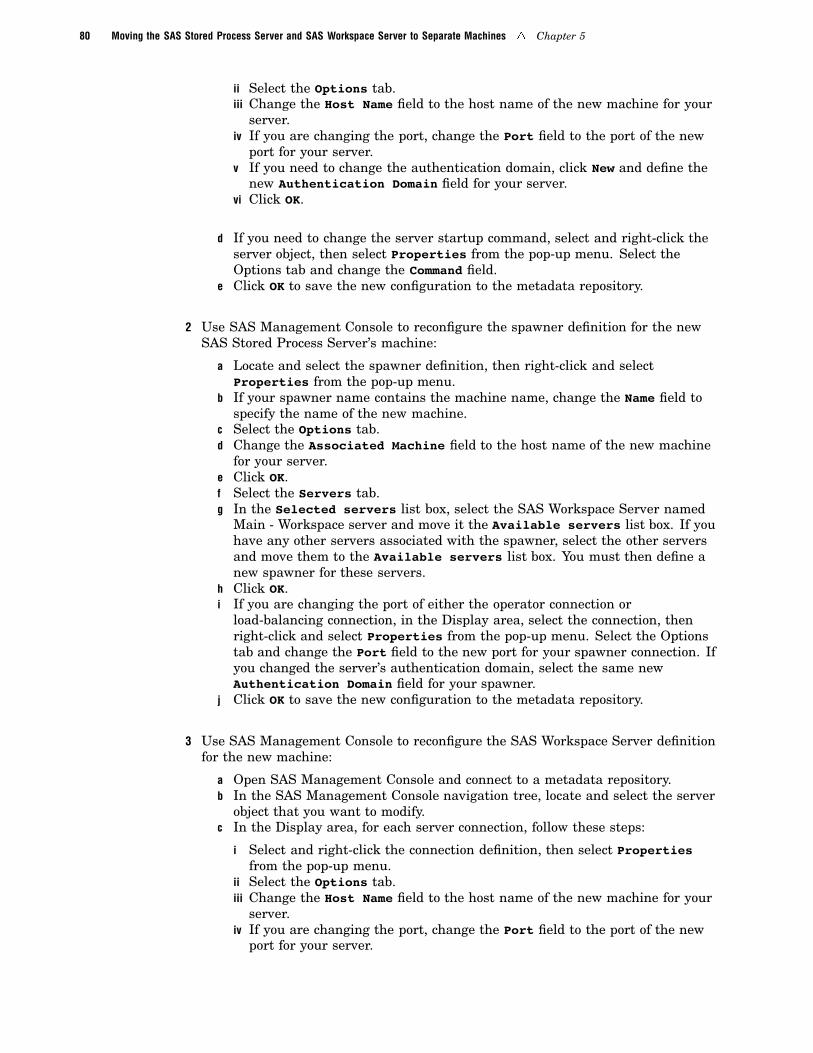
80 Moving the SAS Stored Process Server and SAS Workspace Server to Separate Machines � Chapter 5
ii Select the Options tab.iii Change the Host Name field to the host name of the new machine for your
server.iv If you are changing the port, change the Port field to the port of the new
port for your server.v If you need to change the authentication domain, click New and define the
new Authentication Domain field for your server.vi Click OK.
d If you need to change the server startup command, select and right-click theserver object, then select Properties from the pop-up menu. Select theOptions tab and change the Command field.
e Click OK to save the new configuration to the metadata repository.
2 Use SAS Management Console to reconfigure the spawner definition for the newSAS Stored Process Server’s machine:
a Locate and select the spawner definition, then right-click and selectProperties from the pop-up menu.
b If your spawner name contains the machine name, change the Name field tospecify the name of the new machine.
c Select the Options tab.d Change the Associated Machine field to the host name of the new machine
for your server.e Click OK.f Select the Servers tab.g In the Selected servers list box, select the SAS Workspace Server named
Main - Workspace server and move it the Available servers list box. If youhave any other servers associated with the spawner, select the other serversand move them to the Available servers list box. You must then define anew spawner for these servers.
h Click OK.i If you are changing the port of either the operator connection or
load-balancing connection, in the Display area, select the connection, thenright-click and select Properties from the pop-up menu. Select the Optionstab and change the Port field to the new port for your spawner connection. Ifyou changed the server’s authentication domain, select the same newAuthentication Domain field for your spawner.
j Click OK to save the new configuration to the metadata repository.
3 Use SAS Management Console to reconfigure the SAS Workspace Server definitionfor the new machine:
a Open SAS Management Console and connect to a metadata repository.b In the SAS Management Console navigation tree, locate and select the server
object that you want to modify.c In the Display area, for each server connection, follow these steps:
i Select and right-click the connection definition, then select Propertiesfrom the pop-up menu.
ii Select the Options tab.iii Change the Host Name field to the host name of the new machine for your
server.iv If you are changing the port, change the Port field to the port of the new
port for your server.
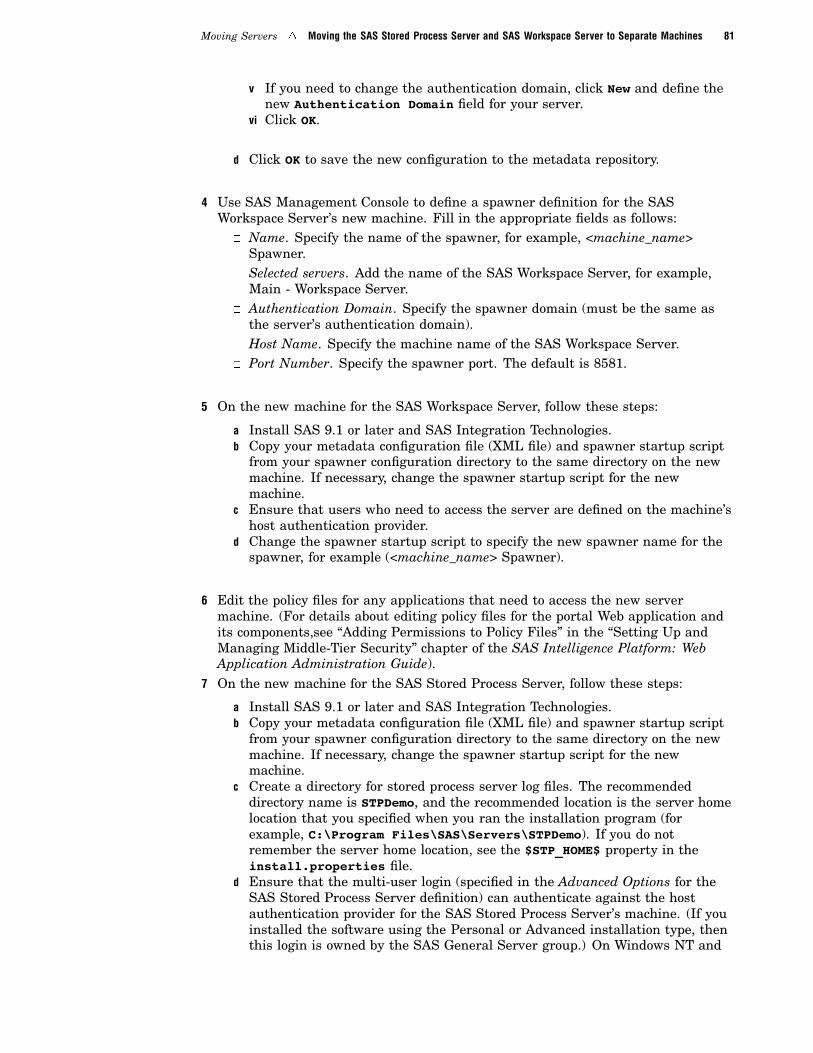
Moving Servers � Moving the SAS Stored Process Server and SAS Workspace Server to Separate Machines 81
v If you need to change the authentication domain, click New and define thenew Authentication Domain field for your server.
vi Click OK.
d Click OK to save the new configuration to the metadata repository.
4 Use SAS Management Console to define a spawner definition for the SASWorkspace Server’s new machine. Fill in the appropriate fields as follows:
� Name. Specify the name of the spawner, for example, <machine_name>Spawner.
� Selected servers. Add the name of the SAS Workspace Server, for example,Main - Workspace Server.
� Authentication Domain. Specify the spawner domain (must be the same asthe server’s authentication domain).
� Host Name. Specify the machine name of the SAS Workspace Server.� Port Number. Specify the spawner port. The default is 8581.
5 On the new machine for the SAS Workspace Server, follow these steps:
a Install SAS 9.1 or later and SAS Integration Technologies.b Copy your metadata configuration file (XML file) and spawner startup script
from your spawner configuration directory to the same directory on the newmachine. If necessary, change the spawner startup script for the newmachine.
c Ensure that users who need to access the server are defined on the machine’shost authentication provider.
d Change the spawner startup script to specify the new spawner name for thespawner, for example (<machine_name> Spawner).
6 Edit the policy files for any applications that need to access the new servermachine. (For details about editing policy files for the portal Web application andits components,see “Adding Permissions to Policy Files” in the “Setting Up andManaging Middle-Tier Security” chapter of the SAS Intelligence Platform: WebApplication Administration Guide).
7 On the new machine for the SAS Stored Process Server, follow these steps:
a Install SAS 9.1 or later and SAS Integration Technologies.b Copy your metadata configuration file (XML file) and spawner startup script
from your spawner configuration directory to the same directory on the newmachine. If necessary, change the spawner startup script for the newmachine.
c Create a directory for stored process server log files. The recommendeddirectory name is STPDemo, and the recommended location is the server homelocation that you specified when you ran the installation program (forexample, C:\Program Files\SAS\Servers\STPDemo). If you do notremember the server home location, see the $STP_HOME$ property in theinstall.properties file.
d Ensure that the multi-user login (specified in the Advanced Options for theSAS Stored Process Server definition) can authenticate against the hostauthentication provider for the SAS Stored Process Server’s machine. (If youinstalled the software using the Personal or Advanced installation type, thenthis login is owned by the SAS General Server group.) On Windows NT and

82 Moving the SAS Stored Process Server and SAS Workspace Server to Separate Machines � Chapter 5
Windows 2000, give this account the Act as part of the Operating Systemuser right.
e Give the shared account for the multi-user login (for example, the SASGeneral Server group “Write” permission to the stored process log directory.
f Ensure that users who need to access the server are defined for eachmachine’s host authentication provider.
8 Ensure that the spawner invoker (for example, the SAS user, if you performed anAdvanced or Personal installation) can authenticate against the hostauthentication provider for each machine.
When you are finished modifying the server and spawner definitions, do the following:� If you have added a new authentication domain for the machine, do both of the
following:� Use the User Manager plug-in to SAS Management Console to add a login
definition for access to the server.� Use the User Manager plug-in to SAS Management Console to modify the login
definition for the multi-user login (for example, the SAS General Server grouplogin, if you performed an Advanced or Personal installation). Modify the logindefinition to specify the new authentication, and, if required, the new user IDcredentials.
� If you have changed operating systems and need to modify user credentials, usethe User Manager plug-in to SAS Management Console to modify user and grouplogin definition for the new user ID credentials of the new machine.
� If you need to move the stored process source code repositories to a differentdirectory, use BI Manager to modify the stored process definition and change theSource Code Repository field on the Execution tab of the Stored ProcessProperties dialog box.
� If your stored process definitions reference content on the old stored process orworkspace server machine, you must add the content to the directory you definedin the stored process definition.

83
C H A P T E R
6Administering SAS OLAP Servers
Overview of SAS OLAP Servers 83Overview of Administrative Tasks for SAS OLAP Servers 85
Overview of SAS OLAP Server Installation and Configuration 85
Software Requirements for SAS OLAP Servers 86
Configure the Java Virtual Machine on SAS OLAP Servers 86
Change the Properties of SAS OLAP Servers 86Configure Storage for Temporary Cube Build Files on SAS Workspace Servers 87
Clean Up Temporary Files After Abnormal Shutdowns 87
Control, Monitor, and Log SAS OLAP Servers 88
Optimize SAS OLAP Servers 88
About the Cube Cache 88
About the Data Cache 89About the Subquery Caches 89
About the Query Thread Pool 89
Change the Number of Cubes in the Cube Cache 90
Refresh Calculated Members and Named Sets in the Cube Cache 90
Tune the Data Cache 91Tune the Subquery Cache 91
Tune the Query Thread Pool 91
Add a SAS OLAP Server to a SAS Metadata Repository 92
Overview of SAS OLAP ServersThe SAS OLAP Server software that is included as part of the SAS Intelligence
Platform consists of the server software itself, along with SAS OLAP Cube Studio, theOLAP procedure for Base SAS, and the SAS OLAP Server Monitor.
The following diagram shows how the SAS OLAP Server software fits into the SASIntelligence Platform.

84 Overview of SAS OLAP Servers � Chapter 6
Figure 6.1 SAS OLAP Server and the SAS Intelligence Platform
SAS ManagementConsole
SAS OLAPServerMonitor,ServerManager,Schedule Mgr,AuthorizationMgr, LibraryMgr, ...
SASApplicationServer(s)
Co-residentper host: SASWorkspaceServer buildscubes, SASOLAP Serverresponds toqueries fromcube viewers
ClientApplications
SAS OLAPCube Studiobuilds andtunes cubes
SAS DataIntegrationStudio createsPROC OLAP jobs
Cube viewersgenerate MDXqueries anddisplay results:SAS web OLAPviewers, SASEnterpriseGuide, 3rd-party viewersincludingMicrosoft Exceland Proclarity
SASMetadataServer
repositories,access control
OperationalSystems
source datafrom starschemas ordetail tables
SAS OLAP Servers run in the background on specially configured host computers.The purpose of these servers is to respond to queries from cube viewers. The queriesare submitted in the MDX (multidimensional expressions) language, through the OLEDB for OLAP application programming interface (API).
The primary cube viewers are SAS Web OLAP Viewer, SAS Web Report Studio, andSAS Enterprise Guide. Because OLE DB for OLAP and MDX support industrystandards, you can also query SAS OLAP cubes using third-party cube viewers such asMicrosoft Excel. Additional information about cube viewers is available in the SASOLAP Server: User’s Guide. Additional information about the MDX query language isprovided in the SAS OLAP Server: MDX Guide.
Note: The titles referenced in this section are available at http://support.sas.com/documentation/onlinedoc/sas9doc.html. �
OLAP schemas are lists of cubes that are grouped together so that they can beexclusively accessed by one or more SAS OLAP Servers. Each cube is listed in one andonly one OLAP schema. Each SAS OLAP Server is required to use one OLAP schema.Multiple servers can use the same schema. To learn more, see “About OLAP Schemas”in the SAS Intelligence Platform: Data Administration Guide.
SAS OLAP Cube Studio is a rich Java client that provides all of the tools that youneed to translate source data into OLAP cubes. You use wizard processes to build andedit cubes. After you create a cube, you can choose to build the physical cube at thattime, or simply register the metadata for the cube and reserve the cube build processfor later. Other tools in SAS OLAP Cube Studio enable you to define aggregations forimproved performance, generate calculated members, export and import cubes betweenmetadata repositories, and generate new OLAP schemas. For further information aboutSAS OLAP Cube Studio, see “SAS OLAP Cube Studio Overview for Administrators” inthe SAS Intelligence Platform: Desktop Application Administration Guide.
PROC OLAP is a SAS procedure that is used to build and edit cubes. Statements inthe procedure specify the cube structure and source data. SAS OLAP Cube Studio

Administering SAS OLAP Servers � Overview of SAS OLAP Server Installation and Configuration 85
automatically creates and submits PROC OLAP programs. PROC OLAP programs canalso be added to multi-step jobs that are created and submitted from SAS DataIntegration Studio or the SAS Scheduler. For information on the syntax and usage ofthe OLAP procedure, refer to the SAS OLAP Server: User’s Guide.
The SAS OLAP Server Monitor is a plug-in for SAS Management Console thatenables administrators to start, stop, restart, and view the active processes on SASOLAP Servers. You can also refresh the server list, the server connections list, and thecube caches of specified cubes, as described in “Using the SAS OLAP Server Monitor” inthe SAS Intelligence Platform: System Administration Guide.
Overview of Administrative Tasks for SAS OLAP ServersAdministrators support SAS OLAP Servers by configuring hosts, installing software,
configuring SAS OLAP Servers and SAS Workspace Servers, starting, stopping, andrestarting servers, monitoring servers, backing up and restoring servers, tuning serversfor optimal performance, and configuring libraries and permissions for users. Thesetasks are accomplished using the SAS Software Navigator, the SAS ConfigurationManager, and SAS Management Console.
User tasks for SAS OLAP Server include building cubes, viewing cubes, and tuningcubes. User tasks are documented in the SAS OLAP Server User’s Guide and in theHelp for SAS OLAP Cube Studio.
Overview of SAS OLAP Server Installation and ConfigurationYou initially install SAS OLAP Servers with the rest of the SAS Intelligence Platform
using your SAS software depot, a planning file, SAS Software Navigator, and SASConfiguration Wizard, as described in the SAS Intelligence Platform: Installation Guide.
After installation, you may need to configure the Java virtual machine on hosts of theSAS OLAP Servers, as described in “Configure the Java Virtual Machine on SAS OLAPServers” on page 86. Additional post-installation setup tasks include the following:
� Configure source data libraries, as described in SAS Intelligence Platform: DataAdministration Guide
� Configure access control, as described in SAS Intelligence Platform: SecurityAdministration Guide. You have the capability of limiting access within cubes bypreventing the display of specified dimensions, hierarchies, levels, and members.
� Configure cube viewers, as described in SAS Intelligence Platform: DesktopApplication Administration Guide
After your initial deployment, demand for additional cubes may call for the additionof new SAS OLAP Servers. Contact a SAS representative to receive assistance withyour hardware configuration plan. Recall that you need to install a SAS WorkspaceServer about each SAS OLAP Server host. For information on SAS Workspace Serverconfiguration, see Chapter 4, “Reconfiguring or Clustering Workspace Servers or StoredProcess Servers,” on page 33.
When you install a new SAS OLAP Server you need to create or update an OLAPschema, as described in “About OLAP Schemas” in the SAS Intelligence Platform: DataAdministration Guide.

86 Software Requirements for SAS OLAP Servers � Chapter 6
Software Requirements for SAS OLAP ServersThe following components must be installed before you install a SAS OLAP Server:� SAS Private JRE 1.4.1� Foundation SAS� SAS Management Console
SAS Management Console does not need be installed on the SAS OLAP Server.A SAS Workspace Server is strongly recommended for installation on each host that
runs a SAS OLAP Server.
Configure the Java Virtual Machine on SAS OLAP ServersWhen they start, SAS OLAP Servers always try to load the Java Virtual Machine
(JVM). The JVM provides support for MDX external functions, and MDX is the querylanguage used by cube-viewing clients.
If a SAS OLAP Server is unable to load the JVM, it sends the following message andcontinues to start up: WARNING: The Java Virtual Machine is not loaded.External functions are not available. At this point, the SAS functions areavailable, but the MDX external functions are disabled.
If you are not planning to use MDX external functions, then you can safely ignorethe warning.
Some common reasons why you might not be able to load the JVM include thefollowing:
� There is no JVM installed on the platform that SAS OLAP Server is installed on.� An unsupported version of the JVM is installed on the platform that SAS OLAP
Server is installed on.� The JVM is incorrectly configured. (Some JVMs require that certain environment
variables be set up in order to load).
For further information about external functions and the JVM, see ExternalFunctions in the SAS OLAP Server: MDX Guide “MDX Queries and Syntax” in the SASOLAP Server: MDX Guide, at http://support.sas.com/documentation/onlinedoc/sas9doc.htm.
For information about installing the Java Runtime Environment, see the SASThird-Party Software Components Volume 1 CD-ROM.
Change the Properties of SAS OLAP ServersTo change the properties of SAS OLAP Servers, complete the following steps:1 Within SAS Management Console, expand the nodes under Server Manager until
you can see your SAS OLAP Server. The server components represent the actualmachines that the SAS OLAP Servers are running on.
Note: The SAS Logical Server definitions enable you to pool servers so theycan be treated as a single server. SAS OLAP Servers do not support pooled serversin SAS 9.1. �
2 Right-click the SAS OLAP Server and display the Properties window, whichcontains panels for the following:

Administering SAS OLAP Servers � Clean Up Temporary Files After Abnormal Shutdowns 87
� General (server name, ID, and description)� Options and Advanced Options� Notes� Extended Attributes� Authorization (Read, Write, Create permissions)
3 When you finish entering the configuration information, click OK to save yourchanges on the SAS Metadata Server.
Configure Storage for Temporary Cube Build Files on SAS WorkspaceServers
When you build a SAS OLAP cube, the SAS Workspace Server generates temporaryutility files. At the end of the build, the server deletes the temporary files. If the buildprocess terminates abnormally, remove the temporary files as described in “Clean UpTemporary Files After Abnormal Shutdowns” on page 87.
Follow these steps to allocate sufficient storage for temporary cube build files:1 For a SAS Workspace Server that will be used to build cubes, determine the
storage capacity that will be required for temporary build files. In general,temporary files can be expected occupy two to three times the disk space that willbe used to store the source data of the largest cube that will be built by that server.
2 Divide in half the estimated storage capacity. Locate two suitable disks on the SASWorkspace Server. The disks need to retain, over time, an amount of free spacethat is equal to half of the estimated storage capacity for temporary build files.
3 In the launch command for the SAS Workspace Server, specify a value for theWORK= system option that consists of a path to one of the two disks. To allocatethe other half of the storage requirement, specify a path to the second disk in bothof the system options SPDEUTILLOC= and UTILLOC=. To learn how to addsystem options to the launch commands of SAS Workspace Servers, see “AddSystem Options to the Workspace Server Launch Command” on page 35.
4 Run test builds to validate and adjust your storage estimate.5 If your cubes are expected to grow in size over time, periodically reassess and
reassign system options to provide sufficient stroage capacity.6 Either ask your cube builders not to assign the WORKPATH= option in the PROC
OLAP statement, or to assign that option with a value that includes the two pathsyou specified for WORK= and SPDEUTILLOC=/UTILLOC=.
7 Be sure to allocate sufficient storage capacity on all SAS Workspace Servers thatwill be used to build SAS OLAP cubes.
For additional information regarding the memory and storage capacity of SASWorkspace Server, contact your SAS support representative.
Clean Up Temporary Files After Abnormal ShutdownsWhen a SAS Workspace Server completes a cube build, it deletes the temporary files
that it created during the build. If a SAS Workspace Server terminates incorrectly,some temporary files might remain. To retain the full amount of temporary storagespace, delete the temporary files before your next cube build.
To delete temporary files, obtain the directory paths that are specified in the SASOLAP Server configuration file for the system options WORK=, SPDEUTILLOC=, andUTILLOC=.
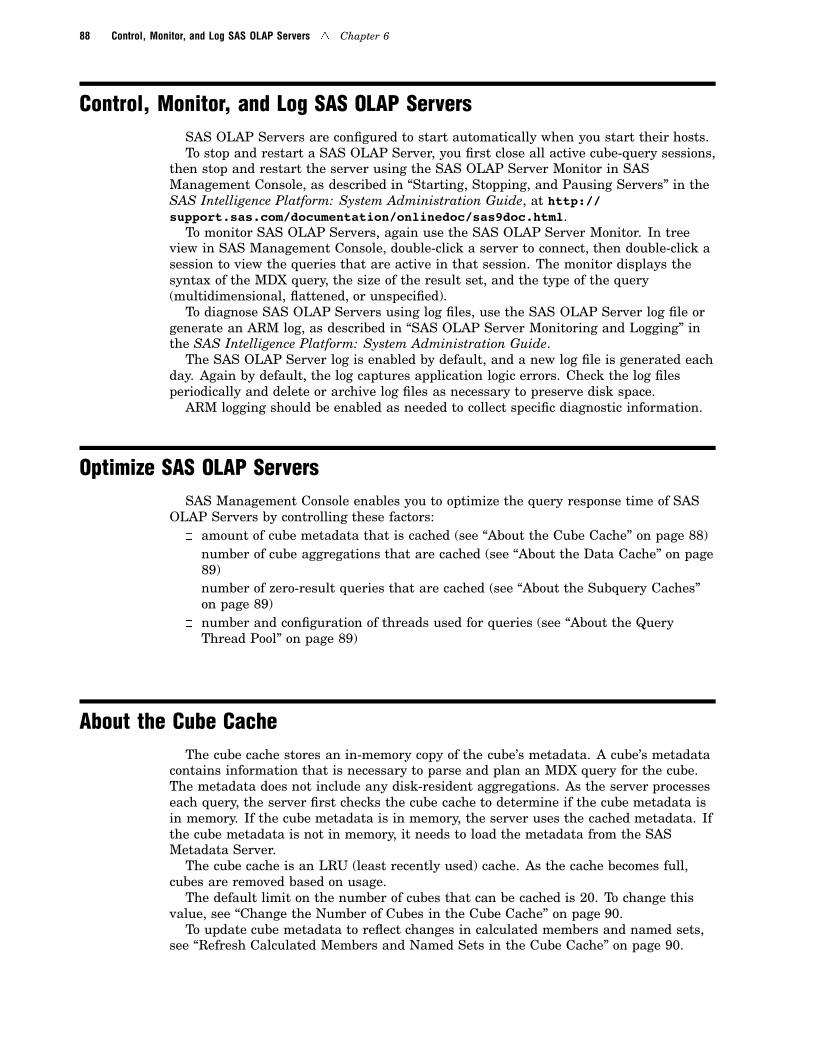
88 Control, Monitor, and Log SAS OLAP Servers � Chapter 6
Control, Monitor, and Log SAS OLAP ServersSAS OLAP Servers are configured to start automatically when you start their hosts.To stop and restart a SAS OLAP Server, you first close all active cube-query sessions,
then stop and restart the server using the SAS OLAP Server Monitor in SASManagement Console, as described in “Starting, Stopping, and Pausing Servers” in theSAS Intelligence Platform: System Administration Guide, at http://support.sas.com/documentation/onlinedoc/sas9doc.html.
To monitor SAS OLAP Servers, again use the SAS OLAP Server Monitor. In treeview in SAS Management Console, double-click a server to connect, then double-click asession to view the queries that are active in that session. The monitor displays thesyntax of the MDX query, the size of the result set, and the type of the query(multidimensional, flattened, or unspecified).
To diagnose SAS OLAP Servers using log files, use the SAS OLAP Server log file orgenerate an ARM log, as described in “SAS OLAP Server Monitoring and Logging” inthe SAS Intelligence Platform: System Administration Guide.
The SAS OLAP Server log is enabled by default, and a new log file is generated eachday. Again by default, the log captures application logic errors. Check the log filesperiodically and delete or archive log files as necessary to preserve disk space.
ARM logging should be enabled as needed to collect specific diagnostic information.
Optimize SAS OLAP ServersSAS Management Console enables you to optimize the query response time of SAS
OLAP Servers by controlling these factors:� amount of cube metadata that is cached (see “About the Cube Cache” on page 88)� number of cube aggregations that are cached (see “About the Data Cache” on page
89)� number of zero-result queries that are cached (see “About the Subquery Caches”
on page 89)� number and configuration of threads used for queries (see “About the Query
Thread Pool” on page 89)
About the Cube CacheThe cube cache stores an in-memory copy of the cube’s metadata. A cube’s metadata
contains information that is necessary to parse and plan an MDX query for the cube.The metadata does not include any disk-resident aggregations. As the server processeseach query, the server first checks the cube cache to determine if the cube metadata isin memory. If the cube metadata is in memory, the server uses the cached metadata. Ifthe cube metadata is not in memory, it needs to load the metadata from the SASMetadata Server.
The cube cache is an LRU (least recently used) cache. As the cache becomes full,cubes are removed based on usage.
The default limit on the number of cubes that can be cached is 20. To change thisvalue, see “Change the Number of Cubes in the Cube Cache” on page 90.
To update cube metadata to reflect changes in calculated members and named sets,see “Refresh Calculated Members and Named Sets in the Cube Cache” on page 90.

Administering SAS OLAP Servers � About the Query Thread Pool 89
About the Data CacheThe data cache saves aggregations in memory. As the server processes each query, it
first looks for the query contents in memory. If the query contents are stored inmemory, then the query processor uses those aggregations instead of accessing the disk.
The default size of the data cache is 16MB.NWAY aggregations, which are fine-grained summaries of source data, are not
cached. Other aggregations are cached if the number of rows in the aggregation is lessthan the maximum row limit. This limit is arrived at by multiplying the cache size by200. The default maximum row limit is 200 x 16 = 3,200. If you change your cache size,you also change your maximum row limit.
Aggregations other than NWAY that meet the row limit are always cached in theirentirety.
To enable, disable, or change the size of the data cache, see “Tune the Data Cache” onpage 91.
About the Subquery CachesThe subquery cache stores in memory the intermediate result sets that are generated
to support calculations that are made during queries. The subquery cache can also beenabled to store additional data, namely the empty intermediate result sets.
The SAS OLAP Server maintains a unique subquery cache for each query for theduration of the processing of that query. When a server is processing concurrentqueries, server memory contains multiple subquery caches.
During query processing, the subquery cache grows in size. If the subquery cachereaches a specified maximum size, the contents of the cache are paged (swapped) intotemporary disk storage.
SAS Management Console allows you to set the maximum size of the subquery cache.You can also enable and disable the caching of empty intermediate result sets. Bydefault, the maximum size of each subquery cache is 5 megabytes, and the caching ofempty intermediate result sets is disabled.
To tune the subquery cache, you need to balance the following factors:� the number of concurrent queries� the number of empty cells that are involved in queries� the number of calculations that are performed per query
Smaller maximum sizes of the subquery cache may limit performance improvementsdue to memory-intensive paging to and from temporary disk storage, particularly if thecache includes empty intermediate result sets.
Larger maximum sizes of the subquery cache, when combined with a large number ofconcurrent queries, may occupy an inefficient percentage of available server memory.
In many cases, the default maximum cache size is a good choice. It is recommendedthat the maximum cache size not exceed 50 megabytes.
To set the maximum size of the subquery cache, and to enable and disable thecaching of empty intermediate result sets, see “Tune the Subquery Cache” on page 91.
About the Query Thread PoolThe query thread pool is used to efficiently assign threads to query requests that are
received by a SAS OLAP Server. The server maintains a minimum number of threads.

90 Change the Number of Cubes in the Cube Cache � Chapter 6
As those threads are assigned to queries, additional threads are allocated, up to aspecified maximum. If the number of active requests decreases, so does the number ofthreads. If the number of requests exceeds the maximum number of threads, requestsare queued and assigned, as threads are reclaimed.
You can set the following parameters of the query thread pool:� minimum number of threads in the pool� maximum number of threads in the pool� threshold number of query requests that are required before the requests are
assigned to threads� time-out for thread reclamation� thread stack size
To tune the query thread pool, see “Tune the Query Thread Pool” on page 91.
Change the Number of Cubes in the Cube CacheBy default, up to 20 cubes can store the metadata for their calculated members and
named sets in the cube cache. To change the number of cubes in the cube cache,complete these steps:
1 In SAS Management Console, open the Server Manager in the navigation tree.2 Select an OLAP Server (not the SAS Logical OLAP Server), and then right-click
and select Properties.3 In the OLAP Server Properties window, select the Options tab, and then select
the Advanced Options button.4 Select the Cache tab.5 Change the value of the field Maximum number of cubes in cache. Click OK to
save changes and close the OLAP Server Properties window.
Refresh Calculated Members and Named Sets in the Cube CacheYou can refresh the calculated members and named sets in the cube cache of a SAS
OLAP Server by selecting Actions � Refresh Cubes in SAS Management Console.Another method is to select cubes in the SAS OLAP Server Monitor, right-click, andselect Refresh. The refresh operation synchronizes the calculated members and namedsets between the SAS Metadata Server and the SAS OLAP Servers.
To refresh cubes you must be connected to the SAS OLAP Servers and have theAdminister permission.
When you refresh a cube, you update calculated members and named sets only. Forinformation about updating all of the data in a cube, see the Help for SAS OLAP CubeStudio.
Note that selecting Refresh in the Server Manager in SAS Management Consoledoes not refresh calculated members and named sets. Instead, the Server Mangerrefreshes server connections.

Administering SAS OLAP Servers � Tune the Query Thread Pool 91
Tune the Data CacheThe SAS OLAP Server data cache is enabled by default. Complete these steps to
enable or disable the data cache and change the size of the data cache for a SAS OLAPServer:
1 In SAS Management Console, open the Server Manager in the navigation tree.2 Select an OLAP Server (not the Logical OLAP Server), and then right-click and
select Properties.
3 In the OLAP Server Properties window, select the Options tab, and then selectthe Advanced Options button.
4 Select the Cache tab.
5 Set the values of the Cache Active and Memory size fields.
6 Click OK to save changes and close the OLAP Server Properties window.
Tune the Subquery CacheSAS Management Console allows you set the maximum size of the subquery cache
and to enable or disable the caching of empty intermediate result sets.For a description of the subquery cache and an overview of tuning issues, see “About
the Subquery Caches” on page 89.Complete these steps to tune the subquery cache:
1 In SAS Management Console, open the Server Manager in the navigation tree.
2 Select an OLAP Server (not the logical OLAP Server), and then right-click andselect Properties.
3 In the OLAP Server Properties window, select the Options tab, and then selectthe Advanced Options button.
4 Select the Cache tab.5 Set the values of the fields Cache the empty subquery result sets and
Memory size for subquery cache.
6 Click OK to save changes and close the OLAP Server Properties window.
Tune the Query Thread PoolYou can tune the query thread pool of a SAS OLAP Server to optimize performance
for the number and frequency of query requests that are received by that server.Follow these steps to tune the query thread pool of a SAS OLAP Server:
1 In SAS Management Console, open the Server Manager in the navigation tree.2 Select an OLAP Server (not the Logical OLAP Server), and then right-click and
select Properties.
3 In the OLAP Server Properties window, select the Options tab, and then selectthe Advanced Options button.
4 Select the Query Thread Pool tab.

92 Add a SAS OLAP Server to a SAS Metadata Repository � Chapter 6
5 Change the values of the fields in the tab as needed. Descriptions of the fields areprovided in the help for the Query Thread Pool tab.
6 Click OK to save changes and close the OLAP Server Properties window.
Add a SAS OLAP Server to a SAS Metadata RepositoryFollow these steps to add a new SAS OLAP Server to a SAS metadata repository:
1 In SAS Management Console, select Server Manager. Right-click, and then selectNew Server.
2 In the New Server Wizard page, select SAS Application Server, and then definethe new server. Enter the name, description, and server properties.
3 Select the server type that you are creating, and then define the defaultconfiguration settings.
4 On the final page, click Finish to create the server.

93
C H A P T E R
7SAS/CONNECT Servers
Overview of SAS/CONNECT and the SAS Intelligence Platform 93Introduction to SAS/CONNECT 94
Overview of Services 94
Compute Services 94
Data Transfer Services 94
Remote Library Services 95The Uses of SAS/CONNECT in the SAS Intelligence Platform 95
Overview of the Uses of SAS/CONNECT in the SAS Intelligence Platform 95
SAS/CONNECT, SAS Data Integration Studio, and SAS Enterprise Miner 95
SAS/CONNECT and Grid Computing 96
SAS/CONNECT and Metadata Promotion 97
Initial Configuration of the SAS/CONNECT Server 98Overview of the Inital Configuration of the SAS/CONNECT Server 98
SAS/CONNECT Metadata Objects 99
SAS/CONNECT Configuration Files 102
Change the Logging Level of the SAS/CONNECT Spawner 103
Overview of SAS/CONNECT and the SAS Intelligence PlatformSAS/CONNECT software provides the essential tools for sharing data and processing
power across multiple computing environments. SAS programs use these tools toperform tasks such as the following:
� dividing time-consuming tasks into multiple units of work and executing theseunits in parallel
� moving data from a client machine to a server machine, or vice versa, so that thedata is on the same machine as the code processing it
Any code that your company writes for use with the SAS Intelligence Platform, such asstored processes, can use these SAS/CONNECT features. For more information aboutthe general capabilities of SAS/CONNECT, see “Introduction to SAS/CONNECT” onpage 94 or the SAS/CONNECT User’s Guide.
In addition, SAS/CONNECT plays some special roles in the SAS IntelligencePlatform. For instance, in a properly configured environment, some of the platformclients, such as SAS Data Integration Studio and SAS Enterprise Miner, can generatecode that includes SAS/CONNECT statements. These statements enable the generatedcode to perform tasks such as those mentioned in the previous paragraph. SAS/CONNECT also plays an important role in the promotion of metadata repositoriesbecause the promotion is accomplished by uploading data sets from a client machine toa server machine. For more information on these special roles, see “Overview of theUses of SAS/CONNECT in the SAS Intelligence Platform” on page 95.
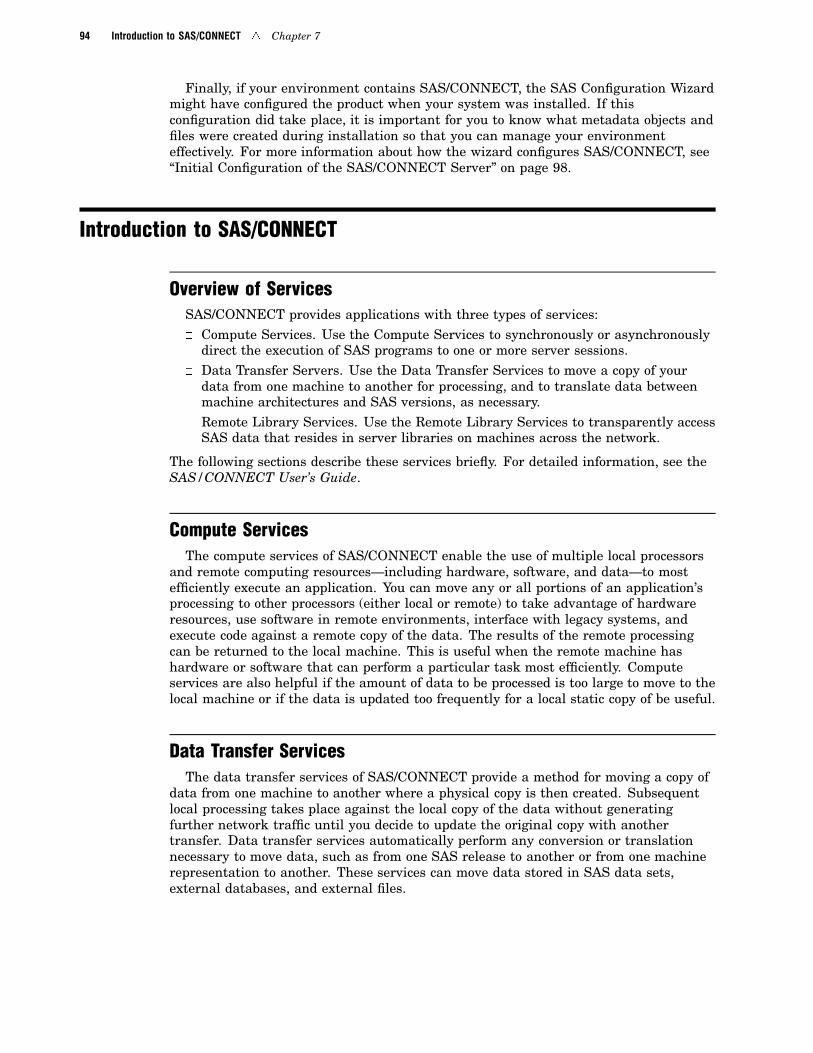
94 Introduction to SAS/CONNECT � Chapter 7
Finally, if your environment contains SAS/CONNECT, the SAS Configuration Wizardmight have configured the product when your system was installed. If thisconfiguration did take place, it is important for you to know what metadata objects andfiles were created during installation so that you can manage your environmenteffectively. For more information about how the wizard configures SAS/CONNECT, see“Initial Configuration of the SAS/CONNECT Server” on page 98.
Introduction to SAS/CONNECT
Overview of ServicesSAS/CONNECT provides applications with three types of services:� Compute Services. Use the Compute Services to synchronously or asynchronously
direct the execution of SAS programs to one or more server sessions.� Data Transfer Servers. Use the Data Transfer Services to move a copy of your
data from one machine to another for processing, and to translate data betweenmachine architectures and SAS versions, as necessary.
� Remote Library Services. Use the Remote Library Services to transparently accessSAS data that resides in server libraries on machines across the network.
The following sections describe these services briefly. For detailed information, see theSAS/CONNECT User’s Guide.
Compute ServicesThe compute services of SAS/CONNECT enable the use of multiple local processors
and remote computing resources—including hardware, software, and data—to mostefficiently execute an application. You can move any or all portions of an application’sprocessing to other processors (either local or remote) to take advantage of hardwareresources, use software in remote environments, interface with legacy systems, andexecute code against a remote copy of the data. The results of the remote processingcan be returned to the local machine. This is useful when the remote machine hashardware or software that can perform a particular task most efficiently. Computeservices are also helpful if the amount of data to be processed is too large to move to thelocal machine or if the data is updated too frequently for a local static copy of be useful.
Data Transfer ServicesThe data transfer services of SAS/CONNECT provide a method for moving a copy of
data from one machine to another where a physical copy is then created. Subsequentlocal processing takes place against the local copy of the data without generatingfurther network traffic until you decide to update the original copy with anothertransfer. Data transfer services automatically perform any conversion or translationnecessary to move data, such as from one SAS release to another or from one machinerepresentation to another. These services can move data stored in SAS data sets,external databases, and external files.

SAS/CONNECT Servers � SAS/CONNECT, SAS Data Integration Studio, and SAS Enterprise Miner 95
Remote Library ServicesThe remote library services of SAS/CONNECT provide access to remote data
libraries as if they were stored locally. The data moves through the network only as thelocal program requests it. A copy of the data is not written to the local files system, andthe data must pass through the network on subsequent use by the local processor. Thisallows you to maintain a single copy of your data and build applications that provideseemingly identical access to local and remote data without requiring the user to knowwhere the data resides.
The Uses of SAS/CONNECT in the SAS Intelligence Platform
Overview of the Uses of SAS/CONNECT in the SAS Intelligence Platform“Introduction to SAS/CONNECT” on page 94 explains the general capabilites that
SAS/CONNECT gives SAS programmers. This section explains how some of the SASIntelligence Platform clients and some of the SAS macros provided with the platformuse SAS/CONNECT. You must install SAS/CONNECT on the correct machines (andpossibly configure a SAS/CONNECT spawner and server) to use the following features:
� the ability of SAS Data Integration Studio and SAS Enterprise Miner to generateSAS/CONNECT code
� the ability of SAS Data Integration Studio and SAS Enterprise Miner to use gridcomputing
� the ability to promote the contents of a metadata repository from one environmentto another (for example, from a development environment to a test environment)
For more information about providing the infrastructure for these features, see thefollowing sections.
SAS/CONNECT, SAS Data Integration Studio, and SAS Enterprise MinerIf you have installed and configured SAS/CONNECT, both SAS Data Integration
Studio and SAS Enterprise Miner can generate SAS/CONNECT code as part of a job.For example, suppose that you are creating a SAS Data Integration Studio job thatprocesses a large amount of remote data. Instead of sending requests for data acrossthe network and results being returned across the network to you, the job can use SAS/CONNECT’s compute services to submit the code that does the processing to a SAS/CONNECT server running on the remote machine, as shown in the figure below.
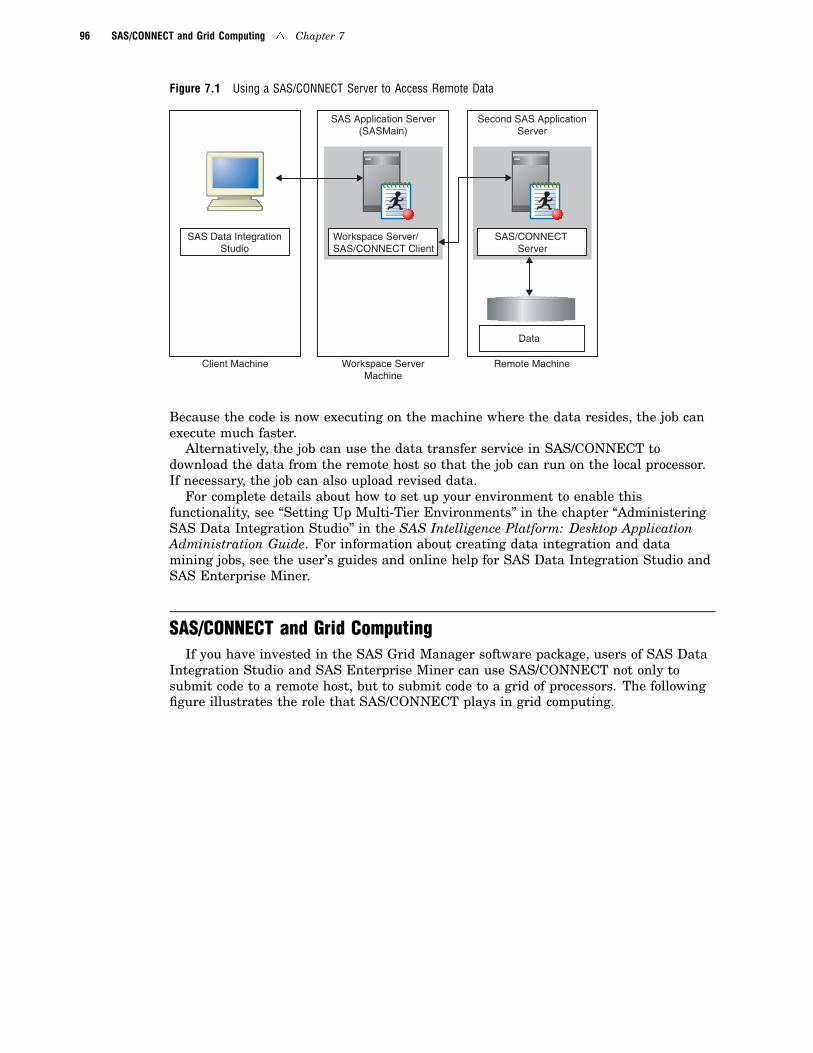
96 SAS/CONNECT and Grid Computing � Chapter 7
Figure 7.1 Using a SAS/CONNECT Server to Access Remote Data
Client Machine Workspace ServerMachine
SAS Application Server(SASMain)
Second SAS ApplicationServer
Remote Machine
Workspace Server/SAS/CONNECT Client
SAS/CONNECT Server
SAS Data IntegrationStudio
Data
Because the code is now executing on the machine where the data resides, the job canexecute much faster.
Alternatively, the job can use the data transfer service in SAS/CONNECT todownload the data from the remote host so that the job can run on the local processor.If necessary, the job can also upload revised data.
For complete details about how to set up your environment to enable thisfunctionality, see “Setting Up Multi-Tier Environments” in the chapter “AdministeringSAS Data Integration Studio” in the SAS Intelligence Platform: Desktop ApplicationAdministration Guide. For information about creating data integration and datamining jobs, see the user’s guides and online help for SAS Data Integration Studio andSAS Enterprise Miner.
SAS/CONNECT and Grid ComputingIf you have invested in the SAS Grid Manager software package, users of SAS Data
Integration Studio and SAS Enterprise Miner can use SAS/CONNECT not only tosubmit code to a remote host, but to submit code to a grid of processors. The followingfigure illustrates the role that SAS/CONNECT plays in grid computing.

SAS/CONNECT Servers � SAS/CONNECT and Metadata Promotion 97
Figure 7.2 The Role of SAS/CONNECT in Grid Computing
Grid (SAS Application Server: SASApp)
Clients: SAS DataIntegration Studio
Metadata ServerMachine
Grid Node
Grid ControlMachine
Grid Node
Grid Node
Again, the illustration is designed to give you an idea of how this type of system isset up. For complete information about installing and configuring the necessarysoftware, see “Supporting Grid Computing” on page 100.
SAS/CONNECT and Metadata PromotionSAS/CONNECT plays an important role in the area of metadata replication and
promotion. The Metadata Manager plug-in to SAS Management Console provides aReplication Wizard and a Promotion Wizard to move an entire metadata repositoryfrom one environment to another. These wizards produce jobs that use SAS macros,and the SAS macros use SAS/CONNECT code to actually move the repository data setsbetween environments.
For example, suppose that you want to move a Foundation repository from adevelopment environment to a test environment. The infrastructure that you must putin place is shown in the following figure.
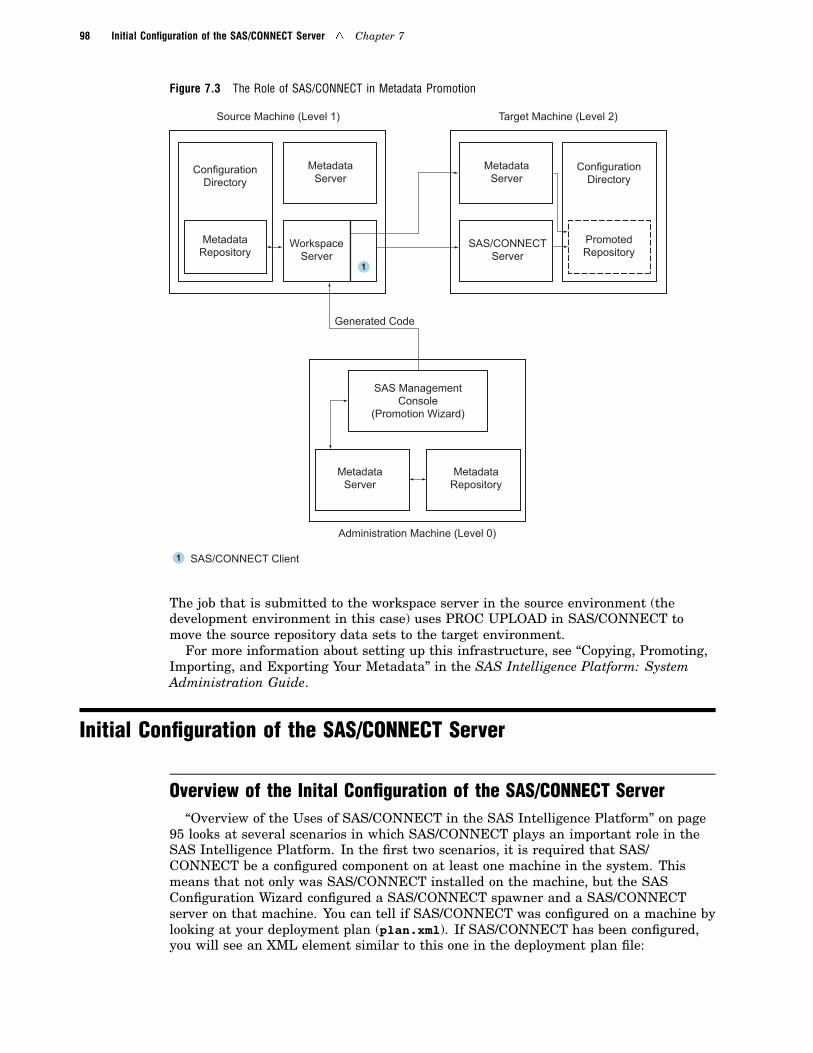
98 Initial Configuration of the SAS/CONNECT Server � Chapter 7
Figure 7.3 The Role of SAS/CONNECT in Metadata Promotion
ConfigurationDirectory
MetadataServer
WorkspaceServer
MetadataServer
SAS/CONNECTServer
ConfigurationDirectory
MetadataRepository
PromotedRepository
Source Machine (Level 1) Target Machine (Level 2)
SAS ManagementConsole
(Promotion Wizard)
MetadataServer
MetadataRepository
Generated Code
Administration Machine (Level 0)
1
1 SAS/CONNECT Client
The job that is submitted to the workspace server in the source environment (thedevelopment environment in this case) uses PROC UPLOAD in SAS/CONNECT tomove the source repository data sets to the target environment.
For more information about setting up this infrastructure, see “Copying, Promoting,Importing, and Exporting Your Metadata” in the SAS Intelligence Platform: SystemAdministration Guide.
Initial Configuration of the SAS/CONNECT Server
Overview of the Inital Configuration of the SAS/CONNECT Server“Overview of the Uses of SAS/CONNECT in the SAS Intelligence Platform” on page
95 looks at several scenarios in which SAS/CONNECT plays an important role in theSAS Intelligence Platform. In the first two scenarios, it is required that SAS/CONNECT be a configured component on at least one machine in the system. Thismeans that not only was SAS/CONNECT installed on the machine, but the SASConfiguration Wizard configured a SAS/CONNECT spawner and a SAS/CONNECTserver on that machine. You can tell if SAS/CONNECT was configured on a machine bylooking at your deployment plan (plan.xml). If SAS/CONNECT has been configured,you will see an XML element similar to this one in the deployment plan file:

SAS/CONNECT Servers � SAS/CONNECT Metadata Objects 99
<ConfiguredComponent Id="._CONNECT" Name="SAS/CONNECT Server"ProductName="SAS/CONNECT Server" ProductIdentifier="CONNECT"
</ConfiguredComponent>
The <Machine> element that contains this <ConfiguredComponent> element willindicate the machine on which SAS/CONNECT was configured.
If SAS/CONNECT was configured, the SAS Configuration Wizard will have createdthe following items:
� metadata objects representing a SAS/CONNECT spawner, a SAS/CONNECTserver, and a connection to the server
� files that are used in the management of the spawner and server
The next two sections explain what metadata objects and files were created so that youcan understand how things are currently set up and where you might need to makechanges.
SAS/CONNECT Metadata ObjectsWhen the SAS Configuration Wizard configures SAS/CONNECT, it creates three
metadata objects:
� one representing a SAS/CONNECT spawner
� one representing a SAS/CONNECT server
� and one representing a connection to the SAS/CONNECT server
You can see all of these objects in SAS Management Console. (To see the connection,you must select the server.)

100 SAS/CONNECT Metadata Objects � Chapter 7
You can view the properties of each object by right-clicking its icon and selectingProperties from the pop-up menu. A properties dialog box will be displayed.
The metadata definition for the SAS/CONNECT spawner is very simple. The mainpieces of information that it contains are the following items:
� the name of the machine on which the spawner will run.
� the name of the metadata definition for the SAS/CONNECT server that thespawner can start. This will be set to SAS-application-server - Connect Server.
This metadata definition also specifies whether sign-on scripts are allowed. By default,this value is set to Yes, as shown in the following display.
The only custom values that the SAS Configuration Wizard uses when it creates themetadata for the SAS/CONNECT server (and the associated connection) are thefollowing items:
� an authentication domain
� the name of the server on which the server will run
� a port number
However, several default values are recorded as well.The values recorded in the server object are shown in the following display:

SAS/CONNECT Servers � SAS/CONNECT Metadata Objects 101
Note that the SASCMD Option field contains the command that the spawner will use tostart server processes.
The values recorded in the connection object are shown in the following display:
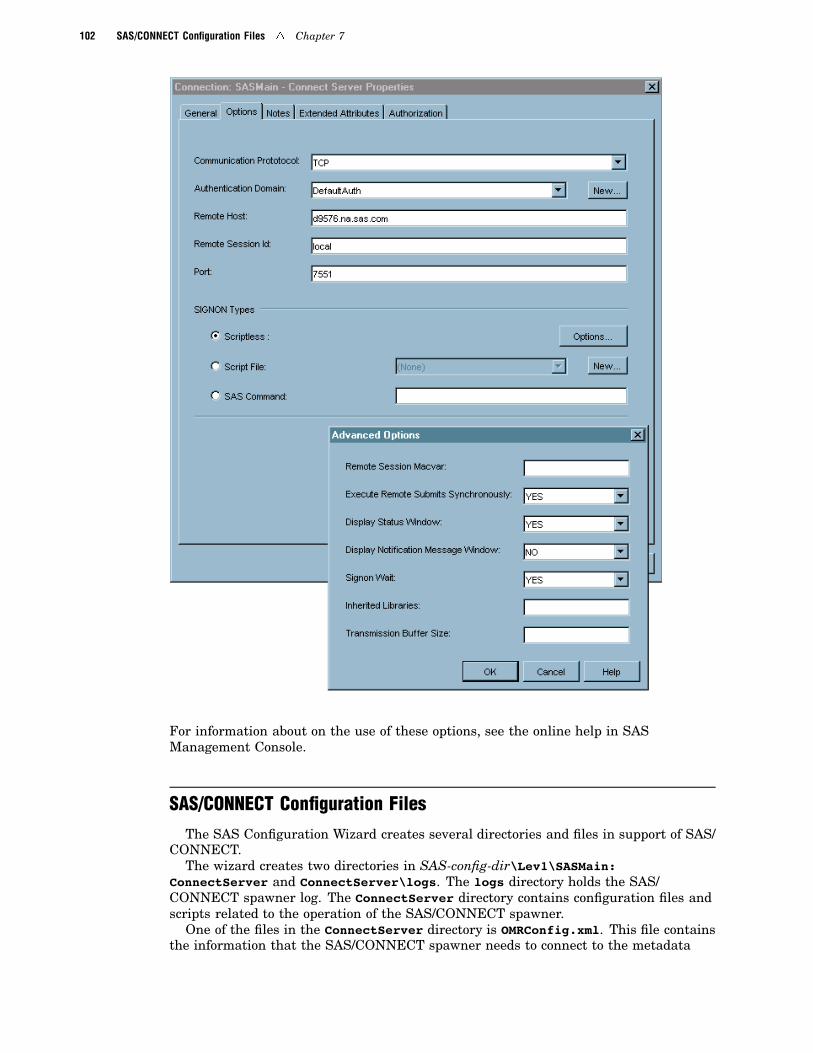
102 SAS/CONNECT Configuration Files � Chapter 7
For information about on the use of these options, see the online help in SASManagement Console.
SAS/CONNECT Configuration Files
The SAS Configuration Wizard creates several directories and files in support of SAS/CONNECT.
The wizard creates two directories in SAS-config-dir\Lev1\SASMain:ConnectServer and ConnectServer\logs. The logs directory holds the SAS/CONNECT spawner log. The ConnectServer directory contains configuration files andscripts related to the operation of the SAS/CONNECT spawner.
One of the files in the ConnectServer directory is OMRConfig.xml. This file containsthe information that the SAS/CONNECT spawner needs to connect to the metadata

SAS/CONNECT Servers � Change the Logging Level of the SAS/CONNECT Spawner 103
server so that it can read the information it needs to start a SAS/CONNECT server.The file contains such information as:
� the name of the machine on which the metadata server is running� the TCP/IP port on which the metadata server is listening� the authentication domain to which the metadata server belongs� credentials that can be authenticated by the metadata server (those of the SAS
Trusted User)� the name of the metadata repository that contains the definition of the SAS/
CONNECT server
The ConnectServer directory also contains a script that can be used to start the SAS/CONNECT spawner: ConnectServer.extenstion. (Note that on Windows systems, thespawner usually runs as a service, so there is no need to use the script for that purpose.)
In addition, the configuration wizard writes SAS/CONNECT related scripts to theapplication server directory, SASMain or SASApp. These are the scripts that the spawneruses to start a SAS/CONNECT server process. On Windows systems, there are threescripts:
� sasconnect.bat, which is the value of the start command stored in the metadatadefinition for the SAS/CONNECT server. This script calls sas.bat.
� sas.bat, which calls sas_internal.bat.� sas_internal.bat, which actually starts the server. The command used to start
the server refers to the configuration file sasv9.cfg, which is also used by manyof the other servers.
On UNIX systems, there is no sas_internal.sh script. The script sas.sh starts theSAS/CONNECT server.
Change the Logging Level of the SAS/CONNECT SpawnerBy default, the SAS/CONNECT spawner does not write much information to its log
file. To debug SIGNON problems, you may need to change the logging mode to verbose.For information on how to perform this task, see “Enabling Increased Logging for theSAS/CONNECT Spawner” in the chapter “Administering Logging for the SAS ObjectSpawner, SAS Workspace Server, SAS Stored Process Server, and SAS/CONNECTServer” in the SAS Intelligence Platform: System Administration Guide.

104

105
C H A P T E R
8The Batch Servers
Overview of SAS Batch Servers 105The SAS Data Step Batch Server 106
The SAS Java Batch Server 107
For Further Information 108
Overview of SAS Batch ServersBatch servers are part of the SAS Intelligence Platform’s scheduling system. They
are metadata objects that store information about an executable that the schedulingserver can use to run scheduled tasks. For example, when a SAS Data IntegrationStudio job is scheduled, the following things happen:
� The name of the SAS program that represents the job is read from a deploymentdirectory.
� Information about the program that will execute the job is read from from a SASData Step Batch Server.
This information is passed to the scheduling server, which can then run the job at theappropriate time.
There are three types of batch servers:� SAS Data Step Batch Server� SAS Java Batch Server� SAS Generic Batch Server
A SAS Data Step Batch Server is used to locate a script that executes SAS programsin batch mode. Generally, these programs are jobs that are created in and deployedfrom SAS Data Integration Studio. If your deployment plan contained a schedulingcomponent, then a SAS Data Step Batch Server object will have been defined duringthe initial installation and configuration of your system. For more information on SASData Step Batch Servers, see “The SAS Data Step Batch Server” on page 106.
A SAS Java Batch Server points to a SAS-supplied Java application. Most often, thisis an application that creates a report. The SAS Configuration Wizard does notautomatically create a SAS Java Batch Server when you install your system, socreating this object is one part of enabling the scheduling of reports. See “Enabling theScheduling of Reports” in the SAS Intelligence Platform: System Administration Guidefor further information on this subject.
A SAS Generic Batch Server is not used frequently. It enables you to store the pathto a standalone command or executable that is supplied by SAS, but does not fall intoeither of the categories mentioned above.
Note: For a complete discussion of scheduling, see “SAS Scheduling Overview” inthe SAS Intelligence Platform: System Administration Guide. �
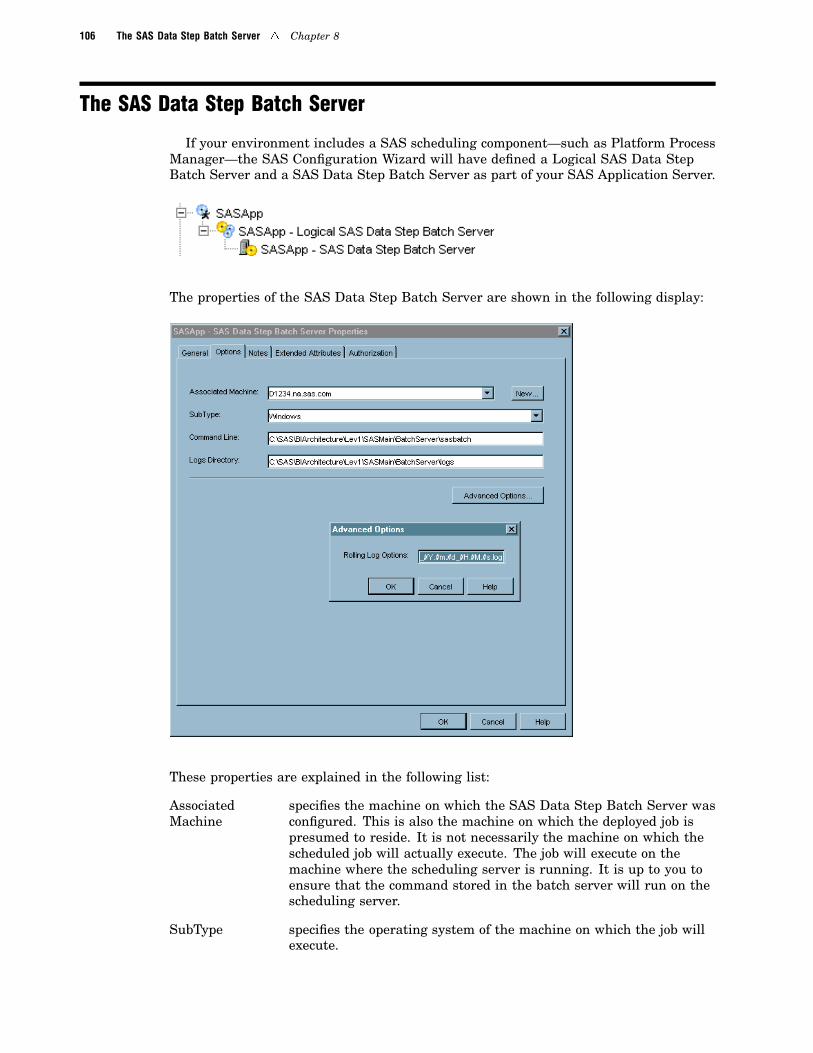
106 The SAS Data Step Batch Server � Chapter 8
The SAS Data Step Batch Server
If your environment includes a SAS scheduling component—such as Platform ProcessManager—the SAS Configuration Wizard will have defined a Logical SAS Data StepBatch Server and a SAS Data Step Batch Server as part of your SAS Application Server.
The properties of the SAS Data Step Batch Server are shown in the following display:
These properties are explained in the following list:
AssociatedMachine
specifies the machine on which the SAS Data Step Batch Server wasconfigured. This is also the machine on which the deployed job ispresumed to reside. It is not necessarily the machine on which thescheduled job will actually execute. The job will execute on themachine where the scheduling server is running. It is up to you toensure that the command stored in the batch server will run on thescheduling server.
SubType specifies the operating system of the machine on which the job willexecute.
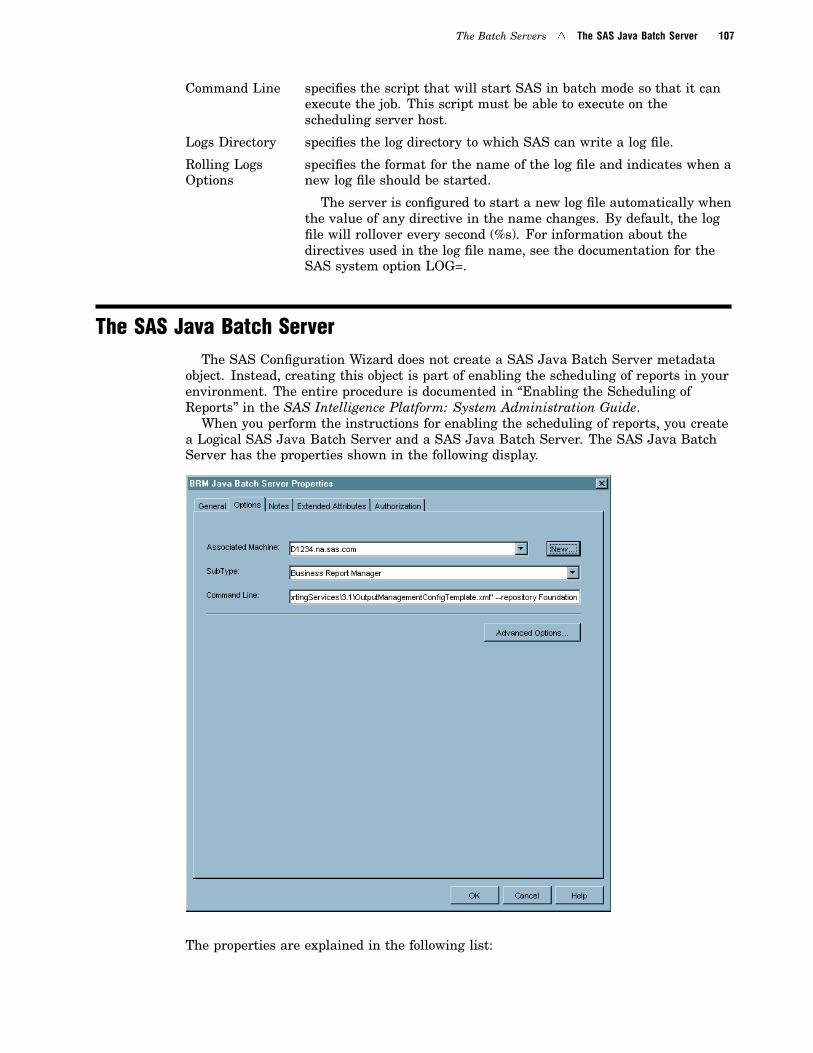
The Batch Servers � The SAS Java Batch Server 107
Command Line specifies the script that will start SAS in batch mode so that it canexecute the job. This script must be able to execute on thescheduling server host.
Logs Directory specifies the log directory to which SAS can write a log file.
Rolling LogsOptions
specifies the format for the name of the log file and indicates when anew log file should be started.
The server is configured to start a new log file automatically whenthe value of any directive in the name changes. By default, the logfile will rollover every second (%s). For information about thedirectives used in the log file name, see the documentation for theSAS system option LOG=.
The SAS Java Batch ServerThe SAS Configuration Wizard does not create a SAS Java Batch Server metadata
object. Instead, creating this object is part of enabling the scheduling of reports in yourenvironment. The entire procedure is documented in “Enabling the Scheduling ofReports” in the SAS Intelligence Platform: System Administration Guide.
When you perform the instructions for enabling the scheduling of reports, you createa Logical SAS Java Batch Server and a SAS Java Batch Server. The SAS Java BatchServer has the properties shown in the following display.
The properties are explained in the following list:
108 For Further Information � Chapter 8
AssociatedMachine
Specifies the machine on which the SAS Java Batch Server isconfigured. This is also the machine on which the reports beingscheduled must reside. It is not necessarily the machine on whichthe scheduled job actually executes. The job executes on themachine where the scheduling server is running. It is up to you toensure that the command stored in the batch server will run on thescheduling server.
SubType For scheduling reports, this property should always be set toBusiness Report Manager.
Command Line Specifies the program that is used to create a report in batch mode:outputgen. This program must be able to run on the schedulingserver host.
For Further Information
The batch servers are just one part of the SAS Intelligence Platform schedulingsystem. For information about the larger picture, see “SAS Scheduling Overview” in theSAS Intelligence Platform: System Administration Guide.
109
C H A P T E R
9SAS Grid Server
The Role of the SAS Grid Server in the SAS Intelligence Platform 109The Initial Configuration of the SAS Grid Server 109
Overview of the Initial Configuration of the SAS Grid Server 109
The Grid Server Metadata Object 110
Grid Server Configuration Files 112
The Role of the SAS Grid Server in the SAS Intelligence Platform
You will work with the SAS Grid Server only if your company has purchased the SASGrid Manager software package. If you have that software, you can build a computegrid that can execute grid-enabled jobs created in SAS Data Integration Studio or SASEnterprise Miner or grid-enabled program written by SAS programmers. Chapter 10,“Supporting Grid Computing,” on page 113 explains in detail how to set up such a grid.Briefly, however, running a job on a grid works as follows.
SAS Data Integration Studio (or SAS Enterprise Miner) submits a grid-enabled job toa workspace server that is running on a grid control machine. SAS/CONNECT andPlatform LSF are also installed on this grid control machine. Platform LSF starts SAS/CONNECT servers on the appropriate grid nodes; then, SAS/CONNECT statements inthe job cause portions of the job to be submitted to the remote SAS/CONNECT serversfor execution.
Where does the SAS Grid Server fit into this picture? It enables Platform LSF to startSAS/CONNECT servers on the grid node. It provides Platform LSF with the commandnecessary to start the servers, and it provides the script that the command refers to.
For detailed information about what happens when you configure a SAS Grid Serveron a machine, see the next section.
The Initial Configuration of the SAS Grid Server
Overview of the Initial Configuration of the SAS Grid ServerWhen you build a SAS compute grid, you configure a SAS Grid Server on the grid
control machine and on each grid node. When you configure a grid server on the gridcontrol machine, two things happen:
� A metadata object is created to represent the grid server. It is a server componentthat belongs to your SAS Application Server. For more information about thisobject, see “The Grid Server Metadata Object” on page 110.

110 The Grid Server Metadata Object � Chapter 9
� A GridServer directory is created in the configuration directory on that machine.This directory contains files and directories that are used in the operation andmanagement of the grid. For more information about the GridServer directory,see “Grid Server Configuration Files” on page 112.
When you configure a grid server on a grid node, only the GridServer directory andits contents are created. Only one metadata object is needed per environment.However, the files in the GridServer directory are needed on each grid node.
The Grid Server Metadata ObjectWhen you configure a SAS Grid Server on the grid control machine, metadata objects
representing the grid server and the associated connection are created. The grid serverbelongs to a logical grid server, which in turn belongs to your application server. Todisplay the icon for the grid server in SAS Management console, open the ServerManager, expand the application server node in the tree, and expand the logical gridserver node.
You can display the properties of the grid server by right-clicking its icon and selectingProperties from the pop-up menu. To see the connection object (in the right pane),select the grid server icon. You can view the properties of the connection by opening itsproperties dialog box.
The grid server object contains one required attribute and one commonly usedoptional attribute.

SAS Grid Server � The Grid Server Metadata Object 111
The SAS Command value is the command that Platform LSF uses to start SAS/CONNECT servers on the grid nodes. (The script sasgrid.extension is written to thegrid nodes when the SAS Grid Server is configured on those machines.) Because thissame command is used to start the SAS/CONNECT servers on all grid nodes, the pathto the configuration directory on each grid node must be the same—for example,C:\SAS\GridDIServer.
The Workload attribute is also frequently used. It affects the subset of grid nodesthat is used to execute a particular job. For full details about this subject, see“Partitioning the Grid” on page 124; however, here is how you use this value. PlatformLSF uses the concept of a resource, where a resource is a string that describes theresources on a machine or the type of work that may be performed on a machine. Forexample, specifying that a machine has the resource “DI” might mean that SAS DataIntegration Studio jobs can run on that machine. (In your LSF cluster configuration file,lsf.cluster, each machine in the cluster and its resources are listed.) If you enter thename of a Platform LSF resource in the Workload field, that workload/resource becomesavailable to users of SAS Data Integration Studio. Users of that application can creategrid-enabled jobs and give those jobs a Grid workload specification (the name of aworkload/resource). If the value of that specification matches a Platform LSF resource,the job is executed only on the machines where that resource has been defined.

112 Grid Server Configuration Files � Chapter 9
Grid Server Configuration FilesWhen you configure a grid server on a grid control machine or a grid node, a
GridServer directory is created on the machine. This directory contains two items:
� One is the script sasgrid.extension. This is the script that Platform LSF calls tostart a SAS/CONNECT server on that machine.
� The other is a logs directory. By default, no program writes a log file to thisdirectory. However, you can change the command used to start the SAS/CONNECT server so that the server writes a log file to this directory.

113
C H A P T E R
10Supporting Grid Computing
Overview of Supporting Grid Computing 115Introduction to Grid Computing 115
Architecture of a Data-Integration Grid System 115
Topics Covered in This Chapter 117
Installing and Configuring the Required Software 117
Overview of Installation and Configuration 117Architecture of a Grid System 117
Metadata Server Machine 117
Grid Control Machine 118
Other Grid Nodes 119
Client Machines 119
Pre-Installation Tasks 120Overview of Pre-installation Tasks 120
System Requirements 120
Configuration Directory 120
User Accounts 121
Platform Computing Software 121Basic Configuration of the Grid 121
Overview of Configuring the Grid 121
Tasks Performed by the LSF Administrator 121
Tasks Performed by the Users Who Will Run Jobs on the Grid 123
Verifying That the Grid Is Working 123Advanced Configuration Tasks 123
Overview of Advanced Configuration Tasks 123
Partitioning the Grid 124
Overview of Partitioning the Grid 124
Add a Resource to the lsf.shared File 124
Configure the Resource in the lsf.cluster File 124Update the Metadata for the SAS Grid Server 125
Update the Metadata for the Loop Transformation 125
Changing the Number of LSF Job Slots 126
Defining a Central Deployment Directory 127
Overview of Defining a Central Deployment Directory 127Create the SASEnvironment Directory Structure 127
Create a New Deployment Directory in SAS Management Console 128
Use the New Deployment Directory from SAS Data Integration Studio 128
Troubleshooting 128
Deadlock 128Resources on Remote Machines Cannot Be Accessed 129
LSF Cannot Start SAS/CONNECT Remote Sessions (Windows) 130
Improving Performance 130

114 Contents � Chapter 10
Overview of Improving Performance 130Short-Running Jobs 130
Contention for Data 131
Partitioning Your Data and Moving It to Your Grid Nodes 132
Grid Manager Plug-in 132
Overview of Grid Manager Plug-in 132Monitoring Jobs 133
Terminating Jobs 133
Supporting Grid Computing � Architecture of a Data-Integration Grid System 115
Overview of Supporting Grid Computing
Introduction to Grid ComputingGrid computing has become an important technology for organizations that:� have long-running applications that can benefit from parallel execution� want to leverage existing IT infrastructure to optimize compute resources and
manage data and computing workloads
SAS applications that perform many replicate runs of the same fundamental task, orperform independent tasks against the same input data source, can often benefit from agrid environment. In addition, enterprise grids provide a virtualized pool of resourcesthat enable multiple SAS applications to perform more efficiently through dynamicresource allocation and prioritization.
Grid computing is not a new concept to SAS. In fact, SAS has supported grid startingwith SAS 8.2 and the parallel processing capabilities of SAS/CONNECT. More recently,SAS has introduced enhanced support for grid computing by providing grid automationwithin several of the SAS products, as well as more dynamic resource basedload-balancing capabilities and monitoring. SAS Data Integration Studio users, SASEnterprise Miner users, and SAS programmers developing SAS applications can allbenefit from these enhanced grid capabilities.
This chapter presents a typical architecture for a SAS ETL data-integrationenvironment. Details are provided for the installation and configuration of the softwareand metadata components necessary to set up an data-integration grid environment.While the focus of this chapter is a data-integration grid, most of the informationpresented here applies to setting up a grid architecture to support any type of SASapplication in a grid environment.
Architecture of a Data-Integration Grid SystemThe following figure shows the typical architecture of an instance of the SAS
Intelligence Platform that contains a computing grid. In this example, the grid is beingused to run SAS Data Integration Studio jobs.
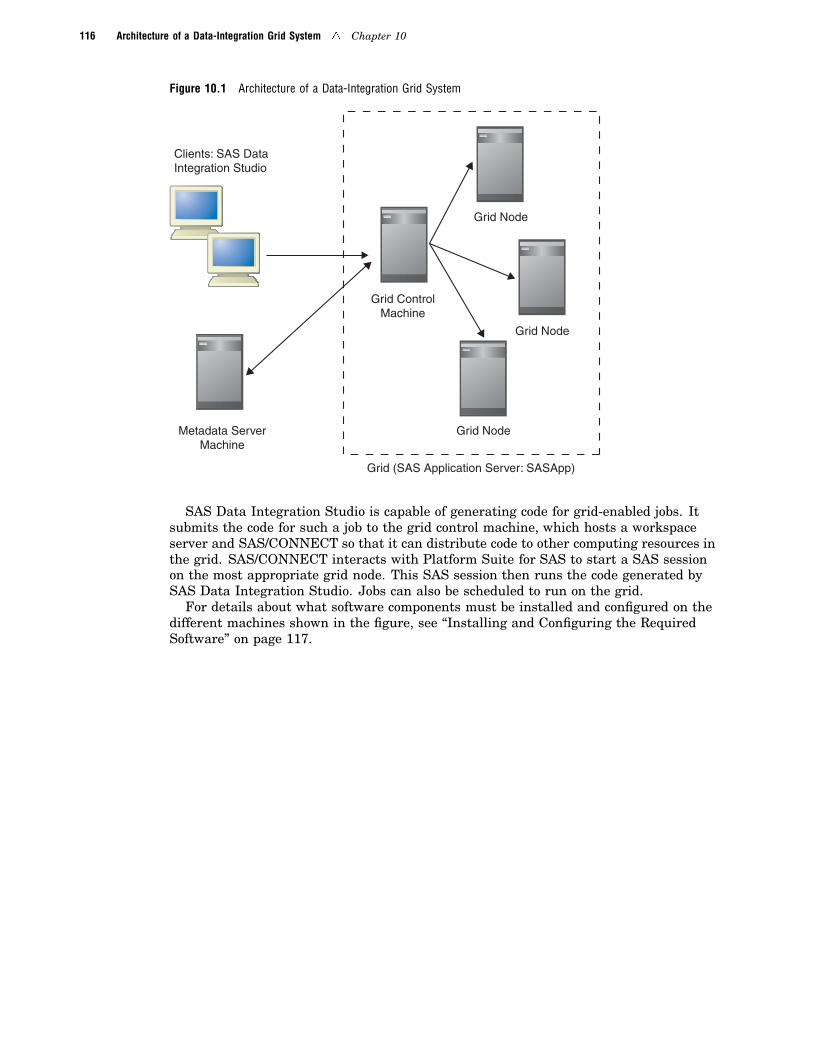
116 Architecture of a Data-Integration Grid System � Chapter 10
Figure 10.1 Architecture of a Data-Integration Grid System
Grid (SAS Application Server: SASApp)
Clients: SAS DataIntegration Studio
Metadata ServerMachine
Grid Node
Grid ControlMachine
Grid Node
Grid Node
SAS Data Integration Studio is capable of generating code for grid-enabled jobs. Itsubmits the code for such a job to the grid control machine, which hosts a workspaceserver and SAS/CONNECT so that it can distribute code to other computing resources inthe grid. SAS/CONNECT interacts with Platform Suite for SAS to start a SAS sessionon the most appropriate grid node. This SAS session then runs the code generated bySAS Data Integration Studio. Jobs can also be scheduled to run on the grid.
For details about what software components must be installed and configured on thedifferent machines shown in the figure, see “Installing and Configuring the RequiredSoftware” on page 117.
Supporting Grid Computing � Architecture of a Grid System 117
Topics Covered in This ChapterThe remainder of this chapter provides the following information:
� “Installing and Configuring the Required Software” on page 117 explains whatsoftware needs to be installed and configured on each machine in the system andthe pre-installation tasks that you must perform before installing this software.
� “Basic Configuration of the Grid” on page 121 discusses the configuration of thePlatform Computing software that you must perform manually, after running theSAS Configuration Wizard, to make the grid functional.
� “Verifying That the Grid Is Working” on page 123 explains how you can run a jobthat is supplied by SAS on the grid in order to make sure that the grid is workingproperly.
� “Advanced Configuration Tasks” on page 123 explains how to partition the gridinto subgrids, how to optimize the number of jobs that can run on a processor, andhow to set up a central deployment directory for scheduled jobs.
� “Troubleshooting” on page 128 explains how to solve problems that you mightencounter while setting up your grid.
� “Improving Performance” on page 130 provides some tips for making jobs run asefficiently as possible.
� “Grid Manager Plug-in” on page 132 discusses a SAS Management Console plug-incalled Grid Manager that you can use to monitor the runtime workload on yourgrid.
Installing and Configuring the Required Software
Overview of Installation and ConfigurationInstalling and configuring an instance of the SAS Intelligence Platform that contains
a grid of computing nodes is really no different from installing the platform without agrid. As usual, you should install any third-party products, including your PlatformSuite for SAS software, before you install and configure your SAS software. You canthen use the SAS Software Navigator and the SAS Configuration Wizard to install andconfigure the SAS software on each machine in your system. You can find informationabout both installing Platform Suite for SAS software and running the SAS installationand configuration tools in the SAS Intelligence Platform: Installation Guide.
However, because grid enablement requires the installation and configuration of anumber of components, the upcoming subsections discuss the following topics:
� which components will be installed and configured on each machine in the system
� which requirements must be met before you begin the installation
Architecture of a Grid System
Metadata Server Machine
First, you install software on the metadata server machine.

118 Architecture of a Grid System � Chapter 10
Figure 10.2 Software Installed on the Metadata Server Machine
Installed Components: SAS Foundation Base SAS SAS Management Console Grid Manager Plug-in for SAS Management Console
Configured Components: Metadata Server Workspace Server
Metadata ServerMachine
When you configure the metadata server on this machine, you create your foundationmetadata repository. As you create metadata objects in subsequent steps of theinstallation, those objects are stored in this repository.
A workspace server is also configured on this machine. It is a component of the SASApplication Server named SASMain. This workspace server is not part of the grid, butcan be used to run SAS DI Studio jobs or to execute metadata-promotion code.
Note: In the recommended configuration, the metadata server machine is not part ofthe grid. However, it is possible to put the metadata server on the grid control machine.You need a custom deployment plan to do this. In addition, this change will affect theway in which you configure Platform LSF. �
Grid Control MachineNext, you install software on the grid control machine.
Figure 10.3 Software Installed on the Grid Control Machine
Grid Control Machine
Installed Components: Platform Process Manager and Platform LSF Platform Grid Management Service SAS Foundation Base SAS SAS Integration Technologies SAS/CONNECT SAS Management Console Grid Manager Plug-in for SAS Management Console
Configured Components: Platform Process Manager Server Grid Monitoring Server SAS Application Server SAS Data Step Batch Server SAS Grid Server Workspace Server SAS/CONNECT Server Object Spawner SAS/CONNECT Spawner
You create metadata objects that represent a number of servers when you configurethis machine:
� The Platform Process Manager Server enables you to schedule jobs in the grid.
� The Grid Monitoring Server enables you to use the Grid Manager in SASManagement Console to monitor the load on the nodes in the grid.
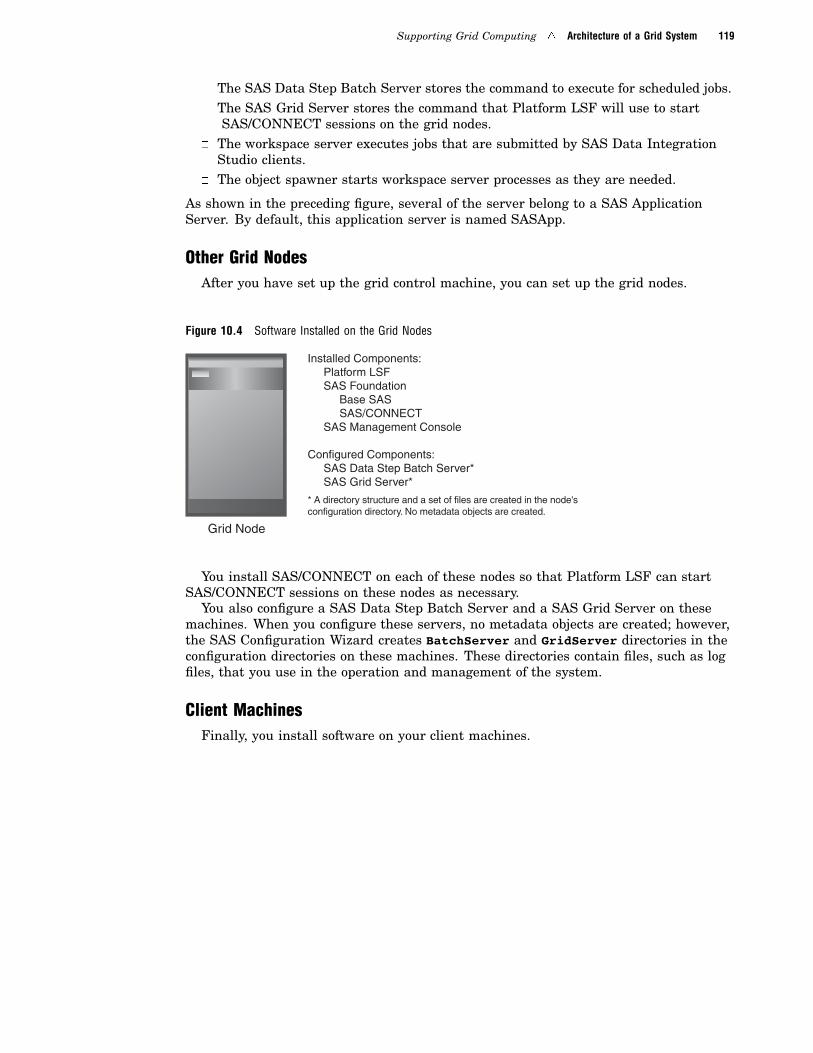
Supporting Grid Computing � Architecture of a Grid System 119
� The SAS Data Step Batch Server stores the command to execute for scheduled jobs.� The SAS Grid Server stores the command that Platform LSF will use to start
SAS/CONNECT sessions on the grid nodes.� The workspace server executes jobs that are submitted by SAS Data Integration
Studio clients.� The object spawner starts workspace server processes as they are needed.
As shown in the preceding figure, several of the server belong to a SAS ApplicationServer. By default, this application server is named SASApp.
Other Grid NodesAfter you have set up the grid control machine, you can set up the grid nodes.
Figure 10.4 Software Installed on the Grid Nodes
Installed Components: Platform LSF SAS Foundation Base SAS SAS/CONNECT SAS Management Console
Configured Components: SAS Data Step Batch Server* SAS Grid Server*
* A directory structure and a set of files are created in the node's configuration directory. No metadata objects are created.
Grid Node
You install SAS/CONNECT on each of these nodes so that Platform LSF can startSAS/CONNECT sessions on these nodes as necessary.
You also configure a SAS Data Step Batch Server and a SAS Grid Server on thesemachines. When you configure these servers, no metadata objects are created; however,the SAS Configuration Wizard creates BatchServer and GridServer directories in theconfiguration directories on these machines. These directories contain files, such as logfiles, that you use in the operation and management of the system.
Client MachinesFinally, you install software on your client machines.

120 Pre-Installation Tasks � Chapter 10
Figure 10.5 Software Installed on Client Machines
Clients
Installed Components: SAS Data Integration Studio SAS Management Console Grid Manager Plug-in for SAS Management Console
Pre-Installation Tasks
Overview of Pre-installation TasksFor complete information about the tasks that you must perform before installing
your SAS software, see the SAS Intelligence Platform: Installation Guide. Theremainder of this section discusses the following topics:
� two special system requirements for installations that include a grid� the need for the SAS configuration directory to be located in the same place on
each grid node� some other requirements that have a direct bearing on grid computing
System RequirementsThere are two main system requirements:� First, if you are using a Windows machine as the grid control machine, that
system must be running a server-class operating system like Windows 2003Server. Because all of the nodes in the grid need to communicate with the controlmachine, it is easy to overrun the connection limit on a machine that is runningan operating system that is not server-class.
� Second, you must make sure that the machines that you have chosen to use forthe grid control machine and grid nodes provide platforms that are supported byboth Platform Computing and SAS. A machine that is running 64-bit Windows,OpenVMS for Integrity Servers, Tru64 UNIX, or z/OS cannot serve as the gridcontrol machine or a grid node.
Configuration DirectoryWhen specifying the configuration directory in the SAS Configuration Wizard, you
must use the same value for all of the nodes of your grid. This is necessary in a gridenvironment because the same grid server definition is used for all grid nodes, andspecifies how to launch a SAS session on any grid node.
For example, if your configuration directory is C:\SAS\GridDIServer, the SASConfiguration Wizard configures your grid to use the same launching command on allgrid nodes: C:\SAS\GridDIServer\Lev1\SASApp\GridServer\sasgrid.bat.
Supporting Grid Computing � Tasks Performed by the LSF Administrator 121
User AccountsFor a complete explanation of the operating-system user accounts that you must
create before installing the SAS Intelligence Platform, see the SAS IntelligencePlatform: Installation Guide. This section discusses the user accounts that relatespecifically to grid computing:
� If you will be installing any part of the Platform Suite for SAS on a Windowssystem, you might want to create a Platform installation account. This can be alocal account on each machine or a domain account. You must log on as this userwhen you install the Platform software on each Windows system. This user mustbe a local administrator on each of the Windows systems and must have the userright “Act as part of the operating system” on Windows NT and Windows 2000systems.
� You must create an account for an LSF Administrator (lsfadmin). The LSFAdministrator is the owner of the LSF configuration and log files. In addition, thisuser has permission to edit configuration files, reconfigure the cluster, and controljobs belonging to any user. Each machine on which Platform Process Manager orPlatform LSF will run must be able to authenticate this user. In addition, onWindows systems, this user needs the user rights “Log on as a batch job” and “Actas part of the operating system.”
Note: It is also necessary to ensure that each user who submits a job to the grid canbe authenticated on each node in the grid. Local user accounts work only if each userhas an account (and the same password) on all of the nodes. Although this is notnecessarily a pre-installation task, it must be performed before the grid is madeavailable to your users. �
Platform Computing SoftwareInstallation of all third-party software is a prerequisite to installing your SAS
software. Before you begin using the SAS Software Navigator to install SAS software,you must install the appropriate components of the Platform Suite for SAS on the gridcontrol machine and on all of the grid nodes. For information about how to install thissoftware, see the SAS Intelligence Platform: Installation Guide.
Basic Configuration of the Grid
Overview of Configuring the GridThe SAS Configuration Wizard handles the majority of the configuration of your grid
for you. However, the LSF Administrator (lsfadmin) and the users who run jobs on thegrid must complete the basic configuration of the grid manually. See the instructions inthe two following subsections.
Tasks Performed by the LSF AdministratorThe LSF Administrator logs to the grid control machine and performs the tasks
described in this section.1 Edit the file LSF-install-dir\conf\lsf.shared to register the grid as an LSF
resource. Open this file, and in the Resource section, add a line similar to thethird line in the following example:

122 Tasks Performed by the LSF Administrator � Chapter 10
Begin ResourceRESOURCENAME TYPE INTERVAL INCREASING DESCRIPTION #Keywords
SASApp Boolean () () (Windows)
By default, the resource name is the name of the SAS application server thatcontains your SAS Grid Server. (If your grid control machine also hosts yourmetadata server, this application server name is SASMain.) This name is casesensitive. The description, of course, can vary.
2 Edit the file LSF-install-dir\conf\lsf.cluster.cluster-name(lsf.cluster.sas_cluster, by default) to indicate which machines, includingthe grid control machine, are part of the grid. Do this by editing a line in the Hostsection of the file for each machine in the grid, as shown in the following example:
Begin HostHOSTNAME model type server rlm mem swp RESOURCES #KeywordsD1234 ! NTX86 1 - - - (nt SASApp)D1235 ! NTX86 1 - - - (nt SASApp)
Note that each grid node is being declared part of the resource SASApp (casesensitive).
The following fields are required:
HOSTNAME the name of the grid node.
model a model name chosen from the HostModel section oflsf.shared, or an exclamation point (!). An exclamation pointindicates that the model is to be detected by the LoadInformation Manager (LIM) running on the host.
type a host type chosen from the HostType section of lsf.shared oran exclamation point.
RESOURCES a set of one or more strings defined in the Resource section oflsf.shared. One of the resources must be the name of theSAS application server. Normally, this is SASApp; however, ifyour grid control machine also hosts your metadata server, thename is SASMain.
For more information about editing lsf.cluster.cluster-name, see thePlatform LSF Reference, which is available from your Platform Computing CDs.
3 On Windows systems, edit the file LSF-install-dir\etc\lsf.conf, if necessary.Look for a line like the following one:
LSF_USER_DOMAIN=domain-name
If a domain name is specified, remove it and save the file.4 If the machines in your grid are Windows machines, reboot the grid control
machine and then reboot all of the other machines in the grid.5 Issue the command lsadmin reconfig in order to restart LIMs on all of the hosts
in the cluster. Note that restarting the LIMs can take a little time. Do not proceedto the next step until this step is complete.
6 Issue the command badmin reconfig to dynamically reconfigure LSF. If thiscommand fails, the preceding step might not have completed. Wait a minute andtry the command again.

Supporting Grid Computing � Overview of Advanced Configuration Tasks 123
Tasks Performed by the Users Who Will Run Jobs on the GridIf the grid control machine is a Windows system, all users who will submit jobs must
register their passwords with LSF. LSF uses these passwords to start jobs on behalf ofthe users. To register a password, the user should follow these steps:
1 At a Command Prompt on any machine in the grid, enter the command lspasswd.2 Enter your password when you are prompted for it.
At this point, the basic configuration of your grid is complete, and you should be ableto verify that the grid is working as explained in “Verifying That the Grid Is Working”on page 123.
Verifying That the Grid Is WorkingIt is a good idea to quickly verify that the grid is working properly. You can do this
by running the short SAS program referred to in this section.On UNIX systems, make sure that you have set the environment variable
LSF_SERVERDIR before you run this program. To set the variable, log on to the LSFmaster host as root, and issue the appropriate command:
� For csh or tcsh: % source LSF-install-dir/conf/cshrc.lsf
� For sh, ksh, or bash: $ . LSF-install-dir/conf/profile.lsf
1 Make sure that no one else is using the grid. Otherwise, the program might notfinish, because it requires all job slots to be free.
2 Open the SAS Editor (by starting SAS).3 Cut and paste into the editor the code at http://support.sas.com/rnd/
scalability/grid/gridfunc.html#testprog.
4 Submit the program by selecting . You are prompted for the informationneeded to connect to the metadata server: a host name, a port number, a user ID,and a password. Supply this information so that the program can run.
Follow the progress of the program in the Grid Manager. Make sure that SASsessions are started on all of the grid nodes and that multiple sessions are startedon any nodes that have multiple CPUs.
Note: There may be some delay as jobs are submitted to the grid nodes. �
5 After the program finishes, check the log file. The value of the variable rc shouldbe 0.
If this program does not write the expected information to the log, contact TechnicalSupport for information about how to diagnose your problem.
Advanced Configuration Tasks
Overview of Advanced Configuration Tasks“Basic Configuration of the Grid” on page 121 discusses the configuration tasks that
you must perform to make your system functional. This section discusses some further

124 Partitioning the Grid � Chapter 10
configuration that you might want to perform, depending on who is using the grid, whattypes of jobs are running on the grid, and whether jobs are being scheduled to run onthe grid.
Partitioning the Grid
Overview of Partitioning the GridYou can partition a grid so that different portions of the grid are allocated to specific
types of workload. Administrators can partition the grid by performing the followingtasks:
� The LSF Administrator defines a resource that includes a subset of the machinesin the grid.
� A SAS administrator updates the metadata for the SAS Grid Server so that itcontains the name of the LSF resource.
In SAS Data Integration Studio, users can specify the LSF resource in the propertiesfor a Loop Transformation in a SAS Data Integration Studio job. When the job issubmitted for execution, it is submitted to one or more machines that are specified inthe resource.
Note: An LSF resource is called a workload in the SAS metadata. �
Add a Resource to the lsf.shared FileThe LSF Administrator performs these steps to add a resource to the lsf.shared
file. Later, in another configuration file, the LSF Administrator associates this resourcewith a subset of the machines in the grid.
1 Log on to the grid control machine as the LSF Administrator.2 Add a resource to the Resource section of the lsf.shared file. Specify at least a
name and a brief description of the resource.3 Save your changes and close the file.
In the following Resource section example, the name of the new resource is ETL.
Begin ResourceRESOURCENAME TYPE INTERVAL INCREASING DESCRIPTIONDI Boolean () () (DI_Workload)End Resource
For details about the syntax for resources in the lsf.shared file, see Platform LSFReference. For general information about adding resources to an LSF cluster, seeAdministering Platform LSF.
Configure the Resource in the lsf.cluster FileAfter a resource has been added to the lsf.shared file, the LSF Administrator
performs these steps to associate the resource with a subset of machines in the grid.
1 Log on to the grid control machine as the LSF Administrator.2 Locate the entries for the grid machines in the Host section of the
lsf.cluster.sas_cluster file.
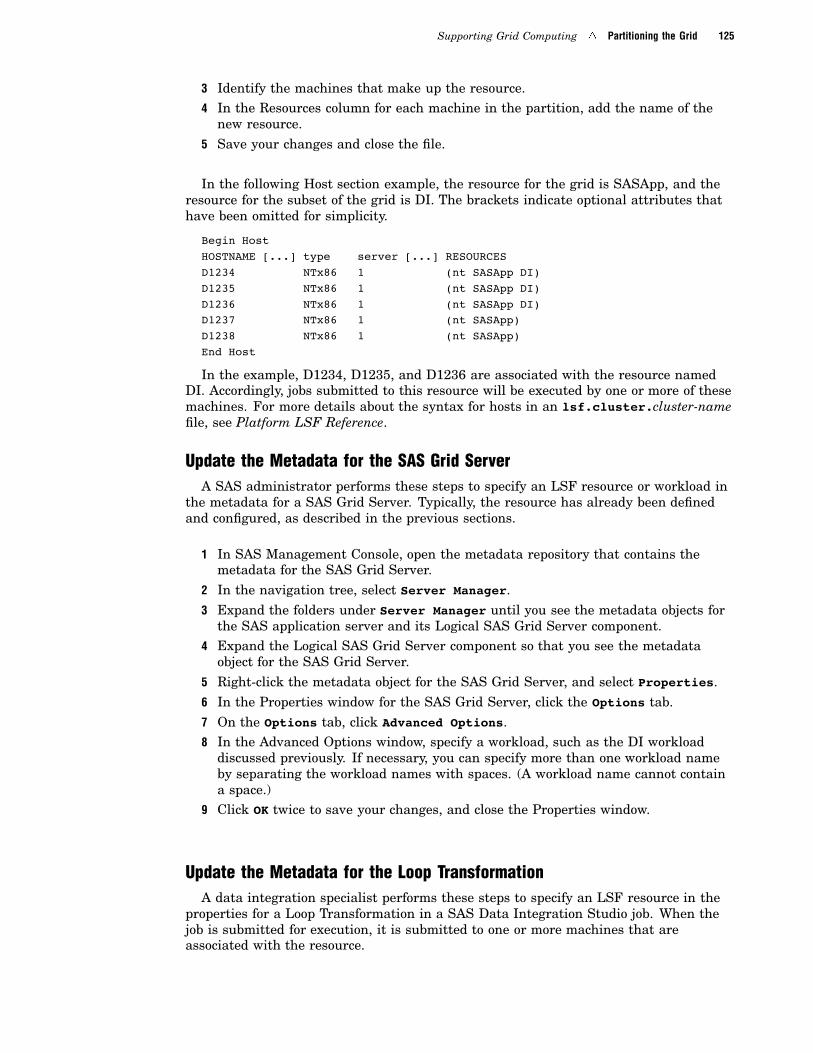
Supporting Grid Computing � Partitioning the Grid 125
3 Identify the machines that make up the resource.4 In the Resources column for each machine in the partition, add the name of the
new resource.5 Save your changes and close the file.
In the following Host section example, the resource for the grid is SASApp, and theresource for the subset of the grid is DI. The brackets indicate optional attributes thathave been omitted for simplicity.
Begin HostHOSTNAME [...] type server [...] RESOURCESD1234 NTx86 1 (nt SASApp DI)D1235 NTx86 1 (nt SASApp DI)D1236 NTx86 1 (nt SASApp DI)D1237 NTx86 1 (nt SASApp)D1238 NTx86 1 (nt SASApp)End Host
In the example, D1234, D1235, and D1236 are associated with the resource namedDI. Accordingly, jobs submitted to this resource will be executed by one or more of thesemachines. For more details about the syntax for hosts in an lsf.cluster.cluster-namefile, see Platform LSF Reference.
Update the Metadata for the SAS Grid ServerA SAS administrator performs these steps to specify an LSF resource or workload in
the metadata for a SAS Grid Server. Typically, the resource has already been definedand configured, as described in the previous sections.
1 In SAS Management Console, open the metadata repository that contains themetadata for the SAS Grid Server.
2 In the navigation tree, select Server Manager.3 Expand the folders under Server Manager until you see the metadata objects for
the SAS application server and its Logical SAS Grid Server component.4 Expand the Logical SAS Grid Server component so that you see the metadata
object for the SAS Grid Server.5 Right-click the metadata object for the SAS Grid Server, and select Properties.6 In the Properties window for the SAS Grid Server, click the Options tab.7 On the Options tab, click Advanced Options.8 In the Advanced Options window, specify a workload, such as the DI workload
discussed previously. If necessary, you can specify more than one workload nameby separating the workload names with spaces. (A workload name cannot containa space.)
9 Click OK twice to save your changes, and close the Properties window.
Update the Metadata for the Loop TransformationA data integration specialist performs these steps to specify an LSF resource in the
properties for a Loop Transformation in a SAS Data Integration Studio job. When thejob is submitted for execution, it is submitted to one or more machines that areassociated with the resource.
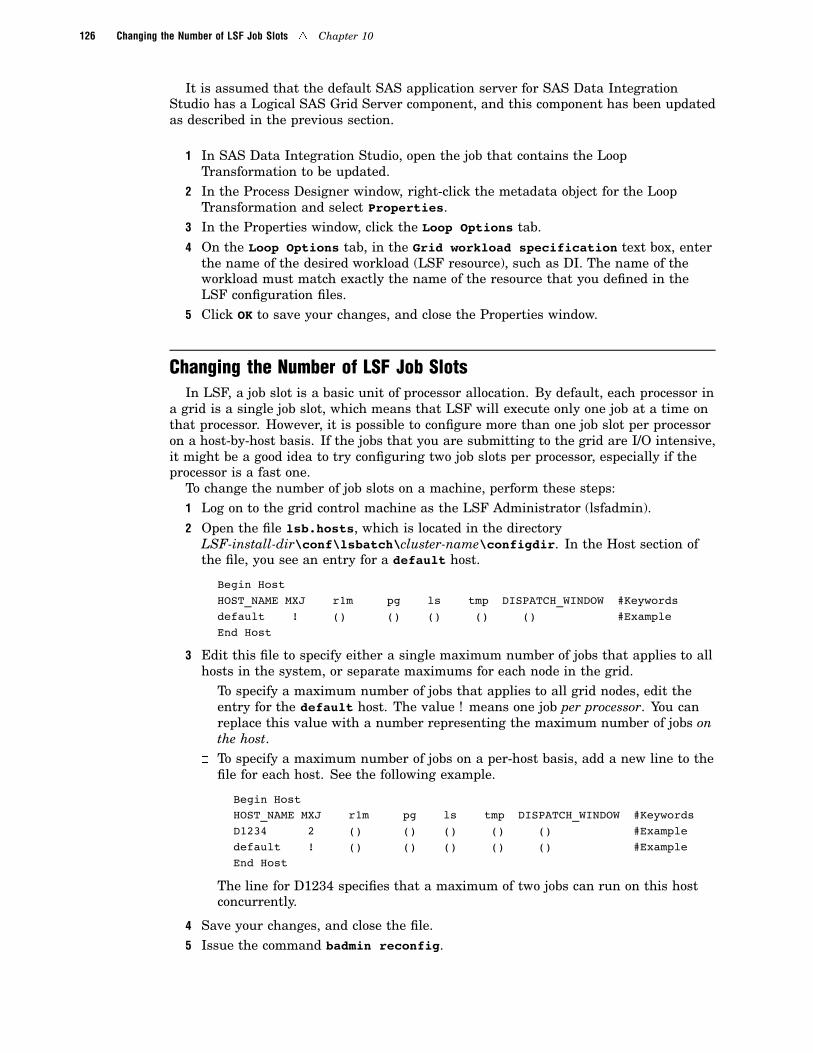
126 Changing the Number of LSF Job Slots � Chapter 10
It is assumed that the default SAS application server for SAS Data IntegrationStudio has a Logical SAS Grid Server component, and this component has been updatedas described in the previous section.
1 In SAS Data Integration Studio, open the job that contains the LoopTransformation to be updated.
2 In the Process Designer window, right-click the metadata object for the LoopTransformation and select Properties.
3 In the Properties window, click the Loop Options tab.4 On the Loop Options tab, in the Grid workload specification text box, enter
the name of the desired workload (LSF resource), such as DI. The name of theworkload must match exactly the name of the resource that you defined in theLSF configuration files.
5 Click OK to save your changes, and close the Properties window.
Changing the Number of LSF Job SlotsIn LSF, a job slot is a basic unit of processor allocation. By default, each processor in
a grid is a single job slot, which means that LSF will execute only one job at a time onthat processor. However, it is possible to configure more than one job slot per processoron a host-by-host basis. If the jobs that you are submitting to the grid are I/O intensive,it might be a good idea to try configuring two job slots per processor, especially if theprocessor is a fast one.
To change the number of job slots on a machine, perform these steps:1 Log on to the grid control machine as the LSF Administrator (lsfadmin).2 Open the file lsb.hosts, which is located in the directory
LSF-install-dir\conf\lsbatch\cluster-name\configdir. In the Host section ofthe file, you see an entry for a default host.
Begin HostHOST_NAME MXJ r1m pg ls tmp DISPATCH_WINDOW #Keywordsdefault ! () () () () () #ExampleEnd Host
3 Edit this file to specify either a single maximum number of jobs that applies to allhosts in the system, or separate maximums for each node in the grid.� To specify a maximum number of jobs that applies to all grid nodes, edit the
entry for the default host. The value ! means one job per processor. You canreplace this value with a number representing the maximum number of jobs onthe host.
� To specify a maximum number of jobs on a per-host basis, add a new line to thefile for each host. See the following example.
Begin HostHOST_NAME MXJ r1m pg ls tmp DISPATCH_WINDOW #KeywordsD1234 2 () () () () () #Exampledefault ! () () () () () #ExampleEnd Host
The line for D1234 specifies that a maximum of two jobs can run on this hostconcurrently.
4 Save your changes, and close the file.5 Issue the command badmin reconfig.

Supporting Grid Computing � Defining a Central Deployment Directory 127
Defining a Central Deployment Directory
Overview of Defining a Central Deployment DirectoryIn a non-grid system, where SAS code is often executed by a single machine,
scheduled jobs are generally deployed to a special deployment directory in theconfiguration directory on that machine:config-dir\Lev1\SASMain\SASEnvironment\SASCode\Jobs. In a grid system, you needto do things differently for a couple of reasons.
� First, there is no central deployment directory in this scenario. The directorystructure mentioned previously exists on every machine in the grid.
� Second, if you declare the deployment directory on one of the grid nodes to be thedeployment directory, the other grid nodes are not likely to have access to thatdirectory.
Therefore, it’s best to create a central deployment directory on a file server that isaccessible from all of the grid nodes.
To create this central deployment directory and make it usable by SAS DataIntegration Studio developers, perform the following tasks:
� Create the SASEnvironment directory structure on a file server, or copy it from thegrid control machine.
� Use the Schedule Manager in SAS Management Console to define metadata forthe deployment directory that references this new location.
� Tell your SAS Data Integration Studio developers to deploy jobs that will be runon the grid to this directory.
The following subsections explain briefly how to perform these tasks.
Create the SASEnvironment Directory StructureTo create the deployment directory, perform these steps:1 Identify a file server that is accessible from all of the nodes in the grid.2 On that file server, create the directory structure shown in the following display, or
copy the structure from your existing grid control machine.

128 Troubleshooting � Chapter 10
Note: Only the SASEnvironment\SASCode\Jobs directory is needed for deployingscheduled jobs. However, you might also want to have a central copy of other resources,such as format catalogs and macros. �
Create a New Deployment Directory in SAS Management ConsoleTo define a new deployment directory, use SAS Management Console to perform the
following steps:1 Right-click Schedule Manager, and select Deployment Directories from the
pop-up menu. A Deployment Directories dialog box appears.2 In the Deployment Directories dialog box, choose the correct application server
from the Application Server drop-down list. Normally, you select SASApp.3 Click New to bring up the New Directory dialog box.4 In the New Directory dialog box, enter a name in the Name box and the path to the
deployment directory in the Directory box. For example, on Windows, you mightenter the directory \\server\SASEnvironment\SASCode\Jobs. Then click OK.
Note: All of the nodes in the grid must be able to access the deployment directoryusing the path you specified above. �
5 Click OK in the Deployment Directories dialog box.
At this point, you have defined a deployment directory that SAS Data IntegrationStudio developers can use.
Use the New Deployment Directory from SAS Data Integration StudioSAS Data Integration Studio developers can deploy jobs to the central deployment
directory just as they deploy jobs to any other deployment directory. Make sure thatyou supply these developers with the name of the application server that contains theSAS Grid Server (normally SASApp) and the path to the central deployment directory.
Troubleshooting
DeadlockThe following display shows a set of related SAS Data Integration Studio jobs. The
first loop, running over the quarters of the year, needs to run a job for each state forthat quarter.
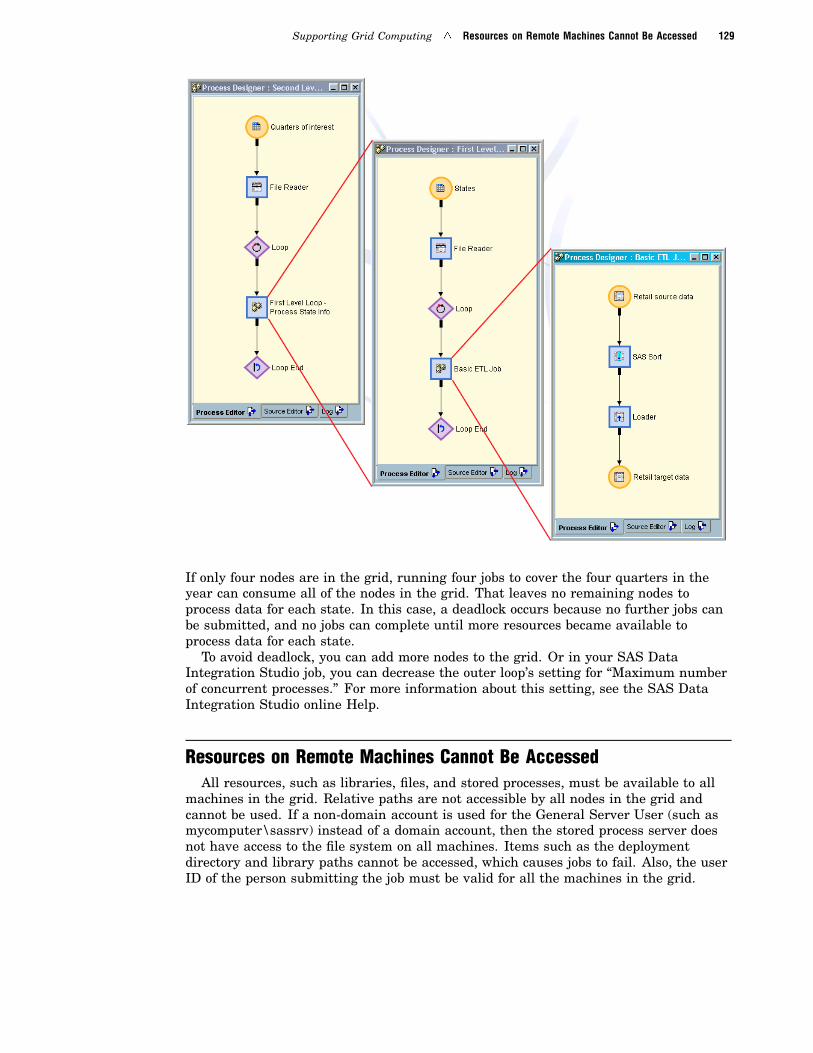
Supporting Grid Computing � Resources on Remote Machines Cannot Be Accessed 129
If only four nodes are in the grid, running four jobs to cover the four quarters in theyear can consume all of the nodes in the grid. That leaves no remaining nodes toprocess data for each state. In this case, a deadlock occurs because no further jobs canbe submitted, and no jobs can complete until more resources became available toprocess data for each state.
To avoid deadlock, you can add more nodes to the grid. Or in your SAS DataIntegration Studio job, you can decrease the outer loop’s setting for “Maximum numberof concurrent processes.” For more information about this setting, see the SAS DataIntegration Studio online Help.
Resources on Remote Machines Cannot Be AccessedAll resources, such as libraries, files, and stored processes, must be available to all
machines in the grid. Relative paths are not accessible by all nodes in the grid andcannot be used. If a non-domain account is used for the General Server User (such asmycomputer\sassrv) instead of a domain account, then the stored process server doesnot have access to the file system on all machines. Items such as the deploymentdirectory and library paths cannot be accessed, which causes jobs to fail. Also, the userID of the person submitting the job must be valid for all the machines in the grid.

130 LSF Cannot Start SAS/CONNECT Remote Sessions (Windows) � Chapter 10
LSF Cannot Start SAS/CONNECT Remote Sessions (Windows)If LSF cannot start remote sessions, you might need to make a registry change. See
the Microsoft Knowledge Base article at http://support.microsoft.com/default.aspx?scid=kb%3BEN-US%3B184802 for an explanation. Be sure to back upthe registry before attempting any modification.
Improving Performance
Overview of Improving PerformanceIf you have set up a grid, you expect your ETL and other jobs to run faster than they
would run on a single processor. However, not all jobs can benefit from running on agrid, and how much other jobs benefit from a grid can depend largely on the location ofyour data.
Short-Running JobsYou might not see an increase in speed if you execute short-running jobs (usually jobs
that do not process a great deal of data). See the following figure.

Supporting Grid Computing � Contention for Data 131
Figure 10.6 Using a Grid versus Using a Single Processor
Grid
SAS ApplicationServer
Grid Node
Grid ControlMachine
Grid Node
Grid Node
Client
Scenario B
Scenario A
Data
Client Data
It might seem that even a job that is processing a relatively small amount of datawould execute faster on three processors than on one processor. However, a certainamount of overhead takes place in Scenario B that is not necessary in Scenario A. Mostobviously, in Scenario B, SAS sessions must be started on the grid nodes and codesubmitted to those sessions. This overhead can cause a short-running job to appear toexecute more slowly on a grid than it does on a single processor.
Contention for DataAnother factor that can affect processing speed is access to data. Let’s assume that
you are running a longer job, one that is processing a lot of data. Scenario B in thepreceding figure may still be slower than Scenario A in cases in which all three SASsessions in Scenario B are reading data from the same data repository. Contentionamong the processes for access to the data can render Scenario B slower than ScenarioA. One way to address this is to have sufficient network and storage infrastructure tosupport the I/O requirements of the application.
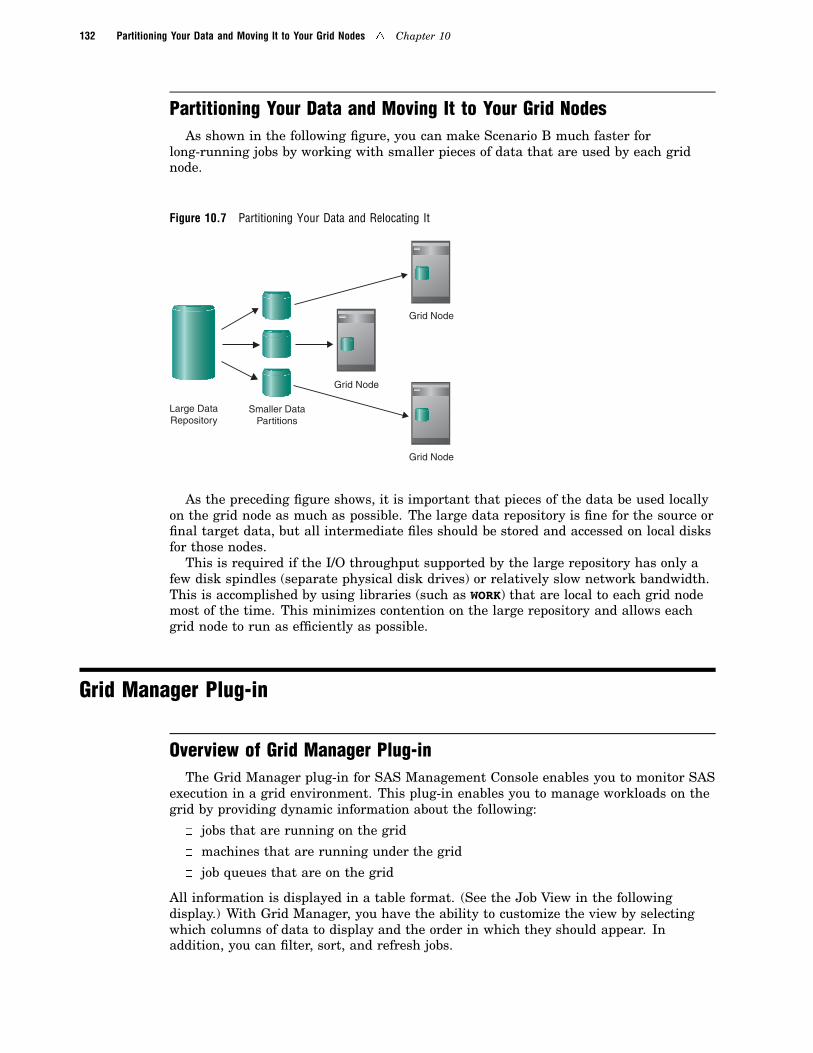
132 Partitioning Your Data and Moving It to Your Grid Nodes � Chapter 10
Partitioning Your Data and Moving It to Your Grid NodesAs shown in the following figure, you can make Scenario B much faster for
long-running jobs by working with smaller pieces of data that are used by each gridnode.
Figure 10.7 Partitioning Your Data and Relocating It
Large DataRepository
Grid Node
Grid Node
Grid Node
Smaller DataPartitions
As the preceding figure shows, it is important that pieces of the data be used locallyon the grid node as much as possible. The large data repository is fine for the source orfinal target data, but all intermediate files should be stored and accessed on local disksfor those nodes.
This is required if the I/O throughput supported by the large repository has only afew disk spindles (separate physical disk drives) or relatively slow network bandwidth.This is accomplished by using libraries (such as WORK) that are local to each grid nodemost of the time. This minimizes contention on the large repository and allows eachgrid node to run as efficiently as possible.
Grid Manager Plug-in
Overview of Grid Manager Plug-inThe Grid Manager plug-in for SAS Management Console enables you to monitor SAS
execution in a grid environment. This plug-in enables you to manage workloads on thegrid by providing dynamic information about the following:
� jobs that are running on the grid
� machines that are running under the grid
� job queues that are on the grid
All information is displayed in a table format. (See the Job View in the followingdisplay.) With Grid Manager, you have the ability to customize the view by selectingwhich columns of data to display and the order in which they should appear. Inaddition, you can filter, sort, and refresh jobs.

Supporting Grid Computing � Terminating Jobs 133
Each grid that you define must have one machine with the Platform GridManagement Service configured and running.
Monitoring JobsWhen you expand the Grid Manager node in the navigation tree, all of the grid
monitoring servers that you have defined are listed under the name of the plug-in. Toview information about the resources on a specific server, expand the server’s node inthe navigation tree. The resources for a server are grouped into three categories in thenavigation tree:
� job information� host information� queue information
Select a category to display a table that contains resource information for thecategory. Right-click on a category in the navigation tree and select Properties fromthe pop-up menu to choose which columns are displayed in the table and to choose howto filter the resource information that is displayed.
Terminating JobsNote: When using Grid Manager to terminate a job in Windows, be careful to match
the domain name, including the case, exactly.If you logged on to SAS Management Console using a user ID that has been defined
as an LSF Administrator ID, you can terminate jobs that have been submitted to theLSF servers. Users can terminate their own jobs. The LSF Administrator canterminate any job. To terminate a job, follow these steps:
1 In the selection tree, select the Job Information node.2 In the table, locate the job that you want to cancel.

134 Terminating Jobs � Chapter 10
3 Right-click any column in the row for the job and select Terminate Task from thepop-up menu.

135
A P P E N D I X
1Reference Information:Workspace and Stored ProcessServers
Object Server Parameters 135ANONYMOUSLOGINPOLICY 136
APPLEVEL 136
CLASSFACTORY 137
CLIENTENCRYPTIONLEVEL 137
DNSMATCH 137IOMLEVEL 137
JNLARRELM 138
JNLLINEMAX 138
JNLSTRMAX 138
LOGFILE 138
METAAUTOINIT | NOMETAAUTOINIT 139PELEVEL 139
PORT 139
PROTOCOL 139
SERVER 140
SERVICE 140TRUSTSASPEER 140
V8ERRORTEXT 140
Fields for the Server Definition 141
Fields for the Pooled Logical Server and Puddle Definitions 145
Fields for the Load-Balancing Logical Server Definition 146Fields for the Spawner Definition 148
Spawner Invocation Options 150
Spawner Error Messages 152
Using Telnet to Administer the Spawner 172
Connecting to a Spawner 172
Available Commands 172
Object Server ParametersAll object server parameters are applicable on the command line that starts the
server:� For servers that are started by the object spawner, the object server parameters
come from your server definition in the SAS Metadata Repository. (The serverdefinition is located under the Server Manager plug-in of SAS ManagementConsole. In the server definition, select the Options tab to locate the ObjectServer Parameters field).
� For servers that are not spawned (such as those that are run from commandscripts, those that are run as Windows services, or those that are launched by

136 ANONYMOUSLOGINPOLICY � Appendix 1
COM), you use the OBJECTSERVERPARMS SAS option to specify the objectserver parameters on the command line.
To simplify the command that is needed to invoke an IOM server, the server startupsequence can also connect back to the metadata server in order to fetch additionalinformation, including object server parameters. This feature involves use of theSERVER= and METAAUTOINIT object server parameters. The object serverparameters that can be obtained in this way have the value “Metadata, Command Line”for the “Valid for Script” attribute. These object server parameters can be specified inthe server definition in SAS Management Console. In the server definition, select theOptions tab to locate the Object Server Parameters field.
Important Note:You can fetch object server parameters from metadata as follows:
� When you start the server with a script, some object server parameters cannot beobtained from the metadata. These parameters have the value "Command LineOnly" for the "Valid for Script" attribute. These object server parameters must bespecified on the command line.
� When you start the server with a spawner, all object server parameters can beobtained from the metadata (even those that have the value "Command LineOnly" for the "Valid for Script" attribute).
Note: Object server parameters that are specified on the command line alwaysoverride object server parameters obtained from a SAS Metadata Repository. �
ANONYMOUSLOGINPOLICYValuesSupported:
DENY, RESTRICT
Valid for Script: Metadata, Command Line
Specifies whether the server permits any access at all to connections that do notsupply a user ID (in programming terms, ones that supply a zero-length user ID).
If you specify RESTRICT, then the server allows connections that do not have a userID; however, the client only has restricted access to the IServerStatus interface (usedprimarily for querying basic server status).
If you specify DENY, then the server completely disallows connections that do notprovide a user ID. The default is "restrict."
APPLEVELValuesSupported:
0, 1, 2, 3, 4
Valid for Script: Metadata, Command Line
Specifies the detail level of the trace that is written by the server application (such asthe OLAP server, the SAS Metadata Server or the SAS Stored Process Server). Thedefault value if APPLEVEL is omitted (1) enables logging at a level that is suitable fora production server; therefore, this parameter is optional. APPLEVEL=0 disables theapplication’s logging and is discouraged because it suppresses useful diagnosticinformation. Higher APPLEVEL values can invoke additional tracing. The SASMetadata Server, for example, defines additional logging levels. For details, see“Administering the Metadata Server Log” in the SAS Intelligence Platform: SystemAdministration Guide.

Reference Information: Workspace and Stored Process Servers � IOMLEVEL 137
CLASSFACTORYAlias: CLSID
ValuesSupported:
36 character class identifier
Valid for Script: Metadata, Command Line
Specifies the class ID number, which specifies the type of server to instantiate (forexample, 2887E7D7-4780-11D4-879F-00C04F38F0DB specifies a SAS Metadata Server).An IOM server exposes one top-level class through its class identifier.
By default, an IOM server hosts the Workspace class. If you want to specify analternate class to expose as the top-level class, use the classfactory option to identifythe class to IOM.
When using the SERVER= objectserverparms suboption, the classfactory does notneed to be specified because it is obtained from the logical server definition in the SASMetadata Repository.
This option is primarily used to start the SAS Metadata Server.
CLIENTENCRYPTIONLEVELAlias: CEL
ValuesSupported:
NONE, CREDENTIALS, EVERYTHING
Valid for Script: Command Line Only
Specifies the degree of encryption to use when making outbound calls. This option isused only by the bridge protocol engine.
DNSMATCHValuesSupported:
DNS– alias
Valid for Script: Command Line Only
Specifies a DNS alias that will be accepted by the server as a match for the localmachine name. In addition, the spawner replaces all instances of the DNSMATCHvalue with the local machine name in its list of servers. This option is necessary if yournetwork configuration resolves a single DNS alias to multiple machines that run SASservers.
For example: You configure SAS OLAP servers on two different machines:n1.my.org and n2.my.org. The DNS alias srv.my.org resolves to both of thesemachines, so clients can send a request to the alias and a server on one of the twomachines will receive it. To support this configuration, specify DNSMATCH=srv.my.orgin the server startup command on each machine.
Note: For Workspace Servers and Stored Process Servers, this parameter isprovided automatically when you specify the -dnsMatch spawner option. �
IOMLEVELValuesSupported:
0, 1, 2, 3
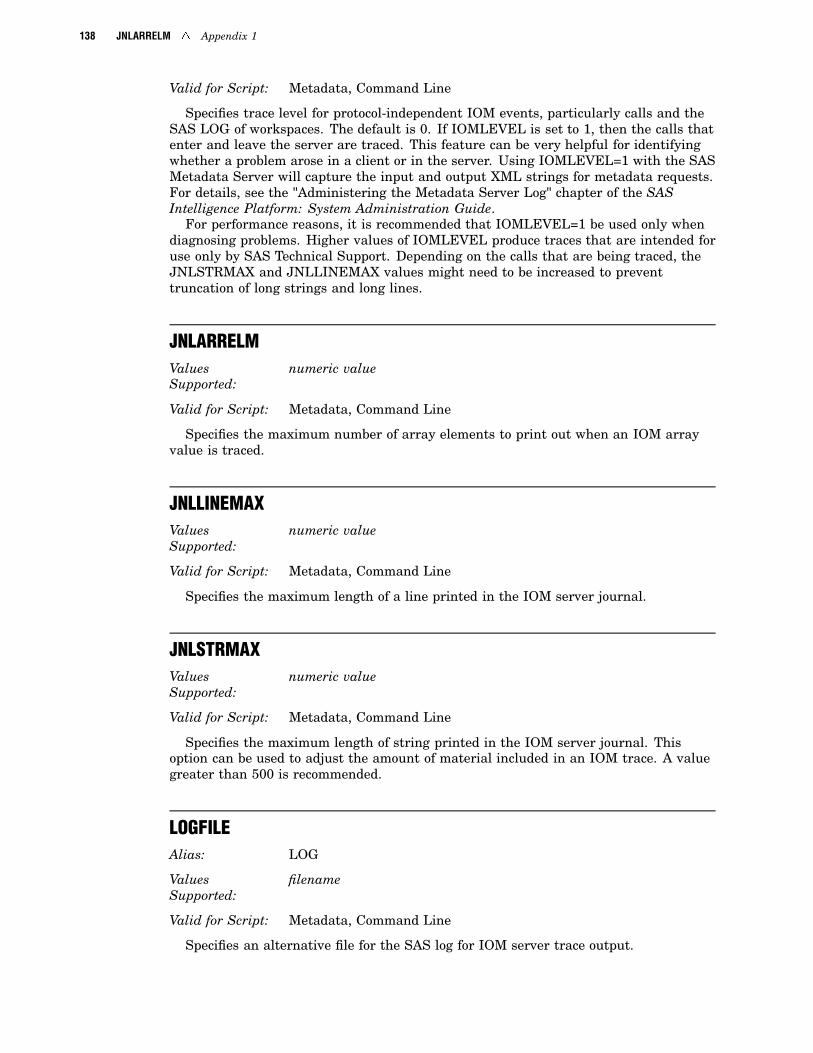
138 JNLARRELM � Appendix 1
Valid for Script: Metadata, Command Line
Specifies trace level for protocol-independent IOM events, particularly calls and theSAS LOG of workspaces. The default is 0. If IOMLEVEL is set to 1, then the calls thatenter and leave the server are traced. This feature can be very helpful for identifyingwhether a problem arose in a client or in the server. Using IOMLEVEL=1 with the SASMetadata Server will capture the input and output XML strings for metadata requests.For details, see the "Administering the Metadata Server Log" chapter of the SASIntelligence Platform: System Administration Guide.
For performance reasons, it is recommended that IOMLEVEL=1 be used only whendiagnosing problems. Higher values of IOMLEVEL produce traces that are intended foruse only by SAS Technical Support. Depending on the calls that are being traced, theJNLSTRMAX and JNLLINEMAX values might need to be increased to preventtruncation of long strings and long lines.
JNLARRELMValuesSupported:
numeric value
Valid for Script: Metadata, Command Line
Specifies the maximum number of array elements to print out when an IOM arrayvalue is traced.
JNLLINEMAXValuesSupported:
numeric value
Valid for Script: Metadata, Command Line
Specifies the maximum length of a line printed in the IOM server journal.
JNLSTRMAXValuesSupported:
numeric value
Valid for Script: Metadata, Command Line
Specifies the maximum length of string printed in the IOM server journal. Thisoption can be used to adjust the amount of material included in an IOM trace. A valuegreater than 500 is recommended.
LOGFILEAlias: LOG
ValuesSupported:
filename
Valid for Script: Metadata, Command Line
Specifies an alternative file for the SAS log for IOM server trace output.

Reference Information: Workspace and Stored Process Servers � PROTOCOL 139
Note: Using this option on a spawned server can prevent multiple servers fromrunning simultaneously because they will all try to open the same log file. It istherefore recommended that this option be used only for specific diagnostic tasks. �
Note: The user who starts the server must have execute and write permissions forthe log destination path. �
METAAUTOINIT | NOMETAAUTOINITValuesSupported:
N/A
Valid for Script: Metadata, Command Line
Specifies whether the IOM server should connect back to the SAS Metadata Serverduring startup in order to obtain additional configuration information such as objectserver parameters and pre-assigned libraries. When METAAUTOINIT is specified, theserver uses the provided META* options to connect to the SAS Metadata Server. WithNOMETAAUTOINIT, IOM server startup does not connect back to the SAS MetadataServer. The default depends on the type of server. For further details, see “Add SystemOptions to the Workspace Server Launch Command” on page 35. This option isapplicable only if you have specified your logical server with the SERVER= object serverparameter.
PELEVELValuesSupported:
0, 1, 2, 3
Valid for Script: Metadata, Command Line
Specifies trace protocol engine logic and packets. Level 3 specifies the most verboseoutput. The default is 0.
PORTValuesSupported:
TCP/IP port number
Valid for Script: Metadata, Command Line
Specifies the value for the bridge protocol engine to use as the port to start listeningfor client connections. Do not specify this option with spawned servers; it will besupplied automatically by the spawner.
PROTOCOLValuesSupported:
BRIDGE, COM, (COM, BRIDGE)
Valid for Script: Metadata, Command Line
Specifies the protocol engines to launch in server mode. Server mode indicates thatthe protocol engines will listen for client connections. If you specify (com, bridge) then amulti-user server can simultaneously support clients using different protocols. Do not

140 SERVER � Appendix 1
specify this option with spawned servers; it will be supplied automatically by thespawner.
SERVERValuesSupported:
Logical server name, OMSOBJ URI (object ID)
Valid for Script: Command Line Only
Specifies the logical server name for the IOM run-time and server application to useto locate configuration information in a SAS Metadata Repository. The SERVER=option can be used to retrieve many of the OBJECTSERVERPARMS options (includingPORT, PROTOCOL and CLASSFACTORY) from a SAS Metadata Repository.
SERVICEValuesSupported:
TCP service name
Valid for Script: Metadata, Command Line
Specifies the TCP service name (for example, from /etc/services on a UNIXsystem) for the port that the IOM Bridge protocol engine uses to listen for connectionsfrom clients. Do not specify this option with spawned servers; it will be suppliedautomatically by the spawner.
TRUSTSASPEERAlias: TSASPEER
ValuesSupported:
XML file
Valid for Script: Metadata, Command Line
Enables SAS peer sessions from IOM servers to connect as trusted peer sessions. Ifyou specify a blank or empty file, any SAS peer session can connect as a trusted peer. Ifyou specify a file that contains a list of trusted domains, SAS peer sessions are onlytrusted only if they belong to a domain that is listed in your trusted peer file.
Note: This parameter is valid only for the command that starts the SAS MetadataServer. �
V8ERRORTEXTValuesSupported:
N/A
Valid for Script: Metadata, Command Line
Indicates that the MVA components should return SAS 8 style error messagesinstead of the SAS®9 XML style error messages.

Reference Information: Workspace and Stored Process Servers � Fields for the Server Definition 141
Fields for the Server DefinitionThe server definition contains startup and connection information for an instance of
a SAS server. The server is defined using the fields listed in the following table. Foreach field, the table shows the following information:
� the name that identifies the field in SAS Management Console. Under each fieldname, the table shows the corresponding properties tab and field name in the SASManagement Console application.
� “Required” or “Optional” to indicate whether the field is required.� a definition of the field.
Table A1.1 Fields for the Server Definition
Field NameRequiredOptional Definition
Availability Timeout
In SAS Management Console:
Options � Advanced Options� Load Balancing Properties:Availability Timeout
Optional For load-balancing servers, the number ofmilliseconds to wait for a load-balancing server tobecome available. This parameter is used in thefollowing situations:
� when all servers have allocated themaximum number of clients per server
� when load balancing is waiting for a server tostart and become available for its first client
Command
In SAS Management Console:
Options � LaunchCommands: Command
Required The command used to launch SAS as an objectserver. If the SAS executable is not already in yourpath, then specify the path to sas.exe. You canalso specify additional options on the commandline. For details, see “Add System Options to theWorkspace Server Launch Command” on page 35.This field is used only for spawned servers.
Description
In SAS Management Console:
General � Description
Optional Text to summarize why this definition exists.
Authentication Domain
In SAS Management Console:
<Connection> � Options �Authentication Domain
Required The domain that is associated with a set ofcomputing resources that use the sameauthentication process. In IOM Bridge serversconfigurations, the spawner definition must havethe same authentication domain name as the serverdefinition. The spawner uses the authenticationdomain name, along with the machine name, todetermine which servers it services.

142 Fields for the Server Definition � Appendix 1
Field NameRequiredOptional Definition
Host Name
In SAS Management Console:
<Connection> � Options �Host Name
Required The DNS name or IP address for the machine onwhich this server definition can execute. Themachine name must be the official network name(for example, machine.corp.com). The stringlocalhost can be used to signify the host onwhich the associated spawner is executing.
Note: If you use localhost in theconfiguration, it could cause clients toconnect to their local machine instead ofthe machine that an administratordesignates as localhost. �
Inactivity Timeout
In SAS Management Console:
Options � Advanced Options� Load Balancing Properties �Inactivity Timeout
and
Options � Advanced Options� Pooling Properties �Inactivity Timeout
Optional If you are using connection pooling (SAS WorkspaceServer only) or load balancing (SAS Stored ProcessServer only), specifies whether an idle servershould always remain running, and if not, howlong it should run before being shut down. If thecheck box is not selected, then idle servers remainrunning. If the check box is selected, then theservers run idle for the number of minutes specifiedin the field before being shut down. If the checkbox is selected and 0 is specified as the inactivitytimeout, then the server behavior is as follows:
� For load balancing, the server will shut downwhen the last client disconnects from theserver.
� For pooling, a connection returned to a poolby a user is disconnected immediately unlessanother user is waiting for a connection fromthe pool.
The maximum value is 1440.
Login
In SAS Management Console:
Options � Advanced Options� Credentials � Login
Optional For SAS Stored Process Servers, the login thatprovides the spawner with credentials to use whenstarting a multi-user SAS session.
Note: If the server runs on Windows2000 and Windows NT, for the user who isthe owner of the multi-user login, definethe "act as part of the operating system"user right. �
Major Version Number
In SAS Management Console:
Options � Major VersionNumber
Required Specifies the major version number of thecomponent.
Minor Version Number
In SAS Management Console:
Options � Minor VersionNumber
Required Specifies the minor version number of thecomponent.

Reference Information: Workspace and Stored Process Servers � Fields for the Server Definition 143
Field NameRequiredOptional Definition
Maximum Clients
In SAS Management Console:
Options � Advanced Options� Load Balancing Properties �Maximum Clients
and
Options � Advanced Options� Pooling Properties �Maximum Clients
Optional � For Pooling (SAS Workspace Server),specifies the maximum number ofsimultaneous server processes that eachpuddle can use on this server.
� For Load Balancing (SAS Stored ProcessServers and Response Time algorithm only),specifies the maximum number ofsimultaneous clients connected to this server.
Maximum Cost
In SAS Management Console:
Options � Advanced Options� Load Balancing Properties �Maximum Cost
Optional For load-balancing servers using the costalgorithm, the maximum cost allowed on each SASserver before requests to the server are denied.
Name
In SAS Management Console:
General � Name
Required The unique name for this server.
Object Server Parameters
In SAS Management Console:
Options � LaunchCommands: Object ServerParameters
Optional
IOMBridge
For spawned servers, these object serverparameters are added to others that are generatedby the spawner and used to launch SAS. Forservers that are not spawned, the values that youspecify here can be used to supplement any thatwere supplied on the server invocation commandline. Any command line parameters takeprecedence. For a list of object server parameters,see “Object Server Parameters” on page 135 . For amore detailed explanation of object serverparameter handling, see “Add System Options tothe Workspace Server Launch Command” on page35.
Port Number
In SAS Management Console:
<Connection> � Options �Port Number
Required ifserver willhave Javaclients
The port on which to connect to this server.
If you specify a value for both port and service,then the value for service is used.
If you are using a spawner and neither port norservice is specified, the spawner attempts to usethe service name sasobjspawn as the service. Ifsasobjspawn has already been used, the spawnerremoves this service definition from its list.
The port number is required if the server will haveJava clients.
The default port numbers are as follows:
� SAS Workspace Server: 8591
� SAS Stored Process Server: 8601
� SAS OLAP Server: 5451
� SAS Metadata Server: 8561

144 Fields for the Server Definition � Appendix 1
Field NameRequiredOptional Definition
Protocol
In SAS Management Console:
<Connection> � Protocol
Required The protocol (Bridge or COM) that clients can usefor connection. The protocol bridge must be usedfor servers that are serviced by the spawner. Theseinclude all servers other than Windows, as well asWindows servers that will be accessed by Javaclients.
Recycle Activation Limit
In SAS Management Console:
Options � Advanced Options� Load Balancing Properties �Recycle Activation Limit
and
Options � Advanced Options� Pooling Properties � RecycleActivation Limit
Optional For pooling (SAS Workspace Servers only) and loadbalancing (SAS Stored Process Servers only),specifies the number of times a connection to theserver will be reused in a pool before it isdisconnected ("recycled"). If the value is 0, thenthere will be no limit on the number of times aconnection to the server can be reused. Thisproperty is optional. The default value is 0.
Note: For SAS Stored Process Servers,setting a Recycle Activation Limit cancause problems with sessions. If you createsessions, use the default value of 0 forReaction Activation Limit. �
Required Encryption Level
In SAS Management Console:
<Connection> � Options �Advanced Options �Encryption � RequiredEncryption Level
Optional The level of encryption to be used between theclient and the server. None means no encryption isperformed; Credentials means that only usercredentials (ID and password) are encrypted; andEverything means that all communicationsbetween the client and server are encrypted. Thedefault is Credentials.
Server Encryption Algorithms
In SAS Management Console:
<Connection> � Options �Advanced Options �Encryption � ServerEncryption Algorithms
Optional The encryption algorithms that are supported bythe launched object server. Valid values are: RC2,RC4, DES, TRIPLEDES, and SASPROPRIETARY,depending on the country in which the SASsoftware is licensed. See SAS/SECUREdocumentation for more information regarding thisfield. The default is SASPROPRIETARY.
Service
In SAS Management Console:
<Connection> � Options �Advanced Options � Service
Optional The service in which to connect to this server.
If you specify a value for both port and service,then the value for service is used.
If you are using a spawner and neither port norservice is specified, the spawner attempts to usethe service name sasobjspawn as the service. Ifsasobjspawn has already been used, the spawnerremoves this service definition from its list.
Note: If the server has Java clients,specify a port instead of a service. �
Software Version
In SAS Management Console:
Options � Software Version
Required Specifies the version of the server software.
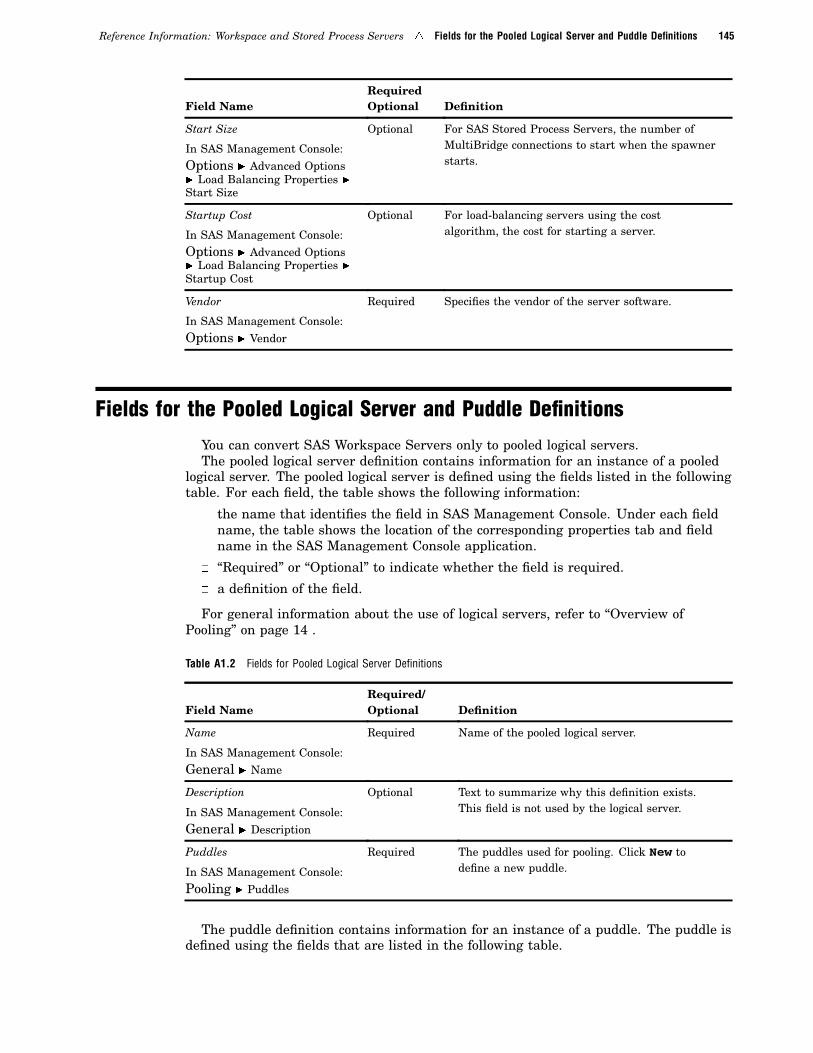
Reference Information: Workspace and Stored Process Servers � Fields for the Pooled Logical Server and Puddle Definitions 145
Field NameRequiredOptional Definition
Start Size
In SAS Management Console:
Options � Advanced Options� Load Balancing Properties �Start Size
Optional For SAS Stored Process Servers, the number ofMultiBridge connections to start when the spawnerstarts.
Startup Cost
In SAS Management Console:
Options � Advanced Options� Load Balancing Properties �Startup Cost
Optional For load-balancing servers using the costalgorithm, the cost for starting a server.
Vendor
In SAS Management Console:
Options � Vendor
Required Specifies the vendor of the server software.
Fields for the Pooled Logical Server and Puddle Definitions
You can convert SAS Workspace Servers only to pooled logical servers.The pooled logical server definition contains information for an instance of a pooled
logical server. The pooled logical server is defined using the fields listed in the followingtable. For each field, the table shows the following information:
� the name that identifies the field in SAS Management Console. Under each fieldname, the table shows the location of the corresponding properties tab and fieldname in the SAS Management Console application.
� “Required” or “Optional” to indicate whether the field is required.
� a definition of the field.
For general information about the use of logical servers, refer to “Overview ofPooling” on page 14 .
Table A1.2 Fields for Pooled Logical Server Definitions
Field NameRequired/Optional Definition
Name
In SAS Management Console:
General � Name
Required Name of the pooled logical server.
Description
In SAS Management Console:
General � Description
Optional Text to summarize why this definition exists.This field is not used by the logical server.
Puddles
In SAS Management Console:
Pooling � Puddles
Required The puddles used for pooling. Click New todefine a new puddle.
The puddle definition contains information for an instance of a puddle. The puddle isdefined using the fields that are listed in the following table.

146 Fields for the Load-Balancing Logical Server Definition � Appendix 1
Table A1.3 Fields for the Puddle Definition
Field NameRequired/Optional Definition
Name
In SAS Management Console:
Pooling � Puddles � Name
Required Name of the puddle.
Minimum Available Servers
In SAS Management Console:
Pooling � Puddles �Minimum Available Servers
Required The minimum number of server processes usingthis login definition that need to be available.This value includes only idle processes.
Minimum Number of Servers
In SAS Management Console:
Pooling � Puddles �Minimum Number of Servers
Required The minimum number of server processes usingthis login definition that are created when thepool is created. This value includes bothprocesses that are in use and processes that areidle. The default value is 0.
Login
In SAS Management Console:
Pooling � Puddles � Login
Required The user ID associated with the puddle. The useror group metadata identity that owns this logincan also access the puddle.
Grant Access to Group
In SAS Management Console:
Pooling � Puddles � GrantAccess to Group
Optional The group metadata identity that can access thispuddle. The user or group metadata identities(and their associated logins) that are members ofthe group can also access this puddle.
Fields for the Load-Balancing Logical Server DefinitionFor SAS Workspace Servers and SAS Stored Process Servers, the load-balancing
logical server definition contains information for a load-balancing cluster. For eachfield, the table shows the following information:
� the name that identifies the field in SAS Management Console. Under each fieldname, the table shows the corresponding properties tab and field name in SASManagement Console.
� “Required” or “Optional” to indicate whether the field is required.� a definition of the field.
For information about load-balancing logical servers, refer to “Overview of LoadBalancing” on page 19 and “Planning and Configuring a Load-Balancing Cluster” onpage 23.

Reference Information: Workspace and Stored Process Servers � Fields for the Load-Balancing Logical Server Definition 147
Table A1.4 Fields for the Load Balancing Logical Server Definition
Field NameRequired/Optional Definition
Name
In SAS Management Console:
General � Name
Required The logical server that is being defined.
Balancing Algorithm
In SAS Management Console:
Load Balancing � BalancingAlgorithm
Required The type of balancing algorithm to use when loadbalancing the servers:
Cost (SASWorkspace Serversand SAS StoredProcess Servers)
Performs load balancingbased on the current cost orrunning servers and thestartup cost of new servers.The cost algorithm takes thecurrent cost of the serversand the startup cost of newservers into account andredirects the client to theserver with the lowest cost.
Response Time(SAS StoredProcess Serversonly)
Performs load balancingbased on servers’ averageresponse time and redirectsthe clients to a server byusing a round-robin approachto the response time list.Response times are updatedbased on the response refreshrate.
Description
In SAS Management Console:
General � Description
Optional Text to summarize why this definition exists. Thisfield is not used by the logical server.
Response Refresh Rate
In SAS Management Console:
Load Balancing �Response Refresh Rate
Required (SAS Stored Process Servers only)
If the BalancingAlgorithm=Response Time, thelength of time (in milliseconds) that a load balanceruses a set of response time values. At the end of thisperiod the load balancer updates the response timesand re-orders the servers for all of the servers in theload-balancing logical server.
Note: If this field is set to 0, the loadbalancer does not use the response time listto redirect clients to servers; instead, theload balancer redirects clients in around-robin manner. �

148 Fields for the Spawner Definition � Appendix 1
Field NameRequired/Optional Definition
Cost Per Client
In SAS Management Console:
Load Balancing � CostPer Client
Required If the BalancingAlgorithm=Cost, the default value ofcost to add or subtract from a server’s cost when aclient connects or disconnects.
Logical Server Credentials
In SAS Management Console:
Load Balancing � LogicalServer Credentials
Required The login that the load-balancing spawner uses toconnect to other load-balancing spawners withservers in the same load-balancing logical server.
Fields for the Spawner DefinitionThe spawner definition contains information for an instance of a SAS spawner (see
“The SAS Object Spawner” on page 13 ). The spawner is defined using the fields listedin the following table. For each option, the table shows the following information:
� the name that identifies the field name in SAS Management Console. Under eachfield’s name, the table shows the corresponding properties tab and field name inthe SAS Management Console application.
� “Required” or “Optional” to indicate whether the field is required.
� a definition of the field.
Table A1.5 Fields for the Spawner Definition
Field NameRequired/Optional Definition
Associated Machines
In SAS Management Console:
Options � AssociatedMachines
Optional The name of the machine on which this spawnerwill run and listen for connection requests for theserver. (The list of machine names is created fromthe machine names for the servers that have arealready defined in a metadata repository. If thedesired machine name is not listed, then you mustcreate a server definition for this machine.
Authentication Domain
In SAS Management Console:
<Connection> � Options �Authentication Domain
Optional The domain that is associated with a set ofcomputing resources that use the sameauthentication process. The spawner definitionmust have the same authentication domain nameas the server with which it connects. The spawneruses the authentication domain name, along withthe machine name to determine which servers itservices.
Description
In SAS Management Console:
General � Description
Optional Text to summarize why this definition exists.
Encryption Key Length
In SAS Management Console:
Options � Encryption KeyLength
Optional A numeric value (0, 40, or 128) that specifies theencryption key length. See SAS/SECUREdocumentation for more information regarding thisfield.

Reference Information: Workspace and Stored Process Servers � Fields for the Spawner Definition 149
Field NameRequired/Optional Definition
Host Name
In SAS Management Console:
<Connection> � Options �Host Name
Required The DNS name and IP address for the machine onwhich this spawner definition can execute. Themachine name must be the official network name(for example, machine.corp.com). The stringlocalhost can be used to signify the host on whichthe spawner is executing.
Log File
In SAS Management Console:
Initialization � Log File
Optional A fully qualified path to the file in which spawneractivity is to be logged. Paths with blank spacesmust be enclosed in quotation marks. On Windows,paths with embedded blank spaces must beenclosed in double quotation marks. On z/OS,specify filenames similar to UNIX file paths due tothe requirement for z/OS UNIX System Services.
Major Version Number
In SAS Management Console:
Options � Major VersionNumber
Required Specifies the major version number of thecomponent.
Minor Version Number
In SAS Management Console:
Options � Minor VersionNumber
Required Specifies the minor version number of thecomponent.
Name
In SAS Management Console:
General � Name
Required The unique name for this spawner. When specifiedat spawner invocation, its value identifies whichspawner definition to use.
Operator Login
In SAS Management Console:
Initialization: OperatorLogin � Operator Login
Required The login that contains the password the spawneruses when starting a server as an operatorconnection. Click New to define a new login. If youdo not specify a login, the operator passworddefaults to sasobjspawn.
Port
In SAS Management Console:
<Connection> � Options �Port
Required The port on which to connect to the spawner. Ifneither port nor service is specified, the servicename sasobjspawn is used as the service. The typeof port depends on the following values of Protocol:
Protocol=LoadBalancing
Port for a load balancingconnection. The default is8571.
Protocol=UUIDPort for a UUID connection.The default is 8551.
Protocol=OperatorPort for the operatorconnection. The default is8581.
Protocol
In SAS Management Console:
<Connection> � Protocol
Optional The type of connection. Possible values are:Load Balancing Connection to a load
balancing port or service.UUID Connection to a UUID port
or service.Operator Connection to the operator
port or service.

150 Spawner Invocation Options � Appendix 1
Field NameRequired/Optional Definition
Servers
In SAS Management Console:
Servers
Required The list of servers that this spawner is permitted tostart. (The servers that are listed have been definedto run on the same host as the spawner.) Select theservers you want this spawner to start. Click Newto define a new server that runs on the same hostas the spawner.
Service
In SAS Management Console:
<Connection> � AdvancedOptions � Service
Optional The service in which to connect to the spawner. Ifneither port nor service is specified, the servicename sasobjspawn is used as the service. Thetype of service depends on the following values ofProtocol.
Protocol=LoadBalancing
is the load balancing service.
Protocol=UUID is the UUID service.
Protocol=Operator is the operator service.
Software Version
In SAS Management Console:
Options � Software Version
Required Specifies the version of the spawner software.
Verbose
In SAS Management Console:
Initialization � Verbose
Optional When selected, this value causes the spawner torecord more details in the log file (LogFile or slf).
Spawner Invocation Options
The following options can be used in the command to start up the spawner for aserver. Note that the spawner must be stopped and restarted in order to reflectconfiguration updates.
If your spawner is configured as a Windows service, you must redefine the service tochange the invocation options. See “Updating a Windows Spawner Service” on page 67.
-allowxcmdenables host commands and PIPE commands for all servers that are started by thespawner. By default, the spawner starts all servers with the -NOXCMD SASsystem option. When you specify -allowxcmd, the spawner no longer specifies-NOXCMD when launching server sessions. Caution: When you specify-allowxcmd, clients can use host commands to perform potentially harmfuloperations such as file deletion.
-authproviderdomainbecause the spawner starts either a SAS Workspace Server or SAS Stored Processserver, and workspace and stored process servers authenticate only against thehost, the -authproviderdomain spawner option can be used only to associate adomain with the host authentication provider. For example,
authproviderdomain (HOSTUSER:MyDomain)

Reference Information: Workspace and Stored Process Servers � Spawner Invocation Options 151
Note: The spawner always authenticates against the host environment. The-authproviderdomain spawner option has the following syntax:
authproviderdomain (HOSTUSER:domain)
This option can be abbreviated as -authpd. �
-conversationPortspecifies which port is used for communication between the spawner and theservers that the spawner launches. This option can be abbreviated as -cp.
-deinstallWindows only. Instructs the spawner to deinstall as a Windows service. Thisoption can be abbreviated as -di.
Note: If you specified a service name when you installed the spawner service,you must specify the same name when you deinstall the service. �
-dnsMatchspecifies a DNS alias that will be accepted by the object spawner as a match forthe local machine name. In addition, the spawner replaces the dnsMatch valuewith the local machine name in its list of servers. This option is necessary if yournetwork configuration resolves a single DNS alias to multiple machines that runSAS object spawners. For example: You configure SAS servers and spawners ontwo different machines: n1.my.org and n2.my.org. The DNS alias srv.my.orgresolves to both of these machines, so clients can send a request to the alias andone of the two spawners will receive it. To support this configuration, specify-dnsMatch srv.my.org in the spawner startup command on each machine.
-dnsNamespecifies which IP stack is used for communication between the spawner and theservers that the spawner launches. This option can be abbreviated as -dns.
-hostKnownBy (Load-balancing spawners only)specifies a DNS alias that will be accepted by the object spawner as a match forthe local machine name. You might need to use this option along withlbUseHostName if your server machine is known by a different machine name andIP address at your client machines.
-installWindows only. Instructs the spawner to install as a Windows service. This optioncan be abbreviated as -i. When asked to install as a service, the spawner recordsall options specified at install time in the registry under the following key:
"SYSTEM\CurrentControlSet\Services\service-name\Parameters"
You can also specify options in the Startup Parameters when you manually startthe spawner service from the Services dialog box.
-installDependenciesWindows only. Specifies the Windows services that must be started before thespawner service starts. The -installDependencies option has the following syntax:
-installDependencies "service1<;service2><;service3>"This option can be abbreviated as -idep.
-lbUseHostName (Load-balancing spawners only)instructs the spawner to use machine names rather than IP addresses when itdirects clients to SAS servers. If the IP address for your server machine is differentfor connections within your network than for connections outside of your network,then this option is necessary to enable connections from outside of your network.
Note: If you use this option, the machine names in your server definitionsmust resolve to the correct IP addresses at your client machines. �
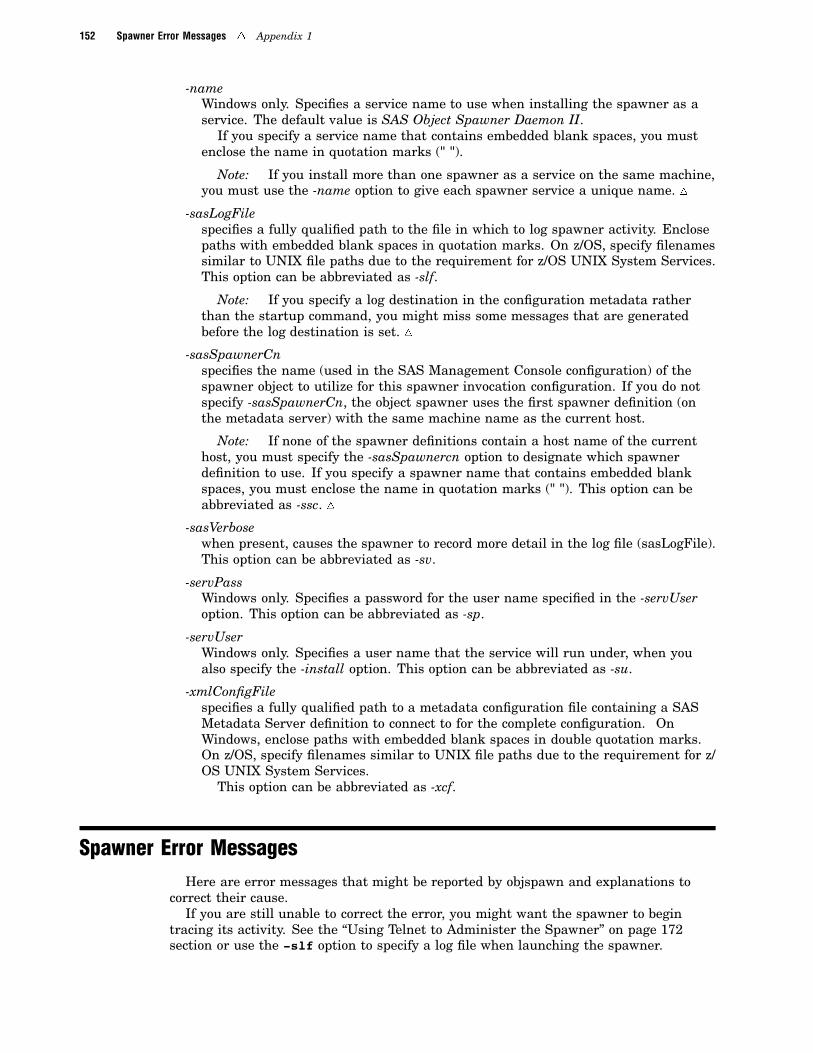
152 Spawner Error Messages � Appendix 1
-nameWindows only. Specifies a service name to use when installing the spawner as aservice. The default value is SAS Object Spawner Daemon II.
If you specify a service name that contains embedded blank spaces, you mustenclose the name in quotation marks (" ").
Note: If you install more than one spawner as a service on the same machine,you must use the -name option to give each spawner service a unique name. �
-sasLogFilespecifies a fully qualified path to the file in which to log spawner activity. Enclosepaths with embedded blank spaces in quotation marks. On z/OS, specify filenamessimilar to UNIX file paths due to the requirement for z/OS UNIX System Services.This option can be abbreviated as -slf.
Note: If you specify a log destination in the configuration metadata ratherthan the startup command, you might miss some messages that are generatedbefore the log destination is set. �
-sasSpawnerCnspecifies the name (used in the SAS Management Console configuration) of thespawner object to utilize for this spawner invocation configuration. If you do notspecify -sasSpawnerCn, the object spawner uses the first spawner definition (onthe metadata server) with the same machine name as the current host.
Note: If none of the spawner definitions contain a host name of the currenthost, you must specify the -sasSpawnercn option to designate which spawnerdefinition to use. If you specify a spawner name that contains embedded blankspaces, you must enclose the name in quotation marks (" "). This option can beabbreviated as -ssc. �
-sasVerbosewhen present, causes the spawner to record more detail in the log file (sasLogFile).This option can be abbreviated as -sv.
-servPassWindows only. Specifies a password for the user name specified in the -servUseroption. This option can be abbreviated as -sp.
-servUserWindows only. Specifies a user name that the service will run under, when youalso specify the -install option. This option can be abbreviated as -su.
-xmlConfigFilespecifies a fully qualified path to a metadata configuration file containing a SASMetadata Server definition to connect to for the complete configuration. OnWindows, enclose paths with embedded blank spaces in double quotation marks.On z/OS, specify filenames similar to UNIX file paths due to the requirement for z/OS UNIX System Services.
This option can be abbreviated as -xcf.
Spawner Error MessagesHere are error messages that might be reported by objspawn and explanations to
correct their cause.If you are still unable to correct the error, you might want the spawner to begin
tracing its activity. See the “Using Telnet to Administer the Spawner” on page 172section or use the -slf option to specify a log file when launching the spawner.
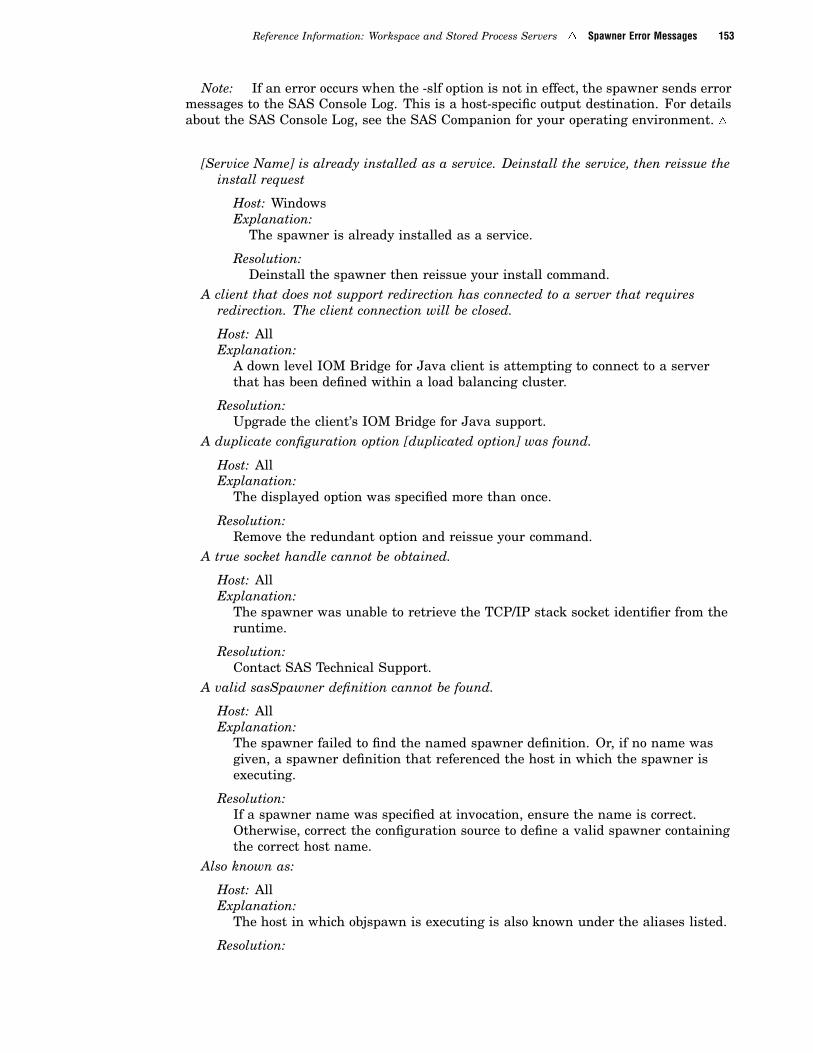
Reference Information: Workspace and Stored Process Servers � Spawner Error Messages 153
Note: If an error occurs when the -slf option is not in effect, the spawner sends errormessages to the SAS Console Log. This is a host-specific output destination. For detailsabout the SAS Console Log, see the SAS Companion for your operating environment. �
[Service Name] is already installed as a service. Deinstall the service, then reissue theinstall request
Host: WindowsExplanation:
The spawner is already installed as a service.
Resolution:Deinstall the spawner then reissue your install command.
A client that does not support redirection has connected to a server that requiresredirection. The client connection will be closed.
Host: AllExplanation:
A down level IOM Bridge for Java client is attempting to connect to a serverthat has been defined within a load balancing cluster.
Resolution:Upgrade the client’s IOM Bridge for Java support.
A duplicate configuration option [duplicated option] was found.
Host: AllExplanation:
The displayed option was specified more than once.
Resolution:Remove the redundant option and reissue your command.
A true socket handle cannot be obtained.
Host: AllExplanation:
The spawner was unable to retrieve the TCP/IP stack socket identifier from theruntime.
Resolution:Contact SAS Technical Support.
A valid sasSpawner definition cannot be found.
Host: AllExplanation:
The spawner failed to find the named spawner definition. Or, if no name wasgiven, a spawner definition that referenced the host in which the spawner isexecuting.
Resolution:If a spawner name was specified at invocation, ensure the name is correct.Otherwise, correct the configuration source to define a valid spawner containingthe correct host name.
Also known as:
Host: AllExplanation:
The host in which objspawn is executing is also known under the aliases listed.
Resolution:

154 Spawner Error Messages � Appendix 1
N/AAn accepted client connection cannot be registered.
Host: AllExplanation:
The spawner was unable to place the socket associated with a connected clientin a select.
Resolution:Review the spawner log file to determine if the spawner is resource constrained.Ensure the client is still connected.
An attempt to communicate with the SAS Metadata Server failed. The error textassociated with the failure is [error text describing failure].
Host: AllExplanation:
The spawner was unable to contact the SAS Metadata Server defined in thespecified SAS Metadata Server configuration file.
Resolution:Ensure that the SAS Metadata Server defined in the SAS Metadata Serverconfiguration file is defined correctly and contains proper credentials. Alsoensure that target SAS Metadata Server is running.
An error occurred while server [server name] was starting. Now attempting a differentserver.
Host: AllExplanation:
The load balancing implementation failed to connect to the server and willattempt to connect to a different server.
Resolution:Ensure that the server port is not already in use.
An NLS pipeline ( [encoding identifier]-to-[encoding identifier] )cannot be created.
Host: AllExplanation:
The spawner was unable to initialize an internal transcoding object.
Resolution:Ensure the SAS installation is complete and correct.
An unexpected error has prevented transfer of handles between processes.
Host: WindowsExplanation:
The SAS process failed to complete its startup.
Resolution:Check your Windows event log for a warning for the SAS application. Thewarning should direct you to a log file that explains why SAS failed to start.
An unknown option ( [option name] )was specified.
Host: AllExplanation:
The spawner encountered an invocation option that is invalid.
Resolution:Remove the invalid option and reissue the spawner command.
An unsupported UUID request version ([invalid version] )was received.

Reference Information: Workspace and Stored Process Servers � Spawner Error Messages 155
Host: AllExplanation:
A connection to the UUID listen port/service specified an invalid UUID protocolversion.
Resolution:Ensure that the IOM server clients are not connecting to the wrong port/service.
Cannot install objspawn with the NOSECURITY option.
Host: WindowsExplanation:
Due to the security exposure associated with the nosecurity option, the spawnerwill not install as a Windows service when nosecurity is specified.
Resolution:Remove the nosecurity option and reissue the install command.
Communication cannot be established with the launched session.
Host: AllExplanation:
The spawner was unable to forward client information to the IOM serverlaunched on behalf of the client.
Resolution:Contact SAS Technical Support.
Configuration source ( [source] )conflicts with the previously specified configurationsource ( [source] ).
Host: AllExplanation:
More than one configuration source was specified.
Resolution:Determine which configuration source is correct and remove the others fromyour spawner invocation.
Failed to launch the server ( [server name] )on behalf of load balancing.
Host: AllExplanation:
The load balancing implementation requested that the spawner launch an IOMserver. The spawner was unable to launch the named server.
Resolution:Ensure that the server start command is correct. Also ensure that there is not aport/service conflict.
Failed to locate the server ( [server name] )to launch on behalf of load balancing.
Host: AllExplanation:
The load balancing implementation requested that the spawner launch an IOMserver. The spawner was unable to locate the named server definition.
Resolution:Ensure that the load balancing cluster is defined correctly.
Failed to locate the server indicated in the kill request.
Host: AllExplanation:
The load balancing implementation requested that a server be stopped. Thespawner was unable to locate the server in which to stop.

156 Spawner Error Messages � Appendix 1
Resolution:N/A
Invalid request to authenticated server
Host: UNIXExplanation:
The object spawner failed to launch an authenticated server.
Resolution:If you have SAS 8 and SAS®9 on the same machine, ensure that the SAS 8directory is not part of your system path ($PATH).
Load Balancing did not authorize server [server] to start and is disregarding theAddServer request.
Host: AllExplanation:
The spawner is using Load Balancing and started a server without LoadBalancing instructing it to do so. This request is thrown out and the spawnershould continue to function.
Resolution:Review the configuration via SAS Management Console to ensure that allservers are set up correctly.
No configuration was specified.
Host: AllExplanation:
The spawner was invoked without a configuration source.
Resolution:Reissue spawner command with a configuration source.
Objspawn cannot be deinstalled.
Host: WindowsExplanation:
The spawner was unable to deinstall as a Windows service.
Resolution:Review the spawner log file to determine the cause of failure. Ensure thespawner is currently installed as a Windows service.
Objspawn cannot be installed.
Host: WindowsExplanation:
The spawner was unable to install as a Windows service.
Resolution:Review the spawner log file to determine the cause of failure. Ensure thespawner is not currently installed as a Windows service.
Objspawn encountered [number of errors] error(s) during command-line processing.
Host: AllExplanation:
The spawner was unable to start.
Resolution:Reissue the spawner invocation command with a valid log file destination.Review the contents of the generated log file to determine why the spawnerfailed to start.
Reference Information: Workspace and Stored Process Servers � Spawner Error Messages 157
Objspawn encountered errors during results processing.
Host: AllExplanation:
The spawner was unable to complete configuration processing.
Resolution:Review the spawner log file to determine the configuration error details.
Objspawn encountered errors while attempting to start. To view the errors, define theDD name TKMVSJNL and restart objspawn with the sasVerbose option.
Host: z/OSExplanation:
The spawner encountered errors and was unable to start.
Resolution:Define the DD name TKMVSJNL and restart objspawn with the sasVerboseoption to create a log file. Review the contents of the log file to determine whythe spawner failed to start.
Objspawn encountered errors while attempting to start. View the application event logfor the name of the log file containing the errors.
Host: WindowsExplanation:
The spawner encountered errors and was unable to start.
Resolution:View the application event log to determine the name of the log file. Review thecontents of the log file to determine why the spawner failed to start.
Objspawn failed to reinitiate multiuser server listen. Objspawn is removing serverdefinition.
Host: AllExplanation:
The spawner was unable to restart a multi-user server listen when thepreviously launched multi-user server exited.
Resolution:Ensure that there is not a port/service conflict.
Objspawn has completed initialization.
Host: AllExplanation:
The spawner is operational.
Resolution:N/A
Objspawn has detected a bridge protocol over the operator conversation socket.Objspawn is closing the operator conversation with the peer (%s).
Host: AllExplanation:
An IOM Bridge client has connected to the operator listen port/service insteadof a port/service belonging to a server definition.
Resolution:Update the client to connect to the proper server definition port/service.
Objspawn is being terminated by the operating system.
Host: z/OS

158 Spawner Error Messages � Appendix 1
Explanation:The operator or operating system has requested that the spawner exit. Thespawner will exit after this message is displayed.
Resolution:N/A
Objspawn is executing on host [fully qualified host name] ( [string IP address for fullyqualified host name]).
Host: AllExplanation:
The host in which the spawner is executing returned the displayed fullyqualified host name that resolved to the displayed IP address. These two stringsplus the string localhost, and any names/IP addresses listed after the aliasmessage on page 153, are used by the spawner to locate the appropriatespawner and server definitions.
Resolution:If the spawner fails to locate a spawner or server definition, ensure the spawneror server definitions specify one of the listed name or IP addresses.
Objspawn is exiting as a result of errors.
Host: AllExplanation:
The spawner was unable to start.
Resolution:Reissue the spawner invocation command with a valid log file destination.Review the contents of the generated log file to determine why the spawnerfailed to start.
Objspawn lost connection with the launched session.
Host: AllExplanation:
The spawner was unable to complete startup of the launched IOM server.
Resolution:If the message is identified as an error, contact SAS Technical Support.
Objspawn may not have been installed.
Host: WindowsExplanation:
The spawner was unable to deinstall as a Windows service. This might be dueto the spawner not being installed as a Windows service.
Resolution:Ensure that the spawner is installed as a Windows service.
Objspawn starting as service[service name].
Host: WindowsExplanation:
Indicates which service the spawner is starting as.Objspawn service ( [name of deinstalled spawner service] )was deinstalled successfully.
Host: WindowsExplanation:
The spawner is no longer installed as a Windows service.
Resolution:

Reference Information: Workspace and Stored Process Servers � Spawner Error Messages 159
N/A
Objspawn service ( [name of installed spawner service] )was installed successfully.
Host: WindowsExplanation:
The spawner successfully installed as a Windows service. Subsequent boots ofWindows will start the spawner automatically.
Resolution:N/A
Objspawn version [major].[minor].[delta] is initializing.
Host: AllExplanation:
The version of the spawner being invoked.
Resolution:N/A
Objspawn was unable to locate a server definition. Objspawn is exiting.
Host: AllExplanation:
The spawner was unable to find a server definition in the configuration sourcespecified that was valid for this machine and the spawner definition’s domainand logical name.
Resolution:Ensure there is a valid server definition that meets the requirements stated. Ifyou are using an LDIF configuration file and the configuration file contains avalid server definition, ensure that there are not two or more blank lines locatedbefore the server definition. In LDIF format, two contiguous blank lines signifythe end of the definitions that will be used.
Objspawn was unable to open the configuration file ([file path] ).
Host: AllExplanation:
The spawner was unable to open a configuration file at the specified location.
Resolution:Ensure that the configuration file exists at the location specified. Ensure theconfiguration file is readable by the spawner.
Objspawn was unable to read data from the operator conversation socket. Thereturned error number is [errno], and the text associated with that error is ( [errordescription] ).
Host: AllExplanation:
The spawner encountered a TCP/IP read error while attempting to conversewith a connected operator.
Resolution:Ensure that the operator is still connected.
Objspawn was unable to send data over the operator conversation socket. Thereturned error number is [errno], and the text associated with that error is ( [errordescription] ).
Host: AllExplanation:

160 Spawner Error Messages � Appendix 1
The spawner encountered a TCP/IP write error while attempting to conversewith the operator.
Resolution:The operator might have terminated their connection.
Port [port number] will be ignored, and service [service name] will be used.
Host: AllExplanation:
The spawner encountered both port and service attributes in the currentdefinition. The service definition takes precedence.
Resolution:Remove the attribute that is redundant/incorrect.
The [attribute name/description] attribute is either missing or is mismatched.
Host: AllExplanation:
The spawner encountered an attribute that did not have a required value.
Resolution:Correct the configuration.
The [attribute name] attribute requires an argument.
Host: AllExplanation:
An attribute present in the configuration requires a value.
Resolution:Supply a value for the attribute and restart the spawner.
The [object class name] attribute [attribute name] is no longer supported and will beignored.
Host: AllExplanation:
The spawner encountered an attribute within the specified configuration sourcethat is no longer supported.
Resolution:If the configuration source is not shared by earlier versions of the spawner,remove the named attribute from the configuration source.
The [option name] option requires an argument.
Host: AllExplanation:
The displayed option requires a value.
Resolution:Reissue the spawner command specifying a value for the displayed option.
The [SAS Metadata Server method name] call of the SAS Metadata Server failed. Theerror ID associated with this failure is [hexadecimal error identifier].
Host: AllExplanation:
The SAS Metadata Server failed to process the spawner’s request.
Resolution:Ensure that the SAS Metadata Server is still operating. Ensure that the SASMetadata Server defined in the SAS Metadata Server configuration file is thecorrect SAS Metadata Server in which to connect.

Reference Information: Workspace and Stored Process Servers � Spawner Error Messages 161
The [spawner utility name] service cannot be loaded.
Host: AllExplanation:
The spawner was unable to locate the specified support.
Resolution:Ensure that the SAS installation is complete and correct.
The [tracker name] resource tracker cannot be created.
Host: AllExplanation:
The spawner was unable to create an internal object repository.
Resolution:Review the spawner log file to determine if the spawner is resource constrained.
The attribute [attribute name] will be ignored.
Host: AllExplanation:
The named attribute is not applicable to the spawner.
Resolution:N/A
The client ( [Client child process identifier] )specified by launched session could not belocated.
Host: AllExplanation:
The spawner was unable to locate the connection information associated withthe client definition in which an IOM server was launched.
Resolution:Ensure that the command associated with the launched session is correct andthat the IOM server is successfully launching.
The client definition cannot be created.
Host: AllExplanation:
The spawner was unable to allocate and initialize a descriptor for the connectedclient.
Resolution:Review the spawner log file to determine if the spawner is resource constrained.
The configuration source [file name] is an objspawn log file. Objspawn is unable toprocess a log file as a configuration file.
Host: AllExplanation:
The value of the -configFile or -xmlConfigFile option specifies an objspawn logfile.
Resolution:Change the value of the configuration source option to specify a configurationfile.
The connection with the UUID generator session was lost.
Host: AllExplanation:
The spawner lost contact with the UUID generator client.

162 Spawner Error Messages � Appendix 1
Resolution:Ensure that the client did not terminate.
The duplicate [attribute name] attribute will be ignored.
Host: AllExplanation:
The named attribute was encountered more than once.
Resolution:N/A
The entry ( [object class name] )is no longer supported and will be ignored.
Host: AllExplanation:
The spawner encountered an object class within the specified configurationsource that is no longer supported.
Resolution:If the configuration source is not shared by earlier versions of the spawner,remove the named object class definition from the configuration source.
The entry ( [object class name] )was defined incorrectly and will be ignored.
Host: AllExplanation:
The spawner encountered an object class within the specified configurationsource that is not defined correctly.
Resolution:Review the spawner log file to determine which values in the object classdefinition are invalid, then correct the object class definition.
The exit handler cannot be installed.
Host: z/OSExplanation:
The spawner was unable to install an exit handler.
Resolution:Contact SAS Technical Support.
The IOM run-time subsystem cannot be initialized.
Host: AllExplanation:
The spawner was unable to locate the IOM server runtime.
Resolution:Ensure that the SAS installation is complete and correct.
The IP address [string IP address] did not transcode.
Host: AllExplanation:
The load balancing implementation requested that the spawner redirect theconnected client to the named IP address. The spawner was unable to transcodethe IP address string to ASCII.
Resolution:Ensure that the IP address is valid in the load balancing cluster definition.
The launched session did not accept forwarded requirements. The reply is [reply errornumber].
Host: All

Reference Information: Workspace and Stored Process Servers � Spawner Error Messages 163
Explanation:The launched IOM server could not process the client requirements presented.
Resolution:Ensure that the spawner and the server being launched are compatible releases.
The load balancing instance [method name] call failed. The error text associated withthe failure is [error string].
Host: AllExplanation:
The spawner was unable to communicate with its in process load balancinginstance.
Resolution:Contact SAS Technical Support.
The log file ( [file path] )already exists. Please erase this file and restart.
Host: AllExplanation:
The spawner was unable to create a log file. A file, that is not a spawner logfile, already exists at the named location.
Resolution:Either delete the file at the named location or specify a different location for thespawner log file.
The log file ( [file path] )cannot be created.
Host: AllExplanation:
The spawner was unable to create a log file at the given file path location.
Resolution:Ensure that the given file path is correct. Ensure that there is not a file at thespecified location that is not a spawner log file.
The logged-in user does not have the appropriate user permissions to invoke [Windowsservice name].
Host: WindowsExplanation:
The spawner was not able to install or deinstall as a Windows service due to thelaunching user not having the appropriate Windows User Rights.
Resolution:Ensure that the invoking user is an administrator on the Windows host andthat the user holds the appropriate Windows User Rights.
The metadata for the SAS Metadata Server failed to process.
Host: AllExplanation:
The metadata received from the SAS Metadata Server is invalid for thisspawner implementation.
Resolution:Ensure that the spawner and SAS Metadata Server are compatible releases.
The multiuser login ( [login identifier] )that was specified for the server ( [servername] )cannot be found.
Host: AllExplanation:

164 Spawner Error Messages � Appendix 1
The spawner was unable to locate the login definition associated with amulti-user server definition.
Resolution:Correct the configuration source to properly define the missing login definitionthen reissue the spawner command.
The old client cannot be redirected as a result of IP address issues.
Host: AllExplanation:
The spawner cannot format the redirect IP address into a format suitable by aback level client.
Resolution:Update the client IOM Bridge for COM or IOM Bridge for Java.
The operator communication buffer cannot be allocated.
Host: AllExplanation:
The spawner was unable to allocate a buffer in which to process operatorconversations.
Resolution:Review the spawner log file to determine if the spawner is resource constrained.
The operator conversation cannot be allocated.
Host: AllExplanation:
The spawner was unable to allocate a descriptor in which to process operatorconversations.
Resolution:Review the spawner log file to determine if the spawner is resource constrained.
The operator conversation was terminated by the peer.
Host: AllExplanation:
The administration session was disconnected by the administrator.
Resolution:N/A
The operator listen definition cannot be allocated.
Host: AllExplanation:
The spawner was unable to allocate a descriptor in which to process theoperator listen definition.
Resolution:Review the spawner log file to determine if the spawner is resource constrained.
The operator listen socket cannot be created. The returned error number is [errno],and the text associated with that error is ( [errno description] ).
Host: AllExplanation:
The spawner was unable to create a TCP/IP socket for use as an operator listensocket.
Resolution:Review the spawner log file to determine if the spawner is resource constrained.

Reference Information: Workspace and Stored Process Servers � Spawner Error Messages 165
The operator password specified by [string IP address] is invalid.
Host: AllExplanation:
The password received by a session originating from the displayed IP addresswas not correct.
Resolution:Reissue operator session and specify the correct password.
The port or service for load balancing the TCP/IP definition is missing.
Host: AllExplanation:
The TCP/IP connection definition associated with the load balancing cluster didnot contain a port or service definition.
Resolution:Correct the TCP/IP connection definition.
The port or service for the UUID generator TCP/IP definition is missing.
Host: AllExplanation:
The TCP/IP connection definition associated with the UUID generation did notcontain a port or service definition.
Resolution:Correct the TCP/IP connection definition.
The process cannot be launched for client [client username].
Host: AllExplanation:
The spawner was unable to launch an IOM server on behalf of the named client.
Resolution:Ensure the command associated with the server definition is correct. Reviewthe spawner log file to determine the cause of failure.
The process definition cannot be tracked for the server[server name].
Host: AllExplanation:
The spawner was unable to insert a server definition object into its repository.
Resolution:Review the spawner log file to determine if the spawner is resource constrained.
The repository information for the SAS Metadata Server failed to process.
Host: AllExplanation:
The repository metadata received from the SAS Metadata Server is invalid forthis spawner implementation.
Resolution:Ensure that the spawner and SAS Metadata Server are compatible releases.
The requested UUIDs cannot be generated.
Host: AllExplanation:
The spawner encountered an error while attempting to fulfill a UUID generatorrequest.
Resolution:

166 Spawner Error Messages � Appendix 1
Review the spawner log file to determine if the spawner is resource constrained.The results extension of the SAS Metadata Server cannot be loaded.
Host: AllExplanation:
The spawner was unable to locate the SAS Metadata Server configurationsupport.
Resolution:Ensure that the SAS installation is complete/correct.
The SAS Metadata Server [SAS Metadata Server method name] call failed. The errortext associated with the failure is [error string].
Host: AllExplanation:
The SAS Metadata Server failed to process the spawner’s request.
Resolution:Ensure that the SAS Metadata Server is still operating. Ensure that the SASMetadata Server defined in the SAS Metadata Server configuration file is thecorrect SAS Metadata Server in which to connect.
The SAS Metadata Server configuration file failed to process.
Host: AllExplanation:
The SAS Metadata Server configuration file is invalid for this spawnerimplementation.
Resolution:Review the spawner log file to determine the SAS Metadata Serverconfiguration file error details.
The SAS Metadata Server repository [repository name] cannot be located.
Host: AllExplanation:
The response from the SAS Metadata Server did not contain the specifiedrepository name.
Resolution:Ensure that the SAS Metadata Server configuration file identifies the correctrepository name. Ensure that the SAS Metadata Server defined in the SASMetadata Server configuration file hosts the given repository name.
The server [name of server] cannot be placed in a resource track.
Host: AllExplanation:
The spawner was unable to insert the internal server definition object in itsrepository.
Resolution:Review the spawner log file to determine if the spawner is resource constrained.
The server [server name] listen cannot be registered.
Host: AllExplanation:
The spawner was unable to place the socket associated with a server listenobject in a select.
Resolution:

Reference Information: Workspace and Stored Process Servers � Spawner Error Messages 167
Review the spawner log file to determine if the spawner is resource constrained.The server connection definition cannot be created.
Host: AllExplanation:
The spawner was unable to create an internal launched IOM server connectionobject.
Resolution:Review the spawner log file to determine if the spawner is resource constrained.
The server name [server-name] is not unique. Therefore this server definition will notbe included.
Host: AllExplanation:
The spawner was unable to process a server definition because another serverdefinition has the same name.
Resolution:Change the server name in the server definition.
The server definition cannot be allocated.
Host: AllExplanation:
The spawner was unable to allocate a server definition.
Resolution:Review the spawner log file to determine if the spawner is resource constrained.
The server did not start in the specified amount of time.
Host: AllExplanation:
The spawner was unable to start the load-balanced server in the time specifiedby the Availability Timeout property.
Resolution:Ensure that the SAS server can start properly. If appropriate, increase thevalue of the Availability Timeout property.
The server launch command cannot be allocated.
Host: AllExplanation:
The spawner was unable to allocate the server’s launch command.
Resolution:Review the spawner log file to determine if the spawner is resource constrained.
The server must define the available encryption algorithm(s) when an encryption levelis set.
Host: AllExplanation:
The server definition specifies an encryption level, but does not specify whichencryption algorithms are available.
Resolution:Specify the available encryption algorithms.
The session socket for the UUID generator was not accepted.
Host: AllExplanation:

168 Spawner Error Messages � Appendix 1
The spawner was unable to process a new UUID generator client.
Resolution:Review the spawner log file to determine if the spawner is resource constrained.
The socket-access method handle cannot be acquired.
Host: AllExplanation:
The spawner was unable to locate the IOM protocol TCP/IP driver.
Resolution:Ensure the SAS installation is complete and correct.
The specified [attribute name] value is invalid ( [invalid attribute value] ).
Host: AllExplanation:
The displayed value for the displayed attribute is not valid.
Resolution:Correct the attribute value and reissue command.
The specified TCP/IP definition protocol is invalid.
Host: AllExplanation:
A TCP/IP connection definition specifies a protocol that is not supported by thespawner.
Resolution:Correct the TCP/IP connection protocol attribute value.
The TCP/IP accept call failed to process the client connection.
Host: AllExplanation:
The spawner was unable to process a new client.
Resolution:Review the spawner log file to determine if the spawner is resource constrained.
The TCP/IP accept call failed to process the operator connection. The returned errornumber is [errno], and the text associated with that error is ( [errno description] ).
Host: AllExplanation:
The spawner was unable to process a new operator.
Resolution:Review the spawner log file to determine if the spawner is resource constrained.
The TCP/IP accept call failed to process the session conversation request.
Host: AllExplanation:
The spawner was unable to process a new IOM server connection.
Resolution:Review the spawner log file to determine if the spawner is resource constrained.
The TCP/IP bind call for the operator listen port failed. The returned error number is[errno], and the text associated with that error is ( [errno description] ).
Host: AllExplanation:
The spawner was unable to establish the operator listen object.

Reference Information: Workspace and Stored Process Servers � Spawner Error Messages 169
Resolution:Ensure that the port or service specified for use by the spawner is defined andnot in use. If in use, ensure that the spawner is not already executing.
The TCP/IP bind call for the server [server name] listen port failed. The textassociated with that error is ( [reason of failure] ).
Host: AllExplanation:
The spawner was unable to establish the named server listen object.
Resolution:Ensure that the port/service specified for use by the spawner is defined and notin use. If in use, ensure that the spawner is not already executing.
The TCP/IP bind call for the session conversation port failed. The returned errornumber is [errno], and the text associated with that number is ( [errno description] ).
Host: AllExplanation:
The spawner was unable to bind to any port in order to establish a listen objectfor use by launched IOM servers.
Resolution:Contact SAS Technical Support.
The TCP/IP bind call for the UUID listen port failed. The returned error number is[errno], and the text associated with that error is ( [errno description] ).
Host: AllExplanation:
The spawner was unable to establish the UUID generator listen object.
Resolution:Ensure that the port/service specified for use by the spawner is defined and notin use. If in use, ensure that the spawner is not already executing.
The TCP/IP listen call for the operator listen port failed. The returned error numberis [errno], and the text associated with that error is ( [errno description] ).
Host: AllExplanation:
The spawner was unable to establish the operator listen object.
Resolution:Ensure that the port or service specified for use by the spawner is defined andnot in use. If in use, ensure that the spawner is not already executing.
The TCP/IP listen call for the server [server name] listen port failed. The textassociated with that error is ( [reason of failure] ).
Host: AllExplanation:
The spawner was unable to establish the server listen object.
Resolution:Ensure that the port or service specified for use by the spawner is defined andnot in use. If in use, ensure that the spawner is not already executing.
The TCP/IP listen call for the session conversation port failed. The returned errornumber is [errno], and the text associated with that error is ( [errno description] ).
Host: AllExplanation:
The spawner was unable to establish the launched IOM server listen object.

170 Spawner Error Messages � Appendix 1
Resolution:Contact SAS Technical Support.
The TCP/IP listen call for the UUID listen port failed. The returned error number is[errno], and the text associated with that error is ( [errno description] ).
Host: AllExplanation:
The spawner was unable to establish the UUID generator listen object.
Resolution:Contact SAS Technical Support.
The URI support extension cannot be loaded.
Host: AllExplanation:
The spawner was unable to locate the URI parsing support.
Resolution:Ensure that the SAS installation is complete and /correct.
The UUID listen definition cannot be created.
Host: AllExplanation:
The spawner was unable to create an internal UUID listen object.
Resolution:Review the spawner log file to determine if the spawner is resource constrained.
The UUID service name ( [service name] )cannot be resolved.
Host: AllExplanation:
The host TCP/IP stack was unable to resolve the displayed TCP/IP service name.
Resolution:Ensure that the given service name is correct and defined to the spawner hostinstallation.
The wait event for the objspawn cannot be created.
Host: AllExplanation:
The spawner was unable to create an internal synchronization object.
Resolution:Review the spawner log file to determine if the spawner is resource constrained.
The Windows [Windows routine name] call failed ( [reason for failure] ).
Host: AllExplanation:
The spawner encountered an Windows SDK error while invoking the givenmethod.
Resolution:Contact the system administrator to determine the meaning of the error text.
The Windows [Windows routine name] call failed. GetLastError() = [GetLastError()return value].
Host: AllExplanation:
The spawner encountered an Windows SDK error while invoking the givenmethod.

Reference Information: Workspace and Stored Process Servers � Spawner Error Messages 171
Resolution:Contact the system administrator to determine the meaning of theGetLastError() return code.
Unable to bind to the SAS Metadata Server because the [name of missing attribute]attribute is missing.
Host: AllExplanation:
The SAS Metadata Server configuration file did not specify the named attribute.
Resolution:Update the SAS Metadata Server configuration file to include the missingattribute.
Unable to create the session conversation definition.
Host: AllExplanation:
The spawner was unable to create an internal launched IOM serverconversation object.
Resolution:Review the spawner log file to determine if the spawner is resource constrained.
Unable to obtain the session conversation port. The returned error number is [errno],and the text associated with that error is ( [errno description] ).
Host: AllExplanation:
The spawner was unable to retrieve the port associated with the sessionconversation listen object.
Resolution:Contact the system administrator to determine if there are issues with the TCP/IP implementation.
Unable to read the server ( [server name] )client update information.
Host: AllExplanation:
The spawner encountered a TCP/IP read error while attempting to conversewith a launched IOM server.
Resolution:The server might have exited.
Unable to resolve localhost.
Host: AllExplanation:
The spawner could not resolve the local IP address.
Resolution:Ensure that your TCP/IP configuration settings are correct.
Unable to redirect the client request.
Host: AllExplanation:
The spawner failed to redirect the connection request to another server in thecluster.
Resolution:Review the spawner log for more information.

172 Using Telnet to Administer the Spawner � Appendix 1
You can only specify one of the following choices: install or deinstall.
Host: WindowsExplanation:
Both the install and deinstall commands were specified.
Resolution:Remove the option that should not be specified.
Using Telnet to Administer the SpawnerThe spawner can be controlled and monitored using a telnet client connected to the
operator port or service.
Connecting to a SpawnerTo connect to an executing spawner, telnet to the operator interface port or service
that is specified in the spawner definition.The following example, run on UNIX, assumes 6337 was specified as the port for the
operator:
myHost> telnet serverhost 6337Trying...Connected to serverhost.Escape character is ’^]’.
After the telnet conversation is active, enter the operator password that is specified.If the operator password was not specified, use sasobjspawn as the password.
Note: You will not be prompted for the password. For example:
sasobjspawnOperator conversation established
�
You can now interact with the executing spawner by issuing any of the “AvailableCommands” on page 172 .
Available CommandsThe following is a list of commands that are available via the spawner’s operator
interface:
Table A1.6 Commands for Spawner Operator Interface
Command Description
btrace filename Begin trace. filename is a fully-qualified path to the file in whichto log spawner activity.
bye Terminate the spawner execution.
Note: You cannot shut down an object spawnerwhile there are current or pending load-balancingtasks. �

Reference Information: Workspace and Stored Process Servers � Available Commands 173
Command Description
cluster reset allorcluster reset<name or ID
of load-balancing
logical server
(cluster)>
� If all is specified, this command shuts down allmulti-user servers associated with load-balancing logicalservers (clusters) defined on the local machine.
Note: This command affects only SAS StoredProcess Servers that were launched from objectspawner that you are currently administering.For example, to shutdown all servers in a cluster:
cluster reset all
�
� If a load-balancing logical server (cluster) name or ID isspecified, this command shuts down all multi-user serverson the local machine that are part of the namedload-balancing logical server (cluster).
Note: If you use a character encoding other thanLatin-1, you must specify the cluster using theobject ID (for example, A5JJTGEQ.AX00005L). �
For example:
� To shut down a cluster by specifying the name of aload-balancing logical server:
cluster reset "SASMain -Logical Stored Process Server"
To determine the name of the load-balancinglogical server, in SAS Management Console, selectthe load-balancing logical server definition, and thenselect File Properties from the menu bar. Usethe value in the Name field.
� To shut down a cluster by specifying the object ID ofa load-balancing logical server:
cluster reset A5JJTGEQ.AX00005L
To determine the object ID of theload-balancing logical server definition, in SASManagement Console, select the load-balancinglogical server definition, and then select FileProperties from the menu bar. Use the value inthe ID field.
etrace End trace.
help List available operator commands.
list List all known servers that are supported by this spawner.
quit Exit operator conversation.

174

175
A P P E N D I X
2Recommended Reading
Recommended Reading 175
Recommended Reading
Here is the recommended reading list for this title:� SAS Intelligence Platform: Overview� SAS Intelligence Platform: System Administration Guide
� SAS Intelligence Platform: Desktop Application Administration Guide� SAS Intelligence Platform: Security Administration Guide� SAS Intelligence Platform: Web Application Administration Guide
� SAS Intelligence Platform: Data Administration Guide� SAS Intelligence Platform: Installation Guide
For a complete list of administration documentation for the SAS Intelligence Platform,see http://support.sas.com/913administration.
For a list of SAS documentation, seehttp://support.sas.com/documentation/onlinedoc/sas9doc.html.
For a complete list of SAS publications, see the current SAS Publishing Catalog. Toorder the most current publications or to receive a free copy of the catalog, contact aSAS representative at
SAS Publishing SalesSAS Campus DriveCary, NC 27513Telephone: (800) 727-3228*Fax: (919) 677-8166E-mail: [email protected] address: http://support.sas.com/pubs* For other SAS Institute business, call (919) 677-8000.
Customers outside the United States should contact their local SAS office.

176

177
Glossary
administrative usera special user of a metadata server who can create and delete user definitions andlogins. An administrative user can also perform administrative tasks such asstarting, stopping, pausing, and refreshing the metadata server. Unlike anunrestricted user, an administrative user does not have unrestricted access to themetadata. You are an administrative user if your user ID is listed in theadminUsers.txt file or if you connect to the metadata server using the same user IDthat was used to start the metadata server.
ARM (Application Response Measurement)an application programming interface that was developed by an industry partnershipand which is used to monitor the availability and performance of softwareapplications. ARM monitors the application tasks that are important to a particularbusiness.
authenticationthe process of verifying the identity of a person or process within the guidelines of aspecific authorization policy.
authentication domaina set of computing resources that use the same authentication process. An individualuses the same user ID and password for all of the resources in a particularauthentication domain. Authentication domains provide logical groupings forresources and logins in a metadata repository. For example, when an applicationneeds to locate credentials that enable a particular user to access a particular server,the application searches the metadata for logins that are associated with theauthentication domain in which the target server is registered.
cubea logical set of data that is organized and structured in a hierarchical,multidimensional arrangement. A cube is a directory structure, not a single file. Acube includes measures, and it can have numerous dimensions and levels of data.
cube loadingthe process of building a logical set of data that is organized and structured in ahierarchical, multidimensional arrangement. See also cube.
dimensiona group of closely related hierarchies. Hierarchies within a dimension typicallyrepresent different groupings of information that pertains to a single concept. For

178 Glossary
example, a Time dimension might consist of two hierarchies: (1) Year, Month, Date,and (2) Year, Week, Day. See also hierarchy.
DNS namea name that is meaningful to people and that corresponds to the numeric TCP/IPaddress of a computer on the Internet. For example, www.alphaliteairways.commight be the DNS name for an Alphalite Airways Web server whose TCP/IP addressis 192.168.145.6.
drill-through tablea view, data set, or other data file that contains data that is used to define a cube.Drill-through tables can be used by client applications to provide a view fromprocessed data into the underlying data source.
encryptionthe act or process of converting data to a form that only the intended recipient canread or use.
hierarchyan arrangement of members of a dimension into levels that are based on parent-childrelationships. Members of a hierarchy are arranged from more general to morespecific. For example, in a Time dimension, a hierarchy might consist of the membersYear, Quarter, Month, and Day. In a Geography dimension, a hierarchy might consistof the members Country, State or Province, and City. More than one hierarchy can bedefined for a dimension. Each hierarchy provides a navigational path that enablesusers to drill down to increasing levels of detail. See also member, level.
IOM bridgea software component of SAS Integration Technologies that enables Java clients andWindows clients to access an IOM server.
IOM servera SAS object server that is launched in order to fulfill client requests for IOMservices. See also IOM (Integrated Object Model).
levelan element of a dimension hierarchy. Levels describe the dimension from the highest(most summarized) level to the lowest (most detailed) level. For example, possiblelevels for a Geography dimension are Country, Region, State or Province, and City.
load balancingfor IOM bridge connections, a program that runs in the object spawner and that usesan algorithm to distribute work across object server processes on the same orseparate machines in a cluster.
logical serverin the SAS Metadata Server, the second-level object in the metadata for SAS servers.A logical server specifies one or more of a particular type of server component, suchas one or more SAS Workspace Servers.
MDX (multidimensional expressions) languagea standardized, high-level language that is used for querying multidimensional datasources. The MDX language is the multidimensional equivalent of SQL (StructuredQuery Language).
measurea special dimension that contains summarized numeric data values that areanalyzed. Total Sales and Average Revenue are examples of measures. For example,you might drill down within the Clothing hierarchy of the Product dimension to seethe value of the Total Sales measure for the Shirts member.

Glossary 179
membera name that represents a particular data element within a dimension. For example,September 1996 might be a member of the Time dimension. A member can be eitherunique or non-unique. For example, 1997 and 1998 represent unique members in theYear level of a Time dimension. January represents non-unique members in theMonth level, because there can be more than one January in the Time dimension ifthe Time dimension contains data for more than one year.
metadata servera server that provides metadata management services to one or more clientapplications. A SAS Metadata Server is an example.
NWAY aggregationthe aggregation that has the minimum set of dimension levels that is required foranswering any business question. The NWAY aggregation is the aggregation that hasthe finest granularity. See also granularity.
object spawnera program that instantiates object servers that are using an IOM bridge connection.The object spawner listens for incoming client requests for IOM services. When thespawner receives a request from a new client, it launches an instance of an IOMserver to fulfill the request. Depending on which incoming TCP/IP port the requestwas made on, the spawner either invokes the administrator interface or processes arequest for a UUID (Universal Unique Identifier).
OLAP (online analytical processing)a software technology that enables users to dynamically analyze data that is storedin multidimensional database (MDDB) tables.
OLAP schemaa group of cubes. A cube is assigned to an OLAP schema when it is created, and anOLAP schema is assigned to a SAS OLAP Server when the server is defined in themetadata. A SAS OLAP Server can access only the cubes that are in its assignedOLAP schema.
SAS Application Serverin the SAS Intelligence Platform, a logical entity that represents the SAS server tier.This logical entity contains specific servers (for example, a SAS Workspace Serverand a SAS Stored Process Server) that execute SAS code. A SAS Application Serverhas relationships with other metadata objects. For example, a SAS library can beassigned to an application server. When a client application needs to access thatlibrary, the client submits code to the application server to which the library isassigned.
SAS ARM interfacean interface that can be used to monitor the performance of SAS applications. In theSAS ARM interface, the ARM API is implemented as an ARM agent. In addition,SAS supplies ARM macros, which generate calls to the ARM API function calls, andARM system options, which enable you to manage the ARM environment and to loginternal SAS processing transactions. See also ARM (Application ResponseMeasurement).
SAS Management Consolea Java application that provides a single user interface for performing SASadministrative tasks.
SAS Metadata Repositorya repository that is used by the SAS Metadata Server to store and retrieve metadata.See also SAS Metadata Server.

180 Glossary
SAS Metadata Servera multi-user server that enables users to read metadata from or write metadata toone or more SAS Metadata Repositories. The SAS Metadata Server uses theIntegrated Object Model (IOM), which is provided with SAS Integration Technologies,to communicate with clients and with other servers.
SAS OLAP Cube Studioa Java interface for defining and building OLAP cubes in SAS System 9 or later. Itsmain feature is the Cube Designer wizard, which guides you through the process ofregistering and creating cubes.
SAS OLAP Servera SAS server that provides access to multidimensional data. The data is queriedusing the multidimensional expressions (MDX) language.
SAS Open Metadata Architecturea general-purpose metadata management facility that provides metadata services toSAS applications. The SAS Open Metadata Architecture enables applications toexchange metadata, which makes it easier for these applications to work together.
SAS Stored Process Servera SAS IOM server that is launched in order to fulfill client requests for SAS StoredProcesses. See also IOM server.
SAS Workspace Servera SAS IOM server that is launched in order to fulfill client requests for IOMworkspaces. See also IOM server, workspace.
schemaa map or model of the overall data structure of a database. An OLAP schemaspecifies which group of cubes an OLAP server can access.
SPD (Scalable Performance Data) Enginea SAS engine that is able to deliver data to applications rapidly because it organizesthe data into a streamlined file format. The SPD Engine divides a problem (such as aWHERE clause) into smaller problems that can be processed in parallel. See alsoparallel processing.
star schematables in a database in which a single fact table is connected to multiple dimensiontables. This is visually represented in a star pattern. SAS OLAP cubes can becreated from a star schema.
threada single path of execution of a process in a single CPU, or a basic unit of programexecution in a thread-enabled operating system. In an SMP environment, which usesmultiple CPUs, multiple threads can be spawned and processed simultaneously.Regardless of whether there is one CPU or many, each thread is an independent flowof control that is scheduled by the operating system. See also SMP (symmetricmultiprocessing), thread-enabled operating system, threading.
threaded I/OI/O that is performed by multiple threads in order to increase its speed. In order forthreaded I/O to improve performance significantly, the application that is performingthe I/O must be capable of processing the data rapidly as well. See also thread.
threadinga high-performance method of data I/O or data processing in which the I/O orprocessing is divided into multiple threads that are executed in parallel. In theboss-worker model of threading, the same code for the I/O or calculation process is

Glossary 181
executed simultaneously in separate threads on multiple CPUs. In the pipelinemodel, a process is divided into steps, which are then executed simultaneously inseparate threads on multiple CPUs. See also parallel I/O, parallel processing, SMP(symmetric multiprocessing).
wizardan interactive utility program that consists of a series of dialog boxes, windows, orpages. Users supply information in each dialog box, window, or page, and the wizarduses that information to perform a task.

182

Index 183
Index
Aabnormal shutdowns
cleaning up temporary files after 87access to data
grid computing 131accessibility features 1administrative tasks 85application server
See SAS Application Serverarchitecture
grid system 115, 117authentication domains
adding to SAS Trusted User login 40
Bbatch servers 5, 105
SAS Data Step Batch Server 106SAS Java Batch Server 107
Ccentral deployment directory
defining 127cleaning up temporary files 87client machine
grid computing 119configuration
changing 86grid 121grid computing software 117JVM on SAS OLAP Servers 86resources in lsf.cluster file 124stored process servers 13workspace servers 13
connection pooling 36contention for data 131Cost algorithm for load balancing 27cube cache 88
changing number of cubes in 90refreshing cube metadata in 90
cube metadatarefreshing in cube cache 90
cube viewers 84cubes
changing number in cube cache 90
Ddata access
for servers on multiple machines 67
grid computing 131
in Database Management Systems 68
data cache 89
tuning 91
data-integration grid system architecture 115
data transfer services 94
deadlock 128
deployment
defining central directory 127
desktop applications
load balancing workspace servers for 53
Eerror messages for object spawners 152
Ggrid
basic configuration of 121
partitioning 124
verifying that grid is working 123
grid computing 115
advanced configuration tasks 123
basic grid configuration 121
data-integration grid system architecture 115
installing and configuring software 117
performance improvement 130
pre-installation tasks 120
SAS/CONNECT Server and 96
SAS Grid Server 109, 125
system requirements 120
troubleshooting 128
user accounts 121
verifying that grid is working 123
grid control machine 118
Grid Manager plug-in for SAS Management Con-sole 132
grid nodes 119
partitioning data and moving to 132
Iinstallation 85installing grid computing software 117Integrated Object Model (IOM) interface 4
Jjob slots, LSF
changing number of 126jobs
monitoring Grid Manager jobs 133terminating Grid Manager jobs 133
JVM (Java Virtual Machine)configuring on SAS OLAP Servers 86
Lload balancing 19
algorithms 22converting logical workspace server to 56Cost algorithm 27logical server definition 146logical stored process server properties 63MultiBridge connections 21object spawner 54, 61planning and configuring 23Response Time algorithm 31security for 22software installation 54, 61stored process servers, configuring 61stored process servers, initial setup 59stored process servers, multiple hosts 60stored process servers, properties 65workspace server, configuring 54workspace server, for desktop applications 53workspace server, parameters 57
logical workspace serverconverting to load balancing 56definition for load balancing 146
Loop Transformationupdating metadata for 125
LSF job slotschanging number of 126
LSF remote sessions 130lsf.cluster file
configuring resources in 124

184 Index
lsf.shared fileadding resources to 124
Mmetadata
updating for Loop Transformation 125updating for SAS Grid Server 125
metadata configuration file 14metadata objects
for SAS/CONNECT 99for SAS Grid Server 110hierarchy for SAS Application Server 6
metadata promotionSAS/CONNECT Server 97
metadata repositoriesadding SAS OLAP Server to 92
metadata server machinegrid computing 117
metadata serversSee SAS Metadata Server
monitoring Grid Manager jobs 133moving servers
SAS Stored Process Server 73SAS Workspace Server 71to separate machines 79to the same machine 76
MultiBridge connections 21multiple application servers 6
accessing remote data (example) 7using with SAS Web Report Studio (exam-
ple) 9
Oobject server parameters 135object spawners 13
administering with telnet 172configuring for load balancing 54, 61definition 148error messages 152invocation options 150updating a Windows service for 67
OLAP procedure 84OLAP schemas 84optimizing SAS OLAP Servers 88
Ppartitioning data and moving to grid nodes 132partitioning the grid 124performance
grid computing 130platform computing software
grid computing 121Platform User Service
configuring 42pool administrator 40pooled SAS Workspace Servers
SAS Information Delivery Portal 36SAS Web Report Studio 36
pooling 14configuring across multiple machines 44
configuring for row-level security 46connection process 15creating a restricted workspace server pool 48planning and configuring 16pooled logical server and puddle defini-
tions 145security for 16, 17
puddles 37
Qquery thread pool 89
tuning 91
Rrefreshing cube metadata 90remote access
resources cannot be accessed 129remote library services 95required software 86resources
adding to lsf.shared file 124cannot be accessed on remote machines 129configuring in lsf.cluster file 124
Response Time algorithm for load balancing 31row-level security
configuring pooling workspace server to en-force 46
SSAS Application Server 1, 3
components 4defining multiple application servers 6hierarchy of metadata objects 6server context 4
SAS Configuration Wizardworkspace and stored process servers 13
SAS/CONNECT Server 5, 93compute services 94configuration files 102data transfer services 94grid computing 96initial configuration 98metadata objects 99metadata promotion 97remote library services 95SAS Data Integration Studio and 95SAS Enterprise Miner and 95
SAS/CONNECT spawnerchanging logging level 103
SAS Data Integration StudioSAS/CONNECT Server and 95using deployment directory from 128using multiple application servers with (exam-
ple) 7SAS Data Step Batch Server 106SAS Enterprise Guide 84SAS Enterprise Miner
SAS/CONNECT Server and 95SAS Grid Server 5, 109
configuration files 112
initial configuration 109metadata object 110updating metadata for 125
SAS Information Delivery Portalworkspace server pooling for 36
SAS Java Batch Server 107SAS Management Console
creating deployment directory in 128Grid Manager plug-in for 132Server Manager plug-in for 3
SAS Metadata Server 5metadata configuration file 14
SAS Object SpawnerSee object spawners
SAS OLAP Cube Studio 84SAS OLAP Server 4, 84
adding to metadata repository 92administrative tasks 85changing configuration of 86components 83configuring JVM on 86controlling and monitoring 88installing 85logging 88optimizing 88
SAS OLAP Server Monitor 85SAS OLAP Server software 83SAS Stored Process Server
See stored process serversSAS Trusted User account
adding authentication domain to login 40SAS Web OLAP Viewer for Java 84SAS Web OLAP Viewer for .Net 84SAS Web Report Studio 84
configuring Platform User Service 42using multiple application servers with (exam-
ple) 9verifying connection pooling 43workspace server pooling for 36
SAS Workspace ServerSee workspace servers
SASEnvironment directory structure 127security
for load balancing 22for pooling 16, 17row-level configuration 46
server definition 141Server Manager plug-in for SAS Management
Console 3short-running jobs 130stored process servers 4, 12
configuration 13configuring for load balancing 61initial load balancing setup 59load balancing on multiple hosts 60load balancing properties 65logical properties for load balancing 63logical server definition for load balanc-
ing 146moving 73MultiBridge connections 21object server parameters 135server definition 141
subquery cache 89tuning 91
system optionsfor workspace server launch command 35

Index 185
for workspace server process 34
Ttelnet for administering object spawners 172temporary files
cleaning up after abnormal shutdowns 87terminating Grid Manager jobs 133tuning
data cache 91query thread pool 91subquery cache 91
Uuser accounts
grid computing 121
setting up for row-level security 47
Wworkspace servers 4, 12
configuration 13
configuration options for pool 39
configuring for Hebrew locale 35
configuring for load balancing 54
configuring pooling across multiple ma-chines 44
configuring to enforce row-level security 46
configuring to store temporary cube buildfiles 87
converting to pooling 38
creating a restricted pool 48
launch command 35
load balancing for desktop applications 53
load balancing parameters 57
logical server definition for load balanc-ing 146
moving 71
object server parameters 135
pooled logical server definitions 145
pooling 14
pooling for SAS Information Delivery Por-tal 36
pooling for SAS Web Report Studio 36
puddle definitions 145
server definition 141
system options for 34
tuning for best performance 34


Your Turn
If you have comments or suggestions about SAS ® 9.1.3 Intelligence Platform:Application Server Administration Guide, please send them to us on a photocopy of thispage, or send us electronic mail.
For comments about this book, please return the photocopy to
SAS PublishingSAS Campus DriveCary, NC 27513E-mail: [email protected]
For suggestions about the software, please return the photocopy to
SAS Institute Inc.Technical Support DivisionSAS Campus DriveCary, NC 27513E-mail: [email protected]


SAS and all other SAS Institute Inc. product or service names are registered trademarks or trademarks of SAS Institute Inc. in the USA and other countries. ® indicates USA registration. Other brand and product names are trademarks of their respective companies. © 2006 SAS Institute Inc. All rights reserved. 403726US.0806
SAS® Publishing gives you the tools to flourish in any environment with SAS®!
Whether you are new to the workforce or an experienced professional, you need to distinguish yourself in this rapidly changing and competitive job market. SAS® Publishing provides you with a wide range of resources— including publications, online training, and software —to help you set yourself apart.
Expand Your Knowledge with Books from SAS® Publishing SAS® Press offers user-friendly books for all skill levels, covering such topics as univariate and multivariate statistics, linear models, mixed models, fixed effects regression, and more. View our complete catalog and get free access to the latest reference documentation by visiting us online.
s u p p o r t . s a s . c o m / p u b s
SAS® Self-Paced e-Learning Puts Training at Your Fingertips You are in complete control of your learning environment with SAS Self-Paced e-Learning! Gain immediate 24/7 access to SAS training directly from your desktop, using only a standard Web browser. If you do not have SAS installed, you can use SAS® Learning Edition for all Base SAS e-learning.
s u p p o r t . s a s . c o m / s e l f p a c e d
Build Your SAS Skills with SAS® Learning Edition SAS skills are in demand, and hands-on knowledge is vital. SAS users at all levels, from novice to advanced, will appreciate this inexpensive, intuitive, and easy-to-use personal learning version of SAS. With SAS Learning Edition, you have a unique opportunity to gain SAS software experience and propel your career in new and exciting directions.
s u p p o r t . s a s . c o m / L E