COMPUTER PROGRAMMING I Understand Problem Solving Tools to Design Programming Solutions.
Upload
alban-fletcherCategory
view
219download
0
Application of Data Programming
BlocksMODULE 2

Objectives
Understand the use of data programming blocks and their applications
Understand the basic logic operations and apply them in programming robots.
Perform mathematical operations using the math block.
Control switches/loops using range and compare blocks
Create variables and constants.
Use the random block to personalize your robot

Data BlocksIn this module we are going to study the configurations & applications of each block.

Math BlockThe Math Block is used to perform a mathematical operation on two input integer numbers.
The result of the operation is available on an output data plug.
The math operations are addition, subtraction, multiplication, and division.
Using the math block, you can calculate the area of an object, the total distance travelled by the robot or modify a sensor reading to reflect the score in a pinball game
Used to Calculate absolute value and square root.

Math Block
Operation
Output (Result)
InputNumbers
Configuration Panel
Data Block
A and B values can either be manually set in the configuration panel Or dynamically set with input data wires.

The variable block stores and retrieves variable values.
You can save sensor readings in a variable and then update them after performing mathematical operations.
For Example, you can count the total number of red or blue objects produced in a factory.
Variable Block

Using variables in NXT-G is a two-step process.
First you create the variable, and then you use the Variable block in your program to work with the data contained in the variable.
Variable Block

1.To create a variable, go to edit define variables
As you can see in the figure, we created a new variable entitled “NumberVar” with the “Number” Datatype. You can create other data types such as “logic” or “text”.
Variable Block
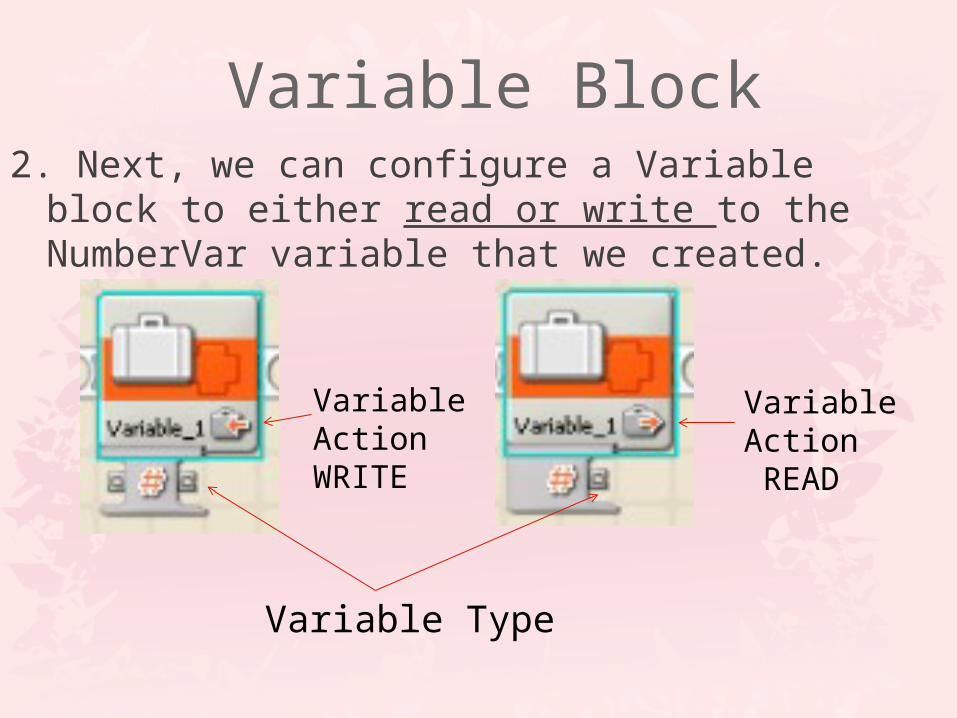
2. Next, we can configure a Variable block to either read or write to the NumberVar variable that we created.
Variable Block
Variable Action WRITE
Variable Action READ
Variable Type

To do so, use the Configuration Panel to select the variable from the list, and then set the Action item to either Read or Write.
When Read is selected, the variable’s current value is put on the data wire attached to the output data plug.
When Write is selected, a value is stored in the variable. That value can be supplied either using the Configuration Panel or via an input data wire.
Usually, you will need to use the Configuration Panel to set a variable’s initial value at the beginning of a program, and then use a data wire if you want to change the value later in the program.

This block can take up to three inputs. It determines whether a test number is inside or outside a range of numbers.
It outputs a logic value depending on the result of the comparison.
Range Block
Test Value
Lower LimitUpper Limit
Output Result
Range Value

This is the Configuration Panel for the range block. You can set the range by using the two-sided slider, by entering the values in the A and B boxes or by supplying the two range limit values using data wires.
Using the slider, you can aselect lower and upper limits between 0 and 100. To use values greater than 100 or less than 0, enter the numbers in the boxes.
The test value can be entered into the box on the Configuration Panel or supplied by using a data wire.
Using the range block, you can improve on traditional color sorting codes by specifying a range values for each color
Range Block

Lab Activity 1 Tasks 1 & 2

This block is designed to perform a logical operation on its inputs and output a true/false logical value.
Its operations consist of , , ,
Logic Block
Logic Operation
Output Result
Input conditions
NOTAND XorOR
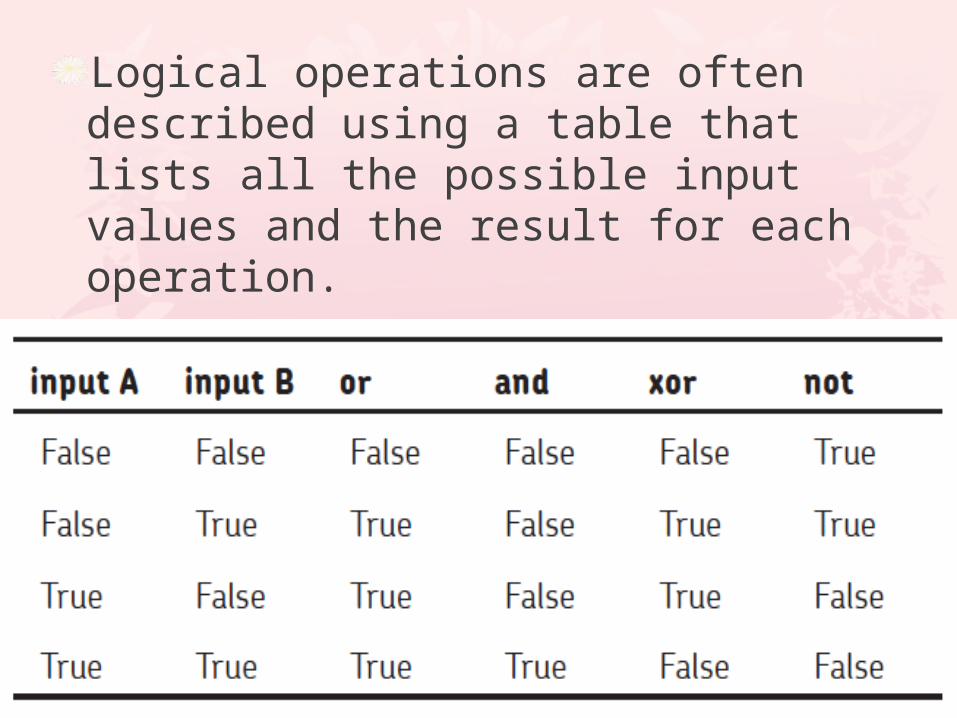
Logical operations are often described using a table that lists all the possible input values and the result for each operation.
This is called a truth table

1. You select the operation you want to perform.
2. Supply the Input values, using either data wires OR the configuration Panel
Logic Block: Configuration Panel
Buttons are used to set the values in the Configuration Panel, with the (√) meaning true and the (x) meaning false.

Lab Activity 1 Task 3

Constant Block is used to access constants in your program.
This block looks like the Variable block, with a lock added to show that the value cannot be changed
Constant Block
Constant Name
Constant Type
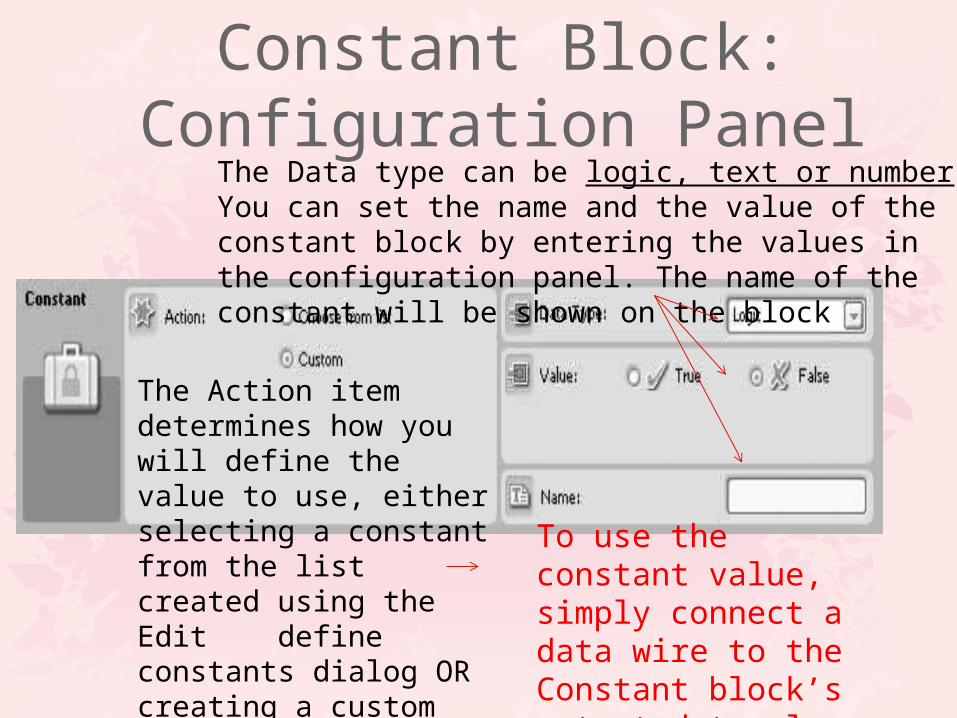
Constant Block: Configuration Panel
The Action item determines how you will define the value to use, either selecting a constant from the list created using the Edit define constants dialog OR creating a custom constant
The Data type can be logic, text or number. You can set the name and the value of the constant block by entering the values in the configuration panel. The name of the constant will be shown on the block
To use the constant value, simply connect a data wire to the Constant block’s output data plug.

This block simply compares two numbers as to whether or not the first number is greater than, less than, or equal to the second number.
It outputs a logic value depending on the result of the comparison.
Compare Block
Input Numbers
Comparison Operation
Output Result
When the block runs; it takes the two input numbers, compares them, and puts the resulting logic value on the output data wire.
For example, if the A value is 7 and the B value is 12, the result will be true, because 7 is less than 12. On the other hand, if A is 25 and B is 8, the result will be false, because 25 is not less than 8.

You can supply the two input values using data wires or the Configuration Panel.
Using the compare block, you can compare the readings from two ultrasonic sensors. You can then use the result of the comparison to control a Switch or Loop block to determine which way your robot should go.

Random Block is used to generate a random number. It takes two inputs in the form of the min and max values of the random numbers it will be allowed to generate.
It is used to create robotic games or a robot that exhibits unpredictable behavior because the block’s output will vary each time the program runs.
Often a robot that is a little unpredictable can be more interesting or seem to have more personality.
Random Block
Lower Limit
Upper Limit
Random Number (Min and Maximum)

Random BlockLike the range block, you can set the range by using the two-sided slider, by entering the values in the A and B boxes, or by supplying the two range limit values using data wires.
Using the slider, you can select lower and upper limits between 0 and 100. To use values greater than 100 or less than 0, enter the numbers in the boxes. The minimum value for the lower limit is 0 while the maximum value for the upper limit is 32767.

Lab Activity 2

Review Questions


![Parallel Programming Course Threading Building Blocks … · Parallel Programming Course Threading Building Blocks ... split/join nodes ... [, task_group_context& group] ) #include](https://static.fdocuments.in/doc/165x107/5b6c92627f8b9aa32b8ba742/parallel-programming-course-threading-building-blocks-parallel-programming-course.jpg)