Application Notes for Biamp AudiaFLEX VoIP-2 with Avaya Aura
CRK; Reviewed:
SPOC 4/5/2012
Solution & Interoperability Test Lab Application Notes
©2012 Avaya Inc. All Rights Reserved.
1 of 19
Biamp-IPO80
Avaya Solution & Interoperability Test Lab
Application Notes for Biamp Tesira SVC-2 and Avaya IP
Office – Issue 1.0
Abstract
These Application Notes describe the procedures for configuring Biamp Tesira SVC-2 which
were compliance tested with Avaya IP Office.
The overall objective of the interoperability compliance testing is to verify Biamp Tesira SVC-
2 functionalities in an environment comprised of Avaya IP Office and various Avaya H.323,
SIP IP Telephones, and DCP telephones.
Information in these Application Notes has been obtained through DevConnect compliance
testing and additional technical discussions. Testing was conducted via the DevConnect
Program at the Avaya Solution and Interoperability Test Lab.
CRK; Reviewed:
SPOC 4/5/2012
Solution & Interoperability Test Lab Application Notes
©2012 Avaya Inc. All Rights Reserved.
2 of 19
Biamp-IPO80
1. Introduction These Application Notes describe the procedures for configuring Biamp Tesira SVC-2 which
was compliance tested with Avaya IP Office.
The Tesira SVC-2 enables conferencing over VoIP directly from Tesira SERVER-IO, with two
channels of VoIP interface per card. Tesira SVC-2 allows Tesira SERVER-IO to connect directly
to IP-based phone systems and eliminate the need for VoIP adapters. Used in conjunction with
SEC-4 4-Channel Wideband Acoustic Echo Cancellation Input Cards and STC-2 Dual-Channel
Telephone Interface Cards, the Tesira SVC-2 makes Tesira SERVER-IO a powerful, flexible,
and affordable telephone conferencing product available. Combined with the STC-2 Card, the
Tesira SVC-2 makes it possible to create redundancies within a conferencing system for multi-
point conferences and/or back-up to VoIP lines. Up to 6 Tesira SVC-2 can be installed into a
single Tesira SERVER-IO unit.
For further details on Tesira SVC-2 configuration steps not covered in this document, consult
[2].
These Application Notes assume that Avaya IP Office is already installed and basic
configuration steps have been performed. Only steps relevant to this compliance test will be
described in this document. For further details on configuration steps not covered in this
document, consult reference [1].
2. General Test Approach and Test Results The general test approach was to place calls to and from Biamp Tesira SVC-2 and exercise basic
telephone operations. The main objectives were to verify the following:
Registration
Codecs (G.711MU)
Inbound calls
Outbound calls
Hold/Resume
Call termination (origination/destination)
Serviceability
2.1. Interoperability Compliance Testing
All test cases were performed manually. The general approach was to place various types of
calls to and from Biamp Tesira SVC-2. Biamp Tesira SVC-2 operations such as inbound calls,
outbound calls, hold, and Biamp Tesira SVC-2 interactions with Avaya IP Office, and Avaya
SIP, H.323, and DCP telephones were verified. For serviceability testing, failures such as cable
pulls and resets were applied.
2.2. Test Results
All test cases passed.
CRK; Reviewed:
SPOC 4/5/2012
Solution & Interoperability Test Lab Application Notes
©2012 Avaya Inc. All Rights Reserved.
3 of 19
Biamp-IPO80
2.3. Support
Technical support for the Biamp Tesira SVC-2 solution can be obtained by contacting Biamp at:
http://www.biamp.com/support/index.aspx
(800)-826-1457
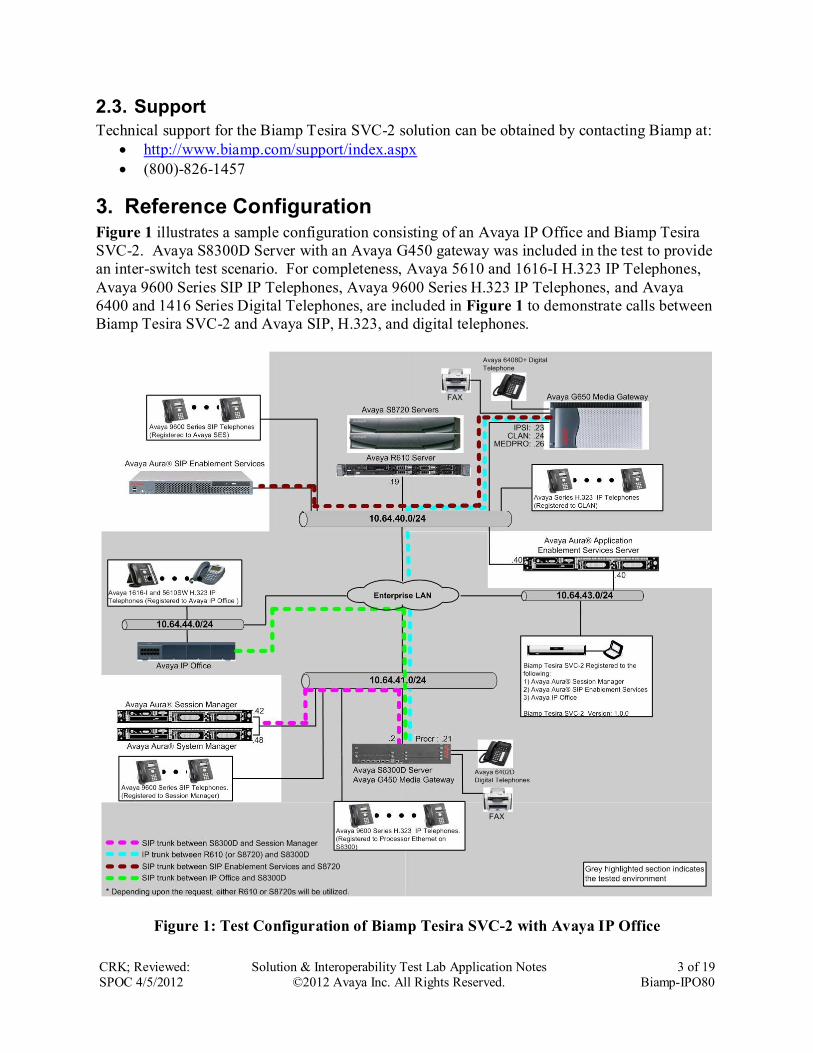
3. Reference Configuration Figure 1 illustrates a sample configuration consisting of an Avaya IP Office and Biamp Tesira
SVC-2. Avaya S8300D Server with an Avaya G450 gateway was included in the test to provide
an inter-switch test scenario. For completeness, Avaya 5610 and 1616-I H.323 IP Telephones,
Avaya 9600 Series SIP IP Telephones, Avaya 9600 Series H.323 IP Telephones, and Avaya
6400 and 1416 Series Digital Telephones, are included in Figure 1 to demonstrate calls between
Biamp Tesira SVC-2 and Avaya SIP, H.323, and digital telephones.
Figure 1: Test Configuration of Biamp Tesira SVC-2 with Avaya IP Office
CRK; Reviewed:
SPOC 4/5/2012
Solution & Interoperability Test Lab Application Notes
©2012 Avaya Inc. All Rights Reserved.
4 of 19
Biamp-IPO80
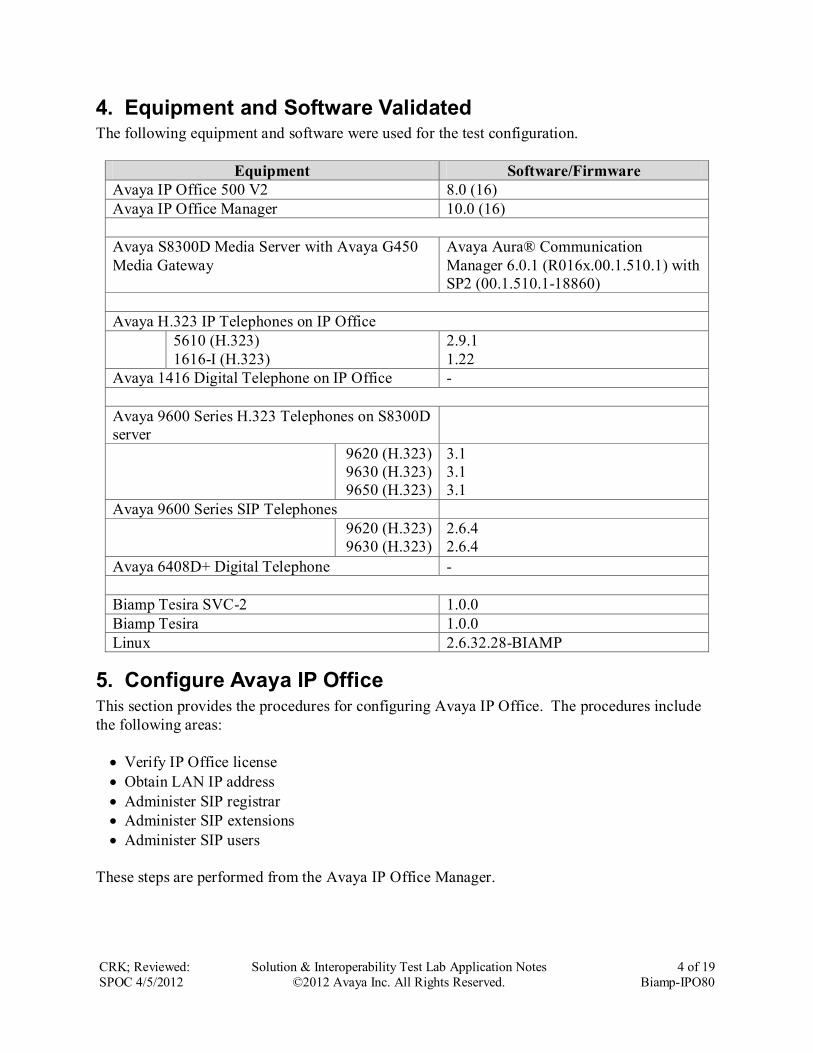
4. Equipment and Software Validated The following equipment and software were used for the test configuration.
Equipment Software/Firmware
Avaya IP Office 500 V2 8.0 (16)
Avaya IP Office Manager 10.0 (16)
Avaya S8300D Media Server with Avaya G450
Media Gateway
Avaya Aura® Communication
Manager 6.0.1 (R016x.00.1.510.1) with
SP2 (00.1.510.1-18860)
Avaya H.323 IP Telephones on IP Office
5610 (H.323)
1616-I (H.323)
2.9.1
1.22
Avaya 1416 Digital Telephone on IP Office -
Avaya 9600 Series H.323 Telephones on S8300D
server
9620 (H.323)
9630 (H.323)
9650 (H.323)
3.1
3.1
3.1
Avaya 9600 Series SIP Telephones
9620 (H.323)
9630 (H.323)
2.6.4
2.6.4
Avaya 6408D+ Digital Telephone -
Biamp Tesira SVC-2 1.0.0
Biamp Tesira 1.0.0
Linux 2.6.32.28-BIAMP
5. Configure Avaya IP Office This section provides the procedures for configuring Avaya IP Office. The procedures include
the following areas:
Verify IP Office license
Obtain LAN IP address
Administer SIP registrar
Administer SIP extensions
Administer SIP users
These steps are performed from the Avaya IP Office Manager.
CRK; Reviewed:
SPOC 4/5/2012
Solution & Interoperability Test Lab Application Notes
©2012 Avaya Inc. All Rights Reserved.
5 of 19
Biamp-IPO80
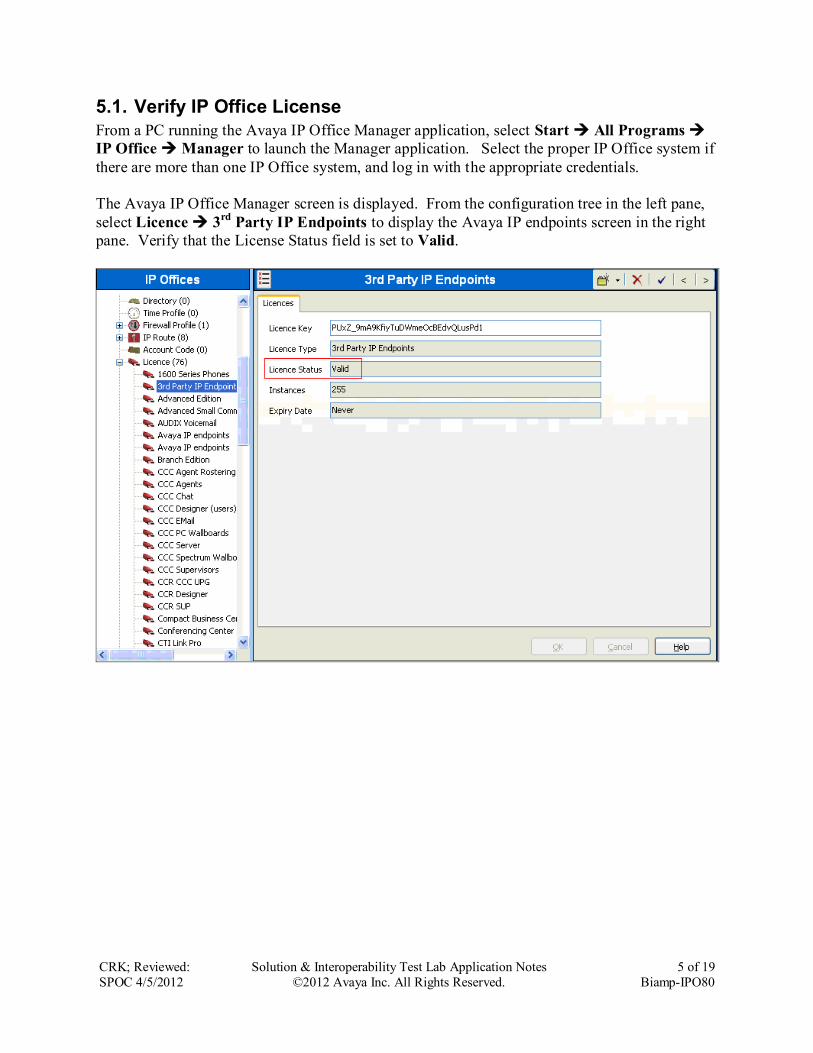
5.1. Verify IP Office License
From a PC running the Avaya IP Office Manager application, select Start All Programs
IP Office Manager to launch the Manager application. Select the proper IP Office system if
there are more than one IP Office system, and log in with the appropriate credentials.
The Avaya IP Office Manager screen is displayed. From the configuration tree in the left pane,
select Licence 3rd
Party IP Endpoints to display the Avaya IP endpoints screen in the right
pane. Verify that the License Status field is set to Valid.
CRK; Reviewed:
SPOC 4/5/2012
Solution & Interoperability Test Lab Application Notes
©2012 Avaya Inc. All Rights Reserved.
6 of 19
Biamp-IPO80
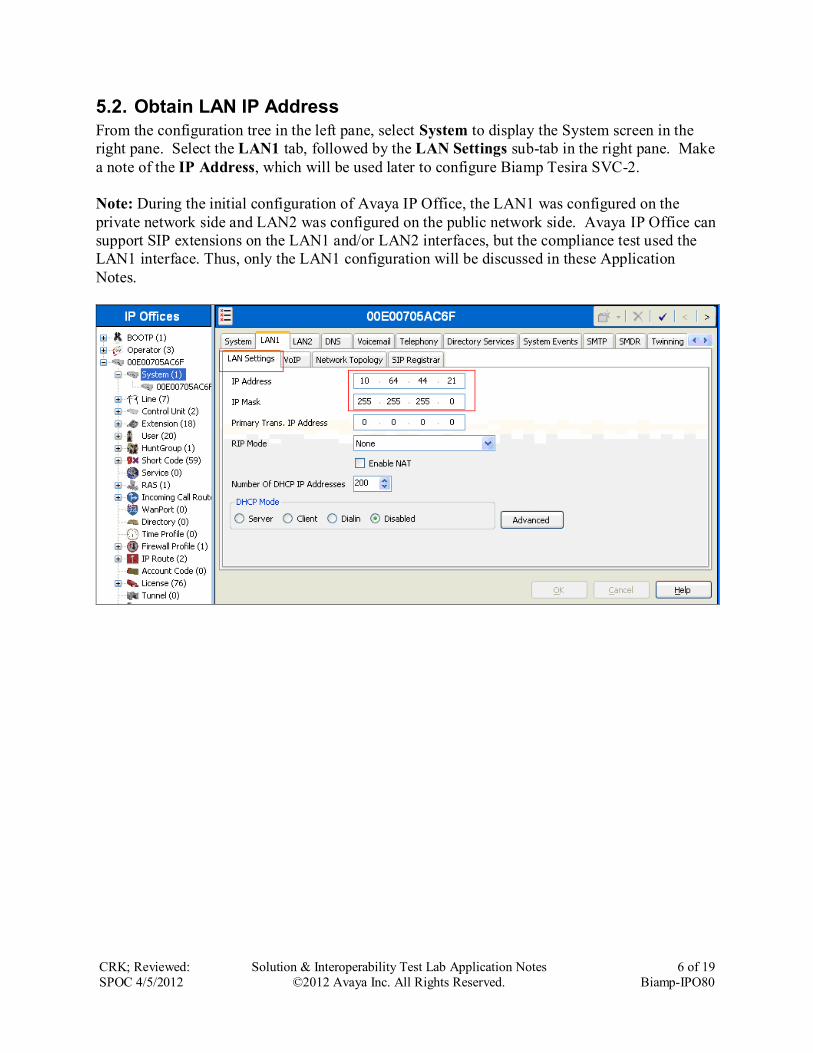
5.2. Obtain LAN IP Address
From the configuration tree in the left pane, select System to display the System screen in the
right pane. Select the LAN1 tab, followed by the LAN Settings sub-tab in the right pane. Make
a note of the IP Address, which will be used later to configure Biamp Tesira SVC-2.
Note: During the initial configuration of Avaya IP Office, the LAN1 was configured on the
private network side and LAN2 was configured on the public network side. Avaya IP Office can
support SIP extensions on the LAN1 and/or LAN2 interfaces, but the compliance test used the
LAN1 interface. Thus, only the LAN1 configuration will be discussed in these Application
Notes.
CRK; Reviewed:
SPOC 4/5/2012
Solution & Interoperability Test Lab Application Notes
©2012 Avaya Inc. All Rights Reserved.
7 of 19
Biamp-IPO80
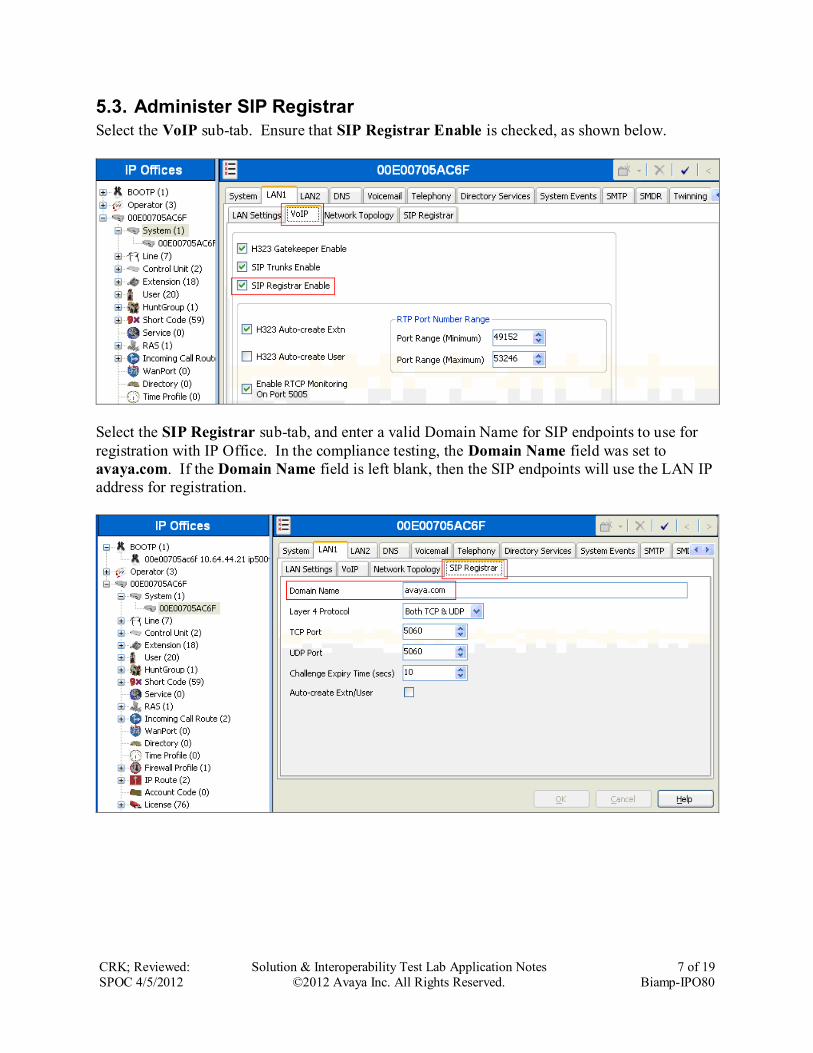
5.3. Administer SIP Registrar
Select the VoIP sub-tab. Ensure that SIP Registrar Enable is checked, as shown below.
Select the SIP Registrar sub-tab, and enter a valid Domain Name for SIP endpoints to use for
registration with IP Office. In the compliance testing, the Domain Name field was set to
avaya.com. If the Domain Name field is left blank, then the SIP endpoints will use the LAN IP
address for registration.
CRK; Reviewed:
SPOC 4/5/2012
Solution & Interoperability Test Lab Application Notes
©2012 Avaya Inc. All Rights Reserved.
8 of 19
Biamp-IPO80
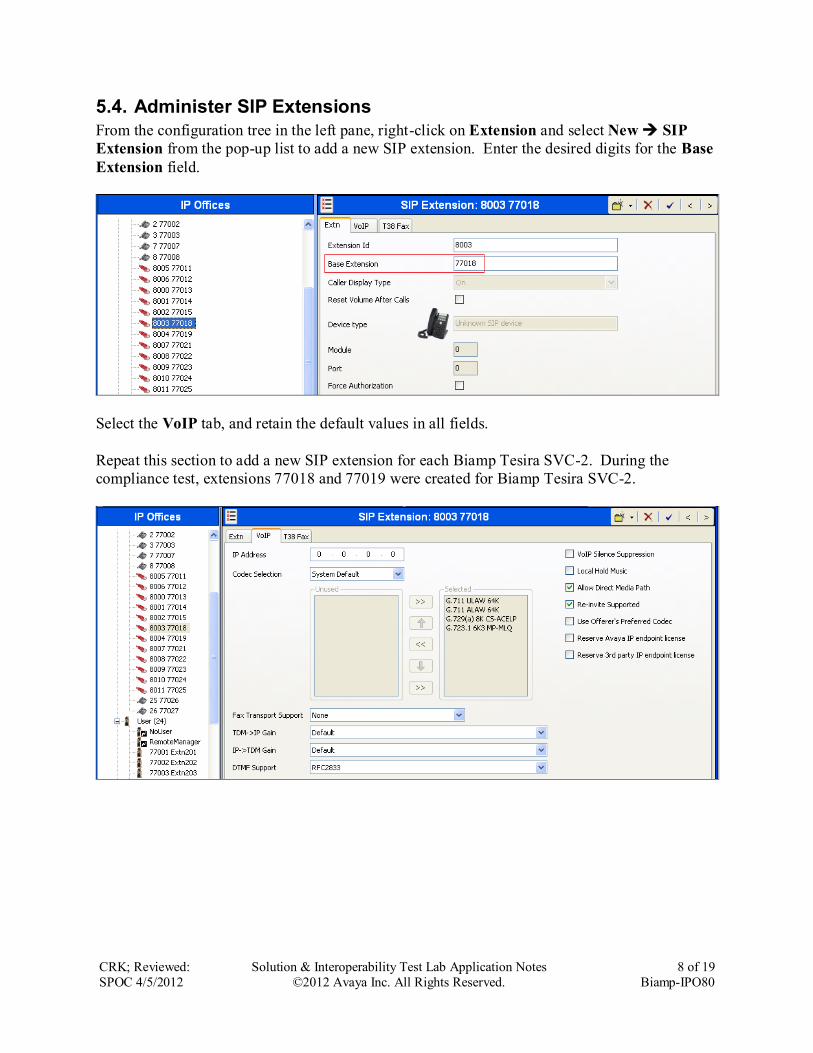
5.4. Administer SIP Extensions
From the configuration tree in the left pane, right-click on Extension and select New SIP
Extension from the pop-up list to add a new SIP extension. Enter the desired digits for the Base
Extension field.
Select the VoIP tab, and retain the default values in all fields.
Repeat this section to add a new SIP extension for each Biamp Tesira SVC-2. During the
compliance test, extensions 77018 and 77019 were created for Biamp Tesira SVC-2.
CRK; Reviewed:
SPOC 4/5/2012
Solution & Interoperability Test Lab Application Notes
©2012 Avaya Inc. All Rights Reserved.
9 of 19
Biamp-IPO80
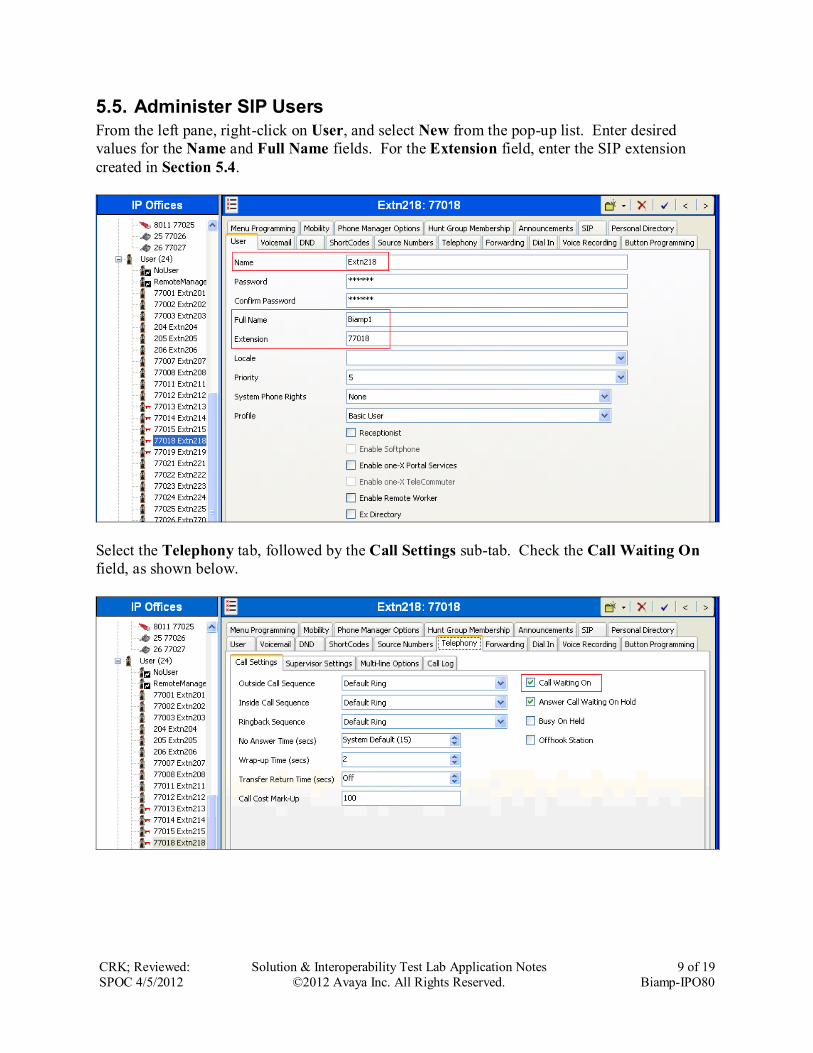
5.5. Administer SIP Users
From the left pane, right-click on User, and select New from the pop-up list. Enter desired
values for the Name and Full Name fields. For the Extension field, enter the SIP extension
created in Section 5.4.
Select the Telephony tab, followed by the Call Settings sub-tab. Check the Call Waiting On
field, as shown below.
CRK; Reviewed:
SPOC 4/5/2012
Solution & Interoperability Test Lab Application Notes
©2012 Avaya Inc. All Rights Reserved.
10 of 19
Biamp-IPO80
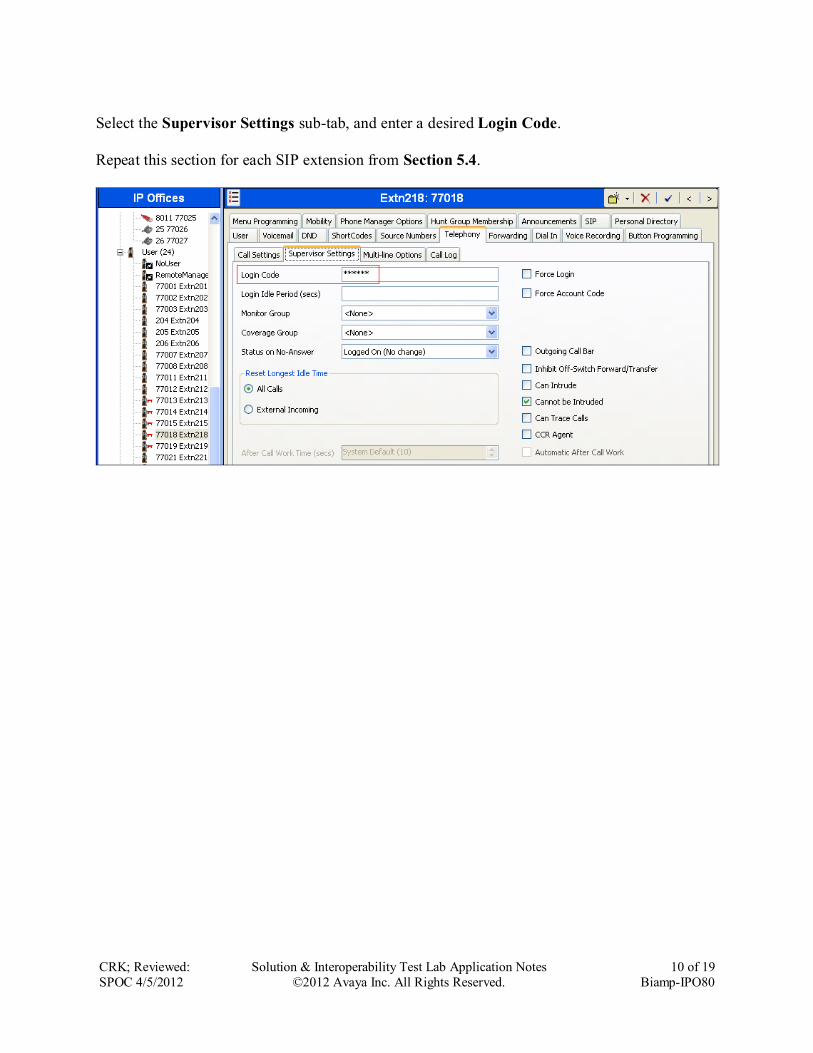
Select the Supervisor Settings sub-tab, and enter a desired Login Code.
Repeat this section for each SIP extension from Section 5.4.
CRK; Reviewed:
SPOC 4/5/2012
Solution & Interoperability Test Lab Application Notes
©2012 Avaya Inc. All Rights Reserved.
11 of 19
Biamp-IPO80
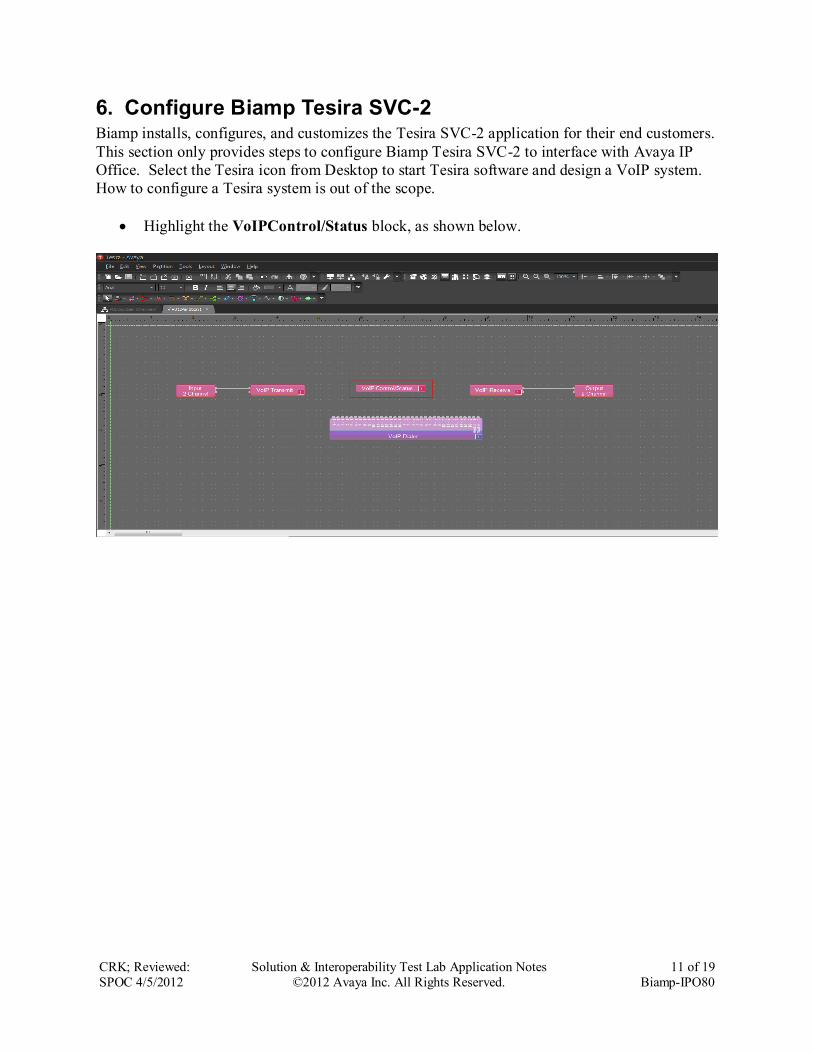
6. Configure Biamp Tesira SVC-2 Biamp installs, configures, and customizes the Tesira SVC-2 application for their end customers.
This section only provides steps to configure Biamp Tesira SVC-2 to interface with Avaya IP
Office. Select the Tesira icon from Desktop to start Tesira software and design a VoIP system.
How to configure a Tesira system is out of the scope.
Highlight the VoIPControl/Status block, as shown below.
CRK; Reviewed:
SPOC 4/5/2012
Solution & Interoperability Test Lab Application Notes
©2012 Avaya Inc. All Rights Reserved.
12 of 19
Biamp-IPO80
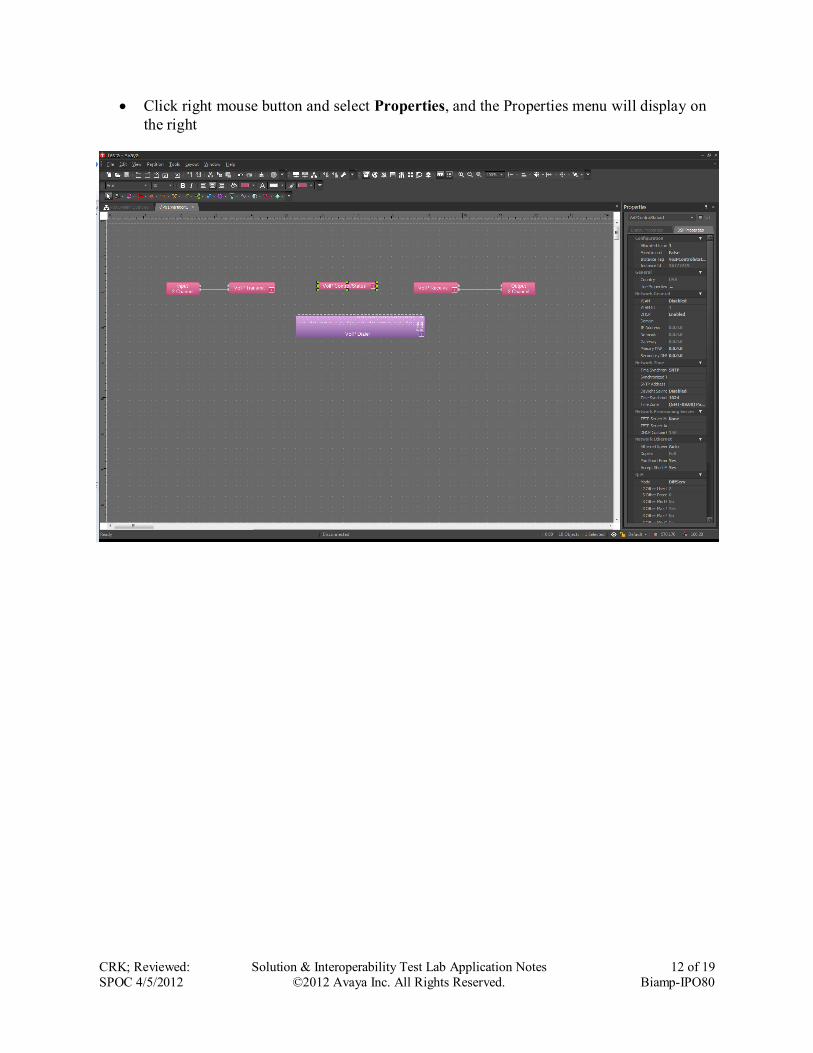
Click right mouse button and select Properties, and the Properties menu will display on
the right
CRK; Reviewed:
SPOC 4/5/2012
Solution & Interoperability Test Lab Application Notes
©2012 Avaya Inc. All Rights Reserved.
13 of 19
Biamp-IPO80
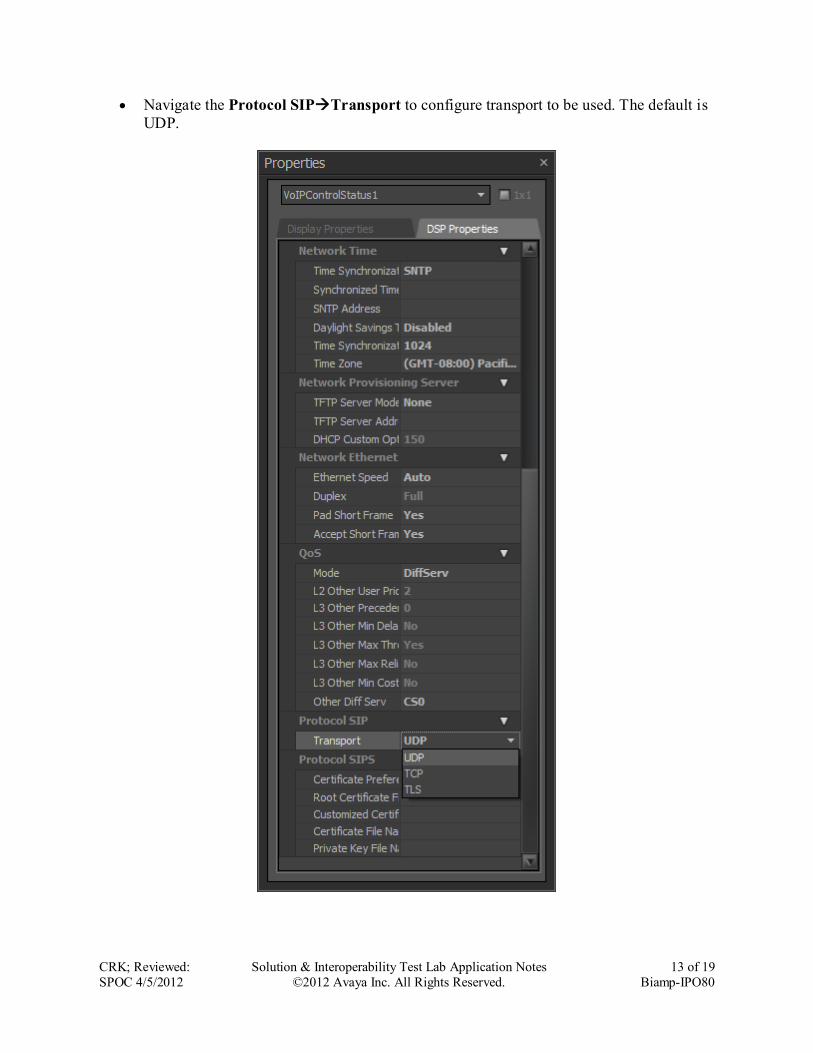
Navigate the Protocol SIPTransport to configure transport to be used. The default is
UDP.

CRK; Reviewed:
SPOC 4/5/2012
Solution & Interoperability Test Lab Application Notes
©2012 Avaya Inc. All Rights Reserved.
14 of 19
Biamp-IPO80
Select Line Properties under the General section
CRK; Reviewed:
SPOC 4/5/2012
Solution & Interoperability Test Lab Application Notes
©2012 Avaya Inc. All Rights Reserved.
15 of 19
Biamp-IPO80
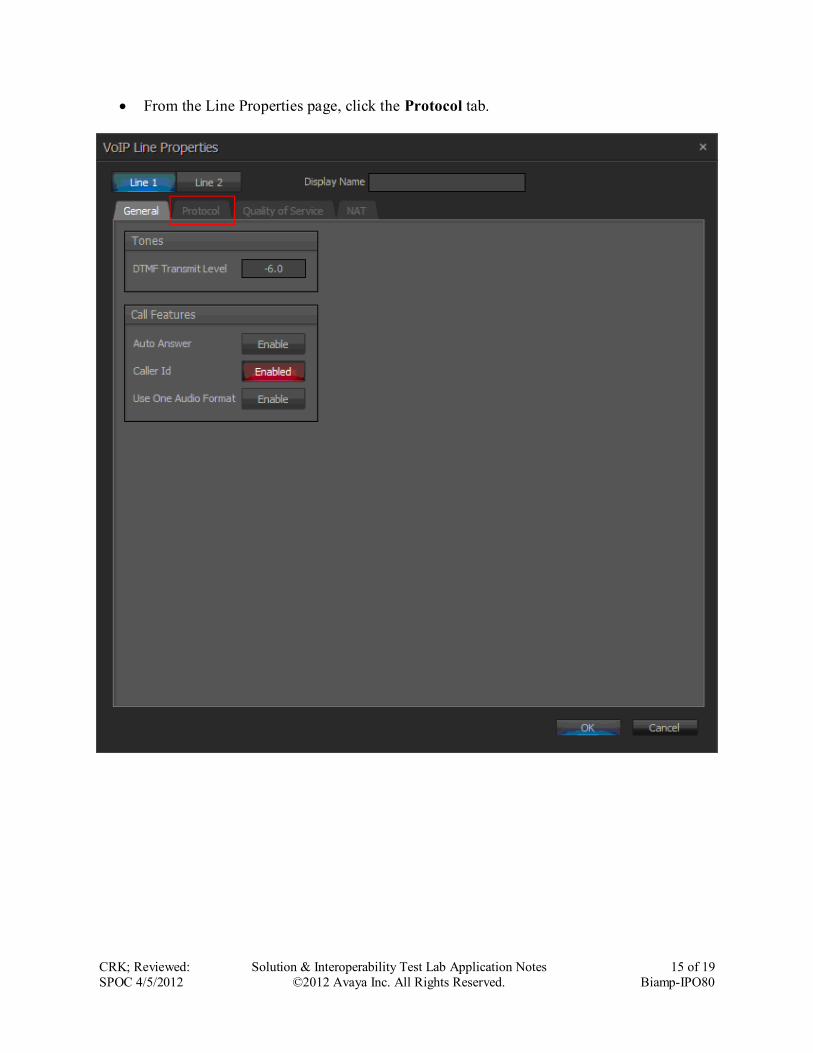
From the Line Properties page, click the Protocol tab.
CRK; Reviewed:
SPOC 4/5/2012
Solution & Interoperability Test Lab Application Notes
©2012 Avaya Inc. All Rights Reserved.
16 of 19
Biamp-IPO80
From the Protocol page, provide the following information:
o SIP User Name – Enter a user created in Avaya IP Office.
o Authentication User Name – Enter a user created in Avaya IP Office.
o Authentication Password – Enter the password for the user in Avaya IP Office.
o Proxy Vendor – Select Avaya IP Office
o Proxy Address – Enter the IP address of IP Office.
o Proxy Port – Enter either 5060.
UDP or TCP – 5060
o Click on the OK button. Default values may be used for all other fields.
Note: Biamp Tesira SVC-2 can provide two inbound extensions (L1 and L2).

CRK; Reviewed:
SPOC 4/5/2012
Solution & Interoperability Test Lab Application Notes
©2012 Avaya Inc. All Rights Reserved.
17 of 19
Biamp-IPO80
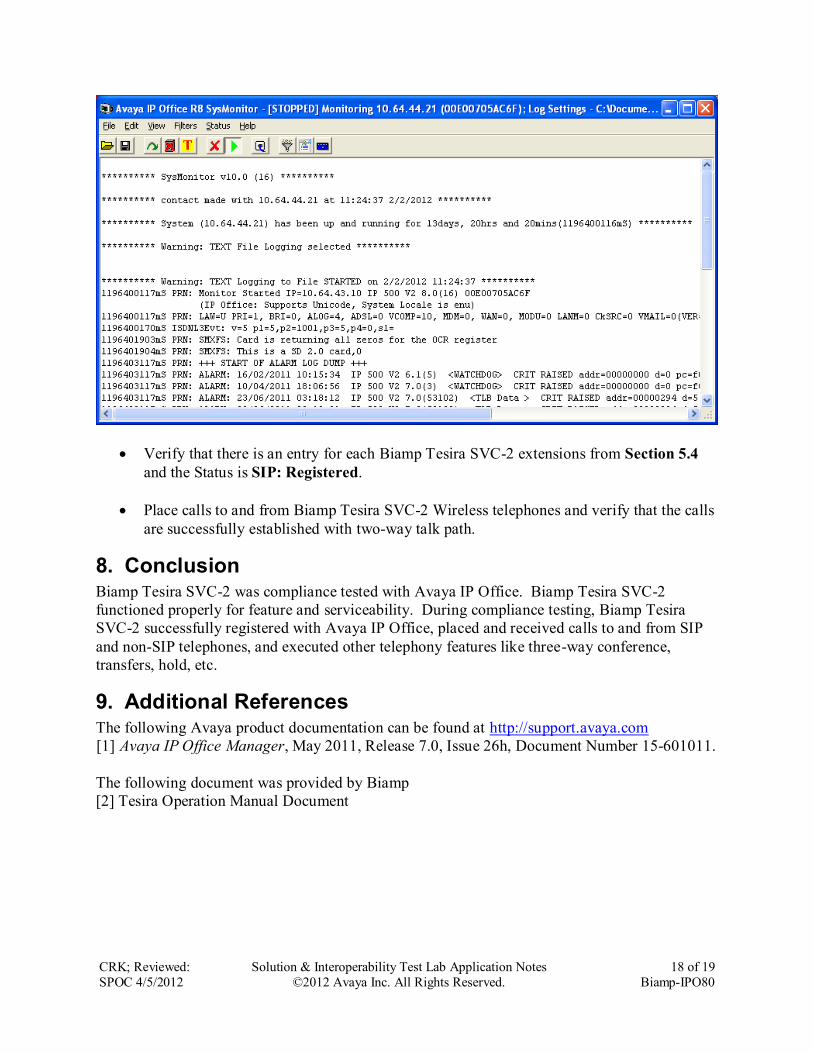
7. Verification Steps The following steps may be used to verify the configuration:
From a PC running the Avaya IP Office Monitor application, select Start All
Programs IP Office Monitor to launch the application. The Avaya IP Office
SysMonitor screen is displayed, as shown below. Select Status SIP Phone Status
from the top menu.
CRK; Reviewed:
SPOC 4/5/2012
Solution & Interoperability Test Lab Application Notes
©2012 Avaya Inc. All Rights Reserved.
18 of 19
Biamp-IPO80
Verify that there is an entry for each Biamp Tesira SVC-2 extensions from Section 5.4
and the Status is SIP: Registered.
Place calls to and from Biamp Tesira SVC-2 Wireless telephones and verify that the calls
are successfully established with two-way talk path.
8. Conclusion Biamp Tesira SVC-2 was compliance tested with Avaya IP Office. Biamp Tesira SVC-2
functioned properly for feature and serviceability. During compliance testing, Biamp Tesira
SVC-2 successfully registered with Avaya IP Office, placed and received calls to and from SIP
and non-SIP telephones, and executed other telephony features like three-way conference,
transfers, hold, etc.
9. Additional References The following Avaya product documentation can be found at http://support.avaya.com
[1] Avaya IP Office Manager, May 2011, Release 7.0, Issue 26h, Document Number 15-601011.
The following document was provided by Biamp
[2] Tesira Operation Manual Document
CRK; Reviewed:
SPOC 4/5/2012
Solution & Interoperability Test Lab Application Notes
©2012 Avaya Inc. All Rights Reserved.
19 of 19
Biamp-IPO80
©2012 Avaya Inc. All Rights Reserved.
Avaya and the Avaya Logo are trademarks of Avaya Inc. All trademarks identified by ® and ™
are registered trademarks or trademarks, respectively, of Avaya Inc. All other trademarks are the
property of their respective owners. The information provided in these Application Notes is
subject to change without notice. The configurations, technical data, and recommendations
provided in these Application Notes are believed to be accurate and dependable, but are
presented without express or implied warranty. Users are responsible for their application of any
products specified in these Application Notes.
Please e-mail any questions or comments pertaining to these Application Notes along with the
full title name and filename, located in the lower right corner, directly to the Avaya DevConnect
Program at [email protected].