Apple Pro Training Series: Logic Pro X: Professional Music...
11
Apple Pro Training Series: Logic Pro X: Professional Music Production By David Nahmani ISBN-13: 978-0-321-96759-6 First print run January 28, 2014: Updates and Errata for Logic Pro X v10.0.6 The guide, Apple Pro Training Series: Logic Pro X, was originally written and published with Logic Pro X version 10.0.4. As of January 9, 2014, Apple released up to version 10.0.6, and some software behavior and interface changes have occurred in releases subsequent to the version the book was originally written to cover. This document provides updates and errata from the original publication to v10.0.6. The screenshots in this document reflect the interface as it appears in v10.0.6. Screenshots of the new interface are provided for reference in this document—especially in the first instance of viewing the screen with the change and when the new interface affects the accuracy or understanding of the text at hand. In some cases, only the portion of the original screenshot that has changed is shown. Please note that if not impacting the accuracy of the text, not all instances of an interface change between the originally published guide and v10.0.6 appear in this document, as they would be too numerous.
Transcript of Apple Pro Training Series: Logic Pro X: Professional Music...

Apple Pro Training Series: Logic Pro X: Professional Music Production By David Nahmani ISBN-13: 978-0-321-96759-6 First print run January 28, 2014: Updates and Errata for Logic Pro X v10.0.6 The guide, Apple Pro Training Series: Logic Pro X, was originally written and published with Logic Pro X version 10.0.4. As of January 9, 2014, Apple released up to version 10.0.6, and some software behavior and interface changes have occurred in releases subsequent to the version the book was originally written to cover. This document provides updates and errata from the original publication to v10.0.6. The screenshots in this document reflect the interface as it appears in v10.0.6. Screenshots of the new interface are provided for reference in this document—especially in the first instance of viewing the screen with the change and when the new interface affects the accuracy or understanding of the text at hand. In some cases, only the portion of the original screenshot that has changed is shown. Please note that if not impacting the accuracy of the text, not all instances of an interface change between the originally published guide and v10.0.6 appear in this document, as they would be too numerous.

Getting Started Page xiv, “Preparing Your Logic Workstation”
After you click Download Additional Content, the Additional Content window opens. Click the Select All Uninstalled button at the bottom left, and click the “Legacy and Compatibility” checkbox twice to deselect it.
Lesson 1 Page 4, Step 3, If the Project Chooser is not open, choose File > New. Follow the rest of the text.
Page 5, Step 4, second image, Replacement image shows the R button in the track header is now gray with a red R.
Page 6, Replacement image shows new Deselect All and Select All buttons at the bottom of the
Advanced Preferences window.
Page 8, Replacement image shows in the Control bar, the Metronome button is gray with a pink
metronome.

Page 11, Replacement image shows the workspace says “Drag Apple Loops here.”
Page 13, Step 2, Replacement image shows the favorite column now has a heart symbol.
Page 14, Step 5, Replacement image shows as you drag the loop, it looks like a blue rectangle in
the workspace.
Page 15, Step 2, Replacement image shows the button at the top left of the Loop Browser now
shows 4 small keyword buttons.
Page 25, Step 13, Replacement image shows the mouse pointer is an arrow.
Page 27, Step 1, Image 1, Replacement image shows the mouse pointer is an arrow with a green ‘+’ sign.
Page 33, Step 3, Instruction should read: In the search field, type Arpeggio.
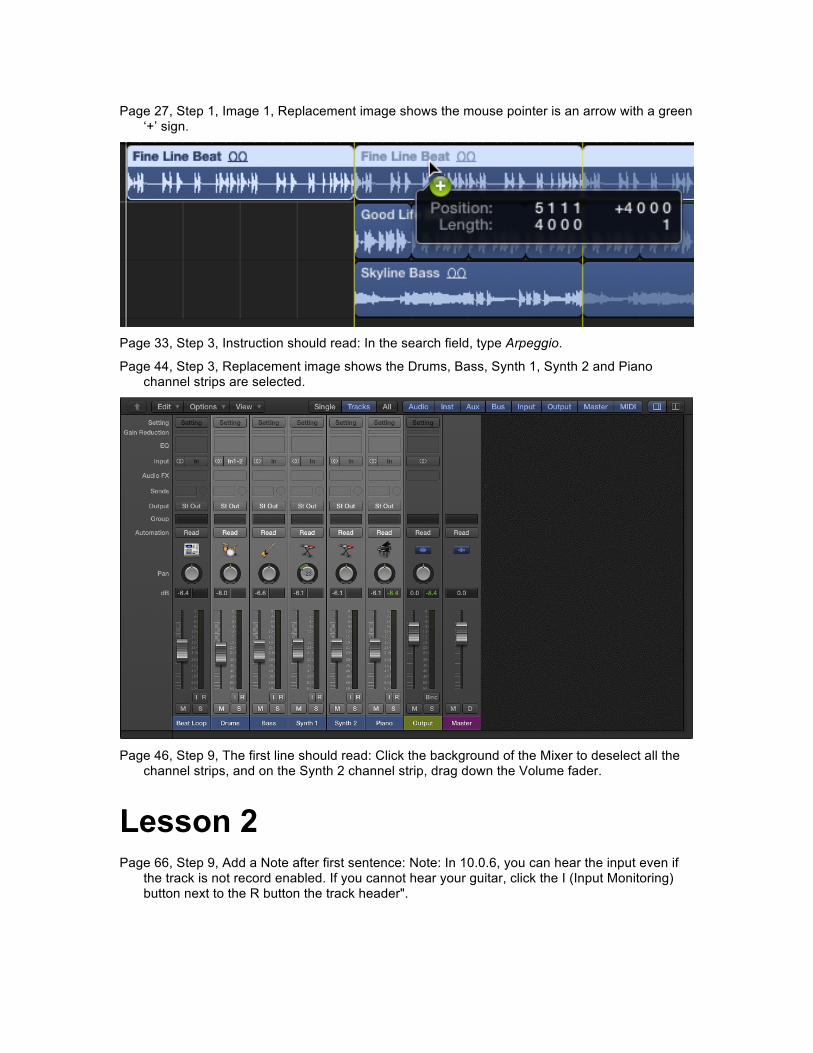
Page 44, Step 3, Replacement image shows the Drums, Bass, Synth 1, Synth 2 and Piano channel strips are selected.
Page 46, Step 9, The first line should read: Click the background of the Mixer to deselect all the
channel strips, and on the Synth 2 channel strip, drag down the Volume fader.
Lesson 2 Page 66, Step 9, Add a Note after first sentence: Note: In 10.0.6, you can hear the input even if
the track is not record enabled. If you cannot hear your guitar, click the I (Input Monitoring) button next to the R button the track header".

Page 66, First paragraph (after Step 9), First sentence should read: Because your new audio track is record-enabled (the R button on the track header blinks in red),
Page 76, Step 1, Instruction should read: In the upper-half of the ruler, drag a cycle area from bar 5 to bar 9.
Page 91, Step 6, Replacement image shows that Control-clicking the Metronome button shows more options that the original image shows.
Page 92, Step 8, Replacement image indicates that there is a new “Simple Mode” option in the
Metronome Settings.
Page 100, Step 5, First sentence should now read: From the Project Audio Browser menu bar,
choose Audio File > Delete File(s).
Lesson 3 Page 104, Add a new Step 1 and renumber remaining steps in exercise: Step 1: Choose Logic
Pro X Files > Lessons, and open 03 Get Dancing.
Page 107, First sentence of Note should read: Different areas of the main window (such as the Tracks area or the editors) have their own sets of tools.

Page 112, First screenshot, Replacement image shows a number now appears in front of each take name:
Page 135, TIP should read: To toggle the alignment guides on and off, choose Edit > Alignment
Guides.
Page 139, Add Note at the end of Step 10: Note: In Logic Pro X 10.0.6, the LCD display does not show the position of the Flex tool.
Lesson 4 Page 149, Step 2, Replacement image shows there are now 6 drummers in the Rock category.
Page 150, Step 3, second line should read: When you’re through, click the drummer named
Jesse.

Page 156, Step 7, Replacement image indicates that Logic Pro X 10.0.6 shows 8th and 16th buttons below the Swing knob:
Page 157, Step 15, Instruction should read: On the XY pad, drag the puck toward the left to
create a simpler beat.
(Kyle no longer plays 1/8th notes on the kick in 10.0.6)
Page 158, Disregard the first screenshot at the top.
Page 160, Step 4, Replacement image shows the menu now shows a new “Rename” option.
Page 170, Step 13, Subtext should read: At the top of the Drummer Editor, the ruler, Play button,
and playhead are hidden. You can now adjust the settings of all the selected regions at once.
Page 182, Step 3, Replacement image below shows that in the Piano Roll, regions now appear selected.
Lesson 5 Page 188, Step 2, Add to subtext following the screenshot: If no MIDI keyboard is detected, the
Musical Typing window opens.
Page 193, Step 8, The red region in the screenshot is now named *Steinway Grand Piano. The first sentence of subtext following the image should read: When you play the first note, a red MIDI region, temporarily named *Steinway Grand Piano, appears on the record-enabled track.
Page 198, Step 5, The subtext below the screenshot should read: In the Piano Roll, you can see the new notes you record being added to the existing notes.

Page 201, Step 12, disregard the subtext.
Page 203, Step 8, Subtext (2nd paragraph), Add this to the end of the first sentence: (if you can hear the take you just recorded, stop recording, then start recording again).
Page 206, Step 6, If you get the following alert when you stop the recording, click “Keep” and continue the exercise.
Page 206, Step 6, in Logic Pro X 10.0.6, the newly recorded region may erase existing notes that
are outside the Autopunch area. (This is potentially unintended behavior.)
Page 210, Step 11, If the 3 tracks are still selected, muting one results in all 3 being muted. Click one of the track headers first to deselect the 3 tracks.
Page 217, Step 1, Replacement image shows new Controls / EQ buttons at the top.
Page 243, Step 26, The replacement image shows the position of the Att, Dec, Sus & Rel
parameter has changed.

Lesson 6 Page 259, Step 4, Replacement image below shows new brighter velocity colors.
Page 261, Step 5, Replacement image below shows that the bars after bar 1 are displayed with
the same size as bar 1, and the dark gray clef section on the left is now narrower by default.
Lesson 7 Page 272, Step 5, Replacement image below shows that Logic now displays the track’s MIDI
channel “[1]” next to the track name.

Page 296 (Lesson 7 opener page), Lesson Files section list should include Logic Pro X Files > Lessons > 07 Empty Project
NOTE: This new 07 Empty Project template may be downloaded from the Lesson & Update Files tab of your Peachpit.com account or by following the instructions to obtain the lesson files provided with your book if you have not already done so.)
Page 298, Step 1, instruction should read: Open Logic Pro X Files > Lessons > 07 Empty Project.
Page 298, Delete Step 2 and renumber remaining steps in exercise.
Page 311, Step 2, Replacement image below shows the control point below the tempo change control point is now a hollow circle:
Page 311, Step 3, Instruction should read: Drag the line located to the right of the new tempo
change vertically to a value of 75 bpm. Listen to the tempo change.
Page 311, Step 3, Replacement image below shows that the pointer no longer turns into a hand tool.
Page 312, Step 4, disregard the sentence “The pointer turns into a Finger tool.”
Page 314, Step 2, depending on your zoom level, you may notice that Logic creates two new regions: a very small one hidden underneath the 1 bar long region. This is a bug, but you can leave the hidden region where it is and complete the exercise.
Lesson 8 Page 362, Step 2, Instruction should read: In the Tracks area menu bar, choose Edit > Alignment
Guides to turn them off.
Lesson 9 Page 401, Step 12, Instruction should read: …drag the output slider down a little bit.
[In Logic Pro X v10.0.6, the help tag indicating the number of dBs does not show up.]

Page 411, Step 3, Replacement image below shows new Channel EQ interface.
Page 411, Step 3, Second sentence of the TIP should read: You can click the Post button inside
the Analyzer button to switch the frequency analyzer to pre EQ.
Page 414, Step 12, Instruction should read: Option-Command-drag the pivot point down to widen the band of EQ until the Q field below reads 0.23.
Lesson 10 No updates for this lesson.