Applanation Tonometerdoclibrary.com/MSC167/PRM/230650-101-Rev-A-UG-TP-AVIA-2...4 230650-101 Rev. A...
44
Tono-Pen AVIA ® Applanation Tonometer With Quick-Tap ™ Second Generation Measurement Mode User’s Guide
Transcript of Applanation Tonometerdoclibrary.com/MSC167/PRM/230650-101-Rev-A-UG-TP-AVIA-2...4 230650-101 Rev. A...

Tono-Pen AVIA® Applanation TonometerWith Quick-Tap™ Second Generation Measurement Mode
User’s Guide

©2018 AMETEK, Inc.
Reichert, Reichert Technologies, Tono-Pen, Tono-Pen AVIA, Tono-Pen AVIA POWERCEL, and Ocu-Film are registered trademarks of Reichert, Inc.
Quick-Tap, and the Quick-Tap logo, are trademarks of Reichert, Inc.
AMETEK is a registered trademark of AMETEK, Inc.
All other trademarks are property of their respective owners.
The information contained in this document was accurate at time of publication. Specifica-tions subject to change without notice. Reichert, Inc. reserves the right to make changes in the product described in this manual without notice and without incorporating those changes in any products already sold.
ISO 13485 Certified – Reichert products are designed and manufactured under quality processes meeting ISO 13485 requirements.
No part of this publication may be reproduced, stored in a retrieval system, or transmitted in any form or by any means, electronic, mechanical, recording, or otherwise, without the prior written permission of Reichert, Inc.
Caution: Federal law restricts this device to sale by or on the order of a licensed physician. Rx only.

230650-101 Rev. A 3
Table of Contents
Warnings and Cautions ............................................... 4Symbols........................................................................ 8Introduction................................................................... 9
Indications for Use ................................................ 9Contraindications .................................................. 9Device Description .............................................. 10Features .............................................................. 10Parts Identification................................................11Accessories ..........................................................11
Instructions for Use .................................................... 12Tono-Pen AVIA Tonometer Modes ...................... 12Tono-Pen AVIA Tonometer Verification ................ 13Tono-Pen AVIA Tonometer Tones ........................ 15Battery Installation and Replacement ................. 16Liquid Crystal Display - User Interface ................ 17Tono-Pen AVIA Tonometer Preparation ............... 21Verification Mode................................................. 22Performing IOP Measurements ........................... 23Measurement Modes .......................................... 24First Generation Measurement Mode ................. 25Second Generation Measurement Mode ............ 27Interpreting the IOP Measurement ...................... 29
Cleaning & Maintenance ............................................ 30Cleaning Instructions........................................... 30Battery ................................................................. 32Storage................................................................ 32Disposal .............................................................. 32
Troubleshooting .......................................................... 33Specifications ............................................................. 35Guidance & Manufacturer’s Declaration .................... 37Warranty ..................................................................... 42

4 230650-101 Rev. A
Warnings and Cautions
Reichert Technologies (Reichert) is not responsible for the safety and reli-ability of this instrument when:
• Assembly, disassembly, repair or modification is made by unauthor-ized dealers or persons.
• Instrument is not used in accordance with its User’s Guide.
WARNING: AN INSTRUCTION THAT DRAWS ATTENTION TO RISK OF INJURY OR DEATH.
WARNING: UNITED STATES FEDERAL LAW AND EUROPEAN REGULATIONS REQUIRE THAT THIS DEVICE BE PURCHASED ONLY BY A PHYSICIAN OR A PERSON ACTING ON BEHALF OF A PHYSICIAN.
WARNING: DO NOT REPAIR OR SERVICE THIS INSTRUMENT WITHOUT AU-THORIZATION FROM THE MANUFACTURER. ANY REPAIR OR SERVICE TO THIS INSTRUMENT MUST BE PERFORMED BY EXPERIENCED PERSONNEL OR DEALERS WHO ARE TRAINED BY REICHERT OR SERIOUS INJURY TO THE OPERATOR OR PATIENT MAY OCCUR.
WARNING: THIS INSTRUMENT SHOULD BE USED IN STRICT ACCORDANCE WITH THE INSTRUCTIONS OUTLINED IN THIS USER’S GUIDE. THE SAFETY OF THE OPERATOR AND THE PERFORMANCE OF THE INSTRUMENT CAN-NOT BE GUARANTEED IF USED IN A MANNER NOT SPECIFIED BY REICHERT TECHNOLOGIES.
WARNING: MODIFICATIONS TO THIS INSTRUMENT ARE NOT ALLOWED. ANY MODIFICATION TO THIS UNIT MUST BE AUTHORIZED BY REICHERT OR SERI-OUS INJURY TO THE OPERATOR OR PATIENT MAY OCCUR.
WARNING: IF THIS INSTRUMENT IS MODIFIED, APPROPRIATE INSPECTION AND TESTING MUST BE CONDUCTED TO ENSURE CONTINUED SAFE USE OF THIS INSTRUMENT.
WARNING: DO NOT USE THE TONO-PEN AVIA TONOMETER ON A PATIENT WITH-OUT AN OCU-FILM + TIP COVER OR INACCURATE READINGS MAY BE OBTAINED.
WARNING: DO NOT USE AN OCU-FILM + TIP COVER ON MORE THAN ONE PATIENT TO HELP PREVENT CROSS CONTAMINATION.
WARNING: IT IS IMPERATIVE THAT A FRESH OCU-FILM + TIP COVER BE USED FOR EACH PATIENT FOR THE PROTECTION OF THE EYE AND THE TRANS-DUCER ASSEMBLY. THE TRANSFER OF INFECTION IS THUS PREVENTED. REPLACE OCU-FILM + TIP COVERS AFTER EXAMINATION OF EACH PATIENT.
WARNING: DO NOT USE EXCESSIVE PRESSURE DURING APPLANATION OR EYE INJURY MAY OCCUR.

230650-101 Rev. A 5
Warnings and Cautions (continued)
WARNING: DO NOT USE THE TONO-PEN AVIA TONOMETER IF THE TRANS-DUCER ASSEMBLY IS CRACKED, CHIPPED OR SHOWS ANY IRREGULARITY OF THE SURFACE, TO PREVENT PATIENT INJURY, AND/OR INACCURATE READINGS.
WARNING: THE CORNEAL SURFACE NEEDS ONLY TO BE MOMENTARILY CONTACTED. INDENTATION OR ADDITIONAL PRESSURE AFTER THE AUDIO “CHIRP” TONE IS HEARD IS NOT REQUIRED AND MAY LEAD TO DAMAGE TO THE EYE. IF MEASUREMENT PROCESS CAUSES PATIENT DISCOMFORT, DEVICE DOES NOT SHOW A MEASUREMENT, OR IF DEVICE REQUIRES MUL-TIPLE ATTEMPTS TO OBTAIN A MEASUREMENT, STOP THE EXAMINATION AND REFER TO THE TROUBLESHOOTING SECTION OF THIS MANUAL.
WARNING: OCU-FILM + TIP COVERS CONTAIN NATURAL LATEX WHICH MAY CAUSE ALLERGIC REACTIONS. QUESTION PATIENTS ABOUT ALLERGIES TO LATEX BEFORE MEASURING THEM WITH THE TONO-PEN AVIA TONOMETER.
WARNING: DO NOT CARRY THE TONO-PEN AVIA POWERCEL BATTERY IN A POCKET, OR CLOSE TO YOUR PERSON, AS A BURN INJURY MAY RESULT.
WARNING: THE BATTERY SHOULD ONLY BE REPLACED WITH THE BATTERY SPECIFIED IN THIS MANUAL. USE OF ANOTHER BATTERY MAY CAUSE FIRE OR AN EXPLOSION.
WARNING: DO NOT PLACE A SHORTING DEVICE BETWEEN THE BATTERY TERMINALS, OR ALLOW THE BATTERY TO BECOME WET. MISUSE OR IMPROPER DISPOSAL OF THIS BATTERY MAY CAUSE IT TO BECOME VERY HOT, IGNITE OR EXPLODE. DAMAGE TO THIS UNIT AND/OR SERIOUS PER-SONAL INJURY MAY RESULT.
WARNING: DO NOT RECHARGE THE BATTERY. THE BATTERY IS NOT DESIGNED TO BE CHARGED BY ANY ELECTRICAL SOURCE. CHARGING COULD GENERATE GAS AND INTERNAL SHORT-CIRCUITING, LEADING TO DISTORTION, LEAKAGE, OVERHEATING, EXPLOSION OR FIRE.
WARNING: NEVER ALLOW LIQUID LEAKING FROM THE BATTERY TO GET IN YOUR EYES OR MOUTH AS THIS LIQUID COULD CAUSE SERIOUS PERSONAL INJURY. IF IT COMES IN CONTACT WITH YOUR EYES OR MOUTH, FLUSH THEM IMMEDIATELY WITH PLENTY OF WATER AND CONSULT A PHYSICIAN.
WARNING: DO NOT EXPOSE THE BATTERY TO TEMPERATURES ABOVE 140ºF, DISASSEMBLE THE BATTERIES, OR DAMAGE TO THIS UNIT AND/OR SERIOUS PERSONAL INJURY MAY RESULT.
-continued-

6 230650-101 Rev. A
Warnings and Cautions (continued)
WARNING: ALWAYS KEEP BATTERIES OUT OF THE REACH OF INFANTS AND YOUNG CHILDREN TO PREVENT THEM FROM BEING SWALLOWED. IF SWALLOWED, CONSULT A PHYSICIAN IMMEDIATELY.
WARNING: THE USE OF ACCESSORIES OR CABLES OTHER THAN THOSE SPECIFIED, WITH THE EXCEPTION OF THOSE SOLD BY THE MANUFACTUR-ER AS REPLACEMENT PARTS FOR INTERNAL COMPONENTS, MAY RESULT IN INCREASED EMISSIONS OR DECREASED IMMUNITY OF THE EQUIPMENT OR SYSTEM.
WARNING: USE OF THIS EQUIPMENT ADJACENT TO OR STACKED WITH OTHER EQUIPMENT SHOULD BE AVOIDED BECAUSE IT COULD RESULT IN IMPROPER OPERATION. IF SUCH USE IS NECESSARY, THIS EQUIPMENT AND THE OTHER EQUIPMENT SHOULD BE OBSERVED TO VERIFY THAT THEY ARE OPERATING NORMALLY.
WARNING: PORTABLE RF COMMUNICATIONS EQUIPMENT (INCLUDING PERIPHERALS SUCH AS ANTENNA CABLES AND EXTERNAL ANTENNAS) SHOULD BE USED NO CLOSER THAN 30 CM (12 INCHES) TO ANY PART OF THE TONO-PEN AVIA, INCLUDING CABLES SPECIFIED BY THE MANUFAC-TURER. OTHERWISE, DEGRADATION OF THE PERFORMANCE OF THIS EQUIPMENT COULD RESULT.
CAUTION: AN INSTRUCTION THAT DRAWS ATTENTION TO THE RISK OF DAMAGE TO THE PRODUCT.
CAUTION: DO NOT USE THE TONO-PEN AVIA TONOMETER WITHOUT AN OCU-FILM + TIP COVER TO PREVENT DAMAGE TO THE TRANSDUCER ASSEMBLY.
CAUTION: DO NOT TOUCH THE TRANSDUCER ASSEMBLY WITHOUT AN OCU-FILM + TIP COVER APPLIED OR DAMAGE TO THE TRANSDUCER ASSEMBLY MAY RESULT.
CAUTION: DO NOT BUMP, JAR OR DROP THE DEVICE BECAUSE DAMAGE TO THE ELECTRONICS OR TRANSDUCER MAY OCCUR. IF THE DEVICE IS DROPPED, CAREFULLY INSPECT THE DEVICE TIP FOR DAMAGE.
CAUTION: DO NOT IMMERSE THE TONO-PEN AVIA TONOMETER IN FLUIDS OR DAMAGE TO THE ELECTRONICS MAY OCCUR.
CAUTION: USE OF AMMONIA BASED CLEANERS ON THE LIQUID CRYSTAL DISPLAY (LCD) MAY CAUSE DAMAGE TO THE DISPLAY. SEE MAINTENANCE SECTION FOR DETAILED CLEANING INSTRUCTION.
CAUTION: DO NOT ATTEMPT TO STERILIZE THE TONO-PEN AVIA TONOM-ETER OR DAMAGE TO THE ELECTRONICS MAY OCCUR.
230650-101 Rev. A 7
Warnings and Cautions (continued)
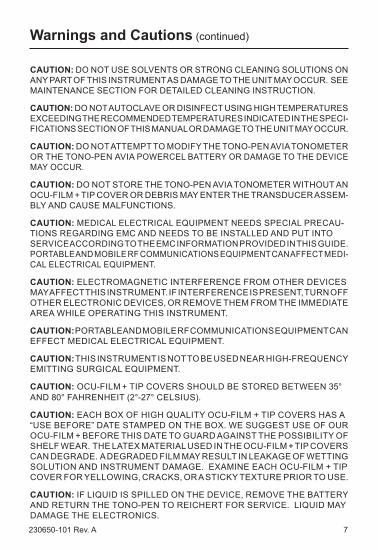
CAUTION: DO NOT USE SOLVENTS OR STRONG CLEANING SOLUTIONS ON ANY PART OF THIS INSTRUMENT AS DAMAGE TO THE UNIT MAY OCCUR. SEE MAINTENANCE SECTION FOR DETAILED CLEANING INSTRUCTION.
CAUTION: DO NOT AUTOCLAVE OR DISINFECT USING HIGH TEMPERATURES EXCEEDING THE RECOMMENDED TEMPERATURES INDICATED IN THE SPECI-FICATIONS SECTION OF THIS MANUAL OR DAMAGE TO THE UNIT MAY OCCUR.
CAUTION: DO NOT ATTEMPT TO MODIFY THE TONO-PEN AVIA TONOMETER OR THE TONO-PEN AVIA POWERCEL BATTERY OR DAMAGE TO THE DEVICE MAY OCCUR.
CAUTION: DO NOT STORE THE TONO-PEN AVIA TONOMETER WITHOUT AN OCU-FILM + TIP COVER OR DEBRIS MAY ENTER THE TRANSDUCER ASSEM-BLY AND CAUSE MALFUNCTIONS.
CAUTION: MEDICAL ELECTRICAL EQUIPMENT NEEDS SPECIAL PRECAU-TIONS REGARDING EMC AND NEEDS TO BE INSTALLED AND PUT INTO SERVICE ACCORDING TO THE EMC INFORMATION PROVIDED IN THIS GUIDE. PORTABLE AND MOBILE RF COMMUNICATIONS EQUIPMENT CAN AFFECT MEDI-CAL ELECTRICAL EQUIPMENT.
CAUTION: ELECTROMAGNETIC INTERFERENCE FROM OTHER DEVICES MAY AFFECT THIS INSTRUMENT. IF INTERFERENCE IS PRESENT, TURN OFF OTHER ELECTRONIC DEVICES, OR REMOVE THEM FROM THE IMMEDIATE AREA WHILE OPERATING THIS INSTRUMENT.
CAUTION: PORTABLE AND MOBILE RF COMMUNICATIONS EQUIPMENT CAN EFFECT MEDICAL ELECTRICAL EQUIPMENT.
CAUTION: THIS INSTRUMENT IS NOT TO BE USED NEAR HIGH-FREQUENCY EMITTING SURGICAL EQUIPMENT.
CAUTION: OCU-FILM + TIP COVERS SHOULD BE STORED BETWEEN 35° AND 80° FAHRENHEIT (2°-27° CELSIUS).
CAUTION: EACH BOX OF HIGH QUALITY OCU-FILM + TIP COVERS HAS A “USE BEFORE” DATE STAMPED ON THE BOX. WE SUGGEST USE OF OUR OCU-FILM + BEFORE THIS DATE TO GUARD AGAINST THE POSSIBILITY OF SHELF WEAR. THE LATEX MATERIAL USED IN THE OCU-FILM + TIP COVERS CAN DEGRADE. A DEGRADED FILM MAY RESULT IN LEAKAGE OF WETTING SOLUTION AND INSTRUMENT DAMAGE. EXAMINE EACH OCU-FILM + TIP COVER FOR YELLOWING, CRACKS, OR A STICKY TEXTURE PRIOR TO USE.
CAUTION: IF LIQUID IS SPILLED ON THE DEVICE, REMOVE THE BATTERY AND RETURN THE TONO-PEN TO REICHERT FOR SERVICE. LIQUID MAY DAMAGE THE ELECTRONICS.

8 230650-101 Rev. A
Symbols
Caution
REF Catalog Number
SN Serial Number
2018Date of Manufacture
Manufacturer
Waste of Electrical and Electronic Equipment
Compliance to Medical Device Directive 93/42/EEC
Consult Instructions for Use
Authorized Representative in European CommunityFragile Contents in Shipping Container - handle with care
Do not get Shipping Container wet
Type BF Applied Part
SYMBOLS FOR OCU-FILM + TIP COVERS ONLY
Do not reuse. Single Use
Use By
LOT Lot Number
Contains natural rubber latex

230650-101 Rev. A 9
Introduction
Congratulations on your purchase of the Tono-Pen AVIA® tonometer.
The Tono-Pen AVIA tonometer is a prescription only device intended for measuring intraocular pressure (IOP) during routine eye examinations or when increased intraocular pressure is suspected by properly trained eyecare professionals such as ophthalmologists, optometrists, opticians, and eye care technicians.
This User’s Guide is designed as a training and reference manual for operation, maintenance, and troubleshooting. We recommend that you read it carefully prior to use and follow the instructions in the guide to ensure optimum performance of your new instrument. If used properly, the Tono-Pen AVIA tonometer will provide you with fast, accurate and reliable measurements for many years. Properly trained eyecare professionals such as ophthalmologists, optometrists, opticians and eye care technicians should operate this instrument.
Please retain this manual for future reference and to share with other users. For additional copies of this manual or questions related to the Tono-Pen AVIA tonometer, contact your local authorized Reichert® dealer or contact our Customer Service department directly at:
Tel: 716-686-4500Toll Free: 888-849-8955Fax: 716-686-4555E-mail: [email protected]
Indications for UseThe indications for use include measuring intraocular pressure (IOP) for suspected glaucoma, or when increased intraocular pressure is suspected.
ContraindicationsNone.

10 230650-101 Rev. A
Introduction (continued)
Device DescriptionThe Tono-Pen AVIA tonometer is a hand-held applanation tonom-eter that measures intraocular pressure. It’s ergonomic design fits the user’s hand, for fast and accurate measurements. The tip of the Transducer Assembly converts applied force into an electrical signal and analyzes the waveforms produced by each applanation of the corneal surface of the eye. An applanation is the flattening of the cornea and the return to its normal state. These are used to produce an averaged IOP measurement, that displayed on the Liquid Crystal Displays (LCDs).
The Tono-Pen AVIA is powered by a replaceable Tono-Pen AVIA POWERCEL™ Battery.
FeaturesThe Tono-Pen AVIA tonometer has the following features:• Easy to use - IOP can be measured reliably by medical
professionals.• Portable - The Tono-Pen AVIA tonometer weighs just
71 g (2.4 oz) and is battery operated.• Accurate - The measurements from the Tono-Pen AVIA
tonometer correlate strongly with Goldmann applanation tonometry and direct measurements of IOP.
• Versatile - The Tono-Pen AVIA tonometer may be used easily with the patient in any position, making the instrument suitable for the office, in glaucoma clinics, at the hospital bedside, and in remote locations.
• Quick - The Ton-Pen AVIA tonometer now features Quick-Tap™ Second Generation Measurement Mode, which allows the user to obtain a reliable IOP in fewer taps. See Tono-Pen AVIA Tonometer Modes, Measurement Modes, and Second Generation Measurement Mode sections of this manual for further information.

230650-101 Rev. A 11
Introduction (continued)
Parts Identification
A Tip - tonometer tipB Transducer Assembly - housing for tonometer tipC LCD - displays the IOP in mm Hg, number of applanations
collected, statistical confidence indicator, and battery life status
D LED IndicatorE Tono-Pen AVIA POWERCEL BatteryF Activation Button - Controls the device
A
B
F
C
DE
Figure 1 - Key Features
Accessories230577 Tono-Pen AVIA POWERCEL Battery230651 Ocu-Film + Tip Covers (150 per box)68C1334 Carrying Case230650-101 User’s Guide230650-105 Quick Reference Guide

12 230650-101 Rev. A
Instruction for Use
Tono-Pen AVIA Tonometer Modes Power Up ModePressing the activation button initiates the battery life, LCD, Transducer Assembly, and electronic self-test. A successful power-up puts the device automatically into measurement mode. A green LED indicates first generation mode, a blue LED indicates second generation mode.
First Generation Measurement ModeThe user will have 15 seconds after pressing the activation button to obtain the first applanation. 6-10 applanations (3-5 taps) are needed to acquire an IOP value. During first generation measurement mode, the LCD will display the number of applanations collected. After 10 applanations are collected, the LCD will display the IOP along with a statistical confidence indicator. After 25 seconds, the device will automatically go into a sleep mode. If the activation button is pressed again the data will be cleared and the unit will be ready to start another measurement sequence.
Second Generation Measurement ModeThe user will have 15 seconds after pressing the activation button to obtain the first applanation. The LCD will display the IOP value for each measurement taken, and the number of applanations collected. As few as 2 taps can produce a high confidence result to complete the measurement. The unit will allow up to 10 applanation measurements to ensure the best possible result. The LCD will display the IOP along with a statistical confidence indicator. After 25 seconds, the device will automatically go into a sleep mode. If the activation button is pressed again the data will be cleared and the unit will be ready to start another measurement sequence.
Verification ModePressing and holding the activation button for 5 seconds initiates verification mode. See Tono-Pen AVIA Tonometer Verification section for details.
Sleep ModeA power-saving mode automatically activates after 25 seconds of non-use. Pressing the activation button will initiate a power-up mode.

230650-101 Rev. A 13
Instruction for Use (continued)
Tono-Pen AVIA Tonometer Verification
If suspect readings are observed, a verification test should be performed. This will ensure that the Transducer Assembly and electronics are performing correctly. Verification1. Hold the Tono-Pen AVIA tonometer with the Transducer
Assembly end pointing down towards the floor.2. Press and hold the activation button for 5 seconds - a beep will
sound at one second intervals.3. At the end of the 5 second button hold, the display will show [dn].4. Keep the pen vertical, with the Transducer Assembly pointing
down towards the floor, for a total of 15 seconds. 5. At the end of this period, a beep will sound and the display will
show [UP].6. Immediately point the Transducer Assembly straight up and
wait for the next beep (within 3 seconds).
Figure 2 - Tono-Pen AVIA Verification Procedure-continued-

14 230650-101 Rev. A
Instruction for Use (continued)
Verification (continued)
7. A properly functioning Tono-Pen AVIA tonometer will display [PASS]. Pressing the activation button will now put the device into Measurement Mode.
Figure 3 - Tono-Pen AVIA Verification Pass8. Verification test will need to be repeated if the display shows
[FAIL]. A single press of the Activation button will re-start the verification test.
Note: The Tono-Pen AVIA tonometer will remain in the Verification mode until it passes verification test.
9. The most common cause for failure is debris in the tip of the Transducer Assembly. Follow the instructions for cleaning the tip in the “Maintenance & Storage” section before re-performing the verification test.
10. If this is unsuccessful, please contact the Reichert Technical Service Department.
230650-101 Rev. A 15
Instruction for Use (continued)
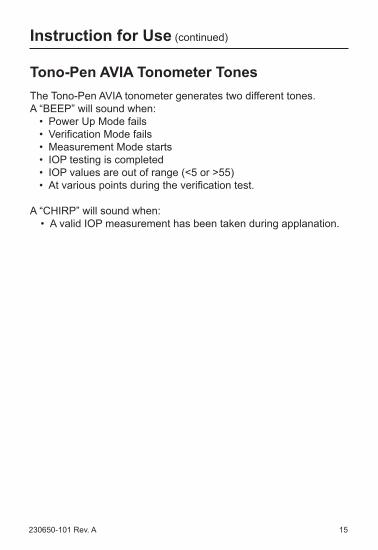
Tono-Pen AVIA Tonometer Tones The Tono-Pen AVIA tonometer generates two different tones. A “BEEP” will sound when:
• Power Up Mode fails• Verification Mode fails• Measurement Mode starts• IOP testing is completed• IOP values are out of range (<5 or >55)• At various points during the verification test.
A “CHIRP” will sound when:• A valid IOP measurement has been taken during applanation.

16 230650-101 Rev. A
Instruction for Use (continued)
Battery Installation and ReplacementThe Tono-Pen AVIA tonometer is supplied with a Tono-Pen AVIA POWERCEL Battery that needs to be installed prior to use. The Tono-Pen AVIA POWERCEL Battery is the only replacement battery that can be used with this device.
1. Insert the Tono-Pen AVIA POWERCEL Battery into the base of Tono-Pen AVIA tonometer until fully seated. The Battery is “keyed” for correct installation.
2. Press the Activation Button.3. Check that the battery symbol in the LCD has all segments
displayed.4. Check that the Self-Test is initiated. 5. Dispose of used Batteries in accordance with local regulations.
Figure 4 - Tono-Pen AVIA POWERCELBattery Installation and Replacement
230650-101 Rev. A 17
Instruction for Use (continued)
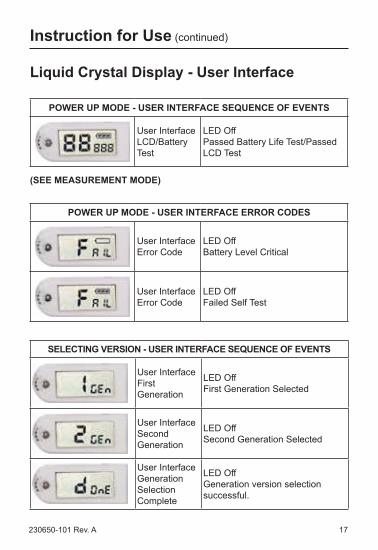
Liquid Crystal Display - User Interface
POWER UP MODE - USER INTERFACE SEQUENCE OF EVENTS
User Interface LCD/Battery Test
LED OffPassed Battery Life Test/Passed LCD Test
(SEE MEASUREMENT MODE)
POWER UP MODE - USER INTERFACE ERROR CODES
User Interface Error Code
LED OffBattery Level Critical
User Interface Error Code
LED OffFailed Self Test
SELECTING VERSION - USER INTERFACE SEQUENCE OF EVENTS
User Interface First Generation
LED OffFirst Generation Selected
User Interface Second Generation
LED OffSecond Generation Selected
User Interface Generation Selection Complete
LED OffGeneration version selection successful.

18 230650-101 Rev. A
Instruction for Use (continued)
Liquid Crystal Display - User Interface (continued)
GEN 1 MEASUREMENT MODE - USER INTERFACE SEQUENCE OF EVENTS
User Interface Ready to Measure
Green LED On, 1 BeepReady to Begin IOP Testing (15 seconds for testing before Time Out)
User Interface Testing Display
Green LED On During Test, screen shows number of applanations achieved (in this case 4 of 10). Each applanation taken equals 1 chirp. Note: Each tap may produce up to 2
applanations.
User Interface Test Complete
LED Off, 1 BeepTest CompleteScreen shows IOP reading of 16 with a statistical confidence indicator of less than 80. It is recommended to repeat the test.
User Interface Test Complete
LED Off, 1 BeepTest CompletePatient has an IOP of 16 with a statistical confidence indicator of 95

230650-101 Rev. A 19
Instruction for Use (continued)
Liquid Crystal Display - User Interface (continued)
GEN 2 MEASUREMENT MODE - USER INTERFACE SEQUENCE OF EVENTS
User Interface Ready to Measure
Blue LED On, 1 BeepReady to Begin IOP Testing (15 seconds for testing before Time Out)
User Interface Testing Display
Yellow LED On During Test, screen shows individual IOP reading and number of applana-tions achieved (in this case 2). LED will remain yellow, indicating not enough readings have been taken for a high confidence reading. Each applanation taken equals 1 chirp. Note: Each tap may produce up to 2
applanations.
User Interface Test Complete
Yellow LED On, 1 BeepTest CompleteScreen shows IOP reading of 16. Yellow LED indicates not enough readings have been taken for a high confidence reading. It is recommended to repeat the test.
User Interface Test Complete
Yellow LED On, 1 Beep Screen shows IOP reading of 16 with a statistical confidence indicator of less than 80. Yellow LED indicates a low confidence reading. It is recommended to repeat the test.
User Interface Test Complete
Green LED on, 1 BeepTest CompletePatient has an IOP of 16 with a statistical confidence indicator of 95. Green LED indicates a high confidence reading.

20 230650-101 Rev. A
Instruction for Use (continued)
Liquid Crystal Display - User Interface (continued)
MEASUREMENT MODE - USER INTERFACE ERROR CODES
User Interface Error Code
LED Off Error - IOP value Under Range (<5mm Hg)
User Interface Error Code
LED Off Error- IOP Value Over Range (>55mm Hg)
User Interface Error Code
LED Off Timeout - not enough IOP values collected
VERIFICATION MODE - SEQUENCE OF EVENTS
User Interface Begin Verification Mode
LED OffHold Tono-Pen AVIA tonometer with transducer down towards floor
User Interface Invert Pen
LED OffInvert Tono-Pen AVIA tonometer
User Interface Successful Verification
LED OffSuccessful Tono-Pen AVIA tonometer verification
VERIFICATION MODE - USER INTERFACE ERROR CODE
User Interface Error Code
LED OffUnsuccessful Tono-Pen AVIA tonometer verification

230650-101 Rev. A 21
Instruction for Use (continued)
Tono-Pen AVIA Tonometer Preparation1. Allow the instrument to thermally stabilize to room temperature
for approximately 30 minutes prior to use.2. Remove the storage Ocu-Film + tip cover from the Transducer
Assembly. 3. Visually inspect the Transducer Assembly for cracks, chips
or other irregularities. Do not use if these conditions are present.
4. Slide an Ocu-Film + Tip Cover onto the Transducer Assembly until the ridge is seated, taking care not to apply the tip cover too tightly or too loosely. Make certain that the rubber is flat across the tip, but not taut.
Figure 5 - Tono-Pen AVIA Tonometer Preparation
Note: Use of the Ocu-Film + Tip Cover is required under original Tono-Pen instrument warranty and service contract terms.
Note: Corneal topical anesthetic is required with tonometry.

22 230650-101 Rev. A
Instruction for Use (continued)
Verification ModeA verification Test may be performed to ensure that the Transducer Assembly and electronics are performing as expected. A verification test may also be initiated if suspect readings are observed. (See Tono-Pen AVIA Tonometer Verification section for details.)
If the verification test resulted with the LCD displaying [FAIL], repeat the verification test, or reference the troubleshooting section for potential causes for test failure.
Note: The Tono-Pen AVIA tonometer will remain in the Verification mode until it passes verification.

230650-101 Rev. A 23
Instruction for Use (continued)
Performing IOP Measurements WARNING: OCU-FILM + TIP COVERS CONTAIN NATURAL RUBBER
LATEX WHICH MAY CAUSE ALLERGIC REACTIONS. QUESTION PATIENTS ABOUT ALLERGIES TO LATEX BEFORE MEASURING THEM WITH THE TONO-PEN AVIA TONOMETER.
WARNING: DO NOT USE AN OCU-FILM + TIP COVER ON MORE THAN ONE PATIENT TO HELP PREVENT CROSS CONTAMINATION.
1. Instill a drop of topical anesthetic into the eye to be examined.2. Position the patient, seated or supine, in front of a fixation target.
Note: The Tono-Pen AVIA tonometer will function in any orientation.
3. Instruct the patient to look straight ahead at the fixation target (i.e. ear, nose, distant object) to minimize eye movement, with eyes fully open.
4. Hold the Tono-Pen AVIA tonometer as you would a pencil and position yourself to allow viewing of the Transducer Assembly and the patient’s cornea where contact will be made. For normal corneas, central corneal contact is recommended.
5. The corneal surface needs only to be momentarily contacted. Indentation or excessive force is not required and may lead to inaccurate readings or patient injury. Refer to Figure 6.
CORRECT INCORRECT
Figure 6 - Corneal Applanation6. Brace the heel of your hand on the patient’s cheek for stability
while holding The Tono-Pen AVIA tonometer perpendicular to and within approximately 1.3 cm (1/2”) of the patient’s cornea.
Note: In the unlikely event an Electrostatic Discharge (ESD) occurs, the Tono-Pen AVIA tonometer may display inaccurate data. Simply re-press the Activation button and start the measurement again.

24 230650-101 Rev. A
Instruction for Use (continued)
Measurement ModesThe Tono-Pen AVIA has the ability to measure in either the first generation mode, which will give an IOP reading in 6-10 applana-tions (as few as 3-5 taps), or the newer second generation mode, featuring Quick-Tap technology, which will display the average IOP value as it is taking each reading. Second generation mode is recommended for patients who are sensitive to the applanation.
Note: In second generation mode, low confidence readings are more likely to occur.
The Tono-Pen AVIA will be shipped to you in the first generation measurement mode. Switching between the different modes is quick and easy.
Switching Modes
1. Remove the battery. 2. Reinsert the battery while pressing and holding the activation button.3. The screen will display the current mode, [1 GEn] or [2 GEn].4. To switch modes, press the activation button so that the desired
mode is displayed. Pressing the activation button will toggle between the two options, [1 GEn] and [2 GEn]. Refer to Figure 7.
Figure 7 - First and Second Generation Screens
5. When the desired mode is displayed, press and hold the activa-tion button for approximately four seconds.
6. The screen will flash [dOnE] and will turn off.7. Press the activation button to turn the instrument on and verify
the mode it is in. The LED light will illuminate green if it is in first generation mode, or blue if it is in second generation mode.

230650-101 Rev. A 25
Instruction for Use (continued)
First Generation Measurement ModeThe Tono-Pen AVIA will be shipped to you in the first generation measurement mode. To verify it is in this mode, press the activa-tion button once. A green LED will illuminate.
1. Press and release the activation button once to initiate the measurement mode.
2. A brief display of [88888] will flash on the LCD, a double row of dashes [===] will be displayed, the green LED will turn on, and a “beep” tone will sound, indicating the Tono-Pen AVIA tonometer is ready to measure intraocular pressure in First Generation mode. Refer to Figure 8.
Figure 8 - First Generation Screens - Ready to Measure
2. Tap very lightly and briefly on the corneal surface.
3. The device will chirp and the DATA field on the LCD will increment for each valid IOP reading obtained. Refer to Figure 9.
4. When another beep tone is heard, indicating 10 applanations have been read, the green LED will turn OFF, and the averaged IOP measurement will appear above the mm Hg field, and the statistical confidence indicator will appear above the DATA field on the LCD. Refer to Figure 10.
-continued-
Figure 9 - 4 IOP Readings Obtained
Figure 10 - IOP Displayed
26 230650-101 Rev. A
Instruction for Use (continued)
First Generation Measurement Mode (continued)
Note: If at least 6 applanations were read, the IOP will be displayed after a 4 second delay, along with the statistical confidence indicator.
Note: After pressing the Activation button, do not shake the Tono-Pen AVIA tonometer as it may register a reading. If this occurs simply re-press the Activation button and start the measurement again.
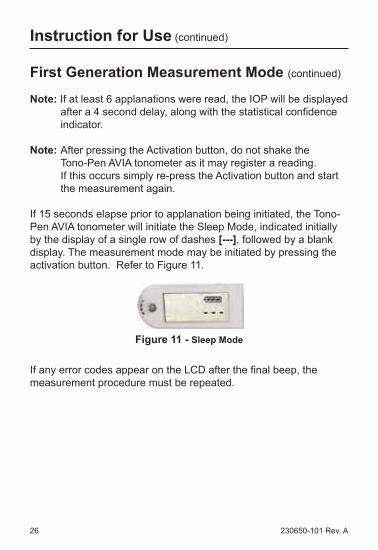
If 15 seconds elapse prior to applanation being initiated, the Tono-Pen AVIA tonometer will initiate the Sleep Mode, indicated initially by the display of a single row of dashes [---], followed by a blank display. The measurement mode may be initiated by pressing the activation button. Refer to Figure 11.
Figure 11 - Sleep Mode
If any error codes appear on the LCD after the final beep, the measurement procedure must be repeated.

230650-101 Rev. A 27
Instruction for Use (continued)
Second Generation Measurement Mode1. Press and release the activation button once to initiate the
applanation mode. 2. A brief display of [88888] will flash on the LCD, a double row of
dashes [===] will be displayed, the blue LED will turn on, and a “beep” tone will sound, indicating the Tono-Pen AVIA tonometer is ready to measure intraocular pressure in Second Generation mode. Refer to Figure 12.
Figure 12 - Second Generation Screens - Ready to Measure
3. Tap very lightly and briefly on the corneal surface.
4. Every time the Tono-Pen AVIA acquires a reading, a beep will sound, and the IOP will be displayed on the left side of the screen in large number. The smaller number to the right indicates how many readings have been taken. Refer to Figure 13.
5. The LED light will illuminate yellow as it is gathering data. A yellow light indicates that there is not enough data collected to give a reliable reading.
6. At any point during the measurement process, if no more readings are obtained within a 4 second period, the unit will beep and display the IOP value and the statistical confidence indicator, if available.
-continued
Figure 13 - 2 IOP Readings Obtained

28 230650-101 Rev. A
Instruction for Use (continued)
Second Generation Measurement Mode (continued)
Note: If less than 3 IOP readings are obtained, a statistical confidence indicator will not be available. If the statistical confidence is less than 90, the LED will remain yellow, indicating a low statistical confidence. If the LED is yellow, a repeat measurement is suggested. Refer to Figure 14.
Figure 14 - IOP Values with Low or No Statistical Confidence
7. Once enough data has been collected to give a high confidence reading, another beep will sound, the LED light will switch from yellow to green, and the averaged IOP measurement will appear above the mmHg field, and the statistical confidence indicator will appear above the DATA field on the LCD. Refer to Figure 15.
Note: After pressing the Activation button, do not shake the Tono-Pen AVIA tonometer as it may register a reading. If this occurs simply re-press the Activation button and start the measurement again.
If 15 seconds elapse prior to applanation being initiated, the Tono-Pen AVIA tonometer will initiate the Sleep Mode, indicated initially by the display of a single row of dashes [---], followed by a blank display. The measurement mode may be initiated by pressing the activation button.
If any error codes appear on the LCD after the final beep, the measurement procedure must be repeated.
Figure 15 - IOP Displayed
230650-101 Rev. A 29
Instruction for Use (continued)
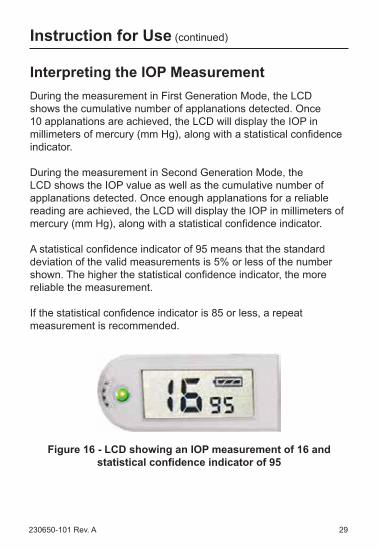
Interpreting the IOP Measurement During the measurement in First Generation Mode, the LCD shows the cumulative number of applanations detected. Once 10 applanations are achieved, the LCD will display the IOP in millimeters of mercury (mm Hg), along with a statistical confidence indicator.
During the measurement in Second Generation Mode, the LCD shows the IOP value as well as the cumulative number of applanations detected. Once enough applanations for a reliable reading are achieved, the LCD will display the IOP in millimeters of mercury (mm Hg), along with a statistical confidence indicator.
A statistical confidence indicator of 95 means that the standard deviation of the valid measurements is 5% or less of the number shown. The higher the statistical confidence indicator, the more reliable the measurement.
If the statistical confidence indicator is 85 or less, a repeat measurement is recommended.
Figure 16 - LCD showing an IOP measurement of 16 and statistical confidence indicator of 95

30 230650-101 Rev. A
Cleaning & Maintenance
Cleaning InstructionsThe Tono-Pen AVIA tonometer may have difficulty taking measurements or display [FAIL] after a verification when its tip is dirty and requires cleaning. When the Transducer Assembly of the tonometer has dirt and contaminants in the tip, cleaning of the tip is necessary. When the tip contains contaminants, it cannot move freely and the Tono-Pen AVIA may have erratic readings and then show a [FAIL] verification.
1. Remove Ocu-Film + tip cover from the tonometer, if one is installed.2. Using canned air, place the tip of the Transducer Assembly
against the outlet of the canned air as shown in Figure 17.3. Blow the canned air into the tip of the tonometer for approximately
3 seconds.
Note: It is necessary to blow canned air directly into the tip so that the contaminants are pushed out.
4. After cleaning the tip with compressed air, the Transducer Assembly will be cold. Allow the Transducer Assembly to warm to room temperature.
5. Perform the tonometer verification as indicated in the Tono-Pen AVIA Tonometer Verification section of this manual.
Note: If the tonometer does not pass the verification procedure, then repeat the above cleaning instructions. Do not clean more than 3 times in a row. If the tonometer still will not pass verification, contact Reichert.
Note: When cleaning between patients is required, the tip may be wiped down with a paper towel or soft cloth lightly dampened with alcohol. Refer to Figure 18.
Figure 17 - Cleaning the Tip
Figure 18 - Wiping Down the Tip

230650-101 Rev. A 31
Cleaning & Maintenance (continued)
Cleaning Instructions (continued)
CAUTION: DO NOT OVER MOISTEN THE PAPER TOWEL OR CLOTH. THE UNIT MAY BE DAMAGED OR FAIL PREMATURELY IF EXCESS LIQUID GETS INSIDE THE TIP.
Note: Never use the Tono-Pen AVIA tonometer without an Ocu-Film + tip cover installed.
Note: Ocu-Film + tip covers are the only manufacturer approved covers for use with the Tono-Pen AVIA tonometer. Use of any other type of branded tip cover may affect readings or may void your warranty.
Note: Always store the Tono-Pen AVIA tonometer with an Ocu-Film + tip cover installed to protect the tonometer tip from dirt and contaminants.
Suggested Cleaning ScheduleNumber of Patients per Week Number of Days Between Cleaning
10 30100 15300 7600 1
Tono-Pen AVIA BodyAvoid any shock or excessive vibration which will damage the unit. Clean with a non-abrasive, dry cloth. When cleaning between patients is required, the body may be wiped down with a paper towel or soft cloth lightly moistened with alcohol. Refer to Figure 19. CAUTION: DO NOT USE EXCESS ALCO-
HOL ON OR AROUND THE LCD SCREEN AS THIS MAY DAMAGE IT.
CAUTION: DO NOT IMMERSE TONO-PEN AVIA BODY IN FLUIDS. THIS WILL CAUSE DAMAGE TO THE ELECTRONICS AND VOID THE WARRANTY.
Figure 19 Wiping Down the Body

32 230650-101 Rev. A
Cleaning & Maintenance
BatteryReplace the Tono-Pen AVIA POWERCEL Battery when:
• The battery indicator shows low battery after depressing the activation button.
• There are no beeps, the LCD remains blank after pressing the activation button, or a noticeable slowing occurs when activating the device.
Note: Replace the battery with PN 230577.
Storage• Cover the tip with an Ocu-Film + tip cover for protection.• If the Tono-Pen AVIA tonometer is not to be used until a subsequent
day, the instrument and accessories should be placed in the storage case provided.
• If the instrument is to be stored for an extended period, remove the Tono-Pen AVIA POWERCEL Battery to avoid possible damage to the instrument due to battery leakage.
DisposalThe Tono-Pen AVIA, Ocu-Film, and Tono-Pen AVIA POWERCEL do not generate any environmentally hazardous residues. At the end of its product service life, follow your local laws and ordinances regarding the proper disposal of this equipment.

230650-101 Rev. A 33
Troubleshooting
The table below provides a guide for troubleshooting some basic Tono-Pen AVIA tonometer operational problems. If a problem persists after using this guide contact Reichert technical services.
SYMPTOM PROBABLE CAUSE CORRECTION
Battery symbol flashes
Low Tono-Pen AVIA POWERCEL Battery capacity
Replace Tono-Pen AVIA POWERCEL Battery
Multiple inaccurate readings
Improper technique (Example: too much or too little force used, taps too long, device not held perpendicular to the patient’s eye )
Review “MEASUREMENT” Section of this manual
Old or improperly applied Ocu-Film + tip cover being used, or non-Reichert tip cover being used
Replace Ocu-Film
tip cover
Debris in tip Clean tip
Mechanical or electronic damage
Arrange for service through Reichert Technical Service Group
No beeps and/or no dashes upon activation
Activation button not properly pressed Press Activation button
No Tono-Pen AVIA POWERCEL Battery capacity
Replace Tono-Pen AVIA POWERCEL Battery
Mechanical or electronic damage
Arrange for service through Reichert Technical Service Group
-continued-

34 230650-101 Rev. A
Troubleshooting (continued)
SYMPTOM PROBABLE CAUSE CORRECTION
Not displaying IOP value with each tap
Unit not in Second Generation mode.
Put unit in Second Generation mode. Refer to the “MEASUREMENT MODES” section of this manual.
Unit displaying IOP values before it has collected enough readings
Unit not in First Generation mode.
Put unit in First Generation mode. Refer to the “MEASUREMENT MODES” section of this manual.
Verification Failure
Debris in tip Clean tip
Compressed air cleaning has lowered the temperature of the instrument
Allow Tono-Pen AVIA tonometer unit to warm to room temperature

230650-101 Rev. A 35
Specifications
-10°C
60°C
10%
80%
106 kPa
50 kPa
PHYSICAL DIMENSIONS Size: 16 x 2 x 4.4 cm
(6 1/4” x 3/4” x 1 3/4”) Weight: 71 g (2.4 oz)
ENVIRONMENTAL REQUIREMENTS
Operational Environment Ambient Temperature range: 15° to 35°C (59° to 95°F)
Relative Humidity range: 30 to 75%
Atmospheric Pressure range: 80 kPa to 106 kPa (23.6 to 31.3 in.Hg)
Transport and Storage EnvironmentAmbient Temperature range: -10° to 60°C (14° to 140°F)
Relative Humidity range: 10 to 80% (non-condensing) Atmospheric Pressure range: 50 kPa to 106 kPa (14.8 to 31.3 in.Hg)
ELECTRICAL
Input Voltage (Tono-Pen AVIA POWERCEL Battery)
2 x 3V Lithium Manganese Dioxide batteries (LiMnO2)
RANGE OF IOP MEASUREMENTSAccuracy by manometric measurements (95% Confidence)
Measurement (mm Hg) Accuracy (mm Hg)
5-25 ± 1.226-39 ± 1.540-55 ± 2.4
OCU-FILM + TIP COVER Contains natural rubber latex
SOFTWARE REVISION The software revision can be obtained by contacting Reichert Technologies. The serial number identifies the manufacture date and will provide access to the software version

36 230650-101 Rev. A
Specifications (continued)
Device Regulatory ClassificationInsulation Protection Internally Powered (6 V battery)Ingress Protection IPX0Applied Part Type BFOperation Mode Continuous
ComplianceThe Tono-pen AVIA complies with:IEC 60601-1:2005 + A1:2012 (Edition 3.1)IEC 60601-1-2:2014 (Edition 4)

230650-101 Rev. A 37
Guidance & Manufacturer’s Declaration
Table 201 – Guidance and Manufacturer’s Declaration
Electromagnetic EmissionsAll Medical Electrical Equipment and Medical Electrical Systems
Guidance and Manufacturer’s Declaration – Electromagnetic Emissions
The Tono-Pen AVIA is intended for use in the electromagnetic environment specified below. The customer or user of the Tono-Pen AVIA should ensure that it is used in such an environment.
Emissions Test Compliance Electromagnetic Environment - Guidance -
Radiated RF Emissions CISPR 11 Group 1
The Tono-Pen AVIA uses RF energy only for its internal function. Therefore, its RF emissions are very low and are not likely to cause any interference in nearby electronic equipment.
Radiated RF Emissions CISPR 11 Class B
The Tono-Pen AVIA is suitable for use in all establish-ments, including domestic establishments and those di-rectly connected to the public low-voltage power supply network that supplies building for domestic power.
Harmonic Distortion IEC 61000-3-2 N/A
Voltage Fluctuations and Flicker IEC 61000-3-3
N/A

38 230650-101 Rev. A
Guidance & Manufacturer’s Declaration (cont.)
Table 202 – Guidance and Manufacturer’s Declaration
Electromagnetic ImmunityAll Medical Electrical Equipment and Medical Electrical Systems
Guidance and Manufacturer’s Declaration – Electromagnetic Immunity
The Tono-Pen AVIA is suitable for use in electromagnetic environment specified below. The customer or user of the Tono-Pen AVIA should ensure that it is used in such an environment.
Immunity Test
IEC 60601 Test Level
Compliance Level
Electromagnetic Environment - Guidance
Electrostatic Discharge IEC 61000-4-2
±8kV Contact ±2kV, ±4kV, ±8kV, ±15kV Air
±8kV Contact ±2kV, ±4kV, ±8kV, ±15kV Air
Floors should be wood, concrete or ceramic tile. If floors are synthetic, the R/H should be at least 30%.
Electrical Fast Transients / Bursts IEC 61000-4-4
±2kV Mains Power Lines ±1kV I/O Lines 100kHz repetition frequency
N/AMains power quality should be that of a typical residential, commercial or hospital environment.
Surges IEC 61000-4-5
±0.5kV, ±1kV Line-to-line ±0.5kV, ±1kV, ±2kV Line-to-ground
N/AMains power quality should be that of a typical residential, commercial or hospital environment.
Voltage Dips IEC 61000-4-11
0% Ut; 0.5 cycle at 0°, 45°, 90°, 135°, 180°, 225°, 270°, 315°
N/A Mains power quality should be that of a typical residential, commercial or hospital environment. If the user of the Tono-Pen AVIA requires continued operation during power mains interruptions, it is recom-mended that the Tono-Pen AVIA be powered from an uninterruptible power supply or battery.
0% Ut; 1.0 cycle and 70% Ut; 25/30 cycles Single phase: at 0°
N/A
Voltage Interruptions IEC 61000-4-11
0% Ut, 250/300 cycles N/A
Power Frequency 50/60Hz Magnetic Field IEC 61000-4-8
30A/m 50 Hz or 60 Hz
30A/m 50 Hz or 60 Hz
Power frequency magnetic fields should be that of a typical residential, commercial or hospital environment.

230650-101 Rev. A 39
Guidance & Manufacturer’s Declaration (cont.)
Table 204 – Guidance and Manufacturer’s Declaration
Electromagnetic ImmunityMedical Electrical Equipment and Medical Electrical Systems that are NOT Life-supporting
Guidance and Manufacturer’s Declaration – Electromagnetic Immunity
The Tono-Pen AVIA is intended for use in the electromagnetic environment specified below. The customer or user of the Tono-Pen AVIA should ensure that it is used in such an environment.
Immunity Test
IEC 60601 Test Level
Compliance Level
Electromagnetic Environment - Guidance
Conducted disturbances induced by RF fields IEC 61000-4-6
3 Vrms 150 kHz to 80 MHz 6 Vrms in ISM bands between 150 kHz and 80 MHz 80% AM at 1 KHz
N/A Portable and mobile RF communications equipment should be no closer to any part of the Tono-Pen AVIA, including cables, than the recommended separation distance calculated from the equation applicable to the frequency of the transmitter.
Recommended Separation Distance:
d=(3.5/V1)(√P)
d=(3.5/E1)(√P) 80 to 800 MHz
d=(7/E1)(√P) 800 MHz to 2.7 GHz
Where P is the max output power rating of the transmitter in watts (W) according to the trans-mitter manufacturer and d is the recommended separation distance in meters (m).
Field strengths from fixed transmitters, as determined by an electromagnetic site survey, should be less than the compliance levels in each frequence range.
Interference may occur in the vicinity of equipment marked with the following symbol.
Radiated RF Electromagnetic Fields IEC 61000-4-3
3 V/m 80 MHz to 2.7 GHz 80% AM at 1kHz
(E1) = 3 V/m 80 MHz to 2.7 GHz 80% AM at 1kHz
10 V/m 80 MHz to 2.7 GHz 80% AM at 1kHz
N/A
Note 1: At 80 MHz and 800 MHz, the separation distance for the higher frequency range applies.
Note 2: These guidelines may not apply in all situations. Electromagnetic propagation is affected by absorption and reflection from structures, objects and people.
* Field strengths from fixed transmitters, such as base stations for radio (cellular/cordless) telephones and land mobile radios, amateur radio, AM and FM radio broadcast and TV broadcast cannot be predicted theoretically with accuracy. To assess the electromagnetic environment due to fixed RF transmitters, an electromagnetic site survey should be considered. The measured field strength in the location in which the ME Equipment or ME System should be observed to verify normal operation. If abnormal performance is observed, additional measures many be necessary, such as re-orienting or relocating the ME Equipment or ME System.
* Over the frequency range 150 kHz to 80 MHz, field strengths should be less then [V1] V/m.
* The ISM (industrial, scientific and medical) bands between 0,15 MHz and 80 MHz are 6,765 MHz to 6,795 MHz; 13,553 MHz to 13,567 MHz; 26,957 MHz to 27,283 MHz; and 40,66 MHz to 40,70 MHz. The amateur radio bands between 0,15 MHz and 80 MHz are 1,8 MHz to 2,0 MHz, 3,5 MHz to 4,0 MHz, 5,3 MHz to 5,4 MHz, 7 MHz to 7,3 MHz, 10,1 MHz to 10,15 MHz, 14 MHz to 14,2 MHz, 18,07 MHz to 18,17 MHz, 21,0 MHz to 21,4 MHz, 24,89 MHz to 24,99 MHz, 28,0 MHz, to 29,7 MHz and 50,0 MHz to 54,0 MHz.

40 230650-101 Rev. A
Guidance & Manufacturer’s Declaration (cont.)
Table 206 – Recommended Separation Distances between Portable and Mobile RF Communications Equipment for ME Equipment and
ME Systems that are NOT Life-supporting.
Guidance and Manufacturer’s Declaration - Electromagnetic ImmunityRecommended Separation Distances for between
Portable and Mobile RF Communications Equipment and the Tono-Pen AVIA.
The Tono-Pen AVIA is intended for use in the electromagnetic environment in which radiated RF disturbances are controlled. The customer or user of the Tono-Pen AVIA can help prevent electromagnetic interference by maintaining a minimum distance between portable and mobile RF Communications Equipment and the Tono-Pen AVIA as recommended below, according to the maximum output power of the communications equipment.
Max Output Power of
Transmitter(W)
Separation (m)150kHz to 80 MHz
Outside ISM Bands
d=(3.5/V1)(√P)
Separation (m)150kHz to 80 MHz
In ISM Bands
d=(10/3)(3.5/V1)(√P)
Separation (m)80 to 800 MHz
d=(3.5/E1)(√P)
Separation (m)800MHz to
2.7GHz
d=(7/E1)(√P)
0.01 0.1166 0.1944 0.1166 0.23330.1 0.3689 0.6149 0.3689 0.73781 1.1666 1.9444 1.1666 2.333310 3.6893 6.1489 3.6893 7.3786100 11.6666 19.4444 11.6666 23.3333
For transmitters rated at a maximum output power not listed above, the recommended separation distance (d) in meters (m) can be estimated using the equation applicable to the frequency of the transmitter, where P is the maximum output power rating of the transmitter in watts (w) according to the transmitter manufacturer.
Note 1: At 80 MHz and 800 MHz, the separation distance for the higher frequency range applies.
Note 2: These guidelines may not apply in all situations. Electromagnetic propagation is affected by absorption and reflection from structures, objects, and people.
Note 3: The compliance levels in the ISM frequency bands between 150 kHz and 80 MHz and in the frequency range 80 MHz to 2.7 GHz are intended to decrease the likelihood that mobile/portable communications equipment could cause interference if it is inadvertently brought into patient areas. For this reason, an additional factor of 10/3 has been incorporated into the formula used in calculating the recommended separation distance for transmitters in these frequency ranges.
230650-101 Rev. A 41
Guidance & Manufacturer’s Declaration (cont.)
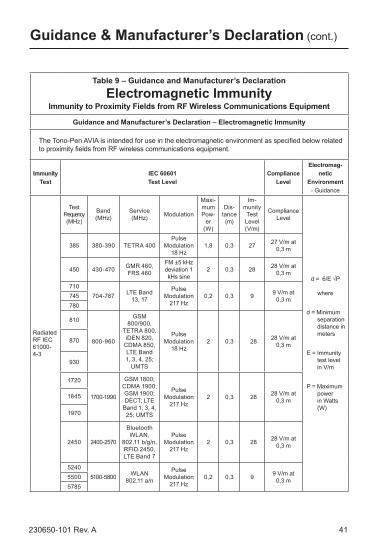
Table 9 – Guidance and Manufacturer’s Declaration
Electromagnetic ImmunityImmunity to Proximity Fields from RF Wireless Communications Equipment
Guidance and Manufacturer’s Declaration – Electromagnetic Immunity
The Tono-Pen AVIA is intended for use in the electromagnetic environment as specified below related to proximity fields from RF wireless communications equipment.
Immunity Test
IEC 60601 Test Level
Compliance Level
Electromag-netic
Environment - Guidance
Radiated RF IEC 61000-4-3
Test Frequency (MHz)
Band (MHz)
Service (MHz) Modulation
Maxi-mum Pow-
er (W)
Dis-tance (m)
Im-munity Test Level (V/m)
Compliance Level
d = 6/E √P
where
d = Minimum separation distance in meters
E = Immunity test level in V/m
P = Maximum power in Watts (W)
385 380-390 TETRA 400Pulse
Modulation 18 Hz
1,8 0,3 27 27 V/m at 0,3 m
450 430-470 GMR 460, FRS 460
FM ±5 kHz deviation 1 kHs sine
2 0,3 28 28 V/m at 0,3 m
710704-787 LTE Band
13, 17
Pulse Modulation
217 Hz0,2 0,3 9 9 V/m at
0,3 m745780
810
800-960
GSM 800/900,
TETRA 800, iDEN 820,
CDMA 850, LTE Band 1, 3, 4, 25;
UMTS
Pulse Modulation
18 Hz2 0,3 28 28 V/m at
0,3 m870
930
1720
1700-1990
GSM 1800; CDMA 1900; GSM 1900; DECT; LTE
Band 1, 3, 4, 25; UMTS
Pulse Modulation
217 Hz2 0,3 28 28 V/m at
0,3 m1845
1970
2450 2400-2570
Bluetooth WLAN,
802.11 b/g/n, RFID 2450, LTE Band 7
Pulse Modulation
217 Hz2 0,3 28 28 V/m at
0,3 m
52405100-5800 WLAN
802.11 a/n
Pulse Modulation
217 Hz0,2 0,3 9 9 V/m at
0,3 m55005785

42 230650-101 Rev. A
Warranty
This product is warranted by Reichert, Inc. against defective material and workmanship under normal use for a period of one year from the date of invoice to the original purchaser. (An authorized dealer shall not be considered an original purchaser.) Under this warranty, Reichert’s sole obligation is to repair or replace the defective part or product at Reichert’s discretion.
This warranty applies to new products and does not apply to a product that has been tampered with, altered in any way, misused, damaged by accident or negligence, or which has had the serial number removed, altered or effaced. Nor shall this warranty be extended to a product installed or operated in a manner not in accordance with the applicable Reichert instruction manual, nor to a product which has been sold, serviced, installed or repaired other than by a Reichert factory, Technical Service Center, or authorized Reichert Dealer.
Lamps, bulbs, charts, cards and other expendable items are not covered by this warranty.
All claims under this warranty must be in writing and directed to the Reichert factory, Technical Service Center, or authorized instrument dealer making the original sale and must be accompanied by a copy of the purchaser’s invoice.
This warranty is in lieu of all other warranties implied or expressed. All implied warranties of merchantability or fitness for a particular use are hereby disclaimed. No representative or other person is authorized to make any other obligations for Reichert. Reichert shall not be liable for any special, incidental, or consequent damages for any negligence, breach of warranty, strict liability or any other damages resulting from or relating to design, manufacture, sale, use or handling of the product.
PATENT WARRANTYIf notified promptly in writing of any action brought against the purchaser based on a claim that the instrument infringes a U.S. Patent, Reichert will defend such action at its expense and will pay costs and damages awarded in any such action, provided that Reichert shall have sole control of the defense of any such action with information and assistance (at Reichert’s expense) for such defense, and of all negotiation for the settlement and compromise thereof.
PRODUCT CHANGESReichert reserves the right to make changes in design or to make additions to or improvements in its products without obligation to add such to products previously manufactured.

230650-101 Rev. A 43
Notes

Manufactured ByReichert, Inc.
3362 Walden AveSuite 100
Depew, NY 14043USA
Toll Free: 888-849-8955Phone: 716-686-4500
Fax: 716-686-4555Email: [email protected]
www.reichert.com
Authorized European RepresentativeAMETEK GmbH
Business Unit ReichertCarl-von-Linde-Strasse 42
85716 Unterschleissheim/Munich GERMANYEmail: [email protected]
Tel. +49 (89) 315 891 10Fax. +49 (89) 315 891 99
ISO-13485 Registered
230650-101 Rev A
2018-06-12