
API Install
76
PI-API Installation Instructions Version 1.4.0.3 February 2022
-
Upload
rama-krishna-mullapudi -
Category
Documents
-
view
116 -
download
3
description
PI Application Programming Interface
Transcript of API Install

PI-API Installation Instructions
Version 1.4.0.3April 2023
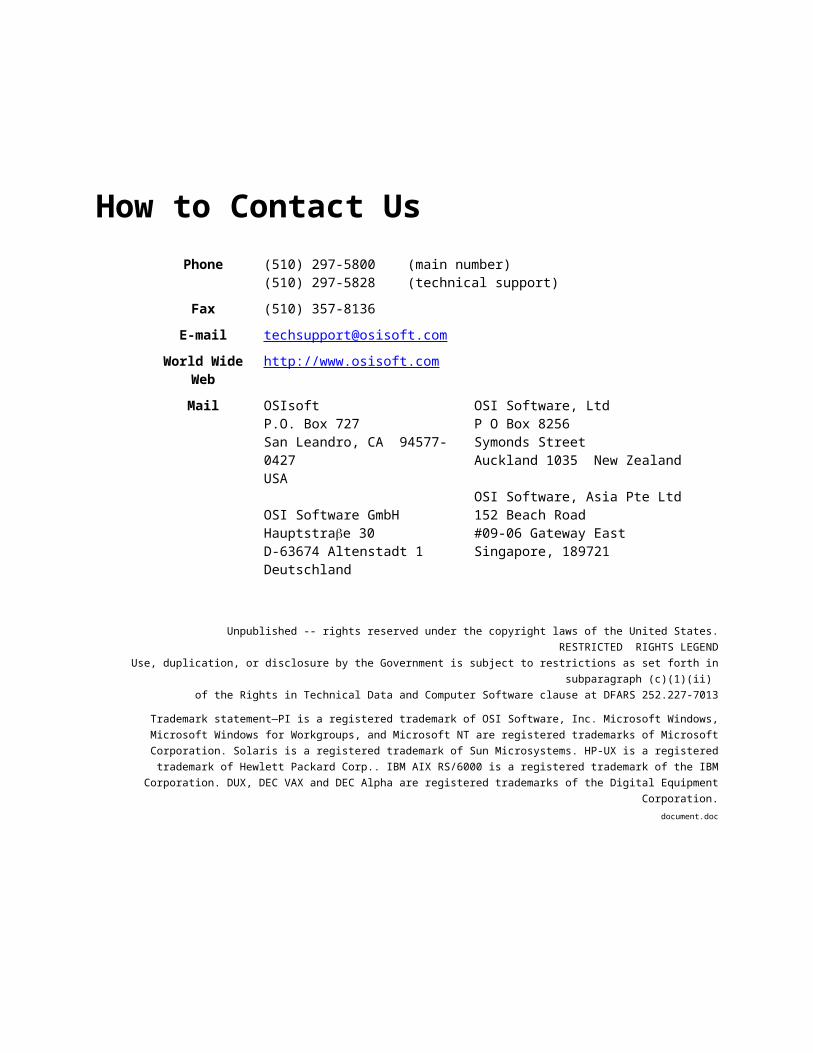
How to Contact Us
Phone (510) 297-5800 (main number)(510) 297-5828 (technical support)
Fax (510) 357-8136
E-mail [email protected]
World Wide Web http://www.osisoft.com
Mail OSIsoftP.O. Box 727San Leandro, CA 94577-0427USA
OSI Software GmbH Hauptstrae 30 D-63674 Altenstadt 1Deutschland
OSI Software, LtdP O Box 8256Symonds StreetAuckland 1035 New Zealand
OSI Software, Asia Pte Ltd152 Beach Road#09-06 Gateway EastSingapore, 189721
Unpublished -- rights reserved under the copyright laws of the United States.
RESTRICTED RIGHTS LEGEND
Use, duplication, or disclosure by the Government is subject to restrictions as set forth in subparagraph (c)(1)(ii)
of the Rights in Technical Data and Computer Software clause at DFARS 252.227-7013
Trademark statement—PI is a registered trademark of OSI Software, Inc. Microsoft Windows, Microsoft Windows for Workgroups, and
Microsoft NT are registered trademarks of Microsoft Corporation. Solaris is a registered trademark of Sun Microsystems. HP-UX is a
registered trademark of Hewlett Packard Corp.. IBM AIX RS/6000 is a registered trademark of the IBM Corporation. DUX, DEC VAX
and DEC Alpha are registered trademarks of the Digital Equipment Corporation.
document.doc
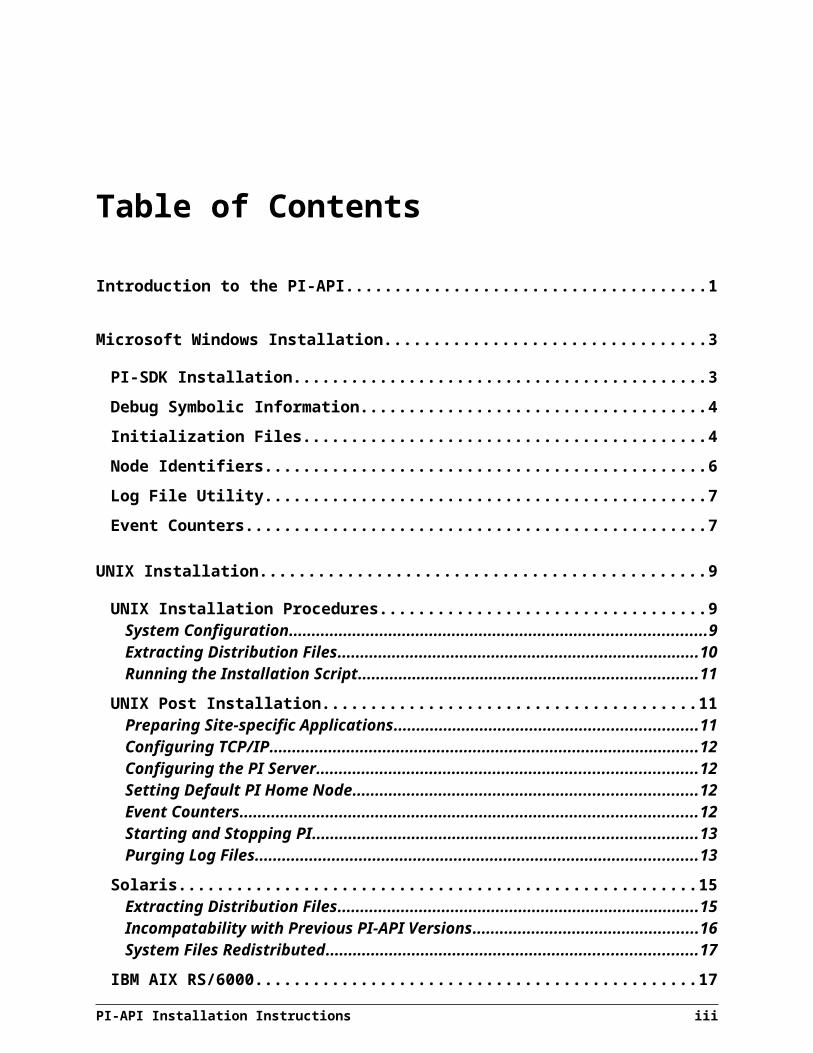
Table of Contents
Introduction to the PI-API..............................................................................................1
Microsoft Windows Installation....................................................................................3
PI-SDK Installation......................................................................................................3
Debug Symbolic Information.....................................................................................4
Initialization Files........................................................................................................4
Node Identifiers..........................................................................................................6
Log File Utility.............................................................................................................7
Event Counters...........................................................................................................7
UNIX Installation............................................................................................................9
UNIX Installation Procedures....................................................................................9System Configuration.............................................................................................9Extracting Distribution Files................................................................................10Running the Installation Script............................................................................11
UNIX Post Installation..............................................................................................11Preparing Site-specific Applications...................................................................11Configuring TCP/IP...............................................................................................12Configuring the PI Server.....................................................................................12Setting Default PI Home Node..............................................................................12Event Counters......................................................................................................12Starting and Stopping PI......................................................................................13Purging Log Files..................................................................................................13
Solaris........................................................................................................................15Extracting Distribution Files................................................................................15Incompatability with Previous PI-API Versions..................................................16System Files Redistributed..................................................................................17
IBM AIX RS/6000.......................................................................................................17Extracting Distribution Files................................................................................17Linking....................................................................................................................17System Files Redistributed..................................................................................17
HP-UX 10.x and 11.x.................................................................................................17Extracting Distribution Files................................................................................18
PI-API Installation Instructions iii
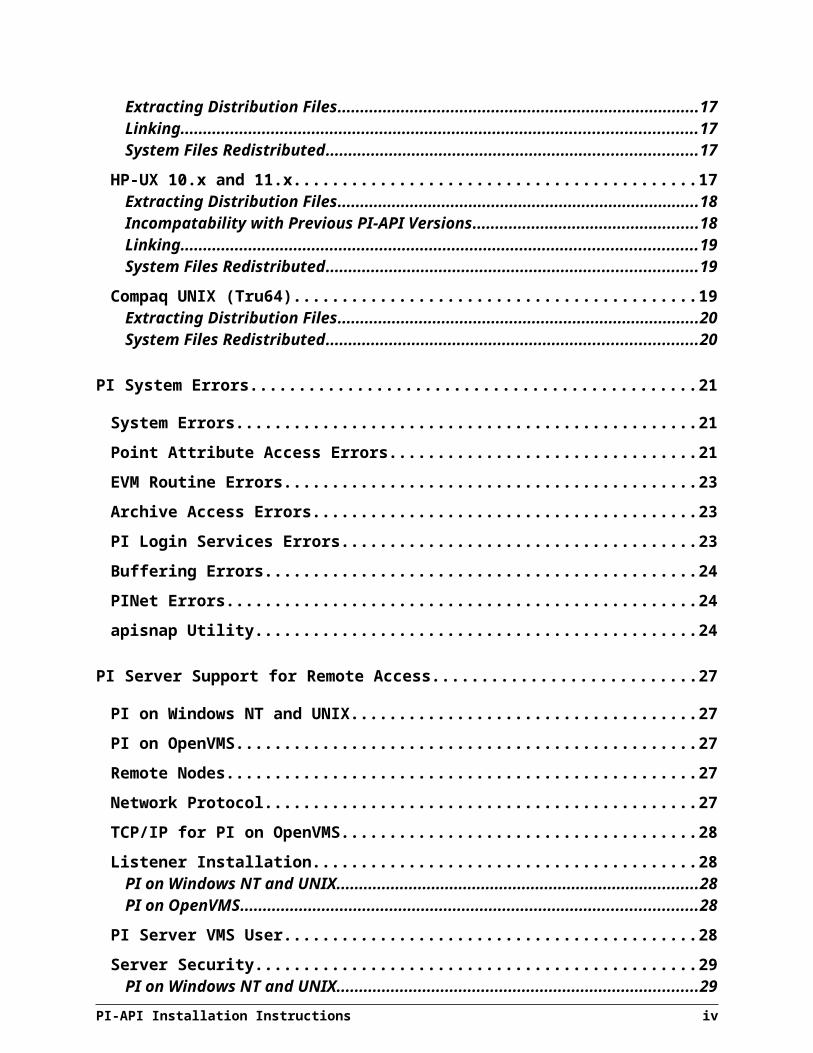
Incompatability with Previous PI-API Versions..................................................18Linking....................................................................................................................19System Files Redistributed..................................................................................19
Compaq UNIX (Tru64)...............................................................................................19Extracting Distribution Files................................................................................20System Files Redistributed..................................................................................20
PI System Errors..........................................................................................................21
System Errors...........................................................................................................21
Point Attribute Access Errors.................................................................................21
EVM Routine Errors..................................................................................................23
Archive Access Errors.............................................................................................23
PI Login Services Errors..........................................................................................23
Buffering Errors........................................................................................................24
PINet Errors...............................................................................................................24
apisnap Utility...........................................................................................................24
PI Server Support for Remote Access.......................................................................27
PI on Windows NT and UNIX...................................................................................27
PI on OpenVMS.........................................................................................................27
Remote Nodes...........................................................................................................27
Network Protocol......................................................................................................27
TCP/IP for PI on OpenVMS.......................................................................................28
Listener Installation..................................................................................................28PI on Windows NT and UNIX................................................................................28PI on OpenVMS......................................................................................................28
PI Server VMS User...................................................................................................28
Server Security.........................................................................................................29PI on Windows NT and UNIX................................................................................29PI on OpenVMS......................................................................................................29
Configuring PI Interface Node Buffering...................................................................30
Features.....................................................................................................................30Buffered Functions...............................................................................................30Server Timestamps...............................................................................................31Error Reporting......................................................................................................31
Installation and Configuration................................................................................31
Operation...................................................................................................................33
PI-API Installation Instructions iv
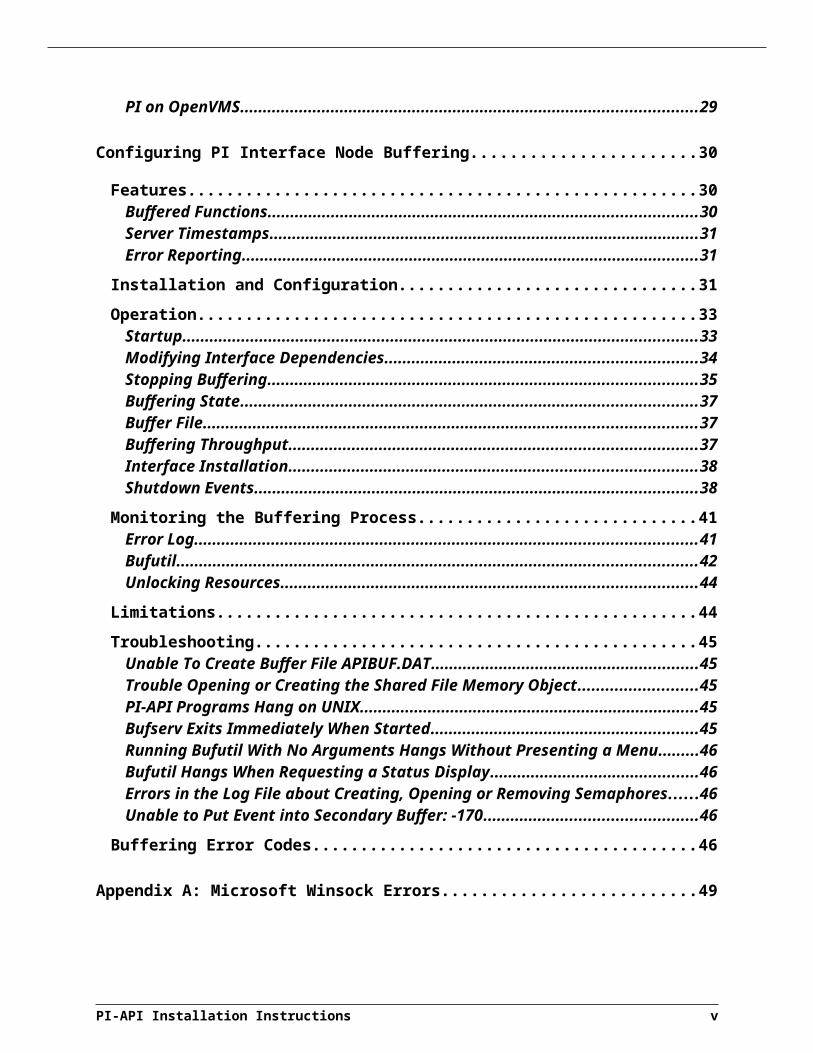
Startup....................................................................................................................33Modifying Interface Dependencies......................................................................34Stopping Buffering................................................................................................35Buffering State.......................................................................................................37Buffer File...............................................................................................................37Buffering Throughput...........................................................................................37Interface Installation.............................................................................................38Shutdown Events..................................................................................................38
Monitoring the Buffering Process...........................................................................41Error Log................................................................................................................41Bufutil.....................................................................................................................42Unlocking Resources............................................................................................44
Limitations................................................................................................................ 44
Troubleshooting.......................................................................................................45Unable To Create Buffer File APIBUF.DAT.........................................................45Trouble Opening or Creating the Shared File Memory Object.........................45PI-API Programs Hang on UNIX...........................................................................45Bufserv Exits Immediately When Started...........................................................45Running Bufutil With No Arguments Hangs Without Presenting a Menu.......46Bufutil Hangs When Requesting a Status Display.............................................46Errors in the Log File about Creating, Opening or Removing Semaphores. . .46Unable to Put Event into Secondary Buffer: -170..............................................46
Buffering Error Codes..............................................................................................46
Appendix A: Microsoft Winsock Errors.....................................................................49
PI-API Installation Instructions v
Introduction to the PI-APIThe PI Application Programming Interface (PI-API) is a library of routines that provide a common programmatic interface to PI Systems. The library is available on a number of hardware platforms where client programs execute. OSIsoft programs, (PI-ProcessBook, PI-DataLink, PI-Profiles, PI interfaces, etc.) use the functions in the PI-API library to communicate with the PI home node.
This document describes installing the PI-API on various platforms to support client programs such as interfaces communicating to PI Systems. The PI-API can also be used to write new programs that send and receive PI data. If you wish to use the PI-API in this fashion, you should purchase the PI-API for the desired platform. You will receive a programmer’s manual that explains and documents the calling of over 100 different functions.
The first part of this manual contains installation instructions for various platforms. Locate the section for the desired platform and follow the instructions. Note that for UNIX systems you should consult the sections entitled:
“UNIX Installation Procedures” on page 9 and
“UNIX Post Installation” on page 11 plus
The section for the UNIX platform you are using.
The second part of this manual contains three sections of reference material. They are:
“PI System Errors” on page 23: This section defines the meaning of error codes returned by the PI-API or the PI home node. When errors are encountered at run time, they are typically logged either in the PI-API log file or in the interface’s log.
"PI Server Support for Remote Access" on page 27:This section describes what configuration is required on the PI home node to support access from PI-API client applications. If the home node already supports one or more remote PI-API programs, then further configuration is typically not required.
"Configuring PI-Interface Node Buffering” on page 30: This section describes how data can be buffered on the PI-Interface node when the PI home node is unavailable and how this behavior is enabled, configured, and managed. Once an interface is installed and running correctly, you may wish to enable buffering to provide this functionality.
PI-API Installation Instructions 1
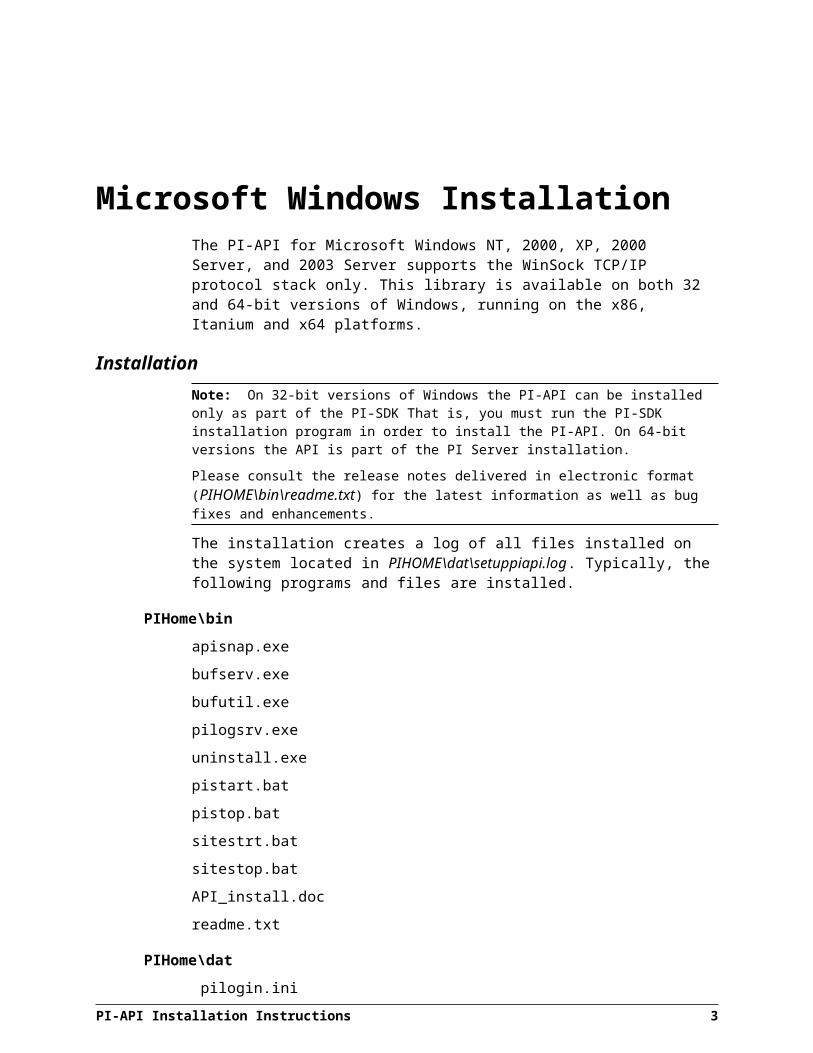
Microsoft Windows InstallationThe PI-API for Microsoft Windows NT, 2000, XP, 2000 Server, and 2003 Server supports the WinSock TCP/IP protocol stack only. This library is available on both 32 and 64-bit versions of Windows, running on the x86, Itanium and x64 platforms.
Installation
Note: On 32-bit versions of Windows the PI-API can be installed only as part of the PI-SDK That is, you must run the PI-SDK installation program in order to install the PI-API. On 64-bit versions the API is part of the PI Server installation.
Please consult the release notes delivered in electronic format (PIHOME\bin\readme.txt) for the latest information as well as bug fixes and enhancements.
The installation creates a log of all files installed on the system located in PIHOME\dat\setuppiapi.log. Typically, the following programs and files are installed.
PIHome\bin
apisnap.exe
bufserv.exe
bufutil.exe
pilogsrv.exe
uninstall.exe
pistart.bat
pistop.bat
sitestrt.bat
sitestop.bat
API_install.doc
readme.txt
PIHome\dat
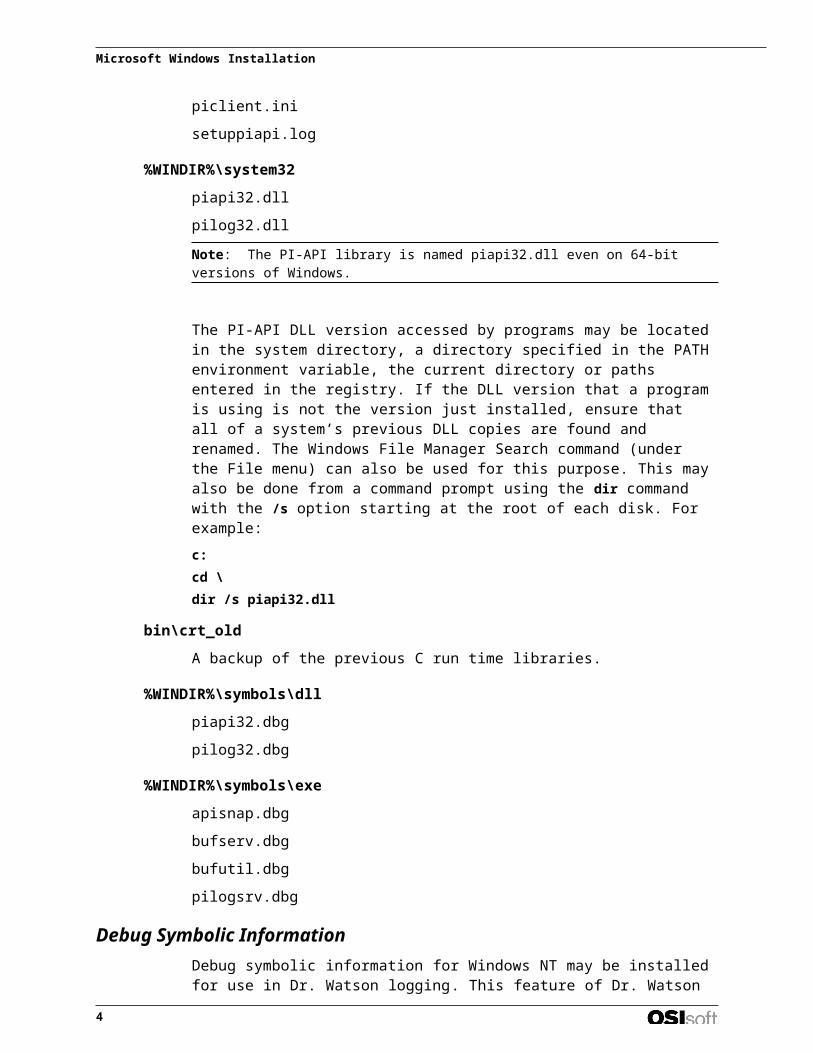
pilogin.ini
piclient.ini
setuppiapi.log
%WINDIR%\system32
piapi32.dll
pilog32.dll
Note: The PI-API library is named piapi32.dll even on 64-bit versions of Windows.
PI-API Installation Instructions 3
Microsoft Windows Installation
The PI-API DLL version accessed by programs may be located in the system directory, a directory specified in the PATH environment variable, the current directory or paths entered in the registry. If the DLL version that a program is using is not the version just installed, ensure that all of a system’s previous DLL copies are found and renamed. The Windows File Manager Search command (under the File menu) can also be used for this purpose. This may also be done from a command prompt using the dir command with the /s option starting at the root of each disk. For example:
c:
cd \
dir /s piapi32.dll
bin\crt_old
A backup of the previous C run time libraries.
%WINDIR%\symbols\dll
piapi32.dbg
pilog32.dbg
%WINDIR%\symbols\exe
apisnap.dbg
bufserv.dbg
bufutil.dbg
pilogsrv.dbg
Debug Symbolic InformationDebug symbolic information for Windows NT may be installed for use in Dr. Watson logging. This feature of Dr. Watson is not available on Windows 9x. If a program exception occurs and Dr. Watson is installed as the default debugger, the %WINDIR%\drwtsn32.log file should contain symbolic information usable in identifying the source of the program exception. The drwtsn32.log file should be saved for OSI Technical Support staff to use.
To install Dr. Watson as the default debugger, run the command drwtsn32 –i.
Initialization FilesAn application built with PI-API-NT looks for the initialization file called pilogin.ini and for the file piclient.ini. These files contain server and port information to support default connections and connection to multiple PI Servers. The piclient.ini file is now used to configure PI-API buffering, bufserv.
The PI-API library uses several methods to find these files. First it checks the dat subdirectory under the directory defined by PIPCSHARE in the pipc.ini file. Next it checks in a directory up one level and back down into a directory called dat from the current directory. If not found there, the directory specified as PIHOME above is used as the current directory and its dat subdirectory is searched. Other locations are also searched for backward compatibility, but it is advisable to have a single instance of these files in the primary location.
4
The piclient.ini file has historically been used to support the definition of the default server. The pilogin.ini file was introduced with the PI-ProcessBook program to support both default connections and multiple connection management. The file now also supports port definition and node ID’s (a numeric mapping of server nodes used to reduce storage and provide server and application mobility). Currently the PI-API will search for either of these files for connection information. The pilogin.ini is preferred, and if found will be used. The piclient.ini file is supported for backward compatibility. Typical .ini files are shown below. During installation, a sample pilogin.ini is installed in the PIHOME\dat subdirectory and may be edited to reflect the user’s servers and login names as described below.
The standard .ini file format is composed of sections (surrounded by brackets), items or keys (to the left of an = sign) and values (to the right of an = sign). All lines beginning with a semicolon (;) are comments only.
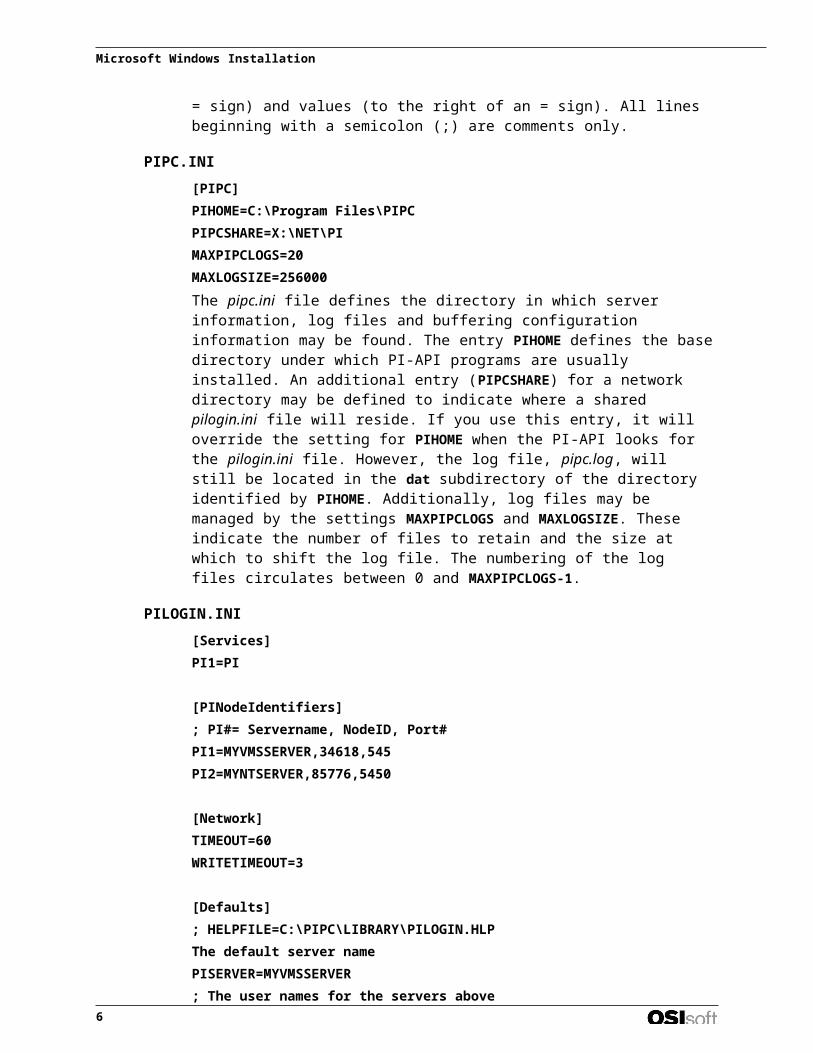
PIPC.INI
[PIPC]
PIHOME=C:\Program Files\PIPC
PIPCSHARE=X:\NET\PI
MAXPIPCLOGS=20
MAXLOGSIZE=256000
The pipc.ini file defines the directory in which server information, log files and buffering configuration information may be found. The entry PIHOME defines the base directory under which PI-API programs are usually installed. An additional entry (PIPCSHARE) for a network directory may be defined to indicate where a shared pilogin.ini file will reside. If you use this entry, it will override the setting for PIHOME when the PI-API looks for the pilogin.ini file. However, the log file, pipc.log, will still be located in the dat subdirectory of the directory identified by PIHOME. Additionally, log files may be managed by the settings MAXPIPCLOGS and MAXLOGSIZE. These indicate the number of files to retain and the size at which to shift the log file. The numbering of the log files circulates between 0 and MAXPIPCLOGS-1.
PILOGIN.INI
[Services]
PI1=PI
[PINodeIdentifiers]
; PI#= Servername, NodeID, Port#
PI1=MYVMSSERVER,34618,545
PI2=MYNTSERVER,85776,5450
[Network]
TIMEOUT=60
WRITETIMEOUT=3
[Defaults]
; HELPFILE=C:\PIPC\LIBRARY\PILOGIN.HLP
The default server name
PISERVER=MYVMSSERVER
; The user names for the servers above
PI-API Installation Instructions 5

Microsoft Windows Installation
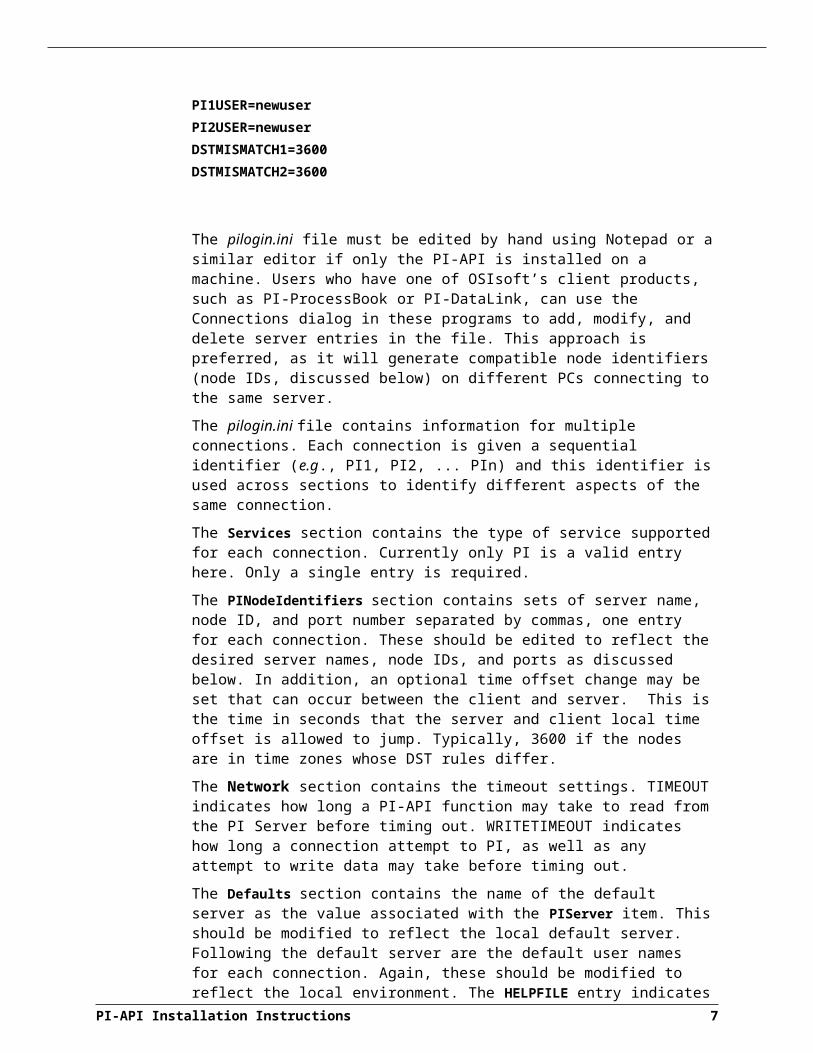
PI1USER=newuser
PI2USER=newuser
DSTMISMATCH1=3600
DSTMISMATCH2=3600
The pilogin.ini file must be edited by hand using Notepad or a similar editor if only the PI-API is installed on a machine. Users who have one of OSIsoft’s client products, such as PI-ProcessBook or PI-DataLink, can use the Connections dialog in these programs to add, modify, and delete server entries in the file. This approach is preferred, as it will generate compatible node identifiers (node IDs, discussed below) on different PCs connecting to the same server.
The pilogin.ini file contains information for multiple connections. Each connection is given a sequential identifier (e.g., PI1, PI2, ... PIn) and this identifier is used across sections to identify different aspects of the same connection.
The Services section contains the type of service supported for each connection. Currently only PI is a valid entry here. Only a single entry is required.
The PINodeIdentifiers section contains sets of server name, node ID, and port number separated by commas, one entry for each connection. These should be edited to reflect the desired server names, node IDs, and ports as discussed below. In addition, an optional time offset change may be set that can occur between the client and server. This is the time in seconds that the server and client local time offset is allowed to jump. Typically, 3600 if the nodes are in time zones whose DST rules differ.
The Network section contains the timeout settings. TIMEOUT indicates how long a PI-API function may take to read from the PI Server before timing out. WRITETIMEOUT indicates how long a connection attempt to PI, as well as any attempt to write data may take before timing out.
The Defaults section contains the name of the default server as the value associated with the PIServer item. This should be modified to reflect the local default server. Following the default server are the default user names for each connection. Again, these should be modified to reflect the local environment. The HELPFILE entry indicates the location of the Login Services help file and should be set to reflect the installed PIHOME location.
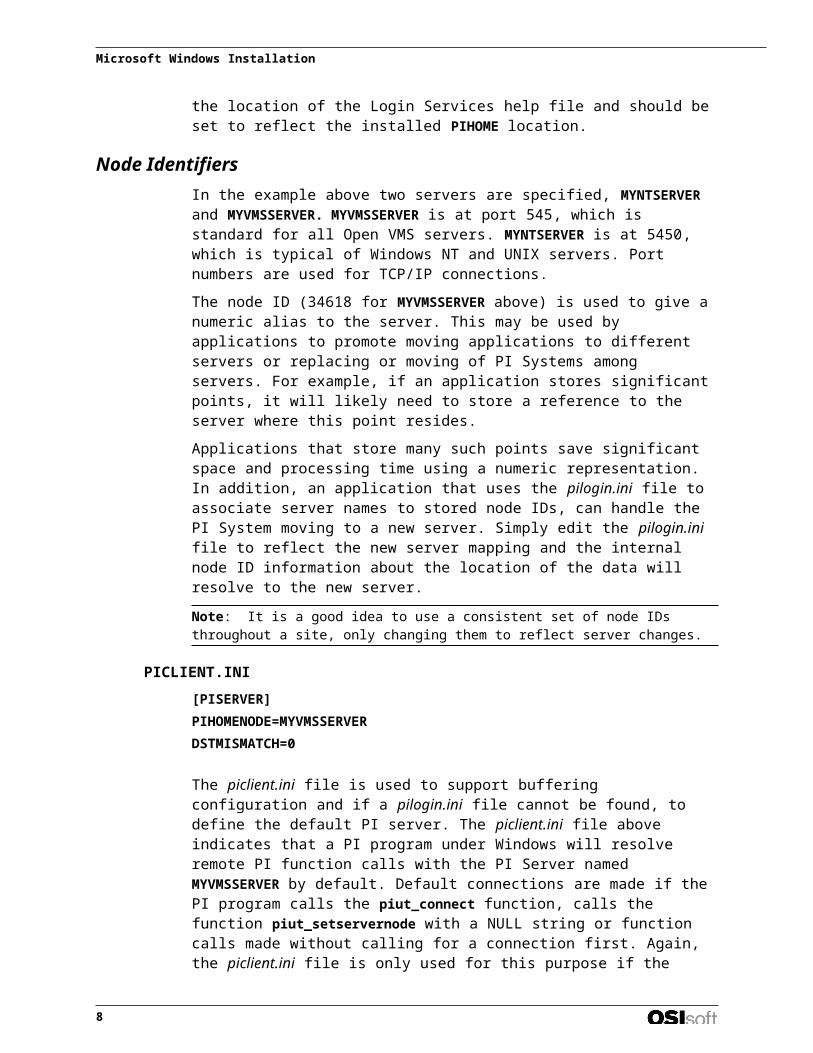
Node IdentifiersIn the example above two servers are specified, MYNTSERVER and MYVMSSERVER. MYVMSSERVER is at port 545, which is standard for all Open VMS servers. MYNTSERVER is at 5450, which is typical of Windows NT and UNIX servers. Port numbers are used for TCP/IP connections.
The node ID (34618 for MYVMSSERVER above) is used to give a numeric alias to the server. This may be used by applications to promote moving applications to different servers or replacing or moving of PI Systems among servers. For example, if an application stores significant points, it will likely need to store a reference to the server where this point resides.
Applications that store many such points save significant space and processing time using a numeric representation. In addition, an application that uses the pilogin.ini file to associate server names to stored node IDs, can handle the PI System moving to a new
6
server. Simply edit the pilogin.ini file to reflect the new server mapping and the internal node ID information about the location of the data will resolve to the new server.
Note: It is a good idea to use a consistent set of node IDs throughout a site, only changing them to reflect server changes.
PICLIENT.INI
[PISERVER]
PIHOMENODE=MYVMSSERVER
DSTMISMATCH=0
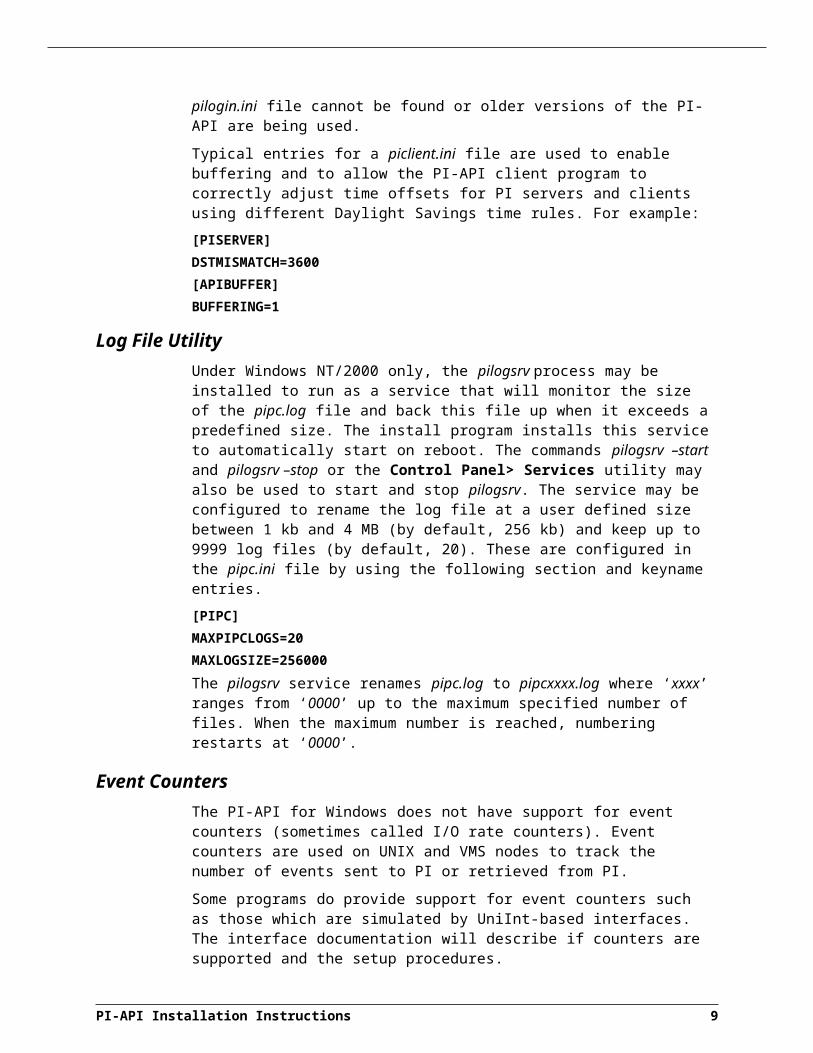
The piclient.ini file is used to support buffering configuration and if a pilogin.ini file cannot be found, to define the default PI server. The piclient.ini file above indicates that a PI program under Windows will resolve remote PI function calls with the PI Server named MYVMSSERVER by default. Default connections are made if the PI program calls the piut_connect function, calls the function piut_setservernode with a NULL string or function calls made without calling for a connection first. Again, the piclient.ini file is only used for this purpose if the pilogin.ini file cannot be found or older versions of the PI-API are being used.
Typical entries for a piclient.ini file are used to enable buffering and to allow the PI-API client program to correctly adjust time offsets for PI servers and clients using different Daylight Savings time rules. For example:
[PISERVER]
DSTMISMATCH=3600
[APIBUFFER]
BUFFERING=1
Log File UtilityUnder Windows NT/2000 only, the pilogsrv process may be installed to run as a service that will monitor the size of the pipc.log file and back this file up when it exceeds a predefined size. The install program installs this service to automatically start on reboot. The commands pilogsrv –start and pilogsrv –stop or the Control Panel> Services utility may also be used to start and stop pilogsrv. The service may be configured to rename the log file at a user defined size between 1 kb and 4 MB (by default, 256 kb) and keep up to 9999 log files (by default, 20). These are configured in the pipc.ini file by using the following section and keyname entries.
[PIPC]
MAXPIPCLOGS=20
MAXLOGSIZE=256000
The pilogsrv service renames pipc.log to pipcxxxx.log where ‘xxxx’ ranges from ‘0000’ up to the maximum specified number of files. When the maximum number is reached, numbering restarts at ‘0000’.
Event CountersThe PI-API for Windows does not have support for event counters (sometimes called I/O rate counters). Event counters are used on UNIX and VMS nodes to track the number of events sent to PI or retrieved from PI.
PI-API Installation Instructions 7
Microsoft Windows Installation
Some programs do provide support for event counters such as those which are simulated by UniInt-based interfaces. The interface documentation will describe if counters are supported and the setup procedures.
Event counters as used in UniInt-based interfaces for Windows are implemented by creating a file PIHOME\dat\iorates.dat in which PI rate counter tags (event tags) are associated to counter numbers (PIHOME is defined in pipc.ini as the path to the PI-API such as D:\Program Files\PIPC). The counter number is usually specified on the interface command line as “/ec=#” where “#” is a number in the range 1-200. Every 10 minutes the interface will write a value for the average events per minute for the 10 minute range.
8
UNIX Installation
UNIX Installation ProceduresThe PI-API library is available on a number of UNIX platforms, including:
Solaris 2.5 and newer
AIX 4.3 and newer
HPUX 10.20 and newer, PA-RISC and Itanium
OSF1 V4.0D and newer (DUX or Tru64)
Linux (Red Hat Linux 9, Red Hat Enterprise Linux 3, or any Linux Standard Base 2 compliant distro)
Many of the procedures for installing and configuring the software on these different platforms are identical. When installing one of the UNIX versions, consult this section for general installation instructions and then the section for the specific operating system platform for additional details. The exception is the Linux platfo rm, where instead of a tar file a RPM installation kit is provided. See the Linux section below.
For systems with previous installations of PI-API, make a backup of the PI-API directory. The UNIX tar command may be used or a separate installation directory may be used. To use the tar command, use the following commands:
cd $PIHOME
tar cvf piapi_previous.tar ./*
To use another installation directory, rename the PI-API directory and create another PI-API directory with the previous name. The shell initialization files will not need to be changed in that case.
cd $PIHOME
cd ..
mv piapi piapi_old
mkdir piapi
System Configuration
The PI installation scripts should be run with super-user privileges (root). If the installation of system files is required as determined by the installation script, and another user is used during installation, errors will be logged to install.log.
Typically, a user named piadmin and a group named pigrp may be created for using the PI-API software. This should be done using system administration tools provided by the operating system vendor.
Environment Variables
The PI-API installation procedure requires the definition of a PI home directory. The PI home directory is typically set to /opt/piapi or /home/piapi, although any
PI-API Installation Instructions 9
directory name in a partition with adequate disk space is suitable. Use the df command to determine the amount of disk space available.
For example:
# mkdir /opt/piapi
If you are also installing or have already installed a full PI System on this machine, it is advisable though not required to define a separate PIHOME directory for the PI-API installation. Once the directory is created, the PIHOME environment variable must be defined to point to this directory. From the Korn or Bourne shell the command is:
# PIHOME=/opt/piapi
# export PIHOME
or using C shell:
# setenv PIHOME /opt/piapi
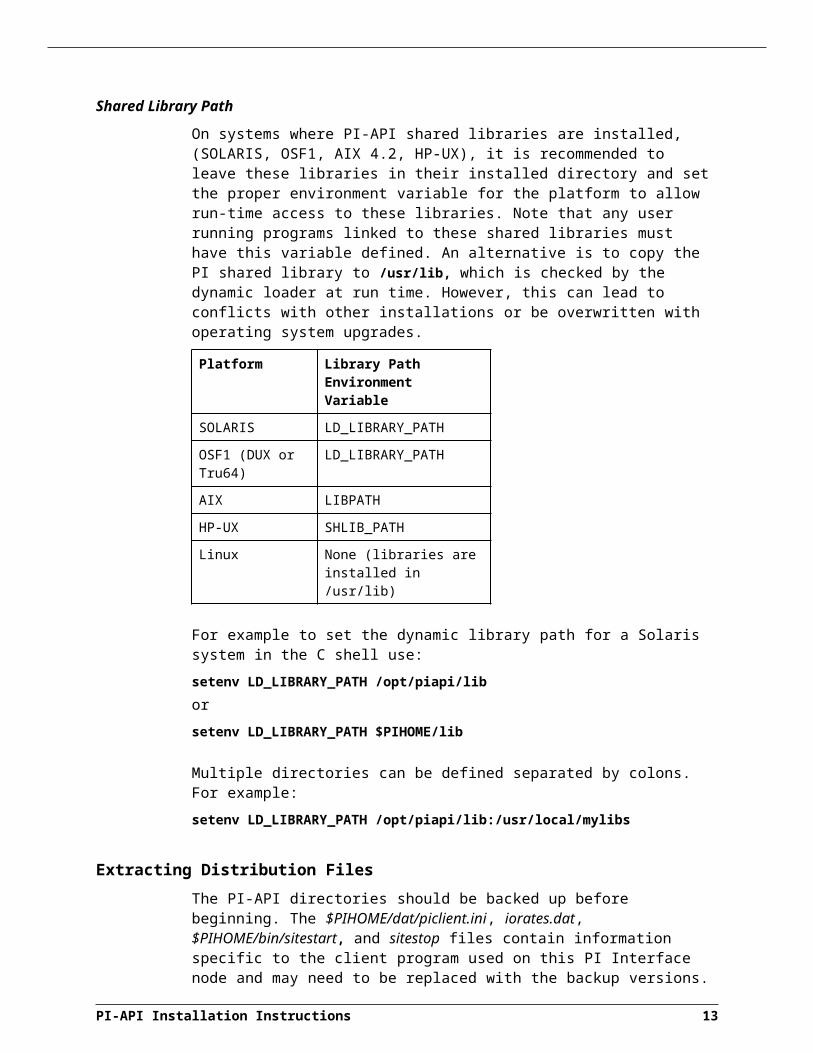
Shared Library Path
On systems where PI-API shared libraries are installed, (SOLARIS, OSF1, AIX 4.2, HP-UX), it is recommended to leave these libraries in their installed directory and set the proper environment variable for the platform to allow run-time access to these libraries. Note that any user running programs linked to these shared libraries must have this variable defined. An alternative is to copy the PI shared library to /usr/lib, which is checked by the dynamic loader at run time. However, this can lead to conflicts with other installations or be overwritten with operating system upgrades.
Platform Library Path Environment Variable
SOLARIS LD_LIBRARY_PATH
OSF1 (DUX or Tru64) LD_LIBRARY_PATH
AIX LIBPATH
HP-UX SHLIB_PATH
Linux None (libraries are installed in /usr/lib)
For example to set the dynamic library path for a Solaris system in the C shell use:
setenv LD_LIBRARY_PATH /opt/piapi/lib
or
setenv LD_LIBRARY_PATH $PIHOME/lib
Multiple directories can be defined separated by colons. For example:
setenv LD_LIBRARY_PATH /opt/piapi/lib:/usr/local/mylibs
Extracting Distribution Files
The PI-API directories should be backed up before beginning. The $PIHOME/dat/piclient.ini, iorates.dat, $PIHOME/bin/sitestart, and sitestop files contain information specific to the client program used on this PI Interface node and may need to be replaced with the backup versions.
The CD-ROM distribution media should be mounted as a directory (In the instructions below, /cdrom will be used. Substitute the actual pathname, if necessary.) and the full
PI-API Installation Instructions 10

path to the tar file should be used in the extraction command below. If the file was retrieved as an Internet distribution, the file may be placed in the $PIHOME directory. The distribution files are extracted with the tar command to a temporary directory with the following commands:
# cd /tmp
# zcat piapi133_sol2_tar.Z | tar xf –
or
# zcat /cdrom/sol2/piapi133_sol2_tar.Z | tar xf -
The temporary directory should contain only the directory build after extracting the files. On all UNIX platforms the build directory contains the distribution files and the installation script, pi.install, which is run to complete the installation.
Running the Installation Script
To complete the PI-API installation on all UNIX platforms the installation script, pi.install, must be run. The installation script should be run by the root user. For multi-platform compatibility pi.install, and all platform-independent PI scripts, are written for the Bourne shell. If the Bourne shell is not the default shell for the user doing the install, pi.install must be explicitly run from the Bourne shell, that is,
sh pi.install
The following commands will run the pi.install script:
# cd build
# sh pi.install
For all installations and upgrades, the pi.install script prompts for a user name (default user is piadmin, which must exist). Enter the name that should be set for all files in the $PIHOME directory tree. The user name entered must exist. If this is a new installation, pi.install will prompt you for a default PI Node name. The TCP/IP host name of the node running the PI Data Archive should be entered. The script asks whether the default home node is a PI2 (OpenVMS) system or a PI3 (Windows NT or UNIX) system. This script also creates several directories, builds the PI-API library, installs system files (if needed) and links PI application and example routines. A listing of the PI home directory should show the following directories:
bin
build
dat
lib
During installation the file $PIHOME/install.log is created. If errors occurred, please review this file to determine what corrective action should be taken. If an obvious solution is not evident, save the file for OSIsoft Technical Support to review.
UNIX Post InstallationAfter successful installation of the PI-API, several other tasks may be required:
Preparing Site-Specific Applications
Configuration of TCP/IP
Configuring the PI Server
Setting the default PI home node
PI-API Installation Instructions 11

UNIX Installation
Preparing Site-specific Applications
Site-specific applications, such as interfaces, may need to be linked with the newly installed library. Applications that were linked with the shared PI-API library will usually run without relinking. Commands may be added to the sitelink script, which is called by the install script to expedite this process.
Launching and terminating site-specific applications is accomplished through the sitestart and sitestop scripts. These scripts are called by the scripts pistart and pistop, respectively. Modify the sitestart and sitestop scripts as appropriate for your site’s local applications.
Configuring TCP/IP
TCP/IP must be configured to allow the UNIX client node to find the PI home node by name. The client node should be able to ping the home node by name and to establish a Telnet session with the home node. The home node should also know the client node by name to permit reverse name lookup used to support security.
Configuring the PI Server
PI on OpenVMS systems requires the installation of a program on the server to respond to client requests. PI on Windows NT and UNIX systems automatically install a responder program called pinetmgr.
For a discussion of protocol stacks and server program installation on various platforms, see “PI Server Support for Remote Access” on page 26.
Setting Default PI Home Node
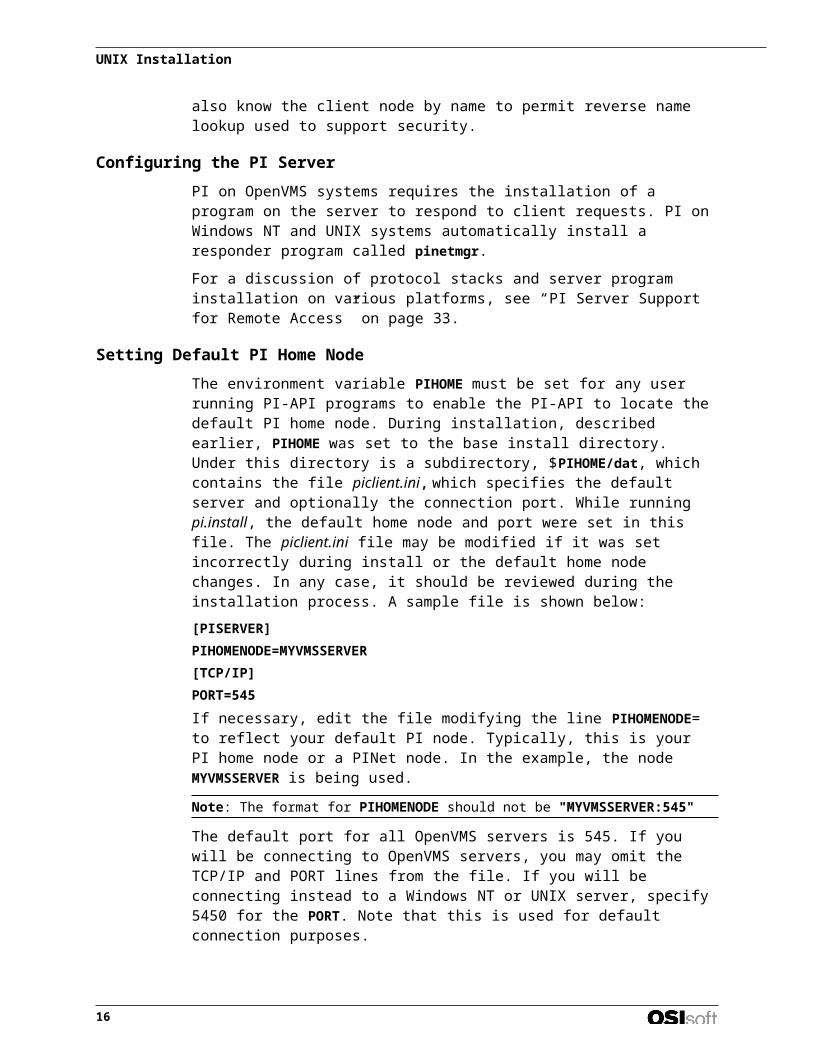
The environment variable PIHOME must be set for any user running PI-API programs to enable the PI-API to locate the default PI home node. During installation, described earlier, PIHOME was set to the base install directory. Under this directory is a subdirectory, $PIHOME/dat, which contains the file piclient.ini, which specifies the default server and optionally the connection port. While running pi.install, the default home node and port were set in this file. The piclient.ini file may be modified if it was set incorrectly during install or the default home node changes. In any case, it should be reviewed during the installation process. A sample file is shown below:
[PISERVER]
PIHOMENODE=MYVMSSERVER
[TCP/IP]
PORT=545
If necessary, edit the file modifying the line PIHOMENODE= to reflect your default PI node. Typically, this is your PI home node or a PINet node. In the example, the node MYVMSSERVER is being used.
Note: The format for PIHOMENODE should not be "MYVMSSERVER:545"
The default port for all OpenVMS servers is 545. If you will be connecting to OpenVMS servers, you may omit the TCP/IP and PORT lines from the file. If you will be connecting instead to a Windows NT or UNIX server, specify 5450 for the PORT. Note that this is used for default connection purposes.
Using the PI-API function piut_setservernode, you can specify a server name followed by a colon and the port number to explicitly direct the connection.
12
The file piclient.ini may also contain a section and entries to support configuration of PI-Interface node buffering. For a description of appropriate entries, see “Configuring PI-Interface Node Buffering,” on page 30. If you do not intend to use node buffering, you do not need these entries in piclient.ini. The default is to not enable buffering.
Event Counters
Event counters are used on UNIX nodes to track the number of events sent to PI or retrieved from PI. Typically, a counter number is associated with a PI tag to which the event rates are written. The counter number is associated with a tag in the $PIHOME/dat/iorates.dat file.
Starting and Stopping PI
When starting and stopping PI, the environment variables, (USER, LOGNAME, PIHOME), as well as the shared library path for those platforms using shared libraries, must be set as described in the section, "UNIX Installation Procedures" on page 9. You may wish to add the commands to set these environment variables to the script executed on login (.login, .profile) for users executing PI applications on the UNIX node.
PI typically has four standard processes running on a UNIX PI-Interface node (If buffering is enabled, a fifth process, bufserv, is also started.):
mqsrv Message log server.
mqmgr Message log manager.
ioshmsrv I/O rates shared memory server.
iorates I/O rates monitor program.
These processes are started by $PIHOME/bin/pistart and stopped by $PIHOME/bin/pistop. These scripts also run sitestart and sitestop, respectively.
To run the Bourne shell, start and stop scripts from a different shell execute the commands preceded by the shell directive, sh:
# sh pistart
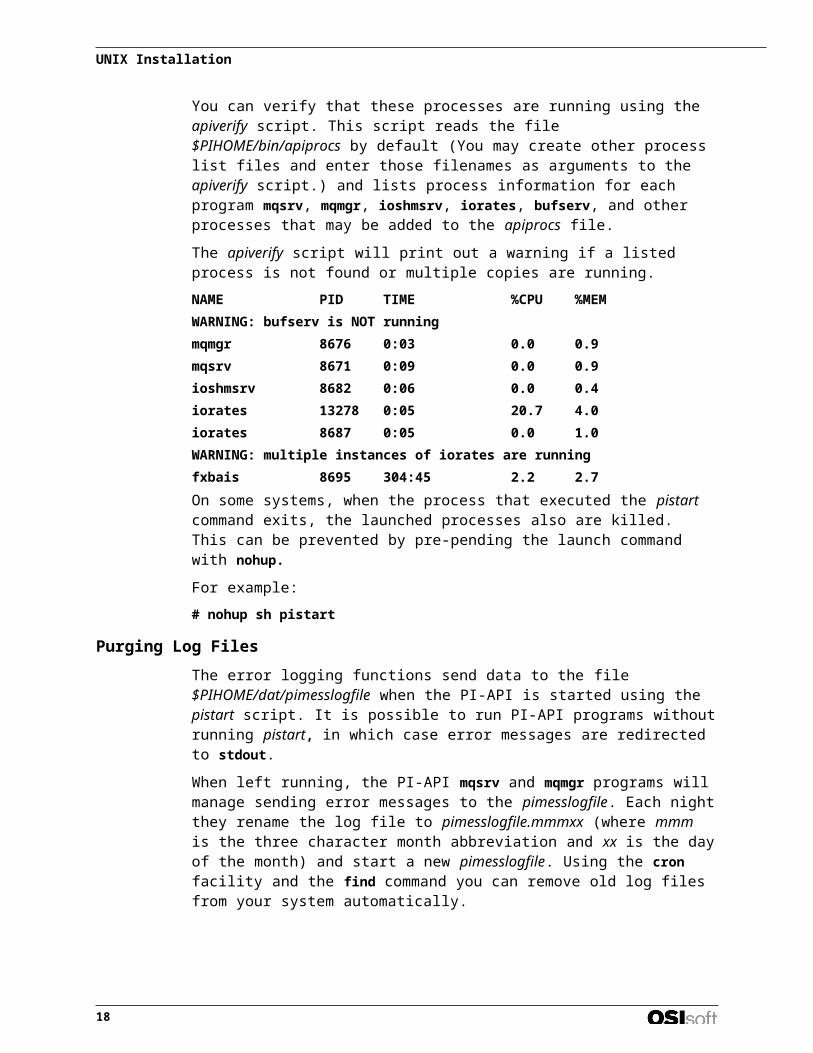
You can verify that these processes are running using the apiverify script. This script reads the file $PIHOME/bin/apiprocs by default (You may create other process list files and enter those filenames as arguments to the apiverify script.) and lists process information for each program mqsrv, mqmgr, ioshmsrv, iorates, bufserv, and other processes that may be added to the apiprocs file.
The apiverify script will print out a warning if a listed process is not found or multiple copies are running.
NAME PID TIME %CPU %MEM
WARNING: bufserv is NOT running
mqmgr 8676 0:03 0.0 0.9
mqsrv 8671 0:09 0.0 0.9
ioshmsrv 8682 0:06 0.0 0.4
iorates 13278 0:05 20.7 4.0
iorates 8687 0:05 0.0 1.0
WARNING: multiple instances of iorates are running
fxbais 8695 304:45 2.2 2.7
PI-API Installation Instructions 13
UNIX Installation
On some systems, when the process that executed the pistart command exits, the launched processes also are killed. This can be prevented by pre-pending the launch command with nohup.
For example:
# nohup sh pistart
Purging Log Files
The error logging functions send data to the file $PIHOME/dat/pimesslogfile when the PI-API is started using the pistart script. It is possible to run PI-API programs without running pistart, in which case error messages are redirected to stdout.
When left running, the PI-API mqsrv and mqmgr programs will manage sending error messages to the pimesslogfile. Each night they rename the log file to pimesslogfile.mmmxx (where mmm is the three character month abbreviation and xx is the day of the month) and start a new pimesslogfile. Using the cron facility and the find command you can remove old log files from your system automatically.
Finding and Removing the Files
The following version of the find command will remove all pimesslogfile.xxxxx files from the directory /usr/piapi/dat that have not been modified within the last seven days.
find /usr/piapi/dat -name pimesslogfile\* -mtime +7 -exec rm -f {} \;
In this command, the \ character is an escape character used before the parenthesis and the semi-colon. The file name to match is surrounded with apostrophes (typically on the same key as the quotation marks).
The command should be entered on a single line. Substitute the correct directory name and desired number of “days without modification” for your situation.
Spaces are significant. The -mtime argument is for last modified, a similar argument -atime can be used for last accessed. Using find on a file subsequently changes its last access time.
Adding a Cron Job
This command can be entered right into the crontab preceded by the designation for when the job should run, for example:
20 4 * * * find /usr/piapi/dat \( -name ̀ pimesslogfile.*’ \) –mtime +7 –exec rm –f {} \;
would run the job at 4:20 AM every day of the week. All text is entered on a single line in the crontab file.
The first five entries in crontab designate a time as follows:
minute (0-59)
hour (0-23)
day of the month (1- 31)
month of the year (1-12)
day of the week (0 - 6, 0 = Sunday)
Users with permission may set up their own cron jobs. The user who owns the
14
directories and in particular the log files should be the one to create the cron entry. A user’s cron entries are stored by the system.
To list them, execute
crontab -l
Modifying the cron table varies among systems. Under Solaris, to add to the user’s crontab, first set an environment variable indicating the editor to use:
For C Shell:
setenv EDITOR vi
For Bourne or Korn shell:
EDITOR=vi
export EDITOR
Then execute the command
crontab -e
An editor is then presented where you may modify the existing cron jobs for this user and add any new ones desired. When the editor is exited the cron table is updated.
Some systems require you to have a file with all the cron commands the user needs. In this case you would execute
crontab -l > tempfile
Next, edit tempfile to contain the additional commands for purging log files. Then add the cron entries with
crontab tempfile
For more information on setting up cron jobs, execute
man crontab
or see your system documentation.
Solaris For installation procedures common to all UNIX platforms, see:
"UNIX Installation Procedures” on page 9.
"UNIX Post Installation" on page 11.
Extracting Distribution Files
The PI-API-SOL2 is distributed on CD-ROM or by Internet download. The files on the CD must be extracted to the PI home directory.
PI-API Installation Instructions 15
UNIX Installation
CD-ROM
To extract from CD-ROM, mount the CD drive and use the commands:
# cd $PIHOME
# zcat /cdrom/solaris/piapi136_sol_tar.Z | tar xf -
After restoring the files, the PI home directory should contain the directory build.
On this platform the PI-API programs and libraries are delivered already linked. To configure the default home node and install system files, run the pi.install procedure answering the prompts as described in the UNIX installation sections.
# cd $PIHOME/build
# sh pi.install
Incompatability with Previous PI-API Versions
On Solaris, programs built with previous versions of the PI-API may not be compatible with PI-API v1.3.9.4. This PI-API distribution contains a version compatible with the Sun SC5 compiler and ANSI streams.
If your PI-API programs (for example, PI-Interfaces) do not mention ANSI C++ compiler compatibility or PI-API v1.3.9.4 compatibility, you should install PI-API v1.3.4 which is available as a separate installation.
If you want to run a program built with PI-API v1.3.9.4 as well as a program built with PI-API v1.3.4, you may need to install two copies of the PI-API.
For example, install PI-API v1.3.9.4 to the directory
/opt/piapi_1.3.9.4
by
# PIHOME=/opt/piapi_1.3.9.4
# export PIHOME
# LD_LIBRARY_PATH=$PIHOME/lib
# export LD_LIBRARY_PATH
# sh pi.install
Also, install PI-API v1.3.4 to the directory
/opt/piapi_1.3.4
by
# PIHOME=/opt/piapi_1.3.4
# export PIHOME
# LD_LIBRARY_PATH=$PIHOME/lib
# export LD_LIBRARY_PATH
# sh pi.install
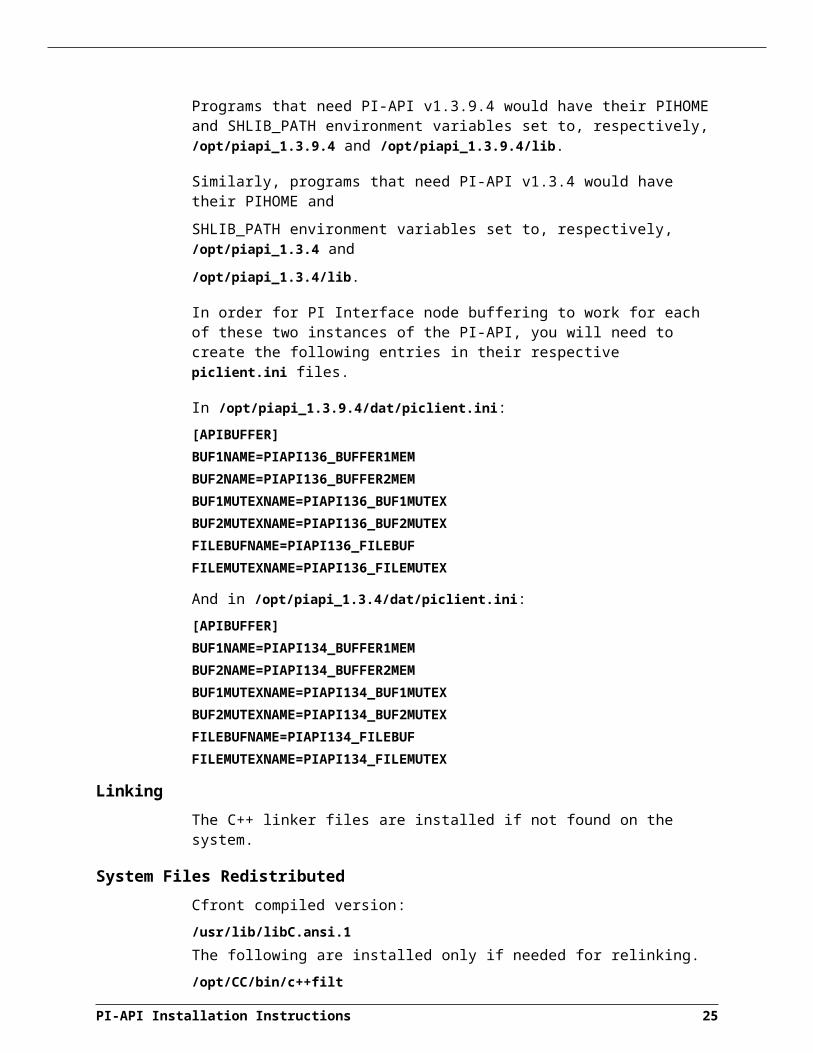
Programs that need PI-API v1.3.9.4 would have their PIHOME and LD_LIBRARY_PATH environment variables set to, respectively, /opt/piapi_1.3.9.4 and /opt/piapi_1.3.9.4/lib.
Similarly, programs that need PI-API v1.3.4 would have their PIHOME and LD_LIBRARY_PATH environment variables set to, respectively, /opt/piapi_1.3.4 and /opt/piapi_1.3.4/lib.
16
In order for PI Interface node buffering to work for each of these two instances of the PI-API, you will need to create the following entries in their respective piclient.ini files.
In /opt/piapi_1.3.9.4/dat/piclient.ini:
[APIBUFFER]
BUF1NAME=PIAPI136_BUFFER1MEM
BUF2NAME=PIAPI136_BUFFER2MEM
BUF1MUTEXNAME=PIAPI136_BUF1MUTEX
BUF2MUTEXNAME=PIAPI136_BUF2MUTEX
FILEBUFNAME=PIAPI136_FILEBUF
FILEMUTEXNAME=PIAPI136_FILEMUTEX
And in /opt/piapi_1.3.4/dat/piclient.ini:
[APIBUFFER]
BUF1NAME=PIAPI134_BUFFER1MEM
BUF2NAME=PIAPI134_BUFFER2MEM
BUF1MUTEXNAME=PIAPI134_BUF1MUTEX
BUF2MUTEXNAME=PIAPI134_BUF2MUTEX
FILEBUFNAME=PIAPI134_FILEBUF
FILEMUTEXNAME=PIAPI134_FILEMUTEX
System Files Redistributed
/usr/lib/libC.so.5
IBM AIX RS/6000For installation procedures common to all UNIX platforms, see:
"UNIX Installation Procedures” on page 9.
"UNIX Post Installation" on page 11.
Extracting Distribution Files
The PI-API-AIX is distributed on CD-ROM. The files on the CD must be extracted to the PI home directory. The following commands will perform this:
# cd $PIHOME
# zcat /cdrom/aix/piapi136_aix_tar.Z | tar xvf -
The PI home directory should contain the directory build after extracting the files. The build directory contains the distribution files and installation script, pi.install.
Linking
The C++ linker files are installed if not found on the system.
System Files Redistributed
/usr/lpp/xlC/lib/libC.a
PI-API Installation Instructions 17
UNIX Installation
/usr/lpp/xlC/lib/crt0.o
/usr/lpp/xlC/exe/munch
/usr/lpp/xlC/bin/c++filt
/usr/lpp/xlC/bin/linkxlC
HP-UX 10.x and 11.xFor installation procedures common to all UNIX platforms, see one of the following sections:
"UNIX Installation Procedures" on page 9
"UNIX Post Installation" on page 11
Extracting Distribution Files
The PI-API-HPUX is distributed on CD-ROM. The files on the CD must be extracted to the PI home directory. The following commands will perform this:
# cd #PIHOME
# zcat /cdrom/hpux/piapi136_hpux_tar.Z | tar xvf -
Note your tape drive may be configured as a different device, in which case the device argument needs to be altered to conform to your local UNIX system. Consult your System Administrator if you have trouble accessing the tape device.
The PI home directory should contain the directory build. The build directory contains the distribution files and installation script, pi.install.
Incompatability with Previous PI-API Versions
On HP-UX, programs built with previous versions of the PI-API are not compatible with PI-API v1.3.9.4. This PI-API distribution contains a version compatible with the ANSI C++ compiler and ANSI streams
If your PI-API programs (for example, PI-Interfaces) do not mention ANSI C++ compiler compatibility or PI-API v1.3.9.4 compatibility, you should install PI-API v1.3.4 which is available as a separate installation.
If you want to run a program built with PI-API v1.3.9.4 as well as a program built with PI-API v1.3.4, you will need to install two copies of the PI-API.
For example, install PI-API v1.3.9.4 to the directory
/opt/piapi_1.3.9.4
by
# PIHOME=/opt/piapi_1.3.9.4
# export PIHOME
# SHLIB_PATH=$PIHOME/lib
# export SHLIB_PATH
# sh pi.install
Also, install PI-API v1.3.4 to the directory
/opt/piapi_1.3.4
by
# PIHOME=/opt/piapi_1.3.4
# export PIHOME
18
# SHLIB_PATH=$PIHOME/lib
# export SHLIB_PATH
# sh pi.install
Programs that need PI-API v1.3.9.4 would have their PIHOME and SHLIB_PATH environment variables set to, respectively, /opt/piapi_1.3.9.4 and /opt/piapi_1.3.9.4/lib.
Similarly, programs that need PI-API v1.3.4 would have their PIHOME and
SHLIB_PATH environment variables set to, respectively, /opt/piapi_1.3.4 and
/opt/piapi_1.3.4/lib.
In order for PI Interface node buffering to work for each of these two instances of the PI-API, you will need to create the following entries in their respective piclient.ini files.
In /opt/piapi_1.3.9.4/dat/piclient.ini:
[APIBUFFER]
BUF1NAME=PIAPI136_BUFFER1MEM
BUF2NAME=PIAPI136_BUFFER2MEM
BUF1MUTEXNAME=PIAPI136_BUF1MUTEX
BUF2MUTEXNAME=PIAPI136_BUF2MUTEX
FILEBUFNAME=PIAPI136_FILEBUF
FILEMUTEXNAME=PIAPI136_FILEMUTEX
And in /opt/piapi_1.3.4/dat/piclient.ini:
[APIBUFFER]
BUF1NAME=PIAPI134_BUFFER1MEM
BUF2NAME=PIAPI134_BUFFER2MEM
BUF1MUTEXNAME=PIAPI134_BUF1MUTEX
BUF2MUTEXNAME=PIAPI134_BUF2MUTEX
FILEBUFNAME=PIAPI134_FILEBUF
FILEMUTEXNAME=PIAPI134_FILEMUTEX
Linking
The C++ linker files are installed if not found on the system.
System Files Redistributed
Cfront compiled version:
/usr/lib/libC.ansi.1
The following are installed only if needed for relinking.
/opt/CC/bin/c++filt
/opt/CC/lbin/c++patch
/opt/CC/bin/CC
/opt/CC/lib/libcxx.a
/opt/langtools/lib/crt0.o
/opt/langtools/lib/end.o
PI-API Installation Instructions 19

UNIX Installation
/usr/lib/nls/C/CC.cat
ANSI C++ compiled version:
/usr/lib/libstd.1
/usr/lib/libstream.1
/usr/lib/libCsup.1
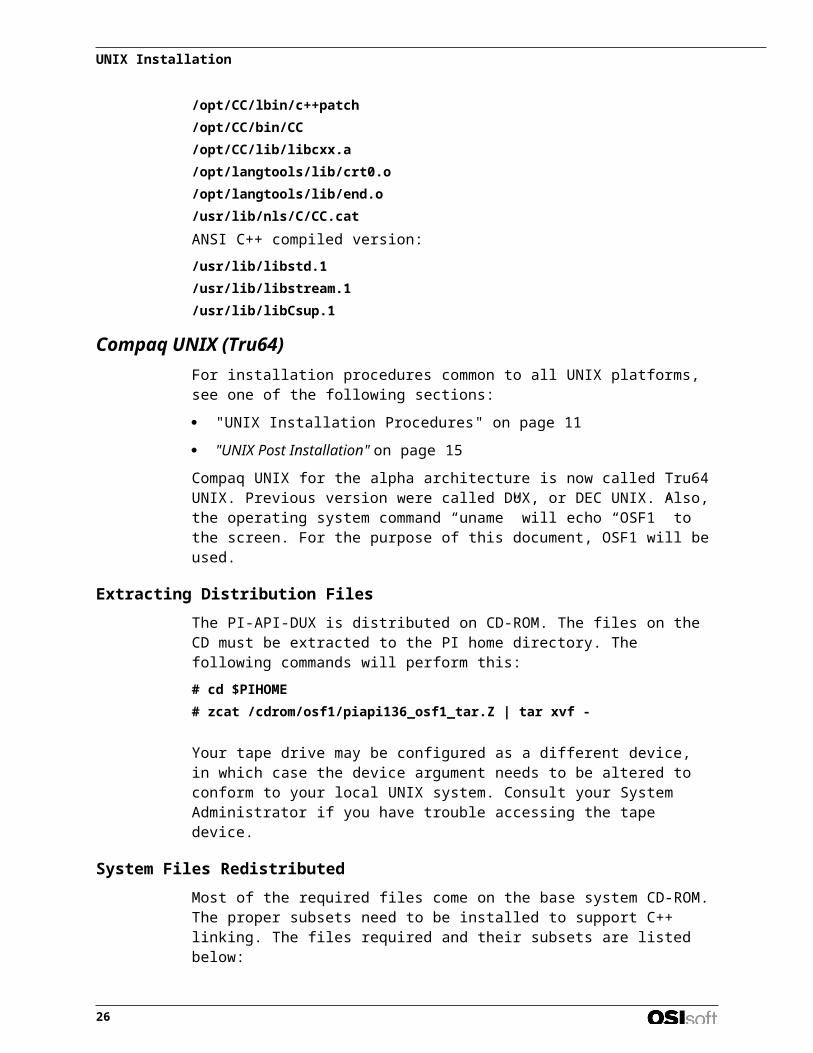
Compaq UNIX (Tru64)For installation procedures common to all UNIX platforms, see one of the following sections:
"UNIX Installation Procedures" on page 9
"UNIX Post Installation" on page 11
Compaq UNIX for the alpha architecture is now called Tru64 UNIX. Previous version were called DUX, or DEC UNIX. Also, the operating system command “uname” will echo “OSF1” to the screen. For the purpose of this document, OSF1 will be used.
Extracting Distribution Files
The PI-API-DUX is distributed on CD-ROM. The files on the CD must be extracted to the PI home directory. The following commands will perform this:
# cd $PIHOME
# zcat /cdrom/osf1/piapi136_osf1_tar.Z | tar xvf -
Your tape drive may be configured as a different device, in which case the device argument needs to be altered to conform to your local UNIX system. Consult your System Administrator if you have trouble accessing the tape device.
System Files Redistributed
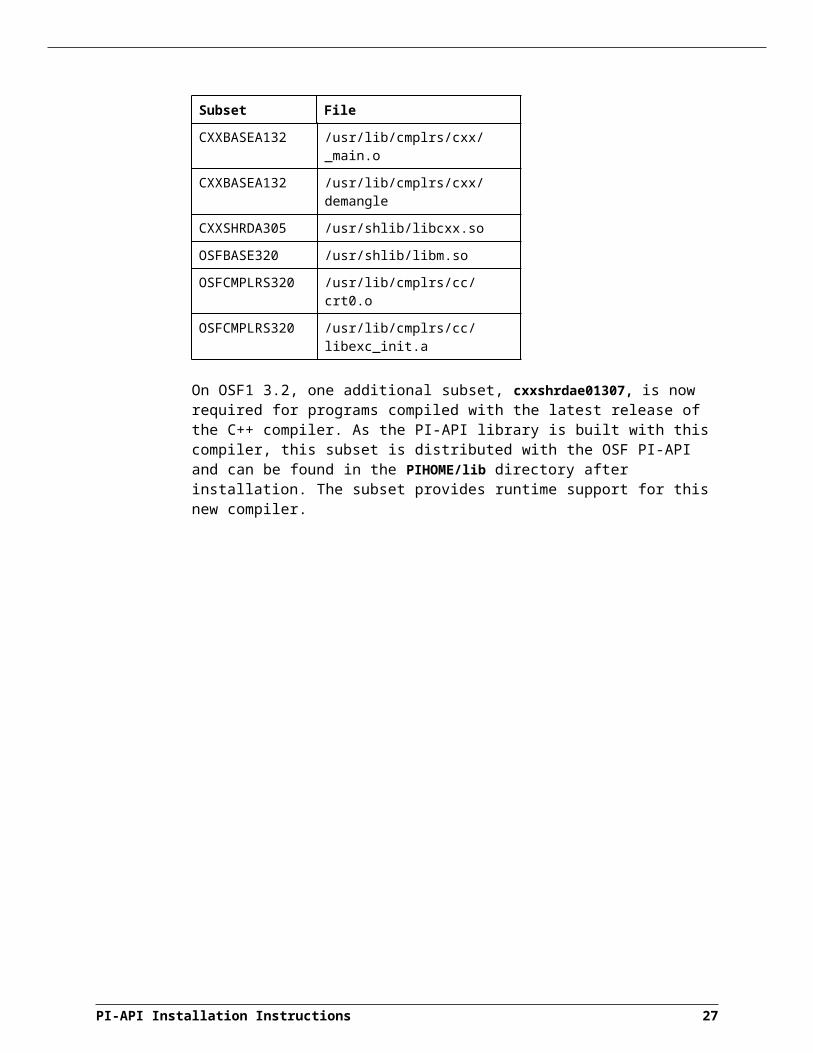
Most of the required files come on the base system CD-ROM. The proper subsets need to be installed to support C++ linking. The files required and their subsets are listed below:
Subset File
CXXBASEA132 /usr/lib/cmplrs/cxx/_main.o
CXXBASEA132 /usr/lib/cmplrs/cxx/demangle
CXXSHRDA305 /usr/shlib/libcxx.so
OSFBASE320 /usr/shlib/libm.so
OSFCMPLRS320 /usr/lib/cmplrs/cc/crt0.o
OSFCMPLRS320 /usr/lib/cmplrs/cc/libexc_init.a
On OSF1 3.2, one additional subset, cxxshrdae01307, is now required for programs compiled with the latest release of the C++ compiler. As the PI-API library is built with this compiler, this subset is distributed with the OSF PI-API and can be found in the PIHOME/lib directory after installation. The subset provides runtime support for this new compiler.
20
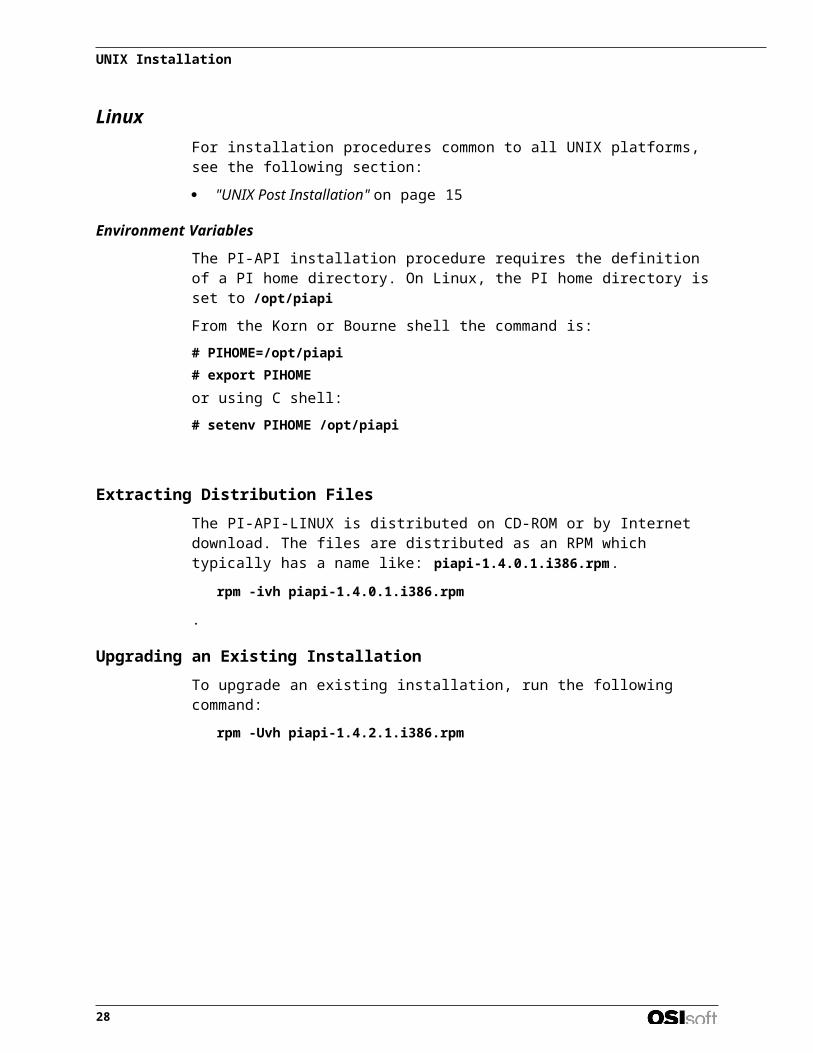
LinuxFor installation procedures common to all UNIX platforms, see the following section:
"UNIX Post Installation" on page 11
Environment Variables
The PI-API installation procedure requires the definition of a PI home directory. On Linux, the PI home directory is set to /opt/piapi
From the Korn or Bourne shell the command is:
# PIHOME=/opt/piapi
# export PIHOME
or using C shell:
# setenv PIHOME /opt/piapi
Extracting Distribution Files
The PI-API-LINUX is distributed on CD-ROM or by Internet download. The files are distributed as an RPM which typically has a name like: piapi-1.4.0.1.i386.rpm.
rpm -ivh piapi-1.4.0.1.i386.rpm
.
Upgrading an Existing Installation
To upgrade an existing installation, run the following command:
rpm -Uvh piapi-1.4.2.1.i386.rpm
PI-API Installation Instructions 21
PI System ErrorsThis section lists some common PI-API function error return values and their meanings as well as discusses system errors that may play a part in PI-API programming.
System ErrorsWhen communicating with PI on OpenVMS systems, errors returned which are greater than zero usually indicate a system fault. When developing applications over a distributed environment, the system errors that may be encountered include both those errors derived from the home node or server and those derived on the local node or client.
Typically, local errors are related to the network layer system calls and to privilege and quota problems. Most of these errors will have an accompanying message in the local message log.
Remote errors are more difficult to address. For calls to PI on Open VMS, system errors are usually even numbers greater than 6 (six) and can range from quota to file system problems. To interpret these errors under VMS use the DCL command
write sys$output f$message(#)
where # is replaced with the returned error value.
Calls to PI Systems on UNIX or Windows NT typically return system errors that are less than or equal to -10000. To interpret these run the command located in the $PIHOME/bin directory,
pilogsrv -e # [function]
where # is replaced with the returned error value and function is an optional argument which specifies which API call received the error number. The function argument is useful for error numbers that have multiple meanings, such as –1.
Often the best the program can do is trap for these errors and typically, the server node message log must be consulted to resolve persistent problems.
Of particular note is the system error 2, which can be returned when communicating with any PI server. This indicates a communication failure. Typically, the program is unable to send a message to the server or it has sent a message to the server and timed out waiting for a response. The default timeout is 60 seconds but is configurable in the PI-API initialization files. On Windows, in the pilogin.ini file, use the section [NETWORK] and key TIMEOUT to change the number of seconds for the timeout. On UNIX, in the piclient.ini file, use the [NETWORK] section and TIMEOUT key to change the timeout.
Point Attribute Access Errors-1 Point # out of range or point not defined
-2 Blank tag
-3 Point data base full
-4 Memory data base full
PI-API Installation Instructions 23
PI System Errors
-5 Tag not found
-6 Illegal characters in tag
-7 Tag already exists
-8 Time is after current time and date or time is < 0
-9 Illegal status value or integer value
-10 Cannot create tag because another process is creating tags
-11 Digital code out of range (<1 or >NumbDigStates)
-12 Digital state string not found
-13 Digital state code out of range for this tag
-15 Source tag not found
-20 Bad zero or span for integer point (<0 or >32767)
-21 Span not greater than 0
-22 Typical value not between zero and top of range
-23 Bad digital state code
-24 Bad number of digital states
-25 Illegal point type
-26 Illegal point source
-27 Illegal engineering unit code
-33 Point type of totalized point is not Real
-34 Rate point type must be Real or Integer
-35 Illegal resolution code
-36 Bad archiving on/off value
-37 Bad compressing on/off value
-38 Illegal compression deviation specification
-39 Illegal compression minimum time specification
-40 Illegal compression maximum time specification
-41 Illegal exception deviation specification
-42 Illegal exception minimum time specification
-43 Illegal exception maximum time specification
-44 Illegal filter code
-45 Illegal totalization code
-46 Illegal totalization conversion factor
-49 Bad square root code
-50 Bad scan on/off value
-51 Cannot change resolution code
-52 Bad time and date string (must be vms absolute or delta time)
-60 No more PID slots for retrieving point update lists
-61 No more tags created, edited, or deleted
-62 Not signed up for point updates
-63 Display digits < -20 or > 10
-64 Bad clamping code (< 0 or > 3)
-65 Bad scheduling code (< 0 or > 2)
-66 Natural scheduling not allowed for post-processed tags
-67 Bad group size for moving average (< 2)
-68 Bad period (< 1 or > 86400 for perf eqns, < 300 or > 86400 for totals)
-69 Bad offset (< 0 or > 86399)
24
EVM Routine Errors-70 Number of points less than 1
-71 Point number out of range
-72 No room for more programs requesting exceptions
-73 No room for this many points for this list
-74 No room for more points
-75 No points established
-76 Some points not disestablished
-78 Timed out
-79 Bad timeout value
Archive Access Errors-101 Date not on-line
-102 Record not found (empty)
-103 No data for this point for this time
-105 End time not after start time or start time <= 0
-106 No good data for this point for this time
-107 Calc error: square root of negative number
-108 Time is before the editing time limit
-109 Value already exists at this time
-110 Archive program not keeping up with events
-111 Event not processed by archive program within 30 seconds
-112 Point not created because archive #1 not on-line
-113 Number of values argument to archive retrieval routine is too small
PI Login Services Errors
Note These errors are dependent on the particular pilg_xxx call being made. This section does not apply to interfaces.
23 Invalid DLL registered
22 DLL already loaded
1 Passed end of selection list
0 Not enough memory
-1 GETFIRST not issued
-2 Already logged on
-3 Unknown server
-4 Allocation error
-5 Server not connected
-6 Invalid server
-7 Invalid node ID
-8 String truncated
-9 Bad status
-100 Invalid DLL
-101 Invalid window handle
-102 Login cancelled
-103 pilg_registerapp not called
-104 Login unsuccessful
PI-API Installation Instructions 25
PI System Errors
-105 User not found
-106 Login initialization data not found
-107 Define connection dialog cancelled
-108 Can’t write the login initialization data
-109 PIPC initialization data not found
-110 Can’t find Windows directory
-111 Can’t find PIHOME or PIPCSHARE definition
-112 Server already exists
-113 Illegal server type
Buffering ErrorsBuffering errors are reproduced in the section on PI Interface node buffering on page 46.
PINet Errors-981 Table id specified is not supported
-982 Specified table code is not supported
-983 Requested transaction mode was not valid
-991 PINET function code is not valid
-992 Specified length is not consistent
-993 Specified count is not valid
-994 Incompatible PINET version
-995 Bad PINET message sequence
-996 Message too big for PINET
-998 Memory allocation error
-999 Request not permitted without Login
-1000 Bad grid (batch or sql error)
-1001 No default host
apisnap UtilityA reliable network connection to the PI Server is required for client programs (especially interfaces) to function properly. In order to test communication to the server, and provide a utility to test the values that reach the server, the apisnap utility is provided. This program checks the server for the snapshot and most recent archive value for a tag that you specify. Executing apisnap with no arguments initiates a connection to the default server and prompts for a tag name. If one argument is given, the server to that you desire to connect must be specified. If two arguments are specified, the first argument is the servername and the second is a tagname. If both arguments are specified, the apisnap program will exit after giving the report for the tag specified.
Additionally, the tagname prompt may be replaced by a backslash to indicate the following number is a point number. This is useful for looking up tag names when only a point number is available. Also, multiple tagnames may be entered if a list of snapshots is desired.
apisnap [server[:port]] [tagname or \PointId, ...]
26
PI Server Support for Remote AccessServer Support for Remote nodes sending data to the PI Data Archive requires software on the archive server to support remote data collection. This server-side software is responsible for monitoring client connection requests and establishing and maintaining a session with each client. This software, referred to as a “listener,” is implemented differently under PI on OpenVMS than under PI on Windows NT and UNIX. This section describes those differences and outlines what is required to enable client application support on the PI home node.
PI on Windows NT and UNIXWindows NT and UNIX PI Systems implement a single process, pinetmgr, which is responsible for handling communication with remote nodes.
PI on OpenVMSWhen communicating with PI on OpenVMS, distributed application support is provided by the PIServer program. PIServer is an application that runs on VMS PI home nodes and provides remote nodes (PINet and PI Interface nodes) with an interface to the PI System. There is one PIServer process for each remote node connection.
Remote NodesCurrently two types of remote nodes are available: PINet nodes are available for VAX VMS platforms; and PI-Interface nodes are available for Microsoft Windows 3.1, Windows 9x, Windows NT, and several different UNIX platforms. Not all remote nodes support the same set of features. In addition, the version of the server program providing remote support affects the feature set available to the remote node.
Network ProtocolRemote nodes communicate with the PI System using the PINet protocol (a proprietary messaging standard). The PINet protocol is implemented on top of the network protocol. VMS PI Systems support communication using both TCP/IP and DECNet protocols. DECNet is typically provided with the system, but TCP/IP support must be purchased separately. Details of supported protocol stacks are provided below.
Windows NT and UNIX PI Systems support only TCP/IP. These systems are typically delivered with network support already included.
Some remote nodes can be configured to use either TCP/IP or DECNet (Windows 3.1 using DEC Pathworks, Sun workstations using SunLink DNI) though TCP/IP is quickly becoming the predominant protocol and is delivered with Windows 9x, Windows NT, and UNIX machines.
TCP/IP for PI on OpenVMSThe following VMS TCP/IP products (minimum required versions are listed) are supported by PI on OpenVMS.
PI-API Installation Instructions 27
Product Version
DEC TCP/IP, v2.0 1 PI 2.0.7
Process Software TCPWare v3.1 PI 2.0.8
Process Software MultiNet v3.2 PI 2.0.8
Process Software MultiNet v3.4 2 PI 2.1.0
Attachmate Pathway release 1.1 PI 2.0.8
Programs which communicate using DECNet require version 2.0.6 or higher of the PI Server program on the VAX.
PI System version 2.0.7 is necessary if PI Server security is desired. PI Server security may be implemented via client node authentication and/or username/password login.
Note: PI System version 2.1.1 is necessary if support for PI-ODBC or the batch (piba_) calls are needed.
Listener Installation
PI on Windows NT and UNIX
The pinetmgr application comes pre-built with each system. It is started automatically with the PI Data Archive and does not require extra installation or configuration steps to enable communication with remote nodes.
PI on OpenVMS
The PI Server application must be installed on any home node where PI-API access is required. Once installed, the PI Server will support connections from many clients, spawning a new instance of the application for each connection. Adding new clients does not require modification of this component. For instructions on installing the PI Server see the publication, PI System Installation/Update Instructions.
PI Server VMS UserPI Server versions using DECNet or DEC TCP/IP Services (UCX) require the PISERVER user to be created on the VAX node.
Internally PI-API client nodes access the PI home node using the privileges and resources of the PISERVER account. This user must be added to the VMS user database. The command procedure PIBuild:AddPIServerUser.com will add and configure this user account. The privilege SYSPRV must be added to the PISERVER account for TCP access if the security is enabled and the default user database in the piserver.dat file is VMS. This is accomplished by running the VMS Authorize utility and modifying the PISERVER account.
The commands are as follows:
$ cd sys$system:
$ run authorize
UAF> modify piserver /defpriv=sysprv
1 Better known as UCX
2 Required for OpenVMS/AXP (i.e. Alpha)
PI-API Installation Instructions 28
%UAF-I-MDFYMSG, user record(s) updated
Server Security
PI on Windows NT and UNIX
These systems offer security down to the individual tag and can be configured to manage read and write access for both data and tag attributes independently. This security is in addition to any authentication mechanisms available through the native transport. Users and groups are defined on the server using the program piconfig. It is also possible to set up proxy accounts for particular client nodes. See the publication, PI Data Archive for Windows NT and UNIX for instructions on creating and managing users, groups and proxies.
PI on OpenVMS
The PI Server may be configured to use node authentication and login protection for read and write access to the PI databases. This security is in addition to any authentication mechanisms available through the native transport.
The PI System Manager enables node authentication and login protection via the file PISysDat:PIServer.Dat. The file contains a default set of protections for nodes not mentioned in the file and explicit protection information on a per node basis. For details on the format and use of this file see the publication, PI System Installation/Update Instructions.
PI-API Installation Instructions 29
Configuring PI Interface Node BufferingPI Interface Node buffering refers to functionality in the PI-API that supports continuous collection of data on a PI Interface Node regardless of the status of the home node server or the network link to the server. This feature is available on UNIX, Windows NT and Windows 2000 platforms.
Features PI Interface Node buffering consists of a buffering process which runs continuously on the local node, a PI-API library whose calls can send data to this buffering process, and a utility program for examining the state of buffering and controlling the buffering process. Buffering is enabled through the use of a configuration file, piclient.ini. Unless this file is modified to explicitly enable buffering, the PI-API will not buffer data, sending data directly to the home node. When enabled, the following calls will buffer all data sent to the default home node.
Buffered Functions
piar_putarcvaluesx
piar_putarcvaluex
piar_putvalue
pisn_putsnapshot
pisn_putsnapshots
pisn_putsnapshotq
pisn_putsnapshotqx
pisn_putsnapshotsx
pisn_putsnapshotx
pisn_sendexceptionq
pisn_sendexceptionqx
pisn_sendexceptionsx
pisn_sendexcepstruc
pisn_sendexcepstrucq
pisn_sendexceptqx
pisn_sendexceptions
Data sent through these calls is redirected to the buffering process, which stores and forwards events to the home node. Buffered data is maintained in First-In, First-Out (FIFO) order to avoid Archive inefficiencies and restrictions with out of order data.
Data is stored initially in memory until the allocated buffers are filled. Data is then stored in a file whose maximum size is configurable. When the buffering process is shutdown, the memory buffers and file buffers are combined into a new file that contains all data not yet sent to the server in FIFO order.
PI-API Installation Instructions 30
When buffering is configured to be on, all calls to the listed buffered functions that send data to the default home node are buffered. Multiple interfaces on a single PI Interface node share the same buffering process and store data to the same buffers.
Server Timestamps
Many interfaces calling pisn_putsnapshot(s) use a timestamp of 0 to indicate that the PI-API should use the current server time as the timestamp for the event being recorded. Buffered data may sit on the PI Interface node for an indefinite period before being sent to the home node. This makes storing a zero timestamp impractical. Instead the buffered PI-API detects the 0 timestamp and makes a call to pitm_fastservertime. This function makes use of a server time and local time retrieved and stored on the local machine during the initial connection. The difference between these times is applied to the current local time to calculate the current server time without calls to the server. This allows interpretation of a 0 timestamp even when the server is down.
Error Reporting
When data is buffered, the error messages returned by the standard PI-API calls represent the success or failure of moving the data to the buffering process. (See the section below for possible errors returned by the buffering process and buffered API functions). Errors typically detected on the home node (bad point number, illegal timestamp, …) are logged by the buffering process when the data is forwarded to the Archive. Errors logged by the buffering process are not propagated back to the program that originally inserted the data in the buffers. For this reason, it is recommended to disable buffering when installing, upgrading, and configuring PI-API programs on an PI Interface node. When the software is working satisfactorily, re-enable buffering.
Installation and ConfigurationThere are no additional steps needed to install buffering after installing the PI-API. The delivered PI-API library supports both buffered and unbuffered calls. The following files are installed for buffering support:
File Name
UNIX Windows NT Purpose
bufserv bufserv.exe Buffering process
bufutil bufutil.exe Utility for managing buffering process
isbuf N/A Program to determine if buffering is requested
piclient.ini piclient.ini Buffering configuration file
Configuration of buffering is achieved through entries in the piclient.ini file. The file is found in the dat subdirectory of the PIHOME directory (typically c:\Program Files\pipc\dat) under Windows NT. On UNIX systems, the file is found in the dat subdirectory of the PIHOME directory (e.g., /opt/piapi/dat). This file follows the conventions of Microsoft Windows initialization files with sections, keywords within sections, and values for keywords. All buffering settings are entered in a section called [APIBUFFER]. To modify settings, simply edit the piclient.ini file in a text editor (Notepad on Windows, vi on UNIX) to the desired values.
PI-API Installation Instructions 31

Configuring PI Interface Node Buffering
The following settings are available for buffering configuration:
keywords Values Default Description
BUFFERING 0,1 0 Turn off/on buffering. OFF = 0, ON = 1,
PAUSERATE 0 - 2,000,000
2 When buffers are empty the buffering process will wait for this long before attempting to send more data to the home node (seconds)
RETRYRATE 0 - 2,000,000
120 When the buffering process discovers the home node is unavailable it will wait this long before attempting to reconnect (seconds)
MAXFILESIZE 1 - 2,000,000
100,000 Maximum buffer file size before buffering fails and discards events. (Kbytes)
MAXTRANSFEROBJS 1 - 2,000,000
500 Maximum number of events to send between each SENDRATE pause.
BUF1SIZE 64 - 2,000,000
32768 Primary memory buffer size. (bytes)
BUF2SIZE 64 - 2,000,000
32768 Secondary memory buffer size. (bytes)
SENDRATE 0 - 2,000,000
100 The time to wait between sending up to MAXTRANSFEROBJS to the server (milliseconds)
On UNIX, in addition to the [APIBUFFER] section, the [PISERVER] section may be used to define the default PI Server, and an optional time offset change that may occur between the client and server.
On Windows NT this information should be stored in the pilogin.ini file, so the piclient.ini would only have the [APIBUFFER] section.
keywords Values Default Description
PIHOMENODE string none Default server for UNIX. Windows default server is in pilogin.ini
DSTMISMATCH 0 - 2,000,000
0 The time that the server and client local time offset is allowed to jump. Typically, 3600 if the nodes are in timezones whose DST rules differ (seconds)
Under UNIX a piclient.ini file might look like:
[PISERVER]
PIHOMENODE=MYNTSERVER
; DSTMISMATCH=0
[TCP/IP]
PORT=5450
[APIBUFFER]
BUFFERING=1
MAXFILESIZE=100000
; the PI-API connection routines have 1 minute default timeout
RETRYRATE=600
32

The MAXFILESIZE entry in Kbytes of 100000 allows up to 100 Megabytes of data storage. Do not use commas or other separators in the numeric entries. The retry rate is set to 600 seconds meaning wait 10 minutes after losing a connection before retrying. The [PISERVER] and [TCP/IP] sections are used to define the default connection. On Windows NT the default server information is stored in the pilogin.ini file so the piclient.ini would only have the [APIBUFFER] section. Comment lines begin with a semicolon.
OperationThe buffering feature makes use of shared resources in the operating system as a means of providing communication between the PI-API functions and the buffering process. The buffering process, implemented by the bufserv program, is responsible for initially creating these resources and making them available to the PI-API functions.
Note When buffering is configured to be on, the bufserv process must be started before other programs using the PI-API, so that these programs can access the shared buffering resources. Any program that makes a connection to a PI Server has this requirement even if it does not write to PI.
Startup
On UNIX platforms, awareness of buffering has been built into the pistart script delivered with the PI-API. The script runs a small program, isbuf, to determine if the piclient.ini file contains instructions to turn buffering on. If this is true, pistart will run bufutil with a -u argument to clean up any outstanding resources and then start the buffering process, bufserv.
Under Windows NT, the buffering process is installed to run as a service by the installation program. The installation program on Windows allows the service to be configured to automatically start upon reboot dependent upon the successful startup of TCP/IP. When the bufserv process is installed, the service must be given a username and password that has permissions to create and delete shared memory (for example, users who are part of the Administrator group). This is done by the installation program if bufserv has not previously been installed as a service. Otherwise, assigning a user name and password is accomplished in the Control Panel> Services utility by selecting the Startup button and picking the radio button indicating “This Account”. Fill in a user name and password that have the appropriate Administrative privileges.
PI-API Installation Instructions 33

Configuring PI Interface Node Buffering
The bufserv program may be started or stopped using the pistart.bat or pistop.bat files provided with this distribution. To complete the configuration for using the pistart.bat and pistop.bat scripts, the scripts must be configured as in the examples provided for your particular client program. Alternately, the Control Panel> Services utility may be used to start and stop bufserv manually. To use the Control Panel> Services utility, highlight the service name and use the Start or Stop button.
StopPriority is a feature supported in version 1.3.9.2 of the PI-API and later. The installation kit under Windows NT installs the bufserv service with a StopPriority of 0; this insures that when Windows is shut down, services which depend on bufserv will get shut down first. If bufserv is not installed with a StopPriority, some data loss may occur. The most common occurrence being that "Intf Shut" will not be written to the Interface points when Windows is shut down.
If for any reason the bufserv service needs to be uninstalled and reinstalled, the following command lines should be used:
bufserv –remove
bufserv –install –depend tcpip -stoppriority 0 [-auto]
The StopPriority flag is stored in the Windows registry:
HKEY_LOCAL_MACHINE\SYSTEM\CurrentControlSet\Services\bufserv\StopPriority
Modifying Interface Dependencies
Interfaces running as services on the node where bufserv is installed are dependent on bufserv starting first. If bufserv and the interfaces are started "automatically" the service installation must include this dependency. Just as bufserv is configured to be dependent on tcp/ip, interfaces are installed to be dependent on bufserv. Dependencies are defined during installation of each service. To modify the dependency list of a service that is already installed, it should be uninstalled and then reinstalled with the proper dependency list.
34

OSI supplied interfaces and bufserv support the same set of command line options for controlling the service. This set of options is displayed by typing bufserv –help. You can install interfaces from the command line or in some cases there may be a preexisting installation script that will need to be modified. The procedure is to remove the interface as a service and reinstall it with the dependency on bufserv. To set an interface’s dependencies, open a command window and change the current working directory to the directory where the interface executable resides. Then remove the interface:
intfc –remove
where intfc is the interface executable without the .exe extension. Install the interface specifying the desired dependency list, including bufserv, and optionally the automatic startup flag.
intfc –install –depend bufserv [-auto]
To include multiple dependencies, enclose the dependency list in quotation marks with the individual dependencies separated by spaces. For example:
… -depend “bufserv tcpip”
Failure to start the buffering process before running PI-API programs, when buffering is configured to be on, manifests itself differently under UNIX and Windows NT.
On UNIX, PI-API programs will hang, trying to make a connection. They are waiting for the resources to become available. To rectify this situation, the program(s) should be stopped and the buffering process started.
On Windows NT, PI-API programs will run, but attempts to subsequently start the buffering process will fail. In this case, the first program trying to obtain the resource, creates the resource itself. When the buffering process is started, it tries to create the resource and fails because the resource already exists; the buffering process exits. Again the program(s) must be stopped and the buffering process started. In this case the bufutil program, described below, should be run with a -u parameter to unlock and remove the created resources before attempting to start the buffering process, bufserv.
Stopping Buffering
To stop the buffering process, first stop all programs that use the PI-API. On Windows, if the interface services have been made dependent on the buffer server, they must stop first before the buffer server will stop. The control panel may be used to stop the interfaces and buffer server. Also, the pistop.bat file may be used. The sitestop.bat file should be modified to contain the interface stop commands.
Then use the bufutil program to stop the buffering process. This can be done either by running bufutil interactively and selecting the option to shutdown the server or by running bufutil from the command prompt with a -k argument.
When the process shuts down, it will forward or store the contents of its memory buffers so that data is not lost.
An example of a script that checks to see that an interface is stopped on UNIX nodes is given here.
###############################################################################
# @(#)sitestop1.3 2000/07/25
# File: sitestop
#
PI-API Installation Instructions 35
Configuring PI Interface Node Buffering
# This file is provided to allow site specific applications to be stopped
# whenever the pistop is executed. An appropriate application start script
# should be inserted into the sitestart file or the verify_stopped()
# routine below may be used.
#
###############################################################################
## Boure shell script to check process shutdown.
verify_stopped()
{
pid=̀ ps -e | grep $1 | grep -v grep | awk '{ print $1 }'̀
if [ ${pid:-0} -gt 0 ]
then
# Change the following line a signal besides SIGTERM is used to stop
# the interface.
kill $pid
lcount=0
dcount=0
while [ ${pid:-0} -gt 0 ]
do
if [ ${lcount} -gt 300 ]
then
break;
fi
sleep 1
echo '.\c'
pid=̀ ps -e | grep $1 | grep -v grep | awk '{ print $1 }'̀
lcount=̀ expr $lcount+1̀
dcount=̀ expr $dcount+1̀
if [ ${dcount} -ge 60 ]
then
echo $lcount
dcount=0
fi
done
if [ ${dcount} -gt 0 ]
then
echo ' '
fi
if [ ${pid:-0} -gt 0 ]
then
echo "ERROR: Unable to stop $1 (pid = $pid)"
$PIHOME/bin/shootq "ERROR: Unable to stop $1 (pid = $pid)"
else
echo "Program $1 stopped"
$PIHOME/bin/shootq "Program $1 stopped"
fi
36
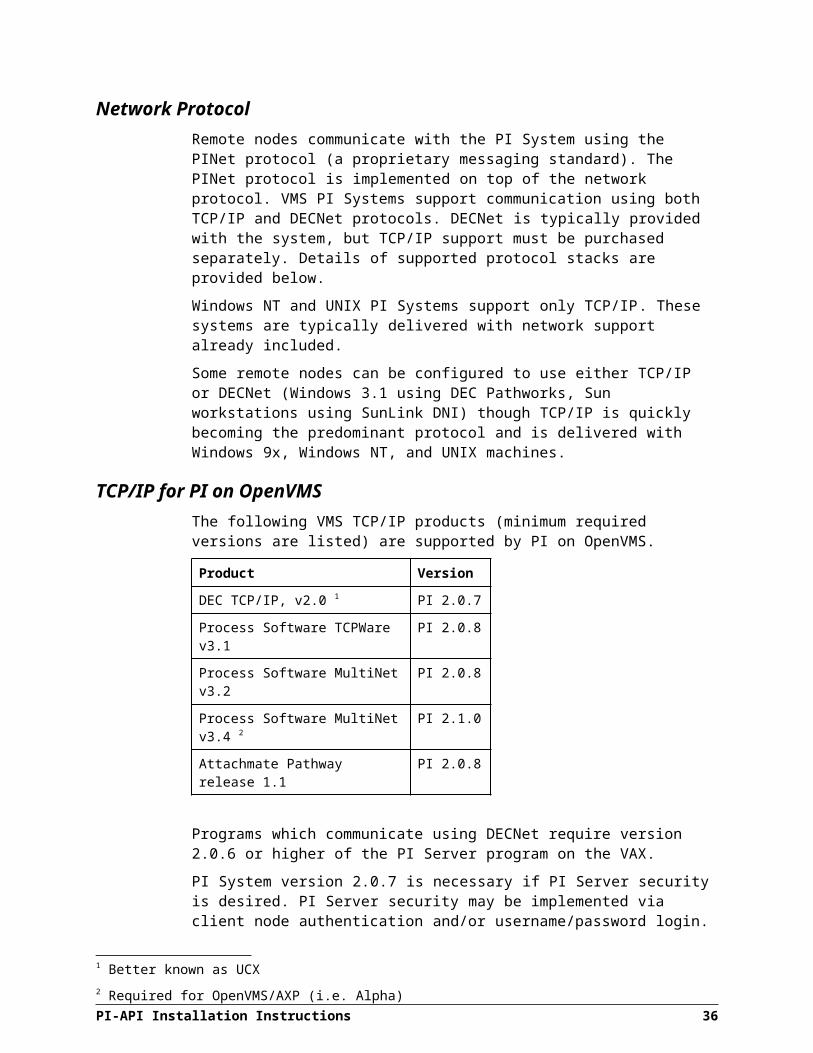
else
echo "Program $1 not found"
$PIHOME/bin/shootq "Program $1 not found"
fi
}
# EXAMPLE:
# verify_stopped buftest
Buffering State
Three buffers are used to process events: a primary memory buffer, a secondary memory buffer, and a file buffer. Depending on the amount of data being buffered, the buffering process can be in one of three states corresponding to the buffers it is using. Initially it uses a single memory buffer. When that fills, it switches to using dual memory buffers. When these buffers become full, it switches to using dual memory buffers and a file. The current state of buffering as well as the status of each buffer can be examined with the bufutil program discussed below.
Buffer File
During operation, when memory buffers become full, the buffering process writes data to a file called APIBUF.DAT.
Under Windows NT, this file is located in the dat subdirectory of the PI home directory as defined in the pipc.ini file. The pipc.ini file is found in the WINDOWS directory (note the name may vary from system to system). It contains a section [PIPC] with an entry for PIHOME which identifies the location of the PIHOME directory. If the pipc.ini file is not available or does not contain an appropriate entry, the file is written to the Windows temp directory.
Under UNIX this file is located in the $PIHOME/dat directory. PIHOME is an environment variable defined to be the base directory where the PI-API was installed.
This buffer file is not initially installed but will be created when needed by the PI-API. When data arrives faster than it is forwarded (data burst, server down), memory buffers fill and events begin to be written to this file. The file will continue to grow as events are added to the end of the file even as the events in the front of the file are processed. Once the file is completely processed it will be truncated. When truncated, the file still contains 16 bytes of header information.
Buffer File Maximum Size
The maximum size of the buffer file may be adjusted by the MAXFILESIZE parameter. To estimate the value for this parameter, estimate the number of events generated by the interface. For example, a typical process can generate 1500 exception events/day. A typical event uses 23 bytes in the file buffer (a float32 point). The number of kilobytes per day would be
(# tags collected) x (1500 events/day) x (23/1024 kb) = # kb/day
The disk space available for the buffer file will be the maximum. Do not fill the disk.
Buffering Throughput
The buffering process will take the number of events defined in MAXTRANSFEROBJS from the buffers and send the events to the server with a pause of SENDRATE after each MAXTRANSFEROBJS. If the default configuration is used, a maximum of 5000 events
PI-API Installation Instructions 37
Configuring PI Interface Node Buffering
per second will be sent to the PI server (500 events times 10 per second, but slightly less because of network transfer time and moving the data from buffers to the TCP/IP port). If you typically have much less data throughput, this may be used to limit the rate at which any one node adds data to the PI server. If a higher throughput rate is needed, either increase MAXTRANSFEROBJS or decrease SENDRATE.
Interface Installation
During initial installation, configuration, and testing of an interface it is advisable to disable buffering. As described under Features, server error messages from buffered functions are logged rather than being returned to the calling program. The calling program instead receives an indication of the success or failure of the buffering process. Disabling buffering during shakedown provides more immediate indication of problems.
Shutdown Events
Shutdown events are typically written into points to indicate when the PI server is taken off-line. This allows an end user to recognize the discontinuity of the data. Without shutdown events, the data looks like it has been interpolated over the time the PI server was unavailable, which can be misleading.
Without buffering, it is clear when the PI server stops running (shutdown or system crash), that every point which is collected on that system should receive a shutdown event. With buffering running, inserting shutdown events in points that are buffered gives an erroneous picture of the data. In fact, when the server comes back up, the buffered data is forwarded and there is no data loss. A shutdown event is irrelevant. The shutdown event can also cause buffered and subsequently forwarded data to be out of order, causing undue load on the PI server and slowing down forwarding. For this reason, points that are buffered on a PI Interface node or PI home node should not have shutdown events written by the home node.
Buffering on a PI Interface Node
The tag attribute shutdown should be modified to be FALSE for remotely collected and buffered points and the default home node PI\dat\shutdown.dat file should use a tag attribute mask of shutdown,1 as shown here.
! shutdown.dat: Shutdown for server points.
! login info - no longer used - ignored.
localhost
! tag mask
*
! tag attribute selection (logical AND for all attrib)
! point attributes,value to select points receiving shutdown
shutdown,1
This will ensure that the points collected by the remote PI Interface node will never have shutdown written by the PI server. The program collecting the data is responsible for writing the status indicating that the PI Interface node was shut down, such as “Intf shut” or “I/O timeout”.
Buffering on the PI Home Node
Buffering on the PI server must deal with two situations. The node on which the PI server runs may be rebooted, or the PI server may be stopped while the API continues to buffer data. In the case in which the PI server node must be rebooted most points should
38
receive a shutdown status. When the PI server is stopped, only those points for which the PI server generates data should receive shutdown. These two situations are handled differently on UNIX and Windows PI server nodes.
Note it would be appropriate for the interface itself to send shutdown events to the home node when it is stopped (UNIINT-based interfaces use “I/O timeout” or “Intf shut” to indicate shutdown to differentiate between server and client shutdown with the /stopstat=”Intf shut” command line parameter). The interface documentation will have specific instructions on implementing shutdown. PINet nodes (VMS clients) currently support sending shutdown events for interfaces collected on the node when the PINet node is shut down.
Calculated and alarm tags (pointsource C, G, @) are examples of locally collected tags that should be listed in shutdown.dat files. Note that time-based calculations are not performed when the base system is down. Event-driven calculations are likely to be wrong when the system has been shutdown and the triggering events have been buffered. A shutdown event in this case alerts the end user to invalid data.
Windows NT PI Home Node Shutdown Events
On Windows NT, both PI server tags and those which are buffered on the local node should have shutdown=TRUE. On reboot of the NT node, the PI service pishutev will run automatically. It only uses the shutdown.dat file when starting as a service. For the case when the PI server is rebooted, the shutdown.dat file should be the same as shown under the remote PI Interface node section above. All tags with the shutdown attribute set to TRUE will receive shutdown events. This should include locally buffered points, calculated, totalized, and alarm points.
For the case when the PI system is restarted the PI server tags should receive shutdown events but not the locally buffered interface tags. The pisrvstart.bat file needs to be modified so that the shutdown.dat file is not run by pishutev. The section between the “Change this section” comments below has been changed.
rem
rem $Archive: /PI/3.2/nt/scripts/pisrvstart.bat $
rem
rem Non-Interactive PI Startup as NT Services
rem
rem Start the Base PI Services
rem
echo Starting Base PI System Services...
set piss=pinetmgr pimsgss
for %%i in (%piss%) do ( ..\bin\%%i -start & pidiag -w 5000 )
set piss=piupdmgr pibasess pisnapss piarchss
for %%i in (%piss%) do ( ..\bin\%%i -start & piartool -block %%i -verbose)
if "%1" == "-base" (goto theend)
rem
rem Start the Extended PI Services
rem
echo Starting Extended PI System Services...
PI-API Installation Instructions 39
Configuring PI Interface Node Buffering
rem === Change this section (below) >>>>>>
rem Do pishutev separately.
..\bin\pishutev -f shutdown_C.dat
..\bin\pishutev -f shutdown_G.dat
..\bin\pishutev -f shutdown_AT.dat
rem set piss=pishutev pisqlss pitotal pibatch pialarm pipeschd
set piss=pisqlss pitotal pibatch pialarm pipeschd
rem <<<<<< Change this section (above) ===
for %%i in (%piss%) do ( ..\bin\%%i -start & pidiag -w 5000 )
rem
rem Check for No Site Startup Flag
rem
if "%1" == "-nosite" (goto theend)
pidiag -w 10000
call pisrvsitestart.bat
:theend
A separate shutdown.dat file copy should be made to include only those points that are not buffered. This may require a separate shutdown.dat file for each point source as shown here.
! shutdown_C.dat: Shutdown for Calculated server points.
! login info - no longer used - ignored.
localhost
! tag mask
*
! tag attribute selection (logical AND for all attrib)
! point attributes,value to select points receiving shutdown
shutdown,1
pointsource,C*
UNIX PI Home Node Shutdown Events
The pistart.sh script should be modified to switch behavior between a system reboot and a PI server stop and start with buffering still running.
Add a new flag option of -reboot.
flag_sitestart=1
flag_minimal=0
flag_standardout=0
flag_basestart=0
flag_reboot=0
for CMDARG in $*
do
case $CMDARG in
I | *nosite ) flag_sitestart=0 ;;
M ) flag_minimal=1 ;;
*stdout ) flag_standardout=1 ;;
*base ) flag_basestart=1 ;;
*reboot ) flag_reboot=1 ;;
40
*) print "Unknown Command Argument" $CMDARG ;;
esac
done
Then add conditional behavior for pishutev later in the script.
if (( flag_reboot == 1 ))
then
echo Adding PI Shutdown Events
if [ -r `./piparams -pl`pishutev.log ]
then
mv `./piparams -pl`pishutev.log `./piparams -pl`pishutev.log.old
fi
`./piparams -pb`pishutev > `./piparams -pl`pishutev.log 2>&1 &
else
`./piparams -pb`pishutev -f shutdownC.dat > `./piparams -pl`pishutevC.log 2>&1 &
`./piparams -pb`pishutev -f shutdownG.dat > `./piparams -pl`pishutevG.log 2>&1 &
`./piparams -pb`pishutev -f shutdownAT.dat > `./piparams -pl`pishutevAT.log 2>&1 &
endif
Finally, the automatic startup scripts for the PI server need to be modified to pass the -reboot flag to the pistart.sh script.
#!/bin/ksh
#
# Filename: Pistart
#
if [ -f /opt/PI/adm/pistart.sh ] ; then
cd /opt/PI/adm
nohup ksh pistart.sh -reboot
fi
Monitoring the Buffering ProcessTwo methods are used to monitor the health of buffering, error logs and the buffering utility bufutil.
Error Log
The PI-API writes error messages to the log file on each system. Under WINDOWS this file is called pipc.log and is located either in the PIHOME\dat directory or in the WINDOWS temp directory. Specification of the PIHOME directory is discussed earlier under the discussion of the buffer file. Under UNIX the log file is called pimesslogfile and is found in the $PIHOME/dat directory.
Errors may be written to this file at any time and periodic inspection is recommended. In addition to errors, the starting and stopping of the buffering process is logged. The log file should be examined whenever the buffering process is started to ensure correct startup.
PI-API Installation Instructions 41
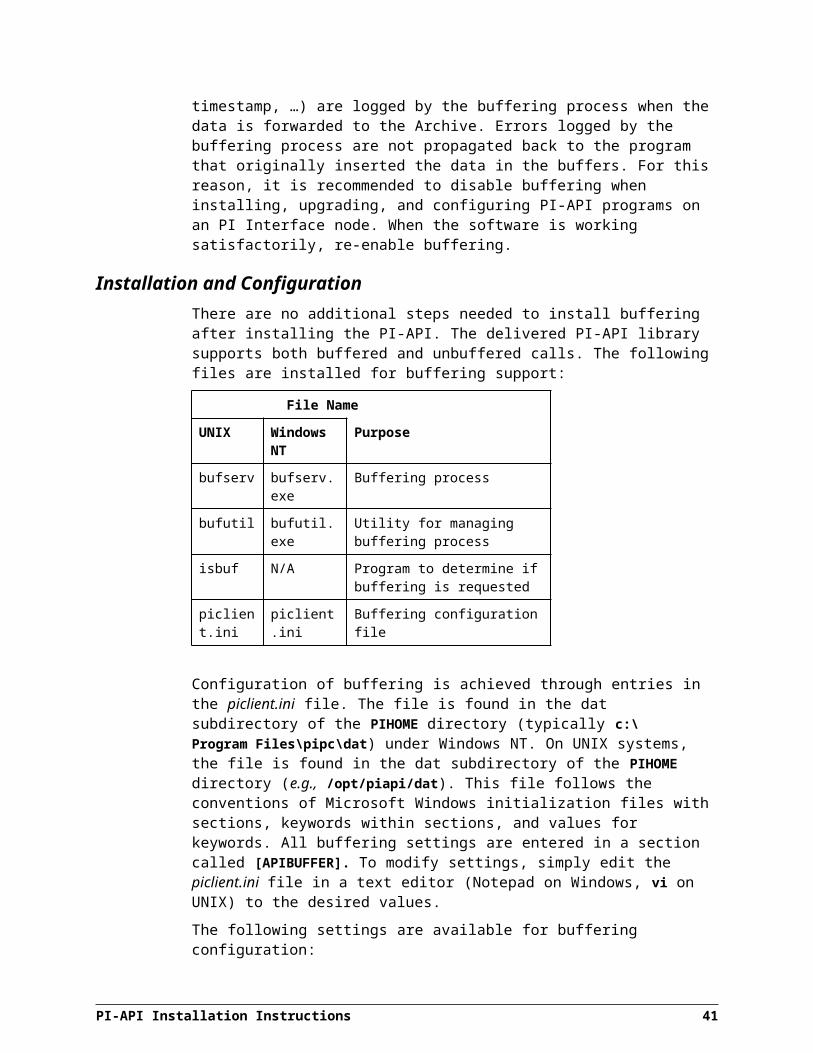
Configuring PI Interface Node Buffering
Error numbers found in this log correspond to messages that may be found in several sources. For a list of common errors, see "PI System Errors" on page 21. Positive error values represent system errors and may be VMS errors (PI2 Servers) or communication errors. When working with PI3 Servers, large negative error numbers are returned starting at -10,000 and growing downwards. These errors can be translated using the pilogsrv utility file delivered with the PI-API.
It is also possible to receive errors from the protocol layer. In particular systems using WINSOCK implementations can receive errors in the range 10000 to 11005. These errors are associated in the log with messages describing socket connection, receive, or send errors and are thus discernible from the PI3 messages. Winsock errors are listed in the file winsock.h provided by the protocol stack vendor.
Bufutil
A utility program, bufutil, is provided to examine the current state of buffering and to shut down the buffering process. The program when run without arguments presents a simple text menu of choices. The presentation is the same on all platforms. Certain functions in bufutil can be run in non-interactive mode through the use of command switches.
Running bufutil with no arguments brings up a menu of choices.
Choices 1,2,3 may take optional arguments of [ #repeats #seconds]
( 1) Show Primary buffer header
( 2) Show Secondary buffer header
( 3) Show file buffer header
( 4) Kill server and quit
( 5) Quit
( 6) Display this menu
Enter choice:
Items 1 and 2 display the state of the memory buffers described earlier. The format of the display is:
Primary Buffer Header Data
-------------------------------------
Version: 1
Mode: Single
Server status: Connected [Buffering OFF]
-------------------------------------
Size: 32768
Next write location: 36
Next read location: 36
Write ptr before wrap: 0
Unprocessed entries: 0
-------------------------------------
Of the various items shown, the Mode, Server status and the Unprocessed entries are the most significant for monitoring the buffering process. The server status may indicate “Connected”, “Disconnected” or “Connected [Buffering OFF]”. When the status is disconnected, the buffer server will buffer events until the server is once again connected. If “[Buffering OFF]” is indicated, buffering has not been enabled in the piclient.ini file by entering BUFFERING=1. To enable buffering, stop all
42
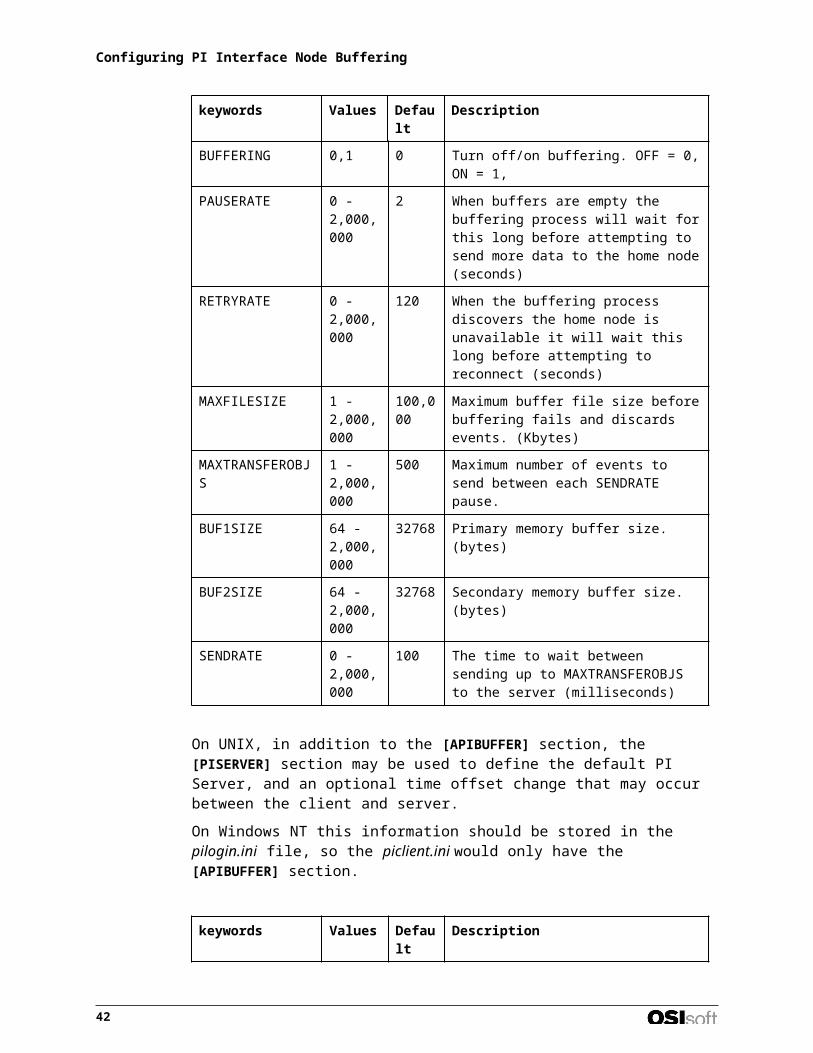
programs that use the PI-API, enable buffering in piclient.ini, and restart the buffer server before starting other PI-API programs.
The mode shows the current buffering state. In the display above, buffering is using a single memory buffer in this display. Other options are “Dual Memory” and “Dual Memory and File”.
The Unprocessed entries shows the number of items in the buffer that have yet to be handled. In the primary buffer Unprocessed entries refers to items not sent to the server. In other buffers, the destination of the Unprocessed events depends on the mode. In Dual Memory mode, events in the secondary buffer are moved to the primary buffer when space is available. In Dual Memory and File mode, events in the secondary buffer are moved to the file when the buffer becomes full. Events in the file are moved to the primary buffer as space becomes available.
By observing the Mode and selecting the desired buffer you can watch the buffers grow and shrink. The display does not update dynamically because querying the information requires a brief locking of the buffering resources. Instead, by repeatedly selecting a buffer, you can watch it change. Alternately, you may enter two numbers indicating the number of times (# repeats) to display the given buffer information with a delay {# seconds) between refreshing the numbers.
The Version item reports the version of buffering being used, for future compatibility issues. The size is the size of the memory buffer and will remain constant. The write and read locations are used to handle inserting and removing values from the buffers. As events are buffered, the write location moves forward. As events are removed, the read location moves forward. These buffers wrap around so the write location can be behind the read location.
As the buffer is a fixed size and the event size can vary, there may be unused bytes at the end of the buffer. The write ptr before wrap entry refers to this condition and shows the last position of the write pointer before it wrapped to the top of the buffer.
Selecting item 3 from the menu displays information about the file buffer in the following format:
File Header Data
Version: 1
Count : 0
Current read position: 16
The Version number in this display is the same as for memory buffers. The Count contains the number of unprocessed events in the file buffer. The Current read position marks how far through the file the buffering process has progressed. As described earlier, the file and therefore this pointer into the file will continue to grow until the buffer process catches up and processes every event in the file. The read position, like the file size will then move from a large number to a small one. The position shown above, 16, represents the file header.
Item 4 on the bufutil menu, “Kill server and quit”, is used to stop the buffering process cleanly. Selecting this item will send a message to the buffering process that it needs to shutdown. It will then lock the resources, move memory information to file, and then exit. Interfaces and other programs utilizing the PI-API on this node should be stopped prior to killing the buffering process.
PI-API Installation Instructions 43
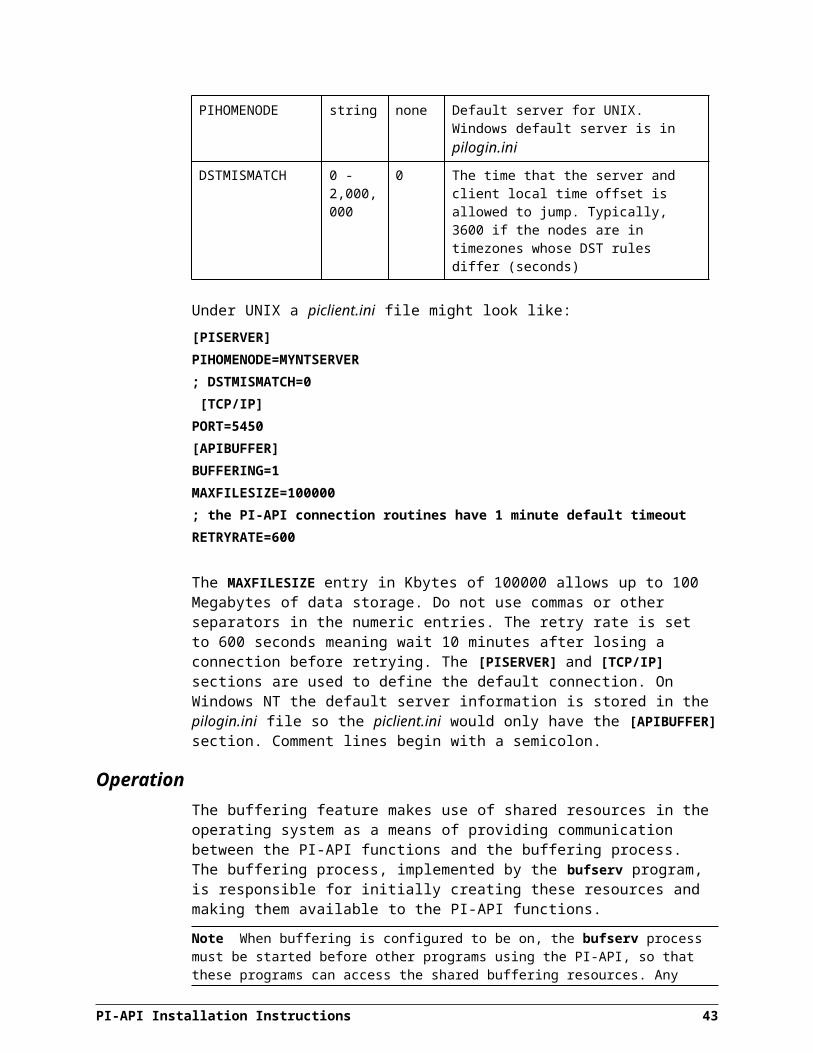
Configuring PI Interface Node Buffering
Item 5, “Quit”, is used to exit bufutil. In a typical session, bufutil is invoked and several buffers are examined, perhaps repeatedly, to assess the current buffering mode and the amount of data stored in buffers. Then “Quit” is selected to exit the monitoring utility.
Bufutil also supports two command line switches which bypass the normal interactive interface. Entering
bufutil -k
to a command prompt shuts down the buffering process, much like selecting item 4 in the bufutil menu. This method is used in the pistop script under UNIX when stopping the API.
Unlocking Resources
The other interactive command:
bufutil -u
is used when due to problems during startup or program crashes, the buffering resources become locked. For example, a program may lock the resources to add event data to the buffers and then crash before it unlocks the resources. Other programs and the buffering process are then prevented from accessing these resources.
To recover cleanly, these processes should be stopped, bufutil run with the -u command (unlock), and then the buffer server and other API processes restarted. Under UNIX this would typically be accomplished by running the pistop script followed by the pistart script. The pistart script uses this command when it starts to ensure that it can cleanly start the buffering process.
Under certain error conditions, or if different users start different PI-API programs on a UNIX system, it may be necessary to become root before running bufutil-u to succeed in removing the resources. Typically semaphores can only be removed by the user that created them. If a different user tries to stop PI than the one who started it, you may run into this problem. If you get errors regarding accessing semaphores in the log file after trying to restart PI and ps -ef shows the bufserv application is not running, “su” to root and run bufutil -u.
LimitationsAs described under Features, only a subset of functions make use of the buffering process. Other PI-API calls continue to be processed through the program’s connection to the home node. Interfaces usually request a list of tags from the PI Server and may register when starting for exceptions if they support output points from PI. For these requests to succeed, the home node must be available. Once an interface is started, the majority of server communication involves sending data to the home node that is handled with buffering. Occasional requests for home node data will time out if the home node is down, though a well written interface will survive these time-outs and continue to send events.
This limitation is a difference between PI Interface nodes with buffering and PINet nodes. PINet nodes store a copy of the point database and snapshots for points that are collected locally (by interfaces on the PINet node). An interface starting on a PINet node can query this local information during startup and succeed even when the home node is down.
Only data sent to the default home node are buffered. In most cases, a PI Interface node will support a small number of interfaces, all talking to the same PI server. The default home node is set in the piclient.ini (UNIX) or pilogin.ini (Windows) file.
44

Data stored in the PI Interface node buffers is not accessible to retrieval calls until it is forwarded to the home node. Calls on the PI Interface node, as well as other nodes, for recent data will return the most current snapshot on the server, not what is currently in the buffers. This situation may be due to the home node being down, slow or a burst of input data on the PI Interface node.
The information retrieval calls continue to be processed through connection to the home node and are ignored by the buffering process. This is similar to the operation on a PINet node when requesting values for points that are not collected locally. This performance is also seen on a home node when input events are being buffered. Until events leave the input queue and go to the snapshot they are not visible to retrieval calls.
Errors generated by bad event data, as discussed earlier, are not detected until the event is forwarded to the home node. Error returns from buffered functions return the success or failure of buffering the events. Errors with the contents of those events (e.g., bad point number, illegal timestamp) are written to the PI Interface node log when encountered. This is why it is recommended to suppress buffering when installing a new interface until data is being collected without problems for the desired points.
TroubleshootingThe following section details some common problems that may be encountered with PI-API programs when buffering is turned on. The descriptive text identifies the condition that may be indicated by program performance, one or more error messages found in the log file, or from logged error codes shown in the next section.
Unable To Create Buffer File APIBUF.DAT
Verify that the buffer file directory is writeable by the offending process. Under UNIX this is $PIHOME/dat. Under Windows NT this is the dat subdirectory under the PIHOME directory specified in the pipc.ini file or the WINDOWS temp directory if this entry is not found.
Also verify that any existing APIBUF.DAT file is accessible by the process reporting the error.
Trouble Opening or Creating the Shared File Memory Object
Check file and directory permissions as described above. Under certain conditions, an earlier startup failure can generate a zero length APIBUF.DAT file. Such a file is invalid and will defeat startup. The file should be 16 bytes (the header data) or larger if present.
If you find a zero-length buffer file, stop any PI-API programs running, remove the zero-length file, run bufutil -u to unlock any locked resources and restart the server and associated processes.
PI-API Programs Hang on UNIX
This occurs when buffering has been indicated in the piclient.ini file but the buffering process, bufserv, was not started before other PI-API applications which make connections. Stop the program. Start the buffering process and retry the program that was hanging. Alternately change the piclient.ini file to turn buffering off and retry the program.
PI-API Installation Instructions 45
Configuring PI Interface Node Buffering
Bufserv Exits Immediately When Started
You can detect that the process has exited by searching for it in the process list. Under UNIX, use
ps -ef | grep bufserv
Under Windows NT, double-click on the background to bring up the task list and look for the bufserv process. Also check the log file for messages about inability to create buffers. The solution is generally to stop any other PI-API programs if they are running and run bufutil -u to unlock the resources. Then when bufserv is started again it can create the resources.
Running Bufutil With No Arguments Hangs Without Presenting a Menu
This is typically the same condition as “PI-API programs hang on UNIX” above. The resources have not been created and bufutil, a PI-API program, is patiently waiting for the resources to become available. This problem can also occur if a program which had these resources locked has abnormally terminated. In this case, stop all PI-API programs, run bufutil -u to unlock the resources, restart bufserv, and retry bufutil.
Bufutil Hangs When Requesting a Status Display
This condition usually indicates that the buffering resources are currently locked by another process. Waiting a few moments is advisable to allow the process to release its locks when it is done accessing the shared resources. If the hang continues, it is likely that a program has abnormally terminated while holding a lock on these resources. Stop all PI-API programs, run bufutil -u, restart bufserv, and retry bufutil.
Errors in the Log File about Creating, Opening or Removing Semaphores
Stop all PI-API applications, stopping the buffer server last. On UNIX run pistop. Run bufutil -u. If problems persist in UNIX, become root (“su”) and run bufutil -u again. Then run pistart (UNIX) or restart bufserv (Windows NT).
Unable to Put Event into Secondary Buffer: -170
The buffer full error, -170, may indicate that a program attempted to insert an array of events bigger than the memory buffer can hold. By default, the buffer server uses 32768 bytes of shared memory for each of the memory buffers. This allows approximately 1200 events maximum per putsnapshot call. Increase the memory buffer sizes using the BUF1SIZE and BUF2SIZE entries in piclient.ini.
Buffering Error CodesFunctions which implement buffering internal to the PI-API return error codes in the range -150 to -190. The majority of these errors will not be returned to calling routines, though some may appear in the log files. The errors are reproduced here along with their symbolic definition that gives an indication to the possible cause of problems encountered. To resolve the error number to a string use the command:
PIHOME\bin> pilogsrv -e -170
[-170] APIBUFFER: Buffer is full
Error Code
Description Symbolic Name
-150 Unable to create shared memory under NT APIBUFERR_CREATEFILEMAPPING
-151 Failure to open shared memory that should APIBUFERR_DOESNOTEXIST
46
Error Code
Description Symbolic Name
already have been created by the server. It was not found.
-152 When creating shared memory, a shared memory object was found already created.
APIBUFERR_ALREADYEXISTS
-153 Error obtaining a memory handle for a shared memory region.
APIBUFERR_MAPVIEW
-154 Error opening or creating a mutex APIBUFERR_MUTEXOPEN
-155 Error opening file APIBUFERR_FILEOPEN
-156 String buffer to small to hold directory path APIBUFERR_FILEBUFDIR
-157 Directory name exceeds buffer length APIBUFERR_DIRTOOLONG
-158 Error writing to a file APIBUFERR_FILEWRITE
-159 Error reading from a file APIBUFERR_FILEREAD
-160 Error transfering data from memory to file APIBUFERR_TRANSFERTOFILE
-161 Error creating a stream APIBUFERR_NEWISTRSTREAM
-162 Error activating an object APIBUFERR_ACTIVATE
-163 Error passivating an object APIBUFERR_PASSIVATE
-164 Unrecognized event type APIBUFERR_BADEVENTTYPE
-165 Unable to obtain a value from an event APIBUFERR_EVENTGETVAL
-166 Server was disconnected APIBUFERR_DISCONNECTED
-167 Snapshot returned a system error APIBUFERR_SNAPSYSERR
-168 Snapshot returned a function error APIBUFERR_SNAPERR
-169 Buffer is empty APIBUFERR_EMPTY
-170 Buffer is full APIBUFERR_FULL
-171 An invalid file location was found APIBUFERR_BADLOC
-172 An unrecognized buffer status was encountered APIBUFERR_BADBUFFERSTATUS
-173 Problem reading piclient.ini file APIBUFERR_INIFILE
-174 Error creating shared memory APIBUFERR_SHMEMCREATE
-175 Error opening shared memory APIBUFERR_SHMEMOPEN
-176 Insufficient space on disk to create a file of the maximum buffer size
APIBUFERR_FILESPACE
-177 Error creating a file APIBUFERR_FILECREATE
-178 PIPC.INI file was not found. Windows NT APIBUFERR_PIPCINI
-179 Attempt to add an event to a full event block APIBUFERR_BLOCKFULL
-180 Out of memory APIBUFERR_OUTOFMEMORY
-181 Error obtaining the PIHOME directory APIBUFERR_TEMPDIR
-182 Buffer file would exceeded its specified limit APIBUFERR_FILEFULL
-183 Error setting a value in an object APIBUFERR_SETVALUE
-184 The memory server is not running APIBUFERR_SERVERNOTRUNNING
PI-API Installation Instructions 47
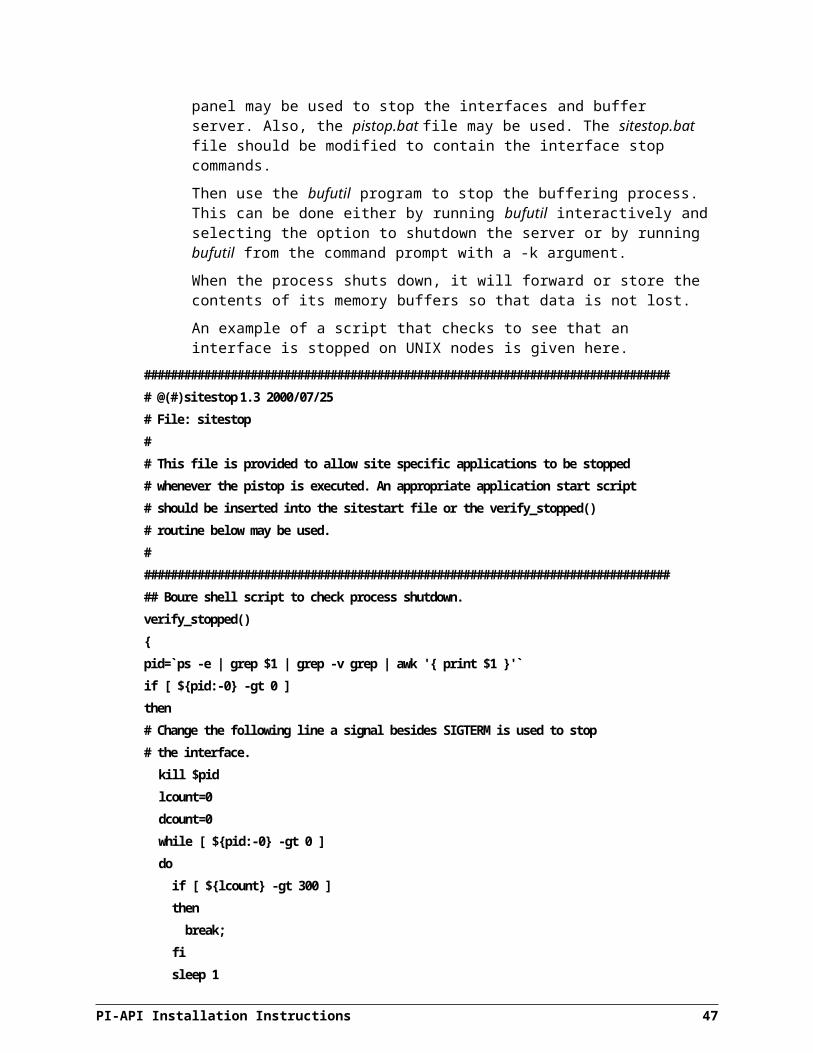
Configuring PI Interface Node Buffering
Error Code
Description Symbolic Name
-185 An event was processed whose function source is not recognized
APIBUFERR_UNKNOWNEVENTSOURCE
48
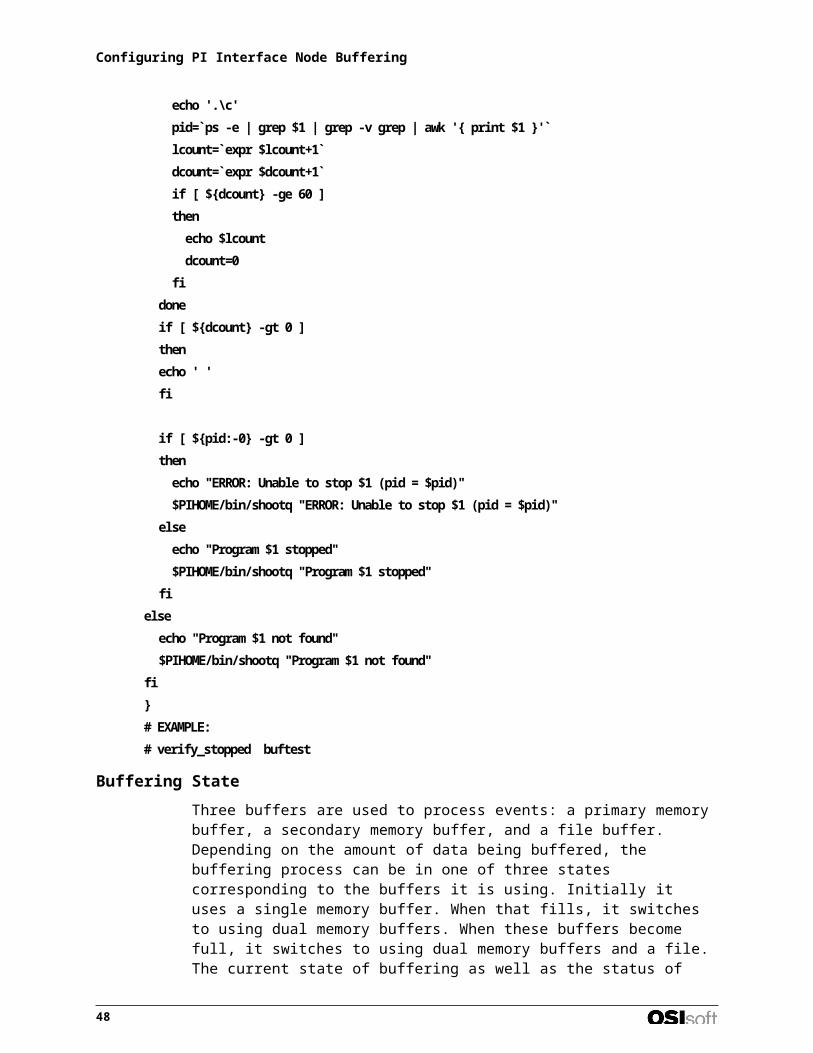
Appendix A:Microsoft Winsock Errors
Windows socket errors do not currently have a routine to translate error numbers to text. A partial table is included here for reference.
Error Code
Description Symbolic Name
10004 A blocking operation was interrupted by a call to WSACancelBlockingCall
WSAEINTR
10013 An attempt was made to access a socket in a way forbidden by its access permissions
WSAEACCES
10014 The system detected an invalid pointer address in attempting to use a pointer argument in a call
WSAEFAULT
10022 An invalid argument was supplied WSAEINVAL
10024 Too many open sockets WSAEMFILE
10035 A non-blocking socket operation could not be completed immediately
WSAEWOULDBLOCK
10036 A blocking operation is currently executing WSAEINPROGRESS
10037 An operation was attempted on a non-blocking socket that already had an operation in progress
WSAEALREADY
10038 An operation was attempted on something that is not a socket
WSAENOTSOCK
10039 A required address was omitted from an operation on a socket
WSAEDESTADDRREQ
10040 A message sent on a datagram socket was larger than the internal message buffer or some other network limit, or the buffer used to receive a datagram into was smaller than the datagram itself
WSAEMSGSIZE
10041 A protocol was specified in the socket function call that does not support the semantics of the socket type requested
WSAEPROTOTYPE
10042 An unknown, invalid, or unsupported option or level was specified in a getsockopt or setsockopt call
WSAENOPROTOOPT
10043 The requested protocol has not been configured into the system, or no implementation for it exists
WSAEPROTONOSUPPORT
10044 The support for the specified socket type does not exist in this address family
WSAESOCKTNOSUPPORT
10045 The attempted operation is not supported for the type of object referenced
WSAEOPNOTSUPP
10046 The protocol family has not been configured into the system or no implementation for it exists
WSAEPFNOSUPPORT
10047 An address incompatible with the requested protocol was WSAEAFNOSUPPORT
PI-API Installation Instructions 49
used
10048 Only one usage of each socket address (protocol/network address/port) is normally permitted
WSAEADDRINUSE
10049 The requested address is not valid in its context WSAEADDRNOTAVAIL
10050 A socket operation encountered a dead network. WSAENETDOWN
10051 A socket operation was attempted to an unreachable network
WSAENETUNREACH
10052 The connection has been broken due to keep-alive activity detecting a failure while the operation was in progress
WSAENETRESET
10053 An established connection was aborted by the software in your host machine
WSAECONNABORTED
10054 An existing connection was forcibly closed by the remote host
WSAECONNRESET
10055 An operation on a socket could not be performed because the system lacked sufficient buffer space or because a queue was full
WSAENOBUFS
10056 A connect request was made on an already connected socket
WSAEISCONN
10057 A request to send or receive data was disallowed because the socket is not connected and (when sending on a datagram socket using a sendto call) no address was supplied
WSAENOTCONN
10058 A request to send or receive data was disallowed because the socket had already been shut down in that direction with a previous shutdown call
WSAESHUTDOWN
10060 A connection attempt failed because the connected party did not properly respond after a period of time, or established connection failed because connected host has failed to respond
WSAETIMEDOUT
10061 No connection could be made because the target machine actively refused it
WSAECONNREFUSED
10064 A socket operation failed because the destination host was down.
WSAEHOSTDOWN
10065 A socket operation was attempted to an unreachable host WSAEHOSTUNREACH
10067 A Windows Sockets implementation may have a limit on the number of applications that may use it simultaneously
WSAEPROCLIM
10091 WSAStartup cannot function at this time because the underlying system it uses to provide network services is currently unavailable
WSASYSNOTREADY
10092 The Windows Sockets version requested is not supported WSAVERNOTSUPPORTED
10093 Either the application has not called WSAStartup, or WSAStartup failed
WSANOTINITIALISED
10101 Graceful shutdown in progress WSAEDISCON
10109 Class type not found WSATYPE_NOT_FOUND
11001 Host not found WSAHOST_NOT_FOUND
11002 Nonauthoritative host not found WSATRY_AGAIN
11003 This is a nonrecoverable error WSANO_RECOVERY
PI-API Installation Instructions 50
11004 Valid name, no data record of requested type WSANO_DATA
PI-API Installation Instructions 51
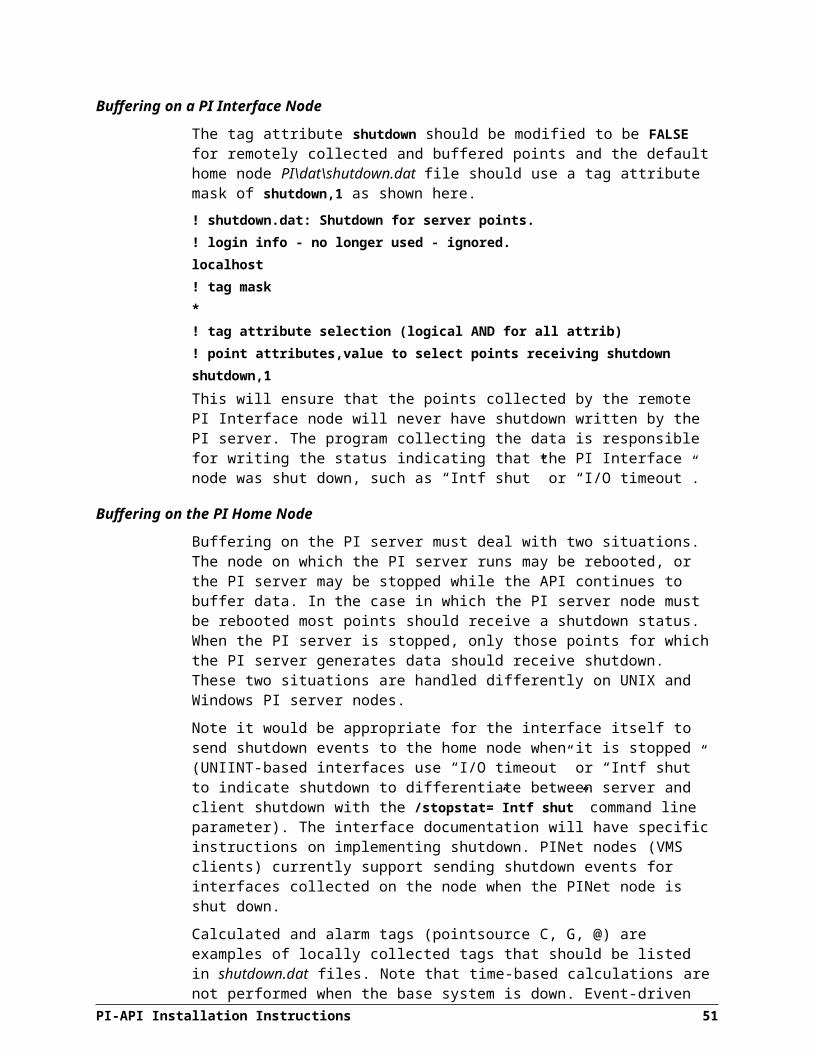
Index
%WINDIR%\symbols.....................................4
AIX
LIBPATH.................................................10
AIX..............................................................17
API Node buffering......................................32
APIBUF.DAT...............................................47
apisnap........................................................27
apisnap utility...............................................26
apiverify.......................................................13
Archive Access Errors..................................25
buffering......................................................32
buffer file..................................................39
buffered functions....................................32
buffering state..........................................39
configuration of........................................34
Error Codes.............................................49
errors.......................................................26
Home node..............................................41
installation................................................33
limitations.................................................47
maximum file size....................................39
monitoring the process.............................44
operation..................................................35
PI Interface node.....................................40
startup.....................................................35
stopping...................................................37
throughput...............................................40
bufserv........................................................33
immediate exits........................................48
bufutil.....................................................34, 44
communication
remote nodes...........................................29
Compaq.......................................................20
Configuring
buffering..................................................33
Open VMS, TCP/IP..................................12
PI Interface Node Buffering......................32
TCP/IP,UNIX...........................................12
Control Panel> Services utility.....................7
Cron Job......................................................14
debug symbols..............................................4
DECNet.......................................................29
default debugger............................................4
Default PI Home Node.................................12
Distribution Files
AIX..........................................................17
HP-UX.....................................................18
OSF1.......................................................20
Solaris.....................................................16
UNIX........................................................10
Dr. Watson
drwtsn32.log..............................................4
installation..................................................4
logging.......................................................4
not on Windows 9x.....................................4
DUX............................................................20
Environment Variables
UNIX..........................................................9
Errors
Archive Access........................................25
buffering..................................................26
buffering error codes................................49
PI-API Installation Instructions 52
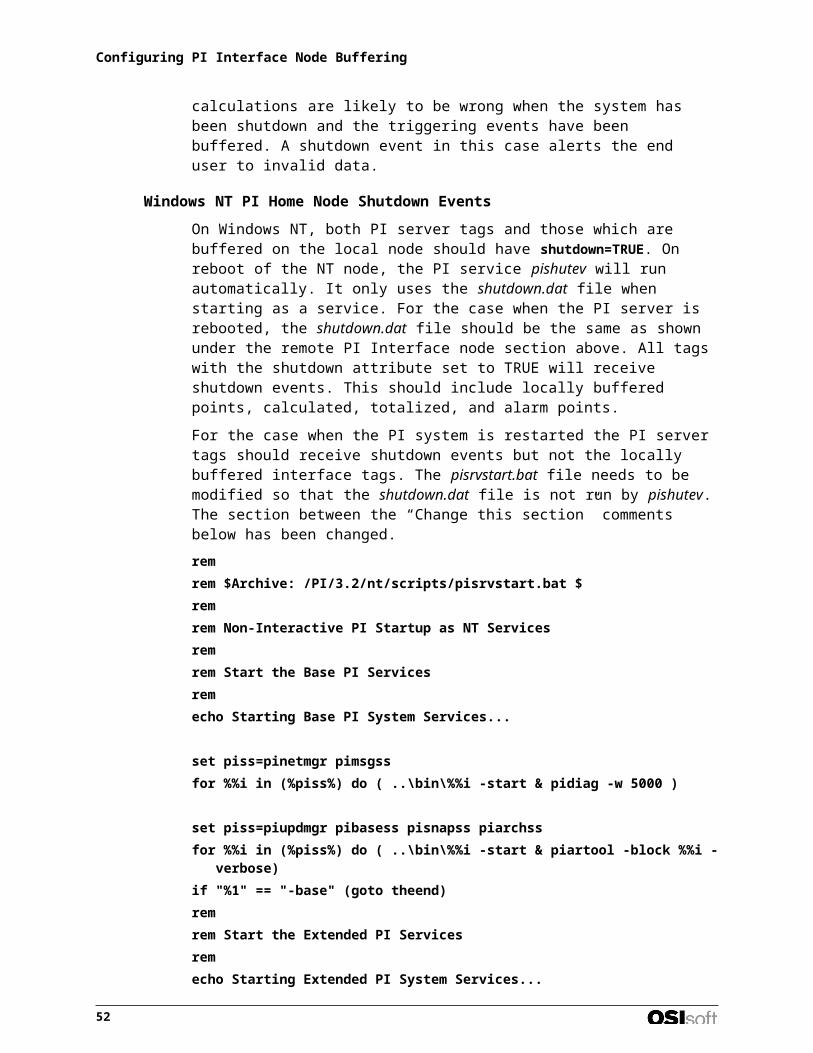
Error Log..................................................44
EVM Routine............................................25
Login Services.........................................25
PINet.......................................................26
Point Attribute Access..............................24
Reporting.................................................33
System....................................................23
Event Counters
UNIX........................................................13
Windows....................................................8
EVM Routine Errors.....................................25
Extracting Distribution Files..........................20
AIX..........................................................17
HPUX......................................................18
Solaris.....................................................16
UNIX........................................................10
file format
.ini files......................................................5
HP-UX.........................................................18
SHLIB_PATH...........................................10
initialization Files............................................4
Initialization Files
default timeout.........................................23
location......................................................4
installation
UNIX..........................................................1
Installation
AIX..........................................................17
buffering..................................................33
HP-UX.....................................................18
Interface, Disable Buffering......................40
OSF1.......................................................20
Solaris.....................................................15
UNIX.............................9, 13, 16, 17, 18, 20
UNIX Script..............................................11
installation log
Windows....................................................3
Installation log
UNIX........................................................11
interface
dependencies...........................................37
iorates.dat................................................8, 13
isbuf............................................................34
keywords....................................................34
Limitations
of the buffering process............................47
Linking
AIX..........................................................18
HP-UX.....................................................19
listener
installation................................................30
software...................................................29
Log files
mqmgr.....................................................14
mqsrv......................................................14
pilogsrv......................................................7
pimesslogfile......................................14, 44
pipc.log....................................................44
Purging....................................................14
Login Services errors...................................25
Microsoft Operating Systems.........................3
network protocol..........................................29
Node buffering.............................................32
Node Identifiers.............................................6
nodes
node buffering..........................................32
PI-API......................................................29
remote.....................................................29
organization of documentation.......................1
OSF1
LD_LIBRARY_PATH................................10
PI Home Node.............................................12
PI Interface Node Buffering..........................32
PI Login Services Errors..............................25
PI server
pinetmgr..................................................29
PI-API Installation Instructions 53
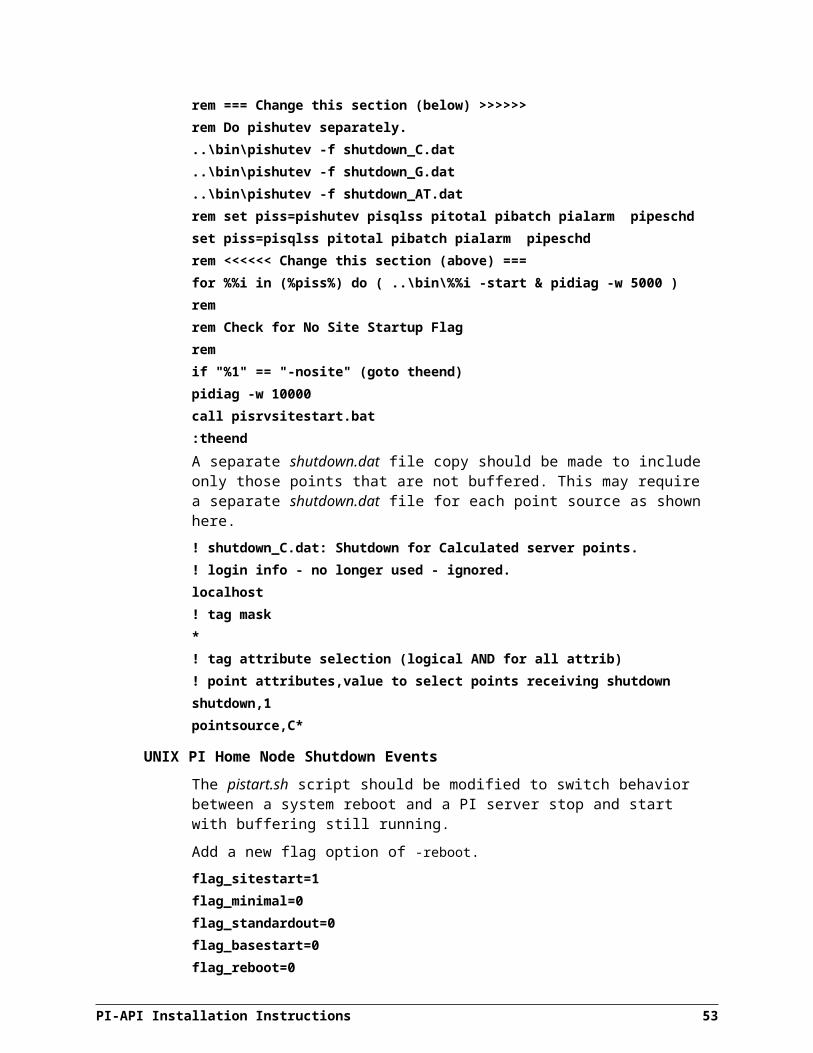
Index
PI Server............................................1, 12, 29
Installation...............................................30
PI System
Errors......................................................23
version 2.0.7............................................30
version 2.1.1............................................30
pi.install.......................................................12
PI-API nodes...............................................29
piclient.ini.............................................4, 7, 34
APIBUFFER............................................34
BUF1SIZE.........................................34, 49
BUF2SIZE.........................................34, 49
BUFFERING......................................34, 45
Default node............................................47
DSTMISMATCH......................................35
MAXFILESIZE.........................................34
MAXTRANSFEROBJS.......................34, 40
NETWORK..............................................23
PAUSERATE...........................................34
PIHOMENODE..................................12, 35
PORT................................................12, 35
RETRYRATE...........................................34
SENDRATE.......................................34, 40
TCP/IP.....................................................35
TIMEOUT................................................23
pilogin.ini................................................4, 5, 6
Default node............................................47
Defaults.....................................................6
HELPFILE.................................................6
NETWORK..............................................23
PINodeIdentifiers.......................................6
PIServer....................................................6
SERVICES................................................6
TIMEOUT................................................23
pilogsrv..............................................7, 23, 44
Error translation.......................................23
Installation.................................................7
MAXLOGSIZE...........................................7
MAXPIPCLOGS........................................7
PINet
Errors......................................................26
nodes.................................................29, 41
protocol....................................................29
pinetmgr......................................................30
pipc.ini.......................................................4, 5
MAXLOGSIZE.......................................5, 7
MAXPIPCLOGS.....................................5, 7
PIHOME....................................................5
PIPC..........................................................5
PIPCSHARE..............................................5
pipc.log..........................................................5
PIServer.Dat................................................31
Point Attribute Access Errors.......................24
port
545............................................................6
5450..........................................................6
Post Installation
UNIX........................................................11
protocol
network....................................................29
remote nodes
PI Server Support for...............................29
root....................................................9, 46, 48
security
server......................................................31
semaphores.................................................46
server
security....................................................31
Timestamps.............................................33
Setting the Default PI Home Node................12
Shared File Memory Object..........................48
Shared Library Path.....................................10
Shutdown events.........................................40
home node.........................................41, 42
PI Interface node......................................40
pishutev.............................................41, 43
54

pisrvstart.bat............................................41
pistart.sh..................................................42
shutdown.dat...........................................41
site-specific applications...............................12
Solaris.........................................................15
LD_LIBRARY_PATH................................10
Starting PI...................................................13
Stopping PI..................................................13
subdirectories
created during installation...........................3
System Configuration
UNIX Installation........................................9
System Errors..............................................23
System Files Redistributed
AIX..........................................................18
HP-UX.....................................................19
OSF1.......................................................20
Solaris.....................................................17
TCP/IP........................................................29
Troubleshooting
buffering..................................................47
Tru64...........................................................20
UNIX Installation Procedures.........................9
unlocking resources.....................................46
Winsock errors
winsock.h.................................................44
WinSock TCP/IP protocol stack.....................3
PI-API Installation Instructions 55


![Rest API Documentation - Gier API... · Rest API Documentation {{}, {}],}](https://static.fdocuments.in/doc/165x107/5fdbbd98d3d6d85ee1033c5a/rest-api-documentation-gier-api-rest-api-documentation-.jpg)