AP314: Payment Processing - Cardinal Project Next 3to Continue Lesson 1: Understanding Payment...
94
AP314: Payment Processing Instructor Led Training
Transcript of AP314: Payment Processing - Cardinal Project Next 3to Continue Lesson 1: Understanding Payment...

AP314: Payment
Processing
Instructor Led Training

Click Next to Continue
Lesson 1: Understanding Payment Processing
Introduction
Welcome
Welcome to Cardinal Training!
This training provides employees with the skills and information necessary to use Cardinal. It is not intended to replace
existing Commonwealth and/or agency policies.
By now, you have completed all prerequisite courses for this course and discovered the different functional areas and
modules included in Cardinal. In this course, we will walk you through payment processes in Cardinal.
2

Click Next to Continue
Lesson 1: Understanding Payment Processing
Introduction
Introduction
In the Introduction to Cardinal course, you learned
that the Accounts Payable functional area of Cardinal
is composed of two modules:
Accounts Payable
The Accounts Payable (AP) module automates
invoice and payment processing to deliver timely and
accurate payment for goods and services.
Expenses
The Expenses module enables the creation of
payments to employees for non-salary related items
(i.e. travel & business expense reimbursements).
Note: The Expenses module is often referred to as
“Travel and Expenses.”
3

Click Next to Continue
Lesson 1: Understanding Payment Processing
Introduction
Objectives
After completing this course, you will be able to:
• Define key payment processing terms
• Describe key payment processing concepts
• Describe the overall payment process and the roles involved in it
• Explain how payment processing integrates with the other Cardinal modules and external systems
• Describe the Treasury pay cycles
• List the steps in a pay cycle
• Use the Pay Cycle Manager to run payment processing
• Update the payment selection date in a pay cycle
• Identify and resolve payment selection exceptions
• Describe the files created by the payment process
• Describe the purpose of express payments and manual payments
• Create an express payment for petty cash
• Explain how to record a manual payment on the voucher
• Cancel payments
• Reconcile petty cash bank statements
• Describe key reports and online inquiries
4
Click Next to Continue
Lesson 1: Understanding Payment Processing
Introduction
Agenda
Today, we will cover the following topics:
• Lesson 1: Understanding Payment Processing
• Lesson 2: Creating Payments through Regular pay cycle
• Lesson 3: Creating Special Payments
• Lesson 4: Managing Payments
• Lesson 5: Payment Reports and Online Inquiries
• Lesson 6: Payment Processing Hands-On Practice
5

Click Next to Continue
Lesson 1: Understanding Payment Processing
Introduction
Lesson Topics
In this lesson, you will learn about the following topics:
• Key Terms
• Key Concepts
• Process and Roles
• Integration and Interfaces
6
Click Next to Continue
Lesson 1: Understanding Payment Processing
Topic 1: Key Terms
Key Terms
• Payment: A record created in Cardinal Accounts
Payable (AP) that causes a payment to be
generated to a vendor or other payee. In Accounts
Payable, payments are generally created by
Accounts Payable vouchers that represent
invoices submitted by vendors. Payments may
also be generated for other reasons, such as for
Travel and Expenses employee reimbursements
or revenue refunds. Payments may be generated
in different forms, like checks or electronic debits.
During the payment process, accounting entries to
the General Ledger (GL) are also generated to
record payment posting.
• Payment Hold: An option that will cause a
payment not to be created for a voucher even if
the voucher would otherwise be selected for
payment. A payment hold can be placed on a
voucher or on a vendor when payment should be
held on all vouchers for that vendor.
7

Click Next to Continue
Lesson 1: Understanding Payment Processing
Topic 1: Key Terms
Key Terms
• Payment Offset: A case where the vendor should
not be paid the full amount of the voucher. In
these cases, the payment is split between the
amount due to the vendor, and the amount due to
a third party (that is, the payment “offset”). There
are two types of offsets:
o A tax lien, garnishment, or similar
circumstance exists where the agency
is responsible for processing the third
party offset amount. In these cases, the
offset must be manually created in
Accounts Payable and tracked in an
offline system.
o A Comptroller’s Debt Setoff (CDS). All
CDS offsets are maintained by the
Department of Taxation rather than the
agency. In these cases, the offset is
automatically identified and processed
by the Department of Taxation.
8

Click Next to Continue
Lesson 1: Understanding Payment Processing
Topic 1: Key Terms
Key Terms (Continued)
• Pay Cycle: A name given to the selection and
creation of payments and their output processes
for scheduled vouchers and expense transactions.
There may be different pay cycles for requests
meeting different criteria such as payment
method. The Treasury pay cycles will be run in the
nightly batch.
• Payment Selection Process: The step in the pay
cycle where vouchers and other items that are
due for payment are selected for payment
processing. Most payment selection is automatic
based on payment configuration, but payments
may also be selected manually.
9

Click Next to Continue
Lesson 1: Understanding Payment Processing
Topic 1: Key Terms
Key Terms (Continued)
• Payment Creation Process: The step in the pay
cycle that processes the requests selected for
payment by the Payment Selection process so
they can be input to the payment output
processes. Generally, vouchers to the same
vendor with the same due date are combined into
one payment. This process creates one payment
from several vouchers to the same vendor with
the same payment due date. This causes the
vendor to receive a single payment, but it can be
overridden for a voucher if the Separate Payment
checkbox was selected on the voucher. Payments
are not combined by Treasury if the Separate
Payment checkbox is checked.
• Payment Output Processes: The processes that
run as part of the pay cycle that use the results of
the Payment Creation process to create output
files for actual payments. These files, for example,
include EDI payment files, Warrant check files,
petty cash checks, and positive payment files.
10
Click Next to Continue
Lesson 1: Understanding Payment Processing
Topic 1: Key Terms
Key Terms (Continued)
• Payment Post Process: The batch process that
runs after the Payment Output processes to
create accounting entries in AP that will be used
by the Journal Generator to generate GL journals
reflecting the payment.
• Express Payment: An alternative to the regular
pay cycle processing that allows payments to be
created on demand. Individual petty cash
vouchers can be paid by petty cash processors by
creating express payments.
11
Click Next to Continue
Lesson 1: Understanding Payment Processing
Topic 2: Key Concepts
Key Concepts
Some key concepts in payment processing include:
• Expense Reports and Cash Advances
o Expense reimbursements and cash advances for employees are managed through the Travel and
Expenses module in Cardinal. Payments for the expense transactions are created in the Accounts Payable
pay cycles.
• Payment Offset Processing – Liens and Garnishments
o Remember that payment offset processing for items such as tax liens or garnishments are entered
manually within Accounts Payable.
o When a vendor is subject to this type of a payment offset, a location is created in the vendor record that
includes a payment hold and the code RR to indicate that special review by the Voucher Processor is
needed. (Note that a vendor location is not a physical address, and instead includes rules for doing
business with the vendor.)
o The LIEN location will be set as the default. This causes the vendor to appear on the Vendor with Payment
Hold and Related Unpaid Vouchers report. This in turn alerts the Voucher Processor to manually update
the voucher payment data so that the appropriate tax lien or garnishment amount is deducted from the
payment and is instead paid to the appropriate party. The agency also maintains an offline agency-specific
tracking system to track the lien or garnishment balances.
o Once the offset has been applied, the Voucher Processor Maintenance must ensure the vendor location on
the voucher is set to the correct location. This location change removes the payment hold if it exists.
12

Click Next to Continue
Lesson 1: Understanding Payment Processing
Topic 2: Key Concepts
Key Concepts (Continued)
• Payment Offset Processing – Withholding
o In Cardinal, a withholding (1099) Vendor is a vendor for which amounts paid must be reported to the IRS
on a 1099 form and/or amounts withheld for taxes. This term is used because the 1099 processes may
also involve withholding amounts from vendor payments for delinquent taxes.
o The withholding information for 1099-reportable vendors is maintained with the vendor’s location as well.
The values on the vendor’s location also trigger 1099 reporting for applicable payments. For 1099 vendors,
the Withholding checkbox is auto-populated and should not be changed.
o Ultimately, reportability will be determined by the accounts used on the voucher. If an account used is non-
reportable, then the amount from that account will not be reported.
13

Click Next to Continue
Lesson 1: Understanding Payment Processing
Topic 2: Key Concepts
Key Concepts (Continued)
• Payment Offset Processing – Comptroller’s Debt Setoff (CDS)
o A vendor’s payment may also be subject to the Comptroller’s Debt Setoff (CDS) maintained by the
Department of Taxation. This process is automated, and follows these steps:
In Cardinal, the CDS extract process runs nightly, selecting vouchers for payment processing
based on the normal payment selection criteria as well as CDS bypass criteria. The extract
process creates files with the resulting payment information which is then sent to the
Department of Taxation.
The Department of Taxation processes the files by looking for matches between the vendors
in the file and vendors subject to CDS.
When the Department of Taxation finds a matching vendor, it processes the payment data in
the file, indicating the amount to be offset. The Department of Taxation then sends the
updated files back to Cardinal.
Once the files are uploaded, the applicable vouchers are automatically updated with a second
remit to a dummy CDS vendor for the amount of the offset. The amount to the original vendor
is updated accordingly and the second remit is marked as a manual payment.
A CDS Informational Matches report is produced as an output of the CDS upload process.
The report shows vouchers that would have had a CDS offset if they were eligible for the
process. This criteria is defined on the CDS Offset Bypass configuration page.
14
Click Next to Continue
Lesson 1: Understanding Payment Processing
Topic 2: Key Concepts
Key Concepts (Continued)
• Payment Offset Processing – Comptroller’s Debt Setoff (CDS) (Continued)
o Some types of payments, such as petty cash payments, are excluded from the CDS processing and are
not included in the files to the Department of Taxation based on the CDS Offset Bypass configuration.
o Since this is an automated process, there is no action taken by the voucher/payment processors. However,
the offsets are visible in the voucher records, and voucher /payment processors should be aware of them
so they can respond to vendor inquiries.
15

Click Next to Continue
Lesson 1: Understanding Payment Processing
Topic 2: Key Concepts
Key Concepts (Continued)
• Petty Cash
o Petty cash payments are created manually by the petty cash processor as express payments. Petty cash
processors should only create payments for their assigned petty cash accounts.
o In Cardinal, regular vouchers are created as needed to provide reimbursements for petty cash. The
Unreimbursed/Reimbursed Petty Cash Vouchers report is run to identify vouchers requiring
reimbursements, and a regular voucher is created to replenish the petty cash account(s) accordingly. The
ID of the voucher created for the petty cash replenishment is noted in the Payment Note field, accessed
through the Payment Comments link on the Payments tab, using the standard format, REIMB followed
by the voucher ID.
16

Click Next to Continue
Lesson 1: Understanding Payment Processing
Topic 2: Key Concepts
Key Concepts (Continued)
• Centralized Vendor Database
o All Cardinal users share the same vendor database. For procurement vendors, eVA is the primary data
source and the Department of Minority Business Enterprise (DMBE) system updates a vendor’s Small,
Women and Minority-owned (SWaM) data. When dealing with a familiar vendor, you may see additional
information such as remit-to addresses that may be used by other users. Make sure you select the correct
address for your voucher.
o In general, procurement vendor information should not be updated in Cardinal to avoid potential conflicts
with the eVA and DMBE sources. However, certain information, such as EDI banking information, can be
updated in Cardinal by the Vendor Maintenance group.
o Non-procurement (or fiscal) vendors (payees such as Right of Way landowners and those receiving
refunds) are created directly in Cardinal and are not eVA vendors.
17

Lesson 1: Understanding Payment Processing
Topic 3: Process and Roles
Payment Processing
In Accounts Payable, payment processing begins when voucher processing ends. Treasury payment processing in Cardinal is
completed in the nightly batch and requires little attention. However, payment processors view pay cycle exceptions, cancel
payments, and run reports and inquiries to obtain information about payments.
Petty cash processors create express payments as required.
18

Lesson 1: Understanding Payment Processing
Topic 3: Process and Roles
19

Lesson 1: Understanding Payment Processing
Topic 3: Process and Roles
Key Payment Processing Roles
20
Module Role Name Functional Description
Accounts
Payable
Accounts Payable
Batch Processor
This role has access to:
•Run all AP batch processes including any custom and delivered
processes and reports
Accounts
Payable
Accounts Payable
Configurator
This role has access to:
•Maintain AP configuration such as global payment messages on checks,
conversation key words for vendor conversations, etc.
Accounts
Payable
Accounts Payable
Manager
This role has access to everything the Voucher Processor has. In addition, this
role has access to:
•Delete and unpost vouchers
•Voucher mass maintenance
•Manually schedule payments
•Record manual payments

Lesson 1: Understanding Payment Processing
Topic 3: Process and Roles
Key Payment Processing Roles (Continued)
21
Module Role Name Functional Description
Accounts
Payable Payment Processor
This role has access to everything the Voucher Processor has. In addition, this
role has access to:
•View pay cycle exceptions
•Cancel payments
Accounts
Payable Petty Cash Processor
This role has access to:
•Run petty cash pay cycle
•Update payment selection criteria
•Resolve pay cycle exceptions
•Print petty cash checks
•Cancel payment
•View Accounting Entries
Accounts
Payable
Petty Cash
Reconciler
This role has access to:
•Manually reconcile/unreconcile petty cash payments
Lesson 1: Understanding Payment Processing
Topic 4: Integration and Interfaces
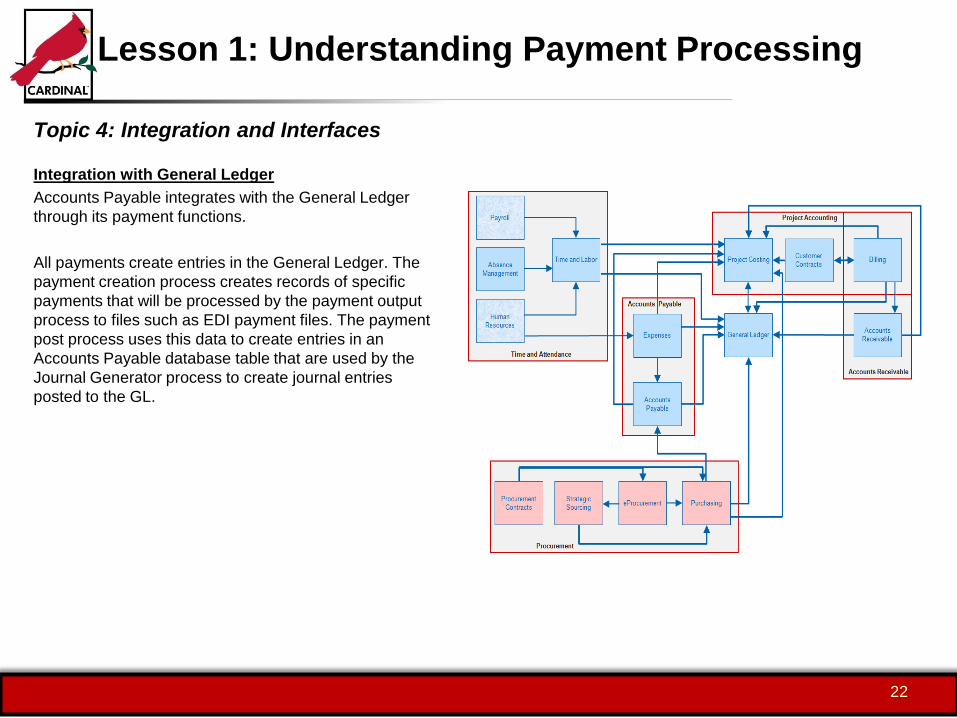
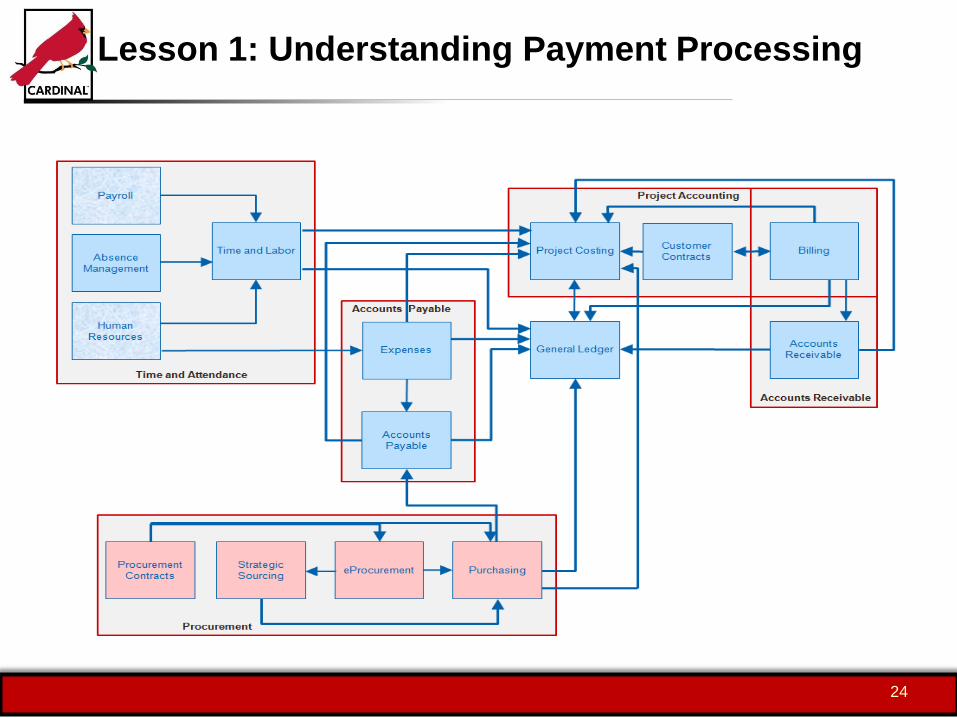
Integration with General Ledger
Accounts Payable integrates with the General Ledger
through its payment functions.
All payments create entries in the General Ledger. The
payment creation process creates records of specific
payments that will be processed by the payment output
process to files such as EDI payment files. The payment
post process uses this data to create entries in an
Accounts Payable database table that are used by the
Journal Generator process to create journal entries
posted to the GL.
22

Lesson 1: Understanding Payment Processing
Topic 4: Integration and Interfaces
Integration with Travel and Expenses
Cardinal uses the Travel and Expenses module to handle
employee travel authorizations, cash advances, and
expense reports.
Though Travel and Expenses is a separate module, it
uses the payment creation processes in Accounts
Payable to generate payment files for cash advances
and expense report reimbursements. The Travel and
Expenses module processes items up to the pay cycle
processing steps and then sends the records to AP to
create the payment record and output files. Travel and
Expenses then creates the accounting entries used by
GL.
23
Lesson 1: Understanding Payment Processing
24
Lesson 1: Understanding Payment Processing
Topic 4: Integration and Interfaces
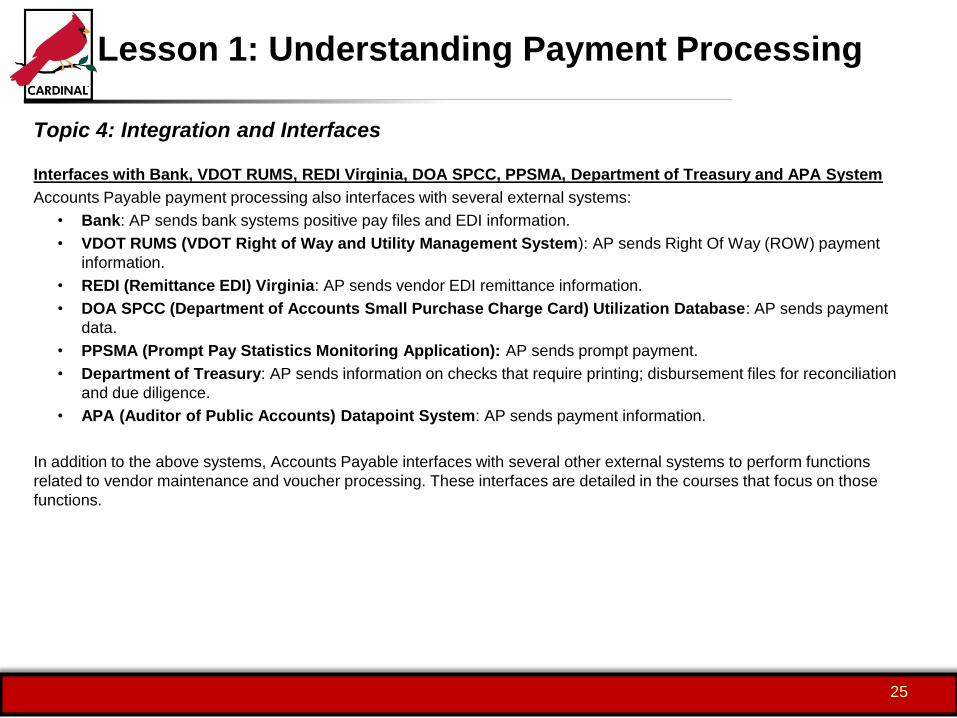
Interfaces with Bank, VDOT RUMS, REDI Virginia, DOA SPCC, PPSMA, Department of Treasury and APA System
Accounts Payable payment processing also interfaces with several external systems:
• Bank: AP sends bank systems positive pay files and EDI information.
• VDOT RUMS (VDOT Right of Way and Utility Management System): AP sends Right Of Way (ROW) payment
information.
• REDI (Remittance EDI) Virginia: AP sends vendor EDI remittance information.
• DOA SPCC (Department of Accounts Small Purchase Charge Card) Utilization Database: AP sends payment
data.
• PPSMA (Prompt Pay Statistics Monitoring Application): AP sends prompt payment.
• Department of Treasury: AP sends information on checks that require printing; disbursement files for reconciliation
and due diligence.
• APA (Auditor of Public Accounts) Datapoint System: AP sends payment information.
In addition to the above systems, Accounts Payable interfaces with several other external systems to perform functions
related to vendor maintenance and voucher processing. These interfaces are detailed in the courses that focus on those
functions.
25

Lesson 1: Understanding Payment Processing
26

Lesson 1: Understanding Payment Processing
Lesson Checkpoint
Lesson Checkpoint
Now is your opportunity to check your understanding of the course material.
27
Lesson 1: Understanding Payment Processing
Lesson Checkpoint
Lesson Checkpoint
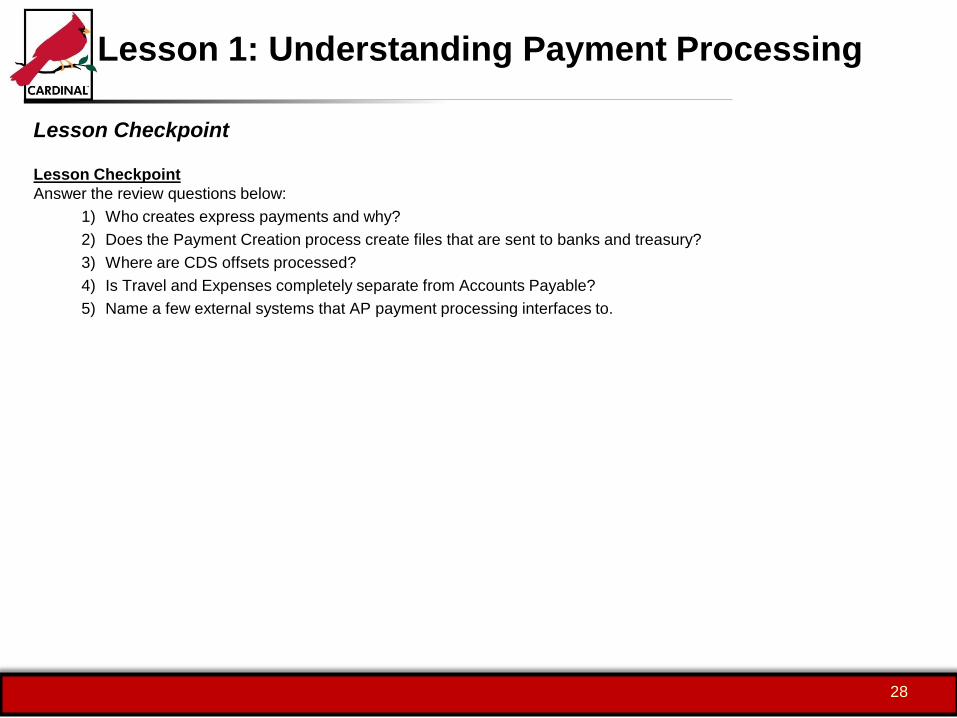
Answer the review questions below:
1) Who creates express payments and why?
2) Does the Payment Creation process create files that are sent to banks and treasury?
3) Where are CDS offsets processed?
4) Is Travel and Expenses completely separate from Accounts Payable?
5) Name a few external systems that AP payment processing interfaces to.
28
Lesson 1: Understanding Payment Processing
Lesson Summary
Lesson Summary
In this lesson, you learned how to:
• Recognize key terms in the Accounts Payable module and explain their meaning.
• Discuss key concepts in the Accounts Payable module.
• Discuss the different processes in the Accounts Payable module.
• Discuss the ways that the Accounts Payable module integrates with other modules in Cardinal and interfaces with
external systems.
29

Lesson 2: Creating Payments Through Regular
Pay Cycles
Introduction
Lesson Objectives
After completing this lesson, you will be able to:
• Describe the Treasury pay cycles
• List the steps in a pay cycle
• Use the Pay Cycle Manager to run payment processing
• Update the payment selection date in a pay cycle
• Identify and resolve payment selection exceptions
• Describe the files created by the payment process
30

Lesson 2: Creating Payments Through Regular
Pay Cycles
Introduction
Lesson Topics
In this lesson, you will learn about the following topics:
• Pay Cycle Processing Overview
• Running Pay Cycle Manager
• Updating Payment Selection Date
• Running Payment Selection and Payment Create Processes
• Locating and Resolving Payment Processing Exceptions
• Running Payment Output Processes
• Running Payment Post Process
• Files Created by Payment Process
31

Lesson 2: Creating Payments Through Regular
Pay Cycles
Topic 1: Pay Cycle Processing Overview
Pay Cycle Processing Overview
There are two nightly Treasury pay cycles that process Warrant and EDI payments for all agencies. The Payment Processor
must review any exceptions that occur in these cycles.
32

Lesson 2: Creating Payments Through Regular
Pay Cycles
Topic 2: Running Pay Cycle Manager
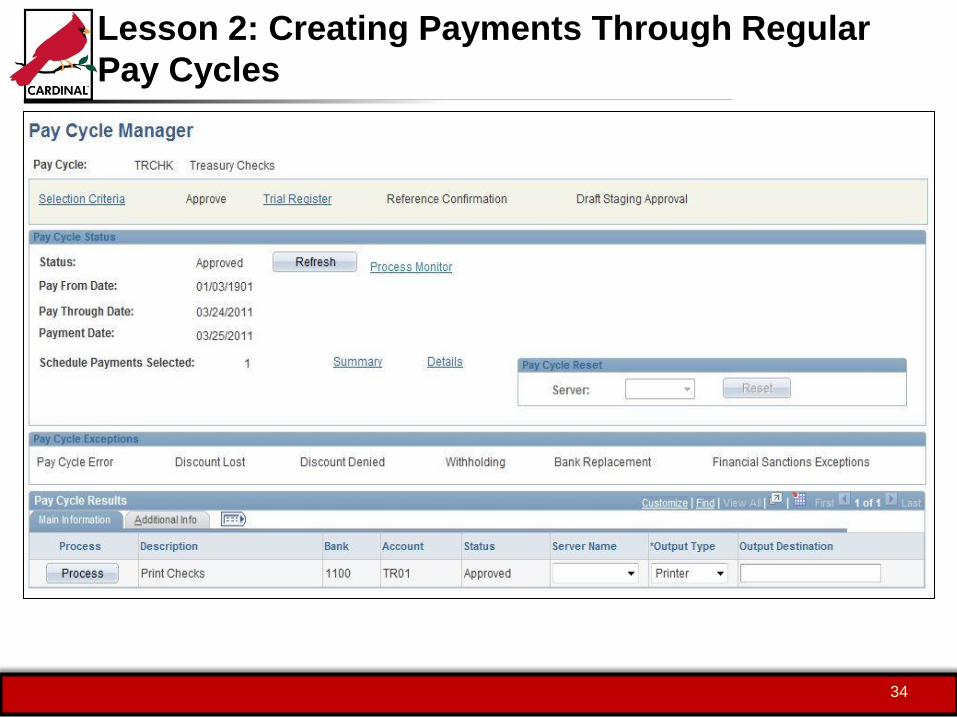
Pay Cycle Manager Page
You use the Pay Cycle Manager page to initiate and
monitor pay cycle processing. This page is available to
the Accounts Payable Batch Processor who performs
overnight payment processing for the Treasury bank
accounts.
You can navigate to this page through the following
path:
Main Menu > Accounts Payable > Payments > Pay
Cycle Processing > Pay Cycle Manager
You use the Pay Cycle Manager page to step through
the processes in pay cycle processing. This page helps
you perform the processes in the correct order, and
provides links to view exceptions.
33
Lesson 2: Creating Payments Through Regular
Pay Cycles
34

Lesson 2: Creating Payments Through Regular
Pay Cycles
Topic 3: Updating Payment Selection Date
Updating Payment Selection Date
As you learned earlier, Cardinal can use different pay cycles for different groups of payments.
Payment Selection is the first process to run in a pay cycle. The Payment Selection process selects vouchers and expense
transactions for payment based on the payment selection criteria. Each pay cycle has different selection criteria so different
transactions will be selected for payment in each cycle.
In all pay cycles, the date criteria need to be updated manually each day before the pay cycles run. This causes the
transactions that are scheduled for payment that day to be selected. This topic introduces you to the procedures for defining
the date criteria for a pay cycle.
Note: Other payment selection criteria can be changed as well, but this is done rarely and is not covered here.
35
Lesson 2: Creating Payments Through Regular
Pay Cycles
Topic 3: Updating Payment Selection Date
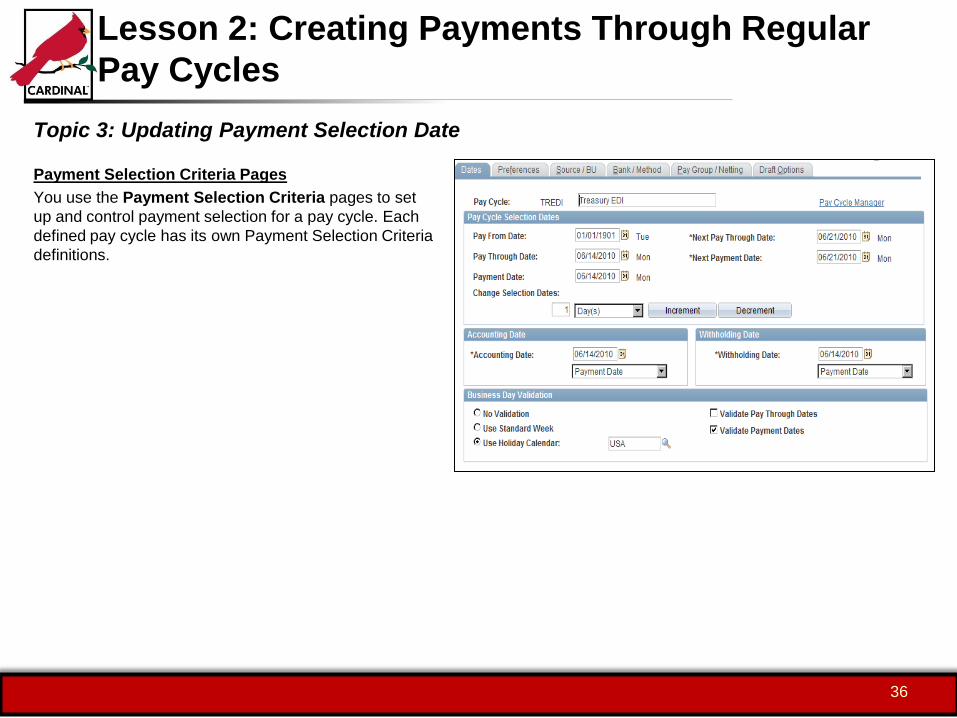
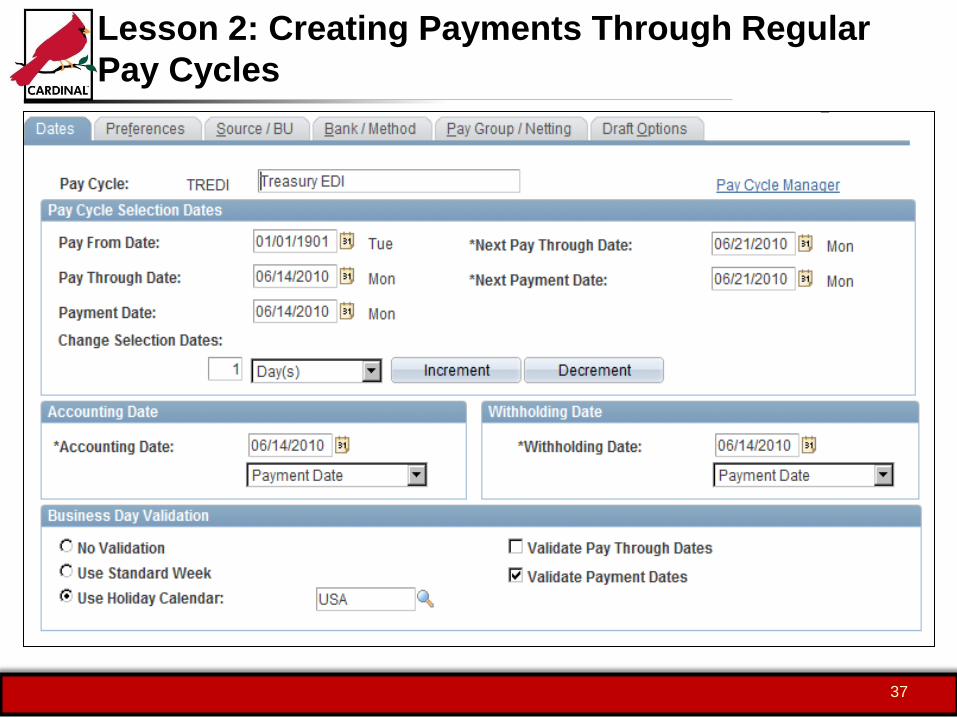
Payment Selection Criteria Pages
You use the Payment Selection Criteria pages to set
up and control payment selection for a pay cycle. Each
defined pay cycle has its own Payment Selection Criteria
definitions.
36
Lesson 2: Creating Payments Through Regular
Pay Cycles
37

Lesson 2: Creating Payments Through Regular
Pay Cycles
Topic 3: Updating Payment Selection Date
Updating Pay Cycle Date Criteria
Updating pay cycle date criteria is done on the Payment
Selection Criteria page.
You can navigate to this page through the following path:
Main Menu > Accounts Payable > Pay Cycle
Processing > Payment Selection Criteria
The steps for updating the date criteria are:
• In the Pay Cycle field of the Payment Selection
Criteria Find an Existing Value page.
• Enter the ID of the pay cycle to be updated
(TRCHK for the warrant pay cycle, or TREDI for
the EDI pay cycle).
• Click the Search button.
38
Lesson 2: Creating Payments Through Regular
Pay Cycles
Topic 3: Updating Payment Selection Date
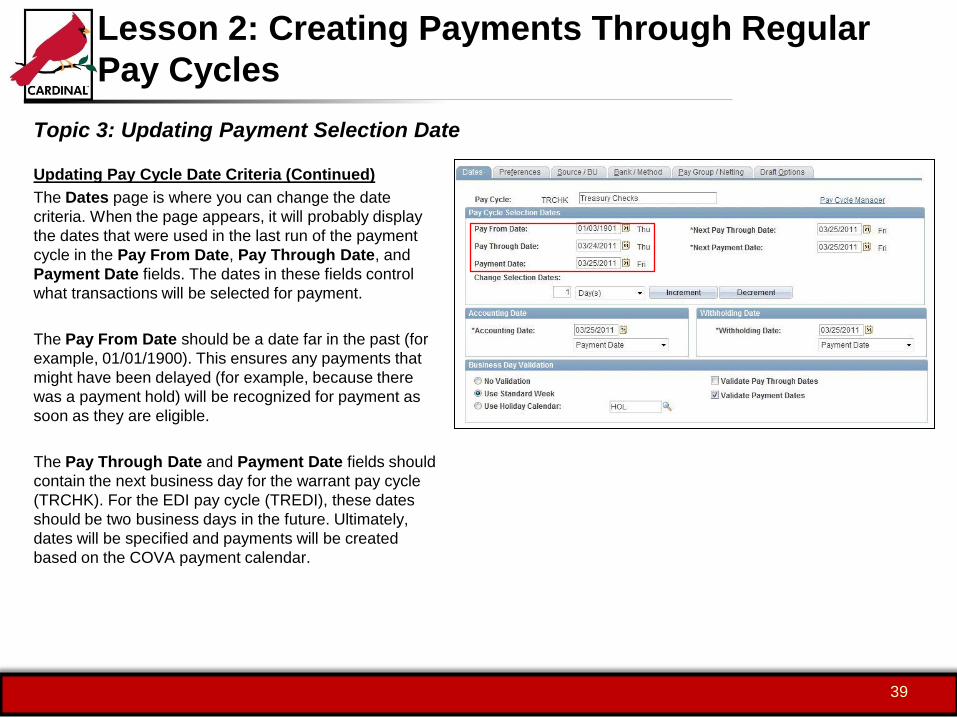
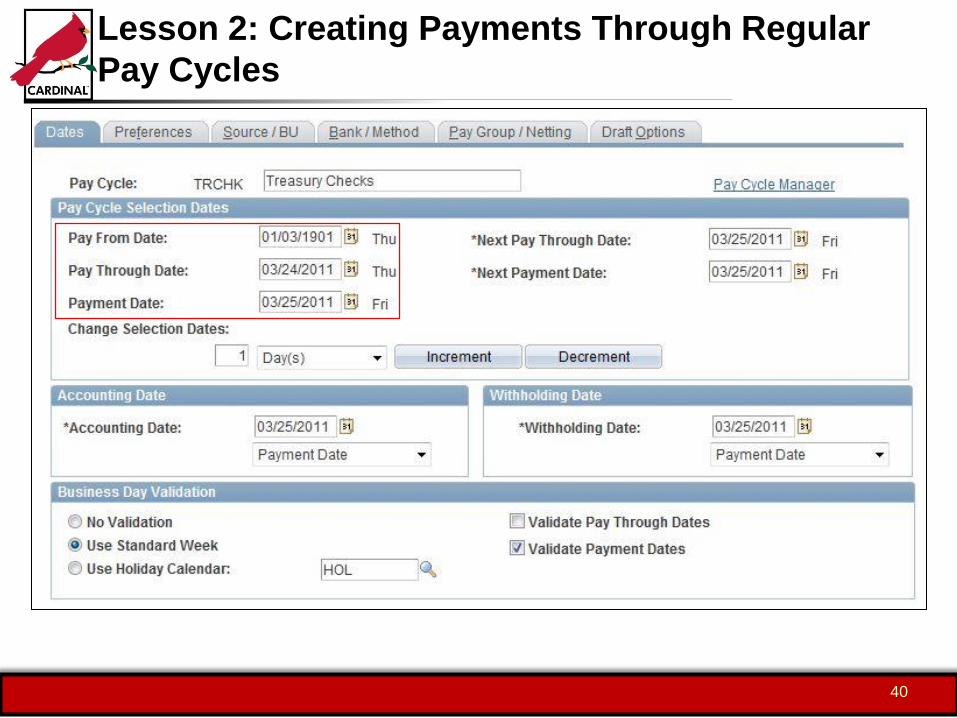
Updating Pay Cycle Date Criteria (Continued)
The Dates page is where you can change the date
criteria. When the page appears, it will probably display
the dates that were used in the last run of the payment
cycle in the Pay From Date, Pay Through Date, and
Payment Date fields. The dates in these fields control
what transactions will be selected for payment.
The Pay From Date should be a date far in the past (for
example, 01/01/1900). This ensures any payments that
might have been delayed (for example, because there
was a payment hold) will be recognized for payment as
soon as they are eligible.
The Pay Through Date and Payment Date fields should
contain the next business day for the warrant pay cycle
(TRCHK). For the EDI pay cycle (TREDI), these dates
should be two business days in the future. Ultimately,
dates will be specified and payments will be created
based on the COVA payment calendar.
39
Lesson 2: Creating Payments Through Regular
Pay Cycles
40

Lesson 2: Creating Payments Through Regular
Pay Cycles
Topic 3: Updating Payment Selection Date
Updating Pay Cycle Date Criteria (Continued)
There are other fields on the Dates page as well, though
they do not often need to be changed manually.
• The Next Pay Through Date and Next Payment
Date fields display the dates that are expected to
be used for the next cycle.
• The Accounting Date is the accounting date that
will be used for the payments and the
Withholding Date is the date that will be used in
the withholding transaction record for payments to
withholding (1099) vendors. These days are
automatically adjusted according to the criteria in
the drop-down list fields below the dates.
• The Business Day Validation section includes
fields for adjusting the dates automatically for
weekends and holidays. The values in these fields
should not be changed.
41

Lesson 2: Creating Payments Through Regular
Pay Cycles
42
Lesson 2: Creating Payments Through Regular
Pay Cycles
Topic 3: Updating Payment Selection Date
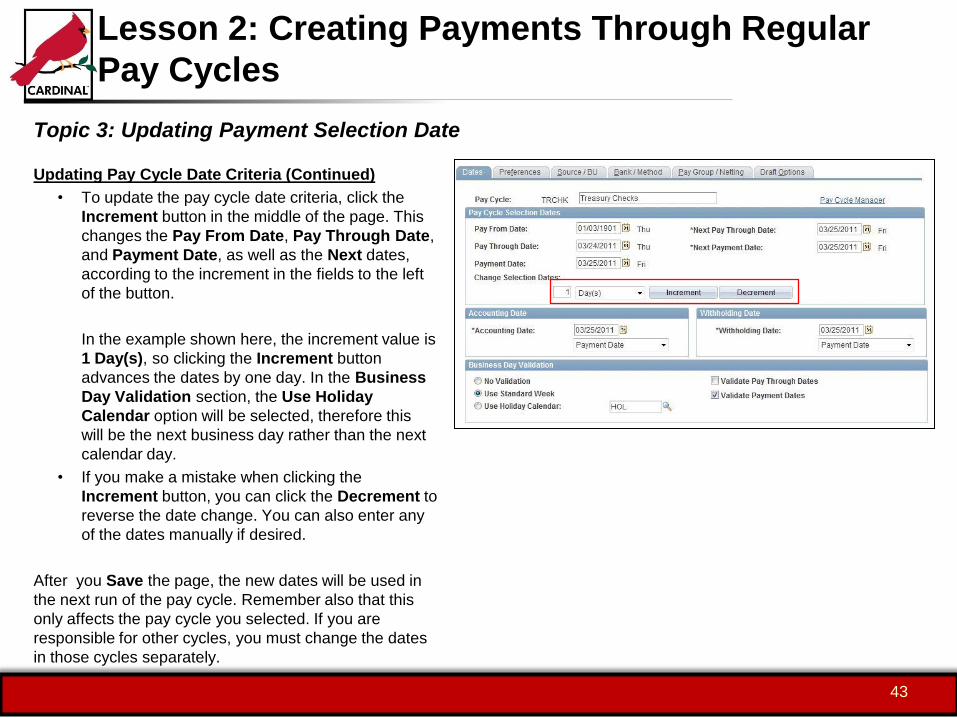
Updating Pay Cycle Date Criteria (Continued)
• To update the pay cycle date criteria, click the
Increment button in the middle of the page. This
changes the Pay From Date, Pay Through Date,
and Payment Date, as well as the Next dates,
according to the increment in the fields to the left
of the button.
In the example shown here, the increment value is
1 Day(s), so clicking the Increment button
advances the dates by one day. In the Business
Day Validation section, the Use Holiday
Calendar option will be selected, therefore this
will be the next business day rather than the next
calendar day.
• If you make a mistake when clicking the
Increment button, you can click the Decrement to
reverse the date change. You can also enter any
of the dates manually if desired.
After you Save the page, the new dates will be used in
the next run of the pay cycle. Remember also that this
only affects the pay cycle you selected. If you are
responsible for other cycles, you must change the dates
in those cycles separately.
43

Lesson 2: Creating Payments Through Regular
Pay Cycles
44

Lesson 2: Creating Payments Through Regular
Pay Cycles
Topic 4: Running Payment Selection and Payment Create Processes
Payment Selection Process and Payment Creation
Processes
Two major processes of the pay cycle include: the
Payment Selection process and the Payment Creation
process.
• Payment Selection Process: This process
selects the vouchers or expense transactions for
payment, according to the selection criteria for the
cycle as you learned in the previous topic.
• Payment Creation Process: This process
creates records that will be used for generating
payments by the Payment Output processes that
follow later in the cycle. To do this, the Payment
Creation process combines all selected items for a
payee and handling code into a single payment –
for example, all vouchers for a particular vendor
selected by the pay cycle. (Vouchers can be
selected to be paid separately, but this is not
common.)
These processes are run nightly as part of the Treasury
pay cycles. If errors occur in these processes, Cardinal
generates exceptions, which can be reviewed and
resolved in the next step.
45

Lesson 2: Creating Payments Through Regular
Pay Cycles
46

Lesson 2: Creating Payments Through Regular
Pay Cycles
Topic 5: Locating and Resolving Payment Processing Exceptions
Payment Processing Exceptions
Treasury pay cycle processing runs overnight. Each morning, the Payment Processor should check if any errors (exceptions)
occurred in the previous night’s run. Once corrected, they will automatically be resubmitted for processing in the next night’s
run.
47

Lesson 2: Creating Payments Through Regular
Pay Cycles
Topic 5: Locating and Resolving Payment Processing Exceptions
Locating Payment Processing Exceptions
Various Payment Cycle Exceptions pages can be found in the Pay Cycle Exceptions folder.
You can navigate to this folder through the following path:
Main Menu > Accounts Payable > Payments > Pay Cycle Exceptions
Several different types of exceptions can occur. The menu lists each type separately. When you check a processing run for
exceptions, you should check these types:
• Review Pay Cycle Errors: This page lists errors in the basic payment process for a payment, such as missing or
corrupted data.
• Review Withholding Alert: This page lists errors in the withholding (1099) transaction process, for payments to
withholding vendors.
• Pay Cycle SDN List Exceptions: This page lists errors related to financial sanctions, where the vendor is subject to
these sanctions.
48

Lesson 2: Creating Payments Through Regular
Pay Cycles
Topic 5: Locating and Resolving Payment Processing Exceptions
Displaying Exception Details
Making a selection on the Pay Cycle Exceptions menu lets you display any exceptions of that type on a details page. An
example of one of the details pages appears here.
This page displays details to help resolve the exception, such as the record/field where the exception occurred, the specific
error message text, etc.
If more than one exception occurred, you can display the additional exceptions on subsequent rows.
49

Lesson 2: Creating Payments Through Regular
Pay Cycles
Topic 5: Locating and Resolving Payment Processing Exceptions
Resolving Payment Processing Exceptions
The steps for resolving payment processing exceptions depend on the specific exception. In some cases, you may be able to
correct the voucher. In other cases, research may be required to resolve.
Remember that after you make the necessary corrections, the item will be reprocessed in the next run. If the correction was
successful, it will no longer appear as an exception and it will be paid along with the other items.
50
Lesson 2: Creating Payments Through Regular
Pay Cycles
Topic 6: Running Payment Output Processes
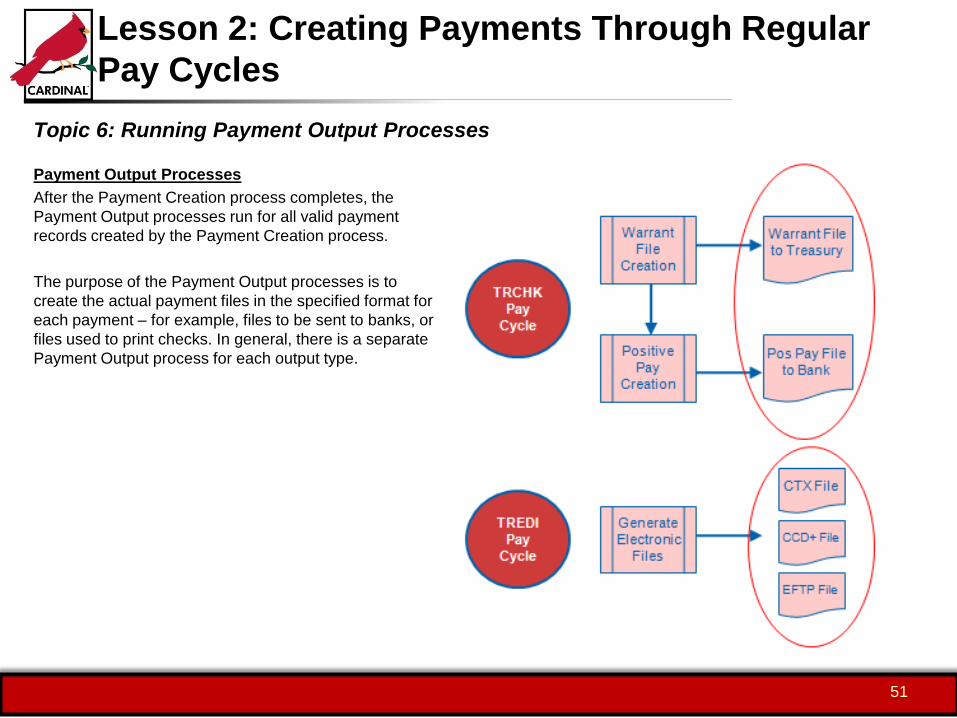
Payment Output Processes
After the Payment Creation process completes, the
Payment Output processes run for all valid payment
records created by the Payment Creation process.
The purpose of the Payment Output processes is to
create the actual payment files in the specified format for
each payment – for example, files to be sent to banks, or
files used to print checks. In general, there is a separate
Payment Output process for each output type.
51

Lesson 2: Creating Payments Through Regular
Pay Cycles
Topic 7: Files Created by Payment Process
Files Created by Payment Process
As noted earlier, pay cycle processing creates various files that include payment records. The specific numbers and types of
files created depend on the specifics of the pay cycle, such as the payment methods used.
Here is a summary of the types of files created by the Payment Output processes. Not every individual file is listed because
different files may be created at different times or for special purposes:
• Automated Clearing House (ACH) files: Files are sent to the bank with direct deposit information.
• Warrant Check files: These are flat files containing warrant details and remittance data. The files are interfaced to
the Department of Treasury for printing.
• Positive Pay files: These are flat files sent to the bank containing all check payments created by the pay cycle for
that bank. When the bank receives a request to process the check for payment, they compare the check to the
Positive Pay file, preventing fraud.
52
Lesson 2: Creating Payments Through Regular
Pay Cycles
Topic 8: Running Payment Post Process
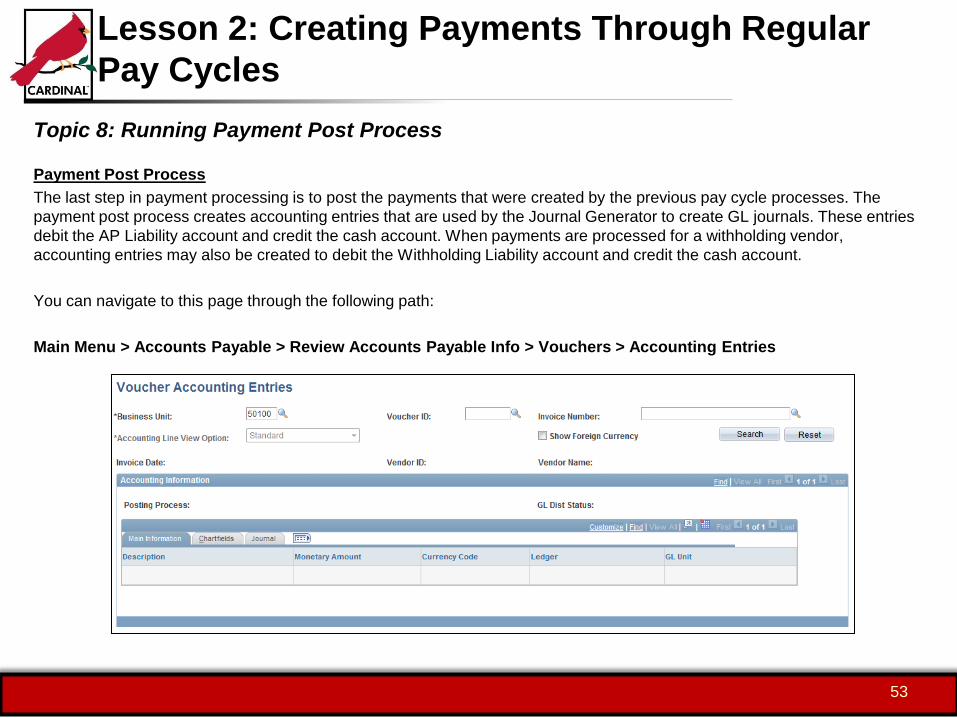
Payment Post Process
The last step in payment processing is to post the payments that were created by the previous pay cycle processes. The
payment post process creates accounting entries that are used by the Journal Generator to create GL journals. These entries
debit the AP Liability account and credit the cash account. When payments are processed for a withholding vendor,
accounting entries may also be created to debit the Withholding Liability account and credit the cash account.
You can navigate to this page through the following path:
Main Menu > Accounts Payable > Review Accounts Payable Info > Vouchers > Accounting Entries
53

Lesson 2: Creating Payments Through Regular
Pay Cycles
Lesson Summary
Lesson Summary
In this lesson, you learned:
• There are two nightly Treasury pay cycles that process warrant and EDI payments for all agencies. The Payment
Processor must review any exceptions that occur in these cycles.
• You use the Pay Cycle Manager page to initiate and monitor pay cycle processing. This page is available to the
Accounts Payable Batch Processor who performs overnight payment processing for the Treasury bank accounts.
• Pay cycle processing creates various files that include payment records. The specific numbers and types of files
created depend on the specifics of the pay cycle, such as the payment methods used.
• The two major processes of the pay cycle include the Payment Selection process and the Payment Creation process.
• The last step in payment processing is to post the payments that were created by the previous pay cycle processes.
54
Lesson 3: Creating Special Payments
Introduction
Lesson Objectives
After completing this lesson, you will be able to:
• Describe the purpose of express payments and manual payments
• Create an express payment for petty cash
• Explain how to record a manual payment on the voucher
55

Lesson 3: Creating Special Payments
Introduction
Lesson Topics
In this lesson, you will learn about the following topics:
• Special Payments Overview
• Creating express payments for Petty Cash
• Recording Manual Payments
56
Lesson 3: Creating Special Payments
Topic 1: Special Payments Overview
Special Payments Overview
In the previous lesson, you learned about the steps in the regular pay cycles. In this lesson, you will learn about methods of
payment other than the regular pay cycle. These methods include the following:
• Creating Express Payments for Petty Cash: This task, performed by a Petty Cash Processor, generates
payments using Cardinal’s express payment feature.
• Recording Manual Payments: This is a procedure to record payments in Cardinal that were made manually
outside of Cardinal. For example, by a manual check given directly to a vendor.
57

Lesson 3: Creating Special Payments
Topic 2: Creating Express Payments for Petty Cash
Creating Express Payments for Petty Cash
A petty cash payment can be issued quickly by creating an express payment. As noted above, a Petty Cash Processor
creates the express payment to generate a single payment that allows a check to be printed immediately.
58

Lesson 3: Creating Special Payments
Topic 2: Creating Express Payments for Petty Cash
Express Payment Page
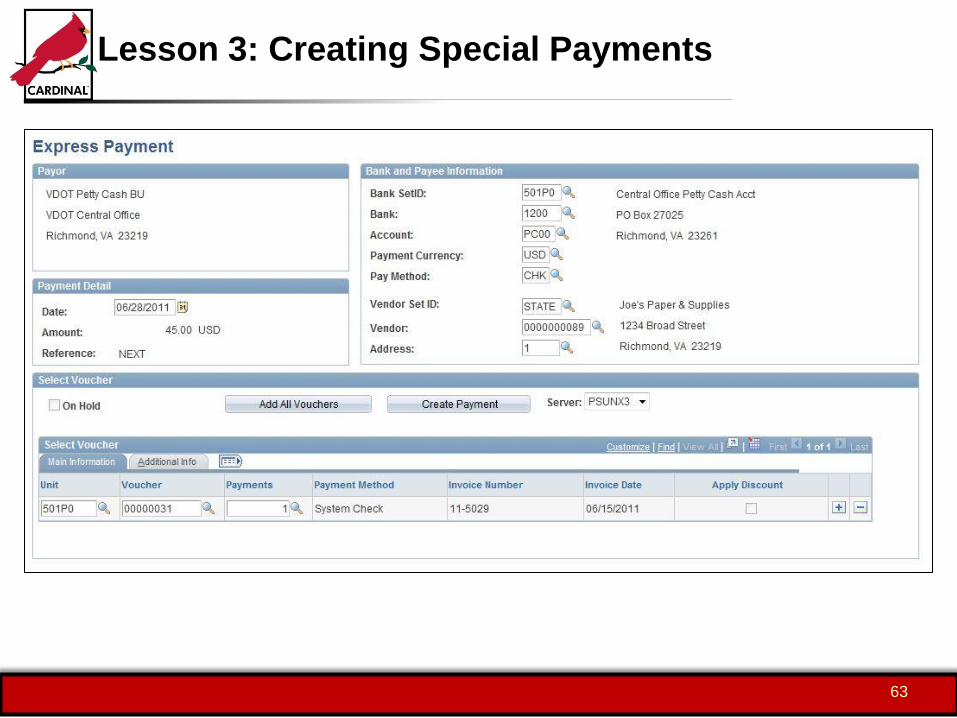
You use the Express Payment page to generate express payments. On this page, enter bank information, vendor
information, and select the vouchers to that vendor to be paid. There are several fields that need to be completed to create the
express payment.
You can navigate to the page through the following path:
Main Menu > Accounts Payable > Payments > Express Payments > Create Express Payment
The Payor section defaults to the agency, so you do not need to make any changes in this section. In the Payment Detail
section, the Date defaults to the current date, and can be changed if needed.
59

Lesson 3: Creating Special Payments
Topic 2: Creating Express Payments for Petty Cash
In the Bank and Payee Information section:
• Bank SetID is the SetID that applies to your particular agency (e.g., the agency’s bank).
• Bank and Account specify the account that the payment should be taken from. Enter or select the bank and account
numbers to be used for payment in these fields.
• Pay Method specifies that the vendor should be paid by check.
• Vendor Set ID is the SetID that applies to your particular agency.
• Vendor contains the ID of the vendor to which the payment should be made. Enter or select the vendor’s ID.
• Address defaults based on the vendor’s default remitting address. If you need to change this to another address, you
can do so by modifying the value in this field.
60

Lesson 3: Creating Special Payments
Topic 2: Creating Express Payments for Petty Cash
In the Select Voucher section:
• If you want to pay all outstanding vouchers to the vendor, you can click the Add All Vouchers button. If you want to
pay specific voucher(s), add information on each in the Select Voucher table.
• Business Unit contains the Business Unit of the voucher that you want to include in this payment (e.g., your Business
Unit).
• Voucher contains the voucher ID of the voucher you want to include in this payment. Enter or select this value.
• You can enter additional vouchers to be included in the payment if you wish by clicking the Add New Row button and
entering them on additional rows.
61
Lesson 3: Creating Special Payments
Topic 2: Creating Express Payments for Petty Cash
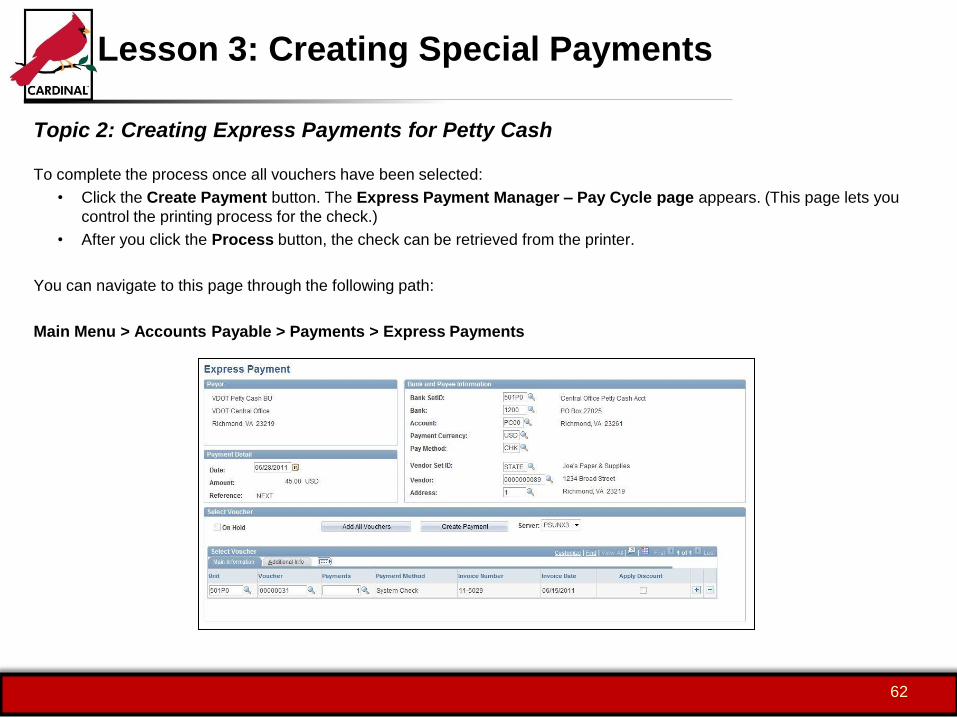
To complete the process once all vouchers have been selected:
• Click the Create Payment button. The Express Payment Manager – Pay Cycle page appears. (This page lets you
control the printing process for the check.)
• After you click the Process button, the check can be retrieved from the printer.
You can navigate to this page through the following path:
Main Menu > Accounts Payable > Payments > Express Payments
62
Lesson 3: Creating Special Payments
63

Lesson 3: Creating Special Payments
Topic 3: Recording Manual Payments
Manual Payments
Sometimes it is necessary to pay a vendor by a manually-written check. Cardinal allows these payments to be accounted for
by recording them on the Payments page on the voucher.
Manual payments may be recorded either by the Voucher Processor Maintenance or the AP Manager. (Other Voucher
Processors do not have access to the necessary fields.)
64

Lesson 3: Creating Special Payments
Topic 3: Recording Manual Payments
Recording a Manual Payment
You can navigate to this page through the following path:
Main Menu > Accounts Payable > Voucher >
Add/Update > Regular Entry
To record a manual payment on the Payments page of
the voucher, use these fields:
• In the Method field in the Payment Options
section, enter MAN to indicate a manual payment
or WIR to indicate a wire payment.
• In the Action drop-down list in the Schedule
Payment section, select Record a Payment.
• In the Pay field in the drop-down list, select the
appropriate value (for example, Full Amount),
and enter a specific value paid if appropriate.
• Enter the date in the Payment Date field, and a
reference (such as the check number) in the
Reference field.
• Click the Save button.
Manual payments can only be recorded on budget
checked and approved vouchers.
65

Lesson 3: Creating Special Payments
66

Lesson 3: Creating Special Payments
Lesson Summary
Lesson Summary
In this lesson, you learned:
• The difference between express payments and manual payments
• The workflow for creating an express payment for petty cash
• When a manual payment should be recorded on the voucher and who has access to do so
67
Lesson 4: Managing Payments
Introduction
Lesson Objectives
After completing this lesson, you will be able to:
• Cancel payments
• Reconcile petty cash bank statements
68
Lesson 4: Managing Payments
Introduction
Lesson Topics
In this lesson, you will learn about the following topics:
• Payment management and maintenance tasks
• Canceling payments
• Reconciling petty cash bank statements
69

Lesson 4: Managing Payments
Topic 1: Payment Management and Maintenance Tasks
Payment Management and Maintenance Tasks
So far in this course, you have learned about the payment processing tasks performed in routine, day-to-day operation.
However, there are other tasks included in payment management that you will perform less frequently, but that are still
necessary for smooth operation.
70

Lesson 4: Managing Payments
Topic 1: Payment Management and Maintenance Tasks
Payment Management Tasks
The tasks in this lesson include:
• Canceling payments, which involves either voiding payments or stopping payments, depending on the payment’s
current status.
• Reconciling petty cash bank statements, which uses the Manual Reconciliation process, to reconcile petty cash
payments to hard copy bank statements.
71

Lesson 4: Managing Payments
Topic 2: Canceling Payments
Canceling Payments Overview
Payments can be canceled in Cardinal if necessary. There are two statuses that can be requested for canceled payments,
which are useful in different cases:
• Void Payment: This status can be requested for payments that have not been sent to the vendor yet. Voiding a
payment automatically reconciles it in Cardinal.
• Stop Payment: This status is requested when a check has not been processed by the bank. When you request this
status, the bank must have already been notified to stop payment. The stop payment process is initiated by Treasury.
Treasury will then request a Cardinal user to enter the stop payment in Cardinal. Stopping a payment automatically
reconciles it in Cardinal.
72
Lesson 4: Managing Payments
Topic 2: Canceling Payments
Disposition of Canceled Payments
When a payment is canceled by either Void or Stop, Cancel Actions are available to determine what will happen with the
payment’s associated voucher(s) or other payment items. There are three options:
• Re-Open Voucher(s)/Re-Issue: This will reopen the vouchers and make them eligible for payment.
• Re-Open Voucher(s)/Put on Hold: This will reopen the vouchers but put a Payment Hold on them so they can be
investigated further.
• Do Not Reissue/Close Liability: This will close the vouchers, and create accounting entries to reverse the liabilities
created by voucher posting. If the payment is to be made later, new voucher(s) would need to be created.
73

Lesson 4: Managing Payments
Topic 2: Canceling Payments
Undoing Cancellations
In addition to the options detailed on the previous pages, you can undo either a Void or a Stop by re-displaying the
payment on the Cancel Payment page, and selecting the Undo Cancel status. This will reverse whatever the previous
option was. This action can only be taken before the canceled payment is posted.
Selecting a Cancel Action is not necessary when selecting Undo Cancel.
74

Lesson 4: Managing Payments
Topic 2: Canceling Payments
Cancel Payment Page
The Cancel Payment page appears here. You can perform the tasks in this topic from this page.
You can navigate to this page through the following path:
Main Menu > Accounts Payable > Payments > Cancel/Void Payments > Payment Cancellation
75

Lesson 4: Managing Payments
Topic 2: Canceling Payments
Posting After Cancellation
After the cancellation options in the previous topic are performed, the nightly batch processes finalize the action:
• When a payment is canceled by either a Void or a Stop, the Payment Post process must run to create reversing
accounting entries for the payment cancellation transaction.
• If the Do Not Reissue/Close Liability Cancel Action is selected, the Voucher Post process must run to create
reversing accounting entries to reflect the closed vouchers that were affected by the closed payment.
• Note that once the Payment Post process runs, the Undo Cancel option can no longer be selected.
You do not need to run these processes yourself. They are run in batch, not automatically, and you should be aware that the
cancellations will not be finalized until the automatic processes are complete.
76

Lesson 4: Managing Payments
Topic 3: Reconciling Petty Cash Bank Statements
Petty Cash Reconciliation
Petty cash payments must be reconciled manually against the paper bank statement.
This step should be performed at least monthly, when the bank statement is received.
77

Lesson 4: Managing Payments
Topic 3: Reconciling Petty Cash Bank Statements
Manual Reconciliation Page
To reconcile payments, you use the Manual Reconciliation page.
You can navigate to this page through the following path:
Main Menu > Banking > Reconcile Statements > Manual Reconciliation
78

Lesson 4: Managing Payments
Topic 3: Reconciling Petty Cash Bank Statements
The steps for reconciliation are:
• Enter criteria in the Search Criteria section of the
page, including the bank, account, date range,
status (Unreconciled) and payment method. Click
the Search button.
• Transactions meeting the search criteria appear in
the Systems Transactions section. These are
the payment transactions that were created in
Cardinal.
• Review the paper bank statement, and match
each transaction on the bank statement to a
transaction on the screen.
• For each matched transaction, select the
checkbox in the Select column.
• After matching all transactions on the statement,
click the Reconcile button on the screen. The
status of the transactions will be changed to
Reconciled.
Note: You can unreconcile a previously reconciled
transaction if necessary, by searching for reconciled
transactions, selecting the transaction, and clicking the
Unreconcile button that appears.
79
Lesson 4: Managing Payments
Lesson Summary
Lesson Objectives
In this lesson, you learned:
• Canceling payments involves either voiding payments or stopping payments, depending on the payment’s current
status.
• Reconciling petty cash bank statements uses the Manual Reconciliation process to reconcile petty cash payments to
hard copy bank statements.
• Petty cash payments must be reconciled manually against the paper bank statement and should be performed at
least monthly, when the bank statement is received.
• When a payment is canceled by either a Void or a Stop, the Payment Post process must run to create reversing
accounting entries for the payment cancellation transaction.
80
Lesson 5: Payment Reports and Online Inquiries
Introduction
Lesson Objectives
After completing this lesson, you will be able to:
• Describe the key reports available
• Describe the key online inquiries available
81
Lesson 5: Payment Reports and Online Inquiries
Introduction
Lesson Topics
In this lesson, you will learn about the following topics:
• Reports
• Online Inquiries
82
Lesson 5: Payment Reports and Online Inquiries
Topic 1: Reports
Payment Reports
Payment reports can be run at various intervals. There are numerous payment reports available. Payment reports include:
• Payment History by Payment
• Due Date Monitoring
• Payment Register Including Offsets
Note: All users with access to view information in the Customers module will be able to run these reports.
83

Lesson 5: Payment Reports and Online Inquiries
Topic 1: Reports
Payment History by Payment Report
This report lists payments generated by a specified cycle and payment method for a specified date range.
You can navigate to this report through the following path:
Main Menu > Accounts Payable > Reports > Payments > Payment History by Payment
84

Lesson 5: Payment Reports and Online Inquiries
Topic 1: Reports
Due Date Monitoring Report
This report provides a list of payments due within the specified date range.
You can navigate to this report through the following path:
Main Menu > Accounts Payable > Reports > Payments > Due Date Monitoring Report
85
Lesson 5: Payment Reports and Online Inquiries
Topic 1: Reports
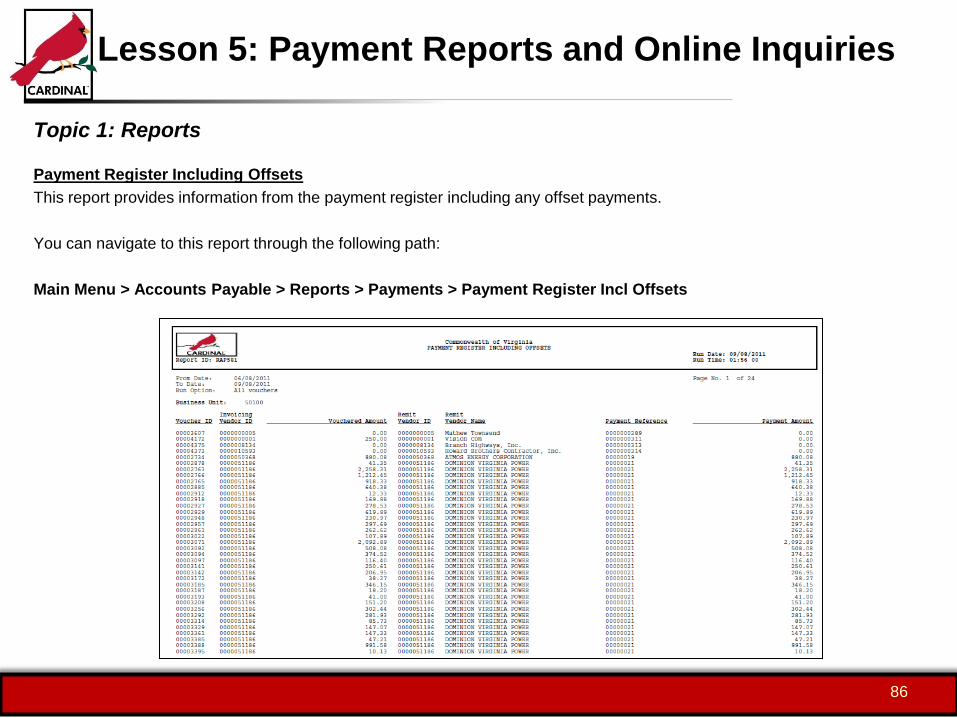
Payment Register Including Offsets
This report provides information from the payment register including any offset payments.
You can navigate to this report through the following path:
Main Menu > Accounts Payable > Reports > Payments > Payment Register Incl Offsets
86

87

Lesson 5: Payment Reports and Online Inquiries
Topic 2: Online Inquiries
Online Inquiries
Payment online inquiries can be run at various intervals. Payment online inquiries include:
• Payment Inquiry
• Document Status Inquiry
Note: All users with access to view information in the Accounts Payable module will be able to run these online inquiries.
88
Lesson 5: Payment Reports and Online Inquiries
Topic 2: Online Inquiries
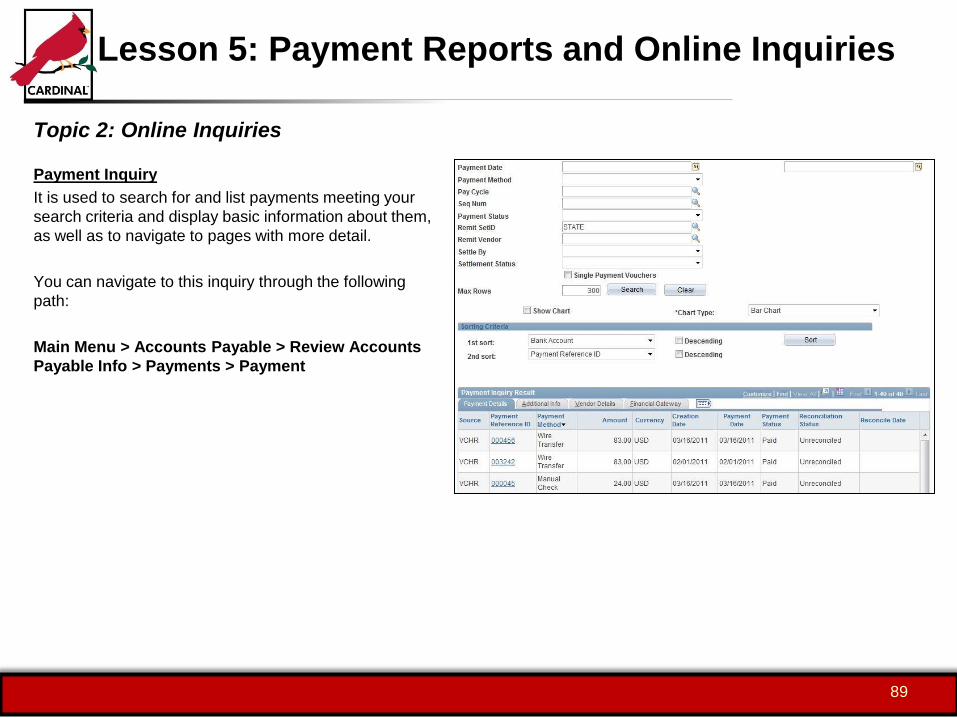
Payment Inquiry
It is used to search for and list payments meeting your
search criteria and display basic information about them,
as well as to navigate to pages with more detail.
You can navigate to this inquiry through the following
path:
Main Menu > Accounts Payable > Review Accounts
Payable Info > Payments > Payment
89

Lesson 5: Payment Reports and Online Inquiries
90

Lesson 5: Payment Reports and Online Inquiries
Lesson Summary
Lesson Summary
In this lesson, you learned how to:
• Describe the key payment reports
• Describe the key payment online inquiries
91

Lesson 6: Payment Processing Hands-On
Practice
Exercises
Exercises
Please refer to your Activity Guide to complete all the required exercises in Payment Processing. You are encouraged to
note all your questions and ask them to the instructor after completing all the exercises.
92

AP314: Payment Processing
Course Summary
In this course, you learned to:
• Define key payment processing terms
• Describe key payment processing concepts
• Describe the overall payment process and the roles involved in it
• Explain how payment processing integrates with the other Cardinal modules and external systems
• Describe the Treasury pay cycles
• List the steps in a pay cycle
• Use the Pay Cycle Manager to run payment processing
• Update the payment selection date in a pay cycle
• Identify and resolve payment selection exceptions
• Describe the files created by the payment process
• Describe the purpose of express payments and manual payments
• Create an express payment for petty cash
• Explain how to record a manual payment on the voucher
• Cancel payments
• Reconcile petty cash bank statements
• Describe key reports and online inquiries
93

AP314: Payment Processing
Course Evaluation
Course Completed
Congratulations! You successfully completed the AP314: Payment Processing course. Please use the evaluation link to
assess this course.
94