Antenna Genius v3 Windows App and Firmware Update Guide · Antenna Genius v3 Windows App and...
25
Antenna Genius v3 Windows App and Firmware Update Guide In September 2016, 4O3A Signature / Sky Sat released the v3 Antenna Genius Windows app (sometimes abbreviated as “App” in this document) and corresponding v3 firmware for the Antenna Genius family of devices : ● Antenna Genius 8x1 Plus ● Antenna Genius 8x2 ● Antenna Genius 8x2 Plus Note: “AG” in this document refers collectively to the entire Antenna Genius family of devices. The Antenna Genius v3 Windows app and v3 firmware adds three new features: 1. Stacking: ability to combine multiple 8x2 Plus AGs for 16x2, 24x2, and even 32x2 switching capability, available only on the ‘Plus’ models 2. Output Module Control: ability to switch 16 accessory OM (Output Module) relays, available on the 8x1 Plus and 8x2 Plus models 3. Three user programmable bands: can be any of range of frequencies supported by your transceiver, plus each of the ham band band edges can now also be user programmed Update procedure This procedure assumes you have already installed your AG on your station LAN. If you haven’t yet installed your AG, please do so first following the procedure in your Antenna Genius Owner’s Guide before updating your App and device firmware. You can download the Antenna Genius Owner’s Guide froum our webpage: http :// www .4 o 3 a . com / index . php / support / downloads / 1. Before proceeding, make sure to save your v2.0.0 Configuration file! Make sure to export your configuration file before upgrading the firmware to the a newer version. It will be lost otherwise. You will later import your manually saved v2.0 configuration file to the v3.0 app.
Transcript of Antenna Genius v3 Windows App and Firmware Update Guide · Antenna Genius v3 Windows App and...

Antenna Genius v3 Windows App and Firmware Update Guide
In September 2016, 4O3A Signature / Sky Sat released the v3 Antenna Genius Windows app (sometimes abbreviated as “App” in this document) and corresponding v3 firmware for the Antenna Genius family of devices :
● Antenna Genius 8x1 Plus● Antenna Genius 8x2● Antenna Genius 8x2 Plus
Note: “AG” in this document refers collectively to the entire Antenna Genius family of devices.
The Antenna Genius v3 Windows app and v3 firmware adds three new features:
1. Stacking: ability to combine multiple 8x2 Plus AGs for 16x2, 24x2, and even 32x2 switching capability, available only on the ‘Plus’ models
2. Output Module Control: ability to switch 16 accessory OM (Output Module) relays, available on the 8x1 Plus and 8x2 Plus models
3. Three user programmable bands: can be any of range of frequencies supported by your transceiver, plus each of the ham band band edges can now also be user programmed
Update procedure
This procedure assumes you have already installed your AG on your station LAN. If you haven’t yet installed your AG, please do so first following the procedure in your Antenna Genius Owner’s Guide before updating your App and device firmware.
You can download the Antenna Genius Owner’s Guide froum our webpage: http :// www .4 o 3 a . com / index . php / support / downloads /
1. Before proceeding, make sure to save your v2.0.0 Configuration file!
Make sure to export your configuration file before upgrading the firmware to the a newer version. It will be lost otherwise.
You will later import your manually saved v2.0 configuration file to the v3.0 app.
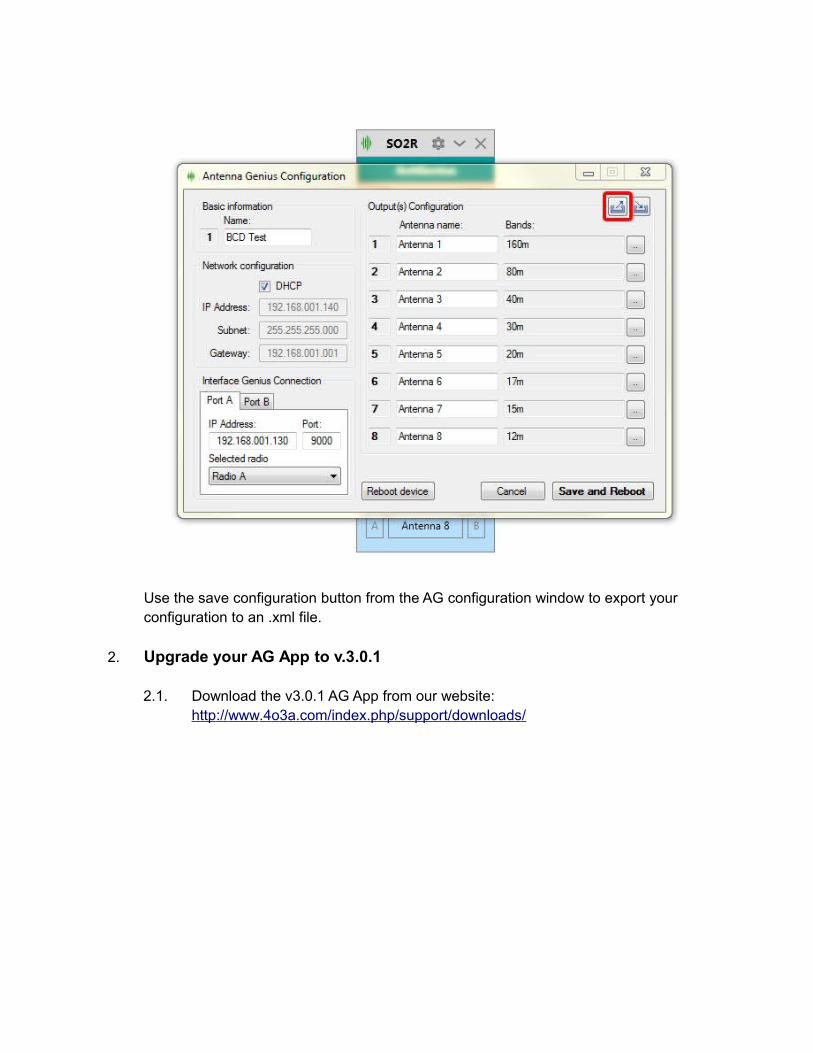
Use the save configuration button from the AG configuration window to export your configuration to an .xml file.
2. Upgrade your AG App to v.3.0.1
2.1. Download the v3.0.1 AG App from our website: http :// www .4 o 3 a . com / index . php / support / downloads /
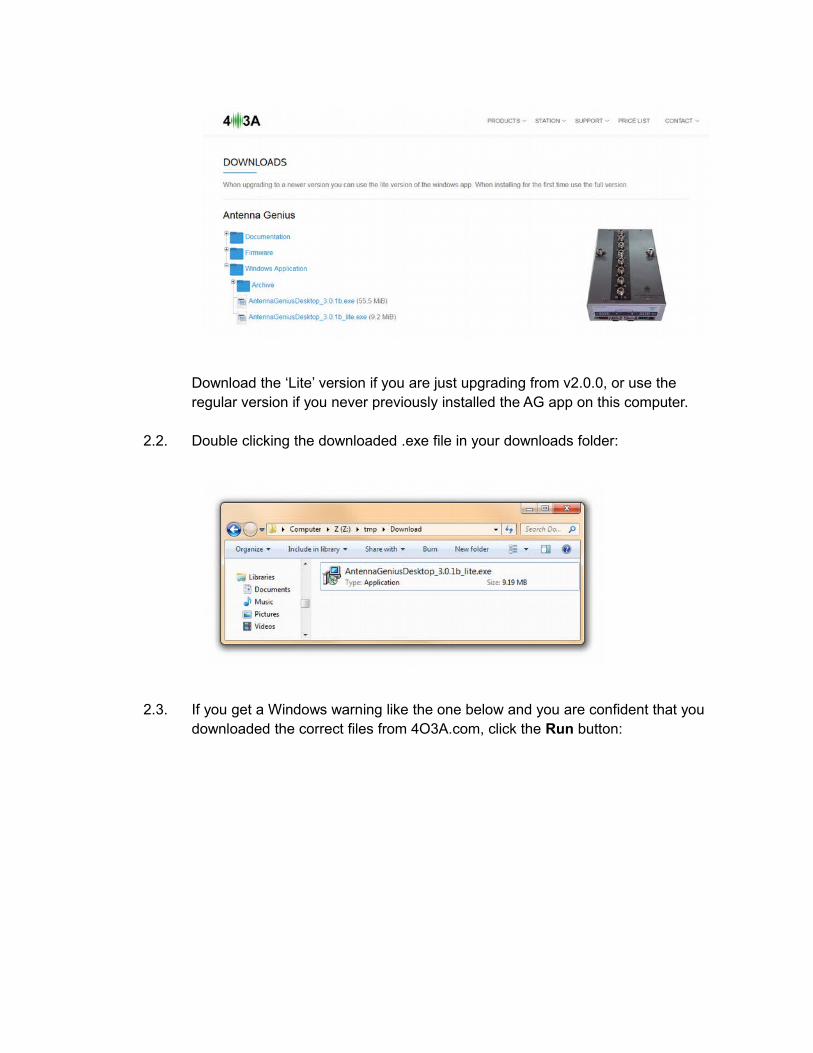
Download the ‘Lite’ version if you are just upgrading from v2.0.0, or use the regular version if you never previously installed the AG app on this computer.
2.2. Double clicking the downloaded .exe file in your downloads folder:
2.3. If you get a Windows warning like the one below and you are confident that you downloaded the correct files from 4O3A.com, click the Run button:

2.4. The second warning message is expected. Click Yes
2.5. Select your Setup Language and then click the OK button:
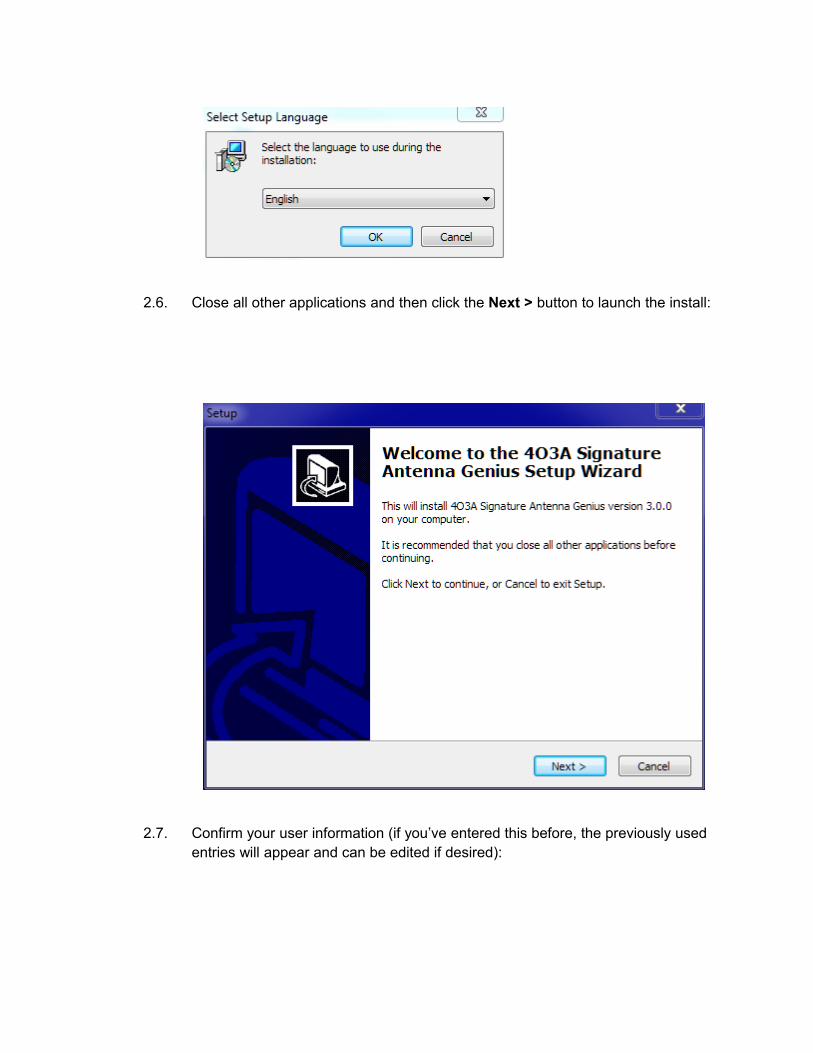
2.6. Close all other applications and then click the Next > button to launch the install:
2.7. Confirm your user information (if you’ve entered this before, the previously used entries will appear and can be edited if desired):

2.8. Select the location on your PC to install the new AG Windows app and click the Next > button; we recommend that you keep the default location C:\Program Files\4O3A Signature\Antenna Genius is recommended:

2.9. Create a Desktop Icon if you wish (optional and click the Next > button:

2.10. Review the information on the Ready to Install window and click the Install buttonif the information is correct; if you want to change any of the Set-Up info, click the< Back button and edit your entries as needed:
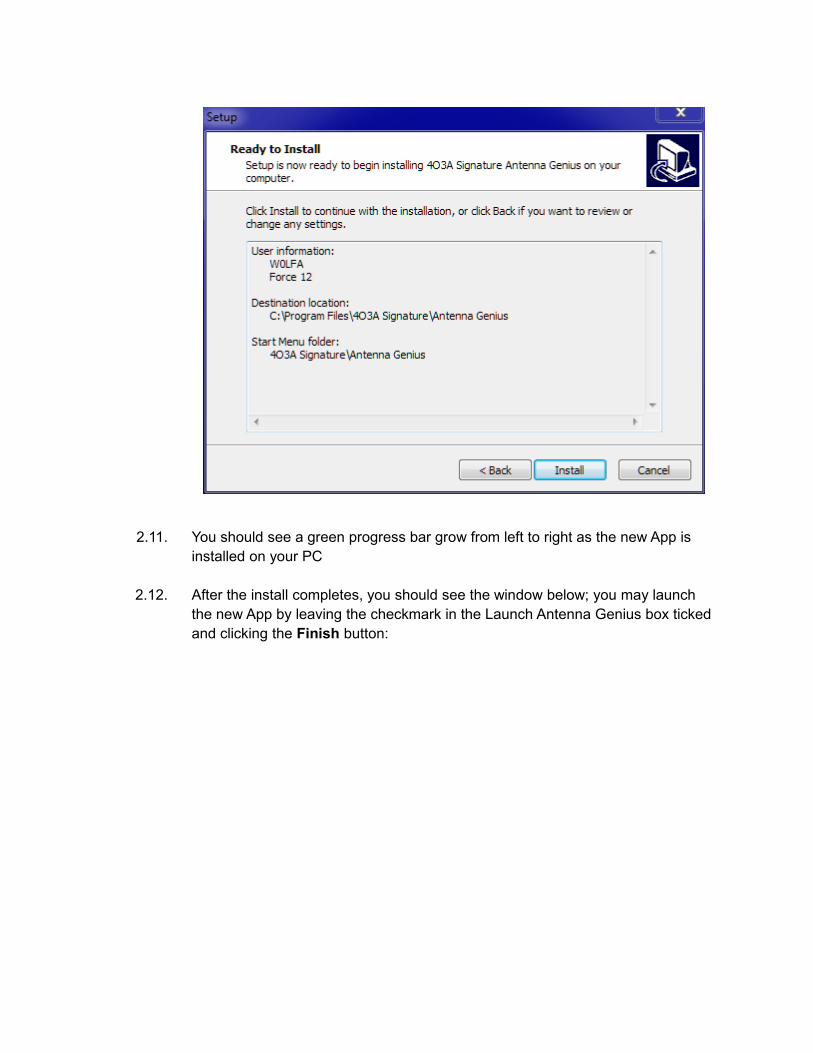
2.11. You should see a green progress bar grow from left to right as the new App is installed on your PC
2.12. After the install completes, you should see the window below; you may launch the new App by leaving the checkmark in the Launch Antenna Genius box ticked and clicking the Finish button:

2.13. The new App should now open the AG Discovery window and show you previously discovered AG(s) detected on your LAN:

2.14. Click the ? in the Discovery Window menu line to confirm that you are running the new v3.0.1 App:
3. Update your AG’s firmware to v3.x
3.1. Connect to your AG (your network IP subnet and address may be different from the examples below):
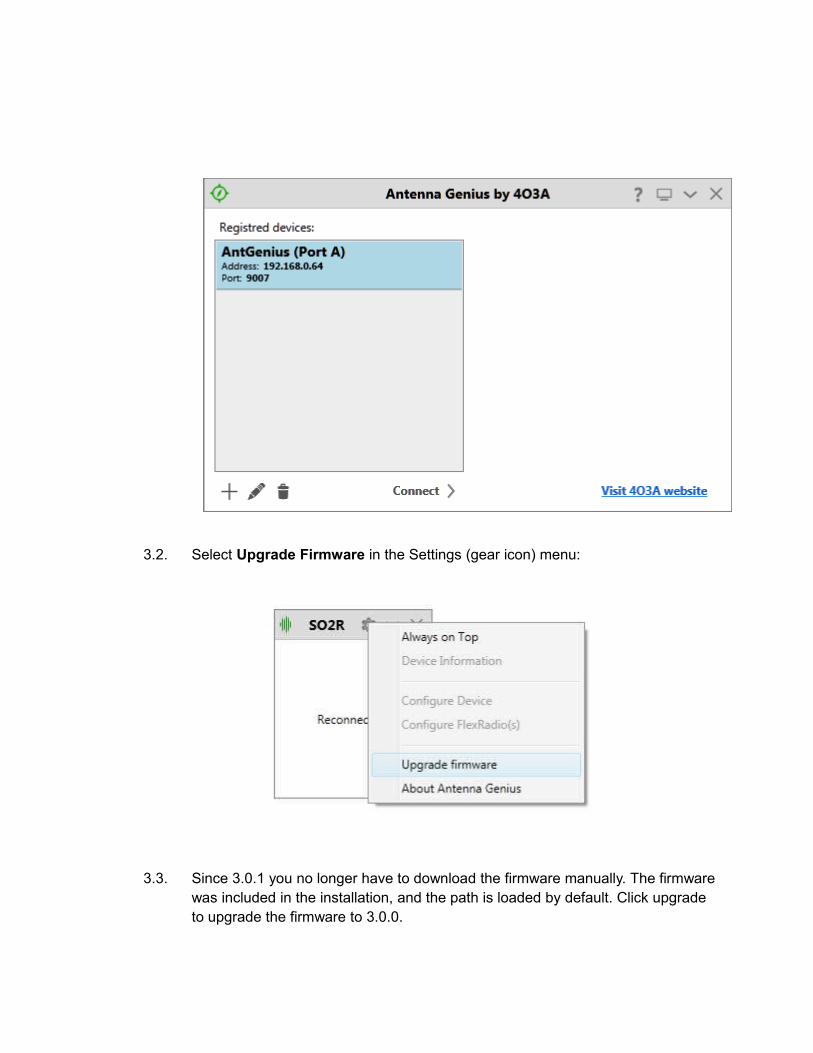
3.2. Select Upgrade Firmware in the Settings (gear icon) menu:
3.3. Since 3.0.1 you no longer have to download the firmware manually. The firmwarewas included in the installation, and the path is loaded by default. Click upgrade to upgrade the firmware to 3.0.0.

If for any reason the file is not loaded, download it from our webpage: http :// www .4 o 3 a . com / index . php / support / downloads /
3.4. The app will say “Upgrading”, be patient, this could take a few minutes. Do not interrupt power or LAN connection to AG during the upgrading process.
3.5. When the upgrade procedure is complete, click ok. The app will reconnect to the device.

If the app fails reconnect for longer than 20 seconds, disconnect from your AG and rediscover your device.
4. New Feature: Stacking
4.1. You can now combine multiple 8x2 Plus units for 16x2, 24x2, and even 32x2 switching capability.
4.2. For example, in this configuration we used two AG 8x2 Plus units and two 4O3A AB Switches to create 16x2 switch.
They use a Master / Slave design to make sure everything will work as intended.

We will configure the top device as a Master device. It is the one taking over control over the logic and the one you will be connecting to. It also holds the configuration file. There is only one configuration file for any stack configuration.
The bottom device will be configured as a Slave device. It will be waiting to issuecommands.
Keep the bottom device powered off to make sure you’re connected to the right one.
4.3. Connect to the top device, click the Gear icon and select Configure Device.
4.4. Notice the G and ID numbers in the top left corner. We will set Group as 1 and IDas 1 for this unit.
You change the Group by editing it directly from the app.
You change the ID by setting DIP switches on the device. To set ID as 1, set DIP 5, DIP 6 and DIP7 to OFF.
4.5.Note that the format has changed and there is a new command Configure Stack:

4.6. Note that the format has changed and there is a new command Configure Stack. Click it and set Mode to Master, and Length to 2. Press Accept, then Save and Reboot.

4.7. The device will reboot and reconnect. When you back to the configuration menu, you will see 16 antenna entries. You will use it the same way as the 8x2 switch, after we’ve configured the Slave device.
4.8. Disconnect from the Master unit. Power it off.
4.9. Power on the Slave unit. Connect to it.
4.10. Configure the mode to Slave.
Set the Group as 1 by editing it directly from the app.
Change the ID by setting DIP 5 to ON, DIP 6 and DIP7 to OFF. Press Accept, then Save and Reboot.

4.11. Power on both of the devices, connect to the first AG and enjoy your 16x2 switch.
5. New Feature: Custom Bands
5.1. Click Configure Bands to do this.
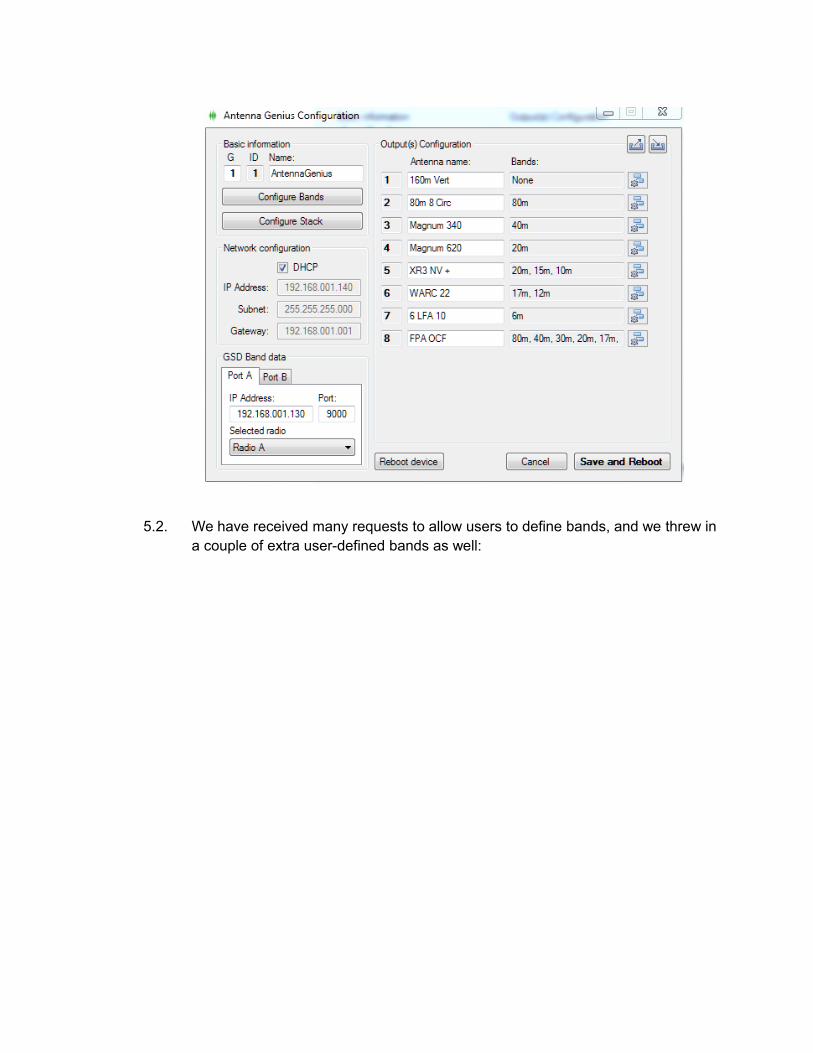
5.2. We have received many requests to allow users to define bands, and we threw ina couple of extra user-defined bands as well:
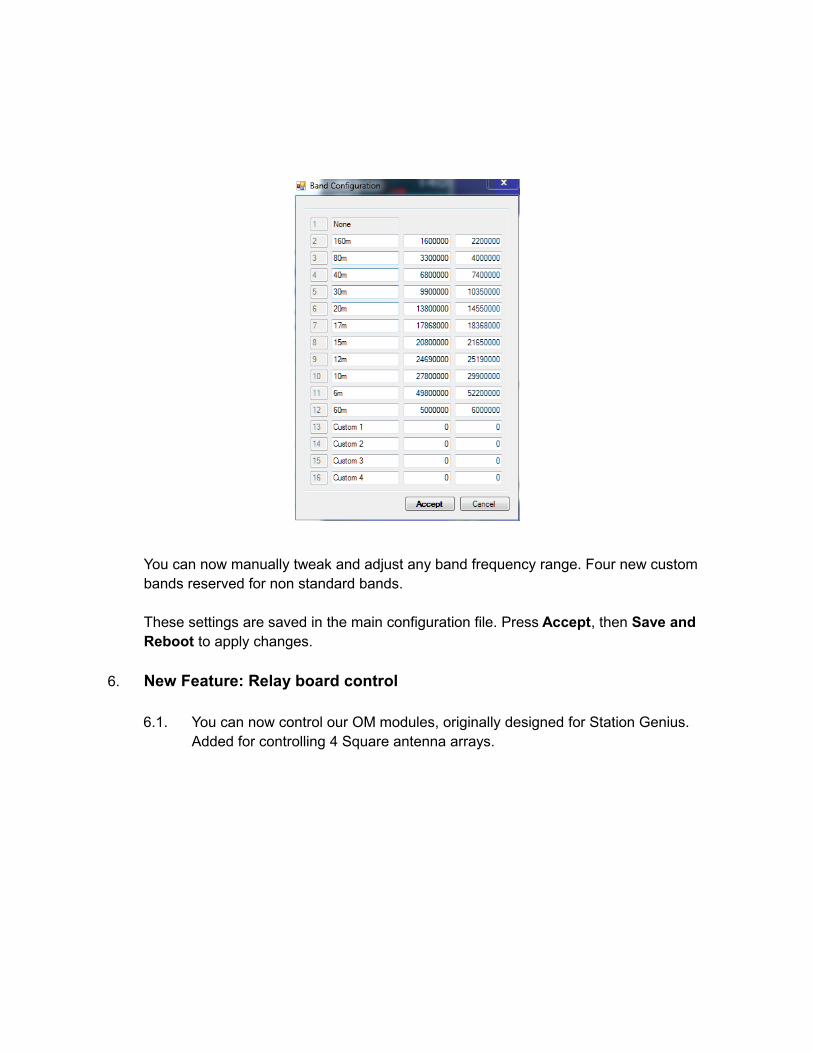
You can now manually tweak and adjust any band frequency range. Four new custom bands reserved for non standard bands.
These settings are saved in the main configuration file. Press Accept, then Save and Reboot to apply changes.
6. New Feature: Relay board control
6.1. You can now control our OM modules, originally designed for Station Genius. Added for controlling 4 Square antenna arrays.

6.2. In the Antenna Configuration menu, notice the new OM Configuration. Use the + button to add buttons, and x to remove buttons.
6.3. You edit names by typing in the textbox.
6.4. The < not set > field to the right is for the keyboard shortcut. Click to set.

6.5. Set it to Alt + 1 for example. Press Enter to confirm.

6.6. Click the OM button to set the relays you wish to control. You toggle states by clicking on the output icon. There are three possible states:
Not used by the button.
Turn off this output.
Turn on this output.
Press Accept when done.

6.7. Repeat the process. It should look something like this in the end.
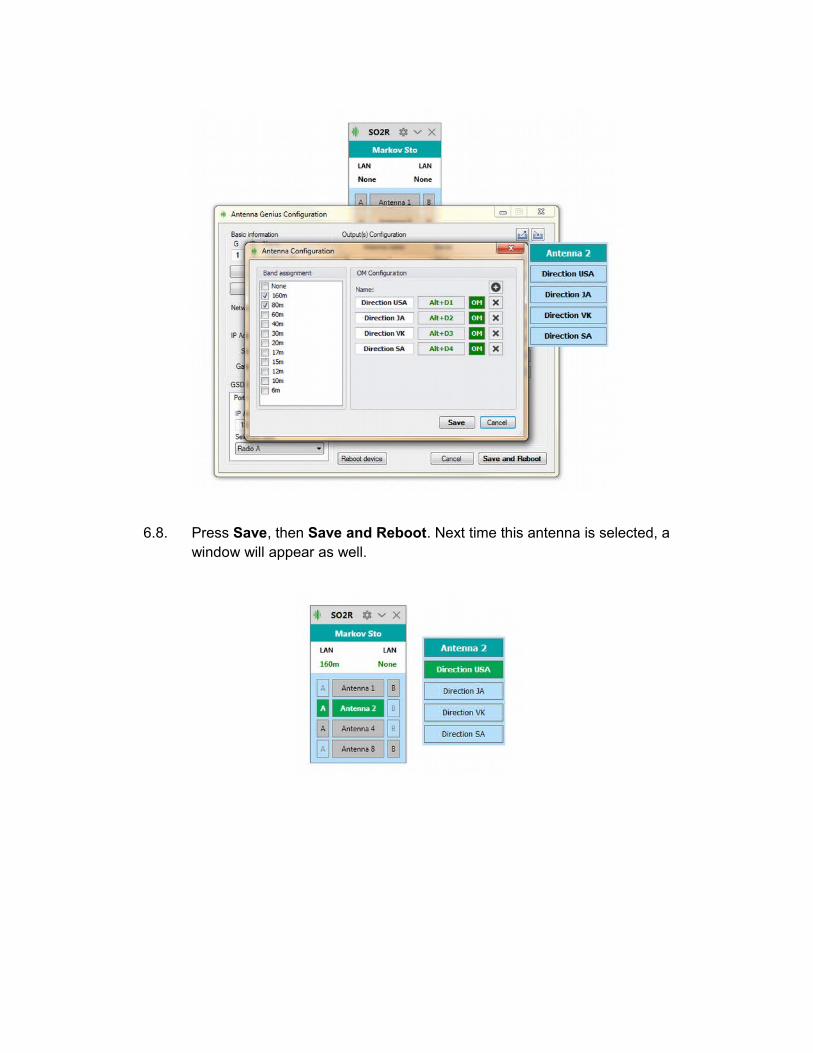
6.8. Press Save, then Save and Reboot. Next time this antenna is selected, a window will appear as well.