Antares Articulator Setup Manual How to
23
ARTICULATOR EVO Configuration Guide While the ARTICULATOR EVO manual covers the basic principles of routing Audio Signals and Control Signals in the various plug-in formats, there is enough variation in how specific hosts accomplish that routing that we thought it would be useful to provide step-by- step instructions for some of the most popular hosts. So here they are:
-
Upload
pete-mills -
Category
Documents
-
view
617 -
download
7
description
Setting up antares articulator vst plugin manual
Transcript of Antares Articulator Setup Manual How to

ARTICULATOR EVOConfiguration Guide
While the ARTICULATOR EVO manual covers the basic principles of routing Audio Signals and Control Signals in the various plug-in formats, there is enough variation in how specific hosts accomplish that routing that we thought it would be useful to provide step-by-step instructions for some of the most popular hosts.
So here they are:
2
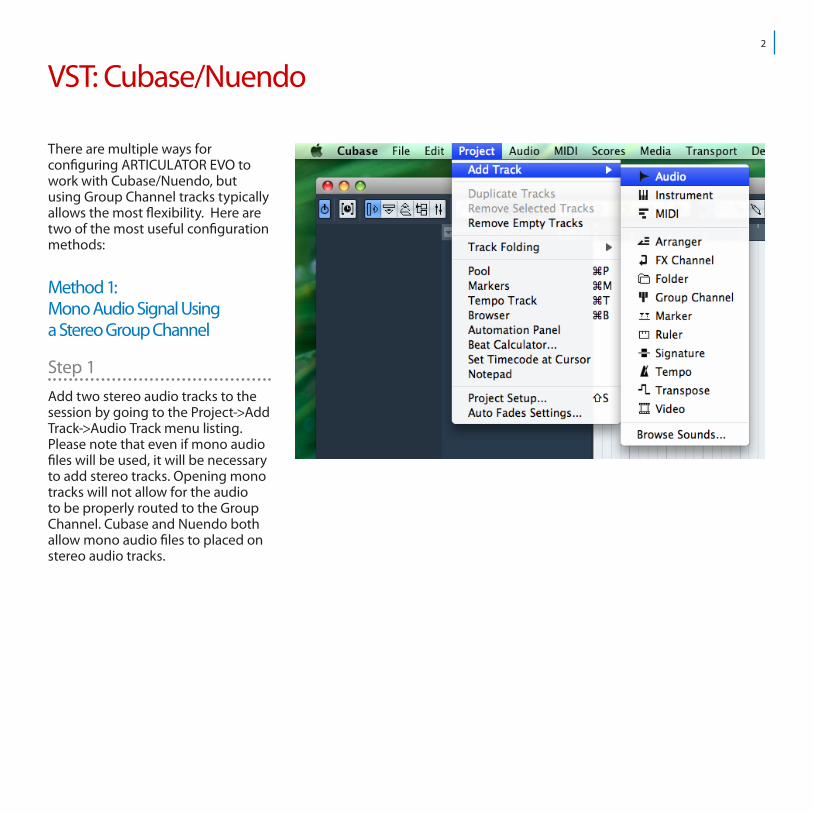
VST: Cubase/Nuendo
There are multiple ways for configuring ARTICULATOR EVO to work with Cubase/Nuendo, but using Group Channel tracks typically allows the most flexibility. Here are two of the most useful configuration methods:
Method 1: Mono Audio Signal Using a Stereo Group Channel
Step 1 Add two stereo audio tracks to the session by going to the Project->Add Track->Audio Track menu listing. Please note that even if mono audio files will be used, it will be necessary to add stereo tracks. Opening mono tracks will not allow for the audio to be properly routed to the Group Channel. Cubase and Nuendo both allow mono audio files to placed on stereo audio tracks.
3
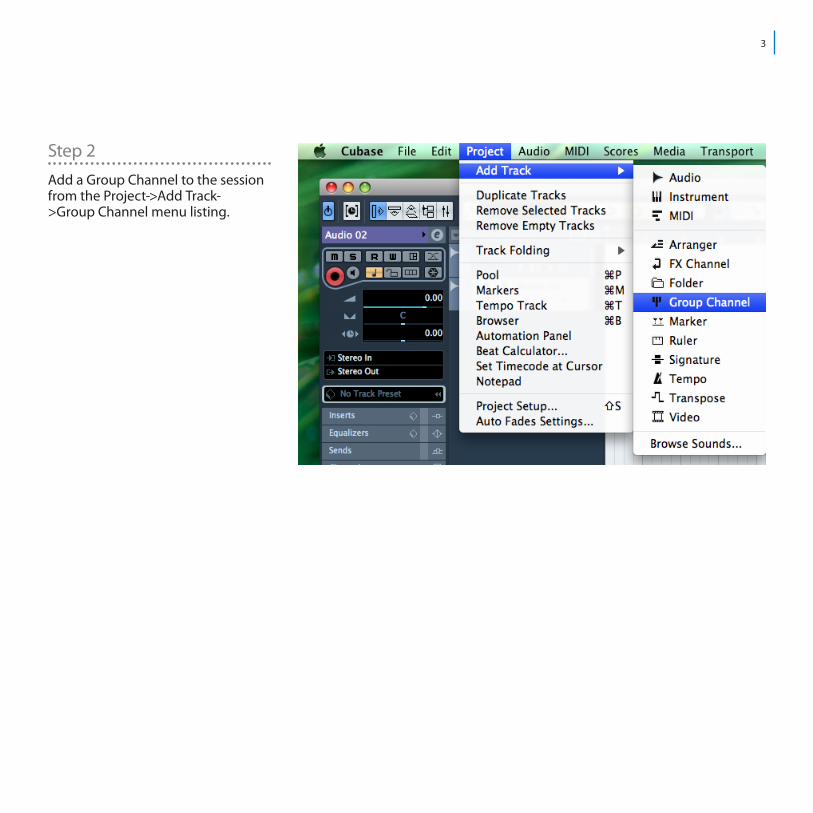
Step 2Add a Group Channel to the session from the Project->Add Track->Group Channel menu listing.
4
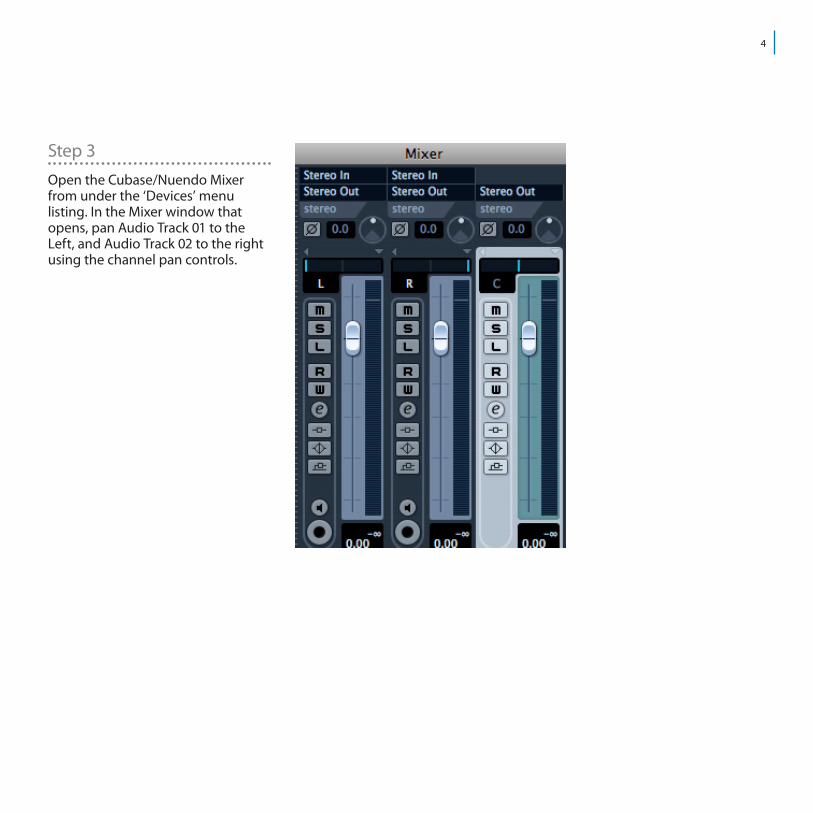
Step 3Open the Cubase/Nuendo Mixer from under the ‘Devices’ menu listing. In the Mixer window that opens, pan Audio Track 01 to the Left, and Audio Track 02 to the right using the channel pan controls.

5
Step 4 Change the output of Audio Track 01 and Audio Track 02 to the Group Channel which was created in Step 2 above.
Step 5 Instantiate ARTICULATOR EVO as an Insert Effect on the Group Channel.
Step 6 The routing for Cubase/Nuendo The routing for Cubase/Nuendo should now be fully set up to allow for the proper operation of ARTICULATOR EVO. Simply import your Audio Signal file to Audio Track 01 and your Control Signal file to Audio Track 02 to begin using ARTICULATOR EVO.
6
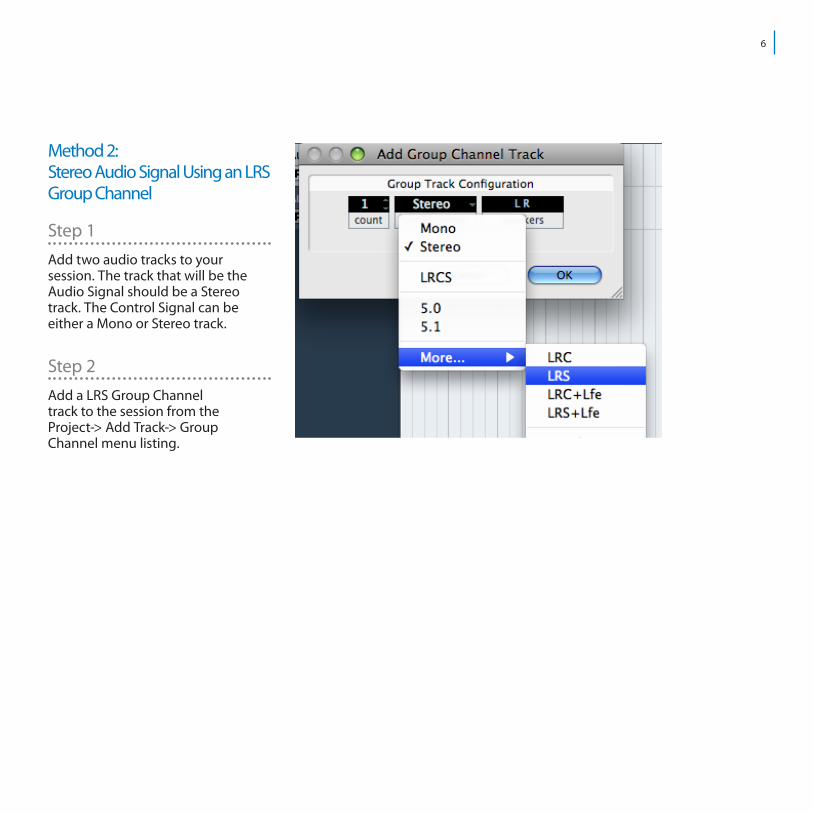
Method 2: Stereo Audio Signal Using an LRS Group Channel
Step 1Add two audio tracks to your session. The track that will be the Audio Signal should be a Stereo track. The Control Signal can be either a Mono or Stereo track.
Step 2Add a LRS Group Channel track to the session from the Project-> Add Track-> Group Channel menu listing.
7
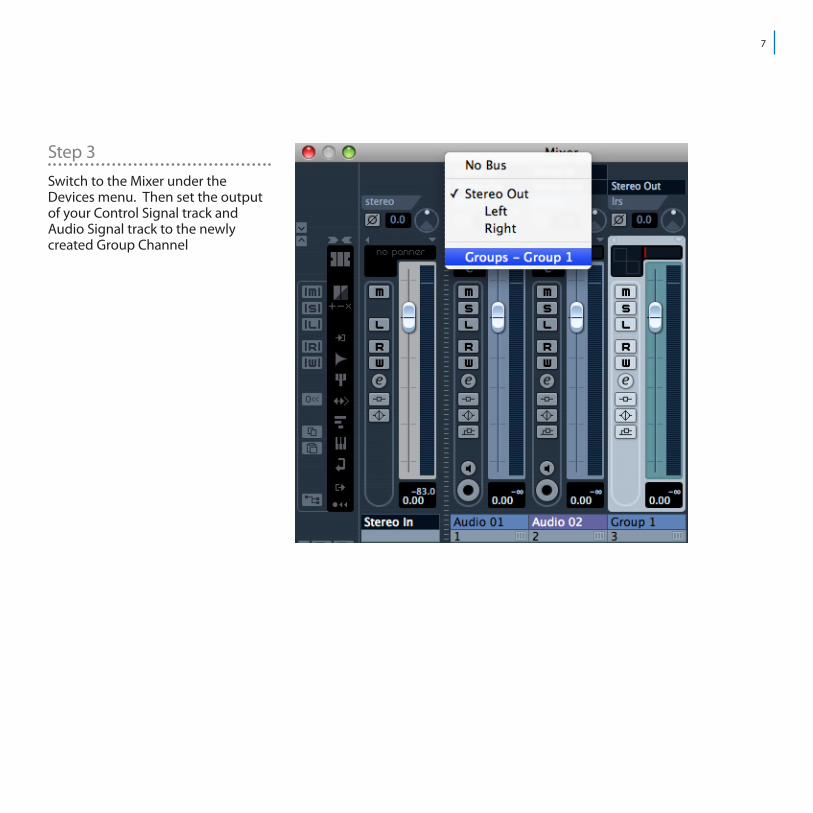
Step 3Switch to the Mixer under the Devices menu. Then set the output of your Control Signal track and Audio Signal track to the newly created Group Channel
8
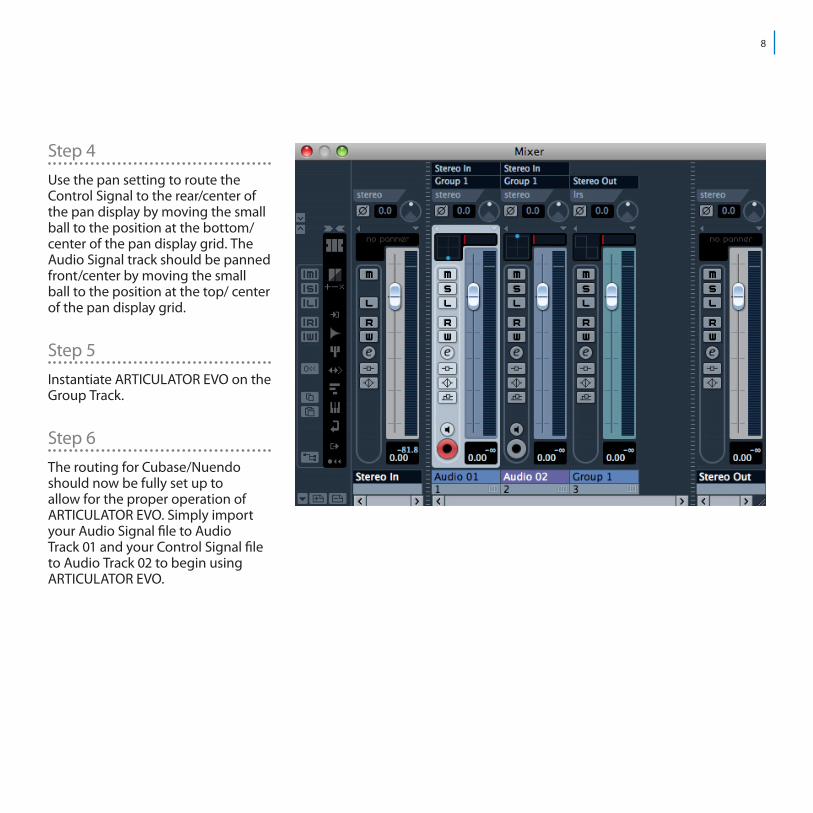
Step 4Use the pan setting to route the Control Signal to the rear/center of the pan display by moving the small ball to the position at the bottom/center of the pan display grid. The Audio Signal track should be panned front/center by moving the small ball to the position at the top/ center of the pan display grid.
Step 5Instantiate ARTICULATOR EVO on the Group Track.
Step 6The routing for Cubase/Nuendo should now be fully set up to allow for the proper operation of ARTICULATOR EVO. Simply import your Audio Signal file to Audio Track 01 and your Control Signal file to Audio Track 02 to begin using ARTICULATOR EVO.
9
Audio Units: Logic 8
Stereo Audio Signal
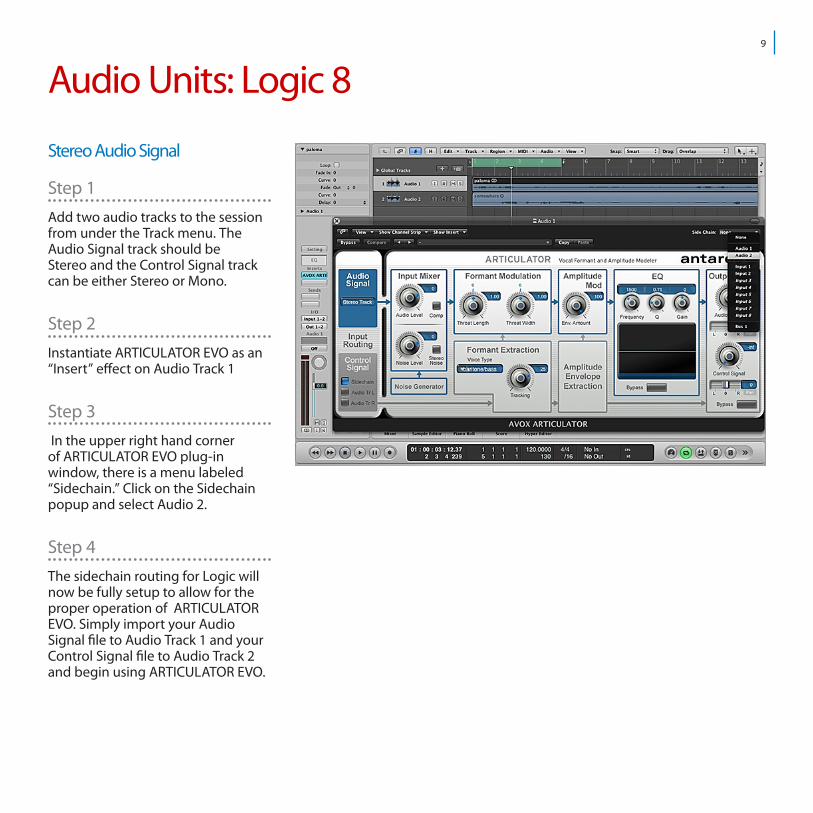
Step 1Add two audio tracks to the session from under the Track menu. The Audio Signal track should be Stereo and the Control Signal track can be either Stereo or Mono.
Step 2Instantiate ARTICULATOR EVO as an “Insert” effect on Audio Track 1
Step 3 In the upper right hand corner of ARTICULATOR EVO plug-in window, there is a menu labeled “Sidechain.” Click on the Sidechain popup and select Audio 2.
Step 4The sidechain routing for Logic will now be fully setup to allow for the proper operation of ARTICULATOR EVO. Simply import your Audio Signal file to Audio Track 1 and your Control Signal file to Audio Track 2 and begin using ARTICULATOR EVO.
10
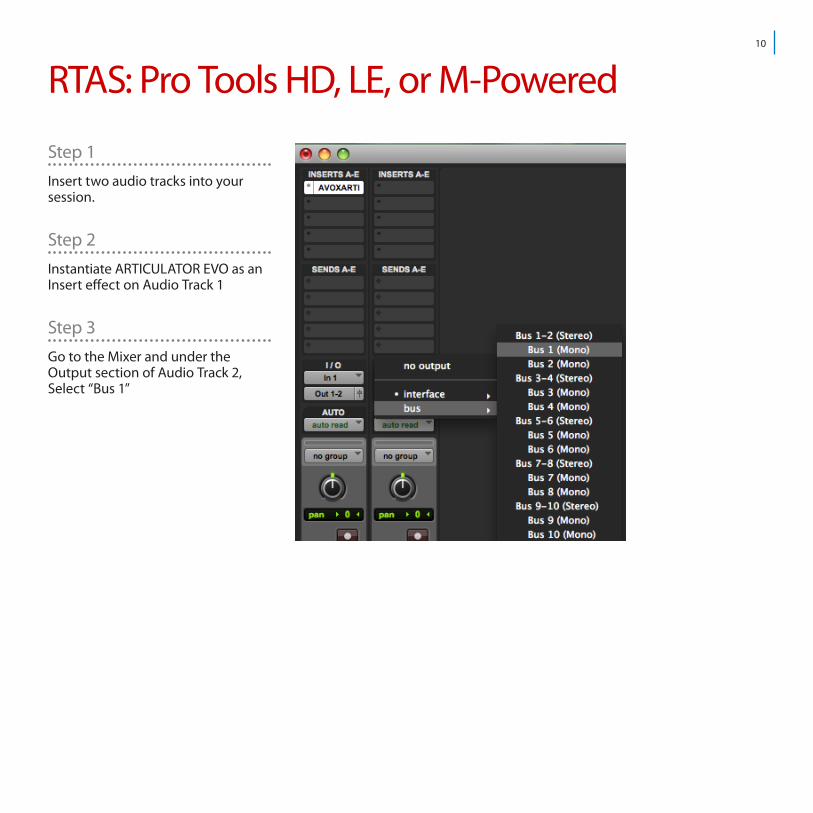
RTAS: Pro Tools HD, LE, or M-Powered
Step 1Insert two audio tracks into your session.
Step 2Instantiate ARTICULATOR EVO as an Insert effect on Audio Track 1
Step 3Go to the Mixer and under the Output section of Audio Track 2, Select “Bus 1”

11
Step 4Return to ARTICULATOR EVO on Audio Track 1, and in the upper left corner of the plug-in window you will find the symbol of a key with a menu next to it. The default setting of the menu will be “no key input”. Click on the menu and select “bus 1 (Mono)”.
NOTE
Bus 1 can now serve as the Control Signal for any instantiation of ARTICULATOR EVO, and any tracks in your session can be routed to bus 1 to act as the Control Signal for added flexibility. (You can, of course, use any bus, it does not have to be bus 1.)

12
Here is what the finished sidechain setup looks like in the mixer and the edit window:
13
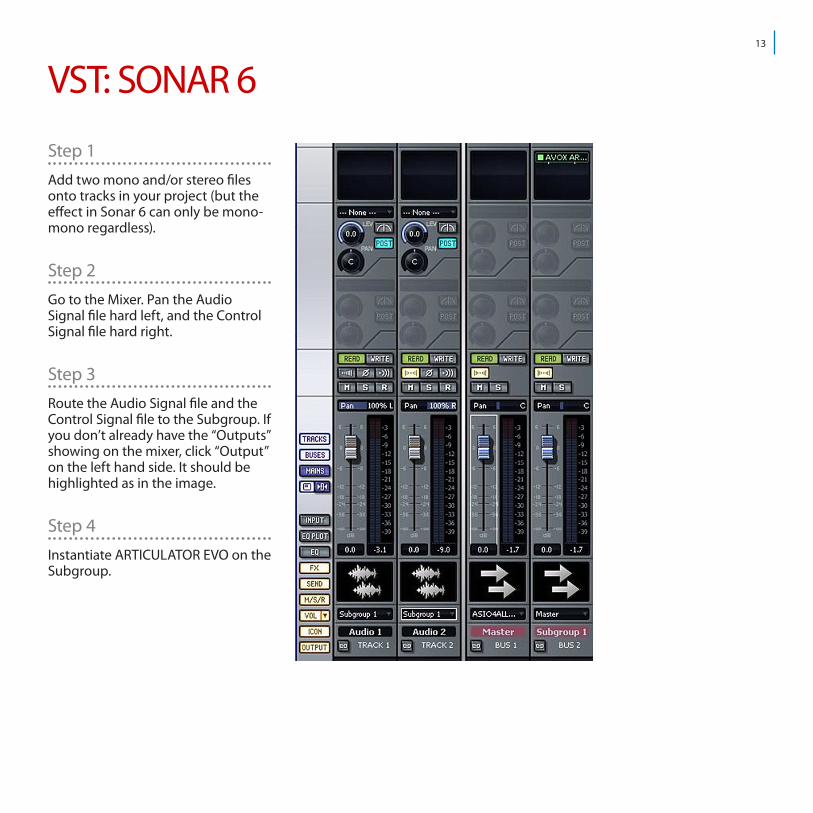
VST: SONAR 6
Step 1Add two mono and/or stereo files onto tracks in your project (but the effect in Sonar 6 can only be mono-mono regardless).
Step 2Go to the Mixer. Pan the Audio Signal file hard left, and the Control Signal file hard right.
Step 3Route the Audio Signal file and the Control Signal file to the Subgroup. If you don’t already have the “Outputs” showing on the mixer, click “Output” on the left hand side. It should be highlighted as in the image.
Step 4Instantiate ARTICULATOR EVO on the Subgroup.
14
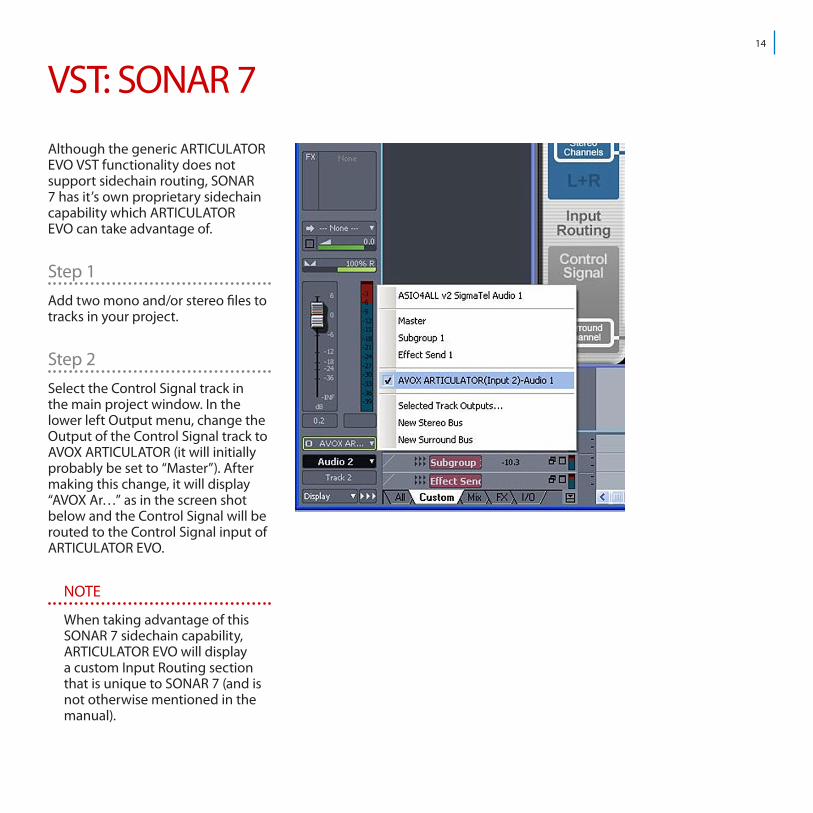
VST: SONAR 7
Although the generic ARTICULATOR EVO VST functionality does not support sidechain routing, SONAR 7 has it’s own proprietary sidechain capability which ARTICULATOR EVO can take advantage of.
Step 1Add two mono and/or stereo files to tracks in your project.
Step 2Select the Control Signal track in the main project window. In the lower left Output menu, change the Output of the Control Signal track to AVOX ARTICULATOR (it will initially probably be set to “Master”). After making this change, it will display “AVOX Ar…” as in the screen shot below and the Control Signal will be routed to the Control Signal input of ARTICULATOR EVO.
NOTE
When taking advantage of this SONAR 7 sidechain capability, ARTICULATOR EVO will display a custom Input Routing section that is unique to SONAR 7 (and is not otherwise mentioned in the manual).
15
Step 3Select the Control Signal track in the main project window. In the lower left Output menu, change the Output of the Control Signal track to AVOX ARTICULATOR (it will initially probably be set to “Master”). After making this change, it will display “AVOX AR…” as in the screen shot and the Control Signal track will be routed to the Control Signal input of ARTICULATOR EVO.
Step 4The routing for Sonar 7 should now be fully setup to allow for the proper operation of ARTICULATOR EVO. Simply import your Audio Signal file to Audio Track 01 and your Control Signal file to Audio Track 02 and begin using ARTICULATOR EVO.

16
VST: SONAR 8
Although the generic ARTICULATOR EVO VST functionality does not support sidechain routing, SONAR 8 has it’s own proprietary sidechain capability which ARTICULATOR EVO can take advantage of.
Step 1Add two mono and/or stereo files to tracks in your project.
Step 2Select the Control Signal track in the main project window. In the lower left Output menu, change the Output of the Control Signal track to AVOX ARTICULATOR (it will initially probably be set to “Master”). After making this change, it will display “AVOX Ar…” as in the screen shot below and the Control Signal will be routed to the Control Signal input of ARTICULATOR EVO.
NOTE
When taking advantage of this SONAR 8 sidechain capability, ARTICULATOR EVO will display a custom Input Routing section that is unique to SONAR 8 (and is not otherwise mentioned in the manual).

17
AU/VST: ABLETON LIVE
Ableton can work with both the AU and the VST plugin formats. The process for configuring each is virtually identical.
Step 1Add two mono and/or stereo files onto tracks in your project, one as the control signal and one as the audio signal.
Step 2Insert ARTICULATOR EVO onto the audio signal track. Navigate through the Plug-In Devices browser until you find AVOX ARTICULATOR, then drag it onto the Audio Effects area for the the audio signal track. This will cause the plugin interface to appear.
Step 3In Session View, go to the in/out section of the control signal. If this isn’t visible by default, go to the View menu and select In/Out to make it appear. In the section titled Audio To, click on the first dropdown and select the track that has the Audio Signal.

18
Step 4The dropdown immediately below that should enable, and default to Track In. Click on this dropdown and select AVOX ARTICULATOR from that list. ARTICULATOR EVO is now configured properly.

19
AU: DIGITAL PEFORMER 6
Step 1Add two mono and/or stereo files onto tracks in your project, one as the control signal and one as the audio signal.
Step 2Switch to the Mixing Board tab. Go to the input/output section on the the control signal track and click where the output is displayed. This will bring up a list of available outputs for that track. Depending on if you have a mono or stereo file, go into New Mono/Stereo Bundle and select an available bus.
20
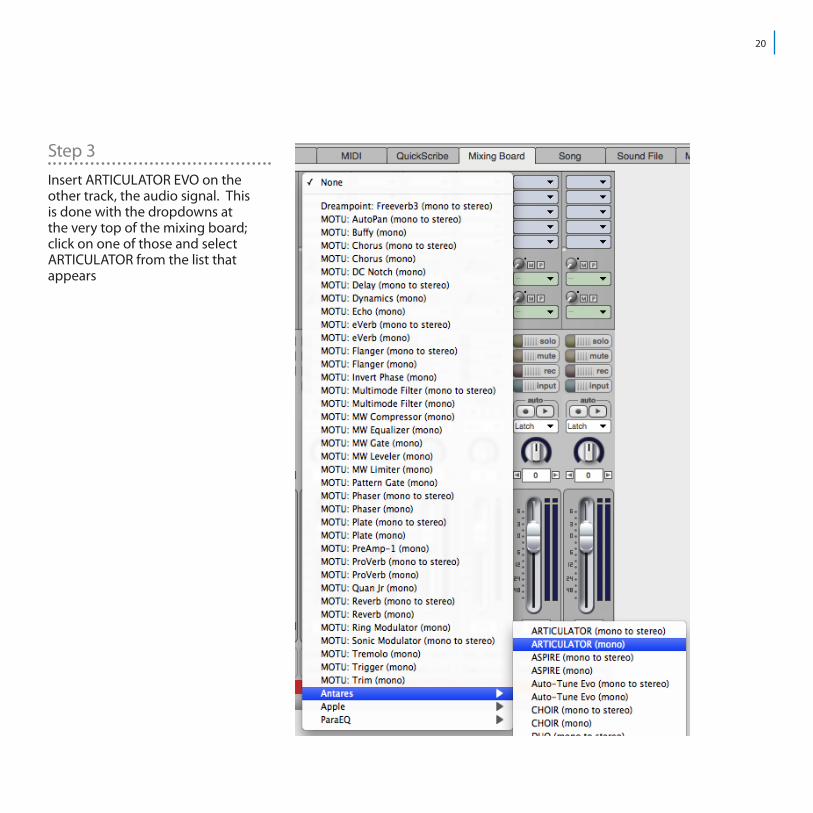
Step 3Insert ARTICULATOR EVO on the other track, the audio signal. This is done with the dropdowns at the very top of the mixing board; click on one of those and select ARTICULATOR from the list that appears

21
Step 4The ARTICULATOR EVO interface will appear after you select it from the list. Near the top of that window will be several dropdowns that configure how the plugin operates within Digital Performer. Find the one that is titled Side Chain and click on it to open a list. Select from that list the bus you picked as the output of the control signal track. Now ARTICULATOR EVO is set up properly.

22

23