Animation with Scripting for Adobe -...
72
Transcript of Animation with Scripting for Adobe -...

Animation with Scripting for Adobe® Flash® Professional CS5 Studio Techniques
Chris Georgenes and Justin Putney
This Adobe Press book is published by Peachpit.
Peachpit1249 Eighth StreetBerkeley, CA 94710(510) 524-2178Fax: (510) 524-2221
Peachpit is a division of Pearson EducationFor the latest on Adobe Press books, go to www.adobepress.comTo report errors, please send a note to [email protected]
Copyright © 2011 Chris Georgenes and Justin Putney
Project Editor: Susan RimermanDevelopment Editor/Copy Editor: Anne Marie WalkerProduction Editor: Hilal SalaTechnical Editor: Amy PetersenComposition: David Van NessProofreader: Scout FestaIndexer: Karin ArrigoniCover design: Peachpit/Charlene WillCover illustration: Pascal Campion
Notice of Rights
All rights reserved. No part of this book may be reproduced or transmitted in any form by any means, electronic, mechanical, photocopying, recording, or otherwise, without the prior written permission of the publisher. For information on getting permission for reprints and excerpts, contact [email protected].
Notice of Liability
The information in this book is distributed on an “As Is” basis, without warranty. While every precaution has been taken in the preparation of the book, neither the authors nor Peachpit shall have any liability to any person or entity with respect to any loss or damage caused or alleged to be caused directly or indirectly by the instructions contained in this book or by the computer software and hardware products described in it.
Trademarks
Adobe, Flash, and ActionScript are either registered trademarks of Adobe Systems Incorporated in the United States and/or other countries. All other trademarks are the property of their respective owners.
Many of the designations used by manufacturers and sellers to distinguish their products are claimed as trademarks. Where those designations appear in this book, and Peachpit was aware of a trademark claim, the designations appear as requested by the owner of the trademark. All other product names and services identified throughout this book are used in editorial fashion only and for the benefit of such companies with no intention of infringement of the trademark. No such use, or the use of any trade name, is intended to convey endorsement or other affiliation with this book.
ISBN 13: 978-0-321-68369-4 ISBN 10: 0-321-68369-2
9 8 7 6 5 4 3 2 1
Printed and bound in the United States of America

iii
Contents
Introduction v
Chapter 1 Getting Started 1File Setup Tips 2
Camera Techniques 13
Incorporating Audio 20
Narrative 27
Character Design 29
Storyboarding 31
Animatics 46
Chapter 2 Character Animation 49Animation Techniques 50
Designing a Character 54
Building a Character in Flash 56
Animating a Character 90
Adding Dialogue 110
Chapter 3 Introduction to ActionScript Classes 129Reasons to Use ActionScript 130
The Importance of Planning 131
ActionScript Basics 134
The Document Class 141
Object-oriented Programming 150
Attaching Classes to Library Items 151
Events 154
Creating Reusable Classes For Animation 155
Using Classes from Other Sources 224
Chapter 4 Workflow Automation 225Why Automate? 226
What Is JSFL? 227
Writing Scripts to Control Flash 232
Extending Flash Even Further 257
Packaging Extensions for Distribution 268
More Resources 270
Chapter 5 Sharing Your Animation 273Showcasing Your Animation on the Web 274
Publishing for Broadcast 325
Publishing to Mobile and Desktop 333
Index 335

iv
Acknowledgments
This book would not have been possible if it weren’t for the tireless efforts of my coauthor Justin Putney. His knowledge of designing and animating in Flash mixed with his Action-Script prowess make for a rare combination of Flash talent.
Thanks to my wife Becky who for weeks tolerated my absence from most of our family-related events. She continues to raise the bar of patience year after year, and for that our marriage remains intact and my gratitude unparalleled.
Thanks to Thibault Imbert for his Sausage Kong ActionScript and overall generosity. Thanks to Amy Petersen for her technical edits. Thanks to Pascal Campion for gracing the cover with his strokes of genius. Thanks to Adobe Systems for providing the tools that allow us to create endlessly.
—Chris Georgenes
Several years ago, in my first days of learning Flash, I emailed Chris for assistance with one of his beginner-level tutorials. I was amazed not only that he wrote me back, but also that he was so enthusiastic about helping a total stranger. His willingness to share his skills with the Flash community has remained a source of inspiration, and I’m honored to have coauthored this book with him.
I’m thrilled and honored that Pascal Campion created the beautiful cover. Thanks to John Smick for graciously lending his voice talent.
Thanks to Anne Marie Walker, Susan Rimerman, and the entire team at Peachpit for their flexibility in the course of making this book.
Thanks to my family, especially my mother and sister, as I worked on the book through most of our shared vacation. Thanks to my mom and my grandfather for supporting my drawing and computer interests. Thanks to Carole Petersen for her enthusiastic encour-agement along the way.
Thanks to my wife, Amy Petersen, who not only did a fantastic job as technical editor, but also served as my sounding board for several elements in the book. She was very patient as she and I spent long hours at the computer. She gave me my first copy of Flash as a birth-day present and encouraged me to start animating my drawings. I would not be where I am today without her.
—Justin Putney

Introduction
This book assumes you have a working knowledge of Flash, meaning that you have probably already drawn with the Brush tool, converted artwork to a symbol, created a tween, personalized your Flash workspace, and published a SWF file. If you are not yet familiar with these tasks, it is recommended that you read a beginning-level Flash book before attempting the exercises in this book.
To best understand the approach to animating with Flash in this book, it helps to know a little bit about Flash history.
The Nature of the Beast
In 1996, FutureSplash Animator was released with a basic set of editing tools and a Time-line, which at the time was one of the few ways to create animations for the web. That same year, Macromedia acquired FutureSplash Animator and renamed it Flash. Over the next three releases, a Library was added, the Movie Clip symbol emerged, and basic scripting was built into the package. In Flash 5, Macromedia introduced ActionScript 1.0, XML sup-port, and HTML formatting. Flash 6, known as Flash MX, included video capabilities and user interface components. Version 7, known as MX 2004, introduced ActionScript 2.0, an extensibility language, more video support, and many other features. Flash 8 expanded on the previous features and added additional mobile support. In 2005, Adobe purchased Macromedia. In 2007, Flash Professional CS3 was released as part of the Adobe Creative Suite and included ActionScript 3.0. Flash is now a platform capable of exporting to the web, television and film, mobile devices, and computer desktops (as native applications). Adobe has introduced a developer tool, Flash Builder (formerly Flex Builder), and a designer tool, Flash Catalyst, which also author Flash content (SWF files).
The Flash we use today is not unlike a chimera, the beast from ancient Greek mythology composed of parts from several different animals.
Introduction
vi
Animation with Scripting for Adobe Flash Professional CS5 Studio Techniques
Who Should Read This Book?
This book is for you: the aspiring animator, motion designer, or graphic designer who seeks to exploit the chi-meric nature of Flash to get the most out of your animat-ing experience. If you’re interested in creating animated shorts, video games, mobile games, or websites, this book can introduce you to parts of Flash that you may have previously shied away—or even recoiled—from, or that you simply didn’t know about.
What makes Flash Professional different from the other tools in the Flash platform is that, at its core, it’s still an animation program. The nonanimation components can be used to radically improve your animations, as well as your animating experience. Although activities such as writing ActionScript and extending Flash can feel daunting to nonprogrammers, once you have completed a project or two using these techniques, much of that original hesita-tion subsides.
You may have been working in Flash for a little while, and you might feel like you’ve plateaued at a certain skill or productivity level. If you find yourself at such a juncture, it is our hope that this book will provide some novel tech-niques. The book also includes several “best practices” for working in teams and may provide insight into the roles of your colleagues who may be using Flash in a different way.
You may have noticed that the titles of many professional Flash users (as well as those seen in job postings) contain “hybrid slashes” (e.g., animator/designer, designer/devel-oper), and even more eccentricities (e.g., Flash guru and Flash ninja) are becoming increasingly common. This book will help you wear any combination of hats you find neces-sary while you’re on the job animating.
After you have completed the exercises in this book, you will probably be pleased to find yourself off that plateau and onto a higher level, and you and that Flash beast will be playing a whole new game.
vii
Introduction
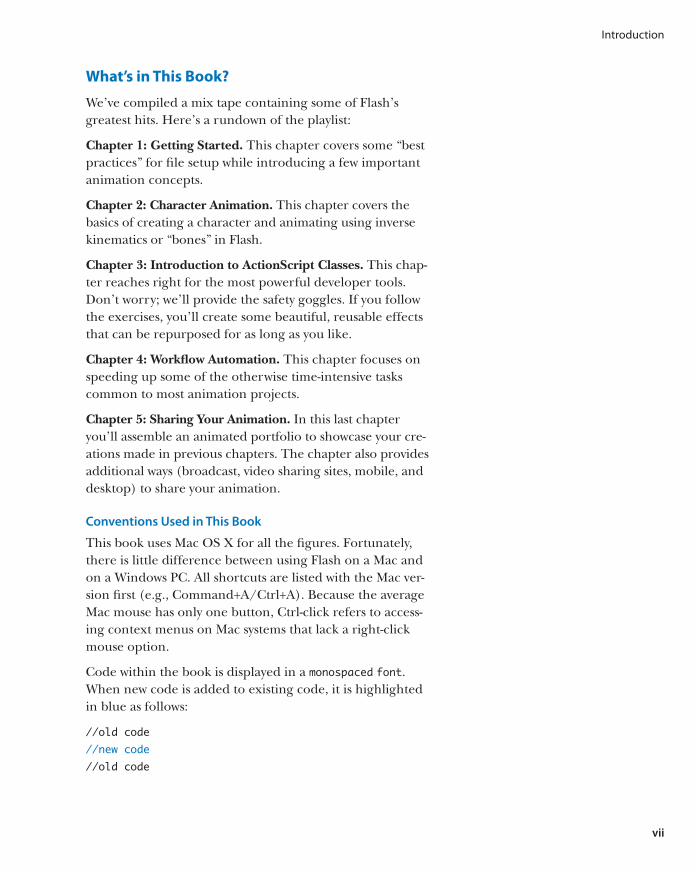
What’s in This Book?
We’ve compiled a mix tape containing some of Flash’s greatest hits. Here’s a rundown of the playlist:
Chapter 1: Getting Started. This chapter covers some “best practices” for file setup while introducing a few important animation concepts.
Chapter 2: Character Animation. This chapter covers the basics of creating a character and animating using inverse kinematics or “bones” in Flash.
Chapter 3: Introduction to ActionScript Classes. This chap-ter reaches right for the most powerful developer tools. Don’t worry; we’ll provide the safety goggles. If you follow the exercises, you’ll create some beautiful, reusable effects that can be repurposed for as long as you like.
Chapter 4: Workflow Automation. This chapter focuses on speeding up some of the otherwise time-intensive tasks common to most animation projects.
Chapter 5: Sharing Your Animation. In this last chapter you’ll assemble an animated portfolio to showcase your cre-ations made in previous chapters. The chapter also provides additional ways (broadcast, video sharing sites, mobile, and desktop) to share your animation.
Conventions Used in This Book
This book uses Mac OS X for all the figures. Fortunately, there is little difference between using Flash on a Mac and on a Windows PC. All shortcuts are listed with the Mac ver-sion first (e.g., Command+A/Ctrl+A). Because the average Mac mouse has only one button, Ctrl-click refers to access-ing context menus on Mac systems that lack a right-click mouse option.
Code within the book is displayed in a monospaced font. When new code is added to existing code, it is highlighted in blue as follows:
//old code
//new code
//old code

viii
Animation with Scripting for Adobe Flash Professional CS5 Studio Techniques
A return character (➥) in front of a line break is used to designate continuous lines of code.
What’s on the CD?
The CD included with this book contains finished versions of the exercises for each chapter, as well as the assets neces-sary to complete the exercises. The CD also contains an Extensions folder that provides you with free Flash exten-sions to support your animation workflow.
Beyond This Book, Where Can I Go?
If you have the print version of the book, your copy comes equipped with a tracking device. If you’re reading the electronic version, we’re already monitoring your location via satellite.
As a Flashstar, Chris is famously accessible. You can follow him on Twitter, Facebook, and/or via his blog:
. Twitter. @keyframer
. Facebook. http://www.facebook.com/chris.georgenes
. Blog. http://www.keyframer.com
. Portfolio. http://www.mudbubble.com
You can find Justin at one or more of the following locations:
. Twitter. @justinputney
. Blog. http://blog.ajarproductions.com
. Portfolio. http://putney.ajarproductions.com
There is also a special landing page for this book at http://animflashbook.ajarproductions.com.

CHAPTER
Animation is an intensely creative art. It requires an understanding not only of shape and color, but also of weight, movement, and timing. Animators often work in teams because creating the illusion of life on a two-dimensional screen is a laborious undertak-ing. Any minuscule loss of form, even for a fraction of a second, chips away at the illusion. To maintain this illusion for the audience, animators need to exercise a great deal of con-trol over the medium. Every measure of control translates into a choice, which can quickly become overwhelming, especially when several steps are needed to enact each choice.
In this chapter, you’ll learn how to make Flash do the heavy lifting for you by taking the complicated sets of choices and automating them into single steps. By simplifying the steps involved in creating your animation, you can focus on the choices that really mat-ter—those involving shape, color, weight, movement, and timing.
The goals for this chapter include:
. Learn some Flash extensibility language basics
. Write scripts to automate common Flash animation tasks
. Integrate user interaction into the scripts
. Build a Flash panel from scratch
You’ll also learn the basics of sharing what you’ve created in this chapter with others as well as where to look for additional resources. By the time you’ve finished this chapter you’ll be an animator and an automator.
4Workflow Automation

226
Animation with Scripting for Adobe Flash Professional CS5 Studio Techniques
Why Automate?
Suppose you’re creating a three-minute animation in Flash that includes a character speaking onscreen for approximately half the duration of the piece. At 24 frames per second (fps), that’s 2,160 potential mouth shapes needed to create the illusion of speech. Although altering every frame may not be necessary to create the illusion of speech, even the modification of every other frame would require 1,080 new mouth shapes.
Now suppose that for each of those 1,080 shapes you must do the following:
1. Scrub the Timeline over the current frame once or twice to hear the audio.
2. Select the symbol on Stage by clicking on it.
3. Highlight the first frame field in the Properties panel by clicking and dragging.
4. Remember the number of the frame inside the mouth symbol containing the mouth shape (which corre-sponds to the audio you heard on the frame).
5. Type the frame number into the keypad.
6. Press the Enter key.
7. Scrub the playhead to the next frame.
All told, this entire process translates to approximately one click, three to four click and drags, and two to three key presses on the keyboard. In addition, the mouse must be moved from the Timeline to the Stage to the Properties panel; all the while, your gaze needs to be darting back and forth between parts of the screen and the keyboard for each new mouth frame for 1,080 frames.
Clearly, the time spent on these actions adds up. If you assume that each frame requires at least 30 seconds to sync, you’ve just spent nine hours lip syncing (and you probably now have some repetitive strain injuries to boot). What if you could reduce the entire process to only four to five clicks—without dragging, keyboarding, and recalling frame numbers—and what if your mouse only needed to
227
Chapter 4 Workflow Automation
traverse an area of 200 by 350 pixels? This latter scenario might only require about ten seconds of your time per frame, which translates into only three hours of lip sync-ing! Now you’ve reduced your animating time by two-thirds with absolutely no loss of creative control. In fact, a greater proportion of your brain is likely to still be intact after only three hours of this process! Also, if you’re getting paid a fixed amount of money for the project, you’ve just tripled your hourly income for that section of the job.
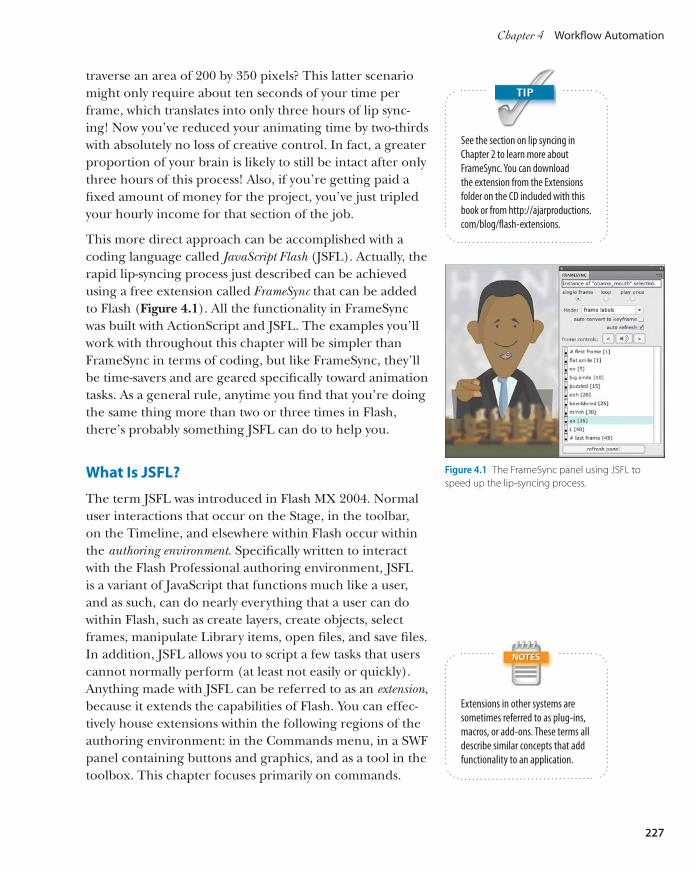
This more direct approach can be accomplished with a coding language called JavaScript Flash (JSFL). Actually, the rapid lip-syncing process just described can be achieved using a free extension called FrameSync that can be added to Flash (Figure 4.1). All the functionality in FrameSync was built with ActionScript and JSFL. The examples you’ll work with throughout this chapter will be simpler than FrameSync in terms of coding, but like FrameSync, they’ll be time-savers and are geared specifically toward animation tasks. As a general rule, anytime you find that you’re doing the same thing more than two or three times in Flash, there’s probably something JSFL can do to help you.
What Is JSFL?
The term JSFL was introduced in Flash MX 2004. Normal user interactions that occur on the Stage, in the toolbar, on the Timeline, and elsewhere within Flash occur within the authoring environment. Specifically written to interact with the Flash Professional authoring environment, JSFL is a variant of JavaScript that functions much like a user, and as such, can do nearly everything that a user can do within Flash, such as create layers, create objects, select frames, manipulate Library items, open files, and save files. In addition, JSFL allows you to script a few tasks that users cannot normally perform (at least not easily or quickly). Anything made with JSFL can be referred to as an extension, because it extends the capabilities of Flash. You can effec-tively house extensions within the following regions of the authoring environment: in the Commands menu, in a SWF panel containing buttons and graphics, and as a tool in the toolbox. This chapter focuses primarily on commands.
See the section on lip syncing in
Chapter 2 to learn more about
FrameSync. You can download
the extension from the Extensions
folder on the CD included with this
book or from http://ajarproductions.
com/blog/flash-extensions.
Figure 4.1 The FrameSync panel using JSFL to
speed up the lip-syncing process.
Extensions in other systems are
sometimes referred to as plug-ins,
macros, or add-ons. These terms all
describe similar concepts that add
functionality to an application.
228
Animation with Scripting for Adobe Flash Professional CS5 Studio Techniques
Although this chapter is geared toward animators, JSFL is a scripting language. Don’t worry if you don’t understand every aspect of the language. Focus on completing the examples. It may take time for new concepts to sink in. The words scripting, programming, and coding will be used interchangeably to mean writing code. Refer to Table 4.1 for any scripting terms that may be unfamiliar to you while reading the chapter.
TABLE 4.1 Scripting terms used in this chapter
TERM DEFINITION
Variable A named object with an associated value that can be changed
Function A portion of code that performs a specific task
Method A function associated with a particular object
Parameter A piece of data that can be used within a function
Argument A parameter that is sent to a function
Loop A piece of code that is repeatedly executed
You create a new JSFL script by choosing File > New and selecting Flash JavaScript File in the New Document dialog box. The file extension for a JSFL script is always .jsfl.It should be noted that JSFL is distinct from ActionScript. The latter is compiled into a SWF, and that SWF can play in the ubiquitous Flash Player. On the other hand, JSFL code is executed on the spot and is used to control the Flash Professional authoring environment. Both JSFL and ActionScript are based on a script standard known as ECMAScript. Whereas the “vocabulary” of JSFL is much smaller than that of ActionScript 3.0, much of the know-how gained in one language will be applicable in the other.
If you’re familiar with other scripting languages, such as ExtendScript or AppleScript, you may be pleasantly surprised with how rapidly JSFL executes. The language is an integral part of the Flash application and is used by the Adobe Flash team to test features for quality assurance. The speed of execution makes JSFL excellent for batch

229
Chapter 4 Workflow Automation
processing and complex actions. In short, JSFL enables the animator to shed hundreds of redundant mouse clicks while saving heaps of time. To date, each Flash Professional update has included a few new commands for the JSFL Application Programming Interface (API), but most of the API has remained consistent since Flash MX 2004.
Your Buddy, DOM
Everything that you can manipulate with code in JSFL is considered an object. The Document Object Model (DOM) is basically the hierarchy or structure (model) of objects within a particular document. If you’ve written JavaScript for a web browser, you’re probably somewhat familiar with this idea. In the case of the browser, you’re traversing the structure of an HTML document to gain access (and make changes) to tags and content.
The good news is that even though you may never have thought about it before, you’re already familiar with the Flash DOM. There’s an order to everything you do within a Flash document, and since you are reading this book, we can assume that you implicitly understand this order. Let’s first consider some objects in Flash and how they relate to each other, starting with frames and layers. Which of the fol-lowing options makes more immediate sense to you?
. A frame on a layer
. A layer on a frame
If the latter makes you scrunch up your nose and won-der how that might even be possible, you do possess an implicit awareness of the DOM. Without this organization of objects, it wouldn’t be possible to make much sense of anything in Flash.
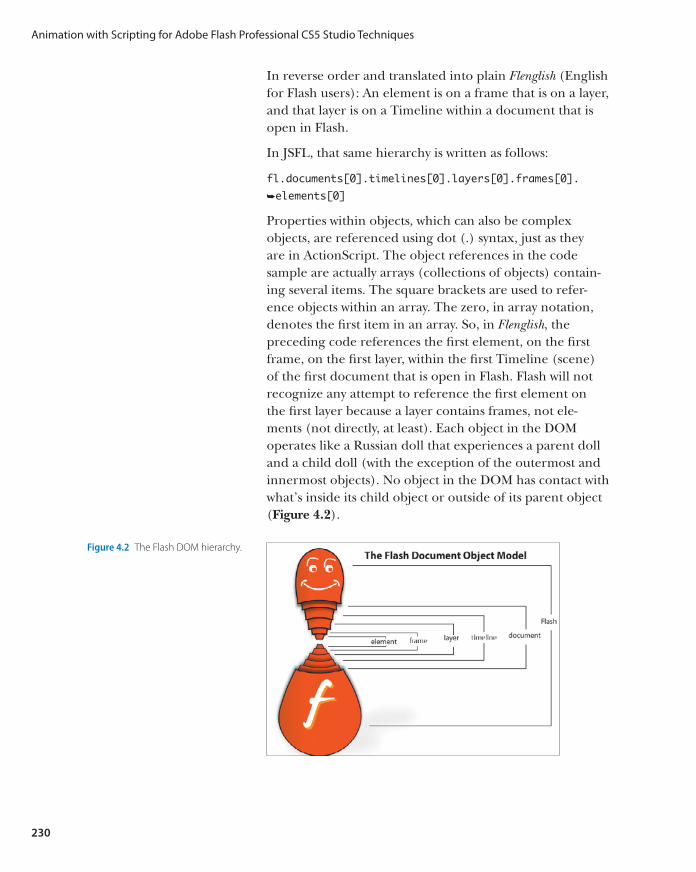
The most basic Stage object in Flash is called an element. All Stage objects—for example, bitmaps, groups, graphic sym-bols, and movieclip symbols—inherit the properties and methods of a basic element. Here’s a representation of the hierarchy for an element that resides on the Flash Stage:
Flash > Document > Timeline > Layer > Frame > Element
230
Animation with Scripting for Adobe Flash Professional CS5 Studio Techniques
In reverse order and translated into plain Flenglish (English for Flash users): An element is on a frame that is on a layer, and that layer is on a Timeline within a document that is open in Flash.
In JSFL, that same hierarchy is written as follows:
fl.documents[0].timelines[0].layers[0].frames[0].
➥elements[0]
Properties within objects, which can also be complex objects, are referenced using dot (.) syntax, just as they are in ActionScript. The object references in the code sample are actually arrays (collections of objects) contain-ing several items. The square brackets are used to refer-ence objects within an array. The zero, in array notation, denotes the first item in an array. So, in Flenglish, the preceding code references the first element, on the first frame, on the first layer, within the first Timeline (scene) of the first document that is open in Flash. Flash will not recognize any attempt to reference the first element on the first layer because a layer contains frames, not ele-ments (not directly, at least). Each object in the DOM operates like a Russian doll that experiences a parent doll and a child doll (with the exception of the outermost and innermost objects). No object in the DOM has contact with what’s inside its child object or outside of its parent object (Figure 4.2).
Figure 4.2 The Flash DOM hierarchy.
231
Chapter 4 Workflow Automation
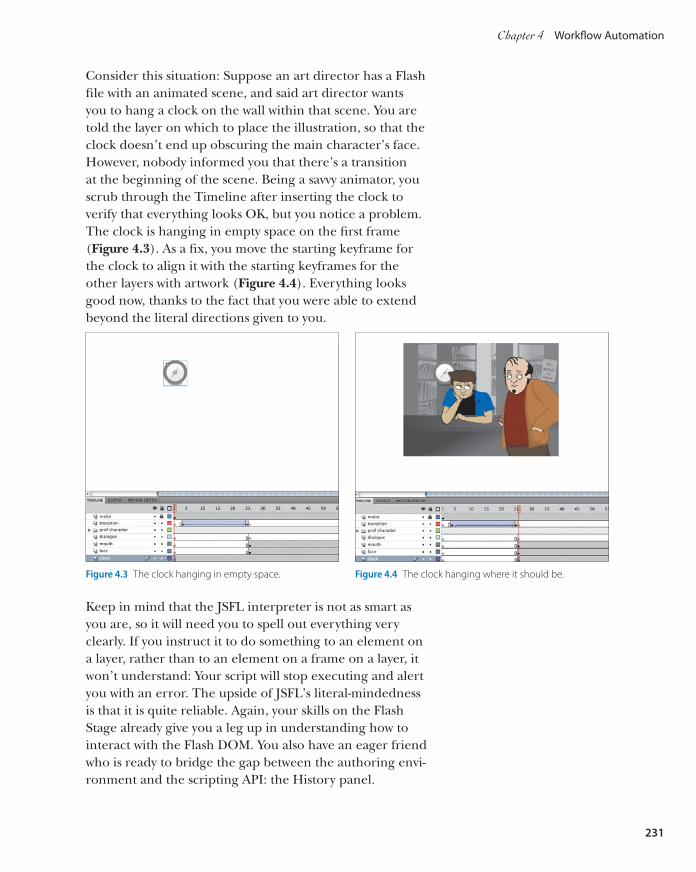
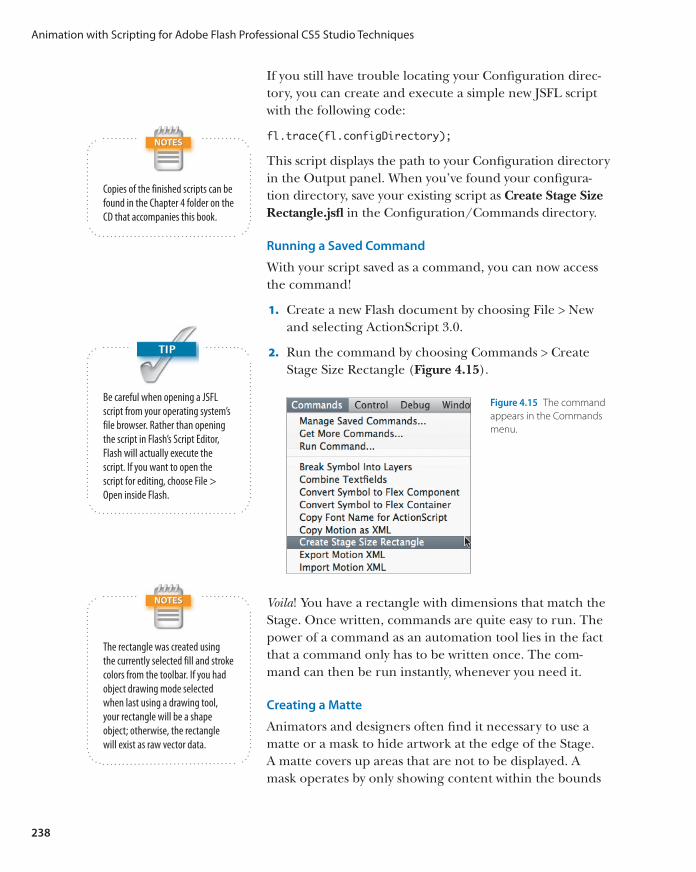
Consider this situation: Suppose an art director has a Flash file with an animated scene, and said art director wants you to hang a clock on the wall within that scene. You are told the layer on which to place the illustration, so that the clock doesn’t end up obscuring the main character’s face. However, nobody informed you that there’s a transition at the beginning of the scene. Being a savvy animator, you scrub through the Timeline after inserting the clock to verify that everything looks OK, but you notice a problem. The clock is hanging in empty space on the first frame (Figure 4.3). As a fix, you move the starting keyframe for the clock to align it with the starting keyframes for the other layers with artwork (Figure 4.4). Everything looks good now, thanks to the fact that you were able to extend beyond the literal directions given to you.
Figure 4.3 The clock hanging in empty space. Figure 4.4 The clock hanging where it should be.
Keep in mind that the JSFL interpreter is not as smart as you are, so it will need you to spell out everything very clearly. If you instruct it to do something to an element on a layer, rather than to an element on a frame on a layer, it won’t understand: Your script will stop executing and alert you with an error. The upside of JSFL’s literal-mindedness is that it is quite reliable. Again, your skills on the Flash Stage already give you a leg up in understanding how to interact with the Flash DOM. You also have an eager friend who is ready to bridge the gap between the authoring envi-ronment and the scripting API: the History panel.

232
Animation with Scripting for Adobe Flash Professional CS5 Studio Techniques
Writing Scripts to Control Flash
The History panel is your conduit from animating on the Flash Stage to writing code in the Script Editor. The History panel stores all the actions you take within a Flash document: creating a new layer, editing a Library item, adding a new scene, drawing a shape, and so on. As such, the History panel is a great way to revert your document to an earlier state, but it’s also a great way to peer inside Flash and see what steps can be automated.
Getting Started with the History Panel
Let’s take a look at the basic workings of the History panel and how you can use it to associate JSFL code with actions that are occurring on Stage.
1. Create a new Flash document by choosing File > New and then selecting ActionScript 3.0 in the New Docu-ment dialog box.
2. Open the History panel by choosing Window > Other Panels > History.
3. Select the Rectangle tool, make sure there is a fill color but no stroke color, and draw a rectangle on the Stage. Notice that this action is recorded in the History panel (Figure 4.5).
Figure 4.5 The new rectangle is recorded in the History panel.
4. Click the menu on the top right of the History panel to change the display format and tooltip display (Figure 4.6).

233
Chapter 4 Workflow Automation
Figure 4.6 Change the History panel display using the menu at the top
right.
5. Change the display to show JavaScript in Panel if it’s not selected already (Figure 4.7).
Figure 4.7 JSFL code is displayed in the History panel.
6. Switch to the Selection tool. Select the rectangle on the Stage by clicking on it. Then delete the rectangle by pressing the Delete key on your keyboard.
7. On the left side of the History panel, drag the slider up so that it’s parallel to the original rectangle command. Note that sliding the arrow undid the deletion of the rectangle. This slider acts as an undo and redo mecha-nism (Figure 4.8).
Figure 4.8 Here the History slider is used as an undo.
Not all actions in the History panel
can be replicated with JSFL. If an
action cannot be replicated with
JSFL, it will appear with a red X in
the History panel, and there will
be a keyword or description in
parentheses rather than a line of
JavaScript.

234
Animation with Scripting for Adobe Flash Professional CS5 Studio Techniques
8. Drag the slider down to the deleteSelection command (Figure 4.9). Select the original addNewRectangle command and click the Replay button. This will create a rectangle with the same dimensions as those of the original rectangle (Figure 4.10).
Figure 4.9 Here the slider is used as a redo (before clicking Replay).
Figure 4.10 After clicking the Replay button.
If this is as far down the rabbit hole as you’d like to ven-ture, you can just save your script as a command. To save the command from the History panel, select the desired steps within the History panel and click the button show-ing the disk icon in the lower-right corner (Figure 4.11). As a result, you will be prompted to name your command, which will then be available via the Commands menu. Be sure to at least skim ahead in this chapter to the section on adding a keyboard shortcut to your command.
Moving from the History Panel to a Script
The History panel is a great place to start automating, but it only allows you to repeat actions that you’ve already taken. Let’s move the JSFL into the Script Editor so you can start generating new actions.
You can select multiple steps in the
History panel using the Command
(Mac) or Ctrl (Windows) key. You
can also select continuous steps by
clicking on the first item, holding
Shift, and then clicking on the last
item.
Figure 4.11 Save your script as a com-
mand from the History panel.

235
Chapter 4 Workflow Automation
1. With only the addNewRectangle command still selected, click the Copy Steps button in the bottom right of the History panel (Figure 4.12).
Figure 4.12 The Copy Steps but-
ton allows you to copy selected
steps to your clipboard.
2. Drag the undo/redo slider to the very top of the His-tory panel to revert the document to its opened state.
3. Choose File > New. When the New Document dialog box appears, select Flash JavaScript File and click OK.
4. Paste the stored command into the newly created script file by choosing Edit > Paste.
5. Click the Run Script button (Figure 4.13) at the top of the Script Editor and return to the Flash document.
Figure 4.13 The Run Script button inside the Flash Script Editor executes
the current script.
Note that a rectangle has been drawn on the Stage in the same place and with the same dimensions as those of the ini-tial rectangle drawn using the Rectangle tool (Figure 4.14).
Figure 4.14 The script successfully draws the rectangle.

236
Animation with Scripting for Adobe Flash Professional CS5 Studio Techniques
Now you’re able to control the Flash Professional author-ing environment, aka the Flash Integrated Development Environment (IDE), using a script, which is pretty cool in its own right. At this point, though, your rectangle has somewhat random and meaningless dimensions. In the next section, you’ll leverage some information from the Flash DOM to make a rectangle using dimensions that will be more useful.
Composing a Smarter Script
You’ll now tweak the current script so that the new rect-angle matches the current size of the Stage. Your rectangle will then be useful as a Stage background or a background for new symbols. By referring to the Extending Flash CS5 Professional help documents, you can see that a Flash document contains simple height and width properties, just like those of a Movieclip object in ActionScript. You’ll utilize those properties when creating your rectangle.
1. Create a new variable to store the current document object by adding this code to the top of your script:
var dom = fl.getDocumentDOM();
2. Replace fl.getDocumentDOM() in the original code with dom.
3. Set the top and left position for the rectangle to 0, and the right and bottom to dom.width and dom.height, respectively. The script should now read:
var dom = fl.getDocumentDOM();
dom.addNewRectangle({left:0, top:0,
➥right:dom.width, bottom:dom.height}, 0);
Now you have a rectangle you can use! Steps 1 and 2 just did a bit of housekeeping to organize your script and make it more readable, so it really only took you one step to make the History panel step more useful. By collecting data from the current document (like Stage height and width), you can make highly responsive scripts that will save you time. The next section shows you where to save your script so you can run it without opening the Script Editor.
To launch the help documents,
choose Help > Flash Help. In the
Adobe Community Help window,
select Extending Flash Professional
CS5. You’ll see a list of contents on
the left (mainly JSFL objects).
The help documents are a program-
mer’s best friend. Get to know the
Extending Flash help documents.
It is highly recommended that you
download a PDF to your local drive
using the link provided on the help
pages. The PDF is faster to navigate
than any other format. There’s no
reason to memorize all the com-
mands and properties within the
JSFL API; just keep your PDF handy.
A new variable is created using the
var keyword.

237
Chapter 4 Workflow Automation
Parameters in Square Brackets
One way of getting the most out of the Flash help documents is knowing how to read the method usage descriptions. These descrip-
tions will help you understand what arguments to send to each method:
. When a parameter is located within square brackets in a method definition of a help document page, it denotes that the
parameter(s) is optional.
. In the following method usage description from the help documents, the parameter boundingRectangle is obligatory, but
the parameter for suppressing the fill of the new rectangle as well as the parameter for suppressing the stroke are both optional:
document.addNewRectangle(boundingRectangle, roundness [, bSuppressFill
➥[, bSuppressStroke]])
. To suppress the stroke, an argument must initially be passed for the bSuppressFill parameter. Here’s an example that
suppresses the stroke, but not the fill:
fl.getDocumentDOM().addNewRectangle({left:0,top:0,right:100,bottom:100},0, false,
➥true);
Saving a Script as a Command
To run your script conveniently from Flash, it helps to be able to access your script from within the Flash authoring environment. The simplest way to access a script inside of Flash is via the Commands menu. To add your script to the Commands menu, place the script file inside the Commands directory. The Commands directory is located within the Flash Configuration directory. The Extending Flash CS5 help document lists the following locations for the three common operating systems:
. Windows Vista. boot drive\Users\username\Local Set-tings\Application Data\Adobe\Flash CS5\language\Configuration\
. Windows XP. boot drive\Documents and Settings\username\Local Settings\Application Data\Adobe\Flash CS5\language\Configuration\
. Mac OS X. Macintosh HD/Users/username/Library/Application Support/Adobe/Flash CS5/language/Configuration/
238
Animation with Scripting for Adobe Flash Professional CS5 Studio Techniques
If you still have trouble locating your Configuration direc-tory, you can create and execute a simple new JSFL script with the following code:
fl.trace(fl.configDirectory);
This script displays the path to your Configuration directory in the Output panel. When you’ve found your configura-tion directory, save your existing script as Create Stage Size Rectangle.jsfl in the Configuration/Commands directory.
Running a Saved Command
With your script saved as a command, you can now access the command!
1. Create a new Flash document by choosing File > New and selecting ActionScript 3.0.
2. Run the command by choosing Commands > Create Stage Size Rectangle (Figure 4.15).
Figure 4.15 The command
appears in the Commands
menu.
Voila! You have a rectangle with dimensions that match the Stage. Once written, commands are quite easy to run. The power of a command as an automation tool lies in the fact that a command only has to be written once. The com-mand can then be run instantly, whenever you need it.
Creating a Matte
Animators and designers often find it necessary to use a matte or a mask to hide artwork at the edge of the Stage. A matte covers up areas that are not to be displayed. A mask operates by only showing content within the bounds
Copies of the finished scripts can be
found in the Chapter 4 folder on the
CD that accompanies this book.
Be careful when opening a JSFL
script from your operating system’s
file browser. Rather than opening
the script in Flash’s Script Editor,
Flash will actually execute the
script. If you want to open the
script for editing, choose File >
Open inside Flash.
The rectangle was created using
the currently selected fill and stroke
colors from the toolbar. If you had
object drawing mode selected
when last using a drawing tool,
your rectangle will be a shape
object; otherwise, the rectangle
will exist as raw vector data.

239
Chapter 4 Workflow Automation
of the mask’s shape. Both mattes and masks must sit on a layer above all others to function properly. Both devices are used to hide objects—typically those that are entering into or exiting from view—at the edge of the Stage. One reason to use a matte or a mask is to prevent these hidden objects from being seen when a SWF is scaled. The experi-ence of seeing what is supposed to be hidden undermines the illusion that the artist is trying to create. This trespass across the imaginary wall separating an audience from the performance on a Stage is sometimes referred to as “break-ing the fourth wall.”
In Flash, it can be frustrating to work with masks because the mask and all the “masked” layers need to be locked for the mask to appear correctly on the Stage. A matte, on the other hand, appears on the Stage just as it will in the published SWF. So, a matte can also serve as Stage guide-lines for the animator. For these reasons, some Flash users prefer to use mattes instead of masks.
Just as there are numerous approaches to accomplishing a task using the tools in the Flash authoring environment, there are a number of ways to accomplish the same end using JSFL. The approach to a problem in JSFL often par-allels what a user would be doing onscreen in the author-ing environment. So, let’s consider this issue when creating a matte script.
Start by making a mental map of the steps that the script might follow. One way to create a matte involves drawing two rectangles and using the inside rectangle to cut a hole in the outer rectangle. You can refer to this strategy as the “two-rectangles” method. Once you have the two rectan-gles, you can approach the next step in two different ways. If the rectangles you drew are not shape objects and they have different color fills, simply deselecting the rectangles and deleting the inner rectangle will leave you with the matte appearance that you’re seeking. Alternatively, you could draw two rectangles, make sure both rectangles are shape objects, and use document.punch() (Modify > Com-bine Objects > Punch) to generate your matte shape. You can verify that this works by replicating these steps on the Stage. If you copy the steps from the History panel, you’ll be most of the way toward having a completed matte script.
Identifying Raw Vector Data
Raw vector graphics are part of Flash’s default
Merge Drawing Model, which automatically
merges shapes that overlap. A raw vector, when
selected, appears as though it’s covered with a dot
pattern. In contrast, shape objects will appear with
a “marquee” border when selected, just as a symbol
or group would appear (Figure 4.16). Shape
objects are part of the Object Drawing Model,
which does merge shapes that overlap.
Figure 4.16 Display differences with
shape objects and raw vector data.

240
Animation with Scripting for Adobe Flash Professional CS5 Studio Techniques
One problem with both of the two-rectangles approaches is that they require you to change the object drawing mode (and/or fill color) setting in the user interface. So you should first check to see whether object drawing mode is off or on (depending on the method), and then restore the setting when you’re finished, so you don’t interrupt your workflow (or the workflow of other users you might share the script with).
Let’s go back to the proverbial drawing board and come up with a strategy that will create a matte without requiring you to fiddle with the user settings. This time let’s consider something that would be difficult for a user to accomplish on Stage. Instead of worrying about object drawing mode, draw a rectangle, select it, and then break it apart into raw vector data (Modify > Break Apart). You could then draw a selection rectangle inside your rectangle on the Stage, and then delete that selection, leaving a hollow frame that surrounds the Stage area. A quick check in the documenta-tion reveals that there is a document.setSelectionRect() method. Accomplishing this type of selection would be dif-ficult (if not impossible) for a user, because the selection would start with a mouse click. As soon as the user clicks, the entire fill is selected. This is a case where JSFL can take an action that a user cannot. Let’s now put this “single-rectangle” strategy to the test.
1. You’ll build on the existing Create Stage Size Rectangle script (choose File > Open to open the script if you’ve closed it) to create your matte script. Choose File > Save As and save the script (also in the Commands directory) as Create Stage Matte.jsfl. This sequence will not overwrite your previous script as long as you choose Save As.
2. Copy the original addNewRectangle line and paste it below the first one:
dom.addNewRectangle({left:0, top:0,
➥right:dom.width, bottom:dom.height}, 0);
dom.addNewRectangle({left:0, top:0,
➥right:dom.width, bottom:dom.height}, 0);
If you check the help page for
fl.objectDrawingMode,
which can toggle object drawing
mode on or off, you’ll notice
that Flash 8 is listed under
Availability. This means that the
fl.objectDrawingMode
property was not available in
Flash MX 2004 (the version before
Flash 8). Pay special attention to
the availability of the properties
and methods that you use if you
intend to distribute your extension
to others.
You can also work with the Create
Stage Size Rectangle script and
ActionScript to create an effect
similar to your Stage matte script
using masking. Do this by convert-
ing the rectangle into a movieclip
symbol and using that symbol
as an ActionScript mask for the
Stage. Note that the masking set in
ActionScript only shows when the
file is compiled. The masking will
not be apparent within the Flash
authoring environment.

241
Chapter 4 Workflow Automation
3. Modify the second line so that it calls the setSelection-Rect instead. Change the second parameter to true to force the selection to replace any existing selections:
dom.addNewRectangle({left:0, top:0,
➥right:dom.width, bottom:dom.height}, 0);
dom.setSelectionRect({left:0, top:0,
➥right:dom.width, bottom:dom.height}, true);
4. Add a variable at the top of the script set to however many pixels you like to control matte thickness. Then update your original rectangle to account for the extra area created by the matte thickness, which will extend beyond the bounds of the Stage on all sides:
var matteThickness = 200;
dom.addNewRectangle({left:-matteThickness, top:
➥-matteThickness, right:dom.width+matteThickness,
➥bottom:dom.height+matteThickness}, 0);
5. Add a couple of optional arguments to keep the fill but suppress the stroke, since the stroke won’t be needed for a matte:
dom.addNewRectangle({left:-matteThickness, top:
➥-matteThickness, right:dom.width+matteThickness,
➥bottom:dom.height+matteThickness}, 0, false,
➥true);
6. Check to see if object drawing mode is indeed turned on, and then break apart your rectangle before mak-ing a selection. To use the breakApart() command, you need to be certain that you’ve first made a selec-tion. Add the following two lines of code between the addNewRectangle and setSelectionRect lines:
dom.selectAll();
if(fl.objectDrawingMode) dom.breakApart();
7. Using selectAll is imprecise because there might be something else on the layer you don’t want to select, but you’ll improve on that step in a moment. Delete your selection to form the cut-out part of the matte by adding this line to the end of the script:
dom.deleteSelection();
242
Animation with Scripting for Adobe Flash Professional CS5 Studio Techniques
If you run the current script on a blank document, it works as intended. Unfortunately, if you run it in almost any other scenario, it will likely wreak havoc on your existing artwork. One thing you can do to improve your single-rectangle script is to situate the matte on its own named layer. Then you’ll be sure to select the contents of that layer rather than selecting all. Ideally, this will prevent your selection rectangle (that you then delete) from also select-ing artwork on other layers as well.
Jumping ahead a few steps, the astute reader may see a speed bump on the horizon. The selection rectangle selects content on all available layers, so when you delete your selection, you’ll still be deleting content from other layers as well. You’ll rectify that in the steps that follow.
Improving the matte script
You can use several approaches to resolve the problem introduced by the selection rectangle:
. Loop through and remove items from the selection that are not contained on your new layer prior to delet-ing the selection.
. Use a mouse click to select only your rectangle (yes, JSFL can do that, too).
. Convert your rectangle into a shape object or a group, enter edit mode, and safely make your deletion there.
. Start over and try an entirely different approach.
Let’s try the third option listed, the edit mode approach. Even if you make your object into a group, you still have to determine if your rectangle is a shape object once you’re in edit mode. If you convert the rectangle into a shape object, you know you’ll be dealing with a raw-vector rectan-gle inside edit mode. However, if your rectangle is a shape object from the beginning, the rectangle will be unaffected by being made into a shape object again, so you’ll attempt to convert the rectangle to a shape object regardless. Test this out: Make an element into a drawing object by select-ing the element on Stage and choosing Modify > Com-bine Object > Union. Then enter edit (in place) mode by double-clicking on the shape object. The shape within the

243
Chapter 4 Workflow Automation
shape object will be raw vector data regardless of whether the shape was a shape object to begin with.
1. Create a variable that will reference the current Time-line. Insert the following text just below the declaration of the dom variable near the top of the script:
var tl = dom.getTimeline();
2. Create a new layer below the matteThickness variable. The addNewLayer method will return the index of the new layer. The index refers to the position of the layer within its parent Timeline. You’ll store the index so that you can use it later:
var newLayerNum = tl.addNewLayer("matte");
3. Make your selection more precise by assigning the ele-ments contained on the first frame of your new layer (which will just be your rectangle) as the document’s current selection. You’re using the elements object because it’s already in array format, and dom.selection only accepts an array. Replace the selectAll line with the following code:
dom.selection = tl.layers[newLayerNum].frames[0].
➥elements;
4. Remove the breakApart line entirely. You’ve rendered the break apart step obsolete.
5. Convert the selection into a shape object, and enter edit mode by adding these two lines right after the line in step 3:
dom.union();
dom.enterEditMode('inPlace');
6. To clean up, exit out of edit mode and lock your matte layer by adding these two lines to the end of the script:
dom.exitEditMode();
tl.setLayerProperty("locked", true);
If you want to make sure your matte layer is on top of the pile, you can add this line to the end of your script:
tl.reorderLayer(newLayerNum, 0);

244
Animation with Scripting for Adobe Flash Professional CS5 Studio Techniques
7. Open a new ActionScript 3.0 document and run your script by choosing Commands > Create Stage Matte (Figure 4.17).
Figure 4.17 The Stage matte in action after the Create Stage Matte com-
mand has been run.
The full script should now read as follows:
var dom = fl.getDocumentDOM();
var tl = dom.getTimeline();
var matteThickness = 200;
var newLayerNum = tl.addNewLayer("matte");
dom.addNewRectangle({left:-matteThickness,
➥top:-matteThickness, right:dom.width+matteThickness,
➥bottom:dom.height+matteThickness}, 0, false, true);
dom.selection = tl.layers[newLayerNum].frames[0].
➥elements;
dom.union();
dom.enterEditMode('inPlace');
dom.setSelectionRect({left:0, top:0, right:dom.width,
➥bottom:dom.height}, true, false);
dom.deleteSelection();
dom.exitEditMode();

245
Chapter 4 Workflow Automation
tl.setLayerProperty("locked", true);
tl.reorderLayer(newLayerNum, 0);
If you were curious as to what your script would have looked like if you had initially followed the two-rectangles approach using object drawing mode, here it is with the drawing mode stored and then restored after all the other code has executed:
var dom = fl.getDocumentDOM();
var tl = dom.getTimeline();
var matteThickness = 200;
var storedODM = fl.objectDrawingMode;
var newLayerNum = tl.addNewLayer("matte");
fl.objectDrawingMode = true;
dom.addNewRectangle({left:-matteThickness,
➥top:-matteThickness, right:dom.width+matteThickness,
➥bottom:dom.height+matteThickness}, 0, false, true);
dom.addNewRectangle({left:0, top:0, right:dom.width,
➥bottom:dom.height}, 0, false, true);
dom.selection = tl.layers[newLayerNum].frames[0].
➥elements;
dom.punch();
tl.setLayerProperty("locked", true);
tl.reorderLayer(newLayerNum, 0);
fl.objectDrawingMode = storedODM;
The two-rectangles method has the same number of lines as the single-rectangle/edit-mode method. Both scripts are fairly robust (i.e., tough to “break” and will work in many scenarios). Both scripts require at least Flash 8, because they use aspects of the object drawing mode that were introduced with Flash 8.
There’s at least one scenario in which the two-rectangles method could be a more robust script: Suppose you wanted to add a matte to a symbol’s Timeline rather than to the main Timeline. If you’re operating on a symbol’s Timeline, then that places you in edit mode to start with, and exiting edit mode could potentially transport you to the main Timeline of the current scene instead of back to the symbol’s Timeline (which you had been editing before you ran the script). The circumstances in which you might
246
Animation with Scripting for Adobe Flash Professional CS5 Studio Techniques
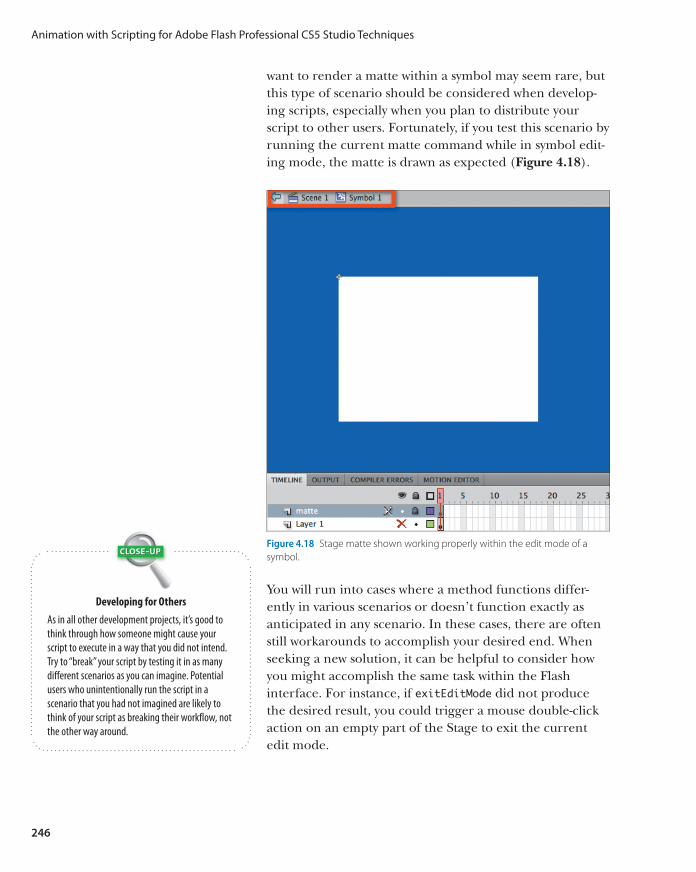
want to render a matte within a symbol may seem rare, but this type of scenario should be considered when develop-ing scripts, especially when you plan to distribute your script to other users. Fortunately, if you test this scenario by running the current matte command while in symbol edit-ing mode, the matte is drawn as expected (Figure 4.18).
Figure 4.18 Stage matte shown working properly within the edit mode of a
symbol.
You will run into cases where a method functions differ-ently in various scenarios or doesn’t function exactly as anticipated in any scenario. In these cases, there are often still workarounds to accomplish your desired end. When seeking a new solution, it can be helpful to consider how you might accomplish the same task within the Flash interface. For instance, if exitEditMode did not produce the desired result, you could trigger a mouse double-click action on an empty part of the Stage to exit the current edit mode.
Developing for Others
As in all other development projects, it’s good to
think through how someone might cause your
script to execute in a way that you did not intend.
Try to “break” your script by testing it in as many
different scenarios as you can imagine. Potential
users who unintentionally run the script in a
scenario that you had not imagined are likely to
think of your script as breaking their workflow, not
the other way around.

247
Chapter 4 Workflow Automation
The process of creating a “smart” script is as much a pro-cess of creative thinking as anything else that can be done in Flash. As with any creative project, you may occasionally find that you need to scrap an idea entirely and start from scratch. With your matte script, a bit of persistence paid off and allowed you to move forward, but scenarios may arise during scripting in which there aren’t ready alternatives. If you feel stuck, remember to comb the documentation further or post your questions on the help forums listed in the “More Resources” section at the end of this chapter.
Adding a Keyboard Shortcut to a Command
The ability to add a shortcut to your commands allows for huge gains in workflow efficiency. Follow the steps here to add a new shortcut to one of the commands that you’ve written.
1. To open the Keyboard Shortcuts dialog box, choose Edit > Keyboard Shortcuts in Windows or Flash > Key-board Shortcuts in Mac OS X (Figure 4.19).
Figure 4.19 The Keyboard Shortcuts dialog box allows you to add shortcuts
to several items within the Flash authoring environment, including com-
mands that you’ve written.
If you’re not worried about the back-
ward compatibility of your script
for any version prior to CS4, you can
write a shorter version of the two-
rectangles matte script using the
addNewPrimitiveRectangle
command. Rectangular Primitives
will be shape objects by default.
248
Animation with Scripting for Adobe Flash Professional CS5 Studio Techniques
2. If you have not done so already, start by duplicating the default set of shortcuts and giving that set a unique name. The Duplicate button is the first on the left after the menu for the current set.
3. Choose Drawing Menu Commands from the Com-mands menu, and then twirl open the Commands item by clicking the adjacent arrow to reveal the list from your Commands menu.
4. Select the command to which you’d like to add a short-cut, and click the plus (+) button where it says Short-cuts. The word <empty> will appear in the “Press key” field and the Shortcut box.
5. Using the keyboard, perform the shortcut that you’d like to add. The shortcut keys will appear in the “Press key” field. If the shortcut is invalid or conflicts with another one of your shortcuts, a warning message will appear at the bottom of the dialog box.
6. When you are happy with a particular (valid) key com-bination, click the Change button to apply this shortcut to the <empty> item in the shortcut list. Note that you can click the plus (+) to add additional shortcuts to the same command.
7. Click the OK button to close the dialog box and save your settings when you’ve finished.
Creating a Script with User Interaction
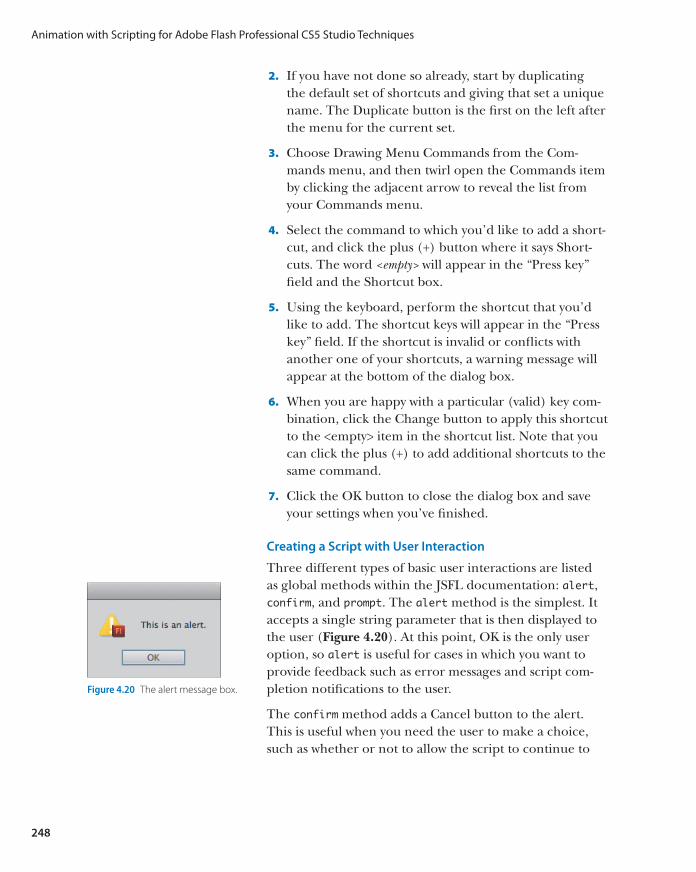
Three different types of basic user interactions are listed as global methods within the JSFL documentation: alert, confirm, and prompt. The alert method is the simplest. It accepts a single string parameter that is then displayed to the user (Figure 4.20). At this point, OK is the only user option, so alert is useful for cases in which you want to provide feedback such as error messages and script com-pletion notifications to the user.
The confirm method adds a Cancel button to the alert. This is useful when you need the user to make a choice, such as whether or not to allow the script to continue to
Figure 4.20 The alert message box.

249
Chapter 4 Workflow Automation
run, even though some precondition has not been met (Figure 4.21). The confirm method returns a value to notify you about which option the user selected.
Figure 4.21 The confirmation
message box.
The prompt method is the most sophisticated of the three. It allows the user to enter text and accepts two parameters when called (Figure 4.22). The first parameter is a prompt message. The second is optional and includes any text that you want to prepopulate into the user’s text entry field. The prompt will then either return what was entered into the field or return a value of null if the user clicked Cancel. Although the prompt function has a number of applications, the most common is to allow the user to name something (e.g., a new symbol, a prefix for Library items, etc.).
Figure 4.22 The Prompt message box.
Bitmap Smoothing
Bitmaps can sometimes become pixelated, blurry, or otherwise “crunchy” when they are animated or scaled. Flash’s default settings don’t tend to display bitmaps well at any scale other than 100%. To fix this, you can open the bitmap Library item by Ctrl-clicking/right-clicking on the Library item and choosing Properties. In the Bitmap
Debugging Your Scripts
Debugging is the process of finding and reducing
the number of bugs, or defects, in your script. You
can use the following methods to generate feed-
back when parts of your script are not working:
. The alert method (described in this section)
can be useful for providing you, the developer,
with feedback when something is not
working.
. The fl.trace method can also be used. It is
similar to the trace method in ActionScript
and prints the feedback into the Output
panel instead of an alert message box. The
fl.trace method will not clear the Output
panel when you retest your script like the
ActionScript trace method does when you
retest a SWF. To clear the Output panel, use
fl.outputPanel.clear() at the top
of your script.

250
Animation with Scripting for Adobe Flash Professional CS5 Studio Techniques
Properties dialog box, select the Allow Smoothing check box. If you’re producing a project for broadcast or physical media (e.g., CD or USB drive) or if you are more con-cerned about quality than about file size, set the Com-pression to Lossless (PNG/GIF) instead of Photo (JPEG) (Figure 4.23). Setting these properties on every bitmap can be a headache if you have a lot of bitmaps in your Library, so let’s script it!
Figure 4.23 The Bitmap Properties dialog box allows you to control settings on
individual bitmaps within the Library.
1. Create a new JSFL file (File > New > Flash JavaScript File) and save it in the Commands directory as Smooth and Lossless Bitmaps.jsfl.
2. Define variables for the Library and the items currently selected in the Library:
var lib = fl.getDocumentDOM().library;
var items = lib.getSelectedItems();
3. Loop through the contents of your items variable using a for in loop and store the current Library item as you go:
for(var i in items) {
var it = items[i];
}
4. You need to set the allowSmoothing and compressionType properties of each variable. Before doing so, check to make sure the current item is a bitmap, since only
251
Chapter 4 Workflow Automation
a bitmap will possess these properties (attempting to apply these properties to any other types of Library items will generate an error). Add the following lines after the declaration line for the it variable inside the for in loop:
if(it.itemType == "bitmap") {
it.allowSmoothing = true;
it.compressionType = 'lossless';
}
The script will run fine at this point, but the user remains uninformed about what’s going on behind the curtain. Even when you’re scripting just for you, it’s nice to have confirmation that the script ran as intended. While you’re at it, check to see if any Library items are selected in the first place. If there are no items selected, give the user the option to apply this command to all the bitmaps in the Library.
5. To see if the user wants to apply the command to all Library items, use a confirm box if no Library items are selected. If the user clicks OK, you’ll reassign your items variable to the entire list of Library items. Add the following lines just after the line containing the declaration of the items variable:
if(items.length < 1) {
var confirmed = confirm("No items are
➥selected. Do you want to run this on all library
➥items?");
if(confirmed) items = lib.items;
}
6. Add a variable at the top of your script that will keep track of the number of bitmap items you’ve altered:
var runCounter = 0;
7. You’ll now increment this variable by 1 for each time a bitmap is encountered in your list of items. When your loop is complete, you’ll display the resulting number to the user in the form of an alert message. Add the highlighted code as shown:

252
Animation with Scripting for Adobe Flash Professional CS5 Studio Techniques
for(var i in items) {
var it = items[i];
if(it.itemType == "bitmap") {
it.allowSmoothing = true;
it.compressionType = 'lossless';
runCounter++;
}
}
alert(runCounter + " items affected.");
If nothing is selected in the Library, the user will see the message that you added in step 5 (Figure 4.24). Now the user has more control and receives some feedback from your script (Figure 4.25).
Figure 4.24 The confirmation message appears and informs the user that no
Library items are selected.
Figure 4.25 The alert message tells the
user how many bitmaps were affected by
the script.
Generating a Ready-made Mouth Symbol
For setting up and organizing files, JSFL is a great tool. Perhaps you have a common set of layers or Library folders that you always use for your files. Any repeated activities used to set up a file or assets within a file will lend them-selves well to scripting. Standards make files simpler to work with. Aside from the organization benefits, standards take away the burden of memorization. For instance, if you have a standard set of mouth shapes for your character, you won’t have to memorize a new set when working with each new character. In this example, you’ll set up a mouth

253
Chapter 4 Workflow Automation
symbol with ready-made frame labels for lip syncing an animated character (Figure 4.26).
Figure 4.26 Frame labels as they will appear when the script is complete.
1. Create a new JSFL file and save it in the Commands directory as New Mouth Symbol.jsfl.
2. Define variables for the current document’s DOM and Library:
var dom = fl.getDocumentDOM();
var lib = dom.library;
3. You’ll define two settings for your script. The first vari-able will store all your standard mouth shapes (which tend to represent phonemes, basic units of sound) as a string with the values separated by commas. You can add to or subtract from this list to fit your needs. The second variable will tell the script how many frames you want between each label, which will enable you to easily read each label. Add the following two variable declara-tions to your script:
var labelString = "default,ee,oh,ah,mm,L,s";
var framesPerLabel = 10;
4. Prompt the user to name the new symbol and to store that name by adding this code immediately after the code in the previous step:
var namePath = prompt("Symbol name: " );
5. You’ll add a graphic symbol to the Library using the name given by the user. The new Library item will auto-matically be selected. You’ll edit the symbol from there. Add these two lines after the code in the previous step:
lib.addNewItem('graphic', namePath);
lib.editItem(namePath);

254
Animation with Scripting for Adobe Flash Professional CS5 Studio Techniques
6. Since you’ve called editItem(), you’re now inside the symbol, and by requesting the current Timeline, you’ll receive the symbol’s Timeline. Add the following line after the lines in the previous step:
var tl = dom.getTimeline();
7. You’ll create a new variable and convert your labelString into an array so that you can loop through each label. Then you’ll use the length of that array and the framesPerLabel variable to determine the number of frames that the symbol should have on its Timeline. Add the following lines to your script:
var labels = labelString.split(',');
tl.insertFrames(labels.length * framesPerLabel);
8. Add the following lines to create a new layer to store your labels, as well as create a variable to store your new layer for easy referencing:
var newLayerNum = tl.addNewLayer("labels");
var newLayerObj = tl.layers[newLayerNum];
9. Loop through all your labels and assign a frame num-ber to each label based on your framesPerLabel setting and the number of times that your loop has run by add-ing this block of code:
for (var i=0; i < labels.length; i++){
var frameNum = i * framesPerLabel;
}
10. For each iteration of the loop, you also want to add a keyframe (except on the first frame, because there’s already a keyframe there by default). You also want to set the name of the current frame in your loop to the current label in the loop. Setting the name of the frame is equivalent to assigning the label name via the Proper-ties panel. Add these next two lines within the for loop after the first line, but before the closing curly brace:
if(frameNum != 0) tl.insertKeyframe(frameNum);
newLayerObj.frames[frameNum].name = labels[i];
255
Chapter 4 Workflow Automation
Improving the mouth symbol script
Your script will work just fine as it is right now, but you should probably do a little housekeeping:
1. Lock the new layer to make sure no content is acciden-tally placed on the “labels” layer by adding the follow-ing line to the end of the script:
newLayerObj.locked = true;
2. You’ll use the next bit of code to move the playhead back to the first frame and target “Layer 1” so the user can immediately begin adding artwork after running the script. This can be accomplished in a single step by setting the selected frame.
There are two different ways to pass a selection to the setSelectedFrames() method. Method A accepts argu-ments for a startFrameIndex, an endFrameIndex, and a toggle about whether to replace the current selection (the toggle is optional and true by default). Method B accepts a selection array as its first argument and the same toggle from method A as the second argu-ment. Because you want to specify the layer that you’re selecting, you’ll use method B with a three-item array that includes the layer that you want to select, the first frame, and the last frame. Layer index numbering starts with zero at the top of the stack. To access the layer below your “labels” layer, you need to add 1 to the layer index that you stored. Add this next line to the bottom of the script:
tl.setSelectedFrames([newLayerNum + 1, 0, 1]);
3. If the user clicks Cancel when asked for the symbol name, you need to be sure to abort the rest of the script. You’ll do this by wrapping most of your code in a function. You can then exit that function at any point in time. Add the following function definition before the declaration of the namePath variable:
function createNewSymbol(){
4. You still need to make sure that you close your function and that the script actually calls the function that you

256
Animation with Scripting for Adobe Flash Professional CS5 Studio Techniques
just defined. Do so by adding the following to the end of the script:
}
createNewSymbol();
5. You’re now able to exit the function if and when the user clicks Cancel. Clicking Cancel causes the prompt() to return a value of null. To exit the function if the user cancels, add the following line immediately after the namePath prompt:
if(namePath == null) return;
6. Save your script (Command+S/Ctrl+S) and test it by opening a new document and choosing Commands > New Mouth Symbol.
Rather than wrapping your code in a function (as you just did), you could have wrapped your code in an if statement block, which would have checked to see if namePath was not set to null. The advantage of wrapping everything in a function is that it’s easy to then exit the function for any number of reasons. For example, you could add another prompt before the symbol name to determine if the user wants to add (or remove) any labels to your set. This is an easy feature to add because you originally defined your label set as a string, not an array. The prompt will also return a string. You thus have the option to abort the script if the user clicks Cancel within the Prompt box. If you had used a second if statement instead of a function, you’d in turn have to wrap everything in another set of brackets, rendering everything more difficult to read.
7. Return to your script. By adding the following snippet inside the beginning of the createNewSymbol function block, the command will present the user with your set of labels and allow the user to add or remove labels:
var returnedLabels = prompt("Labels: ",
➥labelString);
labelString = returnedLabels;
if(labelString == null) return;

257
Chapter 4 Workflow Automation
8. Save your script, return to the open document, and run the command again. Your script will now include a prompt that allows the user to add or remove frame labels (Figure 4.27).
Your completed New Mouth Symbol script should look like this:
var dom = fl.getDocumentDOM();
var lib = dom.library;
var labelString = "default,ee,oh,ah,mm,L,s";
var framesPerLabel = 10;
function createNewSymbol(){
var returnedLabels = prompt("Labels: ", labelString);
labelString = returnedLabels;
if(labelString == null) return;
var namePath = prompt("Symbol name: " );
if(namePath == null) return;
lib.addNewItem('graphic', namePath);
lib.editItem(namePath);
var tl = dom.getTimeline();
var labels = labelString.split(',');
tl.insertFrames(labels.length * framesPerLabel);
var newLayerNum = tl.addNewLayer("labels");
var newLayerObj = tl.layers[newLayerNum];
for (var i=0; i < labels.length; i++){
var frameNum = i * framesPerLabel;
if(frameNum != 0) tl.insertKeyframe(frameNum);
newLayerObj.frames[frameNum].name = labels[i];
}
newLayerObj.locked = true;
tl.setSelectedFrames([newLayerNum + 1, 0, 1]);
}
createNewSymbol();
Extending Flash Even Further
Several topics capable of improving your workflow have been covered to this point, but there are even more power-ful techniques yet to be discovered. This section gives you
Figure 4.27 The prepopulated prompt that allows
users to add or remove labels.

258
Animation with Scripting for Adobe Flash Professional CS5 Studio Techniques
a taste of additional techniques that you can use to extend Flash beyond the topics covered thus far in this chapter.
Advanced Dialog Boxes
So far, we’ve touched upon some very simple user interac-tions, but you can create more complex interactions using the XMLUI object (Figure 4.28). The XMLUI object allows you to create complex dialog boxes using a simple XML con-figuration file. An XML file is a simple text file that uses tags to describe data. Similar to HTML, XML tags begin with a less than sign (<) and end with a greater than sign (>), and a slash (/) is used to close a tag. Here’s the XML that describes the structure of a dialog box for a command that combines textfields in Flash:
<?xml version="1.0" encoding="UTF-8"?>
<dialog id="combineTF" title="Combine TextFields"
➥buttons="accept,cancel">
<vbox>
<label value="Sort from:" />
<radiogroup id="sortby" tabindex="5">
<radio label="top" accesskey="t"
➥selected="true"/>
<radio label="left" accesskey="l" />
<radio label="bottom" accesskey="b" />
<radio label="right" accesskey="r" />
</radiogroup>
</vbox>
<spacer />
<hbox>
<label value="Separator:" />
<textbox id="separator" maxlength="20"
➥multiline="false" value="" tabindex="1" size="12"
➥literal="false" />
</hbox>
</dialog>
Once the XML file is saved, the file location can be passed as an argument using the document.xmlPanel() method, which launches the dialog box. You can access the user
Figure 4.28 The dialog box produced
by an XMLUI file that appears for the
Combine TextFields command.

259
Chapter 4 Workflow Automation
selections made within the dialog box after the dialog box has been closed just as you can with the confirm and prompt methods.
Adobe has almost no official documentation of how these XML files work. The only complete documentation can be found in Extending Macromedia Flash MX 2004: Complete Guide and Reference to JavaScript Flash by Todd Yard and Keith Peters (friends of ED, 2004). You can also find a great article by Guy Watson at www.devx.com/webdev/Article/20825.
Panels
The JSFL knowledge covered in this chapter carries over to Flash panels as well. A Flash panel is simply a published SWF that can be loaded into the Flash Professional inter-face and accessed by choosing Window > Other Panels. You can design custom panels to look like the panels that come installed with Flash, or you can make them entirely unique. To have your SWF show up as a panel, you’ll need to place it in the Configuration/WindowSWF folder. If you have Flash open when you paste (or save) the SWF into the folder for the first time, you must restart Flash to make the panel available.
From a SWF, there is one primary way for ActionScript to talk with JSFL, which is to use the MMExecute() function. This function passes a string to be interpreted as JSFL. When you pass this code as a string, you’ll have to be careful to escape any characters such as quotation marks (using a backslash, e.g., /") that will disrupt the string in ActionScript. If you use double-quotes for JSFL, you can use single quotes to wrap your string, and vice versa:
MMExecute("alert('hello');");
When you publish your SWF by choosing Control > Test Movie, you won’t see any indication that the JSFL code has executed. If you place the SWF inside the WindowSWF folder, restart Flash, and locate the panel by choosing Win-dow > Other Panels (the panel name will be the filename minus the .swf extension), you will then see an alert box that displays “hello” (Figure 4.29).
Figure 4.29 An alert box generated by
a SWF panel using MMExecute.
260
Animation with Scripting for Adobe Flash Professional CS5 Studio Techniques
Complex ActionScript-to-JSFL Interactions
For more complex interactions, it is recommended that you place all your JSFL
functions in a script file and call individual functions within the script using the
fl.runscript() method (from MMExecute) rather than including all your
JSFL inside your ActionScript and sending large strings with MMExecute.
. The method usage for fl.runscript() is documented as follows:
fl.runScript(fileURI [, funcName [, arg1, arg2, ...]])
. To execute an entire script, pass the file location of the script as the only
argument.
. To call a function within a script, also pass the name of the function as the second
argument.
. All arguments after the second one are for arguments that you are passing to the
function that you are calling.
. By keeping your JSFL in a separate script, you avoid the need to republish your
SWF (and copy it to the WindowSWF folder) with every update.
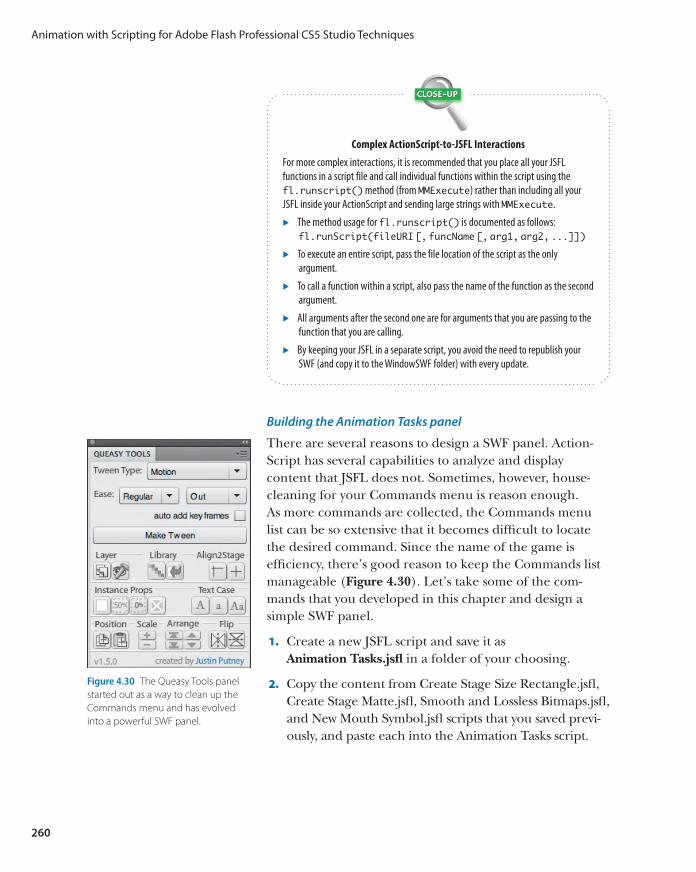
Building the Animation Tasks panel
There are several reasons to design a SWF panel. Action-Script has several capabilities to analyze and display content that JSFL does not. Sometimes, however, house-cleaning for your Commands menu is reason enough. As more commands are collected, the Commands menu list can be so extensive that it becomes difficult to locate the desired command. Since the name of the game is efficiency, there’s good reason to keep the Commands list manageable (Figure 4.30). Let’s take some of the com-mands that you developed in this chapter and design a simple SWF panel.
1. Create a new JSFL script and save it as Animation Tasks.jsfl in a folder of your choosing.
2. Copy the content from Create Stage Size Rectangle.jsfl, Create Stage Matte.jsfl, Smooth and Lossless Bitmaps.jsfl, and New Mouth Symbol.jsfl scripts that you saved previ-ously, and paste each into the Animation Tasks script.
Figure 4.30 The Queasy Tools panel
started out as a way to clean up the
Commands menu and has evolved
into a powerful SWF panel.

261
Chapter 4 Workflow Automation
3. Wrap each block of code from the scripts you cop-ied within the following function names respec-tively: stageRectangle, stageMatte, smoothBMPs, and newMouthSymbol.
4. Consolidate any variable declarations for the docu-ment, Library, and Timeline (except the one in the middle of the newMouthSymbol function) at the top of the script.
Your Animation Tasks script should now read as follows:
var dom = fl.getDocumentDOM();
var tl = dom.getTimeline();
var lib = dom.library;
function stageRectangle(){
dom.addNewRectangle({left:0, top:0,
➥right:dom.width, bottom:dom.height}, 0);
}
function stageMatte(){
var matteThickness = 200;
var newLayerNum = tl.addNewLayer("matte");
dom.addNewRectangle({left:-matteThickness,
➥top:-matteThickness,
➥right:dom.width+matteThickness,
➥bottom:dom.height+matteThickness},
➥0, false, true);
dom.selection = tl.layers[newLayerNum].
➥frames[0].elements;
dom.union();
dom.enterEditMode('inPlace');
dom.setSelectionRect({left:0, top:0,
➥right:dom.width, bottom:dom.height}, true,
➥false);
dom.deleteSelection();
dom.mouseDblClk({x:10, y:10}, false, false,
➥false);
tl.setLayerProperty("locked", true);
tl.reorderLayer(newLayerNum, 0);
}
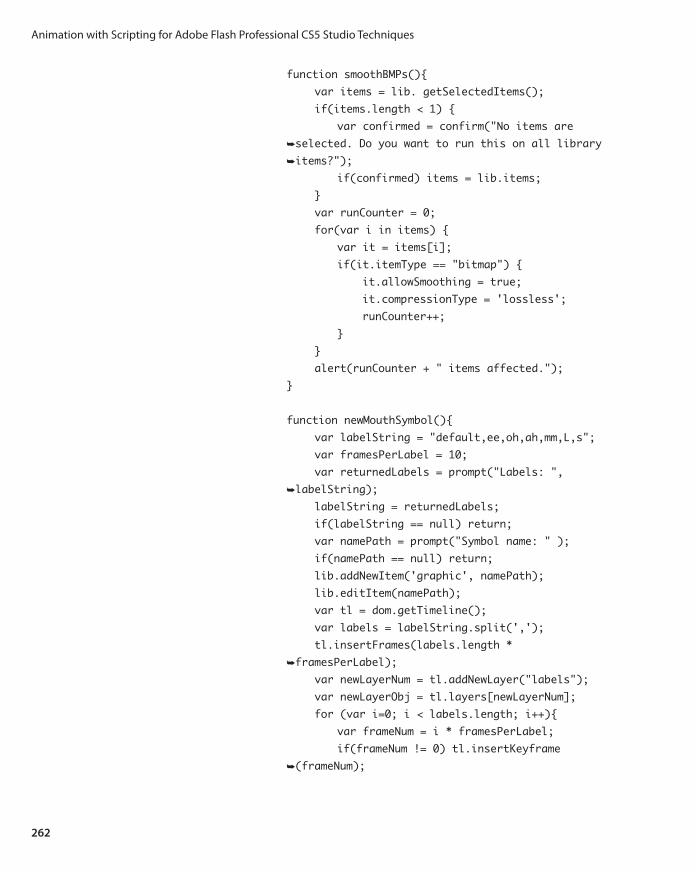
262
Animation with Scripting for Adobe Flash Professional CS5 Studio Techniques
function smoothBMPs(){
var items = lib. getSelectedItems();
if(items.length < 1) {
var confirmed = confirm("No items are
➥selected. Do you want to run this on all library
➥items?");
if(confirmed) items = lib.items;
}
var runCounter = 0;
for(var i in items) {
var it = items[i];
if(it.itemType == "bitmap") {
it.allowSmoothing = true;
it.compressionType = 'lossless';
runCounter++;
}
}
alert(runCounter + " items affected.");
}
function newMouthSymbol(){
var labelString = "default,ee,oh,ah,mm,L,s";
var framesPerLabel = 10;
var returnedLabels = prompt("Labels: ",
➥labelString);
labelString = returnedLabels;
if(labelString == null) return;
var namePath = prompt("Symbol name: " );
if(namePath == null) return;
lib.addNewItem('graphic', namePath);
lib.editItem(namePath);
var tl = dom.getTimeline();
var labels = labelString.split(',');
tl.insertFrames(labels.length *
➥framesPerLabel);
var newLayerNum = tl.addNewLayer("labels");
var newLayerObj = tl.layers[newLayerNum];
for (var i=0; i < labels.length; i++){
var frameNum = i * framesPerLabel;
if(frameNum != 0) tl.insertKeyframe
➥(frameNum);

263
Chapter 4 Workflow Automation
newLayerObj.frames[frameNum].name =
➥labels[i];
}
newLayerObj.locked = true;
tl.setSelectedFrames([newLayerNum + 1, 0, 1]);
}
5. Create a new ActionScript 3.0 document and save it as Animation Tasks.fla (in the same folder with the cor-responding JSFL script).
6. In the Properties panel under the Properties heading, click the Edit button next to Size, change the size of the document to 200 x 150, and click OK.
7. Use the color selector within the Properties panel to change the background color of the Stage to a light gray color, like #CCCCCC.
8. Open the Components panel (Window > Compo-nents), twirl open the User Interface folder, and drag four instances of the Button component onto the Stage.
9. Select all four buttons (Command+A/Ctrl+A), set their width properties to 200 in the Properties panel, and arrange the buttons evenly on the Stage (Figure 4.31).
10. Give the buttons the following instance names using the Properties panel (from top to bottom): rect_btn, matte_btn, bmp_btn, and mouth_btn.
11. Give the buttons the following labels using the Compo-nent Parameters area of the Properties panel: Create Stage Rectangle, Create Stage Matte, Smooth Bitmaps, and New Mouth Symbol (Figure 4.32).
Figure 4.32 Setting the button label in the Prop-
erties panel.
Figure 4.31 Button instances evenly
spaced on the Stage.
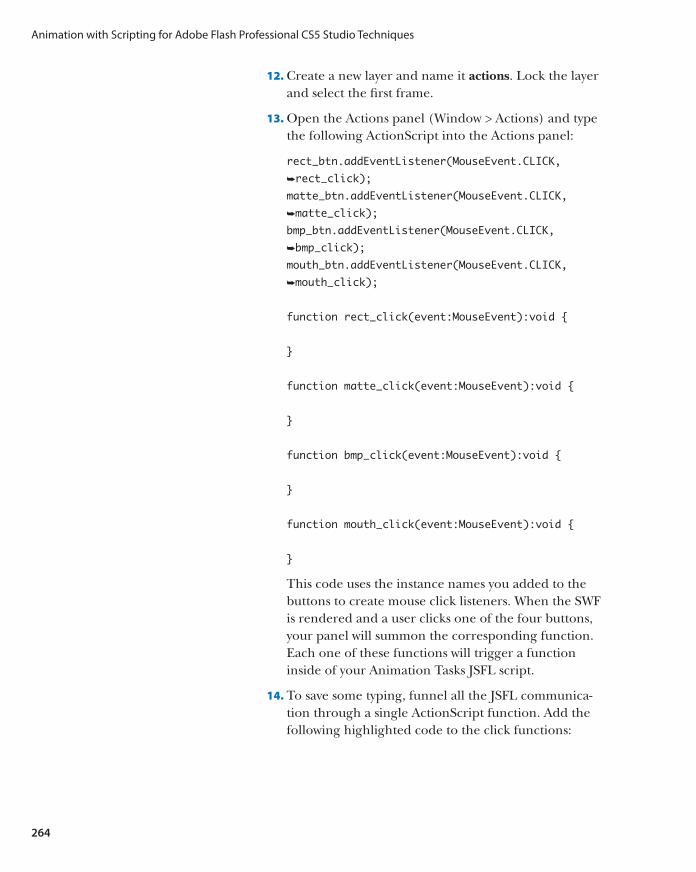
264
Animation with Scripting for Adobe Flash Professional CS5 Studio Techniques
12. Create a new layer and name it actions. Lock the layer and select the first frame.
13. Open the Actions panel (Window > Actions) and type the following ActionScript into the Actions panel:
rect_btn.addEventListener(MouseEvent.CLICK,
➥rect_click);
matte_btn.addEventListener(MouseEvent.CLICK,
➥matte_click);
bmp_btn.addEventListener(MouseEvent.CLICK,
➥bmp_click);
mouth_btn.addEventListener(MouseEvent.CLICK,
➥mouth_click);
function rect_click(event:MouseEvent):void {
}
function matte_click(event:MouseEvent):void {
}
function bmp_click(event:MouseEvent):void {
}
function mouth_click(event:MouseEvent):void {
}
This code uses the instance names you added to the buttons to create mouse click listeners. When the SWF is rendered and a user clicks one of the four buttons, your panel will summon the corresponding function. Each one of these functions will trigger a function inside of your Animation Tasks JSFL script.
14. To save some typing, funnel all the JSFL communica-tion through a single ActionScript function. Add the following highlighted code to the click functions:
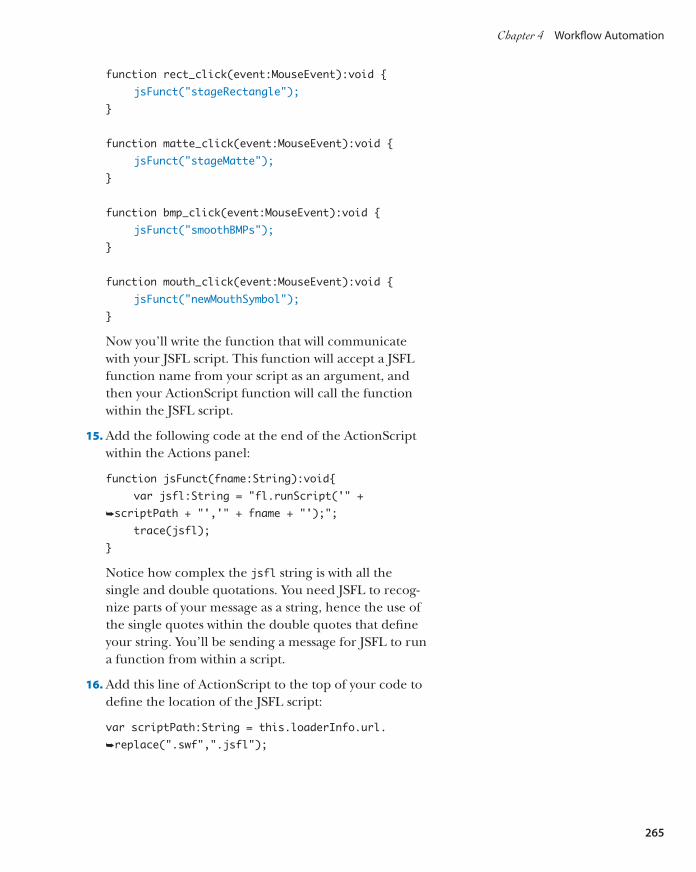
265
Chapter 4 Workflow Automation
function rect_click(event:MouseEvent):void {
jsFunct("stageRectangle");
}
function matte_click(event:MouseEvent):void {
jsFunct("stageMatte");
}
function bmp_click(event:MouseEvent):void {
jsFunct("smoothBMPs");
}
function mouth_click(event:MouseEvent):void {
jsFunct("newMouthSymbol");
}
Now you’ll write the function that will communicate with your JSFL script. This function will accept a JSFL function name from your script as an argument, and then your ActionScript function will call the function within the JSFL script.
15. Add the following code at the end of the ActionScript within the Actions panel:
function jsFunct(fname:String):void{
var jsfl:String = "fl.runScript('" +
➥scriptPath + "','" + fname + "');";
trace(jsfl);
}
Notice how complex the jsfl string is with all the single and double quotations. You need JSFL to recog-nize parts of your message as a string, hence the use of the single quotes within the double quotes that define your string. You’ll be sending a message for JSFL to run a function from within a script.
16. Add this line of ActionScript to the top of your code to define the location of the JSFL script:
var scriptPath:String = this.loaderInfo.url.
➥replace(".swf",".jsfl");

266
Animation with Scripting for Adobe Flash Professional CS5 Studio Techniques
This line retrieves the name of your SWF and replaces the .swf extension with a .jsfl extension to locate the path for your JSFL script (which is in the same folder).
For the moment, you’re using the trace method instead of MMExecute, so that you can preview your JSFL strings in the Output panel.
17. Ensure that Control > Test Movie > in Flash Profes-sional is selected and press Command+Return/Ctrl+Enter to test the movie.
18. Click all four buttons. Your Output window should trace text resembling the following:
fl.runScript('file:////Volumes/Macintosh%20HD/
➥Users/YourName/Desktop/AnimatingWithFlash/
➥jsfl%5Fscripts/Animation%20Tasks.jsfl',
➥'stageRectangle');
fl.runScript('file:////Volumes/Macintosh%20HD/
➥Users/YourName/Desktop/AnimatingWithFlash/
➥jsfl%5Fscripts/Animation%20Tasks.jsfl',
➥'stageMatte');
fl.runScript('file:////Volumes/Macintosh%20HD/
➥Users/YourName/Desktop/AnimatingWithFlash/
➥jsfl%5Fscripts/Animation%20Tasks.jsfl',
➥'smoothBMPs');
fl.runScript('file:////Volumes/Macintosh%20HD/
➥Users/YourName/Desktop/AnimatingWithFlash/
➥jsfl%5Fscripts/Animation%20Tasks.jsfl',
➥'newMouthSymbol');
Verify that the two arguments being sent to fl.runScript are in single quotes and that there are no other quotation marks.
19. Close the test window and update your code to replace the trace method with MMExecute:
MMExecute(jsfl);
20. Test your movie again, click each button, and ensure that there are no errors in the Compiler Error or Output panels.

267
Chapter 4 Workflow Automation
21. Locate the folder containing Animation Tasks.fla. There will be a corresponding Animation Tasks.swf file that was generated as a result of testing your movie in Flash. Copy the Animation Tasks.swf and Animation Tasks.jsfl files into your Configuration/WindowSWF directory. Restart Flash.
22. Open a new ActionScript 3.0 document. You can now open your SWF panel by choosing Window > Other Panels > Animation Tasks (Figure 4.33). Verify that each button completes its task (Figure 4.34).
Figure 4.33 Locating the newly created Flash panel by
choosing Window > Other Panels.
Figure 4.34 The Flash panel in action.
Because you’ve successfully grouped these four commands in a panel, you can now delete the original commands from your Configuration/Commands directory to free some space in the Commands menu.
You can also delete (or rename)
commands by choosing Commands >
Manage Saved Commands.
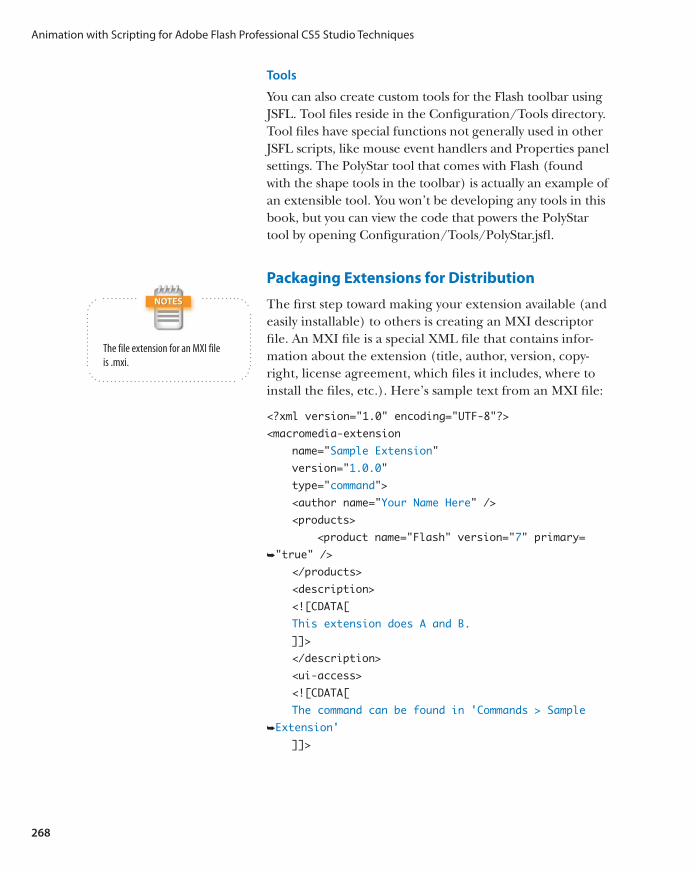
268
Animation with Scripting for Adobe Flash Professional CS5 Studio Techniques
Tools
You can also create custom tools for the Flash toolbar using JSFL. Tool files reside in the Configuration/Tools directory. Tool files have special functions not generally used in other JSFL scripts, like mouse event handlers and Properties panel settings. The PolyStar tool that comes with Flash (found with the shape tools in the toolbar) is actually an example of an extensible tool. You won’t be developing any tools in this book, but you can view the code that powers the PolyStar tool by opening Configuration/Tools/PolyStar.jsfl.
Packaging Extensions for Distribution
The first step toward making your extension available (and easily installable) to others is creating an MXI descriptor file. An MXI file is a special XML file that contains infor-mation about the extension (title, author, version, copy-right, license agreement, which files it includes, where to install the files, etc.). Here’s sample text from an MXI file:
<?xml version="1.0" encoding="UTF-8"?>
<macromedia-extension
name="Sample Extension"
version="1.0.0"
type="command">
<author name="Your Name Here" />
<products>
<product name="Flash" version="7" primary=
➥"true" />
</products>
<description>
<![CDATA[
This extension does A and B.
]]>
</description>
<ui-access>
<![CDATA[
The command can be found in ‘Commands > Sample
➥Extension’
]]>
The file extension for an MXI file
is .mxi.
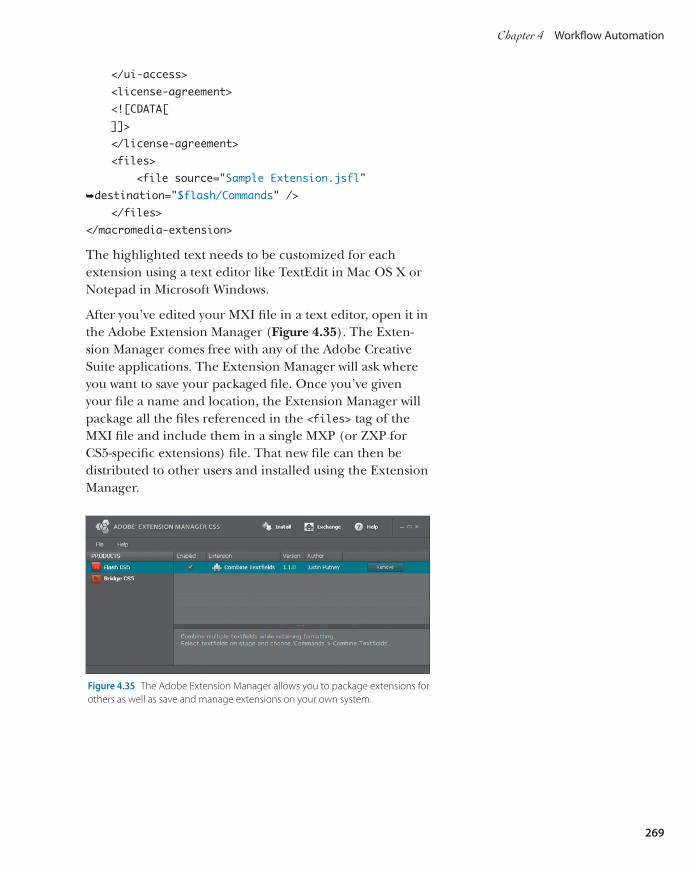
269
Chapter 4 Workflow Automation
</ui-access>
<license-agreement>
<![CDATA[
]]>
</license-agreement>
<files>
<file source="Sample Extension.jsfl"
➥destination="$flash/Commands" />
</files>
</macromedia-extension>
The highlighted text needs to be customized for each extension using a text editor like TextEdit in Mac OS X or Notepad in Microsoft Windows.
After you’ve edited your MXI file in a text editor, open it in the Adobe Extension Manager (Figure 4.35). The Exten-sion Manager comes free with any of the Adobe Creative Suite applications. The Extension Manager will ask where you want to save your packaged file. Once you’ve given your file a name and location, the Extension Manager will package all the files referenced in the <files> tag of the MXI file and include them in a single MXP (or ZXP for CS5-specific extensions) file. That new file can then be distributed to other users and installed using the Extension Manager.
Figure 4.35 The Adobe Extension Manager allows you to package extensions for
others as well as save and manage extensions on your own system.

270
Animation with Scripting for Adobe Flash Professional CS5 Studio Techniques
More Resources
This chapter covered the basics of writing commands and creating a handy SWF panel for accelerating your Flash animation workflow, but we’ve still only scratched the surface of Flash extensibility. This last section provides you with additional resources to continue extending your Flash animation workflow.
Other People’s Extensions
There’s a wealth of cool stuff that’s already available and free to use. If you’re on a tight deadline and you don’t have time to write your own script, don’t be shy about checking to see if anyone has gotten there before you. Conversely, if you just want to write the script as a chal-lenge or to make something work exactly the way you want, then go for it. You can always learn from comparing your solution to others on the web.
Books
There’s only one book to-date that is completely dedicated to JSFL. It hasn’t been updated since the release of JSFL in 2004. Luckily, very little of the language has changed since 2004. Coupled with the (up-to-date) help documenta-tion, Extending Macromedia Flash MX 2004: Complete Guide and Reference to JavaScript Flash by Todd Yard & Keith Peters (friends of ED, 2004) is an invaluable reference.
Forums
Forums are a great way to start a conversation. Sometimes a web search is all that is needed to find a solution, but other times you really need a back-and-forth interaction with someone who understands your problem. Many of the Flash forums are packed with knowledgeable people willing to give free advice. If you’re looking for existing extensions or help with JSFL, here are a few good sites to start with:
. http://forums.adobe.com/
. http://www.keyframer.com/forum/

271
Chapter 4 Workflow Automation
. http://bbs.coldhardflash.com/
. http://www.actionscript.org/forums/
Sites with Flash Extensions
Looking for sites with Flash extensions? Check out these sites:
. http://www.adobe.com/exchange/
. http://ajarproductions.com/blog/
. http://theflashblog.com/
. http://www.animonger.com/flashtools.html
. http://www.dave-logan.com/extensions
. http://www.toonmonkey.com/extensions.html
. http://www.5etdemi.com/blog/archives/2005/01/toolsextensions-for-flash-mx-2004/
Sites with JSFL Help
Here are a few other sites to visit for JSFL techniques:
. http://summitprojectsflashblog.wordpress.com/
. http://www.bit-101.com/blog/
. http://www.adobe.com/devnet/flash/articles/invis-ible_button.html
. http://www.adobe.com/go/em_file_format (MXI documentation in PDF format)

This page intentionally left blank

335
A
absolute paths, 147action, 35action safe guides, 2–5, 328Actions panel, 12, 13ActionScript, 313–318. See also code; scripts
adding animation with, 313–318adding to Flash files, 12–13advantages of, 130–131, 313basics, 12–13, 134–141case sensitivity, 149classes. See classescode coloring, 138considerations, 129, 132creating new document, 142keywords, 137–138navigating to frame labels, 6navigating to scenes, 10objects in, 134operators, 138–141planning phase, 131–133resources, 129, 142, 224saving documents, 142, 143settings, 147statements, 137–138typing, 152–153versions, 12vs. JSFL, 228vs. Timeline, 130–131, 313
ActionScript mask, 240ActionScript-to-JSFL interactions, 259–267addChild method, 300addNewPrimitiveRectangle command, 247Adobe (company), vAdobe Extension Manager, 122, 269After Effects, 328AIFF files, 20alert box, 248, 252, 259alert method, 248, 249, 252alphaMultiplier property, 180animated preloaders, 287–291animatics, 46–48, 93animation. See also character animation
ActionScript vs. Timeline, 313adding with ActionScript, 313–318cutout, 53–54digital portfolio, 274–291dynamic, 330–333
exporting to PNG sequences, 328–330publishing for broadcast, 325–333publishing to mobile/desktop, 333–334resources, 50, 111sharing via web, 274–325stop-motion, 53–54traditional, 50–51
animation classes, 313–318. See also classesAnimation Tasks panel, 260–267AnimSlider, 127anti-aliasing, 284arguments
considerations, 170–171, 237, 260described, 137, 228syntax, 137, 139
arithmetic operators, 139armatures, 104–110arrays, 137, 139, 230arrow keys, 39, 41, 196, 199, 216, 224artwork. See also sketches
collecting for site content, 292converting to symbols, 57–58, 110–111, 148creating for Flash files, 276–281hiding/showing, 8locking layers, 5, 12for preloaders, 287–291previewing, 7repository for, 11–12scaling, 321synchronizing audio with, 22–23vector, 159, 275
as keyword, 171aspect ratio, 326audio. See soundauthoring environment, 227auto-completion, code, 146automating repetitive tasks. See workflow
automation
B
backups, 328Bandwidth Profiler, 310–312base class, 155behaviors
button, 57, 318–321controlling sound with, 22–23edge, 200–206graphics, 57–58
Index

336
Index
drawing on twos, 51driver character. See driver characterflour sack exercise, 50hand-drawn, 50–51lip syncing, 110–128resources, 50run/walk cycle, 92–103, 217–224screen edge behavior, 200–206stop-motion, 53–54synchronizing sound to, 22–23techniques, 50–54traditional, 50–51tweening. See tweening; tweenswandering around screen, 206–216
character control classes, 191–224character design, 29–31, 54–56characters
animating. See character animationbones, 104–110building in Flash, 56–89cleaning up sketches, 56converting to symbols, 88–89designing, 29–31, 54–56driver. See driver characterjoints, 90–92lip syncing, 110–128mouth symbol/shapes, 111–118
checkEdges method, 202–206, 219class examples
character control, 191–224visual effects, 156–191
classes, 129–224. See also specific classesaccess control attributes, 161attaching to Library items, 151–154author of, 146base, 155basic structure, 143within classes, 161composition, 161creating, 141–145, 155–224document class, 141–149, 296–310empty, 154encapsulation, 160event, 154–155examples. See class examplesextending, 135, 155, 160helper, 161importing, 147–148, 315inheritance, 134, 135instantiating, 141names, 142, 145from other sources, 224overview, 134–137
behaviors (continued)movie clip, 57start, 22stop, 22stream, 22symbol, 57–58
Bitmap object, 159, 161, 172, 174bitmap smoothing, 249–252BitmapData object, 172–174blocking, 32blur, motion, 18, 181–191Bone tool, 90, 104–110bones, 104–110Boolean properties, 164boundaries property, 200BoundedMover class, 201–206braces { }, 139, 152brackets [ ], 139, 230branching narrative, 29breakApart() command, 241Brush tool, 47, 61–62, 83–84, 93Button symbols, 57buttons
behaviors, 57, 318–321menu, 281, 297in panels, 263states, 57
C
cameraperspective angle, 37–39stop-motion animation, 53techniques, 13–20
camera shots, 36–37, 328cartoon characters. See characterscase sensitivity, 149CD, included with book, viiicel animation, 50character animation, 49–128. See also animation;
charactersadding dialogue, 110–128animating manually, 90–103animating with inverse kinematics, 104–110bones, 104–110building characters, 56–89cel animation, 50conceptualization, 55–56creating armatures, 104–110creating joints, 90–92cutout animation, 53–54designing characters, 29–31, 54–56doodling, 55drawing on ones, 51

337
Index
preparing for web, 292title/action safe areas for, 2
content directory, 292content layers, 4, 279contentLoader property, 297, 304contentLoaderInfo property, 304coordinate system, 193CSS, styling text with, 312–313CSS files, 312–313CSS properties, 312curly braces { }, 139, 152cutout animation, 53–54
D
debugging, 249Deco tool, 159design patterns, 150desktop computers, publishing to, 333–334dialog boxes, advanced, 258–259dialogue, adding, 110–128dispose method, 166, 174document class, 141–149Document Object Model (DOM), 229–231documents. See also files; Flash files
compacting, 12creating new blank, 59–60, 142help, 236, 237, 270saving, 142, 143templates. See templates
DOM (Document Object Model), 229–231doodling, 55dot syntax, 230DOWN conditional, 221download speeds, 310–312driver character
animating manually, 90–103animating with inverse kinematics, 104–110building, 59–89converting to symbol, 88–89run/walk cycle, 92–103working with imported sketch, 59–63
driver character, componentsbones, 104–110eyes, 63–66hat, 66–70joints, 90–92limbs, 83–89mustache/hair, 71–76torso, 77–83
dynamic animation, 330–333dynamic content, 293–296dynamic text, 283–284
polymorphism, 155–156purpose of, 134reusable, 136, 155–224subclasses, 135, 155, 156superclasses, 155, 156user-created, 135web addresses, 146
classpaths, 145–147clearCanvasOnUpate property, 164, 170, 179, 190code. See also ActionScript
auto-completion options, 146case sensitivity, 149color in, 138comments, 139indenting, 152
code blocks, 139Code Editor, 138, 142–147, 153, 163code hinting, 146code snippets, 13coding. See scriptingcolon (:), 152color
animating for broadcast and, 326in code, 138ColorTransform object, 180fills, 61, 63, 65, 172, 232, 240
ColorTransform object, 180commands
deleting, 267managing, 260, 267renaming, 267running, 238saving scripts as, 233, 237–238shortcuts, 247–248
Commands directory, 237commands list, 260Commands menu, 234, 237, 248, 260, 267comments, 139compiler, 140–141compiler errors, 143, 144, 146composition, 161compression, 332conceptualization, 55–56conditional statements, 171configFile properties, 297Configuration directory, 237–238confirm method, 248–249, 251, 252constructor method, 143, 163, 164content
collecting artwork for, 292dynamic, 293–296guided, 4–5loading/unloading, 297, 300, 303–305

338
Index
JPEG, 292MP3, 20MXI, 268–269PNG, 292SWF, 292SWZ, 285WAV, 20XML, 258–259, 293–296, 299
fills, 61, 63, 65, 172, 232, 240FLA files, 328Flash
advanced techniques, 257–268forums, 270–271help documents, 236, 237, 270popularity of, 54resources, viii, 270–271
Flash Code Editor, 138, 142–147, 153, 163Flash coordinate system, 193Flash DOM, 229–231Flash extensions. See extensionsFlash files. See also documents; files
action safe/title safe guides, 2–5, 328creating artwork for, 276–281displaying on web, 276–291exporting to video, 325–333organizing in Library, 11–12saving/compacting, 12setting up for video output, 326–328setting up for web output, 277setup tips, 2–13templates. See templates
Flash panels, 259–267Flash Player, 276, 331flashbacks, 28–29flashContent element, 324flour sack exercise, 50fl.trace method, 249folders
ActionScript, 147expanding/collapsing, 11layer, 9organizing in Library, 11subfolders, 146
font embedding, 283–284for loop, 300forums, 270–271frame labels, 5–6, 7frame notes, 6frame rates, 51, 327–328frames. See also keyframes
adding, 6, 15, 21adding ActionScript to, 12, 15copying, 16, 210, 279
E
ease, 319easing, 314ECMAScript, 228edge behavior, 200–206elements, 229–230else statement, 171else-if statements, 171, 196, 220encapsulation, 160ENTER_FRAME event, 166envelope, sound, 23–24errors
compiler, 143, 144, 146strict typing and, 153try-catch statements, 305Unhandled ioError, 299
Event behavior, 22event classes, 154–155event listeners, 152, 162, 195, 319events
dispatching, 155keyboard, 196mouse, 154overview, 154–155sounds, 22
exportinganimations to PNG sequences, 328–330dynamic animation, 330–333to QuickTime, 330–333video for Flash output, 325–333to video sharing sites, 274, 333
Extensible Markup Language. See XMLExtension Manager, 122, 269extensions
FrameSync, 122–128, 227included on CD, viiimanaging, 122, 269MotionSketch, 177packaging for distribution, 257–268resources, 270–271SmartMouth, 127
F
fade method, 179–180fadeAmount property, 179, 181, 190file formats, 56files. See also documents; Flash files
AIFF, 20CSS, 312–313FLA, 328GIF, 292HTML, 322–325

339
Index
init method, 164–166, 190, 297–298initBitmap method, 171–173initialization methods, 164instance names, 279instances, 57–59, 110–111, 134instantiation, 134, 141int (integer data type), 193integer data type (int), 193internal keyword, 161interpolation, 51–52. See also tweeninginverse kinematics (IK), 104–110
J
JavaScript, 229, 233JavaScript Flash. See JSFLJPEG files, 292JPEG format, 56JSFL (JavaScript Flash)
ActionScript-to-JSFL interactions, 259–267advantages of, 228–229basics, 227–231custom tools, 268extensions in, 227Flash DOM and, 229–231help documents, 236, 237, 270objects in, 229panels, 259–267resources, 270–271vs. ActionScript, 228
JSFL scripts, 228, 232–257
K
key poses. See keyframeskeyboard
moving object with, 192–200shortcuts, 247–248
keyboard events, 196keyCode property, 196keyDown method, 196, 214–215keyframes. See also frames
considerations, 57, 93creating, 125described, 51frame labels, 5–6inserting, 21, 115
keyUp method, 196, 221keywords, 137–138
L
labels, 5–6, 7, 254, 256lastX property, 182, 183lastY property, 182, 183
cutting, 75, 99layers and, 229pasting, 16, 76, 88, 100selecting, 16size of, 6, 7skipping, 219
FrameSync extension, 122–128, 227framing, 32FTP (File Transfer Protocol), 322, 325functions, 137, 149, 228FutureSplash Animator, v
G
Gap Size setting, 69generateMenu method, 299–300get method, 185getBitmap method, 166getCanvas method, 163getters, 185GIF files, 292GIF format, 56globalToLocal method, 172gradients, 157, 282–283, 287Graphic symbols
considerations, 326, 328described, 57lip syncing via, 111, 114–118uses for, 57–58
graphics tablets, 59greensock.com, 314, 315guide layers, 4–5, 328guides, 2–5, 328
H
help documents, 236, 237, 270helper class, 161hideSymbol property, 164, 179History panel, 232–234hover state, 312HTML files, 322–325htmlText property, 302
I
if statement, 171IK (inverse kinematics), 104–110Illustrator, 56importing
ActionScript classes, 147–148audio, 119–120classes, 147–148, 315
index property, 301inheritance, 134, 135, 170

340
Index
mouth symbol script, 252–257Mover class, 192–200Movie Clip symbols, 57Movie Clip Timeline, 326MovieClip class, 135movies. See also video
action safe/title safe areas, 2–5, 328adding sound to, 20–27testing, 144, 266
MP3 files, 20MXI files, 268–269
N
naming conventions, 11–12narrative, 27–29nesting
described, 58lip syncing via, 111, 121–128symbols, 58–59
new keyword, 166nonlinear narrative, 28–29notes, frame, 6NTSC format, 326, 327
O
Object class, 134–135Object Drawing mode, 112, 238, 240, 245object-oriented design patterns, 150object-oriented programming (OOP), 150objects. See also specific objects
in ActionScript, 134bitmap, 159, 161, 172, 174instances, 57in JSFL, 229moving with keyboard, 192–200primitive, 247on Stage. See Stage
offset property, 169onAddedToStage method, 162, 201onClick function, 152–153onContentLoadProgress method, 304onContentLoadStarted method, 304onDataLoaded method, 298onFrame method, 163, 179Onion Skin feature, 93, 115–118onMenuItemClick method, 319–320onRemovedFromStage method, 163OOP (object-oriented programming), 150operators, ActionScript, 138–139Optimize Curves dialog box, 73Oval tool, 66, 213override keyword, 161, 179
layer folders, 9layers
content, 4, 279displaying as outlines, 8frames on, 229guide, 4–5, 328height, 8–9hiding/showing, 9labels, 5–6, 126locking/unlocking, 5, 12, 278names, 8properties, 8–9sketch, 63, 89title, 281
Library, organizing items in, 11–12library folders, 11Library items, 150, 151–154, 249–253linear narrative, 28–29lines, constraining, 70links, 295, 298, 303, 312lip syncing, 110–128loadContent method, 303–304loadItem method, 302logical operators, 139loops, 137, 228
M
Mac OS X, 237, 247, 324Macromedia, vmasks, 177, 238–239, 240Math.min method, 289matte script, 238–247Media Playback templates, 60memory issues, 166, 174, 328, 333menu buttons, 281, 297menuItemStart property, 297Merge Drawing model, 239methods, 134, 137, 228MMExecute() function, 259–260, 266mobile devices, publishing to, 333–334model sheets, 30–31, 56motion blur, 18, 180–191motion tweens, 4, 15, 16, 18, 52MotionBlurClip class, 181–189MotionBlurTrail class, 190–191MotionBrush class, 159–168MotionSketch extension, 177MotionTrail class, 177–181mouse click listeners, 152, 264, 300mouse clicks, 111, 229, 240, 242, 264MouseEvent object, 152mouth shapes, 115–118mouth symbol, creating, 111–115
341
Index
rotation property, 215Runner class, 217–224run/walk cycles, 92–103, 217–224
S
scaleX property, 215, 221scaling artwork, 321scanners, 56scenes
converting to symbols, 16overview, 10panning, 14–18using sound across, 24–25zooming in/out, 18–20
scr object, 173Script Editor, 234–236scripting, 228. See also ActionScript; codingscripting terms, 228scripts. See also ActionScript; workflow automation
advanced dialog boxes, 258–259for bitmap smoothing, 249–252compatibility, 247executing, 235, 290History panel, 232–234JSFL, 228, 232–257matte creation, 238–247modifying, 236–237mouth symbol, 252–257rectangle, 232–238sample, 238saving as commands, 234, 237–238testing, 246with user interactions, 248–249
scrubbing, 57selectAll function, 241semicolon (;), 140–141set method, 186setBounds method, 203setters, 185setting, 35shape hints, 208–212shapes
adjusting, 65creating armatures with, 108–110merging, 239mouth, 115–118
sharing animations, 273–334overview, 273publishing for broadcast, 325–333publishing to mobile/desktop, 333–334via web, 274–325
Simulate Download option, 310–312Single Frame option, 118
P
package paths, 146packages, 143, 145–147PAL format, 326, 327panels, 259–267panning, 13, 14–18parallax scrolling, 17–18parameters, 137, 228parentheses ( ), 139–140paths, 145–147perspective angle, 37–39phonemes, 115, 121Photoshop, 56playhead, 6, 10, 57, 226, 255plot, 35plug-ins. See extensionsPNG files, 292PNG format, 56PNG sequences, 328–330points, 172polymorphism, 155–156portfolio, digital, 274–325preloaders, 40, 287–291Preview modes, 7primitive objects, 247private keyword, 161, 168programming. See ActionScript; code; scriptsprogramming terms, 136–137prompt method, 249properties. See also specific properties
Boolean, 164CSS, 312layer, 8–9sound, 22–23
protected keyword, 161, 168, 193public keyword, 161, 168publishing
for broadcast, 325–333to mobile/desktop platforms, 333–334
Q
Queasy Tools panel, 260–267QuickTime, 325, 330–333
R
raw vector data, 239rectangles
Create Stage Size Rectangle script, 232–238matte script, 239–247
rigging, 90rollover state, 312root keyword, 201

342
Index
SWF files, 292SWF2Video, 333SWZ files, 285symbol behaviors, 57–58symbol instances, 58–59, 110–111, 134symbol names, 279symbol parameter, 170SymbolCanvas class, 168–177symbolCanvas property, 164symbols
buttons, 57converting artwork to, 57–58, 110–111, 148converting characters to, 88–89converting items to, 57converting scenes to, 16creating armatures with, 104–108described, 57editing, 75, 93, 253, 285, 286Graphic, 57–58Movie Clips, 57nested, 58–59rendering mattes within, 245–246using as masks, 177working with, 57–59
T
tablet devices, 34templates
animatic files as, 46Media Playback, 60NTSC, 326–327PAL, 326–327storyboard, 33using, 3–4, 112
testingdownload speeds, 310–312files for publishing, 325, 331in Flash Player, 331movies, 144, 266scripts, 246
textanti-aliased, 284classic vs. TLF, 285dynamic, 283–284embedded, 283–284, 286, 296formatting, 296, 312–313static, 286styling with CSS, 312–313
text descriptions, 280Text Layout Framework (TLF), 285TextWrangler, 324TIFF format, 56
site document class, 141–149, 296–310site.html file, 323–325sketch layer, 63, 89SketchBook Pro, 56, 59sketches. See also artwork
cleaning up, 56for run/walk cycles, 92in storyboards, 31–45working with, 59–63
SmartMouth extension, 127snapping, 65, 79sound, 20–27
adding to movies, 20–21controlling via behaviors, 22–23disabling, 332event, 22importing, 119–120lip syncing, 110–128narrative, 27–29settings, 25–27streaming, 22synchronizing to animation, 22–23using across multiple scenes, 24–25
sound effects, 24sound envelope, 23–24sound properties, 22–23Spring feature, 52square brackets [ ], 139, 230, 237Stage
camera techniques, 13–20as frame border, 33manipulating objects on, 148–149width/height of, 34
Stage objects, 229stage property, 172Start behavior, 22statements, 137–138Stop behavior, 22stop-motion animation, 53–54story bibles, 30storyboard example, 39–45storyboarding, 31–45storyboards, animated, 46–48storytelling, 27–29Stream behavior, 22streaming sound, 22strict typing, 152–153stroke width, 82styleFile properties, 297styles, CSS, 312–313subclasses, 135, 155, 156super keyword, 179superclasses, 155, 156

343
Index
waveforms, 23–24web addresses, 146websites
digital portfolio, 274–291download speeds, 310–312dynamic content, 293–296preparing content, 292sharing animations via, 274–325site directory, 277site document class, 296–310uploading, 322–325video sharing sites, 274, 333
Windows Vista/XP, 237, 247workflow automation, 225–271. See also scripts
advantages of, 226–227Document Object Model, 229–231History panel, 232–234JavaScript Flash. See JSFLresources, 270–271
write-on effect, 177
X
x coordinate, 172, 193x velocity, 195, 203, 220XML (Extensible Markup Language), 293–296XML attributes, 300XML files, 258–259, 293–296, 299XML tags, 258, 293XMLUI object, 258–259
Y
y coordinate, 172, 193y velocity, 195, 196YouTube, 333
Z
zooming effects, 13, 18–20
Timelineadding frame labels to, 5–6applying audio clip to, 21customizing look of, 6–9vs. ActionScript, 130–131, 313
Tint effect, 87title layer, 281title safe guides, 2–5, 328tools, custom, 268trace method, 266transparency, 172, 179, 180, 315try-catch statements, 305tween classes, 313–318tweening, 51–53, 288TweenLite, 314–318tweens, 4, 15, 18, 52–53typing, 152–153
U
uint (unsigned integer data type), 193unloadContent method, 303, 304–305unsigned integer data type (uint), 193UP conditional, 221update method, 166updatePosition method, 195, 202, 214, 219user interactions, 248–249
V
var keyword, 236variables
described, 137, 228local, 172syntax example, 137
vector artwork, 159, 275vector data, 239velocity, 182, 196, 203, 220video. See also movies
exporting for Flash output, 325–333exporting to video sharing sites, 274, 333publishing for broadcast, 325–333publishing to mobile/desktop, 333–334
video sharing sites, 274, 333Vimeo, 333visemes, 115visual effects classes, 156–191vx property, 221
W
walk cycles, 92–103Wanderer class, 213–217Wanderer symbol, 206–213WAV files, 20

WATCHREAD
CREATEMeet Creative Edge. A new resource of unlimited
books, videos and tutorials for
creatives from the world’s
leading experts.
Creative Edge is your one
stop for inspiration, answers to
technical questions and ways to
stay at the top of your game so
you can focus on what you do
best—being creative.
All for only $24.99 per month
for access—any day any time
you need it.
peachpit.com/creativeedge

1
Chapter 5 Sharing Your Animation
Publishing to Mobile and Desktop
Publishing an Adobe AIR Desktop Application
Adobe AIR (Adobe Integrated Runtime) is a cross-platform (Windows, Mac OS X, and Linux) runtime environment that allows you to deploy your Flash content as a desktop application. Your application will coexist on the user’s machine with Photoshop, Word, Excel, iTunes, and all the other desktop applications on the dock or in the Start menu (depending on the user’s operating system). As a desktop application, your Flash file will enjoy the privileges that come with being on the desktop.
Desktop capabilities
Being a citizen of the desktop has its perks.
Here is a selection of capabilities that an AIR application can possess:
. Native processes. Launch other desktop applications.
. Copy, paste, drag-and-drop. Move content in and out of your application and interact with the local machine (see www.adobe.com/devnet/air/flash/quickstart/scrappy_copy_paste.html for an introduction to these concepts in AIR).
. File menus. Utilize the operating system’s native menus.
. File access. Access the local file system to read or save a file. Also, access a local database to store application information.
. Custom icons. Brand your application in the dock, Start menu, and/or file system.
Most of the capabilities listed are fairly easy to implement. You can access all of these features (with the exception of the custom icons) by utilizing ActionScript classes or meth-ods that are specific to AIR.
The next section will introduce some of the basics of creat-ing an AIR application.
Support for AIR on additional plat-
forms, including Google Android (as
a native application), is also under
development.
You can also use HTML and JavaS-
cript to build an AIR application.
Look for the AIR icon next to classes
or methods inside the ActionScript
3.0 Reference documentation.

2
Animation with Scripting for Adobe Flash Professional CS5 Studio Techniques
Building an AIR application
To begin a new AIR project, choose File > New and select Adobe AIR 2.
Inside your new document, choose File > Adobe AIR 2 Settings to launch the Application & Installer Settings. The Application & Installer Settings allow you to shape how your application will function within the end-user’s operat-ing system. In the Application & Installer Settings are four headings: General, Signature, Icons, and Advanced.
General. The General section allows you to name your output files, include author and version information, add a description and copyright, control the Window style (appearance), choose the device profile, and include any auxiliary files (Figure 5.62).
Figure 5.62 The
General section of the
Application & Installer
Settings for an AIR
document.
Signature. The Signature section allows you to add a digital signature to your application (Figure 5.63). The signature is used to ensure that the application comes from a trusted source. You can purchase an official signature certificate
By default, an application descriptor
file is generated to store informa-
tion about your application, and
this file is automatically incorpo-
rated into the Included files list.
Figure 5.63 The Signature section allows you to
include (and create) a digital certificate to verify the
publisher of your application.

3
Chapter 5 Sharing Your Animation
from a company like Thawte or VeriSign, or you can simply create a new self-signed certificate. If you use a self-signed certificate, users will be presented with a warning when installing your application (Figure 5.64).
Icons. The Icons section allows you to attach images for the various icon sizes used in different operating systems (Figure 5.65). These images should be in PNG format.
Advanced. The Advanced section lets you do all kinds of cool stuff, such as associate a file type with your appli-cation, set the initial window size of your application, indicate which window behaviors your application will allow, and determine where to install your application (Figure 5.66).
Figure 5.65 The Icons section of the Application &
Installer Settings for an AIR document.
Figure 5.66 The Advanced section of the Application
& Installer Settings for an AIR document.
When you have all your settings squared away and your application has been created, you’ll need a way to share your application.
Figure 5.64 A warning is generated when installing
a self-signed AIR application to inform the user that
the software publisher (you) is unverified.

4
Animation with Scripting for Adobe Flash Professional CS5 Studio Techniques
Distributing your desktop application on the web
When you’re ready to distribute your application, you’ll publish your SWF and application descriptor XML file into a single .air package by choosing File > Publish. Your application can then be distributed like any other installa-tion file.
If the users installing your application already have the AIR environment installed, all they have to do is double-click your .air file on their machine to begin the installation. If the users do not have the runtime environment installed, be sure to instruct them to download and install the AIR runtime environment before installing your application.
As if it weren’t cool enough to be able to create a distribut-able desktop application in Flash, Adobe has gone one step further in making your AIR application easy to distribute. You can also create an AIR badge. The badge is essentially a SWF that you can embed in a web page. From the badge SWF, you can allow users to install your AIR application right in their browser (Figure 5.67)! If the users do not yet have the runtime environment, the badge will install that, too.
Figure 5.67 An AIR badge allows you to install a desktop application right from
a web browser.
And as if Flash wasn’t versatile enough, there’s yet another way you can share your Flash content: on those little devices that are everywhere.
For your application to download
properly from your web host, you
may need to add the AIR mime type
to your server. To find instructions
on how to accomplish this, try a
web search using the following
terms: set adobe air mime type.
The AIR installer can be found at
http://get.adobe.com/air.
To learn more about AIR installer
badges, see www.adobe.com/
devnet/air/articles/badge_for_air.
html.

5
Chapter 5 Sharing Your Animation
Publishing a Mobile Application
Developing Flash content for mobile devices thus far has required writing your code in a subset of ActionScript and publishing your movie to a platform known as Flash Lite. Flash Lite is still available in CS5, but with the introduc-tion of Flash Player 10.1, standard Flash content is rapidly becoming available on mobile devices.
Flash Player 10.1 can now:
. Receive text input (a virtual keyboard is automatically raised and lowered in response to focus changes on textfields when editing text on mobile devices support-ing a virtual keyboard).
. Interact with multiple objects simultaneously or inter-pret the incoming event stream as gestures (multi-touch). Native gestures include pinch, scroll, rotate, scale, and two-finger tap.
. Read accelerometer input. A new ActionScript Accel-erometer class provides a way to receive acceleration values in x, y, and z axes from native device accelerom-eter sensors to ActionScript.
. Optimize content for CPU usage and battery performance.
. Accelerate graphics and provide better video performance.
Similar to the projects for other platforms (output for-mats) discussed in this book, projects for a mobile platform should begin with detailed planning. You’ll have to con-sider how your movie will perform on a smaller screen with less available memory and a different mode of interaction. Additionally, you’ll have to decide which devices you are targeting, whether those devices possess Flash Lite or Flash Player 10.1, and how you will go about testing your content for those devices.
Whether your mobile application is targeted for Flash Lite or Flash Player 10.1, you’ll want to test your movie in Device Central first to simulate how it will look and per-form on a mobile device.
6
Animation with Scripting for Adobe Flash Professional CS5 Studio Techniques
Testing in Device Central
Device Central provides an easy way to preview and test Flash Lite, bitmap, web, and video content for mobile devices. The controls within Device Central allow you to simulate the controls and variable conditions within a mobile device (Figure 5.68).
Figure 5.68 Device Central allows you to simulate the conditions and interactions of several different mobile devices.
To test a movie in Device Central from Flash Professional, choose Control > Test Movie > in Device Central. This will launch Device Central if it’s not open already. Within Device Central, you can select a device and begin testing. The list of devices that you can simulate in Device Central is updated frequently as new cell phones and other devices are brought to market.
Not only can you create beautiful and dynamic content, but you can now also distribute it anywhere. Go forth and multiply (the number of places your animation can be seen, that is)!