Android Continuous Integration
152
Android Continuous Integration Build-Deploy-Test Automation for Android Mobile Apps — Pradeep Macharla www.allitebooks.com
Transcript of Android Continuous Integration

Android Continuous Integration
Build-Deploy-Test Automation for Android Mobile Apps—Pradeep Macharla
www.allitebooks.com

Android Continuous Integration
Build-Deploy-Test Automation for Android Mobile Apps
Pradeep Macharla
www.allitebooks.com
Android Continuous Integration
Pradeep Macharla North Carolina, USA
ISBN-13 (pbk): 978-1-4842-2795-4 ISBN-13 (electronic): 978-1-4842-2796-1DOI 10.1007/978-1-4842-2796-1
Library of Congress Control Number: 2017953099
Copyright © 2017 by Pradeep Macharla
This work is subject to copyright. All rights are reserved by the Publisher, whether the whole or part of the material is concerned, specifically the rights of translation, reprinting, reuse of illustrations, recitation, broadcasting, reproduction on microfilms or in any other physical way, and transmission or information storage and retrieval, electronic adaptation, computer software, or by similar or dissimilar methodology now known or hereafter developed.
Trademarked names, logos, and images may appear in this book. Rather than use a trademark symbol with every occurrence of a trademarked name, logo, or image we use the names, logos, and images only in an editorial fashion and to the benefit of the trademark owner, with no intention of infringement of the trademark.
The use in this publication of trade names, trademarks, service marks, and similar terms, even if they are not identified as such, is not to be taken as an expression of opinion as to whether or not they are subject to proprietary rights.
While the advice and information in this book are believed to be true and accurate at the date of publication, neither the authors nor the editors nor the publisher can accept any legal responsibility for any errors or omissions that may be made. The publisher makes no warranty, express or implied, with respect to the material contained herein.
Cover image designed by Freepik
Managing Director: Welmoed SpahrEditorial Director: Todd GreenAcquisitions Editor: Nikhil KarkalDevelopment Editor: Matthew MoodieTechnical Reviewer: Ankita GuptaCoordinating Editor: Prachi MehtaCopy Editor: Kezia EndsleyCompositor: SPi GlobalIndexer: SPi GlobalArtist: SPi Global
Distributed to the book trade worldwide by Springer Science+Business Media New York, 233 Spring Street, 6th Floor, New York, NY 10013. Phone 1-800-SPRINGER, fax (201) 348-4505, e-mail [email protected], or visit www.springeronline.com. Apress Media, LLC is a California LLC and the sole member (owner) is Springer Science + Business Media Finance Inc (SSBM Finance Inc). SSBM Finance Inc is a Delaware corporation.
For information on translations, please e-mail [email protected], or visit http://www.apress.com/rights-permissions.
Apress titles may be purchased in bulk for academic, corporate, or promotional use. eBook versions and licenses are also available for most titles. For more information, reference our Print and eBook Bulk Sales web page at http://www.apress.com/bulk-sales.
Any source code or other supplementary material referenced by the author in this book is available to readers on GitHub via the book’s product page, located at www.apress.com/978-1-4842-2795-4. For more detailed information, please visit http://www.apress.com/source-code.
Printed on acid-free paper
www.allitebooks.com

This book is dedicated to all the software engineers who are passionate about coding and feel the urgency to fix that which is broken,
spend odd hours at night deeply involved in solving the problem, derive gratification when it works, yet repeat it all over when it doesn’t
the next day. To all who ultimately appreciate the fact that software is art and singularity is the future.
www.allitebooks.com

v
Contents at a Glance
About the Author ����������������������������������������������������������������������������� xv
About the Technical Reviewer ������������������������������������������������������� xvii
Acknowledgments �������������������������������������������������������������������������� xix
■Chapter 1: Introduction ������������������������������������������������������������������ 1
■Chapter 2: Mobile Test Automation ���������������������������������������������� 13
■Chapter 3: CI Pattern with Jenkins and Android �������������������������� 23
■Chapter 4: Android System Setup ������������������������������������������������� 47
■Chapter 5: Build the Android App ������������������������������������������������� 67
■Chapter 6: Connect Android Target ����������������������������������������������� 79
■Chapter 7: Deploy or Install Android App ������������������������������������� 91
■Chapter 8: Working with Appium ������������������������������������������������� 95
■Chapter 9: Test Strategy and Execution �������������������������������������� 117
Index ���������������������������������������������������������������������������������������������� 139
www.allitebooks.com

vii
Contents
About the Author ����������������������������������������������������������������������������� xv
About the Technical Reviewer ������������������������������������������������������� xvii
Acknowledgments �������������������������������������������������������������������������� xix
■Chapter 1: Introduction ������������������������������������������������������������������ 1
Architecture ��������������������������������������������������������������������������������������������� 1
Prerequisites ������������������������������������������������������������������������������������������� 3
Windows vs� Mac ������������������������������������������������������������������������������������������������������ 3
The Mac Environment ����������������������������������������������������������������������������������������������� 4
Mobile Devices ��������������������������������������������������������������������������������������������������������� 4
Network �������������������������������������������������������������������������������������������������������������������� 4
Platform �������������������������������������������������������������������������������������������������������������������� 5
Programming Language �������������������������������������������������������������������������� 5
Installation Processes ����������������������������������������������������������������������������� 5
Installing Jenkins ������������������������������������������������������������������������������������������������������ 5
Installing Nexus �������������������������������������������������������������������������������������������������������� 6
Installing SonarQube ������������������������������������������������������������������������������������������������ 7
Installing the CI Tool Stack���������������������������������������������������������������������������������������� 8
Building the Android App ������������������������������������������������������������������������� 9
Deploying/Installing the Android App ������������������������������������������������������ 9
Testing (Automating) the Android App ����������������������������������������������������� 9
www.allitebooks.com

■ Contents
viii
Mobile Technologies ������������������������������������������������������������������������������ 10
What Do Consumers Want? ������������������������������������������������������������������������������������ 10
Ecosystems ������������������������������������������������������������������������������������������������������������ 10
Hardware ���������������������������������������������������������������������������������������������������������������� 11
Platforms/OS ���������������������������������������������������������������������������������������������������������� 11
Types of Mobile Apps����������������������������������������������������������������������������� 11
■Chapter 2: Mobile Test Automation ���������������������������������������������� 13
The WebDriver Protocol ������������������������������������������������������������������������� 13
Why Are We Talking About These Protocols? ���������������������������������������������������������� 14
How Does It Work? ������������������������������������������������������������������������������������������������� 14
How Does It Scale? ������������������������������������������������������������������������������������������������� 15
How Does It Relate to Mobile Automation? ������������������������������������������������������������ 16
Test Automation Libraries ���������������������������������������������������������������������� 17
Why Automate? ������������������������������������������������������������������������������������� 17
Mobile Test Strategy ������������������������������������������������������������������������������ 18
Manual Testing vs� Automation ������������������������������������������������������������������������������� 18
Speed of Testing ����������������������������������������������������������������������������������������������������� 19
Scaling �������������������������������������������������������������������������������������������������������������������� 19
Cost������������������������������������������������������������������������������������������������������������������������� 19
Testing Pyramid ������������������������������������������������������������������������������������������������������ 19
Mobile Test Environment ����������������������������������������������������������������������� 21
Real Devices vs� Emulators/Simulators ������������������������������������������������������������������ 21
Initial Manual Testing on a Local Android Real Device ������������������������������������������� 21
Initial Manual Testing on a Local Android Emulator ������������������������������������������������ 22
Further Manual Testing in the Cloud ����������������������������������������������������������������������� 22
www.allitebooks.com

■ Contents
ix
■Chapter 3: CI Pattern with Jenkins and Android �������������������������� 23
What Is Continuous Integration? ����������������������������������������������������������� 23
Feedback Loops ������������������������������������������������������������������������������������ 23
Feedback Loop 1: Build ������������������������������������������������������������������������������������������ 24
Feedback Loop 2: Code Quality Analysis ���������������������������������������������������������������� 34
Feedback Loop 3: Test �������������������������������������������������������������������������������������������� 40
■Chapter 4: Android System Setup ������������������������������������������������� 47
Installing Java ��������������������������������������������������������������������������������������� 47
JRE vs� JDK vs� SE �������������������������������������������������������������������������������������������������� 47
JDK on Mac ������������������������������������������������������������������������������������������������������������ 48
Installing Android SDK ��������������������������������������������������������������������������� 49
Standalone SDK ������������������������������������������������������������������������������������������������������ 50
Quick Checks ���������������������������������������������������������������������������������������������������������� 51
Installing Android Studio ����������������������������������������������������������������������� 52
Android Studio Basics��������������������������������������������������������������������������������������������� 53
Associate the System SDK with Android Studio ����������������������������������������������������� 54
Installing Gradle ������������������������������������������������������������������������������������ 55
Download and Install ���������������������������������������������������������������������������������������������� 56
Set Gradle Shell Variables��������������������������������������������������������������������������������������� 57
Android Studio with Gradle ������������������������������������������������������������������������������������� 57
Gradle Quick Commands ���������������������������������������������������������������������������������������� 58
Gradle Tasks ����������������������������������������������������������������������������������������������������������� 58
Build the App ���������������������������������������������������������������������������������������������������������� 59
Tools to Know ���������������������������������������������������������������������������������������� 59
ADB ������������������������������������������������������������������������������������������������������������������������� 60
Record Video ����������������������������������������������������������������������������������������������������������� 60
www.allitebooks.com

■ Contents
x
uiautomatorviewer ������������������������������������������������������������������������������������������������� 61
AVD Manager ���������������������������������������������������������������������������������������������������������� 62
SDK Manager ���������������������������������������������������������������������������������������������������������� 63
Android Device Monitor ������������������������������������������������������������������������������������������ 65
■Chapter 5: Build the Android App ������������������������������������������������� 67
The Android Build Process �������������������������������������������������������������������� 67
Overview ����������������������������������������������������������������������������������������������������������������� 67
Another Perspective on the Build Process �������������������������������������������������������������� 68
Output of the Build Process ������������������������������������������������������������������������������������ 68
Building from the Command Line ���������������������������������������������������������� 69
Gradle Tasks ����������������������������������������������������������������������������������������������������������� 69
The Gradle Clean AssembleDebug Task ������������������������������������������������������������������ 70
The �apk File in Debug Mode ���������������������������������������������������������������������������������� 71
The �apk File in Release Mode �������������������������������������������������������������������������������� 71
Building from Android Studio ���������������������������������������������������������������� 72
Import the Project ��������������������������������������������������������������������������������������������������� 72
Android Studio Views ���������������������������������������������������������������������������������������������� 73
Project View ������������������������������������������������������������������������������������������������������������ 74
Building the Sample App ����������������������������������������������������������������������� 75
Source Code ����������������������������������������������������������������������������������������������������������� 75
Environment ����������������������������������������������������������������������������������������������������������� 76
Clone and Build ������������������������������������������������������������������������������������������������������� 76
Sample App: app-debug apk ���������������������������������������������������������������������������������� 77
■Chapter 6: Connect Android Target ����������������������������������������������� 79
Testing with Emulators versus Real Devices ����������������������������������������� 79
Using the Android Emulator ������������������������������������������������������������������� 80
Hardware Acceleration ������������������������������������������������������������������������������������������� 80
Create a New AVD ��������������������������������������������������������������������������������������������������� 80
www.allitebooks.com

■ Contents
xi
Sample AVDs����������������������������������������������������������������������������������������������������������� 82
Learning Curve ������������������������������������������������������������������������������������������������������� 82
Connecting the Android Device ������������������������������������������������������������� 82
ADB Is Your Friend �������������������������������������������������������������������������������������������������� 82
Enable USB Debug �������������������������������������������������������������������������������������������������� 83
Connect the Device ������������������������������������������������������������������������������������������������� 84
Troubleshooting Tips ����������������������������������������������������������������������������������������������� 84
Debugging the WiFi ������������������������������������������������������������������������������� 85
ADB Commands ������������������������������������������������������������������������������������������������������ 85
Connect Over WiFi �������������������������������������������������������������������������������������������������� 86
Remote Debug Chrome ������������������������������������������������������������������������� 87
■Chapter 7: Deploy or Install Android App ������������������������������������� 91
Connect and Identify the Target������������������������������������������������������������� 91
Direct Commands to Target ������������������������������������������������������������������������������������ 91
Install on the Emulator�������������������������������������������������������������������������������������������� 92
Install on Real Device ��������������������������������������������������������������������������������������������� 92
Command-Line Demonstration ������������������������������������������������������������� 92
Android Studio Demonstration �������������������������������������������������������������� 93
■Chapter 8: Working with Appium ������������������������������������������������� 95
Why Appium? ���������������������������������������������������������������������������������������� 95
Appium Concepts ���������������������������������������������������������������������������������� 96
Client/Server Architecture �������������������������������������������������������������������������������������� 96
Session ������������������������������������������������������������������������������������������������������������������� 96
Desired Capabilities ������������������������������������������������������������������������������������������������ 96
Appium Server �������������������������������������������������������������������������������������������������������� 97
Appium Clients ������������������������������������������������������������������������������������������������������� 97
Appium�app and Appium�exe ���������������������������������������������������������������������������������� 97
Appium Design ������������������������������������������������������������������������������������������������������� 97
www.allitebooks.com

■ Contents
xii
Appium Android ������������������������������������������������������������������������������������������������������ 99
Appium ������������������������������������������������������������������������������������������������������������������� 99
Installing the Appium Server ����������������������������������������������������������������� 99
Download and Install the Appium Server ��������������������������������������������������������������� 99
GUI Start Android Mode ���������������������������������������������������������������������������������������� 100
Appium Server Configuration �������������������������������������������������������������� 101
Appium Doctor ������������������������������������������������������������������������������������������������������ 101
Developer Mode ���������������������������������������������������������������������������������������������������� 103
Server Command Line ������������������������������������������������������������������������������������������ 103
Appium Android Settings �������������������������������������������������������������������������������������� 104
Appium Server Settings ���������������������������������������������������������������������������������������� 106
Inspecting an App �������������������������������������������������������������������������������� 106
Appium Ruby Console ������������������������������������������������������������������������� 107
Method1���������������������������������������������������������������������������������������������������������������� 109
Method2���������������������������������������������������������������������������������������������������������������� 109
Inspecting Using ARC �������������������������������������������������������������������������� 109
Prerequisites��������������������������������������������������������������������������������������������������������� 110
The Appium�txt File ����������������������������������������������������������������������������������������������� 111
Using uiautomatorviewer �������������������������������������������������������������������� 113
■Chapter 9: Test Strategy and Execution �������������������������������������� 117
Continuous Test Automation with Cucumber ��������������������������������������� 117
High-Level Mindmap ��������������������������������������������������������������������������� 118
Test Framework ����������������������������������������������������������������������������������� 118
Git Repo and Folder Structure ������������������������������������������������������������������������������ 119
Writing the Tests ���������������������������������������������������������������������������������� 120
Cucumber Scenarios (ci_android�feature) ������������������������������������������������������������ 121
hooks�rb ���������������������������������������������������������������������������������������������������������������� 122
env�rb �������������������������������������������������������������������������������������������������������������������� 123

■ Contents
xiii
Devices Lab ���������������������������������������������������������������������������������������������������������� 123
devices�yaml ��������������������������������������������������������������������������������������������������������� 124
emulators�yaml ����������������������������������������������������������������������������������������������������� 125
Capabilities�rb ������������������������������������������������������������������������������������������������������� 125
ScreenHelper�rb (Not Used) ���������������������������������������������������������������������������������� 126
Step Definitions ���������������������������������������������������������������������������������������������������� 127
Explanation of Key Concepts �������������������������������������������������������������������������������� 128
Executing the Test from the Local Lab ������������������������������������������������ 128
Start the Appium Server ��������������������������������������������������������������������������������������� 129
Execute the Test ��������������������������������������������������������������������������������������������������� 129
Executing the Test from Sauce Labs ��������������������������������������������������� 130
What Is Sauce Labs? �������������������������������������������������������������������������������������������� 131
Running Against Sauce Labs �������������������������������������������������������������������������������� 131
Parallel Devices Automation ���������������������������������������������������������������� 135
Start Appium Servers on Different Ports �������������������������������������������������������������� 136
Client Side ������������������������������������������������������������������������������������������������������������ 137
Index ���������������������������������������������������������������������������������������������� 139

xv
About the Author
Pradeep Macharla is a passionate technical and business leader managing, coaching and growing teams around the globe ranging from Fortune 500 to small and medium companies. His background and experience has made him a highly sought after technical coach and mentor, consulting or working at the senior leadership and executive level with companies spanning across industries where Digital and IT technologies have significant impact. Pradeep has been an integral part of several initiatives in the technology space including mobile, web, financial and consulting services. His github provides an insight into domains of interest. Pradeep likes to play table tennis for stress busting.

xvii
About the Technical Reviewer
Ankita Gupta is a software test professional with experience in automation for web and mobile, and security and performance testing. She has a background of working with companies including PayPal, LinkedIn, Airtel, Wingify, and Expedia. Ankita has previously spoken at NullCon, NewGen Testing Conf., and Selenium Conf. She has also contributed to open source projects related to web-based automation.

xix
Acknowledgments
While technology constantly changes, the need to optimize, accelerate, and see things from newer perspectives is a fundamental human need. I owe my learning and inspiration to the open source community on StackOverflow, GitHub, and countless blogs, including the Appium web site. I also want to thank the Apress team (Nikhil, Matt, and Prachi) for grooming the book to a presentable state and collaborating patiently.

1© Pradeep Macharla 2017 P. Macharla, Android Continuous Integration, DOI 10.1007/978-1-4842-2796-1_1
CHAPTER 1
Introduction
This chapter sets the context and the current mobile landscape. We start by introducing the overall architectural pattern and the definition of Continuous Integration (CI) and subsequently list the installation steps of the tools and software that form the platform. The underlying software platform (Jenkins, Nexus, SonarQube, and Docker, et al.) form the foundation on which we build automation concepts.
ArchitectureIn this book, I present a pattern for CI,a.k.a. quick feedback as soon as the developer checks in the code. Although the term CI for some involves merging and building code in a distributed model, in this book, you will not only merge code, but also build, deploy, and test it. Only when you complete the loop of build-deploy-test (the key piece is testing) will you be confident about the quality of the code you checked in.
You will start with a minimum viable product (MVP) that follows the architecture shown in Figure 1-1. All steps in the process are completely automated—no exceptions!

Chapter 1 ■ IntroduCtIon
2
As you reach initial maturity with the CI feedback loop and see continuous builds and feedback, you will continue to push the envelope and achieve parallel device testing. Figure 1-2 shows the Test Runner architecture.
Figure 1-1. Overall architecture

Chapter 1 ■ IntroduCtIon
3
PrerequisitesThe following sections cover the software tools needed to follow the code patterns in this book.
Windows vs. MacTo develop an Android app, you can use either Mac or Windows platforms. However, I recommend using Mac over Windows because of the following experiences I had:
• Device drivers are easier to obtain on a Mac (as opposed to Windows, where you have to identify the hardware and go to the vendor’s web site)
• System resources (CPU, RAM, etc.) perform better on a Mac
• The emulator performs relatively better on a Mac
• Most online examples refer to the Mac environment
• Android OS is a *nix core underneath, hence the experience of developing, debugging, and testing feels better on a Mac
Figure 1-2. Test Runner architecture

Chapter 1 ■ IntroduCtIon
4
■ Note this book uses a Mac for the hardware and for the underlying oS.
The Mac EnvironmentThe Mac environment shown in Figure 1-3 was used to run all the examples in this book.
Mobile DevicesYou should have at least one real Android device. It’s best to have an Android 4.4 operating system or above, API 17 or above. With Android 4.2 and earlier, the appium server needs to be started with selendroid-port in addition to bootstrap-port. Details of port values are listed in Chapter 8, “Work with Appium”.
NetworkIt’s best if all the servers (Jenkins, Nexus, Sonar, Appium, etc.) and the build machine were in the same network segment. At a minimum, they should be able to ping (assuming ICMP is not disabled) and be able to reach each other on the ports that the processes listen (mostly TCP). (For example, if Jenkins were running on web 8080, you should be able to reach http://jenkins_url:8080 from all other machines.)
Figure 1-3. Mac environment used for the book’s examples

Chapter 1 ■ IntroduCtIon
5
PlatformThe following domain knowledge is required to a certain extent.
• Java programming language and runtime (the Android app source is in Java)
• Ruby programming language (understand the automation framework written with Cucumber and Ruby)
• Usage of *nix operating systems (the Mac aligns with *nix style)
Programming LanguageThe test automation framework uses the Ruby programming language. I chose Ruby with Gherkin, since it’s close to reading the English language.
Installation ProcessesFor each software program you need, the installation instructions are provided. At the end of each section, you’ll find a link to a video demonstrating the installation process.
Installing JenkinsThe version of Jenkins installed at the time of writing this book is 1.642.1.
Use the following steps to install Jenkins:
1. Log in to a machine that has Docker installed on it (installation instructions for Docker, which are machine dependent, are found at https://docs.docker.com/engine/installation/). This example uses Ubuntu 14.04 OS.
2. Run the command docker run –d –name "myjenkins" –p 8083:8080 jenkins:latest (latest at the time of this writing is the 1.642.1 version of Jenkins).
3. Access the Jenkins URL using http://hostname:8083.
4. Navigate to Manage Jenkins ➤ Manager Users. Add a user with the name admin and provide a password.
5. Navigate to Manage Jenkins ➤ Configure Global Security. Check the Enable Security checkbox. On the same page, under Access Control, select Jenkin’s Own User Database. Under Authorization, select Matrix-Based Security.
6. Add a user called admin and check all the boxes in all the columns (for more detailed instructions, watch the video).
7. Now save the page. This will focus the page to the user login.

Chapter 1 ■ IntroduCtIon
6
8. Log in as the admin user.
9. Click New Item in the left menu, provide an Item Name of HelloWorld, and click OK.
10. Go to Build ➤ Add Build Step ➤ Execute Shell.
11. In the text area, type echo "hello world" and click Save.
12. Click Build Now in the left menu.
13. The build passes in and a blue ball shows up against the entry in Build History.
14. If you want to see the console output, click the build number (#1) and then click Console Output.
Jenkins is successfully installed now. Figure 1-4 shows the UI.
The link to the video demonstrating the steps is https://vimeo.com/154497273.
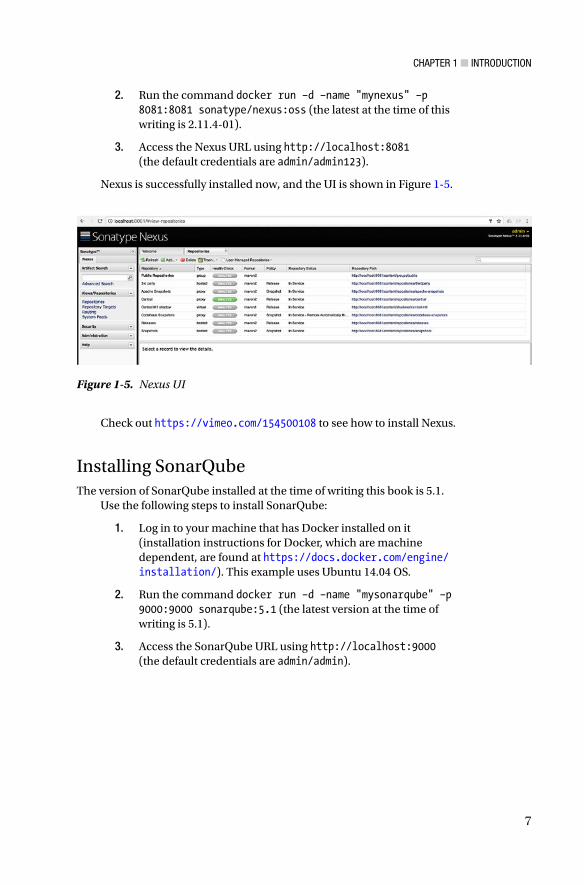
Installing NexusThe version of Nexus installed at the time of writing this book is 2.11.4-01.
Use the following steps to install Nexus:
1. Log in to your machine that has Docker installed on it (installation instructions for Docker, which are machine dependent, are found at https://docs.docker.com/engine/installation/). This example uses Ubuntu 14.04 OS.
Figure 1-4. Jenkins UI
Chapter 1 ■ IntroduCtIon
7
2. Run the command docker run –d –name "mynexus" –p 8081:8081 sonatype/nexus:oss (the latest at the time of this writing is 2.11.4-01).
3. Access the Nexus URL using http://localhost:8081 (the default credentials are admin/admin123).
Nexus is successfully installed now, and the UI is shown in Figure 1-5.
Check out https://vimeo.com/154500108 to see how to install Nexus.
Installing SonarQubeThe version of SonarQube installed at the time of writing this book is 5.1.
Use the following steps to install SonarQube:
1. Log in to your machine that has Docker installed on it (installation instructions for Docker, which are machine dependent, are found at https://docs.docker.com/engine/installation/). This example uses Ubuntu 14.04 OS.
2. Run the command docker run –d –name "mysonarqube" –p 9000:9000 sonarqube:5.1 (the latest version at the time of writing is 5.1).
3. Access the SonarQube URL using http://localhost:9000 (the default credentials are admin/admin).
Figure 1-5. Nexus UI

Chapter 1 ■ IntroduCtIon
8
SonarQube is successfully installed now, and its UI is shown in Figure 1-6.
Check out https://vimeo.com/154499186 to see how to install SonarQube.
Installing the CI Tool StackUntil now, you have installed the tools individually; however, there is another option to install all of them at once (if you prefer). This section is optional.
1. Log in to your machine that has Docker installed on it (installation instructions for Docker, which are machine dependent, are found at https://docs.docker.com/engine/installation/). This example uses Ubuntu 14.04 OS. Alternately, you can have docker-machine do all the work for you.
2. Use the check out code git clone https://github.com/machzqcq/docker-ci-tool-stack.git.
3. Run docker-compose up from the root of the folder.
The table of tools listed in Figure 1-7 will be ready in a few seconds (not more than 60 seconds).
Figure 1-6. SonarQube UI
Figure 1-7. CI tool stack endpoints
Check out https://vimeo.com/154935657 to see how to install the CI tool stack.

Chapter 1 ■ IntroduCtIon
9
Building the Android AppThe build-deploy-test feedback loop starts with the build process. The video at https://vimeo.com/154936765 quickly walks through the steps involved in building an Android app. The Android app you are building here is only for demonstrating how to build an app. In later chapters, when you get to test automation, you will start from the source code and walk through detailed steps to reach the build phase.
■ Note Watching the video is not mandatory to move forward in the book, but it gives you a fast-forward view of the value-add from this book. You may conveniently skip this video and come back after completing the book. Chapter 5, “Build android app,” has detailed instructions and steps if you prefer text instructions.
Check out https://vimeo.com/154936765 to see how to install the Android app.
Deploying/Installing the Android AppThe deploy step in build-deploy-test is when the app becomes real and available to interact. The video quickly walks through the steps involved in building an Android app. The Android app you are deploying here is only for demonstrating how to build an app. In later chapters, when you get to test automation, you will start from the source code and walk through detailed steps to reach the deploy phase.
■ Note Watching the video is not mandatory to move forward in the book, but it gives you a fast-forward view of the value-add from this book. You may conveniently skip this video and come back after completing the book. Chapter 7, “deploy or Install android app,” has detailed instructions and steps if you prefer text instructions.
Check out https://vimeo.com/155159581 to see how to deploy the Android app.
Testing (Automating) the Android AppThe test step in the build-deploy-test feedback loop tells you whether the app meets the specifications and requirements. The test phase feedback is passed into the developer’s queue to improvise and/or fix bugs. The video fast-forwards the end-state solution when running the automated tests against the app.

Chapter 1 ■ IntroduCtIon
10
■ Note Watching the video is not mandatory to move forward in the book, but it gives you a fast-forward view of the value-add from this book. You may conveniently skip this video and come back after completing the book. Chapter 8, “Working to appium,” and Chapter 9, “test Strategy and execution,” include detailed instructions and steps if you prefer text instructions.
Check out https://www.youtube.com/watch?v=In9sCFrv-D0&feature=youtu.be to see how to test the Android app.
Mobile TechnologiesMobile involves hardware, software, platforms, apps, and the overall experience. You can also look at smart vs. other mobile devices. To put perspective on mobile technologies, some attributes that help filter the avalanche of information are listed next.
What Do Consumers Want?See https://info.dynatrace.com/rs/compuware/images/Mobile_App_Survey_Report.pdf for a great read from Dynatrace.
EcosystemsMuch like how Microsoft, Redhat, Canonical, et al. represent ecosystems in the operating systems space, there are ecosystems that are present in the mobile apps domain too. Ecosystems are entry points into the platforms on which mobile applications are developed, maintained, delivered, and enhanced.
At the time of writing this book, the ecosystems are broadly classified into the following categories.
• Apple
• Windows
Within each ecosystem, there can be many more categories, especially in the Google Android ecosystem (based on phone manufacturer, such as Huawei), as it provides more flexibility than Apple to tinker with the hardware architecture.

Chapter 1 ■ IntroduCtIon
11
HardwareHere is a sampling of the hardware you will encounter when developing mobile apps:
• Apple
• Samsung
• Sony
• HTC
• Qualcom
• Motorola
• Huawei
• Lenovo
• LG
You can read more at https://en.wikipedia.org/wiki/List_of_best-selling_mobile_phones.
Platforms/OSThe four main platforms are:
• iOS
• Android
• Windows
• Firefox OS
Types of Mobile AppsThere are different types of mobile apps that meet various needs. The decision on the type of mobile app is based on multiple factors. Here are the types that exist at the time of writing this book (see Figure 1-8).
• Native apps: Mobile apps that are entirely developed using the tool stack available in the respective ecosystem (Apple, Google, Windows, etc.) are called native apps. The tool stack could mean the programming language, the SDK, the underlying platform, and so on. Native apps by far give the best user experience and performance.

Chapter 1 ■ IntroduCtIon
12
• Web apps/HTML5 apps: Apps that use web technologies like HTML5, JavaScript, and CSS that align with w3c standards are called web apps. Web apps do not heavily rely on native platform support and hence are more cross-platform and portable. That said, there is significant opportunity for improvement in the areas of secure local storage and access to device functionalities, like accelerometers, scanners, cameras, etc.
• Hybrid apps: Hybrid, as the name suggests, takes the positives of both web and native apps and brings them together.
You can read more at https://dzone.com/articles/state-native-vs-web-vs-hybrid. This book covers native Android mobile apps.
Figure 1-8. Comparing mobile app types

13© Pradeep Macharla 2017 P. Macharla, Android Continuous Integration, DOI 10.1007/978-1-4842-2796-1_2
CHAPTER 2
Mobile Test Automation
This chapter makes a case for mobile test automation and why it makes sense to invest in automation from the onset of your mobile app development process. The chapter also compares and contrasts the benefits of automation over manual testing practices. But first, you’ll learn about a few evolutionary concepts, some of which are borrowed from web application test automation.
The WebDriver ProtocolWebDriver is a remote control interface that enables introspection and control of user agents. It provides a platform and language-neutral wire protocol as a way for out-of-process programs to remotely instruct the behavior of web browsers. A brief processing model is explained.
The remote end (see https://www.w3.org/TR/webdriver/#dfn-remote-end) is an HTTP server reading requests from the client and writing responses, typically over a TCP socket. For the purposes of this discussion, I model the data transmission between a particular local end and remote end with a connection to which the remote end may write and read bytes.
After such a connection has been established, a remote end must run the following steps:
1. Read bytes from the connection until an HTTP request can be constructed from the data.
2. The HTTP request is matched with the request’s method and URL as parameters.
3. If the request match is of type error, send an error and error code, then return to Step 1.
4. Let the session ID be the corresponding variable from the URL variables.
Chapter 2 ■ Mobile test autoMation
14
5. If the command is New Session (and doesn’t match the existing session’s ID), then go back to Step 1.
6. Execute the request and collect the response object.
7. Send the response code and the results to the local end and return to Step 1.
For further details on WebDriver Protocol, see https://w3c.github.io/webdriver/webdriver-spec.html.
Selenium, the popular web test automation software, is based on the WebDriver protocol as its base layer. In fact, as you progress in the book, you will notice that the Appium communication also follows the WebDriver protocol.
Why Are We Talking About These Protocols?Much like how micro-service APIs over monolithic applications are preferred in distributed systems, to take advantage of horizontal scaling, a similar innovation has happened in the past decade. Selenium (see https://en.wikipedia.org/wiki/Selenium_(software), with its relatively lightweight architecture, is fast replacing many licensed and enterprise tools.
There are web sites that have covered the web test automation use cases at http://www.seleniumframework.com/.
Many mobile automation tools and frameworks adopt principles of web test automation tools. That means that understanding the history of web test automation tools helps you connect the evolution tools like Appium, Calabash, and other open source mobile automation tools.
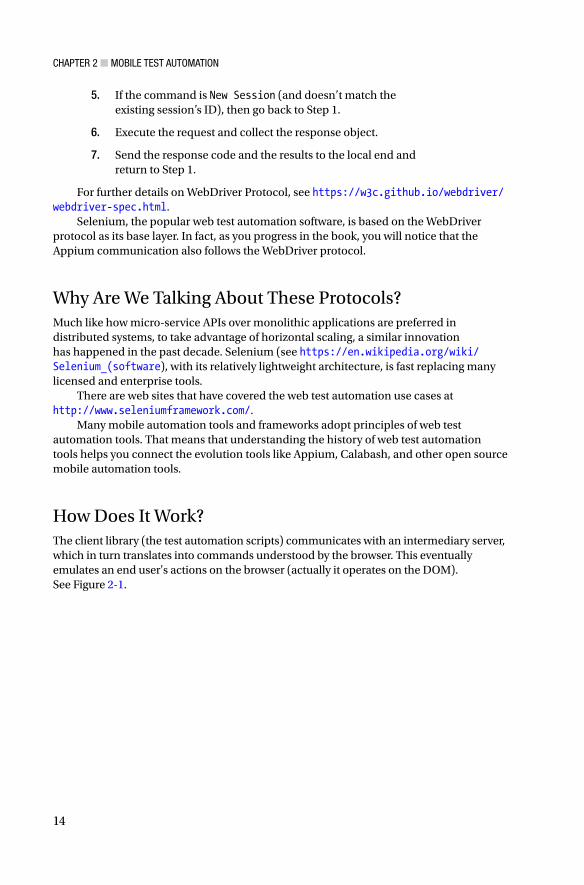
How Does It Work?The client library (the test automation scripts) communicates with an intermediary server, which in turn translates into commands understood by the browser. This eventually emulates an end user's actions on the browser (actually it operates on the DOM). See Figure 2-1.

Chapter 2 ■ Mobile test autoMation
15
So, as you can see in Figure 2-1, as long as you write automation scripts that the intermediary server can understand (WebDriver), the server takes care of translating them into actual commands that emulate user actions on the browser.
How Does It Scale?In Figure 2-1, you can see that a single intermediary server (chromedriver.exe, Driver Server.exe) can maintain the session with an active browser and execute commands that you direct in the automation scripts.
What if you want to execute tests in parallel? How about multiple instances of browsers on the same machine or on remote machines, and so on?
To solve the problem of parallel execution and leverage horizontal scaling, the Selenium Grid came into existence. Its architecture is shown in Figure 2-2.
Figure 2-1. Selenium WebDriver architecture
www.allitebooks.com

Chapter 2 ■ Mobile test autoMation
16
A couple of noteworthy points:
• The HUB is an HTTP server that listens on a port and redirects the requests to the appropriate Grid node (which maps to a WebDriver).
• Since the communication happens on HTTP over TCP/IP, you can scale this model to the boundaries of the ports available on each machine in the control chain.
• The HUB is the entry point and communication between HUB and nodes is purely over REST APIs (GET, POST, etc.)
• The matching of a request from a client is done by the HUB based on the WebDriver protocol algorithm (a DesiredCapabilities object).
How Does It Relate to Mobile Automation?Now, you can remotely execute commands on a browser as long as you have the intermediary server translating it to the right commands emulating user behavior.
The same concept is applied to mobile test automation. The Appium server is like a ChromeDriver, IEDriverServer, or Safari driver, in that it can communicate with the UI Automation library for the Android or iOS ecosystems.
Figure 2-2. The Selenium Grid

Chapter 2 ■ Mobile test autoMation
17
Internally, Appium knows how to talk to the UIAutomation library for Android. The UIAutomation library will take commands from the Appium server and execute them on the app, which eventually translates to set, get, click, and all user actions.
As the author of automation scripts, as long as you know how to identify elements (various locator/selector strategies; this space is quite mature now) and perform operations on those elements, the intended behavior is automated.
Test Automation LibrariesOver the past few years, the test automation tools that got some traction for Android apps included MonkeyTalk, Robotium, UiAutomator (uses UI Automation library), calabash-android, selendroid, Appium, etc.
Android Espresso, a unit testing library that promises to do UI testing, is also relatively new as of writing this book. Let's wait and see how Expresso does; however, the fact that it is inside-out (unit testing) means that it might not cover the scope of integration testing (i.e., testing the exact path that an end user experiences).
This book uses Appium as the test automation tool/framework because I found it aligned with my needs of testing native, web, and hybrid apps. It also follows the WebDriver protocol. You can read Appium's philosophy and competitive analysis with other tools and frameworks on its web site (http://appium.io/introduction.html?lang=en).
Some tradeoffs between Appium and Espresso are as follows:
• Android Espresso is good because the tests are in the same language as the source code, which makes it easier to debug/troubleshoot and fosters collaboration among the technical staff (the dev and test engineers).
• If you need access to the source code, executing the tests may work fine, but requires multiple vetting of build pipelines. CI (and hence testing from outside) gives relatively higher confidence before release. Appium is a better choice in this regard.
• Use ATDD/BDD style because it lets lesser technical staff product owners/business stakeholders define “executable” acceptance criteria. This helps the three amigos (dev, test, and product) be on same page and fosters collaboration.
• Availability of developer’s time, test coverage, etc., is also a tradeoff. Appium, with its support for most programming stacks, is a better choice in this regard.
Why Automate?It should be a no-brainer why you automate processes. In fact, continuous integration and/or continuous delivery (see https://martinfowler.com/bliki/ContinuousDelivery.html) is not possible without automating the repeatable/mundane activities. Humans are not great compared to machines for computing repetitive tasks and performing all permutations and combinations on a certain problem.

Chapter 2 ■ Mobile test autoMation
18
That said, a human still has to architect and design the overall system, so should understand what a machine does and, more importantly, be able to troubleshoot when expected outcomes do not transpire.
For the mobile app space, this article shows the costs associated with resubmitting a mobile app. The numbers are only suggestive; in fact, the costs might be higher than what is displayed in the table. The point is to say that the costs associated with defects/bugs are very dear and include lost customers, countless developer hours, and brand image, to name a few.
Mobile Test StrategySoftware testers are familiar with writing test plans, test cases, and test release documents. A test strategy document is generally written by taking into account the application’s operating environment, the release cycle, test coverage, defect tracking, and overall a document that can be presented to executive management for approval of budget and timelines. Mobile test strategy aims to carve out the how, why, and what aspects that affect mobile testing. The following sections include are few considerations for creating a mobile test strategy.
Manual Testing vs. AutomationThere are very rare scenarios in which the human eye does significantly better than an automated program when validating software, such as the aesthetics of a web site. That gap is also getting narrower by the day. AI (artificial intelligence) and ML (machine learning), for example, provide a much better ROI in the age of speed and continuous delivery. Visual test automation by tools like Applitools is a great example. This is not to say that we should make manual testing function redundant in an organization, rather it is to say that testing capabilities should include both automation and manual approaches, with a focus on automation.
In the context of mobile testing, it is almost impossible for a human to manually test permutations and combinations across the dimensions of devices, SDKs, API levels, and ecosystems. Hence, your testing strategy should include (but not be limited to):
• Automate early and often in the bottom-up order of the testing pyramid (see the “Test Pyramid” section later in this chapter).
• Use BDD/TDD frameworks in the early stages when acceptance criteria are not clear and an automation script cannot be run (use mock frameworks to mitigate the absence of a real system).
• Building and deploying an app should be self-serviced and automated without any exceptions.
• Collaborate with other roles on the team and, in rare circumstances (such as during sprint demos), manually walk through workflows of the system (otherwise, the automation script should be run as a demo).

Chapter 2 ■ Mobile test autoMation
19
• The programming language should start with known, and tend toward the most collaborative.
• Inside-out/outside-in (focus on end users).
• Don’t boil the ocean—pick one and pivot.
• Interoperability—cloud and on-premises infrastructures.
• Tend toward using real devices.
• Use Appium, Espresso, and XCTest.
Speed of TestingHigh-speed testing is a mandatory requirement in the mobile space because a mobile app is successful in the market based on how fast it is delivered in the face of competition. There have been research studies suggesting that mobile users have an attention span of minutes before they uninstall an app. Releasing bug-free apps often is a make-or-break situation.
ScalingThink of AWS and Netflix. The services can respond by scaling the systems based on load, performance, user traffic, and so on. While testing mobile apps, the testing capability should also be scalable across the three Vs (volume, variety, and velocity) with a tradeoff against cost. In the beginning of developing a project, it is advisable to rely on open source and cloud services before investing heavily on paid solutions.
CostCost is a constraint in every decision you make when resources are required. Resources can be human, machine, time, etc. Hence, investing in open source solutions at the beginning is less risky because there is no vendor lock-in. It is a tradeoff decision because if you spend too much time on not-so-mature open source solutions, you might lose time. When it’s all said and done, open source solutions have come a long way and are mature in many ways. In fact, they are much more mature than some paid solutions in some cases. Your strategy should be to spend a week or two and scour the web for solutions and frameworks that are already built and use one as a starting point.
Testing PyramidThe testing pyramid helps in terms of having conversations around how much and what priorities do different kinds of testing have in a project. See Figure 2-3.

Chapter 2 ■ Mobile test autoMation
20
In the context of mobile testing (most mobile apps at the time of writing this book focus on the GUI layer), the pyramid can be read as follows:
• The confidence while building the app (work-in-progress) is enhanced with more tests at the bottom of the pyramid. Hence, automated unit tests that execute successfully give confidence that the unit/component is a higher quality.
• Since a software application is a network of components, integration points between the components become important as you race toward release to production.
• Finally, the user experiences the GUI of the mobile app, hence from a user’s perspective, automated GUI tests give the highest confidence in quality. (For example, if a component at the lower layer breaks, the user’s experience will be felt at the GUI layer.)
• The confidence in the overall system is enhanced by successfully running tests from lower to higher layers in the testing pyramid.
• The testing pyramid also articulates the relative volume of tests to be written at various layers of the application.
Further reading on the testing pyramid can be found at http://www.seleniumframework.com/decision-models/choose-automation-solution-2/.
Figure 2-3. The testing pyramid

Chapter 2 ■ Mobile test autoMation
21
Mobile Test EnvironmentMobile apps like web apps need an environment to run on. The environment is a function of hardware and software. To test a mobile app’s functionality, you need a mobile lab that can emulate a real-world scenario—i.e., a user operating on a mobile app and the workflows being executed. Mobile test environments can be complex to emulate, because the experience is controlled in a chain, and the individual links are owned by multiple entities. For example, the network bandwidth is controlled by the telecom providers, the software experience is controlled by Google and its Android partners, and so on. You’ll explore the considerations that matter while interacting with a mobile test environment in the following sections.
Real Devices vs. Emulators/SimulatorsOne of the biggest challenges with mobile testing is device support. The number of models and the types of smartphones are increasing by the day and growing at an accelerating pace. There are differences between devices and which devices to test is not an easy challenge to solve. It is dependent on identifying the compatibility matrix as early as possible in the project, yet that becomes a challenge to collect as it is not static.
However, you need to start narrowing it all down with an initial list.Emulators/simulators cannot emulate every feature of a real device—pixel perfect,
phone hardware quirks, etc. In general, the software representation of underlying hardware in Android world is called an emulator (as opposed to a simulator in the iOS world).
The test environment for mobile devices involves a mix of real devices and emulators/simulators to get the test coverage you expect—of course, the tradeoff is with cost.
Initial Manual Testing on a Local Android Real DeviceIn the case of a local Android device, use the following steps to experience the first build of an app.
Android SDK installed on a Windows or Mac:
1. Insure that the SDK is updated with the latest device drivers. For the Mac, my experience has been relatively easier with the device drivers; however, with Windows, I had to explicitly install the driver by going to the handset device manufacturer's web site.
2. From the source code perspective, the attribute android:debuggable=true should be set.
3. On the actual device, navigate to Settings ➤ Developer Options ➤ Enable USB Debugging and set that to True. If the setting is not found, navigate to Settings ➤ About Phone and click Build Number seven times. That should bring up the option.

Chapter 2 ■ Mobile test autoMation
22
4. Once the device is connected, a dialog box will appear on the device. Accept the message to allow communication.
5. A quick verification step is to type adb devices from the terminal (the adb binary is located inside the SDK folder inside platform-tools directory).
Initial Manual Testing on a Local Android EmulatorUse the Android Virtual Device Manager to create various Android virtual devices with different devices, SDK versions, and many more hardware characteristics.
Invoke the emulator as follows:
• Navigate to Android SDK folder/tools/ to locate the emulator binary.
• The emulator -avd avd_name command invokes the previously created AVD.
• I found it easier to first create an AVD configuration from IDE like Eclipse or IntelliJ, because the workflow is easier and the complex details are abstracted.
Further Manual Testing in the CloudYou already know that it is almost impossible to have every device, hardware, and software and maintain a full-blown heterogeneous mobile test environment, as well as certify all devices and emulators for your mobile app. As you scale, you have to depend on cloud services.
• Start using Sauce Labs. Sauce Labs natively supports Appium and that helps you be familiar with the tool for the next phase of automation.
• Perfecto mobile is a fast growing service in terms of its coverage for mobile real devices and worth taking a look if you are an enterprise, as the cost vs. benefit analysis works well for large companies.
• Amazon Device Lab has many options since early 2017 and the service is maturing with support for Appium and similar automation tools without leaving the context of Amazon Web Services Console.
• Google Device Lab is a great option, if you are invested fully in Android mobile apps. The Google quality of experience is instantly realized, but bear in mind that the Google Cloud is slowly adding support for software automation frameworks like Appium and Calabash and would take a little bit more time as that is the not the core area they focused on. The purpose of Device Lab is to provide access to real devices in the cloud, not necessarily compete with Sauce Labs and Perfecto.

23© Pradeep Macharla 2017 P. Macharla, Android Continuous Integration, DOI 10.1007/978-1-4842-2796-1_3
CHAPTER 3
CI Pattern with Jenkins and Android
This chapter introduces architectural patterns and covers a specific continuous integration pattern that you will learn to implement in subsequent chapters. The chapter goes through high-level architecture images of the pattern to help you picture it mentally. As you progress through the chapter, you’ll see the steps needed to configure the feedback loop(s) that help you model and implement the pattern. It is important to complete the tools installation described in Chapter 1 before starting this chapter.
What Is Continuous Integration?Continuous integration (CI) is a development practice that requires developers to integrate code into a shared repository several times a day. Each check-in is then verified by an automated build, allowing teams to detect problems early. There are similar concepts, such as continuous deployment and continuous delivery. However, to keep this conversation simple, what I mean by continuous integration in this book involves integration of changes into the source code, building and deploying the binaries, and delivering the binaries to a target environment where end users can interact with the app.
Feedback LoopsAs discussed in Chapter 1, feedback loops can be implemented using the Jenkins tool. Images are provided to give you an idea about each build step inside the Jenkins UI interface.
■ Note I used Jenkins 1.642.1 version. If you installed a different version of Jenkins, make sure you select the free style job. The interface should be the same.

ChapTer 3 ■ CI paTTern wITh JenkIns and androId
24
Feedback Loop 1: BuildFigure 3-1 shows the build feedback loop in the overall architecture diagram. This is where you build the app.
Based on the overall architecture, the first feedback loop does the following:
1. Checks out the code.
2. Applies (any) configuration.
3. Compiles.
4. Runs the unit tests (if any).
5. Packages and uploads the code.
6. Triggers the code quality analysis.
Figure 3-1. The build feedback loop

ChapTer 3 ■ CI paTTern wITh JenkIns and androId
25
Jenkins Job1 ConfigurationFigure 3-2 shows how a Jenkins Job is configured for the first feedback loop.
Name the Jenkins job and specify the Log Rotation strategy.
Define an optional Boolean flag called UPLOAD to control the decision of uploading the build artifact to Nexus. The default value is unchecked. If you check it, then the build artifact gets uploaded to Nexus. See Figure 3-3.
Figure 3-2. The build job rotation
Figure 3-3. The build Nexus flag

ChapTer 3 ■ CI paTTern wITh JenkIns and androId
26
Enter the Nexus credentials to interact with Nexus; see Figure 3-4.
Enter the GitHub repository URL representing the source code, as shown in Figure 3-5.
Figure 3-4. The build Nexus credentials
Figure 3-5. The build source control

ChapTer 3 ■ CI paTTern wITh JenkIns and androId
27
Check the boxes to delete the workspace before the build starts and to mask passwords, as shown in Figure 3-6.
Set the Nexus password as shown in Figure 3-7, so that it can be masked.
Set JAVA_HOME, ANDROID_HOME, GRADLE_HOME (see Figure 3-8 and the following code) and build the project. If any unit tests are written, execute that as the next build step. In this case, there are no unit tests. (Note: SONAR_RUNNER in this job is redundant; you’ll use Sonar in a downstream Jenkins job.)
Figure 3-6. The build workspace and mask password checkboxes
Figure 3-7. The build Nexus password

ChapTer 3 ■ CI paTTern wITh JenkIns and androId
28
#!/bin/bash## uncomment set -xv for debugging#set -xvexport PATH=$PATH:$HOME/.rvm/bin[[ -s "$HOME/.rvm/scripts/rvm" ]] && source "$HOME/.rvm/scripts/rvm"pwdrvm listcurl -u $NEXUS_USERNAME:$NEXUS_PASSWORD -O https://nexus.com/nexus/service/local/repositories/snapshots/content-mobile/MOBILE_SNAPSHOTtar xvzf MOBILE_SNAPSHOTcp app-debug.apk ./features/support/resourcesbundle exec cucumber features/android.feature DEVICE=$DEVICE -t @tag_name
Upload the build artifact (i.e., app-debug.apk) to Nexus so that it can be used further.This example does not version this artifact with the Jenkins build number, because
this is a snapshot. However, feel free to name the artifact aligned with your versioning strategy. See Figure 3-9.
Figure 3-8. The build Nexus password

ChapTer 3 ■ CI paTTern wITh JenkIns and androId
29
Figure 3-9. The build upload artifact
Kick off the downstream job to trigger SonarQube analysis, which is feedback loop 2.The UPSTREAM_BUILD_NUMBER strategy is to pass the value to the downstream job to
pull the “correct” Nexus build artifact, as shown in Figure 3-10.
Figure 3-10. The build trigger job

ChapTer 3 ■ CI paTTern wITh JenkIns and androId
30
Finally, save the job, as shown in Figure 3-11.
Figure 3-11. The build save job

ChapTer 3 ■ CI paTTern wITh JenkIns and androId
31
Feedback (Execution Results)After running the Jenkins job, the console output looks like this (see Figure 3-12 also):
:app:mergeDebugAssets:app:generateDebugResValues:app:generateDebugResources:app:mergeDebugResources:app:processDebugManifest:app:processDebugResources:app:generateDebugSources:app:processDebugJavaRes UP-TO-DATE:app:compileDebugJavaWithJavacNote: Some input files use or override a deprecated API.Note: Recompile with -Xlint:deprecation for details.Note: /Users/mobile-ci/jenkins/workspace/mobile.android/app/src/main/java/com/android/app/request/print/gc/GCGetPrinters.java uses unchecked or unsafe operations.Note: Recompile with -Xlint:unchecked for details.
:app:compileDebugNdk UP-TO-DATE:app:compileDebugSources:app:preDexDebug:app:dexDebug:app:validateDebugSigning:app:packageDebug:app:zipalignDebug:app:assembleDebug
BUILD SUCCESSFUL
Total time: 1 mins 52.858 secs
This build could be faster, please consider using the Gradle Daemon: https://docs.gradle.org/2.8/userguide/gradle_daemon.html[mobile.android] $ /bin/bash /var/folders/m6/zpwf1w6s04b_ccjvm4175y4h0000gp/T/hudson7459346908680899717.sha ./app-debug-unaligned.apka ./app-debug.apk % Total % Received % Xferd Average Speed Time Time Time Current Dload Upload Total Spent Left Speed
0 0 0 0 0 0 0 0 --:--:-- --:-- :-- --:--:-- 0* Trying 192.168.1.71...
* Connected to nexus.server.com (192.168.1.71) port 443 (#0)

ChapTer 3 ■ CI paTTern wITh JenkIns and androId
32
0 0 0 0 0 0 0 0 --:--:-- --:-- :-- --:--:-- 0* TLS 1.2 connection using TLS_DHE_RSA_WITH_AES_256_CBC_SHA
* Server certificate: *.company.com* Server certificate: Go Daddy Secure Certificate Authority - G2* Server certificate: Go Daddy Root Certificate Authority - G2* Server auth using Basic with user 'jenkins'> PUT /nexus/service/local/repositories/snapshots/content-mobile/MOBILE_SNAPSHOT HTTP/1.1> Host: nexus.server.com> Authorization: Basic amVua2luczpJbm1hcjIwMTU=> User-Agent: curl/7.43.0> Accept: */*> Content-Length: 24952303> Expect: 100-continue>< HTTP/1.1 100 Continue} [16384 bytes data]
22 23.7M 0 0 22 5536k 0 5327k 0:00:04 0:00:01 0:00:03 5323k 64 23.7M 0 0 64 15.2M 0 7670k 0:00:03 0:00:02 0:00:01 7670k* We are completely uploaded and fine< HTTP/1.1 201 Created< Server: nginx/1.1.19< Date: Tue, 08 Dec 2015 16:00:35 GMT< Content-Length: 0< Connection: keep-alive< X-Frame-Options: SAMEORIGIN< X-Content-Type-Options: nosniff

ChapTer 3 ■ CI paTTern wITh JenkIns and androId
33
Figure 3-12. Build results

ChapTer 3 ■ CI paTTern wITh JenkIns and androId
34
Feedback Loop 2: Code Quality AnalysisThe second feedback loop is the code quality analysis process using SonarQube, as shown in Figure 3-13.
Figure 3-13. Sonar feedback loop

ChapTer 3 ■ CI paTTern wITh JenkIns and androId
35
Figure 3-14. Sonar job rotation
Jenkins Job 2: SonarName the Jenkins job and define the Log Rotation strategy, as shown in Figure 3-14.
Specify where the Sonar runner is available, as shown in Figure 3-15.
Figure 3-15. Sonar runner
www.allitebooks.com

ChapTer 3 ■ CI paTTern wITh JenkIns and androId
36
Restrict where the project can be run and then download the source code. See Figure 3-16.
Specify the checkout strategy, as shown in Figure 3-17.
Figure 3-16. Sonar source code
Figure 3-17. Sonar checkout

ChapTer 3 ■ CI paTTern wITh JenkIns and androId
37
Here you don't have sonar-project.properties inside the source code, so you can download it from Jenkins config file store and then add it to the check-out folder. See Figure 3-18.
Since the config files are generally copied to the Jenkins master, you can move them to the build machine and hence use the $sonar variable as a carrier. See Figure 3-19.
Figure 3-18. Sonar project properties
Figure 3-19. Sonar job rotation

ChapTer 3 ■ CI paTTern wITh JenkIns and androId
38
You add a build step using the SonarQube plugin for Jenkins and configure it to use the sonar-runner, as defined on the Jenkins System configuration page. See Figure 3-20.
After you run the job, the Jenkins console log looks like Figure 3-21.
Figure 3-20. Sonar job rotation feedback (execution results)
Figure 3-21. Sonar console output

ChapTer 3 ■ CI paTTern wITh JenkIns and androId
39
Click the SonarQube icon. It will open the SonarQube home page/dashboard as you have configured it on the server. See Figure 3-22.
Figure 3-23 shows the Sonar Dashboard and each of the orange highlights (and many more hyperlinks) opens information that contains great feedback for developers.
Figure 3-22. Sonar icon link
Figure 3-23. Sonar Dashboard

ChapTer 3 ■ CI paTTern wITh JenkIns and androId
40
Feedback Loop 3: TestThis feedback loop is the integration automation test—i.e., the acceptance tests that an end user would experience (see Figure 3-24). This is the relative difficult part to automate, so I discuss it in detail in Chapter 8.
Jenkins Job 3: Acceptance TestsName the Jenkins job as smoke tests/acceptance tests, depending on how many you want to execute. This example uses smoke tests, as shown in Figure 3-25.
Figure 3-24. Test feedback loop

ChapTer 3 ■ CI paTTern wITh JenkIns and androId
41
Enter the Nexus username if you want to upload the results of the test execution (this example does not). Then define the DEVICE string parameter and add all the devices that are defined in the devices.yaml file in the acceptance tests projects. See Figure 3-26.
Figure 3-25. Test job rotation
Figure 3-26. Test Nexus and device parameters

ChapTer 3 ■ CI paTTern wITh JenkIns and androId
42
Specify where the project should run and download the acceptance tests code, as shown in Figure 3-27.
Specify the master branch for code checkout, as shown in Figure 3-28.
Figure 3-27. Test source code
Figure 3-28. Test Nexus and device parameters

ChapTer 3 ■ CI paTTern wITh JenkIns and androId
43
For Ruby dependencies, pull gems from the Nexus repo. You must then specify the Nexus access credentials, as shown in Figure 3-29.
Download the app from Nexus, place it in the resources folder, and then execute the acceptance tests. See Figure 3-30.
Figure 3-29. Test Nexus access for Jenkins
Figure 3-30. Test Nexus and device parameters

ChapTer 3 ■ CI paTTern wITh JenkIns and androId
44
#!/bin/bash## uncomment set -xv for debuging#set -xvexport PATH=$PATH:$HOME/.rvm/bin[[ -s "$HOME/.rvm/scripts/rvm" ]] && source "$HOME/.rvm/scripts/rvm"pwdecho $UPSTREAM_BUILD_NUMBERrvm listcurl -u$NEXUS_USERNAME:$NEXUS_PASSWORD -O https://nexus.inmar.com/nexus/service/local/repositories/snapshots/content-mobile/HOPSTER_MOBILE_SNAPSHOT_$UPSTREAM_BUILD_NUMBERls -lbundle exec cucumber features/android.feature:19 DEVICE=$DEVICE
Choose Publish Cucumber Results as a Report, as shown in Figure 3-31.
Figure 3-31. Test publish Cucumber results

ChapTer 3 ■ CI paTTern wITh JenkIns and androId
45
Feedback (Execution Results)Since you choose to publish the Cucumber results as a report, you can get reports, as shown in Figures 3-32 and 3-33.
Figure 3-32. Test Cucumber graphical reports-1

ChapTer 3 ■ CI paTTern wITh JenkIns and androId
46
Figure 3-33. Test cucumber graphical reports-2

47© Pradeep Macharla 2017 P. Macharla, Android Continuous Integration, DOI 10.1007/978-1-4842-2796-1_4
CHAPTER 4
Android System Setup
Chapter 3 focused on how fast you can get to a quick feedback loop, and this chapter covers what is needed for an MVP. The Android world has great tools and utilities that address the varied needs of a developer.
You will install the following so that you can learn to build an app:
• Java
• Android SDK
• Android Studio
• Gradle
Installing JavaThis section explains the Java platform and how to install it.
JRE vs. JDK vs. SEYou will download and install the Java Development Kit (JDK) in this section. As a quick refresher, you might wonder which Java package you need.
• JDK: Software developers generally tend to use the JDK. It includes the Java runtime and libraries for troubleshooting and monitoring applications.
• SE (Standard Edition): Administrators typically use the SE version.
• JRE (Java Runtime Environment): This is the minimal version used by end users to run Java applications.

Chapter 4 ■ android SyStem Setup
48
JDK on MacTo install the JDK on your Mac, you simply accept the license agreement, download the .dmg file, and install it, as shown in Figure 4-1.
After installing and making modifications to ~/.profile, you’ll see something similar to the output shown in Figure 4-2. Ensure that the Java executable is available on the path and that the shell variables $JAVA_HOME, $JDK_HOME, and $PATH are updated as shown.
Figure 4-1. JDK download for the Mac

Chapter 4 ■ android SyStem Setup
49
export JDK_HOME=/Library/Java/JavaVirtualMachines/jdk1.8.0_60.jdk/Contents/Homeexport JAVA_HOME=$(usr/libexec/java_home)export PATH=$PATH:$JDK_HOME/bin
Installing Android SDKAndroid SDK tools can be installed from the Android developer site. If you are a developer, it makes more sense to download Android Studio (which comes bundled with the SDK). However, if you are a devops/build/release/CI engineer, you might want to do things headless, so it makes more sense to download the standalone tools.
This book focuses more on doing things headless, because IDEs in the background mostly call the commands.
Figure 4-2. Shell variables

Chapter 4 ■ android SyStem Setup
50
Figure 4-4. Android SDK folder view
Figure 4-3. Android SDK download
Standalone SDKDownload the standalone SDK from https://developer.android.com/studio/index.html.
Navigate to the bottom of the page for installing the tools, as shown in Figure 4-3.
The contents are extracted to the /Users/pmacharl/Library/Android/sdk folder, as shown in Figure 4-4.

Chapter 4 ■ android SyStem Setup
51
Now add these shell variables to the ~/.profile path (see Figure 4-5):
• ANDROID_HOME=/Users/pmacharl/Library/Android/sdk
• PATH=$PATH:$ANDROID_HOME/platform-tools
• PATH=$PATH:$ANDROID_HOME/tools
Quick ChecksSince you will use the adb and uiautomatorviewer executables in subsequent sections, it’s smart to check that they are available in the PATH now.
Type uiatomatorviewer, as shown in Figure 4-6.
Figure 4-5. Update shell variables
Figure 4-6. uiautomatorviewer

Chapter 4 ■ android SyStem Setup
52
Press Ctrl+C in the shell or close uiautomatorviewer directly.This ensures that you have Android SDK set up and ready for building apps.
Installing Android StudioIn the previous section, you installed the Android SDK as a standalone and made it available to your build environments by setting the PATH variables.
In this section, you will learn how to install and set up Android Studio.
■ Note android Studio is not required for building, deploying, or testing apps. it is a developer environment that enables you to develop apps.
There are many benefits to having Android Studio, because the IDE centralizes accessibility of features like updating the SDK, adb, the device monitor, looking at logs, and more. Hence, it is strongly recommended that you install Android Studio even though it’s not required.
Download it from https://developer.android.com/studio/index.html. See Figure 4-7.
Figure 4-7. Install Android Studio
Follow the instructions from the installer and go with the defaults.

Chapter 4 ■ android SyStem Setup
53
Android Studio BasicsIn this section, you will walk through some of the functionalities in Android Studio that matter to the use cases in this book. Just follow along and click through at this stage in the book.
Open an Android project. Point to the Android project that you are working on, as shown in Figure 4-8.
Figure 4-8. Open the Android project

Chapter 4 ■ android SyStem Setup
54
Figure 4-9. Android Studio subtools
Hover over the icons shown in Figure 4-9 and click each to get a feel for navigating in Android Studio.
Hovering over the icons highlighted in Figure 4-9 shows you options related to the following:
• AVD Manager: This will launch AVD manager. You will learn how to create emulators and manage Android virtual devices in another section.
• SDK Manager: This will help you manage all updates to the Android SDK.
• Android Device Monitor: This will let you monitor your Android device when connected and talking to adb.
Associate the System SDK with Android StudioBy default, Android Studio comes bundled with Android SDK. However, if you are already using an SDK bundle (as mentioned in previous section, if you already have SDK downloaded and set in another folder), then point it to that.
■ Note remember that this book uses an SdK downloaded separately because you need the flexibility to be able to build, deploy, and test the examples with and without android Studio.
Chapter 4 ■ android SyStem Setup
55
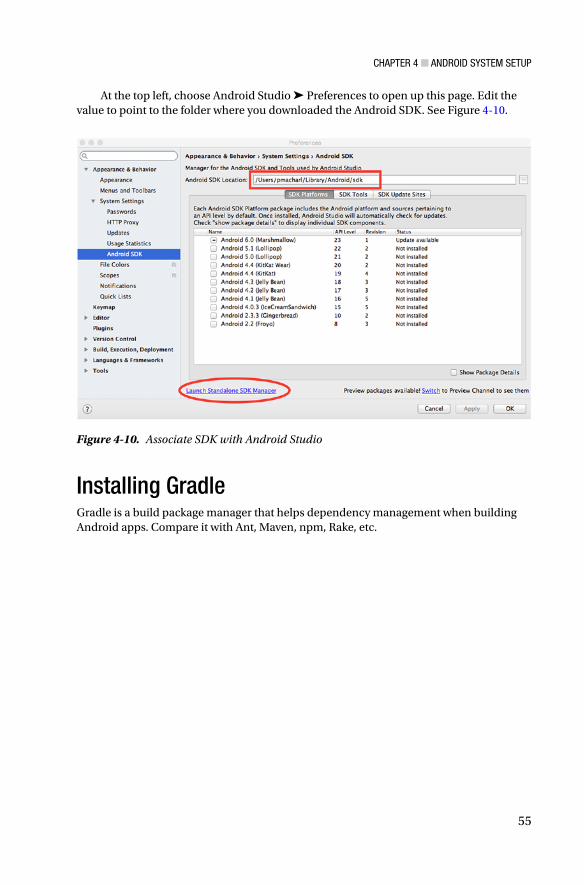
At the top left, choose Android Studio ➤ Preferences to open up this page. Edit the value to point to the folder where you downloaded the Android SDK. See Figure 4-10.
Installing GradleGradle is a build package manager that helps dependency management when building Android apps. Compare it with Ant, Maven, npm, Rake, etc.
Figure 4-10. Associate SDK with Android Studio

Chapter 4 ■ android SyStem Setup
56
Download and InstallDownload the binary from https://gradle.org/gradle-download/. It is an archive, so you need to extract the contents to a folder on your machine. See Figure 4-11.
Figure 4-12 shows where it looks after it’s extracted. The version being used is 2.7, but you should download the latest version you can. There are not too many differences that will affect your Android app build.
Figure 4-11. Download Gradle
Figure 4-12. Gradle folder structure

Chapter 4 ■ android SyStem Setup
57
Set Gradle Shell VariablesAdd the following code to your ~/.profile so that the Gradle binary is available in $PATH and $GRADLE_HOME is available when building the Android app. See Figure 4-13.
GRADLE_HOME=/Users/pmacharl/Installations/gradle-2.7export GRADLE_HOMEexport PATH=$PATH:$GRADLE_HOME/bin
Android Studio with GradleAndroid Studio comes bundled with Gradle and uses its own version internally. If you are a developer, you might find it more comfortable to use the built-in version so that you don’t have to manage yet another tool.
Figure 4-13. Gradle shell variables

Chapter 4 ■ android SyStem Setup
58
Since you need the flexibility to do this with an IDE and do it in the CI (headless) way for this book’s examples, I suggest you direct Android Studio to use the Gradle downloaded previously, as shown in Figure 4-14.
Gradle Quick Commandsgradle --help will give you the options for quick commands.
Gradle TasksGradle works by executing tasks. There can be two types:
• Built-in tasks: Come by default
• Gradle custom tasks: Craft your own tasks
You will use the built-in tasks to start with. It’s beyond the scope of this chapter to go into the details of writing custom tasks.
Figure 4-14. Gradle setting in Android Studio

Chapter 4 ■ android SyStem Setup
59
Built-in tasks are categorized into the following areas:
• Android tasks
• Build tasks
• Build Setup tasks
• Help tasks
• Install tasks
• Verification tasks
• Other tasks
To see all the tasks and more detail, run gradle tasks --all.To see more details about a task, run gradle help --task.
Build the AppGradle generally looks for a build.gradle file in the current directory and parses the file to follow the instructions.
In this book, you will build the app using the following command, which runs inside the Android project root directory:
gradle clean assembleDebug
I will go into details about building the app from the project in subsequent chapters.
■ Note if you do not want to worry about managing Gradle versions (downloading, extracting, and ensuring the right version is used), you can use the Gradle wrapper. the Gradle wrapper comes bundled with Gradle. the only change is, instead of using the gradle binary, you use the gradlew binary in the same folder.
Tools to KnowSome of the Android SDK tools that I found useful (from the perspective of CI) are:
• ADB (Android Debug Bridge)
• Record Video
• uiautomatorviewer
• AVD Manager
• SDK Manager
• Device Monitor
The next few sections cover how to use these tools.

Chapter 4 ■ android SyStem Setup
60
ADBAndroid Debug Bridge (adb) is a client that runs on a developer box and instructs a component that runs on the developer box, which in turn communicates with a daemon that runs either on an emulator or on a real device.
Here is an example of an adb command. It lists the number of devices connected to the machine on which adb is executed.
[email protected]:~ pmacharl$ adb devicesList of devices attached00a219ae09d05912 device
This is one of the most important tools that I recommend you learn to use. You will use adb to communicate with the app on the emulator/real device, to install the app, and to accomplish many other feats.
Here are some adb commands that I use extensively:
• adb devices lists all emulators and devices that can communicate with this adb server.
• adb install <apk> installs apk on the one emulator/device that is available to the adb server.
• adb install -e <serial_number> <apk> installs apk on a targeted emulator or device.
• adb kill-server kills the adb server. I use this when the server is in an unstable state.
• adb start-server starts the adb server.
It will be very beneficial to go over the complete list of options that adb provides, especially when you’re troubleshooting. I recommend the official page, found at https://www.gitbook.com/book/machzqcq/ci-automation-mobileapps/edit.
You will use the previous commands when you build-deploy-test the CI pattern in a later chapter.
Record VideoFrom Android Kitkat, i.e. 4.4 version and above, adb provides a way to record screen video and save it to the device storage. You can pull the video to the local system from there.
Here are the steps for screen recording and saving:
1. Start adb shell screenrecord /path.
2. Recording starts and waits until you no longer need to record the screen.
3. Press Ctrl+C in the shell to stop recording.
4. Pull the video to your local filesystem.

Chapter 4 ■ android SyStem Setup
61
[email protected] $ adb shell screenrecord /sdcard/example.mp4 ^[email protected] $ adb pull /sdcard/example.mp44972 KB/s (2900775 bytes in 0.569s)
uiautomatorviewerFrom the perspective of an automation engineer, uiautomatorviewer is very similar to Chrome’s dev-tools, Firefox’s dev-tools, etc. Writing web-based automation code (such as with Selenium), identifying HTML elements (like ID, name, and other properties), and passing that as input to identify objects is very similar to what you can achieve with uiautomatorviewer, but on the mobile side. Figure 4-15 shows the interface.
Figure 4-15. uiautomatorviewer
Some notes about uiautomatorviewer:
• It’s generally located in the $ANDROID_HOME/tools directory.
• You launch it by typing uiautomatorviewer.
• Figure 4-15 is taken by clicking the Device Screenshot button, which is the second icon from the left.

Chapter 4 ■ android SyStem Setup
62
• You can see the XML hierarchy of the elements and each node property in the node detail. This is useful when you’re writing Appium automated tests (if you want to use uiautomatorviewer).
• You can save a screenshot using this tool.
AVD ManagerThe AVD Manager provides a graphical user interface in which you can create and manage Android Virtual Devices (AVDs), which are required by the Android Emulator.
Launch AVD Manager using either of these options (one is from the command line and the other is from Android Studio):
• Run the android avd command at the command line. It launches avd (shell variables should be set so that the executables are in PATH).
• Click the AVD Manager icon in Android Studio IDE, as shown in Figure 4-16. Figure 4-17 shows the AVDs.
Figure 4-16. AVD Manager
Figure 4-17. AVD Manager with AVDs

Chapter 4 ■ android SyStem Setup
63
When you start to understand the Android world, you want a sandbox to play with. Android Virtual Device Manager lets you create AVDs/emulators for different hardware and software configurations. I found the following features beneficial while learning the platform:
• You can create emulators for phones, tablets, wearing, TV, etc.
• You can play with different form factors, screen resolutions, and sizes.
• You can experiment with different memory sizes, API levels of software, cameras, sensors, etc.
Sure, there is no substitute for a real device, but emulators at least help you understand the various configuration(s) available, as well as identify which ones matter while developing, building, and testing the apps. More domain knowledge for the engineers means a higher chance of a better quality app.
SDK ManagerThe Android SDK Manager (see Figure 4-18) separates the SDK tools, platforms, and other components into packages for easy access and management.
Figure 4-18. SDK Manager

Chapter 4 ■ android SyStem Setup
64
Launch SDK Manager using one of these options (one is from the command line and the other is from Android Studio):
• Run the android sdk command from the command line. It launches the SDK manager (the shell variables should be set so that the executables are in PATH). See https://www.gitbook.com/book/machzqcq/ci-automation-mobileapps/edit for more information.
• Click the SDK Manager icon in the Android Studio IDE, as shown in Figure 4-19. Figure 4-20 shows the result.
Figure 4-19. SDK Manager: Android Studio icon
Figure 4-20. SDK Manager: Android Studio

Chapter 4 ■ android SyStem Setup
65
Android Device MonitorAndroid Device Monitor is a standalone tool that provides a graphical user interface for several Android application debugging and analysis tools.
Launch SDK Manager using one of these options (one is from the command line and the other is from Android Studio):
• Run the monitor command from the command line. It launches the device monitor (shell variables should be set so that the executables are in PATH). See https://www.gitbook.com/book/machzqcq/ci-automation-mobileapps/edit for more information).
• Click the Device Monitor icon in the Android Studio IDE, as shown in Figure 4-21.
You can see the view when one device is connected in Figure 4-22.
Figure 4-21. Device Monitor: Android Studio
Figure 4-22. Device Monitor: device connected

67© Pradeep Macharla 2017 P. Macharla, Android Continuous Integration, DOI 10.1007/978-1-4842-2796-1_5
CHAPTER 5
Build the Android App
The Android app can be built in debug or release mode—the difference being the keystore used to sign the app. If you build the app in release mode, the keystore will let you push to Google Play (assuming that the keystore associated with the user ID has already been registered through Google Play).
Since the CI process requires building many times before being ready to be release, this chapter shows you how to build the app in debug mode and use the .apk that’s generated to pass it to the CI test automation step.
The Android Build ProcessThe following section contains a quick, high-level architecture overview of the Android app build process. Minor variations might exist in your specific projects.
OverviewUnderstanding the build process and being able to tweak it to suit your requirements is necessary once you have an MVP. I am a big fan of building the thin slice first, although there are many inefficiencies that can exist in the process. Once you see the result, the confidence and optimism will motivate you to go back and optimize the process. This is a good way to keep the stakeholders happy too, because it demonstrates continuous progress. Figure 5-1 shows an overview of the build process.
Figure 5-1. The Android build process

Chapter 5 ■ Build the android app
68
Another Perspective on the Build ProcessConsider another perspective with Gradle, which is a build and packaging tool that drives the build process.
Figure 5-2 shows this build process.
Output of the Build ProcessAfter successfully building the app from the source code, you’ll generally be interested in the .apk file, which is the app ready to be deployed. There are other folders created in the ./app folder inside the project too. Figure 5-3 shows the folder contents for reference.
Figure 5-2. Android build process with Gradle
Figure 5-3. Build output folders

Chapter 5 ■ Build the android app
69
Building from the Command LineYou can build your Android app in two main ways:
• IDEs such as Android Studio and Xamarin have a menu option for building the app once the project is imported.
• Open a shell command and start calling Android build binaries (that are part of the SDK).
■ Note even the ide calls into SdK binaries internally, but it is abstracted from the user, hence it seems easier.
Gradle TasksThe Gradle task that you are interested in here is the one that enables you to build, compile, and output the .apk file. This falls under the category of Gradle tasks viz. build tasks. Figure 5-4 shows the tasks available from the gradle tasks command. Type gradle tasks in the command line and check out the output. It is not necessary to remember all the tasks; however, the more you practice the commands, the easier and faster it gets to script it out.
Figure 5-4. Gradle tasks

Chapter 5 ■ Build the android app
70
The Gradle Clean AssembleDebug TaskThe assembleDebug gradle task follows the build process, as mentioned in the architecture view, and the clean task cleans the build folder in the project.
Figure 5-5 shows how the process would look when building an app with the following command:
gradle clean assembleDebug
A successful build should look like Figure 5-6.
Figure 5-5. Gradle clean assembleDebug
Figure 5-6. assembleDebug is successful

Chapter 5 ■ Build the android app
71
The .apk File in Debug ModeThe output you are interested in is the .apk file, which is generally found in the relative folder path /app/build/outputs/apk.
The debug app is typically named app-debug.apk and found in the folder structure shown in Figure 5-7.
The .apk File in Release ModeThe following command puts the .apk file in app/output/apk/release:
./gradlew assembleRelease
■ Note to build the app in release mode, you need to sign the app in release mode with keystore and private keys, as detailed at https://developer.android.com/studio/publish/app-signing.html.
Figure 5-7. Apk debug file

Chapter 5 ■ Build the android app
72
Building from Android StudioThis section explains how you can build the Android app from Android Studio IDE.
Import the ProjectFigure 5-8 shows a sample Android project imported into Android Studio. You would simply click the Play button to build the Android app.
The Play button will run the last run configuration. To see a list of all configurations, click the App dropdown, as shown in Figure 5-9. Choose Edit Configurations to see the screen in Figure 5-10.
Figure 5-8. Build the Android app in Android Studio
Figure 5-9. Edit Configurations in Android Studio

Chapter 5 ■ Build the android app
73
Feel free to click each of the tabs and customize as needed. This example uses the defaults.
Android Studio ViewsAndroid Studio provides different views for the project viz.
• Project
• Packages
• Scratches
• Android
• Project files
• Problems
• Production
• Tests
Figure 5-10. Edit Configuration screen in Android Studio

Chapter 5 ■ Build the android app
74
The version of Android Studio that is stable and works with the code in this book is illustrated in Figure 5-11.
Project ViewSwitch to the Project view so that you can see the changes as Android Studio builds the project. After you run the build configuration, the /app/build/outputs folder and the *.apk file will appear, as shown in Figure 5-12.
Figure 5-11. About Android Studio

Chapter 5 ■ Build the android app
75
■ Note Since you configured android Studio to use the System Gradle and System android SdK (see the android system setup section in Chapter 4), the resultant output should be the same as that of running it from the command line in the previous section.
Building the Sample AppThis section shows you how to build an app from the source code.
Source CodeThis section shows you how to use an app that’s already out there and very popular. The Sunshine app is used for tutorials, so let’s use it as your candidate.
https://github.com/udacity/Sunshine-Version-2
Figure 5-12. Project view in Android Studio

Chapter 5 ■ Build the android app
76
EnvironmentAssuming that you have set up the Android system environment described in Chapter 4, you’ll see the environment shown in Figure 5-13.
cat /opt/android-sdk-linux/platform-tools/source.properties | grep Pkg.Revisioncat /opt/android-sdk-linux/tools/sources.properties | grep Pkg.Revision
■ Note as mentioned on the git repo, sign up for the weather app key at http://openweathermap.org/appid#use. once you have the key, place it inside the ~/.gradle/gradle.properties file. if the file doesn't exist, create it.
Clone and BuildTo clone and build your sample app, cd into the repo and then run this command:
gradle clean assembleDebug
■ Note You can see a video of this process at https://vimeo.com/154936765.
Eventually, your successful build should look like Figure 5-14.
Figure 5-13. Android build environment

Chapter 5 ■ Build the android app
77
Sample App: app-debug apkThe app-debug.apk sample app is found in the app/build/outputs/apk folder, as shown in Figure 5-15.
At this point, you can install the debug apk by following the instructions in Chapter 6.
■ Note this source code is used only for demonstrating the build process. Be sure to use your own e-mail id to create the api key. You need the proper api key to be able to launch the weather app.
Figure 5-14. The sample app build
Figure 5-15. Sample app debug apk

79© Pradeep Macharla 2017 P. Macharla, Android Continuous Integration, DOI 10.1007/978-1-4842-2796-1_6
CHAPTER 6
Connect Android Target
This chapter builds on Chapter 5, in which you learned how to successfully build an .apk file (either through the debug or release APK). Once the .apk file is ready on your filesystem, you have to ensure that you are connected to the target device/emulator where you intend to deploy the .apk file.
Testing with Emulators versus Real DevicesThere is lots of information online about when to use emulators versus real devices. After working with mobile apps that utilize Android to the fullest extent, I have come to believe that real-device testing provides significantly higher confidence when releasing the app to production.
You can start your app testing on an emulator, but because emulators cannot fully emulate the hardware, platform, and software conditions, your testing will be incomplete without testing on real devices too.
For emulators, AVD (Android Virtual Device) Manager helps create virtual devices.For real devices, you have to purchase and maintain them or lease them from device
clouds.

Chapter 6 ■ ConneCt android target
80
Using the Android EmulatorThe Android Emulator, as the name suggests, emulates an Android device. The utility strives to emulate the mobile hardware components, as well as the gestures (swipe, tap, etc.). You deploy your app into the emulator and then launch and test it as if it were running on a real device.
Features that the emulator cannot imitate are geo-location, actual testing of cell towers, network bandwidth conditions, etc.
For more information about using the Android Emulator, see https://developer.android.com/studio/run/emulator.html.
Hardware AccelerationWhen launching and configuring AVD, enabling hardware virtualization will greatly improve performance. You can enable this setting by choosing Emulated Performance: Graphics on the Verify Configuration page after you create the AVD.
To enable hardware acceleration, choose GPU Emulation: True when configuring the AVD.
Note that GPU Emulation and Snapshot: Enabled are mutually exclusive.The URL mentioned previously has more information and details and explains the
various configurations possible.
Create a New AVDAfter launching the AVD Manager, choose Create Virtual Device to open the screens shown in Figure 6-1.

Chapter 6 ■ ConneCt android target
81
Figure 6-1. Android Virtual Device

Chapter 6 ■ ConneCt android target
82
Sample AVDsI created the sample AVDs shown in Figure 6-2 on my machine for this book. Feel free to name yours as you see fit.
Learning CurveIn the beginning stages, you should experiment with various combinations of AVDs. This will help you
• Understand concepts and solidify your memory about the various configuration parameters available.
• Fathom the breadth and depth of form factors and devices available in the market.
• Give you context on this knowledge, so that during troubleshooting, you can connect the dots and find the root cause faster.
Connecting the Android DeviceThis section gets into the details and steps on how to connect an Android device as the target.
ADB Is Your FriendWhen connecting real devices to an Android build machine for debugging purposes, ADB (Android Debug Bridge) is your friend. ADB was covered briefly in the “Tools to Know - ADB” section in Chapter 4, and it’s explored more in this section.
ADB is a command-line utility included with Google’s Android SDK. ADB can control your device over USB from a computer, copy files back and forth, install and uninstall apps, run shell commands, and more.
Figure 6-2. Sample virtual devices

Chapter 6 ■ ConneCt android target
83
ADB comes with Android SDK and is available in ANDROID_HOME/platform-tools. You can check it by launching android sdk from the command line. On my machine, as you can see, it is already installed. (I make an assumption here that you have Android SDK installed and configured with PATH variables).
You can verify that the Android SDK platform tools are installed by opening the SDK Manager, as shown in Figure 6-3.
Enable USB DebugBefore connecting your real device via USB to the computer, you have to enable the Developer options, since only then will ADB be able to talk to this device.
To access these settings, open the Developer options in the system settings. On Android 4.2 and higher, the Developer options screen is hidden by default. To make it visible, go to Settings ➤ About Phone and click Build Number seven times. Return to the previous screen to find the Developer options at the bottom (see Figure 6-4). For more details about this process, see https://developer.android.com/studio/run/device.html.
Figure 6-3. Android SDK Tools

Chapter 6 ■ ConneCt android target
84
Your version of the image in Figure 6-4 might differ, depending on your device.
Connect the DeviceNow you can connect the device using a USB cable to your computer. Open a command prompt (or shell if you are on a Mac) and type:
adb devices
This command will list all the devices that are connected and have USB debugging enabled.
If all goes well, you should see that your device is recognized, as shown in Figure 6-5.
Troubleshooting TipsSometimes, you might see unauthorized instead of the device listed, as shown in the following code. The reason this generally happens is because of an improper handshake between the device and the Mac. The RSA fingerprint should be generated and the Mac should have the public key. You should see a pop-up on the device to accept the connection. The effect of unauthorized is that any subsequent commands will throw an error, such as the $ADB_VENDOR_KEYS not being set:
[email protected]: $ adb devices List of devices attached 209c6111 [email protected]: $ adb tcpip 5555 error: device unauthorizedThis adbd's $ADB_VENDOR_KEYS is not set; try 'adb kill-server' if that seems wrong. Otherwise check for a confirmation dialog on your device
Figure 6-5. adb devices output
Figure 6-4. USB Debug enable screen

Chapter 6 ■ ConneCt android target
85
To solve this unauthorized problem, delete the files adbkey,adbkey.pub from all of these locations. (It is okay to do this, because the files are generated every time the device is connected if one is not found).
~/.android
~/.AndroidStudioXX/.android
After deleting these files, restart ADB with adb kill-server and then adb start-server. At this point, you should see a pop-up on the device to accept the connection. Click Yes. For full details of this problem, see http://forum.xda-developers.com/verizon-lg-g3/help/unable-to-access-adb-t2830087.
Debugging the WiFiThis section is applicable only if you are interested in exploring with WiFi. As a beginner, a USB wired connection will get you the MVP faster.
It is possible to connect an Android device over WiFi. While the experience is not as smooth as connecting to a USB cable, understanding the fundamentals of networking concepts helps you debug and troubleshoot any connection issues.
I find these two links to be helpful for first timers:
http://codetheory.in/android-debug-bridge-adb-wireless-debugging-over-wi-fi/
https://stackoverflow.com/questions/2604727/how-can-i-connect-to-android-with-adb-over-tcp
ADB Commandsadb commands are quite helpful in this context.
There are many options for adb. Simply type adb in the command line to see the options. A few I tried were:
adb get-serialno adb get-devpath
adb get-state (prints: offline | bootloader | device) adb usb (back to listening on usb)
adb tcp (listen on tcp protocol)

Chapter 6 ■ ConneCt android target
86
All these options can also be seen on the command line by typing adb help, as shown in Figure 6-6.
Connect Over WiFiIf the mobile device and machine are in the same network (the adb client has to communicate with the adb daemon running on mobile devices), then the experience will be much easier. Ensure that both of them are connected to the same WiFi connection before following these steps.
1. Manually discover the IP address of the device by navigating to Settings ➤ About Phone ➤ Status.
2. Auto discover the IP address with the adb shell.... command. Any devices that have adbd (the adb daemon) listening will show up here. (You can also check if the Android debug interface is enabled on your device by going to Settings ➤ Developer Options ➤ Debugging section ➤ Android Debugging.)
C:\Users\pmacharl>adb tcpip 5555
C:\Users\pmacharl>adb devices
List of devices attached
Figure 6-6. ADB help

Chapter 6 ■ ConneCt android target
87
C:\Users\pmacharl>adb connect 192.168.1.141:5555 connected to 192.168.1.141:5555 C:\Users\pmacharl>adb devices
List of devices attached 192.168.1.141:5555 device
C:\Users\pmacharl>adb shell ip -f inet addr show wlan0
wlan0: <BROADCAST,MULTICAST,UP,LOWER_UP> mtu 1500 qdisc mq state UP qlen 1000 inet 192.168.1.141/24 brd 192.168.1.255 scope global wlan0C:\Users\pmacharl>adb usb
restarting in USB mode
C:\Users\pmacharl>adb devices
List of devices attached
You can also choose to make adb listen on another port, such as 4455.As you can see in the following code, first the device was connected to the PC/Mac
in both USB and TCP/IP (network) mode, hence, there were two rows listed. But when I unplugged the USB cable, only the TCP/IP mode was enabled and hence only one row is shown.
C:\Users\pmacharl>adb tcpip 4455
restarting in TCP mode port: 4455
C:\Users\pmacharl>adb shell ip -f inet addr show wlan0
wlan0: <BROADCAST,MULTICAST,UP,LOWER_UP> mtu 1500 qdisc mq state UP qlen 1000 inet 192.168.1.141/24 brd 192.168.1.255 scope global wlan0C:\Users\pmacharl>adb connect 192.168.1.141:5555 unable to connect to 192.168.1.141:5555 C:\Users\pmacharl>adb connect 192.168.1.141:4455 connected to 192.168.1.141:4455 C:\Users\pmacharl>adb devices
List of devices attached 209c6111 device 192.168.1.141:4455 device
C:\Users\pmacharl>adb devices List of devices attached 192.168.1.141:4455 device
Remote Debug ChromeThis section is more useful when you start writing automation scripts and have to identify UI element locators; otherwise, the USB wired connection will help with MVP.
www.allitebooks.com

Chapter 6 ■ ConneCt android target
88
Figure 6-7. Chrome connect
To use remote debugging, you need the following:
• Chrome (version 32) or later installed on your machine
• Android device running Android 4.4+
• USB debugging enabled
• USB cable
Once the basic things are in place, connect your device to the machine using a USB cable. Launch Chrome and open a tab with target chrome://inspect. The Chrome screen should resemble Figure 6-7.

Chapter 6 ■ ConneCt android target
89
Once you click OK, your device will show up in the browser tab, as shown in Figure 6-8.
Figure 6-8. Device connected to Chrome
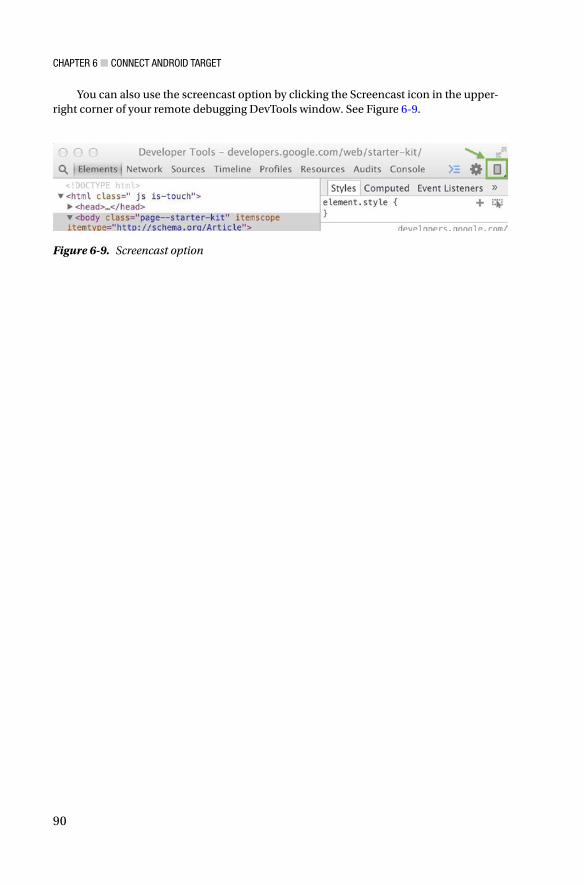
Chapter 6 ■ ConneCt android target
90
You can also use the screencast option by clicking the Screencast icon in the upper-right corner of your remote debugging DevTools window. See Figure 6-9.
Figure 6-9. Screencast option

91© Pradeep Macharla 2017 P. Macharla, Android Continuous Integration, DOI 10.1007/978-1-4842-2796-1_7
CHAPTER 7
Deploy or Install Android App
In Chapters 5 and 6, you learned that the output of the build is the .apk file and the target where you want to install the .apk file has to be connected first. In this chapter, you will learn how to deploy the Android app to the target device that is connected to the Mac.
Connect and Identify the TargetYou can identify the emulators or devices that are connected to the machine using these commands:
Anyones-mac-mini: pmacharl$ adb devices
List of devices attached
emulator-5554 deviceemulator-5556 deviceemulator-5558 device00a219ae09d05912 device
Each line after the List of devices attached line represents either an emulator or a device. Emulator has the word emulator-xx prefixed and the device has a serial number.
Direct Commands to Targetadb can direct commands to a specific target using this syntax:
adb -s <serial_number> <command>
If there is only one device connected, use the -d switch. Similarly, if there is only one emulator connected, use the -e switch.

Chapter 7 ■ Deploy or Install anDroID app
92
To be on the safe side, using the -s switch will ensure that there is only one matched target.
Install on the EmulatorInstall on emulator-5554:
adb -s emulator-5556 install myapp.apk
Install on Real DeviceInstall on device:
adb -s 00a219ae09d05912 install myapp.apk
Command-Line DemonstrationThe commands are shown as follows.
adb –s <device_id> install app-debug.apkadb kill-serveradb start-serveradb devices
Sometimes, if there is too much delay (more than 5 min), you might have to kill adb and start over again. Most of the time, you don’t have to do that, except if you leave the device running for a week or so. That should anyways be handled as part of your mobile device lab set up, where you refresh/reset the adb connections at a certain interval. Figure 7-1 shows the demo.

Chapter 7 ■ Deploy or Install anDroID app
93
Android Studio DemonstrationIf you decided to use Android Studio, click the Run button next to the app icon. The dialog box shown in Figure 7-2 should appear.
Figure 7-1. adb commands demo

Chapter 7 ■ Deploy or Install anDroID app
94
Click OK. You will be able to see the exact commands in the terminal, as shown in Figure 7-3. Copy the .apk file to the /data/* folder in the device and then install the app. Automatically attach the debugger to the running process and so on. The output should look similar to Figure 7-3. You have plenty of information here to munge, like logcat tab, adb log files, and so on.
At this point, you should be able to see activity on your mobile device and the app should be launched with the home activity screen displayed.
Figure 7-3. Installation console
Figure 7-2. Android Studio app installation

95© Pradeep Macharla 2017 P. Macharla, Android Continuous Integration, DOI 10.1007/978-1-4842-2796-1_8
CHAPTER 8
Working with Appium
This chapter covers more about the Appium tool/framework/ library and explains the what, why and how, so that you will be ready to automate the testing in Chapter 9. For detailed information, you can visit Appium's web site at http://appium.io/.
Why Appium?This section explains the reasons behind why Appium is my choice for an automated testing platform. You’ve looked at Appium a little in Chapter 2, and this chapter gets into much more detail.
• WebDriver JSON wire protocol: Appium is designed based on the WebDriver protocol, which is set to become a W3C protocol and aligns with the various frameworks that exist with Selenium.
• Multiple programming languages: Since WebDriver is HTTP over wire, a WebDriver compatible language can work with Appium. Hence, much like Selenium, Appium client libraries exist for Ruby, Java, Python, PHP, JavaScript, and so on. Even with a newer programming language like Go, you have to implement the contract as defined by WebDriver protocol and it works.
• Release app vs. Debug app: While unit testing tests the paths having access to source code, the end user experience has to be tested with a release app build. Appium works on release app builds, which means you’ll have relatively greater confidence in integration and end user test automation scenarios.
• Open source: Since it is open source, there is a huge community supporting and resolving issues. While some might consider this tough initially, open source with crowd sourcing is the way the software world is moving. It makes sense to invest in such technologies that are flexible and put the decision power in the hands of the developer.

Chapter 8 ■ Working With appium
96
Appium ConceptsIn the next few sections, you’ll learn about the fundamental architectural paradigms on which Appium is built. As you read these sections, you might not be surprised to find a strong correlation between Selenium Web Driver Architecture and Appium (i.e., assuming that you are not just a user of Selenium library, but at some point had to dig deep enough into the Selenium source code or its architecture). It is not a prerequisite to understand this analogy, but it will help you when debugging intricate details. (For example, try capturing the remote IP address of the node on which the test is executing.)
Client/Server ArchitectureAppium is at its heart a web server that exposes a REST API. It receives connections from a client, listens for commands, executes those commands on a mobile device, and responds with an HTTP response representing the result of the command execution. The fact that you have a client/server architecture leads to a lot of possibilities. You can write your test code in any language that has a HTTP client API, but it is easier to use one of the Appium client libraries. You can put the server on a different machine than your tests are running on. You can write test code and rely on a cloud services like Sauce Labs to receive and interpret the commands.
SessionAutomation is always performed in the context of a session. Clients initiate a session with a server in ways specific to each library, but they all end up sending a POST /session request to the server, with a JSON object called the “desired capabilities” object. At this point, the server will start the automation session and respond with a session ID, which is used for sending additional commands.
Desired CapabilitiesDesired capabilities are a set of keys and values (i.e., a map or hash) sent to the Appium server to tell it what kind of automation session you’re interested in starting up. There are also various capabilities that can modify the behavior of the server during automation. For example, you might set the platformName capability to Android to tell Appium that you want an Android session. Or you might set the chromeAllowPopups capability to true in order to ensure that, during a Safari automation session, you’re allowed to use JavaScript to open new windows. See the capabilities document for the complete list of capabilities available for Appium.

Chapter 8 ■ Working With appium
97
Appium ServerAppium is a server written in Node.js. It can be built and installed from source or installed directly from NPM.
Appium ClientsThere are client libraries (in Java, Ruby, Python, PHP, JavaScript, and C#) that support Appium’s extensions to the WebDriver protocol. When using Appium, you might want to use these client libraries instead of your regular WebDriver client because the community has already implemented most of the calls. You can view the full list of libraries at https://github.com/appium/appium/blob/master/docs/en/about-appium/appium-clients.md.
Appium.app and Appium.exeThese GUI wrappers around the Appium server can be downloaded. These come bundled with everything required to run the Appium server, so you don’t need to worry about Node. They also come with an Inspector, which enables you to check out the hierarchy of your app. This can come in handy when writing tests.
Appium DesignAppium uses vendor-provided automation frameworks under the hood. That way, you don’t need to compile any Appium-specific or third-party code or frameworks in your app. This means you’re testing the same app you’re shipping. The vendor-provided frameworks are:
• iOS: Apple’s UIAutomation
• Android 4.2+: Google’s UiAutomator
• Android 2.3+: Google’s Instrumentation
Instrumentation support is provided by bundling a separate project, called Selendroid. More information can be found at appium.io.

Chapter 8 ■ Working With appium
98
Figure 8-1. Appium Android architecture
The architecture diagram shown in Figure 8-1 depicts the control flow of the automated test script actions.
1. The left side of the blue dotted line is the users’ concern.
2. The right side of the blue dotted line is abstracted by Appium.
3. The Appium server talks to the necessary native libraries of Android (adb, UI Automator, etc.) and ensures that the commands are passed to the target device/emulator.
4. adb is part of Android SDK and hence the adb server keeps running inside the device and listens to the commands sent by Appium server.
5. On the host machine that the target device is connected to, adb-server communicates with adbd (adb daemon) on either the emulator or on the real device.

Chapter 8 ■ Working With appium
99
6. The Appium server communicates with the adb server through the adb client that comes as part of the Android SDK. (None of this is mentioned in the architecture owing to granular details.)
7. The Appium server also talks to the UI Automator using its internal bootstrap npm module. Prior to Android 4.2, Appium used Selendroid to communicate with the UI Automator. Hence, when you connect to an Android device that’s older (i.e., older than the 4.2 SDK), you have to start the Appium server by specifying --selendroid-port.
Appium AndroidThis chapter shows you how to work with a test automation framework that combines Cucumber, Ruby, and Appium and helps you write automation test cases.
This chapter follows the ATDD (acceptance test driven development) methodology and hence first writes features and scenarios and subsequently writes the code-behind.
AppiumOn the client side, you will use the appium_lib client library and the exposed APIs. It is also possible to use the Selenium WebDriver and create desired capabilities that specify Appium as the WebDriver. Having a background on the WebDriver protocol will greatly help you understand the Appium client library.
Installing the Appium ServerIn this section, you install the Appium server and navigate some screens (the default screens and Android-specific ones).
Download and Install the Appium ServerFollow the instructions on the Appium home page at http://appium.io/. (You can see that it is a Node.js server, and hence you can start the server from the command line. However, to keep it simple initially, I just download the .dmg file and double-click to install and start. Eventually with CI alignment, you will want to go with the Node.js server, though. Click the Launch button.

Chapter 8 ■ Working With appium
100
GUI Start Android ModeFigure 8-2 shows Appium Android mode.
Figure 8-2. Appium Android mode

Chapter 8 ■ Working With appium
101
Some notes about the Appium server:
• The Appium server is started in Android mode (note that the radio button for Android is checked).
• By default, the Appium server listens on port :4723 on all network interfaces (0.0.0.0).
• It is assumed that you have completed the Android System setup section in Chapter 1 (the Android SDK should be available in the PATH, including its Android tools).
• The Appium server version, as you can see, is 1.4.13.
Appium Server ConfigurationNow that you have installed the Appium server, it’s time to learn about the configuration options that Appium provides. I do not go into all the options, but instead focus on the ones that matter to the test automation scripts and the debugging context discussed in this book.
Appium DoctorThe mobile environment set up is a little more complex than the web development environment because of the dependencies on various SDKs, emulator/simulators, and their versions. The permutations and combinations increase and there are often questions that come up for an automation engineer in terms of application compatibility. Such questions include:
• What version of Android SDK is running?
• What versions of emulators/simulators are running?
• What mobile devices are attached?
As you can see, setting up a build environment is dependent on how much clarity you have on these questions. You also need to understand any “backward compatibility” vs. “forward compatibility” issues. Unless you are clear about these issues, you are not sure what you are testing. Sure, you can go ahead and test on the developer’s environment. But that is not guaranteed to be the same on another developer’s machine. Hence, certifying/validating and running the automation tests are heavily dependent on understanding the environment.

Chapter 8 ■ Working With appium
102
Figure 8-3. Appium Doctor
For the Appium environment, these settings are necessary and the Appium server can set most of those values. To be precise, it is always advisable to run the Appium Doctor, which does basic checks on the availability of the Android environment. (Clicking the stethoscope icon will run Appium Doctor from the UI.) See Figure 8-3.

Chapter 8 ■ Working With appium
103
Figure 8-4. Appium developer mode
Developer ModeBecause of the many incompatibilities between items in the tuple (such as OS, platform SDKs, Appium server versions, etc.), you should get comfortable playing and installing multiple Appium server versions. The developer mode enables you to use the Appium source, as shown in Figure 8-4.
In this case, the Appium source was downloaded to /Users/pmacharl/gitprojects/appium.
Server Command LineWhile GUI is one way to start the Appium server, for CI, you need to be able to start the server from the command line. cmd is also necessary so that you can code away the process of starting the server. It’s also important to be able to programmatically (through Bash or PowerShell scripts) kick off the server (such as through a Jenkins CI job).

Chapter 8 ■ Working With appium
104
You can start the command line server by typing appium, as shown in Figure 8-5.
You can also start the command line server from source code.Navigate to ~/appium/bin and type ./appium.js, as shown in Figure 8-6.
Appium Android SettingsAppium server provides many settings for Android. It is beyond the scope of this book to go into each field; however, I want to mention that you can set each of the field values programmatically (which you will see during scripting). Try playing with different settings to get comfortable. See Figure 8-7.
Figure 8-5. Command line start
Figure 8-6. Start Appium from the source code
Figure 8-7. Appium Android settings

Chapter 8 ■ Working With appium
105
The app path can point to an .apk file, for example.Similarly in Advanced settings, you can point the Android SDK to a specific location
instead of the default, which Appium server might look to. This way, you are sure to use only one version of Android SDK and can make updates to that version only. See Figure 8-8.
Figure 8-8. Appium Android Advanced settings

Chapter 8 ■ Working With appium
106
Appium Server SettingsFinally, the Appium server itself has settings that can be changed, as shown in Figure 8-9.
■ Note all of these settings are also available as server arguments and you can access them by typing appium -- help at the command line.
The information you’ve read at this point might seem overwhelming with respect to the number of options available; however, it will become easier once you start coding away all these complexities. That is one of benefits of CI—it helps automate away mundane and repetitive tasks.
Inspecting an AppMuch like how you identify elements of DOM for a web page using Selenium, you follow a similar process for an app. That is, you need to first uniquely identify the locator for an element, before performing an action on it. There are various strategies for that. To get a refresher, check out http://www.seleniumframework.com/basic-tutorial/html-dom/.
Figure 8-9. Appium server settings

Chapter 8 ■ Working With appium
107
Figure 8-10. DOM (document object model)
Most of the UI automation tools and web scrapers have an element identification strategy and knowing it helps you automate actions. It is a good idea to spend some time inspecting your mobile app’s “view” as it gets rendered onto the screen. More importantly, understanding the HTML representation and various attributes will help you write automation scripts faster.
This is very similar to using Chrome’s dev tools (inspect element), Firefox Inspect Element/Firepath/Firebug, or IE Developer tools. While writing web application automation scripts using Selenium, it is essential that you use these developer tools. Figure 8-10 is an illustration.
Appium Ruby ConsoleThe Appium Ruby console (ARC) is a handy tool for quickly looking at the screen HTML. Follow these steps to start using it:
1. Install Ruby 2.0 or higher. Follow the instructions at http://www.seleniumframework.com/basic-tutorial/setup-ruby-and-components/ if you need help. It is a good idea to have RubyMine IDE installed too, as you will use it in the subsequent chapters.
2. Install arc gems.
# Fresh installationgem uninstall -aIx appium_lib ;\gem uninstall -aIx appium_console ;\gem install --no-rdoc --no-ri appium_console bond

Chapter 8 ■ Working With appium
108
For troubleshooting instructions, follow this link at https://github.com/appium/ruby_console.
If you are upgrading, here is what you should expect:
Anyones-Mac-mini:~ pmacharl$ pwd/Users/pmacharlAnyones-Mac-mini:~ pmacharl$ mkdir arc_testsAnyones-Mac-mini:~ pmacharl$ cd arc_tests/Anyones-Mac-mini:arc_tests pmacharl$ arc upgradegem uninstall -aIx appium_lib; gem uninstall -aIx appium_console; gem install --no-rdoc --no-ri appium_consoleUpgrade complete.
3. The ARC configuration file. ARC looks for an appium.txt file, which has key/value pairs as defined by ARC. There are certain key/value pairs expected for Android versus for iOS. Here is an example of how you can get started quickly:
Anyones-Mac-mini:arc_tests pmacharl$ arc versionappium_console: v1.0.4appium_lib: v8.0.1Anyones-Mac-mini:arc_tests pmacharl$ arc setup androidAnyones-Mac-mini:arc_tests pmacharl$ lsappium.txtAnyones-Mac-mini:arc_tests pmacharl$ cat appium.txt[caps]platformName = "android"deviceName = "Nexus 7"app = "./api.apk"appPackage = "io.appium.android.apis"appActivity = ".ApiDemos"[appium_lib]sauce_username = ""sauce_access_key = ""
• The sauce_username and sauce_access_key can be safely ignored until you plan to use Sauce Labs infrastructure for execution.
• Access the appPackage and appActivity values for Android either by talking to the developer of the app or by using the following commands.

Chapter 8 ■ Working With appium
109
Method1There are two ways to look at the app. The first method executes the following code on the command line:
# Returns the package's name, versionCode and so onaapt dump badging app-debug.apk | grep package:\ name
# Returns all launchable activities. Generally the main entry point to app will be named as *.MainActivity (but that may change as per developer's decision) aapt dump badging app-debug.apk | grep launchable-activity
Method2The package name and activity can also be read from the manifest file. You can see the full content of the manifest file by executing the following command. This will output the topology (the metadata and its hierarchy) of your app. The activity that doesn’t have any ParentActivity will be the MainActivity in general. The rest of the activities will have ParentActivity. (An activity is a single screen with the user interface.)
aapt l -a app-debug.apk
■ Note the aapt binary is located in the $ANDROID_HOME/build-tools/x.y.z directory.
For full list of appium.txt capabilities (key/value pairs), see https://github.com/appium/appium/blob/master/docs/en/writing-running-appium/caps.md.
■ Note on android, the deviceName capability is currently ignored.
Inspecting Using ARCUnderstanding the composition of the application from the UI helps you identify the elements and the operations to be performed on them later. This section looks at the app and identifies the HTML elements.

Chapter 8 ■ Working With appium
110
PrerequisitesBefore you start, you need to do the following:
1. Set up an AVD and name it Nexus_4_API_23. The base images are already available with the SDK. See Figure 8-11.
2. Notice that Use Host GPU is selected and Snapshot is not. These two fields are mutually exclusive.
3. The Appium server should be running. If not, start it on the default 4723 port.
Figure 8-11. Set up AVD

Chapter 8 ■ Working With appium
111
The Appium.txt FileUsing the appium.txt configuration file, type arc in the folder that contains appium.txt:
# appium.txt[caps]platformName = "Android"deviceName = "Android"avd = "Nexus_4_API_23"app = ""appPackage = "com.android.settings"appActivity = ".Settings"[appium_lib]sauce_username = ""sauce_access_key = ""
As soon you type arc in the command line, you should see it processing and AVD will be launched. (Patience is a virtue here and AVD's time to launch is based on your machine configuration.)
In the command line, the control returns to ARC (pry), where you can now interact with AVD through appium_lib-provided API calls. See Figure 8-12.
Figure 8-12. Appium Ruby console (ARC)

Chapter 8 ■ Working With appium
112
1. The full list of available commands is found at https://github.com/appium/ruby_console and is always evolving.
2. page_class:
Anyones-Mac-mini:arc_android pmacharl$ arc[1] pry(main)> page_class22x android.widget.LinearLayout10x android.widget.FrameLayout10x android.widget.TextView6x android.view.View6x android.widget.RelativeLayout6x android.widget.ImageView4x android.view.ViewGroup1x android.widget.ScrollView1x hierarchy
3. Source:
[2] pry(main)> source<?xml version="1.0" encoding="UTF-8"?><hierarchy rotation="0"><android.widget.FrameLayout index="0" text="" class="android.widget.FrameLayout"package="com.android.settings" content-desc="" checkable="false" checked="false" clickable="false" enabled="true" focusable="false" focused="false" scrollable="false"long-clickable="false" password="false" selected="false" bounds="[0,0][768,1184]"resource-id="" instance="0"><android.view.ViewGroup index="0" text="" class="android.view.ViewGroup" package="com.android.settings" content-desc="" checkable="false" checked="false" clickable="false"
[3] pry(main)> id('android:id/decor_content_parent')#<Selenium::WebDriver::Element:0x323fca632c4ee948 id="1">
[4] pry(main)> id('android:id/decor_content_parent').methods[[ 0] !() Selenium::WebDriver::Element(BasicObject)[ 1] !=(arg1) Selenium::WebDriver::Element(BasicObject)

Chapter 8 ■ Working With appium
113
[30] pry(main)> xpath('//android.widget.FrameLayout').get_page_class"15x android.widget.FrameLayout\n11x android.widget.LinearLayout\n8x android.widget.TextView\n6x android.view.View\n6x android.widget.ImageView\n1x android.widget.GridLayout\n1x android.widget.ScrollView\n1x android.view.ViewGroup\n1x android.widget.RelativeLayout\n1x hierarchy"
[31] pry(main)> xpath('//android.widget.FrameLayout').get_android_inspect"\nandroid.widget.FrameLayout (1)\n id: com.android.systemui:id/panel_holder\n\nandroid.widget.FrameLayout (2)\n
Finally, if you prefer to use the driver object (the Selenium driver) directly instead of using wrapped methods (like d()used previously), you can access the driver object directly.
driver.textfieldsdriver.find_element(:xpath, "//android.widget.FrameLayout")
The takeaway from this section is that the more practice and comfort you get with the APIs exposed by Appium, the easier it will be to code the same during scripting.
Using uiautomatorviewerIn the chapter that covers uiautomatorviewer, I introduced the tool. Now let’s see how to use it to look at an app.
1. Type uiautomatorviewer in the command line to launch the program ($ANDROID_HOME/platform-tools should be in $PATH).
2. Click the Device Screenshot, uiautomator Dump icon.
3. Select the Android target (avd/device) that uiautomatorviewer should take the XML screenshot from.
4. For AVD, it takes a little bit more time than a real device.

Chapter 8 ■ Working With appium
114
5. After this, you can see the tree hierarchy and use the attributes to further identify elements during automation script writing. See Figure 8-13.
Figure 8-13. Introspecting on the target device

Chapter 8 ■ Working With appium
115
In Figure 8-14, you can identify the element that displays the time in Appium using any of the following locator(s):
id('com.android.systemui:id/clock_view')tag('android.widget.TextView') # Observe that classname is tag in mobile app.
Figure 8-14. Traversing the application DOM

117© Pradeep Macharla 2017 P. Macharla, Android Continuous Integration, DOI 10.1007/978-1-4842-2796-1_9
CHAPTER 9
Test Strategy and Execution
In the previous chapters, you learned how to build and deploy an app on an Android device.
This chapter covers the details of executing automated tests (written in the Cucumber Gherkin framework) against a target device. This is the final step in getting the full feedback on changes introduced in the app.
■ Note We are talking about outside-in tests here. Inside-out, i.e. unit, tests involve only a developer. The goal with CI is to get the maximum value as perceived by the end consumer. Hence, the tests mentioned here are integration/end-end tests.
Continuous Test Automation with CucumberYou can choose any testing framework you like. As an example, I chose Cucumber (with Ruby), because it lets me describe the “what” piece (the features) first. Then I write the “how” layer (the step definitions), i.e. the technical piece, later. In my experience, I feel that this results in good collaboration between multiple roles. If you are a developer and are working in a silo, choose whatever framework fits your needs (JUnit, rspec, testing, et al.). The following links can help you understand the Cucumber basics:
• Why use Cucumber at http://www.seleniumframework.com/cucumber-2/make-a-case/why-cucumber/
• Information about ATDD, BDD, and TDD at http://www.seleniumframework.com/cucumber-2/make-a-case/atdd-tdd-bdd/
• Using continuous test automation at http://www.seleniumframework.com/cucumber-2/make-a-case/continuous-test-automation/
• Learn how Cucumber works at http://www.seleniumframework.com/cucumber-2/make-a-case/how-cucumber-works-2/

CHapTer 9 ■ TesT sTraTegy and exeCuTIon
118
• Installing Cucumber at http://www.seleniumframework.com/cucumber-2/install-cucumber/
• Learn Cucumber’s keywords at http://www.seleniumframework.com/cucumber-2/cucumber-keywords/
• Step definitions at http://www.seleniumframework.com/cucumber-2/step-definitions/
• The basic Ruby tutorial for the web at http://www.seleniumframework.com/introduction/what-is-ruby/
I am not going to explain Cucumber and its fundamentals and will assume that you have a basic understanding and have visited these links.
High-Level MindmapThe high-level explanation of the code you are going to see in the next few sections is as follows:
1. Your Android build process puts the app-debug.apk in the ./features/support/resources folder.
2. Write the Cucumber features.
3. Complete the context code (env.rb and hooks.rb).
4. List your target devices in devices.yaml.
5. List your target emulators in emulators.yaml.
6. Define a module that returns the desired capabilities object (representing the device/emulator) to talk to the Appium server.
7. The default Cucumber profile writes HTML and JSON results.
8. Write tests and tag them so that appPackage and appActivity are defined both for the app to be tested and for the generic settings on the Android device. (The settings needn't be tested in actuality, but we have this example to get started).
Test FrameworkThe test framework used here is based on Cucumber, Ruby, and the Appium_lib gem. Hence, I describe the “what” in features/scenarios and the “how” in the code-behind (step_definitions).
This aligns very well with ATDD (acceptance test-driven development).
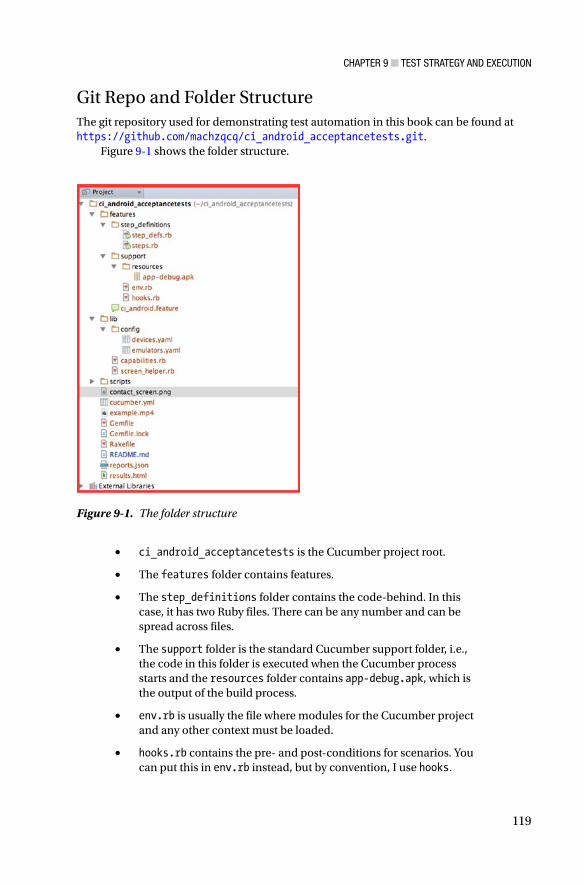
CHapTer 9 ■ TesT sTraTegy and exeCuTIon
119
Git Repo and Folder StructureThe git repository used for demonstrating test automation in this book can be found at https://github.com/machzqcq/ci_android_acceptancetests.git.
Figure 9-1 shows the folder structure.
• ci_android_acceptancetests is the Cucumber project root.
• The features folder contains features.
• The step_definitions folder contains the code-behind. In this case, it has two Ruby files. There can be any number and can be spread across files.
• The support folder is the standard Cucumber support folder, i.e., the code in this folder is executed when the Cucumber process starts and the resources folder contains app-debug.apk, which is the output of the build process.
• env.rb is usually the file where modules for the Cucumber project and any other context must be loaded.
• hooks.rb contains the pre- and post-conditions for scenarios. You can put this in env.rb instead, but by convention, I use hooks.
Figure 9-1. The folder structure

CHapTer 9 ■ TesT sTraTegy and exeCuTIon
120
• ci_android.feature contains the scenarios or tests.
• The lib folder is defined by this framework to store the code that is mixed in. It also contains configuration definitions for devices and emulators.
• devices.yaml contains device definitions.
• emulators.yaml contains emulator definitions.
• capabilities.rb contains the module that returns the desired capabilities object.
• The screen_helper.rb module is for future use to apply page object patterns.
• The scripts folder is to quickly test something before you formalize it in features. It’s not necessary, but it’s helpful for writing quick snippets of code.
• contact_screen.png was a screenshot taken by one of the scenarios.
• cucumber.yml is the configuration file for Cucumber.
• example.mp4 is the screen capture taken when executing the scenario. (See the adb tutorial section on how to take a screen recording).
• Gemfile contains the gems used in this project.
• Gemfile.lock is created when you run bundle install.
• Rakefile is not used at this point, although you can define higher-level tasks.
• README.md contains the readme file for this project.
• reports.json is the JSON-formatted output of Cucumber.
• reports.html is the HTML-formatted output of Cucumber.
Writing the TestsThis section shows you how to write a couple of Cucumber scenarios. Since it is simple English, the scenarios don't need extra explanation.

CHapTer 9 ■ TesT sTraTegy and exeCuTIon
121
Cucumber Scenarios (ci_android.feature)First consider the Cucumber scenario (see Figure 9-2).
Feature: CI AndroidAll screens should launch fine@non-ciScenario: Settings Given I click about phone Then the Android version is a number@ci_smokeScenario: Open ci app and navigate to login screen Given I open login screen on app And I click add contact Then I verify contact screen is displayed@ci_add_contactScenario: Add contact Given I open login screen on app And I click add contact Then I successfully add a contact And verify that it was added@ci_smokeScenario: Take screenshots Given I open login screen on app And I click add contact Then take screenshot of contact form
Figure 9-2. Feature file location in the folder structure

CHapTer 9 ■ TesT sTraTegy and exeCuTIon
122
hooks.rbThe values for appActivity and appPackage were retrieved using the aapt command, as described in Chapter 8.
require './lib/capabilities'include DesiredCapabilitiesBefore('@ci_smoke') docaps = local_capabilities(app='app-debug.apk',appActivity='com.example.android.contactmanager.ContactManager',appPackage='com.example.android.contactmanager')@driver = Appium::Driver.new(caps)Appium.promote_appium_methods AppiumWorldputs "Execute anything before scenario/test case"@driver.start_driverendBefore('@ci_add_contact') docaps = local_capabilities(app='app-debug.apk',appActivity='com.example.android.contactmanager.ContactManager',appPackage='com.example.android.contactmanager')@driver= Appium::Driver.new(caps)Appium.promote_appium_methods AppiumWorldputs "Execute anything before scenario/test case"@driver.start_driverendBefore('@non-ci') docaps = local_capabilities(app='',appActivity='.Settings',appPackage='com.android.settings')@driver = Appium::Driver.new(caps)Appium.promote_appium_methods AppiumWorldputs "Execute anything before scenario/test case"@driver.start_driverendAfter do |scenario|if [email protected]("#{scenario.name}_failed.png")[email protected]_quitputs "Execute anything after scenario/test case"end

CHapTer 9 ■ TesT sTraTegy and exeCuTIon
123
env.rbAs you can see, you create a custom World class, which is used in hooks.rb.
require 'rspec/expectations'require 'appium_lib'require 'cucumber/ast'require 'yaml'require 'active_support/core_ext/hash'# Create a custom World class so we don't pollute `Object` with Appium methodsclass AppiumWorldendWorld doAppiumWorld.newend$devices = YAML.load(File.open('./lib/config/devices.yaml'))$emulators = YAML.load(File.open('./lib/config/emulators.yaml'))
Devices LabMy device lab is shown in Figure 9-3. At this point, there are only three devices; however, you can connect many more by purchasing an USB extension cord.
Figure 9-3. Mini device lab

CHapTer 9 ■ TesT sTraTegy and exeCuTIon
124
You need to start the Appium server(s) on the available network ports to talk to each of these devices. For this example, I execute on only one device.
devices.yamlYou define the devices configuration in a YAML file, as shown in the following code. If you have a new device to be connected, copy and paste the block and then replace the values (serial, name, and port) as needed.
Ensure that you provide a different port for each device.
■ Note This port should be the same value that the appium server starts on (the default appium server port is 4723).
devices:huawei-nexus_6p-84B5T15A17000142:caps:platformName : AndroiddeviceName : huawei-nexus_6p-84B5T15A17000142app: app-debug.apkappActivity : .SettingsappPackage : com.android.settingsappium_lib:sauce_username:sauce_access_key:port: 4768motorola-google-ZX1B222FCD:caps:platformName : AndroiddeviceName : motorola-google-ZX1B222FCDapp: app-debug.apkappActivity : .SettingsappPackage : com.android.settingsappium_lib:sauce_username:sauce_access_key:port: 4778

CHapTer 9 ■ TesT sTraTegy and exeCuTIon
125
emulators.yamlSimilar to the devices, you must also define the emulators’ configuration. You should have already defined the AVDs by this time. See the AVD Manager to learn how to add AVDs.
emulators:Nexus_5_API_23_x86:caps:platformName : AndroiddeviceName : IGNOREDavd : Nexus_5_API_23_x86app: app-debug.apkappActivity : .SettingsappPackage : com.android.settingsappium_lib:sauce_username:sauce_access_key:Nexus_4_API_23_x86:caps:platformName : AndroiddeviceName : IGNOREDavd: Nexus_4_API_23app: app.debug.apkappActivity : .SettingsappPackage : com.android.settingsappium_lib:sauce_username:sauce_access_key:
Capabilities.rbThis file returns the desired capabilities object and is mixed in hooks.rb:
module DesiredCapabilitiesdef local_capabilities(app={},appActivity={},appPackage={})if ENV['DEVICE'].nil? and ENV['EMULATOR'].nil?puts "One of the targets DEVICE or EMULATOR has to be set"puts "Allowed devices: #{$devices['devices'].keys}"puts "Allowed emulators: #{$emulators['emulators'].keys}"exitendif ENV['DEVICE'].nil? || ENV['DEVICE'].empty?puts "Did not specify device target. Assuming emulator is set"caps = $emulators['emulators']["#{ENV['EMULATOR']}"]if app.nil? || app.empty?caps['caps'] = caps['caps'].except('app')

CHapTer 9 ■ TesT sTraTegy and exeCuTIon
126
elsecaps['caps']['app'] = File.join(Dir.pwd,"features/support/resources", app)endcaps['caps']['appActivity'] = appActivitycaps['caps']['appPackage'] = appPackageendif ENV['EMULATOR'].nil? || ENV['EMULATOR'].empty?puts "Did not specify emulator target. Assuming device is set"caps = $devices['devices']["#{ENV['DEVICE']}"]if app.nil? || app.empty?caps['caps'] = caps['caps'].except('app')elsecaps['caps']['app'] = File.join(Dir.pwd,"features/support/resources", app)endcaps['caps']['appActivity'] = appActivitycaps['caps']['appPackage'] = appPackageendcapsendend
ScreenHelper.rb (Not Used)Page object framework enthusiasts can use this module to define page objects using page-factory.
module ScreenHelperdef visit(page_class, &block)on page_class, true, &blockenddef on(page_class, visit=false, &block)page_class = class_from_string(page_class) if page_class.is_a? Stringpage = page_class.new @browser, visitblock.call page if blockpageenddef wait_for_ajax(timeout = 10)timeout.times doreturn true if browser.execute_script('return jQuery.active').to_i == 0sleep(1)endraise Watir::Wait::TimeoutError, "Timeout of #{timeout} seconds exceeded on waiting for Ajax."endprivatedef class_from_string(str)

CHapTer 9 ■ TesT sTraTegy and exeCuTIon
127
str.split('::').inject(Object) do |mod, class_name|mod.const_get(class_name)endendend
Step DefinitionsHere are the step definitions:
Given /^I click about phone$/ doscroll_to('About phone').clickendGiven /^the Android version is a number$/ doandroid_version = 'Android version'scroll_to android_versionview = 'android.widget.TextView'version = xpath(%Q(//#{view}[preceding-sibling::#{view}[@text="#{android_version}"]])).textif !version.match(/\w/).nil? || !version.match(/\d/).nil?puts "Version: #{version} pass"elseputs "Version: #{version} is NOT a word or number"# valid = !version.match(/\d/).nil?end# expect(valid).to eq(true)end
Now step_defs.rb:
Given(/^I open login screen on app$/) doadd_contact = id('com.example.android.contactmanager:id/addContactButton')exists(post_check=30) { add_contact.text == 'Add Contact' } ? puts('Add Contact exists') : puts('App failed to open')endAnd(/^I click add contact$/) doid('com.example.android.contactmanager:id/addContactButton').clickendThen(/^I verify contact screen is displayed$/) doexpect(id('android:id/text1').text).to eql("[email protected]")endThen(/^I successfully add a contact$/) doid('com.example.android.contactmanager:id/contactNameEditText').type "blah"id('com.example.android.contactmanager:id/contactPhoneEditText').type "123-456-7890"

CHapTer 9 ■ TesT sTraTegy and exeCuTIon
128
id('com.example.android.contactmanager:id/contactPhoneTypeSpinner').clicktags('android.widget.CheckedTextView')[2].clickid('com.example.android.contactmanager:id/contactEmailEditText').type "[email protected]"id('com.example.android.contactmanager:id/contactSaveButton').clickendAnd(/^verify that it was added$/) doexpect(id('com.example.android.contactmanager:id/contactEntryText').text).to eql('blah')endThen(/^take screenshot of contact form$/) [email protected]("contact_screen.png")end
Explanation of Key ConceptsThis section explains the key concepts.
• The locators are retrieved through uiautomator or arc or by printing the source. See the section entitled “Introspecting App” to learn about retrieving locators.
• In the step definitions, you must identify the elements, then retrieve the text and assert it against the expected text.
• You also need to perform actions like clicking and setting text by filling in the contact form and verifying that the contact was saved,
• It is also possible to take a screenshot at any point by calling the method on the driver object.
Executing the Test from the Local LabNow that you have written your tests, you can execute them. These examples assume that you connected your devices through USB or WiFi.

CHapTer 9 ■ TesT sTraTegy and exeCuTIon
129
Start the Appium ServerTo start the Appium server, follow these steps:
1. Identify the device using adb devices. (You should have connected the device either through USB or WiFi).
2. Start the Appium server on the port (the same port that was defined for the device in the devices.yaml file) and specify the bootstrap port (must be at least 10 ports apart).
Anyones-Mac-mini:~ pmacharl$ adb devicesList of devices attachedZX1B222FCD deviceAnyones-Mac-mini:~ pmacharl$ appium -p 4778 -bp 4789 -U ZX1B222FCDinfo: Welcome to Appium v1.4.11 (REV 8cf8311f00e59a2b10fde1834fcf6d5ace6fbcd0)info: Appium REST http interface listener started on 0.0.0.0:4778info: [debug] Non-default server args: {"udid":"ZX1B222FCD","port":4778, "bootstrapPort":4789}info: Console LogLevel: debug
Execute the TestThe DEVICE or EMULATOR parameters are mandatory since a target is required to run the test. If none is specified, a validation error is raised. The permissible values are the keys inside the devices.yaml/emulators.yaml file.
• Example 1: DEVICE=motorola-google-ZX1B222FCD
• Example 2: EMULATOR=Nexus_4_API_23_x86
Execute settings scenario on a device:
bundle exec cucumber features/ci_android.feature:5 DEVICE=motorola-google-ZX1B222FCD
Execute open login screen:
bundle exec cucumber features/ci_android.feature:9 DEVICE=motorola-google-ZX1B222FCD
Add contact scenario:
bundle exec cucumber features/ci_android.feature:15 DEVICE=motorola-google-ZX1B222FCD

CHapTer 9 ■ TesT sTraTegy and exeCuTIon
130
Take screenshot scenario:
bundle exec cucumber features/ci_android.feature:21 DEVICE=motorola-google-ZX1B222FCD
Figure 9-4 shows the execution alongside the code.
To see a full video of the execution, visit https://www.youtube.com/watch?v=In9sCFrv-D0&feature=youtu.be.
The device screen is exported and you can see the server and target execution in one screen. That is one of the challenges in demonstrating the automation value on the mobile side. For the web, since the browser launches on the machine itself, it is relatively easier.
Executing the Test from Sauce LabsAs you continue executing tests and attempt to increase the coverage on various devices, form factors become a critical issue. Sure, you can keep buying devices; however, there is not much economy of scale in doing so. Wouldn't it be nice to have that non-core competency of maintaining the devices offloaded to a service provider?
Sure enough, there are many providers out there that do just that, including Sauce Labs, Perfecto Mobile, and ExperiTest. This chapter provides an example of Sauce Labs, because they are aligned with Appium.
Figure 9-4. Execution alongside code

CHapTer 9 ■ TesT sTraTegy and exeCuTIon
131
What Is Sauce Labs?Sauce Labs provides both infrastructure and platform cloud services.
• Infrastructure: Over 700 combinations of browsers and OS platforms. Includes mobile emulators and simulators, as well as real devices.
• Platform: Selenium Grid platform, so that automation tests that talk in the WebDriver protocol can execute tests against the underlying infrastructure.
• User Interface: A nice GUI for manual testing and on-demand availability of browsers, emulators, simulators, and real mobile devices. Sauce Labs’ features cannot be summed up here, but I encourage you to read more about it online.
Running Against Sauce LabsYou can run Sauce Labs on real devices or emulators.
Running on Real DevicesUpload your app to the Sauce storage. Replace the values with your Sauce credentials:
$ curl -u $SAUCE_USERNAME:$SAUCE_ACCESS_KEY -X POST "http://saucelabs.com/rest/v1/stor age/$SAUCE_USERNAME/my_app.zip?overwrite=true" -H "Content-Type: application/octet-str eam" -data-binary @my_app.zip
Now add the real device configuration in devices.yaml. An example is shown in Figure 9-5.

CHapTer 9 ■ TesT sTraTegy and exeCuTIon
132
Feature Files (ci_android.feature)
Here is the feature file:
@ci_add_contact_sauceScenario: Contact on sauce Given I open login screen on app And I click add contact Then I successfully add a contact
Figure 9-5. Sauce Labs configuration in devices.yaml

CHapTer 9 ■ TesT sTraTegy and exeCuTIon
133
Hooks.rb File
Here is the Hooks.rb file:
Before('@ci_add_contact_sauce') do
caps = sauce_capabilities(app='http://saucelabs.com/example_files/app-debug.apk',appActivity='com.example.android.contactmanager.ContactManager',appPackage='com.example.android.contactmanager')
@driver= Appium::Driver.new(caps) Appium.promote_appium_methods AppiumWorld puts "Execute anything before scenario/test case" @driver.start_driverend
Execute the File
Now run it:
bundle exec cucumber features/ci_android.feature:26 DEVICE=saucelabs_samsung_galaxy_s4
Feedback
Once you kick off the execution, you should instantly see a row on the Sauce dashboard that represents the execution session. See Figure 9-6.
Figure 9-6. The Sauce Labs console

CHapTer 9 ■ TesT sTraTegy and exeCuTIon
134
Figure 9-7. Sauce Labs execution results
Figure 9-8. Sauce Labs execution video
When the execution is complete, the results should look like Figure 9-7.
Clicking the execution session row, you can find information that will help you analyze the results (including videos, Appium logs, screenshots, and detailed logs). Figure 9-8 shows the Sauce Labs execution video.

CHapTer 9 ■ TesT sTraTegy and exeCuTIon
135
The results can also be found in the results.html file in the root folder (see Figure 9-9), since the example outputs the HTML results as specified in the cucumber.yaml configuration file.
Running on EmulatorsSince Sauce Labs provides emulators, the difference is the way you construct the desired capabilities object, and therefore replace the values in emulators.yaml. The values can be read from their documentation, found at https://wiki.saucelabs.com/display/DOCS/Platform+Configurator#/.
Parallel Devices AutomationThis section contains a brief description on how to execute tests in parallel across devices.
Executing automated tests in parallel is dependent on any of the following (see Figure 9-10):
• App support of parallel sessions
• Whether the test automation framework can initiate parallel tests
• Whether there are multiple Appium servers, one for each device, with dedicated ports
Figure 9-9. Cucumber results

CHapTer 9 ■ TesT sTraTegy and exeCuTIon
136
Parallel execution also might result in race conditions, so understanding the application domain and call path is extremely important before you can certify parallel tests.
Start Appium Servers on Different PortsHere is the command to start multiple Appium servers. Be sure to open a new shell for each of these Appium servers.
appium -p 4724 -bp 4726 -U EGxxxxxxxxxappium -p 4734 -bp 4736 -U EGxxxxxxxxx
If your target device/emulator has an SDK less than 4.2 or an API level less than 16, Appium uses selendroid. In that case, you have to append --selendroid-port to the previous command (generally stay 10 ports apart, because Appium uses +1 port of -p):
appium -p 4724 -bp 4726 --selendroid-port 4737 -U EGxxxxxxxxxappium -p 4734 -bp 4736 --selendroid-port 4747 -U EGxxxxxxxxx
If you are running Appium from the Appium.exe path, then use:
node appium --nodeconfig path\to\nodeconfig.json -p 4724 -bp 5724
Figure 9-10. Parallel devices execution architecture

CHapTer 9 ■ TesT sTraTegy and exeCuTIon
137
Or if you’re using cmd, use this command:
appium --nodeconfig path\to\nodeconfig1.json -p 4724 -bp 5724
Client SideThis refers to the test automation framework code that can connect to the Appium servers. You must write logic to instantiate the driver session based on the available pool of devices/emulators. In this case, you have to parse the devices.yaml or emulators.yaml file and create a $driver session by connecting to the corresponding port.

139© Pradeep Macharla 2017 P. Macharla, Android Continuous Integration, DOI 10.1007/978-1-4842-2796-1
��������� A, BAcceptance test driven development
(ATDD), 99Amazon Device Lab, 22Android app
deploying/installing, 9installation process, 5
CI tool stack, 8Jenkins, 5–6Nexus, 6–7SonarQube, 7
Mac environment, 4mobile devices, 4network, 4platform, 5testing (automating), 9–10Windows vs. Mac, 3
Android app build process, 9, 67Android Studio, 72
importing the project, 72–73project view, 74–75views, 73–74
command line, 69.apk file in debug mode, 71.apk file in release mode, 71Gradle clean assembleDebug
task, 70Gradle tasks, 69
output, 68overview, 67perspective on, 68sample app, 75
app-debug apk, 77clone and build, 76environment, 76source code, 75
Android Debug Bridge (ADB), 60, 82–83Android device, 82
ADB, 82–83connecting the device, 84enable USB debug, 83–84troubleshooting tips, 84–85
Android Emulator, 80creating new AVD, 80–81hardware acceleration, 80learning curve, 82sample AVDs, 82
Android Espresso, 17Android SDK, 49
quick checks, 51–52standalone SDK, 50–51tools, 59
ADB, 60Android Device Monitor, 65AVD Manager, 62–63record video, 60SDK Manager, 63–64uiautomatorviewer, 61–62
Android Studio, 52associate system SDK, 54–55basics, 53–54demonstration, 93–94with Gradle, 57–58
Android virtual device (AVD) Manager, 79
Appium, 17, 95app, inspecting, 106–107ARC, 107–109ARC, inspecting using, 109–113concepts, 96
Android, 99Appium.app and
Appium.exe, 97
Index

■ INDEX
140
clients, 97client/server architecture, 96design, 97–98desired capabilities, 96server, 97session, 96WebDriver, 99
server, 99download and install, 99GUI start Android
mode, 100–101server configuration, 101
Android settings, 104–105Appium Doctor, 101–102command line, 103–104developer mode, 103server settings, 106
uiautomatorviewer, using, 113–115WebDriver JSON wire protocol, 95
Appium Ruby console (ARC), 107–109inspecting using, 109
appium.txt file, 111–113appium.txt file, 112prerequisites, 110
��������� CChrome, remote debug, 88–90CI tool stack, 8Command-line demonstration, 92–93Continuous delivery, 23Continuous deployment, 23Continuous integration (CI), 1, 23
architecture, 1–2
��������� DDebug app, 95
��������� EEmulators or devices
connecting and identifying the target, 91
direct commands, 91installing on emulator, 92installing on real device, 92
vs. real devices, 79
��������� FFeedback loops, Jenkins, 23
build, 24configuration, 25–28, 30feedback (execution results), 31–33
code quality analysis, 34Sonar, 35–39
test, 40acceptance tests, 40–41, 43–44feedback (execution results), 45–46
��������� GGoogle Device Lab, 22Gradle, 55
Android Studio with, 57–58building app, 59download and install, 56quick commands, 58shell variables, 57tasks, 58–59
��������� H, IHybrid apps, 12
��������� J, K, LJava, 47
JDK on Mac, 48–49JRE vs. JDK vs. SE, 47
Java Development Kit (JDK), 47Java Runtime Environment (JRE), 47Jenkins, 5–6Jenkins tool, feedback loops, 23
build, 24–28, 30–33code quality analysis, 34–39test, 40–41, 43–46
��������� MMinimum viable product (MVP), 1Mobile apps, 11
comparing, 12hybrid apps, 12native apps, 11web apps/HTML5 apps, 12
Mobile devices, 4
Appium (cont.)

■ INDEX
141
Mobile technologies, 10consumers need, 10ecosystems, 10hardware, 11platforms/OS, 11
Mobile test automationlibraries, 17purpose, 17–18WebDriver protocol, 13
mobile automation, 16protocols, 14scaling, 15–16working, 14–15
Mobile test environment, 21local Android Emulator, 22local Android real device, 21manual testing in cloud, 22real devices vs. emulators/simulators, 21
Mobile test strategy, 18cost, 19manual testing vs. automation, 18scaling, 19speed of testing, 19testing pyramid, 19–20
��������� N, ONative apps, 11Nexus, 6–7
��������� P, QParallel devices automation, 135
Appium servers on different ports, 136client side, 137
Perfecto mobile, 22Programming language, 5
��������� RRelease app, 95Remote debug Chrome, 88–90
��������� SSauce Labs, 22SonarQube, 7Standard Edition (SE), 47
��������� T, U, VTest strategy and execution
continuous test automation with Cucumber, 117–118
high-level mindmap, 118local lab, 128
Appium server, 129execute the test, 129–130
parallel devices automation, 135Appium servers on different
ports, 136client side, 137
Sauce labs, 130infrastructure and platform
cloud services, 131running against, 131running on emulators, 135running on real
devices, 131–134test framework, 118
git repo and folder structure, 119–120
writing the tests, 120capabilities.rb, 125–126Cucumber scenario
(ci_android.feature), 121device lab, 123–124devices.yaml, 124emulators.yaml, 125env.rb, 123hooks.rb, 122key concepts, explanation, 128ScreenHelper.rb (not used), 126step definitions, 127–128
��������� W, X, Y, ZWeb apps, 12WebDriver protocol, 13
mobile automation, 16protocols, 14scaling, 15–16working, 14–15
WiFi, debugging, 85ADB commands, 85–86connect over, 86–87