An A3 Network MFP – Copy/Scan/Print User's Manual A3 Network MFP – Copy/Scan/Print User's Manual...
122
An A3 Network MFP – Copy/Scan/Print User's Manual Regulatory model: MT-0904B Avision Inc.
Transcript of An A3 Network MFP – Copy/Scan/Print User's Manual A3 Network MFP – Copy/Scan/Print User's Manual...

An A3 Network MFP – Copy/Scan/Print
User's Manual
Regulatory model: MT-0904B
Avision Inc.

ii
Safety Information
When using this equipment, the following safety precautions should always be followed.
Safety During Operation
In this manual, the following important symbols are used:
WARNING:
Indicates potentially hazardous situations, which if instructions are not followed, could result in death or serious injury.
CAUTION: Indicates a potentially hazardous situation which, if instructions are not followed, may result in minor or moderate injury or damage to property.
Important: Indicates operational requirements and restrictions. Please read and follow these instructions to ensure a proper operation and to avoid damage to the machine.
Note: Indicates further explanation or clarification. Reading this is highly recommended.
WARNING: To avoid hazardous electric shock or fire, do not remove any covers or screws other than those specified in this manual.
CAUTION:
To reduce the risk of fire, use only no.26AWG or larger telecommunication line cord.
Disconnect the power plug by pulling the plug, not the cable.
Do not touch the metal fingers of the ADF pad module. The edges are sharp and touching
them may result in injury.

iii
Precautions
Do not install the equipment near heating or air conditioning units. Do not install the equipment in a humid or dusty place. Place the equipment securely on an even, flat surface. Tilted or uneven surfaces may
cause mechanical or paper-feeding problems. Retain the box and packing materials for shipping purposes.
Notice
Important
Do not make copies of any item for which copying is prohibited by law.
Copying the following items are normally prohibited by the local law:
Bank bills, revenue stamps, bonds, stock certificates, bank drafts, checks, passports, driver's licenses.
This machine is equipped with a function that prevents making counterfeit bank bills. Due to this, images similar to bank bills may not be copied properly.
Copyrights and Trademarks
Ethernet is a registered trademark of Xerox Corporation.
Microsoft, Windows, Windows NT, Windows XP, and Windows Vista are registered trademarks of Microsoft Corporation in the United States and/or other countries.
Other product names used herein are for identification purposes only and may be trademarks of their respective companies. We disclaim any and all rights to those marks.
Warranty
The information contained in this document(s) is subject to change without notice. The manufacturer makes no warranty of any kind with regard to this material, including, but not limited to, the implied warranties of fitness for a particular purpose. The manufacturer shall not be liable for errors contained herein or for incidental or consequential damages in connection with the furnishing, performance, or use of this material.

iv
Federal Communications Commission (FCC) compliance information statement Part 15
The product has been tested and found to comply with the limits for a Class A digital device
pursuant to Part 15 of the FCC Rules. Operation is subject to the following two conditions: (1)
this device may not cause harmful interference and (2) this device must accept any
interference received including interference that may cause undesired operation.
The FCC Class A limits are designed to provide reasonable protection against harmful
interference when the equipment is operated in a commercial environment. This equipment
generates, uses, and can radiate radio frequency energy and, if not installed and used in
accordance with the instruction manual may cause harmful interference in which case the user
will be required to correct the interference at his own expense.
CE Warning
This is a class A product. In a domestic environment this product may cause radio
interference in which case the user may be required to take adequate measures.

v
Table of Contents
1. Getting Started......................................................... 1
Introduction............................................................................................1 Features..................................................................................................1 External View..........................................................................................3 Package Contents....................................................................................5 The Control Panel ....................................................................................6
2. Installing Your Machine.......................................... 11
Unpacking The Product..........................................................................11 Unlocking the Scan Unit ........................................................................12 Removing the Tapes of the Toner Cartridge ...........................................13 Placing The Paper to the Input Trays.....................................................16 Connecting to the Network....................................................................22 Connecting The Power Cable .................................................................23 Turning On The Machine........................................................................24
3. Configuring the Machine......................................... 25
The Navigation Buttons .........................................................................25 Menu Items and Description..................................................................26 Menus Example 1 – Set Manual Tray Paper Size & Orientation ...............33
4. Copying .................................................................. 36
Placing Originals ...................................................................................36 Paper Orientation..................................................................................37 Basic Copy Features ..............................................................................38 Special Copy Features ...........................................................................43
5. Installing the Printer Driver and the Scanner Driver50
System Requirement .............................................................................50 Installing the Printer Driver When the MFP is connected to a Computer With a USB Cable...................................................................................50 Uninstalling the Printer Driver and the Scanner Driver ..........................52 Installing the Printer Driver When the MFP is Connected to Your Computer through A Network Cable ......................................................53
6. Accessing the Printer Driver Properties.................. 56
How To Access the Printer Driver Properties .........................................56 Using the Printer Preferences Dialog Box ..............................................58

vi
7. Scanning.................................................................68
System Requirements ........................................................................... 68 Operating Steps.................................................................................... 68
8. Troubleshooting......................................................83
Clearing A Warning or Error Message.................................................... 83
9. Maintenance ...........................................................88
Cleaning The Glass................................................................................ 88 Replacing a Toner Cartridge.................................................................. 89 Replacing a Fuser ................................................................................. 91
Appendix .....................................................................95
Scanning From The Button.................................................................... 95 Using the MFP Settings ......................................................................... 99 Viewing the Embedded Web page ....................................................... 107 Installing A Duplex Module(Optional) ................................................. 108 Installing Tray 2 (Optional) ................................................................ 111 Specifications ..................................................................................... 113 Index.................................................................................................. 116

1
1. Getting Started
Introduction
Thank you for purchasing the Avision 3-in-1 MFP product. This product is Avision’s
latest innovation which integrates scan, copy, and print functions into one unit which
support document up to A3 size.
Best of all, through the network port at the back of the machine, the product is able
to work as a network printer. Through the LCD screen and easy-to-use control
panel, making copies is easy just as you normally do on a regular copier.
Features
Digital Copying: With the advanced CIS technology, the product is able to perform outstanding copy quality to present photo with various shades of gray. Various Advanced Copy Features The product is designed with various advanced copy features which includes ID card copy, auto rotate to match output paper, paper saver to copy multi-page document onto a single sheet and etc. Duplex Copying With an optional duplex unit, the product allows you to perform duplex copies. Scanning: When the product is connected to a computer, it can be used as a full scanner to capture photos or documents into your computer.
Printing: When the product is connected to a computer through the USB interface, it is able to scan your document and perform printing through your computer.

2
Embedded Web Page: The product provides a convenient way to view the supplies status of printer cartridge, scan count, and copy count to help you maintain the product well. By simply typing the machine's IP address in the URL field of your browser, the product’s embedded web page will be prompted.

3
External View
The Front View
Document Cover
Control Panel
Output Tray
Manual Input Tray
Main Input Tray

4
The Rear View
USB Port
LAN Port
Power Receptacle
Tray 1
Tray 2 (Optional)

5
Package Contents
Main unit
Software CD (Printer Driver, Scanner Driver and Button Manager)
USB Cable
Power Cable

6
The Control Panel
Part A:
Allows you to enter a toner saving mode.
Interrupts a current PC-print job and to do a copy job
first. When the copy is finished, the PC-print job will
continue.
Stops an operation at any time and lets you exit the
menu.
Starts a copy or scan job.
Part A Part B Part C Part D

7
Part B:
Book Mode: Copies two specified pages of a book to two separated pages on the printer output tray.
Auto Rotate: Automatically rotates your document orientation to match with your output paper.
Auto Size: Automatically rescale your document to copy the entire contents on your output paper. None: Uses none of the above functions.
ID Copy: Allows you to copy the front and rear side of your ID card on one side of paper. Paper Saver: Allows you to copy 1, 2, or 4 pages of document into one single sheet of paper.

8
Chooses your copy mode.
Mixed: Suitable for most typed originals.
Photo: Suitable when your original contains photos.
Text: Select to sharpen your text.
Choose your copies to be placed in “Sort” (e.g. pages 1,2,3/1,2,3/1,2,3) order, in “Stack” (e.g. pages 1,1,1/2,2,2/3,3,3) order, or in “Rotate Collate” (e.g. pages 1,2,3/1,2,3 (rotated)/1,2,3/1,2,3 (rotated) )order.
Reduce or enlarge your original.
Lighten or darken your original.
Selects your copy count.
(Pressing the button one time increases one page.)
Selects to load your paper from tray 1, tray 2(optional), or manual tray.

9
Part C:
Press to use the Scan function.
Press to use the Copy function.
Error LED: Turns on when any error unrelated to toner happens.
Toner LED: Turns on when the toner cartridge is empty or blinks when the remaining toner is lower than 20% of the full toner capacity.
LCD Screen: Displays messages on the screen to help you set up and use this product.
Menu Button: Enters Menu Mode.
Scroll Button: Scrolls through the options available for the selected menu item.
Set Button: Confirms the selection on the display.
Back Button: Returns to the previous level of the menu.

10
Part D:
Numeric pad:
Enters a number or alphabetical characters.

11
2. Installing Your Machine
Unpacking The Product
Remove the plastic bag and tapes from the product.

12
Unlocking the Scan Unit
The scan unit is locked during transport to protect the scanning mechanism from being damaged. Be sure to unlock the scan unit by moving the lock switch to the “Unlock” position before using the machine.
Note:
If you need to move the product for repair or any other reason, be sure to lock the product before moving. To lock the product, please do the following, 1. Turn off the product. 2. If the scan unit is not located at the front of the glass, turn on the product.
After the scan unit returns to the front end, turn off the product. 3. Move the lock switch to the “Locked Position”.
Lock position
Unlock position

13
Removing the Tapes of the Toner Cartridge
Important!
When you unpack the machine, a toner cartridge has been included in the printer of this machine. Yet, you need to remove the tape of the toner cartridge before using it. To remove the tape of the toner cartridge,
1. Open the toner cartridge door by pressing the button of the front cover.
Button of the Front Cover

14
2. Remove the toner cartridge from the machine.
Caution!
To prevent damage to the toner cartridge, do not expose it to light for more than a
few minutes.
3. Remove the tapes on the cartridge as shown.
Toner Cartridge
Tapes

15
4. Insert the cartridge back to its place as shown.
5. Close the front cover.
Note:
If toner gets on your clothing or other fabric, wipe off the toner with a dry cloth. Wash the items in cold water and air dry.
Toner Cartridge

16
Placing The Paper to the Input Trays
To insert A4 or Letter-size paper to the main input tray,
1. Fan your paper first.
2. Pull out the main input tray to the end and then lift the input tray to about 30 degrees as indicated to remove the tray from the product.

17
3. Slide the paper guide adjusters to fit the desired paper size.
4. Place the paper in the main input tray.
5. Adjust the paper-size dial to reflect your actual paper size and orientation in the main input tray. Note whenever you have changed your paper size or paper orientation, you have to adjust the paper-size dial at the same time. Otherwise, the machine can not identify your paper size and orientation.
Paper-Size Dial

18
Note:
The choice of paper size and orientation in the paper-size dial includes A4
Landscape, A4 Portrait, A5 Landscape, A3 Portrait, Letter Landscape, Letter
Portrait, and *. If your paper size and orientation is not included in the
paper-size dial, move the dial to the “*” selection.
6. Raise the paper tray to about 30 degrees to insert the tray to the product and then move it to the inside as indicated.

19
To insert A3-size paper,
1. Follow step 2 in the preceding section to remove the paper tray.
2. Move the lock switch of the tray to the “Unlock” position.
7. Move the extension to the end.
Extension

20
8. Move the lock switch back to the “Lock” position.

21
To insert paper to the manual tray,
1. Pull the release button of the front cover. The manual tray will be opened as indicated.
2. Pull the tray extension out and slide the paper guide to fit your paper. Insert the paper to the manual input tray as indicated.
Release Button Manual Tray
Tray Extension Your Paper Paper Guide

22
Connecting to the Network
1. Connect one end of your Ethernet LAN cable to an available port of your
Ethernet Hub.
2. Connect the other end to the LAN port at the back of the product as shown.
Ethernet Cable Optional
Tray 2

23
Connecting The Power Cable
1. Make sure the power switch is at the “0” position.
2. Connect the small end of the power cable to the power jack of your product.
3. Connect the other end to an appropriate power outlet.
Power Cable Optional Tray 2

24
Turning On The Machine
To turn on the product, press the power switch at the bottom toward the "ON" position.
Note:
When the product is not in use, be sure to move the switch toward the "OFF" position to get a zero power consumption state.

25
3. Configuring the Machine
This product is designed to be ready to use with the default settings. However, if
desired, you can change the settings to meet your specific needs. To change the
default settings, press the “menu” button on the control panel. The menu
information will be displayed. The information helps you to make various settings
that fit your needs.
The Navigation Buttons
To navigate the menu items, the Set, Left-arrow, Right-arrow, and Back buttons are provided on the control panel. You can adjust settings (e.g. set the paper size for Tray 1) or view information (e.g. IP address, firmware version).
Typical steps in using the menus are as follows:
1. Press the Menu button to access the menu.
2. Enter menu mode by pressing either the Set button or the Left-arrow or
Right-arrow button and press the latter two repeatedly until the desired menu
is highlighted in the displayed list.
3. Press the Set button to select this menu.
4. Press the Left-arrow or right-arrow buttons repeatedly until the desired item is
highlighted.
5. Press the Set button to select this item. The LCD shows “Settings OK” on the
bottom line.
6. Press the Stop/Cancel button to leave the menu item.

26
Menu Items and Description
Common Setup * Default Settings
Item Description Choice
11. Language The language displays on the LCD panel.
*English, Traditional Chinese, Simplified Chinese
12 Input Tray
Tray 1 The available paper size and orientation on the input tray.
Double Letter (SEF) A3 (SEF) Legal (SEF) Letter (SEF/LEF) A4 (SEF/*LEF) A5 (LEF) B5 (SEF/LEF) B4 (SEF) 8K (SEF) 16K (SEF/LEF)
Tray 2 The available paper size and orientation on the input tray.
Double Letter (SEF) A3 (SEF) Legal (SEF) Letter (SEF/LEF) A4 (SEF/*LEF) A5 (LEF) B5 (SEF/LEF) B4 (SEF) 8K (SEF) 16K (SEF/LEF)
Manual Tray The available paper size and orientation on the manual tray. Note: Please note the duplex module does not work well with small size such as postcard, or passport. Please copy one side at a time.
Double Letter (SEF) A3 (SEF) Legal (SEF) Letter (SEF/LEF) A4 (SEF/*LEF) A5 (SEF/LEF) B5 (SEF/LEF) B4 (SEF) PT (SEF) (Postcard) 8K (SEF) 16K (SEF/LEF)
13. Sleep Mode Choose how long to enter the energy saving mode after your last action.
5Min, *15Min, 30Min, 1Hr, 2Hr, 4Hr

27
14. Output Mode Choose Duplex if a
duplex (two-sided) copy is required and a Duplex unit is installed.
*Simplex, Duplex
15. Duplex Setting Choose the orientation of your duplex printing.
*Booklet, Calendar
Booklet
Calendar
16. Backup Choose ON to enable Backup to automatically save the printing or copying job to a connected computer.
ON, *OFF
17. Recalibration Choose to perform calibration if the scanned image is not satisfactory.
18. Default Mode Choose the default operation mode.
*Copy Mode, Scan Mode
19. Information Choose the view system information.
System Version, S/N
110. Reset Default Press to return to factory default settings.

28
Copy Setup * Default Setting
Item Description Choice
21. Mode Choose your copy mode to enhance text or photo.
*Text, Photo, Mixed
22. Density Choose to lighten or darken your original.
Level 1~6 (*4)
23. Collate Choose ON to place your copies in sort (e.g. pages 1,2,3/1,2,3/1,2,3) orders or OFF in stack (e.g. pages 1,1,1/2,2,2/3,3,3) orders. Note: 1. When Rotate Collate is selected, you need to specify the same paper size in tray 1 and manual tray. 2. Tray 2 can not be selected when Rotate Collate is used.
*OFF, ON, Rotate Collate
Collate
Rotate Collate
24. BG Removal Choose to remove background to sharpen your text. Note: To use this feature, you need to set your copy mode (Text, Mixed, or Photo) on the control panel first.
Text (OFF, *ON), Mixed (OFF, *ON)

29
25. Zoom Choose to rescale your
document. Full Page: Automatically reduce your document to copy the entire page on the output paper. Source to Target: A conveniently way to zoom your original to match your paper size in the input tray. Source means the paper size of your original. Choice: DLT, PT, LT, A5, B5, A4, B4, LG, A3, 8K, 16K, LG. Target which means your current paper size of your input tray will be automatically shown if you have previously set.
*100%, Full Page, Source to Target, Custom(25~400):100%
26. Paper Saver Choose to rescale and combine your document in 2-Up (copy 2 pages in a single sheet) or 4-Up (copy 4 pages in a single sheet). ID Card: Copy the front and rear side of your card in the same side of a single sheet.
*None, 2-Up, 4-Up, ID Card
2-Up
4-Up
ID Card

30
27. Watermark Choose to add
watermark on your document. To use this function, you need to install Button Manager which is included in the printer driver in the supplied CD and connect a computer to this machine. (See Appendix)
*OFF, ON
28. Special Fn Auto Size: Choose to automatically rescale your original to fit the output paper. Auto Rotate: Choose to automatically rotate your document orientation to fit the output paper. Book Mode: Choose Book Mode to delete the bookspine area to improve the copy quality. (See also Book Margin)
*None, Auto Size, Auto Rotate, Book Mode
29. Toner Save Choose to make copy in a toner saving mode.
*OFF/ON
210. Book Margin Set the book margin to be deleted to avoid the shadow at the bookspine area. For example, if you set 18mm, a total of 36 mm (right 18mm, left 15mm) will be cut.
0mm, 3mm, 6mm, 9mm, 12mm, 15mm, 18mm
18 mm 18mm Bookspine margin

31
Report
Item Description
31. Configuration Choose to print the configuration of this machine.
32. Menu Map Choose to print all the menu items and their choices in the LCD screen.
33. Usage Report Choose to print the usage report including scan count, copy count and cartridge information.
Network If this machine needs to serve as a network printer, you need to assign an IP address for the machine on the network. * Default setting
Item Description Choice
41. Enable Choose to enable or disable network.
OFF, *ON
42. TCP/IP
DHCP Choose to use DHCP or assign a static IP.
*ON, OFF
Host Name Enter your host name (this machine’s name).
Static IP
IP Address Enter the IP address of this machine.
Subnet Mask Enter the subnet mask.
Gateway Enter the gateway IP.
WINS Server
Primary Enter the primary IP address of your WINS server.
Secondary Enter the secondary IP address of your WINS server.
DNS Server
Primary Enter the primary IP address of your WINS server.
Secondary Enter the secondary IP address of your WINS server.
IP Infor.
IP Address Press to check the IP address of this machine.
Ethernet
Item Description Choice
Ethernet Choose your network speed.
*Auto, 100M Full, 100M Half, 10M Full, 10M Half

32
Note:
1. DHCP server: With DHCP (Dynamic Host Configuration Protocol), a host can
automatically be given a unique IP address each time it connects to a
network--making IP address management an easier task for network
administrators. If the DHCP server is available from your network, you do not
need to enter TCP/IP, subnet mask, gateway, and DNS information. Instead, this
information will be automatically given for the product.
2. IP Address: An IP (Internet Protocol) address uniquely identifies a host
connection to an IP network. System administrator or network designer assigns
the IP address. The IP address consists of two parts, one identifying the network
and the one identifying your node. The IP address is usually written as four
numbers separated by periods. Each number can be zero to 255. For example,
10.1.30.186 could be an IP address.
3. WINS server: Windows Internet Name Service (WINS) servers dynamically map
IP addresses to computer names (NetBIOS names). This allows users to access
resources by computer name instead of by IP address. If you want this computer
to keep track of the names and IP addresses of other computers in your network,
configure this computer as a WINS server.
4. DNS: Stands for Domain Name System. The DNS server identifies hosts via
names instead of IP addresses. If the DNS server is available on your network,
you can enter the domain name instead of digits for the IP address.
33
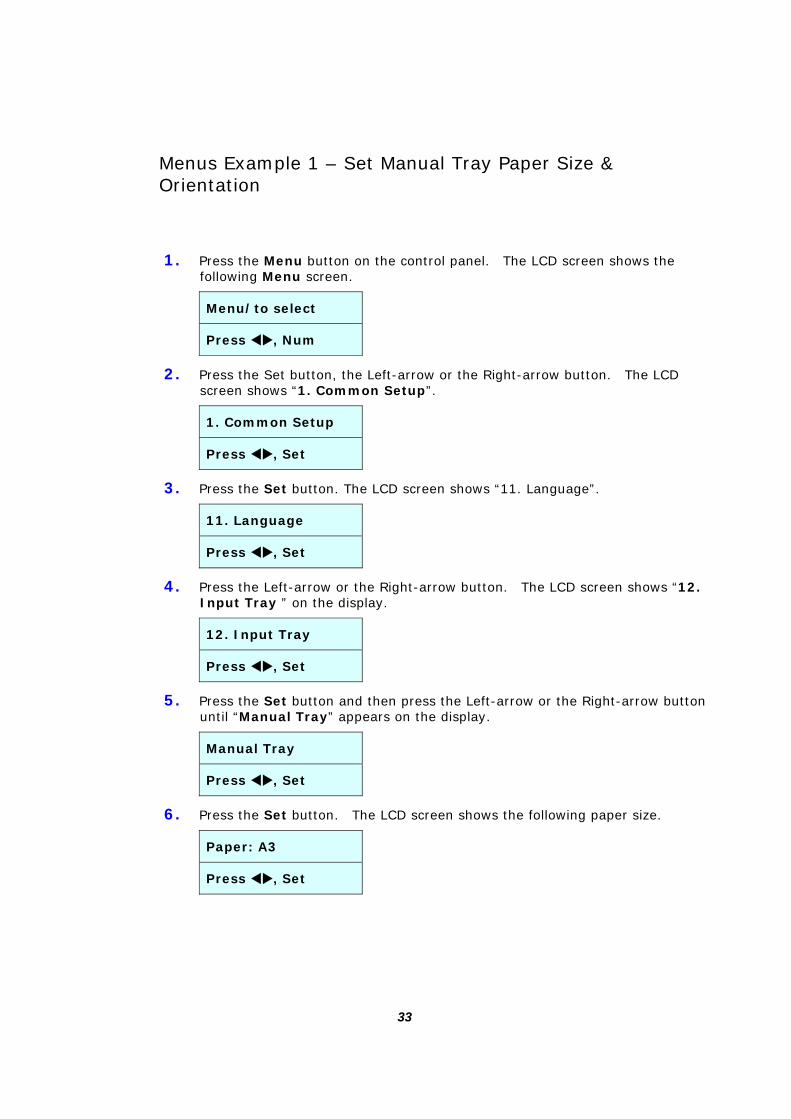
Menus Example 1 – Set Manual Tray Paper Size & Orientation
1. Press the Menu button on the control panel. The LCD screen shows the following Menu screen.
Menu/to select
Press , Num
2. Press the Set button, the Left-arrow or the Right-arrow button. The LCD screen shows “1. Common Setup”.
1. Common Setup
Press , Set
3. Press the Set button. The LCD screen shows “11. Language”.
11. Language
Press , Set
4. Press the Left-arrow or the Right-arrow button. The LCD screen shows “12. Input Tray ” on the display.
12. Input Tray
Press , Set
5. Press the Set button and then press the Left-arrow or the Right-arrow button until “Manual Tray” appears on the display.
Manual Tray
Press , Set
6. Press the Set button. The LCD screen shows the following paper size.
Paper: A3
Press , Set

34
7. Press the Left-arrow or the Right-arrow button repeatedly until your desired paper size appears on the display, for example, PT(Postcard) SEF (Short Edge First).
Paper: PT
Press , Set
8. Press the Set button to confirm the selection. If successfully, the LCD screens will display the “Setting OK” message.
Paper: PT
Setting OK
9. Press the Stop/Cancel button to leave the menu screen and enter the operation mode.

35
Menus Example 2 – Print A Usage Report
1. Press the Menu button on the control panel. The LCD screen shows the following Menu screen.
Menu/to select
Press , Num
2. Press the Set button, the Left-arrow or the Right-arrow button. The LCD screen shows “1. Common Setup”.
1. Common Setup
Press , Set
3. Press the Left-arrow or the Right-arrow button repeatedly until “3. Report ” appears on the display.
3. Report
Press , Set
4. Press the Set button and then press the Right-arrow or Left-arrow button until “33. Usage report” appears on the LCD screen.
33. Usage Report
Press , Set
5. Press the Set button. The Usage Report page will be automatically printed out.
6. Press the Stop/Clear button to leave the menu screen and enter the operation mode.

36
4. Copying
Placing Originals
To place your original on the flatbed glass,
1. Open the document cover.
2. Place the original document with text FACE DOWN on the flatbed glass and align it with the upper-left corner as indicated.
3. Close the document cover.
Upper-left corner
Document Cover
Text FACE DOWN

37
Paper Orientation
Place your A4 or LTR paper vertically on the glass with the text facing down
and align it with the A4 or LTR marks.
If your paper is larger than LTR or A4, for example, LGL or A3, place your
paper horizontally with text facing down and align it with the LGL or A3 marks.
Document Glass
Document Glass

38
Basic Copy Features
Increasing Your Copy Count
To increase your copy count,
1. Place your document on the glass.
2. Press the Copy Count button. The display shows your copy count to
be 2. To increase more count, press the Copy Count button
repeatedly until you desired copy count appears on the LCD display.
Default is 1.
Or
Enter the number of copies by the number keys on the Number Pad.
In either way, the number will be displayed on the LCD screen.
100% A4
2
3. Press the green Start button. Copy is starting.
Adjusting Density
To adjust density,
1. Place your document on the glass.
2. Press the Density button repeatedly until your desired density level appears on the LCD display. (Default is level 3.)
100% A4
1
3. Press the green Start button. Copy is starting.
Copy Count

39
Changing Your Copy Mode
To change your copy mode,
1. Place your document on the glass.
2. Press the Copy Mode button. The selected Copy Mode LED will be lit.
Press the Copy Mode button repeatedly until your desired mode LED is
lit. Default is Mixed mode.
3. Press the green Start button. Copy is starting.
Type of copy mode:
• Mixed: Used for documents mixing with text and graphics. To copy inside pages of a book or magazine, it is recommended to use Mixed mode since a “descreen” function to eliminate the moire patterns commonly found in printed matter is added.
• Photo: Used for the original containing pictures or photographs.
• Text: Used for documents containing mostly text.
Text Mode
Photo Mode
Mixed Mode

40
Collating Your Copies
To collate your copies,
1. Place your document on the glass.
2. Press the Collate button. Default is stack type (e.g. pages 1/1/1, 2/2/2,
3/3/3). The sort type (e.g. pages 1/2/3, 1/2/3, 1/2/3) LED will be lit.
3. Press the green Start button. Copy is starting.
Stack Type
Sort Type
Rescaling Your Copies
To reduce or enlarge your original,
1. Place your document on the glass.
2. Press the Zoom button repeatedly until your desired zoom ratio is
displayed. Default is 100%. Zoom ratio: 25%~400%.
Full Page A4
1
3. Press the green Start button. Copy is starting.

41
Combining Your Document
To combine your documents using Paper Saver,
1. Place your document on the glass. If your original is an ID card, align
your ID card with the ID Card mark.
2. Press the Paper Saver button until the desired paper saver LED is lit.
For example, ID Copy, 2-Up (2-in-1) or 4-Up (4-in-1).
3. When the 1st page is scanned, the screen shows the following message.
Next page: 1
Finish: 2
4. Open document cover. Remove 1st page and insert 2nd page on the
document glass or turn the other side of the ID Card on the glass. Press
1 (Note: The delay time is 30 seconds. If you have not inserted 2nd
page and press the Start button, this machine automatically starts
scanning.)
5. Press 2. Copy is done. If you are using 4-UP, repeat step 4 and 5.
2-Up
4-Up
ID Card Copy
Note:
Making ID card copy using the duplex module may easily cause paperjam. It
is recommended to make ID card copy in simplex mode.

42
Selecting Paper Tray
In normal operation, you do not need to select paper tray. Paper will be copied from the default tray. However, if you wish to use another tray, for example, the manual tray, you can select the paper tray on the control panel. To select paper tray,
1. Place your document on the glass.
2. Press the Input Tray button repeatedly until your desired tray location
LED is lit. Default is tray 1.
3. Press the green Start button. Copy is starting.

43
Special Copy Features
Using the Book Mode
This mode enables you to copy the facing pages in a book or a magazine to separate sheets of paper. To copy facing pages in a book,
1. Press the Special Fn. button repeatedly until the Book Mode LED is
lit. (Default is None.)
2. Place your facing pages FACE DOWN on the glass and align the
bookspine with the bookmark in the center as illustrated.
3. Select the bookspine margin you would like to cut by pressing the
Menu button and select Copy Setup>Book Margin and choose your
ideal margin from a selection of 0mm, 3mm, 6mm, 9mm, 12mm,
15mm, 18mm. Default is 18mm. Selecting 6mm means a total of
12mm (right 6mm, left 6mm) will be cut on the bookspine area to
avoid a possible shadow.
2. Copy Setup
Press , Set
210. Book Margin
Press , Set
4. Press green Start button. The right page is copied first, and the left
page next.
Book Margin (e.g. 6mm)

44
5. If you wish to continue making copies, simply turn next page and press
the Start button to perform next copying. (Note the selected setting
will be saved in 30 seconds. If you have no further action in 30
seconds, all settings return to default. )
Original
Book Mode (two separate pages)
Note:
When using Book Mode, you can not specify the paper size in the input paper
tray to be larger than A4 or Letter such as Legal, Double Letter, B4, 8K, or
A3.
Using Auto Size
This feature allows you to automatically reduce or enlarge your original to fit the output paper from the printer. To use auto size,
1 Place your document FACE DOWN on the glass and align it with the
corresponding mark.
2 Press the Special Fn. button repeatedly until the Auto Size LED is lit.
(Default is None.)
3 Press the green Start button. The copy is starting and your original is
rescaled.
Note: When using Auto Size, only four types of paper sizes such as A4 , A4 , Letter , Letter , Legal, and A3 can be detected.

45
Using Auto Rotate
This feature allows you to automatically rotate the orientation of your original to fit the output paper of the printer. To use auto size,
1 Place your document FACE DOWN on the glass.
2 Press the Special Fn. button repeatedly until the Auto Size LED is lit.
(Default is None.)
3 Press the green Start button. The copy is starting.

46
Using Duplex Mode and Select Binding Orientation
To use duplex mode, you need to purchase and install a duplex module first. To use duplex mode and select binding orientation,
1 Place your original FACE DOWN on the document glass.
2 Press the Menu button on the control panel. The LCD screen shows the following Menu screen.
Menu/to select
Press , Num
3 Press the Set, the Left-arrow or the Right-arrow button. The LCD shows “1. Common Setup”.
1. Common Setup
Press , Set
4 Press the Set button and then the Left-arrow or the Right-arrow button repeatedly until “14. Output Mode” is displayed.
14. Output Mode
Press , Set
5 Press the Set button and then the Left-arrow or the Right-arrow button until Duplex is displayed.
Duplex
Press , Set
6 Press the Set button to choose the selection. If successfully, the LCD shows “Setting OK”.
Duplex
Setting OK
7 Press the Back button and then the Right-arrow or the Left-arrow button repeatedly until “Duplex Setting” is displayed.
15. Duplex Setting
Press , Set

47
8 Press the Set button and then the Right-arrow or the Left-arrow button repeatedly until your desired binding orientation is displayed. For example, Booklet.
Booklet
Press , Set
9 Press the Set button. If successfully, the LCD shows “Setting OK”.
Booklet
Setting OK
10 Press the Stop/Clear button to leave the menu screen and enter the operation mode.
11 Press the green Start button. The copy is starting.

48
Using Background Removal
1. Place your original FACE DOWN on the document glass.
2. Press the Menu button on the control panel. The LCD screen shows the following Menu screen.
Menu/to select
Press , Num
3. Press the Set, the Left-arrow or the Right-arrow button. The LCD shows “1. Common Setup”.
1. Common Setup
Press , Set
4. Press the Left-arrow or the Right-arrow button repeatedly until “Copy Setup” is displayed.
14. Output Mode
Press , Set
5. Press the Set button and then the Left-arrow or the Right-arrow button until “24. BG Removal” is displayed.
24. BG Removal
Press , Set
6. Press the Set button and then the Left-arrow or the Right-arrow button until “Text Mode” is displayed.
Text Mode
Press , Set
7. Press the Set button and then Left-arrow or the Right-arrow button until “ON” is displayed.
ON
Press , Set

49
8. Press the Set button to confirm the selection. If successfully, the LCD displays “Setting OK”.
ON
Setting OK
9. Press the green Start button. The copy is starting and the background color of your original is removed.

50
5. Installing the Printer Driver and the Scanner Driver
If you wish to use the printing and the scan function, you need to install the
printer driver and also the scanner driver. The printer driver and scanner
driver is included in the supplied CD-ROM. Please follow these steps to
complete the installation.
System Requirement
Windows 98/Windows Me/Windows XP/Windows 2003/Windows Vista
Installing the Printer Driver When the MFP is connected to a Computer With a USB Cable
1. Insert the supplied CD into your CD-ROM drive. The installation menu
appears, as shown below.

51
2. Click “Install Scanner Driver and Printer Driver” to install scanner driver, printer driver, and Button Manager in one step.
3. When you finish the installation, connect a USB cable to your product:
a. Connect one end of the USB cable to your computer.
b. Connect the other end to the USB port of your product.
4. Since the product contains two USB devices, one is scanner and the other
is the printer, the computer will prompt the “Found New Hardware” twice to identify the two USB devices. When the following “Found New Hardware” screen appears,click Next and follow the on-screen instruction to complete the installation.
USB Cable
USB Port

52
5. When the other “Found New Hardware” screen appears,click Next and
follow the on-screen instruction to complete the installation.
Uninstalling the Printer Driver and the Scanner Driver
1. Make sure your USB cable is connected to your product.
2. From the “Start” menu, select “All Programs”, the product model, and then “uninstall Driver”.

53
Installing the Printer Driver When the MFP is Connected to Your Computer through A Network Cable
1. Insert the supplied CD into your CD-ROM drive. The installation menu appears, as shown below.
2. Click “Install Scanner Driver and Printer Driver” to install scanner driver, printer driver, and Button Manager in one step.
3. Open the Printers and Faxes window or Printers window.
4. Click Add a printer. This will start the Add Printer Wizard, and then click Next.

54
5. Click Local printer attached to this computer or Local printer, clear the Automatically detect and install my Plug and Play printer check box, and then click Next.
6. Click Create a new port, and then select Standard TCP/IP Port in "Type of port".
7. Click Next to run the Add Standard TCP/IP Printer Port Wizard.
8. Enter the scanner's IP address, and then click Next. For example, 10.1.21.34.

55
9. Choose Avision from the Manufacturer list and AM7000N from the Printers list and click Next and follow the on-screen instructions to complete the driver installation.

56
6. Accessing the Printer Driver Properties
How To Access the Printer Driver Properties
1. Click Start on the system tray and choose Printers and Faxes.
2. Right-click the product’s printer name and choose Preferences.
3. The product’s Printer Properties window appears.
4. Choose Printing Properties to prompt the following printer preferences

57
dialog box.
58
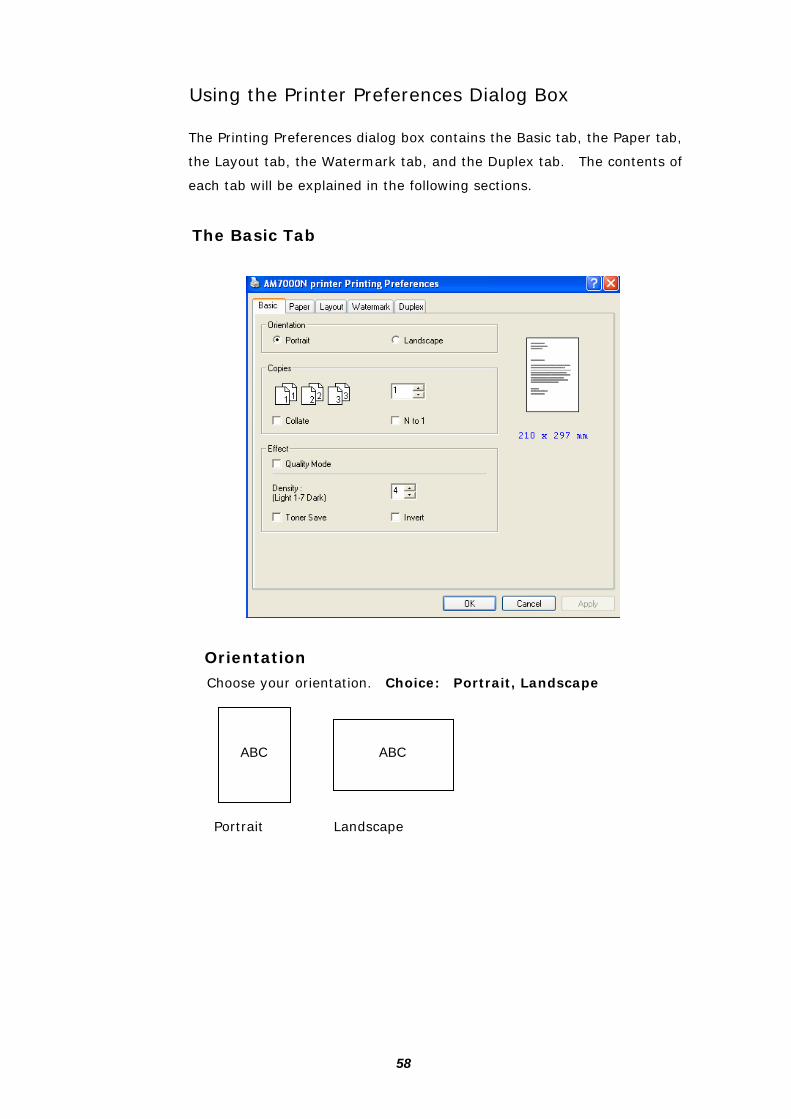
Using the Printer Preferences Dialog Box
The Printing Preferences dialog box contains the Basic tab, the Paper tab,
the Layout tab, the Watermark tab, and the Duplex tab. The contents of
each tab will be explained in the following sections.
The Basic Tab
Orientation
Choose your orientation. Choice: Portrait, Landscape
Portrait
Landscape
ABC ABC

59
Copies
Choose the number of copies to be printed. You can enter up to 999.
Collate: Click to print your document in the page order such as 1/1/1, 2/2/2, 3/3/3.
N to 1: Click to reverse the printing order of your document. As a result, the last page of your document will be printed first and vice versa.
N to 1 (with Collate)
N to 1 (without collate)
Effect
Quality Mode: If the picture in your document does not print clearly, click Quality Mode to improve its quality.
Density: Click to lighten or darken your document. Density level (1~7). Default: 4 (normal)
Toner Save: Allows you to print your document using the toner saving mode.
Invert: Reverses the brightness and the color of the image.

60
The Paper Tab
Paper
Original Size: Choose the size of paper loaded in the designated tray.
Choice: 8K, 16K, A3, B5, A5, Legal, B4, A4, Letter, Postcard
Tray: Choose your desired paper tray.
Choice: Auto, Manual Tray, Main Tray, Tray 2 Auto means automatically select the paper tray which matches the paper size of your document.
Media Type: Choose your media type.
Choice: Plain Paper, Thick Paper, Transparency

61
The Layout Tab
N-up
N-up: Choose number of pages to be printed on a single sheet of paper.
Choice: Off, 2-up(2-in-1), 4-up(4-in-1), 9-up(9-in-1), 16-up(16-in-1)
Border: Choose if you wish to add border for your document.
Choice: None, Border Line, Dashed Line

62
N-up Style:
Choose the style you want when printing multi-page document on a single sheet.
Choice: Horz. Ascending, Horz. Descending, Vert. Ascending, Vert. Descending
Horz. Ascending
Horiz. Descending
Vert. Ascending
Vert. Descending
Output Paper Size
User Define Scale
You can reduce or enlarge your printed image using the Slider Bar. Scaling rate: 25%~400%
Fit to Paper Output the full page of the selected original including the four margins.
Center Print your image in the center of the output paper.

63
The Watermark Tab
The Watermark tab allows you to add some text or image (such as
CONFIDENTIAL, IMPORTANT, DRAFT, etc) for your document.
First Page only Click to print watermark only on the first page
only. Clear the check box will print watermark on all pages.
Text Check and click New/Add to add new text. Click the Edit button to change or the Remove button to delete.
Image Check and click New/Add to add image. Click the Edit button to change or the Remove button to delete. You can choose your image in file format such as BMP, TIFF, or JPEG.

64
The Duplex Tab
Duplex
To print two sides (duplex) of the paper, be sure a duplex unit is installed first.
Duplex Booklet Choose to automatically print two sides of
paper in booklet style.
/
Booklet style
Manual Duplex Choose to manually print both sides of the
paper.

65
Printing both sides of the page (duplex)
To print both sides of the page,
1. Specify your paper orientation in the Basic tab, for example, Portrait.
2. Specify your paper size and input tray in the Paper tab, for example,
A4, and Tray 1.
3. Specify your input tray, paper size and orientation on the LCD panel.
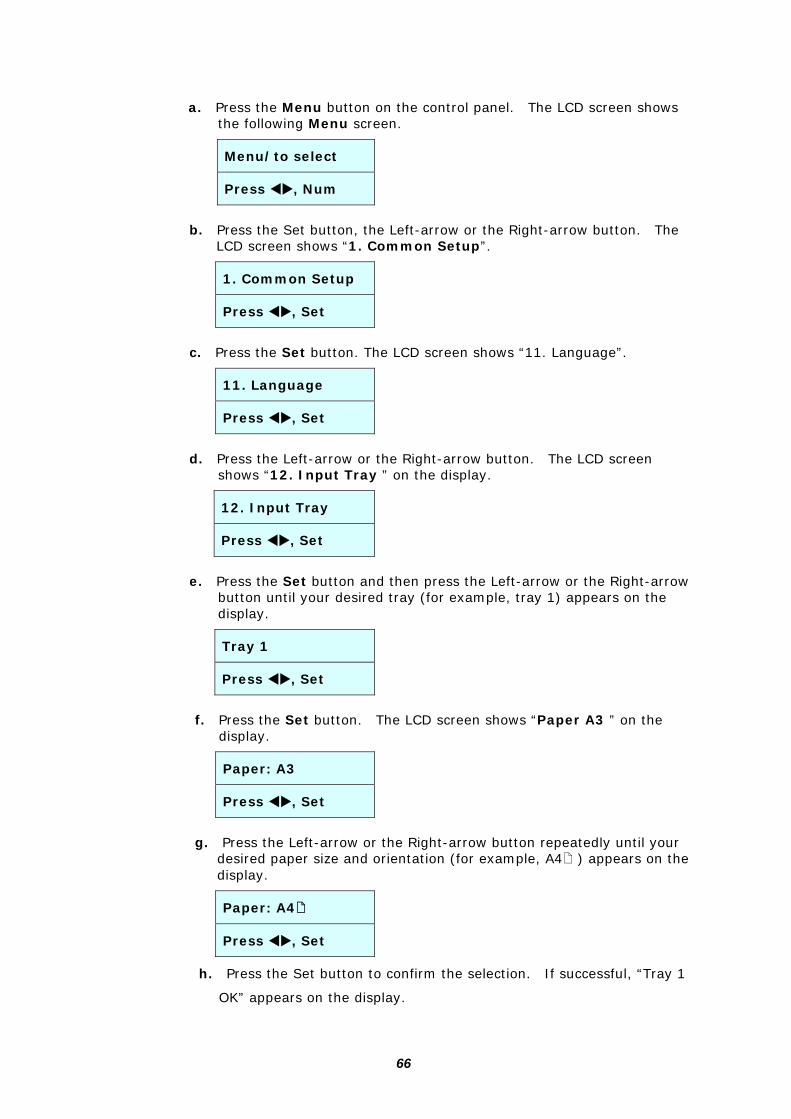
66
a. Press the Menu button on the control panel. The LCD screen shows the following Menu screen.
Menu/to select
Press , Num
b. Press the Set button, the Left-arrow or the Right-arrow button. The LCD screen shows “1. Common Setup”.
1. Common Setup
Press , Set
c. Press the Set button. The LCD screen shows “11. Language”.
11. Language
Press , Set
d. Press the Left-arrow or the Right-arrow button. The LCD screen shows “12. Input Tray ” on the display.
12. Input Tray
Press , Set
e. Press the Set button and then press the Left-arrow or the Right-arrow button until your desired tray (for example, tray 1) appears on the display.
Tray 1
Press , Set
f. Press the Set button. The LCD screen shows “Paper A3 ” on the display.
Paper: A3
Press , Set
g. Press the Left-arrow or the Right-arrow button repeatedly until your desired paper size and orientation (for example, A4 ) appears on the display.
Paper: A4
Press , Set
h. Press the Set button to confirm the selection. If successful, “Tray 1
OK” appears on the display.

67
4. Click OK on the Printer dialog box to start printing.
5. In a second, the odd-numbered pages for side 1 will be printed first, for
example, page 2, page 4, and etc.)
6. Gather the printed page and check the following things:
a. Reload the pages to tray 1 with the printed side UP. (Reload the
pages to manual tray with the printed side DOWN.)
b. The top of the page enters the tray first.
7. Click Continue on the Manual Duplex dialog box on the computer to print
side two.
Manual Tray: Please make the
printed side face DOWN.
Tray 1: Please make the printed
side face UP.

68
7. Scanning After installing the scanner driver and connecting the USB cable to your computer, the product can be used as a full scanner. You can use various scanning features to modify your scanned image.
System Requirements
• IBM compatible PC (Pentium or later);
• Microsoft Windows 2000, Windows XP, Windows Vista
• A USB (universal serial bus) port
• At least 100M bytes of free hard disk space
• At least 128M bytes of system memory
• A VGA monitor
• A CD-ROM drive
Operating Steps
1. Start your image editing application.
2. Pull down the File menu and choose Select Source.
If the Select Source command is not available on the File menu, see your application’s user’s guide to determine how the TWAIN link is used. A dialog box with a list of scanning sources appears.
3. Select the model name of your product.
You need to select the source only once, unless you want o choose another scanner.
4. Place the document FACE DOWN on the document glass.

69
5. Pull down the File menu and choose Acquire.
A dialog box containing scanning features appears.
6. Select the scanning method you want to use on the Scan Method drop-down menu.
7. Select the mode you want to use for your scans on the Image Type drop-down menu.
8. Select a scanning resolution on the Resolution drop-down menu.
9. Select the setting for the scanning features (e.g. Sharpen, Descreen, etc.) that you want to use.
10. Click on Preview or Scan to preview or scan you documents.

70
A Glance Of The User Interface
1. Scan Method Choice: Flatbed.
2. Image Type Choice: Black & White, 8-Bit Gray, 24-Bit Color
3. Resolution Choice: 50, 72, 100, 144, 150, 200, 300, 600 (dpi).
4. Brightness: Adjust the brightness level from –100 to +100.
5. Contrast Adjust the contrast level from –100 to +100.
6. Further Tools Descreen, Sharpen, Color Adjustment, Auto Level, Advanced Settings (From left to right).
7. Invert Reverse the color of your scanned image.
8. Mirror Function Flap your image.
9. Preview Auto Area Resize your scanned area.
10. Paper Size Select your paper size from Card 4”x2.5”, Photo 5”x3.5”, Photo 3.5”x5”, Photo 4”x6”, Photo 6”x4”, A5, B5, A4, Letter, Legal, scanner maximum.
11. Measuring Unit Choice: cm, inch, and pixel.
1 2
3
4
5
6
7
8
9
10
11

71
Using Basic Features
Choosing Scan Method
Choice:
Flatbed: Select this setting if you need to scan a single page from the flatbed.
Selecting Proper Image Type
Black & White Choose B&W if your original contains only B&W text, pencil or ink sketch.
8-bit Gray 8-bit Gray images contain actual shades of gray.
24-bit Color Choose 24-bit Color if you wish to scan a color image.
Black & White Gray
24- bit Color
72
Determining Proper Resolution
A proper resolution reproduces a clear image with good details. The resolution is
measured by dots per inch (dpi).
Adjusting Brightness And Contrast
1. Brightness Adjusts the lightness or darkness of an image. The higher the value, the brighter the image.
2. Contrast Adjusts the range between the darkest and the lightest shades in the image. The higher the contrast, the bigger the different grayscale.
Enlarging Previewed Image
Enlarge your previewed image to the max. of the preview window.
Note this function only enlarging your preview image. This does not enlarge
your real image.
Inverting And Selecting Your Image
The invert command reverses the brightness and the color in the image. For color images, each pixel will be changed into its complementary color at the command of Invert.
Mirror Function
Reverse the right and left side of your image.
Auto Select Image
Automatically set the whole image as your scan area. (Or you may resize the area
by “drag and drop” diagonally.)

73
Enhancing Your Image
1. Descreen
Eliminates the moire patterns* commonly found in printed matter.
2. Sharpen
Sharpen the scanned image.
Before Descreen After Descreen
Before Sharpen
After Sharpen
*Moire pattern: An undesirable pattern in a color printing resulting from incorrect
screen angle of overprinting halftone.
Color Adjustment
Adjusts the color quality of the image so that it comes close to the original. This
function uses default parameters to adjust the image.
Normal
After Color Matching

74
Auto Level
Automatically adjusts the highlight and shadow areas of the scanned image to
optimize your image.
Normal
After Auto Level
Using Advanced Features
The Switch button
1. Click the button to pop up the advanced settings bar at the right side. The advanced settings include Highlight/Shadow, Hue/Saturation/Lightness, Curve, Color Balance, Color Drop-out.
2. The Advanced Settings bar
1 2

75
Adjusting Highlight/Shadow Levels
Highlight refers the lightest point in a scanned image while shadow
refers the darkest point. Using Highlight and Shadow tool together
allows you to extend the range of color and reveal more details in a
gray or color image.
1. Shadow: The darkest point of an image.
2. Gamma: The midtones of the image. 3. Highlight: The lightest point of an image.
4. Pointer: Move the pointer to change the value.
When the value of gamma changes, the image changes accordingly.
Gamma Value: 1.0
Gamma Value: 1.4
Gamma Value: 2.0
1
2 3
4

76
When the value of highlight and shadow change, the image changes
accordingly.
Highlight: 255/Shadow: 0(Normal)
Highlight: 210/Shadow:10
Highlight: 200/Shadow:0
Highlight: 255/Shadow: 50
Adjusting the Brightness Curve
Adjusts the midtones of the image without dramatically altering then lightest and the darkest areas.
When the curve is moved up or down, the image turns brighter or darker.

77
Changing Color Hue/Saturation/Lightness
Improve your image by changing the level of hue/saturation/lightness.
(1). Hue Adjust the hue by moving the triangle to the right or left. (Note the level of intensity for the color will be changed simultaneously when the hue adjustment is made).
(2). Saturation Move the triangle to the right to increase the saturation level or to the left to decrease the level. The level of saturation decides if the color is pale or rich.
(3). Lightness Increase the lightness by moving the triangle to the right or to the left to decrease the lightness.
(1)
(2)
(3)
Move the Saturation pointer to the right, the color turns rich.

78
Using Color Balance
The Color Balance allows you to obtain an optimal image quality.
Move the pointer toward Red, the image turns into a reddish hue.
Move the pointer toward Green, the image turns into a greenish hue.

79
Color Drop-out
Click the button and a dialog box in below will be displayed. This dialog allows you to remove one of the R (Red), G (Green), or B (Blue) color channel. This function is particularly useful when you need to convert text using OCR software. Note that this function supports only black & white and gray image. Therefore, be sure to choose any black & white or gray image type while applying this function.
The effect on image after removing the G channel
The effect on image after removing the R channel.

80
Custom Settings
Click the Custom Settings button to access a dialog box where you can save your scan settings and configuration settings. There are two tabs: Scan Settings and Configuration Settings.
Scan Settings
The Scan Settings tab allows you to save your scanning feature settings in a file, load an existing file, or delete an existing file.
Saving a scan settings file Type a name for your settings in the File Name text box and click the Save button. Your settings will be saved and the file name will appear in the list box.
Using a scan settings file You can use an existing settings file. Right-click the file name for the settings you want to use and click the Load button. The settings in the file will automatically be specified in the scanning features dialog box.
Deleting a scan settings file Right-clicks a file name and press the Delete button the computer keyboard to delete the file. Note you cannot delete the default scan settings file default.av2.

81
Configuration Settings
The Configuration Settings tab allows you to customize some special settings.
Energy Saving Mode—checks the Enable box to enable energy savings. You can
specify a time delay in the Minutes box. Click the Apply button to save the
changes. The default setting is 15 minutes.
Hint Setting—check the Show Hints box if you want to have flags that show the
name of an item appear when you place the mouse cursor on an item in the dialog
box. Click the Apply button to save the changes.

82
Using Other Tools
1. Measuring Unit A reminder of the measuring system in use. By
clicking the button, you can change the measuring unit.
Choice: Inch, cm, Pixel.
2. Paper Size Provide frequently used scan sizes.
Choice: Card 4”x2.5”, Photo 5”x3”, Photo 6”x4”, B5, A5, A4, Letter, and Scanner Maximum.
3. Image Size Display image size for the scanned area.
4. Lock Image Fix your output width and height.
1 2 3 4

83
8. Troubleshooting
Clearing A Warning or Error Message
If a problem occurs during operation, a warning or error message will display on the
LCD panel. In addition, the Error LED will be flashing or solidly lit to indicate a
warning or an error status. To solve the problem, please follow the on-screen
instruction or the following table for more detailed information.
Warning Message
Message Description or Solution
Toner Empty Replace Cartridge
Toner empty.
Replace a new toner cartridge.
Toner Low
Replace Cartridge
Toner remain is lower than 20%. The machine can still perform printing or copying function yet with poor quality.
Fuser Low Replace Fuser
Low fuser temperature. Order and replace a fuser.
Auto Detect Fail
Open & Close Cover
Fails to detect paper size.
Open and close document cover to detect again.
Error LED

84
Warning Message
Message Description or Solution
Book Mode A3
Paper Not Support
When using Book mode, users choose unsupported paper size.
The unsupported paper size includes A3, Legal, B4, Double Letter, and 8K.
Error Message
Message Description or problem solving steps
Service Code
Error: #
An unknown MFP hardware error.
Restart the machine or call service.
Scanner Error
Scanner Module
Error: Code #
Scanner hardware problem.
Restart the machine or call service.
Motor Error
Press #
It is possible that the scanner motor is malfunctioned.
1. Press the “#” button.
2. If the message still display, check motor or call
service to replace the motor.
Scanner Lamp
Error,Press #
It is possible that the scanner lamp is malfunctioned.
1. Press the “#” button.
2. If the message still display, call service to replace
the lamp.
Chassis Lock
Unlock, Press #
The scan unit is locked.
1. Locate the lock switch on the left side of the
document glass and unlock the switch.
2. Press the “#” button. The MFP is ready to use
now.

85
Error Message
Message Description or Problem solving steps
Printer Error
Printer Module
Error: Code #
Printer hardware problem.
Restart the machine or call service.
Duplex Module
Error
Duplex module can not work.
Check duplex module or call service to replace it.
No Duplex
Module
Press # to Abort
No duplex module is installed.
Press # to cancel the duplex job.
Please purchase and install a duplex module. Be sure
to restart the machine again to perform the duplex
job.
No Cartridge
Install Cartridge
No cartridge is installed.
Please install a cartridge.
No Fuser
Install Fuser
No fuser is installed.
Please install a fuser.
Jam at Printer
Open Cover A~E
Printer paper jam.
Remove paper from the indicated positions.
Paperjam at the main unit
Paperjam at the duplex module

86
Error Message
Message Description or Problem solving steps
Printer Error
Paper Mismatch
Press # to Abort
The paper size you have specified does not match with
the paper size in your tray.
Press # to cancel the job.
Cover B Open
Close It
Cover B is open.
Close cover B.
Cover A or C
Close It
Cover A or C open.
Close Cover A or C.
Cover D Open
Close It
Cover of duplex module is open.
Close cover D.
Cover E Open
Close It
Cover of duplex module is open.
Close cover D.
Tray 1 Open
Tray 1 opens.
Close Tray 1.
Tray 2 Open
Tray 2 opens.
Close Tray 2.
Tray 1 Empty
Add Paper
No paper in tray 1.
Please add paper in tray 1.
Tray 2 Empty
Add Paper
No paper in tray 2.
Please add paper in tray 2.
Manual Tray
Empty, Add
Paper
No paper in manual tray.
Please add paper in manual tray.
Watermark Fail
Reset
Watermark
Failed to insert watermark.
Reload the watermark in Button Manager.
Memory Full
Print:1 Abort: 2
Memory full due to too many scan jobs (too many
pages). This error usually occurs when “Auto Collate”
or “Rotate Collate” function has been used.
• Press “1” to print or copy the previously
successful scan job
• Or press “2” to cancel the job. Separate your
documents in a few stacks to complete your job.

87
Error Message
Message Description or Problem solving steps
Network Error
IP Conflict
The same IP address on the network has been found.
Specify another IP address.
Host Name
Conflict
The same host name on the network has been found.
Specify another host name.
No Cable
No network cable has been connected.
Connect a network cable.
DHCP Fail
A wrong DHCP server.
Check with your network administrator for a valid
DHCP server.
Subnet Mask
Error
A wrong subnet mask IP.
Check with your network administrator for a valid
subnet mask IP.
Gateway
Error
A wrong gateway IP.
Check with your network administrator for a valid
gateway IP.
Connect
Speed Setting
Fail
The network speed specified by the machine does not
match with network environment.
Check with your network administrator.
Technical Support
If your problem still exists after trying the above solution, please contact our technical support.
Avision Inc.
No. 20, Creation Road I, Science Park, Hsinchu 300, Taiwan, ROC
TEL: +886 (3) 578-2388 FAX: +886 (3) 577-7017 E-MAIL: [email protected] Web Site: http://www.avision.com

88
9. Maintenance
Cleaning The Glass
The product is designed to be almost maintenance-free. However, it still needs to be cleaned occasionally to ensure optimum image quality and performance.
To clean the glass,
1. Open the document cover as shown below.
2. Dip a soft clean cloth with isopropyl alcohol (95%).
3. Gently wipe the document glass and the white sheet beneath the document cover to remove the dust or any toner particles.
4. Close the document cover. Your machine is now ready to use.
1. Document Cover
2. Document Glass
1
2

89
Replacing a Toner Cartridge
To replace a new toner cartridge,
1. Open the front cover by pressing the release button as shown.
2. Remove the used toner cartridge from the machine.
Caution!
To prevent damage to the toner cartridge, do not expose it to light for more than a
few minutes.
Release Button of the Front Cover
The used Toner Cartridge

90
3. Remove the plastic bag of the new cartridge and remove the tapes as shown.
Important!
Before installing a new toner cartridge, please first remove the tapes of the toner cartridge.
4. Insert the new cartridge to its place as shown.
5. Close the front cover.
Toner Cartridge
Tapes

91
Replacing a Fuser
To remove a current fuser,
1. Open the rear cover by pressing two snap-in buttons as indicated.
2. Remove the rear cover.
Rear Cover
Rear Cover
Snap-in button

92
3. Raise the lock arms at two sides.
4. Pull the fuser out of the machine as illustrated.
Fuser
Fuser
Fuser

93
To install a fuser,
2. Insert the fuser to its original position at the back of the machine as illustrated.
2. Press down the lock arms at both sides as illustrated.
Press down the lock arm
Fuser

94
3. Insert the rear cover back to its original position and press pin inwardly as
illustrated.
4. Close the rear cover as illustrated.
Pin
Rear Cover

95
Appendix
Scanning From The Button
By simply pressing the Start button on the product, the product allows you to scan a
document and send the scanned image to a designated destination application. Yet,
before you scan, it is recommended to set up the button configurations first to
ensure a proper file format and a destination application.
Setting Up The Button Configurations Before Scanning
1. After the scanner driver has been successfully installed on your computer, the Button Panel will be displayed in the Windows System Tray at the bottom right corner of your computer screen.
The Button Panel
The Button Icon
This indicates the product model
The Function Icon

96
2. The Button Panel shows the first three scanning buttons. Right-click any button (function) you wish to set up, the Button Properties window appears.
The default settings are indicated in highlighted color. If you wish to change the
setting, use this window to reset the setting for the file format, destination
application, or other scan settings. See “Configuring the Button” in the subsequent
section to reset the settings.
3. Click the OK button to leave the window.
Note:
If the Button Panel has not been displayed in the Windows System Tray after
restarting your computer, please just turn off and on your product. The Button icon
will then be displayed on the right corner of the Windows System Tray.
Click to select options or setting. The button
number and name.
The file format of the scanned image.
The scan settings for the selected button. (in this case button #1).
The destination application. (This is the application that opens after you have finished scanning.)

97
Scanning From A Touch Of The Start Button
1. Place the original document face down on the flatbed glass and align it in the upper-left corner.
2. Press the Scan button to enter scan mode.
3. The LCD screen displays the following Scan To message. Press the arrow buttons to select your desired destination application, for example, Microsoft Paint.
Scan To 3-Paint
Press , Start
4. Press Start on the product to start scanning.
5. After the scanning is finished, the designated application will be launched and the scanned image appears in the main window of the designated application (For example, Microsoft Paint) as below.

98
Accessing System Information
If you encounter an error message and can not solve the problem, you can send a
report.txt file to your nearest service center for quick trouble shooting. To send the
report.txt file, please follow these steps.
1. Right-click the button icon ( ) on the right bottom of your screen. A pop-up screen appears.
2. Click “About” to prompt the Information dialog box.
3. Click the Report button. A report.txt file (C:\Button_Report.txt) will be
generated and displayed on the screen. Please send this file to the nearest service center for a quick trouble shooting.

99
Using the MFP Settings
In addition to providing scan and quick link to your application, the embedded Button
Manager also allows you to configure more MFP settings including adding watermark
on your copies, storing temperate copy jobs, and updating firmware.
To use the MFP Settings,
1. Right-click the button icon ( ) on the right bottom of your screen. Select the MFP Settings while a pop-up screen appears.
2. The MFP Setting dialog box appears. Access the watermark, backup , or the firmware function by choosing the corresponding tab.

100
Adding Watermark on Your Document
Before using this function, you need to enable watermark by pressing the Menu
button and then choose “2. Copy Setup” >“27 Watermark” >“ON” on the LCD
screen.
Adding An Image Watermark
To add a picture to your copied documents as watermark,
1. Select the Image Watermark option, and your desired picture path from the
Browse button.
2. Save your desired picture path by choosing one of the custom options, and click
the Save button.
3. If you wish to load the image to MFP, click the Load watermark to MFP button.
After completing loading the image, an Update Successfully message will
display on the screen.
4. Click the OK button to save all settings.

101
Adding A Text Watermark
To add a text to your copied documents as watermark,
1. Select the Text Watermark option, type a text in the text field of Text, and then
select your desired font or style from each of the dropdown lists.
2. Save your text watermark by choosing one of the custom options and then click
the Save button.
3. If you wish to load the text to MFP, click the Load watermark to MFP button.
After completing loading the text, an Update Successfully message will
display on the screen.
4. Click the OK button to save all settings.
Angle The Angle dropdown list allows you to choose your text angle.
Size The Size dropdown list allows you to choose your text size.
Density The Density dropdown list allows you to choose your text density.
Preview The Preview dropdown list allows you to view your text watermark.
102
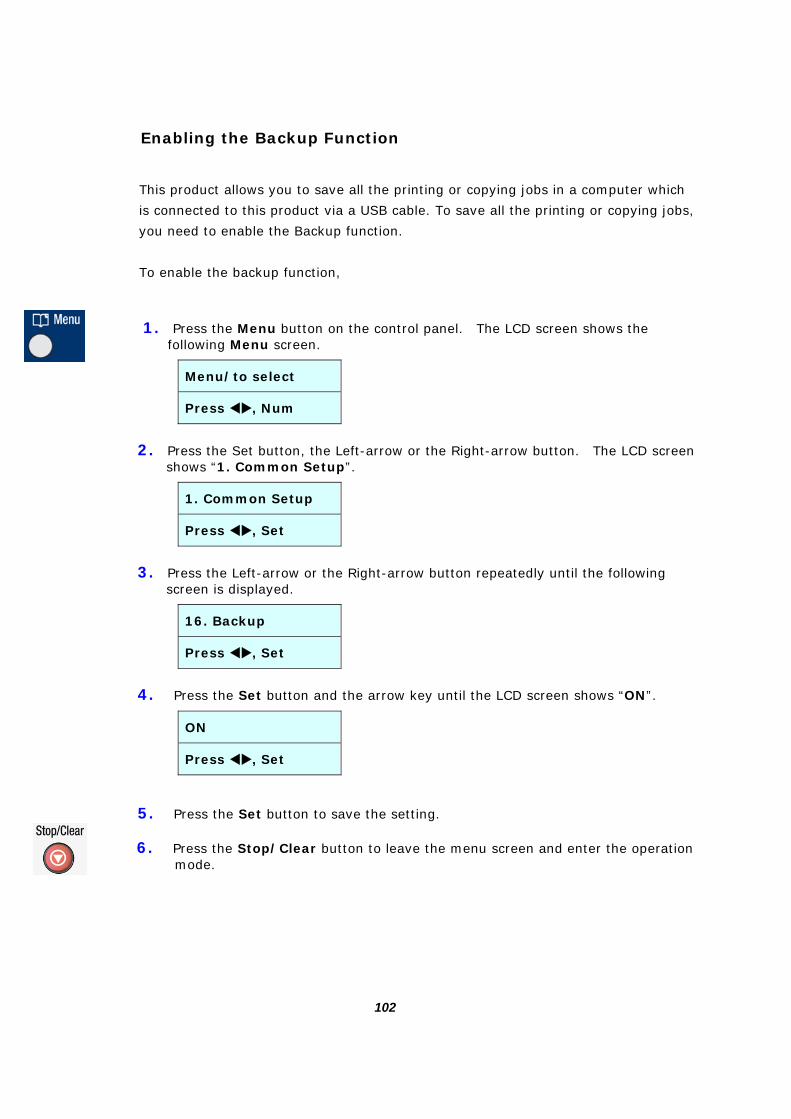
Enabling the Backup Function
This product allows you to save all the printing or copying jobs in a computer which
is connected to this product via a USB cable. To save all the printing or copying jobs,
you need to enable the Backup function.
To enable the backup function,
1. Press the Menu button on the control panel. The LCD screen shows the following Menu screen.
Menu/to select
Press , Num
2. Press the Set button, the Left-arrow or the Right-arrow button. The LCD screen shows “1. Common Setup”.
1. Common Setup
Press , Set
3. Press the Left-arrow or the Right-arrow button repeatedly until the following screen is displayed.
16. Backup
Press , Set
4. Press the Set button and the arrow key until the LCD screen shows “ON”.
ON
Press , Set
5. Press the Set button to save the setting.
6. Press the Stop/Clear button to leave the menu screen and enter the operation mode.

103
Specifying the Backup Path
After the Backup function has been enabled on the LCD panel, please follows these
steps to specify your desired file path.
To specify your file path,
1. On The MFP Setting dialog box, click the Backup tab to prompt the following
Backup screen.
2. Click the Browse button to select your path.
3. Choose your desired file format from the File Format dropdown list box. The
choice includes PDF, BMP, and TIFF.
4. Type your preferred prefix of a file name. A full saved file name is composed of
the prefix you give, the year, the month, the date, a dash symbol, the hour, the
minute, the second.
5. If you wish to return to factory default setting, click the Default button.

104
Updating Firmware
You can upload the product’s firmware into the product by clicking the Firmware tab.
Yet before updating the firmware, make sure the latest firmware is available from
your computer.
1. On the MFP Setting screen, choose the Firmware tab.
2. Choose Firmware and click Browse to select your firmware file.
3. Click Upload to upload the firmware to the product. After completing, an
Update Successfully message will display on the screen.
4. Turn off the MFP and then turn it on again.
5. Click OK to save all settings.

105
Loading and Printing a Demo Page
This machine allows you to upload your desired demo page to the MFP.
To upload a demo page,
1. On the MFP Setting screen, choose the Firmware tab.
2. Choose Demo Page and click Browse to select your file.
3. Click Upload to upload the demo page to the product. After completing, an
Update Successfully message will display on the screen.
4. Turn off the MFP and then turn it on again.
5. Click OK to save all settings.

106
To print a demo page,
The condition to print a demo page is as follows:
• Paper tray has to be set in tray 1.
• Paper size has to be specified as A4 LEF.
To print a demo page,
When the machine is in ready mode, press and hold the “Back” button for 3 seconds.
The demo page will be automatically printed.

107
Viewing the Embedded Web page
The embedded website allows you to remotely watch the supplies status of this
machine.
To view the embedded website,
1. Start your browser, Microsoft I.E. 5.0 or higher, or Netscape Communicator 6.0
or higher, or Mozilla Firefox.
2. Type IP address of the product in the URL field. For example, http://10.1.30.83 The product’s embedded webpage appears as shown below.
3. Click Usage Report to prompt the following Usage Report page.

108
Installing A Duplex Module(Optional)
To install a duplex module, follow these steps:
Important!
To install a duplex module, please first turn off this machine by pressing the power
switch to “OFF” at the front of machine.
1. Open the rear cover by pressing two snap-in buttons as indicated.
Rear Cover
Snap-in button

109
2. Remove the rear cover.
3. Align the front of the duplex module to the tracks on both sides and insert
the duplex module to the machine as shown.
Track
Duplex Module
Rear Cover

110
To remove a duplex module, use the following steps:
1. Press the release button to pull the duplex module as indicated.
2. Gently remove the duplex module and press two mortise locks as indicated.
Mortise Lock
Release Button

111
Installing Tray 2 (Optional)
1. Place tray 2 on a proper platform.
2. Lift up the MFP machine with two personnel. Each person hold one side of the
machine as indicated.
Two sticks on Tray 2
MFP
Holes underneath the MFP
Tray 2

112
3. Align and insert two sticks on tray 2 to the holes underneath the MFP machine.
4. The installation of tray 2 is completed as shown.
Tray 2
Tray 2

113
Specifications
All specifications are subject to change without notice.
General
Type 3-in-1 MFP
Functions Copier-Printer-Scanner-Network
CPU 366MHz ARM1136 (build in SOC)
Flash memory 4MB
RAM 256MB
Dimension (WxDxH) 579mm x 534mm x 570mm
Weight 27Kg
Warm up time 15 seconds or less
LCM 16 X 2 graphic type LCD
Connectivity Hi-speed USB 2.0 (Device/Host)/ RJ-45
Operation temperature 10°C to 35 °C
Storage temperature -40°C ~65°C
Current Consumption 100~127Vac, 9A
220~240Vac, 4.5A
Copier Functions
Copy size A3, Legal, Letter, A4 ,A5, B4(ISO), B5(ISO), 8K,
16K, Postcard, LGL
Max scanning size A3
Copy resolution 600 x 600dpi
Copy speed (1 to
many)
28ppm (A4 LEF)
Copy count up to 999, Auto Reset to 1
Zoom 25 ~ 400%
First copy output time
(FCOT)
7 seconds or less
N-up copy 2 in1 / 4 in 1 / ID card
Copy mode Text / Photo / Mixed
Auto size detection Yes (LTR , LTR ,A4 , A4 , LGL , A3 )
Duplex Copy Optional

114
Laser Printer Function
Printing method Mono Laser
Printing speed 28 ppm printing (A4 LEF)
Max print size 297mm X 420mm
Min print size 90mm X 148mm
Resolution 600 x 600dpi
Max paper capacity 250 (tray 1)
500 (tray 2, optional
100 (manual tray)
PDLs/Emulations GDI - Standard
First print out time 7 seconds or less
N-up print 2 to 16
Edge erase 4.23mm (top, bottom, left, right)
Scaling 25 ~ 400%
Duplex print Optional
Tray 2 Optional
Storage print No
Security print No
Network print Yes
Scanner Function
Scanner type Flatbed/CIS type, Color/BW
Max scanning size A3
Optical resolution 600 x 600 dpi
Enhanced resolution 1200dpi
Scan resolution
Text - 600 x 300 dpi
Fine Text - 600 x 600 dpi
Photo - 600 x 300 dpi
Mix - FB: 600x600dpi
Scanning bit depth
Color - 24bit
Gray - 8bit
B/W - 1bit
File format Color - JPEG, PDF (JPEG), BMP
B/W - TIFF, PDF

115
Consumables(option)
Toner(regular/Max) 6000/15,000 pages
Scanner life 100K scan or 5 years
Printer life (A4 LEF 3P/J Note 2 Power on time taken as: 8
hours x 22 days x 60 months = 10,560 hours)
Humidity
Operating
Environment
15%~85% RPH
Storage /
Transportation
Environment
10%~90% RPH

116
Index
Auto Level ........................................ 74
Auto Select....................................... 72
Brightness........................................ 72
BRIGHTNESS AND CONTRAST............... 72
BRIGHTNESS CURVE ........................... 76
Button Properties window..................... 96
COLLATING YOUR COPIES .................... 40
Color Adjustment ............................. 73
COLOR BALANCE................................. 78
COLOR DROP-OUT............................... 79
COMBINING YOUR DOCUMENT.............. 41
Contrast ........................................... 72
COPY MODE
Mixed, Photo, Text............................ 39
Custom Settings
Scan Settings, Configuration Settings.. 80
DENSITY............................................ 38
Descreen.......................................... 73
DHCP server....................................... 32
Digital Copying................................... 1
DNS .................................................. 32
Duplex
duplex booklet, manual duplex ........... 64
Duplex Module...................................108
ENLARGING PREVIEWED IMAGE............ 72
Ethernet Hub ...................................... 22
Gamma............................................. 75
Highlight ............................................ 75
Hue .................................................. 77
IMAGE TYPE
Black & White, Halftone, Gray Color .... 71
INVERT.............................................. 72
IP Address.......................................... 32
LAN................................................... 22
Lightness ......................................... 77
MIRROR FUNCTION ............................. 72
Moire pattern ................................... 73
Printer Properties ................................ 56
RESCALING YOUR COPIES .................... 40
RESOLUTION ...................................... 72
Saturation ........................................ 77
SCAN METHOD
Flatbed ........................................... 71
Select Source ................................... 68
SELECTING PAPER TRAY....................... 42
Shadow ............................................. 75
Sharpen ........................................... 73
Watermark ......................................... 63
WINS server....................................... 32