Amplified Cordless Telephone with Bluetooth and … · Amplified Cordless Telephone with Bluetooth...
112
Operating Instructions Amplified Cordless Telephone with Bluetooth and Digital Answering Machine Model No. KX-TGM430 Before initial use, see “Getting Started” on page 13. Thank you for purchasing a Panasonic product. Please read these operating instructions before using the unit and save them for future reference. Consulte “Guía Rápida Española”, página 94. For assistance, visit our Web site: http://shop.panasonic.com/support for customers in the U.S.A. Please register your product: http://shop.panasonic.com/support TGM43x(en)_0426_ver031.pdf 1 2016/04/26 10:55:15
Transcript of Amplified Cordless Telephone with Bluetooth and … · Amplified Cordless Telephone with Bluetooth...
Operating InstructionsAmplified Cordless Telephone with Bluetooth and Digital Answering Machine
Model No. KX-TGM430
Before initial use, see “Getting Started”on page 13.
Thank you for purchasing a Panasonic product.Please read these operating instructions before using the unit and save them forfuture reference.
Consulte “Guía Rápida Española”, página 94.
For assistance, visit our Web site: http://shop.panasonic.com/support forcustomers in the U.S.A.
Please register your product: http://shop.panasonic.com/support
TGM43x(en)_0426_ver031.pdf 1 2016/04/26 10:55:15
IntroductionAccessory information ............4Graphical symbols for use onequipment and theirdescriptions ............................7Important InformationFor your safety .......................8Important safetyinstructions ...........................10For best performance ...........10Other information ..................11Specifications .......................12Getting StartedSetting up .............................13Controls ................................18Display icons/Indicators ........21Language settings ................23Date and time .......................24Recording your greetingmessage ...............................24Other settings .......................25AccessibilityAccessibility ..........................26Tone control .........................26Volume booster ....................27Speech booster (making yourvoice louder) .........................29Talking keypad andphonebook ............................29Key tones .............................30Message indicator ................30Slow talk ...............................31Using assistive listeningdevices .................................32
Link to CellLink to cell feature ................34Pairing a cellular phone ........34Link to cell settings ...............35Making/Answering CallsMaking cellular calls .............38Making landline calls ............39Answering calls ....................39Useful features during acall ........................................40Intercom ...............................43Call BlockCall block ..............................45Storing unwanted callers ......45PhonebookPhonebook ...........................47Memory dial ..........................49ProgrammingMenu list ...............................51Alarm ....................................60Silent mode ..........................61Other programming ..............61Registering a unit .................62Caller ID ServiceUsing Caller ID service .........63Caller list ...............................63Using Bluetooth® DevicesCopying phonebook from acellular phone (phonebooktransfer) ................................66Link to Cell app .....................67Text message (SMS) alert ....68
2
Table of Contents
TGM43x(en)_0426_ver031.pdf 2 2016/04/26 10:55:17

Alert settings for your DECTphone ...................................68Using a Bluetooth headset(optional) ..............................69Answering System forLandlineAnswering system forlandline .................................71Turning the answering systemon/off ....................................71Greeting message ................71Listening to messages ..........72Advanced new messagealerting features ....................74Remote operation .................75Answering system settings ...76Useful InformationVoicemail service forlandline .................................78Wall mounting .......................79Error messages ....................81Troubleshooting ....................82FCC and other information ...91Guía Rápida EspañolaGuía Rápida Española .........94AppendixCustomer services ..............107Limited Warranty (ONLY FORU.S.A.) ................................108IndexIndex....................................110
3
Table of Contents
TGM43x(en)_0426_ver031.pdf 3 2016/04/26 10:55:17
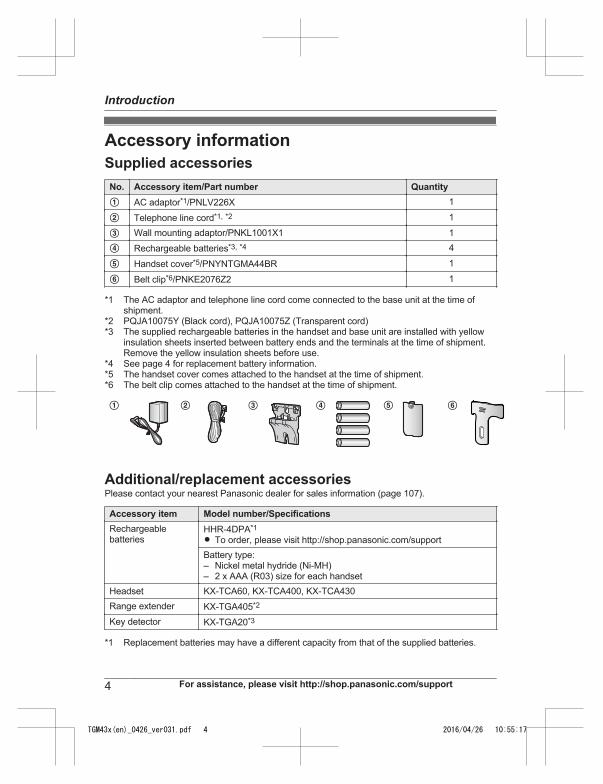
Accessory informationSupplied accessoriesNo. Accessory item/Part number QuantityA AC adaptor*1/PNLV226X 1
B Telephone line cord*1, *2 1
C Wall mounting adaptor/PNKL1001X1 1D Rechargeable batteries*3, *4 4
E Handset cover*5/PNYNTGMA44BR 1
F Belt clip*6/PNKE2076Z2 1
*1 The AC adaptor and telephone line cord come connected to the base unit at the time ofshipment.
*2 PQJA10075Y (Black cord), PQJA10075Z (Transparent cord)*3 The supplied rechargeable batteries in the handset and base unit are installed with yellow
insulation sheets inserted between battery ends and the terminals at the time of shipment.Remove the yellow insulation sheets before use.
*4 See page 4 for replacement battery information.*5 The handset cover comes attached to the handset at the time of shipment.*6 The belt clip comes attached to the handset at the time of shipment.
A B C D E F
Additional/replacement accessoriesPlease contact your nearest Panasonic dealer for sales information (page 107).
Accessory item Model number/SpecificationsRechargeablebatteries
HHR-4DPA*1
R To order, please visit http://shop.panasonic.com/supportBattery type:– Nickel metal hydride (Ni-MH)– 2 x AAA (R03) size for each handset
Headset KX-TCA60, KX-TCA400, KX-TCA430Range extender KX-TGA405*2
Key detector KX-TGA20*3
*1 Replacement batteries may have a different capacity from that of the supplied batteries.
4 For assistance, please visit http://shop.panasonic.com/support
Introduction
TGM43x(en)_0426_ver031.pdf 4 2016/04/26 10:55:17
*2 By installing this unit, you can extend the range of your phone system to include areaswhere reception was previously not available. This product can be purchased online. Pleasevisit our Web site: http://shop.panasonic.com/support
*3 By registering the key detector (4 max.) to a Panasonic Digital Cordless Phone andattaching it to an easy-to-lose item in advance, you can locate and find the mislaid item towhich the key detector is attached. Please visit our Web site:http://www.panasonic.com/tga20
Other informationR Design and specifications are subject to change without notice.R The illustrations in these instructions may vary slightly from the actual product.
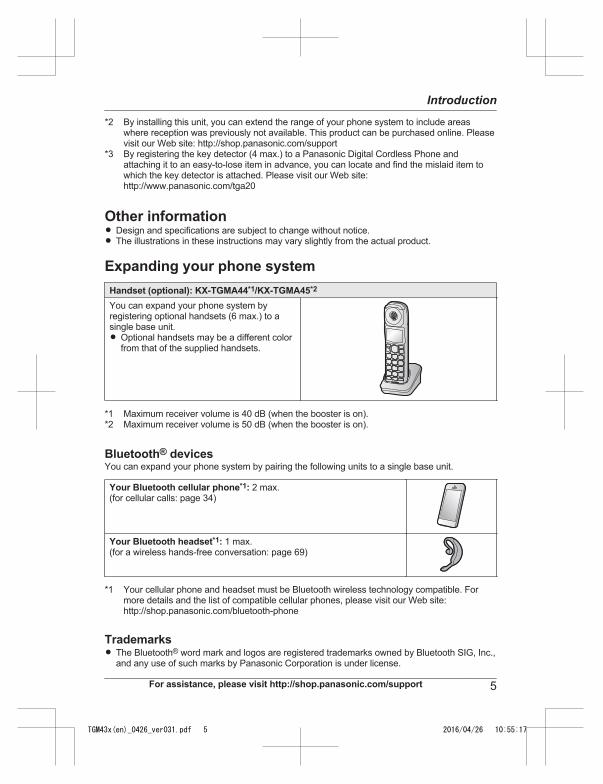
Expanding your phone systemHandset (optional): KX-TGMA44*1/KX-TGMA45*2
You can expand your phone system byregistering optional handsets (6 max.) to asingle base unit.R Optional handsets may be a different color
from that of the supplied handsets.
*1 Maximum receiver volume is 40 dB (when the booster is on).*2 Maximum receiver volume is 50 dB (when the booster is on).
Bluetooth® devicesYou can expand your phone system by pairing the following units to a single base unit.
Your Bluetooth cellular phone*1: 2 max.(for cellular calls: page 34)
Your Bluetooth headset*1: 1 max.(for a wireless hands-free conversation: page 69)
*1 Your cellular phone and headset must be Bluetooth wireless technology compatible. Formore details and the list of compatible cellular phones, please visit our Web site:http://shop.panasonic.com/bluetooth-phone
TrademarksR The Bluetooth® word mark and logos are registered trademarks owned by Bluetooth SIG, Inc.,
and any use of such marks by Panasonic Corporation is under license.
For assistance, please visit http://shop.panasonic.com/support 5
Introduction
TGM43x(en)_0426_ver031.pdf 5 2016/04/26 10:55:17
R iPhone is a registered trademark of Apple Inc.R Android is a trademark of Google Inc.R Gmail, Google Calendar are trademarks of Google Inc.R Facebook is trademark of Facebook, Inc.R Twitter is trademark of Twitter Inc.R Instagram is trademark of Instagram, Inc.R BlackBerry® is owned by Research In Motion Limited and is registered in the United States
and may be pending or registered in other countries. Panasonic is not endorsed, sponsored,affiliated with or otherwise authorized by Research In Motion Limited.
R All other trademarks identified herein are the property of their respective owners.
6 For assistance, please visit http://shop.panasonic.com/support
Introduction
TGM43x(en)_0426_ver031.pdf 6 2016/04/26 10:55:17
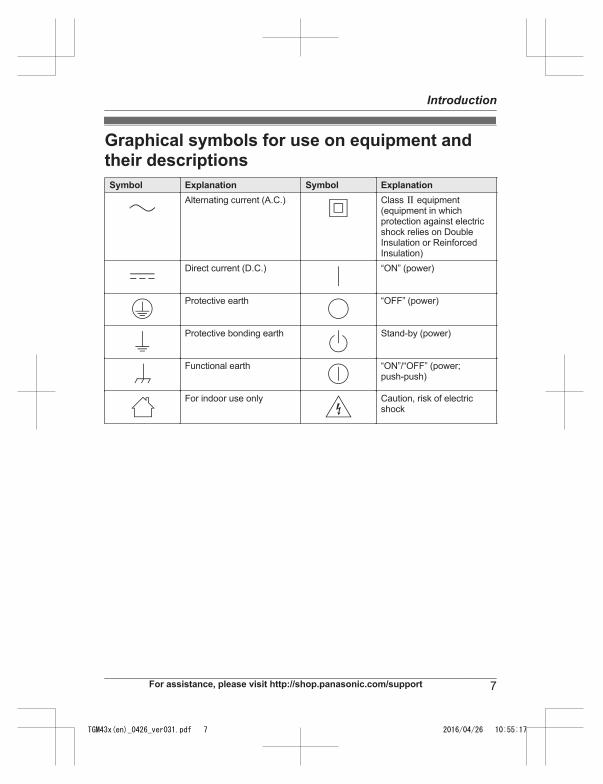
Graphical symbols for use on equipment andtheir descriptionsSymbol Explanation Symbol Explanation
Alternating current (A.C.) Class P equipment(equipment in whichprotection against electricshock relies on DoubleInsulation or ReinforcedInsulation)
Direct current (D.C.) “ON” (power)
Protective earth “OFF” (power)
Protective bonding earth Stand-by (power)
Functional earth “ON”/“OFF” (power;push-push)
For indoor use only Caution, risk of electricshock
For assistance, please visit http://shop.panasonic.com/support 7
Introduction
TGM43x(en)_0426_ver031.pdf 7 2016/04/26 10:55:17
For your safetyTo prevent severe injury and loss of life/property, read this section carefully before using theproduct to ensure proper and safe operation of your product.
WARNING
Power connectionR Use only the power source marked on the product.R Do not overload power outlets and extension cords. This can result in the risk of fire or electric
shock.R Completely insert the AC adaptor/power plug into the power outlet. Failure to do so may cause
electric shock and/or excessive heat resulting in a fire.R Regularly remove any dust, etc. from the AC adaptor/power plug by pulling it from the power
outlet, then wiping with a dry cloth. Accumulated dust may cause an insulation defect frommoisture, etc. resulting in a fire.
R Unplug the product from power outlets if it emits smoke, an abnormal smell, or makes anunusual noise. These conditions can cause fire or electric shock. Confirm that smoke hasstopped emitting and contact us at http://shop.panasonic.com/support
R Unplug from power outlets and never touch the inside of the product if its casing has beenbroken open.
R Never touch the plug with wet hands. Danger of electric shock exists.
InstallationR To prevent the risk of fire or electrical shock, do not expose the product to rain or any type of
moisture.R Do not place or use this product near automatically controlled devices such as automatic
doors and fire alarms. Radio waves emitted from this product may cause such devices tomalfunction resulting in an accident.
R Do not allow the AC adaptor or telephone line cord to be excessively pulled, bent or placedunder heavy objects.
Operating safeguardsR Unplug the product from power outlets before cleaning. Do not use liquid or aerosol cleaners.R Do not disassemble the product.R Do not spill liquids (detergents, cleansers, etc.) onto the telephone line cord plug, or allow it to
become wet at all. This may cause a fire. If the telephone line cord plug becomes wet,immediately pull it from the telephone wall jack, and do not use.
R To prevent hearing damage, make sure anyone who uses this product is aware that theproduct can produce very loud sounds, and make sure children use this product only underadult supervision.
R To prevent hearing damage, we recommend that you set this product to the lowest volumesetting at which you can hear adequately. Note that when the BOOST indicator is lit in red, thevolume booster feature is enabled and the product may emit sounds at very high volume.
R Avoid prolonged exposure to loud sounds produced by this product. Be aware that the loudera sound is, the less time is needed to cause hearing damage. In the event that you experiencehearing discomfort, consult a medical professional.
8 For assistance, please visit http://shop.panasonic.com/support
Important Information
TGM43x(en)_0426_ver031.pdf 8 2016/04/26 10:55:17
MedicalR Consult the manufacturer of any personal medical devices, such as pacemakers or hearing
aids, to determine if they are adequately shielded from external RF (radio frequency) energy.(The product operates in the frequency range of 1.92 GHz to 1.93 GHz, and the RFtransmission power is 115 mW (max.).)
R Do not use the product in health care facilities if any regulations posted in the area instruct younot to do so. Hospitals or health care facilities may be using equipment that could be sensitiveto external RF energy.
CAUTION
Installation and locationR Never install telephone wiring during an electrical storm.R Never install telephone line jacks in wet locations unless the jack is specifically designed for
wet locations.R Never touch uninsulated telephone wires or terminals unless the telephone line has been
disconnected at the network interface.R Use caution when installing or modifying telephone lines.R The AC adaptor is used as the main disconnect device. Ensure that the AC outlet is installed
near the product and is easily accessible.R This product is unable to make calls when:
– the handset batteries need recharging or have failed.– there is a power failure.
Ni-MH rechargeable batteries (supplied)R We recommend using the batteries noted on page 4. USE ONLY rechargeable Ni-MH
batteries AAA (R03) size.R Do not mix old and new batteries.R Do not open or mutilate the batteries. Released electrolyte from the batteries is corrosive and
may cause burns or injury to the eyes or skin. The electrolyte is toxic and may be harmful ifswallowed.
R Exercise care when handling the batteries. Do not allow conductive materials such as rings,bracelets, or keys to touch the batteries, otherwise a short circuit may cause the batteries and/or the conductive material to overheat and cause burns.
R Charge the batteries provided with or identified for use with this product only, in accordancewith the instructions and limitations specified in this manual.
R Only use a compatible base unit (or charger) to charge the batteries. Do not tamper with thebase unit (or charger). Failure to follow these instructions may cause the batteries to swell orexplode.
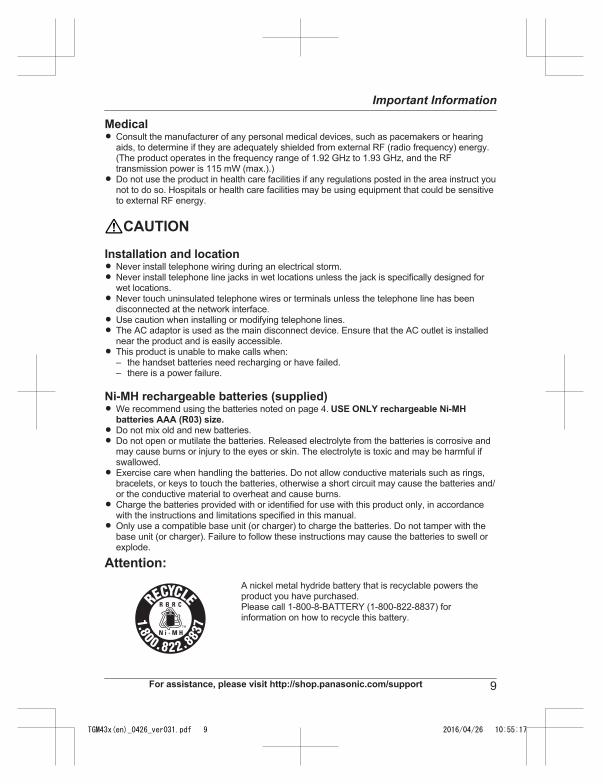
Attention:A nickel metal hydride battery that is recyclable powers theproduct you have purchased.Please call 1-800-8-BATTERY (1-800-822-8837) forinformation on how to recycle this battery.
For assistance, please visit http://shop.panasonic.com/support 9
Important Information
TGM43x(en)_0426_ver031.pdf 9 2016/04/26 10:55:17
Note when using alkaline batteries for power backupR The batteries should be used correctly, otherwise the unit may be damaged due to battery
leakage.R Do not charge, short-circuit, disassemble, or heat the batteries.R Do not dispose of batteries in a fire.R Remove all the batteries when replacing.R Do not mix old, new or different types of batteries.R It is recommended that batteries are replaced annually.R It is recommended that batteries are replaced after a power outage.
Important safety instructionsWhen using your product, basic safety precautions should always be followed to reduce the riskof fire, electric shock, and injury to persons, including the following:1. Do not use this product near water for example, near a bathtub, washbowl, kitchen sink, or
laundry tub, in a wet basement or near a swimming pool.2. Avoid using a telephone (other than a cordless type) during an electrical storm. There may be
a remote risk of electric shock from lightning.3. Do not use the telephone to report a gas leak in the vicinity of the leak.4. Use only the power cord and batteries indicated in this manual. Do not dispose of batteries in
a fire. They may explode. Check with local codes for possible special disposal instructions.SAVE THESE INSTRUCTIONS
For best performanceBase unit location/avoiding noiseThe base unit and other compatible Panasonic units use radio waves to communicate with eachother.R For maximum coverage and noise-free communications, place your base unit:
– at a convenient, high, and central location with no obstructions between the handset andbase unit in an indoor environment.
– away from electronic appliances such as TVs, radios, personal computers, wirelessdevices, or other phones.
– facing away from radio frequency transmitters, such as external antennas of mobile phonecell stations. (Avoid putting the base unit on a bay window or near a window.)
R Coverage and voice quality depends on the local environmental conditions.R If the reception for a base unit location is not satisfactory, move the base unit to another
location for better reception.
EnvironmentR Keep the product away from electrical noise generating devices, such as fluorescent lamps
and motors.R The product should be kept free from excessive smoke, dust, high temperature, and vibration.R The product should not be exposed to direct sunlight.R Do not place heavy objects on top of the product.R When you leave the product unused for a long period of time, unplug the product from the
power outlet.
10 For assistance, please visit http://shop.panasonic.com/support
Important Information
TGM43x(en)_0426_ver031.pdf 10 2016/04/26 10:55:17
R The product should be kept away from heat sources such as heaters, kitchen stoves, etc. Itshould not be placed in rooms where the temperature is less than 0 °C (32 °F) or greater than40 °C (104 °F). Damp basements should also be avoided.
R The maximum calling distance may be shortened when the product is used in the followingplaces: Near obstacles such as hills, tunnels, underground, near metal objects such as wirefences, etc.
R Operating the product near electrical appliances may cause interference. Move away from theelectrical appliances.
Routine careR Wipe the outer surface of the product with a soft moist cloth.R Do not use benzine, thinner, or any abrasive powder.
Other informationCAUTION: Risk of explosion if battery is replaced by an incorrect type. Dispose of used batteriesaccording to the instructions.
Notice for product disposal, transfer, or returnR This product can store your private/confidential information. To protect your privacy/
confidentiality, we recommend that you erase information such as phonebook or caller listentries from the memory before you dispose of, transfer, or return the product.
Notice
For assistance, please visit http://shop.panasonic.com/support 11
Important Information
TGM43x(en)_0426_ver031.pdf 11 2016/04/26 10:55:17
SpecificationsR Standard:
DECT 6.0 (Digital Enhanced Cordless Telecommunications 6.0)Bluetooth wireless technology 2.1
R Frequency range:1.92 GHz to 1.93 GHz (DECT)2.402 GHz to 2.48 GHz (Bluetooth)
R RF transmission power:115 mW (max.)
R Power source:120 V AC, 60 Hz
R Power consumption:Base unit:Standby: Approx. 1.0 WMaximum: Approx. 4.5 W
R Operating conditions:0 °C – 40 °C (32 °F – 104 °F), 20 % – 80 % relative air humidity (dry)
12 For assistance, please visit http://shop.panasonic.com/support
Important Information
TGM43x(en)_0426_ver031.pdf 12 2016/04/26 10:55:17
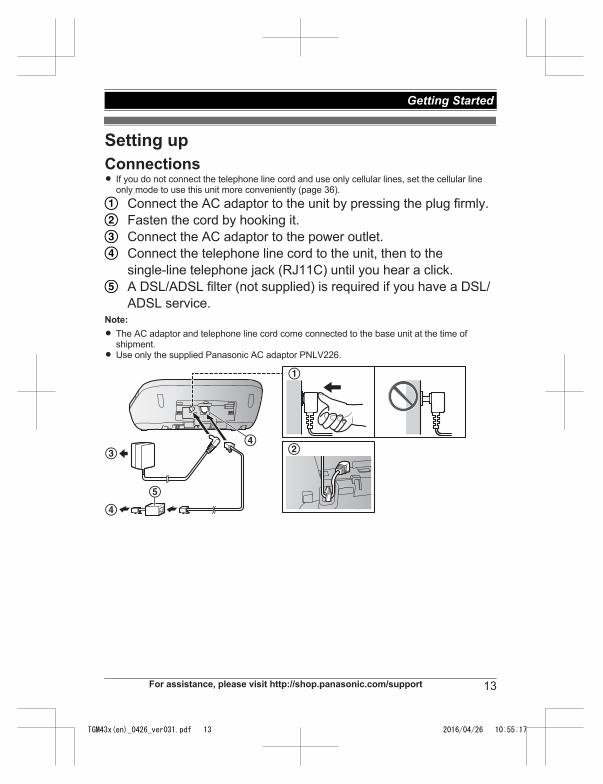
Setting upConnectionsR If you do not connect the telephone line cord and use only cellular lines, set the cellular line
only mode to use this unit more conveniently (page 36).Connect the AC adaptor to the unit by pressing the plug firmly.Fasten the cord by hooking it.Connect the AC adaptor to the power outlet.Connect the telephone line cord to the unit, then to thesingle-line telephone jack (RJ11C) until you hear a click.A DSL/ADSL filter (not supplied) is required if you have a DSL/ADSL service.
Note:R The AC adaptor and telephone line cord come connected to the base unit at the time of
shipment.R Use only the supplied Panasonic AC adaptor PNLV226.
5
4
34
1
2
For assistance, please visit http://shop.panasonic.com/support 13
Getting Started
TGM43x(en)_0426_ver031.pdf 13 2016/04/26 10:55:17

Handset battery charging2 rechargeable Ni-MH batteries are installed in the handset at thetime of shipment.Before initial use: Remove the yellow insulation sheet beforeusing the handset.
Charge for about 7 hours.R Confirm “Charging” is displayed (1).R When the batteries are fully charged, “Fully charged” is displayed.
1
R Follow the directions on the display to set up the unit.
Handset battery levelIcon Battery level
High
Medium
Low
Needs charging.
Empty
Panasonic Ni-MH battery performanceOperation Operating timeIn continuous use 13 hours max.*1
Not in use (standby) 9 days max.*1
*1 If eco mode is on and booster is off.
14 For assistance, please visit http://shop.panasonic.com/support
Getting Started
TGM43x(en)_0426_ver031.pdf 14 2016/04/26 10:55:17
Note:R Actual battery performance depends on usage and ambient environment.
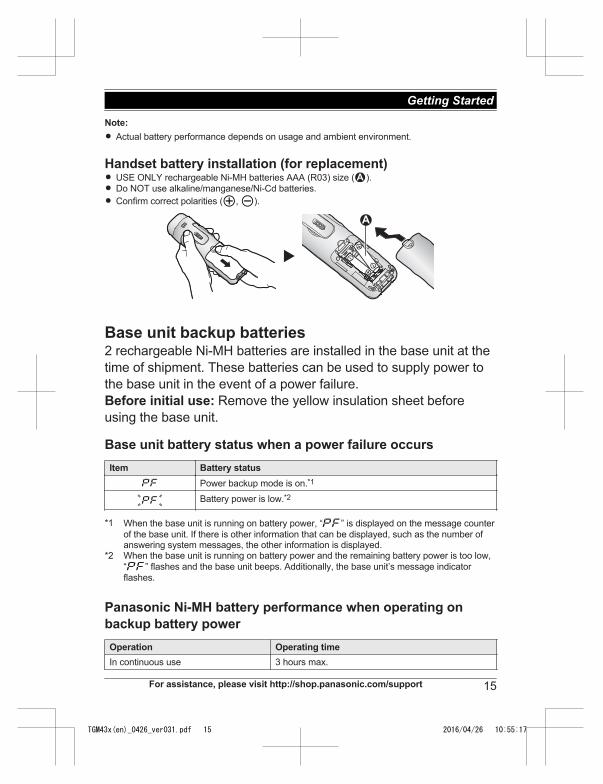
Handset battery installation (for replacement)R USE ONLY rechargeable Ni-MH batteries AAA (R03) size (1).R Do NOT use alkaline/manganese/Ni-Cd batteries.R Confirm correct polarities ( , ).
1
Base unit backup batteries2 rechargeable Ni-MH batteries are installed in the base unit at thetime of shipment. These batteries can be used to supply power tothe base unit in the event of a power failure.Before initial use: Remove the yellow insulation sheet beforeusing the base unit.
Base unit battery status when a power failure occursItem Battery status
Power backup mode is on.*1
Battery power is low.*2
*1 When the base unit is running on battery power, “ ” is displayed on the message counterof the base unit. If there is other information that can be displayed, such as the number ofanswering system messages, the other information is displayed.
*2 When the base unit is running on battery power and the remaining battery power is too low,“ ” flashes and the base unit beeps. Additionally, the base unit’s message indicatorflashes.
Panasonic Ni-MH battery performance when operating onbackup battery powerOperation Operating timeIn continuous use 3 hours max.
For assistance, please visit http://shop.panasonic.com/support 15
Getting Started
TGM43x(en)_0426_ver031.pdf 15 2016/04/26 10:55:17
Operation Operating timeNot in use (standby) 4 hours max.
Note:R Battery performance depends on the type of batteries.R Actual battery performance depends on usage and ambient environment.R If the base unit is running on battery power, the brightness of the message counter on the
base unit is reduced to save battery power.R When the base unit is running on battery power, the maximum ringer volume of the base unit
will be reduced.R If your phone service provider requires additional devices in order to make and receive calls,
such as a modem, you may still not be able to make and receive calls even if the base unit’sbackup power feature is functioning.
Base unit battery installation (for replacement)Important:R The following AAA (R03) size batteries can be used with the base unit:
– Rechargeable Ni-MH batteries*1
– Standard (non-rechargeable) alkaline batteries*2
R Do NOT use manganese batteries.R Confirm correct polarities ( , ).*1 The base unit can fully charge Ni-MH batteries in about 15 hours.*2 If the rechargeable batteries become depleted during a power failure, you can insert alkaline
batteries into the base unit. Remove the alkaline batteries when power is restored.
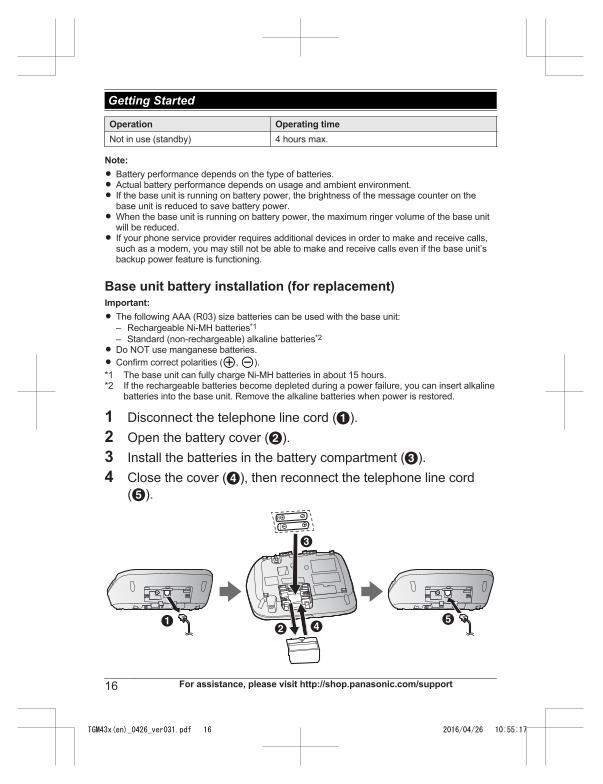
1 Disconnect the telephone line cord (A).2 Open the battery cover (B).3 Install the batteries in the battery compartment (C).4 Close the cover (D), then reconnect the telephone line cord
(E).
A E
C
B D
16 For assistance, please visit http://shop.panasonic.com/support
Getting Started
TGM43x(en)_0426_ver031.pdf 16 2016/04/26 10:55:17
Note when setting up
Note for connectionsR The AC adaptor must remain connected at all times. (It is normal for the adaptor to feel warm
during use.)R The AC adaptor should be connected to a vertically oriented or floor-mounted AC outlet. Do
not connect the AC adaptor to a ceiling-mounted AC outlet, as the weight of the adaptor maycause it to become disconnected.
Note for battery installationR Use the supplied rechargeable batteries. For replacement, we recommend using the
Panasonic rechargeable batteries noted on page 4, 9.
Note for battery chargingR It is normal for the handset to feel warm during charging.R Clean the charge contacts of the handset, base unit, and charger with a soft and dry cloth
once a month. Before cleaning the unit, disconnect from power outlets and any telephone linecords. Clean more often if the unit is exposed to grease, dust, or high humidity.
Intelligent eco modeThis feature automatically reduces handset power consumption bysuppressing handset transmission power when the handset is closeto the base unit.R When this feature is activated, is displayed. However, during a cellular call, is not
displayed even though this feature is activated.R Eco mode is turned off when the sound enhancer is activated (page 41).
For assistance, please visit http://shop.panasonic.com/support 17
Getting Started
TGM43x(en)_0426_ver031.pdf 17 2016/04/26 10:55:17
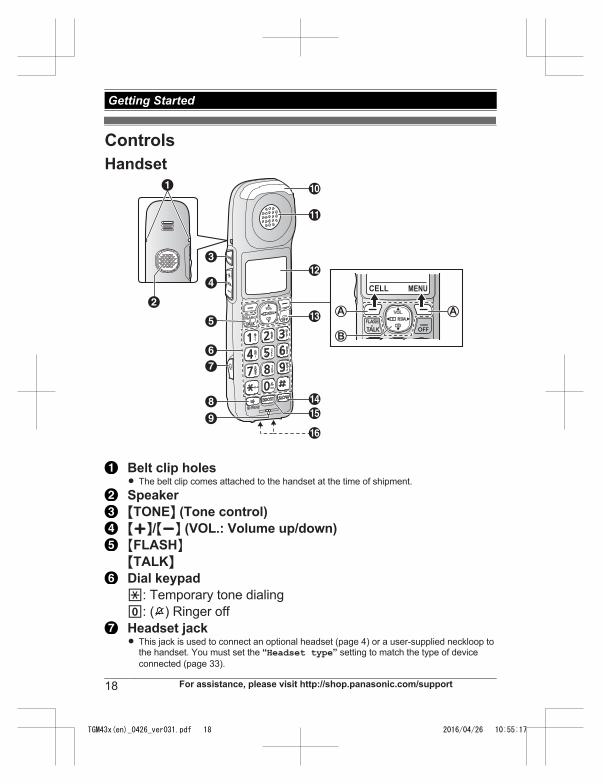
ControlsHandset
B
A
I
K
L
H
M
O
P
F
E
G
C
D
J
A
B
A
N
Belt clip holesR The belt clip comes attached to the handset at the time of shipment.SpeakerMTONEN (Tone control)MjN/MkN (VOL.: Volume up/down)MFLASHNMTALKNDial keypad*: Temporary tone dialing0: ( ) Ringer offHeadset jackR This jack is used to connect an optional headset (page 4) or a user-supplied neckloop to
the handset. You must set the “Headset type” setting to match the type of deviceconnected (page 33).
18 For assistance, please visit http://shop.panasonic.com/support
Getting Started
TGM43x(en)_0426_ver031.pdf 18 2016/04/26 10:55:17
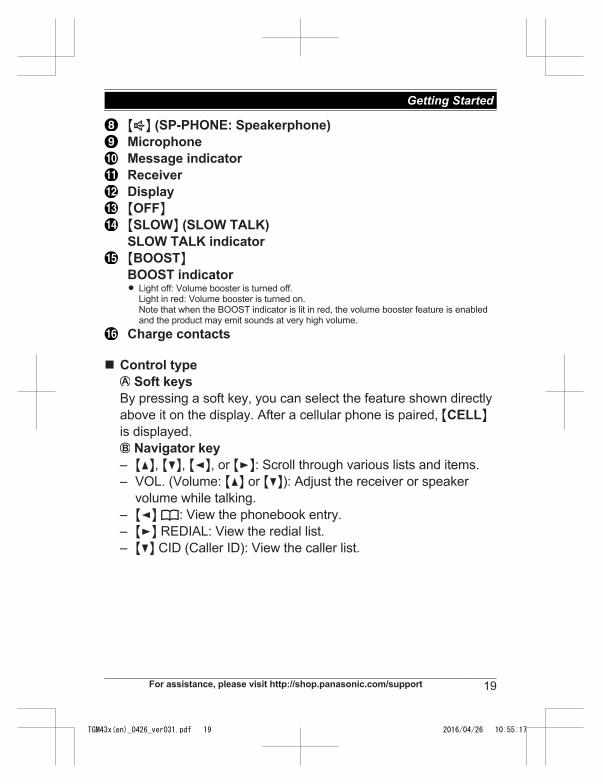
MZN (SP-PHONE: Speakerphone)MicrophoneMessage indicatorReceiverDisplayMOFFNMSLOWN (SLOW TALK)SLOW TALK indicatorMBOOSTNBOOST indicatorR Light off: Volume booster is turned off.
Light in red: Volume booster is turned on.Note that when the BOOST indicator is lit in red, the volume booster feature is enabledand the product may emit sounds at very high volume.
Charge contacts
n Control type Soft keys
By pressing a soft key, you can select the feature shown directlyabove it on the display. After a cellular phone is paired, MCELLNis displayed.
Navigator key– MDN, MCN, MFN, or MEN: Scroll through various lists and items.– VOL. (Volume: MDN or MCN): Adjust the receiver or speaker
volume while talking.– MFN W: View the phonebook entry.– MEN REDIAL: View the redial list.– MCN CID (Caller ID): View the caller list.
For assistance, please visit http://shop.panasonic.com/support 19
Getting Started
TGM43x(en)_0426_ver031.pdf 19 2016/04/26 10:55:17
Base unitA
HI
C
PQ O
KJ
G
L
EF
D
MN
B
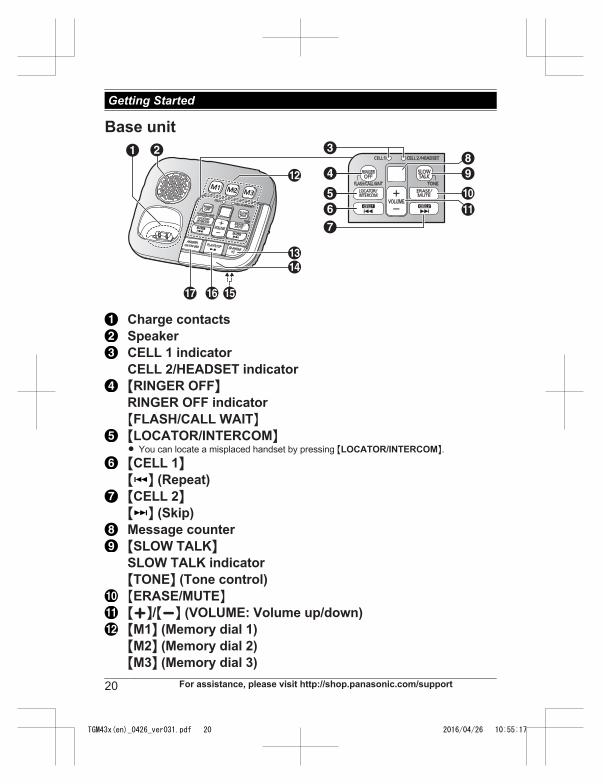
Charge contactsSpeakerCELL 1 indicatorCELL 2/HEADSET indicatorMRINGER OFFNRINGER OFF indicatorMFLASH/CALL WAITNMLOCATOR/INTERCOMNR You can locate a misplaced handset by pressing MLOCATOR/INTERCOMN.MCELL 1NM N (Repeat)MCELL 2NM N (Skip)Message counterMSLOW TALKNSLOW TALK indicatorMTONEN (Tone control)MERASE/MUTENMjN/MkN (VOLUME: Volume up/down)MM1N (Memory dial 1)MM2N (Memory dial 2)MM3N (Memory dial 3)
20 For assistance, please visit http://shop.panasonic.com/support
Getting Started
TGM43x(en)_0426_ver031.pdf 20 2016/04/26 10:55:17
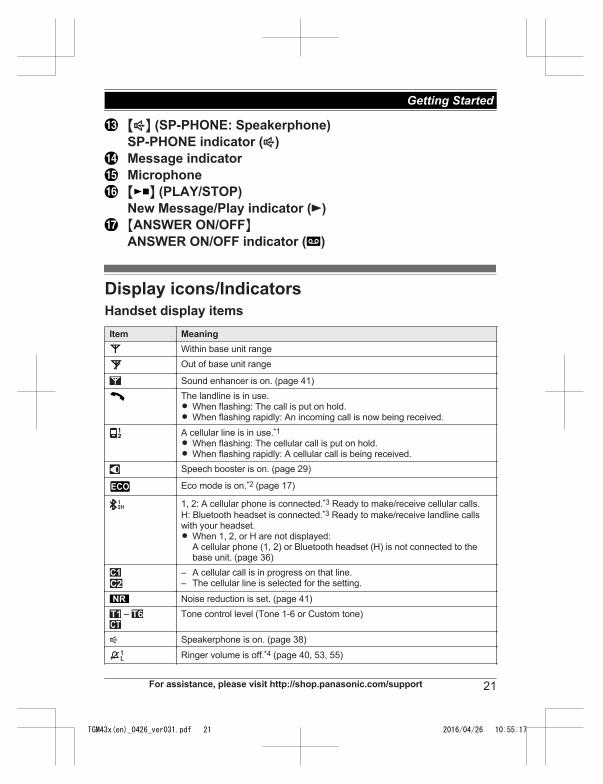
MZN (SP-PHONE: Speakerphone)SP-PHONE indicator (Z)Message indicatorMicrophoneM N (PLAY/STOP)New Message/Play indicator ( )MANSWER ON/OFFNANSWER ON/OFF indicator ( )
Display icons/IndicatorsHandset display itemsItem Meaning
Within base unit rangeOut of base unit range
Sound enhancer is on. (page 41)The landline is in use.R When flashing: The call is put on hold.R When flashing rapidly: An incoming call is now being received.
A cellular line is in use.*1R When flashing: The cellular call is put on hold.R When flashing rapidly: A cellular call is being received.Speech booster is on. (page 29)
Eco mode is on.*2 (page 17)
1, 2: A cellular phone is connected.*3 Ready to make/receive cellular calls.H: Bluetooth headset is connected.*3 Ready to make/receive landline callswith your headset.R When 1, 2, or H are not displayed:
A cellular phone (1, 2) or Bluetooth headset (H) is not connected to thebase unit. (page 36)
– A cellular call is in progress on that line.– The cellular line is selected for the setting.
Noise reduction is set. (page 41) – Tone control level (Tone 1-6 or Custom tone)
Z Speakerphone is on. (page 38)
Ringer volume is off.*4 (page 40, 53, 55)
For assistance, please visit http://shop.panasonic.com/support 21
Getting Started
TGM43x(en)_0426_ver031.pdf 21 2016/04/26 10:55:17
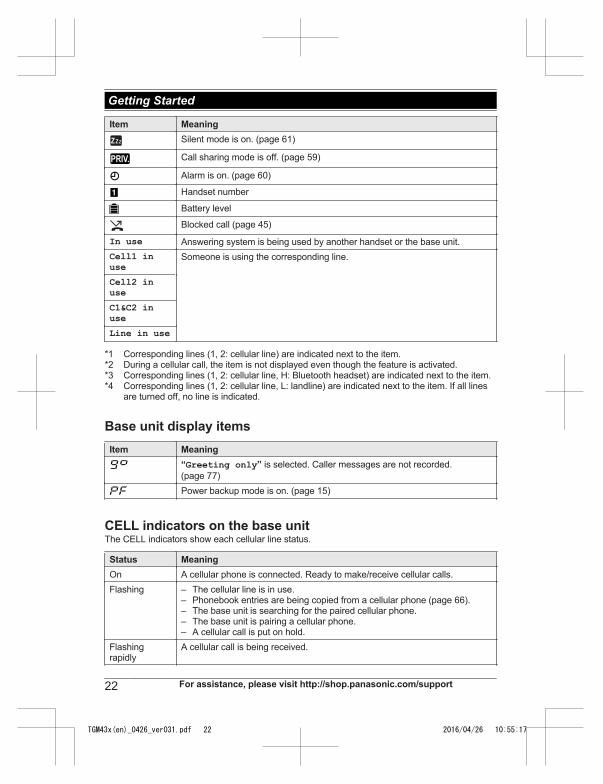
Item MeaningSilent mode is on. (page 61)
Call sharing mode is off. (page 59)
Alarm is on. (page 60)
Handset number
Battery level
Blocked call (page 45)
In use Answering system is being used by another handset or the base unit.Cell1 inuse
Someone is using the corresponding line.
Cell2 inuseC1&C2 inuseLine in use
*1 Corresponding lines (1, 2: cellular line) are indicated next to the item.*2 During a cellular call, the item is not displayed even though the feature is activated.*3 Corresponding lines (1, 2: cellular line, H: Bluetooth headset) are indicated next to the item.*4 Corresponding lines (1, 2: cellular line, L: landline) are indicated next to the item. If all lines
are turned off, no line is indicated.
Base unit display itemsItem Meaning
“Greeting only” is selected. Caller messages are not recorded.(page 77)Power backup mode is on. (page 15)
CELL indicators on the base unitThe CELL indicators show each cellular line status.
Status MeaningOn A cellular phone is connected. Ready to make/receive cellular calls.Flashing – The cellular line is in use.
– Phonebook entries are being copied from a cellular phone (page 66).– The base unit is searching for the paired cellular phone.– The base unit is pairing a cellular phone.– A cellular call is put on hold.
Flashingrapidly
A cellular call is being received.
22 For assistance, please visit http://shop.panasonic.com/support
Getting Started
TGM43x(en)_0426_ver031.pdf 22 2016/04/26 10:55:17
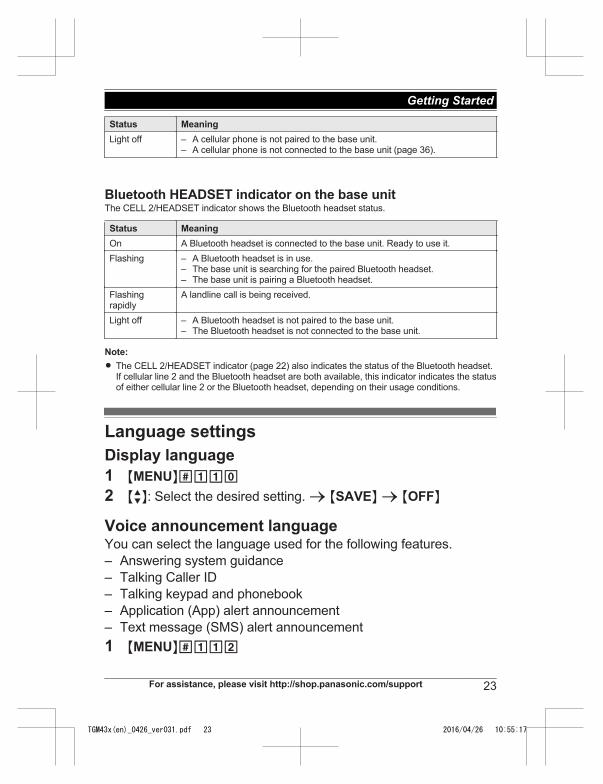
Status MeaningLight off – A cellular phone is not paired to the base unit.
– A cellular phone is not connected to the base unit (page 36).
Bluetooth HEADSET indicator on the base unitThe CELL 2/HEADSET indicator shows the Bluetooth headset status.
Status MeaningOn A Bluetooth headset is connected to the base unit. Ready to use it.Flashing – A Bluetooth headset is in use.
– The base unit is searching for the paired Bluetooth headset.– The base unit is pairing a Bluetooth headset.
Flashingrapidly
A landline call is being received.
Light off – A Bluetooth headset is not paired to the base unit.– The Bluetooth headset is not connected to the base unit.
Note:R The CELL 2/HEADSET indicator (page 22) also indicates the status of the Bluetooth headset.
If cellular line 2 and the Bluetooth headset are both available, this indicator indicates the statusof either cellular line 2 or the Bluetooth headset, depending on their usage conditions.
Language settingsDisplay language1 MMENUN#1102 MbN: Select the desired setting. a MSAVEN a MOFFN
Voice announcement languageYou can select the language used for the following features.– Answering system guidance– Talking Caller ID– Talking keypad and phonebook– Application (App) alert announcement– Text message (SMS) alert announcement1 MMENUN#112
For assistance, please visit http://shop.panasonic.com/support 23
Getting Started
TGM43x(en)_0426_ver031.pdf 23 2016/04/26 10:55:17
2 MbN: Select the desired setting. a MSAVEN a MOFFNR The setting will be applied in about 5 seconds.
Date and time1 MMENUN#1012 Enter the current month, date, and year by selecting 2 digits for
each.Example: July 12, 201607 12 16
3 MOKN4 Enter the current hour and minute (12-hour clock format) by
selecting 2 digits for each.Example: 9:3009 30
5 *: Select “AM” or “PM”.6 MSAVEN a MOFFNNote:R When English is selected as the display language, 12-hour clock format is used. When
Spanish is selected, 24-hour clock format is used.
Recording your greeting messageYou can record your own greeting message instead of using apre-recorded greeting message. See page 71 for details.1 MMENUN#3022 MbN: “Yes” a MSELECTN3 Record a greeting message. a MSTOPN a MOFFN
24 For assistance, please visit http://shop.panasonic.com/support
Getting Started
TGM43x(en)_0426_ver031.pdf 24 2016/04/26 10:55:17
Other settingsDialing modeIf you cannot make calls, change this setting according to yourtelephone line service. The default setting is “Tone”.“Tone”: For tone dial service.“Pulse”: For rotary/pulse dial service.1 MMENUN#1202 MbN: Select the desired setting. a MSAVEN a MOFFN
For assistance, please visit http://shop.panasonic.com/support 25
Getting Started
TGM43x(en)_0426_ver031.pdf 25 2016/04/26 10:55:17
AccessibilityThis product is designed to provide not only optimal volume, butoptimal sound quality as well, ensuring that every call is heard loudand clear.
Tone controlThis feature clarifies the voice of the person you are talking to,producing a more natural-sounding voice that is easier to hear andunderstand. This feature can be set for each unit.The following settings are available.Handset:– Receiver: “Tone 1-6” and “Custom tone 1-20”– Speakerphone: “Tone 1-4”– Headset: “Tone 1-4” and “Custom tone 1-20”Base unit: “ - ” (Tone 1-4)
HandsetYou can select a tone control setting while talking on the phone.There are two methods available.n Using the MTONEN key
1 Press MTONEN on the side repeatedly to select the desiredsetting while talking.
2 To exit, press MBACKN or wait for a few seconds.R The selected setting is shown on the handset display while talking.
Note:R To select one of the “Custom tone” settings, follow the instructions in “Using theMMENUN key”, page 26.
n Using the MMENUN key1 Press MMENUN while talking.2 MbN: “Tone control” a MSELECTN
26 For assistance, please visit http://shop.panasonic.com/support
Accessibility
TGM43x(en)_0426_ver031.pdf 26 2016/04/26 10:55:17
3 MbN: Select the desired setting. a MOKNR If you select “Custom tone”, select the desired type. a MOKNR The selected setting is shown on the handset display while talking.
Base unit1 Press and hold MTONEN for about 2 seconds while talking.2 Press MjN or MkN repeatedly to select the desired setting.
R The selected setting flashes on the message counter while talking.
3 To exit, press MTONEN or wait for about 5 seconds.Note for handset and base unit:R The selected setting is applied immediately and is also used for future calls.R Depending on the condition and quality of your telephone line, this feature may emphasize
existing line noise. If it becomes difficult to hear, reset to the default setting (Tone 2).
Volume boosterThis feature allows you to drastically increase the volume of theother party’s voice. This feature can be set for each unit.
WARNINGR This feature is designed for users who are hard of hearing. If other users use the phone, be
sure to turn this feature off.R Do not use this feature unnecessarily. High volume emitted from the product may cause
hearing damage.R Pressing the MBOOSTN key activates the volume booster feature. Use this key with care. At its
loudest setting (volume and volume booster features set to their highest settings), the productcan output sound at up to 40 dB. To prevent hearing damage, we recommend that you set thisproduct to the lowest volume setting at which you can hear adequately.
Turning on the volume booster1 Press MBOOSTN while on a call.
R The BOOST indicator lights in red.
2 Press MjN or MkN on the side repeatedly to select the desiredvolume.R The selected volume setting is shown on the handset display while talking.R The selected volume setting is used for future calls when the booster is turned on.
Note:R Noise reduction is automatically turned on when the booster is turned on. In this case, the
menu that allows you to turn off noise reduction is not shown even after you press MMENUNwhile on a call.
For assistance, please visit http://shop.panasonic.com/support 27
Accessibility
TGM43x(en)_0426_ver031.pdf 27 2016/04/26 10:55:17
R is not shown if the noise reduction feature was turned off before you turned on thevolume booster.
R If the auto boost feature is turned on (page 28), volume booster turns on automatically whenyou make or answer a call. If the auto boost feature is turned off, volume booster turns offautomatically at the end of each call.
Turning on auto boostIf the auto boost feature is turned on, volume booster turns onautomatically when you make or answer a call. This feature isuseful if the unit is used mainly by a user who is hard of hearing.1 MMENUN#7822 MbN: Select the desired setting. a MSAVEN a MOFFN
R If the volume booster is turned on, the BOOST indicator lights in red during a call.Note:R While on a call, you can temporarily turn the volume booster off by pressing MBOOSTN, and
adjust the volume by pressing MjN or MkN on the side repeatedly.
Adjusting the volumeWhile on a call, you can adjust the volume by pressing MjN or MkNon the side repeatedly.R The selected volume setting is shown on the handset display.R The selected volume setting is applied immediately and is also used for future calls. A
separate setting is used for when volume booster is on and when it is off.
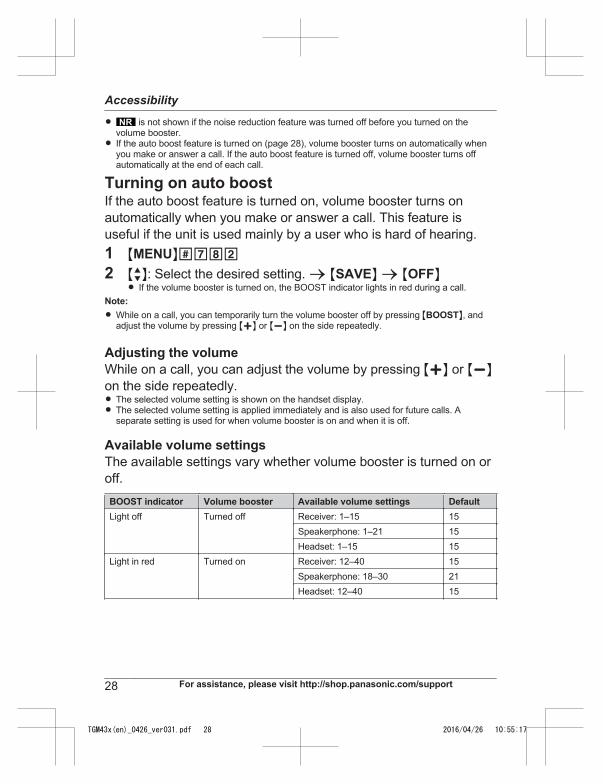
Available volume settingsThe available settings vary whether volume booster is turned on oroff.BOOST indicator Volume booster Available volume settings DefaultLight off Turned off Receiver: 1–15 15
Speakerphone: 1–21 15Headset: 1–15 15
Light in red Turned on Receiver: 12–40 15Speakerphone: 18–30 21Headset: 12–40 15
28 For assistance, please visit http://shop.panasonic.com/support
Accessibility
TGM43x(en)_0426_ver031.pdf 28 2016/04/26 10:55:17
Speech booster (making your voice louder)This feature allows you to increase the volume of your voice heardby the other party. This feature can be set for each handset.
WARNINGR The speech booster feature can be used to increase the volume of your voice heard by the
other party. If this feature is used unnecessarily, your voice may be too loud. We recommendthat you use this feature only if your voice is too quiet to be heard by the other party.
1 Press MMENUN while on a call.2 MbN: “Boost speech on” or “Boost speech off” aMSELECTNR The selected setting is applied immediately and is also used for future calls.
Note:R You can set this feature in standby mode (page 56).
Talking keypad and phonebookThis feature helps you by announcing the following information asyou use the phone.Handset:– Phone numbers entered for dialing, phonebook, and memory
dial. The unit can announce numbers (0 to 9), special keys(*, #, and MFLASHN), and dialing pauses (MDN).
– Name or phone numbers when searching the phonebook, callerlist, redial list, memory dial entries, and call block list.
Base unit:– Name or phone numbers when confirming memory dial keys
(MM1N – MM3N).
Setting the talking keypad and phonebookYou can enable this feature by setting its volume to “High” or“Low”, and disable it by setting its volume to “Off”. The defaultsetting is “Off”. This feature can be set for each unit.
For assistance, please visit http://shop.panasonic.com/support 29
Accessibility
TGM43x(en)_0426_ver031.pdf 29 2016/04/26 10:55:18
1 For handset: MMENUN#750For base unit (using a handset): MMENUN#*750
2 MbN: Select the desired setting. a MSAVEN a MOFFNNote:R If you dial a phone number quickly, the handset may not announce the dialed phone number
correctly. For best results, dial slowly, and wait for the handset to announce each numberbefore dialing the next.
R Some names may not be announced properly.R Talking phonebook is not available in the following situations.
– When the base unit is in use (on an outside call or using the answering system)– When another user is searching the phonebook, caller list, redial list, memory dial, or call
block list
Key tonesUse this procedure to change the volume of the tones that soundwhen you press keys on the handset and base unit, or to turn themoff. The default setting is “Low”. Includes confirmation tones anderror tones, etc. This feature can be set for each unit.1 For handset: MMENUN#165
For base unit (using a handset): MMENUN#*1652 MbN: Select the desired setting. a MSAVEN a MOFFN
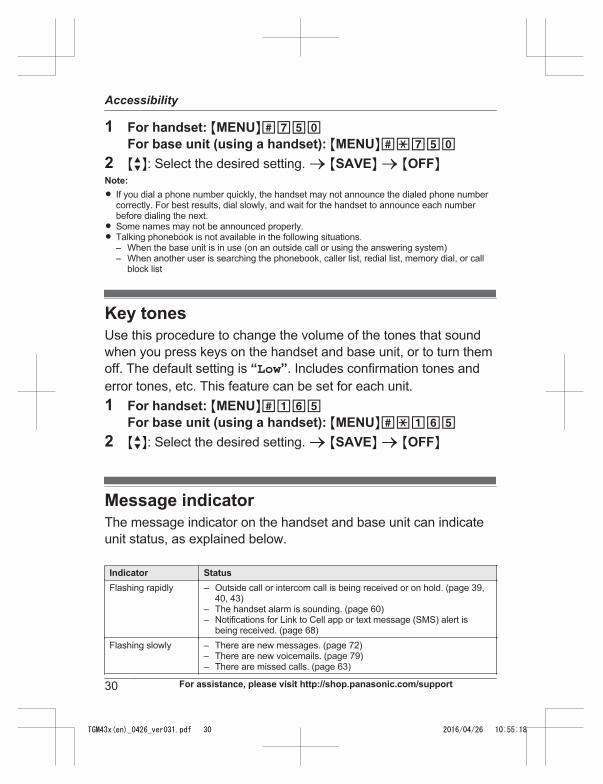
Message indicatorThe message indicator on the handset and base unit can indicateunit status, as explained below.
Indicator StatusFlashing rapidly – Outside call or intercom call is being received or on hold. (page 39,
40, 43)– The handset alarm is sounding. (page 60)– Notifications for Link to Cell app or text message (SMS) alert is
being received. (page 68)Flashing slowly – There are new messages. (page 72)
– There are new voicemails. (page 79)– There are missed calls. (page 63)
30 For assistance, please visit http://shop.panasonic.com/support
Accessibility
TGM43x(en)_0426_ver031.pdf 30 2016/04/26 10:55:18
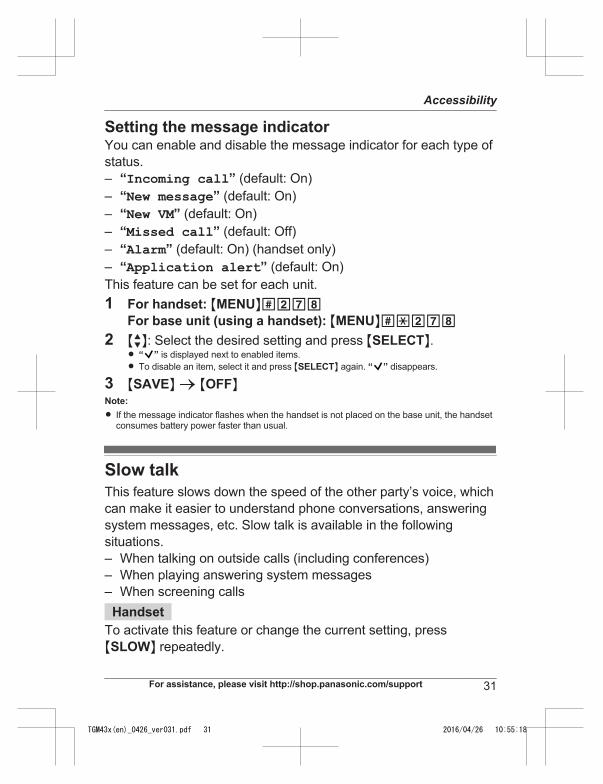
Setting the message indicatorYou can enable and disable the message indicator for each type ofstatus.– “Incoming call” (default: On)– “New message” (default: On)– “New VM” (default: On)– “Missed call” (default: Off)– “Alarm” (default: On) (handset only)– “Application alert” (default: On)This feature can be set for each unit.1 For handset: MMENUN#278
For base unit (using a handset): MMENUN#*2782 MbN: Select the desired setting and press MSELECTN.
R “ ” is displayed next to enabled items.R To disable an item, select it and press MSELECTN again. “ ” disappears.
3 MSAVEN a MOFFNNote:R If the message indicator flashes when the handset is not placed on the base unit, the handset
consumes battery power faster than usual.
Slow talkThis feature slows down the speed of the other party’s voice, whichcan make it easier to understand phone conversations, answeringsystem messages, etc. Slow talk is available in the followingsituations.– When talking on outside calls (including conferences)– When playing answering system messages– When screening calls
HandsetTo activate this feature or change the current setting, pressMSLOWN repeatedly.
For assistance, please visit http://shop.panasonic.com/support 31
Accessibility
TGM43x(en)_0426_ver031.pdf 31 2016/04/26 10:55:18
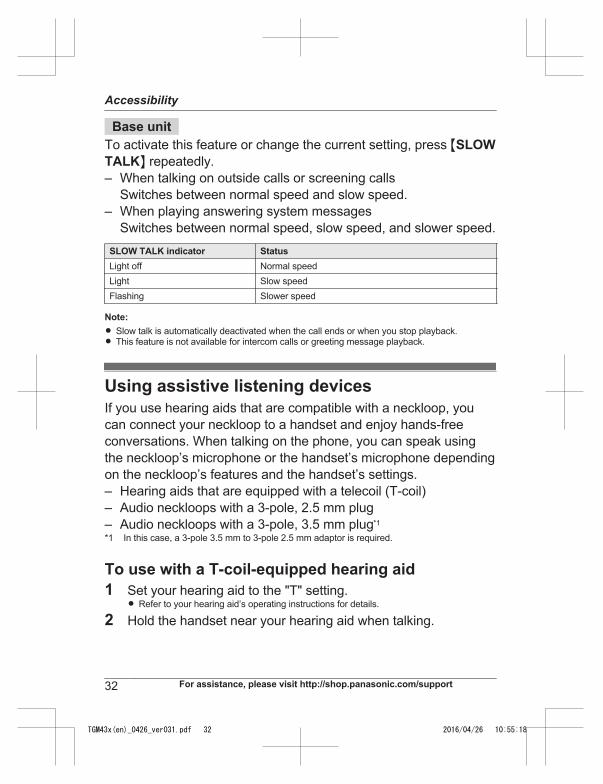
Base unitTo activate this feature or change the current setting, press MSLOWTALKN repeatedly.– When talking on outside calls or screening calls
Switches between normal speed and slow speed.– When playing answering system messages
Switches between normal speed, slow speed, and slower speed.SLOW TALK indicator StatusLight off Normal speedLight Slow speedFlashing Slower speed
Note:R Slow talk is automatically deactivated when the call ends or when you stop playback.R This feature is not available for intercom calls or greeting message playback.
Using assistive listening devicesIf you use hearing aids that are compatible with a neckloop, youcan connect your neckloop to a handset and enjoy hands-freeconversations. When talking on the phone, you can speak usingthe neckloop’s microphone or the handset’s microphone dependingon the neckloop’s features and the handset’s settings.– Hearing aids that are equipped with a telecoil (T-coil)– Audio neckloops with a 3-pole, 2.5 mm plug– Audio neckloops with a 3-pole, 3.5 mm plug*1
*1 In this case, a 3-pole 3.5 mm to 3-pole 2.5 mm adaptor is required.
To use with a T-coil-equipped hearing aid1 Set your hearing aid to the "T" setting.
R Refer to your hearing aid’s operating instructions for details.
2 Hold the handset near your hearing aid when talking.
32 For assistance, please visit http://shop.panasonic.com/support
Accessibility
TGM43x(en)_0426_ver031.pdf 32 2016/04/26 10:55:18
To use a neckloopWhen using a neckloop with the handset, you can speak using theneckloop’s microphone or using the handset’s microphone.Important:R You must set the headset type before use (page 33).
1 Connect the neckloop to the headset jack on the side of thehandset.
2 Use the handset as normal.R Refer to your neckloop’s operating instructions for details.R If your neckloop does not have a microphone, speak into the handset’s microphone.R You can use volume booster (page 27), speech booster (page 29), tone control
(page 26), and other features even when using a neckloop.
Setting the headset typeSet this setting to match the type of device connected. This featurecan be set for each unit.“Headset” (default): Disables the handset’s microphone. Theconnected headset is used for talking and listening.“Neckloop with Mic”: Disables the handset’s microphone. Theconnected neckloop is used for talking and listening.“Neckloop w/o Mic”: Enables the handset’s microphone. Theconnected neckloop is used for listening only.1 MMENUN#7862 MbN: Select the desired setting. a MSAVEN a MOFFN
For assistance, please visit http://shop.panasonic.com/support 33
Accessibility
TGM43x(en)_0426_ver031.pdf 33 2016/04/26 10:55:18
Link to cell featureYou can connect your base unit and cellularphone using Bluetooth wireless technology, sothat you can make or answer cellular callsusing your phone system. This allows you to:– use the unit to talk on cellular calls even if
some areas of your home have poorcellular reception, simply by placing yourcellular phone in an area with goodreception.
– talk on cellular calls even if your cellularphone is in your pocket or bag.
– enjoy cordless cellular calls even if yourcellular phone plugged in and charging.
Important:R Your cellular phone must support the
Hands Free Profile (HFP) specification.R You may pair 2 cellular phones and 1
Bluetooth headset.R The unit can be used to talk on 2 lines at
the same time (for example, 2 cellular lines,or the landline and 1 cellular line).
R Only 2 Bluetooth devices can be used withthe unit at the same time (for example, 2cellular lines, or the Bluetooth headset and1 cellular line*1).
R Locate your cellular phone near the baseunit. If the cellular phone is too close to thebase unit during a cellular call, you mayhear noise. For best performance, werecommend placing the cellular phonebetween 0.6 m to 3 m (2 feet to 10 feet)away from the base unit.
*1 You cannot use a Bluetooth headset totalk on a cellular line.
Pairing a cellular phoneImportant:R For more details and the list of compatible
cellular phones, please visit our Web site:http://shop.panasonic.com/bluetooth-phone
R Before pairing a Bluetooth enabled cellularphone to the base unit, make sure that noother Bluetooth device such as a Bluetoothheadset is connected to your cellular phone.
1 Base unit:Press and hold MCELL 1N or MCELL 2Nfor about 5 seconds.R After the corresponding CELL
indicator on the base unit startsflashing, the rest of the proceduremust be completed within 5 minutes.
2 Your cellular phone:While the corresponding CELLindicator is flashing, follow theinstructions of your cellular phone toenter the pairing mode.R Depending on your cellular phone, it
may ask you to enter the BluetoothPIN (default: “0000”).
R If your cellular phone prompts youto confirm the passkey, tap MOKN orotherwise to accept the pairingrequest.
3 Base unit:Wait until a long beep sounds.R It may take more than 10 seconds
to complete pairing.R When the corresponding CELL
indicator lights up, the cellularphone is connected to the base unit.You are ready to make cellular calls.
Note:R If the cellular phone has already paired
to the base unit, it is overwritten.R Make sure that your cellular phone is set
to connect to this product automatically.Refer to your cellular phone’s operatinginstructions.
R Make sure you cancel your cellularphone’s current pairing if you want topair it to the other line (page 34).
R The default setting for the alert feature is“On”, so when you pair your cellularphone to the base unit, this feature maybe activated (page 68). (This dependson the version and type of cellular phoneyou are using.)
Unpairing a cellular phoneYou can cancel the pairing of a cellular phonethat is stored in the base unit.1 For CELL 1: MMENUN#6111
For CELL 2: MMENUN#6112
34 For assistance, please visit http://shop.panasonic.com/support
Link to Cell
TGM43x(en)_0426_ver031.pdf 34 2016/04/26 10:55:18
2 MbN: “Yes” a MSELECTNR When the cellular phone is unpaired,
the CELL indicator is turned off.3 MOFFN
Link to cell settingsSelecting which unitreceives cellular callsYou can select which unit rings and receivescalls for a cellular line. When “All” isselected, all handsets and the base unit ring.1 For CELL 1: MMENUN#6271
For CELL 2: MMENUN#62722 MbN: Select the desired handset or “All”.
a MSAVEN a MOFFNNote:R When you select a specific handset to
receive calls for a cellular line:– other handsets cannot answer the calls.– the base unit can answer the calls even
though it does not ring. However, youcan make the base unit ring by adjustingthe base unit ringer volume (page 53).
R When you change to “All” from anothersetting, the base unit ringer volume alsoreturns to the lowest level even if the ringervolume was changed.
R The units selected with this setting have thealert feature (page 68) applied to them.
Ring as cell modeOnce this feature is turned on, the handsetand base unit ring using the same ringer toneas your cellular phone.The following settings are available:– “Off”: Turn this feature off to use the
ringer tones of the handset and base unit.Caller information is announced dependingon the Talking Caller ID setting (page 56).
– “On (with Talking CID)” (default):The handset and base unit use your cellularphone’s ringer tone. Caller information isannounced even if the Talking Caller ID isturned off.
– “On (without Talking CID)”: Thehandset and base unit use your cellularphone’s ringer tone. Caller information isnot announced even if the Talking Caller IDis turned on.
Important:R To use this feature, your cellular phone
must support Bluetooth in-band ringtone.Refer to your cellular phone’s operatinginstructions.
1 For CELL 1: MMENUN#6141For CELL 2: MMENUN#6142
2 MbN: Select the desired setting. aMSAVEN a MOFFN
Note:R The units use the preset ringer tones
instead of your cellular phone’s ringer tonewhen a cellular call is being received if:– your cellular phone is in silent mode
(depending on your cellular phone).– the base unit is in use.– 2 handsets are sharing a landline call.
R If your cellular phone is in silent mode with“On (with Talking CID)” set, the unitannounces caller information even whenTalking Caller ID is turned off (page 56).
To use the handset ringer toneinstead of your cellular phone’sringer toneSelect “Off” in step 2, “Ring as cell mode”,page 35.To change the handset ringer tone for acellular line, see page 53.
Auto connection to theBluetooth devices (cellularphones)After pairing, your Bluetooth devices areconnected to the base unit. If you move theBluetooth devices out of base unit range, theBluetooth devices are disconnected from thebase unit. This feature allows the base unit totry to reconnect the Bluetooth devices atregular intervals when it returns within base
For assistance, please visit http://shop.panasonic.com/support 35
Link to Cell
TGM43x(en)_0426_ver031.pdf 35 2016/04/26 10:55:18
unit range. You can set the interval. Thedefault setting is “1 min”.Important:R When 3 Bluetooth devices (2 cellular
phones and 1 headset) are paired to thebase unit, only 2 Bluetooth devices can beused with the unit at the same time, and thebase unit loses its connection from otherBluetooth devices. To automatically resumethe connection to Bluetooth devices, leavethe auto connection on.
R Some cellular phones lose connection afterusage, please check the specifications ofyour cellular phone for more details.
1 MMENUN#6322 MbN: Select the desired setting. a
MSAVEN a MOFFNNote:R Some cellular phones may ask you if you
accept the connection requirement from thebase unit. In that case, select “Off” in step2. Check the specifications of your cellularphone.
Connecting/disconnecting thecellular phone manuallyIf you will not be using the paired cellularphone’s link to cell feature temporarily (forexample, you do not want the unit to ringwhen your cellular line receives a call), youcan disconnect your cellular phone from thebase unit. If you want to use it again,reconnect the cellular phone to the base unit.Note:R After you disconnect a paired cellular
phone from the base unit manually, it willautomatically be connected to the base unitin 30 minutes. If you do not use the link tocell feature anymore, unpair the cellularphone (page 35).
R A disconnected cellular phone is notunpaired from the base unit, so pairing it tothe base unit again is unnecessary.
1 To connect/disconnect:For CELL 1: MMENUN#6251For CELL 2: MMENUN#6252R A long beep sounds.
2 MOFFN
Cellular line only mode (Ifyou do not use the landline)If you do not use the landline, we recommendsetting the unit to the cellular line only mode.The default setting is “Off”.Important:R If you turn on the “Cell line only
mode”, disconnect the telephone line cordfrom the base unit. Otherwise the “Cellline only mode” cannot be activated.
1 MMENUN#1572 To turn on:
MbN: “On” a MSELECTN a MbN: “Yes”a MSELECTNTo turn off:MbN: “Off” a MSELECTN
Note:R Once you set this mode, you can use the
following buttons to make cellular calls:– for the handset, press MTALKN or MZN
instead of MCELLN (page 38).– for the base unit, press and hold the
desired memory dial key (MM1N to MM3N)without pressing MCELL 1N or MCELL 2Nset for the cellular line selection(page 37, 50).
R Once you set this mode, the followingfeatures cannot be used:– Landline features (page 59)– Answering system (page 71)
Messages cannot be received.– Voicemail features (page 78)
R After this mode is turned on or off, the baseunit reboots.– Bluetooth connections from cellular
phones or Bluetooth headset aredisconnected. If the auto connection isturned on (page 35), the cellular phonesare reconnected.
– will be displayed on the handsetmomentarily. The handset can be usedonce is displayed.
36 For assistance, please visit http://shop.panasonic.com/support
Link to Cell
TGM43x(en)_0426_ver031.pdf 36 2016/04/26 10:55:18
When you use the landline againBefore connecting the telephone line to thebase unit, select “Off” in step 2, “Cellular lineonly mode (If you do not use the landline)”,page 36.
Cellular line selectionThis feature determines which cellular line isselected to make cellular calls when:– you press MCELLN on the handset.– you press MTALKN or MZN on the handset
while the cellular line only mode is turnedon.
– you press and hold the desired memory dialkey (MM1N to MM3N) on the base unit whilethe cellular line only mode is turned on.
The following settings are available:– “Manual” (handset only: default): You can
select the desired cellular line when makinga call.
– “Cellphone 1”*1 (base unit default):CELL 1 is selected.
– “Cellphone 2”*1: CELL 2 is selected.1 For handset: MMENUN#634
For base unit: MMENUN#*6342 MbN: Select the desired setting. a
MSAVEN a MOFFN*1 After the Bluetooth device is paired, the
device name is displayed.
Storing your area code (fordialing only a 7-digit phonenumber to make a localcall)You need to add your area code when makingcellular calls to a phone number in your area.Once you store your area code, it isautomatically added to the beginning of the7-digit phone number when making cellularcalls.1 MMENUN#6332 Enter the 3-digit area code.
R To correct a digit, press MCLEARN.3 MSAVEN a MOFFN
Changing the BluetoothPIN (Personal IdentificationNumber)The PIN is used to pair cellular phones to thebase unit. The default PIN is “0000”. Toprevent unauthorized access to this product,we recommend that you change the PIN, andkeep it confidential.Important:R Please make note of your new PIN. The
unit does not reveal the PIN to you. If youforget your PIN, see page 90.
1 MMENUN#619R If the unit prompts you to enter the old
PIN (when the default has beenchanged), enter the current 4-digit PIN.
2 Enter the new 4-digit PIN. a MOKN3 Enter the new 4-digit PIN again. a
MSAVEN a MOFFN
For assistance, please visit http://shop.panasonic.com/support 37
Link to Cell
TGM43x(en)_0426_ver031.pdf 37 2016/04/26 10:55:18
Making cellular callsImportant:R The unit can be used to talk on 2 lines at
the same time (for example, 2 cellular lines,or the landline and 1 cellular line).
R Only 2 Bluetooth devices can be used withthe unit at the same time (for example, 2cellular lines, or the headset and 1 cellularline*1).
R Before making calls, confirm that thecorresponding on the handset isdisplayed (page 21).
*1 You cannot use a Bluetooth headset totalk on a cellular line.
1 Lift the handset and then dial the phonenumber.R To correct a digit, press MCLEARN.
2 MCELLNR The unit starts dialing immediately in
the following situations.– Only 1 cellular phone is paired.– A specific line is set to make cellular
calls (page 37).Go to step 4.
3 MbN: Select the desired cellular phone. aMSELECTN
4 When you finish talking, press MOFFN orplace the handset on the base unit orcharger.
Note:R While talking, you can switch between the
receiver and the speakerphone by pressingMZN.
R In step 1, you can store the dialed phonenumber to the phonebook by pressing andholding MFN W for a few seconds.
Adjusting the receiver orspeaker volume
HandsetPress MjN or MkN on the side repeatedlywhile talking.
R The available settings vary whether volumebooster is turned on or off (page 27).
R Pressing the MBOOSTN key activates thevolume booster feature. Use this key withcare. To prevent hearing damage, werecommend that you set this product to thelowest volume setting at which you canhear adequately.
Base unitPress MjN or MkN repeatedly while talking.
Note for handset and base unit:R The receiver or speaker volume you set is
kept for each line (landline and cellularlines).
Making a cellular call using theredial listThe last 5 phone numbers dialed are stored inthe redial list (each 48 digits max.).1 MEN REDIAL2 MbN: Select the desired entry.3 MCELLN
R The unit starts dialing immediately inthe following situations.– Only 1 cellular phone is paired.– A specific line is set to make cellular
calls (page 37).4 MbN: Select the desired cellular phone. a
MSELECTN
Erasing a number in the redial listn When a cellular phone is paired:
1 MEN REDIAL2 MbN: Select the desired entry. a
MMENUN3 MbN: “Erase” a MSELECTN4 MbN: “Yes” a MSELECTN5 MOFFN
n When a cellular phone is not paired:1 MEN REDIAL2 MbN: Select the desired entry. a
MERASEN3 MbN: “Yes” a MSELECTN a MOFFN
38 For assistance, please visit http://shop.panasonic.com/support
Making/Answering Calls
TGM43x(en)_0426_ver031.pdf 38 2016/04/26 10:55:18
Making landline calls1 Lift the handset and then dial the phone
number.R To correct a digit, press MCLEARN.
2 Press MTALKN to make the call.R To make the call using the
speakerphone, press MZN.3 When you finish talking, press MOFFN or
place the handset on the base unit orcharger.
Note:R While talking, you can switch between the
receiver and the speakerphone by pressingMZN.
R In step 1, you can store the dialed phonenumber to the phonebook by pressing andholding MFN W for a few seconds.
Making a call using the redial listThe last 5 phone numbers dialed are stored inthe redial list (each 48 digits max.).1 MEN REDIAL2 MbN: Select the desired entry.3 MTALKN
Pause (for PBX/longdistance service users)A pause is sometimes required when makingcalls using a PBX or long distance service.When storing a calling card access numberand/or PIN in the phonebook, a pause is alsoneeded (page 49).Example: If you need to dial the line accessnumber “9” when making outside calls with aPBX:1 9 a MDN (Pause)2 Dial the phone number. a MTALKNNote:R A 3.5 second pause is inserted each time
you press MDN (Pause) on the handset.
Answering callsUsing the handsetWhen a call is being received, the messageindicator flashes rapidly if the handsetmessage indicator’s “Incoming call”setting is enabled (page 31).1 Lift the handset and then press MTALKN
or MZN when the unit rings.R To answer a cellular call, you can also
press MCELLN.2 When you finish talking, press MOFFN or
place the handset on the base unit orcharger.
Any key answer: You can answer the call bypressing any dial key (1 to 9, *, or #).Auto talk: You can answer calls simply bylifting the handset (page 58).Temporary handset ringer off: You can turnthe ringer off temporarily by pressing M N (leftsoft key).
Using the base unitWhen a landline call is being received, theSP-PHONE indicator (Z) flashes rapidly.When a cellular call is being received, theCELL indicator and SP-PHONE indicator (Z)flash rapidly.Additionally, the message indicator flashesrapidly if the base unit message indicator’s“Incoming call” setting is enabled(page 31).1 Press MZN when the unit rings.
R You can also answer the cellular callby pressing MCELL 1N or MCELL 2N.
2 Speak into the microphone.3 When you finish talking, press MZN.Note:R While on a call, you can switch from the
base unit to the handset:– Press MTALKN on the handset, then
press MZN on the base unit with the callsharing mode on (page 59).
– If the handset is on the base unit, simplylift it.
For assistance, please visit http://shop.panasonic.com/support 39
Making/Answering Calls
TGM43x(en)_0426_ver031.pdf 39 2016/04/26 10:55:18
Adjusting the ringer volumeHandsetn While the handset is ringing for an
incoming call:Press MjN or MkN on the side repeatedly toselect the desired volume.
n While the handset is in standby mode:Press MjN or MkN on the side repeatedly toselect the desired volume for landline call.
R To turn the ringer off, press MkN repeatedly.
Base unitn While the base unit is ringing for an
incoming call:Press MjN or MkN repeatedly to select thedesired volume.
n While the base unit is in standby mode:Press MjN or MkN repeatedly to select thedesired volume for landline call.
R To turn the ringer off, press and hold MkNuntil the base unit beeps.
Note for handset and base unit:R You can adjust the ringer volume for
cellular call and landline call byprogramming (page 53, 55).
R The ringer volume you set is kept for eachline (landline and cellular lines).
One-touch ringer offHandset
Press and hold 0 until the handset beeps toturn the ringer off. While the ringer is turnedoff, the handset will not ring for calls.R You can turn the ringer on again by
pressing and holding 0 until the handsetbeeps.
Base unitPress MRINGER OFFN to turn the ringer off.While the ringer is turned off, the base unit willnot ring for calls.R The RINGER OFF indicator is lit while the
ringer is turned off.R You can turn the ringer on again by
pressing MRINGER OFFN.
Useful features duringa callHold1 Press MMENUN during an outside call.2 MbN: “Hold” a MSELECTN3 To release hold on the cellular line:
Press MCELLN.*1R Another handset user can take the call
by pressing MCELLN.*1*1 If you press MCELLN and the
selection list is displayed, selectthe desired cellular line and pressMSELECTN.
R The base unit user can take the call bypressing MCELL 1N or MCELL 2N.
To release hold on the landline:Press MTALKN.R Another handset user can take the call
by pressing MTALKN.R The base unit user can take the call by
pressing MZN.Note:R While a landline call is on hold, the
SP-PHONE indicator (Z) on the base unitflashes.
R After holding for 10 minutes, the call isdisconnected.
MuteHandset
1 Press MMUTEN during a call.2 To return to the call, press MMUTEN.Note:R MMUTEN is a soft key visible on the display
during a call.
Base unit1 Press MERASE/MUTEN during a call.
R The SP-PHONE indicator (Z) flashes.2 To return to the call, press MERASE/
MUTEN.
40 For assistance, please visit http://shop.panasonic.com/support
Making/Answering Calls
TGM43x(en)_0426_ver031.pdf 40 2016/04/26 10:55:18
Flash for landline callsHandset / Base unitMFLASHN on the handset or MFLASH/CALLWAITN on the base unit allows you to use thespecial features of your host PBX such astransferring an extension call, or accessingoptional telephone services.Note:R To change the flash time, see page 58.
For call waiting or CallWaiting Caller ID service usersTo use call waiting or Call Waiting Caller ID,you must first subscribe with your phoneservice provider.This feature allows you to receive calls whileyou are already talking on the phone. If youreceive a call while on the phone, you will heara call waiting tone.If you subscribe to both Caller ID and CallWaiting with Caller ID services, the 2ndcaller’s information is displayed on the unitthat is in use after you hear the call waitingtone.
Handset1 Press MFLASHN to answer the 2nd call.2 To switch between calls, press MFLASHN.
Base unit1 Press MFLASH/CALL WAITN to answer
the 2nd call.2 To switch between calls, press MFLASH/
CALL WAITN.Note:R Please contact your phone service provider
for details and availability of this service inyour area.
Temporary tone dialing forlandline calls (for rotary/pulse service users)Press * before entering access numberswhich require tone dialing.
Handset sound enhancerThis feature can improve sound clarity whenthe handset is used in an area where theremay be interference. During an outside call,this feature is turned on automatically whennecessary.R When this feature is turned on, is
displayed.
Handset noise reductionThis feature allows you to hear the voice ofthe person you are talking to more clearly, byreducing the surrounding noise coming fromthe other party’s telephone.1 Press MMENUN while talking.2 MbN: “Noise reduction on” or
“Noise reduction off” aMSELECTN
Note:R The setting you made is kept for each line
(landline and cellular lines).The default settings are as follows:– for landline: “Noise reduction off”– for cellular lines: “Noise reduction
on”R Depending on the environment where this
handset is being used, this feature may notbe effective.
R This feature is not available while using thespeakerphone.
Call shareYou can join an existing outside call.
Handsetn While another unit is on a cellular call:
1 To join the conversation, pressMCELLN.R You can join the conversation in the
following situations.– Only 1 cellular phone is paired.– A specific line is set to make
cellular calls (page 37).2 MbN: Select the corresponding cellular
phone. a MSELECTN
For assistance, please visit http://shop.panasonic.com/support 41
Making/Answering Calls
TGM43x(en)_0426_ver031.pdf 41 2016/04/26 10:55:18
n While another unit is on a landline call:To join the conversation, press MTALKN.
Base unitTo join the conversation, select the line that isbeing used for the call:– for a cellular line press MCELL 1N or MCELL
2N.– for the landline press MZN.Note for handset and base unit:R A maximum of 3 parties (including 1 outside
party) can join a conversation using 2extensions. (3-way conference)
R To prevent other users from joining yourconversations with outside callers, turn callsharing mode off (page 59).
Transferring calls,conference callsOutside calls can be transferred or aconference call*1 with an outside party can bemade:– between 2 handsets– between a handset and the base unit*1 A conference call can be established
using the handset only.
Handset1 During an outside call, press MMENUN.2 MbN: “Intercom” a MSELECTN3 MbN: Select the desired unit. a MSELECTN
R If you select “Voice paging”, thecall will be switched from theear-receiver mode to thespeakerphone mode.
4 Wait for the paged party to answer.R If the paged party does not answer,
press MBACKN to return to the outsidecall.
5 To complete the transfer:Press MOFFN.To establish a conference call:MMENUN a MbN: “Conference” aMSELECTNR To leave the conference, press MOFFN.
The other 2 parties can continue theconversation.
R To put the outside call on hold:MMENUN a MbN: “Hold” aMSELECTNTo resume the conference: MMENUNa MbN: “Conference” a MSELECTN
R To cancel the conference: MMENUN aMbN: “Stop conference” aMSELECTNYou can continue the conversationwith the outside caller.
Base unit1 During an outside call, press MLOCATOR/
INTERCOMN.R All registered handsets ring.R The outside call is put on hold.
2 Wait for the paged party to answer.R If the paged party does not answer,
press MLOCATOR/INTERCOMN toreturn to the outside call.
3 To complete the transfer, press MZN.R The outside call is being routed to the
handset.
Transferring a cellular callbetween the unit and acellular phonen From the handset to a cellular phone
1 Press MMENUN during a cellular call.2 MbN: “Transfer to cell” a
MSELECTNR The cellular call is transferred to the
cellular phone.Note:R Depending on your cellular phone type,
you may need to set the cellular phoneto be ready to talk before transferring.For example, if your cellular phone has atop cover, open it beforehand.
n From a cellular phone to the handsetDuring a conversation using a cellularphone, the call cannot be transferred to thehandset by the cellular phone. Perform thefollowing with the handset.
42 For assistance, please visit http://shop.panasonic.com/support
Making/Answering Calls
TGM43x(en)_0426_ver031.pdf 42 2016/04/26 10:55:18
1 During a conversation using a cellularphone, press MCELLN.R The call is transferred to the
handset in the following situations.– Only 1 cellular phone is paired.– A specific line is set to make
cellular calls (page 37).2 MbN: Select the corresponding cellular
phone. a MSELECTNR The call is transferred to the
handset.n From the base unit to a cellular phone
During a cellular call, press and holdMCELL 1N or MCELL 2N until theSP-PHONE indicator goes out.R The cellular call is transferred to the
cellular phone.n From a cellular phone to the base unit
During a conversation using a cellularphone, press MCELL 1N or MCELL 2N.R The cellular call is transferred to the
base unit.
Answering a 2nd callIf you receive a call while talking on the phone,the interrupt tone sounds (page 56) and the2nd caller’s information is displayed on thehandset if you subscribe to Caller ID service(page 63).
Answering a 2nd call during alandline call
Handset1 Press MMENUN during a landline call.2 MbN: “Hold” a MSELECTN3 To answer the 2nd call:
Press MCELLN while the 2nd call is beingreceived.
4 To hang up the 2nd call and return to the1st call (landline call), press MOFFN, thenpress MTALKN.
Base unitPress MZN, then press MZN while the 2nd callis being received.R Note that the current call is disconnected.
Answering a 2nd call during acellular call
Handset1 Press MMENUN during a cellular call.2 MbN: “Hold” a MSELECTN3 To answer the 2nd call:
Press MTALKN or MCELLN while the 2ndcall is being received.
4 To hang up the 2nd call and return to the1st call (cellular call), press MOFFN, thenpress MCELLN.*1
*1 If you press MCELLN and the selection listis displayed, select the desired cellularline and press MSELECTN.
Base unitPress MZN, then press MZN while the 2nd callis being received.R Note that the current call is disconnected.
IntercomIntercom calls can be made:– between handsets– between a handset and the base unitNote:R When paging unit(s), the paged unit(s)
rings for 1 minute.R If you receive an outside call while talking
on the intercom, the interrupt tone sounds(page 56).– Handset: To finish intercom, pressMOFFN. To answer the call, pressMTALKN or MCELLN.
– Base unit: To finish intercom, pressMZN. To answer the call, press MZNagain or the corresponding cellular linekey (MCELL 1N or MCELL 2N).
R To change the ringer volume and ringertone for intercom calls, see page 55.
For assistance, please visit http://shop.panasonic.com/support 43
Making/Answering Calls
TGM43x(en)_0426_ver031.pdf 43 2016/04/26 10:55:18
Making an intercom callHandset
1 MMENUN a MbN: “Intercom” aMSELECTN
2 MbN: Select the desired unit or “Voicepaging”. a MSELECTNR If you select “Voice paging”, speak
into the microphone after the beep.Your voice will be heard from thespeakers of the base unit and allhandsets. Voice paging ends whenyou press MOFFN or when a handsetuser or base unit user answers yourvoice page.
3 When you finish talking, press MOFFN.Note:R You can also use the MINTERCOMN soft
key, if displayed, to make intercom calls.R You cannot use voice paging if other units
are in use.R Voice paging is not available when a range
extender (KX-TGA405) is registered to thebase unit.
Base unit1 Press MLOCATOR/INTERCOMN.
R All registered handsets ring.2 When you finish talking, press MZN.
Answering an intercom callHandset
1 Press MTALKN to answer the page.2 When you finish talking, press MOFFN.
Base unit1 Press MZN to answer the page.2 When you finish talking, press MZN.
44 For assistance, please visit http://shop.panasonic.com/support
Making/Answering Calls
TGM43x(en)_0426_ver031.pdf 44 2016/04/26 10:55:18
Call blockIn the following situations, you can disconnectthe current call and add the caller’s phonenumber to the call block list.– When an outside call is being received– When an outside caller’s message is being
recorded– When you are talking on an outside call1 When an outside call is being received
orWhen an outside caller’s message isbeing recordedPress MBLOCKN on the handset.When you are talking on an outside callMMENUN a MbN: “Blocked call” aMSELECTN
2 Confirm the call block number and pressMYESN.R The phone number is stored in the call
block list, “Caller blocked” isdisplayed, and the call is disconnected.
Note:R If the call has no phone number, the call is
blocked but it is not stored in the call blocklist.
R The call block feature is not available:– for intercom calls or calls received by call
waiting.– when a landline call (or cellular call) is
being received during a cellular call (orlandline call).
R Blocked calls are logged in the caller list.
Storing unwantedcallersThe unit can block calls by storing the desireditems in the call block list beforehand (CallerID subscribers only).– “Block a single number”: The unit
blocks calls from specific phone numbersstored in the call block list.
– “Block range of numbers”: The unitblocks calls that begin with a number storedin the call block list, such as a toll-freephone number prefix or certain area codes.
– “Block unknown CID”: The unit blockscalls that have no phone number.
Single phone numbers and ranges of numberscan be stored in the call block list up to 250items in total.Blocking unwanted callers:When a call is received, the unit rings once*1while caller information is being received.If the caller’s phone number matches an entryin the call block list, the unit emits no sound tothe caller, and disconnects the call.*1 If you do not want this one ring to sound,
select “No” in “Turning the first ring onand off” (page 46).
Storing a single phonenumberImportant:R We recommend storing 10 digits (including
the area code). If only 7 digits are stored, allnumbers that have the same last 7 digitswill be blocked.
Adding call blocked numbersfrom the caller listn When a cellular phone is paired:
1 MCN CID2 MbN: Select the desired entry to be
blocked. a MSELECTNR To edit the number:
Press * (Edit) repeatedly until thephone number is shown in the10-digit format. a MSAVEN a MbN:“Call block” a MSELECTN aGo to step 4.
3 MSAVEN a MbN: “Call block” aMSELECTN
4 MbN: “Yes” a MSELECTN5 Edit the phone number if necessary
(24 digits max.). a MSAVEN a MOFFNn When a cellular phone is not paired:
1 MCN CID2 MbN: Select the desired entry to be
blocked. a MMENUNR To edit the number: MbN: “Edit” aMSELECTN
For assistance, please visit http://shop.panasonic.com/support 45
Call Block
TGM43x(en)_0426_ver031.pdf 45 2016/04/26 10:55:18
Press MEDITN repeatedly until thephone number is shown in the10-digit format. a MSAVEN a MbN:“Call block” a MSELECTN aGo to step 4.
3 MbN: “Save call block” aMSELECTN
4 MbN: “Yes” a MSELECTN5 Edit the phone number if necessary
(24 digits max.). a MSAVEN a MOFFN
Adding call blocked numbersmanually1 MMENUN#2172 MbN: “Block a single number” a
MSELECTN3 MMENUN a MbN: “Add” a MSELECTN4 Enter the phone number (24 digits max.).
a MSAVEN a MOFFN
Storing a range of number1 MMENUN#2172 MbN: “Block range of numbers” a
MSELECTN3 MMENUN a MbN: “Add” a MSELECTN4 Enter the desired number (2-8 digits). a
MSAVEN a MOFFN
Blocking incoming callsthat have no phone numberYou can block calls when no phone number isprovided, such as private callers or out of areacalls.1 MMENUN#2172 MbN: “Block unknown CID” a
MSELECTN3 MbN: Select the desired setting. a
MSAVEN a MOFFN
Turning the first ring onand offYou can choose whether the first ring soundswhen a call is received.
“Yes” (default): The first ring for all calls willbe heard, including calls from blocked phonenumbers.“No”: The first ring is muted for all calls. If thissetting is selected, the unit will never ring forcalls from blocked phone numbers.1 MMENUN#2172 MbN: “One ring for blocked call”
a MSELECTN3 MbN: Select the desired setting. a
MSAVEN a MOFFN
Viewing/editing/erasingcall block numbers1 MMENUN#2172 MbN: “Block a single number” or
“Block range of numbers” aMSELECTN
3 MbN: Select the desired entry.R After viewing, press MOFFN to exit.
4 To edit a number:MEDITN a Edit the number. a MSAVENa MOFFNTo erase a number:MERASEN a MbN: “Yes” a MSELECTNa MOFFN
Note:R When editing, press the desired dial key to
add digits and press MCLEARN to erasedigits.
Erasing all call blocknumbers1 MMENUN#2172 MbN: “Block a single number” or
“Block range of numbers” aMSELECTN
3 MMENUN a MbN: “Erase all” aMSELECTN
4 MbN: “Yes” a MSELECTN5 MbN: “Yes” a MSELECTN a MOFFN
46 For assistance, please visit http://shop.panasonic.com/support
Call Block
TGM43x(en)_0426_ver031.pdf 46 2016/04/26 10:55:18
PhonebookYou can add 3,000 names (16 charactersmax.) and phone numbers (24 digits max.) tothe phonebook, and assign each phonebookentry to the desired group (page 48). Thefollowing groups are available:– Group 1: “Home”*1 (default)– Group 2: “Cell 1”*1
– Group 3: “Cell 2”*1
– Group 4-9: You can change the groupname for each group.
*1 For groups 1-3, the group names cannotbe changed.
Important:R All entries can be shared by any registered
handset.R You can copy phonebook entries from a
Bluetooth cellular phone to the unit’sphonebook (page 66).
Adding phonebook entries1 MFN W a MMENUN2 MbN: “Add new entry” a MSELECTN3 Enter the party’s name. a MOKN4 Enter the party’s phone number. a MOKN5 MbN: Select the desired group. a
MSELECTN 2 times a MOFFNNote:R In step 3, you can switch the language for
entering characters.# a MbN: Select the desired language. aMOKN
Entering charactersPress the dial key that corresponds to thedesired character. Press repeatedly to scrollthrough the available characters.The following operations are also available.
Key Operation* Switch between the
uppercase and lowercase(A « a)
Key OperationMFN MEN Move the cursorMCLEARN Erase the character or number
R To erase all, press andhold it.
R To enter another character that is locatedon the same dial key, first press MEN tomove the cursor to the next space.
R If you do not press any dial key within 2seconds after entering a character, thecharacter is fixed and the cursor moves tothe next space.
Storing a redial list number to thephonebookPhone numbers of up to 24 digits can bestored in the phonebook.n When a cellular phone is paired:
1 MEN REDIAL2 MbN: Select the desired entry. a
MMENUN3 MbN: “Save” a MSELECTN4 To store the name, continue from step
3, “Editing entries”, page 49.n When a cellular phone is not paired:
1 MEN REDIAL2 MbN: Select the desired entry. a
MSAVEN3 To store the name, continue from step
3, “Editing entries”, page 49.Note:R The name stored in the phonebook will be
reflected in the redial list after you make acall using that phonebook entry.
Storing caller information to thephonebookn When a cellular phone is paired:
1 MCN CID
For assistance, please visit http://shop.panasonic.com/support 47
Phonebook
TGM43x(en)_0426_ver031.pdf 47 2016/04/26 10:55:18
2 MbN: Select the desired entry. aMSELECTNR To edit the number, press * (Edit)
repeatedly until the phone numberis shown in the desired format.
3 MSAVEN4 MbN: “Phonebook” a MSELECTN5 Continue from step 3, “Editing entries”,
page 49.n When a cellular phone is not paired:
1 MCN CID2 MbN: Select the desired entry. a
MMENUNR To edit the number: MbN: “Edit” aMSELECTNPress MEDITN repeatedly until thephone number is shown in thedesired format. a MSAVEN a MbN:“Phonebook” a MSELECTN aGo to step 4.
3 MbN: “Save phonebook” aMSELECTN
4 Continue from step 3, “Editing entries”,page 49.
GroupsGroups can help you find entries in thephonebook quickly and easily. You canchange the group names for groups 4-9(“Friends”, “Family”, etc.). By assigningdifferent ringer tones for different groups ofcallers, you can identify who is calling (ringerID), if you have subscribed to Caller ID service.
Changing group names/settingringer ID1 MFN W a MMENUN2 MbN: “Group” a MSELECTN3 MbN: Select the desired group. a
MSELECTN4 To change group names
MbN: “Group name” a MSELECTN aEdit the name (10 characters max.).
R You cannot change group names ifyou selected “Home”, “Cell 1”, or“Cell 2” in step 3.
To set group ringer toneMbN: Select the current setting of thegroup ringer tone. a MSELECTN a MbN:Select the desired ringer tone.R If you select one of the ringers
(“Ringer 1” to “Ringer 5”), selectthe desired frequency (“Frequency1” to “Frequency 6”).
5 MSAVEN a MOFFN
Finding and calling from aphonebook entry1 MFN W2 To scroll through all entries
MbN: Select the desired entry.To search by first character
Press the dial key (0 to 9, or #)which contains the character you aresearching for.MbN: Scroll through the phonebook ifnecessary.
To search by groupMGROUPNMbN: Select the desired group. aMSELECTNMbN: Scroll through the phonebook ifnecessary.
To search by queryYou can narrow down the search to enterthe first characters of a name.
*To search for the name, enter thefirst characters (up to 4) inuppercase (page 47). a MOKNMbN: Scroll through the phonebook ifnecessary.
3 n Using a cellular line:MCELLNR The unit starts dialing
immediately in the followingsituations.– Only 1 cellular phone is
paired.– A specific line is set to make
cellular calls (page 37).
48 For assistance, please visit http://shop.panasonic.com/support
Phonebook
TGM43x(en)_0426_ver031.pdf 48 2016/04/26 10:55:18

MbN: Select the desired cellularphone. a MSELECTN
n Using a landline:MTALKN
Editing entries1 Find the desired entry (page 48).2 MMENUN a MbN: “Edit” a MSELECTN3 Edit the name if necessary. a MOKN4 Edit the phone number if necessary. a
MOKN5 MbN: Select the desired group (page 48).
a MSELECTN 2 times a MOFFN
Erasing entries
Erasing an entry1 Find the desired entry (page 48).2 MMENUN a MbN: “Erase” a MSELECTN3 MbN: “Yes” a MSELECTN a MOFFN
Erasing all entries1 MFN W a MMENUN2 MbN: “Erase all” a MSELECTN3 MbN: Select the desired group. a
MSELECTN4 MbN: “Yes” a MSELECTN5 MbN: “Yes” a MSELECTN a MOFFN
Chain dialThis feature allows you to dial phone numbersin the phonebook while you are on a call. Thisfeature can be used, for example, to dial acalling card access number or bank accountPIN that you have stored in the phonebook,without having to dial manually.1 During an outside call, press MFN W.2 MbN: Select the desired entry.3 Press MCALLN to dial the number.Note:R When storing a calling card access number
and your PIN in the phonebook as one
phonebook entry, press MDN (Pause) to addpauses after the number and PIN asnecessary (page 39).
R If you have rotary/pulse service, you needto press * before pressing MFN W in step1 to change the dialing mode temporarily totone. When adding entries to thephonebook, we recommend adding * tothe beginning of phone numbers you wishto chain dial (page 47).
Memory dialFor easy dialing, you can assign a phonenumber to each dial key (1 to 9) on thehandset. All memory dial entries can be usedby any handset.Phone numbers assigned to dial keys 1 to 3on the handset are also assigned to the baseunit’s memory dial keys (MM1N, MM2N, andMM3N).
Adding phone numbers tomemory dial keysn By entering phone numbers:
1 Press and hold the desired memorydial key (1 to 9). a MADDN
2 MbN: “Manual” a MSELECTN3 Enter the party’s name (16 characters
max.). a MOKN4 Enter the party’s phone number (24
digits max.). a MOKN a MSELECTNa MOFFN
n From the phonebook:1 Press and hold the desired memory
dial key (1 to 9). a MADDN2 MbN: “Phonebook” a MSELECTN3 MbN: Select the desired entry. a
MSAVEN a MOFFNNote:R If you edit a phonebook entry which is
assigned to a memory dial key, the editedentry does not transfer to the memory dialkey.
For assistance, please visit http://shop.panasonic.com/support 49
Phonebook
TGM43x(en)_0426_ver031.pdf 49 2016/04/26 10:55:18
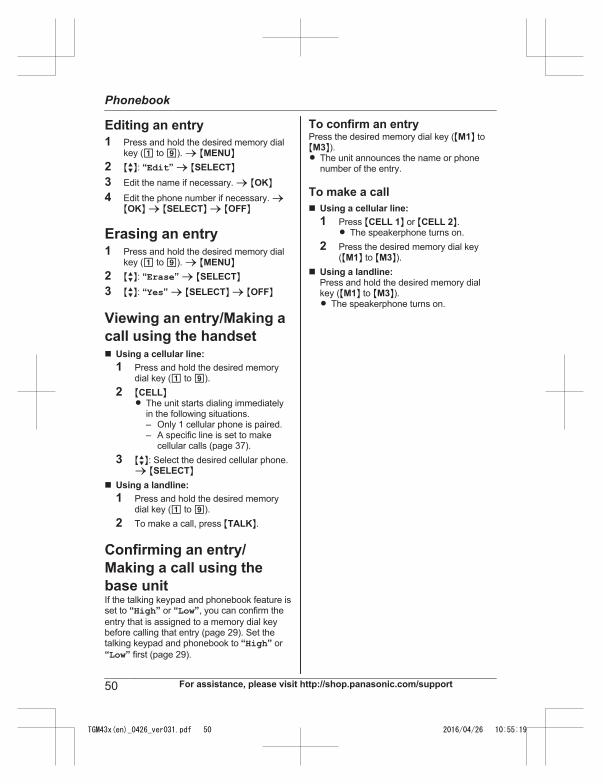
Editing an entry1 Press and hold the desired memory dial
key (1 to 9). a MMENUN2 MbN: “Edit” a MSELECTN3 Edit the name if necessary. a MOKN4 Edit the phone number if necessary. a
MOKN a MSELECTN a MOFFN
Erasing an entry1 Press and hold the desired memory dial
key (1 to 9). a MMENUN2 MbN: “Erase” a MSELECTN3 MbN: “Yes” a MSELECTN a MOFFN
Viewing an entry/Making acall using the handsetn Using a cellular line:
1 Press and hold the desired memorydial key (1 to 9).
2 MCELLNR The unit starts dialing immediately
in the following situations.– Only 1 cellular phone is paired.– A specific line is set to make
cellular calls (page 37).3 MbN: Select the desired cellular phone.
a MSELECTNn Using a landline:
1 Press and hold the desired memorydial key (1 to 9).
2 To make a call, press MTALKN.
Confirming an entry/Making a call using thebase unitIf the talking keypad and phonebook feature isset to “High” or “Low”, you can confirm theentry that is assigned to a memory dial keybefore calling that entry (page 29). Set thetalking keypad and phonebook to “High” or“Low” first (page 29).
To confirm an entryPress the desired memory dial key (MM1N toMM3N).R The unit announces the name or phone
number of the entry.
To make a calln Using a cellular line:
1 Press MCELL 1N or MCELL 2N.R The speakerphone turns on.
2 Press the desired memory dial key(MM1N to MM3N).
n Using a landline:Press and hold the desired memory dialkey (MM1N to MM3N).R The speakerphone turns on.
50 For assistance, please visit http://shop.panasonic.com/support
Phonebook
TGM43x(en)_0426_ver031.pdf 50 2016/04/26 10:55:19
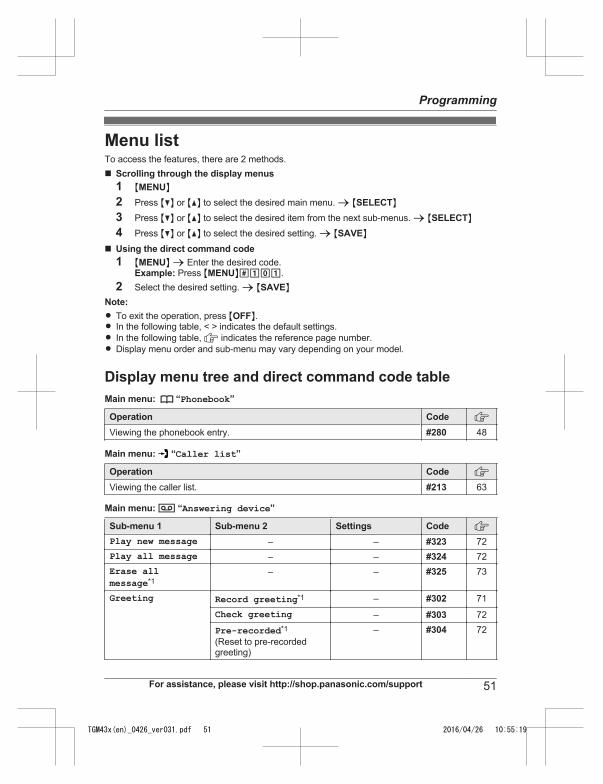
Menu listTo access the features, there are 2 methods.n Scrolling through the display menus
1 MMENUN2 Press MCN or MDN to select the desired main menu. a MSELECTN3 Press MCN or MDN to select the desired item from the next sub-menus. a MSELECTN4 Press MCN or MDN to select the desired setting. a MSAVEN
n Using the direct command code1 MMENUN a Enter the desired code.
Example: Press MMENUN#101.2 Select the desired setting. a MSAVEN
Note:R To exit the operation, press MOFFN.R In the following table, < > indicates the default settings.R In the following table, indicates the reference page number.R Display menu order and sub-menu may vary depending on your model.
Display menu tree and direct command code tableMain menu: W “Phonebook”
Operation CodeViewing the phonebook entry. #280 48
Main menu: “Caller list”
Operation CodeViewing the caller list. #213 63
Main menu: “Answering device”
Sub-menu 1 Sub-menu 2 Settings CodePlay new message – – #323 72Play all message – – #324 72Erase allmessage*1
– – #325 73
Greeting Record greeting*1 – #302 71
Check greeting – #303 72
Pre-recorded*1
(Reset to pre-recordedgreeting)
– #304 72
For assistance, please visit http://shop.panasonic.com/support 51
Programming
TGM43x(en)_0426_ver031.pdf 51 2016/04/26 10:55:19
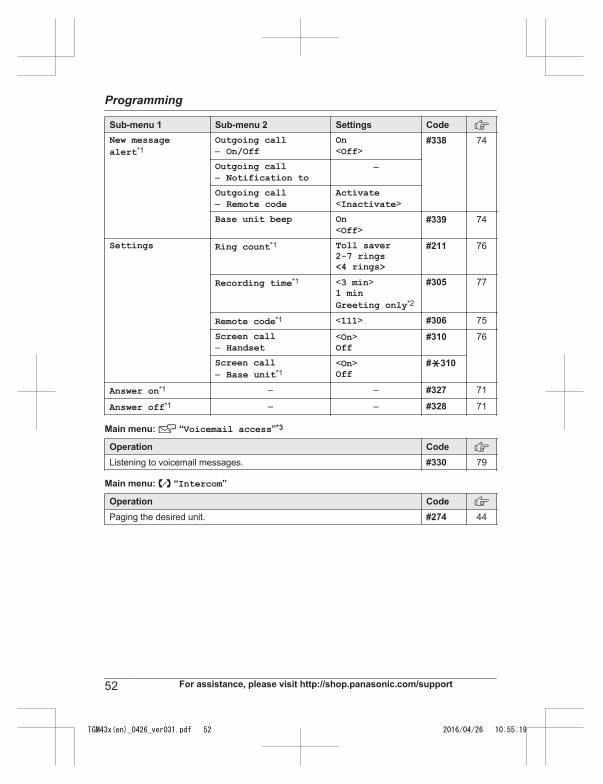
Sub-menu 1 Sub-menu 2 Settings CodeNew messagealert*1
Outgoing call– On/Off
On<Off>
#338 74
Outgoing call– Notification to
–
Outgoing call– Remote code
Activate<Inactivate>
Base unit beep On<Off>
#339 74
Settings Ring count*1 Toll saver2-7 rings<4 rings>
#211 76
Recording time*1 <3 min>1 minGreeting only*2
#305 77
Remote code*1 <111> #306 75
Screen call– Handset
<On>Off
#310 76
Screen call– Base unit*1
<On>Off
#G310
Answer on*1 – – #327 71
Answer off*1 – – #328 71
Main menu: “Voicemail access”*3
Operation CodeListening to voicemail messages. #330 79
Main menu: “Intercom”
Operation CodePaging the desired unit. #274 44
52 For assistance, please visit http://shop.panasonic.com/support
Programming
TGM43x(en)_0426_ver031.pdf 52 2016/04/26 10:55:19
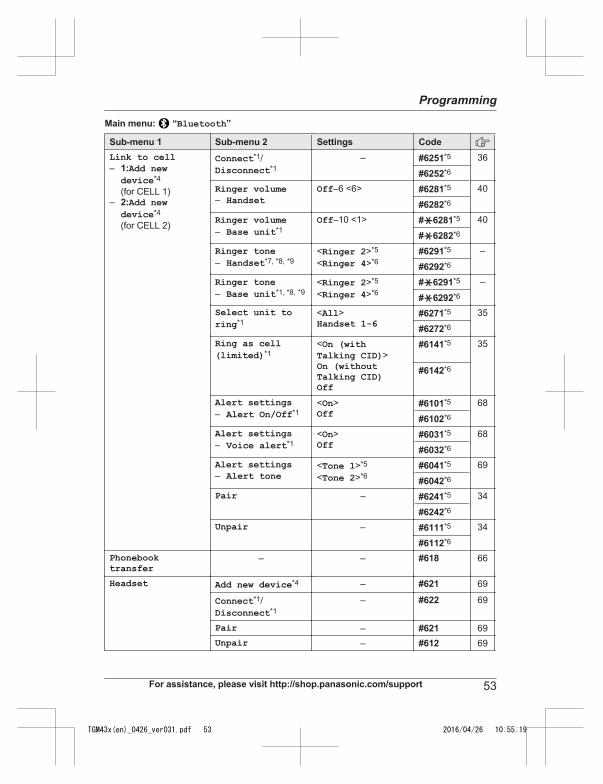
Main menu: “Bluetooth”
Sub-menu 1 Sub-menu 2 Settings CodeLink to cell– 1:Add new
device*4
(for CELL 1)– 2:Add new
device*4
(for CELL 2)
Connect*1/Disconnect*1
– #6251*5 36
#6252*6
Ringer volume– Handset
Off–6 <6> #6281*5 40
#6282*6
Ringer volume– Base unit*1
Off–10 <1> #G6281*5 40
#G6282*6
Ringer tone– Handset*7, *8, *9
<Ringer 2>*5
<Ringer 4>*6#6291*5 –
#6292*6
Ringer tone– Base unit*1, *8, *9
<Ringer 2>*5
<Ringer 4>*6#G6291*5 –
#G6292*6
Select unit toring*1
<All>Handset 1-6
#6271*5 35
#6272*6
Ring as cell(limited)*1
<On (withTalking CID)>On (withoutTalking CID)Off
#6141*5 35
#6142*6
Alert settings– Alert On/Off*1
<On>Off
#6101*5 68
#6102*6
Alert settings– Voice alert*1
<On>Off
#6031*5 68
#6032*6
Alert settings– Alert tone
<Tone 1>*5
<Tone 2>*6#6041*5 69
#6042*6
Pair – #6241*5 34
#6242*6
Unpair – #6111*5 34
#6112*6
Phonebooktransfer
– – #618 66
Headset Add new device*4 – #621 69
Connect*1/Disconnect*1
– #622 69
Pair – #621 69Unpair – #612 69
For assistance, please visit http://shop.panasonic.com/support 53
Programming
TGM43x(en)_0426_ver031.pdf 53 2016/04/26 10:55:19
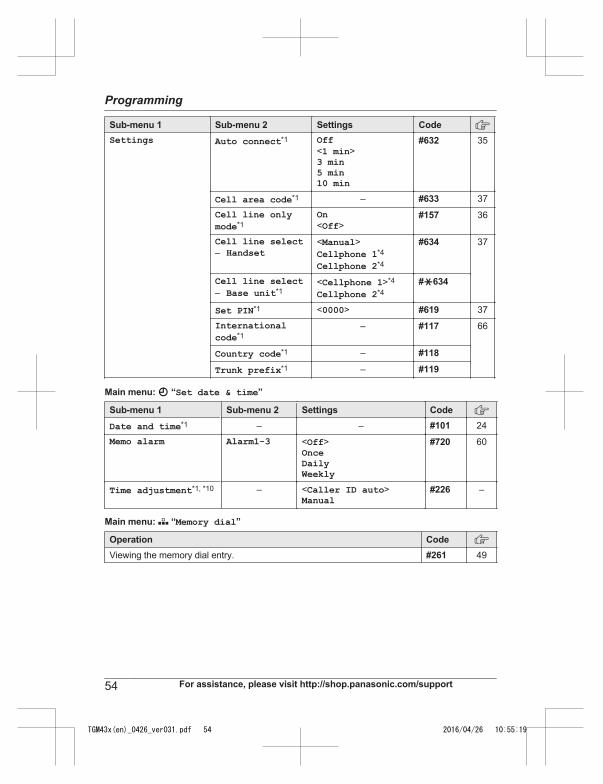
Sub-menu 1 Sub-menu 2 Settings CodeSettings Auto connect*1 Off
<1 min>3 min5 min10 min
#632 35
Cell area code*1 – #633 37
Cell line onlymode*1
On<Off>
#157 36
Cell line select– Handset
<Manual>Cellphone 1*4
Cellphone 2*4
#634 37
Cell line select– Base unit*1
<Cellphone 1>*4
Cellphone 2*4#G634
Set PIN*1 <0000> #619 37
Internationalcode*1
– #117 66
Country code*1 – #118
Trunk prefix*1 – #119
Main menu: “Set date & time”
Sub-menu 1 Sub-menu 2 Settings CodeDate and time*1 – – #101 24
Memo alarm Alarm1-3 <Off>OnceDailyWeekly
#720 60
Time adjustment*1, *10 – <Caller ID auto>Manual
#226 –
Main menu: “Memory dial”
Operation CodeViewing the memory dial entry. #261 49
54 For assistance, please visit http://shop.panasonic.com/support
Programming
TGM43x(en)_0426_ver031.pdf 54 2016/04/26 10:55:19
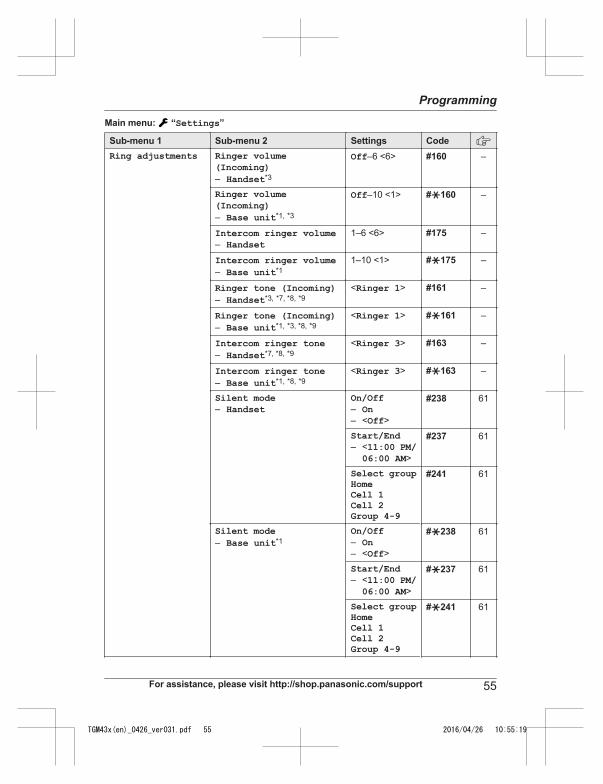
Main menu: “Settings”
Sub-menu 1 Sub-menu 2 Settings CodeRing adjustments Ringer volume
(Incoming)– Handset*3
Off–6 <6> #160 –
Ringer volume(Incoming)– Base unit*1, *3
Off–10 <1> #G160 –
Intercom ringer volume– Handset
1–6 <6> #175 –
Intercom ringer volume– Base unit*1
1–10 <1> #G175 –
Ringer tone (Incoming)– Handset*3, *7, *8, *9
<Ringer 1> #161 –
Ringer tone (Incoming)– Base unit*1, *3, *8, *9
<Ringer 1> #G161 –
Intercom ringer tone– Handset*7, *8, *9
<Ringer 3> #163 –
Intercom ringer tone– Base unit*1, *8, *9
<Ringer 3> #G163 –
Silent mode– Handset
On/Off– On– <Off>
#238 61
Start/End– <11:00 PM/
06:00 AM>
#237 61
Select groupHomeCell 1Cell 2Group 4-9
#241 61
Silent mode– Base unit*1
On/Off– On– <Off>
#G238 61
Start/End– <11:00 PM/
06:00 AM>
#G237 61
Select groupHomeCell 1Cell 2Group 4-9
#G241 61
For assistance, please visit http://shop.panasonic.com/support 55
Programming
TGM43x(en)_0426_ver031.pdf 55 2016/04/26 10:55:19
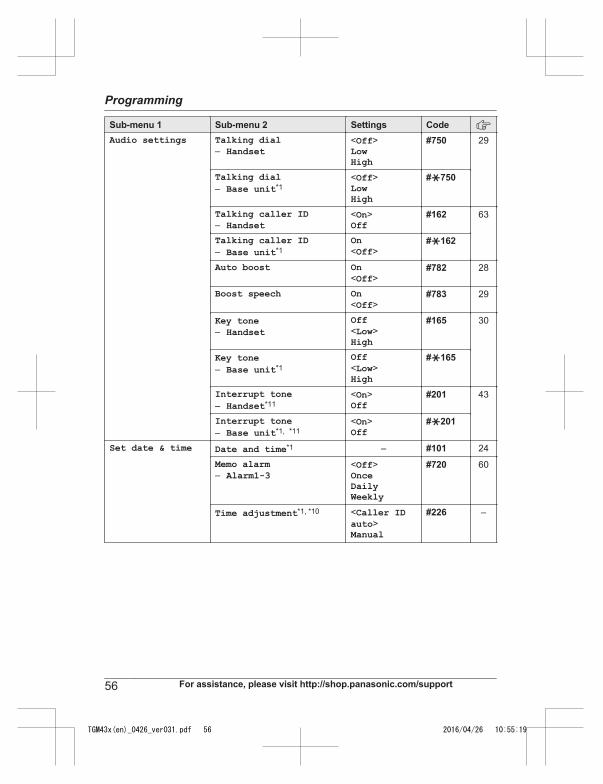
Sub-menu 1 Sub-menu 2 Settings CodeAudio settings Talking dial
– Handset<Off>LowHigh
#750 29
Talking dial– Base unit*1
<Off>LowHigh
#G750
Talking caller ID– Handset
<On>Off
#162 63
Talking caller ID– Base unit*1
On<Off>
#G162
Auto boost On<Off>
#782 28
Boost speech On<Off>
#783 29
Key tone– Handset
Off<Low>High
#165 30
Key tone– Base unit*1
Off<Low>High
#G165
Interrupt tone– Handset*11
<On>Off
#201 43
Interrupt tone– Base unit*1, *11
<On>Off
#G201
Set date & time Date and time*1 – #101 24
Memo alarm– Alarm1-3
<Off>OnceDailyWeekly
#720 60
Time adjustment*1, *10 <Caller IDauto>Manual
#226 –
56 For assistance, please visit http://shop.panasonic.com/support
Programming
TGM43x(en)_0426_ver031.pdf 56 2016/04/26 10:55:19
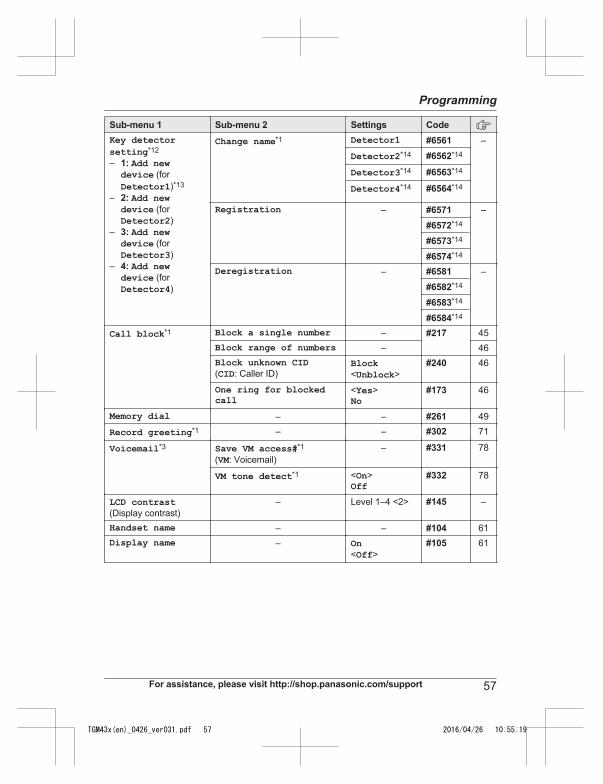
Sub-menu 1 Sub-menu 2 Settings CodeKey detectorsetting*12
– 1: Add newdevice (forDetector1)*13
– 2: Add newdevice (forDetector2)
– 3: Add newdevice (forDetector3)
– 4: Add newdevice (forDetector4)
Change name*1 Detector1 #6561 –
Detector2*14 #6562*14
Detector3*14 #6563*14
Detector4*14 #6564*14
Registration – #6571 –
#6572*14
#6573*14
#6574*14
Deregistration – #6581 –
#6582*14
#6583*14
#6584*14
Call block*1 Block a single number – #217 45Block range of numbers – 46Block unknown CID(CID: Caller ID)
Block <Unblock>
#240 46
One ring for blockedcall
<Yes>No
#173 46
Memory dial – – #261 49
Record greeting*1 – – #302 71
Voicemail*3 Save VM access#*1
(VM: Voicemail)– #331 78
VM tone detect*1 <On> Off
#332 78
LCD contrast(Display contrast)
– Level 1–4 <2> #145 –
Handset name – – #104 61Display name – On
<Off>#105 61
For assistance, please visit http://shop.panasonic.com/support 57
Programming
TGM43x(en)_0426_ver031.pdf 57 2016/04/26 10:55:19
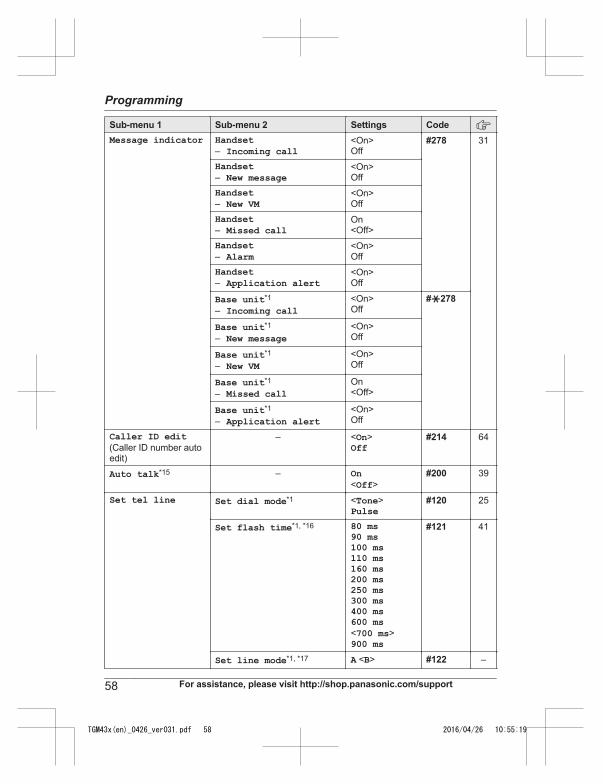
Sub-menu 1 Sub-menu 2 Settings CodeMessage indicator Handset
– Incoming call<On>Off
#278 31
Handset– New message
<On>Off
Handset– New VM
<On>Off
Handset– Missed call
On<Off>
Handset– Alarm
<On>Off
Handset– Application alert
<On>Off
Base unit*1
– Incoming call<On>Off
#G278
Base unit*1
– New message<On>Off
Base unit*1
– New VM<On>Off
Base unit*1
– Missed callOn<Off>
Base unit*1
– Application alert<On>Off
Caller ID edit(Caller ID number autoedit)
– <On> Off
#214 64
Auto talk*15 – On <Off>
#200 39
Set tel line Set dial mode*1 <Tone>Pulse
#120 25
Set flash time*1, *16 80 ms90 ms100 ms110 ms160 ms200 ms250 ms300 ms400 ms600 ms<700 ms>900 ms
#121 41
Set line mode*1, *17 A <B> #122 –
58 For assistance, please visit http://shop.panasonic.com/support
Programming
TGM43x(en)_0426_ver031.pdf 58 2016/04/26 10:55:19
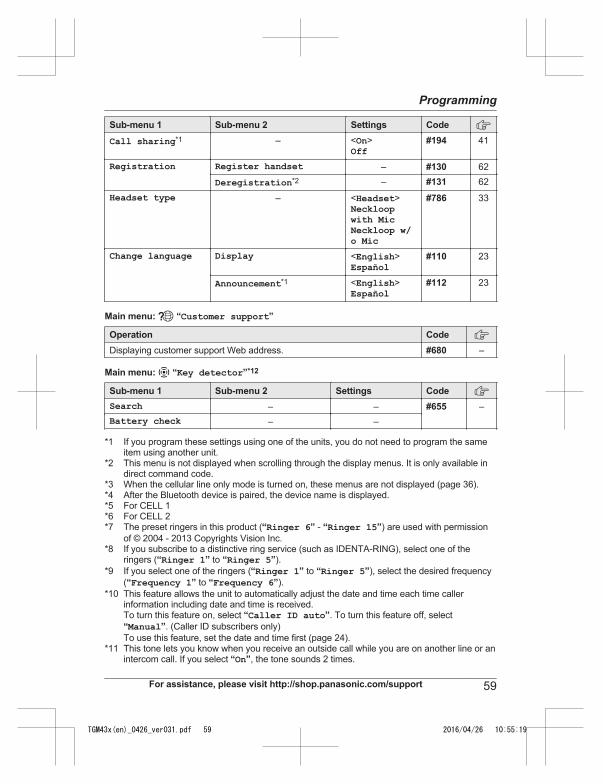
Sub-menu 1 Sub-menu 2 Settings CodeCall sharing*1 – <On>
Off#194 41
Registration Register handset – #130 62
Deregistration*2 – #131 62
Headset type – <Headset>Neckloopwith MicNeckloop w/o Mic
#786 33
Change language Display <English> Español
#110 23
Announcement*1 <English> Español
#112 23
Main menu: “Customer support”
Operation CodeDisplaying customer support Web address. #680 –
Main menu: “Key detector”*12
Sub-menu 1 Sub-menu 2 Settings CodeSearch – – #655 –Battery check – –
*1 If you program these settings using one of the units, you do not need to program the sameitem using another unit.
*2 This menu is not displayed when scrolling through the display menus. It is only available indirect command code.
*3 When the cellular line only mode is turned on, these menus are not displayed (page 36).*4 After the Bluetooth device is paired, the device name is displayed.*5 For CELL 1*6 For CELL 2*7 The preset ringers in this product (“Ringer 6” - “Ringer 15”) are used with permission
of © 2004 - 2013 Copyrights Vision Inc.*8 If you subscribe to a distinctive ring service (such as IDENTA-RING), select one of the
ringers (“Ringer 1” to “Ringer 5”).*9 If you select one of the ringers (“Ringer 1” to “Ringer 5”), select the desired frequency
(“Frequency 1” to “Frequency 6”).*10 This feature allows the unit to automatically adjust the date and time each time caller
information including date and time is received.To turn this feature on, select “Caller ID auto”. To turn this feature off, select“Manual”. (Caller ID subscribers only)To use this feature, set the date and time first (page 24).
*11 This tone lets you know when you receive an outside call while you are on another line or anintercom call. If you select “On”, the tone sounds 2 times.
For assistance, please visit http://shop.panasonic.com/support 59
Programming
TGM43x(en)_0426_ver031.pdf 59 2016/04/26 10:55:19
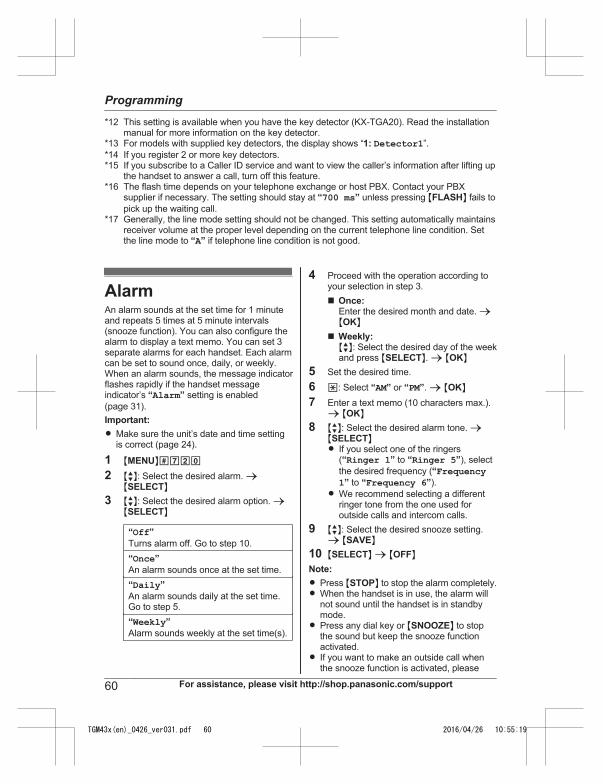
*12 This setting is available when you have the key detector (KX-TGA20). Read the installationmanual for more information on the key detector.
*13 For models with supplied key detectors, the display shows “1: Detector1”.*14 If you register 2 or more key detectors.*15 If you subscribe to a Caller ID service and want to view the caller’s information after lifting up
the handset to answer a call, turn off this feature.*16 The flash time depends on your telephone exchange or host PBX. Contact your PBX
supplier if necessary. The setting should stay at “700 ms” unless pressing MFLASHN fails topick up the waiting call.
*17 Generally, the line mode setting should not be changed. This setting automatically maintainsreceiver volume at the proper level depending on the current telephone line condition. Setthe line mode to “A” if telephone line condition is not good.
AlarmAn alarm sounds at the set time for 1 minuteand repeats 5 times at 5 minute intervals(snooze function). You can also configure thealarm to display a text memo. You can set 3separate alarms for each handset. Each alarmcan be set to sound once, daily, or weekly.When an alarm sounds, the message indicatorflashes rapidly if the handset messageindicator’s “Alarm” setting is enabled(page 31).Important:R Make sure the unit’s date and time setting
is correct (page 24).
1 MMENUN#7202 MbN: Select the desired alarm. a
MSELECTN3 MbN: Select the desired alarm option. a
MSELECTN
“Off”Turns alarm off. Go to step 10.“Once”An alarm sounds once at the set time.“Daily”An alarm sounds daily at the set time.Go to step 5.“Weekly”Alarm sounds weekly at the set time(s).
4 Proceed with the operation according toyour selection in step 3.n Once:
Enter the desired month and date. aMOKN
n Weekly:MbN: Select the desired day of the weekand press MSELECTN. a MOKN
5 Set the desired time.6 *: Select “AM” or “PM”. a MOKN7 Enter a text memo (10 characters max.).
a MOKN8 MbN: Select the desired alarm tone. a
MSELECTNR If you select one of the ringers
(“Ringer 1” to “Ringer 5”), selectthe desired frequency (“Frequency1” to “Frequency 6”).
R We recommend selecting a differentringer tone from the one used foroutside calls and intercom calls.
9 MbN: Select the desired snooze setting.a MSAVEN
10 MSELECTN a MOFFNNote:R Press MSTOPN to stop the alarm completely.R When the handset is in use, the alarm will
not sound until the handset is in standbymode.
R Press any dial key or MSNOOZEN to stopthe sound but keep the snooze functionactivated.
R If you want to make an outside call whenthe snooze function is activated, please
60 For assistance, please visit http://shop.panasonic.com/support
Programming
TGM43x(en)_0426_ver031.pdf 60 2016/04/26 10:55:19
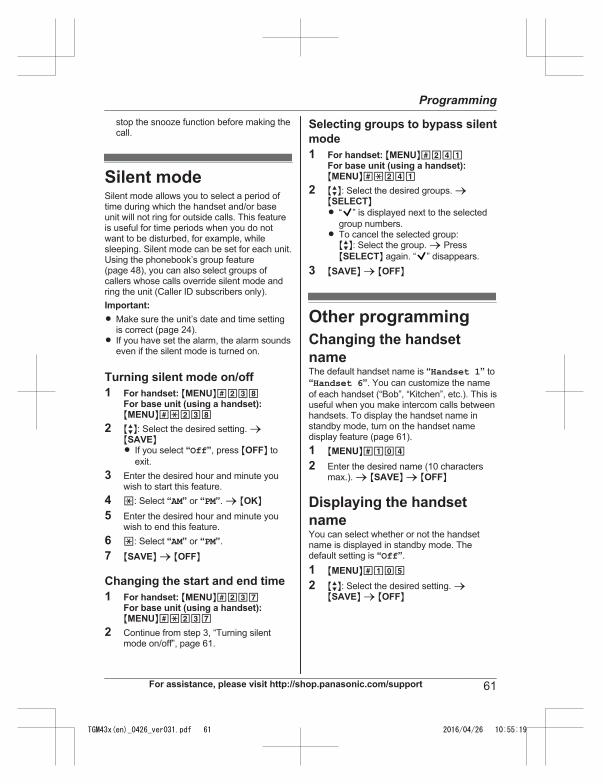
stop the snooze function before making thecall.
Silent modeSilent mode allows you to select a period oftime during which the handset and/or baseunit will not ring for outside calls. This featureis useful for time periods when you do notwant to be disturbed, for example, whilesleeping. Silent mode can be set for each unit.Using the phonebook’s group feature(page 48), you can also select groups ofcallers whose calls override silent mode andring the unit (Caller ID subscribers only).Important:R Make sure the unit’s date and time setting
is correct (page 24).R If you have set the alarm, the alarm sounds
even if the silent mode is turned on.
Turning silent mode on/off1 For handset: MMENUN#238
For base unit (using a handset):MMENUN#*238
2 MbN: Select the desired setting. aMSAVENR If you select “Off”, press MOFFN to
exit.3 Enter the desired hour and minute you
wish to start this feature.4 *: Select “AM” or “PM”. a MOKN5 Enter the desired hour and minute you
wish to end this feature.6 *: Select “AM” or “PM”.7 MSAVEN a MOFFN
Changing the start and end time1 For handset: MMENUN#237
For base unit (using a handset):MMENUN#*237
2 Continue from step 3, “Turning silentmode on/off”, page 61.
Selecting groups to bypass silentmode1 For handset: MMENUN#241
For base unit (using a handset):MMENUN#*241
2 MbN: Select the desired groups. aMSELECTNR “ ” is displayed next to the selected
group numbers.R To cancel the selected group:MbN: Select the group. a PressMSELECTN again. “ ” disappears.
3 MSAVEN a MOFFN
Other programmingChanging the handsetnameThe default handset name is “Handset 1” to“Handset 6”. You can customize the nameof each handset (“Bob”, “Kitchen”, etc.). This isuseful when you make intercom calls betweenhandsets. To display the handset name instandby mode, turn on the handset namedisplay feature (page 61).1 MMENUN#1042 Enter the desired name (10 characters
max.). a MSAVEN a MOFFN
Displaying the handsetnameYou can select whether or not the handsetname is displayed in standby mode. Thedefault setting is “Off”.1 MMENUN#1052 MbN: Select the desired setting. a
MSAVEN a MOFFN
For assistance, please visit http://shop.panasonic.com/support 61
Programming
TGM43x(en)_0426_ver031.pdf 61 2016/04/26 10:55:19
Registering a unitOperating additional units
Additional handsetsUp to 6 handsets can be registered to thebase unit.Important:R See page 5 for information on the available
model.
Registering a handset tothe base unitThe supplied handset and base unit arepre-registered. If for some reason the handsetis not registered to the base unit, re-registerthe handset.1 Handset:
MMENUN#1302 Base unit:
Press and hold MLOCATOR/INTERCOMNfor about 5 seconds.R If all registered handsets start ringing,
press MLOCATOR/INTERCOMN againto stop, then repeat this step.
3 Handset:Press MOKN, then wait until a long beepsounds.
Deregistering a handsetA handset can cancel its own registration tothe base unit, or other handsets registered tothe same base unit. This allows the handset toend its wireless connection with the system.1 MMENUN#131
R All handsets registered to the base unitare displayed.
2 MbN: Select the handset you want tocancel. a MSELECTN
3 MbN: “Yes” a MSELECTN a MOFFN
62 For assistance, please visit http://shop.panasonic.com/support
Programming
TGM43x(en)_0426_ver031.pdf 62 2016/04/26 10:55:19
Using Caller ID serviceImportant:R This unit is Caller ID compatible. To use
Caller ID features, you must subscribe to aCaller ID service. Contact your phoneservice provider for details.
Caller ID featuresWhen an outside call is being received, thecaller information is displayed.Caller information for the last 50 callers islogged in the caller list from the most recentcall to the oldest.R If the unit cannot receive caller information,
the following is displayed:– “Out of area”: The caller dials from
an area which does not provide a CallerID service.
– “Private caller”: The callerrequests not to send caller information.
– “Long distance”: The caller makes along distance call.
R If the unit is connected to a PBX system,caller information may not be properlyreceived. Contact your PBX supplier.
Missed callsIf a call is not answered, the unit treats it as amissed call. The display shows “Missedcall”.When there is a missed call, the messageindicator flashes slowly if the handset or baseunit message indicator’s “Missed call”setting is enabled (page 31).Note:R Even when there are unviewed missed
calls, “Missed call” disappears from thestandby display if the following operation isperformed by one of the units:– A handset is replaced on the base unit
or charger.– Pressing MOFFN on a handset.
Phonebook name displayWhen caller information is received and itmatches a phone number stored in the
phonebook, the stored name in thephonebook is displayed and logged in thecaller list.
Talking Caller IDHandset / Base unit
This feature lets you know who is callingwithout looking at the display.To use this feature, you must:– subscribe to a Caller ID service of your
phone service provider.– turn this feature on (page 56).When caller information is received, thehandsets and/or base unit announce thecaller’s name or phone number received fromyour phone service provider following everyring.R Name pronunciation may vary. This feature
may not pronounce all names correctly.R Caller ID service has a limit of how many
characters can be displayed. If the caller’sname is too long, the unit may not be ableto display or announce the entire name.
Phonebook name announcementWhen caller information is received and itmatches a phone number stored in thephonebook, the stored name in thephonebook is announced.
Caller listImportant:R Make sure the unit’s date and time setting
is correct (page 24).
Viewing the caller list andcalling backn Using a cellular line
1 MCN CID2 Press MCN to search from the most
recent call, or MDN to search from theoldest call.
For assistance, please visit http://shop.panasonic.com/support 63
Caller ID Service
TGM43x(en)_0426_ver031.pdf 63 2016/04/26 10:55:19
3 To call back, press MSELECTN.To exit, press MOFFN.
4 MCELLNR The unit starts dialing immediately
in the following situations.– Only 1 cellular phone is paired.– A specific line is set to make
cellular calls (page 37).5 MbN: Select the desired cellular phone.
a MSELECTNn Using a landline
1 MCN CID2 Press MCN to search from the most
recent call, or MDN to search from theoldest call.
3 To call back, press MTALKN.To exit, press MOFFN.
Note:R If the entry has already been viewed or
answered, “ ” is displayed.R or indicates the caller information
was received from the cellular line.
Editing a caller’s phonenumberYou can edit a phone number in the caller listby removing its area code and/or the longdistance code “1”.n When a cellular phone is paired:
1 MCN CID2 MbN: Select the desired entry. a
MSELECTN3 Press * (Edit) repeatedly until the
phone number is shown in the desiredformat.
4 Using a cellular line:To make a cellular call, continue fromstep 4, “Viewing the caller list andcalling back”, page 63.Using a landline:MTALKN
n When a cellular phone is not paired:1 MCN CID
2 MbN: Select the desired entry. aMMENUN
3 MbN: “Edit” a MSELECTN4 Press MEDITN repeatedly until the
phone number is shown in the desiredformat.
5 MTALKN
Caller ID number auto editfeatureOnce you call back an edited number, the unitwhich was used to call back remembers thearea code and format of the edited number.The next time someone calls from the samearea code, caller information is customized bythe unit as follows:– When the call is being received, the Caller
ID number is displayed in the same formatas the edited number.
– After the call has ended, the caller’s phonenumber is displayed in the same format asthe edited number, when reviewed from thecaller list.
For example, you can use this feature to setthe unit to ignore the area code of callers inyour area, so that you can call these localnumbers using caller information withoutdialing the area code.To activate this feature, you must edit an entryin the caller list, then call that number. Afterthat, phone numbers from that caller’s areacode are edited automatically.This feature can be set for each unit(page 58). The default setting is “On”.Note:R Phone numbers from the 4 most recently
edited area codes are automatically edited.
Erasing selected callerinformation1 MCN CID2 MbN: Select the desired entry.3 MERASEN a MbN: “Yes” a MSELECTN
a MOFFN
64 For assistance, please visit http://shop.panasonic.com/support
Caller ID Service
TGM43x(en)_0426_ver031.pdf 64 2016/04/26 10:55:19
Erasing all callerinformation1 MCN CID2 MERASEN a MbN: “Yes” a MSELECTN
a MOFFN
For assistance, please visit http://shop.panasonic.com/support 65
Caller ID Service
TGM43x(en)_0426_ver031.pdf 65 2016/04/26 10:55:19
Copying phonebookfrom a cellular phone(phonebook transfer)You can copy phonebook entries from thepaired cellular phones or other cellular phones(not paired) to the unit’s phonebook. A cellularphone must be compatible with Bluetoothwireless technology.Important:R Your cellular phone must support Phone
Book Access Profile (PBAP) or ObjectPush Profile (OPP) specification.
R If a copied entry has 2 or more phonenumbers, each phone number (6 max.) isstored as a separate entry with the samename.
R If a phonebook entry includes additionaldata such as a picture, that entry may fail tocopy to the base unit.
R If your cellular phone includes internationalcall entries, set the conversion codesbefore copying (page 66).
1 Handset:MMENUN#618
2 Handset:To copy from paired cellular phones:MbN: Select the desired cellular phone. aMSELECTNR Copied items are stored to the group
(“Cell 1” or “Cell 2”) which thecellular phone is paired to.
To copy from other cellular phones(not paired):MbN: “Other cell” a MSELECTN aMbN: Select the group you want to copy to.a MSELECTN
3 Handset:When “Use the cell totransfer phone book” is displayed:Go to step 4.When “Select mode” menu isdisplayed:MbN: Select “Auto” or “Manual”. aMSELECTN
“Auto”: Download all entries from thecellular phone automatically. Go to step 5.“Manual”: Copy entries you selected.R “Select mode” menu is displayed
only when the cellular phone supportsPBAP (Phone Book Access Profile) forBluetooth connection.
R Some cellular phones may require youto perform an operation on the cellularphone even if you select “Auto”.
4 Cellular phone:Follow the instructions of your cellularphone to copy phonebook entries.R For other cellular phones (not paired),
you need to search for and select thebase unit. The Bluetooth PIN (default:“0000”) may be required.
R If your cellular phone prompts you toconfirm the passkey, tap MOKN orotherwise to accept the pairing request.
R The entries being copied are displayedon the handset.
5 Handset:Wait until “Completed” is displayed.R You can continue copying other entries
if necessary.6 Handset: MOFFNNote:R Some copied entries may have characters
which are not available. These characterscan be displayed but cannot be enteredwhen editing an entry.
R The unit does not support some characters.If a copied entry includes those characters,they are replaced with other availablecharacters or “H”.
R If you receive a call while copyingphonebook entries, the copying procedurestops. Try again after finishing the call.
Setting conversion codesYou must first set the following 3 dialing codesbefore transferring the phonebook from yourcellular phone (each 4 digits max.).– “International code”: An international
prefix used when you make an internationalcall.
– “Country code”: Your country code forinternational calls.
66 For assistance, please visit http://shop.panasonic.com/support
Using Bluetooth® Devices
TGM43x(en)_0426_ver031.pdf 66 2016/04/26 10:55:19
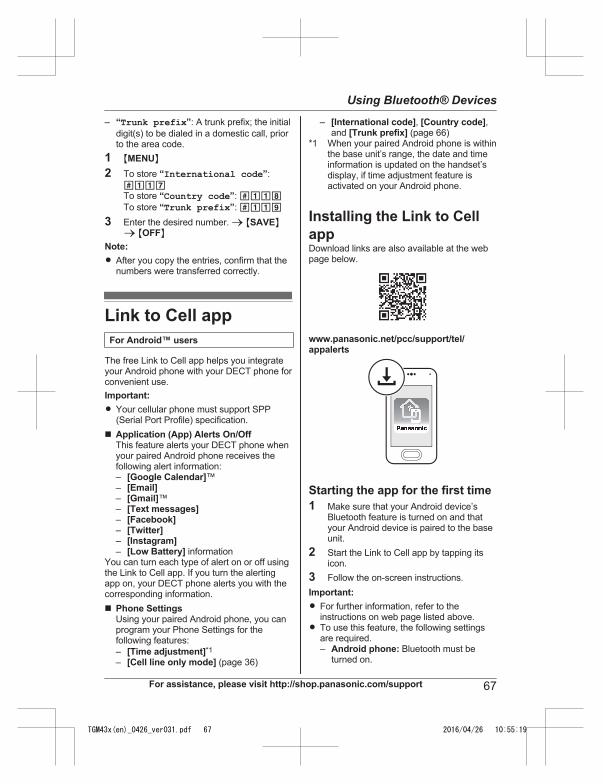
– “Trunk prefix”: A trunk prefix; the initialdigit(s) to be dialed in a domestic call, priorto the area code.
1 MMENUN2 To store “International code”:
#117To store “Country code”: #118To store “Trunk prefix”: #119
3 Enter the desired number. a MSAVENa MOFFN
Note:R After you copy the entries, confirm that the
numbers were transferred correctly.
Link to Cell appFor Android™ users
The free Link to Cell app helps you integrateyour Android phone with your DECT phone forconvenient use.Important:R Your cellular phone must support SPP
(Serial Port Profile) specification.n Application (App) Alerts On/Off
This feature alerts your DECT phone whenyour paired Android phone receives thefollowing alert information:– [Google Calendar]™– [Email]– [Gmail]™– [Text messages]– [Facebook]– [Twitter]– [Instagram]– [Low Battery] information
You can turn each type of alert on or off usingthe Link to Cell app. If you turn the alertingapp on, your DECT phone alerts you with thecorresponding information.n Phone Settings
Using your paired Android phone, you canprogram your Phone Settings for thefollowing features:– [Time adjustment]*1– [Cell line only mode] (page 36)
– [International code], [Country code],and [Trunk prefix] (page 66)
*1 When your paired Android phone is withinthe base unit’s range, the date and timeinformation is updated on the handset’sdisplay, if time adjustment feature isactivated on your Android phone.
Installing the Link to CellappDownload links are also available at the webpage below.
www.panasonic.net/pcc/support/tel/appalerts
Starting the app for the first time1 Make sure that your Android device’s
Bluetooth feature is turned on and thatyour Android device is paired to the baseunit.
2 Start the Link to Cell app by tapping itsicon.
3 Follow the on-screen instructions.Important:R For further information, refer to the
instructions on web page listed above.R To use this feature, the following settings
are required.– Android phone: Bluetooth must be
turned on.
For assistance, please visit http://shop.panasonic.com/support 67
Using Bluetooth® Devices
TGM43x(en)_0426_ver031.pdf 67 2016/04/26 10:55:19
– Android phone: [Application Alertsmanager]*1 must be turned on.
– Handset: “Alert On/Off” must beturned on (page 68).
R If this feature does not work, turn on yourdevice’s Bluetooth feature, unplug the baseunit’s AC adaptor, and remove the batteriesfrom the base unit. Then, reconnect ACadaptor and insert the batteries into thebase unit.
*1 Turning on [Application Alertsmanager]Use the following procedure afterinstalling the Link to Cell app.Android 2.x: Open your device’s[Settings] app. a Tap [Accessibility].a Turn on the [Accessibility] and[Application Alerts manager]checkboxes.Android 4.x: Open your device’s[Settings] app. a Tap [Accessibility].a Turn on [Application Alertsmanager].
RequirementsR An Android device (Android 2.1 or later)
Text message (SMS)alertFor iPhone® and BlackBerry® users
This feature alerts you on your DECT phonewhen your paired cellular phone receives SMSmessages. The Link to Cell app is not requiredfor iPhone and BlackBerry users.Important:R Your cellular phone must support MAP
(Message Access Profile) specification.R For further information, refer to the
instructions on web page listed below:www.panasonic.net/pcc/support/tel/sms/
R To use this feature, the following settingsare required:– iPhone and BlackBerry Phone:
Bluetooth must be turned on.
– Handset: “Alert On/Off” must beturned on (page 68).
R If this feature does not work, turn on yourdevice’s Bluetooth feature, unplug the baseunit’s AC adaptor, and remove the batteriesfrom the base unit. Then, reconnect ACadaptor and insert the batteries into thebase unit.
Alert settings for yourDECT phoneIf your cellular phone is paired to the base unitand receives notifications, the handset canalert you:– by briefly displaying a message– by announcement– by sounding alert tonesAdditionally, the message indicator flashesrapidly if the handset or base unit messageindicator’s “Application alert” setting isenabled (page 31).Important:R For Android users: Use the Link to Cell app
to enable the desired alerts (page 67).
Turning alert on/offOnce this feature is turned on, it will alert youon the handset when your cellular phonereceives notifications.– “On” (default): The handset alerts you.– “Off”: The handset does not alert you.1 For CELL 1: MMENUN#6101
For CELL 2: MMENUN#61022 MbN: Select the desired setting. a
MSAVEN a MOFFN
Setting the voice alertYou can turn on/off the voice alert.– “On” (default): The handset notifies you by
voice announcement.– “Off”: Voice announcement is not
available as alert.1 For CELL 1: MMENUN#6031
For CELL 2: MMENUN#6032
68 For assistance, please visit http://shop.panasonic.com/support
Using Bluetooth® Devices
TGM43x(en)_0426_ver031.pdf 68 2016/04/26 10:55:19
2 MbN: Select the desired setting. aMSAVEN a MOFFN
Selecting the alert tone1 For CELL 1: MMENUN#6041
For CELL 2: MMENUN#60422 MbN: Select the desired setting. a
MSAVEN a MOFFN
Using a Bluetoothheadset (optional)By pairing a Bluetooth headset to the baseunit, you can enjoy hands-free conversationswhen talking on landline calls.Important:R Your Bluetooth headset must support the
Headset Profile (HSP) specification.R Only 1 Bluetooth headset can be paired to
the base unit.R Only 2 Bluetooth devices can be used with
the unit at the same time (for example, 2cellular lines, or the headset and 1 cellularline*1).
R For best performance, we recommendusing your Bluetooth headset within 1 m(3.3 feet) of the base unit. The base unitcan communicate with Bluetooth headsetswithin a approximately 10 m (33 feet) range.
*1 You cannot use a Bluetooth headset totalk on a cellular line.
Pairing a Bluetoothheadset to the base unitImportant:R Make sure that the Bluetooth headset is not
connected to any other Bluetooth device.
1 Bluetooth headset:Set your headset to pairing mode.R Refer to your headset’s operating
instructions.2 Handset:
MMENUN#621
3 If your headset’s PIN is “0000”, go tostep 4.If your headset’s PIN is not “0000”,press MCLEARN, then enter yourheadset’s PIN.R Typically, the default PIN is “0000”.
Refer to the headset’s operatinginstructions.
4 Press MOKN, then wait until a long beepsounds.
5 MOFFNR When the Bluetooth headset is ready
for use:– is displayed on the handset (H:
Bluetooth headset),– the CELL 2/HEADSET indicator on
the base unit lights up.
Connecting/disconnecting aBluetooth headsetIf you cannot connect the headset and baseunit using the headset, you can connect usingthe handset.To use your headset with another Bluetoothdevice such as a cellular phone, you mayneed to disconnect it from the base unit.Important:R Make sure that the headset is turned on.
1 To connect/disconnect:MMENUN#622R A long beep sounds.
2 MOFFN
Unpairing a Bluetooth headsetYou can cancel a pairing of the headset that isstored to the base unit.1 MMENUN#6122 MbN: “Yes” a MSELECTN
R When the headset is unpaired, disappears on the handset.
3 MOFFN
For assistance, please visit http://shop.panasonic.com/support 69
Using Bluetooth® Devices
TGM43x(en)_0426_ver031.pdf 69 2016/04/26 10:55:19

Operating a Bluetoothheadset using a landlineImportant:R Refer to your headset’s operating
instructions for details.
Making landline calls with yourheadset
Base unit1 Press your headset’s button referring to
your headset’s operating instructions.2 Press the desired memory dial key (MM1N
to MM3N).3 When you finish talking, press your
headset’s button referring to yourheadset’s operating instructions.
Note:R If you cannot hang up the call using your
headset, press MZN on the base unit 2times.
Answering landline calls withyour headsetTo answer a landline call, press yourheadset’s button referring to your headset’soperating instructions.When you finish talking, press your headset’sbutton referring to your headset’s operatinginstructions.
Switching between the base unitand your headsetYou can switch between the base unit andyour headset:– during a landline call with the base unit
speakerphone.– during an intercom call between the base
unit and handset.– while listening to messages recorded on
the base unit answering system.n To switch to your headset:
Turn on the headset referring to yourheadset’s operating instructions.
n To switch to the base unit:Press MZN on the base unit.
Call sharing between yourheadset and the handsetImportant:R To activate this feature, you should set call
sharing mode to on beforehand (page 59).n While the handset is on a landline call:
To join the conversation with your headset,press your headset’s button referring toyour headset’s operating instructions.
n While your headset is on a landline call:To join the conversation with the handset,press MTALKN.
Adjusting your headset receivervolume
Base unitPress MjN or MkN repeatedly while using yourheadset.Note:R Depending on your headset, the receiver
volume may not be adjustable.
70 For assistance, please visit http://shop.panasonic.com/support
Using Bluetooth® Devices
TGM43x(en)_0426_ver031.pdf 70 2016/04/26 10:55:19
Answering system forlandlineThe answering system can answer and recordcalls for you when you are unavailable toanswer the phone.You can also set the unit to play a greetingmessage but not to record caller messages byselecting “Greeting only” as the recordingtime setting (page 77).Important:R Make sure the unit’s date and time setting
is correct (page 24).
Memory capacity(including your greetingmessage)The total recording capacity is about 18minutes. A maximum of 64 messages can berecorded.Note:R When message memory becomes full:
– “Messages full” is shown on thehandset display.
– The message counter and the ANSWERON/OFF indicator ( ) on the base unitflashes if the answering system is turnedon.
– If you use the pre-recorded greetingmessage, the unit automatically switchesto another pre-recorded greetingmessage asking callers to call againlater.
– If you recorded your own greetingmessage, the same message is stillannounced to callers even though theirmessages are not recorded.
Turning the answeringsystem on/off
Base unitPress MANSWER ON/OFFN to turn on/off theanswering system.
Handset1 To turn on:
MMENUN#327To turn off:MMENUN#328
2 MOFFNNote for base unit and handset:R When the answering system is turned on,
– the ANSWER ON/OFF indicator ( ) onthe base unit lights up.
– the message counter on the base unitdisplays the total number of messages(old and new).
Greeting messageWhen the unit answers a call, a greetingmessage is played to callers.You can use either:– your own greeting message– a pre-recorded greeting message
Recording your greetingmessage1 MMENUN#3022 MbN: “Yes” a MSELECTN3 After a beep sounds, hold the handset
about 20 cm (8 inches) away and speakclearly into the microphone (2 minutesmax.).
4 Press MSTOPN to stop recording. aMOFFN
For assistance, please visit http://shop.panasonic.com/support 71
Answering System for Landline
TGM43x(en)_0426_ver031.pdf 71 2016/04/26 10:55:19
Using a pre-recordedgreeting messageThe unit provides 2 pre-recorded greetingmessages:– If you reset to pre-recorded greeting or do
not record your own greeting message, theunit plays a pre-recorded greeting askingcallers to leave a message.
– If the message recording time (page 77)is set to “Greeting only”, callers’messages are not recorded and the unitplays a different pre-recorded greetingmessage asking callers to call again.
Resetting to a pre-recordedgreeting messageUse this procedure to erase your greetingmessage and use a pre-recorded one.1 MMENUN#3042 MYESN a MOFFN
Playing back the greetingmessage1 MMENUN#3032 To exit, press MOFFN.
Listening to messagesImportant:R When using the base unit or handset to
listen to messages, the noise reductionfeature (page 41) is activated automaticallyin spite of the setting ( is notdisplayed).
Using the base unitWhen new messages have been recorded:– The new message/play indicator ( ) on
the base unit flashes.– The message indicator on the base unit
flashes slowly if the base unit messageindicator’s “New message” setting isenabled (page 31).
Press M N (PLAY).R During playback, the new message/play
indicator ( ) on the base unit lights.R If new messages have been recorded, the
base unit plays back new messages.R If there are no new messages, the base
unit plays back all messages.
Operating the answering systemduring playback
Key OperationMjN or MkN Adjust the speaker
volumeM N Repeat message*1
M N Skip messageM N (STOP) Stop playbackMERASE/MUTEN
Erase currently playingmessage
*1 If pressed within the first 5 seconds of amessage, the previous message isplayed.
Erasing all messagesPress MERASE/MUTEN 2 times while the unitis not in use.
Using the handsetWhen new messages have been recorded:– “New message” is displayed.– The message indicator on the handset
flashes slowly if the handset messageindicator’s “New message” setting isenabled (page 31).
1 To listen to new messages:MMENUN#323To listen to all messages:MMENUN#324
2 When finished, press MOFFN.Note:R To switch to the receiver, press MZN.R You can also use the MPLAYN soft key, if
displayed, to play new messages.
72 For assistance, please visit http://shop.panasonic.com/support
Answering System for Landline
TGM43x(en)_0426_ver031.pdf 72 2016/04/26 10:55:20
Operating the answering systemMMENUN a MbN: “Answering device” aMSELECTN
Key OperationMjN or MkN Adjust the receiver/speaker
volume (during playback)1 or MFN Repeat message (during
playback)*1
2 or MEN Skip message (duringplayback)
3 Enter the “Settings” menu
4 Play new messages5 Play all messages6 Play greeting message76 Record greeting message8 Turn answering system onMPAUSEN Pause message*2
9 orMSTOPN
Stop recordingStop playback
0 Turn answering system off
*4*3 Erase currently playingmessage
*5 Erase all messages*6 Reset to a pre-recorded
greeting message
*1 If pressed within the first 5 seconds of amessage, the previous message isplayed.
*2 To resume playback:MbN: “Playback” a MSELECTN
*3 You can also erase as follows:MPAUSEN a MbN: “Erase” aMSELECTN a MbN: “Yes” a MSELECTN
Calling back (Caller IDsubscribers only)n Using a landline:
1 Press MPAUSEN during playback.2 MbN: “Call back” a MSELECTN
n Using a cellular line:1 Press MPAUSEN during playback.2 MbN: “Call back (Cell)” a
MSELECTNR The unit starts dialing immediately
in the following situations.– Only 1 cellular phone is paired.– A specific line is set to make
cellular calls (page 37).3 MbN: Select the desired cellular phone.
a MSELECTN
Editing the number before callingbackn Using a landline:
1 Press MPAUSEN during playback.2 MbN: “Edit & Call” a MSELECTN3 Press MEDITN repeatedly until the
phone number is shown in the desiredformat (page 64). a MTALKN
n Using a cellular line:1 Press MPAUSEN during playback.2 MbN: “Edit & Call” a MSELECTN3 Press MEDITN repeatedly until the
phone number is shown in the desiredformat (page 64).
4 MCELLNR The unit starts dialing immediately
in the following situations.– Only 1 cellular phone is paired.– A specific line is set to make
cellular calls (page 37).5 MbN: Select the desired cellular phone.
a MSELECTN
Erasing all messages1 MMENUN#3252 MbN: “Yes” a MSELECTN a MOFFN
For assistance, please visit http://shop.panasonic.com/support 73
Answering System for Landline
TGM43x(en)_0426_ver031.pdf 73 2016/04/26 10:55:20
Advanced newmessage alertingfeaturesAudible message alertThis feature allows the base unit to beep toinform you of a new message arrival whennew messages are recorded. The base unitbeeps 2 times every minute until you listen tothe messages, if the “Base unit beep”setting is turned on. The default setting is“Off”.1 MMENUN#3392 MbN: Select the desired setting. a
MSAVEN a MOFFN
New message alert by a callThis feature allows you to receive anotification by phone when new messages arerecorded. The base unit calls a phone numberyou specify. You can then operate theanswering system remotely to listen to thenew message.To use this feature, you must:– store a phone number to which the unit
makes the call to.– turn on the new message alert setting.After you answer the new message alert call,you can listen to messages from that call(page 75).This feature is only available for landline.Important:R A new message alert is stopped 1 minute
after the unit starts to call. The unit will notretry the call even if the call is not answered.
Storing a phone number to whichthe unit makes an alert calln From the phonebook:
1 MMENUN#3382 MbN: “Notification to” a
MSELECTN a MADDN3 MbN: “Phonebook” a MSELECTN
4 MbN: Select the desired phonebookentry. a MSAVEN a MOFFN
n By entering a phone number:1 MMENUN#3382 MbN: “Notification to” a
MSELECTN a MADDN3 MbN: “Manual” a MSELECTN4 Enter the desired name (16 characters
max.). a MOKN5 Enter the desired number (24 digits
max.). a MOKN a MSELECTN aMOFFN
Turning on/off the new messagealert setting1 MMENUN#3382 MbN: “On/Off” a MSELECTN3 MbN: Select the desired setting. a
MSAVEN a MOFFN
Editing the set phone number1 MMENUN#3382 MbN: “Notification to” a MSELECTN3 MMENUN a MbN: “Edit” a MSELECTN4 Edit the name if necessary (16 characters
max.). a MOKN5 Edit the phone number if necessary (24
digits max.). a MOKN a MSELECTN aMOFFN
Erasing the set phone number1 MMENUN#3382 MbN: “Notification to” a MSELECTN3 MMENUN a MbN: “Erase” a MSELECTN4 MbN: “Yes” a MSELECTN a MOFFN
R The new message alert setting isturned off.
74 For assistance, please visit http://shop.panasonic.com/support
Answering System for Landline
TGM43x(en)_0426_ver031.pdf 74 2016/04/26 10:55:20
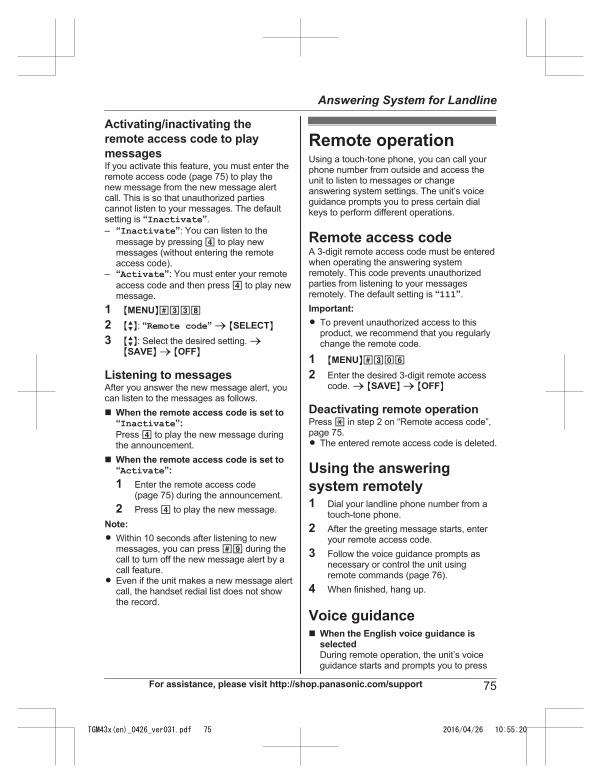
Activating/inactivating theremote access code to playmessagesIf you activate this feature, you must enter theremote access code (page 75) to play thenew message from the new message alertcall. This is so that unauthorized partiescannot listen to your messages. The defaultsetting is “Inactivate”.– “Inactivate”: You can listen to the
message by pressing 4 to play newmessages (without entering the remoteaccess code).
– “Activate”: You must enter your remoteaccess code and then press 4 to play newmessage.
1 MMENUN#3382 MbN: “Remote code” a MSELECTN3 MbN: Select the desired setting. a
MSAVEN a MOFFN
Listening to messagesAfter you answer the new message alert, youcan listen to the messages as follows.n When the remote access code is set to
“Inactivate”:Press 4 to play the new message duringthe announcement.
n When the remote access code is set to“Activate”:1 Enter the remote access code
(page 75) during the announcement.2 Press 4 to play the new message.
Note:R Within 10 seconds after listening to new
messages, you can press #9 during thecall to turn off the new message alert by acall feature.
R Even if the unit makes a new message alertcall, the handset redial list does not showthe record.
Remote operationUsing a touch-tone phone, you can call yourphone number from outside and access theunit to listen to messages or changeanswering system settings. The unit’s voiceguidance prompts you to press certain dialkeys to perform different operations.
Remote access codeA 3-digit remote access code must be enteredwhen operating the answering systemremotely. This code prevents unauthorizedparties from listening to your messagesremotely. The default setting is “111”.Important:R To prevent unauthorized access to this
product, we recommend that you regularlychange the remote code.
1 MMENUN#3062 Enter the desired 3-digit remote access
code. a MSAVEN a MOFFN
Deactivating remote operationPress * in step 2 on “Remote access code”,page 75.R The entered remote access code is deleted.
Using the answeringsystem remotely1 Dial your landline phone number from a
touch-tone phone.2 After the greeting message starts, enter
your remote access code.3 Follow the voice guidance prompts as
necessary or control the unit usingremote commands (page 76).
4 When finished, hang up.
Voice guidancen When the English voice guidance is
selectedDuring remote operation, the unit’s voiceguidance starts and prompts you to press
For assistance, please visit http://shop.panasonic.com/support 75
Answering System for Landline
TGM43x(en)_0426_ver031.pdf 75 2016/04/26 10:55:20
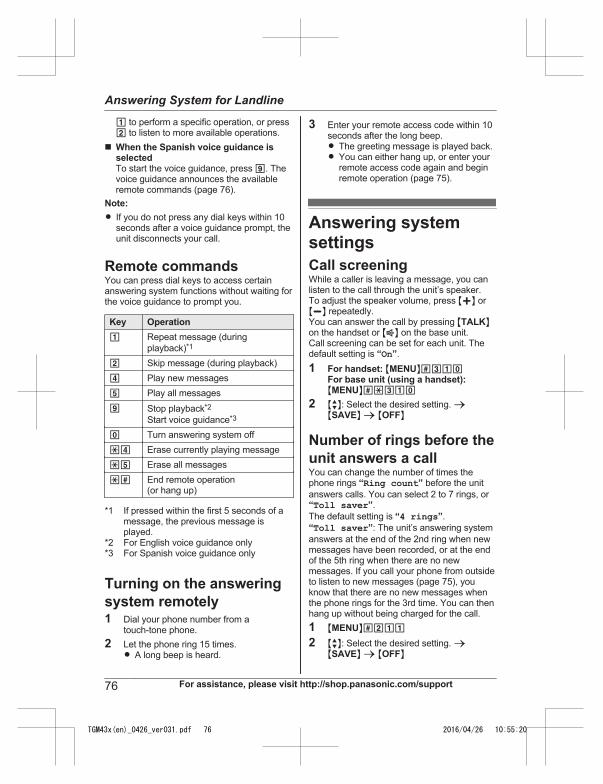
1 to perform a specific operation, or press2 to listen to more available operations.
n When the Spanish voice guidance isselectedTo start the voice guidance, press 9. Thevoice guidance announces the availableremote commands (page 76).
Note:R If you do not press any dial keys within 10
seconds after a voice guidance prompt, theunit disconnects your call.
Remote commandsYou can press dial keys to access certainanswering system functions without waiting forthe voice guidance to prompt you.
Key Operation1 Repeat message (during
playback)*1
2 Skip message (during playback)4 Play new messages5 Play all messages9 Stop playback*2
Start voice guidance*3
0 Turn answering system off*4 Erase currently playing message*5 Erase all messages*# End remote operation
(or hang up)
*1 If pressed within the first 5 seconds of amessage, the previous message isplayed.
*2 For English voice guidance only*3 For Spanish voice guidance only
Turning on the answeringsystem remotely1 Dial your phone number from a
touch-tone phone.2 Let the phone ring 15 times.
R A long beep is heard.
3 Enter your remote access code within 10seconds after the long beep.R The greeting message is played back.R You can either hang up, or enter your
remote access code again and beginremote operation (page 75).
Answering systemsettingsCall screeningWhile a caller is leaving a message, you canlisten to the call through the unit’s speaker.To adjust the speaker volume, press MjN orMkN repeatedly.You can answer the call by pressing MTALKNon the handset or MZN on the base unit.Call screening can be set for each unit. Thedefault setting is “On”.1 For handset: MMENUN#310
For base unit (using a handset):MMENUN#*310
2 MbN: Select the desired setting. aMSAVEN a MOFFN
Number of rings before theunit answers a callYou can change the number of times thephone rings “Ring count” before the unitanswers calls. You can select 2 to 7 rings, or“Toll saver”.The default setting is “4 rings”.“Toll saver”: The unit’s answering systemanswers at the end of the 2nd ring when newmessages have been recorded, or at the endof the 5th ring when there are no newmessages. If you call your phone from outsideto listen to new messages (page 75), youknow that there are no new messages whenthe phone rings for the 3rd time. You can thenhang up without being charged for the call.1 MMENUN#2112 MbN: Select the desired setting. a
MSAVEN a MOFFN
76 For assistance, please visit http://shop.panasonic.com/support
Answering System for Landline
TGM43x(en)_0426_ver031.pdf 76 2016/04/26 10:55:20
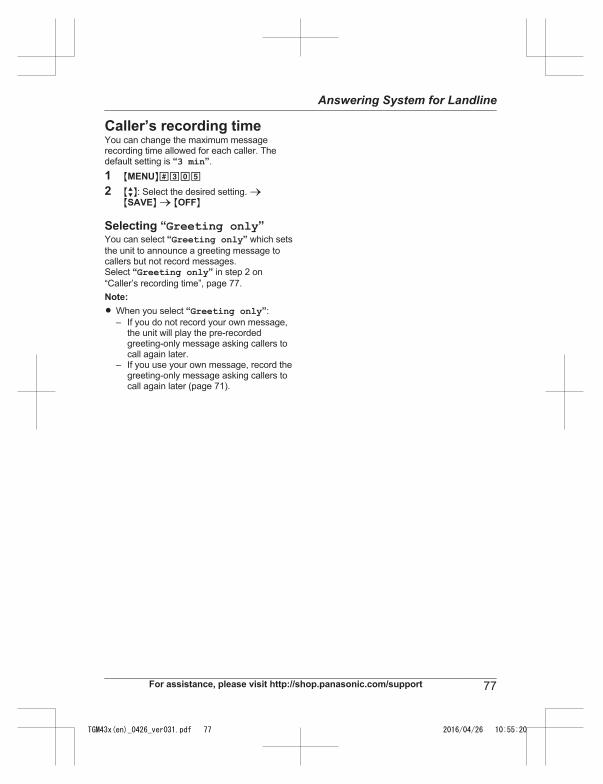
Caller’s recording timeYou can change the maximum messagerecording time allowed for each caller. Thedefault setting is “3 min”.1 MMENUN#3052 MbN: Select the desired setting. a
MSAVEN a MOFFN
Selecting “Greeting only”You can select “Greeting only” which setsthe unit to announce a greeting message tocallers but not record messages.Select “Greeting only” in step 2 on“Caller’s recording time”, page 77.Note:R When you select “Greeting only”:
– If you do not record your own message,the unit will play the pre-recordedgreeting-only message asking callers tocall again later.
– If you use your own message, record thegreeting-only message asking callers tocall again later (page 71).
For assistance, please visit http://shop.panasonic.com/support 77
Answering System for Landline
TGM43x(en)_0426_ver031.pdf 77 2016/04/26 10:55:20
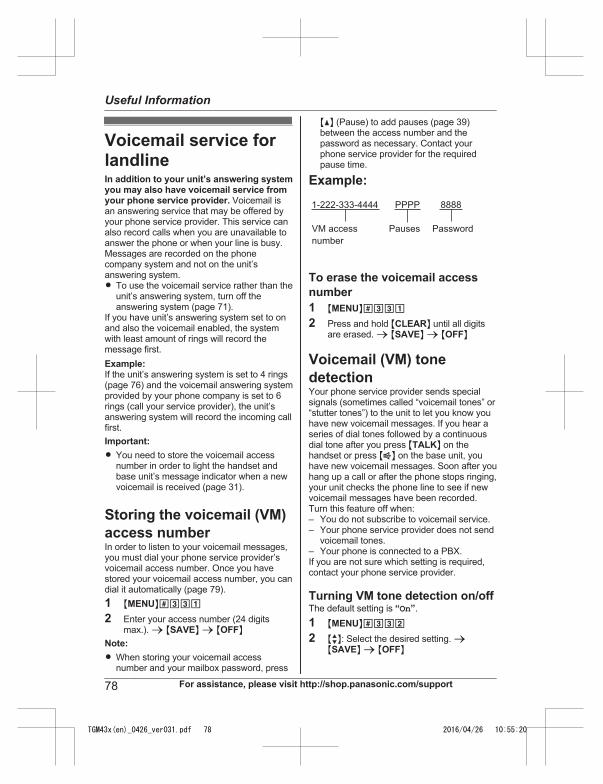
Voicemail service forlandlineIn addition to your unit’s answering systemyou may also have voicemail service fromyour phone service provider. Voicemail isan answering service that may be offered byyour phone service provider. This service canalso record calls when you are unavailable toanswer the phone or when your line is busy.Messages are recorded on the phonecompany system and not on the unit’sanswering system.R To use the voicemail service rather than the
unit’s answering system, turn off theanswering system (page 71).
If you have unit’s answering system set to onand also the voicemail enabled, the systemwith least amount of rings will record themessage first.Example:If the unit’s answering system is set to 4 rings(page 76) and the voicemail answering systemprovided by your phone company is set to 6rings (call your service provider), the unit’sanswering system will record the incoming callfirst.Important:R You need to store the voicemail access
number in order to light the handset andbase unit’s message indicator when a newvoicemail is received (page 31).
Storing the voicemail (VM)access numberIn order to listen to your voicemail messages,you must dial your phone service provider’svoicemail access number. Once you havestored your voicemail access number, you candial it automatically (page 79).1 MMENUN#3312 Enter your access number (24 digits
max.). a MSAVEN a MOFFNNote:R When storing your voicemail access
number and your mailbox password, press
MDN (Pause) to add pauses (page 39)between the access number and thepassword as necessary. Contact yourphone service provider for the requiredpause time.
Example:
1-222-333-4444
VM access
number
Pauses Password
PPPP 8888
To erase the voicemail accessnumber1 MMENUN#3312 Press and hold MCLEARN until all digits
are erased. a MSAVEN a MOFFN
Voicemail (VM) tonedetectionYour phone service provider sends specialsignals (sometimes called “voicemail tones” or“stutter tones”) to the unit to let you know youhave new voicemail messages. If you hear aseries of dial tones followed by a continuousdial tone after you press MTALKN on thehandset or press MZN on the base unit, youhave new voicemail messages. Soon after youhang up a call or after the phone stops ringing,your unit checks the phone line to see if newvoicemail messages have been recorded.Turn this feature off when:– You do not subscribe to voicemail service.– Your phone service provider does not send
voicemail tones.– Your phone is connected to a PBX.If you are not sure which setting is required,contact your phone service provider.
Turning VM tone detection on/offThe default setting is “On”.1 MMENUN#3322 MbN: Select the desired setting. a
MSAVEN a MOFFN
78 For assistance, please visit http://shop.panasonic.com/support
Useful Information
TGM43x(en)_0426_ver031.pdf 78 2016/04/26 10:55:20
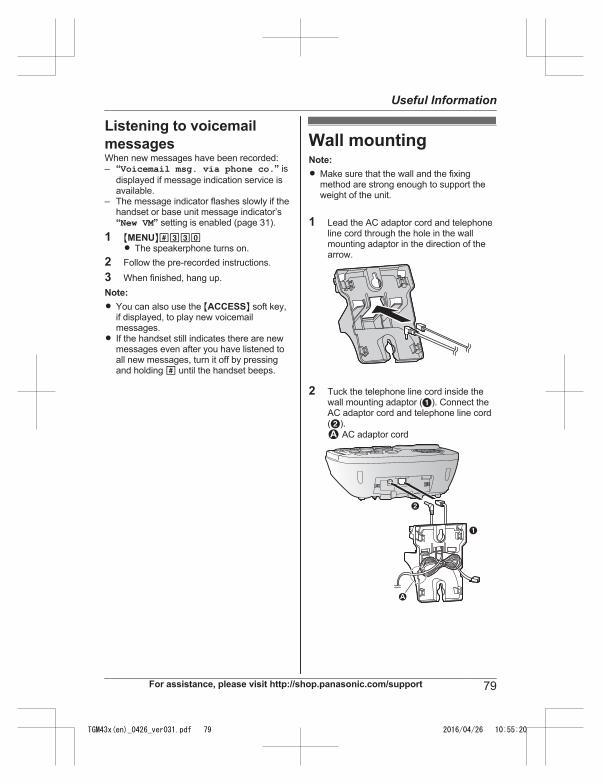
Listening to voicemailmessagesWhen new messages have been recorded:– “Voicemail msg. via phone co.” is
displayed if message indication service isavailable.
– The message indicator flashes slowly if thehandset or base unit message indicator’s“New VM” setting is enabled (page 31).
1 MMENUN#330R The speakerphone turns on.
2 Follow the pre-recorded instructions.3 When finished, hang up.Note:R You can also use the MACCESSN soft key,
if displayed, to play new voicemailmessages.
R If the handset still indicates there are newmessages even after you have listened toall new messages, turn it off by pressingand holding # until the handset beeps.
Wall mountingNote:R Make sure that the wall and the fixing
method are strong enough to support theweight of the unit.
1 Lead the AC adaptor cord and telephoneline cord through the hole in the wallmounting adaptor in the direction of thearrow.
2 Tuck the telephone line cord inside thewall mounting adaptor (A). Connect theAC adaptor cord and telephone line cord(B).1 AC adaptor cord
A
B
1
For assistance, please visit http://shop.panasonic.com/support 79
Useful Information
TGM43x(en)_0426_ver031.pdf 79 2016/04/26 10:55:20
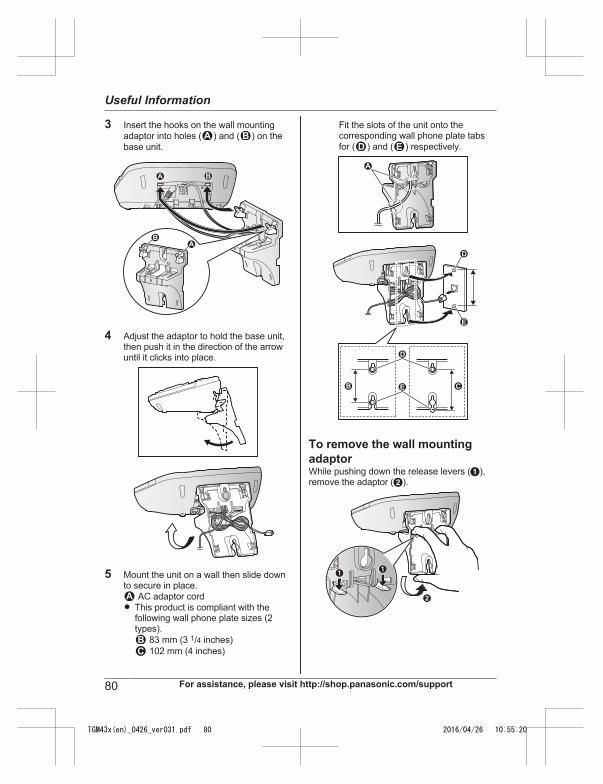
3 Insert the hooks on the wall mountingadaptor into holes (1) and (2) on thebase unit.
12
1 2
4 Adjust the adaptor to hold the base unit,then push it in the direction of the arrowuntil it clicks into place.
5 Mount the unit on a wall then slide downto secure in place.1 AC adaptor cordR This product is compliant with the
following wall phone plate sizes (2types).2 83 mm (3 1/4 inches)3 102 mm (4 inches)
Fit the slots of the unit onto thecorresponding wall phone plate tabsfor (4) and (5) respectively.
2 3
4
5
1
5
4
To remove the wall mountingadaptorWhile pushing down the release levers (A),remove the adaptor (B).
B
AA
80 For assistance, please visit http://shop.panasonic.com/support
Useful Information
TGM43x(en)_0426_ver031.pdf 80 2016/04/26 10:55:20
Error messagesDisplay message Cause/solutionAsk phonecompany forVM access #
R You have not stored the voicemail access number. Store thenumber (page 78).
Busy R No cellular phone is paired to the base unit. Pair a cellularphone (page 34).
R The called unit is in use.R Other units are in use and the system is busy. Try again later.R The handset you are using is too far from the base unit. Move
closer and try again.R Only 2 Bluetooth devices can be used with the unit at the
same time (for example, 2 cellular lines, or the headset and 1cellular line).
Check tel line R The supplied telephone line cord has not been connected yetor not connected properly. Check the connections (page 13).
R If you do not connect the telephone line cord and use onlycellular lines, set the cellular line only mode (page 36).
Error!! R Recording was too short. Try again.R Someone is using a cellular line or Bluetooth headset. Try
again later.R The phonebook copy is incomplete (page 66). The cellular
phone is disconnected from the base unit. Make sure thatother Bluetooth devices are not connected to the cellularphone, and try again.
Failed R Although the unit tried to connect to the cellular phone orBluetooth headset, the connection has been failed.– Someone is using a cellular line or headset. Try again later.– Make sure that the cellular phone or headset is not
connected to other Bluetooth devices.Invalid R There is no handset registered to the base unit matching the
handset number you entered.R The handset is not registered to the base unit. Register the
handset (page 62).Main unit no powerorNo link. Re-connect baseAC adaptor.
R Confirm the base unit’s AC adaptor is connected to the unitand the power outlet correctly.
R The handset has lost communication with the base unit. Movecloser to the base unit and try again.
R Unplug the base unit’s AC adaptor to reset the unit.Reconnect the adaptor and try again.
R The handset’s registration may have been canceled.Re-register the handset (page 62).
Requiressubscriptionto Caller ID.
R You must subscribe to a Caller ID service. Once you receivecaller information after subscribing to a Caller ID service, thismessage will not be displayed.
For assistance, please visit http://shop.panasonic.com/support 81
Useful Information
TGM43x(en)_0426_ver031.pdf 81 2016/04/26 10:55:20
Display message Cause/solutionUserechargeablebattery.
R A wrong type of battery such as alkaline or manganese wasinserted. Use only the rechargeable Ni-MH batteries noted onpage 4, 9.
TroubleshootingIf you still have difficulties after following the instructions in this section, disconnect the base unit’sAC adaptor, then reconnect the base unit’s AC adaptor. Remove the batteries from the handset,and then insert them into the handset again.If the base unit batteries for power backup are installed, remove the batteries from the base unit,and then insert them into the base unit again.
General use
Problem Cause/solutionThe handset does not turn oneven after installing chargedbatteries.
R Place the handset on the base unit or charger to turn onthe handset.
The unit does not work. R Make sure the batteries are installed correctly (page 15).R Fully charge the batteries (page 14).R Check the connections (page 13).R Unplug the base unit’s AC adaptor to reset the unit.
Reconnect the adaptor and try again.R The handset has not been registered to the base unit.
Register the handset (page 62).I cannot pair a cellular phone tothe base unit.
R Depending on the compatibility of the cellular phone, youmay not be able to pair it to the base unit. Confirm thatyour cellular phone supports the hands-free profile (HFP)specification.
R Confirm that the Bluetooth feature of your cellular phoneis turned on. You may need to turn this feature ondepending on your cellular phone.
R The Bluetooth technology on your cellular phone may notbe functioning normally. Turn off and on your cellularphone.
R If your cellular phone is already connected to anotherBluetooth device such as a Bluetooth headset, turn it offor disconnect it from your cellular phone.
R Some cellular phones may require you to enter theBluetooth PIN to pairing. Confirm that you entered thecorrect PIN.
82 For assistance, please visit http://shop.panasonic.com/support
Useful Information
TGM43x(en)_0426_ver031.pdf 82 2016/04/26 10:55:20
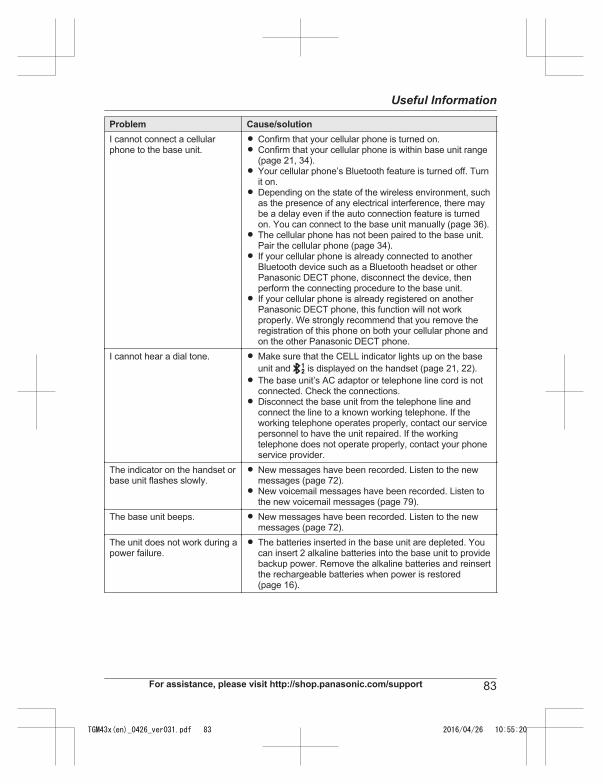
Problem Cause/solutionI cannot connect a cellularphone to the base unit.
R Confirm that your cellular phone is turned on.R Confirm that your cellular phone is within base unit range
(page 21, 34).R Your cellular phone’s Bluetooth feature is turned off. Turn
it on.R Depending on the state of the wireless environment, such
as the presence of any electrical interference, there maybe a delay even if the auto connection feature is turnedon. You can connect to the base unit manually (page 36).
R The cellular phone has not been paired to the base unit.Pair the cellular phone (page 34).
R If your cellular phone is already connected to anotherBluetooth device such as a Bluetooth headset or otherPanasonic DECT phone, disconnect the device, thenperform the connecting procedure to the base unit.
R If your cellular phone is already registered on anotherPanasonic DECT phone, this function will not workproperly. We strongly recommend that you remove theregistration of this phone on both your cellular phone andon the other Panasonic DECT phone.
I cannot hear a dial tone. R Make sure that the CELL indicator lights up on the baseunit and is displayed on the handset (page 21, 22).
R The base unit’s AC adaptor or telephone line cord is notconnected. Check the connections.
R Disconnect the base unit from the telephone line andconnect the line to a known working telephone. If theworking telephone operates properly, contact our servicepersonnel to have the unit repaired. If the workingtelephone does not operate properly, contact your phoneservice provider.
The indicator on the handset orbase unit flashes slowly.
R New messages have been recorded. Listen to the newmessages (page 72).
R New voicemail messages have been recorded. Listen tothe new voicemail messages (page 79).
The base unit beeps. R New messages have been recorded. Listen to the newmessages (page 72).
The unit does not work during apower failure.
R The batteries inserted in the base unit are depleted. Youcan insert 2 alkaline batteries into the base unit to providebackup power. Remove the alkaline batteries and reinsertthe rechargeable batteries when power is restored(page 16).
For assistance, please visit http://shop.panasonic.com/support 83
Useful Information
TGM43x(en)_0426_ver031.pdf 83 2016/04/26 10:55:20
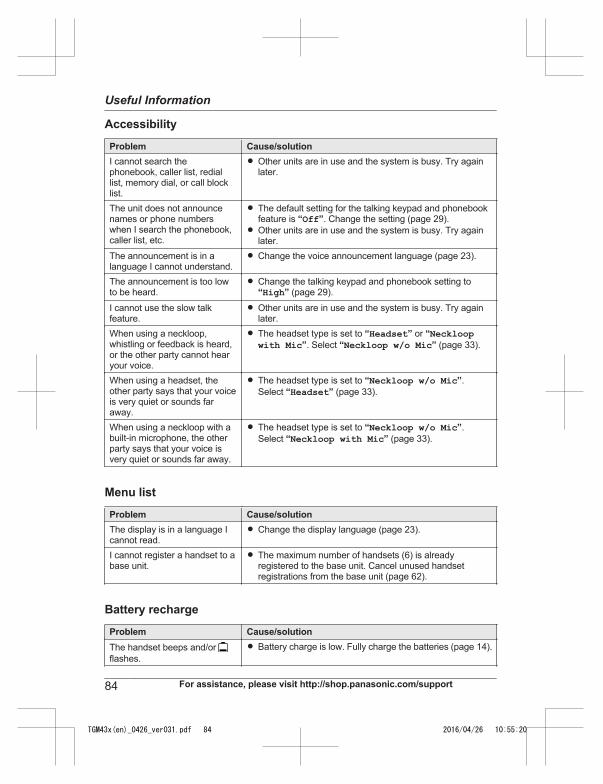
Accessibility
Problem Cause/solutionI cannot search thephonebook, caller list, rediallist, memory dial, or call blocklist.
R Other units are in use and the system is busy. Try againlater.
The unit does not announcenames or phone numberswhen I search the phonebook,caller list, etc.
R The default setting for the talking keypad and phonebookfeature is “Off”. Change the setting (page 29).
R Other units are in use and the system is busy. Try againlater.
The announcement is in alanguage I cannot understand.
R Change the voice announcement language (page 23).
The announcement is too lowto be heard.
R Change the talking keypad and phonebook setting to“High” (page 29).
I cannot use the slow talkfeature.
R Other units are in use and the system is busy. Try againlater.
When using a neckloop,whistling or feedback is heard,or the other party cannot hearyour voice.
R The headset type is set to “Headset” or “Neckloopwith Mic”. Select “Neckloop w/o Mic” (page 33).
When using a headset, theother party says that your voiceis very quiet or sounds faraway.
R The headset type is set to “Neckloop w/o Mic”.Select “Headset” (page 33).
When using a neckloop with abuilt-in microphone, the otherparty says that your voice isvery quiet or sounds far away.
R The headset type is set to “Neckloop w/o Mic”.Select “Neckloop with Mic” (page 33).
Menu list
Problem Cause/solutionThe display is in a language Icannot read.
R Change the display language (page 23).
I cannot register a handset to abase unit.
R The maximum number of handsets (6) is alreadyregistered to the base unit. Cancel unused handsetregistrations from the base unit (page 62).
Battery recharge
Problem Cause/solutionThe handset beeps and/or flashes.
R Battery charge is low. Fully charge the batteries (page 14).
84 For assistance, please visit http://shop.panasonic.com/support
Useful Information
TGM43x(en)_0426_ver031.pdf 84 2016/04/26 10:55:20
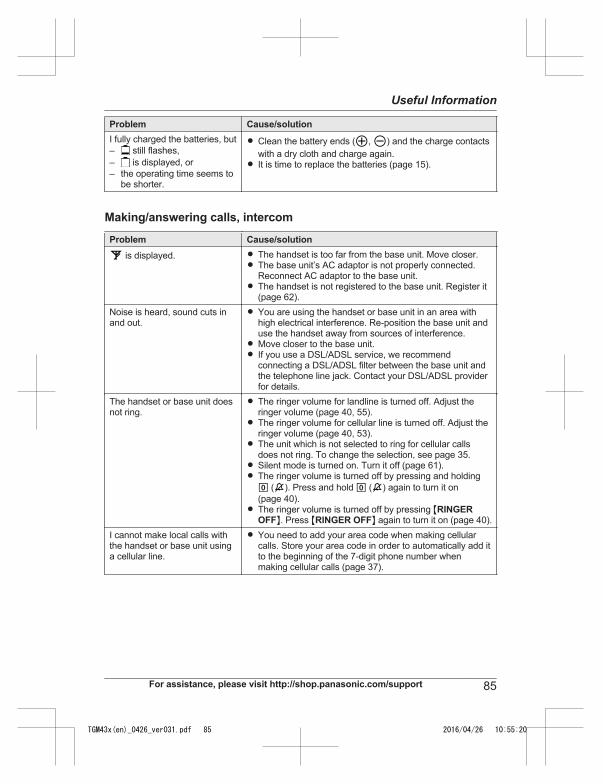
Problem Cause/solutionI fully charged the batteries, but– still flashes,– is displayed, or– the operating time seems to
be shorter.
R Clean the battery ends ( , ) and the charge contactswith a dry cloth and charge again.
R It is time to replace the batteries (page 15).
Making/answering calls, intercom
Problem Cause/solution is displayed. R The handset is too far from the base unit. Move closer.
R The base unit’s AC adaptor is not properly connected.Reconnect AC adaptor to the base unit.
R The handset is not registered to the base unit. Register it(page 62).
Noise is heard, sound cuts inand out.
R You are using the handset or base unit in an area withhigh electrical interference. Re-position the base unit anduse the handset away from sources of interference.
R Move closer to the base unit.R If you use a DSL/ADSL service, we recommend
connecting a DSL/ADSL filter between the base unit andthe telephone line jack. Contact your DSL/ADSL providerfor details.
The handset or base unit doesnot ring.
R The ringer volume for landline is turned off. Adjust theringer volume (page 40, 55).
R The ringer volume for cellular line is turned off. Adjust theringer volume (page 40, 53).
R The unit which is not selected to ring for cellular callsdoes not ring. To change the selection, see page 35.
R Silent mode is turned on. Turn it off (page 61).R The ringer volume is turned off by pressing and holding0 ( ). Press and hold 0 ( ) again to turn it on(page 40).
R The ringer volume is turned off by pressing MRINGEROFFN. Press MRINGER OFFN again to turn it on (page 40).
I cannot make local calls withthe handset or base unit usinga cellular line.
R You need to add your area code when making cellularcalls. Store your area code in order to automatically add itto the beginning of the 7-digit phone number whenmaking cellular calls (page 37).
For assistance, please visit http://shop.panasonic.com/support 85
Useful Information
TGM43x(en)_0426_ver031.pdf 85 2016/04/26 10:55:20

Problem Cause/solutionI cannot make or answercellular calls with the handsetor base unit.
R Depending on the cellular phone’s compatibility (page 5),you may not be able to make or answer cellular calls evenif the cellular phone is connected to the base unit.
R Make sure that the CELL indicator lights up on the baseunit and is displayed on the handset (page 21, 22).
R Make sure that the cellular phone is connected to thebase unit (page 36).
R Only 2 Bluetooth devices can be used with the unit at thesame time (for example, 2 cellular lines, or the headsetand 1 cellular line).
R The cellular phone is being used separately from yoursystem.
I can make and answer cellularcalls but cannot hear a sound.
R The Bluetooth technology on your cellular phone may notbe functioning normally. Turn off and on your cellularphone.
I cannot switch cellular callsfrom the unit to the cellularphone.
R Your cellular phone may not support this feature. Refer tothe operating instructions of your cellular phone.
I cannot make a call using alandline.
R The dialing mode may be set incorrectly. Change thesetting (page 25).
I cannot use a cellular line or alandline.
R The unit can be used to talk on 2 lines at the same time(for example, 2 cellular lines, or the landline and 1 cellularline).
I cannot make long distancecalls.
R Make sure that you have long distance service.
I cannot use voice paging. R You cannot use voice paging if other units are in use.R Voice paging is not available when a range extender
(KX-TGA405) is registered to the base unit.
Caller ID/Talking Caller ID
Problem Cause/solutionCaller information is notdisplayed.
R You must subscribe to Caller ID service. Contact yourphone service provider for details.
R If your unit is connected to any additional telephoneequipment such as a Caller ID box or cordless telephoneline jack, plug the unit directly into the wall jack.
R If you use a DSL/ADSL service, we recommendconnecting a DSL/ADSL filter between the base unit andthe telephone line jack. Contact your DSL/ADSL providerfor details.
R The name display service for landline calls may not beavailable in some areas. Contact your phone serviceprovider for details.
R Other telephone equipment may be interfering with thisunit. Disconnect the other equipment and try again.
86 For assistance, please visit http://shop.panasonic.com/support
Useful Information
TGM43x(en)_0426_ver031.pdf 86 2016/04/26 10:55:20
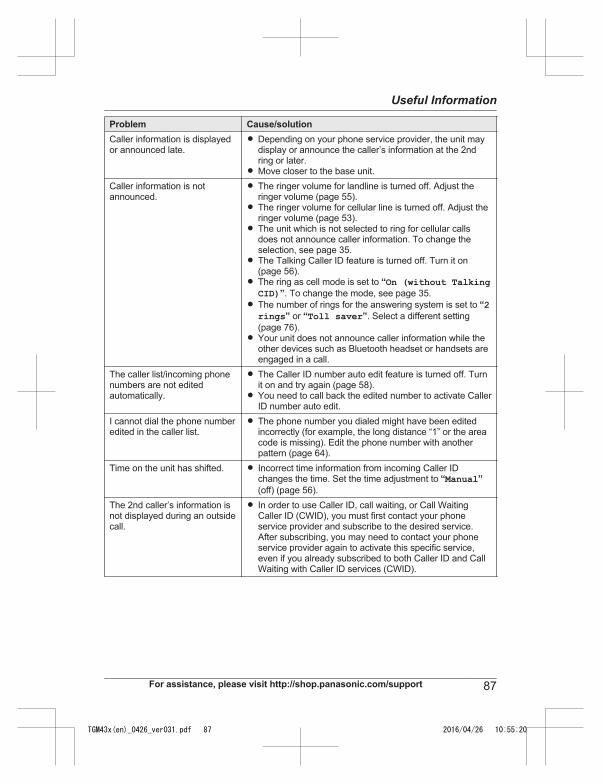
Problem Cause/solutionCaller information is displayedor announced late.
R Depending on your phone service provider, the unit maydisplay or announce the caller’s information at the 2ndring or later.
R Move closer to the base unit.Caller information is notannounced.
R The ringer volume for landline is turned off. Adjust theringer volume (page 55).
R The ringer volume for cellular line is turned off. Adjust theringer volume (page 53).
R The unit which is not selected to ring for cellular callsdoes not announce caller information. To change theselection, see page 35.
R The Talking Caller ID feature is turned off. Turn it on(page 56).
R The ring as cell mode is set to “On (without TalkingCID)”. To change the mode, see page 35.
R The number of rings for the answering system is set to “2rings” or “Toll saver”. Select a different setting(page 76).
R Your unit does not announce caller information while theother devices such as Bluetooth headset or handsets areengaged in a call.
The caller list/incoming phonenumbers are not editedautomatically.
R The Caller ID number auto edit feature is turned off. Turnit on and try again (page 58).
R You need to call back the edited number to activate CallerID number auto edit.
I cannot dial the phone numberedited in the caller list.
R The phone number you dialed might have been editedincorrectly (for example, the long distance “1” or the areacode is missing). Edit the phone number with anotherpattern (page 64).
Time on the unit has shifted. R Incorrect time information from incoming Caller IDchanges the time. Set the time adjustment to “Manual”(off) (page 56).
The 2nd caller’s information isnot displayed during an outsidecall.
R In order to use Caller ID, call waiting, or Call WaitingCaller ID (CWID), you must first contact your phoneservice provider and subscribe to the desired service.After subscribing, you may need to contact your phoneservice provider again to activate this specific service,even if you already subscribed to both Caller ID and CallWaiting with Caller ID services (CWID).
For assistance, please visit http://shop.panasonic.com/support 87
Useful Information
TGM43x(en)_0426_ver031.pdf 87 2016/04/26 10:55:20
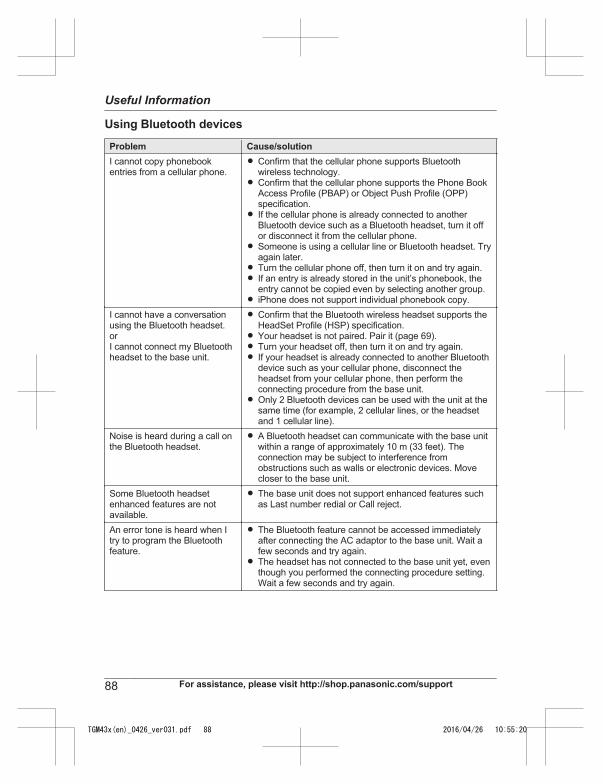
Using Bluetooth devices
Problem Cause/solutionI cannot copy phonebookentries from a cellular phone.
R Confirm that the cellular phone supports Bluetoothwireless technology.
R Confirm that the cellular phone supports the Phone BookAccess Profile (PBAP) or Object Push Profile (OPP)specification.
R If the cellular phone is already connected to anotherBluetooth device such as a Bluetooth headset, turn it offor disconnect it from the cellular phone.
R Someone is using a cellular line or Bluetooth headset. Tryagain later.
R Turn the cellular phone off, then turn it on and try again.R If an entry is already stored in the unit’s phonebook, the
entry cannot be copied even by selecting another group.R iPhone does not support individual phonebook copy.
I cannot have a conversationusing the Bluetooth headset.orI cannot connect my Bluetoothheadset to the base unit.
R Confirm that the Bluetooth wireless headset supports theHeadSet Profile (HSP) specification.
R Your headset is not paired. Pair it (page 69).R Turn your headset off, then turn it on and try again.R If your headset is already connected to another Bluetooth
device such as your cellular phone, disconnect theheadset from your cellular phone, then perform theconnecting procedure from the base unit.
R Only 2 Bluetooth devices can be used with the unit at thesame time (for example, 2 cellular lines, or the headsetand 1 cellular line).
Noise is heard during a call onthe Bluetooth headset.
R A Bluetooth headset can communicate with the base unitwithin a range of approximately 10 m (33 feet). Theconnection may be subject to interference fromobstructions such as walls or electronic devices. Movecloser to the base unit.
Some Bluetooth headsetenhanced features are notavailable.
R The base unit does not support enhanced features suchas Last number redial or Call reject.
An error tone is heard when Itry to program the Bluetoothfeature.
R The Bluetooth feature cannot be accessed immediatelyafter connecting the AC adaptor to the base unit. Wait afew seconds and try again.
R The headset has not connected to the base unit yet, eventhough you performed the connecting procedure setting.Wait a few seconds and try again.
88 For assistance, please visit http://shop.panasonic.com/support
Useful Information
TGM43x(en)_0426_ver031.pdf 88 2016/04/26 10:55:20
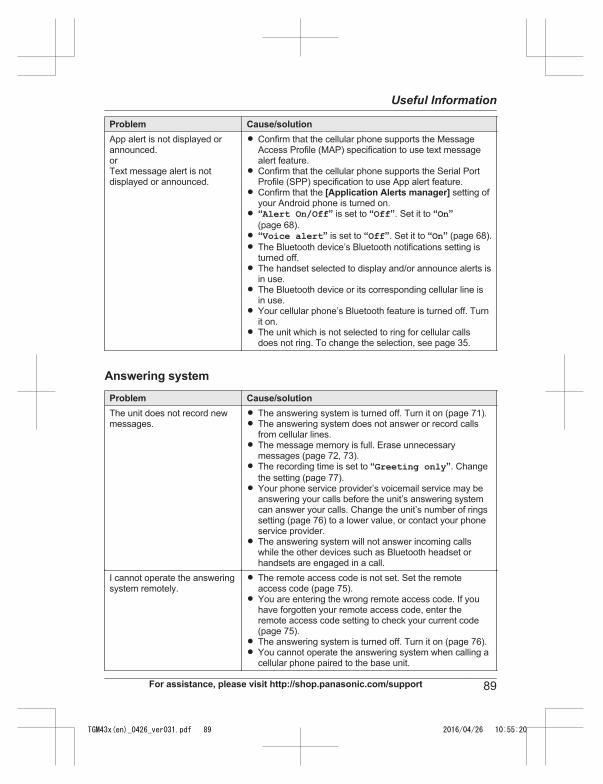
Problem Cause/solutionApp alert is not displayed orannounced.orText message alert is notdisplayed or announced.
R Confirm that the cellular phone supports the MessageAccess Profile (MAP) specification to use text messagealert feature.
R Confirm that the cellular phone supports the Serial PortProfile (SPP) specification to use App alert feature.
R Confirm that the [Application Alerts manager] setting ofyour Android phone is turned on.
R “Alert On/Off” is set to “Off”. Set it to “On”(page 68).
R “Voice alert” is set to “Off”. Set it to “On” (page 68).R The Bluetooth device’s Bluetooth notifications setting is
turned off.R The handset selected to display and/or announce alerts is
in use.R The Bluetooth device or its corresponding cellular line is
in use.R Your cellular phone’s Bluetooth feature is turned off. Turn
it on.R The unit which is not selected to ring for cellular calls
does not ring. To change the selection, see page 35.
Answering system
Problem Cause/solutionThe unit does not record newmessages.
R The answering system is turned off. Turn it on (page 71).R The answering system does not answer or record calls
from cellular lines.R The message memory is full. Erase unnecessary
messages (page 72, 73).R The recording time is set to “Greeting only”. Change
the setting (page 77).R Your phone service provider’s voicemail service may be
answering your calls before the unit’s answering systemcan answer your calls. Change the unit’s number of ringssetting (page 76) to a lower value, or contact your phoneservice provider.
R The answering system will not answer incoming callswhile the other devices such as Bluetooth headset orhandsets are engaged in a call.
I cannot operate the answeringsystem remotely.
R The remote access code is not set. Set the remoteaccess code (page 75).
R You are entering the wrong remote access code. If youhave forgotten your remote access code, enter theremote access code setting to check your current code(page 75).
R The answering system is turned off. Turn it on (page 76).R You cannot operate the answering system when calling a
cellular phone paired to the base unit.
For assistance, please visit http://shop.panasonic.com/support 89
Useful Information
TGM43x(en)_0426_ver031.pdf 89 2016/04/26 10:55:20
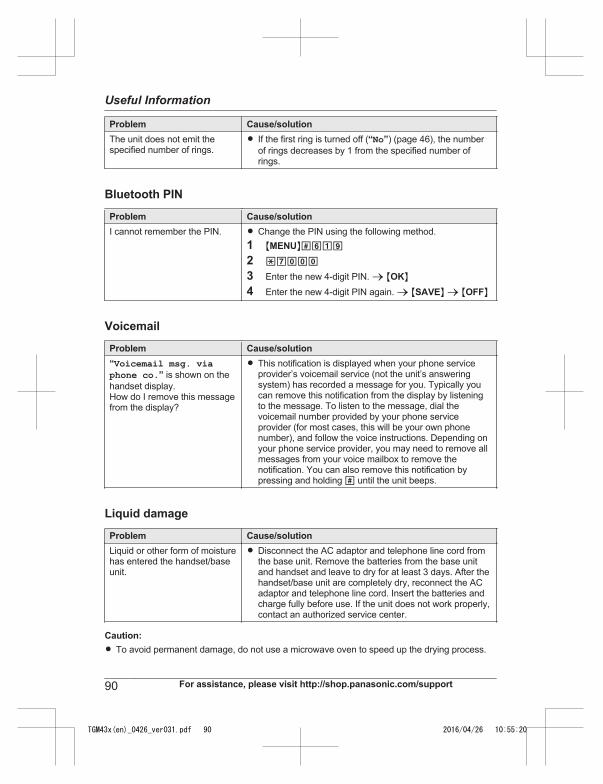
Problem Cause/solutionThe unit does not emit thespecified number of rings.
R If the first ring is turned off (“No”) (page 46), the numberof rings decreases by 1 from the specified number ofrings.
Bluetooth PIN
Problem Cause/solutionI cannot remember the PIN. R Change the PIN using the following method.
1 MMENUN#6192 *7000
3 Enter the new 4-digit PIN. a MOKN4 Enter the new 4-digit PIN again. a MSAVEN a MOFFN
Voicemail
Problem Cause/solution“Voicemail msg. viaphone co.” is shown on thehandset display.How do I remove this messagefrom the display?
R This notification is displayed when your phone serviceprovider’s voicemail service (not the unit’s answeringsystem) has recorded a message for you. Typically youcan remove this notification from the display by listeningto the message. To listen to the message, dial thevoicemail number provided by your phone serviceprovider (for most cases, this will be your own phonenumber), and follow the voice instructions. Depending onyour phone service provider, you may need to remove allmessages from your voice mailbox to remove thenotification. You can also remove this notification bypressing and holding # until the unit beeps.
Liquid damage
Problem Cause/solutionLiquid or other form of moisturehas entered the handset/baseunit.
R Disconnect the AC adaptor and telephone line cord fromthe base unit. Remove the batteries from the base unitand handset and leave to dry for at least 3 days. After thehandset/base unit are completely dry, reconnect the ACadaptor and telephone line cord. Insert the batteries andcharge fully before use. If the unit does not work properly,contact an authorized service center.
Caution:R To avoid permanent damage, do not use a microwave oven to speed up the drying process.
90 For assistance, please visit http://shop.panasonic.com/support
Useful Information
TGM43x(en)_0426_ver031.pdf 90 2016/04/26 10:55:20
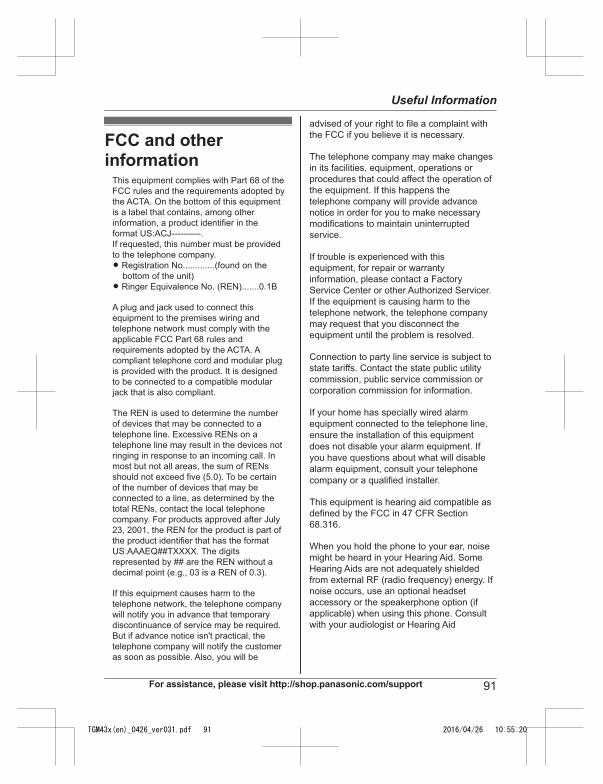
FCC and otherinformation
This equipment complies with Part 68 of the
FCC rules and the requirements adopted by
the ACTA. On the bottom of this equipment
is a label that contains, among other
information, a product identifier in the
format US:ACJ----------.
If requested, this number must be provided
to the telephone company.
L Registration No.............(found on the
bottom of the unit)
L Ringer Equivalence No. (REN).......0.1B
A plug and jack used to connect this
equipment to the premises wiring and
telephone network must comply with the
applicable FCC Part 68 rules and
requirements adopted by the ACTA. A
compliant telephone cord and modular plug
is provided with the product. It is designed
to be connected to a compatible modular
jack that is also compliant.
The REN is used to determine the number
of devices that may be connected to a
telephone line. Excessive RENs on a
telephone line may result in the devices not
ringing in response to an incoming call. In
most but not all areas, the sum of RENs
should not exceed five (5.0). To be certain
of the number of devices that may be
connected to a line, as determined by the
total RENs, contact the local telephone
company. For products approved after July
23, 2001, the REN for the product is part of
the product identifier that has the format
US:AAAEQ##TXXXX. The digits
represented by ## are the REN without a
decimal point (e.g., 03 is a REN of 0.3).
If this equipment causes harm to the
telephone network, the telephone company
will notify you in advance that temporary
discontinuance of service may be required.
But if advance notice isn't practical, the
telephone company will notify the customer
as soon as possible. Also, you will be
advised of your right to file a complaint with
the FCC if you believe it is necessary.
The telephone company may make changes
in its facilities, equipment, operations or
procedures that could affect the operation of
the equipment. If this happens the
telephone company will provide advance
notice in order for you to make necessary
modifications to maintain uninterrupted
service.
If trouble is experienced with this
equipment, for repair or warranty
information, please contact a Factory
Service Center or other Authorized Servicer.
If the equipment is causing harm to the
telephone network, the telephone company
may request that you disconnect the
equipment until the problem is resolved.
Connection to party line service is subject to
state tariffs. Contact the state public utility
commission, public service commission or
corporation commission for information.
If your home has specially wired alarm
equipment connected to the telephone line,
ensure the installation of this equipment
does not disable your alarm equipment. If
you have questions about what will disable
alarm equipment, consult your telephone
company or a qualified installer.
This equipment is hearing aid compatible as
defined by the FCC in 47 CFR Section
68.316.
When you hold the phone to your ear, noise
might be heard in your Hearing Aid. Some
Hearing Aids are not adequately shielded
from external RF (radio frequency) energy. If
noise occurs, use an optional headset
accessory or the speakerphone option (if
applicable) when using this phone. Consult
with your audiologist or Hearing Aid
For assistance, please visit http://shop.panasonic.com/support 91
Useful Information
TGM43x(en)_0426_ver031.pdf 91 2016/04/26 10:55:20
manufacturer about the availability of
Hearing Aids which provide adequate
shielding to RF energy commonly emitted
by digital devices.
WHEN PROGRAMMING EMERGENCY
NUMBERS AND(OR) MAKING TEST
CALLS TO EMERGENCY NUMBERS:
1) Remain on the line and briefly explain to
the dispatcher the reason for the call.
2) Perform such activities in the off-peak
hours, such as early morning or late
evenings.
This device complies with Part 15 of the
FCC Rules. Operation is subject to the
following two conditions:
(1) This device may not cause harmful
interference, and (2) this device must
accept any interference received, including
interference that may cause undesired
operation.
Privacy of communications may not be
ensured when using this phone.
CAUTION:
Any changes or modifications not expressly
approved by the party responsible for
compliance could void the user’s authority
to operate this device.
NOTE:
This equipment has been tested and found
to comply with the limits for a Class B digital
device, pursuant to Part 15 of the FCC
Rules. These limits are designed to provide
reasonable protection against harmful
interference in a residential installation. This
equipment generates, uses, and can radiate
radio frequency energy and, if not installed
and used in accordance with the
instructions, may cause harmful
interference to radio communications.
However, there is no guarantee that
interference will not occur in a particular
installation. If this equipment does cause
harmful interference to radio or television
reception, which can be determined by
turning the equipment off and on, the user is
encouraged to try to correct the interference
by one or more of the following measures:
– Reorient or relocate the receiving
antenna.
– Increase the separation between the
equipment and receiver.
– Connect the equipment into an outlet on a
circuit different from that to which the
receiver is connected.
– Consult the dealer or an experienced
radio/TV technician for help.
Some cordless telephones operate at
frequencies that may cause interference to
nearby TVs and VCRs. To minimize or
prevent such interference, the base of the
cordless telephone should not be placed
near or on top of a TV or VCR. If
interference is experienced, move the
cordless telephone further away from the TV
or VCR. This will often reduce or eliminate
interference.
FCC RF Exposure Warning:
L This product complies with FCC radiation
exposure limits set forth for an
uncontrolled environment.
L To comply with FCC RF exposure
requirements, the base unit must be
installed and operated 20 cm (8 inches)
or more between the product and all
person’s body.
L This product may not be collocated or
operated in conjunction with any other
antenna or transmitter.
L The handset may be carried and operated
with only the specific provided belt-clip.
Other non-tested belt-clips or similar
body-worn accessories may not comply
and must be avoided.
Notice:
L FCC ID can be found inside the battery
compartment or on the bottom of the
units.
92 For assistance, please visit http://shop.panasonic.com/support
Useful Information
TGM43x(en)_0426_ver031.pdf 92 2016/04/26 10:55:20
Compliance with TIA-1083 standard:
Telephone handsets identified with this logo
have reduced noise and interference when
used with T-Coil equipped hearing aids and
cochlear implants.
T
Compatible with
Hearing Aid T-Coil
TIA-1083
Charge only modeThe charge only mode is the dedicated modeto charge the backup batteries of the baseunit. Do not use this mode if it is unnecessarybecause all functions except the base unit’sbattery charge is disabled with this feature on.Leave all the registered handsets on thechargers during use of the charge only mode.n To activate the charge only mode:
1 Press MANSWER ON/OFFN to turn onthe answering system.R Make sure the message counter
turns on.2 Disconnect the telephone line cord, the
AC adaptor plug, and remove thebatteries from the base unit.
3 Press and hold M N, MZN, andMERASEN at the same time, then insertthe AC adaptor plug to the base unit.Keep on pressing these keys until abeep tone sounds.
4 Release these keys.R The message counter turns off.
5 Insert batteries.R The batteries are started to be
charged.Note:R If the message counter is still on when you
release the keys, the base unit is not in thecharging only mode. Repeat from step 1.
n To deactivate the charge only mode:– Press any key.– 24 hours passed after activating the
charge only mode.
For assistance, please visit http://shop.panasonic.com/support 93
Useful Information
TGM43x(en)_0426_ver031.pdf 93 2016/04/26 10:55:20

Guía Rápida EspañolaConexiones
1 Conecte el adaptador de corriente alterna a la unidad presionándolo firmemente.2 Enganche el cable para fijarlo.3 Conecte el adaptador de corriente alterna a la toma de corriente.4 Conecte el cable de la línea telefónica a la unidad, y después a la toma telefónica de una sola línea (RJ11C) hasta que escuche un clic.5 Se requiere un filtro DSL/ADSL (no incluido) si tiene este tipo de servicio.Nota:
L El adaptador de CA y el cable de la línea de teléfono vienen conectados a la unidad base en el momento del envío.
L Use solo el adaptador de corriente alterna Panasonic PNLV226 que se suministra.
5
4
3
4
1
2
94 Para obtener ayuda, visite http://shop.panasonic.com/support (solo en inglés)
Guía Rápida Española
TGM43x(en)_0426_ver031.pdf 94 2016/04/26 10:55:20
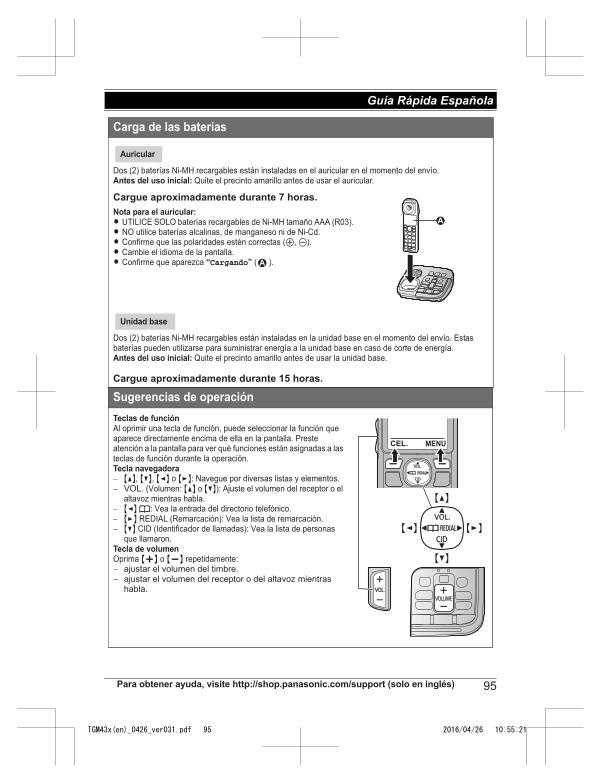
Carga de las baterías
Dos (2) baterías Ni-MH recargables están instaladas en el auricular en el momento del envío.Antes del uso inicial: Quite el precinto amarillo antes de usar el auricular.
Cargue aproximadamente durante 7 horas.
Nota para el auricular:
L UTILICE SOLO baterías recargables de Ni-MH tamaño AAA (R03).L NO utilice baterías alcalinas, de manganeso ni de Ni-Cd.L Confirme que las polaridades estén correctas (S, T).L Cambie el idioma de la pantalla.L Confirme que aparezca “Cargando” ( ).
Dos (2) baterías Ni-MH recargables están instaladas en la unidad base en el momento del envío. Estas baterías pueden utilizarse para suministrar energía a la unidad base en caso de corte de energía. Antes del uso inicial: Quite el precinto amarillo antes de usar la unidad base.
Cargue aproximadamente durante 15 horas.
Sugerencias de operación
Teclas de función
Al oprimir una tecla de función, puede seleccionar la función que aparece directamente encima de ella en la pantalla. Preste atención a la pantalla para ver qué funciones están asignadas a las teclas de función durante la operación.Tecla navegadora
− {^}, {V}, {<} o {>}: Navegue por diversas listas y elementos.− VOL. (Volumen: {^} o {V}): Ajuste el volumen del receptor o el
altavoz mientras habla.− {<} k: Vea la entrada del directorio telefónico.− {>} REDIAL (Remarcación): Vea la lista de remarcación.− {V} CID (Identificador de llamadas): Vea la lista de personas
que llamaron.Tecla de volumen
Oprima {+} o {-} repetidamente:− ajustar el volumen del timbre.− ajustar el volumen del receptor o del altavoz mientras
habla.
Auricular
1
1
Unidad base
{V}
{^}
{<} {>}
Para obtener ayuda, visite http://shop.panasonic.com/support (solo en inglés) 95
Guía Rápida Española
TGM43x(en)_0426_ver031.pdf 95 2016/04/26 10:55:21
Cambio de idiomas (Auricular) (predeterminado: “English”)
Cuando aparece “Set date/time Press SELECT”, presione {OFF} para salir.
Idioma de la pantalla
{MENU}(11) s {r}: “Español” s {GUARDAR} s {OFF}
Idioma de anuncio de voz
{MENU}(112 s {r}: “Español” s {GUARDAR} s {OFF}
Fecha y hora (Auricular)
1 {MENU}(1)1
2 Introduzca el día, mes y año actuales. s {OK}
3 Introduzca la hora y minuto actuales (formato de reloj de 24 horas).
4 {GUARDAR} s {OFF}
Cómo grabar el mensaje de saludo del contestador de llamadas para
la línea terrestre (Auricular)
Puede grabar su propio mensaje de saludo en lugar de usar uno pregrabado.
1 {MENU}(3)2 s {r}: “Sí” s {SELEC.}
2 Después de que se emita un pitido, sostenga el auricular a una distancia aproximada de 20 cm (8 pulgadas) y hable con claridad en el micrófono (máx. de 2 minutos).
3 Oprima {PARAR} para dejar de grabar. s {OFF}
Accesibilidad
Control del tono (Auricular)
1 Oprima repetidamente {TONE} al costado para seleccionar la configuración deseada mientras habla.
2 Para salir, oprima {ATRAS} o espere unos segundos.
Control del tono (Unidad base)
1 Mantenga presionado {TONE} durante 2 segundos durante la llamada.
2 Oprima repetidamente {+} o {-} para seleccionar la configuración deseada.
3 Para salir, presione {TONE} o espere unos 5 segundos.
96 Para obtener ayuda, visite http://shop.panasonic.com/support (solo en inglés)
Guía Rápida Española
TGM43x(en)_0426_ver031.pdf 96 2016/04/26 10:55:21
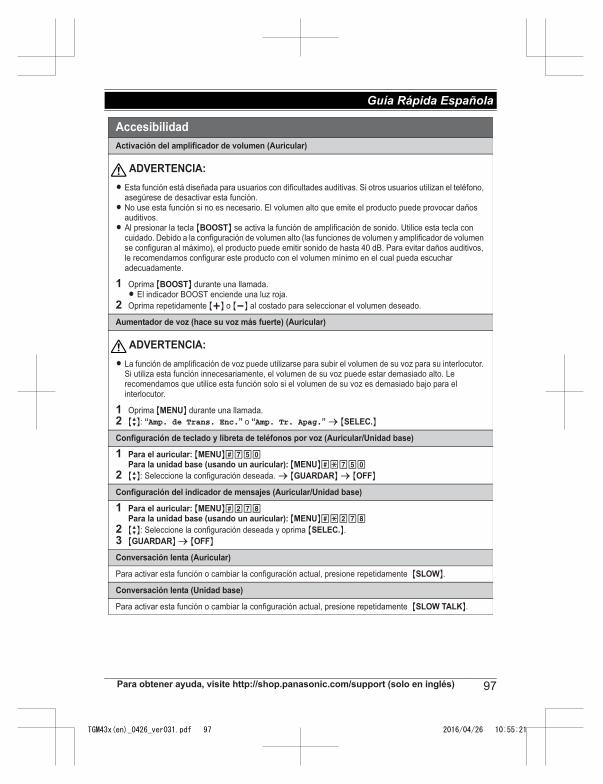
Activación del amplificador de volumen (Auricular)
L Esta función está diseñada para usuarios con dificultades auditivas. Si otros usuarios utilizan el teléfono, asegúrese de desactivar esta función.
L No use esta función si no es necesario. El volumen alto que emite el producto puede provocar daños auditivos.
L Al presionar la tecla {BOOST} se activa la función de amplificación de sonido. Utilice esta tecla con cuidado. Debido a la configuración de volumen alto (las funciones de volumen y amplificador de volumen se configuran al máximo), el producto puede emitir sonido de hasta 40 dB. Para evitar daños auditivos, le recomendamos configurar este producto con el volumen mínimo en el cual pueda escuchar adecuadamente.
1 Oprima {BOOST} durante una llamada.L El indicador BOOST enciende una luz roja.
2 Oprima repetidamente {+} o {-} al costado para seleccionar el volumen deseado.
Aumentador de voz (hace su voz más fuerte) (Auricular)
L La función de amplificación de voz puede utilizarse para subir el volumen de su voz para su interlocutor. Si utiliza esta función innecesariamente, el volumen de su voz puede estar demasiado alto. Le recomendamos que utilice esta función solo si el volumen de su voz es demasiado bajo para el interlocutor.
1 Oprima {MENU} durante una llamada.
2 {r}: “Amp. de Trans. Enc.” o “Amp. Tr. Apag.” s {SELEC.}
Configuración de teclado y libreta de teléfonos por voz (Auricular/Unidad base)
1 Para el auricular: {MENU}(75)Para la unidad base (usando un auricular): {MENU}(*75)
2 {r}: Seleccione la configuración deseada. s {GUARDAR} s {OFF}
Configuración del indicador de mensajes (Auricular/Unidad base)
1 Para el auricular: {MENU}(278Para la unidad base (usando un auricular): {MENU}(*278
2 {r}: Seleccione la configuración deseada y oprima {SELEC.}.
3 {GUARDAR} s {OFF}
Conversación lenta (Auricular)
Para activar esta función o cambiar la configuración actual, presione repetidamente {SLOW}.
Conversación lenta (Unidad base)
Para activar esta función o cambiar la configuración actual, presione repetidamente {SLOW TALK}.
Accesibilidad
ADVERTENCIA:
ADVERTENCIA:
Para obtener ayuda, visite http://shop.panasonic.com/support (solo en inglés) 97
Guía Rápida Española
TGM43x(en)_0426_ver031.pdf 97 2016/04/26 10:55:21

Enlace a celular
Puede conectar su unidad base y teléfono celular usando la tecnología inalámbrica Bluetooth®, para poder hacer o responder llamadas a su teléfono celular usando su sistema telefónico. Para obtener más detalles, visite nuestro sitio web: http://shop.panasonic.com/bluetooth-phoneL Coloque su teléfono celular cerca de la unidad base. Si su teléfono celular está demasiado cerca de la
unidad base durante la llamada celular, es posible que escuche ruido. Para un mejor funcionamiento, le recomendamos que coloque su teléfono celular de 0.6 m a 3 m (2 pies a 10 pies) de la unidad base.
1 Línea celular2 Proveedores de servicios de telefonía celular
Cómo emparejar un teléfono celular con Bluetooth
1 Unidad base:
Oprima y mantenga oprimido {CELL 1} o {CELL 2} durante aproximadamente 5 segundos.L Después de que el indicador de CELL correspondiente comienza a parpadear en la unidad base, el
resto del procedimiento debe completarse en menos de 5 minutos.
2 Su teléfono celular:
Mientras el indicador de CELL correspondiente esté parpadeando, siga las instrucciones de su teléfono celular para entrar al modo de emparejamiento.L Dependiendo de su teléfono celular, es posible que le pida que introduzca el NIP de Bluetooth
(predeterminado: “0000”). L Si el teléfono celular le solicita que confirme la clave, oprima {OK} o acepte la solicitud de enlace.
3 Unidad base:
Espere a que se emita un pitido largo.L Es posible que tarde más de 10 segundos en completar el emparejamiento.L Cuando el indicador de CELL correspondiente se ilumina, esto significa que el teléfono celular está
conectado a la unidad base. Ya está listo para hacer llamadas regulares de celular.Nota:
L Asegúrese de que su teléfono celular está configurado para conectarse a este producto automáticamente. Consulte las instrucciones de operación de su teléfono celular.
Marcas registradas
L La marca denominativa y los logotipos de Bluetooth® son marcas registradas de Bluetooth SIG, Inc., y cualquier uso de dichas marcas por parte de Panasonic Corporation se hace bajo licencia.
L Todas las demás marcas comerciales que se identifican en el presente pertenecen a sus respectivos propietarios.
1
2
98 Para obtener ayuda, visite http://shop.panasonic.com/support (solo en inglés)
Guía Rápida Española
TGM43x(en)_0426_ver031.pdf 98 2016/04/26 10:55:21
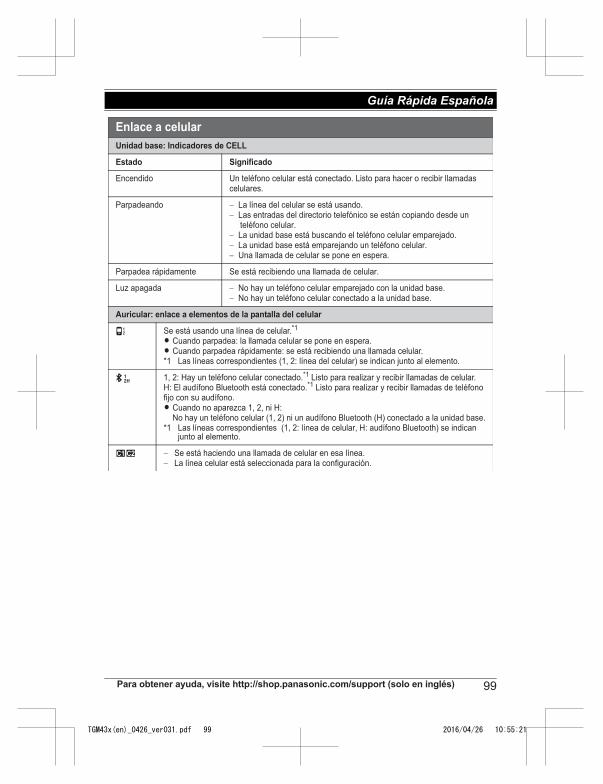
Enlace a celular
Unidad base: Indicadores de CELL
odacifingiSodatsE
Encendido Un teléfono celular está conectado. Listo para hacer o recibir llamadas celulares.
Parpadeando − La línea del celular se está usando.− Las entradas del directorio telefónico se están copiando desde un
teléfono celular.− La unidad base está buscando el teléfono celular emparejado.− La unidad base está emparejando un teléfono celular.− Una llamada de celular se pone en espera.
Parpadea rápidamente Se está recibiendo una llamada de celular.
Luz apagada − No hay un teléfono celular emparejado con la unidad base.− No hay un teléfono celular conectado a la unidad base.
Auricular: enlace a elementos de la pantalla del celular
td Se está usando una línea de celular.*1
L Cuando parpadea: la llamada celular se pone en espera.L Cuando parpadea rápidamente: se está recibiendo una llamada celular.*1 Las líneas correspondientes (1, 2: línea del celular) se indican junto al elemento.
x 1, 2: Hay un teléfono celular conectado.*1 Listo para realizar y recibir llamadas de celular.H: El audífono Bluetooth está conectado.*1 Listo para realizar y recibir llamadas de teléfono fijo con su audífono.L Cuando no aparezca 1, 2, ni H:
No hay un teléfono celular (1, 2) ni un audífono Bluetooth (H) conectado a la unidad base.*1 Las líneas correspondientes (1, 2: línea de celular, H: audífono Bluetooth) se indican
junto al elemento.
uv − Se está haciendo una llamada de celular en esa línea.− La línea celular está seleccionada para la configuración.
Para obtener ayuda, visite http://shop.panasonic.com/support (solo en inglés) 99
Guía Rápida Española
TGM43x(en)_0426_ver031.pdf 99 2016/04/26 10:55:21
Cómo conectar o desconectar el teléfono celular (Auricular)
Conexión automática a los dispositivos con Bluetooth (teléfonos celulares)
La unidad se conecta a los dispositivos Bluetooth a intervalos regulares si se pierde la conexión. Consulte las instrucciones de operación para cambiar el intervalo (predeterminado: “1 min”).L Cuando se sincronizan 3 dispositivos con capacidad Bluetooth (2 teléfonos celulares y 1 auricular) a la
unidad base, sólo 2 dispositivos Bluetooth pueden usarse con la unidad a la vez, y la unidad base pierde su conexión con otros dispositivos Bluetooth. Para restablecer la conexión a los dispositivos Bluetooth automáticamente, deje encendida la conexión automática.
Cómo conectar o desconectar manualmente el teléfono celular
Si no va a utilizar el vínculo del teléfono celular emparejado a la función del celular temporalmente (por ejemplo, si no quiere que la unidad timbre cuando su línea celular reciba una llamada), puede desconectar su teléfono celular de la unidad base. Si desea usarlo de nuevo, reconecte el teléfono celular a la unidad base.L Después de desconectar un teléfono celular emparejado de la unidad base manualmente, se conectará
automáticamente a la misma en 30 minutos. Si ya no usa la función de enlace al celular, deshaga el emparejamiento del celular.
L Los teléfonos celulares desconectados no se desemparejan de la unidad base, así que no es necesario emparejarlos de nuevo con ella.
1 Para conectarlo o desconectarlo:
Para CELL 1: {MENU}(6251Para CELL 2: {MENU}(6252L Se emite un pitido largo.
2 {OFF}
Modo exclusivo para la línea celular (si no utiliza la línea terrestre) (Auricular)
Si no utiliza la línea terrestre, recomendamos configurar la unidad en el modo exclusivo para la línea celular. La configuración predeterminada es “Apagado”.L Si enciende el “Modo Lín. Cel.”, desconecte el cable de la línea telefónica de la unidad base. De lo
contrario, no es posible activar el “Modo Lín. Cel.”.
1 {MENU}(157
2 Para encenderlo:
{r}: “Encendido” s {SELEC.} s {r}: “Sí” s {SELEC.}
Para apagarlo: {r}: “Apagado” s {SELEC.}
Enlace a celular
100 Para obtener ayuda, visite http://shop.panasonic.com/support (solo en inglés)
Guía Rápida Española
TGM43x(en)_0426_ver031.pdf 100 2016/04/26 10:55:21
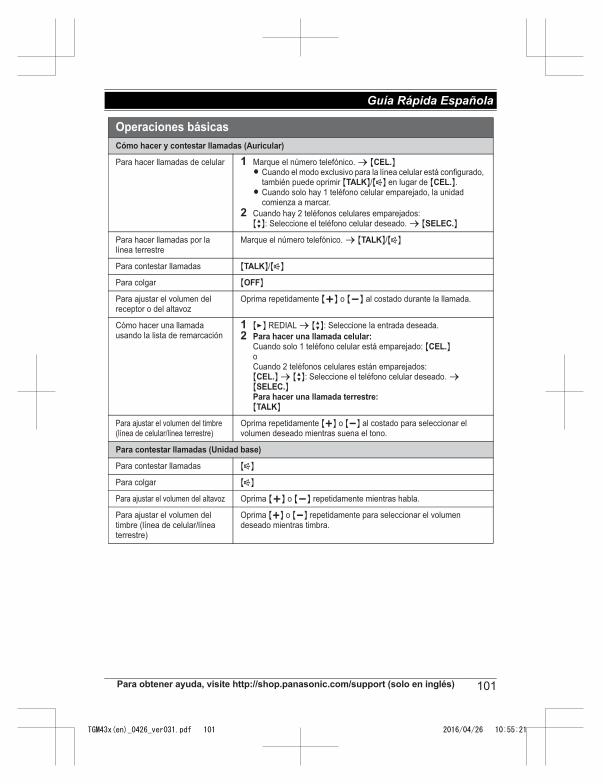
Operaciones básicas
Cómo hacer y contestar llamadas (Auricular)
Para hacer llamadas de celular 1 Marque el número telefónico. s {CEL.}
L Cuando el modo exclusivo para la línea celular está configurado, también puede oprimir {TALK}/{s} en lugar de {CEL.}.
L Cuando solo hay 1 teléfono celular emparejado, la unidad comienza a marcar.
2 Cuando hay 2 teléfonos celulares emparejados:{r}: Seleccione el teléfono celular deseado. s {SELEC.}
Para hacer llamadas por la línea terrestre
Marque el número telefónico. s {TALK}/{s}
Para contestar llamadas {TALK}/{s}
Para colgar {OFF}
Para ajustar el volumen del receptor o del altavoz
Oprima repetidamente {+} o {-} al costado durante la llamada.
Cómo hacer una llamada usando la lista de remarcación
1 {>} REDIAL s {r}: Seleccione la entrada deseada.
2 Para hacer una llamada celular:
Cuando solo 1 teléfono celular está emparejado: {CEL.}
oCuando 2 teléfonos celulares están emparejados:{CEL.} s {r}: Seleccione el teléfono celular deseado. s {SELEC.}
Para hacer una llamada terrestre:
{TALK}
Para ajustar el volumen del timbre (línea de celular/línea terrestre)
Oprima repetidamente {+} o {-} al costado para seleccionar el volumen deseado mientras suena el tono.
Para contestar llamadas (Unidad base)
Para contestar llamadas {s}
Para colgar {s}
Para ajustar el volumen del altavoz Oprima {+} o {-} repetidamente mientras habla.
Para ajustar el volumen del timbre (línea de celular/línea terrestre)
Oprima {+} o {-} repetidamente para seleccionar el volumen deseado mientras timbra.
Para obtener ayuda, visite http://shop.panasonic.com/support (solo en inglés) 101
Guía Rápida Española
TGM43x(en)_0426_ver031.pdf 101 2016/04/26 10:55:21
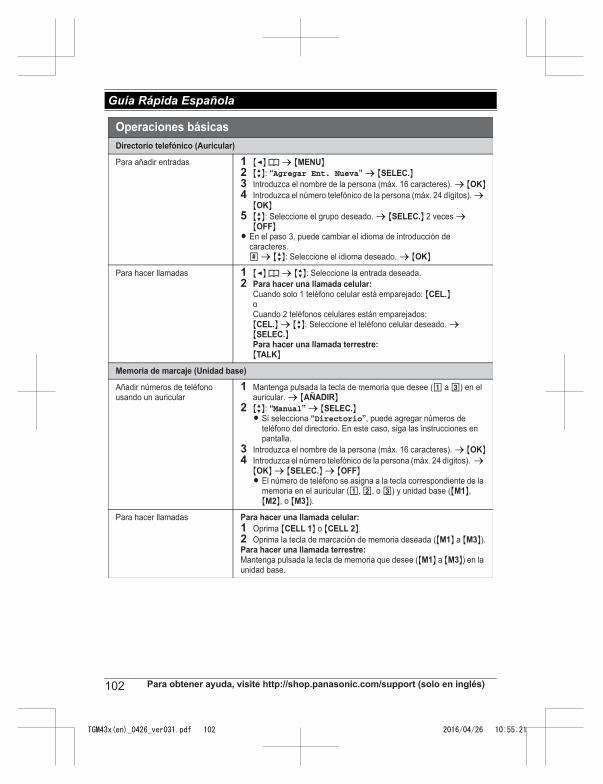
Directorio telefónico (Auricular)
Para añadir entradas 1 {<} k s {MENU}
2 {r}: “Agregar Ent. Nueva” s {SELEC.}
3 Introduzca el nombre de la persona (máx. 16 caracteres). s {OK}
4 Introduzca el número telefónico de la persona (máx. 24 dígitos). s {OK}
5 {r}: Seleccione el grupo deseado. s {SELEC.} 2 veces s {OFF}
L En el paso 3, puede cambiar el idioma de introducción de caracteres.( s {r}: Seleccione el idioma deseado. s {OK}
Para hacer llamadas 1 {<} k s {r}: Seleccione la entrada deseada.
2 Para hacer una llamada celular:
Cuando solo 1 teléfono celular está emparejado: {CEL.}
oCuando 2 teléfonos celulares están emparejados:{CEL.} s {r}: Seleccione el teléfono celular deseado. s {SELEC.}
Para hacer una llamada terrestre:
{TALK}
Memoria de marcaje (Unidad base)
Añadir números de teléfono usando un auricular
1 Mantenga pulsada la tecla de memoria que desee (1 a 3) en el auricular. s {AÑADIR}
2 {r}: “Manual” s {SELEC.}
L Si selecciona “Directorio”, puede agregar números de teléfono del directorio. En este caso, siga las instrucciones en pantalla.
3 Introduzca el nombre de la persona (máx. 16 caracteres). s {OK}
4 Introduzca el número telefónico de la persona (máx. 24 dígitos). s {OK} s {SELEC.} s {OFF}
L El número de teléfono se asigna a la tecla correspondiente de la memoria en el auricular (1, 2, o 3) y unidad base ({M1}, {M2}, o {M3}).
Para hacer llamadas Para hacer una llamada celular:
1 Oprima {CELL 1} o {CELL 2}.
2 Oprima la tecla de marcación de memoria deseada ({M1} a {M3}).Para hacer una llamada terrestre:
Mantenga pulsada la tecla de memoria que desee ({M1} a {M3}) en la unidad base.
Operaciones básicas
102 Para obtener ayuda, visite http://shop.panasonic.com/support (solo en inglés)
Guía Rápida Española
TGM43x(en)_0426_ver031.pdf 102 2016/04/26 10:55:21
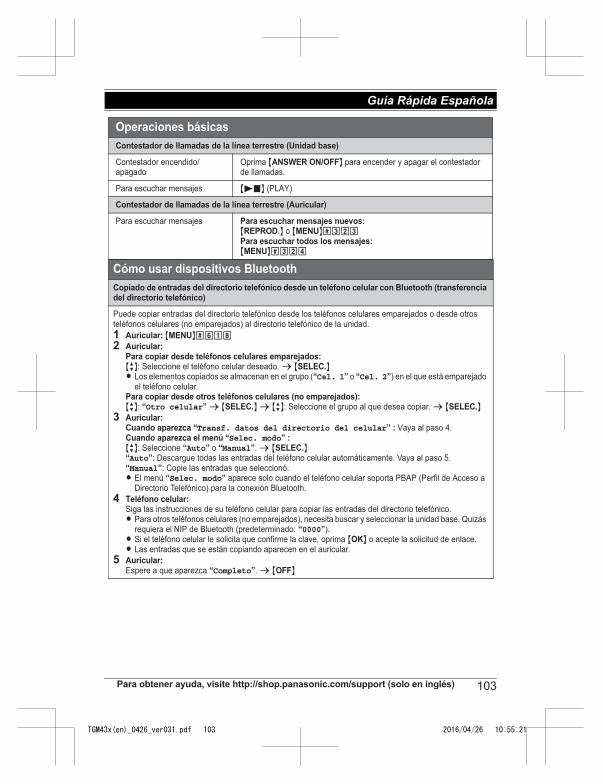
Contestador de llamadas de la línea terrestre (Unidad base)
Contestador encendido/apagado
Oprima {ANSWER ON/OFF} para encender y apagar el contestador de llamadas.
Para escuchar mensajes {P} (PLAY)
Contestador de llamadas de la línea terrestre (Auricular)
Para escuchar mensajes Para escuchar mensajes nuevos:
{REPROD.} o {MENU}(323Para escuchar todos los mensajes:
{MENU}(324
Cómo usar dispositivos Bluetooth
Copiado de entradas del directorio telefónico desde un teléfono celular con Bluetooth (transferencia
del directorio telefónico)
Puede copiar entradas del directorio telefónico desde los teléfonos celulares emparejados o desde otros teléfonos celulares (no emparejados) al directorio telefónico de la unidad.
1 Auricular: {MENU}(618
2 Auricular:
Para copiar desde teléfonos celulares emparejados:
{r}: Seleccione el teléfono celular deseado. s {SELEC.}
L Los elementos copiados se almacenan en el grupo (“Cel. 1” o “Cel. 2”) en el que está emparejado el teléfono celular.
Para copiar desde otros teléfonos celulares (no emparejados):
{r}: “Otro celular” s {SELEC.} s {r}: Seleccione el grupo al que desea copiar. s {SELEC.}
3 Auricular:
Cuando aparezca “Transf. datos del directorio del celular” : Vaya al paso 4.Cuando aparezca el menú “Selec. modo” : {r}: Seleccione “Auto” o “Manual”. s {SELEC.}
“Auto”: Descargue todas las entradas del teléfono celular automáticamente. Vaya al paso 5.“Manual”: Copie las entradas que seleccionó.L El menú “Selec. modo” aparece solo cuando el teléfono celular soporta PBAP (Perfil de Acceso a
Directorio Telefónico) para la conexión Bluetooth.
4 Teléfono celular:
Siga las instrucciones de su teléfono celular para copiar las entradas del directorio telefónico. L Para otros teléfonos celulares (no emparejados), necesita buscar y seleccionar la unidad base. Quizás
requiera el NIP de Bluetooth (predeterminado: “0000”). L Si el teléfono celular le solicita que confirme la clave, oprima {OK} o acepte la solicitud de enlace.L Las entradas que se están copiando aparecen en el auricular.
5 Auricular:
Espere a que aparezca “Completo”. s {OFF}
Operaciones básicas
Para obtener ayuda, visite http://shop.panasonic.com/support (solo en inglés) 103
Guía Rápida Española
TGM43x(en)_0426_ver031.pdf 103 2016/04/26 10:55:21
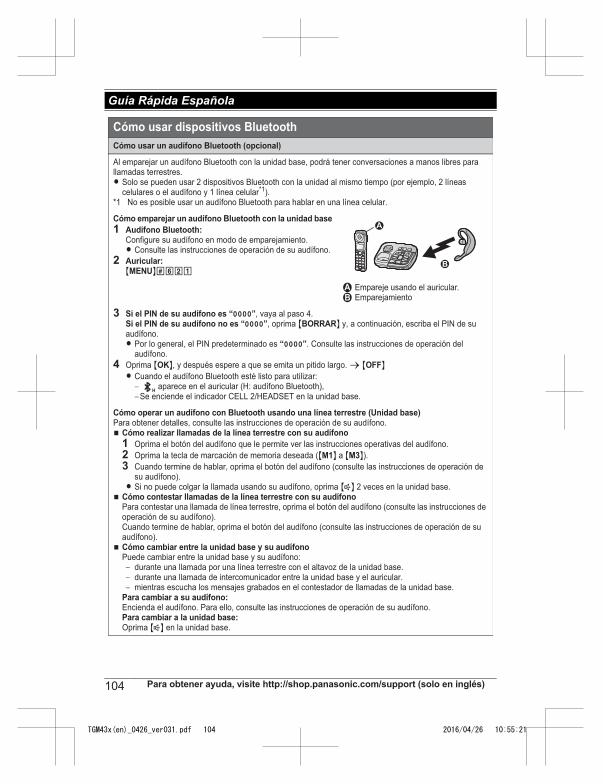
Cómo usar un audífono Bluetooth (opcional)
Al emparejar un audífono Bluetooth con la unidad base, podrá tener conversaciones a manos libres para llamadas terrestres.L Solo se pueden usar 2 dispositivos Bluetooth con la unidad al mismo tiempo (por ejemplo, 2 líneas
celulares o el audífono y 1 línea celular*1).*1 No es posible usar un audífono Bluetooth para hablar en una línea celular.
Cómo emparejar un audífono Bluetooth con la unidad base
1 Audífono Bluetooth:
Configure su audífono en modo de emparejamiento.L Consulte las instrucciones de operación de su audífono.
2 Auricular:
{MENU}(621
1 Empareje usando el auricular.2 Emparejamiento
3 Si el PIN de su audífono es “0000”, vaya al paso 4. Si el PIN de su audífono no es “0000”, oprima {BORRAR} y, a continuación, escriba el PIN de su audífono.L Por lo general, el PIN predeterminado es “0000”. Consulte las instrucciones de operación del
audífono.
4 Oprima {OK}, y después espere a que se emita un pitido largo. s {OFF}
L Cuando el audífono Bluetooth esté listo para utilizar:− aparece en el auricular (H: audífono Bluetooth),−Se enciende el indicador CELL 2/HEADSET en la unidad base.
Cómo operar un audífono con Bluetooth usando una línea terrestre (Unidad base)
Para obtener detalles, consulte las instrucciones de operación de su audífono.N Cómo realizar llamadas de la línea terrestre con su audífono
1 Oprima el botón del audífono que le permite ver las instrucciones operativas del audífono.
2 Oprima la tecla de marcación de memoria deseada ({M1} a {M3}).
3 Cuando termine de hablar, oprima el botón del audífono (consulte las instrucciones de operación de su audífono).
L Si no puede colgar la llamada usando su audífono, oprima {s} 2 veces en la unidad base.N Cómo contestar llamadas de la línea terrestre con su audífono
Para contestar una llamada de línea terrestre, oprima el botón del audífono (consulte las instrucciones de operación de su audífono).Cuando termine de hablar, oprima el botón del audífono (consulte las instrucciones de operación de su audífono).
N Cómo cambiar entre la unidad base y su audífono
Puede cambiar entre la unidad base y su audífono:− durante una llamada por una línea terrestre con el altavoz de la unidad base.− durante una llamada de intercomunicador entre la unidad base y el auricular.− mientras escucha los mensajes grabados en el contestador de llamadas de la unidad base.
Para cambiar a su audífono:
Encienda el audífono. Para ello, consulte las instrucciones de operación de su audífono.Para cambiar a la unidad base:
Oprima {s} en la unidad base.
Cómo usar dispositivos Bluetooth
2
1
104 Para obtener ayuda, visite http://shop.panasonic.com/support (solo en inglés)
Guía Rápida Española
TGM43x(en)_0426_ver031.pdf 104 2016/04/26 10:55:21
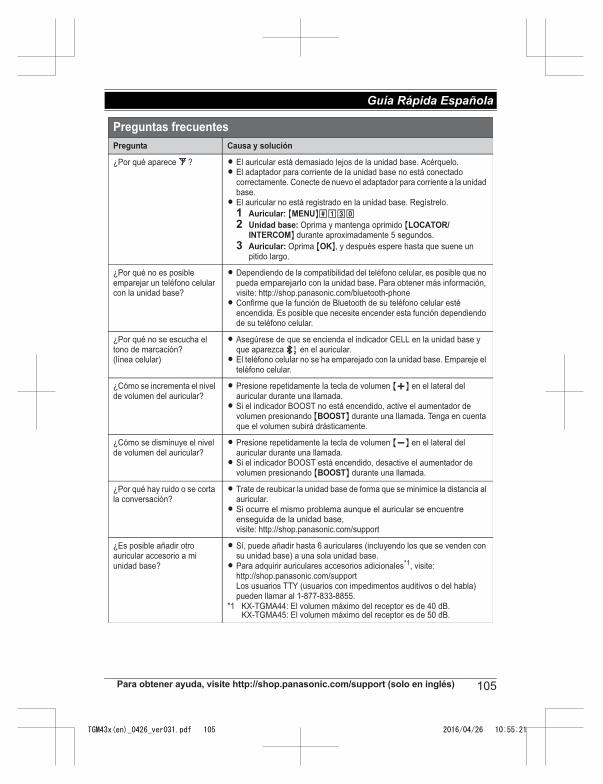
Preguntas frecuentes
Pregunta Causa y solución
¿Por qué aparece _? L El auricular está demasiado lejos de la unidad base. Acérquelo.L El adaptador para corriente de la unidad base no está conectado
correctamente. Conecte de nuevo el adaptador para corriente a la unidad base.
L El auricular no está registrado en la unidad base. Regístrelo.
1 Auricular: {MENU}(13)
2 Unidad base: Oprima y mantenga oprimido {LOCATOR/
INTERCOM} durante aproximadamente 5 segundos.
3 Auricular: Oprima {OK}, y después espere hasta que suene un pitido largo.
¿Por qué no es posible emparejar un teléfono celular con la unidad base?
L Dependiendo de la compatibilidad del teléfono celular, es posible que no pueda emparejarlo con la unidad base. Para obtener más información, visite: http://shop.panasonic.com/bluetooth-phone
L Confirme que la función de Bluetooth de su teléfono celular esté encendida. Es posible que necesite encender esta función dependiendo de su teléfono celular.
¿Por qué no se escucha el tono de marcación? (línea celular)
L Asegúrese de que se encienda el indicador CELL en la unidad base y que aparezca x en el auricular.
L El teléfono celular no se ha emparejado con la unidad base. Empareje el teléfono celular.
¿Cómo se incrementa el nivel de volumen del auricular?
L Presione repetidamente la tecla de volumen {+} en el lateral del auricular durante una llamada.
L Si el indicador BOOST no está encendido, active el aumentador de volumen presionando {BOOST} durante una llamada. Tenga en cuenta que el volumen subirá drásticamente.
¿Cómo se disminuye el nivel de volumen del auricular?
L Presione repetidamente la tecla de volumen {-} en el lateral del auricular durante una llamada.
L Si el indicador BOOST está encendido, desactive el aumentador de volumen presionando {BOOST} durante una llamada.
¿Por qué hay ruido o se corta la conversación?
L Trate de reubicar la unidad base de forma que se minimice la distancia al auricular.
L Si ocurre el mismo problema aunque el auricular se encuentre enseguida de la unidad base,visite: http://shop.panasonic.com/support
¿Es posible añadir otro auricular accesorio a mi unidad base?
L Sí, puede añadir hasta 6 auriculares (incluyendo los que se venden con su unidad base) a una sola unidad base.
L Para adquirir auriculares accesorios adicionales*1, visite: http://shop.panasonic.com/supportLos usuarios TTY (usuarios con impedimentos auditivos o del habla) pueden llamar al 1-877-833-8855.
*1 KX-TGMA44: El volumen máximo del receptor es de 40 dB.KX-TGMA45: El volumen máximo del receptor es de 50 dB.
Para obtener ayuda, visite http://shop.panasonic.com/support (solo en inglés) 105
Guía Rápida Española
TGM43x(en)_0426_ver031.pdf 105 2016/04/26 10:55:21
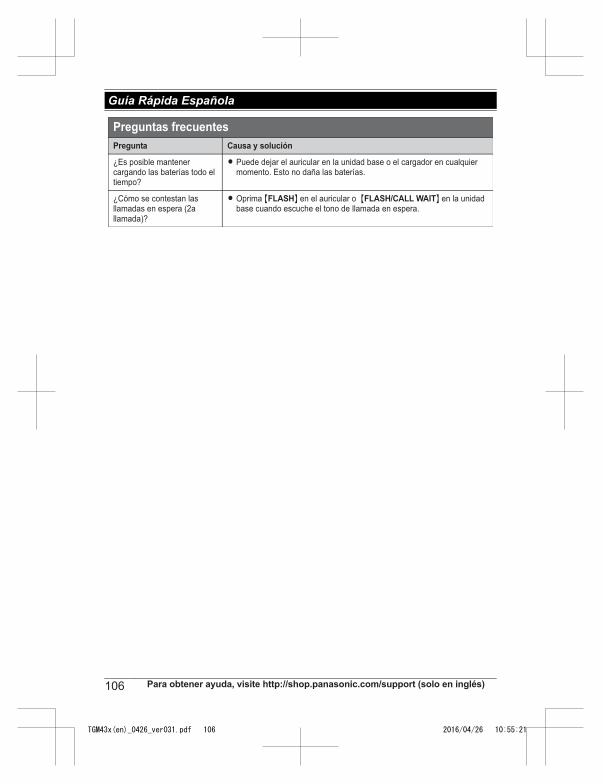
Pregunta Causa y solución
¿Es posible mantener cargando las baterías todo el tiempo?
L Puede dejar el auricular en la unidad base o el cargador en cualquier momento. Esto no daña las baterías.
¿Cómo se contestan las llamadas en espera (2a llamada)?
L Oprima {FLASH} en el auricular o {FLASH/CALL WAIT} en la unidad base cuando escuche el tono de llamada en espera.
Preguntas frecuentes
106 Para obtener ayuda, visite http://shop.panasonic.com/support (solo en inglés)
Guía Rápida Española
TGM43x(en)_0426_ver031.pdf 106 2016/04/26 10:55:21

Customer services
Accessories!
h�p://shop.panasonic.com/support
Customer Services Directory
Shop
for all your Panasonic gearGo to
Get everything you need to get the most out of
your Panasonic products
Accessories & Parts for your Camera, Phone, A/V
products, TV, Computers & Networking, Personal
Care, Home Appliances, Headphones, Ba�eries,
Backup Chargers & more…
For Product Informa!on, Opera!ng Assistance,
Parts, Owner’s Manuals, Dealer and Service info
go to h�p://shop.panasonic.com/support
For the hearing or speech impaired TTY: 1- 877-833-8855
As of June 2015
For assistance, please visit http://shop.panasonic.com/support 107
Appendix
TGM43x(en)_0426_ver031.pdf 107 2016/04/26 10:55:21
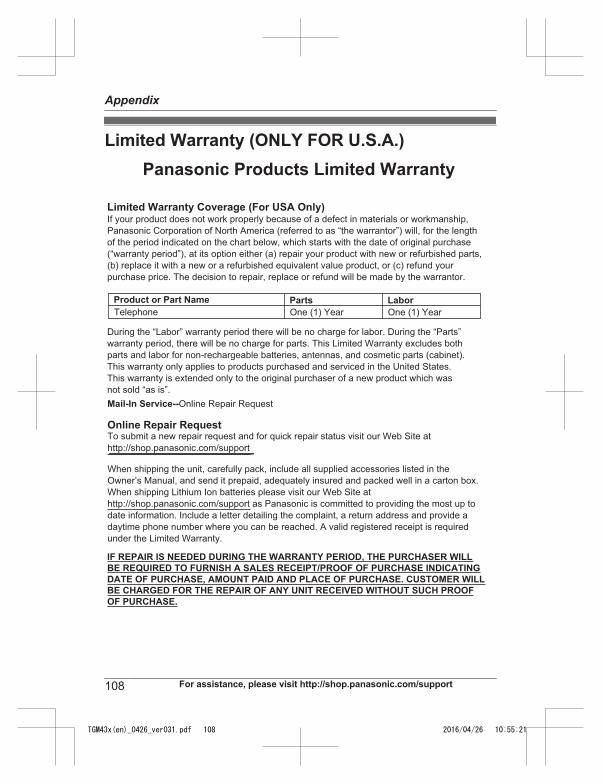
Limited Warranty (ONLY FOR U.S.A.)
Limited Warranty Coverage (For USA Only)
Labor
One (1) Year
Parts
One (1) Year
To submit a new repair request and for quick repair status visit our Web Site at
http://shop.panasonic.com/support
Panasonic Products Limited Warranty
Online Repair Request
Mail-In Service--Online Repair Request
If your product does not work properly because of a defect in materials or workmanship,
Panasonic Corporation of North America (referred to as “the warrantor”) will, for the length
of the period indicated on the chart below, which starts with the date of original purchase
(“warranty period”), at its option either (a) repair your product with new or refurbished parts,
(b) replace it with a new or a refurbished equivalent value product, or (c) refund your
purchase price. The decision to repair, replace or refund will be made by the warrantor.
During the “Labor” warranty period there will be no charge for labor. During the “Parts”
warranty period, there will be no charge for parts. This Limited Warranty excludes both
parts and labor for non-rechargeable batteries, antennas, and cosmetic parts (cabinet).
This warranty only applies to products purchased and serviced in the United States.
This warranty is extended only to the original purchaser of a new product which was
not sold “as is”.
Telephone
When shipping the unit, carefully pack, include all supplied accessories listed in the
Owner’s Manual, and send it prepaid, adequately insured and packed well in a carton box.
When shipping Lithium Ion batteries please visit our Web Site at
http://shop.panasonic.com/support as Panasonic is committed to providing the most up to
date information. Include a letter detailing the complaint, a return address and provide a
daytime phone number where you can be reached. A valid registered receipt is required
under the Limited Warranty.
IF REPAIR IS NEEDED DURING THE WARRANTY PERIOD, THE PURCHASER WILL
BE REQUIRED TO FURNISH A SALES RECEIPT/PROOF OF PURCHASE INDICATING
DATE OF PURCHASE, AMOUNT PAID AND PLACE OF PURCHASE. CUSTOMER WILL
BE CHARGED FOR THE REPAIR OF ANY UNIT RECEIVED WITHOUT SUCH PROOF
OF PURCHASE.
Product or Part Name
108 For assistance, please visit http://shop.panasonic.com/support
Appendix
TGM43x(en)_0426_ver031.pdf 108 2016/04/26 10:55:21
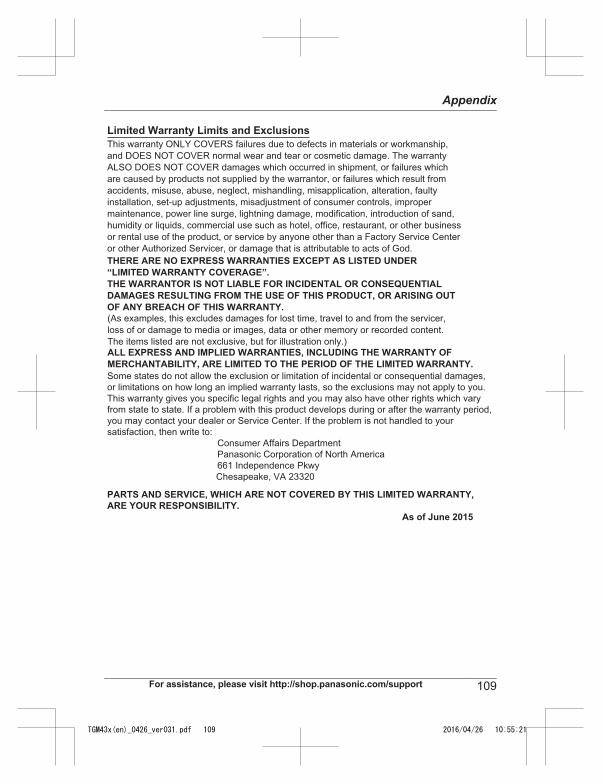
Limited Warranty Limits and Exclusions
(As examples, this excludes damages for lost time, travel to and from the servicer,
loss of or damage to media or images, data or other memory or recorded content.
The items listed are not exclusive, but for illustration only.)
This warranty ONLY COVERS failures due to defects in materials or workmanship,
and DOES NOT COVER normal wear and tear or cosmetic damage. The warranty
ALSO DOES NOT COVER damages which occurred in shipment, or failures which
are caused by products not supplied by the warrantor, or failures which result from
accidents, misuse, abuse, neglect, mishandling, misapplication, alteration, faulty
installation, set-up adjustments, misadjustment of consumer controls, improper
maintenance, power line surge, lightning damage, modification, introduction of sand,
humidity or liquids, commercial use such as hotel, office, restaurant, or other business
or rental use of the product, or service by anyone other than a Factory Service Center
or other Authorized Servicer, or damage that is attributable to acts of God.
THERE ARE NO EXPRESS WARRANTIES EXCEPT AS LISTED UNDER
“LIMITED WARRANTY COVERAGE”.
THE WARRANTOR IS NOT LIABLE FOR INCIDENTAL OR CONSEQUENTIAL
DAMAGES RESULTING FROM THE USE OF THIS PRODUCT, OR ARISING OUT
OF ANY BREACH OF THIS WARRANTY.
ALL EXPRESS AND IMPLIED WARRANTIES, INCLUDING THE WARRANTY OF
MERCHANTABILITY, ARE LIMITED TO THE PERIOD OF THE LIMITED WARRANTY.
PARTS AND SERVICE, WHICH ARE NOT COVERED BY THIS LIMITED WARRANTY,
ARE YOUR RESPONSIBILITY.
Some states do not allow the exclusion or limitation of incidental or consequential damages,
or limitations on how long an implied warranty lasts, so the exclusions may not apply to you.
This warranty gives you specific legal rights and you may also have other rights which vary
from state to state. If a problem with this product develops during or after the warranty period,
you may contact your dealer or Service Center. If the problem is not handled to your
satisfaction, then write to:
Consumer Affairs Department
Panasonic Corporation of North America
661 Independence Pkwy
Chesapeake, VA 23320
As of June 2015
For assistance, please visit http://shop.panasonic.com/support 109
Appendix
TGM43x(en)_0426_ver031.pdf 109 2016/04/26 10:55:21

Index# 3-way conference: 42A Accessibility
Auto boost: 28Booster (speech): 29Booster (volume): 27Headset type: 33Message indicator: 30Neckloop: 32Talking dial: 29Tone control: 26
Additional handset: 62Alarm: 60Answering calls: 39Answering system
Call screening: 76Erasingmessages: 72, 73, 76Greeting message: 71Greeting only: 77Listening tomessages: 72, 75New message alerting: 74Number of rings: 76Recording time: 77Remote access code: 75Remote operation: 75Ring count: 76Toll saver: 76Turning on/off: 71
Auto talk: 39, 58B Battery: 15, 17
Bluetooth wireless technologyBluetooth headset: 69Cellular phone (Link tocell): 34Phonebook transfer: 66
C Call block: 45One ring for blocked call: 46
Call share: 41, 59Call waiting: 41Call Waiting Caller ID: 41
Caller ID number autoedit: 58, 64Caller ID service: 63Caller list: 63Caller list edit: 64Cellular calls: 38Cellular phone
Pairing: 34Unpairing: 34
Chain dial: 49CID (Caller ID): 63, 64Conference calls: 42Control type: 19Customer support: 59
D Date and time: 24Dialing mode: 25Direct command code: 51Display
Contrast: 57Language: 23
E Eco mode: 17Error messages: 81
F Flash: 41, 58G Groups: 48H Handset
Deregistration: 62Name: 61Registration: 62
Hold: 40I Intercom: 43K Key detector: 57, 59
Key tone: 56L Landline calls: 39
Line mode: 58Link to cell
Alert settings for your DECTphone: 68Area code: 37Auto connection: 35Cellular line only mode: 36Cellular line selection: 37Connection: 36Link to Cell app: 67Ring as cell mode: 35
110
Index
TGM43x(en)_0426_ver031.pdf 110 2016/04/26 10:55:21
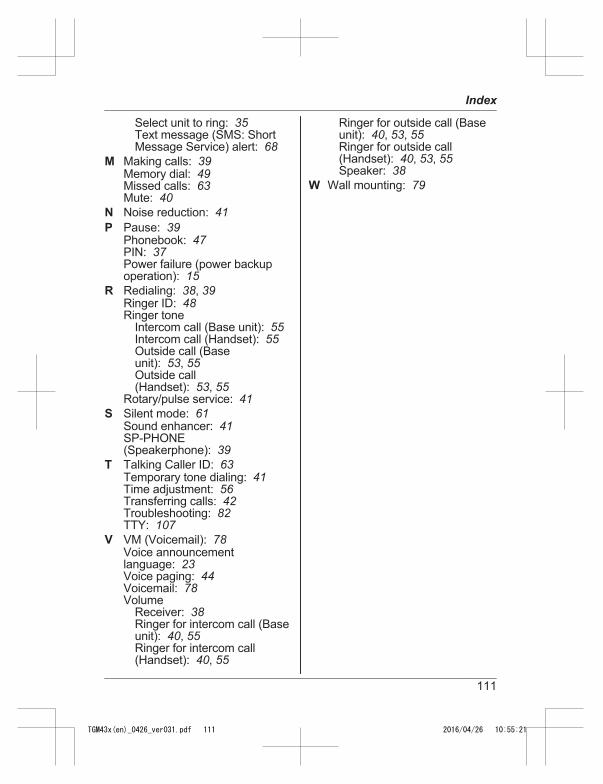
Select unit to ring: 35Text message (SMS: ShortMessage Service) alert: 68
M Making calls: 39Memory dial: 49Missed calls: 63Mute: 40
N Noise reduction: 41P Pause: 39
Phonebook: 47PIN: 37Power failure (power backupoperation): 15
R Redialing: 38, 39Ringer ID: 48Ringer tone
Intercom call (Base unit): 55Intercom call (Handset): 55Outside call (Baseunit): 53, 55Outside call(Handset): 53, 55
Rotary/pulse service: 41S Silent mode: 61
Sound enhancer: 41SP-PHONE(Speakerphone): 39
T Talking Caller ID: 63Temporary tone dialing: 41Time adjustment: 56Transferring calls: 42Troubleshooting: 82TTY: 107
V VM (Voicemail): 78Voice announcementlanguage: 23Voice paging: 44Voicemail: 78Volume
Receiver: 38Ringer for intercom call (Baseunit): 40, 55Ringer for intercom call(Handset): 40, 55
Ringer for outside call (Baseunit): 40, 53, 55Ringer for outside call(Handset): 40, 53, 55Speaker: 38
W Wall mounting: 79
111
Index
TGM43x(en)_0426_ver031.pdf 111 2016/04/26 10:55:21
1 Disconnect AC adaptor and remove batteries from base unit.
2 Reconnect AC adaptor and reinsert batteries into base unit.
3 Check if telephone line cord is connected.
4 Use rechargeable Ni-MH batteries.
5 Read troubleshooting page in the Operating Instructions.
(Alkaline/Manganese/Ni-Cd batteries CANNOT be used.)
Visit our Web site: http://shop.panasonic.com/support
L FAQ and troubleshooting hints are available.
If your product is not working properly. . .
IMPORTANT!
For your future referenceWe recommend keeping a record of the following information to assist with any repair underwarranty.
Serial No. Date of purchase(found on the bottom of the base unit) Name and address of dealer
Attach your purchase receipt here.
Two Riverfront Plaza, Newark, NJ 07102-5490
© Panasonic System Networks Co., Ltd. 2016
Printed in Malaysia
*PNQX7805ZA**PNQX7805ZA*
PNQX7805ZA TT0416YK0
TGM43x(en)_0426_ver031.pdf 112 2016/04/26 10:55:21