Amherst Media - Field Production Guide/ Camera Workshop Sony PD 150/ 170
43
Basic Field Production - Sony PD 150/170
-
Upload
amherst-media -
Category
Self Improvement
-
view
435 -
download
0
Transcript of Amherst Media - Field Production Guide/ Camera Workshop Sony PD 150/ 170

Basic Field Production - Sony PD 150/170

Overview
• Field kit basic parts and operation
• Advanced Camera Adjustments
• Shot composition
• Types of mics and getting good audio
• VCR functions of the camera

The TripodExtend the legs using the releases
1st
2ndExtend each leg one “level” at a time
Make sure to lock the releases afterextending each level
Make sure the tripod is levelby adjusting the legs incrementally.

The Tripod
Pan lock
Tilt lock
LevelPlate safety latch
Plate lock
Tilt/pan handle

Sony PD-150/170

What’s in the box?
On board mic
Sony PD-150or PD-170
AC Adapter

Putting the Camera on the Tripod
Line up the copper piece and the screw on the plate with the threaded openingbottom of the camera and tighten the screw. You can use a coin to tighten the
screw if you would like.

Putting the Camera on the Tripod
1. Put the plate on the camera2. Loosen the lock lever3. Push and hold the safety latch in4. Slide the camera on5. Tighten the lock lever
The camera should now be secureon the tripod.

I M P O R T A N T
Make sure that the plate is left onthe TRIPOD and not the camerawhen you are done with it!

What’s next?
Batteries
Mini DV tapes

Power!
You can use the AC adapter(lift the rubber flap)
Or you can use a (small or large) batteryby tilting up the eyepiece and inserting the battery with
the arrow pointing down

Removing Batteries
To remove the battery after use, simplypress down on the battery release buttonon top of the camera and pull the batteryup and out of the camera.

TapesWe sell both 63 and 83 minute tapes.

Inserting a tapeHold down the blue button and push down. The tape deck willopen. Insert the tape with the wheels facing in toward thecamera and the flap facing down. Once the tape is in the camera,Hold the “PUSH” button on the door until you hear it click.

Opening the LCD
Push the silver button on the side andthe LCD screen will open out.

Different Modes
VCR – Allows you to play back your footage
Camera – Puts the camera in record modeso you can film your subject
Memory – If you were to put a MemoryStick in the camera, you could take photosin this mode
Playback controls for VCR mode
Press in the green button and push up or down toChange modes
Record start/stop(Camera mode)

Ways to Zoom
Turn the ring farthest from the lensTo zoom manually
Or use the zoom buttons on top of the camera

Note!
The PD-170’s also havea record start/stop anda zoom control on thehandle.

Focus
You can either set the camerato auto focus (top), manualfocus (middle) or infinityfocus (bottom).
In manual focus, rotate the ring closest to the lens to focus.

Iris/ApertureThe depth of field is the in-focus range, measured from the distance behind
a subject to the distance in front. Depth of field varies depending on the iris setting.A large iris (low F-stop value) will reduce your depth of field.
A small iris (high F-stop value) will increase your depth of field.
Small iris (low F-stop value) Large iris (high F-stop value)

Iris/Aperture
You can adjust the iris by pushing the “Iris” buttonlocated just in front of the LCD. Once you do this, youShould see “F” and a number such as “2.8” appear on yourLCD screen.
Adjust the iris size usingThe wheel located in frontof the iris button.
To manually adjust the iris,make sure that the lock slideron the back of the camera is
switched to the middle position.

Iris/ApertureThe larger the iris (high F-stop value), the more light will be let into the camera.
The smaller the iris (low F-stop value), the less light will be let in.
A still camera would normally compensate for this by adjusting the shutter speed automatically.if you’re manually adjusting the iris, the camcorders do not automatically compensate for this.You can use a neutral density filter or adjust the shutter speed to let in less light if the image
is too bright.
After pressing the “Shutter Speed” button, usethe scrolling wheel on the back of the camerato adjust the shutter speed.

Gain
The gain button acts like a volume controlfor the video signal.
Gain increases the voltage level of the videosignal, causing the image to look brighter.
More gain means more noise, so use gainwith caution.
You can adjust the gain by pushing the gainbutton and using the scrolling wheel on theback of the camera. Gain will show up onYour LCD as a number followed by “dB.”

Neutral Density Filters

White balancing your camera before everyshoot is very important. If you don’t whitebalance the camera, your footage may lookblue, green, or yellow, depending on the typeof lighting that you’re shooting in.
To set the white balance, like adjusting the irismanually, make sure that the lock slider on theback of the camera is set to the middleposition. Zoom in on something white (a pieceof paper, a projector screen, etc.) and press onthe “WHT BAL” button for a couple of seconds.Voilaa! Your camera is white balanced! This iscalled one step white balancing.
If you’re shooting in specific lighting, such as incandescent, florescent, or sun, you can also use whitebalance presets by pushing the white balance button and using the scroll wheel on the back of the camerato scroll through the three presets. For mixed light conditions (sun and incandescent, etc.) one step whitebalancing is best.
NOTE – If you move to another location, always remember to re-white balance the camera!
White Balance

Buttons in the LCD AreaThe most commonly used features in the LCD area are the menu button and the zebra switch.
There are many settings that canbe changed on the camera by goinginto the menu. To do this, press themenu button and scroll through theoptions using the same scrolling wheelon the Back of the camera that weused for Adjusting the gain and thewhite Balance presets. You can pushdown on the scrolling wheel to selectan option from the menu.
The zebra switch shows you where parts of the image are overexposed. If you’re seeing a lotof “zebra”, you may need to adjust your iris or use a neutral density filter to reduce the amountof light entering the camera. Some zebra is ok, but too much means you might lose some detailon your subject.
Note – The zebra lines will not record on your footage!

Rule of ThirdsImagine a grid on your screen that looks like a tic-tac-toe board.
Shots look best if the subject is placed at the intersection of any two of the lines on the grid.
Note: Sometimes rules are meant to be broken.
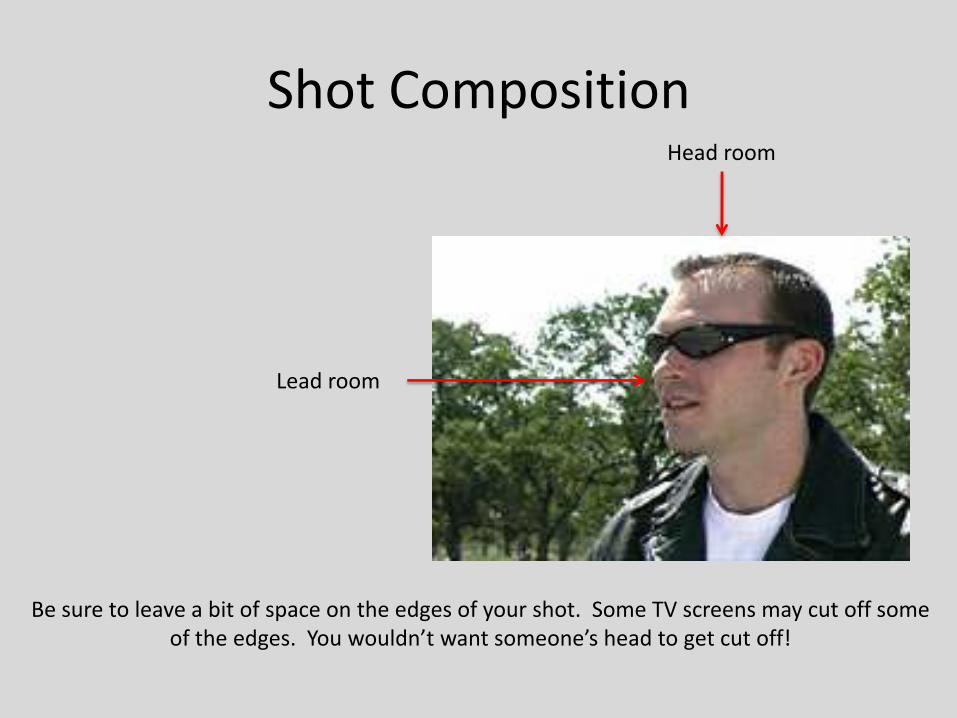
Shot CompositionHead room
Lead room
Be sure to leave a bit of space on the edges of your shot. Some TV screens may cut off someof the edges. You wouldn’t want someone’s head to get cut off!
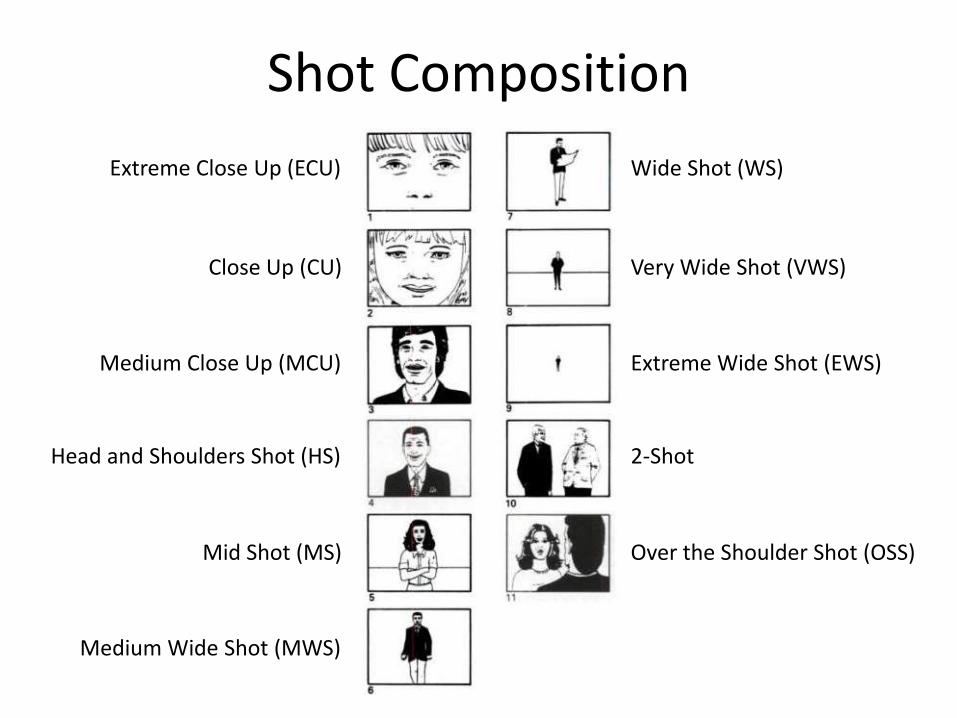
Shot Composition
Extreme Close Up (ECU)
Close Up (CU)
Medium Close Up (MCU)
Mid Shot (MS)
Head and Shoulders Shot (HS)
Wide Shot (WS)
Very Wide Shot (VWS)
Extreme Wide Shot (EWS)
2-Shot
Over the Shoulder Shot (OSS)
Medium Wide Shot (MWS)

Shot Composition

7 Deadly Camcorder Sins
-Headhunting - placing every subject in the center of your frame.
-Motorzooming - overuse of on-screen zooms.
-Rooting - staying in one spot instead of looking for interesting angles.
-Firehosing - panning all over the scene.
-Upstanding - shooting everything from standing eye-level.
-Snapshooting - taping only two or three seconds per shot.
-Backlighting - too much light falling on the background instead of on the subject.

MicrophonesAll of the Sony cameras come with an onboard shotgun mic.

MicrophonesWe also have stereo mics available. You can take out floor stands, table stands or boompoles for use with these mics. The one below is shown with a vibration reduction clip.

MicrophonesLavaliere (Lav) mics clip on to the subject’s shirt. We have two types.
The one shown below is a hardwired lavaliere.

MicrophonesThe other type of lavaliere is the wireless lav. This comes with a transmitter, a receiver and
9V batteries.

MicrophonesLavalieres simply clip onto the shirt, like the one in the photo below.

Microphone Setup
All of the microphones connect to the camerausing a male-female XLR cable. The female endof the cable plugs into the mic and the maleend plugs into one of the two inputs located onthe side of the camera handle.

Microphone Setup
When using only one mic, plug the mic intoInput 1 and make sure that the channel selectSwitch is set to “CH1-CH2.”
When using a 2 mic setup, make sure theChannel select switch is set to “CH1.”

HeadphonesTo plug in headphones, lift the small flap on the side of the camera that the tape deck
Is located on. They plug into the green input on the top.

Adjusting Audio Levels
To adjust the audio levels, press the “Audio Level”button on the back of the camera. A meter willappear on your LCD. To adjust the level, use thescrolling wheel that we used for gain, whitebalance, etc. You can change which channel isselected by pressing the scrolling wheel in.
Generally, a level between -20 and -12 should bethe right volume.
Always make sure to look at the levels meter andnot just go off of what you’re hearing in theheadphones!

Camera Manuals Are Available!
We have camera manuals available, so if you’reinterested in going more in depth with thecamera, make sure to ask for a manual when youcheck out the equipment.
A Few Reminders
• Make sure to check the camera to see if it is set for manual or automatic focus before you start filming.
• White balance any time you start filming in a new location!
• Keep an eye on your audio levels. Between -20 and -12 should be good.

Happy Filming
This work is licensed under a
Creative Commons Attribution-Non Commercial-Share Alike license