Amethyst Ignition Instructions - Osney Consultingosneyconsulting.com/AmethystInstructions.pdf ·...
22
“Amethyst” Performance Mappable Ignition System Instructions for Installation and Configuration Revision 1.11 Aldon Automotive Ltd Breener Industrial Estate Station Drive Brierley Hill West Midlands DY5 3JZ Telephone (01384) 572553 www.aldonamethyst.co.uk
Transcript of Amethyst Ignition Instructions - Osney Consultingosneyconsulting.com/AmethystInstructions.pdf ·...

“Amethyst”
Performance Mappable Ignition System
Instructions forInstallation and Configuration
Revision 1.11
Aldon Automotive LtdBreener Industrial Estate
Station DriveBrierley Hill
West MidlandsDY5 3JZ
Telephone (01384) 572553
www.aldonamethyst.co.uk

Contents Page
1. Introduction 3
2. Installation 42.1 Locking the centrifugal advance mechanism 42.2 Installing Amethyst 52.3 The immobiliser/map select wire 72.4 Vacuum, boost and throttle position sensors 82.5 Re-setting the timing 82.6 Spark plug gaps 8
3. Configuration 93.1 Setting the number of cylinders 113.2 Loading, changing and saving maps 113.3 Creating ignition maps 143.4 Immobiliser configuration 173.5 Map select mode 173.6 Trigger edge configuration 18
Appendix A. Troubleshooting 19
Appendix B. Dwell calculation 20
Appendix C. Library map file format 21
Appendix D. Using Amethyst with optical triggers 22
Disclaimer
Severe engine damage can result if ignition timing is either excessively advancedor excessively retarded. Aldon Automotive can accept no liability for injury ordamage to property resulting from the use of this product.
We strongly recommend that you use the data in your car's workshop manual as thestarting point for centrifugal and vacuum advance settings, and only deviate fromthese settings cautiously and in small steps. If you are not 100% confident in yourability to set the timing correctly, you should entrust this work to a reputable garage.
Limited warranty: Aldon Automotive Ltd warrants that this product will be free from defects inmaterials and workmanship under normal use and service for a period of one year from the date ofpurchase. If the product proves to be defective within the warranty period, it should be returned toyour retailer. We will repair, replace or adjust the product, at our sole discretion, provided that ourinspection discloses that such defect developed under normal and proper use.
The information contained in this user guide may be subject to change without notice. No part of this documentmay be transferred or reproduced, digitally or otherwise, without prior consent from Aldon Automotive Ltd.
Copyright © 2015-2017 Osney Consulting Ltd. All rights reserved.
“Amethyst” is a trade mark of Aldon Automotive Ltd.
2

1. Introduction
Aldon Automotive's “Amethyst” mappable ignition system is designed to replace thecentrifugal and vacuum advance units of a traditional distributor. It provides full usercontrol of advance characteristics via a PC connected to its USB interface.
Amethyst takes its inputs from the car's distributor and inlet manifold. Thecentrifugal advance mechanism must be locked in position so that each trigger pulse isgenerated at the same crankshaft angle. The vacuum pipe from the inlet manifoldshould be connected to the Manifold Absolute Pressure sensor on the unit (wherefitted), instead of the original vacuum advance unit.
For best accuracy, the Amethyst unit should be used in conjunction with an AldonIgnitor. However, conventional points can be used, as can some popular types ofoptical and other electronic input.
Amethyst offers two main advantages over traditional advance mechanisms. First, itis possible to match the advance characteristic much more precisely to the engine'srequirements. Second, the unit does not suffer the friction and wear associated withtraditional advance mechanisms, so its output is fully repeatable. Any givencombination of RPM and load will always result in exactly the same advance.
Limitations
Amethyst is not suitable for use with coils of less than 1.5 ohms resistance.
Amethyst works by measuring the time between pairs of pulses from the distributorand generating a spark slightly before the next pulse is due. Because of this, it isunsuitable for engines with unequal firing intervals. This affects only a few engines,generally V-twins, V4's and a few V6's.
Amethyst is suitable for 12v negative earth vehicles only.
3

2. Installation
2.1 Locking the centrifugal advance mechanism
The first step is to disable the centrifugal advance mechanism, so that every triggerpulse from the distributor to the Amethyst unit occurs at the same crankshaft angle. Itis usually most sensible to lock the distributor in the fully advanced position, sincethis is the natural position for the advance weights. The mechanism can be locked inthis position with lock wire or light extension springs pulling the mechanism round tofull advance.
Fig. 1. Advance mechanism locked using springs
If you are using points, you will no longer need the condenser, so discard it.Furthermore, the dwell angle is unimportant so far as the Amethyst unit is concerned,since it will generate the correct dwell electronically.
The engine will have to be re-timed, so that the trigger pulse is generated at thevehicle manufacturer's static timing point. However, this step can wait until the unitis installed.
4

2.2 Installing Amethyst
The unit should be located well away from sources of moisture, heat and electricalinterference. Ideally, it should be mounted fairly high up in the engine bay, well awayfrom road dirt, and not too close to the exhaust, coil or HT leads.
Fig. 2. Amethyst unit
The wires on the unit should be connected as shown below.
The unit may be destroyed if the wires are connected incorrectly.
Thick black: Earth
Red: +12v from a switched line
Yellow: Coil LT minus terminal (don't connect this yet). Note that thecoil must have a resistance of at least 1.5 ohms.
Green: Sense input
Thin black: Immobiliser/map select input
Note: The immobiliser/map select wire is the one at the far right of the unit, adjacentto the green wire.
2.2.1 Using Amethyst with an Aldon Ignitor
If you are using Amethyst in combination with an Aldon Ignitor, connect the greenwire from the Amethyst unit to the black wire from the Ignitor.
5
2.2.2 Input from points
If you are using points, the green wire should be connected to the contact breaker.
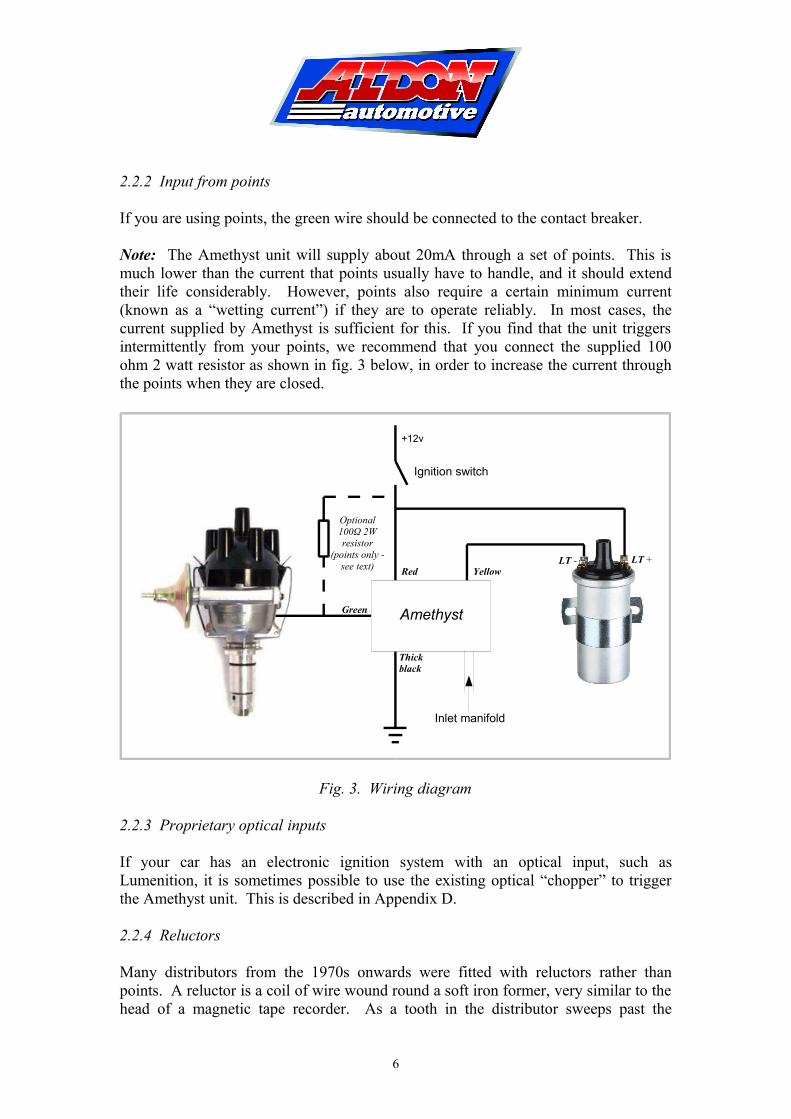
Note: The Amethyst unit will supply about 20mA through a set of points. This ismuch lower than the current that points usually have to handle, and it should extendtheir life considerably. However, points also require a certain minimum current(known as a “wetting current”) if they are to operate reliably. In most cases, thecurrent supplied by Amethyst is sufficient for this. If you find that the unit triggersintermittently from your points, we recommend that you connect the supplied 100ohm 2 watt resistor as shown in fig. 3 below, in order to increase the current throughthe points when they are closed.
Fig. 3. Wiring diagram
2.2.3 Proprietary optical inputs
If your car has an electronic ignition system with an optical input, such asLumenition, it is sometimes possible to use the existing optical “chopper” to triggerthe Amethyst unit. This is described in Appendix D.
2.2.4 Reluctors
Many distributors from the 1970s onwards were fitted with reluctors rather thanpoints. A reluctor is a coil of wire wound round a soft iron former, very similar to thehead of a magnetic tape recorder. As a tooth in the distributor sweeps past the
6
Amethyst
Inlet manifold
+12v
Optional100Ω 2Wresistor
(points only -see text) Red
Thickblack
Ignition switch
LT -Yellow
LT +
Green

reluctor, the magnetic flux in the iron former changes and a voltage pulse isgenerated.
Usually, the reluctor output can be connected directly to the green wire on theAmethyst unit.
The voltage generated by a reluctor is proportional to RPM. No voltage at all isgenerated when the engine is stationary. It is therefore impossible to set static timingwith a reluctor input. Instead, you will have to start the engine and adjust the timingusing a strobe light.
2.2.5 Other electronic inputs
Although we cannot guarantee compatibility in all cases, Amethyst can be triggeredfrom many types of electronic input. The trigger requirements are described inAppendix E.
Note: Amethysts are running successfully in vehicles of dozens of different types andwith a wide variety of trigger inputs. However, we cannot guarantee compatibility inapplications with which we are not familiar. If you are in any doubt about thecompatibility of your vehicle with Amethyst, please contact us before installation andwe will be happy to advise. Any units returned to us must be in “as new” condition,in their original packaging, and will be subject to a re-stocking fee.
2.3 The immobiliser/map select wire
By default, the built-in immobiliser is turned off. You can turn it on under softwarecontrol (see section 3.4). If the immobiliser is turned on, the thin black wire will needto be touched to a +12v supply, at least momentarily, before the unit will allow theengine to start.
You can connect this wire to a hidden switch or, if you can prefer, you can connect itto one of the vehicle's existing switches. This way, you can install the system suchthat the car will start only if (for example) the interior light has been turned onmomentarily, or the gear lever has been touched against reverse.
The same wire may instead be used to switch “on the fly” between pairs of ignitionmaps. This option is described in section 3.5.
If you do not intend to use either the immobiliser or the map select feature, you canleave this wire unconnected.
7

2.4 Vacuum, boost and throttle position sensors
If you are using vacuum advance, or measuring boost on a supercharged engine,connect a length of vacuum pipe from the vacuum take-off on the inlet manifold to themanifold pressure sensor on the Amethyst unit. Alternatively, if you are using aThrottle Position Sensor (TPS), connect the multi-way connector from the Amethystunit to your TPS.
If you are using none of these, you can leave the vacuum sensor (or boost, or TPS)disconnected.
2.5 Re-setting the timing
Note that this step cannot be carried out if your distributor is fitted with a reluctor.
Ensure that the yellow lead is disconnected from the coil. Remove or loosen the sparkplugs to make the engine easier to turn accurately. Now turn on the ignition. TheLED on the Amethyst unit should be on when the coil is on (i.e. with the points closedon a traditional system), and off when the coil is off. You should see the LED turn onand off as you turn the engine by hand.
Adjust the distributor so that the LED turns off just as the engine passes the vehiclemanufacturer's specified timing point.
At this point, you can re-fit or tighten the spark plugs, connect the yellow wire to thecoil LT terminal and start the engine. The Amethyst unit contains a default mapwhich will allow the engine to run. Almost immediately, the unit will switch fromstart mode into run mode, which means that it is constantly computing the timingadvance required. When the unit enters run mode, the LED goes out.
2.6 Spark plug gaps
The plug gaps specified for classic cars (typically around 0.6mm / 0.025 inch) werelimited by the capabilities of traditional ignition systems. Your coil will generate amuch higher HT voltage with Amethyst than with points and condenser, so it willoften be possible to open up the plug gaps, giving improved efficiency. Gaps up to0.8mm will normally work well.
8

3. Configuration
Install the Amethyst application onto your PC from the supplied USB stick. With thestick attached to the PC, move to the folder created from it and double-click on the“Aldon Amethyst” application. Within a few seconds, a window will appear showingthe control panel for Amethyst.
Next, connect the Amethyst unit to the PC via the supplied USB lead. Turn on theignition, but do not start the engine. The ignition must always be left switched onwhilst the Amethyst unit is being configured.
Note: When a PC is connected to an Amethyst unit for the first time, the PC willrecognise that a new USB Human Interface Device has been found. This procedure iscompletely automatic, exactly the same as when a new mouse, keyboard or memorystick is connected. Within a few seconds, the PC will tell you that the new hardwareis installed and ready for use.
9

The Amethyst display is split into three sections:
(i) The information on the left-hand side is constantly updated: engine RPM, thecurrent vacuum reading in inches of mercury (or boost in bar if you have the boostversion of Amethyst, or throttle position reading if your Amethyst unit is fitted with athrottle position sensor), and the advance that Amethyst has calculated in crankshaftdegrees. You can also see the current unit status, which is either disconnected,immobilised, start mode, running or rev limit.
(ii) The information in the top panel applies to the Amethyst unit as a whole: thenumber of cylinders and whether the immobiliser is enabled or disabled. You can usethe "Load map" and "Save map" buttons to load and store up to eight ignition maps.
(iii) The information in the bottom panel applies to the current map: advancesettings at various RPM and vacuum points, an advance offset, the maximumpermitted advance, and an RPM limit. You can also specify a dwell angle here,although the unit calculates dwell automatically by default.
Note: The following screen shots were taken using the vacuum version of Amethyst.If you have the boost version, the screen will display pressure from -0.5 to 1.5 barinstead. If you have the TPS version, the screen will display throttle angle, from 0 to90 degrees.
10

3.1 Setting the number of cylinders
The first step is to make sure that the number of cylinders is correct, otherwise theRPM calculations will be wrong. New Amethyst units are programmed for fourcylinders by default. If this is wrong, select the correct number from the drop-downlist and press "Apply".
3.2 Loading, changing and saving maps
3.2.1 The current map
The current map is always displayed in the “Map Settings” box. This set of figurescontrols the timing whenever the engine is running. To make any changes to thecurrent map, type in the figures required and press “Apply”.
Note that the current map will be lost when the ignition is turned off. If you want tokeep the changes you have made, you will have to save the map to the Amethyst unit'sinternal flash memory.
3.2.2 Stored maps
The Amethyst unit stores eight maps in flash memory. Any map can be loaded (i.e. itbecomes the current map) by selecting the map number from the drop-down menu andpressing “Load Map”. The current map can be saved to any of the eight locations by
11

selecting a number from the drop-down menu and pressing “Save Map As...” Theunit will then load this map the next time the ignition is started.
For example, if you store the current map as map 3, then map 3 will be loaded as thecurrent map the next time the unit is started.
3.2.3 Default maps and the null map
By default, maps 1-7 contain the advance figures shown in these screen shots. Map 8is a null map, meaning that the advance figures are all set to zero. This can be used toset the timing dynamically with a strobe light. With no advance or retard whatsoever,the strobe light should illuminate the same timing point regardless of RPM. This willconfirm whether the distributor advance mechanism has been locked successfully, andcan also be used to show whether any slack has been taken up between the crankshaftand the distributor drive.
Even though map 8 is null by default, you can still use it as a regular ignition map,storing advance figures of your choice.
12

3.2.4 Library maps
An unlimited number of maps may be stored on a PC, and transferred to the Amethystunit via the USB interface. Each map is stored as a file on the PC's disk. Librarymaps for certain popular cars can be downloaded from www.aldonamethyst.co.uk.The list of library maps is updated from time to time.
To load a library map, press “Load library map” and navigate to the file required.Then press “Open”.
Once you have loaded a library map, you will still have to press "Apply" to send thenew map to the Amethyst unit, and "Save Map As" to write it to flash memory so thatit is preserved the next time the engine is started.
Maps can be stored to the PC using “Save library map”.
The library map format is described in Appendix C.
13

3.3 Creating ignition maps
Amethyst calculates the advance required by summing three numbers, all of which arespecified in crankshaft degrees:
an offset, which is constant. Changing the offset allows the entire map to beadvanced or retarded without altering its shape. The offset can be eitherpositive or negative (i.e. either an advance or a retard)
a centrifugal figure, which is calculated by reference to a table of advanceagainst RPM. Linear interpolation is used when the measured RPM fallsbetween two defined points. The centrifugal advance figures must be positive.
a load figure, which is calculated by reference to a table of advance againstmanifold vacuum (or boost on units fitted with a boost sensor, or throttleposition on units fitted with a Throttle Position Sensor). Linear interpolationis used when the measured vacuum (or boost, or throttle position) fallsbetween two defined points. These advance figures can be either positive ornegative.
The unit has fourteen RPM points (500 RPM increments from 500 RPM to 7,000RPM) and eight load points (from zero to 14 inches mercury). Thus the entireadvance characteristic is specified in 23 numbers (1 offset, 14 centrifugal, 8 load).
In addition, each map contains a maximum advance figure, as a precaution againstadvance calculations which might harm the engine. By default, the maximumadvance is 34 degrees. If the total of offset plus centrifugal advance plus vacuumadvance exceeds the maximum advance, then the total advance will be limitedaccordingly:
14

3.3.1 Ignition map example
One typical curve (1973-74 MGB) specifies the following advance requirements, inaddition to the static advance of 6°:
600 RPM 0.5° 3,600 RPM 22°1,200 RPM 4° 4,500 RPM 28°2,200 RPM 12° 6,000 RPM 30°
The following figures can be read off the graph:
500 RPM 0° 3,000 RPM 17.5°1,000 RPM 3° 3,500 RPM 22°1,500 RPM 7° 4,000 RPM 24.5°2,000 RPM 11° 4,500 RPM 28°2,500 RPM 14° 5,000 RPM 28°
These map points are then entered as shown below:
15
0 500 1000 1500 2000 2500 3000 3500 4000 4500 5000 5500 6000 6500
0
5
10
15
20
25
30
35

You can review the shape of your ignition map by pressing the "Plot" button:
To send this information from the PC to the Amethyst unit so that the engine runswith these settings, press "Apply".
To write the map to the Amethyst unit's flash memory, so that it will still be there thenext time the engine is started, select a map number from the drop-down menu andpress "Save Map As..." As described in section 3.2.2, you can store your map to anyof the eight locations.
3.3.2 Vacuum advance
Vacuum advance characteristics can be entered in exactly the same way. An exampleis shown below. Note that there is approximately 13” Hg of manifold vacuum in thiscase, typical of an engine running at part throttle:
If your Amethyst unit is fitted with a TPS, you will see load points labelled from 0 to90 degrees, rather than from 0 to 14 inches of mercury. If you have a boost sensorinstead of a vacuum sensor, your will see the load points labelled from -0.5 to 1.5 bar.
You can review the shape of your load curve by pressing the "Plot" button.
Note: No vacuum advance (or boost, or throttle angle) is applied below 1,000 RPM,and the amount of advance applied is tapered off between 1,500 RPM and 1,000RPM. This means that the vacuum sensor can be connected directly to the inletmanifold with no risk of full advance being applied at idle.
16

3.3.3 Rev limit
The built-in rev limiter can be set from 2,000 RPM to 9,999 RPM. A "soft" revlimiter is used, which progressively cuts out more and more sparks as the limit isexceeded. The ignition is cut out completely if the rev limit is exceeded by more than500 RPM.
If the rev limit is exceeded, the LED on the Amethyst unit will light.
3.3.4 Dwell configuration
The unit automatically calculates dwell, so as to provide a strong spark at all timeswithout causing the coil to become unnecessarily hot at low RPM. In nearly all cases,you can leave auto dwell selected. However, if you wish to specify a dwell angle, youcan do so by selecting "Manual", entering the required figure in the box and pressing"Apply". Dwell angles are specified in distributor degrees.
The rules used for dwell calculation are explained in Appendix B.
3.4 Immobiliser configuration
By default, the immobiliser is disabled. To enable it, select "Enabled" and press"Apply". When the immobiliser is enabled, the immobiliser/map select wire will needto be touched to +12v, at least momentarily, before the Amethyst unit will allow theengine to start.
3.5 Map select mode
The immobiliser/map select input can be configured to swap between pairs of mapsinstead of being used as an immobiliser. Using this feature, you can change betweenmaps at the flick of a switch, without needing to have a PC connected to the USBport. The map pairs are maps 1 and 2; 3 and 4; 5 and 6; and 7 and 8.
To enter map select mode, choose "Map Select" and press "Apply".
In map select mode, when the immobiliser/map select lead is disconnected, the unitwill always run with an odd-numbered map. When the immobiliser/map select lead isconnected to +12v, the unit will always run with an even-numbered map.
If the unit is operating in map select mode with the immobiliser/map select switchopen (i.e. odd-numbered maps), the LED will flash once every few seconds. In mapselect mode with the switch closed (even-numbered maps), the LED will flash twiceevery few seconds.
17

3.6 Trigger edge configuration
By default, the Amethyst unit triggers on the rising edge of the signal from thedistributor, i.e. from 0v to +12v. If you are using points, this will happen when thepoints open. This setting can be left unchanged with most electronic inputs, includingAldon Ignitors and reluctors.
If you are using an optical input such as Lumenition, you might find it moreconvenient to configure the unit to trigger from the falling edge instead, so as tominimise the angle through which the distributor must be turned to set the statictiming.
18

Appendix A: Troubleshooting
If your Amethyst unit does not seem to work correctly, the following steps shouldhelp you to determine where the problem lies.
PC connection
The ignition must be switched on for the Amethyst unit to connect to the PC.
Phase errors
If the Amethyst unit seems to be triggering badly out of phase, the trigger edge mightbe set incorrectly.
Input circuit test
When the unit is in start mode, the LED should be on with the points closed (or theelectronic equivalent) and off with the points open, as described in section 2.3. Whenyou crank the engine on the starter, you should see the LED flash on and off until theengine fires.
If the LED does not flash, you can test the input circuit as follows:
1. Disconnect the green wire.
2. Turn the ignition on. The LED should not light.
3. Connect the green wire to earth. The LED should now turn on.
If the LED does not turn on and off in response to the green wire being grounded andreleased, the unit is defective.
You can optionally connect the green wire to earth via a multimeter on its currentsetting. You should find that the Amethyst unit supplies about 20mA.
Output circuit test
If no sparks are generated, even though the LED flashes when the engine is beingcranked, you can check the Amethyst output circuit as follows:
1. Disconnect the yellow lead from the coil.
2. Connect the yellow lead to the vehicle positive supply via a low-wattage 12v bulb.A tail light bulb will suffice.
3. Turn the engine over on the starter. You should see the bulb flash on and off.
If the bulb does not flash, the Amethyst unit is defective.
19

Appendix B: Dwell calculation
The amount of energy stored in an ignition coil depends on the length of time that thepoints are closed. If they are closed for a very short time (less than a couple ofmilliseconds) there will only be enough energy to produce a weak spark, or perhapsnone at all. If they are closed for longer than a few milliseconds, the coil becomessaturated, which means that it holds the maximum energy possible for its size. If thepoints remain closed beyond this time, the only effect is to heat up the coil.
With a traditional ignition system, the dwell angle specifies the distributor anglethrough which the points are closed. This has to be set such that, at maximum RPM,the points remain closed for long enough to ensure sufficient energy in the coil toproduce adequately strong sparks. However, this means that the points stay closed formuch longer than necessary at lower RPM.
Amethyst calculates a suitable dwell time rather than using a fixed dwell angle. Thisallows the coil to run cooler at low RPM and may contribute to improved reliability.The unit calculates dwell time based on the number of cylinders and the rev limit, andassumes that the coil should be on for 70% of the time at maximum RPM. This isequivalent to a dwell angle of 63° with a four-cylinder engine, 42° with a six, or 31.5°with an eight.
The dwell time calculated is then applied regardless of RPM. This ensures that strongsparks are generated, but also enables the coil to run cool at lower RPM.
You can specify a dwell angle manually if required. However, the unit will stillconvert this into a dwell time based on the RPM limit that you specify, and apply thatdwell time throughout the RPM range.
20

Appendix C: Library map file format
Each library map is stored as a text file. A typical example is shown below:
The figures opposite the CENTRIFUGAL heading specify advance at the fourteen RPMpoints, beginning at 500RPM. The VACUUM figures specify advance at the eight loadpoints, beginning at 0” Hg (or 0 bar boost, or 0 degrees of throttle angle).
Each of the headings can be abbreviated to its first two letters, for example AD for theadvance limit or CY for the number of cylinders.
Any line that does not begin with CYLINDERS, REVLIMIT, ADVLIMIT, OFFSET,CENTRIFUGAL or VACUUM, or their abbreviations, is ignored. In the example above, wehave used “//” to denote a comment. Comments can be used to record what vehiclethe map is for, when the map was created and from what information, and whether themap has been modified from standard.
21
// Aldon Amethyst ignition map// MGB 1973-74
CYLINDERS 4REVLIMIT 5500ADVLIMIT 34OFFSET 0CENTRIFUGAL 0,3,7,11,14,18,22,25,28,28,28,28,28,28VACUUM 0,0,0,1,3,5,8,11

Appendix D. Using Amethyst with optical triggers
Amethyst units are in use on cars fitted with Lumenition and similar optical inputs. Insuch cases, the original amplifier can be discarded, and the optical trigger in thedistributor can be connected directly to the Amethyst green wire.
As described in section 3.6, you might find it more convenient to trigger from thefalling edge of the signal from the detector. Triggering from the default rising edgewill work, but you might find it necessary to turn the distributor through a larger anglein order to set the static timing.
Optical inputs consist of an LED, the “chopper” and a photodiode. If you discard theoriginal ignition amplifier, you will need to set up a separate current supply to theLED. Do not connect the LED directly to the +12v supply, since this will probablydestroy it. The LED can safely be connected to the +12v supply via the supplied 560ohm resistor.
Connect the Lumenition detector to the Amethyst unit as shown below:
22
Amethyst
Inlet manifold
+12v
Red
Thickblack
Ignition switch
LT -Yellow
LT +560Ω 0.5Wresistor
Lumenitiondetector
Green
Red
Black
Blue
Amethyst installation with Lumenition Optronic trigger