American Woodworker 159 (April-May 2012)
76
-
Upload
emilian-baluta -
Category
Documents
-
view
201 -
download
27
description
modelism
Transcript of American Woodworker 159 (April-May 2012)


b .... 1159 AtnoricM1 W_. (ISSN 1074-91521. Pul>l0IIed bomonthly bv WoodwMung _ Ltc. 90 SIlornlon St. c.mt>ndgo. MA 021«1. ___ pood.1 Boston, MA ond _ mooting _... POSTMASTEJI ,Sond
cNngo aI odd,.,. nooc. 10 AtnoricM1 W_. PO. Box 420235. Polm Coost FL 32142-0235 SubocnptJon , .... , U5. ono-yHf. 524.91. SongIKOPY. 5599. CoNdo ono-yHf. 529.91. SlnglKOPY 16-99 rtJ5. Funds~ GST' RI229886" . FOfOIgn slMfac. ono-yHf. 529.98 {US FundsJ. US. MWS.1MId _ bv C ..... UCuIo_ ""'-'Y. Ltc. _ _ NJ 07646. CoNdo Post PubCocotiOns Mool AgI_I _ 41 525524 CoNdo Po>tmoster Sond _ __ 10' AmoricMl W_. PO Box 456, Niogaf. FoCI. ON L2£ 6V2. Sond ",""'" ond ___ 10 Amtt'on w_. P.o. b_2OJ.35, PilmCOiISt. FL32142..()235. Pnnt!d II"II.JSA. 0 2012 NfwTr~ Med&i LlC. AI nghts--
4 AmAIrlcanWoodworker.com A P A I LI M A Y 10 1 2
10 FREE Digital Plans em at AmericanWoodworker.comlwfcysqm.aspx
This offerexpite5 an May 37,2072
#159, April/May 2012
Features 38 How to Make Banding Inlay
A mark of true craftsmanship, bandings are much more than just decoration.
44 Country Cupboard Do you collect Americana? Here's a cabinet for storing and displaying it.
51 Classic Door Joinery How to make strong mortise and tenon joints with a plunge router and a tablesaw.
56 3-level Basket Stand The Mdrawers" are ready-made-you just provide the stand.
58 The Amazing Tablesaw Bowl It's just like sawing a cove molding, but now the wood is round.
63 Easy Rub-Out Three qUIck steps to a Silky-smooth finish.
67 Sawtooth Desk C 'eate a~ esome patterns with a spindle sander.
Departments 8 Workshop Tips
14 CNC Workshop
18 Well-Equipped Shop
28 A Great American Woodworker
32 Turning Wood
36 My Shop 14
74 Oops!

For interior projects, check out the new, stronger formula of Elmer's Garpenter's Wood Glue.

More On the Web at AmericanWoodworker.com
Crosscut Sled A new, improved design. See the plans at AmericanWoodworker.comIWebExtras
Raised-Panel Jig Se 0 t works at AmericanWoodworker .comIWebExtras
Zero-Clearance Throat Plates Upgrade your saw! Get the how-to at AmericanWoodworker .comIWebExtras
Loose-Tenon Joinery Rout four types with one jig at AmericanWoodworker.comIWebExtras
Tablesaw Bowl A bowl made on a tablesaw? (See page 58.) Watch the magic at AmerkanWoodworker.com/WebExtras
I I I I I I I I I I I I I I I I I I I I I I I I I
Finish the Finish Make a brushed-on finish feel smooth as silk. See how at AmerkanWoodworker.comlWebExtras
I I I I I II I I I I I I I I I I I I II I I I I
Find us on: facebo 6 AmeriC:aDWoodwol'kel'.c:om APRIL / MA Y 2012
#159, April/May 2012
EDITORIAL
Editor in Ch.ef Randy Johnson Editor Tom Caspar
Senior Editor Tim Johnson Contri buting Editors Spike Carlsen
Jeff Corns Brad Holden David Radtke Mario Rodriguez Kevin SouthwICk Rkhard Tendick
Office Administrator Shelly Jacobsen
AliT. DESIGN
Art Director Joe Gohman Director of Photography Jason Zentner
VIce President/Production Barbara Schmitz
Production Manager Mkhael J. Rueckwald
Systems Engineer Denise Donnarumma
V.P. Consumer Marketing Nkole McGuire
Newsstand Consultant TJ Montilli
Online Subscription Manager Jodi lee
New Business Manager Joe Ino
Assistant Marketing Manager Hannah di Ckco
Renewal and Billing Manager Nekeya Dancy
Renew.land Billing Associate Adriana Maldonado
ADVIIITISING SALIS 1285 Corporate Center Drive, Suite 180, Eagan, MN 55121
Brian Zlff, bziffOAmericanWoodworker.com offICe (860) 417·2275, cell (203) 509-0125
Susan Taust.r, stausterOAmerkanWoodworker.com offICe (630) 858-1558, cell (630) 336-0916, fax (866) 643·9662
Tim Henning. thenningtPArnerkanWoodworker.com offICe (708) 606-3358, fax (866) 496-2376
NEW TIIACK MEDIA LLC Chief Executive Offker Stephen J. Kent
Executive VICe President/CFO Mark F. Arnett ICe President/Publishing Director Joel P. Toner
Customer Service Subscription/Billing Questions Onlin.: www.AmerlCanWoodworker.comlSublnfo Email: e-mail.wwserYlCeOAmerlCOnWoodworker.com Phon.: US.odCwdo (BOO) 666-3111 .1nttfN1JOnII (SIS) 462·5394 Paper mail: AmerICan Woodworker Subscriber Servke Dept.. '0. Box ~20235, Palm Coast, Fl321~2-0235.
Back Issues ~ are available for $6.99 each, plus shipping and handling. Ordef at www.awbookstore.comlmagazlnes
Contact the editors Email: .wedltorOI\mericanWoodworker.com Phon.: (952) 948·5890, Fax (952) 948-5895 hper mall: 1285 Corporate Center Drive,
Suite 180. Eagan,MN 5S121.
Amrncan Woodworktr may v.-Infotmation abouI you with repI/' _ companies In order for them to ~ you products and seMces d ~ to you. W you woukl rather WO! not v.-Inbmation, please
to us at I\meIican Woodwort<8, Customer SeNa ()epaitmenL PO. Box ~20235. Palm Coast, FL 321 ~2-O235. Please Indudu copy d our address label.
S4Ibscrlben: W the Post Office alerts us that your magazine is iverable. "'" have no fuither obligation unless WO! receive
• UlfTected address WIthin one )'9r.
part of this pUblkation may be reproduced by any meehanl· a!. photographic, or electronic process, nor may it be stored In • retriev.1 system. transmitted, or otherwise copied (with the
<eptlon of <>ne-tlme. non-commercial, personal use) Without tten permission from the publIsher.
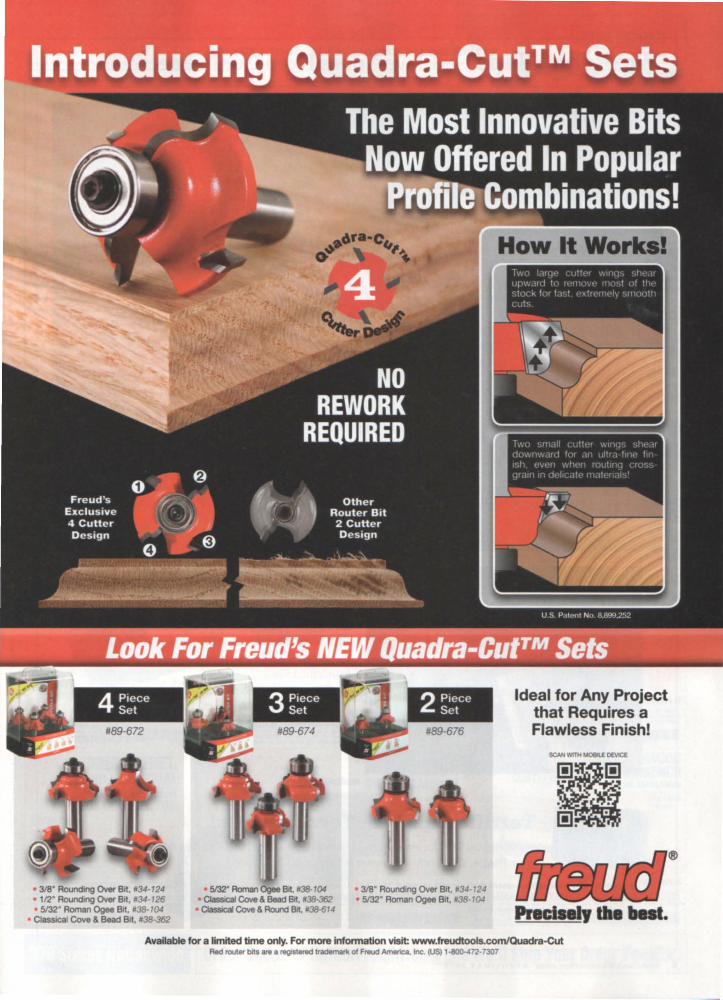
. 3/8' Round.ng Over e.t, .34-124 · 112' Round.ng Over e.t,.34·126 · 5132' Roman Ogee e.t.'38-104
• CIIISSICa Cove & Bead e.t, ~ ~
2 Piece Set
::89-676
. 5/32' Roman Ogee Bot. 138-104 · 318' Round.ng Over e.t. '34·124 • Classical Cove & s-:l Bot. 1138--362 • 5132' Roman Ogee e.t, .38-104 • a-:.I Cove & Round Bot. '38-614
Ideal for Any Project that Requires a Flawless Finish!
Pre~tII ....... Available for a limited time only. For more information visit _.freudtools.comIQuadra-Cut
Red rout .. bo IN. IWgIStI<Wd tr.demari< 01 Freud ArTw1ca. Inc. (US) 1-a0G-4n·1307

Workshop Tips Clever Ideas From Our Readers
' I 1 I " \ ,II, \ I, ,
"
Foam Finis I 9 Stand-Offs TO MAKE A QUICK and 'i)' dr)ing rack, or to raise a project off your bench \ bile apphing a finish, use blocks of rigid foam in ulation and dr)'Wali screws. For stability, the screws should be no more than 112" longer than the foam's thickne .
If you simpl\' p e rews through, they'll punch out a chunk of foam on the back side. The answer: Turn them through \\ith :rewdn\'er.
John Cusimano
Terrific Tips Win Terrific Too s! We'll give you $100 for e ery original workshop tip e
in each issue. The Terr fic tp w 'nner receives a $250 g
o e Terrific Tip is featured
E-mail your tip to workshoptips • • merlc.nwooclworker.co or send It to American Wood .
Suite 180, Eagan, MN 55121. Submissions can't be retu rned and become our property upon ace
and use them in all print and electronic media.
w,...~...., - . 1285 Corporate Center Drive,
ent. We may edit submissions
8 AmericanWooclworker.com A PR II L I M AY 1011
8 .... o z '" '" W ..J Z ::> a: w Z .... Z w N
Z o '" ~ >I C>. -< a: <!)
o .... o I C>.
z w o o I o -< a: '" a: o .... o w

,
How does Harbor Freight Tools sell high quality tools at such ridiculously low prices? We buy direct from the factories who also supply the major brands and sell direct to you. It's just that simplel See for yourself at one of our 370 Stores Nationwide and use this 20% Off Coupon on one of our 7,000 products- , plus pick up a Free 1- x 25 Ft. Tape Measure, a $5.99 value. We stock Shop Equipment, Hand Tools, Tarps, Compressors, Air & Power Tools, Woodworking Tools, Welders, Tool Boxes, Generators, and much more.
• Over 20 MIllion Satisfied Customers! • 1 Year Competitor's Low Price Guarantee • No Hassle Return Policyl • 100% Satisfaction Guaranteedl
d Price!
~_~!:r - - - - - - - - - - - - - - - - - - - - - - -
1/~---1I!!lt.~~ ,. 4 PIECE --::::::!~.~
CHISEL SET 11l' ...
A L~1::9 314 c::::;i:>~.E;:1
$399 1· REEG;:. PR;:;ICE~S7 .• 99 .~~
: CENTRAL MeQHAY [. 2 HP INDUSTRIAL
5 MICRON DUST COUECTOR
LOT NO. 97869
$14999 ,:~gE $24'.99
®
-. ::J --.---
__ IW.!:"' -l"OT iio.---e::EN=ree::H. 92471 12" COMBINATION
SQUARE SET
4 PIECE 1" X 15 FT.
OSCIWTING MULTIFUNCTION ~ POWER TOOL shown
• flnc:tio& Sandi ... CUt Fl ......
RATCHETING TIE DOWN SET
LOT NO. !10914
LOT NO. 61303/ 17256161811 CUt Metal, SCIIpt CoIImtl,
"-Gnut. CUt Pllstic, ScrIpI Floart .. , Plunge CUt HARIO" fMtGHT TOOU UMtT J
$1999 ,:~gE SS'.99
="-::"-:-,;==".::-c::::*.,:,,,:::::.-::: =-:,:=-~-::r:. ... c:..- ......... - ........... 0fttIIIII
=-"::..-=::"·7~t"='= I I I I III ....... __ .. ___ .... 't s
~1If~~-----------------------500 LB. CAPACITY ALUMINUM
.... qmlMlt ... CARGO CARRIER LOT NO. 92655
LOT NO. 46107/ .. __ -- 619751&9221
"ARIOR fR I DOli · UIUT ..
REG. PRICE $5.49
CBITUlPfRMATlr 18 GAUGE 2·IN·1 NAILERJSTAPLER
LOTNO. 61019
="~"=':=:".::-=:::-""":c:.:;:..-:.-= ,.... ..................... IIIlc.._ .................... 1IrIIIIIII _ .. lit .............. ,..
::.-::..-==:7~2·=.: I I I II I ..... c..-.. .. _ _ ~~_*! _________________ !
CIITIAlPfIIMATlr : 3 GALLON 1 PSI : OIUESS PANCAKE : AIR COMPRESSOR :
LOTNO. 95275
370 Stores Nationwide Order Online at HarborFreight.com and We'll Ship Your Order FedEx.

op Tips continued
Turn" Handles Into Savings THE PRICE OF GOOD TURNING TOOLS can be pretty steep.
ince most of the better lathe tools can be purchased without a handle, put your money where it counts-in the teel, not the handle. After all, it's the steel that does the
work, and high-quality steel gives you an edge that lasts a very long time.
Besides the obvious cost savings, there are other benefits to making your own handles. First, you can customize their length and diameter-no longer do you have to settle for "one-size-fits-all" tools. Second, although a matched set of tools might seem like a good idea, giving each tool a unique handle is an easy way to tell them apart when they're stored edge-down in a tool rack.
John English
For more information on turning handles, go to AmericanWoodworker.mm/WebExtras
10 &m.rlcanWooclwo~k.~.com APRil L/MAY 1011
Tailstock Parking Spot
z < :::;: ~ '" u < o > g
WHEN I TURN hollow ve els, I have to remove my lathe's tailstock to in tall a upport for the hollowing tool. When I'm done hollOWing, I have to re-mount the tailstock to finish the turning. It's a pain-literally. My tailstock is quite hean"; removing it is hard on my back, and getting it re-aligned on the ways is worse yet.
To solve the problem, I made a "parking spot" for the tailstock and bolted it to the end of my lathe. This addition is ju t for torage-it's not a bed extender. It's aligned with the lathe' ways, so I can slide the tail stock into the parking pot instead oflifting it.
I made mo t of the parking spot from dimensional lumber and common hardware, and used hard maple for the ways.
Lloyd Ackerman

Full-size performance. Mid-size package. The Buddy: 16sq feet of industrial strength CNC.
• Get professional speed, power and accuracy at a fraction of the cost of a big-iron CNC machine.
• Cut wood, vinyl, aluminum, foam, plastic - just about anything
• All ShopBot Tools are designed, built and supported in the USA
Check out our website, then give us a call. We'll help you choose the right Shop Bot tool for your business.
ShopBotTools.com 888-680-4466
--tBla~~ Serious woodworkers count on American-made Forrest saw blades for smooth, quiet cuts, everytime ... without splintering scratching or tearouts. No matter what your application, Forrest blades are simply the best money can buy. That's why discriminating craftsmen prefer them!
"[Your blades] cut true, with no vibration. I can say with confidence that Forrest blades are the best.· Carl Stude - Burbank, CA
Our Most Popular Saw Blades: Woodworker II - This aWard-winning all-purpose blade is the finest of its type.
Chop Master - Produces perfect miters with smooth edges ... and no bottom splinters.
Ask for Forrest blades at a fine dealer
Woodworker II Rne Woodworking
ChopMasllr Woodshop News
. ~, . II . •
""'\~
or retailer, order online, or call the factory directly. Your satisfaction is guaranteed ... or your money back!
RlIR3SI The Fnt Choice ~ SeriouI ::; ~SincttMS www.ForrestBlades.com 1-800-733-7111 (In NJ, call 973-473-5236)
Durallne HI-AT Woodshop News
- , 0 ) . II :
One of the reasons we've been the top award winner In every Independent test we've ever been in is workers like Greg.
"We two-plane balance every fan wheel to ISO 6.3 specifications. The same as aircraft turbine rotors .. "
• Greg S • MachonoIt. Oneoda All Syslams

Wor shop Tips continued
Bullet-Catch Bench Dogs WHEN I BUILT my workbench, I drilled round bench-dog holes in the top so I didn't have to cut square mortises. Being a thrifty sort, I didn't want to shell out for store-bought dogs, so I made my own.
At first, I thought all ICl need was a couple 3/4" dowels with flat faces cut into them at a slight angle. They worked, but I couldn't leave the dogs in the holes when they weren't in use-they fell right through!
I had some leftover bullet catches from another job, so I installed a pair in each dog. They're spring-loaded, providing just enough pressure to keep the dogs in place.
The catches have a lip, so I supported the dogs in a V-block and drilled shallow counterbores to sink the lips below the surface.
Serge Dudos
-- -- --------

Precision Height Gauge TO SET THE HEIGHT of a router bit-within .001", if necessary-I made this simple stand for my caliper. It works on a router table or a hand-held router.
Two screws with washers secure the caliper. When I need the caliper without the stand, it's easy to remove. The exact position of the caliper on the stand isn't important; it just has to be plumb.
Our new 2 oz. cap, with a stainless steel pin and a precision seal, prevents clogging and impnra rausability.
To use the gauge, set the bit at roughly the height you want. Place the caliper over the bit. Extend the caliper's depth rod until it touches the top of the bit's cutting edge, then turn the caliper's dial face so the zero is right on the needle.
Slide the gauge away from the bit and push the depth rod down to the table's surface. The reading you get is the bit's height. If the bit's height is not quite right, adjust the bit and repeat the procedure.
Fred Adams
SOURCE
Highland Woodworking, highlandwoodworking.com,
800-241-6748, Woodworker'S 6" Dial Caliper (reads
in fractions and thousandths), #465008, $30.

C CWor shop By Randy Johnson
(rea eng ( (Textures CNC ROUTERS are opening up lots of new ways to create texture in wood. Here are my three favorite way of creating texture using a CNC. The first method u es the repetition of shapes to create a design that is routed u ing one or more bits. If you enjoy doodling patterns, this is a technique that you will enjoy. The second method use programming built in to the de ign oftware to generate a texture de ign that simulate a hand-
Shape-Based Textures Shape-based textures are created by repeating a pattern of either asymmetrical or symmetrical shapes. Patterns can be hand-drawn or drafted with a CAD program such as Google Sketch Up. Hand drawn designs need to be scanned or digitally photographed so they can be imported into the CNC design program. CNC design programs are also capable of creating shape-based patterns. One creative aspect of this type of texturing is that you can rout on the lines or between them to achieve different effects. I routed the crackle texture shown below using a 1/4" dia. 50° v-bitlttook about 60 minutes to carve the design into this 10" cherry lid. The dome shape of the lid was created first using a 1/4" dia. ball nose bit.
14 J.mericaaWoodwod,er.com A' RI L/MAY 1011
carved pattern. The third texturing method starts with a photograph and converts the light and dark areas into the routing path . Each method ha a few basic rules to follow, but add orne imagination and the variations you can achieve are vIrtually limitle s. I u ed Vectric Aspire CNC design oftware to create the texture for this article, but other oftware packages uch as ArtCAM and En Route can al 0 be u ed to create textures.

Texture Toolpath
Toot Sal Nose (0.250 inch)
I Select ... I Edt ...
Start Depth 0.0 inches
Use selected vectors as pattem
Texture Settings
Max. Cut Depth 0.125 inches
Mn. Depth -. f) 0.065·
Max. Cut Length 1.5 inches
Mn.lenoth 0.78·
Max Overtap % 10.0 %
Variation -.:~ n 51%
Stepover 0.15 nches
Vanation -. .... f) :a.Ol0!
Angle 0.0 deg'ees
Save ... I I load ...
Software-Based Textures Using the built-in texturing program that comes with most CNC design software packages is an easy way to create a simulated hand-carved texture. As shown in the program window to the left, there are several options to choose from when designing this type of texture. Adjusting these variables enables you to create a wide variety of simulated hand-carved textures, ranging from those with long, closely spaced cuts, to those with short, widely spaced cutsand anything in between. Once the options are selected, the program creates a semi-random pattern of lines (see middle image below) for the router bit to follow. I used the settings shown here to create texture on the walnut lid show below. I used a 1/4" ball nose bit to create the texture, but other profiles such as straight bits or v-bits can also be used, expanding your options even further. It took about 60 minutes to carve the texture shown below.
APRil / MAY 1011 JlmerlcanWood_l'kel'.com 15

CNC Workshop continued
Photo-Based Textures Another way to create a CNC texture is to start with a photo. Not all photos work equally well, however. That's because the CNC design software reads the light areas as high points and the dark areas as low points and tells the CNC router to carve accordingly. A good photo image is one that is evenly lit without long shadows, but yet has good contrast. As you can see in the alligator skin photograph below, the highlights
16 AmericaaWoocSwwku.com APRil / MAY 1012
accent similar areas, while the dark areas are consistent in the rest of the photo. This type of photo will create a texture that closely resembles the contours of the original. Carving a photo-based texture requires the use of a small ball nose bit to attain the details. For the design below, I first roughed out the texture and dome shape of the lid with a 1/4" ball nose bit and then carved the final shape and details using a l/S" ball nose bit. It took about two hours to do the final routing and about the same amount of time for the roughing passes.

Texture Variations
@](§J(§JITm
rn1JJm]rn1J(§ fm]~~fml
Shape-based textures can take many forms, from low relief to high relief, and from subtle to bold. The three textures above are just a sampling of options that are possible with this approach to designing textures for the (NC. The one on the left
Software-based textures are the easiest-and often the fastest-to create, and can be run on top of a shape (left), around a shape (middle), or overlapping in different directions (right). These options allow you to be selective
Photo-based textures are an easy way to simulate existing textures-as seen in these three examples. The weathered end grain (left) shows a surprising amount of detail, as does the cloth texture (right). The stones (middle) create an interesting pattern, although they are rendered quite
was created using a collection of small circles that were then routed around with a 600 v-bit. The middle design is simply an array of concentric squares, while the one on the right uses a grid pattern made with a 1200 v-bit.
and creative in where and how the texture is applied. Using different bits will also expand the variations you can create with this method of texturing.
flat. Additional depth can be added to the stones through the use of other modeling tools, if so desired. The thing to remember about creating textures from photos is to always start with a photo that has even contrast.
APR I L I M A Y Z 0 11 JlmericanWoodworku.com 17

The Well-Equipped Shop
Thrifty Dovetail Jig THROUGH DOVETAILS--for woodworkers, this is batting in the big leagues, isn't it? Cutting them by hand certainly requires skill and practice, but if you use a well-designed router jig, almost anybody can play ball. Many of these jigs are quite expensive, but Leigh Industries, the maker of one of the best-known jigs, has just introduced a money-saving option: the R9 Plus Joinery System.
The heart of the R9 is a very precise, double-sided aluminum template. You mount the template to a wooden
,. JlmericaaWooclworlutr.com APR I L / MA Y 2 0 11
by Brad Holden
beam, which you make yourself. The template allows you to make through dovetails up to 9" wide-and box joints, too. You can vary the size of the dovetails somewhat, but not their spacing. Using two different bits, you rout pins on one side of the jig and tails on the other side.
You're not limited to 9" boards, though: By moving the R9 template down the beam (which can be any length), you can dovetail boards of any width. The template is indexed by a series of "pin plates;' which you screw to the beam. After you move the template to dovetail a wide piece, the pin plates enable you to return the template to the same
positions for the next board. The R9 comes with three pin plates, enough to dovetail an 18" wide piece; more plates are available as accessories.
A cam-shaped guide bushing installed on your router's base controls the joint's fit. You just turn the bushing one way or the other to tighten or loosen the fit.
With the R9, you'll be able to make five different sizes of through dovetails on boards of any thickness up to 13/16". You can choose from three different pin widths and two joint pitches. For box joints, you can use stock of any thickness up to 7/8", with three different finger sizes. The R9 Plus works with either a hand-held router or on your router table.
SOURCE Leigh Industries, leighjigs.com. 8()(Hj63-8932. R9 Plus Joinery System, IR9 Plus, $169; R9 Pin Plates-2 pack. '201OPR.S lO.
o w ... o z ~ w ~
Z ::;)
a: w Z ... Z w
'" Z
~ <
>:x: ... < a:
" o ... o :x: ... a: < ... "" < u :::;; o ... a: o ... a w

ARROWMONT I .,,/ r ("
2012 WEEKEND AND ONE-WEEK WORKSHOPS Spring I Summer I Fall
BEGINNER TO ADVANCED LEVELS AVAILABLE PROFESSIONAllY· EQUIPPED FURNITURE, WOODWORKING & WOODTURNING STUDIOS
GATLINBURG, TN • 865.436.5860
WIN a $100 Gift Certificate
Enter to win by taking a brief online sUIVey at
AmericanWoodworker.com/ Survey un'e) mu t be completed by May 31. The winner will
be chosen b random dra,\;ng. The ,\;nner will be awarded a 100 gift certi ficate to AV.'Sook tore.com
ii 7~g~,
by HICKORY ~ America's ~ster Woodarver and Woodtumer since 1971
100% SOLID WOOD
Ready-to-Finish
Premium Components made in Virginia
Wholesale Direct pricing with No-Mlnimum order
Table legs - Bun Feet -Corbels -Cabinet Columns -Table Bases - Posts
Online Catalog" ordering at
www.tablelegsUSA.com ·Proud to be an Ameflcan Manufacturer·
• High efficiency patented cyclone design separates 99% of the dust. Helps maintain consistent airflow.
Dulf Deputy
Dust Oeputy® Deluxe· $79.00 Shown here • Portable with casters.
• 5 • 30 gal. bins.
Dust Oeputy® 0.1. Y .• $39.00 (Cyclone Only)
Mode in the USA. ~ (U.S. Patented Invention)

The Well-Equipped Shop continued
TURN CARVE
'~"" ".J'!! • . ~ ' , ' I .. . " -' !
. t,
TURN TO PACKARD WCIOCfW
FUR QUAUTY ToOLS AND
See ALL of our planer/ moulder models On-line at
www.logosol.com
~ LOGOSOL
20 JlmericanWooclworker.com APR III MAY 1011
Award Winning Tools & Accessories
iNFINITt ExclusIve Carbide & HSS Knives
.134&135 ./ Ltuts Longer
./ Tbldcer
./Stronger

Wiggle-Free Guide Bars A CROSSCUT SLED is one of the handiest jigs you can build for your tablesaw, but making the runner i fu y work. They have to fit tight in the miter lot, yet still be loose enough to Lide. Thi require a tolerance of only a few thousandth of an inch over the length of the runner. The folks at Micro-jig have made thi task much easier for you.
Their ZeroPlay guide bars come in two parts: a top and a bottom. The mating surface of the bar have a serie of oppo ing wedge molded into them. To ize each bar, you pLace the bottom part in the miter lot up again t a top, which is provided. Then you pu h the top bar along
the bottom bar, and the whole unit expand . When the guide bar fits the miter lot ju t right, you tighten the parts together with three etscrew and you're good to go. The bar have threaded insert for machine crew, which you'll use to mount the led to the bar . Lining up hole in the led with the inserts \ViU require some precise drilling.
ZeroPlay bar are made from Noryl, a reinforced plastic nylon. Unlike solid wood bar, which can fit tight in ummer and become loose in winter, these bar will alway
give your led mooth, wiggle-free action. ZeroPlay bar are de igned for 3/4" wide miter lot.
• Custom o.Igns
• ClNnerAir
• Longerut.
• Economk:lll
• Best SIze & Fit
Included with the bar are plan for a mall-parts cutoff led with an off-cut deflector and a mall-part jointing jig
for your router table.
SOURCE Micro Jig. microjig.com, 855-747-7233, ZeroPlay Guide Bar 5ystem
(includes two bars and two stops), 'ZP9-B2S2, $27.
\!~N~Jrjf~ You know a CNC Router would be the most versatile tool in your shop ...
We can prove how easy it is to get great results with one!
A'~llIMAY lO12 Americ .. Wooclworker.com 21

The We I-Equipped Shop continued
Bargain Vise WHAT GOOD is a bench without a decent vise? You really need one-the bigger, the better. I've found that large vises hold work much better than small ones because their jaws have more surface area. Northern Tool now offers a large generic vise that costs only 35-about 100 less than a comparable name-brand model.
Inexpensive tools always make me suspicious, so I've given this one a good hard look. Right off the bat, I noticed that it doe n't have a quick release or a dog. A quick release allows you to slide the front jaw in and out without turning the screw-nice, but not a nece ity. And I don't miss the dog; if I wanted one, I'd ju t add a thick face to the vise, drill a hole in it and add my own dog.
The Northern Tool vise does have more ide-to-side play in it than a more expensive model, however. When you open or close it, the front jaw wiggles around. But does that matter, really? Nope. When you've got a board clamped up, the front jaw doe n't move at all, and that's what really counts.
The vise is 9" wide and has a depth capacity of 3". It opens a total of 8". The front jaw i canted forward, so it's vertical when fully tightened. All in all, a pretty good deal!
Tip 15 now showing at: AmericanWoodworker.com/gctips
••.. "0\ IRWIN " " Titebond ~
... . .. llolIL' ~
22 AmerfcaaWoodWOlfkelf.com APR III MAY 201 2
SOURCE Northern Tool + Equipment. northerntool.com, 800-22H)516,
Northern Industrial Woodworker's Vise - 9 in. #62895, $35.
WIN A ...shapB~t..:. DESKTOP
FORA YEAR You could Win the use of a ShopBot Des ,home shop. sma I or mill. 17~ rnanufactunng facility, Of your STEM or vocat ooal ed classroom
The Shop80t Desktop is Shop80t's newest innovation - a powerful digital fabrication tool that delivers precision and performance in a small space. The Desktop's CNC router cuts wood, plastic, thin metals, styrofoam - just about anything And it's a flexible platform for capabilities such as Rotary Indexer for turning objects, and 3D Print Head Icomlng soon I)
ENTER at American Wo worker. com/contest To enter, subrnlt an essay of up to ZOO words about how you'd use a
ShopBot Desktop. and how it would change the way you work. If you win the contest. you win the use of a Desktop for a year Some requirements
apply. See Americanwoodworker.com/contest for complete details
Entry deadline is July 31, 2012 .

Refined Gentlemen "GENT'S SAW" is a marketing term that dates back to Victorian times. It was used to sell small, professionalquality saws for joinery to "gentleman" woodworkers-the hobbyists of the day. Those saws have been in production ever since; today, Lee Valley has a new take on them. They've issued both rip and crosscut versions.
A gent's saw has a straight, turned handle, as opposed to a pistol-grip handle. The handle on the Veritas saws is quite comfortable, but it's also replaceable. You can make a new one that's any hape you wish.
The real story is in the blade. Although these saws cut on
Veritas Rip Gent's Saw
.018" kerf
Looking for
Moisture Meters Lignomat offers a wide selection of pin and plnless meters
Buy Quality Accuracy and Professional Customer Service Protected by a 2-Year Warranty.
Check out the new We~site www.moistureproblems.info
Lignomat: 800-227-2105 www.lignomat .com
the push stroke, in the Western tradition, their blades are just about as thin as a Japanese dozuki saw, which cuts on the pull stroke. A thin blade removes less wood, which makes a saw easier to push (or pull) and easier to control.
Both saws have very fine teeth: 20 tpi for the rip saw and 22 tpi for the crosscut. Fine-toothed saws are excellent for beginners; they don't require the steady, confident strokes essential to cutting with a coarser blade. Unlike a dozuki saw, these teeth aren't hardened; when they get dull, you must re-sharpen them yourself. (With a dozuki saw, you replace the blade.) Sharpening teeth this small takes a steady hand and a good eye.
These saws are very similar to two pistol-grip saws also offered by Lee Valley. The gent's saws are a bit shorter, but are considerably less expensive. If you're considering buying a gent's saw for dovetailing, go for the rip version, since dovetail cuts are essentially rip cuts. My ad-hoc test for a dovetail saw is to make a cut, then make another cut right next to the first, leaving as little material as possible -1/64" or less-between the two cuts. The Veritas gent's saws passed with flying colors.
SOURCE
Lee Valley & Veritas,leevalley.com, 800-267-8735, Rip Gent's Saw, IOSTl 0.01, $49; Crosscut Gent's Saw, IOSTl 0.05, $49; Pair of saws, IOST10.08, $89.
APRIL / MAY 2012 .lmerieaaWoochrodtu.com 23

The We I-Equipped Shop continued
Fast-Track to Flat Stones FLAT STONES ARE ESSENTIAL to good sharpening. The new Dia-Flat from Diamond Machining Technology (DMT) is certified flat to within .0005" and makes quick work of flattening waterstones or oilstones.
I tried it out on a well-used Shapton ceramic stone, and was finished in about two minutes! (That's pretty impressive, as Shapton stones are so hard that flattening them with sandpaper is impractical.) In fact, I had so much fun that I flattened every stone in my shop.
Accordjng to DMT, their Diamond Hardcoat Technology-utilizing precisely-sized micron monocrystalline diamond-outlasts any other diamondcoated lapping plate. It's 120 micron (roughly equjvalent to 120 grit sandpaper) and can be used on any stone, from coarse to fine. The Dia-Flat's generous size is another plus. The plate is 4-1/2" wide by 10" long, which is plenty large to flatten any stone. For the quickest results, use it under running water or in a tub of water. If you're flattening oilstones, use oil instead of water.
24 AmericaaWoocIworlter.com A' Rill MAY 20 1 2
SOURCE Diamond Machining Technology, dmtsharp.com, 800-{i66-4368, Dia-Flat. $200.

::==mli-------------:t 4 Models 10 Choose: from Hobby 10 Super·Pro
CAlL TOll FRIE 1-800-942-4406
www.limberking.com I .... ________________ --a. _____________ ~
THE BEALL TOOL CO. 541 SwanlS Road N.E. Newark Ohio
1-800-331-4718 WNW.bealltool.com
"WATCH ME MAKE $96,000 EVEN IN TODAY'S TOUGH ECONOMY, with my Woodmast8r MoIder/Planer

The Well-Equipped Shop continued
New Cap for Poly Glue MLONGER SHELF LlFEI" That's what the folks at Gorilla Glue heard from customers about their flagship product, which is a polyurethane glue. As you know, poly glues react with moisture in the wood or in the air to cure. If the bottle cap doesn't form a complete seal, poly glue can harden in the bottle before you reach for it again. The answer: a better cap.
Gorilla's new anti-clog cap has a stainless steel pin attached to the inside. The cap is threaded; as you tighten it down, the inner walls compress the bottle's opening to create an airtight seal around the pin. The cap has integrated "wings" so it's easy to turn.
The anti-clog cap is only available on the 2 oz. versions of both the original Gorilla Glue and the new "Dries White Two Times Faster" formula. These glues will last for months after you open the bottle-just don't lose that cap!
SOURCE Gorilla Glue, gorillatough.com, 800-966-3458, Gorilla Glue 2 oz. products. $5.
26 AmencaDWoodworker.com APR III MAY 10 1l
Cap threads
Stainless steel pin

Mantis is the original compact tiller/cultivator, proven over 30 years with more than a million satisfied owners worldwide. Now the new Mantis Deluxe raises the bar with two- and four-cycle models that add more comfort and performance features. With the power of Mantis on your side, gardening jobs are a pleasure.
o Lightweight/Compact - easy to maneuver, store and transport f) NEW Controls - for more power, comfort and control
8 NEW Comfort Grips - fight fatigue, new flush-mount throttle
o NEW Easy, Fast-Starting Engines o Precision Gear System - steel-cut in heavy-duty cast housing o Rugged Construction - for long-lasting durability
f) Powerful Engine Options - 2-cycle, 4-cycle commercial grade
o NEW Adjustable Handles - and NEW front-bumper handle o No Risk - one-year money-back guarantee
CD Lifetime Tine Warranty - guaranteed against breakage forever
MOl ,,'MG SlOPS a MaIl'S.
fontis. You
To learn how UNSTOPPABLE you can be, call 1-800-366-6268 or visit www.mantistiller.com
for more information, DVD and FREE Good Soil Bookl
o 2012 Schiller Grounds Care, Inc. youtube.com/MantisYardandGarden facebook.com/mantistiller Dept MTl20024

A Great American Woodworker An Artisan's Life Story
Brian Hubel Amazing woods and curvaceous curves.
BRIAN HUBEL'S WORK is a seamless blend of amazing woods and fabulous craftsmanship, of cutting edge design and ancient Asian influences, and of graceful curves and chunky slabs. What woodworking school teaches this amazing range of skills and techniques? None other than SHK-the infamous Skool of Hard Knocks.
Brian is completely self-taught. ''I've never taken a class or a course," he explains. "Though there are lots of times 1 wish 1 had. It would have
made the learning curve way less expensive."
Not a straight line When asked how he got into woodworking, Brian says, "It sure wasn't a straight line:' He started at the age of nine, making plaques on his grandfather's scroll saw. "I was one of tho e kids that would rip stuff apart, just to see if 1 could put it back together again;' he recalls.
Brian's woodworking path took a major detour while he earned
28 Amerlc_WoocIworker.com APRIL/MAY 1011
b S ike Carlsen
degrees in criminal justice, chemistry and biology. Shortly after graduating he was hired to build railings and trampoline decks for the gymnastics school in Denver where his wife taught. Payment came in the form of a Powermatic 66 tablesaw. This tool, along with the acquisition of even more heavy-duty equipment, produced enough momentum to launch him into woodworking full time. He moved to Colorado Springs, where he now lives with his wife and two kids, and paid his dues
o ~ .... o z
'" '" ~ ~
Z :0
~ ~
z Q z o o > I "< a:
'" o .... o I "-
z o ..,. Z I
Q ~ ;::: a: o .... a

remodeling kitchens, building cabinets and taking any business that walked through the door.
Today he builds an average of20 pieces a year. Many have a distinct, Asian look and feel. "I've never studied Asian culture or design;' Brian explains. "A lot of my work just winds up that way:' He loves the design aspects of woodworking. On the commissioned pieces he builds, he warns his clients ahead of time that the drawings will be rough, often letting the wood's figure and the joinery dictate the details. When asked how his clients feel about this, he says that no client has ever been dissatisfied. "At least none that have told me;' he smiles. And he loves the little things; Brian takes great care in carving, turning and shaping the intricate ebony and
burled pulls showcased on much of his casework.
Some years the bulk of Brian's work is based on commissions through professional designers and private individuals; other years his work is built primarily on speculation and sold through galleries and, increasingly, high-end art shows.
When asked about memorable mistakes, the conversation turns to business, not sawdust. "The biggest blunders I've made are in pricing. I don't know how many times I've undercut myself and wound up working for $2 or 3 an hour."
Brian's commute to his 1000 sq. ft. shop, a stone's throw from his back door, is ideal. His 1920s Oliver lathe, his 60 year old Tannewitz bandsaw (with 19" resaw capacity!), and his aged Craftsman drill press inherited from his grandfather
Forward in Time 70'Hx16'Wxl1'D
Sapele, ebony
Bakers Table 20' H x 36' dia.
Big leaf maple burl, ebonized ash
attest to his love of old, heavy-duty tools. He works primarily alone. "My 36" wide belt sander keeps me from having to hire somebody:' But the workbench he built for his kids, who love tinkering in the shop with scraps, attest to his love of carrying on the woodworking tradition.
Wonderful woods Brian has learned to acquire fabulous woods whenever he runs across them. "Since Colorado isn't exactly a hotbed for hardwoods;' Brian explains, "I hoard wood like there's no tomorrow. It' a very bad habit. I have a 500 sq. ft. storage area packed with unique boards, wide boards, you name it. I'll stumble across something that's fabulous and I have to buy it, even though I have no idea what I'll do with it. I can't help it:'
He's stumbled across some amazing wood in unexpected places. The big leaf maple burl top that grace Bakers Table ( ee Photo, above) came from a tump discovered when Baker Lake in Washington tate was drained.
APR II I MAY lO 11 americanWoodworker.com 29

A Gre t American Woodworker cOlltlnued
The base for another table was crafted from purpleheart salvaged from the beds of old trailers found at Fort Carson military base. The wood for one of Brian's case pieces began life as a Russian olive tree on his grandfather's farm. The drawer fronts of that same piece are from Claro Walnut trees cleared from an orchard in northern California. Another unique piece of wood from this same orchard serves as the top of another distinctive table. It's a slab of Claro walnut displaying a dramatic change in grain and color where English walnut was grafted to the tree decades ago. Regarding his passion for wood, Brian reflects, "Luckily my wife is very understanding."
More than one way to skin a curve Brian loves a good curve and employs a variety of methods to create them. Curved seats, such as those in Flare (see Photo, page 31, bottom left), are roughed out on a bandsaw, refined with a spokeshave and finished off with "a whole lot of an ding:' he says.
Other pieces, such as Forward in Time (see Photo, page 29, at bottom), employ torsion box construction which involves building an internal curved frame or skeleton from ash, then applying a 5/16" thick skin veneer for the fini hed surface.
But Brian's favorite method for creating curves involves using his mammoth vacuum press; a tool he equates to a gigantic Ziplock bag. Initially he used a homemade press, but he now owns a commercial version that can accommodate pieces up to 5' x 10'. He starts by creating a bending form and then resaws boards into strips for laminating. His rule of thumb is to cut the laminations thin enough so he can bend them around the form by hand. He applies resin or
formaldehyde glue to the strips, uses heavy-duty tape to secure the strips to the form and then puts the vacuum press to work. "The pressure it exerts is phenomenal;' Brian
Room Divider African mahogany, ebonized ash
Show Tyme 30' H x64'Wx 18' D Cherry, Claro walnut, khaya
30 J.merlcuWoo4worker.com "P R I LIM" Y IO 1 I
explains. Since springback is negligible, the form he creates produces the shape he needs. He makes pieces slightly longer and wider than needed so he has extra material for

SoIide 30" H x 96"W x 40" D Figured Bubinga, cherry, ebony
Up-Ufted 46" H x 70"Wx 16" D Quartersawn mahogany, ebony
Flare 19" H x SO"W x 14" D (17" seat height) Cherry, bubinga
final haping and anding. Brian i currently building team-bending equipment 0 he can experiment with yet another type of curve.
Hi advice for tho e getting into curvaceou woodworking i to imply experiment and not worry about the end re ult . "Even if it' a complete failure, you'Ulearn omething from it." ~
ee more of Brian' work at hubelhi.com.
Sterling 48" H x 14"Wx 11"D Claro walnut, ebonized ash, ebony
Spike Carlsen's upcoming book, Woodworking FAQ: The Workshop Companion ( lorey Publishing) wiU be available April 10th. His other books include A ;plintered History of Wood and Ridiculously Simple Furniture Projects.
A' Rll l M A Y 2012 JlmerlcaaWooclworker.com 31

Turning Wood by Alan Lacer
An essential part of your turning
tool arsenal.
THERE'S A THEORY in woodturningpopularized by some Briti h turnersthat wood "prefers" to be cut rather than scraped. While I agree with thi notion, I've also found that scraping tool play an essential role in woodturning.
craping tool are u ed primarily for bowl turning, ve eI and endgrain hollowing. They're rarely u ed for pindle work, becau e cutting tool are better uited to the ta k. craping tools excel at roughing out hape when the quality of the cut i n't critical, and in ituation where a cutting tool can't be pre ented to the wood practically or afely-a situation that commonly occur while hollow turning.
Surpri ingly, a craper can al 0 be used as a fine finj hing tool (Photo 1). Elevating the humble scraper to uch a high level of performance may seem like creating a ilk purse from a ow's ear. But as I'll how, it actually depend on how the tool i refined, how it edge i prepared and how the tool i presented to the wood.
Cu mg vs. scrapmg In this tory, I'll focus on the traditional notion of crapers and craping; that i , using only the edge, with no bevel upport on the wood. Mo t turning tool (including gouges, kew and parting tool) are cutting tools, de igned to work with upport from the bevelthe tool i pre ented at an angle, so the bevel bear again t the wood as the edge cuts. craping tools, on the other hand, are presented nearly straight on, so the edge receive no upport from the beveL Of course, cutting tools are sometimes
'" ... z z ..... z ~ ~ >::: .,. • '" " o ... Q c;:
z o '" z ::: Q
~ '" ~ o ...

Used the trad~1 way, a scraper leaves torn and crushed fibers (left). But after refining its surface and edge and using a technique called ·shear scraping; the same tool leaves a nearperfect surface (right).
Two flaws commonly appear on the top surfaces of new scrapers: rough surfaces from little (or no) milling, or deep marks left from milling, along with very sharp comers.
3 Smooth the scraper's top surface by rubbing it on a large, flat diamond hone to remove the pits and coarse mill marks. Concentrate on the last inch or two.
Soften the four long, sharp corners using a medium-grit wheel. Remove the tool rest and then freehand each corner from the leading edge to the ferrule.
u ed thi way. And craper are sometimes used as cutting tools, by riding the bevel. Hence, the angle at which you present the tool really determine whether you cut or crape.
Woodturning scraper have two basic attribute , flat teel and a bevel ground on only one ide. The hape of the edge i almo t emile Iy variablestraight acro , kewed, half-rounded, full-rounded, side-cutting with a relief behind the edge, even profiled to fit the hape you wi h to create-virtually any hape the turner desire .
Refine the tool New craper often how problem right from the tart. The top urface of the teel can be quite rough, or even pitted, which means it ha had little or no milling. Or, it can how deep milling marks or very harp corners along it entire length (Photo 2).
Smoothing the craper's top urface give the tool a more con istent edge. This step i especially important for fine fini hing applications, because it dramatically improves the quality of the cutting burr that harpening create . To remove pits or mill marks, rub the top urface on a medium or fine flat diamond hone (Photo 3 and Source , page 35).
oftening or fully rounding the craper's corner from behind the
cutting edge all the way to the ferrule make the tool much friendlier to grip and helps it glide smoothly acro the tool re t (Photo 4). I often follow the grinding by running the diamond hone along those edge to mooth them a bit more.
Shape the profile The good new about crapers is that their profile can be quickly and eas-
ily changed, whether for a particular application or per onal preference. Install a coar e (46 grit) wheel in your grinder and et the rest horizontal to the wheel. Then move the tool quickly and continuously to shape the edge (PhotoS).
The next tep i to reduce the bevel angle. Unlike the bevel on a cutting tool that upports the cut, the bevel on the craper i more for clearance (although it will al 0 be used for upport). Scrapers often come with steeply angled bevel (800 to 85°). But if the bevel inadvertently touche the wood while craping, it can cause problems. Therefore, it's better to reduce the angle to between 60° and 70° (Photo 6). Change the angle on the grinder' tool re t and follow the hape of the edge as you grind. Keep the tool moving con-tantl)" to avoid overheating.
A' ~ I LI lli A Y lO 11 AmericaaWoodworker.com 33

Shape the IHdlng edge of the scraper, using a coarse wheel and the tool rest set in a horizontal position. You can grind the edge to almost any profile.
Test for the presence of a burr by running your thumb off the end of the top edge. This ground burr serves as the cutting edge for most scraping tasks.
Create the edge The final step in producing the bevel angle also produces an edge. Sparks consistently traveling over the top of the tool indicate that a heavy burr-a curl of steel along the edge-is being formed (Photo 7). This burr must be consistently formed acro s the scraper's entire profile for the tool to work properly. You can test for a consistent burr by feel (Photo 8). Your thumb is sensitive enough to detect even the faintest burr.
For subsequent sharpenings, you'll need to periodically regrind the edgeusually with a finer wheel, 60 or 80 grit. Simply match the rest to the bevel angle, follow the shape as you grind, and watch for the sparks.
A ground burr is a suitable cutting edge for at least 90% of scraping jobs, such as rough shaping and other coarse applications. However, to use a
Reduce the bevel angle to provide better clearance. The factory bevel is often too steep. Tilt the tool rest to 60° and then regrind the bevel by following the profile.
Sharpening for finish work requires a finer edge. The first step is to remove the ground burr by polishing the scraper's top edge with a diamond hone/slipstone.
scraper for finish work, a finer, even more consistent burr is necessary. Start by removing all traces of the ground burr (Photo 9). A few passes with a diamond slipstone does the trick ( ee Sources). Then replace the ground burr with a burnished burr (Photo 10).
Use a burnisher to raise (or pull) the burr. Any material harder than the steel will work for burnishing, whether a carbide rod mounted in a handle or a cabinetmaker's burnisher used to sharpen card scrapers. With a ingle pass, pull the burnisher across
the edge while holding it at a slight angle towards the top. The amount of pre ure you apply dictates the size of the burr. For finishing work, the burr should be very light -almost undetectable to the touch, but certainly there.
Thi tiny burr wears down fairly quickly during use, but it can be ea -ily renewed by re-burnishing. How-
34 Jlmeric:anWooclworker.c:om A PR I LI M A Y 1 011
When tiny sparks appur at the top edge, the new bevel is fully ground and a burr is being formed.
Crute a new, finer burr by burnishing the edge. Tilt the burnisher about 5° toward the top of the scraper and pull it once across the entire edge.
ever, each time you burnish, the edge is slightly rounded. After using and pulling a burr five to 10 times, you'll need to return to the grinder to create a new "sharp edge" and then repeat the process of removing the ground burr and pulling a burnished burr. Always remove the previous burr before pulling a new one, whether ground or burnished.
IirD Renew the burr when the surface it cuts on the wood begins to degrade or when the shavings become short or turn to dust. Both results indicate the tool is dull.
Using scrapers The most common scraping method is to place the tool flat on the rest and slightly tip up the handle at the back, to keep the bevel away from the wood (Photo 11 ). As the bevel

rr.dltlonal scrllping technique tips the tool's cutting edge slightly downward by raising the handle in back. while keeping the tool flat on the lathe's rest This method leaves tom and crushed fibers. as shown in Photo 1.
CI'Hte. smooth surfKe during end-graIn hollowing by shear scraping. Tilt the tool up onto its comer (450 degrees or higher) and angle it towards the work. Then move from the center to the left in order to follow the grain.
Ribbons Curls
ShHr scrIIping works well on the outside of a face-grain bowl because it's cutting across end grain. Lift the tool 45° in the direction of the cut and work from smaller to larger diameter.
The sMvIngs tell the tale when the scraper is tilted at the correct angle for shear scraping, because they'll change from ribbons (left) to fine, twisted curls of wood (right).
doesn't ride against the wood for extra support, the tool rest must be positioned as close as possible to the work-this is a fundamental rule for using scrapers.
This method is great for rough hollowing in face-grain bowl work or for end-grain hollowing of goblets and lidded boxes. (You can use a gouge for these tasks, but using a craper is often easier.) However, scraping often tears the grain-especially end grain-and it's harsher on softer woods than harder woods (see Photo 1).
Creating a smooth surface with a scraper requires a technique called "shear scraping:' This method, which can produce a surface that requires very little sanding, works well on the inside of end-grain hollowed items (boxes, vessels, bowls, goblets, etc.) and on the outside of face-grain shapes.
IiJDA bowl gouge can be used to work most of the inside of a face-grain bowl, but the scraper, held flat on the rest and close to the work. is great for blending from the lower sides to the center.
Start by lightly burnishing the edge to create a fre h burr. Next, rather than holding the tool flat on the rest, twist it in the direction of the cut to 45° or higher. When hollowing end-grain vessels. work from the center to the edge (Photo 12). When shear craping the outside of face-grain objects, work from small to large diameters (Photo 13). When shear scraping is executed correctly. a fine. twisted fiber of wood rolls off the edge (Photo 14). Slowly elevate the scraper onto its comer while making a cut. When you ee the shavings change, you've reached the correct angle for shear scraping. ~
SOURCES
Alan Lacer is a turner. writer and teacher living in western WISCOnsin.
• M5C. mscdirectcom, 800-645-7270, Flat
Diamond Hone, 325 (medium) grit,
#05 126643S, 5 12S; Combination Flat Diamond
Hone, 325/600 grit, 1401 09456, 5160; Carbide
Rod (to be mounted in a handle with ferrule),
3/S" dia. x 2-1 /2~ #04114310, 523.20. • Alan Lacer Woodtuming, alanlacer.com,
71 5-42~9451, Diamond Slipstone, 600 grit. 595.
learn how to sharpen woodturning gouges at AmericanWoodworker.comlWebExtm
APRIL / MAT 1011 .lmericUlWooclworker.com 3S


The top consists of three torsion box sections that provide out feed and side support for sawing, sanding and routing. Each section is surface-drilled like an air-hockey game table and can be attached to a heavy-duty shop vacuum that resides under the flat bed sander. Used as a blower, the vacuum makes it easy to slide large panels across the drilled surface. Used as a vacuum, it holds panels down for sanding or routing. Collected dust is routed to a central system stationed in the attached shed via ducts down the center of the assembly. Each branch is fitted with blast gates to insure proper airflow. Users of Google Sketch Up 8 can find a basic drawing of this workstation by searching for "outfeed table" and then "saw assy with air table" by Frank.
In addition to building my own shop fixtures such as the miter saw stand, router table, workbench,
downdraft sanding table, sharpening station and the main workstation, I've also built several items for our home, including a Murphy bed and a room-size computer center. I've also built many projects for friends and family-the most unusual was a cremation urn.
Some future shop improvements I'm considering include a new insulated overhead door and some ceiling drop cords. I'd also like a more powerful shop vacuum, so all three air table sections can be operated simultaneously . ..4
Frank Marti,t Regina, SK
A'Rll / MAY 1011 JlmertcanWoociworker.com 37
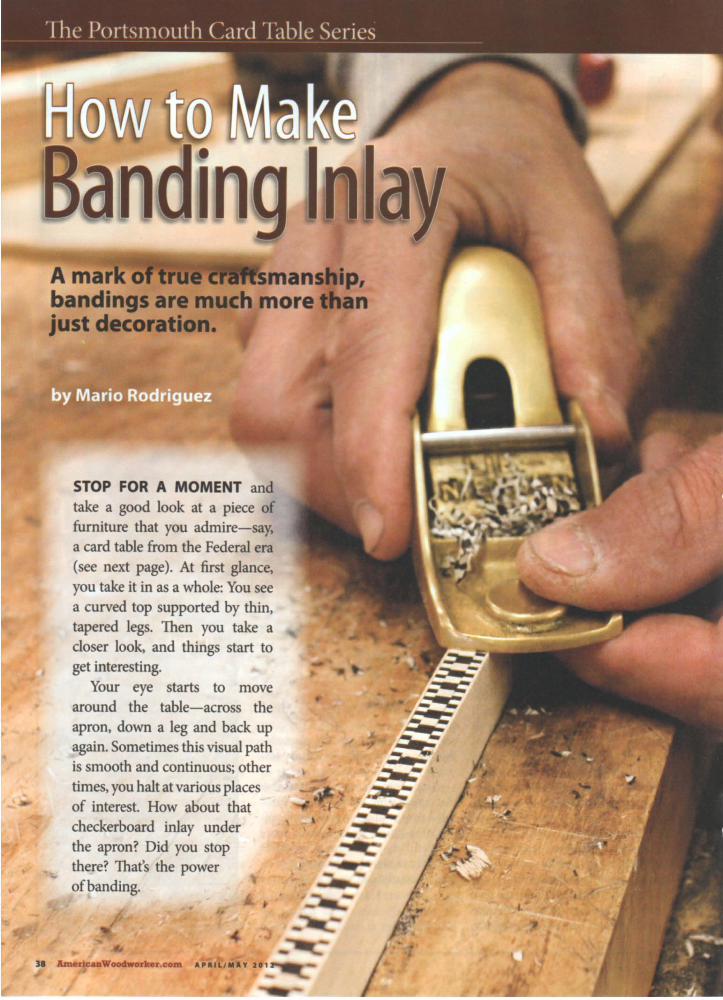
STOP FOR A MOMENT and take a good look at a piece of furniture that you admire-say, a card table from the Federal era (see next page). At first glance, you take it in as a whole: You see a curved top supported by thin, tapered legs. Then you take a closer look, and things start to get interesting.
Your eye starts to move around the table-across the apron, down a leg and back up again. Sometimes this visual path is smooth and continuous; other times, you halt at various places of interest. How about that checkerboard inlay under the apron? Did you stop there? That's the power of banding.

:r ... '" II>
'" :r o '" '" z '" II: ... z o ;::
'" '" .... '" ~
:;:: :> \!)
a: o o II:
BandIng Mel stringing serve different purposes. Stringing is linear; it moves your eye smoothly around a piece of furniture . A banding consists of geometric patterns; it forces you to pause.
~----------------------------------------------'" ~ > :r ... '" II: \!) o .... o :r ... II:
'" ... '" '" v ~ o .... '" o .... o ..,
Banding vs. stringing Inlay that consists of repetitive pattern i called banding (Photo 1). Inlay that's just a simple line is called stringing. Banding and stringing are integral to the de ign of Federal furniture, but in different ways.
Stringing facilitates the movement of the eye from one area to another-it leads you on. Banding does just the opposite-it arrests your eye, forcing you to pause momentarily. Banding give you time to appraise the piece and con ider what you've een before moving on.
Banding can al 0 erve as a border that separates areas of a piece, much like molding. But unlike molding,
banding doe n't project from the surface. It often has the illu ion of three dimensions (Photo 2), but all bandings are flat, lying on a single plane, embedded in the wood. I find that fascinating!
The card table I mentioned before has three different types of banding. The principal banding is the checkerboard pattern, which divides the apron from the legs. Two narrower and impler bandings playa maller role, dividing Ie prominent areas of the table. In this article, I'll give you orne general principles for making any kind of banding, how you how to put together one of the table's simple band
ing , then unwrap the my tery behind the checkerboard.

. "
a.ndlngs rely on their size, color and pattem to make an impact. While you can buy commercially made banding, it's really not that hard to make yourself. once you understand the basic steps.
)I ., J ,,\ ~
Basic rules Banding are u ually compo ed of " trip " of veneer (Photo 3) and "chip " of thicker wood or layers of veneer (Photo 4). Making a banding doesn't require any specialized tool ; you just have to be methodical and follow four important rules: • Rule 1. All bandings are cut to how long grain, not end grain. End grain i weak and won't hold together. And it won't maintain the trong contrast necessary for an attractive end result. • Rule 2. Material hould be carefully selected. The wood hould be free of knots and flaw, traight-grained, uniform
in color, and have tight (not porous) grain. • Rule 3. Banding materials must be uniform in dimension. This requires careful preparation when re- awing, thickne planing or sanding, and cro cutting. • Rule 4. Cuts must be clean. Any voids, tearout, burning or variation in dimen ion will adversely affect the appearance of your banding .
Materials The Portsmouth card table's bandings are tark, relying on the contrast between black and white for effect. The materials I cho e are typical for many tyle of banding.
Historically, ebony and holly would have been used for black and white elements. The e woods are available today, but at a premium price. In my experience, cutting high-quality trip from these woods generate enormous waste, so I use
les expensive ubstitutes: dyed harewood veneer and tight-
40 &mericanWooclworker.com A'Rll / MA Y JOll
2
grained maple veneer and olid maple. (Dyed veneers are available in many different colors.) These woods are relatively easy to acquire and work. Once the veneer are cut into strip , they stay true and don't warp, twi t or split. Maple and blackdyed veneer are available in 1/32" and 1/16" thicknesses; other colors are only available in 1/32" heets ( ee Source, page 43).
Cutting strips I use a tablesaw for cutting veneer into strip . To perform this operation safely, you'll need nvo things: • A zero-clearance throat plate. There can't be a gap around the blade, where offcuts can get tuck. • A good push stick. I make a new one each time. A push stick i essential to keep your hands at a safe distance from the blade and to guide the material past the blade.
Laminating strips Strip can laminated into "bricks" to make tock of almo t any thickne that a de ign require . You can also alternate different color of veneer, as I did to make the checkerboard ection of the card table's principal banding.
Always u e tout caul when gluing up banding. Cauls en ure that the re ulting piece will be straight and flat. Apply cellophane or tape to the working surfaces of the cauls so the trips won't adhere to them. Cauls also allow you to evenly
spread clamping pre ure. I usually place my clamps about 3" apart. Using plenty of clamp en ures adequate and even pre ure without requiring excessive force, which can result in an uneven thickne .

landings .re made from layers of veneer and solid wood. Veneers that are dyed all the way through, such as this black harewood, allow you to work with a large palette of colors. Veneers are cut into narrow·strips" on the tablesaw.
Chips .re made by repeatedly slicing the end of a longer piece, such as this laminated brick. This operation requires a safe and accurate setup. You'll need a zero-clearance throat plate and a standoff block clamped to the saw's fence.
Slicing chips Bricks are next cut into chip (Photo 5). ( ometime you make chip from solid wood, too.) Each chip must be exactly the ame thickne , a proce that require careful preparation and due regard for safety.
To cut chip , I use a imple device called a tandoffblock. It' 5" long and 2" wide; I clamp it to the tablesaw' fence 2" in front of the blade. I al 0 use an aftermarket miter gauge that fits tight in the miter lot- 0 there' no wiggle-and upport the brick with a zero-clearance fence.
Here' how the tandoffblock works: You butt the brick up to the block, then push the miter gauge forward and lice off the chip. The chip fall away from the blade and join other chip in the area behind the standoff block. After cutting a small number of chip , turn off the aw and retrieve them. It' a good idea to cut about 25% extra chip and di card those
For instructions on how to make your own inexpensive zero-clearance throat plates, go to AmericanWoodworker.com/WebExtras
Solid wood layers are usually composed of"chips."The grain of a chip runs the short way. Sometimes, chips are composed of mUltiple layers of veneer, called a "brick; as you'll see next.
Ven .. ,.nd chips are glued in layers between two cauls, creating a · Ioaf." The loaf is then sawn into thin strips of banding. I'll show you how to make two kinds of banding on the next pages.
that aren't perfect. Chip are placed ide-to- ide in a banding (Photo 6). When you do thi , you can see why they mu t be precisely uniform in thickne
A simple banding Let' combine all the e tep and make a imple banding (Photo 7 and Fig. A, page 42). On the Port mouth card table, thi banding goe around the leg , down near the floor. I call it an "ankle" banding.
Begin by ripping 1/32" maple veneer and 1/16" black veneer into trip that are 1-3/4" wide and 9" long. You'll need two trip of each color. Laminate the trip, one maple trip glued onto one black trip, between caul .
Maple chip will go between the layer of veneer. Make the chip from stock that i 3/4" thick, 1-1/4" wide and about 12" long. Clamp the tandoffblock to your fence, then adjust the fence to saw chip that are exactly 1/4" thick.
Place one of the veneer lamination on a caul, black ide up, and pread a thin layer of glue down its length (Photo 8). Place the chip ide-by- ide on the veneer (it' not necessary to put glue between the chip). pread glue on the black ide of the other piece of laminated veneer and place it on the chip . Put a second caul on top and clamp. You've made a "loaf.'
A'~ Il / M A Y 1011 AmericanWoodworkar.com 41

this a.nclng is composed of solid maple chips and layers of maple veneer and black harewood veneer. It goes around the legs of the Portsmouth table, near the floor.
, 9 r
Plllne the sides of the loaf to even up all the layers.
Fig. A Portsmouth Ankle Banding
42 JlmAIrlcanWoocIworker.com li P IIll ' M II Y 1011
Mllple chips are butted up to each other to make the core of the loaf. These chips sit on top of two strips of veneer, which were glued together beforehand.
Bandsaw the .., into 1/16" thick strips of banding. A fine blade leaves the surface quite smooth.
The next day, after the glue is good and dry, plane the edges of the loaf square and straight (Photo 9). Now it's ready to be sawn into 1/16" thick strips (Photo 10). Use a zeroclearance table and a 1/4" 6 tpi blade. After a few cuts, plane the surface of the blank again. Tape the banding pieces to a 1/4" board for safekeeping.
A complex banding Now let's make the banding that runs under the apron of the Portsmouth card table. Its staggered checkerboard pattern looks quite complicated, but when you deconstruct it, the part are very simple (Fig. B).
The core of this loaf is made from 1116" and 1/8" thick chips, which are cut from similar types of bricks (Photo 11 ). The bricks for the 1116" thick chips are made from 1/16" thick laminations-that's what produces the square pattern you see on the ends of the chips. The bricks for the 1/8" thick chips, of course, are made from 1/8" thick laminations. (I made these by gluing together two layers of 1/16" veneer.)
To make the bricks, saw a number of strips that are 1-3/4" wide by 9" long. Make at least 24 strips from the 1/ 16" veneer and at least 12 strips from the 1/8" material. Prepare one stack of 1/ 16" strips and another of 1/8" strips, each 1-1/2" high. Make sure the stacks start with a light

A complex a,.ndlng can be made from bricks composed of glued-up layers of veneer. The brick in the foreground has l /S" thick layers; the other brick has 1/ 16" thick layers.
Glue the 1/16" chips on a strip of maple veneer and clamp the assembly between cauls. Make two of these.
layer and end with a dark one. Glue the tacks between caul . After the glue i dry, rip both side to make bricks that are 1-1/2" wide. Cut the bricks into chip (Photo 12).
The chips are andwiched betw'een layer of 1/16" maple veneer. Cut the veneer into strip that are 1-1/2" wide and about 20" long.
Now that you have all the ingredients prepared, it' time to glue up the loaf. There are too many piece involved to glue the loaf all at once, 0 we'll break it down into two stage , starting from the out ide and working in. Fir t, glue the 1/16" chip to each piece of veneer (Photo 13). Place the chips carefully, black edge against white edge. Clamp the e andwiches between cauls and let the glue dry overnight.
For the econd tage, glue the 1/8" chip between the e two pieces (Photo 14). Plane the edges of the loaf and band aw it into individual pieces of banding . ..6
SOURCE Constantine's Wood Center, constantines.com, 800-443-9667, maple and dyed veneers, prices vary.
The bricks are then cut into chips. The 1/16" brick is sawn into 1/16" thick chips, the l /S" brick into l /S" chips. This produces a square, checkerboard pattern on the ends of the chips.
14 Glue the 1/8" chips in between these two pieces to complete the banding.
Fig. B Portsmouth Apron Banding
A' R II I MAY ZO 1l .lmertcaaWooclworker.com 43


Cabinet side
Join the sides and horizontal dividers to the face frame with a rabbeted tongue and groove. To make this joint, rout a rabbet on the front edges of the sides and dividers.
Assemble the fac. mil". with pocket screws and glue. I use a bench-mounted hold-down clamp to make sure the pieces are flush (see Sources, p. 50).
Start with the face frame This cabinet i compo ed of two major parts: the face frame and the case. Some folks build a case first, then make a slightly oversized face frame, glue the face frame to the cabinet and trim off the excess. I follow a different method: The face frame and the ca e fit together with a rabbeted tongue-and-groove joint (Fig. C). I'll point out how this method makes the building proce s easier as we go along, but it does require you to cut and fit piece in a particular order.
Begin by cutting all the parts of the face frame (AI-A4) to exact size. Next, cut the plywood side of the cabinet (Bl) to exact size (Fig. H). Cut the horizontal divider (B2) and subtop (B3) 1/4" extra-wide and 1" extra-long.
Rout a rabbet along the front edge of the sides and dividers, using a 112" bit in a router table (Photo 1). The precise height of the bit will depend on the thickne of your plywood, which is usually 1/32" or so Ie than 3/4". Adjust the router bit's height until the lip just above the rabbet measures exactly 112" thick (Fig. C). You may want to cut a 1/2" wide groove with this router bit in a crap piece of wood first, to test the thickness of the lip. Don't make the fit too tight; you shouldn't have to force the plywood in the groove.
Next, cut groove in each part of the face frame (Photo 2 and Fig. D). Leave the router bit at the same height as the pre-
Face frame
2 Rout • matching groove on each part of the face frame.
4 PIKe Nch side of the cabinet in the face frame. You'll be cutting rabbets and dadoes in the sides to receive the dividers; use a framing square to mark the locations of these joints.
vious cut, then adjust the fence so that the distance between the outer edge of the bit and the fence is equal to the thickne s of your plywood. When you a emble the joint, the face frame will automatically be flush with the plywood-a key benefit to this method.
Drill pocket hole in the ends of all three face-frame rails. Mark the po itions of the middle rail and bottom rail on the face-frame stile (Fig. D), then assemble the face frame with screws and glue (Photo 3).
Fit the dividers The two horizontal dividers fit into dadoes that you'll be cutting into the sides (Fig. B). The ubtop fits into a rabbet Mark the location of these joints by standing each side in the face frame (Photo 4). U ing shim , adjust the width of a tablesaw dado set to cut a test groove that exactly fits your plywood. Cut the dadoe and rabbet (Photo 5). In addition, cut a rabbet along the back edge of each ide piece to receive the backboard .
Back to the dividers and subtop. Remember, they're extra-long; the next step i to figure out how long they must be to fit between the ide. tand both of the sides in the face frame, then mea ure the distance between the bottom of the dadoe that receive the dividers. Cut both dividers and the subtop to thi length.
A'Rll / MA" 2011 JlmertcUlWoodworker.com 45

Fig. A Exploded View
c:;
C4
....... .. -
Tongue and groove joints ensure that the sides and shelves are flush with the
face frame.
46 JlmertClUlWooclworker.com A'RIL / MAY 1011
Fig. B Plan View of Cabinet Side
C I
Fig. C Face Frame and Side Joint

Cut the dadoes and rabbets on the tablesaw, using a dado set. Use a miter gauge with a long fence to help push the plywood, so it doesn't twist and kick back.
Glue the 'Ke frame to the case. The tongue-and-groove joints lock the face frame in place, ensuring that all joints will be flush.
Fig. 0 Plan View of Face Frame
Place the sides back in the face frame, without glue, then nail the sides to the dividers.
F.sten the ablnet's top to the upper divider.
IiID Clamp a speed square to the face frame and sides of tIle case to make sure the parts are perpendicular.
Next, cut off the ends of the rabbeted lip on the dividers and ubtop (Fig. A, Detail in circle). (This notch enables the e piece to butt up against the face-frame tile.) The easiest way to cut the rabbet is on the tablesaw. Make hort rip cuts first, then cro scut the rabbets with a handsaw. U e a chi eI to clean out the corners.
The last task i to cut the dividers to exact width. Again, the ea ie t way to figure out this dimen ion i by mea uring directly from the partially a embled cabinet. Here's your goal: The back edge of all three divider hould be flush with the rabbet in the ide that receive the backboard. Iide the middle divider down in ide the cabinet until it's tight against the face frame. Make a mark on the divider just oppo ite the lower edge of the backboard rabbet. Remove the divider and rip all three dividers to this width.
One la t item, before a embly: Layout and drill hole in the ide for helf pin .
Assemble the cabinet Place the face frame, face down, on a surface that you know is level. Thi i important: If your worktable i n't level, your cabinet will probably come out twi ted. Hanging door on a twi ted cabinet i a nightmare you'll want to avoid at all co ts.
A' R I L I M A Y 1011 &mericaaWooclworker.com 47

Paint the panels before assembling the doors. Pre-finishing the edges prevents bare wood from showing when the panels shrink in winter, when humidity is low.
Shim the doors with 1/16" spacers, then mount the hinges. When you're sure that both doors hang properly, remove the hinges and paint the whole cabinet, inside and out.
lila Make an assembly table by placing a hollow-core door on sawhorses. It's guaranteed to be flat.
Stand the ide of the cabinet in the face frame- without glue. Fa ten the divider to the ide , with glue (Photo 6). Turn the cabinet over and remove the face frame. Apply glue to the rabbet on the ca e, then place the face frame back on the ca e (Photo 7). Clamp it all around.
Cut the top (B4) to final ize and applying edging (C1 and C2) to it front and ides. Fa ten the top to the cabinet (Photo 8). Cut the band that goe under the top (C3 and C4) and nail it to the cabinet. Cut one or two helve (B5) to
... AmericaaWoodworker.com "'~IL / M"Y 1011
Glue the doors after the paint dries. These doors are fairly large, so I use mortise and tenon joints for extra strength.
Finish the front sides of the backboards, then nail the boards to the dividers. This stiffens the case and prevents it from going out of square-an essential requirement for a cabinet with doors.
ize and apply piece of olid wood (C5) to the front edge .
Hang the doors ) made my door an old-fa hioned way: They overlap in the center (Fig. n. (Back in the farmhou e day, an overlap prevented mice from gnawing a hole between the door of a jelly cupboard.) I wanted all the door tile (D1 and D2) to look like they're the ame width, but the one that overlap actually have to be wider than they appear, to accommodate a rabbet on the left-hand door and a bead on the right-hand door.
tand the case on a level urface. Measure the opening

Fig. E Exploded View of Door
1>;;
1>1
1>1 1>;;
@ learn how to build a jig for cutting raised panels on the tablesaw at AmericanWoodworker.mmlWebExtras
Fig. F Door Joinery ,-
Fig. G Cross Section of Cabinet Front
~------------------------------------ 35-~-----------------------------------~
Fig. H Plywood Cutting Diagram Fig. J Cross Section of Door Overlap
I 8;; 8;; n~ 83
85
~
81 81 r----,
8q 85
I i A'R I L / MA Y 2012 AmericanWoodwol'kel'.com 49
for the doors and refer to Fig. G. If your opening i a different width than indicated, adjust the length of the door rails (D3) as needed. Measure the height of the opening and cut the door stiles 1/8" shorter, for a 1116" clearance above and below the doors. For more information on making the doors, see "Classic Door JOinery," page 51.
Glue the door panels (D4) from two pieces of wood. Use your tablesaw to bevel the panels (Fig. F). Tilt the blade 15° and stand the panels on edge. Use a zero-clearance insert and an auxiliary tall fence to support the panels as you cut. Paint or finish both sides of the bevels (Photo 9), then glue the doors together (Photo 10).
Use a corner-beading bit (see Sources, right) to rout the bead on the right-hand door. Cut rabbets on the stiles that will overlap, then hang the doors (Photo 11 ). Glue and screw a block (D5) under the middle divider to mount a catch for the right-hand door and a stop for the left-hand door (Figs. A and E; see Sources).lnstall the catch and stop, then remove the doors and the hardware.
Cut the backboards (E 1) to length. I used bam siding for these pieces, but any kind of pre-milled tongue-and-groove materialor plywood-will work Test the fit of the back pieces; you'll probably have to rip one to make their spacing come out right
Give it an old look I like to give an aged look to my painted furniture, so I used a crackle medium when painting the backboards white (see Sources). For the rest of the cabinet, I brushed on two coats of blue paint This looked a bit too bright, so I sealed the paint with two coats of wipe-on poly, then wiped on a pre-mixed brown glaze, which helped darken the paint (see Sources). The secret in glazing is to wipe most of it off, but leave some in crevices and comers to imitate the look of old painted furniture.
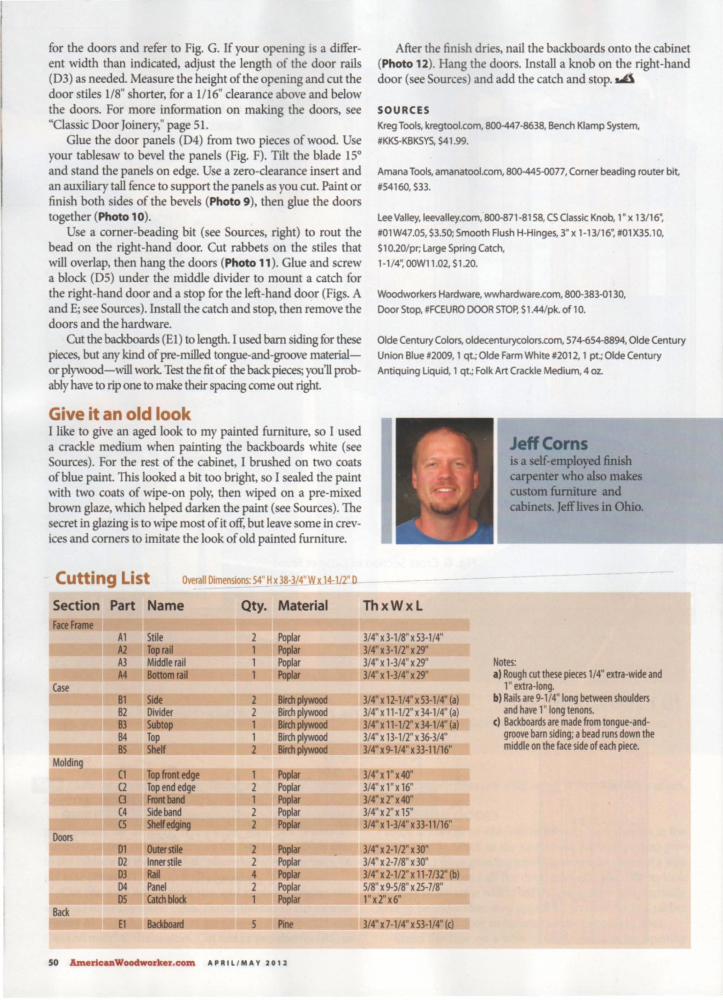
Cutting List Ow.rall OilTlP.rcions: 54' H x 3S-3/4'Wx14111" 0
Section Part Name Qty. Material FufAme
Al Stile 2 Poplar A2 Top rail 1 ~ A3 Middle rail 1 Poplar A4 Bonomrall 1 Poplar
Case Bl SIde 2 BidI~ B2 Divider 2 Birch plywood B3 SubIop 1 BidI plywood B4 Top 1 Birch plywood as Shelf 2 BidI plywood
Molding C1 Top fnInt edgf 1 Poplar Q Top end edge 2 Poplar 0 Ftaltbind 1 I'opW (4 Sideband 2 Poplar C5 Shelf edging 2 Poplar
01 Oulfrsdf 2 !'aPIar 02 Inner stile 2 Poplar 03 RaIl 4 Poplar D4 Panel 2 Poplar OS CatdI block 1 Poplar
El BaddIoaId 5 PInt
50 JlmerlcanWoodworker.com APRIL/MAY 1011
After the fini h dries, nail the backboards onto the cabinet (Photo 12). Hang the doors. Install a knob on the right-hand door (see Source ) and add the catch and stop. ~
SOURCES
Kreg Tools, kregtool.com, 800-447-8638, Bench Klamp System,
#KKS-KBKSYS, $41 .99.
Amana Tools, amanatool.com, 800-44S-0077, Corner beading router bit,
#54160, $33.
Lee Valley, leevalley.com, 800-871 -8158, CS Classic Knob, I ' x 13/16~
#01 W47.05, $3.50; Smooth Flush H-Hinges, 3' x 1 -13/16~ #01 X35.1 0,
$1 0.20/pr; Large Spring Catch,
1-1 /4~ OOW11 .02, $1.20.
Woodworkers Hardware, wwhardware.com, 800-383-{)130,
Door Stop, #FCEURO OOOR STOP, $1 .44/pk. of I o.
Olde Century Colors, oldecenturycolors.com, 574-654-8894, Olde Century
Union Blue #2009, I qt~ Olde Farm White #2012, I pt~ Olde Century
Antiquing Liquid, I qt~ Folk Art Crackle Medium, 4 oz.
ThxWxl
3/4" x 3-1/S" x 53-1/4" 3/4" X 3-112". 'S' 3/4" x 1-3/4" x 29" 3/4" X 1-3/4". 'S'
3/4" x 12-1/4" x 53-1/4" (a) 3/4" x 11-112" x 34-1/4" (a) 3/4".11-112".34-1/4" (a) 3/4" x 13-1/2" x 36-3/4" 3/4".9-1/4" x 33-11/16"
3/4" x 1".40" 3/4"xl"xI6" 3/4" x 2".40" 3/4" x 2" xIS" 3/4" x 1-3/4" x 33-11/16"
3/4" x 2-112" x 30" 3/4" x2-7/S" x30" 3/4".2-112".11-7/32" (b) 5/S" .9-5/S" x 25-7/S" 1".2"x6"
3/4".7-1/4".53-1/4" (e)
JeffComs is a self-employed finish carpenter who also makes custom furniture and cabinets. Jetrlives in Ohio.
Notes: I ) Rough cut these pieces 1/4" extra-wide and
l ' extra-long. b) Rails are 9-1/4" long between shoulders
and have 1"long tenons. c) Backboards are made from tongue-and-
groove bam siding; a bead runs down the middle on the face side of each piece.
Text Box
WWS

v .. '" e o '" "" z .. '" z o ;: .. e: '" :>
~
How to make strong mortise and tenon joints
with a plunge router
IMAGINE turning the clock back 500 years and vi iting a fellow woodworker in any large European town. You could in tantly strike up a conver ation about the fine points of building a door with mortise and tenon jointshe'd know exactly what you're talking about. Woodworker figured out thi joinery a long time ago, and we u e the same de ign today.
Of cour e, we also have modern method of building door, uch as cope-and- tick joinery, but when it come to making a large door with a 100 e panel, the morti e and tenon joint is till the way to go. Properly made, it will never ag or come apart.
There are many way to make a door with mortise and tenon joints. I'd like to how you how to do it u ing very basic power tools-a plunge router and a table aw. Ju t about any plunge router will do, but I prefer u ing a small one, equipped with an upcut piral bit (ee ource, page 55). (A mall router i ea ier to balance than a large one.) You'll need a dado et for your table aw.
When making morti e and tenon joint ,it' standard practice to make the morti e fir t, then cut the tenon to fit. Let' begin by looking at a new tyle of morti ing jig I've devi ed.
and a tablesaw.
Making the Mortises We'll be using a new type of router jig that automatically centers the mortises in the grooves.
Making the Tenons We'll be using a dado set and a dedicated sled to get a precise fit.
by Tom Caspar
"'. l l / M"T lOll ADwriC&JlWoodworku.com 51

1/4" panel groove
Cutaway mortise
Adjustment screw 1/4" bit
Fig. A Stop Support ~ I-!l ... " x #~ SC{'Ew I
I" # ~ SC{'Ew
1/4" guide bar Making the Mortising Jig
SMIlLL s-rop BLOCK
LIl{,GE s-rop BLOCK
How to build it
Fig . B Guided Sub-Base
This jig is composed of two simple parts. First, there's a replacement sub-base for your router (the Guided Sub-Base, Fig. B). It slides in the groove that will receive the door panel. Second, there's a board that supports the router as you cut the mortise (the Stop Support, Fig. A). This block has stops that limit the router's travel, controlling the length of the mortise.
!I.," -r01PE{'CJ) 'l/11{'J)B0I1{'J), !I ... " w:rJ;E{' 11,-.0 LONGE{' -r'l/IlN BIlSt: Or {'O~{'.
Clamp or screw the Guided Sub-Base to your router. Using a ruler as a straightedge, position the Sub-Base so the 1/4" wide guide strips are exactly in line with a 1/4" bit.
S2 JlmericaaWoodworker.com A' RIL l MAY 10 1Z
To make the Guided Sub-Base, start by cutting a piece of 1/4" tempered hardboard or MDF (A) about 1/2" wider and 1/2" longer than the base of your router. Drill a 3/8" hole in the center of the piece. Next, cut a 1/4" groove down the approximate middle of the piece, using a dado set. Make the groove 1/8" deep.
Make two guide strips (B), from one longer piece, to fit snugly into the groove. Glue them in place. Using the dado set, cut a 1/4" x 1/4" groove in a scrap piece and test fit the Sub-Base in the groove. It should slide easily, but should not wiggle. You may have to sand the sides of the guide strips to get the right fit. Rub a little paraffin wax on the SubBase to keep it sliding smoothly. Clamp the SubBase to your router (see photo, left).
To make the Stop Support, cut two pieces of 3/4" plywood or solid wood the exact same width as your door stiles and about 20" long (C). Set one piece aside, for use later. Drill two 3/4" dia. holes near the ends of the other piece. Make a large stop block with a pointed end (D), and fasten it to this piece. Lastly, make two smaller stop blocks (E). Drill pilot holes in the ends of these blocks, then run in two mall screws most of the way. Drill pilot holes for fa tening the blocks to the Stop Supportyou'll attach them later.

sing the Mortising Jig
DrMw a.,out lines on the mortIs JIg s Stop Support directly from one ofthe door'Hails. C 4 x 1/4" grooves in all the stiles and rails first. then draw the of the tenon on the end of one of the rails.
Clamp one of the stop blocks to the Support. so the adjusting screw in the end of the block butts against the Guided Sub-Base. Repeat this operation for the other stop block, then screw both blocks to the Support.
Set up the jig's stops Begin by milling all your stiles and rails to final width and length. (Make a few extra pieces for testing the setup operations ahead.) Mark the face sides of each piece. Using a dado set, cut a 114" x 114" groove for the door panel along the inside edges of all the stiles and rails, keeping their face sides against the tablesaw's fence. The groove doesn't have to be exactly centered; close is good enough. It can be offset, too.
Draw the width of your tenon on the end of one rail (Photo 1). Clamp the rail in a vise and butt the Stop Support against the rail. Make sure the large stop on the Support is tight against the rail Transfer the lines from the rail to the Support.
Turn the router upside down and place the Support on the router (Photo 2). Draw a large X on the comer of the Guided Sub-Base nearest the large stop. Align the bit with the right-hand line on the Support (see inset). Clamp one of the small stop blocks to the Support (Photo 3). Slide the Support so the bit aligns with the left-hand pencil line and clamp the second small stop block in place. Draw an X on top of this stop. Remove the Support from the router, clamp the Support in a vise and screw the stops to the Support.
2 PIKe the Stop Support on top of the router. line up the bit with the right-hand line on the Support. Note the XS on both parts of the jig- these marks will help you orient the router the right way when you tum it OYer.
Set up the jig and rout a mortise In a stile. The stile Is damped between two support pieces to steady the router. Adjust the screws in the stop blocks, if necessary, to fine-tune the mortise'5 length. Once you're set. use the same setup to rout aM the mortises.
Cut the mortises To assemble the jig, place the test piece against the Support. Butt the end of the piece up to the large stop (Photo 4; see inset). Place the second Support Piece (it's just a plain board) against the test piece, making a threeboard sandwich. Clamp all the pieces together, and clamp the whole assembly down to the bench.
Place the router on top of the jig, with the X mark on the Sub-Base near the X on the Support. Plunge the bit about 1/4" into the wood, then move the router back and forth between the stop blocks. Plunge the bit another 1/4" and repeat the operation until you've reached the full depth of the mortise.
Remove the router and make sure the mortise is in line with the groove; if it isn't, adjust the position of the SubBase. Also, compare the length of the mortise with your original layout lines. Adjust the screws in the stop blocks as necessary. Be fussy about the end of the mortise farthest away from the end of the stile-it has to be spot on. Once the screws are set, rout both ends of all the stiles.
A ' R III MAY 2012 AmericanWooc:lworker.com 53

Making the Tenons
Cut the ....... with a dado set. using a sled or a miter gauge. Butt the rails against a stop, so all the cuts are equal in width. Arst, cut only one face of a test piece.
Cut the opposite .... of the tenons, starting with a test piece. Lower the dado set a bit, so the tenon starts out a bit fat on the first try. Then raise the blade little by little, making more cuts, until the tenon is the right thickness.
Saw the tenons Set up a 3/4" wide dado set in your saw. Door tenons are usually at least 1" long, so cutting them will require at least two overlapping passes. Clamp a stop block to your sled or miter gauge's fence to ensure that all the tenons are the same length (Photo 5).
Place a test piece on the sled, face side down, and raise the dado blade to cut about 1132" lower than the panel groove. Cut both passes, then compare the depth of the cut to one of the door's stiles (Photo 6). Raise the blade in small increments, recutting the test piece, until the face of the test rail is perfectly flush with the groove. Once you're set, cut tenons on the face sides of all the rails.
Turn over the test rail and repeat the same procedure, starting with the blade 1/32" lower than the groove (Photo 7). Check the fit of the tenon in a mortise (Photo 8). At this point, the tenon should be too tight, or not fit at all. Raise the blade in small increments, making more test cuts, until the fit is correct.
How tight should the joint be? If you have to pound
54 .lmerlcIUlWoodworker.com APR III M A V l 0 11
Check the depth of the cut. Place the rail against a stile, face to face; the rail's face should be flush with the groove in the stile. Adjust the height of the dado set, if necessary, then cut the face sides of the tenons on all of the rails.
Test the fit of the tenon in a rail. Once the dado set is at the correct height, and the test tenon slides In nicely, cut the back side of the tenons on all the rails.
or push hard on the rail to get it in the mortise, it's too tight. If there's a gap between the tenon and mortise that's greater than the thickness of a piece of notebook paper, it's too loose.
Cut out the haunches The last step in making the joint is to cut a notch just above each tenon, leaving a small stub to fit into the panel groove. This stub is called a "haunch," making this a "haunched mortise and tenon joint:' The best way to layout the haunch, which is identical on both ends of each rail, is by directly marking from a stile. First, mark the width of the tenon, so it's exactly as wide as the mortise (Photo 9). Second, mark the length of the haunch (Photo 10).
You can saw the haunches by hand, but it's faster to use a bandsaw. Set up a rip fence to cut on the first line you laid out. Clamp a stop to the fence to limit the length of the cut. Use a miter gauge equipped with a fence and stop block to make the second cut (Photo 11). Make this

L.yout the haunch- a notch above the tenon-directly from a mortise. Clamp a stile in your vise,level with the face of the tenon, to make this line easier to transfer.
s.w .11 of the haunches on the bandsaw. Set up a rip fence for the first cuts; use a miter gauge for the second cuts.
cut about 1/32" off the line, so the haunch doesn't quite bottom out in the panel groove (this guarantees that the tenon's shoulders will draw up tight).
Finally, round all the tenons with a file (Photo 12). A 10" double-cut flat bastard gets the job done very quickly. Place a morti e nearby for reference; you'll be able to copy the round shape, by eye, quite easily. ~
SOURCES Hartville Tool, hartvilletool.com, 800-345-2396, 1/4" Upcut Spiral 8it,
1/4" shank, #RRU2100, $16.85.
Porter-Cable, portercable.com, 888-848-5175, Model 450PK, Compact
Combination Fixed Base/Plunge Base router, $180.
Woodhaven, woodhaven.com, 800-344-6657, #4910 Deluxe Miter
Gauge, $139.99.
For plans to make a top-notch crosscut sled, see AmericanWooclwolbr.mmlWebExtras
Mark the length of the haunch directly from the same stile. This time, clamp the stile so it's even with the top edge of the rail.
12 Round the tenons with a file, to match the rounded ends of the mortises.
Why Use A Sled To ake Tenons? To make tenons with a dado set, you must be able to make a perfect right-angle cut on your tablesaw. Sad to say, many stock miter gauges aren't capable of this level of precision because their bars have too much play in the saw's miter slots. If the head of the miter gauge wiggles just a little bit as you make a cut, the shoulders of your tenons won't be straight or square or in the same plane, front and back. And that leads to gaps or joints that are out of square.
Here are a few solutions to the wiggle problem: First, scrounge a second miter gauge and attach both gauges to a long wooden fence. The fence will prevent both gauges from wiggling. Second, use an aftermarket miter gauge whose bar can be adjusted to custom-fit your miter slots (see Sources, left). Third, build a sled with two runners. Normally, a sled is just used for crosscutting with a standard blade; if you use the same sled with a dado blade, you'll create a huge opening in its base and fence, which is not ideal. It's far better to build a dedicated sled for making tenons-it will payoff many times over.
A' RllIM A Y ZO 1 Z JlmericaIlWoodworker.com SS

velBa k and The Iidrawers" are ready-made-you just provide the stand.
by Spike Carlsen
56 AmericiUlWoodwodter.com AP~IL/MAY 2012
EVERYBODY NEEDS more room for storage-for extra towels in the bathroom, for hats and
gloves in the entryway, for workout clothes in the bedroom or for veggies or hand towels in the kitchen. But making the drawers for a storage unit can be complicated and frustrating. Here's a way to simplify the job: Use ready-made baskets. This "chest of baskets" is easy to build and will fit in nearly any room.
I purchased these baskets at a Michael's craft store, but many other retailers like Pier 1 and Ikea also carry them. Buy your baskets before you build the stand; you may have to change the stand's dimensions to fit them. I made the stand's openings about 112" wider and taller than the baskets so the "drawers" are easy to slide in and out.
Cut the legs (A), front and back rails (B) and side rails (C) to final length. Note that the lower three front rails lie flat, while the other rails stand on edge. This gets a bit tricky to layout; here's how you do it. First, clamp all the legs together and draw centerlines for each set of rails. Draw an "X" on each of these lines. Next, draw two lines on either side of the centerlines (Photo 1). The inner two lines indicate the position of the three front rails (the horizontal ones);
the outer lines indicate the position of all the other rails (the vertical ones).
Cut biscuit slots in all the legs and rails (Photo 2). Glue the sides of the stand together (Photo 3). The biscuits will be slightly wider than the slots; trim off the overhang after this glue-up. Add the front and back rails. Cut the runners (D) to length, then glue and nail them to the side rails (Photo 4).
Cut the top (E) to exactly fit the stand, with no overhang. Glue and nail it to the rails. Apply stock 3/4" cove molding (F and G)
around the top with glue and nails. ~
This and 40 more clever, easy-to-build woodworking projects are featured in Spike Carlsen's new book, Ridiculously Simple Furniture Projects (linden Publishing). Available at owbooIcstore.com.
::t: '< a: cr ::t: C cr
"" Z < a:
a; ;: ::t: Q.
< cr I:J o >-o ::t: Q.
a: < Q.
'" < u ~
8 a: o >--a ~

Clamp the legs together, then draw a centerline for each set of rails. Mark this line with an ·X~ Then draw pairs of lines to show the outer edges of the rails.
Cut biKult slots in the legs and side rails. Center each slot on an ·X~
Glue the sides together. Next, cut slots for the front and back rails. Note that the back rails are upright, like the side rails, but the lower three front rails lay flat.
Install runners for the baskets after gluing up the whole frame. These pieces are level with the front rails.
Cutting List " "~36- 14"H.1· '/4"Wxl4-1n"O
Part Name Qty. ThxWxL A leg 4 3/4" x l-ln" x 36" B Front & back rail 8 3/4" x 1-112" x 12-114" C Side rail 8 3/4"x1-W"x10" D Runner 6 3/4" x 3/4" x 10-3/4" E Top 1 3/4" x 1]" x 13-3/4" F Molding, front and back 2 3/4" x 1-114" x 15-114" G Molding. side 2 3/4" x 1-1/4" x 14-1n"
A ,a Il / MA Y lOll JlmerlcanWoodwod,er.com 57


Saw the bowl blMk as round as possible. I use a circle-cutting jig, where the blank rotates on a pin like a record on a turntable. The result is a near-perfect circle.
PIKe the blank in the jig and raise the blade 1/16". Rotate the blank one revolution. The result will be a dish-shaped, concave cut. Raise the blade another 1/16" and repeat the procedure.
Make the blank I designed the e jigs for 8" x 8" turning blanks that are 3" thick (see Source, page 60). Blanks of this size are widely available and come in a variety of species. (The bowl hown here is made from padauk). I prefer to use wood that is thoroughly dry-wet wood can clog up the jigs and might rust your saw. Many blanks aren't dry enough; I recommend setting them aside until they are as dryas kiln-dried wood.
Caution: Don't use cracked or knotty wood for making this bowl. It could break apart during the awing operations. In any case, wear safety glasses, goggles or a face shield.
Flatten both sides of the blank with a belt sander, electric plane or hand plane, or by using a thickness planer. If you use a planer, temporarily fasten 3/4" x 3" x 16" boards to both sides of the blank, to effectively lengthen the piece. On most planers, it's not safe to mill pieces that are less than 1t' long.
Cut the blank into a 7-5/8" dia. circle (Photo 1). When using the bowl-making jig, you'll get the best results if the blank is perfectly round. Cutting the blank freehand will work OK if you're careful and go low, but making a perfect circle is a cinch if you u e a circle-cutting jig. You can
Install. jig on your tablesaw for hollowing the interior of the bowl. Tighten two knobs to lock the jig in the miter slot. so it can't move. Raise the blade so it's even with the top of the saw table.
Remove the blank after a few passes and check your progress. Keep raising the blade 1/16" at a time until the cut measures 6-1 /2" across.
buy one or make one your elf (see Source and "Adjustable Circle-Cutting Jig," AW#lS8, February/March 2012).
Note that the blank is 1/8" maller in diameter than the holes in the jigs you'll be u ing.
Using the hollowing jig First, put an 8" dia. blade in your tablesaw. Any blade will do, but I've found that an outer blade from an 8" stacked dado set leaves the smoothe t surface.
Install the hollowing jig (Photo 2 and Fig. A, page 61). Align the front of the jig with the front edge of your saw, then tighten the knob of the locking miter bars. Adjust the height of the saw's blade 0 the top of the blade is just a bit below the surface of the table.
Place the blank in the jig. Pre s down lightly on the blank with one hand, turn on the aw and raise the blade 1116" (on my aw, that's about 1/4 turn of the blade-elevation handwheel). Rotate the blank, clockwise, one complete revolution (Photo 3). (You might want to make a mark on the blank, so you can tell when 'ou've turned the blank full circle.)
Keeping one hand on the blank, crank up the blade another 1116" and repeat the procedure. Keep raising the
A' .' I //IA T an &mericaaWoodworker.com S9


Fig. A Hollowing Jig
Fig. B Cross Section of the Bowl in the Hollowing Jig
Maldng the Hollowing Jig Cut the base (A) from a flat piece d plywood or MOF. Draw a line down the middle of the base (FIg. A). Measure the distance from the center d your saw blade to the center of the right-hand miter slot. Draw a second line down the base. Measure the distance from the front edge of the saWs table to the center d the saw's arbor. Draw this line across the base.
Draw a 7-314" dIa. cIrde from the Intersection d the saw blade Ones. Carefully cut out this clrde with a jigsaw, then drill holes for the miter slot locking bars (see Source. page 60) and Install the hardware. You're good to go.
A tablesaw bowl? Watch the video at AmericanWoodwoltcer.mmlWebExtras
Cutting List for Hollowing Jig
Part Name Qty. ThxWxL A Basel 314". 16" ...... 11", __ ~_~
A PR IL / MA Y 2012 llmericaaWooct_rku.com 61

Fig. C Coping Jig
;)" X 3" 1>tlS-r COLLEC-rZON
OPENZNG
MakIng the CopIng Jig Start with the base (B). Draw the same three lines IS you did for the coping jig. In addition. draw one line 5-ln front of the ·center of saw blade" line (FIg. C).
To mike the platform (0 and guide pieces (0), start by SIWing six pieces 12- wide by 11-1/r' long. Saw a 4S- bevel on one end of each piece (FIg. D). Set ISIde one of these pieces for the platform. Stack the rest. 50 the bevels line up, and aosscut each piece Individually. 50 the square ends also line up. Glue the stack together. MIlk the c:encer of the hole that will hold the bowl blink. Saw the hole on the bandsaw. either freehInd or using a dIde-cuttIng jig. Saw off the st.p comers of the hole. RnaIIy. cut out a 2-wide by 3" lang slot In the end of the platform for dust ex1raC1IoI .. then glue the stack to the platform. Glue and screw the platform and stack to the base.
MaIre the supports (E) and fasten them to the base. MaIre the dustport (F) and screw It to the supports.
62 Jlmeric .. Wooclwo~ke~.com "P III LIM" Y 201 2
Fig. 0 Top and Side Views of Coping Jig
~_31'1 . 1>zA.
! </5° MffE,f' I
Fig. E Cross Section of the Bowl in the Coping Jig
Cutting List for Coping Jig
Part Name Qty. Th x W xl B .. 2 1 114"1 1r 127" (Platform 1 3/4" x 12" x 11-112" (a) D GuIde S 114"1 12"1 ll-1Jr(b) E Support 4 3/4"x6"x6" F ~ 1 114"14"16", ___ ----'
Notes: I) Mltff onr end. II) MiIff tilt ends at ill piKes. thtn CJOS5(UI to IrngtII as shown in Fi!J. D.

I .. &, 101 1 .lmericaaWoodwoI'UI'._ 6J

Embedded MIn MMI dust nibs are almost impossible to avoid with film-forming finshes. Removing these imperfections and creating a smooth, lustrous finish is easier than you might think.
~rt by sanding very gently with the grain using a felt block wrapped with 400 grit paper (or finer). Removing dust and hairs requires only a few strokes.
Consistently work the surfKe while carefully staying about 1/2" from the edges. Sanding gently leaves smaller scratches that are easier to remove.
64 &m.ric:&llWoodworker.com APRIL / MAY lOU
Rubbed-o 't s. hand-rubbed While the term are similar, a "rubbed-out" fini hand a "hand-rubbed" fini h are distinctly different. Abrasive rub-out methods are typically u ed on film-building finishe that are su ceptible to debris getting stuck in the film a it dries. A hand-rubbed finish usually refer to a wipe on/rub off proces that does not involve building a film above the surface of the wood.
Rubbing a film fini h with fine abrasives allows you to ubtly control how light is reflected, for a warmer, more
inviting and refined appearance. Using fine abra ives to remove minor imperfections in the fini h will al 0 give your project an elegant feel that makes it hard for people to keep their hands off.
Most rub-out method include difficult, labor intensive proce e with a fairly high level of ri k that problems will occur. For example, the first step in many of the e methods i "leveling the finish" to remove all the wood texture. This step is risky because it's so aggre sive. For anyone, even an experienced finisher, rubbing through the top layer of fini h or even right down to the wood is a di tinct possiblitly.
My rub-out method carrie almo t no risk, becau e leveling the surface isn't required. Leveling is only really nece sary when the goal is a high-glos heen, a in a "piano fini h." My method produce a atin sheen.
Start with satin varnish It's important to start with a satin- or flat- heen varnish, so that the pore and low spot in the texture of the wood don't appear shiny after the fini h has been rubbed out. The table shown here is made of figured cherry that ha been fini hed with General Fini he Arm-R- eal atin polyurethane, applied with a foam bru h (see Source, page 66). Thi product flows out nicely due to its thinner visco ity, so there are no vi ible bru h marks to remove.
IiID If your satin varnish is thick enough to leave brush marks, try thinning it at least 25%.
I've applied three coat everywhere but the top, which has a fourth coat becau e it will be subjected to more wear and tear. Unfortunately, my dog stopped by to check things out while the last coat was still wet (Photo 1).
Before rubbing out the finish, you must allow it to dry for at lea t three day in optimal conditions (above 60 F with relative humidity at 50%), but it's better to wait a week. Allow even more time when the relative humidity remains above 80%.
Silky-smooth in three steps This rub-out technique ha only three steps. There's no rea on to worry about the confusing range of abra ive heets, pads, powders and compounds used in more
involved proces e . All you need i atin Arm-R-Seal, 400 grit or finer andpaper, a felt anding block, goodquality steel wool (made by Liberon or Briwax), and a few drop of di h soap. The e product are available online or at woodworking specialty store (ee ources).

Step 1: Remove dust ni fection s above the surfa most effective tool for h it's important not to rem applied fini h than nec paper cut to one-quarter scratchy edges). For con sandpaper around a 0 p blocks for this job are m (Neoprene blocks of a available through autom
Sand very lightly with t hair (Photo 2). Thi pr -
• and very small imperfine andpaper i the the e bugger , becau e m re of your carefull .
00 grit or finer sand-e (not torn with rough, tting action, wrap the nding block. The be t
It or neoprene rubber. n ity and pliability are lier .)
in to hear off dust and
maybe as much as the \\ Lh . ur hand. It feels more like dusting or gentle cleamn th n anding. It doe n't take long, either. Two or thr e t °e will often do the trick.
Applying the minimum am unt of anding pre sure keep the anding crat h mall as pos ible. Push-ing down harder than n r . create bigger, deeper cratche that require m r r - to remove in the steps
that follow. Feel the urfac u go and stop anding as oon a it feel mooth. Com 1 ing this tep on an aver
age- ize dining room table h uld take between five and ten minute.
In all three step of thi pr e ,it' be t to work carefully to within about 1/2 0 the edge to avoid cutting through (Photo 3). Then fini the work around the edge eparately and cautiou I)' (Photos 4 and 5). Consi tency i
very important for an even t:t:n \ ipe the urface clean with a damp cloth. You hould ee a consistent visible scratch pattern that how on the high pots in the texture of the wood.
Step 2: Remove tI,e visible scratches from sanding and replace them with smaller scratches. For this step you must have good quality ;:0000 teel wool that' pecially made for rubbing fini he ee "Type of Steel Wool," page 66). It's important to cut and fold the steel wool carefullv to create a good, consistently-abra ive surface (Photo 6). An 18" to 20" length of wool fold into an effective four-laver pad. U e your felt or neoprene block to back up the teel wool. As with the sandpaper, thi provide a much more even and gentle cutting urface. Work the urface carefu I ' and consi tently to create an even appearance (Photo 7). As with the fir t step, thi tep require very little prt -ure. Once again, ave the edge for la t. Wipe clean with
damp cloth. This tep should take 10 to 20 minute . To rub turned leg or haped moldings, u e the nd
paper on only the straight portions. On the haped portions, skip the sanding and go straight to the teel w 01 (PhotoS).
Step 3: Remove the scratches made by the dr t el wool and replace them with scratches that aren't l'i ible to the human eye. cratche that are easily vi lbl create a hazy appearance. Moving from the e cratch to scratches 0 small they're not detectable is wha m . this tep different from the fir t two.
tart with fre h teel wool prepared as in the pr iou
Sand to the ends using two or three short,light strokes. lifting at the end of each stroke so you don't cut through the edge.
Sand to the sides, working with the grain and using your thumb as a gu de to keep the abrasive away from the vulnerable edge.
C.refully cut .nd fold good-q a a consistent abrasive pad. Fold ng e wool allows you to renew the cuning surface by unfold ng esh layers.
Remove the uncIp.per scmches by working with the grain using the steel wool wool pad with the felt block to create a more co ng tool.
"' 1 ADutricaaWoodworker.com 6S

Go stgIght to the steel wool on the shaped portions of turned legs and moldings. Be careful to avoid cutting through delicate edges. It's OK to sand the flat portions. but stop short of any curves.
Rnlsh the job with a fresh wool pad, soapy water and a circular rubbing pattern. The lubricated wool removes the scratches from the dry wool and leaves no visible marks behind.
66 AmarlcaaWooclworker.com Ii' R I LI M Ii Y 201 2
tep, with the oft felt block to back it up. Mix a couple drops of mild di h oap or hand oap in a mall dish of water. Use just enough to get some ud going. Dip the teel wool in the soapy water or ju t sprinkle drop around
on your surface. Work the wool in a circular pattern u ing the arne gentle approach a in the fir t two tep (Photo 9). Add a drop of soap to the urface anytime you need more ud . Move across the surface in an overlapping pattern.
After one complete pas over the entire surface, repeat the pattern two more times, then wipe dry with clean, oft paper towels. Let the water evaporate and then carefully a e your progre . Repeat this last step as needed to create a consistent atin sheen. This step should take 10 to 20 minute . ...6
SOURCES
Woodcraft, woodcraft.com, 800-225-1153,
General Finishes Satin Arm·R-Seal, 1 qt., '56606, $15.99; Norton 3X
Sandpaper, 400 grit, 20 sheets, '29533, $12.99; Felt Block, '582B9,
$10.59; Liberon.oooo Steel Wool, 1/2 lb. roll, '58354, $21.49.
Rockier Woodworking and Hardware, rockler.com, 800-279-4441,
General Finishes Satin Arm-R-Seal, 1 qt. '85FOB, $14.99; Norton 3X
Sandpaper, 400 grit, 3 sheets, '145034, $5.99; Felt Rubbing Pad,
'38N41, $14.50; Briwax 4/0 Steel Wool, 1 roll, '844337, $11.50.
K yin Southwick is a wood-finishing specialist and furniture restorer/con ervator in Minneapolis, MN.
See how little time this rub-out process takes at AmericanWoodworker.mmlWebExtras
ofSte 01 The fibers in good-quality steel wool are long and very consistent. That makes it far better for rubbing finishes than ordinary steel wool, because it provides consistent cutting action and produces a consistent scratch pattern. It also lasts longer. Good-quality steel wool is more expensive than ordinary wool and harder to find (see Sources, above).
Ordinary steel wool has shorter fibers that are viSibly inconsistent. It often feels greasy with residual oil from the manufacturing process and it has a tendency to crumble.
A quick look at the cutting surface of a nylon abrasive pad shows that it's significantly different from good-quality #0000 steel wool. Although it's a useful finishing tool, a nylon abrasive pad isn't appropriate for the process shown here, because it doesn't cut the same way that good-quality steel wool cuts.

r u ..: '" a: r o a: >< z ..: a: ~
z o ;::: ..: a: .... '" ::;)
j
'" .... z w
~ ..... u o w .... ,;: r Q. ..: a:
" o .... o r Q.
z o '" z r Q ~ ;::: a: o .... a w
by Lisa Clements
WHEN MOST OF MY FRIENDS want something-like a new phone or a computer desk-they just ask their parents for it. I'm a little different, because I've been woodworking with my Dad for about eight years; when I want something, my dad and I make it. He's taught me how to use all of the machinery in his shop and we've built many projects together. When I told him that I wanted to build a computer desk, we sketched a few ideas to work out the dimensions and then headed to the hop.
We get design ideas by experimenting. That's how we came up with the de k' culpted legs. We were using the
Create awesome patterns with a spindle sander.
oscillating spindle sander to hape some rounded cutouts on a scrap-wood leg when we decided to see what happened if we tilted the ander' table. Wow! Pushing the leg directly into the pindle created a really cool cone shape . Before long we di covered how to combine multiple cone shapes to create an intncate overlapping pattern that looked like a serrated a\\100th .• 'ext came the idea to face a pair of mirror-image pattern . eparating them with ginormous loose tenons in a contrasting wood was the last piece of the puzzle. Awesome! We<i developed a simple process that gave our desk a ignature feature.
A'RlL f MAY lOll Jlmeric:anWoodworker.com 67


The legs .... shaped using a sImple fixture mounted on an oscillating spindle sander that 's outfined with a 4" drum. Square the fixture to the spindle and then tl the table to 45·.
Mark. third line on the fixture using a blank marked 3" from one end. Align the mark with the fixture's right diameter line. Make sure the edges are flush.
Wood and big machines The de k's legs, rails and top are made of8/4 Spanish cedar boards that were left over from one of my Dad's projects. I like working with Spanish cedar because it doe n't weigh a ton! It al 0 and easily, smell good and looks pretty. We decided to u e wenge for the expo ed tenons because its dark color would accentuate the overlapping curve we<l be anding into the leg . Wenge looks awe orne, but it's no fun
to work with becau e it's hard and uper plintery. We u ed two of my favorite tool to make thi de k. In
addition to the big 0 cillating pindle ander, we u ed our Multi-Router to cut the morti e (ee ource, page 72). Dad ay it' unusual for a mall hop like our to have these tool . I ay we're lucky!
We tarted by milling lumber for the top, leg (including a te t leg) and rails (A, 8 and C, Fig. A, and Cutting List, page 68). We cho e the be t-looking boards to make the top and the "next-be t" to make the leg. Dad said to u e the uglie t board (or even offcut from the top and legs) to make the rail , becau e they wouldn't how. I u ed ugly wood to make the te t leg blank, too. We cut all the boards a couple of inche longer than the final dimen ions and et
2 Mark the diameter of the spindle on the face and edge of the fixture.
F.sten • 90" '-nee to the fixture at the line you've just marked.
aside the ones we<l cho en for the top and the rails. We were fortunate to have wide board, 0 our leg
blanks didn't have to be glued up. We quared the ends of the leg blanks at 28" and jointed their edges smooth while cutting them to their final 8" width.
Set up the sander I in talled a 4" spindle with a 6O-grit sleeve in the 0 cillating pindle ander while Dad a embled the 3/4" plywood fixture that upports the leg blanks. Its 12" x 25" ba e and 6" x 60" upport rail are fastened together to create one flu h edge. Dad quared the fixture to the spindle and held it in po ition (butted against the spindle) while I clamped it to the table. Then I tilted the table to 45° (Photo 1).
I marked both sides of the spindle on the fixure's rail and extended the two marks onto the edge that face the drum (Photo 2). Meanwhile, Dad marked a reference line on the edge of each leg blank, 3" from one end. I placed the te t blank on the fixture, quared it and aligned its reference line with the right diameter mark. Then I drew a third line on the rail (Photo 3).
I completed the etup by fa tening the flXture's 1-1/2"
A'.' LI M A Y lO, l .lmeric .. Woodwodtu.com 69

s.nd the first profile by sliding the leg blank up and into the sanding drum while holding the end firmly against the fence.
Mn • line tangent to the apex of the deep cutout on the blank's bottom face. Extend this line down the length of the blank, on both faces.
x 3" x 11" fe nce at this line (Photo 4). A 3/4" x 3" square block fastened to one end of the fence automatically positions it.
Shape the first profile Dad turned on the sander while I held the test leg blank on the fixture with its end against the fence. Then I slowly but firmly pushed the blank straight up into the pindle (Photo 5). The spindle's counter-clockwi e rotation helped hold the blank against the fence. I kept pushing the blank until the sanded profile touched the mark (Photo 6). Then I removed the blank so we could check our setup by measuring the cone-shaped cutout on its edge, which we knew from earlier experiments should be 4" long at the bottom (the diameter of the drum) and 1-7/8" long at the top.
The cutouts length at the top edge is important because it determines the overall length of the overlapping pattem (You'll learn why it's the determinant in the next step.) When Dad and I were experimenting earlier, we learned that every 1 ° variance from 45° in the table's tilt adds (or subtracts) about 1" to the pattern's overall length, and this can cause problems with centering the overall pattern when you cut the legs to final length.
70 &mericaJlWooclworker.com A 'IIIL/ MA Y 1011
6 Stop sanding when the profile meets the line on the blank. Sanding the edge at 45° creates a cone-shaped profile.
MIIrk the edge of the blank again, exactly 4· from the end of the shallow cutout on its top face.
BD If the length at the top is greater than 1-7/S': it means the table is tilted less than 45° and needs to be adjusted.
Our mea urements showed our etup was good, and that meant I could shape the first profile on the four real legs. So I did.
Shape on! When the etup is correct, the large cutout on the blank's bottom face is a semi-circle with a 4" diameter. I used its apex to draw a pair of reference line , one on the bottom face and another on the opposite face (Photo 7). I u ed these lines as depth gauges to check all the remaining cutouts.
Next, I marked another reference line on the edge of the board, exactly 4" from the end of the 1-7/8" long cutout on the top edge (Photo 8). My Dad removed the fence from the fixture. Then we flipped over the blank and used its new reference line to reposition the fence and in tall it (Photo 9).
We were finally ready to shape the econd profile- and create the first overlap. Dad turned on the sander after m po itioned the te t blank on the fixture with its large cutout facing up and its end planted against the fence. Then, like before, I lowly pushed it up into the pindle (Photo 10).

Draw another line on the fixture with the blank positioned so that the shallow cutout and your second mark align with the fixture's two diameter lines.
The wide end of the second profile should be tangent to the line on the opposite face of the blank. Repeat the process shown in Photos 7 through 10 to complete each blank.
Keeping the blank against the fence was harder this time, because the spindle's rotation tried to pull it away. When the anded profile reached the reference line on the edge, it also
reached the depth gauge line on the oppo ite face (Photo 11 ). After verifying the profile's dimensions and depth, we marked and haped the second profile on the four real leg .
From here on, we just repeated the proce s to complete the overall profile: I marked the test blank. 4" from the mo t recent 1-7/8" cutout, u ed it to reposition the fence, and then shaped the next cutout After verifying the profile, I shaped that profile on the real legs. There are seven overlapping profiles in all.
Iil!D If you just can't get the top cutout to measure 1-7/8': don't use it to locate the overlapping profiles. Instead, draw the seven reference marks dimensioned in Fig. B (page 68) on the edge of your blank and use them to position the leg on the fixture. Using this alternate method will keep the overall profile at its intended length.
Match the legs The next step was to align the overall profiles on each pair of legs and mark their final lengths by measuring from the center
Install the fence at the line you've just drawn and then sand the second profile. As before, stop sanding when the profile reaches the mark on the leg.
_/~
12 Mark the legs in pairs for cutting to final length. Butt the legs together and align their sanded profiles. Then measure from the center.
(Photo 12). I al 0 marked each pair, so theya stay together. Then I cut the legs to final length. After that, I cut a centered notch in the top of each leg using a bandsaw with a fence. I carefully fit the width of the centered notches so the rail blanks slid in nugly, without binding or wobbling. I started by cutting just in ide my layout lines and removing mo t of the waste. Next, Dad quared the bottoms using a coping aw. Then I went back to the bandsaw and trimmed the houlders by making tiny fence adjustments and testing the fit
Rout the mortises You may be thinking that we should have cut the morti e for the 100 e tenons before haping the edges of the leg . That would have been nece ary if we were planning to cut them with a plunge router or a Forstner bit mounted in a drill pre . But as I aid, Dad has this sweet tool called a Multi-Router, a joint-making machine that he u e constantly.
Unlike a plunge router, which would have to sit on the edge of the leg, the Multi-Router stations the leg on a table. And rather than plunging the bit into the wood, the Multi-Router move the leg into the bit. 0, by using the Multi-Router, it doe n't matter that the leg' traight edge has been anded
A ' R I LIM A Y 2012 AmericaaWooclworker.com 71

Cut mortises in all the legs for the loose tenons. The MultiRouter's three-axis adjustability makes this easy.
away. Be ide ,Dad ays shaping the leg fir t make morti ing ea ier, becau e the bit doe n't have to plunge 2-112" deep into olid wood.
We tarted by laying out the morti e , which we centered on hvo of the mall cutout in the out ide face of each pair of leg (Fig. C). Then we u ed the te t leg to set up the MultiRouter. Fir t we centered the bit on the edge of the leg. After in tailing the 4" long end mill, we et the table' plunge depth and it ide-to-side travel. Then we centered the bit on the edge of the leg. Once we<j dialed in the setup, cutting the morti e was easy (Photo 13).
Assemble t e legs Dad milled a wenge board to fit the 1/2" wide morti e and rounded the edges on the router table, u ing a bullnose bit. Then I cro cut the board to make the four giant 100 e tenons (D).
I applied glue inside the morti e in each pair of leg , in erted the tenon and damped together the assembly (Photo 14). After making ure the a embly wa quare I wa hed off all the queezed-out glue.
Dad aid the hVo leg assemblies hould be identical, 0
when they were both dry, I undamped them and put them together. They didn't quite match, 0 Dad trued them up with a hand plane. Then he had me fini h- and them. I hate anding, but Dad say it's one of the mo t important part of building a project.
Glue up the base I cut notches in the rails to fit the one ra cut earlier in the leg . Then I drilled counter unk crew hole for mounting the top to the rails and the rail to the leg . I al 0 drilled pilot hole in the leg, 0 the crew wouldn't plit the end grain. Meanwhile, Dad widened the hole I'd drilled for mounting the top into lots to allow for ea onal movement.
We stood the legs on our uper-flat as embly table to glue in the rail, 0 we could make sure everything wa quare. The only damp we u ed for thi glue-up were the crew we drove into the leg .
72 &mericaaWoodworker.com A' Rill M A Y 1011
Dry fit the legs and loose tenons to make sure the parts fit and the assembly is square.
Make the top I jointed the edge of the boards we<I cho en for the top and damped them together with a ingle centered damp to make sure the joint do ed and the top would glue up flat. Then I glued the top together and washed off all the queezed-out glue.
After the glue wa dry I cut the top to its final width and length. The top was pretty big, 0 Dad helped while I routed it edges on the router table-we u ed a crown molding bit to create a concave profile that matched the cutouts on the legs (ee ource). This bit cut a 2-1/4" long profile; we only u ed the top part of it, tarting at the 45° chamfer. After that I was entenced to finish- and the top. At least it was flat-there
weren't a million cone hape to and!
Back to school The ba e needed a little touch-up sanding, e pecially where I wa hed off the glue. The next step wa to apply the fini h, a job I always leave to my Dad, because he' great with a pray gun. When the fini h wa dry, I attached the ba e to the top. Now to catch up on all that homework! ..4
SOURCES Grizzly Industrial, grizzly.com, 800-523-4777, Oscillating Spindle Sander,
#Gl 071, $750. JDS Company, jdstools.com, 800-480-7269, Multi-Router, $2695; 112· dia. x 4· end mill, #12856, $48.95. Ace Tool Repair,lnc.
acetoolonline.com, 877-783-8899, Freud Crown Molding 8it,
'FRE-99-408, $62.99.
Li CI m s ha been woodworking in Friend wood. Texa for about eight years.

h ~ MARKETPLACE ]
American Fabric Filter www.americanfabricfilter.com 21
Apollo Sprayer www.hvlp.com/amwood 12
Arrowmont School of Arts & Crafts www.arrowmont.org 19
Artisan Media Limited www.artisanco.com 75
Beall Tool www.bealltool.com 25
Contempo Living www.contempoliving.com 73
Elmer's www.elmers.com/demos 5
Epilog Laser www.epiloglaser.com 23
Forrest Manufacturing www.forrestblades.com 11
Frame Build www.framebuild.info 73
Franklin International www.titebond.com 76
FRAME BUILD Freud www.freudtools.com 7
PROJECTS Grand Brass Lamp Parts www.grandbrass.com 25
Build "i!h IUds. rafters. and joi I. Groff & Groff Lumber www.groffslumber.com 73 ew ideas "itb lOIS of variabl
Go to WNW.framebudd.info Harbor Freight www.harborfreight.com 9
Hickory Frame Co. www.tablelegsUSA.com 19
GROFF & GROFF LUMBER, INC. Infinity Tools www.infinitytools.com 20 0Yt1 70 DOMfS11C AND IMPOIlllI SPKIfS
C_MacIo flooring eu.ty a-y . , ... 16' ....... ' r .... Maple
Mohogony 30"+ ' _ W"'-"', a-y Laguna Tools www.lagunatools.com 2-3 Z MoIchoOV 1._ 51",I/'II·~w"" _ KD L.mI*. __ ' "'_ ...... s. ""'ov
No ~ Too Large 01 Too 5moI Lignomat USA, Ltd. www.lignomat.com 23 _ M.d."..- not ~
Ib 1717) mooDl aoo-:J.42'()()()1 fAX 1717) 2.HAOO
Logosol, Inc www.logosol.com 20
Cabinet Hardware, Glas Moaaic Tile, Ceramic SIIIII: Oneida Air Systems www.oneida-air.com 11, 19
• Hop Qoohoy"- Stool .. PoU. I .. hi! oM c.too.. KooIo
Osborne Wood Products www.osbornewood.com 20, 25
COIIt_Lm",1JI< 1220 Santa Aalta AVI Uo.t A. SoutIo E1 Mua .. CA 91733
Packard Woodworks www.packardwoodworks.com 20
Order Online or Call 626-450-0560 www.contempolivinginc.com ShopBotTools, Inc www.shopbottools.com 11
The Gorilla Glue Company www.gorillatough.com 13
Timberking www.timberking.com 25 For Classified &
Small Space Advertising: Vectric www.vectric.com/aw 21
Email Tim Henning at: Wood master Tools www.woodmastertools.com 25 11:!!iloning@am!il[i!Oi!nYiQQdwQr !ilf!<Qm
Or Call at: 708.606.3358 WoodMizer Products, Inc. www.woodmizer.com 25
Woodworkers Source www.101woods.com 73


Complete DVDsaies
DVD topics include: • Woodworking Es ential 1 • Woodworking E entials 2 • Ma tering Dovetails • Ma tering Hou ing Dadoe
• Ma tering Morti e & Tenon • ~fa tering Sharpening • ~fa tering Workbenches
E h DI'J) )0 II n
Companion Book In thl beautiful 320-rage full-color book, you'll learn how to harpen any edge too in Ie than two minute , and how to make
practical, heirloom-quality item, uch a aMi sion- tyle table and a haker-in pired dovetailed box.