American Woodworker - 120 (March 2006)
65
-
Upload
emilian-baluta -
Category
Documents
-
view
298 -
download
71
description
modelism
Transcript of American Woodworker - 120 (March 2006)


I56
58
66
Features
Elr
t5
BB
F.l is r - t o -b t t i l r l l t c ' t ' t ' sso t ' i t ' s
l i r r - r r rak ing l l ( ( t t l ' t t t e t l l t r l o t ' s .
n io t t i s t ' s l r r r t l s l r t ' l l - p i t t l t o l t ' s .
l l o t l r l e l v e s s t ( ) l ' ( ' t t t t r l t ' t ' t l t t ' t o 1 l .
\ l : r t c ' l r c r I l t o t t t t l s l t t ' t ' t l t t ' t l o t l t t i t t g t o t t t ] i
t ( ) : i s l ) ( ' c i : r l l t t ' o i t ' t t .
ToolTest
( )nc n t ' t r n to r le l l t l t s l l r t
r i l u r l r t l i g l i t o r r i t .
\

Departmentsln Ouestion &Answerr\-' Sharpening router bits,
mounting aface vise, testinga cordless battery and more.
1A WorkshopTipst\-t Eliminate pipe-clamp stains,
make knobs from buttons,measure bevel angles withtwo protractors and more.
94 Well-Equipped Shoph t- Router with above-table adjustment,
30
double-duty flush-trim bit, Woodshop Calculatorsoftware, Powermatic cabinet saw and more.
Modern CabinetmakerPerfect Butt Joints in LaminateMake perfect seams in plastic laminateusing an underscribe attachment.
BuildYour SkillsSlot & Spline Paneled DoorA slot-cutting bit makes the work easy.
37
e2Small ShopTipsMake folding sawhorses,dispense finish froma wine box and storelumber on a ladder.
OA Ooos!r'tLt Disaster looms
when a car sharesa workshop.
24SuescntPTtoNSAmerican Woodworker Subscriber Service Dept., PO. Box 81t8,Red Oalc lA 51 591 -fl rA, (800) m&3111, e-mai I A\AMservice @ rd'com
Article IndexA complete index is available online atwww.a mericanwoodworker.comGopies of Past ArticlesPhotocopies are available for $3 eadr. Write or call: AmericanWoodworker Reprint Center, PO. Box 83695, Stillwater, MN55083-0695, 17151246-43M, 8 a.m. to 5 p.m. CSI Mon. throughFri. Visa, MasterCard, Discover and American Express accepted.
Back lssuesSome are available for $6 each. Order from the Reprint Centdr at theaddress above.Comments & SuggestionsWrite to us at American Woodworker, 2915 Commers Dr., Suite 700,Eagan, MN'55121, (651)454-9200, fax (651) 994-2250,e-mail aweditor@ readersdigest.com
4 American Woodworker MARCH 2ooo

GOMPTETE KITREAIIY.TO.ASSEMBLE
l|II YI|UR IIEGK l|R PATIOit in a weekend!' Build it in a weekend!
t Converts from screensto windows in minutes!
t Factory direct pricing,delivered to your door.
'Standard & custom sizes.I Meets codes for snow
and wind loads.
FOR GATALOE, SIZES & PRIGES:I -800-221-2550Extension: AMW
Mon-Fri, 8AM-SPM EST
www.sunp0lGh.Gom NNlu=$unPorch$Our32nilYou
Promo Code: AMW
I American Woodworker MARCH 2006
Editor
Execr.rtive Editor
Senior Editor
Associate Editors
Tools and Producs Editor
Editorial Intern
Design Director
Art Director
CoPY Editor
Fact Checking Specialiss
Production Manager
Production Artist
Offrce Administrative Manager
Technical Manager
Reader Service Specialist
Administrative Assistant
Ken Collier
RandyJohnson
Tom Caspar
Tim IolmsonDaviMunkittrick
George Vondriska
Luke Hartle
Sara Koehler
VernJohnson
Joe Gohman .
Jean Cook
Iennifer Feist-Nitta Child.;o}r..oo
Judy Rodriguez
Lisa Pahl Knecht
Alice Garrett
Shannon Hooge
Roxie Filipkowski
ShellyJacobsen
Group Director,Honre & Garden GrouP KerrY Bianchi
Publisher RickStraface
Group Marketing Director Dawn Eggerts
National Sales Manager James Ford
Promotion Manager Andrea Vecchio
Promotion Coordinator Joanne No6
MarketingCoordinator DerrickPhillip
Designer RichardNakano
Advertising Coordinator Barbara Berezowski
Research Manager Georgia Sorensen
ADVERTISING SALES
260 Madison Ave.. NewYork, NY 10016; (212) 85U7226
CHICAC'OJames Ford (312) 5404804
Sherry Mallit (sales assistant) (312) 5404824
NEW YORK Tuck Silers (212) 85G7197
Classified Advertising, The McNeill Group, Inc'
Classified Manager, Don Serfass, (215) 321-9662, ext. 30
PUBLISHED BY HOME SERVICE PUBLICATIONS, INC.'A SUBSIDIARY OF THE
READER'S DIGEST ASSOCIATION' INC.
President, U.S. Magazines Bonnie Bachar
Plesident. ConsumerMarketing, North America Dawn Zier
Circulation Marketing Director Lou Sassano
Vice President, CFONorth America StePhen W. Simon
President andChief Executive Officer Eric W. Schrier
Chairman of the Board Thomas O. Ryder
Issue #120. American \4bodworker@, ISSN 107'19152'
USPS 738-710 Published bimonthly, except monthlyOctober and November by Home Service Publications, Inc ,260 Madison Avenue, 5th Floor, NewYork' NY 10016.Periodicals postage paid at Nerv York, NY and additionalmailing offites. Postmaster: Send change of address-noticeto Amirican Woodworker@, P'O. Box 8148, Red Oak' IA
51591-1148. Subscription mtes: U.S' one-year, $24.98. Single-
copy, $5.99. Canadaone-yeaq $29.98 (U.S. Funds); GST #
RI22988611. Foreign surface one-year' $29'98 (U.S. Funds)'
U.S. newsstand <iisti'ibution by Hearst Distribution Group,NewYork, NY 10019. In Canada: Postage paid at Gateway,
Mississauga, Ontario; CPM# 1447866. Send returns and
address c"hangcs to American \4bodrvorker@, PO. Box 8148,
Red Oak, IA, USA 51591-1148. Printed in USA. O 2005
Home Sen'ice Publications, Inc. All righs resened.
Reader's Digest may share information about you with reputable
companies iir order for them to offer,vou prodncts and sen'ices
of interest to you. If you rvould mther rve tlot share infotmation,pleroe rrite to tts at: Reader's Digest Association. American
fooodworker, Crrslolner Senice Departnrent' P'O. Box 8148'
Red Oak, lA 51591. Pleroe include a copy ofyorrr addres label'
Subscribers: If the Post Office alerts us that your magazine is
undelirerable, we have no further obligation unless rve
receive a corrected address rvithin one year.

SnnnPENTNG Brrs
Can I sharpen my own carbiderouter bits?
The short answer is no. It takes
the specialized equipment of a
professional sharpening service to properly
sharpen carbide bits, especially if they have
any nicks in the edge. Howeveq it is possible
to hone the edge of a bit that'sjust starting to
get dull.
You'll need a 1,2OGgrit diamond stone or
fine diamond paddle to cut the hard carbide.
Lay the bit so the cutter's face lies flat on the
stone or paddle. Thke a half dozen strokes or
so on each cutter face. Count your strokes.
Lubricate the stone or paddle with water or a
lighnveight oil, such as 3-In-One. It's impor-
tant to take an equal amount offeach cutter.
Check for sharpness by visually inspecting
the edge. You should see no spots where
light reflects back off the cutting edge.
Besr Wav To MouruT A FncE Vlsr
t I The back jaw of my face vise sticks out an inch
{rfrom the edge of my workbench. l 've noticedtradiiiSnal benches have the back jaw set flush with theedge of the bench. ls there any advantage to this?
This vise question comes up all the time. The reason
the backjawwas setflush on traditional benches is that
it provides better support for a long board clamped on edge.
Boards were held in this position so the edge could be jointed
with a hand plane. The flush vise jaw allows the opposite end
of the board to be clamped to the bench. The board is then
continuously supported against the edge of the workbench.
This allows you to work on the edge without wobble. Few of us
still joint boards by hand anymore, but there are still times
when we modern woodworkers need to tightly clamp a long
board to the bench.
o[J,JFozaauJ
zf
a>r
cc
F
I
a
. z
I .
(,ulo-2truJ
o
E
10 American Woodworker MARcH 2006

IuVJIuJfN
=co
The battery on my cordlessdr i l l runs down quick ly ,
Z4rvolt range and touch the tr,vo battery terminals with the
probes. A good battery should test 1 to 2 volts over the voltage
listed on the battery. A 14.4volt battery for example, should
read 14.4 to 16.4 volts. If it doesn't, you need a new battery.
The biggest cause of premature battery failure is running it
down too far before it's recharged. Unlike a cell-phone battery
a power-tool battery should be charged as soon as it begins to
slow. When you detect a loss of power, let the battery cool to
room temperature and then put it in a charger.
a l though I haven' t had this tool forvery long. How can I tel l for surewhether my battery is shot?
Run a simple test. First, make
sure your battery is fully charged.
Then set an electronic multimeter to a
t-
ffiffirLlltd.Id
ffiItloortroil|rrtoo|.,
hrorha, ErrrplLr rr.thlmlorlbo}{rd
tLrprryr 5 ba a ,a0|/, tcott ot*r fi, b{nl.N. to o. n&.t',,&'a, t&b .d drng-
W*onrulooOrortml wat hra b hahtou t|d h.woodnotthohtont|0on iru il|(, -frkl rtd Inlo about po{rar tooh, $op sororh., .hop fJppLl woodwoddng tpa.hos.b rrtc|a,$lod,hrdvraJt.|nlhlilC rDpll.f prolctplrtl.' rMm00h fiott,8.awt 5 !od.m]l{l'brfutt]a nbn$a,.rfideooatioo(hoilloe byoul
ta rlo vllthr llldlbel-UGrttdlgrltu.l.'r youll ltrd .[tythhe t,|.,t tir.ut soodtrolthg td.rd.
Dontlllrtbdtnupbront|.EoilIlllrlit|bqnsocwlng lr|rfilf$rb oi.|} h.lu{,|rytaaonklr woorlort?rrd pEb,bolGddo' fid r|b|.rlplloi o[n,
Asyr.otr|trhgoel -|o6'nr glen uP b b. nollhd bt i'ldl
Find out about some clubs near YOU. This is anextensive list of clubs nationwide indexed by state. Join one and you'll leam how quickly experiencedwoodworkers will share their secrets.
Wods*lne Cbb. I Oronlr$or bl S|l. tttal od OOut |flir dula nItYOU, l!t|| | ]tr*raf| trl otd$r illonwuo hdrr.d bt lrla. Joh ona |'ld ]oul bm hoo qulddy .|9.thnodwoodwuLat| rl[ $rr halr|.lrL
Uted[tlu.Qltrohll-Fhdrltthertd.vxyhhgn.n t prLtr., hl r p.dt llf lL.ltfr'lwf loo.rltofir0f Fo(DorIobolrmd rrp9lhl
WHERE To Frwo A WooDWoRKtNG CLue
I recently moved to a newstate and l'm looking for a
local woodworking club. ls there a ref-erence available for us it inerate wood-workers to find fellow enthusiasts?
This Web site offers an extensive
list of woodworking clubs and
guilds : www.betterwoodworking. com. Click
on "Clubs and Organizations." Then select
your state and you'll find a comprehensive
listing of woodworking, carving and wood-
turning organizations in your area.
This site also has many other useful links
for the woodworker, including schools.
Click on "Woodworking Directory" then
"Schools and Academies."
g I?dnt l||ll
12 American Woodworker MARcH 2006

RourrNGEveru-DEPTH RaSBETS
My rou ter tab le i s j inxed.When I cut a rabbet al l the
way alound a board, i t 's never even.What should I do?
First check that your insert plate is
even with the router tabletop. If
that's OK, either your board or your
router table isn't flat. Either way, here's a
simple fix to your problem. Clamp a feath-
erboard on your fence directly over the
bit. The featherboard holds the workpiece
tight to the table to ensure a consistent
depth of cut. It's almost impossible to
apply even downward pressure on a work-
piece by hand. Slight variations in the
pressure you apply invariably result in
uneven routing along an edge.
If you find your router table has a sag in it,
add a brace or two under the top for support.
14 American Woodworker MARCH 2006
If you have a question you'd like answered, send it to us at Question &Answer, American Woodr,vorker, 2915 Cornmers Drive, Suite 700, Eagan, MN55121 or ernail to qanda@rcadersdigest-com. Sorry but the volume of mailprevents us from answering each question individually.
FREE Tool Gatalog
6)\wDcRArrffiue:CA
Visit one of our storeslocated nationwide! Call usfor the store nearest you.
Your Best WorkStarts With Us...
with over 8,000 of the finestwoodworking tools in the world,Woodcraft can help you workmore efficiently and skillfully thanever. Call for your free copy today.
800 542-91 15www.w00dcraft.c0m
406 Airport lndustrial Park RoadP.0. Box'1686Parkersburg, WV 261 02-1 686
tjepr: c00wAr]30
Circle No. 165

edited by TimJohnson
Eliminate Pipe StainsI learned the hard way that pipe clamps leave ugly
black stains during glue-ups wherever they contact wet
wood. Those stains are hard to sand out! Fortunately,
I've discovered an inexpensive solution that keeps all
my glue-ups pristine.
For a couple dollars at the home center, I bought a
shower-curtain rod cover, which is a 5-ft.Jong flexible
plastic tube that's slotted along its length.
Coincidentally, it's the perfect diameter to slip over my
l-in. pipe clamps. I cut the tube into 3-in.Jong sections
and outfitted all of my clamps. Now before I tighten
the clamps, I simply slide the tube sections into po.si-
tion over squeezed-out glue or any other damp spot.Serge Duclos
oLU
za<t)u-i
=l
2azI
-zELu
;Io_
E(,F
IL
z
' zI
-z(rLU
2F_(JulE
oFE
16 American Woodworker MARcH 2ooo

BenurrFUL Burroru KNoasAs a kid, I used to plav rvitl-r rn,v graudurother
ed. I loved all thosc bright, shinv colorsl Non,
hoard, I found a way to displal' these beatrtifirl
made for my rvife.
s buttcln box everry time rve r,isit-
that I'r,e inheritecl her treasure
antiqtres on a servir-rg cabinet I
Old buttons rnake fascir-rating knobs. I tttm or bttv
a set of n'oodert knobs (see Sotrrcer, belorr,)
zrnd then drill otrt the centers of the
knobs rvith a Forstner bit. I finish
the knob zurd epoxv the btrt-
ton into the recess. Of
course, ner'r, bttttotrs
$'ork fine, too, altd
are easier to bur
in ur complete set.
Vern Joltnson
Fd
f
f:::,-f.
S o u r c e : H o r t o n B r a s s e s I n c , ,
(8001 754-9127,
www. hor ton-brasses .com
Fla t -g ra ined nrap le knobs in^ . , ^ . ; ^ . . , ^ { ^ L ^ ^ ^ ^ - ^ !a v a r e t y o ' s n a p e s a n u s r z e s ,
a b o u t $ 1 e a c h .
PnornACToR AwGLE Gnucr\Arhen I was in high school, tny math teacher shon'ed tts
easy way to indicate ausles. She sirnpl)' faster-red two see-
through plastic protractors olt top of onc zrnother. I'r'e
used this simple devise to drarv and cl'reck anp;les in
my workshop ever since.
Start with a pair of iclentical protractors frorn au
off ice supply store (about $l each). Careftr l l l '
dr i l l out the center holes to exactly f i t a 6-32 x
3/B-in. f lathead machine screw. Next, dri l l a
countersink fbr the screw head in the bottorl
protractol, so the protractor sits flat for dran
ing angles. h-rstall the screrv and nut, rnakir-rg
slrre the pr-otractors are preciselt' aliened.
During use, the top protrzlctor 's zero l ine indi-
cates the angle on tl-re bottorn protractor's
scale. The angle matches the openine.
becatrse the bottom eclgers of tl'rc
protractors are paral lel to t l te
zero l ines
Alice Garrett
alt
(l i)
jI
,/t .
"1... , ( r ' \l)"7'f(;
-A\-,
.i#t&- \ t
-*
_.-;t,i ffi l{ ,...- +-l., l '- /
INDICATED
F
rl*SC*l*lrl
Kt'
oodsrrlkcr ' M A R C H 2 0 0 6

RoUTERWnENcHRrse nsTrying to keep the
wrenches that came withg my router in position for
tightening or loosening the
collet trsed to drive me crazy.
The nuts are so widely spaced
that the slim wrenches would
often slip out of place.
Fortttnatell', I discovered a
solution at my local hardware
store: basin rnack gaskets,
which are stepped rubber
rvashers trsed while installing
sinks.
Fasten a gasket on each
side of one wrench with spray
adhesive or contact cement.
Then Llse a utility knife to
sculpt tl-re openine.
During Llse, the gasket-
covered wrench goes on the
shaft nut. One gasket holds
this wrench away from the
motor housing. The other
gasket acts as a platform for
the wrench that goes on the
collet nut. If the gaskets are
too thick to properly align
the rvrenches, just slice them
thinner. One side of this
wrench works for tightening;
flip it over fcrr loosening.
C.Jnlfrq Goldberg
Source Ace Hardware, (866) 290-5334, www.acehardware.comDanco #36561 B basin mack gasket ,#4025029, $8 for a pack of five.
\I
2 0 A r r r t ' r ' i c l t r t \ A o o t l l ' o t ' k e l M A R C H 2 0 0 6

l rurxpENSrvE BlapEFoR SusPEcr LuvBER
I'm always on the lookout fororphaned boards. I 'vereclaimed lots of useful
material from old pal-
lets, downed trees,
remodeling job sites
and salvage yards; I'veeven rescued weath-ered siding from oldbarns. I trv to remove allthe nails, dirt and gritbefore sawing my salvaged treas-ures. But to make sure I don't dam-age one of my expensive blades, I cut these
boards with an inexpensive 7-l/4-lin. circular saw blade
purchased at a home center. These blades can cut
boards as thick as l-l/2 in. and they're designed for
tough use, with teeth made from a softer but less brittle
grade of carbide' Daaid, okon
Source Home Depot, (800) 553-3199, www.homedepot.comOldham 7-114-in.16-tooth industrial carbide combination saw blade,#87254216. $4.50.
American Woodworker MARCH 2006 21
@
cizogC)

Save up to $200 on select JETproducts with JET Power Rebates!
Purchases must be madebetween September 1, 2005
and March 31, 2006 to qual i fy .
For more detai ls, visi t your nearest qual i tyJET woodworking dealer or jettools.com.
-
JET F-
Az-9.!
jettools.com 22 American Wbodworker MARcH 2006
ztl-lE.
z
E
DouBLE ScnoLLsAW Blnoe Ll r rWhen my scrollsaw blade gets dull, it's really only dull on the bot-
tom half, because the wood I cut is usually less than 1/2 in. thick. To
get more life out of my blade, I made an auxiliary table that raises the
workpiece, so I can cut with the top half of the blade when the bot-
tom half gets dull.
I made the table by screwing together pieces of 3/4.in. melamine
andl/2-in ply,vood and edge-banding all four sides. I drilled a 7-1Gin.
hole in the center for the blade and cut a \/l!in slot in from the
back so I can slip the table on and off without removing the blade.
I filed slight chamfers on the top of the hole and
slot, so they won't catch on the workpiece. I
also widened the slot at the back, so it easily
slips around the blade. Cleats glued on the
bottom hold the table securely in place on
the saw (see photo, below).
I've discovered that it takes less time to
install the table than it takes to change a
blade, so in addition to saving a few
bucks in scrollsaw blades, mv
table saves time, too.
Jay McCkllan
t _ _ , } '
*t
zI.IJ
z

oUJF
zo@U-J
zl
cctJ-l
l
L
fz
T
-I
z
T
TJJ
-)2tr(J
IJJt
o
. a
zazI
-oz
ccFouJ
24 American Woodworker MARcH 2006

SorrwARE FoR Eesv CalcuLATtoNS
Want to see smoke come out of a woodworker's
ears? Have the person calculate the part sizes for
frame-and-panel doors or figure out the total board
feet required for a project.
If you don't do these calculations every day, it's
easy to get confused. The Woodshop Calculator,
easy-to-use $35 softu,are makes it easy to calculate
door and board-foot requirements. It also provides
layout dimensions for making your own arched-
panel door templates or can be used with a set of
commercially made cathedral-door patterns. This is
powerful software at a great price.
To calculate board feet, you enter your part
sizes-just as you would ir-r a cutting list-including
each part's quantity, thickness, width, length and
description. Thickness must be entered as the mate-
rial's rough thickness; for instance, 3/*in. material
is entered as 1-in. The software produces a prir-rted
report that contains all the part sizes and the total
board feet.
The frame-and-panel door function provides a
parts list report that lists all the dimensions and total
board feet needed for yotrr doors. If you are making
lots of doors, you can even print labels to attach to
each part as you make it, so you can keep track of
what goes where. The arched-panel template set,
which sells separately for $60, includes an instruc-
tional DVD.
Source SPC, (651) 450-0644, www.woodshopcalc.comWoodshop calculator, $35. Cathedral-door template set, $60.
6 n ns tl r,lad\ *:n.r\ &d
-.
W
l:.:,il
:--"----f
rffi
NEwSnw ls Lonoro ': '
the blade or use fivo nn-enches
to crack your blade loose.
And when it cornes to
rolling, the folks at Powermatic
have reall,v come up with a great
idea. Retractable casters are
built in to the cabinet. The
hand wheel that typically con-
trols the blade angle has nvo
positions on the PM2000. In the
second position, it operztes the
caster mechanism, pushing the
casters down toward the floor
and lifting the cast-iron base.
The PM2000 is available with
a 30-in. fence for $2,100 or a 5G
in. fence for $2,200. The price
tag on this saw puts it toward
the top of its category but
the list of new-to-the-category
features helps set it apart.
Source Powermatic, (800) 274-6848,www.powermatic.com 10-in cabinetsaw, #PM2000, with 30-in. fence,S2.100. wi th 50- in. fence, $2,200.
The nerv 3-hp, 240-r,olt, Powermatic
PM2000 1O-in. cabinet saw has a retro
look, btrt a load of innovative features.
Of al l the blade guards I ' \ 'e seen, the
PM2000's is one of the easiest to use. I t is easv to take
off and, more importantlr,, easv to put back on. It also has a rivir-rg kr-rife,
a feature not seen on rnost U.S. sarvs. The r ivir-re knife, posit ioned
behind the blade, acts as 2r spacer in the san' kerf to prevent the blade
from being pinched cltrring sawing. It's a valuable safety device that
reduces the r isk of kickbacks. The r iving knife has a quick release, so i t 's
easy to take on and off. The blade is shrouded, so dust collection hap-
pens right at the blacle , instead of down in the cabinet, the way it occtrrs
in most cabinet saws. The shroud real ly improves dust col lect ion.
The PM2000 has an arbor lock, so you don't need to bite a board ir-rto
26 Anrel ican \ \ i roc l r r r r lke l MARCH 2006

UxTvERSAL RourER Basr wlrH a TwtsrGot a router that you can't get a
set of guide bushings for? Or do you
just want to simpli$' attaching your
router to such accessories as an off-
set base, circle cutter, or fence?
The Turnlock base plate from
Milescraft, $20, is part of a system
that will turn you on to a whole new
OFFSETBASE
rQnm,+-mffiPATRICK HUNTER
way of attaching fixtures to your
router. Components simply lock
and unlock with a twist of your wrist.
The Turnlock baseplate has a
nearly infinite combination of holes
that will align with many different
routers. A list on the Milescraft Web
site will tell you which
routers the base does
and doesn't fit. A
centering pin
comes with the baseplate to center
it on your router collet. One 3 / 4-.in.
guide bushing is included with the
baseplate but a set of eight can be
added for $15.
They're made of glass-filled
ABS plastic. I was skeptical of the
material and the super-simple
mounting system, but both work
well.
When you've got the Thrnl-ock
baseplate on your router, you can
easily twist your router in and out
of other accessories, such as the
1205 offset base, $20, and 1203 cir-
cleledge guide, $30. Milescraft
products are available at Lowe's.
Source Milescraft, (815) 874-2400,www.milescraft.com TurnLock baseplate,#1200, $20. TurnLock bushing set, #1202,
$15. Circle/edge guide, #1203, $30.TurnLock offset base, #1 205, $20.
the cutters, not the bit. The cut-ters sell for $30 apiece and, ofcourse, you need two.
Second, Infinity asserts that
the finer-grain carbide used in
these cutters results in a keener
edge, which means a smoother
profile, which means less sand-
ing. Sweet! Third, the longer-last-
ing carbide saves you sharpening
costs. When the cutters need to
be honed, /ou can remove them
from the body, lay them flat on
a diamond stone and easily
touch them up.
The Insert-Pro panel-raising bits are not available
with a back cutter. Infinity bitscan be purchased directly fromthe manufacturer.
Source Infinity Tools, (877) 872-2487,www.inf initvtools.com I nsert-Pro,$140. Replacement cutters, $30 each,two reouired.
CIRCLE/EDGEGUIDE BASE
h . ' its.,.
ub/"n.*
t
MULTTPLE-PnoFILE Doon Ser
The Insert-Pro raised-panel bits
from Infinity Tools, $140, are a
prime example of what can be done
with insert cutters in router bits.
One raised-panel router-bit body
accepts cutters with three different
profiles. And because it's not brazed
into the bit, carbide used for insert
tooling is different than the carbide
that's brazed into conventional bits.
CENTERINGPIN
3/4'' BUSHING
According to Infinity, these cutters
will last about twice as long as those
made of brazed carbide.
The Insert-Pro bit, with one pro-
file included, is at the high end of
the raised-panel cutters' price
range. But here's the deal: First, you
get convenience. If you want to have
access to more than one raised-
panel profile, you only have to buy
28 American Woodworker MARCH 2006

I(J
rI
ccvzEll-
2F
rFalJ=a
z
-
uJ
-)>-
-
z
o_
<no
eoz
tr(JLUfr
n:-E
1z l^ r 1( r iz lT I
^ lI
' l
n l2 lt l
I' ' I
F I
9 lt
r \ lL U I
I
iIII
II
III
III
II
III
II
30 American Woodworker MARcH 2ooo

I fne first step to making a perfect plastic-laminateI Outt joint is to rout a straight edge on one piece oflaminate. Use a straight board as a guide and a f lush-trim bit to make the cut.
9 Apply both pieces of laminate to the substrate.Thefr piece with the straight edge goes down first; thesecond piece overlaps it by a small amount. Spacersticks prevent the laminate from sticking to the sub-strate, making it easy to align the parts.
l. Start by making a couple of small (approxi-
mately l2-in. x 12-in.) test countertops from scrapsof the same laminate you will use in your finishedproject. Using the same kind of laminate is impor-tant, because even a small difference in laminatethickness will affect the accuracy and fit of the finaljoint. Use the test countertops and Steps 2 through9, to set up the underscribe attachment. Rout aninch or two on one of the test tops, check the fitand adjust the underscribe base as necessary. Thebase has built-in micro-adjusters, so fine-tuning issimple. When you have the perfect fit, run onemore test cut using the entire joint on one of thetest counteftops. You will only get one shot at yourproject, so now is the time to fine-tune the attach-ment to perfection.
2. Rout a straight edge on one piece of laminate(Photo 1). You'll end up with a small burr on thebottom edge of the laminate. Remove the burrwith a file, so the laminate will glue down com-pletely flat. Mark a straight pencil line along thisstraight edge. The lip on the underscibe attach-ment rides on this edge and guides the routerthrough the cut. As a result, this first piece of lam-inate is called the guide piece. Mark the adjoiningedge on the second piece of laminate with awavyline to show ttrat it has a rough edge (Photo 2).
Q Rout the joint. Keep the underscribe attachment'sul lip in constant contact with the bottom piece'sstraight edge while routing and keep the attachment'firmly
aga.inst the laminate surface.
Frcune A UruornscRrBE ArrncnmeNT DETATLThe underscribe attachment has a l ip that r ides on thestraight edge of the bottom piece of laminate and l i f tsthe edge of the top piece while a 1/8-in. router bitdoes the cutt ing.
32 American Woodworker MARCH 2ooo

( eress the overlap piece into place using a block ofvf wood.The piece should f i t snugly and snap intoplace.
Shave the burr off the bottom edge of the overlappiece with a utility knife.
3. Position the guide piece on the substratewithout adhesive and make a pencil line on thesubstrate along the laminate's straight edge.Next, lay down the second piece, overlapping theguide piece by l/a in. to 3/4 ir^. Use pieces ofmasking tape to mark this overlap.
4. Remove the laminate pieces from the substrate and apply adhesive to all parts.
5. Reapply the guide piece of laminate, makingsure it lines up with the pencil mark you tracedonto the substrate in Step 3. Use spacer sticks toprevent it from sticking until you have the lami-nate aligned. Pull out one stick at a time, startingwith the edge closest to the pencil line. Use a lam-inate roller to make sure the laminate is thor-oughly pressed down.
6. Apply the overlap piece using the samemethod. Line it up with the tape on the guidepiece, remove the spacer sticks, and roll it down.Roll as close to the seam as you can. This helpsprevent chips from getting under the laminatewhen you rout the seam. Also, a vacuum attach-ment is available for the underscribe attachment.It removes almost all the debris as you rout theseam so is well worth the money (see Source,below).
7. Clean the laminate surface and your routerbase, because a small piece of debris between therouter base and the laminate could cause a nastyscratch. A little paraffrn wax on the router basehelps it to slide easily.
You're now ready to rout the joint (Photo 3).With the router turned off, position the lip of theunderscribe attachment firmly against thestraight edge on the guide piece (Fig. A). Turnthe router on only afteryou're sure it's positionedproperly. Maintain contact benueen the lip andthe guide piece throughout the cut.
8. Use a utility knife to remove the burr fromthe bottom edge of the newly trimmed piece(Photo 4). Flick the waste away from the bottomof the joint as you go. Also peek under this piecefor any stray chips and remove them. It's para-mount that you leave no chips under this piece oflaminate or it will not push down level with thefirst piece
9. Snap the trimmed piece into place using awood block with a rounded edge (Photo 5). Use alaminate roller to press the seam down thoroughly.
10. Hide the seam with permanent marker or anoil stain in a color similar to the laminate (Photo6). Wipe the seamwith asolvent, such as denanrredalcohol or lacquer thinner, to remove any excessmarker or stain on the surface of the laminate.
ft niOe any trace of the seam by applying permanentLf marker or an oi l s ta in of s imi lar color to the lami-nate. Wipe off the excess with solvent and a rag.
Source Betterley Industries Inc., (800) 871-7516,www.betterleytools.com Complete kit including trim router, base.plate, underscribe attachment and vacuum hookup, #DU310, $279.Kit including trim routel baseplate and underscribe attachment,#U310, $219. Underscribe attachment and vacuum hookup,#DU8310. $159. Underscribe attachment only, #UB310, $100.Vacuum hookup only, #D100, $79.
34 American Woodworker MARcH 20tl6

oulF
z(/,@ulJ- zf
2lltzT-)
Slot&Spline
PandedDOHands down,
A good-looking frame-and-panel
A door is really quite easy toL Imake, if you keep it simple.Justuse a ply,vood panel and a slot-and-spline joint (see photo, below). Thisdoor is held together by splines madefrom 1/Lini plyr,vood. The panel is
l/4.in. plywood,
the easiest way to makeaframe-and-panel door
too. The splines and panel fit into thesame size slots in the stiles and rails.
All you need to make the door is arouter table and a l/&-in. slotting cut-ter (see photo, right). Plywood is usual-ly undersized, so al/4-,in. cutter wouldbe too big. Instead, you'll make twoslightly overlapping passes using thel/8-in. cutter. That way, you can adjustthe slot's width to perfectly fityour ply-
wood, whatever its actual
A 1/8-in. slottingcutter is theonly bit you
need to makethis door.
thickness.
PLYWOODSPLINE
It

1 Mark theI door's partsusing the cabi-netmaker's tri-angle. l t identi-f ies the topand bottomrai ls, and theleft and r ightst i les.
Q ntt tne^4rjoints forthis door arecut on therouter table.Set up a 118-in. slot cutterso i ts bearingis f lush withthe fence.
Q nout 1/8-in.-\-tthick slotsthe ful l lengthof each stileand rai l . Referto your marksto be sure eachface side isdown and theinside edge isagainst thefence.
,{ Rout slotsTin the rai ls 'ends. Pusheach rail witha backerboard.Th issteadies therai l and pre-vents tear-outon its backs ide.
Tools t\ND ManeRtnlsYou'll need a tablesaw, small handsaw
router table and 1/8-in. slot cutter with abearing that makes a 3/$-in.-deep slot,though al/2-in.-deep slot is OK too. Slotcutters and bearings are widely available. Iused a set from Amana tools, aL/*in. three-*irg slotting cutter assembly (#5340G1,
$30) with bearings for 3,/&in. and l/4-'in.deep slots (#47729, $20).
If you're making lots of doors, I recom-mend using an adjustable cutter. You'llonly have to make one pass per slot, ratherthan the two passes shown in Photo 6. Mostadjustable cutters use shims, but I foundone that can be dialed to various widths,the Amana E-Z Dial slot cutter (#55500,
$104). It makes 1/8- to l/4-,in.-wide slotsthat are l/2-in. deep. I made my door from3/Lin.-thick solid wood and l/4-,in. MDF-core plywood, but you can use this tech-nique with any type of plywood or materialof any thickness.
Mrl l - THE SrtLEs AND Rat lsRip and crosscut the stiles and rails so
they have square sides and ends. Note thatthe rails butt up to the stiles. Make an extrastile or rail for testing the router setup.Mark the stiles and rails (Photo 1).
Rour Stors, Ftnsr PnssInstall the slot cutter in the router table.
To approximately center the slots on3/4in. material, raise the cutter L/4.in.above the table. Exactly centering the slotsisn't important. Align the fence so it's flushwith the bearing (Photo 2). If your routertable is equipped with sliding subfences,push them within l/16 in. of the cutter.This makes routing end grain safer andmore accurate.
Rout 3/8-in.-deep slots in each stile andrail, face sides down (Photo 3). Rout slotsin the end of each rail, face side down(Photo 4). Push the rails with an 8-in.-square backer board.
Rour Stors, Secorvo PassFigure out exactly how much wider the
slots must be to fit the plywood. Hold asmall piece of plywood next to a testpiece's slot and mark the plywood's thick-ness (Photo 5).
38 American Woodworker MARCH 2006

IiII Place the test piece on the router table,
face side down. Raise the cutter to justbelow the pencil line. Turn on the routerand make a short second pass (Photo 6).Test the plywood's fit in the slot. If youhave to use force to push in the plywood,the slot is too narrow. If you can fit twopieces of paper between the spline and theslot's wall, the slot is too wide. Whenyou've got the right fit, make a second passon all the rails and stiles.
Cur rHE Spr-trueRip a long, narrow strip from the ply-
wood. Cut the strip 1/32 in. narrower thanthe combined depth of tr,vo slots.
Measure the rails to determine thespline's length. The splines nrn from theoutside edge of a rail to the bottom of theslot. Cut the splines to length. The safestway to cut these small pieces is with a band-saw or with a backsaw and miter box. Putthe splines in the rails' ends, without glue,and assemble the door.
Cur Tne ParurlMeasure the panel opening. Add 11116 in.
to the opening's length and width and cutthe panel to this size.
Grue rHE DoonSand the panel and the inside edges of
the stiles and rails. Glue the splines intothe rail's ends (Photo 7). Put glue on bothsides of the splines' slots and on the rails'end grain. Position the splines so theyextend l/32 in. beyond each rail's outsideedge. Apply glue to both sides of thesplines protruding from the rails.
To make the door as strong as possible,glue the panel, too. You can't do this witha solid-wood panel, because it must be freeto expand and contract, but ply,rrood won'tmove. Run a bead of glue on the back sideof the long slots in the stiles and rails.
To assemble the dooq insert one railinto a stile. Slide in the panel, then the sec-ond rail. Make sure the rails align with thestile's ends. Push the second stile into placeand clamp (Photo 8). Sand flush the pro-truding spline after the glue has dried.
The oherry sideboard photo on page 37 comes fromThos. Moser: Artistry in Wood by Thomas. F. Moser withBrad Lemley, 2002. Used with permission of ChronicleBooks LLC, San Francisco, www.chroniclebooks,com.
f,Mark ther-,lplywood'sthickness on theend of a testpiece. Raise theslot cutter tojust below thepenci l mark.
A tvtake a sec-Llond pass onthe test pieceto widen theslot. Adjust theslot's width byraising or low-ering the cufierunti l the ply-wood fits per-fectly. Thenmake a secondpass on al l thesti les and rai ls.
4e t "/ spl ines into
the ra i ls 'ends.Apply a beadof glue to thepanel slots,too, but onlyon the slot'sback edge, soglue won't leakout the front.
Clamp thedoor.There's
no messysqueeze-outaround thepanel's front,just in the back.Gluing the panelisn't required,but it makes thedoor extremelystrong.
American Woodworker MARCH 2006 39

&eat$sMake your router
a \Norkshop \ruorkhorse
\f ith tl-ris jig, r'our router can do the
same job as an expensive dovetailir-rg
machine.
Fortunatelr', \'ou cal-I make lnaltlr
usefirl router jigs in your shop without
spending an arm ancl a leg. I ' l l show
you three simple jigs that will expand
fu Tirnjohnson
your rvoodrvorking czrpabilities bv leaps
and bounds: one for dacloing, one for
rnortising and one for rnaking shelf pin
holes. Nthougl-r these .jigs have been
around since the darvt-t of rottters,
they're indispensable adclitions to any
woodworking shop.
Amelican rvtbodworker MARCH 2ooo 41
f ' t 'ott onlt ,use vouf router to rout
decorative edges, \ 'ou're rnissitrg
tl-re boat. Your- router can be the
lnost versatile tool irt \,our shop. The
secret to un lock ing your router 's
potential is to use it rvith specialized
jigs. A dovetail jig is a perfect example:

^'#TABLE.Dd Eo
BEARING
fnir;ig (Fig. A, below) takes the guesswork
I out of routing dadoes, because setting the
exact width is virtually foolproof. Being able to
tailor the dadoes' width to precisely match the
thickness of shelves is a real blessing when you're
building cabines with hardwood plywood, which is
always undersize in thickness.
This jig accommodates wood up to 24 rn. wide. Its double
T:square design guarantees dadoes that are square to the edges on''\l'',,
*df both left and right cabinet sides. Positioning the jig couldn't be easier-
just line up rhe fixed fence with the top of each dado. Thisjig must be used
with a pattern bit (see photo, left, and Sources, page 43). This combination is
perfect for use with nomi nal 3/ lin.-thick plyr,vood. It allows routing dadoes from
5/8 to I-1/8 in. wide and up to I/2 in. deep'
M r r rHr J tc1. Glue and screw the fixed fence (A) to the rails 4. Drill and counterbore the holes.
(B). Make sure the joints are perfectly square.
2. Rout the slos in the adjustable fence (C) on a
router table, using the router table's fence and a 5/76
in. straight bit.
3. Use the adjustable fence's slots to locate the rails'
carriage bolt holes. Luy the fence on the jig, snug
against the fixed fence and flush with the rails. Using
a pencil, transfer the slot locations to the rails.
jNs\'
A pattern bit isa f lush-tr im bitwith the bear-ing mountedon the shaft.
5. Install the carriage bolts.
CurrtNc LtsrPart Name Number Dimensions
A Fixed fence 1 314'x 5" x 29-718' *
B Rai l 2 11116" x2-112" x 18"C Adjustable fence 1 314'x 6 x 29-718' *
* Length al lows cutt ing both fences from one 60-ln.length of Balt ic birch plywood
I(J
mccI
CEVz
r2E
EFalJJ
zUE
z
E
Io_
E
F
-o_
z'a
z--zcctl.l
2trUE
o
cc
perfectlY
Sized'dadoesCVCTVtime!'
.-___.-_......--i \_
42 American Wbodworker MARCH 2ooo
\*\.-=-*--.--.

Usp tnr . l tc1 Pos i t ion the f ixedI f " n . " on a l i ne i nd i ca t -ing the top of each dado.Always or ient the j ig wi ththe f ixed fence at the topof the worko iece. Makesu re t he j i g ' s r a i l i s f i rm l yseated against the edge.Then c l amp bo th p iecesto you r bench .
Bo th ra i l s a re soua reto the f ixed fence, so i tdoesn ' t mat ter which ra i lreg is ters the j ig . Out o fhab i t , t hough , I a lwaysreg is ter the j ig againstthe f ront edge of theworkp iece.
Q S" t the ad justab leI fence using offcutsf rom your she lves asspacers . Th is methodgua ran tees t ha t t hedadoes wi l l be exact lyt he r i gh t w id th .
Q nor t t he dado in twot f p a s s e s . D u r i n g t h ecut , the pat tern bi t 's shaf t -moun ted bear ing r i desaga ins t the j i g ' s fences , sothe dado i t cu ts i s exac t l yt h e s a m e w i d t h a s t h eo p e n i n g . B e a r a g a i n s t t h ef i xed fence du r ing onep a s s a n d a g a i n s t t h ea d j u s t a b l e f e n c e d u r i n gthe o the r .
Sources Amana Tool . (800)445-007 7 www.a ma natool. com5/8- in.-d ia. x 1 l2- ,^ . f lusn-t r implunge-rout ing (pat tern) b i t ,#45469, $2'1. . Rockler , (800)27 9-4441 www. rockler. com5-star knob, #23804. $1 ea.
FIXEDFENCE
\ " .
FRONTEDGE
)
ADJUSTABLEFENCE
:'\
, \ rnct ' ic i t t t \ \bodn,or-ker MARCH 2006 43

VE.RSA
ryI'krtbhgJgI
f you have a plunge router with an edge guide, you can
I mach i ne professional-quality mortises wi thout buyi n g an
expensive benchtop mortiser. All you need is a pltrnge-
routing bit (see photo, left, and Sotrrces, page 45) and
thisjig (Fig. B, belorv).
This jig accepts rvorkpieces of any length. They can
be positioned against one end of the jig or extend beyond
both ends. Although it accepts stock up to 3 in. wide and
+t/Z in. thick, this jig is invaluable for routing mortis-
es in narrow pieces, such as door stiles or delicate legs,
on which a large, top-healy plunge router would be
tough to balance. By fully supporting the router's base,
this jig makes mortising a breeze.
4:
&
J ",ry
An up-cut spi-ral bit routs abetter mortisethan a regu la rs t ra ight b i t can.I t cuts l ike adr i l l b i t , l i f t ingch ips up andout as i t sp ins,ins tead of jam-m ing t hemins ide the ho le .Chatter-freeoperat ion andsmooth-walledmort ises arethe resu l t ,
lV la rc r rHF . l rc1. Glue two oversize blanks together.
From the glued-up blank, cut the bottom
piece (A) to final size.
2. Glue on the sides (B), making sure
they're square to the bottom and level at the
top.
3. Fasten the clamp rail (C).
4. Drill \/Lin. holes and install the hang-
er bolts. Spin a nut all the way onto the bolt.
Then use a wrench to thread the bolt into
the hole. A doweling jig rnakes it easy to
accurately drill the holes.
5. Make the end stop (D). To make the
adjustable stop (E), drill start holes at the
ends. Then rout the slots in several passes,
using a 5/16-rn. straight bit, your router
table ancl a fence. Raise the bit in 1/4-lin.
increments.
6. Cut stop blocks (F) as necessary for
each routingjob.
CENTER OF SLOT3/8" FROM EDGE -\-'
5/16" x 5"slor (TYP.)
o
-lHARDWOOD /
1" DlA. KNOB-\
W
- / ' > - F \
/'ALTERNATE
/"' 5/g": J, -1/' , v
,.i
Plurr,qc* .rout*morfisesq-,4€:EE ease!
Currrruc LrsrPart NameA BottomB SideC Clamp ra i lD End s topE Adjustable stopF Stop block
Dimensions1-112" x3-114" x24"3 1 4 " x 6 " x 2 4 "1 " x 1 - 1 1 2 " x 3 0 "314" x 1-314" x 4-314' *
3 1 4 " x 4 - 3 1 4 " x x 6 "314" x 1-112" x2-112 '
* Cut to f i t actual j ig: plywood thickness is nominal.
44 American \4bodrr 'orker MARCH 2006
7/8" 3-STAR }KNog z

LJsE THE J tc- l
Ctamp the workp iece inI pos i t ion. F i rs t , use sh ims tora ise i t f lush wi th or s l ight lybe low the top of the ra i ls .lns ta l l a s top b lock when yourout mul t ip le p ieces wi th mor-t ises near the ends, such as th istab le leg.The width o f the s toPblock determines the locat ion o fthe top of the mort ise. Toaccommodate wide stock, cutnotches for the c lamp heads inthe back of the j ig ,
Q Center the b i t on the layoutZr l ines by ad just ing therouter 's edge gu ide. Wi th therouter unplugged, use theplunge mechanism to lock theb i t in pos i t ion jus t above theworkpiece's surface. Before youadjust the edge gu ide, or ientthe bit 's cutt ing f lutes to sPanthe mor t ise.
Q tnsta t t s top b locks. For ther,-f table leg shown here, theend s top determines the toP ofthe monise and the ad justab lestop determines the bottom.
To rout mor t ises in the mid-d le o f a long workp iece, such asa bedpost, remove both stops.Insta l l a second ad justab le s topand re locate the f i rs t , us ing theal ternate hanger-bo l t ho les (F ig .B). Center the mort ise betweenthe s tops when you c lamp theworkp iece in the j ig . l f you on lyhave a couple moft ises to rout,don't bother with the stops.Just rout to the layout l ines.
7l elunge-rout the mortise in-T severa l sha l low passes.
Af ter rout ing, square the mor-t ises wi th a ch ise l i f your tenonsare square-shouldered,
Sources Freud Tools, (800) 334-41 07, www.freudtools.com 1/4-in.-dia.up-cut spiral bit , #75-102, $21. 5/16-in,-dia. up-cut spiral bit , #75-104, $45.3/8-in.-dia. up-cut spiral bit , #75-'106,$42. 1 12-in,-dia. up-cut spiral bit ,#75-109, $74. . Rockler, (800) 279-4441 , www.rockler.com 1/4-in. x 3-in.hanger bolts, #24463, $2 per packageof eight, 1-in. round knobs, #34095, $1ea.7lB-in.3-star knobs, #68064, $1 ea.
ADJUSTABLE
American \A/oodlvorker MARcH 2006 45

SUPE,R.SIMPLE.
M\
i
Shee|-.1] orget about tedious drill press setups or using
I pegboard as a not-so-accurate template: This jig
(FiS. C, below) eliminates the onerous task of drilling
adjustable shelf holes. And because you plunge-rout the holes, you
won't have any of the unsightly tear-out that drill bits frequently cause.
To use the jig, you need a plunge router equipped with a I/L\n.
bit and a template guide (see photo, left, and Sources, page 47).
Your router's plunge mechanism must slide smoothly; side-to-side
play will result in oversize holes. Operate at a slow (9,000- to 12,000-
rpm) speed and use a steady plunge rate.
It's easy to modi$ thisjig. For example, the holes can be spaced differ-
ently from the edges or clustered in groups. You may need a shorter version to
fit inside a cabinet.
l \ / la r<r rH tr - lrc
ROTATION
A so i ra l down-cutb i t e l iminatestear-out aroundthe edge of thehole , thanks tothe bit 's down-ward shear ingact ion, Th is b i tw'orks especial lywel l w i thveneered p ly-wood, whichtears out eas i ly .
1. Before you make the jig, test-fit your tem-
plate in a hole drilled with your Forstner bit. The
guide should fit snugly without binding.
2. Lay out the holes.
3. Drill the holes on your drill press, using a
fence and a I/2-in. Forstner bit. Before you drill,
set the depth stop so only the center point of the
bit goes all the way through the jig.
4. Flip the jig over to finish drilling the holes.
This two-step drilling method ensures clean holes
on both faces of thejig.
5. Make the alignment pin:r Joint one side of a 2x4 and clamp it to your
drill press, jointed side down.. Using a Forstner bit, drill a l/2-in. hole all
the way through the 2x4.. Seat a1-3/8-tn. length of I /2- in. dowel in the
hole so it sits below the 2x4's surface.. Without starting the drill press, lower the bit
to mark the dowel's center, using the walls of
the I/2-in hole to guide the bit.. Install a 1/{in. bit and drill a l/2-in.-deep
hole in the dowel, using the center mark
you've just made to guide the bit.. Glue a 7/4.rn. dowel in the centered hole.
Then trim it to final length.
ALIGNMENTPINRout,-pertect^holes for
adiustableshblves:
114"
YtI
1-3/8"
t
@/
/a I 16r r
..Q':'' 3;A\ \
/ ' + '
{s€s

UsE rue J lc-l
Posit ion the j igI f lush with the topand the front edge of
the cabinet side.Securely clamp the j ig andyou're good to go,To rout theback row of holes, f l ip the j igover and al ign i t f lush withthe top and the back edge.You can also use this j iginside a completed cabinet.Just register i t against thecabinet's top or bottom. lfyou need to allow room foran inset door or Euro-stylehinges, use a pair of setbackguides (F ig . C) to move theholes farther back from thefront edge.
C) The template guide pre-
frcisely fits each hole, lock-ing the router in posit ion, soevery hole you rout is per-fect ly located. The guide'scol lar must extend less than112in. so i t doesn't protrudebeyond the 1/2-in.-thick j ig.The guide must exactly f i tthe ho les in the j ig , but thesize of i ts outside diameterisn't cr i t ical.To use a 112-in.template gu ide l ike the oneshown here, dri l l 1|2-in.-dia.holes; to use a 5/8-in. guide,dr i l l 5 /8- in . -d ia . ho les.
Q fne a l i gnment p in makes
r- l i t easy to reposi t ion thej i g on long cab ine t s ides .Ins ta l l i ng the p in a l i gns thej ig 's top hole wi th the lasthole you've routed. With thep in i ns ta l l ed , c lamp the j i g
f lush wi th the f ront edge andyou're ready to rout addi t ion-a l ho les .
Sources Porter-Cable, (888)848-5 1 75, www.porter-cable. com112-in.-o.d, template gulde (mostrouters accommodate Porter-Cable template guides), #42033,$7. o MLCS, (800) 533-9298,www. mlcswoodworkin g.com1 I 4-in.-dia. sol id-ca rbide spi ra Idown-cut b i t , #5177, $14.
*e*rair;#
American Woodworker MARCH 2006 47


Materials:
40 bd. ft. of 4/4 cherry
10 bd. ft. of 5/4 cherry
Four turned cherry table legs
One pair of table extension slidesOne sheet of 7/Z-in. MDF for templatesTwo quarts of varnish
Tools:
Tablesaw, tenoning jig, jointer, 1 3-in.
planer, mort ising machine, biscuit join-
ter, router, router table, l-in.-dia. flush-
trim pattern bit, 3/S-in.-dia. straight bit,I / Lrn.-dra. edge-beading bit, finish
sander, bar and pipe clamps
Hardware:
Rare earth magnets
Continuous hinges
Table alignment pins
Tabletop fasteners
Table locks
Gost: $500 for average
hardwood lumber
CONTINUOUSHINGE
TABLEocK
112' ,#10PAN.HEAD
I
I
r>t1-112" #g
F.H. SCREW
1-112" #gF.H. SCREW l--r-'r.il
F.H. SCREW
50 American \4/oodworker MARCH 2006

'r *. ;:
I I used wide, roughsawn boards for my tabletop and flat-I tened them with my planer. Place each board on a MDF ormelamine carr ier and st ick shims under the board's high spots.This prevents the board from rocking or bending as it's planed.
Mar<r Tops AND Lravrsl. The tops may be made from pieces of any width. I
selected wide matched boards (A, Fig. A, page 50) (see also"Honey, I Bought a Log!" page 56.) The top's thickness isonly 3/4 in., but I played it safe and used 5/4 (7-7/a in.thick) lumber to allow for cup or tr,rdst in 12-in.-wide pieces.If you use 4 to Gin.-wide top boards, 4/4lumber is fine. Idon't have a monster 12-in. jointer, so I used my planer anda carrier board to flatten the top's boards (Photo 1). Thecarrier board has a stop screwed to one end to prevent the
' planed wood from slipping backward. Every gap under theplaned board has to be shimmed. I used tape to hold the
Q fne table's top is made in two pieces; the grain runs the shortlway.Each piece consists of three or more boards. Use biscuitsand glue one joint at a t ime to make the joints as even as possi-ble. Keep the top flat with cauls. Make the tops slightly oversize.
shims in place. \4rhen the top surface became flat, I flippedthe board over, removed the carrier and continued planing.
I used narrower boards for the leaves (B) to lessen thechance that they may cup. The tops are restrained fromcupping by the aprons screwed underneath, but the leaves'
aprons aren't fastened the same way.
2. Glue the tops and leaves l/4 in. wider and l/4 in.longer than final size (Photo 2). Use biscuits or splines for
alignment. Sand the tops and leaves to make thejoints flush(Photo 3).
3. Trim the tops and leaves to size (Photo 4). I made trvo
Folding trafApronsOur family rarely uses a tablecloth when our table is fully
opened, so I added aprons to the leaves. Leaf aprons makethe table look uniform. lf you routinely use a tablecloth, how-ever, you don't need them.
I h inged the aprons so the leaves would f i t under thetable's top. Two pairs of rare earth magnets hold each apronin place. One set of magnets (see photo, right) holds theapron flat for storage. Another set, behind the hinge, holdsthe apron perpendicular when in use.
Both leaves storeunder the top. Thei raprons fold f lat,which enablesthem to sit on ashel f that has beenattached to theextension sl ides,
American Woodworker MARCH 2006 51

I
I,f
f
QSanO the top 's g lue jo in ts unt i l the p ieces are f lush. Myr., l favori te tool for this job is a 6-in. random-orbit sander. l tremoves material much faster and more evenly than a stan-dard 5- in . machine can.
f {Or i t t ho les in the leaves for a l ignment p ins,These ho les... f must be spaced exactly the same on each leaf and bothtops. I used a shop-made j ig and a series of layout st icks toposit ion each hole.
router templates, one for the tops and one for the leaves.
These templates ensure that the tops and leaves are exactly
the same length, so their ends line up when the table is
assembled. Make the templates the final size of a top and a
leaf. To avoid router blowout, cut the end grain first, then
the long grain.
4. Build the jig for drilling alignment-pin holes in the
tops and leaves (Fig. G, page 53). Position the jig for the
first hole by butting its block to the end of the workpiece.
For registering subsequent holes, use a series of layout sticks
(K) (Photo 5; Cutting List, page 54). Register the sticks
from the same ends of the tops and leaves. Drill the holes
using a brad-point drill, and tap alignment pins into the
holes (see Sources, page 55).
52 American Woodworker MARcH 2006
TEMPLATE
f trim both tops to final size with a large ,:*ftemplate and a pattern bit (see inset
photo).This ensures that the tops are exactlythe same width and length. I left my router table'sinsert plate attached to the router to help steady it.
MnrcE THH BasE5. Rout shallow grooves in the legs on the router table
(Photo 6, Fig. D, page 53). This starts the mortises. Finish
the mortises using a mortising machine (Photo 7).
6. Mill the apron pieces (C, D, E). I used straight-grained
boards for these pieces to complement the table's straight
lines. Make one or two extra pieces for testing the tenoning
setup. Note that the leaf aprons are L/I6 in. shorter than a
leaf's width. If the leaf shrinks in width, the apron won't
protrude. A protruding apron would create a gap between
the Ieaf and the tops.
1/2"-DtA. CUP
1/2"-DlA. HOLE, 1/4" DEEP
LAYOUT

g-inout a groove in the legs to staft the mort ises.This step ist Inot strictly necessary, but it improves the joint's accuracy.The groove's purpose is to guide a mort ising machine's chisel.
Mail0rderTable LegsI bought the legs for my table, rather than turn them
myself. lt isn't as much fun, but it is much quicker. Here are
three legs I considered. They're all made from solid 2-314-in.
stock, with no glue lines, and are sanded ready to go. I chose
the middle leg for my table. These suppliers make many
more leg styles in various widths, lengths and wood species.
r/Cutthe mort ises using a hol low-chisel mort iser.The routedf, grooves automatical ly al ign the chisel, so you won't get
holes that are sl ightly offset in an irregular l ine.This methodproduces deep mortises with very straight, even sides.
Class ic Des igns,www.tablelegs.com,
#303-1, $35 each.
OsborneWood Products,
www.osbornewood.com,#1020, $27 each.
Adams Wood Products,rrwyw.ada mswood p rod u sts. com,
#40901-28-3, $21 each.
American Woodworker MARcH 2006 53

QSa* tenons on the aprons.There are many ways to do(Jthis, but I l ike to use a tenoning j ig. l t cuts the tenon'scheeks with only one setup.The spacer goes inside theapron for the f irst cut, outside for the second.
7. Saw the tenon's cheeks (Photo 8, Fig. E). The spacer's
thickness is 1/2 in., which equals the 3/8-in. width of the
tenon plus the 1/8-in. width of a saw cut. Cut the tenon's
side shoulders using a miter gauge. Cut the haunch and
bottom shoulder by hand or using a bandsaw.
8. Cut grooves in the rails for tabletop fasteners using a
platejoiner or router (Fig. B, page 50). Drill screw holes in
the end of the side aprons (D).
9. Sand the aprons. Rout a bead on the aprons' lower
edges (Fig. E). Sand the beads.
10. Glue the legs and end aprons (C). Then add the side
aprons (D).
ASSEMBLE THE Tae l rll. Fasten the extension slides to the tops (Fig. B). Make
sure the slides are square to the tops and parallel to each
other.
12. Make the slide cleats (H) and leaf shelves (K).Fasten
the cleats, centered on the slides' middle sections. Fasten
the shelves to the cleats.
13. Screw two table locks to the tops. Fasten them togeth-
er to draw the tops tight.
14. Attach the leg and apron assemblies to the tops. Make
sure the apron's ends line up with the joint between the
tops and with each other. Install the screws at the aprons'
ends. These screws lock the aprons in place, while tabletop
fasteners allow the tops to expand and contract. Install the
tabletop fasteners.
15. Make the ogee blocks (F, FiS. F, page 53) and screw
them in place. These blocks keep the rails aligned and
square to the tops.
ASSEMBLE THE Lrnvrs16. Drill holes for the magnet cups and washers in the
leaves and aprons (Fig. C, page 52). Mount the hinges to
the aprons.
17. To install the aprons on the leaves, open the table
upside down and place one leaf between the tops (Photo 9).
Align the leafs aprons to the tabletop aprons. Insert shims
at both ends of each leaf apron to make up the difference
between the apron's length and the leafs width. Fasten the
apron's hinges to the leaf. Add the table locks to the leaf.
Repeat the process on the second leaf.
Frrunl ToucHES l\ND FrrxrsHrNc18. Remove the leaves and turn the table upright. Round
the tops' corners with coarse and then fine sandpaper.
Slightly round the edges of the tops and leaves with sandpa-
per, too, as well as the aprons' bottom edges. As you sit at
the table, every edge you touch should be soft and smooth.
19. Break down the table into smaller pieces for finish-
ing. Remove the rail-and-leg assemblies and the extension
slides. To equalize the absorbency of my figured wood, I
applied SealCoat shellac to all the table parts (see Sources,
page 55). SealCoat is essentially clear, dewaxed shellac in a
2-lb. cut. Apply two coats of varnish. To protect the finish,
put a large piece of felt between the leaves when you store
them, face to face, inside the table.
Oty. Dimensions (Th xWx Ll
ABcDEFGHJK
TopLeafEnd apronSide apronLeaf apronOgee blockLegSlide cleatLeaf shelfLayout sticks
2224444234
314" x34'x 42'3 1 4 " x 1 2 " x 4 2 "718"x3-1 /2"x35"718" x3-112'x29-112"7 18" x 3-1 12' x 1 1-1 5/1 6"7 1 8 " x 3 " x 3 "2-314'x2-314" x29"314" x3f4" x20"314' x6' x 17-314'314" x 314" x 9-1 12', 19', 28-1 12', 38'
54 American Woodworker MARcH 2006

-6
6
q-,& Instal l aprons on the leaves after the whole table is assembled. \
". f Clamp a support board to the table to ensure that the leaf apron is f lush
with the table aprons.Then fasten the apron to the leaf.
Sources Enco, (800) 873-3626, www.use-enco.com Sleeve bear ing, 318 x 112 x 1-114 in. , #325-1495,$1 ea. r Freud Tools, (800)334-4107, www.freudtools.com Edge-beading bi t , 1/B- in. radius, #80-122,$20Top-bear ing f l ush - t r im (pa t te rn ) b i t , 1 - i n d ia . , #50 -112 ,$27 . S t ra igh t b i t , 3 /8 - in . d ia . , #12 - '110 , $16 . r Lee Va l ley ,(800)871-8158 , www. leeva l l ey .com Con t inuous h inge ,3 /4 i n . x 8 i n . , #00E28 .08 , $7 ea . Rare ea r th magne ts ,3 /8 - in .d ia. , #99K32.03, $0.36 ea. Magnet cups, 1/2- in. d ia. , #99K32.52, $0.36 ea. Magnet washers, 112- in.d ia. , #99K32.62, $0.32oe r \ /an r) r r lzo 'c Roc+n1s1s, (800) 787-3355, www.vandykes.com Table locks, #02012448, $2 ea. Table al ignment p ins,3/8 in. d ia. , #02363845, $1 for 10Tab le top fas teners ,#02367325 ,$3 fo r fou r . rWoodworke r ' sHardware , (800)383-0130 ,www.wwhardware .com 36- in . - l ongex tens ions l i des ,#2M3,$39for a set . . Z insser, \7321 469-8100, www.zinsser.com SealCoat Universal Sanding Sealer , $15 a quart .
American \4loodwor-ker MARcH 2006 55
Circle No. 193 Circle No. 187

-TI
I ordered a rruhole f l i tch-cut cherrY log. AJoe Gohman
For perfectly matched boards,
I love the look of natural, unstained cherry, but I've never
had much luck matching its color and figure. Every cherry
board I've bought at a lumbeqprd has looked different. Some
were red; others were brown. Some were curly; others were
plain.Variation isn't a big problem with many projects, but
when I dived into building a huge dining table (see,'Extending Dining Thble," page 48), t board in each log. Before I ordered,
resolved to be choosy. I wanted showy I bOUght
oirgh, I talked to a real percon at the
boardsttratalllookedalike. rlJvt . Itmberyardwhotoldmemoreaboutthe
A dining table is a great opportunity to mV IOg
log, such as the presence of defects,
display beautifirl boards. I could have ., -/-
l-O, color,figureandexpectedyield.
used cherry plywood and glued on solid- OVef the fnrcmet- There are as many different logs as
wood edges, but I prefer the look of wide, eVeI V bOafd tfere are trees in a forest. tll tell you a bit
solid-wood planks. Where would that -:'--;^J--li^-:-l --
about the particular log I ordered, but
matched wood come from? \{A.S SnOWtf-fn you shouldn't generalize too much from
.,*'il'J',H'l*, *f*f,ffi"::T: photographs' ;l::*"x",lt*j*s;ybuy from a sawmill or lumber company Shipping added another $250. That eye-'that keeps all the boards from one log together as a unit, poppingpricereallystretchedmybudget,butitwasworthit.
called a flirch. A flitchcut log is sawn in successive layers (see The log was 12 ft. long with center boards 16 in. wide. It was
photo, above) and is dried, stickered and stacked as a unit all cut into l-l/4:in.-thick (5/4) boards. (Many logs are cut
Flitch<ui logp are sold as whole units or in parts. You may into boards that are l-in.-thick (a/9 or a mixture of thick-
have to buy the whole log or you may be able to pick individ- nesses.) The log contained 170 bd. ft. of 5/4 wood, which
56 American Woodworker MARcH 2ooo
ual boards. Buyrng awhole log gives you more options in cut-
ting and arranging pieces, but it's also more expensive. You'll
probably get more wood than you'll need for a single project.
I nrrned to the Internet to order my log (see Source, page
57). This was fun! There are many companies to choose from.
On manyWeb sites, I could see Photos of every log and every
ozI,IJCEo
zo
E
I(L
E
t-oI(Lo
z
T
uJo-2tr(JuJ(E
oFCE
aE,I.J,JLu-t u=a.lJ
G. d t
oZ t
Ef(n

works out to be about $6 per bd. ft.
That's about the same price lpay atthe lumberyard for top
grade 5/4lumber, but the yield of this log was substantially
less. Flitch<utwood generally includes an irregular bark edge,
all the sapwood and the pith, which is the soft and unstable
center of the tree. It may also contain crotches, where the fork
of a branch makes the wood grain much wilder. My log had
everything: bark, sapwood, pith and a crotch. The crotch was
too highly figured to use in my table, but its grain is so cool
that I've set it aside for another project
My log was sliced into 10 boards. The two out-
side slices were mostly light-colored sap
wood, so I set them aside for use as(expensive) utility wood in other proj-
ects. The center four slices were quarter-
sawn and had cracks following the pith. The
remaining four slices were plainsawn, wide and rel-
atively defect-free. All in all, my yield was reduced at
least 25 percent.
On the plus side, I made eight 12 x 4&in. boards
with the same striking figure, two more than I needed.
I also cut a lot of 4in.-wide straightgrained boards (the
quartersawn and riftsawn portions of the flitch), which
were perfect for the table's aprons.
After all that work, this table really looks fabulous. My
spouse knows-all too well-that our table is a real con-
versation piece. Buying awhole logwas an expensive but con-
venient wEry to get matched boards. It sure makes a great
afterdinner storv.
Source Hearne Hardwoods, (888)81+0007 www hearnehardwoods.comCherry lumber and logs, pricesvary.
mering curly
American Woodworker MARcH 2006 57
expensive, but theymake a spectacula
A complete system of resln, hardeners,flllers and addltlves.r Choose fast or slow working timesr Easily modified for gap fillingr Excellent water resistancer Good adhesion to riearly everything
m"BFIAND
Epory pr0duch r Reliable solutlongWest System Inc
866.937.8797www.westsysiem.com
PENMANENT, EMENGENCY OB WOOD BESTONATIONNEPAINS MADE EASY W'TH OUN COMPLETE LINE
OF EPOXY PASTE AND PUTTY PNODUCTS.
PC-PfOilUCE@ pnortcrvr coATtNG c0. (since 1e54)221 S. THIRD ST., ALLENTOWN, PA 18102 .PH0]'IE (610) 432-3543.FM (610) 432-5043
www.pcepory.comCall today for your free User Manual and Product GuideCircle No. 113


outer-based jigs are the fastest way to cut dove-
tails. Dovetail joints are a strong, attractive way to join
many projects, including drawers, jewelry boxes and
blanket chests. We examined l1jigs that can cut both
through and half-blind dovetails (see photos, below).
Many jigs on the market cut only half-blind dovetails.
You can see our review of half-blind dovetail jigs in AW
#84, December 2000, page 66.
UsrR-FRTENDLY FrnruRESAfter using these jigs for a while, we found several fea-
tures that made some more user-friendly than others.
These features included cam levers for clamping,
adjustable side stops, icons that tell what part of the joint
is will be cut and setup indicators to accurately reset the
jig to a previous successful setting. Other features that sep
arated the jigs were bit-shank diameter, adjustable or
fixed templates and the widths of thejoints they make. All
but one of the jigs use some type of guide bushing as part
of its system (see "Guide Bushing," page 60). If your
router doesn't accept the guide bushing required by the
jig, you may be able to get an adapter from your router's
manufacturer. Or you can make a custom router base-
plate that will accept the correct guide bushing (see "See-
Through Router Base, page 75).
THnoucHDovrrausThrough doveta i lsproject al l the waythrough the mat ingp iece, making thepins and ta i ls v is ib lefrom both sides.They're typical ly usedin case construction,for ins tance, in ablanket chest.
Hn l r -BLTNDDovgrausHalf-blind dovetails can beseen half the time: fromthe side, but not from thef ront. They're typical lyused for drawers.
HALF.BLINDOOVETAILS..
:tul
'.1
rq
American Woodworker MARCH 2006 59

Jg-ntq1m*f r"_r* *m.,e""F"t*.t.e-#h{
a
a
at o
r,,s3r:ryE
Lnnce-SHeNreo BrrsCHerrrn Lrss
Router bits with 112-in. shanks areless prone to chattering through thecut than those with small shanks.Cutt ing dovetai ls in 3/4-in.-thickhardwood can real ly tax thebit. With careful han-d l ing, any s izeshank can do thework, but youwon't have tobaby the large-shank bits asmuch.The j igs inthis test use 1/4-in.,8-mm or 112-in.-shank router bits.
Jrcs CovreIN DIFFERENTWrorus
_r' The first step indec id ing which j ig
is for you is decid-ing how much width
capacity you need.Jigs are avai lable with12-in., 1 6-in, or 24-in.
width capacit ies. The 12-in. capacityj igs wil l handle drawers and jewelryboxes, but not blanket chests. Jigswith larger capacit ies have largerprice tags, but may also offer addi-t ional features. Al l the j igs wil l handlewood that is 3/4 in. thick, but somewil l also accept wood as thin as 1/8 in.and as thick as 1-112in.We think a jigthat handles a range of 112 in. to 1-114 in,is sufficient for most shops.
GuroE Busur lcAll but one of these j igsrequi re a gu ide bushingon your router. Most usethe Porter-Cable style,shown here.
Ao;usraBLE SIDE SropsEese CErurgnrrucYoun Wonr
Adiustable side stops are better thanfixed stops because an adjustablestop allows you to center the jointon the end of your board. With fixedstops, you must size your workpieceto match the template. if you want aperfectly centered joint. Jigs withadiustabletemplates FXEDTEMpLATEdon't requireadiustableside stops,because youcan move thetemplate f in-gers to anylocation youwant.
ADJUSTABLE SIDE STOP
' a
a
L
U
AolusraBlE TEMPLATES PnovroeDesrcru FlexrerLrrY
Here's one of the most impor-tant j ig-buying decisions: Howcreative would you l ike to be?Some dovetai l j igs use tem-plates with adjustable f in-gers that al low you to varythe size and spacing of thedovetai I joi nt. Adjustable-
template j igs are notsignif icantly morecomplicated to use
than j igs with f ixedtemplates, which create
only closely spaced joints.
CevtLocrrrucLrvERsAnE EesvTo UsE
Cam locks area much easier, {faster way to clamp \material in the j ig.We '"#[prefer cam locks overthreaded knobs, handsdown, You' l I especial lynotice their convenienceand speed when dove-tai l ing a big stack ofpans or i f your handsdon't have the strengththey used to.
60 American Woodworker MARCH 2006

ffiTEMPLATEFINGERS \_'
$3OO TNcLUDES TEMpLATE FTNGERS FoR HALF-
BLTND, 7-oecnEg THRoucH DovETAtLS AND Box
JOTNTS (erS eXrnA) . $5OO COMPLETE Klr,
INCLUDES DUST HOOKUP, COMPLETE SET OF BITS
eruo AoorrtoNAl TEMPLATE FTNGERS
The Akeda DC16 uses a unique template system made up
of separate phenolic fingers that can snap in and out of the
jig. The system works well and is easy to use. The finger sys-
tem is engineered to provide a perfectly fitting through
Cofcityl1tVidf' Capactty/'fndans
lxorcanoR LrNEs StvtpLtFY Serup
Indicator l ines simpli fy repeating setups on a dovetai lj ig.This is important because j igs that cut boththrough and half-bl ind dovetai ls require you tochange the templates when you switch from throughto half-bl ind or from pins to tai ls. Since t iny changesin the setup can affect the joint 's qual i ty, the questionbecomes, "How easyis it to repeat thesetup the next t imeyou use the j ig?"Theanswer? lt's mucheasier on j igs thathave a setup indi-cator l ines as partof the machine.
INDICATORLINES
: i i r . ! ., r i : i :
ICON FORHALF.BLIND
SETUP
ONaoanolcoNsKeEp YoulruronvrEo
Onboard icons provide you a visual clue as towhich part of the joint the machine is set up tocut, whether i t 's half-bl ind, pins or tai ls. Whenyou face the j ig, the icon that is r ight-side upshows you the joint that the j ig is set to cut. lconssimpli fy setup and may save you a miscut board.This is especial ly important i f you don't use thej ig frequently.
dovetail with little or no test cutting. Adjusting the fit of a
through dovetail is done using different-diameter
straight bits. The jig's body provides a platform that
completely supports the router, eliminating any
chance of the router tipping and ruining your work. A
dust collection kit is available, $30, which allows a shop
vacuum to grab most of the chips pouring off the jig. It
works great. Included with the jig are fingers for cutting
half-blind and 7-degree through dovetails and boxjoints.
The owner's manual is comprehensive and well-done.
Thisjig doesn't have cam locks, but the entire clamp bar
tightens from one handle position. You only have one han-
dle to spin, and the leverage from it is good. Cutting half-
blind dovetails on this jig is a slower process than on the
otherjigs, because the Akeda does only one board at a time.
Most of the jigs in this test rout both boards at once for half-
blind joints.
You can buy the complete kit, with all the bits, a dust col-
lection kit and three sets of guide fingers. Or you can buy
the jig only and add bits and accessories as you need them.
Thejig comes with template fingers for half-blind, 7-degree
through dovetails and boxjoints. Four other sets of through
dovetail fingers are available for cutting 9-, 11-, 14 and
Z0degree through dovetails. The corresponding bits are
also sold separately.
Source Akeda Jigs, (877) 381 6544, www.akedajigs.com
fi. - - - t
: -* EE:* -i!
= E !
Cam Lwers Mushble Side Stops
No tN/A
0nhard lcons Setp lndieats
No No
"ai- -
*
ArcrDA DC16
BitStnnkDiameter AdjusbbfeTenplahs
U4in. Yesl6 in. 1/4to 1 in.
American Woodworker MARcH 2006 61

ffiLncH D1600
S32O . TNcLUDES HALF-BLTND AND
THROUGH F INGERS, B ITS, GUIDE BUSHING
eruo 1 /2- tN. ro 8-vv REDUcER
LrrcH D4R
THROUGH
Leigh mak, . nvo jigs: the D1600 with t&in. capacity and the
D4R with 24tn. capacity. They are very similar, but the D4R
has a couple of advantages. The individual fingers on the D4R
can also be split, allowing you to change the size of your pins
for both through and halFblind dovetails. In fact, the D4R is
the only jig in this test that allows you to vary the size of the
pins in both through and halfblind dovetails. Additionally, the
D4R will handle thicker material. Both jigs have easy-toread icons
indicatirrg which mode the jig is in. The indicator lines on their tem-
plates, used for repeating setups, are also easy to read. There's a spot
in the owner's manual to record these setting for your next use. Using
Leigh's &mm-shank router bits requiresaL/2-in. to &mm adaptor ($6,
not included with the D4R), but they'll chatter less than l/{in. shank
cutters. The owner's manual is comprehensive and well done.
HalFblindjoints on both jigs are cut one board at a time, a slower
process than with jigs that cut both boards at once.
Adjustable box-joint templates are available for both jigs, $229 for
the D4R and $197 for the D1600.$45O o TNcLUDES HALF-BLTND AND
FINGERS, BITS AND GUIDE BUSHING Source Leigh J igs, (800)663-8932, www.le ighj igs.com
CapacrtylwiOtr Camcrty/lhickess BitShank Diameter AdjustableTernplates
16 in. 1/8to 1 in. l/4 in. and 8 mm Yes
hm Levers Adjusuble Side Stops 0nboryd lcwrs Settip lrdlcatsrs
Yes N/A Yes Yes
24in.
11
CarytVMdtt CaPacitY/Thiclces
24in. 1/2to 1 in.
1/8to l-12 in. 1/4 in. and I mm Yes
PoRTEn-CnBLE721 6
$4OO . TNcLUDES FrxED HALF-BLTND TEMpLATE,
ADJUSTABLE THROUGH TEMPLATE, BIT FOR HALF-
BL IND TEMPLATE AND GUIDE BUSHING
The 7216 is a heavyjig with a built-
like-a-tank feel and a well-written
owner's manual. Its through dovetail
template provides variable spacing; its
half-blind template does not. Half-
blind dovetails are cut with both
boards in the jig, a bonus in a produc-
tion operation. Two additional router
bits are required for through dovetails. For
through dovetails, the jig will accept a l/Z-in.-shank dove-
tail bit, which reduces chatter.
The 7216 allows you to change the size of the pins in
through dovetails only.
Source Porter-Cable, (888) 848-5175, www.porter-cable.com
Bit Shank Diameter Adjustable Templates hm Levers Mjusbble Side Stop Onhard lcons SehlB,lrdi@rs
U4in.,1l2-in.* Yes * Yes Yes No Yes
YesYesN/AYes
62 American Woodworker MARcH 2006
* 1/4 in. fm half-blind, l/2 in. auailablz for through ** Fm through doaetaik only, not fm half-blind

+THROUGH
\--TEMPLATES
MOUNTINGBRACKET
MOUNTINGBRACKET
\*Tnrrun CDJ 3OO
$zsz r TNCLUDES HALF-BLTND$2+o .AND
I N C L U D E S
T H R O U G H
HALF-BL IND
TEMPLATES
CMT 3OO
AND THROUGH TEMPLATES
These rwo jigs are nearly identical. On the CM! themounting bracket used ro hold the template on thejig mustbe swapped between templates. On the Trend, the mount-ing brackets are attached to each template, which meansfewer parts ro adjust and misplace. The guide bushingsincluded with the jigs require the purchase of a universalrouter base, $40. Otherwise you'll need to provide your own
15.8-mm guide bushing.Box-joint templates are available for bothjigs: $90 for the
CMT templares, $70 for Trend rernplares. Bits for half-blindjoints are included in both.
Sources CMT, (888) 268-2481 , www.cmtusa.com. Trend, (2701 872-4674., www.trend-usa.con
CapacltyMOtr Capacity/Thickress
12in. U2tolin.
QapacityMdfr Capacity/Thickness
Bit shank Diameter Adjustable Templates cam Levers Adjushble side stops
U4in. No No No
0nboard lcons Setup Indicators
Yes Yes
CnnrrsMAN 25,4Ss
W i; **"\*:* *: :il:,:T,",T1;lt
has a sreater capacitv than
re: -,1'T,':iffl#$T{ffi#*T#-* d5?;*'
' grip. This machine has a built-in depth-of-cut indi-
* - @ s. *nn.\ ,'o t cator which greatly simplifies setting the cutting depth-
*,,..1' r t of your router bit. The templates are more flexible than we
*## like, so you need to be careful that you don't flex the templateout of alignment when you position marerial. Add $25 for thecraftsman router bit set for cutting through dovetails.
Source Sears, (800) 349-43b9, www.sears.com
$2OO . INcLUDES HALF-BL IND,
THROUGH AND BOX-JOINT TEMPLATESCLAMP AND BIT FOR HALF-BL IND JOINTS- BAR
€
This Craftsman jig has a greater capacity than
Bit Shank Diameter Adjustable Templates Cam Leuers Adjustable Side Stops 6nboard lcons Setup Indicat.rs
U4in. No No No No yes
ff
-'7
16 in. VBto 1 in.
American Woodworker MARcH 2006 63

PoRTEn-CABLE421 2
S 1 5 9 . T N c L U D E S H A L F - B L I N D A N D T H R o u c H
TEMPLATES, GUIDE BUSHING AND B ITS
This Porter-Cable model is one well-conceived jig and a
great value. A great amount of how-to'use-it information is
printed right on the body of the jig. Icons etched into the
templates remind you which one to use. The etching on
these icons could be deeper, to make them easier to see, but
it's still pretty easy to glance at the jig and know what to
do, even if you haven't used it in a while. A number of
depth-ofcut gauges are also built right into the jig to sim-
pli$ getting bis setjust right. Withl/2-in. shank cutters used
for all the cuts, there's very little risk of chatter. Indicator
lines are also etched into the templates to help you.with
repeating setups, although these lines could be a little finer
for greater accuracy. Template changes are dirt simple-just
a matter of loosening a knob and sliding the template on or
off.
The templates included with thejig also allow cutting box
joints and sliding dovetails. To cut boxjoints, you'll also need
a7/2-in. straight bit.
Source Porter-Cable, (888) 848-5175, www.porter-cable.com
CapacrtyMOtr Capacity/Thicknes BitShankDiameter AdjusubleTemplates hmLevers AdjustableSideStops 0nboardlctns Setuplndicators
12in. l/4to 1-18 in. lflin. No Yes Yes Yes Yes
Frsrool VS6OOF,447 . TNcLUDES
AND THROUGH
HALF-BL IND
TEMPLATES
CapmityAilidtt Capacity/lhichess
2SU4in. l/4to 1 in.
Bit Shank Diameter Adjustable Templates
8mm No
The VS 600 is more than a dovetailjig; it's a
joinery system. If you purchase additional
templates, besides making dovetails, the
jig can be used for adjustable shelf
holes, box joints and dowel join-
ery. It has the largest width capacity of
all the jigs in our test. The template is on a
nge-like mount that allows you to easily flip it out
of the way to check your work.
The VS 600 works best with Festool routers because the jig
requires a guide bushing made specifically for Festool routers.
The bushings are metric and have a built-in retainer ring that
engages with the template fingers.
Source Festool, (888) 337-8600, www.festoolusa.com
&m Levers Adjustable Side Stops Onboard lcons Setup lrdicators
No Yes No Yes
U American Woodworker MARcH 2006
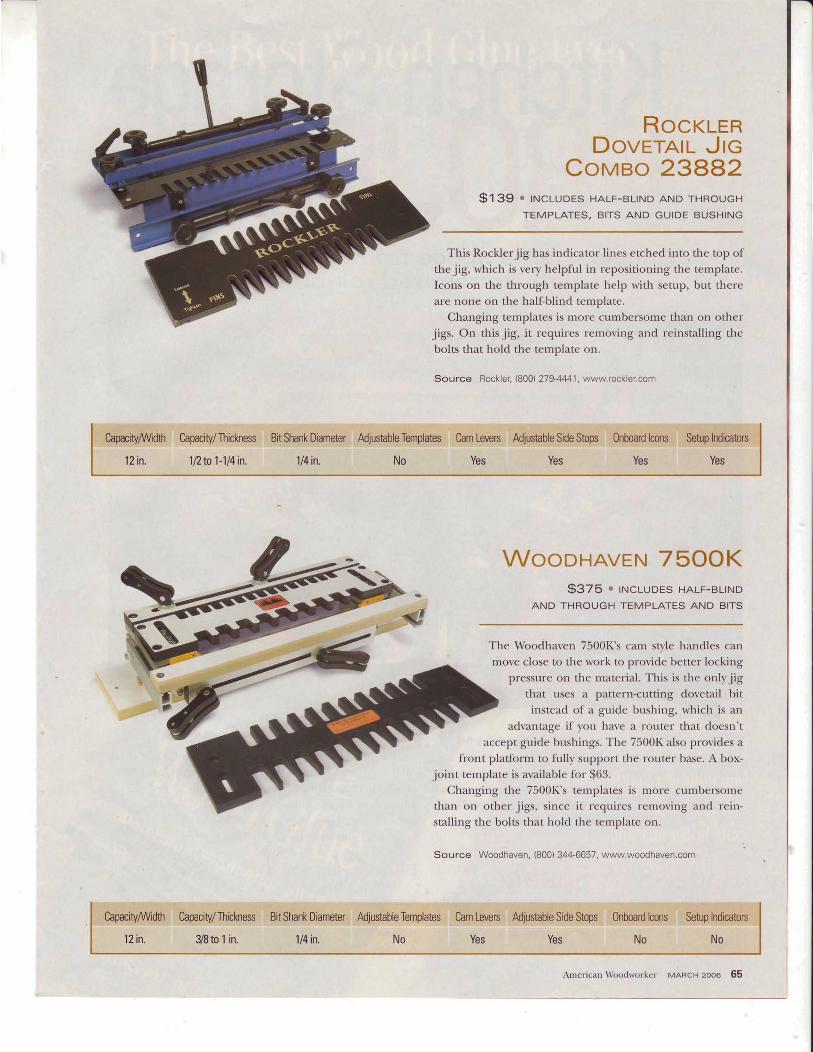
CapacityMdth Capacity/lhickness
12in. U2to1-U4in.
Bit Shank Diameter Adjustable Templates
U4in. No
ROCKLERDovrrArl Jrc
CoMBo 23882S 1 3 9 . T N c L U D E S H A L F - B L I N D A N D T H R o U G H
TEMPLATES, B ITS AND GUIDE BUSHING
This Rocklerjig has indicator lines etched into. the top of
the jig, which is very helpful in repositioning the template.
Icons on the through template help with setup, but there
are none on the half-blind template.
Changing templates is more cumbersome than on other
jigs. On this jig, it requires removing and reinstalling the
bolts that hold the template on.
Source Rockler. (80C) 279-4441, www.rockler.com
Cam Levers Adjustable Side Stops 0nboard lcons Setup Indicatots
Yes Yes Yes Yes
WooDHAVEN 75OOK$375 . INcLUDES HALF-BL IND
AND THROUGH TEMPLATES AND BITS
The Woodhaven 7500K's cam style handles can
move close to the work to provide better locking
pressure on the material. This is the onlyjig
that uses a pattern-cutting dovetail bit
instead of a guide bushing, which is an
advantage if you have a router that doesn't
accept guide bushings. The 7500K also provides a
front platform to fully support the router base. A box-
joint template is available for $63.Changing the 7500K's templates is more cumbersome
than on other jigs, since it requires removing and rein-
stalling the bolts that hold the template on.
Source Woodhaven, (800) 344-6657, www.woodhaven.com
CapacityMdtr Capacity/Ihicknes
12 in. VSto 1 in.
Bit Shank Diameter Adjustable Templates
U4in. No
Cam Levers Adjustable Side Stops
Yes Yes
Onboard lcons Setup Indicators
No No
American Wbodworker MARCH 2006 65

Squeeze more space from your cabinetswith customized roll-outs.
,,,rir"H*T*
t may seem like a paradox, but even kitchens that are
overflowing have underutilized space. Many basecabinets are only half used, .because the back is
inaccessible, stuffed with long-forgotten items you can't see
unless you get down on your knees with a flashlight. Here's
a set of pull-outs that bring everything within reach.
I'Under-Sink Storage,.i To begin, measure the areas of open space around the
ri$lumbing. You may only be able to put a single pull-out onrcne side, or.you may have to shorten them or build them'bround pipes coming up through the base.
66 American Woodworker MARcH 2006
To make the trays shown here, you'll need a half sheet
of 3/4lin hardwood plywood, Z-ft. x 2-ft. of l/2-in.
plywood, 17 lineal ft. of l-in. x 4in. maple, 2 lineal ft. of
l-in. x 6-in. maple, four pairs of 20-in. full-extension
ball-bearing slides, a box of l-5/8-in. screws,
wood glue and construction adhesive.
Borrov Pur-r--OursMeasure the frame
opening and cut the
base (A) 1/4in.
narrower (Fig.
A, page 67).
MargnIALS

Make the drawers 1 in. narrower than the opening betrueenthe partitions. Cutand assemble the base assembly (A, B) anddrawer parts (C, D, E). Sand and apply two coats of finish tothe base and drawers.
Set the drawer slides on 3/4in spacers flush with thefront edge of the partition (B). Screw them to thepartitions; then pull out the drawer members. Set the
drawer members on the same 3/{in. spacers to create theproper bottom clearance for the tray, and screw them tothe sides of the trays flush to the fronts. Screw the base
assembly to the bottom of the cabinet (Photo l). Slide in
the drawers.
Srpr -MoUNTED Pul l -OursMake the side support cleats (K) so they sit flush or
slightly proud of the face frame. Check for hinges thatmight get in the way of the pull-out tray. Assemble the trayswith glue and screws.Apply finish.
Attach the slides and mount them in the cabinet(Photos 2 and 3). Scuff the cabinet side with sandpaper
and use construction adhesive and screws to hold thecleats. Cabinet sides are often finished. so screws alonemay not hold well.
Part Name Dimensions(ThxWx
2 ,12' x5-112" x 18-112"G -_ Plywood up-pgrlrqyjde 2 - 3-l{' {__5"_x 18-1/2" _ _H . . F-ly"w-qeC ypper.trav -sld-e-__-?"-.*-_314'l_x_9_xl9ll?__ _-*J__ _ _U_pp_e_LIr9J_tQnLba_qK + _3_/_+_l x 5:"712*' x" "5:1.12-K.._... .Sids*cj.egl, double lavgJ -.-.*4... 1L2*I,Q-1/2'1..x. 20".
{I Bui ld and instal l a base assembly for the bottom pul l-
I outs. Center the base assembly in the cabinet justbehind the hinges. Al ign the front edge with the face frameand screw it to the bottom of the cabinet.
Q lnrt.lt the slides on the side pull-out trays. Center a 3-112-in.. f template on the cleat and the tal l side of each tray andtrace the edges. Center the mounting holes of the sl ides onthese l ines.
Attach the support cleats to the side of the cabinet usingscrews and construction adhesive. Use a temporary
plywood spacer to hold each cleat in posit ion.
I
x.-{_u_'...-. "- - -- .
American Woodworker MARcH 2006 67

Mini-PantryThese pull-outs bring boxes, jars and cans
within easy reach. To build this mini-pantry,
you'll need two sheets of 3/Lin. hardwood
plyruood (I used Baltic birch for its attractive
edge) and two pairs of 20-in. full-extension
ball-bearing slides.
Start by building a box to fit inside the
cabinet. Measure the frame opening and
subtract 1/4 in. to get the box's outside
dimensions. I made this pantry for a 24in. base
cabinet, so change the cutting list to fit your
base. Also keep in mind that most 3/Lin.
plyrvood actually measures 23/32 in.
Cut the box parts (A, B, C) and assemble
them with glue and screws (Fig. B, below
right). Find the drawers' width by subtracting
1 in. from the openings in the box.
Cut all the pieces for the drawers (D, E, 4G). Soften the edges of the drawer sides (D)
and drawer face (G) using a 7/{in. round-
over bit. Assemble the drawer parts (D, E, F)
with screws and glue. Position the center shelf(F) at the height you prefer. Attach the sides(D) with finish nails and glue.
Set the drawer slides on the bottom of the box. Align the slides
with the front edge and attach. Remove the drawer member and
screw it to the drawer side l/4 in. above the bottom.Install the box (see photo, below). Install the drawers.
Center the drawer faces (G) on the drawers and screw themfrom the inside. Dnl|'7-I/2-in.-dia. holes for finger pulls or
attach shallow pulls. Apply two coats of finish.
Part NameA
-"865e'5nd too
" '
B Sides and centerC Back^ - - - - ; , - , .u Snel l s roeE Drawer front and backF Drawer top, bottom, shelfG Drawer face
D imens ions (ThxWxL)jl+' i.)o-1tz'; * 2[3i['""314" x20-112" x 18-13116"3l +" x 20,3,1"41| .x 20-1 f 4'l3 1 4 ' x 1 3 1 4 ' x 2 0 1 1 1 4 |314'| 4 6 7 18" x I8.-1 f/"314]x6-718" x 18:314s"!!." J_9 "?,1+"", 4.1 Q 314 . _ _
*o-J"Y."-2--^ --
1- - ;tt
4---;'---
,
Build a box for the drawers to f i t inside the base cabinet.Remove the cabinet doors and sl ide the box into the cabinet.Screw the box securely to the bottom of the cabinet.
68 American Woodrvorker MARCH 2006

Under-Cabin etDrawer
Unused space often sits in plain view
under the upper cabinets. This pull-out is
perfect for storing knives or coupons. You'll
need 8 lineal ft. of 3/4-in. x l-3/4lin.
hardwood that matches your cabinet, 2 lineal
ft. of l-l,/&in. x l-l/&in. hardwood, 1 ft. x 2 ft.
of l/Lin. hardwood plywood and one pair of
12-in. full-extension drawer slides.
Measure the space under the cabinet. Cut
the supports (G) to fit this space and
protrude about 1/16 in. below the cabinet.
Size the drawer by subtracnng 2-7/2 in.-
1 in. for the slides and l-7/2 in. for the
two fixed sides (D). The front-to-back
dimension is the minimum required for a
12-in. drawer slide.
Cut the drawer parts (A, B, C, E).
Assemble the drawer using pocket screws or
glue and finish nails. Rout the bottom of the
drawer frame with a 3/8-in. rabbeting bit set
l/4 in. deep. Square the corners with a
chisel. Then nail in the plywood bottom wtth 3/Lin. brad
nails. Draw a centerline 3/4 in. up from the bottom edge
on the fixed sides (D) and the drawer sides (B). Screw onthe drawer slides, flush to the front.
Glue and screw the undercabinet supports to the fixed
sides. Install the drawer assembly (see photo, below). Glue
the drawer pull (F) in the center behind the drawer front.
Then finish the drawer to match the cabinet.
I
-r}ZzE.L
2tr
F(t)
lauJ\ZJIUJ)N
JJ
cooz
zuJ
o
z
(E
r
E
I
tuJ)ZLr!
FI
E3
o- z
IIJ
VLU
uJztrozsr!
2troIJJ
o
a
:Z
EF=z:)I.JJ
ao
cc
EoI.JJ
Drawer bottom 1 114' x 16-1/8" x11-314"F- --P-raw-er.p-qll* -.__**- _1- -_ __ 1l2*it-18) t*sl::________ _ __G Support .,,,-.,,,-,..,.,,. ?.---_,-1-3/16" x 1-118"x 10-3/4"
Instal l the completed drawer assembly. Clamp it to thecabin€t and fasten it with screws from above.
2 314" x 1-314" x 11-718"
American Woodworker MARcH 2006 69

uter-MFF ..1
n 'ttl.,Three custom prof i les rrui th inf ini te possibi l i t ies
\Zour router table is the perfect tool for making an
I almost limitless variety of picture frames. The
problem is that with so many router bits and possible
combinations of bis, where do you start? The three
picture-frame profiles in this article are a good begin-
ning. With the exception of the final profile, all use
common router bits. Each frame illustrates a basic
technique; use them as springboards for your own
unique creations.
h Eric Smith
One8it Frames Are Fast and Eaqyr-T'l
I his mahogany picture frame is no tr,vo-bit
L design. The complete profile is made with a
single 3/8-in. rabbeting bit, a single fence setting
and a single depth-of-cut setting. There's no fuss-
ing around.
Repeating a router-bit cut on both sides of a
piece of wood or changing the depth of the cut is
an easyway to create unique profiles. Tryusing dif-ferent router-bit profiles for other custom frames.
z(nzI
-z(rul
>I
TEC9oF
oI
oz
zaFouJ(ro
E
a\z
EE\zzf
uJeo
doFoul2,'*_-__.4

American Woodworker MARcH 2006 71

Inlays Add Interest and D.pthl\/f*e this frame profile using three standard router bits: a l/4|in.
IVlround-over bit, a classic ogee bit and a 3/4-lin. straight bit. Rout all
the pieces, glue the inlay and then cut the miters. I like to use contrasting
woods, in this case, riftsawn white oak with a purpleheart inlay.
1 Round al l four edges on an extra-wide blank of inlayI stock. Make the blank at least 1-112in. wide so youcan safely rip two 3/8-in.-deep inlays from each blank.
Make Large Frames in TWo Partsr r - t
I wo-part (or even three- or four-part) frames are a
I great way to create deep, eye-catching picture
frames bee$ enough for a big landscape painting but
capable of holding even a small family photo.
I built this frame with cherry on the outside and
quartersawn sycamore in the inside. Make the inner
frame first, cutting the usual
3/8-in. rabbet (Photo 1) and
then routing the profile on the
face (Photo 2).
Then machine the outside
frame (Photos 3 through 6).
Miter and glue the inner
frame; then cut the outer
frame to fit. Tack the
frames together with a few
brad nails.
A-
A
III
1-314"
IIIIV
t314"
I
fG
fF
+E
Q nout the roundover on the outside edge of thel frame stock.
72 American

2-1t2"+
*. f f i
Q etow the in lay groove next to the rounded edge.J
- l On the inner f rame, cut the rabbet
I to house the mat te board, g lass andartwork.
7l Complete the rounded edge by flip-l f p ing the board and rout ing aroundover on the ogee's opposite side.
Y , ,
5ff:;
3;::ates an
Sources(A)Amana Tools f rom ToolsToday.com, (888) 699-3939, www,toolstoday.com 3/8- in. rabbet ing bi t wi th 1/4- in. shank, #49300, $26;wi th 1/2- in. shank,#49302, $27. (B) MLCS, (800) 533-9298, www.mlcswoodworking.com 3/4- in. st ra ight b i t , #5455 1/4- in. shank, $13;#7755 1/2- in. shank, $14.(C) Freud Tools from Seven Corners Hardware, (6511224-4859, www.Tcorners.com 1/4-in. round-over bit with 1/4-in. shank, #34-110, $28; with 1/2-in.shank, #34-120, $30. (D) Rockler , (800]1279-4441, www.rockler .com Classic ogee bi t wi th 1/4- in. shank, #91666, $32; wi th 1/2- in. shank, #91673, $32.(E) MLCS, (800) 533-9298, mlcswoodworking.com Picture-frame ogee bit with 1/2-in. shank only, #8622, $39. (F)Amana Tools from ToolsToday.com,(888) 699-3939, www.toolstoday.com Chamfer b i t wi th 1/4- in. shank, #49400, $25;wi th 1/2- in. shank, #49402, $26. (G) MLCS, (800) 533-9298,mlcswoodworking.com Picture- f rame molding bi twi th 1/4- in. shank,#6321, $30;wi th 1/2- in. shank, #8621, $30.
outer frame gets an ogee pro-I used a special ized bit that cre-extra-large roundover.
straight bit to cut a rabbet tothe inner f rame.
ftCframter the back edge to l i f t the\-f frame off the wall and make thef rame appear less mass ive.
*ffi
7l Cutthe inside edge profi le using a classic ogee bit .' f Cut the back edge profi le by dropping the bit to half
height. Move the fence forward to cut half the bit's depth.
Q nOO a dist inct ive prof i le to the face1 of the inner f rame us ing a spec ia l -ized p ic ture- f rame mold ing b i t .
American Woodworker MARcH 2006 73

American Woodrvorker MABcH 2006 75

r..ii1i 1: * ; i
I S t rape a rough-cut c lear p last ic b lank on the router tab leI us ing a f lush- t r im b i t . Secure the or ig ina l base to theb lank us ing double-s t ick tape.
BLUE PROTECTIVE
QOr i t t t he moun t i ng sc rew ho les us ing t he d imp le marks. - f to center the b i t . Center the d impled ho le under the b i tw i th the power o f f . Secure the b lank f i rmly wi th your hand,ra i se t he b i t , t u rn on t he d r i l l p ress and d r i l l t he ho le .
MnrrRrALS AND TooLSMake your base fron 7 / *in.-thick acrylic or pol,vcarbonate
plastic. Acrllic is available at most hardrvare stol-es and home
centers. Polvcarbonate is more shatterresistant, although it's
less stiff, harder to find and rnore expensive. Either plastic
can be machined like an1, l-rardivood nsing standard rvood-
working equipment. Leave the protective fihn on to protect
the plastic from scratches during macl-rining.
To make ,vour clear base, yotr'll need these iterns: a drill
press, router table, banclsarv or j igsan, f lush-tr irn bit ,
l - I /Lrn. and 1-3/8-in. Forstner bits, a countersink bit , a cen-
tering bit for vollr l-outer (see Source, page 78) and double-
stick tape. You may neecl lonser scre\vs to fhsten this ner,r'
thicker base to vollr rollter.
QVtark the mount ing screw locat ions us ing a se l f -center inglb i t moun ted i n a d r i l l p ress . A l l you need i s a s l i gh t d im-p le on t he su r face . Don ' t d r i l l a l l t he way t h rough the b lank ,because the center ing b i t is not the f ina l d iameter ,
Counters ink the mount ing screw ho les. Center the b i t bylower ing i t in to the ho le wi th the power o f f , as in Photo 4 .
Set the depth o f cut so the screw heads wi l l be sunk s l ight lybelow the base's surface.
Dnu l MoUNTTNG HoLESUse the manufacturer-supplied base as a template for
your clear base. Secure the original base to the plastic
blank rvith double-stick tape. Cut and shape the blank onyour bandsaw and router table (Photo 1). Keep the blank
moving at about the speed of a clock's second hand to
prevent the plastic from melting. On the drill press, mark
the centers for the mounting screws (Photo 2).Gently pr,v the original base off the blank using a putty
knife. Select a twist bitjust large enough to let the mount-
ing screw shank easily pass through the hole. Drill the
rxounting holes all the rvay through the base (Photo 3).
Friction from a spinning drill bit car-r easily melt plastic.
\{hen drilling plastic, Llse a quick, repetitive in-and-out
action. Pause for a second benveen strokes to allow the bit
and plastic to cool.
; I'fiil
76 Anrel icirn \ ' \ i rochvorker- MARcH 2006

(to..t" the base's center by putting a centering bit in yourr.,lrouter, lowering the baseplate onto it and tapping theplastic with a hammer. The resulting mark will be dead center.
f,,Oritl out the center hole. Center the plate on the bit andLlclamp it down. Use an in-out feed action to keep the bitcool and the plast ic from melt ing.You should get wispy curlsof plastic, not molten mounds.
nnipthe plate and drill the larger counterbore hole./ Center the plate using the smalter bit and clamp.
Change to the larger bit and dri l l .
Drill countersinks for flat-head screws (Photo 4). I use flat-
head screws to mount a base, because the tapered heads auto'
matically draw the base into the exact location each time it's
fastened. A countersink bit has the same profile as a flat-head
screw. Don't use a large tr,rrist bit to drill the countersinks; the
profiles don't match.
Dnru CErurEn HolrsAfter the base has been shaped and the mounting screw
holes completed, fasten the base to your router. Chuck a cen-
tering bit or a Vgroove bit with a sharp pciint into your router.
With the new base in place, gendy lower it onto the router
until itbarely touches the plastic surface. Lock the router base
assembly tightly to the router. Thke a small hammer and light-
ly t p tlie plastic over the centering bit (Photo 5). Use the
resulting mark to center the base under al-7/4'in. Forstner
bit. Clamp the base to the drill press table. Check to make
sure the bit is still in line with the mark. Drill the center hole
78 American Woodworker MARCH 2006
QR ttame finish adds just the right touch. lt turns the hazy,L)machined edges crystal clear. Just wave the flame from ablowtorch back and forth until you see the haze disappear.Be careful not to overheat the plastic or it will bubble.
through the base (Photo 6).
Flip the base so the countersinks face up (Photo 7). Center
the base on the table using the same Forstner bit that drilled
the hole and clamp the base down to the drill press table.
Change to a larger l-3/&in. Forsfirer bit. Now, before you get
too excited about drilling from a smaller hole to a larger one,
let me explain: Typically, you would drill a large counterbore
first, followed by the smaller through hole. In this case, the
mark from the centering bit is on the wrong side of the base
for the large counterbore hole. I use Forstner bits because
they are rimguided. Th.y can cut a larger hole over a small-
er one without trouble.
After all the machining is done, remove the protective film
and use sandpaper to lightly round-over the bottom edge.
You can clean up machine marks and scratches by carefully
using a blowtorch (Photo 8). The result is a crptal-clear fin-
ish that's not really necessary, but it sure looks good.
Source MLCS, (800) 533-9298, www.mlcswoodworking.com,Universal centering alignment pin, #9054, $6.

;"1 ,t*
rro
II
|5etqfor
Stop router disasters before they start.Dy Eric Smith
Snap, crackle, crunch!
No, it's not your breakfast cereal. That's
the sound of router tear-out.
Aaargh!
And that's the sound of a woodworker
facing a do-over or repair.
Tear-out can happen cutting across or
against the grain, cutting too deeply, using
a dull bit or just running into a hidden
flaw. One thing's for sure: It'll always hap-
pen at the worst possible time. Although it
can't completely be avoided, you can defi-
nitely minimize the chances of tear-out by
following some simple techniques and
precautions-without adding a lot of time
or expense to your projects.
u
tsa
Io_
t(,oF
oIo_
z
cozIf-)-zt
;2oF(JL]JE
-cc
uOcc
rY
zl
ul
occoF
oU
PayAttention to Grain DirectionVisualize a feather cut by a router. It would be a mess, of course, but the point is that
when you rout against the grain (see photo, left), the wood reacts just like a feather. The
grain is running right into the bit rotation. The wood's fibers are likely to catch and break
apart ahead of the cut, producing tear-out. But when you run the router with the grain
(see photo, right), you get a smooth cut.
-o,frltt?o*F;tr- tm' '"
Feeding your stock so the grain direct ioncrashes head on into the bit rotat ion is l ikerunning your f inger the wrong way on afeather. Nasty tear-out is almost a sure thing.
*l*r**
Fl ip a board end for end to change the direc-t ion from which the grain meets the cutter.Now the grain f lows in the same direct ionas the bit rotat ion.The result wi l l be asmooth cut with little or no tear-out worries.
worker MARCH 2006

t ' ,
f. .c3n j r . ! t , .
t\ LrcHr sEcoND PASS
Make a Very Light Final Pass'l l ' r i r rg ' t ( )
hog ou t ? t c leu rn e r lge i r r o l l c l ) : r ss i s ask i r rg { i l -
tear-out tr '<tuble. Instead cll ' s'anrblinu u-ith :ru erlrensire
piece of $'clocl, take the time to nrzrke at least t$'o l)irsses: olle
heavv pzrss ancl a verv linht final pass.
"i#.E
ffi
FIRST PASS
Bec:ruse the f rn:r l l l rss is- just a shaving cut , the bi t is a lot
lcss l iker l r to catch anr l te:u- the rr 'oc l r l I ibers. \ 'ou ' l l .qet i r
snrocltlr srrrf:rce, t--r,r 'n if the qrain is qoing the lr,r 'ong rr':r\ '.
t-Ise a Zerffileanance Fence. \ z t ' r o - r ' l t ' : l l l r r r c t ' l t ' r r c t ' l l r c l . s r r l t l l r t ' r r . o o r l t r s i t ' s 1 i ' r I i r r t < r
t l r t ' r ' o r r t t ' r ' l r i t . r r r l l . i r r g i t r l i l l i < r r l l f i r r t l r c r r o o r l t o < l r i l i .
I i r r r n l i t ' l z t ' r ' o - < l t ' l u l u t ( ' ( ' I t ' r r t t ' . s ( ' t t l l ( ' l ' ( ) r r t ( . t ' l r i t l r t t l r c
l r t ' i g ' l t t l t r r t l r l r ' l r t l r \ ( ) r r \ \ ' r u r t . I f r o r r l l r r t ' r ' t ' t r r o r l r l r l t ' s r r l r -
l i ' t t t t ' s . t t t t ' t t t l t t ' l ' ( ) u l ( ' l o r r l r r t r l s l o r r l r s l i t l c t l r t ' i r r l t ' t ' < l s i r l t '
o l l l t c l i ' r r c t ' i r r t o t l r t ' l r i t . I l r o r r r I t ' r i t t ' l l r s l r l i r t , r l l l r r t ' .
t l ; t t t i l l t ( ' l l r l ) o r l r r s r r l t l i ' l t ( ( ' \ o r r l r o t l r s i r l t ' s . \ \ i t l r t l r c r ' ( ) u l ( ' l '
l r u t r t i r t g . l o o s t ' r r t l r t ' r l t r n r ; t s o r r t l r t ' i u l c c r l I t ' r r t t ' t ' r r o r r g l r t o
s l o t r l i s l i t l t ' l l r c s u l r l t ' t r < t ' s i r r t o t l r c s 1 ; i r r r r i r r g l r i t .
ROTATION
M E L A M I N E
LIse a Dortnfirrting Spir:alBitfor Fhrsi lr unrnins'- ^ ̂ ^^ ̂ il
l ) o r v t t - r ' r t t t i r t g s l l i r , r l l ; 1 i r 1 ) r r s l t r l r ) \ \ n ( ) l r l l r t ' u o o ( l ' s s u t -
I l t t t ' . I l r t ' t ' r ' s r r l t i s r r t l t ' l r n . 1 ( ' i u o r r l - l r c r ' : l r t ' l r r i n g ( l l l .
l ) < l t l r t - t ' t t t t i t r u s l i i t l r l l t i t ' r r o r l . r ' : 1 t t ' r ' i l r l l r r r t ' l l l o r l t i r r r r r r i n g
( ) l ' ( u t t i r r g t l r l o r r g l r r l t ' l i < l r t t ' \ ( ' n ( ' ( ' r ' \ . r r r t . l l r r r i r r t ' . l l r r r r i r u r l t ' t
l t t t r l l r i g l r l r l l s ' r u c r l r r o o r l s .
INFEEDFENCE

Make $omePlung Cuts
Routing against the grain may be
unavoidable. On some edges, the
grain reverses direction, so you
can't win. If you're getting tear-out
along an edge-or even if it looks
like you might-make a series of
plunge cuts every inch or rwo. This
will cause the splinters to break off
at the cutout before they can ruin
your profile.
The best way to make plunge
cuts is to hold one end of the board
tightly against the outfeed fence
and the other end away from the
spinning bit. Push the board
against the fence, then pull it out.
Move the board forward an inch or
two and repeat.
.':: Rip and Start OverSometimes you have no choice but to cut your loss and make a
netryr,piece. Other times, you can afford to trim the piece and start
orreplrrst rip a bit off the damaged edge and then rout it again.
,$ffh.r I'm working with wood that looks likely to tear out, I try to
$ive myself some wiggle room by cutting a wider piece than I need,
then ripping it to size after I've successfully routed the edge.
Stop EndCrain Blowoumwith aBackerBoard
Rout the end grain first and use a backer board. That's the best way to
reduce your chances of blowing out a corner. The backer board suPPorts
the cut so the corner has no chance to tear away. Make sure the backer
piece is at least as thick as the piece you're routing. Clamp the pieces
together for rock-solid support.
90 American Woodworker MARCH 2006
+,1v"h

I:'
Fl J - r ^ _
"#''. t +' ' t " '
""".*{f
CLIMB.CUTAREA
| t *
SECONDPASS
Play it safe:
r Always make very shallow, light passes, especially whenusing a big bit.
r Secure the wood and/or router very firmly.r Make sure the bit is sharp. A dull bit grabs and pulls, but
a sharp bit cuts with less effort.r On a router table, use featherboards whenever possible to
hold the board and keep it from running away.r \Arhen using a handheld router, firmly clamp down the
stock. If the workpiece is narrow, add support so therouter won't tip.
r Never climb-cut small or narrow pieces on the routertable. It's better to cut the profile on a large piece andtrim it to the size you want later.
'LE[,,J
Make Shatlo\,v Climb Cuts
CLIMB.CUT FEED DIRECTION
Reversing the normal direction of the router feed iscalled climb-cutting. Climb-cuming can involve either mov-ing clockwise with a handheld router or pushing wood fromleft to right on a rourer table. Climb-cutting almost alwayseliminates tear-out, but it also makes the router more diffi-cult to control. That's because the stock is fed in the samedirection as the bit is spinning, so the bit wants to grab thewood and pull. This makes climb-cuting potentially dan-gerous. It's not recommended for most rolrting. If you fol-low a few rules, though, climb-cutting is a great way to getyourself over those pesky areas where tear-out is almost asure thing.
Make aScoring Cuton Dovet"iut5
Face grain can splinter whenyou run a bit in and out of aboard in a dovetail jig. Instead ofhaving wood filler at the ready,start by making a light scoringpass along the entire edge of theboard. Gently move the router inand out of the template fingers.Make the cuts about a 1/8 in.deep. Then go back and finish.
1/8".DEEPSCORE CUT
Arn-ericanWoodralortdf MARcH 2006
%#

\D-BASED SupponrTit *,0"g plywood or bases for an assembly
ffi.ff }iinF. d, I'u*.' il' l"_i* "_1 :y1: :::: Jl: :t ?g : iffii'thtb-"ttable, double-armed platforms that can be used indi-
fi{ia,:it-i'Each assembly consists of nvo identical frames and rwo identical gates'made
from 3/*in. fir plyr,vood using half-lap joinery. Four continuous
hinges hold the parts together and facilitate opening and closing. Hook-
and-eye screw latches lock the assembly in the open position.Randy Johnson
Overal l Dimensions: 31-7 18" x 37" x 37"* for one hinged f rame assembly
Part D i m e n s i o n
BC
U
EF
\J
314" x 31-7/B' x 37" *
3 / 4 " x 3 - 1 1 2 ' x 3 1 - 7 1 8 "3 / 4 " x 3 - 1 1 2 " x 3 7 "1-112" x 30"3 1 4 " x 1 6 " x 2 0 "3 / 4 " x 3 " x 2 0 '3 / 4 " x 3 x 1 61-112" x 18"2" hook-and-eye screw
" 2 " x31 -7 18" x 37" when c losed** 2- in. toe k ick below bot tom rai l
zazI
-zEU
Io-
ca(9
F
I
oz
z
FC)UE.
oFcc
92 American \Alooclrvorker- MARCH 2006

t
FrrvrsH oN TapI buy varnish by the gallon because it's more economical,
but after a few uses, the rim fills with gunk and the finish
begins to skin over inside the can. As a result, I usually have to
throw the can away before it's empry.
I solved this problem by recycling a Sliter wine box into an air-
tightvarnish dispenser. Choose a box with a twist-open spout. After
enjoyrng the wine (and a good night's sleep!), remove the empty
bag and carefrrlly pry the spout out of its fit-
94 American Woodworker MARcH 2006
:[n|')Itu
ting. Rinse the bag and let it dry.Filling the bag with
varnish is a two'personjob: One person holds a fun-nel and the bag while the other
person pours. Stir the varnish thoroughlybefore pouring it. After pouring, remove
arry air that remains inside the bag by care-compressing it on a table, fitting side up.
the bag is compressed, open the spout and press
k into the fitting. Make sure the sPout is oriented to
operate correctly when the bag is back inside the box.
Because the bag is air-free, once it's reinstalled, you'll be able to stir the
varnish by simply shaking the box. A classy label ensures that no one mistakes
your polyurethane for pinot noir.
Jay McCIcIlan
t-
t00l( il D0,a
Convert your table saw into a molder with the Mtgt. Moldent - - " * - - a - l . ' . n e w
Adding engrovingnever been more
it's os eosy to operote os otoll free 888-437 -4564 tosomple kit, ond CD demo of
Toll Free: I .888,437,4564Phone: 303,277.1
. l88
www. epilogloser. com/AmerVlM, htm
Circle No. 136

La?DER LuwBER RacrI organized all my short boards by turning an
inexpensive Gft. stepladder (about $30 at a homecenter) into a lumber rack. Now every board is easyto see and reach.
My ladder didn't have treads on the back legs, soI screwed on wooden cleats that align with the treadson the front.
I connected the cleas and treads by screwingl/ 4.in.plywood shelves on top. The shelves make boardsslide easily. I can store boards as long as 7 ft. on thebottom shelf. Fully loaded, my ladder lumber rackholds about 20 bd. ft. of lumber.
Dan Kelts
1/4'PLYWOOD
If you have an original Small Shop Tip, send it to us with a sketch orphoto. If we print it, you'll get 9100! Send it to Small Shop Tips,American Woodworker, 2915 Commers Driven Suite ?00, Eagan, MN55121 or email to smallshoptips@readersdigesgcom. Submissions can'tbe returned and become our property upon acceptance and payment.We may edit submissions and rxe them in all print and electronic media.
American Woodworker MARcH 2006 95
installation-simplifying, idea-inspiring resource. It's also morethan hardware. It's got just about everything you need forcabinet making with the deepest inventory available so, unlikeother suppliers, your design is never limited by our selection.All this - and it 's free!
Woodworker's HARDtrAREWe supply all your cabinet hardware needsl
For your complimentary catalog, call (8OO) 383-O130or visit us online at woodworkershardware.com
Promotlon Number 475
Circ le No. 167

l ited by TimJohnson
Swnru-Dtvltvc DnrssrnIn my garage, my workbench sits against the front wall, leaving just enough room to squeeze in my
car. Recently, I was building a solid-oak chest of drawers for my mother-in-law. At the end of each day,
I stored the chest on my workbench so my car would fit in the garage. The workbench is narrow, so the
chest barely fit on it.
While parking the car one night, I bumped into the workbench, jarring the chest. It teetered and
slowly fell toward the hood of my car. Helpless, I watched each drawer.
--t Islide out and whack the hood. The blunt edge of the top fol-
lowed, delivering the final blow. Then, the hulking thing
screeched off the hood and onto the floor, its drawer
handles lgaving a nasty trail of scratches.
lt's too bad my car isn't made of oak-the
chest survived the fall with barely a mark!
Jeff Wittrock
i&l
CnAZY MISTAKES WooDWoRKERS Mnrr
Snw SrntNERLast week, while building a pergola for my back yard,I set a treated 2x6 on
my brand-new tablesaw, which had been a much-apPreciated gift from my
wife. I set the fence to rip the 2x6 to size, but then I was called ^way.
I had fully intended to come right back to make the cut. Unfortunately, life
got in the way, and I did not return to my shop until the next morning. When
.I picked up the 2x6,I was horrified. Where the board had been, the cast-iron
table had rusted. I guess damp treated wood and cast iron don't mix.
Fortunately, I was able to remove the stain with steel wool and elbow
grease, but now the table has an uneven sheen. And, no, my wife doesn't
know what happened to her gift-yet.Bob Huddl,eston
\
If you have a
woodworking blun-
der that you're willing to
share, send it to us. You'll
receive $100 for each one we
print. Send it to AW Oops!,
American Woodworker, 2915
Commers Drive, Suite 700,
Eagan, MN 55121, or email to
oops@readersd iges t . com.Submissions can't be returned
and become our property
upon acceptance and pay-
ment. We may edit submissions
and use them in all print and
electronic media.
z
VE
-cor!
t.lJFU)
2
EFa=)
zaz=-zU
2oF(_)uJE.
-Fcc
96 American Woodworker MARcH 2006