Amazon Sumerian - User Guide - AWS Documentation · PDF fileAmazon Sumerian User Guide...
87
Amazon Sumerian User Guide
Transcript of Amazon Sumerian - User Guide - AWS Documentation · PDF fileAmazon Sumerian User Guide...

Amazon SumerianUser Guide

Amazon Sumerian User Guide
Amazon Sumerian: User GuideCopyright © 2018 Amazon Web Services, Inc. and/or its affiliates. All rights reserved.
Amazon's trademarks and trade dress may not be used in connection with any product or service that is not Amazon's, in any mannerthat is likely to cause confusion among customers, or in any manner that disparages or discredits Amazon. All other trademarks notowned by Amazon are the property of their respective owners, who may or may not be affiliated with, connected to, or sponsored byAmazon.

Amazon Sumerian User Guide
Table of ContentsWhat Is Amazon Sumerian? .... . . . . . . . . . . . . . . . . . . . . . . . . . . . . . . . . . . . . . . . . . . . . . . . . . . . . . . . . . . . . . . . . . . . . . . . . . . . . . . . . . . . . . . . . . . . . . . . . . . . . . . . . . . . . . 1Use Cases .... . . . . . . . . . . . . . . . . . . . . . . . . . . . . . . . . . . . . . . . . . . . . . . . . . . . . . . . . . . . . . . . . . . . . . . . . . . . . . . . . . . . . . . . . . . . . . . . . . . . . . . . . . . . . . . . . . . . . . . . . . . . . . . . . . . . . . . 2Permissions .... . . . . . . . . . . . . . . . . . . . . . . . . . . . . . . . . . . . . . . . . . . . . . . . . . . . . . . . . . . . . . . . . . . . . . . . . . . . . . . . . . . . . . . . . . . . . . . . . . . . . . . . . . . . . . . . . . . . . . . . . . . . . . . . . . . . 3
User Permissions .... . . . . . . . . . . . . . . . . . . . . . . . . . . . . . . . . . . . . . . . . . . . . . . . . . . . . . . . . . . . . . . . . . . . . . . . . . . . . . . . . . . . . . . . . . . . . . . . . . . . . . . . . . . . . . . . . . . . . 3Scene Permissions .... . . . . . . . . . . . . . . . . . . . . . . . . . . . . . . . . . . . . . . . . . . . . . . . . . . . . . . . . . . . . . . . . . . . . . . . . . . . . . . . . . . . . . . . . . . . . . . . . . . . . . . . . . . . . . . . . . . 3
Getting Started .... . . . . . . . . . . . . . . . . . . . . . . . . . . . . . . . . . . . . . . . . . . . . . . . . . . . . . . . . . . . . . . . . . . . . . . . . . . . . . . . . . . . . . . . . . . . . . . . . . . . . . . . . . . . . . . . . . . . . . . . . . . . . . . 5Prerequisites ... . . . . . . . . . . . . . . . . . . . . . . . . . . . . . . . . . . . . . . . . . . . . . . . . . . . . . . . . . . . . . . . . . . . . . . . . . . . . . . . . . . . . . . . . . . . . . . . . . . . . . . . . . . . . . . . . . . . . . . . . . . . 5Create a Project and Scene .... . . . . . . . . . . . . . . . . . . . . . . . . . . . . . . . . . . . . . . . . . . . . . . . . . . . . . . . . . . . . . . . . . . . . . . . . . . . . . . . . . . . . . . . . . . . . . . . . . . . . . 5Configure the Scene .... . . . . . . . . . . . . . . . . . . . . . . . . . . . . . . . . . . . . . . . . . . . . . . . . . . . . . . . . . . . . . . . . . . . . . . . . . . . . . . . . . . . . . . . . . . . . . . . . . . . . . . . . . . . . . . . 6Add and Configure Entities ... . . . . . . . . . . . . . . . . . . . . . . . . . . . . . . . . . . . . . . . . . . . . . . . . . . . . . . . . . . . . . . . . . . . . . . . . . . . . . . . . . . . . . . . . . . . . . . . . . . . . . . . 7Add Behavior ... . . . . . . . . . . . . . . . . . . . . . . . . . . . . . . . . . . . . . . . . . . . . . . . . . . . . . . . . . . . . . . . . . . . . . . . . . . . . . . . . . . . . . . . . . . . . . . . . . . . . . . . . . . . . . . . . . . . . . . . . 10Add VR Mode .... . . . . . . . . . . . . . . . . . . . . . . . . . . . . . . . . . . . . . . . . . . . . . . . . . . . . . . . . . . . . . . . . . . . . . . . . . . . . . . . . . . . . . . . . . . . . . . . . . . . . . . . . . . . . . . . . . . . . . . 12Publish and View the Scene .... . . . . . . . . . . . . . . . . . . . . . . . . . . . . . . . . . . . . . . . . . . . . . . . . . . . . . . . . . . . . . . . . . . . . . . . . . . . . . . . . . . . . . . . . . . . . . . . . . . . 14Clean Up .... . . . . . . . . . . . . . . . . . . . . . . . . . . . . . . . . . . . . . . . . . . . . . . . . . . . . . . . . . . . . . . . . . . . . . . . . . . . . . . . . . . . . . . . . . . . . . . . . . . . . . . . . . . . . . . . . . . . . . . . . . . . . . 14Next Steps .... . . . . . . . . . . . . . . . . . . . . . . . . . . . . . . . . . . . . . . . . . . . . . . . . . . . . . . . . . . . . . . . . . . . . . . . . . . . . . . . . . . . . . . . . . . . . . . . . . . . . . . . . . . . . . . . . . . . . . . . . . . . 14
Concepts .... . . . . . . . . . . . . . . . . . . . . . . . . . . . . . . . . . . . . . . . . . . . . . . . . . . . . . . . . . . . . . . . . . . . . . . . . . . . . . . . . . . . . . . . . . . . . . . . . . . . . . . . . . . . . . . . . . . . . . . . . . . . . . . . . . . . . . 15Scenes .... . . . . . . . . . . . . . . . . . . . . . . . . . . . . . . . . . . . . . . . . . . . . . . . . . . . . . . . . . . . . . . . . . . . . . . . . . . . . . . . . . . . . . . . . . . . . . . . . . . . . . . . . . . . . . . . . . . . . . . . . . . . . . . . . 15Components and Entities ... . . . . . . . . . . . . . . . . . . . . . . . . . . . . . . . . . . . . . . . . . . . . . . . . . . . . . . . . . . . . . . . . . . . . . . . . . . . . . . . . . . . . . . . . . . . . . . . . . . . . . . . 15Assets ... . . . . . . . . . . . . . . . . . . . . . . . . . . . . . . . . . . . . . . . . . . . . . . . . . . . . . . . . . . . . . . . . . . . . . . . . . . . . . . . . . . . . . . . . . . . . . . . . . . . . . . . . . . . . . . . . . . . . . . . . . . . . . . . . . . 15Hosts ... . . . . . . . . . . . . . . . . . . . . . . . . . . . . . . . . . . . . . . . . . . . . . . . . . . . . . . . . . . . . . . . . . . . . . . . . . . . . . . . . . . . . . . . . . . . . . . . . . . . . . . . . . . . . . . . . . . . . . . . . . . . . . . . . . . . 15Projects ... . . . . . . . . . . . . . . . . . . . . . . . . . . . . . . . . . . . . . . . . . . . . . . . . . . . . . . . . . . . . . . . . . . . . . . . . . . . . . . . . . . . . . . . . . . . . . . . . . . . . . . . . . . . . . . . . . . . . . . . . . . . . . . . . 16Templates .... . . . . . . . . . . . . . . . . . . . . . . . . . . . . . . . . . . . . . . . . . . . . . . . . . . . . . . . . . . . . . . . . . . . . . . . . . . . . . . . . . . . . . . . . . . . . . . . . . . . . . . . . . . . . . . . . . . . . . . . . . . . . 16
Dashboard .... . . . . . . . . . . . . . . . . . . . . . . . . . . . . . . . . . . . . . . . . . . . . . . . . . . . . . . . . . . . . . . . . . . . . . . . . . . . . . . . . . . . . . . . . . . . . . . . . . . . . . . . . . . . . . . . . . . . . . . . . . . . . . . . . . . . 17Projects ... . . . . . . . . . . . . . . . . . . . . . . . . . . . . . . . . . . . . . . . . . . . . . . . . . . . . . . . . . . . . . . . . . . . . . . . . . . . . . . . . . . . . . . . . . . . . . . . . . . . . . . . . . . . . . . . . . . . . . . . . . . . . . . . . 17Scenes .... . . . . . . . . . . . . . . . . . . . . . . . . . . . . . . . . . . . . . . . . . . . . . . . . . . . . . . . . . . . . . . . . . . . . . . . . . . . . . . . . . . . . . . . . . . . . . . . . . . . . . . . . . . . . . . . . . . . . . . . . . . . . . . . . 18Asset Packs .... . . . . . . . . . . . . . . . . . . . . . . . . . . . . . . . . . . . . . . . . . . . . . . . . . . . . . . . . . . . . . . . . . . . . . . . . . . . . . . . . . . . . . . . . . . . . . . . . . . . . . . . . . . . . . . . . . . . . . . . . . . 19Templates .... . . . . . . . . . . . . . . . . . . . . . . . . . . . . . . . . . . . . . . . . . . . . . . . . . . . . . . . . . . . . . . . . . . . . . . . . . . . . . . . . . . . . . . . . . . . . . . . . . . . . . . . . . . . . . . . . . . . . . . . . . . . . 20Locks .... . . . . . . . . . . . . . . . . . . . . . . . . . . . . . . . . . . . . . . . . . . . . . . . . . . . . . . . . . . . . . . . . . . . . . . . . . . . . . . . . . . . . . . . . . . . . . . . . . . . . . . . . . . . . . . . . . . . . . . . . . . . . . . . . . . 20
Editor ... . . . . . . . . . . . . . . . . . . . . . . . . . . . . . . . . . . . . . . . . . . . . . . . . . . . . . . . . . . . . . . . . . . . . . . . . . . . . . . . . . . . . . . . . . . . . . . . . . . . . . . . . . . . . . . . . . . . . . . . . . . . . . . . . . . . . . . . . . . . 22Canvas .... . . . . . . . . . . . . . . . . . . . . . . . . . . . . . . . . . . . . . . . . . . . . . . . . . . . . . . . . . . . . . . . . . . . . . . . . . . . . . . . . . . . . . . . . . . . . . . . . . . . . . . . . . . . . . . . . . . . . . . . . . . . . . . . . 23Asset Library .... . . . . . . . . . . . . . . . . . . . . . . . . . . . . . . . . . . . . . . . . . . . . . . . . . . . . . . . . . . . . . . . . . . . . . . . . . . . . . . . . . . . . . . . . . . . . . . . . . . . . . . . . . . . . . . . . . . . . . . . . 24Assets Panel ... . . . . . . . . . . . . . . . . . . . . . . . . . . . . . . . . . . . . . . . . . . . . . . . . . . . . . . . . . . . . . . . . . . . . . . . . . . . . . . . . . . . . . . . . . . . . . . . . . . . . . . . . . . . . . . . . . . . . . . . . . 25Entities Panel ... . . . . . . . . . . . . . . . . . . . . . . . . . . . . . . . . . . . . . . . . . . . . . . . . . . . . . . . . . . . . . . . . . . . . . . . . . . . . . . . . . . . . . . . . . . . . . . . . . . . . . . . . . . . . . . . . . . . . . . . . 26Inspector Panel ... . . . . . . . . . . . . . . . . . . . . . . . . . . . . . . . . . . . . . . . . . . . . . . . . . . . . . . . . . . . . . . . . . . . . . . . . . . . . . . . . . . . . . . . . . . . . . . . . . . . . . . . . . . . . . . . . . . . . . 26Tools ... . . . . . . . . . . . . . . . . . . . . . . . . . . . . . . . . . . . . . . . . . . . . . . . . . . . . . . . . . . . . . . . . . . . . . . . . . . . . . . . . . . . . . . . . . . . . . . . . . . . . . . . . . . . . . . . . . . . . . . . . . . . . . . . . . . . . 27
Text Editor ... . . . . . . . . . . . . . . . . . . . . . . . . . . . . . . . . . . . . . . . . . . . . . . . . . . . . . . . . . . . . . . . . . . . . . . . . . . . . . . . . . . . . . . . . . . . . . . . . . . . . . . . . . . . . . . . . . . . 28State Machine Editor ... . . . . . . . . . . . . . . . . . . . . . . . . . . . . . . . . . . . . . . . . . . . . . . . . . . . . . . . . . . . . . . . . . . . . . . . . . . . . . . . . . . . . . . . . . . . . . . . . . . . . . 28Timeline .... . . . . . . . . . . . . . . . . . . . . . . . . . . . . . . . . . . . . . . . . . . . . . . . . . . . . . . . . . . . . . . . . . . . . . . . . . . . . . . . . . . . . . . . . . . . . . . . . . . . . . . . . . . . . . . . . . . . . . . 29
Keyboard and Mouse .... . . . . . . . . . . . . . . . . . . . . . . . . . . . . . . . . . . . . . . . . . . . . . . . . . . . . . . . . . . . . . . . . . . . . . . . . . . . . . . . . . . . . . . . . . . . . . . . . . . . . . . . . . . . . 30Publish .... . . . . . . . . . . . . . . . . . . . . . . . . . . . . . . . . . . . . . . . . . . . . . . . . . . . . . . . . . . . . . . . . . . . . . . . . . . . . . . . . . . . . . . . . . . . . . . . . . . . . . . . . . . . . . . . . . . . . . . . . . . . . . . . . 32
Scene Settings .... . . . . . . . . . . . . . . . . . . . . . . . . . . . . . . . . . . . . . . . . . . . . . . . . . . . . . . . . . . . . . . . . . . . . . . . . . . . . . . . . . . . . . . . . . . . . . . . . . . . . . . . . . . . . . . . . . . . . . . . . . . . . . 33AWS Configuration .... . . . . . . . . . . . . . . . . . . . . . . . . . . . . . . . . . . . . . . . . . . . . . . . . . . . . . . . . . . . . . . . . . . . . . . . . . . . . . . . . . . . . . . . . . . . . . . . . . . . . . . . . . . . . . . . 35Snapshots .... . . . . . . . . . . . . . . . . . . . . . . . . . . . . . . . . . . . . . . . . . . . . . . . . . . . . . . . . . . . . . . . . . . . . . . . . . . . . . . . . . . . . . . . . . . . . . . . . . . . . . . . . . . . . . . . . . . . . . . . . . . . . 36Document .... . . . . . . . . . . . . . . . . . . . . . . . . . . . . . . . . . . . . . . . . . . . . . . . . . . . . . . . . . . . . . . . . . . . . . . . . . . . . . . . . . . . . . . . . . . . . . . . . . . . . . . . . . . . . . . . . . . . . . . . . . . . 38Environment .... . . . . . . . . . . . . . . . . . . . . . . . . . . . . . . . . . . . . . . . . . . . . . . . . . . . . . . . . . . . . . . . . . . . . . . . . . . . . . . . . . . . . . . . . . . . . . . . . . . . . . . . . . . . . . . . . . . . . . . . . 39Post Effects ... . . . . . . . . . . . . . . . . . . . . . . . . . . . . . . . . . . . . . . . . . . . . . . . . . . . . . . . . . . . . . . . . . . . . . . . . . . . . . . . . . . . . . . . . . . . . . . . . . . . . . . . . . . . . . . . . . . . . . . . . . . 40Scene Size .... . . . . . . . . . . . . . . . . . . . . . . . . . . . . . . . . . . . . . . . . . . . . . . . . . . . . . . . . . . . . . . . . . . . . . . . . . . . . . . . . . . . . . . . . . . . . . . . . . . . . . . . . . . . . . . . . . . . . . . . . . . . 43Scene Stats ... . . . . . . . . . . . . . . . . . . . . . . . . . . . . . . . . . . . . . . . . . . . . . . . . . . . . . . . . . . . . . . . . . . . . . . . . . . . . . . . . . . . . . . . . . . . . . . . . . . . . . . . . . . . . . . . . . . . . . . . . . . . 43
Entities ... . . . . . . . . . . . . . . . . . . . . . . . . . . . . . . . . . . . . . . . . . . . . . . . . . . . . . . . . . . . . . . . . . . . . . . . . . . . . . . . . . . . . . . . . . . . . . . . . . . . . . . . . . . . . . . . . . . . . . . . . . . . . . . . . . . . . . . . . . 45Managing Entities ... . . . . . . . . . . . . . . . . . . . . . . . . . . . . . . . . . . . . . . . . . . . . . . . . . . . . . . . . . . . . . . . . . . . . . . . . . . . . . . . . . . . . . . . . . . . . . . . . . . . . . . . . . . . . . . . . . . 45Managing Components .... . . . . . . . . . . . . . . . . . . . . . . . . . . . . . . . . . . . . . . . . . . . . . . . . . . . . . . . . . . . . . . . . . . . . . . . . . . . . . . . . . . . . . . . . . . . . . . . . . . . . . . . . . 46Transform ..... . . . . . . . . . . . . . . . . . . . . . . . . . . . . . . . . . . . . . . . . . . . . . . . . . . . . . . . . . . . . . . . . . . . . . . . . . . . . . . . . . . . . . . . . . . . . . . . . . . . . . . . . . . . . . . . . . . . . . . . . . . . 47Geometry .... . . . . . . . . . . . . . . . . . . . . . . . . . . . . . . . . . . . . . . . . . . . . . . . . . . . . . . . . . . . . . . . . . . . . . . . . . . . . . . . . . . . . . . . . . . . . . . . . . . . . . . . . . . . . . . . . . . . . . . . . . . . . 47Material ... . . . . . . . . . . . . . . . . . . . . . . . . . . . . . . . . . . . . . . . . . . . . . . . . . . . . . . . . . . . . . . . . . . . . . . . . . . . . . . . . . . . . . . . . . . . . . . . . . . . . . . . . . . . . . . . . . . . . . . . . . . . . . . . . 48
iii

Amazon Sumerian User Guide
Camera .... . . . . . . . . . . . . . . . . . . . . . . . . . . . . . . . . . . . . . . . . . . . . . . . . . . . . . . . . . . . . . . . . . . . . . . . . . . . . . . . . . . . . . . . . . . . . . . . . . . . . . . . . . . . . . . . . . . . . . . . . . . . . . . . 49VR Camera Rig .... . . . . . . . . . . . . . . . . . . . . . . . . . . . . . . . . . . . . . . . . . . . . . . . . . . . . . . . . . . . . . . . . . . . . . . . . . . . . . . . . . . . . . . . . . . . . . . . . . . . . . . . . . . . . . . . . . . . . . 49HMD Camera .... . . . . . . . . . . . . . . . . . . . . . . . . . . . . . . . . . . . . . . . . . . . . . . . . . . . . . . . . . . . . . . . . . . . . . . . . . . . . . . . . . . . . . . . . . . . . . . . . . . . . . . . . . . . . . . . . . . . . . . . 50VR Controller ... . . . . . . . . . . . . . . . . . . . . . . . . . . . . . . . . . . . . . . . . . . . . . . . . . . . . . . . . . . . . . . . . . . . . . . . . . . . . . . . . . . . . . . . . . . . . . . . . . . . . . . . . . . . . . . . . . . . . . . . . 50Host .... . . . . . . . . . . . . . . . . . . . . . . . . . . . . . . . . . . . . . . . . . . . . . . . . . . . . . . . . . . . . . . . . . . . . . . . . . . . . . . . . . . . . . . . . . . . . . . . . . . . . . . . . . . . . . . . . . . . . . . . . . . . . . . . . . . . 50Speech .... . . . . . . . . . . . . . . . . . . . . . . . . . . . . . . . . . . . . . . . . . . . . . . . . . . . . . . . . . . . . . . . . . . . . . . . . . . . . . . . . . . . . . . . . . . . . . . . . . . . . . . . . . . . . . . . . . . . . . . . . . . . . . . . . 51
State Machine .... . . . . . . . . . . . . . . . . . . . . . . . . . . . . . . . . . . . . . . . . . . . . . . . . . . . . . . . . . . . . . . . . . . . . . . . . . . . . . . . . . . . . . . . . . . . . . . . . . . . . . . . . . . . . . . 52Script ... . . . . . . . . . . . . . . . . . . . . . . . . . . . . . . . . . . . . . . . . . . . . . . . . . . . . . . . . . . . . . . . . . . . . . . . . . . . . . . . . . . . . . . . . . . . . . . . . . . . . . . . . . . . . . . . . . . . . . . . . . . . 53
2D Graphics ... . . . . . . . . . . . . . . . . . . . . . . . . . . . . . . . . . . . . . . . . . . . . . . . . . . . . . . . . . . . . . . . . . . . . . . . . . . . . . . . . . . . . . . . . . . . . . . . . . . . . . . . . . . . . . . . . . . . . . . . . . . 53HTML .... . . . . . . . . . . . . . . . . . . . . . . . . . . . . . . . . . . . . . . . . . . . . . . . . . . . . . . . . . . . . . . . . . . . . . . . . . . . . . . . . . . . . . . . . . . . . . . . . . . . . . . . . . . . . . . . . . . . . . . . . . . . . . . . . . . 54HTML 3D .... . . . . . . . . . . . . . . . . . . . . . . . . . . . . . . . . . . . . . . . . . . . . . . . . . . . . . . . . . . . . . . . . . . . . . . . . . . . . . . . . . . . . . . . . . . . . . . . . . . . . . . . . . . . . . . . . . . . . . . . . . . . . . 54Sound .... . . . . . . . . . . . . . . . . . . . . . . . . . . . . . . . . . . . . . . . . . . . . . . . . . . . . . . . . . . . . . . . . . . . . . . . . . . . . . . . . . . . . . . . . . . . . . . . . . . . . . . . . . . . . . . . . . . . . . . . . . . . . . . . . . 55Light .... . . . . . . . . . . . . . . . . . . . . . . . . . . . . . . . . . . . . . . . . . . . . . . . . . . . . . . . . . . . . . . . . . . . . . . . . . . . . . . . . . . . . . . . . . . . . . . . . . . . . . . . . . . . . . . . . . . . . . . . . . . . . . . . . . . . 55Particle System ..... . . . . . . . . . . . . . . . . . . . . . . . . . . . . . . . . . . . . . . . . . . . . . . . . . . . . . . . . . . . . . . . . . . . . . . . . . . . . . . . . . . . . . . . . . . . . . . . . . . . . . . . . . . . . . . . . . . . 56Animation .... . . . . . . . . . . . . . . . . . . . . . . . . . . . . . . . . . . . . . . . . . . . . . . . . . . . . . . . . . . . . . . . . . . . . . . . . . . . . . . . . . . . . . . . . . . . . . . . . . . . . . . . . . . . . . . . . . . . . . . . . . . . 57Collider ... . . . . . . . . . . . . . . . . . . . . . . . . . . . . . . . . . . . . . . . . . . . . . . . . . . . . . . . . . . . . . . . . . . . . . . . . . . . . . . . . . . . . . . . . . . . . . . . . . . . . . . . . . . . . . . . . . . . . . . . . . . . . . . . . 58Rigid Body .... . . . . . . . . . . . . . . . . . . . . . . . . . . . . . . . . . . . . . . . . . . . . . . . . . . . . . . . . . . . . . . . . . . . . . . . . . . . . . . . . . . . . . . . . . . . . . . . . . . . . . . . . . . . . . . . . . . . . . . . . . . . 59State Machine .... . . . . . . . . . . . . . . . . . . . . . . . . . . . . . . . . . . . . . . . . . . . . . . . . . . . . . . . . . . . . . . . . . . . . . . . . . . . . . . . . . . . . . . . . . . . . . . . . . . . . . . . . . . . . . . . . . . . . . . 60Script ... . . . . . . . . . . . . . . . . . . . . . . . . . . . . . . . . . . . . . . . . . . . . . . . . . . . . . . . . . . . . . . . . . . . . . . . . . . . . . . . . . . . . . . . . . . . . . . . . . . . . . . . . . . . . . . . . . . . . . . . . . . . . . . . . . . . 64Timeline .... . . . . . . . . . . . . . . . . . . . . . . . . . . . . . . . . . . . . . . . . . . . . . . . . . . . . . . . . . . . . . . . . . . . . . . . . . . . . . . . . . . . . . . . . . . . . . . . . . . . . . . . . . . . . . . . . . . . . . . . . . . . . . . 65
Assets ... . . . . . . . . . . . . . . . . . . . . . . . . . . . . . . . . . . . . . . . . . . . . . . . . . . . . . . . . . . . . . . . . . . . . . . . . . . . . . . . . . . . . . . . . . . . . . . . . . . . . . . . . . . . . . . . . . . . . . . . . . . . . . . . . . . . . . . . . . . 68Packs .... . . . . . . . . . . . . . . . . . . . . . . . . . . . . . . . . . . . . . . . . . . . . . . . . . . . . . . . . . . . . . . . . . . . . . . . . . . . . . . . . . . . . . . . . . . . . . . . . . . . . . . . . . . . . . . . . . . . . . . . . . . . . . . . . . . 69Templates .... . . . . . . . . . . . . . . . . . . . . . . . . . . . . . . . . . . . . . . . . . . . . . . . . . . . . . . . . . . . . . . . . . . . . . . . . . . . . . . . . . . . . . . . . . . . . . . . . . . . . . . . . . . . . . . . . . . . . . . . . . . . . 70VR Tools ... . . . . . . . . . . . . . . . . . . . . . . . . . . . . . . . . . . . . . . . . . . . . . . . . . . . . . . . . . . . . . . . . . . . . . . . . . . . . . . . . . . . . . . . . . . . . . . . . . . . . . . . . . . . . . . . . . . . . . . . . . . . . . . . 71AR Tools ... . . . . . . . . . . . . . . . . . . . . . . . . . . . . . . . . . . . . . . . . . . . . . . . . . . . . . . . . . . . . . . . . . . . . . . . . . . . . . . . . . . . . . . . . . . . . . . . . . . . . . . . . . . . . . . . . . . . . . . . . . . . . . . . 72Hosts ... . . . . . . . . . . . . . . . . . . . . . . . . . . . . . . . . . . . . . . . . . . . . . . . . . . . . . . . . . . . . . . . . . . . . . . . . . . . . . . . . . . . . . . . . . . . . . . . . . . . . . . . . . . . . . . . . . . . . . . . . . . . . . . . . . . . 72Models ... . . . . . . . . . . . . . . . . . . . . . . . . . . . . . . . . . . . . . . . . . . . . . . . . . . . . . . . . . . . . . . . . . . . . . . . . . . . . . . . . . . . . . . . . . . . . . . . . . . . . . . . . . . . . . . . . . . . . . . . . . . . . . . . . . 73Skybox .... . . . . . . . . . . . . . . . . . . . . . . . . . . . . . . . . . . . . . . . . . . . . . . . . . . . . . . . . . . . . . . . . . . . . . . . . . . . . . . . . . . . . . . . . . . . . . . . . . . . . . . . . . . . . . . . . . . . . . . . . . . . . . . . . 74Media .... . . . . . . . . . . . . . . . . . . . . . . . . . . . . . . . . . . . . . . . . . . . . . . . . . . . . . . . . . . . . . . . . . . . . . . . . . . . . . . . . . . . . . . . . . . . . . . . . . . . . . . . . . . . . . . . . . . . . . . . . . . . . . . . . . . 76
Scripting .... . . . . . . . . . . . . . . . . . . . . . . . . . . . . . . . . . . . . . . . . . . . . . . . . . . . . . . . . . . . . . . . . . . . . . . . . . . . . . . . . . . . . . . . . . . . . . . . . . . . . . . . . . . . . . . . . . . . . . . . . . . . . . . . . . . . . . 78Built-in Scripts ... . . . . . . . . . . . . . . . . . . . . . . . . . . . . . . . . . . . . . . . . . . . . . . . . . . . . . . . . . . . . . . . . . . . . . . . . . . . . . . . . . . . . . . . . . . . . . . . . . . . . . . . . . . . . . . . . . . . . . . 79The Context Object ... . . . . . . . . . . . . . . . . . . . . . . . . . . . . . . . . . . . . . . . . . . . . . . . . . . . . . . . . . . . . . . . . . . . . . . . . . . . . . . . . . . . . . . . . . . . . . . . . . . . . . . . . . . . . . . . 79Parameters and Arguments .... . . . . . . . . . . . . . . . . . . . . . . . . . . . . . . . . . . . . . . . . . . . . . . . . . . . . . . . . . . . . . . . . . . . . . . . . . . . . . . . . . . . . . . . . . . . . . . . . . . . 80
Parameter Format .... . . . . . . . . . . . . . . . . . . . . . . . . . . . . . . . . . . . . . . . . . . . . . . . . . . . . . . . . . . . . . . . . . . . . . . . . . . . . . . . . . . . . . . . . . . . . . . . . . . . . . . . . 81Parameter Types .... . . . . . . . . . . . . . . . . . . . . . . . . . . . . . . . . . . . . . . . . . . . . . . . . . . . . . . . . . . . . . . . . . . . . . . . . . . . . . . . . . . . . . . . . . . . . . . . . . . . . . . . . . . 81
External Dependencies .... . . . . . . . . . . . . . . . . . . . . . . . . . . . . . . . . . . . . . . . . . . . . . . . . . . . . . . . . . . . . . . . . . . . . . . . . . . . . . . . . . . . . . . . . . . . . . . . . . . . . . . . . . . 82Debugging .... . . . . . . . . . . . . . . . . . . . . . . . . . . . . . . . . . . . . . . . . . . . . . . . . . . . . . . . . . . . . . . . . . . . . . . . . . . . . . . . . . . . . . . . . . . . . . . . . . . . . . . . . . . . . . . . . . . . . . . . . . . . 83
iv

Amazon Sumerian User Guide
What Is Amazon Sumerian?Amazon Sumerian is a set of tools for creating high-quality virtual reality (VR) experiences on the web.With Sumerian, you can construct an interactive 3D scene without any programming experience, test it inthe browser, and publish it as a website that is immediately available to users.
Public PreviewAmazon Sumerian is in public preview. Send feedback to [email protected] to helpus improve the editor prior to general availability.
Use the Sumerian library of assets or bring your own. When you import 3D models, Sumerian convertsand optimizes them automatically. Sumerian also has a library of primitive shapes, 3D models, hosts,textures, and scripts.
NoteNew to 3D, VR, animation, and scripting? The Sumerian website has a ton of helpful tutorials forevery level of experience.
The Sumerian 3D engine provides a library for advanced scripting with JavaScript, but you don't have tobe a programmer to create interactive VR! Use the built-in state machine to animate objects and respondto user actions like clicks and movement.
When you're ready to share your work with the world, you can publish it directly to Amazon CloudFrontas a static website that can be viewed with any WebVR-compatible browser and headset.
1

Amazon Sumerian User Guide
Amazon Sumerian Use Cases andRequirements
At the core of Amazon Sumerian is a web-based editor for constructing 3D scenes with animation,scripted interaction, and special effects. The editor runs in your web browser, and all of your data isstored in AWS. The editor outputs scenes to Amazon CloudFront as a static website that you can loaddirectly into any WebVR-compatible browser and headset, or embed in your website for others to access.
NoteDon't know how to script? The Sumerian editor provides a fully featured state machine forscripting animations and user interactions visually, with no coding required.
WebVR is an open specification that lets you create and share virtual reality (VR) experiences throughthe web. WebVR applications, like any web app, are supported on several desktop and mobile operatingsystems. This enables you to avoid the need to port your application to different programminglanguages and package formats to reach all users. Sumerian provides tools and components that you canuse to add VR to your scene (p. 71).
Sumerian also lets you create augmented reality (AR) applications. An AR application can use yourphone's camera or an AR-compatible headset to overlay graphics on the real world. Sumerian provides atemplate and sample application (p. 72) for creating ARKit applications for iOS phones.
Sumerian provides a library of optimized 3D objects and scene templates that you can use to constructscenes without any existing assets. If you do have 3D models, you can import them with their animationsand textures by dragging them from your file system into the editor canvas. Sumerian supports modelsin OBJ and FBX formats.
2

Amazon Sumerian User GuideUser Permissions
Amazon Sumerian PermissionsYou can use AWS Identity and Access Management (IAM) to grant Sumerian permissions to users andcompute resources in your account. IAM controls access to AWS at the API level to enforce permissionsuniformly and securely.
User PermissionsTo use the Sumerian editor (p. 22), add the following policy to your IAM user.
{ "Version": "2012-10-17", "Statement": [ { "Effect": "Allow", "Action": [ "sumerian:*" ], "Resource": "*" } ]}
You only need access to Sumerians APIs. Sumerian manages all of the storage (Amazon S3) and contentdelivery (Amazon CloudFront) related to the scenes that you create outside of your account.
Scene PermissionsTo use AWS services in a scene, the scene needs credentials as well. You can use Amazon Cognito Identityto create an identity pool that gives the scene access to a role with permission to use AWS. Create a rolethat has permissions to any services that you will access from scripts, and permissions for componentsthat use AWS services.
To create an identity pool for a Sumerian scene
1. Open the Federated identities page in the Amazon Cognito console.2. Choose Create new identity pool.3. Create a pool with the following settings.
• Unauthenticated identities – enabled4. Choose Edit identity pool to see the pool details.5. Note the Identity pool ID for later use.
When you create an identity pool, Amazon Cognito prompts you to create two roles, an authenticatedrole, and an unauthenticated role. Add permissions to the unauthenticated role.
To add permissions to an identity pool role for a Sumerian scene
1. Open the Roles page in the IAM console.
3
Amazon Sumerian User GuideScene Permissions
2. Choose the role named Cognito_pool-nameUnauth_Role.3. Choose Attach policy and add policies for the services that your scene uses.
• Speech component – AmazonPollyReadOnlyAccess gives the scene permission to use AmazonPolly to render text into audio with the speech component (p. 51).
• AWS SDK for JavaScript – add policies that grant access to the services that you call with the SDKfor JavaScript. For example, AmazonS3ReadOnlyAccess.
Assign the identity pool to your scene under AWS configuration (p. 35) in scene settings.
4

Amazon Sumerian User GuidePrerequisites
Getting Started with AmazonSumerian
To get started with Amazon Sumerian, assemble a scene from assets in the Sumerian library. In less thanan hour, you can create a scene with effects, animation, and support for virtual reality (VR) headsets. Thistutorial also shows basic use of scripting with the speech component, which uses Amazon Polly to rendertext into audio.
Sections
• Prerequisites (p. 5)
• Create a Project and Scene (p. 5)
• Configure the Scene (p. 6)
• Add and Configure Entities (p. 7)
• Add Behavior (p. 10)
• Add VR Mode (p. 12)
• Publish and View the Scene (p. 14)
• Clean Up (p. 14)
• Next Steps (p. 14)
PrerequisitesTo use the Sumerian editor, you need permission to use Sumerian APIs on your IAM user. Additionally,the scene itself needs permission to call Amazon Polly. You provide this permission by creating a role andan Amazon Cognito identity pool. Following the instructions at Amazon Sumerian Permissions (p. 3) toset up both.
You can use the editor in recent versions of Chrome or Firefox. To view the finished scene in VR, use thelatest version of Firefox. For VR mode, you also need a compatible headset.
Supported Hardware
• Oculus Rift
• HTC Vive
Create a Project and SceneCreate a project and a scene. The project can contain multiple scenes, as well as asset packs andtemplates that you create from those scenes.
To create a project and scene
1. Open the Sumerian dashboard.
5

Amazon Sumerian User GuideConfigure the Scene
2. Choose Projects, New project.
3. Enter tutorials for the project name and then choose Create.
4. Choose Create new scene.
5. Enter seesaw for the scene name and then choose Create.
Configure the SceneA skybox is a texture or set of textures that wraps around the scene to provide a background image. Adda skybox from the Sumerian Asset library.
To import a skybox from the Sumerian library
1. Choose Import assets at the top of the screen.
2.Choose Blue skysphere. If you don't find it right away, click the skybox icon to filter the list.
3. Choose Add.
This adds the skybox asset pack to the Asset panel. The pack contains the skybox asset, and the PNG-formatted texture that the skybox uses. Add the skybox to the scene in the scene settings underEnvironment. While you're there, add some fog and snow.
To configure the scene's environment
1. Choose the root node (seesaw) in the Entities panel, or click on the background of the scene in thecanvas. The groups of options that appear in the inspector panel on the right side of the screen arescene settings.
2. Click the Environment section to expand it. Expand the Skybox, Fog & Ambient, and Particlessections under it.
3. Click and drag the Blue skysphere skybox from the assets panel to the Drop skybox field in theinspector panel to attach it to the scene.
4. Choose Fog to enable it and configure its parameters:
• Fog near – 5
• Fog far – 20
This starts fading in fog at 5 units away from the camera, and completely obscures anything 20 unitsaway or farther.
5. Choose Snow to enable it, and then configure its parameters:
• Velocity – 20
• Rate – 30
• Height – 100
6. Click the play button at the bottom of the screen to see the snow fall. Adjust the velocity and rate ofthe snow to your liking. Changes to these settings are applied immediately during playback mode.
Later in this tutorial, you configure the scene to use Amazon Polly to render text into audio duringplayback. To do this, your scene needs credentials to use the AWS SDK for JavaScript in the web browser.Give the scene credentials by assigning it the ID of the identity pool that you created in the prerequisitessection (p. 5).
6
Amazon Sumerian User GuideAdd and Configure Entities
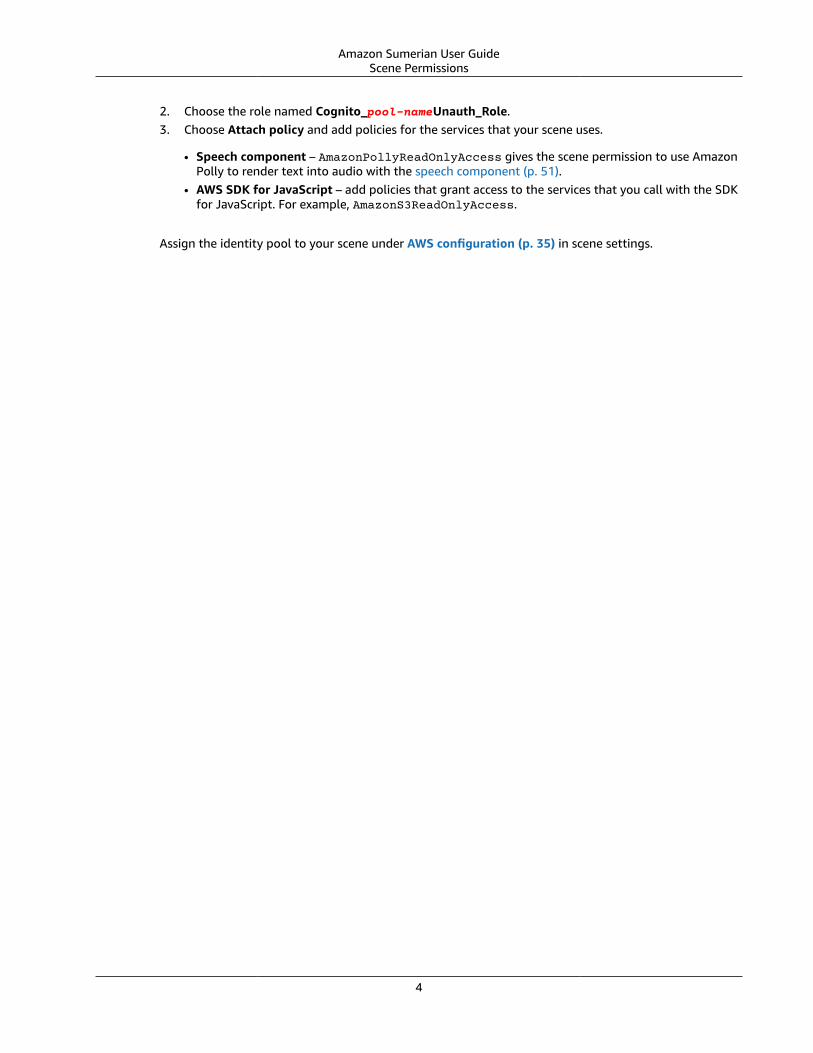
To configure AWS SDK for JavaScript credentials
1. Choose the root node in the Entities panel.
2. Expand the AWS configuration section in the inspector panel.3. Enter the Amazon Cognito identity pool ID.
Add and Configure EntitiesAdd some ground to the scene.
To add a snowy field to your scene
1. Choose Create entity.2.
Under 3D primitives, choose the quad .
The quad is selected automatically. If you select something else, you can click it in the canvas orentities panel to select it again
3. The quad's components appear in the inspector panel on the right side of the canvas. Expand thetop section and change the name of the entity to ground. The change is reflected in the sectionname and entities panel immediately.
4. Expand the Transform section, and then enter the following values:
• X rotation – -90• X, Y, and Z scale – 100
7

Amazon Sumerian User GuideAdd and Configure Entities
• Static – enabled
5. Expand the Material section and review the settings on each layer. You can click the diffuse orspecular colors to choose a different color, or drop image files to add textures.
The space near the camera right now is pretty dark. Add a directional light to light the scene, like the sunis shining in it.
To add a directional light
1. Choose Create entity.2. Under Lights, choose Directional.3. Expand the Transform section, and then enter the following values:
• Y translation – 10• X rotation – -30• Y rotation – -60• Static – enabled
4. Expand the Light section and enable Shadows.
Add a blank entity to represent the seesaw, and shapes for the fulcrum and plank.
To add the seesaw
1. Choose Create entity.2. Under Others, choose Entity.3. In the inspector panel, change the name of the entity to seesaw.4. Choose Create entity, and then add a cylinder to the scene.5. Rename the cylinder to fulcrum, uncheck Uniform scale, and set the Z scale to 0.6. Set the diffuse
color to yellow.6. Add a blank entity. Rename it to plank. This blank entity will serve as the parent to the plank
model, as well as a camera and host entity that will move with the plank.7. Add a box entity. Rename it to plank model. Apply the following transform and set the diffuse
color to blue:
8

Amazon Sumerian User GuideAdd and Configure Entities
• Y translation – .5
• Z rotation – 12
• X scale – 4.5
• Y scale – 0.1
• Z scale – 0.6
• Static – disabled
Next, import a host from the Sumerian library. Hosts are Sumerian-provided character models with built-in animation and support for speech.
To add a host
1. Choose Import assets.
2. Choose Cristine or Preston. Then choose Add.
3. When the asset pack finishes loading, drag the host entity from the Asset panel to the canvas.
4. Apply the following transform:
• X translation – 1.95
• Y translation – 0.97
• Z rotation – 12
• Y rotation – -90
• X, Y, and Z scale – 1.3
• Static – disabled
Finally, use the Entities panel to organize the entities that you created into a hierarchy. Drag an entityonto another one to make them parent and child.
9

Amazon Sumerian User GuideAdd Behavior
Add BehaviorYou can add behavior to your scene by attaching script or state machine components to entities.
A state machine lets you add behavior visually by choosing actions that are triggered by events, andorganizing them into states. Add a state machine to the plank entity to animate it and its children.
To animate the plank with a state machine.
1. Choose the plank in the entities panel.
2. In the inspector panel, choose Add component. Then choose State machine.
3. Click the plus symbol next to the behavior field to create a new behavior. Name it animate.
4. The State machine panel appears with a single state. Name the state up , and then choose Addaction.
5. Under Animate, choose Tween rotate. Apply the following properties:
• Z rotation – -24
• Relative – disabled
• Time – 1000
• Easing type – Linear
• Direction – In
6. Choose Add action again, and then add a Wait action. Apply the following properties:
• Time – 2000
• Random – 0
7. In the State machine panel, choose Duplicate state to make a copy of up. Double-click the newstate to open it in the inspector panel.
8. Change the state's name to down, and then change the rotation value from -24 to 0.
10

Amazon Sumerian User GuideAdd Behavior
9. In the State machine panel, each state shows two events, one that occurs at the end of theanimation, and one that occurs at the end of the wait action. Click the On wait end event under upand drag a line to the down state. Then do the same in the other direction.
10. Play the scene to watch the seesaw animate.
Add a camera to the other end of the seesaw and make it the default camera. During playback, the userwill stay in one location and look around the environment. A built-in camera script allows the user tolook around with the mouse prior to entering VR mode.
To add a camera with mouse look controls
1. Choose Create entity, and then add a fixed camera to the scene. Rename it to user, and then applythe following transform:
• X translation – -2.5
• Y translation – 1.2
• Y rotation – -90
2. In the entities panel, drag the camera onto the plank entity to make it move with the seesaw.
3. In the camera's Camera component, apply the following properties:
• Main camera – enabled
• FOV – 35
4. Choose Add component, and then add a script component to the camera.
5. Click the plus symbol next to the script field, and then choose Mouse look control. This adds aninstance of the mouse look built-in script. All instances of a script share the same script code, buthave separate parameter values.
6. To prevent the user from looking too low, change the Min ascent parameter to -40.
11

Amazon Sumerian User GuideAdd VR Mode
7. Play the scene and confirm the camera's behavior. Click and drag the left mouse button to lookaround the scene. You can adjust the script's parameters during playback and see how they affectthe controls immediately.
Hosts come with a speech component attached. To use it, you need to add AWS credentials to yourscene, add text files to the component, and add a script or state machine component to trigger thespeech during playback.
For this example, you'll use a script to do something that the state machine can't—choose and playa file at random. If you haven't already configured AWS credentials for your scene as described in theprerequisites section (p. 5), do that first.
To configure speech on the host
1. Choose the host in the canvas or entities panel.
2. Under Speech, drop some text files onto the speech field. You can use the files in this archive:sonnets.zip.
3. Choose a voice for the host. See Available voices in the Amazon Polly Developer Guide for a list ofvoices sorted by locale.
4. Add a script component to the host.
5. Click the plus symbol next to the script field, and then choose Custom.
6. Click edit (pencil icon) in the script instance parameters to open the script in the text editor. You canalso press the J key to open the text editor at any time.
7. Double-click the script name (Script) in the Documents list to change the name toRandomSpeech.
8. Replace the placeholder setup function with the following.
var setup = function(args, ctx) { sumerian.SystemBus.addListener('aws.sdkReady', () => { var speechComponent = ctx.entity.getComponent("speechComponent"); var speeches = speechComponent.speeches; var speech = speeches[Math.floor(Math.random() * speeches.length)]; speech.play(); }, true );};
This script waits for the AWS SDK for JavaScript to load and retrieve credentials. Then it gets areference to the speech component on the same entity (the host), and gets a list of all of theattached speeches. It chooses a speech from the array and plays it.
9. Play the scene to see the host recite a speech.
10.Return to the speech component and click next to each speech file to add gesture markup.
11. Play the scene again to see the host recite a speech with gestures.
Add VR ModeSo far you've only used a standard camera in playback mode. Add a virtual reality (VR) rig to let usersview the scene in 3D with a VR headset and head tracking. Sumerian bundles the entities and scriptsrequired for VR mode in an asset pack named CoreVR.
12
Amazon Sumerian User GuideAdd VR Mode
To add VR mode
1. Choose Import assets, and then add the CoreVR asset pack to your scene.
2. When the asset pack finishes loading, drag the VRCameraRig entity onto the canvas to add it toyour scene.
3. Choose the VRCameraRig entity.
4. Choose the VRCameraRig component.
5. Choose the Current VR camera rig option to enable the rig.
6. Uncheck the Start at current camera option. This enables use of the camera rig where it's placed inthe scene, instead of using the location of the non-VR camera when the user enters VR mode.
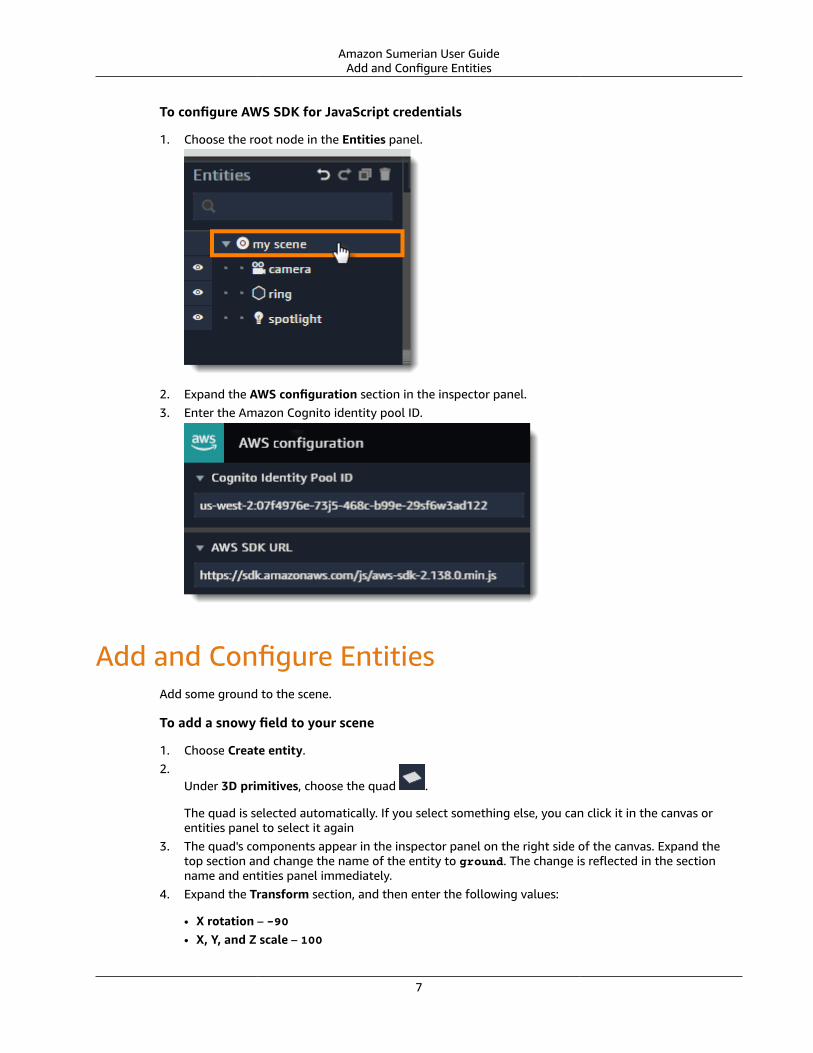
7. In the entities panel, drag the VRCameraRig entity onto the plank entity to make it a sibling to theuser camera.
8. Choose the user camera. Click the cog icon on the Transform section, and then choose Copy to copythe transform values.
9. Choose the VRCameraRig. Click the cog icon on the Transform section, and then choose Paste topaste the transform values from the user camera.
10. Use the green transform handle to adjust the height of the VR camera relative to the plank.
11. Play the scene and click the VR headset icon to enter VR mode.
13

Amazon Sumerian User GuidePublish and View the Scene
Publish and View the SceneTime to share your scene with the world. Publish the scene with Amazon CloudFront to host it as awebsite that anyone can see.
To publish and view the scene
1. Choose Publish from the Scene menu in the top left corner of the screen.2. Choose Publish.3. When the editor finishes publishing the scene, choose View.
Clean UpYour published scene is public and will stay online until you unpublish it.
To unpublish the scene
1. Choose Publish from the Scene menu in the top left corner of the screen.2. Choose Unpublish.3. Choose Yes.
You can keep the Sumerian scene and project around for use with other tutorials, or delete them. Youcan always restore the deleted items later from the trash menu.
To delete the project
1. Open the Sumerian dashboard.2. Choose a project.3. Under Project details, choose Delete.
If you created an identity pool for this tutorial and don't plan to use it again, delete it in the AmazonCognito console.
Next StepsLearn more about Sumerian in the next chapter, Amazon Sumerian Concepts (p. 15).
14

Amazon Sumerian User GuideScenes
Amazon Sumerian Concepts
Amazon Sumerian lets you create virtual reality (VR) and augmented reality (AR) scenes that are madeup of components and entities, organized into projects. Let's look closely at the concepts used in theSumerian editor and this guide.
ScenesA scene is a 3D space that contains objects and behaviors that define a VR or AR environment. Objectsinclude geometry, materials, and sounds that you import from a supported file format, and objectsthat you create in the scene like lights, cameras, and particle effects. Behaviors include state machinebehaviors, animations, timelines, and scripts.
When you're ready to show off your scene, export it directly to Amazon CloudFront as a static websitethat you can open in a browser.
See Scenes (p. 18) for more information.
Components and EntitiesAll objects and behaviors are components that combine to create entities. For example, when you importa 3D model and add it to a scene, the editor creates an entity that has a geometry component, a materialcomponent, a transform component, and an animation component. You can then use the editor to add arigid body, colliders, and other components to the entity.
See Amazon Sumerian Entities (p. 45) for more information.
AssetsAssets are the images, sounds, scripts, models, and documents that you import into Sumerian to use in ascene. You can manage assets independently of the scenes that use them in the asset library. Assets canbelong to a user or project.
See Asset Packs (p. 19) for more information.
HostsA host is a asset provided by Sumerian that has built in animation, speech, and behavior for interactingwith users.
15

Amazon Sumerian User GuideProjects
Hosts use Amazon Polly to speak to users from a text source. You can use hosts to engage users andguide them through a VR experience.
See Amazon Sumerian Host Component (p. 50) for more information.
ProjectsProjects are an organizational tool for managing scenes, assets, and templates.
See Projects (p. 17) for more information.
TemplatesTemplates let you save a copy of a scene to use as a starting point for other scenes. Templates belong toa project. Sumerian provides several templates, which you can access from the dashboard.
See Templates (p. 20) for more information.
16

Amazon Sumerian User GuideProjects
The Amazon Sumerian DashboardThe Dashboard is the first thing you see when you open the Amazon Sumerian app. This is where youmanage your projects, scenes, asset packs, and templates.
Projects collect scenes and the templates and asset packs that you export from them. You can createdraft projects outside of a project, but you must have a project to export templates and assets.
When you open a scene in the editor, it is locked to prevent other users from modifying it. The dashboardmanages locks and lets you steal a lock if the other user leaves a scene open by accident.
Topics
• Projects (p. 17)
• Scenes (p. 18)
• Asset Packs (p. 19)
• Templates (p. 20)
• Locks (p. 20)
ProjectsProjects collect the scenes that you are working on.
17

Amazon Sumerian User GuideScenes
To create a project
1. Open the Sumerian dashboard.2. Choose Projects.3. Choose New project.4. Enter a project name and choose Create.
Once you have a project, you can use the dashboard to make a copy or delete it.
To manage a project
1. Open the Sumerian dashboard.2. Choose a project.3. Under Project details, use one of the following options.
• Thumbnail – Choose Browse to upload a thumbnail image.• Name – Change the project name.• Description – Change the project description.• Actions – Move or Copy the project. Delete the project to send it to the Trash.• Published URLs – Choose View URL List to get links to all of the project's scenes that have been
published in Amazon CloudFront.
ScenesA scene is a 3D space that you manage in the dashboard and work on in the Sumerian editor. Sumerianprovides several templates that you can use as a starting point.
Scenes can be drafts, or part of a project.
To create a scene
1. Open the Sumerian dashboard.2. Choose the location to create the scene.
• Home – Create a draft scene.• Drafts – Create a draft scene.• Project – Create a scene in one of your projects.
3. Choose Create scene.4. (optional) Choose a template (p. 20).5. Enter a scene name and choose Create.
18

Amazon Sumerian User GuideAsset Packs
When you create a scene, it opens in the Sumerian editor (p. 22) for immediate use. Once you have ascene, you can use the dashboard to make a copy or delete it. Choose the Sumerian icon in the upper leftcorner to leave the scene and return to the dashboard.
To manage a scene
1. Open the Sumerian dashboard.2. Locate your scene under Recent scenes, Drafts, or a project.3. Choose the scene by clicking its thumbnail.
NoteIf you click on the name of the scene or double-click the thumbnail, the scene opens in theSumerian editor.
4. Under Scene details, use one of the following options.
• Thumbnail – Choose Browse to upload a thumbnail image.• Name – Change the scene name.• Description – Change the scene description.• Tags – Add tags to the scene for use with filters.• Actions
• Open – Open the scene in the Sumerian editor.• View published – Open the published version of the scene hosted in Amazon CloudFront.• Move – Move the scene to a different project.• Copy – Copy the scene to a different project.• Duplicate – Create a copy of the scene in the same project.• Delete – Send the scene to the Trash
Additional options for scenes are available in the Sumerian editor scene settings (p. 33).
Asset PacksThe Assets page for a project shows asset packs that have been exported from a scene.
In the dashboard, you can change the name and description of a pack, and copy or move it to anotherproject.
To manage an asset pack
1. Open the Sumerian dashboard.2. Choose a project.3. Choose Assets.4. Choose an asset pack.5. Under Asset details, use one of the following options.
• Thumbnail – Choose Browse to upload a thumbnail image.• Name – Change the asset pack name.• Description – Change the asset pack description.• Tags – Add tags to the asset pack for use with filters.• Actions
• Move – Move the asset pack to a different project.
19
Amazon Sumerian User GuideTemplates
• Copy – Copy the asset pack to a different project.• Delete – Send the asset pack to the Trash
Additional options for asset packs are available in the Sumerian editor (p. 69).
TemplatesTemplates are scenes that have been exported from a project for use as a starting point for other scenes.In addition to the templates provided by Sumerian, the dashboard lets you manage templates that youhave exported from a scene.
You can use the dashboard to create a scene from a template, or move or copy templates betweenscenes. Sumerian also provides a library of templates.
To create a scene from a template
1. Open the Sumerian dashboard.2. Choose Create new scene.3. Choose one of the Sumerian Templates, or choose My templates to use a template from one of
your projects.4. Enter a name for your scene and choose Create.
Create templates from your scenes from the scene settings section (p. 33) in the Sumerian editor. Youcan then copy your templates to other projects from the Templates section of the scene's project page inthe dashboard.
To manage a template
1. Open the Sumerian dashboard.2. Choose a project.3. Choose Templates.4. Choose a template.5. Under Template details, use one of the following options.
• Thumbnail – Choose Browse to upload a thumbnail image.• Name – Change the template name.• Description – Change the template description.• Tags – Add tags to the template for use with filters.• Actions
• Move – Move the template to a different project.• Copy – Copy the template to a different project.• Delete – Send the template to the Trash
LocksThe Amazon Sumerian editor uses locks to control modifications to a scene. When you open a scene, theeditor creates a lock on the scene and refreshes it periodically. If you try to open the scene in a differentbrowser while the lock is active, you will see an error.
20

Amazon Sumerian User GuideLocks
You can force Sumerian to discard the lock if you are sure that no one else is working on the scene, orcreate a copy of the scene and work on that.
21

Amazon Sumerian User Guide
Amazon Sumerian EditorThe Sumerian editor provides an interface for easily importing assets, building a scene, and publishingthe scene on the internet.
When you load a scene in the Sumerian editor, you can see a menu bar at the top of the screen, theentities panel, the assets panel, the canvas, and the inspector panel. This menu bar provides menus fornavigating between scenes, accessing tools, and publishing.
Top bar
• Sumerian logo– Exit to dashboard.• Scene – Create a new scene, publish your scene, or open a recent scene.• Tools – Access the text editor, behavior editor, and timeline editor.• Create entity – Add a shape, light, camera, or blank entity to the scene.• Import assets – Open the asset library.• Help – View the shortcut list or submit feedback.• Username – Log out.
The status bar at the bottom of the screen shows updates about save, import, and rendering operations.
Status bar
22

Amazon Sumerian User GuideCanvas
• Progress bar – Shows information about the current activity, such as model uploading.
• Path – The current user, project, and scene.
The following topics describe the menu options in each of the areas of the editor.
Panels and Menus
• Amazon Sumerian Editor Canvas (p. 23)
• Importing Assets From the Asset Library in the Amazon Sumerian Editor (p. 24)
• Using the Assets Panel in the Amazon Sumerian Editor (p. 25)
• Using the Entities Panel in the Amazon Sumerian Editor (p. 26)
• Using the Inspector Panel in the Amazon Sumerian Editor (p. 26)
• Using the Tools in the Amazon Sumerian Editor (p. 27)
• Keyboard and Mouse Controls for the Amazon Sumerian Editor (p. 30)
• Publishing Scenes in the Amazon Sumerian Editor (p. 32)
Amazon Sumerian Editor CanvasThe WebGL-rendered viewport is located in the center of the Sumerian editor. Here you can navigate,inspect, and preview the contents of your scene.
The menu bar at the top of the canvas has options for camera, playback, and rendering. Many of thebuttons also have equivalent keyboard commands (p. 30).
Canvas Menu
• – Hide or show side panels.
• – Change the transform handles to translate mode.
• – Change the transform handles to rotation mode.
• – Change the transform handles to scale mode.
• – Switch between relative and absolute positioning.
•
– Preview the rendered scene in the canvas.
• – Choose the render mode for the canvas.
• – Show or hide the skybox (p. 74) texture.
• – Show or hide the grid.
23

Amazon Sumerian User GuideAsset Library
• – Show or hide post effects.
• – View the scene with a preset camera.
• – Fill the canvas with the selected entity.
• – Fill the canvas with all entities in the scene.
• – Fill the screen with the canvas.
Importing Assets From the Asset Library in theAmazon Sumerian Editor
You can use the Sumerian editor's asset library to import assets from the Sumerian library, your localmachine, or from asset packs (p. 69) that you export from a scene.
To import assets
1. Open a scene in the Sumerian editor.
2. Choose Import assets.
3. Choose an asset type (p. 68) to filter the available assets by type.
4. Choose an asset pack, and then choose Add to add it to your scene's assets.
5. After the editor finishes importing the asset pack, drag an entity that it contains from the assetspanel (p. 25) onto the canvas to add it to your scene.
24
Amazon Sumerian User GuideAssets Panel
Using the Assets Panel in the Amazon SumerianEditor
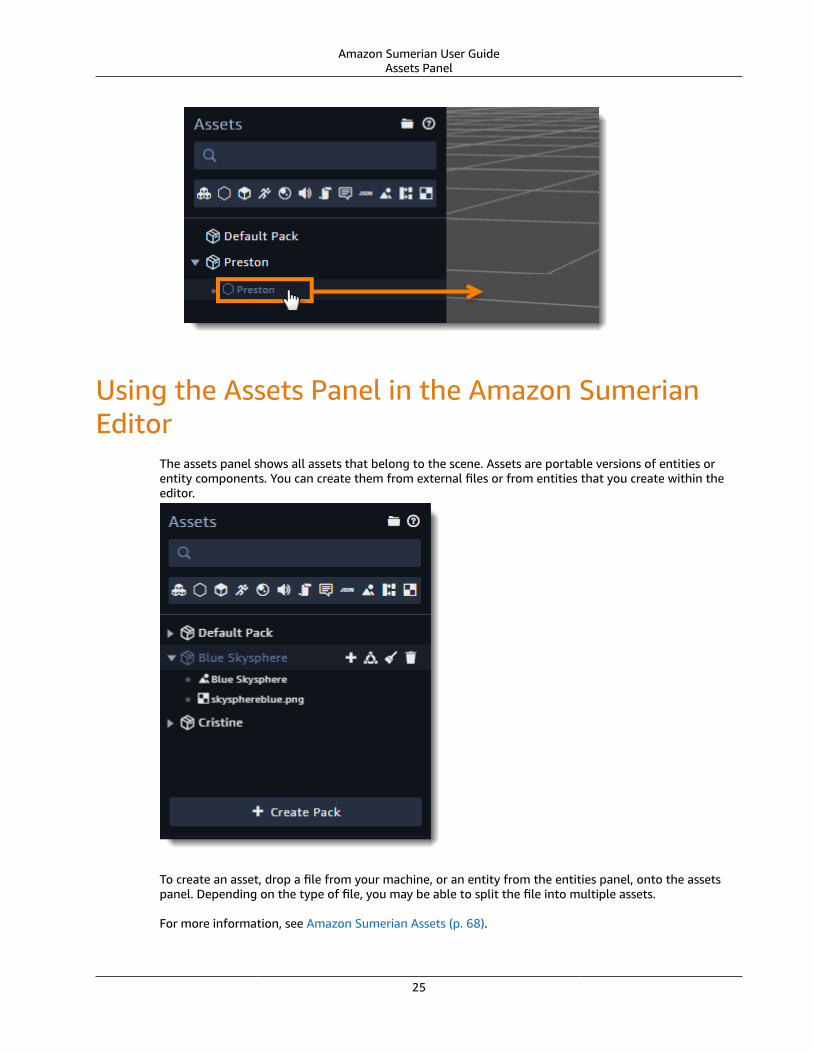
The assets panel shows all assets that belong to the scene. Assets are portable versions of entities orentity components. You can create them from external files or from entities that you create within theeditor.
To create an asset, drop a file from your machine, or an entity from the entities panel, onto the assetspanel. Depending on the type of file, you may be able to split the file into multiple assets.
For more information, see Amazon Sumerian Assets (p. 68).
25

Amazon Sumerian User GuideEntities Panel
Using the Entities Panel in the Amazon SumerianEditor
The entities panel shows you a scene's entities in a hierarchy, starting with the scene itself. An entitycan be a child of the scene or of another entity. When you choose the scene in the entities panel, theinspector panel (p. 26) shows the scene's settings. When you choose an entity, the inspector panelshows the entity's components.
Organize your entities by their physical or logical relationship to other entities. An entity's position,rotation, and scale are relative to its parent. When you move the parent, the child moves as well. Tochange an entity's parent, drag it onto the new parent in the entities panel.
Entities panel controls
• – Collapse the entity to hide its children in the entities panel.
• – Hide or show an entity in the canvas.
• – Duplicate an entity.
• – Delete an entity.
• – Undo or redo changes.
Using the Inspector Panel in the Amazon SumerianEditor
Use the inspector panel to manage scene settings, entities, and assets. When you select any of theseelements in the Sumerian editor, you get the following properties in a section named after the element.
26

Amazon Sumerian User GuideTools
Generic properties
• Thumbnail – The thumbnail image for the element. Drop an image onto the thumbnail field or pauseyour mouse over it. Then choose Take screenshot to save an image of the current view of the canvas.
• Name – The name of the element.
• ID (read-only) – A unique identifier for the element.
• Type (read-only) – The type of element: scene, entity, or an asset type (p. 68).
• Description – Description of the element.
• Tags – Key-only metadata that you can use in scripting. You can read tags or search for entities withspecific tags by using the context object (p. 79).
• Custom attributes – Key-value metadata that you can use in scripting. You can read attributes byusing the context object (p. 79).
When you choose the scene in the entities panel (p. 45), or click the scene's background in the canvas,the inspector panel shows several additional sections for settings that apply to the entire scene. Theseinclude environmental settings, post-processing effects, and AWS SDK credentials. See ??? (p. 33) formore information.
When you choose an entity in the entities panel, or click it in the canvas, the inspector panel shows asection for each component on the entity. At a minimum, every entity has a transform component thatdetermines its location, rotation, and size. Entities you create by dropping assets onto the scene haveadditional components based on their type. You can add components to any entity in the inspector panelby choosing Add component at the bottom of the panel. See ??? (p. 45) for more information.
When you choose an asset in the assets panel (p. 25), the inspector panel shows sections for onlycomponents that apply to every instance of the asset in the scene. For example, a script asset only hascode, but a script component on an entity can have parameters that customize that instance of thescript. A material asset, however, has all of the material component (p. 48) properties. Modifying anyof these properties changes every instance of the material in the scene.
Using the Tools in the Amazon Sumerian EditorThe Sumerian editor has three tool panels for working with complex assets and components:
• The text editor provides an interface for authoring scripts, JSON documents, and speech files.
27

Amazon Sumerian User GuideText Editor
• The timeline editor animates entities between keyframes.
• The state machine editor lets you visually construct and connect state machine behaviors and actions.
Text EditorThe text editor lets you view and modify all text assets in the scene, including scripts, JSON documents,and speech files.
To use the text editor, choose Tools, Text Editor. Or press the J key.
The Documents panel lists the text assets in your scene. Click one to open it in a tab. To rename an asset,highlight it and click the pencil icon.
When you open a script, the External Resources panel appears. You can use this panel to importlibrariesfrom the internet that your script depends on. See External Dependencies (p. 82) for moreinformation.
State Machine EditorThe state machine editor provides a visual representation of the actions and behaviors attached to astate machine component.
28

Amazon Sumerian User GuideTimeline
To use the state machine editor, click the pencil icon next to a behavior in the assets panel or on a statemachine component.
The state machine editor shows a box for each behavior. Each box has a stack of actions, listed in theorder that they execute. When an action transitions to another behavior, an arrow connects the action tothe target behavior. Click an action and drag the cursor to a behavior to create a transition between thetwo.
TimelineUse timelines to move, rotate, or change the scale of entities over time. You can set the start and endvalues of these properties, and add keyframes to control the speed or direction of the animation alongthe way. The timeline can also emit custom events, which can be consumed from a state machine orscript.
29

Amazon Sumerian User GuideKeyboard and Mouse
For more information, see Amazon Sumerian Timeline Component (p. 65).
Keyboard and Mouse Controls for the AmazonSumerian Editor
The default camera that Sumerian adds to every scene supports mouse controls for pan, zoom, andorbiting around the camera's anchor point. To move the camera, press and hold a mouse button whileyou move the mouse. If you only have one mouse button, you can use a keyboard key plus mouse buttoncombination to perform the same movements.
Camera Movement
• Zoom in or out – Mouse wheel scroll up or down
• Pan – Mouse wheel button, or Shift+Left mouse button
• Orbit – Right mouse button, or Alt+Left mouse button
30

Amazon Sumerian User GuideKeyboard and Mouse
The Sumerian editor provides keyboard equivalents of most of the canvas menu buttons (p. 23). Usethe bottom row of keys to switch between preset camera views, and the F key to fill the canvas with asingle entity. The space bar hides the side panels to let the canvas fill the screen.
Camera
• Frame entity – F• Frame all – Shift+F• Bottom and top views – V• Back and front views – C• Left and right views – X• Editor camera view – Z• Show and hide side bars – Space
Select entities by clicking them in either the editor or the Entities panel. With an entity selected, use thefollowing commands to speed up editing.
Editing
• Delete entity – Backspace or Delete• Duplicate entity – Ctrl+D• Translate handles – W• Rotation handles – E• Scale handles – R• Switch between global and relative transform – G• Undo – Ctrl+Z• Redo – Ctrl+Shift+Z
Use the following commands to open the text editor, timeline editor, and publishing menu.
Tools
• Text editor – J• Timeline – T• Publish – Ctrl+Shift+P
With the timeline open, use the following commands to adjust keyframes and playheads.
Timeline
• Move keyframe left – Left (fast), Ctrl+Left (slow)• Move keyframe right – Right (fast), Ctrl+Right (slow)• Move playhead left – Shift+Left (fast), Ctrl+Shift+Left (slow)• Move playhead right – Shift+Right (fast), Ctrl+Shift+Right (slow)• Align keyframe left – Ctrl+Alt+1• Align keyframe center – Ctrl+Alt+2• Align keyframe right – Ctrl+Alt+3• Move keyframe to start – Home• Move keyframe to end – End
31

Amazon Sumerian User GuidePublish
Publishing Scenes in the Amazon Sumerian EditorPublish your Sumerian scene to share it with users on the internet. When you publish a scene, Sumeriancreats a static website with your scene and hosts it on Amazon CloudFront. You can link users directly tothe scene, or embed it in a frame in your website.
To publish a scene
1. Open your scene in the Sumerian editor.2. Choose Scene, and then choose Publish.3. Configure publishing settings.
• Custom CSS – Specify the contents of a style tag to add to the generated webpage.• Custom JavaScript – Specify the contents of a script tag to add to the generated webpage.
4. Choose Publish.
After a few seconds, your scene is live. You can click View to open it.
32

Amazon Sumerian User Guide
Amazon Sumerian Scene Settings
In addition to the options available in the dashboard (p. 18), the Sumerian editor contains many optionsfor configuring a scene. In the inspector panel, you can configure credentials for the AWS SDK forJavaScript, adjust the canvas size and grid, and configure global settings like fog, background image, andpost-processing effects.
To configure a scene
1. Open a scene in the Sumerian editor.
2. Choose the root node in the Entities panel.
3. Modify scene settings in the inspector panel.
• Details – Update the scene's name and description.
• Tags – Add metadata tags to the scene.
• Custom attributes – Add metadata key-value pairs to the scene.
You can save a copy of your scene as a template to use as a starting point for creating other scenes. Ifyour scene is saved to a project, the template is saved to the same project. Otherwise, you must choose aproject to hold the template.
To create a template
1. Open a scene in the Sumerian editor.
2. Choose the root node in the Entities panel.
33

Amazon Sumerian User Guide
3. Expand the scene section in the inspector panel.
4. Choose Save scene as template.
5. If the scene is a draft, choose a project for the template.
You can copy or move templates between scenes (p. 20) in the dashboard. You can update a template bycreating a template again from the same source scene or from a scene created from the template. Whenyou save a template, you can choose to create a new template or update the existing template.
Collapse the scene settings section by choosing the name of your scene.
Sections
• Configuring AWS Credentials for Your Amazon Sumerian Scene (p. 35)
• Creating Snapshots of Your Amazon Sumerian Scene (p. 36)
• Configuring the Canvas for Your Amazon Sumerian Scene (p. 38)
• Configuring Environment Settings for Your Amazon Sumerian Scene (p. 39)
• Configuring Post-Processing Effects for Your Amazon Sumerian Scene (p. 40)
34

Amazon Sumerian User GuideAWS Configuration
• Calculating the Size of Your Amazon Sumerian Scene (p. 43)• Viewing Performance Information for Your Amazon Sumerian Scene (p. 43)
Configuring AWS Credentials for Your AmazonSumerian Scene
The AWS configuration section lets you configure credentials to use with the AWS SDK for JavaScript.You can set a Amazon Cognito identity pool ID, which Sumerian uses to retrieve credentials when thescene is loaded. The identity pool must have an unauthenticated role with permission to use the AWSAPIs that your scripts access.
NoteIf you don't have an identity pool, follow the instructions under Amazon SumerianPermissions (p. 3) to create one.
To configure AWS SDK for JavaScript credentials
1. Open a scene in the Sumerian editor.2. Choose the root node in the Entities panel.
3. Expand the AWS configuration section in the inspector panel.4. Enter an Amazon Cognito identity pool ID.
To use the credentials, create a script that listens for aws.sdkReady before initializing an SDK forJavaScript client. The following example lists the contents of an Amazon S3 bucket named mybucket in
35

Amazon Sumerian User GuideSnapshots
the browser console. To test its functionality, create a script (p. 78), attach it to an entity, and play thescene.
Example S3listobjects script
'use strict';
var setup = function(args, ctx) { sumerian.SystemBus.addListener('aws.sdkReady', () => { let s3 = new AWS.S3(); s3.listObjects({Bucket: "mybucket"}, function(err, data) { if (err) { console.log('ERROR', err, data); } else { console.log('DATA', data); } } ); }, true );};
Creating Snapshots of Your Amazon SumerianScene
You can use the Snapshots panel to create a copy of your scene that you can use to restore your scenelater. Create snapshots to set a restore point prior to trying new features or making sweeping changes toyour scene.
To create a snapshot
1. Open a scene in the Sumerian editor.
2. Choose the root node in the Entities panel.
3. Expand the Snapshots section in the inspector panel.
36

Amazon Sumerian User GuideSnapshots
4. Enter a description.
5. Choose Create.
To restore or delete a snapshot
1. Open a scene in the Sumerian editor.
2. Choose the root node in the Entities panel.
3. Expand the Snapshots section in the inspector panel.
4. Choose a snapshot.
5. Choose Restore or Delete.
37

Amazon Sumerian User GuideDocument
Configuring the Canvas for Your Amazon SumerianScene
You can use the document panel to configure the size of the WebGL canvas and grid color. These settingsapply only while you are working on a scene in the editor, and to the published scene.
To configure the canvas using document settings
1. Open a scene in the Sumerian editor.
2. Choose the root node in the Entities panel.
3. Expand the Document section in the inspector panel.
38
Amazon Sumerian User GuideEnvironment
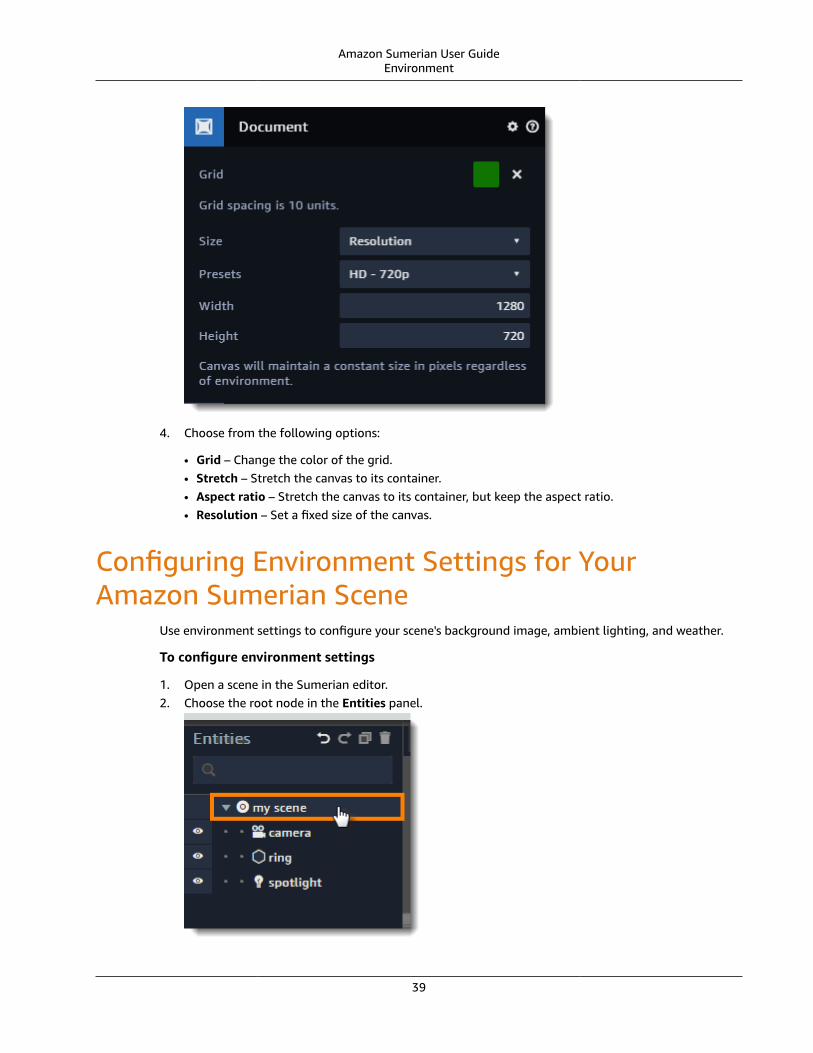
4. Choose from the following options:
• Grid – Change the color of the grid.• Stretch – Stretch the canvas to its container.• Aspect ratio – Stretch the canvas to its container, but keep the aspect ratio.• Resolution – Set a fixed size of the canvas.
Configuring Environment Settings for YourAmazon Sumerian Scene
Use environment settings to configure your scene's background image, ambient lighting, and weather.
To configure environment settings
1. Open a scene in the Sumerian editor.2. Choose the root node in the Entities panel.
39
Amazon Sumerian User GuidePost Effects
3. Expand the Environment section in the inspector panel.
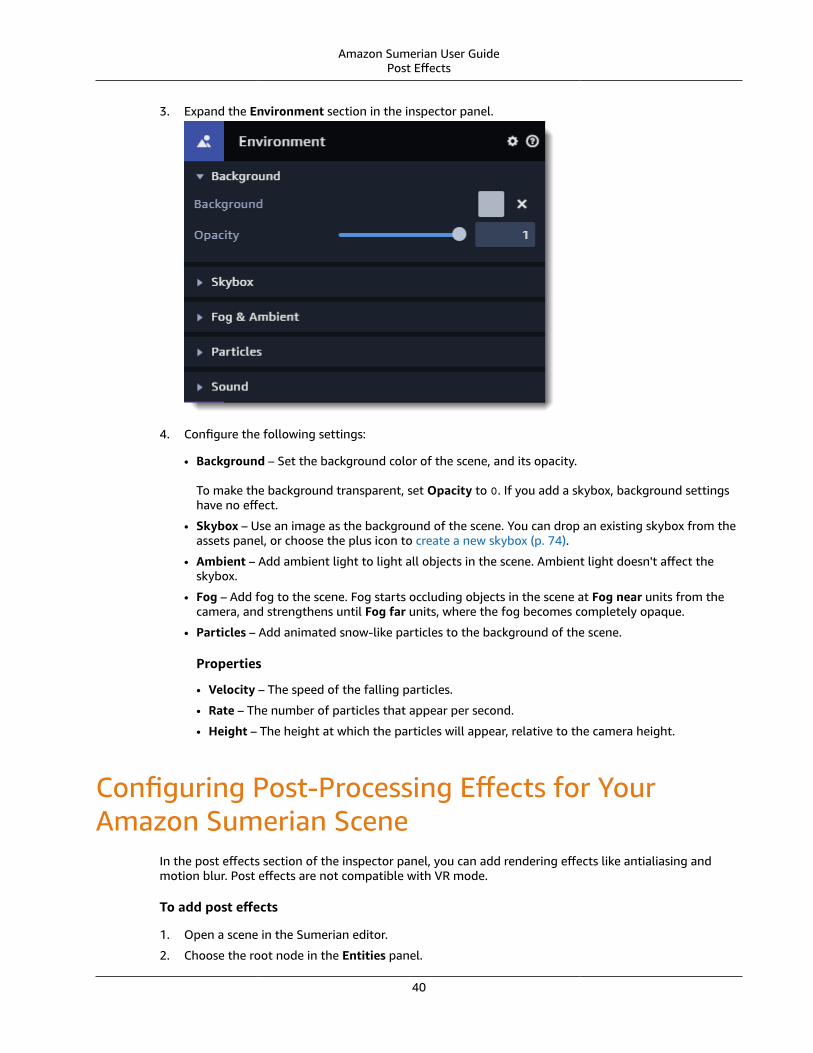
4. Configure the following settings:
• Background – Set the background color of the scene, and its opacity.
To make the background transparent, set Opacity to 0. If you add a skybox, background settingshave no effect.
• Skybox – Use an image as the background of the scene. You can drop an existing skybox from theassets panel, or choose the plus icon to create a new skybox (p. 74).
• Ambient – Add ambient light to light all objects in the scene. Ambient light doesn't affect theskybox.
• Fog – Add fog to the scene. Fog starts occluding objects in the scene at Fog near units from thecamera, and strengthens until Fog far units, where the fog becomes completely opaque.
• Particles – Add animated snow-like particles to the background of the scene.
Properties
• Velocity – The speed of the falling particles.
• Rate – The number of particles that appear per second.
• Height – The height at which the particles will appear, relative to the camera height.
Configuring Post-Processing Effects for YourAmazon Sumerian Scene
In the post effects section of the inspector panel, you can add rendering effects like antialiasing andmotion blur. Post effects are not compatible with VR mode.
To add post effects
1. Open a scene in the Sumerian editor.
2. Choose the root node in the Entities panel.
40

Amazon Sumerian User GuidePost Effects
3. Expand the Post effects section in the inspector panel.
4. Choose Add effects.
5. Choose one or more effects, and then choose Add.
6. Adjust the settings for each effect in the inspector panel.
7.See how post effects affect rendering by clicking the post effects icon in the canvas toolbar totoggle them on and off.
Post effects properties
• Antialias – Add FXAA-based antialiasing to smooth out jagged edges.
• Span – The area of the smoothing effect.
• Bloom – Make bright background colors bleed over the edges of foreground objects.
• Opacity – The amount of bloom applied.
• Size – The size of the glow area.
• Gain – The amount of brightness added.
• Intensity – The amount of contrast.
• Bleach – Alter input color by its luminance.
• Opacity – The blending multiplier for the effect.
• Blur – Blur the entire scene to make it appear out of focus.
41

Amazon Sumerian User GuidePost Effects
• Amount – The amount of blending that causes the blur.• Size –The size of the blur area.
• Contrast – Adjust the brightness, contrast, and saturation.• Brightness – Remove or add brightness.• Contrast – Adjust the contrast.• Saturation – Adjust the color saturation.
• Dot – Add a black-and-white lattice effect.• Angle – The angle of the lattice.• Scale – The thickness of the lattice.• SizeX – Skew the lattice on the X axis.• SizeY – Skew the lattice on the Y axis.
• Edge detect – Add a difference of Gaussians-based edge detection.• Gauss Sigma – The base of the two Gaussian kernels.• Threshold – The edge detection tolerance value.• Background % – The amount of blending between the background and edge colors.• Edge Color – The edge color.• Background Color – The background color.
• Film grain – Add noise and resolution lines.• Noise – The amount of noise.• Line Intensity – The sharpness of the lines.• Line Count – The number of lines.
• Hatch – Render the scene in black and white, with a lattice effect over black areas.• Width – The width of the lattice lines.• Spread – The distance between the lattice lines.
• HSB (hue, saturation, and brightness) – Adjust colors of the scene.• Hue – Adjust the hue.• Saturation – Adjust the color saturation.• Brightness – Adjust the image brightness.
• Levels – Apply gamma correction to the image.• Gamma – Adjust the gamma level.• Min input and Max input – The gamma input range.• Min output and Max output – The gamma output range.
• Motion Blur – Apply a blur effect to objects that moved since the previous rendered frame. If thecamera moves, the entire image blurs.• Amount – The amount of blending.• Scale – Overlay the previous frame on top of the current frame at a different scale to create a
zooming or flying effect.• Noise – Add signal noise to the image.
• Noise – The amount of signal noise.• Overlay – Overlay a texture on the image.
• Texture – The texture asset.• Blend mode – The method of blending the overlay and background.• Amount – The amount of blending.
• Radial – Add a radial blur to the image.• Offset – The blur offset.• Multiplier – The blur multiplier.
42

Amazon Sumerian User GuideScene Size
• RGB shift – Split the image into red, green, and blue layers with an offset between layers.
• Amount – The distance between the layers.
• Angle – The angle in radians between the layers.
• Sepia – Add a sepia color filter.
• Amount – The intensity of the effect.
• Tint – Apply a color filter to the image.
• Color – The tint color.
• Amount – The intensity of the effect.
• Vignette – Add a dark gradient around the edges of the image.
• Offset – The size of the gradient.
• Darkness – The strength of the gradient.
Calculating the Size of Your Amazon SumerianScene
The Scene Size section calculates how much data your scene is using. You can see the number ofkilobytes from JSON, mesh data, and binaries.
The numbers shown reflect the uncompressed size of the scene. When a scene is served from AmazonCloudFront, the contents are compressed. To see the compressed size, open your scene and use thenetwork tab of the browser developer tools to find the amount of data transferred.
Viewing Performance Information for YourAmazon Sumerian Scene
The Scene stats section gives you some performance statistics about the current scene.
43

Amazon Sumerian User GuideScene Stats
Stats
• FPS – The number of frames rendered per second.• Draw calls – The number of draw calls made per frame.• Entities – The number of visible entities.• Lights – The number of lights being rendered.• Shadow casters – The number of shadow casters being rendered.• Shaders – The number of shaders being rendered.• Texture size – The current texture size in the GPU.• Triangles – The number of triangles being rendered.
To improve performance, try reducing the number of draw calls, lights, and shaders.
44

Amazon Sumerian User GuideManaging Entities
Amazon Sumerian EntitiesEntities are a kind of container in Sumerian that you use to collect and organize assets in your scene.For example, when you add a 3D model to your scene, the editor splits it into mesh, texture, andanimation assets and assigns them to an entity with the corresponding Sumerian geometry, material,and animation components.
Entities can be cameras, lights, or containers for other entities. The Entities panel (p. 26) organizesentities into a hierarchy. You can use it to attach entities to one another in parent-child relationships.
Components are the configurable parts of an entity that determine its appearance and behavior duringplayback. To make a lamp model light the scene, add a light component. To move or change the entityduring playback, add a state machine, timeline, or script component.
To create an entity and add components
1. Open a scene in the Sumerian editor.2. Choose Create entity.3. Choose a shape or built-in object. For a blank entity, choose Entity.4. Choose the new entity in the entities panel.5. In the inspector panel, expand the Details section. Enter text in the fields to change the entity name,
description, tags, and attributes.6. To place the entity in the scene, use the X, Y, and Z axis handles in the canvas. Or expand the
Transform section and enter absolute coordinates.7. Choose the plus icon, and then choose a component type to add a component to the entity.
Managing EntitiesUse the entities panel to organize your scene's entities in a hierarchy. When you make an entity a child ofanother entity, it attaches to the parent. That is, when you move the parent, the child moves, and whenyou set the child's position, it's relative to the position of the parent.
To manage entities
1. Open a scene in the Sumerian editor.
45

Amazon Sumerian User GuideManaging Components
2. Choose an entity in the entities panel.3. Drag the entity onto another entity to make it a child of that entity.4. Use the icons next to the entity name to manage it the eye icon next to an entity to hide it.
• – Hide the entity.
• – Make a copy of the entity.
• – Delete the entity.
Managing ComponentsComponents have properties you can use to configure settings or attach assets. All entities include atransform component that you can use to move the entity around the scene. Depending on the type ofentity that you create, other components are also included automatically.
Default Components
• 2D shapes – Transform, 2d graphics• 3D shapes – Transform, geometry, material• Cameras – Transform, camera, script• HTML 3D – Transform, HTML 3D• Lights – Transform, light• Particles – Transform, particles• Timeline – Transform, timeline
To manage components
1. Open a scene in the Sumerian editor.2. Choose an entity in the entities panel.3. In the inspector panel, choose a component's name to expand or collapse its properties. See the
topics below for each component for details on their available properties.4. Click the cog icon and use the following options:
• Reset – Restore the default values for the component's properties.• Toggle panel – Show or hide the component properties.• Remove – Delete the component.• Copy (some components) – Copy the component configuration.• Paste (some components) – Paste the component configuration that you copied from the same
component on a different entity.
Some components also have special properties that are affected by the components on their parent. Forexample, a collider's behavior changes depending on the type of rigid body that's attached to the sameentity or parent entity.
The following topics describe the parameters and use of each type of component.
46

Amazon Sumerian User GuideTransform
Basic Components
• Amazon Sumerian Transform Component (p. 47)• Amazon Sumerian Geometry Component (p. 47)• Amazon Sumerian Material Component (p. 48)• Amazon Sumerian Camera Component (p. 49)• Amazon Sumerian VR Camera Rig Component (p. 49)• Amazon Sumerian HMD Camera Component (p. 50)• Amazon Sumerian VR Controller Component (p. 50)• Amazon Sumerian Host Component (p. 50)• Amazon Sumerian Speech Component (p. 51)
Content and Effects
• Amazon Sumerian 2D Graphics Component (p. 53)• Amazon Sumerian HTML Component (p. 54)• Amazon Sumerian HTML 3D Component (p. 54)• Amazon Sumerian Sound Component (p. 55)• Amazon Sumerian Light Component (p. 55)• Amazon Sumerian Particle System Component (p. 56)
Animation and Physics
• Amazon Sumerian Animation Component (p. 57)• Amazon Sumerian Collider Component (p. 58)• Amazon Sumerian Rigid Body Component (p. 59)• Amazon Sumerian State Machine Component (p. 60)• Amazon Sumerian Script Component (p. 64)• Amazon Sumerian Timeline Component (p. 65)
Amazon Sumerian Transform ComponentThe transform component contains the local transform of the component –translation, rotation, andscale. The transform is relative to its parent.
Properties
• Translation – Position of the object relative to its parent.• Rotation – Rotation of the object in degrees.• Scale – Size of the object.• Uniform scale – Proportions to maintain when scale is modified on any axis.• Static – Optimization of the object's rendering based on it not moving during playback.
Amazon Sumerian Geometry ComponentThe geometry component contains a renderable mesh or primitive on the entity. When you import a 3Dmodel, or create a primitive from the Create entity menu, it always gets a geometry component.
47

Amazon Sumerian User GuideMaterial
Together with a material component, you can render the entity. If you don't have a material component,the geometry is invisible.
The panel looks different for different kinds of meshes and primitives, but in general, they have thesesettings:
Properties
• Cast shadows• Receive shadows• Dimensions and/or number of samples (primitives only)
Amazon Sumerian Material ComponentWhen you add a 3D model to your environment, it has at least two components. The geometrycomponent (p. 47) defines the shape of the model. The material component defines its textures andrendering properties.
Properties
• Diffuse color – The base color of the surface.• Color – The base diffuse color.• Texture – The diffuse color from a texture.
• Normal – A type of bump map. Normal maps are a special kind of texture that you use to add surfacedetail such as bumps, grooves, and scratches to a model. These details catch the light as if they arerepresented by real geometry.
You set the normal map via the Texture input, and you can alter its magnitude by setting the Strengthvalue.
• Specular – Specular effects, which are essentially the direct reflections of light sources in your scene.These typically show up as bright highlights or shininess on the surface of objects (although specularhighlights can be subtle or diffuse, too).
You can set the base specularity Color, use a Texture, and set the shininess value.• Emissive – The self-illumination color of an object. You can set the emissive color by using the Color
input and/or by using a Texture.• Ambient – The color of an object where it is in shadow. This color is what the object reflects when
illuminated by ambient light instead of direct light.• Color The base ambient color.• Texture Ambient map that identifies areas on a mesh that are exposed or hidden from ambient
lighting.• Opacity – Used with transparency blending. You can use Strength to input a value between 0 and 1,
where 0.0 represents completely transparent and 1.0 represents fully opaque.• Threshold – Used to indicate when a surface is completely transparent, and can be discarded from
rendering.• Dual transparency – Render both front and back surfaces of the material.
• Reflectivity – Reflectivity settings for the material.• Texture – Reflectivity texture.• Environment – Environment map that you see in the reflection. If not selected, the current skybox is
used.• Amount – Amount of reflectivity to use.• Fresnel – A nonzero fresnel value results in less reflection, depending on the normal direction.
48

Amazon Sumerian User GuideCamera
• Refractivity – Refraction input. Takes in a texture or value that simulates the surface's index ofrefraction. This is useful for things like glass and water, which refract light that passes through them.The environment texture is used for the refraction.• Amount – How much refraction to blend with the current color.• Refraction – Ratio of the refractive indices involved in the refraction.
• Blending – Blending mode to use for the material.• NoBlending• TransparencyBlending• CustomBlending• AdditiveBlending• SubtractiveBlending• MultiplyBlending
• Culling – Whether to cull on the triangle level, and which face (back, front, both) to cull.• Depth – Whether to enable depth testing or depth writing, and which RenderQueue value to use.• Shading
• Flat – Turn on flat shading for the mesh.• Wireframe – Render the mesh in wireframe mode.• Wrap factor – The wrap factor.• Wrap amount – The wrap amount.
NoteYou can share material assets between entities. If a material asset is shared, changing the lookof one entity also changes the ones that are sharing the material.
Amazon Sumerian Camera ComponentThe camera component adds a camera to your entity. In the Amazon Sumerian editor, you can use it todefine your 3D viewport.
Properties
• Main camera – Use this camera at the beginning of the scene. If you have multiple cameras, you canswitch between them during both edit and playback modes.
• Follow editor camera – Set the camera position with the editor camera. This is useful when switchingbetween edit and play modes.
• Projection – Control how the camera will project the 3D world on the 2D canvas.• Field of view (FOV) – Set the number of degrees from left to right that the camera will span.• Clipping planes – Set the distance from the camera at which objects are drawn.
Amazon Sumerian VR Camera Rig ComponentThe VR camera rig component configures a virtual reality (VR) headset and controllers for use in VRmode during playback. When a user has a supported headset, they can click the VR button to switchbetween the main camera (p. 49) and the head mounted display (HMD) camera (p. 50) thatrepresents a VR headset.
Supported Hardware
• Oculus Rift
49

Amazon Sumerian User GuideHMD Camera
• HTC Vive
Attach the VR camera rig component to an entity with child entities for the HMD camera and each VRcontroller. The CoreVR asset pack (p. 71) in the Sumerian library contains a rig entity with an HMDcamera and controllers for each supported headset.
Properties
• Load gamepads – Deselect to disable controllers.• Start at current camera – Deselect to use the camera from its transform location, instead of swapping
out the main camera for the VR rig when the user enters VR mode.• Current VR camera rig – Select to use this rig in VR mode.
Amazon Sumerian HMD Camera ComponentThe HMD camera component represents a head mounted display (HMD) in a VR camera rig. When youattach an entity with an HMD camera component to a VR camera rig, users can use a VR headset to viewthe scene in VR mode.
This component doesn't have any configurable properties. See Amazon Sumerian VR Camera RigComponent (p. 49) for more information.
Amazon Sumerian VR Controller ComponentThe VR controller component represents a single virtual reality (VR) controller in a VR camera rig. Whena user enters VR mode with a controller attached, the VR controller component tracks its location in 3Dspace.
See Amazon Sumerian VR Camera Rig Component (p. 49) for more information.
Properties
• ID – Controller type that this entity represents.
Amazon Sumerian Host ComponentA host is an asset provided by Sumerian that has built in animation, speech, and behavior for interactingwith users. Add a host to your scene from the asset library (p. 24).
50

Amazon Sumerian User GuideSpeech
When you add a host to your scene, it includes a Host component for configuring the host's behavior,and a speech component (p. 51) that you can use to configure the host's voice and script.
Properties
• Point of interest – Set to Look at entity to keep the host's eyes trained on a camera, object, or otherentity during playback.
• Target entity – Drop an entity here to set it as the host's point of interest.
• Lip sync – Play lip sync animations during speech.
• Gestures – Play gesture animations during speech.
• Gesture hold time – Set the number of seconds to play a gesture animation.
• Minimum gesture period – Set the number of seconds to wait after a gesture is complete beforeanother gesture can occur.
Amazon Sumerian Speech ComponentThe speech component assigns text to an entity for playback with Amazon Polly. You assign text to anentity, and play the audio output from Amazon Polly with a state machine or script. The scene callsAmazon Polly at runtime to generate the audio.
To use Amazon Polly during playback, the scene needs AWS credentials from Amazon Cognito Identity.Create an identity pool (p. 3) for your scene, and configure it under AWS configuration (p. 35) in thescene settings.
51

Amazon Sumerian User GuideState Machine
Properties
• Voice – An Amazon Polly voice.
• Volume – Volume of the rendered audio.
•Speech files – Drop text files here to add them to the component. Click to mark up a speech filewith gestures.
To trigger a speech during playback, use a state machine or script component on the same entity.
State MachineTo play a speech, add a state machine (p. 60) to the entity with the speech component. Add a statewith AWS SDK ready and Start speech actions.
52

Amazon Sumerian User GuideScript
ScriptTo play a speech, get a reference to the speech component from the context object. The component hasa speeches array that contains the speeches attached to the component. Call play on a speech.
Sumerian calls Amazon Polly when you play a speech, so you must use the aws.sdkReady listener toensure that your scene's AWS credentials are loaded before the call.
Example script – play a random speech
'use strict';var setup = function(args, ctx) {sumerian.SystemBus.addListener('aws.sdkReady', () => { var speechComponent = ctx.entity.getComponent("speechComponent"); var speeches = speechComponent.speeches; var speech = speeches[Math.floor(Math.random() * speeches.length)]; speech.play(); }, true);};
Amazon Sumerian 2D Graphics ComponentA two-dimensional image or video.
Properties
• Tint – The tint color.
• Emissiveness – The emissiveness of the image.
• Opacity – The opacity of the image.
• Reflection – The reflectivity of the image.
53

Amazon Sumerian User GuideHTML
Amazon Sumerian HTML ComponentThe HTML component adds a 2D DOM element to the entity, and lets you edit its HTML contents usingthe text editor. You can position the component using the entity transform, or use CSS to position itrelative to the viewport.
Properties
• Move with transform – Deselect to position the component with CSS, instead of using the transformcomponent.
• Pixel perfect – Snap the HTML component to the closest pixel position.
• Attributes – Add HTML attributes to the DOM. This can be useful for positioning, for example. If youwant to set the position to the bottom right corner, you can do this:
Note that other attributes on the DOM element will be overridden by the attributes you add here.
Choose the Open in editor button to open the HTML editor for the component. This lets you edit theHTML contents.
This is the HTML used for the HTML component shown in the previous screenshot.
<style>.my-paragraph{ background:#fefefe; font-size:16px; padding:10px; border-radius:3px; margin:0; font-family:sans-serif;}</style><pclass="my-paragraph"> This is HTML</p>
Amazon Sumerian HTML 3D ComponentThe HTML 3D component adds a 3D DOM element to the entity, and lets you mix it with WebGL easily.The 3D DOM element behaves like a quad in 3D space and you can edit its content in the text editor.
Properties
• Width – The number of pixels that should fit into the 3D quad along the X axis.
The technique behind the HTML 3D component is as follows. The WebGL canvas is put in front of a DOMelement, which is transformed using CSS3D. Inside the WebGL scene, there's a Quad that masks theCanvas, so that the DOM element behind the canvas is visible through it. Synchronization of the WebGLand CSS3D transforms is done by the Sumerian engine internally.
54
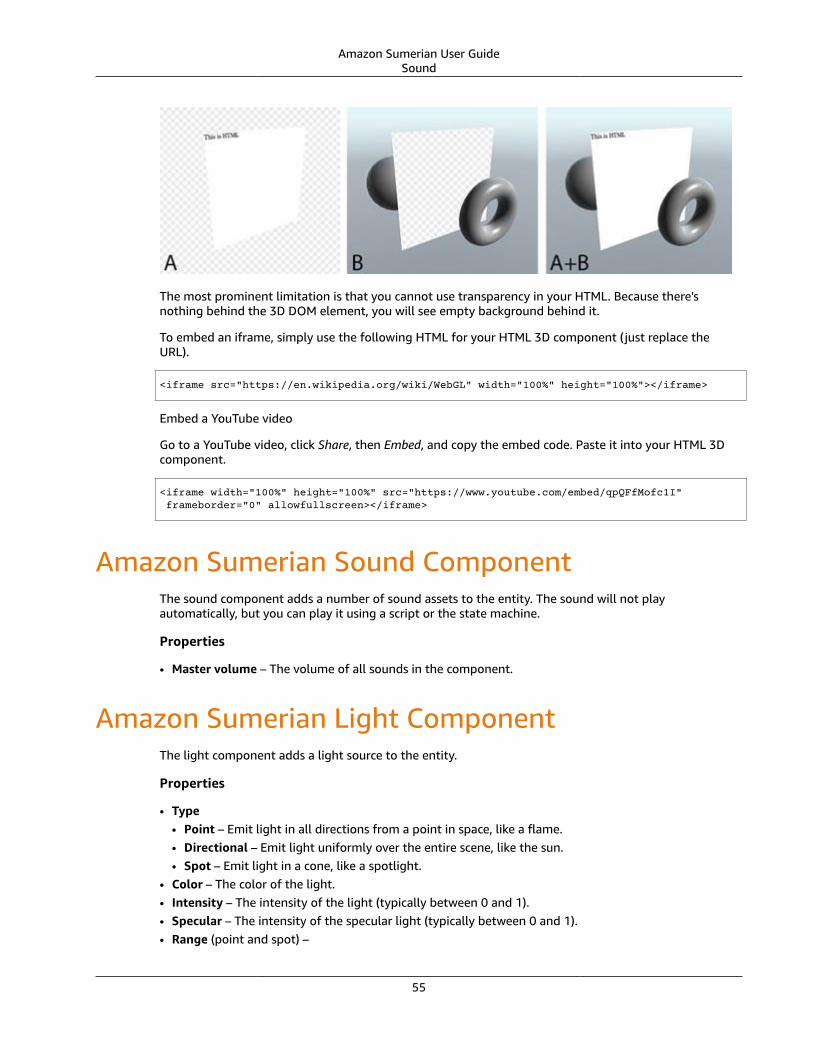
Amazon Sumerian User GuideSound
The most prominent limitation is that you cannot use transparency in your HTML. Because there'snothing behind the 3D DOM element, you will see empty background behind it.
To embed an iframe, simply use the following HTML for your HTML 3D component (just replace theURL).
<iframe src="https://en.wikipedia.org/wiki/WebGL" width="100%" height="100%"></iframe>
Embed a YouTube video
Go to a YouTube video, click Share, then Embed, and copy the embed code. Paste it into your HTML 3Dcomponent.
<iframe width="100%" height="100%" src="https://www.youtube.com/embed/qpQFfMofc1I" frameborder="0" allowfullscreen></iframe>
Amazon Sumerian Sound ComponentThe sound component adds a number of sound assets to the entity. The sound will not playautomatically, but you can play it using a script or the state machine.
Properties
• Master volume – The volume of all sounds in the component.
Amazon Sumerian Light ComponentThe light component adds a light source to the entity.
Properties
• Type• Point – Emit light in all directions from a point in space, like a flame.• Directional – Emit light uniformly over the entire scene, like the sun.• Spot – Emit light in a cone, like a spotlight.
• Color – The color of the light.• Intensity – The intensity of the light (typically between 0 and 1).• Specular – The intensity of the specular light (typically between 0 and 1).• Range (point and spot) –
55

Amazon Sumerian User GuideParticle System
• Cone angle (spot) – The angle of the cone at the light source, in degrees.• Penumbra (spot) – The intensity of the light near the edges of the cone.• Projection (directional and spot) – Upload a texture to apply to the light.• Shadows (directional and spot) – Cast shadows from objects that the light hits.
Amazon Sumerian Particle System ComponentThe particle system component simulates fluid entities such as liquids, clouds, and flames by generatingand animating large numbers of small 2D images in the scene.
Properties
• General – The basic behavior of the particle emitter.• Auto play – Start the emission animation when the scene starts.• Loop – Loop the animation.• Duration – Duration of the animation in seconds.• Prewarm – Load the effect prior to playback.• Max particles – Limit the number of visible particles.• Gravity – Vector of the gravity force that applies to particles.• Seed – Randomization seed. Experiment with values to find a look that you like, or set to -1 to get a
different effect each time.• Local space simulation – Set to true to simulate the particle system within the boundaries of the
parent entity, instead of in the entire scene.• Emitter shape – The shape and size of the emitter. Additional settings are specific to each shape.
Box
• Random direction – Emit each particle in a random direction.• Box extents – The height, width, and length of the emitter.
Sphere
• Radius – The size of the emitter.• Emit from shell – Emit particles from the outside edge of the emitter.• Random direction – Emit each particle in a random direction.
Cone
• Random direction – Emit each particle in a random direction.• Emit from – Emit particles from the narrow end of the cone (Base), the center of the cone (Volume),
or the edges of the cone (Volumeedge).• Cone radius – The radius of the cone at the narrow end.• Cone angle – The angle at which the sides of the cone flare out.• Cone length – The length of the sides of the cone.
• Over duration properties – Fine tune values that apply to each loop of animation. Each value can beconstant, or progress linearly or randomly over the duration.• Emission rate – The number of particles emitted per second.• Start speed – The speed of the particles.• Start size – The size of the particles.• Start color – The color of the particles.• Start life time – The number of seconds before each particle disappears.
56
Amazon Sumerian User GuideAnimation
• Start angle – The angle of particles.• Over lifetime properties – Fine tune values that apply to the entire lifetime of the particle emitter.
Each value can be constant, or progress linearly or randomly over the lifetime.• Color – The color of the particles. Compounds with the duration color.• Size – The size of the particles. Compounds with the duration size.• Rotation speed – Rotation of particles in degrees per second.• Local velocity – Local space velocity in units per second.• World velocity – World space velocity in units per second.
• Texture – The texture of each particle. Use one of the provided textures or choose custom to upload atexture.
• Texture animation• Texture tiles – The number of tiles in the sprite sheet, in X and Y directions.• Cycles – The number of texture animation cycles to finish over the lifetime.• Frame over lifetime – A curve specifying when to show which frame in the animation. 0 is the
first frame and 1 is the last. A linear curve starting at 0 and ending at 1 traverses all frames in theanimation.
• Rendering – Customize the rendering behavior.• Billboard – Particles always face the camera.• Render queue – Render queue of the particle mesh.• Render queue offset – Offset added to the render queue.• Blending – The type of blending (None, Additive, Subtractive, Multiply, or Transparency).• Depth write – Write to the depth buffer.• Depth test – Test against the depth buffer.• Sorting mode – The draw order for particles (None or Camera distance). For transparency blending,
camera distance sorting is recommended.• Opacity threshold – The lower alpha threshold at which fragments are discarded.
Amazon Sumerian Animation ComponentThe animation component controls the animations of an imported 3D mesh. It contains a list ofanimation states and transitions.
When you import your model into the editor, you get a geometry component and an animationcomponent.
The animation State contains information about an animation, such as how many times it should loop,how fast it should run, and if it has any transition. If there's no transition for an animation state, thedefault transitions at the bottom are used.
If you want to switch between animation states, but want the transition between them to be smooth,add a Transition.
Transitions
• Fade – A transition that blends over a given time from one animation state to another, beginning thetarget clip from local time 0 at the start of the transition. This is best used with two clips that havesimilar motions.
• SyncFade – A transition that blends over a given time from one animation state to another,synchronizing the target state to the initial state's start time. This is best used with two clips that havesimilar motions.
57
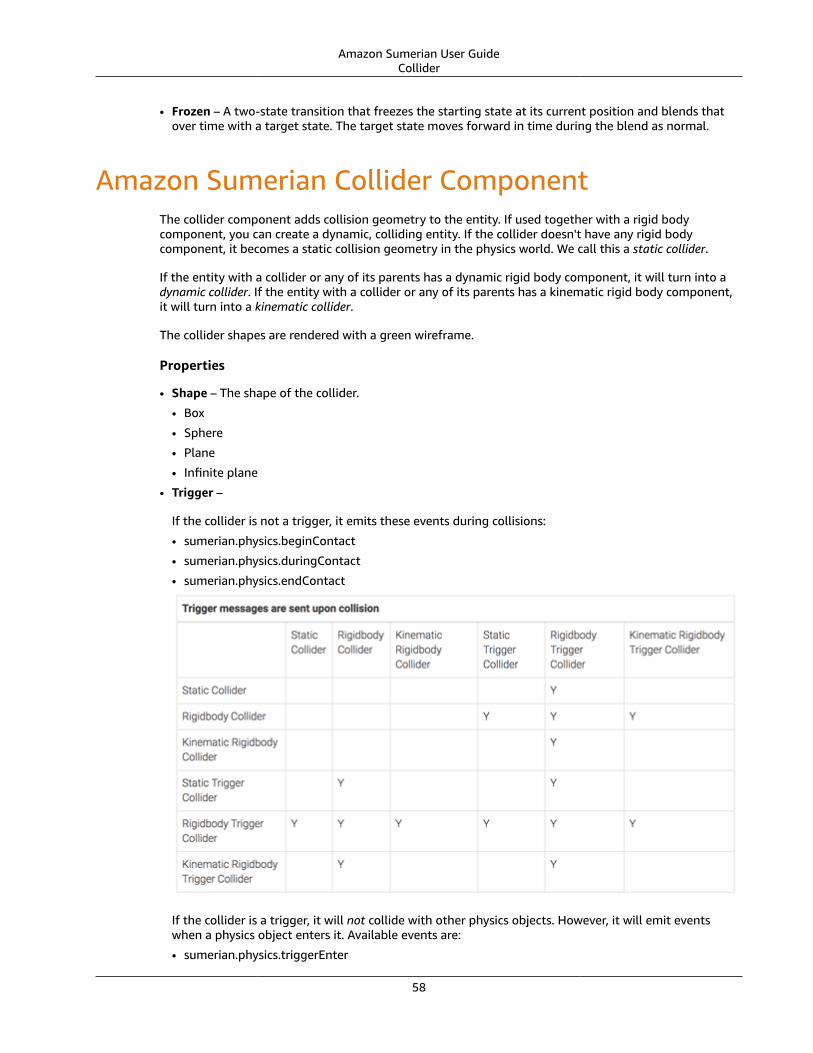
Amazon Sumerian User GuideCollider
• Frozen – A two-state transition that freezes the starting state at its current position and blends thatover time with a target state. The target state moves forward in time during the blend as normal.
Amazon Sumerian Collider ComponentThe collider component adds collision geometry to the entity. If used together with a rigid bodycomponent, you can create a dynamic, colliding entity. If the collider doesn't have any rigid bodycomponent, it becomes a static collision geometry in the physics world. We call this a static collider.
If the entity with a collider or any of its parents has a dynamic rigid body component, it will turn into adynamic collider. If the entity with a collider or any of its parents has a kinematic rigid body component,it will turn into a kinematic collider.
The collider shapes are rendered with a green wireframe.
Properties
• Shape – The shape of the collider.
• Box
• Sphere
• Plane
• Infinite plane
• Trigger –
If the collider is not a trigger, it emits these events during collisions:
• sumerian.physics.beginContact
• sumerian.physics.duringContact
• sumerian.physics.endContact
If the collider is a trigger, it will not collide with other physics objects. However, it will emit eventswhen a physics object enters it. Available events are:
• sumerian.physics.triggerEnter
58

Amazon Sumerian User GuideRigid Body
• sumerian.physics.triggerStay
• sumerian.physics.triggerLeave
• Friction – 0 Means no friction. The final friction (and restitution) value used in a collision is computedusing multiplication. For example, a sphere with friction=0.5 that collides with a plane withfriction=0.5 will get a friction value of 0.25.
• Restitution – How much the collider should bounce. 0 is no bounce and 1 is maximum bounce. If youset restitution to a number larger than one, it gains more and more energy for each bounce.
• Half extents – The collider's half extents on the X, Y, and Z axises.
Amazon Sumerian Rigid Body ComponentThe rigid body component adds physics properties, such as mass and velocity, to the entity. Thecomponent will simulate physics for the component and set the position and orientation of the entityaccordingly.
Properties
• Mass – The mass of the body.
• Kinematic – Make the rigid body kinematic instead of dynamic. A dynamic body is affected by externalforces such as gravity. Kinematic bodies do not fall or react when hit.
• Velocity – The initial linear velocity of the body.
• Angular velocity – The initial angular velocity of the body
• Linear drag – Resistance of the body to linear movement, between 0 and 1.
• Angular drag – Resistance of the body to angular movement, between 0 and 1.
If you add a collider component to the entity, the collider is used for rigid body collision, with the centerof mass being at the same location as the rigid body.
59

Amazon Sumerian User GuideState Machine
Adding a single collider component and a rigid body component on the same entity is a bit limited.The collider will always be centered in the entity and you cannot move it. The solution is to put it on anentity below the rigid body component in the hierarchy. This lets you move the collider or use multiplecolliders.
So if you'd like to make a chair consisting out of six colliders (four legs + back rest + seat), you first createa root entity with a rigid body component. Then you create six entities with box collider components andput them as children of the root entity. Scale and position them correctly, and you're done.
Amazon Sumerian State Machine ComponentThe state machine component adds simple logic to the entity, similarly to scripts. The difference fromscripts is that the state machine is much easier to use (no coding required!) and has many built-in actions.
The state machine component has two main panels, the panel for the component, and a panel for thebehavior.
The state machine has a set of behaviors, which contain states, which in turn contain actions.
60

Amazon Sumerian User GuideState Machine
Read more about Finite State Machines on Wikipedia.
A behavior is a collection of states. A state machine component can have several behaviors, and they areindependent of each other. A behavior can be seen as and behaves like an independent state machine.
Each behavior has one or more states, but only one active state. When a state is active, all of its actionsare also active. The active state can be changed by transitions in the state's actions.
A behavior always has one default state, which is activated when the scene loads.
An action is some logic that gets executed while its state is active. Some actions execute once and aredone, while others execute once per frame. There are also actions that listen for events, and executelogic when the event happens.
Many of the actions have events, and they can trigger transitions to other states. For example, when theWaitAction executes, it sets a timer for a number of seconds. When the timer is up, it can transition toanother state.
Actions
• Add light – Add a point light to the entity.
• Apply force – Apply a force to the attached rigid body.
• Apply impulse – Apply an impulse to the attached rigid body.
• Apply torque – Apply a torque to the attached rigid body.
• Arrow keys – Transition to other states when arrow keys are pressed.
• Change speech volume – Change the volume of a speech component.
• Choose/tap on entity – Select an entity.
• Compare counter – Compare a counter with a value.
• Compare 2 counters – Compare the value of two counters.
• Camera distance – Perform a transition based on the distance to the main camera or to a location.
• Copy joint transform – Copy a joint's transform from another entity, and apply it to this entity. Thisentity must be a child of an entity with an animation component.
• Dolly zoom – Perform a dolly zoom.
• DOM listen – Add a DOM event listener on one or many elements (specified by a query selector), andperform a transition on a given event.
• Emit message – Emit a message (a ping) to a channel on the bus. Messages can be listened to by theListen action, or by scripts using the SystemBus.addListener(channel, callback) function.
61
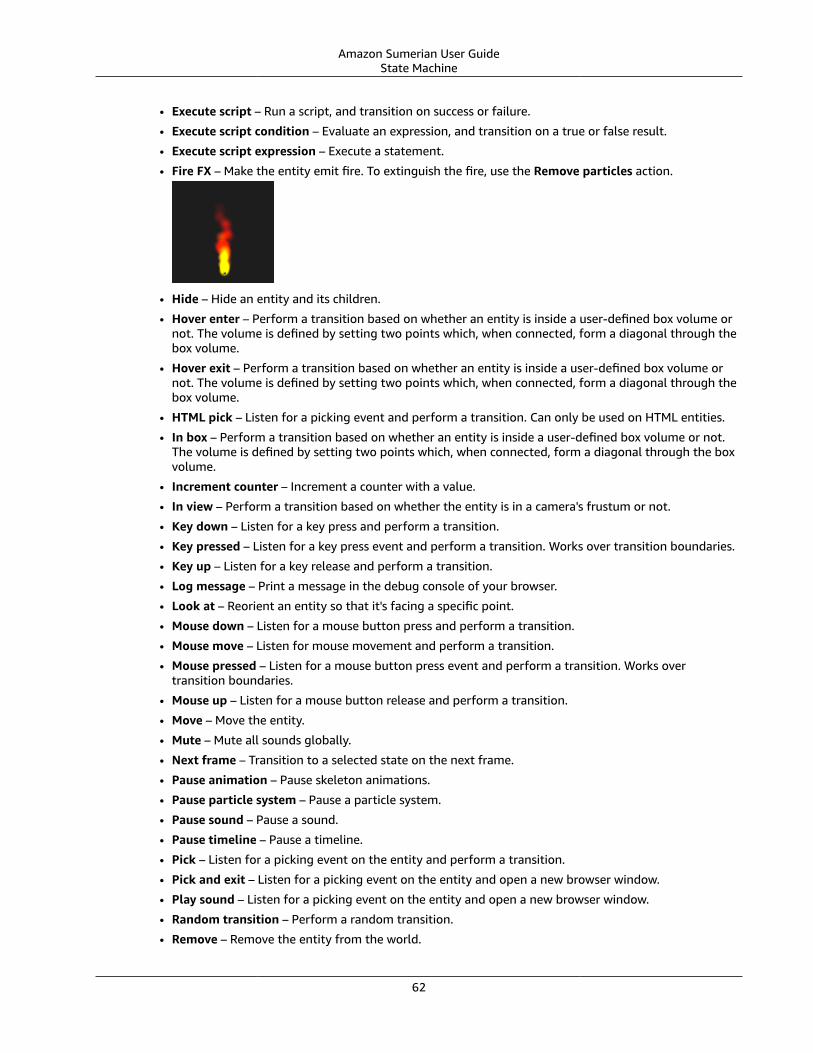
Amazon Sumerian User GuideState Machine
• Execute script – Run a script, and transition on success or failure.
• Execute script condition – Evaluate an expression, and transition on a true or false result.
• Execute script expression – Execute a statement.
• Fire FX – Make the entity emit fire. To extinguish the fire, use the Remove particles action.
• Hide – Hide an entity and its children.
• Hover enter – Perform a transition based on whether an entity is inside a user-defined box volume ornot. The volume is defined by setting two points which, when connected, form a diagonal through thebox volume.
• Hover exit – Perform a transition based on whether an entity is inside a user-defined box volume ornot. The volume is defined by setting two points which, when connected, form a diagonal through thebox volume.
• HTML pick – Listen for a picking event and perform a transition. Can only be used on HTML entities.
• In box – Perform a transition based on whether an entity is inside a user-defined box volume or not.The volume is defined by setting two points which, when connected, form a diagonal through the boxvolume.
• Increment counter – Increment a counter with a value.
• In view – Perform a transition based on whether the entity is in a camera's frustum or not.
• Key down – Listen for a key press and perform a transition.
• Key pressed – Listen for a key press event and perform a transition. Works over transition boundaries.
• Key up – Listen for a key release and perform a transition.
• Log message – Print a message in the debug console of your browser.
• Look at – Reorient an entity so that it's facing a specific point.
• Mouse down – Listen for a mouse button press and perform a transition.
• Mouse move – Listen for mouse movement and perform a transition.
• Mouse pressed – Listen for a mouse button press event and perform a transition. Works overtransition boundaries.
• Mouse up – Listen for a mouse button release and perform a transition.
• Move – Move the entity.
• Mute – Mute all sounds globally.
• Next frame – Transition to a selected state on the next frame.
• Pause animation – Pause skeleton animations.
• Pause particle system – Pause a particle system.
• Pause sound – Pause a sound.
• Pause timeline – Pause a timeline.
• Pick – Listen for a picking event on the entity and perform a transition.
• Pick and exit – Listen for a picking event on the entity and open a new browser window.
• Play sound – Listen for a picking event on the entity and open a new browser window.
• Random transition – Perform a random transition.
• Remove – Remove the entity from the world.
62

Amazon Sumerian User GuideState Machine
• Remove light – Remove the light attached to the entity.
• Remove particles – Remove any particle emitter attached to the entity
• Resume animation – Continue playing a skeleton animation.
• Rotate – Rotate the entity with the set angles (in degrees).
• Scale – Scale the entity.
• Set animation – Transition to a selected animation.
• Set animation offset – Change the animation clip offset.
• Set background color – Change the background color.
• Set counter – Change a counter to a value.
• Set HTML text – Change the contents of an HTML element.
• Set light properties – Change various properties of a light.
• Set light range – Change the range of a light.
• Set material color – Change the color of a material.
• Set render target – Render what a camera sees on the current entity's texture.
• Set rigid body angular velocity – Change the angular velocity of a rigid body.
• Set rigid body position – Change the position of a rigid body.
• Set rigid body rotation – Change the rotation of a rigid body.
• Set rigid body velocity – Change the velocity of a rigid body.
• Set rotation – Change the rotation of an entity.
• Set timelime time – Jump to a point on a timeline.
• Set animation time scale – Change the time scale for the current animation.
• Shake – Shake the entity and optionally perform a transition.
• Show – Make an entity visible.
• Smoke FX – Make an entity emit smoke. To cancel the smoke emitter, use the Remove particles action.
• Sound fade in – Fade in a sound.
• Sound fade out – Fade out a sound and stop it.
• Sprite animation – Start a sprite animation.
• Start particle system – Start a particle emitter.
• Start speech – Start a speech component.
• Start timeline – Start a timeline.
• Stop particle system – Stop a particle emitter.
• Stop sound – Stop a sound.
• Stop speech – Stop a speech component.
• Stop timeline – Stop a timeline.
• Switch camera – Switch to a different camera.
• Toggle full screen – Toggle fullscreen on/off. Note that in most browsers this must be initiated by auser gesture. For example, click or touch.
63
Amazon Sumerian User GuideScript
• Toggle mute – Toggle mute of all sounds globally.
• Toggle post FX – Enable or disable post fx globally.
• Transition – Transition to a selected state.
• Listen – Perform a transition on receiving a system bus message (a ping) on a specific channel.
• Trigger enter – Transition when a trigger volume is entered.
• Trigger leave – Transition when a collider is leaving the trigger volume.
• Tween light – Tween the color of the light.
• Tween look at – Transition the entity's rotation to face the set position.
• Tween material color – Tween the color of a material.
• Tween move – Transition to the set location.
• Tween material opacity – Tween the opacity of a material.
• Tween rotate – Transition to the set rotation, in angles.
• Tween scale – Transition to the set scale.
• Tween texture offset – Smoothly change the texture offset of the entity.
• Unmute – Unmute all sounds globally.
• Wait – Perform a transition after a specified amount of time. A random time can be set. This will addbetween 0 and the set random time to the specified wait time.
• WASD keys – Transition to other states when the WASD keys are pressed.
Amazon Sumerian Script ComponentYou can add scripts to any entity. A script component can contain multiple scripts. Scripts run in orderfrom top to bottom and you can adjust the order in the script component properties.
To support reuse, you add an instance of a script to the script component, not the script itself. Theinstance contains the state and parameters of the script, letting you add multiple instances of the samescript with different behavior on each, based on the arguments provided.
Properties
• Enabled – Clear the check box to disable a script.
• Instance of – Each script instance in the list has a reference to the script it is using. Choose a script togo to the script's own panel.
• Parameters – Any parameters defined in the script's parameters array (p. 80) appear here. Adjustthe values to customize the behavior of this script instance.
To structure your parameters, you can store them in a JSON file. Start by defining the parameters in thescript itself. Then add the JSON file and reference it from the script settings.
Example Script with JSON parameter
varsetup=function(args,ctx){ console.log(args.myJsonParameter);// Prints the parsed JSON data};
var parameters=[{ key:'myJsonParameter', type:'json'
64

Amazon Sumerian User GuideTimeline
}];
To create a script with JSON parameters
1. Create a blank entity (p. 45).
2. Choose Add component, and then choose Script.
3. Choose Add script, and then choose Custom.
4. Choose Edit script.
5. Replace the default parameters declaration with the following.
var parameters=[{ key:'myJsonParameter', type:'json'}];
6. Return to the script settings. The settings automatically update to include the JSON parameter.
7. Drop a JSON file in the parameter field.
Amazon Sumerian Timeline ComponentUse timelines to move, rotate, or change the scale of entities over time. You can set the start and endvalues of these properties, and add keyframes to control the speed or direction of the animation along
65

Amazon Sumerian User GuideTimeline
the way. The timeline can also emit custom events, which can be consumed from a state machine orscript.
To create a timeline, choose Create entity, Timeline. You can also add the timeline component to anexisting entity, but don't add it to the entity that you want to animate. The timeline can only controlentities other than the one to which it is attached.
Properties
• Duration – Length of the timeline, in seconds.• Loop – Enable to repeat the timeline animation in a loop.• Auto start – To trigger the timeline with a state machine or script, disable this option to prevent the
timeline from starting automatically in playback mode.
To open the timeline editor, choose Toggle timeline in the timeline component, or choose Timelinefrom the Tools menu.
To add entities to the timeline, drag them from the entities panel onto the timeline editor. Each channelin the editor controls one property of the transform, such as the X translation or the Z scale. Click theclock icon next to a property to enable the channel and add the first keyframe.
Add more keyframes to a channel by choosing a time and changing the property's value. Duringplayback, the entity animates between the transform values at each keyframe. By default, changing a
66

Amazon Sumerian User GuideTimeline
property's value automatically creates a keyframe. You can disable this by clicking the key icon next tothe Drop entity here box.
Add Event channels to the timeline to emit custom events onto the system bus. The name of thechannel is the name of the event that Sumerian emits at each keyframe on the event channel. Consumethis event from a script with SystemBus.addListener, or from a state machine (p. 60) with the Listenaction.
67

Amazon Sumerian User Guide
Amazon Sumerian AssetsThe assets panel in Sumerian collects shareable assets in the scene. When you add an asset to a scene,Sumerian automatically adds it to a default pack in the assets panel. Entities that you create are notautomatically added, but you can drag them from the entities panel into the assets panel to create anentity asset.
Asset Types
• Entity – A Sumerian entity (p. 45). If you import a file or asset pack, drop the entity from the
assets panel onto the canvas to add it to your scene.
• Mesh – A polygon mesh from a 3D model.
• Skeleton – A skeleton and animations from a 3D model.
• Material – A material component (p. 48) with textures for each renderable layer generated from a
3D model.
• Sound – An audio file for use with a sound component (p. 55).
• Script – A JavaScript script that can be instantiated on a script component (p. 55).
• Speech – A text file for use with a speech component (p. 51).
• JSON – A JSON file that can be used as a parameter input on a script component (p. 55).
• Skybox – A collection of textures that can be added to the background of the scene in the scene's
environment settings (p. 39).
• Behavior – A collection of actions that can be added to a state machine component (p. 60).
• Texture – An image file that can be added to layers of a material component (p. 48), a 2D
graphics component (p. 53), or a skybox.
To add an asset to a scene, you can drag it from your desktop directly onto the canvas. Depending on thefile type, the editor creates an entity in the entities panel, and one or more assets. For example, whenyou add a JPG image to a scene, you get an image entity in the scene, a material asset, and a textureasset.
To add an asset to a scene
1. Open a scene in the Sumerian editor.
2. Drag a file from your desktop file browser onto the canvas.
or
68

Amazon Sumerian User GuidePacks
Create a blank asset by clicking the plus icon next to the default pack. To see the icon, select thepack name.
3. Choose the asset in the assets panel and modify it by using the options in the inspector panel.
Amazon Sumerian Asset PacksYou can organize your assets and share them between scenes by creating a pack. Create a pack in theassets panel and move or copy assets into it.
Packs support the following actions:
• – Create a new asset in the pack.
• – Export the pack to the asset library.
• – Delete any assets in the pack that are not used in the scene.
• – Delete the asset pack.
Exporting a pack adds it to the project that you choose. If you don't have a project yet, create one in thedashboard (p. 17). You can then use the dashboard to copy or move the pack (p. 19) to a different sceneor project. Exported packs are not tied to the in-scene pack or its assets.
To add an asset to a pack and export it
1. Open a scene in the Sumerian editor.2. Under Assets, choose Create pack.3. Choose the pack and modify the name, description, tags, and custom attributes in the inspector
panel.4. Drag an asset from the default pack into the custom pack.
or
Duplicate the item by selecting it and then clicking the duplicate icon. Drag the duplicate into thecustom pack.
5.Select the custom pack, and then click the asset library icon , or choose Add to asset library inthe inspector panel.
69

Amazon Sumerian User GuideTemplates
6. Choose an asset type (p. 68) for the asset pack.7. Choose Add to asset library.8. Choose a project, and then choose Select.
Amazon Sumerian Scene TemplatesSumerian provides scene templates that you can use as a starting point for your scene. Templatescontain models and other assets that might not be available in other locations. You can export assetsfrom templates to save them to your project for use with other scenes.
Sumerian Scene Templates
• Augmented Reality – Template for creating augmented reality (AR) scenes with a companion sampleapp. See Amazon Sumerian Augmented Reality Tools (p. 72) for more information.
• Campfire Particle Flythru – A wooded exterior scene with rocks, bushes, logs, and grass. This templateis used in the particle system tutorial.
• Cargo Ship – An exterior scene with a cargo ship and water.• Cristine and Preston – Empty scenes with Sumerian hosts (p. 72). These templates are used in the
speech tutorial.• Default Lighting – An empty scene with a skysphere and three directional lights. This template is used
in the interface tutorial.• Starter Spaces – An interior scene with doors, windows, carpet, and walls.
70

Amazon Sumerian User GuideVR Tools
• Training Room – An interior scene with conference room equipment.• View Room – An interior scene with home theater equipment. This template is used in the Sumerian
basics tutorial.• Warehouse – An interior scene with warehouse equipment.
Choose any of these templates in the dashboard (p. 17) to create a draft scene.
Many of these scenes have models and other assets that are not available in the Sumerian library. Theseare either included in the default asset pack, or contained in separate asset packs for each model. Youcan export these assets to your project to use them in other scenes.
To export assets from a template
1. Create a scene from the template.2. Locate the assets that you want to use in the assets panel.3. If the assets are in the default pack, create a new pack and move them into it.4.
Highlight a pack and click the asset library icon ( ) to export it.
For more information, see Amazon Sumerian Asset Packs (p. 69).
Amazon Sumerian Virtual Reality ToolsSumerian provides a pack of virtual reality (VR)-related assets to make it easy to enable VR in your scene.The asset pack includes a VR camera that lets the user enter VR mode, and VR controllers for interactingwith the environment.
Supported Hardware
• Oculus Rift• HTC Vive
To enable VR in your scene
1. Open a scene in the Sumerian editor.2. Choose Import assets.3. Choose CoreVR, and then choose Add.4. When the asset pack finishes loading, drag the VRCameraRig entity onto the canvas to add it to
your scene.5. Choose the VRCameraRig entity.6. Choose the VRCameraRig component.7. Choose the Current VR camera rig option to enable the rig.
When a user enters VR mode with a headset and controllers attached, the HMD camera (p. 50) tracksthe headset, and the VR controllers (p. 50) track the controllers in 3D space. The VR camera rig (p. 49)manages the other entities and enables the VR mode button in the scene.
Only the controllers of the type attached are rendered in the scene, so you can leave all of the includedentities attached to support both types. You can also replace the included controller models with yourown.
71

Amazon Sumerian User GuideAR Tools
See Getting Started with VR for a tutorial that uses these assets.
Amazon Sumerian Augmented Reality ToolsSumerian provides a template, assets, and sample project that you can use to develop augmented reality(AR) applications for iOS devices.
The Augmented Reality scene template is available in the dashboard (p. 17). Use it as a starting pointfor your augmented reality scene.
The scene includes the following resources:
• AR Camera – The main camera, with a script that maps it to the device's camera.
• AR Camera Control – A script that uses the Sumerian engine AR System to access the device'saugmented reality API. You can view this script in the text editor.
• ARAnchor – An empty entity that the AR app uses to anchor objects in the scene to the real world.
You can construct an AR scene from this template by adding models and making them children of theARAnchor entity. Publish the scene, and then use the sample AR Kit project to build an app that uses it.
The sample project, amazon-sumerian-arkit-starter-app, is an XCode project with a Swift app that loadsa scene created with the AR template. Replace the scene URL in the view controller with the URL of yourpublished scene, build the app, and then run it on a compatible iOS device to see it in action.
See the Augmented Reality Using Sumerian and ARKit tutorial to explore how to use these assets.
Amazon Sumerian HostsA host is a asset provided by Sumerian that has built in animation, speech, and behavior for interactingwith users. Use hosts to engage users in conversation and convey information.
72

Amazon Sumerian User GuideModels
To add a host to your scene
1. Open a scene in the Sumerian editor.
2. Choose Import assets.
3. Choose one of the following hosts:
• Cristine
• Preston
4. Choose Add.
5. Drag the host entity from the assets panel onto the canvas.
All of a host's meshes, materials, animations, and scripts are bundled into a single entity with threeconfigurable components:
• Transform (p. 47) – The host's location relative to the scene or its parent entity.
• Host (p. 50) – Animation and behavior settings.
• Speech (p. 51) – Text-to-speech capability with Amazon Polly.
Models and animations for hosts are locked. You cannot modify or extend them.
ModelsDrop a model file on the assets panel to import it. When you import a model, Sumerian converts itinto an asset pack that contains the model's meshes, skeletons, materials, and textures. Meshes aretriangulated automatically during import. The process can take some time, depending on the model sizeand format.
You can import models in the following formats.
File Formats
• FilmBox – .fbx
www.autodesk.com/products/fbx/overview
73
Amazon Sumerian User GuideSkybox
• Wavefront OBJ – .obj
en.wikipedia.org/wiki/Wavefront_.obj_file
After the model is imported, drop the model entity from the asset pack onto the canvas. This addsone or more entities to the scene in a hierarchy based on the imported file. At a minimum, the entityhas transform, geometry, and material components. If you import a model that has a skeleton andanimations, you also get an animation component. The skeleton and polygon mesh are attached to thegeometry component, and textures are attached to the material component.
To optimize the model importing process, remove unneeded data by deleting the object history andfreezing transformations in your modeling tool. If you can, avoid using geometric transformations. Ifyour model has animations, bake them into the model and avoid using constraints.
The Sumerian engine supports the following model features.
Model Features
• Vertex colors – Per-vertex colors or per-face-vertex colors are supported.
When the mesh data contains vertex colors, a slider is available on the mesh's material panel under thediffuse channel. You can use the slider to blend between the set diffuse map or color and the vertexcolor.
• UV maps – If two are available, you can use the second one, for example, for light maps or ambientocclusion maps.
In the editor, you are able to apply these textures on the ambient channel in the material panel.
• Tangents – If no tangent data is provided, it is generated during the conversion.
• Normals – If no normal data is provided, interpolated normals are generated during the conversion.
• Skeleton animations – Animation via skeleton mesh deformation is supported. You can provideseveral animations in one file.
Shader limitations
• The maximum number of weights per vertex is 4. If more are provided, the ones with the least valuesare removed.
• Keeping the joint count low enables the support of a broader set of hardware.
If you have already converted a model with skeleton animations into the editor, and later add moreanimations in your modeling tool, you can add those new animations onto the existing model in theeditor.
You do this by dropping the file on the animation panel's animation state drop area. This issues the fileupload as usual, but during conversion, only the animation data is exported. The underlying skeletonrig must be the same for this to work. If you changed the rig, you must reimport the model throughthe regular process.
• Embedded textures (FBX) – When exporting to the FBX binary format, you can embed textures intothe resulting file.
SkyboxA skybox is a texture that you apply to the background of a scene to show the sky, space, or an enclosingstructure. A skybox can be a single texture that wraps onto a sphere, or six textures that wrap onto acube. Add a skybox to your scene in the scene's environment settings (p. 39).
74
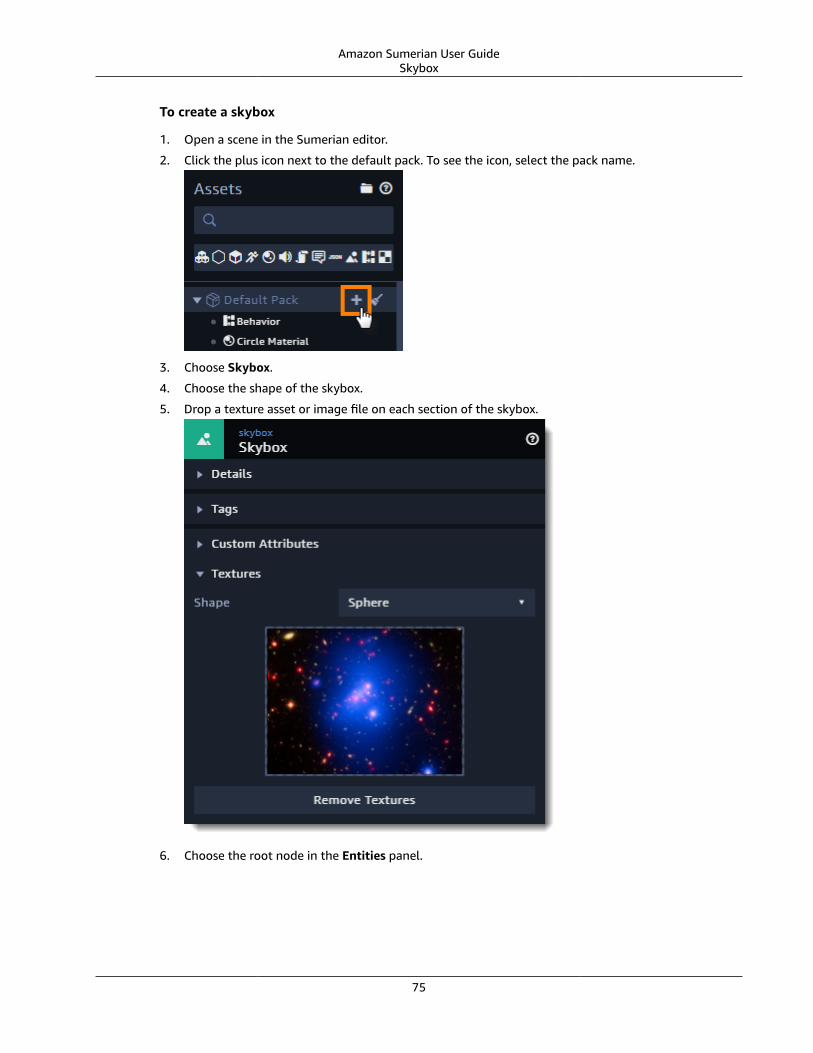
Amazon Sumerian User GuideSkybox
To create a skybox
1. Open a scene in the Sumerian editor.
2. Click the plus icon next to the default pack. To see the icon, select the pack name.
3. Choose Skybox.
4. Choose the shape of the skybox.
5. Drop a texture asset or image file on each section of the skybox.
6. Choose the root node in the Entities panel.
75

Amazon Sumerian User GuideMedia
7. Choose Environment.8. Drop the skybox asset from the assets panel onto the Skybox field.
MediaYou can import media files into Sumerian to use as textures or audio objects. Files up to 10 MB aresupported in the following formats.
Images
• CRN• DDS• JPG, JPEG• PNG• SVG• TGA
Sound
• OGG• MP3• WAVE, WAV
Video
• MP4• OGV
76

Amazon Sumerian User GuideMedia
• WEBM
Text
• JS• JSON
77

Amazon Sumerian User Guide
ScriptingAdd scripts to your scene to update your scene based on user input or events. You can use scripts toaccess the DOM, create and modify entities with the Sumerian engine library, or use the AWS SDK forJavaScript to access AWS services and resources.
NoteReference documentation for the Sumerian engine library is available on the Sumerian website.
To create a blank script
1. Open a scene in the Sumerian editor.
2. Create a blank asset by clicking the plus icon next to the default pack and then click Script. Selectthe pack name to see the icon.
3. Press j to open the text editor.
4. Choose the new script under documents. Use the pencil icon next to the script name to change itsname.
The script template includes 7 methods and a parameters (p. 80) array. The methods correspond to ascene's lifecycle events and are called by the engine at the following times.
• setup – when scene playback starts.
• fixedUpdate – on every physics update.
• update – on every render frame.
• lateUpdate – after calling all update methods in the scene.
• enter – on a state machine script action, when the state is entered.
• exit – on a state machine script action, when the state is exited.
• cleanup – when scene playback stops.
Topics• Built-in Scripts (p. 79)
• The Context Object (p. 79)
• Parameters and Arguments (p. 80)
• External Dependencies (p. 82)
• Debugging (p. 83)
78

Amazon Sumerian User GuideBuilt-in Scripts
Built-in ScriptsThe editor also has several built-in scripts that provide standard functionality like camera, keyboard, andmouse controls.
Camera scripts
• Orbit camera control – lets the user orbit the scene by holding a mouse button and moving themouse.
• Orbit and pan control – lets the user orbit the scene with one mouse button and pan the camera withanother.
• Fly control – lets the user zoom and pan with the keyboard.• Axis-aligned camera control – Move the camera to a fixed distance away on the X or Z axis.• Pan camera control – lets the user pan the camera by holding a mouse button and moving the mouse.• Mouse look control – lets the user look around by holding a mouse button and moving the mouse.• WASD control – lets the user walk around on the XZ plane with the keyboard.
Object scripts
• Button – lets the user click on an object to open a URL.• Pick and rotate – lets the user grab an object and manipulate its orientation.• Lens flare – generates a lens flare when the user looks at an object.
The Context ObjectYou can use the context object, ctx to store your script data during the script life time. The context iscreated upon setup() and cleared on cleanup() and is passed into all of the script functions. It has a fewpre-defined properties:
Properties
• entity (Entity) – the entity to which the script is attached.• entityData (Object) – a data object shared between all scripts on the entity.• activeCameraEntity (Entity) – the currently active camera entity.• domElement (HTMLCanvasElement) – the WebGL canvas element.• playTime (number) – the elapsed time since scene start.• viewportHeight (number) – the height of the canvas.• viewportWidth (number) – the width of the canvas.• world (World) – the world object.• worldData (Object) – a data object shared between all scripts in the world.
Some of the properties on ctx are shared between scripts. entityData is shared by all scripts on theentity and worldData is shared by all scripts. They are all initially empty, and can be used to store anykind of data
For example, if we'd like to define a property called acceleration, we could make it available on threelevels:
// Only accessible to the script that defined the property
79

Amazon Sumerian User GuideParameters and Arguments
ctx.acceleration=9.82; // Accessible to all scripts on the entityctx.entityData.acceleration=9.82; // Accessible to all scriptsctx.worldData.acceleration=9.82;
The built-in context properties also contain some convenience functions. For example, the worldobject lets you search for entities based on their tags. You can get all entities with a specific tag withctx.world.by.tag:
var entities = ctx.world.by.tag('myTag');
Parameters and ArgumentsParameters let you create scripts that are customizable by adding fields to the script properties in theeditor. For example, the following script defines a parameter named Velocity that takes 3 numbers (avec3 parameter (p. 81)).
var setup = function(args, ctx){ console.log(args.velocity);}; var parameters = [ { name : "Velocity", key : "velocity", type : "vec3", default : [1,0,0] }];
During the setup phase, the script reads the parameter values from the args object and prints them tothe console.
When you add an instance of the above script to an entity, the editor shows a Velocity field that acceptsthree values and reflects the default value.
80

Amazon Sumerian User GuideParameter Format
Parameter FormatParameters are objects with the following required and optional fields.
Required fields
• key [string] – a unique key used to store and retrieve the parameter values in the args object.
• type [string] – the parameter type (p. 81).
• default – the default value or values for the parameter.
Optional fields
• name [string] – the label for the parameter field shown on instances of the script. If you don't specify aname, the key is used to generate the label.
• control [string enum] – the control type.
• slider – a slider control.
• color – a color wheel.
• select – a drop down listing the values in the options field.
• jointSelector – a drop down listing the joints on the animation component on the script's parententity.
• description [string] – the description shown when you hover over the parameter.
• options [array] – an array of possible values for a select control.
• min and max [number] – the minimum and maximum values for an int or float parameter.
• decimal [number] – the number of significant digits for a float parameter.
• step [number] – the incremental value that float values snap to.
• precision [number] – the number of significant digits for float values.
• exponential [boolean] – set to true to distribute the values on a slider control logarithmically.
Parameter TypesThe type property must be set to one of a few predefined strings, each corresponding to a type ofparameter.
• int – Integer number variable (e.g. 1).
• float – Number variable (e.g. 3.14).
• string – String (e.g. “HelloGoo”).
• boolean – boolean (true or false).
• vec2, vec3, vec4 – an array of 2, 3, or 4 numbers.
• texture, sound, entity, camera, animation, json – an asset of the specified type (p. 68).
All types in action, including a sample script:
var parameters = [ {type: 'int', key: 'int', 'default': 1, description: 'Integer input'}, {type: 'float', key: 'float', 'default': 0.1, description: 'Float input'}, {type: 'string', key: 'string', 'default': 'Hello!', description: 'String input'}, {type: 'boolean', key: 'boolean', 'default': true, description: 'Checkbox'},
81

Amazon Sumerian User GuideExternal Dependencies
{type: 'vec2', key: 'vec2', 'default': [0, 0], description: 'Vector2 input'}, {type: 'vec3', key: 'vec3', 'default': [0, 0, 0], description: 'Vector3 input'}, {type: 'vec4', key: 'vec4', 'default': [0, 0, 0, 0], description: 'Vector4 input'}, {type: 'texture', key: 'texture', description: 'Texture asset drop area'}, {type: 'sound', key: 'sound', description: 'Sound asset drop area'}, {type: 'entity', key: 'entity', description: 'Entity drop area'}, {type: 'camera', key: 'camera', description: 'Camera drop down'}, {type: 'animation', key: 'animation', description: 'Animation state from the Animation component on the same entity'}, {type: 'json', key: 'json', description: 'JSON asset drop area'}, {type: 'float', control: 'slider', key: 'floatSlider', 'default': 10.1, min: 5, max: 15, exponential: false, decimal: 1, description: 'Float slider input'}, {type: 'int', control: 'slider', key: 'intSlider', 'default': 10, min: 5, max: 15, exponential: false, description: 'Integer slider input'}, {type: 'vec3', control: 'color', key: 'vec3Color', 'default': [1, 0, 0], description: 'RGB color input'}, {type: 'vec4', control: 'color', key: 'vec4Color', 'default': [1, 0, 0, 1], description: 'RGBA color input'}, {type: 'string', control: 'select', key: 'select', 'default': 'a', options: ['a', 'b', 'c'], description: 'Dropdown/select'}, {type: 'int', control: 'jointSelector', key: 'jointSelector', description: 'Joint select from the animation component on a parent entity'}];
External DependenciesIf your script uses external JavaScript libraries from the web into your script, declare them in theExternal resources section of the text editor.
To declare external dependencies
1. Open a scene in the Sumerian editor.
2. Press J to open the text editor.
3. Choose a script asset in the Documents list.
4. Under External resources, enter a URL starting with // (excluding the protocol).
5. Click the plus icon to add the library to the list.
82

Amazon Sumerian User GuideDebugging
The editor loads libraries as soon as you add them to this list. To reload a library, choose Refreshresources. In your published scene, all dependencies are loaded and executed during the loading phase.
DebuggingTo debug a script in the Sumerian editor, use the built in tools in your browser. In Google Chrome, openDeveloper Tools by pressing ALT-CMD-J on Mac or F12 on Windows.
Open the Sources panel at the top of Devtools. To the left you can see all scripts loaded in the browser.If you have a script in your scene, it will be listed in below sumerian-custom-scripts. Choose your script toview it.
The simplest way to start debugging a script is by adding a debugger; statement in your Custom Scriptin the editor. If you have Devtools open, and this statement is executed, Devtools will automatically goto the file and line where your statement is.
83