Amateur Digital Astrophotography: the affordable end of ... · PDF fileAmateur Digital...
23
Amateur Astrophotography: Chanan Greenberg Page 1 Amateur Digital Astrophotography: the affordable end of the spectrum A practical guide on how to see beyond what meets the eye(piece) without being a zillionaire Sculptor Galaxy (10.9 Million light years from earth). Image by: Chanan Greenberg By Chanan Greenberg VP San Mateo County Astronomical Society Member of Fremont Peak Observatory Association
Transcript of Amateur Digital Astrophotography: the affordable end of ... · PDF fileAmateur Digital...

Amateur Astrophotography: Chanan Greenberg Page 1
Amateur Digital Astrophotography: the affordable end of the spectrum A practical guide on how to see beyond what meets the eye(piece) without being a zillionaire
Sculptor Galaxy (10.9 Million light years from earth). Image by: Chanan Greenberg
By Chanan Greenberg VP San Mateo County Astronomical Society Member of Fremont Peak Observatory Association

Amateur Astrophotography: Chanan Greenberg Page 2
Amateur Digital Astrophotography: the affordable end of the spectrum A practical guide on how to see beyond what meets the eye(piece) without being a zillionaire By Chanan Greenberg VP San Mateo County Astronomical Society Member of Fremont Peak Observatory Association
Image Details: Chanan Greenberg 10" Newtonian, Orion Deep Space Pro 35 minute exposure
This series of articles is designed to educate how to take exciting images of planets, clusters, nebulae and galaxies. People often find celestial photographs breath-taking and believe that producing such images can only be achieved by professionals and the wealthy. Over the last 3-5 years there has been a minor revolution in high quality, affordable equipment that puts astrophotography within reach of more people than ever before. Whether you are an avid observer with a curiosity about astrophotography, if you are thinking about taking a plunge into this space or a practicing astrophotographer who is seeking tips and tricks these articles will provide you with guidance, tips, notes on equipment,
sample images, and direction to additional data sources. This series will include 4 segments: Part 1: Is Astrophotography for me? Part 2: Astrophotography 101: Shooting a Moving Target Part 3: Equipment: Mount, Camera, Focusing and Guiding Part 4: Imaging & Image Processing Part 1: Is Astrophotography for me? Astrophotography is technically demanding, time consuming and requires a long learning curve – in short everyone can enjoy the pictures but taking them may not be fun for some people. If you are just starting to develop your interests in astronomy the best advice I can offer is to stay away from astrophotography. The high demand and little tolerance for in-accurate alignment and guiding may turn the fun and exciting hobby of amateur astronomy to a nightmare of frustration and cause some to lose interest in astronomy altogether. If you are new to astronomy there are many gratifying and easy things to do before considering astrophotography:
Amateur Astrophotography: Chanan Greenberg Page 3
• Learn the night sky, constellations and stars
• Go to star parties and observe through telescopes; see what objects you can find
• Read about the objects you see • Go to planetarium shows
All these activities are fun, easy and extremely rewarding and help build-up knowledge that will later be used in astrophotography. If you enjoy looking at pictures of deep space objects they are readily available by the thousands, on hundreds of Internet Web sites. Its cheap, easy, no fancy equipment and you don’t risk losing extremities during cold nights. Some people who delve into astrophotography never look through an eyepiece again, while other “pure” observers have a disdain for astrophotography as they only want to see what they can see through the eyepiece. Personally I am a hybrid. For years I did pure observations with a Newtonian non Go To scope finding objects using star maps, decent polar alignment and my RA and DEC setting circles. This was a great way to learn about the night sky and where objects are located. Words cannot describe the excitement I felt when I first laid eyes on M17. My polar alignment was inaccurate that night and the nebula did not appear in my eyepiece at first. As I slowly searched in expanding circles suddenly this ghostly object came into view – M17 in all its glory. My excitement knew no bounds and it felt like I was the one who had discovered it.
This is why I like going to our star parties at Crestview Park trying to find new objects I have never seen before and often revisiting objects I have viewed many times. Its also great fun to share these night sky jewels with the public who love to look through the telescope and learn more about what their eyes can see. This leads to an interesting question – if observations can be so fun and breath taking images, taken by the Hubble Space Telescope and other space observatories, are readily available online why bother with the hard work and expense involved with astrophotography? There is no correct answer to this question - it is completely subjective and will change from one person to the next. The Interstellar Tourist For me the interest started simply with the desire to share what I saw through the eyepiece with friends and family who did not come to star parties. Much like a tourist who visits a special place, and though professional photographs are available on postcards and in books they still take their own snap shot to say “Look where I have been, look what I saw”. In a similar way I was so blown away by views of the moon and its craters and fainter objects that I just had to capture those views and share them with others. And so on September 2003, I took a Fuji Digital Camera 2.0 MP, which is a very simple regular digital camera, pressed it against the eyepiece holding it as steady as I could and took my first image – the moon!

Amateur Astrophotography: Chanan Greenberg Page 4
Image Details: Chanan Greenberg 6" Newtonian, Fuji Camera 2.0 MB Auto Settings
I was proud and excited about my first successful shot and immediately started wondering what other images I could take. I started experimenting trying to shoot planets, globular clusters and nebulae. Much to my dismay I rapidly discovered that even though I could see wonderful views through the eyepiece my digital camera was no where nearly as sensitive as my eyes and was unable to capture the details I could see. Out of sight and out of pocket Additionally, there were many objects I heard about, read about but could never see in the eyepiece and so I asked myself how can I take images of objects I cannot see? As I started asking around I learned what astrophotographers used and how much it cost and reached the sad conclusion that astrophotography is probably not for me. For a couple of years I just stuck to observing and occasionally trying my luck with my digital camera only to be disappointed all over again. But there was a nagging feeling that I am missing out, that there is so much more to see, combined with my own disposition which never likes to admit,
let alone accept, defeat I kept looking for a way I could engage in this space. The big change occurred with the introduction of a line of products that made astrophotography financially viable and in late 2006 I re-engaged and started investing little by little and started learning the art and science involved in astrophotography. If at first you don’t succeed…… Destroy all evidence you ever tried, or do as your mother told you and try, try, try again. Astrophotography requires investing in learning, acquiring skills, trial and error and lots of patience. Rarely do people produce amazing images on day 1. Learning and improving on past mistakes is key to a successful outcome.
The Ring Progression This series of images of M57, the Ring Nebula, illustrate my first attempt of trying to capture the image with a regular digital camera and the progress made in equipment and technique over time. So, if seeing through the eyepiece is not enough. If you feel a need to be able to say "I took that picture" and if you are not easily deterred by setbacks and love overcoming technical challenges....well then astrophotography might be just right for you!
Carpe Noctem! (Seize the night)
Next Month: Astrophotography 101 Shooting a Moving Target
Amateur Astrophotography: Chanan Greenberg Page 5
Part 2: Astrophotography 101 Shooting a Moving Target Why is astrophotography so demanding? Why is it more difficult than just pointing the camera and taking a shot? Astrophotography has some similarities to shooting with any digital camera but it introduces some interesting twists that can make achieving a single good shot a daunting challenge. As with taking a family snap shot with your digital camera, at the heart of the process is a Charged Coupled Device, also known as a CCD chip. These chips have a special characteristic – they are sensitive to light. More precisely they react to a photon hitting the atoms that make up the chip and “excite electrons”. When a photon hits a specific pixel on the chip it is registered by the chip. The more photons hit a pixel the brighter that pixel will be. This is the same process that occurs when a digital image is captured no matter what object you are shooting. This is more or less where the similarity between regular photography and astrophotography ends. In regular photography the object you are photographing is rarely moving at hundreds of miles an hour and located trillions of miles away from you – this is what astrophotography deals with. There are several challenges presented to us when we try to photograph celestial objects:
• Limited amount of light • Motion of the Earth • Earths Atmosphere
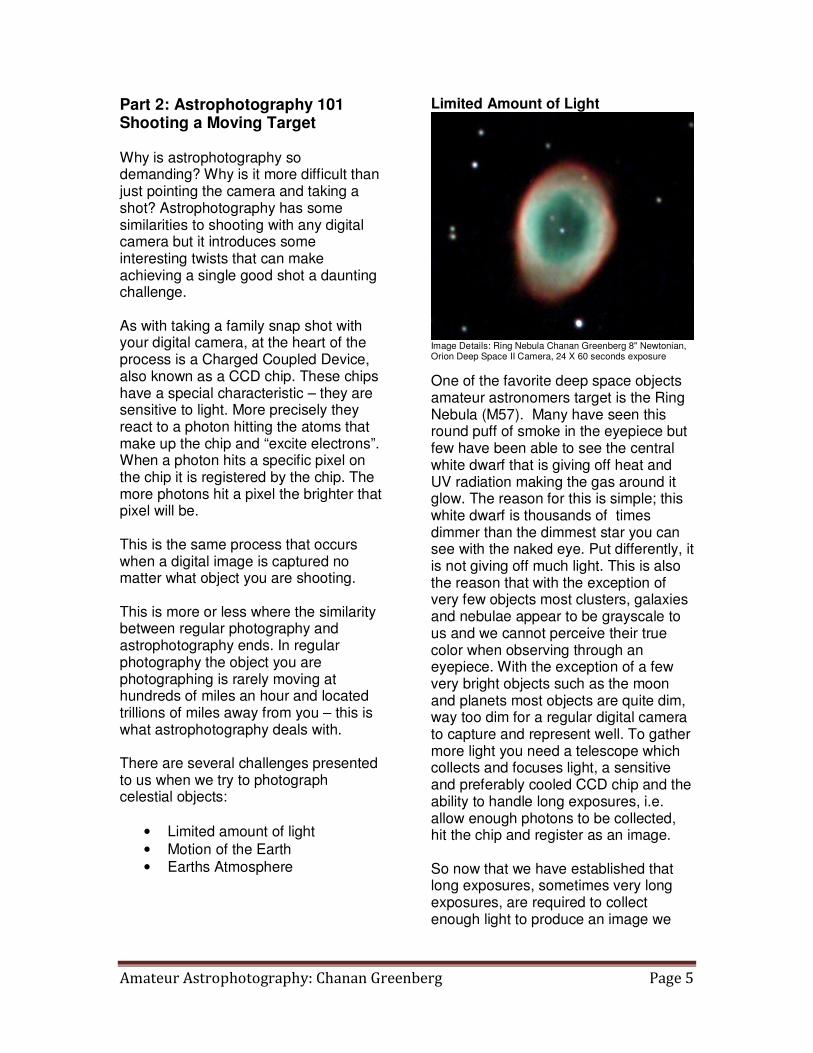
Limited Amount of Light
Image Details: Ring Nebula Chanan Greenberg 8" Newtonian, Orion Deep Space II Camera, 24 X 60 seconds exposure
One of the favorite deep space objects amateur astronomers target is the Ring Nebula (M57). Many have seen this round puff of smoke in the eyepiece but few have been able to see the central white dwarf that is giving off heat and UV radiation making the gas around it glow. The reason for this is simple; this white dwarf is thousands of times dimmer than the dimmest star you can see with the naked eye. Put differently, it is not giving off much light. This is also the reason that with the exception of very few objects most clusters, galaxies and nebulae appear to be grayscale to us and we cannot perceive their true color when observing through an eyepiece. With the exception of a few very bright objects such as the moon and planets most objects are quite dim, way too dim for a regular digital camera to capture and represent well. To gather more light you need a telescope which collects and focuses light, a sensitive and preferably cooled CCD chip and the ability to handle long exposures, i.e. allow enough photons to be collected, hit the chip and register as an image. So now that we have established that long exposures, sometimes very long exposures, are required to collect enough light to produce an image we

Amateur Astrophotography: Chanan Greenberg Page 6
need to tackle the next challenge – shooting a moving target. Motion of the Earth: Polar alignment and Tracking Over 4 billion years ago a massive object about the size of Mars collided with our planet tilting our axes of rotation. The Earth is rotating at a speed of over 900 miles an hour which causes the skies to appear to be moving from east to west. So as a night progresses objects that start out in the east will slowly move westward. Taking long exposures of objects in space is effectively trying to shoot a moving target which needs to be tracked. In order to track an object in the sky we must compensate for the Earth’s rotation using a Right Ascension (RA) tracking motor and properly Polar Align the scope along the axis of rotation otherwise the tracking will not follow accurately. Also, finding objects can become quite difficult. Most amateur astronomers who use equatorial mounts have come accustomed to handling polar alignment. Whether doing a rough visual alignment or using a polar scope built into the mount, such an alignment is quite sufficient for observing. Those who use a fork type mount rely on a 2-star or 3-star alignment and can easily find objects in the sky to observe. For astrophotography this is not good enough. While the human eye and brain are quite forgiving and will either not detect or compensate for any tracking errors, a CCD chip is very unforgiving. While observing slight motions often go un-noticed. A CCD chip however, faithfully records every photon hit and if tracking and alignment are not accurate it will faithfully record every error making images look blurry or even show streaking star lines in the image.
Sample images of poor tracking
To take any exposure that is longer than 20 seconds, accurate polar alignment and good tracking is a pre-requisite to acquiring good images. In fact, the best deep space camera on the market will still produce lousy results without a good mount for tracking and good polar alignment. A middle of the road type of camera can produce excellent results if the mount is properly aligned and tracking well. So the mount is where you want to invest most of your dollars. There are several methods to obtain good and even excellent polar alignment. The one most commonly used is Drift Alignment which is an iterative process of first tracking a star near the intersection of the celestial equator and the meridian and making azimuth adjustments to your mount and then tracking a star near the horizon and making altitude adjustments to the mount. When the stars stop drifting you are accurately aligned. Polar Alignment / Drift Alignment http://www.petesastrophotography.com/index.html? Select Drift Technique from the menu on the left to get an excellent step by step tutorial

Amateur Astrophotography: Chanan Greenberg Page 7
Another method to align your scope is using your CCD camera and software like PoleAlignMax which automatically measures how far off you are from the actual pole and helps you in the process of achieving very accurate polar alignment. PoleAlignMax http://users.bsdwebsolutions.com/~larryweber/PoleAlignMaxDownload.htm
Getting good polar alignment is a matter of repeated efforts and as time goes by you will get better at it. Don’t despair it is time well invested which makes finding very dim objects easier and reduces tracking errors significantly which helps produce better images. Now that you are polar aligned you can tackle the next task – accurate tracking. While most RA motors can track objects quite well for observational purposes no motor is perfect and inconsistencies in the gears will cause objects to move just enough to potentially ruin a nice image. To deal with this issue better mounts offer a feature known as Periodic Error Correction (PEC). Basically, you run a training session in which you use a high magnification illuminated eyepiece to track a star and keep it centered using the RA control buttons. The mount records the actions you take to correct the tracking and uses these corrections as part of its standard tracking process compensating for any built-in errors it may have. While PEC can produce excellent results and is strongly recommended, even that alone will not be enough for really long exposures. This leads us into guiding and specifically auto-guiding. Guiding used to mean that the astronomer would have to be next to the scope and look through an eyepiece at a guiding star and manually make adjustments to correct any tracking
errors during the exposures. That can be a very demanding and uncomfortable experience. This is why auto-guiding is so helpful. Auto guiding does essentially the same thing, a second CCD camera tracks a specific star and when it drifts by more than a preset distance (often less than 0.3 pixels) the camera will send a correction action to the mount. There are various ways to handle auto-guiding from dual chip cameras, to off-axis guiding cameras to having a completely separate camera and scope used for guiding. In summary to be able to produce high quality images you need to be:
• Polar Aligned • Tracking well using PEC • Auto-guiding
Earth’s Atmosphere Now you are ready to focus and start imaging and process your images. But there is one more challenging factor – Earth’s atmosphere. Imaging objects in space through Earth’s atmosphere is like taking images from the bottom of a pool. The atmosphere is filled with warm and cold air streams, pollutants, water vapor and numerous other components that can make life quite difficult for astrophotography. A petition to have the Earth’s atmosphere removed has been rejected on the grounds that it is required to sustain life – even the life of astrophotographers. The two main factors that impact our ability to take images through our atmosphere are Transparency and Seeing. Although there are some solutions that introduce adaptive optics which compensates for changes in the atmosphere these still remain rather expensive, so most astrophotographers keep hoping for good conditions.
Amateur Astrophotography: Chanan Greenberg Page 8
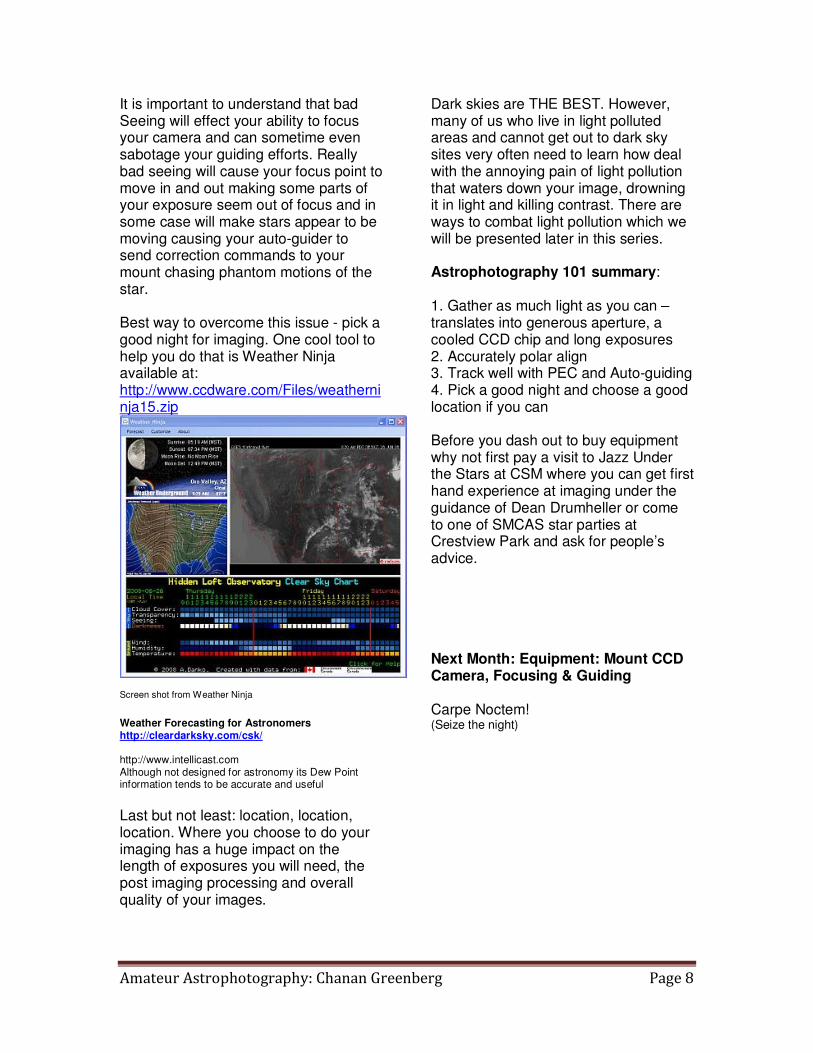
It is important to understand that bad Seeing will effect your ability to focus your camera and can sometime even sabotage your guiding efforts. Really bad seeing will cause your focus point to move in and out making some parts of your exposure seem out of focus and in some case will make stars appear to be moving causing your auto-guider to send correction commands to your mount chasing phantom motions of the star. Best way to overcome this issue - pick a good night for imaging. One cool tool to help you do that is Weather Ninja available at: http://www.ccdware.com/Files/weatherninja15.zip
Screen shot from Weather Ninja
Weather Forecasting for Astronomers http://cleardarksky.com/csk/ http://www.intellicast.com Although not designed for astronomy its Dew Point information tends to be accurate and useful
Last but not least: location, location, location. Where you choose to do your imaging has a huge impact on the length of exposures you will need, the post imaging processing and overall quality of your images.
Dark skies are THE BEST. However, many of us who live in light polluted areas and cannot get out to dark sky sites very often need to learn how deal with the annoying pain of light pollution that waters down your image, drowning it in light and killing contrast. There are ways to combat light pollution which we will be presented later in this series. Astrophotography 101 summary: 1. Gather as much light as you can – translates into generous aperture, a cooled CCD chip and long exposures 2. Accurately polar align 3. Track well with PEC and Auto-guiding 4. Pick a good night and choose a good location if you can Before you dash out to buy equipment why not first pay a visit to Jazz Under the Stars at CSM where you can get first hand experience at imaging under the guidance of Dean Drumheller or come to one of SMCAS star parties at Crestview Park and ask for people’s advice. Next Month: Equipment: Mount CCD Camera, Focusing & Guiding Carpe Noctem! (Seize the night)

Amateur Astrophotography: Chanan Greenberg Page 9
Part 3: Equipment: Mount, CCD Camera, Focusing & Guiding This chapter will cover what you should consider when selecting equipment. The whole objective of this series of articles is to provide a practical guide on how to create an affordable imaging setup. That said these are all relative terms. For some of us living in a light polluted environment is a fact of life we need to deal with while for others going often to locations with dark skies is a practical option. Affordability is also something quite relative. So my assumption is that the reader is likely to be working in a light polluted area. If you are not, all the advice is just as valid and your life will be easier. Additionally at the end of this chapter I have provided a check list on how to build what I consider to be a good imaging system with the estimated costs. Important Clarification: I am openly biased towards equipment provided by Orion Telescopes. This is my main frame of reference and is what has worked for me. In my opinion they offer the best balance between cost and performance and the quality of customer service I have received has been beyond reproach, especially from the Cupertino store. I wanted to make it clear that I am not compensated in any way by Orion and am merely expressing an opinion based on my experience. My equipment comments will extend to other vendors such as SBIG, Meade and others. How long does 'long' mean? Throughout these articles I have referred to taking long exposures. Some images require hours of exposure. However, it is common practice to take a series of shorter exposures 1 to 10 minutes long and stack them during the image processing stage (see next
month’s chapter). There are a few good reasons to follow this practice:
1. Planes & Satellites can often fly through the field of view you are imaging. If you're in mid exposure of a 1 hour image that whole image may be lost and that hour is wasted. If you were taking 6 ten minute exposures one of them may be lost but the combined 50 minutes can still be used.
2. While the best results are derived from long exposures there is another practical consideration that limits how long we should expose which is light pollution. When a CCD Camera is exposing it collects light – all light - including that orange haze we see in the sky in light polluted areas. That light waters down the image and reduces contrast and is difficult to remove. In heavily light polluted areas, an exposure that goes much longer than 2 minutes, will cause the CCD chip to over-saturate by light pollution. You can still achieve good results, just by taking many shorter exposures and then combine them.
Image Details: M42 Chanan Greenberg Orion 10” Newtonian, Orion Deep Space Pro. 9 X 2 minute exposures taken under light polluted skies

Amateur Astrophotography: Chanan Greenberg Page 10
Selecting a Mount As mentioned in a previous chapter, the mount is the place you want to invest the majority of your budget. The best telescope with the best camera will still deliver poor results if mounted on a mount that does not perform well. The key features you want to make sure you mount can handle are:
1. Equatorial Vs Fork – most people that I know who do imaging use an equatorial mount as it is best designed to mimic the motions of the sky. This does not mean you cannot do imaging with a fork mount and some fork models from both Celestron and Meade offer auto-guiding capabilities. My recommendation leans towards the equatorial design especially for long exposure sessions.
2. Weight Limit – you have to make sure that your mount is capable of handling the weight you plan to put on it. If you overload the mount you increase the chance of ruining the gears and it will strain to keep up with your tracking demands. Your weight limit will vary depending on the setup you create. A camera with a dual-chip setup which can self-guide with a small refractor, which is a great setup for wide field imaging, can way less than 20 lbs. While a large scope, with a secondary guiding scope and 2 cameras can weigh more than 50 lbs.
3. Quality of Motors – make sure your mount has high quality dual-axis motors allowing it to track in both RA and DEC. There are many mounts out there that will claim to do a great job but few that actually meet the demanding accuracy required for imaging.
4. PEC Capability – the ability to train the mount on how to compensate for periodic errors
5. Auto-Guiding – the mount needs to have a port designed to accept auto-guiding commands
6. Computer Control – you will spend a significant amount of time at your computer during an imaging session, the ability to control the mount through the computer is going to make your life significantly easier and make your session more productive
7. GO-TO – while not a must, you can find targets using setting circles and star maps, it is a huge efficiency gain and is absolutely required if you plan to use automated processes like PoleAlignMax to refine your polar alignment
8. GPS – definitely a nice to have gadget but not a must. The GPS feeds in the correct time, coordinates and altitude information into to your mount’s hand controller instead of you having to do it every time.
9. Budget – mounts that offer this entire scope of abilities start at $700 and go as high as $70,000 (yes that is $70,000). There are very good mounts such as Losmandy, Celestron CGE, Vixen Atlux and Vixen SXD all retailing from $3,000 to $5,000 which perform well and can carry a heavy load. Since we are focusing on affordability the most cost effective investment I have seen to-date, which is what I use, is the Orion Atlas EQ-G mount which retails at $1,499

Amateur Astrophotography: Chanan Greenberg Page 11
Leveling and Balancing your Mount Regardless of which mount you select, leveling your mount and balancing are critical for good imaging. A non leveled scope means that even if you are properly polar aligned and your tracking is accurate you will experience field rotation and deteriorating tracking during your session as you are not truly tracking in RA. Most mounts have a built in bubble that makes leveling the mount an easy and fast task. A non balanced mount means that your mount is heavier on one axis. This will press your gears tighter against each other when pointing the scope in one direction and may cause them not to mesh well when pointing in another direction. Overall this strains the motors, unhealthy for the gears and will make your tracking and guiding efforts more difficult.
The Orion Atlas EQ-G Mount
Selecting a CCD Camera Let me start by making a quick note about DSLR cameras. I have seen
some astrophotographers use various DSLR cameras and produce very impressive results. DSLR cameras probably out-perform many small chip and cheap astrophotography CCD cameras. I have very limited experience using DSLR cameras. Overall a true dedicated camera for astrophotography should give better performance when used with cooling. The key considerations when selecting a camera:
1. Camera / Scope combination – different chip sizes and scopes with different apertures and focal lengths create different imaging systems which impact the type of objects you can image and the field of view you have. As a rule the smaller the chip and the larger the aperture of the scope the more limited the field of view will be and the higher the magnification. Larger chip and small aperture produce wide fields of view and lower magnification. Additionally, the scope’s focal length is a determining factor impacting exposure time. For 2 scopes of the same aperture but different focal lengths, the shorter focal length will require shorter exposures.
2. Sensitivity – different chips used by different manufacturers have different levels of sensitivity and other related parameters. Quantum efficiency basically is a good indicator for how sensitive the chip is. Generally the more sensitive the better. The Kodak chips used in SBIG cameras boasts an 85% quantum efficiency. While Orion cameras using Sony made chips have 60% quantum efficiency and are therefore less sensitive. Full-well capacity is another parameter.

Amateur Astrophotography: Chanan Greenberg Page 12
Each pixel on the chip has a full-well capacity, after a certain amount of photons have hit that pixel it can no longer “contain” them and spills over to adjacent pixel making them bright too.
3. Cooling – cooling the chip below ambient temperature is very effective in reducing the amount of ‘noise’ the camera detects and the less noise will make its way into your image. Additionally, some cameras not only cool the chip but allow you to set the temperature the chip is cooled to. This is very helpful when imaging over several days and using Dark Frames (to be explained in next month’s chapter) when it is important to make sure the images are being captured by the chip at the same temperature.
4. Blooming Vs Anti-Blooming – blooming is what happens with the full-well capacity is exceeded and adjacent pixels appear bright to the point that a star is burnt out and lines appear in the image. Some cameras ‘bloom’ while others introduce a cut-off point that prevents blooming. Generally, anti-blooming camera’s are less sensitive and require longer exposures than blooming cameras.
5. One Shot Color Vs Monochrome – generally speaking Monochrome cameras (that shoot in “black and white” and use filters to capture color information) typically produce superior results to One Shot Color imagers. That said, they take at least double the time to capture the same image as each exposure requires 4 sets of exposure (Luminance, Red, Green and Blue) and they are more expensive as in addition to the camera you need a filter
wheel and filters. They also require more processing work after imaging is done. For a similar sized chip it can be said that Monochrome provides higher resolution as the entire chip is used for each type of exposure while the One Shot Color uses a Bayer filter and offers lower resolution.
6. Software Support – make sure your camera works with one of the following software packages: CCDSoft, or MaxIm DL or MaxIm DL Essentials, or Nebulosity. Its not just that these are good application but there is a large community of users who have formed user groups on the Internet that can provide lots of advice and feedback
7. Guiding Cameras – some imaging cameras have a built in second chip that is used for guiding (AKA self guiding). These tend to be available in the higher priced cameras. Other alternatives are dedicated guiding cameras such as Orion’s Auto-guider or using a second imager that is not dedicated to guiding. While some will say it is critical to use a monochrome camera for guiding, I have been using a One Shot Color camera for guiding with very good results.
8. Solar System Vs Deep Space – solar system objects are significantly brighter than deep space objects. The image of the moon below is a 0.08 second exposure while deep space objects require many minutes to start showing up in the image. There are some cameras that are less sensitive and designed for solar system imaging; they are also moderately priced – well below $200.

Amateur Astrophotography: Chanan Greenberg Page 13
Image Details: Chanan Greenberg 0.08 Second exposure of the moon
9. Budget - it's surprising how many
vendors and how many models of astronomy CCD cameras are available. Vendors such as StarlightXPress, FLI, Apogee and the very well respected SBIG provide high quality cameras ranging from $2,000 to $35,000. There are other vendors such as the Meade DSI product line but frankly in my limited experience they do not match up in comparison to the vendors listed above or to the Orion product line of cameras. As this series of articles is titled "the affordable end of the spectrum" I have focused on what I believe provides the highest quality within a reasonable level of expense. After doing my own survey of the market to select which products I invest in I selected the Orion StarShoot product line which offers:
• Solar System camera available for $179
• Deep Space Camera II - $399
• Deep Space Camera Pro $1,299
The Orion Start Shoot Deep Space Pro offers the only large format 6.1 Mega Pixel cooled chip camera in the market retailing below $2K. Most comparable cameras cost double that or more. While its cooling is automatic and not controlled and it has no shutter control that requires covering the front of your scope to do Dark Frames it is by far the best camera on the market today and all comparables cameras cost significantly more.
Orion StarShoot Solar System
Orion StarShoot Deep Space Pro

Amateur Astrophotography: Chanan Greenberg Page 14
Image Details: Lagoon Nebula (M8), Trifid Nebula (M20) and Open Cluster M21 Chanan Greenberg Orion 80mm APO Refractor, Orion Deep Space Pro. 15 X 2 minute exposures and 5 X 3 minute exposures
Focusing This is probably one of the hardest tasks in astrophotography that requires the most practice until fully mastered. Imaging dim objects sometimes objects that you cannot really see presents an interesting challenge – how to focus the image. The simplest way is to set your camera on continuous exposures while pointing the scope at a bright star and bringing it into focus. This manual process requires time to master and is rarely accurate. A combination of hardware and software can help you focus quickly and accurately: Electronic Focuser – a motor attached to your focuser allowing you to move the focuser position without touching the scope. There are several excellent Electronic Focusers like JMI that not only control the movement of the
focuser but also track temperature changes allowing you to adapt your focus point during an imaging session. Orion’s AccuFocus works very well and is quite affordable. Focus Controller – a control box that allows your computer to communicate directly with the Electronic Focuser so you can control the focuser from your computer. Shoestring Astronomy provides FCUSB which works very well and supports a wide range of focusers. Imaging Software – such as CCDSoft and MaxIm DL that can show you as you focus the Full Width Half Maximum (FWHM) and Half Flux Diameter (HFD) numbers. Using the software you can focus “by the numbers” as you bring down both HFD and FWHM numbers the closer you are to being in focus. Its always a good idea to go beyond the optimal focus point and work your way back then you know you are at the optimal focus point FocusMax Software – this free software completely automates your focusing efforts. It initially does an analysis of the optical performance of your system. It then takes over the camera and focuser and automatically brings you into the best focus point it can find.
Orion AccuFocus

Amateur Astrophotography: Chanan Greenberg Page 15
Shoestring Astronomy FCUSB
Guiding The process of guiding and auto-guiding was touched on in the chapter Astrophotography 101, and additional practical tips on how to achieve good guiding will be covered in the next chapter Imaging and Image Processing. In this chapter focused on equipment I will just say this: almost any descent CCD camera and scope can provide good enough guiding. I often use my 80mm APO Refractor as a guiding scope. You do not need an APO refractor to do guiding; there are good guiding scopes available for under $300. Since I have several deep space cameras from Orion I use one of those as my guider camera although it was not design to be used as a guiding camera it works very well. Some people try and use CCD camera’s designed for solar system imaging and try those for guiding mostly with no success as those cameras are not sensitive enough. I know of some people who use simple webcams as their guiding camera who claim to achieve good results. Guiding Software – almost any commercial application designed for imaging such as MaxIm DL and CCDSoft support controlling a second guiding camera and guiding routines including calibration and tracking. I personally prefer using PHD Guiding which is free and is literally a point and click solution. You connect your equipment, start exposing, select a star
and your done. The application will do all the rest of the work for you and has delivered excellent performance. Software There is some software you need to have and lots of software that is nice to have. The following list includes all the software I use and I mention some alternatives, there are 13 software packages listed, 9 are available for FREE and only 4 cost money: New Astronomy CCDCalc – this application is a great tool which is available free from Ron Wodaski’s web site (http://www.newastro.com/). Ron’s book “New CCD Astronomy” is highly recommended and provides great detail and guidance on astrophotography. This application allows you to create any combination of telescope and camera and see the resolution of the system in arc seconds per pixel and see your field of view overlaid on top of an actual image of many targets. This tool is great for planning imaging sessions Polar Finder – this is a nice little application also available for free (http://www.polarfinder.co.uk/) which simply shows you where Polaris should be in your polar scope. It’s a fast way to validate your initial polar alignment is close ASCOM Platform – ASCOM platform is free and it is a standard protocol for astronomy allowing software to control various types of equipment ranging from mounts, cameras, to guiders and focusers Starry Night Pro – is a planetarium package that simulates the night sky, it allows you to find objects and get huge amounts of information about almost any object. This application also provides cool tools such as field of view which allows you to setup any

Amateur Astrophotography: Chanan Greenberg Page 16
combination of scope, camera, eyepiece and Barlow and see exactly what your field of view would look like which is very helpful in planning imaging sessions. It also can control the mount and you can send your scope to any object directly from your desktop. An alternative to Starry Night Pro is The Sky which offers excellent options and is considered an excellent software package. FocusMax – already reviewed earlier in this chapter. This application automates your focusing process and is available for free. PoleAlignMax - already reviewed earlier in this chapter. This application automates the process of correcting your polar alignment and is available for free. MaxIm DL Essentials – this software comes bundled with Orion Deep Space cameras. It handles imaging, auto-guiding and image processing MaxIm DL 5 – I use this version of MaxIm although I got the Essentials version for free with my Orion Cameras. I prefer the full version as it offers a lot more tools for planning image sequences, batch processes that automate many commands and its support of Pin Point astrometry which is
required for correcting your polar alignment errors. PHD Guiding – I use this for auto-guiding. Simply works great and is free (http://www.stark-labs.com/phdguiding.html) CCD Stack – wonderful software that handles image stacking and processing. In my opinion it is the fastest way to good results. Photoshop – final retouching, non-linear stretching of an image’s histogram and where certain filters can be used to clean up images. Weather Ninja – free software to help you assess if weather conditions will be favorable for imaging Virtual Moon Atlas Pro – this free software provides incredible detailed maps and images of the moon, helps learn about the moon and about each crater. It is the perfect companion for a night of lunar observing Assembling a complete imaging system So what does is it cost to assemble a good imaging system from scratch:

Amateur Astrophotography: Chanan Greenberg Page 17
Item Estimated Cost Comments
Orion Atlas EQ-G GoTo Mount $1,499 Orion 10” Newtonian $499 Orion 8” Newtonian $289 Alternative Item* Orion Guiding Scope $300 Orion 80mm APO $490 Alternative item* Orion Star Shoot Deep Space Pro $1,299 Large format CCD camera Orion Star Shoot Deep Space II $399 Small format CCD camera Orion Auto-guider $249 Alternative item* Orion Sky Glow Filter for Imaging $119 Orion AccuFocuser $100 Shoestring Astronomy FOCUSB $100 Shoestring Astronomy GUSB $100 Starry Night Pro $259 MaxIm DL Essentials FREE Bundled with Orion Cameras MaxIm DL full version $399 Optional CCD Stack $399 Optional
Photoshop $699 Optional
PHD Guiding FREE FocusMax FREE PoleAlignMax FREE GPS Unit for Mount $150 Optional
* Alternative item – this item is an alternative to the item listed above, you should choose which one of these items you prefer
1. If you avoid the optional items and select the alternative items suggested the
entire system from scratch including mount, 2 telescopes, guiding camera, main imaging camera and software will cost roughly $4K
2. If you choose all the optional items and select some of the more expensive options your entire cost for a good imaging system would be $6K
3. Many amateur astronomers already have scopes and a mount and may only need the imaging camera and guiding camera, In that scenario the investment may be as little as $1,500 or less
Until a few years ago just a good camera could easily cost $3,000 and up to $15,000 dollars for the camera alone!! The entire list of equipment listed above combined, costs less than many cameras available today and with practice can produce very impressive results. For those who wish to shave off more money off this budget check out sales opportunities and Clearance sales on Orion (www.telescope.com) and Scope City's (www.scopecity.com) web sites as well as Astromart.com and Cloudynights.com - you can reduce this budget by 30-40% if you are willing to use second hand equipment Next Month: Imaging and Image Processing Carpe Noctem! (Seize the night)

Amateur Astrophotography: Chanan Greenberg Page 18
Part 4: Imaging & Image Processing This last installment about amateur astrophotography is focused on providing practical guidance on how to capture and process images to produce pleasing results. At the end of this chapter is a list of links to additional information on all the topics that were covered in these articles. Imaging This section will describe the steps I follow in an imaging session, which are:
• Plan • Setup • Improve Polar Alignment • Star Alignment • Focus • Slew to Object • Start Guiding • Imaging
Plan – think about what objects are going to be visible and which ones you want capture. Use CCDCalc or Starry Night to see what your field of view will be when looking at these objects with your scope and camera combination so you can plan what orientation your camera may need to be in, in order to capture the image. Spending some time planning your session allows you to be more effective during your session. Setup – if you are fortunate enough to have a permanent setup you can skip this section. If you are like me and have to setup every time here are the steps I follow: • Rough polar alignment • Balance scope • Check collimation (important for
Newtonian scopes) • Install all cables, control boxes for
focusers and guider
Improve Polar Alignment I recommend either drift alignment method or using PoleAlignMax which were described in chapter 2. This process of adjusting your azimuth and altitude to get as close as possible to the true pole can take 15 to 45 minutes based on experience and some luck. While this is a time consuming process it will make for a better imaging session and is worth the investment. Star Alignment This is the same process you would do for an observation session, using 2 or 3 star alignment to allow your scope to find its bearings and be able to accurately point to your desired object. Make sure that tracking or tracking with PEC is turned on. Focus Find a star that is 3 to 5 magnitude and center it. Using your focuser controls move the camera in or out and watch what happens to the FWHM and HFD numbers. Make sure your camera is on continuous exposure mode exposing an image every second or so. If your camera supports sub-frames draw a rectangle around the star you are focusing on and the images will download much faster from your camera. After each change you make to the focuser allow for 3 -4 exposures to determine if this made things better or worse as minor vibrations from the motion of the focuser tube and slight changes in seeing may impact the results of a single exposure. Keep making changes until you can bring the numbers of FWHM to below 4 and HFD below 3. These numbers will produce decent focus. If your have very good seeing you might be able to get the numbers down to 2 which is very good focus. Using the free FocusMax application can effectively automate the entire process for you.

Amateur Astrophotography: Chanan Greenberg Page 19
Slew to Object Using your planetarium software select the object you wish to image and slew the scope to that object. If it is a very dim object try taking a few sample exposures increasing their time until you can see the object you are looking for is in fact located in your field of view. If needed make minor adjustments in RA and DEC to place the object where you want it to be in the final image. Star Guiding Using PHD guiding establish a connection to your guiding camera and to the mount. Start capturing images, try 2-3 second exposures and see if you can find a reasonably bright star to use for guiding. Click on the star and a green rectangle will appear around the star. Click the stop button and then click on the Guide button – lean back and enjoy the show. PHD Guiding will conduct a calibration process slewing the scope West, East, North and South measuring the distance the star moves. Once done it will start guiding. Congratulations if your scope is well aligned you should get rock solid guiding. Imaging So this is what all the fuss is about….you are now ready to start imaging! When imaging you should take into account the nature of the object your are trying to capture, its brightness and the light pollution situation as well as seeing conditions. Under certain conditions a 2 minute exposure may look better than a 3 minute exposure that got oversaturated with light pollution – so experiment and see what produces the best results. In principal longer exposures produce better results. In other words a 10 minute exposure should look better than 5 X 2 minute exposures. BUT, this rules works well under dark skies, in light polluted areas CCD chips get oversaturated quickly and so combining shorter exposures will
produce better results. If you are using the full version of MaxIm DL you can easily setup an Imaging Sequence, instructing MaxIm DL to take 20 2 minute exposures and 10 3 minute exposures etc and it will execute for you automatically saving the images in a folder you designate. When you are at this phase it is pretty much an auto pilot situation but its always a good idea to keep track of what is going on. I always try to take several types if images ranging from 90 seconds and up to 10 minutes to see what produces the best results. I use the Orion StarShoot Deep Space Pro camera which is a One Shot color camera. So when imaging it is important to make sure the output is set to raw or monochrome. These images contain color data but you currently cannot see it. Do not try to shoot directly in color it will produce poor results. A useful tool to combat light pollution is Orion’s Sky Glow Filter for Imaging. Unlike regular broadband filters available from Orion, Lumicon and many other vendors that block out sodium spectrum lines they also block out quite a bit of red light, this filter was designed specifically for imaging and lets a lot more red data get through while still doing a good job reducing the effects of light pollution. Other exposures In addition to the Light exposures you will want to do 3 more types of exposures. Dark Frames, Flat Field and Bias these will be used in image processing to reduce various types of noise from your image. You can think about it this way: Dark frames capture ambient noise and hot pixels your camera might be capturing even when no light is going into the camera. It is recommended you take the dark frames at a similar temperature as the light exposures and that you take a few to create an average

Amateur Astrophotography: Chanan Greenberg Page 20
that can be subtracted from the light frames later. You should make sure that for each light exposure length you have several dark frames with the same exposure length. Flat fields – is the way to capture ‘noise’ or dirt on your optics and have those subtracted from the image. Flat fields are an image taken of an evenly illuminated object like the twilight sky or dawn sky. These images are not 100% required but do improve the look of an image. Since they are not easy to take some people build a light box to create an evenly illuminated view. If you are just starting, you can put off doing flat fields for a while until you have mastered all other aspects of imaging. Bias frame – is the level of ‘noise’ the chip may see when no or limited current goes through it. If your are using a One Shot Color CCD Camera you do not need to do a Bias frame as it is built into your Dark Frames. Image Processing Congratulations!! You now have a series of images taken including light and dark frames. For the purposes of this explanation I will assume the images were taken with a One Shot Color CCD camera. The steps in processing the images are:
• Calibrate • Convert to color • Register • Normalize • Reject Data • Stack • De-saturate background • Flatten Background • Digital Development (DDP) • Noise Ninja • Unsharp Mask
Calibrate In MaxIm DL select Set Calibration from the Process Menu. Select the folder where you have saved your files and click on Auto Generate. MaxIm will automatically identify the dark frames. IMPORTANT NOTE: since some processes may have undesired results it is always a best practice never to work on your original images. Make a copy of your images and apply the following steps to this copy. If mistakes occur or you don’t like the outcome, you can always make another copy of your original images and start over. Next open all the images you wish to process in MaxIm DL and select Calibrate All from the Process menu. All the noise captured in the dark frames will be subtracted from the light frames. Save all the light frames that were calibrated. Convert to Color Open the images you just calibrated in MaxIm DL and select Convert to Color from the Color Menu. Make sure your camera brand is selected in the Camera drop down menu and click OK. If you have many images you can automate this process using MaxIm DL’s batch command mode. Save your color converted images. Register You can continue the process in MaxIm that offers powerful stacking tools. I have grown accustomed and I like using CCD Stack. Where you first select Register from the Stack Menu to select stars used to align images before they get stacked. Normalize This processes starts with the reference image and analyzes all the other images and defines what weight to give them when stacking the images.

Amateur Astrophotography: Chanan Greenberg Page 21
Reject Data This option provides several procedures that allow you to systematically remove noise and artifacts from your images before they are stacked. Stack This is the final step in stacking images. There are several types of methods to stacking. You should experiment and see what works well. In my experience selecting Mean produces the best results. De-saturation and background flattening If you are lucky to be imaging under really dark skies you may not need this step. From my backyard in light-drenched silicon valley this is a step that helps reduce the impact of light pollution. I sometimes run the Adjust Color / De-saturate background option, 2 or 3 times before using Flatten Background under the Process menu Digital Development (DDP) Is a method of reducing background information while enhancing fine details in nebulae and galaxies Noise Ninja This is an optional step. If previous processes have produced a grainy image, there is a filter that can work independently or within Photoshop that helps smooth out grainy areas in your image which is a very good alternative to Gaussian Blur which does the same thing but also blurs the image a little UnSharp This process which is available in MaxIm DL and in Photoshop helps improve the sharpness of an image. It effectively creates a blurred version of the image and then subtracts that from the image creating a sharper image. Beware no to overdo it or you will create a sharp but grainy image.
Imaging the Horeshead Nebula This section will walk you through the various stages with sample images so you get an idea of what to expect. This image is of the Horeshead Nebula and Flame Nebula in the Orion Constellation. Technical Data: Date: October 22, 2008 Telescope: Orion 10" Newtonian Imaging Camera: Orion StarShoot Deep Space Pro Guiding Scope: Orion 80mm APO Refractor Guide Camera: Orion StarShoot Deep Space Camera Mount: Orion Atlas EQ-G 10 X 120 second exposure 5 X 300 second exposure MaxIm DL 5 PHD Guiding CCD Stack Photoshop Image 1 Raw Data: this is one 300 second exposure. You may notice poor contrast, no color, there are some black diagonal lines going through the image (result of slow communication USB) and a satellite line streaking through the image just to the right of the horsehead.

Amateur Astrophotography: Chanan Greenberg Page 22
Image 2: Calibrated and Color Convert The image below is the same image after calibration and color conversion
Image 3: Stacked Image The image below is the final result of registration, normalizing, data rejection and stacking - note all noises and artifacts have been removed. The image is drenched in light pollution
Image 4: Flattened Background & DDP The image below is the final result of adjusting color saturation, flattening the background and Digital Development.
Image 5: Final Image The image below is the final result of cleaning up the image from grains using Noise Ninja.
This brings this chapter and this series about astrophotography to an end. This is by no means a comprehensive overview. For those interested in how it's done it should give a good idea. And for those looking for tips on how to get started it provides good information. I would encourage those interested, to deepen your education through the data sources listed below Carpe Noctem! (Seize the night)

Amateur Astrophotography: Chanan Greenberg Page 23
List of additional Data Resources Ron Wodaski's New CCD Astronomy - this book can teach you everything you need to know http://www.newastro.com/ CCDCalc Application http://www.newastro.com/downloads/index.php Sample photos in SMCAS Yahoo Group http://groups.yahoo.com/group/SMCAS/photos/album/1287259648/pic/list Orion StarShoot User Group http://tech.groups.yahoo.com/group/Orion_StarShoot/ Atlas EQ-G User Group http://tech.groups.yahoo.com/group/EQ6/ Orion's Web site www.telescope.com Scope City's web site www.scopecity.com Stark-Labs (Nebulosity & PHD Guiding) http://tech.groups.yahoo.com/group/stark-labs-astronomy-software/ http://www.stark-labs.com/phdguiding.html Starry Night http://www.starrynightstore.com/stniso.html http://tech.groups.yahoo.com/group/StarryNight/ SBIG http://www.sbig.com/ CCD Stack http://www.ccdware.com/
MaxIm DL http://www.cyanogen.com/help/maximdl/MaxIm-DL.htm http://www.cyanogen.com/help/maximdl/MaxIm-DL.htm Pin Point Astrometry http://pinpoint.dc3.com/