Altering Drop-Down Menus for Admissions IT Service Request Form
29
ALTERING DROP-DOWN MENUS FOR THE ADMISSIONS IT SERVICE REQUEST FORM This document outlines the steps necessary to alter one (1) or more of the XML Files in the Admissions IT Service Request Log Reference Tables Data Connection Library, which are used to populate the various drop- down menus on the Admissions IT Service Request Form
-
Upload
edwin-jackson -
Category
Documents
-
view
15 -
download
0
Transcript of Altering Drop-Down Menus for Admissions IT Service Request Form

ALTERING DROP-DOWN MENUS FOR THE
ADMISSIONS IT SERVICE REQUEST FORM
This document outlines the steps necessary to alter one (1) or more of the XML Files in the Admissions IT Service Request Log Reference Tables Data Connection Library, which are used to populate the various drop-
down menus on the Admissions IT Service Request Form

Page 1 of 28

Page 2 of 28
Introduction
Dear Reader:
The drop-down menus on the Admissions IT Service Request Form are populated using XML
Files hosted in the Admissions IT Service Request Log Reference Tables Data Connection Library.
Over time, these XML Files may need to be updated to reflect current departments or business
practices.
This document has been compiled to instruct you in the procedure to add or remove a single entry
to one (1) of the hosted XML Files. While this tutorial is for a single entry, the techniques may be
extended to add or remove multiple entries to one of the hosted XML Files. I hope these
instructions prove helpful.
Sincerely,
Edwin M. Jackson

Page 3 of 28

Page 4 of 28
Contents Adding an Entry to an XML File .................................................................................................................. 6
Step 1: Opening the Admissions IT SharePoint Site in SharePoint Designer ......................... 6
Step 2: Navigating to the XML File in SharePoint Designer...................................................... 7
Step 3: Opening the Data Connection Library in SharePoint Designer .................................. 8
Step 4, Part A: Opening the XML File for Editing ...................................................................... 9
Step 4, Part B: Opening the XML File for Editing ..................................................................... 10
Step 5: Copying an XML Entry for Insertion .............................................................................. 11
Step 6: Creating Insertion Point for Copied XML Entry .......................................................... 12
Step 7: Inserting the Copied XML Entry..................................................................................... 13
Step 8: Updating the Contents of the ID and SEVERITY XML Elements ................................ 14
Step 9: Update the Contents of the ID XML Elements for Subsequent XML Entries .......... 15
Step 10: Update Other XML Elements If Necessary ................................................................. 16
Step 11: Saving Your Changes ..................................................................................................... 17
Step 12: Check That Your Changes Have Taken Effect .......................................................... 18
Removing an Entry from an XML File ....................................................................................................... 20
Step 1: Select the XML Entry You Wish to Remove ................................................................. 20
Step 2: Removing the Selected XML Entry ................................................................................ 21
Step 3: Updating the Contents of the ID XML Elements ......................................................... 22
Step 4: Update Other XML Elements If Necessary ................................................................... 23
Step 5: Saving Your Changes ....................................................................................................... 24
Step 6: Check That Your Changes Have Taken Effect............................................................. 25

Page 5 of 28
Page 6 of 28
Adding an Entry to an XML File
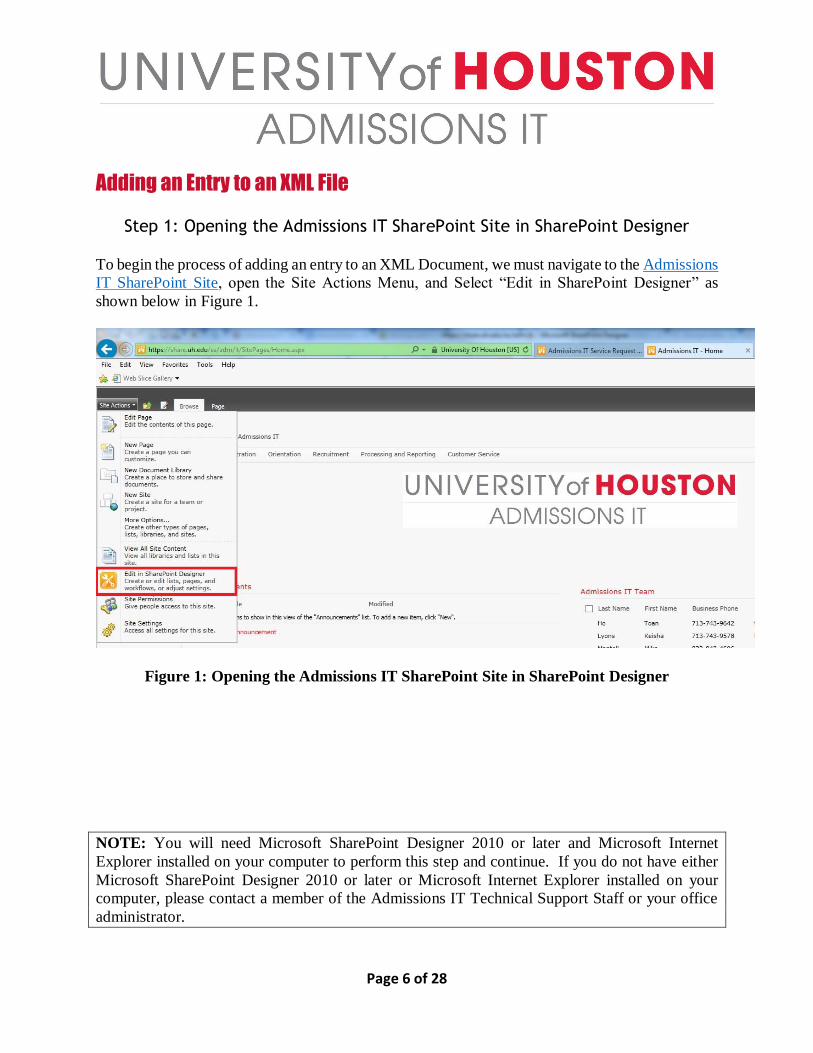
Step 1: Opening the Admissions IT SharePoint Site in SharePoint Designer To begin the process of adding an entry to an XML Document, we must navigate to the Admissions
IT SharePoint Site, open the Site Actions Menu, and Select “Edit in SharePoint Designer” as
shown below in Figure 1.
Figure 1: Opening the Admissions IT SharePoint Site in SharePoint Designer
NOTE: You will need Microsoft SharePoint Designer 2010 or later and Microsoft Internet
Explorer installed on your computer to perform this step and continue. If you do not have either
Microsoft SharePoint Designer 2010 or later or Microsoft Internet Explorer installed on your
computer, please contact a member of the Admissions IT Technical Support Staff or your office
administrator.

Page 7 of 28
Step 2: Navigating to the XML File in SharePoint Designer
With the Admissions IT SharePoint Site now open in SharePoint Designer, in the Navigation Pane,
select “All Files” as shown in Figure 2.
Figure 2: Viewing All Site Objects

Page 8 of 28
Step 3: Opening the Data Connection Library in SharePoint Designer
In the All Files Tab of the explorer window, select the “Admissions IT Service Request Log
Reference Tables” folder to open it, seen below in Figure 3.
Figure 3: Opening the Admissions IT Service Request Log Reference Tables Data
Connection Library

Page 9 of 28
Step 4, Part A: Opening the XML File for Editing
With the Data Connection Library now open in the explorer window, select the XML File you
wish to edit. In our example, we will edit the file named Severity.xml as shown in Figure 4.
Figure 4: Opening the XML File for Editing
Page 10 of 28
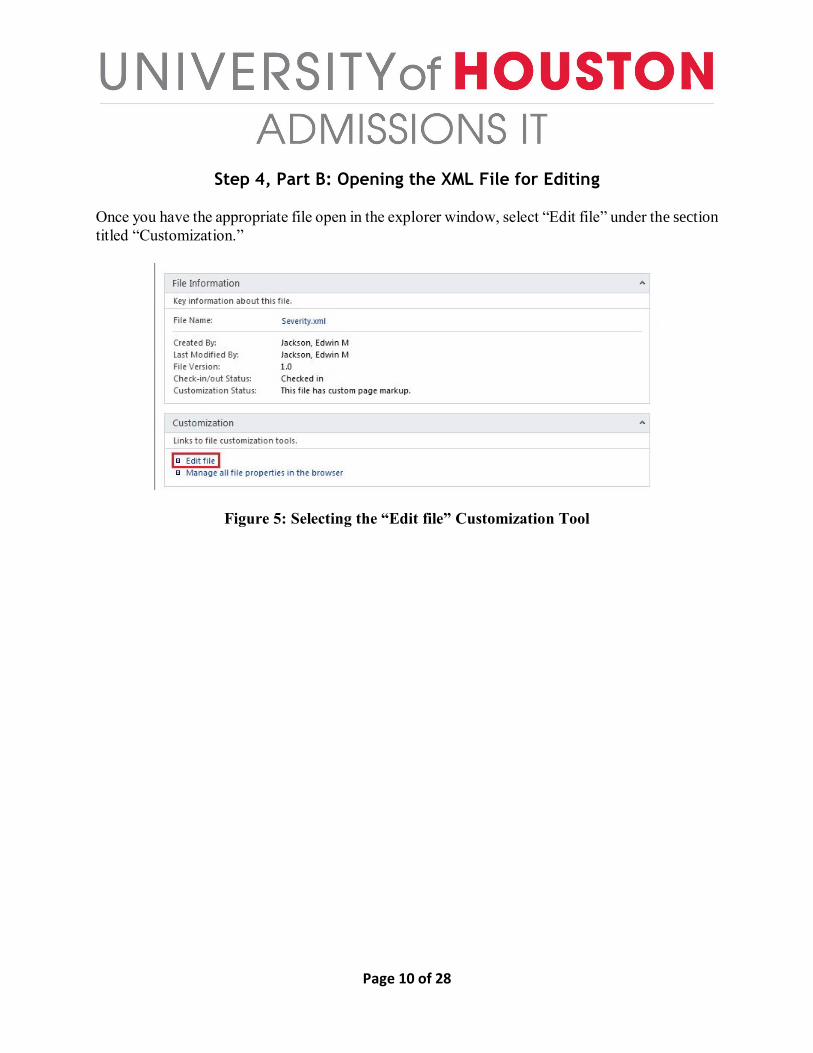
Step 4, Part B: Opening the XML File for Editing
Once you have the appropriate file open in the explorer window, select “Edit file” under the section
titled “Customization.”
Figure 5: Selecting the “Edit file” Customization Tool

Page 11 of 28
Step 5: Copying an XML Entry for Insertion
Instead of entering a new entry manually, we will copy one of the existing entries in the XML File
and use it as a starting point for our new entry in the list. This method will ensure we do not omit
any of the XML element tags (i.e. the portions of an XML File entry in angle brackets). You will
highlight the first entry in the XML File and copy it to the clipboard via using the Control-C (Ctrl
+ c) Command.
The entries in each of the XML Files follow the following format:
For XML Files with file names containing
exactly one (1) word:
<Filename>
<ID> List Index </ID>
<FILENAME> Entry in List </FILENAME>
</Filename>
For XML Files with file names containing
more than one (1) word:
<File _x0020_Name>
<ID> List Index </ID>
<FILE_NAME> Entry in List </FILE_NAME>
</File _x0020_Name>
where _x0020_ represents the space character in hexadecimal (XML does not support the space
character in element names as the space character is reserved to separate element names from
attribute names; For more information about XML or Hexadecimal, or if you would like an
introduction to using XML via an XML Tutorial, please use the enclosed hyperlinks).
Figure 6: Copying an XML Entry for Insertion
Page 12 of 28
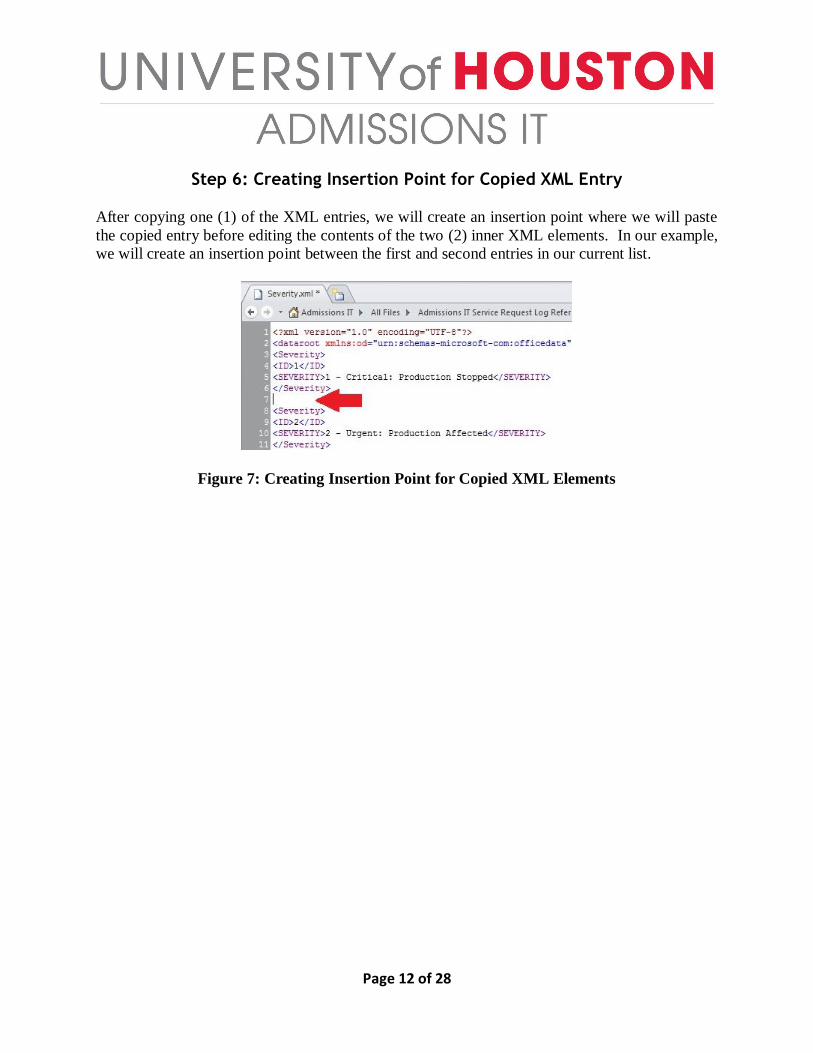
Step 6: Creating Insertion Point for Copied XML Entry
After copying one (1) of the XML entries, we will create an insertion point where we will paste
the copied entry before editing the contents of the two (2) inner XML elements. In our example,
we will create an insertion point between the first and second entries in our current list.
Figure 7: Creating Insertion Point for Copied XML Elements
Page 13 of 28
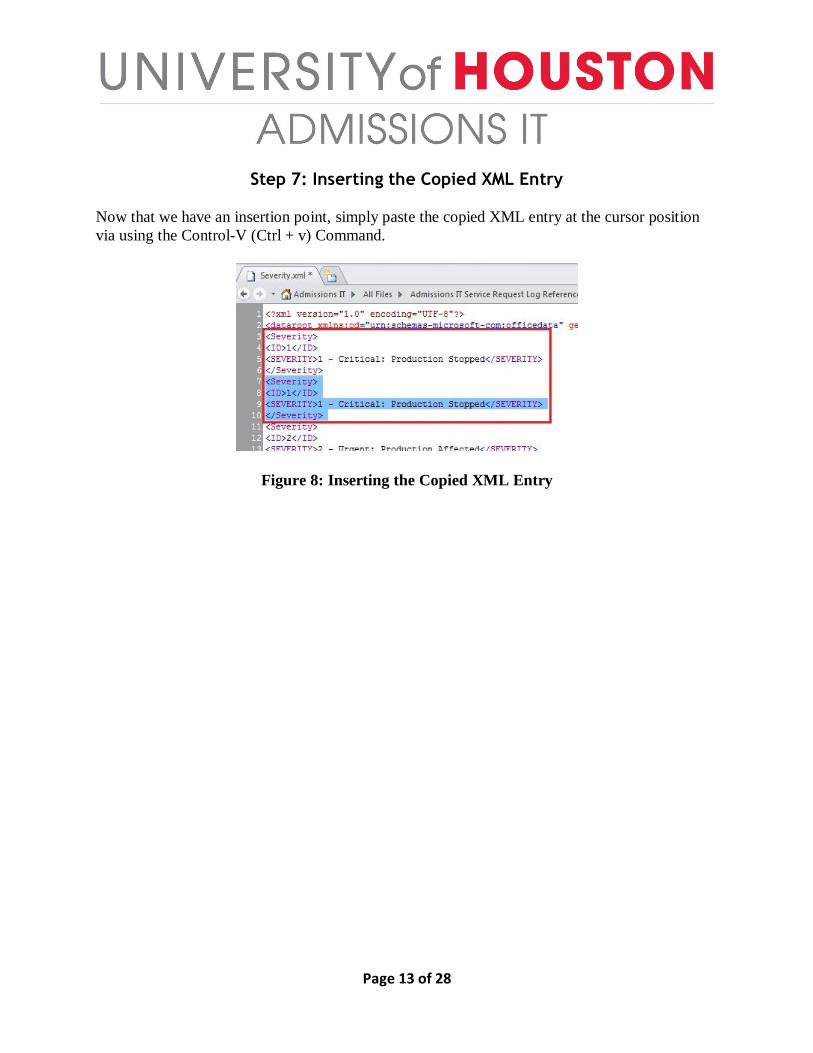
Step 7: Inserting the Copied XML Entry
Now that we have an insertion point, simply paste the copied XML entry at the cursor position
via using the Control-V (Ctrl + v) Command.
Figure 8: Inserting the Copied XML Entry
Page 14 of 28
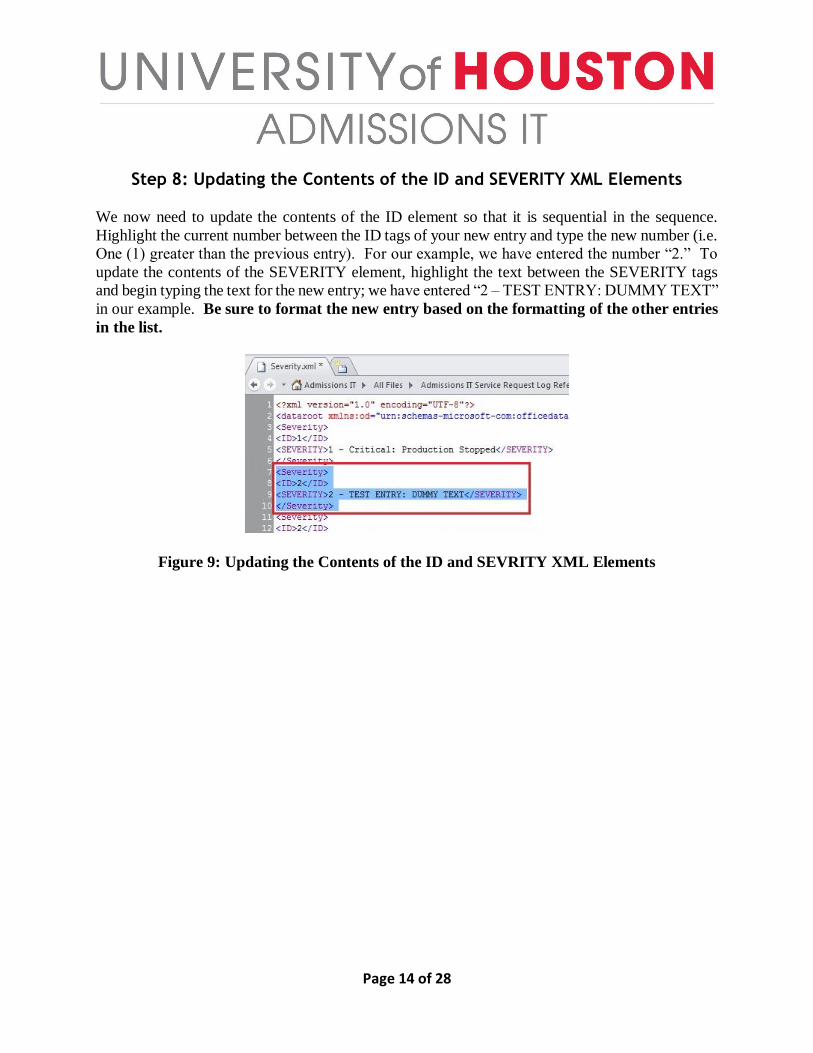
Step 8: Updating the Contents of the ID and SEVERITY XML Elements
We now need to update the contents of the ID element so that it is sequential in the sequence.
Highlight the current number between the ID tags of your new entry and type the new number (i.e.
One (1) greater than the previous entry). For our example, we have entered the number “2.” To
update the contents of the SEVERITY element, highlight the text between the SEVERITY tags
and begin typing the text for the new entry; we have entered “2 – TEST ENTRY: DUMMY TEXT”
in our example. Be sure to format the new entry based on the formatting of the other entries
in the list.
Figure 9: Updating the Contents of the ID and SEVRITY XML Elements
Page 15 of 28
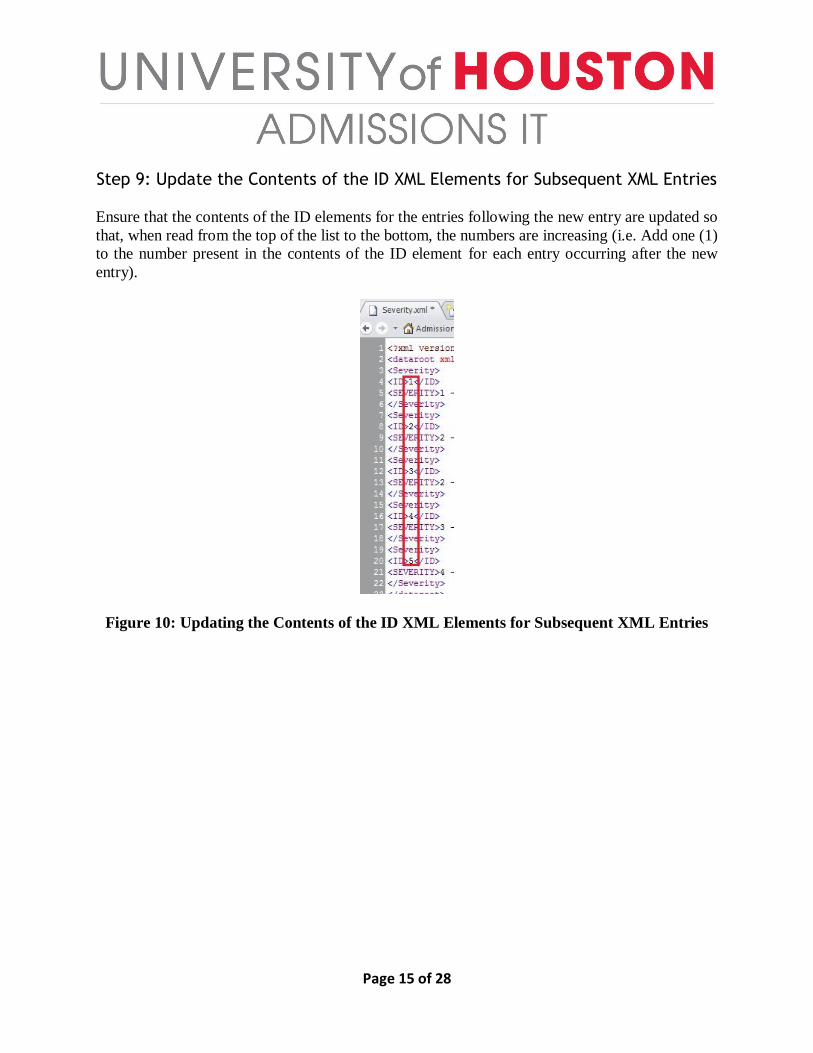
Step 9: Update the Contents of the ID XML Elements for Subsequent XML Entries
Ensure that the contents of the ID elements for the entries following the new entry are updated so
that, when read from the top of the list to the bottom, the numbers are increasing (i.e. Add one (1)
to the number present in the contents of the ID element for each entry occurring after the new
entry).
Figure 10: Updating the Contents of the ID XML Elements for Subsequent XML Entries

Page 16 of 28
Step 10: Update Other XML Elements If Necessary
In our example, the contents of the SEVERITY elements are also numbered sequentially, so we
must update the values of each entry following the new entry by increasing the number present in
each subsequent SEVERITY element entry by one (1).
Figure 11: Updating the SEVERITY Element Contents for Subsequent Entries

Page 17 of 28
Step 11: Saving Your Changes
To save your changes, right-click the XML file tab in the explorer window, in our example the
“Severity.xml” tab, and select “Save.”
Figure 12: Saving Your Changes

Page 18 of 28
Step 12: Check That Your Changes Have Taken Effect
Now, return to the Admissions IT SharePoint Site and open the Admissions IT Service Request
Form. Check that the changes you have made to the appropriate drop-down menu have taken
effect in the service request form. Note that you may have change to another view to see the
appropriate drop-down menu. If you notice any errors, repeat the process as outlined until the
appropriate drop-down menu appears as desired.
Figure 13: Checking That Your Changes Have Taken Effect

Page 19 of 28

Page 20 of 28
Removing an Entry from an XML File
Refer to Steps 1 through 4 (Parts A and B) of the section “Adding an Entry to an XML File” before
proceeding with the following steps.
Step 1: Select the XML Entry You Wish to Remove
After Opening the Admissions IT SharePoint Site in SharePoint Designer, Navigating to the XML
File, Opening the Data Connection Library, and Opening the XML File for Editing (Part A and
Part B), we will highlight the XML entry we would like to remove which, in our example, is the
second entry. If you have read through the steps to add an entry to the list, you will notice the
entry we are removing is the very entry we added previously.
Figure 14: Selecting the XML Entry to Remove

Page 21 of 28
Step 2: Removing the Selected XML Entry
With the entry to be removed highlight, press the “Backspace” key.
Figure 15: Removing the Selected XML Entry

Page 22 of 28
Step 3: Updating the Contents of the ID XML Elements
Ensure the contents of the ID elements are numbered sequentially in ascending order (i.e. 1, 2, 3,
…, n – 1, n where n is the total number of entries in the list). In our example, the contents of the
ID elements should read, from top of the list to the bottom, 1, 2, 3, and 4.
Figure 16: Updating the Contents of the ID XML Elements

Page 23 of 28
Step 4: Update Other XML Elements If Necessary
In our example, the contents of the SEVERITY elements are also numbered sequentially, so we
must update the values of each entry so that the number for the ID matches the number in the
respective SEVERITY element.
Figure 17: Updating the SEVERITY Element Contents

Page 24 of 28
Step 5: Saving Your Changes
To save your changes, right-click the XML file tab in the explorer window, in our example the
“Severity.xml” tab, and select “Save.”
Figure 18: Saving Your Changes
Page 25 of 28
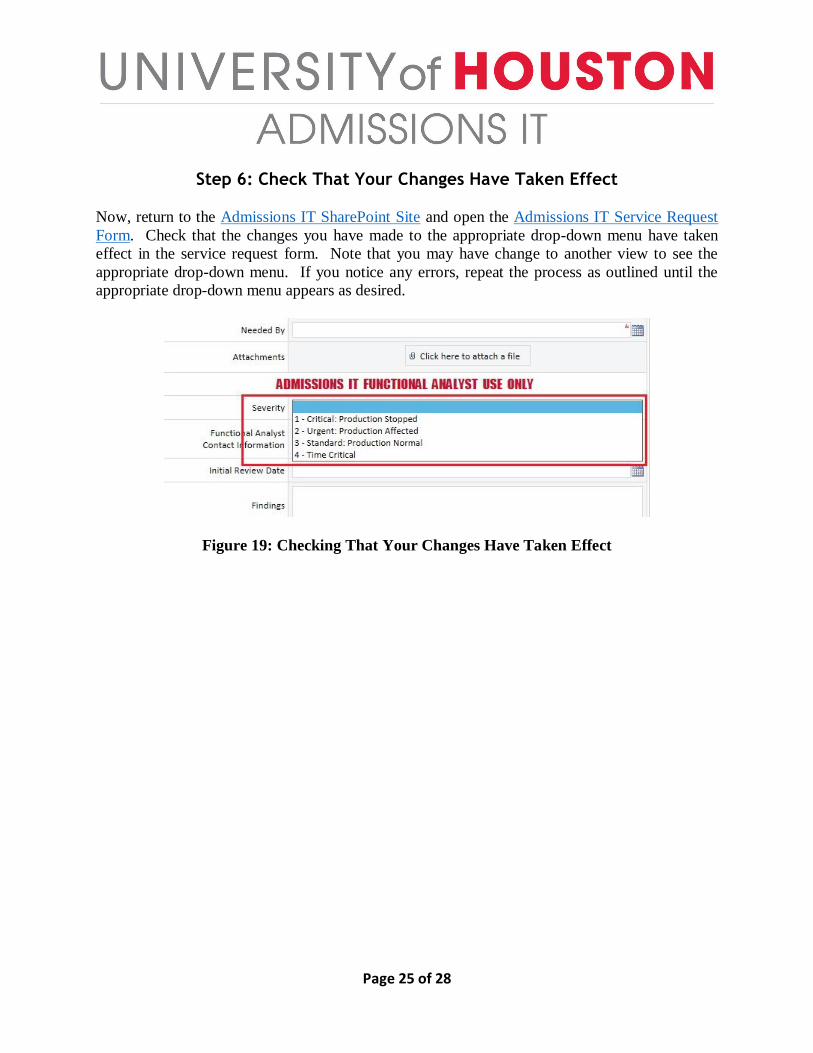
Step 6: Check That Your Changes Have Taken Effect
Now, return to the Admissions IT SharePoint Site and open the Admissions IT Service Request
Form. Check that the changes you have made to the appropriate drop-down menu have taken
effect in the service request form. Note that you may have change to another view to see the
appropriate drop-down menu. If you notice any errors, repeat the process as outlined until the
appropriate drop-down menu appears as desired.
Figure 19: Checking That Your Changes Have Taken Effect

Page 26 of 28

Page 27 of 28

© 2014 University of Houston. All rights reserved.