ALSAN RS Reinforced Membrane Page 1 of 13 Application Guide
12
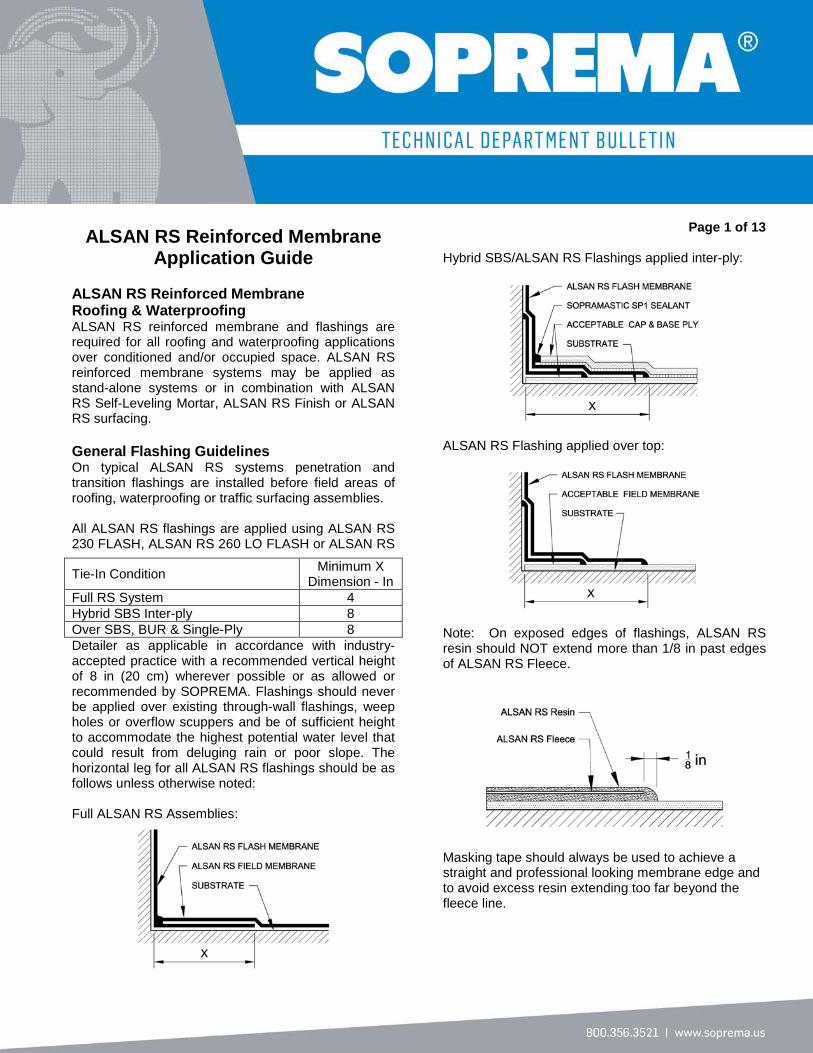
ALSAN RS Reinforced Membrane Application Guide ALSAN RS Reinforced Membrane Roofing & Waterproofing ALSAN RS reinforced membrane and flashings are required for all roofing and waterproofing applications over conditioned and/or occupied space. ALSAN RS reinforced membrane systems may be applied as stand-alone systems or in combination with ALSAN RS Self-Leveling Mortar, ALSAN RS Finish or ALSAN RS surfacing. General Flashing Guidelines On typical ALSAN RS systems penetration and transition flashings are installed before field areas of roofing, waterproofing or traffic surfacing assemblies. All ALSAN RS flashings are applied using ALSAN RS 230 FLASH, ALSAN RS 260 LO FLASH or ALSAN RS Detailer as applicable in accordance with industry- accepted practice with a recommended vertical height of 8 in (20 cm) wherever possible or as allowed or recommended by SOPREMA. Flashings should never be applied over existing through-wall flashings, weep holes or overflow scuppers and be of sufficient height to accommodate the highest potential water level that could result from deluging rain or poor slope. The horizontal leg for all ALSAN RS flashings should be as follows unless otherwise noted: Full ALSAN RS Assemblies: Page 1 of 13 Hybrid SBS/ALSAN RS Flashings applied inter-ply: ALSAN RS Flashing applied over top: Note: On exposed edges of flashings, ALSAN RS resin should NOT extend more than 1/8 in past edges of ALSAN RS Fleece. Masking tape should always be used to achieve a straight and professional looking membrane edge and to avoid excess resin extending too far beyond the fleece line. Tie-In Condition Minimum X Dimension - In Full RS System 4 Hybrid SBS Inter-ply 8 Over SBS, BUR & Single-Ply 8
Transcript of ALSAN RS Reinforced Membrane Page 1 of 13 Application Guide
ALSAN RS Reinforced Membrane
Application Guide ALSAN RS Reinforced Membrane Roofing & Waterproofing ALSAN RS reinforced membrane and flashings are required for all roofing and waterproofing applications over conditioned and/or occupied space. ALSAN RS reinforced membrane systems may be applied as stand-alone systems or in combination with ALSAN RS Self-Leveling Mortar, ALSAN RS Finish or ALSAN RS surfacing. General Flashing Guidelines On typical ALSAN RS systems penetration and transition flashings are installed before field areas of roofing, waterproofing or traffic surfacing assemblies. All ALSAN RS flashings are applied using ALSAN RS 230 FLASH, ALSAN RS 260 LO FLASH or ALSAN RS
Detailer as applicable in accordance with industry-accepted practice with a recommended vertical height of 8 in (20 cm) wherever possible or as allowed or recommended by SOPREMA. Flashings should never be applied over existing through-wall flashings, weep holes or overflow scuppers and be of sufficient height to accommodate the highest potential water level that could result from deluging rain or poor slope. The horizontal leg for all ALSAN RS flashings should be as follows unless otherwise noted: Full ALSAN RS Assemblies:
Page 1 of 13
Hybrid SBS/ALSAN RS Flashings applied inter-ply:
ALSAN RS Flashing applied over top:
Note: On exposed edges of flashings, ALSAN RS resin should NOT extend more than 1/8 in past edges of ALSAN RS Fleece.
Masking tape should always be used to achieve a straight and professional looking membrane edge and to avoid excess resin extending too far beyond the fleece line.
Tie-In Condition Minimum X Dimension - In
Full RS System 4 Hybrid SBS Inter-ply 8 Over SBS, BUR & Single-Ply 8

Fleece Cutting Guidelines All ALSAN RS waterproofing systems require reinforced flashings at transitions and penetrations applied using ALSAN RS Flash resin with ALSAN RS Fleece. ALSAN RS Fleece can be easily cut into patterns and shapes using a sharp clean pair of scissors. Each penetration or condition should be field measured, with the measurements transferred and marked onto the fleece accordingly. Once the pattern layout is complete, cut the fleece pattern to suit. Be sure to mark the topside of the fleece before cutting sections from the roll. For all details, ALSAN RS Fleece should be applied with proper overlap conforming to the following typical fleece cutting pattern guidelines: Fleece Dimension Key Recommended Minimum - In Tie-In Condition A B C D Full RS System 8 4 2-3 1.5 Hybrid SBS Inter-ply 8 8 2-3 1.5 Over SBS, BUR & Single-Ply 8 8 2-3 1.5 Inside Corners:
Page 2 of 13 Outside Bottom Corners:

Outside Top Corners:
Page 3 of 13 Pipe Penetrations:

Stanchion/Supports:
Page 4 of 13 Drain (pinwheel) Flashing (Option 1):

Drain Finger Flashing (Option 2):
Page 5 of 13 Column Support:
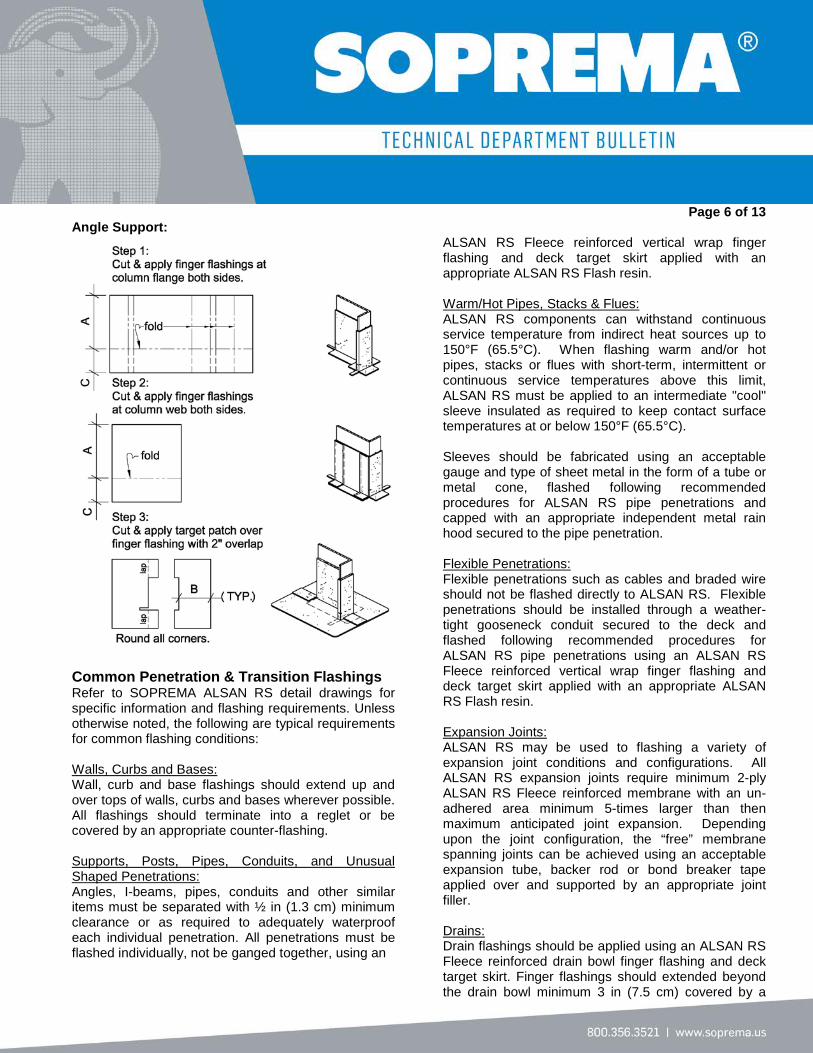
Angle Support:
Common Penetration & Transition Flashings Refer to SOPREMA ALSAN RS detail drawings for specific information and flashing requirements. Unless otherwise noted, the following are typical requirements for common flashing conditions: Walls, Curbs and Bases: Wall, curb and base flashings should extend up and over tops of walls, curbs and bases wherever possible. All flashings should terminate into a reglet or be covered by an appropriate counter-flashing. Supports, Posts, Pipes, Conduits, and Unusual Shaped Penetrations: Angles, I-beams, pipes, conduits and other similar items must be separated with ½ in (1.3 cm) minimum clearance or as required to adequately waterproof each individual penetration. All penetrations must be flashed individually, not be ganged together, using an
Page 6 of 13 ALSAN RS Fleece reinforced vertical wrap finger flashing and deck target skirt applied with an appropriate ALSAN RS Flash resin. Warm/Hot Pipes, Stacks & Flues: ALSAN RS components can withstand continuous service temperature from indirect heat sources up to 150°F (65.5°C). When flashing warm and/or hot pipes, stacks or flues with short-term, intermittent or continuous service temperatures above this limit, ALSAN RS must be applied to an intermediate "cool" sleeve insulated as required to keep contact surface temperatures at or below 150°F (65.5°C). Sleeves should be fabricated using an acceptable gauge and type of sheet metal in the form of a tube or metal cone, flashed following recommended procedures for ALSAN RS pipe penetrations and capped with an appropriate independent metal rain hood secured to the pipe penetration. Flexible Penetrations: Flexible penetrations such as cables and braded wire should not be flashed directly to ALSAN RS. Flexible penetrations should be installed through a weather-tight gooseneck conduit secured to the deck and flashed following recommended procedures for ALSAN RS pipe penetrations using an ALSAN RS Fleece reinforced vertical wrap finger flashing and deck target skirt applied with an appropriate ALSAN RS Flash resin. Expansion Joints: ALSAN RS may be used to flashing a variety of expansion joint conditions and configurations. All ALSAN RS expansion joints require minimum 2-ply ALSAN RS Fleece reinforced membrane with an un-adhered area minimum 5-times larger than then maximum anticipated joint expansion. Depending upon the joint configuration, the “free” membrane spanning joints can be achieved using an acceptable expansion tube, backer rod or bond breaker tape applied over and supported by an appropriate joint filler. Drains: Drain flashings should be applied using an ALSAN RS Fleece reinforced drain bowl finger flashing and deck target skirt. Finger flashings should extended beyond the drain bowl minimum 3 in (7.5 cm) covered by a
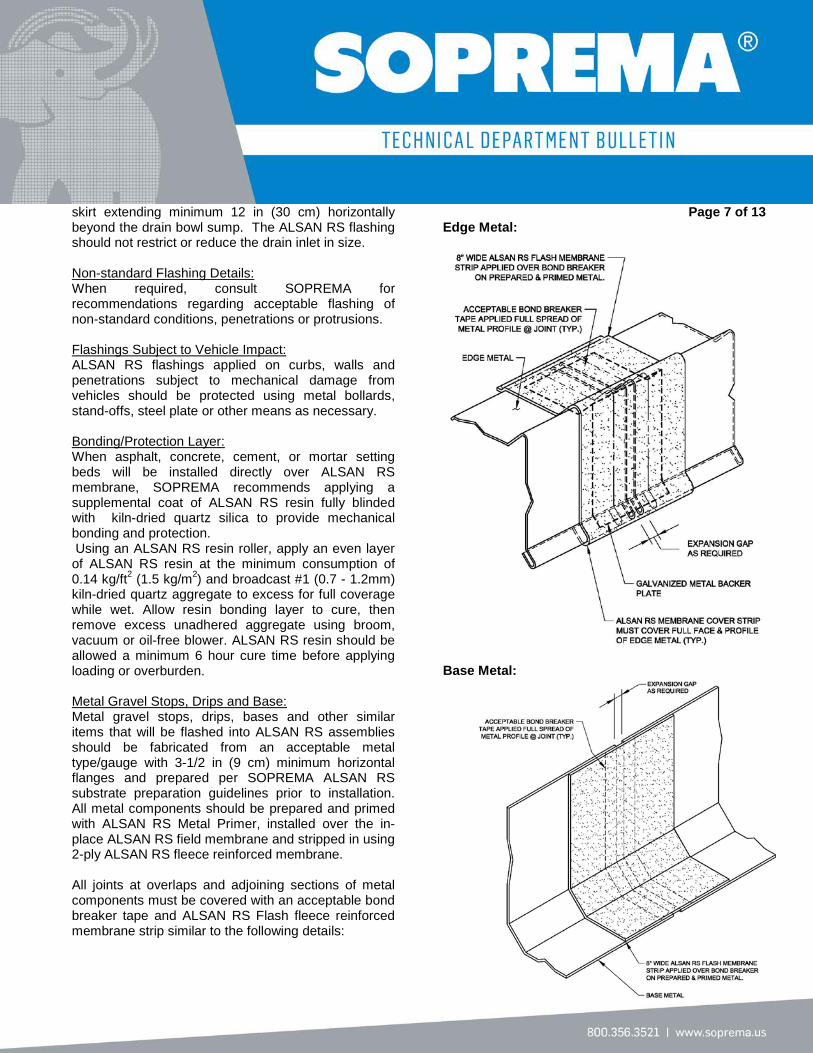
skirt extending minimum 12 in (30 cm) horizontally beyond the drain bowl sump. The ALSAN RS flashing should not restrict or reduce the drain inlet in size. Non-standard Flashing Details: When required, consult SOPREMA for recommendations regarding acceptable flashing of non-standard conditions, penetrations or protrusions. Flashings Subject to Vehicle Impact: ALSAN RS flashings applied on curbs, walls and penetrations subject to mechanical damage from vehicles should be protected using metal bollards, stand-offs, steel plate or other means as necessary. Bonding/Protection Layer: When asphalt, concrete, cement, or mortar setting beds will be installed directly over ALSAN RS membrane, SOPREMA recommends applying a supplemental coat of ALSAN RS resin fully blinded with kiln-dried quartz silica to provide mechanical bonding and protection. Using an ALSAN RS resin roller, apply an even layer of ALSAN RS resin at the minimum consumption of 0.14 kg/ft2 (1.5 kg/m2) and broadcast #1 (0.7 - 1.2mm) kiln-dried quartz aggregate to excess for full coverage while wet. Allow resin bonding layer to cure, then remove excess unadhered aggregate using broom, vacuum or oil-free blower. ALSAN RS resin should be allowed a minimum 6 hour cure time before applying loading or overburden. Metal Gravel Stops, Drips and Base: Metal gravel stops, drips, bases and other similar items that will be flashed into ALSAN RS assemblies should be fabricated from an acceptable metal type/gauge with 3-1/2 in (9 cm) minimum horizontal flanges and prepared per SOPREMA ALSAN RS substrate preparation guidelines prior to installation. All metal components should be prepared and primed with ALSAN RS Metal Primer, installed over the in-place ALSAN RS field membrane and stripped in using 2-ply ALSAN RS fleece reinforced membrane. All joints at overlaps and adjoining sections of metal components must be covered with an acceptable bond breaker tape and ALSAN RS Flash fleece reinforced membrane strip similar to the following details:
Page 7 of 13 Edge Metal:
Base Metal:
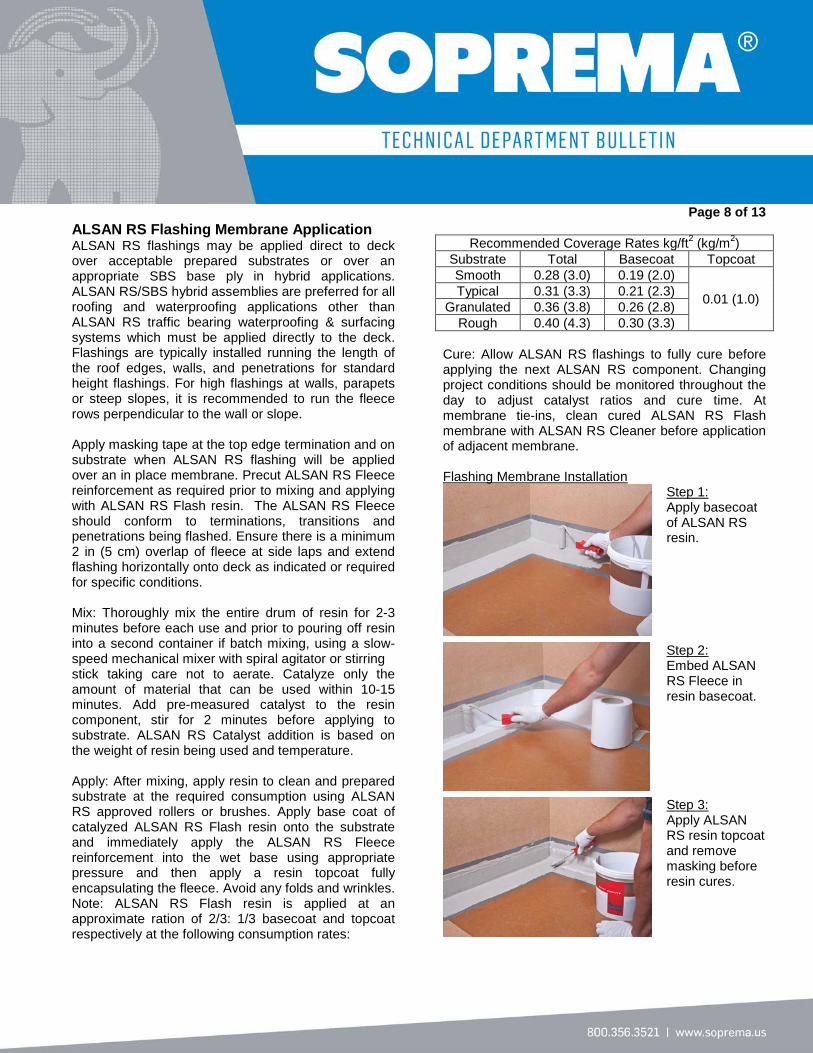
ALSAN RS Flashing Membrane Application ALSAN RS flashings may be applied direct to deck over acceptable prepared substrates or over an appropriate SBS base ply in hybrid applications. ALSAN RS/SBS hybrid assemblies are preferred for all roofing and waterproofing applications other than ALSAN RS traffic bearing waterproofing & surfacing systems which must be applied directly to the deck. Flashings are typically installed running the length of the roof edges, walls, and penetrations for standard height flashings. For high flashings at walls, parapets or steep slopes, it is recommended to run the fleece rows perpendicular to the wall or slope. Apply masking tape at the top edge termination and on substrate when ALSAN RS flashing will be applied over an in place membrane. Precut ALSAN RS Fleece reinforcement as required prior to mixing and applying with ALSAN RS Flash resin. The ALSAN RS Fleece should conform to terminations, transitions and penetrations being flashed. Ensure there is a minimum 2 in (5 cm) overlap of fleece at side laps and extend flashing horizontally onto deck as indicated or required for specific conditions. Mix: Thoroughly mix the entire drum of resin for 2-3 minutes before each use and prior to pouring off resin into a second container if batch mixing, using a slow-speed mechanical mixer with spiral agitator or stirring stick taking care not to aerate. Catalyze only the amount of material that can be used within 10-15 minutes. Add pre-measured catalyst to the resin component, stir for 2 minutes before applying to substrate. ALSAN RS Catalyst addition is based on the weight of resin being used and temperature. Apply: After mixing, apply resin to clean and prepared substrate at the required consumption using ALSAN RS approved rollers or brushes. Apply base coat of catalyzed ALSAN RS Flash resin onto the substrate and immediately apply the ALSAN RS Fleece reinforcement into the wet base using appropriate pressure and then apply a resin topcoat fully encapsulating the fleece. Avoid any folds and wrinkles. Note: ALSAN RS Flash resin is applied at an approximate ration of 2/3: 1/3 basecoat and topcoat respectively at the following consumption rates:
Page 8 of 13
Recommended Coverage Rates kg/ft2 (kg/m2) Substrate Total Basecoat Topcoat Smooth 0.28 (3.0) 0.19 (2.0)
0.01 (1.0) Typical 0.31 (3.3) 0.21 (2.3) Granulated 0.36 (3.8) 0.26 (2.8)
Rough 0.40 (4.3) 0.30 (3.3) Cure: Allow ALSAN RS flashings to fully cure before applying the next ALSAN RS component. Changing project conditions should be monitored throughout the day to adjust catalyst ratios and cure time. At membrane tie-ins, clean cured ALSAN RS Flash membrane with ALSAN RS Cleaner before application of adjacent membrane. Flashing Membrane Installation
Step 1: Apply basecoat of ALSAN RS resin.
Step 2: Embed ALSAN RS Fleece in resin basecoat.
Step 3: Apply ALSAN RS resin topcoat and remove masking before resin cures.
ALSAN RS Field Membrane Application ALSAN RS field membrane may be applied direct to deck over acceptable prepared substrates or over an appropriate SBS base ply in hybrid applications. ALSAN RS/SBS hybrid assemblies are preferred for all roofing and waterproofing applications other than ALSAN RS waterproofing & Traffic Surfacing systems which must be applied direct to deck. ALSAN RS waterproofing membranes must be reinforced with ALSAN RS Fleece applied with a minimum 2 in (5 cm) overlap at side laps and minimum 4 in (10 cm) overlap at end laps. Though fleece direction and configuration generally are not an issue, the following is recommended:
• When applying ALSAN RS as a cap ply over SBS in hybrid applications, ALSAN RS Fleece should run parallel to the SBS plies wherever possible.
• On slopes, ALSAN RS Fleece should be applied top down, allowing the top fleece edge to stop resin from running down the slope.
• On very steep slope applications, ALSAN RS Fleece should parallel to the slope.
Mix: Thoroughly mix the entire drum of resin for 2-3 minutes before each use, and prior to pouring off resin into a second container if batch mixing, using a slow-speed mechanical mixer with spiral agitator or stirring stick taking care not to aerate. Catalyze only the amount of material that can be used within 10-15 minutes. Add pre-measured catalyst to the resin component, stir for 2 minutes before applying to substrate. ALSAN RS Catalyst addition is based on the weight of resin being used and temperature. Apply: After mixing, apply resin to clean and prepared substrate at the required consumption using ALSAN RS approved v-notched squeegee, rollers or brushes. Apply base coat of catalyzed ALSAN RS resin onto the substrate using: Normal application: 3/8 in steel v-notch rake Steep slope: 1/4 in steel v-notch rake All conditions: 7 in ALSAN RS roller
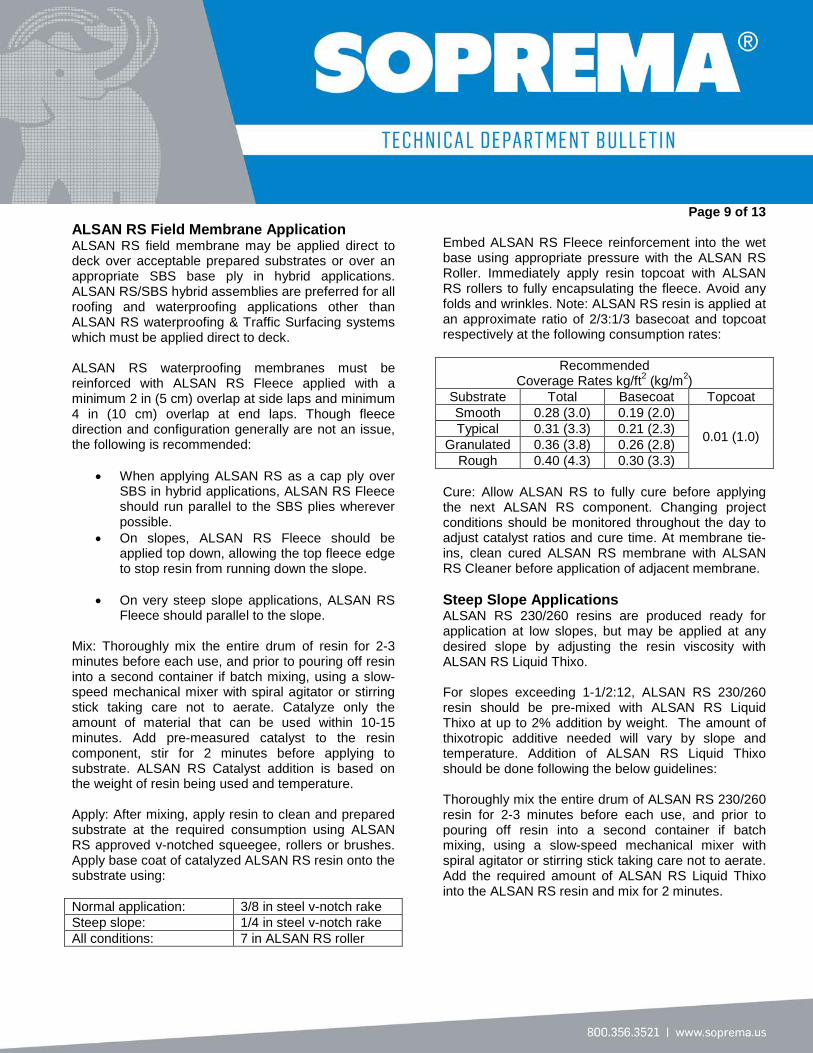
Page 9 of 13 Embed ALSAN RS Fleece reinforcement into the wet base using appropriate pressure with the ALSAN RS Roller. Immediately apply resin topcoat with ALSAN RS rollers to fully encapsulating the fleece. Avoid any folds and wrinkles. Note: ALSAN RS resin is applied at an approximate ratio of 2/3:1/3 basecoat and topcoat respectively at the following consumption rates:
Recommended Coverage Rates kg/ft2 (kg/m2)
Substrate Total Basecoat Topcoat Smooth 0.28 (3.0) 0.19 (2.0)
0.01 (1.0) Typical 0.31 (3.3) 0.21 (2.3) Granulated 0.36 (3.8) 0.26 (2.8)
Rough 0.40 (4.3) 0.30 (3.3) Cure: Allow ALSAN RS to fully cure before applying the next ALSAN RS component. Changing project conditions should be monitored throughout the day to adjust catalyst ratios and cure time. At membrane tie-ins, clean cured ALSAN RS membrane with ALSAN RS Cleaner before application of adjacent membrane. Steep Slope Applications ALSAN RS 230/260 resins are produced ready for application at low slopes, but may be applied at any desired slope by adjusting the resin viscosity with ALSAN RS Liquid Thixo. For slopes exceeding 1-1/2:12, ALSAN RS 230/260 resin should be pre-mixed with ALSAN RS Liquid Thixo at up to 2% addition by weight. The amount of thixotropic additive needed will vary by slope and temperature. Addition of ALSAN RS Liquid Thixo should be done following the below guidelines: Thoroughly mix the entire drum of ALSAN RS 230/260 resin for 2-3 minutes before each use, and prior to pouring off resin into a second container if batch mixing, using a slow-speed mechanical mixer with spiral agitator or stirring stick taking care not to aerate. Add the required amount of ALSAN RS Liquid Thixo into the ALSAN RS resin and mix for 2 minutes.
• Test the amount of ALSAN RS Liquid Thixo
required by mixing small batches before mixing entire unit of product.
• Start adding ALSAN RS Liquid Thixo at 1% addition and adjust upwards as needed until the desired viscosity is reached.
• Resin mixed with ALSAN RS Liquid Thixo must be allowed to stand 20 to 30 minutes before use.
• Approximately (1) TBSP = 20g or 2% when measuring ALSAN RS Liquid Thixo.
Note: Storage and working times are not affected by addition of ALSAN RS Liquid Thixo additive. Application Quality Control Wet film thickness gauges cannot be used to measure wet film mil thickness and resin consumption with fleece reinforced membrane. For ALSAN RS reinforced membranes, resin consumption and membrane thickness is gaged by monitoring surface profile, distances and kg’s of resin applied. The following table shows typical consumptions per 25kg can of ALSAN RS Field resin using 41” wide ALSAN RS Fleece :
Approximate ALSAN RS Field resin coverage per 25kg can using 41” wide ALSAN RS Fleece
Substrate Total ft2
Base Coat
Top Coat
Application Distance
Smooth 90 16.67 8.33 +/-26’ Typical 81 17.42 7.58 +/-23’-8”
Granulated 71 18.42 6.58 +/-20’-8” rough 62 19.19 5.81 +/-18’
Page 10 of 14
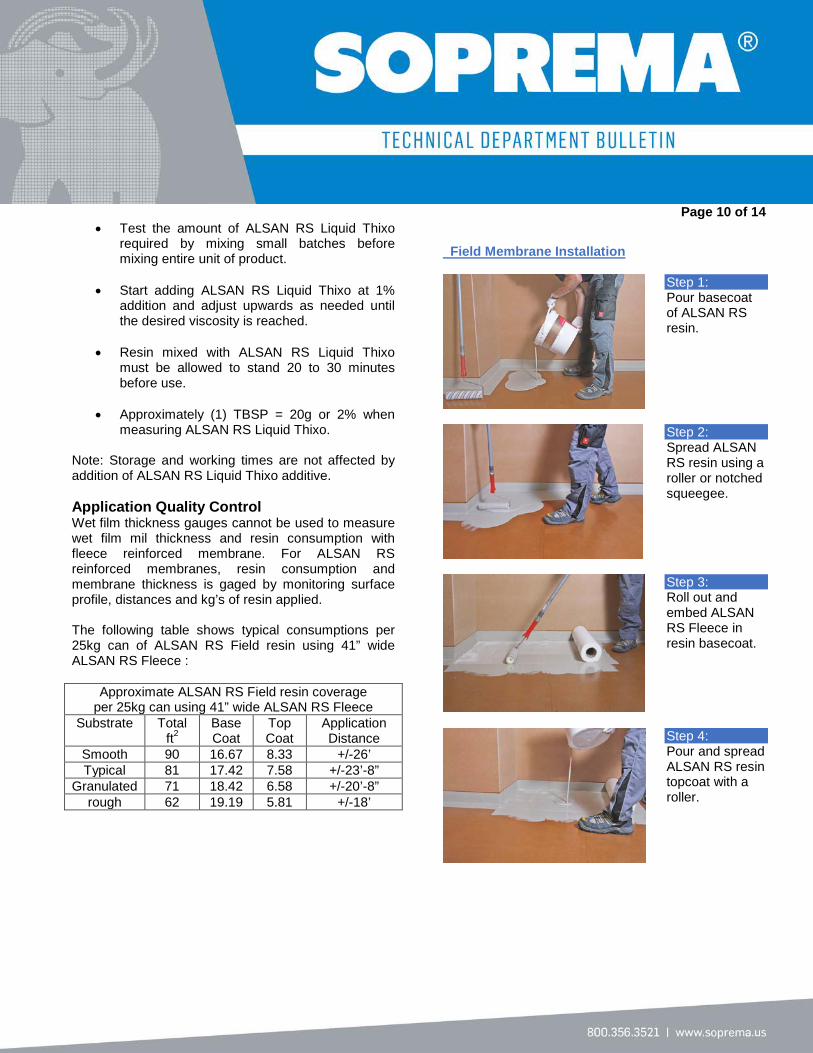
Field Membrane Installation
Step 1: Pour basecoat of ALSAN RS resin.
Step 2: Spread ALSAN RS resin using a roller or notched squeegee.
Step 3: Roll out and embed ALSAN RS Fleece in resin basecoat.
Step 4: Pour and spread ALSAN RS resin topcoat with a roller.

A graphic representation of coverages presented in the above table follows:
After confirming the approximate surface profile and recommended resin consumption, a chalk-line grid can be applied on the substrate defining coverage distances per can of resin. The grid should be applied perpendicular to the fleece roll-out direction as follows:
Page 11 of 13 Membrane Adhesive Bond Testing: Determinations of bond strength and moisture content should be performed periodically by the contractor throughout the course of work. Bond strength and adhesion can be monitored at the job site using both qualitative and quantitative means depending on the type of system application. For most roofing and waterproofing applications, bond testing may be performed by means of an adhesive peel test. For waterproofing and surfacing applications, bond testing should be performed with an appropriate adhesion tester. Tests should be performed on completely cured sample membrane applied adjacent to work at start-up, and intervals as required throughout the project assuring specified adhesion with a minimum of three tests per 5000 ft2 (464.5 m2). In the event the tensile bond strengths are lower than the minimum recommended, additional substrate preparation should be performed and testing repeated to verify suitability of substrate. Contractor shall immediately notify SOPREMA in the event tensile bond test results are below recommended criteria. Refer to SOPREMA ALSAN RS Technical Data Sheet regarding field adhesion testing for additional information. Crew Size & Workforce The appropriate workforce must be determined by the applicator on a job by job basis based on the project size, complexity, scheduling and access. A typical size crew usually consists of approximately 5 persons, with a designated mixer, runner and 3 applicators. Application of the roof field typically requires two workers per run working a roll. Larger applications may have multiple staggered runs working at the same time. Flashing large runs of walls are also done best with two workers together, while small penetrations and flashings can be done by a single individual.
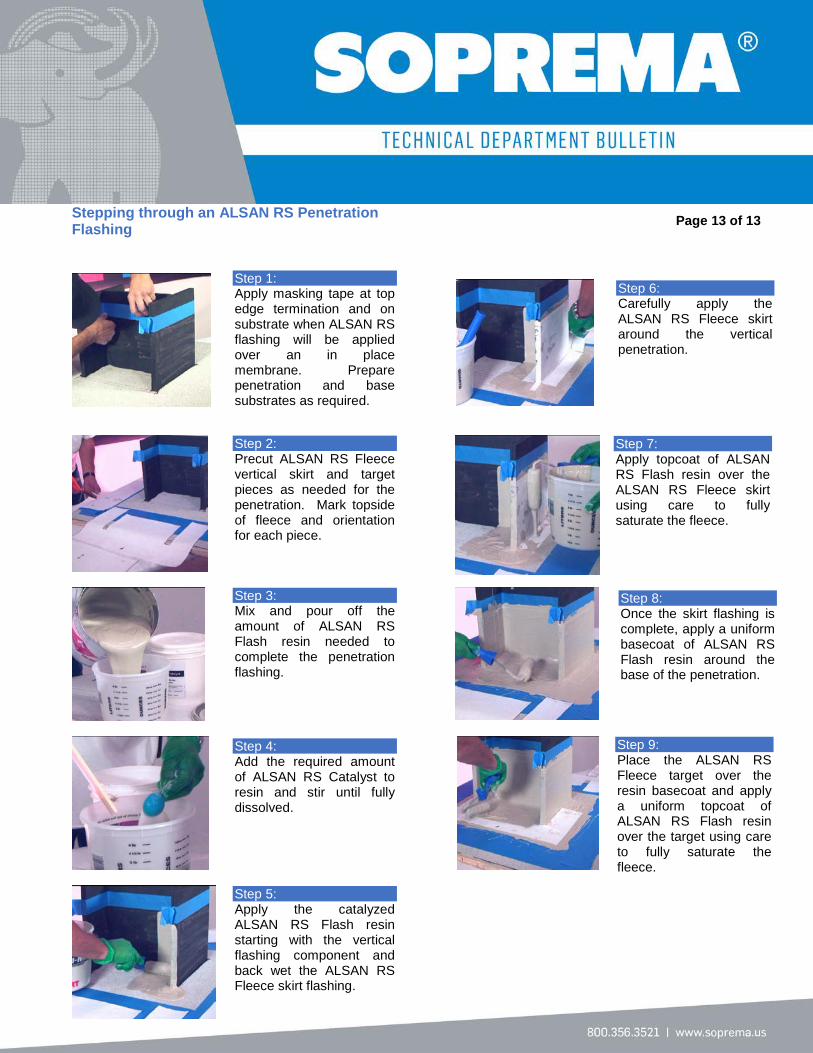
Stepping through an ALSAN RS Penetration Flashing Page 13 of 13
Step 1: Apply masking tape at top edge termination and on substrate when ALSAN RS flashing will be applied over an in place membrane. Prepare penetration and base substrates as required.
Step 2: Precut ALSAN RS Fleece vertical skirt and target pieces as needed for the penetration. Mark topside of fleece and orientation for each piece.
Step 3: Mix and pour off the amount of ALSAN RS Flash resin needed to complete the penetration flashing.
Step 4: Add the required amount of ALSAN RS Catalyst to resin and stir until fully dissolved.
Step 5: Apply the catalyzed ALSAN RS Flash resin starting with the vertical flashing component and back wet the ALSAN RS Fleece skirt flashing.
Step 6: Carefully apply the ALSAN RS Fleece skirt around the vertical penetration.
Step 7: Apply topcoat of ALSAN RS Flash resin over the ALSAN RS Fleece skirt using care to fully saturate the fleece.
Step 8: Once the skirt flashing is complete, apply a uniform basecoat of ALSAN RS Flash resin around the base of the penetration.
Step 9: Place the ALSAN RS Fleece target over the resin basecoat and apply a uniform topcoat of ALSAN RS Flash resin over the target using care to fully saturate the fleece.