ALMA-BALACLAVA-INKERMAN BLOODY STEPPES OF CRIMEA …strategemata.pl/img/cms/rulebook_krym.pdf ·...
24
ALMA-BALACLAVA-INKERMAN BLOODY STEPPES OF CRIMEA 1854 TACTICAL WARGAME Rulebook Table of Contents. Chapter I – General Rules........................................................................................ Chapter II – Maneuvers............................................................................................ Chapter III – Command............................................................................................ Chapter IV – Marshaling units................................................................................. Chapter V – Orienting units and performing evolutions.......................................... Chapter VI – Controling terrain and reactions......................................................... Chapter VII – Grouping Units.................................................................................. Chapter VIII – Moving Units................................................................................... Chapter IX – Visibility .............................................................................................. Chapter X – Infantry fire......................................................................................... Chapter XI – Artillery fire....................................................................................... Chapter XII – Attacking with cold steel................................................................... Chapter XIII – Commanders in combat................................................................... Chapter XIV – Units after combat........................................................................... Chapter V – Optional activation rules, solo gaming................................................ Literature................................................................................................................... 2 3 5 8 9 10 13 13 14 14 16 17 20 20 23 24
Transcript of ALMA-BALACLAVA-INKERMAN BLOODY STEPPES OF CRIMEA …strategemata.pl/img/cms/rulebook_krym.pdf ·...

ALMA-BALACLAVA-INKERMANBLOODY STEPPES OF CRIMEA 1854
TACTICAL WARGAMERulebook
Table of Contents. Chapter I – General Rules........................................................................................ Chapter II – Maneuvers............................................................................................ Chapter III – Command............................................................................................ Chapter IV – Marshaling units................................................................................. Chapter V – Orienting units and performing evolutions.......................................... Chapter VI – Controling terrain and reactions......................................................... Chapter VII – Grouping Units.................................................................................. Chapter VIII – Moving Units................................................................................... Chapter IX – Visibility.............................................................................................. Chapter X – Infantry fire......................................................................................... Chapter XI – Artillery fire....................................................................................... Chapter XII – Attacking with cold steel................................................................... Chapter XIII – Commanders in combat................................................................... Chapter XIV – Units after combat........................................................................... Chapter V – Optional activation rules, solo gaming................................................ Literature...................................................................................................................
23 5 8 9 10 13 13 14 14 16 17 20202324

STRATEGEMATA BLOODY STEPPES OF CRIMEA 1854
2
Chapter IGENERAL RULES
1. Maps and timescaleI.1 The game contains maps that allow players to recreate 3 separate battles during the Crimean War, namely the Battle of Alma (20th September 1854), the Battle of Balaclava (25th October 1854) and the Battle of Inkerman (5th No-vember 1854).I.2 Map scale: in Balaclava and Inkerman, each hex repre-sents about 200 meters of actual terrain. In Alma each hex is about 250 meters of terrain.I.3 A hexagonal grid has been applied to the maps to orga-nize the movement of units. One field of this grid is called a hex. I.4 Each game turn corresponds to 30 minutes of real time.2. Counters.I.5 The game contains unit counters (infantry, cavalry and artillery units), commander counters, dispatch riders and auxiliary markers. Each Strength Point (SP) of an infantry or cavalry counter represents 75 soldiers. The number of guns in an artillery counter depends onthe unit it represents, but it’s usually 2 to 4 guns.I.6 Auxiliary markers are described later in the rules.I.7 Russian units are colored green, British units are col-ored red, French units are colored dark blue, and Turkish units are colored light blue.I.8 Infantry counters generally represent infantry battalions (regiments in the case of British forces), companies of light infantry, or in the case of British and French forces “squad-rons” (two companies of such light infantry).I.9 Cavalry counters represent horse regiments, which in some circuymstances can be broken down into two “squad-rons”. I.10 Artillery counters represent batteries ( British, French and Turkish forces) or “half-batteries (Russian forces - usu-ally grouped by weight and type). Two exceptions are: 1) the British naval artillery at Balaclava is artificially grouped in “batteries” defending individual redoubts and four-cannon “batteries” defending the Hiblak Hill, and 2) part of the Russian artillery in the Battle of Inkerman scenario in which the batteries are presented as a single counter.I.11 Commander counters represent Commanders-in-Chief, corps/wing commanders, division and independent brigade commanders and subordinate brigade commanders. I.12 Infantry and cavalry units have Strength Points that are specified and tracked on special player aid charts. Loss of Strength Points during the game is indicated using the above-mentioned charts. Units that loser all their Strength Points are destroyed and permanently removed from the game. I.13 Artillery units do not have the Strength Points. I.14 The following diagrams describe templates of unit and commander counters.

STRATEGEMATA BLOODY STEPPES OF CRIMEA 1854
3
3. Die.I.15 The game uses one ten-sided die (d10). A “0” result means zero, not ten. I.16 If the rules say to make a 1d10 check, you make a roll with one ten-sided die.4. Morale checks.I.17 The game will often require that morale checks be made. To make a morale check: 1. roll a d10, 2. modify the result using all applicable modifiers,3. compare the modified result to the morale level of the unit. If the result of modified die roll is equal to or less than the morale level of the unit, the unit has passed the morale check. If the result is higher than the morale level of the unit, the unit has failed the morale check.I.18 The morale of units in the same hex with their own cammander is increased by the commander’s morale modi-fier. If a commander loos check must be made, , first check the possibility of losing the commander before checking the morale of any units he I stacked with. If the commander is lost, then any units in the same hex checks morale with by adding the commander’smorale modifier as a positive number to the morale die roll.5. Rounding.I.19 Whenever the game mentions the rounding of frac-tions, it shall be done according to the mathematical princi-ples, that is, to 0-0.49 round down, 0.50 or giher round up. 6. Active/Passive player.I.20 An Active player is the player, whose activation is be-ing performed. The other player is then the Passive player.7. Contents.I.21 The box contains:1) two A1-sized maps (Alma, Balaclava)2) one A2-sized map (Inkerman)3) rulebook4) scenario book5) two player reference tables6) two sets of Strength diagrams with command diagrams7) six numbered counter sheets8) one ten-sided die.
Chapter IIMANEUVERS
1.General rules.II.1 The players perform actions in the order described be-low.
II.2 The game is played in turns.. The current turn is marked by the “TURN” marker on the turn track. II.3 The turn is divided into phases:
1) Command phase – players secretly give orders to their division and independent brigade commanders, and move their Commanders-in-Chief and corps/wing commanders. They may also initiate reorganization of routed units.2) Activation phase – players activate divisions or inde-pendent brigades, moving their forces, conducting infantry and artillery fire, resolving melee combats, and reorganiz-inge disorganized units. In the enemy activation phase, the

STRATEGEMATA BLOODY STEPPES OF CRIMEA 1854
4
the opponent draws the next marker, but see “Sustaining the initiative” (II.9 and next.),6) the player with initiative begins each turn by choosing, not randomly drawing, the first AM for activation (if he is a coalition player he must take under consideration that he activates a British, French or a Turkish division). When he is finished, his opponent draws an AM, and the players alternate drawing for activation. The activation phase ends when all divisions/independent brigades of both sides have been activated. 7) to make things easier, there is an activation sequence marker available in the game. The player who is activating his units takes the marker and puts it in front of him on its front side (with number “I”). After the activation, if he wants to sustain the initiative, and he is successful in the at-tempt, the player turns the marker on the reverse side (with number “II”). If he is not successful or he does not want to sustain the initiative, he passes the marker to the opponent who puts it in front of him on the front side and may now folow the same sequence.
active blank sequenceII.7 An activated division/independent brigade may per-form actions in the following order:1) the player may try to change the order/vector of the commander. If he succeeds on a commander independence check, he immediately changes the order on the command chart, and new order automatically applies to the com-mander and his subordinate units. If he fails, he must com-ply with the current order.2) the player indicates out of command units and com-manders with “Out of command” markers3) the player may move his units (move, change forma-tion/front, fire, initiate melee attacks). If the unit enters an enemy zone of control, the enemy may react by firing and/or, changing formation/front. During movement, the player can reorganize disorganized units. The opponent may initi-ate counterattacks and countercharges.4) attacks, counterattacks and countercharges are resolved immediately during the active player’s movement; the pas-sive player may try to withdraw before the fight.II.8 Initiative. The following procedure states which side has initiative at the beginning of a given turn: 1) each player rolls a d102) the player with more active AMs adds the difference to the result. 3) players modify their results with modifiers specified by the scenario4) the player with the higher result chooses (not draws) the first AM from his cup. 5) after the first activation the rest of the turn proceeds nor-mally by drawing AMs from the cup. Example: [Battle of Alma] The coalition player activates
player may react on enemy actions3) Reorganization phase – players may rally routed units (see XIV.58 and next) II.4 Command phase. The command phase is common for both players – they perform actions in the following order:1. place new troops and commanders (including those re-turning to the map) on the edge of the map near the entry hex or on the same map.2. may automatically change orders for division/indepen-dent brigade commanders, if the commander is within the Commander-in-Chief command range.3. automatically change orders for division/independent brigade commanders, if the commander is within 4 to 10 hexes from the Commander-in-Chief, by placing a dis-patch rider counter from under the C-in-C to the following turn box on the turn track.4. move dispatch riders already en route, towards their targets5. if the dispatch rider reaches its destination – automati-cally change orders, vector (see III.20) and distance for the commander, then place the dispatch rider counter the fol-lowing turn box on the turn track6. may begin to change order of a division/independent brigade commander which is farther than 10 hexes from the Commander-in-Chief, by moving a dispatch rider coun-ter from under the C-in-C towards the commander. On the command diagram, mark in the corresponding dispatch rid-er box, the target commander, target hex, and the new order.7. move the dispatch rider counter from the turn track un-der the C-in-C, when the turn marker is placed on the same turn box as the counter – you can use the dispatch rider from the next turn.8. may change orders using corps/wing commanders9. mark units that meet the conditions for reorganization.10. move Commanders-in-Chief and corps/wing com-manders11. determine the number of Activation Markers (AMs) available and put them in the cups12. determine the initiative for the turnII.5 The Activation phase is common for both players, and it is divided into particular division and independent brigade activations. The number of activations in this phase is the total of divisions or independent brigades for both sides in that turn. II.6 Activation occurs in the following way:1) each player has his own cup or box that allows him to secretly draw AMs2) the number and kind of AMs entitled for the player is determined by the scenario3) during the Command phase, the player who owns the larger number of AMs puts them into his cup first4) the other player, adds enough blank AMs to his mix to have the same number of counters as his opponent, and puts them into his cup5) except for the first turn players draw one AM from their cups; drawing an active marker allows for the activation of the selected division/independent brigade; drawing a blank marker means the loss of a player activation - in this case,
STRATEGEMATA BLOODY STEPPES OF CRIMEA 1854
5
II.20 The game ends with the completion of the last turn of the game or at the time indicated by the description of the scenario (automatic victory).
Chapter IIICOMMAND
1. The command chain.III.1 There are four command levels in the game1) C-in-C level – the C-in-C is represented by a separate counter. His role is to give orders to his subordinate divi-sions and independent brigades 2) Corps/wing commander level – a corps/wing com-mander forwards the orders from the C-in-C to division/independent brigade commanders and may change those orders3) Division/Independent brigade (not subordinated to a division) level – the division/independent brigade com-mander has to implement commands received from his C-in-C or the corps/wing commander, or change them on his own, to adapt to the changing tactical situation. Activations in the game are based on this level4) Subordinate brigade level – the subordinate brigade commander may only implement commands that apply to his division commander. III.2 A divisional unit (not subordinate to any brigade in the division) is in-command, when in the command range of his division or any brigade commander of the division. III.3 Army units may be commanded by any division or brigade commander.III.4 Corps units may be commanded by any division or brigade commander of the given corps.III.5 Commander movement. Every commander has 10 Movement Points (MP) and pays 1 MP for every hex it moves on to. Exception: for every hex or hexside impass-able to cavalry unit, the commander always pays an ad-ditional 1 MP.2. Orders – obeying ordersIII.6 Division/independent brigade commanders are obliged to carry out one of three possible orders during gameplay.III.7 Commands:1) are given out by the C-in-C to division/independent bri-gade commanders in the command phase2) they can be changed by corps/wing commanders in the command phase3) they can be changed by division/independent brigade commanders, using the independent command procedure in the activation phase3. Brigade commanders and out-of-command units.III.8 Out-of-command subordinate brigade commanders and out-of-command units are not obliged to move. III.9 Out-of-command units cannot attack, counterattack or charge. Out-of-command cavalry units may countercharge. Except for the above restrictions, an out-of-command unit fights, reorganizes and moves like an in-command unit. III.10 An out-of-command unit is:1) a unit that is out of command range of the commander its own brigade (units belonging to the divisional brigade)
a division subordinate to Lord Raglan if he draws a “Brit-ish” AM. The coalition player activates a French or Turk-ish division if he draws a “French” AM.6) the player with the initiative, at any moment can yield it to the opponent, who is obliged to draw an AM and to activate a selected division/independent brigade. II.9 Sustaining the initiative. The player who finished his initial activation after drawing or choosing an AM may try to sustain the initiative by attempting to activate the next division/independent brigade. II.10 The player chooses a division/independent brigade commander and makes a d10 roll, comparing the result with the independence rating of the commander. If the re-sult is lower or equal to the rating, the player may activate the chosen division/brigade. In such case the player takes (not draws) the corresponding AM from his cup. If the re-sult is higher than the independence factor, the player can-not activate the chosen division/brigade and the opponent takes the initiative. II.11 If the division/independent brigade commander cho-sen in II.10 is within 3 hexes of the the C-in-C, the player can modify the sustaining the initiative check by -1, us-ing up one available dispatch rider – the player must place the dispatch rider counter on the next turn box on the turn track. If there are no dispatch riders available the player cannot use the C-in-C when sustaining the initiative.Designer notes: The following rule describes a temporary engagement of the C-in-C directly into combat, and the re-sulting temporary loss of orientation on the whole battle-field.II.12 If the player draws a blank AM he may try to “sustain the initiative” by choosing any division/independent brigade and making a check. Such activation is treated as a second one (i.e, he may not attempt to sustain the initiative after this activation). After that the opponent has initiative and draws his AM. II.13 Yielding the initiative. The player who has initiative may at any moment waive the activation to the opponent who then chooses an active AM from his cup and performs his activation, and he may sustain the initiative after that. II.14 The player may perform only two activations in a row. The first after the opponent activation (or first in given turn) and the next after successfully sustaining the initia-tive. After the second activation, initiative goes to the op-ponent. The rule does not apply to the situation when the player with initiative yields it to the opponent (as in II.13)II.15 In a given turn, a division/independent brigade may be activated only once.II.16 The scenarios may define additional activation rules.II.17 Units entering the map as reinforcements are treated the same as other units for the purposes of activation. Add the appropriate number of AMs to the cups. II.18 After all activations are complete, the reorganization phase occurs, which is common for both players. During this phase the players may rally routed units. II.19 After the reorganizations are finished, move the turn marker on the next box on the turn track. A new turn begins and players repeat the procedure described in II.3

STRATEGEMATA BLOODY STEPPES OF CRIMEA 1854
6
move outside the command range of its brigade or division commander (also applies to units subordinated to the divi-sional brigade commander)- does not apply to routed units, the units may follow the command in any allowed formation, the commander may aid in rallying of routed units
3) Forced March- the division/independent brigade commander must move a minimum of one hex along the action vector towards the designated map edge,
and a maximum of the number of hexes that he has MPs, but not more than the given number of hexes - units subordinated to the commander may not initiate me-lee or fire, but they may reorganize,- routed units cannot follow this order – such a unit must be rallied before moving, - the order may be followed by a unit in assault column for-mation for infantry units or column formation for cavalry units; a skirmisher unit in Forced March is treated as being in an assault column formation- the unit following the Forced March order is marked with a ‘FORCED MARCH’ counter- placing the counter and taking it away (changing forma-tion from battle to march and vice versa) always costs an additional 1 MP.- voluntarily removing the ‘FORCED MARCH’ counter is possible only by changing the division/independent bri-gade commander order to Attack or Defense.- if an enemy unit moves adjacent hex to a unit with a ‘FORCED MARCH’ counter, the Force Marching unit must remove the counter and make a morale check - if it fails it’s immediately disorganized., This is treated as a reaction for the united with the Forced March counter.- changing formation to Forced March is possible even if the unit is out-of-command- units and commanders using Forced March double their movement allowance (additionally they can use roads more effectively – see the Movement Cost table)5. Action vector, distance.III.20 An action vector is a straight line starting from the hex that contains the division/independent brigade com-mander to a selected map edge. This line has to lie within the angle defined in the command diagram. III.21 The angle defining the action vector is a 60 degrees angle the arms of which are included in two hexes adjacent to the hex occupied by the commander.III.22 The distance is the number of hexes that the divi-sion/independent brigade commander has to move towards a point in the map edge designated by the action vector. Players write the distance on the command diagram for the given commander. The hex occupied by commander of the division/independent brigade is not included in the distance to be moved.III.23 The command is recognized as carried out when:1) Attack: the division/independent brigade commander moves the given number of hexes according to the action vector. The commander is automatically given the DE-FENSE order of the occupied hex
or its own division, or any one of brigade commanders of the division or independent brigade commander (units not directly subordinated to the commander of the divisional brigade).2) a brigade commander out of command range of its divi-sion commander.III.11 A unit belonging to the divisional brigade is always in command, if at the beginning of its activation it’s in the command range of his brigade commander (even if the bri-gade commander is out-of-command). III.12 A divisional unit is always in command, if at the beginning of its activation it’s in the command range of his division commander or any one of brigade commanders of the division. III.13 Non-divisional unit (like Cossacks in Alma scenar-io, or the Light Horse in Inkerman) are always in com-mand and may move according to the rules defined in the scenarios.
III.14 At the beginning of the activation the player marks out-of-command subordinate bri-gade commanders and units with an ‘OUT-OF-COMMAND’ counter.
III.15 Out-of-command subordinate brigade commanders and out-of-command units move first in the division/inde-pendent brigade activation towards their own brigade or di-vision headquarters (brigade units towards the brigade HQ) until they enter the command range. When they reach the command range they must stop, and their activation ends.III.16 Units of the out-of-command subordinate brigade commander, may not move alternatively with other units in the same division. In such a case, the player must move the out-of-command subordinate brigade commander’s unit first, then the other subordinate brigades.III.17 Routed units, even out-of-command, may move freely outside the command range of their own division or brigade commander.III.18 When the activation of a division ends, the player re-moves the ‘OUT-OF-COMMAND’ counter from its units/commander.4. Types of orders.III.19 The player may issue the following types of orders:1) Attack- the division/independent brigade commander, during the turn, must move along the action vector (see III.20) towards the designated map edge, minimum one hex and maximum the number of hexes that he has MPs, but not more than the given number of hexes- units subordinated to the commander may initiate melee, counterattack, charge, countercharge, fire, reorganize and move, and may follow the order in any allowed formation2) Defense- the division/independent brigade commander cannot move from the occupied hex, units subordinated to the commander may not initiate melee or charge, but may counterattack, countercharge, fire, reorganize and move. A subordinate brigade commander cannot voluntarily move outside the command range of its division commander. A divisional unit under a “Defense” order cannot voluntarily

STRATEGEMATA BLOODY STEPPES OF CRIMEA 1854
7
change the order for any available with the exception of Forced March.III.29 The division/independent brigade commander can change the distance in the action vector, but only to a hex than can be seen by this commander. III.30 The orders Attack and Forced March can only be is-sued for a hex not currently occupied by the this commander.III.31 If in the given division more than half of the units (valid at the time of check) are disorganized or routed, its commander may at any time change the order to Defense (without the use of a dispatch rider and a d10 check).III.32 It is allowed to change the order without changing the action vector/distance, to change the distance without changing the action vector/order, or to change the action vector without changing the order/distanceIII.33 The change of the order is immediately marked on the command diagram for the commander.
7. Command range, dispatch ridersIII.34 The C-in-C com-mand range is 3 hexes.
III.35 A corps/wing commander’s command range is 6 hexes.III.36 A division commander’s command range is 3 hexes.III.37 An independent and subordinate brigade command-er’s command range is 2 hexes.III.38 During the command phase the player may change the orders of a division/independent brigade commander who is in the C-in-C command range, without using the dispatch rider.III.39 If the division/independent brigade commander is outside the C-in-C command range, the order may be
2) Defense: the division/independent brigade commander cannot – without changing the order – move the occupied hex; 3) Forced March: see Attack.III.24 The Attack/Forced March order is marked on the command diagram by writing the kind of order, action vec-tor and the distance. After the commander moves, enter the appropriate number of hexes remaining to move (subtract the number of hexes moved). III.25 When the number of hexes left to go comes down to zero, the commander is automatically stops and is given the Defense order.III.26 The commander must move toward the map edge on the shortest possible route, free of enemy commanders and units. The momentary inability to move the command-er on the action vector caused by enemy units standing in the way does not mean an automatic change of order - the commander must resume the march when it will be pos-sible (the obstacle is removed). III.27 The obligation of movement by the commander on the action vector does not apply to a situation in which the commander would be forced to cross a hexside or enter a hex that is impassable for him. In such a situation the com-mander must move through the shortest route as possible to a hex from which he will be able to continue the march on the prescribed vector. Until the implementation of move-ment in the direction of the prescribed map edge the player does not reduce the amount of hexes to remaining to move by the given commander. 6. Changing orders/action vector/distanceIII.28 The division/independent brigade commander can
Sketch No.7 - Order - Vector - Distance
1 - The gray dashed lines define the range of possible action vectors including hexes, through which the lines run. To avoid confu-sion action vectors are marked in the command diagram basing on the arrows applied on the game map. Grey arrows show possible action vectors.2 - Distance specified here with a 2digit means the number of hexes that the commander must move toward the point of the map to execute the order.3 - The letter „A” indicates the type of order (here „Attack”). The letter „D” in the next diagram means that the order is „Defense”.

STRATEGEMATA BLOODY STEPPES OF CRIMEA 1854
8
change occurs.III.48 The division/independent brigade commander may, in the beginning of his activation, try to change his current order by making a d10 check. A result equal or lower than the inde-pendence factor means that the commander can immediately change the order. A higher result means that no change occurs and the commander has to carry out his current order.
Chapter IVMARSHALLING UNITS
1. Infantry formations.IV.1. Infantry units can create following formations:1. line formation – a developed formation used for both fire combat and bayonet assaults2. assault column – a close formation used for maneuvers and bayonet assaults, not suitable for fire combat Author’s note: The “assault column” is a summary term used by the Author to describe various forms of battalion columns, in particular platoon and division columns. I used this term to distinguish this formation from the com-pany column (rotnaja kołonna), that was used by the Rus-sians in that time.3. company column – a close formation used for maneu-vers, bayonet assaults and fire combat. Less mobile than the assault column, nevertheless it allowed the partial use of the battlaion’s firepower. This formation is more maneu-verable than line. 4. skirmish formation – a dispersed formation used for screening, to disorganize enemy formations with individual fire and to fight in broken terrain (wooded, urban terrain). In the game it exists only in the case of light infantry (British and Russian Rifles, French Chasseurs, Zouaves and Alge-rian Rifles); the skirmish formation may include units up to 4 SP – it is not allowed to place more units in such a forma-tion in one hex; if they exceed the limit the stack should be dismantled at the earliest opportunity; infantry in skirmish formation can only attack alone (without the participation of units in close formation) other infantry units in skirmish formation, artillery units and any routed units.Exception! Zouaves and Algerian Rifles can attack any en-emy unit regardless of the formation it is currently in.5. square – a specific type of formation used only in infan-try defense against cavalry – such a formation is not very mobile, can initiate fire combat, cannot initiate bayonet at-tacks. A square can be treated as a formation of infantry unit defending buildings and field fortifications - in this case, the unit cannot move before the change of formation for any other.IV.2 British line infantry fights and shoots only in line for-mation.IV.3 Infantry formation properties and symbols are de-scribed in FORMATIONS CHART.2. Cavalry formations.IV.4 Cavalry units may create following formations, which possess following properties:1) line – the only combat formation of cavalry units, in which they can initiate charges and countercharges.2) march column – formation used for movement – to fight
changed only by sending a dispatch rider.III.40 To change the command using a dispatch rider, the player marks on his command diagram the new order (ac-tion vector and distance) and the number of a dispatch rider who carries the order, then he moves the dispatch rider 10 hexes towards the division/independent brigade command-er, who is the target of the new order. In the next command phase, the player moves the dispatch rider until he reaches the hex with the target of the order, which is the appropriate division/independent brigade commander.III.41 When the dispatch rider reaches its destination, place the counter on the next turn box on the turn track. He is available in the next turn command phase.III.42 If the division/independent brigade commander is 4 to 10 hexes away from the C-in-C, the player changes the order on the command diagram turn track, and then places the dispatch rider on the turn track on the turn when the dispatch rider gets back to the game.III.43 If the division/independent brigade commander in-dependently has changed his order, the arrival of the dis-patch rider automatically changes the order that was car-ried by the dispatch rider. III.44 The dispatch rider has 10 Movement Points (MP) and pays 1 MP for every hex moved. The dispatch rider cannot enter a hex containing an enemy unit, and a hex ad-jacent to it, if it there are no allied units on it. It also cannot enter hexes with the escarpment and the sea terrain.III.44/1 If an enemy unit enters the hex with an alone standing dispatch rider, then:a) if the enemy unit is an infantry unit, the active player moves the dispatch rider in any direction by one hex(does this every time, even when the same unit enters a hex adja-cent to a alone standing rider),b) if the enemy unit is a cavalry unit, the active player performs a 1d10 check: with a result of “0-8” -proceed as above; with the result of ”9” is the rider remove from the map on the turn track on the field two turns later than the turn when the rider was removed.III.44/2 This rule should also be applied when the dispatch rider will remain alone in the hex as a result of combat. However, the rider can withdraw or retreat with a unit.III.45 If there is a corps/wing command level in the game, to change the order using the dispatch rider, he must first move through the corps/wing commander spending addi-tional 2 MPs before moving towards the target of the order.III.46 If there is a corps/wing command level in the game to change the order without using the dispatch rider, the corps/wing commander has to be within the C-in-C com-mand range, and the division/independent brigade com-mander within the corps/wing commander command range.III.47 The corps/wing commander may in the command phase try to change the order of his subordinate division/independent brigade commanders. The change can only be applied to division/independent brigade commanders in the corps/wing commander command range. The change requires a d10 check. A result equal or lower than the independence factor means that the commander can im-mediately change the order. A higher result means that no

STRATEGEMATA BLOODY STEPPES OF CRIMEA 1854
9
IV.14 Absorption or merging of skirmishers is only pos-sible with units belonging to the same battalion.IV.15 Strength diagrams for the battalions of light infan-try show the division of the battalion into „squadrons” of skirmishers.IV.16 Changing formation on the hex adjacent to the en-emy unit in its front zone, requires a morale check. Failure means that the unit changes formation, but is disorganized.IV.17 Changing formation on the hex adjacent to the enemy unit not in its front zone, does not require a morale check.IV.18 British infantry is required to change from the col-umn into the line, only if it is attacked directly, making a morale check. A failed morale check, means that the unit reforms into line, but it is disorganized.IV.19 Through all its activation, the unit Movement Points are derived from the formation that the unit had at the be-ginning of its move.IV.20 Skirmisher units may be only deployed before the unit’s movement.IV.21 Changing the infantry formation from a square to an-other available is done by removing the auxiliary counter from the unit and spending an additional 1 Movement Point.IV.22 The unit can change its formation any number of times, using the limit of its Movement Points.IV.23 The unit’s former formation doesn’t influence the cost of changing into the new formation. Changing the for-mation does not cause disorganization if it is performed in terrain causing such an effect on the entry on it.IV.24 Only in the village/farm or redoubt terrain, infantry units in square or skirmish formation use the fire and melee modifiers for terrain.IV.25 Infantry units in the open rampart receives the modi-fiers for remaining in them for fire and melee combat only when is in line or skirmish formations and only in case of attack/fire from the front of these defenses.IV.26 Infantry units in column formation located in the for-tifications or village receives no modifiers to the fire com-bat for the terrain.IV.27 Artillery units in fortifications always receive modi-fiers to fire/melee combat, if they take place from the front of the fortifications.
CHAPTER VORIENTING UNITS AND PERFORMING EVOLUTIONSV.1 With the exception of routed units and skirmishers, every unit has to be oriented.V.2 Units placed into a stack have to be oriented in the same way, with the exception of artillery units. Artillery units, also standing in the same hex with non-artillery units, may be oriented freely.V.3 Hexes in the front of the unit are called the front zone, hexes on the sides are its flanks, and hexes behind the unit is the rear zone. Units in skirmish and square formations have front zones to all adjacent hexes.
the cavalry unit must reform into line. A cavalry unit at-tacked in this formation must make a morale check. Failure means change of the formation but also disorganization.3) dispersed formation - a special formation is the used by Cossacks. It is described as ‘horse skirmishers’ and has the same movement abilities. They can only attack artil-lery units, skirmishers and other units only when they are routed.IV.5 Cavalry formation properties and symbols are de-scribed in FORMATIONS CHART.3. Artillery formations.IV.6 Artillery units never create formations. After move-ment artillery units fire with negative roll modifiers. See FORMATIONS CHART.4. Necessity of having formations.IV.7 Except artillery, commanders, and routed units, every unit needs to be in a particular formation. IV.8 Units occupying a single hex, at the end of their ac-tivation, must have one common formation, otherwise the whole stack is routed. The exception being a skirmisher unit on the top of the stack, which always counts as being in skirmish formation. If it is in the middle or at the end of the stack, it uses the stack’s formation.5. Changing formations.IV.9 The cost to change the formation is shown in FOR-MATIONS CHART.IV.10 The change in formation is displayed by:1) in the case of line and columns (both types) – by flip-ing over the unit counter on the side containing the sym-bol of the wanted formation, or by placing on the map the unit counter in closed formation and removing skirmisher counters,2) in the case of skirmish formation – by changing the bat-talion counter for corresponding skirmish counters, or by separating a skirmish counter from the unit,
3) in the case of square formation – by plac-ing an auxiliary counter representing the for-mation on the unit.IV.11 In the case of the conversion of the whole
battalion, remove the battalion counter and replace it with appropriate skirmisher counters.IV.12 Changing formation on the hex adjacent to the en-emy unit is possible as a reaction for the enemy actions (in opponent’s activation) or during the unit’s activation, or, in the case of British infantry and the cavalry of all sides, during attacks on such unit. IV.13 The absorption of skirmishers by the unit does not require spending Movement Points and can occur at any time during the activation, but a unit in a closed forma-tion loses as many Movement Points as the skirmish-ers lost. In this case, however, you cannot move troops gradually - first the skirmishers have to move, then units in closed formation. In the case of forming a closed forma-tion by two or more skirmisher units, the unit in closed formation loses as many Movement Points as the skirmish-ers, who spent the most MPs. It is allowed to move several skirmisher units to one hex and then change the formation into a closed one.

STRATEGEMATA BLOODY STEPPES OF CRIMEA 1854
10
V.4 Changing orientation is performed by making turns. The unit can turn 60 or 180 degrees. To make a 120 degree turn, the unit must make two 60 degree turns.V.5 Changing orientation is possible at any time of activa-tion of the unit taking into account the cost of such change described in the FORMATIONS CHART.V.6 Changing orientation on a hex adjacent to the enemy unit, requires a morale check. A negative result means dis-organization of the unit. V.7 The cost of orientation change for individual forma-tions is described in the FORMATIONS CHART.V.8 The cost, described in the CHART, concerns 60 and 180 degree turns on one hex. The player wishing to make two 60 degree turns, must pay for them separately. Chang-ing orientation on subsequent hexes necessitate spending more separate Movement Points.V.9 The terrain has no effect on turning possibility and cost.V.10 Turning on terrain described on the TERRAIN EF-FECTS CHART as “D” does not automatically disorganize the unit.V.11 Effect of orientation on movement – see VIII.3V.12 Effect of orientation on combat – see X.3 and XII.1
Chapter VICONTROLING TERRAIN AND REACTIONS
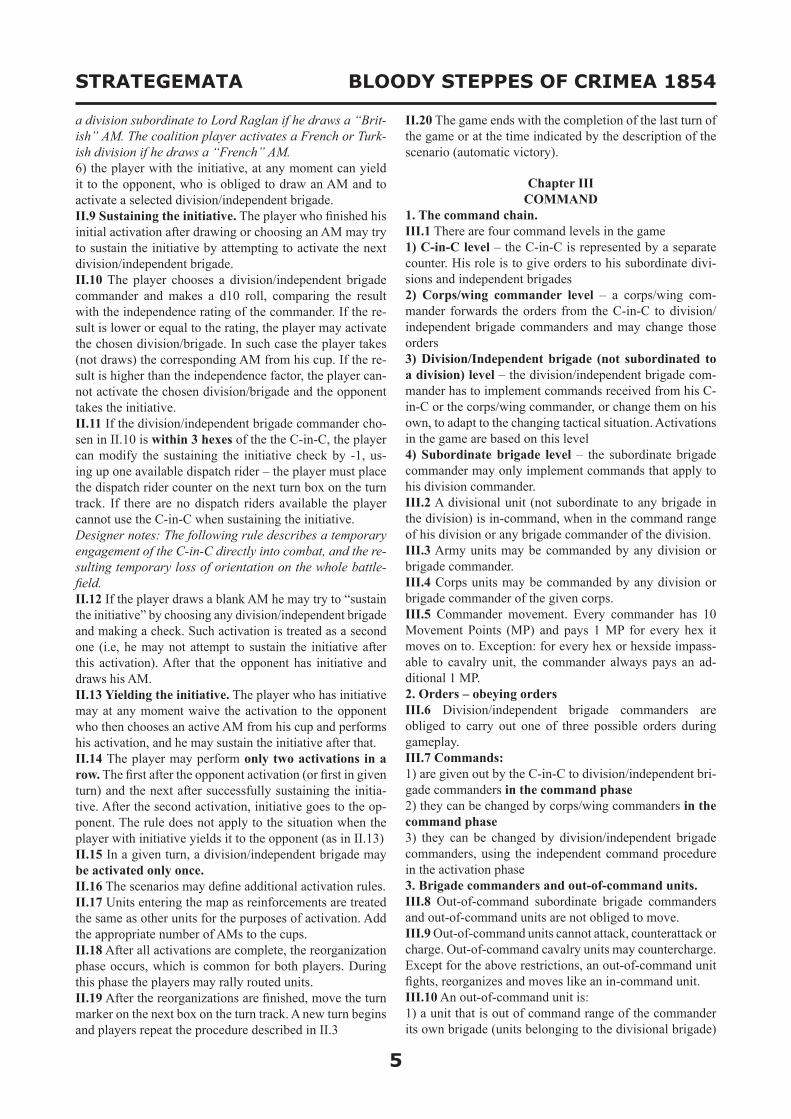
VI.1 The infantry and artillery Zone of Control (ZOC) consists of front zone hexes in the range of fire of the unit. If the unit’s formation forbids fire combat, its ZOC consists of adjacent front zone hexes.VI.2 The cavalry Zone of Control consists of adjacent front zone hexes and within a distance of one more hex from the front of the unit.
STRATEGEMATA BLOODY STEPPES OF CRIMEA 1854
11
ZOC, can be fired upon by any enemy infantry or artillery unit and can be the target of infantry counterattack and cav-alry countercharge.VI.8 This rule also applies to each activity (moving, chang-ing formation, changing orientation, shooting, reorganiza-tion), which the unit performs within the opponent’s ZOC.VI.9 After being fired upon by the Passive player, the unit may continue its movement, if it has any MPs left.VI.10 If the unit in the beginning of an enemy activation, has an enemy unit in an adjacent hex in its front zone, the reaction requires a morale check – a negative result means no reaction occurs. This rule does not apply to the reac-tion by infantry fire and cavalry countercharge – those do not require a separate morale check.VI.11 If the enemy unit moves into the hex in an infantry unit ZOC, the unit may try to change formation or orientation in-stead of shooting. After the change the Passive player makes a morale check. A negative result means disorganization of the unit.VI.12 An infantry unit (or few units on the same hex) with at least 3 SP, may react by changing its formation into square, also if the cavalry is 2 hexes away from the infantry (even if the infantry ZOC does not extend that far). Form-ing a square requires a morale check – a negative result means that the unit remains in its original formation and gets disorganized. If the square is formed, the Active player cavalry unit may abandon the charge, by disorganiz-ing units that were about to charge. Those units end their move in this activation.VI.13 An infantry unit entering the ZOC of an enemy cav-alry cannot change the formation, if the enemy has coun-tercharged.VI.14 Beginning movement in ZOC. If an unit begins its activation in a ZOC, the reaction is also possible if this unit attempts to immediately leave the ZOC. In this case, the declaration to leave the ZOC produces the possibility of an immediate reaction. Designation with an „Assault” marker also counts as moving in the ZOC (this is also the declara-tion of player that he will carry out an assault instead of moving- in case of loss of MPs due to weapon fire the as-sault may become impossible).VI.15 Infantry counterattack. If an unit enters the hex lying directly in the front zone of the infantry unit, or when at the beginning of its activation in such zone it performs any activity (movement, changing formation, changing orientation, shooting) the Passive player may, instead of shooting, try to perform a counterattack. The counterattacking player makes a morale check - in the case of a positive result he immediately attacks. The combat is resolved using general principles with the counterattacking unit as the attacker (with the possibility for the active player to withdraw before the counterattacking opponent). A nega-tive result means that no counterattack occurs. The Active player may continue his actions.
VI.3 The ZOC consists only of hexes visible by the unit
Hex under unit ZOC (seen by the unit)
Hex outside unit ZOC (shooting prohibited) - no visibility
VI.4 Routed units do not have ZOC.VI.5 There is no obligation to stop in an enemy ZOC – but every movement in the ZOC or entering that ZOC allows the opponent to react.
VI.6 There are the following types of reactions in the game:1. Changing formation2. Changing orientation (60 degree turn)
3. Infantry fire4. Infantry counterattack (may be preceded by infantry fire)5. Cavalry countercharge6. Fire and withdrawal of skirmishers or horse artillery7. Changing formation by a unit in march column (covered by FORCED MARCH counter)VI.7 A unit which, in his activation, moves into an enemy

STRATEGEMATA BLOODY STEPPES OF CRIMEA 1854
12
VI.17 Reaction - Withdrawing infantry skirmish units. If an enemy infantry or artillery unit enters, during move-ment, the ZOC of an alone standing skirmisher unit, the skirmishers can shoot the enemy, and after that withdraw back one or two hexes. In such a manner infantry can-not withdraw against cavalry. A unit cannot withdraw if at the beginning of the opponents activation is adjacent to an enemy unit in its ZOC. The enemy unit can continue its move, if it has remaining Movement Points.VI.18 Reaction - the withdrawal of horse artillery. The rules of the withdrawal of infantry in skirmish formations should be applied to withdrawal of horse artillery. Artillery can’t withdraw againts cavalry.VI.19 Reaction - Withdrawing cavalry. If an enemy in-fantry unit enters a hex adjacent to the hex occupied by an alone standing cavalry, then the cavalry – if it is not countercharging - must move back one or two hexes and it is covered by a REACTION counter. A cavalry unit may withdraw only once in the opponent’s activation (it has to fight later).The enemy unit can move on, if it has remaining Movement Points. VI.20 Horse skirmishers. Cavalry unit in skirmish forma-tion may, using the rule of withdrawing infantry skirmish units, withdraw versus cavalry units with exception of oth-er horse skirmishers.VI.20/1 To the withdrawal of skirmish formations (infan-try and cavalry) and horse artillery use the rule for a re-treat after combat (this applies to both the opportunities and the direction of the withdrawal and the effects of going through the hexes adjacent to the enemy troops, if they are within their ZOC).VI.21 The unit can perform only one type of reaction in the opponent activation. A cavalry unit cannot continue a countercharge.VI.22 A unit that reacted must be covered by a REAC-TION marker. Such a unit in the activation may still be the target of fire or melee combat, except for units covered with a ASSAULT counter. In the event of melee combat of the unit, which previously reacted, replace the REAC-TION counter with an ASSAULT counter.VI.23 Remove the REACTION marker immediately after the activation.VI.24 Withdrawal, retreat and routing through a ZOC. If during withdrawal after combat or during retreat, a unit enters a hex adjacent to an enemy unit in its front zone, the withdrawing player makes an additional morale check with modifier +1 for each such hex (even if it is in the front zone of several enemy units); a negative result means a loss of combat efficiency level. Routing to such a hex means elimination of the unit. The unit can complete withdrawal or retreat in the hex adjacent to the enemy.VI.25 A withdrawing, retreating or routing unit cannot be the subject of an enemy reaction.
Sketch No. 12 Infantry counterattack.
1. A British battalion enters a hex in the ZOC of the 3rd batta-lion of Dnieprowsky Regiment.2. The Russian player may react. For example he may counte-rattack by making a morale check. If he succeeds he marks the British unit with an ASSAULT counter and the Russian unit with a REACTION counter.3. The combat is resolved immediately, with the Dnieprowsky Regiment battalion as the attacker.4. If the Russian player does not counterattack, the British play-er continues his move using the remaining Movement Points.5. If the Russian player counterattacks the British unit ends its movement – it can no longer be the target of a counterattack or shooting, while the Russian unit can no longer react in the activation and - if there was a counterattack – it took part in the combat in which case the REACTION counter must be chan-ged to an ASSAULT counter.
VI.16 Cavalry countercharge. Cavalry countercharge is described in XII.45 and following.
The Ingermanland Hussars Regiment may attempt to perform both a charge on the 17th Lancers Regiment (it only performs a morale check then) and on the 1st African Chasseurs Regiment (1 CA) - after a positive morale check – it moves one hex for-ward and combat occurs.

STRATEGEMATA BLOODY STEPPES OF CRIMEA 1854
13
gardless of their location on the stack), and their Strength is summed up. VII.19 Artillery located on the stack with infantry/cavalry units can shoot regardless of their location on the stack. Non-artillery units - regardless of location - can perform a counterattack.
Chapter VIIIMOVING UNITS
VIII.1 Each unit has a number of Movement Points (MPs), used for movement, changing formation, changing ori-entation, shooting and reorganization. During movement player initiate and resolve melee attacks.VIII.2 The mobility of the units depends on its type and current formation (see FORMATIONS CHART)VIII.3 A unit may only move towards hexes in its front or in its back. To move into a hex not in its front or in its back, a unit must make a turn.VIII.4 Moving backwards always costs an additional Movement Point.VIII.5 A unit must move hex by hex, spending for each of them an appropriate amount of Movement Points. A unit cannot jump over hexes. A unit cannot save MPs for the next activation or transfer MPs between units. Unused MPs in an activation are forfeit.VIII.6 Players must always take into account the effect of hex on which the movement occurs, or the edge of the hex, through which a unit takes movement.VIII.7 During movement a unit cannot move into the hex if this involves spending a greater amount of MPs than the unit currently has. The rule does not apply to the unit begin-ning its movement – it can move onto such hex, even if it involves spending more MPs than it currently has and stop there, unless the hex or hexside is impassable for the unit.VIII.8 A unit cannot enter a hex impassable for the type and formation in which it is currently is.VIII.9 A unit cannot enter a hex occupied by an enemy unit.VIII.10 Moving through friendly units is possible only if it does not exceed the limit of units per stack (see VII.7)VIII.11 Units must be moved one by one, it is forbidden to split the movement (move the first unit, then the second, and then come back to the first). Splitting movement can only be done as a part of reaction – after reacting to the op-ponent, the unit may still move using the remaining Move-ment Points. Exception: merging skirmisher units with a units in closed formation (see IV.13).VIII.12 Another unit can move only after the previous unit finished its movement. Stack existing before movement is treated as one unit, unless the player declares dismantling the stack before moving.VIII.13 Always move out-of-command units and brigade commanders first.VIII.14 Influence of terrain on movement - depending on the type and current formation – is described in the TER-RAIN EFFECTS CHART.
Chapter VIIGROUPING UNITS
VII.1 Counters standing on one hex form a stack.VII.2 It is not allowed to form a stack with infantry and cavalry units. Infantry and artillery units or cavalry and ar-tillery units may form a stack.VII.3 At any time one hex may contain only units belong-ing to one brigade, or not included in any brigade (divi-sional, corps and army units).VII.4 Formations and orientation. Infantry or cavalry units in the stack must be in the same formation and orienta-tion. Exception: skirmishers at the top of the stack are still regarded as skirmishers. Skirmishers in the middle or at the bottom of the stack are treated as being in close formation. Any artillery unit standing alone, or as a part of the stack may be oriented freely.VII.5 Creation and dismantling of a stack does not require extra Movement Points.VII.6 The topmost unit in the stack is considered as stand-ing at the head of the formation.VII.7 At any time a hex may contain units of a maximum Strength of 24 points.VII.8 For the purpose of creating stacks, treat each artillery unit as having 8 points of Strength.VII.9 Units grouped in a stack only move together. If a player is going to exclude some units from the stack, it should be done before the moving the stack. In this case, move stacked units before or after those separated. Excep-tion: absorbing skirmishers see IV.13.VII.10 Disorganized units and stack. After the activation a stack may contain disorganized and fully capable units.VII.11 Routed units and stack. All units in the stack are routed if at the end of an activation of a division/indepen-dent brigade one of the units in the stack is routed.VII.12 If the player has not previously dismantled the stack, the reorganization of one of the units in the stack causes a loss of an adequate number of Movement Points from the whole stack.VII.13 Moving a disorganized unit through the stack or the stack through a hex containing a disorganized unit does not affect the units in the stack.VII.14 Moving a routed unit through the stack or the stack through a hex containing a routed unit, requires a morale check for non-routed units. The failed check means a reduction in the combat readiness level of non-routed units.VII.15 The effects of shooting or melee are always subject to the entire stack. If an artillery unit is on top of the stack, reduce Strength Points from the first non-artillery unit in the stack. Other effects of artillery fire – see X.13.VII.16 A morale check is made once for all units in the stack, using the highest morale level on a non-artillery unit in the stack. Reduction of combat readiness level is marked separately for each of the units in the stack, taking under consideration its current level.VII.17 Only unit on top of the stack can perform fire com-bat.VII.18 The melee combat involves all units in the stack (re-

STRATEGEMATA BLOODY STEPPES OF CRIMEA 1854
14
Chapter IXVISIBILITY
IX.1 A Line of Sight (LoS) is used to determine whether an in-fantry or artillery unit can fire at an enemy unit and whether the cavalry unit can make a charge (whether the hex is in the unit’s ZOC), or if a commander can issue an Attack/Forced March or-der.IX.2 The Line of Sight is a straight line, which begins in the mid-dle of the hex with a commander or a unit, and ends in the middle of the hex you want to see.IX.3 Visibility exists when there is no object that could block the Line of Sight.IX.4 Visibility does not exist when:1. A hex on the LoS is higher than the area occupied by the viewer and the target.2. A hex on the Los includes an orchard, forest, village or a com-bat unit (friendly or enemy), and neither the viewer nor the target is above the terrain blocking the visibility.3. If the viewer is higher than the target and higher than the hex blocking visibility, and the object blocking the visibility is closer to the target (including the hex occupied by the target).4. If the viewer is lower than the target and lower than the hex blocking visibility, and the object blocking the visibility is closer to the viewer (including the hex occupied by the viewer).5. A friendly or enemy unit is on the same level as the viewer and the target.
1 - No visibility. Russian artillery two levels higher. Hex bloc-king visibility (village) is located 5 hexes of the viewer (closer to target). Between the artillery and the visibility blocking hex there are 3 hexes distance, and between blocking hex and the target there are 2 hexes (due to „move”)2- visibility exists. The blocking hex (vineyard, hex 1228) is within 5 hexes of the viewer. However, there is a difference of two levels, so for the purposes of visibility hex blocking it is ”moved” one hex toward the viewer; in this way between the observing artillery and the hex blocking visibility the distance is 3 and between this hex and the target, the distance is 4 hexes.
IX.5 Visibility does not exist if there is difference in levels between the viewer and the target and hex containing the edge level is:1. Closer to the viewer if he is lower.2. Closer to the target if he is higher.IX.6 If the difference in levels between the viewer and the target is greater than one, when checking visibility for each additional level “move” the hex blocking visibility towards the viewer, if he is lower, or towards the target, if the target is higher.IX.7 To check whether the LoS exist compare only the dis-tance in hexes between the viewer and hex blocking vis-ibility and visibility between the hex blocking and the tar-get. In any case, do not take into account the hex occupied by an object blocking visibility.IX.8 An escarpment crossing the LoS blocks visibility, ex-cept in the following situations:1. The viewer is below the escarpment, 3 or more hexes from hex from the escarpment, and the target is in a hex containing the escarpment,2. The viewer is on the hex containing the escarpment.3. Artillery standing on the hex with the escarpment can see the target beneath only if it is at least 3 hexes away from the targetIX.9 If between the unit on the escarpment and a unit be-low the escarpment exists a hex blocking visibility, take into account the number of levels on which the escarpment rises.IX.10 Ravines (the place where the road breaks down the escarpment) are treated for purposes of visibility as a ter-rain above or below by an appropriate number of levels.IX.11 Visibility exists, if the LoS runs stright through the edge of the hex that blocks visibility.IX.12 You can always shoot or charge the hex blocking the visibility, if it is visible.IX.13 You can always shoot or charge from the hex block-ing the visibility.IX.14 Auxiliary rule. If in doubt, the players must settle for themselves, if in this case visibility exists or not.The author is not able to extend the rules to all possible cases, and often to check the visibility common sense is just required backed up by imagining a situation that is to be solved at the moment.
Chapter XINFANTRY FIRE
X.1 The infantry unit can shoot:1. in their own activation, during the movement (at any time, but not after melee combat),2. in the opponent’s activation - as a reaction (see VI.6).X.2 Fire combat is performed only by the unit standing on top of a stack.X.3 You can only shoot a target in the unit’s ZOC.X.4 Firing a volley in their own activation costs 2 Move-ment Points.X.5 During its activation phase an infantry unit can fire any number of volleys, using its own Movement Points.X.6 As a reaction on enemy movement, the unit may fire

STRATEGEMATA BLOODY STEPPES OF CRIMEA 1854
15
only one volley per enemy activation.X.7 Infantry may fire only when they are in a formation which allows the use of firearms.X.8 Infantry firing ranges, together with modifiers for range, are shown on the unit counters.X.9 Other modifiers are shown in the INFANTRY FIRE MODIFIERS CHART and TERRAIN EFFECTS CHART.Example 1Infantry unit with a “-1/0” modifier firing at an adjacent hex subtracts “1” from the result, and shooting at a target two hexes away modifies the result by “0”.Example 2Infantry unit with a “+1/-” modifier firing at an adjacent hex adds “1” to the result, and can’t shoot at a target two hexes away.Example 3Shooting at a infantry assault column on the adjacent hex, by infantry unit with a distance modifier “-1” gives a to-
tal modifier of “-2” (-1 for the target formation, -1 for the distance).Author’s notice: The range modifier is to show a few factors that determine the strength of the fire combat, namely, the actual range of small arms, its accuracy (resulting from the fact that part of the unit used rifled weapons and others still smooth-bore weapons), but also differences in fire combat training.X.10 In case of shooting at a single alone standing artillery unit, an appropriate modifier is used. The same applies to a single alone standing skirmisher unit. These modifiers do not apply when the target is an artillery unit standing together with skirmishers.X.11 Shooting is performed by rolling a d10. The result is modified by the modifiers shown in INFANTRY FIRE MODIFIERS CHART. Then find the result in INFANTRY FIRE CHART in the row corresponding to the current mo-rale level of the shooting unit.
1 - No visibility. Edge of the level is closer to the target than the viewer.2 – No visibility. Like in point 1 and further – the LoS runs through a hex level higher than the target (1604), and this hex is closer to the target than the viewer.3 - No visibility. Hex with a higher level (1504) is closer to the viewer than the target. Unit located at 1603 hex is equidistant from the artillery and the unit on the 1501 hex.4 - No visibility. Hex with a higher level (1504) is closer to the viewer than the target.5 - Visibility exists, as artillery “looks” along the canyon (the road from the field in 1308 to the field in 1407). The distance from artillery to the target is 3 hexes. Infantry is in the hex with the escarpment.6 - Visibility exists because the difference in levels is 4 hexes. For an additional level of objects obscuring visibility (village in 1209 and orchard in 1309) we “move” them one hex toward the target. In this way, the two objects are closer to and not block visibility. Infantry is in the hex with the escarpment.7 - As in point 6. The vineyard does not block visibility.
STRATEGEMATA BLOODY STEPPES OF CRIMEA 1854
16
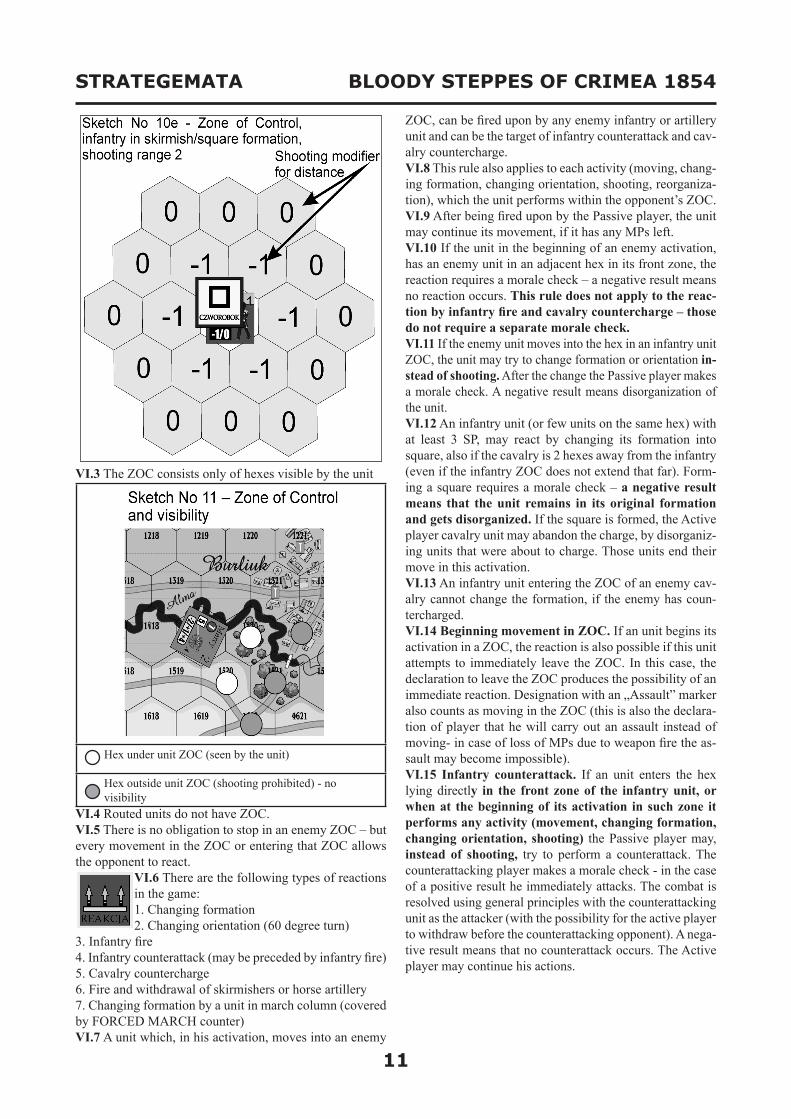
X.12 Modifiers for fire combat are cumulative.X.13 An artillery unit fired upon (also standing in a stack with non-artillery units) is subject to the same consequ-ences as non-artillery units, but it does not lose Strength Points. If there are no non-artillery units in the stack, skip the Strength Points reduction, if they are, they bear the loss of Strength Points.X.14 The results of shooting are applied immediately.X.15 The result of losing Movement Points by the active player or withdrawal by inactive player is independent of the automatic disorganizationX.16 The principle of function of modifiers for distance is shown in the following sketch.
1 - Infantry in line formation fires at a unit of skirmishers in a grove. Modifiers to the shooting roll are:a) 0 for the distance,b) +2 for the target in a grove,c) -1 for shooting unit Strength (e.g., a line with a Strength of 8)d) +1 for shooting at skirmishers.The total modifier to the roll is +2 (the firing unit morale „8”).2 - Infantry in skirmish formation fires at a unit in line forma-tion in a clear area. Modifiers to the shooting roll are:a) +1 for the distance,b) +0 for the target in line formation,c) +1 for shooting unit Strength (let’s say skirmishers have 1 SP),The total modifier to the roll is +2 (the firing unit morale „7”)
X.17 The effects of shooting at units in the stack - see VII.16.
Chapter XIARTILLERY FIRE
XI.1 Unless these rules provide otherwise, artillery fire com-bat uses the same rules as infantry fire combat.XI.2 Artillery units shoot in their own activation during move-ment, or during the activation of the opponent, as a reaction to his actions, using ARTILLERY FIRE CHART – 1 HEX and ARTILLERY FIRE CHART 2 HEXES AND FURTHER.XI.3 Each artillery unit shoots separately, even if it is in a stack with other artillery units.
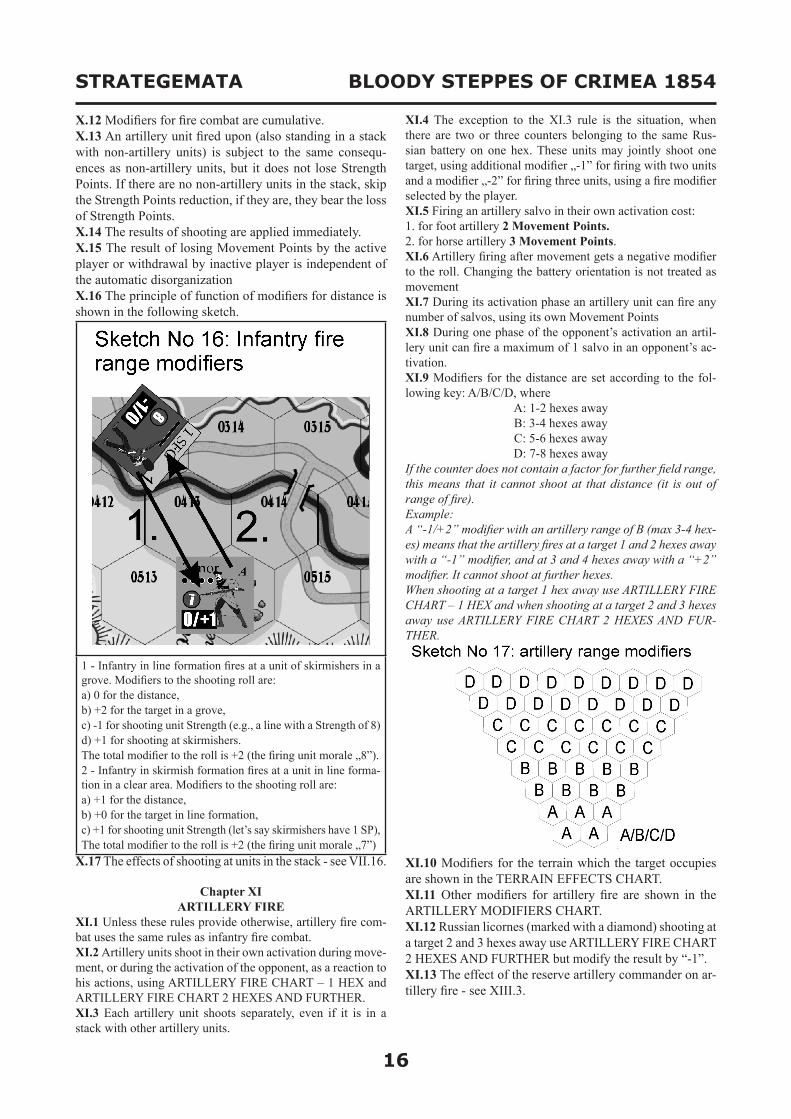
XI.4 The exception to the XI.3 rule is the situation, when there are two or three counters belonging to the same Rus-sian battery on one hex. These units may jointly shoot one target, using additional modifier „-1” for firing with two units and a modifier „-2” for firing three units, using a fire modifier selected by the player.XI.5 Firing an artillery salvo in their own activation cost:1. for foot artillery 2 Movement Points.2. for horse artillery 3 Movement Points.XI.6 Artillery firing after movement gets a negative modifier to the roll. Changing the battery orientation is not treated as movementXI.7 During its activation phase an artillery unit can fire any number of salvos, using its own Movement PointsXI.8 During one phase of the opponent’s activation an artil-lery unit can fire a maximum of 1 salvo in an opponent’s ac-tivation. XI.9 Modifiers for the distance are set according to the fol-lowing key: A/B/C/D, where
A: 1-2 hexes awayB: 3-4 hexes awayC: 5-6 hexes awayD: 7-8 hexes away
If the counter does not contain a factor for further field range, this means that it cannot shoot at that distance (it is out of range of fire).Example:A “-1/+2” modifier with an artillery range of B (max 3-4 hex-es) means that the artillery fires at a target 1 and 2 hexes away with a “-1” modifier, and at 3 and 4 hexes away with a “+2” modifier. It cannot shoot at further hexes.When shooting at a target 1 hex away use ARTILLERY FIRE CHART – 1 HEX and when shooting at a target 2 and 3 hexes away use ARTILLERY FIRE CHART 2 HEXES AND FUR-THER.
XI.10 Modifiers for the terrain which the target occupies are shown in the TERRAIN EFFECTS CHART.XI.11 Other modifiers for artillery fire are shown in the ARTILLERY MODIFIERS CHART.XI.12 Russian licornes (marked with a diamond) shooting at a target 2 and 3 hexes away use ARTILLERY FIRE CHART 2 HEXES AND FURTHER but modify the result by “-1”.XI.13 The effect of the reserve artillery commander on ar-tillery fire - see XIII.3.

STRATEGEMATA BLOODY STEPPES OF CRIMEA 1854
17
Chapter XIIATTACKING WITH COLD STEEL
1) Common rules.XII.1 The game distinguishes infantry melee attacks (bay-onet assault) and the cavalry charge attacks. A unit can only attack an enemy unit in its front zone.XII.2 Infantry can attack in their own activation phase and in the activation phase of the opponent, making a counter-attack (see VI.6).XII.3 Cavalry can attack in their own activation phase and in the activation phase of the opponent, making a counter-charge (see VI.6 and XII.49).XII.4 An attack in their own activation is performed during unit’s movement, if the unit after entering the hex adjacent to the target hex has enough Movement Points allowing for entering the target hex. This does not mean moving the unit onto the hex with the opponent just the need to have enough MPs, that allow such move.
XII.5 If the unit intends to attack the opponent and has enough Movement Points, cover it with a „ASSAULT” marker. This marker is taken off immediately from the active player unit after
resolving the attack, and placed on the attacked unit.XII.6 You can attack one hex from a couple of hexes. From one hex you can attack only one hex.XII.7 A disorganized unit cannot attack and counterattack, but it can normally defend itself, using a reduced level of morale (see XIV.36).XII.8 The procedure of attack follows: indicating attacking units, indicating the attacked hex, checking the results of battles and putting them into effect.XII.9 Attacks are not mandatory.XII.10 Units may attack together only when:1. They are in a stack, or2. They stand on the hexes adjacent to each other - it is pos-sible to attack from several hexes, if all the units are adja-cent to each other.3. On a hex adjacent to the target of the attack there are other units already covered with an „ASSAULT” marker, and the player before moving another unit declares combined attack.XII.11 If the next unit moved by the player does not move on the hex adjacent to the unit that is the target of attack (adjacent to a friendly unit covered with an „ASSAULT” marker), or if it moves in but does not declare a desire to participate in a combined attack, previously placed „AS-SAULT” marker is immediately removed and the units cov-ered by it end their activation in this turn.
Sketch No. 18: combined attack
1 – The 3rd Battalion of Dneprowsky Regiment and the 2nd „Company” of the Marine Battalion can attack the 1st Batta-lion of Scotts Guard Fusiliers, because they stand on adjacent hexes. Skirmishers can also attack, because in the planned at-tack units in closed formation will take part.2 - The 3rd Battalion of Dneprowsky Regiment and the 2nd „Company” of the Marine Battalion cannot attack the 1st Bat-talion of Scotts Guard Fusiliers, because they do not stand on adjacent hexes. Skirmishers also cannot attack, because in the planned attack no units in closed formation will take part.
XII.12 A unit (stack) can be attacked only once during an activation.XII.13 A unit (stack) can attack only once during an activa-tion (except for the continuation of charge - but not coun-tercharge!).XII.14 In the event of an attack of several units:1. The morale of the topmost unit in the stack is tested.2. If the attack is carried out from several hexes - each stack separately checks morale (for the topmost unit in the stack). A negative result means that the stack cannot par-ticipate in the attack. Units that passed the morale test must take part in an ongoing attack. You must test the morale for all units covered with an „ASSAULT” marker - even if the first stack fail the morale check consecutive stacks must test their morale, and if they pass, they must perform the attack.3. Modifier to morale for Strength applies to each stack of the attacking player, which has been covered with an „AS-SAULT” marker, combining the Strength of units covered by this marker.XII.15 To determine the effect on the morale of the Strength ratio shall be rounded according to mathematical principles (0.25 is rounded up to 0.5).XII.16 Withdrawal before melee. Immediately after de-claring an attack (but before the morale check of the At-tacker) the Defender may declare a withdrawal before combat. The Defender must withdraw up to 2 hexes. The Attacker can continue its move using remaining Move-

STRATEGEMATA BLOODY STEPPES OF CRIMEA 1854
18
ment Points (the attack does not occur, the enemy retreats). Withdrawal is not a unit’s reaction. A unit can withdraw in this way only once during the activation of an opponent. To withdrawal before combat use the rule for a retreat after combat (this applies to both the opportunities and the di-rection of the withdrawal and the effects of going through the hexes adjacent to the enemy troops if they are within their ZOC).XII.17 After withdrawing the defender must perform a mo-rale check – a negative means the loss of level of combat efficiency.XII.18 Withdrawal through a hex adjacent to the front zone of an enemy unit means +1 modifier to the morale check for each such hex.XII.19 Each unit that was the target of a counterattack or a countercharge, or a unit that initiated a melee attack, or failed to initiate such an attack, ends its movement in its ac-tivation. Cavalry units may however continue their charge – see XII.45. The passive player unit is covered with an „ASSAULT” marker, and it cannot be attacked again or fired upon in this active player activation. The marker is removed at the end of the active player activation.XII.20 Attacks are resolved using the following procedure:A. Attacker first morale check phase.1. The Attacker indicates units involved in the melee, and makes a morale check for each of the hexes from which the attack originates.2. The Attacker modifies the result with modifiers from MELEE COMBAT MODIFIERS CHART – cavalry units beginning their charge or trying to countercharge do not modify the result by their momentum factor, with the ex-ception of ‘momentum’ of a square.3. A negative result for all stacks, means that no attack occurs.4. A positive result for at least one stack, means that an attack occurs – the Defender must make a morale check.B. Defender morale check phase.1. The Defender unit (stack) makes a morale check, modi-fying the result with MELEE COMBAT MODIFIERS CHART (take into account the Strength of the Attacker before the defender morale check, not the Attacker); cav-alry units modify the result by the difference in momentum factors – if the opponent does not countercharge treat the impetus of his cavalry units as “0”.2. A positive result means a disorganization of all Defend-er units – go to phase C (Attacker second morale check)3. A negative result means:a. Loss of 1 or 2 Strength Points in the case of the result being 1 or 2 points higher than the Defenders morale and disorganization of all Defender units.b. Loss of 3 or more Strength Points in the case of the result being 3 or more points higher than the Defenders morale and routing of all Defender units.c. Retreat in the case of disorganization and fleeing in the case of a rout.d. Second Attacker morale checkAttention! A rout resulting from second disorganization is treated identically as a rout, but the Defender may lose maximum 2 Strength Points this way.
C. Attacker second morale check phase.1. During the second morale check the Attacker must ap-ply an additional “+1” modifier (apart from the modifiers from the MELEE COMBAT MODIFIERS CHART); cav-alry units modify the result by the difference in momentum factors2. The Attacker takes under consideration the modifier for the force ratio, only from the forces which actually took part in the melee attack (does not include units that failed the Attacker first morale check).3. A positive result means a disorganization of all Attacker units.4. A negative result means:a. Loss of 1 or 2 Strength Points in the case of the result being 1 or 2 points higher than the Attacker morale and disorganization of all Attacker units.b. Loss of 3 or more Strength Points in the case of the result being 3 or more points higher than the Attacker morale and routing of all Attacker units.Attention! A rout resulting from second disorganization is treated identically as for the Defender above.XII.21 If the Defender failed his morale check, he is treat-ed as the loser of the combat.XII.22 If the Defender passed his morale check, the At-tacker is treated as the loser of the combat (independently from the Attackers second morale check result).XII.23 If the Attacker lost, he stays on the occupied hexes.XII.24 If the Defender lost, he must retreat or flee. The At-tacker is obliged to pursue the Defender at least on the hex vacated by him. Further pursuit may be executed according to the rules.XII.25 Melee combat expends all remaining Movement Points for the units – the unit finished its activation in the turn.XII.26 Losses modifiers. The players modify their losses in the following way:1. Both players multiply lost Strength Points by 2 if the Defender was in entrenchments, village, copse, vineyard, orchard hex2. Infantry losing combat with cavalry, and cavalry losing combat with infantry in a square formation multiply lost Strength Points by 2.XII.27 Modifiers for melee combat are described in the MELEE COMBAT MODIFIERS CHART.2. Infantry melee combat – detailed rules.XII.28 Infantry in skirmish formation can only attack other units in skirmish formations or alone standing artillery units (not in stack with infantry or cavalry units). Exceptions:1. Zouaves and Algerian rifles in skirmish formation, can attack enemy units in any formation.2. Other skirmishers can always attack, if there is at least one friendly unit involved in the melee combat in a column or line formation, or the target is a routed unit.XII.29 Infantry in square formation cannot initiate melee combat.XII.30 A failed counterattack does not prevent the active player from trying his attacks.
STRATEGEMATA BLOODY STEPPES OF CRIMEA 1854
19
3. Cavalry charge – detailed rules.XII.31 Cavalry units cannot make a combined attack with infantry units.XII.32 Charges are resolved as infantry melee combat, with the following modifications.XII.33 A charge is possible, if at the beginning of move-ment by the cavalry:1. A LoS exists between the target and the charging unit, and2. the cost of movement is not more than 3 Movement Points for each hex, including the hex occupied by the enemy unit.XII.34 Cavalry can enter the hex adjacent to the hex oc-cupied by the enemy only after meeting all conditions re-quired to charge and only to attack the enemy. For the at-tacking cavalry a positive morale check is the condition for entering the hex adjacent to a enemy unit. A failed morale check means that the cavalry unit stops, losing remaining Movement Points.XII.35 A cavalry unit which begins its activation with an enemy unit in its ZOC may immediately charge the enemy unit in its front zone. After the charge declaration, the op-ponent may react.XII.36 Each unit of cavalry, which moved on the hex adja-cent to enemy units, must charge, as long as the conditions for its implementation are met.XII.37 Momentum factor. A cavalry unit in combat modi-fies their morale check result by adding their own momen-tum modifier and then subtracting the enemy momentum modifier. The momentum factor is used in B and C combat phases, and in the case of a square also in the A phase.XII.38 The momentum factor is described with a number of stars on cavalry counters.Example: The momentum of the Attacker ‘3’ (3 stars) and the Defender ‘1’ (1 star) means that the Attacker has a’+2’ modifier and the Defender a ‘-2’ modifier.XII.39 Momentum – cavalry/cavalry. In the case of a failed morale check when trying to countercharge, the mo-mentum of the passive player cavalry units is treated as ‘0’.XII.40 Momentum – cavalry/square. In the case of a charge on an infantry unit in a square formation:1. Cavalry units with 3 or 2 stars – have a momentum fac-tor of ‘1’.2. Cavalry units with 1 star – have a momentum factor of ‘0’.3. Infantry in a square formations – have a momentum fac-tor of ‘3’.XII.41 Momentum - Infantry. In the case of a charge on an infantry unit not in a square formation:1. Infantry units in line, assault column or company col-umn - have a momentum factor of ‘0’.2. Infantry units in skirmish formation - have a momen-tum factor of ‘-5’, that means that the cavalry unit subtracts their own momentum factor and 5 from the morale check result, and the infantry unit adds 5 and the cavalry momen-tum factor to their result.XII.42 Cavalry units with different momentum factors. In the case of an attack with cavalry units with different momentum factors, take under consideration the highest
factor available.XII.43 Charging the skirmish cavalry. A cavalry unit in skirmish formation must withdraw before melee in the case of a charge by heavy cavalry.XII.44 Charging the infantry. A failed morale check by a defending infantry unit always results in routing the unit and the loss of 3 Strength Points. From the Author.The momentum factor is derived from the training of cav-alry units and the horse and rider weight (hence the divi-sion for light and heavy cavalry).In the case of cavalry charging another cavalry this factor, according to the author, did not matter in the first phase of melee combat - the cavalry was trained to fight by charg-ing and - as a weapon equivalent to the opponent - was not subject to such stress as the infantry being charged.Hence, only in the event of a charge on infantry, the infan-try unit when making their first morale check, include the momentum factor by adding it to the die result, because often only the appearance of cavalry nearby caused confu-sion in infantry units, a loss of cohesion and morale, often ending with a retreat.XII.45 Continuation of charge. A cavalry unit, which forced the enemy to flee (not to retreat!) and was not dis-organized, after pursuing one hex, has 3 Movement Points - may move freely (the opponent may react) and attack any enemy unit, including the unit that was just charged. An-other charge on a unbroken unit is resolved by standard rules. Continuation of charge is resolved by standard rules. Cavalry units that meet the conditions for the continuation of charge are again covered by a „CHARGE” marker.XII.46 You may countercharge a cavalry unit which is con-tinuing its charge.XII.47 Continuation of charge is conducted in a way that after the first successful charge the cavalry performs pur-suit and checks if it continues the charge. Then we resolve other charges and pursuits of other cavalry units (not con-tinuations!) in this activation. After resolving all charges and pursuits in the activation, we resolve continuation of charge and resulting combat. So, the order is charge and pursuit of all units in the division/brigade – then continu-ation of charge.XII.48 A unit may continue the charge only once in the activation.4. Countercharge – detailed rules.XII.49 Cavalry countercharge. If a cavalry unit begins movement or enters a hex in the ZOC of an enemy cavalry unit (between both cavalry units is 2 hexes distance - remem-ber VI.2), the enemy cavalry may attempt to perform a coun-tercharge. The countercharging player makes a morale check (but does not modify the result by the momentum factor) - in the case of a positive result he moves one hex forward to be adjacent to the target. XII.50 After a successful morale check of the countercharging unit a melee combat occurs with the countercharging unit as the Attacker (it makes the second morale check after the active player – the Defender in this case) and the combat is resolved immediately using general rules. XII.51 If a countercharging unit fails its morale check, the ac-

STRATEGEMATA BLOODY STEPPES OF CRIMEA 1854
20
tive player may continue to move his unit or – after a success-ful morale check – attack the cavalry unit which attempted to countercharge and which, in such a case, has a momentum factor of ‘0’. An attempt to countercharge is treated as a reac-tion.Example 1An active player (A) cavalry unit enters a hex in a ZOC of a passive player (B) cavalry unit. At this moment the player B checks morale of his cavalry unit, but not using the momentum modifier. A positive result means that the player B unit executes a countercharge, moves to the hex adjacent to the player A unit and is treated as the Attacker. Now player A makes a morale check, using his momentum modifier (he is moving), and if the result is positive, the passive player (Attacker) makes his morale check using his momentum modifier.Example 2An active player (A) cavalry unit enters a hex in a ZOC of a passive player (B) cavalry unit. At this moment the player B checks morale of his cavalry unit, but not using the mo-mentum modifier. A negative result means that the player B unit does not countercharge. Player A checks morale of his cavalry unit, but not using the momentum modifier. If the result is positive he moves to the hex adjacent to the player B and makes a charge. Player B makes a morale check with a momentum modifier of “0” (his unit did not counter-charge). If this check is positive, player A makes his morale check again, this time using the momentum modifier.5. Direct artillery combat.XII.52 An alone standing artillery unit attacked by an en-emy infantry unit is automatically destroyed. XII.53 Attacking an artillery unit from its front zone re-quires the attacking unit to pass a morale check.
Chapter XIIICOMMANDERS AND COMBAT
XIII.1 If a corps, division or brigade commander with a morale factor takes part in combat (he is located on one of the hexes from which the attack is carried out, or which are the target of the attack), or he is a part of stack being fired upon, the player increases the morale of his troops by the commander’s modifier.XIII.2 The commander modifier affects melee combat and shooting results if the unit with the commander is the tar-get. It does not affect shooting results if the unit with the commander is the shooter.XIII.3 The artillery commander modifier is subtracted from the die roll for each firing artillery unit located with the commander or on an adjacent hex. XIII.4 One combat can be supported only by one com-mander.XIII.5 If as a result of melee combat or shooting the unit, on which the division or brigade commander is placed, suffers a loss of Strength Points or Movement Points, the player makes a d10 roll. A result of 9 means the loss of the commander.XIII.6 If during the activation, an enemy infantry unit en-ters the hex adjacent to a alone standing commander, move
the commander on the nearest unit subordinate to the com-mander, unless the hex is completely surrounded by enemy units. In such a case we proceed as in the case of loss as a result of combat. If there are several units at an equal distance from the commander, the player chooses a unit on which the commander moves on. Also, in a situation in which the commander is transferred in its own activation, it does not change neither command nor the distance to be moved.XIII.7 If during the activation, an enemy cavalry unit en-ters the hex adjacent to a alone standing commander, the player makes a d10 roll. A result of 9 means the loss of the commander. If the result is 1-8 apply the XIII.6 rule.XIII.8 The lost commander is placed on the turn track on an appropriate box two turns forward.XIII.9 If the commander is not eliminated during the com-bat, he withdraws or flees together with the unit on which he was placed. Pursuit or withdrawal accordingly affect the order (they change it) held by the commanderXIII.10 Effects of commander loss:1. Loss of Commander-in-Chief – means the lack of abil-ity to issue orders by the player - until the return of the Commander-in-Chief on the map, the division command-ers and independent brigade commanders must command themselves only.2. Loss of corps/wing commander - units subordinate to this commander are directly led by the Commander-in-Chief until the return of the commander to the map.3. Loss of brigadier - units subordinate to this commander are directly led by the division commander until the return of the commander to the map.4. Loss of division commander – means that the brigade commanders subordinate to this commander are out-of-command and cannot move. Division units (units not tied to any brigade of the division) are led by any brigadiers of the division.5. Loss of independent brigadier – units subordinate to this commander cannot move and initiate melee combat or counterattack until the return of the commander to the map. They can shoot, and defend themselves normally.XIII.11 A lost division/brigade commander appears on the map at the beginning of an appropriate turn, on any hex with their unit. A lost Commander-in-Chief or corps/wing commander appear on a map on any hex.
Chapter XIVUNITS AFTER COMBAT
1. Loss of StrengthXIV.1 Loss of Strength is an effect of:1. Artillery or infantry fire2. Melee combat3. Fleeing trough a hex adjacent to the enemy.XIV.2 The initial Strength of the units are defined in a Strength diagram for a given scenario.XIV.3 Loss of Strength is marked by crossing an appropri-ate number of boxes in the Strength diagram of the unit. The diagram shows the current Strength of the unit.

STRATEGEMATA BLOODY STEPPES OF CRIMEA 1854
21
The I Battalion of the 3rd Regiment of Zouaves consists of 4 skirmisher counters (1.I, 2.I and 3.I - each with the Strength of 2 and 4.I with the Strength of 1). In the diagram, each of them has been marked as the counter (for example 1.I). The battalion as a whole has a Strength equal to the number of boxes (here 7).If the battalion acts as a whole unit the crossing out of bo-xes may be done freely (according to the will of the player, to which the unit belongs).If skirmisher units operate separately their Strength is reduced by crossing out the boxes for appropriate counters.In this case, the I Battalion of the 3rd Regiment of Zouaves lost 2 Strength points – skirmisher units 1.I / 3 Zv and 3.I / 3 Zv both lost 1 SP.
XIV.4 Loss of Strength is irreversible.XIV.5 If the Strength of the unit drops to zero, the unit is per-manently eliminated from the game – it is destroyed.XIV.6 As a result of combat losses are borne solely by the unit at the top of the stack (but see fleeing).XIV.7 If there are a few stacks involved in a combat, losses are distributed equally (hence loss of 3 Strength Points with three stacks attacking means assigning one point of losses to each of the stacks). Only when the stacks bear even losses the losing player further subtracts the Strength points at his own discretion.2. Retreat/Flight.XIV.8 A unit may be forced to retreat or flee as a result of combat. XIV.9 A retreat means that the unit must move back 1 hex. Fleeing means that the unit must move back 3 hexes.XIV.10 Retreating or fleeing is performed in a way so that after its completion the unit is away from all hexes occupied by enemy troops, with which the unit fought, by the given number of hexes. If this is not possible, each unit having to retreat is routed and a routed unit is destroyed and removed from the game.XIV.11 A retreat can only be made through the rear zone of the unit. A branch which cannot move in this manner, is routed and may move in any direction possible, as a fleeing unit.XIV.12 Fleeing can be done in any direction, but first avoiding the enemy troops and hexes adjacent to them (including those that were not in their ZOCs).XIV.13 Fleeing is performed regardless of the limit of Move-ment Points and the cost of moving through a given terrain.XIV.14 If the unit flees through the hexes adjacent to enemy units, for each such hexes every fleeing unit loses 1 Strength Point. If the flight ends in a hex adjacent to enemy units, the fleeing unit is eliminated.XIV.15 It is impossible to flee through enemy troops. It is im-possible to flee through terrain impassable for the type of the unit. Should a friendly unit stood on the route of escape, the player must move this unit one hex forward or backward by and make a morale check – a negative result means disorga-nization. Only then the unit which took part in combat may continue its flight.XIV.16 It is impossible to retreat through terrain impassable
for the type of the unit, or through an allied unit if the stacking limit is exceeded, or through an enemy unit. In such a case, a unit becomes routed and flees 3 hexes.XIV.17 No unit (even skirmishers) cannot flee over the edge of the escarpment (regardless of whether going up or down).XIV.18 If fleeing or retreat is not possible according to the above rules, the unit is destroyed – it is permanently removed from the game.3. Pursuit.XIV.19 If the enemy unit is fleeing, retreating or withdrawing before combat, the unit that attacked or planned to attack must perform a pursuit at least on the attacked hex.XIV.20 In the event of enemy flight a cavalry unit must enter the hex abandoned by the Defender, and can make a pursuit in any direction using the 3 additional Movement Points and perform another charge, if it was not previously disorganized. In case of retreat the pursuit ends on the hex vacated by the Defender.XIV.21 A unit performing a pursuit ignores the cost for chang-ing facing. On the hex where the pursuit ends the unit may adopt any orientation.XIV.22 A unit performing a pursuit does not have to stop in the ZOC of an enemy unit, and these cannot react.4. Loss of mobility.XIV.23 Units fired upon by artillery or infantry as a reaction may partially lose mobility in the activation.Loss of mobility symbolizes the need to slow down the unit for the marshalling of formation and replaces the need for continuous checking of morale of shot unit. A unit marshals automatically, losing only Movement Points, so long as the sum of lost Movement and Strength points in the activation does not exceed the amount described in the chart.XIV.24 Loss of Movement Points for cavalry are doubled, also for the purposes of withdrawal and disorganization.XIV.25 Losses are implemented immediately, reducing the amount of Movement Points available for the unit at that time.XIV.26 If after firing the number of available Movement Points drops to zero, the unit can no longer move in the acti-vation.XIV.27 If a stack is the target of fire, the loss of mobility af-fects the whole stack.5. Levels of combat efficiency.XIV.28 Each non-artillery unit has three levels of combat ef-ficiency:1. Combat-effective2. Disorganized3. RoutedXIV.29 If the rules impose reduction of the level of efficiency combat, this means disorganization of a combat-effective unit or routing of a disorganized unit. XIV.30 Each artillery unit has two levels of combat efficiency:1. Combat-effective2. DisorganizedXIV.31 A second disorganization of an artillery unit results in the elimination of such unit. The same applies for routing in melee combat.
5.1 Disorganization.XIV.32 Disorganization of a unit may be the re-sult of melee combat or fire (artillery or infantry).XIV.33 If during the fire combat a unit will lose a
number of Movement Points/Strength Points set out in WITH-
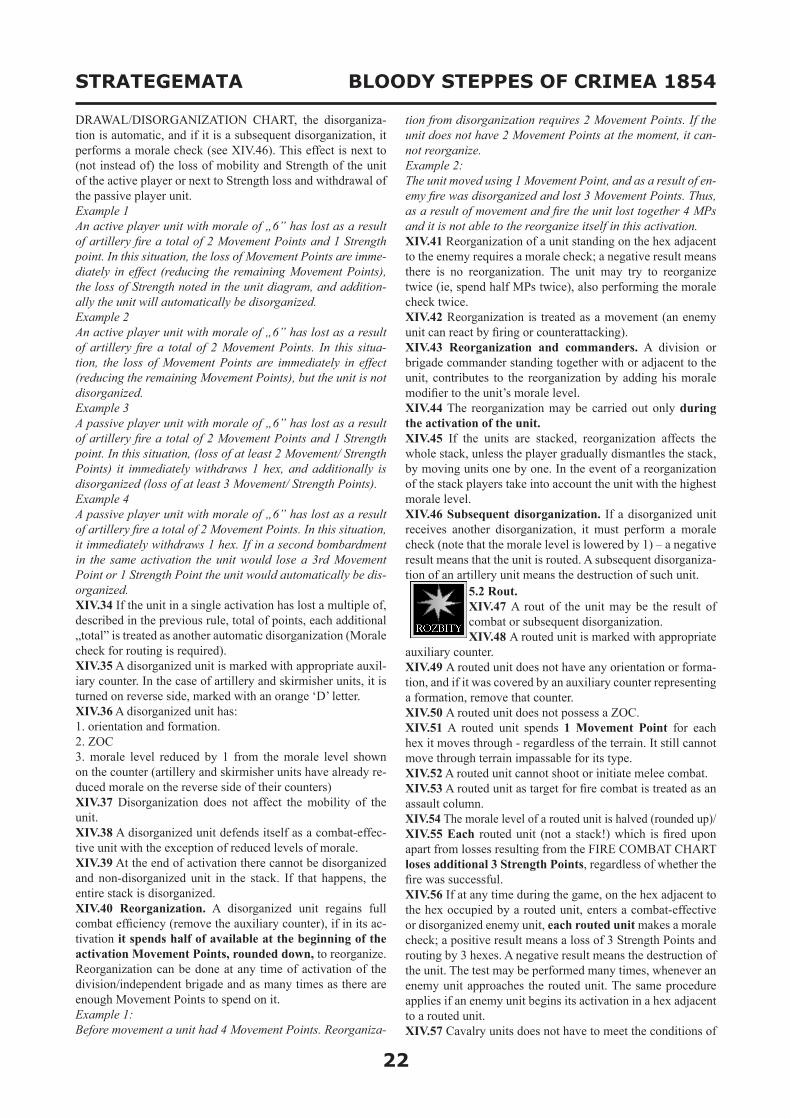
STRATEGEMATA BLOODY STEPPES OF CRIMEA 1854
22
DRAWAL/DISORGANIZATION CHART, the disorganiza-tion is automatic, and if it is a subsequent disorganization, it performs a morale check (see XIV.46). This effect is next to (not instead of) the loss of mobility and Strength of the unit of the active player or next to Strength loss and withdrawal of the passive player unit.Example 1An active player unit with morale of „6” has lost as a result of artillery fire a total of 2 Movement Points and 1 Strength point. In this situation, the loss of Movement Points are imme-diately in effect (reducing the remaining Movement Points), the loss of Strength noted in the unit diagram, and addition-ally the unit will automatically be disorganized.Example 2An active player unit with morale of „6” has lost as a result of artillery fire a total of 2 Movement Points. In this situa-tion, the loss of Movement Points are immediately in effect (reducing the remaining Movement Points), but the unit is not disorganized.Example 3A passive player unit with morale of „6” has lost as a result of artillery fire a total of 2 Movement Points and 1 Strength point. In this situation, (loss of at least 2 Movement/ Strength Points) it immediately withdraws 1 hex, and additionally is disorganized (loss of at least 3 Movement/ Strength Points).Example 4A passive player unit with morale of „6” has lost as a result of artillery fire a total of 2 Movement Points. In this situation, it immediately withdraws 1 hex. If in a second bombardment in the same activation the unit would lose a 3rd Movement Point or 1 Strength Point the unit would automatically be dis-organized.XIV.34 If the unit in a single activation has lost a multiple of, described in the previous rule, total of points, each additional „total” is treated as another automatic disorganization (Morale check for routing is required).XIV.35 A disorganized unit is marked with appropriate auxil-iary counter. In the case of artillery and skirmisher units, it is turned on reverse side, marked with an orange ‘D’ letter.XIV.36 A disorganized unit has:1. orientation and formation.2. ZOC3. morale level reduced by 1 from the morale level shown on the counter (artillery and skirmisher units have already re-duced morale on the reverse side of their counters)XIV.37 Disorganization does not affect the mobility of the unit.XIV.38 A disorganized unit defends itself as a combat-effec-tive unit with the exception of reduced levels of morale.XIV.39 At the end of activation there cannot be disorganized and non-disorganized unit in the stack. If that happens, the entire stack is disorganized.XIV.40 Reorganization. A disorganized unit regains full combat efficiency (remove the auxiliary counter), if in its ac-tivation it spends half of available at the beginning of the activation Movement Points, rounded down, to reorganize. Reorganization can be done at any time of activation of the division/independent brigade and as many times as there are enough Movement Points to spend on it.Example 1:Before movement a unit had 4 Movement Points. Reorganiza-
tion from disorganization requires 2 Movement Points. If the unit does not have 2 Movement Points at the moment, it can-not reorganize.Example 2:The unit moved using 1 Movement Point, and as a result of en-emy fire was disorganized and lost 3 Movement Points. Thus, as a result of movement and fire the unit lost together 4 MPs and it is not able to the reorganize itself in this activation.XIV.41 Reorganization of a unit standing on the hex adjacent to the enemy requires a morale check; a negative result means there is no reorganization. The unit may try to reorganize twice (ie, spend half MPs twice), also performing the morale check twice.XIV.42 Reorganization is treated as a movement (an enemy unit can react by firing or counterattacking).XIV.43 Reorganization and commanders. A division or brigade commander standing together with or adjacent to the unit, contributes to the reorganization by adding his morale modifier to the unit’s morale level.XIV.44 The reorganization may be carried out only during the activation of the unit.XIV.45 If the units are stacked, reorganization affects the whole stack, unless the player gradually dismantles the stack, by moving units one by one. In the event of a reorganization of the stack players take into account the unit with the highest morale level.XIV.46 Subsequent disorganization. If a disorganized unit receives another disorganization, it must perform a morale check (note that the morale level is lowered by 1) – a negative result means that the unit is routed. A subsequent disorganiza-tion of an artillery unit means the destruction of such unit. 5.2 Rout.
XIV.47 A rout of the unit may be the result of combat or subsequent disorganization.XIV.48 A routed unit is marked with appropriate
auxiliary counter.XIV.49 A routed unit does not have any orientation or forma-tion, and if it was covered by an auxiliary counter representing a formation, remove that counter.XIV.50 A routed unit does not possess a ZOC.XIV.51 A routed unit spends 1 Movement Point for each hex it moves through - regardless of the terrain. It still cannot move through terrain impassable for its type.XIV.52 A routed unit cannot shoot or initiate melee combat.XIV.53 A routed unit as target for fire combat is treated as an assault column.XIV.54 The morale level of a routed unit is halved (rounded up)/XIV.55 Each routed unit (not a stack!) which is fired upon apart from losses resulting from the FIRE COMBAT CHART loses additional 3 Strength Points, regardless of whether the fire was successful. XIV.56 If at any time during the game, on the hex adjacent to the hex occupied by a routed unit, enters a combat-effective or disorganized enemy unit, each routed unit makes a morale check; a positive result means a loss of 3 Strength Points and routing by 3 hexes. A negative result means the destruction of the unit. The test may be performed many times, whenever an enemy unit approaches the routed unit. The same procedure applies if an enemy unit begins its activation in a hex adjacent to a routed unit.XIV.57 Cavalry units does not have to meet the conditions of

STRATEGEMATA BLOODY STEPPES OF CRIMEA 1854
23
a charge to enter the hex adjacent to the routed unit (even if it is a hex adjacent to a hex occupied by a non-routed unit).
XIV.58 Reorganization. A routed unit raises its level of combat efficiency to „disorganized” (change the auxiliary counter), in the reorganiza-tion phase, if:
1) At the beginning of the turn (command phase) the ROUT-ED counter was turned on the reverse (REORGANIZATION)2) during the entire turn it was not attacked or shot at3) did not move in its activation phase 4) is at least 5 hexes away from any non-routed enemy unit during the entire turn.XIV.59 If, during the turn, the unit ceases to meet the condi-tions of the Reorganization, turn the ‘REORGANIZATION’ counter to the ‘ROUTED’ side again.XIV.60 To reorganize the routed unit it must first pass a mo-rale check. A positive result indicates an increase in the level of combat efficiency to ‘Disorganized’. Use morale levels de-scribed in rule XIV.54 for this check.XIV.61 Routed units in the stack are reorganized by one mo-rale check using the unit with the highest morale level in the stack. Use morale levels described in rule XIV.54 for this check.XIV.62 The commander of the brigade or division to which the broken unit belongs can support reorganization only when the brigade/division has a “Defense” order and the command-er is standing together with or in an adjacent hex to the routed unit. Support of reorganization means adding the commander modifier to the current unit morale level. 6.Withdrawal of shot defender.XIV.63 If during shooting in the enemy activation a passive player unit loses a number of Movement Points/Strength Points set out in WITHDRAWAL/DISORGANIZATION CHART, the unit must withdraw 1 hex; the active player can pursuit if he has enough Movement Points. This result is intro-duced next to mandatory disorganization (if it occurs).
7. 7. Marking loss of Movement Points/Strength Points during acti-vation.XIV.64 Loss of Movement Points/Strength Points as a result of shoot-ing in the activation of any of the players should be marked with LOST MOVEMENT POINTS/STRENGTH
POINTS auxiliary counter. This applies to units of both players.XIV.65 An increase in the number of lost Movement Points/Strength Points in the activation is marked by turning over the marker or exchanging the marker with one with a higher numberXIV.66 The counter is removed immediately after the number of lost Movement Points/Strength Points reaches a number re-sulting in an automatic disorganization. In this case, the unit is covered with a ‘Disorganization’ marker or performs a morale check (subsequent disorganization).XIV.67 If the unit continues to lose Movement Points/Strength Points, the auxiliary counter should be placed back on the unit.XIV.68 LOST MOVEMENT POINTS/STRENGTH POINTS auxiliary counters are removed by both players after each ac-tivation. Points lost in one activation are not left in the next activation.XIV.69 Player modifies every morale check in combat by
„+1” if any of his units taking part in the combat or attempting to take part in combat is covered by a LOST MOVEMENT POINTS/STRENGTH POINTS counter.8. Morale checks.XIV.70 A morale check is made after the combat in the situ-ation of subsequent disorganization or having to retreat/with-draw through the hex in the front zone of the enemy and adja-cent to the opponent’s unit.XIV.71 Morale checks are made according to the I.17 rule.
CHAPTER XVOPTIONAL ACTIVATION RULES, SOLO PLAY
1. Introductory rules.XV.1 This chapter contains rules specifying the optional method of determining the order of activated units and allowing one play-er to play the game alone.XV.2 Apply the rules of this chapter instead of the rules number II.6, II.8, II.9, II.10, II.11 and II.12.2. Optional activations rules.XV.3 Activation is performed in the following manner:1) Each player has its own cup (box, etc.) allowing to secretly draw AMs.2) Each scenario determines what active AMs of divisions/inde-pendent brigades are involved in the scenario.3) At first players put all planned for each scenario active AMs to one cup, taking into account, however, the turn of the game (markers appropriate for the turn - without taking into account losses incurred and not yet introduced reinforcements).4) One player draws a AM - drawn AM represents the initiative for the given player and the necessity to activate the selected divi-sion/independent brigade.5) The player with the initiative activates the drawn division/in-dependent brigade.6) After the first activation both the players move into their cups the remaining active AMs, and the player with the lower initial number of AMs in his cup add adequate number of inactive AMs. 7) The player with the initiative - as long as he wishes - draws from his cup another AM in order to sustain the initiative and per-forms a independence check of the drawn division/independent brigade commander.8) In the case of a positive result, the player with the initiative activates the drawn division.9) In the case of a negative result or resignation of sustaining the initiative or after activation of it the player without the initiative turn, to draws a AM from his cup. If the check to sustain the ini-tiative is failed the second drawn AM returns to the cup.10) Drawing an inactive AM means the loss of activation and (if the draw was the first) the ability to attempt to sustain the initia-tive (drawing a further AM and making a independence check).11) The player with the initiative in the turn - before drawing - may yield the draw to the opponent. In this situation the player without the initiative is forced to draw his AM and activate the drawn division/ independent brigade.12) Each player can make a maximum of two consecutive activa-tions – after the second one the opponent draws his AMs - this rule does not apply to situation of yielding the draw by the player with the initiative.13) To facilitate there is an activation sequence counter available in the game. The player who uses the first activation (in turn or after the acquisition) takes the activation sequence counter and places it in front of him on the obverse (with a number ‘I’); after activation, if he is going to sustain the initiative, and the indepen-dence check is positive, the player turns the activation sequence counter on the reverse (with a number ‘II’), if the independence

STRATEGEMATA BLOODY STEPPES OF CRIMEA 1854
24
check is negative or player resigns from sustaining the initiative, the counter goes to the opponent, and he puts it in front of him on the obverse, and, if he is sustaining the initiative he acts the same as the first player.14) After drawing all active AMs and possible activation of non-divisional units the players proceed to Reorganization Phase.XV.4 If division/independent brigade commander drawn to sus-tain the initiative is within range of the Commander-in-Chief and the Commander-in-Chief has free dispatch riders, the indepen-dence check must be supported by the Commander-in-Chief, and the dispatch riders is moved to the turn track onto the box cor-responding to the next turn.
XV.5 If the player decides to try to sustain the ini-tiative - if the drawn commander passes his inde-pendence check - is forced to activate the drawn division/independent brigade.3. Optional rules – solo gaming.
XV.6 When playing a solo game the player performs actions specified in the rules XV.1 - XV.5, also deciding on whether to sustain the initiative.
LITERATURE1) Bazancourt de, Cesar: “L’Expédition de Crimée jusqu’à la prise de Sé-bastopol, chronique de la guerre d’Orient”, British edition: “The Crimean Expedition to the Capture of Sebastopol. Chronicles of the War in the East, from its Commencement to the Signing of the Treaty of Peace”, London 1856,2) Bogdanowicz M.: “Wostocznaja Wojna 1853-56 godow“ (”Восточная война 1853-1856 годов”) T. I-IV, Sankt Petersburg 1877; http://history.scps.ru/crimea/bogdan00.htm ,3) Brighton T.: “Hell Riders”; Polish 1st edition, Warsaw 2006,4) Dawson A.L: “French Infantry of the Crimean War”, Partizan Press 2012,5) Fletcher I. & Ishchenko N.: “The Battle of the Alma 1854. First blood to the Allies in the Crimea”; Penn & Sword Military 2008,6) “Guerre d’Orient: Siege de Sebastopol. Historique du service de l’artillerie “T. Premiere; Paris 1859; http://books.google.pl/books?id=dyNEAAAAYAAJ&printsec=frontcover&source=gbs_ge_summary_r&cad=0#v=onepage&q&f=false7) Kinglake A.W.: “Inkerman”; Edinburgh and London 1885,8) Kinglake A.W.: “Invasion to the Crimea: its origin, and an account of its progress down to the death of Lord Raglan” T. III; Edinburgh and London 1877,9) Mercer P.: “Give them a volley and charge! The battle of Inkerman 1854”; Spellmount 2008,10) Todleben E. (red.): “Opisanije oborony goroda Sewastopol’a” (“Описание обороны г. Севастополя”); Sankt Petersburg 1863,11) Tarle E.: “Crimean War T.I-II (tytuł oryginału: “Крымская война”); Polish 1st edition, Warsaw 1953 ,12) Zajonczkowski A.: “Wostocznaja Wojna 1853-1856”, T. I, (“Bосточная война 1853-1856”); Poligon 2002 http://adjudant.ru/crimea/zai00.htm .In addition, the author used in a wide range of websites trying to complete the information needed to create the game. In particular, the author used a series of interesting articles by Paweł Zatryb:1) “ The Russian army on the eve of the Crimean War”http://wargaming.pl/index.php?mode=view_article&article=352) “ The British army on the eve of the Crimean War”http://wargaming.pl/index.php?mode=view_article&article=323) “ Danube Campaign: October 1853 - June 1854”http://wargaming.pl/index.php?mode=view_article&article=1494) “ The Battle of the River Alma in 1854”http://wargaming.pl/index.php?mode=view_article&article=1555) “ Battle of Balaklava - the first attempt to deblockade the fortress.”http://wargaming.pl/index.php?mode=view_article&article=1616) “ Battle of Inkerman 1854”:http://wargaming.pl/index.php?mode=view_article&article=1747) “The Siege of Sevastopol” (http://wargaming.pl/index.php?mode=view_article&article=189In addition, the author recommends interesting websites useful for under-
standing the events that led to the set of battles and fights, and the general knowledge of battles at Alma, Balaklava, and at the Inkerman.The list can be found here:http://www.wojenne-planszowki.pl/viewtopic.php?t=1221&start=0Credits:Rules, scenarios: Sławomir Łukasik.Maps: Tomasz Hanas, with cooperation from Sławomir Łukasik.Icons on the counters: Paskudny Ork z WarsztAtu (sketches), To-masz Hanas (colouring), Katarzyna Tretyn-Zečević (http://kt-z.pl) – French foot rifles and Algerian rifles – coloured version.Graphic counter design: Tomasz Hanas, Sławomir Łukasik.Play testers – rules, scenarios: Bartosz Bruziak, Bartłomiej Gładyszewski, Łukasz Godecki, Tomasz Hanas, Adam Niechwiej, Gabriel Szala and Sławomir ŁukasikPlay testers – rules: Cezary Domalski, Miloš Zečević.Project of the box and editorial support: Piotr Gołdon, PPHU STRAT-EGY, Wrocław; http://www.strategy.com.pl/ .Special thanks to Bartosz Bruziak, Ryszard Tokarczuk and Paul Ace-to for thier contributions in English version of rules.
The image on the box and the cover of the rulebook: “Charge of the Light Brigade. October 25, 1854 under the Earl of Cardigan”. Litog-raphy from William Simpson.Images of commanders: photos by Roger Fenton (http://allworld-wars.com/Crimean-War-Photographs-by-Roger-Fenton-1855.html) and Wikipedia.Contact the Author: [email protected]: http://www.strategemata.pl/Game forum: http://www.wojenne-planszowki.pl - Gry Polskie/Strat-egemata/Krwawe Stepy Krymu.
Count Eduard Ivanovich Todleben b. 20th (8th old style) of May 1818 in Mitawa (Russian Empire, now Latvia), d. 1st of July (June 19th old style) 1884 in Bad Soden (near Frankfurt am Main), Russian engineer, ge-neral and military writer. The general’s family came from Thuringia (now a land in Germany) and moved to Courland for business. The general’s father, Johann Heinrich Todleben was a member of the merchant guild. In 1840 he was adopted into a training sapper battalion, where he also studied mine warfare (the use of excavation for the acquisition or defense of fortifications). He took part in the activities in the Caucasus in the years from 1848 to 1849. At the beginning of 1854 years he was moved to the headquarters of the Army of the Danube and took part in the activities of this unit during the Balkan campaign in 1854. After lifting the siege of Silistria he was moved to Sevastopol, where he led engineering duties in the fortress. After the end of the Crimean War he became the Deputy Inspec-tor General for engineering. He oversaw the expansion of the Nowogeorgijewski Fortress (Modlin) and under his command the famous 2 km-long fortress were erected. Chief designer of Osowiec Stronghold and the precursor of engineering training of infantry, cavalry and artillery. During the Russo-Turkish War (1877-1878) from 3rd (new style) of November 1877 he directed the siege and blockade of the city Plevna (Pleven) - changing the nature of the activities under the Turks ad hoc erected fortress. The siege ended with an unsuccessful attempt to unlock the garrison and the surrender of the Turkish troops locked in the fortress with the-ir commander Osman Pasha. Since 1879 the Governor General and Commander of the Odessa Military District, then Governor-General of Vilnius, Kaunas, and Grodno and the commander of the Military District of Vilnius.
Author of a detailed work „Описание обороны г. Севастополя.” („Description of the defense of the city of Sevastopol”), which benefited the author of the game.
©2014 STRATEGEMATA and Sławomir Łukasik