IGCSE Coordinate Science 1 Thermal Energy P5, P6, C6 Key Notes.
description

P5 Energy USER MANUAL……………………………………..4
BETRIEBSANLEITUNG......................................15
MANUAL DE USUARIO……………………..……27
FELHASZNALOI KEZIKONYV…………….….…37
MANUAL D’USO……………………………..……45
GEBRUIKERSHANDLEIDING............................58
PODRĘCZNIK DLA UŻYTKOWNIKA.................70
MANUAL DE UTILIZARE………………………...82
PRIRUČNIK ZA KORIŠĆENJE…………………94


3
EN DE ES HU IT
1 Power button 1 Power-Taste 1 Botón de encendido 1 Bekapcsoló gomb 1 Tasto di accensione
2 Speaker 2 Lautsprecher 2 Altavoz 2 Hangszóró 2 Altoparlante
3 Micro USB plug 3 Micro-USB 3 Enchufe micro USB 3 Micro USB 3 Porta Micro USB
4 Light sensor 4 Lichtsensor 4 Sensor de luz 4 Fényérzékelő 4 Sensore di luce
5 Volume buttons 5 Lautstärketasten 5 Volumen 5 Hangerő gombok 5 Tasti volume
6 Earphones jack 6 Kopfhörerbuchse 6 Enchufe auriculares 6 Fülhallgató jack 6 Jack auricolare
7 Led Flash 7 LED-Blitz 7 LED Flash 7 LED vaku 7 Led Flash
8 Main camera 8 Zurück Kamera 8 Cámara trasera 8 Hátulsó kamera 8 Fotocamera principale
9 Front camera 9 zweite Kamera 9 Cámara frontal 9 Elülső kamera 9 Fotocamera frontale
NL PL RO SR
1 Uit-knop 1 Przycisk zasilania 1 Buton pornire 1 Dugme za uključivanje
2 Spreker 2 Głośnik 2 Difuzor 2 Mikrofon
3 Micro-USB-stekker 3 Micro USB plug 3 Mufa Micro USB 3 Utičnica USB
4 Lichtsensor 4 Czujnik światła 4 Senzor lumina 4 svetlosni senzor
5 Volumeknoppen 5 Przyciski głośności 5 Butoane volum 5 Dugme za jačinu zvuka
6 Oortelefoon-aansluiting 6 Słuchawki jack 6 Mufa casti 6 Utičnica za zvučnike
7 LED-flitser 7 Led Flash 7 Led Flash 7 Led Flash
8 Terug camera 8 Tylna kamera 8 Camera principala 8 Kamera pozadi
9 Camera vooraan 9 Aparat z przodu 9 Camera frontala 9 Kamera spreda

4
Notices for the use of phone CAUTION! Please read carefully this instructions and follow them, in the case of dagerous situations.
Driving safety: It is recommended not to use the phone while driving. If you use it however, turn on the Handsfree
mode.
Turn off your phone while in an aircraft.
Interference caused by mobile phones affects aviation safety, and thus is illegal to use it on the plane. Please make
sure that your mobile phone is turned off when you are on the plane.
In hospital: When using the phone in a hospital must submit to the relevant rules specified by the hospital. Any
interference caused by wireless devices may affect the performance of the phone.
Approved service: Only approved repair shops can repair mobile phones. If you open the phone and try to fix it
yourself you will void the warranty of the product.
Accesories and batteries: Only accesories and batteries approved by the producer can be used.
Emergency calls: Make sure the phone is turned on and enabled if you wish to make an emergency call, press the
call key and confirm the location, explain what happened and do not close the call.
The battery and charging the battery: It is recommended to fully charge before first use of the device. Do not expose
the battery to temperatures above 40 C. Do not dispose the battery in fire or drop anywhere. Return defective
batteries in special centers or to the supplier center.
Warning: We take no responsibility for situations where the phone is used other than as provided in the manual.
Our company reserves the right to make changes in the content of the manual without making this public. These
changes will be posted on the company website to the product it amends.
The contents of this manual may be different from that in the product. In this last case will be considered.
To avoid the problems that might occur with the service shops approved by Visual Fan Ltd. (because Visual Fan
reserves the right to stop the collaboration with any service shop which was previously approved and mentioned in
the waranty card on the date on which the product batch was sold on the market), before taking a product to the
service shop, please check the updated list of approved service shops on Allview website at the section:

5
“Support&Service – Approved service”.
For more product details visit www.allviewmobile.com. Do not cover the antenna with your hand or other objects
Failure to comply resulting in connectivity issues and rapid discharge of the battery.
All applications provided by third parties and installed in this device, may be modified and/or stopped at any
moment. Visual Fan Ltd will not be responsible in any way for modifications of the services or content of these
applications. Any request or question regarding third party applications may be addressed to owners of these
applications.
Device power on/off and standby After inserting the SIM card, memory card and battery, start the phone by holding down the Power button for 3
seconds. To power off, press and hold the same button and confirm. If you press the Power button you will set phone
in standby mode, to return shortly press the same button.
Unlocking, idle screen and applications menu To unlock the screen when resuming from standby, slide your finger from the bottom to the top of the screen.
The main screen will be displayed
Home screen pages can be customized with shortcuts and widgets. At the top of the screen is placed the
notification bar that contains information about the mobile network signal, WiFi, Bluetooth, battery level, time and
events.
To display the applications menu, touch the Menu icon from the bottom of the main screen. Slide the
screen to left to scroll main menu. Touch the desired application icon to access it. Use the Back button to return to
the main screen.

6
Dialing To call a number, from the main screen open the dialer, dial the number and press the call key.
To answer a call drag the icon to the right, and to reject the call drag the icon to the left.
You can call numbers directly from Call log, touch the dial symbol from the right side of the desired number.
Messaging To create and send an SMS, proceed as follows:
- Open the applications menu;
- Open the Messaging application;
- From the bottom-right side of the screen touch Compose new message symbol;
- Write the message;
Note: You create an MMS by touching the attach symbol and adding media content: images, sound or movies.
- In the top text box add the number or the name of the recipient;
- Tap the arrow -> symbol from the right side of the text box to send the message.
Contacts Access the Contacts from menu applications.
Add new contact:
- Open Contacts from main menu;
- Tap the + symbol from the bottom-right side of the screen;
- Select the memory where you will store: account or phone entry;

7
- Enter contact information;
- Finally, tap Save.
Add new contact from call log:
- From the applications menu, open the Dialer;
- Tap the phone number you want to save;
- Tap New contact button;
- Select the memory where you will store: account or phone entry;
- Enter contact information;
- Finally, tap Save.
Import/export contacts
You can import or export contacts between memories and accounts available, as follows:
- Open Contacts;
- Press the Options button and select Import / Export;
- Choose memory from which to copy contacts;
- Choose in which memory to copy the contacts;
- Select contacts to copy;
- Press the Copy button;
Synchronize contacts with an account
Note: If you don’t have an account, you can create one which is also necessary for the Google PlayTM store.
You can synchronize the contacts of an account by following the next steps:
- Open the applications menu -> Settings -> Applications -> ACCOUNTS;
- Touch the desired account; if you don’t have allready set, you can add a new one by touching the button Add

8
new account ;
- Tick the option Sync contact;
Customize contacts with photo
Note: The contacts from SIM card cannot be customized with photo.
To add a photo to one contacts follow the steps:
- Open Contacts;
- Touch the desired contact name;
- On the top-right of the screen touch the contact editing symbol;
- In the left corner of the screen touch the symbol to add image;
- Select the input method of image: photo shoot or from gallery.
Google Play store Google Play store provides a multitude of applications from various categories: games, business,
communication, shopping, travel, entertainment, books, education, finance, photography, tools, media, social, sports,
news.
The first time you open the Google Play store, you will be prompted to authenticate. If you already have a
Google™ account, enter the data. If not, click the Create button to create a new account and follow the steps on the
screen.
9
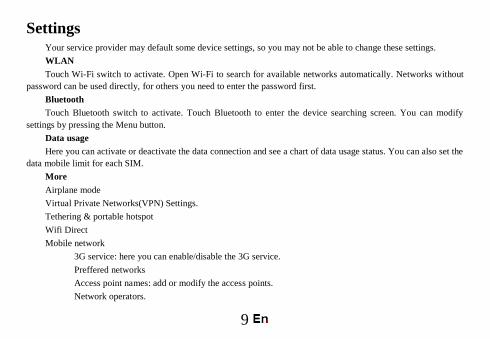
Settings Your service provider may default some device settings, so you may not be able to change these settings.
WLAN
Touch Wi-Fi switch to activate. Open Wi-Fi to search for available networks automatically. Networks without
password can be used directly, for others you need to enter the password first.
Bluetooth
Touch Bluetooth switch to activate. Touch Bluetooth to enter the device searching screen. You can modify
settings by pressing the Menu button.
Data usage
Here you can activate or deactivate the data connection and see a chart of data usage status. You can also set the
data mobile limit for each SIM.
More
Airplane mode
Virtual Private Networks(VPN) Settings.
Tethering & portable hotspot
Wifi Direct
Mobile network
3G service: here you can enable/disable the 3G service.
Preffered networks
Access point names: add or modify the access points.
Network operators.

10
Sounds
This option allows you to set audio tones for incoming calls, e-mail alerts and SMS notifications. Settings
include: Vibration, Volume, Tone Audio, Reviews
Select General / Silent / Meeting / Outdoor profile by touching the right side circle.
Power Saving
You can choose one of the three power schemes:
-Closed
-Normal: calling and messaging are available; data connection remains the same state
-Super-long standby: calling and messaging services remains in the same state.
Display
a. Brightness: adjust the brightness
b. Wallpaper: change the wallpaper picture for idle screen, lock screen and main menu
c. Auto rotating screen: rotate phone to change direction
d. Alert missed call & sms: blink screen backlight on missed call or unread sms. You will also receive
notifications about missed calls and unread messages in the form of animated icons in the lock screen;
e. Sleep: adjust the delay before the screen automatically locks
f. Font size
Storage
1) View SD Card and Phone Memory.
2) Uninstall or Format SD Card.
Battery
Displays information about the charging status and usage of the battery.

11
Applications
Shows the list of the installed and downloaded applications, which of them are installed on SD CARD.
Location
Access to my location: enable applications to use your location information.
GPS satellites: switch on/off the GPS receiver.
Google Location Service™: let applications to use the WiFi or mobile network connection to get localization.
Security
1) Set up screen locks: you can choose slide, pattern, PIN or password to unlock the screen.
2) Set up SIM card lock: enter 4-8numbers PIN to set the lock of SIM.
If you enter 10 times wrong PUK code, the SIM card will be permanently locked.
3) Password visible: password visible when enter it
4) Select device administration: add or delete device manager.
5) Unknown sources: install apps from unknown sources
6) Trusted credentials: show the trusted credentials
7) Install from SD card: install the encrypted certificate from SD card.
Languages and input
1) Selecting Language: include all the languages on the phone and totally amount of 12 kinds.
2) Spell checker
3) Personal Dictionary: add words to custom dictionary or delete.
4) Input method : you can select Android™ keyboard or MultiLing keyboard input method.
5) Text to speech settings
6) Pointer speed

12
Reset to factory settings
Backup my data: backup my settings and data of other applications.
Factory data reset: clear all data stored on the phone.
Accounts
Add, manage and change synchronization options for the used accounts.
Date and Time
1) Automatic date & time: use date and time provided by network or by GPS
2) Automatic time zone: check to use network-provided time zone
3) Set Date / Set time: touch to set date / time.
4) Selecting time zone Select Time Zone according to where you are.
4) Use 24 hour time format : ON/OFF
5) Select date format.
Schedule power on/off
You can set time of boot or shutdown the phone.
Schedule airplane on/off
You can set the time of activating or deactivating the plane mode.

13
Accessibility
1.Power button end call
2.Touch and hold delay
3.Install web scripts
Developer options
Set options dedicated to the Android software developers
About phone
You can check the information about: phone status, legal informations, software version.

14
DECLARATION OF CONFORMITY
Nr. 1368
We, S.C. Visual Fan S.R.L, with the social headquarters in Brasov, 61st Brazilor Street, post code 500313 Romania, registered at the
Register of Commerce Brasov under nr. J08/818/2002, CUI RO14724950, as importer, ensure, guarantee and declare on own
responsibility according to Art. 4 HG nr.1.022/2002 regarding the products and services regime, which could put in danger the life and
health, security and labour protection, that the ALLVIEW product P5 Energy does not put in danger the life, safety of labour, does cause
adverse environmental impacts and is according to:
-The 2011/65/UE Directive regarding the usage restrictions of some dangerous substances ]n the electonic and electrical equipments.
-The Directive regarding the radio and telecommunications equipments R&TTE 1999/5/CEE (HG 88/2003)
-The Directive regarding the ensurance of low voltage equipment users 73/32/CEE , modified by the 93/68/CEE (HG457/2003)
Directive.
-The Directive regarding the electromagnetic compatibility 89/336/CEE, modified by the 92/31/CEE si 93/68/CEE (HG982/2007);
RoHS Directive: EN50581:2012
-The safety requirements of the European Directive 2001/95/EC and of the EN 60065:2002/A12:2011 si EN 60950-1:2006/ A1:2010
/A11:2009/A12:2011 standards, regarding the decibel level limit of the commercialized devices.
The product had been evaluated according to the following standards:
-Health: EN 50360:2001, EN 50361; EN 62209-1 : 2006
-Safety: EN 60950- 1: 2001 +A11:2004; EMC EN 301 489- 01 V1.6.1 (09-2005)
EN 301 489- 07 V1.3.1 (11-2005); EN 301 489- 17 V1.2.1 (08-2002)
-Radio spectrum: EN 301 511 V9.0.2 (03-2003);EN 300 328 V1.7.1 (10-2006)
The conformity assesment procedure was done according to the 1999/5/CEE Directive (of the Annex II of HG nr. 88/2003) the
documentation being at S.C. Visual Fan S.R.L., Brasov , 61st Brazilor Street, post code 500313 ,Romania at it will be put at disposal on
demand. The products conformity assesment procedure was fulfilled with the participation of the following institutions: Phoenix Testlab
GmbH
The product has the CE mark applied. The conformity declaration is available at www.allviewmobile.com.
CE0700 Director
SAR: 0,687 W/kg COTUNA GHEORGHE
Brasov
15.07.2015

15
Sicherheitsmaßnahmen WICHTIG! Wir bitten Sie diese Bedienungsanleitung vorsichtig durchzulesen und zu beachten in Gefahrfällen Sicherheit beim
Fahren: Wir empfohlen Ihnen das Handy nicht während Sie fahren zu benutzen. Wenn Sie es benutzen müssen, benützen Sie immer das
„Hands free“ System während Sie fahren.
Sie müssen Ihr Mobiltelefon in dem Flugzeug abschalten.
Die von dem Mobiltelefon verursachten Empfangsstörungen wirken sich auf die Sicherheit des Flugzeuges aus, und deswegen ist die
Benutzung des Mobiltelefons IM Flugzeug gesetzlich verboten. Bitte vergewissern Sie sich dass das Mobiltelefon ausgeschaltet ist
während Sie sich im Flugzeug befinden.
Schalten Sie das Telefon aus in dem Bereich wo Sandstrahlreinigungen stattfinden.
Im Krankenhaus: Wenn Sie das Telefon in einem Krankenhaus benutzen, sollen Sie relevanten Normen des Krankenhauses beachten.
Jede Interferenz, die von den Wireless-Ausrüstungen verursacht wurden, kann die Leistungen des Telefons beeinträchtigen.
Genehmigtes Servicewerkstätte: Nur die genehmigte Servicewerkstätte dürfen die Mobiltelefonen reparieren. Wenn Sie den Telefon
öffnen und versuchen es zu reparieren, verlieren Sie die Produktgarantie.
Zubehör und Akkus: Sie dürfen nur die von dem Hersteller genehmigte Akkus und Zubehör benutzen.
Notanrufe: Sie sollen dafür sorgen dass das Telefon angeschaltet und aktiviert ist, wenn Sie ein Notanruf an 112 machen wollen,
drücken Sie die Anruftaste und bestätigen Sie die Speicherort, sagen Sie was los ist und beenden Sie das Gespräch nicht.
Der Akku und die Akkuaufladung: Wir empfehlen die vollständige Beladung des Akkus vor der ersten Benutzung des Gerätes. Setzen
Sie nicht den Akku keinen Temperaturen höher als +40°C aus. Entsorgen Sie den Akku nicht im Feuer oder im Hausmüll. Bringen Sie
die beschädigten Akkus zurück beim Lieferanten oder in den spezialisierten Stellen für Sammlung der beschädigten Akkus.
Achtung: Wir übernehmen keine Haftung für die Fälle, in denen das Telefon in einer anderen Weise benutzt wurde als beschrieben im
Betriebshandbuch. Unsere Gesellschaft behaltet sich das Recht vor Änderungen in die Betriebsanleitung zu bringen ohne diese zu
veröffentlichen. Diese Änderungen werden auf der Internetseite der Handelsgesellschaft, beim Produkt, an dem Änderungen gebracht
wurden, bekannt gemacht .

16
Der Inhalt dieser Betriebsanleitung kann von dem Inhalt des Produktes verschieden sein. In diesem letzten Fall, wird der Inhalt des
Produktes berücksichtigt. Um die Probleme, die bei den Werkstätten, die von der Gesellschaft S.C. Visual Fan S.R.L. (weil Visual Fan
behält sich das Recht, die Zusammenarbeit mit jeder genehmigten Partner- Werkstatt bestehend am Garantiezertifikat am Datum der
Verkauf auf dem Markt der Produktgruppe) nicht genehmigt sind, zu vermeiden, bitten wir Sie, bevor Sie ein Produkt zur Werkstatt
führen, die aktualisierte Liste der genehmigten Werkstätte zu überprüfen. Diese finden Sie an der Allview Website unter Abteilung
“Support&Werkstatt – Genehmigte Werkstatt”.
Für weitere Informationen besuchen Sie www.allviewmobile.com. Sie die Antenne mit der Hand oder anderen Gegenständen Failure
was zu Verbindungsproblemen und schnelle Entladung der Batterie entsprechen nicht abdecken.
Alle Anwendungen die das Produkt begleiten und werden von Dritten zur Verfügung gestellt , jederzeit modifiziert und / oder gestoppt
können. S.C. VISUAL FAN S.R.L. wird in keiner Weise für Änderungen der Dienste oder Inhalte dieser Anwendungen verantwortlich
sein . Jede Anfrage oder eine Frage betreffend Anwendungen von Drittanbietern können die Eigentümer dieser Anwendungen
angesprochen werden
An-/Ausschaltung und Standby des Gerätes Nach der Einführung der SIM Karten, der Speicherkarte und der Batterie, schalten Sie das Telefon an indem Sie den Startknopf für
3 Sekunde gedrückt behalten. Um das Telefon auszuschalten, drücken Sie lang denselben Knopf und bestätigen Sie die Ausschaltung.
Wenn sie kurz den Startknopf gedruckt behalten, geht das Telefon in Standby-Modus, und um zurückzukehren, drücken Sie kurz
denselben Knopf.
Entsperren, Hauptbildschirm, Menü der Applicationen Um den Bildschirm nach der Rückkehr vom Standby-Modus zu entsperren, Schieben Sie Ihren Finger von unten nach oben auf dem
Bildschirm. Dann wird der Hauptbildschirm angezeigt.
Die Seiten des Hauptbildschirmes können mit Schnelltasten und Widgets individualisiert werden. In dem oberen Bereich des
Bildschirms, befindet sich der Meldungsbalken, der Angaben über das Niveau des Signals von Mobilnetzwerken, WiFi, Bluetooth,
Batterieniveau, Uhr und Ereignisse.

17
Zur Anzeige des Applikationsmenüs, berühren Sie das Symbol vom rechten unteren Bereich des Hauptbildschirms.
Gleiten Sie nach links zur Abwicklung der Seiten des Hauptmenüs. Berühren Sie das entsprechende Symbol um die erwünschte
Applikation zu betätigen. Benutzen Sie den Zurück Knopf um zum Hauptbildschirm zurückzukehren.
Anrufe Um eine Nummer anzurufen, Sie sollen die Anrufanwendung zugreifen, die Telefonnummer wählen und die
Anruftaste drücken.
Einen Anruf Ziehen Sie das Symbol nach rechts, und, um den Anruf Ziehen Sie das Symbol nach links
zurückweisen.
Sie können Nummern direkt vom Anrufprotokoll wählen, berühren Sie den Anrufknopf im rechten Bereich der
gewünschten Nummer.
Nachrichte Um eine SMS Nachricht zu verfassen und zu senden, verfahren Sie wie folgt:
- Sie sollen den Applikationenmenü abrufen;
- Aktivieren sie die Nachrichtanwendung;
- Im rechten-unteren bereich des Bildschirmes, drücken Sie den Knopf für eine neue Nachricht;
- Eintragung des Nachrichttextes;
Vermerk: Sie können die Nachricht in MMS umsetzen, indem Sie das Spangesymbol drücken und den Media-Inhalt
eingeben: Bilder, Klänge oder Filme.
- Im oberen Bereich geben Sie die Telefonnummer oder den Namen des Empfängers ein;

18
- Drücken Sie das Pfeilsymbol -> vom rechten Bereich des Textfeldes um die Nachricht zu übersenden.
Kontakte Aktivieren Sie die Kontaktenanwendung im Anwendungen-Menü.
Hinzufügen eines neuen Kontaktes:
- Aktivieren Sie die Kontakte – Anwendung im Anwendung-Menü;
- Berühren Sie das Hinzufügenssymbol + im unteren Bereich des Bildschirmes;
- Wählen Sie den Speicher oder das Konto, wo die Eintragung gespeichert werden soll;
- Eintragung der Kontaktangaben;
- Am Ende, berühren Sie den Speicherknopf.
Hinzufügen eines Kontaktes im Anrufprotokoll:
- Aktivieren Sie die Telefonanwendung im Anwendung - Menü;
- Berühren Sie das Telefonnummer, die Sie speichern wünschen;
- Berühren Sie den Knopf neue Kontakte;
- Wählen Sie den Speicher oder das Konto, wo die Eintragung gespeichert werden soll;
- Eintragung der Kontaktangaben;
- Letztlich berühren Sie den Speichern-Knopf.
Import/Export von Kontakten
Sie können Kontakte zwischen den Speichern oder den verfügbaren Kontos wie folgend importieren oder
exportieren:

19
- Aktivieren Sie die Kontakte;
- Drücken Sie den Optionen-Knopf und wählen Sie Importieren/Exportieren;
- Wählen Sie den Speicher von dem Sie Kontakte kopieren möchten;
- Wählen Sie den Speicher in dem Sie die Kontakte kopieren;
- Wählen Sie die Kontakte, die Sie kopieren möchten;
- Drücken Sie den Kopierungsknopf;
Synchronisierung der Kontakte mit einem neuen Konto
Vermerk: Wenn Sie noch kein erstelltes Konto besitzen, können Sie ein Google-Benutzer Konto benutzen, das
für den Zugang zum virtuellen Anwendungsladen nötig ist.
Sie können die Angaben eines Kontos wie folgend synchronisieren:
- Aktivieren Sie den Anwendungmenü > Einstellungen -> KONTOS;
- Berühren Sie das gewünschte Konto; wenn Sie kein bereits eingetragene Konto besitzen, können Sie die
Angaben eines neuen Konto eintragen, indem Sie den Knopf Hinzufügen eines Kontos drücken;.
- Wählen Sie Agenda.
Individualisierung von Kontakten durch eigenes Bild
Vermerk: Für die Kontakte in dem SIM-Speicher kann man keine eigene Klingel oder Bild assoziieren.
Um ein Bild zu assoziieren, müssen Sie folgende Schritte durchführen:
- Öffnen Sie Kontakte;
- Berühren Sie die Nummer des gewünschten Kontaktes;
- Im unteren Bereich des Bildschirmes berühren Sie das Symbol zur Editierung des Kontaktes;

20
- Berühren Sie das Symbol des Kontaktes;
- Fotografieren oder wählen Sie ein Bild aus der Galerie um dieses Bild zum Kontakt zu assoziieren.
Google Play store
Google Play store wird eine Vielfalt von Anwendungen der verschiedenen Kategorien zur Verfügung stellen:
Spiele, Geschäfte, Kommunikation, Einkufen, Reise, Unterhaltung, Bücher, Bildung, Finanzen, Fotografie,
Instrumente, Medien, Sozialbereich, Sport, Nachrichten, andere.
Beim ersten Zugang zum virtuellen Laden wird Ihre Authentifizierung gefordert. Wenn Sie bereits ein Google-
Konto besitzen, wird die Eintragung von Angaben beantragt. Wenn nicht, drücken Sie den Knopf Neues Konto um
ein neues Konto zu erstellen und folgen Sie die Schritte, die auf den Bildschirm angezeigt werden.
Einstellungen
Wi-Fi
WiFi Einstellungen: drücken Sie auf diese Option um die Funktion zu aktivieren.
Öffnen Sie WiFi, die verfügbaren Netze können automatisch gesucht werden, die Netze ohne Passwort können
direkt benutzt werden, für die Netze mit Passwort, wird die Eintragung des Passwortes nötig.
Bluetooth
Die verfügbaren Geräte werden automatisch angezeigt. Um sich zu einem Gerät anzuschließen, berühren Sie
den Name und fügen Sie das Überprüfungspasswort ein.

21
Die Benutzungsquote der Daten
Hier können Sie den Datenverkehr des Telefons aktivieren oder deaktivieren. Sie können auch eine graphische
Darstellung des Zustandes des Datenanschlusses und eine Limit des Datenverkehrs konfigurieren.
Mehr
Flugzeugmodus
VPN-Einstellungen (Virtual private network)
Portables Hotspot Einstellungen: Sie können das Telefon benutzen, um einen Punkt für Wireless-Zugang zu
erstellen.
Wifi Direkt
Mobilnetze:
Profils
Diese Option erlaubt Ihnen die Rufsignale für die Eingangsanrufe, das E-Mail- und SMS- Signal,
Ankündigungen. Die Einstellungen enthalten: Schwingungen, Lautstärkenregelung, Audio-Klingen, Ankündigungen
Wählen Sie Allgemein/ geräuschlos/ Treffen/ im Freien. Um zu wählen, berühren Sie den Punkt im rechten
Bereich.
Energieeinsparung
Sie können einer der drei Profile für die Energiesparung:
- Ausgeschaltet

22
-Normal: Anruf und Nachrichtoption aktiviert; Der Datenanschluss bewahrt seinen Zustand;
-Verlängertes Stand-by: Anrufdienste, Der SMS bewahrt seinen Zustand.
Anzeige
a. Leuchtstärke: Einstellung der Leuchtstärke;
b. Hintergrundbild: Sie können Hintergrundbilder für das Hauptbildschirm wählen, für den
Versperrungsbildschirm und für das Menü;
c. Eigenrotierung des Bildschirmes: Drehen Sie das Mobiltelefon um die Orientierung des Bildes zu ändern;
d. Warnung für verlorene Anrufe und SMSs: haken Sie diese Option um die visuelle Warnung für verlorene
Anrufe und neues SMS zu aktivieren, durch die periodische Einschaltung des Bildschirms. Sie werden auch
Notifizierungen über verlorene Anrufe und nicht gelesene Nachrichten in der Form von animierten Piktogrammen
im Versperrungsbildschirm;
e. Keine Tätigkeit: Wartungszeit bis das Telefon in Stand-by Modus gelangt;
f. Fontdimension.
Speicher
1.Visualisierung des internen Speichers und der SD-Karte
2.Deinstallierung und Formatierung der SD-Karte
Akku
Die Anzeige von Informationen über den Ladenzustand der Batterie und über die Benutzung dieser Batterie.

23
Anwendungen
Verwaltung von Anwendungen: Verwaltung und Löschung der installierten Anwendungen.
Lokalisierungsdienste
Zugang: es erlaubt den Anwendungen Angaben über den Ort zu benutzen.
GPS. Satteliten: Aktivierung /Deaktivierung der GPS Satelliten
Google Location Service: damit erlauben Sie die Übersendung von anonymen Lokalisierungsangaben. Sie
erlauben die Benutzung von Angaben aus Quellen wie WiFi-Netzen oder Mobilnetzen um den ungefähre Ort
festzustellen.
Sicherheit
Versperrung des Bildschirmes. Sie können eine der folgenden Muster wählen: Ohne, Gleitung, Model, PIN,
Passwort.
Info über den Inhaber: Sie können vorausbestimmte Angaben in dem Versperrungsbildschirm anzeigen.
Aktivieren der SIM-Karte.
Sichtbare Passwörter: Anzeige der Passwörter während Sie diese beifügen.
Verwalter des Gerätes.
Unbekannte Quellen: abhaken Sie um die Installation der Anwendungen zur Installierung von Anwendungen
von unbekannten Quellen zu erlauben.
Vertrauensakkreditierungen.
Installieren Sie von der SIM-Karte.
24
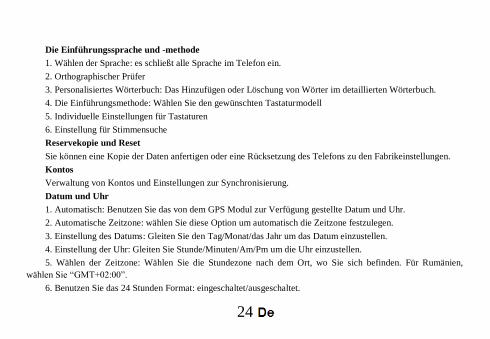
Die Einführungssprache und -methode
1. Wählen der Sprache: es schließt alle Sprache im Telefon ein.
2. Orthographischer Prüfer
3. Personalisiertes Wörterbuch: Das Hinzufügen oder Löschung von Wörter im detaillierten Wörterbuch.
4. Die Einführungsmethode: Wählen Sie den gewünschten Tastaturmodell
5. Individuelle Einstellungen für Tastaturen
6. Einstellung für Stimmensuche
Reservekopie und Reset
Sie können eine Kopie der Daten anfertigen oder eine Rücksetzung des Telefons zu den Fabrikeinstellungen.
Kontos
Verwaltung von Kontos und Einstellungen zur Synchronisierung.
Datum und Uhr
1. Automatisch: Benutzen Sie das von dem GPS Modul zur Verfügung gestellte Datum und Uhr.
2. Automatische Zeitzone: wählen Sie diese Option um automatisch die Zeitzone festzulegen.
3. Einstellung des Datums: Gleiten Sie den Tag/Monat/das Jahr um das Datum einzustellen.
4. Einstellung der Uhr: Gleiten Sie Stunde/Minuten/Am/Pm um die Uhr einzustellen.
5. Wählen der Zeitzone: Wählen Sie die Stundezone nach dem Ort, wo Sie sich befinden. Für Rumänien,
wählen Sie “GMT+02:00”.
6. Benutzen Sie das 24 Stunden Format: eingeschaltet/ausgeschaltet.

25
7. Wählen des Stundenformats: es gibt 3 Arten von Formaten, Sie können wählen von: Monat-Tag-Jahr, Tag-
Monat-Jahr und Jahr-Monat-Tag, von denen das Jahr-Monat-Tag Format die implizite Einstellung ist.
Planung der Einschaltung/Ausschaltung
Sie können die automatische Einschaltungs- oder Ausschaltungszeit des Telefons einstellen.
Planung des Flugzeugsmodus
Einstellungen zur Einschaltung und Ausschaltung des Flugzeugmodus um gewünschter Uhr.
Zugänglichkeit
Der Powerknopf beendet Anrufe
Verspätung Berühren-und- Behalten
Installierung von Web-Skripten
Optionen für den Entwickler
Einstellungen und Optionen, die für die Entwickler von Android-Anwendungen nötig sind.
Über das Telefon
1.Zustand des Telefons
2.Legale Informationen
3.Software – Versionen

26
KONFORMITÄTSERKLÄRUNG
Nr.1368
Wir, SC Visual Fan SRL, mit dem sozialen Hauptsitz in Brasov, 61. Brazilor Straße, Postleitzahl 500313 Rumänien, in das Handelsregister Brasov unter nr registriert. J08 / 818/2002, CUI RO14724950, als Importeur, zu gewährleisten, garantieren und erklären auf eigene Verantwortung nach Art. 4 HG nr.1.022 / 2002 in Bezug auf die Produkte und Dienstleistungen Regime, das in Gefahr bringen könnte, das Leben und die Gesundheit,
Sicherheit und Arbeitsschutz, dass die ALLVIEW Produkt P5 Energy nicht in Gefahr zu bringen, das Leben, die Sicherheit der Arbeit, hat nachteilige
Auswirkungen auf die Umwelt und ist nach:
-Der 2011/65 / UE-Richtlinie in Bezug auf die Nutzungsbeschränkungen einiger gefährlicher Stoffe] n den electonic und elektrische Ausrüstungen.
-Die Richtlinie über die Radio- und Telekommunikationsausrüstungen R & TTE 1999/5 / EWG (HG 88/2003)
-Die Richtlinie in Bezug auf die Schaffung der Voraussetzungen für Niederspannungsgeräte Benutzer 73/32 / EWG, durch die 93/68 / CEE (HG457 / 2003) Richtlinie erfordert.
-Die Richtlinie über die elektromagnetische Verträglichkeit 89/336 / EWG, geändert durch die 92/31 / CEE si 93/68 / CEE (HG982/2007); RoHS-Richtlinie: EN50581: 2012
-Die Sicherheitsanforderungen der Europäischen Richtlinie 2001/95 / EG und der EN 60065: 2002 / A12: 2011 si EN 60950-1: 2006 / A1: 2010 / A11: 2009 / A12: 2011-Standards in Bezug auf die Dezibel Grenze der kommerzialisiert Geräte.
Das Produkt hatte nach den folgenden Standards beurteilt:
-Gesundheit: EN 50360: 2001, EN 50361; EN 62209-1: 2006
-Sicherheit: EN 60950- 1: 2001 + A11: 2004; EMC EN 301 489- 01 V1.6.1 (09-2005)
EN 301 489- 07 V1.3.1 (11-2005); EN 301 489- 17 V1.2.1 (08-2002)
-Radio Spektrum: EN 301 511 V9.0.2 (03-2003), EN 300 328 V1.7.1 (10-2006)
Die Übereinstimmung assesment Verfahren wurde nach getan 1999/5 / EWG-Richtlinie (der Anhang II der HG-Nr. 88/2003) die Dokumentation zumin SC Visual Fan SRL, Brasov, 61. Brazilor Straße, Postleitzahl 500313, Rumänien auf sie wird zur Verfügung auf Wunsch gestellt werden. Die
Produkte der Konformitätsbeurteilung Verfahren wurde mit der Teilnahme von folgenden Institutionen erfüllt: Phoenix Testlab GmbH
Das Produkt verfügt über die CE-Kennzeichnung aufgebracht. Die Konformitätserklärung ist bei www.allviewmobile.com erhältlich.
CE 0700
SAR: 0,687 W/kg Geschäftsführer
Brasov Gheorghe Cotuna
15.07.2015

27
Medidas de seguridad ¡IMPORTANTE! Por favor lee atentamente estas instrucciones.
Seguridad vial: Se recomienda no utilizar el teléfono móvil mientras esté conduciendo. Si hace falta utilizarlo, se
recomienda utilizarlo en el modo manos libres.
Apagar el móvil cuando esté en un avión. Las interferencias móviles afectan a la seguridad de la aviación y es ilegal
utilizarlo en un avión. Por favor, asegúrate de que el móvil esté apagado o en el modo avión cuando estés viajando.
Cuando esté en un hospital debe someterse a las normas impuestas por el hospital. Las interferencias wireless pueden
afectar el funcionamiento del móvil.
Solo los talleres aprobados pueden arreglar el móvil. Si intentas arreglar el móvil por tu cuenta perderás la garantía.
Solo las baterías y los accesorios aprobadas por Allview pueden ser utilizados.
Si necesitas hacer una llamada de urgencia al 112, asegúrate de que el móvil esté encendido, comunica al operador lo
ocurrido, facilita tu locación y no cuelgues la llamada.
Antes de utilizar el móvil se recomienda hacer una carga completa de la batería. No exponer la batería a temperaturas
superiores a 40 grados Celsius. No tirar la batería al fuego o al azar, devolver la batería antigua al centro de donde
compró el móvil o llevarla a un sitio de recuperaciones.
Atención: No nos hacemos cargo de las situaciones donde se utiliza el teléfono de otra manera que el expuesto en el
manual. Nuestra empresa reserva el derecho de realizar cambios en el contenido de este manual sin avisar. Estos
cambios se publicarán en el
sitio web de la empresa.
El contenido de este manual puede ser diferente al existente en el producto. En este caso, el último se tomarán en
cuenta.
Para evitar problemas que puedan ocurrir con servicios que no estén aprobados por S.C. Visual Fan Ltd (porque
Visual Fan se reserva el derecho a dejar de trabajar con cualquier existente colaborador), antes de dirigirte a un
servicio de garantía, por favor consulta la lista actualizada de los establecimientos aprobados por Visual Fan en
www.allviewmobile.com en la sección Soporte&Service.

28
Encendido/apagado y dispositivo en espera Después de insertar la tarjeta SIM, tarjeta de memoria y la batería, inicia el teléfono manteniendo pulsado el botón de
encendido durante 3 segundos. Para desconectar, presiona el mismo botón y confirma. Si pulsas brevemente el
teléfono, entrará en modo de espera y para volver otra vez, debes pulsar brevemente el mismo botón.
Desbloquear la pantalla principal y menú de aplicaciones Para desbloquear la pantalla al reanudar desde el modo de espera, deslice el dedo desde la parte inferior a la parte
superior de la pantalla. Se mostrará la pantalla principal. Las páginas de la pantalla principal pueden personalizarse
con accesos directos y widgets. En la parte superior de la pantalla está la barra de notificaciones, las herramientas
que contienen información sobre la señal de red móvil, Wi-Fi, Bluetooth, batería, reloj y eventos.
Para mostrar el menú de aplicaciones pulsa el botón menú de la pantalla principal. Desliza el botón para
cambiar la página de las aplicaciones. Pulsa la aplicación deseada para abrirla y pulsa el botón ¨Atrás¨ para volver a
la pantalla inicial.
Llamar Para marcar un número desde la pantalla principal, haz clic en el icono "Teléfono", marca el número y pulsa la tecla
llamar. Para llamar a números directamente desde el registro de llamadas, pulsa el botón de llamada que está a la
derecha del número deseado. Para contestar a una llamada, desliza el icono de la derecha al centro y para rechazar la
llamada, desliza hacia la izquierda.
Mensajes Para crear y enviar un mensaje SMS:
-Ve al menú de aplicaciones;

29
-Accede a la aplicación de mensajería;
-En la parte inferior derecha de la pantalla pulsa el botón nuevo mensaje;
-Introduce el texto del mensaje;
Nota: puedes cambiar el mensaje haciendo clic en el icono de clip de papel en MMS e introduciendo contenido
multimedia: imágenes, sonidos o películas.
-En el campo superior, escribe el número de teléfono o el nombre del destinatario;
-Pulsa la flecha a la derecha del campo de texto para enviar el mensaje.
Contactos
Para agregar un contacto nuevo:
-Accede a la aplicación de contactos desde el menú;
-Pulsa el símbolo + que está en la parte inferior derecha de la pantalla;
-Elige la memoria o cuenta donde almacenar la entrada;
-Introduce los datos de contacto;
-Al final toca el botón guardar.
Para agregar contactos desde el registro de llamadas:
-Desde el menú accede a la aplicación Teléfono;
-Pulsa el número que desees guardar;
-Pulsa el botón Contacto Nuevo;
-Elige la memoria o cuenta donde almacenar la entrada;
-Introduce los datos de contacto;
-Al final pulsa el botón guardar.

30
Importar/exportar contactos
-Accede a la aplicación de contactos desde el menú;
-Pulsa Opciones y selecciona Importar/Exportar;
-Elige la memoria desde la cual serán copiados los contactos;
-Elige la memoria donde se van a copiar los contactos;
-Selecciona los contactos que deseas copiar;
-Haz clic en el botón Copiar;
Sincronización de los contactos con una cuenta
Nota: Si no tienes una cuenta ya creada, puedes crear una cuenta de usuario de Google, necesaria para acceder a las
aplicaciones de la tienda virtual.
-Accede desde el menú acceder a Ajustes > Cuentas;
-Elige la cuenta que desees; Si no tienes una cuenta ya creada, puedes introducir los datos de la nueva cuenta
haciendo clic en el botón agregar una cuenta;
-Elige agenda
Personalización de contactos con una imagen
Nota: los contactos de tu SIM no permiten asignar timbre o imagen.
-Abre la aplicación de contactos;
-Haz clic en el nombre del contacto que desees;
-En la parte baja de la pantalla del contacto está el icono de editar;
-Pulsa el icono del contacto;
-Haz una foto o elige una imagen de la galería para ser asociada con el contacto.

31
Google Play Store La tienda virtual te ofrece una multitud de aplicaciones en diferentes categorías: juegos, negocios, comunicación,
compras, viajes, entretenimiento, libros, educación, finanzas,medios de comunicación, herramientas, fotos, social,
deportes, noticias, etc. La primera conexión en la tienda virtual requiere autenticación. Si ya tienes una cuenta de
Google, introduce tus datos. Si no, crea una nueva cuenta y sigue con las instrucciones de la pantalla.
Ajustes El proveedor de servicios puede activar por defecto algunas configuraciones del dispositivo, los cuales no podrás
cambiar.
Gestión de SIM
Opciones para configurar el tráfico marcado, mensajería de servicios y datos, individualmente para cada tarjeta SIM.
Wi-Fi
Configuración de Wi-Fi: Pulsa para acceder a la función. Abre el Wi-Fi busca las redes disponibles. Bluetooth
Los dispositivos disponibles se mostrarán automáticamente. Para conectarse a un
dispositivo, elige su nombre e introduce la contraseña para su verificación.
Tráfico de datos
Aquí puedes habilitar o deshabilitar el tráfico de datos en el teléfono. También puedes ver el estado en un gráfico
utilizando la conexión de datos y estableciendo un límite de tráfico.
Más…
Modo avión

32
Configuración de VPN (red privada virtual)
Configuración de hotspot portátil: puedes utilizar tu teléfono para crear un punto de acceso inalámbrico.
Wi-Fi Direct
Redes móviles: servicio 3G: acceso a desactivar/activar el servicio 3G. Preferencias.
Puntos de acceso: ver y modificar los puntos de acceso.
Operadores de red.
Perfiles
Esta opción te permite configurar los tonos de audio para las llamadas entrantes, notificaciones de email y mensaje
de alerta. Los ajustes incluyen: opción de vibración, notificaciones de volumen, tonos de audio, selección
general/silencioso/reunión/exterior. Pulsa el botón hacia la derecha para seleccionar.
Ahorro de energía (opcional)
Puedes elegir uno de los tres perfiles de ahorro de energía:
- Apagado
- Normal: llamadas y mensajes activados; la conexión de datos mantiene su estatus;
-Stand-by: llamada en espera, servicio de mensajes conserva su estado.
Pantalla
a. Brillo: ajuste brillo;
b. Imagen de fondo: puedes elegir las imágenes de fondo para la pantalla principal para desbloquear la pantalla y
menú;
c. Autorotación de la pantalla: rotar el teléfono. Para cambiar la orientación de la imagen;
d. Alerta de llamadas perdidas y SMS: selecciona para activar la alerta visual de llamadas perdidas y SMS nuevos.
33
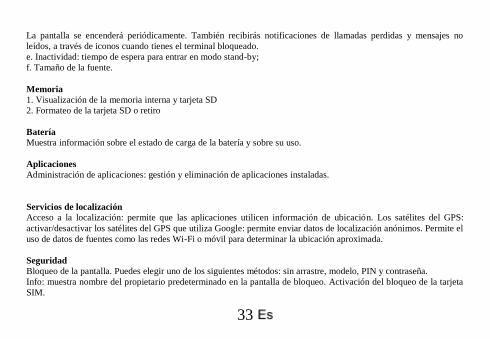
La pantalla se encenderá periódicamente. También recibirás notificaciones de llamadas perdidas y mensajes no
leídos, a través de iconos cuando tienes el terminal bloqueado.
e. Inactividad: tiempo de espera para entrar en modo stand-by;
f. Tamaño de la fuente.
Memoria
1. Visualización de la memoria interna y tarjeta SD
2. Formateo de la tarjeta SD o retiro
Batería
Muestra información sobre el estado de carga de la batería y sobre su uso.
Aplicaciones
Administración de aplicaciones: gestión y eliminación de aplicaciones instaladas.
Servicios de localización
Acceso a la localización: permite que las aplicaciones utilicen información de ubicación. Los satélites del GPS:
activar/desactivar los satélites del GPS que utiliza Google: permite enviar datos de localización anónimos. Permite el
uso de datos de fuentes como las redes Wi-Fi o móvil para determinar la ubicación aproximada.
Seguridad
Bloqueo de la pantalla. Puedes elegir uno de los siguientes métodos: sin arrastre, modelo, PIN y contraseña.
Info: muestra nombre del propietario predeterminado en la pantalla de bloqueo. Activación del bloqueo de la tarjeta
SIM.

34
Contraseñas visibles: contraseñas cuando accedes.
Administradores del dispositivo.
Fuentes desconocidas: Comprueba que permite instalar aplicaciones de fuentes desconocidas.
Credenciales confiables. Instala la tarjeta SIM.
Método de entrada e idioma
1. Selecciona el idioma: incluye todos los idiomas en tu teléfono.
2. Corrector ortográfico.
3. Diccionario: agregar o eliminar palabras del diccionario personalizado.
4. Método de entrada: selecciona el modelo deseado del teclado.
5. Ajustes del teclado.
6. Configuración de búsqueda de voz.
Copia de seguridad y reinicio
Puedes crear una copia de seguridad de los datos o puedes realizar un reseteo del teléfono para los ajustes de fábrica.
Cuentas
Administración de cuentas y sincronización.
Fecha y hora
1. Automático: utilizar la fecha y la hora dada por la red o módulo GPS.
2. Zona horaria automáticamente: para comprobar la configuración automática de tu zona horaria.
3. Ajuste de la fecha: arrastra el día/mes/año para fijar la fecha.
4. Ajuste de la hora: hora/minuto/Am/Pm
5. Selecciona zona horaria: selecciona zona horaria dependiendo de la ubicación en la que te encuentres.
35
6. Formato de 24 horas de uso: interruptor on/off.
7. Formato de fecha: hay 3 tipos de formatos que puedes elegir: mes-día- año, día-mes-año y año-mes-día, año, mes
y día es la configuración predeterminada.
Configurar encendido / apagado automático Puedes configurar el inicio o apagado del teléfono. Planificación modo
vuelo
Puesta en marcha y el modo de configuración de avión.
Accesibilidad
El botón encendido / apagado cuelga llamadas. Instalar secuencias web.
Retraso al pulsar y mantener.
Opciones de desarrollador
Ajustes para los desarrolladores de Android.
Acerca de teléfono
1. Estado del teléfono.
2. Información legal.
3. Versión del software.
Ambas tarjetas SIM están activas en modo de espera.
La función "Llamada en Espera" está disponible sólo para SIM que hacen llamadas activando la opción ofrecida por
el proveedor móvil.

36
Declaración de conformidad Nª 1368
Nosotros, SC VISUAL FAN SRL, importador ubicado en Brasov, Brazilor 61 500314, registrado en la
Cámara de Comercio de Brasov nº J08/818/2002, CUI RO14724950, garantiza y declara bajo nuestra responsabilidad, de
conformidad con el art. 5 de HG nº 1.022/2002 sobre el estatuto del producto P5 Energy teléfono móvil marca Allview, que
no pone en peligro la vida, la salud, la seguridad en el trabajo y la protección del medio ambiente y que son de acuerdo con:
- La Dirección nº 2011/65/UE relativa a las restricciones sobre el uso de determinadas sustancias peligrosas en aparatos
eléctricos y electrónicos.
- La Dirección con respecto a los equipos de radio y telecomunicaciones R & TTE 1999/5/CE (HG 88/303).
- La Dirección sobre el equipo de los usuarios 73/32/CEE de baja tensión, modificada por la Dirección
93/68/CEE (HG982/2007); Directiva RoHS: EN50581:2012
- Los requisitos de seguridad de la Directiva 2001/95/CE Europea y de las normas.
EN60065:2002 / A12: 2011 y EN 60950-1:2006 / A12: 2011, el nivel de decibelios emitidos por el dispositivo.34 vendido. El
producto que se describe arriba, en la presente Declaración y todos los accesorios son de acuerdo con las siguientes normas:
- Salud EN 50360:2001, EN 50361; EN 62209-1 : 2006
- Seguridad EN 60950- 1: 2001 +A11:2004; EMC EN 301 489- 01 V1.6.1 (09-2005)
EN 301 489- 07 V1.3.1 (11-2005); EN 301 489- 17 V1.2.1 (08-2002)
- Radio espectro EN 301 511 V9.0.2 (03-2003);EN 300 328 V1.7.1 (10-2006)
El producto tiene la pegatina CE. Procedimiento de evaluación de la conformidad, se ha realizado según las disposiciones del
anexo II de la resolución nº 88/2003, documentación se deposita en el SC Visual Fan LTD, Brasov, str.Brazilor nº 61,
500313. El procedimiento assesment productos conforme se cumplió con la participación de las siguientes instituciones:
Phoenix Testlab GmbH.
El producto tiene la marca CE. La declaración de conformidad está disponible en la web www.allviewmobile.com
CE: 0700 Director
SAR: 0,687 W/KG COTUNA GHEORGHE
Brasov
15.07.2105

37
BIZTONSAG FONTOS! Olvassuk el az alabbi egyszeru utmutatot. Az itt leirtak be nem tartasa veszelyekkel jarhat, vagy torvenyserto lehet. Bovebb informaciot a reszletes felhasznaloi utmutato tartalmaz.
Tartsunk be minden helyi jogszabalyt. Vezetes kozben mindig hagyjuk szabadon kezeinket, hogy a jarmuvet iranyithassuk. A biztonsag legyen vezetes kozben a legfontosabb szempont.
Kapcsoljuk ki a keszuleket olyan helyeken, ahol annak hasznalata tiltott, interferenciat, illetve
veszelyt okozhat. Peldaul repulogepen, korhazakban, illetve orvosi berendezesek, uzemanyag,
vegyszerek vagy robbantasi teruletek kozeleben. A hasznalatot korlatozo helyeken tartsunk
be minden utasitast.
A termek uzembe helyezeset es javitasat csak szakember vegezheti.
Ehhez a tipusu keszulekhez kizarolag a gya rto altal jovahagyott akkumulatorokat, toltokeszulekeket es tartozekokat hasznaljuk. Ne csatlakoztassunk nem kompatibis termekeket.
Segelyhivas: Kapcsolja be a telefont es tarcsazza be az 112 telefonszamot
Akkumulator es ennek feltoltese: Ajanlott az akkumulator telyes teltoltese mielott a telefont
hasznaljuk. Ne hasznaljuk tobb mint +40C homersekleten. Ne dobjuk az akkumulatort a tuzre vagy
tiltott helyre. A hasznalt akkumulatorokat mindig vigyuk vissza egy kijelolt gyujtohelyre
Figyelem: Nem vallalunk feleloseget a telefon nem megfelelo hasznalata eseten. A hasznalati
utasitasban leirtak elterhetnek a termektol, illetve a
szolgaltatoktol kapott szoftverektol, es elozetes ertesites nelkul megvaltozhatnak. A felhasznaloi
utmutato legujabb verziojaert latogasson el a weboldalunkra.
A jelen kezikonyv tartalma kulombozhet a termektol. Ennek eseten az utolso kezikonyv masolat less

38
figyelembe veve. Barmilyen problema elkerulese erdekeben, ami a Visual Fan Kft alltal elfogadott
szerviszeket illeti (mivelhogy a Visual Fan Kft fenntartja a jogot, hogy lemondjon barmilyen
kolaboralasrol egy szervisszel, amely a Garancian jelen volt a termek elarulasakor), mielott egy
termeket elvigyen a szerviszbe, megkerjuk nezze meg a legujabb listat az elfogadott szerviszekkel az
Allview honlapon az “Support&Service – Approved service” reszen talalhato.
További részletekért látogasson el www.allviewmobile.com. Ne takarjuk le az antennát a kezével vagy
más tárggyal elmulasztása így kapcsolódási problémák és gyors mentesítés az akkumulátort.
Minden harmadik felek alltal nyujtott alkalmazas, ami a jelen keszuleken talalhato, modosithato
es/vagy leallhat barmikor. Visual Fan Kft. nem vallal feleloseget semmilyen modon ezen alkalmazasok
mododitasaiert vagy tartalmaert. Barmilyen kerdes vagy keres ezen alkalmazasok tulajdonosai fele
fogalmazhatoak.
A telefon be- vagy kikapcsolasa
Nyomjuk meg es tartsuk lenyomva a bekapcsologombot 3 masodpercig. Ha roviden nyomjuk
meg a Bekapcsolasi gombot, a telefon keszenleti allapotba lep. A keszulek elso bekapcsolasakor
kovesse a kepernyon
megjeleno utasitasokat a keszulek kezdeti beallitasainak megadasahoz. A keszulek kikapcsolasahoz
nyomja meg hosszan a Bekapcsolo-/lezaro gombot, majd valassza a Kikapcsolas → OK lehetoseget.
Kinyitas, fokepernyo, menu
A gombok es az erintokepernyo lezarasaval megakadalyozhatja a nemkivanatos keszulekműveleteket.
Lezarashoz nyomja meg a Bekapcsolo-/lezaro gombot. Feloldásához csúsztassa az ujját az alsó a

39
képernyő felső részén
Amikor a keszulek keszenleti allapotban van, a keszenleti kepernyo lathato. A keszenleti kepernyo
tobb panelbol all. Balra vagy jobbra lapozva lepjen a keszenleti kepernyo valamelyik paneljere. A
keszenleti kepernyot sajat igenyeinek megfeleloen alakithatja alkalmazasokra mutato parancsikonok,
alkalmazasokhoz tartozo elemek, widgetek (vezerlok) es mappak felvetelevel. A gyorsgombokat
tartalmazo panel megnyitasahoz keszenleti uzemmodban vagy alkalmazas hasznalata kozben erintse
meg az allapotjelzo ikonok teruletet es huzza lefele az ujjat. A gyorsgombokat tartalmazo panelrol a
kovetkezo opciokat hasznalhatja: WIFI, Bluetooth, GPS, Hang / Rezges, Automata elfordulas.
Telefonalas
Ismerje meg a telefonalasi funkciokat, peldaul a hivasok kezdemenyezeset es fogadasat a telefonalas
kozben elerheto funkciok hasznalataval, valamint a telefonalassal kapcsolatos szolgaltatasok
testreszabasat es igenybevetelet. Egy hívás fogadásához húzza az ikont a jobb oldalon, és a hívás
elutasításához húzza az ikont balra. A keszulek a nem fogadott hivasokat megjeleniti a kijelzon. Nem fogadott hivas telefonszamanak
tarcsazasahoz nyissa meg az ertesitesek panelt, es valassza ki a visszahivando nem fogadotthivast.
Uzenetkuldes Keszenleti allapotban nyissa meg az alkalmazaslistat, majd valassza a boritek ikont.
Valassza az Uj uzenet lehetoseget.
40
Adja meg az uzenet cimzetteit.
Valassza az Ide irja be az uzenetet lehetoseget, es irja be azuzenet szoveget.
Az uzenet elkuldesehez valassza a Kuldes lehetoseget.
Nevjegyek Ismerje meg, hogyan hozhat letre es kezelheti a szemelyes es uzleti nevjegyeit. A nevjegyekbe neveket,
mobil- es vezetekes telefonszamokat, e-mail cimeket, zuletesnapokat es egyeb adatokat menthet.
Uj nevjegy letrehozasa:
- Keszenleti allapotban nyissa meg az alkalmazaslistat, majd valassza a + ikont.;
- Valassza ki a memoriahelyet es irja be az adatokat
- A nev memoriara mentesehez valassza a Ment lehetoseget.
Nevjegyet a tarcsazo kepernyorol is letrehozhat:
- Keszenleti allapotban nyissa meg az alkalmazaslistat;
- Irjuk be a telefonszamot;
- Valassza a Uj nevjegy letrehozasa lehetoseget.;
- Valasszon memoriahelyet
- Irja be az adatokat
- valassza a Ment lehetoseget..

41
Nevjegy import/exporalas
Kulombozo tarolasi helyek kozotti nevjegyeket tudunk importalni/exportalni a kovetkezo lepeskkel:
- Nevjegyek – Opciok Import/exportalas
- Valassza ki a memoriat ahonnan atmasolja az adatokat, majd azt, ahova atmasolja
- Valassza ki a nevjegyeket es nyomja meg a Masolas gombot
Fiokok es szinkronizalas
Az automatikus szinkronizalasi funkcio beallitasainak es a szinkronizalashoz hasznalt fiokok
kezelesenek
modositasa.
Google Play store Az Android platform segitsegevel a telefon funkcioi tovabbi alkalmazasok telepitesevel bovithetok,
mint peldaul jatekok, sport, hirek, stb. Keszenleti allapotban nyissa meg az alkalmazaslistat, majd
valassza a Google Play store lehetoseget. Amennyiben ezt az alkalmazast most inditja el eloszor,
valassza az Elfogadom lehetoseget es jelenkzezzen be a Google fiokjaval. Keressen egy fajlt vagy
alkalmazast, es toltse le.
BEALLITASOK
Keszenleti allapotban nyissa meg az alkalmazaslistat, majd valassza a Beallitasok lehetoseget:

42
Vezetek nelkuli halozat beallitasok:
Wi-Fi, Bluetooth beallitasok.
- repulo uzemmod: A keszulek osszes vezetek nelkuli szolgaltatasanak be-, kikapcsolasa.
Csak a halozatot nem igenylo szolgaltatasokat hasznalhatja.
- Wi-Fi: Be-, kikapcsolas;
-Wi-Fi Direkt: Kapcsolja be a WLAN Direkt funkcio hasznalatat ket eszkoz hozzaferesi pont nelkuli
csatlakoztatasahoz WLAN segitsegevel.
- Bluetooth: A Bluetooth vezetek nelkuli szolgaltatas be- es kikapcsolasa.;
- VPN beallitasok: Virtualis maganhalozatok beallitasa es csatlakoztatasa
- Mobilhalozatok: Az elerheto halozatok keresese es egy halozat kivalasztasa barangolasra.
Profilok
A keszulek altal megszolaltatott hangok beallitasainak modositasa.
Akkumulatorhasznalat: Mi hasznalta az akkumulatort
Sajat pozicio:
- Hozzajarulas helyadatokhoz: Hely megjelenitese az alkalmazasokban.
- GPS muholdak hasznalata: Utszaszintu helymeghatarozas (cask nyilt helyen lehetseges)
Biztonsag:
- Kepernyozar beallitasa: Kepernyo lezarasa mintaval, PIN koddal vagy jelszoval.
- SIM-kartya zarolasanak beallitasa;
- Jelszavak: Jelszo megjelenitese gepeleskor
- Eszkozfelugyelet: Eszkozkezelok hozzaadasa es eltavolitasa

43
- Telepites SD kartyarol: Titkositott tanusitvanyok telepitese az SD-kartyarol
Nyelv es billentyuzet: Telefon nyelve es billentyuzetere vonatkozo beallitasok
Fiokok es szinkronizalas
- Hatteradatok: Az alkalmazasok barmikor szinkronizalhatnak, kuldhetnek es fogadhatnak adatokat
- Automatikus szinkronizalas: Az alkalmazasok automatikusan szinkronizaljak az adatokat
Datum es ora: A datum es ora modisitasanak beallitasai
Ki-, bekapcsolasi beallitasok: A telefon automatikusan ki- es bekapcsolasat tudjuk beallitani.
Repulo mod beallitasa: A repulo mod automatikusan ki- es bekapcsolasat tudjuk beallitani.
lkalmazasok kezelese: A telepitett alkalmazasok kezelese es eltavolitasa.

44
MEGFELELOSEGI NYILATKOZAT
1368
Mi, SC Visual Fan SRL, a szociális központja Brassó, 61. Brazilor Street, irányítószám 500313 Romania, regisztrált a
Register of Commerce Brassó mellett nr. J08 / 818/2002, CUI RO14724950, mint importőr, biztosítják, garanciális és
kijelentjük saját felelősségére cikkelye szerint. 4 HG nr.1.022 / 2002 kapcsolatos termékek és szolgáltatások rendszerét,
ami veszélybe sodorná az élet és az egészség, a biztonság és a munkavédelem, hogy a Allview terméket P5 Energy nem
kerül veszélybe életét, biztonságát munkaerő, nem okoz káros környezeti hatások, és az alábbiak szerint:
-A 2011/65 / UE irányelvben a használati feltételeit néhány veszélyes anyagok] n a electonic és elektromos
berendezések.
-A Irányelv tekintetében a rádió- és távközlési berendezések R & TTE 1999/5 / CEE (HG 88/2003)
-A Irányelv tekintetében ensurance kisfeszültségű készülékek felhasználói 73/32 / CEE, módosítja a 93/68 / CEE
(HG457 / 2003) szóló irányelv.
-A Irányelv tekintetében az elektromágneses összeférhetőség 89/336 / CEE, módosítja a 92/31 / CEE si 93/68 / CEE
(HG982/2007); RoHS irányelv: EN50581: 2012
-A Biztonsági követelményeket az Európai szóló 2001/95 / EK irányelv és az EN 60065: 2002 / A12: 2011 si EN
60950-1: 2006 / A1: 2010 / A11: 2009 / A12: 2011 szabványok tekintetében a decibel szint limit a kereskedelmi
forgalomba eszközöket.
A termék már értékelhető a következő szabványoknak:
Egészségvédelem: EN 50360: 2001, EN 50361; EN 62209-1: 2006
-Biztonsági: EN 60950- 1: 2001 + A11: 2004; EMC EN 301 489- 01 V1.6.1 (09-2005)
EN 301 489- 07 V1.3.1 (11-2005); EN 301 489- 17 V1.2.1 (08-2002)
-Radio Spektrum: EN 301 511 V9.0.2 (03-2003); EN 300 328 v1.7.1 (10-2006)
A megfelelőségi felmérő eljárás szerint végeztük a 1999/5 / CEE irányelv (a II HG nr. 88/2003) e dokumentációt a
SC Visual Fan SRL, Brasov, 61. Brazilor Street, irányítószám 500313, Románia rá majd rendelkezésére bocsátani a
kereslet. A termékek megfelelőségének felmérő eljárás teljesült részvételével a következő intézmények: Phoenix Testlab
GmbH
A termék a CE jelzése. A megfelelőségi nyilatkozat a at www.allviewmobile.com.
CE0700 Igazgato
SAR: 0,687 W/kg Gheorghe Cotuna
Brasov
15.07.2015

45
Misure di sicurezza
IMPORTANTE! Si prega leggere attentamente queste istruzioni e seguire implicitamente, in
caso di situazioni
pericolose. Sicurezza durante la guida: si raccomanda di non utilizzare il cellulare durante la
guida. Se è necessario
utilizzarlo, sempre utilizzare il sistema “Vivavoce” durante la guida.
Spegnere il cellulare allora quando si viaggia in aereo.
Le interferenze determinate dai cellulari possono avere delle ripercussioni sulla sicurezza de
l’aviazione, e d’altra
parte, è illegale utilizzarlo in aereo. Si prega assicurarsi che il cellulare sia spento allora
quando si trovi in aereo. Spegnere il cellulare nella zona di operazioni di levigatura.
Nell’ospedale: Quando si utilizza il cellulare in un ospedale, si deve osservare le norme
rilevanti specificate
dall’ospedale. Qualsiasi interferenza determinata dagli equipaggiamenti wireless può modificare
la performance del cellulare.
Centri di riparazione autorizzati: Soltanto i centri di riparazione autorizzati possono riparare i
cellulari. Se si apre il
cellulare e si cerca di ripararlo da soli si perde la garanzia del prodotto.
Accessori e batterie: Possono essere utilizzati soltanto gli accessori e le batterie approvati dal

46
produttore.
Chiamate di emergenza: Si assicuri che il telefono sia acceso ed attivato se desidera
effettuare una Chiamata di Emergenza a 112, premere il tasto di chiamata e confermare
l’ubicazione, spiegare cosa è successo e non finire la conversazione.
La batteria ed il caricamento della batteria: Si raccomanda la carica completa della batteria
prima della prima utilizzazione del dispositivo. Non esporre la batteria a temperature più grandi
di +40°C. Non buttare la batteria nel fuoco oppure a caso. Ritornare le batterie difettose al
fornitore oppure ai centri speciali per la raccolta delle batterie
difetti.
Attenzione: Non ci assumiamo la responsabilità per le situazioni quando il telefono viene
utilizzato in altro modo che quello previsto nel manuale. La nostra società si riserva il diritto di
fare delle modifiche nel contenuto del manuale senza fare pubblica questa cosa. Queste
modifiche saranno menzionate sul sito della società al prodotto al quale vengono fatte delle
modifiche.
Il contenuto di questo manuale può essere diverso da quello esistente nel prodotto. In questo
caso l’ultimo sarà preso in considerazione. Per evitare dei problemi che possono verificarsi
riguardante i centri di riparazione che non sono più accettati dalla S.C. Visual Fan S.R.L.
(perché la Visual Fan si riserva il diritto di cessare la collaborazione con qualsiasi centro di
riparazione collaboratore autorizzato, esistente sul certificato di garanzia alla data della
commercializzazione sul mercato del lotto dei prodotti), prima di portare un prodotto nel
centro di riparazione si prega consultare l’elenco aggiornato dei centri di riparazione
autorizzati esistente sul sito Allview nella sezione “Supporto & Centri di riparazione – Centro
di riparazione autorizzato”. Per più informazioni sul prodotto consultare

47
www.allviewmobile.com. Non coprire l’antenna con la mano oppure con altri oggetti,
l'inosservanza di questa indicazione determinando dei problemi di connessione e allo scarico
rapido della batteria.
Le applicazioni che accompagnano il prodotto, e sono fornite da terze parti, possono essere
chiuse oppure interrotte in qualsiasi momento. La S.C. Visual Fan S.R.L. non assume
esplicitamente nessuna responsabilità riguardante la modifica, l’interruzione oppure la
sospensione dei servizi/del contenuto messi alla disposizione da terze parti per il tramite di
questo dispositivo. Le domande oppure altre richieste riguardante questo contenuto saranno
rivolte direttamente ai fornitori proprietari di questi.
Accensione/ spegnimento e standby del dispositivo In seguito all’introduzione delle schede SIM, della scheda microSD e della batteria,
accendere il telefono tenendo premuto il tasto Accensione per 3 secondi. Per spegnimento,
premere lungo lo stesso tasto e confermare. Se si preme brevemente il tasto Accensione, il
telefono sarà introdotto nel modo standby, e per tornare premere di nuovo, brevemente, lo
stesso tasto.
Sblocco, schermo principale, menu di applicazioni Per sbloccare lo schermo quando si riprende dalla modalità standby, far scorrere il dito dal
basso verso l'alto dello schermo. Sarà visualizzato lo schermo principale.
Le pagine dello schermo principale saranno personalizzate con vie brevi e widget. Nella
parte superiore dello schermo si trova la barra di notifiche che contiene delle informazioni sul
livello de l segnale delle reti mobili, Wi-Fi, Bluetooth, livello della batteria, orologio ed eventi.

48
Per la visualizzazione del menu di applicazioni, toccare il simbolo menu dallo
schermo principale. Scorrere per la visualizzazione delle pagine del menu principale.
Scegliere l’icona adeguata per accedere
all’applicazione desiderata. Utilizzare il tasto Indietro per tornare allo schermo principale.
Chiamare Per chiamare un numero, dallo schermo principale, accedere l’applicazione di chiamare,
immettere il numero di telefono e premere il tasto di chiamata. È possibile chiamare
direttamente numeri dal Registro chiamate, toccare il tasto di chiamata dalla destra del numero
desiderato.
Per rispondere ad una chiamata scorrere il simbolo centrale a destra, e per rifiutare la
chiamata scorrere a sinistra.
Messaggi Per creare e inviare un SMS, procedere come segue:
- Accedere al menu di applicazioni;
- Accedere l’applicazione Messaggistica;
- Dalla parte destra – laggiù dello schermo premere il tasto di nuovo messaggio;
- Introdurre il testo del messaggio;
Nota: È possibile trasformare il messaggio in MMS premendo il simbolo graffetta ed
introducendo contenuto media: immagini, suoni oppure film.
- Nel campo superiore introdurre il numero di telefono oppure il nome del destinatario;
- Premere il simbolo freccia -> dalla parte destra del campo di testo per inviare il messaggio.

49
Contatti
Accedere all’applicazione Contatti dal menu di applicazioni.
Aggiungere nuovo contatto:
- Accedere all’applicazione Contatti dal menu di applicazioni;
- Toccare il simbolo di aggiungere + dalle parte destra dello schermo;
- Scegliere la memoria oppure il conto dove sarà salvata l’entrata;
- Introdurre i dati del contatto;
- Alla fine, toccare il tasto Salva.
Aggiungere contatto dalla rubrica di chiamate:
- Dal menu di applicazioni accedere l’applicazione Telefono;
- Toccare il numero di telefono che si desidera essere salvato;
- Toccare il tasto Nuovo contatto;
- Scegliere la memoria oppure il conto dove sarà salvata l’entrata;
- Introdurre i dati del contatto;
- Alla fine, sfiora il tasto Salva.
Importazione /esportazione contatti
È possibile importare oppure esportare dei contatti tra le memorie oppure i conti
disponibili, come segue:
- Sfiora Contatti;
- Premere il tasto Opzioni e selezionare Importare/Esportare;
- Scegliere la memoria dalla quale saranno copiati i contatti;
- Scegliere la memoria dove copiare i contatti;
- Scegliere i contatti da copiare;

50
- Premere il tasto Copiare;
La sincronizzazione dei contatti con un conto
Nota: Se esiste già un conto creato, è possibile creare un conto di utente Google necessario
per accedere
Google Play store.
È possibile sincronizzare i contatti di un conto, come segue:
- Accedere al menu di applicazioni -> Impostazioni -> CONTI;
- Sfiorare il conto desiderato; se non esiste già un conto introdotto, è possibile
introdurre i dati di un nuovo conto premendo il tasto Aggiungere un conto;.
- Selezionare l’opzione Rubrica.
Personalizzazioni dei contatti con immagine propria
Nota: Ai contatti della memoria SIM non è possibile associare suoni oppure immagine propria.
Per associare un’immagine procedere come segue:
- Aprire Contatti;
- Sfiorare il nome del contatto desiderato;
- Dal sottosuolo dello schermo sfiorare il simbolo di modifica contatto;
- Sfiorare il simbolo del contatto;
- Fotografare oppure scegliere un’immagine dalla galleria per essere associata al contatto.
Google Play Store
Google Play store mette alla vostra disposizione una varietà di applicazioni dalle più diverse
categorie: giochi, affari, comunicazione, acquisti, viaggi, divertimento, libri, educazione,

51
finanze, fotografie, strumenti, media, social, sport, notizie ecc.
Al primo accedere a Google Play store si richiede l’autenticazione. Se ha già un conto Google,
introdurre i dati.
Se no, premere il tasto Nuovo per creare un nuovo conto e seguire i passi presenti sullo schermo.
Impostazioni Il fornitore di servizi può attivare implicitamente alcune impostazioni del dispositivo, così che
non sia possibile modificare queste impostazioni.
Gestione SIM
Opzioni di configurazione dei servizi di chiamata, messaggistica e traffico di dati,
individualmente per ogni SIM.
Wi-Fi
Impostazioni Wi-Fi: scrivere per accedere alla funzione.
Aprire Wi-Fi, è possibile cercare le reti disponibili automaticamente, le reti senza password è
possibile che siano utilizzate direttamente, per le reti con parola è necessario introdurre il
password.
Bluetooth
I dispositivi disponibili saranno visualizzati subito. Per essere connesso a un dispositivo,
sfiorare il nome
rispettivo e introdurre la parola di verifica.

52
Rata di utilizzazione dei dati
Qui è possibile attivare oppure disattivare il traffico di dati del telefono. Anche è possibile
visualizzare un
grafico di stato dell’utilizzazione della connessione di dati e configurare un limite di traffico.
Più informazioni
Modalità aereo
Impostazioni VPN (Virtual private network)
Impostazioni hotspot portatile: è possibile utilizzare il telefono per creare un punto di accesso
wireless. Wi-Fi Direct
Reti mobili:
Servizio 3G: accedere per disattivare/attivare il servizio 3G. Preferenze.
Punti di accesso: visualizzare e modificare i punti di accesso.
Operatori di rete.
Profili
Questa opzione permette impostare i toni audio per chiamate in entrata, allarme e-amil
e sms, notifiche. Le impostazioni includono: Vibrazioni, Volume, Toni audio, Notifiche
Selezionare Generale / Silenzioso / Seduta / Fuori. Sfiorare il punto dalla destra per selezionare.
Risparmio dell’energia
È possibile scegliere uno dei tre profili di risparmio dell’energia:
-Spento
-Normale: chiamare e messaggistica attivi; la connessione di dati conserva il suo stato;
-Stand-by prolungato: i servizi di chiamata, sms conservano il loro stato.

53
Visualizzazione
a. Luminosità: regolazione della luminosità;
b. Immagine di fondo: e possibile scegliere immagine di fondo per lo schermo principale,
per lo schermo di blocco e per il menu;
c. Rotazione automatica dello schermo: girare il telefono per cambiare l’orientamento
dell’immagine;
d. Allarme per chiamata persa e SMS: selezionare per attivare l’avvertimento visivo per una
chiamata persa e nuovo SMS, tramite l’accensione periodico dello schermo. In più, riceverà
delle notifiche sulle chiamate perse e messaggi non letti a forma di icone animati nello schermo
di blocco;
e. Inattività: periodo di attesa fino all’entrata nella modalità stand-by;
f. Dimensione dei caratteri.
Memoria
1.Visualizzazione memoria interna e scheda SD
2. Disinstallazione oppure cancellazione scheda SD
Accumulatore
Visualizzazione informazioni sullo stato di carica della batteria e sull’utilizzazione di questa.
Applicazioni
Gestione delle applicazioni: La gestione e l’eliminazione delle applicazioni istallate.
Servizi di localizzazione
Accesso all’ubicazione: consente alle applicazioni di utilizzare delle informazioni

54
sull’ubicazione. I satelliti GPS: attivazione/disattivazione dell’utilizzazione dei satelliti GPS
Google Location Service: permettere l’invio dei dati anonimi di localizzazione. Permettere
l’utilizzazione dei dati da risorse come le reti Wi-Fi oppure mobili per la determinazione
dell’ubicazione approssimativa.
Sicurezza
Blocco dello schermo. E possibile scegliere uno dei metodi: Senza, Scorrimento, Modello, PIN,
Password. Informazioni sul proprietario: visualizzazione dei dati prestabiliti nello schermo di
blocco.
Attivare il blocco della scheda SIM.
Password visibili : visualizzazione delle parole mentre sono introdotte. Amministratori
dispositivo.
Fonti sconosciuti: selezionare per permettere l’istallazione delle applicazioni da fonti
sconosciuti.
Autorizzazioni di fiducia. Istallare dalla scheda SIM.
Lingua e metodo di introduzione
1. Selezionare Lingua: Include tutte le lingue dal telefono
2. Correttore ortografico
3. Dizionario personalizzato: aggiungere oppure eliminare parole al dizionario personalizzato.
4. Metodo di introduzione: selezionare il modello di tastiera desiderato
5. Impostazioni individuali tastiere
6. Impostazioni ricerca vocale

55
Copia di riserva e reset
È possibile creare una copia di riserva dei dati oppure è possibile effettuare un
reset del telefono alle impostazioni iniziali.
Conti
Gestione dei conti e impostazioni di sincronizzazione.
Data e ora
1. Automaticamente: utilizzare la data e l’ora offerte dalla rete oppure dal modulo GPS.
2. Fuso orario automatico: selezionare per configurare automaticamente il fuso orario.
3. Impostazione della data: scorrere il giorno/il mese/l’anno per configurare la data.
4. Impostazione ora: scorrere l’ora/il minuto/AM/PM per impostare l’ora.
5. Selezione del fuso orario: selezionare il fuso orario secondo il posto dove si trovi. Per
Romania, selezionare
“GMT+02:00”.
6. Utilizzare la forma 24 ore: accesso/spento.
7. Selezionare la forma della data: ci sono 3 tipi di forme, è possibile scegliere tra: mese-
giorno-anno, giorno- mese-anno e anno – mese – giorno, tra quali anno-mese-giorno è anche
l’impostazione implicita.
Pianificazione accensione/spegnimento
È possibile selezionare il tempo di accensione oppure di spegnimento automatico del telefono.
Pianificazione modalità aereo
Impostazioni di accensione e spegnimento della modalità aereo alle ore prestabilite.

56
Accessibilità
1. Il tasto Power chiude chiamate
2. Ritardo tocca-e-mantiene
3. Istallazione programmi web
Opzioni sviluppatore
Impostazioni ed opzioni necessarie agli sviluppatori di applicazioni Android.
Sul telefono
1. Stato telefono
2. Informazioni legali
3. Versioni di software

57
DICHIARAZIONE DI CONFORMITÀ
Numero 1368 Noi S.C.Visual Fan S.R.L, con la sede sociale in Romania, citta Brasov, Via Brazilor numero 61, CP 500313, registrata al Registro
de l Commercio di Brasov sotto il numero J08/818/2002, CUI RO14724950, nella qualità di importatore, assicuriamo , garantiamo
e dichiariamo a propria responsabilità, in conformità ai disposti dell’articolo 4 HG numero 1.022/2002 riguardante il regime de i prodotti e
dei servizi, che possono mettere in pericolo la vita e la salute, la sicurezza e la protezione del lavo ro, che il prodotto P5 Ener gy
marca ALLVIEW, non mette in pericolo la vita, la salute, la sicurezza del lavoro, non causa impatto negativo sull’ambiente ed è in
conformità con:
-Direttiva numero 2011/65/UE riguardante le restrizioni di utilizzazione di certe sostanze pericolose negli equipaggiamenti elettrici ed
elettronici.
-Direttiva riguardante gli equipaggiamenti radio e di telecomunicazioni R&TTE 1999/5/CEE (Decisione del Governo 88/2003)
-Direttiva riguardante l’assicurazione degli utenti di equipaggiamenti di bassa tensione 73/32/CEE, modificata dalla Direttiva
93/68/CEE (Decisione del Governo 457/2003)
-Direttiva riguardante la compatibilità elettromagnetica 89/336/CEE, modificata dalla Direttiva 92/31/CEE e 93/68/CEE (Decis ione del
Governo 982/2007); RoHS: EN50581:2012
-Requisiti di sicurezza della Direttiva Europea 2001/95/EC e degli standard EN 60065:2002/A12:2011 e EN 60950-1:2006/ A1:2010
/A11:2009/A12:2011, riguardante il livello dei decibel rilasciato dagli apparecchi commercializzati. Il prodotto è stato valutato in
conformità ai seguenti standard:
-Salute: EN 50360:2001, EN 50361; EN 62209-1 : 2006
-Sicurezza : EN 60950- 1 : 2001 +A11:2004; EMC EN 301 489- 01 V1.6.1 (09-2005)
EN 301 489- 07 V1.3.1 (11-2005); EN 301 489- 17 V1.2.1 (08-2002)
-Spettro radio: EN 301 511 V9.0.2 (03-2003);EN 300 328 V1.7.1 (10-2006)
La procedura di valutazione della conformità è stata effettuata in conformità alla Direttiva 1999/5/CEE ( Allegato II della Decisione del
Governo numero 88/2003), la documentazione essendo depositata a S.C. Visual Fan S.R.L., Brasov Via Brazilor numero 61, CP 500 313,
Romania e sarà messa alla disposizione a richiesta. La procedura di valutazione del prodotto è stata compiuta con la partecipazione dei
seguenti organismi: Phoenix Testlab GmbH
Il prodotto ha applicato il marchio CE. La dichiarazione di conformità è disponibile all’indirizzo www.allviewmobile.com.
CE 0700 Director
SAR: 0,687 W/kg Cotuna Gheorghe
Brasov
15.07.2015

58
Over deze gebruiksaanwijzing Dank u voor uw keuze van dit mobiele toestel van Allview Mobile. Dit toestel biedt hoogwaardige mobiele
communicatie op basis van de uitzonderlijke technologie en de hoge normen van Allview Mobile. Deze gebruiksaanwijzing is bedoeld om u stap voor stap bekend te maken met de functies en onderdelen van het
toestel. Veiligheids Instructies OPGELET! Lees alstublieft aandachtig deze handleiding en de instructies door.
Veiligheid tijdens het rijden.
Het is aanbevolen geen telefoongesprekken te voeren tijdens het rijden om u niet af te leiden van het juist besturen
van uw auto. Mocht u dit echter toch willen doen, gebruik dan de handsfree functie, de headset of een bluetooth
carkit.
Schakel uw telefoon uit wanneer u gaat vliegen.
Het zenden en ontvangen van GSM signalen kan mogelijk storing opleveren voor electronica in het vliegtuig.
Schakel om deze reden dan ook altijd uw GSM uit als u gaat vliegen.
In het ziekenhuis:
Het zenden en ontvangen van GSM signalen kan mogelijk storing veroorzaken bij diverse medische apparaten. Volg
derhalve altijd de regels op die in het ziekenhuis gelden.
Servicepunten:
Enkel aangewezen reparatiebedrijven mogen uw GSM openen en repareren. Indien u de GSM zelf opent of op een
andere manier tracht te repareren, vervalt hierbij de garantie op uw product.
Accessoires en batterijen:
Enkel door de fabrikant toegestane accessoires en accu`s mogen gebruikt worden op uw GSM

59
Noodoproepen:
Zorg dat de GSM aangeschakeld is als u een noodoproep wilt maken. Toets in Europa 112 en druk op de belknop.
Zodra u met een operator spreekt, meldt dan duidelijk uw locatie en omschrijf de aard van het noodgeval. Beeindig
het gesprek niet totdat de operator het vraagt.
Accu en opladen:
Het is aanbevolen om de accu voor het eerste gebruik volledig op te laden. Stel de accu niet bloot aan temperaturen
boven de 40 graden Celcius.
Gooi accu`s nooit in vuur en laat ze ook niet vallen. Retourneer defecte accu`s aan de leverancier of lever deze in bij
special inleverpunten.
Waarschuwing! Allview Mobile neemt geen verantwoording indien de telefoon anders wordt gebruikt dan als
voorgeschreven in de handleiding.
Allview Mobile behoudt het recht om wijzigingen te maken in de handleidingen zonder de klanten hiervan vooraf op
de hoogte te stellen. Deze wijzigingen zullen verschijnen op de website van de fabrikant
Om eventuele problemen te voorkomen met servicepunten die zijn goedgekeurd door Visual Fan Ltd. (daar Visual
Fan het recht bezit om de samenwerking met ieder servicepunt ieder gewenst moment te beëindigen, ongeacht de
informatie die vermeld is op de garantiekaart op het moment dat het product verkocht is), gaarne voordat u uw
product verstuurt/brengt naar een dergelijk servicepunt onze geüpdatet lijst met servicepunten te bekijken op de
Allview website in de sectie: “Support&Service – Approved Service”.
Voor meer product informatie bezoek www.allviewmobile.com. Bedek de antenne niet met uw hand of andere
voorwerpen niet naleven resulteert in problemen met de verbinding en snelle ontlading van de batterij.
Alle toepassingen die door derden en geïnstalleerd in dit apparaat, kan worden gewijzigd en / of gestopt op ieder
moment. Visual Fan Ltd zal niet enkele wijze verantwoordelijk voor de wijzigingen van de diensten of de inhoud
van deze aanvragen. Elk verzoek of vraag over applicaties van derden kunnen worden gericht aan de eigenaars van
deze toepassingen.

60
Aan/uit schakelen van het apparaat. Na het plaatsen van de simkaart(-ten), geheugenkaart en accu, start de telefoon door de aan/uit knop ingedrukt te
houden voor 3 seconden. Om het toestel uit te schakelen drukt u dezelfde knop wederom een aantal seconden in.
Vervolgens krijgt u een scherm om het uitschakelen te bevestigen. Om het toestel in stand-by of op
toetsenblokkering te zetten, druk dan eenmaal kort de aan/uit knop in. Om het toestel weer te activeren, druk dan
nogmaals kort op de aan/uit knop.
Ontgrendelen, homescreen en applicatiemenu.
Om het scherm te kunnen ontgrendelen vanuit de standbyfunctie, schuif uw vinger van de onderkant naar de
bovenkant van het scherm. Als u dit correct uitvoert komt u terecht op het Android bureaublad.
Alle bureaubladen kunnen geheel naar eigen wens gepersonaliseerd en aangepast worden. Bovenaan ieder scherm
treft u een notificatiebalk aan waar u informatie aantreft over de status uw GSM. U treft hier bijvoorbeeld informatie
aan over het GSM bereik, WiFi signaal, batterij, gemiste oproepen, gemiste SMSjes etc etc.
Om dit gehele menu te kunnen bekijken, dient u uw vinger van bovenaan het scherm naar beneden te vegen.
Vervolgens kunt u hier alle snelkoppelingen benaderen. Om het scherm weer af te sluiten kunt u het scherm weer
naar boven vegen of eenmaal op de backknop onderaan drukken.
Bellen
Om een nummer te bellen druk op het Telefoon-icoontje in het hoofdscherm en toets het nummer in. Druk hierna op
het bel icoontje en selecteer met welke SIM u wilt uitbellen.
Om een oproep te beantwoorden sleep het pictogram naar rechts, en om de oproep te slepen weigeren het pictogram
naar links.
Ook kunt u nummers en contacten direct uit uw gespreksgeschiedenis of contactenlijst bellen.

61
SMSen Om een SMS aan te maken en te verzenden, voert u de volgende handelingen uit:
- Open het hoofdmenu van het toestel
- Klik op het “Berichten” icoontje
- Klik rechtsbeneden in het scherm op het “Aanmaken nieuwe SMS” symbool
- Typ het bericht
NB: U kunt eenvoudig een MMS aanmaken door door middel van het “Attach” symbol een bijlage toe te
voegen aan uw bericht. .
- Voeg in de bovenste box het nummer of naam van de ontvanger in.
- Klik op het Pijltje -> symbool aan de rechterzijde van de tekstinvoer box om uw bericht te verzenden.
Contacten U kunt het telefoonboek benaderen via het hoofdmenu van uw toestel onder de naam “Personen”.
Toevoegen van een nieuw contact:
- Open Personen vanuit het hoofdmenu van uw toestel
- Klik op het + symbool aan de rechterbenedenzijde van het scherm.
- Selecteer op welke locatie u het nieuwe contact op wenst te slaan
- Voeg de informatie van het nieuwe contact in
- Wanneer u hiermee gereed bent, klik op ”Opslaan”

62
Nieuw contact toevoegen vanuit uw belgeschiedenis:
- Vanuit het menu van uw toestel, open de “Telefoon”toepassing
- Klik op het nummer welke u wenst op te slaan
- Klik op de tekst: “New Contact” bovenin
- Selecteer op welke locatie u het nieuwe contact op wenst te slaan
- Voeg de contactinfo en naam toe.
- Klik wanneer u gereed bent op “Opslaan”
Importeren/Exporteren van contacten
U kunt uw contacten als volgt eenvoudig importeren van of exporteren naar diverse geheugenlocaties.
- Open “Personen”
- Klik op het opties menu rechtsonder en selecteer “importeren/exporteren”
- Selecteer vervolgens een locatie waar de contacten zich nu bevinden en klik op “Volgende”
- Selecteer vervolgens waarheen u deze contacten wilt importeren/exporteren en klik op “Volgende”
- Selecteer vervolgens welke contacten u wenst te kopieeren
- Bevestig dit vervolgens om de handeling uit te voeren.
Synchroniseer uw contacten met een account
Nb: Als u nog geen Gmail™ account heeft kunt u deze eenvoudig aanmaken wanneer u de Google Play store
voor het eerst opent.
U kunt uw contacten eenvoudig met uw account synchroniseren d.m.v. de volgende stappen:

63
- Open het hoofdmenu van uw toestel en ga naar “Instellingen>>Accounts en Synchroniseren”
- Selecteer het gewenste account waargeen u uw contacten heen wilt synchroniseren. Heeft u nog niet eerder op
uw toestel een account toegevoegd, dan kunt u dat doen door middel van de functie “Account
Toevoegen”benedenaan het scherm.
- Selecteer vervolgens de optie “Contacten Synchroniseren”. Uw GSM zal nu periodiek uw contacten met dit
account syncroniseren.
Contacten personaliseren met een foto
Nb: De contacten welke op de simkaart staan, kunnen niet voorzien worden van een foto!
Om een foto aan een contact toe te voegen, voert u de volgende stappen uit:
- Open Personen
- Selecteer de gewenste contactpersoon
- Klik rechtsboven in het scherm op het contact aanpassen symbool
- In de linker hoek van het scherm, klik op het symbool voor het toevoegen van een afbeelding
- Selecteer of u een foto wilt maken of er een wilt selecteren uit uw fotogalerij.
Google Play store De Google Play store biedt een zeer ruim aanbod in diverse applicaties voor allerhande toepassingen. Van
spelletjes tot financiele toepassingen en van fotografieapplicaties het laatste nieuws.
De eerste keer dat u de Google Play store opent zal u worden gevraagd of u uw Gmail account wilt invoeren.
Indien u deze nog niet heeft kunt u er eenvoudig eentje aanmaken door het volgen van de stappen op het toestel.

64
Instellingen WLAN
Hier kunt u WiFi aan/uit schakelen. Open de Wi-Fi functie om te zoeken naar beschikbare WiFi netwerken.
WiFi netwerken zonder wachtwoord bieden u direct toegang. Voor andere WiFi netwerken dient u eerst een WiFi
wachtwoord in te voeren alvorens u toegang krijgt tot het netwerk.
Bluetooth
Hier kunt u Bluetooth aan/uit schakelen. Open de Bluetooth functie om naar beschikbare apparaten te zoeken.
Koppel vervolgens eenvoudig met deze apparaten door eenmaal op de naam van het apparaat te klikken.
Data gebruik
Hier kunt u het mobiel datagebruik van uw toestel per simkaart in de gaten houden. Tevens kunt u hier ook
grenzen stellen aan het gebruik van mobiel internet per simkaart. .
Meer
Vliegtuigmodus
Virtual Private Networks(VPN) Instellingen
Tethering & draagbare hotspot
Wifi Direct
Mobiele Netwerken
3G service: Hier kunt u de 3G service per simkaart instellen of geheel uitschakelen.
Preffered network

65
Namen toegangspunten
Mobiele providers
Geluiden
Hier kunt u geluiden in tonen instellen voor inkomende oproepen, e-mails en SMSjes. Instellingen bevatten
onder meer: vibratie, volume, ringtone, notificatie toon etc.
Selecteer het audoprofiel naar keuze door aan de rechterzijde aan het eind van de regel het cirkeltje aan te raken.
Accubesparing
Hier kunt u een keuze maken uit 3 energie instellingen:
- Uit (geen energie besparing)
-Normaal: bellen en SMSen zijn beschikbaar; data connectie blijft aanstaan.
-Super-lange standby: Enkel bellen en SMSen blijven beschikbaar. Al het overige is uitgeschakeld.
Beeldscherm
a. Helderheid. Pas de helderheid aan van het scherm
b. Wallpaper: verander de wallpaper op het homescreen en het lockscreen
c. Auto rotatie Hier kunt u de functie autorotatie van het display aan/uit zetten,
d. Alert missed call & sms: Met deze functie aangeschakeld laat het toestel door middle van het periodiek
oplichten van het display weten dat u een gemist gesprek of SMSje heeft.
e. Slaapstand: Hiermee kunt u de tijd instellen voordat het scherm zich automatisch afsluit.
f. Lettergrootte

66
Opslagruimte
1) Bekijk het gebruikte en beschikbare geheugen op telefoon en geheugenkaart
2) Verwijderen of formatteren van microSD geheugenkaart.
Accu
Hier treft u informatie over de status van de accu en de wijze van gebruik.
Toepassingen
Hier treft een lijst van alle geïnstalleerde en gedownloadse applicaties aan. Tevens kunt u zien op welke locatie
de applicaties zich bevinden.
Locatiediensten
Toegang tot GPS instellingen voor positiebepalingen
GPS satellieten: hier kunt u de GPS sensor van het toestel aan/uit schakelen.
Google Location Service: Hiermee geeft u Google toestemming om zoekresultaten op uw locatie af te stemmen.
Beveiliging
1) Schermbeveiliging: hier kunt u een unlock code, pin of patroon instellen om uw toestel te deblokkeren.
2) SIM kaartvergrendeling: Hier kunt u instellen of u de simkaart wilt laten vragen om een pincode.
3) Wachtwoorden zichtbaar maken: Hiermee kunt u ingetoetste wachtwoorden zichtbaar maken.
4) Beheerders apparaat: Selecteer hier welke autorisaties u aan bepaalde applicaties wilt toekennen.
5) Onbekende bronnen: Hiermee kunt u instellen om apps geinstalleerd buiten de Google Play store om te
6) Vertrouwde referenties: Hier kunt u de lijst met vertrouwde certificaten bekijken.
7) Installeren vanaf SD kaart: Hiermee kunt u zelf certificaten installeren vanaf de SD kaart.

67
Taal en invoer
1) Selecteer Taal
2) Spellingscontrole
3) Persoonlijke woordenboeken: Hiermee kunt u zelf veelgebruikte woorden opslaan.
4) Invoermethodes: Hier kunt u diverse varianten toetsenborden selecteren. Als u een ander toetsenbord
download komt deze ook hier te staan.
5) Tekst naar spraak uitvoer
6) Aanwijzersnelheid
Back-up en terugzetten
Backup van mijn gegevens maken: Door middel van deze optie kunt u een backup maken van WiFI
wachtwoorden en andere instellingen naar de Google servers.
Automatisch herstellen: Het toestel zal automatisch zichzelf instellen met de gegevens welke u heeft bewaard.
Terugzetten op fabrieksinstellingen: Hiermee wist u al uw gegevens op het toestel en wordt het toestel weer
teruggezet naar fabrieksinstellingen.
Accounts en synchroniseren.
Hier kunt u accounts toevoegen om te kunnen synchroniseren.
Datum & tijd
1) Automatische datum en tijd: Toestel gebruikt de door het netwerk aangeboden tijd en datum.
2) Automatische tijdzone: Toestel gebruikt de door het netwerk aangeboden tijdzone
3) Datum / tijd instellen: hier kunt u de tijd en datum in het toestel instellen.
68
4) Tijdzone selecteren: selecteer de juiste tijdszone
4) 24-uurs notatie gebruiken: Keuze uit 12 uurs en 24 uurs notatie.
5) Datumopmaak selecteren.
Schema aan/uit
Hier kunt u tijdstippen instellen dat u het toestel automatisch wilt laten aan-/uitschakelen.
Schedule airplane on/off
Hier kunt u tijdstippen instellen dat u het toestel automatisch naar vliegtuigmodus wilt laten schakelen.
Toegangkelijkheid
1.Oproepen beeindigen met aan-/uitknop
2.Vertraging tussen aanraken en vasthouden instellen
3.Webscripts installeren
Ontwikkelaarsopties
Diverse opties gemaakt voor Android ontwikkelaars.
Over de telefoon
Hier treft u informatie over het toestel, juridische informatie en softwareversie evenals de status van o.a. de
accu, IMEI, WiFi op uw toestel.

69
VERKLARING VAN CONFORMITEIT
Nr. 1368
Wij, SC Visual Fan SRL, met de sociale hoofdkantoor in Brasov, 61e Brazilor Straat, postcode 500313 Roemenië,
ingeschreven in het Register van Koophandel Brasov onder nr. J08 / 818/2002, CUI RO14724950, als importeur, verzekeren,
garantie en verklaren op eigen verantwoordelijkheid volgens art. 4 HG nr.1.022 / 2002 met betrekking tot de producten en diensten
regime, dat in gevaar zou kunnen brengen het leven en de gezondheid, veiligheid en bescherming van de arbeid, dat de Allview
product P5 Energy niet in gevaar het leven, de veiligheid van de arbeid, heeft nadelige milieueffecten en is in overeenstemming met:
-De 2011/65 / UE-richtlijn met betrekking tot de beperkingen in het gebruik van bepaalde gevaarlijke stoffen] n de electonic en
elektrische apparatuur.
-De Richtlijn met betrekking tot de radio-en telecommunicatie-apparatuur R & TTE 1999/5 / EEG (HG 88/2003)
-De Richtlijn met betrekking tot het waarborgen van een laag voltage apparatuur gebruikers 73/32 / EEG, gewijzigd door
de richtlijn 93/68 / CEE (HG457 / 2003) richtlijn.
-De Richtlijn met betrekking tot de elektromagnetische compatibiliteit 89/336 / EEG, gewijzigd door de 92/31 / CEE si
93/68 / CEE (HG982/2007); RoHS-richtlijn: EN50581: 2012
-De Veiligheidseisen van de Europese Richtlijn 2001/95 / EG en de EN 60065: 2002 / A12: 2011 si EN 60950-1: 2006
/ A1: 2010 / A11: 2009 / A12: 2011 normen, met betrekking tot de limiet decibel van de gecommercialiseerde apparaten.
Het product werd geëvalueerd op basis van de volgende normen:
-Gezondheid: EN 50360: 2001, EN 50361; EN 62209-1: 2006
-Veiligheid: EN 60950- 1: 2001 + A11: 2004; EMC EN 301 489- 01 V1.6.1 (09-2005)
EN 301 489- 07 V1.3.1 (11-2005); EN 301 489- 17 V1.2.1 (08-2002)
-Radio Spectrum: EN 301 511 V9.0.2 (03-2003); EN 300 328 V1.7.1 (10-2006)
De conformiteit assesment procedure werd gedaan op basis van de 1999/5 / EEG (Richtlijn van de bijlage II van HG nr.
88/2003) de documentatie die zich in SC Visual Fan SRL, Brasov, 61e Brazilor Straat, postcode 500313, Roemenië bij het zal ter
beschikking worden gesteld op de vraag. De producten conformiteit assesment procedure werd vervuld met de deelname van de
volgende instellingen: Phoenix Testlab GmbH
Het product heeft het CE-merk. De conformiteitsverklaring is beschikbaar op www.allviewmobile.com.
CE0700 Director
SAR: 0,687 W/kg COTUNA GHEORGHE
Brasov
15.07.2015

70
Środki bezpieczeństwa
WAŻNE! Prosimy zapoznać się uważnie z niniejszymi wskazaniami oraz wykonać wszystkie zalecenia, jeżeli
znajdziecie się w niebezpiecznej sytuacji
Bezpieczeństwo prowadzenia pojazdów: Wskazanym jest, aby prowadząc samochód nie korzystać
równocześnie z telefonu komórkowego. Jeżeli koniecznie musicie skorzystać z telefonu komórkowego podczas
jazdy, radzimy zawsze używać systemu „Zestawu głośno mówiącego”.
Należy wyłączyć telefon komórkowy w czasie lotu samolotem. Zakłócenia spowodowane telefonią
komórkową, wpływają ujemnie na bezpieczeństwo lotu, dlatego nie należy używać telefonu komórkowego w
samolocie. Prosimy upewnić sie czy wasz telefon komórkowy jest zablokowany na czas w którym znajdujecie się w
samolocie.
W szpitalu: Kiedy używacie telefonu komórkowego na ternie szpitalu, musicie przestrzegać obowiązujących
tam zasad. Jakiekolwiek zakłócenia spowodowane wyposażeniem wireless, może wpływać ujemnie, na jakość i
wyniki telefonu.
Servis jedynie zatwierdzony: Jedynie do serwisów zatwierdzonych należy zgłaszać się w sprawie naprawy
telefonu. Jeżeli otwierasz telefon komórkowy próbując sprawdzić lub naprawić go osobiście, stracisz bezpowrotnie,
przyznaną gwarancję.
Akcesoria i baterie: Używaj do swego telefonu komórkowego jedynie takie akcesoria i baterie, jakie zalecane są
przez producenta
Telefon alarmowy: Upewnij się czy telefon jest czynny, czy działa, dzwoniąc pod numer Telefon Alarmowy
112, naciśnij odpowiedni przycisk wezwania i potwierdź miejscowość, następnie wytłumacz, co się stało i nie kończ
rozmowy.
Bateria i naładowanie baterii: Dobrze jest naładować baterię przed pierwszym wykorzystaniem telefonu. Nie
należy narażać baterii na działanie temperatury wyższej niż +40°C. Zużytych baterii nie wrzucaj do ognia, nie

71
wyrzucaj gdziekolwiek. Zwracaj baterie zużyte lub uszkodzone dostawcy lub przekaż do specjalnych punktów
zbiórki uszkodzonych baterii. Uwaga: Nie odpowiadamy za sytuacje, kiedy telefon używany jest niezgodnie z sposobem podanym w
niniejszym podręczniku. Nasza Kompania zachowuje prawo do wprowadzenia zmian w treści podręcznika bez
podania tego do wiadomości publicznej. Ewentualne zmiany zostaną wyświetlone na naszym site’cie, obok tego
produktu, którego dotyczą zmiany. Treść niniejszego podręcznika może być inna niż załączonego do produktu.
Należy brać pod uwagę treść ostatniego..
Aby uniknąć nieporozumień, jakie mogą mieć miejsce w związku z niektórymi serwisami, które obecnie nie są
preferowane przez naszą spółkę, S.C. Visual Fan S.R.L. (ponieważ Visual Fan zachowuje sobie prawo do zerwania
współpracy z niektórymi serwisami, wskazanym na świadectwie gwarancji w dniu wejścia na rynki sprzedaży
danego zestawu produktów), dlatego, przed oddaniem produktu do serwisu, prosimy o przejrzenie aktualnej listy
naszych serwisów, którą znajdziecie państwo na stronie Allview w zakladce “Suport&Service – Serwis
autoryzowany”.”
Aby uzyskać więcej informacji, odwiedź www.allviewmobile.com. Nie zasłaniaj anteny dłonią lub innej awarii
obiektów do wykonania w wyniku problemów z łącznością i szybkiego rozładowania akumulatora.
Wszystkie aplikacje dostarczone przez firmy trzecie oraz zainstalowane na tym urządzeniu mogą być modyfikowane
lub zatrzymane w każdej chwili. Visual Fan LTD nie ponosi odpowiedzialności za jakiekolwiek modyfikacje usług
lub treści tych aplikacji. Wszelkie prośby lub pytania dotyczące aplikacji firm trzecich powinny być kierowane do
ich dostawców.

72
Urządzenia Włącz / Wyłącz i standby
Po wprowadzeniu karty SIM, i karty pamięci oraz baterii, przyciskiem Włącz, przyciskając przez 3 sekundy,
włączysz telefon. Dla wyłączenia, naciśnij ten sam przycisk i potwierdź. Jeżeli naciśniesz krótko przycisk Włącz,
włączysz telefon w stan standby, aby powrócić, naciśnij ponownie, krótko, ten sam przycisk.
Odblokowanie, ekranu głównego, menu aplikacji
Aby uwolnić ekran przy powrocie ze standby, przytrzymaj naciskając, przesuń palcem od dołu do góry ekranu.
Stronom głównego ekranu można nadać osobowość skrótami i widget’ami. W górnej części ekranu znajduje się
taśma zawierająca informacje o zakresie sygnału sieci telefonii komórkowej WiFi, Bluetooth, poziomie baterii,
godzinie oraz o bieżących wydarzeniach.
Celem wyświetlenia menu aplikacji, naciśnij symbol .znajdujący się na głównej części ekranu. Przesuń w lewo,
aby przewinąć główne strony menu. Dotknij odpowiednią ikonkę, aby mieć dostęp do poszukiwanej aplikacji. Aby
powrócić na główny ekran, naciśnij przycisk Wróć.
Wywołanie
Aby wywołać numer, z głównego ekranu należy zastosować aplikację wywołania, wybierz numer telefonu i
naciśnij przycisk wywołania.
Aby odebrać rozmowę, przeciągnij ikonę do prawej, i odrzucić rozmowę, Przeciągnij ikonę w lewo.Możesz
wywoływać żądane numery bezpośrednio z Dziennika połączeń, dotknij przycisk wezwania z prawej strony
żądanego numeru.
Wiadomość
Aby stworzyć i wysłać wiadomość SMS, należy:
Wejść na aplikacje Wiadomość;

73
Wejdź na aplikację Wiadomość,j
Naciśnij na przycisk Nowa wiadomość - który znajduje się w dolnej, prawej części ekranu.
Wprowadź tekst wiadomości;
Uwaga: możesz przekształcić wiadomość, w MMS przyciskając symbol agrafka, wprowadzając równocześnie treść:
wiadomości: obrazy, dźwięki lub film.
W górnej części pola wybierz numer telefonu lub nazwisko adresata.
Przyciśnij symbol strzałka -> znajdujący się po prawej stronie pola tekstu, aby wysłać wiadomość.
Kontakty (połączenia)
Przejdź do aplikacji Kontakty znajdującej się w menu aplikacji
Dodanie nowego kontaktu:
• Przejdź do aplikacji Kontakty znajdującej się w menu aplikacji;
• dotknij symbol plus + po prawej, dolnej części ekranu;;
• wybierz pamięć lub konto, w których gromadzić się będzie nowy kontakt;
wprowadź dane kontaktu;
• na koniec, dotknij przycisk Zapisz.
Dodanie kontaktu z dziennika wywołań:
• z menu aplikacji przejdź do aplikacji Telefon;
• dotknij numeru telefonu, który pragniesz zapisać;
• dotknij przycisk Nowy kontakt;
wybierz pamięć lub kontakt, w którym gromadzą się połączenia;

74
zapisz dane kontaktu;
• na koniec, dotknij przycisk Zapisz.
Import / eksport kontaktów
Możesz importować I eksportować kontakty pomiędzy wolnymi pamięciami lub kontami, mianowicie:
• wejdź na Kontakty;
• naciśnij Opcje i wybierz Importuj/Eksportuj;
• wybierz pamięć, z której należy skopiować kontakty;
• wybierz pamięć, do której należy wpisać kontakty;
• wybierz kontakty do skopiowania;
• naciśnij przycisk Kopiuj;
Synchronizacja kontaktu z kontem
Uwaga:, Jeżeli nie posiadasz jeszcze konta, możesz stworzyć konto użytkownika Gogle, konieczne do wejścia do
wirtualnego magazynu aplikacji.
Możesz synchronizować kontakty konta, mianowicie:
• wejdź do menu aplikacji ->Ustawienia -> KONTA;
• dotknij żądanego konta, jeżeli nie masz wprowadzonego konta, możesz wprowadzić dane nowego konta
naciskając Dodaj konto;
• zaznacz opcję Dziennik wywołań (Agenda).
75
Personalizacja kontaktów z własnym obrazem
Uwaga: Do kontaktów z pamięci SIM nie można dodawać własnych obrazów lub dzwonków.
Aby dodać obraz należy:
• wejść na Kontakty;
dotknąć imię/nazwę żądanego kontaktu;
• dotknij symbolu edytuj kontakt znajdujący się w dolnej części ekranu;;
• dotknij symbolu kontaktu;
• sfotografuj lub wybierz obraz z galerii, aby go dodać do kontaktu.
Google Play store
Wirtualny magazyn (sklep) aplikacji to możliwość aplikacji (zastosowania) w różnych dziedzinach,
takich jak: gry, interesy, komunikacja, zakupy, podróże, rozrywka, książki, edukacje, finanse, fotografia
instrumenty, publikacje media, dziedziny społeczne, sport, wiadomości itd.
Przy pierwszym wejściu do wirtualnego magazynu, zostaniesz zapytany o swoje dane, jeżeli posiadasz
konto Google wprowadź dane. Jeżeli nie, to naciśnij przycisk Nowe, aby stworzyć nowe konto, oraz postępuj
zgodnie z krokami wyświetlonymi na ekranie.
Ustawienia
Dostawca usług może domyślnie uaktywnić niektóre ustawienia urządzenia, w taki sposób, iż nie będziesz mógł
zmienić tych ustawień.

76
Wi-Fi
Dla ustawienia WiFi: należy wejść na funkcję.
Wchodząc na Wi Fi można wyszukiwać automatycznie wolne sieci, sieci bez hasła można używać bezpośrednio, w
przypadku sieci zakodowanych, konieczne jest podanie hasła.
Bluetooth
Wolne urządzenia wyświetlają się automatycznie, natychmiast. Aby połączyć się z jednym z urządzeń, należy
dotknąć odpowiedniej nazwy i podać hasło do sprawdzenia.
Wykorzystanie danych
W tym miejscu możecie włączyć lub wyłączyć obieg (ruch) danych z telefonu. Możecie również przeglądnąć zarys
wykorzystania połączeń danych, oraz konfigurować granice obrotu (ruchu) danych.
Więcej infirmacji
Sposób samolot.
Ustawienia VPN (Virtual private network).
Ustawienia hotspot przenośny, można wykorzystać telefon, aby tym samym stworzyć punkt dostępu do wireless.
Wi-Fi Bezpośredni
Sieci komórkowe:
Servis 3G: w celu włączenia / wyłączenia serwisu 3G
Preferencje (Wybór).
Punkty dostępu: przeglądnij i zmień, jeśli zachodzi taka potrzeba, punkty dostępu.
Operatorzy sieci.

77
Profile
Powyższa opcja pozwoli na ustawienie mocy dźwięku dla wezwań wejściowych, czujności e-mail i sms, wiadomości
pisemnych. Ustawienia mają na uwadze: Drgania i Wibracje, Głośność, Sygnał dźwiękowy, Wiadomości.
Należy wybrać: Ogólne, / Ciche / Spotkanie / Zewnętrzne. Celem odpowiedniego wyboru, należy przycisnąć punkt z
prawej strony.
Oszczędzaj energię
Możesz wybrać jedną z trzech poniżej podanych możliwości oszczędzania energii:
• Zatrzymany
• Normalny: połączenia i wiadomości są włączone, połączenia danych są zachowane.
• Wydłużony stan Stand-by: zostają zachowane usługi wzywania i sms,
Wyświetlanie
a. Świetlność: wyregulować świetlność ekranu;
b. Obraz w tle ekranu: możecie wybrać obraz tła dla głównego ekranu, dla ekranu odblokowania i dla menu;
c. Automatyczne obracanie ekranu: należy odwrócić telefon, aby zmienić orientację obrazu;
d. Czujnik zagubione wezwanie, i SMS:: należy zaznaczyć włączenie ostrzeżenia wizualnego w przypadku
zagubionego wywołania i nowego SMS, poprzez okresowe oświetlanie ekranu. Otrzymacie zawiadomienie o
zagubionych wezwaniach i nieprzeczytanych wiadomościach w formie animowanych ikonek na ekranie blokowania;
e. Bezczynność: czas oczekiwania przed wejściem w stan stand-by;
f. Wielkość liter.

78
Pamięć
1.wyświetlenie pamięci wewnętrznej i karty SD;
2. odinstalowanie lub formatowanie karty SD;
Akumulator
Wyświetlanie informacji dotyczących stanu naładowania baterii oraz jej działania.
Aplikacje
Zarządzanie aplikacjami: oglądaj, usuwaj przenoś zainstalowane aplikacje.
Usługi lokalizacji
Dostęp do lokalizacji: pozwala, aby aplikacje wykorzystały informacje dotyczące lokalizacji.
Wykorzystanie satelitów GPS: włączyć / wyłączyć wykorzystanie satelitów GPS;
Usługi lokalizacji Google: pozwalają na przesyłanie danych anonimowych do lokalizacji, na wykorzystanie danych
pochodzących ze źródeł takich jak sieci Wi Fi lub komórkowe, celem ustalenia prawdopodobnej lokalizacji.
Bezpieczeństwo
Zablokowanie ekranu: możecie wybrać jedną z metod: Bez blokowania, Przesuwanie, Model, PIN, Hasło.
Właściciel info: wyświetlić ustalone dane na ekranie blokującym.
Włączyć blokadę karty SIM.
Hasła widoczne: wyświetlić hasła podczas ich wprowadzania.
Administracja urządzenia.
Źródła nieznane: zaznaczyć, zezwalając tym samym na instalacji aplikacji ze źródeł nieznanych.
Wiarygodne akredytacje.
Instalacje z karty SIM.

79
Język oraz metody wprowadzenia
1. Wybór języka. Podaj wszystkie języki, jakie masz w telefonie.
2. Sprawdzanie ortografii.
3. Słownik użytkownika: dodaj lub wycofaj słowa z niestandardowego słownika użytkownika.
4. Metoda wprowadzenia: wybór i konfiguracja żądanego modelu klawiatury.
5. Indywidualne ustawienia klawiatury.
6. Ustawienia wyszukiwania głosowego.
Zapasowe kopie i wyzerowanie
Możecie stworzyć zapasowe kopie danych lub wyzerować (zresetować) telefon, zgodnie z ustawieniem fabrycznym.
Konta
Zarządzanie kontami i ustawieniami synchronizacji.
Data i godzina
1. Automatycznie: korzystajcie z daty i godziny podanych przez sieć lub przez moduł GPS.
2. Automatyczna strefa czasu: zaznaczyć celem automatycznej konfiguracji strefy czasowej.
3. Ustawienie daty: należy przesunąć dzień / miesiąc / rok, aby ustawić nową datę.
4. Ustawienie godziny: należy przesunąć godzinę / minutę / AM / PM, aby ustawić nową godzinę.
5. Ustawienie strefy czasowej: ustawić strefę czasową w zależności od miejscowości, w której się znajdujecie.
Dla Rumunii należy wybrać “GMT+02:00”.
6. Radzimy używać formatu dobowego (24 godzinnego): ruszony / zatrzymany, on / off.

80
7. Ustawienie formatu daty: istnieją 3 rodzaje formatowania, możecie wybrać jeden z nich: miesiąc –dzień-rok,
dzień -miesiąc-rok, lub rok -miesiąc-dzień, gdzie wariant rok -miesiąc-dzień jest ustawieniem najszerzej
stosowanym, podanym przez fabrykę.
Programowanie włączenie / wyłączenie:
Jest możliwe automatyczne ustawienie czasu włączenia i wyłączenia telefonu.
Programowanie sposobu samolot.
Można ustawić urządzenie, aby włączało i wyłączało sposób samolot o wyznaczonej przez użytkownika godzinie;
Dostępność
1. Przycisk Power zamyka dostęp wezwań
2. Opóźnienie dotknij -i-przytrzymaj.
3. Instalacja skryptów web.
Opcje dla deweloperów
Ustawienia i opcje użyteczne deweloperom aplikacji Android.
O telefonie
1. Stan telefonu
2. Informacje prawne
3. Wersje software’u.

81
NDECLARACJA ZGODNOŚCI nr.1368
My, SC Visual Fan SRL z siedzibą w Brasov społecznej, 61st Brazilor ulica, kod pocztowy 500313 Rumunia, zarejestrowana w
Rejestrze Handlowym pod nr Brasov. J08 / 818/2002, CUI RO14724950, jako importer, zapewnienia, gwarancji i deklarują na
własną odpowiedzialność, zgodnie z art. 4 HG nr.1.022 / 2002 w odniesieniu do produktów i usług systemu, co mogłoby podać w
niebezpieczeństwie życia i zdrowia, bezpieczeństwa i ochrony pracy, że produkt Allview P5 Energy nie naraża na niebezpieczeństwo
życie, bezpieczeństwo pracy, powoduje niekorzystne wpływ na środowisko naturalne i jest zgodne z:
Dyrektywa / UE -The 2011/65 dotyczące ograniczeń użytkowania niektórych substancji niebezpiecznych w] i elektrycznych
urządzeń electonic.
-The Dyrektywa dotycząca badania sprzętów radiowe i telekomunikacyjne & TTE 1999/5 / EWG (HG 88/2003)
-The Dyrektywa dotycząca ensurance niskiego napięcia użytkowników sprzętu 73/32 / CEE, zmodyfikowany przez 93/68 /
EWG (HG457 / 2003) dyrektywy.
Mianowicie z dyrektywą dotyczącą kompatybilności elektromagnetycznej 89/336 / EWG zmieniona przez 92/31 / CEE si 93/68
/ EWG (HG982/2007); Dyrektywa RoHS: EN50581: 2012
-The Wymogi bezpieczeństwa dyrektywy europejskiej 2001/95 / WE oraz z EN 60065: 2002 / A12: 2011 si EN 60950-1: 2006
/ A1: 2010 / A11: 2009 / A12: 2011 normy, dotyczące poziomu decybeli limitu z skomercjalizowanych urządzeń.
Produkt został oceniony zgodnie z następującymi standardami:
-Health: EN 50360: 2001, EN 50361; EN 62209-1: 2006
-Safety: EN 60950- 1: 2001 + A11: 2004; EMC EN 301 489- 01 v1.6.1 (09-2005)
EN 301 489- 07 V1.3.1 (11-2005); EN 301 489- 17 V1.2.1 (08-2002)
-Radio Spektrum: EN 301 511 V9.0.2 (03-2003); PL 300 328 V1.7.1 (10-2006)
Procedura zgodności oceny wniosku została wykonana zgodnie z 1999/5 / dyrektywa CEE (załącznika II HG nr. 88/2003)
dokumentacji będącej w SC Visual Fan SRL, Brasov, 61-ci Brazilor ulica, kod 500313, w Rumunii na to zostaną oddane do
dyspozycji na żądanie. Procedura oceny wniosku produkty zgodności został spełniony z udziałem następujących instytucji: Phoenix
Testlab GmbH
Produkt posiada znak CE stosowane.Deklaracja zgodności jest dostępna na www.allviewmobile.com.
CE0700 Dyrektor
SAR: 0,687 W/kg Gheorghe Cotuna
Brasov
15.07.2015

82
Masuri de siguranta IMPORTANT! Va rugam sa cititi cu atentie aceste instructiuni si urmati-le implicit, în caz de situaţii periculoase
Siguranta in conducere: Este recomandat sa nu folositi telefonul mobil in timp ce conduceti. Daca trebuie sa-l
folositi, intotdeauna folositi sistemul de “Maini libere” cand conduceti.
Inchideti telefonul mobil cand sunteti in avion
Interferentele cauzate de telefoanele mobile afecteaza siguranta aviatiei, si, astfel, este ilegal sa-l folositi in avion.
Va rugam asigurati-va ca telefonul mobil este oprit atunci cand sunteti in avion.
Inchideti telefonul mobil in zona de operatii de sablare.
In spital: Atunci cand folositi telefonul intr-un spital, trebuie sa va supuneti normelor relevante specificate de catre
spital. Orice interferenta cauzata de echipamentele wireless poate afecta performantele telefonului.
Service-uri aprobate: Numai service-urile aprobate pot repara telefoanele mobile. Daca desfaceti telefonul si
incercati sa-l reparati singuri veti pierde garantia produsului.
Accesorii si baterii: Numai accesoriile si bateriile aprobate de producator pot fi folosite.
Apeluri de urgenta: Asigurati-va ca telefonul este pornit si activat daca doriti sa efectuati un Apel de Urgenta la
112, apasati tasta de apel si confirmati locatia, explicati ce s-a intamplat si nu inchideti convorbirea.
Bateria si incarcarea bateriei: Se recomanda incarcarea completa a bateriei inainte de prima utilizare a
dispozitivului. Nu expuneti bateria la temperaturi mai mari de +40C. Nu aruncati bateria in foc sau la intamplare.
Returnati bateriile defecte la furnizor sau la centrele speciale ptr.colectarea bateriilor defecte.
Atentie: Nu ne asumam responsabilitatea pentru situatiile in care telefonul este folosit in alt mod decat cel prevazut
in manual. Compania noastra isi rezerva dreptul de a aduce modificari in continutul manualului fara a face public
acest lucru. Aceste modificari vor fi afisate pe siteul companiei la produsul la care se aduc modificari.
Continutul acestui manual poate fi diferit de cel existent in produs. In acest caz ultimul va fi luat in considerare.
Pentru a evita probleme care pot sa apara cu service-uri care nu mai sunt agreate de S.C. Visual Fan S.R.L. (deoarece
Visual Fan isi rezerva dreptul de a inceta colaborarea cu orice service colaborator agreat, existent pe certificatul de

83
garantie la data punerii in vanzare pe piata a lotului de produse), inainte de a duce un produs in service va rugam sa
consultati lista actualizata a service-urilor agreate existenta pe site-ul Allview la sectiunea “Suport&Service - Service
autorizat”. Pentru mai multe detalii despre produs accesati www.allviewmobile.com. Nu acoperiti antena cu mana
sau alte obiecte, nerespectarea acestei indicatii ducand la probleme de conectivitate si descarcarea rapida a bateriei.
Aplicatiile care insotesc produsul, si sunt furnizate de terte parti, pot fi oprite sau intrerupte in orice moment. S.C.
Visual Fan S.R.L. se dezice in mod explicit de orice responsabilitate sau raspundere privind modificarea, oprirea ori
suspendarea serviciilor/continutului puse la dispozitie de catre terte parti prin intermediul acestui dispozitiv.
Intrebarile sau alte solicitari legate de acest continut ori servicii se vor adresa direct furnizorilor propietari ai
acestora.
Pornire/oprire si standby dispozitiv Dupa introducerea cartelelor SIM, a cardului de memorie si a bateriei, porniti telefonul tinand apasat butonul
Pornire pentru 3 secunde. Pentru oprire, apasati lung acelasi buton si confirmati. Daca apasati scurt butonul Pornire
veti introduce telefonul in modul standby, iar pentru a reveni apasati din nou, scurt, acelasi buton.
Deblocare, ecran principal, meniu de aplicatii Pentru a debloca ecranul la revenirea din standby, glisati cu degetul din partea de jos catre partea de sus a
ecranuui. Se va afisa ecranul principal.
Paginile ecranului principal pot fi personalizate cu scurtaturi si widget-uri. In partea superioara a ecranului se
gaseste bara de notificari care contine informatii despre nivelul semnalului retelelor mobile, WiFi, Bluetooth, nivelul
bateriei, ceas si evenimente.
Pentru afisarea meniului de aplicatii, atingeti simbolul meniu din ecranul principal. Glisati pentru

84
derularea paginilor meniului principal. Atingeti iconita corespunzatoare pentru accesarea aplicatiei dorite. Folositi
butonul Inapoi pentru a reveni in ecranul principal.
Apelare Pentru apelarea unui numar, din ecranul principal, accesati aplicatia de apelare, formati numarul de telefon si
apasati tasta de apelare. Puteti apela numere direct din Jurnalul de apeluri, atingeti butonul de apelare din partea
dreapta a numarului dorit.
Pentru a raspunde unui apel glisati simbolul central catre partea dreapta, iar pentru a respinge apelul glisati catre
partea stanga.
Mesaje Pentru a crea si trimite un mesaj SMS, procedati astfel:
- Accesati meniul de aplicatii;
- Accesati aplicatia Mesagerie;
- Din partea dreapta-jos a ecranului apasati butonul de mesaj nou;
- Introduceti textul mesajului;
Nota: Puteti transforma mesajul in MMS apasand simbolul agrafa si introducand continut media: imagini,
sunete sau filme.
- In campul superior tastati numarul de telefon sau numele destinatarului;
- Apasati simbolul sageata -> din partea dreapta a campului de text pentru a trimite mesajul.

85
Contacte Accesati aplicatia Contacte din meniul de aplicatii.
Adaugare contact nou:
- Accesati aplicatia Contacte din meniul de aplicatii;
- Atingeti simbolul de adaugare + din partea dreapta-jos a ecranului;
- Alegeti memoria sau contul unde se va stoca intrarea;
- Introduceti datele contactului;
- La final, atingeti butonul Salvare.
Adaugare contact din jurnalul de apeluri:
- Din meniul de aplicatii accesati aplicatia Telefon;
- Atingeti numarul de telefonul care doriti sa il salvati;
- Atingeti butonul Contact nou;
- Alegeti memoria sau contul unde se va stoca intrarea;
- Introduceti datele contactului;
- La final, atingeti butonul Salvare.
Import/export contacte
Puteti importa sau exporta contacte intre memoriile sau conturile disponibile, astfel:
- Accesati Contacte;
86
- Apasati butonul Optiuni si selectati Importati/Exportati;
- Alegeti memoria din care se vor copia contacte;
- Alegeti memoria in care copiati contactele;
- Alegeti contactele de copiat;
- Apasati butonul Copiere;
Sincronizare contacte cu un cont
Nota: Daca nu aveti deja un cont creat, puteti crea un cont de utilizator Google necesar accesarii Google Play
store.
Puteti sincroniza contactele unui cont, astfel:
- Accesati meniul de aplicatii -> Setari -> CONTURI;
- Atingeti contul dorit; daca nu aveti un cont deja introdus, puteti introduce datele unui nou cont apasand
butonul Adaugati un cont;.
- Bifati optiunea Agenda.
Personalizare contacte cu imagine proprie
Nota: Contactelor de pe memoria SIM nu li se pot asocia sonerie sau imagine proprie.
Pentru a asocia o imagine procedati astfel:
- Deschideti Contacte;
- Atingeti numele contactului dorit;
- Din subsolul ecranului atingeti simbolul de editare contact;
- Atingeti simbolul contactului;
- Fotografiati sau alegeti o imagine din galerie pentru a fi asociata contactului.

87
Google Play store
Google Play store va pune la dispozitie o multitudine de aplicatii din cele mai diverse categorii: jocuri, afaceri,
comunicare, cumparaturi, calatorii, divertisment, carti, educatie, finante, fotografie, instrumente, media, social, sport,
stiri s.a.
La prima accesare a Google Play store vi se solicita autentificarea. Daca aveti deja un cont Google, introduceti
datele. Daca nu, apasati butonul Nou pentru a crea un cont nou si urmatii pasii afisati pe ecran.
Setari
Furnizorul de servicii poate activa implicit unele setări ale dispozitivului, astfel încât este posibil să nu puteti
schimba aceste setări.
Wi-Fi
Setari WiFi: tastati ptr. a accesa functia.
Deschideţi WiFi, se pot căuta reţelele disponibile în mod automat, reţelele fără parolă pot fi folosite direct, ptr.
retelele cu parola este neceasara introducerea parolei.
Bluetooth
Dispozitive disponibile se vor afisa automat. Pentru a va conecta cu un dispozitiv, atingeti numele respectiv si
introduceti parola de verificare.
88
Rata de utilizare a datelor
Aici puteti activa sau dezactiva traficul de date de pe telefon. Deasemeni puteti vizualiza un grafic de stare al
utilizarii conexiunii de date si configura o limita de trafic.
Mai multe
Mod avion
Setari VPN (Virtual private network)
Setari hotspot portabil: puteti utiliza telefonul pentru a crea un punct de acces wireless.
Wifi Direct
Retele mobile:
Serviciu 3G: accesati pentru a dezactiva/activa serviciul 3G.
Preferinte.
Puncte de access: vizualizati si modificati punctele de acces.
Operatori reţea.
Profiluri
Aceasta optiune va permite sa setati tonurile audio ptr. apeluri de intrare, alerta e-amil si sms, notificari. Setarile
includ: Vibratii, Volum, Tonuri audio, Notificari
Selectati General / Silentios / Intalnire / Afara. Atingeti punctul din dreapta pentru a selecta.
Economisire energie
Puteti alege unul dintre cele trei profiluri de economisire energie:
-Oprit

89
-Normal: apelare si mesagerie activate; conexiunea de date isi pastreaza starea;
-Stand-by prelungit: serviciile de apelare, sms isi pastreaza starea.
Afisare
a. Luminozitate: ajustare luminozitate;
b. Imagine de fundal: puteti alege imagini de fundal pentru ecranul principal, pentru ecranul de deblocare si
pentru meniu;
c. Auto rotire ecran: rotiti telefonul ptr. a schimba orientarea imaginii;
d. Alerta apel pierdut si SMS: bifati pentru a activa avertizarea vizuala pentru apel pierdut si SMS nou, prin
aprinderea periodica a ecranului. De asemenea, veti primi notificari despre apelurile pierdute si mesajele necitite sub
forma de iconite animate in ecranul de blocare;
e. Inactivitate: timp asteptare pana la intrarea in modul stand-by;
f. Dimensiune font.
Memorie
1.Vizualizare memorie interna si card SD
2.Dezinstalare sau formatare card SD
Acumulator
Afisare informatii despre starea de incarcare a bateriei si despre utilizarea acesteia.
Aplicatii
Gestionare aplicatii: Gestionare si stergere aplicatii instalate.
90
Servicii de localizare
Acces la locatie: permite aplicatiilor sa utilizeze informatii despre locatie.
Sateliti GPS: activare/dezactivare utilizare sateliti GPS
Google Location Service: permiteti trimiterea datelor anonime de localizare. Permiteti utilizarea datelor din
resurse ca retele WiFi sau mobile pentru a determina locatia aproximativa.
Securitate
Blocarea ecranului. Puteti alege una din metodele: Fara, Glisare, Model, PIN, Parola.
Info proprietar: afisati date prestabilite in ecranul de blocare.
Activati blocarea cardului SIM.
Parole vizibile: afisare parole in timp ce introduceti.
Administratori dispozitiv.
Surse necunoscute: bifati pentru a permite instalarea aplicatiilor din surse necunoscute.
Acreditari de incredere.
Instalati de pe cardul SIM.
Limba şi metoda de introducere
1. Selectarea Limba: Include toate limbile de pe telefon
2. Verificator ortografic
3. Dictionar personalizat: adăugare sau stergere cuvinte la icţionarul particularizat.
4. Metoda de introducere: selectati modelul de tastatura dorit
5. Setari individuale tastaturi

91
6. Setari cautare vocala
Copie de rezerva si reset
Puteti crea o copie de rezerva a datelor sau puteti efectua o resetare a telefonului la setarile de fabrica.
Conturi
Gestionare conturi si setari de sincronizare.
Data si ora
1. Automat: utilizaţi data şi ora oferite de reţea sau de modulul GPS.
2. Fus orar automat: bifati pentru a configura automat fusul orar.
3. Setare data: glisati ziua/luna/anul pentru a seta data.
4. Setare ora: glisati ora/minutul/Am/Pm pentru a seta ora.
5. Selectare fus orar: electaţi fusul orar în funcţie de locatia în care vă aflaţi. Pentru Romania, selectati
“GMT+02:00”.
6. Folosiţi formatul 24 ore: pornit/oprit.
7. Selectare format data: există 3 tipuri de formate, puteţi alege de la: luna-zi-an, zi-lună-an şi an-lună-zi, printre
care an-lună-zi este setarea implicită.
Planificare pornire/oprire
Puteţi seta timpul de pornire sau oprire automata a telefonului.
Planificare mod avion
Setari de pornire si oprire a modului avion la ore prestabilite.

92
Accesibilitate
1. Butonul de Power inchide apeluri
2. Intarziere atinge-si-mentine
3. Instalare scripturi web
Optiuni dezvoltator
Setari si optiuni necesare deszvoltatorilor de aplicatii Android.
Despre telefon
1.Stare telefon
2.Informatii legale
3.Versiuni de software

93
DECLARATIE DE CONFORMITATE Nr.1368
Noi S.C.Visual Fan S.R.L, cu sediul social in Brasov, Str. Brazilor nr.61, CP 500313 Romania, inregistrata la Reg. Com. Brasov sub nr.
J08/818/2002, CUI RO14724950, in calitate de importator, asiguram, garantam si declaram pe proprie raspundere, conform prevederilor
art. 4 HG nr.1.022/2002 privind regimul produselor si serviciilor, care pot pune in pericol viata si sanatatea, securitatea si protectia
muncii, ca produsul P5 Energy marca ALLVIEW, nu pune in pericol viata, sanatatea, securitatea muncii, nu produce impact negativ
asupra mediului si este in conformitate cu:
-Directiva nr. 2011/65/UE privind restrictiile de utilizare a anumitor substante periculoase in echipamentele electrice si electronice.
-Directiva privind echipamente radio si de telecomunicatii R&TTE 1999/5/CEE (HG 88/2003)
-Directiva privind asigurarea utilizatorilor de echipamente de joasa tensiune 73/32/CEE , modificata de Directiva 93/68/CEE
(HG457/2003)
-Directiva cu privire la compatibilitatea electromagnetica 89/336/CEE, modificate de Directiva 92/31/CEE si 93/68/CEE (HG982/2007);
RoHS: EN50581:2012
-Cerintele de siguranta ale Directivei Europene 2001/95/EC si a standardelor EN 60065:2002/A12:2011 si EN 60950-1:2006/ A1:2010
/A11:2009/A12:2011, referitor la nivelul de decibeli emis de aparatele comercializate.
Produsul a fost evaluat conform urmatoarelor standarde:
-Sanatate: EN 50360:2001, EN 50361; EN 62209-1 : 2006
-Siguranta : EN 60950- 1 : 2001 +A11:2004; EMC EN 301 489- 01 V1.6.1 (09-2005)
EN 301 489- 07 V1.3.1 (11-2005); EN 301 489- 17 V1.2.1 (08-2002)
-Spectru radio: EN 301 511 V9.0.2 (03-2003);EN 300 328 V1.7.1 (10-2006)
Procedura de evaluare a conformitatii a fost efectuata in conformitate cu Directiva 1999/5/CEE ( Anexei II a HG nr. 88/2003),
documentatia fiind depozitata la S.C. Visual Fan S.R.L., Brasov str. Brazilor nr.61, CP 500313 ,Romania si va fii pusa la dispozitie la
cerere. Procedura de evaluare a conformităţii produsului a fost îndeplinită cu participarea următoarelor organisme: Phoenix Testlab
GmbH
Produsul are aplicat marcajul CE. Declaratia de conformitate este disponibila la adresa www.allviewmobile.com.
CE0700
SAR: 0,687 W/kg Director
Brasov Cotuna Gheorghe
15.07.2015

94
SIGURNOSNE MERE VAŽNO! Molimo vas da pažljivo pročitate ova uputstva da ih sledite u opasnim slučajevima.
Bezbednost u vožnji. Preporučuje se da ne koristite mobilni telefon dok vozite. Ako treba da ga koristite, uvek
koristite sistem "Slobodne ruke" dok vozite.
Isključite mobilni telefon kad ste u avionu.
Smetnje prouzročene od strane mobilnih telefon štete sigurnosti avionskog prometa, i tako, ilegalno je da ga
koristite u avionu. Molimo vas da se osigurate da je mobilni telefon isključen onda kada ste u avionu. Zatvorite
mobilni telefon u zonama gde se obaljaju radovi brušenja.
U bolnici: Onda kada koristite telefon u bolnici, trebate da poštujete relevantne norme koje bolnica specifikuje.
Bilo koja smetnja prouzročena od strane wireless (bežičnih) opreme može naškoditi performantnosti telefona.
Ovlašteni servisi: Samo ovlašteni service mogu popravljati mobilne telephone: Ako otvorite telefon i pokušate da
ga sami popravite izgubićete garanciju proizvoda.
Dodaci i baterije: Mogu da se koriste samo dodaci i baterije koje odobrava proizvođač..
Hitni pozivi: osigurajte se da je telefon uključen i aktiviran ako želite nazvati Hitan poziv 112, i to tako da ćete
pritisnuti tipku za nazivanje i potvrditi lokaciju, objasniti što se dogodilo i zatim ne trebate da prekinete razgovor.
Baterija i punjenje baterije: Preporučuje se kompletno napuniti bateriju pre prvog korišćenja aparata. Nemojte da
izlagate bateriju temperaturama većim od +40°C. Nemojte da bacate bateriju u vatru ili nasumce bilo gde. Vratite
pokvarene baterije nabavljaču ili u specijalizovane centre za sakupljanje pokvarenih baterija.
Pažnja: Ne preuzimamo odgovornost za situacije kada se telefon koristi na drugi način od onog kako je
predviđeno u priručniku. Naša kompanija ima pravo napraviti promene u sadržaju priručnika bez da to objavi. Te
promene biće stavljene na internetsku stranicu naše kompanije, kod proizvoda kod kojeg se te promene vrše.
Sadržaj ovog priručnika može da bude različit od sadašnjeg sadržaja koji se odnosi na proizvod. U takvom slučaju,

95
uzmeće u obzir poslednji sadržaj.
Da biste izbegli probleme koji se mogu pojaviti sa servisima koji nisu odobreni od strane S.C. Visual Fan S.R.L. (jer
Visual Fan zadržava pravo da raskine saradnju sa bilo kojim odobrenim suradničkim servisom, koji se nalazi na
certifikatu za garanciju na dan plasiranja dotičnih proizvoda na tržište), pre nego što se proizvod donese u servis
molimo vas da proverite ažurirani spisak odobrenih servisa, koji spisak možete naći na stranici Allview pod
“Suport&Service – Ovlašćeni servis”.
Za više detalja o proizvodu posetite www.allviewmobile.com . Nemojte pokrivati antenu rukom ili drugim objektima
Nepoštovanje dovodi u pitanja povezivanja i brzog pražnjenja baterije .
Sve aplikacije koje treće strane, a koji su ugrađeni u ovaj uređaj, može biti izmenjen i / ili prekinuti u svakom
trenutku. Vizuelna Ventilator doo neće biti odgovoran na bilo koji način za modifikacije na usluga ili sadržaju ovih
aplikacija. Svaki zahtev ili pitanje u vezi sa aplikacijama trećih strana može da bude upućena vlasnicima ovih
aplikacija.
Uključivanje/Isključivanje i uređaj standby
Nakon unošenja SIM kartica, kartice za memoriju i nakon unošenja baterije, uključite telefon tako da držite
pritisnutu dugme Uključivanje za 3 sekundi. Za isključivanje, držite pritisnutu isto dugme i potvrdite tu naredbu. .
Odblokiranje, glavni ekran, meni za aplikacije
Kako biste otpustili ekran pri povratku iz standbya, pređite prstom od dna do vrha ekrana. Pojaviće se glavni
ekran.
Stranice glavnog ekrana mogu biti personalizirane s kraticama i widget-ima. U gornjem delu ekrana nalazi se
crta s vestima koje sadrže informacije o nivou signala mobilnih mreža, WiFi, Bluetooth, o tome koliko je puna
baterija, sat zbivanja.

96
Za prikazivanje menija s aplikacijam, pritisnite simbol meni na glavnom ekranu. Klizite kako
bi se prikazale stranice glavnog menija. Pritisnike odgovarajuću sliku za pokretanje željene aplikac ije. Koristite
tipke Nazad da bi se vratili na glavni ekran.
Pozivanje
Kako biste nazvali jedan broj, s glavnog ekrana, uključite aplikaciju za pozivanje, birajte telefonski broj i
pritisnite dirku za pozivanje. Možete birati brojeve direktno iz Dnevnika poziva, pritisnite dirku za nazivanje s desne
strane željenog broja.
Da odgovorite na poziv prevucite ikonu u pravu , i da odbije poziv prevucite ikonu na levo .
Poruke
Kako biste kreirali i poslali SMS poruku, postupite kako sledi:
- Otvorite meni s aplikacijama;
- Otvorite aplikaciju Poruke;
- S desne strane – dole pritisnite dirku za novu poruku;
- Unesite tekst poruke;
Napomena: Možete da pretvorite poruku u MMS tako da pritisnete simbol ukosnica i unesete medijski
sadržaj: slike, zvukove ili filmove.
- U gornjem polju upišite telefonski broj ili ime primaoca poruke;
- Pritisnite znak strelica -> s desne strane polja teksta kako biste poslali poruku.

97
Kontakti
Otvorite aplikaciju Kontakti iz menija za aplikacije.
Dodavanje novog kontakta:
- Otvorite aplikaciju Kontakti iz menija za aplikacije;
- Pritisnite znak za dodavanje + s desne strane dole na ekranu;
- Odaberite memoriju ili konto gde ćete da pohranite ulazak;
- Unesite podatke kontakta;
- Na kraju, pritisnite dirku Pohrani.
Dodavanje kontakta na popis poziva:
- U meniju s aplikacijama otvorite aplikaciju Telefon;
- Pritisnite telefonski broj koji želite da pohranite;
- Pritisnite dirku Novi kontakt;
- Odaberite memoriju ili račun gde ćete da pohranite ulaz;
- Unesite podatke kontakta;
- Na kraju, pritisnite dirku Pohrani.
Unošenje/Iznošenje kontakata
Možete uneti ili izneti kontakte iz memorija ili raspoloživih konta, na sledeći način:
- Otvorite Kontakte;
- Pritisnite dirku Opcije i odaberite Unesi/Iznesi;

98
- Odaberite memoriju iz koje želite da iznesete kontakte;
- Odaberite memoriju u koju želite da pohranite kontakte;
- Odaberite kontakte za prepisivanje;
- Pritisnite dirku Prepiši.
Sinkroniziranje kontakata s novim kontom
Napomena: Iako nemate otvorenu do sada korisničku adresu, možete otvoriti jedan korisnički račun na
Google-u potreban za otvaranje virtualne prodavnice aplikacija. Možete da sinkronizujete kontakte jednog računa, i
to kako sledi:
- Otvorite meni za aplikacije -> Podešavanja -> RAČUNI;
- Pritisnite željeno dugme; ako nemate već unesen račun (adresu), možete uneti podatke novog kontakta i to
tako da pritisnete dugme Dodaj novi konto;.
- Odaberite opciju Agenda.
Personaliziranje kontakata s ličnom slikom
Napomena: Kontaktima koji se nalaze u SIM memoriji mogu im se dodati zvonjave ili lična slika.
Da biste dodali specifičnu zvonjavu nekoj slici postupite kako sledi:
- Otvorite Kontakte;
- Pritisnite ime željenog kontakta;
- U donjem delu ekrana pritisnite znak za editiranje (otvaranje) kontakta;
- Pritisnite znak kontakta;
- Uslikaj ili odaberite jednu sliku iz galerije kako biste je pridodali kontaktu.

99
Google Play store
Google Play store stavlja vam na raspolaganje mnogobrojne apliakcije iz najrazličitijih kategorija: igre,
poslovi, komunikacija, kupovina, putovanja, razonoda, knjige, edukacija, finansije, fotografije, instrumenti, mediji,
socijalne teme, sport, vesti itd. Kod prvog otvaranja virtualne prodavnice zatražiće se od vas da se autentifikujete.
Ako već imate Google adresu, unesite podatke. Ako nemate, pritisnite tipku Novo da biste otvorili novu adresu i
sledite korake koji vam se pojavljuju na ekranu.
Podešavanja
Dobavljač usluga može implicitno aktivirati pojedina podešavanja uređaja, tako da je moguće da ne možete da
menjate dotična podešavanja.
Wi-Fi
Podešavanja WiFi: pritisnite da biste pokrenuli ovu funkciju.
Otvorite WiFi, mogu se automtaski tražiti raspoložive mreže, mreže bez šifre mogu da se koriste direktno, za
mreže sa šifrom potrebno je da unesete šifru.
Bluetooth
Raspoloživi uređaji prikazaće se automatski. Da biste se spojili s jednim uređajem, pritisnite dotično ime i
unesite šifru za proveru.
100
Rata korišćenja podataka
Ovde možete da aktivirate ili dezaktivirate promet podataka s telefona. Takođe, možete da vizualizovati
grafički prikaz stanja korišćenja spajanja podataka i može se konfigurisati granica prometa.
Više
Avionski način
Podešavanja VPN (Virtual private network)
Podešavanja hotspot prenosiv: možete koristiti telefon da biste otvorili wireless tačku.
Wifi Direktno
Mobilne mreže:
Usluga 3G: otvorite kako biste aktivizirati/dezaktivizirati uslugu 3G.
Preferencije.
Tačke za pristup: vizualizirajte i promenite tačke za pristup.
Operatori mreža.
Profili
Ova opcija dopušta da podešavate audio tonove za ulazne pozive, upozorenja da je stigao e-mail i poruka sms,
notifikacije. Podešavanja uključuju: Vibracije, Volum, Audio tonove, Notifikacije.
Odaberite Generalno / Nemo / Sastanak / Vani. Pritisnite tačku s desne strane kako biste odabrali.
Ušteda energije
Možete odabrati jedan od tri profila za uštedu električne energije:
- Zaustavljeno

101
-Normalno: pozivanje i aktiviranu opciju za dobivanje poruka; spojena baza podataka zadržava svoje stanje;
-Produženi Stand-by: usluge pozivanja i sms usluge zadržavaju svoje stanje.
Prikazivanje
a. Svetlost: podešavanje svetlosti;
b. Slika na pozadini: možete odabrati slike za pozadinu za glavni ekran, za ekran za deblokiranje i za meni;
c. Auto okretanje ekrana: rotirajte telefon da biste promenili smer (usmerenost) slike ;
d. Izgubljeni poziv i SMS: označite kako biste aktivizirali vizualnu opomenu za izgubljeni poziv i novu SMS
poruku, i to periodičnim osvetljavanjem ekrana. Takođe, dobićete pismenu notifikaciju o izgubljenim pozivima i
nepročitanim porukama u obliku animirane sličice (ikonice) na ekranu za blokiranje;
e. Kada nije aktivno: vreme čekanja do ulaza u stand-by modul;
f. Dimenzije (veličina) slova.
Memorija
1.Vizualiziranje interne memorije i kartica SD
2.Dezinstalacija ili formatiranje SD kartice
Akumulator
Prikaz informacije o statusu punjenosti baterije i njenom korišćenju.
Aplikacije
Upravljanje aplikacijama: Upravljanje i brisanje instaliranih aplikacija.
Usluge lokalizacije
Pristup lokaciji: dopušta aplikacijama da koriste informacije o lokaciji.

102
Sateliti GPS: aktiviziranje/dezaktiviziranje korištenja GPS satelita.
Google Location Service: dopušta slanje anonimnih podataka za lokalizaciju. Dopušta korišćenje podataka iz
resursi kao što su mreže WiFi ili mobilne mreže da bi odredila otprilike lokaciju.
Bezbednost
Blokiranje ekrana. Možete odabrati jednu od metoda: Bez, Klizanje, Model, PIN, PIN code.
Informacije o vlasniku: prikažite unapred određene podatke na ekranu za blokiranje.
Aktivizirajte blokiranje SIM kartice.
Vidjlive šifre (kodovi): prikazivanje koda dok ga unosite.
Administratori uređaja.
Nepoznati izvori: označite kako bi dopustili instaliranje aplikaciija iz nepoznatih izvora.
Akreditacije poverenja
Instalirajte sa SIM kartice.
Jezik i metoda unošenja
1. Odaberite Jezik: Uključuje sve jezike na telefonu
2. Pravopisni verifikator
3. Personalizirani rečnik: dodavanje ili brisanje reči iz ličnog rečnika.
4. Metoda za unošenje: odaberite željeni način tastature
5. Individualna podešavanja tastature
6. Podešavanja traženja glasa

103
Kopija za rezervu i reset
Možete kreirati rezervnu kopiju podataka ili možete napraviti resetiranje telefona u odnosu na podešavanja iz
fabrike.
Kontovi
Upravljanje kontovima i podešavanja tajminga.
Datum i sat
1. Automatski: koristite datum i vreme koje nudi mreža ili GPS funkcija.
2. Automatsko prikazivanje vremena geografske zone: označite da bi automatski podesili vreme (sat).
3. Podešavanje datuma: klizite po danu/mesecu/godini da biste podesili datum.
4. Podešavanje sata: klizite po satu/minuti/AM/PM da biste podesili vreme (sat).
5. Podešavanje vemenske zone: odaberite vremensku zonu zavisno o mestu gde se nalazite. Za Rumuniju,
odaberite “GMT+02:00”.
6. Koristite format 24 sata: uključeno/isključeno.
7. Odaberite format datuma: postoje 3 vrste formata, možete odabrati između: mesec-dan-godina, dan-mesec-
godina şi godina-mesec-dani, među kojima je godina-mesec-dan standardno.
Planiranje uključiti/isključiti
Možete da podesite vreme početka ili automatskog zaustavljanja telefona.

104
Planiranje načina u avionu
Podešavanje start i stop modula avion u predefinisanim vremenima
Pristup
Dirka Power zatvara pozive
Kašnjenje pritisni-i-zadrži
Instalacija web pisma
Opcije proizvođača
Podešavanja i potrebne opcije za one koji razvijaju Android aplikacije.
O telefonu
1.Stanje telefona
2. Pravne informacije
3.Verzije softwarea

105
DEKLARACIJA O USKLAĐENOSTI Br.1368
Mi, SC Visual Fan SRL, sa sedištem u društvenom Brasov, 61st Brazilor ulica, poštanski broj 500313 Rumunija, registrovan je u
Registru Commerce Brasov pod br. J08 / 818/2002, CUI RO14724950, kao uvoznik, osigurati, garanciju i proglasi na sopstvenu
odgovornost u skladu sa čl. 4 HG nr.1.022 / 2002 u vezi režima proizvoda i usluga, što bi moglo da ugrozi zdravlje život i zdravlje,
bezbednost i zaštitu rada, da P5 Energy, ALLVIEW proizvod ne ugrozi život, bezbednost rada, ne izaziva neželjena uticaji na životnu
sredinu i se prema:
/ UE Direktiva -The 2011/65 u vezi ograničenja na korišćenje nekih opasnih materija u] Electonic i električnih uređaja.
-The Direktiva pogledu radio i telekomunikacionih Opreme R & TTE 1999/5 / CEE (HG) 88/
-The Direktiva u vezi sa ensurance niskonaponskih opreme korisnicima 73/32 / CEE, modifikovana 93/68 / CEE (HG457 / 2003)
Direktiva.
-The Direktiva pogledu elektromagnetske kompatibilnosti 89/336 / CEE, izmenjena 92/31 / CEE si 93/68 / CEE (HG982/2007);
RoHS Direktiva: EN50581: 2012
-The Sigurnosni zahtjevi Evropske direktive 2001/95 / EC i na EN 60065: 2002 / A12: 2011 SI EN 60950-1: 2006 / A1: 2010 /
A11: 2009 / A12: 2011 standardi, u vezi limita nivoa decibela od komercijalizovana uređaja.
Proizvod se ocenjuje u skladu sa sledećim standardima:
-Zdravstvenim: EN 50360: 2001, EN 50361; EN 62209-1: 2006
-Sigurnosna: EN 60950- 1: 2001 + A11: 2004; EMC EN 301 489- 01 V1.6.1 (09-2005)
EN 301 489- 07 V1.3.1 (11-2005); EN 301 489- 17 V1.2.1 (08-2002)
-Radio Spektar: EN 301 511 V9.0.2 (03-2003) EN 300 328 V1.7.1 (10-2006)
Procedura saglasnosti procenjivanje izvršeno je prema 1999/5 / CEE Direktiva (u Aneksu II od HG br 88/2003.) Dokumentacija biti
na SC Visual Fan SRL, Brašov, 61. Brazilor ulicu, poštanski broj 500313, Rumunije u tome će biti stavljen na raspolaganje na
zahtev.Postupak procenjivanje usaglašenosti proizvoda je ispunjena uz učešće sledećih institucija: Phoenix Testlab GmbH
Proizvod ima oznaku CE primenjuje. Deklaracija usaglašenosti je dostupan na www.allviewmobile.com.
CE0700 Direktor
SAR: 0,687 W/kg Gheorghe Cotuna
Brasov
15.07.2015

106
SPECIFICATIONS / TECHNISCHE DATEN / ESPIFICACIONES /
MŰSZAKI ADATOK / SPECIFICAZIONI / TECHNISCHE GEGEVENS /
DANE TECHNICZNE / SPECIFICATII / SPECIFIKACIJE
General/General/General/általános/Generale/Algemeen/ Ogólne /General/Opšti
Language/Sprache/Idioma/Nyelv/Lingua/Taal/Język/Limba/Jezik
RO, EN, DE, HU, NL, PL etc.
Network/Mrezha/Síť/Netzwerk/Hálózat/Netwerk/Sieć/Retea/Mreža
2G: 850/900/1800/1900 MHz
3G: UMTS 900/1900/2100 MHz
4G: FDD 800/1800/2600 MHz
Dual Sim /2 Micro sim/2 Micro sim/2 Micro-sim/2 Micro sim/2 Micro sim/2 Micro sim/2 Micro sim/2 Micro sim
Yes/Ja/Sí/Igen/Sì/Ja/Tak/Da/Da
Dimensions/ Abmessungen/Dimensiones/Méretek/Dimensioni/Wymiary/Dimensiuni/Dimenzije
Dimensions/ Abmessungen/Dimensiones/Méretek/Dimensioni/Wymiary/Dimensiuni/Dimenzije
134,2x66,2x11,2 mm
Weight/Gewicht/Peso/Súly/Peso/Gewicht/Waga/Greutate/Težina
156,5g
Display/Bildschirm/Display/ Kijelző/Schermo/ Tentoonstelling/ Wyświetlacz
Resolution/Auflösung/Resolución/Felbontás/Risoluzione/Resolutie/ Rozdzielczość /Rezolutie/Rezolucija
4,5” 854x480 px IPS LCD
TDD 2600 MHz

107
/Display/Displej Touchscreen/Touchscreen/Pantalla Táctil/Érintőképernyő/Touch Screen/Touch Screen/Ekran Dotykowy/Touchscreen/Ekran osetljiv na dodir
Capacitive touchscreen multitouch OGS / Kapazitiven Touchscreen Multitouch OGS/ Pantalla táctil capacitiva multitouch OGS/ Kapacitív érintőképernyő multitouch OGS/ Touchscreen capacitivo multitouch OGS /Capacitieve touchscreen multitouch OGS/ Pojemnościowy ekran dotykowy multitouch OGS/ Touchscreen capacitive multitouch OGS/ Capacitive touchscreen multitouch OGS
Soda Lime Glass Yes/Ja/Sí/Igen/Sì/Ja/Tak/Da/Da
Characteristics/ Charakteristik/ Características/Jellemzők/ Karakteristieken/ Charakterystyka/Caracteristici/Karakteristike
Operating system/Betriebssystem/Sistema operativo/Operációs rendszer/Sistema Operativo/Besturingssysteem/System operacyjny/Sistem de operare/Operativni sistem
Android 5.1, Lollipop
Processor/Prozessor/Procesador/Feldolgozó/Processore/Bewerker/Procesor/Procesor/Processor
Cortex®-A53 64-bit 1GHz Quad-Core
Graphic processor/Grafikprozessor/ procesador gráfico/Grafikus processzor/Processore grafico/Grafische processor/ procesor graficzny/Procesor graphic/Grafički procesor
Mali T720

108
GPS Yes/Ja/Sí/Igen/Sì/Ja/Tak/Da/Da
AGPS Yes/Ja/Sí/Igen/Sì/Ja/Tak/Da/Da
Flash memory/Flash-Speicher/Memoria flash/Flashmemória/Memoria flash/Flash-geheugen/Pamięć flash/Memorie flash/Fleš memorija
16 GB
RAM memory/RAM-Speicher/Memoria RAM/RAM memória/Memoria RAM/RAM-geheugen/Pamięć RAM/Memorie RAM/RAM memorija
1 GB
Widget/Widget/Widget/Widget/Widget/ Widget/Widget/Widget/Widget/
Yes/Ja/Sí/Igen/Sì/Ja/Tak/Da/Da
Multitasking/Multitasking/Multitarea/ Többfeladatos/Multitasking/Multitasking/ Wielozadaniowość/Multitasking/Multitasking
Yes/Ja/Sí/Igen/Sì/Ja/Tak/Da/Da
FM radio/FM-Radio/radio FM/FM rádió/radio FM/FM-radio/radio FM/Radio FM/FM Radio
Yes/Ja/Sí/Igen/Sì/Ja/Tak/Da/Da
Sound/Klingen/Sonar/Hang/Suono/Klinken/Dźwięk/Sunet/Zvuk
3.5mm jack/3,5 mm Klinkenbuchse/Jack de 3,5 mm/3,5 mm-es jack/Jack da 3,5 millimetri/3,5 mm jack/Jack 3,5 mm/Jack 3.5 mm/3,5 mm Priključak
Yes/Ja/Sí/Igen/Sì/Ja/Tak/Da/Da
Speaker/Sprecher/Altavoz/Hangszóró/Altoparlante/Spreker/Głośnik/Difuzor/Zvučnik
Yes/Ja/Sí/Igen/Sì/Ja/Tak/Da/Da
DTS Yes/Ja/Sí/Igen/Sì/Ja/Tak/Da/Da

109
Video/Video/Vídeo/Videó/Video/Video/Wideo/Video/Video
Render/Machen/Reproducir/Render/Rendere/Weergeven/Oddać/Redare/Učiniti
FullHD 1080p
Internet render/Internet Machen/Internet render/Internet render/Internet render/ Internet maken/Internet renderowanie/Redare internet/Internet render
FullHD 1080p
Camera/Kamera/Cámara/Kamera/Macchina fotografica/Camera/Kamera/Camera/Kamera
Camera resolution/ Kamera-Auflösung/Resolución de la cámara/Kamera felbontása/ risoluzione fotocamera/ camera resolutie/ rozdzielczość kamery/Rezolutie camera/ Rezolucija kamere
5 MP AF / 2 MP
Video recording/Videoaufnahme/ Grabación de video/Videó felvétel/ Registrazione video/Video-opname/Nagrywanie wideo/Inregistrare video/Video snimanje
1280 x 720p HD
Touchfocus/Touchfocus/Touchfocus/Touchfocus/Touchfocus/Touchfocus/Touchfocus/Touchfocus/Touchfocus
Yes/Ja/Sí/Igen/Sì/Ja/Tak/Da/Da
Face detection
Yes/Ja/Sí/Igen/Sì/Ja/Tak/Da/Da
High Dynamic Range(HDR)
Yes/Ja/Sí/Igen/Sì/Ja/Tak/Da/Da
Gesture shot
Yes/Ja/Sí/Igen/Sì/Ja/Tak/Da/Da
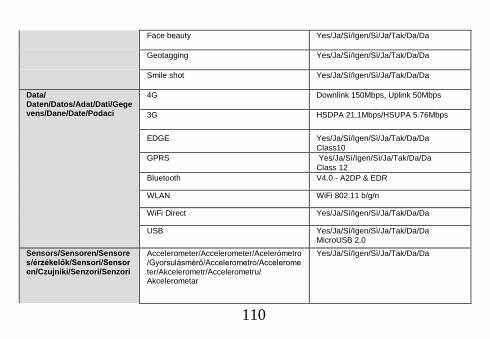
110
Face beauty
Yes/Ja/Sí/Igen/Sì/Ja/Tak/Da/Da
Geotagging
Yes/Ja/Sí/Igen/Sì/Ja/Tak/Da/Da
Smile shot
Yes/Ja/Sí/Igen/Sì/Ja/Tak/Da/Da
Data/ Daten/Datos/Adat/Dati/Gegevens/Dane/Date/Podaci
4G Downlink 150Mbps, Uplink 50Mbps
3G HSDPA 21,1Mbps/HSUPA 5.76Mbps
EDGE Yes/Ja/Sí/Igen/Sì/Ja/Tak/Da/Da
Class10
GPRS Yes/Ja/Sí/Igen/Sì/Ja/Tak/Da/Da
Class 12
Bluetooth V4.0 - A2DP & EDR
WLAN WiFi 802.11 b/g/n
WiFi Direct Yes/Ja/Sí/Igen/Sì/Ja/Tak/Da/Da
USB Yes/Ja/Sí/Igen/Sì/Ja/Tak/Da/Da MicroUSB 2.0
Sensors/Sensoren/Sensores/érzékelők/Sensori/Sensoren/Czujniki/Senzori/Senzori
Accelerometer/Accelerometer/Acelerómetro/Gyorsulásmérő/Accelerometro/Accelerometer/Akcelerometr/Accelerometru/ Akcelerometar
Yes/Ja/Sí/Igen/Sì/Ja/Tak/Da/Da

111
Proximity sensor/Näherungsschalter/Sensor de proximidad/Közelség érzékelő/Sensore di prossimità/Nabijheids sensor/Czujnik zbliżeniowy/Senzor de proximitate/Senzor blizine
Yes/Ja/Sí/Igen/Sì/Ja/Tak/Da/Da
Light sensor/Lichtsensor/Sensor de luz/Fényérzékelő/Sensore di luce/Lichtsensor/Czujnik światła/Senzor de lumina/Svetlosni senzor
Yes/Ja/Sí/Igen/Sì/Ja/Tak/Da/Da
Compass/Kompass/Brújula/Iránytű bussola/Kompas/Kompas/Compas/Kompas
Yes/Ja/Sí/Igen/Sì/Ja/Tak/Da/Da
Internet Social networking/Soziales Netzwerk/Redes Sociales/Social networking/Il social networking/Sociaal netwerken/Sieć społecznościowa/Retele de socializare/Socijalna mreža
Yes/Ja/Sí/Igen/Sì/Ja/Tak/Da/Da
E-mail Yes/Ja/Sí/Igen/Sì/Ja/Tak/Da/Da
Applications/Anwendungen/Aplicaciones/Alkalmazások/Applicazioni/Toepassingen/Aplikacje/Aplicatii/Aplikacije
Yes/Ja/Sí/Igen/Sì/Ja/Tak/Da/Da
Hotspot Tethering Wifi / Bluetooth / USB

112
Battery/Batterie/Batería/Akkumulátor/Batteria/Batterij/Bacteria/Acumulator/Baterija
Capacity/Kapazität/Capacidad/Kapacitás/Capienza/Hoedanigheid/Pojemność/Capacitate/Kapacitet
Li-Pol 4000 mAh
cargador/A töltő típusa/Caricabatterie tipo/Het type oplader/Typ ładowarki/Tip incarcator/Tip punjač
Standby/Stehen zu/En espera/Készenlét/Stand-by/Standby/Tryb czuwania/ Timp asteptare/Pričekati
< 400 h
Conversation/Unterhaltung/Conversación/Beszélgetés/Conversazione/Conversatie/Rozmowa/Timp convorbire/Razgovor
< 1140 min
Box content/Packungsinhalt/Contenido de la caja/A doboz tartalma/Contenuto della confezione/Inhoud van de doos/Zawartość zestawu/Continut pachet/Bok content
headphones,blister/ Telefon, Bedienungsanleitung, Garantiekarte, Netzteil, USB-
fejhallgató, blister/ Telefono, manuale, scheda di garanzia, alimentatore, cavo dati USB,
Charger type/Ladegerät-Typ/Tipo de DC 5V, 1000mA
Phone, user manual, warranty card, power adapter, USB data cable,
Datenkabel, Kopfhörer, Blister/ Teléfono, manual de usuario, tarjeta de garantía, adaptador de corriente, cable de datos USB, auriculares, blister/ Telefon, használati utasítás, garancia, hálózati adapter, USB adatkábel,
cuffie, blister/ Telefoon, handleiding, garantiekaart, power adapter, USB-kabel, koptelefoon, blister/ Telefon, instrukcja obsługi, karta gwarancyjna, zasilacz, kabel USB, słuchawki, blister/ Telefon, manual de utilizare, certificat de garantie, alimentator, cablu de date USB, căști, blister/ Telefon , uputstvo za upotrebu, garantni list , adapter za napajanje , USB kabl , slušalice , blister

113
English (en)
Google, Android, Google Play and other marks are trademarks of Google Inc.
German (de)
Google, Android, Google Play und andere Marken sind Marken von Google Inc.
Espanyol (es)
Google, Android, Google Play y otras marcas son marcas comerciales de Google Inc.
Hungarian (hu)
A Google, az Android, a Google Play valamint az egyéb jelölések a Google Inc. védjegyei.
Italiano (it)
Google, Android, Google Play e altri marchi sono marchi di Google Inc.
Dutch (nl)
Google, Android, Google Play en andere merken zijn handelsmerken van Google Inc.
Polish (pl)
Google, Android, Google Play i inne marki są znakami towarowymi Google Inc.
Romanian (ro)
Google, Android, Google Play şi alte mărci sunt mărci comerciale deţinute de Google Inc.
Serbian (sr)
Google, Android, Google Play i drugi znakovi su žigovi kompanije Google Inc.