
Alcatel-Lucent 5620 SAM LogToFile 2.3.0.0 Technology · PDF filev Release notes v...
96
IBM Tivoli Netcool Performance Manager Wireline Component Document Revision R2E1 Alcatel-Lucent 5620 SAM LogToFile 2.3.0.0 Technology Pack Installation and User Guide
Transcript of Alcatel-Lucent 5620 SAM LogToFile 2.3.0.0 Technology · PDF filev Release notes v...

IBM Tivoli Netcool Performance ManagerWireline ComponentDocument Revision R2E1
Alcatel-Lucent 5620 SAM LogToFile2.3.0.0 Technology Pack Installationand User Guide
���

NoteBefore using this information and the product it supports, read the information in “Notices” on page 83.
© Copyright IBM Corporation 2014.US Government Users Restricted Rights – Use, duplication or disclosure restricted by GSA ADP Schedule Contractwith IBM Corp.

Contents
Installing and Using Alcatel-Lucent 5620SAM LogToFile 2.3.0.0 Technology Pack . vIntended audience . . . . . . . . . . . . vTivoli Netcool Performance Manager - WirelineComponent. . . . . . . . . . . . . . . vService Management Connect . . . . . . . . viTivoli technical training . . . . . . . . . . viiSupport information . . . . . . . . . . . viiConventions used in this publication . . . . . . vii
Typeface conventions . . . . . . . . . . vii
Chapter 1. Alcatel-Lucent 5620 SAMLogToFile 2.3.0.0 Technology Packoverview . . . . . . . . . . . . . . 1UBA structure . . . . . . . . . . . . . . 1Dynamic models . . . . . . . . . . . . . 1Data collection model . . . . . . . . . . . 2
Chapter 2. Devices and services . . . . 5Alcatel-Lucent 5620 SAM server compatibility . . . 5Supported devices . . . . . . . . . . . . 5Alcatel-Lucent 5620 SAM LogToFile services . . . . 6Bulk input file formats . . . . . . . . . . . 7Bulk adapter design files . . . . . . . . . . 8
Chapter 3. Installation and configurationof IBM InfoSphere Information Serverand related components. . . . . . . . 9Planning for IBM InfoSphere Information Serversoftware installation . . . . . . . . . . . . 9Installing IBM InfoSphere Information Server 8.7software . . . . . . . . . . . . . . . . 9
Installing IBM InfoSphere Information Server byusing the wizard (graphical mode) . . . . . . 9Installing IBM InfoSphere Information Serverclient by using the wizard (graphical mode) . . 13
Installing Apache ActiveMQ . . . . . . . . . 18Installing Oracle 11g client . . . . . . . . . 19
Chapter 4. Configure the InfoSphereInformation Server components . . . . 21Opening the IBM InfoSphere Information Serverweb console . . . . . . . . . . . . . . 21Configuring web browser to open the IBMInfoSphere Information Server web console. . . . 21
Configuring Microsoft Internet Explorer to openthe IBM InfoSphere Information Server webconsole . . . . . . . . . . . . . . . 22Configuring Mozilla Firefox to open the IBMInfoSphere Information Server web console. . . 23
Creating dsadm users in the IBM InfoSphereInformation Server web console . . . . . . . 23
Chapter 5. Deploying Alcatel-Lucent5620 SAM LogToFile 2.3.0.0 DataStagejobs . . . . . . . . . . . . . . . . 25Alcatel-Lucent 5620 SAM LogToFile 2.3.0.0Technology Pack job design . . . . . . . . . 25Setting up a project . . . . . . . . . . . . 26Extracting the job archive file . . . . . . . . 26Updating the operator.apt file . . . . . . . . 27Importing an IBM InfoSphere DataStage job . . . 27Configuring the DataStage job . . . . . . . . 28Configuring the CSV files in the cfg directory . . . 29Enabling the firewall on the IBM InfoSphereInformation Server and WebSphere ApplicationServer . . . . . . . . . . . . . . . . 31Compiling the job . . . . . . . . . . . . 32Running the job . . . . . . . . . . . . . 32
Viewing the JMS message flow from SAM serverin Apache ActiveMQ . . . . . . . . . . 33
Gracefully shutting down the job . . . . . . . 33Starting the daemon manually . . . . . . . 34
Data flow in the data subdirectories . . . . . . 35Configuring the DataStage job for Secure FileTransfer support . . . . . . . . . . . . . 35
Chapter 6. Installing the Alcatel-Lucent5620 SAM LogToFile 2.3.0.0Technology Pack . . . . . . . . . . 37Prerequisite software . . . . . . . . . . . 37
Prerequisite software for Alcatel-Lucent 5620SAM LogToFile 2.3.0.0 Technology Packinstallation . . . . . . . . . . . . . 37Additional information . . . . . . . . . 38
Preinstallation setup tasks . . . . . . . . . 39Preparing the Alcatel-Lucent 5620 SAM LogToFile2.3.0.0 Technology Pack installation directory . . . 39Installing the technology pack by using thelaunchpad . . . . . . . . . . . . . . . 40Populating the family dictionary table . . . . . 42UBA collectors . . . . . . . . . . . . . 43
Adding a UBA collector for a UBA pack . . . . 43Log files . . . . . . . . . . . . . . . 44
Chapter 7. Configuring the technologypack . . . . . . . . . . . . . . . . 45Verifying resources . . . . . . . . . . . . 50Configuring Secure File Transfer support inAlcatel-Lucent 5620 SAM LogToFile 2.3.0.0Technology Pack. . . . . . . . . . . . . 51
Chapter 8. Upgrading the technologypack . . . . . . . . . . . . . . . . 53Upgrading the Alcatel-Lucent 5620 SAM 2.14.0.0Technology Pack to Alcatel-Lucent 5620 SAMLogToFile 2.3.0.0 . . . . . . . . . . . . . 53
© Copyright IBM Corp. 2014 iii

Upgrading the Alcatel-Lucent 5620 SAM LogToFile2.2.0.0 Technology Pack to Alcatel-Lucent 5620 SAMLogToFile 2.3.0.0 . . . . . . . . . . . . . 54
Chapter 9. Setting up theAlcatel-Lucent 5620 SAM servers tosupport LogToFile . . . . . . . . . . 57Install SAM on the primary and redundant servers 57Synchronize the clocks. . . . . . . . . . . 57Install the Alcatel-Lucent 5620 SAM Client GUI . . 57Configure an OSS user account . . . . . . . . 57Configure the SAM accounting and polling statistics 58
Enable the MIBs for the SAM statistics classes . . 59Setting up ping tests . . . . . . . . . . . 60
Chapter 10. Modifying the collectionstrategy . . . . . . . . . . . . . . 63Specifying what inventory and metrics to collect . . 63
Configuring multiple UBA collectors instances. . 64Changing the collection period for SAM statistics. . 66
General guidelines on changing the collectionperiod for SAM statistics . . . . . . . . . 66
List of classes that are enabled or disabled . . . . 68Disabling or enabling a class . . . . . . . 71
Chapter 11. TroubleshootingAlcatel-Lucent 5620 SAM LogToFileTechnology Pack . . . . . . . . . . 73Specifying parameter values . . . . . . . . . 73Inventory issues . . . . . . . . . . . . . 73
Metric data collection issues . . . . . . . . 73General Alcatel-Lucent 5620 SAM LogToFile 2.3.0.0Technology Pack issue . . . . . . . . . . . 76
Data for Near End Unavailable (per second)metric is not calculated correctly . . . . . . 76
General Alcatel-Lucent 5620 SAM LogToFile 2.2.0.0Technology Pack issues . . . . . . . . . . 77
Data for the Inbound Errors might not bedisplayed . . . . . . . . . . . . . . 77SAM server generates the XML file that containsmore than one datapoint . . . . . . . . . 77The description property is not updated in theResource Editor . . . . . . . . . . . . 77SQL error occurs during the Fulldump process 77The subelement time changes on severalunexpected occasions . . . . . . . . . . 78Subelement state is not updated to OFF whenyou change the SAP Ingress or Egress Policy . . 78Synchronize the time on the IBM InfoSphereInformation server and the SAM server . . . . 78Data is not displayed properly in the Volumeand Utilization report . . . . . . . . . . 78Partitioning must be done at the element level . 79The CSV file name changes when you mapanother class that does not correspond to itscollector . . . . . . . . . . . . . . 79The OAM data exists at the SAM server but isnot transferred to DataStage . . . . . . . . 79
General IBM InfoSphere Information Server relatedissues . . . . . . . . . . . . . . . . 81
Troubleshooting IBM InfoSphere InformationServer installations . . . . . . . . . . . 81DataStage job stops running because ofinsufficient buffer size . . . . . . . . . . 81How to turn off the keepAlive message flag . . 81Verifying that the ports are enabled for all thecomponents required for Alcatel-Lucent 5620SAM LogToFile 2.3.0.0 Technology Pack . . . . 82
Notices . . . . . . . . . . . . . . 83
iv Alcatel-Lucent 5620 SAM LogToFile 2.3.0.0 Technology Pack Installation and User Guide

Installing and Using Alcatel-Lucent 5620 SAM LogToFile2.3.0.0 Technology Pack
Installing and Using Alcatel-Lucent 5620 SAM LogToFile 2.3.0.0 Technology Packdescribes how to install and configure the various components such as:v IBM InfoSphere Information Serverv IBM InfoSphere Information Clientv Apache ActiveMQ
Apart from these installations, this guide also talks about the following topics:v Job related tasksv The devices and technologies that operate in the Alcatel-Lucent 5620 SAM
LogToFile 2.3.0.0 Technology Pack environment.
Intended audienceThe audiences are the network administration engineers at IBM customer sites whoinstall, configure, and use the Alcatel-Lucent 5620 SAM LogToFile 2.3.0.0Technology Pack as part of their installation.
To install and use the Alcatel-Lucent 5620 SAM LogToFile 2.3.0.0 Technology Pack,you must have a working knowledge of the following subjects:v Tivoli Netcool Performance Manager DataMartv Tivoli Netcool Performance Manager administrationv Internet Protocol networksv Tivoli Netcool Performance Manager Wireline Technology Pack
The audiences must also be familiar with the specific technology that theAlcatel-Lucent 5620 SAM LogToFile 2.3.0.0 Technology Pack deals with.
Tivoli Netcool Performance Manager - Wireline ComponentIBM® Tivoli Netcool Performance Manager consists of a wireline component(formerly Netcool/Proviso) and a wireless component (formerly Tivoli® Netcool®
Performance Manager for Wireless).
Tivoli Netcool Performance Manager - Wireline Component consists of thefollowing subcomponents:v DataMart is a set of management, configuration, and troubleshooting GUIs. The
Tivoli Netcool Performance Manager System Administrator uses the GUIs todefine policies and configuration, and to verify and troubleshoot operations.
v DataLoad provides flexible, distributed data collection and data import of SNMPand non-SNMP data to a centralized database.
v DataChannel aggregates the data collected through Tivoli Netcool PerformanceManager DataLoad for use by the Tivoli Netcool Performance ManagerDataView reporting functions. It also processes online calculations and detectsreal-time threshold violations.
v DataView is a reliable application server for on-demand, web-based networkreports.
© Copyright IBM Corp. 2014 v

v Technology Packs extend the Tivoli Netcool Performance Manager system withservice-ready reports for network operations, business development, andcustomer viewing.
The following figure shows the different Tivoli Netcool Performance Managermodules.
Tivoli Netcool Performance Manager documentation consists of the following:v Release notesv Configuration recommendationsv Installation and upgrade informationv User guidesv Technical notesv Online help
The documentation is available for viewing and downloading on the informationcenter at http://publib.boulder.ibm.com/infocenter/tivihelp/v8r1/topic/com.ibm.tnpm.doc/welcome_tnpm.html.
Service Management ConnectConnect, learn, and share with Service Management professionals: product supporttechnical experts who provide their perspectives and expertise.
Access Network and Service Assurance community at https://www.ibm.com/developerworks/servicemanagement/nsa/index.html. Use Service ManagementConnect in the following ways:v Become involved with transparent development, an ongoing, open engagement
between other users and IBM developers of Tivoli products. You can access earlydesigns, sprint demonstrations, product roadmaps, and prerelease code.
v Connect one-on-one with the experts to collaborate and network about Tivoliand the Network and Service Assurance community.
v Read blogs to benefit from the expertise and experience of others.v Use wikis and forums to collaborate with the broader user community.Related information:
vi Alcatel-Lucent 5620 SAM LogToFile 2.3.0.0 Technology Pack Installation and User Guide

Tivoli Netcool Performance Manager Wiki on developerWorks
Tivoli technical trainingFor Tivoli technical training information, see the following Tivoli NetcoolPerformance Manager Training website at https://tnpmsupport.persistentsys.com/training.
Support informationIf you have a problem with your IBM software, you want to resolve it quickly. IBMprovides the following ways for you to obtain the support you need:
OnlineAccess the IBM Software Support site at http://www.ibm.com/software/support/probsub.html .
IBM Support AssistantThe IBM Support Assistant is a free local software serviceability workbenchthat helps you resolve questions and problems with IBM softwareproducts. The Support Assistant provides quick access to support-relatedinformation and serviceability tools for problem determination. To installthe Support Assistant software, go to http://www.ibm.com/software/support/isa.
Troubleshooting GuideFor more information about resolving problems, see the problemdetermination information for this product.
Conventions used in this publicationSeveral conventions are used in this publication for special terms, actions,commands, and paths that are dependent on your operating system.
Typeface conventionsThis publication uses the following typeface conventions:
Bold
v Lowercase commands and mixed case commands that are otherwisedifficult to distinguish from surrounding text
v Interface controls (check boxes, push buttons, radio buttons, spinbuttons, fields, folders, icons, list boxes, items inside list boxes,multicolumn lists, containers, menu choices, menu names, tabs, propertysheets), labels (such as Tip:, and Operating system considerations:)
v Keywords and parameters in text
Italic
v Citations (examples: titles of publications, diskettes, and CDs)v Words defined in text (example: a nonswitched line is called a
point-to-point line)v Emphasis of words and letters (words as words example: "Use the word
that to introduce a restrictive clause."; letters as letters example: "TheLUN address must start with the letter L.")
v New terms in text (except in a definition list): a view is a frame in aworkspace that contains data.
Installing and Using Alcatel-Lucent 5620 SAM LogToFile 2.3.0.0 Technology Pack vii

v Variables and values you must provide: ... where myname represents....
Monospace
v Examples and code examplesv File names, programming keywords, and other elements that are difficult
to distinguish from surrounding textv Message text and prompts addressed to the userv Text that the user must typev Values for arguments or command options
Bold monospace
v Command names, and names of macros and utilities that you can typeas commands
v Environment variable names in textv Keywordsv Parameter names in text: API structure parameters, command
parameters and arguments, and configuration parametersv Process namesv Registry variable names in textv Script names
viii Alcatel-Lucent 5620 SAM LogToFile 2.3.0.0 Technology Pack Installation and User Guide
Chapter 1. Alcatel-Lucent 5620 SAM LogToFile 2.3.0.0Technology Pack overview
The LogToFile feature is added to the SAM server to allow downstream systems toretrieve metric data as it arrives and without any filtering. The data is fed to thedownstream systems in a streaming fashion. The downstream system must do thefiltering with caution and as necessary.
In the earlier releases of Alcatel-Lucent 5620 SAM Technology Pack, FindToFile isused to obtain the metric data from SAM Server for any time period you want.Though this feature is convenient, FindToFile feature adds extra computationalburden to the SAM Server. The new LogToFile feature relieves the SAM server ofthe burden of querying and filtering for the subset of data that the downstreamsystem needs.
UBA structureAn array of UBAs is divided into UBAs for accounting and performance. There canbe multiple UBAs. However, the UBAs must be in a set of accounting andperformance. These UBAs processes the inventory and metric data that ispresented to them by IBM InfoSphere Information Server DataStage.
The metrics (XML files) and inventory (XML files/JMS messages) from the SAMserver are parsed by DataStage and converted to CSV files for the UBAs. DataStageproduces one file per UBA per period.
The record types in the incoming CSV files are heterogeneous. The inventory datais added to the CSV file only under the following conditions:v When there is a full dump.v When a JMS inventory message is received.
Dynamic modelsIn the previous versions of Alcatel-Lucent 5620 SAM Technology Pack, the SAMIFand BLB communicate directly with SAM server. SAMIF acquires and processesinventory via bulk transfer (full dump) and JMS messages (changes). BLB issuesperiodic SOAP FindToFile requests for metric data and acquires that data overSFTP and makes it available to the UBAs. SAMIF communicated via JMS, SOAP,and SFTP to acquire and process inventory. The BLB communicated via SOAP andSFTP to export and acquire bulk metric data files. One UBA processes performancemetrics and another UBA processes accounting metrics. This design does notaccommodate more than two UBAs. In the current design SAMIF and BLB areremoved and IBM InfoSphere DataStage is used to interface with the SAM serverby using JMS, SOAP and SFTP. You can have an array of UBAs that are subdividedinto UBAs for accounting metrics and UBAs for polled metrics.
Currently, in Alcatel-Lucent 5620 SAM LogToFile 2.3.0.0 Technology Pack,DataStage interfaces with the SAM server and provides metric and inventory datato the UBAs. Rather than having a separate component to process inventory for theentire system, inventory is processed inline by the UBAs. DataStage performs thefollowing functions:v Acquires and processes inventory and metrics from SAM in XML format.
© Copyright IBM Corp. 2014 1

v Filters the inventory and metric data. This function was previously handled bySAM server.
v Partitions data by UBA-based partition key. This information is taken fromProviso DB.
v Waits for complete data for a window period.v Merges metrics and inventory into one CSV file per period per UBA.
Data collection modelThe performance data and accounting data metrics are for the networkinfrastructure and services that the Alcatel-Lucent 5620 SAM LogToFile TechnologyPack manages.
DataStage parses the SOAP/XML files and JMS messages from the SAM serverand transfers the data to the UBAs as CSV files. DataStage produces one file perUBA per period. These XML files contain records of inventory and metric data. Theinventory and metrics data are in the CSV format, with an initial integer identifierthat specifies a record type, and the subsequent fields contain the actual data of therecord.
The incoming CSV files are processed by a single input schema in the UBA. Therecord types in the incoming CSV files are heterogeneous. For more informationabout the file formats, see “Bulk input file formats” on page 7.
Figure 1. Data collection model for the Alcatel-Lucent 5620 SAM LogToFile 2.3.0.0 Technology Pack
2 Alcatel-Lucent 5620 SAM LogToFile 2.3.0.0 Technology Pack Installation and User Guide

The UBAs handle processing of both inventory and metric data. Any number ofUBAs can be configured to handle this process with each UBA designated either asaccounting UBA or performance UBA. The number of UBAs are best scaled up toload.
These XML files are then collected and processed, with the results presented in aset of web-based reports. These reports are listed and described in Alcatel-Lucent5620 SAM LogToFile 2.3.0.0 Technology Pack Reference.
InventoryThe Alcatel-Lucent 5620 SAM contains an object database that representsthe network resources and their relationships to other network resources. Italso represents some abstract resources and relationships. Services andtheir subscribers are represented, along with their relationships to eachother and to the Service Access Point Queues.
MetricsDataStage periodically receives the metrics file. The DataStage is notifiedon every period about the metrics file availability. The SAM statistics arethen passed to the UBA for parsing and processing into Tivoli NetcoolPerformance Manager metrics.
Figure 1 shows that the Alcatel-Lucent 5620 SAM LogToFile 2.3.0.0 TechnologyPack manages the inventory of the resources and metrics, real, and abstract, in twoways:v Complete data collection for inventoryv Event-driven data collection for inventory
Complete data collection
In the complete data collection, DataStage sends SOAP/XML requests tothe Alcatel-Lucent 5620 SAM server for each SAM object type that isneeded to run the inventory and metric data collection. Specifically, therequest is for XML files that contain information about all instances of thatobject type and metrics. The requests from DataStage specify result filter ofproperty values that are returned for each SAM object type. This filteroperation limits the set of property values to the values that matter to thetechnology pack inventory.
DataStage partitions the Proviso database on IP address and merge metricsand inventory into one CSV file per period per subchannel that is thendelivered to the UBAs in CSV format.
When the inventory and metrics are in separate bulk input files (as is thecase in the Alcatel-Lucent 5620 SAM environment), a technology packdeveloper typically implements several types of bulk adapter design files,as described in “Bulk adapter design files” on page 8.
Event-driven data collection for inventory
The Alcatel-Lucent 5620 SAM LogToFile uses the JMS to view real-timeevents and alarm feed information from the managed network. For moreinformation, see the Alcatel- Lucent 5620 SAM-O OSS Interface DeveloperGuide. DataStage establishes a JMS connection with SAM to receiveinventory updates and notices of metric data file availability. SAM JMSclient daemon listens for JMS messages from SAM and passes them toApache ActiveMQ queue. DataStage job reads the messages from thequeue and processes them.
Chapter 1. Alcatel-Lucent 5620 SAM LogToFile 2.3.0.0 Technology Pack overview 3

Note: Alcatel-Lucent 5620 SAM-O is an open interface on theAlcatel-Lucent 5620 SAM. An OSS client application can access informationthrough the Alcatel-Lucent 5620 SAM-O.Figure 1 shows that in the event-driven inventory, DataStage processes JMScreate, delete, and update messages.
DataStage resynchronizes the element names that are based on IP addressand subchannel affiliations from the Tivoli Netcool Performance Managerdatabase on startup. For newly encountered elements, a hash of theelement name IP address is used to assign it to a subchannel. It is notnecessary for DataStage to write the element to the Tivoli NetcoolPerformance Manager database. The UBAs generate the elements and otherinventory. By default, the hash function is used and applied to the entireset of accounting or metric subchannels.
However, it is possible through configuration to restrict the assignedsubchannels to a subset of the accounting or metric subchannels. This isprovided in the event one subchannel starts to approach capacity. Inaddition, the user might explicitly override the subchannel affiliation forindividual IP addresses. Intended to all for the case that a network has ahandful of large devices that they want to ensure are evenly distributedacross the available subchannels. Metrics and inventory are mergedtogether and appended to a file destined for a subchannel with the IPaddress that determines the destination subchannel. After the data for aperiod is complete, the file is cut and staged atomically for UBAacquisition.
When the DataStage is started, it establishes the SAM metric data by usingthe new LogToFile feature. Availability of metric file is notified to theDataStage through JMS connection. DataStage then retrieves the file.DataStage uses SFTP connections for multiple downloads rather thanestablish new connections for every download.
DataStage also establishes a JMS connection with SAM to receive inventoryupdates, file available messages and control messages. The JMS process isrunning continuously. The Monitor stage in job periodically checks andrestarts the JMS daemon if the daemon is not running. JMS daemon buffersmessages and passes the messages to DataStage.
DataStage also processes the full inventory dump by using the existingFindToFile SOAP requests. Full dump on inventory is run on need basis.There is no automated full dump on startup. Warnings can be found in thelogs that show missed JMS messages. These warnings can be monitored toinitiate a full dump if required.
Finally, DataStage requires that all inventory update messages haveinformation to help determine the IP address. DataStage requires the IPaddress to determine to which subchannel an inventory update must berouted.
4 Alcatel-Lucent 5620 SAM LogToFile 2.3.0.0 Technology Pack Installation and User Guide

Chapter 2. Devices and services
Details about Alcatel-Lucent SAM 5620 LogToFile server compatibility, supporteddevices, Alcatel-Lucent SAM 5620 LogToFile services, data collection model, bulkinput file formats, and bulk adapter design files.
Alcatel-Lucent 5620 SAM server compatibilityCurrently, the Alcatel-Lucent 5620 SAM LogToFile 2.3.0.0 Technology Pack runs onthe Alcatel-Lucent 5620 SAM Server Release 10 and Release 11.
Supported devicesThe list of devices that are supported by the Alcatel-Lucent 5620 SAM LogToFileTechnology Pack depends on the version of the technology pack.
Devices supported in this release
The Alcatel-Lucent 5620 SAM LogToFile 2.3.0.0 Technology Pack supports thefollowing devices:v Alcatel-Lucent 7750 Service Routerv Alcatel-Lucent 7710 Service Routerv Alcatel-Lucent 7705 Service Aggregation Routerv Alcatel-Lucent 7450 Ethernet Service Switchv Alcatel-Lucent 7210 Service Access Switchv Alcatel-Lucent OmniSwitch 6850v Alcatel-Lucent OmniSwitch 6250v Alcatel-Lucent 7750 MGv Alcatel-Lucent 9471 WMMv Alcatel-Lucent 9500 MPR
For more information about these devices, see http://www.alcatel-lucent.com.
How the devices are supported
The Alcatel-Lucent 5620 SAM LogToFile Technology Pack supports these devices inthe following ways:
Defines data generation, data storage, and data collection methodsThe Alcatel-Lucent 5620 SAM LogToFile Technology Pack communicateswith the device through the SOAP/XML interface, and uses JMS fornotification of inventory changes. For more information about theSOAP/XML interface and other components that are associated with thedata collection model, see “Data collection model” on page 2.
Defines Tivoli Netcool Performance Manager propertiesThe Alcatel-Lucent 5620 SAM defines and manages all of the relevantobjects that are associated with the device in the Alcatel-Lucent XML-basedequipment package. The Alcatel-Lucent 5620 SAM LogToFile TechnologyPack maps the appropriate set of SAM object properties that are defined inthe equipment package to Tivoli Netcool Performance Manager properties.Typically, the Netcool Performance Manager property name is the same as
© Copyright IBM Corp. 2014 5

the SAM object property name, except that the Netcool PerformanceManager property name also has the prefix sam. For information about theproperties that are currently supported by the Alcatel-Lucent 5620 SAMLogToFile Technology Pack, see the IBM Tivoli Netcool Performance Manager:Alcatel-Lucent 5620 SAM LogToFile 2.3.0.0 Technology Pack Reference.
Alcatel-Lucent 5620 SAM LogToFile servicesAlcatel-Lucent 5620 SAM users can configure services such as VPRN, VPLS, andcustomer or subscriber sites to the core network at the SAPs.
A user might also configure a set of policies to manage different classes of traffic atthe SAPs. A SAP can have one policy that is applied for ingress traffic, and anotherfor egress (to the customer site). Alcatel-Lucent 5620 SAM has a predefined set ofeight traffic classes:
bel2afl1h2efh1nc
In addition, the Alcatel-Lucent 5620 SAM LogToFile supports unicast, multicast,and broadcast IP traffic.
A user can define a policy to manage each combination of traffic classes and casttypes uniquely. With eight classes and four types, 32 different combinations arepossible. On a SAP, each unique combination is supported by a separate queue,which means up to 32 queues to be managed. On ingress, the SAPs supportseparate queues for the different casts of traffic. However, on egress, the SAPs donot support separate queues. Therefore, on egress, there is a maximum of eightqueues.
The Alcatel-Lucent 5620 SAM represents these entities in the following objects:
SAPs SAP object represents a SAP. The SAP object has a PolicyId property.
PoliciesPolicy object represents the policy.
ForwardingClassesForwardingClass object represents one of the eight possible classes oftraffic. This object has a PolicyId property that indicates the policy towhich it belongs. If the object is an ingress ForwardingClass, it has fourqueue IDs, one each for Unicast, Multicast, Broadcast, and Other. If theobject is an egress ForwardingClass, it has one queue ID.
Service queuesEgress Service Queue object or an Ingress Service Queue object represents aservice queue on a SAP.
6 Alcatel-Lucent 5620 SAM LogToFile 2.3.0.0 Technology Pack Installation and User Guide

Bulk input file formatsDataStage produces one file for each UBA per period. These files contain records ofinventory and metric data.
The inventory and metrics data records are in the CSV format. The initial integeridentifier of the CSV files specifies a record type, and the subsequent fields containthe actual data of the record. The output CSV file from the DataStage has twosections:1. Header2. Data
Header starts with 0 (zero), and is called as the 0-record schema. Data starts withrecord type, which is identical to the one that is defined in the header.
Sample Header0,"{""recordType"":17,""dataType"":""C"",""className"":""equipment.Shelf"",""fieldNames"":[""administrativeState"",""deviceState"",""displayedName"",""equipmentState"",""numberOfCardSlots"",""objectFullName"",""operationalState"",""shelfId"",""shelfName"",""shelfType"",""siteId"",""siteName""]}"
Sample data17,"noop","deviceStateUnknown","sim242_60","indeterminate","12","network:138.120.242.60:shelf-1","unknown","1","sim242_60","sr_shelf_12Slot","138.120.242.60","sim242_60"
Bulk input file schema
The UBA input has a schema that works on CSV input files. The general format ofa CSV file is as follows:0, "{“recordType”: 1, ”dataType”:”input source”, “className”: “TheClassName”,“fieldNames”: [“field1”, “field2”, ... “fieldn”]}"
recordTypeSpecifies an integer that is used to identify the record format.
dataType
Specifies the source of the record data. The sources can be "A", "D", "C", or"M".
The following list contains the definition of 0-Record CSV data type:v A - Attribute Changev D - Object Deletionv C - Object Creation or Full dumpv M - Metrics
Note: The JMS inventory messages are identified by data types of A, Dand C.
classNameSpecifies the Alcatel-Lucent class name that is used to identify the class(inventory or metric) that this record belongs to. The class name is used bythe UBA to identify the mapping between the class and the recordidentifier.
fieldNamesSpecifies an array of the field names that is available within the record thatis defined.
Chapter 2. Devices and services 7

Bulk adapter design filesTivoli Netcool Performance Manager bulk adapters support bulk input files in theCSV format. The DataStage server produces data in CSV format and uses JMS fornotification of inventory changes.
Each UBA technology pack provides at least one bulk adapter design file to definethe data format supported by that technology pack. Technology pack developersimplement bulk adapter design files using JavaScript®. Some technology packsprovide several bulk adapter design files.
Typically, a bulk adapter design file can process both inventory and metrics datafrom the same bulk input file, and provides a function that creates the bulkcollection formula names. When the inventory and metrics are located in separatebulk input files (as is the case in the Alcatel-Lucent 5620 SAM environment), atechnology pack developer implements several types of bulk adapter design files.The Alcatel-Lucent 5620 SAM LogToFile Technology Pack provides the UBA designfiles.
UBA design files
UBA is a DataChannel application that interprets and parses bulk input files thatcontain inventory and metrics data, or (as is the case in the Alcatel-Lucent 5620SAM environment) metrics data only. A technology pack developer implementsUBA design files that tell the UBA application how to interpret and parse thesebulk input files.
The current version of the Alcatel-Lucent 5620 SAM LogToFile Technology Packsupports two UBA Bulk Collectors. The two main UBA design files are as follows:v The SAMUBAAdaptor_polled.js file is used by the first UBA Bulk Collector and
handles most of the metrics.v The SAMUBAAdaptor_accounting.js file is used by the second (accounting) UBA
Bulk Collector and handles the accounting metrics. These metrics areservice-oriented metrics.
You can find the UBA design files in the Alcatel-Lucent 5620 SAM LogToFileTechnology Pack from the following location:datachannel/scripts/alcatel_5620_sam_log2file
8 Alcatel-Lucent 5620 SAM LogToFile 2.3.0.0 Technology Pack Installation and User Guide

Chapter 3. Installation and configuration of IBM InfoSphereInformation Server and related components
Describes how to install and configure the various IBM InfoSphere InformationServer and other related components that are required for Alcatel-Lucent 5620SAM LogToFile 2.3.0.0 Technology Pack such as:
Components
v IBM InfoSphere Information Server 8.7v IBM InfoSphere Information Server Client 8.7v Apache ActiveMQ 5.5.1v Oracle Client 11g
Planning for IBM InfoSphere Information Server software installationEnsure that hardware and software requirements for the product modules that youwant to install are met on your computers.
For latest information about the installation requirements, see these resources:v System Requirements
Restriction: You can install the IBM InfoSphere Information Server on acomputer that has Red Hat Enterprise Linux x86_64 version 5.5 or later.
v Release Notes
Installing IBM InfoSphere Information Server 8.7 softwareIBM® InfoSphere™ Information Server includes a set of collaborative productmodules and components that you can distribute across multiple computers. Thissection describes how to install and remove the InfoSphere Information Server andInfoSphere Information Server client software.
Installing IBM InfoSphere Information Server by using thewizard (graphical mode)
You can run the installation program locally by using a web browser on the targetcomputer. Alternatively, you can use a web browser on any system in a distributedenvironment.
Before you begin
During the initial installation session, install the required product modules thatyou plan to use either now or in future. If you install only some of the productmodules now, and then install fixes and service packs, you must reinstall the fixesand service packs as you add the product modules later.
Note: Ensure that the system has only RHEL 5.5 or later installed and no othercomponents on it. You can install the other components as and when required.
Ensure that you disable the firewall by using the following step:
© Copyright IBM Corp. 2014 9

v Click System > System Firewall > Disable Firewall to disable the firewall.Disable the firewall temporarily until the installation is complete.
About this task
When you first start the installation program, it presents a non-graphical interface.The program starts a self-contained web server on the computer. You can then starta web browser on the computer or on a remote computer and access the graphicalinterface. After you enter your settings in the wizard pages, the program storesyour settings in a response file. If you run the installation program again, you canload your settings from this file into the program instead of entering them again.
Procedure1. Extract the InfoSvr_v8.7_Linux64.tar.gz file to a location of your choice.
The installation media is in the is-suite directory.2. Change to the is-suite directory and run the installation program as root
user by using the following command:./setup [-verbose]
The -verbose option is optional. The option causes the installation program todisplay log messages to the console and also write them to the log file. If the-verbose option is not specified, log messages are written to the log file only.Several messages are displayed. The program then displays a message abouthow to access the installation wizard:
======> Enter one of the following URLs to your web browser to begin the installation process:http://localhost:8080/ISInstallhttps://localhost:8443/ISInstall
3. Open a web browser on the computer or on a remote computer, and go to oneof the addresses that is listed in the messages from starting the installationprogram.
4. Select a language from the menu for the installation program to use and clickLogin. This selection applies only to this installation session. Later in theinstallation process, you can select the language to apply to the InfoSphereInformation Server installation.
5. Click Next on the prompts in the installation program to continue to installthe product. The installation program runs an Early Requirements Check toensure that your installation is configured correctly as shown in the figure:
10 Alcatel-Lucent 5620 SAM LogToFile 2.3.0.0 Technology Pack Installation and User Guide

The page displays the results of the check as PASSED or FAILED. If the checkfound issues that might cause problems with the installation, it is marked asWARNING on the page.For more information about resolving the failed installation prerequisites, seehttp://pic.dhe.ibm.com/infocenter/iisinfsv/v8r7/topic/com.ibm.swg.im.iis.productization.iisinfsv.install.doc/topics/wsisinst_install_prereq_check_fails.html.
6. When all early requirements checks are passed, click Next.7. Click the default path where you want to install the Information Server in the
Installation directory field, and then click Next. By default, the installationdirectory is /opt/IBM/InformationServer.
8. Click New installation in the "Installation Type Selection" page, and then clickNext.
9. Click to select all the tiers in the "Tier Selection" page and click Next.10. Enter the password for the root user in the Password for root field and click
OK.11. Click Select All in the "Product Selection" page and click Next.12. Accept the terms and conditions in the "Software License Agreement" page
and click Next.13. Select the IBM InfoSphere DataStage (Select this edition to develop parallel
and server jobs) check box and clear the IBM InfoSphere DataStageBalanced Optimization check box in the "IBM InfoSphere DataStageInstallation Options" page and click Next.
14. Click Next in the "High Availability Server Cluster Configuration" page asthere is no support for High Availability Server in the present context.
Chapter 3. Installation and configuration of IBM InfoSphere Information Server and related components 11

15. Click Install WebSphere Application Server in the "Application ServerOptions" page and click Next.
16. Click Browse to select the installation directory for the WebSphere ApplicationServer. By default, the installation directory is /opt/IBM/WebSphere/AppServer.
17. Select the Customize WebSphere Application Server profile ports check boxin the "IBM WebSphere Application Server Installation" page, and then clickNext.
18. Verify that each port number is unique in the "IBM WebSphere ApplicationServer Profile Ports Assignment" page and click Next.
19. Enter the Application Server administrator user name and password and clickNext.
20. Enter the InfoSphere Information Server administrator user name andpassword and click Next.
21. Click Install IBM DB2 9.7 Enterprise Server Edition to install and create thedatabases within DB2 and click Next.
22. Specify the default directory where you want to install the DB2 databasesystem. By default, the installation directory is /opt/IBM/db2/v9.
23. Click Create a user as an instance owner in the "IBM DB2 Instance User"page and enter the user information, and then click Next. Also, enter a portnumber for the new instance. You receive a conformation after the user iscreated. Click OK.
24. Click Create a new user as a fenced user in the "DB2 Fenced UserInformation" page and enter the DB2 fenced user information and then clickNext.
25. Click Create the user as administrator user in the "DB2 Administrator Userinformation" page and enter the administrator user information, and then clickNext
26. Enter the metadata repository owner information, database name, databaseinstance name, and database location in the "Metadata RepositoryConfiguration" page, and then click Next.
27. Enter the metadata repository owner information, database name, databaseinstance name, and database location in the "Staging Area Configuration"page, and then click Next. The default agent port settings that are displayedin the "IBM InfoSphere Information Server Agent Ports Configuration" pagework in most configurations.
28. Click Next.29. Enter the two TCP/IP port numbers to use for the IBM InfoSphere DataStage
and QualityStage job monitor in the "Job Monitor Ports Configuration" page,which takes snapshots of job performance. The job monitor uses one port torequest job information and the second port to report job information. Thedefault port settings are acceptable in most configurations. The default settingsare 13400 and 13401 for the first and second ports.
30. Enter the unique tag information for the engine in the ITAG field and portnumber in the RPC port number field. If you are not installing multipleengine instances on the same computer, you can skip this step.
31. Click Create user as the IBM InfoSphere DataStage Administrator in the"IBM InfoSphere DataStage Administrator" page and enter the userinformation, and then click Next.
32. Clear the SAS check box and click Next. The existing job does not use SASand you can ignore this step.
12 Alcatel-Lucent 5620 SAM LogToFile 2.3.0.0 Technology Pack Installation and User Guide

33. Click Add Projects and enter the InfoSphere DataStage projects to create inthe "IBM InfoSphere DataStage Projects" page. You must create at least oneproject during installation. By default, a project by name dstage1 is created.Remove the dstage1 project and add the UDM project.
34. Click Next. The installation program runs a system requirements check for theselections that are made. The page displays the results of the check as PASSEDor FAILED. If the check found issues that might cause problems with theinstallation, it is marked as WARNING on the page. To resolve the issues thatare found during this check, see http://publib.boulder.ibm.com/infocenter/iisinfsv/v8r7/topic/com.ibm.swg.im.iis.productization.iisinfsv.install.doc/topics/wsisinst_install_prereq_check_fails.html
35. Click Next if all the system requirements checks are passed.36. Click Install IBM InfoSphere Information Server and save my settings in a
response file in the "Response File Review" page and click Next to begin theinstallation.Or, enter a name and location for the response file in the Response filelocation field in the "Response File Review" page. By default, it is available inthe following location: /opt/IBM/InformationServer/response.txt and clickNext to begin the installation. You can choose to cancel the installation anduse the saved response file in a later session. The "Post Installation Summaryfor Current Computer" page is displayed that contains the product, tiers, andproduct components that you installed, and information about how long theinstallation program ran and whether the installation was successful.
37. Click Install.38. Click Finish.
What to do next
If you face any installation problems, resolve them with this installationtroubleshooting information from here:http://publib.boulder.ibm.com/infocenter/iisinfsv/v8r7/topic/com.ibm.swg.im.iis.productization.iisinfsv.install.doc/topics/wsisinst_ts_is_container.html.
You can find more troubleshooting information in the information centers andcustomer support technical notes for various product modules and components.
Installing IBM InfoSphere Information Server client by usingthe wizard (graphical mode)
You can run the installation program locally by using a web browser on the targetcomputer. Alternatively, you can use a web browser on any system in a distributedenvironment.
Before you begin
During the initial installation session, install all of the product modules that youplan to use either now or in the future unless explicitly stated otherwise. If youinstall only some of the product modules now, and then install fixes and servicepacks, you must reinstall the fixes and service packs if you add product moduleslater. Ensure that you disable the firewall by using the following step:v Click Control Panel > System and security > Windows Firewall to disable the
firewall. Disable the firewall temporarily until the installation is complete.
Chapter 3. Installation and configuration of IBM InfoSphere Information Server and related components 13

About this task
When you first start the installation program, it presents a non-graphical interface.The program starts a self-contained web server on the computer. You can then starta web browser on the computer or on a remote computer and access the graphicalinterface. After you enter your settings in the wizard pages, the program storesyour settings in a response file. If you run the installation program again, you canload your settings from this file into the program instead of entering them again.
Procedure1. Extract the Infosvr_Client_v8.7_Win.zip file to a location of your choice. For
example, C:\is-client2. Double-click the installation program, setup.exe. Several messages are
displayed. The program then displays a message about how to access theinstallation wizard:
======> Enter one of the following URLs to your web browser to begin the installation process:http://localhost:8080/ISInstallhttps://localhost:8443/ISInstall
The installation program automatically starts the default web browser on thelocal computer to display the graphical interface.
3. Select a language from the menu for the installation program to use and clickLogin. This selection applies only to this installation session. Later in theinstallation process, you can select the language to apply to the InfoSphereInformation Server installation.
4. Click Next on the prompts in the installation program to continue to installthe product. The installation program runs an Early Requirements Check toensure that your installation is configured correctly as shown in the figure:
14 Alcatel-Lucent 5620 SAM LogToFile 2.3.0.0 Technology Pack Installation and User Guide

The page displays the results of the check as PASSED or FAILED. If the checkfound issues that might cause problems with the installation, it is marked asWARNING on the page.
5. When all early requirements checks are passed, click Next.6. Click Browse to select the directories where you want to install the
Information Server in the Installation directory field, and then click Next. Bydefault, the installation directory is C:\IBM\InformationServer
7. Click New installation in the "Installation Type Selection" page, and then clickNext.
8. Click Select All in the "Product Selection" page and click Next.9. Accept the terms and conditions in the "Software License Agreement" page
and click Next.10. Enter the port numbers in the "Metadata Interchange Agents Ports
Configuration" page. The default port numbers are as shown in the figure:
Chapter 3. Installation and configuration of IBM InfoSphere Information Server and related components 15

11. Select the Create desktop shortcuts check box in the "Desktop shortcutcreation option" page and click Next. After the installation program hascollected your selections, it runs another, more detailed system requirementscheck in the "System Requirements Check" page that is based on yourselections. During this check, it analyzes your computer resources and filesystem to determine whether the installation is likely to succeed.
12. Click Next if all the system requirements checks are passed. For any warningsthat are displayed, you can select the Ignore "WARNING" items andcontinue check box, and then click Next.
13. Specify a name and location for the response file in the Response file locationfield in the "Response File Review" page. By default, it is:C:\IBM\InformationServer\response.txt. You can choose to cancel theinstallation and use the saved response file in a later session.
14. Click Install IBM InfoSphere Information Server and save my settings in aresponse file in the "Response File Review" page and click Next. A"Preinstallation Summary for the Current Computer" page is displayed thatcontains the product, installation directory, tiers, and disk space information.
15. Click Install. When the installation process is complete, a "Post InstallationSummary for the Current Computer" page is displayed that contains theproduct, tiers, and product components that you installed, and informationabout how long the installation program ran and whether the installation wassuccessful.
16. Click Finish.
What to do next
If you face any installation problems, resolve them with this installationtroubleshooting information from here:
16 Alcatel-Lucent 5620 SAM LogToFile 2.3.0.0 Technology Pack Installation and User Guide

http://publib.boulder.ibm.com/infocenter/iisinfsv/v8r7/topic/com.ibm.swg.im.iis.productization.iisinfsv.install.doc/topics/wsisinst_ts_is_container.html.
You can find more troubleshooting information in the information centers andcustomer support technical notes for various product modules and components.
Verifying and testing the installationAfter you install and configure InfoSphere DataStage and InfoSphereQualityStage™, test the installation by logging in to the Administrator and Designerclients.
About this task
For example, open the IBM InfoSphere DataStage and QualityStage Administrationclient by providing the information as follows and click Login:
Chapter 3. Installation and configuration of IBM InfoSphere Information Server and related components 17

Installing Apache ActiveMQApache ActiveMQ is an open source software that is customized and bundled withAlcatel-Lucent 5620 SAM LogToFile 2.3.0.0 Technology Pack JAR file. ApacheActiveMQ is responsible for buffering messages that are received from SAM JMSfor the DataStage Job. Apache ActiveMQ is an interface to JMS poller to passmessages.
About this task
Apache ActiveMQ must be installed on the same server where the IBM InfoSphereInformation Server server is installed.
Procedure1. The tnpm-apache-activemq-5.5.1-bin.tar.gz file is available in the technology
pack jar. After pack installation, you must be able to find the Apache ActiveMQbundle at $PVM_HOME/APFiles/alcatel_5620_sam_log2file/datastage/.
2. As root user, extract the file to /opt directory by using the following command:
tar zxvf tnpm-apache-activemq-5.5.1-bin.tar.gz
3. Add activemq.rc file as a system service by linking the file in /etc/init.d byusing the following commands:
ln-s /opt/apache/activemq/5.5.1/bin/activemq.rc /etc/init.d/activemq.rc/sbin/chkconfig --add activemq.rc/sbin/chkconfig activemq.rc on/sbin/chkconfig service active
4. Start Apache ActiveMQ by using the following command:
./activemq.rc start
If you want to stop the Apache ActiveMQ, you can use the followingcommand:
./activemq.rc stop
5. To verify that ActiveMQ installation is successful, do one of the following steps:a. Log in to the server where ActiveMQ is installed by using the following
command:
http://<host_name>:8161/admin/
If the web page opens as shown in the figure, the installation is successful:
18 Alcatel-Lucent 5620 SAM LogToFile 2.3.0.0 Technology Pack Installation and User Guide

b. OrTo check that the ActiveMQ service is running, give the followingcommand:
ps -ef |grep active
Installing Oracle 11g clientOracle 11g is required for DataStage to establish connection with Proviso DB. OnJob start, DataStage connects to Proviso DB to obtain all collector information,which can be used for data partition for UBA.
Before you begin
Ensure that all dependencies are installed and kernel parameters that are updatedso.v To check the kernel parameter, use the following command:
/sbin/sysctl -a | grep <PARAMETER>
v To update the kernel parameter, use the following command:
/sbin/sysctl -w <PARAMETER>="<VALUE>"
Permanently, change the kernel parameter by modifying the /etc/sysctl.conffile.
About this task
Oracle 11g client must be installed on the same server where the IBM InfoSphereInformation Server server is installed.
Procedure1. Install Oracle 11g client. For more information about Oracle client installation,
see http://publib.boulder.ibm.com/infocenter/tivihelp/v8r1/topic/com.ibm.tnpm.doc/oracle/ctnpm_ora_installora10gclient.html.
Chapter 3. Installation and configuration of IBM InfoSphere Information Server and related components 19

Note: The 64-bit Oracle client must be installed.2. Configure the tnsname.ora file that is located in $ORACLE_HOME/network/admin to
connect to Tivoli Netcool Performance Manager wireline.3. Update the DataStage dsenv file that is located in $DS_HOME. By default, the
$DS_HOME is /opt/IBM/InformationServer/Server/DSEngine.4. Create a soft link to libccora11g.so by using the following command:
cd $ORACLE_HOME/libln -s /opt/IBM/InformationServer/Server/StagingArea/Installed/OracleConnector/Server/linux/libccora11g.solicccora11g.so
Typically, The libccora11g.so is located in the following path:/opt/IBM/InformationServer/Server/StagingArea/Installed/OracleConnector/Server/linux/libccora11g.so.
5. Update the $DSHOME/dsenv as dsadm user. The following parameters must beincluded:
export ORACLE_HOMEexport TNS_ADMINupdate LD_LIBRARY_PATH to include $APT_ORCHHOME/bin, $ORACLE_HOME/lib and $ORACLE_HOME/rdbms/libupdate PATH to include $APT_ORCHHOME/bin and $ORACLE_HOME/libexport ORACLE_BASEupdate LIBPATH to include $ORACLE_HOME/rdbms/lib & $ORACLE_HOME/lib
6. Run the install.liborchoracle script by using the following steps:a. Source the environment by using the following commands:
export DSHOME=/opt/IBM/InformationServer/Server/DSEngineexport APT_ORCHHOME=/opt/IBM/InformationServer/Server/PXEngine
b. Run the install.liborchoracle script by using the following command:
/opt/IBM/InformationServer/Server/StagingArea/Installed/PxOracle/install/install.liborchoracl
7. Restart the DataStage as root by using the following commands:
/etc/init.d/ds.rc stop/etc/init.d/ds.rc start
20 Alcatel-Lucent 5620 SAM LogToFile 2.3.0.0 Technology Pack Installation and User Guide

Chapter 4. Configure the InfoSphere Information Servercomponents
Describes the configuration tasks.
Opening the IBM InfoSphere Information Server web consoleUse the InfoSphere Information Server web console to manage security, viewscheduled tasks, work with reports, or perform tasks that are related to IBM®
InfoSphere® Business Glossary or the Information Services catalog.
Before you begin
To access the web console, determine the URL to use, configure your browser, andgo to the console window.
About this task
The URL for the IBM® InfoSphere® Information Server web console differsdepending upon the IBM WebSphere® Application Server communication protocoland configuration. The syntax of the URL is as follows:protocol://host:port/ibm/iis/console
protocol is the communication protocol: either http or https. host and port differdepending upon the communication protocol and WebSphere Application Serverconfiguration (clustered or non-clustered).
For example, in a configuration where clustering is not set up, the HTTPS URLmight be:https://<myhost.example.com>:9443/ibm/iis/console
Configuring web browser to open the IBM InfoSphere InformationServer web console
The IBM® InfoSphere® Information Server web console is supported by bothMicrosoft Internet Explorer and Mozilla Firefox. You must do these steps in yourpreferred web browser before you use the IBM InfoSphere Information Server webconsole.
About this taskv For information about supported browsers, see the InfoSphere Information
Server system requirements at http://www-01.ibm.com/software/data/infosphere/info-server/overview/requirements.html.
v For more information about IBM InfoSphere Information Server, seehttp://publib.boulder.ibm.com/infocenter/iisinfsv/v8r7/topic/com.ibm.swg.im.iis.found.moz.rc.common.doc/topics/iisinfsrv_mcom_overview.html.
v Determine the URL to use as described in “Opening the IBM InfoSphereInformation Server web console.”
v If HTTPS is enabled in the URL, follow the browser prompts to accept thecertificate and proceed to the login page.
© Copyright IBM Corp. 2014 21

Procedure1. Open a web browser, and go to the console. The URL to use depends upon the
IBM WebSphere Application Server communication protocol and configurationin use.
2. Type your user name and password. By default, use wasadmin user andpassword.
3. Click OK to open the Home tab.
Configuring Microsoft Internet Explorer to open the IBMInfoSphere Information Server web console
Procedure1. Enable JavaScript:
a. Click Tools > Internet Options .b. On the Security tab, click Custom Level.c. In the Security Settings window, select Scripting > Active Scripting >
Enable.2. Set the browser to accept cookies for the InfoSphere Information Server host
site.a. Click Tools > Internet Options.b. On the Privacy tab, click Sites.c. In the Address of Web site field, enter the InfoSphere Information Server
host name.d. Click Allow.e. Click OK.
3. Enable pop-up windows for the URL of the IBM InfoSphere Information Serverweb console:a. Click Tools > Pop-up Blocker > Pop-up Blocker Settings or turn off the
pop-up window blocker.b. If you selected the settings, type the URL and click Add.
4. Specify that the pages are refreshed every time that you visit the site:a. Click Tools > Internet Options and on the General tab, click Settings.
Select Settings in the Browsing history section.b. Select Every time I visit the webpage or Automatically and click OK.
5. Optional: Disable the display of friendly HTTP error messages. Follow thesesteps:a. Click Tools > Internet Options.b. On the Advanced tab, clear Browsing > Show friendly HTTP error
messages.
22 Alcatel-Lucent 5620 SAM LogToFile 2.3.0.0 Technology Pack Installation and User Guide

Configuring Mozilla Firefox to open the IBM InfoSphereInformation Server web console
Procedure1. Enable JavaScript:
a. Click Tools > Options in the Content tab.2. Set the browser to accept cookies for the InfoSphere Information Server host
site.a. Click Tools > Options.b. On the Privacy tab, click the Accept cookies from sites option or click
Exceptions and add the site to the allowed site list by entering the hostname and click Allow.
3. Enable pop-windows for the URL of the web console.a. Click Tools > Options.b. Select the Contents tab and either clear the Block pop-up windows option
or click Exceptions and add the site to the allowed list by entering the hostname and click Allow.
Creating dsadm users in the IBM InfoSphere Information Server webconsole
You must create a user for each person that must log in to IBM InfoSphereInformation Server.
About this task
Ensure that you have suite administrator authority. To create a user, follow thesesteps:
Procedure1. In the IBM InfoSphere Information Server web console as wasadmin user, click
the Administration tab.2. In the Navigation pane, select Users and Groups > Users.3. In the Users pane, click New User.4. In the Create New User pane, provide information about the user. Give the
following information:
Option Description
User name dsadm.Note: You must create a dsadm user. Thedsadm user is required for all operations onDataStage job in Alcatel-Lucent 5620 SAMLogToFile 2.3.0.0 Technology Pack.
Password Give the same password as you set for dsadmUNIX user.
First/Last Name dsadm
5. In the Roles pane, specify all roles.6. In the Suite Component pane, select whether the user has any suite component
roles. To log in to any of the product modules, a user must have the suite userrole. Also, add at least one suite component role for each suite component thatyou want the user to access. For example, if you are creating a user that
Chapter 4. Configure the InfoSphere Information Server components 23

accesses IBM InfoSphere Information Analyzer, you must assign the suite userrole, and also the Information Analyzer Project Administrator, DataAdministrator, or User role.
7. Link the dsadm user to Server Engine by using these steps:a. Expand Domain Management from Navigation pane.b. Click Engine Credentials.c. Select the server.d. Open Configuration.e. Select the Share User registry between Infosphere Information Server and
its engine option.f. Click Save and Close.
8. Click Save and Close to save the user information in the metadata repository.
24 Alcatel-Lucent 5620 SAM LogToFile 2.3.0.0 Technology Pack Installation and User Guide
Chapter 5. Deploying Alcatel-Lucent 5620 SAM LogToFile2.3.0.0 DataStage jobs
You can design InfoSphere DataStage Administrator jobs by using the IBMInfoSphere DataStage and QualityStage Designer client.
To deploy DataStage LogToFile, the following clients are used:
Administrator ClientYou can create and configure the UDM project.
Designer ClientYou can import, configure, and compile the UDM project.
Director ClientYou can run and monitor a job.
The Designer client uses a repository where you can store the objects that you arecreating as part of the design process. These objects can be reused by other jobdesigners.
Note: You must not modify the job design.
Jobs and their associated objects are organized in projects. DataStageadministrators create projects by using the Administrator client. When you startthe Designer client, you specify the project that you work, and everything that youdo is stored in that project.
When your job designs are finished, they are run in the Director client. No data ismoved or transformed until you actually run the job. When you start the Directorclient, you specify the project that contains the jobs to run.
Alcatel-Lucent 5620 SAM LogToFile 2.3.0.0 Technology Pack jobdesign
The features of Alcatel-Lucent 5620 SAM LogToFile 2.3.0.0 Technology Pack jobdesign are as follows:
LogTofile interface to SAM serverLogToFile solution relieves loads from SAM server thus allowing SAMserver to support higher performance load.
Class record filter optionData from SAM server are not filtered. Filtering the class records reducesloads from DataStage and UBA processing.
Multiple UBA PartitionThis solution supports multiple sets of Accounting and Performance UBAsto support UBA and Data Channel scalability.
Period window handlingClass Data from LogToFile might not arrive within the period interval. Toensure data completeness, job waits for late data files and merge the datainto its correct period interval.
© Copyright IBM Corp. 2014 25

CSV output for UBAsCSV file requires less processing effort that is compared to XML. Multiplesmall files are bundled in single UBA input to improve I/O utilization.
Setting up a projectA project is a container that organizes and provides security for objects that aresupplied, created, or maintained for data integration, data profiling, qualitymonitoring, and so on. Projects are a method for organizing your work. You definedata files, stages, and build jobs in a specific project. A project can contain one ormore jobs. Any of the metadata objects in a project (such as jobs or tabledefinitions) can be grouped logically and organized into folders. You can definesecurity at the project level. Only users who are authorized for your project canaccess your jobs.
Procedure1. Log in to the Administrator client as dsadm.2. Click the Projects tab in the Administrator window.3. Click the Add button.4. Enter the project name in the Name field. The project name must be given as
UDM. You must create the UDM project only if you have not created in Step 35of “Installing IBM InfoSphere Information Server by using the wizard(graphical mode)” on page 9. UDM is automatically appended to the defaultlocation for the new project. You cannot add a project to a location that exists.
5. Click OK. You can see the project that you created in the following directory:/opt/IBM/InformationServer/Server/Projects/UDM
6. Create a directory by name udm inside the project that you created by using thefollowing commands:cd /opt/IBM/InformationServer/Server/Projects/UDMumask 002mkdir udm
You can install and import the job in this directory.
Extracting the job archive fileBefore you begin
Ensure that you have created a project by name UDM and a subdirectory by nameudm inside the project directory. The ds_job_vm.n.0.0.b.dsx is packaged inside thealcatel_5620_sam_ds_vm.n.0.0_build_b.tar.gz file from the technology pack JARfile. Note that m denotes version number, n denotes major build number, and bdenotes minor build number.
Procedure1. Extract the alcatel_5620_sam_ds_vm.n.0.0_build_b.tar.gz file in
/opt/IBM/InformationServer/Server/Projects/UDM/udm by using the followingcommand:tar zxvf alcatel_5620_sam_ds_vm.n.0.0_build_b.tar.gz
2. Open IBM InfoSphere DataStage and QualityStage Administrator on yourdesktop.
3. Log in with the user name and password of dsadm with the DataStage andQualityStage Administrator.
26 Alcatel-Lucent 5620 SAM LogToFile 2.3.0.0 Technology Pack Installation and User Guide

4. Click the Projects tab to list the Projects.5. Select the project UDM, and then click Properties.6. In the Project Properties window, click Environment. The Environment
Variables window opens.7. Expand General and change the value for LD_LIBRARY_PATH variable to:
/usr/lib:.:/opt/IBM/InformationServer/Server/Projects/UDM/udm/libThis is the path where the custom libraries are located.
8. Optional: Expand Parallel and change the value for APT_CONFIG_FILE variableto other than default (/opt/IBM/InformationServer/Server/Configurations/default.apt) with appropriate numbers of DataStage nodes that are required.
9. Click OK.10. Click Close to save the new project and to exit the InfoSphere DataStage and
QualityStage Administrator.
Updating the operator.apt fileAn extra configuration step.
Procedure1. Go to the operator.apt file from this location:
/opt/IBM/InformationServer/Server/PXEngine/etc/operator.apt
2. Edit the operator.apt file to add the following lines:CSVWriterOp libCSVWriterOperator 1FeedbackOp libWaveOperator 1ReceiverOp libWaveOperator 1WindowOp libWindowOperator 1PerlizeOp libPerlizeOperator 1CombineOp libCombineOperator 1AuditOp libAuditOperator 1HousekeeperOp libHousekeeperOperator 1XMLChunkerOp libXMLChunkerOperator 1DeduplicateOp libDeduplicateOperator.so 1
These are the custom libraries that are specific to Alcatel-Lucent 5620 SAMLogToFile 2.3.0.0 Technology Pack.
Importing an IBM InfoSphere DataStage jobYou must import the SAM LogToFile job into the project. The project and its jobare created and then imported into the metadata repository by using IBM®
InfoSphere™ DataStage® and QualityStage™ Designer.
Before you begin
Before you import the ds_job_v2.2.0.0.6.dsx that is available in the technologypack JAR file, close all the existing jobs that are open in the Designer from theprevious JAR file. This is not required on a fresh installation.
Procedure1. Log in to IBM InfoSphere DataStage and QualityStage Designer as dsadm and
password, and select your project from the Project list.2. Transfer the ds_job_v2.2.0.0.6.dsx file from the DataStage Server machine
(/opt/IBM/InformationServer/Server/Projects/UDM/udm/jobs) to the designerclient machine.
Chapter 5. Deploying Alcatel-Lucent 5620 SAM LogToFile 2.3.0.0 DataStage jobs 27

3. On the menu bar, click Import > DataStage Components.4. In the DataStage Repository Import window, browse to the directory where you
transferred the job files. Select ds_job_v2.2.0.0.6.dsx as the import file.5. Select Import selected radio button and Perform impact analysis check box.6. Click OK to import the job. You see the Import load progress window that
shows the number of items that are loaded.7. In the "DataStage Import" window, select all the items that are loaded and click
OK.8. Click Jobs > 5620sam > J02main5620sam You can see the job design flow
diagram in the canvas.
Configuring the DataStage jobProcedure1. In the IBM InfoSphere DataStage and QualityStage Designer, click Routines >
5620sam > checksum from the Repository pane.2. Optional:
Note: This step is needed only if you created a project with a name other thanUDM.Change the Library path for all routines to /opt/IBM/InformationServer/Server/Projects/UDM/udm/lib/libroutines.so and click Save. The compiledcustom libraries are available in this path.
3. Repeat step 1 through step 2 for all the routines.4. Click Close.5. Click the Job Properties button and then click the Parameters tab.6. Change the default value for the following parameters:
Option Description
DS_HOME /opt/IBM/InformationServer/Server/DSEngine
DS_WORKSPACE /opt/IBM/InformationServer/Server/Projects/UDM
SAM_PRIMARY_SERVER <sam_primary_server>
SAM_SECONDARY_SERVER <sam_secondary_server>
SAM_USER <SAM_USER>
SAM_PASSWORD <SAM_PASSWORD>
SAM_FTP_USERNAME <SAM_FTP_USERNAME>
SAM_FTP_PASSWORD <SAM_FTP_PASSWORD>
For the remaining parameters, accept the default values.
28 Alcatel-Lucent 5620 SAM LogToFile 2.3.0.0 Technology Pack Installation and User Guide

7. Click OK.8. Click File > Exit to close IBM InfoSphere DataStage and QualityStage Designer.
Configuring the CSV files in the cfg directoryThe four CSV files that you must configure from the cfg directory where the IBMInfoSphere Information Server server is installed.
You can access the cfg directory from this location:/opt/IBM/InformationServer/Server/Projects/UDM/udm/cfg
The files that you must configure are as follows:
server_lookup.csvIf you have an auxiliary server, you must enter the IP address and the usercredentials to log in to the server in this file.
filter_lookup.csvIf you want to filter some records that are coming from the SAM server,you can write an expression for the filter criteria in this file. For moreinformation about this file, see “Specifying what inventory and metrics tocollect” on page 63.
collector_lookup.csvYou can specify the UBAs with their collector IDs that you have in this file.The UBAs exist in pairs of Performance and Accounting UBAs. For moreinformation about this file, see “Specifying what inventory and metrics tocollect” on page 63.
Chapter 5. Deploying Alcatel-Lucent 5620 SAM LogToFile 2.3.0.0 DataStage jobs 29

collector_mapping.csvWhen you want to provision a new element and you have the loadbalancing criteria, you can specify the family, IP address of the elementand collector ID it must be mapped to. There are 37 families and thefamilies are as follows:v 5620_SAM_AingrAengrQueuev 5620_SAM_Aosqos_Policyv 5620_SAM_BaseCardv 5620_SAM_CardSlotv 5620_SAM_CfmEthTestv 5620_SAM_CfmOneWayDelayv 5620_SAM_CfmSingleEndedLossv 5620_SAM_CfmTwoWayDelayv 5620_SAM_Channelv 5620_SAM_ControlProcessorv 5620_SAM_DaughterCardv 5620_SAM_DHCP6_Addressv 5620_SAM_DS1_E1v 5620_SAM_Hw_Environmentv 5620_SAM_IMALinkv 5620_SAM_ISA_Mdav 5620_SAM_ISA_Memberv 5620_SAM_LAGInterfacev 5620_SAM_MCMCardv 5620_SAM_MMEv 5620_SAM_MPLS_Sitev 5620_SAM_MPLSInterfacev 5620_SAM_MSSv 5620_SAM_NQueuev 5620_SAM_OAM_Testv 5620_SAM_PhysicalPortv 5620_SAM_PPP_Interfacev 5620_SAM_PPP_Protocolv 5620_SAM_S11Peerv 5620_SAM_S1UPeerv 5620_SAM_S5Peerv 5620_SAM_S8Peerv 5620_SAM_SdpBindingv 5620_SAM_ServiceAccessInterfacev 5620_SAM_Shelfv 5620_SAM_Subnet_Addressv 5620_SAM_Virtual_Router
30 Alcatel-Lucent 5620 SAM LogToFile 2.3.0.0 Technology Pack Installation and User Guide

Enabling the firewall on the IBM InfoSphere Information Server andWebSphere Application Server
Open and make the TCP ports available through firewall for InfoSphereInformation Server and WebSphere Application Server.
Procedure1. Activate the firewall on the DataStage server by using the following steps:
a. Click System > Administration > Security Level and Firewall.b. In the Security Level Configuration window, click Firewall list and select
Enabled.c. Click the SELinux tab and select Permissive from the SELinux Setting list.
2. Enable the ports for the DataStage server by using the following steps:a. Log in to https:/<hostname>:<port>/ibm/console. InfoSphere Information
Server web-based client opens.b. Click Servers > Server Types > Websphere application servers.c. Select your server name from the Application Server panel.d. On the Communications section, click Ports. A page that displays the list of
ports opens.3. Additionally, you must enable all the was.* ports and dsrpc.port port. To do
this, follow these steps:a. Open the response.txt file and add the port number with this command:
Note: The default location for response.txt file is:/opt/IBM/InformationServer/Server/Projects
$ cat /opt/IBM/InformationServer/response.txt | grep -i port
A list of ports are displayed in the console.b. Open the ports with this command:
iptables -I INPUT -p tcp --dport <port_number> -j ACCEPT
c. Enable the ports was.* ports and dsrpc.port port.d. Save the setting and restart the iptables with these commands:
service iptables save
service iptables restart
e. List the opened ports with this command:iptables –L
f. Save this setting to a file by using the following command:iptables-save > /root/ds_firewalls
g. Append the following lines to /etc/rc.local file so that setting is restoredupon restart:iptables-restore > /root/ds_firewalls
Note: For more information about verifying the network and opening ports,seehttp://publib.boulder.ibm.com/infocenter/iisinfsv/v8r7/index.jsp?topic=%2Fcom.ibm.swg.im.iis.productization.iisinfsv.install.doc%2Ftopics%2Fwsisinst_pln_networks.html
Chapter 5. Deploying Alcatel-Lucent 5620 SAM LogToFile 2.3.0.0 DataStage jobs 31

Compiling the jobYou must compile the job to prepare it to run on your system on the IBMInfoSphere DataStage and QualityStage Designer.
Before you begin
Ensure that the job named J02main5620sam that you created is open and active inthe job design area.
Procedure1. Select File > Compile.
Or, click the Compile ( ) button from the toolbar. The "Compile Job"window opens. As the job is compiled, the window is updated with messagesfrom the compiler.
2. When the "Compile Job" window displays a message that the job is compiledsuccessfully, click OK.
Results
The job is now compiled and ready to run. For more information about gettingyour jobs ready to run, see http://publib.boulder.ibm.com/infocenter/iisinfsv/v8r7/topic/com.ibm.swg.im.iis.ds.design.doc/topics/gettingjobsreadytorun.html
Running the jobYou can use the Director client to run the job and to view the log that the jobproduces as it runs.
About this task
You run the job from the Director client. The Director client is the operatingconsole. You also can use the Director client to monitor the jobs and troubleshootthe job by any error log that you receive when you run the job.
Procedure1. Click Start > All Programs > IBM InfoSphere Information Server > IBM
InfoSphere DataStage and QualityStage Director. The IBM InfoSphereDataStage and QualityStage Director opens. In the Director client, your jobstatus is compiled, which means that the job is ready to run.
2. Select your job in the right pane of the Director client, and select Job > RunNow. Ensure that the job parameters are set correctly.
3. In the "Job Run Options" window, click Limits tab and select No limit inWarnings pane.
4. Optional: In the "Job Run Options" window, click the General tab, and thenclick Record job performance data option to enable performance data.
5. Click Run.6. When the job status changes to Running, select View > Log.
Or, click the Log ( ) button to open the job in log mode.7. Examine the job log to see the type of information that the Director client
reports as it runs a job. The messages that you see are either control orinformation type. Jobs can also have Fatal and Warning messages.
32 Alcatel-Lucent 5620 SAM LogToFile 2.3.0.0 Technology Pack Installation and User Guide

8. Select File > Exit to close the Director client.
What to do next
You see many warning messages at the time of a job startup. These warningmessages can be ignored. These warnings are thrown by DataStage checks. But payattention to the warnings that you might see while the job is running. Thesewarnings are displayed to alert the user.
The job starts a daemon. This daemon is connected to SAM JMS and directs all themessages to ActiveMQ. The DataStage job reads from the ActiveMQ. To check thedaemon process, follow these steps:1. Go to /opt/IBM/InformationServer/Server/Projects/UDM/udm/logs directory.2. Open the sam-jms-daemon.log file to see the messages that are flowing in. By
default, the KeepAlive messages appear every 30 seconds. This time intervalcan be configured on the SAM server.
Attention: It is recommended to restart the DataStage job once in every few days.When the job is restarted without restarting the JMS client daemon, the full dumpis not started.
Viewing the JMS message flow from SAM server in ApacheActiveMQ
You can view the results of your job execution by opening the Apache AciveMQfrom the Web browser. You can see the JMS message flow from SAM server inApache ActiveMQ.
Procedure1. Open the Apache ActiveMQ console from the web browser:
http://<Server_IP_Address>:8161/admin/
<Server_IP_Address> is the server where Apache ActiveMQ is installed.2. Click the Queues tab. You can see the Number Of Consumers, Messages
Enqueued and Messages Dequeued. You can also perform maintenance fromhere.
Gracefully shutting down the jobThe stages are shut down one after the other. Job continues to run until its processis complete and then shuts down. To stop a job, you must wait until the job iscompleted.
Procedure1. Go to /opt/IBM/InformationServer/Server/Projects/UDM/udm/bin directory.2. Run the sendDoneMessage.sh file by using the following command:
cd /opt/IBM/InformationServer/Server/Projects/UDM/udm/bin./sendDoneMessage.sh
Ideally, when you stop the Job, the daemon process must be running. Check thestatus of the daemon by using the following command:./daemon.sh status
If for some reason the status gives the following output:
Chapter 5. Deploying Alcatel-Lucent 5620 SAM LogToFile 2.3.0.0 DataStage jobs 33

UDMD_STATUS=STOPPEDUDMD_REASON=’daemon no longer running’DS_DIR=${DS_DIR-/opt/IBM/InformationServer/Server/DSEngine}SAM_JMSURL1=${SAM_JMSURL1-10.0.0.56}SAM_JMSURL2=${SAM_JMSURL2-10.0.0.79}DS_WORKSPACE=${DS_WORKSPACE-//opt/IBM/InformationServer/Server/Projects/UDM}SAM_UNIQUE_ID=${SAM_UNIQUE_ID-devds_J01main5620sam}SAM_USERNAME=${SAM_USERNAME-sam-o}SAM_PASSWORD=${SAM_PASSWORD-5620Sam!}
Look at the sam-jms-daemon.log file from the /opt/IBM/InformationServer/Server/Projects/UDM/udm/logs directory. You can troubleshoot and start thedaemon manually. For more information about starting the daemon, see“Starting the daemon manually”
Starting the daemon manuallyAt the time of job start, it checks whether the daemon process is running or not. Ifthe daemon is not running, the job starts the daemon. You can run the daemonmanually.
About this task
To run the daemon manually, follow these steps:
Procedure1. Go to /opt/IBM/InformationServer/Server/Projects/UDM/udm/bin directory.2. Start the daemon process by using the following command:
./daemon.sh startSTATUS:SUCCESS
3. To check the status of the daemon, use the following command:./daemon.sh status
The following output is displayed:
UDMD_STATUS=RUNNINGUDMD_REASON=’daemon is running’UDMD_PID=6505DS_DIR=${DS_DIR-/opt/IBM/InformationServer/Server/DSEngine}SAM_JMSURL1=${SAM_JMSURL1-10.0.0.56}SAM_JMSURL2=${SAM_JMSURL2-10.0.0.79}DS_WORKSPACE=${DS_WORKSPACE-//opt/IBM/InformationServer/Server/Projects/UDM}SAM_UNIQUE_ID=${SAM_UNIQUE_ID-devds_J01main5620sam}SAM_USERNAME=${SAM_USERNAME-sam-o}SAM_PASSWORD=${SAM_PASSWORD-5620Sam!}
Note: You can start the daemon manually only after the job is run successfullyat least once.
34 Alcatel-Lucent 5620 SAM LogToFile 2.3.0.0 Technology Pack Installation and User Guide

Data flow in the data subdirectoriesAccess the data directory from here: /opt/IBM/InformationServer/Server/Projects/UDM/udm/data.
The data directory contains all the data files. The different subdirectories in thedata directory are as follows:
in When there is a file available message from the SAM server, DataStage jobfetches the XML files and places it in the in directory.
done After the DataStage job processes these XML files, it moves them into thedone directory. You must clean these XML files to free the space for storage.
cache This directory contains the temporary data that is required by the job forits processing. This directory contains a set of socket files forintercommunication, map files for sharing the memory among the differentstages, and litedb files are where the data is buffered and storedtemporarily even when the job is shut down to avoid data loss.
out The CSV files are created in the out directory that is based on theinformation in the XML files and JMS messages if any.
Important: The files from the cache directory are used by the DataStage job forinternal use. You must not delete or alter any file from the subdirectory while thejob is running. Otherwise, the job might fail.
Configuring the DataStage job for Secure File Transfer supportAbout this task
To add Secure File Transfer support for DataStage job, follow these steps:
Procedure1. In the IBM InfoSphere DataStage and QualityStage Designer, click the Job
Properties button, and then click the Parameters tab.2. Change the default value for the SECURE_FILE_TRANSFER to TRUE.3. Create the SSH private key file by name sshkey_file.4. Copy the SSH private key file to this location:
/opt/IBM/InformationServer/Server/Projects/UDM/udm/cfg/sshkey_file
5. Or, link the sshkey_file to the target private key file by using the followingcommands as dsadm:$ pwd/opt/IBM/InformationServer/Server/Projects/UDM/udm/cfg$ ls -l sshkey_filelrwxrwxrwx 1 dsadm dstage 23 Nov 7 21:47 sshkey_file ->/home/dsadm/.ssh/id_rsa
Chapter 5. Deploying Alcatel-Lucent 5620 SAM LogToFile 2.3.0.0 DataStage jobs 35

36 Alcatel-Lucent 5620 SAM LogToFile 2.3.0.0 Technology Pack Installation and User Guide

Chapter 6. Installing the Alcatel-Lucent 5620 SAM LogToFile2.3.0.0 Technology Pack
The Topology Editor was introduced at the same time as the 4.3-U technology packrelease. All 4.3-U or higher UBA technology pack installations require the TopologyEditor to configure the technology pack.
Configuration details are described in the Pack Installation and Configuration Guide.You can install the Alcatel-Lucent 5620 SAM LogToFile 2.3.0.0 Technology Packeither from a launchpad or by using the command line.
Tivoli Netcool Performance Manager supports the 4.3-U or higher technology packinstallation procedures.
All technology packs, both legacy bundle and stand-alone packs, require theTechnology Pack Installer. Always use the latest Technology Pack Installer,regardless of the version of the technology pack.
Important: A new Technology Pack Installer is released in 1.3-G release with theversion 3.3.1.0. This version has no feature enhancements but is released for licensetext changes.
All technology packs require that the Starter Kit or the Pack Bundle PrerequisitePack to be installed.
Prerequisite softwareEnsure that you fulfill these prerequisites before you install and configure theAlcatel-Lucent 5620 SAM LogToFile 2.3.0.0 Technology Pack.
Prerequisite software for Alcatel-Lucent 5620 SAM LogToFile2.3.0.0 Technology Pack installation
You must have all the prerequisite software and required information before youinstall and configure a technology pack.v IBM Tivoli Netcool Performance Manager 1.3.2. Additionally, you require the
1.3.2.0-TIV-TNPM-IF0019 fix pack.
Note: This fix pack contains the DataChannel fixes to support IBM InfoSphereInformation Server for Alcatel-Lucent 5620 SAM LogToFile 2.3.0.0 TechnologyPack.
v Oracle 11g client 64 bitv UBA collectors. You can add UBA collectors as described in Add a Collector in
Installing Tivoli Netcool Performance Manager - Wireline Component and associate itwith a UBA pack as part of this technology pack installation.
v Ensure that you have access to the Tivoli Netcool Performance ManagerDataMart server that is running an X Window System server.
Note: If there is no graphics card on the DataMart server, the Xvfb virtual framebuffer package that provides X Window System services is automaticallyinstalled. For more information, see Setting Up a Remote X Window Display inInstalling Tivoli Netcool Performance Manager - Wireline Component.
© Copyright IBM Corp. 2014 37

v Ensure that you have access to the Tivoli Integrated Portal.v Ensure that you have access to the DataChannel server.v Ensure that you have access to the Alcatel-Lucent 5620 SAM LogToFile 2.3.0.0
Technology Pack installation files on one of the following locations:– Product distribution site: https://www-112.ibm.com/software/howtobuy/
softwareandservices. On the product distribution sites are theProvisoPackInstaller.jar file, and technology pack JAR files.
– Tivoli Netcool Performance Manager CD distribution, which contains theProvisoPackInstaller.jar file, technology pack JAR files, and the JAR filesfor the Starter Kit components.For more information about the Starter Kit, see “Preinstallation setup tasks”on page 39.For more information about obtaining software, see your IBM customerrepresentative.
v The correct version of Java. For more information, see ConfigurationRecommendations.
v Apache ActiveMQ v5.5.1 that is bundled with the Alcatel-Lucent 5620 SAMLogToFile 2.3.0.0 Technology Pack JAR file.
Additional informationBefore configuring a technology pack, ensure that you:v Have the following documentation for your version of Tivoli Netcool
Performance Manager:– IBM Tivoli Netcool Performance Manager: Pack Release Notes for the current
technology pack release– IBM Tivoli Netcool Performance Manager: Installation Guide
– IBM Tivoli Netcool Performance Manager: Upgrade Guide (if you are upgradingthe core software)
– IBM Tivoli Netcool Performance Manager: Pack Upgrade Guide (if you areupgrading the technology-pack software)
– IBM Tivoli Netcool Performance Manager: DataMart Configuration Guide
Note: Refer to this guide to create an inventory profile and initiate adiscovery.
v Ensure that you have access to the following site to check for interim fixes or fixpacks that might apply to your technology pack:http://www-306.ibm.com/software/sysmgmt/products/support/NetcoolProviso.html
v The Tivoli Netcool Performance Manager documentation and the IBM TivoliNetcool Performance Manager: Pack Release Notes, which are available on thefollowing website:http://publib.boulder.ibm.com/infocenter/tivihelp/v8r1/topic/com.ibm.netcool_pm.doc/welcome_tnpm.html
v The Oracle TNS name of the server on which you installed Oracle server withthe Tivoli Netcool Performance Manager database configuration. For moreinformation, see Specifying a Basename for DB_USER_ROOT in the Installing TivoliNetcool Performance Manager - Wireline Component.
38 Alcatel-Lucent 5620 SAM LogToFile 2.3.0.0 Technology Pack Installation and User Guide

Preinstallation setup tasksEnsure that all necessary configuration steps are completed on the prerequisitesoftware.v Completed the following tasks:
– Reviewed the release notes for the current technology pack.
Note: Release notes contain important information that you must considerbefore you install a technology pack. They also contain information aboutspecific patches that must be installed before you configure a technology pack
– Installed the 1.3.2 version of the Tivoli Netcool Performance Managercomponents, as described in the IBM Tivoli Netcool Performance Manager:Installation Guide.
– Configured at least one DataChannel.– Created a user on the server with permission to FTP and delete files.
v Open a terminal emulator and log on to the DataMart server as pvuser.v Change your working directory to the DataMart home directory (/opt/datamart,
by default).v Load the shell with the DataMart environment by sourcing the dataMart.env
file, as follows:. /opt/datamart/dataMart.env
Note: After you load the DataMart environment into the shell, the PVMHOMEvariable is set to the DataMart home directory, /opt/datamart, by default. Theseinstructions assume that this variable is set.
v Set and export the DISPLAY environment variable (see Setting Up a Remote XWindow Display in the Installing Tivoli Netcool Performance Manager - WirelineComponent), so that the Technology Pack Installer GUI displays back on yoursystem.
v Installed the Technology Pack.
Note: Localization is done automatically during installation of the technologypack.
Preparing the Alcatel-Lucent 5620 SAM LogToFile 2.3.0.0 TechnologyPack installation directory
You can obtain technology pack installation files from the IBM product distributionwebsite, or from the Tivoli Netcool Performance Manager technology pack CD.
Before you begin
If you are installing the packs by using an instance of the Tivoli NetcoolPerformance Manager launchpad on the local file system, you can install directlyfrom the CD. Otherwise, you must create a temporary directory and copy thetechnology pack files to the local system before you begin the installation. Youcannot run the launchpad from the Tivoli Netcool Performance Manager DVD, andthen install technology packs directly from the CD distribution.
Note: If you are using a local instance of the launchpad and you want to installdirectly from the technology pack CD, you can skip this step and proceed toChapter 6, “Installing the Alcatel-Lucent 5620 SAM LogToFile 2.3.0.0 TechnologyPack,” on page 37.
Chapter 6. Installing the Alcatel-Lucent 5620 SAM LogToFile 2.3.0.0 Technology Pack 39

Procedure1. On the system where DataMart is located, use the mkdir command to create
app-packs directory to hold the technology pack JAR files and theProvisoPackInstaller.jar file. For example:mkdir -p $PVMHOME/version/app-packs
2. If you want to use technology packs from the IBM product distributionwebsite, download the JAR files by following these steps:a. Use the cd command to change your working directory to the app-packs
directory that you created in Step 1. For example:cd $PVMHOME/version/app-packs
b. Download the following from this website:https://www-112.ibm.com/software/howtobuy/softwareandservicesv ProvisoPackInstaller.jar filev JAR files for technology packs you want to install (the bundled JAR file
for bundled packs or individual JAR files for stand-alone packs)3. If you want to use technology packs from the Tivoli Netcool Performance
Manager technology pack CD, browse to the /Proviso/AP/jar location on theCD and copy the following files to the temporary directory:v ProvisoPackInstaller.jar filev JAR files for technology packs you want to install (the bundled JAR file for
bundled packs or individual JAR files for stand-alone packs)4. Unmount the CD.
Installing the technology pack by using the launchpadUse this information to install a technology pack by using the launchpad.
Before you begin
Check the version of Java running on your system by entering the followingcommand:java -version
You must upgrade your version of Java depending on the technology pack release.
Important: For 4.3-U and higher technology packs, the launchpad requires you toenter the path to supported Java runtime binary files. Only version 1.5.0_b(14+) issupported. The Tivoli Netcool Performance Manager topology editor provides asupported version of the Java binary files. Using the older Java version mightresult in an error detailing that it is not possible to proceed with the installation.
About this task
To install a Tivoli Netcool Performance Manager technology pack, follow thesesteps:
Procedure1. Start the installer as follows:
a. If it is not already open, open the launchpad (see Starting the Launchpad inthe Installing Tivoli Netcool Performance Manager - Wireline Component).
40 Alcatel-Lucent 5620 SAM LogToFile 2.3.0.0 Technology Pack Installation and User Guide

Note: Open a terminal emulator and log on to the DataMart server aspvuser. You must su to root. Otherwise, the launchpad fails to start.
b. On the launchpad, click Install Technology Pack.c. On the Install Technology Pack window, enter the following information:
v The DataMart home directory (for example,/opt/datamart, by default).v The Java run time environment home directory (for example,
/opt/IBM/proviso/topologyEditor/jre/bin).
Note: For information about supported JRE versions, see the IBM TivoliNetcool Performance Manager: Configuration Recommendations.
v The Tivoli Netcool Performance Manager user (for example, pvuser).d. Click the Install Technology Pack link.
A window prompts you to select the technology pack installation setupdirectory.
e. Click Browse to locate the temporary directory ($PVMHOME/version/app-packs) that you created in “Preparing the Alcatel-Lucent 5620 SAMLogToFile 2.3.0.0 Technology Pack installation directory” on page 39, or thedirectory on the Tivoli Netcool Performance Manager CD where the packJAR files are located (by default, /Proviso/AP/jar).The technology pack can be loaded to the server where the Tivoli NetcoolPerformance Manager database is installed.
f. Click the directory, and then click Select to display the specified directoryin the window.
g. Click OK.When the Technology Pack Installer starts, it displays a Tivoli NetcoolPerformance Manager Technology Packs Welcome window.
2. Click Next.3. Accept the license agreement, and then click Next.
The Technology Pack Installer displays the Database Access Parameterswindow with the parameter values that you specified when installing andconfiguring Oracle, the Tivoli Netcool Performance Manager database, andTivoli Netcool Performance Manager DataMart. For more information, seeInstalling and configuring the prerequisite software and Installing in a distributedenvironment in the Installing Tivoli Netcool Performance Manager - WirelineComponent.
4. Reenter the password of the database user, which is PV by default.5. Click Next to continue.
The Technology Pack Installer displays the Tivoli Integrated Portal accessparameter values that you specified when installing and configuring TivoliNetcool Performance Manager DataView as described in Installing in adistributed environment in the Installing Tivoli Netcool Performance Manager -Wireline Component.
Note: The Technology Pack Installer GUI always displays 16315 as the defaultport number for Tivoli Integrated Portal. If you want to use a different portnumber, you must give the port number at the time of Tivoli NetcoolPerformance Manager installation. Otherwise, the Technology Pack Installerdisplays an error message and you cannot proceed with the installation.
6. Reenter the password, which is tipadmin for the Tivoli Integrated Portal user.The Technology Pack Installer displays a Feature Selection window, which listsall the packs you downloaded to the directory created in “Preparing the
Chapter 6. Installing the Alcatel-Lucent 5620 SAM LogToFile 2.3.0.0 Technology Pack 41

Alcatel-Lucent 5620 SAM LogToFile 2.3.0.0 Technology Pack installationdirectory” on page 39 in the left panel. All the packs are automaticallyselected for installation.
7. Clear any technology packs in the list that you do not want to install, andthen click Next.
Note: The prerequisites for technology packs item in the Feature Selectionwindow is always installed. You cannot clear this item. The Starter Kit is notincluded in this item.Depending on the type of packs you install, you might be presented withslightly different windows.
8. Click Next to start the installation.As the stand-alone packs are installed, the Technology Pack Installer displaysthe name of each pack and indicates the progress. When the installationcompletes, the Technology Pack Install Complete window is displayed.
9. Click Finish to exit the Technology Pack Installer.10. Go to What to do next section to perform post-installation tasks.
What to do next
After the installation completes, do the following tasks:
Important: A technology pack does not work until it is configured. After youconfigure the technology pack, data is collected and reports are populated.v Populate the family dictionary table as described in “Populating the family
dictionary table.”v Add a UBA collector as described in“Adding a UBA collector for a UBA pack”
on page 43.v Configure the technology pack as described in Chapter 7, “Configuring the
technology pack,” on page 45.
Populating the family dictionary tableUse this information to populate the family dictionary table for any newAlcatel-Lucent 5620 SAM LogToFile 2.3.0.0 installation.
Procedure1. Change your working directory to the standard directory by using the
following command:cd $PVMHOME/APFiles/alcatel_5620_sam_log2file/datamart/standard/
2. Provide the run permission to the importLogToFileFamilyDictionary.rmg scriptfile by using the following command:chmod +x importLogToFileFamilyDictionary.rmg
3. Source the DataMart environment by using the following command:.$PVMHOME/dataMart.env
4. Run the importLogToFileFamilyDictionary.rmg script file by using thefollowing command:./importLogToFileFamilyDictionary.rmg
Initially, you receive the $Import has started message. When the import iscompleted, you see the $Completed import message.
42 Alcatel-Lucent 5620 SAM LogToFile 2.3.0.0 Technology Pack Installation and User Guide

UBA collectorsThe UBA collector is associated with two DataChannel components:
Complex Metric Engine (CME)x.xPerforms calculations on the collected data.
File Transfer Engine (FTE)x.xTransfers files from the collector output directories and places them in theinput directory of the CME.
Note: Topology Editor includes the channel and collector numbers in thecomponent names. For example, Data Channel 1 can have Collector UBA1.1, with Complex Metric Engine 1.1 and File Transfer Engine 1.1.The FTE writes data to the file /var/adm/wtmpx on each system that hosts acollector. As part of routine maintenance, check the size of this file toprevent it from growing too large. For more information about Disk QuotaManagement, see Installing Tivoli Netcool Performance Manager - WirelineComponent.
Note: The Solaris version can be configured with strict access defaultsettings for secure environments. Strict FTP access settings might interferewith automatic transfers between a DataChannel subchannel and theDataLoad server. Check for FTP lockouts in /etc/ftpd/ftpusers, and checkfor strict FTP rules in /etc/ftpd/ftpaccess.
Follow the instructions in “Adding a UBA collector for a UBA pack.”
Adding a UBA collector for a UBA packUse this information to add a UBA collector.
Procedure1. Load the pack XSD file into an existing topology, as follows:
a. If it is not already open, open the Topology Editor (see Starting the TopologyEditor in the Installing Tivoli Netcool Performance Manager - WirelineComponent).
b. Open a deployed topology (a topology.xml file) (see Opening an ExistingTopology File in the Installing Tivoli Netcool Performance Manager - WirelineComponent).
c. In the Technology Pack view, right-click the Technology Packs folder andselect Load Technology Pack from the menu.The Load the technology pack configuration metadata window displays.There are two radio buttons: XSD file and JAR file.
d. Click the JAR file radio button and select Browse.There is a known issue and a workaround for opening an XSD file from aUBA pack. For more information, see UBA pack XSD file inside a JAR filecannot be loaded into the Topology Editor section in IBM Tivoli NetcoolPerformance Manager: Pack Release Notes.
e. Using the Directory: field, the up and down arrows, and the Folders paneon the configuration metadata window, go to the directory where thetechnology pack JAR files exist. For example, $PVMHOME/APFiles or adirectory on the Tivoli Netcool Performance Manager CD
f. Select a technology pack JAR file, and then click OK. The pack JAR file isdisplayed in the configuration metadata window.
Chapter 6. Installing the Alcatel-Lucent 5620 SAM LogToFile 2.3.0.0 Technology Pack 43

g. Click Finish. The Topology Editor adds the selected stand-alone technologypack to the list of technology packs displayed in the Technology Packsview.
2. After you load a UBA pack XSD file, you must add a UBA collector andassociate it with a UBA technology pack as follows:a. In the Logical view, right-click the DataChannel x folder and select from
the Add collector UBA menu.The Configure Collector window opens.
b. Select the technology pack. For example, Alcatel-Lucent 5620 SAMLogToFile from the list of technology packs, and then click Next.
c. Using the list of available hosts on the Configure Collector window, selectthe workstation that hosts the collector. For example, corinth
d. Accept the default collector number. For example, 2.e. Click Finish.
The Topology Editor displays the new collector under the DataChannel xfolder in the Logical view.
f. Highlight the collector to view its properties. The Topology Editor displaysboth the UBA collector core parameters and the UBA technologypack-specific parameters. The core parameters are configured with all UBAtechnology packs. Review the values for the parameters to make sure thatthey are valid. For information about the core parameters, see the PropertiesReference. For information about the pack-specific parameters, see theTopology Editor Help.
g. To add extra UBA collectors for a UBA technology pack, repeat Step 2-athrough Step 2-f.
h. Redeploy the updated topology. See Starting the Deployer in the InstallingTivoli Netcool Performance Manager - Wireline Component.
3. Configure the UBA technology packs.
Log filesThe Technology Pack Installer writes log files to the /usr/tmp directory.
Log files in this directory contain a detailed history of the tasks the TechnologyPack Installer performs as it installs technology packs. You can check this log fileto help solve any issues that might occur during technology pack installation. Forexample, a log file might contain a message that indicates that the Technology PackInstaller GUI cannot display back on your system because the DISPLAYenvironment variable was not set. For more information, see Setting Up a Remote XWindow Display in the Installing Tivoli Netcool Performance Manager - WirelineComponent.
Log files for bulk technology packs are named installer<timestamp>.log, wheretimestamp is the time that the file was created in seconds since the UNIX epoch.Log files for stand-alone packs are named: APInstall<timestamp>.log.
For technology packs, log file names have the format APInstall<number>.log. Forexample: APInstall1311248677586.log.
44 Alcatel-Lucent 5620 SAM LogToFile 2.3.0.0 Technology Pack Installation and User Guide

Chapter 7. Configuring the technology pack
Configure the Alcatel-Lucent 5620 SAM LogToFile 2.3.0.0 Technology pack.
Before you begin
Ensure that you:v Have the following software and documentation for your version of Tivoli
Netcool Performance Manager:– IBM Tivoli Netcool Performance Manager: Pack Release Notes for the current
technology pack release– Installing Tivoli Netcool Performance Manager - Wireline Component.– IBM Tivoli Netcool Performance Manager: Pack Installation and Configuration
Guide.– Configuring and Operating DataMart
Important: Refer to this guide to run a bulk inventory profile.– Access to the Tivoli Netcool Performance Manager DataMart server
Note: Alcatel-Lucent 5620 SAM LogToFile 2.3.0.0 Technology pack issupported on Tivoli Netcool Performance Manager 1.3.2.
– An X Window server on the DataMart server– Access to the Tivoli Integrated Portal– Access to the DataChannel server.
v Ensure that you completed the following tasks:– Reviewed the release notes for the current technology pack.
Note: Release notes contain important information that you must considerbefore you install a technology pack. They also contain information aboutspecific patches that must be installed before you configure a technologypack.
– Installed the current version of the Tivoli Netcool Performance Managercomponents, as described in the Installing Tivoli Netcool Performance Manager -Wireline Component.
– Installed the Alcatel-Lucent 5620 SAM LogToFile 2.3.0.0 Technology Pack.– Configured at least one DataChannel.– Configured two UBA Bulk Collector subchannels.– Created a user on the Alcatel-Lucent 5620 SAM server with permission to FTP
and delete files.v Configured the XSD file. To configure the XSD file,
1. Open the Topology Editor, and click Topology > Open existing topology toload existing topology from database
2. On the Technology Packs pane, load the Alcatel-Lucent SAM 5620 LogToFileXSD file.
3. In the Logical View, create the following collectors on any new or existingchannels, and configure their corresponding parameters:– Performance UBA
© Copyright IBM Corp. 2014 45

– Accounting UBA4. Click Run > Run Deployer for Installation to deploy the topology that you
configured.
To configure the Alcatel-Lucent 5620 SAM LogToFile 2.3.0.0 Technology Pack,follow these steps:
Procedure1. Load the DataMart environment. To load the shell with the DataMart
environment, follow these steps:a. Log in to the DataMart server as pvuser.b. Create new folder DATA_CHANNEL_HOME/scripts/alcatel_5620_sam_log2file.c. Change your working directory to the DataMart home directory
(/opt/datamart, by default), by using the following command:$ cd /opt/datamart
d. Load the shell with the DataMart environment, by sourcing thedataMart.env file, as follows:$ . /opt/datamart/dataMart.env
Note: After you load the DataMart environment into the shell, thePVMHOME variable is set to the DataMart home directory, /opt/datamartby default. These instructions assume that this variable is set.
2. Copy technology-specific files from the DataMart server to the DataChannelserver. Technology-specific files are used to associate a UBA technology packwith a specific instance of the UBA.
Note: While it is possible to install DataMart and DataChannel on the sameserver, in a typical installation these modules are installed on separate servers.If so, use FTP to copy the technology-specific files. Otherwise, if DataMart andDataChannel are on the same server, use the cp command to copy the files tothe appropriate DataChannel directory.To copy technology-specific files to the DataChannel server, follow these steps:a. Log in to the Tivoli Netcool Performance Manager DataChannel server by
entering the user name and password that you specified when you installand configuring a DataChannel. The default user name and password arepvuser and PV.
b. Change your working directory to the DATA_CHANNEL_HOME/scripts/alcatel_5620_sam_log2file directory by entering the following command,replacing DATA_CHANNEL_HOME with the DataChannel home directory(/opt/datachannel, by default):$ cd DATA_CHANNEL_HOME/scripts/alcatel_5620_sam_log2file
c. Using the FTP utility in text mode, log in to the DataMart server by usingthe appropriate user name and password (pvuser and PV, by default).
d. Using the cd subcommand, change your working directory to the$PVMHOME/APFiles/alcatel_5620_sam_log2file/datachannel/scripts/alcatel_5620_sam_log2file directory.
e. By using the get subcommand, copy the bulk adapter design files (*.js),scripts (if any), and other files (if any) from the DataMart server to theDataChannel server.
f. Exit the FTP utility by entering the bye subcommand.g. Verify that the technology-specific files are now in the target directory as
follows:
46 Alcatel-Lucent 5620 SAM LogToFile 2.3.0.0 Technology Pack Installation and User Guide

v Verify that the bulk adapter design files (*.js), scripts, other files (if any)are now in the $ cd DATA_CHANNEL_HOME/scripts/alcatel_5620_sam_log2file directory.
3. Copy the samOss.jar file to the IBM InfoSphere Information Server. ThesamOss.jar file is distributed on a SAM distribution DVD referred to as the5620 SAM software DVD-ROM, and is in the following directory:<SAM_ROOT_RELEASE_DIR>/nms/integrations/SAM_O,You must copy the samOss.jar file from the directory on the DVD to the/opt/IBM/InformationServer/Server/Projects/UDM/udm/jar directory.
4. Activate data collection requests. During installation of the technology pack, allpredefined data collection requests are promoted to the database and set toinactive (that is, idle displays in the Active column of the Tivoli NetcoolPerformance Manager DataMart Request Editor). You must activate thesepredefined data collections requests by using the Request Editor. To set datacollection requests to active, follow these steps:a. Change your working directory to $PVMHOME/bin (/opt/datamart/bin, by
default) on the DataMart server.b. Start the DataMart GUI by entering the following command and pressing
Enter:$ pvm
c. Click the Configuration tab, then click Request Editor to open the RequestEditor.
d. Click the Collection tab.e. Click Refresh. The predefined data collection requests are loaded into the
Request Editor from the database.f. Click the Inactive button in the Filter group box to display only idle
requests.g. In the Sub-Element Groups pane, select all idle data collection requests in
the following group or groups: Root->Sub-Element Collect->Alcatel-Lucent 5620 SAM
h. Click the Active box under Details. The Request Editor toggles the idlesetting for these data collection requests from idle to active in the Activecolumn.
i. Click Save.5. Load the DataChannel environment. In subsequent steps, you can run the
dccmd commands. To ensure that you can run these commands, load the shellwith the DataChannel environment by following these steps:a. Log in to the DataChannel server as pvuser.b. Change your working directory to the DataChannel home directory
(/opt/datachannel, by default), by using the following command:$ cd /opt/datachannel
c. Load the shell with the DataChannel environment, by sourcing thedataChannel.env file, as follows:$ . /opt/datachannel/dataChannel.env
6. Restart the DataChannel to activate the UBA and read in changes to thedeployed topology.a. Open a terminal emulator on the DataChannel server.b. Use the dccmd command to stop all DataChannel applications:
$ dccmd stop all
c. Use the dccmd command to release all daemons that are running in theDataChannel:
Chapter 7. Configuring the technology pack 47

$ dccmd forget all
d. Use the following command to find the process identifiers (pids) associatedwith the DataChannel visual processes:$ findvisual
e. Use the following commands to stop each DataChannel visual process:$ kill -9 <cnsw_pid>$ kill -9 <logw_pid>$ kill -9 <amgrw_pid>$ kill -9 <cmgrw_pid>
f. Use the following commands to restart each DataChannel visual process:$ cnsw$ logw$ amgrw$ cmgrw
g. Use the dccmd command to start all DataChannel applications:$ dccmd start all
h. Use the dccmd command to verify that all of the DataChannel applicationsstarted properly:$ dccmd status all
More specifically, make sure that the UBA application associated with theDataChannel that you configured for the Alcatel-Lucent SAM 5620LogToFile Technology Pack is running.
i. Watch the output of the status switch to verify that all the necessaryprocesses are running. If these processes are running, run the tail utility onthe log file for the UBA by issuing a command similar to the followingcommand:tail -f DATA_CHANNEL_HOME/log/proviso.log | grep UBA.<channel_number>.<collector_number> | more
where:
Variable Meaning
<channel_number> Specifies the channel number.
<collector_number> Specifies the collector number (for example,100) that you specified when you configurethis UBA Bulk Collector.
The trailing dash (–) after <collector_number> Removes extraneous log messages from yourview. That is, the trailing dash guaranteesthat the command displays only thosemessages that are generated by yourapplication. The first set of messages relateto syntax checks.
The following table identifies some events to watch for during the syntaxcheck:
Event Meaning
The UBA application starts successfully, butthen stops running.
Typically, this event occurs because of alicensing issue.
The bulk adapter design file might becorrupted.
This event causes a syntax error before theUBA application connects to the database.
48 Alcatel-Lucent 5620 SAM LogToFile 2.3.0.0 Technology Pack Installation and User Guide
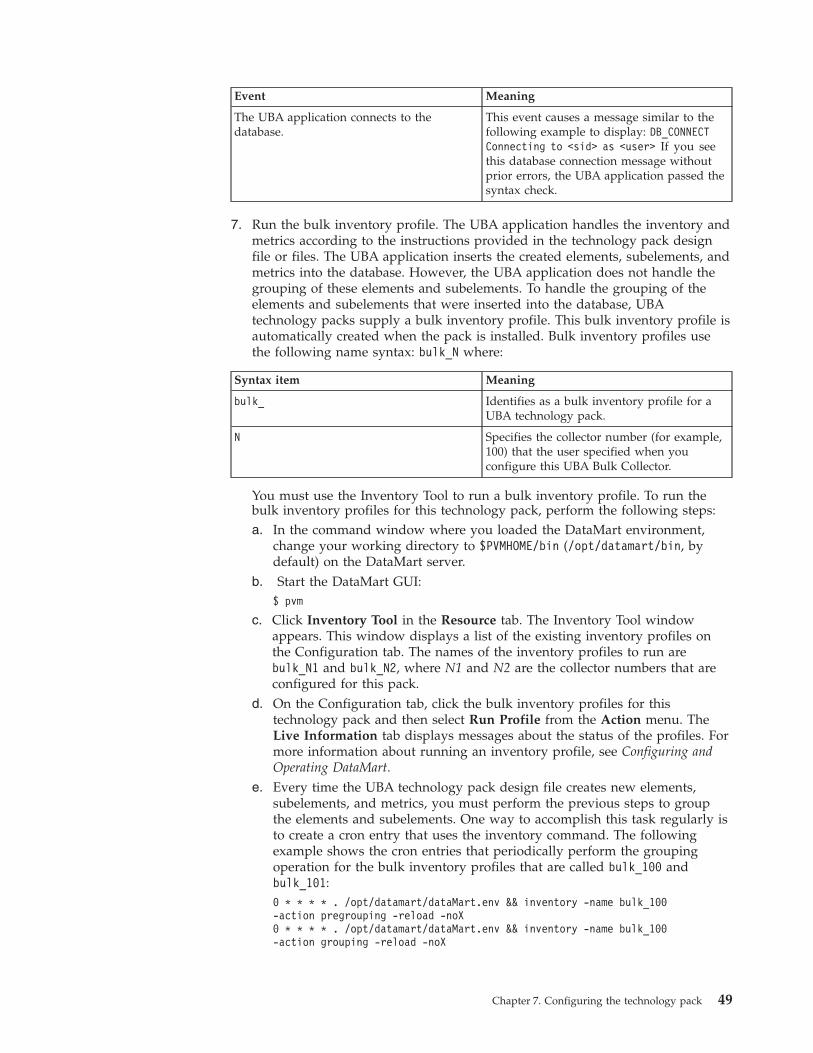
Event Meaning
The UBA application connects to thedatabase.
This event causes a message similar to thefollowing example to display: DB_CONNECTConnecting to <sid> as <user> If you seethis database connection message withoutprior errors, the UBA application passed thesyntax check.
7. Run the bulk inventory profile. The UBA application handles the inventory andmetrics according to the instructions provided in the technology pack designfile or files. The UBA application inserts the created elements, subelements, andmetrics into the database. However, the UBA application does not handle thegrouping of these elements and subelements. To handle the grouping of theelements and subelements that were inserted into the database, UBAtechnology packs supply a bulk inventory profile. This bulk inventory profile isautomatically created when the pack is installed. Bulk inventory profiles usethe following name syntax: bulk_N where:
Syntax item Meaning
bulk_ Identifies as a bulk inventory profile for aUBA technology pack.
N Specifies the collector number (for example,100) that the user specified when youconfigure this UBA Bulk Collector.
You must use the Inventory Tool to run a bulk inventory profile. To run thebulk inventory profiles for this technology pack, perform the following steps:a. In the command window where you loaded the DataMart environment,
change your working directory to $PVMHOME/bin (/opt/datamart/bin, bydefault) on the DataMart server.
b. Start the DataMart GUI:$ pvm
c. Click Inventory Tool in the Resource tab. The Inventory Tool windowappears. This window displays a list of the existing inventory profiles onthe Configuration tab. The names of the inventory profiles to run arebulk_N1 and bulk_N2, where N1 and N2 are the collector numbers that areconfigured for this pack.
d. On the Configuration tab, click the bulk inventory profiles for thistechnology pack and then select Run Profile from the Action menu. TheLive Information tab displays messages about the status of the profiles. Formore information about running an inventory profile, see Configuring andOperating DataMart.
e. Every time the UBA technology pack design file creates new elements,subelements, and metrics, you must perform the previous steps to groupthe elements and subelements. One way to accomplish this task regularly isto create a cron entry that uses the inventory command. The followingexample shows the cron entries that periodically perform the groupingoperation for the bulk inventory profiles that are called bulk_100 andbulk_101:0 * * * * . /opt/datamart/dataMart.env && inventory -name bulk_100-action pregrouping -reload -noX0 * * * * . /opt/datamart/dataMart.env && inventory -name bulk_100-action grouping -reload -noX
Chapter 7. Configuring the technology pack 49

0 * * * * . /opt/datamart/dataMart.env && inventory -name bulk_101-action pregrouping -reload -noX0 * * * * . /opt/datamart/dataMart.env && inventory -name bulk_101-action grouping -reload -noX
For more information about the inventory command, see Command LineInterface Reference.
8. Deploy reports. After the technology pack installation completes, the rules forthe new device are automatically loaded into the database. The inventoryprocess uses those rules to group elements and subelements. You mustmanually deploy (auto-group) the reports by associating them with groups inthe NOC Reporting tree in the DataMart Resource Editor. To deploy theAlcatel-Lucent SAM 5620 LogToFile Technology Pack reports, follow thesesteps:a. Open the Tivoli Netcool Performance Manager DataMart Resource Editor.b. Click the ReportSEGroup tab.c. Move the cursor to the left pane and scroll up to select any group under the
SUB-ELEMENTS > NOC Reporting tree.d. Right-click and select the AutoGrouping option from the menu. The
AutoGrouping option places the reports in dynamically generated groupsthat are created during inventory.
e. Click Yes to continue.f. Click Close to exit the message box, or click Details to view a description of
any errors.g. You can also deploy reports regularly by creating a cron entry that uses the
inventory CLI command and the-reportGrouping
option. This option instructs the inventory command to run the reportgrouping rules and update the deployed reports that are stored in thedatabase. Report grouping rules must first are created before this option canbe used. For information about creating report grouping rules, seeConfiguring and Operating DataMart. The following example shows a cronentry that periodically performs the deployment report operation:0 * * * * . /opt/datamart/dataMart.env && inventory -noX -reportGrouping
For more information about the inventory command, see Command LineInterface Reference.
Verifying resourcesUse the Tivoli Netcool Performance Manager DataMart Resource Editor todetermine whether the technology pack resources (elements, subelements,properties, and so on) were successfully discovered and created in the databaseduring inventory.
For information about using the DataMart Resource Editor, see the IBM TivoliNetcool Performance Manager DataMart Configuration and Operation Guide.
50 Alcatel-Lucent 5620 SAM LogToFile 2.3.0.0 Technology Pack Installation and User Guide

Configuring Secure File Transfer support in Alcatel-Lucent 5620 SAMLogToFile 2.3.0.0 Technology Pack
If you want to use Secure File Transfer, OpenSSH must be configured forkey-based authentication when you connect from the Tivoli Netcool PerformanceManager account on the client (the host that is running the Tivoli NetcoolPerformance Manager process that must use SFTP) to the account on the server. Inaddition, the host keys must be established such that the host key confirmationprompt is not displayed during the connection.
UBAs in Alcatel-Lucent 5620 SAM LogToFile 2.3.0.0 Technology Pack can connectto the DataStage server by using FTP alone. If you want to use SFTP support, usethe steps that are described in the following technical note:http://publib.boulder.ibm.com/infocenter/tivihelp/v8r1/topic/com.ibm.netcool_proviso.doc_4.4.2/tech_notes/NetcoolProvisoTechNote-sftp.pdf
For more information about SSH login without password, see http://www.linuxproblem.org/art_9.html
Chapter 7. Configuring the technology pack 51

52 Alcatel-Lucent 5620 SAM LogToFile 2.3.0.0 Technology Pack Installation and User Guide

Chapter 8. Upgrading the technology pack
Describes how to upgrade Alcatel-Lucent 5620 SAM 2.14.0.0 Technology Pack andAlcatel-Lucent 5620 SAM LogToFile 2.2.0.0 Technology Pack to Alcatel-Lucent 5620SAM LogToFile 2.3.0.0 Technology Pack.
Upgrading the Alcatel-Lucent 5620 SAM 2.14.0.0 Technology Pack toAlcatel-Lucent 5620 SAM LogToFile 2.3.0.0
You can upgrade the Alcatel-Lucent 5620 SAM 2.14.0.0 Technology Pack toAlcatel-Lucent 5620 SAM LogToFile 2.3.0.0.
About this task
To upgrade the Alcatel-Lucent 5620 SAM 2.14.0.0 Technology Pack toAlcatel-Lucent 5620 SAM LogToFile 2.3.0.0:
Procedure1. Stop the DataChannel:
a. Start a terminal emulator on the DataChannel serverb. Run the dccmd command to stop all the DataChannel applications:
$ dccmd stop all
c. Run the dccmd command to release all daemons that are running in theDataChannel:$ dccmd forget all
d. Run the following command to find the process identifiers (pids) that areassociated with the DataChannel visual processes:$ findvisual
e. Run the following commands to stop each DataChannel visual process:$ kill -9 <cnsw_pid>$ kill -9 <logw_pid>$ kill -9 <amgrw_pid>$ kill -9 <cmgrw_pid>
2. Start the Topology Editor, and delete the Performance and Accounting UBAs:a. Open the Topology Editor, and click Topology > Open existing topology
to load existing topology from database.b. In the Logical View, select the UBA collector, right click and Remove
Collector channels.c. Repeat for the same step for all existing UBA collectors in system.d. Click Topology > Save Topology.e. Click Run > Run Deployer for Uninstallation to deploy the topology that
you configured.3. Run the following commands to remove the files:
v /opt/proviso/datachannel/binrm –rf *_visual
v /opt/proviso/datachannel/staterm –rf *pidrm -rf *_visual
© Copyright IBM Corp. 2014 53

v /opt/proviso/datachannel/logrm –rf *log
4. Create backup of the DataChannel directories and do not delete them from theoriginal location except UBA directories.
5. Install the Alcatel-Lucent 5620 SAM LogToFile 2.3.0.0 Technology Pack. Formore information, see “Installing the technology pack by using thelaunchpad” on page 40.
6. Copy the core patches to/opt/proviso/datachannel/state.7. Start the Topology Editor and load the technology pack from the JAR file.8. Configure the Accounting and Performance UBAs with the same collector
numbers that you deleted in step 2.9. Set the APP.FILE_PERIOD parameter value same as the data file polling time.
For example, if the data file polling is at the cycle of every 5 Minutes, set thevalue to 300.
10. Save the topology.11. Run the deployer to complete the installation.12. Start the Request Editor, set to inactive, and then save.13. Update the polling time to 5 Minutes or 15 Minutes, set to active, and then
click Save.14. Run the following commands to restart each DataChannel visual process:
$ cnsw$ logw$ amgrw$ cmgrw
15. Run the dccmd command to start all the DataChannel applications: .$ dccmd start all
16. Compile the uba profiles.17. Run the auto-grouping again after the full dump process is completed for the
first time.
Upgrading the Alcatel-Lucent 5620 SAM LogToFile 2.2.0.0 TechnologyPack to Alcatel-Lucent 5620 SAM LogToFile 2.3.0.0
You can upgrade Alcatel-Lucent 5620 SAM LogToFile 2.2.0.0 Technology Pack toAlcatel-Lucent 5620 SAM LogToFile 2.3.0.0 Technology Pack.
Before you begin
Before you upgrade Alcatel-Lucent 5620 SAM LogToFile 2.2.0.0 Technology Pack toAlcatel-Lucent 5620 SAM LogToFile 2.3.0.0 Technology Pack, you must first removethe linking for timeCaptured metric and then remove the timeCaptured metric. ThetimeCaptured metric is available in bulk groups InterfaceAdditionStats andInterfaceStats.
To remove the linking for timeCaptured metric, follow these steps:1. Source the dataMart.env file by using the following command:
source /opt/datamart/dataMart.env
2. Start the DataMart GUI by using the following command:pvm &
3. Click the Configuration tab, and then click Request Editor to open theRequest Editor.
54 Alcatel-Lucent 5620 SAM LogToFile 2.3.0.0 Technology Pack Installation and User Guide

4. Click the Collection tab.5. From the Formulas pane, expand the following group:
AP > Specific > Alcatel > 5620 SAM > Bulk > Equipment >InterfaceAdditionalStats > timeCaptured
6. Right-click timeCaptured, select Apply as filter, and click Refresh. Themetrics are displayed in the pane for the timeCaptured filter.
7. Right-click within the pane and click Select All. All the metrics are selected.8. Right-click within the pane and click Remove Selection.9. Again, from the Formulas pane, expand the InterfaceStats > timeCaptured
group.10. Repeat steps 6 – 8 to remove the linking for timeCaptured metric.11. Click Save.12. Click File > Exit.
After the linking is removed, you can now remove the metrics.
To remove metrics, follow these steps:1. From the Tivoli Netcool Performance Manager DataMart GUI, click File >
Selectors > Formula Selector.2. From the Formulas pane, expand the following group:
AP > Specific > Alcatel > 5620 SAM > Bulk > Equipment >InterfaceAdditionalStats
The metrics are displayed in the right pane.3. Right-click the timeCaptured metric and click Delete. The timeCaptured metric
is deleted.4. Similarly, select InterfaceStats from the Formulas pane. The metrics are
displayed in the right pane.5. Right-click the timeCaptured metric and click Delete. The timeCaptured metric
is deleted.6. Click Edit > Apply.7. Click File > Close.
Complete the upgrade procedure by following these steps:
Procedure1. Stop the DataChannel:
a. Start a terminal emulator on the DataChannel server.b. Run the dccmd command to stop all the DataChannel applications:
$ dccmd stop all
c. Run the following command to find the process identifiers (pids) that areassociated with the DataChannel visual processes:$ findvisual
d. Run the following commands to stop each DataChannel visual process:$ kill -9 <cnsw_pid>$ kill -9 <logw_pid>$ kill -9 <amgrw_pid>$ kill -9 <cmgrw_pid>
2. Run the following commands to remove the files:v /opt/proviso/datachannel/bin
rm –rf *_visual
Chapter 8. Upgrading the technology pack 55

v /opt/proviso/datachannel/staterm –rf *pidrm -rf *_visual
v /opt/proviso/datachannel/logrm –rf *log
3. Create backup of the DataChannel directories and do not delete them from theoriginal location.
4. Install the Alcatel-Lucent 5620 SAM LogToFile 2.3.0.0 Technology Pack. Formore information, see “Installing the technology pack by using thelaunchpad” on page 40.
5. Copy the core patches to/opt/proviso/datachannel/state.6. Start the Topology Editor and load the technology pack from the JAR file.7. Check the properties set in the UBA Collectors. Modify the value accordingly
for the upgrade environment, if needed.8. Save the topology.9. Run the deployer to complete the installation.
10. Start the Request Editor, set to inactive, and then save.11. Update the polling time to 5 Minutes or 15 Minutes, set to active, and then
click Save.12. Run the following commands to restart each DataChannel visual process:
$ cnsw$ logw$ amgrw$ cmgrw
13. Run the dccmd command to start all the DataChannel applications: .$ dccmd start all
14. Compile the uba profiles.15. Run the auto-grouping again after the full dump process is completed for the
first time.
Note: When you upgrade Alcatel-Lucent 5620 SAM FindToFile 2.14.0.0Technology Pack to Alcatel-Lucent 5620 SAM LogToFile 2.3.0.0 TechnologyPack, you do not need to remove linking and timeCaptured metrics. You mustfollow the upgrade steps.
56 Alcatel-Lucent 5620 SAM LogToFile 2.3.0.0 Technology Pack Installation and User Guide

Chapter 9. Setting up the Alcatel-Lucent 5620 SAM servers tosupport LogToFile
The SAM server administrator must set up the appropriate SAM serversenvironment so that the Alcatel-Lucent SAM 5620 LogToFile Technology Packoperates correctly.
About this task
Setting up the Alcatel-Lucent 5620 SAM servers includes the following tasks:
Install SAM on the primary and redundant serversThe SAM server administrator must have installed SAM on primary andredundant servers. The DataStage job accesses the SAM servers to request theinventory and metrics.
Synchronize the clocksUse the appropriate tool to ensure that the clocks on the SAM server and theserver on which the DataStage is installed are synchronized.
For example, make sure that the Coordinated Universal Time (UTC) on the serveron which DataStage is operating matches the UTC time on the server on whichAlcatel-Lucent 5620 SAM is operating.
Install the Alcatel-Lucent 5620 SAM Client GUIThe SAM server administrator must have installed the Alcatel-Lucent 5620 SAMClient GUI on some client computer or server.
During the installation, the SAM server administrator must configure the IPaddresses of the SAM primary and redundant servers.
Configure an OSS user accountThe SAM server administrator uses the Alcatel-Lucent 5620 SAM Client GUI toconfigure an OSS (operational support system) user account from the clientcomputer or server.
This user account consists of a user name and password that allows the user toaccess the SAM primary and redundant servers. This OSS user account must nothave administrative privileges. The SAM server administrator must record the username and password for this OSS user account and keep it in a secure place.
The IBM InfoSphere Information Server needs access to this OSS account.
© Copyright IBM Corp. 2014 57

Configure the SAM accounting and polling statisticsAccounting policies are relevant to the Access Interfaces and the metrics that theyreport. The type of accounting policy on an Access Interface determines the metricsthat are reported.
When inventory is collected, Tivoli Netcool Performance Manager learns theaccounting policy for each Access Interface. From these accounting policies, theAlcatel-Lucent 5620 SAM LogToFile Technology Pack can determine the accountingpolicy type.
The Alcatel-Lucent 5620 SAM defines and manages accounting policies, whichdetermine how SAM accounting statistics are collected. The Alcatel-Lucent 5620SAM LogToFile Technology Pack currently supports two types of SAM accountingstatistic: access-port statistics and network-port statistics. The accounting packageprovides a maximum of 13 active accounting policies, one for each type of recordfor the eight access-port statistics types and for the five network-port statisticstypes.
The SAM server administrator uses the Alcatel-Lucent 5620 SAM Client GUI toconfigure SAM accounting statistics on the primary and redundant SAM servers.
The Alcatel-Lucent 5620 SAM LogToFile Technology Pack supports the accountingpolicies that are listed in the Table, depending on the type of nodes that aremonitored.
Table 1. Supported accounting policies
Accounting policy Description
CombinedNetworkEgressOctetsLogRecord Manages the collection of octet activity foregress network queues.
CombinedNetworkIngressOctetsLogRecord Manages the collection of octet activity foringress network queues.
CompleteServiceEgressPacketOctetsLogRecord
Manages the collection of packet and octetactivity for egress service queues.
CompleteServiceIngressPacketOctetsLogRecord
Manages the collection of packet and octetactivity for ingress service queues.
ServiceEgressOctetsLogRecord Manages the collection of octet activity foregress service queues.
ServiceEgressPacketsLogRecord Manages the collection of packet activity foregress service queues.
ServiceIngressOctetsLogRecord Manages the collection of octet activity foringress service queues.
ServiceIngressPacketsLogRecord Manages the collection of packet activity foringress service queues.
Note:
The service.ServiceEgressOctetsLogRecord class and theservice.ServiceEgressPacketsLogRecord class are mutually exclusive. You cannotcollect metrics for both classes at the same time.
58 Alcatel-Lucent 5620 SAM LogToFile 2.3.0.0 Technology Pack Installation and User Guide

Similarly, the service.ServiceIngressOctetsLogRecord class and theservice.ServiceIngressPacketsLogRecord class are mutually exclusive. You cannotcollect metrics for both classes at the same time.
The SAM server administrator uses the appropriate utility to configure pollingstatistics for SAM statistics classes. To configure polling statistics for these SAMstatistics classes, enable the appropriate MIBs on the primary and redundant SAMservers.
The default Tivoli Netcool Performance Manager collection period for all types ofSAM statistics is set to every 15 minutes, so the SAM server policies must beconfigured to match this default value.
Note: The collection period for any type of SAM statistics must be set to the samevalue as the collection period for the corresponding Tivoli Netcool PerformanceManager requests.
Enable the MIBs for the SAM statistics classesSAM server administrator must enable all of the MIBs listed in the table for theAlcatel-Lucent 5620 SAM LogToFile Technology Pack.
The first column of the table identifies the SAM statistics class on which to enablepolling statistics; the second column identifies the MIBs to enable for the SAMstatistics classes; and the third column identifies the object types to enable. TheSAM server administrator can enable more object types, but the Alcatel-Lucent5620 SAM LogToFile Technology Pack expects at a minimum the ones that arelisted in the third column.
Table 2. MIBs to enable for SAM statistics classes
SAM statistics class MIB Object types
equipment.AllocatedMemoryStatsLogRecord TIMETRA-SYSTEMMIB sgiMemoryPoolAllocated
equipment.AvailableMemoryStatsLogRecord TIMETRA-SYSTEMMIB sgiMemoryAvailable
equipment.InterfaceAdditionalStatsLogRecord IF-MIB ifXEntry
equipment.InterfaceStatsLogRecord IF-MIB (in the filenamed rfc2233-IF-MIB)
ifEntry
equipment.MediaIndependentStatsLogRecord HC-RMON-MIB mediaIndependentEntry
equipment.SystemCpuStatsLogRecord TIMETRA-SYSTEMMIB sgiCpuUsage
equipment.SystemMemoryStatsLogRecord TIMETRA-SYSTEMMIB sgiMemoryUsed
mpls.MplsInterfaceStatsLogRecord TIMETRA-MPLS-MIB vRtrMplsIfStatEntry
ppp.PppStatsLogRecord andppp.PppControlProtocol
TIMETRA-PPP-MIB tmnxPppEntry
svt.SdpBindingBaseStatsLogRecord TIMETRA-SERV-MIB sdpBindBaseStatsEntry
ethernetequipment.Dot3StatsLogRecord EtherLike-MIB dot3StatsEntry
mpls.SiteStatsLogRecord TIMETRA-MPLS-MIB vRtrMplsGeneralStatEntry
service.PppoeSapStatsLogRecord TIMETRA-PPPOEMIB tmnxPppoeSapStatsEntry
svq.CustMultiSvcSiteIngSchedPlcyPortStatsLogRecord
TIMETRA-SERV-MIB custMultiSvcSiteIngSchedPlcyPortStatsEntry
svq.CustMultiSvcSiteEgrSchedPlcyPortStatsLogRecord
TIMETRA-SERV-MIB custMultiSvcSiteEgrSchedPlcyPortStatsEntry
Chapter 9. Setting up the Alcatel-Lucent 5620 SAM servers to support LogToFile 59

Table 2. MIBs to enable for SAM statistics classes (continued)
SAM statistics class MIB Object types
aosqos.QoSIngressPolicyStatsLogRecord ALCATEL-IND1-QOS-MIB
alaQoSRuleEntry
equipment.CardHealthStatsLogRecord ALCATEL-IND1-HEALTH-MIB
healthModuleEntry
Setting up ping testsThe SAM server enables SAM server administrators to run ping tests to receiveinformation about traffic latency and jitter.
The results from the tests can include SAM statistics such as round-trip time,one-way trip time, jitter. These test results can be collected as metrics against OAMTest object subelements representing the tests.
Note: This section describes one method of creating OAM (ping) tests. Thismethod uses the Alcatel-Lucent 5620 SAM Client GUI to set up the OAM test torun periodically by using the scheduler on the SAM server. To run the OAM teston the SAM server, you must set the NE schedulable setting to off. This is only onemethod for running OAM tests and is provided for users who have no knowledgeabout how to run OAM tests. In other methods for running OAM tests, the NEschedulable setting can be set to on. In any method that is employed to run theOAM tests, the period of the tests must be set to the same value as the period forthe metric requests. The default value is 15 minutes.
A SAM server administrator can create ping tests in two ways:
Alcatel-Lucent 5620 SAM Client GUIThe Alcatel-Lucent 5620 SAM Client GUI allows a SAM serveradministrator to set up a ping test, specifying the period of the test, thetype of test, and so on.
OSS requestsThe SAM server administrator might also establish OSS requests thatcreates ping tests on the SAM server.
Although the two methods are available, the Alcatel-Lucent SAM 5620 LogToFileTechnology Pack expects that a SAM server administrator manually set up pingtests by using the Alcatel-Lucent 5620 SAM Client GUI. For more informationabout setting up these ping tests, see the Alcatel-Lucent 5620 Service Aware ManagerRelease 7.0 User Guide.
To collect ping-related SAM statistics that are meaningful within Tivoli NetcoolPerformance Manager, multiple consecutive data points must be collected for anyparticular OAM Test object subelement. Thus, it is recommended that ping tests beset up to run on a schedule that lasts for a significant duration (minimum threehours).
This section summarizes the steps to follow. For more information, see theAlcatel-Lucent 5620 Service Aware Manager Release 7.0 User Guide.v Create a test suite. Make sure the NE Schedulable option is selected and Test
Result Storage is set to Both Database and File
v Create one or more ping tests. The Alcatel-Lucent 5620 SAM LogToFileTechnology Pack supports several types of ping tests. Remember to select the
60 Alcatel-Lucent 5620 SAM LogToFile 2.3.0.0 Technology Pack Installation and User Guide
NE Schedulable option and set the Test Result Storage to Both Database andFile. Make sure the tests run without errors.
v Add the ping tests to the test suite.v Create a schedule to run the test suite. Set the schedule to run at the same
frequency as the Tivoli Netcool Performance Manager collection requests forjitter and latency. For example, if Tivoli Netcool Performance Manager collectionrequests occur every 15 minutes, then set the schedule to run the ping test suiteevery 15 minutes.
Note: Ensure that you set the frequency to a value that is consistent with theother collection periods.
v Apply the schedule to the test suite and run the tests that are contained in thesuite. Each time a test completes, Tivoli Netcool Performance Manager collects aset of metrics.
SAM server administrators can run several types of ping tests to measure trafficcharacteristics at different levels of the network stack. Each ping test is representedby its own SAM class and associated ping result class. For more information aboutthese classes, see the Alcatel-Lucent 5620 SAM XML Reference - Release 7.0documentation.
Chapter 9. Setting up the Alcatel-Lucent 5620 SAM servers to support LogToFile 61

62 Alcatel-Lucent 5620 SAM LogToFile 2.3.0.0 Technology Pack Installation and User Guide

Chapter 10. Modifying the collection strategy
Describes how to modify the amount of data that is managed by the Alcatel-Lucent5620 SAM LogToFile Technology Pack. You can modify by changing the types ofdata that are collected, or by changing the collection period for the SAM statistics,or both.
Specifying what inventory and metrics to collectThe types of inventory and metrics that must be collected from SAM server isspecified in the configuration files. These configuration files are found on theDataStage server. The configuration files specify which inventory class and metricsclasses must be requested from the SAM server. The SAM server then creates thenecessary files that are received by DataStage.
About this task
There are three different configuration items:
Filter Drops the records.
PartitionEnables multiple UBAs.
WindowHandles different periods. For example, 5, 15.
Filter:The name of the filter file is filter_lookup.csv, and has the configuration level asUser. No match for this file is not available.
Fields Steps to get the information
Class name Name of the SAM Class. For metric classes,use <class name>LogRecord names.
Expression Set it as '1' (TRUE) if no filter is needed.
The Expression field accepts full blown Perl expressions with special variablesenclosed with '{}' to refer to attributes within the class. There is a special'{DEFAULT}' to refer to the partition key attribute of the class.
For example, equipment.PhysicalPort,{DEFAULT} eq "1.1.1.1"This expression means that the DataStage filter allows only theequipment.PhysicalPort class objects that have "1.1.1.1" value for its siteId.
equipment.PhysicalPort,{cardSlotId} != 2This expression means that the DataStage filter allows only theequipment.PhysicalPort class objects other than the card slot id of 2.
equipment.PhysicalPort,{DEFAULT} eq "1.1.1.1" && {cardSlotId} != 2 logicaloperator is supported.
equipment.PhysicalPort,{DEFAULT} =~ /^1.1/ Regular expression is supported. Itallows site key that starts with "1.1".equipment.PhysicalPort,0
© Copyright IBM Corp. 2014 63

It is the simple way to filter out all records of class equipment.PhysicalPort.
Configuring multiple UBA collectors instancesPartitioning
The UBA partitioning involves two configuration files:1. collector_lookup.csv
2. collector_mapping.csv
collector_lookup.csvThe name of the filter file is collector_lookup.csv, and has theconfiguration level as User. No match for this file is not available. This fileis used to specify the number of UBAs that are available in theenvironment, and the type of each UBA. For details, see “Specifying whatinventory and metrics to collect” on page 63. Following is an example forthe collector_lookup.csv format:v 100, Performancev 101, Accounting
Fields Steps to get the information.
Collector id Id for the collector that is based on the UBAconfiguration.
Class category Performance or Accounting.
Note: You must update this configuration.
collector_mapping.csvThe name of the filter file is collector_mapping.csv, and has theconfiguration level as User. No match for this file is not available.Following is an example for the collector_mapping.csv format:v 5620_SAM_Channel,10.1.241.76,100v 5620_SAM_Shelf,38.120.242.185,100
Fields Steps to get the information.
64 Alcatel-Lucent 5620 SAM LogToFile 2.3.0.0 Technology Pack Installation and User Guide

Class Family Possible family classes are as follows:
v 5620_SAM_AingrAengrQueue
v 5620_SAM_Aosqos_Policy
v 5620_SAM_BaseCard
v 5620_SAM_CardSlot
v 5620_SAM_CfmEthTest
v 5620_SAM_CfmOneWayDelay
v 5620_SAM_CfmTwoWayDelay
v 5620_SAM_CfmSingleEndedLoss
v 5620_SAM_Channel
v 5620_SAM_ControlProcessor
v 5620_SAM_DaughterCard
v 5620_SAM_DHCP6_Address
v 5620_SAM_DS1_E1
v 5620_SAM_Hw_Environment
v 5620_SAM_IMALink
v 5620_SAM_ISA_Mda
v 5620_SAM_ISA_Member
v 5620_SAM_LAGInterface
v 5620_SAM_MCMCard
v 5620_SAM_MME
v 5620_SAM_MPLSInterface
v 5620_SAM_MPLS_Site
v 5620_SAM_MSS
v 5620_SAM_NQueue
v 5620_SAM_OAM_Test
v 5620_SAM_PhysicalPort
v 5620_SAM_PPP_Interface
v 5620_SAM_PPP_Protocol
v 5620_SAM_S11Peer
v 5620_SAM_S1UPeer
v 5620_SAM_S5Peer
v 5620_SAM_S8Peer
v 5620_SAM_SdpBinding
v 5620_SAM_ServiceAccessInterface
v 5620_SAM_Shelf
v 5620_SAM_Subnet_Address
v 5620_SAM_Virtual_Router
Key value The value for key. The key is from therelation lookup configuration. Most of thesekeys are based on the IP address. TheobjectFullName can also be used as a key.
Collector id Id for collector that is based on the UBAdestination.
Note: This configuration is intended for new elements from SAM that theuser wants to overwrite the default hash key rule. For example, a user canforce the element to go to a specific collector or UBA for better load
Chapter 10. Modifying the collection strategy 65

balance. However, this configuration does not overwrite mapping that theJob gathers from Proviso. Therefore, following is the partition rule:Mapping from Priviso DB → collector_mapping.csv → Job key hash.
Changing the collection period for SAM statisticsThis section provides general guidelines on how to change the collection period forSAM statistics:v “General guidelines on changing the collection period for SAM statistics”
General guidelines on changing the collection period for SAMstatistics
The default collection period for all SAM statistics is 15 minutes. If you change thecollection period, ensure that you follow these guidelines:1. You must set the APP.FILE_PERIOD parameter on each UBA component and the
WINDOW_PERIOD parameter on the IBM InfoSphere Information Server toequivalent values.For example, if you set the APP.FILE_PERIOD parameter to 300 (that is, 300seconds, or 5 minutes), then you must set the WINDOW_PERIOD parameter to 300.
Note: The APP.FILE_PERIOD parameter is specified in seconds, and theWINDOW_PERIOD parameter is specified as a series of values that are expressed inminutes.
2. The collection period for any type of SAM statistics must be set to the samevalue as the collection period for the corresponding Tivoli Netcool PerformanceManager requests.
DataStage settings
You can configure the SAM classes for 5 minutes, 15 minutes, or in mix periods.This configuration is done at the SAM Server. However, you must specify thisperiod information in the Job parameter to enable Job, which produces the CSV fileat the correct period interval.
In the mix periods, you can configure some Alcatel-Lucent SAM 5620 classes at 15minutes, and the remaining classes at 5 minutes. You can use the mix period toincrease the collection frequency for some classes that you want, while you cankeep the other classes at the default collection period, which is 15 minutes. As aresult, thev Processing load on the DataStage and UBA is reducedv Resource usage efficiency of the underlying machine is improved
DataStage receives and processes the metric XML files both at 5 minutes and 15minutes at the respective frequency. However, the output CSV files are generatedafter every 15 minutes. These CSV files contain one datapoint for the classes thatare at 15-minutes period, and 3 datapoints for the classes that are at 5-minutesperiod. The UBA can receive the CSV files, and process the single and threedatapoints accordingly.
Restriction: This configuration is useful when you want a higher collectionfrequency to obtain detailed reporting. However, you will experience an additionallatency of 5 minutes because the data is collected for 15 minutes, and then it ispassed to the UBA. If you want to achieve minimum latency at higher collection
66 Alcatel-Lucent 5620 SAM LogToFile 2.3.0.0 Technology Pack Installation and User Guide

frequency, then you must increase the collection period for all the metrics classes.However, you must ensure that you have adequate machine resource.
WINDOW_PERIOD is measured in seconds. The values are 900 (default) and 300 for15-Minutes and 5-Minutes periods respectively. However, on special mix period,you must set the value at 900 (15 Minutes)WAVE_PERIOD is an internal window sliding period that is measured in seconds. Thisvalue must be non-zero integer, and a denominator value for WINDOW_PERIOD. Thedefault value is 300 for 5 Minutes. The default value is recommended for most ofthe scenarios. Therefore, you change the default value only when you have astrong reason.
ACCOUNTING_WAIT_DURATION or PERFORMANCE_WAIT_DURATION is the amount of time towait for complete records for a period before writing to the CSV file. TheACCOUNTING_WAIT_DURATION parameter is used for the accounting classes and thePERFORMANCE_WAIT_DURATION parameter is used for the performance classes.However, both the parameters function the same way. This value must be divisibleby WAVE_PERIOD. The default value is 300 for 5 Minutes.
For example, if ACCOUNTING_WAIT_DURATION and WAVE_PERIOD is 300, then the jobwill buffer records for one sliding window period (ACCOUNTING_WAIT_DURATION andWAVE_PERIOD), while the WINDOW_PERIOD is 900
Scenario 1
01:31 Received 100 accounting records with timestamp of 01:01 (Rounded downto its window period: 01:00)
01:32 Received 200 accounting records with timestamp of 01:01 (Rounded downto its window period: 01:00)
01:40 WAVE_PERIOD is triggered.
01:42 Received 200 accounting records with timestamp of 01:17 (Rounded downto its window period: 01:15)
01:45 WAVE_PERIOD is triggered. There are no new records for the 01:00 periodbecause the wait period is 1 sliding window. The records for the 01:00period will be written to the CSV file.
Scenario 2
01:31 Received 100 accounting records with timestamp of 01:01 (Rounded downto its window period: 01:00)
01:32 Received 200 accounting records with timestamp of 01:01 (Rounded downto its window period: 01:00)
01:40 WAVE_PERIOD is triggered.
01:42 Received 200 accounting records with timestamp of 01:17 (Rounded downto its window period: 01:15)
01:45 WAVE_PERIOD is triggered. There are no new records for the 01:00 period.The records for the 01:00 period will not be written to the CSV file.
01:46 Received 200 accounting records with timestamp of 01:19 (Rounded downto its window period: 01:15)
01:50 WAVE_PERIOD is triggered. There are no new records for the 01:00 periodbecause the wait period is 1 sliding window. The records for the 01:00period will be written to the CSV file.
Chapter 10. Modifying the collection strategy 67

Tivoli Netcool Performance Manager 1.3.2 settings
The Alcatel-Lucent 5620 SAM LogToFile Technology Pack supplies theseparameters that are based on the Tivoli Netcool Performance Manager platforms.
These parameters are supplied in the pack XSD file. You specify values for theseparameters as part of adding a UBA Bulk Collector and associating it with theAlcatel-Lucent SAM 5620 LogToFile Technology Pack. For more information, seethe section on adding a UBA Bulk Collector in the IBM Tivoli Netcool PerformanceManager: Installation Guide.
List of classes that are enabled or disabledList of classes that are enabled or disabled in the DataStage requestxml_lookup.csvfile. The requestxml_lookup.csv file is in /opt/IBM/InformationServer/Server/Projects/UDM/udm/cfg directory. Some classes are disabled. However, you canenable a disabled class.
Classes that are enabledv aengr.ForwardingClassv aengr.Policyv aengr.Queuev aingr.ForwardingClassv aingr.Policyv aingr.Queuev aosqos.Policyv aosqos.QoSIngressPolicyStatsLogRecordv dhcp.Dhcp6AddressPrefixv dhcp.LocalDhcp6ServerPrefixStatsv dhcp.LocalDhcpServerSubnetStatsv dhcp.Subnetv epipe.Epipev equipment.AllocatedMemoryStatsLogRecordv equipment.AvailableMemoryStatsLogRecordv equipment.BaseCardv equipment.CardHealthStatsLogRecordv equipment.CardSlotv equipment.ControlProcessorv equipment.DaughterCardv equipment.HardwareTemperaturev equipment.HwEnvironment (metrics)v equipment.HwEnvironmentv equipment.InterfaceAdditionalStatsLogRecordv equipment.InterfaceStatsLogRecordv equipment.MCMCardv equipment.MediaIndependentStatsLogRecordv equipment.PhysicalPortv equipment.Shelf
68 Alcatel-Lucent 5620 SAM LogToFile 2.3.0.0 Technology Pack Installation and User Guide

v equipment.SystemCpuMonStatsv equipment.SystemCpuStatsLogRecordv equipment.SystemMemoryStatsLogRecordv ethernetequipment.AggrMaintRxStatsv ethernetequipment.AggrMaintTxStatsv ethernetequipment.Dot3StatsLogRecordv ethernetoam.CfmEthTestv ethernetoam.CfmLoopbackv ethernetoam.CfmOneWayDelayTestv ethernetoam.CfmTwoWayDelayTestv ethernetoam.Mepv icmp.IcmpPingv ies.L3AccessInterfacev ies.ServiceAccessPointv ipipe.L2AccessInterfacev lag.Interfacev lte.S11AgwPeerStatsv lte.S11Peerv lte.S1uAgwPeerStatsv lte.S1uPeerv lte.S5AgwPeerStatsv lte.S5Peerv lte.S8AgwPeerStatsv lte.S8Peerv ltegw.S11FailureCodeStatsv ltegw.S5AgwFailureCodeStatsv ltegw.S8AgwFailureCodeStatev ltemme.MAFConnectionv ltemme.MmeServiceMemberMafv mpls.Interfacev mpls.LspPingv mpls.MplsInterfaceStatsLogRecordv mpls.Sitev mpls.SiteStatsLogRecordv mpr.IMALinkv mpr.IMALinkCurrentStatsv nat.IsaMdav nat.IsaMemberv nat.IsaMemberUsageStatsv nqueue.Entryv nqueue.ForwardingClassv nqueue.Policyv ppp.Interfacev ppp.PppControlProtocolv ppp.PppControlProtocol (metrics)
Chapter 10. Modifying the collection strategy 69

v radioequipment.PdhFrameHopHistoryDataStats15Minv radioequipment.PdhFrameLinkHistoryDataStats15Minv radioequipment.RadioAnalogueMeasurev rtr.RouteStatsLogRecordv rtr.VirtualRouterv sasqos.AccessIngressv sasqos.Meterv sasqos.PortAccessEgressv sasqos.PortAccessEgressQueuev service.CombinedNetworkEgressOctetsLogRecordv service.CombinedNetworkIngressOctetsLogRecordv service.CompleteServiceEgressPacketOctetsLogRecordv service.CompleteServiceIngressPacketOctetsLogRecordv service.PppoeSapStatsLogRecordv sonetequipment.Sts12Channelv sonetequipment.Sts1Channelv sonetequipment.Sts48Channelv svq.AggregationSchedulerv svt.MeshSdpBindingv svt.MirrorSdpBindingv svt.SdpBindingBaseStatsLogRecordv svt.SpokeSdpBindingv svt.TunnelPingv svt.VccvPingv vll.L2AccessInterfacev vpls.L2AccessInterfacev vpls.Vplsv vprn.ServiceAccessPointv ethernetoam.CfmLoopbackResultv ethernetoam.CfmTwoWayDelayTestResultv ethernetoam.CfmSingleEndedLossTestv icmp.IcmpPingResultv svt.TunnelPingResultv svt.VccvPingResultv tdmequipment.DS1E1PortSpecificsv tdmequipment.DS1HistoryStats15minInv tdmequipment.DS1HistoryStats15minOutv tdmequipment.E1HistoryStats15minInv tdmequipment.E1HistoryStats15minOutv service.SitePingv svq.CustMultiSvcSiteEgrSchedPlcyPortStatsLogRecordv svq.CustMultiSvcSiteIngSchedPlcyPortStatsLogRecord
70 Alcatel-Lucent 5620 SAM LogToFile 2.3.0.0 Technology Pack Installation and User Guide

Classes that are disabledv equipment.DigitalDiagnosticMonitoringv ethernetoam.CfmEthTestResultv ethernetoam.CfmOneWayDelayTestResultv ethernetoam.CfmSingleEndedLossTestResultv mirror.L2AccessInterfacev ppp.PppStatsv sasqos.AccessIngressForwardingClassv sasqos.PortAccessEgressForwardingClassv service.NetworkEgressPacketsv service.NetworkIngressPacketsv service.ServiceEgressOctetsv service.ServiceEgressPacketsv service.ServiceIngressOctetsv service.ServiceIngressPacketsv service.SitePingResultv sonetequipment.Sts192Channelv sonetequipment.Sts3Channelv sonetequipment.TributaryChannelv sonetequipment.TributaryGroupv sonetequipment.Tu3Channelv sonetequipment.Tug3Groupv tdmequipment.DS0ChannelGroupv tdmequipment.DS1E1Channelv tdmequipment.DS3E3Channelv vprn.L3AccessInterface
Disabling or enabling a classHow to enable or disable a class.
About this task
The requestxml_lookup.csv is comma-separated file with the following fields:1. Request type2. Request (in the XML format)
Procedure
To disable a class:v Add a dot before the Request type. Notice that a dot is added before findToFile
in the following example:.findToFile,<?xml version="1.0" encoding="UTF-8"?>...<fullClassName>equipment.DigitalDiagnosticMonitoring</fullClassName>...</SOAP:Envelope> .registerLogToFile,<?xml version="1.0" encoding="UTF-8"?>...<fullClassName >service.NetworkEgressPackets</fullClassName>...</SOAP:Envelope>
To enable a class:
Chapter 10. Modifying the collection strategy 71

v Remove the dot that is available before Request type. Notice that the dot thatwas added before findToFile is removed in the following example:findToFile,<?xml version="1.0" encoding="UTF-8"?>...<fullClassName>equipment.DigitalDiagnosticMonitoring</fullClassName>...</SOAP:Envelope> .registerLogToFile,<?xml version="1.0" encoding="UTF-8"?>...<fullClassName >service.NetworkEgressPackets</fullClassName>...</SOAP:Envelope>
72 Alcatel-Lucent 5620 SAM LogToFile 2.3.0.0 Technology Pack Installation and User Guide

Chapter 11. Troubleshooting Alcatel-Lucent 5620 SAMLogToFile Technology Pack
Troubleshooting tips for issues related to Alcatel-Lucent 5620 SAM LogToFileTechnology Pack and its related components.
Specifying parameter valuesSeveral of the tips to tell you to make sure that the correct values were specifiedfor parameters in the deployed topology.
You specify the values for these parameters depending on the Tivoli NetcoolPerformance Manager platform.
Tivoli Netcool Performance Manager 1.3.2
These parameters are supplied in the pack XSD file. You used the Topology Editorto specify a value for these parameters as part of adding a UBA Bulk Collector andassociating it with the Alcatel-Lucent 5620 SAM Technology Pack. For moreinformation, see Adding a UBA Bulk Collector in the IBM Tivoli Netcool PerformanceManager: Installation Guide.
Inventory issuesIf you do not see the expected inventory in your Tivoli Netcool PerformanceManager instance, use this information. Complete the steps in each subsection, toverify that you have configured your instance correctly.
Metric data collection issuesIf you do not see the expected metrics in your Tivoli Netcool PerformanceManager instance, use this information. Complete the steps in each subsection, toverify that you have configured your instance correctly.
The following sections provide an overview of metric data, and describetroubleshooting tips for issues related to the metric data collection:
Overview of metric dataThe SAM server supports the following types of metric data:
Polled
Polled metric data is collected by the SAM server from the routers usingSNMP. To collect this data, MIBs must be enabled on the SAM server, andpolling periods must be set. For more information about the MIBs that areneeded, see “Enable the MIBs for the SAM statistics classes” on page 59.
Exception to the Rule: The exception is the HwEnvironmentTemperature files.These files are in effect inventory files in which the temperature propertiesare read in as metrics. For a variety of reasons related to this data notbeing real metrics, the temperature data is only available for a subelementunder the following conditions:v The CPU utilization metric for that subelement is available.
© Copyright IBM Corp. 2014 73

v The data being processed is “current”: the UBA has caught up to thewall-clock time as much as is possible, and no backlog of data is beingprocessed.
AccountingAccounting metric data is collected by the routers into files. These files areretrieved by the SAM server, and read into its database. To get this data,the accounting and file policies must be configured on the SAM server anddistributed to the routers. Accounting data is the data collected forservices. For more information about accounting data, see “Configure theSAM accounting and polling statistics” on page 58.
Availability dataThe availability data is collected from the SAM Server and is convertedinto CSV datafile records. This CSV datafile records are then picked by theUBAs.
The Alcatel-Lucent 5620 SAM LogToFile Technology Pack uses the following syntaxfor metric-data file names:proviso<type of Class>_<date>_<time>_<collector number>.csvtype of Class = Performance, Accountingdate = yyyy.mm.ddtime = Hour.Minutes.SecondsCollector = 100, 101
Note: 100 and 101 are the default values. However, you can change this value.
Here is an example file name for a metric-data file:provisoPerformance_2013.02.25-01.00.00_100.csvprovisoAccounting_2013.02.25-01.05.00_101.csv
SAM metrics do not display in the Alcatel-Lucent 5620 SAMClient GUIThe SAM server administrator uses the Alcatel-Lucent 5620 SAM Client GUI todisplay metrics for the different objects (for example, services and networkelements) in a SAM network environment.
If SAM metrics do not display in the Alcatel-Lucent 5620 SAM Client GUI,complete the following troubleshooting steps:1. Enable the appropriate MIBs for the polled data.2. Enable an accounting policy for the service data.
SAM metric files are empty or do not exist in the SAM serverTypically, SAM metric files are transferred to a directory, such as/opt/5620sam/nms/server/xml_output, on the SAM server.
If the SAM metric files are empty (that is, the XML file has left and right anglebrackets with no data, and is 60 bytes or less), complete the followingtroubleshooting steps:1. Determine whether the absence of data is because there are no inventory
elements and subelements from which to receive metrics.2. Ensure that you enabled the appropriate MIBs for polled data.3. Ensure that you enabled an accounting policy for service data.4. Ensure that you have set your filter parameters correctly. For more information
about filter parameters, see “Specifying what inventory and metrics to collect”on page 63.
74 Alcatel-Lucent 5620 SAM LogToFile 2.3.0.0 Technology Pack Installation and User Guide

If SAM metric files do not exist in the SAM server, complete the followingtroubleshooting steps:1. Make sure that an OSS user account is configured. For more information, see
“Configure an OSS user account” on page 57.2. Make sure that the correct values were specified for the SAM.USERNAME and
SAM.PASSWORD parameters, as described in “Specifying parameter values” onpage 73, based on the Tivoli Netcool Performance Manager platform:
Platform Parameter
Tivoli Netcool Performance Manager 1.3.2 ALCATEL_5620_SAM.SAM.USERNAMEALCATEL_5620_SAM.SAM.PASSWORD
3. Make sure that the correct value was specified for the SAM.SAM_VERSIONparameter, as described in “Specifying parameter values” on page 73 based onthe Tivoli Netcool Performance Manager platform:
Platform Parameter
Tivoli Netcool Performance Manager 1.3.2 ALCATEL_5620_SAM.SAM.SAM_VERSION
The SAM.SAM_VERSION parameter refers to the JMS protocol version, not theSAM server version.
4. Make sure that the correct values were specified for the SAM.SOAP_URI andSAM.SOAP_URI_2 parameters, as described in “Specifying parameter values” onpage 73, based on the Tivoli Netcool Performance Manager platform:
Platform Parameter
Tivoli Netcool Performance Manager 1.3.2 ALCATEL_5620_SAM.SAM.SOAP_URIALCATEL_5620_SAM.SAM.SOAP_URI_2
5. Check the UNIX file permissions. Ensure that the permissions on thexml_output directory are set to allow read, write, and run by the SAM FTPuser.
6. Ensure that you have enough disk space. For more information, see “Metricscollection fails due to lack of disk space” on page 76.
BOF files do not exist in the FTE output directoryTypically, the DataChannel File Transfer Engine (FTE) application transfers BOFs(Binary Object Files) to the DataChannel FTE application output directory.
If the BOF files are not transferred to the FTE application output directory,complete the following troubleshooting steps:1. Make sure that an FTP user account is configured on the primary and
redundant SAM servers.2. Make sure that the user exists on the SAM server and that the correct FTP user
name and password values were specified for the SAM.EXPORT_URI andSAM.EXPORT_URI_2 parameters, as described in “Specifying parameter values” onpage 73, based on the Tivoli Netcool Performance Manager platform:
Platform Parameter
Tivoli Netcool Performance Manager 1.3.2 ALCATEL_5620_SAM.SAM.EXPORT_URIALCATEL_5620_SAM.SAM.EXPORT_URI_2
3. Check the UNIX permissions.
Chapter 11. Troubleshooting Alcatel-Lucent 5620 SAM LogToFile Technology Pack 75

4. Ensure that you have enough disk space. For more information, see “Metricscollection fails due to lack of disk space”
BOF files do not exist in the CME output directoryTypically, the DataChannel File Transfer Engine (FTE) application transfers BOFs(Binary Object Files) to the DataChannel Complex Metric Engine (CME) applicationoutput directory.
If the BOF files are not transferred to the CME application output directory,complete the following troubleshooting steps:1. Make sure that you imported the Alcatel-Lucent 5620 SAM LogToFile
Technology Pack predefined collection requests.2. Check the UNIX permissions.3. Ensure that you have enough disk space. For more information, see “Metrics
collection fails due to lack of disk space.”
Metrics collection fails due to lack of disk spaceIf the metric-collection operation fails on the SAM server, make sure that you haveenough disk space on the computer or server on which Tivoli Netcool PerformanceManager is installed.
The amount of space that is required depends on the following points:v Size of the SAM networkv Values that are set for the following retention parameters in the dc.cfg file:
Platform Parameter
Tivoli Netcool Performance Manager 1.3.2 FC_RETENTION_HOURS
It is possible, in a SAM networking environment, that several gigabytes worth ofdata files can be collected and transferred to the UBA application done directoryeach day. These data files accumulate according to the values specified for theretention parameters. Therefore, it is possible to use the maximum disk spacebefore the retention period expires and the DataChannel deletes the data filesfrom the done directory.You must monitor the size of the data files that are transferred to the donedirectory during metric collection, and determine whether adjustments must bemade to the retention parameters.
General Alcatel-Lucent 5620 SAM LogToFile 2.3.0.0 Technology Packissue
This is a general issue for Alcatel-Lucent 5620 SAM LogToFile 2.3.0.0 TechnologyPack.
Data for Near End Unavailable (per second) metric is notcalculated correctly
SymptomsIf you run the Error Management Near-End report on Dashboard ApplicationServices Hub, data for Near End Unavailable (per second) metric is not calculatedcorrectly.
To run this report, browse to the following path on Dashboard Application ServicesHub: NOC Reporting > Alcatel-Lucent 5620 SAM > SAM Router Health > 9500
76 Alcatel-Lucent 5620 SAM LogToFile 2.3.0.0 Technology Pack Installation and User Guide

MPR > IMA Link > Error Management Near-End.
General Alcatel-Lucent 5620 SAM LogToFile 2.2.0.0 Technology Packissues
These are the general issues for Alcatel-Lucent 5620 SAM LogToFile 2.2.0.0Technology Pack.
Data for the Inbound Errors might not be displayedSymptomsIf you run the Packet Health for LAG interface Group report on the TivoliIntegrated Portal, data for the Inbound Errors might not be displayed. To run thePacket Health for LAG interface Group report, browse to the following path on theTivoli Integrated Portal: NOC Reporting > Alcatel-Lucent 5620 SAM > SAMRouter Health > Link Aggregation Groups (LAG Interfaces). On this report, inthe table, the data for the Inbound Errors might not be displayed.
SAM server generates the XML file that contains more thanone datapoint
SymptomsIn the Alcatel-Lucent 5620 SAM LogToFile 2.3.0.0 technology pack, the SAM servergenerates the XML file that contains more than one datapoint for the sameresource. For example, at the SAM server, if you configure the OAM classes for 5minutes, the OAM XML file is generated after every five minutes. However, thisXML file contains more than one datapoint for the same resource. As a result, theCSV file that is received by the UBA also contains more than one datapoint. Onlythe first datapoint is processed properly while the remaining two datapoints areignored.
The description property is not updated in the ResourceEditor
SymptomsIn the Alcatel-Lucent 5620 SAM LogToFile 2.3.0.0 technology pack, on the SAMserver, you modify the Description property for SAP, SAP Queue, and NetworkQueue. The JMS update event is triggered, and the modifications are reflected inthe CSV files that are produced by DataStage. However, these modifications in theDescription property are not reflected in the Resource Editor after the UBAprocesses the CSV files.
SQL error occurs during the Fulldump processSymptomsAfter you install the Alcatel-Lucent 5620 SAM LogToFile 2.3.0.0 Technology packfor the first time, you configure multiple UBA collectors. For example, you setcollectors that are numbered 100 and 102 for the Performance metrics, andcollectors that are numbered 101 and 103 for the Accounting metrics. When boththe Performance or Accounting collectors process the Fulldump file at the sametime, SQL error occurs.
Resolving the problemTo avoid this problem, you must not start more than one Performance orAccounting collector during the resource provisioning. You must start onePerformance and one Accounting collector, and wait until the correspondingFulldump files are processed. You can then start the remaining Performance and
Chapter 11. Troubleshooting Alcatel-Lucent 5620 SAM LogToFile Technology Pack 77

Accounting collectors.
The subelement time changes on several unexpectedoccasions
In the Resource Editor, the subelement date must change when:v A subelement is added, updated, or deleted.v JMS event is triggered.
However, in the Alcatel-Lucent 5620 SAM LogToFile Technology Pack, thesubelement date also changes when:v A full dump file is processed by the UBA even if a subelement is not inserted,
updated, or deleted.v Performance or Accounting CSV file is created by DataStage.v Alcatel-Lucent 5620 SAM is upgraded to Alcatel-Lucent 5620 SAM LogToFile.
Subelement state is not updated to OFF when you change theSAP Ingress or Egress Policy
SymptomsWhen you change the Ingress and Egress Policy for the existing SAPs, the newSAP Queues associated with the new Policy are created correctly in ResourceEditor with State = ON. However, the old SAP Queues associated with the oldPolicy remain as state = ON, and they are not updated to state = OFF.
Synchronize the time on the IBM InfoSphere Informationserver and the SAM server
SymptomsTypically, there is a time difference on the IBM InfoSphere Information server andthe SAM server. This may result in incorrect timestamps on the generated reports.
CausesTime at the IBM InfoSphere Information server and the SAM server is notsynchronized.
Resolving the problemTo resolve this issue, set the SAM server time to be same as the IBM InfoSphereInformation server even if both servers are at different timezone. To verify whetherboth servers are synchronized, run the date +%s command, and make sure that thevalue that is returned for both servers is same.
Data is not displayed properly in the Volume and Utilizationreport
SymptomsYou browse to the following path on the Tivoli Integrated Portal to run the Volumeand Utilization report: NOC Reporting > Alcatel-Lucent 5620 SAM > SAMRouter Health > Link Aggregation Groups (LAG Interfaces) > Volume &Utilization Group Summary. The report is displayed on the right. In the InboundUtilization and Outbound Utilization fields, --, 0, and No Data Available, aredisplayed in the following tables:v Group Summary
v Resource Summary
v Detail Chart
78 Alcatel-Lucent 5620 SAM LogToFile 2.3.0.0 Technology Pack Installation and User Guide

Partitioning must be done at the element levelSymptomsDataStage collector mapping configuration provides fine level of partitioning at thesubelement level. However, some subelements must be configured to the samecollector. Because this rule is not verified by the DataStage job, mistakes might beintroduced in the relation lookup configuration file.
Resolving the problemTo avoid this problem, you must create the partition at the element level only. Youmust configure all family names for an element to a single set of collectors.
The CSV file name changes when you map another class thatdoes not correspond to its collector
SymptomsOn DataStage, the CSV file in the out directory is not correctly named. Forexample, the provisoAccounting_2013.02.18-08.05.00_101.csv file is incorrectlynamed as provisoPerformance_2013.02.18-08.05.00_101.csv.
CausesThis problem occurs when you map one more class that does not correspond to itscollector in the collector_mapping.csv file. For example, in thecollector_lookup.csv file, you set the 101 collector as Accounting. However, in thecollector_mapping.csv file, instead of the Accounting class, you map one or morePerformance classes to the 101 collector. As a result, the Accounting 101 collectorgets mixed with the Performance classes, and you find theprovisoPerformance_2013.02.18-08.05.00_101.csv file instead ofprovisoAccounting_2013.02.18-08.05.00_101.csv file in the out directory.
The OAM data exists at the SAM server but is not transferredto DataStage
SymptomsThe OAM data exists at the SAM server in the xml_ouput directory. However, thisdata is not transferred to DataStage at DS/done.
Diagnosing the problemTo identify the cause of the problem, follow these steps:1. Run this command to verify if the registerSasLogToFile requests are sent to
the SAM server:$ grep -q "^registerSasLogToFile" ./data/responsexmls.csv && echo "yes, there is a response forthe request!"
2. Run this command to identify if an exception has occurred:$ grep "^registerSasLogToFile" ./data/responsexmls.csv | grep -i "exception"$# None - all ok
3. Check if the logFileAvailable message is received from the SAM JMS for thesesasLogToFile:$ grep "/oam/" ./logs/sam-jms-daemon.log$# None - No message is received.
Note: /oam/ is the parent directory for these classes.4. Check if there is a problem with the register sasLogToFile:
Chapter 11. Troubleshooting Alcatel-Lucent 5620 SAM LogToFile Technology Pack 79

$ grep "^registerSasLogToFile" ./data/responsexmls.csv | perl -e’while (<>){m/<fullClassName >(.*)<\/fullClassName>/; print $1."\n"}’ |sort | uniq ethernetoam.CfmLoopbackResultethernetoam.CfmTwoWayDelayTestResulticmp.IcmpPingResultmpls.LspPingResultsvt.TunnelPingResultsvt.VccvPingResult
$ grep "^registerSasLogToFile" ./data/responsexmls.csv | wc -l222# Unexpected logs of registerSasLogToFile - you must expect up to 6 lines,which means 6 classes.You notice 222 lines that is not correct.
Note: You can view logs after you run the command as explained in Step 1.5. Check the number of times SasLogToFile is unregistered and registered:
$ grep registerSasLog ./data/responsexmls.csv | cut -d, -f1
6. Check times when the SasLogToFile is unregistered and registered:$ grep deregisterSasLogToFile ./data/responsexmls.csv | perl -e’while (<>){m/responseTime>(.*)<\/responseTime>/; print $1."\n"}'
You can see the following output:
Feb 22, 2013 11:30:56 AM Feb 22, 2013 11:32:33 AM Feb 22, 2013 11:37:33 AMFeb 22, 2013 11:42:33 AM Feb 22, 2013 11:47:33 AM Feb 22, 2013 11:52:33 AMFeb 22, 2013 11:57:33 AM Feb 22, 2013 12:02:33 PM Feb 22, 2013 12:07:33 PMFeb 22, 2013 12:12:33 PM Feb 22, 2013 12:17:33 PM Feb 22, 2013 12:22:33 PMFeb 22, 2013 12:27:33 PM Feb 22, 2013 12:32:33 PM Feb 22, 2013 12:37:33 PMFeb 22, 2013 12:42:33 PM Feb 22, 2013 12:47:33 PM Feb 22, 2013 12:52:33 PMFeb 22, 2013 12:57:33 PM Feb 22, 2013 1:02:33 PM Feb 22, 2013 1:07:33 PMFeb 22, 2013 1:12:33 PM Feb 22, 2013 1:17:33 PM Feb 22, 2013 1:22:33 PMFeb 22, 2013 1:27:33 PM Feb 22, 2013 1:32:33 PM Feb 22, 2013 1:37:33 PMFeb 22, 2013 1:42:33 PM Feb 22, 2013 1:47:33 PM Feb 22, 2013 1:52:33 PMFeb 22, 2013 1:57:33 PM Feb 22, 2013 2:02:33 PM Feb 22, 2013 2:07:33 PM
Note: The register cycle happens every 5 minutes, which is same as thewindow period.
7. Verify whether the keepalive event is sent by SAM:$ grep KeepAliveEvent ./logs/sam-jms-daemon.log | grep -v "Connected to JMS"
# no keepalive events. This indicates that SAM does not send the keepAlivemessage but the Monitor stage, which expects keepalive message per period isfalsely indicated that the daemon is not functioning properly, and restarts thedaemon in cycle.
Resolving the problemTo turn off the keepAlive check, follow the steps in “How to turn off the keepAlivemessage flag” on page 81
80 Alcatel-Lucent 5620 SAM LogToFile 2.3.0.0 Technology Pack Installation and User Guide

General IBM InfoSphere Information Server related issuesThese are the general issues for IBM InfoSphere Information Server that is requiredfor Alcatel-Lucent 5620 SAM LogToFile 2.3.0.0 Technology Pack.
Troubleshooting IBM InfoSphere Information Serverinstallations
You can resolve all installation problems, with this information.
For all troubleshooting problems with installation, see http://publib.boulder.ibm.com/infocenter/iisinfsv/v8r7/topic/com.ibm.swg.im.iis.productization.iisinfsv.install.doc/topics/wsisinst_ts_is_container.html. You can find more troubleshooting information in theinformation centers and customer support technical notes for various productmodules and components.
DataStage job stops running because of insufficient buffersize
SymptomsWhen the buffer size is insufficient, you might encounter a unrecoverable error andthe job stops running. You receive the following error:The record is too big to fit in a block; the length requested is: 131952, the max blocklength is: 131072
CausesYou receive this error if the record length exceeds the block size.
Resolving the problemTo resolve this issue, increase the APT_DEFAULT_TRANSFER_BLOCK_SIZE accommodatethe size. For more information about how to increase the size of this parameter, seehttp://www-01.ibm.com/support/docview.wss?uid=swg21386618.
How to turn off the keepAlive message flagBy default, the keepAlive message flag is turned on. You can manually turn off thisflag.
SymptomsWhen you do not see the keepAlive messages that are coming in, the daemonprocess might get restarted. To avoid that, you can turn off the keepAlive messageflag.
Resolving the problemTo turn off the keepAlive message flag, follow these steps:1. In the IBM InfoSphere DataStage and QualityStage Designer. Double-click the
Job. The job opens in canvas.2. Stop the Job.3. Right-click the Monitor_Stage and select Properties.4. In the Monitor_Stage -JTransformerPX stage window, click the Properties tab.5. Update the parameter sam_keepalive_max_missed from 1 to 0.6. Click OK.7. Compile and restart the Job.
Chapter 11. Troubleshooting Alcatel-Lucent 5620 SAM LogToFile Technology Pack 81

Verifying that the ports are enabled for all the componentsrequired for Alcatel-Lucent 5620 SAM LogToFile 2.3.0.0Technology Pack
Enabling the ports for all the components that are required for Alcatel-Lucent 5620SAM LogToFile 2.3.0.0 Technology Pack. This is applicable for Apache ActiveMQalso.
SymptomsIf you cannot access the IBM InfoSphere Information Server server or clientcomponents, verify that the component ports are enabled. To check the status ofthe ports, use the following command:iptables -L
Resolving the problemFor more information about enabling the ports, see “Enabling the firewall on theIBM InfoSphere Information Server and WebSphere Application Server” on page31.
82 Alcatel-Lucent 5620 SAM LogToFile 2.3.0.0 Technology Pack Installation and User Guide

Notices
This information was developed for products and services offered in the U.S.A.IBM may not offer the products, services, or features discussed in this document inother countries. Consult your local IBM representative for information on theproducts and services currently available in your area. Any reference to an IBMproduct, program, or service is not intended to state or imply that only that IBMproduct, program, or service may be used. Any functionally equivalent product,program, or service that does not infringe any IBM intellectual property right maybe used instead. However, it is the user's responsibility to evaluate and verify theoperation of any non-IBM product, program, or service.
IBM may have patents or pending patent applications covering subject matterdescribed in this document. The furnishing of this document does not give youany license to these patents. You can send license inquiries, in writing, to:
IBM Director of LicensingIBM CorporationNorth Castle DriveArmonk, NY 10504-1785 U.S.A.
For license inquiries regarding double-byte (DBCS) information, contact the IBMIntellectual Property Department in your country or send inquiries, in writing, to:
Intellectual Property LicensingLegal and Intellectual Property LawIBM Japan, Ltd.19-21, Nihonbashi-Hakozakicho, Chuo-kuTokyo 103-8510, Japan
The following paragraph does not apply to the United Kingdom or any othercountry where such provisions are inconsistent with local law :
INTERNATIONAL BUSINESS MACHINES CORPORATION PROVIDES THISPUBLICATION "AS IS" WITHOUT WARRANTY OF ANY KIND, EITHEREXPRESS OR IMPLIED, INCLUDING, BUT NOT LIMITED TO, THE IMPLIEDWARRANTIES OF NON-INFRINGEMENT, MERCHANTABILITY OR FITNESSFOR A PARTICULAR PURPOSE.
Some states do not allow disclaimer of express or implied warranties in certaintransactions, therefore, this statement might not apply to you.
This information could include technical inaccuracies or typographical errors.Changes are periodically made to the information herein; these changes will beincorporated in new editions of the publication. IBM may make improvementsand/or changes in the product(s) and/or the program(s) described in thispublication at any time without notice.
Any references in this information to non-IBM Web sites are provided forconvenience only and do not in any manner serve as an endorsement of those Websites. The materials at those Web sites are not part of the materials for this IBMproduct and use of those Web sites is at your own risk.
© Copyright IBM Corp. 2014 83

IBM may use or distribute any of the information you supply in any way itbelieves appropriate without incurring any obligation to you.
Licensees of this program who wish to have information about it for the purposeof enabling: (i) the exchange of information between independently createdprograms and other programs (including this one) and (ii) the mutual use of theinformation which has been exchanged, should contact:
IBM Corporation2Z4A/10111400 Burnet RoadAustin, TX 78758 U.S.A.
Such information may be available, subject to appropriate terms and conditions,including in some cases payment of a fee.
The licensed program described in this document and all licensed materialavailable for it are provided by IBM under terms of the IBM Customer Agreement,IBM International Program License Agreement or any equivalent agreementbetween us.
Any performance data contained herein was determined in a controlledenvironment. Therefore, the results obtained in other operating environments mayvary significantly. Some measurements may have been made on development-levelsystems and there is no guarantee that these measurements will be the same ongenerally available systems. Furthermore, some measurement may have beenestimated through extrapolation. Actual results may vary. Users of this documentshould verify the applicable data for their specific environment.
Information concerning non-IBM products was obtained from the suppliers ofthose products, their published announcements or other publicly available sources.IBM has not tested those products and cannot confirm the accuracy ofperformance, compatibility or any other claims related to non-IBM products.Questions on the capabilities of non-IBM products should be addressed to thesuppliers of those products.
All statements regarding IBM's future direction or intent are subject to change orwithdrawal without notice, and represent goals and objectives only.
All IBM prices shown are IBM's suggested retail prices, are current and are subjectto change without notice. Dealer prices may vary.
This information is for planning purposes only. The information herein is subject tochange before the products described become available.
This information contains examples of data and reports used in daily businessoperations. To illustrate them as completely as possible, the examples include thenames of individuals, companies, brands, and products. All of these names arefictitious and any similarity to the names and addresses used by an actual businessenterprise is entirely coincidental.
COPYRIGHT LICENSE:
This information contains sample application programs in source language, whichillustrate programming techniques on various operating platforms. You may copy,modify, and distribute these sample programs in any form without payment to
84 Alcatel-Lucent 5620 SAM LogToFile 2.3.0.0 Technology Pack Installation and User Guide

IBM, for the purposes of developing, using, marketing or distributing applicationprograms conforming to the application programming interface for the operatingplatform for which the sample programs are written. These examples have notbeen thoroughly tested under all conditions. IBM, therefore, cannot guarantee orimply reliability, serviceability, or function of these programs. You may copy,modify, and distribute these sample programs in any form without payment toIBM for the purposes of developing, using, marketing, or distributing applicationprograms conforming to IBM's application programming interfaces.
Each copy or any portion of these sample programs or any derivative work, mustinclude a copyright notice as follows:
© (your company name) (year). Portions of this code are derived from IBM Corp.Sample Programs. © Copyright IBM Corp. _enter the year or years_. All rightsreserved.
If you are viewing this information in softcopy form, the photographs and colorillustrations might not be displayed.
Trademarks
IBM, the IBM logo, and ibm.com are trademarks or registered trademarks ofInternational Business Machines Corp., registered in many jurisdictions worldwide.Other product and service names might be trademarks of IBM or other companies.A current list of IBM trademarks is available on the web at “Copyright andtrademark information” at www.ibm.com/legal/copytrade.shtml.
Adobe, Acrobat, PostScript and all Adobe-based trademarks are either registeredtrademarks or trademarks of Adobe Systems Incorporated in the United States,other countries, or both.
IT Infrastructure Library is a registered trademark of the Central Computer andTelecommunications Agency which is now part of the Office of GovernmentCommerce.
Intel, Intel logo, Intel Inside, Intel Inside logo, Intel Centrino, Intel Centrino logo,Celeron, Intel Xeon, Intel SpeedStep, Itanium, and Pentium are trademarks orregistered trademarks of Intel Corporation or its subsidiaries in the United Statesand other countries.
Linux is a registered trademark of Linus Torvalds in the United States, othercountries, or both
Microsoft and Windows are trademarks of Microsoft Corporation in the UnitedStates, other countries, or both.
ITIL is a registered trademark, and a registered community trademark of TheMinister for the Cabinet Office, and is registered in the U.S. Patent and TrademarkOffice.
UNIX is a registered trademark of The Open Group in the United States and othercountries.
Notices 85

Java and all Java-based trademarks and logos are trademarks orregistered trademarks of Oracle and/or its affiliates.
Cell Broadband Engine is a trademark of Sony Computer Entertainment, Inc. in theUnited States, other countries, or both and is used under license therefrom.
Linear Tape-Open, LTO, the LTO Logo, Ultrium, and the Ultrium logo aretrademarks of HP, IBM Corp. and Quantum in the U.S. and other countries.
86 Alcatel-Lucent 5620 SAM LogToFile 2.3.0.0 Technology Pack Installation and User Guide


����
Printed in USA