
Alaskan Guide Model Tents - Cabela's Official Website ... lev "A a nd op mb y th rug f rear sleeve...
3
A S S E M B L Y I N S T R U C T I O N S Alaskan Guide Model Tents Your Alaskan Guide Model tent is relatively easy to set up as long as you follow these instructions. We strongly recommend setting it up at home prior to using in the field, two person set up is reccomended. 1. Spread out your tent floor side down. Place a stake at each corner of the tent, through the loop at the end of the webbing. Begin this process with the two positions at either end of the tent. Pull the webbing taut so that you attain a straight line but do not distort the shape of the tent. Place the stakes into the ground at a 45-degree angle facing away from the tent. (Fig 1) Review your staking to ensure you have a secure symmetrical fit. Take out the seven enclosed shock-corded poles and assemble. Six of the pole lines are the same length and used for the tent. The shorter pole line will be used later in the fly for the front vestibule. Do not unpack the replacement pole sections. Pass one pole line through the front to rear pole sleeve "A" and one pole assembly through front to rear sleeve "B". Next pass one pole assembly through the side to side pole sleeve "C". (Fig. 1) 2. Insert the one end of pole assembly "A1" into the middle ring pin of the three available ring pins (Fig. 2) Do the same for pole assembly "B1". (Three pin ring assemblies are only located at the front of the tent at locations "A1" and "B1". Two ring assemblies are present at the rest of the pin and ring locations) (Fig. 3) While your partner, located at the opposite end of "A2", holds onto pole assembly "A" end, carefully lift up the tent. Your partner should then insert the pole line at "A2" into one of the available ring pins. Repeat the process for pole assembly "B" and "C". -Continued on Back- R Fig. 1 Fig. 2 Fig. 3 A 1 B 1 C 1 B 2 A 2 C 2 A and B 1 1 Front Door B A C
Transcript of Alaskan Guide Model Tents - Cabela's Official Website ... lev "A a nd op mb y th rug f rear sleeve...

ASSEMBLY
INSTRUCTIONS
Alaskan Guide Model Tents
Your Alaskan Guide Model tent is relatively easy to set up as long as you follow these instructions. We strongly recommend setting it up at home prior to using in the field, two person set up is reccomended.
1. Spread out your tent floor side down. Place a stake at each corner of the tent, through the loop at the end of the webbing. Begin this process with the two positions at either end of the tent. Pull the webbing taut so that you attain a straight line but do not distort the shape of the tent. Place the stakes into the ground at a 45-degree angle facing away from the tent. (Fig 1) Review your staking to ensure you have a secure symmetrical fit. Take out the seven enclosed shock-corded poles and assemble. Six of the pole lines are the same length and used for the tent. The shorter pole line will be used later in the fly for the front vestibule. Do not unpack the replacement pole sections. Pass one pole line through the front to rear pole sleeve "A" and one pole assembly through front to rear sleeve "B". Next pass one pole assembly through the side to side pole sleeve "C". (Fig. 1)
2. Insert the one end of pole assembly "A1" into the middle ring pin of the three available ring pins (Fig. 2) Do the same for pole assembly "B1". (Three pin ring assemblies are only located at the front of the tent at locations "A1" and "B1". Two ring assemblies are present at the rest of the pin and ring locations) (Fig. 3) While your partner, located at the opposite end of "A2", holds onto pole assembly "A" end, carefully lift up the tent. Your partner should then insert the pole line at "A2" into one of the available ring pins. Repeat the process for pole assembly "B" and "C".
-Continued on Back-
R
Fig. 1
Fig. 2
Fig. 3
A1 B1
C1
B2 A2
C2
A and B1 1
Front Door
B A
C
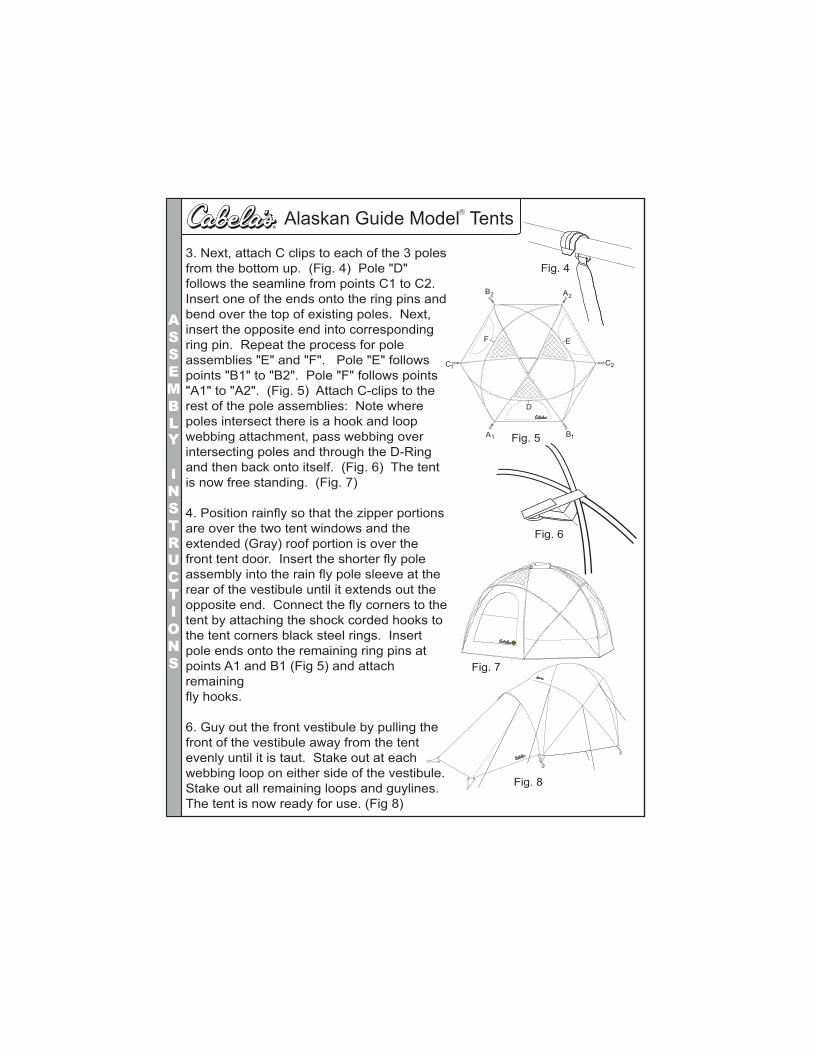
Fig. 5
A
A B
B
CC
D
EF
ASSEMBLY
INSTRUCTIONS
Alaskan Guide Model Tents
3. Next, attach C clips to each of the 3 poles from the bottom up. (Fig. 4) Pole "D" follows the seamline from points C1 to C2. Insert one of the ends onto the ring pins and bend over the top of existing poles. Next, insert the opposite end into corresponding ring pin. Repeat the process for pole assemblies "E" and "F". Pole "E" follows points "B1" to "B2". Pole "F" follows points "A1" to "A2". (Fig. 5) Attach C-clips to the rest of the pole assemblies: Note where poles intersect there is a hook and loop webbing attachment, pass webbing over intersecting poles and through the D-Ring and then back onto itself. (Fig. 6) The tent is now free standing. (Fig. 7)
4. Position rainfly so that the zipper portions are over the two tent windows and the extended (Gray) roof portion is over the front tent door. Insert the shorter fly pole assembly into the rain fly pole sleeve at the rear of the vestibule until it extends out the opposite end. Connect the fly corners to the tent by attaching the shock corded hooks to the tent corners black steel rings. Insert pole ends onto the remaining ring pins at points A1 and B1 (Fig 5) and attach remaining fly hooks.
6. Guy out the front vestibule by pulling the front of the vestibule away from the tent evenly until it is taut. Stake out at each webbing loop on either side of the vestibule. Stake out all remaining loops and guylines. The tent is now ready for use. (Fig 8)
R
Fig. 4
Fig. 6
Fig. 7
Fig. 8
1
2
1
1
2 2
R
R
R

TENT
CARE
INSTRUCTIONS
Alaskan Guide Model Tents1. Cabela's tents have been produced to strict specifications, using only the finest coated fabrics. To prevent stitching leakage, all floor and fly seams have been factory seam taped. The included seam sealer can be used to repair seams that may deteriorate over time.
2. Do not erect the tent over rocks, sticks or other sharp objects which could damage the tent floor. Placing a ground cloth under the tent is highly recommended.
3. Cabela's tent fabrics are flame retardant treated per CPAI-84 specifications. Open flames should not be used in or near the tent since a flame-resistant tent can still burn or melt.
4. When possible, open doors to increase ventilation and reduce condensation which can form on the inner tent surface.
5. The lightweight, durable shock-corded poles are specifically designed to reduce the weight load and to allow for maximum tautness. Care should be taken to avoid unnecessary stress to these poles. The poles should only be used as intended and not bent more than the curvature of the tent. Make sure joints are fully engaged before bending the poles. Should you break or lose a pole, a replacement can be obtained from Cabela's.
6. Always store the tent dry and clean. To clean soiled areas, gently apply non-detergent soap and water.
Fly Sheet with attached guy linesTent Body
WATER BASED
SEAM SEAL
Waterproofs seams in
nylon and other synthetic
outdoor fabrics
2 fl. oz.
59.16 ccSeam Sealer
Repair Nylon
x 2
Pole Sections x 2x 2
Shockcords
ContentsCarry Bag
Gear Locker
Pole AssembliesMain Frame Poles x6
Fly Pole x1
x 3
Brass ClipsReplacements
Stakes
x 24
R
ALASKAN GUIDE MODEL #2 W/FG GREENR
Pole Bag
Stake Bag
Aluminum Repair Pole Sleeve QTY: 2(Only in Aluminum Pole Models)
R
R
R


![Pole Side Impact Accidentsin Germany - UNECE impacts in Germany [comparedtoAUS] However, likewisein AUS Pole casualtiestendtobemale driver(s) Slide Nr. 4](https://static.fdocuments.in/doc/165x107/5bf0ed9e09d3f23f5f8ba5fa/pole-side-impact-accidentsin-germany-impacts-in-germany-comparedtoaus-however.jpg)


