
AKD and TwinCAT 3 CNC EtherCAT Communication Test · Configuration Step 1. Install Real-time...
9
AKD and TwinCAT 3 CNC EtherCAT Communication Test Pre-Work ...................................................................................................................................................................... 1 Configuration Step ....................................................................................................................................................... 2 1. Install Real-time Ethernet................................................................................................................................ 2 2. Add XML File.................................................................................................................................................... 2 3. Create Project.................................................................................................................................................. 2 4. Insert CNC Configuration................................................................................................................................. 3 5. Add CNC Axis ................................................................................................................................................... 4 6. Insert Channel ................................................................................................................................................. 4 7. Scan Device ..................................................................................................................................................... 5 8. Link to CNC Axis............................................................................................................................................... 5 9. Link to Drive and Choose Channel................................................................................................................... 6 10. Activation Configuration ............................................................................................................................. 6 11. Check Process data...................................................................................................................................... 7 12. Modify Axis Parameter ................................................................................................................................ 7 13. Add CNC Program........................................................................................................................................ 8 14. Programming G-Code in HMI ...................................................................................................................... 8 Trouble Shooting.......................................................................................................................................................... 9 1. Following Error so Big:.................................................................................................................................. 9 2. F125 in AKD Drive ............................................................................................................................................ 9 AKD 与 TwinCAT 3 CNC 通讯实验 Pre-Work HW:AKD drive /AKM motor / network card support EtherCAT /EtherCAT cable SW:TwinCAT3 /AKD Workbench Wiring:Reference to AKD installation manual, using cable with shield.
-
Upload
vuongquynh -
Category
Documents
-
view
220 -
download
1
Transcript of AKD and TwinCAT 3 CNC EtherCAT Communication Test · Configuration Step 1. Install Real-time...
AKD and TwinCAT 3 CNC EtherCAT Communication Test
Pre-Work ...................................................................................................................................................................... 1
Configuration Step ....................................................................................................................................................... 2
1. Install Real-time Ethernet ................................................................................................................................ 2
2. Add XML File.................................................................................................................................................... 2
3. Create Project .................................................................................................................................................. 2
4. Insert CNC Configuration ................................................................................................................................. 3
5. Add CNC Axis ................................................................................................................................................... 4
6. Insert Channel ................................................................................................................................................. 4
7. Scan Device ..................................................................................................................................................... 5
8. Link to CNC Axis ............................................................................................................................................... 5
9. Link to Drive and Choose Channel................................................................................................................... 6
10. Activation Configuration ............................................................................................................................. 6
11. Check Process data...................................................................................................................................... 7
12. Modify Axis Parameter ................................................................................................................................ 7
13. Add CNC Program ........................................................................................................................................ 8
14. Programming G-Code in HMI ...................................................................................................................... 8
Trouble Shooting .......................................................................................................................................................... 9
1. Following Error so Big: .................................................................................................................................. 9
2. F125 in AKD Drive ............................................................................................................................................ 9
AKD 与 TwinCAT 3 CNC 通讯实验
Pre-Work
HW:AKD drive /AKM motor / network card support EtherCAT /EtherCAT cable
SW:TwinCAT3 /AKD Workbench
Wiring:Reference to AKD installation manual, using cable with shield.

Configuration Step
1. Install Real-time Ethernet Open TwinCAT 3 software, check whether Ethernet adapters has correctly installed firstly, if not, click install and
enable.
Please be noted that not all of the PC support EtherCAT, you can check if your device support EtherCAT
communication on Beckhoff website.
2. Add XML File Add AKS.XML file in the folder C:\TwinCAT\3.1\Config\Io\EtherCAT, after that, you’d better restart the TwinCAT
software before scan the IO device.
3. Create Project Add new project on the get started page.

4. Insert CNC Configuration
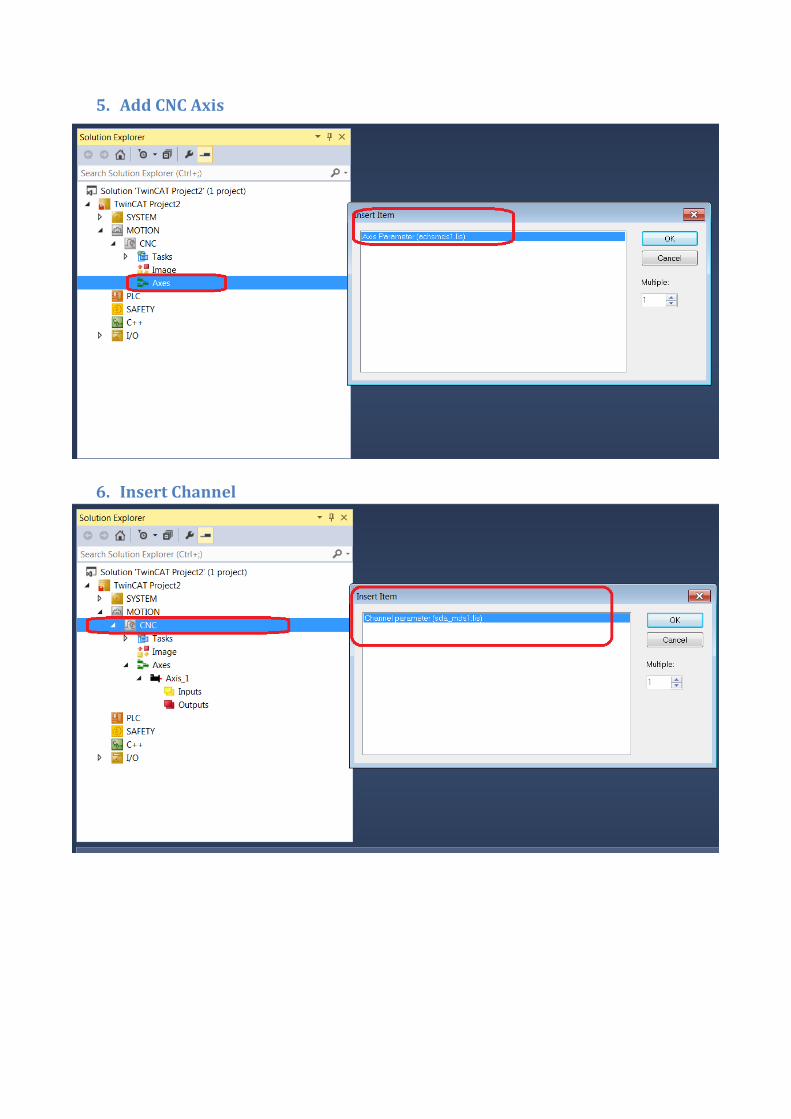
5. Add CNC Axis
6. Insert Channel

7. Scan Device On configuration mode, ensure right wiring and add a right version XML file, then scan device.
Choose as below
8. Link to CNC Axis For NC control, you need to link to NC configuration, my document mainly talk about how to link to CNC.
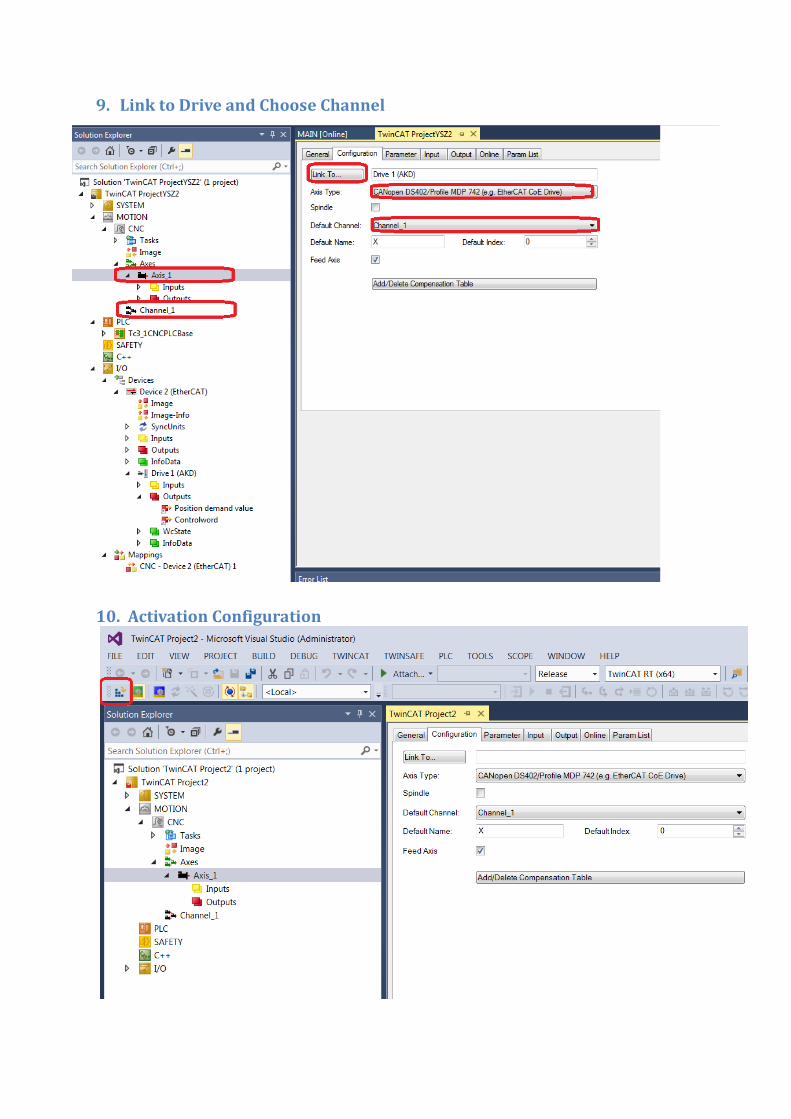
9. Link to Drive and Choose Channel
10. Activation Configuration

11. Check Process data
12. Modify Axis Parameter For my drive and motor feedback, 1 motor rev=2^20=1048576

13. Add CNC Program
14. Programming G-Code in HMI

Trouble Shooting
1. Following Error so Big:
Set maximum following error bigger or disable following error monitor
2. F125 in AKD Drive Check EtherCAT cable or Check AKD drive Fieldbus.Parameter set up.


![[BECKHOFF TwinCAT Tag Import]...- MONITOUCH HMI can communicate with BECKHOFF's TwinCAT3 and TwinCAT2 over Ethernet using tags. [BECKHOFF TwinCAT Tag Import] Introducing useful tips](https://static.fdocuments.in/doc/165x107/6104c612ac18a9348c5e05ad/beckhoff-twincat-tag-import-monitouch-hmi-can-communicate-with-beckhoffs.jpg)


