AIX 5L Version 5.3 General Programming Concepts: Writing and
636
AIX 5L Version 5.3 General Programming Concepts: Writing and Debugging Programs SC23-4896-07
Transcript of AIX 5L Version 5.3 General Programming Concepts: Writing and

AIX 5L Version 5.3
General Programming Concepts:Writing and Debugging Programs
SC23-4896-07
���


AIX 5L Version 5.3
General Programming Concepts:Writing and Debugging Programs
SC23-4896-07
���

NoteBefore using this information and the product it supports, read the information in Appendix B, “Notices,” on page 601.
Eighth Edition (April 2010)
This edition applies to AIX 5L Version 5.3 and to all subsequent releases of this product until otherwise indicated innew editions.
A reader’s comment form is provided at the back of this publication. If the form has been removed, addresscomments to Information Development, Department 04XA-905-6B013, 11501 Burnet Road, Austin, Texas78758-3400. To send comments electronically, use this commercial Internet address: [email protected]. Anyinformation that you supply may be used without incurring any obligation to you.
(C) Copyright Apollo Computer, Inc., 1987. All rights reserved.
(C) Copyright AT&T, 1984, 1989. All rights reserved.
(C) Copyright Sun Microsystems, Inc., 1985, 1986, 1987, 1988. All rights reserved.
(C) Copyright TITN, Inc., 1984, 1989. All rights reserved.
(C) Copyright Regents of the University of California, 1986, 1987. All rights reserved.
© Copyright International Business Machines Corporation 1997, 2010.US Government Users Restricted Rights – Use, duplication or disclosure restricted by GSA ADP Schedule Contractwith IBM Corp.

Contents
About This Book . . . . . . . . . . . . . . . . . . . . . . . . . . . . . . . . xiHighlighting . . . . . . . . . . . . . . . . . . . . . . . . . . . . . . . . . . . xiCase-Sensitivity in AIX . . . . . . . . . . . . . . . . . . . . . . . . . . . . . . . xiISO 9000 . . . . . . . . . . . . . . . . . . . . . . . . . . . . . . . . . . . . xiRelated Publications. . . . . . . . . . . . . . . . . . . . . . . . . . . . . . . . xi
Chapter 1. Tools and Utilities . . . . . . . . . . . . . . . . . . . . . . . . . . . . 1Entering a Program into the System . . . . . . . . . . . . . . . . . . . . . . . . . . 1Checking a Program . . . . . . . . . . . . . . . . . . . . . . . . . . . . . . . . 1Compiling and Linking a Program . . . . . . . . . . . . . . . . . . . . . . . . . . . 1Subroutines . . . . . . . . . . . . . . . . . . . . . . . . . . . . . . . . . . . 2Shell Commands . . . . . . . . . . . . . . . . . . . . . . . . . . . . . . . . . 2Related Information . . . . . . . . . . . . . . . . . . . . . . . . . . . . . . . . 3
Chapter 2. Curses Library . . . . . . . . . . . . . . . . . . . . . . . . . . . . . 5Terminology . . . . . . . . . . . . . . . . . . . . . . . . . . . . . . . . . . . 5Naming Conventions. . . . . . . . . . . . . . . . . . . . . . . . . . . . . . . . 5Structure of a Curses Program . . . . . . . . . . . . . . . . . . . . . . . . . . . . 6Return Values . . . . . . . . . . . . . . . . . . . . . . . . . . . . . . . . . . 6Initializing Curses . . . . . . . . . . . . . . . . . . . . . . . . . . . . . . . . . 6Windows in the Curses Environment . . . . . . . . . . . . . . . . . . . . . . . . . . 7Manipulating Window Data with Curses . . . . . . . . . . . . . . . . . . . . . . . . . 8Controlling the Cursor with Curses . . . . . . . . . . . . . . . . . . . . . . . . . . 11Manipulating Characters with Curses . . . . . . . . . . . . . . . . . . . . . . . . . 11Understanding Terminals with Curses . . . . . . . . . . . . . . . . . . . . . . . . . 18Working with Color . . . . . . . . . . . . . . . . . . . . . . . . . . . . . . . . 24Manipulating Video Attributes . . . . . . . . . . . . . . . . . . . . . . . . . . . . 24Manipulating Soft Labels . . . . . . . . . . . . . . . . . . . . . . . . . . . . . . 26Curses Compatibility . . . . . . . . . . . . . . . . . . . . . . . . . . . . . . . 27List of Additional Curses Subroutines . . . . . . . . . . . . . . . . . . . . . . . . . 27
Chapter 3. Debugging Programs . . . . . . . . . . . . . . . . . . . . . . . . . . 29adb Debug Program Overview. . . . . . . . . . . . . . . . . . . . . . . . . . . . 29Getting Started with the adb Debug Program . . . . . . . . . . . . . . . . . . . . . . 29Controlling Program Execution . . . . . . . . . . . . . . . . . . . . . . . . . . . 31Using adb Expressions . . . . . . . . . . . . . . . . . . . . . . . . . . . . . . 35Customizing the adb Debug Program . . . . . . . . . . . . . . . . . . . . . . . . . 37Computing Numbers and Displaying Text . . . . . . . . . . . . . . . . . . . . . . . . 40Displaying and Manipulating the Source File with the adb Program . . . . . . . . . . . . . . 41adb Debug Program Reference Information . . . . . . . . . . . . . . . . . . . . . . . 48Example adb Program: adbsamp. . . . . . . . . . . . . . . . . . . . . . . . . . . 52Example adb Program: adbsamp2 . . . . . . . . . . . . . . . . . . . . . . . . . . 53Example adb Program: adbsamp3 . . . . . . . . . . . . . . . . . . . . . . . . . . 53Example of Directory and i-node Dumps in adb Debugging . . . . . . . . . . . . . . . . . 54Example of Data Formatting in adb Debugging . . . . . . . . . . . . . . . . . . . . . 56Example of Tracing Multiple Functions in adb Debugging . . . . . . . . . . . . . . . . . . 58dbx Symbolic Debug Program Overview . . . . . . . . . . . . . . . . . . . . . . . . 61Using the dbx Debug Program . . . . . . . . . . . . . . . . . . . . . . . . . . . 61Displaying and Manipulating the Source File with the dbx debug Program. . . . . . . . . . . . 65Examining Program Data . . . . . . . . . . . . . . . . . . . . . . . . . . . . . 70Debugging at the Machine Level with dbx . . . . . . . . . . . . . . . . . . . . . . . 76Customizing the dbx Debugging Environment . . . . . . . . . . . . . . . . . . . . . . 80Developing for the dbx Plug-in Framework . . . . . . . . . . . . . . . . . . . . . . . 82
© Copyright IBM Corp. 1997, 2010 iii

List of dbx Subcommands . . . . . . . . . . . . . . . . . . . . . . . . . . . . . 98Related Information . . . . . . . . . . . . . . . . . . . . . . . . . . . . . . . 101
Chapter 4. Error-Logging Overview . . . . . . . . . . . . . . . . . . . . . . . . 103Error-Logging Facility . . . . . . . . . . . . . . . . . . . . . . . . . . . . . . 103Managing Error Logging . . . . . . . . . . . . . . . . . . . . . . . . . . . . . 104Error Notification . . . . . . . . . . . . . . . . . . . . . . . . . . . . . . . . 107Error Logging Tasks . . . . . . . . . . . . . . . . . . . . . . . . . . . . . . . 110Error Logging and Alerts . . . . . . . . . . . . . . . . . . . . . . . . . . . . . 118Error Logging Controls . . . . . . . . . . . . . . . . . . . . . . . . . . . . . . 118Related Information . . . . . . . . . . . . . . . . . . . . . . . . . . . . . . . 119
Chapter 5. File Systems and Logical Volumes . . . . . . . . . . . . . . . . . . . . 121File Types. . . . . . . . . . . . . . . . . . . . . . . . . . . . . . . . . . . 121Working With JFS Directories . . . . . . . . . . . . . . . . . . . . . . . . . . . 123Working with JFS2 Directories . . . . . . . . . . . . . . . . . . . . . . . . . . . 125Working with JFS i-nodes . . . . . . . . . . . . . . . . . . . . . . . . . . . . . 127Working with JFS2 i-nodes . . . . . . . . . . . . . . . . . . . . . . . . . . . . 128Allocating JFS File Space . . . . . . . . . . . . . . . . . . . . . . . . . . . . . 130Allocating JFS2 File Space . . . . . . . . . . . . . . . . . . . . . . . . . . . . 133JFS File System Layout . . . . . . . . . . . . . . . . . . . . . . . . . . . . . 135JFS2 File System Layout . . . . . . . . . . . . . . . . . . . . . . . . . . . . . 136Writing Programs That Access Large Files . . . . . . . . . . . . . . . . . . . . . . . 137Linking for Programmers . . . . . . . . . . . . . . . . . . . . . . . . . . . . . 144Using File Descriptors . . . . . . . . . . . . . . . . . . . . . . . . . . . . . . 146Creating and Removing Files. . . . . . . . . . . . . . . . . . . . . . . . . . . . 149Working with File I/O . . . . . . . . . . . . . . . . . . . . . . . . . . . . . . . 151File Status . . . . . . . . . . . . . . . . . . . . . . . . . . . . . . . . . . 157File Accessibility . . . . . . . . . . . . . . . . . . . . . . . . . . . . . . . . 158Creating New File System Types . . . . . . . . . . . . . . . . . . . . . . . . . . 159Logical Volume Programming . . . . . . . . . . . . . . . . . . . . . . . . . . . 162Related Information . . . . . . . . . . . . . . . . . . . . . . . . . . . . . . . 162
Chapter 6. Floating-Point Exceptions . . . . . . . . . . . . . . . . . . . . . . . . 165Floating-Point Exception Subroutines . . . . . . . . . . . . . . . . . . . . . . . . . 165Floating-Point Trap Handler Operation . . . . . . . . . . . . . . . . . . . . . . . . 166Related Information . . . . . . . . . . . . . . . . . . . . . . . . . . . . . . . 173
Chapter 7. Input and Output Handling . . . . . . . . . . . . . . . . . . . . . . . 175Low-Level I/O Interfaces . . . . . . . . . . . . . . . . . . . . . . . . . . . . . 175Stream I/O Interfaces . . . . . . . . . . . . . . . . . . . . . . . . . . . . . . 176Terminal I/O Interfaces . . . . . . . . . . . . . . . . . . . . . . . . . . . . . . 177Asynchronous I/O Interfaces . . . . . . . . . . . . . . . . . . . . . . . . . . . . 178
Chapter 8. Storage Protect Keys. . . . . . . . . . . . . . . . . . . . . . . . . . 181User protect keys . . . . . . . . . . . . . . . . . . . . . . . . . . . . . . . . 181Using protect keys . . . . . . . . . . . . . . . . . . . . . . . . . . . . . . . 182Regions protected by user keys. . . . . . . . . . . . . . . . . . . . . . . . . . . 183System prerequisites for key protection . . . . . . . . . . . . . . . . . . . . . . . . 183Program prerequisites for key protection . . . . . . . . . . . . . . . . . . . . . . . 183Subroutines . . . . . . . . . . . . . . . . . . . . . . . . . . . . . . . . . . 184Debugging . . . . . . . . . . . . . . . . . . . . . . . . . . . . . . . . . . 184Hardware details . . . . . . . . . . . . . . . . . . . . . . . . . . . . . . . . 184Sample program . . . . . . . . . . . . . . . . . . . . . . . . . . . . . . . . 185
Chapter 9. Large Program Support . . . . . . . . . . . . . . . . . . . . . . . . . 189
iv AIX 5L Version 5.3 General Programming Concepts: Writing and Debugging Programs

Understanding the Large Address-Space Model . . . . . . . . . . . . . . . . . . . . . 189Understanding the Very Large Address-Space Model . . . . . . . . . . . . . . . . . . . 190Enabling the Large and Very Large Address-Space Models . . . . . . . . . . . . . . . . 190Executing Programs with Large Data Areas . . . . . . . . . . . . . . . . . . . . . . 191Related Information . . . . . . . . . . . . . . . . . . . . . . . . . . . . . . . 192
Chapter 10. Programming on Multiprocessor Systems . . . . . . . . . . . . . . . . . 193Identifying Processors . . . . . . . . . . . . . . . . . . . . . . . . . . . . . . 193Controlling Processor Use . . . . . . . . . . . . . . . . . . . . . . . . . . . . . 194Using Dynamic Processor Deallocation . . . . . . . . . . . . . . . . . . . . . . . . 194Dynamic Memory Guarding . . . . . . . . . . . . . . . . . . . . . . . . . . . . 198Creating Locking Services . . . . . . . . . . . . . . . . . . . . . . . . . . . . . 199Related Information . . . . . . . . . . . . . . . . . . . . . . . . . . . . . . . 201
Chapter 11. Multi-Threaded Programming . . . . . . . . . . . . . . . . . . . . . . 203Understanding Threads and Processes . . . . . . . . . . . . . . . . . . . . . . . . 203Thread-Safe and Threaded Libraries in AIX . . . . . . . . . . . . . . . . . . . . . . 208Creating Threads . . . . . . . . . . . . . . . . . . . . . . . . . . . . . . . . 208Terminating Threads . . . . . . . . . . . . . . . . . . . . . . . . . . . . . . . 211Synchronization Overview . . . . . . . . . . . . . . . . . . . . . . . . . . . . . 218Using Mutexes . . . . . . . . . . . . . . . . . . . . . . . . . . . . . . . . . 218Using Condition Variables . . . . . . . . . . . . . . . . . . . . . . . . . . . . . 224Using Read-Write Locks . . . . . . . . . . . . . . . . . . . . . . . . . . . . . 229Joining Threads . . . . . . . . . . . . . . . . . . . . . . . . . . . . . . . . 237Scheduling Threads . . . . . . . . . . . . . . . . . . . . . . . . . . . . . . . 240Contention Scope and Concurrency Level . . . . . . . . . . . . . . . . . . . . . . . 243Synchronization Scheduling . . . . . . . . . . . . . . . . . . . . . . . . . . . . 244One-Time Initializations . . . . . . . . . . . . . . . . . . . . . . . . . . . . . . 246Thread-Specific Data. . . . . . . . . . . . . . . . . . . . . . . . . . . . . . . 248Creating Complex Synchronization Objects . . . . . . . . . . . . . . . . . . . . . . 251Signal Management . . . . . . . . . . . . . . . . . . . . . . . . . . . . . . . 255Process Duplication and Termination . . . . . . . . . . . . . . . . . . . . . . . . . 258Threads Library Options . . . . . . . . . . . . . . . . . . . . . . . . . . . . . 260Writing Reentrant and Thread-Safe Code . . . . . . . . . . . . . . . . . . . . . . . 269Developing Multi-Threaded Programs . . . . . . . . . . . . . . . . . . . . . . . . 274Developing Multi-Threaded Programs to Examine and Modify pthread Library Objects. . . . . . . 277Developing Multi-Threaded Program Debuggers. . . . . . . . . . . . . . . . . . . . . 281Benefits of Threads . . . . . . . . . . . . . . . . . . . . . . . . . . . . . . . 286Related Information . . . . . . . . . . . . . . . . . . . . . . . . . . . . . . . 287
Chapter 12. lex and yacc Program Information . . . . . . . . . . . . . . . . . . . . 291Generating a Lexical Analyzer with the lex Command. . . . . . . . . . . . . . . . . . . 291Using the lex Program with the yacc Program . . . . . . . . . . . . . . . . . . . . . 292Extended Regular Expressions in the lex Command . . . . . . . . . . . . . . . . . . . 293Passing Code to the Generated lex Program . . . . . . . . . . . . . . . . . . . . . . 296Defining lex Substitution Strings. . . . . . . . . . . . . . . . . . . . . . . . . . . 297lex Library. . . . . . . . . . . . . . . . . . . . . . . . . . . . . . . . . . . 297Actions Taken by the Lexical Analyzer . . . . . . . . . . . . . . . . . . . . . . . . 298lex Program Start Conditions . . . . . . . . . . . . . . . . . . . . . . . . . . . . 301Creating a Parser with the yacc Program . . . . . . . . . . . . . . . . . . . . . . . 302The yacc Grammar File. . . . . . . . . . . . . . . . . . . . . . . . . . . . . . 303Using the yacc Grammar File . . . . . . . . . . . . . . . . . . . . . . . . . . . 304yacc Grammar File Declarations . . . . . . . . . . . . . . . . . . . . . . . . . . 306yacc Rules . . . . . . . . . . . . . . . . . . . . . . . . . . . . . . . . . . 308yacc Actions . . . . . . . . . . . . . . . . . . . . . . . . . . . . . . . . . . 309yacc Program Error Handling . . . . . . . . . . . . . . . . . . . . . . . . . . . . 311
Contents v

Parser Operation Generated by the yacc Command . . . . . . . . . . . . . . . . . . . 312Using Ambiguous Rules in the yacc Program . . . . . . . . . . . . . . . . . . . . . . 314Turning on Debug Mode for a Parser Generated by the yacc Command . . . . . . . . . . . . 315Example Program for the lex and yacc Programs . . . . . . . . . . . . . . . . . . . . 315Related Information . . . . . . . . . . . . . . . . . . . . . . . . . . . . . . . 319
Chapter 13. make Command . . . . . . . . . . . . . . . . . . . . . . . . . . . 321Creating a Description File . . . . . . . . . . . . . . . . . . . . . . . . . . . . 321Internal Rules for the make Program . . . . . . . . . . . . . . . . . . . . . . . . . 324Defining and Using Macros in a Description File. . . . . . . . . . . . . . . . . . . . . 328Creating a Target File with the Make Command . . . . . . . . . . . . . . . . . . . . . 332Using the make Command with Source Code Control System (SCCS) Files . . . . . . . . . . 332Using the make Command with Non-Source Code Control System (SCCS) Files . . . . . . . . 334Understanding How the make Command Uses Environment Variables . . . . . . . . . . . . 334Using the make Command in Parallel Run Mode . . . . . . . . . . . . . . . . . . . . 335Example of a Description File . . . . . . . . . . . . . . . . . . . . . . . . . . . 335
Chapter 14. m4 Macro Processor Overview . . . . . . . . . . . . . . . . . . . . . 339Using the m4 Macro Processor . . . . . . . . . . . . . . . . . . . . . . . . . . . 339Creating a User-Defined Macro . . . . . . . . . . . . . . . . . . . . . . . . . . . 339Using a Predefined m4 Macro . . . . . . . . . . . . . . . . . . . . . . . . . . . 342Additional m4 Macros . . . . . . . . . . . . . . . . . . . . . . . . . . . . . . 347
Chapter 15. Object Data Manager (ODM) . . . . . . . . . . . . . . . . . . . . . . 349ODM Object Classes and Objects . . . . . . . . . . . . . . . . . . . . . . . . . . 349ODM Descriptors . . . . . . . . . . . . . . . . . . . . . . . . . . . . . . . . 353ODM Object Searches . . . . . . . . . . . . . . . . . . . . . . . . . . . . . . 356ODM Commands and Subroutines. . . . . . . . . . . . . . . . . . . . . . . . . . 359ODM Example Code and Output . . . . . . . . . . . . . . . . . . . . . . . . . . 360Related Information . . . . . . . . . . . . . . . . . . . . . . . . . . . . . . . 363
Chapter 16. Simultaneous Multi-Threading . . . . . . . . . . . . . . . . . . . . . . 365Benefitting from Simultaneous Multi-Threading . . . . . . . . . . . . . . . . . . . . . 365Setting the Mode With the smtctl Command . . . . . . . . . . . . . . . . . . . . . . 365Hardware Management Console Configuration for Simultaneous Multi-Threading . . . . . . . . 366Micro-Partitioning and Simultaneous Multi-Threading . . . . . . . . . . . . . . . . . . . 366Hardware Thread Priorities . . . . . . . . . . . . . . . . . . . . . . . . . . . . 367
Chapter 17. Dynamic logical partitioning . . . . . . . . . . . . . . . . . . . . . . 369DLPAR-Safe and -Aware Programs . . . . . . . . . . . . . . . . . . . . . . . . . 369Processor Bindings . . . . . . . . . . . . . . . . . . . . . . . . . . . . . . . 372Integrating the DLPAR Operation into the Application . . . . . . . . . . . . . . . . . . . 373Actions Taken by DLPAR Scripts . . . . . . . . . . . . . . . . . . . . . . . . . . 374Making Kernel Extensions DLPAR-Aware . . . . . . . . . . . . . . . . . . . . . . . 379Related Information . . . . . . . . . . . . . . . . . . . . . . . . . . . . . . . 383
Chapter 18. sed Program Information . . . . . . . . . . . . . . . . . . . . . . . . 385Manipulating Strings with sed . . . . . . . . . . . . . . . . . . . . . . . . . . . 385
Chapter 19. Shared Libraries and Shared Memory . . . . . . . . . . . . . . . . . . . 391Shared Objects and Runtime Linking . . . . . . . . . . . . . . . . . . . . . . . . . 391Shared Libraries and Lazy Loading . . . . . . . . . . . . . . . . . . . . . . . . . 393Named Shared Library Areas. . . . . . . . . . . . . . . . . . . . . . . . . . . . 395Creating a Shared Library . . . . . . . . . . . . . . . . . . . . . . . . . . . . . 397Program Address Space Overview. . . . . . . . . . . . . . . . . . . . . . . . . . 399Understanding Memory Mapping . . . . . . . . . . . . . . . . . . . . . . . . . . 401
vi AIX 5L Version 5.3 General Programming Concepts: Writing and Debugging Programs

Inter-Process Communication (IPC) Limits . . . . . . . . . . . . . . . . . . . . . . . 405Creating a Mapped Data File with the shmat Subroutine. . . . . . . . . . . . . . . . . . 408Creating a Copy-On-Write Mapped Data File with the shmat Subroutine . . . . . . . . . . . . 409Creating a Shared Memory Segment with the shmat Subroutine . . . . . . . . . . . . . . . 410Paging Space Programming Requirements . . . . . . . . . . . . . . . . . . . . . . 410List of Memory Manipulation Services . . . . . . . . . . . . . . . . . . . . . . . . 411List of Memory Mapping Services . . . . . . . . . . . . . . . . . . . . . . . . . . 412Related Information . . . . . . . . . . . . . . . . . . . . . . . . . . . . . . . 412
Chapter 20. System Memory Allocation Using the malloc Subsystem . . . . . . . . . . . 415Working with the Process Heap . . . . . . . . . . . . . . . . . . . . . . . . . . . 416Understanding System Allocation Policy . . . . . . . . . . . . . . . . . . . . . . . . 417User-Defined Malloc Replacement . . . . . . . . . . . . . . . . . . . . . . . . . . 425Debug Malloc Tool . . . . . . . . . . . . . . . . . . . . . . . . . . . . . . . 429Malloc Multiheap . . . . . . . . . . . . . . . . . . . . . . . . . . . . . . . . 435Malloc Buckets . . . . . . . . . . . . . . . . . . . . . . . . . . . . . . . . . 436Malloc Trace . . . . . . . . . . . . . . . . . . . . . . . . . . . . . . . . . . 439Malloc Log . . . . . . . . . . . . . . . . . . . . . . . . . . . . . . . . . . 440Malloc Disclaim. . . . . . . . . . . . . . . . . . . . . . . . . . . . . . . . . 441Malloc Detect . . . . . . . . . . . . . . . . . . . . . . . . . . . . . . . . . 441Configuring and Using the Malloc Thread Cache . . . . . . . . . . . . . . . . . . . . 442
Chapter 21. AIX Vector Programming . . . . . . . . . . . . . . . . . . . . . . . . 445Vector Extension Overview . . . . . . . . . . . . . . . . . . . . . . . . . . . . 445Runtime Determination of Vector Capability . . . . . . . . . . . . . . . . . . . . . . 445AIX ABI Extension. . . . . . . . . . . . . . . . . . . . . . . . . . . . . . . . 446Legacy ABI Compatibility and Interoperability . . . . . . . . . . . . . . . . . . . . . . 448Extended Context . . . . . . . . . . . . . . . . . . . . . . . . . . . . . . . . 448Vector Memory Allocation and Alignment . . . . . . . . . . . . . . . . . . . . . . . 449printf and scanf of Vector Data Types . . . . . . . . . . . . . . . . . . . . . . . . 449Threaded Applications . . . . . . . . . . . . . . . . . . . . . . . . . . . . . . 450Compilers . . . . . . . . . . . . . . . . . . . . . . . . . . . . . . . . . . . 450Assembler . . . . . . . . . . . . . . . . . . . . . . . . . . . . . . . . . . 451Debugger . . . . . . . . . . . . . . . . . . . . . . . . . . . . . . . . . . . 451Core Files. . . . . . . . . . . . . . . . . . . . . . . . . . . . . . . . . . . 452
Chapter 22. Packaging Software for Installation . . . . . . . . . . . . . . . . . . . . 453Installation Procedure Requirements . . . . . . . . . . . . . . . . . . . . . . . . . 453Package Control Information Requirements . . . . . . . . . . . . . . . . . . . . . . 454Format of a Software Package . . . . . . . . . . . . . . . . . . . . . . . . . . . 454Package Partitioning Requirements . . . . . . . . . . . . . . . . . . . . . . . . . 454Software Vital Product Data (SWVPD) . . . . . . . . . . . . . . . . . . . . . . . . 454Software Product Packaging Parts . . . . . . . . . . . . . . . . . . . . . . . . . . 455Package and Fileset Naming Conventions . . . . . . . . . . . . . . . . . . . . . . . 455Fileset Revision Level Identification . . . . . . . . . . . . . . . . . . . . . . . . . 457Contents of a Software Package . . . . . . . . . . . . . . . . . . . . . . . . . . 457The lpp_name Package Information File . . . . . . . . . . . . . . . . . . . . . . . 458The liblpp.a Installation Control Library File . . . . . . . . . . . . . . . . . . . . . . 468Further Description of Installation Control Files . . . . . . . . . . . . . . . . . . . . . 471Installation Control Files Specifically for Repackaged Products . . . . . . . . . . . . . . . 476Installation Files for Supplemental Disk Subsystems . . . . . . . . . . . . . . . . . . . 479Format of Distribution Media . . . . . . . . . . . . . . . . . . . . . . . . . . . . 479Tape . . . . . . . . . . . . . . . . . . . . . . . . . . . . . . . . . . . . . 479CD-ROM . . . . . . . . . . . . . . . . . . . . . . . . . . . . . . . . . . . 479Diskette . . . . . . . . . . . . . . . . . . . . . . . . . . . . . . . . . . . 480The Table of Contents File. . . . . . . . . . . . . . . . . . . . . . . . . . . . . 481
Contents vii

The installp Processing of Product Packages . . . . . . . . . . . . . . . . . . . . . . 482Installation Commands Used During Installation and Update Processing . . . . . . . . . . . . 488
Chapter 23. Source Code Control System (SCCS) . . . . . . . . . . . . . . . . . . . 489Introduction to SCCS. . . . . . . . . . . . . . . . . . . . . . . . . . . . . . . 489SCCS Flag and Parameter Conventions . . . . . . . . . . . . . . . . . . . . . . . 490Creating, Editing, and Updating an SCCS File . . . . . . . . . . . . . . . . . . . . . 490Controlling and Tracking SCCS File Changes. . . . . . . . . . . . . . . . . . . . . . 492Detecting and Repairing Damaged SCCS Files . . . . . . . . . . . . . . . . . . . . . 493List of Additional SCCS Commands . . . . . . . . . . . . . . . . . . . . . . . . . 494Related Information . . . . . . . . . . . . . . . . . . . . . . . . . . . . . . . 494
Chapter 24. Subroutines, Example Programs, and Libraries . . . . . . . . . . . . . . . 495128-Bit Long Double Floating-Point Data Type . . . . . . . . . . . . . . . . . . . . . 496List of Character Manipulation Subroutines . . . . . . . . . . . . . . . . . . . . . . 498List of Executable Program Creation Subroutines . . . . . . . . . . . . . . . . . . . . 499List of Files and Directories Subroutines . . . . . . . . . . . . . . . . . . . . . . . 499List of FORTRAN BLAS Level 1: Vector-Vector Subroutines . . . . . . . . . . . . . . . . 501List of FORTRAN BLAS Level 2: Matrix-Vector Subroutines . . . . . . . . . . . . . . . . 501List of FORTRAN BLAS Level 3: Matrix-Matrix Subroutines . . . . . . . . . . . . . . . . 502List of Numerical Manipulation Subroutines . . . . . . . . . . . . . . . . . . . . . . 502List of Long Long Integer Numerical Manipulation Subroutines . . . . . . . . . . . . . . . 503List of 128-Bit Long Double Numerical Manipulation Subroutines . . . . . . . . . . . . . . 503List of Processes Subroutines . . . . . . . . . . . . . . . . . . . . . . . . . . . 504List of Multi-threaded Programming Subroutines. . . . . . . . . . . . . . . . . . . . . 506List of Programmer’s Workbench Library Subroutines . . . . . . . . . . . . . . . . . . . 508List of Security and Auditing Subroutines . . . . . . . . . . . . . . . . . . . . . . . 509List of String Manipulation Subroutines . . . . . . . . . . . . . . . . . . . . . . . . 511Programming Example for Manipulating Characters . . . . . . . . . . . . . . . . . . . 511Searching and Sorting Example Program . . . . . . . . . . . . . . . . . . . . . . . 513List of Operating System Libraries . . . . . . . . . . . . . . . . . . . . . . . . . . 516librs2.a Library . . . . . . . . . . . . . . . . . . . . . . . . . . . . . . . . . 517Related Information . . . . . . . . . . . . . . . . . . . . . . . . . . . . . . . 518
Chapter 25. System Management Interface Tool (SMIT) . . . . . . . . . . . . . . . . . 519SMIT Screen Types . . . . . . . . . . . . . . . . . . . . . . . . . . . . . . . 519SMIT Object Classes. . . . . . . . . . . . . . . . . . . . . . . . . . . . . . . 522SMIT Aliases and Fast Paths. . . . . . . . . . . . . . . . . . . . . . . . . . . . 525SMIT Information Command Descriptors . . . . . . . . . . . . . . . . . . . . . . . 526SMIT Command Generation and Execution . . . . . . . . . . . . . . . . . . . . . . 528Adding Tasks to the SMIT Database . . . . . . . . . . . . . . . . . . . . . . . . . 530Debugging SMIT Database Extensions . . . . . . . . . . . . . . . . . . . . . . . . 531Creating SMIT Help Information for a New Task . . . . . . . . . . . . . . . . . . . . . 531sm_menu_opt (SMIT Menu) Object Class . . . . . . . . . . . . . . . . . . . . . . . 532sm_name_hdr (SMIT Selector Header) Object Class . . . . . . . . . . . . . . . . . . . 534sm_cmd_opt (SMIT Dialog/Selector Command Option) Object Class . . . . . . . . . . . . . 536sm_cmd_hdr (SMIT Dialog Header) Object Class . . . . . . . . . . . . . . . . . . . . 540SMIT Example Program . . . . . . . . . . . . . . . . . . . . . . . . . . . . . 542Related Information . . . . . . . . . . . . . . . . . . . . . . . . . . . . . . . 554
Chapter 26. System Resource Controller . . . . . . . . . . . . . . . . . . . . . . 555Subsystem Interaction with the SRC . . . . . . . . . . . . . . . . . . . . . . . . . 555SRC Objects. . . . . . . . . . . . . . . . . . . . . . . . . . . . . . . . . . 556SRC Communication Types . . . . . . . . . . . . . . . . . . . . . . . . . . . . 560Programming Subsystem Communication with the SRC . . . . . . . . . . . . . . . . . . 563Defining Your Subsystem to the SRC. . . . . . . . . . . . . . . . . . . . . . . . . 569
viii AIX 5L Version 5.3 General Programming Concepts: Writing and Debugging Programs

List of Additional SRC Subroutines. . . . . . . . . . . . . . . . . . . . . . . . . . 570Related Information . . . . . . . . . . . . . . . . . . . . . . . . . . . . . . . 570
Chapter 27. Trace Facility . . . . . . . . . . . . . . . . . . . . . . . . . . . . 573The Trace Facility Overview . . . . . . . . . . . . . . . . . . . . . . . . . . . . 573Controlling the Trace . . . . . . . . . . . . . . . . . . . . . . . . . . . . . . . 573Recording Trace Event Data . . . . . . . . . . . . . . . . . . . . . . . . . . . . 574Generating a Trace Report . . . . . . . . . . . . . . . . . . . . . . . . . . . . 575Extracting trace data from a dump . . . . . . . . . . . . . . . . . . . . . . . . . . 575Trace Facility Commands . . . . . . . . . . . . . . . . . . . . . . . . . . . . . 575Start the Trace Facility . . . . . . . . . . . . . . . . . . . . . . . . . . . . . . 578Related Information . . . . . . . . . . . . . . . . . . . . . . . . . . . . . . . 580
Chapter 28. tty Subsystem . . . . . . . . . . . . . . . . . . . . . . . . . . . . 581TTY Subsystem Objectives . . . . . . . . . . . . . . . . . . . . . . . . . . . . 581Line Discipline Module (ldterm) . . . . . . . . . . . . . . . . . . . . . . . . . . . 585Converter Modules . . . . . . . . . . . . . . . . . . . . . . . . . . . . . . . 588TTY Drivers . . . . . . . . . . . . . . . . . . . . . . . . . . . . . . . . . . 589Related Information . . . . . . . . . . . . . . . . . . . . . . . . . . . . . . . 590
Chapter 29. Loader Domains . . . . . . . . . . . . . . . . . . . . . . . . . . . 591Using Loader Domains . . . . . . . . . . . . . . . . . . . . . . . . . . . . . . 591Creating/Deleting Loader Domains. . . . . . . . . . . . . . . . . . . . . . . . . . 593
Chapter 30. Data Management Application Programming Interface (DMAPI) . . . . . . . . . 595DMAPI Considerations for the Enhanced Journaled File System . . . . . . . . . . . . . . . 596
Appendix A. High-Resolution Time Measurements Using POWER-based Time Base or POWERfamily Real-Time Clock . . . . . . . . . . . . . . . . . . . . . . . . . . . . 599
Appendix B. Notices . . . . . . . . . . . . . . . . . . . . . . . . . . . . . . 601Trademarks . . . . . . . . . . . . . . . . . . . . . . . . . . . . . . . . . . 602
Index . . . . . . . . . . . . . . . . . . . . . . . . . . . . . . . . . . . . 603
Contents ix

x AIX 5L Version 5.3 General Programming Concepts: Writing and Debugging Programs

About This Book
This book provides application developers with complete information about writing applications for the AIXoperating system. Programmers can use this book to gain knowledge of programming guidelines andresources. Topics include input and output handling, curses, file systems and directories, lex and yacc,logical volume programming, shared libraries, large program support, packaging, trace facility, and SystemManagement Interface Tool (SMIT).
HighlightingThe following highlighting conventions are used in this book:
Bold Identifies commands, subroutines, keywords, files, structures, directories, and other items whosenames are predefined by the system. Also identifies graphical objects such as buttons, labels, andicons that the user selects.
Italics Identifies parameters whose actual names or values are to be supplied by the user.Monospace Identifies examples of specific data values, examples of text similar to what you might see
displayed, examples of portions of program code similar to what you might write as a programmer,messages from the system, or information you should actually type.
Case-Sensitivity in AIXEverything in the AIX operating system is case-sensitive, which means that it distinguishes betweenuppercase and lowercase letters. For example, you can use the ls command to list files. If you type LS, thesystem responds that the command is ″not found.″ Likewise, FILEA, FiLea, and filea are three distinct filenames, even if they reside in the same directory. To avoid causing undesirable actions to be performed,always ensure that you use the correct case.
ISO 9000ISO 9000 registered quality systems were used in the development and manufacturing of this product.
Related PublicationsThe following books contain information about or related to writing programs:
v AIX 5L Version 5.3 Kernel Extensions and Device Support Programming Concepts
v AIX 5L Version 5.3 Communications Programming Concepts
v AIX 5L Version 5.3 AIXwindows Programming Guide
v Operating system and device management
v Networks and communication management
v AIX 5L Version 5.3 Commands Reference
v Keyboard Technical Reference
v AIX 5L Version 5.3 Technical Reference: Base Operating System and Extensions Volume 1
v AIX 5L Version 5.3 Technical Reference: Base Operating System and Extensions Volume 2
v Understanding the Diagnostic Subsystem for AIX
© Copyright IBM Corp. 1997, 2010 xi

xii AIX 5L Version 5.3 General Programming Concepts: Writing and Debugging Programs

Chapter 1. Tools and Utilities
This chapter provides an overview of the tools and utilities that you can use to develop C compiledlanguage programs. Many tools are provided to help you develop C compiled programs. The tools providehelp with the following programming tasks:
v “Entering a Program into the System”
v “Checking a Program”
v “Compiling and Linking a Program”
v “Subroutines” on page 2
v “Shell Commands” on page 2
Subroutines and shell commands are provided for use in a C compiled program.
Entering a Program into the SystemThe system has a line editor called ed for use in entering a program into a file. The system also has thefull-screen editor called vi, which displays one full screen of data at a time and allows interactive editing ofa file.
Checking a ProgramUse the following commands to check the format of a program for consistency and accuracy:
cb Reformats a C language source program into a consistent format that uses indentation levels to showthe structure of the program.
cflow Generates a diagram of the logic flow of a C language source program.cxref Generates a list of all external references for each module of a C language source program, including
where the reference is resolved (if it is resolved in the program).lint Checks for syntax and data type errors in a C language source program. The lint command might
check these areas of a program more carefully than the C language compiler does, and displays manymessages that point out possible problems.
Compiling and Linking a ProgramTo convert source code into a program that the system can run, you must process the source file with acompiler and a linkage editor.
A compiler is a program that reads text from a file and changes the programming language in that file to aform that the system understands. The linkage editor connects program modules and determines how toput the finished program into memory. To create this final form of the program, the system does thefollowing:
1. If a file contains compiler source code, the compiler translates it into object code.
2. If a file contains assembler language, the assembler translates it into object code.
3. The linkage editor links the object files created in the previous step with any other object files specifiedin the compiler command.
Other programming languages available for use on the operating system include the C++, FORTRAN,COBOL, and Assembler and other compiler languages.
You can write parts of a program in different languages and have one main routine call and start theseparate routines to execute. You can also use the compiler program to create object code and link theprogram.
© Copyright IBM Corp. 1997, 2010 1

Correcting Errors in a ProgramYou can use the following debugging tools that are provided with the base operating system:
v The dbx symbolic debug program allows you to debug programs written in C language, C++, FORTRAN,COBOL and Assembler languages. For more information, see “dbx Symbolic Debug Program Overview”on page 61.
v The adb debug program provides subcommands you can use to examine, debug, and repair executablebinary files and to examine non-ASCII data files. For more information, see “adb Debug ProgramOverview” on page 29.
v KDB Kernel Debugger and kdb command can help you determine errors in code running in the kernel.You can use this debug program to debug device drivers and kernel extensions.
v The trace facility helps isolate system problems by monitoring selected system events. For moreinformation see Chapter 27, “Trace Facility,” on page 573.
When syntax errors or parameter-naming inconsistencies are discovered in a program file, you can use atext editor or string-searching and string-editing programs to locate and change strings in the file.String-searching and string-editing programs include the grep, sed, and awk commands. To make manychanges in one or more program files, you can include the commands in a shell program and then run theshell program to locate and change the code in the files.
Building and Maintaining a ProgramThe following facilities help you control program changes and build a program from many source modules.These facilities can be particularly useful in software development environments in which many sourcemodules are produced.
v The make command builds a program from source modules. Because the make command compilesonly those modules changed since the last build, its use can reduce compilation time when manysource modules must be processed.
v The Source Code Control System (SCCS) allows you to maintain separate versions of a programwithout storing separate, complete copies of each version. The use of SCCS can reduce storagerequirements and help in tracking the development of a project that requires keeping many versions oflarge programs. For more information, see Chapter 23, “Source Code Control System (SCCS),” on page489
SubroutinesSubroutines from system libraries handle many complex or repetitive programming situations so that youcan concentrate on unique programming situations. See Chapter 24, “Subroutines, Example Programs,and Libraries,” on page 495 for information on using subroutines and for lists of many of the subroutinesavailable on the system.
Shell CommandsYou can include the functions of many of the shell commands in a C language program. Any shellcommand used in a program must be available on all systems that use the program.
You can then use the fork and exec subroutines in a program to run the command as a process in a partof the system that is separate from the program. The system subroutine also runs a shell command in aprogram, and the popen subroutine uses shell filters.
2 AIX 5L Version 5.3 General Programming Concepts: Writing and Debugging Programs

Related InformationFor further information on this topic, see the following:
v “Manipulating Strings with sed” on page 385
v “Generating a Lexical Analyzer with the lex Command” on page 291
v Chapter 13, “make Command,” on page 321
v Chapter 24, “Subroutines, Example Programs, and Libraries,” on page 495
Chapter 1. Tools and Utilities 3

4 AIX 5L Version 5.3 General Programming Concepts: Writing and Debugging Programs

Chapter 2. Curses Library
The curses library provides a set of functions that enable you to manipulate a terminal’s display regardlessof the terminal type. The curses library supports color. However, multibyte characters are not supported. Allreferences to characters in the curses documentation refer to single-byte characters. Throughout thisdocumentation, the curses library is referred to as curses.
The basis of curses programming is the window data structure. Using this structure, you can manipulatedata on a terminal’s display. You can instruct curses to treat the entire terminal display as one largewindow, or you can create multiple windows on the display. The windows can be different sizes and canoverlap one another. A typical curses application has a single large window and one subwindow within it.
Each window on a terminal’s display has its own window data structure. This structure keeps stateinformation about the window, such as its size and where it is located on the display. Curses uses thewindow data structure to obtain the relevant information it needs to carry out your instructions.
TerminologyWhen programming with curses, you should be familiar with the following terms:
Term Definitioncurrent character The character that the logical cursor is currently on.current line The line that the logical cursor is currently on.curscr A virtual default window provided by curses. The curscr (current screen) is an internal
representation of what currently appears on the terminal’s external display. Do notmodify the curscr.
display A physical display connected to a workstation.logical cursor The cursor location within each window. The window data structure keeps track of the
location of its logical cursor.pad A pad is a window that is not restricted by the size of the screenphysical cursor The cursor that appears on a display. The workstation uses this cursor to write to the
display. There is only one physical cursor per display.screen The window that fills the entire display. The screen is synonymous with the stdscr.stdscr A virtual default window (standard screen) provided by curses that represents the entire
display.window A pointer to a C data structure and the graphic representation of that data structure on
the display. A window can be thought of as a two-dimensional array representing howall or part of the display looks at any point in time.
Naming ConventionsA single curses subroutine can have more than one version. Curses subroutines with multiple versionsfollow distinct naming conventions that identify the separate versions. These conventions add a prefix to astandard curses subroutine and identify what arguments the subroutine requires or what actions take placewhen the subroutine is called. The different versions of curses subroutine names use the followingprefixes:
Prefix Descriptionw Identifies a subroutine that requires a window argumentp Identifies a subroutine that requires a pad argumentmv Identifies a subroutine that first performs a move to the program-supplied coordinates
If a curses subroutine has multiple versions and does not include one of the preceding prefixes, the cursesdefault window stdscr (standard screen) is used. The majority of subroutines that use the stdscr are
© Copyright IBM Corp. 1997, 2010 5
macros created in the /usr/include/curses.h file using #define statements. The preprocessor replacesthese statements at compilation time. As a result, these macros do not appear in the compiled assemblercode, a trace, a debug program, or the curses source code.
If a curses subroutine has only a single version, it does not necessarily use stdscr. For example, theprintw subroutine prints a string to the stdscr. The wprintw subroutine prints a string to a specific windowby supplying the window argument. The mvprintw subroutine moves the specified coordinates to thestdscr and then performs the same function as the printw subroutine. Likewise, the mvwprintw subroutinemoves the specified coordinates to the specified window and then performs the same function as thewprintw subroutine.
Structure of a Curses ProgramIn general, a curses program has the following progression:
1. Start curses.
2. Check for color support (optional).
3. Start color (optional).
4. Create one or more windows.
5. Manipulate windows.
6. Destroy one or more windows.
7. Stop curses.
Some steps are optional, so your program does not have to follow this progression exactly.
Return ValuesWith a few exceptions, all curses subroutines return either the integer value ERR or the integer value OK.Subroutines that do not follow this convention are noted appropriately. Subroutines that return pointersalways return a null pointer or an error.
Initializing CursesUse the following commnads to initialize curses:
endwin Terminates the curses subroutine libraries and their data structuresinitscr Initializes the curses subroutine library and its data structuresisendwin Returns TRUE if the endwin subroutine has been called without any subsequent calls to the
wrefresh subroutinenewterm Sets up a new terminalsetupterm Sets up the TERMINAL structure for use by curses
You must include the curses.h file at the beginning of any program that calls curses subroutines. To dothis, use the following statement:#include <curses.h>
Before you can call subroutines that manipulate windows or screens, you must call the initscr or newtermsubroutine. These subroutines first save the terminal’s settings and then call the setupterm subroutine toestablish a curses terminal.
If you need to temporarily suspend curses, use a shell escape or subroutine. To resume after a temporaryescape, call the wrefresh or doupdate subroutine. Before exiting a curses program, you must call theendwin subroutine. The endwin subroutine restores tty modes, moves the cursor to the lower-left cornerof the screen, and resets the terminal into the proper nonvisual mode.
6 AIX 5L Version 5.3 General Programming Concepts: Writing and Debugging Programs

Most interactive, screen-oriented programs require character-at-a-time input without echoing the result tothe screen. To establish your program with character-at-a-time input, call the cbreak and noechosubroutines after calling the initscr subroutine. When accepting this type of input, programs should alsocall the following subroutines:
v nonl subroutine.
v intrflush subroutine with the Window parameter set to the stdscr and the Flag parameter set toFALSE. The Window parameter is required but ignored. You can use stdscr as the value of theWindow parameter, because stdscr is already created for you.
v keypad subroutine with the Window parameter set to the stdscr and the Flag parameter set to TRUE.
The isendwin subroutine is helpful if, for optimization reasons, you do not want to call the wrefreshsubroutine needlessly. To determine if the endwin subroutine was called without any subsequent calls tothe wrefresh subroutine, use the isendwin subroutine.
Windows in the Curses EnvironmentA curses program manipulates windows that appear on a terminal’s display. A window can be as large asthe entire display or as small as a single character in length and height.
Note: A pad is a window that is not restricted by the size of the screen. For more information, see “Pads”on page 8
Within a curses program, windows are variables declared as type WINDOW. The WINDOW data type isdefined in the /usr/include/curses.h file as a C data structure. You create a window by allocating aportion of a machine’s memory for a window structure. This structure describes the characteristics of thewindow. When a program changes the window data internally in memory, it must use the wrefreshsubroutine (or equivalent subroutine) to update the external, physical screen to reflect the internal changein the appropriate window structure.
Default Window StructureCurses provides a virtual default window structure called stdscr. The stdscr represents, in memory, theentire terminal display. The stdscr window structure is created automatically when the curses library isinitialized and it describes the display. When the library is initialized, the length and width variables are setto the length and width of the physical display.
Programs that use the stdscr first manipulate the stdscr. They then call the refresh subroutine to refreshthe external display so that it matches the stdscr window.
In addition to the stdscr, you can define your own windows. These windows are known as user-definedwindows to distinguish them from the stdscr. Like the stdscr, user-defined windows exist in machinememory as structures. Except for the amount of memory available to a program, there is no limit to thenumber of windows you can create. A curses program can manipulate the default window, user-definedwindows, or both.
Current Window StructureCurses supports another virtual window called curscr (current screen). The curscr window is an internalrepresentation of what currently appears on the terminal’s external display.
When a program requires the external representation to match the internal representation, it must call asubroutine, such as the wrefresh subroutine, to update the physical display (or the refresh subroutine ifthe program is working with the stdscr).
The curscr is reserved for internal use by curses. Do not manipulate the curscr.
Chapter 2. Curses Library 7

SubwindowsCurses also allows you to construct subwindows. Subwindows are rectangular portions within otherwindows. A subwindow is also of type WINDOW. The window that contains a subwindow is known as thesubwindow’s parent, and the subwindow is known as the containing window’s child.
Changes to either the parent window or the child window within the area overlapped by the subwindow aremade to both windows. After modifying a subwindow, call the touchline or touchwin subroutine on theparent window before refreshing it.
touchline Forces a range of lines to be refreshed at the next call to the wrefresh subroutine.touchwin Forces every character in a window’s character array to be refreshed at the next call of the
wrefresh subroutine. The touchwin subroutine does not save optimization information. Thissubroutine is useful with overlapping windows.
A refresh called on the parent also refreshes the children. A subwindow can also be a parent window. Theprocess of layering windows inside of windows is called nesting.
Before you can delete a parent window, you must first delete all of its children using the delwinsubroutine. Curses returns an error if you try to delete a window before first deleting all of its children.
PadsA pad is a type of window that is not restricted by the terminal’s display size or associated with a particularpart of the display. Because a pad is usually larger than the physical display, only a portion of a pad isvisible to the user at a given time.
Use pads if you have a large amount of related data that you want to keep all together in one window butyou do not need to display all of the data at one time.
Windows within pads are known as subpads. Subpads are positioned within a pad at coordinates relativeto the parent pad. This placement differs from subwindows, which are positioned using screen coordinates.
Unlike other windows, scrolling or echoing of input does not automatically refresh a pad. Like subwindows,when changing the image of a subpad, you must call either the touchline or touchwin subroutine on theparent pad before refreshing the parent.
You can use all the curses subroutines with pads except for the newwin, subwin, wrefresh, andwnoutrefresh subroutines. These subroutines are replaced with the newpad, subpad, prefresh, andpnoutrefresh subroutines.
Manipulating Window Data with CursesWhen curses is initialized, the stdscr is provided automatically. You can manipulate the stdscr using thecurses subroutine library or you can create user-defined windows.
Creating WindowsYou can create your own window using the newwin subroutine.
Each time you call the newwin subroutine, curses allocates a new window structure in memory. Thisstructure contains all the information associated with the new window. Curses does not put a limit on thenumber of windows you can create. The number of nested subwindows is limited to the amount of memoryavailable, up to the value of SHRT_MAX as defined in the /usr/include/limits.h file.
You can change windows without regard to the order in which they were created. Updates to the terminal’sdisplay occur through calls to the wrefresh subroutine.
8 AIX 5L Version 5.3 General Programming Concepts: Writing and Debugging Programs

SubwindowsYou must supply coordinates for the subwindow relative to the terminal’s display. The subwindow, createdusing the subwin subroutine, must fit within the bounds of the parent window. Otherwise, a null value isreturned.
PadsUse the following subroutines to create pads:
newpad Creates a pad data structure.subpad Creates and returns a pointer to a subpad within a pad.
The new subpad is positioned relative to its parent.
Removing Windows, Pads, and SubwindowsTo remove a window, pad, or subwindow, use the delwin subroutine. Before you can delete a window orpad, you must have already deleted its children; otherwise, the delwin subroutine returns an error.
Changing the Screen or Window ImagesWhen curses subroutines change the appearance of a window, the internal representation of the window isupdated, while the display remains unchanged until the next call to the wrefresh subroutine. The wrefreshsubroutine uses the information in the window structure to update the display.
Refreshing WindowsWhenever you write output to a window or pad structure, you must refresh the terminal’s display to matchthe internal representation. A refresh does the following:
v Compares the contents of the curscr to the contents of the user-defined or stdscr
v Updates the curscr structure to match the user-defined or stdscr
v Redraws the portion of the physical display that changed
Use the following subroutines to refresh windows:
refresh, or wrefresh Updates the terminal and curscr to reflect changes made to a window.wnoutrefresh or doupdate Updates the designated windows and outputs them all at once to the
terminal. These subroutines are useful for faster response when thereare multiple updates.
The refresh and wrefresh subroutines first call the wnoutrefresh subroutine to copy the window beingrefreshed to the current screen. They then call the doupdate subroutine to update the display.
If you need to refresh multiple windows at the same time, use one of the two available methods. You canuse a series of calls to the wrefresh subroutine that result in alternating calls to the wnoutrefresh anddoupdate subroutines. You can also call the wnoutrefresh subroutine once for each window and then callthe doupdate subroutine once. With the second method, only one burst of output is sent to the display.
Subroutines Used for Refreshing PadsThe prefresh and pnoutrefresh subroutines are similar to the wrefresh and wnoutrefresh subroutines.
The prefresh subroutine updates both the current screen and the physical display, while the pnoutrefreshsubroutine updates curscr to reflect changes made to a user-defined pad. Because pads instead ofwindows are involved, these subroutines require additional parameters to indicate which part of the padand screen are involved.
Chapter 2. Curses Library 9

Refreshing Areas that Have Not ChangedDuring a refresh, only those areas that have changed are redrawn on the display. You can refresh areas ofthe display that have not changed using the touchwin and touchline subroutines:
touchline Forces a range of lines to be refreshed at the next call to the wrefresh subroutine.touchwin Forces every character in a window’s character array to be refreshed at the next call of the
wrefresh subroutine. The touchwin subroutine does not save optimization information. Thissubroutine is useful with overlapping windows.
Combining the touchwin and wrefresh subroutines is helpful when dealing with subwindows oroverlapping windows. To bring a window forward from behind another window, call the touchwinsubroutine followed by the wrefresh subroutine.
Garbled DisplaysIf text is sent to the terminal’s display with a noncurses subroutine, such as the echo or printf subroutine,the external window can become garbled. In this case, the display changes, but the current screen is notupdated to reflect these changes. Problems can arise when a refresh is called on the garbled screenbecause after a screen is garbled, there is no difference between the window being refreshed and thecurrent screen structure. As a result, spaces on the display caused by garbled text are not changed.
A similar problem can also occur when a window is moved. The characters sent to the display with thenoncurses subroutines do not move with the window internally.
If the screen becomes garbled, call the wrefresh subroutine on the curscr to update the display to reflectthe current physical display.
Manipulating Window ContentAfter a window or subwindow is created, programs often must manipulate them in some way, by using thefollowing subroutines:
box Draws a box in or around a windowcopywin Provides more precise control over the overlay and overwrite subroutinegarbagedlines Indicates to curses that a screen line is discarded and should be thrown away before
having anything written overmvwin Moves a window or subwindow to a new locationoverlay or overwrite Copies one window on top of anotherripoffline Removes a line from the default screen
To use the overlay and overwrite subroutines, the two windows must overlap. The overwrite subroutineis destructive, whereas the overlay subroutine is not. When text is copied from one window to anotherusing the overwrite subroutine, blank portions from the copied window overwrite any portions of thewindow copied to. The overlay subroutine is nondestructive because it does not copy blank portions fromthe copied window.
Similar to the overlay and overwrite subroutines, the copywin subroutine allows you to copy a portion ofone window to another. Unlike overlay and overwrite subroutines, the windows do not have to overlap foryou to use the copywin subroutine.
To remove a line from the stdscr, you can use the ripoffline subroutine. If you pass this subroutine apositive line argument, the specified number of lines is removed from the top of the stdscr. If you pass thesubroutine a negative line argument, the lines are removed from the bottom of the stdscr.
To discard a specified range of lines before writing anything new, you can use the garbagedlinessubroutine.
10 AIX 5L Version 5.3 General Programming Concepts: Writing and Debugging Programs

Support for FiltersThe filter subroutine is provided for curses applications that are filters. This subroutine causes curses tooperate as if the stdscr was only a single line. When running with the filter subroutine, curses does notuse any terminal capabilities that require knowledge of the line that curses is on.
Controlling the Cursor with CursesThe following types of cursors exist in the curses library:
logical cursor The cursor location within each window. A window’s data structure keeps track of thelocation of its logical cursor. Each window has a logical cursor.
physical cursor The display cursor. The workstation uses this cursor to write to the display. There isonly one physical cursor per display.
You can only add to or erase characters at the logical cursor in a window. The following subroutines areprovided for controlling the cursor:
getbegyx Places the beginning coordinates of the window in integer variables y and xgetmaxyx Places the size of the window in integer variables y and xgetsyx Returns the current coordinates of the virtual screen cursorgetyx Returns the position of the logical cursor associated with a specified windowleaveok Controls physical cursor placement after a call to the wrefresh subroutinemove Moves the logical cursor associated with the stdscrmvcur Moves the physical cursorsetsyx Sets the virtual screen cursor to the specified coordinatewmove Moves the logical cursor associated with a user-defined window
After a call to the refresh or wrefresh subroutine, curses places the physical cursor at the last updatedcharacter position in the window. To leave the physical cursor where it is and not move it after a refresh,call the leaveok subroutine with the Window parameter set to the desired window and the Flag parameterset to TRUE.
Manipulating Characters with CursesYou can add characters to a curses window using a keyboard or a curses application. This sectiondescribes how you can add, remove, or change characters that appear in a curses window.
Character SizeSome character sets define multi-column characters that occupy more than one column position whendisplayed on the screen.
Writing a character whose width is greater than the width of the destination window produces an error.
Adding Characters to the Screen ImageThe curses library provides a number of subroutines that write text changes to a window and mark thearea to be updated at the next call to the wrefresh subroutine.
waddch SubroutinesThe waddch subroutines overwrite the character at the current logical cursor location with a specifiedcharacter. After overwriting, the logical cursor is moved one space to the right. If the waddch subroutinesare called at the right margin, these subroutines also add an automatic newline character. Additionally, if
Chapter 2. Curses Library 11

you call one of these subroutines at the bottom of a scrolling region and the scrollok subroutine isenabled, the region is scrolled up one line. For example, if you added a new line at the bottom line of awindow, the window would scroll up one line.
If the character to add is a tab, newline, or backspace character, curses moves the cursor appropriately inthe window to reflect the addition. Tabs are set at every eighth column. If the character is a newline,curses first uses the wclrtoeol subroutine to erase the current line from the logical cursor position to theend of the line before moving the cursor. The waddch subroutine family is made up of the following:
addch macro Adds a character to the stdscrmvaddch macro Moves a character to the specified location before adding it to the stdscrmvwaddch macro Moves a character to the specified location before adding it to the user-defined
windowwaddch subroutine Adds a character to the user-defined window
By using the winch and waddch subroutine families together, you can copy text and video attributes fromone place to another. Using the winch subroutine family, you can retrieve a character and its videoattributes. You can then use one of the waddch subroutines to add the character and its attributes toanother location. For more information, see “winch Subroutines” on page 18.
You can also use the waddch subroutines to add control characters to a window. Control characters aredrawn in the ^X notation.
Note: Calling the winch subroutine on a position in the window containing a control character does notreturn the character. Instead, it returns one character of the control character representation.
Outputting Single, Noncontrol Characters: When outputting single, noncontrol characters, there can besignificant performance gain to using the wechochar subroutines. These subroutines are functionallyequivalent to a call to the corresponding waddchr subroutine followed by the corresponding wrefreshsubroutine. The wechochar subroutines include the wechochar subroutine, the echochar macro, and thepechochar subroutine.
Some character sets may contain nonspacing characters. (Nonspacing characters are those, other thanthe ’ \ 0 ’ character, for which the wcwidth subroutine returns a width of zero.) The application may writenonspacing characters to a window. Every nonspacing character in a window is associated with a spacingcharacter and modifies the spacing character. Nonspacing characters in a window cannot be addressedseparately. A nonspacing character is implicitly addressed whenever a Curses operation affects thespacing character with which the nonspacing character is associated.
Nonspacing characters do not support attributes. For interfaces that use wide characters and attributes,the attributes are ignored if the wide character is a nonspacing character. Multi-column characters have asingle set of attributes for all columns. The association of nonspacing characters with spacing characterscan be controlled by the application using the wide character interfaces. The wide character stringfunctions provide codeset-dependent association.
The typical effects of a nonspacing character associated with a spacing character called c, are as follows:
v The nonspacing character may modify the appearance of c. (For instance, there may be nonspacingcharacters that add diacritical marks to characters. However, there may also be spacing characters withbuilt-in diacritical marks.)
v The nonspacing characters may bridge c to the character following c. Examples of this usage are theformation of ligatures and the conversion of characters into compound display forms, words, orideograms.
Implementations may limit the number of nonspacing characters that can be associated with a spacingcharacter, provided any limit is at least 5.
12 AIX 5L Version 5.3 General Programming Concepts: Writing and Debugging Programs

Complex CharactersA complex character is a set of associated characters, which may include a spacing character and mayalso include any nonspacing characters associated with it. A spacing complex character is a complexcharacter that includes one spacing character and any nonspacing characters associated with it. Anexample of a code set that has complex characters is ISO/IEC 10646-1:1993.
A complex character can be written to the screen. If the complex character does not include a spacingcharacter, any nonspacing characters are associated with the spacing complex character that exists at thespecified screen position. When the application reads information back from the screen, it obtains spacingcomplex characters.
The cchar_t data type represents a complex character and its rendition. When a cchar_t represents anonspacing complex character (that is, when there is no spacing character within the complex character),then its rendition is not used. When it is written to the screen, it uses the rendition specified by the spacingcharacter already displayed.
An object of type cchar_t can be initialized using the setchar subroutine, and its contents can be extractedusing the getchar subroutine. The behavior of functions that take a cchar_t value that was not initialized inthis way are obtained from a curses function that has a cchar_t output argument.
Special CharactersSome functions process special characters. In functions that do not move the cursor based on theinformation placed in the window, these special characters would only be used within a string in order toaffect the placement of subsequent characters. The cursor movement specified below does not persist inthe visible cursor beyond the end of the operation. In functions that do not move the cursor, these specialcharacters can be used to affect the placement of subsequent characters and to achieve movement of thephysical cursor.
Backspace Unless the cursor was already in column 0, Backspace moves the cursor one column towardthe start of the current line, and any characters after the Backspace are added or insertedstarting there.
Carriage return Unless the cursor was already in column 0, Carriage return moves the cursor to the start ofthe current line. Any characters after the Carriage return are added or inserted starting there.
newline In an add operation, curses adds the background character into successive columns untilreaching the end of the line. Scrolling occurs, and any characters after the newline characterare added, starting at the beginning of the new line.
In an insert operation, newline erases the remainder of the current line with the backgroundcharacter (effectively a wclrtoeol subroutine), and moves the cursor to the start of a newline. When scrolling is enabled, advancing the cursor to a new line may cause scrolling. Anycharacters after the newline character are inserted at the beginning of the new line.
The filter function may inhibit this processing.Tab Tab characters in text move subsequent characters to the next horizontal tab stop. By
default, tab stops are in columns 0, 8, 16, and so on.
In an insert or add operation, curses inserts or adds, respectively, the background characterinto successive columns until reaching the next tab stop. If there are no more tab stops inthe current line, wrapping and scrolling occur.
Control Characters: The curses functions that perform special-character processing conceptuallyconvert control characters to the ( ’ ^ ’ ) character followed by a second character (which is an uppercaseletter if it is alphabetic) and write this string to the window in place of the control character. The functionsthat retrieve text from the window will not retrieve the original control character.
Line Graphics: You can use the following variables to add line-drawing characters to the screen with thewaddch subroutine. When defined for the terminal, the variable will have the A_ALTCHARSET bit turned
Chapter 2. Curses Library 13
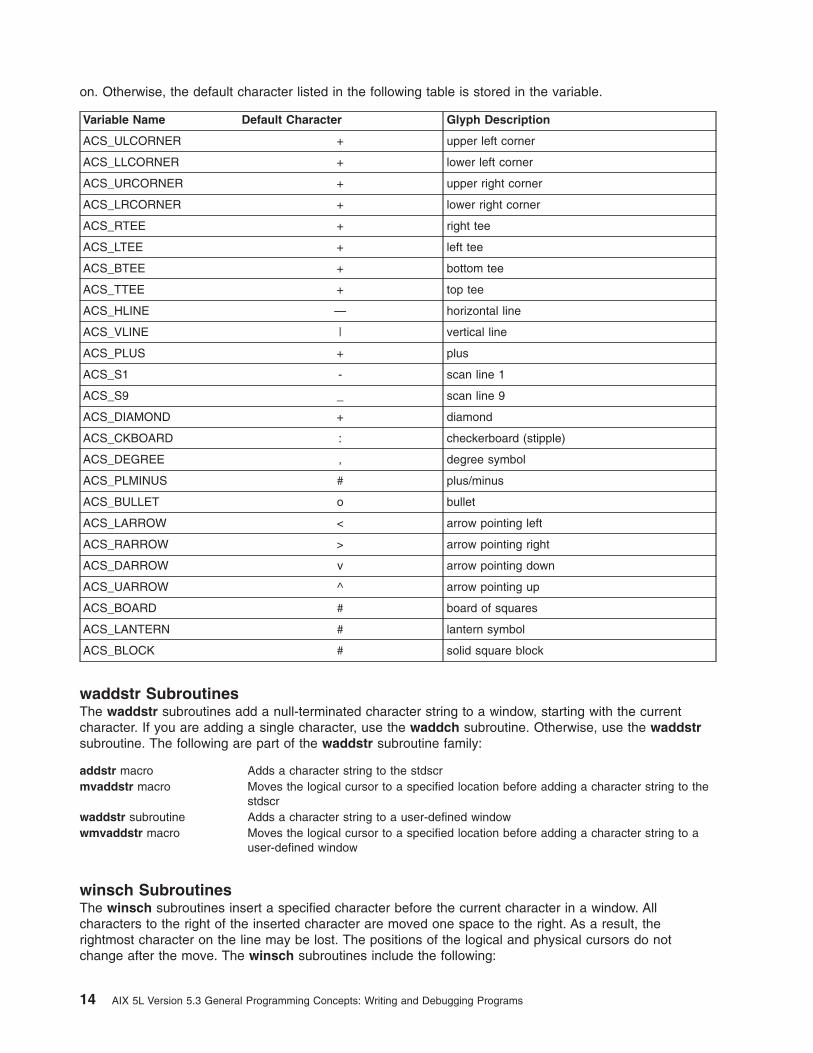
on. Otherwise, the default character listed in the following table is stored in the variable.
Variable Name Default Character Glyph Description
ACS_ULCORNER + upper left corner
ACS_LLCORNER + lower left corner
ACS_URCORNER + upper right corner
ACS_LRCORNER + lower right corner
ACS_RTEE + right tee
ACS_LTEE + left tee
ACS_BTEE + bottom tee
ACS_TTEE + top tee
ACS_HLINE — horizontal line
ACS_VLINE | vertical line
ACS_PLUS + plus
ACS_S1 - scan line 1
ACS_S9 _ scan line 9
ACS_DIAMOND + diamond
ACS_CKBOARD : checkerboard (stipple)
ACS_DEGREE , degree symbol
ACS_PLMINUS # plus/minus
ACS_BULLET o bullet
ACS_LARROW < arrow pointing left
ACS_RARROW > arrow pointing right
ACS_DARROW v arrow pointing down
ACS_UARROW ^ arrow pointing up
ACS_BOARD # board of squares
ACS_LANTERN # lantern symbol
ACS_BLOCK # solid square block
waddstr SubroutinesThe waddstr subroutines add a null-terminated character string to a window, starting with the currentcharacter. If you are adding a single character, use the waddch subroutine. Otherwise, use the waddstrsubroutine. The following are part of the waddstr subroutine family:
addstr macro Adds a character string to the stdscrmvaddstr macro Moves the logical cursor to a specified location before adding a character string to the
stdscrwaddstr subroutine Adds a character string to a user-defined windowwmvaddstr macro Moves the logical cursor to a specified location before adding a character string to a
user-defined window
winsch SubroutinesThe winsch subroutines insert a specified character before the current character in a window. Allcharacters to the right of the inserted character are moved one space to the right. As a result, therightmost character on the line may be lost. The positions of the logical and physical cursors do notchange after the move. The winsch subroutines include the following:
14 AIX 5L Version 5.3 General Programming Concepts: Writing and Debugging Programs

insch macro Inserts a character in the stdscrmvinsch macro Moves the logical cursor to a specified location in the stdscr before inserting a
charactermvwinsch macro Moves the logical cursor to a specified location in a user-defined window before
inserting a characterwinsch subroutine Inserts a character in a user-defined window
winsertln SubroutinesThe winsertln subroutines insert a blank line above the current line in a window. The insertln subroutineinserts a line in the stdscr. The bottom line of the window is lost. The winsertln subroutine performs thesame action in a user-defined window.
wprintw SubroutinesThe wprintw subroutines replace a series of characters (starting with the current character) with formattedoutput. The format is the same as for the printf command. The printw family is made up of the following:
mvprintw macro Moves the logical cursor to a specified location in the stdscr before replacing anycharacters
mvwprintw macro Moves the logical cursor to a specified location in a user-defined window beforereplacing any characters
printw macro Replaces a series of characters in the stdscrwprintw subroutine Replaces a series of characters in a user-defined window
The wprintw subroutines make calls to the waddch subroutine to replace characters.
unctrl Macro
The unctrl macro returns a printable representation of the specified control character, displayed in the ^Xnotation. The unctrl macro returns print characters as is.
Enabling Text ScrollingUse the following subroutines to enable scrolling:
idlok Allows curses to use the hardware insert/delete line featurescrollok Enables a window to scroll when the cursor is moved off the right edge of the last line of a
windowsetscrreg orwsetscrreg
Sets a software scrolling region within a window
Scrolling occurs when a program or user moves a cursor off a window’s bottom edge. For scrolling tooccur, you must first use the scrollok subroutine to enable scrolling for a window. A window is scrolled ifscrolling is enabled and if any of the following occurs:
v The cursor is moved off the edge of a window.
v A newline character is encountered on the last line.
v A character is inserted in the last position of the last line.
When a window is scrolled, curses will update both the window and the display. However, to get thephysical scrolling effect on the terminal, you must call the idlok subroutine with the Flag parameter set toTRUE.
If scrolling is disabled, the cursor remains on the bottom line at the location where the character wasentered.
Chapter 2. Curses Library 15

When scrolling is enabled for a window, you can use the setscrreg subroutines to create a softwarescrolling region inside the window. You pass the setscrreg subroutines values for the top line and bottomline of the region. If setscrreg is enabled for the region and scrolling is enabled for the window, anyattempt to move off the specified bottom line causes all the lines in the region to scroll up one line. Youcan use the setscrreg macro to define a scrolling region in the stdscr. Otherwise, you use the wsetscrregsubroutine to define scrolling regions in user-defined windows.
Note: Unlike the idlok subroutine, the setscrreg subroutines have no bearing on the use of the physicalscrolling region capability that the terminal may have.
Deleting CharactersYou can delete text by replacing it with blank spaces or by removing characters from a character array andsliding the rest of the characters on the line one space to the left.
werase SubroutinesThe erase macro copies blank space to every position in the stdscr. The werase subroutine puts a blankspace at every position in a user-defined window. To delete a single character in a window, use thewdelch subroutine.
wclear SubroutinesUse the following subroutines to clear the screen:
clear, or wclear Clears the screen and sets a clear flag for the next refresh.clearok Determines whether curses clears a window on the next call to the refresh or
wrefresh subroutine.
The wclear subroutines are similar to the werase subroutines. However, in addition to putting a blankspace at every position of a window, the wclear subroutines also call the wclearok subroutine. As a result,the screen is cleared on the next call to the wrefresh subroutine.
The wclear subroutine family contains the wclear subroutine, the clear macro, and the clearoksubroutine. The clear macro puts a blank at every position in the stdscr.
wclrtoeol SubroutinesThe clrtoeol macro operates in the stdscr, while the wclrtoeol subroutine performs the same action withina user-defined window.
wclrtobot SubroutinesThe clrtobot macro operates in the stdscr, while the wclrtobot performs the same action in a user-definedwindow.
wdelch SubroutinesUse the following subroutines to delete characters from the screen:
delch macro Deletes the current character from the stdscrmvdelch macro Moves the logical cursor before deleting a character from the stdscrmvwdelch macro Moves the logical cursor before deleting a character from a user-defined windowwdelch subroutine Deletes the current character in a user-defined window
The wdelch subroutines delete the current character and move all the characters to the right of the currentcharacter on the current line one position to the left. The last character in the line is filled with a blank. Thedelch subroutine family consists of the following subroutine and macros:
16 AIX 5L Version 5.3 General Programming Concepts: Writing and Debugging Programs
wdeleteln SubroutinesThe deleteln subroutines delete the current line and move all lines below the current line up one line. Thisaction clears the window’s bottom line.
Getting CharactersYour program can retrieve characters from the keyboard or from the display. The wgetch subroutinesretrieve characters from the keyboard. The winch subroutines retrieve characters from the display.
wgetch SubroutinesThe wgetch subroutines read characters from the keyboard attached to the terminal associated with thewindow. Before getting a character, these subroutines call the wrefresh subroutines if anything in thewindow has changed: for example, if the cursor has moved or text has changed. For more information,see wgetch Subroutine, in AIX 5L Version 5.3 Technical Reference: Base Operating System andExtensions Volume 2.
The wgetch subroutine family is made up of the following:
getch macro Gets a character from the stdscrmvgetch macro Moves the cursor before getting a character from the stdscrmvwgetch macro Moves the cursor before getting a character from a user-defined windowwgetch subroutine Gets a character from a user-defined window
To place a character previously obtained by a call to the wgetch subroutine back in the input queue, usethe ungetch subroutine. The character is retrieved by the next call to the wgetch subroutine.
Terminal Modes: The output of the wgetch subroutines is, in part, determined by the mode of theterminal. The following list describes the action of the wgetch subroutines in each type of terminal mode:
DELAY mode Stops reading until the system passes text through the program. If CBREAK mode is also set, theprogram stops after one character. If CBREAK mode is not set (NOCBREAK mode), the wgetchsubroutine stops reading after the first newline character. If ECHO is set, the character is alsoechoed to the window.
HALF-DELAYmode
Stops reading until a character is typed or a specified timeout is reached. If ECHO mode is set,the character is also echoed to the window.
NODELAY mode Returns a value of ERR if there is no input waiting.
Note: When you use the wgetch subroutines, do not set both the NOCBREAK mode and the ECHOmode at the same time. Setting both modes can cause undesirable results depending on the stateof the tty driver when each character is typed.
Function Keys: Function keys are defined in the curses.h file. Function keys can be returned by thewgetch subroutine if the keypad is enabled. A terminal may not support all of the function keys. To see if aterminal supports a particular key, check its terminfo database definition. For a list of function keys, seegetch, mvgetch, mvwgetch, or wgetch Subroutine, in AIX 5L Version 5.3 Technical Reference: BaseOperating System and Extensions Volume 2.
Getting Function Keys: If your program enables the keyboard with the keypad subroutine, and the userpresses a function key, the token for that function key is returned instead of raw characters. The/usr/include/curses.h file defines the possible function keys. Each define statement begins with a KEY_prefix, and the keys are defined as integers beginning with the value 03510.
If a character is received that could be the beginning of a function key (such as an Escape character),curses sets a timer (a structure of type timeval that is defined in /usr/include/sys/time.h). If the remainderof the sequence is not received before the timer expires, the character is passed through. Otherwise, thefunction key’s value is returned. For this reason, after a user presses the Esc key there is a delay before
Chapter 2. Curses Library 17

the escape is returned to the program. Avoid using the Esc key where possible when you call asingle-character subroutine such as the wgetch subroutine. This timer can be overridden or extended bythe use of the ESCDELAY environment variable.
The ESCDELAY environment variable sets the length of time to wait before timing out and treating theESC keystroke as the Escape character rather than combining it with other characters in the buffer tocreate a key sequence. The ESCDELAY value is measured in fifths of a millisecond. If the ESCDELAYvariable is 0, the system immediately composes the Escape response without waiting for more informationfrom the buffer. You may choose any value from 0 to 99,999. The default setting for the ESCDELAYvariable is 500 (1/10th of a second).
To prevent the wgetch subroutine from setting a timer, call the notimeout subroutine. If notimeout is set toTRUE, curses does not distinguish between function keys and characters when retrieving data.
keyname SubroutineThe keyname subroutine returns a pointer to a character string containing a symbolic name for the Keyargument. The Key argument can be any key returned from the wgetch, getch, mvgetch, or mvwgetchsubroutines.
winch SubroutinesThe winch subroutines retrieve the character at the current position. If any attributes are set for theposition, the attribute values are ORed into the value returned. You can use the winch subroutines toextract only the character or its attributes. To do this, use the predefined constants A_CHARTEXT andA_ATTRIBUTES with the logical & (ampersand) operator. These constants are defined in the curses.hfile. The following are the winch subroutines:
inch macro Gets the current character from the stdscrmvinch macro Moves the logical cursor before calling the inch subroutine on the stdscrmvwinch macro Moves the logical cursor before calling the winch subroutine in the user-defined windowwinch subroutine Gets the current character from a user-defined window
wscanw SubroutinesThe wscanw subroutines read character data, interpret it according to a conversion specification, andstore the converted results into memory. The wscanw subroutines use the wgetstr subroutines to readthe character data. The following are the wscanw subroutines:
mvscanw macro Moves the logical cursor before scanning the stdscrmvwscanw macro Moves the logical cursor in the user-defined window before scanningscanw macro Scans the stdscrwscanw subroutine Scans a user-defined window
The vwscanw subroutine scans a window using a variable argument list. For information aboutmanipulating variable argument lists, see the varargs macros in AIX 5L Version 5.3 Technical Reference:Base Operating System and Extensions Volume 2.
Understanding Terminals with CursesThe capabilities of your program are limited, in part, by the capabilities of the terminal on which it runs.This section provides information about initializing terminals and identifying their capabilities.
Manipulating Multiple Terminals
With curses, you can use one or more terminals for input and output. The terminal subroutines enable youto establish new terminals, to switch input and output processing, and to retrieve terminal capabilities.
18 AIX 5L Version 5.3 General Programming Concepts: Writing and Debugging Programs
You can start curses on a single default screen using the initscr subroutine. If your application sendsoutput to more than one terminal, use the newterm subroutine. Call the newterm subroutine for eachterminal. Also use the newterm subroutine if your application wants an indication of error conditions sothat it can continue to run in a line-oriented mode if the terminal cannot support a screen-orientedprogram.
When it completes, a program must call the endwin subroutine for each terminal it used. If you call thenewterm subroutine more than once for the same terminal, the first terminal referred to must be the lastone for which you call the endwin subroutine.
The set_term subroutine switches input and output processing between different terminals.
Determining Terminal CapabilitiesCurses supplies the following subroutines to help you determine the capabilities of a terminal:
has_ic Determines whether a terminal has the insert-character capabilityhas_il Determines whether a terminal has the insert-line capabilitylongname Returns the verbose name of the terminal
The longname subroutine returns a pointer to a static area containing a verbose description of the currentterminal. This static area is defined only after a call to the initscr or newterm subroutine. If you intend touse the longname subroutine with multiple terminals, each call to the newterm subroutine overwrites thisarea. Calls to the set_term subroutine do not restore the value. Instead, save this area between calls tothe newterm subroutine.
The has_ic subroutine returns TRUE if the terminal has insert and delete character capabilities.
The has_il subroutine returns TRUE if the terminal has insert and delete line capabilities or can simulatethe capabilities using scrolling regions. Use the has_il subroutine to check whether it is appropriate to turnon physical scrolling using the scrollok or idlok subroutines.
Setting Terminal Input and Output ModesThe subroutines that control input and output determine how your application retrieves and displays datato users.
Input ModesSpecial input characters include the flow-control characters, the interrupt character, the erase character,and the kill character. The following mutually-exclusive curses modes let the application control the effectof the input characters:
Cooked ModeThis mode achieves normal line-at-a-time processing with all special characters handled outsidethe application, achieving the same effect as canonical-mode input processing. The state of theISIG and IXON flags is not changed upon entering this mode by calling nocbreak( ) and are setupon entering this mode by calling noraw( ).
The implementation supports erase and kill characters from any supported locale, regardless ofthe width of the character.
cbreak ModeCharacters typed by the user are immediately available to the application and curses does notperform special processing on either the erase character or the kill character. An application canselect cbreak mode to do its own line editing but to let the abort character be used to abort thetask. This mode achieves the same effect as noncanonical mode, Case B input processing (withMIN set to 1 and ICRNL cleared). The state of the ISIG and IXON flags is not changed uponentering this mode.
Chapter 2. Curses Library 19
Half-Delay ModeThe effect is the same as cbreak, except that input functions wait until a character is available oran interval defined by the application elapses, whichever comes first. This mode achieves thesame effect as noncanonical mode, Case C input processing (with TIME set to the value specifiedby the application). The state of the ISIG and IXON flags is not changed upon entering this mode.
Raw ModeRaw mode gives maximum control to the application over terminal input. The application seeseach character as it is typed. This achieves the same effect as noncanonical mode, Case D inputprocessing. The ISIG and IXON flags are cleared upon entering this mode.
The terminal interface settings are recorded when the process calls the initscr or newterm subroutines toinitialize curses and restores these settings when the endwin subroutine is called. The initial input modefor curses operations is unspecified unless the implementation supports enhanced curses compliance, inwhich the initial input mode is cbreak mode.
The behavior of the BREAK key depends on other bits in the display driver that are not set by curses.
Delay ModeThe following mutually exclusive delay modes specify how quickly certain curses functions return to theapplication when there is no terminal input waiting when the function is called:
No Delay The function fails.Delay The application waits until the implementation passes text through to the application. If cbreak mode
or Raw Mode is set, this is after one character. Otherwise, this is after the first newline character,end-of-line character, or end-of-file character.
The effect of No Delay mode on function-key processing is unspecified.
Echo Mode ProcessingEcho mode determines whether curses echoes typed characters to the screen. The effect of echo mode isanalogous to the effect of the echo flag in the local mode field of the termios structure associated with theterminal device connected to the window. However, curses always clears the echo flag when invoked, toinhibit the operating system from performing echoing. The method of echoing characters is not identical tothe operating system’s method of echoing characters, because curses performs additional processing ofterminal input.
If in echo mode, curses performs its own echoing. Any visible input character is stored in the current orspecified window by the input function that the application called, at that window’s cursor position, asthough the addch subroutine was called, with all consequent effects such as cursor movement andwrapping.
If not in echo mode, any echoing of input must be performed by the application. Applications often performtheir own echoing in a controlled area of the screen, or do not echo at all, so they disable echo mode.
It may not be possible to turn off echo processing for synchronous and network asynchronous terminalsbecause echo processing is done directly by the terminals. Applications running on such terminals shouldbe aware that any characters typed will display on the screen at the point where the cursor is positioned.
The following are a part of the echo processing family of subroutines:
cbreak or nocbreak Puts the terminal into or takes it out of CBREAK modedelay_output Sets the output delay in millisecondsecho or noecho Controls echoing of typed characters to the screenhalfdelay Returns ERR if no input was typed after blocking for a specified amount of
time
20 AIX 5L Version 5.3 General Programming Concepts: Writing and Debugging Programs

nl or nonl Determines whether curses translates a new line into a carriage return andline feed on output, and translates a return into a new line on input
raw or noraw Places the terminal into or out of mode
The cbreak subroutine performs a subset of the functions performed by the raw subroutine. In cbreakmode, characters typed by the user are immediately available to the program, and erase or kill characterprocessing is not done. Unlike RAW mode, interrupt and flow characters are acted upon. Otherwise, thetty driver buffers the characters typed until a new line or carriage return is typed.
Note: CBREAK mode disables translation by the tty driver.
The delay_output subroutine sets the output delay to the specified number of milliseconds. Do not usethis subroutine excessively because it uses padding characters instead of a processor pause.
The echo subroutine puts the terminal into echo mode. In echo mode, curses writes characters typed bythe user to the terminal at the physical cursor position. The noecho subroutine takes the terminal out ofecho mode.
The nl and nonl subroutines, respectively, control whether curses translates new lines into carriagereturns and line feeds on output, and whether curses translates carriage returns into new lines on input.Initially, these translations do occur. By disabling these translations, the curses subroutine library has morecontrol over the line-feed capability, resulting in faster cursor motion.
The nocbreak subroutine takes the terminal out of cbreak mode.
The raw subroutine puts the terminal into raw mode. In raw mode, characters typed by the user areimmediately available to the program. Additionally, the interrupt, quit, suspend, and flow-control charactersare passed uninterpreted instead of generating a signal as they do in cbreak mode. The noraw subroutinetakes the terminal out of raw mode.
Using the terminfo and termcap FilesWhen curses is initialized, it checks the TERM environment variable to identify the terminal type. Then,curses looks for a definition explaining the capabilities of the terminal. This information is usually kept in alocal directory specified by the TERMINFO environment variable or in the /usr/share/lib/terminfodirectory. All curses programs first check to see if the TERMINFO environment variable is defined. If thisvariable is not defined, the /usr/share/lib/terminfo directory is checked.
For example, if the TERM variable is set to vt100 and the TERMINFO variable is set to the/usr/mark/myterms file, curses checks for the /usr/mark/myterms/v/vt100 file. If this file does not exist,curses checks the /usr/share/lib/terminfo/v/vt100 file.
Additionally, the LINES and COLUMNS environment variables can be set to override the terminaldescription.
Writing Programs That Use the terminfo SubroutinesUse the terminfo subroutines when your program must deal directly with the terminfo database. Forexample, use these subroutines to program function keys. In all other cases, curses subroutines are moresuitable and their use is recommended.
Initializing Terminals: Your program should begin by calling the setupterm subroutine. Normally, thissubroutine is called indirectly by a call to the initscr or newterm subroutine. The setupterm subroutinereads the terminal-dependent variables defined in the terminfo database. The terminfo database includesboolean, numeric, and string variables. All of these terminfo variables use the values defined for the
Chapter 2. Curses Library 21

specified terminal. After reading the database, the setupterm subroutine initializes the cur_term variablewith the terminal definition. When working with multiple terminals, you can use the set_curterm subroutineto set the cur_term variable to a specific terminal.
Another subroutine, restartterm, is similar to the setupterm subroutine. However, it is called after memoryis restored to a previous state. For example, you would call the restartterm subroutine after a call to thescr_restore subroutine. The restartterm subroutine assumes that the input and output options are thesame as when memory was saved, but that the terminal type and baud rate may differ.
The del_curterm subroutine frees the space containing the capability information for a specified terminal.
Header Files: Include the curses.h and term.h files in your program in the following order:#include <curses.h>#include <term.h>
These files contain the definitions for the strings, numbers, and flags in the terminfo database.
Handling Terminal Capabilities: Pass all parameterized strings through the tparm subroutine toinstantiate them. Use the tputs or putp subroutine to print all terminfo strings and the output of the tparmsubroutine.
putp Provides a shortcut to the tputs subroutinetparm Instantiates a string with parameterstputs Applies padding information to the given string and outputs it
Use the following subroutines to obtain and pass terminal capabilities:
tigetflag Returns the value of a specified boolean capability. If the capability is not boolean, a -1 is returned.tigetnum Returns the value of a specified numeric capability. If the capability is not numeric, a -2 is returned.tigetstr Returns the value of a specified string capability. If the capability specified is not a string, the
tigetstr subroutine returns the value of (char *) -1.
Exiting the Program: When your program exits, restore the tty modes to their original state. To do this,call the reset_shell_mode subroutine. If your program uses cursor addressing, it should output theenter_ca_mode string at startup and the exit_ca_mode string when it exits.
Programs that use shell escapes should call the reset_shell_mode subroutine and output theexit_ca_mode string before calling the shell. After returning from the shell, the program should output theenter_ca_mode string and call the reset_prog_mode subroutine. This process differs from standardcurses operations, which call the endwin subroutine on exit.
Low-Level Screen SubroutinesUse the following subroutines for low-level screen manipulations:
ripoffline Strips a single line from the stdscrscr_dump Dumps the contents of the virtual screen to a specified filescr_init Initializes the curses data structures from a specified filescr_restore Restores the virtual screen to the contents of a previously dumped file
termcap SubroutinesIf your program uses the termcap file for terminal information, the termcap subroutines are included as aconversion aid. The parameters are the same for the termcap subroutines. Curses emulates thesubroutines using the terminfo database. The following termcap subroutines are supplied:
22 AIX 5L Version 5.3 General Programming Concepts: Writing and Debugging Programs

tgetent Emulates the setupterm subroutine.tgetflag Returns the boolean entry for a termcap identifier.tgetnum Returns the numeric entry for a termcap identifier.tgetstr Returns the string entry for a termcap identifier.tgoto Duplicates the tparm subroutine. The output from the tgoto subroutine should be passed to the
tputs subroutine.
Converting termcap Descriptions to terminfo DescriptionsThe captoinfo command converts termcap descriptions to terminfo descriptions. The following exampleillustrates how the captoinfo command works:captoinfo /usr/lib/libtermcap/termcap.src
This command converts the /usr/lib/libtermcap/termcap.src file to terminfo source. The captoinfocommand writes the output to standard output and preserves comments and other information in the file.
Manipulating TTYsThe following functions save and restore the state of terminal modes:
savetty Saves the state of the tty modes.resetty Restores the state of the tty modes to what they were the last time the savetty subroutine was called.
Synchronous and Networked Asynchronous TerminalsSynchronous, networked synchronous (NWA) or non-standard directly connected asynchronous terminalsare often used in a mainframe environment and communicate to the host in block mode. That is, the usertypes characters at the terminal, then presses a special key to initiate transmission of the characters to thehost.
Note: Although it may be possible to send arbitrarily sized blocks to the host, it is not possible ordesirable to cause a character to be transmitted with only a single keystroke. Doing so could causesevere problems to an application that makes use of single-character input.
OutputThe curses interface can be used for all operations pertaining to output to the terminal, with the possibleexception that on some terminals, the refresh routine may have to redraw the entire screen contents inorder to perform any update.
If it is additionally necessary to clear the screen before each such operation, the result could beundesirable.
InputBecause of the nature of operation of synchronous (block-mode) and NWA terminals, it might not bepossible to support all or any of the curses input functions. In particular, note the following points:
v Single-character input might not possible. It may be necessary to press a special key to cause allcharacters typed at the terminal to be transmitted to the host.
v It is sometimes not possible to disable echo. Character echo may be performed directly by the terminal.On terminals that behave in this way, any curses application that performs input should be aware thatany characters typed will appear on the screen at the point where the cursor is positioned. This doesnot necessarily correspond to the position of the cursor in the window.
Chapter 2. Curses Library 23

Working with ColorIf a terminal supports color, you can use the color manipulation subroutines to include color in your cursesprogram. Before manipulating colors, test whether a terminal supports color. To do this, you can use eitherthe has_colors subroutine or the can_change_color subroutine. The can_change_color subroutine alsochecks to see if a program can change the terminal’s color definitions. Neither of these subroutinesrequires an argument.
can_change_color Checks to see if the terminal supports colors and changing of the color definitionhas_colors Checks that the terminal supports colorsstart_color Initializes the eight basic colors and two global variables, COLORS and
COLOR_PAIRS
After you have determined that the terminal supports color, call the start_color subroutine before you callother color subroutines. It is a good practice to call this subroutine immediately after the initscr subroutineand after a successful color test. The COLORS global variable defines the maximum number of colors thatthe terminal supports. The COLOR_PAIRS global variable defines the maximum number of color pairs thatthe terminal supports.
Manipulating Video AttributesYour program can manipulate a number of video attributes.
Video Attributes, Bit Masks, and Default ColorsCurses enables you to control the following attributes:
A_ALTCHARSET Alternate character set.A_BLINK Blinking.A_BOLD Extra bright or bold.A_DIM Half-bright.A_NORMAL Normal attributes.A_REVERSE Reverse video.A_STANDOUT Terminal’s best highlighting mode.A_UNDERLINE Underline.COLOR_PAIR (Number) Displays the color pair represented by Number. You must have already
initialized the color pair using the init_pair subroutine.
These attributes are defined in the curses.h file. You can pass attributes to the wattron, wattroff, andwattrset subroutines, or you can OR them with the characters passed to the waddch subroutine. The Clogical OR operator is a | (pipe symbol). The following bit masks are also provided:
A_ATTRIBUTES Extracts attributesA_CHARTEXT Extracts a characterA_COLOR Extracts color-pair field informationA_NORMAL Turns all video attributes off
The following macros are provided for working with color pairs: COLOR_PAIR( Number) andPAIR_NUMBER( Attribute). The COLOR_PAIR( Number) macro and the A_COLOR mask are used by thePAIR_NUMBER( Attribute) macro to extract the color-pair number found in the attributes specified by theAttribute parameter.
If your program uses color, the curses.h file defines a number of macros that identify the following defaultcolors:
24 AIX 5L Version 5.3 General Programming Concepts: Writing and Debugging Programs

Color Integer ValueCOLOR_BLACK 0COLOR_BLUE 1COLOR_GREEN 2COLOR_CYAN 3COLOR_RED 4COLOR_MAGENTA 5COLOR_YELLOW 6COLOR_WHITE 7
Curses assumes that the default background color for all terminals is 0 (COLOR_BLACK ).
Setting Video AttributesThe current window attributes are applied to all characters written into the window with the addchsubroutines. These attributes remain as a property of the characters. The characters retain these attributesduring terminal operations.
attroff or wattroff Turns off attributesattron or wattron Turns on attributesattrset or wattrset Sets the current attributes of a windowstandout, wstandout, standend, or wstandend
Puts a window into and out of the terminal’s best highlight modevidputs or vidattr Outputs a string that puts the terminal in a video-attribute mode
The attrset subroutine sets the current attributes of the default screen. The wattrset subroutine sets thecurrent attributes of the user-defined window.
Use the attron and attroff subroutines to turn on and off the specified attributes in the stdscr withoutaffecting any other attributes. The wattron and wattroff subroutines perform the same actions inuser-defined windows.
The standout subroutine is the same as a call to the attron subroutine with the A_STANDOUT attribute.It puts the stdscr into the terminal’s best highlight mode. The wstandout subroutine is the same as a callto the wattron( Window, A_STANDOUT) subroutine. It puts the user-defined window into the terminal’sbest highlight mode. The standend subroutine is the same as a call to the attrset(0) subroutine. It turnsoff all attributes for stdscr. The wstandend subroutine is the same as a call to the wattrset( Window, 0)subroutine. It turns off all attributes for the specified window.
The vidputs subroutine outputs a string that puts the terminal in the specified attribute mode. Charactersare output through the putc subroutine. The vidattr subroutine is the same as the vidputs subroutineexcept that characters are output through the putchar subroutine.
Working with Color PairsThe COLOR_PAIR (Number) macro is defined in the curses.h file so you can manipulate color attributesas you would any other attributes. You must initialize a color pair with the init_pair subroutine before youuse it. The init_pair subroutine has the following parameters: Pair, Foreground, and Background. The Pairparameter must be between 1 and COLOR_PAIRS -1. The Foreground and Background parameters mustbe between 0 and COLORS -1. For example, to initialize color pair 1 to a foreground of black with abackground of cyan, you would use the following:init_pair(1, COLOR_BLACK, COLOR_CYAN);
You could then set the attributes for the window as follows:wattrset(win, COLOR_PAIR(1));
Chapter 2. Curses Library 25

If you then write the string Let’s add Color to the terminal, the string displays as black characters on acyan background.
Extracting AttributesYou can use the results from the call to the winch subroutine to extract attribute information, including thecolor-pair number. The following example uses the value returned by a call to the winch subroutine withthe C logical AND operator (&) and the A_ATTRIBUTES bit mask to extract the attributes assigned to thecurrent position in the window. The results from this operation are used with the PAIR_NUMBER macro toextract the color-pair number, and the number 1 is printed on the screen.win = newwin(10, 10, 0, 0);init_pair(1, COLOR_RED, COLOR_YELLOW);wattrset(win, COLOR_PAIR(1));waddstr(win, "apple");
number = PAIR_NUMBER((mvwinch(win, 0, 0) & A_ATTRIBUTES));wprintw(win, "%d\n", number);wrefresh(win);
Lights and WhistlesThe curses library provides the following alarm subroutines to signal the user:
beep Sounds an audible alarm on the terminalflash Displays a visible alarm on the terminal
Setting Curses OptionsAll curses options are initially turned off, so it is not necessary to turn them off before calling the endwinsubroutine. The following subroutines allow you to set various options with curses:
curs_set Sets the cursor visibility to invisible, normal, or very visible.idlok Specifies whether curses can use the hardware insert and delete line features of terminals so
equipped.intrflush Specifies whether an interrupt key (interrupt, quit, or suspend) flushes all output in the tty driver.
This option’s default is inherited from the tty driver.keypad Specifies whether curses retrieves the information from the terminal’s keypad. If enabled, the user
can press a function key (such as an arrow key) and the wgetch subroutine returns a single valuerepresenting that function key. If disabled, curses will not treat the function keys specially and yourprogram must interpret the escape sequences. For a list of these function keys, see the wgetchsubroutine.
typeahead Instructs curses to check for type ahead in an alternative file descriptor.
See the wgetch subroutines and “Setting Terminal Input and Output Modes” on page 19 for descriptions ofadditional curses options.
Manipulating Soft LabelsCurses provides subroutines for manipulating soft function-key labels. These labels appear at the bottomof the screen and give applications, such as editors, a more user-friendly look. To use soft labels, youmust call the slk_init subroutine before calling the initscr or newterm subroutines.
slk_clear Clears soft labels from the screen.slk_init Initializes soft function key labels.slk_label Returns the current label.slk_noutrefresh Refreshes soft labels. This subroutine is functionally equivalent to the wnoutrefresh
subroutine.slk_refresh Refreshes soft labels. This subroutine is functionally equivalent to the refresh
subroutine.
26 AIX 5L Version 5.3 General Programming Concepts: Writing and Debugging Programs

slk_restore Restores the soft labels to the screen after a call to the slk_clear subroutine.slk_set Sets a soft label.slk_touch Updates soft labels on the next call to the slk_noutrefresh subroutine.
To manage soft labels, curses reduces the size of the stdscr by one line. It reserves this line for use bythe soft-label functions. This reservation means that the LINES environment variable is also reduced.Many terminals support built-in soft labels. If built-in soft labels are supported, curses uses them.Otherwise, curses simulates the soft-labels with software.
Because many terminals that support soft labels have 8 labels, curses follows the same standard. A labelstring is restricted to 8 characters. Curses arranges labels in one of two patterns: 3-2-3 (3 left, 2 center, 3right) or 4-4 (4 left, 4 right).
To specify a string for a particular label, call the slk_set subroutine. This subroutine also instructs cursesto left-justify, right-justify, or center the string on the label. To obtain a label name before it was justified bythe slk_set subroutine, use the slk_label subroutine. The slk_clear and slk_restore subroutines clearand restore soft labels respectively. Normally, to update soft labels, your program should call theslk_noutrefresh subroutine for each label and then use a single call to the slk_refresh subroutine toperform the actual output. To output all the soft labels on the next call to the slk_noutrefresh subroutine,use the slk_touch subroutine.
Curses CompatibilityThe following compatibility issues need to be considered:
v In AIX 4.3, curses is not compatible with AT&T System V Release 3.2 curses.
v Applications compiled, rebound, or relinked may need source code changes for compatibility with theAIX Version 4 of curses. The curses library does not have or use AIX extended curses functions.
v Applications requiring multibyte support might still compile and link with extended curses. Use of theextended curses library is, however, discouraged except for applications that require multibyte support.
List of Additional Curses SubroutinesThe following sections describe additional curses subroutines:
v “Manipulating Windows”
v “Manipulating Characters”
v “Manipulating Terminals” on page 28
v “Manipulating Color” on page 28
v “Miscellaneous Utilities” on page 28
Manipulating WindowsUse the following subroutines to manipulate windows:
scr_dump Writes the current contents of the virtual screen to the specified filescr_init Uses the contents of a specified file to initialize the curses data structuresscr_restore Sets the virtual screen to the contents of the specified file
Manipulating CharactersUse the following subroutines to manipulate characters:
echochar, wechochar,or pechochar
Functionally equivalent to a call to the addch (or waddch) subroutine followed by a call tothe refresh (or wrefresh) subroutine.
Chapter 2. Curses Library 27
flushinp Flushes any type-ahead characters typed by the user but not yet read by the program.insertln or winsertln Inserts a blank line in a window.keyname Returns a pointer to a character string containing a symbolic name for the Key parameter.meta Determines whether 8-bit character return for the wgetch subroutine is allowed.nodelay Causes a call to the wgetch subroutine to be a nonblocking call. If no input is ready, the
wgetch subroutine returns ERR.scroll Scrolls a window up one line.unctrl Returns the printable representation of a character. Control characters are punctuated with
a ^ (caret).vwprintw Performs the same operation as the wprintw subroutine, but takes a variable list of
arguments.vwscanw Performs the same operation as the wscanw subroutine, but takes a variable list of
arguments.
Manipulating TerminalsUse the following subroutines to manipulate terminals:
def_prog_mode Identifies the current terminal mode as the in-curses modedef_shell_mode Saves the current terminal mode as the not-in-curses modedel_curterm Frees the space pointed to by the oterm variablenotimeout Prevents the wgetch subroutine from setting a timer when interpreting an input
escape sequencepechochar Equivalent to a call to the waddch subroutine followed by a call to the prefresh
subroutine.reset_prog_mode Restores the terminal into the in-curses program mode.reset_shell_mode Restores the terminal to shell mode (out-of-curses mode). The endwin subroutine
does this automatically.restartterm Sets up a TERMINAL structure for use by curses. This subroutine is similar to the
setupterm subroutine. Call the restartterm subroutine after restoring memory to aprevious state. For example, call this subroutine after a call to the scr_restoresubroutine.
Manipulating ColorUse the following subroutines to manipulate colors:
color_content Returns the composition of a colorinit_color Changes a color to the desired compositioninit_pair Initializes a color pair to the specified foreground and background colorspair_content Returns the foreground and background colors for a specified color-pair number
Miscellaneous UtilitiesThe following miscellaneous utilities are available:
baudrate Queries the current terminal and returns its output speederasechar Returns the erase character chosen by the userkillchar Returns the line-kill character chosen by the user
28 AIX 5L Version 5.3 General Programming Concepts: Writing and Debugging Programs
Chapter 3. Debugging Programs
There are several debug programs available for debugging your programs: the adb, dbx, dex, softdb, andkernel debug programs. The adb program enables you to debug executable binary files and examinenon-ASCII data files. The dbx program enables source-level debugging of C, C++, and FORTRANlanguage programs, as well as assembler-language debugging of executable programs at the machinelevel. The (dex) provides an X interface for the dbx debug program, providing windows for viewing thesource, context, and variables of the application program. The softdb debug program works much like thedex debug program, but softdb is used with AIX Software Development Environment Workbench. Thekernel debug program is used to help determine errors in code running in the kernel.
The following articles provide information on the adb and dbx debug programs:
v “adb Debug Program Overview”
v “dbx Symbolic Debug Program Overview” on page 61
adb Debug Program OverviewThe adb command provides a general purpose debug program. You can use this command to examineobject and core files and provide a controlled environment for running a program.
While the adb command is running, it takes standard input and writes to standard output. The commanddoes not recognize the Quit or Interrupt keys. If these keys are used, the adb command waits for a newcommand.
Getting Started with the adb Debug ProgramThis section explains how to start the adb debugging program from a variety of files, use the adb prompt,use shell commands from within the adb program, and stop the adb program.
Starting adb with a Program File
You can debug any executable C or assembly language program file by entering a command line of theform:
adb FileName
where FileName is the name of the executable program file to be debugged. The adb program opens thefile and prepares its text (instructions) and data for subsequent debugging. For example, the command:adb sample
prepares the program named sample for examination and operation.
Once started, the adb debug program places the cursor on a new line and waits for you to typecommands.
Starting adb with a Nonexistent or Incorrect File
If you start the adb debug program with the name of a nonexistent or incorrectly formatted file, the adbprogram first displays an error message and then waits for commands. For example, if you start the adbprogram with the command:adb sample
and the sample file does not exist, the adb program displays the message:
© Copyright IBM Corp. 1997, 2010 29

sample: no such file or directory.
Starting adb with the Default File
You can start the adb debug program without a file name. In this case, the adb program searches for thedefault a.out file in your current working directory and prepares it for debugging. Thus, the command:adb
is the same as entering:adb a.out
The adb program starts with the a.out file and waits for a command. If the a.out file does not exist, theadb program starts without a file and does not display an error message.
Starting adb with a Core Image File
You can use the adb debug program to examine the core image files of programs that causedirrecoverable system errors. Core image files maintain a record of the contents of the CPU registers,stack, and memory areas of your program at the time of the error. Therefore, core image files provide away to determine the cause of an error.
To examine a core image file with its corresponding program, you must give the name of both the coreand the program file. The command line has the form:
adb ProgramFile CoreFile
where ProgramFile is the file name of the program that caused the error, and CoreFile is the file name ofthe core image file generated by the system. The adb program then uses information from both files toprovide responses to your commands.
If you do not give the filename of the core image file, the adb program searches for the default core file,named core, in your current working directory. If such a file is found, the adb program determines whetherthe core file belongs to the ProgramFile. If so, the adb program uses it. Otherwise, the adb programdiscards the core file by giving an appropriate error message.
Note: The adb command cannot be used to examine 64-bit objects and AIX 4.3 core format. adb stillworks with pre-AIX 4.3 core format. On AIX 4.3, user can make kernel to generate pre-AIX 4.3 stylecore dumps using smitty.
Starting adb with a Data File
The adb program provides a way to look at the contents of the file in a variety of formats and structures.You can use the adb program to examine data files by giving the name of the data file in place of theprogram or core file. For example, to examine a data file named outdata, enter:adb outdata
The adb program opens a file called outdata and lets you examine its contents. This method of examiningfiles is useful if the file contains non-ASCII data. The adb command may display a warning when you givethe name of a non-ASCII data file in place of a program file. This usually happens when the content of thedata file is similar to a program file. Like core files, data files cannot be executed.
30 AIX 5L Version 5.3 General Programming Concepts: Writing and Debugging Programs
Starting adb with the Write Option
If you open a program or data file with the -w flag of the adb command, you can make changes andcorrections to the file. For example, the command:adb -w sample
opens the program file sample for writing. You can then use adb commands to examine and modify thisfile. The -w flag causes the adb program to create a given file if it does not already exist. The option alsolets you write directly to memory after running the given program.
Using a Prompt
After you have started the adb program you can redefine your prompt with the $P subcommand.
To change the [adb:scat]>> prompt to Enter a debug command—->, enter:$P"Enter a debug command--->"
The quotes are not necessary when redefining the new prompt from the adb command line.
Using Shell Commands from within the adb Program
You can run shell commands without leaving the adb program by using the adb escape command (!)(exclamation point). The escape command has the form:
! Command
In this format Command is the shell command you want to run. You must provide any required argumentswith the command. The adb program passes this command to the system shell that calls it. When thecommand is finished, the shell returns control to the adb program. For example, to display the date, enterthe following command:! date
The system displays the date and restores control to the adb program.
Exiting the adb Debug Program
You can stop the adb program and return to the system shell by using the $q or $Q subcommands. Youcan also stop the adb program by typing the Ctrl-D key sequence. You cannot stop the adb program bypressing the Interrupt or Quit keys. These keys cause adb to wait for a new command. For moreinformation, see “Stopping a Program with the Interrupt and Quit Keys” on page 35.
Controlling Program Execution
This section explains the commands and subcommands necessary to prepare programs for debugging;execute programs; set, display, and delete breakpoints; continue programs; single-step through a program;stop programs; and kill programs.
Preparing Programs for Debugging with the adb Program
Compile the program using the cc command to a file such as adbsamp2 by entering the following:cc adbsamp2.c -o adbsamp2
To start the debug session, enter:
Chapter 3. Debugging Programs 31

adb adbsamp2
The C language does not generate statement labels for programs. Therefore, you cannot refer to individualC language statements when using the debug program. To use execution commands effectively, you mustbe familiar with the instructions that the C compiler generates and how those instructions relate toindividual C language statements. One useful technique is to create an assembler language listing of yourC program before using the adb program. Then, refer to the listing as you use the debug program. Tocreate an assembler language listing, use the -S or -qList flag of the cc command.
For example, to create an assembler language listing of the example program, adbsamp2.c, use thefollowing command:cc -S adbsamp2.c -o adbsamp2
This command creates the adbsamp2.s file, that contains the assembler language listing for the program,and compiles the program to the executable file, adbsamp2.
Running a Program
You can execute a program by using the :r or :R subcommand. For more information see, (“Displayingand Manipulating the Source File with the adb Program” on page 41). The commands have the form:
[ Address ][,Count ] :r [Arguments ]
OR
[ Address ][,Count ] :R [Arguments ]
In this format, the Address parameter gives the address at which to start running the program; the Countparameter is the number of breakpoints to skip before one is taken; and the Arguments parameterprovides the command-line arguments, such as file names and options, to pass to the program.
If you do not supply an Address value, the adb program uses the start of the program. To run the programfrom the beginning enter::r
If you supply a Count value, the adb program ignores all breakpoints until the given number has beenencountered. For example, to skip the first five named breakpoints, use the command:,5:r
If you provide arguments, separate them by at least one space each. The arguments are passed to theprogram in the same way the system shell passes command-line arguments to a program. You can usethe shell redirection symbols.
The :R subcommand passes the command arguments through the shell before starting program operation.You can use shell pattern-matching characters in the arguments to refer to multiple files or other inputvalues. The shell expands arguments containing pattern-matching characters before passing them to theprogram. This feature is useful if the program expects multiple file names. For example, the followingcommand passes the argument [a-z]* to the shell where it is expanded to a list of the corresponding filenames before being passed to the program::R [a-z]*.s
The :r and :R subcommands remove the contents of all registers and destroy the current stack beforestarting the program. This operation halts any previous copy of the program that may be running.
32 AIX 5L Version 5.3 General Programming Concepts: Writing and Debugging Programs
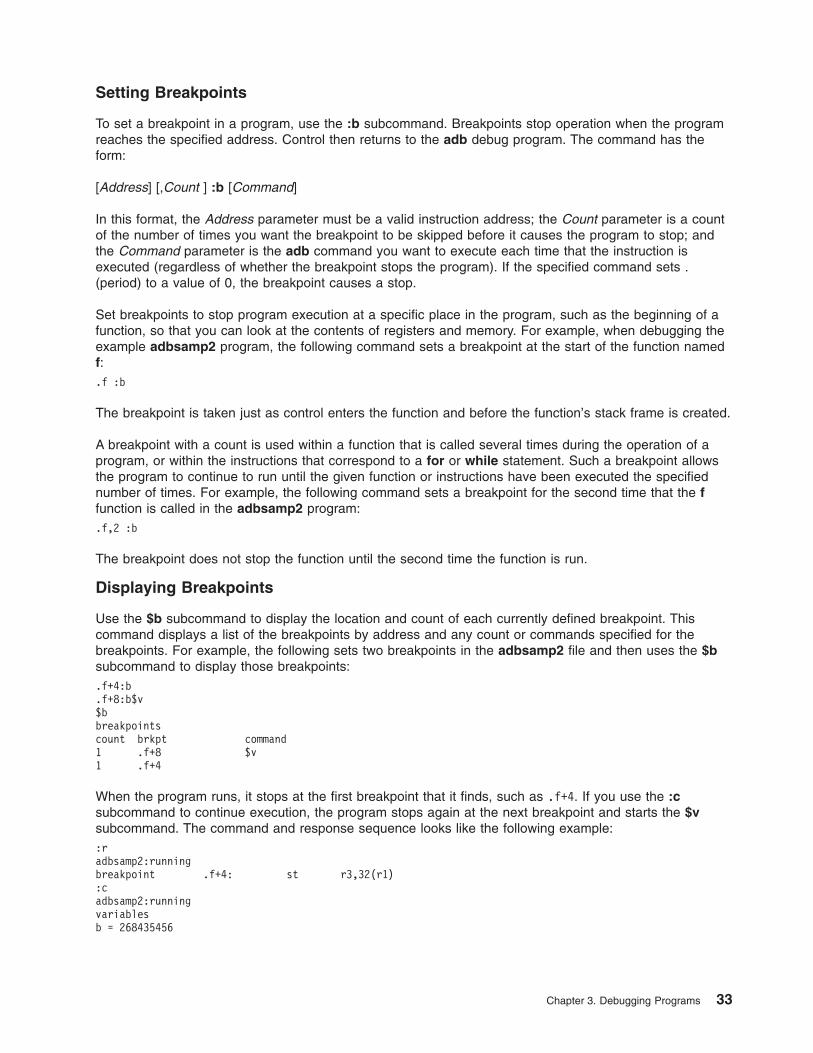
Setting Breakpoints
To set a breakpoint in a program, use the :b subcommand. Breakpoints stop operation when the programreaches the specified address. Control then returns to the adb debug program. The command has theform:
[Address] [,Count ] :b [Command]
In this format, the Address parameter must be a valid instruction address; the Count parameter is a countof the number of times you want the breakpoint to be skipped before it causes the program to stop; andthe Command parameter is the adb command you want to execute each time that the instruction isexecuted (regardless of whether the breakpoint stops the program). If the specified command sets .(period) to a value of 0, the breakpoint causes a stop.
Set breakpoints to stop program execution at a specific place in the program, such as the beginning of afunction, so that you can look at the contents of registers and memory. For example, when debugging theexample adbsamp2 program, the following command sets a breakpoint at the start of the function namedf:.f :b
The breakpoint is taken just as control enters the function and before the function’s stack frame is created.
A breakpoint with a count is used within a function that is called several times during the operation of aprogram, or within the instructions that correspond to a for or while statement. Such a breakpoint allowsthe program to continue to run until the given function or instructions have been executed the specifiednumber of times. For example, the following command sets a breakpoint for the second time that the ffunction is called in the adbsamp2 program:.f,2 :b
The breakpoint does not stop the function until the second time the function is run.
Displaying Breakpoints
Use the $b subcommand to display the location and count of each currently defined breakpoint. Thiscommand displays a list of the breakpoints by address and any count or commands specified for thebreakpoints. For example, the following sets two breakpoints in the adbsamp2 file and then uses the $bsubcommand to display those breakpoints:.f+4:b.f+8:b$v$bbreakpointscount brkpt command1 .f+8 $v1 .f+4
When the program runs, it stops at the first breakpoint that it finds, such as .f+4. If you use the :csubcommand to continue execution, the program stops again at the next breakpoint and starts the $vsubcommand. The command and response sequence looks like the following example::radbsamp2:runningbreakpoint .f+4: st r3,32(r1):cadbsamp2:runningvariablesb = 268435456
Chapter 3. Debugging Programs 33

d = 236e = 268435512m = 264breakpoint .f+8 l r15,32(r1)
Deleting Breakpoints
To use the :d subcommand to delete a breakpoint from a program, enter:
Address :d
In this format, the Address parameter gives the address of the breakpoint to delete.
For example, when debugging the example adbsamp2 program, entering the following command deletesthe breakpoint at the start of the f function:.f:d
Continuing Program Execution
To use the :c subcommand to continue the execution of a program after it has been stopped by abreakpoint enter:
[Address ] [,Count ] :c [Signal ]
In this format, the Address parameter gives the address of the instruction at which to continue operation;the Count parameter gives the number of breakpoints to ignore; and the Signal parameter is the number ofthe signal to send to the program.
If you do not supply an Address parameter, the program starts at the next instruction after the breakpoint.If you supply a Count parameter, the adb debug program ignores the first Count breakpoints.
If the program is stopped using the Interrupt or Quit key, this signal is automatically passed to the programupon restarting. To prevent this signal from being passed, enter the command in the form:
[Address] [,Count] :c 0
The command argument 0 prevents a signal from being sent to the subprocess.
Single-Stepping a Program
Use the :s subcommand to run a program in single steps or one instruction at a time. This commandissues an instruction and returns control to the adb debug program. The command has the form:
[Aaddress ] [,Count ] :s [Signal]
In this format, the Address parameter gives the address of the instruction you want to execute, and theCount parameter is the number of times you want to repeat the command. If there is no currentsubprocess, the ObjectFile parameter is run as a subprocess. In this case, no signal can be sent and theremainder of the line is treated as arguments to the subprocess. If you do not supply a value for theAddress parameter, the adb program uses the current address. If you supply the Count parameter, theadb program continues to issue each successive instruction until the Count parameter instructions havebeen run. Breakpoints are ignored while single-stepping. For example, the following command issues thefirst five instructions in the main function:.main,5:s
34 AIX 5L Version 5.3 General Programming Concepts: Writing and Debugging Programs

Stopping a Program with the Interrupt and Quit Keys
Use either the Interrupt or Quit key to stop running a program at any time. Pressing either of these keysstops the current program and returns control to the adb program. These keys are useful with programsthat have infinite loops or other program errors.
When you press the Interrupt or Quit key to stop a program, the adb program automatically saves thesignal. If you start the program again using the :c command, the adb program automatically passes thesignal to the program. This feature is useful when testing a program that uses these signals as part of itsprocessing. To continue running the program without sending signals, use the command::c 0
The command argument 0 (zero) prevents a signal from being sent to the program.
Stopping a Program
To stop a program you are debugging, use the :k subcommand. This command stops the process createdfor the program and returns control to the adb debug program. The command clears the current contentsof the system unit registers and stack and begins the program again. The following example shows theuse of the :k subcommand to clear the current process from the adb program::k
560: killed
Using adb ExpressionsThis section describes the use of adb expressions.
Using Integers in Expressions
When creating an expression, you can use integers in three forms: decimal, octal, and hexadecimal.Decimal integers must begin with a non-zero decimal digit. Octal numbers must begin with a 0 (zero) andhave octal digits only (0-7). Hexadecimal numbers must begin with the prefix 0x and can contain decimaldigits and the letters a through f (in both uppercase and lowercase). The following are examples of validnumbers:Decimal Octal Hexadecimal34 042 0x224090 07772 0xffa
Using Symbols in Expressions
Symbols are the names of global variables and functions defined within the program being debugged.Symbols are equal to the address of the given variable or function. They are stored in the program symboltable and are available if the symbol table has not been stripped from the program file.
In expressions, you can spell the symbol exactly as it is in the source program or as it has been stored inthe symbol table. Symbols in the symbol table are no more than 8 characters long.
When you use the ? subcommand, the adb program uses the symbols found in the symbol table of theprogram file to create symbolic addresses. Thus, the ? subcommand sometimes gives a function namewhen displaying data. This does not happen if the ? subcommand is used for text (instructions) and the /command is used for data.
Local variables can only be addressed if the C language source program is compiled with the -g flag.
Chapter 3. Debugging Programs 35

If the C language source program is not compiled using the -g flag the local variable cannot be addressed.The following command displays the value of the local variable b in a function sample:.sample.b / x - value of local variable..sample.b = x - Address of local variable.
Using Operators in Expressions
You can combine integers, symbols, variables, and register names with the following operators:
Unary Operators:~ (tilde) Bitwise complementation- (dash) Integer negation* (asterisk) Returns contents of location
Binary Operators:+ (plus) Addition- (minus) Subtraction* (asterisk) Multiplication% (percent) Integer division& (ampersand) Bitwise conjunction] (right bracket) Bitwise disjunction^ (caret) Modulo# (number sign) Round up to the next multiple
The adb debug program uses 32-bit arithmetic. Values that exceed 2,147,483,647 (decimal) are displayedas negative values. The following example shows the results of assigning two different values to thevariable n, and then displaying the value in both decimal and hexadecimal:2147483647>n<n=D
2147483647<n=X
7fffffff2147483648>n<n=D
-2147483648<n=X
80000000
Unary operators have higher precedence than binary operators. All binary operators have the sameprecedence and are evaluated in order from left to right. Thus, the adb program evaluates the followingbinary expressions as shown:2*3+4=d
104+2*3=d
18
You can change the precedence of the operations in an expression by using parentheses. The followingexample shows how the previous expression is changed by using parentheses:4+(2*3)=d
10
The unary operator, * (asterisk), treats the given address as a pointer into the data segment. Anexpression using this operator is equal to the value pointed to by that pointer. For example, theexpression:*0x1234
36 AIX 5L Version 5.3 General Programming Concepts: Writing and Debugging Programs

is equal to the value at the data address 0x1234, whereas the example:0x1234
is equal to 0x1234.
Customizing the adb Debug ProgramThis section describes how you can customize the adb debug program.
Combining Commands on a Single Line
You can give more than one command on a line by separating the commands with a ; (semicolon). Thecommands are performed one at a time, starting at the left. Changes to the current address and formatcarry over to the next command. If an error occurs, the remaining commands are ignored. For example,the following sequence displays both the adb variables and then the active subroutines at one point in theadbsamp2 program:$v;$cvariablesb = 10000000d = ece = 10000038m = 108t = 2f8.f(0,0) .main+26.main(0,0,0) start+fa
Creating adb Scripts
You can direct the adb debug program to read commands from a text file instead of from the keyboard byredirecting the standard input file when you start the adb program. To redirect standard input, use theinput redirection symbol, < (less than), and supply a file name. For example, use the following commandto read commands from the file script:adb sample <script
The file must contain valid adb subcommands. Use the adb program script files when the same set ofcommands can be used for several different object files. Scripts can display the contents of core files aftera program error. The following example shows a file containing commands that display information about aprogram error. When that file is used as input to the adb program using the following command to debugthe adbsamp2 file, the specified output is produced.120$w4095$s.f:b:r=1n"======= adb Variables ======="$v=1n"======= Address Map ======="$m=1n"======= C Stack Backtrace ======="$C=1n"======= C External Variables ======="$e=1n"======= Registers ======="$r0$s=1n"======= Data Segment ======="<b,10/8xna
$ adb adbsamp2 <script
Chapter 3. Debugging Programs 37
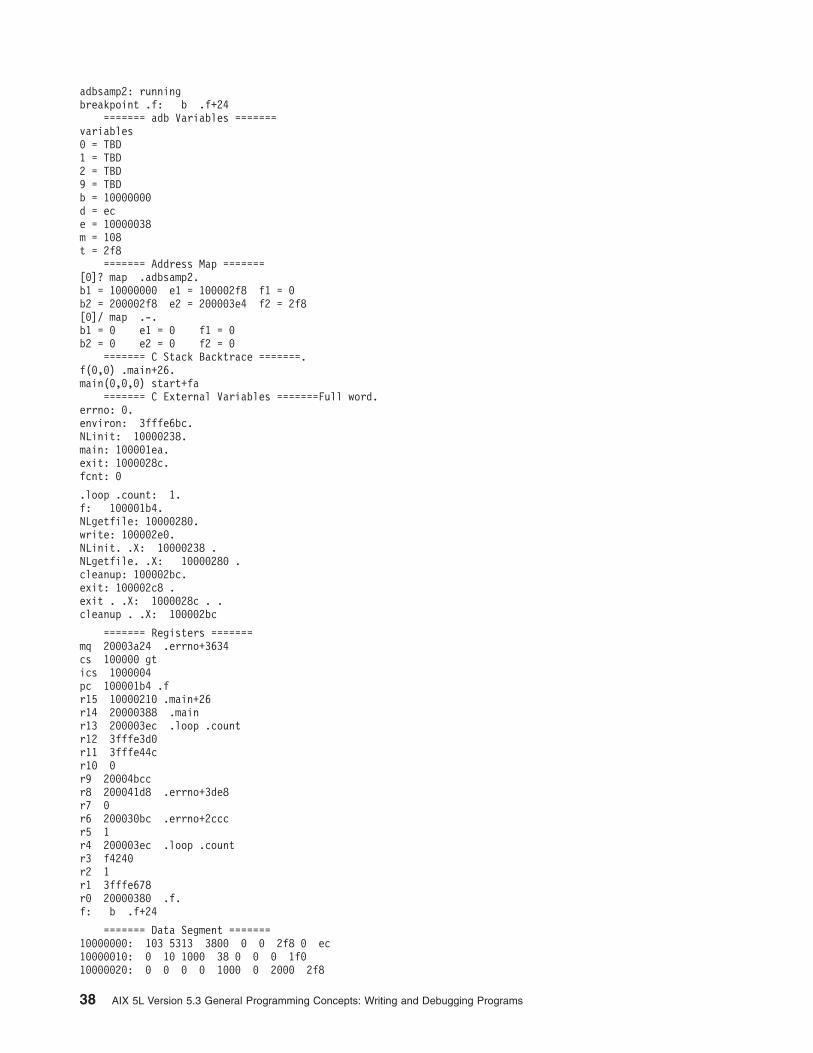
adbsamp2: runningbreakpoint .f: b .f+24
======= adb Variables =======variables0 = TBD1 = TBD2 = TBD9 = TBDb = 10000000d = ece = 10000038m = 108t = 2f8
======= Address Map =======[0]? map .adbsamp2.b1 = 10000000 e1 = 100002f8 f1 = 0b2 = 200002f8 e2 = 200003e4 f2 = 2f8[0]/ map .-.b1 = 0 e1 = 0 f1 = 0b2 = 0 e2 = 0 f2 = 0
======= C Stack Backtrace =======.f(0,0) .main+26.main(0,0,0) start+fa
======= C External Variables =======Full word.errno: 0.environ: 3fffe6bc.NLinit: 10000238.main: 100001ea.exit: 1000028c.fcnt: 0
.loop .count: 1.f: 100001b4.NLgetfile: 10000280.write: 100002e0.NLinit. .X: 10000238 .NLgetfile. .X: 10000280 .cleanup: 100002bc.exit: 100002c8 .exit . .X: 1000028c . .cleanup . .X: 100002bc
======= Registers =======mq 20003a24 .errno+3634cs 100000 gtics 1000004pc 100001b4 .fr15 10000210 .main+26r14 20000388 .mainr13 200003ec .loop .countr12 3fffe3d0r11 3fffe44cr10 0r9 20004bccr8 200041d8 .errno+3de8r7 0r6 200030bc .errno+2cccr5 1r4 200003ec .loop .countr3 f4240r2 1r1 3fffe678r0 20000380 .f.f: b .f+24
======= Data Segment =======10000000: 103 5313 3800 0 0 2f8 0 ec10000010: 0 10 1000 38 0 0 0 1f010000020: 0 0 0 0 1000 0 2000 2f8
38 AIX 5L Version 5.3 General Programming Concepts: Writing and Debugging Programs

10000030: 0 0 0 0 4 6000 0 600010000040: 6e10 61d0 9430 a67 6730 6820 c82e 810000050: 8df0 94 cd0e 60 6520 a424 a432 c84e10000060: 8 8df0 77 cd0e 64 6270 8df0 8610000070: cd0e 60 6520 a424 a432 6470 8df0 6a10000080: cd0e 64 c82e 19 8df0 78 cd0e 6010000090: 6520 a424 a432 c84e 19 8df0 5b cd0e100000a0: 64 cd2e 5c 7022 d408 64 911 c82e100000b0: 2e 8df0 63 cd0e 60 6520 a424 a432100000c0: c84e 2e 8df0 46 cd0e 64 15 6280100000d0: 8df0 60 cd0e 68 c82e 3f 8df0 4e100000e0: cd0e 60 6520 a424 a432 c84e 3f 8df0100000f0: 31 cd0e 64 c820 14 8df0 2b cd0e10000100:
Setting Output Width
Use the $w subcommand to set the maximum width (in characters) of each line of output created by theadb program. The command has the form:
Width$w
In this format, the Width parameter is an integer that specifies the width in characters of the display. Youcan give any width convenient for your display device. When the adb program is first invoked, the defaultwidth is 80 characters.
This command can be used when redirecting output to a line printer or special output device. For example,the following command sets the display width to 120 characters, a common maximum width for lineprinters:120$w
Setting the Maximum Offset
The adb debug program normally displays memory and file addresses as the sum of a symbol and anoffset. This format helps to associate the instructions and data on the display with a particular function orvariable. When the adb program starts up, it sets the maximum offset to 255, so that symbolic addressesare assigned only to instructions or data that occur less than 256 bytes from the start of the function orvariable. Instructions or data beyond that point are given numeric addresses.
In many programs, the size of a function or variable is actually larger than 255 bytes. For this reason theadb program lets you change the maximum offset to accommodate larger programs. You can change themaximum offset by using the $s subcommand.
The subcommand has the form:
Offset$s
In this format, the Offset parameter is an integer that specifies the new offset. For example, the followingcommand increases the maximum possible offset to 4095:4095$s
All instructions and data that are less than 4096 bytes away are given symbolic addresses. You candisable all symbolic addressing by setting the maximum offset to zero. All addresses are given numericvalues instead.
Chapter 3. Debugging Programs 39

Setting Default Input Format
To alter the default format for numbers used in commands, use the $d or $o (octal) subcommands. Thedefault format tells the adb debug program how to interpret numbers that do not begin with 0 (octal) or 0x(hexadecimal), and how to display numbers when no specific format is given. Use these commands towork with a combination of decimal, octal, and hexadecimal numbers.
The $o subcommand sets the radix to 8 and thus sets the default format for numbers used in commandsto octal. After you enter that subcommand, the adb program displays all numbers in octal format exceptthose specified in some other format.
The format for the $d subcommand is the Radix$d command, where the Radix parameter is the new valueof the radix. If the Radix parameter is not specified, the $d subcommand sets the radix to a default valueof 16. When you first start the adb program, the default format is hexadecimal. If you change the defaultformat, you can restore it as necessary by entering the $d subcommand by itself:$d
To set the default format to decimal, use the following command:0xa$d
Changing the Disassembly ModeUse the $i and $n subcommands to force the adb debug program to disassemble instructions using thespecified instruction set and mnemonics. The $i subcommand specifies the instruction set to be used fordisassembly. The $n subcommand specifies the mnemonics to be used in disassembly.
If no value is entered, these commands display the current settings.
The $i subcommand accepts the following values:
com Specifies the instruction set for the common intersection mode of the PowerPC and POWER family.pwr Specifies the instruction set and mnemonics for the POWER® implementation of the POWER Architecture.pwrx Specifies the instruction set and mnemonics for the POWER2 implementation of the POWER family.ppc Specifies the instruction set and mnemonics for the PowerPC.601 Specifies the instruction set and mnemonics for the PowerPC 601 RISC Microprocessor.603 Specifies the instruction set and mnemonics for the PowerPC 603 RISC Microprocessor.604 Specifies the instruction set and mnemonics for the PowerPC 604 RISC Microprocessor.ANY Specifies any valid instruction. For instruction sets that overlap, the mnemonics will default to PowerPC
mnemonics.
The $n subcommand accepts the following values:
pwr Specifies the instruction set and mnemonics for the POWER implementation of the POWER architecture.ppc Specifies the mnemonics for the PowerPC architecture.
Computing Numbers and Displaying Text
You can perform arithmetic calculations while in the adb debug program by using the = (equal sign)subcommand. This command directs the adb program to display the value of an expression in a specifiedformat. The command converts numbers in one base to another, double-checks the arithmetic performedby a program, and displays complex addresses in simpler form. For example, the following commanddisplays the hexadecimal number 0x2a as the decimal number 42:0x2a=d
42
40 AIX 5L Version 5.3 General Programming Concepts: Writing and Debugging Programs

Similarly, the following command displays 0x2a as the ASCII character * (asterisk):0x2a=c
*
Expressions in a command can have any combination of symbols and operators. For example, thefollowing command computes a value using the contents of the r0 and r1 registers and the adb variable b.<r0-12*<r1+<b+5=X
8fa86f95
You can also compute the value of external symbols to check the hexadecimal value of an external symboladdress, by entering:main+5=X
2000038d
The = (equal sign) subcommand can also display literal strings. Use this feature in the adb programscripts to display comments about the script as it performs its commands. For example, the followingsubcommand creates three lines of spaces and then prints the message C Stack Backtrace:=3n"C Stack Backtrace"
Displaying and Manipulating the Source File with the adb Program
This section describes how to use the adb program to display and manipulate the source file.
Displaying Instructions and Data
The adb program provides several subcommands for displaying the instructions and data of a givenprogram and the data of a given data file. The subcommands and their formats are:
Display address Address [, Count ] = FormatDisplay instruction Address [, Count ] ? FormatDisplay value of variable Address [, Count ] / Format
In this format, the symbols and variables have the following meaning:
Address Gives the location of the instruction or data item.Count Gives the number of items to be displayed.Format Defines how to display the items.= Displays the address of an item.? Displays the instructions in a text segment./ Displays the value of variables.
Forming Addresses
In the adb program addresses are 32-bit values that indicate a specific memory address. They can,however, be represented in the following forms:
Absolute address The 32-bit value is represented by an 8-digit hexadecimal number, or its equivalent inone of the other number-base systems.
Symbol name The location of a symbol defined in the program can be represented by the name ofthat symbol in the program.
Chapter 3. Debugging Programs 41

Entry points The entry point to a routine is represented by the name of the routine preceded by a .(period). For example, to refer to the address of the start of the main routine, use thefollowing notation:
.mainDisplacements Other points in the program can be referred to by using displacements from entry
points in the program. For example, the following notation references the instructionthat is 4 bytes past the entry point for the symbol main:
.main+4
Displaying an Address
Use the = (equal sign) subcommand to display an address in a given format. This command displaysinstruction and data addresses in a simpler form and can display the results of arithmetic expressions. Forexample, entering:main=an
displays the address of the symbol main:10000370:
The following example shows a command that displays (in decimal) the sum of the internal variable b andthe hexadecimal value 0x2000, together with its output:<b+0x2000=D
268443648
If a count is given, the same value is repeated that number of times. The following example shows acommand that displays the value of main twice and the output that it produces:main,2=x
370 370
If no address is given, the current address is used. After running the above command once (setting thecurrent address to main), the following command repeats that function:,2=x
370 370
If you do not specify a format, the adb debug program uses the last format that was used with thiscommand. For example, in the following sequence of commands, both main and one are displayed inhexadecimal:main=x
370one=
33c
Displaying the C Stack Backtrace
To trace the path of all active functions, use the $c subcommand. This subcommand lists the names of allfunctions that have been called and have not yet returned control. It also lists the address from which eachfunction was called and the arguments passed to each function. For example, the following commandsequence sets a breakpoint at the function address .f+2 in the adbsamp2 program. The breakpoint callsthe $c subcommand. The program is started, runs to the breakpoint, and then displays a backtrace of thecalled C language functions:.f+2:b$c:radbsamp2:running
42 AIX 5L Version 5.3 General Programming Concepts: Writing and Debugging Programs

.f(0,0) .main+26
.main(0,0,0) start+fabreakpoint f+2: tgte r2,r2
By default, the $c subcommand displays all calls. To display fewer calls, supply a count of the number ofcalls to display. For example, the following command displays only one of the active functions at thepreceding breakpoint:,1$c
.f(0,0) .main+26
Choosing Data Formats
A format is a letter or character that defines how data is to be displayed. The following are the mostcommonly used formats:
Letter Formata The current symbolic addressb One byte in octal (displays data associated with instructions, or the high or low byte of a register)c One byte as a character (char variables)d Halfword in decimal (short variables)D Fullword in decimal (long variables)i Machine instructions in mnemonic formatn A new lineo Halfword in octal (short variables)O Fullword in octal (long variables)r A blank spaces A null-terminated character string (null-terminated arrays of char variables)t A horizontal tabu Halfword as an unsigned integer (short variables)x Halfword in hexadecimal (short variables)X Fullword in hexadecimal (long variables)
For example, the following commands produce the indicated output when using the adbsamp exampleprogram:
Command Responsemain=o 1560main=O 4000001560main=d 880main=D 536871792main=x 370main=X 20000370main=u 880
A format can be used by itself or combined with other formats to present a combination of data in differentforms. You can combine the a, n, r, and t formats with other formats to make the display more readable.
Changing the Memory Map
You can change the values of a memory map by using the ?m and /m subcommands. See, (“adb DebugProgram Reference Information” on page 48). These commands assign specified values to thecorresponding map entries. The commands have the form:[,count] ?m b1 e1 f1[,count] /m b1 e1 f2
Chapter 3. Debugging Programs 43

The following example shows the results of these commands on the memory map displayed with the $msubcommand in the previous example:,0?m 10000100 10000470 0/m 100 100 100$m
[0] : ?map : 'adbsamp3'b1 = 0x10000100, e1 = 10000470, f1 = 0b2 = 0x20000600, e2 = 0x2002c8a4, f2 = 0x600
[1] : ?map : 'shr.o' in library '/usr/ccs/lib/libc.a'b1 = 0xd00d6200, e1 = 0xd01397bf, f1 = 0xd00defbcb2 = 0x20000600, e2 = 0x2002beb8, f2 = 0x4a36c
[-] : /map : '-'b1 = 100, e1 = 100, f1 = 100b2 = 0, e2 = 0, f2 = 0
To change the data segment values, add an * (asterisk) after the / or ?.,0?*m 20000270 20000374 270/*m 200 200 200$m
[0] : ?map : 'adbsamp3'b1 = 0x10000100, e1 = 10000470, f1 = 0b2 = 0x20000270, e2 = 0x20000374, f2 = 0x270
[1] : ?map : 'shr.o' in library '/usr/ccs/lib/libc.a'b1 = 0xd00d6200, e1 = 0xd01397bf, f1 = 0xd00defbcb2 = 0x20000600, e2 = 0x2002beb8, f2 = 0x4a36c
[-] : /map : '-'b1 = 100, e1 = 100, f1 = 100b2 = 0, e2 = 0, f2 = 0
Patching Binary Files
You can make corrections or changes to any file, including executable binary files, by starting the adbprogram with the -w flag and by using the w and W (“adb Debug Program Reference Information” on page48) subcommands.
Locating Values in a File
Locate specific values in a file by using the l and L subcommands. See (“adb Debug Program ReferenceInformation” on page 48). The subcommands have the form:
?l Value
OR
/l Value
The search starts at the current address and looks for the expression indicated by Value. The lsubcommand searches for 2-byte values. The L subcommand searches for 4-byte values.
The ?l subcommand starts the search at the current address and continues until the first match or the endof the file. If the value is found, the current address is set to that value’s address. For example, thefollowing command searches for the first occurrence of the f symbol in the adbsamp2 file:?l .f.write+a2
44 AIX 5L Version 5.3 General Programming Concepts: Writing and Debugging Programs
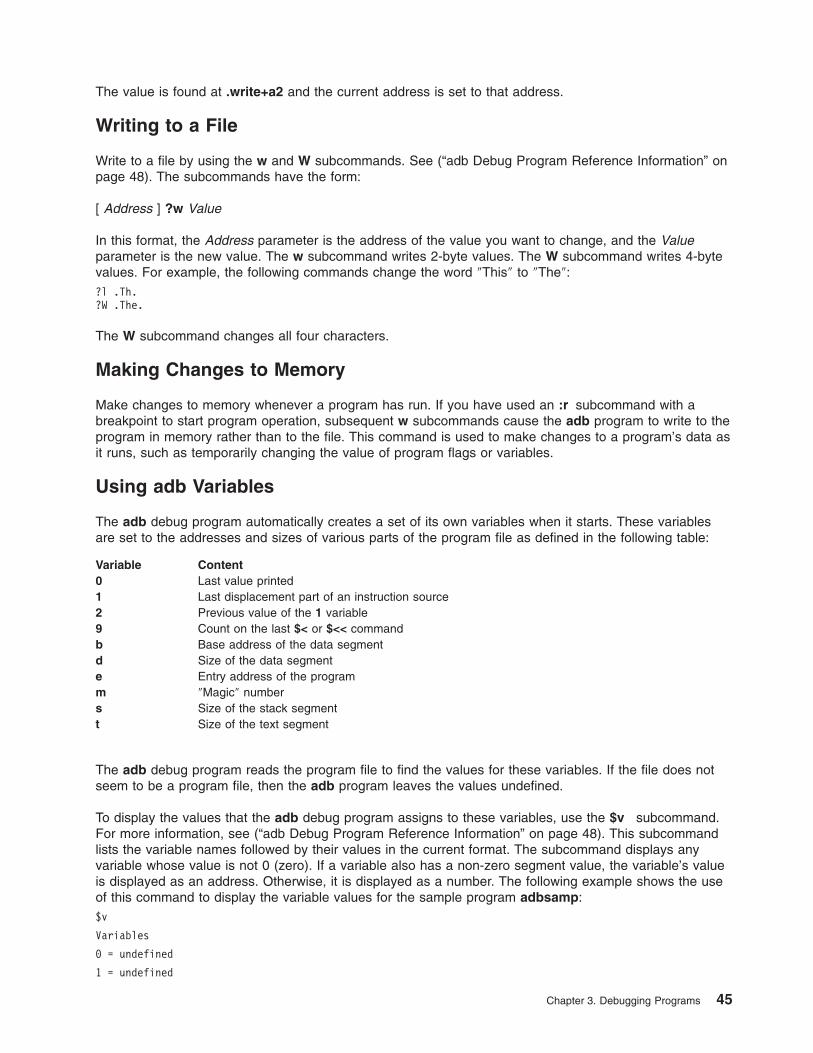
The value is found at .write+a2 and the current address is set to that address.
Writing to a File
Write to a file by using the w and W subcommands. See (“adb Debug Program Reference Information” onpage 48). The subcommands have the form:
[ Address ] ?w Value
In this format, the Address parameter is the address of the value you want to change, and the Valueparameter is the new value. The w subcommand writes 2-byte values. The W subcommand writes 4-bytevalues. For example, the following commands change the word ″This″ to ″The″:?l .Th.?W .The.
The W subcommand changes all four characters.
Making Changes to Memory
Make changes to memory whenever a program has run. If you have used an :r subcommand with abreakpoint to start program operation, subsequent w subcommands cause the adb program to write to theprogram in memory rather than to the file. This command is used to make changes to a program’s data asit runs, such as temporarily changing the value of program flags or variables.
Using adb Variables
The adb debug program automatically creates a set of its own variables when it starts. These variablesare set to the addresses and sizes of various parts of the program file as defined in the following table:
Variable Content0 Last value printed1 Last displacement part of an instruction source2 Previous value of the 1 variable9 Count on the last $< or $<< commandb Base address of the data segmentd Size of the data segmente Entry address of the programm ″Magic″ numbers Size of the stack segmentt Size of the text segment
The adb debug program reads the program file to find the values for these variables. If the file does notseem to be a program file, then the adb program leaves the values undefined.
To display the values that the adb debug program assigns to these variables, use the $v subcommand.For more information, see (“adb Debug Program Reference Information” on page 48). This subcommandlists the variable names followed by their values in the current format. The subcommand displays anyvariable whose value is not 0 (zero). If a variable also has a non-zero segment value, the variable’s valueis displayed as an address. Otherwise, it is displayed as a number. The following example shows the useof this command to display the variable values for the sample program adbsamp:$v
Variables
0 = undefined
1 = undefined
Chapter 3. Debugging Programs 45

2 = undefined
9 = undefined
b = 10000000
d = 130
e = 10000038
m = 108
t = 298
Specify the current value of an adb variable in an expression by preceding the variable name with < (lessthan sign). The following example displays the current value of the b base variable:<b=X
10000000
Create your own variables or change the value of an existing variable by assigning a value to a variablename with > (greater than sign). The assignment has the form:
Expression > VariableName
where the Expression parameter is the value to be assigned to the variable and the VariableNameparameter is the variable to receive the value. The VariableName parameter must be a single letter. Forexample, the assignment:0x2000>b
assigns the hexadecimal value 0x2000 to the b variable. Display the contents of b again to show that theassignment occurred:<b=X
2000
Finding the Current Address
The adb program has two special variables that keep track of the last address used in a command andthe last address typed with a command. The . (period) variable, also called the current address, containsthe last address used in a command. The ″ (double quotation mark) variable contains the last addresstyped with a command. The . and ″ variables usually contain the same address except when impliedcommands, such as the newline and ^ (caret) characters, are used. These characters automaticallyincrease and decrease the . variable but leave the ) (right parenthesis) variable unchanged.
Both the . and the ″ variables can be used in any expression. The < (less than sign) is not required. Forexample, the following commands display these variables at the start of debugging with the adbsamp(“Example adb Program: adbsamp” on page 52) program:.=
0.=
0
Displaying External Variables
Use the $e (“adb Debug Program Reference Information” on page 48) subcommand to display the valuesof all external variables in the adb program. External variables are the variables in your program that haveglobal scope or have been defined outside of any function, and include variables defined in library routinesused by your program, as well as all external variables of shared libraries.
46 AIX 5L Version 5.3 General Programming Concepts: Writing and Debugging Programs

The $e subcommand is useful to get a list of the names for all available variables or a summary of theirvalues. The command displays one name on each line with the variable’s value (if any) on the same line.If the Count parameter is specified, only the external variables associated with that file are printed.
The following example illustrates the setting of a breakpoint in the adbsamp2 (“Example adb Program:adbsamp2” on page 53) sample program that calls the $e subcommand, and the output that results whenthe program runs (be sure to delete any previous breakpoints that you may have set):.f+2:b,0$e:radbsamp2: running_errno: 0_environ: 3fffe6bc__NLinit: 10000238_main: 100001ea_exit: 1000028c_fcnt: 0_loop_count: 1_f: 100001b4_NLgetfile: 10000280_write: 100002e0__NLinit__X: 10000238_NLgetfile__X: 10000280__cleanup: 100002bc__exit: 100002c8_exit__X: 1000028c__cleanup__X: 100002bcbreakpoint .f+2: st r2,1c(r1)
Displaying the Address Maps
The adb program prepares a set of maps for the text and data segments in your program and uses thesemaps to access items that you request for display. Use the $m subcommand to display the contents of theaddress maps. For more information, see (“adb Debug Program Reference Information” on page 48). Thesubcommand displays the maps for all segments in the program and uses information taken from eitherthe program and core files or directly from memory.
The $m subcommand displays information similar to the following:$m
[0] : ?map : 'adbsamp3'b1 = 0x10000200, e1 = 0x10001839, f1 = 0x10000200b2 = 0x2002c604, e2 = 0x2002c8a4, f2 = 0x600
[1] : ?map : 'shr.o' in library 'lib/libc.a'b1 = 0xd00d6200, e1 = 0xd013976f, f1 = 0xd00defbcb2 = 0x20000600, e2 = 0x2002bcb8, f2 = 0x4a36c
[-] : /map : '-'b1 = 0x0000000, e1 = 0x00000000, f1 = 0x00000000b2 = 0x0000000, e2 = 0x00000000, f2 = 0x00000000
The display defines address-mapping parameters for the text (b1, e1, and f1) and data (b2, e2, and f2)segments for the two files being used by the adb debug program. This example shows values for theadbsamp3 sample program only. The second set of map values are for the core file being used. Sincenone was in use, the example shows the file name as - (dash).
The value displayed inside the square brackets can be used as the Count parameter in the ?e and ?msubcommands.
Chapter 3. Debugging Programs 47

adb Debug Program Reference InformationThe adb debug program uses addresses, expressions, operators, subcommands, and variables toorganize and manipulate data.
adb Debug Program Addresses
The address in a file associated with a written address is determined by a mapping associated with thatfile. Each mapping is represented by two triples (B1, E1, F1) and (B2, E2, F2). The FileAddress parameterthat corresponds to a written Address parameter is calculated as follows:
B1<=Address<E1=>FileAddress=Address+F1-B1
OR
B2<=Address<E2=>FileAddress=Address+F2-B2
If the requested Address parameter is neither between B1 and E1 nor between B2 and E2, the Addressparameter is not valid. In some cases, such as programs with separated I and D space, the two segmentsfor a file may overlap. If a ? (question mark) or / (slash) subcommand is followed by an * (asterisk), onlythe second triple is used.
The initial setting of both mappings is suitable for normal a.out and core files. If either file is not of thekind expected, the B1 parameter for that file is set to a value of 0, the E1 parameter is set to themaximum file size, and the F1 parameter is set to a value of 0. In this way, the whole file can be examinedwith no address translation.
adb Debug Program Expressions
The following expressions are supported by the adb debug program:
. (period) Specifies the last address used by a subcommand. The last address is also knownas the current address.
+ (plus) Increases the value of . (period) by the current increment.^ (caret) Decreases the value of . (period) by the current increment.″ (double quotes) Specifies the last address typed by a command.Integer Specifies an octal number if this parameter begins with 0o, a hexadecimal number
if preceded by 0x or #, or a decimal number if preceded by 0t. Otherwise, thisexpression specifies a number interpreted in the current radix. Initially, the radix is16.
`Cccc’ Specifies the ASCII value of up to 4 characters. A \ (backslash) can be used toescape an ’ (apostrophe).
< Name Reads the current value of the Name parameter. The Name parameter is either avariable name or a register name. The adb command maintains a number ofvariables named by single letters or digits. If the Name parameter is a registername, the value of the register is obtained from the system header in the CoreFileparameter. Use the $r subcommand to see the valid register names.
Symbol Specifies a sequence of uppercase or lowercase letters, underscores, or digits,though the sequence cannot start with a digit. The value of the Symbol parameteris taken from the symbol table in the ObjectFile parameter. An initial _ (underscore)is prefixed to the Symbol parameter, if needed.
.Symbol Specifies the entry point of the function named by the Symbol parameter.Routine.Name Specifies the address of the Name parameter in the specified C language routine.
Both the Routine and Name parameters are Symbol parameters. If the Nameparameter is omitted, the value is the address of the most recently activated Cstack frame corresponding to the Routine parameter.
48 AIX 5L Version 5.3 General Programming Concepts: Writing and Debugging Programs

(Expression) Specifies the value of the expression.
adb Debug Program Operators
Integers, symbols, variables, and register names can be combined with the following operators:
Unary Operators*Expression Returns contents of the location addressed by the Expression parameter in the CoreFile
parameter.@Expression Returns contents of the location addressed by the Expression parameter in the
ObjectFile parameter.-Expression Performs integer negation.~Expression Performs bit-wise complement.#Expression Performs logical negation.
Binary OperatorsExpression1+Expression2 Performs integer addition.Expression1-Expression2 Performs integer subtraction.Expression1*Expression2 Performs integer multiplication.Expression1%Expression2 Performs integer division.Expression1&Expression2 Performs bit-wise conjunction.Expression1|Expression2 Performs bit-wise disjunction.Expression1#Expression2 Rounds up the Expression1 parameter to the next multiple of
the Expression2 parameter.
Binary operators are left-associative and are less binding than unary operators.
adb Debug Program Subcommands
You can display the contents of a text or data segment with the ? (question mark) or the / (slash)subcommand. The = (equal sign) subcommand displays a given address in the specified format. The ?and / subcommands can be followed by an * (asterisk).
?Format Displays the contents of the ObjectFile parameter starting at the Address parameter. The value of .(period) increases by the sum of the increment for each format letter.
/Format Displays the contents of the CoreFile parameter starting at the Address parameter. The value of .(period) increases by the sum of the increment for each format letter.
=Format Displays the value of the Address parameter. The i and s format letters are not meaningful for thiscommand.
The Format parameter consists of one or more characters that specify print style. Each format charactermay be preceded by a decimal integer that is a repeat count for the format character. While steppingthrough a format, the . (period) increments by the amount given for each format letter. If no format isgiven, the last format is used.
The available format letters are as follows:
a Prints the value of . (period) in symbolic form. Symbols are checked to ensure that they havean appropriate type.
b Prints the addressed byte in the current radix, unsigned.c Prints the addressed character.
Chapter 3. Debugging Programs 49
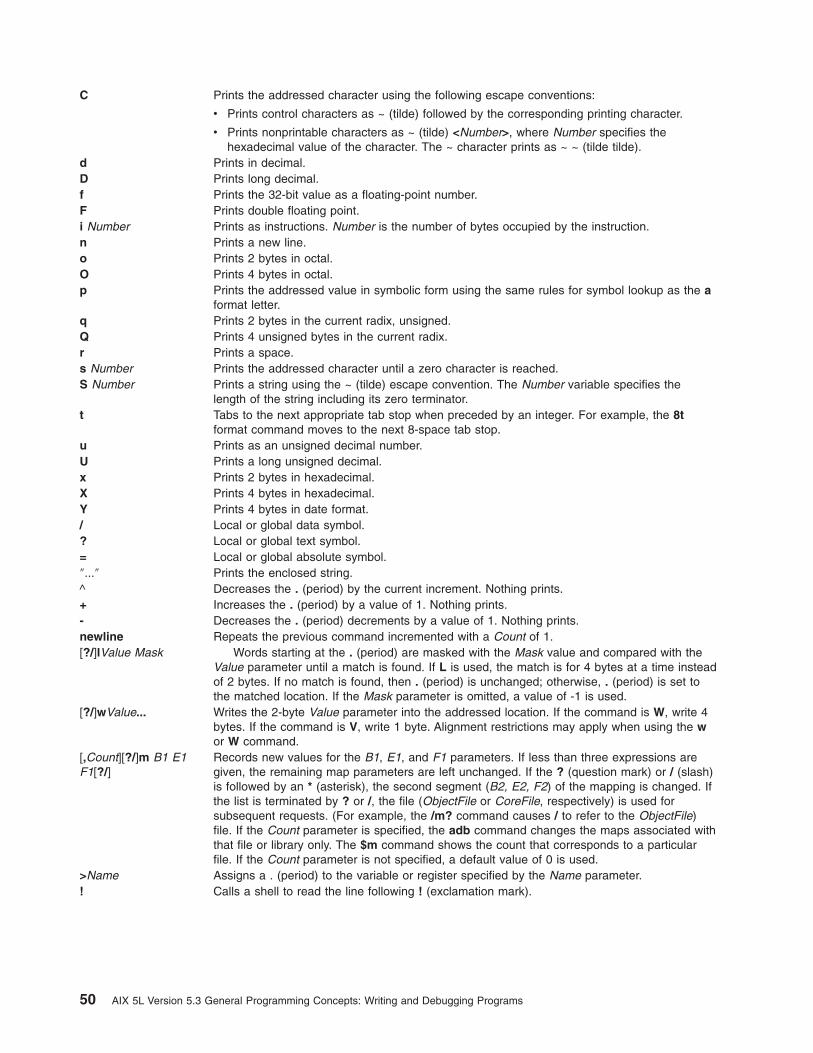
C Prints the addressed character using the following escape conventions:
v Prints control characters as ~ (tilde) followed by the corresponding printing character.
v Prints nonprintable characters as ~ (tilde) <Number>, where Number specifies thehexadecimal value of the character. The ~ character prints as ~ ~ (tilde tilde).
d Prints in decimal.D Prints long decimal.f Prints the 32-bit value as a floating-point number.F Prints double floating point.i Number Prints as instructions. Number is the number of bytes occupied by the instruction.n Prints a new line.o Prints 2 bytes in octal.O Prints 4 bytes in octal.p Prints the addressed value in symbolic form using the same rules for symbol lookup as the a
format letter.q Prints 2 bytes in the current radix, unsigned.Q Prints 4 unsigned bytes in the current radix.r Prints a space.s Number Prints the addressed character until a zero character is reached.S Number Prints a string using the ~ (tilde) escape convention. The Number variable specifies the
length of the string including its zero terminator.t Tabs to the next appropriate tab stop when preceded by an integer. For example, the 8t
format command moves to the next 8-space tab stop.u Prints as an unsigned decimal number.U Prints a long unsigned decimal.x Prints 2 bytes in hexadecimal.X Prints 4 bytes in hexadecimal.Y Prints 4 bytes in date format./ Local or global data symbol.? Local or global text symbol.= Local or global absolute symbol.″...″ Prints the enclosed string.^ Decreases the . (period) by the current increment. Nothing prints.+ Increases the . (period) by a value of 1. Nothing prints.- Decreases the . (period) decrements by a value of 1. Nothing prints.newline Repeats the previous command incremented with a Count of 1.[?/]lValue Mask Words starting at the . (period) are masked with the Mask value and compared with the
Value parameter until a match is found. If L is used, the match is for 4 bytes at a time insteadof 2 bytes. If no match is found, then . (period) is unchanged; otherwise, . (period) is set tothe matched location. If the Mask parameter is omitted, a value of -1 is used.
[?/]wValue... Writes the 2-byte Value parameter into the addressed location. If the command is W, write 4bytes. If the command is V, write 1 byte. Alignment restrictions may apply when using the wor W command.
[,Count][?/]m B1 E1F1[?/]
Records new values for the B1, E1, and F1 parameters. If less than three expressions aregiven, the remaining map parameters are left unchanged. If the ? (question mark) or / (slash)is followed by an * (asterisk), the second segment (B2, E2, F2) of the mapping is changed. Ifthe list is terminated by ? or /, the file (ObjectFile or CoreFile, respectively) is used forsubsequent requests. (For example, the /m? command causes / to refer to the ObjectFile)file. If the Count parameter is specified, the adb command changes the maps associated withthat file or library only. The $m command shows the count that corresponds to a particularfile. If the Count parameter is not specified, a default value of 0 is used.
>Name Assigns a . (period) to the variable or register specified by the Name parameter.! Calls a shell to read the line following ! (exclamation mark).
50 AIX 5L Version 5.3 General Programming Concepts: Writing and Debugging Programs

$Modifier Miscellaneous commands. The available values for Modifier are:
<File Reads commands from the specified file and returns to standard input. If a count isgiven as 0, the command will be ignored. The value of the count is placed in theadb 9 variable before the first command in the File parameter is executed.
<<File Reads commands from the specified file and returns to standard input. The <<Filecommand can be used in a file without causing the file to be closed. If a count isgiven as 0, the command is ignored. The value of the count is placed in the adb 9variable before the first command in File is executed. The adb 9 variable is savedduring the execution of the <<File command and restored when <<File completes.There is a limit to the number of <<File commands that can be open at once.
>File Sends output to the specified file. If the File parameter is omitted, output returns tostandard output. The File parameter is created if it does not exist.
b Prints all breakpoints and their associated counts and commands.
c Stacks back trace. If the Address parameter is given, it is taken as the address ofthe current frame (instead of using the frame pointer register). If the format letter Cis used, the names and values of all automatic and static variables are printed foreach active function. If the Count parameter is given, only the number of framesspecified by the Count parameter are printed.
d Sets the current radix to the Address value or a value of 16 if no address isspecified.
e Prints the names and values of external variables. If a count is specified, only theexternal variables associated with that file are printed.
f Prints the floating-point registers in hexadecimal.
i instruction setSelects the instruction set to be used for disassembly.
I Changes the default directory as specified by the -I flag to the Name parametervalue.
m Prints the address map.
n mnem_setSelects the mnemonics to be used for disassembly.
o Sets the current radix to a value of 8.
q Exits the adb command.
r Prints the general registers and the instruction addressed by iar and sets the .(period) to iar. The Number$r parameter prints the register specified by the Numbervariable. The Number,Count$r parameter prints registers Number+Count-1,...,Number.
s Sets the limit for symbol matches to the Address value. The default is a value of255.
v Prints all non-zero variables in octal.
w Sets the output page width for the Address parameter. The default is 80.
P NameUses the Name value as a prompt string.
? Prints the process ID, the signal that caused stoppage or termination, and theregisters of $r.
Chapter 3. Debugging Programs 51

:Modifier Manages a subprocess. Available modifiers are:
bCommandSets the breakpoint at the Address parameter. The breakpoint runs the Countparameter -1 times before causing a stop. Each time the breakpoint is encountered,the specified command runs. If this command sets . (period) to a value of 0, thebreakpoint causes a stop.
cSignal Continues the subprocess with the specified signal. If the Address parameter isgiven, the subprocess is continued at this address. If no signal is specified, thesignal that caused the subprocess to stop is sent. Breakpoint skipping is the sameas for the r modifier.
d Deletes the breakpoint at the Address parameter.
k Stops the current subprocess, if one is running.
r Runs the ObjectFile parameter as a subprocess. If the Address parameter is givenexplicitly, the program is entered at this point. Otherwise, the program is entered atits standard entry point. The Count parameter specifies how many breakpoints are tobe ignored before stopping. Arguments to the subprocess can be supplied on thesame line as the command. An argument starting with < or > establishes standardinput or output for the command. On entry to the subprocess, all signals are turnedon.
sSignal Continues the subprocess in single steps up to the number specified in the Countparameter. If there is no current subprocess, the ObjectFile parameter is run as asubprocess. In this case no signal can be sent. The remainder of the line is treatedas arguments to the subprocess.
adb Debug Program Variables
The adb command provides a number of variables. When the adb program is started, the followingvariables are set from the system header in the specified core file. If the CoreFile parameter does notappear to be a core file, these values are set from the ObjectFile parameter:
0 Last value printed1 Last displacement part of an instruction source2 Previous value of the 1 variable9 Count on the last $< or $<< subcommandb Base address of the data segmentd Size of the data segmente Entry address of the programm ″Magic″ numbers Size of the stack segmentt Size of the text segment
Example adb Program: adbsamp
The following sample program is used in this example:/* Program Listing for adbsamp.c */char str1[ ] = "This is a character string";int one = 1;int number = 456;long lnum = 1234;float fpt = 1.25;char str2[ ] = "This is the second character string";main(){
52 AIX 5L Version 5.3 General Programming Concepts: Writing and Debugging Programs

one = 2;printf("First String = %s\n",str1);printf("one = %d\n",one);printf("Number = %d\n",lnum);printf("Floating point Number = %g\n",fpt);printf("Second String = %s\n",str2);
}
Compile the program using the cc command to the adbsamp file as follows:cc -g adbsamp.c -o adbsamp
To start the debug session, enter:adb adbsamp
Example adb Program: adbsamp2The following sample program is used in this example:/*program listing for adbsamp2.c*/int fcnt,loop_count;
f(a,b)int a,b;{
a = a+b;fcnt++;return(a);
}main(){
loop_count = 0;while(loop_count <= 100){
loop_count = f(loop_count,1);printf("%s%d\n","Loop count is: ", loop_count);printf("%s%d\n","fcnt count is: ",fcnt);
}}
Compile the program using the cc command to the adbsamp2 file with the following command:cc -g adbsamp2.c -o adbsamp2
To start the debug session, enter:adb adbsamp2
Example adb Program: adbsamp3The following sample program adbsamp3.c contains an infinite recursion of subfunction calls. If you runthis program to completion, it causes a memory fault error and quits.int fcnt,gcnt,hcnt;h(x,y)int x,y;{
int hi;register int hr;hi = x+1;hr = x-y+1;hcnt++;hj:f(hr,hi);
}g(p,q)int p,q;
Chapter 3. Debugging Programs 53

{int gi;register int gr;gi = q-p;gr = q-p+1;gcnt++;gj:h(gr,gi);
}f(a,b)int a,b;{
int fi;register int fr;fi = a+2*b;fr = a+b;fcnt++;fj:g(fr,fi);
}main(){
f(1,1);}
Compile the program using the cc command to create the adbsamp3 file with the following command:cc -g adbsamp3.c -o adbsamp3
To start the debug session, enter:adb adbsamp3
Example of Directory and i-node Dumps in adb Debugging
This example shows how to create adb scripts to display the contents of a directory and the i-node map ofa file system. In the example, the directory is named dir and contains a variety of files. The file system isassociated with the /dev/hd3 device file (/tmp), which has the necessary permissions to be read by theuser.
To display a directory, create an appropriate script. A directory normally contains one or more entries. Eachentry consists of an unsigned i-node number (i-number) and a 14-character file name. You can display thisinformation by including a command in your script file. The adb debug program expects the object file tobe an xcoff format file. This is not the case with a directory. The adb program indicates that the directory,because it is not an xcoff format file, has a text length of 0. Use the m command to indicate to the adbprogram that this directory has a text length of greater than 0. Therefore, display entries in your adbsession by entering:,0?m 360 0
For example, the following command displays the first 20 entries separating the i-node number and filename with a tab:0,20?ut14cn
You can change the second number, 20, to specify the number of entries in the directory. If you place thefollowing command at the beginning of the script, the adb program displays the strings as headings foreach column of numbers:="inumber"8t"Name"
54 AIX 5L Version 5.3 General Programming Concepts: Writing and Debugging Programs

Once you have created the script file, redirect it as input when you start the adb program with the name ofyour directory. For example, the following command starts the adb program on the geo directory usingcommand input from the ddump script file:adb geo - <ddump
The minus sign (-) prevents the adb program from opening a core file. The adb program reads thecommands from the script file.
To display the i-node table of a file system, create a new script and then start the adb program with thefile name of the device associated with the file system. The i-node table of a file system has a complexstructure. Each entry contains:
v A word value for status flags
v A byte value for number links
v 2-byte values for the user and group IDs
v A byte and word value for the size
v 8-word values for the location on disk of the file’s blocks
v 2-word values for the creation and modification dates
The following is an example directory dump output:inumber Name
0: 26 .2 ..27 .estate28 adbsamp29 adbsamp.c30 calc.lex31 calc.yacc32 cbtest68 .profile66 .profile.bak46 adbsamp2.c52 adbsamp235 adbsamp.s34 adbsamp2.s48 forktst1.c49 forktst2.c50 forktst3.c51 lpp&us1.name33 adbsamp3.c241 sample198 adbsamp355 msgqtst.c56 newsig.c
The i-node table starts at the address 02000. You can display the first entry by putting the followingcommand in your script file:02000,-1?on3bnbrdn8un2Y2na
The command specifies several new-line characters for the output display to make it easier to read.
To use the script file with the i-node table of the /dev/hd3 file, enter the following command:adb /dev/hd3 - <script
Each entry in the display has the form:
Chapter 3. Debugging Programs 55

02000: 0731450163 0164 01410162 1035628770 8236 25956 27766 25455 8236 25956 252061976 Feb 5 08:34:56 1975 Dec 28 10:55:15
Example of Data Formatting in adb Debugging
To display the current address after each machine instruction, enter:main , 5 ? ia
This produces output such as the following when used with the example program adbsamp:.main:.main: mflr 0.main+4: st r0, 0x8(r1).main+8: stu rs, (r1).main+c: li l r4, 0x1.main+10: oril r3, r4, 0x0.main+14:
To make it clearer that the current address does not belong to the instruction that appears on the sameline, add the new-line format character (n) to the command:.main , 5 ? ian
In addition, you can put a number before a formatting character to indicate the number of times to repeatthat format.
To print a listing of instructions and include addresses after every fourth instruction, use the followingcommand:.main,3?4ian
This instruction produces the following output when used with the example program adbsamp:.main:
mflr 0st r0, 0x8(r1)stu r1, -56(r1)lil r4, 0x1
.main+10:oril r3, r4, 0x0bl .fl r0, Ox40(r1)ai r1, r1, 0x38
.main+20:mtlr r0brInvalid opcodeInvalid opcode
.main+30:
Be careful where you put the number.
The following command, though similar to the previous command, does not produce the same output:main,3?i4an
.main:
.main: mflr 0
.main+4: .main+4: .main+4: .main+4:
56 AIX 5L Version 5.3 General Programming Concepts: Writing and Debugging Programs

st r0, 0x8(r1).main+8: .main+8: .main+8: .main+8:
stu r1, (r1).main+c: .main+c: .main+c: .main+c:
You can combine format requests to provide elaborate displays. For example, entering the followingcommand displays instruction mnemonics followed by their hexadecimal equivalent:.main,-1?i^xn
In this example, the display starts at the address main. The negative count (-1) causes an indefinite call ofthe command, so that the display continues until an error condition (such as end-of-file) occurs. In theformat, i displays the mnemonic instruction at that location, the ^ (caret) moves the current address backto the beginning of the instruction, and x re-displays the instruction as a hexadecimal number. Finally, nsends a newline character to the terminal. The output is similar to the following, only longer:.main:.main: mflr 0
7c0802a6st r0, 0x8(r1)
9001008st r1, -56(r1)
9421ffc8lil r4, 0x1
38800001oril r3, r4, 0x0
60830000bl - .f
4bffff71l r0, 0x40(r1)
80010040ai r1, r1, 0x38
30210038mtlr r0
7c0803a6
The following example shows how to combine formats in the ? or / subcommand to display different typesof values when stored together in the same program. It uses the adbsamp program. For the commands tohave variables with which to work, you must first set a breakpoint to stop the program, and then run theprogram until it finds the breakpoint. Use the :b command to set a breakpoint:.main+4:b
Use the $b command to show that the breakpoint is set:$bbreakpointscount bkpt command1 .main+4
Run the program until it finds the breakpoint by entering::radbsamp: runningbreakpoint .main+4: st r0, 0x8(r1)
You can now display conditions of the program when it stopped. To display the value of each individualvariable, give its name and corresponding format in a / (slash) command. For example, the followingcommand displays the contents of str1 as a string:str1/sstr1:str1: This is a character string
The following command displays the contents of number as a decimal integer:
Chapter 3. Debugging Programs 57

number/Dnumber:number: 456
You can choose to view a variable in a variety of formats. For example, you can display the long variablelnum as a 4-byte decimal, octal, and hexadecimal number by entering the commands:lnum/Dlnum:lnum: 1234
lnum/Olnum:lnum: 2322
lnum/Xlnum:lnum: 4d2
You can also examine variables in other formats. For example, the following command displays somevariables as eight hexadecimal values on a line and continues for five lines:str1,5/8xstr1:str1: 5468 6973 2069 7320 6120 6368 6172 6163
7465 7220 7374 7269 6e67 0 0 0 0
number: 0 1c8 0 0 0 4d2 0 03fa0 0 0 0 5468 6973 2069 73207468 6520 7365 636f 6e64 2063 6861 7261
Since the data contains a combination of numeric and string values, display each value as both a numberand a character to see where the actual strings are located. You can do this with one command:str1,5/4x4^8Cnstr1:str1: 5468 6973 2069 7320 This is
6120 6368 6172 6163 a charac7465 7220 7374 7269 ter stri6e67 0 0 0 ng~@~@~@~@~@~@0 1c8 0 0 ~@~@~A~<c8>~@~@~@~@
In this case, the command displays four values in hexadecimal, then displays the same values as eightASCII characters. The ^ (caret) is used four times just before displaying the characters to set the currentaddress back to the starting address for that line.
To make the display easier to read, you can insert a tab between the values and characters and give anaddress for each line:str1,5/4x4^8t8Cnastr1:str1: 5468 6973 2069 7320 This isstr1+8: 6120 6368 6172 6163 a characstr1+10: 7465 7220 7374 7269 ter stristr1+18: 6e67 0 0 1 ng~@~@~@~@~@~A
number:number: 0 1c8 0 0 ~@~@~A~<c8>~@~@~@~@fpt:
Example of Tracing Multiple Functions in adb Debugging
Note: The example program used in this section, adbsamp3, contains an infinite recursion of subfunctioncalls. If you run this program to completion, it causes a memory fault error and quits.
58 AIX 5L Version 5.3 General Programming Concepts: Writing and Debugging Programs
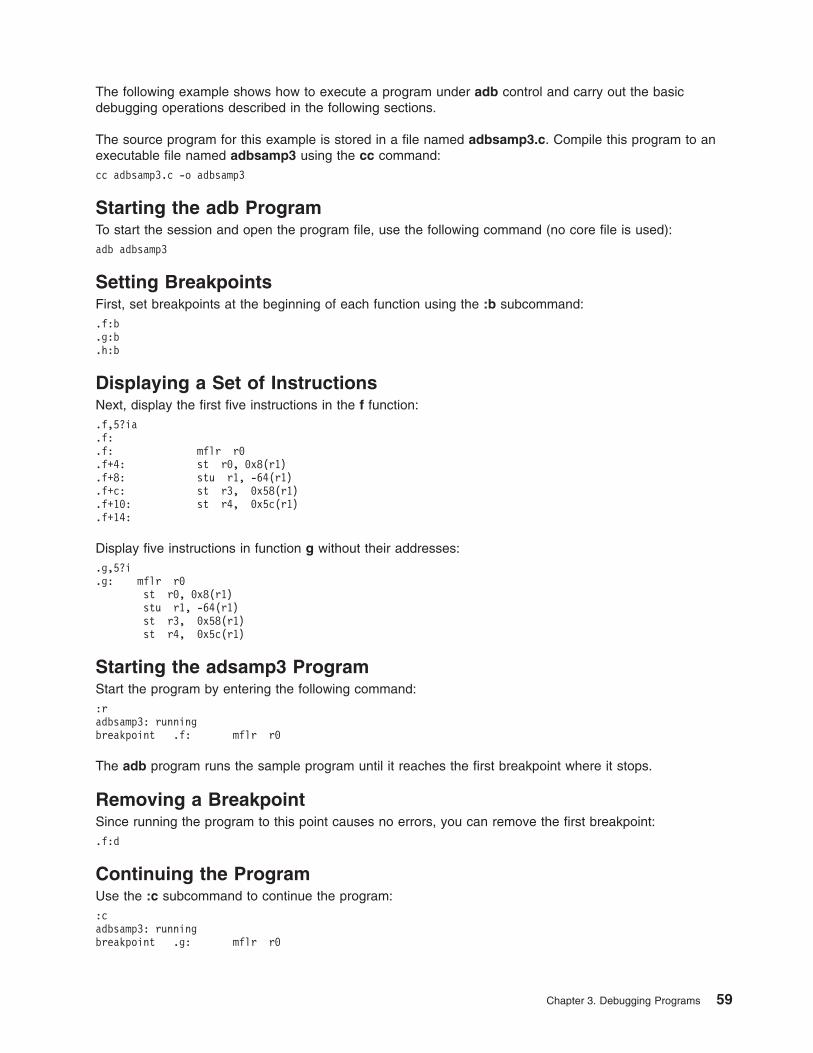
The following example shows how to execute a program under adb control and carry out the basicdebugging operations described in the following sections.
The source program for this example is stored in a file named adbsamp3.c. Compile this program to anexecutable file named adbsamp3 using the cc command:cc adbsamp3.c -o adbsamp3
Starting the adb ProgramTo start the session and open the program file, use the following command (no core file is used):adb adbsamp3
Setting BreakpointsFirst, set breakpoints at the beginning of each function using the :b subcommand:.f:b.g:b.h:b
Displaying a Set of InstructionsNext, display the first five instructions in the f function:.f,5?ia.f:.f: mflr r0.f+4: st r0, 0x8(r1).f+8: stu r1, -64(r1).f+c: st r3, 0x58(r1).f+10: st r4, 0x5c(r1).f+14:
Display five instructions in function g without their addresses:.g,5?i.g: mflr r0
st r0, 0x8(r1)stu r1, -64(r1)st r3, 0x58(r1)st r4, 0x5c(r1)
Starting the adsamp3 ProgramStart the program by entering the following command::radbsamp3: runningbreakpoint .f: mflr r0
The adb program runs the sample program until it reaches the first breakpoint where it stops.
Removing a BreakpointSince running the program to this point causes no errors, you can remove the first breakpoint:.f:d
Continuing the ProgramUse the :c subcommand to continue the program::cadbsamp3: runningbreakpoint .g: mflr r0
Chapter 3. Debugging Programs 59

The adb program restarts the adbsamp3 program at the next instruction. The program operationcontinues until the next breakpoint, where it stops.
Tracing the Path of ExecutionTrace the path of execution by entering:$c.g(0,0) .f+2a.f(1,1) .main+e.main(0,0,0) start+fa
The $c subcommand displays a report that shows the three active functions: main, f and g.
Displaying a Variable ValueDisplay the contents of the fcnt integer variable by entering the command:fcnt/Dfcnt:fcnt: 1
Skipping BreakpointsNext, continue running the program and skip the first 10 breakpoints by entering:,10:cadbsamp3: runningbreakpoint .g: mflr r0
The adb program starts the adbsamp3 program and displays the running message again. It does not stopthe program until exactly 10 breakpoints have been encountered. To ensure that these breakpoints havebeen skipped, display the backtrace again:$c.g(0,0) .f+2a.f(2,11) .h+28.h(10,f) .g+2a.g(11,20) .f+2a.f(2,f) .h+28.h(e,d) .g+2a.g(f,1c) .f+2a.f(2,d) .h+28.h(c,b) .g+2a.g(d,18) .f+2a.f(2,b) .h+28.h(a,9) .g+2a.g(b,14) .f+2a.f(2,9) .h+28.h(8,7) .g+2a.g(9,10) .f+2a.f(2,7) .h+28.h(6,5) .g+2a.g(7,c) .f+2ae.f(2,5) .h+28.h(4,3) .g+2a.g(5,8) .f+2a.f(2,3) .h+28.h(2,1) .g+2a.g(2,3) .f+2a.f(1,1) .main+e.main(0,0,0) start+fa
60 AIX 5L Version 5.3 General Programming Concepts: Writing and Debugging Programs

dbx Symbolic Debug Program Overview
The dbx symbolic debug program allows you to debug an application program at two levels: thesource-level and the assembler language-level. Source level debugging allows you to debug your C, C++,or FORTRAN language program. Assembler language level debugging allows you to debug executableprograms at the machine level. The commands used for machine level debugging are similar to thoseused for source-level debugging.
Using the dbx debug program, you can step through the application program you want to debug one lineat a time or set breakpoints in the object program that will stop the debug program. You can also searchthrough and display portions of the source files for an application program.
The following sections contain information on how to perform a variety of tasks with the dbx debugprogram:
v “Using the dbx Debug Program”
v “Displaying and Manipulating the Source File with the dbx debug Program” on page 65
v “Examining Program Data” on page 70
v “Debugging at the Machine Level with dbx” on page 76
v “Customizing the dbx Debugging Environment” on page 80
v “Developing for the dbx Plug-in Framework” on page 82
Using the dbx Debug Program
This section contains information on how to use the dbx debug program.
Starting the dbx Debug Program
The dbx program can be started with a variety of flags. The three most common ways to start a debugsession with the dbx program are:
v Running the dbx command on a specified object file
v Using the -r flag to run the dbx command on a program that ends abnormally
v Using the -a flag to run the dbx command on a process that is already in progress
When the dbx command is started, it checks for a .dbxinit (“Using the .dbxinit File” on page 81) file in theuser’s current directory and in the user’s $HOME directory. If a .dbxinit file exists, its subcommands run atthe beginning of the debug session. If a .dbxinit file exists in both the home and current directories, thenboth are read in that order. Because the current directory .dbxinit file is read last, its subcommands cansupercede those in the home directory.
If no object file is specified, then the dbx program asks for the name of the object file to be examined. Thedefault is a.out. If the core file exists in the current directory or a CoreFile parameter is specified, then thedbx program reports the location where the program faulted. Variables, registers, and memory held in thecore image may be examined until execution of the object file begins. At that point the dbx debug programprompts for commands.
Debugging a Core Image With Missing Dependent ModulesBeginning with AIX 5.3, the dbx program has the ability to examine a core image even if one or moredependent modules are inaccessible. During initialization, notification messages are displayed for eachmissing dependent module.
Chapter 3. Debugging Programs 61
In normal operation, the dbx program relies on the information contained in the dependent modules’symbol tables and text sections. Because some of that information is missing, a dbx session with missingdependent modules has the following limitations:
v All attempts by the user to read the contents of memory residing in the text sections of the missingdependent modules result in an error message. The error message is like the error that occurs whendata cannot be accessed because it does not reside in the core file.
v The user cannot obtain information concerning any symbols that would have been read from the symboltables of the missing dependent modules. The behavior of the dbx program is similar to the case wherea dependent module’s symbol table was stripped.
v Stack frames corresponding to routines within the missing dependent modules are displayed simply as:.()
In addition, the instruction address within the unknown routine and the name of the correspondingmissing dependent module are displayed.
The user always has the option of directing the dbx program to accessible dependent modules using the-p flag. For more information, see the dbx command in the AIX 5L Version 5.3 Commands Reference,Volume 2
Debugging a Core Image With Mismatched Dependent ModulesBeginning with AIX 5.3, the dbx program detects if any dependent modules referenced in the core file aredifferent than at core file creation. During initialization, notification messages are displayed for eachmismatched dependent module.
The user should be aware that any information displayed by the dbx program that is based on thecontents of a mismatched dependent module might be unreliable. In an effort to alert the user toinformation that should not be trusted, the dbx program sends notification messages wheneverquestionable information is displayed.
To disable this function and force the dbx program to treat mismatched dependent modules as missingdependent modules, the user can export the DBX_MISMATCH_MODULE environment variable with avalue of DISCARD. With this variable exported, the dbx program still notifies the user of the mismatch, butproceeds as if mismatched dependent modules were inaccessible.
The user always has the option of directing the dbx program to matching dependent modules using the -pflag. For more information, see the dbx command in the AIX 5L Version 5.3 Commands Reference,Volume 2
Running Shell Commands from dbx
You can run shell commands without exiting from the debug program using the sh subcommand.
If sh is entered without any commands specified, the shell is entered for use until it is exited, at which timecontrol returns to the dbx program.
Command Line Editing in dbx
The dbx command provides command line editing features similar to those provided by Korn Shell. vimode provides vi-like editing features, while emacs mode gives you controls similar to emacs.
You can turn these features on by using dbx subcommand set -o or set edit. So, to turn on vi-stylecommand line editing, you would type the subcommand set edit vi or set -o vi.
You can also use the EDITOR environment variable to set the editing mode.
62 AIX 5L Version 5.3 General Programming Concepts: Writing and Debugging Programs
The dbx command saves commands entered to history file .dbxhistory. If the DBXHISTFILE environmentvariable is not set, then the history file used is $HOME/.dbxhistory.
By default, the dbx command saves the text of the last 128 commands entered. The DBXHISTSIZEenvironment variable can be used to increase this limit.
Using Program Control
The dbx debug program allows you to set breakpoints (stopping places) in the program. After entering thedbx program you can specify which lines or addresses are to be breakpoints and then run the programyou want to debug with the dbx program. The program halts and reports when it reaches a breakpoint.You can then use dbx commands to examine the state of your program.
An alternative to setting breakpoints is to run your program one line or instruction at a time, a procedureknown as single-stepping.
Setting and Deleting Breakpoints
Use the stop subcommand to set breakpoints in the dbx program. The stop subcommand halts theapplication program when certain conditions are fulfilled:
v The Variable is changed when the Variable parameter is specified.
v The Condition is true when the if Condition flag is used.
v The Procedure is called when the in Procedure flag is used.
v The SourceLine line number is reached when the at SourceLine flag is used.
Note: The SourceLine variable can be specified as an integer or as a file name string followed bya : (colon) and an integer.
After any of these commands, the dbx program responds with a message reporting the event IDassociated with your breakpoint along with an interpretation of your command. You can associate dbxsubcommands to the specified event ID by using the addcmd subcommand. These associated dbxsubcommands are issued when the breakpoint, tracepoint, or watchpoint corresponding to this event is hit.Use the delcmd subcommand to delete the associated dbx subcommands from the specified event ID.
Running a Program
The run subcommand starts your program. It tells the dbx program to begin running the object file,reading any arguments just as if they were typed on the shell command line. The rerun subcommand hasthe same form as run; the difference is that if no arguments are passed, the argument list from theprevious execution is used. After your program begins, it continues until one of the following eventsoccurs:
v The program reaches a breakpoint.
v A signal occurs that is not ignored, such as INTERRUPT or QUIT.
v A multiprocess event occurs while multiprocess debugging is enabled.
v The program performs a load, unload, or loadbind subroutine.
Note: The dbx program ignores this condition if the $ignoreload debug variable is set. This is thedefault. For more information see the set subcommand.
v The program completes.
In each case, the dbx debug program receives control and displays a message explaining why theprogram stopped.
Chapter 3. Debugging Programs 63

There are several ways to continue the program once it stops:
cont Continues the program from where it stopped.detach Continues the program from where it stopped, exiting the debug program. This is useful after you have
patched the program and want to continue without the debug program.return Continues execution until a return to Procedure is encountered, or until the current procedure returns if
Procedure is not specified.skip Continues execution until the end of the program or until Number + 1 breakpoints execute.step Runs one or a specified Number of source lines.next Runs up to the next source line, or runs a specified Number of source lines.
A common method of debugging is to step through your program one line at a time. The step and nextsubcommands serve that purpose. The distinction between these two commands is apparent only whenthe next source line to be run involves a call to a subprogram. In this case, the step subcommand stops inthe subprogram; the next subcommand runs until the subprogram has finished and then stops at the nextinstruction after the call.
The $stepignore debug variable can be used to modify the behavior of the step subcommand. See thedbx command in AIX 5L Version 5.3 Commands Reference, Volume 2 for more information.
There is no event number associated with these stops because there is no permanent event associatedwith stopping a program.
If your program has multiple threads, they all run normally during the cont, next, nexti, and stepsubcommands. These commands act on the running thread (the thread which stopped execution by hittinga breakpoint), so even if another thread runs the code which is being stepped, the cont, next, nexti, orstep operation continues until the running thread has also executed that code.
If you want these subcommands to execute the running thread only, you can set the dbx debug programvariable $hold_next; this causes the dbx debug program to hold all other user threads during cont, next,nexti, and step subcommands.
Note: If you use this feature, remember that a held thread will not be able to release any locks whichit has acquired; another thread which requires one of these locks could deadlock your program.
Separating dbx Output from Program Output
Use the screen subcommand for debugging programs that are screen-oriented, such as text editors orgraphics programs. This subcommand opens an Xwindow for dbx command interaction. The programcontinues to operate in the window in which it originated. If screen is not used, dbx program output isintermixed with the screen-oriented program output.
Tracing Execution
The trace subcommand tells the dbx program to print information about the state of the program beingdebugged while that program is running. The trace subcommand can slow a program considerably,depending on how much work the dbx program has to do. There are five forms of program tracing:
v You can single-step the program, printing out each source line that is executed. The $stepignore debugvariable can be used to modify the behavior of the trace subcommand. See the set subcommand formore information.
v You can restrict the printing of source lines to when the specified procedure is active. You can alsospecify an optional condition to control when trace information is produced.
v You can display a message each time a procedure is called or returned.
v You can print the specified source line when the program reaches that line.
64 AIX 5L Version 5.3 General Programming Concepts: Writing and Debugging Programs

v You can print the value of an expression when the program reaches the specified source line.
Deleting trace events is the same as deleting stop events. When the trace subcommand is executed, theevent ID associated is displayed along with the internal representation of the event.
Displaying and Manipulating the Source File with the dbx debugProgram
You can use the dbx debug program to search through and display portions of the source files for aprogram.
You do not need a current source listing for the search. The dbx debug program keeps track of the currentfile, current procedure, and current line. If a core file exists, the current line and current file are set initiallyto the line and file containing the source statement where the process ended. This is only true if theprocess stopped in a location compiled for debugging.
Changing the Source Directory Path
By default, the dbx debug program searches for the source file of the program being debugged in thefollowing directories:
v Directory where the source file was located when it was compiled. This directory is searched only if thecompiler placed the source path in the object.
v Current directory.
v Directory where the program is currently located.
You can change the list of directories to be searched by using the -I option on the dbx invocation line orissuing the use subcommand within the dbx program. For example, if you moved the source file to a newlocation since compilation time, you might want to use one of these commands to specify the old location,the new location, and some temporary location.
Displaying the Current File
The list subcommand allows you to list source lines.
The $ (dollar sign) and @ (at sign) symbols represent SourceLineExpression and are useful with the list,stop, and trace subcommands. The $ symbol represents the next line to be run. The @ symbolrepresents the next line to be listed.
The move subcommand changes the next line number to be listed.
Changing the Current File or Procedure
Use the func and file subcommands to change the current file, current procedure, and current line withinthe dbx program without having to run any part of your program.
Search through the current file for text that matches regular expressions. If a match is found, the currentline is set to the line containing the matching text. The syntax of the search subcommand is:
/ RegularExpression [/] Searches forward in the current source file for the given expression.? RegularExpression [?] Searches backward in the current source file for the given expression.
If you repeat the search without arguments, the dbx command searches again for the previous regularexpression. The search wraps around the end or beginning of the file.
Chapter 3. Debugging Programs 65

You can also invoke an external text editor for your source file using the edit subcommand. You canoverride the default editor (vi) by setting the EDITOR environment variable to your desired editor beforestarting the dbx program.
The dbx program resumes control of the process when the editing session is completed.
Debugging Programs Involving Multiple Threads
Programs involving multiple user threads call the subroutine pthread_create. When a process calls thissubroutine, the operating system creates a new thread of execution within the process. When debugging amulti-threaded program, it is necessary to work with individual threads instead of with processes. The dbxprogram only works with user threads: in the dbx documentation, the word thread is usually used alone tomean user thread. The dbx program assigns a unique thread number to each thread in the process beingdebugged, and also supports the concept of a running and current thread:
Running thread The user thread that was responsible for stopping the program by hitting a breakpoint.Subcommands that single-step the program work with the running thread.
Current thread The user thread that you are examining. Subcommands that display information work inthe context of the current thread.
By default, the running thread and current thread are the same. You can select a different current threadby using the thread subcommand. When the thread subcommand displays threads, the current thread lineis preceded by a >. If the running thread is not the same as the current thread, its line is preceded by a *.
Identifying Thread-Related Objects
Threads use mutexes and condition variables to synchronize access to resources. Threads, mutexes, andcondition variables are created with attribute objects that define how they behave. The dbx programautomatically creates several variables that identify these various thread-related objects. For each objectclass, dbx maintains a numbered list and creates an associated variable for each object in the list. Thesevariable names begin with a $ (dollar sign), followed by a letter indicating the object class (a, c, m, or t),followed by a number indicating the object’s position in the class list. The letters and their associatedobject classes are as follows:
v a for attributes
v c for condition variables
v m for mutexes
v t for threads.
For example, $t2 corresponds to the second thread in the dbx thread list. In this case, 2 is the object’sthread number, which is unrelated to the kernel thread identifier (tid). You can list the objects in each classusing the following dbx subcommands: attribute, condition, mutex, and thread. For example, you cansimply use the thread subcommand to list all threads.
The dbx program automatically defines and maintains the variable $running_thread, which identifies thethread that was running when a breakpoint was hit.
Breakpoints and ThreadsIf your program has multiple user threads, simply setting a breakpoint on a source line will not guaranteethat a particular thread will hit the breakpoint, because several threads can execute the same code. If anythread hits the breakpoint, all the threads of the process will stop.
If you want to specify which thread is to hit the breakpoint, you can use the stop or stopi subcommandsto set a conditional breakpoint. The following aliases set the necessary conditions automatically:
66 AIX 5L Version 5.3 General Programming Concepts: Writing and Debugging Programs

v bfth (Function, ThreadNumber)
v blth (LineNumber, ThreadNumber)
These aliases stop the thread at the specified function or source line number, respectively. ThreadNumberis the number part of the symbolic thread name as reported by the thread subcommand (for example, 2 isthe ThreadNumber for the thread name $t2).
For example, the following subcommand stops thread $t1 at function func1:(dbx) bfth (func1, 1)
and the following subcommand stops thread $t2 at source line 103:(dbx) blth (103, 2)
If no particular thread was specified with the breakpoint, any thread that runs the code where thebreakpoint is set could become the running thread.
Debugging system-scope threadsdbx provides additional support for debugging system scope threads.
Each user thread should have exactly one kernel thread mapped to it. For more details on contentionscope of a thread, refer to Chapter 11, “Multi-Threaded Programming,” on page 203.
Creating thread-level events: To set source/instruction level breakpoints for a thread, use thetstop/tstopi subcommands. These subcommands are similar to stop/stopi subcommands, which setbreakpoints for the process. When a thread-level and a process-level breakpoint are hit at the same time,both the breakpoints are processed and the thread-level breakpoint is reported.
To set a source or instruction level trace for a thread, use the ttrace/ttracei subcommands. Thesesubcommands are similar to trace/tracei subcommands, which enable tracing for the process.
To set a thread-level watchpoint stop, use the tstophwp subcommand. To set a thread-level watchpointtrace, use the ttracehwp subcommand. These are similar to the stophwp/tracehwp subcommands, whichenable watchpoints for the process. When a process-level watchpoint exists, a thread having nothread-level watchpoint watches the process watchpoint location. A thread having a thread-level watchpointwatches the thread watchpoint location.
When the thread terminates, the events associated with it are deleted.
Displaying and manipulating thread-level events: To view the thread-level events, use the statussubcommand. To delete thread-level events, use the delete subcommand. Like process-level events, youcan enable and disable thread-level events using the enable/disable subcommands.
Running a thread: To continue the running thread to the next source line or instruction, use thetnext/tnexti subcommand. You can use the number parameter to specify the number of times thesesubcommands are to repeat. These subcommands are similar to the next/nexti subcommands, whichcontinue the process up to the next source line or instruction.
To make the running thread issue a source line or machine instruction from the current stopping point, usethe tstep/tstepi subcommand. You can use the number parameter to specify the number of times thesesubcommands are to repeat. These subcommands are similar to the step/stepi subcommands, whichmake the process issue a source line or machine instruction.
To skip the thread-level breakpoints for the running thread, use the tskip subcommand. You can use thecount parameter to specify the number of thread-level breakpoints to be skipped. The execution can ceasewhen any thread hits a breakpoint or watchpoint. Though the execution started by tskip command cancease because of an event for another thread, the tskip count specified for the previous thread is still
Chapter 3. Debugging Programs 67

active and the number of thread-level breakpoints specified by the tskip count are ignored for that threadwhen the process continues. To view the remaining skip-count for the threads, use the statussubcommand. To delete the remaining skip-count for the threads, use the delete subcommand. When thethread terminates, the tskip count associated with it is deleted.
Thread-Related SubcommandsThe dbx debug program has the following subcommands that enable you to work with individual attributeobjects, condition variables, mutexes, and threads:
attribute Displays information about all attribute objects, or attribute objects specified by attribute number.condition Displays information about all condition variables, condition variables that have waiting threads,
condition variables that have no waiting threads, or condition variables specified by conditionnumber.
mutex Displays information about all mutexes, locked or unlocked mutexes, or mutexes specified bymutex number.
thread Displays information about threads, selects the current thread, and holds and releases threads.tstophwp Sets a thread-level hardware watchpoint stop.ttracehwp Sets a thread-level hardware watchpoint trace.tstop Sets a source-level breakpoint stop for a thread.tstopi Sets an instruction-level breakpoint stop for a thread.ttrace Sets a source-level trace for a thread.ttracei Sets an instruction-level trace for a thread.tnext Runs a thread up to the next source line.tnexti Runs a thread up to the next machine instruction.tstep Runs a thread one source line.tstepi Runs a thread one machine instruction.tskip Skips breakpoints for a thread.
A number of subcommands that do not deal with threads directly are also affected when used to debug amulti-threaded program:
print If passed a symbolic object name reported by the thread, mutex, condition, orattribute subcommands, displays status information about the object. For example,to display the third mutex and the first thread:
(dbx) print $m3, $t1stop, stopi If a single thread hits a breakpoint, all other threads are stopped as well, and the
process timer is halted. This means that the breakpoint does not affect the globalbehavior of the process. These normal breakpoints are global, meaning that theycan stop any thread.
If you want to specify which thread will hit the breakpoint, you must use a conditionas shown in the following example, which ensures that only thread $t5 can hit thebreakpoint set on function f1:
(dbx) stopi at &f1 if ($running_thread == 5)
This syntax also works with the stop subcommand. Another way to specify theseconditions is to use the bfth and blth aliases, as explained in the section″Breakpoints and Threads″ (“Breakpoints and Threads” on page 66).
step, next, nexti All threads resume execution during the step, next, and nexti subcommands. Ifyou want to step the running thread only, set the $hold_next dbx debug programvariable; this holds all threads except the running thread during thesesubcommands.
stepi The stepi subcommand issues the specified number of machine instructions in therunning thread only. Other threads in the process being debugged will not runduring the stepi subcommand.
68 AIX 5L Version 5.3 General Programming Concepts: Writing and Debugging Programs

trace, tracei A specific user thread can be traced by specifying a condition with the trace andtracei subcommands as shown in the following example, which traces changesmade to var1 by thread $t1:
(dbx) trace var1 if ($running_thread == 1)
If a multi-threaded program does not protect its variables with mutexes, the dbx debug program behaviormight be affected by the resulting race conditions. For example, suppose that your program contains thefollowing lines:
59 var = 5;
60 printf(″var=%d\n″, var);
If you want to verify that the variable is being initialized correctly, you could type:
stop at 60 if var==5
The dbx debug program puts a breakpoint at line 60, but if access to the variable is not controlled by amutex, another thread could update the variable before the breakpoint is hit. This means that the dbxdebug program would not see the value of five and would continue execution.
Debugging Programs Involving Multiple Processes
Programs involving multiple processes call the fork and exec subroutines. When a program forks, theoperating system creates another process that has the same image as the original. The original process iscalled the parent process, the created process is called the child process.
When a process performs an exec subroutine, a new program takes over the original process. Undernormal circumstances, the debug program debugs only the parent process. However, the dbx programcan follow the execution and debug the new processes when you issue the multproc subcommand. Themultproc subcommand enables multiprocess debugging.
When multiprocess debugging is enabled and a fork occurs, the parent and child processes are halted. Aseparate virtual terminal Xwindow is opened for a new version of the dbx program to control running ofthe child process:(dbx) multproc on(dbx) multprocmulti-process debugging is enabled(dbx) run
When the fork occurs, execution is stopped in the parent, and the dbx program displays the state of theprogram:application forked, child pid = 422, process stopped, awaiting inputstopped due to fork with multiprocessing enabled in fork at 0x1000025a (fork+0xe)(dbx)
Another virtual terminal Xwindow is then opened to debug the child process:debugging child, pid=422, process stopped, awaiting inputstopped due to fork with multiprocessing enabled in fork at 0x1000025010000250 (fork+0x4) )80010010 1 r0,0x10(r1)(dbx)
At this point, two distinct debugging sessions are running. The debugging session for the child processretains all the breakpoints from the parent process, but only the parent process can be rerun.
Chapter 3. Debugging Programs 69
When a program performs an exec subroutine in multiprocess debugging mode, the program overwritesitself, and the original symbol information becomes obsolete. All breakpoints are deleted when the execsubroutine runs; the new program is stopped and identified for the debugging to be meaningful. The dbxprogram attaches itself to the new program image, makes a subroutine to determine the name of the newprogram, reports the name, and then prompts for input. The prompt is similar to the following:(dbx) multprocMulti-process debugging is enabled(dbx) runAttaching to program from exec . . .Determining program name . . .Successfully attached to /home/user/execprog . . .Reading symbolic information . . .(dbx)
If a multi-threaded program forks, the new child process will have only one thread. The process should callthe exec subroutine. Otherwise, the original symbol information is retained, and thread-relatedsubcommands (such as thread) display the objects of the parent process, which are obsolete. If an execsubroutine is called, the original symbol information is reinitialized, and the thread-related subcommandsdisplay the objects in the new child process.
It is possible to follow the child process of a fork without a new Xwindow being opened by using the childflag of the multproc subcommand. When a forked process is created, dbx follows the child process. Theparent flag of the multproc subcommand causes dbx to stop when a program forks, but then follows theparent. Both the child and parent flags follow an execed process. These flags are very useful fordebugging programs when Xwindows is not running.
Examining Program Data
This section explains how to examine, test, and modify program data.
Handling SignalsThe dbx debug program can either trap or ignore signals before they are sent to your program. Each timeyour program is to receive a signal, the dbx program is notified. If the signal is to be ignored, it is passedto your program; otherwise, the dbx program stops the program and notifies you that a signal has beentrapped. The dbx program cannot ignore the SIGTRAP signal if it comes from a process outside of thedebug process. In a multi-threaded program, a signal can be sent to a particular thread via thepthread_kill subroutine. By default, the dbx program stops and notifies you that a signal has beentrapped. If you request a signal be passed on to your program using the ignore subcommand, the dbxprogram ignores the signal and passes it on to the thread. Use the catch and ignore subcommands tochange the default handling.
In the following example, a program uses SIGGRANT and SIGREQUEST to handle allocation ofresources. In order for the dbx program to continue each time one of these signals is received, enter:(dbx) ignore GRANT(dbx) ignore SIGREQUEST(dbx) ignoreCONT CLD ALARM KILL GRANT REQUEST
The dbx debug program can block signals to your program if you set the $sigblock variable. By default,signals received through the dbx program are sent to the source program or the object file specified bythe dbx ObjectFile parameter. If the $sigblock variable is set using the set subcommand, signals receivedby the dbx program are not passed to the source program. If you want a signal to be sent to the program,use the cont subcommand and supply the signal as an operand.
70 AIX 5L Version 5.3 General Programming Concepts: Writing and Debugging Programs

You can use this feature to interrupt execution of a program running under the dbx debug program.Program status can be examined before continuing execution as usual. If the $sigblock variable is notset, interrupting execution causes a SIGINT signal to be sent to the program. This causes execution, whencontinued, to branch to a signal handler if one exists.
The following example program illustrates how execution using the dbx debug program changes when the$sigblock variable is set:#include <signal.h>#include <stdio.h>void inthand( ) {
printf("\nSIGINT received\n");exit(0);
}
main( ){
signal(SIGINT, inthand);while (1) {
printf(".");fflush(stdout);
sleep(1);}
}
The following sample session with the dbx program uses the preceding program as the source file. In thefirst run of the program, the $sigblock variable is not set. During rerun, the $sigblock variable is set.Comments are placed between angle brackets to the right:dbx version 3.1.Type 'help' for help.reading symbolic information ...(dbx) run.........^C <User pressed Ctrl-C here!>interrupt in sleep at 0xd00180bc0xd00180bc (sleep+0x40) 80410014 1 r2,0x14(r1)(dbx) cont
SIGINT received
execution completed(dbx) set $sigblock(dbx) rerun[ looper ]..............^C <User pressed Ctrl-C here!>interrupt in sleep at 0xd00180bc0xd00180bc (sleep+0x40) 80410014 1 r2,0x14(r1)(dbx) cont....^C <Program did not receive signal, execution continued>
interrupt in sleep at 0xd00180bc0xd00180bc (sleep+0x40) 80410014 1 r2,0x14(r1)(dbx) cont 2 <End program with a signal 2>
SIGINT received
execution completed(dbx)
Calling Procedures
You can call your program procedures from the dbx program to test different arguments. You can also calldiagnostic routines that format data to aid in debugging. Use the call subcommand or the printsubcommand to call a procedure.
Chapter 3. Debugging Programs 71

Displaying a Stack Trace
To list the procedure calls preceding a program halt, use the where command.
In the following example, the executable object file, hello, consists of two source files and threeprocedures, including the standard procedure main. The program stopped at a breakpoint in proceduresub2.(dbx) run[1] stopped in sub2 at line 4 in file "hellosub.c"(dbx) wheresub2(s = "hello", n = 52), line 4 in "hellosub.c"sub(s = "hello", a = -1, k = delete), line 31 in "hello.c"main(), line 19 in "hello.c"
The stack trace shows the calls in reverse order. Starting at the bottom, the following events occurred:
1. Shell called main.
2. main called sub procedure at line 19 with values s = ″hello″, a = -1, and k = delete.
3. sub called sub2 procedure at line 31 with values s = ″hello″ and n = 52.
4. The program stopped in sub2 procedure at line 4.
A portion of the stack trace from frame number 0 to frame number 1 can be displayed using where 0 1.(dbx)run[1] stopped in sub2 at line 4 in file "hellosub.c"(dbx) where 0 1sub2(s = "hello", n = 52), line 4 in "hellosub.c"sub(s = "hello", a = -1, k = delete), line 31 in "hello.c"
Note: Set the debug program variable $noargs to turn off the display of arguments passed toprocedures. Set the debug program variable $stack_details to display the frame number and theregister set for each active function or procedure.
You can also display portions of the stack with the up, down, and frame subcommands.
Displaying and Modifying Variables
To display an expression, use the print subcommand. To print the names and values of variables, use thedump subcommand. If the given procedure is a period, then all active variables are printed. If thePATTERN parameter is specified, then instead of displaying only the specified symbol, all the symbols thatmatch the PATTERN are printed. To modify the value of a variable, use the assign subcommand.
In the following example, a C program has an automatic integer variable x with value 7, and s and nparameters in the sub2 procedure:(dbx) print x, n7 52(dbx) assign x = 3*x(dbx) print x21(dbx) dumpsub2(s = "hello", n = 52)x = 21
Displaying Thread-Related InformationTo display information on user threads, mutexes, conditions, and attribute objects, use the thread, mutex,condition, and attribute subcommands. You can also use the print subcommand on these objects. In thefollowing example, the running thread is thread 1. The user sets the current thread to be thread 2, lists thethreads, prints information on thread 1, and finally prints information on several thread-related objects.
72 AIX 5L Version 5.3 General Programming Concepts: Writing and Debugging Programs

(dbx) thread current 2(dbx) threadthread state-k wchan state-u k-tid mode held scope function*$t1 run running 12755 u no pro main>$t2 run running 12501 k no sys thread_1
(dbx) print $t1(thread_id = 0x1, state = run, state_u = 0x0, tid = 0x31d3, mode = 0x1, held = 0x0, priority = 0x3c,
policy = other, scount = 0x1, cursig = 0x5, attributes = 0x200050f8)
(dbx) print $a1,$c1,$m2(attr_id = 0x1, type = 0x1, state = 0x1, stacksize = 0x0, detachedstate = 0x0, process_shared = 0x0,contentionscope = 0x0, priority = 0x0, sched = 0x0, inherit = 0x0, protocol = 0x0, prio_ceiling = 0x0)(cv_id = 0x1, lock = 0x0, semaphore_queue = 0x200032a0, attributes = 0x20003628)(mutex_id = 0x2, islock = 0x0, owner = (nil), flags = 0x1, attributes = 0x200035c8)
Scoping of Names
Names resolve first using the static scope of the current function. The dynamic scope is used if the nameis not defined in the first scope. If static and dynamic searches do not yield a result, an arbitrary symbol ischosen and the message using QualifiedName is printed. You can override the name resolution procedureby qualifying an identifier with a block name (such as Module.Variable). Source files are treated asmodules named by the file name without the suffix. For example, the x variable, which is declared in thesub procedure inside the hello.c file, has the fully qualified name hello.sub.x. The program itself has aperiod for a name.
The which and whereis subcommands can be helpful in determining which symbol is found when multiplesymbols with the same name exist.
Using Operators and Modifiers in Expressions
The dbx program can display a wide range of expressions. Specify expressions with a common subset ofC syntax, with some FORTRAN extensions.
* (asterisk) or ^ (caret) Denotes indirection or pointer dereferencing.[ ] (brackets) or ( ) (parentheses) Denotes subscript array expressions.. (period) Use this field reference operator with pointers
and structures. This makes the C operator ->(arrow) unnecessary, although it is allowed.
& (ampersand) Gets the address of a variable... (two periods) Separates the upper and lower bounds when
specifying a subsection of an array. Forexample: n[1..4].
The following types of operations are valid in expressions:
Algebraic =, -, *,/(floating division), div (integral division), mod, exp (exponentiation)Bitwise -, I, bitand, xor, ~, <<, >>Logical or, and, not, II, &&Comparison <, >, <=, >=, <> or !=, = or ==Other sizeof
Logical and comparison expressions are allowed as conditions in stop and trace subcommands.
Checking of Expression Types
The dbx debug program checks expression types. You can override the expression type by using arenaming or casting operator. There are three forms of type renaming:
Chapter 3. Debugging Programs 73

v Typename (Expression)
v Expression \ Typename
v (Typename) Expression
Note: When you cast to or from a structure, union, or class, the casting is left-justified. However,when casting from a class to a base class, C++ syntax rules are followed.
For example, to rename the x variable where x is an integer with a value of 97, enter:(dbx) print char (x), x \ char, (char) x, x,'a' 'a' 'a' 97
The following examples show how you can use the (Typename) Expression form of type renaming:print (float) i
print ((struct qq *) void_pointer)->first_element
The following restrictions apply to C-style typecasting for the dbx debug program:
v The Fortran types (integer*1, integer*2, integer*4, logical*1, logical*2, logical*4, and so on) are notsupported as cast operators.
v If an active variable has the same name as one of the base types or user-defined types, the typecannot be used as a cast operator for C-style typecasting.
The whatis subcommand prints the declaration of an identifier, which you can then qualify with blocknames.
Use the $$TagName construct to print the declaration of an enumeration, structure, or union tag.
The type of the assign subcommand expression must match the variable type you assigned. If the typesdo not match, an error message is displayed. Change the expression type using a type renaming. Disabletype checking by setting a special dbx debug program $unsafeassign variable.
Folding Variables to Lowercase and Uppercase
By default, the dbx program folds symbols based on the current language. If the current language is C,C++, or undefined, the symbols are not folded. If the current language is Fortran, the symbols are foldedto lowercase. The current language is undefined if the program is in a section of code that has not beencompiled with the debug flag. You can override default handling with the case subcommand.
Using the case subcommand without arguments displays the current case mode.
The Fortran compiler converts all program symbols to lowercase; the C compiler does not. However, someFortran compilers might not always generate lowercase symbols. For example, given a procedure namedproc1 inside a module named mod2, the XLF Fortran compiler generates the __mod2_MOD_proc1symbol, which is mixed case. In such situations, you must change the case in the dbx program to mixedcase.
Changing Print Output with Special Debug Program Variables
Use the set subcommand to set the following special dbx debug program variables to get different resultsfrom the print subcommand:
$hexints Prints integer expressions in hexadecimal.$hexchars Prints character expressions in hexadecimal.$hexstrings Prints the address of the character string, not the string itself.$octints Prints integer expressions in octal.
74 AIX 5L Version 5.3 General Programming Concepts: Writing and Debugging Programs

$expandunions Prints fields within a union.$pretty Displays complex C and C++ types in pretty format.$print_dynamic Prints the dynamic type of the C++ objects.$show_vft Prints Virtual Function Table while printing C++ objects.
Set and unset the debug program variables to get the desired results. For example:
(dbx) whatis x; whatis i; whatis sint x;char i;char *s;(dbx) print x, i, s375 'c' "hello"(dbx) set $hexstrings; set $hexints; set $hexchars(dbx) print x, i, s0x177 0x63 0x3fffe460(dbx) unset $hexchars; set $octints(dbx) print x, i0567 'c'(dbx) whatis pstruct info p;(dbx) whatis struct infostruct info {
int x;double position[3];unsigned char c;struct vector force;
};(dbx) whatis struct vectorstruct vector {
int a;int b;int c;
};(dbx) print p(x = 4, position = (1.3262493258532527e-315, 0.0, 0.0), c = '\0', force = (a = 0, b = 9, c = 1))(dbx) set $pretty="on"(dbx) print p{
x = 4position[0] = 1.3262493258532527e-315position[1] = 0.0position[2] = 0.0c = '\0'force = {
a = 0b = 9c = 1
}}(dbx) set $pretty="verbose"(dbx) print px = 4position[0] = 1.3262493258532527e-315position[1] = 0.0position[2] = 0.0c = '\0'force.a = 0force.b = 9force.c = 1
Chapter 3. Debugging Programs 75

When show_vft is not set and an object is printed using print sub command, the Virtual Function Table(VFT) is not printed. If it is set, VFT is displayed as shown below. For example:(dbx) p *d
B1:(int_in_b1 = 91)B2:(int_in_b2 = 92)
(int_in_d = 93)(dbx) p *b2(int_in_b2 = 20)(dbx)set $show_vft(dbx) p *d
B1:(B1::f1(), int_in_b1 = 91)B2:(D::f2(), int_in_b2 = 92)
(int_in_d = 93)(dbx) p *b2(B2::f2(), int_in_b2 = 20)(dbx)
When print_dynamic is not set, the object is displayed as per the static type’s (what is defined in thesource code) template. When print_dynamic is set, it will be displayed as per the dynamic type’s (whatan object was before any casts were made to it) template. For example:(dbx) r[1] stopped in main at line 57
57 A *obj1 = new A();(dbx) nstopped in main at line 58
58 A *obj2 = new B();(dbx) nstopped in main at line 59
59 cout<<" a = "<<obj2->a<<" b = "<<obj2->b<<endl;(dbx) p *obj2(a = 1, b = 2)(dbx)set $print_dynamic(dbx) print *obj2
A:(a = 1, b = 2)(c = 3, d = 4)(dbx)
Debugging at the Machine Level with dbx
You can use the dbx debug program to examine programs at the assembly language level. You candisplay and modify memory addresses, display assembler instructions, single-step instructions, setbreakpoints and trace events at memory addresses, and display the registers.
In the commands and examples that follow, an address is an expression that evaluates to a memoryaddress. The most common forms of addresses are integers and expressions that take the address of anidentifier with the & (ampersand) operator. You can also specify an address as an expression enclosed inparentheses in machine-level commands. Addresses can be composed of other addresses and theoperators + (plus), - (minus), and indirection (unary *).
The following sections contain more information on debugging at the machine level with the dbx program.
v “Using Machine Registers” on page 77
v “Examining Memory Addresses” on page 78
v “Running a Program at the Machine Level” on page 79
v “Displaying Assembly Instructions” on page 80
76 AIX 5L Version 5.3 General Programming Concepts: Writing and Debugging Programs

Using Machine Registers
Use the registers subcommand to see the values of the machine registers. Registers are divided intothree groups: general-purpose, floating-point, and system-control.
General-purpose registersGeneral-purpose registers are denoted by $rNumber, where Number represents the number of theregister.
Note: The register value may be set to a hexadecimal value of 0xdeadbeef. This is an initializationvalue assigned to all general-purpose registers at process initialization.
Floating-point registersFloating-point registers are denoted by $frNumber, where Number represents the register number.Floating-point registers are not displayed by default. You can unset the $noflregs debug program variableto enable the floating-point register display (unset $noflregs). You can also reference floating-pointregisters by type when using these registers with the print and assign subcommands. $frNumberdefaults to the double type. $frNumberh references the floating-point registers as type _Decimal32.$frNumberd references the floating-point registers as type _Decimal64. The following are examples of thedifferent types of floating-point registers:
(dbx) print $fr0
1.10000002
(dbx) print $fr0h
1.100001
(dbx) print $fr0d
1.10000062
(dbx) assign $fr0 = 9.876
(dbx) assign $fr0h = 9.876df
(dbx) assign $fr0d = 9.876dd
Vector RegistorsVector registers are denoted by $vrNumber, where Number represents the number of the register. Vectorregisters are not displayed by default, and are only present on processors supporting a Vector ProcessingUnit.
You can unset the $novregs debug program variable to enable the vector register display with unset$novregs. You can also reference vector registers by type when using them with the print and assignsubcommands. $vrNumber defaults to a vector type of int. $vrNumberf references the vector as type float.$vrNumbers references the vector as type short. $vrNumberc references the vector as type char.
Following are examples of the different types of vector registers:
(dbx) print $vr20
((1066192077, 1074161254, 1078355558, 1082340147))
(dbx) print $vr20f
Chapter 3. Debugging Programs 77

((1.10000002, 2.0999999, 3.0999999, 4.0999999))
(dbx) print $vr20s
((16268, 52429, 16390, 26214, 16454, 26214, 16515, 13107))
(dbx) assign $vr20f[3] = 9.876
(dbx) print $vr20f ((1.10000002, 2.0999999, 3.0999999, 9.8760004))
System-control registersSupported system-control registers are denoted by:
v The Instruction Address register, $iar or $pc
v The Condition Status register, $cr
v The Multiplier Quotient register, $mq
v The Machine State register, $msr
v The Link register, $link
v The Count register, $ctr
v The Fixed Point Exception register, $xer
v The Transaction ID register, $tid
v The Floating-Point Status register, $fpscr
Examining Memory Addresses
Use the following command format to print the contents of memory starting at the first address andcontinuing up to the second address, or until the number of items specified by the Count variable aredisplayed. The Mode specifies how memory is to print.
Address, Address / [Mode][> File]
Address / [Count][Mode] [> File]
If the Mode variable is omitted, the previous mode specified is reused. The initial mode is X. The followingmodes are supported:
b Prints a byte in octal.c Prints a byte as a character.D Prints a long word in decimal.d Prints a short word in decimal.Df Prints a double-precision decimal float number.DDf Prints a quad-precision decimal float number.f Prints a single-precision floating-point number.g Prints a double-precision floating-point number.Hf Prints a single-precision decimal float number.h Prints a byte in hexadecimal.i Prints the machine instruction.lld Prints an 8-byte signed decimal number.llo Prints an 8-byte unsigned octal number.llu Prints an 8-byte unsigned decimal number.llx Prints an 8-byte unsigned hexadecimal number.O Prints a long word in octal.o Prints a short word in octal.q Prints an extended-precision floating-point number.s Prints a string of characters terminated by a null byte.
78 AIX 5L Version 5.3 General Programming Concepts: Writing and Debugging Programs

X Prints a long word in hexadecimal.x Prints a short word in hexadecimal.
In the following example, expressions in parentheses can be used as an address:(dbx) print &x0x3fffe460(dbx) &x/X3fffe460: 31323300(dbx) &x,&x+12/x3fffe460: 3132 3300 7879 7a5a 5958 5756 003d 0032(dbx) ($pc)/2i100002cc (sub) 7c0802a6 mflr r0100002d0 (sub + 0x4) bfc1fff8 stm r30,-8(r1)
Running a Program at the Machine Level
The commands for debugging your program at the machine-level are similar to those at the symbolic level.The stopi subcommand stops the machine when the address is reached, the condition is true, or thevariable is changed. The tracei subcommands are similar to the symbolic trace commands. The stepisubcommand executes either one or the specified Number of machine instructions.
If you performed another stepi subcommand at this point, you would stop at address 0x10000618,identified as the entry point of procedure printf. If you do not intend to stop at this address, you coulduse the return subcommand to continue execution at the next instruction in sub at address 0x100002e0.At this point, the nexti subcommand will automatically continue execution to 0x10000428.
If your program has multiple threads, the symbolic thread name of the running thread is displayed whenthe program stops. For example:stopped in sub at 0x100002d4 ($t4)10000424 (sub+0x4) 480001f5 bl 0x10000618 (printf)
Debugging fdpr Reordered Executables
You can debug programs that have been reordered with fdpr (feedback directed program restructuring,part of Performance Toolbox for AIX) at the instruction level. If optimization options -R0 or -R2 are used,additional information is provided enabling dbx to map most reordered instruction addresses to thecorresponding addresses in the original executable as follows:0xRRRRRRRR = fdpr[0xYYYYYYYY]
In this example, 0xRRRRRRRR is the reordered address and 0xYYYYYYYY is the original address. In addition,dbx uses the traceback entries in the original instruction area to find associated procedure names for thestopped in message, the func subcommand, and the traceback.(dbx) stepistopped in proc_d at 0x1000061c = fdpr[0x10000278]0x1000061c (???) 9421ffc0 stwu r1,-64(r1)(dbx)
In the preceding example, dbx indicates the program is stopped in the proc_d subroutine at address0x1000061c in the reordered text section originally located at address 0x10000278. For more informationabout fdpr, see the fdpr command.
Chapter 3. Debugging Programs 79

Displaying Assembly InstructionsThe listi subcommand for the dbx command displays a specified set of instructions from the source file. Inthe default mode, the dbx program lists the instructions for the architecture on which it is running. You canoverride the default mode with the $instructionset and $mnemonics variables of the set subcommandfor the dbx command.
For more information on displaying instructions or disassembling instructions, see the listi subcommandfor the dbx command. For more information on overriding the default mode, see the $instructionset and$mnemonics variables of the set subcommand for the dbx command.
Customizing the dbx Debugging Environment
You can customize the debugging environment by creating subcommand aliases and by specifying optionsin the .dbxinit file. You can read dbx subcommands from a file using the -c flag. The following sectionscontain more information about customization options:
v “Defining a New dbx Prompt”
v “Creating dbx Subcommand Aliases”
v “Using the .dbxinit File” on page 81
v “Debugging Spinlocks” on page 82
Defining a New dbx Prompt
The dbx prompt is normally the name used to start the dbx program. If you specified /usr/ucb/dbx a.outon the command line, then the prompt is /usr/ucb/dbx.
You can change the prompt with the prompt subcommand, or by specifying a different prompt in theprompt line of the .dbxinit file. Changing the prompt in the .dbxinit file causes your prompt to be usedinstead of the default each time you initialize the dbx program.
For example, to initialize the dbx program with the debug prompt debug—>, enter the following line in your.dbxinit file:prompt "debug-->"
Creating dbx Subcommand Aliases
You can build your own commands from the dbx primitive subcommand set. The following commandsallow you to build a user alias from the arguments specified. All commands in the replacement string forthe alias must be dbx primitive subcommands. You can then use your aliases in place of the dbxprimitives.
The alias subcommand with no arguments displays the current aliases in effect; with one argument thecommand displays the replacement string associated with that alias.
alias [AliasName[ CommandName] ]
alias AliasName ″CommandString″
alias AliasName (Parameter1, Parameter2, . . . ) ″CommandString″
The first two forms of the alias subcommand are used to substitute the replacement string for the aliaseach time it is used. The third form of aliasing is a limited macro facility. Each parameter specified in thealias subcommand is substituted in the replacement string.
80 AIX 5L Version 5.3 General Programming Concepts: Writing and Debugging Programs

The following aliases and associated subcommand names are defaults:
attr attributebfth stop (in given thread at specified function)blth stop (in given thread at specified source line)c contcv conditiond deletee edith helpj statusl listm mapmu mutexn nextp printq quitr runs stepst stopt whereth threadx registers
You can remove an alias with the unalias command.
Using the .dbxinit File
Each time you begin a debugging session, the dbx program searches for special initialization files named.dbxinit, which contain lists of dbx subcommands to execute. These subcommands are executed beforethe dbx program begins to read subcommands from standard input. When the dbx command is started, itchecks for a .dbxinit file in the user’s current directory and in the user’s $HOME directory. If a .dbxinit fileexists, its subcommands run at the beginning of the debug session. If a .dbxinit file exists in both thehome and current directories, then both are read in that order. Because the current directory .dbxinit file isread last, its subcommands can supercede those in the home directory.
Normally, the .dbxinit file contains alias subcommands, but it can contain any valid dbx subcommands.For example:$ cat .dbxinitalias si "stop in"prompt "dbg-->"$ dbx a.outdbx version 3.1Type 'help' for help.reading symbolic information . . .dbg--> aliassi stop int where . . .dbg-->
Reading dbx Subcommands from a File
The -c invocation option and .dbxinit file provide mechanisms for executing dbx subcommands beforereading from standard input. When the -c option is specified, the dbx program does not search for a.dbxinit file. Use the source subcommand to read dbx subcommands from a file once the debuggingsession has begun.
Chapter 3. Debugging Programs 81

After executing the list of commands in the cmdfile file, the dbx program displays a prompt and waits forinput.
You can also use the -c option to specify a list of subcommands to be executed when initially starting thedbx program.
Debugging Spinlocks
You can use the dbx program to debug spinlocks. To do so, set the AIXTHREAD_SPINLOCKSenvironment variable to ON.
Developing for the dbx Plug-in Frameworkdbx provides a plug-in framework for developers who want to add new dbx subcommands and eventhandlers. Any dbx user can create a plug-in that enhances dbx with application or library specificcommands to aid in debugging.
Notes:
1. Care should be taken not to confuse dbx callback routines and plug-in interface routines.
2. dbx callback routines are the set of services offered by dbx to the plug-in. The plug-in is givenaccess to these routines through a set of function pointers.
3. plug-in interface routines are the set of methods dbx requires to be implemented by the plug-in.
v “File Format”
v “Naming”
v “Location” on page 83
v “Loading” on page 83
v “Unloading” on page 83
v “Version Control” on page 83
v “Header File” on page 84
v “Plug-in Interface” on page 84
v “dbx callback routines” on page 86
v “Example” on page 97
File FormatEach plug-in must be a shared object file.
NamingTo correctly redirect subcommand input, dbx requires each plug-in to have a unique name.
The file name of the plug-in communicates this unique name to dbx. Upon initialization, dbx searches aset of predefined and user-specified directories for files whose base name matches the regular expression:^libdbx_.+\.so$
The following table shows examples of file names that are valid and not valid for dbx plug-ins. Thecorresponding unique name is shown for all valid examples:
File Name Valid Unique Name
libdbx_sample.so Yes sample
libdbx_xyz.so Yes xyz
libdbx_my_app.so Yes my_app
82 AIX 5L Version 5.3 General Programming Concepts: Writing and Debugging Programs

File Name Valid Unique Name
libdbx.so No
libdbx_.so No
libdbx_sample.so.plugin No
plugin_libdbx_sample.so No
Location
dbx allows the user to specify a list of directories to search using the DBX_PLUGIN_PATH environmentvariable. Each directory in the list should be separated by a colon. In the following example, the colonseparates two directories.$ export dbx_PLUGIN_PATH=$HOME/dbx_plugins:/mnt/share/dbx_plugins
Upon initialization, dbx searches for plug-ins. dbx also searches the directory of the executable file (ifknown). This directory is searched after the user-defined directories are searched.
Note: When you use dbx to attach to a process, the full path to the executable file cannot be determined.
LoadingA plug-in can be loaded in one of the following ways:
v A plug-in can be automatically loaded and initialized by placing it in a directory that is searched by dbx(as described in “Location”). This occurs at dbx initialization time.
v A plug-in can be manually loaded and initialized by specifying its location to the pluginload dbxsubcommand. This can occur at any time during the dbx session.
After a successful automatic or manual plug-in load, a message similar to the following is displayed:(dbx) pluginload /home/user/dbx_plugins/libdbx_sample.soplug-in "/home/user/dbx_plugins/libdbx_sample.so" loaded
Any plug-in whose unique name is identical to that of a currently active plug-in is discarded and a warningmessage similar to the following is displayed.(dbx) pluginload /mnt/share/dbx_plugins/libdbx_sample.so
could not load plug-in"/mnt/share/dbx_plugins/libdbx_sample.so":plug-in "/home/user/dbx_plugins/libdbx_sample.so" already loaded.
UnloadingAny plug-in, regardless of how it was loaded, can be manually unloaded by specifying its name to thepluginunload dbx subcommand. After a plug-in is successfully unloaded, a message similar to thefollowing is displayed.(dbx) pluginunload sampleplug-in "/home/user/dbx_plugins/libdbx_sample.so" unloaded.
Version ControlIf changes are made to the plug-in framework that would otherwise break backward compatibility withexisting plug-ins, a new version identifier will be created. This is true of any significant changes oradditions to the Plug-in Interface or Plug-in dbx callback routine.
To minimize the need for frequent plug-in version changes, some Plug-in dbx callback routines requirean additional parameter that represents the size of the buffer. This practice is used for buffer parameters
Chapter 3. Debugging Programs 83

that are based on system structures whose size is not controlled by dbx. This allows the size of thesystem structures to change without requiring updates to the plug-in version.
Currently, the only version identifier is DBX_PLUGIN_VERSION_1.
Header Filedbx Plug-in developers can find function prototypes, data structure definitions and macro definitions in thefollowing header file:/usr/include/sys/dbx_plugin.h
Plug-in InterfaceRefer to the dbx_plugin.h header file for prototypes and definitions for the Plug-in Interface routines.
Each plug-in must implement and export all of the following routines:
v int dbx_plugin_version(void)
For more information on this routine, see “int dbx_plugin_version(void)”
v int dbx_plugin_session_init(dbx_plugin_session_t session, constdbx_plugin_service_t*servicep)
For more information on this routine, see “int dbx_plugin_session_init(dbx_plugin_session_t session,constdbx_plugin_service_t *servicep)”
v void dbx_plugin_session_command(dbx_plugin_session_t session, int argc, char *const argv[])
For more information on this routine, see “void dbx_plugin_session_command(dbx_plugin_session_tsession, int argc, char *const argv[])”
v void dbx_plugin_session_event(dbx_plugin_session_t session, int event,dbx_plugin_event_info_t *event_infop)
For more information on this routine, see “void dbx_plugin_session_event(dbx_plugin_session_tsession, int event, dbx_plugin_event_info_t *event_infop)” on page 85
int dbx_plugin_version(void)This routine should return the dbx Plug-in version identifier corresponding to the version to which theplug-in conforms. Currently, the only version identifier is DBX_PLUGIN_VERSION_1.
int dbx_plugin_session_init(dbx_plugin_session_t session,constdbx_plugin_service_t *servicep)This routine should perform any initialization needed for the plug-in to function properly before returningcontrol back to dbx. This includes setting up any aliases for plug-in subcommands, if desired.
This routine should create a plug-in session that associates the given session identifier with the applicationprogram or core file. To identify the process or core file, the session identifier is used by dbx in Plug-inInterface calls and by the plug-in for plugin dbx callback routine requests. This routine also accepts thecallback routine structure that contains pointers to the “dbx callback routines” on page 86.
This routine should return zero for successful initialization. If initialization is not successful, dbx unloadsand discards the plug-in.
void dbx_plugin_session_command(dbx_plugin_session_t session, int argc, char*const argv[])This routine should accept input from the dbx user in the form of arguments provided to the pluginsubcommand. The syntax of the plugin subcommand is as follows:plugin Name [arg0 arg1 arg2 ... argn]
This allows the dbx user to provide any input to any single plug-in. The plug-in has full control over what itaccepts as input.
84 AIX 5L Version 5.3 General Programming Concepts: Writing and Debugging Programs

The plugin subcommand passes the command specified by the arg* parameters to the plug-in specifiedby the Name parameter. (For example, the plug-in name could be libdbx_Name.so) Using this routine, dbxpasses arg0 through argn to the plug-in. argv[0] corresponds to arg0, argv[1] to arg1, and so on.
In most circumstances, arg0 would represent the name of a subcommand defined by the plug-in and arg1through argn would represent additional flags or arguments. However, this is not a requirement.
Developers are encouraged to implement a help subcommand which displays usage information for theplug-in.
void dbx_plugin_session_event(dbx_plugin_session_t session, int event,dbx_plugin_event_info_t *event_infop)In response to application program events, this routine should perform any internal processing required bythe plug-in. The routine is invoked once by dbx upon the occurrence of each event. The following tabledescribes the event types for which a plug-in is notified:
ID (event)Associated Data
(event_infop)Cause
DBX_PLUGIN_EVENT_RESTART None The dbx user executedthe run subcommand.
DBX_PLUGIN_EVENT _EXIT Exit code The application programended through the exitroutine.
DBX_PLUGIN_EVENT _TERM Terminating signalnumber
The application programterminated because of anunhandled signal.
DBX_PLUGIN_EVENT _LOAD dbx_plugin_modinfo_tstructure of loadedmodule
A module was loaded intothe application program.
DBX_PLUGIN_EVENT _UNLOAD dbx_plugin_modinfo_tstructure of unloadedmodule
A module was unloadedfrom the applicationprogram.
DBX_PLUGIN_EVENT_BP None The application programhas stopped because of auser or internal dbxbreakpoint or datawatchpoint.
DBX_PLUGIN_EVENT_SIGNAL Signal number The application programstopped because of asignal delivery.
DBX_PLUGIN_EVENT_SWTHRD Handle of current pthread The dbx user executedthe threadcurrent<handle>subcommand resulting ina change in the currentpthread.
The DBX_PLUGIN_EVENT_BP and DBX_PLUGIN_EVENT_SIGNAL events imply that the applicationprogram was started but has stopped. These events are meant to signify that any cached data that theplug-in possesses might no longer be valid. Upon notification of these events, it is more efficient forplug-ins to simply invalidate any cached data rather than refreshing the data. A complete refresh of cacheddata should only occur when the data is needed. This is especially relevant because some signals might
Chapter 3. Debugging Programs 85

be ignored by dbx and some breakpoints might be internal breakpoints. If the user has no opportunity torun subcommands before the application program starts again, repeatedly refreshing data wastesresources.void dbx_plugin_session_destroy(dbx_plugin_session_t session)
This routine should perform any final cleanup and memory management tasks required by the plug-in.
dbx callback routinesThe following are the dbx callback routines provided for each plug-in through thedbx_plugin_session_init routine.
v “session”
v “process” on page 87
v “fds” on page 87
v “modules” on page 88
v “regions” on page 88
v “threads” on page 89
v “pthreads” on page 90
v “get_thread_context” on page 91
v “set_thread_context” on page 92
v “get_pthread_context” on page 92
v “set_pthread_context” on page 93
v “read_memory” on page 94
v “write_memory” on page 94
v “locate_symbol” on page 94
v “what_function” on page 95
v “print” on page 95
v “alias” on page 96
sessionThe dbx session callback routine allows you to get characteristics of the dbx session. dbx fills in theflagsp parameter.typedef int (*dbx_plugin_session_service_t)(dbx_plugin_session_t session,
dbx_plugin_session_flags_t *flagsp).
The dbx session callback routine parameters are:
Parameter Description
session Session identifier.
flagsp Session characteristics in any combination of:
v DBX_PLUGIN_SESSION_64BIT
If set, the session represents a 64-bit application program. Otherwise, the sessionrepresents a 32-bit application program.
v DBX_PLUGIN_SESSION_CORE
If set, the session represents a core file. Otherwise, the session represents a liveprocess.
The dbx session callback routine return codes are:
v DBX_PLUGIN_SUCCESS
v DBX_PLUGIN_BAD_SESSION session is not valid
86 AIX 5L Version 5.3 General Programming Concepts: Writing and Debugging Programs

v DBX_PLUGIN_BAD_POINTER flagsp is NULL
processThe dbx process callback routine allows you to get information on the process being debugged. dbxpopulates the infop parameter.typedef int (*dbx_plugin_process_service_t)(dbx_plugin_session_t session,
dbx _plugin_procinfo_t *infop,size_t procinfo_size)
The dbx process callback routine parameters are:
Parameter Description
session Session identifier
infop Allocated dbx_plugin_procinfo_t structure
procinfo_size Size of dbx_plugin_procinfo_t structure
The dbx process callback routine return codes are:
v DBX_PLUGIN_SUCCESS
v DBX_PLUGIN_BAD_SESSION session is not valid
v DBX_PLUGIN_BAD_POINTER infop is NULL
v DBX_PLUGIN_BAD_ARG procinfo_size is not valid
v DBX_PLUGIN_UNAVAILABLE process not active or info not in core
fdsThe dbx fds callback routine allows you to get information on file descriptors for the process. You caneither:
v Call iteratively to get information separately on each file descriptor. Or,
v Call once to get the total number of file descriptors and call once again to get information on all filedescriptors simultaneously.
If the plug-in passes a non-NULL infop buffer, dbx populates the buffer with the number of entriesrequested in *countp, starting with the file descriptor referenced by *indexp.
If the plug-in passes a *countp that is greater than the number of remaining entries, dbx retrieves allremaining entries. dbx updates countp to reflect the actual number of entries retrieved and indexp toreflect the next module index. If the last file descriptor was retrieved, indexp is set to -1. If the plug-inpasses a NULL infop buffer, indexp and countp are still updated — just as if infop were non-NULL.typedef int (*dbx_plugin_fds_service_t)(dbx_plugin_session_t session,
dbx_plugin_fdinfo_t *infop,size_t fdinfo_size,unsigned int *indexp,unsigned int *countp)
The dbx fds callback routine parameters are:
Parameter Description
session Session identifier
infop Allocated array of dbx_plugin_fdinfo_t structures or NULL
fdinfo_size Size of a single dbx_plugin_fdinfo_t structure
indexp Starting/next file descriptor (where zero corresponds to the first file descriptor)
countp number of file descriptors
Chapter 3. Debugging Programs 87

The dbx fds callback routine return codes are:
v DBX_PLUGIN_SUCCESS
v DBX_PLUGIN_BAD_SESSION session is not valid
v DBX_PLUGIN_BAD_POINTER indexp is NULL or countp is NULL
v DBX_PLUGIN_BAD_ARG fdinfo_size is not valid or * countp == 0
v DBX_PLUGIN_UNAVAILABLE process not active or info not in core
modulesThe dbx modules callback routine allows you to get information on loaded modules for the process. Youcan either:
v Call iteratively to get information separately on each module. Or,
v Call once to get the total number of modules and call once again to get information on all modulessimultaneously.
If the plug-in passes a non-NULL infop buffer, dbx populates the buffer with the number of entriesrequested in *countp, starting with the module referenced by *indexp.
If the plug-in passes a *countp that is greater than the number of remaining entries, dbx retrieves allremaining entries. dbx updates countp to reflect the actual number of entries retrieved and updates indexpto reflect the next module index. If the last module was retrieved, indexp is set to -1. If the plug-in passesa NULL infop buffer, indexp and countp are still updated — just as if infop were not NULL.
Note: This routine allocates memory to hold the file name and member character strings. The caller mustfree this memory when it is no longer needed.
typedef int (*dbx_plugin_modules_service_t)(dbx_plugin_session_t session,dbx_plugin_modinfo_t *infop,size_t modinfo_size,unsigned int *indexp,unsigned int *countp)
The dbx modules callback routine parameters are:
Parameter Description
session Session identifier
infop Allocated array of dbx_plugin_modinfo_t structures or NULL
modinfo_size Size of a single dbx_plugin_modinfo_t structure
indexp Starting/next module (where zero corresponds to the first module)
countp Number of modules
The dbx modules callback routine return codes are:
v DBX_PLUGIN_SUCCESS
v DBX_PLUGIN_BAD_SESSION session is not valid
v DBX_PLUGIN_BAD_POINTER indexp is NULL or countp is NULL
v DBX_PLUGIN_BAD_ARG modinfo_size is not valid or *countp == 0
regionsThe dbx regions callback routine allows you to get information on memory regions for the process.
Retrieved regions can include:
v Main thread stack region (DBX_PLUGIN_REGION_STACK)
88 AIX 5L Version 5.3 General Programming Concepts: Writing and Debugging Programs

v User data region (DBX_PLUGIN_REGION_DATA)
v Process private data region (DBX_PLUGIN_REGION_SDATA)
v Memory mapped region (DBX_PLUGIN_REGION_MMAP)
v Shared memory region (DBX_PLUGIN_REGION_SHM)
You can either:
v Call iteratively to get information separately on one region. Or,
v Call once to get the total number of regions and call once again to get information on all regionssimultaneously.
If the plug-in passes a non-NULL infop buffer, dbx populates the buffer with the number of entriesrequested in *countp, starting with the region referenced by *indexp.
If the plug-in passes a *countp that is greater than the number of remaining entries, dbx retrieves allremaining entries. dbx updates countp to reflect the actual number of entries retrieved and indexp toreflect the next region index.
If the last region was retrieved, indexp is set to -1. If the plug-in passes a NULL infop buffer, indexp andcountp are still updated — just as if infop were non-NULL.
Note: Currently, this routine is only implemented for sessions representing core files. Sufficient informationis not available to dbx for sessions representing live processes. Calls for such sessions returnDBX_PLUGIN_UNAVAILABLE.
typedef int (*dbx_plugin_regions_service_t)(dbx_plugin_session_t session,dbx_plugin_reginfo_t *infop,size_t reginfo_size,unsigned int *indexp,unsigned int *countp)
The dbx regions callback routine parameters are:
Parameter Description
session Session identifier
infop Allocated array of dbx_plugin_region_t structures or NULL
reginfo_size Size of a single dbx_plugin_reginfo_t structure
indexp Starting/next region (where zero corresponds to the first region)
countp Number of regions
The dbx regions callback routine return codes are:
v DBX_PLUGIN_SUCCESS
v DBX_PLUGIN_BAD_SESSION session is not valid
v DBX_PLUGIN_BAD_POINTER indexp is NULL or countp is NULL
v DBX_PLUGIN_BAD_ARG reginfo_size is not valid or *countp == 0
v DBX_PLUGIN_UNAVAILABLE session represents a live processes and regions not accessible
threadsThe dbx threads callback routine allows you to get information on the kernel threads in the process.
You can either:
v Call iteratively to get information separately on one thread. Or,
Chapter 3. Debugging Programs 89

v Call once to get the total number of threads and call once again to get information on all threadssimultaneously.
If the plug-in passes a non-NULL infop buffer, dbx populates the buffer with the number of entriesrequested in *countp, starting with the thread referenced by *indexp.
If the plug-in passes a *countp that is greater than or equal to the number of remaining entries, dbxretrieves all remaining entries and updates countp to reflect the actual number of entries retrieved.
If the last entry was retrieved, and countp is less than its passed value, indexp is set to -1. Otherwise,indexp is updated to reflect the thread id for the next request.
Note: If the value of countp passed is equal to the number of available entries, countp remains the same,but indexp is not set to -1.
If the plug-in passes a NULL infop buffer, indexp and countp are updated — just as if infop werenon-NULL.typedef int (*dbx_plugin_threads_service_t)(dbx_plugin_session_t session,
dbx _plugin_thrdinfo_t *infop,size_t thrdinfo_size,tid64_t *indexp,unsigned int *countp)
The dbx threads callback routine parameters are:
Parameter Description
session Session identifier
infop Allocated array of dbx_plugin_thrdinfo_t structures or NULL
thrdinfo_size Size of a single dbx_plugin_thrdinfo_t structure
indexp Starting/next thread id (where, on input, zero corresponds to the first thread)
countp Number of threads
The dbx threads callback routine return codes are:
v DBX_PLUGIN_SUCCESS
v DBX_PLUGIN_BAD_SESSION session is not valid
v DBX_PLUGIN_BAD_POINTER indexp is NULL or countp is NULL
v DBX_PLUGIN_BAD_ID *indexp is not a valid id
v DBX_PLUGIN_BAD_ARG thrdinfo_size is not valid or *countp ==0
v DBX_PLUGIN_UNAVAILABLE process not active or entries not in core
pthreadsThe dbx pthreads callback routine allows you to get information on pthreads in the process, including anykernel thread associations.
You can either:
v Call iteratively to get information separately on one pthread. Or,
v Call once to get the total number of pthreads and call once again to get information on all pthreadssimultaneously.
If the plug-in passes a non-NULL infop buffer, dbx populates the buffer with the number of entriesrequested in *countp, starting with the pthread referenced by *indexp.
90 AIX 5L Version 5.3 General Programming Concepts: Writing and Debugging Programs

If the plug-in passes a *countp that is greater than the number of remaining entries, dbx retrieves allremaining entries. dbx updates countp to reflect the actual number of entries retrieved and indexp toreflect the pthread handle for the next request.
If the last entry was retrieved, indexp is set to -1. If the plug-in passes a NULL infop buffer, indexp andcountp are still updated — just as if infop were non-NULL.
If the first pthread is requested and countp is updated to zero, the process is not pthreaded.typedef int (*dbx_plugin_pthreads_service_t)(dbx_plugin_session_t session,
dbx_plugin_pthinfo_t *infop,size_t pthrdinfo_size,pthdb_pthread_t *indexp,unsigned int *countp)
The dbx pthreads callback routine parameters are:
Parameter Description
session Session identifier
infop Allocated array of dbx_plugin_pthinfo_t structures or NULL
pthrdinfo_size Size of a single dbx_plugin_pthrdinfo_t structure
indexp Starting/next pthread handle (where, on input, zero corresponds to the first pthread andDBX_PLUGIN_PTHREAD_CURRENT corresponds to the current pthread in dbx)
countp Number of pthreads
The dbx pthreads callback routine return codes are:
v DBX_PLUGIN_SUCCESS
v DBX_PLUGIN_BAD_SESSION session is not valid
v DBX_PLUGIN_BAD_POINTER indexp is NULL or countp is NULL
v DBX_PLUGIN_BAD_ARG pthrdinfo_size is not valid or *countp == 0
get_thread_contextThe dbx get_thread_context callback routine allows you to read a kernel thread’s general purpose,special purpose, and floating point registers. dbx populates the contextp parameter.typedef int (*dbx_plugin_reg_service_t)(dbx_plugin_session_t session,
uint64_t reg_flags,uint64_t id,dbx_plugin_context_t *contextp,size_t context_size)
The dbx get_thread_context callback routine parameters are:
Parameter Description
session Session identifier
reg_flags Logical OR of at least one of DBX_PLUGIN_REG_GPRS, DBX_PLUGIN_REG_SPRS,DBX_PLUGIN_REG_FPRS, DBX_PLUGIN_REG_EXT
id Kernel thread tid (tid64_t)
contextp Allocated dbx_plugin_context_t structure
context_size Size of dbx_plugin_context_t structure. If the DBX_PLUGIN_REG_EXT register flag isused, then the size of the dbx_plugin_extctx_t structure should be used. Thedbx_plugin_extctx_t structure is an extended version of dbx_plugin_context_t structure.
The dbx get_thread_context callback routine return codes are:
Chapter 3. Debugging Programs 91

v DBX_PLUGIN_SUCCESS.
v DBX_PLUGIN_BAD_SESSION session is not valid.
v DBX_PLUGIN_BAD_ID id is not valid.
v DBX_PLUGIN_BAD_ARG reg_flags is not valid or context_size is not valid.
v DBX_PLUGIN_BAD_POINTER contextp is NULL
v DBX_PLUGIN_UNAVAILABLE process is not active or thread is in kernel mode and registers are notaccessible.
set_thread_contextThe dbx set_thread_context callback routine allows you to write to a kernel thread’s general purpose,special purpose and floating point registers.typedef int (*dbx_plugin_reg_service_t) (dbx_plugin_session_t session,
uint64_t reg_flags,uint64_t id,dbx_plugin_context_t *contextp,size_t context_size)
The dbx set_thread_context callback routine parameters are:
Parameter Description
session Session identifier
reg_flags Logical OR of at least one of DBX_PLUGIN_REG_GPRS, DBX_PLUGIN_REG_SPRS,DBX_PLUGIN_REG_FPRS, DBX_PLUGIN_REG_EXT
id Kernel thread tid (tid64_t)
contextp Allocated dbx_plugin_context_t structure
context_size Size of dbx_plugin_context_t structure. If the DBX_PLUGIN_REG_EXT register flag isused, then the size of the dbx_plugin_extctx_t structure should be used. Thedbx_plugin_extctx_t structure is an extended version of dbx_plugin_context_t structure.
The dbx set_thread_context callback routine return codes are:
v DBX_PLUGIN_SUCCESS
v DBX_PLUGIN_BAD_SESSION session is not valid
v DBX_PLUGIN_BAD_ID id is not valid
v DBX_PLUGIN_BAD_ARG reg_flags is not valid or context_size is not valid
v DBX_PLUGIN_BAD_POINTER contextp is NULL
v DBX_PLUGIN_UNAVAILABLE process is not active or thread is in kernel mode and registers are notaccessible
get_pthread_contextThe dbx get_pthread_context callback routine allows you to read a pthread’s general purpose, specialpurpose and floating point registers. dbx populates the contextp parameter.typedef int (*dbx_plugin_reg_service_t)(dbx_plugin_session_t session,
uint64_t reg_flags,uint64_t id,dbx_plugin_context_t *contextp,size_t context_size)
The dbx get_pthread_context callback routine parameters are:
Parameter Description
session Session identifier
92 AIX 5L Version 5.3 General Programming Concepts: Writing and Debugging Programs

reg_flags logical OR of at least one of DBX_PLUGIN_REG_GPRS, DBX_PLUGIN_REG_SPRS,DBX_PLUGIN_REG_FPRS, DBX_PLUGIN_REG_EXT
id pthread handle (pthdb_pthread_t)
contextp Allocated dbx_plugin_context_t structure
context_size size of dbx_plugin_context_t structure. If the DBX_PLUGIN_REG_EXT register flag isused, then the size of the dbx_plugin_extctx_t structure should be used. Thedbx_plugin_extctx_t structure is an extended version of dbx_plugin_context_t structure.
The dbx get_pthread_context callback routine return codes are:
v DBX_PLUGIN_SUCCESS
v DBX_PLUGIN_BAD_SESSION session is not valid
v DBX_PLUGIN_BAD_ID id is not valid.
v DBX_PLUGIN_BAD_ARG reg_flags is not valid or context_size is not valid
v DBX_PLUGIN_BAD_POINTER contextp is NULL
v DBX_PLUGIN_UNAVAILABLE process is not active or thread is in kernel mode and registers are notaccessible
set_pthread_contextThe dbx set_pthread_context callback routine allows you to write to a pthread’s general purpose, specialpurpose and floating point registers.typedef int (*dbx_plugin_reg_service_t)(dbx_plugin_session_t session,
uint64_t reg_flags,uint64_t id,dbx_plugin_context_t *contextp,size_t context_size)
The dbx set_pthread_context callback routine parameters are:
Parameter Description
session Session identifier
reg_flags Logical OR of at least one of DBX_PLUGIN_REG_GPRS, DBX_PLUGIN_REG_SPRS,DBX_PLUGIN_REG_FPRS, DBX_PLUGIN_REG_EXT
id Pthread handle (pthdb_pthread_t)
contextp Allocated dbx_plugin_context_t structure
context_size Size of dbx_plugin_context_t structure. If the DBX_PLUGIN_REG_EXT register flag isused, then the size of the dbx_plugin_extctx_t structure should be used. Thedbx_plugin_extctx_t structure is an extended version of dbx_plugin_context_t structure.
The dbx set_pthread_context callback routine return codes are:
v DBX_PLUGIN_SUCCESS
v DBX_PLUGIN_BAD_SESSION session is not valid
v DBX_PLUGIN_BAD_ID id is not valid
v DBX_PLUGIN_BAD_ARG reg_flags is not valid or context_size is not valid
v DBX_PLUGIN_BAD_POINTER contextp is NULL
v DBX_PLUGIN_UNAVAILABLE process is not active or kernel thread associated with pthread is in kernelmode and registers are not accessible
Chapter 3. Debugging Programs 93

read_memoryThe dbx read_memory callback routine allows you to read from the process’s address space. dbxpopulates the buffer parameter.typedef int (*dbx_plugin_mem_service_t)(dbx_plugin_session_t session,
uint64_t addr,void *buffer,size_t len)
The dbx read_memory callback routine parameters are:
Parameter Description
session Session identifier
addr Address to read from
buffer Allocated buffer to hold memory contents
len Number of bytes to read
The dbx read_memory callback routine return codes are:
v DBX_PLUGIN_SUCCESS
v DBX_PLUGIN_BAD_SESSION session is not valid
v DBX_PLUGIN_BAD_POINTER buffer is NULL
v DBX_PLUGIN_UNAVAILABLE unable to read from addr
write_memoryThe dbx write_memory callback routine allows you to write to the process’s address space.typedef int (*dbx_plugin_mem_service_t)(dbx_plugin_session_t session,
uint64_t addr,void *buffer,size_t len)
The dbx write_memory callback routine parameters are:
Parameter Description
session Session identifier
addr Address to write to
buffer Allocated and initialized buffer
len Number of bytes to write
The dbx write_memory callback routine return codes are:
v DBX_PLUGIN_SUCCESS
v DBX_PLUGIN_BAD_SESSION session is not valid
v DBX_PLUGIN_BAD_POINTER buffer is NULL
v DBX_PLUGIN_UNAVAILABLE unable to write to addr
locate_symbolThe dbx locate_symbol callback routine allows you to convert symbol names to addresses.
The plug-in must initialize the name and mod fields of each entry in the symbols parameter array. Thename field specifies the name of the symbol to be located. The mod field specifies the module index of themodule in which the lookup should occur. A mod field initialized to -1 denotes that all modules should besearched.
94 AIX 5L Version 5.3 General Programming Concepts: Writing and Debugging Programs

dbx populates the addr field. Any unknown symbols have an address of zero. If the symbol is located andall modules searched, dbx updates the mod field with the actual module index of the symbol.typedef int (*dbx_plugin_sym_service_t)(dbx_plugin_session_t session,
dbx_plugin_sym_t *symbols,size_t syminfo_size,unsigned int count)
The dbx locate_symbol callback routine parameters are:
Parameter Description
session Session identifier
symbols Allocated array of dbx_plugin_sym_t structures with the name and mod fields initialized
syminfo_size Size of dbx_plugin_sym_t structure
count Number of symbols to locate
The dbx locate_symbol callback routine return codes are:
v DBX_PLUGIN_SUCCESS
v DBX_PLUGIN_BAD_SESSION session is not valid
v DBX_PLUGIN_BAD_ARG syminfo_size is not valid
v DBX_PLUGIN_BAD_POINTER symbols is NULL
what_functionThe dbx what_function callback routine allows you to convert text addresses to symbols.
The plug-in must initialize the addr field of each entry in the symbols parameter array. The addr fieldspecifies an instruction address within the function to be identified.
dbx populates the name field. Any unknown text address has a name of NULL. dbx populates the modfield with the actual module index of the text address.typedef int (*dbx_plugin_sym_service_t)(dbx_plugin_session_t session,
dbx_plugin_sym_t *symbols,size_t syminfo_size,unsigned int count)
The dbx what_function callback routine parameters are:
Parameter Description
session Session identifier
symbols Allocated array of dbx_plugin_sym_t structures with the addr field(s) initialized with textaddress(es)
syminfo_size Size of dbx_plugin_sym_t structure
count Number of addresses to convert
The dbx what_function callback routine return codes are:
v DBX_PLUGIN_SUCCESS
v DBX_PLUGIN_BAD_SESSION session is not valid
v DBX_PLUGIN_BAD_ARG syminfo_size is not valid
v DBX_PLUGIN_BAD_POINTER symbols is NULL
printThe dbx print callback routine allows you to display informational output or error output.
Chapter 3. Debugging Programs 95

typedef int (*dbx_plugin_print_service_t)(dbx_plugin_session_t session,int print_mode,char *message)
The dbx print callback routine parameters are:
Parameter Description
session session identifier
print_mode Either DBX_PLUGIN_PRINT_MODE_OUT or DBX_PLUGIN_PRINT_MODE_ERR
message Character string for dbx to display
The dbx print callback routine return codes are:
v DBX_PLUGIN_SUCCESS
v DBX_PLUGIN_BAD_SESSION session is not valid
v DBX_PLUGIN_BAD_ARG print_mode is not valid
v DBX_PLUGIN_BAD_POINTER message is NULL
aliasThe dbx alias callback routine allows you to create an alias for a plug-in subcommand.
The syntax of the plugin dbx subcommand requires the dbx user to type a prefix of plugin Name for eachplug-in subcommand invocation. To provide a way to shorten such invocations, dbx allows plug-ins tocreate new aliases.
The alias and expansion parameters should provide a description of the new alias. The syntax is the sameas the syntax defined for the alias dbx subcommand.
The following are example invocations of the dbx alias callback routine:alias("intprt", "plugin xyz interpret");
alias("intprt2(addr, count, format)", "addr / count format; plugin xyz interpret addr");
Note: If you try to create an alias that has the same name as an existing alias, the request is denied anda warning message is displayed. Plug-in developers are encouraged to carry out alias creation in away that allows users to correct alias conflicts. One way to accomplish this is by reading aliasdefinitions from a configuration file that is packaged with the plug-in.
typedef int (*dbx_plugin_alias_service_t)(dbx_plugin_session_t session,const char *alias,const char *expansion)
The dbx alias callback routine parameters are:
Parameter Description
session Session identifier
alias Character string representing the alias name and optional parameter
expansion Character string representing the alias expansion
The dbx alias callback routine return codes are:
v DBX_PLUGIN_SUCCESS
v DBX_PLUGIN_BAD_SESSION session is not valid
v DBX_PLUGIN_BAD_ARG alias is not valid
v DBX_PLUGIN_BAD_POINTER alias is NULL or expansion is NULL
96 AIX 5L Version 5.3 General Programming Concepts: Writing and Debugging Programs
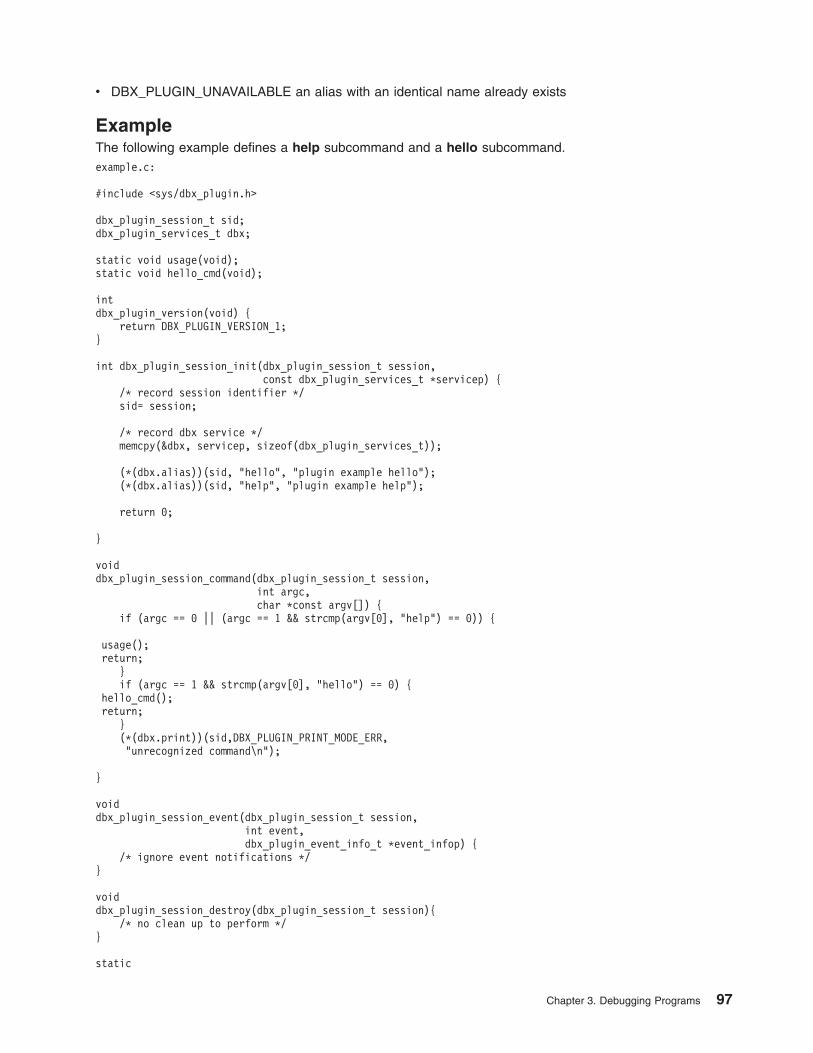
v DBX_PLUGIN_UNAVAILABLE an alias with an identical name already exists
ExampleThe following example defines a help subcommand and a hello subcommand.example.c:
#include <sys/dbx_plugin.h>
dbx_plugin_session_t sid;dbx_plugin_services_t dbx;
static void usage(void);static void hello_cmd(void);
intdbx_plugin_version(void) {
return DBX_PLUGIN_VERSION_1;}
int dbx_plugin_session_init(dbx_plugin_session_t session,const dbx_plugin_services_t *servicep) {
/* record session identifier */sid= session;
/* record dbx service */memcpy(&dbx, servicep, sizeof(dbx_plugin_services_t));
(*(dbx.alias))(sid, "hello", "plugin example hello");(*(dbx.alias))(sid, "help", "plugin example help");
return 0;
}
voiddbx_plugin_session_command(dbx_plugin_session_t session,
int argc,char *const argv[]) {
if (argc == 0 || (argc == 1 && strcmp(argv[0], "help") == 0)) {
usage();return;
}if (argc == 1 && strcmp(argv[0], "hello") == 0) {
hello_cmd();return;
}(*(dbx.print))(sid,DBX_PLUGIN_PRINT_MODE_ERR,"unrecognized command\n");
}
voiddbx_plugin_session_event(dbx_plugin_session_t session,
int event,dbx_plugin_event_info_t *event_infop) {
/* ignore event notifications */}
voiddbx_plugin_session_destroy(dbx_plugin_session_t session){
/* no clean up to perform */}
static
Chapter 3. Debugging Programs 97

voidusage(void) {
(*(dbx.print))(sid,DBX_PLUGIN_PRINT_MODE_OUT,"Subcommands for Plug-in \"example\":\n\n" \" help - displays this output\n" \" hello - displays a greeting\n" \
"\n");}
staticvoidhello_cmd(void) {
(*(dbx.print))(sid,DBX_PLUGIN_PRINT_MODE_OUT,"Hello dbx World!\n");
}
example.exp:
dbx_plugin_versiondbx_plugin_session_initdbx_plugin_session_commanddbx_plugin_session_eventdbx_plugin_session_destroy
To compile the example plug-in, you type:cc -o libdbx_example.so example.c -bM:Sre -bE:example.exp -bnoentry
List of dbx Subcommands
The commands and subcommands for the dbx debug program are located in the AIX 5L Version 5.3Commands Reference.
The dbx debug program provides subcommands for performing the following task categories:
v “Setting and Deleting Breakpoints”
v “Running Your Program” on page 99
v “Tracing Program Execution” on page 99
v “Ending Program Execution” on page 99
v “Displaying the Source File” on page 99
v “Printing and Modifying Variables, Expressions, and Types” on page 99
v “Thread Debugging” on page 100
v “Multiprocess Debugging” on page 100
v “Procedure Calling” on page 100
v “Signal Handling” on page 100
v “Machine-Level Debugging” on page 100
v “Debugging Environment Control” on page 100
Setting and Deleting Breakpoints
clear Removes all stops at a given source line.cleari Removes all breakpoints at an address.delete Removes the traces and stops corresponding to the specified numbers.status Displays the currently active trace and stop subcommands.stop Stops execution of the application program.
98 AIX 5L Version 5.3 General Programming Concepts: Writing and Debugging Programs

Running Your Program
cont Continues running the program from the current breakpoint until the program finishes or anotherbreakpoint is encountered.
detach Exits the debug program, but continues running the application.down Moves a function down the stack.goto Causes the specified source line to be the next line run.gotoi Changes program counter addresses.next Runs the application program up to the next source line.nexti Runs the application program up to the next source instruction.rerun Begins running an application.return Continues running the application program until a return to the specified procedure is reached.run Begins running an application.skip Continues execution from the current stopping point.step Runs one source line.stepi Runs one source instruction.up Move a function up the stack.
Tracing Program Execution
trace Prints tracing information.tracei Turns on tracing.where Displays a list of all active procedures and functions.
Ending Program Execution
quit Quits the dbx debug program.
Displaying the Source File
edit Invokes an editor on the specified file.file Changes the current source file to the specified file.func Changes the current function to the specified function or procedure.list Displays lines of the current source file.listi Lists instructions from the application.move Changes the next line to be displayed./ (Search) Searches forward in the current source file for a pattern.? (Search) Searches backward in the current source file for a pattern.use Sets the list of directories to be searched when looking for a file.
Printing and Modifying Variables, Expressions, and Types
assign Assigns a value to a variable.case Changes the way in which dbx interprets symbols.dump Displays the names and values of variables in the specified procedure.print Prints the value of an expression or runs a procedure and prints the return code.set Assigns a value to a nonprogram variable.unset Deletes a nonprogram variable.whatis Displays the declaration of application program components.whereis Displays the full qualifications of all the symbols whose names match the specified identifier.which Displays the full qualification of the specified identifier.
Chapter 3. Debugging Programs 99

Thread Debugging
attribute Displays information about all or selected attributes objects.condition Displays information about all or selected condition variables.mutex Displays information about all or selected mutexes.thread Displays and controls threads.tstophwp Sets a thread-level hardware watchpoint stop.ttracehwp Sets a thread-level hardware watchpoint trace.tstop Sets a source-level breakpoint stop for a thread.tstopi Sets an instruction-level breakpoint stop for a thread.ttrace Sets a source-level trace for a thread.ttracei Sets an instruction-level trace for a thread.tnext Runs a thread up to the next source line.tnexti Runs a thread up to the next machine instruction.tstep Runs a thread one source line.tstepi Runs a thread one machine instruction.tskip Skips breakpoints for a thread.
Multiprocess Debugging
multproc Enables or disables multiprocess debugging.
Procedure Calling
call Runs the object code associated with the named procedure or function.print Prints the value of an expression or runs a procedure and prints the return code.
Signal Handling
catch Starts trapping a signal before that signal is sent to the application program.ignore Stops trapping a signal before that signal is sent to the application program.
Machine-Level Debugging
display memory Displays the contents of memory.gotoi Changes program counter addresses.map Displays address maps and loader information for the application program.nexti Runs the application program up to the next machine instruction.registers Displays the values of all general-purpose registers, system-control registers,
floating-point registers, and the current instruction register.stepi Runs one source instruction.stopi Sets a stop at a specified location.tracei Turns on tracing.
Debugging Environment Control
alias Displays and assigns aliases for dbx subcommands.help Displays help information for dbx subcommands or topics.prompt Changes the dbx prompt to the specified string.screen Opens an Xwindow for dbx command output.sh Passes a command to the shell for execution.
100 AIX 5L Version 5.3 General Programming Concepts: Writing and Debugging Programs

source Reads dbx commands from a file.unalias Removes an alias.
Related InformationThe adb command.
Chapter 3. Debugging Programs 101

102 AIX 5L Version 5.3 General Programming Concepts: Writing and Debugging Programs

Chapter 4. Error-Logging Overview
The error-logging process begins when an operating system module detects an error. The error-detectingsegment of code then sends error information to either the errsave and errlast kernel service or to theerrlog subroutine. This error information is then written to the /dev/error special file. This process thenadds a time stamp to the collected data. The errdemon daemon constantly checks the /dev/error file fornew entries, and when new data is written, the daemon conducts a series of operations.
Before an entry is written to the error log, the errdemon daemon compares the label sent by the kernel orapplication code to the contents of the Error Record Template Repository. If the label matches an item inthe repository, the daemon collects additional data from other parts of the system.
To create an entry in the error log, the errdemon daemon retrieves the appropriate template from therepository, the resource name of the unit that detected the error, and detail data. Also, if the error signifiesa hardware-related problem and hardware vital product data (VPD) exists, the daemon retrieves the VPDfrom the Object Data Manager. When you access the error log, either through SMIT or with the errptcommand, the error log is formatted according to the error template in the error template repository andpresented in either a summary or detailed report. Entries can also be retrieved using the services providedin liberrlog, errlog_open, errlog_close, errlog_find_first, errlog_find_next, errlog_find_sequence,errlog_set_direction, and errlog_write. errlog_write provides a limited update capability.
Most entries in the error log are attributable to hardware and software problems, but informationalmessages can also be logged.
The diag command uses the error log to diagnose hardware problems. To correctly diagnose new systemproblems, the system deletes hardware-related entries older than 90 days from the error log. The systemdeletes software-related entries 30 days after they are logged.
You should be familiar with the following terms:
error ID A 32-bit CRC hexadecimal code used to identify a particular failure. Eacherror record template has a unique error ID.
error label The mnemonic name for an error ID.error log The file that stores instances of errors and failures encountered by the
system.error log entry A record in the system error log that describes a hardware failure, a
software failure, or an operator message. An error log entry containscaptured failure data.
error record template A description of information displayed when the error log is formatted for areport, including information on the type and class of the error, probablecauses, and recommended actions. Collectively, the templates comprise theError Record Template Repository.
Error-Logging FacilityThe error-logging facility records hardware and software failures in the error log for information purposesor for fault detection and corrective action.
Refer to the following to use the error-logging facility:
v Chapter 4, “Error-Logging Overview”
v “Managing Error Logging” on page 104
v “Error Logging Tasks” on page 110
v “Error Logging and Alerts” on page 118
© Copyright IBM Corp. 1997, 2010 103
v “Error Logging Controls” on page 118
In AIX Version 4 some of the error log commands are delivered in an optionally installable package calledbos.sysmgt.serv_aid. The base system (bos.rte) includes the following services for logging errors to theerror log file:
v errlog subroutines
v errsave and errlast kernel service
v error device driver (/dev/error)
v error daemon
v errstop command
The commands required for licensed program installation (errinstall and errupdate) are also included inbos.rte. For information on transferring your system’s error log file to a system that has the SoftwareService Aids package installed, see “Transferring Your Error Log to Another System.”
Managing Error LoggingError logging is automatically started by the rc.boot script during system initialization and is automaticallystopped by the shutdown script during system shutdown. The error log analysis performed by the diagcommand analyzes hardware error entries. The default length of time that hardware error entries remain inthe error log is 90 days. If you remove hardware error entries less than 90 days old, you can limit theeffectiveness of this error log analysis.
Transferring Your Error Log to Another SystemThe errclear, errdead, errlogger, errmsg, and errpt commands are part of the optionally installableSoftware Service Aids package (bos.sysmgt.serv_aid). You need the Software Service Aids package togenerate reports from the error log or to delete entries from the error log. You can install the SoftwareService Aids package on your system, or you can transfer your system’s error log file to a system that hasthe Software Service Aids package installed.
Determine the path to your system’s error log file by running the following command:/usr/lib/errdemon -l
You can transfer the file to another system in a number of ways. You can:
v Copy the file to a remotely mounted file system using the cp command
v Copy the file across the network connection using the rcp, ftp, or tftp commands
v Copy the file to removable media using the tar or backup command and restore the file onto anothersystem.
You can format reports for an error log copied to your system from another system by using the -i flag ofthe errpt command. The -i flag allows you to specify the path name of an error log file other than thedefault. Likewise, you can delete entries from an error log file copied to your system from another systemby using the -i flag of the errclear command.
Configuring Error LoggingYou can customize the name and location of the error log file and the size of the internal error buffer tosuit your needs. You can also control the logging of duplicate errors.
Listing the Current SettingsTo list the current settings, run /usr/lib/errdemon -l. The values for the error log file name, error log filesize, and buffer size that are currently stored in the error-log configuration database display on yourscreen.
104 AIX 5L Version 5.3 General Programming Concepts: Writing and Debugging Programs

Customizing the Log File LocationTo change the file name used for error logging, run the /usr/lib/errdemon -i FileName command. Thespecified file name is saved in the error log configuration database, and the error daemon is immediatelyrestarted.
Customizing the Log File SizeTo change the maximum size of the error log file, type:/usr/lib/errdemon -s LogSize
The specified size limit for the log file is saved in the error-log configuration database, and the errordaemon is immediately restarted. If the size limit for the log file is smaller than the size of the log filecurrently in use, the current log file is renamed by appending .old to the file name, and a new log file iscreated with the specified size limit. The amount of space specified is reserved for the error log file and isnot available for use by other files. Therefore, be careful not to make the log excessively large. But, if youmake the log too small, important information may be overwritten prematurely. When the log file size limitis reached, the file wraps, that is, the oldest entries are overwritten by new entries.
Customizing the Buffer SizeTo change the size of the error log device driver’s internal buffer, type:/usr/lib/errdemon -B BufferSize
The specified buffer size is saved in the error-log configuration database, and if it is larger than the buffersize currently in use, the in-memory buffer is immediately increased. If it is smaller than the buffer sizecurrently in use, the new size is put into effect the next time that the error daemon is started after thesystem is rebooted. The buffer cannot be made smaller than the hard-coded default of 8 KB. The size youspecify is rounded up to the next integral multiple of the memory page size (4 KBs). The memory used forthe error log device driver’s in-memory buffer is not available for use by other processes (the buffer ispinned).
Be careful not to impact your system’s performance by making the buffer excessively large. But, if youmake the buffer too small, the buffer may become full if error entries are arriving faster than they are beingread from the buffer and put into the log file. When the buffer is full, new entries are discarded until spacebecomes available in the buffer. When this situation occurs, an error log entry is created to inform you ofthe problem, and you can correct the problem by enlarging the buffer.
Customizing Duplicate Error HandlingBy default, starting with AIX 5.1, the error daemon eliminates duplicate errors by looking at each error thatis logged. An error is a duplicate if it is identical to the previous error, and if it occurs within theapproximate time interval specified with /usr/lib/errdemon -t time-interval. The default time value is10000, or 10 seconds. The value is in milliseconds.
The -m maxdups flag controls how many duplicates can accumulate before a duplicate entry is logged.The default value is 1000. If an error, followed by 1000 occurrences of the same error, is logged, aduplicate error is logged at that point rather than waiting for the time interval to expire or for a unique errorto occur.
For example, if a device handler starts logging many identical errors rapidly, most will not appear in thelog. Rather, the first occurrence will be logged. Subsequent occurrences will not be logged immediately,but are only counted. When the time interval expires, the maxdups value is reached, or when anothererror is logged, an alternate form of the error is logged, giving the times of the first and last duplicate andthe number of duplicates.
Note: The time interval refers to the time since the last error, not the time since the first occurrence of thiserror, that is, it is reset each time an error is logged. Also, to be a duplicate, an error must exactly
Chapter 4. Error-Logging Overview 105
match the previous error. If, for example, anything about the detail data is different from theprevious error, then that error is considered unique and logged as a separate error.
Removing Error Log EntriesEntries are removed from the error log when the root user runs the errclear command, when the errclearcommand is automatically invoked by a daily cron job, or when the error log file wraps as a result ofreaching its maximum size. When the error log file reaches the maximum size specified in the error-logconfiguration database, the oldest entries are overwritten by the newest entries.
Automatic RemovalA crontab file provided with the system deletes hardware errors older than 90 days and other errors olderthan 30 days. To display the crontab entries for your system, type:crontab -l Command
To change these entries, type:crontab -e Command
errclear CommandThe errclear command can be used to selectively remove entries from the error log. The selection criteriayou may specify include the error ID number, sequence number, error label, resource name, resourceclass, error class, and error type. You must also specify the age of entries to be removed. The entries thatmatch the selection criteria you specified, and are older than the number of days you specified, will beremoved.
Enabling and Disabling Logging for an EventYou can disable logging or reporting of a particular event by modifying the Log or the Report field of theerror template for the event. You can use the errupdate command to change the current settings for anevent.
Showing Events for Which Logging is DisabledTo list all events for which logging is currently disabled, type:errpt -t -F Log=0
Events for which logging is disabled are not saved in the error log file.
Showing Events for Which Reporting is DisabledTo list all events for which reporting is currently disabled, type:errpt -t -F Report=0
Events for which reporting is disabled are saved in the error log file when they occur, but they are notdisplayed by the errpt command.
Changing the Current Setting for an EventTo change the current settings for an event, you can use the errupdate command The necessary input tothe errupdate command can be in a file or from standard input.
The following example uses standard input. To disable the reporting of the ERRLOG_OFF event (error ID192AC071), type the following to run the errupdate command:errupdate <Enter>=192AC071: <Enter>Report=False <Enter><Ctrl-D><Ctrl-D>
106 AIX 5L Version 5.3 General Programming Concepts: Writing and Debugging Programs

Logging Maintenance ActivitiesThe errlogger command allows the system administrator to record messages in the error log. Wheneveryou perform a maintenance activity, such as clearing entries from the error log, replacing hardware, orapplying a software fix, it is a good idea to record this activity in the system error log.
The ras_logger command provides a way to log any error from the command line. It can be used to testnewly created error templates and provides a way to log an error from a shell script.
Redirecting syslog Messages to Error LogSome applications use syslog for logging errors and other events. To list error log messages and syslogmessages in a single report, redirect the syslog messages to the error log. You can do this by specifyingerrlog as the destination in the syslog configuration file (/etc/syslog.conf). See the syslogd daemon formore information.
Directing Error Log Messages to syslogYou can log error log events in the syslog file by using the logger command with the concurrent errornotification capabilities of error log. For example, to log system messages (syslog), add an errnotify objectwith the following contents:
errnotify:en_name = "syslog1"en_persistenceflg = 1en_method = "logger Msg from Error Log: `errpt -l $1 | grep -v 'ERROR_ID TIMESTAMP'`"
For example, create a file called /tmp/syslog.add with these contents. Then run the odmadd/tmp/syslog.add command (you must be logged in as root user).
For more information about concurrent error notification, see “Error Notification.”
Error NotificationThe Error Notification object class specifies the conditions and actions to be taken when errors arerecorded in the system error log. The user specifies these conditions and actions in an Error Notificationobject.
Each time an error is logged, the error notification daemon determines if the error log entry matches theselection criteria of any of the Error Notification objects. If matches exist, the daemon runs theprogrammed action, also called a notify method, for each matched object.
The Error Notification object class is located in the /etc/objrepos/errnotify file. Error Notification objectsare added to the object class by using Object Data Manager (ODM) commands. Only processes runningwith the root user authority can add objects to the Error Notification object class. Error Notification objectscontain the following descriptors:
en_alertflg Identifies whether the error can be alerted. This descriptor is provided for use byalert agents associated with network management applications using the SNA AlertArchitecture. The valid alert descriptor values are:
TRUE can be alerted
FALSE cannot be alerted
Chapter 4. Error-Logging Overview 107

en_class Identifies the class of the error log entries to match. The valid en_class descriptorvalues are:
H Hardware Error class
S Software Error class
O Messages from the errlogger command
U Undetermineden_crcid Specifies the error identifier associated with a particular error. An error identifier can
be any numeric value that is valid as a Predefined Attribute (PdAt) object classattribute value. The errpt command displays error identifiers as hexadecimal. Forexample, to select an entry that the errpt command displays with IDENTIFIER:67581038, specify en_crcid = 0x67581038.
en_dup If set, identifies whether duplicate errors as defined by the kernel should bematched. The valid en_dup descriptor values are:
TRUE Error is a duplicate.
FALSE Error is not a duplicate.en_err64 If set, identifies whether errors from a 64-bit or 32-bit environment should be
matched. The valid en_err64 descriptors value are:
TRUE Error is from a 64-bit environment.
FALSE Error is from a 32-bit environment.en_label Specifies the label associated with a particular error identifier as defined in the
output of the errpt -t command.en_method Specifies a user-programmable action, such as a shell script or command string, to
be run when an error matching the selection criteria of this Error Notification objectis logged. The error notification daemon uses the sh -c command to execute thenotify method.
The following key words are automatically expanded by the error notificationdaemon as arguments to the notify method.
$1 Sequence number from the error log entry
$2 Error ID from the error log entry
$3 Class from the error log entry
$4 Type from the error log entry
$5 Alert flags value from the error log entry
$6 Resource name from the error log entry
$7 Resource type from the error log entry
$8 Resource class from the error log entry
$9 Error label from the error log entryen_name Uniquely identifies the object. This unique name is used when removing the object.
108 AIX 5L Version 5.3 General Programming Concepts: Writing and Debugging Programs

en_persistenceflg Designates whether the Error Notification object should be automatically removedwhen the system is restarted. For example, to avoid erroneous signaling, ErrorNotification objects containing methods that send a signal to another processshould not persist across system restarts. The receiving process and its process IDdo not persist across system restarts.
The creator of the Error Notification object is responsible for removing the ErrorNotification object at the appropriate time. In the event that the process terminatesand fails to remove the Error Notification object, the en_persistenceflg descriptorensures that obsolete Error Notification objects are removed when the system isrestarted.
The valid en_persistenceflg descriptor values are:
0 non-persistent (removed at boot time)
1 persistent (persists through boot)en_pid Specifies a process ID (PID) for use in identifying the Error Notification object.
Objects that have a PID specified should have the en_persistenceflg descriptorset to 0.
en_rclass Identifies the class of the failing resource. For the hardware error class, theresource class is the device class. The resource error class is not applicable for thesoftware error class.
en_resource Identifies the name of the failing resource. For the hardware error class, a resourcename is the device name.
en_rtype Identifies the type of the failing resource. For the hardware error class, a resourcetype is the device type by which a resource is known in the devices object class.
en_symptom Enables notification of an error accompanied by a symptom string when set toTRUE.
en_type Identifies the severity of error log entries to match. The valid en_type descriptorvalues are:
INFO Informational
PEND Impending loss of availability
PERM Permanent
PERF Unacceptable performance degradation
TEMP Temporary
UNKN Unknown
Examples1. To create a notify method that mails a formatted error entry to root each time a disk error of type
PERM is logged, create a file called /tmp/en_sample.add containing the following Error Notificationobject:errnotify:
en_name = "sample"en_persistenceflg = 0en_class = "H"en_type = "PERM"en_rclass = "disk"en_method = "errpt -a -l $1 | mail -s 'Disk Error' root"
To add the object to the Error Notification object class, type:odmadd /tmp/en_sample.add
The odmadd command adds the Error Notification object contained in /tmp/en_sample.add to theerrnotify file.
Chapter 4. Error-Logging Overview 109

2. To verify that the Error Notification object was added to the object class, type:odmget -q"en_name='sample'" errnotify
The odmget command locates the Error Notification object within the errnotify file that has anen_name value of ″sample″ and displays the object. The following output is returned:errnotify:
en_pid = 0en_name = "sample"en_persistenceflg = 0en_label = ""en_crcid = 0en_class = "H"en_type = "PERM"en_alertflg = ""en_resource = ""en_rtype = ""en_rclass = "disk"en_method = "errpt -a -l $1 | mail -s 'Disk Error' root"
3. To delete the sample Error Notification object from the Error Notification object class, type:odmdelete -q"en_name='sample'" -o errnotify
The odmdelete command locates the Error Notification object within the errnotify file that has anen_name value of ″sample″ and removes it from the Error Notification object class.
4. To send an e-mail to root when a duplicate error occurs, create a file called /tmp/en_sample.addcontaining the following error notification stanza:errnotify:
en_name = "errdupxmp"en_persistenceflg = 1en_dup = "TRUE"en_method = "/usr/lib/dupmethod $1"
Create the /usr/lib/dupmethod script as follows:#!/bin/sh# e-mail root when a duplicate error is logged.# We currently don't clear the duplicate from the log.## Input:# $1 contains the error log sequence number.## Use errpt to generate the body of this e-mail./usr/bin/errpt -al$1 | /usr/bin/mail -s "Duplicate Error Logged" root >/dev/null
# Now delete that error (currently not done)#/usr/bin/errclear -l$1 0exit $?
Error Logging TasksError-logging tasks and information to assist you in using the error logging facility include:
v “Reading an Error Report” on page 111
v “Examples of Detailed Error Reports” on page 113
v “Example of a Summary Error Report” on page 116
v “Generating an Error Report” on page 116
v “Stopping an Error Log” on page 116
v “Cleaning an Error Log” on page 117
v “Copying an Error Log to Diskette or Tape” on page 117
v “Using the liberrlog Services” on page 117
110 AIX 5L Version 5.3 General Programming Concepts: Writing and Debugging Programs

Reading an Error ReportTo obtain a report of all errors logged in the 24 hours prior to the failure, type:errpt -a -s mmddhhmmyy | pg
where mmddhhmmyy represents the month, day, hour, minute, and year 24 hours prior to the failure.
An error-log report contains the following information:
Note: Not all errors generate information for each of the following categories.
LABEL Predefined name for the event.ID Numerical identifier for the event.Date/Time Date and time of the event.Sequence Number Unique number for the event.Machine ID Identification number of your system processor unit.Node ID Mnemonic name of your system.Class General source of the error. The possible error classes are:
H Hardware. (When you receive a hardware error, refer to your systemoperator guide for information about performing diagnostics on theproblem device or other piece of equipment. The diagnostics programtests the device and analyzes the error log entries related to it todetermine the state of the device.)
S Software.
O Informational messages.
U Undetermined (for example, a network).Type Severity of the error that has occurred. The following types of errors are
possible:
PEND The loss of availability of a device or component is imminent.
PERF The performance of the device or component has degraded to belowan acceptable level.
PERM Condition that could not be recovered from. Error types with this valueare usually the most severe errors and are more likely to mean thatyou have a defective hardware device or software module. Error typesother than PERM usually do not indicate a defect, but they are recordedso that they can be analyzed by the diagnostics programs.
TEMP Condition that was recovered from after a number of unsuccessfulattempts. This error type is also used to record informational entries,such as data transfer statistics for DASD devices.
UNKN It is not possible to determine the severity of the error.
INFO The error log entry is informational and was not the result of an error.Resource Name Name of the resource that has detected the error. For software errors. this is
the name of a software component or an executable program. For hardwareerrors, this is the name of a device or system component. It does not indicatethat the component is faulty or needs replacement. Instead, it is used todetermine the appropriate diagnostic modules to be used to analyze the error.
Resource Class General class of the resource that detected the failure (for example, a deviceclass of disk).
Resource Type Type of the resource that detected the failure (for example, a device type of355mb).
Location Code Path to the device. There may be up to four fields, which refer to drawer, slot,connector, and port, respectively.
Chapter 4. Error-Logging Overview 111

VPD Vital product data. The contents of this field, if any, vary. Error log entries fordevices typically return information concerning the device manufacturer, serialnumber, Engineering Change levels, and Read Only Storage levels.
Description Summary of the error.Probable Cause List of some of the possible sources of the error.User Causes List of possible reasons for errors due to user mistakes. An improperly inserted
disk and external devices (such as modems and printers) that are not turned onare examples of user-caused errors.
Recommended Actions Description of actions for correcting a user-caused error.Install Causes List of possible reasons for errors due to incorrect installation or configuration
procedures. Examples of this type of error include hardware and softwaremismatches, incorrect installation of cables or cable connections becomingloose, and improperly configured systems.
Recommended Actions Description of actions for correcting an installation-caused error.Failure Causes List of possible defects in hardware or software.
Note: A failure causes section in a software error log usually indicates asoftware defect. Logs that list user or installation causes or both, but not failurecauses, usually indicate that the problem is not a software defect.
If you suspect a software defect, or are unable to correct user or installationcauses, report the problem to your software service department.
Recommended Actions Description of actions for correcting the failure. For hardware errors, PERFORMPROBLEM DETERMINATION PROCEDURES is one of the recommended actions listed.For hardware errors, this will lead to running the diagnostic programs.
Detailed Data v Failure data that is unique for each error log entry, such as device sensedata.
v Information on the current working directory of the process, such as FILESYSTEM SERIAL NUMBER and INODE NUMBER when the process dumpsthe core.
To display a shortened version of the detailed report produced by the -a flag, use the -A flag. The -A flagis not valid with the -a, -g, or -t flags. The items reported when you use -A to produce the shortenedversion of the report are:
v Label
v Date and time
v Type
v Resource name
v Description
v Detail data
The example output of this flag is in the following format:LABEL: STOK_RCVRY_EXITDate/Time: Tue Dec 14 15:25:33Type: TEMP Resource Name: tok0Description PROBLEM RESOLVEDDetail Data FILE NAME line: 273 file: stok_wdt.cSENSE DATA0000 0000 0000 0000 0000 0000 DEVICE ADDRESS 0004 AC62 25F1
Reporting can be turned off for some errors. To show which errors have reporting turned off, type:errpt -t -F report=0 | pg
If reporting is turned off for any errors, enable reporting of all errors using the errupdate command.
112 AIX 5L Version 5.3 General Programming Concepts: Writing and Debugging Programs

Logging may also have been turned off for some errors. To show which errors have logging turned off,type:errpt -t -F log=0 | pg
If logging is turned off for any errors, enable logging for all errors using the errupdate command. Loggingall errors is useful if it becomes necessary to re-create a system error.
Examples of Detailed Error ReportsThe following are sample error-report entries that are generated by issuing the errpt -a command.
An error-class value of H and an error-type value of PERM indicate that the system encountered ahardware problem (for example, with a SCSI adapter device driver) and could not recover from it.Diagnostic information might be associated with this type of error. If so, it displays at the end of the errorlisting, as illustrated in the following example of a problem encountered with a device driver:LABEL: SCSI_ERR1ID: 0502F666
Date/Time: Jun 19 22:29:51Sequence Number: 95Machine ID: 123456789012Node ID: host1Class: HType: PERMResource Name: scsi0Resource Class: adapterResource Type: hscsiLocation: 00-08VPD:
Device Driver Level.........00Diagnostic Level............00Displayable Message.........SCSIEC Level....................C25928FRU Number..................30F8834Manufacturer................IBM97FPart Number.................59F4566Serial Number...............00002849ROS Level and ID............24Read/Write Register Ptr.....0120
DescriptionADAPTER ERROR
Probable CausesADAPTER HARDWARE CABLECABLE TERMINATOR DEVICE
Failure CausesADAPTERCABLE LOOSE OR DEFECTIVE
Recommended ActionsPERFORM PROBLEM DETERMINATION PROCEDURESCHECK CABLE AND ITS CONNECTIONS
Detail DataSENSE DATA0000 0000 0000 0000 0000 0000 0000 0000 0000 0000 0000 0000
Diagnostic Log sequence number: 153Resource Tested: scsi0Resource Description: SCSI I/O ControllerLocation: 00-08SRN: 889-191
Chapter 4. Error-Logging Overview 113

Description: Error log analysis indicates hardware failure.Probable FRUs:
SCSI Bus FRU: n/a 00-08Fan Assembly
SCSI2 FRU: 30F8834 00-08SCSI I/O Controller
An error-class value of H and an error-type value of PEND indicate that a piece of hardware (the TokenRing) may become unavailable soon due to numerous errors detected by the system.LABEL: TOK_ESERRID: AF1621E8
Date/Time: Jun 20 11:28:11Sequence Number: 17262Machine Id: 123456789012Node Id: host1Class: HType: PENDResource Name: TokenRingResource Class: tok0Resource Type: AdapterLocation: TokenRing
DescriptionEXCESSIVE TOKEN-RING ERRORS
Probable CausesTOKEN-RING FAULT DOMAIN
Failure CausesTOKEN-RING FAULT DOMAIN
Recommended ActionsREVIEW LINK CONFIGURATION DETAIL DATACONTACT TOKEN-RING ADMINISTRATOR RESPONSIBLE FOR THIS LAN
Detail DataSENSE DATA0ACA 0032 A440 0001 0000 0000 0000 0000 0000 0000 0000 0000 00000000 2080 0000 0000 0010 0000 0000 0000 0000 0000 0000 0000 00000000 0000 78CC 0000 0000 0005 C88F 0304 F4E0 0000 1000 5A4F 56851000 5A4F 5685 3030 3030 0000 0000 0000 0000 0000 0000 0000 00000000 0000 0000 0000 0000 0000 0000 0000 0000 0000 0000 0000 00000000 0000 0000 0000 0000 0000 0000 0000 0000 0000 0000 0000 00000000 0000 0000 0000 0000 0000
An error-class value of S and an error-type value of PERM indicate that the system encountered aproblem with software and could not recover from it.LABEL: DSI_PROCID: 20FAED7F
Date/Time: Jun 28 23:40:14Sequence Number: 20136Machine Id: 123456789012Node Id: 123456789012Class: SType: PERMResource Name: SYSVMM
DescriptionData Storage Interrupt, Processor
Probable CausesSOFTWARE PROGRAM
114 AIX 5L Version 5.3 General Programming Concepts: Writing and Debugging Programs

Failure CausesSOFTWARE PROGRAM
Recommended ActionsIF PROBLEM PERSISTS THEN DO THE FOLLOWINGCONTACT APPROPRIATE SERVICE REPRESENTATIVE
Detail DataData Storage Interrupt Status Register4000 0000Data Storage Interrupt Address Register0000 9112Segment Register, SEGREGD000 1018EXVAL0000 0005
An error-class value of S and an error-type value of TEMP indicate that the system encountered a problemwith software. After several attempts, the system was able to recover from the problem.LABEL: SCSI_ERR6ID: 52DB7218
Date/Time: Jun 28 23:21:11Sequence Number: 20114Machine Id: 123456789012Node Id: host1Class: SType: INFOResource Name: scsi0
DescriptionSOFTWARE PROGRAM ERROR
Probable CausesSOFTWARE PROGRAM
Failure CausesSOFTWARE PROGRAM
Recommended ActionsIF PROBLEM PERSISTS THEN DO THE FOLLOWINGCONTACT APPROPRIATE SERVICE REPRESENTATIVE
Detail DataSENSE DATA0000 0000 0000 0000 0000 0011 0000 0008 000E 0900 0000 0000 FFFFFFFE 4000 1C1F 01A9 09C4 0000 000F 0000 0000 0000 0000 FFFF FFFF0325 0018 0040 1500 0000 0000 0000 0000 0000 0000 0000 0000 08000000 0100 0000 0000 0000 0000 0000 0000 0000 0000 0000 0000 00000000 0000
An error class value of O indicates that an informational message has been logged.LABEL: OPMSGID: AA8AB241
Date/Time: Jul 16 03:02:02Sequence Number: 26042Machine Id: 123456789012Node Id: host1Class: OType: INFOResource Name: OPERATOR
DescriptionOPERATOR NOTIFICATION
Chapter 4. Error-Logging Overview 115

User Causeserrlogger COMMAND
Recommended ActionsREVIEW DETAILED DATA
Detail DataMESSAGE FROM errlogger COMMANDhdisk1 : Error log analysis indicates a hardware failure.
Example of a Summary Error ReportThe following is an example of a summary error report generated using the errpt command. One line ofinformation is returned for each error entry.ERROR_IDENTIFIER TIMESTAMP T CL RESOURCE_NAME ERROR_DESCRIPTION192AC071 0101000070 I 0 errdemon Error logging turned off0E017ED1 0405131090 P H mem2 Memory failure9DBCFDEE 0101000070 I 0 errdemon Error logging turned on038F2580 0405131090 U H scdisk0 UNDETERMINED ERRORAA8AB241 0405130990 I O OPERATOR OPERATOR NOTIFICATION
Generating an Error ReportTo create an error report of software or hardware problems do the following:
1. Determine if error logging is on or off by determining if the error log contains entries:errpt -a
The errpt command generates an error report from entries in the system error log.
If the error log does not contain entries, error logging has been turned off. Activate the facility bytyping:/usr/lib/errdemon
Note: You must have root user access to run this command.
The errdemon daemon starts error logging and writes error log entries in the system error log. If thedaemon is not running, errors are not logged.
2. Generate an error log report using the errpt command. For example, to see all the errors for thehdisk1 disk drive, type:errpt -N hdisk1
3. Generate an error log report using SMIT. For example, use the smit errpt command:smit errpt
a. Select 1 to send the error report to standard output, or select 2 to send the report to the printer.
b. Select yes to display or print error log entries as they occur. Otherwise, select no.
c. Specify the appropriate device name in the Select resource names option (such as hdisk1).
d. Select Do.
Stopping an Error LogThis procedure describes how to stop the error-logging facility.
To turn off error logging, use the errstop command. You must have root user authority to use thiscommand.
Ordinarily, you would not want to turn off the error-logging facility. Instead, you should clean the error logof old or unnecessary entries. For instructions about cleaning the error log, refer to “Cleaning an ErrorLog” on page 117.
116 AIX 5L Version 5.3 General Programming Concepts: Writing and Debugging Programs

Turn off the error-logging facility when you are installing or experimenting with new software or hardware.This way the error logging daemon does not use CPU time to log problems you know you are causing.
Cleaning an Error LogError-log cleaning is normally done for you as part of the daily cron command. If it is not doneautomatically, clean the error log yourself every couple of days after you have examined the contents tomake sure there are no significant errors.
You can also clean up specific errors. For example, if you get a new disk and you do not want the olddisk’s errors in the log, you can clean just the old disk’s errors.
Delete all entries in your error log by doing either of the following:
v Use the errclear -d command. For example, to delete all software errors, type:errclear -d S 0
The errclear command deletes entries from the error log that are older than a specified number ofdays. The 0 in the previous example indicates that you want to delete entries for all days.
v Use the smit errclear command:smit errclear
Copying an Error Log to Diskette or TapeCopy an error log by doing one of the following:
v To copy the error log to diskette, use the ls and backup commands. Insert a formatted diskette into thediskette drive and type:ls /var/adm/ras/errlog | backup -ivp
v To copy the error log to tape, insert a tape in the drive and type:ls /var/adm/ras/errlog | backup -ivpf/dev/rmt0
v To gather system configuration information in a tar file and copy it to diskette, use the snap command.Insert a formatted diskette into the diskette drive and type:snap -a -o /dev/rfd0
Note: To use the snap command, you need root user authority.
The snap command in this example uses the -a flag to gather all information about your systemconfiguration. The -o flag copies the compressed tar file to the device you name. The /dev/rfd0 namesyour disk drive.
To gather all configuration information in a tar file and copy it to tape, type:snap -a -o /dev/rmt0
The /dev/rmt0 names your tape drive.
Using the liberrlog ServicesThe liberrlog services allow you to read entries from an error log, and provide a limited update capability.They are especially useful from an error notification method written in the C programming language, ratherthan a shell script. Accessing the error log using the liberrlog functions is much more efficient than usingthe errpt command.
The services are errlog_open, errlog_close, errlog_find_first, errlog_find_next,errlog_find_sequence, errlog_set_direction, and errlog_write.
Chapter 4. Error-Logging Overview 117

Error Logging and AlertsIf the Alert field of an error record template is set to True, programs that process alerts use the followingfields in the error log to build an alert:
v Class
v Type
v Description
v Probable Cause
v User Cause
v Install Cause
v Failure Cause
v Recommended Action
v Detail Data
These template fields must be set up according to the SNA Generic Alert Architecture described in SNAFormats, order number GA27-3136. You can view the book at http://publib.boulder.ibm.com/cgi-bin/bookmgr/BOOKS/D50A5007. Alerts that are not set up according to the architecture cannot be processedproperly by a receiving program, such as NetView.
Messages added to the error-logging message sets must not conflict with the SNA Generic AlertArchitecture. When the errmsg command is used to add messages, the command selects messagenumbers that do not conflict with the architecture.
If the Alert field of an error record template is set to False, you can use any of the messages in theerror-logging message catalog.
Error Logging ControlsTo control the error-logging facility, you can use error-logging commands, subroutines and kernel services,as well as files.
Error-Logging Commands
errclear Deletes entries from the error log. This command can erase the entire error log. Removesentries with specified error ID numbers, classes, or types.
errdead Extracts errors contained in the /dev/error buffer captured in the system dump. Thesystem dump will contain error records if the errdemon daemon was not active prior to thedump.
errdemon Reads error records from the /dev/error file and writes error log entries to the system errorlog. The errdemon also performs error notification as specified in the error notificationobjects in the Object Data Manager (ODM). This daemon is started automatically duringsystem initialization.
errinstall Can be used to add or replace messages in the error message catalog. Provided for useby software installation procedures. The system creates a backup file named File.undo.The undo file allows you to cancel the changes you made by issuing the errinstallcommand.
errlogger Writes an operator message entry to the error log.errmsg Implements error logging in in-house applications. The errmsg command lists, adds, or
deletes messages stored in the error message catalog. Using this command, text can beadded to the Error Description, Probable Cause, User Cause, Install Cause, FailureCause, Recommended Action, and Detailed Data message sets.
118 AIX 5L Version 5.3 General Programming Concepts: Writing and Debugging Programs

errpt Generates an error report from entries in the system error log. The report can be formattedas a single line of data for each entry, or the report can be a detailed listing of dataassociated with each entry in the error log. Entries of varying classes and types can beomitted from or included in the report.
errstop Stops the errdemon daemon, which is initiated during system initialization. Running theerrstop command also disables some diagnostic and recovery functions of the system.
errupdate Adds or deletes templates in the Error Record Template Repository. Modifies the Alert, Log,and Report attributes of an error template. Provided for use by software installationprocedures.
Error Logging Subroutines and Kernel Services
errlog Writes an error to the error log device drivererrsave and errlast Allows the kernel and kernel extensions to write to the error logerrlog_open Opens an error logerrlog_close Closes an error logerrlog_find_first Finds the first occurrence of an error log entryerrlog_find_next Finds the next occurrence of an error log entryerrlog_find_sequence Finds the error log entry with the specified sequence numbererrlog_set_direction Sets the direction for the error log find functionserrlog_write Updates an error log entryerrresume Resumes error logging after an errlast command was issued.
Error Logging Files
/dev/error Provides standard device driver interfaces required by the error logcomponent
/dev/errorctl Provides nonstandard device driver interfaces for controlling the errorlogging system
/usr/include/sys/err_rec.h Contains structures defined as arguments to the errsave kernel serviceand the errlog subroutine
/usr/include/sys/errlog.h Defines the interface to the liberrlog subroutines/var/adm/ras/errlog Stores instances of errors and failures encountered by the system/var/adm/ras/errtmplt Contains the Error Record Template Repository
Related InformationFor further information on this topic, see the following:
v Error Logging Special Files in AIX 5L Version 5.3 Files Reference.
v The errsave kernel service in AIX 5L Version 5.3 Technical Reference: Kernel and Subsystems Volume1.
Subroutine ReferencesThe errlog subroutine in AIX 5L Version 5.3 Technical Reference: Base Operating System and ExtensionsVolume 1.
Commands ReferencesThe crontab command in AIX 5L Version 5.3 Commands Reference, Volume 1.
The errclear command, errdead command, errdemon daemon, errinstall command, errloggercommand, errmsg command, errpt command, errstop command, errupdate command in AIX 5L Version5.3 Commands Reference, Volume 2.
Chapter 4. Error-Logging Overview 119

The odmadd command, odmdelete command, odmget command in AIX 5L Version 5.3 CommandsReference, Volume 4.
The snap command in AIX 5L Version 5.3 Commands Reference, Volume 5.
120 AIX 5L Version 5.3 General Programming Concepts: Writing and Debugging Programs

Chapter 5. File Systems and Logical Volumes
A file is a one-dimensional array of bytes that can contain ASCII or binary information. AIX files cancontain data, shell scripts, and programs. File names are also used to represent abstract objects such assockets or device drivers.
Files are represented internally by index nodes (i-nodes). Within the journaled file system (JFS), an i-nodeis a structure that contains all access, timestamp, ownership, and data location information for each file.An i-node is 128-bytes in JFS and 512-bytes in the enhanced journaled file system (JFS2). Pointers withinthe i-node structure designate the real disk address of the data blocks associated with the file. An i-node isidentified by an offset number (i-number) and has no file name information. The connection of i-numbersand file names is called a link.
File names exist only in directories. Directories are a unique type of file that give hierarchical structure tothe file system. Directories contain directory entries. Each directory entry contains a file name and ani-number.
JFS and JFS2 are supported by this operating system. The file system links the file and directory data tothe structure used by storage and retrieval mechanisms.
This chapter contains the following topics about file systems:
v “File Types”
v “Working With JFS Directories” on page 123
v “Working with JFS2 Directories” on page 125
v “Working with JFS i-nodes” on page 127
v “Working with JFS2 i-nodes” on page 128
v “Allocating JFS File Space” on page 130
v “Allocating JFS2 File Space” on page 133
v “JFS File System Layout” on page 135
v “JFS2 File System Layout” on page 136
v “Writing Programs That Access Large Files” on page 137
v “Linking for Programmers” on page 144
v “Using File Descriptors” on page 146
v “Creating and Removing Files” on page 149
v “Working with File I/O” on page 151
v “File Status” on page 157
v “File Accessibility” on page 158
v “JFS File System Layout” on page 135
v “Creating New File System Types” on page 159
This chapter also contains information about programming considerations concerning Logical VolumeManager (LVM). See “Logical Volume Programming” on page 162.
File TypesA file is a one-dimensional array of bytes with at least one hard link (file name). Files can contain ASCII orbinary information. Files contain data, shell scripts, or programs. File names are also used to representabstract objects, such as sockets, pipes, and device drivers. For a list of subroutines used to control files,see “Working with Files” on page 123.
© Copyright IBM Corp. 1997, 2010 121

The kernel does not distinguish record boundaries in regular files, so programs can establish their ownboundary markers. For example, many programs use line-feed characters to mark the end of lines.“Working with Files” on page 123 contains a list of the subroutines used to control files.
Files are represented in the journaled file system (JFS and JFS2) by disk index nodes (i-node).Information about the file (such as ownership, access modes, access time, data addresses, andmodification time) is stored in the i-node. For more information about the internal structure of files, see“Working with JFS i-nodes” on page 127 or “Working with JFS2 i-nodes” on page 128.
The journaled file system supports the following file types:
File Types Supported By Journaled File System
Type of File Macro Name Used in mode.h Description
Regular S_ISREG A sequence of bytes with one or morenames. Regular files can containASCII or binary data. These files canbe randomly accessed (read from orwritten to) from any byte in the file.
Directory S_ISDIR Contains directory entries (file nameand i-number pairs). Directory formatsare determined by the file system.Processes read directories as they doordinary files, but the kernel reservesthe right to write to a directory.Special sets of subroutines controldirectory entries.
Block Special S_ISBLK Associates a structured device driverwith a file name.
Character Special S_ISCHR Associates an unstructured devicedriver with a file name.
Pipes S_ISFIFO Designates an interprocesscommunication (IPC) channel. Themkfifo subroutine creates namedpipes. The pipe subroutine createsunnamed pipes.
Symbolic Links S_ISLNK A file that contains either an absoluteor relative path name to another filename.
Sockets S_ISSOCK An IPC mechanism that allowsapplications to exchange data. Thesocket subroutine creates sockets,and the bind subroutine allowssockets to be named.
The maximum size of a regular file in a JFS file system enabled for large files is slightly less than 64gigabytes (68589453312). In other file systems that are enabled for large files and in other JFS file systemtypes, all files not listed as regular in the previous table have a maximum file size of 2 gigabytes minus 1(2147483647). The maximum size of a file in JFS2 is limited by the size of the file system itself.
The architectural limit on the size of a JFS2 file system is 252 bytes, or 4 petabytes. In AIX 5.2, themaximum JFS2 file size supported by the 32-bit kernel is 240 - 4096 bytes, or just under 1 terabyte. Themaximum file size supported by the 64-bit kernel is 244 - 4096 bytes, or just less than 16 terabytes.
The maximum length of a file name is 255 characters, and the maximum length of a path name is 1023bytes.
122 AIX 5L Version 5.3 General Programming Concepts: Writing and Debugging Programs
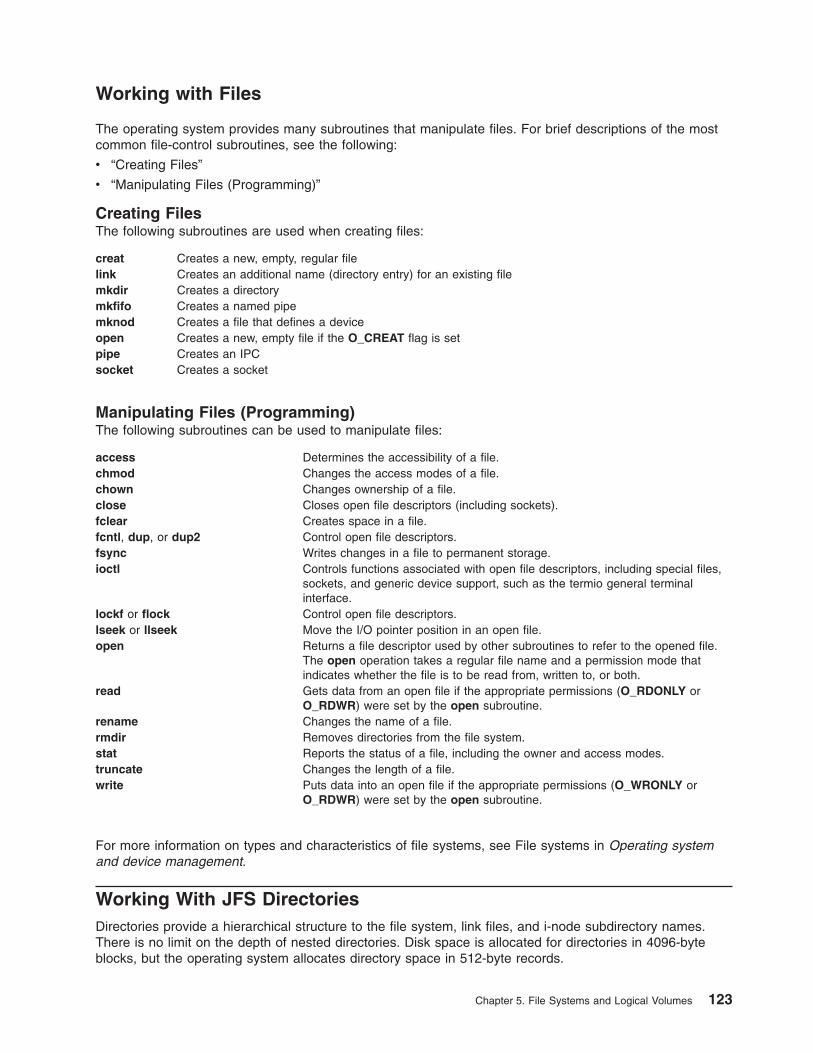
Working with Files
The operating system provides many subroutines that manipulate files. For brief descriptions of the mostcommon file-control subroutines, see the following:
v “Creating Files”
v “Manipulating Files (Programming)”
Creating FilesThe following subroutines are used when creating files:
creat Creates a new, empty, regular filelink Creates an additional name (directory entry) for an existing filemkdir Creates a directorymkfifo Creates a named pipemknod Creates a file that defines a deviceopen Creates a new, empty file if the O_CREAT flag is setpipe Creates an IPCsocket Creates a socket
Manipulating Files (Programming)The following subroutines can be used to manipulate files:
access Determines the accessibility of a file.chmod Changes the access modes of a file.chown Changes ownership of a file.close Closes open file descriptors (including sockets).fclear Creates space in a file.fcntl, dup, or dup2 Control open file descriptors.fsync Writes changes in a file to permanent storage.ioctl Controls functions associated with open file descriptors, including special files,
sockets, and generic device support, such as the termio general terminalinterface.
lockf or flock Control open file descriptors.lseek or llseek Move the I/O pointer position in an open file.open Returns a file descriptor used by other subroutines to refer to the opened file.
The open operation takes a regular file name and a permission mode thatindicates whether the file is to be read from, written to, or both.
read Gets data from an open file if the appropriate permissions (O_RDONLY orO_RDWR) were set by the open subroutine.
rename Changes the name of a file.rmdir Removes directories from the file system.stat Reports the status of a file, including the owner and access modes.truncate Changes the length of a file.write Puts data into an open file if the appropriate permissions (O_WRONLY or
O_RDWR) were set by the open subroutine.
For more information on types and characteristics of file systems, see File systems in Operating systemand device management.
Working With JFS DirectoriesDirectories provide a hierarchical structure to the file system, link files, and i-node subdirectory names.There is no limit on the depth of nested directories. Disk space is allocated for directories in 4096-byteblocks, but the operating system allocates directory space in 512-byte records.
Chapter 5. File Systems and Logical Volumes 123

Processes can read directories as regular files. However, the kernel can write directories. For this reason,directories are created and maintained by a set of subroutines unique to them.
JFS Directory StructuresDirectories contain a sequence of directory entries. Each directory entry contains three fixed-length fields(the index number associated with the file’s i-node, the length of the file name, and the number of bytesfor the entry) and one variable-length field for the file name. The file name field is null-terminated andpadded to 4 bytes. File names can be up to 255 bytes long.
Directory entries are of variable length to allow file names the greatest flexibility. However, all directoryspace is allocated at all times.
No directory entry can span 512-byte sections of a directory. When a directory requires more than 512bytes, another 512-byte record is appended to the original record. If all of the 512-byte records in theallocated data block are filled, an additional data block (4096 bytes) is allotted.
When a file is removed, the space that the file occupied in the directory structure is added to thepreceding directory entry. The information about the removed directory remains until a new entry fits intothe space vacated.
Every directory contains the entries . (dot) and .. (dot, dot). The . (dot) directory entry points to the i-nodefor the directory itself. The .. (dot, dot) directory entry points to the i-node for the parent directory. Themkfs program initializes a file system so that the . (dot) and .. (dot, dot) entries in the new root directorypoint to the root i-node of the file system.
Directories have the following access modes:
read Allows a process to read directory entrieswrite Allows a process to create new directory entries or remove old ones by using the creat, mknod, link,
and unlink subroutinesexecute Allows a process to use the directory as a current working directory or to search below the directory in
the file tree
Working with JFS Directories (Programming)The following is a list of subroutines available for working with directories:
closedirCloses a directory stream and frees the structure associated with the DirectoryPointer parameter
mkdir Creates directories
opendirOpens the directory designated by the DirectoryName parameter and associates a directorystream with it
readdirReturns a pointer to the next directory entry
rewinddirResets the position of the specified directory stream to the beginning of the directory
rmdir Removes directories
seekdirSets the position of the next readdir subroutine operation on the directory stream
telldir Returns the current location associated with the specified directory stream
124 AIX 5L Version 5.3 General Programming Concepts: Writing and Debugging Programs

Changing the Current Directory of a ProcessWhen the system is booted, the first process uses the root directory of the root file system as its currentdirectory. New processes created with the fork subroutine inherit the current directory used by the parentprocess. The chdir subroutine changes the current directory of a process.
The chdir subroutine parses the path name to ensure that the target file is a directory and that theprocess owner has permissions to the directory. After the chdir subroutine is run, the process uses thenew current directory to search all path names that do not begin with a / (slash).
Changing the Root Directory of a ProcessYou can cause the directory named by a process Path parameter to become the effective root directory byusing the chroot subroutine. Child processes of the calling process consider the directory indicated by thechroot subroutine as the logical root directory of the file system.
Processes use the global file system root directory for all path names starting with a / (slash). All pathname searches beginning with a / (slash) begin at this new root directory.
Subroutines That Control JFS Directories
Due to the unique nature of directory files, directories are controlled by a special set of subroutines. Thefollowing subroutines are designed to control directories:
chdir Changes the current working directorychroot Changes the effective root directorygetcwd or getwd Gets path to current directorymkdir Creates a directoryopendir, readdir, telldir, seekdir, rewinddir, or closedir
Perform various actions on directoriesrename Renames a directoryrmdir Removes a directory
Working with JFS2 DirectoriesDirectories provide a hierarchical structure to the file system, link files, and i-node subdirectory names.There is no limit on the depth of nested directories. Disk space is allocated for directories in file systemblocks.
Processes can read directories as regular files. However, the kernel can write directories. For this reason,directories are created and maintained by a set of subroutines unique to them.
JFS2 Directory StructuresA directory contains entries that describe the objects contained in the directory. A directory entry has afixed length and contains the following:
v The i-node number
v The name (up to 22 bytes long)
v A name length field
v A field to continue the entry if the name is longer than 22 bytes
The directory entries are stored in a B+ tree sorted by name. The self (.) and parent (..) information iscontained in the i-node instead of in a directory entry. For more information about B+ trees, see “B+ Trees”on page 134.
Chapter 5. File Systems and Logical Volumes 125

Directories have the following access modes:
read Allows a process to read directory entrieswrite Allows a process to create new directory entries or remove old ones, by using the creat, mknod, link,
and unlink subroutinesexecute Allows a process to use the directory as a current working directory or to search below the directory in
the file tree
Working with JFS2 Directories (Programming)The following is a list of subroutines available for working with directories:
closedirCloses a directory stream and frees the structure associated with the DirectoryPointer parameter
mkdir Creates directories
opendirReturns a structure pointer that is used by the readdir subroutine to obtain the next directoryentry, by rewinddir to reset the read position to the beginning, and by closedir to close thedirectory.
readdirReturns a pointer to the next directory entry
rewinddirResets the position of the specified directory stream to the beginning of the directory
rmdir Removes directories
seekdirReturns to a position previously obtained with the telldir subroutine
telldir Returns the current location associated with the specified directory stream
Do not use the open, read, lseek, and close subroutines to access directories.
Changing Current Directory of a ProcessWhen the system is booted, the first process uses the root directory of the root file system as its currentdirectory. New processes created with the fork subroutine inherit the current directory used by the parentprocess. The chdir subroutine changes the current directory of a process.
The chdir subroutine parses the path name to ensure that the target file is a directory and that theprocess owner has permissions to the directory. After the chdir subroutine is run, the process uses thenew current directory to search all path names that do not begin with a / (slash).
Changing the Root Directory of a ProcessProcesses can change their understanding of the root directory through the chroot subroutine. Childprocesses of the calling process consider the directory indicated by the chroot subroutine as the logicalroot directory of the file system.
Processes use the global file system root directory for all path names starting with a / (slash).All pathname searches beginning with a / (slash) begin at this new root directory.
Subroutines That Control JFS2 DirectoriesDue to the unique nature of directory files, directories are controlled by a special set of subroutines. Thefollowing subroutines are designed to control directories:
chdir Changes the current working directorychroot Changes the effective root directory
126 AIX 5L Version 5.3 General Programming Concepts: Writing and Debugging Programs

opendir, readdir, telldir, seekdir, rewinddir, or closedirPerform various actions on directories
getcwd or getwd Gets path to current directorymkdir Creates a directoryrename Renames a directoryrmdir Removes a directory
Working with JFS i-nodesFiles in the journaled file system (JFS) are represented internally as index nodes (i-nodes). JFS i-nodesexist in a static form on disk and contain access information for the file, as well as pointers to the real diskaddresses of the file’s data blocks. The number of disk i-nodes available to a file system is dependent onthe size of the file system, the allocation group size (8 MB by default), and the number of bytes per i-noderatio (4096 by default). These parameters are given to the mkfs command at file system creation. Whenenough files have been created to use all the available i-nodes, no more files can be created, even if thefile system has free space.
To determine the number of available i-nodes, use the df -v command. Disk i-nodes are defined in the/usr/include/jfs/ino.h file.
Disk i-node Structure for JFSEach disk i-node in JFS is a 128-byte structure. The offset of a particular i-node within the i-node list of thefile system produces the unique number (i-number) by which the operating system identifies the i-node. Abit map, known as the i-node map, tracks the availability of free disk i-nodes for the file system.
Disk i-nodes include the following information:
Field Contentsi_mode Type of file and access permission mode bitsi_size Size of file in bytesi_uid Access permissions for the user IDi_gid Access permissions for the group IDi_nblocks Number of blocks allocated to the filei_mtime Last time the file was modifiedi_atime Last time the file was accessedi_ctime Last time the i-node was modifiedi_nlink Number of hard links to the filei_rdaddr[8] Real disk addresses of the datai_rindirect Real disk address of the indirect block, if any
You cannot change file data without changing the i-node, but it is possible to change the i-node withoutchanging the contents of the file. For example, when permission is changed, the information within thei-node (i_mode) is modified, but the data in the file remains the same.
The i_rdaddr field within the disk i-node contains 8 disk addresses. These addresses point to the first 8data blocks assigned to the file. The i_rindirect field address points to an indirect block. Indirect blocksare either single indirect or double indirect. Thus, there are three possible geometries of block allocationfor a file: direct, indirect, or double indirect. Use of the indirect block and other file space allocationgeometries are discussed in the article “Allocating JFS File Space” on page 130.
Disk i-nodes do not contain file or path name information. Directory entries are used to link file names toi-nodes. Any i-node can be linked to many file names by creating additional directory entries with the linkor symlink subroutine. To determine the i-node number assigned to a file, use the ls -i command.
Chapter 5. File Systems and Logical Volumes 127

The i-nodes that represent files that define devices contain slightly different information from i-nodes forregular files. Files associated with devices are called special files. There are no data block addresses inspecial device files, but the major and minor device numbers are included in the i_rdev field.
A disk i-node is released when the link count (i_nlink) to the i-node equals 0. Links represent the filenames associated with the i-node. When the link count to the disk i-node is 0, all the data blocksassociated with the i-node are released to the bit map of free data blocks for the file system. The i-node isthen placed on the free i-node map.
JFS In-core i-node StructureWhen a file is opened, the operating system creates an in-core i-node. The in-core i-node contains a copyof all the fields defined in the disk i-node, plus additional fields for tracking and managing access to thein-core i-node. When a file is opened, the information in the disk i-node is copied into an in-core i-node foreasier access. In-core i-nodes are defined in the /usr/include/jfs/inode.h file. Some of the additionalinformation tracked by the in-core i-node is as follows:
v Status of the in-core i-node, including flags that indicate:
– An i-node lock
– A process waiting for the i-node to unlock
– Changes to the file’s i-node information
– Changes to the file’s data
v Logical device number of the file system that contains the file
v i-number used to identify the i-node
v Reference count. When the reference count field equals 0, the in-core i-node is released.
When an in-core i-node is released (for example, with the close subroutine), the in-core i-node referencecount is reduced by 1. If this reduction results in the reference count to the in-core i-node becoming 0, thei-node is released from the in-core i-node table, and the contents of the in-core i-node are written to thedisk copy of the i-node (if the two versions differ).
Working with JFS2 i-nodesFiles in JFS2 are represented internally as index nodes (i-nodes). JFS2 disk i-nodes exist in a static formon the disk and contain access information for the files, as well as pointers to the real disk addresses ofthe file’s data blocks. The i-nodes are allocated dynamically by JFS2. Disk-inodes are defined in the/usr/include/j2/j2_dinode.h file.
When a file is opened, an in-core i-node is created by the operating system. The in-core i-node contains acopy of all the fields defined in the disk i-node, plus additional fields for tracking the in-core i-node. In-corei-nodes are defined in the /usr/include/j2/j2_inode.h file.
Disk i-node Structure for JFS2Each disk i-node in JFS2 is a 512-byte structure. The index of a particular i-node allocation map of the filesystem produces the unique number (i-number) by which the operating system identifies the i-node. Thei-node allocation map tracks the location of the i-nodes on the disk, as well as their availability.
Disk i-nodes include the following information:
Field Contentsdi_mode Type of file and access permission mode bitsdi_size Size of file in bytesdi_uid Access permissions for the user IDdi_gid Access permissions for the group IDdi_nblocks Number of blocks allocated to the file
128 AIX 5L Version 5.3 General Programming Concepts: Writing and Debugging Programs

Field Contentsdi_mtime Last time the file was modifieddi_atime Last time the file was accesseddi_ctime Last time the i-node was modifieddi_nlink Number of hard links to the filedi_btroot Root of B+ tree describing the disk addresses of the data
You cannot change the file data without changing the i-node, but it is possible to change the i-node withoutchanging the contents of the file. For example, when permission is changed, the information within thei-node (di_mode) is modified, but the data in the file remains the same.
The di_btroot describes the root of the B+ tree. It describes the data for the i-node. di_btroot has a fieldindicating how many of its entries in the i-node are being used and another field describing whether theyare leaf nodes or internal nodes for the B+ tree. File space allocation geometries are discussed in thearticle “Allocating JFS2 File Space” on page 133.
Disk i-nodes do not contain file or path name information. Directory entries are used to link file names toi-nodes. Any i-node can be linked to many file names by creating additional directory entries with the linkor symlink subroutine. To determine the i-node number assigned to a file, use the ls -i command.
The i-nodes that represent files that define devices contain slightly different information from i-nodes forregular files. Files associated with devices are called special files. There are no data block addresses inspecial device files, but the major and minor device numbers are included in the di_rdev field.
A disk i-node is released when the link count (di_nlink) to the i-node equals 0. Links represent the filenames associated with the i-node. When the link count to the disk i-node is 0, all the data blocksassociated with the i-node are released to the bit map of free data blocks for the file system. The i-node isthen placed on the free i-node map.
JFS2 In-core i-node StructureWhen a file is opened, the information in the disk i-node is copied into an in-core i-node for easier access.The in-core i-node structure contains additional fields that manage access to the disk i-node’s valuabledata. The fields of the in-core i-node are defined in the j2_inode.h file. Some of the additional informationtracked by the in-core i-node is as follows:
v Status of the in-core i-node, including flags that indicate:
– An i-node lock
– A process waiting for the i-node to unlock
– Changes to the file’s i-node information
– Changes to the file’s data
v Logical device number of the file system that contains the file
v i-number used to identify the i-node
v Reference count. When the reference count field equals 0, the in-core i-node is released.
When an in-core i-node is released (for example, with the close subroutine), the in-core i-node referencecount is reduced by 1. If this reduction results in the reference count to the in-core i-node becoming 0, thei-node is released from the in-core i-node table, and the contents of the in-core i-node are written to thedisk copy of the i-node (if the two versions differ).
Chapter 5. File Systems and Logical Volumes 129

Allocating JFS File SpaceFile space allocation is the method by which data is apportioned physical storage space in the operatingsystem. The kernel allocates disk space to a file or directory in the form of logical blocks. A logical blockfor JFS refers to the division of a file or directory’s contents into 4096-byte units. Logical blocks are nottangible entities; however, the data in a logical block consumes physical storage space on the disk. Eachfile or directory consists of 0 or more logical blocks. Fragments, instead of logical blocks, are the basicunits for allocated disk space in JFS.
Full and Partial Logical BlocksA file or directory may contain full or partial logical blocks. A full logical block contains 4096 bytes of data.Partial logical blocks occur when the last logical block of a file or directory contains less than 4096 bytesof data.
For example, a file of 8192 bytes is two logical blocks. The first 4096 bytes reside in the first logical blockand the following 4096 bytes reside in the second logical block. Likewise, a file of 4608 bytes consists oftwo logical blocks. However, the last logical block is a partial logical block, containing the last 512 bytes ofthe file’s data. Only the last logical block of a file can be a partial logical block.
Allocation in Fragmented File SystemsThe default fragment size is 4096 bytes. You can specify smaller fragment sizes with the mkfs commandduring a file system’s creation. Allowable fragment sizes are: 512, 1024, 2048, and 4096 bytes. You canuse only one fragment size in a file system. See “JFS File System Layout” on page 135 for moreinformation on the file system structure.
To maintain efficiency in file system operations, the JFS allocates 4096 bytes of fragment space to filesand directories that are 32 KB or larger in size. A fragment that covers 4096 bytes of disk space isallocated to a full logical block. When data is added to a file or directory, the kernel allocates diskfragments to store the logical blocks. Thus, if the file system’s fragment size is 512 bytes, a full logicalblock is the allocation of eight fragments.
The kernel allocates disk space so that only the last bytes of data receive a partial block allocation. As thepartial block grows beyond the limits of its current allocation, additional fragments are allocated. If thepartial block increases to 4096 bytes, the data stored in its fragments reallocated into 4096 file-systemblock allocations. A partial logical block that contains less than 4096 bytes of data is allocated the numberof fragments that best matches its storage requirements.
Block reallocation also occurs if data is added to logical blocks that represent file holes. A file hole is anempty logical block located prior to the last logical block that stores data. (File holes do not occur withindirectories.) These empty logical blocks are not allocated fragments. However, as data is added to fileholes, allocation occurs. Each logical block that was not previously allocated disk space is allocated 4096bytes of fragment space.
Additional block allocation is not required if existing data in the middle of a file or directory is overwritten.The logical block containing the existing data has already been allocated fragments.
JFS tries to maintain contiguous allocation of a file or directory’s logical blocks on the disk. Maintainingcontiguous allocation lessens seek time because the data for a file or directory can be accessedsequentially and found on the same area of the disk. However, disk fragments for one logical block are notalways contiguous to the disk fragments for another logical block. The disk space required for contiguousallocation may not be available if it has already been written to by another file or directory. An allocation fora single logical block, however, always contains contiguous fragments.
130 AIX 5L Version 5.3 General Programming Concepts: Writing and Debugging Programs

The file system uses a bitmap called the block allocation map to record the status of every block in the filesystem. When the file system needs to allocate a new fragment, it refers to the fragment allocation map toidentify which fragments are available. A fragment can only be allocated to a single file or directory at atime.
Allocation in Compressed JFS File SystemsIn a file system that supports data compression, directories are allocated disk space. Data compressionalso applies to regular files and symbolic links whose size is larger than that of their i-nodes.
The allocation of disk space for compressed file systems is the same as that of fragments in fragmentedfile systems. A logical block is allocated 4096 bytes when it is modified. This allocation guarantees thatthere will be a place to store the logical block if the data does not compress. The system requires that awrite or store operation report an out-of-disk-space condition into a memory-mapped file at a logicalblock’s initial modification. After modification is complete, the logical block is compressed before it iswritten to a disk. The compressed logical block is then allocated only the number of fragments required forits storage.
In a fragmented file system, only the last logical block of a file (not larger than 32 KB) can be allocatedless than 4096 bytes. The logical block becomes a partial logical block. In a compressed file system, everylogical block can be allocated less than a full block.
A logical block is no longer considered modified after it is written to a disk. Each time a logical block ismodified, a full disk block is allocated again, according to the system requirements. Reallocation of theinitial full block occurs when the logical block of compressed data is successfully written to a disk.
Allocation in JFS File Systems Enabled for Large FilesIn a file system enabled for large files, the JFS allocates two sizes of fragments for regular files. A ″large″fragment (32 X 4096) is allocated for logical blocks after the 4 MB boundary, and a 4096 bytes fragment isallocated for logical blocks before the 4 MB boundary. All nonregular files allocate 4096 bytes fragments.This geometry allows a maximum file size of slightly less than 64 gigabytes (68589453312).
A large fragment is made up of 32 contiguous 4096 bytes fragments. Because of this requirement, it isrecommended that file systems enabled for large files have predominantly large files in them. Storingmany small files (files less than 4 MB) can cause free-space fragmentation problems. This can cause largeallocations to fail with an ENOSPC error condition because the file system does not contain 32 contiguousdisk addresses.
Disk Address FormatJFS fragment support requires fragment-level addressability. As a result, disk addresses have a specialformat for mapping where the fragments of a logical block reside on the disk. Fragmented andcompressed file systems use the same method for representing disk addresses. Disk addresses arecontained in the i_rdaddr field of the i-nodes or in the indirect blocks. All fragments referenced in a singleaddress must be contiguous on the disk.
The disk address format consists of the nfrags and addr fields. These fields describe the area of diskcovered by the address:
addr Indicates which fragment on the disk is the starting fragmentnfrags Indicates the total number of contiguous fragments not used by the address
For example, if the fragment size for the file system is 512 bytes and the logical block is divided into eightfragments, the nfrags value is 3, indicating that five fragments are included in the address.
Chapter 5. File Systems and Logical Volumes 131

The following examples illustrate possible values for the addr and nfrags fields for different diskaddresses. These values assume a fragment size of 512 bytes, indicating that the logical block is dividedinto eight fragments.
Address for a single fragment:addr: 143
nfrags: 7
This address indicates that the starting location of the data is fragment 143 on the disk. The nfrags valueindicates that the total number of fragments included in the address is one. The nfrags value changes in afile system that has a fragment size other than 512 bytes. To correctly read the nfrags value, the system,or any user examining the address, must know the fragment size of the file system.
Address for five fragments:addr: 1117
nfrags: 3
In this case, the address starts at fragment number 1117 on the disk and continues for five fragments(including the starting fragment). Three fragments are remaining, as illustrated by the nfrags value.
The disk addresses are 32 bits in size. The bits are numbered from 0 to 31. The 0 bit is always reserved.Bits 1 through 3 contain the nfrags field. Bits 4 through 31 contain the addr field.
JFS Indirect BlocksThe JFS uses the indirect blocks to address the disk space allocated to larger files. Indirect blocks allowthe greatest flexibility for file sizes and the fastest retrieval time. The indirect block is assigned using thei_rindirect field of the disk i-node. This field allows for the following geometries or methods for addressingthe disk space:
v Direct
v Single indirect
v Double indirect
Each of these methods uses the same disk address format as compressed and fragmented file systems.Because files larger than 32 KB are allocated fragments of 4096 bytes, the nfrags field for addressesusing the single indirect or double indirect method has a value of 0.
Direct MethodWhen the direct method of disk addressing is used, each of the eight addresses listed in the i_rdaddr fieldof the disk i-node points directly to a single allocation of disk fragments. The maximum size of a file usingdirect geometry is 32,768 bytes (32KB), or 8 x 4096 bytes. When the file requires more than 32 KB, anindirect block is used to address the file’s disk space.
Single Indirect MethodThe i_rindirect field contains an address that points to either a single indirect block or a double indirectblock. When the single indirect disk-addressing method is used, the i_rindirect field contains the addressof an indirect block containing 1024 addresses. These addresses point to the disk fragments for eachallocation. Using the single indirect block geometry, the file can be up to 4,194,304 bytes (4 MB), or 1024x 4096 bytes.
Double Indirect MethodThe double indirect disk-addressing method uses the i_rindirect field to point to a double indirect block.The double indirect block contains 512 addresses that point to indirect blocks, which contain pointers tothe fragment allocations. The largest file size that can be used with the double indirect geometry in a filesystem not enabled for large files is 2,147,483,648 bytes (2 GB), or 512(1024 x 4096) bytes.
132 AIX 5L Version 5.3 General Programming Concepts: Writing and Debugging Programs

Note: The maximum file size that the read and write system calls would allow is 2 GB minus 1 (231–1 ).When memory map interface is used, 2 GB can be addresed. See “Writing Programs That AccessLarge Files” on page 137 for more information.
File systems enabled for large files allow a maximum file size of slightly less than 64 gigabytes(68589453312). The first single indirect block contains 4096 byte fragments, and all subsequent singleindirect blocks contain (32 X 4096) byte fragments. The following produces the maximum file size for filesystems enabling large files:(1 * (1024 * 4096)) + (511 * (1024 * 131072))
The fragment allocation assigned to a directory is divided into records of 512 bytes each and grows inaccordance with the allocation of these records.
QuotasDisk quotas restrict the amount of file system space that any single user or group can monopolize.
The quotactl subroutine sets limits on both the number of files and the number of disk blocks allocated toeach user or group on a file system. Quotas enforce the following types of limits:
hard Maximum limit allowed. When a process hits its hard limit, requests for more space fail.
soft Practical limit. If a process hits the soft limit, a warning is printed to the user’s terminal. Thewarning is often displayed at login. If the user fails to correct the problem after several loginsessions, the soft limit can become a hard limit.
System warnings are designed to encourage users to heed the soft limit. However, the quota systemallows processes access to the higher hard limit when more resources are temporarily required.
Allocating JFS2 File SpaceFile space allocation is the method by which data is apportioned physical storage space in the operatingsystem. The kernel allocates disk space to a file or directory in the form of logical blocks. A logical blockrefers to the division of a file or directory contents into 512, 1024, 2048, or 4096 byte units. When a JFS2file system is created, the logical block size is specified to be one of 512, 1024, 2048, or 4096 bytes.Logical blocks are not tangible entities; however, the data in a logical block consumes physical storagespace on the disk. Each file or directory consists of 0 or more logical blocks.
Full and Partial Logical BlocksA file or directory may contain full or partial logical blocks. A full logical block contains 512, 1024, 2048, or4096 bytes of data, depending on the file system block size specified when the JFS2 file system wascreated. Partial logical blocks occur when the last logical block of a file or directory contains less than afile-system block size of data.
For example, a JFS2 file system with a logical block size of 4096 with a file of 8192 bytes is two logicalblocks. The first 4096 bytes reside in the first logical block and the following 4096 bytes reside in thesecond logical block. Likewise, a file of 4608 bytes consists of two logical blocks. However, the last logicalblock is a partial logical block containing the last 512 bytes of the file’s data.
JFS2 File Space AllocationThe default block size is 4096 bytes. You can specify smaller block sizes with the mkfs command during afile system’s creation. Allowable block sizes are 512, 1024, 2048, and 4096 bytes. You can use only oneblock size in a file system. See “JFS2 File System Layout” on page 136 for more information on the filesystem structure.
Chapter 5. File Systems and Logical Volumes 133

The kernel allocates disk space so only the last file system block of data receives a partial blockallocation. As the partial block grows beyond the limits of its current allocation, additional blocks areallocated.
Block reallocation also occurs if data is added to logical blocks that represent file holes. A file hole is anempty logical block located prior to the last logical block that stores data. (File holes do not occur withindirectories.) These empty logical blocks are not allocated blocks. However, as data is added to file holes,allocation occurs. Each logical block that was not previously allocated disk space is allocated a file systemblock of space.
Additional block allocation is not required if existing data in the middle of a file or a directory is overwritten.The logical block containing the existing data has already been allocated file system blocks.
JFS2 tries to maintain contiguous allocation of a file or directory’s logical blocks on the disk. Maintainingcontiguous allocation lessens seek time because the data for a file or directory can be accessedsequentially and found on the same area of the disk. The disk space required for contiguous allocationmight not be available if another file or directory has already written to it.
The file system uses a bitmap called the block allocation map to record the status of every block in the filesystem. When the file system needs to allocate a new block, it refers to the block allocation map to identifywhich blocks are available. A block can only be allocated to a single file or directory at a time.
ExtentsAn extent is a contiguous variable-length sequence of file system blocks allocated to a JFS2 object as aunit. Large extents may span multiple allocation groups.
An i-node represents every JFS2 object. I-nodes contain the expected object-specific information such astime stamps or file type (regular or directory, and so on). They also contain a B+ tree to record theallocation of extents.
The length and address values are necessary to define an extent. The length is measured in units of thefile system block size. A 24-bit value represents the length of an extent, so an extent can range in sizefrom 1 to 224 -1 file system blocks. Therefore, the size of the maximum extent depends on the file systemblock size. The address is the address of the first block of the extent. The address is also in units of filesystem blocks; it is the block offset from the beginning of the file system.
An extent-based file system combined with user-specified file system block size allows JFS2 to not haveseparate support for internal fragmentation. You can configure the file system with a small file systemblock size, such as 512 bytes, to minimize internal fragmentation for file systems with large numbers ofsmall-sized files.
In general, the allocation policy for JFS2 tries to maximize contiguous allocation by allowing a minimumnumber of extents, with each extent as large and contiguous as possible. This allows for larger I/Otransfer, resulting in improved performance. However, in some cases, this is not always possible.
B+ TreesThe B+ tree data structure is used for file layout. The most common operations that JFS2 performs arereading and writing extents. B+ trees are used to help with performance of these operations.
An extent allocation descriptor (xad_t structure) describes the extent and adds two more fields that areneeded for representing files: an offset field, describing the logical byte address the extent represents, anda flags field. The xad_t structure is defined in the /usr/include/j2/j2_xtree.h file.
An xad structure describes two abstract ranges:
134 AIX 5L Version 5.3 General Programming Concepts: Writing and Debugging Programs
v The physical range of disk blocks. This starts at file system block number addressXAD(xadp) addressand extends for lengthXAD(xadp) file system blocks.
v The logical range of bytes within a file. This starts at byte number offsetXAD(xadp)*(file system blocksize) and extends for lengthXAD(xadp)*(file system block size.)
The physical range and the logical range are both the same number of bytes in length. Note that offset isstored in units of file system block size (for example, a value of 3) in offset means 3 file system blocks, not3 bytes. Extents within a file are always aligned on file system block size boundaries.
JFS2 LimitationJFS2 requires contiguous free space of at least a page, or 4 KB, in length when extending files. If you donot have contiguous free space of at least 4 KB, then the file system does not allow the extension of thefile, even if there is enough available storage space in smaller blocks.
JFS File System LayoutA file system is a set of files, directories, and other structures. File systems maintain information andidentify where a file or directory’s data is located on the disk. In addition to files and directories, JFS filesystems contain a boot block, a superblock, bitmaps, and one or more allocation groups. Each file systemoccupies one logical volume.
JFS Boot BlockThe boot block occupies the first 4096 bytes of the file system, starting at byte offset 0 on the disk. Theboot block is available to start the operating system.
JFS SuperblockThe superblock is 4096 bytes in size and starts at byte offset 4096 on the disk. The superblock maintainsinformation about the entire file system and includes the following fields:
v Size of the file system
v Number of data blocks in the file system
v A flag indicating the state of the file system
v Allocation group sizes
JFS Allocation BitmapsThe file system contains the following allocation bitmaps:
v The fragment allocation map records the allocation state of each fragment.
v The disk i-node allocation map records the status of each i-node.
JFS FragmentsMany file systems have disk blocks or data blocks. These blocks divide the disk into units of equal size tostore the data in a file or directory’s logical blocks. The disk block may be further divided into fixed-sizeallocation units called fragments. Some systems do not allow fragment allocations to span the boundariesof the disk block. In other words, a logical block cannot be allocated fragments from different disk blocks.
The journaled file system (JFS), however, provides a view of the file system as a contiguous series offragments. JFS fragments are the basic allocation unit and the disk is addressed at the fragment level.Thus, fragment allocations can span the boundaries of what might otherwise be a disk block. The defaultJFS fragment size is 4096 bytes, although you can specify smaller sizes. In addition to containing data forfiles and directories, fragments also contain disk addresses and data for indirect blocks. “Allocating JFSFile Space” on page 130 explains how the operating system allocates fragments.
Chapter 5. File Systems and Logical Volumes 135

JFS Allocation Groups
The set of fragments making up the file system are divided into one or more fixed-sized units ofcontiguous fragments. Each unit is an allocation group. The first of these groups begins the file systemand contains a reserved area occupying the first 32 x 4096 bytes of the group. The first 4096 bytes of thisarea hold the boot block, and the second 4096 bytes hold the file system superblock.
Each allocation group contains a static number of contiguous disk i-nodes that occupy some of the group’sfragments. These fragments are reserved for the i-nodes at file-system creation and extension time. Forthe first allocation group, the disk i-nodes occupy the fragments immediately following the reserved blockarea. For subsequent groups, the disk i-nodes are found at the start of each group. Disk i-nodes are 128bytes in size and are identified by a unique disk i-node number or i-number. The i-number maps a diski-node to its location on the disk or to an i-node within its allocation group.
A file system’s fragment allocation group size and the disk i-node allocation group size are specified as thenumber of fragments and disk i-nodes that exist in each allocation group. The default allocation group sizeis 8 MB, but can be as large as 64 MB. These values are stored in the file system superblock, and theyare set at file system creation.
Allocation groups allow the JFS resource allocation policies to use effective methods for to achieveoptimum file system I/O performance. These allocation policies try to cluster disk blocks and disk i-nodesfor related data to achieve good locality for the disk. Files are often read and written sequentially, and fileswithin a directory are often accessed together. Also, these allocation policies try to distribute unrelated datathroughout the file system in an attempt to minimize free-space fragmentation.
JFS Disk i-NodesA logical block contains a file or directory’s data in units of 4096 bytes. Each logical block is allocatedfragments for the storage of its data. Each file and directory has an i-node that contains accessinformation such as file type, access permissions, owner’s ID, and number of links to that file. Thesei-nodes also contain ″addresses″ for finding the location on the disk where the data for a logical block isstored.
Each i-node has an array of numbered sections. Each section contains an address for one of the file ordirectory’s logical blocks. These addresses indicate the starting fragment and the total number offragments included in a single allocation. For example, a file with a size of 4096 bytes has a singleaddress on the i-node’s array. Its 4096 bytes of data are contained in a single logical block. A larger filewith a size of 6144 bytes has two addresses. One address contains the first 4096 bytes and a secondaddress contains the remaining 2048 bytes (a partial logical block). If a file has a large number of logicalblocks, the i-node does not contain the disk addresses. Instead, the i-node points to an indirect block thatcontains the additional addresses.
JFS2 File System LayoutA file system is a set of files, directories and other structures. The file systems maintain information andidentify where the data is located on the disk for a file or directory. In addition to files and directories aJFS2 file system contains a superblock, allocation maps and one or more allocation groups. Each filesystem occupies one logical volume.
JFS2 SuperblockThe superblock is 4096 bytes in size and starts at byte offset 32768 on the disk. The superblock maintainsinformation about the entire file system and includes the following fields:
v Size of the file system
v Number of data blocks in the file system
v A flag indicating the state of the file system
136 AIX 5L Version 5.3 General Programming Concepts: Writing and Debugging Programs

v Allocation group sizes
v File system block size
JFS2 Allocation MapsThe file system contains the following allocation maps:
v The i-node allocation map records the location and allocation of all i-nodes in the file system.
v The block allocation map records the allocation state of each file system block.
JFS2 Disk i-NodesA logical block contains a file or directory’s data in units of file system blocks. Each logical block isallocated file system blocks for the storage of its data. Each file and directory has an i-node that containsaccess information such as file type, access permissions, owner’s ID, and number of links to that file.These i-nodes also contain a B+ tree for finding the location on the disk where the data for a logical blockis stored.
JFS2 Allocation GroupsAllocation groups divide the space on a file system into chunks. Allocation groups are used only for aproblem-solving technique in which the most appropriate solution, found by attempting alternative methods,is selected at successive stages of a program for using in the next step of the program. Allocation groupsallow JFS2 resource-allocation policies to use well-known methods for achieving optimum I/Operformance. First, the allocation policies try to cluster disk blocks and disk i-nodes for related data toachieve good locality for the disk. Files are often read and written sequentially and the files within adirectory are often accessed together. Second, the allocation policies try to distribute unrelated datathroughout the file system in order to accommodate disk locality.
Allocation groups within a file system are identified by a zero-based allocation group index, the allocationgroup number.
Allocation group sizes must be selected that yield allocation groups that are large enough to provide forcontiguous resource allocation over time. Allocation groups are limited to a maximum number of 128groups. The minimum allocation group size is 8192 file-system blocks.
Partial Allocation GroupsA file system whose size is not a multiple of the allocation group size will contain a partial allocation group;the last allocation group of the file system is not fully covered by disk blocks. This partial allocation groupwill be treated as a complete allocation group, except that the nonexistent disk blocks will be marked asallocated in the block allocation map.
Writing Programs That Access Large FilesAIX supports files that are larger than 2 gigabytes (2 GB). This section assists programmers inunderstanding the implications of large files on their applications and to assist them in modifying theirapplications. Application programs can be modified, through programming interfaces, to be aware of largefiles. The file system programming interfaces generally are based on the off_t data type.
Implications for Existing ProgramsThe 32-bit application environment that all applications used prior to AIX 4.2 remains unchanged. However,existing application programs cannot handle large files.
For example, the st_size field in the stat structure, which is used to return file sizes, is a signed, 32-bitlong. Therefore, that stat structure cannot be used to return file sizes that are larger than LONG_MAX. If
Chapter 5. File Systems and Logical Volumes 137

an application attempts to use the stat subroutine with a file that is larger than LONG_MAX, the statsubroutine will fail, and errno will be set to EOVERFLOW, indicating that the file size overflows the sizefield of the structure being used by the program.
This behavior is significant because existing programs that might not appear to have any impacts as aresult of large files will experience failures in the presence of large files even though the file size isirrelevant.
The errno EOVERFLOW can also be returned by an lseek pointer and by the fcntl subroutine if thevalues that need to be returned are larger than the data type or structure that the program is using. Forlseek, if the resulting offset is larger than LONG_MAX, lseek will fail and errno will be set toEOVERFLOW. For the fcntl subroutine, if the caller uses F_GETLK and the blocking lock’s starting offsetor length is larger than LONG_MAX, the fcntl call will fail, and errno will be set to EOVERFLOW.
Open ProtectionMany existing application programs could have unexpected behavior, including data corruption, if allowedto operate on large files. AIX uses an open-protection scheme to protect applications from this class offailure.
In addition to open protection, a number of other subroutines offer protection by providing an executionenvironment, which is identical to the environment under which these programs were developed. If anapplication uses the write family of subroutines and the write request crosses the 2 GB boundary, thewrite subroutines will transfer data only up to 2 GB minus 1. If the application attempts to write at orbeyond the 2GB -1 boundary, the write subroutines will fail and set errno to EFBIG. The behavior of themmap, ftruncate, and fclear subroutines are similar.
The read family of subroutines also participates in the open-protection scheme. If an application attemptsto read a file across the 2 GB threshold, only the data up to 2 GB minus 1 will be read. Reads at orbeyond the 2GB -1 boundary will fail, and errno will be set to EOVERFLOW.
Open protection is implemented by a flag associated with an open file description. The current state of theflag can be queried with the fcntl subroutine using the F_GETFL command. The flag can be modified withthe fcntl subroutine using the F_SETFL command.
Because open file descriptions are inherited across the exec family of subroutines, application programsthat pass file descriptors that are enabled for large-file access to other programs should consider whetherthe receiving program can safely access the large file.
Porting Applications to the Large File EnvironmentAIX provides two methods for applications to be enabled for large-file access. Application programmersmust decide which approach best suits their needs:
v Define _LARGE_FILES, which carefully redefines all of the relevant data types, structures, andsubroutine names to their large-file enabled counterparts. Defining _LARGE_FILES has the advantageof maximizing application portability to other platforms because the application is still written to thenormal POSIX and XPG interfaces. It has the disadvantage of creating some ambiguity in the codebecause the size of the various data items cannot be determined from looking at the code.
v Recode the application to explicitly call the large-file enabled subroutines. Recoding the application hasthe disadvantages of requiring more effort and reducing application portability. It can be used when theredefinition effect of _LARGE_FILES would have a considerable negative impact on the program orwhen it is desirable to convert only a very small portion of the program.
In either case, the application program must be carefully audited to ensure correct behavior in the newenvironment. Some of the common programming problems are discussed in “Common Pitfalls in Using theLarge File Environment” on page 141.
138 AIX 5L Version 5.3 General Programming Concepts: Writing and Debugging Programs

Using _LARGE_FILESIn the default compilation environment, the off_t data type is defined as a signed, 32-bit long. If theapplication defines _LARGE_FILES before the inclusion of any header files, then the large-fileprogramming environment is enabled and off_t is defined to be a signed, 64-bit long long. In addition, allof the subroutines that deal with file sizes or file offsets are redefined to be their large-file enabledcounterparts. Similarly, all of the data structures with embedded file sizes or offsets are redefined.
The following table shows the redefinitions that occur in the _LARGE_FILES environment:
Entity Redefined As Header File
off_t Object long long <sys/types.h>
fpos_t Object long long <sys/types.h>
struct stat Structure struct stat64 <sys/stat.h>
stat Subroutine stat64() <sys/stat.h>
fstat Subroutine fstat64() <sys/stat.h>
lstat Subroutine lstat64() <sys/stat.h>
mmap Subroutine mmap64() <sys/mman.h>
lockf Subroutine lockf64() <sys/lockf.h>
struct flock Structure struct flock64 <sys/flock.h>
open Subroutine open64() <fcntl.h>
creat Subroutine creat64() <fcntl.h>
F_GETLK CommandParameter
F_GETLK64 <fcntl.h>
F_SETLK CommandParameter
F_SETLK64 <fcntl.h>
F_SETLKW CommandParameter
F_SETLKW64 <fcntl.h>
ftw Subroutine ftw64() <ftw.h>
nftw Subroutine nftw64() <ftw.h>
fseeko Subroutine fseeko64() <stdio.h>
ftello Subroutine ftello64() <stdio.h>
fgetpos ubroutine fgetpos64() <stdio.h>
fsetpos Subroutine fsetpos64() <stdio.h>
fopen Subroutine fopen64() <stdio.h>
freopen Subroutine freopen64() <stdio.h>
lseek Subroutine lseek64() <unistd.h>
ftruncate Subroutine ftruncate64() <unistd.h>
truncate Subroutine truncate64() <unistd.h>
fclear Subroutine fclear64() <unistd.h>
pwrite Subroutine pwrite64() <unistd.h>
pread Subroutine pread64() <unistd.h>
struct aiocb Structure struct aiocb64 <sys/aio.h>
aio_read Subroutine aio_read64() <sys/aio.h>
aio_write Subroutine aio_write64() <sys/aio.h>
aio_cancel Subroutine aio_cancel64() <sys/aio.h>
Chapter 5. File Systems and Logical Volumes 139

aio_suspend Subroutine aio_suspend64() <sys/aio.h>
aio_return Subroutine aio_return64() <sys/aio.h>
aio_error Subroutine aio_error64() <sys/aio.h>
liocb Structure liocb64 <sys/aio.h>
lio_listio Subroutine lio_listio64() <sys/aio.h>
Using 64-Bit File System SubroutinesUsing the _LARGE_FILES environment may be impractical for some applications due to the far-reachingimplications of changing the size of off_t to 64 bits. If the number of changes is small, it may be morepractical to convert a relatively small part of the application to be large-file enabled. The 64-bit file systemdata types, structures, and subroutines are listed below:<sys/types.h>typedef long long off64_t;typedef long long fpos64_t;
<fcntl.h>
extern int open64(const char *, int, ...);extern int creat64(const char *, mode_t);
#define F_GETLK64#define F_SETLK64#define F_SETLKW64
<ftw.h>extern int ftw64(const char *, int (*)(const char *,const struct stat64 *, int), int);extern int nftw64(const char *, int (*)(const char *, const struct stat64 *, int,struct FTW *),int, int);
<stdio.h>
extern int fgetpos64(FILE *, fpos64_t *);extern FILE *fopen64(const char *, const char *);extern FILE *freopen64(const char *, const char *, FILE *);extern int fseeko64(FILE *, off64_t, int);extern int fsetpos64(FILE *, fpos64_t *);extern off64_t ftello64(FILE *);
<unistd.h>
extern off64_t lseek64(int, off64_t, int);extern int ftruncate64(int, off64_t);extern int truncate64(const char *, off64_t);extern off64_t fclear64(int, off64_t);extern ssize_t pread64(int, void *, size_t, off64_t);extern ssize_t pwrite64(int, const void *, size_t, off64_t);extern int fsync_range64(int, int, off64_t, off64_t);
<sys/flock.h>
struct flock64;
<sys/lockf.h>
extern int lockf64 (int, int, off64_t);
<sys/mman.h>
extern void *mmap64(void *, size_t, int, int, int, off64_t);
<sys/stat.h>
140 AIX 5L Version 5.3 General Programming Concepts: Writing and Debugging Programs

struct stat64;
extern int stat64(const char *, struct stat64 *);extern int fstat64(int, struct stat64 *);extern int lstat64(const char *, struct stat64 *);
<sys/aio.h>
struct aiocb64int aio_read64(int, struct aiocb64 *):int aio_write64(int, struct aiocb64 *);int aio_listio64(int, struct aiocb64 *[],
int, struct sigevent *);int aio_cancel64(int, struct aiocb64 *);int aio_suspend64(int, struct aiocb64 *[]);
struct liocb64int lio_listio64(int, struct liocb64 *[], int, void *);
Common Pitfalls in Using the Large File EnvironmentPorting of application programs to the large-file environment can expose a number of different problems inthe application. These problems are frequently the result of poor coding practices, which are harmless in a32-bit off_t environment, but which can manifest themselves when compiled in a 64-bit off_t environment.Some of the more common problems and solutions are discussed in this section.
Note: In the following examples, off_t is assumed to be a 64-bit file offset.
Improper Use of Data TypesA common source of problems with application programs is a failure to use the proper data types. If anapplication attempts to store file sizes or file offsets in an integer variable, the resulting value will betruncated and lose significance. To avoid this problem, use the off_t data type to store file sizes andoffsets.
Incorrect:int file_size;struct stat s;
file_size = s.st_size;
Better:off_t file_size;struct stat s;file_size = s.st_size;
Avoiding Parameter MismatchesWhen you are passing 64-bit integers to functions as arguments or when you are returning 64-bit integersfrom functions, both the caller and the called function must agree on the types of the arguments and thereturn value.
Passing a 32-bit integer to a function that expects a 64-bit integer causes the called function tomisinterpret the caller’s arguments, leading to unexpected behavior. This type of problem is especiallysevere if the program passes scalar values to a function that expects to receive a 64-bit integer.
You can avoid problems by using function prototypes carefully. In the code fragments below, fexample() isa function that takes a 64-bit file offset as a parameter. In the first example, the compiler generates thenormal 32-bit integer function linkage, which would be incorrect because the receiving function expects64-bit integer linkage. In the second example, the LL specifier is added, forcing the compiler to use the
Chapter 5. File Systems and Logical Volumes 141

proper linkage. In the last example, the function prototype causes the compiler to promote the scalar valueto a 64-bit integer. This is the preferred approach because the source code remains portable between32-bit and 64-bit environments.
Incorrect:fexample(0);
Better:fexample(0LL);
Best:void fexample(off_t);
fexample(0);
Arithmetic Overflows
Even when an application uses the correct data types, the application can remain vulnerable to failuresdue to arithmetic overflows. This problem usually occurs when the application performs an arithmeticoperation before it is promoted to the 64-bit data type. In the following example, blkno is a 32-bit blocknumber. Multiplying the block number by the block size occurs before the promotion, and overflow willoccur if the block number is sufficiently large. This problem is especially destructive because the code isusing the proper data types and the code works correctly for small values, but fails for large values. To fixthis problem, type the values before the arithmetic operation.
Incorrect:int blkno;off_t offset;
offset = blkno * BLKSIZE;
Better:int blkno;off_t offset;offset = (off_t) blkno * BLKSIZE;
This problem can also occur when passing values based on fixed constants to functions that expect 64-bitparameters. In the following example, LONG_MAX+1 results in a negative number, which is sign-extendedwhen it is passed to the function.
Incorrect:void fexample(off_t);
fexample(LONG_MAX+1);
Better:void fexample(off_t);
fexample((off_t)LONG_MAX+1);
fseek and ftell Subroutines
The data type used by fseek and ftell subroutines is long and cannot be redefined to the appropriate64-bit data type in the large-files environment. Application programs that access large files and that usefseek and ftell need to be converted. This can be done in a number of ways. The fseeko and ftellosubroutines are functionally equivalent to fseek and ftell except that the offset is given as an off_t insteadof a long. Make sure to convert all variables that can be used to store offsets to the appropriate type.
142 AIX 5L Version 5.3 General Programming Concepts: Writing and Debugging Programs
Incorrect:long cur_offset, new_offset;
cur_offset = ftell(fp);fseek(fp, new_offset, SEEK_SET);
Better:off_t cur_offset, new_offset;
cur_offset = ftello(fp);fseeko(fp, new_offset, SEEK_SET);
Including Correct Header Files
To see the function and data type redefinitions, application programs must include the correct header files.This has the additional benefit of exposing the function prototypes for various subroutines, which enablesstronger type-checking in the compiler.
Many application programs that call the open and creat subroutines do not include <fcntl.h>, whichcontains the defines for the various open modes. Because these programs typically hardcode the openmodes, run-time failures occur when the program is compiled in the large-file environment. The programdoes call the correct open subroutine, and the resulting file descriptor is not enabled for large-file access.Ensure that programs include the correct header files, especially in the large-file environment, to getvisibility to the redefinitions of the environment.
Incorrect:fd = open("afile",2);
Better:#include <fcntl.h>
fd = open("afile",O_RDWR);
String Conversions
Converting file sizes and offsets to and from strings can cause problems when porting applications to thelarge-file environment. The printf format string for a 64-bit integer is different than for a 32–bit integer.Ensure that programs that do these conversions use the correct format specifier. This is especially difficultwhen the application needs to be portable between 32-bit and 64-bit environments because there is noportable format specifier between the two environments. You can handle this problem by writing offsetconverters that use the correct format for the size of off_t.off_tatooff(const char *s){
off_t o;
if (sizeof(off_t) == 4)sscanf(s,"%d",&o);
else if (sizeof(off_t) == 8)sscanf(s,"%lld",&o);
elseerror();
return o;}
main(int argc, char **argv){
off_t offset;offset = atooff(argv[1]);fexample(offset);
}
Chapter 5. File Systems and Logical Volumes 143

Imbedded File OffsetsApplication programs that imbed file offsets or sizes in data structures may be affected by the change tothe size of the off_t in the large-file environment. This problem can be especially severe if the datastructure is shared between various applications or if the data structure is written into a file. In such cases,the programmer must decide if the application should continue to contain a 32-bit offset or if it should beconverted to contain a 64-bit offset. If the application program needs to have a 32-bit file offset even ifoff_t is 64 bits, the program may use the soff_t data type, a short off_t. This data type remains 32 bitseven in the large-file environment. If the data structure is converted to a 64-bit offset, all of the programsthat deal with that structure must be converted to understand the new data structure format.
File-Size Limits
Application programs that are converted to be aware of large files may fail in their attempts to create largefiles due to the file-size resource limit. The file-size resource limit is a signed, 32-bit value that limits themaximum file offset to which a process can write to a regular file. Programs that need to write large filesmust have their file-size limit set to RLIM_INFINITY, as follows.struct rlimit r;
r.rlim_cur = r.rlim_max = RLIM_INFINITY;setrlimit(RLIMIT_FSIZE,&r);
To set this limit from the Korn shell, run the following command:ulimit -f unlimited
To set this value permanently for a specific user, use the chuser command, as shown in the followingexample:chuser fsize_hard = -1 root
The maximum size of a file is ultimately a characteristic of the file system itself, not just the file size limit orthe environment, as follows:
v For the JFS, the maximum file size is determined by the parameters used at the time the file systemwas made. For JFS file systems that are enabled for large files, the maximum file size is slightly lessthan 64 gigabytes (0xff8400000). For all other JFS file systems, the maximum file size is 2Gb-1(0x7fffffff). Attempts to write a file in excess of the maximum file size in any file system format will fail,and errno will be set to EFBIG.
v For the JFS2, the maximum file size is limited by the size of the file system itself.
Linking for ProgrammersA link is a connection between a file name and an i-node (hard link) or between file names (symbolic link).Linking allows access to an i-node (see “Working with JFS i-nodes” on page 127 or “Working with JFS2i-nodes” on page 128) from multiple file names. Directory entries pair file names with i-nodes. File namesare easy for users to identify, and i-nodes contain the real disk addresses of the file’s data. A referencecount of all links into an i-node is maintained in the i_nlink field of the i-node. Subroutines that create anddestroy links use file names, not file descriptors (see “Using File Descriptors” on page 146). Therefore, it isnot necessary to open files when creating a link.
Processes can access and change the contents of the i-node by any of the linked file names. AIX supportshard links and symbolic links.
Hard Links
link Subroutine that creates hard links.The presence of a hard link guarantees the existence of a filebecause a hard link increments the link count in the i_nlink field of the i-node.
144 AIX 5L Version 5.3 General Programming Concepts: Writing and Debugging Programs

unlink Subroutine that releases links. When all hard links to an i-node are released, the file is no longeraccessible.
Hard links must link file names and i-nodes within the same file system because the i-node number isrelative to a single file system. Hard links always refer to a specific file because the directory entry createdby the hard link pairs the new file name to an i-node. The user ID that created the original file owns the fileand retains access mode authority over the file. Otherwise, all hard links are treated equally by theoperating system.
Example: If the /u/tom/bob file is linked to the /u/jack/foo file, the link count in the i_nlink field of the foofile is 2. Both hard links are equal. If /u/jack/foo is removed, the file continues to exist by the name/u/tom/bob and can be accessed by users with access to the tom directory. However, the owner of the fileis jack even though /u/jack/foo was removed. The space occupied by the file is charged to jack’s quotaaccount. To change file ownership, use the chown subroutine.
Symbolic LinksSymbolic links are implemented as a file that contains a path name by using the symlink command. Whena process encounters a symbolic link, the path contained in the symbolic link is prepended to the path thatthe process was searching. If the path name in the symbolic link is an absolute path name, the processsearches from the root directory for the named file. If the path name in the symbolic link does not beginwith a / (slash), the process interprets the rest of the path relative to the position of the symbolic link. Theunlink subroutine also removes symbolic links.
Symbolic links can traverse file systems because they are treated as regular files by the operating systemrather than as part of the file system structure. The presence of a symbolic link does not guarantee theexistence of the target file because a symbolic link has no effect on the i_nlink field of the i-node.
readlink Subroutine that reads the contents of a symbolic link. Many subroutines (including the open and statsubroutines) follow symbolic paths.
lstat Subroutine created to report on the status of the file containing the symbolic link and does not followthe link. See the symlink subroutine for a list of subroutines that traverse symbolic links.
Symbolic links are also called soft links because they link to a file by path name. If the target file isrenamed or removed, the symbolic link cannot resolve.
Example: The symbolic link to /u/joe/foo is a file that contains the literal data /u/joe/foo. When the ownerof the foo file removes this file, subroutine calls made to the symbolic link cannot succeed. If the fileowner then creates a new file named foo in the same directory, the symbolic link leads to the new file.Therefore, the link is considered soft because it is linked to interchangeable i-nodes.
In the ls -l command listing, an l in the first position indicates a linked file. In the final column of thatlisting, the links between files are represented as Path2 -> Path1 (or Newname -> Oldname).
unlink Subroutine that removes a directory entry. The Path parameter in the subroutine identifies the file to bedisconnected. At the completion of the unlink call, the link count of the i-node is reduced by the value of1.
remove Subroutine that also removes a file name by calling either the unlink or rmdir subroutine.
Directory Links
mkdir Subroutine that creates directory entries for new directories, which creates hard links to thei-node representing the directory
Chapter 5. File Systems and Logical Volumes 145
Symbolic links are recommended for creating additional links to a directory. Symbolic links do not interferewith the . and .. directory entries and will maintain the empty, well-formed directory status. The followingillustrates an example of the empty, well-formed directory /u/joe/foo and the i_nlink values./u
68 j o e 0
/u/joemkdir ("foo", 0666)
68 n 0 0 0
n n 0 0
235 f o o 0
/u/joe/foo
235 n 0 0 0
68 n n 0 0
i_nlink Values
i = 68
n_link 3
For i = 68, the n_link value is 3 (/u; /u/joe; /u/joe/foo).
i = 235
n_link 2
For i = 235, the n_link value is 2 (/u/joe; /u/joe/foo).
Using File DescriptorsA file descriptor is an unsigned integer used by a process to identify an open file. The number of filedescriptors available to a process is limited by the /OPEN_MAX control in the sys/limits.h file. Thenumber of file descriptors is also controlled by the ulimit -n flag. The open, pipe, creat, and fcntlsubroutines all generate file descriptors. File descriptors are generally unique to each process, but theycan be shared by child processes created with a fork subroutine or copied by the fcntl, dup, and dup2subroutines.
File descriptors are indexes to the file descriptor table in the u_block area maintained by the kernel foreach process. The most common ways for processes to obtain file descriptors are through open or creatoperations or through inheritance from a parent process. When a fork operation occurs, the descriptortable is copied for the child process, which allows the child process equal access to the files used by theparent process.
146 AIX 5L Version 5.3 General Programming Concepts: Writing and Debugging Programs

File Descriptor Tables and System Open File TablesThe file descriptor and open file table structures track each process’ access to a file and ensure dataintegrity.
file descriptor table Translates an index number (file descriptor) in the table to an open file. Filedescriptor tables are created for each process and are located in the u_block areaset aside for that process. Each of the entries in a file descriptor table has thefollowing fields: the flags area and the file pointer. There are up to OPEN_MAX filedescriptors. The structure of the file descriptor table is as follows:
struct ufd{
struct file *fp;int flags;
} *u_ufdsystem open file table Contains entries for each open file. A file table entry tracks the current offset
referenced by all read or write operations to the file and the open mode(O_RDONLY, O_WRONLY, or O_RDWR) of the file.
The open file table structure contains the current I/O offset for the file. The systemtreats each read/write operation as an implied seek to the current offset. Thus if xbytes are read or written, the pointer advances x bytes. The lseek subroutine can beused to reassign the current offset to a specified location in files that are randomlyaccessible. Stream-type files (such as pipes and sockets) do not use the offsetbecause the data in the file is not randomly accessible.
Managing File DescriptorsBecause files can be shared by many users, it is necessary to allow related processes to share a commonoffset pointer and have a separate current offset pointer for independent processes that access the samefile. The open file table entry maintains a reference count to track the number of file descriptors assignedto the file.
Multiple references to a single file can be caused by any of the following:
v A separate process opening the file
v Child processes retaining the file descriptors assigned to the parent process
v The fcntl or dup subroutine creating copies of the file descriptors
Sharing Open FilesEach open operation creates a system open file table entry. Separate table entries ensure each processhas separate current I/O offsets. Independent offsets protect the integrity of the data.
When a file descriptor is duplicated, two processes then share the same offset and interleaving can occur,in which bytes are not read or written sequentially.
Duplicating File DescriptorsFile descriptors can be duplicated between processes in the following ways: the dup or dup2 subroutine,the fork subroutine, and the fcntl (file descriptor control) subroutine.
dup and dup2 Subroutines
The dup subroutine creates a copy of a file descriptor. The duplicate is created at an empty spacein the user file descriptor table that contains the original descriptor. A dup process increments thereference count in the file table entry by 1 and returns the index number of the file-descriptorwhere the copy was placed.
The dup2 subroutine scans for the requested descriptor assignment and closes the requested filedescriptor if it is open. It allows the process to designate which descriptor entry the copy willoccupy, if a specific descriptor-table entry is required.
Chapter 5. File Systems and Logical Volumes 147

fork SubroutineThe fork subroutine creates a child process that inherits the file descriptors assigned to the parentprocess. The child process then execs a new process. Inherited descriptors that had theclose-on-exec flag set by the fcntl subroutine close.
fcntl (File Descriptor Control) SubroutineThe fcntl subroutine manipulates file structure and controls open file descriptors. It can be used tomake the following changes to a descriptor:
v Duplicate a file descriptor (identical to the dup subroutine).
v Get or set the close-on-exec flag.
v Set nonblocking mode for the descriptor.
v Append future writes to the end of the file (O_APPEND).
v Enable the generation of a signal to the process when it is possible to do I/O.
v Set or get the process ID or the group process ID for SIGIO handling.
v Close all file descriptors.
Preset File Descriptor ValuesWhen the shell runs a program, it opens three files with file descriptors 0, 1, and 2. The defaultassignments for these descriptors are as follows:
0 Represents standard input.1 Represents standard output.2 Represents standard error.
These default file descriptors are connected to the terminal, so that if a program reads file descriptor 0 andwrites file descriptors 1 and 2, the program collects input from the terminal and sends output to theterminal. As the program uses other files, file descriptors are assigned in ascending order.
If I/O is redirected using the < (less than) or > (greater than) symbols, the shell’s default file descriptorassignments are changed. For example, the following changes the default assignments for file descriptors0 and 1 from the terminal to the appropriate files:prog < FileX > FileY
In this example, file descriptor 0 now refers to FileX and file descriptor 1 refers to FileY. File descriptor 2has not been changed. The program does not need to know where its input comes from nor where it issent, as long as file descriptor 0 represents the input file and 1 and 2 represent output files.
The following sample program illustrates the redirection of standard output:#include <fcntl.h>#include <stdio.h>
void redirect_stdout(char *);
main(){
printf("Hello world\n"); /*this printf goes to* standard output*/
fflush(stdout);redirect_stdout("foo"); /*redirect standard output*/printf("Hello to you too, foo\n");
/*printf goes to file foo */fflush(stdout);
}
148 AIX 5L Version 5.3 General Programming Concepts: Writing and Debugging Programs

voidredirect_stdout(char *filename){
int fd;if ((fd = open(filename,O_CREAT|O_WRONLY,0666)) < 0)
/*open a new file */{
perror(filename);exit(1);
}close(1); /*close old */
*standard output*/if (dup(fd) !=1) /*dup new fd to
*standard input*/{
fprintf(stderr,"Unexpected dup failure\n");exit(1);
}close(fd); /*close original, new fd,*/
* no longer needed*/}
Within the file descriptor table, file descriptor numbers are assigned the lowest descriptor number availableat the time of a request for a descriptor. However, any value can be assigned within the file descriptortable by using the dup subroutine.
File Descriptor Resource LimitThe number of file descriptors that can be allocated to a process is governed by a resource limit. Thedefault value is set in the /etc/security/limits file and is typically set at 2000. The limit can be changed bythe ulimit command or the setrlimit subroutine. The maximum size is defined by the constantOPEN_MAX.
Creating and Removing FilesThis section describes the internal procedures performed by the operating system when creating, opening,closing, or removing files.
Creating a File
Different subroutines create specific types of files, as follows:
Subroutine Type of File Createdcreat Regularopen Regular (when the O_CREAT flag is set)mknod Regular, first-in-first-out (FIFO), or specialmkfifo Named pipe (FIFO)pipe Unnamed pipesocket Socketsmkdir Directoriessymlink Symbolic link
Creating a Regular File (creat, open, or mknod Subroutines)
You use the creat subroutine to create a file according to the values set in the Pathname and Modeparameters. If the file named in the Pathname parameter exists and the process has write permission tothe file, the creat subroutine truncates the file. Truncation releases all data blocks and sets the file size to0. You can also create new, regular files using the open subroutine with the O_CREAT flag.
Chapter 5. File Systems and Logical Volumes 149

Files created with the creat, mkfifo, or mknod subroutine take the access permissions set in the Modeparameter. Regular files created with the open subroutine take their access modes from the O_CREATflag Mode parameter. The umask subroutine sets a file-mode creation mask (set of access modes) fornew files created by processes and returns the previous value of the mask.
The permission bits on a newly created file are a result of the reverse of the umask bits ANDed with thefile-creation mode bits set by the creating process. When a new file is created by a process, the operatingsystem performs the following actions:
v Determines the permissions of the creating process
v Retrieves the appropriate umask value
v Reverses the umask value
v Uses the AND operation to combine the permissions of the creating process with the reverse of theumask value
Creating a Special File (mknod or mkfifo Subroutine)
You can use the mknod and mkfifo subroutines to create new special files. The mknod subroutinehandles named pipes (FIFO), ordinary, and device files. It creates an i-node for a file identical to thatcreated by the creat subroutine. When you use the mknod subroutine, the file-type field is set to indicatethe type of file being created. If the file is a block or character-type device file, the names of the major andminor devices are written into the i-node.
The mkfifo subroutine is an interface for the mknod subroutine and is used to create named pipes.
Opening a File
The open subroutine is the first step required for a process to access an existing file. The opensubroutine returns a file descriptor. Reading, writing, seeking, duplicating, setting I/O parameters,determining file status, and closing the file all use the file descriptor returned by the open call. The opensubroutine creates entries for a file in the file descriptor table when assigning file descriptors.
The open subroutine does the following:
v Checks for appropriate permissions that allow the process access to the file.
v Assigns a entry in the file descriptor table for the open file. The open subroutine sets the initialread/write byte offset to 0, the beginning of the file.
The ioctl or ioctlx subroutines perform control operations on opened special device files.
Closing a File
When a process no longer needs access to the open file, the close subroutine removes the entry for thefile from the table. If more than one file descriptor references the file table entry for the file, the referencecount for the file is decreased by 1, and the close completes. If a file has only 1 reference to it, the filetable entry is freed. Attempts by the process to use the disconnected file descriptor result in errors untilanother open subroutine reassigns a value for that file descriptor value. When a process exits, the kernelexamines its active user file descriptors and internally closes each one. This action ensures that all filesclose before the process ends.
Removing a FileWhen a file is no longer needed, you can use the unlink subroutine to remove the specified file from thedirectory containing it. If there are multiple hard links to the same file, the unlink subroutine removes thespecified link. If there is only one link, the unlink subroutine removes the file itself. For more information,see the unlink subroutine.
150 AIX 5L Version 5.3 General Programming Concepts: Writing and Debugging Programs

Working with File I/OAll input and output (I/O) operations use the current file offset information stored in the system filestructure. The current I/O offset designates a byte offset that is constantly tracked for every open file. Thecurrent I/O offset signals a read or write process where to begin operations in the file. The opensubroutine resets it to 0. The pointer can be set or changed using the lseek subroutine. For moreinformation, see “File Descriptor Tables and System Open File Tables” on page 147.
Manipulating the Current OffsetRead and write operations can access a file sequentially because the current I/O offset of the file tracksthe byte offset of each previous operation. The offset is stored in the system file table.
You can adjust the offset on files that can be randomly accessed, such as regular and special-type files,using the lseek subroutine.
lseek Allows a process to position the offset at a designated byte. The lseek subroutine positions the pointer atthe byte designated by the Offset variable. The Offset value can be calculated from the following places inthe file (designated by the value of the Whence variable):
absolute offsetBeginning byte of the file
relative offsetPosition of the former pointer
end_relative offsetEnd of the file
The return value for the lseek subroutine is the current value of the pointer’s position in the file. Forexample:cur_off= lseek(fd, 0, SEEK_CUR);
The lseek subroutine is implemented in the file table. All subsequent read and write operations use thenew position of the offset as their starting location.
Note: The offset cannot be changed on pipes or socket-type files.
fclear Subroutine that creates an empty space in a file. It sets to zero the number of bytes designated in theNumberOfBytes variable beginning at the current offset. The fclear subroutine cannot be used if theO_DEFER flag was set at the time the file was opened.
Reading a File
read Subroutine that copies a specified number of bytes from an open file to a specified buffer. The copybegins at the point indicated by the current offset. The number of bytes and buffer are specified bythe NBytes and Buffer parameters.
The read subroutine does the following:
1. Ensures that the FileDescriptor parameter is valid and that the process has read permissions. Thesubroutine then gets the file table entry specified by the FileDescriptor parameter.
2. Sets a flag in the file to indicate a read operation is in progress. This action locks other processes outof the file during the operation.
3. Converts the offset byte value and the value of the NBytes variables into a block address.
4. Transfers the contents of the identified block into a storage buffer.
Chapter 5. File Systems and Logical Volumes 151

5. Copies the contents of the storage buffer into the area designated by the Buffer variable.
6. Updates the current offset according to the number of bytes actually read. Resetting the offset ensuresthat the data is read in sequence by the next read process.
7. Deducts the number of bytes read from the total specified in the NByte variable.
8. Loops until the number of bytes to be read is satisfied.
9. Returns the total number of bytes read.
The cycle completes when the file to be read is empty, the number of bytes requested is met, or a readingerror is encountered during the process.
To avoid an extra iteration in the read loop, start read requests at the beginning of data block boundariesand to be multiples of the data block size. If a process reads blocks sequentially, the operating systemassumes all subsequent reads will also be sequential.
During the read operation, the i-node is locked. No other processes are allowed to modify the contents ofthe file while a read is in progress. However the file is unlocked immediately on completion of the readoperation. If another process changes the file between two read operations, the resulting data is different,but the integrity of the data structure is maintained.
The following example illustrates how to use the read subroutine to count the number of null bytes in thefoo file:#include <fcntl.h>#include <sys/param.h>
main(){
int fd;int nbytes;int nnulls;int i;char buf[PAGESIZE]; /*A convenient buffer size*/nnulls=0;if ((fd = open("foo",O_RDONLY)) < 0)
exit();while ((nbytes = read(fd,buf,sizeof(buf))) > 0)
for (i = 0; i < nbytes; i++)if (buf[i] == '\0';
nnulls++;printf("%d nulls found\n", nnulls);
}
Writing a File
write Subroutine that adds the amount of data specified in the NBytes variable from the space designated by theBuffer variable to the file described by the FileDescriptor variable. It functions similar to the readsubroutine. The byte offset for the write operation is found in the system file table’s current offset.
If you write to a file that does not contain a block corresponding to the byte offset resulting from the writeprocess, the write subroutine allocates a new block. This new block is added to the i-node information thatdefines the file. Adding the new block might allocate more than one block if the underlying file systemneeds to add blocks for addressing the file blocks.
During the write operation, the i-node is locked. No other processes are allowed to modify the contents ofthe file while a write is in progress. However, the file is unlocked immediately on completion of the writeoperation. If another process changes the file between two write operations, the resulting data is different,but the integrity of the data structure is maintained.
152 AIX 5L Version 5.3 General Programming Concepts: Writing and Debugging Programs

The write subroutine loops in a way similar to the read subroutine, logically writing one block to disk foreach iteration. At each iteration, the process either writes an entire block or only a portion of one. If only aportion of a data block is required to accomplish an operation, the write subroutine reads the block fromdisk to avoid overwriting existing information. If an entire block is required, it does not read the blockbecause the entire block is overwritten. The write operation proceeds block by block until the number ofbytes designated in the NBytes parameter is written.
Delayed WriteYou can designate a delayed write process with the O_DEFER flag. The data is then transferred to disk asa temporary file. The delayed write feature caches the data in case another process reads or writes thedata sooner. Delayed write saves extra disk operations. Many programs, such as mail and editors, createtemporary files in the /tmp directory and quickly remove them.
When a file is opened with the deferred update (O_DEFER) flag, the data is not written to permanentstorage until a process issues an fsync subroutine call or a process issues a synchronous write to the file(opened with O_SYNC flag). The fsync subroutine saves all changes in an open file to disk. See the opensubroutine for a description of the O_DEFER and O_SYNC flags.
Truncating FilesThe truncate or ftruncate subroutines change the length of regular files. The truncating process musthave write permission to the file. The Length variable value indicates the size of the file after the truncationoperation is complete. All measures are relative to the first byte of the file, not the current offset. If the newlength (designated in the Length variable) is less than the previous length, the data between the two isremoved. If the new length is greater than the existing length, zeros are added to extend the file size.When truncation is complete, full blocks are returned to the file system, and the file size is updated.
Direct I/O vs. Normal Cached I/ONormally, the JFS or JFS2 caches file pages in kernel memory. When the application does a file readrequest, if the file page is not in memory, the JFS or JFS2 reads the data from the disk into the file cache,then copies the data from the file cache to the user’s buffer. For application writes, the data is merelycopied from the user’s buffer into the cache. The actual writes to disk are done later.
This type of caching policy can be extremely effective when the cache hit rate is high. It also enablesread-ahead and write-behind policies. Lastly, it makes file writes asynchronous, allowing the application tocontinue processing instead of waiting for I/O requests to complete.
Direct I/O is an alternative caching policy that causes the file data to be transferred directly between thedisk and the user’s buffer. Direct I/O for files is functionally equivalent to raw I/O for devices. Applicationscan use direct I/O on JFS or JFS2 files.
Benefits of Direct I/OThe primary benefit of direct I/O is to reduce CPU utilization for file reads and writes by eliminating thecopy from the cache to the user buffer. This can also be a benefit for file data which has a very poorcache hit rate. If the cache hit rate is low, then most read requests have to go to the disk. Direct I/O canalso benefit applications that must use synchronous writes because these writes have to go to disk. Inboth of these cases, CPU usage is reduced because the data copy is eliminated.
A second benefit of direct I/O is that it allows applications to avoid diluting the effectiveness of caching ofother files. Anytime a file is read or written, that file competes for space in the cache. This situation maycause other file data to be pushed out of the cache. If the newly cached data has very poor reusecharacteristics, the effectiveness of the cache can be reduced. Direct I/O gives applications the ability toidentify files where the normal caching policies are ineffective, thus releasing more cache space for fileswhere the policies are effective.
Chapter 5. File Systems and Logical Volumes 153

Performance Costs of Direct I/OAlthough direct I/O can reduce CPU usage, using it typically results in the process taking longer tocomplete, especially for relatively small requests. This penalty is caused by the fundamental differencesbetween normal cached I/O and direct I/O.
Direct I/O ReadsEvery direct I/O read causes a synchronous read from disk; unlike the normal cached I/O policy whereread may be satisfied from the cache. This can result in very poor performance if the data was likely to bein memory under the normal caching policy.
Direct I/O also bypasses the normal JFS or JFS2 read-ahead algorithms. These algorithms can beextremely effective for sequential access to files by issuing larger and larger read requests and byoverlapping reads of future blocks with application processing.
Applications can compensate for the loss of JFS or JFS2 read-ahead by issuing larger read requests. At aminimum, direct I/O readers should issue read requests of at least 128k to match the JFS or JFS2read-ahead characteristics.
Applications can also simulate JFS or JFS2 read-ahead by issuing asynchronous direct I/O read-aheadeither by use of multiple threads or by using the aio_read subroutine.
Direct I/O WritesEvery direct I/O write causes a synchronous write to disk; unlike the normal cached I/O policy where thedata is merely copied and then written to disk later. This fundamental difference can cause a significantperformance penalty for applications that are converted to use direct I/O.
Conflicting File Access ModesTo avoid consistency issues between programs that use direct I/O and programs that use normal cachedI/O, direct I/O is an exclusive use mode. If there are multiple opens of a file and some of them are directand others are not, the file will stay in its normal cached access mode. Only when the file is openexclusively by direct I/O programs will the file be placed in direct I/O mode.
Similarly, if the file is mapped into virtual memory through the shmat or mmap system calls, the file willstay in normal cached mode.
The JFS or JFS2 will attempt to move the file into direct I/O mode anytime the last conflicting or non-directaccess is eliminated (either by the close, munmap, or shmdt subroutines). Changing the file from normalmode to direct I/O mode can be rather expensive because it requires writing all modified pages to disk andremoving all the file’s pages from memory.
Enabling Applications to use Direct I/OApplications enable direct I/O access to a file by passing the O_DIRECT flag to the open subroutine. Thisflag is defined in the fcntl.h file. Applications must be compiled with _ALL_SOURCE enabled to see thedefinition of O_DIRECT.
Offset/Length/Address Alignment Requirements of the Target BufferFor direct I/O to work efficiently, the request should be suitably conditioned. Applications can query theoffset, length, and address alignment requirements by using the finfo and ffinfo subroutines. When theFI_DIOCAP command is used, the finfo and ffinfo subroutines return information in the diocapbufstructure as described in the sys/finfo.h file. This structure contains the following fields:
dio_offset Recommended offset alignment for direct I/O writes to files in this file systemdio_max Recommended maximum write length for direct I/O writes to files in this systemdio_min Recommended minimum write length for direct I/O writes to files in this file systemdio_align Recommended buffer alignment for direct I/O writes to files in this file system
154 AIX 5L Version 5.3 General Programming Concepts: Writing and Debugging Programs

Failure to meet these requirements may cause file reads and writes to use the normal cached model andmay cause direct I/O to be disabled for the file. Different file systems may have different requirements, asthe following table illustrates.
File System Format dio_offset dio_max dio_min dio_align
JFS fixed, 4 K blk 4 K 2 MB 4 K 4 K
JFS fragmented 4 K 2 MB 4 K 4 K
JFS compressed n/a n/a n/a n/a
JFS big file 128 K 2 MB 128 K 4 K
JFS2 4 K 4 GB 4 K 4 K
Direct I/O LimitationsDirect I/O is not supported for files in a compressed-file file system. Attempts to open these files withO_DIRECT will be ignored and the files will be accessed with the normal cached I/O methods.
Direct I/O and Data I/O Integrity CompletionAlthough direct I/O writes are done synchronously, they do not provide synchronized I/O data integritycompletion, as defined by POSIX. Applications that need this feature should use O_DSYNC in addition toO_DIRECT. O_DSYNC guarantees that all of the data and enough of the metadata (for example, indirectblocks) have written to the stable store to be able to retrieve the data after a system crash. O_DIRECTonly writes the data; it does not write the metadata.
Working with PipesPipes are unnamed objects created to allow two processes to communicate. One process reads and theother process writes to the pipe file. This unique type of file is also called a first-in-first-out (FIFO) file. Thedata blocks of the FIFO are manipulated in a circular queue, maintaining read and write pointers internallyto preserve the FIFO order of data. The PIPE_BUF system variable, defined in the limits.h file, designatesthe maximum number of bytes guaranteed to be atomic when written to a pipe.
The shell uses unnamed pipes to implement command pipelining. Most unnamed pipes are created by theshell. The | (vertical) symbol represents a pipe between processes. In the following example, the output ofthe ls command is printed to the screen:ls | pr
Pipes are treated as regular files as much is possible. Normally, the current offset information is stored inthe system file table. However, because pipes are shared by processes, the read/write pointers must bespecific to the file, not to the process. File table entries are created by the open subroutine and are uniqueto the open process, not to the file. Processes with access to pipes share the access through commonsystem file table entries.
Using Pipe SubroutinesThe pipe subroutine creates an interprocess channel and returns two file descriptors. File descriptor 0 isopened for reading. File descriptor 1 is opened for writing. The read operation accesses the data on aFIFO basis. These file descriptors are used with read, write, and close subroutines.
In the following example, a child process is created and sends its process ID back through a pipe:#include <sys/types.h>main(){
int p[2];char buf[80];pid_t pid;
Chapter 5. File Systems and Logical Volumes 155

if (pipe(p)){
perror("pipe failed");exit(1)'
}if ((pid=fork()) == 0){
/* in child process */close(p[0]); /*close unused read */
*side of the pipe */sprintf(buf,"%d",getpid());
/*construct data *//*to send */
write(p[1],buf,strlen(buf)+1);/*write it out, including/*null byte */
exit(0);}
/*in parent process*/close(p[1]); /*close unused write side of pipe */read(p[0],buf,sizeof(buf)); /*read the pipe*/printf("Child process said: %s/n", buf);
/*display the result */exit(0);
}
If a process reads an empty pipe, the process waits until data arrives. If a process writes to a pipe that istoo full (PIPE_BUF), the process waits until space is available. If the write side of the pipe is closed, asubsequent read operation to the pipe returns an end-of-file.
Other subroutines that control pipes are the popen and pclose subroutines:
popen Creates the pipe (using the pipe subroutine) then forks to create a copy of the caller. The childprocess decides whether it is supposed to read or write, closes the other side of the pipe, thencalls the shell (using the execl subroutine) to run the desired process.
The parent closes the end of the pipe it did not use. These closes are necessary to makeend-of-file tests work correctly. For example, if a child process intended to read the pipe does notclose the write end of the pipe, it will never see the end of file condition on the pipe, becausethere is one write process potentially active.
The conventional way to associate the pipe descriptor with the standard input of a process is:close(p[1]);close(0);dup(p[0]);close(p[0]);
The close subroutine disconnects file descriptor 0, the standard input. The dup subroutine returnsa duplicate of an already open file descriptor. File descriptors are assigned in ascending order andthe first available one is returned. The effect of the dup subroutine is to copy the file descriptor forthe pipe (read side) to file descriptor 0, thus standard input becomes the read side of the pipe.Finally, the previous read side is closed. The process is similar for a child process to write from aparent.
pcloseCloses a pipe between the calling program and a shell command to be executed. Use the pclosesubroutine to close any stream opened with the popen subroutine.
The pclose subroutine waits for the associated process to end, then closes and returns the exitstatus of the command. This subroutine is preferable to the close subroutine because pclosewaits for child processes to finish before closing the pipe. Equally important, when a process
156 AIX 5L Version 5.3 General Programming Concepts: Writing and Debugging Programs
creates several children, only a bounded number of unfinished child processes can exist, even ifsome of them have completed their tasks. Performing the wait allows child processes to completetheir tasks.
Synchronous I/OBy default, writes to files in JFS or JFS2 file systems are asynchronous. However, JFS and JFS2 filesystems support the following types of synchronous I/O:
v Specified by the O_DSYNC open flag. When a file is opened using the O_DSYNC open mode, the write() system call will not return until the file data and all file system meta-data required to retrieve the filedata are both written to their permanent storage locations.
v Specified by the O_SYNC open flag. In addition to items specified by O_DSYNC, O_SYNC specifiesthat the write () system call will not return until all file attributes relative to the I/O are written to theirpermanent storage locations, even if the attributes are not required to retrieve the file data.
Before the O_DSYNC open mode existed, AIX applied O_DSYNC semantics to O_SYNC. For binarycompatibility reasons, this behavior still exists. If true O_SYNC behavior is required, then bothO_DSYNC and O_SYNC open flags must be specified. Exporting the XPG_SUS_ENV=ON environmentvariable also enables true O_SYNC behavior.
v Specified by the O_RSYNC open flag, and it simply applies the behaviors associated with O_SYNC or_DSYNC to reads. For files in JFS and JFS2 file systems, only the combination of O_RSYNC |O_SYNC has meaning, indicating that the read system call will not return until the file’s access time iswritten to its permanent storage location.
File Status
File status information resides in the i-node. The stat subroutines are used to return information on a file.The stat subroutines report file type, file owner, access mode, file size, number of links, i-node number,and file access times. These subroutines write information into a data structure designated by the Buffervariable. The process must have search permission for the directories in the path to the designated file.
stat Subroutine that returns the information about files named by the Path parameter. If the size of the filecannot be represented in the structure designated by the Buffer variable, stat will fail with the errno set toEOVERFLOW.
lstat Subroutine that provides information about a symbolic link, and the stat subroutine returns informationabout the file referenced by the link.
fstat Returns information from an open file using the file descriptor.
The statfs, fstafs, and ustat subroutines return status information about a file system.
fstatfs Returns the information about the file system that contains the file associated with thegiven file descriptor. The structure of the returned information is described in the/usr/include/sys/statfs.h file for the statfs and fstatfs subroutines and in the ustat.hfile for the ustat subroutine.
statfs Returns information about the file system that contains the file specified by the Pathparameter.
ustat Returns information about a mounted file system designated by the Device variable.This device identifier is for any given file and can be determined by examining thest_dev field of the stat structure defined in the /usr/include/sys/stat.h file. The ustatsubroutine is superseded by the statfs and fstatfs subroutines.
utimes and utime Also affect file status information by changing the file access and modification time inthe i-node.
Chapter 5. File Systems and Logical Volumes 157

File AccessibilityEvery file is created with an access mode. Each access mode grants read, write, or execute permission tousers, the user’s group, and all other users.
The access bits on a newly created file are a result of the reverse of the umask bits ANDed with thefile-creation mode bits set by the creating process. When a new file is created by a process, the operatingsystem performs the following actions:
v Determines the permissions of the creating process
v Retrieves the appropriate umask value
v Reverses the umask value
v Uses the AND operation to combine the permissions of the creating process with the reverse of theumask value
For example, if an existing file has the 027 permissions bits set, the user is not allowed any permissions.Write permission is granted to the group. Read, write, and execute access is set for all others. The umaskvalue of the 027 permissions modes would be 750 (the opposite of the original permissions). When 750 isANDed with 666 (the file creation mode bits set by the system call that created the file), the actualpermissions for the file are 640. Another representation of this example is:027 = _ _ _ _ W _ R W X Existing file access mode750 = R W X R _ X _ _ _ Reverse (umask) of original
permissions666 = R W _ R W _ R W _ File creation access modeANDED TO750 = R W X R _ X _ _ _ The umask value640 = R W _ R _ _ _ _ _ Resulting file access mode
access subroutine Investigates and reports on the accessibility mode of the file named in the Pathnameparameter. This subroutine uses the real user ID and the real group ID instead of theeffective user and group ID. Using the real user and group IDs allows programs withthe set-user-ID and set-group-ID access modes to limit access only to users withproper authorization.
chmod and fchmodsubroutines
Changes file access permissions.
chown subroutine Resets the ownership field of the i-node for the file and clears the previous owner.The new information is written to the i-node and the process finishes. The chmodsubroutine works in similar fashion, but the permission mode flags are changedinstead of the file ownership.
umask Sets and gets the value of the file creation mask.
In the following example, the user does not have access to the file secrets. However, when the programspecial is run and the access mode for the program is set-uID root, the program can access the file. Theprogram must use the access subroutine to prevent subversion of system security.$ ls -ltotal 0-r-s--x--x 1 root system 8290 Jun 09 17:07 special-rw------- 1 root system 1833 Jun 09 17:07 secrets$ cat secretscat: cannot open secrets
The access subroutine must be used by any set-uID or set-gID program to forestall this type of intrusion.Changing file ownership and access modes are actions that affect the i-node, not the data in the file. Tomake these changes, the owner of the process must have root user authority or own the file.
158 AIX 5L Version 5.3 General Programming Concepts: Writing and Debugging Programs

Creating New File System TypesIf it is necessary to create a new type of file system, file system helpers and mount helpers must becreated. This section provides information about the implementation specifics and execution syntax of filesystem helpers and mount helpers.
File System HelpersTo enable support of multiple file system types, most file system commands do not contain the code thatcommunicates with individual file systems. Instead, the commands collect parameters, file system names,and other information not specific to one file system type and then pass this information to a back-endprogram. The back end understands specific information about the relevant file system type and does thedetail work of communicating with the file system. Back-end programs used by file system commands areknown as file system helpers and mount helpers.
To determine the appropriate file system helper, the front-end command looks for a helper under the/sbin/helpers/vfstype/command file, where vfstype matches the file system type found in the /etc/vfs fileand command matches the name of the command being executed. The flags passed to the front-endcommand are passed to the file system helper.
One required file system helper that needs to be provided, called fstype, does not match a commandname. This helper is used to identify if a specified logical volume contains a file system of the vfstype ofthe helper.
v The helper returns 0 if the logical volume does not contain a file system of its type. A return value of 0indicates the logical volume does not contain a log.
v The helper returns 1 if the logical volume does contain a file system of its type and the file system doesnot need a separate device for a log. A return value of 1 indicates the logical volume does contain a log.
v The helper returns 2 if the logical volume does contain a file system of its type and the file system doesneed a separate device for a log. If the -l flag is specified, the fstype helper should check for a log of itsfile system type on the specified logical volume.
Obsolete File System Helper MechanismThis section describes the obsolete file system helper mechanism that was used on previous versions ofAIX. This mechanism is still available but should not be used anymore.
File System Helper OperationsThe following table lists the possible operations requested of a helper in the /usr/include/fshelp.h file:
Helper Operations Value#define FSHOP_NULL 0#define FSHOP_CHECK 1#define FSHOP_CHGSIZ 2#define FSHOP_FINDATA 3#define FSHOP_FREE 4#define FSHOP_MAKE 5#define FSHOP_REBUILD 6#define FSHOP_STATFS 7#define FSHOP_STAT 8#define FSHOP_USAGE 9#define FSHOP_NAMEI 10#define FSHOP_DEBUG 11
However, the JFS file system supports only the following operations:
Chapter 5. File Systems and Logical Volumes 159
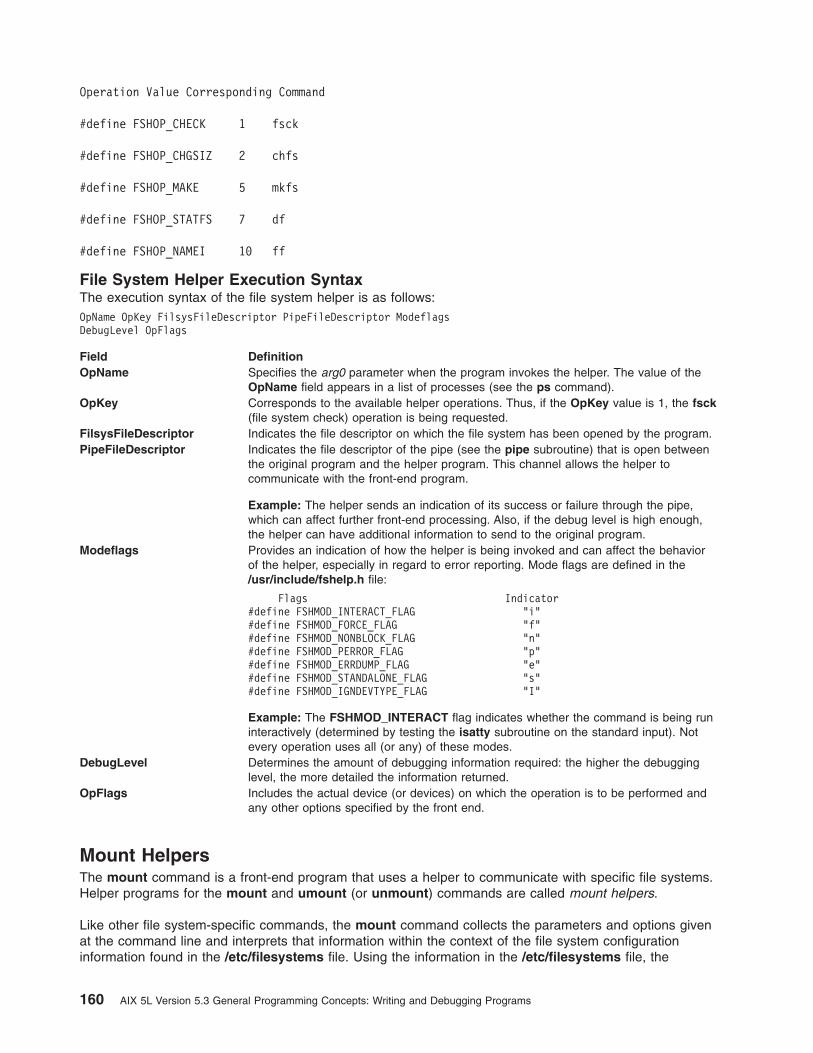
Operation Value Corresponding Command
#define FSHOP_CHECK 1 fsck
#define FSHOP_CHGSIZ 2 chfs
#define FSHOP_MAKE 5 mkfs
#define FSHOP_STATFS 7 df
#define FSHOP_NAMEI 10 ff
File System Helper Execution SyntaxThe execution syntax of the file system helper is as follows:OpName OpKey FilsysFileDescriptor PipeFileDescriptor ModeflagsDebugLevel OpFlags
Field DefinitionOpName Specifies the arg0 parameter when the program invokes the helper. The value of the
OpName field appears in a list of processes (see the ps command).OpKey Corresponds to the available helper operations. Thus, if the OpKey value is 1, the fsck
(file system check) operation is being requested.FilsysFileDescriptor Indicates the file descriptor on which the file system has been opened by the program.PipeFileDescriptor Indicates the file descriptor of the pipe (see the pipe subroutine) that is open between
the original program and the helper program. This channel allows the helper tocommunicate with the front-end program.
Example: The helper sends an indication of its success or failure through the pipe,which can affect further front-end processing. Also, if the debug level is high enough,the helper can have additional information to send to the original program.
Modeflags Provides an indication of how the helper is being invoked and can affect the behaviorof the helper, especially in regard to error reporting. Mode flags are defined in the/usr/include/fshelp.h file:
Flags Indicator#define FSHMOD_INTERACT_FLAG "i"#define FSHMOD_FORCE_FLAG "f"#define FSHMOD_NONBLOCK_FLAG "n"#define FSHMOD_PERROR_FLAG "p"#define FSHMOD_ERRDUMP_FLAG "e"#define FSHMOD_STANDALONE_FLAG "s"#define FSHMOD_IGNDEVTYPE_FLAG "I"
Example: The FSHMOD_INTERACT flag indicates whether the command is being runinteractively (determined by testing the isatty subroutine on the standard input). Notevery operation uses all (or any) of these modes.
DebugLevel Determines the amount of debugging information required: the higher the debugginglevel, the more detailed the information returned.
OpFlags Includes the actual device (or devices) on which the operation is to be performed andany other options specified by the front end.
Mount HelpersThe mount command is a front-end program that uses a helper to communicate with specific file systems.Helper programs for the mount and umount (or unmount) commands are called mount helpers.
Like other file system-specific commands, the mount command collects the parameters and options givenat the command line and interprets that information within the context of the file system configurationinformation found in the /etc/filesystems file. Using the information in the /etc/filesystems file, the
160 AIX 5L Version 5.3 General Programming Concepts: Writing and Debugging Programs
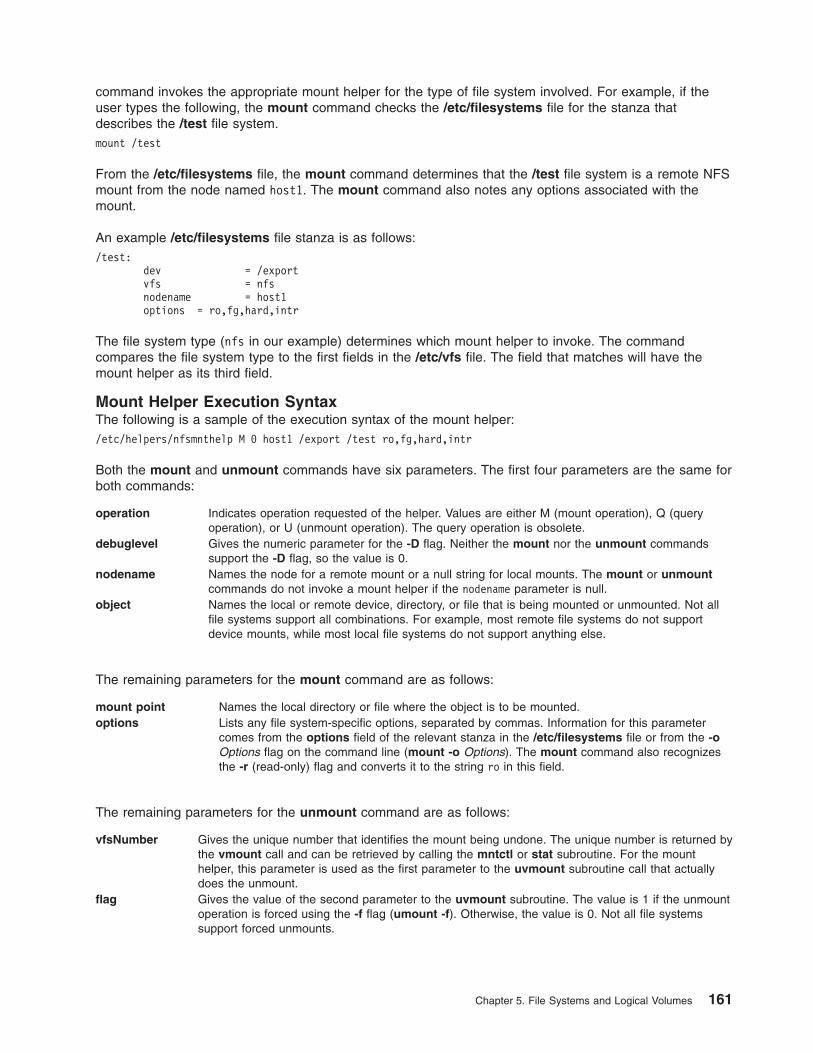
command invokes the appropriate mount helper for the type of file system involved. For example, if theuser types the following, the mount command checks the /etc/filesystems file for the stanza thatdescribes the /test file system.mount /test
From the /etc/filesystems file, the mount command determines that the /test file system is a remote NFSmount from the node named host1. The mount command also notes any options associated with themount.
An example /etc/filesystems file stanza is as follows:/test:
dev = /exportvfs = nfsnodename = host1options = ro,fg,hard,intr
The file system type (nfs in our example) determines which mount helper to invoke. The commandcompares the file system type to the first fields in the /etc/vfs file. The field that matches will have themount helper as its third field.
Mount Helper Execution SyntaxThe following is a sample of the execution syntax of the mount helper:/etc/helpers/nfsmnthelp M 0 host1 /export /test ro,fg,hard,intr
Both the mount and unmount commands have six parameters. The first four parameters are the same forboth commands:
operation Indicates operation requested of the helper. Values are either M (mount operation), Q (queryoperation), or U (unmount operation). The query operation is obsolete.
debuglevel Gives the numeric parameter for the -D flag. Neither the mount nor the unmount commandssupport the -D flag, so the value is 0.
nodename Names the node for a remote mount or a null string for local mounts. The mount or unmountcommands do not invoke a mount helper if the nodename parameter is null.
object Names the local or remote device, directory, or file that is being mounted or unmounted. Not allfile systems support all combinations. For example, most remote file systems do not supportdevice mounts, while most local file systems do not support anything else.
The remaining parameters for the mount command are as follows:
mount point Names the local directory or file where the object is to be mounted.options Lists any file system-specific options, separated by commas. Information for this parameter
comes from the options field of the relevant stanza in the /etc/filesystems file or from the -oOptions flag on the command line (mount -o Options). The mount command also recognizesthe -r (read-only) flag and converts it to the string ro in this field.
The remaining parameters for the unmount command are as follows:
vfsNumber Gives the unique number that identifies the mount being undone. The unique number is returned bythe vmount call and can be retrieved by calling the mntctl or stat subroutine. For the mounthelper, this parameter is used as the first parameter to the uvmount subroutine call that actuallydoes the unmount.
flag Gives the value of the second parameter to the uvmount subroutine. The value is 1 if the unmountoperation is forced using the -f flag (umount -f). Otherwise, the value is 0. Not all file systemssupport forced unmounts.
Chapter 5. File Systems and Logical Volumes 161

Logical Volume ProgrammingThe Logical Volume Manager (LVM) consists of the library of LVM subroutines and the logical volumedevice driver, described as follows:
v Library of LVM subroutines. These subroutines define volume groups and maintain the logical andphysical volumes of volume groups.
v Logical volume device driver. The logical volume device driver is a pseudo-device driver that processesall logical I/O. It exists as a layer between the file system and the disk device drivers. The logicalvolume device driver converts a logical address to a physical address, handles mirroring and bad-blockrelocation, and then sends the I/O request to the specific disk device driver. Interfaces to the logicalvolume device driver are provided by the open, close, read, write, and ioctl subroutines.
For a description of the readx and writex extension parameters and those ioctl operations specific to thelogical volume device driver, see the AIX 5L Version 5.3 Kernel Extensions and Device SupportProgramming Concepts.
For more information about logical volumes, see the Operating system and device management.
Library of Logical Volume SubroutinesLVM subroutines define and maintain the logical and physical volumes of a volume group. Systemmanagement commands use these subroutines to perform system management for the logical andphysical volumes of a system. The programming interface for the library of LVM subroutines is available toprovide alternatives to or expand the function of the system management commands for logical volumes.
Note: The LVM subroutines use the sysconfig system call, which requires root user authority, to queryand update kernel data structures describing a volume group. You must have root user authority touse the services of the LVM subroutine library.
The following services are available:
lvm_querylv Queries a logical volume and returns all pertinent information.lvm_querypv Queries a physical volume and returns all pertinent information.lvm_queryvg Queries a volume group and returns pertinent information.lvm_queryvgs Queries the volume groups of the system and returns information for groups that are varied
online.
Related InformationFor further information on this topic, see the following:
v Chapter 5, “File Systems and Logical Volumes,” on page 121
v Chapter 7, “Input and Output Handling,” on page 175
v Chapter 20, “System Memory Allocation Using the malloc Subsystem,” on page 415
v File and directory links, File systems, Processes, Logical volume storage, File system managementtasks in Operating system and device management
v Special Files Overview, Header Files Overview in AIX 5L Version 5.3 Files Reference
v Understanding Generic I-nodes (G-nodes), Virtual File System Overview, Programming in the KernelEnvironment, Understanding the Logical Volume Device Driver in AIX 5L Version 5.3 Kernel Extensionsand Device Support Programming Concepts
v Command Support for Files Larger than 2 Gigabytes in AIX 5L Version 5.3 Commands Reference,Volume 6
162 AIX 5L Version 5.3 General Programming Concepts: Writing and Debugging Programs
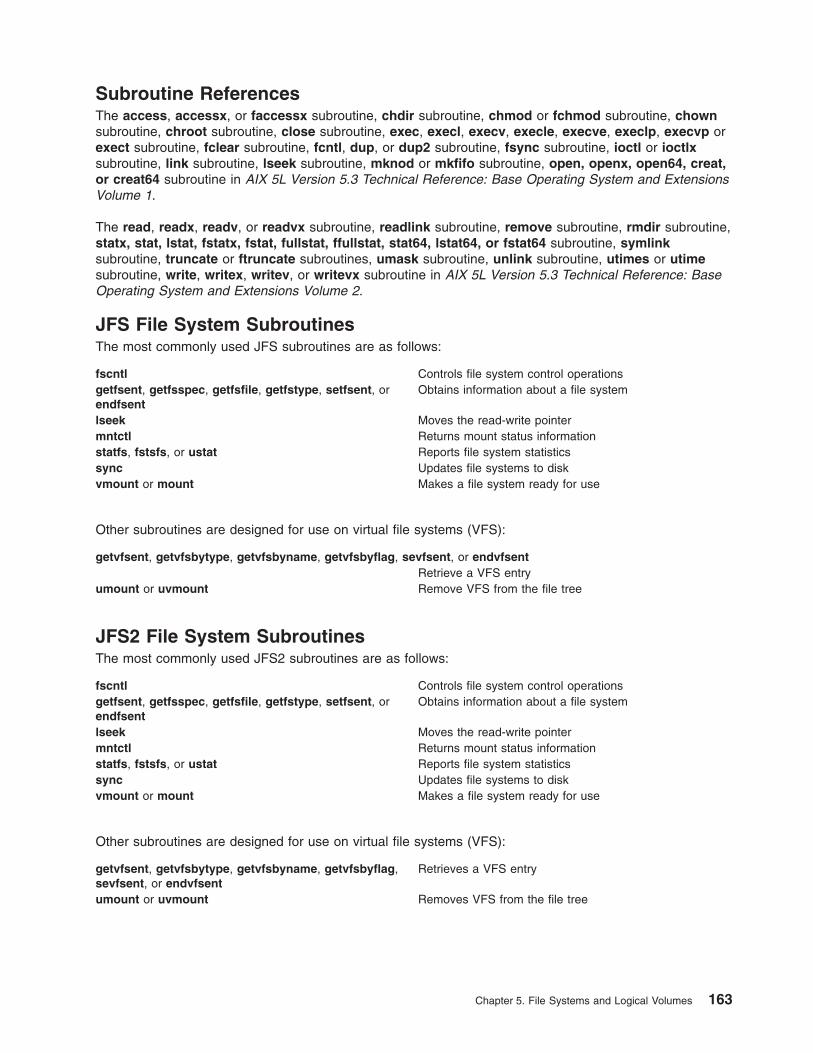
Subroutine ReferencesThe access, accessx, or faccessx subroutine, chdir subroutine, chmod or fchmod subroutine, chownsubroutine, chroot subroutine, close subroutine, exec, execl, execv, execle, execve, execlp, execvp orexect subroutine, fclear subroutine, fcntl, dup, or dup2 subroutine, fsync subroutine, ioctl or ioctlxsubroutine, link subroutine, lseek subroutine, mknod or mkfifo subroutine, open, openx, open64, creat,or creat64 subroutine in AIX 5L Version 5.3 Technical Reference: Base Operating System and ExtensionsVolume 1.
The read, readx, readv, or readvx subroutine, readlink subroutine, remove subroutine, rmdir subroutine,statx, stat, lstat, fstatx, fstat, fullstat, ffullstat, stat64, lstat64, or fstat64 subroutine, symlinksubroutine, truncate or ftruncate subroutines, umask subroutine, unlink subroutine, utimes or utimesubroutine, write, writex, writev, or writevx subroutine in AIX 5L Version 5.3 Technical Reference: BaseOperating System and Extensions Volume 2.
JFS File System SubroutinesThe most commonly used JFS subroutines are as follows:
fscntl Controls file system control operationsgetfsent, getfsspec, getfsfile, getfstype, setfsent, orendfsent
Obtains information about a file system
lseek Moves the read-write pointermntctl Returns mount status informationstatfs, fstsfs, or ustat Reports file system statisticssync Updates file systems to diskvmount or mount Makes a file system ready for use
Other subroutines are designed for use on virtual file systems (VFS):
getvfsent, getvfsbytype, getvfsbyname, getvfsbyflag, sevfsent, or endvfsentRetrieve a VFS entry
umount or uvmount Remove VFS from the file tree
JFS2 File System SubroutinesThe most commonly used JFS2 subroutines are as follows:
fscntl Controls file system control operationsgetfsent, getfsspec, getfsfile, getfstype, setfsent, orendfsent
Obtains information about a file system
lseek Moves the read-write pointermntctl Returns mount status informationstatfs, fstsfs, or ustat Reports file system statisticssync Updates file systems to diskvmount or mount Makes a file system ready for use
Other subroutines are designed for use on virtual file systems (VFS):
getvfsent, getvfsbytype, getvfsbyname, getvfsbyflag,sevfsent, or endvfsent
Retrieves a VFS entry
umount or uvmount Removes VFS from the file tree
Chapter 5. File Systems and Logical Volumes 163

Commands ReferencesThe ls command, mkfs command in AIX 5L Version 5.3 Commands Reference, Volume 3.
The pr command in AIX 5L Version 5.3 Commands Reference, Volume 4.
Files ReferencesThe fullstat.h file, stat.h file, statfs.h file.
164 AIX 5L Version 5.3 General Programming Concepts: Writing and Debugging Programs

Chapter 6. Floating-Point Exceptions
This chapter provides information about floating-point exceptions and how your programs can detect andhandle them.
The Institute of Electrical and Electronics Engineers (IEEE) defines a standard for floating-point exceptionscalled the IEEE Standard for Binary Floating-Point Arithmetic (IEEE 754). This standard defines five typesof floating-point exception that must be signaled when detected:
v Invalid operation
v Division by zero
v Overflow
v Underflow
v Inexact calculation
When one of these exceptions occurs in a user process, it is signaled either by setting a flag or taking atrap. By default, the system sets a status flag in the Floating-Point Status and Control registers (FPSCR),indicating the exception has occurred. Once the status flags are set by an exception, they are cleared onlywhen the process clears them explicitly or when the process ends. The operating system providessubroutines to query, set, or clear these flags.
The system can also cause the floating-point exception signal (SIGFPE) to be raised if a floating-pointexception occurs. Because this is not the default behavior, the operating system provides subroutines tochange the state of the process so the signal is enabled. When a floating-point exception raises theSIGFPE signal, the process terminates and produces a core file if no signal-handler subroutine is presentin the process. Otherwise, the process calls the signal-handler subroutine.
Floating-Point Exception Subroutines
Floating-point exception subroutines can be used to:
v Change the execution state of the process
v Enable the signaling of exceptions
v Disable exceptions or clear flags
v Determine which exceptions caused the signal
v Test the exception sticky flags
The following subroutines are provided to accomplish these tasks:
fp_any_xcp or fp_divbyzero Test the exception sticky flagsfp_enable or fp_enable_all Enable the signaling of exceptionsfp_inexact, fp_invalid_op, fp_iop_convert,fp_iop_infdinf, fp_iop_infmzr, fp_iop_infsinf,fp_iop_invcmp, fp_iop_snan, fp_iop_sqrt,fp_iop_vxsoft, fp_iop_zrdzr, or fp_overflow
Test the exception sticky flags
fp_sh_info Determines which exceptions caused the signalfp_sh_set_stat Disables exceptions or clear flagsfp_trap Changes the execution state of the processfp_underflow Tests the exception sticky flagssigaction Installs signal handler
© Copyright IBM Corp. 1997, 2010 165

Floating-Point Trap Handler Operation
To generate a trap, a program must change the execution state of the process using the fp_trapsubroutine and enable the exception to be trapped using the fp_enable or fp_enable_all subroutine.
Changing the execution state of the program may slow performance because floating-point trappingcauses the process to execute in serial mode.
When a floating-point trap occurs, the SIGFPE signal is raised. By default, the SIGFPE signal causes theprocess to terminate and produce a core file. To change this behavior, the program must establish a signalhandler for this signal. See the sigaction, sigvec, or signal subroutines for more information on signalhandlers.
Exceptions: Disabled and Enabled Comparison
Refer to the following lists for an illustration of the differences between the disabled and enabledprocessing states and the subroutines that are used.
Exceptions-Disabled ModelThe following subroutines test exception flags in the disabled processing state:
v fp_any_xcp
v fp_clr_flag
v fp_divbyzero
v fp_inexact
v fp_invalid_op
v fp_iop_convert
v fp_iop_infdinf
v fp_iop_infmzr
v fp_iop_infsi
v fp_iop_invcmp
v fp_iop_snan
v fp_iop_sqrt
v fp_iop_vxsoft
v fp_iop_zrdzr
v fp_overflow
v fp_underflow
Exceptions-Enabled ModelThe following subroutines function in the enabled processing state:
fp_enable or fp_enable_all Enable the signaling of exceptionsfp_sh_info Determines which exceptions caused the signalfp_sh_set_stat Disables exceptions or clear flagsfp_trap Changes the execution state of the processsigaction Installs signal handler
Imprecise Trapping ModesSome systems have imprecise trapping modes. This means the hardware can detect a floating-pointexception and deliver an interrupt, but processing may continue while the signal is delivered. As a result,the instruction address register (IAR) is at a different instruction when the interrupt is delivered.
166 AIX 5L Version 5.3 General Programming Concepts: Writing and Debugging Programs

Imprecise trapping modes cause less performance degradation than precise trapping mode. However,some recovery operations are not possible, because the operation that caused the exception cannot bedetermined or because subsequent instruction may have modified the argument that caused the exception.
To use imprecise exceptions, a signal handler must be able to determine if a trap was precise orimprecise.
Precise TrapsIn a precise trap, the instruction address register (IAR) points to the instruction that caused the trap. Aprogram can modify the arguments to the instruction and restart it, or fix the result of the operation andcontinue with the next instruction. To continue, the IAR must be incremented to point to the nextinstruction.
Imprecise TrapsIn an imprecise trap, the IAR points to an instruction beyond the one that caused the exception. Theinstruction to which the IAR points has not been started. To continue execution, the signal handler doesnot increment the IAR.
To eliminate ambiguity, the trap_mode field is provided in the fp_sh_info structure. This field specifies thetrapping mode in effect in the user process when the signal handler was entered. This information canalso be determined by examining the Machine Status register (MSR) in the mstsave structure.
The fp_sh_info subroutine allows a floating-point signal handler to determine if the floating-point exceptionwas precise or imprecise.
Note: Even when precise trapping mode is enabled some floating-point exceptions may be imprecise(such as operations implemented in software). Similarly, in imprecise trapping mode some exceptionsmay be precise.
When using imprecise exceptions, some parts of your code may require that all floating-point exceptionsare reported before proceeding. The fp_flush_imprecise subroutine is provided to accomplish this. It isalso recommended that the atexit subroutine be used to register the fp_flush_imprecise subroutine torun at program exit. Running at exit ensures that the program does not exit with unreported impreciseexceptions.
Hardware-Specific SubroutinesSome systems have hardware instructions to compute the square root of a floating-point number and toconvert a floating-point number to an integer. Models not having these hardware instructions use softwaresubroutines to do this. Either method can cause a trap if the invalid operation exception is enabled. Thesoftware subroutines report, through the fp_sh_info subroutine, that an imprecise exception occurred,because the IAR does not point to a single instruction that can be restarted to retry the operation.
Example of a Floating-Point Trap Handler/** This code demonstates a working floating-point exception* trap handler. The handler simply identifies which* floating-point exceptions caused the trap and return.* The handler will return the default signal return* mechanism longjmp().*/
#include <signal.h>#include <setjmp.h>#include <fpxcp.h>#include <fptrap.h>#include <stdlib.h>#include <stdio.h>
Chapter 6. Floating-Point Exceptions 167

#define EXIT_BAD -1#define EXIT_GOOD 0
/** Handshaking variable with the signal handler. If zero,* then the signal hander returns via the default signal* return mechanism; if non-zero, then the signal handler* returns via longjmp.*/
static int fpsigexit;#define SIGRETURN_EXIT 0#define LONGJUMP_EXIT 1
static jmp_buf jump_buffer; /* jump buffer */#define JMP_DEFINED 0 /* setjmp rc on initial call */#define JMP_FPE 2 /* setjmp rc on return from */
/* signal handler */
/** The fp_list structure allows text descriptions* of each possible trap type to be tied to the mask* that identifies it.*/
typedef struct{fpflag_t mask;char *text;} fp_list_t;
/* IEEE required trap types */
fp_list_ttrap_list[] =
{{ FP_INVALID, "FP_INVALID"},{ FP_OVERFLOW, "FP_OVERFLOW"},{ FP_UNDERFLOW, "FP_UNDERFLOW"},{ FP_DIV_BY_ZERO, "FP_DIV_BY_ZERO"},{ FP_INEXACT, "FP_INEXACT"}
};
/* INEXACT detail list -- this is an system extension */
fp_list_tdetail_list[] =
{{ FP_INV_SNAN, "FP_INV_SNAN" } ,{ FP_INV_ISI, "FP_INV_ISI" } ,{ FP_INV_IDI, "FP_INV_IDI" } ,{ FP_INV_ZDZ, "FP_INV_ZDZ" } ,{ FP_INV_IMZ, "FP_INV_IMZ" } ,{ FP_INV_CMP, "FP_INV_CMP" } ,{ FP_INV_SQRT, "FP_INV_SQRT" } ,{ FP_INV_CVI, "FP_INV_CVI" } ,{ FP_INV_VXSOFT, "FP_INV_VXSOFT" }
};
/** the TEST_IT macro is used in main() to raise* an exception.*/
#define TEST_IT(WHAT, RAISE_ARG) \{ \puts(strcat("testing: ", WHAT)); \fp_clr_flag(FP_ALL_XCP); \fp_raise_xcp(RAISE_ARG); \}
168 AIX 5L Version 5.3 General Programming Concepts: Writing and Debugging Programs

/** NAME: my_div** FUNCTION: Perform floating-point division.**/
doublemy_div(double x, double y)
{return x / y;}
/** NAME: sigfpe_handler** FUNCTION: A trap handler that is entered when* a floating-point exception occurs. The* function determines what exceptions caused* the trap, prints this to stdout, and returns* to the process which caused the trap.** NOTES: This trap handler can return either via the* default return mechanism or via longjmp().* The global variable fpsigexit determines which.** When entered, all floating-point traps are* disabled.** This sample uses printf(). This should be used* with caution since printf() of a floating-* point number can cause a trap, and then* another printf() of a floating-point number* in the signal handler will corrupt the static* buffer used for the conversion.** OUTPUTS: The type of exception that caused* the trap.*/
static voidsigfpe_handler(int sig,
int code,struct sigcontext *SCP)
{struct mstsave * state = &SCP->sc_jmpbuf.jmp_context;fp_sh_info_t flt_context; /* structure for fp_sh_info()
/* call */int i; /* loop counter */extern int fpsigexit; /* global handshaking variable */extern jmp_buf jump_buffer /* */
/** Determine which floating-point exceptions caused* the trap. fp_sh_info() is used to build the floating signal* handler info structure, then the member* flt_context.trap can be examined. First the trap type is* compared for the IEEE required traps, and if the trap type* is an invalid operation, the detail bits are examined.*/
fp_sh_info(SCP, &flt_context, FP_SH_INFO_SIZE);
static voidsigfpe_handler(int sig,
int code,struct sigcontext *SCP)
{struct mstsave * state = &SCP->sc_jmpbuf.jmp_context;fp_sh_info_t flt_context; /* structure for fp_sh_info()
Chapter 6. Floating-Point Exceptions 169

/* call */int i; /* loop counter */extern int fpsigexit; /* global handshaking variable */extern jmp_buf jump_buffer; /* */
/** Determine which floating-point exceptions caused* the trap. fp_sh_info() is used to build the floating signal* handler info structure, then the member* flt_context.trap can be examined. First the trap type is* compared for the IEEE required traps, and if the trap type* is an invalid operation, the detail bits are examined.*/
fp_sh_info(SCP, &flt_context, FP_SH_INFO_SIZE);
for (i = 0; i < (sizeof(trap_list) / sizeof(fp_list_t)); i++){if (flt_context.trap & trap_list[i].mask)
(void) printf("Trap caused by %s error\n", trap_list[i].text);}
if (flt_context.trap & FP_INVALID){for (i = 0; i < (sizeof(detail_list) / sizeof(fp_list_t)); i++)
{if (flt_context.trap & detail_list[i].mask)
(void) printf("Type of invalid op is %s\n", detail_list[i].text);}
}
/* report which trap mode was in effect */
switch (flt_context.trap_mode){
case FP_TRAP_OFF:puts("Trapping Mode is OFF");break;
case FP_TRAP_SYNC:puts("Trapping Mode is SYNC");break;
case FP_TRAP_IMP:puts("Trapping Mode is IMP");break;
case FP_TRAP_IMP_REC:puts("Trapping Mode is IMP_REC");break;
default:puts("ERROR: Invalid trap mode");}
if (fpsigexit == LONGJUMP_EXIT){/** Return via longjmp. In this instance there is no need to* clear any exceptions or disable traps to prevent* recurrence of the exception, because on return the* process will have the signal handler's floating-point* state.*/longjmp(jump_buffer, JMP_FPE);}
else{/** Return via default signal handler return mechanism.
170 AIX 5L Version 5.3 General Programming Concepts: Writing and Debugging Programs
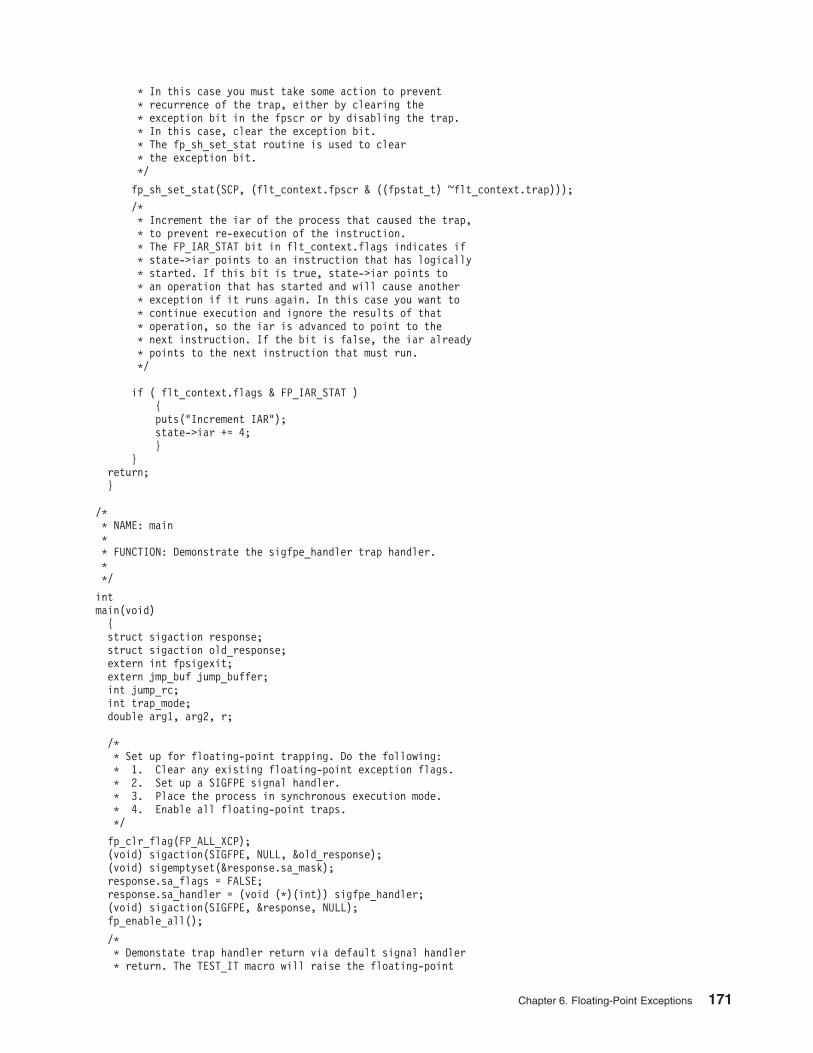
* In this case you must take some action to prevent* recurrence of the trap, either by clearing the* exception bit in the fpscr or by disabling the trap.* In this case, clear the exception bit.* The fp_sh_set_stat routine is used to clear* the exception bit.*/
fp_sh_set_stat(SCP, (flt_context.fpscr & ((fpstat_t) ~flt_context.trap)));
/** Increment the iar of the process that caused the trap,* to prevent re-execution of the instruction.* The FP_IAR_STAT bit in flt_context.flags indicates if* state->iar points to an instruction that has logically* started. If this bit is true, state->iar points to* an operation that has started and will cause another* exception if it runs again. In this case you want to* continue execution and ignore the results of that* operation, so the iar is advanced to point to the* next instruction. If the bit is false, the iar already* points to the next instruction that must run.*/
if ( flt_context.flags & FP_IAR_STAT ){puts("Increment IAR");state->iar += 4;}
}return;}
/** NAME: main** FUNCTION: Demonstrate the sigfpe_handler trap handler.**/
intmain(void)
{struct sigaction response;struct sigaction old_response;extern int fpsigexit;extern jmp_buf jump_buffer;int jump_rc;int trap_mode;double arg1, arg2, r;
/** Set up for floating-point trapping. Do the following:* 1. Clear any existing floating-point exception flags.* 2. Set up a SIGFPE signal handler.* 3. Place the process in synchronous execution mode.* 4. Enable all floating-point traps.*/
fp_clr_flag(FP_ALL_XCP);(void) sigaction(SIGFPE, NULL, &old_response);(void) sigemptyset(&response.sa_mask);response.sa_flags = FALSE;response.sa_handler = (void (*)(int)) sigfpe_handler;(void) sigaction(SIGFPE, &response, NULL);fp_enable_all();
/** Demonstate trap handler return via default signal handler* return. The TEST_IT macro will raise the floating-point
Chapter 6. Floating-Point Exceptions 171

* exception type given in its second argument. Testing* is done in this case with precise trapping, because* it is supported on all platforms to date.*/
trap_mode = fp_trap(FP_TRAP_SYNC);if ((trap_mode == FP_TRAP_ERROR) ||
(trap_mode == FP_TRAP_UNIMPL)){printf("ERROR: rc from fp_trap is %d\n",
trap_mode);exit(-1);}
(void) printf("Default signal handler return: \n");fpsigexit = SIGRETURN_EXIT;
TEST_IT("div by zero", FP_DIV_BY_ZERO);TEST_IT("overflow", FP_OVERFLOW);TEST_IT("underflow", FP_UNDERFLOW);TEST_IT("inexact", FP_INEXACT);
TEST_IT("signaling nan", FP_INV_SNAN);TEST_IT("INF - INF", FP_INV_ISI);TEST_IT("INF / INF", FP_INV_IDI);TEST_IT("ZERO / ZERO", FP_INV_ZDZ);TEST_IT("INF * ZERO", FP_INV_IMZ);TEST_IT("invalid compare", FP_INV_CMP);TEST_IT("invalid sqrt", FP_INV_SQRT);TEST_IT("invalid coversion", FP_INV_CVI);TEST_IT("software request", FP_INV_VXSOFT);
/** Next, use fp_trap() to determine what the* the fastest trapmode available is on* this platform.*/
trap_mode = fp_trap(FP_TRAP_FASTMODE);switch (trap_mode)
{case FP_TRAP_SYNC:
puts("Fast mode for this platform is PRECISE");break;
case FP_TRAP_OFF:puts("This platform dosn't support trapping");break;
case FP_TRAP_IMP:puts("Fast mode for this platform is IMPRECISE");break;
case FP_TRAP_IMP_REC:puts("Fast mode for this platform is IMPRECISE RECOVERABLE");break;
default:printf("Unexpected return code from fp_trap(FP_TRAP_FASTMODE): %d\n",
trap_mode);exit(-2);}
/** if this platform supports imprecise trapping, demonstate this.*/
trap_mode = fp_trap(FP_TRAP_IMP);if (trap_mode != FP_TRAP_UNIMPL)
{puts("Demonsrate imprecise FP execeptions");arg1 = 1.2;
172 AIX 5L Version 5.3 General Programming Concepts: Writing and Debugging Programs

arg2 = 0.0;r = my_div(arg1, arg2);fp_flush_imprecise();}
/* demonstate trap handler return via longjmp().*/
(void) printf("longjmp return: \n");fpsigexit = LONGJUMP_EXIT;jump_rc = setjmp(jump_buffer);
switch (jump_rc){
case JMP_DEFINED:(void) printf("setjmp has been set up; testing ...\n");TEST_IT("div by zero", FP_DIV_BY_ZERO);break;
case JMP_FPE:(void) printf("back from signal handler\n");/** Note that at this point the process has the floating-* point status inherited from the trap handler. If the* trap hander did not enable trapping (as the example* did not) then this process at this point has no traps* enabled. We create a floating-point exception to* demonstrate that a trap does not occur, then re-enable* traps.*/
(void) printf("Creating overflow; should not trap\n");TEST_IT("Overflow", FP_OVERFLOW);fp_enable_all();break;
default:(void) printf("unexpected rc from setjmp: %d\n", jump_rc);exit(EXIT_BAD);}
exit(EXIT_GOOD);}
Related InformationFor further information on this topic, see the following:
v Chapter 1, “Tools and Utilities,” on page 1
v Chapter 6, “Floating-Point Exceptions,” on page 165
Subroutine ReferencesThe fp_clr_flag, fp_set_flag, fp_read_flag, or fp_swap_flag subroutine, fp_raise_xcp subroutine,fp_sh_trap_info or fp_sh_set_stat subroutine, fp_trap subroutine in AIX 5L Version 5.3 TechnicalReference: Base Operating System and Extensions Volume 1.
The sigaction, sigvec or signal subroutine in AIX 5L Version 5.3 Technical Reference: Base OperatingSystem and Extensions Volume 2.
Chapter 6. Floating-Point Exceptions 173

174 AIX 5L Version 5.3 General Programming Concepts: Writing and Debugging Programs
Chapter 7. Input and Output Handling
This chapter provides an introduction to programming considerations for input and output handling and theinput and output (I/O) handling subroutines.
The I/O library subroutines can send data to or from either devices or files. The system treats devices as ifthey were I/O files. For example, you must also open and close a device just as you do a file.
Some of the subroutines use standard input and standard output as their I/O channels. For most of thesubroutines, however, you can specify a different file for the source or destination of the data transfer. Forsome subroutines, you can use a file pointer to a structure that contains the name of the file; for others,you can use a file descriptor (that is, the positive integer assigned to the file when it is opened).
The I/O subroutines stored in the C Library (libc.a) provide stream I/O. To access these stream I/Osubroutines, you must include the stdio.h file by using the following statement:#include <stdio.h>
Some of the I/O library subroutines are macros defined in a header file and some are object modules offunctions. In many cases, the library contains a macro and a function that do the same type of operation.Consider the following when deciding whether to use the macro or the function:
v You cannot set a breakpoint for a macro using the dbx program.
v Macros are usually faster than their equivalent functions because the preprocessor replaces the macroswith actual lines of code in the program.
v Macros result in larger object code after being compiled.
v Functions can have side effects to avoid.
The files, commands, and subroutines used in I/O handling provide the following interfaces:
Low-level The low-level interface provides basic open and close functions for files and devices.For more information, see “Low-Level I/O Interfaces.”
Stream The stream interface provides read and write I/O for pipes and FIFOs. For moreinformation, see “Stream I/O Interfaces” on page 176.
Terminal The terminal interface provides formatted output and buffering. For more information,see “Terminal I/O Interfaces” on page 177.
Asynchronous The asynchronous interface provides concurrent I/O and processing. For moreinformation, see “Asynchronous I/O Interfaces” on page 178.
Input Language The input language interface uses the lex and yacc commands to generate a lexicalanalyzer and a parser program for interpreting I/O. For more information, see“Generating a Lexical Analyzer with the lex Command” on page 291.
Low-Level I/O InterfacesLow-level I/O interfaces are direct entry points into a kernel, providing functions such as opening files,reading to and writing from files, and closing files.
The line command provides the interface that allows one line from standard input to be read, and thefollowing subroutines provide other low-level I/O functions:
open, openx, or creat Prepare a file, or other path object, for reading and writing by means of an assigned filedescriptor
read, readx, readv, orreadvx
Read from an open file descriptor
© Copyright IBM Corp. 1997, 2010 175

write, writex, writev, orwritevx
Write to an open file descriptor
close Relinquish a file descriptor
The open and creat subroutines set up entries in three system tables. A file descriptor indexes the firsttable, which functions as a per process data area that can be accessed by read and write subroutines.Each entry in this table has a pointer to a corresponding entry in the second table.
The second table is a per-system database, or file table, that allows an open file to be shared amongseveral processes. The entries in this table indicate if the file was open for reading, writing, or as a pipe,and when the file was closed. There is also an offset to indicate where the next read or write will takeplace and a final pointer to indicates entry to the third table, which contains a copy of the file’s i-node.
The file table contains entries for every instance of an open or create subroutine on the file, but the i-nodetable contains only one entry for each file.
Note: While processing an open or creat subroutine for a special file, the system always calls thedevice’s open subroutine to allow any special processing (such as rewinding a tape or turning on adata-terminal-ready modem lead). However, the system uses the close subroutine only when thelast process closes the file (that is, when the i-node table entry is deallocated). This means that adevice cannot maintain or depend on a count of its users unless an exclusive-use device (thatprevents a device from being reopened before its closed) is implemented.
When a read or write operation occurs, the user’s arguments and the file table entry are used to set up thefollowing variables:
v User address of the I/O target area
v Byte count for the transfer
v Current location in the file
If the file referred to is a character-type special file, the appropriate read or write subroutine is called totransfer data, as well as update the count and current location. Otherwise, the current location is used tocalculate a logical block number in the file.
If the file is an ordinary file, the logical block number must be mapped to a physical block number. Ablock-type special file need not be mapped. The resulting physical block number is used to read or writethe appropriate device.
Block device drivers can provide the ability to transfer information directly between the user’s core imageand the device in block sizes as large as the caller requests without using buffers. The method involvessetting up a character-type special file corresponding to the raw device and providing read and writesubroutines to create a private, non-shared buffer header with the appropriate information. Separate openand close subroutines can be provided, and a special-function subroutine can be called for magnetic tape.
Stream I/O InterfacesStream I/O interfaces provide data as a stream of bytes that is not interpreted by the system, which offersmore efficient implementation for networking protocols than character I/O processing. No recordboundaries exist when reading and writing using stream I/O. For example, a process reading 100 bytesfrom a pipe cannot determine if the process that wrote the data into the pipe did a single write of 100bytes, or two writes of 50 bytes, or even if the 100 bytes came from two different processes.
Stream I/Os can be pipes or FIFOs (first-in, first-out files). FIFOs are similar to pipes because they allowthe data to flow only one way (left to right). However, a FIFO can be given a name and can be accessedby unrelated processes, unlike a pipe. FIFOs are sometimes referred to as named pipes. Because it has a
176 AIX 5L Version 5.3 General Programming Concepts: Writing and Debugging Programs

name, a FIFO can be opened using the standard I/O fopen subroutine. To open a pipe, you must call thepipe subroutine, which returns a file descriptor, and the standard I/O fdopen subroutine to associate anopen file descriptor with a standard I/O stream.
Note: Stream I/O interfaces buffer data at the user level and cannot write the data until the fclose orfflush Subroutine is performed, which might lead to unexpected results when mixed with file I/Osuch as read() or write().
Stream I/O interfaces are accessed through the following subroutines and macros:
fclose Closes a streamfeof, ferror, clearerr, or fileno Check the status of a streamfflush Write all currently buffered characters from a streamfopen, freopen, or fdopen Open a streamfread or fwrite Perform binary inputfseek, rewind, ftell, fgetpos, or fsetpos Reposition the file pointer of a streamgetc, fgetc, getchar, or getw Get a character or word from an input streamgets or fgets Get a string from a streamgetwc, fgetwc, or getwchar Get a wide character from an input streamgetws or fgetws Get a string from a streamprintf, fprintf, sprintf, wsprintf, vprintf, vfprintf, vsprintf, or vwsprintf
Print formatted outputputc, putchar, fputc, or putw Write a character or a word to a streamputs or fputs Write a string to a streamputwc, putwchar, or fputwc Write a character or a word to a streamputws or fputws Write a wide character string to a streamscanf, fscanf, sscanf, or wsscanf Convert formatted inputsetbuf, setvbuf, setbuffer, or setlinebuf Assign buffering to a streamungetc or ungetwc Push a character back into the input stream
Terminal I/O InterfacesTerminal I/O interfaces operate between a process and the kernel, providing functions such as bufferingand formatted output. Every terminal and pseudo-terminal has a tty structure that contains the currentprocess group ID. This field identifies the process group to receive the signals associated with theterminal. Terminal I/O interfaces can be accessed through the iostat command, which monitors I/O systemdevice loading, and the uprintfd daemon, which allows kernel messages to be written to the systemconsole.
Terminal characteristics can be enabled or disabled through the following subroutines:
cfgetospeed, cfsetospeed, cfgetispeed, or cfsetispeedGet and set input and output baud rates
ioctl Performs control functions associated with the terminal
termdefQueries terminal characteristics
tcdrainWaits for output to complete
tcflow Performs flow control functions
tcflushDiscards data from the specified queue
tcgetpgrpGets foreground process group ID
Chapter 7. Input and Output Handling 177

tcsendbreakSends a break on an asynchronous serial data line
tcsetattrSets terminal state
ttylock, ttywait, ttyunlock, or ttylockedControl tty locking functions
ttyname or isattyGet the name of a terminal
ttyslot Finds the slot in the utmp file for the current user
Asynchronous I/O InterfacesAsynchronous I/O subroutines allow a process to start an I/O operation and have the subroutine returnimmediately after the operation is started or queued. Another subroutine is required to wait for theoperation to complete (or return immediately if the operation is already finished). This means that aprocess can overlap its execution with its I/O or overlap I/O between different devices. Althoughasynchronous I/O does not significantly improve performance for a process that is reading from a disk fileand writing to another disk file, asynchronous I/O can provide significant performance improvements forother types of I/O driven programs, such as programs that dump a disk to a magnetic tape or display animage on an image display.
Although not required, a process that is performing asynchronous I/O can tell the kernel to notify it when aspecified descriptor is ready for I/O (also called signal-driven I/O). When using LEGACY AIO, the kernelnotifies the user process with the SIGIO signal. When using POSIX AIO, the sigevent structure is used bythe programmer to determine which signal for the kernel to use to notify the user process. Signals includeSIGIO, SIGUSR1, and SIGUSR2.
To use asynchronous I/O, a process must perform the following steps:
1. Establish a handler for the SIGIO signal. This step is necessary only if notification by the signal isrequested.
2. Set the process ID or the process group ID to receive the SIGIO signals. This step is necessary only ifnotification by the signal is requested.
3. Enable asynchronous I/O. The system administrator usually determines whether asynchronous I/O isloaded (enabled). Enabling occurs at system startup.
The following asynchronous I/O subroutines are provided:
aio_cancel Cancels one or more outstanding asynchronous I/O requestsaio_error Retrieves the error status of an asynchronous I/O requestaio_fsync Synchronizes asynchronous files.aio_nwait Suspends the calling process until a certain number of asynchronous
I/O requests are completed.aio_read Reads asynchronously from a file descriptoraio_return Retrieves the return status of an asynchronous I/O requestaio_suspend Suspends the calling process until one or more asynchronous I/O
requests is completedaio_write Writes asynchronously to a file descriptorlio_listio Initiates a list of asynchronous I/O requests with a single callpoll or select Check I/O status of multiple file descriptors and message queues
For use with the poll subroutine, the following header files are supplied:
poll.h Defines the structures and flags used by the poll subroutine
178 AIX 5L Version 5.3 General Programming Concepts: Writing and Debugging Programs

aio.h Defines the structure and flags used by the aio_read, aio_write, andaio_suspend subroutines
Chapter 7. Input and Output Handling 179

180 AIX 5L Version 5.3 General Programming Concepts: Writing and Debugging Programs

Chapter 8. Storage Protect Keys
Storage protect keys provide a mechanism for you to improve the reliability of your programs. Protect keysapply to memory pages and work at the page level of granularity, similar to the mprotect subroutine,which can be used to read- or write-protect one or more pages. However, with storage keys you can marksections of your data for specific levels of read and write access protection. Protection by storage keys isa function not only of the data page, but also of the thread attempting access. You can enable certainwell-defined code paths to access data that is unavailable to your larger program, thereby encapsulatingcritical program data and protecting it against accidental damage.
Because access to key-protected pages is an attribute of the running thread, this mechanism extendsnaturally to multithreaded applications, but with the restriction that these use only 1:1 (or system scope)pthreads. The mprotect subroutine approach does not work reliably in a multithreaded environment,because you have to remove protection for all threads when you want to grant access to any thread. Youcan use both mechanisms simultaneously, and both are fully enforced; therefore, your program cannotwrite to a write-protected page even if a protect key would otherwise allow this.
Protect keys sample uses include:
v Encapsulate your program’s private data completely, limiting access to just selected code paths.
v Protect your program’s private data from accidental damage by always running with read accessgranted, but granting write access only when you intend to modify the data. This can be especiallyuseful when code in a core engine allows calls out to untrusted code.
v When multiple private keys are available, additional granularity of data protection is possible.
You can simplify debugging by designing your application with key protection in mind. Setting a page’sprotect key and setting your active user keyset are both system calls, and therefore relatively expensiveoperations. You should design your program so that the frequency of these operations is not excessive.
User protect keysThe two main elements of key protection are:
v Each virtual memory page has a single integer-valued protect key assigned to it.
v Each thread runs with access to the pages protected by these keys as granted by its active user keyset.
A user keyset is an opaque data type, ukeyset_t, which is defined in sys/ukeys.h. The active user keysetis part of every key-aware thread’s running context, and encodes the thread’s level of access to each andevery protect key simultaneously.
There is always one user public key, and up to an architectural maximum of 31 possible user private keys.The number of user private keys is limited, depending on the physical capabilities of the underlyinghardware and the administrative allocation of hardware keys for use by user applications.
v User protect keys are numbered consecutively from 0 (the user public key) upwards for a maximum of31 user private keys.
– If there are n user keys available, they will always appear to be numbered 0 through n−1.
– There are #defines for UKEY_PUBLIC, UKEY_PRIVATE1, ... UKEY_PRIVATE31.
– Each memory page can be assigned to one of these protect keys, if that key is available.
v User key 0 is the user public key. Read/write access is always granted to pages whose protect key is 0.
v User key 1, user key 2, ..., user key 31 are the possible user private keys. There can be from 0 to 31private keys available.
v All available keys are usable by all processes.
© Copyright IBM Corp. 1997, 2010 181

– Because private process memory is not shared, there is no problem with independent processesusing the same protect keys. For example, access to user key 1 in your process does not enableaccess to private key 1 data in another process, because you cannot address that data (unless it isin shared memory).
– This numbering of virtual storage keys is consistent across the operating system. In particular, onethread can protect shared memory with an agreed upon key that any other thread sharing thatmemory must use.
– Only programs with write authority to a shared memory object can change its protect key or keys.
Typically, only one private key is available. You can design your application to use additional private keys ifany more are available, but your application must be aware of the actual number of private keys, and beprepared to multiplex its protection domains when there are fewer keys available than protection domainsdefined.
A thread’s active user keyset grants access to pages for each of the corresponding private user protectkeys individually. Access can be:
v None
v Read Only
v Write Only
v Read/Write
Note: If you want to use the disclaim service, which logically zeroes pages, your program must havewrite access to the page.
Using protect keysThe following guidelines and considerations apply when using protect keys:
v Pages that are exported read-only from the kernel will continue to be visible to your program. Thesepages have a protect key of UKEY_SYSTEM. This protect key is not a protect key that is under yourprogram’s control, but is always accessible by your program.
v All of your program’s memory pages initially have the user public key assigned to them. As notedabove, access to key 0 storage is always granted, making this the user public key.
v You can set protect keys only for your normal and shared data. You cannot, for example, protect librarydata, low memory shared with the kernel, or program text.
v Depending on the underlying hardware and administrative choice, only a limited number of user privatekeys (typically just one) are available. When your program assigns a private key to one or more of itspages, the data in those pages is no longer available by default. You must explicitly grant read or writeaccess to this data by surrounding code paths that require access with calls to a new service tomanage your active user keyset.
v The physical hardware likely supports additional protect keys that are not available for use as userprotect keys.
v No special privilege is needed to assign protect keys to a page. The only requirement is current writeaccess to the page.
v There is no control of execute authority with protect keys.
If your program accesses key protected data in violation of the access rights expressed in its active userkeyset, it receives a SIGSEGV signal, as is already the case for violating read- or write-protected pages. Ifyou choose to handle this signal, be aware that signal handlers are invoked without access to privatekeys. Signal handling code must add any needed access rights to the active user keyset beforereferencing key-protected data.
182 AIX 5L Version 5.3 General Programming Concepts: Writing and Debugging Programs

Child processes, created by the fork system call, logically inherit their parent’s memory and running state.This includes the protect key associated with each page, as well as the parent thread’s active user keysetat the time of fork.
Regions protected by user keysUser protect keys can protect pages in the following regions:
v Data region
v Default stack region
v mmaped regions
v Shared memory attached with the shmat() subroutine, except as below
v These categories of pages cannot use protect keys:
– shmated files and pinned shared memory
– Large (nonpageable) pages
– Program text
– Low memory shared read-only with the kernel
System prerequisites for key protectionStorage key protection is a hardware-specific privileged page protection mechanism that is made availableby the AIX kernel for use in application programs. To use this feature, your system must:
v Be running on physical hardware that provides storage key protection
v Be running the 64-bit kernel
v Enable the use of user protect keys
Program prerequisites for key protectionTo use user keys, your program must:
v Declare itself user-key aware and determine how many user protect keys are available, if any, with theukey_enable subroutine.
v Organize its protected data on page boundaries.
v Assign a private key to each page you want to protect with the ukey_protect subroutine.
v If you protect the malloc’d data, remember to unprotect it before you free it.
v Prepare one or more keysets with the ukeyset_init subroutine.
v Possibly add desired keys to your keyset with the ukeyset_add_key subroutine, to enable future reador write accesses as desired.
v Make a keyset active with the ukeyset_activate subroutine to grant the access rights defined in akeyset.
Your program must not:
v Include any M:N (process scope) pthreads
v Be able to have a checkpoint performed on it (for example have CHECKPOINT=yes in the environment)
Note: When a program is user-key aware, it has additional context associated with it to represent itsactive user keyset. This can be seen in:
v Signal handlers receiving a ucontext_t structure. The previously active user keyset is inucontext_t.__extctx.__ukeys, an array of two ints containing a 64-bit user keyset value
v User context structures compiled with __EXTABI__ defined (used by setcontext, getcontext,makecontext, swapcontext)
Chapter 8. Storage Protect Keys 183

SubroutinesThe following new AIX kernel subroutines are provided for using protect keys:
sysconfUse with _SC_AIX_UKEYS to determine the number of user keys supported(can be called on older versions of AIX)
ukey_enable Enable the user-key aware programming environment for your process, andreport how many user keys are available
ukeyset_init Initialize a user keyset, which will represent a set of access rights to yourprivate key or keys
ukeyset_add_key Add read or write access, or both for a specified key to a keyset
ukeyset_remove_key Remove or write access, or both for a specified key from a keyset
ukeyset_add_set Add all the access rights in one keyset to another
ukeyset_remove_set Remove all the access rights in one keyset from another
ukeyset_activate Apply the access rights in a keyset to the running thread
ukeyset_ismember Test if a given access right is contained in a keyset
ukey_setjmp Extended form of setjmp that preserves the active keyset (uses aukey_jmp_buf structure)
pthread_attr_getukeyset_np Get the keyset attribute of a pthread
pthread_attr_setukeyset_np Set the keyset attribute for a pthread
ukey_protect Set a user protect key for a page-aligned range of user memory
ukey_getkey Retrieve the user protect key for a specified address
DebuggingThe dbx command adds limited support for protect keys:
v When debugging a running program:
– The ukeyset subcommand displays the active keyset.
– The ukeyvalue subcommand displays the protect key associated with a given memory location.
v When debugging a core file, the ukeyexcept subcommand reports the active keyset, effective addressof the key exception, and the storage key involved.
Hardware detailsThe active user keyset in the running context of a key-aware thread parallels the actual hardware authoritymask register (AMR) in format, represented by the ukeyset_t abstract data type. This information isprovided for debugging purposes only. Use only the defined programming services to set up your activeuser keyset.
v The AMR is a 64-bit register comprising 32-bit pairs, one pair per key, for a maximum of 32 keysnumbered 0 through 31.
– The first bit of each pair represents write access to the corresponding numbered key.
– Similarly, the second bit of each pair represents read access to the corresponding numbered key.
v A bit value of 0 grants the corresponding access, and a bit value of 1 denies it.
v The bit pair granting access to key 0 is not controlled by your program. User key 0 is the user publickey, and all threads always have full access to data in this key, without regard to your settings in theactive user keyset.
v All the other bit pairs represent user private keys, which, subject to availability, you can use to protectyour data as you see fit.
184 AIX 5L Version 5.3 General Programming Concepts: Writing and Debugging Programs
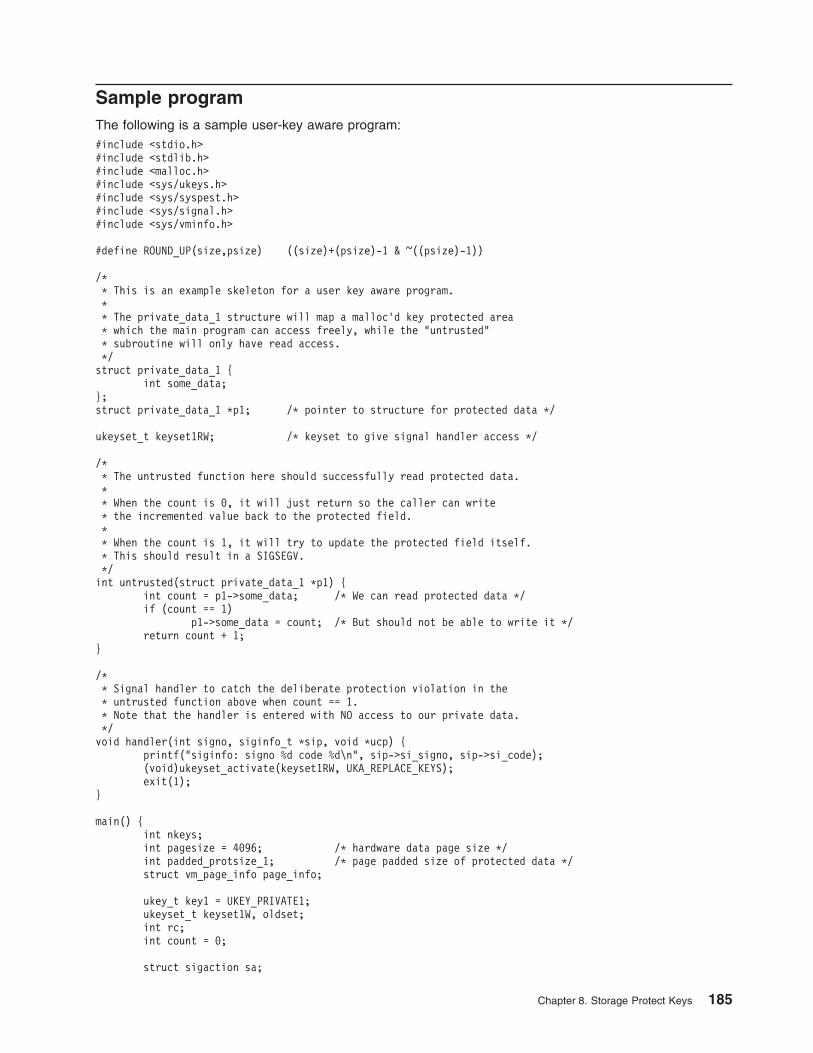
Sample programThe following is a sample user-key aware program:#include <stdio.h>#include <stdlib.h>#include <malloc.h>#include <sys/ukeys.h>#include <sys/syspest.h>#include <sys/signal.h>#include <sys/vminfo.h>
#define ROUND_UP(size,psize) ((size)+(psize)-1 & ~((psize)-1))
/** This is an example skeleton for a user key aware program.** The private_data_1 structure will map a malloc'd key protected area* which the main program can access freely, while the "untrusted"* subroutine will only have read access.*/struct private_data_1 {
int some_data;};struct private_data_1 *p1; /* pointer to structure for protected data */
ukeyset_t keyset1RW; /* keyset to give signal handler access */
/** The untrusted function here should successfully read protected data.** When the count is 0, it will just return so the caller can write* the incremented value back to the protected field.** When the count is 1, it will try to update the protected field itself.* This should result in a SIGSEGV.*/int untrusted(struct private_data_1 *p1) {
int count = p1->some_data; /* We can read protected data */if (count == 1)
p1->some_data = count; /* But should not be able to write it */return count + 1;
}
/** Signal handler to catch the deliberate protection violation in the* untrusted function above when count == 1.* Note that the handler is entered with NO access to our private data.*/void handler(int signo, siginfo_t *sip, void *ucp) {
printf("siginfo: signo %d code %d\n", sip->si_signo, sip->si_code);(void)ukeyset_activate(keyset1RW, UKA_REPLACE_KEYS);exit(1);
}
main() {int nkeys;int pagesize = 4096; /* hardware data page size */int padded_protsize_1; /* page padded size of protected data */struct vm_page_info page_info;
ukey_t key1 = UKEY_PRIVATE1;ukeyset_t keyset1W, oldset;int rc;int count = 0;
struct sigaction sa;
Chapter 8. Storage Protect Keys 185

/** Attempt to become user key aware.*/nkeys = ukey_enable();if (nkeys == -1) {
perror("ukey_enable");exit(1);
}assert(nkeys >= 2);
/** Determine the data region page size.*/page_info.addr = (long)&p1; /* address in data region */rc = vmgetinfo(&page_info, VM_PAGE_INFO, sizeof(struct vm_page_info));
if (rc)perror("vmgetinfo");
elsepagesize = page_info.pagesize; /* pick up actual page size */
/** We need to allocate page aligned, page padded storage* for any area that is going to be key protected.*/padded_protsize_1 = ROUND_UP(sizeof(struct private_data_1), pagesize);rc = posix_memalign((void **)&p1, pagesize, padded_protsize_1);if (rc) {
perror("posix_memalign");exit(1);
}
/** Initialize the private data.* We can do this before protecting it if we want.** Note that the pointer to the private data is in public storage.* We only protect the data itself.*/p1->some_data = count;
/** Construct keysets to use to access the protected structure.* Note that these keysets will be in public storage.*/rc = ukeyset_init(&keyset1W, 0);if (rc) {
perror("ukeyset_init");exit(1);
}
rc = ukeyset_add_key(&keyset1W, key1, UK_WRITE); /* WRITE */if (rc) {
perror("ukeyset_add_key 1W");exit(1);
}
keyset1RW = keyset1W;rc = ukeyset_add_key(&keyset1RW, key1, UK_READ); /* R/W */if (rc) {
perror("ukeyset_add_key 1R");exit(1);
}
/** Restrict access to the private data by applying a private key
186 AIX 5L Version 5.3 General Programming Concepts: Writing and Debugging Programs

* to the page(s) containing it.*/rc = ukey_protect(p1, padded_protsize_1, key1);if (rc) {
perror("ukey_protect");exit(1);
}
/** Allow our general code to reference the private data R/W.*/oldset = ukeyset_activate(keyset1RW, UKA_ADD_KEYS);if (oldset == UKSET_INVALID) {
printf("ukeyset_activate failed\n");exit(1);
}
/** Set up a signal handler for SIGSEGV, to catch the deliberate* key violation in the untrusted code.*/sa.sa_sigaction = handler;SIGINITSET(sa.sa_mask);sa.sa_flags = SA_SIGINFO;rc = sigaction(SIGSEGV, &sa, 0);if (rc) {
perror("sigaction");exit(1);
}
/** Program's main processing loop.*/while (count < 2) {
/** When we need to run "untrusted" code, change access* to the private data to R/O by removing write access.*/(void)ukeyset_activate(keyset1W, UKA_REMOVE_KEYS);
/** Call untrusted subroutine here. It can only read* the protected data passed to it.*/count = untrusted(p1);
/** Restore our full access to private data.*/(void)ukeyset_activate(keyset1W, UKA_ADD_KEYS);
p1->some_data = count;}
ukey_protect(p1, padded_protsize_1, UKEY_PUBLIC);free(p1);exit(0);
}
Chapter 8. Storage Protect Keys 187

188 AIX 5L Version 5.3 General Programming Concepts: Writing and Debugging Programs

Chapter 9. Large Program Support
This chapter provides information about using the large and very large address-space models toaccommodate programs requiring data areas that are larger than those provided by the defaultaddress-space model. The large address-space model is available on AIX 4.3 and later. The very largeaddress-space model is available on AIX 5.1 and later.
Note: The discussion in this chapter applies only to 32-bit processes. For information about the default32-bit address space model and the 64-bit address space model, see “Program Address SpaceOverview” on page 399 and Chapter 20, “System Memory Allocation Using the malloc Subsystem,”on page 415.
The virtual address space of a 32-bit process is divided into 16 256-megabyte areas (or segments), eachaddressed by a separate hardware register. The operating system refers to segment 2 (virtual addresses0x20000000-0x2FFFFFFF) as the process-private segment. By default, this segment contains the user stackand data, including the heap. The process-private segment also contains the u-block of the process, whichis used by the operating system and is not readable by an application.
Because a single segment is used for both user data and stack, their maximum aggregate size is slightlyless than 256 MB. Certain programs, however, require large data areas (initialized or uninitialized), or theyneed to allocate large amounts of memory with the malloc or sbrk subroutine. Programs can be built touse the large or very large address-space model, allowing them to use up to 2 GB of data.
It is possible to use either the large or very large address-space model with an existing program, byproviding a non-zero maxdata value. The maxdata value is obtained either from the LDR_CNTRLenvironment variable or from a field in the executable file. Some programs have dependencies on thedefault address-space model, and they will break if they are run using the large address-space model.
Understanding the Large Address-Space ModelThe large address-space model allows specified programs to use more than 256 MB of data. Otherprograms continue to use the default address-space model. To allow a program to use the largeaddress-space model, specify a non-zero maxdata value. You can specify a non-zero maxdata valueeither by using the ld command when you’re building the program, or by exporting the LDR_CNTRLenvironment variable before executing the program.
When a program using the large address-space model is executed, the operating system reserves asmany 256 MB segments as needed to hold the amount of data specified by the maxdata value. Then,beginning with segment 3, the program’s initialized data is read from the executable file into memory. Thedata read begins in segment 3, even if the maxdata value is smaller than 256 MB. With the largeaddress-space model, a program can have a maximum of 8 segments or 2 GB or 3.25 GB of datarespectively.
In the default address-space model, 12 segments are available for use by the shmat or mmapsubroutines. When the large address-space model is used, the number of segments reserved for datareduces the number of segments available for the shmat and mmap subroutines. Because the maximumsize of data is 2 GB, at least two segments are always available for the shmat and mmap subroutines.
The user stack remains in segment 2 when the large address-space model is used. As a result, the size ofthe stack is limited to slightly less than 256 MB. However, an application can relocate its user stack into ashared memory segment or into allocated memory.
While the size of initialized data in a program can be large, there is still a restriction on the size of text. Inthe executable file for a program, the size of the text section plus the size of the loader section must be
© Copyright IBM Corp. 1997, 2010 189

less than 256 MB. This is required so that these sections will fit into a single, read-only segment (segment1, the TEXT segment). You can use the dump command to examine section sizes.
Understanding the Very Large Address-Space ModelThe very large address-space model enables large data programs in much the same way as the largeaddress-space model, although there are several differences between them. To allow a program to use thevery large address-space model, you must specify a maxdata value and the dynamic segment allocation(dsa) property. Use either the ld command or the LDR_CNTRL environment variable to specify a maxdatavalue and the DSA option.
If a maxdata value is specified, the very large address-space model follows the large-address spacemodel in that a program’s data is read into memory starting with segment 3, and occupies as manysegments as needed. The remaining data segments, however, are not reserved for the data area atexecution time, but are obtained dynamically. Until a segment is needed for a program’s data area, it canbe used by the shmat or mmap subroutines. With the very large address-space model, a program can amaximum of 13 segments or 3.25 GB of data. Of these 13 segments, 12 segments or 3 GB, are availablefor shmat and mmap subroutine purposes.
When a process tries to expand its data area into a new segment, the operation succeeds as long as thesegment is not being used by the shmat or mmap subroutines. A program can call the shmdt ormunmap subroutine to stop using a segment so that the segment can be used for the data area. After asegment has been used for the data area, however, it can no longer be used for any other purpose, evenif the size of the data area is reduced.
If a maxdata value is not specified (maxdata = 0) with the dsa property, a slight variation from the abovebehaviour is achieved. The process will have its data and stack in segment 2, similiar to a regular process.The process will not have access to the global shared libraries, so all shared libraries used by the processwill be loaded privately. The advantage to running this way is that a process will have all 13 segments(3.25 GB) available for use by the shmat and mmap subroutines.
To reduce the chances that the shmat or mmap subroutines will use a segment that could be used for thedata area, the operating system uses a different rule for choosing an address to be returned (if a specificaddress is not requested). Normally, the shmat or mmap subroutines return an address in the lowestavailable segment. When the very large address-space model is used, these subroutines will return anaddress in the highest available segment. A request for a specific address will succeed, as long as theaddress is not in a segment that has already been used for the data area. This behaviour is followed forall process that specify the dsa property.
With the very large address-space model, a maxdata value of zero or a value of up to 0xD0000000 can bespecified. If a maxdata value larger than 0xAFFFFFFF is specified, a program will not use globally loadedshared libraries. Instead, all shared libraries will be loaded privately. This can affect program performance.
Enabling the Large and Very Large Address-Space ModelsThe large address space model is used if any non-zero value is specified for the maxdata value, and thedynamic segment allocation (dsa) property is not specified. The very large address-space model is used ifany maxdata value is given and the dsa property is specified. Use the ld command with the -bmaxdataflag to specify a maxdata value and to set the dsa property.
Use the following command to link a program that will have the maximum 8 segments reserved for itsdata:cc -bmaxdata:0x80000000 sample.o
To link a program with the very large-address space model enabled on the POWER-based platform, usethe following command:
190 AIX 5L Version 5.3 General Programming Concepts: Writing and Debugging Programs

cc -bmaxdata:0xD0000000/dsa sample.o
To link a program with the very large-address space model enabled, use the following command:cc -bmaxdata:0xD0000000/dsa sample.o
You can cause existing programs to use the large or very large address-space models by specifying themaxdata value with the LDR_CNTRL environment variable. For example, use the following command torun the a.out program with 8 segments reserved for the data area:LDR_CNTRL=MAXDATA=0x80000000 a.out
The following command runs the a.out program using the very large address-space model, allowing theprogram’s data size to use up to 8 segments for data:LDR_CNTRL=MAXDATA=0x80000000@DSA a.out
You can also modify an existing program so that it will use the large or very large address-space model.To set the maxdata value in an existing 32-bit XCOFF program, a.out, to 0x80000000, use the followingcommand:/usr/ccs/bin/ldedit -bmaxdata:0x80000000 a.out
If an existing 32-bit XCOFF program, a.out, with a maxdata value of 0x80000000 does not already havethe DSA property, you can add the property with the following command:/usr/ccs/bin/ldedit -bmaxdata:0x80000000/dsa a.out
You can use the dump command to examine the maxdata value, or to determine whether a program hasthe dsa property.
Some programs have dependencies on the default address-space model. These programs terminate if anon-zero maxdata value has been specified, either by modifying the executable file of the program or bysetting the LDR_CNTRL environment variable.
Executing Programs with Large Data AreasWhen you execute a program that uses the large address-space model, the operating system attempts tomodify the soft limit on data size to match the maxdata value. If the maxdata value is larger than thecurrent hard limit on data size, either the program will not execute if the environment variableXPG_SUS_ENV has the value set to ON, or the soft limit will be set to the current hard limit.
If the maxdata value is smaller than the size of the program’s static data, the program will not execute.
After placing the program’s initialized and uninitialized data in segments 3 and beyond, the break value iscomputed. The break value defines the end of the process’s static data and the beginning of itsdynamically allocatable data. Using the malloc, brk or sbrk subroutine, a process can move the breakvalue to increase the size of the data area.
For example, if the maxdata value specified by a program is 0x68000000, then the maximum break valueis in the middle of segment 9 (0x98000000). The brk subroutine extends the break value across segmentboundaries, but the size of the data area cannot exceed the current soft data limit.
The setrlimit subroutine allows a process to set its soft data limit to any value that does not exceed thehard data limit. The maximum size of the data area, however, is limited to the original maxdata value,rounded up to a multiple of 256 MB.
The majority of subroutines are unaffected by large data programs. The shmat and mmap subroutines arethe most affected, because they have fewer segments available for use. If a large data-address modelprogram forks, the child process inherits the current data resource limits.
Chapter 9. Large Program Support 191
Special ConsiderationsPrograms with large data spaces require a large amount of paging space. For example, if a program witha 2-GB address space tries to access every page in its address space, the system must have 2 GB ofpaging space. The operating system terminates processes when paging space runs low. Programs withlarge data spaces are terminated first because they typically consume a large amount of paging space.
Debugging programs using the large data model is no different than debugging other programs. The dbxcommand can debug these large programs actively or from a core dump. A full core dump from alarge-data program can be quite large. To avoid truncated core files, be sure the coredump resource limitis large enough, and make sure that there is enough free space in the file system where your program isrunning.
Some application programs might be written in such a way that they rely on characteristics of the defaultaddress space model. These programs might not work if they execute using the large or very largeaddress-space model. Do not set the LDR_CNTRL environment variable when you run these programs.
Processes using the very large address-space model must make code changes to their programs in orderto move the break value of the address-space in chunks larger than 2 GB. This is a limitation of the sbrksystem call which takes a signed value as the parameter. As a workaround, a program can call sbrk morethan one time to move the break value to the desired position.
Related InformationFor further information on this topic, see the following:
v “Program Address Space Overview” on page 399
v Bourne shell commands in Operating system and device management
Subroutine Referencesv The brk or sbrk subroutine, exec subroutine, fork subroutine, malloc subroutine in AIX 5L Version 5.3
Technical Reference: Base Operating System and Extensions Volume 1
v The setrlimit subroutine in AIX 5L Version 5.3 Technical Reference: Base Operating System andExtensions Volume 2
Commands Referencesv The dd command in AIX 5L Version 5.3 Commands Reference, Volume 2
v The ld command in AIX 5L Version 5.3 Commands Reference, Volume 3
Files ReferencesThe XCOFF Object (a.out) File Format in AIX 5L Version 5.3 Files Reference
192 AIX 5L Version 5.3 General Programming Concepts: Writing and Debugging Programs
Chapter 10. Programming on Multiprocessor Systems
On a uniprocessor system, threads execute one after another in a time-sliced manner. This contrasts witha multiprocessor system, where several threads execute at the same time, one on each availableprocessor. Overall performance can be improved by running different process threads on differentprocessors. However, an individual program cannot take advantage of multiprocessing, unless it hasmultiple threads.
Multiprocessing is not apparent to most users because it is handled completely by the operating systemand the programs it runs. Users can bind their processes (force them to run on a certain processor);however, this is not required, nor recommended for ordinary use. Even for most programmers, takingadvantage of multiprocessing simply amounts to using multiple threads. On the other hand, kernelprogrammers have to deal with several issues when porting or creating code for multiprocessor systems.
Identifying ProcessorsSymmetric multiprocessor (SMP) machines have one or more CPU boards, each of which canaccommodate two processors. For example, a four-processor machine has two CPU boards, each havingtwo processors. Commands, subroutines, or messages that refer to processors must use an identificationscheme. Processors are identified by physical and logical numbers, and by Object Data Manager (ODM)processor names and location codes.
ODM Processor NamesODM is a system used to identify various parts throughout a machine, including bus adapters, peripheraldevices such as printers or terminals, disks, memory boards, and processor boards. For more informationabout ODM, see Chapter 15, “Object Data Manager (ODM),” on page 349.
ODM assigns numbers to processor boards and processors in order, starting from 0 (zero), and createsnames based on these numbers by adding a prefix cpucard or proc. Thus, the first processor board iscalled cpucard0, and the second processor on it is called proc1.
ODM location codes for processors consist of four 2-digit fields, in the form AA-BB-CC-DD, as follows:
AA Always 00. It indicates the main unit.BB Indicates the processor board number. It can be 0P, 0Q, 0R, or 0S, indicating respectively the first, second, third
or fourth processor card.CC Always 00.DD Indicates the processor position on the processor board. It can be 00 or 01.
Logical Processor NumbersProcessors can also be identified using logical numbers, which start with 0 (zero). Only enabledprocessors have a logical number.
The logical processor number 0 (zero) identifies the first physical processor in the enabled state; thelogical processor number 1 (one) identifies the second enabled physical processor, and so on. Generally,all operating system commands and library subroutines use logical numbers to identify processors.
ODM Processor StatesIf a processor functions correctly, it can be enabled or disabled using a software command. A processor ismarked faulty if it has a detected hardware problem. ODM classifies processors using the following states:
© Copyright IBM Corp. 1997, 2010 193

State Description
enabled Processor works and can be used by AIX.
disabled Processor works, but cannot be used by AIX.
faulty Processor does not work (a hardware fault was detected).
Controlling Processor UseOn a multiprocessor system, the use of processors can be controlled in the following way:
v A user can force a process or kernel threads to run on a specific processor.
Binding Processes and Kernel ThreadsUsers may force their processes to run on a given processor; this action is called binding. A systemadministrator may bind any process. From the command line, binding is controlled with the bindprocessorcommand.
The process itself is not bound, but rather its kernel threads are bound. After kernel threads are bound,they are always scheduled to run on the chosen processor, unless they are later unbound. When a newkernel thread is created, it has the same bind properties as its creator.
This situation applies to the initial thread in the new process created by the fork subroutine; the newthread inherits the bind properties of the thread that called the fork subroutine. When the exec subroutineis called, bind properties are left unchanged. After a process is bound to a processor, if no other binding orunbinding action is performed, all child processes will be bound to the same processor.
It is only possible to bind processes to enabled processors using logical processor numbers. To listavailable logical processor numbers, use the bindprocessor -q command. For a system with four enabledprocessors, this command produces output similar to the following:The available processors are: 0 1 2 3
Binding may also be controlled within a program using the bindprocessor subroutine, which allows theprogrammer to bind a single kernel thread or all kernel threads in a process. The programmer can alsounbind either a single kernel thread or all kernel threads in a process.
Using Dynamic Processor Deallocation
Starting with machine type 7044 model 270, the hardware of all systems with more than two processorscan detect correctable errors, which are gathered by the firmware. These errors are not fatal and, as longas they remain rare occurrences, can be safely ignored. However, when a pattern of failures seems to bedeveloping on a specific processor, this pattern may indicate that this component is likely to exhibit anunrecoverable failure in the near future. This prediction is made by the firmware based-on-failure rates andthreshold analysis.
AIX implements continuous hardware surveillance and regularly polls the firmware for hardware errors.When the number of processor errors hits a threshold and the firmware recognizes the distinct probabilitythat this system component will fail, the firmware returns an error report to AIX and logs the error in thesystem error log. In addition, on multiprocessor systems, depending on the type of failure, AIX attempts tostop using the untrustworthy processor and deallocate it. This feature is called dynamic processordeallocation.
At this point, the firmware flags the processor for persistent deallocation for subsequent reboots, untilservice personnel replace the processor.
194 AIX 5L Version 5.3 General Programming Concepts: Writing and Debugging Programs
Potential Impact to ApplicationsProcessor deallocation is not apparent for the vast majority of applications, including drivers and kernelextensions. However, you can use AIX published interfaces to determine whether an application or kernelextension is running on a multiprocessor machine, find out how many processors there are, and bindthreads to specific processors.
The bindprocessor interface for binding processes or threads to processors uses bind CPU numbers. Thebind CPU numbers are in the range [0..N-1] where N is the total number of CPUs. To avoid breakingapplications or kernel extensions that assume no ″holes″ in the CPU numbering, AIX always makes itappear for applications as if the CPU is the ″last″ (highest numbered) bind CPU to be deallocated. Forinstance, on an 8-way SMP, the bind CPU numbers are [0..7]. If one processor is deallocated, the totalnumber of available CPUs becomes 7, and they are numbered [0..6]. Externally, CPU 7 seems to havedisappeared, regardless of which physical processor failed.
Note: In the rest of this description, the term CPU is used for the logical entity and the term processor forthe physical entity.
Applications or kernel extensions using processes/threads binding could potentially be broken if AIXsilently terminated their bound threads or forcibly moved them to another CPU when one of the processorsneeds to be deallocated. Dynamic processor deallocation provides programming interfaces so that thoseapplications and kernel extensions can be notified that a processor deallocation is about to happen. Whenthese applications and kernel extensions get this notification, they are responsible for moving their boundthreads and associated resources (such as timer request blocks) away form the last bind CPU ID andadapt themselves to the new CPU configuration.
If, after notification of applications and kernel extensions, some of the threads are still bound to the lastbind CPU ID, the deallocation is aborted. In this case, AIX logs the fact that the deallocation has beenaborted in the error log and continues using the ailing processor. When the processor ultimately fails, itcreates a total system failure. Thus, it is important for applications or kernel extensions that are bindingthreads to CPUs to get the notification of an impending processor deallocation, and to act on this notice.
Even in the rare cases where the deallocation cannot go through, dynamic processor deallocation stillgives advanced warning to system administrators. By recording the error in the error log, it gives them achance to schedule a maintenance operation on the system to replace the ailing component before aglobal system failure occurs.
Flow of Events for Processor DeallocationThe typical flow of events for processor deallocation is as follows:
1. The firmware detects that a recoverable error threshold has been reached by one of the processors.
2. AIX logs the firmware error report in the system error log, and, when executing on a machinesupporting processor deallocation, starts the deallocation process.
3. AIX notifies non-kernel processes and threads bound to the last bind CPU.
4. AIX waits for all the bound threads to move away from the last bind CPU. If threads remain bound, AIXeventually times out (after ten minutes) and aborts the deallocation. Otherwise, AIX invokes thepreviously registered High Availability Event Handlers (HAEHs). An HAEH may return an error that willabort the deallocation. Otherwise, AIX continues with the deallocation process and ultimately stops thefailing processor.
In case of failure at any point of the deallocation, AIX logs the failure, indicating the reason why thedeallocation was aborted. The system administrator can look at the error log, take corrective action (whenpossible) and restart the deallocation. For instance, if the deallocation was aborted because at least oneapplication did not unbind its bound threads, the system administrator could stop the application(s), restartthe deallocation (which should continue this time) and restart the application.
Chapter 10. Programming on Multiprocessor Systems 195

Programming Interfaces Dealing with Individual ProcessorsThe following sections describe available programming interfaces:
v “Interfaces to Determine the Number of CPUs on a System”
v “Interfaces to Bind Threads to a Specific Processor”
Interfaces to Determine the Number of CPUs on a System
sysconf SubroutineThe sysconf subroutine returns a number of processors using the following parameters:
v _SC_NPROCESSORS_CONF: Number of processors configured
v _SC_NPROCESSORS_ONLN: Number of processors online
For more information, see sysconf Subroutine in AIX 5L Version 5.3 Technical Reference: Base OperatingSystem and Extensions Volume 2.
The value returned by the sysconf subroutine for _SC_NPROCESSORS_CONF will remain constant betweenreboots. Uniprocessor (UP) machines are identified by a 1. Values greater than 1 indicate multiprocessor(MP) machines. The value returned for the _SC_NPROCESSORS_ONLN parameter will be the count ofactive CPUs and will be decremented every time a processor is deallocated.
The _system_configuration.ncpus field identifies the number of CPUs active on a machine. This field isanalogous to the _SC_NPROCESSOR_ONLN parameter. For more information, see systemcfg.h File inAIX 5L Version 5.3 Files Reference.
For code that must recognize how many processors were originally available at boot time, the ncpus_cfgfield is added to the _system_configuration table, which remains constant between reboots.
The CPUs are identified by bind CPU IDs in the range [0..(ncpus-1)]. The processors also have a physicalCPU number that depends on which CPU board they are on, in which order, and so on. The commandsand subroutines dealing with CPU numbers always use bind CPU numbers. To ease the transition tovarying numbers of CPUs, the bind CPU numbers are contiguous numbers in the range [0..(ncpus-1). Theeffect of this is that from a user point of view, when a processor deallocation takes place, it always lookslike the highest-numbered (″last″) bind CPU is disappearing, regardless of which physical processor failed.
Note: To avoid problems, use the ncpus_cfg variable to determine what the highest possible bind CPUnumber is for a particular system.
Interfaces to Bind Threads to a Specific ProcessorThe bindprocessorcommand and the bindprocessor programming interface allow you to bind a thread ora process to a specific CPU, designated by its bind CPU number. Both interfaces will allow you to bindthreads or processes only to active CPUs. Those programs that directly use the bindprocessorprogramming interface or are bound externally by a bindprocessor command must be able to handle theprocessor deallocation.
The primary problem seen by programs that bind to a processor when a CPU has been deallocated is thatrequests to bind to a deallocated processor will fail. Code that issues bindprocessor requests shouldalways check the return value from those requests.
For more information on these interfaces, see bindprocessor Command in AIX 5L Version 5.3Commands Reference, Volume 1 or bindprocessor Subroutine in AIX 5L Version 5.3 TechnicalReference: Base Operating System and Extensions Volume 1.
196 AIX 5L Version 5.3 General Programming Concepts: Writing and Debugging Programs

Interfaces for Processor Deallocation NotificationThe notification mechanism is different for user-mode applications having threads bound to the last bindCPU than it is for kernel extensions.
Notification in User ModeEach thread of a user mode application that is bound to the last bind CPU is sent the SIGCPUFAIL andSIGRECONFIG signals. These applications need to be modified to catch these signals and dispose of thethreads bound to the last bind CPU (either by unbinding them or by binding them to a different CPU). Formore information on the SIGRECONFIG signal, see Chapter 17, “Dynamic logical partitioning,” on page369
Notification in Kernel ModeThe drivers and kernel extensions that must be notified of an impending processor deallocation mustregister a High-Availability Event Handler (HAEH) routine with the kernel. This routine will be called whena processor deallocation is imminent. An interface is also provided to unregister the HAEH before thekernel extension is unconfigured or unloaded.
Registering a High-Availability Event Handler: The kernel exports a new function to allow notificationof the kernel extensions in case of events that affect the availability of the system.
The system call is:int register_HA_handler(ha_handler_ext_t *)
For more information on this system call, see register_HA_handler in AIX 5L Version 5.3 TechnicalReference: Kernel and Subsystems Volume 1.
The return value is equal to 0 in case of success. A non-zero value indicates a failure.
The system call argument is a pointer to a structure describing the kernel extension’s HAEH. Thisstructure is defined in a header file, named sys/high_avail.h, as follows:typedef struct _ha_handler_ext_ {
int (*_fun)(); /* Function to be invoked */long long _data; /* Private data for (*_fun)() */char _name[sizeof(long long) + 1];
} ha_handler_ext_t;
The private _data field is provided for the use of the kernel extension if it is needed. Whatever value givenin this field at the time of registration will be passed as a parameter to the registered function when thefield is called due to a CPU predictive failure event.
The _name field is a null-terminated string with a maximum length of 8 characters (not including the nullcharacter terminator) which is used to uniquely identify the kernel extension with the kernel. This namemust be unique among all the registered kernel extensions. This name is listed in the detailed data area ofthe CPU_DEALLOC_ABORTED error log entry if the kernel extension returns an error when the HAEH routine iscalled by the kernel.
Kernel extensions should register their HAEH only once.
Invocation of the High-Availability Event Handler: The following parameters call the HAEH routine:
v The value of the _data field of the ha_handler_ext_t structure passed to register_HA_handler.
v A pointer to a ha_event_t structure defined in the sys/high_avail.h file as:typedef struct { /* High-availability related event */
uint _magic; /* Identifies the kind of the event */#define HA_CPU_FAIL 0x40505546 /* "CPUF" */
union {struct { /* Predictive processor failure */
Chapter 10. Programming on Multiprocessor Systems 197

cpu_t dealloc_cpu; /* CPU bind ID of failing processor */ushort domain; /* future extension */
ushort nodeid; /* future extension */ushort reserved3; /* future extension */uint reserved[4]; /* future extension */
} _cpu;/* ... */ /* Additional kind of events -- *//* future extension */
} _u;} haeh_event_t;
The function returns one of the following codes, also defined in the sys/high_avail.h file:#define HA_ACCEPTED 0 /* Positive acknowledgement */#define HA_REFUSED -1 /* Negative acknowledgement */
If any of the registered extensions does not return HA_ACCEPTED, the deallocation is aborted. TheHAEH routines are called in the process environment and do not need to be pinned.
If a kernel extension depends on the CPU configuration, its HAEH routine must react to the upcomingCPU deallocation. This reaction is highly application-dependent. To allow AIX to proceed with thedeconfiguration, they must move the threads that are bound to the last bind CPU, if any. Also, if they havebeen using timers started from bound threads, those timers will be moved to another CPU as part of theCPU deallocation. If they have any dependency on these timers being delivered to a specific CPU, theymust take action (such as stopping them) and restart their timer requests when the threads are bound to anew CPU, for instance.
Canceling the Registration of a High-Availability Event Handler: To keep the system coherent andprevent system crashes, the kernel extensions that register an HAEH must cancel the registration whenthey are unconfigured and are going to be unloaded. The interface is as follows:int unregister_HA_handler(ha_handler_ext_t *)
This interface returns 0 in case of success. Any non-zero return value indicates an error.
For more information on the system call, see unregister_HA_handler in AIX 5L Version 5.3 TechnicalReference: Kernel and Subsystems Volume 1.
Deallocating a Processor in the Test EnvironmentTo test any of the modifications made in applications or kernel extensions to support this processordeallocation, use the following command to trigger the deallocation of a CPU designated by its logical CPUnumber. The syntax is:cpu_deallocate cpunum
where:
cpunum is a valid logical CPU number.
You must reboot the system to get the target processor back online. Hence, this command is provided fortest purposes only and is not intended as a system administration tool.
Dynamic Memory GuardingAIX systems are designed to be resilient in regards to memory errors. Memory error resilience is the resultof both hardware and operating system-level recoveries. There are multiple ways to categorize memoryerrors, but for the purposes of this discussion, memory errors are classified as recoverable andnon-recoverable errors.
198 AIX 5L Version 5.3 General Programming Concepts: Writing and Debugging Programs

Recoverable errors result in data located in specific locations being retrievable, and unrecoverable errorsresult in a loss of data from the specific location in question. Unrecoverable errors are typically resolved byusing hardware redundancy in the memory subsystem, or by masking the area in question from use duringboot time of the operating system.
AIX supports resilience as a means of preventing recoverable memory errors from becomingunrecoverable errors through a technique known as Dynamic Memory Guarding. Dynamic MemoryGuarding is based on support provided by the hardware. Hardware provides mechanisms for the detectionof and recovery from errors (such as memory scrubbing and error correcting circuits (ECC)). Hardware canprovide mechanisms for avoiding future unrecoverable errors as well, including redundant bit steering.
As a complement to these hardware mechanisms, the hardware can inform the operating system abouterrors best handled through Dynamic Memory Guarding. This is done by identifying areas of memory to bedeallocated. The AIX operating system uses this information to mask off the memory area in question andto stop using it. The operating system will move any data currently contained in the memory area in errorto another memory area, and then stop using the memory page that contains the memory location in error.This memory guarding is done by the operating system without any user intervention and is transparent toend users and applications.
Creating Locking ServicesSome programmers may want to implement their own high-level locking services instead of using thestandard locking services (mutexes) provided in the threads library. For example, a database product mayalready use a set of internally defined services; it can be easier to adapt these locking services to a newsystem than to adapt all the internal modules that use these services.
For this reason, AIX provides atomic locking service primitives that can be used to build higher-levellocking services. To create services that are multiprocessor-safe (like the standard mutex services),programmers must use the atomic locking services described in this section and not atomic operationsservices, such as the compare_and_swap subroutine.
Multiprocessor-Safe Locking ServicesLocking services are used to serialize access to resources that may be used concurrently. For example,locking services can be used for insertions in a linked list, which require several pointer updates. If theupdate sequence by one process is interrupted by a second process that tries to access the same list, anerror can occur. A sequence of operations that should not be interrupted is called a critical section.
Locking services use a lock word to indicate the lock status: 0 (zero) can be used for free, and 1 (one) forbusy. Therefore, a service to acquire a lock would do the following:test the lock wordif the lock is free
set the lock word to busyreturn SUCCESS
...
Because this sequence of operations (read, test, set) is itself a critical section, special handling is required.On a uniprocessor system, disabling interrupts during the critical section prevents interruption by a contextswitch. But on a multiprocessor system, the hardware must provide a test-and-set primitive, usually with aspecial machine instruction. In addition, special processor-dependent synchronization instructions calledimport and export fences are used to temporarily block other reads or writes. They protect againstconcurrent access by several processors and against the read and write reordering performed by modernprocessors and are defined as follows:
Chapter 10. Programming on Multiprocessor Systems 199

Import FencesThe import fence is a special machine instruction that delays until all previously issued instructionsare complete. When used in conjunction with a lock, this prevents speculative execution ofinstructions until the lock is obtained.
Export FencesThe export fence guarantees that the data being protected is visible to all other processors prior tothe lock being released.
To mask this complexity and provide independence from these machine-dependent instructions, thefollowing subroutines are defined:
_check_lock Conditionally updates a single word variable atomically, issuing an import fence formultiprocessor systems. The compare_and_swap subroutine is similar, but it does not issuean import fence and, therefore, is not usable to implement a lock.
_clear_lock Atomically writes a single word variable, issuing an export fence for multiprocessor systems.
Kernel ProgrammingFor complete details about kernel programming, see AIX 5L Version 5.3 Kernel Extensions and DeviceSupport Programming Concepts. This section highlights the major differences required for multiprocessorsystems.
Serialization is often required when accessing certain critical resources. Locking services can be used toserialize thread access in the process environment, but they will not protect against an access occurring inthe interrupt environment. New or ported code should use the disable_lock and unlock_enable kernelservices, which use simple locks in addition to interrupt control, instead of the i_disable kernel service.These kernel services can also be used for uniprocessor systems, on which they simply use interruptservices without locking. For detailed information, see Locking Kernel Services in AIX 5L Version 5.3Kernel Extensions and Device Support Programming Concepts.
Device drivers by default run in a logical uniprocessor environment, in what is called funneled mode. Mostwell-written drivers for uniprocessor systems will work without modification in this mode, but must becarefully examined and modified to benefit from multiprocessing. Finally, kernel services for timers nowhave return values because they will not always succeed in a multiprocessor environment. Therefore, newor ported code must check these return values. For detailed information, see Using Multiprocessor-SafeTimer Services in AIX 5L Version 5.3 Kernel Extensions and Device Support Programming Concepts.
Example of Locking ServicesThe multiprocessor-safe locking subroutines can be used to create custom high-level routines independentof the threads library. The example that follows shows partial implementations of subroutines similar to thepthread_mutex_lock and pthread_mutex_unlock subroutines in the threads library:#include <sys/atomic_op.h> /* for locking primitives */#define SUCCESS 0#define FAILURE -1#define LOCK_FREE 0#define LOCK_TAKEN 1
typdef struct {atomic_p lock; /* lock word */tid_t owner; /* identifies the lock owner */... /* implementation dependent fields */
} my_mutex_t;
...
int my_mutex_lock(my_mutex_t *mutex){tid_t self; /* caller's identifier */
200 AIX 5L Version 5.3 General Programming Concepts: Writing and Debugging Programs

/*Perform various checks:
is mutex a valid pointer?has the mutex been initialized?
*/...
/* test that the caller does not have the mutex */self = thread_self();if (mutex->owner == self)
return FAILURE;
/*Perform a test-and-set primitive in a loop.In this implementation, yield the processor if failure.Other solutions include: spin (continuously check);
or yield after a fixed number of checks.*/while (_check_lock(mutex->lock, LOCK_FREE, LOCK_TAKEN))
yield();
mutex->owner = self;return SUCCESS;
} /* end of my_mutex_lock */
int my_mutex_unlock(my_mutex_t *mutex){
/*Perform various checks:
is mutex a valid pointer?has the mutex been initialized?
*/...
/* test that the caller owns the mutex */if (mutex->owner != thread_self())
return FAILURE;
_clear_lock(mutex->lock, LOCK_FREE);return SUCCESS;
} /* end of my_mutex_unlock */
Related InformationLocking Kernel Servicesat is in I in AIX 5L Version 5.3 Kernel Extensions and Device SupportProgramming Concepts
Using Multiprocessor-Safe Timer Services in AIX 5L Version 5.3 Kernel Extensions and Device SupportProgramming Concepts
Subroutine ReferencesThe bindprocessor, compare_and_swap, fork, pthread_mutex_lock, pthread_mutex_unlocksubroutines.
Kernel ServicesThe disable_lock, i_disable, and unlock_enable kernel services.
Commands ReferencesThe bindprocessor command.
Chapter 10. Programming on Multiprocessor Systems 201

202 AIX 5L Version 5.3 General Programming Concepts: Writing and Debugging Programs

Chapter 11. Multi-Threaded Programming
This chapter provides guidelines for writing multi-threaded programs using the threads library(libpthreads.a). The AIX threads library is based on the X/Open Portability Guide Issue 5 standard. Forthis reason, the following information presents the threads library as the AIX implementation of the XPG5standard.
Parallel programming uses the benefits of multiprocessor systems, while maintaining a full binarycompatibility with existing uniprocessor systems. The parallel programming facilities are based on theconcept of threads.
The advantages of using parallel programming instead of serial programming techniques are as follows:
v Parallel programming can improve the performance of a program.
v Some common software models are well-suited to parallel-programming techniques. For moreinformation, see “Software Models” on page 204.
Traditionally, multiple single-threaded processes have been used to achieve parallelism, but someprograms can benefit from a finer level of parallelism. Multi-threaded processes offer parallelism within aprocess and share many of the concepts involved in programming multiple single-threaded processes.
The following information introduces threads and the associated programming facilities. It also discussesgeneral topics concerning parallel programming:
Note: In this book, the word thread used alone refers to user threads. This also applies to user-modeenvironment programming references, but not to articles related to kernel programming.
To learn how to write programs using multiple threads, read the topics in sequential order. If you arelooking for specific information, see one of the following topics:
v “Thread-Safe and Threaded Libraries in AIX” on page 208
v “Synchronization Overview” on page 218
v “Threads Library Options” on page 260
Understanding Threads and ProcessesA thread is an independent flow of control that operates within the same address space as otherindependent flows of controls within a process. Traditionally, thread and process characteristics aregrouped into a single entity called a process. In other operating systems, threads are sometimes calledlightweight processes, or the meaning of the word thread is sometimes slightly different.
The following sections discuss the differences between a thread and a process.
In traditional single-threaded process systems, a process has a set of properties. In multi-threadedsystems, these properties are divided between processes and threads.
Threads have some limitations and cannot be used for some special purposes that require multi-processedprograms. For more information, see “Limitations” on page 287.
Process PropertiesA process in a multi-threaded system is the changeable entity. It must be considered as an executionframe. It has traditional process attributes, such as:
v Process ID, process group ID, user ID, and group ID
v Environment
© Copyright IBM Corp. 1997, 2010 203

v Working directory
A process also provides a common address space and common system resources, as follows:
v File descriptors
v Signal actions
v Shared libraries
v Inter-process communication tools (such as message queues, pipes, semaphores, or shared memory)
Thread PropertiesA thread is the schedulable entity. It has only those properties that are required to ensure its independentcontrol of flow. These include the following properties:
v Stack
v Scheduling properties (such as policy or priority)
v Set of pending and blocked signals
v Some thread-specific data
An example of thread-specific data is the errno error indicator. In multi-threaded systems, errno is nolonger a global variable, but usually a subroutine returning a thread-specific errno value. Some othersystems may provide other implementations of errno.
Threads within a process must not be considered as a group of processes. All threads share the sameaddress space. This means that two pointers having the same value in two threads refer to the same data.Also, if any thread changes one of the shared system resources, all threads within the process areaffected. For example, if a thread closes a file, the file is closed for all threads.
Initial ThreadWhen a process is created, one thread is automatically created. This thread is called the initial thread. Itensures the compatibility between the old processes with a unique implicit thread and the newmulti-threaded processes. The initial thread has some special properties, not visible to the programmer,that ensure binary compatibility between the old single-threaded programs and the multi-threadedoperating system. It is also the initial thread that executes the main routine in multi-threaded programs.
ModularityPrograms are often modeled as a number of distinct parts interacting with each other to produce a desiredresult or service. A program can be implemented as a single, complex entity that performs multiplefunctions among the different parts of the program. A more simple solution consists of implementingseveral entities, each entity performing a part of the program and sharing resources with other entities.
By using multiple entities, a program can be separated according to its distinct activities, each having anassociated entity. These entities do not have to know anything about the other parts of the program exceptwhen they exchange information. In these cases, they must synchronize with each other to ensure dataintegrity.
Threads are well-suited entities for modular programming. Threads provide simple data sharing (all threadswithin a process share the same address space) and powerful synchronization facilities, such as mutexes(mutual exclusion locks) and condition variables.
Software ModelsThe following common software models can easily be implemented with threads:
v Master/Slave Model
v Divide-and-Conquer Models
204 AIX 5L Version 5.3 General Programming Concepts: Writing and Debugging Programs

v Producer/Consumer Models
All these models lead to modular programs. Models may also be combined to efficiently solve complextasks.
These models can apply to either traditional multi-process solutions, or to single process multi-threadsolutions, on multi-threaded systems. In the following descriptions, the word entity refers to either asingle-threaded process or to a single thread in a multi-threaded process.
Master/Slave ModelIn the master/slave (sometimes called boss/worker) model, a master entity receives one or more requests,then creates slave entities to execute them. Typically, the master controls the number of slaves and whateach slave does. A slave runs independently of other slaves.
An example of this model is a print job spooler controlling a set of printers. The spooler’s role is to ensurethat the print requests received are handled in a timely fashion. When the spooler receives a request, themaster entity chooses a printer and causes a slave to print the job on the printer. Each slave prints onejob at a time on a printer, while it also handles flow control and other printing details. The spooler maysupport job cancelation or other features that require the master to cancel slave entities or reassign jobs.
Divide-and-Conquer ModelsIn the divide-and-conquer (sometimes called simultaneous computation or work crew) model, one or moreentities perform the same tasks in parallel. There is no master entity; all entities run in parallelindependently.
An example of a divide-and-conquer model is a parallelized grep command implementation, which couldbe done as follows. The grep command first establishes a pool of files to be scanned. It then creates anumber of entities. Each entity takes a different file from the pool and searches for the pattern, sending theresults to a common output device. When an entity completes its file search, it obtains another file fromthe pool or stops if the pool is empty.
Producer/Consumer ModelsThe producer/consumer (sometimes called pipelining) model is typified by a production line. An itemproceeds from raw components to a final item in a series of stages. Usually a single worker at each stagemodifies the item and passes it on to the next stage. In software terms, an AIX command pipe, such asthe cpio command, is an example of this model.
For example, a reader entity reads raw data from standard input and passes it to the processor entity,which processes the data and passes it to the writer entity, which writes it to standard output. Parallelprogramming allows the activities to be performed concurrently: the writer entity may output someprocessed data while the reader entity gets more raw data.
Kernel Threads and User ThreadsA kernel thread is the schedulable entity, which means that the system scheduler handles kernel threads.These threads, known by the system scheduler, are strongly implementation-dependent. To facilitate thewriting of portable programs, libraries provide user threads.
A kernel thread is a kernel entity, like processes and interrupt handlers; it is the entity handled by thesystem scheduler. A kernel thread runs within a process, but can be referenced by any other thread in thesystem. The programmer has no direct control over these threads, unless you are writing kernelextensions or device drivers. For more information about kernel programming, see AIX 5L Version 5.3Kernel Extensions and Device Support Programming Concepts.
A user thread is an entity used by programmers to handle multiple flows of controls within a program. TheAPI for handling user threads is provided by the threads library. A user thread only exists within a process;a user thread in process A cannot reference a user thread in process B. The library uses a proprietary
Chapter 11. Multi-Threaded Programming 205

interface to handle kernel threads for executing user threads. The user threads API, unlike the kernelthreads interface, is part of a POSIX-standards compliant portable-programming model. Thus, amulti-threaded program developed on an AIX system can easily be ported to other systems.
On other systems, user threads are simply called threads, and lightweight process refers to kernel threads.
Thread Models and Virtual ProcessorsUser threads are mapped to kernel threads by the threads library. The way this mapping is done is calledthe thread model. There are three possible thread models, corresponding to three different ways to mapuser threads to kernel threads.
v M:1 model
v 1:1 model
v M:N model
The mapping of user threads to kernel threads is done using virtual processors. A virtual processor (VP) isa library entity that is usually implicit. For a user thread, the VP behaves like a CPU. In the library, the VPis a kernel thread or a structure bound to a kernel thread.
In the M:1 model, all user threads are mapped to one kernel thread; all user threads run on one VP. Themapping is handled by a library scheduler. All user-threads programming facilities are completely handledby the library. This model can be used on any system, especially on traditional single-threaded systems.
In the 1:1 model, each user thread is mapped to one kernel thread; each user thread runs on one VP.Most of the user threads programming facilities are directly handled by the kernel threads. This model canbe set by setting the AIXTHREAD_SCOPE environment variable to S.
In the M:N model, all user threads are mapped to a pool of kernel threads; all user threads run on a poolof virtual processors. A user thread may be bound to a specific VP, as in the 1:1 model. All unbound userthreads share the remaining VPs. This is the most efficient and most complex thread model; the userthreads programming facilities are shared between the threads library and the kernel threads. This is thedefault model.
Threads Library APIThis section provides general information about the threads library API. Although the following informationis not required for writing multi-threaded programs, it can help the programmer understand the threadslibrary API.
Object-Oriented InterfaceThe threads library API provides an object-oriented interface. The programmer manipulates opaque objectsusing pointers or other universal identifiers. This ensures the portability of multi-threaded programsbetween systems that implement the threads library and also allows implementation changes between tworeleases of AIX, necessitating only that programs be recompiled. Although some definitions of data typesmay be found in the threads library header file (pthread.h), programs should not rely on theseimplementation-dependent definitions to directly handle the contents of structures. The regular threadslibrary subroutines must always be used to manipulate the objects.
The threads library essentially uses the following kinds of objects (opaque data types): threads, mutexes,rwlocks, and condition variables. These objects have attributes that specify the object properties. Whencreating an object, the attributes must be specified. In the threads library, these creation attributes arethemselves objects, called threads attributes objects.
The following pairs of objects are manipulated by the threads library:
v Threads and thread-attributes objects
v Mutexes and mutex-attributes objects
206 AIX 5L Version 5.3 General Programming Concepts: Writing and Debugging Programs
v Condition variables and condition-attributes objects
v Read-write locks
An attributes object is created with attributes having default values. Attributes can then be individuallymodified by using subroutines. This ensures that a multi-threaded program will not be affected by theintroduction of new attributes or by changes in the implementation of an attribute. An attributes object canthus be used to create one or several objects, and then destroyed without affecting objects created withthe attributes object.
Using an attributes object also allows the use of object classes. One attributes object may be defined foreach object class. Creating an instance of an object class is done by creating the object using the classattributes object.
Naming Convention for the Threads LibraryThe identifiers used by the threads library follow a strict naming convention. All identifiers of the threadslibrary begin with pthread_. User programs should not use this prefix for private identifiers. This prefix isfollowed by a component name. The following components are defined in the threads library:
pthread_ Threads themselves and miscellaneous subroutinespthread_attr Thread attributes objectspthread_cond Condition variablespthread_condattr Condition attributes objectspthread_key Thread-specific data keyspthread_mutex Mutexespthread_mutexattr Mutex attributes objects
Data type identifiers end with _t. Subroutine and macro names end with an _ (underscore), followed by aname identifying the action performed by the subroutine or the macro. For example, pthread_attr_init is athreads library identifier (pthread_) that concerns thread attributes objects (attr) and is an initializationsubroutine (_init).
Explicit macro identifiers are in uppercase letters. Some subroutines may, however, be implemented asmacros, although their names are in lowercase letters.
pthread Implementation FilesThe following AIX files provide the implementation of pthreads:
/usr/include/pthread.h C/C++ header with most pthread definitions./usr/include/sched.h C/C++ header with some scheduling definitions./usr/include/unistd.h C/C++ header with pthread_atfork() definition./usr/include/sys/limits.h C/C++ header with some pthread definitions./usr/include/sys/pthdebug.h C/C++ header with most pthread debug definitions./usr/include/sys/sched.h C/C++ header with some scheduling definitions./usr/include/sys/signal.h C/C++ header with pthread_kill() and
pthread_sigmask() definitions./usr/include/sys/types.h C/C++ header with some pthread definitions./usr/lib/libpthreads.a 32-bit/64-bit library providing UNIX98 and POSIX
1003.1c pthreads./usr/lib/libpthreads_compat.a 32-bit only library providing POSIX 1003.1c Draft 7
pthreads./usr/lib/profiled/libpthreads.a Profiled 32-bit/64-bit library providing UNIX98 and
POSIX 1003.1c pthreads./usr/lib/profiled/libpthreads_compat.a Profiled 32-bit only library providing POSIX 1003.1c
Draft 7 pthreads.
Chapter 11. Multi-Threaded Programming 207

Thread-Safe and Threaded Libraries in AIXBy default, all applications are now considered ″threaded,″ even though most are of the case ″singlethreaded.″ These thread-safe libraries are as follows:
libbsd.a libc.a libm.alibsvid.a libtli.a libxti.alibnetsvc.a
POSIX Threads LibrariesThe following POSIX threads libraries are available:
libpthreads.a POSIX Threads LibraryThe libpthreads.a library is based on the POSIX 1003.1c industry standard for a portable userthreads API. Any program written for use with a POSIX thread library can be ported for use withanother POSIX threads library; only the performance and very few subroutines of the threadslibrary are implementation-dependent. To enhance the portability of the threads library, the POSIXstandard made the implementation of several programming facilities optional. For more informationabout checking the POSIX options, see “Threads Library Options” on page 260.
libpthreads_compat.a POSIX Draft 7 Threads LibraryAIX provides binary compatibility for existing multi-threads applications that were coded to Draft 7of the POSIX thread standard. These applications will run without relinking. Thelibpthreads_compat.a library is only provided for backward compatibility with applications writtenusing the Draft 7 of the POSIX Thread Standard. All new applications should use thelibpthreads.a library, which supports both 32-bit and 64-bit applications. Thelibpthreads_compat.a library only supports 32-bit applications. Beginning with AIX 5.1, thelibpthreads.a library provides support for the Single UNIX Specification, Version 2 which includesthe final POSIX 1003.1c Pthread Standard. For more information, see “Developing Multi-ThreadedPrograms” on page 274.
Creating ThreadsThread creation differs from process creation in that no parent-child relation exists between threads. Allthreads, except the initial thread automatically created when a process is created, are on the samehierarchical level. A thread does not maintain a list of created threads, nor does it know the thread thatcreated it.
When creating a thread, an entry-point routine and an argument must be specified. Every thread has anentry-point routine with one argument. The same entry-point routine may be used by several threads.
A thread has attributes, which specify the characteristics of the thread. To control thread attributes, athread attributes object must be defined before creating the thread.
Thread Attributes ObjectThe thread attributes are stored in an opaque object, the thread attributes object, used when creating thethread. It contains several attributes, depending on the implementation of POSIX options. The object isaccessed through a variable of type pthread_attr_t. In AIX, the pthread_attr_t data type is a pointer to astructure; on other systems, it may be a structure or another data type.
Creating and Destroying the Thread Attributes ObjectThe thread attributes object is initialized to default values by the pthread_attr_init subroutine. Theattributes are handled by subroutines. The thread attributes object is destroyed by thepthread_attr_destroy subroutine. This subroutine can release storage dynamically allocated by thepthread_attr_init subroutine, depending on the implementation of the threads library.
208 AIX 5L Version 5.3 General Programming Concepts: Writing and Debugging Programs

In the following example, a thread attributes object is created and initialized with default values, then usedand finally destroyed:pthread_attr_t attributes;
/* the attributes object is created */...if (!pthread_attr_init(&attributes)) {
/* the attributes object is initialized */...
/* using the attributes object */...pthread_attr_destroy(&attributes);
/* the attributes object is destroyed */}
The same attributes object can be used to create several threads. It can also be modified between twothread creations. When the threads are created, the attributes object can be destroyed without affectingthe threads created with it.
Detachstate AttributeThe following attribute is always defined:
Detachstate Specifies the detached state of a thread.
The value of the attribute is returned by the pthread_attr_getdetachstate subroutine; it can be set by thepthread_attr_setdetachstate subroutine. Possible values for this attributes are the following symbolicconstants:
PTHREAD_CREATE_DETACHED Specifies that the thread will be created in the detached statePTHREAD_CREATE_JOINABLE Specifies that the thread will be created in the joinable state
The default value is PTHREAD_CREATE_JOINABLE.
If you create a thread in the joinable state, you must call the pthread_join subroutine with the thread.Otherwise, you may run out of storage space when creating new threads, because each thread takes up asignficant amount of memory. For more information on the pthread_join subroutine, see “Calling thepthread_join Subroutine” on page 237.
Other Threads AttributesAIX also defines the following attributes, which are intended for advanced programs and may requirespecial execution privilege to take effect. Most programs operate correctly with the default settings. Theuse of the following attributes is explained in “Using the inheritsched Attribute” on page 240.
Contention Scope Specifies the contention scope of a threadInheritsched Specifies the inheritance of scheduling properties of a threadSchedparam Specifies the scheduling parameters of a threadSchedpolicy Specifies the scheduling policy of a thread
The use of the following stack attributes is explained in “Stack Attributes” on page 260.
Stacksize Specifies the size of the thread’s stackStackaddr Specifies the address of the thread’s stackGuardsize Specifies the size of the guard area of the thread’s stack
Chapter 11. Multi-Threaded Programming 209

Creating a Thread using the pthread_create Subroutine
A thread is created by calling the pthread_create subroutine. This subroutine creates a new thread andmakes it runnable.
Using the Thread Attributes ObjectWhen calling the pthread_create subroutine, you may specify a thread attributes object. If you specify aNULL pointer, the created thread will have the default attributes. Thus, the following code fragment:pthread_t thread;pthread_attr_t attr;...pthread_attr_init(&attr);pthread_create(&thread, &attr, init_routine, NULL);pthread_attr_destroy(&attr);
is equivalent to the following:pthread_t thread;...pthread_create(&thread, NULL, init_routine, NULL);
Entry Point RoutineWhen calling the pthread_create subroutine, you must specify an entry-point routine. This routine,provided by your program, is similar to the main routine for the process. It is the first user routineexecuted by the new thread. When the thread returns from this routine, the thread is automaticallyterminated.
The entry-point routine has one parameter, a void pointer, specified when calling the pthread_createsubroutine. You may specify a pointer to some data, such as a string or a structure. The creating thread(the one calling the pthread_create subroutine) and the created thread must agree upon the actual typeof this pointer.
The entry-point routine returns a void pointer. After the thread termination, this pointer is stored by thethreads library unless the thread is detached. For more information about using this pointer, see “ReturningInformation from a Thread” on page 238.
Returned InformationThe pthread_create subroutine returns the thread ID of the new thread. The caller can use this thread IDto perform various operations on the thread.
Depending on the scheduling parameters of both threads, the new thread may start running before the callto the pthread_create subroutine returns. It may even happen that, when the pthread_create subroutinereturns, the new thread has already terminated. The thread ID returned by the pthread_create subroutinethrough the thread parameter is then already invalid. It is, therefore, important to check for the ESRCHerror code returned by threads library subroutines using a thread ID as a parameter.
If the pthread_create subroutine is unsuccessful, no new thread is created, the thread ID in the threadparameter is invalid, and the appropriate error code is returned. For more information, see “Example of aMulti-Threaded Program” on page 276.
Handling Thread IDsThe thread ID of a newly created thread is returned to the creating thread through the thread parameter.The current thread ID is returned by the pthread_self subroutine.
A thread ID is an opaque object; its type is pthread_t. In AIX, the pthread_t data type is an integer. Onother systems, it may be a structure, a pointer, or any other data type.
210 AIX 5L Version 5.3 General Programming Concepts: Writing and Debugging Programs

To enhance the portability of programs using the threads library, the thread ID should always be handledas an opaque object. For this reason, thread IDs should be compared using the pthread_equalsubroutine. Never use the C equality operator (==), because the pthread_t data type may be neither anarithmetic type nor a pointer.
Terminating ThreadsA thread automatically terminates when it returns from its entry-point routine. A thread can also explicitlyterminate itself or terminate any other thread in the process, using a mechanism called cancelation.Because all threads share the same data space, a thread must perform cleanup operations at terminationtime; the threads library provides cleanup handlers for this purpose.
Exiting a ThreadA process can exit at any time when a thread calls the exit subroutine. Similarly, a thread can exit at anytime by calling the pthread_exit subroutine.
Calling the exit subroutine terminates the entire process, including all its threads. In a multi-threadedprogram, the exit subroutine should only be used when the entire process needs to be terminated; forexample, in the case of an unrecoverable error. The pthread_exit subroutine should be preferred, even forexiting the initial thread.
Calling the pthread_exit subroutine terminates the calling thread. The status parameter is saved by thelibrary and can be further used when joining the terminated thread. Calling the pthread_exit subroutine issimilar, but not identical, to returning from the thread’s initial routine. The result of returning from thethread’s initial routine depends on the thread:
v Returning from the initial thread implicitly calls the exit subroutine, thus terminating all the threads in theprocess.
v Returning from another thread implicitly calls the pthread_exit subroutine. The return value has thesame role as the status parameter of the pthread_exit subroutine.
To avoid implicitly calling the exit subroutine, to use the pthread_exit subroutine to exit a thread.
Exiting the initial thread (for example, by calling the pthread_exit subroutine from the main routine) doesnot terminate the process. It terminates only the initial thread. If the initial thread is terminated, the processwill be terminated when the last thread in it terminates. In this case, the process return code is 0.
The following program displays exactly 10 messages in each language. This is accomplished by callingthe pthread_exit subroutine in the main routine after creating the two threads, and creating a loop in theThread routine.#include <pthread.h> /* include file for pthreads - the 1st */#include <stdio.h> /* include file for printf() */
void *Thread(void *string)
{int i;
for (i=0; i<10; i++)printf("%s\n", (char *)string);
pthread_exit(NULL);}
int main(){
char *e_str = "Hello!";char *f_str = "Bonjour !";
pthread_t e_th;
Chapter 11. Multi-Threaded Programming 211

pthread_t f_th;
int rc;
rc = pthread_create(&e_th, NULL, Thread, (void *)e_str);if (rc)
exit(-1);rc = pthread_create(&f_th, NULL, Thread, (void *)f_str);if (rc)
exit(-1);pthread_exit(NULL);
}
The pthread_exit subroutine releases any thread-specific data, including the thread’s stack. Any dataallocated on the stack becomes invalid, because the stack is freed and the corresponding memory may bereused by another thread. Therefore, thread synchronization objects (mutexes and condition variables)allocated on a thread’s stack must be destroyed before the thread calls the pthread_exit subroutine.
Unlike the exit subroutine, the pthread_exit subroutine does not clean up system resources sharedamong threads. For example, files are not closed by the pthread_exit subroutine, because they may beused by other threads.
Canceling a ThreadThe thread cancelation mechanism allows a thread to terminate the execution of any other thread in theprocess in a controlled manner. The target thread (that is, the one that is being canceled) can holdcancelation requests pending in a number of ways and perform application-specific cleanup processingwhen the notice of cancelation is acted upon. When canceled, the thread implicitly calls thepthread_exit((void *)-1) subroutine.
The cancelation of a thread is requested by calling the pthread_cancel subroutine. When the call returns,the request has been registered, but the thread may still be running. The call to the pthread_cancelsubroutine is unsuccessful only when the specified thread ID is not valid.
Cancelability State and TypeThe cancelability state and type of a thread determines the action taken upon receipt of a cancelationrequest. Each thread controls its own cancelability state and type with the pthread_setcancelstate andpthread_setcanceltype subroutines.
The following possible cancelability states and cancelability types lead to three possible cases, as shownin the following table.
Cancelability State Cancelability Type Resulting Case
Disabled Any (the type is ignored) Disabled cancelability
Enabled Deferred Deferred cancelability
Enabled Asynchronous Asynchronous cancelability
The possible cases are described as follows:
v Disabled cancelability. Any cancelation request is set pending, until the cancelability state is changed orthe thread is terminated in another way.
A thread should disable cancelability only when performing operations that cannot be interrupted. Forexample, if a thread is performing some complex file-save operations (such as an indexed database)and is canceled during the operation, the files may be left in an inconsistent state. To avoid this, thethread should disable cancelability during the file save operations.
v Deferred cancelability. Any cancelation request is set pending, until the thread reaches the nextcancelation point. It is the default cancelability state.
212 AIX 5L Version 5.3 General Programming Concepts: Writing and Debugging Programs

This cancelability state ensures that a thread can be cancelled, but limits the cancelation to specificmoments in the thread’s execution, called cancelation points. A thread canceled on a cancelation pointleaves the system in a safe state; however, user data may be inconsistent or locks may be held by thecanceled thread. To avoid these situations, use cleanup handlers or disable cancelability within criticalregions. For more information, see “Using Cleanup Handlers” on page 216.
v Asynchronous cancelability. Any cancelation request is acted upon immediately.
A thread that is asynchronously canceled while holding resources may leave the process, or even thesystem, in a state from which it is difficult or impossible to recover. For more information aboutasync-cancel safety, see “Async-Cancel Safety.”
Async-Cancel SafetyA function is said to be async-cancel safe if it is written so that calling the function with asynchronouscancelability enabled does not cause any resource to be corrupted, even if a cancelation request isdelivered at any arbitrary instruction.
Any function that gets a resource as a side effect cannot be made async-cancel safe. For example, if themalloc subroutine is called with asynchronous cancelability enabled, it might acquire the resourcesuccessfully, but as it was returning to the caller, it could act on a cancelation request. In such a case, theprogram would have no way of knowing whether the resource was acquired or not.
For this reason, most library routines cannot be considered async-cancel safe. It is recommended that youuse asynchronous cancelability only if you are sure only to perform operations that do not hold resourcesand only to call library routines that are async-cancel safe.
The following subroutines are async-cancel safe; they ensure that cancelation will be handled correctly,even if asynchronous cancelability is enabled:
v pthread_cancel
v pthread_setcancelstate
v pthread_setcanceltype
An alternative to asynchronous cancelability is to use deferred cancelability and to add explicit cancelationpoints by calling the pthread_testcancel subroutine.
Cancelation PointsCancelation points are points inside of certain subroutines where a thread must act on any pendingcancelation request if deferred cancelability is enabled. All of these subroutines may block the callingthread or compute indefinitely.
An explicit cancelation point can also be created by calling the pthread_testcancel subroutine. Thissubroutine simply creates a cancelation point. If deferred cancelability is enabled, and if a cancelationrequest is pending, the request is acted upon and the thread is terminated. Otherwise, the subroutinesimply returns.
Other cancelation points occur when calling the following subroutines:
v pthread_cond_wait
v pthread_cond_timedwait
v pthread_join
The pthread_mutex_lock and pthread_mutex_trylock subroutines do not provide a cancelation point. Ifthey did, all functions calling these subroutines (and many functions do) would provide a cancelation point.Having too many cancelation points makes programming very difficult, requiring either lots of disabling andrestoring of cancelability or extra effort in trying to arrange for reliable cleanup at every possible place. Formore information about these subroutines, see “Using Mutexes” on page 218.
Chapter 11. Multi-Threaded Programming 213

Cancelation points occur when a thread is executing the following functions:
aio_suspend closecreat fcntlfsync getmsggetpmsg lockfmq_receive mq_sendmsgrcv msgsndmsync nanosleepopen pausepoll preadpthread_cond_timedwait pthread_cond_waitpthread_join pthread_testcancelputpmsg pwriteread readvselect sem_waitsigpause sigsuspendsigtimedwait sigwaitsigwaitinfo sleepsystem tcdrainusleep waitwait3 waitidwaitpid writewritev
A cancelation point can also occur when a thread is executing the following functions:
catclose catgets catopenclosedir closelog ctermiddbm_close dbm_delete dbm_fetchdbm_nextkey dbm_open dbm_storedlclose dlopen endgrentendpwent fwprintf fwritefwscanf getc getc_unlockedgetchar getchar_unlocked getcwdgetdate getgrent getgrgidgetgrgid_r getgrnam getgrnam_rgetlogin getlogin_r popenprintf putc putc_unlockedputchar putchar_unlocked putspututxline putw putwcputwchar readdir readdir_rremove rename rewindendutxent fclose fcntlfflush fgetc fgetposfgets fgetwc fgetwsfopen fprintf fputcfputs getpwent getpwnamgetpwnam_r getpwuid getpwuid_rgets getutxent getutxidgetutxline getw getwcgetwchar getwd rewinddirscanf seekdir semopsetgrent setpwent setutxentstrerror syslog tmpfile
214 AIX 5L Version 5.3 General Programming Concepts: Writing and Debugging Programs

tmpnam ttyname ttyname_rfputwc fputws freadfreopen fscanf fseekfseeko fsetpos ftellftello ftw globiconv_close iconv_open ioctllseek mkstemp nftwopendir openlog pcloseperror ungetc ungetwcunlink vfprintf vfwprintfvprintf vwprintf wprintfwscanf
The side effects of acting upon a cancelation request while suspended during a call of a function is thesame as the side effects that may be seen in a single-threaded program when a call to a function isinterrupted by a signal and the given function returns [EINTR]. Any such side effects occur before anycancelation cleanup handlers are called.
Whenever a thread has cancelability enabled and a cancelation request has been made with that threadas the target and the thread calls the pthread_testcancel subroutine, the cancelation request is actedupon before the pthread_testcancel subroutine returns. If a thread has cancelability enabled and thethread has an asynchronous cancelation request pending and the thread is suspended at a cancelationpoint waiting for an event to occur, the cancelation request will be acted upon. However, if the thread issuspended at a cancelation point and the event that it is waiting for occurs before the cancelation requestis acted upon, the sequence of events determines whether the cancelation request is acted upon orwhether the request remains pending and the thread resumes normal execution.
Cancelation ExampleIn the following example, both ″writer″ threads are canceled after 10 seconds, and after they have writtentheir message at least five times.#include <pthread.h> /* include file for pthreads - the 1st */#include <stdio.h> /* include file for printf() */#include <unistd.h> /* include file for sleep() */
void *Thread(void *string){
int i;int o_state;
/* disables cancelability */pthread_setcancelstate(PTHREAD_CANCEL_DISABLE, &o_state);
/* writes five messages */for (i=0; i<5; i++)
printf("%s\n", (char *)string);
/* restores cancelability */pthread_setcancelstate(o_state, &o_state);
/* writes further */while (1)
printf("%s\n", (char *)string);pthread_exit(NULL);
}
int main(){
char *e_str = "Hello!";char *f_str = "Bonjour !";
pthread_t e_th;
Chapter 11. Multi-Threaded Programming 215

pthread_t f_th;
int rc;
/* creates both threads */rc = pthread_create(&e_th, NULL, Thread, (void *)e_str);if (rc)
return -1;rc = pthread_create(&f_th, NULL, Thread, (void *)f_str);if (rc)
return -1;
/* sleeps a while */sleep(10);
/* requests cancelation */pthread_cancel(e_th);pthread_cancel(f_th);
/* sleeps a bit more */sleep(10);pthread_exit(NULL);
}
Timer and Sleep SubroutinesTimer routines execute in the context of the calling thread. Thus, if a timer expires, the watchdog timerfunction is called in the thread’s context. When a process or thread goes to sleep, it relinquishes theprocessor. In a multi-threaded process, only the calling thread is put to sleep.
Using Cleanup HandlersCleanup handlers provide a portable mechanism for releasing resources and restoring invariants when athread terminates.
Calling Cleanup HandlersCleanup handlers are specific to each thread. A thread can have several cleanup handlers; they are storedin a thread-specific LIFO (last-in, first-out) stack. Cleanup handlers are all called in the following cases:
v The thread returns from its entry-point routine.
v The thread calls the pthread_exit subroutine.
v The thread acts on a cancelation request.
A cleanup handler is pushed onto the cleanup stack by the pthread_cleanup_push subroutine. Thepthread_cleanup_pop subroutine pops the topmost cleanup handler from the stack and optionallyexecutes it. Use this subroutine when the cleanup handler is no longer needed.
The cleanup handler is a user-defined routine. It has one parameter, a void pointer, specified when callingthe pthread_cleanup_push subroutine. You can specify a pointer to some data that the cleanup handlerneeds to perform its operation.
In the following example, a buffer is allocated for performing some operation. With deferred cancelabilityenabled, the operation can be stopped at any cancelation point. In that case, a cleanup handler isestablished to release the buffer./* the cleanup handler */
cleaner(void *buffer)
{free(buffer);
}
/* fragment of another routine */
216 AIX 5L Version 5.3 General Programming Concepts: Writing and Debugging Programs

...myBuf = malloc(1000);if (myBuf != NULL) {
pthread_cleanup_push(cleaner, myBuf);
/** perform any operation using the buffer,* including calls to other functions* and cancelation points*/
/* pops the handler and frees the buffer in one call */pthread_cleanup_pop(1);
}
Using deferred cancelability ensures that the thread will not act on any cancelation request between thebuffer allocation and the registration of the cleanup handler, because neither the malloc subroutine nor thepthread_cleanup_push subroutine provides any cancelation point. When popping the cleanup handler,the handler is executed, releasing the buffer. More complex programs may not execute the handler whenpopping it, because the cleanup handler should be thought of as an ″emergency exit″ for the protectedportion of code.
Balancing the Push and Pop OperationsThe pthread_cleanup_push and pthread_cleanup_pop subroutines should always appear in pairs withinthe same lexical scope; that is, within the same function and the same statement block. They can bethought of as left and right parentheses enclosing a protected portion of code.
The reason for this rule is that on some systems these subroutines are implemented as macros. Thepthread_cleanup_push subroutine is implemented as a left brace, followed by other statements:#define pthread_cleanup_push(rtm,arg) { \
/* other statements */
The pthread_cleanup_pop subroutine is implemented as a right brace, following other statements:#define pthread_cleanup_pop(ex) \
/* other statements */ \}
Adhere to the balancing rule for the pthread_cleanup_push and pthread_cleanup_pop subroutines toavoid compiler errors or unexpected behavior of your programs when porting to other systems.
In AIX, the pthread_cleanup_push and pthread_cleanup_pop subroutines are library routines, and canbe unbalanced within the same statement block. However, they must be balanced in the program, becausethe cleanup handlers are stacked.
List of Threads Basic Operation Subroutines
pthread_attr_destroy Deletes a thread attributes object.pthread_attr_getdetachstate Returns the value of the detachstate attribute of a thread
attributes object.pthread_attr_init Creates a thread attributes object and initializes it with default
values.pthread_cancel Requests the cancelation of a thread.pthread_cleanup_pop Removes, and optionally executes, the routine at the top of the
calling thread’s cleanup stack.pthread_cleanup_push Pushes a routine onto the calling thread’s cleanup stack.pthread_create Creates a new thread, initializes its attributes, and makes it
runnable.pthread_equal Compares two thread IDs.
Chapter 11. Multi-Threaded Programming 217
pthread_exit Terminates the calling thread.pthread_self Returns the calling thread’s ID.pthread_setcancelstate Sets the calling thread’s cancelability state.pthread_setcanceltype Sets the calling thread’s cancelability type.pthread_testcancel Creates a cancelation point in the calling thread.
Synchronization OverviewOne main benefit of using threads is the ease of using synchronization facilities. To effectively interact,threads must synchronize their activities. This includes:
v Implicit communication through the modification of shared data
v Explicit communication by informing each other of events that have occurred
More complex synchronization objects can be built using the primitive objects. For more information, see“Creating Complex Synchronization Objects” on page 251.
The threads library provides the following synchronization mechanisms:
v Mutexes (See “Using Mutexes.”)
v Condition variables (See“Using Condition Variables” on page 224. )
v Read-write locks (See “Using Read-Write Locks” on page 229.)
v Joins (See “Joining Threads” on page 237.)
Although primitive, these powerful mechanisms can be used to build more complex mechanisms.
Using MutexesA mutex is a mutual exclusion lock. Only one thread can hold the lock. Mutexes are used to protect dataor other resources from concurrent access. A mutex has attributes, which specify the characteristics of themutex.
Mutex Attributes ObjectLike threads, mutexes are created with the help of an attributes object. The mutex attributes object is anabstract object, containing several attributes, depending on the implementation of POSIX options. It isaccessed through a variable of type pthread_mutexattr_t. In AIX, the pthread_mutexattr_t data type is apointer; on other systems, it may be a structure or another data type.
Creating and Destroying the Mutex Attributes ObjectThe mutex attributes object is initialized to default values by the pthread_mutexattr_init subroutine. Theattributes are handled by subroutines. The thread attributes object is destroyed by thepthread_mutexattr_destroy subroutine. This subroutine may release storage dynamically allocated by thepthread_mutexattr_init subroutine, depending on the implementation of the threads library.
In the following example, a mutex attributes object is created and initialized with default values, then usedand finally destroyed:pthread_mutexattr_t attributes;
/* the attributes object is created */...if (!pthread_mutexattr_init(&attributes)) {
/* the attributes object is initialized */...
/* using the attributes object */...pthread_mutexattr_destroy(&attributes);
/* the attributes object is destroyed */}
218 AIX 5L Version 5.3 General Programming Concepts: Writing and Debugging Programs

The same attributes object can be used to create several mutexes. It can also be modified between mutexcreations. When the mutexes are created, the attributes object can be destroyed without affecting themutexes created with it.
Mutex AttributesThe following mutex attributes are defined:
Protocol Specifies the protocol used to prevent priority inversions for a mutex. This attributedepends on either the priority inheritance or the priority protection POSIX option.
Process-shared Specifies the process sharing of a mutex. This attribute depends on the process sharingPOSIX option.
For more information on these attributes, see “Threads Library Options” on page 260 and “SynchronizationScheduling” on page 244.
Creating and Destroying MutexesA mutex is created by calling the pthread_mutex_init subroutine. You may specify a mutex attributesobject. If you specify a NULL pointer, the mutex will have the default attributes. Thus, the following codefragment:pthread_mutex_t mutex;pthread_mutexattr_t attr;...pthread_mutexattr_init(&attr);pthread_mutex_init(&mutex, &attr);pthread_mutexattr_destroy(&attr);
is equivalent to the following:pthread_mutex_t mutex;...pthread_mutex_init(&mutex, NULL);
The ID of the created mutex is returned to the calling thread through the mutex parameter. The mutex IDis an opaque object; its type is pthread_mutex_t. In AIX, the pthread_mutex_t data type is a structure;on other systems, it might be a pointer or another data type.
A mutex must be created once. However, avoid calling the pthread_mutex_init subroutine more thanonce with the same mutex parameter (for example, in two threads concurrently executing the same code).Ensuring the uniqueness of a mutex creation can be done in the following ways:
v Calling the pthread_mutex_init subroutine prior to the creation of other threads that will use this mutex;for example, in the initial thread.
v Calling the pthread_mutex_init subroutine within a one time initialization routine. For more information,see “One-Time Initializations” on page 246.
v Using a static mutex initialized by the PTHREAD_MUTEX_INITIALIZER static initialization macro; themutex will have default attributes.
After the mutex is no longer needed, destroy it by calling the pthread_mutex_destroy subroutine. Thissubroutine may reclaim any storage allocated by the pthread_mutex_init subroutine. After havingdestroyed a mutex, the same pthread_mutex_t variable can be reused to create another mutex. Forexample, the following code fragment is valid, although not very practical:pthread_mutex_t mutex;...for (i = 0; i < 10; i++) {
/* creates a mutex */pthread_mutex_init(&mutex, NULL);
Chapter 11. Multi-Threaded Programming 219

/* uses the mutex */
/* destroys the mutex */pthread_mutex_destroy(&mutex);
}
Like any system resource that can be shared among threads, a mutex allocated on a thread’s stack mustbe destroyed before the thread is terminated. The threads library maintains a linked list of mutexes. Thus,if the stack where a mutex is allocated is freed, the list will be corrupted.
Types of MutexesThe type of mutex determines how the mutex behaves when it is operated on. The following types ofmutexes exist:
PTHREAD_MUTEX_DEFAULT or PTHREAD_MUTEX_NORMALResults in a deadlock if the same pthread tries to lock it a second time using thepthread_mutex_lock subroutine without first unlocking it. This is the default type.
PTHREAD_MUTEX_ERRORCHECKAvoids deadlocks by returning a non-zero value if the same thread attempts to lock the samemutex more than once without first unlocking the mutex.
PTHREAD_MUTEX_RECURSIVEAllows the same pthread to recursively lock the mutex using the pthread_mutex_lock subroutinewithout resulting in a deadlock or getting a non-zero return value from pthread_mutex_lock. Thesame pthread has to call the pthread_mutex_unlock subroutine the same number of times as itcalled pthread_mutex_lock subroutine in order to unlock the mutex for other pthreads to use.
When a mutex attribute is first created, it has a default type of PTHREAD_MUTEX_NORMAL. Aftercreating the mutex, the type can be changed using the pthread_mutexattr_settype API library call.
The following is an example of creating and using a recursive mutex type:pthread_mutexattr_t attr;pthread_mutex_t mutex;
pthread_mutexattr_settype(&attr, PTHREAD_MUTEX_RECURSIVE);pthread_mutex_init(&mutex, &attr);
struct {int a;int b;int c;
} A;
f(){
pthread_mutex_lock(&mutex);A.a++;g();A.c = 0;pthread_mutex_unlock(&mutex);
}
g(){
pthread_mutex_lock(&mutex);A.b += A.a;pthread_mutex_unlock(&mutex);
}
220 AIX 5L Version 5.3 General Programming Concepts: Writing and Debugging Programs

Locking and Unlocking MutexesA mutex is a simple lock, having two states: locked and unlocked. When it is created, a mutex is unlocked.The pthread_mutex_lock subroutine locks the specified mutex under the following conditions:
v If the mutex is unlocked, the subroutine locks it.
v If the mutex is already locked by another thread, the subroutine blocks the calling thread until the mutexis unlocked.
v If the mutex is already locked by the calling thread, the subroutine might block forever or return an errordepending on the type of mutex.
The pthread_mutex_trylock subroutine acts like the pthread_mutex_lock subroutine without blockingthe calling thread under the following conditions:
v If the mutex is unlocked, the subroutine locks it.
v If the mutex is already locked by any thread, the subroutine returns an error.
The thread that locked a mutex is often called the owner of the mutex.
The pthread_mutex_unlock subroutine resets the specified mutex to the unlocked state if it is owned bythe calling mutex under the following conditions:
v If the mutex was already unlocked, the subroutine returns an error.
v If the mutex was owned by the calling thread, the subroutine unlocks the mutex.
v If the mutex was owned by another thread, the subroutine might return an error or unlock the mutexdepending on the type of mutex. Unlocking the mutex is not recommended because mutexes areusually locked and unlocked by the same pthread.
Because locking does not provide a cancelation point, a thread blocked while waiting for a mutex cannotbe canceled. Therefore, it is recommended that you use mutexes only for short periods of time, as ininstances where you are protecting data from concurrent access. For more information, see “CancelationPoints” on page 213 and “Canceling a Thread” on page 212.
Protecting Data with MutexesMutexes are intended to serve either as a low-level primitive from which other thread synchronizationfunctions can be built or as a data protection lock. For more information about implementing long locksand writer-priority readers/writers locks with mutexes, see “Creating Complex Synchronization Objects” onpage 251.
Mutex Usage ExampleMutexes can be used to protect data from concurrent access. For example, a database application maycreate several threads to handle several requests concurrently. The database itself is protected by a mutexcalled db_mutex. For example:/* the initial thread */pthread_mutex_t mutex;int i;...pthread_mutex_init(&mutex, NULL); /* creates the mutex */for (i = 0; i < num_req; i++) /* loop to create threads */
pthread_create(th + i, NULL, rtn, &mutex);... /* waits end of session */pthread_mutex_destroy(&mutex); /* destroys the mutex */...
/* the request handling thread */... /* waits for a request */pthread_mutex_lock(&db_mutex); /* locks the database */
Chapter 11. Multi-Threaded Programming 221

... /* handles the request */pthread_mutex_unlock(&db_mutex); /* unlocks the database */...
The initial thread creates the mutex and all the request-handling threads. The mutex is passed to thethread using the parameter of the thread’s entry point routine. In a real program, the address of the mutexmay be a field of a more complex data structure passed to the created thread.
Avoiding DeadlocksThere are a number of ways that a multi-threaded application can deadlock. Following are someexamples:
v A mutex created with the default type, PTHREAD_MUTEX_NORMAL, cannot be relocked by the samepthread without resulting in a deadlock.
v An application can deadlock when locking mutexes in reverse order. For example, the following codefragment can produce a deadlock between threads A and B./* Thread A */pthread_mutex_lock(&mutex1);pthread_mutex_lock(&mutex2);
/* Thread B */pthread_mutex_lock(&mutex2);pthread_mutex_lock(&mutex1);
v An application can deadlock in what is called resource deadlock. For example:struct {
pthread_mutex_t mutex;char *buf;
} A;
struct {pthread_mutex_t mutex;char *buf;
} B;
struct {pthread_mutex_t mutex;char *buf;
} C;
use_all_buffers(){
pthread_mutex_lock(&A.mutex);/* use buffer A */
pthread_mutex_lock(&B.mutex);/* use buffers B */
pthread_mutex_lock(&C.mutex);/* use buffer C */
/* All done */pthread_mutex_unlock(&C.mutex);pthread_mutex_unlock(&B.mutex);pthread_mutex_unlock(&A.mutex);
}
use_buffer_a(){
pthread_mutex_lock(&A.mutex);/* use buffer A */pthread_mutex_unlock(&A.mutex);
}
222 AIX 5L Version 5.3 General Programming Concepts: Writing and Debugging Programs

functionB(){
pthread_mutex_lock(&B.mutex);/* use buffer B */if (..some condition){
use_buffer_a();}pthread_mutex_unlock(&B.mutex);
}
/* Thread A */use_all_buffers();
/* Thread B */functionB();
This application has two threads, thread A and thread B. Thread B starts to run first, then thread Astarts shortly thereafter. If thread A executes use_all_buffers() and successfully locks A.mutex, it willthen block when it tries to lock B.mutex, because thread B has already locked it. While thread Bexecutes functionB and some_condition occurs while thread A is blocked, thread B will now also blocktrying to acquire A.mutex, which is already locked by thread A. This results in a deadlock.
The solution to this deadlock is for each thread to acquire all the resource locks that it needs beforeusing the resources. If it cannot acquire the locks, it must release them and start again.
Mutexes and Race ConditionsMutual exclusion locks (mutexes) can prevent data inconsistencies due to race conditions. A race conditionoften occurs when two or more threads must perform operations on the same memory area, but theresults of computations depends on the order in which these operations are performed.
Consider, for example, a single counter, X, that is incremented by two threads, A and B. If X is originally 1,then by the time threads A and B increment the counter, X should be 3. Both threads are independententities and have no synchronization between them. Although the C statement X++ looks simple enough tobe atomic, the generated assembly code may not be, as shown in the following pseudo-assembler code:move X, REGinc REGmove REG, X
If both threads in the previous example are executed concurrently on two CPUs, or if the schedulingmakes the threads alternatively execute on each instruction, the following steps may occur:
1. Thread A executes the first instruction and puts X, which is 1, into the thread A register. Then thread Bexecutes and puts X, which is 1, into the thread B register. The following example illustrates theresulting registers and the contents of memory X.Thread A Register = 1Thread B Register = 1Memory X = 1
2. Thread A executes the second instruction and increments the content of its register to 2. Then threadB increments its register to 2. Nothing is moved to memory X, so memory X stays the same. Thefollowing example illustrates the resulting registers and the contents of memory X.Thread A Register = 2Thread B Register = 2Memory X = 1
3. Thread A moves the content of its register, which is now 2, into memory X. Then thread B moves thecontent of its register, which is also 2, into memory X, overwriting thread A’s value. The followingexample illustrates the resulting registers and the contents of memory X.Thread A Register = 2Thread B Register = 2Memory X = 2
Chapter 11. Multi-Threaded Programming 223

In most cases, thread A and thread B execute the three instructions one after the other, and the resultwould be 3, as expected. Race conditions are usually difficult to discover, because they occurintermittently.
To avoid this race condition, each thread should lock the data before accessing the counter and updatingmemory X. For example, if thread A takes a lock and updates the counter, it leaves memory X with a valueof 2. After thread A releases the lock, thread B takes the lock and updates the counter, taking 2 as itsinitial value for X and incrementing it to 3, the expected result.
Using Condition VariablesCondition variables allow threads to wait until some event or condition has occurred. A condition variablehas attributes that specify the characteristics of the condition. Typically, a program uses the followingobjects:
v A boolean variable, indicating whether the condition is met
v A mutex to serialize the access to the boolean variable
v A condition variable to wait for the condition
Using a condition variable requires some effort from the programmer. However, condition variables allowthe implementation of powerful and efficient synchronization mechanisms. For more information aboutimplementing long locks and semaphores with condition variables, see “Creating Complex SynchronizationObjects” on page 251.
When a thread is terminated, its storage may not be reclaimed, depending on an attribute of the thread.Such threads can be joined by other threads and return information to them. A thread that wants to joinanother thread is blocked until the target thread terminates. This joint mechanism is a specific case ofcondition-variable usage, the condition is the thread termination. For more information about joins, see“Joining Threads” on page 237.
Condition Attributes ObjectLike threads and mutexes, condition variables are created with the help of an attributes object. Thecondition attributes object is an abstract object, containing at most one attribute, depending on theimplementation of POSIX options. It is accessed through a variable of type pthread_condattr_t. In AIX,the pthread_condattr_t data type is a pointer; on other systems, it may be a structure or another datatype.
Creating and Destroying the Condition Attributes ObjectThe condition attributes object is initialized to default values by the pthread_condattr_init subroutine. Theattribute is handled by subroutines. The thread attributes object is destroyed by thepthread_condattr_destroy subroutine. This subroutine can release storage dynamically allocated by thepthread_condattr_init subroutine, depending on the implementation of the threads library.
In the following example, a condition attributes object is created and initialized with default values, thenused and finally destroyed:pthread_condattr_t attributes;
/* the attributes object is created */...if (!pthread_condattr_init(&attributes)) {
/* the attributes object is initialized */...
/* using the attributes object */...pthread_condattr_destroy(&attributes);
/* the attributes object is destroyed */}
224 AIX 5L Version 5.3 General Programming Concepts: Writing and Debugging Programs

The same attributes object can be used to create several condition variables. It can also be modifiedbetween two condition variable creations. When the condition variables are created, the attributes objectcan be destroyed without affecting the condition variables created with it.
Condition AttributeThe following condition attribute is supported:
Process-shared Specifies the process sharing of a condition variable. This attribute depends on theprocess sharing POSIX option.
Creating and Destroying Condition VariablesA condition variable is created by calling the pthread_cond_init subroutine. You may specify a conditionattributes object. If you specify a NULL pointer, the condition variable will have the default attributes. Thus,the following code fragment:pthread_cond_t cond;pthread_condattr_t attr;...pthread_condattr_init(&attr);pthread_cond_init(&cond, &attr);pthread_condattr_destroy(&attr);
is equivalent to the following:pthread_cond_t cond;...pthread_cond_init(&cond, NULL);
The ID of the created condition variable is returned to the calling thread through the condition parameter.The condition ID is an opaque object; its type is pthread_cond_t. In AIX, the pthread_cond_t data type isa structure; on other systems, it may be a pointer or another data type.
A condition variable must be created once. Avoid calling the pthread_cond_init subroutine more thanonce with the same condition parameter (for example, in two threads concurrently executing the samecode). Ensuring the uniqueness of a newly created condition variable can be done in the following ways:
v Calling the pthread_cond_init subroutine prior to the creation of other threads that will use thisvariable; for example, in the initial thread.
v Calling the pthread_cond_init subroutine within a one-time initialization routine. For more information,see “One-Time Initializations” on page 246.
v Using a static condition variable initialized by the PTHREAD_COND_INITIALIZER static initializationmacro; the condition variable will have default attributes.
After the condition variable is no longer needed, destroy it by calling the pthread_cond_destroysubroutine. This subroutine may reclaim any storage allocated by the pthread_cond_init subroutine. Afterhaving destroyed a condition variable, the same pthread_cond_t variable can be reused to create anothercondition. For example, the following code fragment is valid, although not very practical:pthread_cond_t cond;...for (i = 0; i < 10; i++) {
/* creates a condition variable */pthread_cond_init(&cond, NULL);
/* uses the condition variable */
/* destroys the condition */pthread_cond_destroy(&cond);
}
Chapter 11. Multi-Threaded Programming 225

Like any system resource that can be shared among threads, a condition variable allocated on a thread’sstack must be destroyed before the thread is terminated. The threads library maintains a linked list ofcondition variables; thus, if the stack where a mutex is allocated is freed, the list will be corrupted.
Using Condition VariablesA condition variable must always be used together with a mutex. A given condition variable can have onlyone mutex associated with it, but a mutex can be used for more than one condition variable. It is possibleto bundle into a structure the condition, the mutex, and the condition variable, as shown in the followingcode fragment:struct condition_bundle_t {
int condition_predicate;pthread_mutex_t condition_lock;pthread_cond_t condition_variable;
};
For more information about using the condition predicate, see “Synchronizing Threads with ConditionVariables” on page 228.
Waiting for a ConditionThe mutex protecting the condition must be locked before waiting for the condition. A thread can wait for acondition to be signaled by calling the pthread_cond_wait or pthread_cond_timedwait subroutine. Thesubroutine atomically unlocks the mutex and blocks the calling thread until the condition is signaled. Whenthe call returns, the mutex is locked again.
The pthread_cond_wait subroutine blocks the thread indefinitely. If the condition is never signaled, thethread never wakes up. Because the pthread_cond_wait subroutine provides a cancelation point, the onlyway to exit this deadlock is to cancel the blocked thread, if cancelability is enabled. For more information,see “Canceling a Thread” on page 212.
The pthread_cond_timedwait subroutine blocks the thread only for a given period of time. Thissubroutine has an extra parameter, timeout, specifying an absolute date where the sleep must end. Thetimeout parameter is a pointer to a timespec structure. This data type is also called timestruc_t. Itcontains the following fields:
tv_sec A long unsigned integer, specifying secondstv_nsec A long integer, specifying nanoseconds
Typically, the pthread_cond_timedwait subroutine is used in the following manner:struct timespec timeout;...time(&timeout.tv_sec);timeout.tv_sec += MAXIMUM_SLEEP_DURATION;pthread_cond_timedwait(&cond, &mutex, &timeout);
The timeout parameter specifies an absolute date. The previous code fragment shows how to specify aduration rather than an absolute date.
To use the pthread_cond_timedwait subroutine with an absolute date, you can use the mktimesubroutine to calculate the value of the tv_sec field of the timespec structure. In the following example,the thread waits for the condition until 08:00 January 1, 2001, local time:struct tm date;time_t seconds;struct timespec timeout;...
date.tm_sec = 0;date.tm_min = 0;
226 AIX 5L Version 5.3 General Programming Concepts: Writing and Debugging Programs

date.tm_hour = 8;date.tm_mday = 1;date.tm_mon = 0; /* the range is 0-11 */date.tm_year = 101; /* 0 is 1900 */date.tm_wday = 1; /* this field can be omitted -
but it will really be a Monday! */date.tm_yday = 0; /* first day of the year */date.tm_isdst = daylight;
/* daylight is an external variable - we are assumingthat daylight savings time will still be used... */
seconds = mktime(&date);
timeout.tv_sec = (unsigned long)seconds;timeout.tv_nsec = 0L;
pthread_cond_timedwait(&cond, &mutex, &timeout);
The pthread_cond_timedwait subroutine also provides a cancelation point, although the sleep is notindefinite. Thus, a sleeping thread can be canceled, whether or not the sleep has a timeout.
Signaling a ConditionA condition can be signaled by calling either the pthread_cond_signal or the pthread_cond_broadcastsubroutine.
The pthread_cond_signal subroutine wakes up at least one thread that is currently blocked on thespecified condition. The awoken thread is chosen according to the scheduling policy; it is the thread withthe most-favored scheduling priority (see “Scheduling Policy and Priority” on page 241) . It may happen onmultiprocessor systems, or some non-AIX systems, that more than one thread is awakened. Do notassume that this subroutine wakes up exactly one thread.
The pthread_cond_broadcast subroutine wakes up every thread that is currently blocked on the specifiedcondition. However, a thread can start waiting on the same condition just after the call to the subroutinereturns.
A call to these routines always succeeds, unless an invalid cond parameter is specified. This does notmean that a thread has been awakened. Furthermore, signaling a condition is not remembered by thelibrary. For example, consider a condition C. No thread is waiting on this condition. At time t, thread 1signals the condition C. The call is successful although no thread is awakened. At time t+1, thread 2 callsthe pthread_cond_wait subroutine with C as cond parameter. Thread 2 is blocked. If no other threadsignals C, thread 2 may wait until the process terminates.
You can avoid this kind of deadlock by checking the EBUSY error code returned by thepthread_cond_destroy subroutine when destroying the condition variable, as in the following codefragment:while (pthread_cond_destroy(&cond) == EBUSY) {
pthread_cond_broadcast(&cond);pthread_yield();
}
The pthread_yield subroutine gives the opportunity to another thread to be scheduled; for example, oneof the awoken threads. For more information about the pthread_yield subroutine, see “SchedulingThreads” on page 240.
The pthread_cond_wait and the pthread_cond_broadcast subroutines must not be used within a signalhandler. To provide a convenient way for a thread to await a signal, the threads library provides thesigwait subroutine. For more information about the sigwait subroutine, see “Signal Management” on page255.
Chapter 11. Multi-Threaded Programming 227

Synchronizing Threads with Condition VariablesCondition variables are used to wait until a particular condition predicate becomes true. This conditionpredicate is set by another thread, usually the one that signals the condition.
Condition Wait SemanticsA condition predicate must be protected by a mutex. When waiting for a condition, the wait subroutine(either the pthread_cond_wait or pthread_cond_timedwait subroutine) atomically unlocks the mutex andblocks the thread. When the condition is signaled, the mutex is relocked and the wait subroutine returns. Itis important to note that when the subroutine returns without error, the predicate may still be false.
The reason is that more than one thread may be awoken: either a thread called thepthread_cond_broadcast subroutine, or an unavoidable race between two processors simultaneouslywoke two threads. The first thread locking the mutex will block all other awoken threads in the waitsubroutine until the mutex is unlocked by the program. Thus, the predicate may have changed when thesecond thread gets the mutex and returns from the wait subroutine.
In general, whenever a condition wait returns, the thread should reevaluate the predicate to determinewhether it can safely proceed, should wait again, or should declare a timeout. A return from the waitsubroutine does not imply that the predicate is either true or false.
It is recommended that a condition wait be enclosed in a ″while loop″ that checks the predicate. Basicimplementation of a condition wait is shown in the following code fragment:pthread_mutex_lock(&condition_lock);while (condition_predicate == 0)
pthread_cond_wait(&condition_variable, &condition_lock);...pthread_mutex_unlock(&condition_lock);
Timed Wait SemanticsWhen the pthread_cond_timedwait subroutine returns with the timeout error, the predicate may be true,due to another unavoidable race between the expiration of the timeout and the predicate state change.
Just as for non-timed wait, the thread should reevaluate the predicate when a timeout occurred todetermine whether it should declare a timeout or should proceed anyway. It is recommended that youcarefully check all possible cases when the pthread_cond_timedwait subroutine returns. The followingcode fragment shows how such checking could be implemented in a robust program:int result = CONTINUE_LOOP;
pthread_mutex_lock(&condition_lock);while (result == CONTINUE_LOOP) {
switch (pthread_cond_timedwait(&condition_variable,&condition_lock, &timeout)) {
case 0:if (condition_predicate)
result = PROCEED;break;
case ETIMEDOUT:result = condition_predicate ? PROCEED : TIMEOUT;break;
default:result = ERROR;break;
}}
...pthread_mutex_unlock(&condition_lock);
228 AIX 5L Version 5.3 General Programming Concepts: Writing and Debugging Programs

The result variable can be used to choose an action. The statements preceding the unlocking of themutex should be done as soon as possible, because a mutex should not be held for long periods of time.
Specifying an absolute date in the timeout parameter allows easy implementation of real-time behavior. Anabsolute timeout need not be recomputed if it is used multiple times in a loop, such as that enclosing acondition wait. For cases where the system clock is advanced discontinuously by an operator, using anabsolute timeout ensures that the timed wait will end as soon as the system time specifies a date laterthan the timeout parameter.
Condition Variables Usage ExampleThe following example provides the source code for a synchronization point routine. A synchronizationpoint is a given point in a program where different threads must wait until all threads (or at least a certainnumber of threads) have reached that point.
A synchronization point can simply be implemented by a counter, which is protected by a lock, and acondition variable. Each thread takes the lock, increments the counter, and waits for the condition to besignaled if the counter did not reach its maximum. Otherwise, the condition is broadcast, and all threadscan proceed. The last thread that calls the routine broadcasts the condition.#define SYNC_MAX_COUNT 10
void SynchronizationPoint(){
/* use static variables to ensure initialization */static mutex_t sync_lock = PTHREAD_MUTEX_INITIALIZER;static cond_t sync_cond = PTHREAD_COND_INITIALIZER;static int sync_count = 0;
/* lock the access to the count */pthread_mutex_lock(&sync_lock);
/* increment the counter */sync_count++;
/* check if we should wait or not */if (sync_count < SYNC_MAX_COUNT)
/* wait for the others */pthread_cond_wait(&sync_cond, &sync_lock);
else
/* broadcast that everybody reached the point */pthread_cond_broadcast(&sync_cond);
/* unlocks the mutex - otherwise only one threadwill be able to return from the routine! */
pthread_mutex_unlock(&sync_lock);}
This routine has some limitations: it can be used only once, and the number of threads that will call theroutine is coded by a symbolic constant. However, this example shows a basic usage of conditionvariables. For more complex usage examples, see “Creating Complex Synchronization Objects” on page251.
Using Read-Write LocksIn many situations, data is read more often than it is modified or written. In these cases, you can allowthreads to read concurrently while holding the lock and allow only one thread to hold the lock when data ismodified. A multiple-reader single-writer lock (or read-write lock) does this. A read-write lock is acquiredeither for reading or writing, and then is released. The thread that acquires the read-write lock must be theone that releases it.
Chapter 11. Multi-Threaded Programming 229

Read-Write Attributes ObjectThe pthread_rwlockattr_init subroutine initializes a read-write lock attributes object (attr). The defaultvalue for all attributes is defined by the implementation. Unexpected results can occur if thepthread_rwlockattr_init subroutine specifies an already-initialized read-write lock attributes object.
The following examples illustrate how to call the pthread_rwlockattr_init subroutine with the attr object:pthread_rwlockattr_t attr;
and:pthread_rwlockattr_init(&attr);
After a read-write lock attributes object has been used to initialize one or more read-write locks, anyfunction affecting the attributes object (including destruction) does not affect any previously initializedread-write locks.
The pthread_rwlockattr_destroy subroutine destroys a read-write lock attributes object. Unexpectedresults can occur if the object is used before it is reinitialized by another call to thepthread_rwlockattr_init subroutine. An implementation can cause the pthread_rwlockattr_destroysubroutine to set the object referenced by the attr object to an invalid value.
Creating and Destroying Read-Write LocksThe pthread_rwlock_init subroutine initializes the read-write lock referenced by the rwlock object withthe attributes referenced by the attr object. If the attr object is NULL, the default read-write lock attributesare used; the effect is the same as passing the address of a default read-write lock attributes object. Uponsuccessful initialization, the state of the read-write lock becomes initialized and unlocked. After initialized,the lock can be used any number of times without being reinitialized. Unexpected results can occur if thecall to the pthread_rwlock_init subroutine is called specifying an already initialized read-write lock, or if aread-write lock is used without first being initialized.
If the pthread_rwlock_init subroutine fails, the rwlock object is not initialized and the contents areundefined.
The pthread_rwlock_destroy subroutine destroys the read-write lock object referenced by the rwlockobject and releases any resources used by the lock. Unexpected results can occur in any of the followingsituations:
v If the lock is used before it is reinitialized by another call to the pthread_rwlock_init subroutine.
v An implementation can cause the pthread_rwlock_destroy subroutine to set the object referenced bythe rwlock object to an invalid value. Unexpected results can occur if pthread_rwlock_destroy iscalled when any thread holds the rwlock object.
v Attempting to destroy an uninitialized read-write lock results in unexpected results. A destroyedread-write lock object can be reinitialized using the pthread_rwlock_init subroutine. Unexpected resultscan occur if the read-write lock object is referenced after it has been destroyed.
In cases where default read-write lock attributes are appropriate, use thePTHREAD_RWLOCK_INITIALIZER macro to initialize read-write locks that are statically allocated. Forexample:pthread_rwlock_t rwlock1 = PTHREAD_RWLOCK_INITIALIZER;
The effect is similar to dynamic initialization using a call to the pthread_rwlock_init subroutine with theattr parameter specified as NULL, except that no error checks are performed. For example:pthread_rwlock_init(&rwlock2, NULL);
The following example illustrates how to use the pthread_rwlock_init subroutine with the attr parameterinitialized. For an example of how to initialize the attr parameter, see “Read-Write Attributes Object.”
230 AIX 5L Version 5.3 General Programming Concepts: Writing and Debugging Programs

pthread_rwlock_init(&rwlock, &attr);
Locking a Read-Write Lock Object for ReadingThe pthread_rwlock_rdlock subroutine applies a read lock to the read-write lock referenced by therwlock object. The calling thread acquires the read lock if a writer does not hold the lock and there are nowriters blocked on the lock. It is unspecified whether the calling thread acquires the lock when a writerdoes not hold the lock and there are writers waiting for the lock. If a writer holds the lock, the callingthread will not acquire the read lock. If the read lock is not acquired, the calling thread does not returnfrom the pthread_rwlock_rdlock call until it can acquire the lock. Results are undefined if the callingthread holds a write lock on the rwlock object at the time the call is made.
A thread may hold multiple concurrent read locks on the rwlock object (that is, successfully call thepthread_rwlock_rdlock subroutine n times). If so, the thread must perform matching unlocks (that is, itmust call the pthread_rwlock_unlock subroutine n times).
The pthread_rwlock_tryrdlock subroutine applies a read lock similar to the pthread_rwlock_rdlocksubroutine with the exception that the subroutine fails if any thread holds a write lock on the rwlock objector there are writers blocked on the rwlock object. Results are undefined if any of these functions arecalled with an uninitialized read-write lock.
If a signal is delivered to a thread waiting for a read-write lock for reading, upon return from the signalhandler, the thread resumes waiting for the read-write lock for reading as if it was not interrupted.
Locking a Read-Write Lock Object for WritingThe pthread_rwlock_wrlock subroutine applies a write lock to the read-write lock referenced by therwlock object. The calling thread acquires the write lock if no other thread (reader or writer) holds theread-write lock on the rwlock object. Otherwise, the thread does not return from thepthread_rwlock_wrlock call until it can acquire the lock. Results are undefined if the calling thread holdsthe read-write lock (whether a read or write lock) at the time the call is made.
The pthread_rwlock_trywrlock subroutine applies a write lock similar to the pthread_rwlock_wrlocksubroutine, with the exception that the function fails if any thread currently holds rwlock for reading orwriting. Results are undefined if any of these functions are called with an uninitialized read-write lock.
If a signal is delivered to a thread waiting for a read-write lock for writing, upon return from the signalhandler, the thread resumes waiting for the read-write lock for writing as if it was not interrupted.
Sample Read-Write Lock ProgramsThe following sample programs demonstrate how to use locking subroutines. To run these programs, youneed the check.h file and makefile.
check.h file:#include stdio.h#include stdio.h#include stdio.h#include stdio.h
/* Simple function to check the return code and exit the programif the function call failed*/
static void compResults(char *string, int rc) {if (rc) {
printf("Error on : %s, rc=%d",string, rc);
Chapter 11. Multi-Threaded Programming 231

exit(EXIT_FAILURE);}return;
}
Makefile:CC_R = xlc_r
TARGETS = test01 test02 test03
OBJS = test01.o test02.o test03.o
SRCS = $(OBJS:.o=.c)
$(TARGETS): $(OBJS)$(CC_R) -o $@ [email protected]
clean:rm $(OBJS) $(TARGETS)
run:test01test02test03
Single-Thread ExampleThe following example uses the pthread_rwlock_tryrdlock subroutine with a single thread. For anexample of using the pthread_rwlock_tryrdlock subroutine with multiple threads, see “Multiple-ThreadExample” on page 233.Example: test01.c
#define _MULTI_THREADED#include pthread.h#include stdio.h#include "check.h"
pthread_rwlock_t rwlock = PTHREAD_RWLOCK_INITIALIZER;
void *rdlockThread(void *arg){
int rc;int count=0;
printf("Entered thread, getting read lock with mp wait\n");Retry:rc = pthread_rwlock_tryrdlock(&rwlock);if (rc == EBUSY) {
if (count >= 10) {printf("Retried too many times, failure!\n");
exit(EXIT_FAILURE);}++count;printf("Could not get lock, do other work, then RETRY...\n");sleep(1);goto Retry;
}compResults("pthread_rwlock_tryrdlock() 1\n", rc);
sleep(2);
printf("unlock the read lock\n");rc = pthread_rwlock_unlock(&rwlock);compResults("pthread_rwlock_unlock()\n", rc);
232 AIX 5L Version 5.3 General Programming Concepts: Writing and Debugging Programs
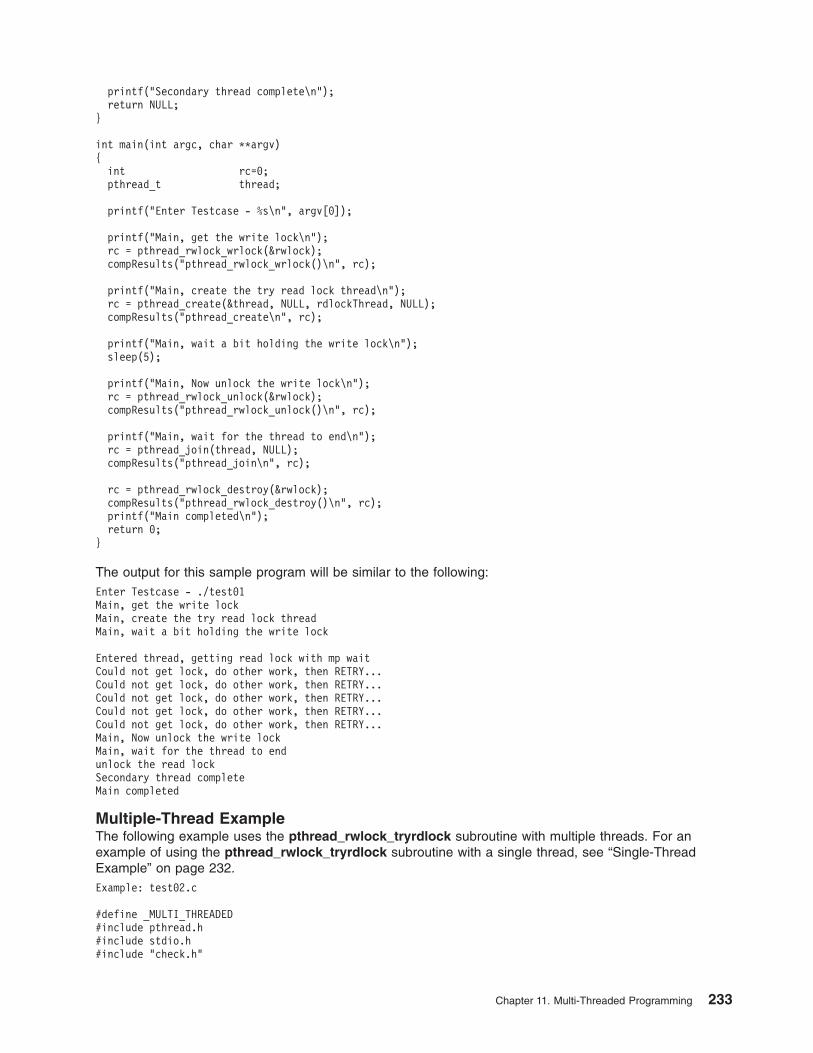
printf("Secondary thread complete\n");return NULL;
}
int main(int argc, char **argv){
int rc=0;pthread_t thread;
printf("Enter Testcase - %s\n", argv[0]);
printf("Main, get the write lock\n");rc = pthread_rwlock_wrlock(&rwlock);compResults("pthread_rwlock_wrlock()\n", rc);
printf("Main, create the try read lock thread\n");rc = pthread_create(&thread, NULL, rdlockThread, NULL);compResults("pthread_create\n", rc);
printf("Main, wait a bit holding the write lock\n");sleep(5);
printf("Main, Now unlock the write lock\n");rc = pthread_rwlock_unlock(&rwlock);compResults("pthread_rwlock_unlock()\n", rc);
printf("Main, wait for the thread to end\n");rc = pthread_join(thread, NULL);compResults("pthread_join\n", rc);
rc = pthread_rwlock_destroy(&rwlock);compResults("pthread_rwlock_destroy()\n", rc);printf("Main completed\n");return 0;
}
The output for this sample program will be similar to the following:Enter Testcase - ./test01Main, get the write lockMain, create the try read lock threadMain, wait a bit holding the write lock
Entered thread, getting read lock with mp waitCould not get lock, do other work, then RETRY...Could not get lock, do other work, then RETRY...Could not get lock, do other work, then RETRY...Could not get lock, do other work, then RETRY...Could not get lock, do other work, then RETRY...Main, Now unlock the write lockMain, wait for the thread to endunlock the read lockSecondary thread completeMain completed
Multiple-Thread ExampleThe following example uses the pthread_rwlock_tryrdlock subroutine with multiple threads. For anexample of using the pthread_rwlock_tryrdlock subroutine with a single thread, see “Single-ThreadExample” on page 232.Example: test02.c
#define _MULTI_THREADED#include pthread.h#include stdio.h#include "check.h"
Chapter 11. Multi-Threaded Programming 233
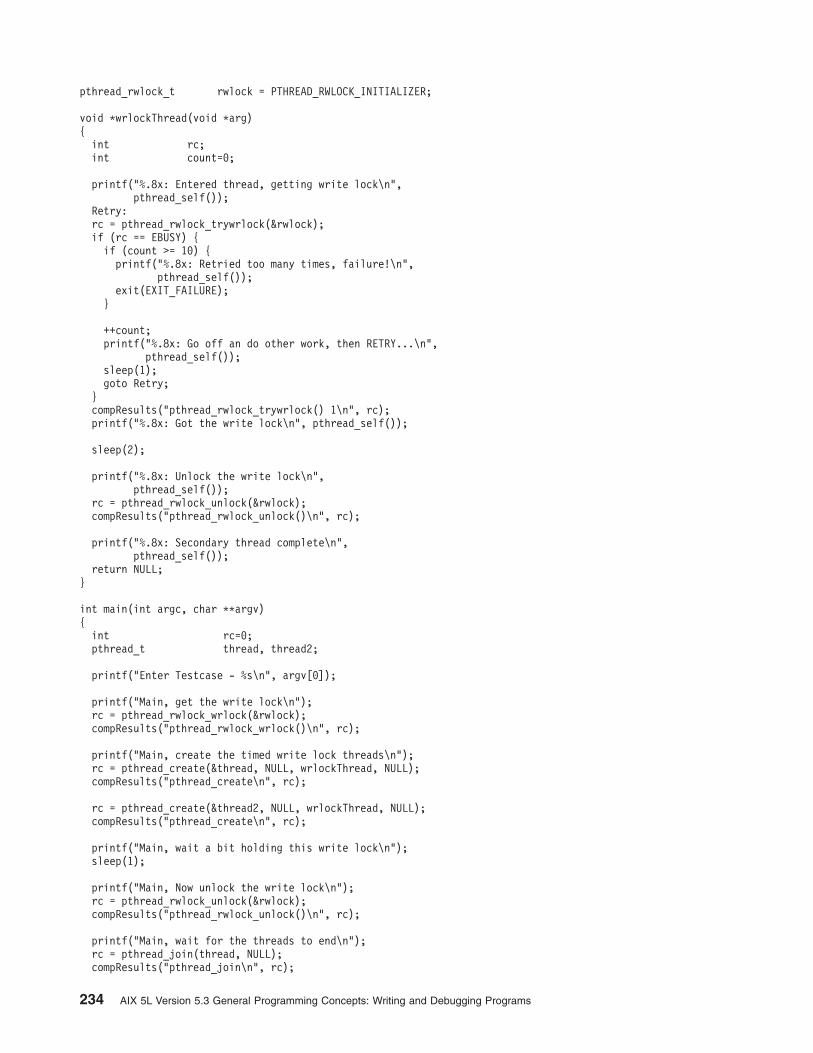
pthread_rwlock_t rwlock = PTHREAD_RWLOCK_INITIALIZER;
void *wrlockThread(void *arg){
int rc;int count=0;
printf("%.8x: Entered thread, getting write lock\n",pthread_self());
Retry:rc = pthread_rwlock_trywrlock(&rwlock);if (rc == EBUSY) {
if (count >= 10) {printf("%.8x: Retried too many times, failure!\n",
pthread_self());exit(EXIT_FAILURE);
}
++count;printf("%.8x: Go off an do other work, then RETRY...\n",
pthread_self());sleep(1);goto Retry;
}compResults("pthread_rwlock_trywrlock() 1\n", rc);printf("%.8x: Got the write lock\n", pthread_self());
sleep(2);
printf("%.8x: Unlock the write lock\n",pthread_self());
rc = pthread_rwlock_unlock(&rwlock);compResults("pthread_rwlock_unlock()\n", rc);
printf("%.8x: Secondary thread complete\n",pthread_self());
return NULL;}
int main(int argc, char **argv){
int rc=0;pthread_t thread, thread2;
printf("Enter Testcase - %s\n", argv[0]);
printf("Main, get the write lock\n");rc = pthread_rwlock_wrlock(&rwlock);compResults("pthread_rwlock_wrlock()\n", rc);
printf("Main, create the timed write lock threads\n");rc = pthread_create(&thread, NULL, wrlockThread, NULL);compResults("pthread_create\n", rc);
rc = pthread_create(&thread2, NULL, wrlockThread, NULL);compResults("pthread_create\n", rc);
printf("Main, wait a bit holding this write lock\n");sleep(1);
printf("Main, Now unlock the write lock\n");rc = pthread_rwlock_unlock(&rwlock);compResults("pthread_rwlock_unlock()\n", rc);
printf("Main, wait for the threads to end\n");rc = pthread_join(thread, NULL);compResults("pthread_join\n", rc);
234 AIX 5L Version 5.3 General Programming Concepts: Writing and Debugging Programs

rc = pthread_join(thread2, NULL);compResults("pthread_join\n", rc);
rc = pthread_rwlock_destroy(&rwlock);compResults("pthread_rwlock_destroy()\n", rc);printf("Main completed\n");return 0;
}
The output for this sample program will be similar to the following:Enter Testcase - ./test02Main, get the write lockMain, create the timed write lock threadsMain, wait a bit holding this write lock00000102: Entered thread, getting write lock00000102: Go off an do other work, then RETRY...00000203: Entered thread, getting write lock00000203: Go off an do other work, then RETRY...Main, Now unlock the write lockMain, wait for the threads to end00000102: Got the write lock00000203: Go off an do other work, then RETRY...00000203: Go off an do other work, then RETRY...00000102: Unlock the write lock00000102: Secondary thread complete00000203: Got the write lock00000203: Unlock the write lock00000203: Secondary thread completeMain completed
Read-Write Read-Lock ExampleThe following example uses the pthread_rwlock_rdlock subroutine to implement read-write read locks:Example: test03.c
#define _MULTI_THREADED#include pthread.h#include stdio.h#include "check.h"
pthread_rwlock_t rwlock;
void *rdlockThread(void *arg){
int rc;
printf("Entered thread, getting read lock\n");rc = pthread_rwlock_rdlock(&rwlock);compResults("pthread_rwlock_rdlock()\n", rc);printf("got the rwlock read lock\n");
sleep(5);
printf("unlock the read lock\n");rc = pthread_rwlock_unlock(&rwlock);compResults("pthread_rwlock_unlock()\n", rc);printf("Secondary thread unlocked\n");return NULL;
}
void *wrlockThread(void *arg){
int rc;
printf("Entered thread, getting write lock\n");
Chapter 11. Multi-Threaded Programming 235

rc = pthread_rwlock_wrlock(&rwlock);compResults("pthread_rwlock_wrlock()\n", rc);
printf("Got the rwlock write lock, now unlock\n");rc = pthread_rwlock_unlock(&rwlock);compResults("pthread_rwlock_unlock()\n", rc);printf("Secondary thread unlocked\n");return NULL;
}
int main(int argc, char **argv){
int rc=0;pthread_t thread, thread1;
printf("Enter Testcase - %s\n", argv[0]);
printf("Main, initialize the read write lock\n");rc = pthread_rwlock_init(&rwlock, NULL);compResults("pthread_rwlock_init()\n", rc);
printf("Main, grab a read lock\n");rc = pthread_rwlock_rdlock(&rwlock);compResults("pthread_rwlock_rdlock()\n",rc);
printf("Main, grab the same read lock again\n");rc = pthread_rwlock_rdlock(&rwlock);compResults("pthread_rwlock_rdlock() second\n", rc);
printf("Main, create the read lock thread\n");rc = pthread_create(&thread, NULL, rdlockThread, NULL);compResults("pthread_create\n", rc);
printf("Main - unlock the first read lock\n");rc = pthread_rwlock_unlock(&rwlock);compResults("pthread_rwlock_unlock()\n", rc);
printf("Main, create the write lock thread\n");rc = pthread_create(&thread1, NULL, wrlockThread, NULL);compResults("pthread_create\n", rc);
sleep(5);printf("Main - unlock the second read lock\n");rc = pthread_rwlock_unlock(&rwlock);compResults("pthread_rwlock_unlock()\n", rc);
printf("Main, wait for the threads\n");rc = pthread_join(thread, NULL);compResults("pthread_join\n", rc);
rc = pthread_join(thread1, NULL);compResults("pthread_join\n", rc);
rc = pthread_rwlock_destroy(&rwlock);compResults("pthread_rwlock_destroy()\n", rc);
printf("Main completed\n");return 0;
}
The output for this sample program will be similar to the following:$ ./test03Enter Testcase - ./test03Main, initialize the read write lock
236 AIX 5L Version 5.3 General Programming Concepts: Writing and Debugging Programs

Main, grab a read lockMain, grab the same read lock againMain, create the read lock threadMain - unlock the first read lockMain, create the write lock threadEntered thread, getting read lockgot the rwlock read lockEntered thread, getting write lockMain - unlock the second read lockMain, wait for the threadsunlock the read lockSecondary thread unlockedGot the rwlock write lock, now unlockSecondary thread unlockedMain completed
Joining ThreadsJoining a thread means waiting for it to terminate, which can be seen as a specific usage of conditionvariables.
Waiting for a ThreadUsing the pthread_join subroutine alows a thread to wait for another thread to terminate. More complexconditions, such as waiting for multiple threads to terminate, can be implemented by using conditionvariables. For more information, see “Synchronizing Threads with Condition Variables” on page 228.
Calling the pthread_join Subroutine
The pthread_join subroutine blocks the calling thread until the specified thread terminates. The targetthread (the thread whose termination is awaited) must not be detached. If the target thread is alreadyterminated, but not detached, the pthread_join subroutine returns immediately. After a target thread hasbeen joined, it is automatically detached, and its storage can be reclaimed.
The following table indicates the possible cases when a thread calls the pthread_join subroutine,depending on the state and the detachstate attribute of the target thread.
Undetached target Detached target
Target is still running The caller is blocked until the target isterminated.
The call returns immediately,indicating an error.
Target is terminated The call returns immediately,indicating a successful completion.
A thread cannot join itself because a deadlock would occur and it is detected by the library. However, twothreads may try to join each other. They will deadlock, but this situation is not detected by the library.
Multiple JoinsSeveral threads can join the same target thread, if the target is not detached. The success of thisoperation depends on the order of the calls to the pthread_join subroutine and the moment when thetarget thread terminates.
v Any call to the pthread_join subroutine occurring before the target thread’s termination blocks thecalling thread.
v When the target thread terminates, all blocked threads are awoken, and the target thread isautomatically detached.
v Any call to the pthread_join subroutine occurring after the target thread’s termination will fail, becausethe thread is detached by the previous join.
Chapter 11. Multi-Threaded Programming 237

v If no thread called the pthread_join subroutine before the target thread’s termination, the first call to thepthread_join subroutine will return immediately, indicating a successful completion, and any further callwill fail.
Join ExampleIn the following example, the program ends after exactly five messages display in each language. This isdone by blocking the initial thread until the ″writer″ threads exit.#include <pthread.h> /* include file for pthreads - the 1st */#include <stdio.h> /* include file for printf() */
void *Thread(void *string){
int i;
/* writes five messages and exits */for (i=0; i<5; i++)
printf("%s\n", (char *)string);pthread_exit(NULL);
}
int main(){
char *e_str = "Hello!";char *f_str = "Bonjour !";
pthread_attr_t attr;pthread_t e_th;pthread_t f_th;
int rc;
/* creates the right attribute */pthread_attr_init(&attr);pthread_attr_setdetachstate(&attr,
PTHREAD_CREATE_UNDETACHED);
/* creates both threads */rc = pthread_create(&e_th, &attr, Thread, (void *)e_str);if (rc)
exit(-1);rc = pthread_create(&f_th, &attr, Thread, (void *)f_str);if (rc)
exit(-1);pthread_attr_destroy(&attr);
/* joins the threads */pthread_join(e_th, NULL);pthread_join(f_th, NULL);
pthread_exit(NULL);}
Returning Information from a ThreadThe pthread_join subroutine also allows a thread to return information to another thread. When a threadcalls the pthread_exit subroutine or when it returns from its entry-point routine, it returns a pointer (see“Exiting a Thread” on page 211). This pointer is stored as long as the thread is not detached, and thepthread_join subroutine can return it.
For example, a multi-threaded grep command may choose the implementation in the following example. Inthis example, the initial thread creates one thread per file to scan, each thread having the same entry pointroutine. The initial thread then waits for all threads to be terminated. Each ″scanning″ thread stores thefound lines in a dynamically allocated buffer and returns a pointer to this buffer. The initial thread printseach buffer and releases it.
238 AIX 5L Version 5.3 General Programming Concepts: Writing and Debugging Programs

/* "scanning" thread */...buffer = malloc(...);
/* finds the search pattern in the fileand stores the lines in the buffer */
return (buffer);
/* initial thread */...for (/* each created thread */) {
void *buf;pthread_join(thread, &buf);if (buf != NULL) {
/* print all the lines in the buffer,preceded by the filename of the thread */
free(buf);}
}...
If the target thread is canceled, the pthread_join subroutine returns a value of -1 cast into a pointer (see“Canceling a Thread” on page 212). Because -1 cannot be a pointer value, getting -1 as returned pointerfrom a thread means that the thread was canceled.
The returned pointer can point to any kind of data. The pointer must still be valid after the thread wasterminated and its storage reclaimed. Therefore, avoid returning a value, because the destructor routine iscalled when the thread’s storage is reclaimed. For more information, see “Thread-Specific Data” on page248.
Returning a pointer to dynamically allocated storage to several threads needs special consideration.Consider the following code fragment:void *returned_data;...pthread_join(target_thread, &returned_data);/* retrieves information from returned_data */free(returned_data);
The returned_data pointer is freed when it is executed by only one thread. If several threads execute theabove code fragment concurrently, the returned_data pointer is freed several times; a situation that mustbe avoided. To prevent this, use a mutex-protected flag to signal that the returned_data pointer was freed.The following line from the previous example:free(returned_data);
would be replaced by the following lines, where a mutex can be used for locking the access to the criticalregion (assuming the flag variable is initially 0):/* lock - entering a critical region, no other thread should
run this portion of code concurrently */if (!flag) {
free(returned_data);flag = 1;
}/* unlock - exiting the critical region */
Locking access to the critical region ensures that the returned_data pointer is freed only once. For moreinformation, see“Using Mutexes” on page 218.
When returning a pointer to dynamically allocated storage to several threads all executing different code,you must ensure that exactly one thread frees the pointer.
Chapter 11. Multi-Threaded Programming 239

Scheduling ThreadsThreads can be scheduled, and the threads library provides several facilities to handle and control thescheduling of threads. It also provides facilities to control the scheduling of threads during synchronizationoperations such as locking a mutex. Each thread has its own set of scheduling parameters. Theseparameters can be set using the thread attributes object before the thread is created. The parameters canalso be dynamically set during the thread’s execution.
Controlling the scheduling of a thread can be a complicated task. Because the scheduler handles allthreads systemwide, the scheduling parameters of a thread interact with those of all other threads in theprocess and in the other processes. The following facilities are the first to be used if you want to controlthe scheduling of a thread.
The threads library allows the programmer to control the execution scheduling of the threads in thefollowing ways:
v By setting scheduling attributes when creating a thread
v By dynamically changing the scheduling attributes of a created thread
v By defining the effect of a mutex on the thread’s scheduling when creating a mutex (known assynchronization scheduling)
v By dynamically changing the scheduling of a thread during synchronization operations (known assynchronization scheduling)
For more information about synchronization scheduling, see “Synchronization Scheduling” on page 244.
Scheduling ParametersA thread has the following scheduling parameters:
scope The contention scope of a thread is defined by the thread model used in the threads library. For moreinformation about contention scope, see “Contention Scope and Concurrency Level” on page 243.
policy The scheduling policy of a thread defines how the scheduler treats the thread after it gains control ofthe CPU.
priority The scheduling priority of a thread defines the relative importance of the work being done by eachthread.
The scheduling parameters can be set before the thread’s creation or during the thread’s execution. Ingeneral, controlling the scheduling parameters of threads is important only for threads that areCPU-intensive. Thus, the threads library provides default values that are sufficient for most cases.
Using the inheritsched AttributeThe inheritsched attribute of the thread attributes object specifies how the thread’s scheduling attributeswill be defined. The following values are valid:
PTHREAD_INHERIT_SCHED Specifies that the new thread will get the scheduling attributes(schedpolicy and schedparam attributes) of its creating thread.Scheduling attributes defined in the attributes object are ignored.
PTHREAD_EXPLICIT_SCHED Specifies that the new thread will get the scheduling attributes defined inthis attributes object.
The default value of the inheritsched attribute is PTHREAD_INHERIT_SCHED. The attribute is set bycalling the pthread_attr_setinheritsched subroutine. The current value of the attribute is returned bycalling the pthread_attr_getinheritsched subroutine.
240 AIX 5L Version 5.3 General Programming Concepts: Writing and Debugging Programs

To set the scheduling attributes of a thread in the thread attributes object, the inheritsched attribute mustfirst be set to PTHREAD_EXPLICIT_SCHED. Otherwise, the attributes-object scheduling attributes areignored.
Scheduling Policy and PriorityThe threads library provides the following scheduling policies:
SCHED_FIFO First-in first-out (FIFO) scheduling. Each thread has a fixed priority; when multiple threads havethe same priority level, they run to completion in FIFO order.
SCHED_RR Round-robin (RR) scheduling. Each thread has a fixed priority; when multiple threads have thesame priority level, they run for a fixed time slice in FIFO order.
SCHED_OTHER Default AIX scheduling. Each thread has an initial priority that is dynamically modified by thescheduler, according to the thread’s activity; thread execution is time-sliced. On other systems,this scheduling policy may be different.
In versions of AIX prior to 5.3, changing the priority of a thread when setting its scheduling policy toSCHED_OTHER is not permitted. In this case, the kernel directly manages the priority, and the only legalvalue that can be passed to the pthread_setschedparam subroutine is the DEFAULT_PRIO value. TheDEFAULT_PRIO value is defined in pthread.h file as 1, and any other passed values are ignored.
Beginning with AIX 5.3, you can change the priority of a thread when you set its scheduling policy toSCHED_OTHER. The legal values that can be passed to the pthread_setschedparam subroutine arefrom 40 to 80, however, only privileged users can set a priority greater than 60. A priority in the range of 1to 39 provides the same priority as that of 40, and a priority in the range of 81 to 127 provides the samepriority as that of 80.
Note: In AIX, the kernel inverts the priority levels. For the AIX kernel, the priority is in the range from 0 to127, where 0 is the most favored priority and 127 the least favored priority. Commands, such as theps command, report the kernel priority.
The threads library handles the priority through a sched_param structure, defined in the sys/sched.hheader file. This structure contains the following fields:
sched_priority Specifies the priority.sched_policy This field is ignored by the threads library. Do not use.
Setting the Scheduling Policy and Priority at Creation TimeThe scheduling policy can be set when creating a thread by setting the schedpolicy attribute of the threadattributes object. The pthread_attr_setschedpolicy subroutine sets the scheduling policy to one of thepreviously defined scheduling policies. The current value of the schedpolicy attribute of a thread attributesobject can be obtained by using the pthread_attr_getschedpolicy subroutine.
The scheduling priority can be set at creation time of a thread by setting the schedparam attribute of thethread attributes object. The pthread_attr_setschedparam subroutine sets the value of the schedparamattribute, copying the value of the specified structure. The pthread_attr_getschedparam subroutine getsthe schedparam attribute.
In the following code fragment, a thread is created with the round-robin scheduling policy, using a prioritylevel of 3:sched_param schedparam;
schedparam.sched_priority = 3;
pthread_attr_init(&attr);pthread_attr_setinheritsched(&attr, PTHREAD_EXPLICIT_SCHED);pthread_attr_setschedpolicy(&attr, SCHED_RR);
Chapter 11. Multi-Threaded Programming 241

pthread_attr_setschedparam(&attr, &schedparam);
pthread_create(&thread, &attr, &start_routine, &args);pthread_attr_destroy(&attr);
For more information about the inheritsched attribute, see “Using the inheritsched Attribute” on page 240.
Setting the Scheduling Attributes at Execution TimeThe pthread_getschedparam subroutine returns the schedpolicy and schedparam attributes of athread. These attributes can be set by calling the pthread_setschedparam subroutine. If the target threadis currently running on a processor, the new scheduling policy and priority will be implemented the nexttime the thread is scheduled. If the target thread is not running, it can be scheduled immediately at theend of the subroutine call.
For example, consider a thread T that is currently running with round-robin policy at the moment theschedpolicy attribute of T is changed to FIFO. T will run until the end of its time slice, at which time itsscheduling attributes are then re-evaluated. If no threads have higher priority, T will be rescheduled, evenbefore other threads having the same priority. Consider a second example where a low-priority thread isnot running. If this thread’s priority is raised by another thread calling the pthread_setschedparamsubroutine, the target thread will be scheduled immediately if it is the highest priority runnable thread.
Note: Both subroutines use a policy parameter and a sched_param structure. Although this structurecontains a sched_policy field, programs should not use it. The subroutines use the policyparameter to pass the scheduling policy, and the subroutines then ignore the sched_policy field.
Scheduling-Policy ConsiderationsApplications should use the default scheduling policy, unless a specific application requires the use of afixed-priority scheduling policy. Consider the following points about using the nondefault policies:
v Using the round-robin policy ensures that all threads having the same priority level will be scheduledequally, regardless of their activity. This can be useful in programs where threads must read sensors orwrite actuators.
v Using the FIFO policy should be done with great care. A thread running with FIFO policy runs tocompletion, unless it is blocked by some calls, such as performing input and output operations. Ahigh-priority FIFO thread may not be preempted and can affect the global performance of the system.For example, threads doing intensive calculations, such as inverting a large matrix, should never runwith FIFO policy.
The setting of scheduling policy and priority is also influenced by the contention scope of threads. Usingthe FIFO or the round-robin policy may not always be allowed.
sched_yield Subroutine
The sched_yield subroutine is the equivalent for threads of the yield subroutine. The sched_yieldsubroutine forces the calling thread to relinquish the use of its processor and gives other threads anopportunity to be scheduled. The next scheduled thread may belong to the same process as the callingthread or to another process. Do not use the yield subroutine in a multi-threaded program.
The interface pthread_yield subroutine is not available in Single UNIX Specification, Version 2.
List of Scheduling Subroutines
pthread_attr_getschedparam Returns the value of the schedparam attribute of a threadattributes object.
pthread_attr_setschedparam Sets the value of the schedparam attribute of a thread attributesobject.
242 AIX 5L Version 5.3 General Programming Concepts: Writing and Debugging Programs

pthread_getschedparam Returns the value of the schedpolicy and schedparam attributesof a thread.
sched_yield Forces the calling thread to relinquish use of its processor.
Contention Scope and Concurrency LevelThe contention scope of a user thread defines how it is mapped to a kernel thread. The threads librarydefines the following contention scopes:
PTHREAD_SCOPE_PROCESS Process contention scope, sometimes called local contention scope. Specifiesthat the thread will be scheduled against all other local contention scope threadsin the process. A process-contention-scope user thread is a user thread thatshares a kernel thread with other process-contention-scope user threads in theprocess. All user threads in an M:1 thread model have process contentionscope.
PTHREAD_SCOPE_SYSTEM System contention scope, sometimes called global contention scope. Specifiesthat the thread will be scheduled against all other threads in the system and isdirectly mapped to one kernel thread. All user threads in a 1:1 thread modelhave system contention scope.
In an M:N thread model, user threads can have either system or process contention scope. Therefore, anM:N thread model is often referred as a mixed-scope model.
The concurrency level is a property of M:N threads libraries. It defines the number of virtual processorsused to run the process-contention scope user threads. This number cannot exceed the number ofprocess-contention-scope user threads and is usually dynamically set by the threads library. The systemalso sets a limit to the number of available kernel threads.
For more information about thread models, see “Thread Models and Virtual Processors” on page 206.
Setting the Contention ScopeThe contention scope can only be set before a thread is created by setting the contention-scope attributeof a thread attributes object. The pthread_attr_setscope subroutine sets the value of the attribute; thepthread_attr_getscope returns it.
The contention scope is only meaningful in a mixed-scope M:N library implementation. ATestImplementation routine could be written as follows:int TestImplementation(){
pthread_attr_t a;int result;
pthread_attr_init(&a);switch (pthread_attr_setscope(&a, PTHREAD_SCOPE_PROCESS)){
case 0: result = LIB_MN; break;case ENOTSUP: result = LIB_11; break;case ENOSYS: result = NO_PRIO_OPTION; break;default: result = ERROR; break;
}
pthread_attr_destroy(&a);return result;
}
Chapter 11. Multi-Threaded Programming 243

Impacts of Contention Scope on Scheduling
The contention scope of a thread influences its scheduling. Each contention-scope thread is bound to onekernel thread. Thus, changing the scheduling policy and priority of a global user thread results in changingthe scheduling policy and priority of the underlying kernel thread.
In AIX, only kernel threads with root authority can use a fixed-priority scheduling policy (FIFO orround-robin). The following code will always return the EPERM error code if the calling thread has systemcontention scope but does not have root authority. This code would not fail, if the calling thread hadprocess contention scope.schedparam.sched_priority = 3;pthread_setschedparam(pthread_self(), SCHED_FIFO, schedparam);
Note: Root authority is not required to control the scheduling parameters of user threads having processcontention scope.
Local user threads can set any scheduling policy and priority, within the valid range of values. However,two threads having the same scheduling policy and priority but having different contention scope will notbe scheduled in the same way. Threads having process contention scope are executed by kernel threadswhose scheduling parameters are set by the library.
Synchronization SchedulingProgrammers can control the execution scheduling of threads when there are constraints, especially timeconstraints, that require certain threads to be executed faster than other ones. Synchronization objects,such as mutexes, may block even high-priority threads. In some cases, undesirable behavior, known aspriority inversion, may occur. The threads library provides the mutex protocols facility to avoid priorityinversions.
Synchronization scheduling defines how the execution scheduling, especially the priority, of a thread ismodified by holding a mutex. This allows custom-defined behavior and avoids priority inversions. It isuseful when using complex locking schemes. Some implementations of the threads library do not providesynchronization scheduling.
Priority InversionPriority inversion occurs when a low-priority thread holds a mutex, blocking a high-priority thread. Due toits low priority, the mutex owner may hold the mutex for an unbounded duration. As a result, it becomesimpossible to guarantee thread deadlines.
The following example illustrates a typical priority inversion. In this example, the case of a uniprocessorsystem is considered. Priority inversions also occur on multiprocessor systems in a similar way.
In our example, a mutex M is used to protect some common data. Thread A has a priority level of 100 andis scheduled very often. Thread B has a priority level of 20 and is a background thread. Other threads inthe process have priority levels near 60. A code fragment from thread A is as follows:pthread_mutex_lock(&M); /* 1 */...pthread_mutex_unlock(&M);
A code fragment from thread B is as follows:pthread_mutex_lock(&M); /* 2 */...fprintf(...); /* 3 */...pthread_mutex_unlock(&M);
244 AIX 5L Version 5.3 General Programming Concepts: Writing and Debugging Programs

Consider the following execution chronology. Thread B is scheduled and executes line 2. While executingline 3, thread B is preempted by thread A. Thread A executes line 1 and is blocked, because the mutex Mis held by thread B. Thus, other threads in the process are scheduled. Because thread B has a very lowpriority, it may not be rescheduled for a long period, blocking thread A, although thread A has a very highpriority.
Mutex ProtocolsTo avoid priority inversions, the following mutex protocols are provided by the threads library:
Priority inheritance protocolSometimes called basic priority inheritance protocol. In the priority inheritance protocol, the mutexholder inherits the priority of the highest-priority blocked thread. When a thread tries to lock amutex using this protocol and is blocked, the mutex owner temporarily receives the blockedthread’s priority, if that priority is higher than the owner’s. It recovers its original priority when itunlocks the mutex.
Priority protection protocolSometimes called priority ceiling protocol emulation. In the priority protection protocol, each mutexhas a priority ceiling. It is a priority level within the valid range of priorities. When a thread owns amutex, it temporarily receives the mutex priority ceiling, if the ceiling is higher than its own priority.It recovers its original priority when it unlocks the mutex. The priority ceiling should have the valueof the highest priority of all threads that may lock the mutex. Otherwise, priority inversions or evendeadlocks may occur, and the protocol would be inefficient.
Both protocols increase the priority of a thread holding a specific mutex, so that deadlines can beguaranteed. Furthermore, when correctly used, mutex protocols can prevent mutual deadlocks. Mutexprotocols are individually assigned to mutexes.
Choosing a Mutex ProtocolThe choice of a mutex protocol is made by setting attributes when creating a mutex. The mutex protocol iscontrolled through the protocol attribute. This attribute can be set in the mutex attributes object by usingthe pthread_mutexattr_getprotocol and pthread_mutexattr_setprotocol subroutines. The protocolattribute can have one of the following values:
PTHREAD_PRIO_NONE Denotes no protocol. This is the default value.PTHREAD_PRIO_INHERIT Denotes the priority inheritance protocol.PTHREAD_PRIO_PROTECT Denotes the priority protection protocol.
The priority protection protocol uses one additional attribute: the prioceiling attribute. This attribute containsthe priority ceiling of the mutex. The prioceiling attribute can be controlled in the mutex attributes object, byusing the pthread_mutexattr_getprioceiling and pthread_mutexattr_setprioceiling subroutines.
The prioceiling attribute of a mutex can also be dynamically controlled by using thepthread_mutex_getprioceiling and pthread_mutex_setprioceiling subroutines. When dynamicallychanging the priority ceiling of a mutex, the mutex is locked by the library; it should not be held by thethread calling the pthread_mutex_setprioceiling subroutine to avoid a deadlock. Dynamically setting thepriority ceiling of a mutex can be useful when increasing the priority of a thread.
The implementation of mutex protocols is optional. Each protocol is a POSIX option. For more informationabout the priority inheritance and the priority protection POSIX options, see “Threads Library Options” onpage 260.
Inheritance or ProtectionBoth protocols are similar and result in promoting the priority of the thread holding the mutex. If bothprotocols are available, programmers must choose a protocol. The choice depends on whether the
Chapter 11. Multi-Threaded Programming 245

priorities of the threads that will lock the mutex are available to the programmer who is creating the mutex.Typically, mutexes defined by a library and used by application threads will use the inheritance protocol,whereas mutexes created within the application program will use the protection protocol.
In performance-critical programs, performance considerations may also influence the choice. In mostimplementations, especially in AIX, changing the priority of a thread results in making a system call.Therefore, the two mutex protocols differ in the amount of system calls they generate, as follows:
v Using the inheritance protocol, a system call is made each time a thread is blocked when trying to lockthe mutex.
v Using the protection protocol, one system call is always made each time the mutex is locked by athread.
In most performance-critical programs, the inheritance protocol should be chosen, because mutexes arelow contention objects. Mutexes are not held for long periods of time; thus, it is not likely that threads areblocked when trying to lock them.
List of Synchronization Subroutines
pthread_mutex_destroy Deletes a mutex.pthread_mutex_init Initializes a mutex and sets its attributes.PTHREAD_MUTEX_INITIALIZER Initializes a static mutex with default attributes.pthread_mutex_lock or pthread_mutex_trylock
Locks a mutex.pthread_mutex_unlock Unlocks a mutex.pthread_mutexattr_destroy Deletes a mutex attributes object.pthread_mutexattr_init Creates a mutex attributes object and initializes it with
default values.pthread_cond_destroy Deletes a condition variable.pthread_cond_init Initializes a condition variable and sets its attributes.PTHREAD_COND_INITIALIZER Initializes a static condition variable with default attributes.pthread_cond_signal or pthread_cond_broadcast
Unblocks one or more threads blocked on a condition.pthread_cond_wait or pthread_cond_timedwait
Blocks the calling thread on a condition.pthread_condattr_destroy Deletes a condition attributes object.pthread_condattr_init Creates a condition attributes object and initializes it with
default values.
One-Time InitializationsSome C libraries are designed for dynamic initialization, in which the global initialization for the library isperformed when the first procedure in the library is called. In a single-threaded program, this is usuallyimplemented using a static variable whose value is checked on entry to each routine, as in the followingcode fragment:static int isInitialized = 0;extern void Initialize();
int function(){
if (isInitialized == 0) {Initialize();isInitialized = 1;
}...
}
246 AIX 5L Version 5.3 General Programming Concepts: Writing and Debugging Programs

For dynamic library initialization in a multi-threaded program, a simple initialization flag is not sufficient.This flag must be protected against modification by multiple threads simultaneously calling a libraryfunction. Protecting the flag requires the use of a mutex; however, mutexes must be initialized before theyare used. Ensuring that the mutex is only initialized once requires a recursive solution to this problem.
To keep the same structure in a multi-threaded program, use the pthread_once subroutine. Otherwise,library initialization must be accomplished by an explicit call to a library exported initialization function priorto any use of the library. The pthread_once subroutine also provides an alternative for initializing mutexesand condition variables.
One-Time Initialization ObjectThe uniqueness of the initialization is ensured by the one-time initialization object. It is a variable havingthe pthread_once_t data type. In AIX and most other implementations of the threads library, thepthread_once_t data type is a structure.
A one-time initialization object is typically a global variable. It must be initialized with thePTHREAD_ONCE_INIT macro, as in the following example:static pthread_once_t once_block = PTHREAD_ONCE_INIT;
The initialization can also be done in the initial thread or in any other thread. Several one-time initializationobjects can be used in the same program. The only requirement is that the one-time initialization object beinitialized with the macro.
One-Time Initialization RoutineThe pthread_once subroutine calls the specified initialization routine associated with the specifiedone-time initialization object if it is the first time it is called; otherwise, it does nothing. The sameinitialization routine must always be used with the same one-time initialization object. The initializationroutine must have the following prototype:void init_routine();
The pthread_once subroutine does not provide a cancelation point. However, the initialization routine mayprovide cancelation points, and, if cancelability is enabled, the first thread calling the pthread_oncesubroutine may be canceled during the execution of the initialization routine. In this case, the routine is notconsidered as executed, and the next call to the pthread_once subroutine would result in recalling theinitialization routine.
It is recommended to use cleanup handlers in one-time initialization routines, especially when performingnon-idempotent operations, such as opening a file, locking a mutex, or allocating memory. For moreinformation, see “Using Cleanup Handlers” on page 216.
One-time initialization routines can be used for initializing mutexes or condition variables or to performdynamic initialization. In a multi-threaded library, the code fragment shown above (void init_routine();)would be written as follows:static pthread_once_t once_block = PTHREAD_ONCE_INIT;extern void Initialize();
int function(){
pthread_once(&once_block, Initialize);...
}
Chapter 11. Multi-Threaded Programming 247

Thread-Specific DataMany applications require that certain data be maintained on a per-thread basis across function calls. Forexample, a multi-threaded grep command using one thread for each file must have thread-specific filehandlers and list of found strings. The thread-specific data interface is provided by the threads library tomeet these needs.
Thread-specific data may be viewed as a two-dimensional array of values, with keys serving as the rowindex and thread IDs as the column index. A thread-specific data key is an opaque object, of thepthread_key_t data type. The same key can be used by all threads in a process. Although all threads usethe same key, they set and access different thread-specific data values associated with that key.Thread-specific data are void pointers, which allows referencing any kind of data, such as dynamicallyallocated strings or structures.
In the following figure, thread T2 has a thread-specific data value of 12 associated with the key K3. ThreadT4 has the value of 2 associated with the same key.
Threads
T1 T2 T3 T4
Keys
K1 6 56 4 1
K2 87 21 0 9
K3 23 12 61 2
K4 11 76 47 88
Creating and Destroying KeysThread-specific data keys must be created before being used. Their values can be automatically destroyedwhen the corresponding threads terminate. A key can also be destroyed upon request to reclaim itsstorage.
Key CreationA thread-specific data key is created by calling the pthread_key_create subroutine. This subroutinereturns a key. The thread-specific data is set to a value of NULL for all threads, including threads not yetcreated.
For example, consider two threads A and B. Thread A performs the following operations in chronologicalorder:
1. Create a thread-specific data key K.
Threads A and B can use the key K. The value for both threads is NULL.
2. Create a thread C.
Thread C can also use the key K. The value for thread C is NULL.
The number of thread-specific data keys is limited to 450 per process. This number can be retrieved bythe PTHREAD_KEYS_MAX symbolic constant.
The pthread_key_create subroutine must be called only once. Otherwise, two different keys are created.For example, consider the following code fragment:/* a global variable */static pthread_key_t theKey;
/* thread A */...pthread_key_create(&theKey, NULL); /* call 1 */...
248 AIX 5L Version 5.3 General Programming Concepts: Writing and Debugging Programs

/* thread B */...pthread_key_create(&theKey, NULL); /* call 2 */...
In our example, threads A and B run concurrently, but call 1 happens before call 2. Call 1 will create a keyK1 and store it in the theKey variable. Call 2 will create another key K2, and store it also in the theKeyvariable, thus overriding K1. As a result, thread A will use K2, assuming it is K1. This situation should beavoided for the following reasons:
v Key K1 is lost, thus its storage will never be reclaimed until the process terminates. Because thenumber of keys is limited, you may not have enough keys.
v If thread A stores a thread-specific data using the theKey variable before call 2, the data will be boundto key K1. After call 2, the theKey variable contains K2; if thread A then tries to fetch its thread-specificdata, it would always get NULL.
Ensuring that keys are created uniquely can be done in the following ways:
v Using the one-time initialization facility. See “One-Time Initializations” on page 246.
v Creating the key before the threads that will use it. This is often possible, for example, when using apool of threads with thread-specific data to perform similar operations. This pool of threads is usuallycreated by one thread, the initial (or another ″driver″) thread.
It is the programmer’s responsibility to ensure the uniqueness of key creation. The threads library providesno way to check if a key has been created more than once.
Destructor RoutineA destructor routine may be associated with each thread-specific data key. Whenever a thread isterminated, if there is non-NULL, thread-specific data for this thread bound to any key, the destructorroutine associated with that key is called. This allows dynamically allocated thread-specific data to beautomatically freed when the thread is terminated. The destructor routine has one parameter, the value ofthe thread-specific data.
For example, a thread-specific data key may be used for dynamically allocated buffers. A destructorroutine should be provided to ensure that when the thread terminates the buffer is freed, the freesubroutine can be used as follows:pthread_key_create(&key, free);
More complex destructors may be used. If a multi-threaded grep command, using a thread per file toscan, has thread-specific data to store a structure containing a work buffer and the thread’s file descriptor,the destructor routine may be as follows:typedef struct {
FILE *stream;char *buffer;
} data_t;...
void destructor(void *data){
fclose(((data_t *)data)->stream);free(((data_t *)data)->buffer);free(data);*data = NULL;
}
Destructor calls can be repeated up to four times.
Chapter 11. Multi-Threaded Programming 249

Key DestructionA thread-specific data key can be destroyed by calling the pthread_key_delete subroutine. Thepthread_key_delete subroutine does not actually call the destructor routine for each thread having data.After a data key is destroyed, it can be reused by another call to the pthread_key_create subroutine.Thus, the pthread_key_delete subroutine is useful especially when using many data keys. For example,in the following code fragment, the loop would never end:/* bad example - do not write such code! */pthread_key_t key;
while (pthread_key_create(&key, NULL))pthread_key_delete(key);
Using Thread-Specific DataThread-specific data is accessed using the pthread_getspecific and pthread_setspecific subroutines.The pthread_getspecific subroutine reads the value bound to the specified key and is specific to thecalling thread; the pthread_setspecific subroutine sets the value.
Setting Successive ValuesThe value bound to a specific key should be a pointer, which can point to any kind of data. Thread-specificdata is typically used for dynamically allocated storage, as in the following code fragment:private_data = malloc(...);pthread_setspecific(key, private_data);
When setting a value, the previous value is lost. For example, in the following code fragment, the value ofthe old pointer is lost, and the storage it pointed to may not be recoverable:pthread_setspecific(key, old);...pthread_setspecific(key, new);
It is the programmer’s responsibility to retrieve the old thread-specific data value to reclaim storage beforesetting the new value. For example, it is possible to implement a swap_specific routine in the followingmanner:int swap_specific(pthread_key_t key, void **old_pt, void *new){
*old_pt = pthread_getspecific(key);if (*old_pt == NULL)
return -1;else
return pthread_setspecific(key, new);}
Such a routine does not exist in the threads library because it is not always necessary to retrieve theprevious value of thread-specific data. Such a case occurs, for example, when thread-specific data arepointers to specific locations in a memory pool allocated by the initial thread.
Using Destructor RoutinesWhen using dynamically allocated thread-specific data, the programmer must provide a destructor routinewhen calling the pthread_key_create subroutine. The programmer must also ensure that, when releasingthe storage allocated for thread-specific data, the pointer is set to NULL. Otherwise, the destructor routinemight be called with an illegal parameter. For example:pthread_key_create(&key, free);...
...private_data = malloc(...);pthread_setspecific(key, private_data);...
250 AIX 5L Version 5.3 General Programming Concepts: Writing and Debugging Programs

/* bad example! */...pthread_getspecific(key, &data);free(data);...
When the thread terminates, the destructor routine is called for its thread-specific data. Because the valueis a pointer to already released memory, an error can occur. To correct this, the following code fragmentshould be substituted:/* better example! */...pthread_getspecific(key, &data);free(data);pthread_setspecific(key, NULL);...
When the thread terminates, the destructor routine is not called, because there is no thread-specific data.
Using Non-Pointer ValuesAlthough it is possible to store values that are not pointers, it is not recommended for the followingreasons:
v Casting a pointer into a scalar type may not be portable.
v The NULL pointer value is implementation-dependent; several systems assign the NULL pointer anon-zero value.
If you are sure that your program will never be ported to another system, you may use integer values forthread-specific data.
Creating Complex Synchronization ObjectsThe subroutines provided in the threads library can be used as primitives to build more complexsynchronization objects.
Long LocksThe mutexes provided by the threads library are low-contention objects and should not be held for a verylong time. Long locks are implemented with mutexes and condition variables, so that a long lock can beheld for a long time without affecting the performance of the program. Long locks should not be used ifcancelability is enabled.
A long lock has the long_lock_t data type. It must be initialized by the long_lock_init routine. Thelong_lock, long_trylock, and long_unlock subroutine performs similar operations to thepthread_mutex_lock, pthread_mutex_trylock, and pthread_mutex_unlock subroutine.
The following example shows a typical use of condition variables. In this example, the lock owner is notchecked. As a result, any thread can unlock any lock. Error handling and cancelation handling are notperformed.typedef struct {
pthread_mutex_t lock;pthread_cond_t cond;int free;int wanted;
} long_lock_t;
void long_lock_init(long_lock_t *ll){
pthread_mutex_init(&ll->lock, NULL);pthread_cond_init(&ll->cond);ll->free = 1;
Chapter 11. Multi-Threaded Programming 251

ll->wanted = 0;}
void long_lock_destroy(long_lock_t *ll){
pthread_mutex_destroy(&ll->lock);pthread_cond_destroy(&ll->cond);
}
void long_lock(long_lock_t *ll){
pthread_mutex_lock(&ll->lock);ll->wanted++;while(!ll->free)
pthread_cond_wait(&ll->cond);ll->wanted--;ll->free = 0;pthread_mutex_unlock(&ll->lock);
}
int long_trylock(long_lock_t *ll){
int got_the_lock;
pthread_mutex_lock(&ll->lock);got_the_lock = ll->free;if (got_the_lock)
ll->free = 0;pthread_mutex_unlock(&ll->lock);return got_the_lock;
}
void long_unlock(long_lock_t *ll){
pthread_mutex_lock(&ll->lock);ll->free = 1;if (ll->wanted)
pthread_cond_signal(&ll->cond);pthread_mutex_unlock(&ll->lock);
}
SemaphoresTraditional semaphores in UNIX systems are interprocess-synchronization facilities. For specific usage,you can implement interthread semaphores.
A semaphore has the sema_t data type. It must be initialized by the sema_init routine and destroyed withthe sema_destroy routine. The semaphore wait and semaphore post operations are respectivelyperformed by the sema_p and sema_v routines.
In the following basic implementation, error handling is not performed, but cancelations are properlyhandled with cleanup handlers whenever required:typedef struct {
pthread_mutex_t lock;pthread_cond_t cond;int count;
} sema_t;
void sema_init(sema_t *sem){
pthread_mutex_init(&sem->lock, NULL);pthread_cond_init(&sem->cond, NULL);sem->count = 1;
}
252 AIX 5L Version 5.3 General Programming Concepts: Writing and Debugging Programs

void sema_destroy(sema_t *sem){
pthread_mutex_destroy(&sem->lock);pthread_cond_destroy(&sem->cond);
}
void p_operation_cleanup(void *arg){
sema_t *sem;
sem = (sema_t *)arg;pthread_mutex_unlock(&sem->lock);
}
void sema_p(sema_t *sem){
pthread_mutex_lock(&sem->lock);pthread_cleanup_push(p_operation_cleanup, sem);while (sem->count <= 0)
pthread_cond_wait(&sem->cond, &sem->lock);sem->count--;/** Note that the pthread_cleanup_pop subroutine will* execute the p_operation_cleanup routine*/pthread_cleanup_pop(1);
}
void sema_v(sema_t *sem){
pthread_mutex_lock(&sem->lock);sem->count++;if (sem->count <= 0)
pthread_cond_signal(&sem->cond);pthread_mutex_unlock(&sem->lock);
}
The counter specifies the number of users that are allowed to use the semaphore. It is never strictlynegative; thus, it does not specify the number of waiting users, as for traditional semaphores. Thisimplementation provides a typical solution to the multiple wakeup problem on the pthread_cond_waitsubroutine. The semaphore wait operation is cancelable, because the pthread_cond_wait subroutineprovides a cancelation point.
Write-Priority Read/Write Locks
A write-priority read/write lock provides multiple threads with simultaneous read-only access to a protectedresource, and a single thread with write access to the resource while excluding reads. When a writerreleases a lock, other waiting writers will get the lock before any waiting reader. Write-priority read/writelocks are usually used to protect resources that are more often read than written.
A write-priority read/write lock has the rwlock_t data type. It must be initialized by the rwlock_init routine.The rwlock_lock_read routine locks the lock for a reader (multiple readers are allowed), therwlock_unlock_read routine unlocks it. The rwlock_lock_write routine locks the lock for a writer, therwlock_unlock_write routine unlocks it. The proper unlocking routine (for the reader or for the writer)must be called.
In the following example, the lock owner is not checked. As a result, any thread can unlock any lock.Routines, such as the pthread_mutex_trylock subroutine, are missing and error handling is notperformed, but cancelations are properly handled with cleanup handlers whenever required.typedef struct {
pthread_mutex_t lock;pthread_cond_t rcond;
Chapter 11. Multi-Threaded Programming 253

pthread_cond_t wcond;int lock_count; /* < 0 .. held by writer */
/* > 0 .. held by lock_count readers *//* = 0 .. held by nobody */
int waiting_writers; /* count of wating writers */} rwlock_t;
void rwlock_init(rwlock_t *rwl){
pthread_mutex_init(&rwl->lock, NULL);pthread_cond_init(&rwl->wcond, NULL);pthread_cond_init(&rwl->rcond, NULL);rwl->lock_count = 0;rwl->waiting_writers = 0;
}
void waiting_reader_cleanup(void *arg){
rwlock_t *rwl;
rwl = (rwlock_t *)arg;pthread_mutex_unlock(&rwl->lock);
}
void rwlock_lock_read(rwlock_t *rwl){
pthread_mutex_lock(&rwl->lock);pthread_cleanup_push(waiting_reader_cleanup, rwl);while ((rwl->lock_count < 0) && (rwl->waiting_writers))
pthread_cond_wait(&rwl->rcond, &rwl->lock);rwl->lock_count++;/** Note that the pthread_cleanup_pop subroutine will* execute the waiting_reader_cleanup routine*/pthread_cleanup_pop(1);
}
void rwlock_unlock_read(rwlock_t *rwl){
pthread_mutex_lock(&rwl->lock);rwl->lock_count--;if (!rwl->lock_count)
pthread_cond_signal(&rwl->wcond);pthread_mutex_unlock(&rwl->lock);
}
void waiting_writer_cleanup(void *arg){
rwlock_t *rwl;
rwl = (rwlock_t *)arg;rwl->waiting_writers--;if ((!rwl->waiting_writers) && (rwl->lock_count >= 0))
/** This only happens if we have been canceled*/pthread_cond_broadcast(&rwl->wcond);pthread_mutex_unlock(&rwl->lock);
}
void rwlock_lock_write(rwlock_t *rwl){
pthread_mutex_lock(&rwl->lock);rwl->waiting_writers++;pthread_cleanup_push(waiting_writer_cleanup, rwl);while (rwl->lock_count)
254 AIX 5L Version 5.3 General Programming Concepts: Writing and Debugging Programs
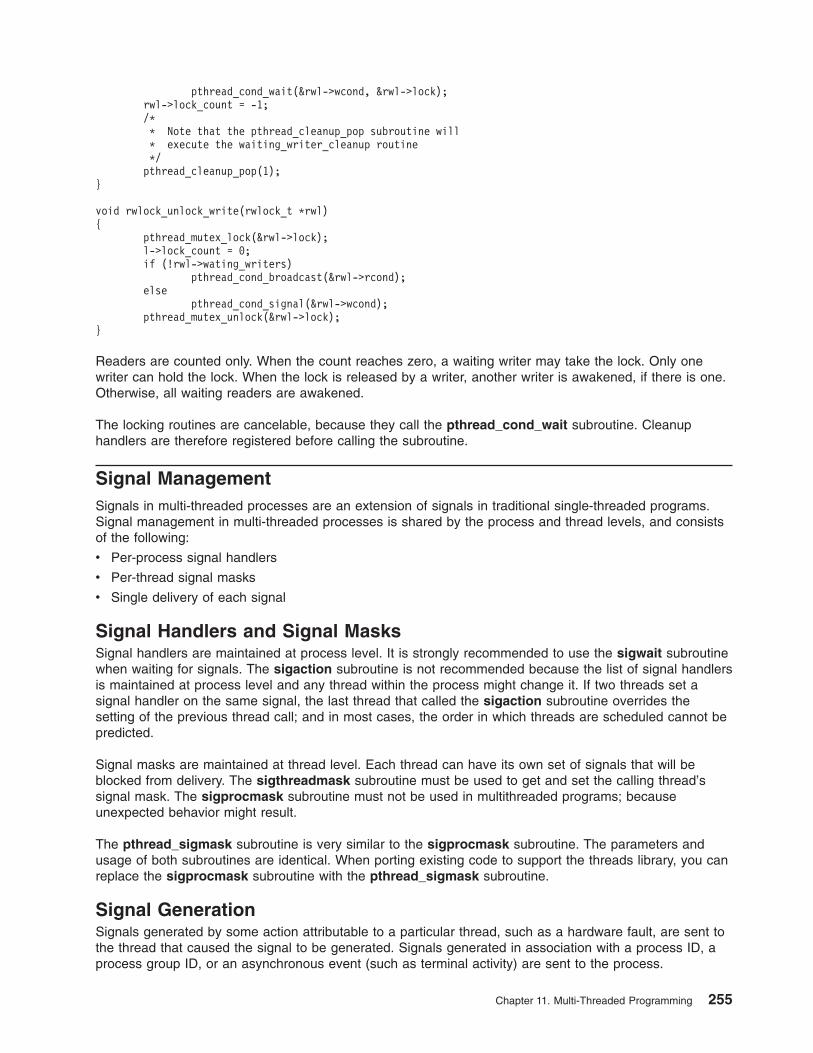
pthread_cond_wait(&rwl->wcond, &rwl->lock);rwl->lock_count = -1;/** Note that the pthread_cleanup_pop subroutine will* execute the waiting_writer_cleanup routine*/pthread_cleanup_pop(1);
}
void rwlock_unlock_write(rwlock_t *rwl){
pthread_mutex_lock(&rwl->lock);l->lock_count = 0;if (!rwl->wating_writers)
pthread_cond_broadcast(&rwl->rcond);else
pthread_cond_signal(&rwl->wcond);pthread_mutex_unlock(&rwl->lock);
}
Readers are counted only. When the count reaches zero, a waiting writer may take the lock. Only onewriter can hold the lock. When the lock is released by a writer, another writer is awakened, if there is one.Otherwise, all waiting readers are awakened.
The locking routines are cancelable, because they call the pthread_cond_wait subroutine. Cleanuphandlers are therefore registered before calling the subroutine.
Signal ManagementSignals in multi-threaded processes are an extension of signals in traditional single-threaded programs.Signal management in multi-threaded processes is shared by the process and thread levels, and consistsof the following:
v Per-process signal handlers
v Per-thread signal masks
v Single delivery of each signal
Signal Handlers and Signal MasksSignal handlers are maintained at process level. It is strongly recommended to use the sigwait subroutinewhen waiting for signals. The sigaction subroutine is not recommended because the list of signal handlersis maintained at process level and any thread within the process might change it. If two threads set asignal handler on the same signal, the last thread that called the sigaction subroutine overrides thesetting of the previous thread call; and in most cases, the order in which threads are scheduled cannot bepredicted.
Signal masks are maintained at thread level. Each thread can have its own set of signals that will beblocked from delivery. The sigthreadmask subroutine must be used to get and set the calling thread’ssignal mask. The sigprocmask subroutine must not be used in multithreaded programs; becauseunexpected behavior might result.
The pthread_sigmask subroutine is very similar to the sigprocmask subroutine. The parameters andusage of both subroutines are identical. When porting existing code to support the threads library, you canreplace the sigprocmask subroutine with the pthread_sigmask subroutine.
Signal GenerationSignals generated by some action attributable to a particular thread, such as a hardware fault, are sent tothe thread that caused the signal to be generated. Signals generated in association with a process ID, aprocess group ID, or an asynchronous event (such as terminal activity) are sent to the process.
Chapter 11. Multi-Threaded Programming 255

v The pthread_kill subroutine sends a signal to a thread. Because thread IDs identify threads within aprocess, this subroutine can only send signals to threads within the same process.
v The kill subroutine (and thus the kill command) sends a signal to a process. A thread can send aSignal signal to its process by executing the following call:kill(getpid(), Signal);
v The raise subroutine cannot be used to send a signal to the calling thread’s process. The raisesubroutine sends a signal to the calling thread, as in the following call:pthread_kill(pthread_self(), Signal);
This ensures that the signal is sent to the caller of the raise subroutine. Thus, library routines written forsingle-threaded programs can easily be ported to a multithreaded system, because the raise subroutineis usually intended to send the signal to the caller.
v The alarm subroutine requests that a signal be sent later to the process, and alarm states aremaintained at process level. Thus, the last thread that called the alarm subroutine overrides the settingsof other threads in the process. In a multithreaded program, the SIGALRM signal is not necessarilydelivered to the thread that called the alarm subroutine. The calling thread might even be terminated;and therefore, it cannot receive the signal.
Handling SignalsSignal handlers are called within the thread to which the signal is delivered. The following limitations tosignal handlers are introduced by the threads library:
v Signal handlers might call the longjmp or siglongjmp subroutine only if the corresponding call to thesetjmp or sigsetjmp subroutine is performed in the same thread.
Usually, a program that wants to wait for a signal installs a signal handler that calls the longjmpsubroutine to continue execution at the point where the corresponding setjmp subroutine is called. Thiscannot be done in a multithreaded program, because the signal might be delivered to a thread otherthan the one that called the setjmp subroutine, thus causing the handler to be executed by the wrongthread.
Note: Using longjmp from a signal handler can result in undefined behavior.
v No pthread routines can be called from a signal handler. Calling a pthread routine from a signalhandler can lead to an application deadlock.
To allow a thread to wait for asynchronously generated signals, the threads library provides the sigwaitsubroutine. The sigwait subroutine blocks the calling thread until one of the awaited signals is sent to theprocess or to the thread. There must not be a signal handler installed on the awaited signal using thesigwait subroutine.
Typically, programs might create a dedicated thread to wait for asynchronously generated signals. Such athread loops on a sigwait subroutine call and handles the signals. It is recommended that such a threadblock all the signals. The following code fragment gives an example of such a signal-waiter thread:#include <pthread.h>#include <signal.h>
static pthread_mutex_t mutex;sigset_t set;static int sig_cond = 0;
void *run_me(void *id){
int sig;int err;sigset_t sigs;sigset_t oldSigSet;sigfillset(&sigs);sigthreadmask(SIG_BLOCK, &sigs, &oldSigSet);
256 AIX 5L Version 5.3 General Programming Concepts: Writing and Debugging Programs

err = sigwait(&set, &sig);
if(err){
/* do error code */}else{
printf("SIGINT caught\n");pthread_mutex_lock(&mutex);sig_cond = 1;pthread_mutex_unlock(&mutex);
}
return;}
main(){
pthread_t tid;
sigemptyset(&set);sigaddset(&set, SIGINT);pthread_sigmask(SIG_BLOCK, &set, 0);
pthread_mutex_init(&mutex, NULL);
pthread_create(&tid, NULL, run_me, (void *)1);
while(1){
sleep(1);/* or so something here */
pthread_mutex_lock(&mutex);if(sig_cond){
/* do exit stuff */return;
}pthread_mutex_unlock(&mutex);
}
}
If more than one thread called the sigwait subroutine, exactly one call returns when a matching signal issent. Which thread is awakened cannot be predicted. If a thread is going to do sigwait as well as handlingof some other signals for which it is not doing sigwait, the user-defined signal handlers need to block thesigwaiter signals for the proper handling. Note that the sigwait subroutine provides a cancellation point.
Because a dedicated thread is not a real signal handler, it might signal a condition to any other thread. It ispossible to implement a sigwait_multiple routine that would awaken all threads waiting for a specificsignal. Each caller of the sigwait_multiple routine registers a set of signals. The caller then waits on acondition variable. A single thread calls the sigwait subroutine on the union of all registered signals. Whenthe call to the sigwait subroutine returns, the appropriate state is set and condition variables arebroadcasted. New callers to the sigwait_multiple subroutine cause the pending sigwait subroutine call tobe canceled and reissued to update the set of signals being waited for. For more information on conditionvariables, see “Using Condition Variables” on page 224.
Chapter 11. Multi-Threaded Programming 257

Signal DeliveryA signal is delivered to a thread, unless its action is set to ignore. The following rules govern signaldelivery in a multi-threaded process:
v A signal whose action is set to terminate, stop, or continue the target thread or process respectivelyterminates, stops, or continues the entire process (and thus all of its threads). Single-threaded programscan thus be rewritten as multi-threaded programs without changing their externally visible signalbehavior.
For example, consider a multi-threaded user command, such as the grep command. A user can startthe command in his favorite shell and then decide to stop it by sending a signal with the kill command.The signal should stop the entire process running the grep command.
v Signals generated for a specific thread, using the pthread_kill or the raise subroutines, are delivered tothat thread. If the thread has blocked the signal from delivery, the signal is set pending on the threaduntil the signal is unblocked from delivery. If the thread is terminated before the signal delivery, thesignal will be ignored.
v Signals generated for a process, using the kill subroutine for example, are delivered to exactly onethread in the process. If one or more threads called the sigwait subroutine, the signal is delivered toexactly one of these threads. Otherwise, the signal is delivered to exactly one thread that did not blockthe signal from delivery. If no thread matches these conditions, the signal is set pending on the processuntil a thread calls the sigwait subroutine specifying this signal or a thread unblocks the signal fromdelivery.
If the action associated with a pending signal (on a thread or on a process) is set to ignore, the signal isignored.
List of Threads-Processes Interactions Subroutines
alarm Causes a signal to be sent to the calling process after aspecified timeout.
kill or killpg Sends a signal to a process or a group of processes.pthread_atfork Registers fork cleanup handlers.pthread_kill Sends a signal to the specified thread.pthread_sigmask Sets the signal mask of a thread.raise Sends a signal to the executing thread.sigaction, sigvec, or signal Specifies the action to take upon delivery of a signal.sigsuspend or sigpause Atomically changes the set of blocked signals and waits for a
signal.sigthreadmask Sets the signal mask of a thread.sigwait Blocks the calling thread until a specified signal is received.
Process Duplication and TerminationBecause all processes have at least one thread, creating (that is, duplicating) and terminating a processimplies the creation and the termination of threads. This section describes the interactions betweenthreads and processes when duplicating and terminating a process.
ForkingProgrammers call the fork subroutine in the following cases:
v To create a new flow of control within the same program. AIX creates a new process.
v To create a new process running a different program. In this case, the call to the fork subroutine issoon followed by a call to one of the exec subroutines.
In a multi-threaded program, the first use of the fork subroutine, creating new flows of control, is providedby the pthread_create subroutine. The fork subroutine should thus be used only to run new programs.
258 AIX 5L Version 5.3 General Programming Concepts: Writing and Debugging Programs
The fork subroutine duplicates the parent process, but duplicates only the calling thread; the child processis a single-threaded process. The calling thread of the parent process becomes the initial thread of thechild process; it may not be the initial thread of the parent process. Thus, if the initial thread of the childprocess returns from its entry-point routine, the child process terminates.
When duplicating the parent process, the fork subroutine also duplicates all the synchronization variables,including their state. Thus, for example, mutexes may be held by threads that no longer exist in the childprocess and any associated resource may be inconsistent.
It is strongly recommended that the fork subroutine be used only to run new programs, and to call one ofthe exec subroutines as soon as possible after the call to the fork subroutine in the child process.
Fork HandlersThe preceding forking rule does not address the needs of multi-threaded libraries. Application programsmay not be aware that a multi-threaded library is in use and will call any number of library routinesbetween the fork and the exec subroutines, just as they always have. Indeed, they may be oldsingle-threaded programs and cannot, therefore, be expected to obey new restrictions imposed by thethreads library.
On the other hand, multi-threaded libraries need a way to protect their internal state during a fork in case aroutine is called later in the child process. The problem arises especially in multi-threaded input/outputlibraries, which are almost sure to be invoked between the fork and the exec subroutines to affectinput/output redirection.
The pthread_atfork subroutine provides a way for multi-threaded libraries to protect themselves frominnocent application programs that call the fork subroutine. It also provides multi-threaded applicationprograms with a standard mechanism for protecting themselves from calls to the fork subroutine in alibrary routine or the application itself.
The pthread_atfork subroutine registers fork handlers to be called before and after the call to the forksubroutine. The fork handlers are executed in the thread that called the fork subroutine. The following forkhandlers exist:
Prepare The prepare fork handler is called just before the processing of the fork subroutine begins.Parent The parent fork handler is called just after the processing of the fork subroutine is completed in the
parent process.Child The child fork handler is called just after the processing of the fork subroutine is completed in the child
process.
The prepare fork handlers are called in last-in first-out (LIFO) order, whereas the parent and child forkhandlers are called in first-in first-out (FIFO) order. This allows programs to preserve any desired lockingorder.
Process TerminationWhen a process terminates, by calling the exit, atexit, or _exit subroutine either explicitly or implicitly, allthreads within the process are terminated. Neither the cleanup handlers nor the thread-specific datadestructors are called.
Note: The unatexit subroutine unregisters functions that were previously registered by the atexitsubroutine. If the referenced function is found, it is removed from the list of functions that are calledat normal program termination.
The reason for this behavior is that there is no state to leave clean and no thread-specific storage toreclaim, because the whole process terminates, including all the threads, and all the process storage isreclaimed, including all thread-specific storage.
Chapter 11. Multi-Threaded Programming 259

Threads Library OptionsThis section describes special attributes of threads, mutexes, and condition variables. The POSIX standardfor the threads library specifies the implementation of some parts as optional. All subroutines defined bythe threads library API are always available. Depending on the available options, some subroutines maynot be implemented. Unimplemented subroutines can be called by applications, but they always return theENOSYS error code.
Stack AttributesA stack is allocated for each thread. Stack management is implementation-dependent. Thus, the followinginformation applies only to AIX, although similar features may exist on other systems.
The stack is dynamically allocated when the thread is created. Using advanced thread attributes, it ispossible for the user to control the stack size and address of the stack. The following information does notapply to the initial thread, which is created by the system.
Stack SizeThe stack size option enables the control of the stacksize attribute of a thread attributes object. Thisattribute specifies the minimum stack size to be used for the created thread.
The stacksize attribute is defined in AIX. The following attribute and subroutines are available when theoption is implemented:
v The stacksize attribute of the thread attributes object
v The pthread_attr_getstacksize returns the value of the attribute
v and pthread_attr_setstacksize subroutines sets the value
The default value of the stacksize attribute is 96 KB. The minimum value of the stacksize attribute for the32-bit kernel is 8 KB and 16 KB for the 64-bit kernel. If the assigned value is less than the minimum value,the minimum value is allocated.
In the AIX implementation of the threads library, a chunk of data, called user thread area, is allocated foreach created thread. The area is divided into the following sections:
v A red zone, which is both read-protected and write-protected for stack overflow detection. There is nored zone in programs that use large pages.
v A default stack.
v A pthread structure.
v A thread structure.
v A thread attribute structure.
Note: The user thread area described here has no relationship to the uthread structure used in the AIXkernel. The user thread area is accessed only in user mode and is exclusively handled by thethreads library, whereas the uthread structure only exists within the kernel environment.
Stack Address POSIX OptionThe stack address option enables the control of the stackaddr attribute of a thread attributes object. Thisattribute specifies the location of storage to be used for the created thread’s stack.
The following attribute and subroutines are available when the option is implemented:
v The stackaddr attribute of the thread attributes object specifies the address of the stack that will beallocated for a thread.
v The pthread_attr_getstackaddr subroutine returns the value of the attribute.
v and pthread_attr_setstackaddr subroutine sets the value.
260 AIX 5L Version 5.3 General Programming Concepts: Writing and Debugging Programs

If no stack address is specified, the stack is allocated by the system at an arbitrary address. If you musthave the stack at a known location, you can use the stackaddr attribute. For example, if you need a verylarge stack, you can set its address to an unused segment, guaranteeing that the allocation will succeed.
If a stack address is specified when calling the pthread_create subroutine, the system attempts toallocate the stack at the given address. If it fails, the pthread_create subroutine returns EINVAL. Becausethe pthread_attr_setstackaddr subroutine does not actually allocate the stack, it only returns an error ifthe specified stack address exceeds the addressing space.
Priority Scheduling POSIX OptionThe priority scheduling option enables the control of execution scheduling at thread level. When this optionis disabled, all threads within a process share the scheduling properties of the process. When this optionis enabled, each thread has its own scheduling properties. For local contention scope threads, thescheduling properties are handled at process level by a library scheduler, while for global contention scopethreads, the scheduling properties are handled at system level by the kernel scheduler. For moreinformation about the scheduling properties of a thread, see “Scheduling Threads” on page 240.
The folowing attributes and subroutines are available when the option is implemented:
v The inheritsched attribute of the thread attributes object
v The schedparam attribute of the thread attributes object and the thread
v The schedpolicy attribute of the thread attributes objects and the thread
v The contention-scope attribute of the thread attributes objects and the thread
v The pthread_attr_getschedparam and pthread_attr_setschedparam subroutines
v The pthread_getschedparam subroutine
Checking the Availability of an OptionOptions can be checked at compile time or at run time. Portable programs should check the availability ofoptions before using them, so that they need not be rewritten when ported to other systems.
Compile-Time CheckingSymbolic constants (symbols) can be used to get the availability of options on the system where theprogram is compiled. The symbols are defined in the pthread.h header file by the #define pre-processorcommand. For unimplemented options, the corresponding symbol is undefined by the #undefpre-processor command. Check option symbols in each program that might be ported to another system.
The following list indicates the symbol associated with each option:
Stack address _POSIX_THREAD_ATTR_STACKADDRStack size _POSIX_THREAD_ATTR_STACKSIZEPriority scheduling _POSIX_THREAD_PRIORITY_SCHEDULINGPriority inheritance _POSIX_THREAD_PRIO_INHERITPriority protection _POSIX_THREAD_PRIO_PROTECTProcess sharing _POSIX_THREAD_PROCESS_SHARED
When an option is not available, you can stop the compilation, as in the following example:#ifndef _POSIX_THREAD_ATTR_STACKSIZE#error "The stack size POSIX option is required"#endif
The pthread.h header file also defines the following symbols that can be used by other header files or byprograms:
_POSIX_REENTRANT_FUNCTIONS Denotes that reentrant functions are required
Chapter 11. Multi-Threaded Programming 261

_POSIX_THREADS Denotes the implementation of the threads library
Run-Time CheckingThe sysconf subroutine can be used to get the availability of options on the system where the program isexecuted. This is useful when porting programs between systems that have a binary compatibility, such astwo versions of AIX.
The following list indicates the symbols that are associated with each option and that must be used for theName parameter of the sysconf subroutine. The symbolic constants are defined in the unistd.h headerfile.
Stack address _SC_THREAD_ATTR_STACKADDRStack size _SC_THREAD_ATTR_STACKSIZEPriority scheduling _SC_THREAD_PRIORITY_SCHEDULINGPriority inheritance _SC_THREAD_PRIO_INHERITPriority protection _SC_THREAD_PRIO_PROTECTProcess sharing _SC_THREAD_PROCESS_SHARED
To check the general options, use the sysconf subroutine with the following Name parameter values:
_SC_REENTRANT_FUNCTIONS Denotes that reentrant functions are required._SC_THREADS Denotes the implementation of the threads library.
Process SharingAIX and most UNIX systems allow several processes to share a common data space, known as sharedmemory. For more information about the AIX shared memory facility, see “Understanding MemoryMapping” on page 401. The process-sharing attributes for condition variables and mutexes are meant toallow these objects to be allocated in shared memory to support synchronization among threads belongingto different processes. However, because there is no industry-standard interface for shared memorymanagement, the process-sharing POSIX option is not implemented in the AIX threads library.
Threads Data TypesThe following data types are defined for the threads library. The definition of these data types can varybetween systems:
pthread_tIdentifies a thread
pthread_attr_tIdentifies a thread attributes object
pthread_cond_tIdentifies a condition variable
pthread_condattr_tIdentifies a condition attributes object
pthread_key_tIdentifies a thread-specific data key
pthread_mutex_tIdentifies a mutex
pthread_mutexattr_tIdentifies a mutex attributes object
262 AIX 5L Version 5.3 General Programming Concepts: Writing and Debugging Programs

pthread_once_tIdentifies a one-time initialization object
Limits and Default ValuesThe threads library has some implementation-dependent limits and default values. These limits and defaultvalues can be retrieved by symbolic constants to enhance the portability of programs:
v The maximum number of threads per process is 512. The maximum number of threads can be retrievedat compilation time using the PTHREAD_THREADS_MAX symbolic constant defined in the pthread.hheader file. If an application is compiled with the -D_LARGE_THREADS flag, the maximum number ofthreads per process is 32767.
v The minimum stack size for a thread is 8 K. The default stack size is 96 KB. This number can beretrieved at compilation time using the PTHREAD_STACK_MIN symbolic constant defined in thepthread.h header file.
Note: The maximum stack size is 256 MB, the size of a segment. This limit is indicated by thePTHREAD_STACK_MAX symbolic constant in the pthread.h header file.
v The maximum number of thread-specific data keys is limited to 508. This number can be retrieved atcompilation time using the PTHREAD_KEYS_MAX symbolic constant defined in the pthread.h headerfile.
Default Attribute ValuesThe default values for the thread attributes object are defined in the pthread.h header file by the followingsymbolic constants:
v The default value for the DEFAULT_DETACHSTATE symbolic constant isPTHREAD_CREATE_DETACHED, which specifies the default value for the detachstate attribute.
v The default value for the DEFAULT_JOINABLE symbolic constant is PTHREAD_CREATE_JOINABLE,which specifies the default value for the joinable state.
v The default value for the DEFAULT_INHERIT symbolic constant is PTHREAD_INHERIT_SCHED, whichspecifies the default value for the inheritsched attribute.
v The default value for the DEFAULT_PRIO symbolic constant is 1, which specifies the default value forthe sched_prio field of the schedparam attribute.
v The default value for the DEFAULT_SCHED symbolic constant is SCHED_OTHER, which specifies thedefault value for the schedpolicy attribute of a thread attributes object.
v The default value for the DEFAULT_SCOPE symbolic constant is PTHREAD_SCOPE_LOCAL, whichspecifies the default value for the contention-scope attribute.
List of Threads Advanced-Feature Subroutines
pthread_attr_getstackaddr Returns the value of the stackaddr attribute of a threadattributes object.
pthread_attr_getstacksize Returns the value of the stacksize attribute of a threadattributes object.
pthread_attr_setstackaddr Sets the value of the stackaddr attribute of a thread attributesobject.
pthread_attr_setstacksize Sets the value of the stacksize attribute of a thread attributesobject.
pthread_condattr_getpshared Returns the value of the process-shared attribute of acondition attributes object.
pthread_condattr_setpshared Sets the value of the process-shared attribute of a conditionattributes object.
pthread_getspecific Returns the thread-specific data associated with the specifiedkey.
pthread_key_create Creates a thread-specific data key.
Chapter 11. Multi-Threaded Programming 263

pthread_key_delete Deletes a thread-specific data key.pthread_mutexattr_getpshared Returns the value of the process-shared attribute of a mutex
attributes object.pthread_mutexattr_setpshared Sets the value of the process-shared attribute of a mutex
attributes object.pthread_once Executes a routine exactly once in a process.PTHREAD_ONCE_INIT Initializes a one-time synchronization control structure.pthread_setspecific Sets the thread-specific data associated with the specified
key.
Supported Interfaces
On AIX systems, the _POSIX_THREADS, _POSIX_THREAD_ATTR_STACKADDR,_POSIX_THREAD_ATTR_STACKSIZE and _POSIX_THREAD_PROCESS_SHARED symbols are alwaysdefined. Therefore, the following threads interfaces are supported.
POSIX InterfacesThe following is a list of POSIX interfaces:
v pthread_atfork
v pthread_attr_destroy
v pthread_attr_getdetachstate
v pthread_attr_getschedparam
v pthread_attr_getstacksize
v pthread_attr_getstackaddr
v pthread_attr_init
v pthread_attr_setdetachstate
v pthread_attr_setschedparam
v pthread_attr_setstackaddr
v pthread_attr_setstacksize
v pthread_cancel
v pthread_cleanup_pop
v pthread_cleanup_push
v pthread_detach
v pthread_equal
v pthread_exit
v pthread_getspecific
v pthread_join
v pthread_key_create
v pthread_key_delete
v pthread_kill
v pthread_mutex_destroy
v pthread_mutex_init
v pthread_mutex_lock
v pthread_mutex_trylock
v pthread_mutex_unlock
v pthread_mutexattr_destroy
v pthread_mutexattr_getpshared
264 AIX 5L Version 5.3 General Programming Concepts: Writing and Debugging Programs
v pthread_mutexattr_init
v pthread_mutexattr_setpshared
v pthread_once
v pthread_self
v pthread_setcancelstate
v pthread_setcanceltype
v pthread_setspecific
v pthread_sigmask
v pthread_testcancel
v pthread_cond_broadcast
v pthread_cond_destroy
v pthread_cond_init
v pthread_cond_signal
v pthread_cond_timedwait
v pthread_cond_wait
v pthread_condattr_destroy
v pthread_condattr_getpshared
v pthread_condattr_init
v pthread_condattr_setpshared
v pthread_create
v sigwait
Single UNIX Specification, Version 2 InterfacesThe following is a list of Single UNIX Specification, Version 2 interfaces:
v pthread_attr_getguardsize
v pthread_attr_setguardsize
v pthread_getconcurrency
v pthread_mutexattr_gettype
v pthread_mutexattr_settype
v pthread_rwlock_destroy
v pthread_rwlock_init
v pthread_rwlock_rdlock
v pthread_rwlock_tryrdlock
v pthread_rwlock_trywrlock
v pthread_rwlock_unlock
v pthread_rwlock_wrlock
v pthread_rwlockattr_destroy
v pthread_rwlockattr_getpshared
v pthread_rwlockattr_init
v pthread_rwlockattr_setpshared
v pthread_setconcurrency
On AIX systems, _POSIX_THREAD_SAFE_FUNCTIONS symbol is always defined. Therefore, thefollowing interfaces are always supported:
v asctime_r
v ctime_r
Chapter 11. Multi-Threaded Programming 265

v flockfile
v ftrylockfile
v funlockfile
v getc_unlocked
v getchar_unlocked
v getgrgid_r
v getgrnam_r
v getpwnam_r
v getpwuid_r
v gmtime_r
v localtime_r
v putc_unlocked
v putchar_unlocked
v rand_r
v readdir_r
v strtok_r
AIX does not support the following interfaces; the symbols are provided but they always return an errorand set the errno to ENOSYS:
v pthread_mutex_getprioceiling
v pthread_mutex_setprioceiling
v pthread_mutexattr_getprioceiling
v pthread_mutexattr_getprotocol
v pthread_mutexattr_setprioceiling
v pthread_mutexattr_setprotocol
Non-Thread-Safe InterfacesThe following AIX interfaces are not thread-safe.
libc.a Library (Standard Functions):
v advance
v asctime
v brk
v catgets
v chroot
v compile
v ctime
v cuserid
v dbm_clearerr
v dbm_close
v dbm_delete
v dbm_error
v dbm_fetch
v dbm_firstkey
v dbm_nextkey
v dbm_open
v dbm_store
266 AIX 5L Version 5.3 General Programming Concepts: Writing and Debugging Programs

v dirname
v drand48
v ecvt
v encrypt
v endgrent
v endpwent
v endutxent
v fcvt
v gamma
v gcvt
v getc_unlocked
v getchar_unlocked
v getdate
v getdtablesize
v getgrent
v getgrgid
v getgrnam
v getlogin
v getopt
v getpagesize
v getpass
v getpwent
v getpwnam
v getpwuid
v getutxent
v getutxid
v getutxline
v getw
v getw
v gmtime
v l64a
v lgamma
v localtime
v lrand48
v mrand48
v nl_langinfo
v ptsname
v putc_unlocked
v putchar_unlocked
v pututxline
v putw
v rand
v random
v readdir
v re_comp
Chapter 11. Multi-Threaded Programming 267

v re_exec
v regcmp
v regex
v sbrk
v setgrent
v setkey
v setpwent
v setutxent
v sigstack
v srand48
v srandom
v step
v strerror
v strtok
v ttyname
v ttyslot
v wait3
libc.a Library (AIX-Specific Functions):
v endfsent
v endttyent
v endutent
v getfsent
v getfsfile
v getfsspec
v getfstype
v getttyent
v getttynam
v getutent
v getutid
v getutline
v pututline
v setfsent
v setttyent
v setutent
v utmpname
libbsd.a library:
v timezone
libm.a and libmsaa.a libraries:
v gamma
v lgamma
None of the functions in the following libraries are thread-safe:
v libPW.a
268 AIX 5L Version 5.3 General Programming Concepts: Writing and Debugging Programs
v libblas.a
v libcur.a
v libcurses.a
v libplot.a
v libprint.a
The ctermid and tmpnam interfaces are not thread-safe if they are passed a NULL argument.
Note: Certain subroutines may be implemented as macros on some systems. Avoid using the address ofthreads subroutines.
Writing Reentrant and Thread-Safe CodeIn single-threaded processes, only one flow of control exists. The code executed by these processes thusneed not be reentrant or thread-safe. In multi-threaded programs, the same functions and the sameresources may be accessed concurrently by several flows of control. To protect resource integrity, codewritten for multi-threaded programs must be reentrant and thread-safe.
Reentrance and thread safety are both related to the way that functions handle resources. Reentrance andthread safety are separate concepts: a function can be either reentrant, thread-safe, both, or neither.
This section provides information about writing reentrant and thread-safe programs. It does not cover thetopic of writing thread-efficient programs. Thread-efficient programs are efficiently parallelized programs.You must consider thread effiency during the design of the program. Existing single-threaded programscan be made thread-efficient, but this requires that they be completely redesigned and rewritten.
ReentranceA reentrant function does not hold static data over successive calls, nor does it return a pointer to staticdata. All data is provided by the caller of the function. A reentrant function must not call non-reentrantfunctions.
A non-reentrant function can often, but not always, be identified by its external interface and its usage. Forexample, the strtok subroutine is not reentrant, because it holds the string to be broken into tokens. Thectime subroutine is also not reentrant; it returns a pointer to static data that is overwritten by each call.
Thread SafetyA thread-safe function protects shared resources from concurrent access by locks. Thread safety concernsonly the implementation of a function and does not affect its external interface.
In C language, local variables are dynamically allocated on the stack. Therefore, any function that doesnot use static data or other shared resources is trivially thread-safe, as in the following example:/* thread-safe function */int diff(int x, int y){
int delta;
delta = y - x;if (delta < 0)
delta = -delta;
return delta;}
Chapter 11. Multi-Threaded Programming 269

The use of global data is thread-unsafe. Global data should be maintained per thread or encapsulated, sothat its access can be serialized. A thread may read an error code corresponding to an error caused byanother thread. In AIX, each thread has its own errno value.
Making a Function ReentrantIn most cases, non-reentrant functions must be replaced by functions with a modified interface to bereentrant. Non-reentrant functions cannot be used by multiple threads. Furthermore, it may be impossibleto make a non-reentrant function thread-safe.
Returning DataMany non-reentrant functions return a pointer to static data. This can be avoided in the following ways:
v Returning dynamically allocated data. In this case, it will be the caller’s responsibility to free the storage.The benefit is that the interface does not need to be modified. However, backward compatibility is notensured; existing single-threaded programs using the modified functions without changes would not freethe storage, leading to memory leaks.
v Using caller-provided storage. This method is recommended, although the interface must be modified.
For example, a strtoupper function, converting a string to uppercase, could be implemented as in thefollowing code fragment:/* non-reentrant function */char *strtoupper(char *string){
static char buffer[MAX_STRING_SIZE];int index;
for (index = 0; string[index]; index++)buffer[index] = toupper(string[index]);
buffer[index] = 0
return buffer;}
This function is not reentrant (nor thread-safe). To make the function reentrant by returning dynamicallyallocated data, the function would be similar to the following code fragment:/* reentrant function (a poor solution) */char *strtoupper(char *string){
char *buffer;int index;
/* error-checking should be performed! */buffer = malloc(MAX_STRING_SIZE);
for (index = 0; string[index]; index++)buffer[index] = toupper(string[index]);
buffer[index] = 0
return buffer;}
A better solution consists of modifying the interface. The caller must provide the storage for both input andoutput strings, as in the following code fragment:/* reentrant function (a better solution) */char *strtoupper_r(char *in_str, char *out_str){
int index;
for (index = 0; in_str[index]; index++)out_str[index] = toupper(in_str[index]);
270 AIX 5L Version 5.3 General Programming Concepts: Writing and Debugging Programs

out_str[index] = 0
return out_str;}
The non-reentrant standard C library subroutines were made reentrant using caller-provided storage. Thisis discussed in “Reentrant and Thread-Safe Libraries” on page 273.
Keeping Data over Successive CallsNo data should be kept over successive calls, because different threads may successively call thefunction. If a function must maintain some data over successive calls, such as a working buffer or apointer, the caller should provide this data.
Consider the following example. A function returns the successive lowercase characters of a string. Thestring is provided only on the first call, as with the strtok subroutine. The function returns 0 when itreaches the end of the string. The function could be implemented as in the following code fragment:/* non-reentrant function */char lowercase_c(char *string){
static char *buffer;static int index;char c = 0;
/* stores the string on first call */if (string != NULL) {
buffer = string;index = 0;
}
/* searches a lowercase character */for (; c = buffer[index]; index++) {
if (islower(c)) {index++;break;
}}return c;
}
This function is not reentrant. To make it reentrant, the static data, the index variable, must be maintainedby the caller. The reentrant version of the function could be implemented as in the following codefragment:/* reentrant function */char reentrant_lowercase_c(char *string, int *p_index){
char c = 0;
/* no initialization - the caller should have done it */
/* searches a lowercase character */for (; c = string[*p_index]; (*p_index)++) {
if (islower(c)) {(*p_index)++;break;
}}return c;
}
The interface of the function changed and so did its usage. The caller must provide the string on each calland must initialize the index to 0 before the first call, as in the following code fragment:
Chapter 11. Multi-Threaded Programming 271

char *my_string;char my_char;int my_index;...my_index = 0;while (my_char = reentrant_lowercase_c(my_string, &my_index)) {
...}
Making a Function Thread-SafeIn multi-threaded programs, all functions called by multiple threads must be thread-safe. However, aworkaround exists for using thread-unsafe subroutines in multi-threaded programs. Non-reentrant functionsusually are thread-unsafe, but making them reentrant often makes them thread-safe, too.
Locking Shared ResourcesFunctions that use static data or any other shared resources, such as files or terminals, must serialize theaccess to these resources by locks in order to be thread-safe. For example, the following function isthread-unsafe:/* thread-unsafe function */int increment_counter(){
static int counter = 0;
counter++;return counter;
}
To be thread-safe, the static variable counter must be protected by a static lock, as in the followingexample:/* pseudo-code thread-safe function */int increment_counter();{
static int counter = 0;static lock_type counter_lock = LOCK_INITIALIZER;
pthread_mutex_lock(counter_lock);counter++;pthread_mutex_unlock(counter_lock);return counter;
}
In a multi-threaded application program using the threads library, mutexes should be used for serializingshared resources. Independent libraries may need to work outside the context of threads and, thus, useother kinds of locks.
Workarounds for Thread-Unsafe FunctionsIt is possible to use a workaround to use thread-unsafe functions called by multiple threads. This can beuseful, especially when using a thread-unsafe library in a multi-threaded program, for testing or whilewaiting for a thread-safe version of the library to be available. The workaround leads to some overhead,because it consists of serializing the entire function or even a group of functions. The following arepossible workarounds:
v Use a global lock for the library, and lock it each time you use the library (calling a library routine orusing a library global variable). This solution can create performance bottlenecks because only onethread can access any part of the library at any given time. The solution in the following pseudocode isacceptable only if the library is seldom accessed, or as an initial, quickly implemented workaround./* this is pseudo code! */
lock(library_lock);library_call();unlock(library_lock);
272 AIX 5L Version 5.3 General Programming Concepts: Writing and Debugging Programs

lock(library_lock);x = library_var;unlock(library_lock);
v Use a lock for each library component (routine or global variable) or group of components. This solutionis somewhat more complicated to implement than the previous example, but it can improveperformance. Because this workaround should only be used in application programs and not in libraries,mutexes can be used for locking the library./* this is pseudo-code! */
lock(library_moduleA_lock);library_moduleA_call();unlock(library_moduleA_lock);
lock(library_moduleB_lock);x = library_moduleB_var;unlock(library_moduleB_lock);
Reentrant and Thread-Safe LibrariesReentrant and thread-safe libraries are useful in a wide range of parallel (and asynchronous) programmingenvironments, not just within threads. It is a good programming practice to always use and write reentrantand thread-safe functions.
Using LibrariesSeveral libraries shipped with the AIX Base Operating System are thread-safe. In the current version ofAIX, the following libraries are thread-safe:
v Standard C library (libc.a)
v Berkeley compatibility library (libbsd.a)
Some of the standard C subroutines are non-reentrant, such as the ctime and strtok subroutines. Thereentrant version of the subroutines have the name of the original subroutine with a suffix _r (underscorefollowed by the letter r).
When writing multi-threaded programs, use the reentrant versions of subroutines instead of the originalversion. For example, the following code fragment:token[0] = strtok(string, separators);i = 0;do {
i++;token[i] = strtok(NULL, separators);
} while (token[i] != NULL);
should be replaced in a multi-threaded program by the following code fragment:char *pointer;...token[0] = strtok_r(string, separators, &pointer);i = 0;do {
i++;token[i] = strtok_r(NULL, separators, &pointer);
} while (token[i] != NULL);
Thread-unsafe libraries may be used by only one thread in a program. Ensure the uniqueness of thethread using the library; otherwise, the program will have unexpected behavior, or may even stop.
Converting LibrariesConsider the following when converting an existing library to a reentrant and thread-safe library. Thisinformation applies only to C language libraries.
Chapter 11. Multi-Threaded Programming 273

v Identify exported global variables. Those variables are usually defined in a header file with the exportkeyword. Exported global variables should be encapsulated. The variable should be made private(defined with the static keyword in the library source code), and access (read and write) subroutinesshould be created.
v Identify static variables and other shared resources. Static variables are usually defined with the statickeyword. Locks should be associated with any shared resource. The granularity of the locking, thuschoosing the number of locks, impacts the performance of the library. To initialize the locks, theone-time initialization facility may be used. For more information, see “One-Time Initializations” on page246.
v Identify non-reentrant functions and make them reentrant. For more information, see “Making a FunctionReentrant” on page 270.
v Identify thread-unsafe functions and make them thread-safe. For more information, see “Making aFunction Thread-Safe” on page 272.
Developing Multi-Threaded ProgramsDeveloping multi-threaded programs is similar to developing programs with multiple processes. Developingprograms also consists of compiling and debugging the code.
Compiling a Multi-Threaded ProgramThis section explains how to generate a multi-threaded program. It describes the following:
v The required header file
v Invoking the compiler, which is used to generate multi-threaded programs.
Header FileAll subroutine prototypes, macros, and other definitions for using the threads library are in the pthread.hheader file, which is located in the /usr/include directory.
The pthread.h header file must be the first included file of each source file using the threads library,because it defines some important macros that affect other header files. Having the pthread.h header fileas the first included file ensures that thread-safe subroutines are used. The following global symbols aredefined in the pthread.h file:
_POSIX_REENTRANT_FUNCTIONS Specifies that all functions should be reentrant. Several header files usethis symbol to define supplementary reentrant subroutines, such as thelocaltime_r subroutine.
_POSIX_THREADS Denotes the POSIX threads API. This symbol is used to check if thePOSIX threads API is available. Macros or subroutines may be defined indifferent ways, depending on whether the POSIX or some other threadsAPI is used.
The pthread.h file also redefines the errno global variable as a function returning a thread-specific errnovalue. The errno identifier is, therefore, no longer an l-value in a multi-threaded program.
Invoking the CompilerWhen compiling a multi-threaded program, invoke the C compiler using one of the following commands:
xlc_r Invokes the compiler with default language level of ansicc_r Invokes the compiler with default language level of extended
These commands ensure that the adequate options and libraries are used to be compliant with the SingleUNIX Specification, Version 2. The POSIX Threads Specification 1003.1c is a subset of the Single UNIXSpecification, Version 2.
274 AIX 5L Version 5.3 General Programming Concepts: Writing and Debugging Programs

The following libraries are automatically linked with your program when using the xlc_r and cc_rcommands:
libpthreads.a Threads librarylibc.a Standard C library
For example, the following command compiles the foo.c multi-threaded C source file and produces thefoo executable file:cc_r -o foo foo.c
Invoking the Compiler for Draft 7 of POSIX 1003.1cAIX provides source code compatibility for Draft 7 applications. It is recommended that developers porttheir threaded application to the latest standard.
When compiling a multi-threaded program for Draft 7 support of threads, invoke the C compiler using oneof the following commands:
xlc_r7 Invokes the compiler with default language level of ansicc_r7 Invokes the compiler with default language level of extended
The following libraries are automatically linked with your program when using the xlc_r7 and cc_r7commands:
libpthreads_compat.a Draft 7 Compatibility Threads librarylibpthreads.a Threads librarylibc.a Standard C library
To achieve source code compatibility, use the compiler directive _AIX_PTHREADS_D7. It is alsonecessary to link the libraries in the following order: libpthreads_compat.a, libpthreads.a, and libc.a.Most users do not need to know this information, because the commands provide the necessary options.These options are provided for those who do not have the latest AIX compiler.
Porting Draft 7 Applications to the Single UNIX Specification, Version 2Differences exist between Draft 7 and the final standard include:
v Minor errno differences. The most prevalent is the use of ESRCH to denote the specified pthread couldnot be found. Draft 7 frequently returned EINVAL for this failure.
v The default state when a pthread is created is joinable. This is a significant change because it canresult in a memory leak if ignored. For more information about thread creation, see “Creating Threads”on page 208.
v The default pthread scheduling parameter is scope. For more information about scheduling, see“Scheduling Threads” on page 240.
v The pthread_yield subroutine has been replaced by the sched_yield subroutine.
v The various scheduling policies associated with the mutex locks are slightly different.
Memory Requirements of a Multi-Threaded ProgramAIX supports up to 32768 threads in a single process. Each individual pthread requires some amount ofprocess address space, so the actual maximum number of pthreads that a process can have depends onthe memory model and the use of process address space, for other purposes. The amount of memory thata pthread needs includes the stack size and the guard region size, plus some amount for internal use. Theuser can control the size of the stack with the pthread_attr_setstacksize subroutine and the size of theguard region with the pthread_attr_setguardsize subroutine.
Chapter 11. Multi-Threaded Programming 275

Note: The soft limit on stack size imposed by the command ulimit –s applies only to the stack of themain thread of the application.
The following table indicates the maximum number of pthreads that could be created in a 32-bit processusing a simple program which does nothing other than create pthreads in a loop using the NULL pthreadattribute. In a real program, the actual numbers depend on other memory usage in the program. For a64-bit process, the ulimit subroutine controls how many threads can be created. Therefore, the big datamodel is not necessary and in fact, can decrease the maximum number of threads.
Data Model -bmaxdata Maximum Pthreads
Small Data n/a 1084
Big Data 0x10000000 2169
Big Data 0x20000000 4340
Big Data 0x30000000 6510
Big Data 0x40000000 8681
Big Data 0x50000000 10852
Big Data 0x60000000 13022
Big Data 0x70000000 15193
Big Data 0x80000000 17364
The NUM_SPAREVP environment variable can be set to control the number of spare virtual processorsthat are maintained by the library. It is not necessary to modify this variable. In some circumstances,applications that use only a few megabytes of memory can reduce memory overhead by setting theNUM_SPAREVP environment variable to a lower value. Typical settings include the number of CPUs onthe system or the peak number of process threads. Setting this variable does not affect processperformance. The default setting is 256.
Note: The NUM_SPAREVP environment variable is available only in AIX 5.1.
Example of a Multi-Threaded ProgramThe following short multi-threaded program displays ″Hello!″ in both English and French for five seconds.Compile with cc_r or xlc_r. For more information about compiling thread programs, see “DevelopingMulti-Threaded Programs” on page 274.#include <pthread.h> /* include file for pthreads - the 1st */#include <stdio.h> /* include file for printf() */#include <unistd.h> /* include file for sleep() */
void *Thread(void *string){
while (1)printf("%s\n", (char *)string);
pthread_exit(NULL);}
int main(){
char *e_str = "Hello!";char *f_str = "Bonjour !";
pthread_t e_th;pthread_t f_th;
int rc;
rc = pthread_create(&e_th, NULL, Thread, (void *)e_str);
276 AIX 5L Version 5.3 General Programming Concepts: Writing and Debugging Programs
if (rc)exit(-1);
rc = pthread_create(&f_th, NULL, Thread, (void *)f_str);if (rc)
exit(-1);sleep(5);
/* usually the exit subroutine should not be usedsee below to get more information */
exit(0);}
The initial thread (executing the main routine) creates two threads. Both threads have the sameentry-point routine (the Thread routine), but a different parameter. The parameter is a pointer to the stringthat will be displayed.
Debugging a Multi-Threaded ProgramThe following tools are available to debug multi-threaded programs:
v Application programmers can use the dbx command to perform debugging. Several subcommands areavailable for displaying thread-related objects, including attribute, condition, mutex, and thread.
v Kernel programmers can use the kernel debug program to perform debugging on kernel extensions anddevice drivers. The kernel debug program provides limited access to user threads, and primarilyhandles kernel threads. Several subcommands support multiple kernel threads and processors,including:
– The cpu subcommand, which changes the current processor
– The ppd subcommand, which displays per-processor data structures
– The thread subcommand, which displays thread table entries
– The uthread subcommand, which displays the uthread structure of a thread
For more information on the kernel debug program, see the AIX 5L Version 5.3 Kernel Extensions andDevice Support Programming Concepts.
Core File Requirements of a Multi-Threaded ProgramBy default, processes do not generate a full core file. If an application must debug data in shared memoryregions, particularly thread stacks, it is necessary to generate a full core dump. To generate full core fileinformation, run the following command as root user:chdev -l sys0 -a fullcore=true
Each individual pthread adds to the size of the generated core file. The amount of core file space that apthread needs includes the stack size, which the user can control with the pthread_attr_setstacksizesubroutine. For pthreads created with the NULL pthread attribute, each pthread in a 32-bit process adds128 KB to the size of the core file, and each pthread in a 64-bit process adds 256 KB to the size of thecore file.
Developing Multi-Threaded Programs to Examine and Modify pthreadLibrary ObjectsThe pthread debug library (libpthdebug.a) provides a set of functions that enable application developersto examine and modify pthread library objects. This library can be used for both 32-bit applications and64-bit applications. This library is thread-safe. The pthread debug library contains a 32-bit shared objectand a 64-bit shared object.
Chapter 11. Multi-Threaded Programming 277

The pthread debug library provides applications with access to the pthread library information. Thisincludes information on pthreads, pthread attributes, mutexes, mutex attributes, condition variables,condition variable attributes, read/write locks, read/write lock attributes, and information about the state ofthe pthread library.
Note: All data (addresses, registers) returned by this library is in 64-bit format both for 64-bit and 32-bitapplications. It is the application’s responsibility to convert these values into 32-bit format for 32-bitapplications. When debugging a 32-bit application, the top half of addresses and registers isignored.
The pthread debug library does not report information on mutexes, mutex attributes, condition variables,condition variable attributes, read/write locks, and read/write lock attibutes that have the pshared value ofPTHREAD_PROCESS_SHARED.
InitializationThe application must initialize a pthread debug library session for each pthreaded process. Thepthdb_sessison_init function must be called from each pthreaded process after the process has beenloaded. The pthread debug library supports one session for a single process. The application must assigna unique user identifier and pass it to the pthdb_session_init function, which in turn assigns a uniquesession identifier that must be passed as the first parameter to all other pthread debug library functions,except pthdb_session_pthreaded function, in return. Whenever the pthread debug library invokes a callback function, it will pass the unique application assigned user identifier back to the application. Thepthdb_session_init function checks the list of call back functions provided by the application, andinitializes the session’s data structures. Also, this function sets the session flags. An appplication mustpass the PTHDB_FLAG_SUSPEND flag to the pthdb_session_init Function. See thepthdb_session_setflags function for a full list of flags.
Call Back FunctionsThe pthread debug library uses the call back functions to obtain and write data, as well as to give storagemanagement to the application. Required call back functions for an application are as follows:read_data
Retrieves pthread library object informationalloc Allocates memory in the pthread debug libraryrealloc
Reallocates memory in the pthread debug librarydealloc
Frees allocated memory in the pthread debug library
Optional call back functions for an application are as follows:read_regs
Necessary only for the pthdb_pthread_context and pthdb_pthread_setcontext subroutineswrite_data
Necessary only for the pthdb_pthread_setcontext subroutinewrite_regs
Necessary only for pthdb_pthread_setcontext subroutine
Update FunctionEach time the application is stopped, after the session has been initialized, it is necessary to call thepthdb_session_update function. This function sets or resets the lists of pthreads, pthread attributes,mutexes, mutex attributes, condition variables, condition variable attributes, read/write locks, read/writelock attributes, pthread specific keys, and active keys. It uses call back functions to manage memory forthe lists.
278 AIX 5L Version 5.3 General Programming Concepts: Writing and Debugging Programs

Context FunctionsThe pthdb_pthread_context function obtains the context information, and the pthdb_pthread_setcontextfunction sets the context. The pthdb_pthread_context function obtains the context information of apthread from either the kernel or the pthread data structure in the application’s address space. If thepthread is not associated with a kernel thread, the context information saved by the pthread library isobtained. If a pthread is associated with a kernel thread, the information is obtained from the applicationusing the call back functions. The application must determine if the kernel thread is in kernel mode or usermode and then to provide the correct information for that mode.
When a pthread with kernel thread is in kernel mode, you cannot get the full user mode context becausethe kernel does not save it in one place. The getthrds function can be used to obtain part of thisinformation, because it always saves the user mode stack. The application can discover this by checkingthe thrdsinfo64.ti_scount structure. If this is non-zero, the user mode stack is available in thethrdsinfo64.ti_ustk structure. From the user mode stack, it is possible to determine the instructionaddress register (IAR) and the call back frames, but not the other register values. The thrdsinfo64structure is defined in procinfo.h file.
List FunctionsThe pthread debug library maintains lists for pthreads, pthread attributes, mutexes, mutex attributes,condition variables, condition variables attributes, read/write locks, read/write lock attributes, pthreadspecific keys and active keys, each represented by a type-specific handle. The pthdb_object functionsreturn the next handle in the appropriate list, where object is one of the following: pthread, attr, mutex,mutexattr, cond, condattr, rwlock, rwlockattr or key. If the list is empty or the end of the list is reached,PTHDB_INVALID_OBJECT is reported, where OBJECT is one of the following: PTHREAD, ATTR,MUTEX, MUTEXATTR, COND, CONDATTR, RWLOCK, RWLOCKATTR or KEY.
Field FunctionsDetailed information about an object can be obtained by using the appropriate object member function,pthdb_object_field, where object is one of the following: pthread, attr, mutex, mutexattr, cond, condattr,rwlock, rwlockattr or key and where field is the name of a field of the detailed information for the object.
Customizing the SessionThe pthdb_session_setflags function allows the application to change the flags that customize thesession. These flags control the number of registers that are read or written during context operations.
The pthdb_session_flags function obtains the current flags for the session.
Terminating the SessionAt the end of the session, the session data structures must be deallocated, and the session data must bedeleted. This is accomplished by calling the pthdb_session_destroy function, which uses a call backfunction to deallocate the memory. All of the memory allocated by the pthdb_session_init, andpthdb_session_update functions will be deallocated.
Example of Connecting to the pthread Debug LibraryThe following example shows how an application can connect to the pthread debug library:
/* includes */
#include <pthread.h>#include <sys/pthdebug.h>
...
int my_read_data(pthdb_user_t user, pthdb_symbol_t symbols[],int count)
Chapter 11. Multi-Threaded Programming 279

{int rc;
rc=memcpy(buf,(void *)addr,len);if (rc==NULL) {
fprintf(stderr,“Error message\n”);return(1);
}return(0);
}int my_alloc(pthdb_user_t user, size_t len, void **bufp){
*bufp=malloc(len);if(!*bufp) {
fprintf(stderr,“Error message\n”);return(1);
}return(0);
}int my_realloc(pthdb_user_t user, void *buf, size_t len, void **bufp){
*bufp=realloc(buf,len);if(!*bufp) {
fprintf(stderr,“Error message\n”);return(1);
}return(0);
}int my_dealloc(pthdb_user_t user,void *buf){
free(buf);return(0);
}
status(){
pthdb_callbacks_t callbacks ={ NULL,
my_read_data,NULL,NULL,NULL,my_alloc,my_realloc,my_dealloc,NULL
};
...
rc=pthread_suspend_others_np();if (rc!=0)
deal with error
if (not initialized)rc=pthdb_session_init(user,exec_mode,PTHDB_SUSPEND|PTHDB_REGS,callbacks,
&session);if (rc!=PTHDB_SUCCESS)
deal with error
rc=pthdb_session_update(session);if (rc!=PTHDB_SUCCESS)
deal with error
retrieve pthread object information using the object list functions andthe object field functions
280 AIX 5L Version 5.3 General Programming Concepts: Writing and Debugging Programs

...
rc=pthread_continue_others_np();if (rc!=0)
deal with error}
...
main(){
...}
Developing Multi-Threaded Program DebuggersThe pthread debug library (libpthdebug.a) provides a set of functions that allows developers to providedebug capabilities for applications that use the pthread library.
The pthread debug library is used to debug both 32-bit and 64-bit pthreaded applications. This library isused to debug targeted debug processes only. It can also be used to examine pthread information of itsown application. This library can be used by a multi-threaded debugger to debug a multi-threadedapplication. Multi-threaded debuggers are supported in the libpthreads.a library, which is thread-safe. Thepthread debug library contains a 32-bit shared object and a 64-bit shared object.
Debuggers using the ptrace facility must link to the 32-bit version of the library, because the ptrace facilityis not supported in 64-bit mode. Debuggers using the /proc facility can link to either the 32-bit version orthe 64-bit version of this library.
The pthread debug library provides debuggers with access to pthread library information. This includesinformation on pthreads, pthread attributes, mutexes, mutex attributes, condition variables, conditionvariable attributes, read/write locks, read/write lock attributes, and information about the state of thepthread library. This library also provides help with controlling the execution of pthreads.
Note: All data (addresses, registers) returned by this library is in 64-bit format both for 64-bit and 32-bitapplications. It is the debugger’s responsibility to convert these values into 32-bit format for 32-bitapplications. When debugging a 32-bit application, the top half of addresses and registers isignored.
The pthread debug library does not report mutexes, mutex attributes, condition variables, conditionvariable attributes, read/write locks, and read/write lock attributes that have the pshared value ofPTHREAD_PROCESS_SHARED.
InitializationThe debugger must initialize a pthread debug library session for each debug process. This cannot be doneuntil the pthread library has been initialized in the debug process. The pthdb_session_pthreaded functionhas been provided to tell the debugger when the pthread library has been initialized in the debug process.Each time the pthdb_session_pthreaded function is called, it checks to see if the pthread library hasbeen initialized. If initialized, it returns PTHDB_SUCCESS. Otherwise, it returns PTHDB_NOT_PTHREADED. In bothcases, it returns a function name that can be used to set a breakpoint for immediate notification that thepthread library has been initialized. Therefore, the pthdb_session_pthreaded function provides thefollowing methods for determining when the pthread library has been initialized:
v The debugger calls the function each time the debug process stops, to see if the program that is beingdebugged is pthreaded.
v The debugger calls the function once and if the program that is being debugged is not pthreaded, sets abreakpoint to notify the debugger when the debug process is pthreaded.
Chapter 11. Multi-Threaded Programming 281

After the debug process is pthreaded, the debugger must call the pthdb_session_init function, to initializea session for the debug process. The pthread debug library supports one session for a single debugprocess. The debugger must assign a unique user identifier and pass it to pthdb_session_init which inturn will assign a unique session identifier which must be passed as the first parameter to all other pthreaddebug library functions, except pthdb_session_pthreaded, in return. Whenever the pthread debug libraryinvokes a call back function, it will pass the unique debugger assigned user identifier back to thedebugger. The pthdb_session_init function checks the list of call back functions provided by thedebugger, and initializes the session’s data structures. Also, this function sets the session flags. See thepthdb_session_setflags function in AIX 5L Version 5.3 Technical Reference: Base Operating System andExtensions Volume 1.
Call Back FunctionsThe pthread debug library uses call back functions to do the following:
v Obtain addresses and data
v Write data
v Give storage management to the debugger
v Aid debugging of the pthread debug library
Update FunctionEach time the debugger is stopped, after the session has been initialized, it is necessary to call thepthdb_session_update function. This function sets or resets the lists of pthreads, pthread attributes,mutexes, mutex attributes, condition variables, condition variable attributes, read/write locks, read/writelock attributes, pthread specific keys, and active keys. It uses call back functions to manage memory forthe lists.
Hold and Unhold FunctionsDebuggers must support hold and unhold of threads for the following reasons:
v To allow a user to single step a single thread, it must be possible to hold one or more of the otherthreads.
v For users to continue through a subset of available threads, it must be possible to hold threads not inthe set.
The following list of functions perform hold and unhold tasks:
v The pthdb_pthread_hold function sets the hold state of a pthread to hold.
v The pthdb_pthread_unhold function sets the hold state of a pthread to unhold.
Note: The pthdb_pthread_hold and pthdb_pthread_unhold functions must always be used, whetheror not a pthread has a kernel thread.
v The pthdb_pthread_holdstate function returns the hold state of the pthread.
v The pthdb_session_committed function reports the function name of the function that is called after allof the hold and unhold changes are committed. A breakpoint can be placed at this function to notify thedebugger when the hold and unhold changes have been committed.
v The pthdb_session_stop_tid function informs the pthread debug library, which informs the pthreadlibrary the thread ID (TID) of the thread that stopped the debugger.
v The pthdb_session_commit_tid function returns the list of kernel threads, one kernel thread at a time,that must be continued to commit the hold and unhold changes. This function must be called repeatedly,until PTHDB_INVALID_TID is reported. If the list of kernel threads is empty, it is not necessary to continueany threads for the commit operation.
The debugger can determine when all of the hold and unhold changes have been committed in thefollowing ways:
282 AIX 5L Version 5.3 General Programming Concepts: Writing and Debugging Programs

v Before the commit operation (continuing all of the tids returned by the pthdb_session_commit_tidfunction) is started, the debugger can call the pthdb_session_committed function to get the functionname and set a breakpoint. (This method can be done once for the life of the process.)
v Before the commit operation is started, the debugger calls the pthdb_session_stop_tid function withthe TID of the thread that stopped the debugger. When the commit operation is complete, the pthreadlibrary ensures that the same TID is stopped as before the commit operation.
To hold or unhold pthreads, use the follow the following procedure, before continuing a group of pthreadsor single-stepping a single pthread:
1. Use the pthdb_pthread_hold and pthdb_pthread_unhold functions to set up which pthreads will beheld and which will be unheld.
2. Select the method that will determine when all of the hold and unhold changes have been committed.
3. Use the pthdb_session_commit_tid function to determine the list of TIDs that must be continued tocommit the hold and unhold changes.
4. Continue the TIDs in the previous step and the thread that stopped the debugger.
The pthdb_session_continue_tid function allows the debugger to obtain the list of kernel threads thatmust be continued before it proceeds with single-stepping a single pthread or continuing a group ofpthreads. This function must be called repeatedly, until PTHDB_INVALID_TID is reported. If the list of kernelthreads is not empty, the debugger must continue these kernel threads along with the others that it isexplicitly interested in. The debugger is responsible for parking the stop thread and continuing the stopthread. The stop thread is the thread that caused the debugger to be entered.
Context FunctionsThe pthdb_pthread_context function obtains the context information and the pthdb_pthread_setcontextfunction sets the context. The pthdb_pthread_context function obtains the context information of apthread from either the kernel or the pthread data structure in the debug process’s address space. If thepthread is not associated with a kernel thread, the context information saved by the pthread library isobtained. If a pthread is associated with a kernel thread, the information is obtained from the debuggerusing call backs. It is the debugger’s responsibility to determine if the kernel thread is in kernel mode oruser mode and then to provide the correct information for that mode.
When a pthread with kernel thread is in kernel mode, you cannot get the full user mode context becausethe kernel does not save it in one place. The getthrds function can be used to obtain part of thisinformation, because it always saves the user mode stack. The debugger can discover this by checkingthe thrdsinfo64.ti_scount structure. If this is non-zero, the user mode stack is available in thethrdsinfo64.ti_ustk structure. From user mode stack, it is possible to determine the instruction addressregister (IAR) and the call back frames, but not the other register values. The thrdsinfo64 structure isdefined in procinfo.h file.
List FunctionsThe pthread debug library maintains lists for pthreads, pthread attributes, mutexes, mutex attributes,condition variables, condition variables attributes, read/write locks, read/write lock attributes, pthreadspecific keys and active keys, each represented by a type-specific handle. The pthdb_object functionsreturn the next handle in the appropriate list, where object is one of the following: pthread, attr, mutex,mutexattr, cond, condattr, rwlock, rwlockattr or key. If the list is empty or the end of the list is reached,PTHDB_INVALID_object is reported, where object is one of the following: PTHREAD, ATTR, MUTEX,MUTEXATTR, COND, CONDATTR, RWLOCK, RWLOCKATTR or KEY.
Chapter 11. Multi-Threaded Programming 283

Field FunctionsDetailed information about an object can be obtained by using the appropriate object member function,pthdb_object_field, where object is one of the following: pthread, attr, mutex, mutexattr, cond,condattr, rwlock, rwlockattr or key and where field is the name of a field of the detailed information forthe object.
Customizing the SessionThe pthdb_session_setflags function allows the debugger to change the flags that customize thesession. These flags control the number of registers that are read or written to during context operations,and to control the printing of debug information.
The pthdb_session_flags function obtains the current flags for the session.
Terminating the SessionAt the end of the debug session, the session data structures must be deallocated, and the session datamust be deleted. This is accomplished by calling the pthdb_session_destroy function, which uses a callback function to deallocate the memory. All of the memory allocated by the pthdb_session_init andpthdb_session_update functions will be deallocated.
Example of Hold/Unhold FunctionsThe following pseudocode example shows how the debugger uses the hold/unhold code:/* includes */
#include <sys/pthdebug.h>
main(){
tid_t stop_tid; /* thread which stopped the process */pthdb_user_t user = <unique debugger value>;pthdb_session_t session; /* <unique library value> */pthdb_callbacks_t callbacks = <callback functions>;char *pthreaded_symbol=NULL;char *committed_symbol;int pthreaded = 0;int pthdb_init = 0;char *committed_symbol;
/* fork/exec or attach to the program that is being debugged */
/* the program that is being debugged uses ptrace()/ptracex() with PT_TRACE_ME */
while (/* waiting on an event */){
/* debugger waits on the program that is being debugged */
if (pthreaded_symbol==NULL) {rc = pthdb_session_pthreaded(user, &callbacks, pthreaded_symbol);if (rc == PTHDB_NOT_PTHREADED){
/* set breakpoint at pthreaded_symbol */}else
pthreaded=1;}if (pthreaded == 1 && pthdb_init == 0) {
rc = pthdb_session_init(user, &session, PEM_32BIT, flags, &callbacks);if (rc)
/* handle error and exit */pthdb_init=1;
}
284 AIX 5L Version 5.3 General Programming Concepts: Writing and Debugging Programs

rc = pthdb_session_update(session)if ( rc != PTHDB_SUCCESS)
/* handle error and exit */
while (/* accepting debugger commands */){
switch (/* debugger command */){
...case DB_HOLD:
/* regardless of pthread with or without kernel thread */rc = pthdb_pthread_hold(session, pthread);if (rc)
/* handle error and exit */case DB_UNHOLD:
/* regardless of pthread with or without kernel thread */rc = pthdb_pthread_unhold(session, pthread);if (rc)
/* handle error and exit */case DB_CONTINUE:
/* unless we have never held threads for the life *//* of the process */if (pthreaded){
/* debugger must handle list of any size */struct pthread commit_tids;int commit_count = 0;/* debugger must handle list of any size */struct pthread continue_tids;int continue_count = 0;
rc = pthdb_session_committed(session, committed_symbol);if (rc != PTHDB_SUCCESS)
/* handle error *//* set break point at committed_symbol */
/* gather any tids necessary to commit hold/unhold *//* operations */do{
rc = pthdb_session_commit_tid(session,&commit_tids.th[commit_count++]);
if (rc != PTHDB_SUCCESS)/* handle error and exit */
} while (commit_tids.th[commit_count - 1] != PTHDB_INVALID_TID);
/* set up thread which stopped the process to be *//* parked using the stop_park function*/
if (commit_count > 0) {rc = ptrace(PTT_CONTINUE, stop_tid, stop_park, 0,
&commit_tids);if (rc)
/* handle error and exit */
/* wait on process to stop */}
/* gather any tids necessary to continue *//* interesting threads */do{
rc = pthdb_session_continue_tid(session,&continue_tids.th[continue_count++]);
if (rc != PTHDB_SUCCESS)/* handle error and exit */
Chapter 11. Multi-Threaded Programming 285

} while (continue_tids.th[continue_count - 1] != PTHDB_INVALID_TID);
/* add interesting threads to continue_tids */
/* set up thread which stopped the process to be parked *//* unless it is an interesting thread */
rc = ptrace(PTT_CONTINUE, stop_tid, stop_park, 0,&continue_tids);
if (rc)/* handle error and exit */
}case DB_EXIT:
rc = pthdb_session_destroy(session);/* other clean up code */exit(0);
...}
}
}exit(0);
}
Benefits of ThreadsMulti-threaded programs can improve performance compared to traditional parallel programs that usemultiple processes. Furthermore, improved performance can be obtained on multiprocessor systems usingthreads.
Managing ThreadsManaging threads; that is, creating threads and controlling their execution, requires fewer systemresources than managing processes. Creating a thread, for example, only requires the allocation of thethread’s private data area, usually 64 KB, and two system calls. Creating a process is far more expensive,because the entire parent process addressing space is duplicated.
The threads library API is also easier to use than the library for managing processes. Thread creationrequires only the pthread_create subroutine.
Inter-Thread CommunicationsInter-thread communication is far more efficient and easier to use than inter-process communication.Because all threads within a process share the same address space, they need not use shared memory.Protect shared data from concurrent access by using mutexes or other synchronization tools.
Synchronization facilities provided by the threads library ease implementation of flexible and powerfulsynchronization tools. These tools can replace traditional inter-process communication facilities, such asmessage queues. Pipes can be used as an inter-thread communication path.
Multiprocessor Systems
On a multiprocessor system, multiple threads can concurrently run on multiple CPUs. Therefore,multi-threaded programs can run much faster than on a uniprocessor system. They can also be faster thana program using multiple processes, because threads require fewer resources and generate lessoverhead. For example, switching threads in the same process can be faster, especially in the M:N librarymodel where context switches can often be avoided. Finally, a major advantage of using threads is that asingle multi-threaded program will work on a uniprocessor system, but can naturally take advantage of amultiprocessor system, without recompiling.
286 AIX 5L Version 5.3 General Programming Concepts: Writing and Debugging Programs

LimitationsMulti-threaded programming is useful for implementing parallelized algorithms using several independententities. However, there are some cases where multiple processes should be used instead of multiplethreads.
Many operating system identifiers, resources, states, or limitations are defined at the process level and,thus, are shared by all threads in a process. For example, user and group IDs and their associatedpermissions are handled at process level. Programs that need to assign different user IDs to theirprogramming entities need to use multiple processes, instead of a single multi-threaded process. Otherexamples include file-system attributes, such as the current working directory, and the state and maximumnumber of open files. Multi-threaded programs may not be appropriate if these attributes are betterhandled independently. For example, a multi-processed program can let each process open a largenumber of files without interference from other processes.
Related Informationv Performance management provides a performance overview of the CPU Scheduler.
Subroutine Referencesv Session Functions in AIX 5L Version 5.3 Technical Reference: Base Operating System and Extensions
Volume 1
– pthdb_session_commit_tid
– pthdb_session_committed
– pthdb_session_concurrency
– pthdb_session_continue_tid
– pthdb_session_destroy
– pthdb_session_flags
– pthdb_session_init
– pthdb_session_pthreaded
– pthdb_session_setflags
– pthdb_session_stop_tid
– pthdb_session_update
v List Functions in AIX 5L Version 5.3 Technical Reference: Base Operating System and ExtensionsVolume 1
– pthdb_attr
– pthdb_cond
– pthdb_condattr
– pthdb_key
– pthdb_mutex
– pthdb_mutexattr
– pthdb_pthread
– pthdb_pthread_key
– pthdb_rwlock
– pthdb_rwlockattr
v Pthread Functions in AIX 5L Version 5.3 Technical Reference: Base Operating System and ExtensionsVolume 1
– pthdb_pthread_addr
– pthdb_pthread_arg
Chapter 11. Multi-Threaded Programming 287
– pthdb_pthread_cancelpend
– pthdb_pthread_cancelstate
– pthdb_pthread_canceltype
– pthdb_pthread_detachstate
– pthdb_pthread_exit
– pthdb_pthread_func
– pthdb_pthread_ptid
– pthdb_pthread_schedparam
– pthdb_pthread_schedpolicy
– pthdb_pthread_schedpriority
– pthdb_pthread_scope
– pthdb_pthread_state
– pthdb_pthread_suspendstate
– pthdb_ptid_pthread
v Pthread Context Functions in AIX 5L Version 5.3 Technical Reference: Base Operating System andExtensions Volume 1
– pthdb_pthread_context
– pthdb_pthread_setcontext
v Pthread Signal Functions in AIX 5L Version 5.3 Technical Reference: Base Operating System andExtensions Volume 1
– pthdb_pthread_sigmask
– pthdb_pthread_sigpend
– pthdb_pthread_sigwait
v Pthread Specific Data Functions in AIX 5L Version 5.3 Technical Reference: Base Operating Systemand Extensions Volume 1
– pthdb_pthread_specific
v Pthread Mapping to Kernel Thread Functions in AIX 5L Version 5.3 Technical Reference: BaseOperating System and Extensions Volume 1
– pthdb_pthread_tid
– pthdb_tid_pthread_tid
v Pthread Hold/Unhold Functions
– pthdb_pthread_hold
– pthdb_pthread_holdstate
– pthdb_pthread_unhold
v Attribute Functions in AIX 5L Version 5.3 Technical Reference: Base Operating System and ExtensionsVolume 1
– pthdb_attr_addr
– pthdb_attr_detachstate
– pthdb_attr_guardsize
– pthdb_attr_inheritsched
– pthdb_attr_schedparam
– pthdb_attr_schedpolicy
– pthdb_attr_schedpriority
– pthdb_attr_scope
– pthdb_attr_stackaddr
– pthdb_attr_stacksize
288 AIX 5L Version 5.3 General Programming Concepts: Writing and Debugging Programs

– pthdb_attr_suspendstate
v Mutex Functions in AIX 5L Version 5.3 Technical Reference: Base Operating System and ExtensionsVolume 1
– pthdb_mutex_addr
– pthdb_mutex_lock_count
– pthdb_mutex_owner
– pthdb_mutex_pshared
– pthdb_mutex_prioceiling
– pthdb_mutex_protocol
– pthdb_mutex_state
– pthdb_mutex_type
v Mutex Attribute Functions in AIX 5L Version 5.3 Technical Reference: Base Operating System andExtensions Volume 1
– pthdb_mutexattr_addr
– pthdb_mutexattr_prioceiling
– pthdb_mutexattr_protocol
– pthdb_mutexattr_pshared
– pthdb_mutexattr_type
v Condition Variable Functions in AIX 5L Version 5.3 Technical Reference: Base Operating System andExtensions Volume 1
– pthdb_cond_addr
– pthdb_cond_mutex
– pthdb_cond_pshared
v Condition Variable Attribute Functions in AIX 5L Version 5.3 Technical Reference: Base OperatingSystem and Extensions Volume 1
– pthdb_condattr_addr
– pthdb_condattr_pshared
v Read/Write Lock Functions in AIX 5L Version 5.3 Technical Reference: Base Operating System andExtensions Volume 1
– pthdb_rwlock_addr
– pthdb_rwlock_lock_count
– pthdb_rwlock_owner
– pthdb_rwlock_pshared
– pthdb_rwlock_state
v Read/Write Lock Attribute Functions in AIX 5L Version 5.3 Technical Reference: Base Operating Systemand Extensions Volume 1
– pthdb_rwlockattr_addr
– pthdb_rwlockattr_pshared
v Waiter Functions in AIX 5L Version 5.3 Technical Reference: Base Operating System and ExtensionsVolume 1
– pthdb_mutex_waiter
– pthdb_cond_waiter
– pthdb_rwlock_read_waiter
– pthdb_rwlock_write_waiter
Chapter 11. Multi-Threaded Programming 289

Files ReferencesThe pthread.h file.
290 AIX 5L Version 5.3 General Programming Concepts: Writing and Debugging Programs

Chapter 12. lex and yacc Program Information
For a program to receive input, either interactively or in a batch environment, you must provide anotherprogram or a routine to receive the input. Complicated input requires additional code to break the inputinto pieces that mean something to the program. You can use the lex and yacc commands to develop thistype of input program.
The lex command generates a lexical analyzer program that analyzes input and breaks it into tokens, suchas numbers, letters, or operators. The tokens are defined by grammar rules set up in the lex specificationfile. The yacc command generates a parser program that analyzes input using the tokens identified by thelexical analyzer (generated by the lex command and stored in the lex specification file) and performsspecified actions, such as flagging improper syntax. Together these commands generate a lexical analyzerand parser program for interpreting input and output handling.
The following topics are covered in this chapter:
v “Generating a Lexical Analyzer with the lex Command”
v “Using the lex Program with the yacc Program” on page 292
v “Extended Regular Expressions in the lex Command” on page 293
v “Passing Code to the Generated lex Program” on page 296
v “Defining lex Substitution Strings” on page 297
v “lex Library” on page 297
v “Actions Taken by the Lexical Analyzer” on page 298
v “lex Program Start Conditions” on page 301
v “Creating a Parser with the yacc Program” on page 302
v “The yacc Grammar File” on page 303
v “Using the yacc Grammar File” on page 304
v “yacc Grammar File Declarations” on page 306
v “yacc Rules” on page 308
v “yacc Actions” on page 309
v “yacc Program Error Handling” on page 311
v “Parser Operation Generated by the yacc Command” on page 312
v “Using Ambiguous Rules in the yacc Program” on page 314
v “Turning on Debug Mode for a Parser Generated by the yacc Command” on page 315
v “Example Program for the lex and yacc Programs” on page 315
v “Related Information” on page 319
Generating a Lexical Analyzer with the lex CommandThe lex command helps write a C language program that can receive and translate character-stream inputinto program actions. To use the lex command, you must supply or write a specification file that contains:
Extended regular expressions Character patterns that the generated lexical analyzer recognizes.Action statements C language program fragments that define how the generated lexical
analyzer reacts to extended regular expressions it recognizes.
For information about the format and logic allowed in this file, see the lex command in AIX 5L Version 5.3Commands Reference, Volume 3.
© Copyright IBM Corp. 1997, 2010 291

The lex command generates a C language program that can analyze an input stream using information inthe specification file. The lex command then stores the output program in a lex.yy.c file. If the outputprogram recognizes a simple, one-word input structure, you can compile the lex.yy.c output file with thefollowing command to produce an executable lexical analyzer:cc lex.yy.c -ll
However, if the lexical analyzer must recognize more complex syntax, you can create a parser program touse with the output file to ensure proper handling of any input. For more information, see “Creating aParser with the yacc Program” on page 302.
You can move a lex.yy.c output file to another system if it has a C compiler that supports the lex libraryfunctions.
The compiled lexical analyzer performs the following functions:
v Reads an input stream of characters.
v Copies the input stream to an output stream.
v Breaks the input stream into smaller strings that match the extended regular expressions in the lexspecification file.
v Executes an action for each extended regular expression that it recognizes. These actions are Clanguage program fragments in the lex specification file. Each action fragment can call actions orsubroutines outside of itself.
The lexical analyzer generated by the lex command uses an analysis method called a deterministicfinite-state automaton. This method provides for a limited number of conditions in which the lexicalanalyzer can exist, along with the rules that determine the state of the lexical analyzer.
The automaton allows the generated lexical analyzer to look ahead more than one or two characters in aninput stream. For example, suppose you define two rules in the lex specification file: one looks for thestring ab and the other looks for the string abcdefg. If the lexical analyzer receives an input string ofabcdefh, it reads characters to the end of the input string before determining that it does not match thestring abcdefg. The lexical analyzer then returns to the rule that looks for the string ab, decides that itmatches part of the input, and begins trying to find another match using the remaining input cdefh.
Compiling the Lexical AnalyzerTo compile a lex program, do the following:
1. Use the lex program to change the specification file into a C language program. The resulting programis in the lex.yy.c file.
2. Use the cc command with the -ll flag to compile and link the program with a library of lex subroutines.The resulting executable program is in the a.out file.
For example, if the lex specification file is called lextest, enter the following commands:lex lextestcc lex.yy.c -ll
Using the lex Program with the yacc ProgramWhen used alone, the lex program generator produces a lexical analyzer that recognizes simple, one-wordinput or receives statistical input. You can also use the lex program with a parser generator, such as theyacc command. The yacc command generates a program, called a parser, that analyzes the constructionof more than one-word input. This parser program operates well with the lexical analyzers that the lexcommand generates. The parsers recognize many types of grammar with no regard to context. Theseparsers need a preprocessor to recognize input tokens such as the preprocessor that the lex commandproduces.
292 AIX 5L Version 5.3 General Programming Concepts: Writing and Debugging Programs

The lex program recognizes only extended regular expressions and formats them into character packagescalled tokens, as specified by the input file. When using the lex program to make a lexical analyzer for aparser, the lexical analyzer (created from the lex command) partitions the input stream. The parser (fromthe yacc command) assigns structure to the resulting pieces. You can also use other programs along withthe programs generated by either the lex or yacc commands.
A token is the smallest independent unit of meaning as defined by either the parser or the lexical analyzer.A token can contain data, a language keyword, an identifier, or other parts of a language syntax.
The yacc program looks for a lexical analyzer subroutine named yylex, which is generated by the lexcommand. Normally, the default main program in the lex library calls the yylex subroutine. However, if theyacc command is installed and its main program is used, the yacc program calls the yylex subroutine. Inthis case, where the appropriate token value is returned, each lex program rule should end with thefollowing:return(token);
The yacc command assigns an integer value to each token defined in the yacc grammar file through a#define preprocessor statement. The lexical analyzer must have access to these macros to return thetokens to the parser. Use the yacc -d option to create a y.tab.h file, and include the y.tab.h file in the lexspecification file by adding the following lines to the definition section of the lex specification file:%{#include "y.tab.h"%}
Alternately, you can include the lex.yy.c file in the yacc output file by adding the following line after thesecond %% (percent sign, percent sign) delimiter in the yacc grammar file:#include "lex.yy.c"
The yacc library should be loaded before the lex library to obtain a main program that invokes the yaccparser. You can generate lex and yacc programs in either order.
Extended Regular Expressions in the lex CommandSpecifying extended regular expressions in a lex specification file is similar to methods used in the sed ored commands. An extended regular expression specifies a set of strings to be matched. The expressioncontains both text characters and operator characters. Text characters match the corresponding charactersin the strings being compared. Operator characters specify repetitions, choices, and other features.
Numbers and letters of the alphabet are considered text characters. For example, the extended regularexpression integer matches the string integer, and the expression a57D looks for the string a57D.
OperatorsThe following list describes how operators are used to specify extended regular expressions:
CharacterMatches the character Character.
Example: a matches the literal character a; b matches the literal character b, and c matches theliteral character c.
″String″Matches the string enclosed within quotes, even if the string includes an operator.
Example: To prevent the lex command from interpreting $ (dollar sign) as an operator, enclose thesymbol in quotes.
Chapter 12. lex and yacc Program Information 293

\Character or \DigitsEscape character. When preceding a character class operator used in a string, the \ characterindicates that the operator symbol represents a literal character rather than an operator. Validescape sequences include:
\a Alert
\b Backspace
\f Form-feed
\n New line character (Do not use the actual new line character in an expression.)
\r Return
\t Tab
\v Vertical tab
\\ Backslash
\Digits The character whose encoding is represented by the one-digit, two-digit, or three-digitoctal integer specified by the Digits string.
\xDigitsThe character whose encoding is represented by the sequence of hexadecimal charactersspecified by the Digits string.
When the \ character precedes a character that is not in the preceding list of escapesequences, the lex command interprets the character literally.
Example: \c is interpreted as the c character unchanged, and [\^abc] represents theclass of characters that includes the characters ^abc.
Note: Never use \0 or \x0 in the lex command.
[List] Matches any one character in the enclosed range ([x-y]) or the enclosed list ([xyz]) based on thelocale in which the lex command is invoked. All operator symbols, with the exception of thefollowing, lose their special meaning within a bracket expression: - (dash), ^ (caret), and \(backslash).
Example: [abc-f] matches a, b, c, d, e, or f in the en_US locale.
[:Class:]Matches any of the characters belonging to the character class specified between the [::]delimiters as defined in the LC_TYPE category in the current locale. The following character classnames are supported in all locales:alnum cntrl lower space
alpha digit print upper
blank graph punct xdigit
The lex command also recognizes user-defined character class names. The [::] operator is validonly in a [] expression.
Example: [[:alpha:]] matches any character in the alpha character class in the current locale,but [:alpha:] matches only the characters :,a,l,p, and h.
[.CollatingSymbol.]Matches the collating symbol specified within the [..] delimiters as a single character. The [..]operator is valid only in a [ ] expression. The collating symbol must be a valid collating symbol forthe current locale.
Example: [[.ch.]] matches c and h together while [ch] matches c or h.
294 AIX 5L Version 5.3 General Programming Concepts: Writing and Debugging Programs

[=CollatingElement=]Matches the collating element specified within the [==] delimiters and all collating elementsbelonging to its equivalence class. The [==] operator is valid only in a [] expression.
Example: If w and v belong to the same equivalence class, [[=w=]] is the same as [wv] andmatches w or v. If w does not belong to an equivalence class, then [[=w=]] matches w only.
[^Character]Matches any character except the one following the ^ (caret) symbol. The resultant character classconsists solely of single-byte characters. The character following the ^ symbol can be a multibytecharacter. However, for this operator to match multibyte characters, you must set %h and %m togreater than zero in the definitions section.
Example: [^c] matches any character except c.
CollatingElement-CollatingElementIn a character class, indicates a range of characters within the collating sequence defined for thecurrent locale. Ranges must be in ascending order. The ending range point must collate equal toor higher than the starting range point. Because the range is based on the collating sequence ofthe current locale, a given range may match different characters, depending on the locale in whichthe lex command was invoked.
Expression?Matches either zero or one occurrence of the expression immediately preceding the ? operator.
Example: ab?c matches either ac or abc.
Period Character (.)Matches any character except the new line character. In order for the period character (.) to matchmulti-byte characters, %z must be set to greater than 0 in the definitions section of the lexspecification file. If %z is not set, the period character (.) matches single-byte characters only.
Expression*Matches zero or more occurrences of the expression immediately preceding the * operator. Forexample, a* is any number of consecutive a characters, including zero. The usefulness ofmatching zero occurrences is more obvious in complicated expressions.
Example: The expression, [A-Za-z][A-Za-z0-9]* indicates all alphanumeric strings with a leadingalphabetic character, including strings that are only one alphabetic character. You can use thisexpression for recognizing identifiers in computer languages.
Expression+Matches one or more occurrences of the pattern immediately preceding the + operator.
Example: a+ matches one or more instances of a. Also, [a-z]+ matches all strings of lowercaseletters.
Expression|ExpressionIndicates a match for the expression that precedes or follows the | (pipe) operator.
Example: ab|cd matches either ab or cd.
(Expression)Matches the expression in the parentheses. The () (parentheses) operator is used for groupingand causes the expression within parentheses to be read into the yytext array. A group inparentheses can be used in place of any single character in any other pattern.
Example: (ab|cd+)?(ef)* matches such strings as abefef, efefef, cdef, or cddd; but not abc,abcd, or abcdef.
^ExpressionIndicates a match only when Expression is at the beginning of the line and the ^ (caret) operator isthe first character in an expression.
Chapter 12. lex and yacc Program Information 295

Example: ^h matches an h at the beginning of a line.
Expression$Indicates a match only when Expression is at the end of the line and the $ (dollar sign) operator isthe last character in an expression.
Example: h$ matches an h at the end of a line.
Expression1/Expression2Indicates a match only if Expression2 immediately follows Expression1. The / (slash) operatorreads only the first expression into the yytext array.
Example: ab/cd matches the string ab, but only if followed by cd, and then reads ab into theyytext array.
Note: Only one / trailing context operator can be used in a single extended regular expression.The ^ (caret) and $ (dollar sign) operators cannot be used in the same expression with the/ operator as they indicate special cases of trailing context.
{DefinedName}Matches the name as you defined it in the definitions section.
Example: If you defined D to be numerical digits, {D} matches all numerical digits.
{Number1,Number2}Matches Number1 to Number2 occurrences of the pattern immediately preceding it. Theexpressions {Number} and {Number,} are also allowed and match exactly Number occurrencesof the pattern preceding the expression.
Example: xyz{2,4} matches either xyzxyz, xyzxyzxyz, or xyzxyzxyzxyz. This differs from the +, *and ? operators in that these operators match only the character immediately preceding them. Tomatch only the character preceding the interval expression, use the grouping operator. Forexample, xy(z{2,4}) matches xyzz, xyzzz or xyzzzz.
<StartCondition>Executes the associated action only if the lexical analyzer is in the indicated start condition (see“lex Program Start Conditions” on page 301).
Example: If being at the beginning of a line is start condition ONE, then the ^ (caret) operatorequals the expression <ONE>.
To use the operator characters as text characters, use one of the escape sequences: ″ ″ (double quotationmarks) or \ (backslash). The ″ ″ operator indicates that what is enclosed is text. Thus, the followingexample matches the string xyz++:xyz"++"
A portion of a string can be quoted. Quoting an ordinary text character has no effect. For example, thefollowing expression is equivalent to the previous example:"xyz++"
To ensure that text is interpreted as text, quote all characters that are not letters or numbers.
Another way to convert an operator character to a text character is to put a \ (backslash) character beforethe operator character. For example, the following expression is equivalent to the preceding examples:xyz\+\+
Passing Code to the Generated lex ProgramThe lex command passes C code, unchanged, to the lexical analyzer in the following circumstances:
296 AIX 5L Version 5.3 General Programming Concepts: Writing and Debugging Programs

v Lines beginning with a blank or tab in the definitions section, or at the start of the rules section beforethe first rule, are copied into the lexical analyzer. If the entry is in the definitions section, it is copied tothe external declaration area of the lex.yy.c file. If the entry is at the start of the rules section, the entryis copied to the local declaration area of the yylex subroutine in the lex.yy.c file.
v Lines that lie between delimiter lines containing only %{ (percent sign, left brace) and %} (percent sign,right brace) either in the definitions section or at the start of the rules section are copied into the lexicalanalyzer in the same way as lines beginning with a blank or tab.
v Any lines occurring after the second %% (percent sign, percent sign) delimiter are copied to the lexicalanalyzer without format restrictions.
Defining lex Substitution StringsYou can define string macros that the lex program expands when it generates the lexical analyzer. Definethem before the first %% delimiter in the lex specification file. Any line in this section that begins in column 1and that does not lie between %{ and %} defines a lex substitution string. Substitution string definitionshave the following general format:name translation
where name and translation are separated by at least one blank or tab, and the specified name beginswith a letter. When the lex program finds the string defined by name enclosed in {} (braces) in the rulespart of the specification file, it changes that name to the string defined in translation and deletes thebraces.
For example, to define the names D and E, put the following definitions before the first %% delimiter in thespecification file:D [0-9]E [DEde][-+]{D}+
Then, use these names in the rules section of the specification file to make the rules shorter:{D}+ printf("integer");{D}+"."{D}*({E})? |{D}*"."{D}+({E})? |{D}+{E} printf("real");
You can also include the following items in the definitions section:
v Character set table
v List of start conditions
v Changes to size of arrays to accommodate larger source programs
lex LibraryThe lex library contains the following subroutines:
main() Invokes the lexical analyzer by calling the yylex subroutine.yywrap() Returns the value 1 when the end of input occurs.yymore() Appends the next matched string to the current value of the yytext array rather than
replacing the contents of the yytext array.yyless(int n) Retains n initial characters in the yytext array and returns the remaining characters to the
input stream.yyreject() Allows the lexical analyzer to match multiple rules for the same input string. (The yyreject
subroutine is called when the special action REJECT is used.)
Chapter 12. lex and yacc Program Information 297

Some of the lex subroutines can be substituted by user-supplied routines. For example, the lex commandsupports user-supplied versions of the main and yywrap subroutines. The library versions of theseroutines, provided as a base, are as follows:
main Subroutine#include <stdio.h>#include <locale.h>main() {
setlocale(LC_ALL, "");yylex();exit(0);
}
yywrap Subroutineyywrap() {
return(1);}
The yymore, yyless, and yyreject subroutines are available only through the lex library. However, thesesubroutines are required only when used in lex command actions.
Actions Taken by the Lexical Analyzer
When the lexical analyzer matches one of the extended regular expressions in the rules section of thespecification file, it executes the action that corresponds to the extended regular expression. Withoutsufficient rules to match all strings in the input stream, the lexical analyzer copies the input to standardoutput. Therefore, do not create a rule that only copies the input to the output. The default output can helpfind gaps in the rules.
When using the lex command to process input for a parser that the yacc command produces, providerules to match all input strings. Those rules must generate output that the yacc command can interpret.
Null ActionTo ignore the input associated with an extended regular expression, use a ; (C language null statement) asan action. The following example ignores the three spacing characters (blank, tab, and new lline):[ \t\n] ;
Same As Next ActionTo avoid repeatedly writing the same action, use the | (pipe symbol). This character indicates that theaction for this rule is the same as the action for the next rule. For instance, the previous example thatignores blank, tab, and new line characters can also be written as follows:" " |"\t" |"\n" ;
The quotation marks that surround \n and \t are not required.
Printing a Matched StringTo determine what text matched an expression in the rules section of the specification file, you can includea C language printf subroutine call as one of the actions for that expression. When the lexical analyzerfinds a match in the input stream, the program puts the matched string into the external character (char)and wide character (wchar_t) arrays, called yytext and yywtext, respectively. For example, you can usethe following rule to print the matched string:[a-z]+ printf("%s",yytext);
298 AIX 5L Version 5.3 General Programming Concepts: Writing and Debugging Programs

The C language printf subroutine accepts a format argument and data to be printed. In this example, thearguments to the printf subroutine have the following meanings:
%s A symbol that converts the data to type string before printing%S A symbol that converts the data to wide character string (wchar_t) before printingyytext The name of the array containing the data to be printedyywtext The name of the array containing the multibyte type (wchar_t) data to be printed
The lex command defines ECHO; as a special action to print the contents of yytext. For example, thefollowing two rules are equivalent:[a-z]+ ECHO;[a-z]+ printf("%s",yytext);
You can change the representation of yytext by using either %array or %pointer in the definitions sectionof the lex specification file, as follows:
%array Defines yytext as a null-terminated character array. This is the default action.%pointer Defines yytext as a pointer to a null-terminated character string.
Finding the Length of a Matched StringTo find the number of characters that the lexical analyzer matched for a particular extended regularexpression, use the yyleng or the yywleng external variables.
yyleng Tracks the number of bytes that are matched.yywleng Tracks the number of wide characters in the matched string. Multibyte characters have a length greater
than 1.
To count both the number of words and the number of characters in words in the input, use the followingaction:[a-zA-Z]+ {words++;chars += yyleng;}
This action totals the number of characters in the words matched and puts that number in chars.
The following expression finds the last character in the string matched:yytext[yyleng-1]
Matching Strings within Strings
The lex command partitions the input stream and does not search for all possible matches of eachexpression. Each character is accounted for only once. To override this choice and search for items thatmay overlap or include each other, use the REJECT action. For example, to count all instances of she andhe, including the instances of he that are included in she, use the following action:she {s++; REJECT;}he {h++}\n |. ;
After counting the occurrences of she, the lex command rejects the input string and then counts theoccurrences of he. Because he does not include she, a REJECT action is not necessary on he.
Chapter 12. lex and yacc Program Information 299

Adding Results to the yytext ArrayTypically, the next string from the input stream overwrites the current entry in the yytext array. If you usethe yymore subroutine, the next string from the input stream is added to the end of the current entry in theyytext array.
For example, the following lexical analyzer looks for strings:%s instring%%<INITIAL>\" { /* start of string */
BEGIN instring;yymore();}
<instring>\" { /* end of string */printf("matched %s\n", yytext);BEGIN INITIAL;}
<instring>. {yymore();}
<instring>\n {printf("Error, new line in string\n");BEGIN INITIAL;}
Even though a string may be recognized by matching several rules, repeated calls to the yymoresubroutine ensure that the yytext array will contain the entire string.
Returning Characters to the Input StreamTo return characters to the input stream, use the following call:yyless(n)
where n is the number of characters of the current string to keep. Characters in the string beyond thisnumber are returned to the input stream. The yyless subroutine provides the same type of look-aheadfunction that the / (slash) operator uses, but it allows more control over its usage.
Use the yyless subroutine to process text more than once. For example, when parsing a C languageprogram, an expression such as x=-a is difficult to understand. Does it mean x is equal to minus a, or is itan older representation of x -= a, which means decrease x by the value of a? To treat this expression asx is equal to minus a, but print a warning message, use a rule such as the following:=-[a-zA-Z] {
printf("Operator (=-) ambiguous\n");yyless(yyleng-1);... action for = ...}
Input/Output SubroutinesThe lex program allows a program to use the following input/output (I/O) subroutines:
input() Returns the next input characteroutput(c) Writes the character c on the outputunput(c) Pushes the character c back onto the input stream to be read later by the input subroutinewinput() Returns the next multibyte input characterwoutput(C) Writes the multibyte character C back onto the output streamwunput(C) Pushes the multibyte character C back onto the input stream to be read by the winput subroutine
The lex program provides these subroutines as macro definitions. The subroutines are coded in thelex.yy.c file. You can override them and provide other versions.
300 AIX 5L Version 5.3 General Programming Concepts: Writing and Debugging Programs
The winput, wunput, and woutput macros are defined to use the yywinput, yywunput, and yywoutputsubroutines. For compatibility, the yy subroutines subsequently use the input, unput, and outputsubroutine to read, replace, and write the necessary number of bytes in a complete multibyte character.
These subroutines define the relationship between external files and internal characters. If you change thesubroutines, change them all in the same way. These subroutines should follow these rules:
v All subroutines must use the same character set.
v The input subroutine must return a value of 0 to indicate end of file.
v Do not change the relationship of the unput subroutine to the input subroutine or the look-aheadfunctions will not work.
The lex.yy.c file allows the lexical analyzer to back up a maximum of 200 characters.
To read a file containing nulls, create a different version of the input subroutine. In the normal version ofthe input subroutine, the returned value of 0 (from the null characters) indicates the end of file and endsthe input.
Character SetThe lexical analyzers that the lex command generates process character I/O through the input, output,and unput subroutines. Therefore, to return values in the yytext subroutine, the lex command uses thecharacter representation that these subroutines use. Internally, however, the lex command representseach character with a small integer. When using the standard library, this integer is the value of the bitpattern the computer uses to represent the character. Normally, the letter a is represented in the sameform as the character constant a. If you change this interpretation with different I/O subroutines, put atranslation table in the definitions section of the specification file. The translation table begins and endswith lines that contain only the following entries:%T
The translation table contains additional lines that indicate the value associated with each character. Forexample:%T{integer} {character string}{integer} {character string}{integer} {character string}%T
End-of-File ProcessingWhen the lexical analyzer reaches the end of a file, it calls the yywrap library subroutine, which returns avalue of 1 to indicate to the lexical analyzer that it should continue with normal wrap-up at the end of input.
However, if the lexical analyzer receives input from more than one source, change the yywrap subroutine.The new function must get the new input and return a value of 0 to the lexical analyzer. A return value of 0indicates that the program should continue processing.
You can also include code to print summary reports and tables when the lexical analyzer ends in a newversion of the yywrap subroutine. The yywrap subroutine is the only way to force the yylex subroutine torecognize the end of input.
lex Program Start ConditionsA rule may be associated with any start condition. However, the lex program recognizes the rule onlywhen in that associated start condition. You can change the current start condition at any time.
Chapter 12. lex and yacc Program Information 301

Define start conditions in the definitions section of the specification file by using a line in the followingform:%Start name1 name2
where name1 and name2 define names that represent conditions. There is no limit to the number ofconditions, and they can appear in any order. You can also shorten the word Start to s or S.
When using a start condition in the rules section of the specification file, enclose the name of the startcondition in <> (less than, greater than) symbols at the beginning of the rule. The following exampledefines a rule, expression, that the lex program recognizes only when the lex program is in start conditionname1:<name1> expression
To put the lex program in a particular start condition, execute the action statement in the action part of arule; for instance, BEGIN in the following line:BEGIN name1;
This statement changes the start condition to name1.
To resume the normal state, enter:BEGIN 0;
orBEGIN INITIAL;
where INITIAL is defined to be 0 by the lex program. BEGIN 0; resets the lex program to its initialcondition.
The lex program also supports exclusive start conditions specified with %x (percent sign, lowercase x) or%X (percent sign, uppercase X) operator followed by a list of exclusive start names in the same format asregular start conditions. Exclusive start conditions differ from regular start conditions in that rules that donot begin with a start condition are not active when the lexical analyzer is in an exclusive start state. Forexample:%s one%x two%%abc {printf("matched ");ECHO;BEGIN one;}<one>def printf("matched ");ECHO;BEGIN two;}<two>ghi {printf("matched ");ECHO;BEGIN INITIAL;}
In start state one in the preceding example, both abc and def can be matched. In start state two, only ghican be matched.
Creating a Parser with the yacc ProgramThe yacc program creates parsers that define and enforce structure for character input to a computerprogram. To use this program, you must supply the following inputs:
grammar file A source file that contains the specifications for the language to recognize. This file alsocontains the main, yyerror, and yylex subroutines. You must supply these subroutines.
main A C language subroutine that, as a minimum, contains a call to the yyparse subroutinegenerated by the yacc program. A limited form of this subroutine is available in the yacclibrary.
yyerror A C language subroutine to handle errors that can occur during parser operation. A limitedform of this subroutine is available in the yacc library.
302 AIX 5L Version 5.3 General Programming Concepts: Writing and Debugging Programs
yylex A C language subroutine to perform lexical analysis on the input stream and pass tokens tothe parser. You can use the lex command to generate this lexical analyzer subroutine.
When the yacc command gets a specification, it generates a file of C language functions called y.tab.c.When compiled using the cc command, these functions form the yyparse subroutine and return aninteger. When called, the yyparse subroutine calls the yylex subroutine to get input tokens. The yylexsubroutine continues providing input until either the parser detects an error or the yylex subroutine returnsan end-marker token to indicate the end of operation. If an error occurs and the yyparse subroutinecannot recover, it returns a value of 1 to the main subroutine. If it finds the end-marker token, the yyparsesubroutine returns a value of 0 to the main subroutine.
The yacc Grammar FileTo use the yacc command to generate a parser, provide it with a grammar file that describes the inputdata stream and what the parser is to do with the data. The grammar file includes rules describing theinput structure, code to be invoked when these rules are recognized, and a subroutine to do the basicinput.
The yacc command uses the information in the grammar file to generate a parser that controls the inputprocess. This parser calls an input subroutine (the lexical analyzer) to pick up the basic items (calledtokens) from the input stream. A token is a symbol or name that tells the parser which pattern is beingsent to it by the input subroutine. A nonterminal symbol is the structure that the parser recognizes. Theparser organizes these tokens according to the structure rules in the grammar file. The structure rules arecalled grammar rules. When the parser recognizes one of these rules, it executes the user code suppliedfor that rule. The user code is called an action. Actions return values and use the values returned by otheractions.
Use the C programming language to write the action code and other subroutines. The yacc commanduses many of the C language syntax conventions for the grammar file.
main and yyerror SubroutinesYou must provide the main and yyerror subroutines for the parser. To ease the initial effort of using theyacc command, the yacc library contains simple versions of the main and yyerror subroutines. Includethese subroutines by using the -ly argument to the ld command (or to the cc command). The source codefor the main library program is as follows:#include <locale.h>main(){
setlocale(LC_ALL, "");yyparse();
}
The source code for the yyerror library program is as follows:#include <stdio.h>yyerror(s)
char *s;{
fprintf( stderr, "%s\n" ,s);}
The argument to the yyerror subroutine is a string containing an error message, usually the string syntaxerror.
Chapter 12. lex and yacc Program Information 303

Because these programs are limited, provide more function in these subroutines. For example, keep trackof the input line number and print it along with the message when a syntax error is detected. You may alsowant to use the value in the external integer variable yychar. This variable contains the look-ahead tokennumber at the time the error was detected.
yylex SubroutineThe input subroutine that you supply to the grammar file must be able to do the following:
v Read the input stream.
v Recognize basic patterns in the input stream.
v Pass the patterns to the parser, along with tokens that define the pattern to the parser.
For example, the input subroutine separates an input stream into the tokens of WORD, NUMBER, andPUNCTUATION, and it receives the following input:I have 9 turkeys.
The program could choose to pass the following strings and tokens to the parser:
String TokenI WORDhave WORD9 NUMBERturkeys WORD. PUNCTUATION
The parser must contain definitions for the tokens passed to it by the input subroutine. Using the -d optionfor the yacc command, it generates a list of tokens in a file called y.tab.h. This list is a set of #definestatements that allow the lexical analyzer (yylex) to use the same tokens as the parser.
Note: To avoid conflict with the parser, do not use subroutine names that begin with the letters yy.
You can use the lex command to generate the input subroutine, or you can write the routine in the Clanguage.
Using the yacc Grammar FileA yacc grammar file consists of the following sections:
v Declarations
v Rules
v Programs
Two adjacent %% (percent sign, percent sign) separate each section of the grammar file. To make the fileeasier to read, put the %% on a line by themselves. A complete grammar file looks like the following:declarations%%rules%%programs
The declarations section may be empty. If you omit the programs section, omit the second set of %%.Therefore, the smallest yacc grammar file is as follows:%%rules
304 AIX 5L Version 5.3 General Programming Concepts: Writing and Debugging Programs

The yacc command ignores blanks, tabs, and new line characters in the grammar file. Therefore, usethese characters to make the grammar file easier to read. Do not, however, use blanks, tabs or new linecharacters in names or reserved symbols.
Using CommentsTo explain what the program is doing, put comments in the grammar file. You can put comments anywherein the grammar file that you can put a name. However, to make the file easier to read, put the commentson lines by themselves at the beginning of functional blocks of rules. A comment in a yacc grammar filelooks the same as a comment in a C language program. The comment is enclosed between /*(backslash, asterisk) and */ (asterisk, backslash). For example:/* This is a comment on a line by itself. */
Using Literal StringsA literal string is one or more characters enclosed in ’’ (single quotes). As in the C language, the \(backslash) is an escape character within literals, and all the C language escape codes are recognized.Thus, the yacc command accepts the symbols in the following table:
Symbol Definition’\a’ Alert’\b’ Backspace’\f’ Form-feed’\n’ New line’\r’ Return’\t’ Tab’\v’ Vertical tab’\’’ Single quote (’)’\″’ Double quote (″)’\?’ Question mark (?)’\\’ Backslash (\)’\Digits’ The character whose encoding is represented by the one-, two-, or three-digit octal integer
specified by the Digits string.’\xDigits’ The character whose encoding is represented by the sequence of hexadecimal characters
specified by the Digits string.
Because its ASCII code is zero, the null character (\0 or 0) must not be used in grammar rules. The yylexsubroutine returns 0 if the null character is used, signifying end of input.
Formatting the Grammar FileTo help make the yacc grammar file more readable, use the following guidelines:
v Use uppercase letters for token names, and use lowercase letters for nonterminal symbol names.
v Put grammar rules and actions on separate lines to allow changing either one without changing theother.
v Put all rules with the same left side together. Enter the left side once, and use the vertical bar to beginthe rest of the rules for that left side.
v For each set of rules with the same left side, enter the semicolon once on a line by itself following thelast rule for that left side. You can then add new rules easily.
v Indent rule bodies by two tab stops and action bodies by three tab stops.
Errors in the Grammar FileThe yacc command cannot produce a parser for all sets of grammar specifications. If the grammar rulescontradict themselves or require matching techniques that are different from what the yacc commandprovides, the yacc command will not produce a parser. In most cases, the yacc command provides
Chapter 12. lex and yacc Program Information 305

messages to indicate the errors. To correct these errors, redesign the rules in the grammar file, or providea lexical analyzer (input program to the parser) to recognize the patterns that the yacc command cannot.
yacc Grammar File DeclarationsThe declarations section of the yacc grammar file contains the following:
v Declarations for any variables or constants used in other parts of the grammar file
v #include statements to use other files as part of this file (used for library header files)
v Statements that define processing conditions for the generated parser
You can keep semantic information associated with the tokens that are currently on the parse stack in auser-defined C language union, if the members of the union are associated with the various names in thegrammar file.
A declaration for a variable or constant uses the following syntax of the C programming language:TypeSpecifier Declarator ;
TypeSpecifier is a data type keyword and Declarator is the name of the variable or constant. Names canbe any length and consist of letters, dots, underscores, and digits. A name cannot begin with a digit.Uppercase and lowercase letters are distinct.
Terminal (or token) names can be declared using the %token declaration, and nonterminal names can bedeclared using the %type declaration. The %type declaration is not required for nonterminal names.Nonterminal names are defined automatically if they appear on the left side of at least one rule. Withoutdeclaring a name in the declarations section, you can use that name only as a nonterminal symbol. The#include statements are identical to C language syntax and perform the same function.
The yacc program has a set of keywords that define processing conditions for the generated parser. Eachof the keywords begin with a % (percent sign), which is followed by a token or nonterminal name. Thesekeywords are as follows:
%left Identifies tokens that are left-associative with other tokens.
%nonassoc Identifies tokens that are not associative with other tokens.
%right Identifies tokens that are right-associative with other tokens.
%start Identifies a nonterminal name for the start symbol.
%token Identifies the token names that the yacc command accepts. Declares all token names in thedeclarations section.
%type Identifies the type of nonterminals. Type-checking is performed when this construct is present.
%union Identifies the yacc value stack as the union of the various type of values desired. By default, thevalues returned are integers. The effect of this construct is to provide the declaration of YYSTYPEdirectly from the input.
306 AIX 5L Version 5.3 General Programming Concepts: Writing and Debugging Programs

%{Code%}
Copies the specified Code into the code file. This construct can be used to add C languagedeclarations and definitions to the declarations section.Note: The %{ (percent sign, left bracket) and %} (percent sign, right bracket) symbols must appearon lines by themselves.
The %token, %left, %right, and %nonassoc keywords optionally support the name of a C union member (asdefined by %union) called a <Tag> (literal angle brackets surrounding a union member name). The %typekeyword requires a <Tag>. The use of <Tag> specifies that the tokens named on the line are to be of thesame C type as the union member referenced by <Tag>. For example, the following declaration declaresthe Name parameter to be a token:%token [<Tag>] Name [Number] [Name [Number]]...
If <Tag> is present, the C type for all tokens on this line are declared to be of the type referenced by<Tag>. If a positive integer, Number, follows the Name parameter, that value is assigned to the token.
All of the tokens on the same line have the same precedence level and associativity. The lines appear inthe file in order of increasing precedence or binding strength. For example, the following describes theprecedence and associativity of the four arithmetic operators:%left '+' '-'%left '*' '/'
The + (plus sign) and - (minus sign) are left associative and have lower precedence than * (asterisk) and/ (slash), which are also left associative.
Defining Global VariablesTo define variables to be used by some or all actions, as well as by the lexical analyzer, enclose thedeclarations for those variables between %{ (percent sign, left bracket) and %} (percent sign, right bracket)symbols. Declarations enclosed in these symbols are called global variables. For example, to make thevar variable available to all parts of the complete program, use the following entry in the declarationssection of the grammar file:%{int var = 0;%}
Start ConditionsThe parser recognizes a special symbol called the start symbol. The start symbol is the name of the rulein the rules section of the grammar file that describes the most general structure of the language to beparsed. Because it is the most general structure, the parser starts in its top-down analysis of the inputstream at this point. Declare the start symbol in the declarations section using the %start keyword. If youdo not declare the name of the start symbol, the parser uses the name of the first grammar rule in thegrammar file.
For example, when parsing a C language function, the most general structure for the parser to recognizeis as follows:main(){
code_segment}
The start symbol points to the rule that describes this structure. All remaining rules in the file describeways to identify lower-level structures within the function.
Chapter 12. lex and yacc Program Information 307

Token NumbersToken numbers are nonnegative integers that represent the names of tokens. If the lexical analyzer passesthe token number to the parser, instead of the actual token name, both programs must agree on thenumbers assigned to the tokens.
You can assign numbers to the tokens used in the yacc grammar file. If you do not assign numbers to thetokens, the yacc grammar file assigns numbers using the following rules:
v A literal character is the numerical value of the character in the ASCII character set.
v Other names are assigned token numbers starting at 257.
Note: Do not assign a token number of 0. This number is assigned to the endmarker token. You cannotredefine it. For more information on endmarker tokens, see “End-of-Input Marker” on page 309.
To assign a number to a token (including literals) in the declarations section of the grammar file, put apositive integer (not 0) immediately following the token name in the %token line. This integer is the tokennumber of the name or literal. Each token number must be unique. All lexical analyzers used with the yacccommand must return a 0 or a negative value for a token when they reach the end of their input.
yacc RulesThe rules section of the grammar file contains one or more grammar rules. Each rule describes a structureand gives it a name. A grammar rule has the following form:A : BODY;
where A is a nonterminal name, and BODY is a sequence of 0 or more names, literals, and semantic actionsthat can optionally be followed by precedence rules. Only the names and literals are required to form thegrammar. Semantic actions and precedence rules are optional. The colon and the semicolon are requiredyacc punctuation.
Semantic actions allow you to associate actions to be performed each time that a rule is recognized in theinput process. An action can be an arbitrary C statement, and as such, perform input or output, callsubprograms, or alter external variables. Actions can also refer to the actions of the parser; for example,shift and reduce.
Precedence rules are defined by the %prec keyword and change the precedence level associated with aparticular grammar rule. The reserved symbol %prec can appear immediately after the body of thegrammar rule and can be followed by a token name or a literal. The construct causes the precedence ofthe grammar rule to become that of the token name or literal.
Repeating Nonterminal NamesIf several grammar rules have the same nonterminal name, use the | (pipe symbol) to avoid rewriting theleft side. In addition, use the ; (semicolon) only at the end of all rules joined by pipe symbols. Forexample, the following grammar rules:A : B C D ;A : E F ;A : G ;
can be given to the yacc command by using the pipe symbol as follows:A : B C D
| E F| G;
308 AIX 5L Version 5.3 General Programming Concepts: Writing and Debugging Programs

Using Recursion in a Grammar FileRecursion is the process of using a function to define itself. In language definitions, these rules normallytake the following form:rule : EndCase
| rule EndCase
Therefore, the simplest case of the rule is the EndCase, but rule can also consist of more than oneoccurrence of EndCase. The entry in the second line that uses rule in the definition of rule is therecursion. The parser cycles through the input until the stream is reduced to the final EndCase.
When using recursion in a rule, always put the call to the name of the rule as the leftmost entry in the rule(as it is in the preceding example). If the call to the name of the rule occurs later in the line, such as in thefollowing example, the parser may run out of internal stack space and stop.rule : EndCase
| EndCase rule
The following example defines the line rule as one or more combinations of a string followed by a newlinecharacter (\n):lines : line
| lines line;
line : string '\n';
Empty StringTo indicate a nonterminal symbol that matches the empty string, use a ; (semicolon) by itself in the bodyof the rule. To define a symbol empty that matches the empty string, use a rule similar to the following rule:empty : ;
| x;
ORempty :
| x;
End-of-Input MarkerWhen the lexical analyzer reaches the end of the input stream, it sends an end-of-input marker to theparser. This marker is a special token called endmarker, which has a token value of 0. When the parserreceives an end-of-input marker, it checks to see that it has assigned all input to defined grammar rulesand that the processed input forms a complete unit (as defined in the yacc grammar file). If the input is acomplete unit, the parser stops. If the input is not a complete unit, the parser signals an error and stops.
The lexical analyzer must send the end-of-input marker at the appropriate time, such as the end of a file,or the end of a record.
yacc ActionsWith each grammar rule, you can specify actions to be performed each time the parser recognizes the rulein the input stream. An action is a C language statement that does input and output, calls subprograms,and alters external vectors and variables. Actions return values and obtain the values returned by previousactions. The lexical analyzer can also return values for tokens.
Specify an action in the grammar file with one or more statements enclosed in {} (braces). The followingexamples are grammar rules with actions:
Chapter 12. lex and yacc Program Information 309

A : '('B')'{
hello(1, "abc" );}
ANDXXX : YYY ZZZ
{printf("a message\n");flag = 25;}
Passing Values between ActionsTo get values generated by other actions, an action can use the yacc parameter keywords that begin witha dollar sign ($1, $2, ... ). These keywords refer to the values returned by the components of the rightside of a rule, reading from left to right. For example, if the rule is:A : B C D ;
then $1 has the value returned by the rule that recognized B, $2 has the value returned by the rule thatrecognized C, and $3 the value returned by the rule that recognized D.
To return a value, the action sets the pseudo-variable $$ to some value. For example, the following actionreturns a value of 1:{ $$ = 1;}
By default, the value of a rule is the value of the first element in it ($1). Therefore, you do not need toprovide an action for rules that have the following form:A : B ;
The following additional yacc parameter keywords beginning with a $ (dollar sign) allow for type-checking:
v $<Tag>$
v $<Tag>Number
$<Tag>Number imposes on the reference the type of the union member referenced by <Tag>. This adds.tag to the reference so that the union member identified by Tag is accessed. This construct is equivalentto specifying $$.Tag or $1.Tag. You can use this construct when you use actions in the middle of ruleswhere the return type cannot be specified through a %type declaration. If a %type has been declared for anonterminal name, do not use the <Tag> construct; the union reference will be done automatically.
Putting Actions in the Middle of RulesTo get control of the parsing process before a rule is completed, write an action in the middle of a rule. Ifthis rule returns a value through the $ keywords, actions that follow this rule can use that value. This rulecan also use values returned by actions that precede it. Therefore, the following rule sets x to 1 and y tothe value returned by C. The value of rule A is the value returned by B, following the default rule.A : B
{$$ =1;
}C
{x = $2;y = $3;
};
310 AIX 5L Version 5.3 General Programming Concepts: Writing and Debugging Programs
Internally, the yacc command creates a new nonterminal symbol name for the action that occurs in themiddle. It also creates a new rule matching this name to the empty string. Therefore, the yacc commandtreats the preceding program as if it were written in the following form:$ACT : /* empty */
{$$ = 1;
};
A : B $ACT C{
x = $2;y = $3;
};
where $ACT is an empty action.
yacc Program Error HandlingWhen the parser reads an input stream, that input stream might not match the rules in the grammar file.The parser detects the problem as early as possible. If there is an error-handling subroutine in thegrammar file, the parser can allow for entering the data again, ignoring the bad data, or initiating a cleanupand recovery action. When the parser finds an error, for example, it may need to reclaim parse treestorage, delete or alter symbol table entries, and set switches to avoid generating further output.
When an error occurs, the parser stops unless you provide error-handling subroutines. To continueprocessing the input to find more errors, restart the parser at a point in the input stream where the parsercan try to recognize more input. One way to restart the parser when an error occurs is to discard some ofthe tokens following the error. Then try to restart the parser at that point in the input stream.
The yacc command uses a special token name, error, for error handling. Put this token in the rules file atplaces that an input error might occur so that you can provide a recovery subroutine. If an input erroroccurs in this position, the parser executes the action for the error token, rather than the normal action.
The following macros can be placed in yacc actions to assist in error handling:
YYERROR Causes the parser to initiate error handlingYYABORT Causes the parser to return with a value of 1YYACCEPT Causes the parser to return with a value of 0YYRECOVERING() Returns a value of 1 if a syntax error has been detected and the parser has not yet fully
recovered
To prevent a single error from producing many error messages, the parser remains in error state until itprocesses three tokens following an error. If another error occurs while the parser is in the error state, theparser discards the input token and does not produce a message.
For example, a rule of the following form:stat : error ';'
tells the parser that when there is an error, it should ignore the token and all following tokens until it findsthe next semicolon. All tokens after the error and before the next semicolon are discarded. After finding thesemicolon, the parser reduces this rule and performs any cleanup action associated with it.
Providing for Error CorrectionYou can also allow the person entering the input stream in an interactive environment to correct any inputerrors by entering a line in the data stream again. The following example shows one way to do this.
Chapter 12. lex and yacc Program Information 311

input : error '\n'{
printf(" Reenter last line: " );}input
{$$ = $4;
};
However, in this example, the parser stays in the error state for three input tokens following the error. If thecorrected line contains an error in the first three tokens, the parser deletes the tokens and does notproduce a message. To allow for this condition, use the following yacc statement:yyerrok;
When the parser finds this statement, it leaves the error state and begins processing normally. Theerror-recovery example then becomes:input : error '\n'
{yyerrok;printf(" Reenter last line: " );}input
{$$ = $4;
};
Clearing the Look-Ahead TokenThe look-ahead token is the next token that the parser examines. When an error occurs, the look-aheadtoken becomes the token at which the error was detected. However, if the error recovery action includescode to find the correct place to start processing again, that code must also change the look-ahead token.To clear the look-ahead token, include the following statement in the error-recovery action:yyclearin ;
Parser Operation Generated by the yacc CommandThe yacc command converts the grammar file to a C language program. That program, when compiledand executed, parses the input according to the grammar specification provided.
The parser is a finite state machine with a stack. The parser can read and remember the look-aheadtoken. The current state is always the state at the top of the stack. The states of the finite state machineare represented by small integers. Initially, the machine is in state 0, the stack contains only 0, and nolook-ahead token has been read.
The machine can perform one of the following actions:
shift State The parser pushes the current state onto the stack, makes State the current state, and clearsthe look-ahead token.
reduce Rule When the parser finds a string defined by Rule (a rule number) in the input stream, the parserreplaces that string with Rule in the output stream.
accept The parser looks at all input, matches it to the grammar specification, and recognizes the inputas satisfying the highest-level structure (defined by the start symbol). This action appears onlywhen the look-ahead token is the endmarker and indicates that the parser has successfullydone its job.
312 AIX 5L Version 5.3 General Programming Concepts: Writing and Debugging Programs

error The parser cannot continue processing the input stream and still successfully match it with anyrule defined in the grammar specification. The input tokens that the parser looked at, togetherwith the look-ahead token, cannot be followed by anything that would result in valid input. Theparser reports an error and attempts to recover the situation and resume parsing.
The parser performs the following actions during one process step:
1. Based on its current state, the parser decides whether it needs a look-ahead token to determine theaction to be taken. If the parser needs a look-ahead token and does not have one, it calls the yylexsubroutine to obtain the next token.
2. Using the current state, and the look-ahead token if needed, the parser decides on its next action andcarries it out. As a result, states may be pushed onto or popped off the stack, and the look-aheadtoken may be processed or left alone.
Shift ActionThe shift action is the most common action that the parser takes. Whenever the parser does a shift, alook-ahead token always exists. For example, consider the following grammar specification rule:IF shift 34
If the parser is in the state that contains this rule and the look-ahead token is IF, the parser:
1. Pushes the current state down on the stack.
2. Makes state 34 the current state (puts it at the top of the stack).
3. Clears the look-ahead token.
Reduce ActionThe reduce action keeps the stack from growing too large. The parser uses reduce actions after matchingthe right side of a rule with the input stream. The parser is then ready to replace the characters in theinput stream with the left side of the rule. The parser may have to use the look-ahead token to decide ifthe pattern is a complete match.
Reduce actions are associated with individual grammar rules. Because grammar rules also have smallinteger numbers, it is easy to confuse the meanings of the numbers in the two actions, shift and reduce.For example, the following action refers to grammar rule 18:. reduce 18
The following action refers to state 34:IF shift 34
For example, to reduce the following rule, the parser pops off the top three states from the stack:A : x y z ;
The number of states popped equals the number of symbols on the right side of the rule. These states arethe ones put on the stack while recognizing x, y, and z. After popping these states, a state is uncovered,which is the state that the parser was in before beginning to process the rule; that is, the state that neededto recognize rule A to satisfy its rule. Using this uncovered state and the symbol on the left side of the rule,the parser performs an action called goto, which is similar to a shift of A. A new state is obtained, pushedonto the stack, and parsing continues.
The goto action is different from an ordinary shift of a token. The look-ahead token is cleared by a shiftbut is not affected by a goto action. When the three states are popped, the uncovered state contains anentry such as the following:A goto 20
Chapter 12. lex and yacc Program Information 313

This entry causes state 20 to be pushed onto the stack and become the current state.
The reduce action is also important in the treatment of user-supplied actions and values. When a rule isreduced, the parser executes the code that you included in the rule before adjusting the stack. Anotherstack running in parallel with the stack holding the states holds the values returned from the lexicalanalyzer and the actions. When a shift takes place, the yylval external variable is copied onto the stackholding the values. After executing the code that you provide, the parser performs the reduction. When theparser performs the goto action, it copies the yylval external variable onto the value stack. The yacckeywords that begin with $ refer to the value stack.
Using Ambiguous Rules in the yacc ProgramA set of grammar rules is ambiguous if any possible input string can be structured in two or more differentways. For example, the following grammar rule states a rule that forms an arithmetic expression by puttingtwo other expressions together with a minus sign between them.expr : expr '-' expr
Unfortunately, this grammar rule does not specify how to structure all complex inputs. For example, if theinput is:expr - expr - expr
a program could structure this input as either left associative:( expr - expr ) - expr
or as right associative:expr - ( expr - expr )
and produce different results.
Parser ConflictsWhen the parser tries to handle an ambiguous rule, confusion can occur over which of its four actions toperform when processing the input. The following major types of conflict develop:
shift/reduce conflict A rule can be evaluated correctly using either a shift action or a reduceaction, but the result is different.
reduce/reduce conflict A rule can be evaluated correctly using one of two different reduceactions, producing two different actions.
A shift/shift conflict is not possible. The shift/reduce and reduce/reduce conflicts result from a rule thatis not completely stated. For example, using the ambiguous rule stated in the previous section, if theparser receives the input:expr - expr - expr
after reading the first three parts, the parser has:expr - expr
which matches the right side of the preceding grammar rule. The parser can reduce the input by applyingthis rule. After applying the rule, the input becomes:expr
which is the left side of the rule. The parser then reads the final part of the input:- expr
and reduces it. This produces a left-associative interpretation.
314 AIX 5L Version 5.3 General Programming Concepts: Writing and Debugging Programs
However, the parser can also look ahead in the input stream. If, when the parser receives the first threeparts:expr - expr
it reads the input stream until it has the next two parts, it then has the following input:expr - expr - expr
Applying the rule to the rightmost three parts reduces them to expr. The parser then has the expression:expr - expr
Reducing the expression once more produces a right-associative interpretation.
Therefore, at the point where the parser has read only the first three parts, it can take either of two validactions: a shift or a reduce. If the parser has no rule to decide between the two actions, a shift/reduceconflict results.
A similar situation occurs if the parser can choose between two valid reduce actions, which is called areduce/reduce conflict.
How the Parser Responds to ConflictsWhen shift/reduce or reduce/reduce conflicts occur, the yacc command produces a parser by selectingone of the valid steps wherever it has a choice. If you do not provide a rule that makes the choice, theyacc program uses the following rules:
v In a shift/reduce conflict, choose the shift.
v In a reduce/reduce conflict, reduce by the grammar rule that can be applied at the earliest point in theinput stream.
Using actions within rules can cause conflicts if the action must be performed before the parser is surewhich rule is being recognized. In such cases, the preceding rules result in an incorrect parser. For thisreason, the yacc program reports the number of shift/reduce and reduce/reduce conflicts resolved byusing the preceding rules.
Turning on Debug Mode for a Parser Generated by the yacc CommandYou can access the debugging code either by invoking the yacc command with the -t option or compilingthe y.tab.c file with -DYYDEBUG.
For normal operation, the yydebug external integer variable is set to 0. However, if you set it to a nonzerovalue, the parser generates a description of the input tokens it receives and actions it takes for each tokenwhile parsing an input stream.
Set this variable in one of the following ways:
v Put the following C language statement in the declarations section of the yacc grammar file:int yydebug = 1;
v Use the dbx program to execute the final parser, and set the variable ON or OFF using dbxcommands.
Example Program for the lex and yacc ProgramsThis section contains example programs for the lex and yacc commands. Together, these exampleprograms create a simple, desk-calculator program that performs addition, subtraction, multiplication, anddivision operations. This calculator program also allows you to assign values to variables (each designatedby a single, lowercase letter) and then use the variables in calculations. The files that contain the examplelex and yacc programs are as follows:
Chapter 12. lex and yacc Program Information 315
File Contentcalc.lex Specifies the lex command specification file that defines the lexical analysis rules. For more
information, see “Lexical Analyzer Source Code” on page 319.calc.yacc Specifies the yacc command grammar file that defines the parsing rules, and calls the yylex
subroutine created by the lex command to provide input. For more information, see “Parser SourceCode” on page 317.
The following descriptions assume that the calc.lex and calc.yacc example programs are located in yourcurrent directory.
Compiling the Example ProgramTo create the desk calculator example program, do the following:
1. Process the yacc grammar file using the -d optional flag (which informs the yacc command to create afile that defines the tokens used in addition to the C language source code):yacc -d calc.yacc
2. Use the ls command to verify that the following files were created:
y.tab.cThe C language source file that the yacc command created for the parser
y.tab.hA header file containing define statements for the tokens used by the parser
3. Process the lex specification file:lex calc.lex
4. Use the ls command to verify that the following file was created:
lex.yy.cThe C language source file that the lex command created for the lexical analyzer
5. Compile and link the two C language source files:cc y.tab.c lex.yy.c
6. Use the ls command to verify that the following files were created:
y.tab.oThe object file for the y.tab.c source file
lex.yy.oThe object file for the lex.yy.c source file
a.out The executable program file
To run the program directly from the a.out file, type:$ a.out
OR
To move the program to a file with a more descriptive name, as in the following example, and run it, type:$ mv a.out calculate$ calculate
In either case, after you start the program, the cursor moves to the line below the $ (command prompt).Then, enter numbers and operators as you would on a calculator. When you press the Enter key, theprogram displays the result of the operation. After you assign a value to a variable, as follows, the cursormoves to the next line.m=4 <enter>_
316 AIX 5L Version 5.3 General Programming Concepts: Writing and Debugging Programs

When you use the variable in subsequent calculations, it will have the assigned value:m+5 <enter>9_
Parser Source CodeThe following example shows the contents of the calc.yacc file. This file has entries in all three sections ofa yacc grammar file: declarations, rules, and programs.%{#include <stdio.h>
int regs[26];int base;
%}
%start list
%token DIGIT LETTER
%left '|'%left '&'%left '+' '-'%left '*' '/' '%'%left UMINUS /*supplies precedence for unary minus */
%% /* beginning of rules section */
list: /*empty */|list stat '\n'|list error '\n'{
yyerrok;};
stat: expr{
printf("%d\n",$1);}|LETTER '=' expr{
regs[$1] = $3;}
;
expr: '(' expr ')'{
$$ = $2;}|expr '*' expr{
$$ = $1 * $3;}|expr '/' expr{
$$ = $1 / $3;}|
Chapter 12. lex and yacc Program Information 317

expr '%' expr{
$$ = $1 % $3;}|expr '+' expr{
$$ = $1 + $3;}|expr '-' expr{
$$ = $1 - $3;}|expr '&' expr{
$$ = $1 & $3;}|expr '|' expr{
$$ = $1 | $3;}|
'-' expr %prec UMINUS{
$$ = -$2;}|LETTER{
$$ = regs[$1];}
|number;
number: DIGIT{
$$ = $1;base = ($1==0) ? 8 : 10;
} |number DIGIT{
$$ = base * $1 + $2;};
%%main(){return(yyparse());
}
yyerror(s)char *s;{
fprintf(stderr, "%s\n",s);}
yywrap(){
return(1);}
318 AIX 5L Version 5.3 General Programming Concepts: Writing and Debugging Programs

The file contains the following sections:
v Declarations Section. This section contains entries that:
– Include standard I/O header file
– Define global variables
– Define the list rule as the place to start processing
– Define the tokens used by the parser
– Define the operators and their precedence
v Rules Section. The rules section defines the rules that parse the input stream.
v Programs Section. The programs section contains the following subroutines. Because thesesubroutines are included in this file, you do not need to use the yacc library when processing this file.
main The required main program that calls the yyparse subroutine to start the program.yyerror(s) This error-handling subroutine only prints a syntax error message.yywrap The wrap-up subroutine that returns a value of 1 when the end of input occurs.
Lexical Analyzer Source CodeThis file contains include statements for standard input and output, as well as for the y.tab.h file. If youuse the -d flag with the yacc command, the yacc program generates that file from the yacc grammar fileinformation. The y.tab.h file contains definitions for the tokens that the parser program uses. In addition,the calc.lex file contains the rules to generate these tokens from the input stream. The following are thecontents of the calc.lex file.%{
#include <stdio.h>#include "y.tab.h"int c;extern int yylval;%}%%" " ;[a-z] {
c = yytext[0];yylval = c - 'a';return(LETTER);
}[0-9] {
c = yytext[0];yylval = c - '0';return(DIGIT);
}[^a-z0-9\b] {
c = yytext[0];return(c);
}
Related Information
Subroutine ReferencesThe printf subroutine.
Command ReferencesThe ed command in AIX 5L Version 5.3 Commands Reference, Volume 2.
The lex command in AIX 5L Version 5.3 Commands Reference, Volume 3.
Chapter 12. lex and yacc Program Information 319

The sed command in AIX 5L Version 5.3 Commands Reference, Volume 5.
The yacc command in AIX 5L Version 5.3 Commands Reference, Volume 6.
320 AIX 5L Version 5.3 General Programming Concepts: Writing and Debugging Programs

Chapter 13. make Command
This chapter provides information about simplifying the recompiling and relinking processes using themake command. It allows you to record, once only, specific relationships among files. You can then usethe make command to automatically perform all updating tasks.
In any project, you normally link programs from object files and libraries. Then, after modifying a sourcefile, you recompile some of the sources and relink the program as often as required. The make commandassists in maintaining a set of programs, usually pertaining to a particular software project, by buildingup-to-date versions of programs. The make command is most useful for medium-sized programmingprojects. It does not solve the problems of maintaining more than one source version and of describinglarge programs (see sccs command).
Using the make command to maintain programs, you can:
v Combine instructions for creating a large program in a single file.
v Define macros to use within the make command description file.
v Use shell commands to define the method of file creation, or use the make command to create many ofthe basic types of files.
v Create libraries.
The make command requires a description file, file names, specified rules to inform the make commandhow to build many standard types of files, and time stamps of all system files.
The following topics are covered in this chapter:
v “Creating a Description File”
v “Internal Rules for the make Program” on page 324
v “Defining and Using Macros in a Description File” on page 328
v “Creating a Target File with the Make Command” on page 332
v “Using the make Command with Source Code Control System (SCCS) Files” on page 332
v “Understanding makefile considerations in Source Code Control Systems (SCCS)” on page 333
v “Using the make Command with Non-Source Code Control System (SCCS) Files” on page 334
v “Understanding How the make Command Uses Environment Variables” on page 334
v “Using the make Command in Parallel Run Mode” on page 335
v “Example of a Description File” on page 335
Creating a Description File
The make command uses information from a description file, which you create, to build a file containingthe completed program, which is then called a target file. The description file informs the make commandhow to build the target file, which files are involved, and what their relationships are to the other files in theprocedure. The description file contains the following information:
v Target file name
v Parent file names that make up the target file
v Commands that create the target file from the parent files
v Definitions of macros in the description file
v User-specified rules for building target files
© Copyright IBM Corp. 1997, 2010 321

By checking the dates of the parent files, the make command determines which files to create to get anup-to-date copy of the target file. If any parent file was changed more recently than the target file, themake command creates the files affected by the change, including the target file.
If you name the description file either makefile or Makefile and are working in the directory containing thatdescription file, type the following to update the first target file and its parent files:make
Updating occurs regardless of the number of files changed since the last time the make command createdthe target file. In most cases, the description file is easy to write and does not change often.
To keep many different description files in the same directory, name them differently. Then, enter:make -f Desc-File
where Desc-File is the name of the description file.
Format of an Entry in the make Description FileThe general form of an entry is:target1 [target2..]:[:] [parent1..][; command]...[(tab) commands]
Items inside brackets are optional. Targets and parents are file names (strings of letters, numbers, periods,and slashes). The make command recognizes wildcard characters such as * (asterisk) and ? (questionmark). Each line in the description file that contains a target file name is called a dependency line. Linesthat contain commands must begin with a tab character.
Note: The make command uses the $ (dollar sign) to designate a macro. Do not use that characterin file names of target or parent files, or in commands in the description file unless you are using apredefined make command macro.
Begin comments in the description file with a # (pound sign). The make command ignores the # and allcharacters that follow it. The make command also ignores blank lines.
Except for comment lines, you can enter lines longer than the line width of the input device. To continue aline on the next line, put a \ (backslash) at the end of the line to be continued.
Using Commands in a make Description FileA command is any string of characters except a # (pound sign) or a new-line character. A command canuse a # only if it is in quotation marks. Commands can appear either after a semicolon on a dependencyline or on lines beginning with a tab that immediately follows a dependency line.
When defining the command sequence for a particular target, specify one command sequence for eachtarget in the description file, or else separate the command sequences for special sets of dependencies.Do not do both.
To use one command sequence for every use of the target file, use a single : (colon) following the targetname on the dependency line. For example:test: dependency list1...
command list......
test: dependency list2...
322 AIX 5L Version 5.3 General Programming Concepts: Writing and Debugging Programs

defines a target name, test, with a set of parent files and a set of commands to create the file. The targetname, test, can appear in other places in the description file with another dependency list. However, thatname cannot have another command list in the description file. When one of the files that test depends onchanges, the make command runs the commands in that one command list to create the target file namedtest.
To specify more than one set of commands to create a particular target file, enter more than onedependency definition. Each dependency line must have the target name, followed by :: (two colons), adependency list, and a command list that the make command uses if any of the files in the dependencylist changes. For example:test:: dependency list1...
command list1...test:: dependency list2...
command list2...
defines two separate processes to create the target file, test . If any of the files in dependency list1changes, the make command runs command list1. If any of the files in dependency list2 changes, themake command runs command list2. To avoid conflicts, a parent file cannot appear in both dependencylist1 and dependency list2.
Note: The make command passes the commands from each command line to a new shell. Becareful when using commands that have meaning only within a single shell process; for example, cdand shell commands. The make command discards these results before running the commands onthe next line.
To group commands together, use the \ (backslash) at the end of a command line. The make commandthen continues that command line into the next line in the description file. The shell sends both of theselines to a single new shell.
Calling the make command from a Description FileTo nest calls to the make command within a make command description file, include the $(MAKE) macroin one of the command lines in the file.
If the -n flag is set when the $(MAKE) macro is found, the new copy of the make command does notexecute any of its commands, except another $(MAKE) macro. To use this characteristic to test a set ofdescription files that describe a program, enter:make -n
The make command does not perform any of the program operations. However, it does write all of thesteps needed to build the program, including output from lower-level calls to the make command.
Preventing the make Command from Writing CommandsTo prevent the make command from writing the commands while it runs, do any of the following:
v Use the -s flag on the command line when using the make command.
v Put the target name .SILENT on a dependency line by itself in the description file. Because .SILENT isnot an actual target file, it is called a fake target. If .SILENT has prerequisites, the make commanddoes not display any of the commands associated with them.
v Put an @ (at sign) in the first character position of each line in the description file that the makecommand should not write.
Preventing the make Command from Stopping on ErrorsThe make command normally stops if any program returns a nonzero error code. Some programs returnstatus that has no meaning.
Chapter 13. make Command 323

To prevent the make command from stopping on errors, do any of the following:
v Use the -i flag with the make command on the command line.
v Put the fake target name .IGNORE on a dependency line by itself in the description file. Because.IGNORE is not a real target file, it is called a fake target. If .IGNORE has prerequisites, the makecommand ignores errors associated with them.
v Put a - (minus sign) in the first character position of each line in the description file where the makecommand should not stop on errors.
Example of a Description FileFor example, a program named prog is made by compiling and linking three C language files x.c, y.c, andz.c. The x.c and y.c files share some declarations in a file named defs. The z.c file does not share thosedeclarations. The following is an example of a description file, which creates the prog program:# Make prog from 3 object filesprog: x.o y.o z.o# Use the cc program to make prog
cc x.o y.o z.o -o prog# Make x.o from 2 other filesx.o: x.c defs# Use the cc program to make x.o
cc -c x.c# Make y.o from 2 other filesy.o: y.c defs# Use the cc program to make y.o
cc -c y.c# Make z.o from z.cz.o: z.c# Use the cc program to make z.o
cc -c z.c
If this file is called makefile, enter the make command to update the prog program after making changesto any of the source files: x.c, y.c, z.c, or defs.
Simplifying the Description FileTo make this file simpler, use the internal rules of the make program. Based on file-system namingconventions, the make command recognizes three .c files corresponding to the needed .o files. Thiscommand can also generate an object from a source file, by issuing a cc -c command.
Based on these internal rules, the description file becomes:# Make prog from 3 object filesprog: x.o y.o z.o# Use the cc program to make prog
cc x.o y.o z.o -o prog# Use the file defs and the .c file# when making x.o and y.ox.o y.o: defs
Internal Rules for the make Program
The internal rules for the make command are located in a file that looks like a description file. When the -rflag is specified, the make command does not use the internal rules file. You must supply the rules tocreate the files in your description file. The internal-rules file contains a list of file-name suffixes (such as.o or .a) that the make command understands, and rules that inform the make command how to create afile with one suffix from a file with another suffix. If you do not change the list, the make commandunderstands the following suffixes:
.a Archive library
.C C++ source file
324 AIX 5L Version 5.3 General Programming Concepts: Writing and Debugging Programs

.C\~ Source Code Control System (SCCS) file containing C++ source file
.c C source file
.c~ SCCS file containing C source file
.f FORTRAN source file
.f~ SCCS file containing FORTRAN source file
.h C language header file.
.h~ SCCS file containing C language header file
.l lex source grammar
.l~ SCCS file containing lex source grammar.
.o Object file.
.s Assembler source file.
.s~ SCCS file containing assembler source file.
.sh Shell-command source file.
.sh~ SCCS file containing shell-command source file.
.y yacc-c source grammar.
.y~ SCCS file containing yacc-c source grammar.
The list of suffixes is similar to a dependency list in a description file and follows the fake target name of.SUFFIXES. Because the make command looks at the suffixes list in left-to-right order, the order of theentries is important.
The make command uses the first entry in the list that satisfies the following equirements:
v The entry matches input and output suffix requirements for the current target and dependency files.
v The entry has a rule assigned to it.
The make command creates the name of the rule from the two suffixes of the files that the rule defines.For example, the name of the rule to transform a .c file to an .o file is .c.o.
To add more suffixes to the list, add an entry for the fake target name of .SUFFIXES in the description file.For a .SUFFIXES line without any suffixes following the target name in the description file, the makecommand erases the current list. To change the order of the names in the list, erase the current list andthen assign a new set of values to .SUFFIXES.
Example of Default Rules FileThe following example shows a portion of the default rules file:# Define suffixes that make knows..SUFFIXES: .o .C .C\~ .c .c~ .f .f~ .y .y~ .l .l~ .s .s~ .sh .sh~ .h .h~ .a#Begin macro definitions for#internal macrosYACC=yaccYFLAGS=ASFLAGS=LEX=lexLFLAGS=CC=ccCCC=xlCAS=asCFLAGS=CCFLAGS=# End macro definitions for# internal macros# Create a .o file from a .c# file with the cc program.c.o:
$(CC) $(CFLAGS) -c $<
Chapter 13. make Command 325
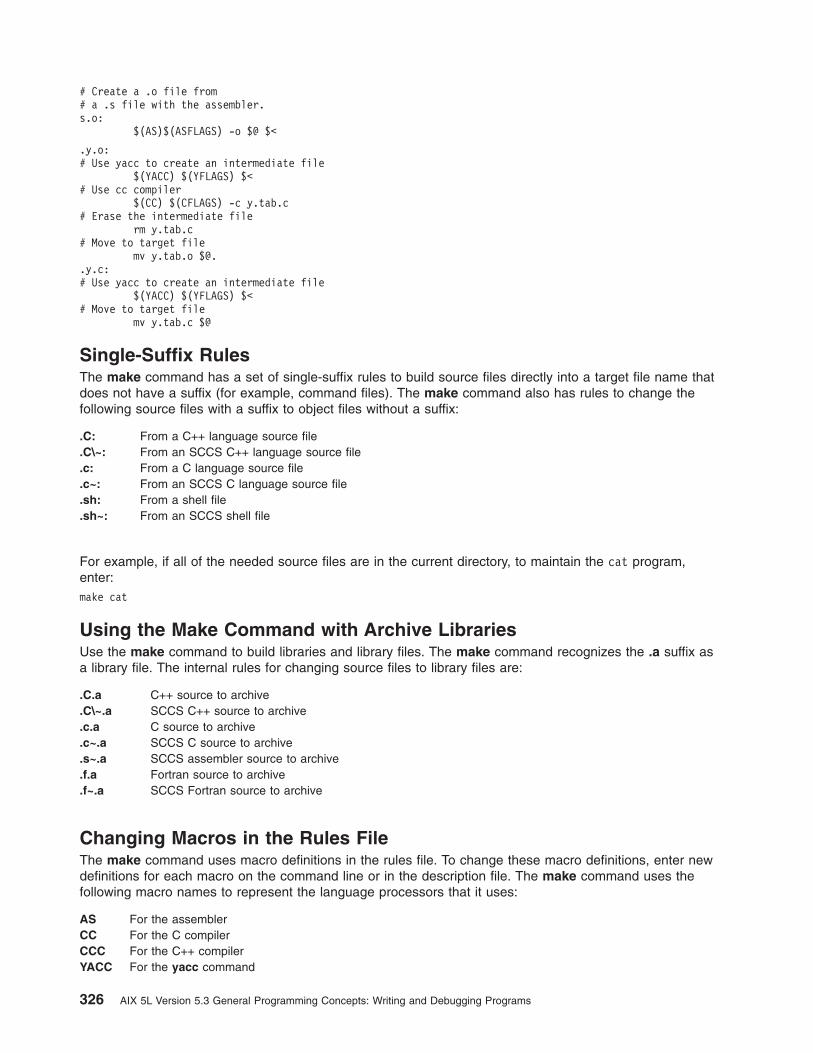
# Create a .o file from# a .s file with the assembler.s.o:
$(AS)$(ASFLAGS) -o $@ $<
.y.o:# Use yacc to create an intermediate file
$(YACC) $(YFLAGS) $<# Use cc compiler
$(CC) $(CFLAGS) -c y.tab.c# Erase the intermediate file
rm y.tab.c# Move to target file
mv y.tab.o [email protected]:# Use yacc to create an intermediate file
$(YACC) $(YFLAGS) $<# Move to target file
mv y.tab.c $@
Single-Suffix RulesThe make command has a set of single-suffix rules to build source files directly into a target file name thatdoes not have a suffix (for example, command files). The make command also has rules to change thefollowing source files with a suffix to object files without a suffix:
.C: From a C++ language source file
.C\~: From an SCCS C++ language source file
.c: From a C language source file
.c~: From an SCCS C language source file
.sh: From a shell file
.sh~: From an SCCS shell file
For example, if all of the needed source files are in the current directory, to maintain the cat program,enter:make cat
Using the Make Command with Archive LibrariesUse the make command to build libraries and library files. The make command recognizes the .a suffix asa library file. The internal rules for changing source files to library files are:
.C.a C++ source to archive
.C\~.a SCCS C++ source to archive
.c.a C source to archive
.c~.a SCCS C source to archive
.s~.a SCCS assembler source to archive
.f.a Fortran source to archive
.f~.a SCCS Fortran source to archive
Changing Macros in the Rules FileThe make command uses macro definitions in the rules file. To change these macro definitions, enter newdefinitions for each macro on the command line or in the description file. The make command uses thefollowing macro names to represent the language processors that it uses:
AS For the assemblerCC For the C compilerCCC For the C++ compilerYACC For the yacc command
326 AIX 5L Version 5.3 General Programming Concepts: Writing and Debugging Programs

LEX For the lex command
The make command uses the following macro names to represent the flags that it uses:
CFLAGS For C compiler flagsCCFLAGS For C++ compiler flagsYFLAGS For yacc command flagsLFLAGS For lex command flags
Therefore, the command:make "CC=NEWCC"
directs the make command to use the NEWCC command in place of the usual C language compiler.
Similarly, the command:make "CFLAGS=-O"
directs the make command to optimize the final object code produced by the C language compiler.
To review the internal rules that the make command uses, see the /usr/ccs/lib/make.cfg file.
Defining Default Conditions in a Description FileWhen the make command creates a target file but cannot find commands in the description file or internalrules to create a file, it looks at the description file for default conditions. To define the commands that themake command performs in this case, use the .DEFAULT target name in the description file as follows:.DEFAULT:
commandcommand
.
.
.
Because .DEFAULT is not a real target file, it is called a fake target. Use the .DEFAULT fake target namefor an error-recovery routine or for a general procedure to create all files in the command that are notdefined by an internal rule of the make program.
Including Other Files in a Description FileInclude files other than the current description file by using the word include as the first word on any linein the description file. Follow the word with a blank or a tab, and then the file name for the makecommand to include in the operation.
Note: Only one file is supported for each include statement.
For example:include /home/tom/temp
include /home/tom/sample
directs the make command to read the temp and sample files and the current description file to build thetarget file.
When you are using include files, do not use more than 16 levels of nesting.
Chapter 13. make Command 327

Defining and Using Macros in a Description File
A macro is a name (or label) to use in place of several other names. It is a way of writing the longer stringof characters by using just one shorter name. To define a macro:
1. Start a new line with the name of the macro.
2. Follow the name with an = (equal sign).
3. To the right of the = (equal sign), enter the string of characters that the macro name represents.
The macro definition can contain blanks before and after the = (equal sign) without affecting the result.The macro definition cannot contain a : (colon) or a tab before the = (equal sign).
The following are examples of macro definitions:# Macro -"2" has a value of "xyz"2 = xyz
# Macro "abc" has a value of "-ll -ly"abc = -ll -ly
# Macro "LIBES" has a null valueLIBES =
A macro that is named, but not defined, has the same value as the null string.
Using Macros in a Description FileAfter defining a macro in a description file, use the macro in description file commands by putting a $(dollar sign) before the name of the macro. If the macro name is longer than one character, put ( )(parentheses) or { } (braces) around the macro name. The following are examples of using macros:$(CFLAGS)$2$(xy)$Z$(Z)
The last two examples in the previous list have the same effect.
The following fragment shows how to define and use some macros:# OBJECTS is the 3 files x.o, y.o and# z.o (previously compiled)OBJECTS = x.o y.o z.o# LIBES is the standard libraryLIBES = -lc# prog depends on x.o y.o and z.oprog: $(OBJECTS)# Link and load the 3 files with# the standard library to make prog
cc $(OBJECTS) $(LIBES) -o prog
The make command that uses this description file links and loads the three object files (x.o, y.o, and z.o)with the libc.a library.
A macro definition entered on the command line overrides any duplicate macro definitions in thedescription file. Therefore, the following command loads the files with the lex (-11) library:make "LIBES= -ll"
Note: When macros contain blanks and you enter them, on the command line, put ″ ″ (doublequotation marks) around the macro. Without the double quotation marks, the shell interprets theblanks as parameter separators and not as part of the macro.
328 AIX 5L Version 5.3 General Programming Concepts: Writing and Debugging Programs

The make command handles up to 10 levels of nested macro expansion. Based on the definitions in thefollowing example, the expression $($(macro2)) would evaluate to value1:macro1=value1
macro2=macro1
The evaluation of a macro occurs each time the macro is referenced. It is not evaluated when it is defined.If a macro is defined but never used, it will never be evaluated. This is especially important if the macro isassigned values that will be interpreted by the shell, particularly if the value might change. A variabledeclaration such as:OBJS = 'ls *.o'
could change in value if referenced at different times during the process of building or removing objectfiles. It does not hold the value of the ls command at the time the OBJS macro is defined.
Internal MacrosThe make command has built-in macro definitions for use in the description file. These macros helpspecify variables in the description file. The make command replaces the macros with one of the followingvalues:
$@ Name of the current target file$$@ Label name on the dependency line$? Names of the files that have changed more recently than the target$< Parent file name of the out-of-date file that caused a target file to be created$* Name of the current parent file without the suffix$% Name of an archive library member
Target File NameIf the $@ macro is in the command sequence in the description file, the make command replaces thesymbol with the full name of the current target file before passing the command to the shell to be run. Themake command replaces the symbol only when it runs commands from the description file to create thetarget file.
Label NameIf the $$@ macro is on the dependency line in a description file, the make command replaces this symbolwith the label name that is on the left side of the colon in the dependency line. For example, if thefollowing is included on a dependency line:cat: [email protected]
The make command translates it to:cat: cat.c
when the make command evaluates the expression. Use this macro to build a group of files, each ofwhich has only one source file. For example, to maintain a directory of system commands, use adescription file similar to:# Define macro CMDS as a series# of command namesCMDS = cat dd echo date cc cmp comm ar ld chown# Each command depends on a .c file$(CMDS): [email protected]# Create the new command set by compiling the out of# date files ($?) to the target file name ($@)
$(CC) -O $? -o $@
Chapter 13. make Command 329

The make command changes the $$(@F) macro to the file part of $@ when it runs. For example, use thissymbol when maintaining the usr/include directory while using a description file in another directory. Thatdescription file is similar to the following:# Define directory name macro INCDIRINCDIR = /usr/include# Define a group of files in the directory# with the macro name INCLUDESINCLUDES = \
$(INCDIR)/stdio.h \$(INCDIR)/pwd.h \$(INCDIR)/dir.h \$(INCDIR)/a.out.h \
# Each file in the list depends on a file# of the same name in the current directory$(INCLUDES): $$(@F)# Copy the younger files from the current# directory to /usr/include
cp $? $@# Set the target files to read only status
chmod 0444 $@
The preceding description file creates a file in the /usr/include directory when the corresponding file in thecurrent directory has been changed.
Changed FilesIf the $? macro is in the command sequence in the description file, the make command replaces thesymbol with a list of parent files that have been changed since the target file was last changed. The makecommand replaces the symbol only when it runs commands from the description file to create the targetfile.
First Out-of-Date FileIf the $< macro is in the command sequence in the description file, the make command replaces thesymbol with the name of the file that started the file creation. The Out-of-Date file name is the name of theparent file whose timestamp did not match the timestamp of the target file, and therefore caused the makecommand to create the target file again.
In addition, use a letter (D or F) after the < (less-than sign) to get either the directory name (D) or the filename (F) of the first out-of-date file. For example, if the first out-of-date file is:/home/linda/sample.c
then the make command gives the following values:$(<D) = /home/linda$(<F) = sample.c$< = /home/linda/sample.c
The make command replaces this symbol only when the program runs commands from its internal rules orfrom the .DEFAULT list.
Current File-Name PrefixIf the $* macro is in the command sequence in the description file, the make command replaces thesymbol with the file-name part (without the suffix) of the parent file that the make command is currentlyusing to generate the target file. For example, if the make command is using the file:test.c
then the $* macro represents the file name test.
In addition, use a letter (D or F) after the * (asterisk) to get either the directory name (D) or the file name(F) of the current file.
330 AIX 5L Version 5.3 General Programming Concepts: Writing and Debugging Programs

For example, the make command uses many files (specified either in the description file or in the internalrules) to create a target file. Only one of those files (the current file) is used at any moment. If that currentfile is:/home/tom/sample.c
then the make command gives the following values for the macros:$(*D) = /home/tom$(*F) = sample$* = /home/tom/sample
The make command replaces this symbol only when running commands from its internal rules (or from the.DEFAULT list), but not when running commands from a description file.
Archive Library MemberIf the $% macro is in a description file, and the target file is an archive library member, the makecommand replaces the macro symbol with the name of the library member. For example, if the target fileis:lib(file.o)
then the make command replaces the $% macro with the member name file.o.
Changing Macro Definitions in a CommandWhen macros in the shell commands are defined in the description file, you can change the values thatthe make command assigns to the macro. To change the assignment of the macro, put a : (colon) afterthe macro name, followed by a replacement string. The form is as follows:$(macro:string1=string2)
where string1 is either a suffix or a word to be replaced in the macro definition and string2 is thereplacement suffix or word.
When the make command reads the macro and begins to assign the values to the macro based on themacro definition, the command replaces each string1 in the macro definition with a value of string2. Forexample, if the description file contains the macro definition:FILES=test.o sample.o form.o defs
You can replace the form.o file with a new file, input.o, by using the macro in the description-filecommands, as follows:cc -o $(FILES:form.o=input.o)
You can all replace all the suffixes .o in the macro with .c as follows:cc -c $(FILES:.o=.c)
The macro values can also be changed using pattern matching replacements of the following form:$(macro: op%os= np%ns)
Where op is the existing (old) prefix, os is the existing (old) suffix, np is the new prefix, and ns is the newsuffix.
op, os, np and ns can be a string of zero or more characters. The pattern matched by the percent sign (%)on the left-hand side of the equal-sign, which is a string of zero or more characters, is used with np and nsto replace the macro value. The percent sign (%) operator can appear any number of times on theright-hand side of the equal sign (=).
For example:
Chapter 13. make Command 331

FOO=abc defBAR=$(FOO:%=dir1/%.o dir1/%_cltn.o)
sets the value of BAR to dir1/abc.o dir1/abc_cltn.o dir1/def.o dir1/def_cltn.o
Changing the value of a macro in this manner is useful when maintaining archive libraries. For moreinformation, see the ar command.
Creating a Target File with the Make Command
To create a file containing the completed program called a target file, the make program:
1. Finds the name of the target file in the description file or in the make command
2. Ensures that the files on which the target file depends exist and are up-to-date
3. Determines if the target file is up-to-date with the files on which it depends.
If the target file or one of the parent files is out-of-date, the make command creates the target file usingone of the following:
v Commands from the description file
v Internal rules to create the file (if they apply)
v Default rules from the description file
If all files in the procedure are up-to-date when running the make program, the make command displays amessage to indicate that the file is up-to-date, and then stops. If some files have changed, the makecommand builds only those files that are out-of-date. The command does not rebuild files that are alreadycurrent.
When the make command runs commands to create a target file, it replaces macros with their values,writes each command line, and then passes the command to a new copy of the shell.
Using the make Command with Source Code Control System (SCCS)Files
The SCCS commands and file system is primarily used to control access to a file, track who altered thefile, why it was altered, and what was altered. An SCCS file is any text file controlled with SCCScommands. Using non-SCCS commands to edit SCCS files can damage the SCCS files. For moreinformation about SCCS, seeChapter 23, “Source Code Control System (SCCS),” on page 489.
All SCCS files use the prefix s. to indicate that the files are SCCS files and not regular text files. Themake command does not recognize references to prefixes of file names. Therefore, do not refer to SCCSfiles directly within the make command description file. The make command uses a different suffix, the ~(tilde), to represent SCCS files. Therefore, .c~.o refers to the rule that transforms an SCCS C languagesource file into an object file. The internal rule is:.c~.o:
$(GET) $(GFLAGS) -p $< >$*.c$(CC) $(CFLAGS) -c $*.c-rm -f $*.c
The ~ (tilde) added to any suffix changes the file search into an SCCS file-name search, with the actualsuffix named by the . (period) and all characters up to (but not including) the ~ (tilde). The GFLAGS macropasses flags to the SCCS to determine which SCCS file version to use.
332 AIX 5L Version 5.3 General Programming Concepts: Writing and Debugging Programs

The make command recognizes the following SCCS suffixes:
.C\~ C++ source
.c~ c source
.y~ yacc source grammar
.s~ Assembler source
.sh~ Shell
.h~ Header
.f~ FORTRAN
.l~ lex source
The make command has internal rules for changing the following SCCS files:
.C\~.a:
.C\~.c:
.C\~.o:
.c~:
.c~.a:
.c~.c:
.c~.o:
.f~:
.f~.a:
.f~.o:
.f~.f:
.h~.h:
.l~.o:
.s~.a:
.sh~:
.s~.o:
.y~.c:
.y~.o:
Understanding makefile considerations in Source Code ControlSystems (SCCS)If you specify a description file, or a file named makefile or Makefile is in the current directory, the makecommand does not look for a description file within SCCS. If a description file is not in the current directoryand you enter the make command, the make command looks for an SCCS file named either s.makefileor s.Makefile. If either of these files is present, the make command uses a get command to direct SCCSto build the description file from that source file. When the SCCS generates the description file, the makecommand uses the file as a normal description file. When the make command finishes executing, itremoves the created description file from the current directory.
Suppressing Default SCCS RetrievalYou can suppress the default SCCS retrieval. The commands for retrieving source files from SCCS can bespecified in the rules for SCCS_GET special target in the description file. This suppresses the defaultsource retrieval from SCCS.
Chapter 13. make Command 333

For example:SCCS_GET:
get -p $< > $*.c
Using the make Command with Non-Source Code Control System(SCCS) Files
Start the make command from the directory that contains the description file for the file to create. Thevariable name desc-file represents the name of that description file. Then, enter the command:make -f desc-file
If the name of the description file is makefile or Makefile, you do not have to use the -f flag. Enter macrodefinitions, flags, description file names, and target file names along with the make command on thecommand line as follows:make [flags] [macro definitions] [targets]
The make command then examines the command-line entries to determine what to do. First, it looks at allmacro definitions on the command line (entries that are enclosed in quotes and contain equal signs) andassigns values to them. If the make command finds a definition for a macro on the command line differentfrom the definition for that macro in the description file, it uses the command-line definition for the macro.
Next, the make command looks at the flags. For more information, see “Changing Macros in the RulesFile” on page 326 for a list of the make command flags.
The make command expects the remaining command-line entries to be the names of target files to becreated. Any shell commands enclosed in back quotes that generate target names are performed by themake command. Then the make command creates the target files in left-to-right order. Without a targetfile name, the make command creates the first target file named in the description file that does not beginwith a period. With more than one description file specified, the make command searches the firstdescription file for the name of the target file.
Understanding How the make Command Uses Environment VariablesEach time the make command runs, it reads the current environment variables and adds them to itsdefined macros. Using the MAKEFLAGS macro or the MFLAGS macro, the user can specify flags to bepassed to the make command. If both are set, the MAKEFLAGS macro overrides the MFLAGS macro.The flags specified using these variables are passed to the make command along with any command-lineoptions. In the case of recursive calls to the make command, using the $(MAKE) macro in the descriptionfile, the make command passes all flags with each invocation.
When the make command runs, it assigns macro definitions in the following order:
1. Reads the MAKEFLAGS environment variable.
If the MAKEFLAGS environment variable is not present or null, the make command checks for anon-null value in the MFLAGS environment variable. If one of these variables has a value, the makecommand assumes that each letter in the value is an input flag. The make command uses these flags(except for the -f, -p, and -d flags, which cannot be set from the MAKEFLAGS or MFLAGSenvironment variable) to determine its operating conditions.
2. Reads and sets the input flags from the command line. The command line adds to the previoussettings from the MAKEFLAGS or MFLAGS environment variable.
3. Reads macro definitions from the command line. The make command ignores any further assignmentsto these names.
4. Reads the internal macro definitions.
334 AIX 5L Version 5.3 General Programming Concepts: Writing and Debugging Programs

5. Reads the environment. The make command treats the environment variables as macro definitionsand passes them to other shell programs.
Using the make Command in Parallel Run ModeNormally, the make command runs commands sequentially for only one target at a time, waiting for thecommand to finish before running the next. However, the make command can also run in a parallel runmode, where it can run many concurrent jobs to build independent targets.
The -j flag tells the make command simultaneously to run independent targets.
If you follow the -j option with an integer, then the integer specifies the maximum number of concurrentjobs that can be executed to build the targets.
If -j flag is not followed by an integer, then there is no limit on the number of jobs that will be invoked tobuild the targets.
If the make command encounters an error while building a target in parallel execution mode, and none ofthe methods used to ignore errors are used, then further execution of commands to build that target willstop, and the make command will wait for child jobs already running to exit before completing (see“Preventing the make Command from Stopping on Errors” on page 323 for more information).
When you are running more than one job in parallel mode, the output that the jobs generate prints to thescreen a it is produced. This can lead to the confusion of messages from different jobs on the screenunless you suppress the messages using redirection, or instructing the make command to run silently. Formore information, see “Preventing the make Command from Writing Commands” on page 323.
Example of a Description FileThe following example description file could maintain the make program. The source code for the makecommand is spread over a number of C language source files and yacc grammar.# Description file for the Make program# Macro def: send to be printedP = qprt# Macro def: source filenames used
FILES = Makefile version.c defs main.c \doname.c misc.c files.c \dosy.c gram.y lex.c gcos.c
# Macro def: object filenames usedOBJECTS = version.o main.o doname.o \
misc.o files.o dosys.o \gram.o
# Macro def: lint program and flagsLINT = lint -p# Macro def: C compiler flagsCFLAGS = -O# make depends on the files specified# in the OBJECTS macro definitionmake: $(OBJECTS)# Build make with the cc program
cc $(CFLAGS) $(OBJECTS) -o make# Show the file sizes
@size make
# The object files depend on a file# named defs
$(OBJECTS): defs# The file gram.o depends on lex.c# uses internal rules to build gram.ogram.o: lex.c# Clean up the intermediate files
Chapter 13. make Command 335

clean:-rm *.o gram.c-du
# Copy the newly created program# to /usr/bin and deletes the program# from the current directoryinstall:
@size make /usr/bin/makecp make /usr/bin/make ; rm make
# Empty file "print" depends on the# files included in the macro FILESprint: $(FILES)# Print the recently changed files
pr $? | $P# Change the date on the empty file,# print, to show the date of the last# printing
touch print
# Check the date of the old# file against the date# of the newly created filetest:
make -dp | grep -v TIME >1zap/usr/bin/make -dp | grep -v TIME >2zapdiff 1zap 2zaprm 1zap 2zap
# The program, lint, depends on the# files that are listedlint: dosys.c doname.c files.c main.c misc.c \
version.c gram.c# Run lint on the files listed# LINT is an internal macro
$(LINT) dosys. doname.c files.c main.c \misc.c version.c gram.crm gram.c
# Archive the files that build makearch:
ar uv /sys/source/s2/make.a $(FILES)
The make command usually writes out each command before issuing it.
The following output results from entering the simple make command in a directory containing only thesource and description file:cc -O -c version.ccc -O -c main.ccc -O -c doname.ccc -O -c misc.ccc -O -c files.ccc -O -c dosys.cyacc gram.ymv y.tab.c gram.ccc -O -c gram.ccc version.o main.o doname.o misc.o files.o dosys.o
gram.o -o makemake: 63620 + 13124 + 764 + 4951 = 82459
None of the source files or grammars are specified in the description file. However, the make commanduses its suffix rules to find them and then issues the needed commands. The string of digits on the lastline of the previous example results from the size make command. Because the @ (at sign) on the sizecommand in the description file prevented writing of the command, only the sizes are written.
The output can be sent to a different printer or to a file by changing the definition of the P macro on thecommand line, as follows:
336 AIX 5L Version 5.3 General Programming Concepts: Writing and Debugging Programs

make print "P = print -sp"
ORmake print "P = cat >zap"
Chapter 13. make Command 337

338 AIX 5L Version 5.3 General Programming Concepts: Writing and Debugging Programs

Chapter 14. m4 Macro Processor Overview
This chapter provides information about the m4 macro processor, which is a front-end processor for anyprogramming language being used in the operating system environment.
At the beginning of a program, you can define a symbolic name or symbolic constant as a particular stringof characters. You can then use the m4 macro processor to replace unquoted occurrences of the symbolicname with the corresponding string. Besides replacing one string of text with another, the m4 macroprocessor provides the following features:
v Arithmetic capabilities
v File manipulation
v Conditional macro expansion
v String and substring functions
The m4 macro processor processes strings of letters and digits called tokens. The m4 macro processorreads each alphanumeric token and determines if it is the name of a macro. The program then replacesthe name of the macro with its defining text, and pushes the resulting string back onto the input to berescanned. You can call macros with arguments, in which case the arguments are collected andsubstituted into the right places in the defining text before the defining text is rescanned.
The m4 macro processor provides built-in macros such as define. You can also create new macros.Built-in and user-defined macros work the same way.
Using the m4 Macro Processor
To use the m4 macro processor, enter the following command:m4 [file]
The m4 macro processor processes each argument in order. If there are no arguments or if an argumentis - (dash), m4 macro processor reads standard input as its input file. The m4 macro processor writes itsresults to standard output. Therefore, to redirect the output to a file for later use, use a command such asthe following:m4 [file] >outputfile
Creating a User-Defined Macro
define (MacroName, Replacement) Defines new macro MacroName with a value ofReplacement.
For example, if the following statement is in a program:define(name, stuff)
The m4 macro processor defines the string name as stuff. When the string name occurs in a program file,the m4 macro processor replaces it with the string stuff. The string name must be ASCII alphanumericand must begin with a letter or underscore. The string stuff is any text, but if the text containsparentheses, the number of open, or left, parentheses must equal the number of closed, or right,parentheses. Use the / (slash) character to spread the text for stuff over multiple lines.
The open (left) parenthesis must immediately follow the word define. For example:
© Copyright IBM Corp. 1997, 2010 339

define(N, 100). . .
if (i > N)
defines N to be 100 and uses the symbolic constant N in a later if statement.
Macro calls in a program have the following form:name(arg1,arg2, . . . argn)
A macro name is recognized only if it is surrounded by non-alphanumeric characters. In the followingexample, the variable NNN is not related to the defined macro N.define(N, 100). . .
if (NNN > 100)
You can define macros in terms of other names. For example:define(N, 100)define(M, N)
defines both M and N to be 100. If you later change the definition of N and assign it a new value, M retainsthe value of 100, not N.
The m4 macro processor expands macro names into their defining text as soon as possible. The string Nis replaced by 100. Then the string M is also replaced by 100. The overall result is the same as using thefollowing input initially.define(M, 100)
The order of the definitions can be interchanged as follows:define(M, N)define(N, 100)
Now M is defined to be the string N, so when the value of M is requested later, the result is the value of N atthat time (because the M is replaced by N, which is replaced by 100).
Using the Quote Characters
To delay the expansion of the arguments of define, enclose them in quote characters. If you do notchange them, quote characters are ` and ’ (left and right single quotes). Any text surrounded by quotecharacters is not expanded immediately, but quote characters are removed. The value of a quoted string isthe string with the quote characters removed. If the input is:define(N, 100)define(M, `N')
The quote characters around the N are removed as the argument is being collected. The result of usingquote characters is to define M as the string N, not 100. The general rule is that the m4 macro processoralways strips off one level of quote characters whenever it evaluates something. This is true even outsideof macros. To make the word define appear in the output, enter the word in quote characters, as follows:`define' = 1;
Another example of using quote characters is redefining N. To redefine N, delay the evaluation by putting Nin quote characters. For example:define(N, 100). . .define(`N', 200)
340 AIX 5L Version 5.3 General Programming Concepts: Writing and Debugging Programs

To prevent problems from occurring, quote the first argument of a macro. For example, the followingfragment does not redefine N:define(N, 100). . .define(N, 200)
The N in the second definition is replaced by 100. The result is the same as the following statement:define(100, 200)
The m4 macro processor ignores this statement because it can define only names, not numbers.
Changing the Quote Characters
Quote characters are normally ` and ’ (left or right single quotes). If those characters are not convenient,change the quote characters with the following built-in macro:
changequote (l, r ) Changes the left and right quote characters to the charactersrepresented by the l and r variables.
To restore the original quote characters, use changequote without arguments as follows:changequote
Arguments
The simplest form of macro processing is replacing one string by another (fixed) string. However, macroscan also have arguments, so that you can use the macro in different places with different results. Toindicate where an argument is to be used within the replacement text for a macro (the second argument ofits definition), use the symbol $n to indicate the nth argument. When the macro is used, the m4 macroprocessor replaces the symbol with the value of the indicated argument. For example, the followingsymbol:$2
Refers to the second argument of a macro. Therefore, if you define a macro called bump as:define(bump, $1 = $1 + 1)
The m4 macro processor generates code to increment the first argument by 1. The bump(x) statement isequivalent to x = x + 1.
A macro can have as many arguments as needed. However, you can access only nine arguments usingthe $n symbol ($1 through $9). To access arguments past the ninth argument, use the shift macro.
shift (ParameterList) Returns all but the first element of ParameterList to perform adestructive left shift of the list.
This macro drops the first argument and reassigns the remaining arguments to the $n symbols (secondargument to $1, third argument to $2. . . tenth argument to $9). Using the shift macro more than onceallows access to all arguments used with the macro.
The $0 macro returns the name of the macro. Arguments that are not supplied are replaced by null strings,so that you can define a macro that concatenates its arguments as follows:define(cat, $1$2$3$4$5$6$7$8$9)
Chapter 14. m4 Macro Processor Overview 341

Thus:cat(x, y, z)
is the same as:xyz
Arguments $4 through $9 in this example are null because corresponding arguments were not provided.
The m4 macro processor discards leading unquoted blanks, tabs, or new-line characters in arguments, butkeeps all other white space. Thus:define(a, b c)
defines a to be b c.
Arguments are separated by commas. Use parentheses to enclose arguments containing commas, so thatthe comma does not end the argument. For example:define(a, (b,c))
has only two arguments. The first argument is a, and the second is (b,c). To use a comma or singleparenthesis, enclose it in quote characters.
Using a Predefined m4 Macro
The m4 macro processor provides a set of predefined macros. This section explains many of the macrosand their uses.
Removing a Macro Definition
undefine (`MacroName’) Removes the definition of a user-defined or built-in macro (`MacroName’)
For example:undefine(`N')
removes the definition of N. After you remove a built-in macro with the undefine macro, as follows:undefine(`define')
You cannot use the definition of the built-in macro again.
Single quotes are required in this case to prevent substitution.
Checking for a Defined Macro
ifdef (`MacroName’, Argument1, Argument2) If macro MacroName is defined and is not defined to zero, returnsthe value of Argument1. Otherwise, it returns Argument2.
The ifdef macro permits three arguments. If the first argument is defined, the value of ifdef is the secondargument. If the first argument is not defined, the value of ifdef is the third argument. If there is no thirdargument, the value of ifdef is null.
342 AIX 5L Version 5.3 General Programming Concepts: Writing and Debugging Programs

Using Integer Arithmetic
The m4 macro processor provides the following built-in functions for doing arithmetic on integers only:
incr (Number) Returns the value of Number + 1.decr (Number) Returns the value of Number - 1.eval Evaluates an arithmetic expression.
Thus, to define a variable as one more than the Number value, use the following:define(Number, 100)define(Number1, `incr(Number)')
This defines Number1 as one more than the current value of Number.
The eval function can evaluate expressions containing the following operators (listed in descending orderof precedence) :
unary + and -** or ^ (exponentiation)* / % (modulus)+ -== != < <= > >=!(not)& or && (logical AND)| or || (logical OR)
Use parentheses to group operations where needed. All operands of an expression must be numeric. Thenumeric value of a true relation (for example, 1 > 0) is 1, and false is 0. The precision of the eval functionis 32 bits.
For example, define M to be 2==N+1 using the eval function as follows:define(N, 3)define(M, `eval(2==N+1)')
Unless the text is very simple, use quote characters around the text that defines a macro
Manipulating Files
To merge a new file in the input, use the built-in include function.
include (File) Returns the contents of the file File.
For example:include(FileName)
inserts the contents of FileName in place of the include command.
A fatal error occurs if the file named in the include macro cannot be accessed. To avoid a fatal error, usethe alternate form, the sinclude macro (silent include).
sinclude (File ) Returns the contents of the file File, but does not report an error if itcannot access File.
Chapter 14. m4 Macro Processor Overview 343

The sinclude (silent include) macro does not write a message, but continues if the file named cannot beaccessed.
Redirecting Output
The output of the m4 macro processor can be redirected again to temporary files during processing, andthe collected material can be output upon command. The m4 macro processor maintains nine possibletemporary files, numbered 1 through 9. If you use the built-in divert macro.
divert (Number) Changes output stream to the temporary file Number.
The m4 macro processor writes all output from the program after the divert function at the end oftemporary file, Number. To return the output to the display screen, use either the divert or divert(0)function, which resumes the normal output process.
The m4 macro processor writes all redirected output to the temporary files in numerical order at the end ofprocessing. The m4 macro processor discards the output if you redirect the output to a temporary fileother than 0 through 9.
To bring back the data from all temporary files in numerical order, use the built-in undivert macro.
undivert (Number1, Number2... ) Appends the contents of the indicatedtemporary files to the current temporary file.
To bring back selected temporary files in a specified order, use the built-in undivert macro with arguments.When using the undivert macro, the m4 macro processor discards the temporary files that are recoveredand does not search the recovered data for macros.
The value of the undivert macro is not the diverted text.
You can use the divnum macro to determine which temporary file is currently in use.
divnum Returns the value of the currently activetemporary file.
If you do not change the output file with the divert macro, the m4 macro processor puts all output in atemporary file named 0.
Using System Programs in a Program
You can run any program in the operating system from a program by using the built-in syscmd macro. Forexample, the following statement runs the date program:syscmd(date)
Using Unique File Names
Use the built-in maketemp macro to make a unique file name from a program.
maketemp (String...nnnnn...String) Creates a unique file name by replacing thecharacters nnnnn in the argument string withthe current process ID.
For example, for the statement:
344 AIX 5L Version 5.3 General Programming Concepts: Writing and Debugging Programs

maketemp(myfilennnnn)
the m4 macro processor returns a string that is myfile concatenated with the process ID. Use this stringto name a temporary file.
Using Conditional ExpressionsConditional expression evaluation allows process time determination of macro expressions.
ifelse (String1, String2, Argument1, Argument2) If String1 matches String2, returns the value ofArgument1. Otherwise it returns Argument2.
The built-in ifelse macro performs conditional testing. In the simplest form:ifelse(a, b, c, d)
compares the two strings a and b.
If a and b are identical, the built-in ifelse macro returns the string c. If they are not identical, it returnsstring d. For example, you can define a macro called compare to compare two strings and return yes if theyare the same, or no if they are different, as follows:define(compare, `ifelse($1, $2, yes, no)')
The quote characters prevent the evaluation of the ifelse macro from occurring too early. If the fourthargument is missing, it is treated as empty.
The ifelse macro can have any number of arguments, and therefore, provides a limited form ofmultiple-path decision capability. For example:ifelse(a, b, c, d, e, f, g)
This statement is logically the same as the following fragment:if(a == b) x = c;else if(d == e) x = f;else x = g;return(x);
If the final argument is omitted, the result is null, so:ifelse(a, b, c)
is c if a matches b, and null otherwise.
Manipulating StringsThe macros in this section allow you to convert input strings into output strings.
len Returns the byte length of the string that makes up its argument
Thus:len(abcdef)
is 6, and:len((a,b))
is 5.
dlen Returns the length of the displayable characters in a string
Chapter 14. m4 Macro Processor Overview 345

Characters made up from 2-byte codes are displayed as one character. Thus, if the string contains any2-byte, international character-support characters, the results of dlen will differ from the results of len.
substr (String, Position, Length) Returns a substring of String that begins atcharacter number Position and is Lengthcharacters long.
Using input, substr (s, i, n) returns the substring of s that starts at the ith position (origin zero) and is ncharacters long. If n is omitted, the rest of the string is returned. For example, the function:substr(`now is the time',1)
returns the following string:ow is the time
index (String1, String2) Returns the character position in String1 where String2 starts(starting with character number 0), or -1 if String1 does notcontain String2.
As with the built-in substr macro, the origin for strings is 0.
translit (String, Set1, Set2) Searches String for characters that are in Set1. If it findsany, changes (transliterates) those characters tocorresponding characters in Set2.
It has the general form:translit(s, f, t)
which modifies s by replacing any character found in f by the corresponding character of t. For example,the function:translit(`little', aeiou, 12345)
replaces the vowels by the corresponding digits and returns the following:l3ttl2
If t is shorter than f, characters that do not have an entry in t are deleted. If t is not present at all,characters from f are deleted from s. So:translit(`little', aeiou)
deletes vowels from string little and returns the following:lttl
dnl Deletes all characters that follow it, up to and including the new-linecharacter.
Use this macro to get rid of empty lines. For example, the function:define(N, 100)define(M, 200)define(L, 300)
results in a new-line at the end of each line that is not part of the definition. These new-line characters arepassed to the output. To get rid of the new lines, add the built-in dnl macro to each of the lines.
346 AIX 5L Version 5.3 General Programming Concepts: Writing and Debugging Programs

define(N, 100) dnldefine(M, 200) dnldefine(L, 300) dnl
Debugging M4 MacrosThe macros in this section allow you to report errors and processing information.
errprint (String) Writes its argument (String) to the standard error file
For example:errprint (`error')
dumpdef (`MacroName’... ) Dumps the current names and definitions ofitems named as arguments (`MacroName’...)
If you do not supply arguments, the dumpdef macro prints all current names and definitions. Rememberto quote the names.
Additional m4 MacrosA list of additional m4 macros, with a brief explanation of each, follows:
changecom (l, r ) Changes the left and right commentcharacters to the characters represented bythe l and r variables.
defn (MacroName) Returns the quoted definition of MacroNameen (String) Returns the number of characters in String.m4exit (Code) Exits m4 macro processor with a return code
of Code.m4wrap (MacroName) Runs macro MacroName at the end of m4
macro processor .popdef (MacroName) Replaces the current definition of MacroName
with the previous definition saved with thepushdef macro.
pushdef (MacroName, Replacement) Saves the current definition of MacroNameand then defines MacroName to beReplacement.
sysval Gets the return code from the last use of thesyscmd macro.
traceoff (MacroList) Turns off trace for any macro in MacroList. IfMacroList is null, turns off all tracing.
traceon (MacroName) Turns on trace for macro MacroName. IfMacroName is null, turns trace on for allmacros.
Chapter 14. m4 Macro Processor Overview 347

348 AIX 5L Version 5.3 General Programming Concepts: Writing and Debugging Programs

Chapter 15. Object Data Manager (ODM)
Object Data Manager (ODM) is a data manager intended for storing system information. Information isstored and maintained as objects with associated characteristics. You can also use ODM to manage datafor application programs.
System data managed by ODM includes:
v Device configuration information
v Display information for SMIT (menus, selectors, and dialogs)
v Vital product data for installation and update procedures
v Communications configuration information
v System resource information
You can create, add, lock, store, change, get, show, delete, and drop objects and object classes withODM. ODM commands provide a command-line interface to these functions. ODM subroutines accessthese functions from within an application program.
Some object classes are provided with the system. These object classes are discussed in thedocumentation for the specific system products that provide them.
This chapter discusses:
v “ODM Object Classes and Objects”
v “ODM Descriptors” on page 353
v “ODM Object Searches” on page 356
v “ODM Commands and Subroutines” on page 359
v “ODM Example Code and Output” on page 360
ODM Object Classes and Objects
The basic components of ODM are object classes and objects. To manage object classes and objects, youuse the ODM commands and subroutines (see “ODM Commands and Subroutines” on page 359).Specifically, you use the create and add features of these interfaces to build object classes and objects forstorage and management of your own data.
object class A group of objects with the same definition. An objectclass comprises one or more descriptors. It is similar to atable. Each object class you create with an odmcreatecommand or odm_create_class subroutine is stored in afile as a C language definition of an array of structures.(see “ODM Descriptors” on page 353).
object A member of an object class. It is an entity that requiresstorage and management of data. It is similar to a logicalrecord in a database.
Each object you add to the object class with an odmaddcommand or an odm_add_obj subroutine is stored as aC language structure in the same file. You determine thedirectory in which to store this file when you create theobject class.
© Copyright IBM Corp. 1997, 2010 349

An object class is conceptually similar to an array of structures, with each object being a structure that isan element of the array. Values are associated with the descriptors of an object when the object is addedto an object class. The descriptors of an object and their associated values can be located and changedwith ODM facilities.
The following is an example of manipulating object classes and objects.
1. To create an object class called Fictional_Characters, enter:class Fictional_Characters {
char Story_Star[20];char Birthday[20];short Age;char Friend[20];
};
In this example, the Fictional_Characters object class contains four descriptors: Story_Star,Birthday, and Friend, which have a descriptor type of character and a 20-character maximum length;and Age, with a descriptor type of short. To create the object class files required by ODM, you processthis file with the odmcreate command or the odm_create_class subroutine.
2. Once you create an object class, you can add objects to the class using the odmadd command or theodm_add_obj subroutine. For example, enter the following code with the odmadd command to addthe objects Cinderella and Snow White to the Fictional_Characters object class, along with values forthe descriptors they inherit:Fictional_Characters:
Story_Star = "Cinderella"Birthday = "Once upon a time"Age = 19Friend = "mice"
Fictional_Characters:Story_Star = "Snow White"Birthday = "Once upon a time"Age = 18Friend = "Fairy Godmother"
The Fictional_Characters table shows a conceptual picture of the Fictional_Characters object classwith the two added objects Cinderella and Snow White.
Table 1. Fictional Characters
Story Star (char) Birthday (char) Age (short) Friend (char)
Cinderella Once upon a time 19 Mice
Snow White Once upon a time 18 Fairy Godmother
Retrieved data for 'Story_Star = "Cinderella"'Cinderella:
Birthday = Once upon a timeAge = 19Friend = Mice
3. After the Fictional_Characters object class is created and the objects Cinderella and Snow White areadded, the retrieved data for ’Story_Star = ″Cinderella″’ is:Cinderella:
Birthday = Once upon a timeAge = 19Friend = mice
Using ODM CommandsWhen using the odmcreate or odmdrop command to create or drop an object class, specify the directoryfrom which the class definition file will be accessed using one of the following:
1. Store the file in the default directory indicated by $ODMDIR, which is the /etc/objrepos directory.
350 AIX 5L Version 5.3 General Programming Concepts: Writing and Debugging Programs
2. Use the export command to set the ODMDIR environment variable to specify a directory for storage.
3. Use the unset command to unset the ODMDIR environment variable and the cd command to changethe current directory to the one in which you want the object classes stored. Then, run the ODMcommands in that directory. The file defining the object classes will be stored in the current directory.
When using the odmdelete, odmadd, odmchange, odmshow, or odmget command to work with classesand objects, specify the directory containing the object classes using one of the following:
1. Work with object classes in the default directory indicated by $ODMDIR, which is the /etc/objreposdirectory.
2. Use the export command to set the ODMDIR environment variable to specify the directory.
3. From the command line, use the export command to set the ODMPATH environment variable to astring containing a colon-separated list of directories to be searched for object classes. For example:$ export ODMPATH = /usr/lib/objrepos:/tmp/myrepos
The directories in the $ODMPATH are searched only if the directory indicated by $ODMDIR does notcontain the object class.
Creating an Object Class
Attention: Making changes to files that define system object classes and objects can result insystem problems. Consult your system administrator before using the /usr/lib/objrepos directory asa storage directory for object classes and objects.
1. Create the definition for one or more object classes in an ASCII file. “ODM Example Code and Output”on page 360 shows an ASCII file containing several object class definitions.
2. Specify the directory in which the generated object must be stored.
″ODM Object Class and Object Storage″ discusses the criteria used at object-class creation time fordetermining the directory in which to store generated object classes and objects. Most system objectclasses and objects are stored in the /usr/lib/objrepos directory.
Generate an empty object class by running the odmcreate command with the ASCII file of object classdefinitions specified as the ClassDescriptionFile input file.
Adding Objects to an Object Class
Attention: Making changes to files that define system object classes and objects can result insystem problems. Consult your system administrator before using the /usr/lib/objrepos directory asa storage directory for object classes and objects.
1. Create the object class to which the objects will be added. See “Creating an Object Class” forinstructions on creating an object class.
2. Create the definitions for one or more objects. “ODM Example Code and Output” on page 360 showsan ASCII file containing several object definitions.
3. Specify the directory which contains the object class in which the generated objects will be stored.
″ODM Object Class and Object Storage″ discusses the criteria used at object class creation time fordetermining the directory in which to store generated object classes and objects. Most system objectclasses and objects are stored in the /usr/lib/objrepos directory.
4. Add objects to an object class by running the odmadd command with the ASCII file of objectdefinitions specified as the InputFile input file.
Chapter 15. Object Data Manager (ODM) 351

Locking Object Classes
ODM does not implicitly lock object classes or objects. The coordination of locking and unlocking is theresponsibility of the applications accessing the object classes. However, ODM provides the odm_lock andodm_unlock subroutines to control locking and unlocking object classes by application programs.
odm_lock Processes a string that is a path name and can resolve inan object class file or a directory of object classes. Itreturns a lock identifier and sets a flag to indicate that thespecified object class or classes defined by the path nameare in use.
When the odm_lock subroutine sets the lock flag, it does not disable use of the object class by otherprocesses. If usage collision is a potential problem, an application program should explicitly wait until it isgranted a lock on a class before using the class.
Another application cannot acquire a lock on the same path name while a lock is in effect. However, a lockon a directory name does not prevent another application from acquiring a lock on a subdirectory or thefiles within that directory.
To unlock a locked object class, use an odm_unlock subroutine called with the lock identifier returned bythe odm_lock subroutine.
Storing Object Classes and Objects
Each object class you create with an odmcreate command or odm_create_class subroutine is stored in afile as a C language definition of an array of structures. Each object you add to the object class with anodmadd command or an odm_add_obj subroutine is stored as a C language structure in the same file.
You determine the directory in which to store this file when you create the object class.
Storage methods vary according to whether commands or subroutines are used to create object classesand objects.
Attention: Making changes to files that define system object classes and objects can result insystem problems. Consult your system administrator before using the /usr/lib/objrepos directory asa storage directory for object classes and objects.
Using the odm_create_class or odm_add_obj SubroutinesThe odm_create_class or odm_add_obj subroutine is used to create object classes and objects:
v If there is a specific requirement for your application to store object classes other than specified by theODMDIR environment variable, use the odm_set_path subroutine to reset the path. It is stronglyrecommended that you use this subroutine to set explicitly the storage path whenever creating objectclasses or objects from an application.
OR
v Before running your application, use the set command from the command line to set the ODMDIRenvironment variable to specify a directory for storage.
OR
v Store the file in the object repository used to store many of the system object classes, the/usr/lib/objrepos directory.
352 AIX 5L Version 5.3 General Programming Concepts: Writing and Debugging Programs
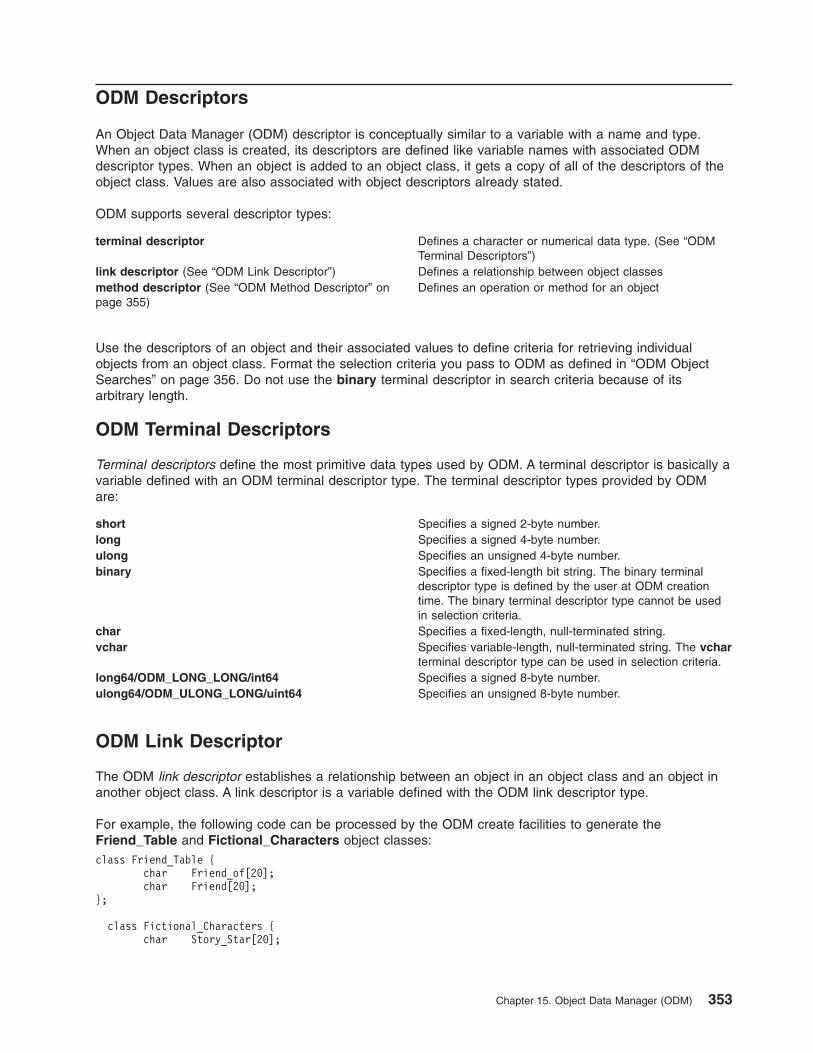
ODM Descriptors
An Object Data Manager (ODM) descriptor is conceptually similar to a variable with a name and type.When an object class is created, its descriptors are defined like variable names with associated ODMdescriptor types. When an object is added to an object class, it gets a copy of all of the descriptors of theobject class. Values are also associated with object descriptors already stated.
ODM supports several descriptor types:
terminal descriptor Defines a character or numerical data type. (See “ODMTerminal Descriptors”)
link descriptor (See “ODM Link Descriptor”) Defines a relationship between object classesmethod descriptor (See “ODM Method Descriptor” onpage 355)
Defines an operation or method for an object
Use the descriptors of an object and their associated values to define criteria for retrieving individualobjects from an object class. Format the selection criteria you pass to ODM as defined in “ODM ObjectSearches” on page 356. Do not use the binary terminal descriptor in search criteria because of itsarbitrary length.
ODM Terminal Descriptors
Terminal descriptors define the most primitive data types used by ODM. A terminal descriptor is basically avariable defined with an ODM terminal descriptor type. The terminal descriptor types provided by ODMare:
short Specifies a signed 2-byte number.long Specifies a signed 4-byte number.ulong Specifies an unsigned 4-byte number.binary Specifies a fixed-length bit string. The binary terminal
descriptor type is defined by the user at ODM creationtime. The binary terminal descriptor type cannot be usedin selection criteria.
char Specifies a fixed-length, null-terminated string.vchar Specifies variable-length, null-terminated string. The vchar
terminal descriptor type can be used in selection criteria.long64/ODM_LONG_LONG/int64 Specifies a signed 8-byte number.ulong64/ODM_ULONG_LONG/uint64 Specifies an unsigned 8-byte number.
ODM Link Descriptor
The ODM link descriptor establishes a relationship between an object in an object class and an object inanother object class. A link descriptor is a variable defined with the ODM link descriptor type.
For example, the following code can be processed by the ODM create facilities to generate theFriend_Table and Fictional_Characters object classes:class Friend_Table {
char Friend_of[20];char Friend[20];
};
class Fictional_Characters {char Story_Star[20];
Chapter 15. Object Data Manager (ODM) 353

char Birthday[20];short Age;link Friend_Table Friend_Table Friend_of Friends_of;
};
The Fictional_Characters object class uses a link descriptor to make the Friends_of descriptors link tothe Friend_Table object class. To resolve the link, the Friends_of descriptor retrieves objects in theFriend_Table object class with matching data in its Friend_of descriptors. The link descriptor in theFictional_Characters object class defines the class being linked to (Friend_Table), the descriptor beinglinked to (Friend_of), and the name of the link descriptor (Friends_of) in the Fictional_Characters objectclass.
The following code could be used to add objects to the Fictional_Characters and Friend_Table objectclasses:Fictional_Characters:
Story_Star = "Cinderella"Birthday = "Once upon a time"Age = 19Friends_of = "Cinderella"
Fictional_Characters:Story_Star = "Snow White"Birthday = "Once upon a time"Age = 18Friends_of = "Snow White"
Friend_Table:Friend_of = "Cinderella"Friend = "Fairy Godmother"
Friend_Table:Friend_of = "Cinderella"Friend = "mice"
Friend_Table:Friend_of = "Snow White"Friend = "Sneezy"
Friend_Table:Friend_of = "Snow White"Friend = "Sleepy"
Friend_Table:Friend_of = "Cinderella"Friend = "Prince"
Friend_Table:Friend_of = "Snow White"Friend = "Happy"
The following tables show a conceptual picture of the Fictional_Characters and Friend_Table objectclasses, the objects added to the classes, and the link relationship between them.
Story_Star (char) Birthday (char) Age (short) Friends_of (link)
Cinderella Once upon a time 19 Cinderella
Snow White Once upon a time 18 Snow White
Retrieved data for 'Story_Star = "Cinderella"Cinderella:
Birthday = Once upon a timeAge = 19Friends_of = CinderellaFriend_of = Cinderella
There is a direct link between the ″Friends_of″ and ″Friend_of″ columns of the two tables. The followingtable provides a conceptual picture of a link relationship between two object classes.
354 AIX 5L Version 5.3 General Programming Concepts: Writing and Debugging Programs
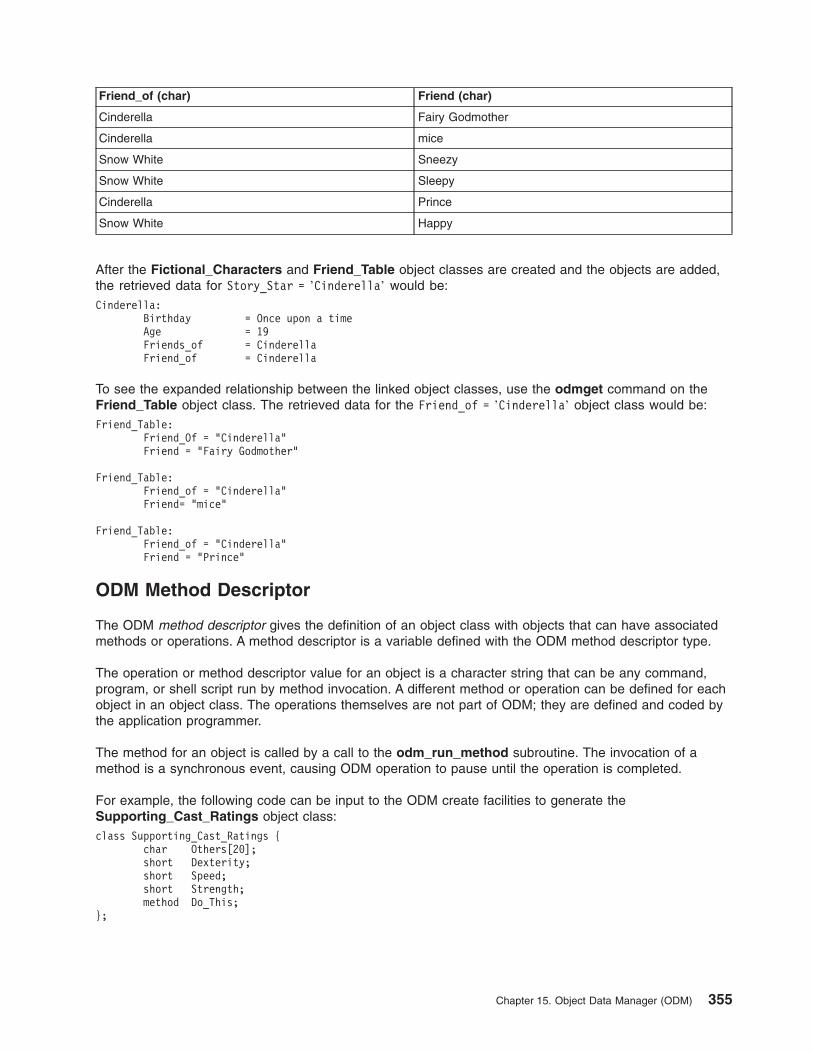
Friend_of (char) Friend (char)
Cinderella Fairy Godmother
Cinderella mice
Snow White Sneezy
Snow White Sleepy
Cinderella Prince
Snow White Happy
After the Fictional_Characters and Friend_Table object classes are created and the objects are added,the retrieved data for Story_Star = ’Cinderella’ would be:Cinderella:
Birthday = Once upon a timeAge = 19Friends_of = CinderellaFriend_of = Cinderella
To see the expanded relationship between the linked object classes, use the odmget command on theFriend_Table object class. The retrieved data for the Friend_of = ’Cinderella’ object class would be:Friend_Table:
Friend_Of = "Cinderella"Friend = "Fairy Godmother"
Friend_Table:Friend_of = "Cinderella"Friend= "mice"
Friend_Table:Friend_of = "Cinderella"Friend = "Prince"
ODM Method Descriptor
The ODM method descriptor gives the definition of an object class with objects that can have associatedmethods or operations. A method descriptor is a variable defined with the ODM method descriptor type.
The operation or method descriptor value for an object is a character string that can be any command,program, or shell script run by method invocation. A different method or operation can be defined for eachobject in an object class. The operations themselves are not part of ODM; they are defined and coded bythe application programmer.
The method for an object is called by a call to the odm_run_method subroutine. The invocation of amethod is a synchronous event, causing ODM operation to pause until the operation is completed.
For example, the following code can be input to the ODM create facilities to generate theSupporting_Cast_Ratings object class:class Supporting_Cast_Ratings {
char Others[20];short Dexterity;short Speed;short Strength;method Do_This;
};
Chapter 15. Object Data Manager (ODM) 355

In the example, the Do_This descriptor is a method descriptor defined for the Supporting_Cast_Ratingsobject class. The value of the method descriptor can be a string specifying a command, program, or shellscript for future invocation by an odm_run_method subroutine.
The following code is an example of how to add objects to the Supporting_Cast_Ratings object class:Supporting_Cast_Ratings:
Others = "Sleepy"Dexterity = 1Speed = 1Strength = 3Do_This = "echo Sleepy has speed of 1"
Supporting_Cast_Ratings:Others = "Fairy Godmother"Dexterity = 10Speed = 10Strength = 10Do_This = "odmget -q "Others='Fairy Godmother'" Supporting_Cast_Ratings"
The following table shows a conceptual picture of the Supporting_Cast_Ratings object class with theDo_This method descriptor and operations associated with individual objects in the class.
Others (char) Dexterity (short) Speed (short) Stength (short) Do_This (method)
Sleepy 1 1 3 echo Sleepy has speed of 1
Fairy Godmother 10 10 10 odmget —q "Others='FairyGodmother'"Supporting_Cast_Ratings"
odm_run_method run of Sleepy's method displays(using echo):"Sleepy has speed of 1"
After the Supporting_Cast_Ratings object class is created and the objects are added, an invocation (bythe odm_run_method subroutine) of the method defined for Sleepy would cause the echo command todisplay:Sleepy has speed of 1
ODM Object Searches
Many ODM routines require that one or more objects in a specified object class be selected forprocessing. You can include search criteria in the form of qualifiers when you select objects with certainroutines.
qualifier A null-terminated string parameter on ODM subroutinecalls that gives the qualification criteria for the objects toretrieve
The descriptor names and qualification criteria specified by this parameter determine which objects in theobject class are selected for later processing. Each qualifier contains one or more predicates connectedwith logical operators. Each predicate consists of a descriptor name, a comparison operator, and aconstant.
A qualifier with three predicates joined by two logical operators follows:SUPPNO=30 AND (PARTNO>0 AND PARTNO<101)
In this example, the entire string is considered the qualifier. The three predicates are SUPPNO=30, PARTNO>0,and PARTNO<101, and the AND logical operator is used to join the predicates. In the first predicate, SUPPNO
356 AIX 5L Version 5.3 General Programming Concepts: Writing and Debugging Programs

is the name of the descriptor in an object, the = (equal sign) is a comparison operator, and 30 is theconstant against which the value of the descriptor is compared.
Each predicate specifies a test applied to a descriptor that is defined for each object in the object class.The test is a comparison between the value of the descriptor of an object and the specified constant. Thefirst predicate in the example shows an = (equal to) comparison between the value of a descriptor(SUPPNO) and a constant (30).
The part of the qualifier within parenthesesPARTNO>0 AND PARTNO<101
contains two predicates joined by the AND logical operator. The PARTNO descriptor is tested for a valuegreater than 0 in the first predicate, then tested for a value less than 101 in the second predicate. Then thetwo predicates are logically concatenated to determine a value for that part of the qualifier. For example, ifPARTNO is the descriptor name for a part number in a company inventory, then this part of the qualifierdefines a selection for all products with part numbers greater than 0 and less than 101.
In another example, the qualifier:lname='Smith' AND Company.Dept='099' AND Salary<2500
can be used to select everyone (in ODM, every object) with a last name of Smith who is in Department099 and has a salary less than $2500. Note that the Dept descriptor name is qualified with its Companyobject class to create a unique descriptor.
Descriptor Names in ODM Predicates
In ODM, a descriptor name is not necessarily unique. You can use a descriptor name in more than oneobject class. When this is the case, you specify the object class name along with the descriptor name in apredicate to create a unique reference to the descriptor.
Comparison Operators in ODM Predicates
The following are valid comparison operators:
= Equal to!= Not equal to> Greater than>= Greater than or equal to< Less than<= Less than or equal toLIKE Similar to; finds patterns in character string data
Comparisons can be made only between compatible data types.
LIKE Comparison OperatorThe LIKE operator enables searching for a pattern within a char descriptor type. For example, thepredicate:NAME LIKE 'ANNE'
defines a search for the value ANNE in the NAME descriptor in each object in the specified object class. Inthis case, the example is equivalent to:NAME = 'ANNE'
You can also use the LIKE operator with the following pattern-matching characters and conventions:
Chapter 15. Object Data Manager (ODM) 357

v Use the ? (question mark) to represent any single character. The predicate example:NAME LIKE '?A?'
defines a search for any three-character string that has A as a second character in the value of the NAMEdescriptor of an object. The descriptor values PAM, DAN, and PAT all satisfy this search criterion.
v Use the * (asterisk) to represent any string of zero or more characters. The predicate example:NAME LIKE '*ANNE*'
defines a search for any string that contains the value ANNE in the NAME descriptor of an object. Thedescriptor values LIZANNE, ANNETTE, and ANNE all satisfy this search criterion.
v Use [ ] (brackets) to match any of the characters enclosed within the brackets. The predicate example:NAME LIKE '[ST]*'
defines a search for any descriptor value that begins with S or T in the NAME descriptor of an object.
Use a - (minus sign) to specify a range of characters. The predicate example:NAME LIKE '[AD-GST]*'
defines a search for any descriptor value that begins with any of the characters A, D, E, F, G, S, or T.
v Use [!] (brackets enclosing an exclamation mark) to match any single character except one of thoseenclosed within the brackets. The predicate example:NAME LIKE '[!ST]*'
defines a search for any descriptor value except those that begin with S or T in the NAME descriptor ofan object.
You can use the pattern-matching characters and conventions in any combination in the string.
Constants in ODM Predicates
The specified constant can be either a numeric constant or a character string constant:
1. Numeric constants in ODM predicates consist of an optional sign followed by a number (with or withouta decimal point), optionally followed by an exponent marked by the letter E or e. If used, the letter E ore must be followed by an exponent that can be signed.
Some valid numeric constants are:2 2.545 0.5 -2e5 2.11E0+4.555e-10 4E0 -10 999 +42
The E0 exponent can be used to specify no exponent.
2. Character string constants must be enclosed in single quotation marks:'smith' '91'
All character string constants are considered to have a variable length. To represent a single quotationmark inside a string constant, use two single quotation marks. For example:'DON''T GO'
is interpreted as:DON'T GO
AND Logical Operator for Predicates
The AND logical operator can be used with predicates. Use AND or and for the AND logical operator.
The AND logical operator connects two or more predicates. The qualifier example:predicate1 AND predicate2 AND predicate3
358 AIX 5L Version 5.3 General Programming Concepts: Writing and Debugging Programs
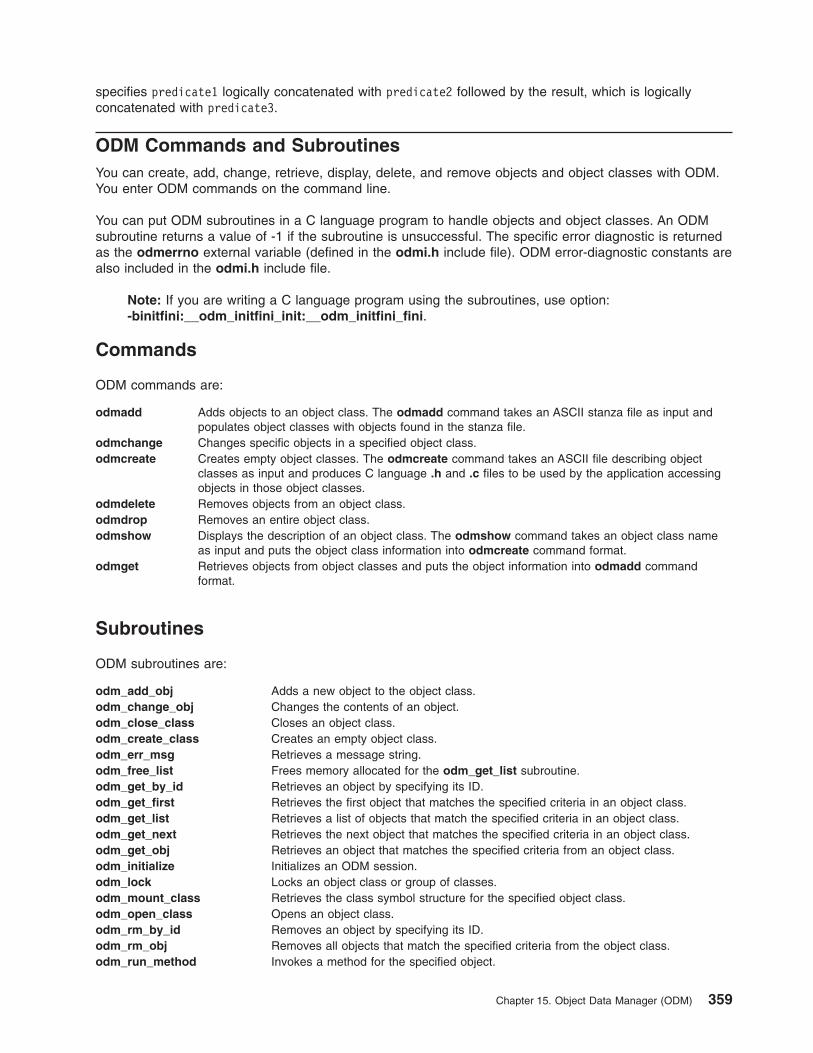
specifies predicate1 logically concatenated with predicate2 followed by the result, which is logicallyconcatenated with predicate3.
ODM Commands and SubroutinesYou can create, add, change, retrieve, display, delete, and remove objects and object classes with ODM.You enter ODM commands on the command line.
You can put ODM subroutines in a C language program to handle objects and object classes. An ODMsubroutine returns a value of -1 if the subroutine is unsuccessful. The specific error diagnostic is returnedas the odmerrno external variable (defined in the odmi.h include file). ODM error-diagnostic constants arealso included in the odmi.h include file.
Note: If you are writing a C language program using the subroutines, use option:-binitfini:__odm_initfini_init:__odm_initfini_fini.
Commands
ODM commands are:
odmadd Adds objects to an object class. The odmadd command takes an ASCII stanza file as input andpopulates object classes with objects found in the stanza file.
odmchange Changes specific objects in a specified object class.odmcreate Creates empty object classes. The odmcreate command takes an ASCII file describing object
classes as input and produces C language .h and .c files to be used by the application accessingobjects in those object classes.
odmdelete Removes objects from an object class.odmdrop Removes an entire object class.odmshow Displays the description of an object class. The odmshow command takes an object class name
as input and puts the object class information into odmcreate command format.odmget Retrieves objects from object classes and puts the object information into odmadd command
format.
Subroutines
ODM subroutines are:
odm_add_obj Adds a new object to the object class.odm_change_obj Changes the contents of an object.odm_close_class Closes an object class.odm_create_class Creates an empty object class.odm_err_msg Retrieves a message string.odm_free_list Frees memory allocated for the odm_get_list subroutine.odm_get_by_id Retrieves an object by specifying its ID.odm_get_first Retrieves the first object that matches the specified criteria in an object class.odm_get_list Retrieves a list of objects that match the specified criteria in an object class.odm_get_next Retrieves the next object that matches the specified criteria in an object class.odm_get_obj Retrieves an object that matches the specified criteria from an object class.odm_initialize Initializes an ODM session.odm_lock Locks an object class or group of classes.odm_mount_class Retrieves the class symbol structure for the specified object class.odm_open_class Opens an object class.odm_rm_by_id Removes an object by specifying its ID.odm_rm_obj Removes all objects that match the specified criteria from the object class.odm_run_method Invokes a method for the specified object.
Chapter 15. Object Data Manager (ODM) 359

odm_rm_class Removes an object class.odm_set_path Sets the default path for locating object classes.odm_unlock Unlocks an object class or group of classes.odm_terminate Ends an ODM session.
ODM Example Code and Output
The following Fictional_Characters, Friend_Table, and Enemy_Table Object Classes and Relationshipstables list the object classes and objects created by the example code in this section.
Table 2. Fictional_Characters
Story_Star (char) Birthday (char) Age (short) Friends_of (link) Enemies_of (link) Do_This (method)
Cinderella Once upon a time 19 Cinderella Cinderella echo CleansHouse
Snow White Once upon a time 18 Snow White Snow White echo CleansHouse
Table 3. Friend_Table
Friend_of (char) Friend (char)
Cinderella Fairy Godmother
Cinderella mice
Snow White Sneezy
Snow White Sleepy
Cinderella Prince
Snow White Happy
Table 4. Enemy_Table
Enemy_of (char) Enemy (char)
Cinderella midnight
Cinderella Mean Stepmother
Snow White Mean Stepmother
ODM Example Input Code for Creating Object Classes
The following example code in the MyObjects.cre file creates three object classes when used as an inputfile with the odmcreate command:* MyObjects.cre* An input file for ODM create utilities.* Creates three object classes:* Friend_Table* Enemy_Table* Fictional_Characters
class Friend_Table {char Friend_of[20];char Friend[20];
};
360 AIX 5L Version 5.3 General Programming Concepts: Writing and Debugging Programs

class Enemy_Table {char Enemy_of[20];char Enemy[20];
};
class Fictional_Characters {char Story_Star[20];char Birthday[20];short Age;link Friend_Table Friend_Table Friend_of Friends_of;link Enemy_Table Enemy_Table Enemy_of Enemies_of;method Do_This;
};
* End of MyObjects.cre input file for ODM create utilities. *
The Fictional_Characters object class contains six descriptors:
v Story_Star and Birthday, each with a descriptor type of char and a 20-character maximum length.
v Age with a descriptor type of short.
v Friends_of and Enemies_of are both from the link class and link to the two previously defined objectclasses.
Note: The object class link is repeated twice.
v Do_This with a descriptor type of method.
To generate the object class files required by ODM, the file containing this code must be processed withthe odmcreate command
ODM Example Output for Object Class DefinitionsProcessing the code in the MyObjects.cre file with the odmcreate command generates the followingstructures in a .h file:* MyObjects.h* The file output from ODM processing of the MyObjects.cre input* file. Defines structures for the three object classes:* Friend_Table* Enemy_Table* Fictional_Characters#include <odmi.h>
struct Friend_Table {long _id; * unique object id within object class *long _reserved; * reserved field *long _scratch; * extra field for application use *char Friend_of[20];char Friend[20];
};
#define Friend_Table_Descs 2extern struct Class Friend_Table_CLASS[];#define get_Friend_Table_list(a,b,c,d,e) (struct Friend_Table * )odm_get_list (a,b,c,d,e)
struct Enemy_Table {long _id;long _reserved;long _scratch;char Enemy_of[20];char Enemy[20];
};#define Enemy_Table_Descs 2extern struct Class Enemy_Table_CLASS[];#define get_Enemy_Table_list(a,b,c,d,e) (struct Enemy_Table * )odm_get_list (a,b,c,d,e)
struct Fictional_Characters {long _id;long _reserved;
Chapter 15. Object Data Manager (ODM) 361
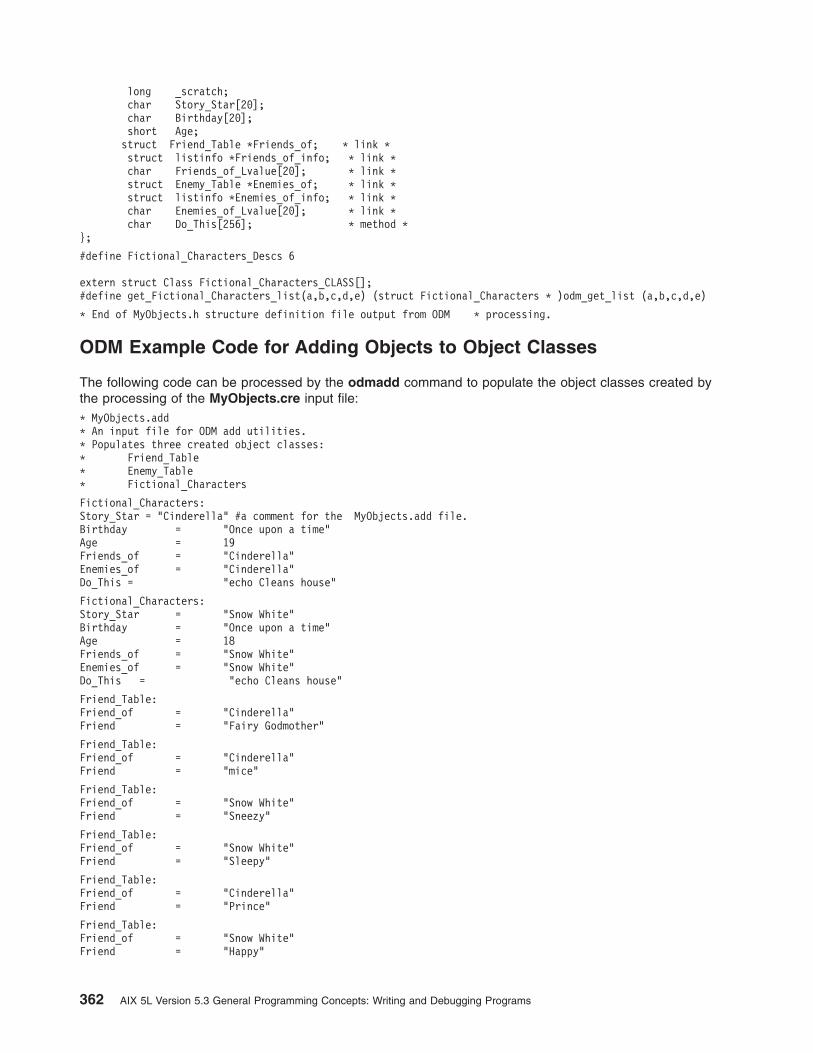
long _scratch;char Story_Star[20];char Birthday[20];short Age;struct Friend_Table *Friends_of; * link *struct listinfo *Friends_of_info; * link *char Friends_of_Lvalue[20]; * link *struct Enemy_Table *Enemies_of; * link *struct listinfo *Enemies_of_info; * link *char Enemies_of_Lvalue[20]; * link *char Do_This[256]; * method *
};
#define Fictional_Characters_Descs 6
extern struct Class Fictional_Characters_CLASS[];#define get_Fictional_Characters_list(a,b,c,d,e) (struct Fictional_Characters * )odm_get_list (a,b,c,d,e)
* End of MyObjects.h structure definition file output from ODM * processing.
ODM Example Code for Adding Objects to Object Classes
The following code can be processed by the odmadd command to populate the object classes created bythe processing of the MyObjects.cre input file:* MyObjects.add* An input file for ODM add utilities.* Populates three created object classes:* Friend_Table* Enemy_Table* Fictional_Characters
Fictional_Characters:Story_Star = "Cinderella" #a comment for the MyObjects.add file.Birthday = "Once upon a time"Age = 19Friends_of = "Cinderella"Enemies_of = "Cinderella"Do_This = "echo Cleans house"
Fictional_Characters:Story_Star = "Snow White"Birthday = "Once upon a time"Age = 18Friends_of = "Snow White"Enemies_of = "Snow White"Do_This = "echo Cleans house"
Friend_Table:Friend_of = "Cinderella"Friend = "Fairy Godmother"
Friend_Table:Friend_of = "Cinderella"Friend = "mice"
Friend_Table:Friend_of = "Snow White"Friend = "Sneezy"
Friend_Table:Friend_of = "Snow White"Friend = "Sleepy"
Friend_Table:Friend_of = "Cinderella"Friend = "Prince"
Friend_Table:Friend_of = "Snow White"Friend = "Happy"
362 AIX 5L Version 5.3 General Programming Concepts: Writing and Debugging Programs

Enemy_Table:Enemy_of = "Cinderella"Enemy = "midnight"
Enemy_Table:Enemy_of = "Cinderella"Enemy = "Mean Stepmother"
Enemy_Table:Enemy_of = "Snow White"Enemy = "Mean Stepmother"
* End of MyObjects.add input file for ODM add utilities. *
Note: The * (asterisk) or the # (pound sign) comment in the previous example code will not go intothe object file. If the beginning of the line causes the line to be a comment, the command does notgo in the object file. The comment will be included in the file and treated as a string if it is includedinside the ″ ″ (double quotation marks).
Related InformationFor further information on this topic, see ODM Error Codes in AIX 5L Version 5.3 Technical Reference.
Subroutine ReferencesThe odm_add_objsubroutine, odm_create_class subroutine, odm_run_method subroutine.
Commands ReferencesThe odmadd command, odmchange command, odmcreate command, odmdelete command, odmdropcommand, odmget command, odmshow command in AIX 5L Version 5.3 Commands Reference, Volume4.
Chapter 15. Object Data Manager (ODM) 363

364 AIX 5L Version 5.3 General Programming Concepts: Writing and Debugging Programs

Chapter 16. Simultaneous Multi-Threading
Simultaneous multi-threading is the ability of a single physical processor to simultaneously dispatchinstructions from more than one hardware thread context. Because there are two hardware threads perphysical processor, additional instructions can run at the same time. The POWER5 processor is asuperscalar processor that is optimized to read and run instructions in parallel. Simultaneousmulti-threading allows you to take advantage of the superscalar nature of the POWER5 processor byscheduling two applications at the same time on the same processor. No single application can fullysaturate the processor. Simultaneous multi-threading is a feature of the POWER5 processor and isavailable with shared processors.
Note: Simultaneous multi-threading is available only on IBM eServer i5 and IBM eServer p5 models.
Benefitting from Simultaneous Multi-ThreadingSimultaneous multi-threading is primarily beneficial in commercial environments where the speed of anindividual transaction is not as important as the total number of transactions that are performed.Simultaneous multi-threading is expected to increase the throughput of workloads with large or frequentlychanging working sets, such as database servers and Web servers.
Workloads that see the greatest simultaneous multi-threading benefit are those that have a high CyclesPer Instruction (CPI) count. These workloads tend to use processor and memory resources poorly. LargeCPIs are usually caused by high cache-miss rates from a large working set. Large commercial workloadsare somewhat dependent upon whether the two hardware threads share instructions or data, or thehardware threads are completely distinct. Large commercial workloads typically have this characteristic.Workloads that share instructions or data, including those that run extensively in the operating system orwithin a single application, might see increased benefits from simultaneous multi-threading.
Workloads that do not benefit much from simultaneous multi-threading are those in which the majority ofindividual software threads use a large amount of any resource in the processor or memory. For example,workloads that are floating-point intensive are likely to gain little from simultaneous multi-threading and arethe ones most likely to lose performance. These workloads heavily use either the floating-point units or thememory bandwidth. Workloads with low CPI and low cache miss rates might see a some small benefit.
Measurements taken on a dedicated partition with commercial workloads indicated a 25%-40% increase inthroughput. Simultaneous multi-threading is should help shared processor partition processing. The extrathreads give the partition a boost after simultaneous multi-threading is dispatched because the partitionrecovers its working set more quickly. Subsequently, the threads perform like they would in a dedicatedpartition. Although it might be somewhat counterintuitive, simultaneous multi-threading performs best whenthe performance of the cache is at its worst.
Setting the Mode With the smtctl CommandAIX allows you to control the mode of the partition for simultaneous multi-threading with the smtctlcommand. With this command, you can turn simultaneous multi-threading on or off system-wide, eitherimmediately or the next time the system boots. The simultaneous multi-threading mode persists acrosssystem boots. By default, AIX enables simultaneous multi-threading.
The syntax for the smtctl command is as follows:smtctl [ -m { off | on } [ { -boot | -now } ] ]
For more information, see the smtctl command in the AIX 5L Version 5.3 Commands Reference, Volume5.
© Copyright IBM Corp. 1997, 2010 365

Hardware Management Console Configuration for SimultaneousMulti-ThreadingWhen you configure shared processor partitions at the Hardware Management Console (HMC), youspecify the minimum, desired, and maximum number of virtual processors. For dedicated partitions, youspecify the same type of parameters, but the processor terminology is different. For dedicated partitions,the processors are always called processors.
Both partitioning models require that you specify a range of processors that control the boot and runtimeassignment of processors to the partition. If possible, the desired processor setting is granted when thesystem starts. If this is not possible, the POWER Hypervisor™™ chooses a different value based on the setof available resources that is greater than, or equal to, the minimum value.
The number of processors specified at the HMC impacts the number of logical processors that AIXallocates. If the partition is capable of simultaneous multi-threading, AIX allocates twice as many logicalprocessors as the maximum processor value because there are two hardware threads per processor andAIX configures each hardware thread as a separate logical processor. This allows AIX to enable or disablesimultaneous multi-threading without rebooting the partition.
Dynamic logical partitioning for Simultaneous Multi-ThreadingWhile a partition is running, you can change the number of processors that are assigned to a partitionthrough Dynamic logical partitioning (DLPAR) procedures at the HMC. You can add or remove processorswithin the constraints of the processor range defined for the partition. When a processor is added to apartition that is enabled for simultaneous multi-threading, AIX starts both hardware threads and two logicalprocessors are brought online. When a processor is removed from a partition that is enabled forsimultaneous multi-threading, AIX stops both hardware threads and two logical processors are takenoffline.
Two DLPAR events are generated when simultaneous multi-threading is enabled. One event is generatedfor each of the logical processors that is added or removed. The API for DLPAR scripts is based on logicalprocessors, so the number of DLPAR events parallels the addition and removal of logical processors. Ifsimultaneous multi-threading is not enabled in the partition, there is only one DLPAR event. AIXautomatically translates the DLPAR request that is sent from the HMC into the appropriate number ofDLPAR events presented to DLPAR-aware applications.
Micro-Partitioning and Simultaneous Multi-ThreadingThe POWER Hypervisor™ saves and restores all necessary processor states when preempting ordispatching virtual processors. For processors that are enabled for simultaneous multi-threading, thismeans two active thread contexts. Each hardware thread is supported as a separate logical processor byAIX. For this reason, a dedicated partition that is created with one physical processor is configured by AIXas a logical 2-way processor. Because this is independent of the partition type, a shared partition with twovirtual processors is configured by AIX as a logical 4-way processor and a shared partition with four virtualprocessors is configured by AIX as a logical 8-way processor. Paired threads are always scheduledtogether at the same time in the same partition.
Shared processor capacity is always delivered in terms of whole physical processors. Withoutsimultaneous multi-threading, AIX configures a 4-way virtual processor partition with 200 units of processorentitlement as a 4-way logical processor partition where each logical processor has the power of 50% of aphysical processor. With simultaneous multi-threading, the 4-way logical processor partition becomes an8-way logical processor partition, where each logical processor has the approximate power of 25% of aphysical processor. However, with simultaneous multi-threading, latency concerns normally associated witha virtual processor’s fractional capacity do not apply linearly to the threads. Because both threads aredispatched together, they are active for the duration of a 50% dispatch window and they share the
366 AIX 5L Version 5.3 General Programming Concepts: Writing and Debugging Programs

underlying physical processor to achieve the logical 25%. This means that each of the logical processorsare able to field interrupts for twice as long as their individual capacities allow.
Hardware Thread PrioritiesThe POWER5 processor allows priorities to be assigned to hardware threads. The difference in prioritybetween sibling threads determines the ratio of physical processor decode slots allotted to each thread.More slots provide better thread performance. Normally, AIX maintains sibling threads at the same priority,but raises or lowers thread priorities in key places to optimize performance. For example, AIX lowersthread priorities when the thread is doing nonproductive work spinning in the idle loop or on a kernel lock.Thread priorities are raised when a thread is holding a critical kernel lock. These priority adjustments donot persist in user mode. AIX does not consider a software thread’s dispatching priority when it is choosingthe hardware thread priority.
Work is distributed across all primary threads before work is dispatched to secondary threads. Theperformance of a thread is best when its paired thread is idle. Thread affinity is also considered in idlestealing and in periodic run queue load balancing.
Chapter 16. Simultaneous Multi-Threading 367

368 AIX 5L Version 5.3 General Programming Concepts: Writing and Debugging Programs

Chapter 17. Dynamic logical partitioning
Partitioning your system is similar to partitioning a hard drive. When you partition a hard drive, you divide asingle physical hard drive so that the operating system recognizes it as a number of separate logical harddrives. On each of these divisions, called partitions, you can install an operating system and use eachpartition as you would a separate physical system.
A logical partition (LPAR) is the division of a computer’s processors, memory, and hardware resources intomultiple environments so that each environment can be operated independently with its own operatingsystem and applications. The number of logical partitions that can be created depends on the system.Typically, partitions are used for different purposes, such as database operation, client/server operations,Web server operations, test environments, and production environments. Each partition can communicatewith the other partitions as if each partition were a separate machine.
Dynamic logical partitioning (DLPAR) provides the ability to logically attach and detach a managedsystem’s resources to and from a logical partition’s operating system without rebooting. Some of thefeatures of DLPAR include:
v The Capacity Upgrade on Demand (CUoD) feature of the IBM System p, which allows customer toactivate preinstalled but inactive processors as resource requirements change.
v The Dynamic Processor Deallocation feature of the IBM System p5 servers, and on some SMP models.Dynamic Processor Deallocation enables a processor to be taken offline dynamically when an internalthreshold of recoverable errors is exceeded. DLPAR enhances the Dynamic Processor Deallocationfeature by allowing an inactive processor, if one exists, to be substituted for the processor that issuspected of being defective. This online switch does not affect applications or kernel extensions.
v DLPAR enables cross-partition workload management, which is particularly important for serverconsolidation in that it can be used to manage system resources across partitions.
DLPAR requests are built from simple add and remove requests that are directed to logical partitions. Theuser can execute these commands as move requests at the Hardware Management Console (HMC),which manages all DLPAR operations. DLPAR operations are enabled by System p firmware and AIX.
DLPAR-Safe and -Aware ProgramsA DLPAR-safe program is one that does not fail as a result of DLPAR operations. Its performance mightsuffer when resources are removed and it might not scale with the addition of new resources, but theprogram still works as expected In fact, a DLPAR-safe program can prevent a DLPAR operation fromsucceeding because it has a dependency that the operating system is obligated to honor.
A DLPAR-aware program is one that has DLPAR code that is designed to adjust its use of systemresources as the actual capacity of the system varies over time. This can be accomplished in the followingways:
v By regularly polling the system in an attempt to discover changes in the system topology
v By registering application specific code that is notified when a change is occurring to the systemtopography
DLPAR-aware programs must be designed, at minimum, to avoid introducing conditions that might causeDLPAR operations to fail. At maximum, DLPAR-aware programs are concerned with performance andscalability. This is a much more complicated task because buffers might need to be drained and resized tomaintain expected levels of performance when memory is added or removed. In addition, the number ofthreads must be dynamically adjusted to account for changes in the number of online processors. Thesethread-based adjustments are not necessarily limited to processor-based decisions. For example, the best
© Copyright IBM Corp. 1997, 2010 369

way to reduce memory consumption in Java™ programs might be to reduce the number of threads,because this reduces the number of active objects that need to be processed by the Java VirtualMachine’s garbage collector.
Most applications are DLPAR-safe by default.
Making Programs DLPAR-SafeThe following types of errors, which represent binary compatibility exposures, can be introduced byDLPAR:
Note: These errors are a result of processor addition.
v If a program has code that is optimized for uniprocessor systems and the number of processors in thepartition is increased from one to two, programs that make runtime checks might take an unexpectedpath if a processor is added during one of these checks. Potential problems can also occur in programsthat implement their own locking primitives, but do so using uniprocessor serialization techniques; thatis, the sync and isync instructions are not included. The use of these instructions is also required forself-modifying and generated code, and are thus necessary on DLPAR-enabled systems. Be sure tolook for uniprocessor-based logic. Programs that make uniprocessor assertions must include logic thatidentifies the number of online processors.
Programs can determine the number of online processors by:
– Loading the _system_configuration.ncpus field
– var.v_ncpus
– Using the sysconf system call with the _SC_NPROCESSORS_ONLN flag.
v Programs that index data by processor number typically use the mycpu system call to determine theidentity of the currently executing processor, in order to index into their data structures. The problempotentially occurs when a new processor is added because the path to the data might not be properlyinitialized or allocated. Programs that preallocate processor-based lists using the number of onlineCPUs are broken, because this value changes with DLPAR.
Avoid this problem by preallocating processor-based data using the maximum possible number ofprocessors that can be brought online at the same time. The operating system can be said to beconfigured to support a maximum of N processors, not that there are N processors active at any giventime. The maximum number of processors is constant, while the number of online processors isincremented and decremented as processors are brought online and taken offline. When a partition iscreated, the minimum, desired, and maximum numbers of processors are specified. The maximumvalue is reflected in the following variables:
– _system_configuration.max_ncpus
– _system_configuration.original_ncpus
– var.v_ncpus_cfg
– sysconf (_SC_NPROCESSORS_CONF)
The _system_configuration.original_ncpus and var.v_ncpus_cfg variables are preexisting variables. OnDLPAR-enabled systems they represent a potential maximum value. On systems not enabled forDLPAR, the value is dictated by the number of processors that are configured at boot time. Bothrepresent the conceptual maximum value that can be supported, even though a processor might havebeen taken offline by Dynamic Processor Deallocation. The use of these preexisting fields isrecommended for applications that are built on AIX 4.3, because this facilitates the use of the samebinary on AIX 4.3 and later. If the application requires runtime initialization of its processor-based data, itcan register a DLPAR handler that is called before a processor is added.
Making Programs DLPAR-AwareA DLPAR-aware program is one that is designed to recognize and dynamically adapt to changes in thesystem configuration. This code need not subscribe to the DLPAR model of awareness, but can bestructured more generally in the form of a system resource monitor that regularly polls the system to
370 AIX 5L Version 5.3 General Programming Concepts: Writing and Debugging Programs

discover changes in the system configuration. This approach can be used to achieve some limitedperformance-related goals, but because it is not tightly integrated with DLPAR, it cannot be effectivelyused to manage large-scale changes to the system configuration. For example, the polling model mightnot be suitable for a system that supports processor hot plug, because the hot-pluggable unit might becomposed of several processor and memory boards. Nor can it be used to manage application-specificdependencies, such as processor bindings, that need to be resolved before the DLPAR processor removeevent is started.
The following types of applications can exploit DLPAR technology:
v Applications that are designed to scale with the system configuration, including those:
– That detect the number of online processors or the size of physical memory when the applicationstarts
– That are externally directed to scale based on an assumed configuration of processors and memory,which usually translates into the use of a maximum number of threads, maximum buffer sizes, or amaximum amount of pinned memory
v Applications that are aware of the number of online processors and the total quantity of system memory,including the following types of applications:
– Performance monitors
– Debugging tools
– System crash tools
– Workload managers
– License managers
Note: Not all license managers are candidates for DLPAR, especially user-based license managers.
v Applications that pin their application data, text, or stack using the plock system call
v Applications that use System V Shared Memory Segments with the PinvOption (SHM_PIN)
v Applications that bind to processors using the bindprocessor system call
Dynamic logical partitioning of large memory pages is not supported. The amount of memory that ispreallocated to the large page pool can have a material impact on the DLPAR capabilities of the partitionregarding memory. A memory region that contains a large page cannot be removed. Therefore, applicationdevelopers might want to provide an option to not use large pages.
Making Programs DLPAR-Aware Using DLPAR APIsApplication interfaces are provided to make programs DLPAR-aware. The SIGRECONFIG signal is sent tothe applications at the various phases of dynamic logical partitioning. The DLPAR subsystem definescheck, pre and post phases for a typical operation. Applications can watch for this signal and use theDLPAR-supported system calls to learn more about the operation in progress and to take any necessaryactions.
Note: When using signals, the application might inadvertently block the signal, or the load on the systemmight prevent the thread from running in a timely fashion. In the case of signals, the system willwait a short period of time, which is a function of the user-specified timeout, and proceed to thenext phase. It is not appropriate to wait indefinitely because a non-privileged rogue thread couldprevent all DLPAR operations from occurring.
The issue of timely signal delivery can be managed by the application by controlling the signal mask andscheduling priority. The DLPAR-aware code can be directly incorporated into the algorithm. Also, the signalhandler can be cascaded across multiple shared libraries so that notification can be incorporated in a moremodular way.
To integrate the DLPAR event using APIs, do the following:
Chapter 17. Dynamic logical partitioning 371

1. Catch the SIGRECONFIG signal by using the sigaction system call. The default action is to ignore thesignal.
2. Control the signal mask in at least one of the threads so that the signal can be delivered in real time.
3. Ensure that the scheduling priority for the thread that is to receive the signal is sufficient so that it willrun quickly after the signal has been sent.
4. Run the dr_reconfig system call to obtain the type of resource, type of action, phase of the event, aswell as other information that is relevant to the current request.
Note: The dr_reconfig system call is used inside the signal handler to determine the nature of theDLPAR request.
Managing an Application’s DLPAR DependenciesA DLPAR remove request can fail for a variety of reasons. The most common of these is that the resourceis busy, or that there are not enough system resources currently available to complete the request. Inthese cases, the resource is left in a normal state as if the DLPAR event never happened.
The primary cause of processor removal failure is processor bindings. The operating system cannot ignoreprocessor bindings and carry on DLPAR operations or applications might not continue to operate properly.To ensure that this does not occur, release the binding, establish a new one, or terminate the application.The specific process or threads that are impacted is a function of the type of binding that is used. Formore information, see “Processor Bindings.”
The primary cause of memory removal failure is that there is not enough pinned memory available in thesystem to complete the request. This is a system-level issue and is not necessarily the result of a specificapplication. If a page in the memory region to be removed has a pinned page, its contents must bemigrated to another pinned page, while atomically maintaining its virtual to physical mappings. The failureoccurs when there is not enough pinnable memory in the system to accommodate the migration of thepinned data in the region that is being removed. To ensure that this does not occur, lower the level ofpinned memory in the system. This can be accomplished by destroying pinned shared memory segments,terminating programs that implement the plock system call, or removing the plock on the program.
The primary cause of PCI slot removal failure is that the adapters in the slot are busy. Note that devicedependencies are not tracked. For example, the device dependency might extend from a slot to one of thefollowing: an adapter, a device, a volume group, a logical volume, a file system, or a file. In this case,resolve the dependencies manually by stopping the relevant applications, unmounting file systems, andvarying off volume groups.
Processor BindingsApplications can bind to a processor by using the bindprocessor system call. This system call assumes aprocessor-numbering scheme starting with zero (0) and ending with N-1, where N is the number of onlineCPUs. N is determined programmatically by reading the _system_configuration.ncpus system variable.As processors are added and removed, this variable is incremented and decremented using dynamiclogical partitioning.
Note that the numbering scheme does not include holes. Processors are always added to the Nth positionand removed from the Nth-1 position. The numbering scheme used by the bindprocessor system callcannot be used to bind to a specific logical processor, because any processor can be removed and this isnot reflected in the numbering scheme, because the Nth-1 CPU is always deallocated. For this reason, theidentifiers used by the bindprocessor system call are called bind CPU IDs.
Changes to the _system_configuration.ncpus system variables have the following implications:
372 AIX 5L Version 5.3 General Programming Concepts: Writing and Debugging Programs

v Applications must be prepared to receive an error from the bindprocessor system call if the lastprocessor is removed after the applications have read the variable. This error condition was firstintroduced by the Dynamic Processor Deallocation (runtime deallocation of defective processors).
v Applications that are designed to scale with the number of processors must reread the_system_configuration.ncpus system variable when the number of processors changes.
Applications can also bind to a set of processors using a feature of Workload Manager (WLM) calledSoftware Partitioning. It assumes a numbering scheme that is based on logical CPU IDs, which also startwith zero (0) and end with N-1. However, N in this case is the maximum number of processors that can besupported architecturally by the partition. The numbering scheme reflects both online and offlineprocessors.
Therefore, it is important to note the type of binding that is used so that the correct remedy can be appliedwhen removing a processor. The bindprocessor command can be used to determine the number ofonline processors. The ps command can be used to identify the processes and threads that are bound tothe last online processor. After the targets have been identified, the bindprocessor command can be usedagain to define new attachments.
WLM-related dependencies can be resolved by identifying the particular software partitions that arecausing problems. To resolve these dependencies, do the following:
Note: The system schedules bound jobs around offline or pending offline processors, so no change isrequired if the particular software partition has another online CPU.
1. Use the lsrset command to view the set of software partitions that are used by WLM.
2. Identify these software partitions by using the lsclass command.
3. Identify the set of classes that use these software partitions by using the chclass command.
4. Reclassify the system using the wlmctrl command.
At this point, the new class definitions take effect and the system automatically migrates bound jobs awayfrom the logical processor that is being removed.
Integrating the DLPAR Operation into the ApplicationThe DLPAR operation can be integrated into the application in the following ways:
v Using a script-based approach, where the user installs a set of DLPAR scripts into a directory. Thesescripts are invoked while the DLPAR operation is being run. The scripts are designed to externallyreconfigure the application.
v Using the SIGRECONFIG signal, which is used to catch the signal of every process that has registered.The signal method assumes that the application has been coded to catch the signal, and that the signalhandler will reconfigure the application. The signal handler invokes an interface to determine the natureof the DLPAR operation.
Both of these methods follow the same high level structure. Either method can be used to provide supportfor DLPAR, although only the script-based mechanism can be used to manage DLPAR dependenciesrelated to Workload Manager software partitions (processor sets). No APIs are associated with WorkloadManager, so the use of a signal handler is not a suitable vehicle for dealing with the WorkloadManager-imposed scheduling constraints. The applications themselves are not Workload Manager-aware.In this case, the system administrator might want to provide a script that invokes Workload Managercommands to manage DLPAR interactions with Workload Manager.
The decision of which method to use should be based on how the system or resource-specific logic wasintroduced into the application. If the application was externally directed to use a specific number ofthreads or to size its buffers, use the script-based approach. If the application is directly aware of thesystem configuration and uses this information accordingly, use the signal-based approach.
Chapter 17. Dynamic logical partitioning 373

The DLPAR operation itself is divided into the following phases:
v check phase
The check phase is invoked first and it enables applications to fail the current DLPAR request beforeany state in the system is changed. For example, the check phase could be used by a CPU-basedlicense manager to fail the integration of a new processor if that CPU addition makes the number ofprocessors in the system exceed the number of licensed processors. It could also be used to preservethe DLPAR safeness of a program that is not DLPAR-safe. In the latter case, consideration must begiven to services provided by the application, because it might be better to stop the program, completethe request, and then restart the program.
v pre phase and post phase
The pre phase and post phase are provided to stop the program, complete the request, and then restartthe program.
The system attempts to ensure that all of the check code across the different mediums is executed in itsentirety at the system level before the DLPAR event advances to the next phase.
Actions Taken by DLPAR ScriptsApplication scripts are invoked for both add and remove operations. When removing resources, scripts areprovided to resolve conditions imposed by the application that prevent the resource from being removed.The presence of particular processor bindings and the lack of pinnable memory might cause a removerequest to fail. A set of commands is provided to identify these situations, so that scripts can be written toresolve them.
To identify and resolve the DLPAR dependencies, the following commands can be used:
v The ps command displays bindprocessor attachments and plock system call status at the processlevel.
v The bindprocessor command displays online processors and makes new attachments.
v The kill command sends signals to processes.
v The ipcs command displays pinned shared-memory segments at the process level.
v The lsrset command displays processor sets.
v The lsclass command displays Workload Manager classes, which might include processor sets.
v The chclass command is used to change class definitions.
Scripts can also be used for scalability and general performance issues. When resources are removed,you can reduce the number of threads that are used or the size of application buffers. When the resourcesare added, you can increase these parameters. You can provide commands that can be used todynamically make these adjustments, which can be triggered by these scripts. Install the scripts to invokethese commands within the context of the DLPAR operation.
High-Level Structure of DLPAR ScriptsThis section provides an overview of the scripts, which can be Perl scripts, shell scripts, or commands.Application scripts are required to provide the following commands:
v scriptinfo
Identifies the version, date, and vendor of the script. It is called when the script is installed.
v register
Identifies the resources managed by the script. If the script returns the resource name cpu, mem,capacity, or var_weight, the script is automatically invoked when DLPAR attempts to reconfigureprocessors, memory, entitled capacity, or variable weight, respectively. The register command is calledwhen the script is installed with the DLPAR subsystem.
v usage resource_name
374 AIX 5L Version 5.3 General Programming Concepts: Writing and Debugging Programs

Returns information describing how the resource is being used by the application. The descriptionshould be relevant so that the user can determine whether to install or uninstall the script. It shouldidentify the software capabilities of the application that are impacted. The usage command is called foreach resource that was identified by the register command.
v checkrelease resource_name
Indicates whether the DLPAR subsystem should continue with the removal of the named resource. Ascript might indicate that the resource should not be removed if the application is not DLPAR-aware andthe application is considered critical to the operation of the system.
v prerelease resource_name
Reconfigures, suspends, or terminates the application so that its hold on the named resource isreleased.
v postrelease resource_name
Resumes or restarts the application.
v undoprerelease resource_name
Invoked if an error is encountered and the resource is not released.
v checkacquire resource_name
Indicates whether the DLPAR subsystem should proceed with the resource addition. It might be used bya license manager to prevent the addition of a new resource, for example cpu, until the resource islicensed.
v preacquire resource_name
Used to prepare for a resource addition.
v undopreacquire resource_name
Invoked if an error is encountered in the preacquire phase or when the event is acted upon.
v postacquire resource_name
Resumes or starts the application.
Installing Application Scripts Using the drmgr CommandThe drmgr command maintains an internal database of installed-script information. This information iscollected when the system is booted and is refreshed when new scripts are installed or uninstalled. Theinformation is derived from the scriptinfo, register, and usage commands. The installation of scripts issupported through options to the drmgr command, which copies the named script to the/usr/lib/dr/scripts/all/ directory where it can be later accessed. You can specify an alternate location forthis repository. To determine the machine upon which a script is used, specify the target host name wheninstalling the script.
To specify the location of the base repository, use the following command:drmgr -R base_directory_path
To install a script, use the following command:drmgr -i script_name [-f] [-w mins] [-D hostname]
The following flags are defined:
v The -i flag is used to name the script.
v The -f flag must be used to replace a registered script.
v The -w flag is used to specify the number of minutes that the script is expected to execute. This isprovided as an override option to the value specified by the vendor.
v The -D flag is used to register a script to be used on a particular host.
To uninstall a script, use the following command:drmgr -u script_name [-D hostname]
Chapter 17. Dynamic logical partitioning 375

The following flags are defined:
v The -u flag is used to indicate which script should be uninstalled.
v The -D flag is used to uninstall a script that has been registered for a specific directory.
To display information about scripts that have already been installed, use the following command:drmgr -l
Naming Conventions for ScriptsIt is suggested that the script names be built from the vendor name and the subsystem that is beingcontrolled. System administrators should name their scripts with the sysadmin prefix. For example, asystem administrator who wanted to provide a script to control Workload Manager assignments mightname the script sysadmin_wlm.
Script Execution Environment and Input ParametersScripts are invoked with the following execution environment :
v Process UID is set to the UID of the script.
v Process GID is set to the GID of the script.
v PATH environment variable is set to the /usr/bin:/etc:/usr/sbin directory.
v LANG environment variable might or might not be set.
v Current working directory is set to /tmp.
v Command arguments and environment variables are used to describe the DLPAR event.
Scripts receive input parameters through command arguments and environment variables, and provideoutput by writing name=value pairs to standard output, where name=value pairs are delimited by newlines. The name is defined to be the name of the return data item that is expected, and value is the valueassociated with the data item. Text strings must be enclosed by parentheses; for example,DR_ERROR="text". All environment variables and name=value pairs must begin with DR_, which is reservedfor communicating with application scripts.
The scripts use DR_ERROR name=value environment variable pair to provide error descriptions.
You can examine the command arguments to the script to determine the phase of the DLPAR operation,the type of action, and the type of resource that is the subject of the pending DLPAR request. Forexample, if the script command arguments are checkrelease mem, then the phase is check, the action isremove, and the type of resource is memory. The specific resource that is involved can be identified byexamining environment variables.
The following environment variables are set for memory add and remove:
Note: In the following description, one frame is equal to 4 KB.
v DR_FREE_FRAMES=0xFFFFFFFF
The number of free frames currently in the system, in hexadecimal format.
v DR_MEM_SIZE_COMPLETED=n
The number of megabytes that were successfully added or removed, in decimal format.
v DR_MEM_SIZE_REQUEST=n
The size of the memory request in megabytes, in decimal format.
v DR_PINNABLE_FRAMES=0xFFFFFFFF
The total number of pinnable frames currently in the system, in hexadecimal format. This parameterprovides valuable information when removing memory in that it can be used to determine when thesystem is approaching the limit of pinnable memory, which is the primary cause of failure for memoryremove requests.
376 AIX 5L Version 5.3 General Programming Concepts: Writing and Debugging Programs

v DR_TOTAL_FRAMES=0xFFFFFFFF
The total number of frames currently in the system, in hexadecimal format.
The following environment variables are set for processor add and remove:
v DR_BCPUID=N
The bind CPU ID of the processor that is being added or removed in decimal format. A bindprocessorattachment to this processor does not necessarily mean that the attachment has to be undone. This isonly true if it is the Nth processor in the system, because the Nth processor position is the one that isalways removed in a CPU remove operation. Bind IDs are consecutive in nature, ranging from 0 to Nand are intended to identify only online processors. Use the bindprocessor command to determine thenumber of online CPUs.
v DR_LCPUID=N
The logical CPU ID of the processor that is being added or removed in decimal format.
The following environment variables are set for Micro-Partitioning.
DR_CPU_CAPACITY=NThe partition’s percentage of shared physical processors.
DR_VAR_WEIGHT=NThe partition’s relative priority for determining how to allocate shared pool idle cycles.
DR_CPU_CAPACITY_DELTA=NThe difference between the current value of the partition’s percentage of shared physicalprocessors and the value to which it will be changed when this operation is complete.
DR_VAR_WEIGHT_DELTA=NThe difference between the current value of the partition’s variable weight and the value to which itwill be changed when this operation is complete.
The operator can display the information about the current DLPAR request using the detail level at theHMC to observe events as they occur. This parameter is specified to the script using theDR_DETAIL_LEVEL=N environment variable, where N can range from 0 to 5. The default value is zero (0)and signifies no information. A value of one (1) is reserved for the operating system and is used to presentthe high-level flow. The remaining levels (2-5) can be used by the scripts to provide information with theassumption that larger numbers provide greater detail.
Scripts provide detailed data by writing the following name=value pairs to standard output:
name=value pair Description
DR_LOG_ERR=message Logs the message with the syslog level of the LOG_ERR environmentvariable.
DR_LOG_WARNING=message Logs the message with the syslog level of the LOG_WARNINGenvironment variable.
DR_LOG_INFO=message Logs the message with the syslog level of the LOG_INFOenvironment variable.
DR_LOG_EMERG=message Logs the message with the syslog level of the LOG_EMERGenvironment variable.
DR_LOG_DEBUG=message Logs the message with the syslog level of the LOG_DEBUGenvironment variable.
In addition, the operator can also set up a log of information that is preserved by using the syslog facility,in which case, the above information is routed to that facility as well. You must configure the syslog facilityin this case.
Chapter 17. Dynamic logical partitioning 377
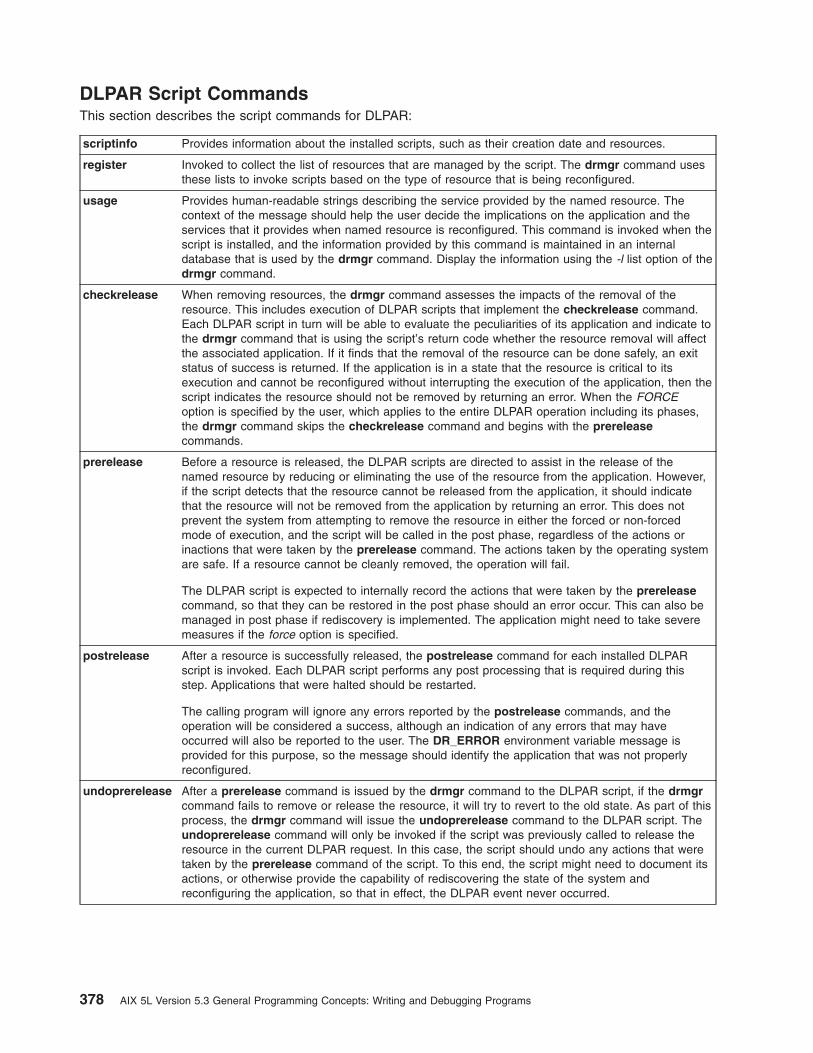
DLPAR Script CommandsThis section describes the script commands for DLPAR:
scriptinfo Provides information about the installed scripts, such as their creation date and resources.
register Invoked to collect the list of resources that are managed by the script. The drmgr command usesthese lists to invoke scripts based on the type of resource that is being reconfigured.
usage Provides human-readable strings describing the service provided by the named resource. Thecontext of the message should help the user decide the implications on the application and theservices that it provides when named resource is reconfigured. This command is invoked when thescript is installed, and the information provided by this command is maintained in an internaldatabase that is used by the drmgr command. Display the information using the -l list option of thedrmgr command.
checkrelease When removing resources, the drmgr command assesses the impacts of the removal of theresource. This includes execution of DLPAR scripts that implement the checkrelease command.Each DLPAR script in turn will be able to evaluate the peculiarities of its application and indicate tothe drmgr command that is using the script’s return code whether the resource removal will affectthe associated application. If it finds that the removal of the resource can be done safely, an exitstatus of success is returned. If the application is in a state that the resource is critical to itsexecution and cannot be reconfigured without interrupting the execution of the application, then thescript indicates the resource should not be removed by returning an error. When the FORCEoption is specified by the user, which applies to the entire DLPAR operation including its phases,the drmgr command skips the checkrelease command and begins with the prereleasecommands.
prerelease Before a resource is released, the DLPAR scripts are directed to assist in the release of thenamed resource by reducing or eliminating the use of the resource from the application. However,if the script detects that the resource cannot be released from the application, it should indicatethat the resource will not be removed from the application by returning an error. This does notprevent the system from attempting to remove the resource in either the forced or non-forcedmode of execution, and the script will be called in the post phase, regardless of the actions orinactions that were taken by the prerelease command. The actions taken by the operating systemare safe. If a resource cannot be cleanly removed, the operation will fail.
The DLPAR script is expected to internally record the actions that were taken by the prereleasecommand, so that they can be restored in the post phase should an error occur. This can also bemanaged in post phase if rediscovery is implemented. The application might need to take severemeasures if the force option is specified.
postrelease After a resource is successfully released, the postrelease command for each installed DLPARscript is invoked. Each DLPAR script performs any post processing that is required during thisstep. Applications that were halted should be restarted.
The calling program will ignore any errors reported by the postrelease commands, and theoperation will be considered a success, although an indication of any errors that may haveoccurred will also be reported to the user. The DR_ERROR environment variable message isprovided for this purpose, so the message should identify the application that was not properlyreconfigured.
undoprerelease After a prerelease command is issued by the drmgr command to the DLPAR script, if the drmgrcommand fails to remove or release the resource, it will try to revert to the old state. As part of thisprocess, the drmgr command will issue the undoprerelease command to the DLPAR script. Theundoprerelease command will only be invoked if the script was previously called to release theresource in the current DLPAR request. In this case, the script should undo any actions that weretaken by the prerelease command of the script. To this end, the script might need to document itsactions, or otherwise provide the capability of rediscovering the state of the system andreconfiguring the application, so that in effect, the DLPAR event never occurred.
378 AIX 5L Version 5.3 General Programming Concepts: Writing and Debugging Programs

checkacquire This command is the first DLPAR script-based command that is called in the acquire-new-resourcesequence. It is called for each installed script that previously indicated that it supported theparticular type of resource that is being added. One of the primary purposes of the checkacquirephase is to enable processor-based license managers, which might want to fail the addition of aprocessor. The checkacquire command is always invoked, regardless of the value of the FORCEenvironment variable, and the calling program honors the return code of the script. The usercannot force the addition of a new processor if a script or DLPAR-aware program fails the DLPARoperation in the check phase.
In short, the FORCE environment variable does not really apply to the checkacquire command,although it does apply to the other phases. In the preacquire phase, it dictates how far the scriptshould go when reconfiguring the application. The force option can be used by the scripts tocontrol the policy by which applications are stopped and restarted similar to when a resource isreleased, which is mostly a DLPAR-safe issue.
preacquire Assuming that no errors were reported in the checkacquire phase, the system advances to thepreacquire phase, where the same set of scripts are invoked to prepare for the acquisition of anew resource, which is supported through the preacquire command. Each of these scripts arecalled, before the system actually attempts to integrate the resource, unless an error was reportedand the FORCE environment variable was not specified by the user. If the FORCE environmentvariable was specified, the system proceeds to the integrate stage, regardless of the script’s statedreturn code. No errors are detected when the FORCE environment variable is specified, becauseall errors are avoidable by unconfiguring the application, which is an accepted practice when theFORCE environment variable is specified. If an error is encountered and the FORCE environmentvariable is not specified, the system will proceed to the undopreacquire phase, but only thepreviously executed scripts in the current phase are rerun. During this latter phase, the scripts aredirected to perform recovery actions.
undopreacquire The undopreacquire phase is provided so that the scripts can perform recovery operations. If ascript is called in the undopreacquire phase, it can assume that it successfully completed thepreacquire command.
postacquire The postacquire command is executed after the resource has been successfully integrated by thesystem. Each DLPAR script that was previously called in the check and pre phases is called again.This command is used to incorporate the new resource into the application. For example, theapplication might want to create new threads, expands its buffers, or the application might need tobe restarted if it was previously halted.
Making Kernel Extensions DLPAR-AwareLike applications, most kernel extensions are DLPAR-safe by default. However, some are sensitive to thesystem configuration and might need to be registered with the DLPAR subsystem. Some kernel extensionspartition their data along processor lines, create threads based on the number of online processors, orprovide large pinned memory buffer pools. These kernel extensions must be notified when the systemtopology changes. The mechanism and the actions that need to be taken parallel those of DLPAR-awareapplications.
Registering Reconfiguration HandlersThe following kernel services are provided to register and unregister reconfiguration handlers:#include sys/dr.h
int reconfig_register(int (*handler)(void *, void *, int, dr_info_t *),int actions, void * h_arg, ulong *h_token, char *name);
void reconfig_unregister(ulong h_token);
int (*handler)(void *event, void *h_arg, unsigned long long req, void *resource_info);
void reconfig_unregister(ulong h_token);
Chapter 17. Dynamic logical partitioning 379

int reconfig_register_ext (int (*handler)(void *, void *, unsigned long long, dr_info_t *),unsigned long long actions, void * h_arg, ulong *h_token, char *name);
int (*handler)(void *event, void *h_arg, unsigned long long req, void *resource_info);
Note: Programmers are encouraged to use the kernel service reconfig_register_ext. This servicesupports more events to be notified to the kernel extensions. The old kernel service(reconfig_register) is limited to 32 events, making the kernel extensions using this service notportable to future systems supporting more than 32 events.
The parameters for the reconfig_register and reconfig_register_ext subroutines are as follows:
v The handler parameter is the kernel extension function to be invoked.
v The actions parameter allows the kernel extension to specify which events require notification. For a listof the events, see the reconfig_register, reconfig_register_ext, and reconfig_unregister kernelservices.
v The h_arg parameter is specified by the kernel extension, remembered by the kernel along with thefunction descriptor for the handler, and then passed to the handler when it is invoked. It is not useddirectly by the kernel, but is intended to support kernel extensions that manage multiple adapterinstances. In practice, this parameter points to an adapter control block.
v The h_token parameter is an output parameter and is intended to be used when the handler isunregistered.
v The name parameter is provided for information purposes and can be included within an error log entryif the driver returns an error. It is provided by the kernel extension and should be limited to 15 ASCIIcharacters.
The reconfig_register and reconfig_register_ext functions return 0 for success and the appropriateerrno value otherwise.
The reconfig_unregister function is called to remove a previously installed handler.
The reconfig_register, reconfig_register_ext, and reconfig_unregister functions can only be called inthe process environment.
If a kernel extension registers for the pre-phase, it is advisable that it register for the check phase to avoidpartial unconfiguration of the system when removing resources.
Reconfiguration HandlersThe interface to the reconfiguration handler is as follows:int (*handler)(void *event, void *h_arg, int req, void *resource_info);
The parameters to the reconfiguration handler are as follows:
v The event parameter is passed to the handler and is intended to be used only when calling thereconfig_handler_complete subroutine.
v The h_arg parameter is specified at registration time by the handler.
v The req parameter indicates the DLPAR operation performed by the handler. For a list of the events,see the reconfig_register, reconfig_register_ext, and reconfig_unregister kernel services.
v The resource_info parameter identifies the resource-specific information for the current DLPAR request.If the request is processor-based, then the resource_info data is provided through a dri_cpu structure. Ifthe request is memory-based, a dri_mem structure is used. On a Micro-Partitioning partition, if therequest is CPU-capacity based, the resource_info data is provided through a dri_cpu_capacity structure.For more information, and for the format of the dri_cpu_capacity structure, refer to reconfig KernelService.
380 AIX 5L Version 5.3 General Programming Concepts: Writing and Debugging Programs

struct dri_cpu {cpu_t lcpu; /* Logical CPU Id of target CPU */cpu_t bcpu; /* Bind Id of target CPU */
};
struct dri_mem {size64_t req_memsz_change; /* user requested mem size */size64_t sys_memsz; /* system mem size at start */size64_t act_memsz_change; /* mem added/removed so far */rpn64_t sys_free_frames; /* Number of free frames */rpn64_t sys_pinnable_frames;/* Number of pinnable frames */rpn64_t sys_total_frames; /* Total number of frames */unsigned long long lmb_addr; /* start addr of logical memory block */size64_t lmb_size; /* Size of logical memory block being added */
};
If the current DLPAR request is migration of a partition, the handler provides resource_info data to theresource_info data kernel extensions, but the kernel extensions do not need to access the contents of theresource_info data because this data is not used by the kernel extensions.
Reconfiguration handlers are invoked in the process environment.
Kernel extensions can assume the following:
v Only a single type of resource is being configured or removed at a time.
v Multiple processors will not be specified at the same time. However, kernel extensions should be codedto support the addition or removal of multiple logical memory blocks. You can initiate a request to add orremove gigabytes of memory.
The check phase provides the ability for DLPAR-aware applications and kernel extensions to react to theuser’s request before it has been applied. Therefore, the check-phase kernel extension handler is invokedonce, even though the request might devolve to multiple logical memory blocks. Unlike the check phase,the pre-phase, post phase, and post-error phase are applied at the logical memory block level. This isdifferent for application notification, where the pre-phase, post phase, or alternatively the post-error phaseare invoked once for each user request, regardless of the number of underlying logical memory blocks.Another difference is that the post-error phase for kernel extensions is used when a specific logicalmemory block operation fails, whereas the post-error phase for applications is used when the operation,which in this case is the entire user request, fails.
In general, during the check phase, the kernel extension examines its state to determine whether it cancomply with the impending DLPAR request. If this operation cannot be managed, or if it would adverselyeffect the proper execution of the extension, then the handler returns DR_FAIL. Otherwise the handlerreturns DR_SUCCESS.
During the pre-remove phase, kernel extensions attempt to remove any dependencies that they mighthave on the designated resource. An example is a driver that maintains per-processor buffer pools. Thedriver might mark the associated buffer pool as pending delete, so that new requests are not allocatedfrom it. In time, the pool is drained and might be freed. Other items that must be considered in thepre-remove phase are timers and bound threads, which need to be stopped and terminated, respectively.Alternatively, bound threads can be unbound.
During the post-remove phase, kernel extensions attempt to free any resources through garbagecollection, assuming that the resource was actually removed. If it was not, timers and threads must bereestablished. The DR_resource_POST_ERROR request is used to signify that an error occurred.
During the pre-add phase, kernel extensions must pre-initialize any data paths that are dependent on thenew resource, so that when the new resource is configured, it is ready to be used. The system does notguarantee that the resource will not be used prior to the handler being called again in the post phase.
Chapter 17. Dynamic logical partitioning 381

During the post-add phase, kernel extensions can assume that the resource has been properly added andcan be used. This phase is a convenient place to start bound threads, schedule timers, and increase thesize of buffers.
Kernel extensions can also be notified of memory removals or additions on a per-operation basis, muchlike applications, by registering for one or more of the _OP_ notification types. This enables a kernelextension to modify its resource usage in response to a memory DR operation only once per operation,rather than once per logical memory block (LMB).
DR_MEM_REMOVE_OP_PRE notification is sent before a memory remove. Reconfiguration handlers canstart adjusting their resources in anticipation of the memory remove at this time.DR_MEM_REMOVE_OP_POST and DR_MEM_ADD_OP_POST notifications are sent after a memoryremove or add operation, respectively, whether the operation failed or not. If the operation failed,act_memsz_change is 0.
If possible, within a few seconds, the reconfiguration handlers return DR_SUCCESS to indicate successfulreconfiguration, or DR_FAIL to indicate failure. If more time is required, the handler returns DR_WAIT.
Extended DR HandlersIf a kernel extension expects that the operation is likely to take a long time, that is, several seconds, thehandler returns DR_WAIT to the caller, but proceed with the request asynchronously. In the following case,the handler indicates that it has completed the request by invoking the reconfig_handler_completeroutine.void reconfig_handler_complete(void *event, int rc);
The event parameter is the same parameter that was passed to the handler when it was invoked by thekernel. The rc parameter must be set to either DR_SUCCESS or DR_FAIL to indicate the completionstatus of the handler.
The reconfig_handler_complete kernel service can be invoked in the process or interrupt environments.
Using the xmemdma Kernel ServiceOn systems that are capable of DLPAR, such as the dynamic removal of memory, calls to the xmemdmakernel service without the XMEM_DR_SAFE flag result in the specified memory being flagged as notremovable. This is done to guarantee the integrity of the system, because the system has no knowledge ofhow the caller intends to use the real memory address that was returned. Dynamic memory removaloperations are still possible for other memory, but not for the memory that the xmemdma call specifies.
If the caller is using the real memory address only for informational purposes, such as for trace buffers ordebug information, then the caller can set the XMEM_DR_SAFE flag. This is an indication to the systemthat the real memory address can be exposed to the caller without any risk of data corruption. When thisflag is present, the system will still permit the specified memory to be dynamically removed.
If the caller is using the real memory address to perform actual data access, either by turning off datatranslation and performing CPU load or store access to the real memory, or by programming directmemory access (DMA) controllers to target the real memory, the XMEM_DR_SAFE flag must not be set. Ifthe flag is set, the system’s data integrity could be compromised when the memory is dynamicallyremoved. For information on converting a kernel extension that uses real memory addresses in this way tobe DLPAR-aware, contact your IBM Service Representative.
For more information, see the xmemdma kernel service.
Controlling Memory DLPAR Notification for ApplicationsDynamic addition or removal of memory from an LPAR running multiple DLPAR-aware programs can resultin conflict for resources. By default, each program gets notified equally about the resource change. For
382 AIX 5L Version 5.3 General Programming Concepts: Writing and Debugging Programs

example, if 1 GB of memory is removed from an LPAR running two DR-aware programs, then, by default,each program is notified that 1 GB of memory has been removed. Because the two programs aregenerally unaware of each other, both of them will scale down their memory use by 1 GB, leading toinefficiency. A similar efficiency problem can also occur when new memory is added.
To overcome this problem, AIX allows application scripts to be installed with a percentage factor thatindicates the percentage of the actual memory resource change. The system then notifies the applicationin the event of a memory DLPAR. While installing the application scripts using the drmgr command, youcan specify this percentage factor using the DR_MEM_PERCENT name=value pair. The application scriptwill need to output this name=value pair when it is invoked by the drmgr command with the scriptinfosubcommand. The value must be an integer between 1 and 100. Any value outside of this range isignored, and the default value, which is 100, is used. Additionally, you can also set this name=value pairas an environment variable at the time of installation. During installation, the value from the environmentvariable, if set, will override the value provided by the application script.
Similarly, in applications using the SIGRECONFIG signal handler and dr_reconfig() system call, you cancontrol the memory DLPAR notification by setting the DR_MEM_PERCENT name=value pair as anenvironment variable before the application begins running. This value, however, cannot be changedwithout restarting the application.
Related InformationSample scripts are available in the /usr/samples/dr/scripts directory.
cpupstat, drmgr, drslot command in AIX 5L Version 5.3 Commands Reference, Volume 2.
dr_reconfig System Call and reconfig_register and reconfig_unregister Kernel Services in AIX 5LVersion 5.3 Technical Reference: Kernel and Subsystems Volume 1
Hardware Management Console Installation and Operations Guide
Planning for Partitioned-System Operations
Chapter 17. Dynamic logical partitioning 383

384 AIX 5L Version 5.3 General Programming Concepts: Writing and Debugging Programs

Chapter 18. sed Program Information
The sed program is a text editor that has similar functions to those of ed, the line editor. Unlike ed,however, the sed program performs its editing without interacting with the person requesting the editing.
Manipulating Strings with sed
The sed program performs its editing without interacting with the person requesting the editing. Thismethod of operation allows sed to do the following:
v Edit very large files
v Perform complex editing operations many times without requiring extensive retyping and cursorpositioning (as interactive editors do)
v Perform global changes in one pass through the input.
The editor keeps only a few lines of the file being edited in memory at one time, and does not usetemporary files. Therefore, the file to be edited can be any size as long as there is room for both the inputfile and the output file in the file system.
Starting the Editor
To use the editor, create a command file containing the editing commands to perform on the input file. Theediting commands perform complex operations and require a small amount of typing in the command file.Each command in the command file must be on a separate line. Once the command file is created, enterthe following command on the command line:sed -fCommandFile >Output <Input
In this command the parameters mean the following:
CommandFile The name of the file containing editing commands.Output The name of the file to contain the edited output.Input The name of the file, or files, to be edited.
The sed program then makes the changes and writes the changed information to the output file. Thecontents of the input file are not changed.
How sed WorksThe sed program is a stream editor that receives its input from standard input, changes that input asdirected by commands in a command file, and writes the resulting stream to standard output. If you do notprovide a command file and do not use any flags with the sed command, the sed program copiesstandard input to standard output without change. Input to the program comes from two sources:
Input stream A stream of ASCII characters either from one or more files or entered directly from thekeyboard. This stream is the data to be edited.
Commands A set of addresses and associated commands to be performed, in the following general form:
[Line1 [,Line2] ] command [argument]
The parameters Line1 and Line2 are called addresses. Addresses can be either patterns tomatch in the input stream, or line numbers in the input stream.
You can also enter editing commands along with the sed command by using the -e flag.
© Copyright IBM Corp. 1997, 2010 385

When sed edits, it reads the input stream one line at a time into an area in memory called the patternspace. When a line of data is in the pattern space, sed reads the command file and tries to match theaddresses in the command file with characters in the pattern space. If it finds an address that matchessomething in the pattern space, sed then performs the command associated with that address on the partof the pattern space that matched the address. The result of that command changes the contents of thepattern space, and thus becomes the input for all following commands.
When sed has tried to match all addresses in the command file with the contents of the pattern space, itwrites the final contents of the pattern space to standard output. Then it reads a new input line fromstandard input and starts the process over at the start of the command file.
Some editing commands change the way the process operates.
Flags used with the sed command can also change the operation of the command. See “Using the sedCommand Summary” for more information.
Using Regular ExpressionsA regular expression is a string that contains literal characters, pattern-matching characters and/oroperators that define a set of one or more possible strings. The stream editor uses a set ofpattern-matching characters that is different from the shell pattern-matching characters, but the same asthe line editor, ed.
Using the sed Command Summary
All sed commands are single letters plus some parameters, such as line numbers or text strings. Thecommands summarized below make changes to the lines in the pattern space.
The following symbols are used in the syntax diagrams:
Symbol Meaning[ ] Square brackets enclose optional parts of the commandsitalics Parameters in italics represent general names for a name that you enter. For example, FileName
represents a parameter that you replace with the name of an actual file.Line1 This symbol is a line number or regular expression to match that defines the starting point for applying
the editing command.Line2 This symbol is a line number or regular expression to match that defines the ending point to stop
applying the editing command.
Line Manipulation
Function Syntax/Description
append lines [Line1]a\\nText
Writes the lines contained in Text to the output stream after Line1. The a command mustappear at the end of a line.
change lines [Line1 [,Line2] ]c\\nText
Deletes the lines specified by Line1 and Line2 as the delete lines command does. Then itwrites Text to the output stream in place of the deleted lines.
386 AIX 5L Version 5.3 General Programming Concepts: Writing and Debugging Programs

Function Syntax/Description
delete lines [Line1 [,Line2] ]d
Removes lines from the input stream and does not copy them to the output stream. Thelines not copied begin at line number Line1. The next line copied to the output stream is linenumber Line2 + 1. If you specify only one line number, then only that line is not copied. Ifyou do not specify a line number, the next line is not copied. You cannot perform any otherfunctions on lines that are not copied to the output.
insert lines [Line1] i \\nText
Writes the lines contained in Text to the output stream before Line1. The i command mustappear at the end of a line.
next line [Line1 [,Line2] ]n
Reads the next line, or group of lines from Line1 to Line2 into the pattern space. The currentcontents of the pattern space are written to the output if it has not been deleted.
Substitution
Function Syntax/Description
substitution for pattern [Line1 [,Line2] ] s/Pattern/String/Flags
Searches the indicated line(s) for a set of characters that matchesthe regular expression defined in Pattern. When it finds a match, thecommand replaces that set of characters with the set of charactersspecified by String.
Input and Output
Function Syntax/Description
print lines [Line1 [,Line2] ] p
Writes the indicated lines to STDOUT at the point in the editing process that the p commandoccurs.
write lines [Line1 [,Line2] ]w FileName
Writes the indicated lines to a FileName at the point in the editing process that the wcommand occurs.
If FileName exists, it is overwritten; otherwise, it is created. A maximum of 10 different filescan be mentioned as input or output files in the entire editing process. Include exactly onespace between w and FileName.
read file [Line1]r FileName
Reads FileName and appends the contents after the line indicated by Line1.
Include exactly one space between r and FileName. If FileName cannot be opened, thecommand reads it as a null file without giving any indication of an error.
Chapter 18. sed Program Information 387

Matching Across Lines
Function Syntax/Description
join next line [Line1 [,Line2] ]N
Joins the indicated input lines together, separatingthem by an embedded new-line character. Patternmatches can extend across the embeddednew-lines(s).
delete first line of pattern space [Line1 [,Line2] ]D
Deletes all text in the pattern space up to andincluding the first new-line character. If only oneline is in the pattern space, it reads another line.Starts the list of editing commands again from thebeginning.
print first line of pattern space [Line1 [,Line2] ]P
Prints all text in the pattern space up to andincluding the first new-line character to STDOUT.
Pick up and Put down
Function Syntax/Description
pick up copy [Line1 [,Line2] ]h
Copies the contents of the pattern space indicated by Line1 and Line2if present, to the holding area.
pick up copy, appended [Line1 [,Line2] ]H
Copies the contents of the pattern space indicated by Line1 and Line2if present, to the holding area, and appends it to the end of theprevious contents of the holding area.
put down copy [Line1 [,Line2] ]g
Copies the contents of the holding area to the pattern space indicatedby Line1 and Line2 if present. The previous contents of the patternspace are destroyed.
put down copy, appended [Line1 [,Line2] ]G
Copies the contents of the holding area to the end of the pattern spaceindicated by Line1 and Line2 if present. The previous contents of thepattern space are not changed. A new-line character separates theprevious contents from the appended text.
exchange copies [Line1 [,Line2] ]x
Exchanges the contents of the holding area with the contents of thepattern space indicated by Line1 and Line2 if present.
Control
Function Syntax/Description
negation [Line1 [,Line2] ]!
The ! (exclamation point) applies the command thatfollows it on the same line to the parts of the input filethat are not selected by Line1 and Line2.
388 AIX 5L Version 5.3 General Programming Concepts: Writing and Debugging Programs

Function Syntax/Description
command groups [Line1 [,Line2] ]{
grouped commands
}
The { (left brace) and the } (right brace) enclose a set ofcommands to be applied as a set to the input linesselected by Line1 and Line2. The first command in theset can be on the same line or on the line following theleft brace. The right brace must be on a line by itself. Youcan nest groups within groups.
labels :Label
Marks a place in the stream of editing command to beused as a destination of each branch. The symbol Labelis a string of up to 8 bytes. Each Label in the editingstream must be different from any other Label.
branch to label, unconditional [Line1 [,Line2] ]bLabel
Branches to the point in the editing stream indicated byLabel and continues processing the current input line withthe commands following Label. If Label is null, branchesto the end of the editing stream, which results in readinga new input line and starting the editing stream over. Thestring Label must appear as a Label in the editing stream.
test and branch [Line1 [,Line2] ]tLabel
If any successful substitutions were made on the currentinput line, branches to Label. If no substitutions weremade, does nothing. Clears the flag that indicates asubstitution was made. This flag is cleared at the start ofeach new input line.
wait [Line1 ]q
Stops editing in an orderly fashion by writing the currentline to the output, writing any appended or read test tothe output, and stopping the editor.
find line number [Line1 ]=
Writes to standard output the line number of the line thatmatches Line1.
Using Text in Commands
The append, insert and change lines commands all use a supplied text string to add to the outputstream. This text string conforms to the following rules:
v Can be one or more lines long.
v Each \n (new-line character) inside Text must have an additional \ character before it (\\n).
v The Text string ends with a new-line that does not have an additional \ character before it (\n).
v Once the command inserts the Text string, the string:
– Is always written to the output stream, regardless of what other commands do to the line that causedit to be inserted.
– Is not scanned for address matches.
Chapter 18. sed Program Information 389
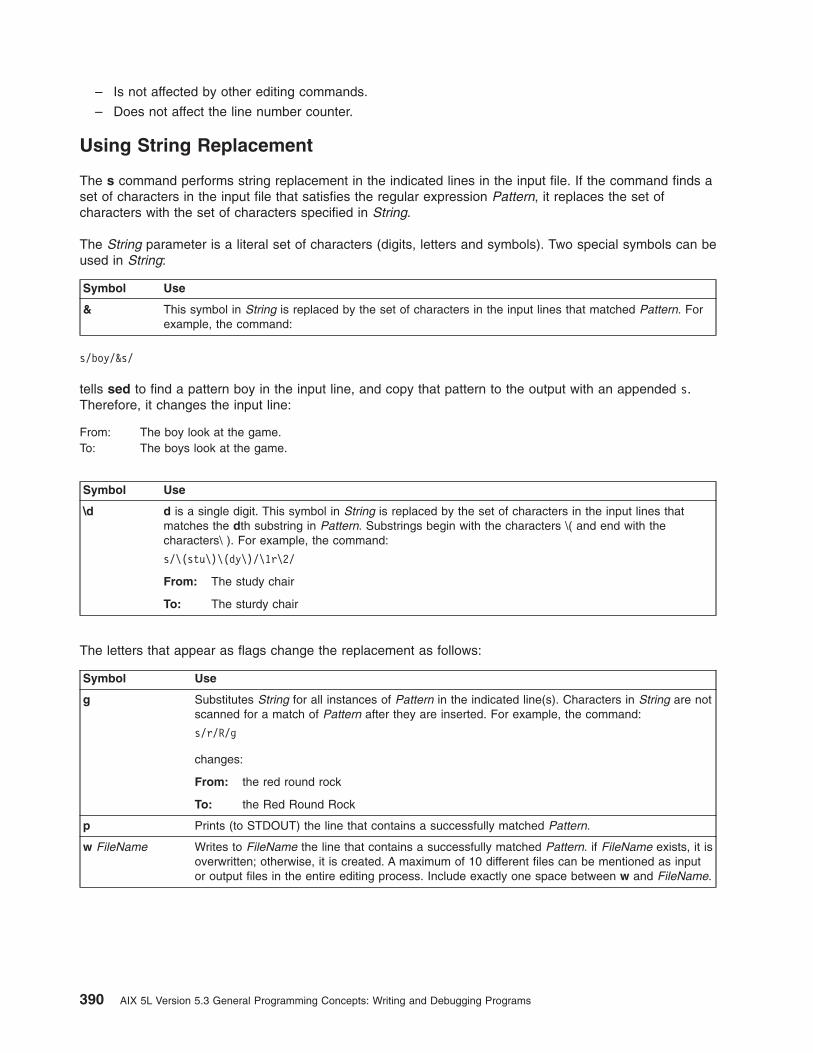
– Is not affected by other editing commands.
– Does not affect the line number counter.
Using String Replacement
The s command performs string replacement in the indicated lines in the input file. If the command finds aset of characters in the input file that satisfies the regular expression Pattern, it replaces the set ofcharacters with the set of characters specified in String.
The String parameter is a literal set of characters (digits, letters and symbols). Two special symbols can beused in String:
Symbol Use
& This symbol in String is replaced by the set of characters in the input lines that matched Pattern. Forexample, the command:
s/boy/&s/
tells sed to find a pattern boy in the input line, and copy that pattern to the output with an appended s.Therefore, it changes the input line:
From: The boy look at the game.To: The boys look at the game.
Symbol Use
\d d is a single digit. This symbol in String is replaced by the set of characters in the input lines thatmatches the dth substring in Pattern. Substrings begin with the characters \( and end with thecharacters\ ). For example, the command:
s/\(stu\)\(dy\)/\1r\2/
From: The study chair
To: The sturdy chair
The letters that appear as flags change the replacement as follows:
Symbol Use
g Substitutes String for all instances of Pattern in the indicated line(s). Characters in String are notscanned for a match of Pattern after they are inserted. For example, the command:
s/r/R/g
changes:
From: the red round rock
To: the Red Round Rock
p Prints (to STDOUT) the line that contains a successfully matched Pattern.
w FileName Writes to FileName the line that contains a successfully matched Pattern. if FileName exists, it isoverwritten; otherwise, it is created. A maximum of 10 different files can be mentioned as inputor output files in the entire editing process. Include exactly one space between w and FileName.
390 AIX 5L Version 5.3 General Programming Concepts: Writing and Debugging Programs

Chapter 19. Shared Libraries and Shared Memory
This chapter provides information about the operating system facilities provided for sharing libraries andmemory allocation.
The operating system provides facilities for the creation and use of dynamically bound shared libraries.Dynamic binding allows external symbols referenced in user code and defined in a shared library to beresolved by the loader at run time.
The shared library code is not present in the executable image on disk. Shared code is loaded intomemory once in the shared library segment and shared by all processes that reference it. The advantagesof shared libraries are:
v Less disk space is used because the shared library code is not included in the executable programs.
v Less memory is used because the shared library code is only loaded once.
v Load time may be reduced because the shared library code may already be in memory.
v Performance may be improved because fewer page faults will be generated when the shared librarycode is already in memory. However, there is a performance cost in calls to shared library routines ofone to eight instructions.
The symbols defined in the shared library code that are to be made available to referencing modules mustbe explicitly exported using an exports file, unless the -bexpall options is used. The first line of the fileoptionally contains the path name of the shared library. Subsequent lines contain the symbols to beexported.
Shared Objects and Runtime LinkingBy default, programs are linked so that a reference to a symbol imported from a shared object is bound tothat definition at load time. This is true even if the program, or another shared object required by theprogram, defines the same symbol.
Runtime linker A shared object that allows symbols to be rebound for appropriately linked programs
You include the runtime linker in a program by linking the program with the -brtl option. This option hasthe following effects:
v A reference to the runtime linker is added to your program. When program execution begins, the startupcode (/lib/crt0.o) will call the runtime linker before the main function is called.
v All input files that are shared objects are listed as dependents of your program in your program’s loadersection. The shared objects are listed in the same order as they were specified on the command line.This causes the system loader to load all these shared objects so that the runtime linker can use theirdefinitions. If the -brtl option is not used, a shared object that is not referenced by the program is notlisted, even if it provides definitions that might be needed by another shared object used by theprogram.
v A shared object contained in an archive is only listed if the archive specifies automatic loading for theshared object member. You specify automatic loading for an archive member foo.o by creating a filewith the following lines:# autoload#! (foo.o)
and adding the file as a member to the archive.
v In dynamic mode, input files specified with the -l flag may end in .so, as well as in .a. That is, areference to -lfoo is satisfied by the first libfoo.so or libfoo.a found in any of the directories beingsearched. Dynamic mode is in effect by default unless the -bstatic option is used.
© Copyright IBM Corp. 1997, 2010 391

The runtime linker mimics the behavior of the ld command when static linking is used, except that onlyexported symbols can be used to resolve symbols. Even when runtime linking is used, the system loadermust be able to load and resolve all symbol references in the main program and any module it dependson. Therefore, if a definition is removed from a module, and the main program has a reference to thisdefinition, the program will not execute, even if another definition for the symbol exists in another module.
The runtime linker can rebind all references to symbols imported from another module. A reference to asymbol defined in the same module as the reference can only be rebound if the module was built withruntime linking enabled for that symbol.
Shared modules shipped with AIX 4.2 or later have runtime linking enabled for most exported variables.Runtime linking for functions is only enabled for functions called through a function pointer. For example,as shipped, calls to the malloc subroutine within shared object shr.o in /lib/libc.a cannot be rebound,even if a definition of malloc exists in the main program or another shared module. You can link mostshipped shared modules to enable runtime linking for functions as well as variables by running thertl_enable command.
Operation of the Runtime LinkerThe main program is loaded and resolved by the system loader in the usual way. If the executableprogram cannot be loaded for any reason, the exec() subroutine fails and the runtime linker is not invokedat all. If the main program loads successfully, control passes to the runtime linker, which rebinds symbolsas described below. When the runtime linker completes, initialization routines are called, if appropriate, andthen the main function is called.
The runtime linker processes modules in breadth-first search order, starting with the main executable andcontinuing with the direct dependents of the main executable, according to the order of dependentmodules listed in each module’s loader section. This order is also used when searching for the defininginstance of a symbol. The ″defining instance″ of a symbol is usually the first instance of a symbol, butthere are two exceptions. If the first instance of a symbol is an unresolved, deferred import, no defininginstance exists. If the first instance is a BSS symbol (that is, with type XTY_CM, indicating an uninitializedvariable), and there is another instance of the symbol that is neither a BSS symbol nor an unresolved,deferred import, the first such instance of the symbol is the defining instance.
The loader section of each module lists imported symbols, which are usually defined in another specifiedmodule, and exported symbols, which are usually defined in the module itself. A symbol that is importedand exported is called a ″passed-through’’ import. Such a symbol appears to be defined in one module,although it is actually defined in another module.
Symbols can also be marked as ″deferred imports.″ References to deferred import symbols are neverrebound by the runtime linker. Resolution of these symbols must be performed by the system loader, eitherby calling loadbind() or by loading a new module explicitly with load() or dlopen().
References to imported symbols (other than deferred imports) can always be rebound. The system loaderwill have already resolved most imports. References to each imported symbol are rebound to the symbol’sdefining instance. If no defining instance exists, an error message will be printed to standard error. Inaddition, if the typechecking hash string of an imported symbol does not match the hash string of thedefining symbol, an error message is printed.
References to exported symbols are also rebound to their defining instances, as long as the referencesappear in the relocation table of the loader section. (Passed-through imports are processed along withother imports, as described above.) Depending on how the module was linked, some references toexported symbols are bound at link time and cannot be rebound. Since exported symbols are defined inthe exporting module, a defining instance of the symbol will always exist, unless the first instance is adeferred import, so errors are unlikely, but still possible, when rebinding exported symbols. As with imports,errors are printed if the typechecking hash strings do not match when a symbol is rebound.
392 AIX 5L Version 5.3 General Programming Concepts: Writing and Debugging Programs

Whenever a symbol is rebound, a dependency is added from the module using the symbol to the moduledefining the symbol. This dependency prevents modules from being removed from the address spaceprematurely. This is important when a module loaded by the dlopen subroutine defines a symbol that isstill being used when an attempt is made to unload the module with the dlclose subroutine.
The loader section symbol table does not contain any information about the alignment or length ofsymbols. Thus, no errors are detected when symbols are rebound to instances that are too short orimproperly aligned. Execution errors may occur in this case.
Once all modules have been processed, the runtime linker calls the exit subroutine if any runtime linkingerrors occurred, passing an exit code of 144 (0x90). Otherwise, execution continues by calling initializationroutines or main().
Creating a Shared Object with Runtime Linking EnabledTo create a shared object enabled for runtime linking, you link with the -G flag. When this flag is used, thefollowing actions take place:
1. Exported symbols are given the nosymbolic attribute, so that all references to the symbols can berebound by the runtime linker.
2. Undefined symbols are permitted (see the -berok option). Such symbols are marked as being importedfrom the symbolic module name ″..″. Symbols imported from ″..″ must be resolved by the runtimelinker before they can be used because the system loader will not resolve these symbols.
3. The output file is given a module type of SRE, as if the -bM:SRE option had been specified.
4. All shared objects listed on the command line are listed as dependents of the output module, in thesame manner as described when linking a program with the -brtl option.
5. Shared objects in archives are listed if they have the autoload attribute.
Using the -berok option, implied by the -G flag, can mask errors that could be detected at link time. If youintend to define all referenced symbols when linking a module, you should use the -bernotok option afterthe -G flag. This causes errors to be reported for undefined symbols.
Shared Libraries and Lazy Loading
By default, when a module is loaded, the system loader automatically loads all of the module’s dependentsat the same time. Loading of dependents occurs because when a module is linked, a list of the module’sdependent modules is saved in the loader section of the module.
dump -H Command that allows viewing of dependent modules list.-blazy In AIX 4.2.1 and later, linker option that links a module so that only some of its dependents are loaded
when a function in the module is first used.
When you use lazy loading, you can improve the performance of a program if most of a module’sdependents are never actually used. On the other hand, every function call to a lazily loaded module hasan additional overhead of about 7 instructions, and the first call to a function requires loading the definingmodule and modifying the function call. Therefore, if a module calls functions in most of its dependents,lazy loading may not be appropriate.
When a function defined in a lazily loaded module is called for the first time, an attempt is made to loadthe defining module and find the desired function. If the module cannot be found or if the function is notexported by the module, the default behavior is to print an error message to standard error and exit with areturn code of 1. An application can supply its own error handler by calling the function_lazySetErrorHandler and supplying the address of an error handler. An error handler is called with 3arguments: the name of the module, the name of the symbol, and an error value indicating the cause of
Chapter 19. Shared Libraries and Shared Memory 393

the error. If the error handler returns, its return value should be the address of a substitute function for thedesired function. The return value for _lazySetErrorHandler is NULL if no error handler exists, and theaddress of a previous handler if one exists.
Using lazy loading does not usually change the behavior of a program, but there are a few exceptions.First, any program that relies on the order that modules are loaded is going to be affected, becausemodules can be loaded in a different order, and some modules might not be loaded at all.
Second, a program that compares function pointers might not work correctly when lazy loading is used,because a single function can have multiple addresses. In particular, if module A calls function `f’ inmodule B, and if lazy loading of module B was specified when module A was linked, then the address of `f’computed in module A differs from the address of `f’ computed in other modules. Thus, when you use lazyloading, two function pointers might not be equal, even if they point to the same function.
Third, if any modules are loaded with relative path names and if the program changes working directories,the dependent module might not be found when it needs to be loaded. When you use lazy loading, youshould use only absolute path names when referring to dependent modules at link time.
The decision to enable lazy loading is made at link time on a module-by-module basis. In a singleprogram, you can mix modules that use lazy loading with modules that do not. When linking a singlemodule, a reference to a variable in a dependent module prevents that module from being loaded lazily. Ifall references to a module are to function symbols, the dependent module can be loaded lazily.
The lazy loading facility can be used in both threaded and non-threaded applications.
Lazy Loading Execution TracingA runtime feature is provided that allows you to view the loading activity as it takes place. This isaccomplished using the environment variable LDLAZYDEBUG. The value of this variable is a number, indecimal, octal (leading 0), or hexadecimal (leading 0x) that is the sum of one or more of the followingvalues:
1 Show load or look-up errors.
If a required module cannot be found, a message displays and the lazy load error handler is called. If arequested symbol is not available in the loaded referenced module, a message displays before the errorhandler is called.
2 Write tracing messages to stderr instead of stdout.
By default, these messages are written to the standard output file stream. This value selects the standarderror stream.
4 Display the name of the module being loaded.
When a new module is required to resolve a function call, the name of the module that is found and loadeddisplays. This only occurs at the first reference to a function within that module; that is, once a module isloaded, it remains available for subsequent references to functions within that module. Additional loadoperations are not required.
8 Display the name of the called function.
The name of the required function, along with the name of the module from which the function is expected,displays. This information displays before the module is loaded.
394 AIX 5L Version 5.3 General Programming Concepts: Writing and Debugging Programs

Named Shared Library AreasBy default, AIX shares libraries among processes using a global set of segments, referred to as the globalshared library area. For 32-bit processes, this area consists of one segment for shared library text(segment 0xD) and one segment for pre-relocated library data (segment 0xF). Sharing text andpre-relocating data improves performance on systems where a large number of processes use commonshared libraries.
Because the global shared library area is a single fixed-size resource, attempts to share a set of librariesthat exceed the capacity of the area cannot succeed. In this situation, a portion of a process libraries areloaded privately. Loading libraries privately, as opposed to shared, consumes private address space in theprocess and places greater demands on paging space, leading to a degradation in overall systemperformance.
To address this limitation of the global shared library area, AIX 5.3 supports named shared library areas,which include the following benefits:
v A named shared library area replaces the global shared library area for a group of processes.
v A named shared library area enables a group of processes to have the full shared library capacityavailable to them at the same location in the effective address space as the global shared library area(segments 0xD and 0xF).
v The named shared library area feature is enabled via the LDR_CNTRL environment variable and nochanges are required to existing binaries.
v Multiple named shared library areas can be active on the system simultaneously.
v Processes specify a particular named shared library area by a unique name. This name is chosen bythe process that causes the area’s creation.
v Named shared library areas are available for use only by 32-bit processes.
Because the use of a specific named shared library area is restricted to processes that request it, none ofits space will be consumed by processes using the global shared library area or a different named sharedlibrary area. This decrease in competition for space in the named shared library area benefits processesusing the area. These processes experience lower private address space consumption and a greaterability to share libraries among themselves. Use of a named shared library area among processes thatutilize common shared libraries can optimize the processes’ address space usage and decrease demandson paging space, resulting in enhanced overall system performance.
Alternate Memory Model (doubletext32)In addition to the default shared library area memory model (one segment dedicated to shared library textand one segment dedicated to pre-relocated library data), named shared library areas support an alternatememory model that dedicates both segments to shared library text. This model is useful for processgroups that share greater than 256 MB of library text. Note that since this alternate memory modelperforms no pre-relocation of library data, some performance degradation during module loading (for bothexec-time dependencies and dynamically loaded modules) may be experienced. Therefore, the actualperformance benefits of increased shared library text capacity should be considered on a case by casebasis.
Interface
AccessA process requests the use of a named shared library area by having the LDR_CNTRL environmentvariable with the NAMEDSHLIB option in its environment at run time. The syntax of the new option is asfollows:NAMEDSHLIB=name[,attribute][,attribute2]...[,attributeN]
Chapter 19. Shared Libraries and Shared Memory 395

A valid name string can be any string matching the regular expression, [A-Za-z0-9_\.]+ (containing onlyalphanumeric, underbar, and period characters).
A valid name string must be terminated by one of the following characters:
v @ (at sign): The delimiter for multiple LDR_CNTRL options
v , (comma): The delimiter for NAMEDSHLIB attributes
v \0 (null): The terminator of the LDR_CNTRL environment string
If an invalid name string is specified, the entire NAMEDSHLIB option is ignored. If an invalid attribute isspecified, only that attribute is ignored. Currently, there is only one supported attribute: doubletext32.
There are no access restrictions for using named shared library areas. All requests for use of an area aregranted.
CreationThere is no explicit interface to create a named shared library area. When a process requests the use of anamed shared library area that does not exist, the area is automatically created.
PurgingThe system removes unused libraries from a named shared library area using the same mechanisms thatapply to the global shared library area:
v Automatic removal of unused libraries occurs when the area becomes full.
v Forced removal of unsused libraries can be accomplished using the slibclean command.
DestructionThere is no explicit interface to destroy a named shared library area. When the last process using anamed shared library area exits (the usecount of the area drops to zero), the area is automaticallydestroyed.
AttributesThe NAMEDSHLIB attributes are examined by the system loader only during named shared library areacreation. Therefore, requests to use an existing named shared library area are not strictly required tospecify attributes matching those specified at creation (the request will not fail because of an attributemismatch). However, because the system automatically destroys unused named shared library areas, it isgood practice to always specify attributes, even when you are requesting the use of an existing namedshared library area.
Examples1. Run a pair of applications using the named shared library area named XYZ with one segment
dedicated to shared library text and one segment dedicated to pre-relocated library data by running thefollowing commands:$ export LDR_CNTRL=NAMEDSHLIB=XYZ$ xyz_app$ xyz_app2
2. Run a pair of applications using the named shared library area named more_shtext with bothsegments dedicated to shared library text by running the following commands:$ export LDR_CNTRL=NAMEDSHLIB=more_shtext,doubletext32$ mybigapp$ mybigapp2
Related informationThe slibclean command.
396 AIX 5L Version 5.3 General Programming Concepts: Writing and Debugging Programs
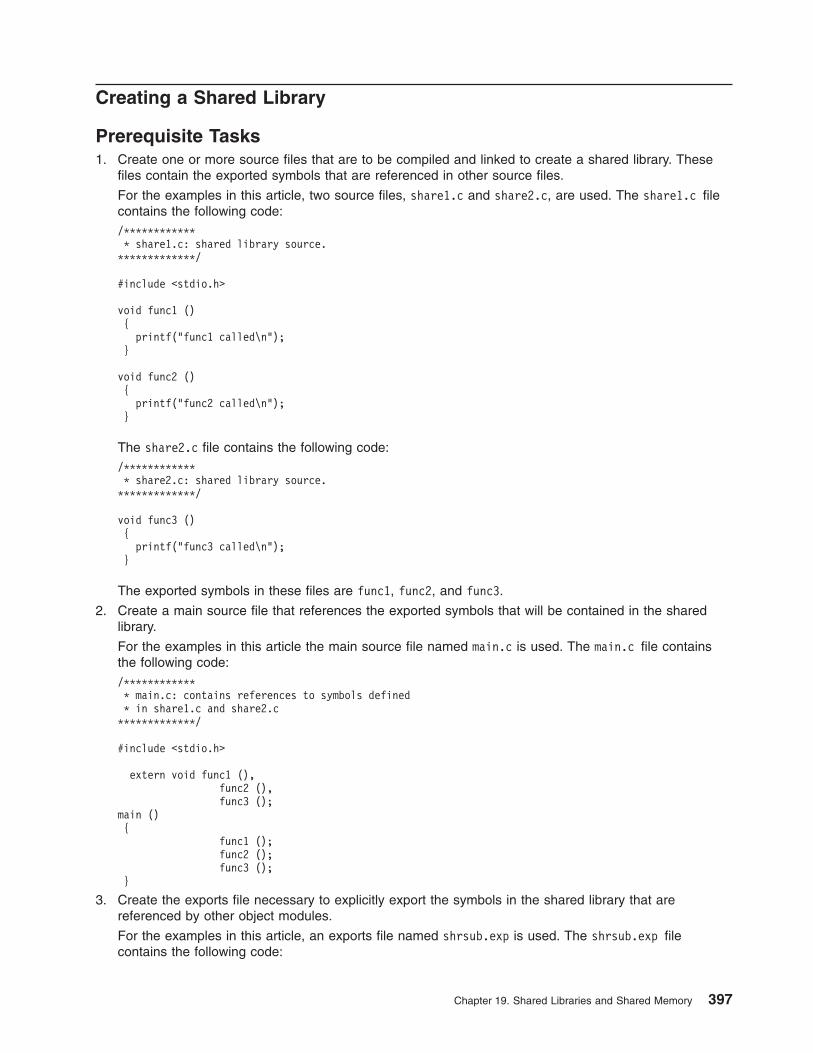
Creating a Shared Library
Prerequisite Tasks1. Create one or more source files that are to be compiled and linked to create a shared library. These
files contain the exported symbols that are referenced in other source files.
For the examples in this article, two source files, share1.c and share2.c, are used. The share1.c filecontains the following code:/************* share1.c: shared library source.*************/
#include <stdio.h>
void func1 (){
printf("func1 called\n");}
void func2 (){
printf("func2 called\n");}
The share2.c file contains the following code:/************* share2.c: shared library source.*************/
void func3 (){
printf("func3 called\n");}
The exported symbols in these files are func1, func2, and func3.
2. Create a main source file that references the exported symbols that will be contained in the sharedlibrary.
For the examples in this article the main source file named main.c is used. The main.c file containsthe following code:/************* main.c: contains references to symbols defined* in share1.c and share2.c*************/
#include <stdio.h>
extern void func1 (),func2 (),func3 ();
main (){
func1 ();func2 ();func3 ();
}
3. Create the exports file necessary to explicitly export the symbols in the shared library that arereferenced by other object modules.
For the examples in this article, an exports file named shrsub.exp is used. The shrsub.exp filecontains the following code:
Chapter 19. Shared Libraries and Shared Memory 397

#! /home/sharelib/shrsub.o* Above is full pathname to shared library object filefunc1func2func3
The #! line is meaningful only when the file is being used as an import file. In this case, the #! lineidentifies the name of the shared library file to be used at run time.
Procedure1. Compile and link the two source code files to be shared. (This procedure assumes you are in the
/home/sharedlib directory.) To compile and link the source files, enter the following commands:cc -c share1.ccc -c share2.ccc -o shrsub.o share1.o share2.o -bE:shrsub.exp -bM:SRE -bnoentry
This creates a shared library name shrsub.o in the /home/sharedlib directory.
-bM:SRE flag Marks the resultant object file shrsub.o as a re-entrant, shared library
Each process that uses the shared code gets a private copy of the data in its private process area.
flag Sets the dummy entry point _nostart to override the default entry point, _start-bnoentry flag Tells the linkage editor that the shared library does not have an entry point
A shared library may have an entry point, but the system loader does not make use of an entry pointwhen a shared library is loaded.
2. Use the following command to put the shared library in an archive file:ar qv libsub.a shrsub.o
This step is optional. Putting the shared library in an archive makes it easier to specify the sharedlibrary when linking your program, because you can use the -l and -L flags with the ld command.
3. Compile and link the main source code with the shared library to create the executable file. (This stepassumes your current working directory contains the main.c file.) Use the following command:cc -o main main.c -lsub -L/home/sharedlib
If the shared library is not in an archive, use the command:cc -o main main.c /home/sharedlib/shrsub.o -L/home/sharedlib
The program main is now executable. The func1, func2, and func3 symbols have been marked forload-time deferred resolution. At run time, the system loader loads the module in to the shared library(unless the module is already loaded) and dynamically resolves the references.
Note: When creating a shared library from a C++ object, you must use the mangled C++ symbol namesin the export file. However, your C++ compiler might provide an option to create the shared libraryfor you. Refer to your compiler documentation for more information.
-L flag Adds the specified directory (in this case, /home/sharedlib) to the library search path, which is savedin the loader section of the program.
At run time the library search path is used to tell the loader where to find shared libraries.
LIBPATH environment variable A colon-separated list of directory paths that can also beused to specify a different library search path. Its format isidentical to that of the PATH environment variable.
398 AIX 5L Version 5.3 General Programming Concepts: Writing and Debugging Programs

The directories in the list are searched to resolve references to shared objects. The /usr/lib and /libdirectories contain shared libraries and should normally be included in your library search path.
Program Address Space Overview
The Base Operating System provides a number of services for programming application program memoryuse. Tools are available to assist in allocating memory, mapping memory and files, and profiling applicationmemory usage. As background, this section describes the system’s memory management architecture andmemory management policy.
System Memory Architecture Introduction
The system employs a memory management scheme that uses software to extend the capabilities of thephysical hardware. Because the address space does not correspond one-to-one with real memory, theaddress space (and the way the system makes it correspond to real memory) is called virtual memory.
The subsystems of the kernel and the hardware that cooperate to translate the virtual address to physicaladdresses make up the memory management subsystem. The actions the kernel takes to ensure thatprocesses share main memory fairly comprise the memory management policy. The following sectionsdescribe the characteristics of the memory management subsystem in greater detail.
The Physical Address Space of 32-bit SystemsThe hardware provides a continuous range of virtual memory addresses, from 0x0000000000000 to0xFFFFFFFFFFFFF, for accessing data. The total addressable space is more than 1,000 terabytes. Memoryaccess instructions generate an address of 32 bits: 4 bits to select a segment register and 28 bits to givean offset within the segment. This addressing scheme provides access to 16 segments of up to 256Mbytes each. Each segment register contains a 24-bit segment ID that becomes a prefix to the 28-bit offset,which together form the virtual memory address. The resulting 52-bit virtual address refers to a single,large, systemwide virtual memory space.
The process space is a 32-bit address space; that is, programs use 32-bit pointers. However, eachprocess or interrupt handler can address only the systemwide virtual memory space (segment) whosesegment IDs are in the segment register. A process accesses more than 16 segments by changingregisters rapidly.
32-bit processes on 64-bit systems have the same effective address space as on 32-bit systems (23 2
bytes), but can access the same virtual address space as 64-bit processes (28 0 bytes).
The Physical Address Space of 64-bit SystemsThe hardware provides a continuous range of virtual memory addresses, from 0x00000000000000000000 to0xFFFFFFFFFFFFFFFFFFFF, for accessing data. The total addressable space is more than 1 trillion terabytes.Memory access instructions generate an address of 64 bits: 36 bits to select a segment register and 28bits to give an offset within the segment. This addressing scheme provides access to more than 64 millionsegments of up to 256M bytes each. Each segment register contains a 52-bit segment ID that becomes aprefix to the 28-bit offset, which together form the virtual memory address. The resulting 80-bit virtualaddress refers to a single, large, systemwide virtual memory space.
The process space is a 64-bit address space; that is, programs use 64-bit pointers. However, eachprocess or interrupt handler can address only the systemwide virtual memory space (segment) whosesegment IDs are in the segment register.
Chapter 19. Shared Libraries and Shared Memory 399

Segment Register AddressingThe system kernel loads some segment registers in the conventional way for all processes, implicitlyproviding the memory addressability needed by most processes. These registers include two kernelsegments, and a shared-library segment, and an I/O device segment, that are shared by all processes andwhose contents are read-only to non-kernel programs. There is also a segment for the exec system call ofa process, which is shared on a read-only basis with other processes executing the same program, aprivate shared-library data segment that contains read-write library data, and a read-write segment that isprivate to the process. The remaining segment registers may be loaded using memory mappingtechniques to provide more memory, or through memory access to files according to access permissionsimposed by the kernel. See “Understanding Memory Mapping” on page 401 for information on theavailable memory mapping services.
The system’s 32-bit addressing and the access provided through indirection capabilities gives eachprocess an interface that does not depend on the actual size of the systemwide virtual memory space.Some segment registers are shared by all processes, others by a subset of processes, and yet others areaccessible to only one process. Sharing is achieved by allowing two or more processes to load the samesegment ID.
Paging SpaceTo accommodate the large virtual memory space with a limited real memory space, the system uses realmemory as a work space and keeps inactive data and programs that are not mapped on disk. The area ofdisk that contains this data is called the paging space. A page is a unit of virtual memory that holds 4Kbytes of data and can be transferred between real and auxiliary storage. When the system needs data ora program in the page space, it:
1. Finds an area of memory that is not currently active.
2. Ensures that an up-to-date copy of the data or program from that area of memory is in the pagingspace on disk.
3. Reads the new program or data from the paging space on disk into the newly freed area of memory.
Memory Management PolicyThe real-to-virtual address translation and most other virtual memory facilities are provided to the systemtransparently by the Virtual Memory Manager (VMM). The VMM implements virtual memory, allowing thecreation of segments larger than the physical memory available in the system. It accomplishes this bymaintaining a list of free pages of real memory that it uses to retrieve pages that need to be brought intomemory.
The VMM occasionally must replenish the pages on the free list by removing some of the current pagedata from real memory. The process of moving data between memory and disk as the data is needed iscalled ″paging.″ To accomplish paging, the VMM uses page-stealing algorithms that categorize pages intothree classes, each with unique entry and exit criteria:
v working storage pages
v local file pages
v remote file pages
In general, working pages have highest priority, followed by local file pages, and then remote file pages.
In addition, the VMM uses a technique known as the clock algorithm to select pages to be replaced. Thistechnique takes advantage of a referenced bit for each page as an indication of what pages have beenrecently used (referenced). When a page-stealer routine is called, it cycles through a page frame table,examining each page’s referenced bit. If the page was unreferenced and is stealable (that is, not pinnedand meets other page-stealing criteria), it is stolen and placed on the free list. Referenced pages may not
400 AIX 5L Version 5.3 General Programming Concepts: Writing and Debugging Programs

be stolen, but their reference bit is reset, effectively ″aging″ the reference so that the page may be stolenthe next time a page-stealing algorithm is issued. See “Paging Space Programming Requirements” onpage 410 for more information.
Memory AllocationVersion 3 of the operating system uses a delayed paging slot technique for storage allocated toapplications. This means that when storage is allocated to an application with a subroutine such asmalloc, no paging space is assigned to that storage until the storage is referenced. See Chapter 20,“System Memory Allocation Using the malloc Subsystem,” on page 415 to learn more about the system’sallocation policy.
Understanding Memory Mapping
The speed at which application instructions are processed on a system is proportionate to the number ofaccess operations required to obtain data outside of program-addressable memory. The system providestwo methods for reducing the transactional overhead associated with these external read and writeoperations. You can map file data into the process address space. You can also map processes toanonymous memory regions that may be shared by cooperating processes.
Memory mapped files provide a mechanism for a process to access files by directly incorporating file datainto the process address space. The use of mapped files can significantly reduce I/O data movement sincethe file data does not have to be copied into process data buffers, as is done by the read and writesubroutines. When more than one process maps the same file, its contents are shared among them,providing a low-overhead mechanism by which processes can synchronize and communicate.
Mapped memory regions, also called shared memory areas, can serve as a large pool for exchanging dataamong processes. The available subroutines do not provide locks or access control among the processes.Therefore, processes using shared memory areas must set up a signal or semaphore control method toprevent access conflicts and to keep one process from changing data that another is using. Sharedmemory areas can be most beneficial when the amount of data to be exchanged between processes istoo large to transfer with messages, or when many processes maintain a common large database.
The system provides two methods for mapping files and anonymous memory regions. The followingsubroutines, known collectively as the shmat services, are typically used to create and use sharedmemory segments from a program:
shmctl Controls shared memory operationsshmget Gets or creates a shared memory segmentshmat Attaches a shared memory segment from a process. Does not allow you to map block devices.shmdt Detaches a shared memory segment from a processmprotect Modifies the access protections of a specified address range within a shared memory segment.disclaim Removes a mapping from a specified address range within a shared memory segment
The ftok subroutine provides the key that the shmget subroutine uses to create the shared segment
The second set of services, collectively known as the mmap services, is typically used for mapping files,although it may be used for creating shared memory segments as well.
All operations valid on memory resulting from mmap() of a file are valid on memory resulting from mmap()of a block device. A block device is a special file that provides access to a device driver that presents ablock interface. A block interface to a device driver requires data access in blocks of a fixed size. Theinterface is typically used for data storage devices.
Chapter 19. Shared Libraries and Shared Memory 401

The mmap services include the following subroutines:
madvise Advises the system of a process’ expected paging behaviormincore Determines residency of memory pagesmmap Maps an object file into virtual memory. Allows you to map block devices one process at a time.mprotect Modifies the access protections of memory mappingmsync Synchronizes a mapped file with its underlying storage devicemunmap Unmaps a mapped memory region
The msem_init, msem_lock, msem_unlock, msem_remove, msleep, and mwakeup subroutinesprovide access control for the processes mapped using the mmap services.
Refer to the following sections to learn more about memory mapping:
v “Comparing mmap with shmat”
v “mmap Compatibility Considerations” on page 403
v “Using the Semaphore Subroutines” on page 404
v “Mapping Files with the shmat Subroutine” on page 404
v “Mapping Shared Memory Segments with the shmat Subroutine” on page 405
Comparing mmap with shmatAs with the shmat services, the portion of the process address space available for mapping files with themmap services is dependent on whether a process is a 32-bit process or a 64-bit process. For 32-bitprocesses, the portion of address space available for mapping consists of addresses in the range of0x30000000-0xCFFFFFFF, for a total of 2.5G bytes of address space. The portion of address space availablefor mapping files consists of addresses in the rangesof 0x30000000-0xCFFFFFFF and 0xE0000000-0xEFFFFFFF for a total of 2.75G bytes of address space. In AIX 5.2 and later, a 32-bit process run with thevery large address-space model has the range 0x30000000-0xFFFFFFFF available for mappings, with atotal of up to 3.25GB of address space. For more information on the very large address-space model, see“Understanding the Large Address-Space Model” on page 189.
All available ranges within the 32-bit process address space are available for both fixed-location andvariable-location mappings. Fixed-location mappings occur when applications specify that a mapping beplaced at a fixed location within the address space. Variable-location mappings occur when applicationsspecify that the system should decide the location at which a mapping should be placed.
For 64-bit processes, two sets of address ranges with the process address space are available for mmapor shmat mappings. The first, consisting of the single range 0x07000000_00000000-0x07FFFFFF_FFFFFFFF, isavailable for both fixed-location and variable-location mappings. The second set of address ranges isavailable for fixed-location mappings only and consists of the ranges 0x30000000-0xCFFFFFFF,0xE0000000-0xEFFFFFFF, and 0x10_00000000-0x06FFFFFF_FFFFFFFF. The last range of this set, consisting of0x10_00000000-0x06FFFFFF_FFFFFFFF, is also made available to system loader to hold program text, dataand heap, so only unused portions of the range are available for fixed-location mappings.
Both the mmap and shmat services provide the capability for multiple processes to map the same regionof an object such that they share addressability to that object. However, the mmap subroutine extends thiscapability beyond that provided by the shmat subroutine by allowing a relatively unlimited number of suchmappings to be established. While this capability increases the number of mappings supported per fileobject or memory segment, it can prove inefficient for applications in which many processes map the samefile data into their address space.
The mmap subroutine provides a unique object address for each process that maps to an object. Thesoftware accomplishes this by providing each process with a unique virtual address, known as an alias.The shmat subroutine allows processes to share the addresses of the mapped objects.
402 AIX 5L Version 5.3 General Programming Concepts: Writing and Debugging Programs

Because only one of the existing aliases for a given page in an object has a real address translation atany given time, only one of the mmap mappings can make a reference to that page without incurring apage fault. Any reference to the page by a different mapping (and thus a different alias) results in a pagefault that causes the existing real-address translation for the page to be invalidated. As a result, a newtranslation must be established for it under a different alias. Processes share pages by moving thembetween these different translations.
For applications in which many processes map the same file data into their address space, this togglingprocess may have an adverse affect on performance. In these cases, the shmat subroutine may providemore efficient file-mapping capabilities.
Note: On systems with PowerPC processors, multiple virtual addresses can exist for the same realaddress. A real address can be aliased to different effective addresses in different processeswithout toggling. Because there is no toggling, there is no performance degradation.
Use the shmat services under the following circumstances:
v For 32-bit application, eleven or fewer files are mapped simultaneously, and each is smaller than256MB.
v When mapping files larger than 256MB.
v When mapping shared memory regions which need to be shared among unrelated processes (noparent-child relationship).
v When mapping entire files.
Use mmap under the following circumstances:
v Portability of the application is a concern.
v Many files are mapped simultaneously.
v Only a portion of a file needs to be mapped.
v Page-level protection needs to be set on the mapping.
v Private mapping is required.
An ″extended shmat″ capability is available for 32-bit applications with their limited address spaces. If youdefine the environment variable EXTSHM=ON, then processes executing in that environment can createand attach more than eleven shared memory segments. The process can attach these segments into theaddress space for the size of the segment. Another segment can be attached at the end of the first one inthe same 256M byte region. The address at which a process can attach is at page boundaries, which is amultiple of SHMLBA_EXTSHM bytes.
Some restrictions exist on the use of the extended shmat feature. These shared memory regions cannotbe used as I/O buffers where the unpinning of the buffer occurs in an interrupt handler. The restrictions onthe use of extended shmat I/O buffers is the same as that of mmap buffers.
The environment variable provides the option of executing an application with either the additionalfunctionality of attaching more than 11 segments when EXTSHM=ON, or the higher-performance access to11 or fewer segments when the environment variable is not set. Again, the ″extended shmat″ capabilityonly applies to 32-bit processes.
mmap Compatibility Considerations
The mmap services are specified by various standards and commonly used as the file-mapping interfaceof choice in other operating system implementations. However, the system’s implementation of the mmapsubroutine may differ from other implementations. The mmap subroutine incorporates the followingmodifications:
v Mapping into the process private area is not supported.
Chapter 19. Shared Libraries and Shared Memory 403

v Mappings are not implicitly unmapped. An mmap operation which specifies MAP_FIXED will fail if amapping already exists within the range specified.
v For private mappings, the copy-on-write semantic makes a copy of a page on the first write reference.
v Mapping of I/O or device memory is not supported.
v Mapping of character devices or use of an mmap region as a buffer for a read-write operation to acharacter device is not supported.
v The madvise subroutine is provided for compatibility only. The system takes no action on the advicespecified.
v The mprotect subroutine allows the specified region to contain unmapped pages. In operation, theunmapped pages are simply skipped over.
v The OSF/AES-specific options for default exact mapping and for the MAP_INHERIT,MAP_HASSEMAPHORE, and MAP_UNALIGNED flags are not supported.
Using the Semaphore SubroutinesThe msem_init, msem_lock, msem_unlock, msem_remove, msleep and mwakeup subroutinesconform to the OSF Application Environment specification. They provide an alternative to IPC interfacessuch as the semget and semop subroutines. Benefits of using the semaphores include an efficientserialization method and the reduced overhead of not having to make a system call in cases where thereis no contention for the semaphore.
Semaphores should be located in a shared memory region. Semaphores are specified by msemaphorestructures. All of the values in a msemaphore structure should result from a msem_init subroutine call.This call may or may not be followed by a sequence of calls to the msem_lock subroutine or themsem_unlock subroutine. If a msemaphore structure values originated in another manner, the results ofthe semaphore subroutines are undefined.
The address of the msemaphore structure is significant. You should be careful not to modify thestructure’s address. If the structure contains values copied from a msemaphore structure at anotheraddress, the results of the semaphore subroutines are undefined.
The semaphore subroutines may prove less efficient when the semaphore structures exist in anonymousmemory regions created with the mmap subroutine, particularly in cases where many processes referencethe same semaphores. In these instances, the semaphore structures should be allocated out of sharedmemory regions created with the shmget and shmat subroutines.
Mapping Files with the shmat SubroutineMapping can be used to reduce the overhead involved in writing and reading the contents of files. Oncethe contents of a file are mapped to an area of user memory, the file may be manipulated as if it weredata in memory, using pointers to that data instead of input/output calls. The copy of the file on disk alsoserves as the paging area for that file, saving paging space.
A program can use any regular file as a mapped data file. You can also extend the features of mappeddata files to files containing compiled and executable object code. Because mapped files can be accessedmore quickly than regular files, the system can load a program more quickly if its executable object file ismapped to a file.See “Creating a Mapped Data File with the shmat Subroutine” on page 408 forinformation on using any regular file as a mapped data file.
To create a program as a mapped executable file, compile and link the program using the -K flag with thecc or ld command. The -K flag tells the linker to create an object file with a page-aligned format. That is,each part of the object file starts on a page boundary (an address that can be divided by 2K bytes with noremainder). This option results in some empty space in the object file but allows the executable file to bemapped into memory. When the system maps an object file into memory, the text and data portions arehandled differently.
404 AIX 5L Version 5.3 General Programming Concepts: Writing and Debugging Programs

Copy-on-Write Mapped FilesTo prevent changes made to mapped files from appearing immediately in the file on disk, map the file as acopy-on-write file. This option creates a mapped file with changes that are saved in the system pagingspace, instead of to the copy of the file on disk. You must choose to write those changes to the copy ondisk to save the changes. Otherwise, you lose the changes when closing the file.
Because the changes are not immediately reflected in the copy of the file that other users may access,use copy-on-write mapped files only among processes that cooperate with each other.
The system does not detect the end of files mapped with the shmat subroutine. Therefore, if a programwrites beyond the current end of file in a copy-on-write mapped file by storing into the correspondingmemory segment (where the file is mapped), the actual file on disk is extended with blocks of zeros inpreparation for the new data. If the program does not use the fsync subroutine before closing the file, thedata written beyond the previous end of file is not written to disk. The file appears larger, but contains onlythe added zeros. Therefore, always use the fsync subroutine before closing a copy-on-write mapped fileto preserve any added or changed data. See “Creating a Copy-On-Write Mapped Data File with the shmatSubroutine” on page 409 for additional information.
Mapping Shared Memory Segments with the shmat SubroutineThe system uses shared memory segments similarly to the way it creates and uses files. Defining theterms used for shared memory with respect to the more familiar file-system terms is critical tounderstanding shared memory. A definition list of shared memory terms follows:
Term Definitionkey The unique identifier of a particular shared segment. It is associated with the shared segment as long as
the shared segment exists. In this respect, it is similar to the file name of a file.shmid The identifier assigned to the shared segment for use within a particular process. It is similar in use to a
file descriptor for a file.attach Specifies that a process must attach a shared segment in order to use it. Attaching a shared segment is
similar to opening a file.detach Specifies that a process must detach a shared segment once it is finished using it. Detaching a shared
segment is similar to closing a file.
See “Creating a Shared Memory Segment with the shmat Subroutine” on page 410 for additionalinformation.
Inter-Process Communication (IPC) LimitsThis document describes system limits for IPC mechanisms.
On some UNIX systems, the system administrator can edit the /etc/master file and define limits for IPCmechanisms (semaphores, shared memory segments, and message queues). The problem with thismethod is that the higher the limits, the more memory the operating system uses, and performance can beadversely affected.
AIX uses a different method. In AIX, upper limits are defined for the IPC mechanisms, which are notconfigurable. The individual IPC data structures are allocated and deallocated as needed, so memoryrequirements depend on the current system usage of IPC mechanisms.
This difference in methods sometimes confuses users who are installing or using databases. The limit thatis the most confusing is the maximum number of shared memory segments that can be attachedsimultaneously per process. For 64-bit processes, the maximum number of shared memory segments is268435456. For 32-bit processes, the maximum number of shared memory segments is 11, unless theextended shmat capability is used. For more information on extending shmat, see “UnderstandingMemory Mapping” on page 401.
Chapter 19. Shared Libraries and Shared Memory 405
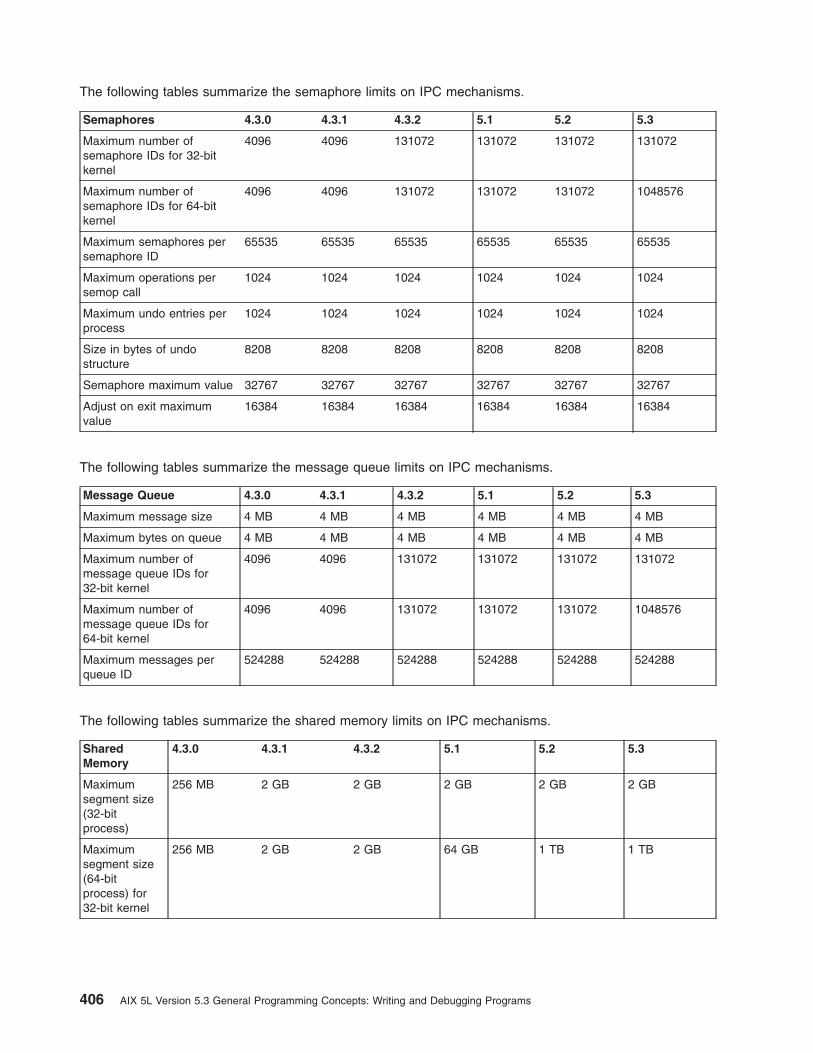
The following tables summarize the semaphore limits on IPC mechanisms.
Semaphores 4.3.0 4.3.1 4.3.2 5.1 5.2 5.3
Maximum number ofsemaphore IDs for 32-bitkernel
4096 4096 131072 131072 131072 131072
Maximum number ofsemaphore IDs for 64-bitkernel
4096 4096 131072 131072 131072 1048576
Maximum semaphores persemaphore ID
65535 65535 65535 65535 65535 65535
Maximum operations persemop call
1024 1024 1024 1024 1024 1024
Maximum undo entries perprocess
1024 1024 1024 1024 1024 1024
Size in bytes of undostructure
8208 8208 8208 8208 8208 8208
Semaphore maximum value 32767 32767 32767 32767 32767 32767
Adjust on exit maximumvalue
16384 16384 16384 16384 16384 16384
The following tables summarize the message queue limits on IPC mechanisms.
Message Queue 4.3.0 4.3.1 4.3.2 5.1 5.2 5.3
Maximum message size 4 MB 4 MB 4 MB 4 MB 4 MB 4 MB
Maximum bytes on queue 4 MB 4 MB 4 MB 4 MB 4 MB 4 MB
Maximum number ofmessage queue IDs for32-bit kernel
4096 4096 131072 131072 131072 131072
Maximum number ofmessage queue IDs for64-bit kernel
4096 4096 131072 131072 131072 1048576
Maximum messages perqueue ID
524288 524288 524288 524288 524288 524288
The following tables summarize the shared memory limits on IPC mechanisms.
SharedMemory
4.3.0 4.3.1 4.3.2 5.1 5.2 5.3
Maximumsegment size(32-bitprocess)
256 MB 2 GB 2 GB 2 GB 2 GB 2 GB
Maximumsegment size(64-bitprocess) for32-bit kernel
256 MB 2 GB 2 GB 64 GB 1 TB 1 TB
406 AIX 5L Version 5.3 General Programming Concepts: Writing and Debugging Programs
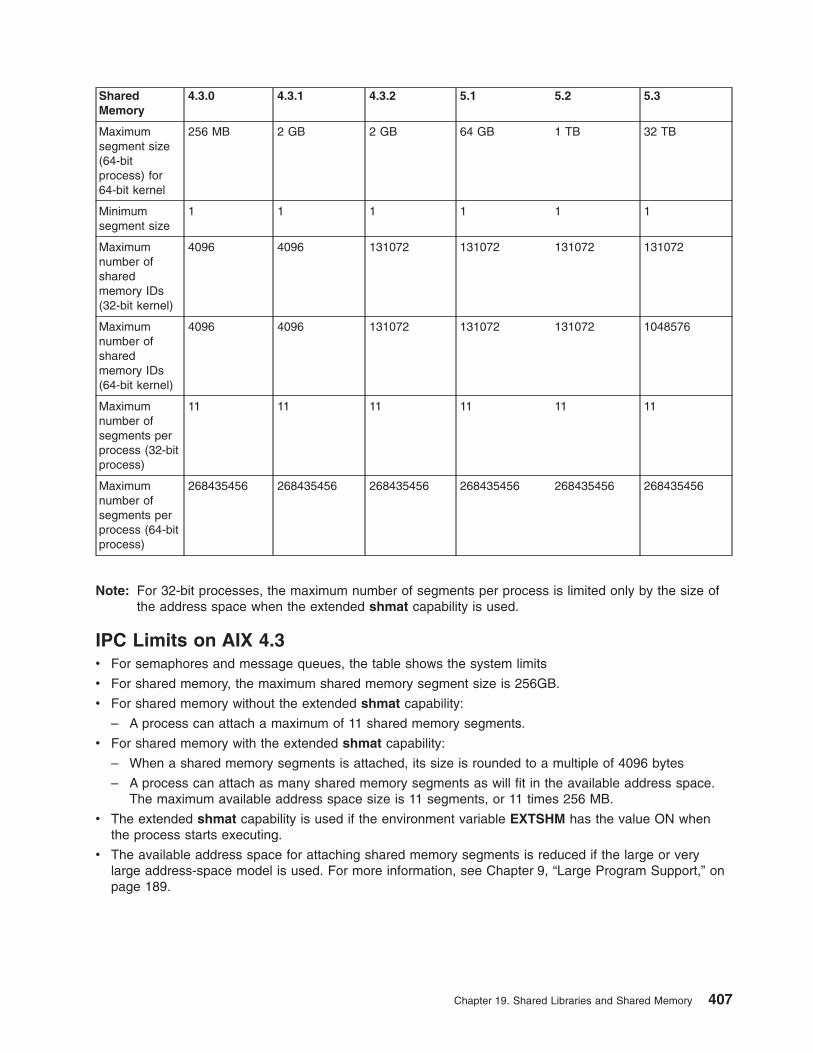
SharedMemory
4.3.0 4.3.1 4.3.2 5.1 5.2 5.3
Maximumsegment size(64-bitprocess) for64-bit kernel
256 MB 2 GB 2 GB 64 GB 1 TB 32 TB
Minimumsegment size
1 1 1 1 1 1
Maximumnumber ofsharedmemory IDs(32-bit kernel)
4096 4096 131072 131072 131072 131072
Maximumnumber ofsharedmemory IDs(64-bit kernel)
4096 4096 131072 131072 131072 1048576
Maximumnumber ofsegments perprocess (32-bitprocess)
11 11 11 11 11 11
Maximumnumber ofsegments perprocess (64-bitprocess)
268435456 268435456 268435456 268435456 268435456 268435456
Note: For 32-bit processes, the maximum number of segments per process is limited only by the size ofthe address space when the extended shmat capability is used.
IPC Limits on AIX 4.3v For semaphores and message queues, the table shows the system limits
v For shared memory, the maximum shared memory segment size is 256GB.
v For shared memory without the extended shmat capability:
– A process can attach a maximum of 11 shared memory segments.
v For shared memory with the extended shmat capability:
– When a shared memory segments is attached, its size is rounded to a multiple of 4096 bytes
– A process can attach as many shared memory segments as will fit in the available address space.The maximum available address space size is 11 segments, or 11 times 256 MB.
v The extended shmat capability is used if the environment variable EXTSHM has the value ON whenthe process starts executing.
v The available address space for attaching shared memory segments is reduced if the large or verylarge address-space model is used. For more information, see Chapter 9, “Large Program Support,” onpage 189.
Chapter 19. Shared Libraries and Shared Memory 407

IPC Limits on AIX 4.3.1v The maximum size of a shared memory segment increases from 256 MB to 2 GB. When a shared
memory segment larger than 256 MB is attached, its size is rounded to a multiple of 256 MB, even ifthe extended shmat capability is being used.
IPC Limits on AIX 4.3.2v The maximum number of message queues, semaphore IDs, and shared memory segments is 131072.
v The maximum number of messages per queue is 524288.
IPC Limits on AIX 5.1v The maximum size of a shared memory segment for 64-bit processes is 64 GB. A 32-bit process cannot
attach a shared memory segment larger than 2 GB.
IPC Limits on AIX 5.2v The maximum size of a shared memory segment for 64-bit processes is 1 TB. A 32-bit process cannot
attach a shared memory segment larger than 2 GB.
v 32-bit applications can use the shmat capability to obtain more than 11 segments when using the verylarge address space model without having to use extended shmat. For more information on the verylarge address space model, see “Understanding the Very Large Address-Space Model” on page 190.
v Applications can query the IPC limits on the system using the vmgetinfo system call.
IPC Limits on AIX 5.3v The maximum size of a shared memory segment for 64-bit processes is 32 TB. A 32-bit process cannot
attach a shared memory segment larger than 2 GB.
v 32-bit applications can use the shmat capability to obtain more than 11 segments when using the verylarge address space model without having to use extended shmat. For more information on the verylarge address space model, see “Understanding the Very Large Address-Space Model” on page 190.
v Applications can query the IPC limits on the system using the vmgetinfo system call.
Creating a Mapped Data File with the shmat Subroutine
Prerequisite ConditionThe file to be mapped is a regular file.
ProcedureThe creation of a mapped data file is a two-step process. First, you create the mapped file. Then, becausethe shmat subroutine does not provide for it, you must program a method for detecting the end of themapped file.
1. To create the mapped data file:
a. Open (or create) the file and save the file descriptor:if( ( fildes = open( filename , 2 ) ) < 0 ){
printf( "cannot open file\n" );exit(1);
}
b. Map the file to a segment with the shmat subroutine:file_ptr=shmat (fildes, 0, SHM_MAP);
408 AIX 5L Version 5.3 General Programming Concepts: Writing and Debugging Programs

The SHM_MAP constant is defined in the /usr/include/sys/shm.h file. This constant indicates that thefile is a mapped file. Include this file and the other shared memory header files in a program withthe following directives:#include <sys/shm.h>
2. To detect the end of the mapped file:
a. Use the lseek subroutine to go to the end of file:eof = file_ptr + lseek(fildes, 0, 2);
This example sets the value of eof to an address that is 1 byte beyond the end of file. Use thisvalue as the end-of-file marker in the program.
b. Use file_ptr as a pointer to the start of the data file, and access the data as if it were in memory:while ( file_ptr < eof){
.
.
.(references to file using file_ptr)
}
Note: The read and write subroutines also work on mapped files and produce the same dataas when pointers are used to access the data.
c. Close the file when the program is finished working with it:close (fildes );
Creating a Copy-On-Write Mapped Data File with the shmat Subroutine
Prerequisite ConditionThe file to be mapped is a regular file.
Procedure1. Open (or create) the file and save the file descriptor:
if( ( fildes = open( filename , 2 ) ) < 0 ){
printf( "cannot open file\n" );exit(1);
}
2. Map the file to a segment as copy-on-write, with the shmat subroutine:file_ptr = shmat( fildes, 0, SHM_COPY );
The SHM_COPY constant is defined in the /usr/include/sys/shm.h file. This constant indicates that thefile is a copy-on-write mapped file. Include this header file and other shared memory header files in aprogram with the following directives:#include <sys/shm.h>
3. Use file_ptr as a pointer to the start of the data file, and access the data as if it were in memory.while ( file_ptr < eof){
.
.
.(references to file using file_ptr)
}
4. Use the fsync subroutine to write changes to the copy of the file on disk to save the changes:fsync( fildes );
Chapter 19. Shared Libraries and Shared Memory 409

5. Close the file when the program is finished working with it:close( fildes );
Creating a Shared Memory Segment with the shmat Subroutine
Prerequisite Tasks or ConditionsNone.
Procedure1. Create a key to uniquely identify the shared segment. Use the ftok subroutine to create the key. For
example, to create the key mykey using a project ID of R contained in the variable proj (type char) anda file name of null_file, use a statement like:mykey = ftok( null_file, proj );
2. Either:
v Create a shared memory segment with the shmget subroutine. For example, to create a sharedsegment that contains 4096 bytes and assign the shmid to an integer variable mem_id, use astatement like:mem_id = shmget(mykey, 4096, IPC_CREAT | o666 );
v Get a previously created shared segment with the shmget subroutine. For example, to get a sharedsegment that is already associated with the key mykey and assign the shmid to an integer variablemem_id, use a statement like:mem_id = shmget( mykey, 4096, IPC_ACCESS );
3. Attach the shared segment to the process with the shmat subroutine. For example, to attach apreviously created segment, use a statement like:ptr = shmat( mem_id );
In this example, the variable ptr is a pointer to a structure that defines the fields in the sharedsegment. Use this template structure to store and retrieve data in the shared segment. This templateshould be the same for all processes using the segment.
4. Work with the data in the segment using the template structure.
5. Detach from the segment using the shmdt subroutine:shmdt( ptr );
6. If the shared segment is no longer needed, remove it from the system with the shmctl subroutine:shmctl( mem_id, IPC_RMID, ptr );
Note: You can also use the ipcs command to get information about a segment, and the ipcrmcommand to remove a segment.
Paging Space Programming RequirementsThe amount of paging space required by an application depends on the type of activities performed on thesystem. If paging space runs low, processes may be lost. If paging space runs out, the system may panic.When a paging space low condition is detected, additional paging space should be defined.
The system monitors the number of free paging space blocks and detects when a paging space shortageexists. The vmstat command obtains statistics related to this condition. When the number of free pagingspace blocks falls below a threshold known as the paging space warning level, the system informs allprocesses (excepts kprocs) of the low condition by sending the SIGDANGER signal.
Note: If the shortage continues and falls below a second threshold known as the paging space kill level,the system sends the SIGKILL signal to processes that are the major users of paging space and
410 AIX 5L Version 5.3 General Programming Concepts: Writing and Debugging Programs

that do not have a signal handler for the SIGDANGER signal. (The default action for theSIGDANGER signal is to ignore the signal). The system continues sending SIGKILL signals untilthe number of free paging space blocks is above the paging space kill level. If thelow_ps_handling parameter is set to 2 (under the vmo command) and if no process is found to kill(without the SIGDANGER handler), the system sends the SIGKILL signal to the earliest processesthat have a signal handler for the SIGDANGER signal.
Processes that dynamically allocate memory can ensure that sufficient paging space exists by monitoringthe paging space levels with the psdanger subroutine or by using special allocation routines. Processescan avoid being ended when the paging space kill level is reached by defining a signal handler for theSIGDANGER signal and by using the disclaim subroutine to release memory and paging space resourcesallocated in the data and stack areas, and in shared memory segments.
Other subroutines that can assist in dynamically retrieving paging information from the VMM include thefollowing:
mincore Determines the residency of memory pages.madvise Permits a process to advise the system about its expected paging behavior.swapqry Returns paging device status.swapon Activates paging or swapping to a designated block device.
List of Memory Manipulation Services
The memory functions operate on arrays of characters in memory called memory areas. Thesesubroutines enable you to:
v Locate a character within a memory area
v Copy characters between memory areas
v Compare contents of memory areas
v Set a memory area to a value.
You do not need to specify any special flag to the compiler in order to use the memory functions.However, you must include the header file for these functions in your program. To include the header file,use the following statement:#include <memory.h>
The following memory services are provided:
compare_and_swap Compares and swaps datafetch_and_add Updates a single word variable atomicallyfetch_and_and or fetch_and_or Set or clear bits in a single word variable atomicallymalloc, free, realloc, calloc, mallopt, mallinfo, or alloca Allocate memorymemccpy, memchr, memcmp, memcpy, memset ormemmove
Perform memory operations.
moncontrol Starts and stops execution profiling after initialization by the monitor subroutinemonitor Starts and stops execution profiling using data areas defined in the function parametersmonstartup Starts and stops execution profiling using default-sized data areasmprotect Modifies the access protections of a specified address range within a shared memory
segment.msem_init Initializes a semaphore in a mapped file or shared memory regionmsem_lock Locks a semaphoremsem_remove Removes a semaphoremsem_unlock Unlocks a semaphore
Chapter 19. Shared Libraries and Shared Memory 411

msleep Puts a process to sleep when a semaphore is busymwakeup Wakes up a process that is waiting on a semaphoredisclaim Disclaims the content of a memory address rangeftok Generates a standard interprocess communication keygetpagesize Gets the system page sizepsdanger Defines the amount of free paging space availableshmat Attaches a shared memory segment or a mapped file to the current processshmctl Controls shared memory operationsshmdt Detaches a shared memory segmentshmget Gets a shared memory segmentswapon Activates paging or swapping to a designated block deviceswapqry Returns device status
List of Memory Mapping Services
The memory mapping subroutines operate on memory regions that have been mapped with the mmapsubroutine. These subroutines enable you to:
v Map an object file into virtual memory
v Synchronize a mapped file
v Determine residency of memory pages
v Determine access protections to a mapped memory region
v Unmap mapped memory regions.
You do not need to specify any special flag to the compiler to use the memory functions. However, youmust include the header file for some of these subroutines. If the subroutine description specifies a headerfile, you can include it with the following statement:#include <HeaderFile.h>
The following memory mapping services are provided:
madvise Advises the system of a process’ expected paging behavior.mincore Determines residency of memory pages.mmap Maps an object file onto virtual memory.mprotect Modifies access protections of memory mapping.msync Synchronizes a mapped file with its underlying storage device.munmap Unmaps a mapped memory region.
Related InformationFor further information on this topic, see the following:
v Performance management has a section on Virtual Memory Manager (VMM) which describes the VMMand its page-stealing algorithms in detail.
v Memory Kernel Services in AIX 5L Version 5.3 Kernel Extensions and Device Support ProgrammingConcepts describes the various kernel extensions available to manipulate kernel memory.
v Paging space in Operating system and device management
Subroutine Referencesv The dlclose subroutine, dlopen subroutine, _end, _etext or _edata identifier, exec subroutine, exit
subroutine, ftok subroutine, fsync subroutine, load subroutine, loadquery subroutine, loadbind
412 AIX 5L Version 5.3 General Programming Concepts: Writing and Debugging Programs

subroutine, malloc, free, realloc, calloc, mallopt, mallinfo, or alloca subroutine, monitor subroutine,moncontrol subroutine, monstartup subroutine in AIX 5L Version 5.3 Technical Reference: BaseOperating System and Extensions Volume 1.
v shmat subroutine, shmctl subroutine, shmdt subroutine, shmget subroutine, unload subroutine in AIX5L Version 5.3 Technical Reference: Base Operating System and Extensions Volume 2.
Commands ReferncesThe ar command, as command, cc command in AIX 5L Version 5.3 Commands Reference, Volume 1.
The dump command, ipcs command in AIX 5L Version 5.3 Commands Reference, Volume 2.
The ipcrm command, ld command in AIX 5L Version 5.3 Commands Reference, Volume 3.
The pagesize command,rtl_enable command, update command in AIX 5L Version 5.3 CommandsReference, Volume 5.
The vmstat command in AIX 5L Version 5.3 Commands Reference, Volume 6.
Files ReferencesThe XCOFF object (a.out) file format.
Chapter 19. Shared Libraries and Shared Memory 413

414 AIX 5L Version 5.3 General Programming Concepts: Writing and Debugging Programs

Chapter 20. System Memory Allocation Using the mallocSubsystem
Memory is allocated to applications using the malloc subsystem. The malloc subsystem is a memorymanagement API that consists of the following subroutines:
v malloc
v calloc
v realloc
v free
v mallopt
v mallinfo
v alloca
v valloc
v posix_memalign
The malloc subsystem manages a logical memory object called a heap. The heap is a region of memorythat resides in the application’s address space between the last byte of data allocated by the compiler andthe end of the data region. The heap is the memory object from which memory is allocated and to whichmemory is returned by the malloc subsystem API.
The malloc subsystem performs the following fundamental memory operations:
v Allocation:
Performed by the malloc, calloc valloc, alloca, and posix_memalign subroutines.
v Deallocation:
Performed by the free subroutine.
v Reallocation:
Performed by the realloc subroutine.
The mallopt and mallinfo subroutines are supported for System V compatibility. The mallinfo subroutinecan be used during program development to obtain information about the heap managed by the mallocsubroutine. The mallopt subroutine can be used to disclaim page-aligned, page-sized free memory, and toenable and disable the default allocator. Similar to the malloc subroutine, the valloc subroutine isprovided for compatibility with the Berkeley Compatibility Library.
For additional information, see the following sections:
v “Working with the Process Heap” on page 416
– “Process Address Space in 32-bit Applications” on page 416
– “Process Address Space in 64-bit Applications” on page 416
v “Understanding System Allocation Policy” on page 417
– “Understanding the Default Allocation Policy” on page 417
– “Understanding the Watson Allocation Policy” on page 418
– “Understanding the malloc 3.1 Allocation Policy” on page 419
– “Understanding the Pool Allocation Policy” on page 421
– “Understanding the User-defined Allocation Policy” on page 422
– “Understanding the no_overwrite Option” on page 422
v “Comparing the Various Allocation Policies” on page 423
– “Comparing the Default and malloc 3.1 Allocation Policies” on page 423
© Copyright IBM Corp. 1997, 2010 415
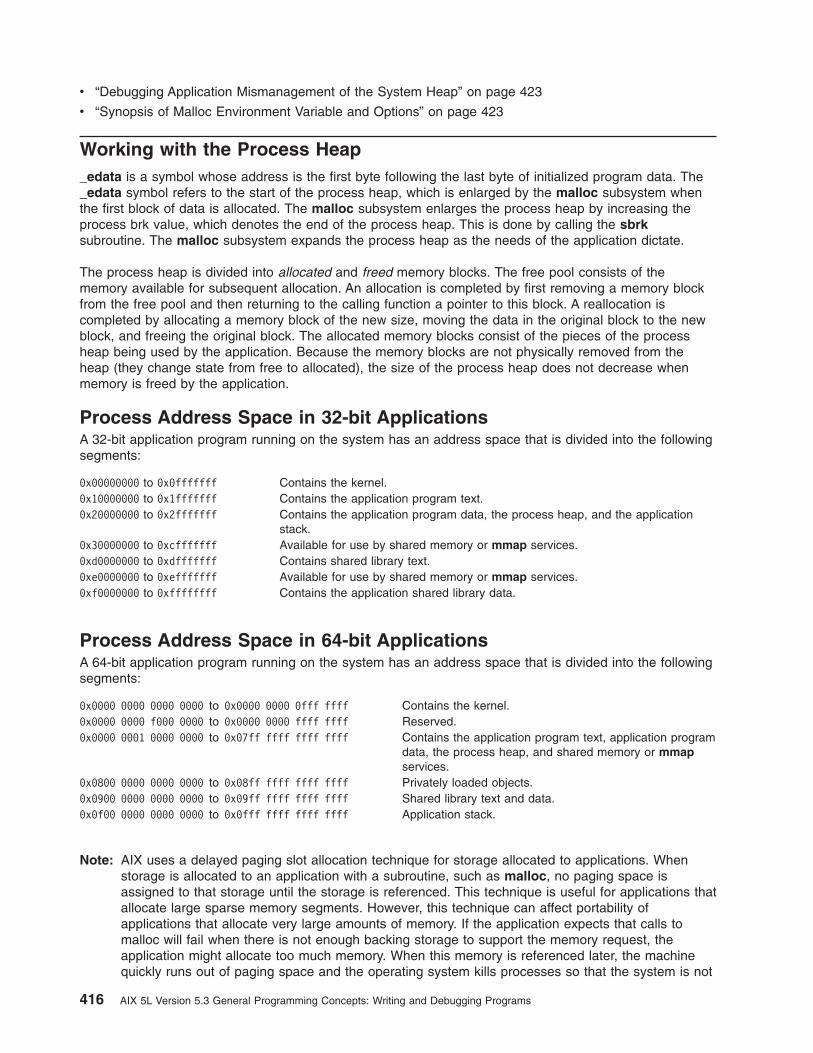
v “Debugging Application Mismanagement of the System Heap” on page 423
v “Synopsis of Malloc Environment Variable and Options” on page 423
Working with the Process Heap_edata is a symbol whose address is the first byte following the last byte of initialized program data. The_edata symbol refers to the start of the process heap, which is enlarged by the malloc subsystem whenthe first block of data is allocated. The malloc subsystem enlarges the process heap by increasing theprocess brk value, which denotes the end of the process heap. This is done by calling the sbrksubroutine. The malloc subsystem expands the process heap as the needs of the application dictate.
The process heap is divided into allocated and freed memory blocks. The free pool consists of thememory available for subsequent allocation. An allocation is completed by first removing a memory blockfrom the free pool and then returning to the calling function a pointer to this block. A reallocation iscompleted by allocating a memory block of the new size, moving the data in the original block to the newblock, and freeing the original block. The allocated memory blocks consist of the pieces of the processheap being used by the application. Because the memory blocks are not physically removed from theheap (they change state from free to allocated), the size of the process heap does not decrease whenmemory is freed by the application.
Process Address Space in 32-bit ApplicationsA 32-bit application program running on the system has an address space that is divided into the followingsegments:
0x00000000 to 0x0fffffff Contains the kernel.0x10000000 to 0x1fffffff Contains the application program text.0x20000000 to 0x2fffffff Contains the application program data, the process heap, and the application
stack.0x30000000 to 0xcfffffff Available for use by shared memory or mmap services.0xd0000000 to 0xdfffffff Contains shared library text.0xe0000000 to 0xefffffff Available for use by shared memory or mmap services.0xf0000000 to 0xffffffff Contains the application shared library data.
Process Address Space in 64-bit ApplicationsA 64-bit application program running on the system has an address space that is divided into the followingsegments:
0x0000 0000 0000 0000 to 0x0000 0000 0fff ffff Contains the kernel.0x0000 0000 f000 0000 to 0x0000 0000 ffff ffff Reserved.0x0000 0001 0000 0000 to 0x07ff ffff ffff ffff Contains the application program text, application program
data, the process heap, and shared memory or mmapservices.
0x0800 0000 0000 0000 to 0x08ff ffff ffff ffff Privately loaded objects.0x0900 0000 0000 0000 to 0x09ff ffff ffff ffff Shared library text and data.0x0f00 0000 0000 0000 to 0x0fff ffff ffff ffff Application stack.
Note: AIX uses a delayed paging slot allocation technique for storage allocated to applications. Whenstorage is allocated to an application with a subroutine, such as malloc, no paging space isassigned to that storage until the storage is referenced. This technique is useful for applications thatallocate large sparse memory segments. However, this technique can affect portability ofapplications that allocate very large amounts of memory. If the application expects that calls tomalloc will fail when there is not enough backing storage to support the memory request, theapplication might allocate too much memory. When this memory is referenced later, the machinequickly runs out of paging space and the operating system kills processes so that the system is not
416 AIX 5L Version 5.3 General Programming Concepts: Writing and Debugging Programs

completely exhausted of virtual memory. The application that allocates memory must ensure thatbacking storage exists for the storage being allocated. Setting the PSALLOC environment variableto PSALLOC=early changes the paging space allocation technique to an early allocation algorithm. Inearly allocation, paging space is assigned once the memory is requested. For more information,see Paging space and virtual memory in Operating system and device management.
Understanding System Allocation PolicyThe allocation policy refers to the set of data structures and algorithms employed to represent the heapand to implement allocation, deallocation, and reallocation. The malloc subsystem supports severaldifferent allocation policies, including the default allocation policy, the watson allocation policy, the malloc3.1 allocation policy, and the user-defined allocation policy. The API for accessing the malloc subsystem isidentical for all allocation policies; only the underlying implementation is different.
You can use the following environment variables to specify the allocation policy and any normal or debugoptions for that policy:
v MALLOCTYPE specifies the allocation policy.
v MALLOCOPTIONS specifies normal options to the chosen allocation policy.
v MALLOCDEBUG specifies debug options to the chosen allocation policy.
v MALLOCALIGN specifies the default malloc alignment external to a program.
The default allocation policy is generally more efficient and is the preferred choice for the majority ofapplications. The other allocation policies have some unique behavioral characteristics that can bebeneficial in specific circumstances, as described in Comparing the Different Allocation Policies.
Some options to the various allocation policies are compatible with each other and can be used in tandem.When you are using options in tandem, use a comma (,) to separate options specified by theMALLOCOPTIONS and MALLOCDEBUG environment variables.
The MALLOCALIGN environment variable can be set to the default alignment desired for every malloc()allocation. An example isMALLOCALIGN=16; export MALLOCALIGN
The MALLOCALIGN environment variable can be set to any power of 2 value greater than or equal to thesize of a pointer in the corresponding run mode (4 bytes for 32-bit mode, 8 bytes for 64-bit mode). For32-bit vector-enabled programs, this environment variable can be set to 16, so all malloc()s will besuitably aligned for vector data types if necessary. Note that 64-bit vector programs will already receive16-byte-aligned allocations.
Also, internally to a program, the program can use the mallopt(M_MALIGN, 16) routine to change thedefault malloc() to provide 16-byte aligned allocations. The mallopt(M_MALIGN) routine allows a programto control the default malloc alignment dynamically at runtime.
Understanding the Default Allocation PolicyThe default allocation policy maintains the free space in the heap as nodes in a cartesian binary searchtree in which the nodes are ordered left-to-right by address (increasing address to the right) andtop-to-bottom by length (such that no child is larger than its parent). This data structure imposes nolimitation on the number of block sizes supported by the tree, allowing a wide range of potential blocksizes. Tree-reorganization techniques optimize access times for node location, insertion, and deletion, andalso protect against fragmentation.
The default allocation policy provides support for the following optional capabilities:
Chapter 20. System Memory Allocation Using the malloc Subsystem 417

AllocationA small amount of overhead is required to service an allocation request. This is due to the need for ametadata prefix and the need for suitable alignment of each block of memory. The size of the metadataprefix for all allocations is 8 and 16 bytes for 32-bit and 64-bit programs respectively. Each block must bealigned on a 16 or 32 byte boundary, thus the total amount of memory required for an allocation of size nis:size = roundup(n + prefix_size, alignment requirement)
For example, an allocation of size 37 in a 32-bit process would require roundup(37 + 8, 16), which isequal to 48 bytes.
The node of the tree with the lowest address that is greater than or equal to the size required is removedfrom the tree. If the block found is larger than the needed size, the block is divided into two blocks: one ofthe needed size, and the second a remainder. The second block, called the runt, is returned to the freetree for future allocation. The first block is returned to the caller.
If a block of sufficient size is not found in the free tree, the heap is expanded, a block the size of theacquired extension is added to the free tree, and allocation continues as previously described.
DeallocationMemory blocks deallocated with the free subroutine are returned to the tree, at the root. Each node alongthe path to the insertion point for the new node is examined to see if it adjoins the node being inserted. Ifit does, the two nodes are merged and the newly merged node is relocated in the tree. If no adjoiningblock is found, the node is simply inserted at the appropriate place in the tree. Merging adjacent blockscan significantly reduce heap fragmentation.
ReallocationIf the size of the reallocated block will be larger than the original block, the original block is returned to thefree tree with the free subroutine so that any possible coalescence can occur. A new block of therequested size is then allocated, the data is moved from the original block to the new block, and the newblock is returned to the caller.
If the size of the reallocated block is smaller than the original block, the block is split and the smaller oneis returned to the free tree.
LimitationsThe default allocation policy supports the following options:
v Malloc Multiheap
v Malloc Buckets
v Malloc Disclaim
v Malloc Thread Cache
v no_overwrite
Understanding the Watson Allocation PolicyThe Watson allocation policy maintains the free space in the heap as nodes in two separate red-blacktrees: one sorted by address, the other by size. Red-black trees provide simpler and more efficient treeoperations than the cartesian trees of the default allocator, thus the watson allocation policy is often fasterthan the default.
AllocationThe Watson allocation policy has the same overhead requirements as the default allocation policy.
The size tree is searched for the smallest possible block that is greater than or equal to the size required.This block is then removed from the size tree. If the block found is larger than the needed size, the block
418 AIX 5L Version 5.3 General Programming Concepts: Writing and Debugging Programs

is divided into two blocks: one block of the remaining size, and the second of the required size. The firstblock, called the runt, is returned to the size tree for future allocation. The second block is returned to thecaller. If the block found in the size tree was exactly the required size, the block is removed from both thesize and the address tree, and then returned to the caller.
If a block of sufficient size is not found in the free tree, the process heap is expanded, a block the size ofthis expansion is added to the size and address trees, and allocation continues as previously described.
DeallocationMemory blocks deallocated with the free subroutine are returned to the address tree at the root. Eachnode along the path to the insertion point for the new node is examined to see if it adjoins the node beinginserted. If it does, the two nodes are merged and the newly merged node is relocated in the size tree. Ifno adjoining block is found, the node is simply inserted at the appropriate place in the both the addressand size tree.
After insertion, both red-black trees must be checked for correct balancing.
ReallocationIf the size of the reallocated block will be larger than the original block, the original block is returned to thefree trees with the free subroutine so that any possible coalescence can occur. A new block of therequested size is then allocated, the data is moved from the original block to the new block, and the newblock is returned to the caller.
If the size of the reallocated block is smaller than the original block, the block is split and the remainder isreturned to the free tree.
LimitationsThe Watson allocation policy supports the following options:
v Malloc Multiheap
v Malloc Buckets
v Malloc Disclaim
v Malloc Thread Cache
v no_overwrite
Understanding the malloc 3.1 Allocation PolicyThe malloc 3.1 allocation policy can be selected by setting MALLOCTYPE=3.1 prior to process startup.Thereafter, all 32-bit programs run by the shell will use the malloc 3.1 allocation policy (64-bit programswill continue to use the default allocation policy).
The malloc 3.1 allocation policy maintains the heap as a set of 28 hash buckets, each of which points to alinked list. Each linked list contains blocks of a particular size. The index into the hash buckets indicatesthe size of the blocks in the linked list. The size of the block is calculated using the following formula:size = 2 i + 4
where i identifies the bucket. This means that the blocks in the list anchored by bucket zero are 20+4 = 16bytes long. Therefore, given that a prefix is 8 bytes in size, these blocks can satisfy requests for blocksbetween 0 and 8 bytes long. The following table illustrates how requested sizes are distributed among thebuckets.
Note: This algorithm can use as much as twice the amount of memory actually requested by theapplication. An extra page is required for buckets larger than 4096 bytes because objects of a pagein size or larger are page-aligned. Because the prefix immediately precedes the block, an entirepage is required solely for the prefix.
Chapter 20. System Memory Allocation Using the malloc Subsystem 419

Bucket Block Size Sizes Mapped Pages Used
0 16 0 ... 8
1 32 9 ... 24
2 64 25 ... 56
3 128 57 ... 120
4 256 121 ... 248
5 512 249 ... 504
6 1K 505 ... 1K-8
7 2K 1K-7 ... 2K-8
8 4K 2K-7 ... 4K-8 2
9 8K 4K-7 ... 8K-8 3
10 16K 8K-7 ... 16K-8 5
11 32K 16K-7 ... 32K-8 9
12 64K 32K-7 ... 64K-8 17
13 128K 64K-7 ... 128K-8 33
14 256K 128K-7 ... 256K-8 65
15 512K 256K-7 ... 512K-8 129
16 1M 256K-7 ... 1M-8 257
17 2M 1M-7 ... 2M-8 513
18 4M 2M-7 ... 4M-8 1K + 1
19 8M 4M-7 ... 8M-8 2K + 1
20 16M 8M-7 ... 16M-8 4K + 1
21 32M 16M-7 ... 32M-8 8K + 1
22 64M 32M-7 ... 64M-8 16K + 1
23 128M 64M-7 ... 128M-8 32K + 1
24 256M 128M-7 ... 256M-8 64K + 1
25 512M 256M-7 ... 512M-8 128K + 1
26 1024M 512M-7 ... 1024M-8 256K + 1
27 2048M 1024M-7 ... 2048M-8 512K + 1
AllocationA block is allocated from the free pool by first converting the requested bytes to an index in the bucketarray, using the following equation:needed = requested + 8
If needed <= 16,thenbucket = 0
If needed > 16,thenbucket = (log(needed)/log(2) rounded down to the nearest integer) - 3
The size of each block in the list anchored by the bucket is block size = 2 bucket + 4. If the list in the bucketis null, memory is allocated using the sbrk subroutine to add blocks to the list. If the block size is less thana page, then a page is allocated using the sbrk subroutine, and the number of blocks arrived at bydividing the block size into the page size are added to the list. If the block size is equal to or greater than
420 AIX 5L Version 5.3 General Programming Concepts: Writing and Debugging Programs
a page, needed memory is allocated using the sbrk subroutine, and a single block is added to the free listfor the bucket. If the free list is not empty, the block at the head of the list is returned to the caller. Thenext block on the list then becomes the new head.
DeallocationWhen a block of memory is returned to the free pool, the bucket index is calculated as with allocation. Theblock to be freed is then added to the head of the free list for the bucket.
ReallocationWhen a block of memory is reallocated, the needed size is compared against the existing size of theblock. Because of the wide variance in sizes handled by a single bucket, the new block size often maps tothe same bucket as the original block size. In these cases, the length of the prefix is updated to reflect thenew size and the same block is returned. If the needed size is greater than the existing block, the block isfreed, a new block is allocated from the new bucket, and the data is moved from the old block to the newblock.
LimitationsSetting MALLOCTYPE=3.1 will only enable the malloc 3.1 policy for 32-bit programs. For 64-bit programs touse the malloc 3.1 policy, the MALLOCTYPE environment variable must be explicitly set toMALLOCTYPE=3.1_64BIT. This allocation policy is less efficient than the default and is not recommended foruse in most cases.
The malloc 3.1 allocation policy supports the following options:
v Malloc Disclaim
v no_overwrite
Understanding the Pool Allocation PolicyMalloc pool is a high performance front end to the libc functions malloc, calloc, free, posix_memalignand realloc for managing storage objects smaller than 513 bytes. The performance benefits derive fromdramatically shorter path lengths and better data cache utilization. For multi-threaded applications, there isthe further benefit that thread local pool anchors are used to avoid atomic operations. This front end canbe used in conjunction with any of the storage management schemes currently provided in libc (such asyorktown, and watson).
To use malloc pool, run the following command:export MALLOCOPTIONS=pool<:max_size>
When this option is specified, a collection of pools is created during malloc initialization where each poolis a linked list of fixed sized objects. The smallest pool can hold objects of pointer-size (such as 4 bytesfor 32-bit applications or 8 bytes for 64-bit applications). Each successive pool can accommodate objectswhose size is pointer-size larger than the previous pool. This means there are 128 pools for 32-bitapplications and 64 pools for 64-bit applications. The collection of pools is represented as an array ofpointers that ″anchor″ the linked lists.
Malloc pool uses its own memory, the pool heap, which is not shared with standard malloc. Whenspecified, the max_size option is rounded up to the next higher 2 MB value and is used to control the sizeof the pool heap. The max_size option can be specified as a decimal number or a hexadecimal numberpreceded by 0x or 0X (for example, export MALLOCOPTIONS=pool:0x1700000 will set max_size to 24 MBafter rounding up.
For 32-bit applications, the size of the pool heap starts at 2 MB. If more storage is required and the totalpool heap storage is less than max_size, an additional 2 MB is acquired. Each 2 MBb area will be on a 2MB boundary, but need not be contiguous to any of the other 2 MB areas. For 64-bit applications, a singlecontiguous pool heap of max_size is allocated during malloc initialization and never extended. If
Chapter 20. System Memory Allocation Using the malloc Subsystem 421

max_size is not specified, it defaults to 512 MB for 32-bit applications and 32 MB for 64-bit applications.For both 32- and 64-bit modes, max_size will be set to 512 MB if a larger size is specified.
Storage UtilizationAll pool anchors are initially set to NULL or empty. When malloc pool services a request and thecorresponding pool is empty, a routine is called that allocates storage from the pool heap in contiguous1024-byte chunks on 1024-byte boundaries. Multiple objects of the requested size are ″created″. Theaddress of the first is returned to satisfy the request, while the remaining objects are linked together andplaced on the pool anchor. For each 1024-byte chunk, there is a 2-byte entry in an auxiliary table that isused by free to determine the size of a returned object.
When an object is freed by malloc pool, it is merely ″pushed″ onto the appropriate pool anchor. Noattempt is made to coalesce blocks to create larger sized objects.
Because of this behavior, malloc pool may use more storage than other forms of malloc.
AlignmentThe default alignment for the malloc(), calloc(), and realloc() subroutines must be specified by setting theMALLOCALIGN environment variable appropriately. The posix_memalign() subroutine continues workingeven if the MALLOCALIGN environment variable is not set. If MALLOCALIGN is greater than 512,malloc pool is not used.
Cache EfficiencyThe memory objects are allocated through the malloc_pool have no prefixes or suffixes. Data cache linesare therefore more densely packed with application usable data. As all memory objects that are a power of2 in size are aligned on a boundary equal to that size, each object is contained within the minimal numberof cache lines. The malloc and free subroutines do not scan trees or linked lists and therefore do not“pollute” the cache.
Multi-threaded SupportMalloc pools can improve performance significantly in a multi-threaded scenario because it reduces lockcontention and the need of atomic operations.
Debugging SupportThere is no debug version of this high-performance front end. If the MALLOCDEBUG environmentvariable is set, the pool option is ignored. It is expected that applications will be debugged using ″normal″malloc prior to activating pooling.
Understanding the User-defined Allocation PolicyThe malloc subsystem provides a mechanism through which users may develop their own algorithms formanaging the system heap and allocating memory. For more information, see “User-Defined MallocReplacement” on page 425.
Understanding the no_overwrite OptionAn additional option available to all allocation policies is no_overwrite. To reduce the overhead of glinkcode within the malloc subsystem, the function descriptor for the malloc subsystem APIs are overwrittenwith the function descriptor for the actual underlying implementation. Because some programs, such asthird-party debuggers, might not work when function pointers are modified in this manner, theno_overwrite option can be used to disable this optimization.
To disable this optimization, set MALLOCOPTIONS=no_overwrite prior to process startup.
422 AIX 5L Version 5.3 General Programming Concepts: Writing and Debugging Programs

Comparing the Various Allocation PoliciesThe various malloc allocation policies elaborated above provide flexibility to application developers whenused separately or combined in supported ways. It is the responsibility of the developer to recognize theunique needs of an application and to tune the various allocation policy parameters in a beneficial way.
Comparing the Default and malloc 3.1 Allocation PoliciesBecause the malloc 3.1 allocation policy rounds up the size of each allocation request to the next power of2, it can produce considerable virtual- and real-memory fragmentation and poor locality of reference. Thedefault allocation policy is generally a better choice because it allocates exactly the amount of spacerequested and is more efficient about reclaiming previously used blocks of memory.
Unfortunately, some application programs may depend inadvertently on side effects of the malloc 3.1allocation policy for acceptable performance or even for correct functioning. For example, a program thatoverruns the end of an array may function correctly when using the malloc 3.1 allocator only because ofthe additional space provided by the rounding-up process. The same program is likely to experienceerratic behavior or even fail when used with default allocator because the default allocator allocates onlythe number of bytes requested.
As another example, because of the inefficient space reclamation of the malloc 3.1 allocation algorithm,the application program almost always receives space that has been set to zeros (when a process touchesa given page in its working segment for the first time, that page is set to zeros). Applications may dependon this side effect for correct execution. In fact, zeroing out of the allocated space is not a specifiedfunction of the malloc subroutine and would result in an unnecessary performance penalty for programsthat initialize only as required and possibly not to zeros. Because the default allocator is more aggressiveabout reusing space, programs that are dependent on receiving zeroed storage from malloc will probablyfail when the default allocator is used.
Similarly, if a program continually reallocates a structure to a slightly greater size, the malloc 3.1 allocatormay not need to move the structure very often. In many cases, the realloc subroutine can make use ofthe extra space provided by the rounding implicit in the malloc 3.1 allocation algorithm. The defaultallocator will usually have to move the structure to a slightly larger area because of the likelihood thatsomething else has been called by the malloc subroutine just above it. This may present the appearanceof a degradation in realloc subroutine performance when the default allocator is used instead of themalloc 3.1 allocator. In reality, it is the surfacing of a cost that is implicit in the application program’sstructure.
Debugging Application Mismanagement of the System HeapThe malloc subsystem offers a collection of debugging tools intended to help the application developerdebug and correct errors in a program’s heap management. These debugging tools are controlled throughthe MALLOCDEBUG environment variable. For more information, see “Debug Malloc Tool” on page 429.
Synopsis of Malloc Environment Variable and OptionsThe following table shows the compatibility between the MALLOCTYPE and MALLOCOPTIONSenvironment variables.
Table 5. Compatibility between MALLOCTYPE and MALLOCOPTIONS Environment Variables
<DefaultAllocator>
3.1 Watson user: multiheap (andsub-options)
<Default Allocator> no no no yes
3.1 no no no no
Watson no no no yes
user: no no no no
multiheap (and sub-options) yes no yes no
Chapter 20. System Memory Allocation Using the malloc Subsystem 423

Table 5. Compatibility between MALLOCTYPE and MALLOCOPTIONS Environment Variables (continued)
<DefaultAllocator>
3.1 Watson user: multiheap (andsub-options)
buckets (and sub-options) yes no no no yes
Thread Cache yes no yes no yes
disclaim yes yes yes no yes
no_overwrite yes yes yes yes yes
Table 6. Compatibility between MALLOCTYPE and MALLOCOPTIONS Environment Variables (continued)
buckets (andsub-options)
ThreadCache
disclaim no_overwrite
<Default Allocator> yes yes yes yes
3.1 no no yes yes
Watson no yes yes yes
user: no no no yes
multiheap (and sub-options) yes yes yes yes
buckets (and sub-options) yes yes yes
Thread Cache yes yes yes
disclaim yes yes yes
no_overwrite yes yes yes
The following table shows the compatibility of the MALLOCTYPE, MALLOCOPTIONS, andMALLOCDEBUG environment variables.
Table 7. Compatibility of MALLOCTYPE, MALLOCOPTIONS, and MALLOCDEBUG Environment Variables
<DefaultAllocator>
3.1 Watson user: multiheap (andsub-options)
catch_overflow (andsub-options)
yes no yes no yes1
report_allocations yes no yes no yes
postfree_checking yes no yes no yes
validate_ptrs yes no yes no yes
trace yes no yes no yes
log yes no yes no yes
verbose yes no yes no yes
check_arena yes no yes no yes
Notes:
1. Bucket allocations will not be debugged.
Table 8. Compatibility of MALLOCTYPE, MALLOCOPTIONS, and MALLOCDEBUG Environment Variables(continued)
buckets (andsub-options)
Thread Cache disclaim no_overwrite
catch_overflow (andsub-options)
yes yes1 yes yes
424 AIX 5L Version 5.3 General Programming Concepts: Writing and Debugging Programs

Table 8. Compatibility of MALLOCTYPE, MALLOCOPTIONS, and MALLOCDEBUG Environment Variables(continued) (continued)
buckets (andsub-options)
Thread Cache disclaim no_overwrite
report_allocations yes yes yes yes
report_allocations yes yes yes yes
postfree_checking yes yes yes yes
validate_ptrs yes yes yes yes
trace yes yes yes yes
log yes yes yes yes
verbose yes yes yes yes
check_arena yes yes yes yes
Notes:
1. Thread cache allocations will not be debugged.
User-Defined Malloc ReplacementUsers can replace the memory subsystem (malloc, calloc, realloc, free, mallopt and mallinfosubroutines ) with one of their own design.
Note: Replacement Memory Subsystems written in C++ are not supported due to the use of the libc.amemory subsystem in the C++ library libC.a.
The existing memory subsystem works for both threaded and non-threaded applications. The user-definedmemory subsystem must be thread-safe so that it works in both threaded and non-threaded processes.Because there are no checks to verify that it is, if a non-thread-safe memory module is loaded in athreaded application, memory and data may be corrupted.
The user defined memory subsystem 32- and 64- bit objects must be placed in an archive with the 32-bitshared object named mem32.o and the 64-bit shared object named mem64.o.
The user-shared objects must export the following symbols :
v __malloc__
v __free__
v __realloc__
v __calloc__
v __mallinfo__
v __mallopt__
v __malloc_init__
v __malloc_prefork_lock__
v __malloc_postfork_unlock__
The user-shared objects can optionally export the following symbol:
v __malloc_start__
v __posix_memalign__
Execution does not stop if these symbols do not exist.
Chapter 20. System Memory Allocation Using the malloc Subsystem 425

The functions are defined as follows:
void *__malloc__(size_t) :This function is the user equivalent of the malloc subroutine.
void __free__(void *) :This function is the user equivalent of the free subroutine.
void *__realloc__(void *, size_t) :This function is the user equivalent of the realloc subroutine.
void *__calloc__(size_t, size_t) :This function is the user equivalent of the calloc subroutine.
int __mallopt__(int, int) :This function is the user equivalent of the mallopt subroutine.
struct mallinfo __mallinfo__() :This function is the user equivalent of the mallinfo subroutine.
void __malloc_start__()This function will be called once before any other user-defined malloc entry point is called.
void __posix_memalign__()This function is the user equivalent of the posix_memalign subroutine. If this symbol does notexist, the execution will not stop, but a call made to the posix_memalign subroutine will causeunexpected results.
The following functions are used by the thread subsystem to manage the user-defined memory subsystemin a multi-threaded environment. They are only called if the application and/or the user defined module arebound with libpthreads.a. Even if the the user-defined subsystem is not thread-safe and not bound withlibpthreads.a, these functions must be defined and exported. Otherwise, the object will not be loaded.
void __malloc_init__(void)Called by the pthread initialization routine. This function is used to initialize the threaded-usermemory subsystem. In most cases, this includes creating and initializing some form of lockingdata. Even if the user-defined memory subsystem module is bound with libpthreads.a, theuser-defined memory subsystem must work before __malloc_init__() is called.
void __malloc_prefork_lock__(void)Called by pthreads when the fork subroutine is called. This function is used to insure that thememory subsystem is in a known state before the fork() and stays that way until the fork() hasreturned. In most cases this includes acquiring the memory subsystem locks.
void __malloc_postfork_unlock__(void)Called by pthreads when the fork subroutine is called. This function is used to make the memorysubsystem available in the parent and child after a fork. This should undo the work done by__malloc_prefork_lock__. In most cases, this includes releasing the memory subsystem locks.
All of the functions must be exported from a shared module. Separate modules must exist for 32- and64-bit implementations placed in an archive. For example:
v mem.exp module:__malloc____free____realloc____calloc____mallopt____mallinfo____malloc_init____malloc_prefork_lock____malloc_postfork_unlock____malloc_start__
426 AIX 5L Version 5.3 General Programming Concepts: Writing and Debugging Programs

v mem_functions32.o module:
Contains all of the required 32-bit functions
v mem_functions64.o module:
Contains all of the required 64-bit functions
The following examples are for creating the shared objects. The -lpthreads parameter is needed only ifthe object uses pthread functions.
v Creating 32-bit shared object:ld -b32 -m -o mem32.o mem_functions32.o \-bE:mem.exp \-bM:SRE -lpthreads -lc
v Creating 64-bit shared object:ld -b64 -m -o mem64.o mem_functions64.o \-bE:mem.exp \-bM:SRE -lpthreads -lc
v Creating the archive (the shared objects name must be mem32.o for the 32bit object and mem64.o for the64bit object):ar -X32_64 -r archive_name mem32.o mem64.o
Enabling the User-Defined Memory SubsystemThe user-defined memory subsystem can be enabled by using one of the following:
v The MALLOCTYPE environment variable
v The _malloc_user_defined_name global variable in the user’s application
To use the MALLOCTYPE environment variable, the archive containing the user defined memorysubsystem is specified by setting MALLOCTYPE to user:archive_name where archive_name is in theapplication’s libpath or the path is specified in the LIBPATH environment variable.
To use the _malloc_user_defined_name global variable, the user’s application must declare the globalvariable as:char *_malloc_user_defined_name="archive_name"
where archive_name must be in the application’s libpath or a path specified in the LIBPATH environmentvariable.
Note:
1. When a setuid application is run, the LIBPATH environment variable is ignored so the archivemust be in the application’s libpath.
2. archive_name cannot contain path information.
3. When both the MALLOCTYPE environment variable and the _malloc_user_defined_name globalvariable are used to specify the archive_name, the archive specified by MALLOCTYPE willoverride the one specified by _malloc_user_defined_name.
32-bit and 64-bit ConsiderationsIf the archive does not contain both the 32-bit and 64-bit shared objects and the user-defined memorysubsystem was enabled using the MALLOCTYPE environment variable, there will be problems executing64-bit processes from 32-bit applications and 32-bit processes from 64-bit applications. When a newprocess is created using the exec subroutine, the process inherits the environment of the callingapplication. This means that the MALLOCTYPE environment variable will be inherited and the newprocess will attempt to load the user-defined memory subsystem. If the archive member does not exist forthis type of program, the load will fail and the new process will exit.
Chapter 20. System Memory Allocation Using the malloc Subsystem 427
Thread ConsiderationsAll of the provided functions must work in a multi-threaded environment. Even if the module is linked withlibpthreads.a, at least __malloc__() must work before __malloc_init__() is called and pthreads isinitialized. This is required because the pthread initialization requires malloc() before __malloc_init__()is called.
All provided memory functions must work in both threaded and non-threaded environments. The__malloc__() function should be able to run to completion without having any dependencies on__malloc_init__() (that is, __malloc__() should initially assume that __malloc_init__() has not yet run.)After __malloc_init__() has completed, __malloc__() can rely on any work done by __malloc_init__().This is required because the pthread initialization uses malloc() before __malloc_init__() is called.
The following variables are provided to prevent unneeded thread-related routines from being called:
v The __multi_threaded variable is zero until a thread is created when it becomes non-zero and will notbe reset to zero for that process.
v The __n_pthreads variable is -1 until pthreads has been initialized when it is set to 1. From that point onit is a count of the number of active threads.
Example:
If __malloc__() uses pthread_mutex_lock(), the code might look similar to the following:if (__multi_threaded)pthread_mutex_lock(mutexptr);
/* ..... work ....... */
if (__multi_threaded)pthread_mutex_unlock(mutexptr);
In this example, __malloc__() is prevented from executing pthread functions before pthreads is fullyinitialized. Single-threaded applications are also accelerated because locking is not done until a secondthread is started.
LimitationsMemory subsystems written in C++ are not supported due to initialization and the dependencies of libC.aand the libc.a memory subsystem.
Error messages are not translated because the setlocale subroutine uses malloc() to initialize thelocales. If malloc() fails then the setlocale subroutine cannot finish and the application is still in the POSIXlocale. Therefore, only the default English messages will be displayed.
Existing statically built programs cannot use the user-defined memory subsystem without recompiling.
Error ReportingThe first time the malloc subroutine is called, the 32- or 64-bit object in the archive specified by theMALLOCTYPE environment variable is loaded. If the load fails, a message displays and the applicationexits. If the load is successful, an attempt is made to verify that all of the required symbols are present. Ifany symbols are missing, the application is terminated and the list of missing symbols displays.
428 AIX 5L Version 5.3 General Programming Concepts: Writing and Debugging Programs

Debug Malloc ToolDebugging applications that are mismanaging memory allocated by the malloc subsystem can be difficultand tedious. This is because there is generally no synchronicity between the insertion of an error and theexposure of its resulting symptom. Adding to the difficulty is the inherent complexity of memory allocation,with thousands of allocations being made, undone, and accessed (perhaps) asynchronously andsimultaneously, all within a multi-threaded context that necessitates robust and efficient synchronization.
It is for these reasons that the focus of our debugging tools is primarily to move the time of symptomdetection closer to the time of error insertion. This helps the application developer to pinpoint moreprecisely which section of code is responsible for committing the error.
Many different debugging tools have been developed for use with malloc. Some can be used incombination with other debugging tools and with all allocation policies; others are more limited in their use.Many of the debugging tools consume resources additional to those required by the process. It is up to theapplication developer to provide adequate resources when necessary.
Performance ConsiderationsThe debug malloc tools are not appropriate for full-time, constant, or system-wide use. Although they aredesigned for minimal performance impact upon the application being debugged, significant negative impacton overall system throughput can result if they are used widely throughout a system. In particular, settingMALLOCDEBUG=catch_overflow in the /etc/environment file is not recommended, and will likely causesignificant system problems, such as excessive use of paging space. The debug malloc tools should onlybe used to debug single applications or small groups of applications at the same time.
Because of the extra work involved in making various run-time checks, malloc subsystem performance willdegrade variably with debug malloc tools enabled (depending on which tool is being used), but not to thepoint that applications will become unusable. After the problem is resolved, the debug malloc tools shouldbe turned off to restore malloc subsystem performance.
Disk and Memory ConsiderationsWith the catch_overflow or Malloc Log tools enabled, the malloc subsystem will consume significantlymore memory.
For catch_overflow, each malloc request is increased by 4096 + 2 times the size of unsigned long, thenrounded up to the next multiple of the PAGESIZE macro. catch_overflow might prove to be toomemory-intensive to use for very large applications, but for the majority of applications that need memorydebugging, the extra use of memory should not cause a problem. For large applications, the use of thedebug_range and functionset options to catch_overflow can significantly lower memory usage, allowingthe program to be debugged piecemeal.
For Malloc Log, an allocation record is stored for every active allocation in the process. This memoryoverhead can be minimized by specifying a low number of saved stack pointers.
If the application being debugged frequently calls malloc subsystem allocation routines, it might encountermemory usage problems with debug malloc tools enabled that could prevent the application fromexecuting properly in a single segment. If this occurs, it may be helpful to enable the application to accessadditional memory by using the ulimit command and the -bmaxdata option of the ld command.
For the purpose of running with debug malloc tools enabled, set the ulimit for both the data (-d) and stack(-s) variables as follows:ulimit -d unlimitedulimit -s unlimited
Chapter 20. System Memory Allocation Using the malloc Subsystem 429

To reserve the maximum of 8 segments for a 32-bit process, the -bmaxdata option should be specified as-bmaxdata:0x80000000.
When the debug malloc tools are turned off, the default values for ulimit and -bmaxdata can be restored.
For more information about the ulimit command and the -bmaxdata option, see Large Program Support.
The debug malloc tools are not appropriate for use in some debugging situations. Because some of thedebug malloc tools require the overhead of a page or more per allocation, programs that issue many smallallocation requests will see their memory usage increase dramatically. These programs might encounternew failures as memory allocation requests are denied due to a lack of memory or paging space. Thesefailures are not necessarily errors in the program being debugged, and they are not errors in the debugmalloc tool.
One specific example of this is the X server, which issues numerous tiny allocation requests during itsinitialization and operation. Any attempt to run the X server using the X or xinit commands withcatch_overflow enabled will result in the failure of the X server due to a lack of available memory. It ispossible, however, to debug X in piecemeal fashion using the debug_range or functionset options. Xclients in general will not encounter functional problems running with catch_overflow enabled. To usecatch_overflow on an X client program, take the following steps:
1. Start the X server with catch_overflow turned off.
2. Start a terminal window (for example, dtterm, xterm, aixterm).
3. Set the appropriate environment variables within the terminal window session to enablecatch_overflow.
4. Invoke the X client program to be debugged from within the same window.
Enabling Debug MallocDebug Malloc is not enabled by default, but is enabled and configured by setting the MALLOCDEBUGenvironment variable to the appropriate option. If more than one option is required, options can beseparated by a comma (,). Options requested in tandem must be compatible with each other.
Malloc Debugging ToolsThe following malloc debugging tools are available:
v Buffer Overflow Detection
– align
– override_signal_handling
– debug_range
– functionset
– allow_overreading
– postfree_checking
v Malloc Trace
v Malloc Log
– report_allocations
– validate_ptrs
v Malloc Detect
– verbose
– checkarena
– output
– continue
430 AIX 5L Version 5.3 General Programming Concepts: Writing and Debugging Programs

Buffer Overflow DetectionMemory management errors are sometimes caused by the application program writing past the end of anallocated buffer. Because this often has no immediate consequence, symptoms do not arise until muchlater when the memory that was overwritten (usually belonging to another allocation) is referenced and nolonger contains the data originally stored therein.
The catch_overflow debug option exists to allow users to identify memory overwrites, overreads, duplicatefrees, and reuse of freed memory allocated by the malloc subroutine. Memory problems detected by thecatch_overflow tool result in an abort call or a segmentation violation (SIGSEGV). In most cases, when anerror is detected, the application stops immediately and a core file is produced.
The catch_overflow option affects the allocations of the following allocation policies and options:
v Default Allocation Policy
v Watson Allocation Policy
v Malloc Multiheap Option
v Malloc Threadcache Option
v Malloc Disclaim Option
The catch_overflow debug option is enabled by setting MALLOCDEBUG=catch_overflow. This will turn onidentification of memory overwrites and overreads.
align: By default, the malloc subroutine returns a pointer aligned on a 2-word boundary. This isnecessary for standards conformance and for programs which cannot accept unaligned memory accesses(e.g. programs using DCE components). However, due to a quirk in the implementation of thecatch_overflow option, it is possible for a program to overwrite a buffer by an amount less than thealignment value without being detected by catch_overflow. The align option can be used to tell themalloc subsystem to disregard this default alignment in order to decrease or eliminate the number ofbytes by which a buffer can be overwritten without detection. A custom alignment can be specified for anypower of two between 0 and 4096 inclusive (e.g. 0,1,2,4,...). The values 0 and 1 are treated as the same,that is, there is no memory alignment; therefore any memory accesses beyond the allocated area willcause a SEGFAULT.
The align option is part of the catch_overflow option and is only meaningful when catch_overflow isenabled. To enable a non-default alignment, set the MALLOCTYPE environment variable as follows:MALLOCDEBUG=catch_overflow,align:n
where n is the desired alignment.
To calculate how many bytes of overreads or overwrites the catch_overflow option will allow for a givenallocation request when n is the requested alignment and size is the number of bytes to be allocated, usethe following formula:((((size / n) + 1) * n) - size) % n
The following example demonstrates the effect of the align option on the application’s ability to performoverreads or overwrites with the catch_overflow option enabled. In this example, the align option isspecified with a value of 2:MALLOCTYPE=debugMALLOCDEBUG=align:2,catch_overflow
The catch_overflow option handles overreads and overwrites as follows:
v When an even number of bytes is allocated, malloc allocates exactly the number of bytes requested,which will allow for 0 bytes of overreads or overwrites.
Chapter 20. System Memory Allocation Using the malloc Subsystem 431

v When an odd number of bytes is allocated, malloc allocates the number of bytes requested, plus oneadditional byte to satisfy the required alignment. This allows for 1 byte of possible overreads oroverwrites.
override_signal_handling: The catch_overflow option reports errors in one of the following ways:
v Memory access errors (such as trying to read or write past the end of allocated memory) cause asegmentation violation (SIGSEGV), resulting in a core dump.
v For other types of errors (such as trying to free space that was already freed), the catch_overflowoption will output an error message, then call the abort function , which will send a SIGIOT signal to endthe current process.
If the calling program is blocking or catching the SIGSEGV and the SIGIOT signals, the catch_overflowoption will be prevented from reporting errors. The override_signal_handling option provides a means ofbypassing this situation without recoding and rebuilding the application.
If the override_signal_handling option is specified, the catch_overflow option will perform the followingactions upon each call to a malloc subsystem routine:
1. Disable any existing signal handlers set up by the application for SIGSEGV or SIGIOT.
2. Set the action for both SIGIOT and SIGSEGV to the default (SIG_DFL).
3. Unblock both SIGIOT and SIGSEGV.
If an application signal handler modifies the action for SIGSEGV between memory allocation routine callsand then attempts an invalid memory access, the catch_overflow option will be unable to report the error (theapplication will not exit and no core file will be produced).
Notes:
1. The override_signal_handling option can be ineffective in a threaded application environmentbecause the catch_overflow option uses the sigprocmask subroutine and many threaded processesuse the pthread_sigmask subroutine.
2. If a thread calls the sigwait subroutine without including SIGSEGV and SIGIOT in the signal set andthe catch_overflow option subsequently detects an error, the thread will hang because thecatch_overflow option can only generate SIGSEGV or SIGIOT.
3. If a pointer to invalid memory is passed to a kernel routine, the kernel routine will fail and usuallyreturn with errno set to EFAULT. If the application is not checking the return from the system call, thiserror might be undetected.
debug_range: By default, if the catch_overflow option is enabled, buffer overflow detection is performedfor every allocation in the program. If the debug_range option is specified, only allocation requests that fallbetween a user-defined minimum and maximum size will have buffer overflows detected by thecatch_overflow option. Otherwise, no buffer overflow detection will be performed. This option allows theuser to control the amount of extra memory resources consumed by the catch_overflow option by onlyusing the tool in specific cases.
The debug_range option is only meaningful in the context of the catch_overflow option. It is enabled asfollows:MALLOCDEBUG=catch_overflow,debug_range:min:max
where min is the lower bound and max is the upper bound of the range in which buffer overflow detectionis to be performed. If 0 is specified as a minimum value, then anything that is less than the maximumvalue will have buffer overflow detection performed. If 0 is specified as a maximum value, then anythingthat is greater than the minimum value will have buffer overflow detection performed.
Limitations: Due to an internal implementation requirement, each allocation will still necessarily be at leasta page size in length. Therefore the debug_range option merely reduces the overhead of thecatch_overflow option rather than eliminating it.
432 AIX 5L Version 5.3 General Programming Concepts: Writing and Debugging Programs

If the realloc subroutine is called with an allocation request that falls within the user-specified range ,buffer overflow detection is performed even if the original allocation was not within the specified range.The reverse of this is also true.
Note: If the override_signal option is set in conjunction with the debug_range option, the overriding of theSIGIOT and SIGSEGV signal behavior is performed for all allocations.
functionset: By default, if the catch_overflow option is enabled, buffer overflow detection is performedfor every allocation in the program. If the functionset option is specified, only allocation requests issuedby a user-defined set of functions will have buffer overflows detected by the catch_overflow option.Otherwise, no buffer overflow detection will be performed. This option allows the user to control theamount of extra memory resources consumed by the catch_overflow option by only using the tool inspecific cases.
The function_set option is only meaningful in the context of the catch_overflow option. It can be enabledas follows:MALLOCDEBUG=catch_overflow,functionset:func1:func2:...
where func1 and func2 are functions in which buffer overflow detection is to be performed on allocatedmemory.
Limitations: Due to an internal implementation requirement, each allocation will still necessarily be at leasta page size in length. Therefore the functionset option merely reduces the overhead of thecatch_overflow option rather than eliminating it.
If the realloc subroutine is called from a function that is a member of the user-specified function list ,buffer overflow detection is performed even if the original allocation was not made from a specifiedfunction. The reverse of this is also true.
Note: If the override_signal option is set in conjunction with the functionset option, the overriding of theSIGIOT and SIGSEGV signal behavior is performed for all allocations.
The functionset option does not check the validity of the functions specified in the list.
allow_overreading: By default, when the catch_overflow debug option is enabled and the callingprogram attempts to read past the end of allocated memory, a segmentation violation will occur and theprocess will core dump. However, the user may not be interested in catching this type of error, and mayhave enabled catch_overflow in order to catch more dangerous overwrites. Specifying theallow_overreading option will cause the catch_overflow option to ignore overreads so that other types oferrors, which may be considered more serious, can be detected first.
The allow_overreading option is only meaningful in the context of the catch_overflow option. It is enabledas follows:MALLOCDEBUG=catch_overflow,allow_overreading,
postfree_checking: By default, the malloc subsystem allows an application program to access memorythat it has previously freed. This is an error in the calling program which can lead to severe heapcorruption. If the postfree_checking option is specified, any attempt to access memory after it is freedresults in a segfault and a core file is produced.
The postfree_checking option is only meaningful in the context of the catch_overflow option. It is enabledas follows:MALLOCDEBUG=catch_overflow,postfree_checking
Limitations: The postfree_checking option consumes a substantial amount of extra memory. Programswith very large memory requirements may not be able to use the postfree_checking option.
Chapter 20. System Memory Allocation Using the malloc Subsystem 433

Malloc TraceMalloc Trace is a debugging option designed to allow tracing of all calls to the malloc subsystem APIthrough the system trace facility. For more information, see “Malloc Trace” on page 439.
Malloc LogMalloc Log is a debugging option designed to provide the user with a runtime database of activeallocations in the malloc subsystem. For more information, see “Malloc Log” on page 440.
report_allocations: The report_allocations option is a tool for detecting memory leaks in anapplication program. The report_allocations option uses the database constructed by Malloc Log toreport a list of allocations currently held by the user. A record of each successful allocation is made at thetime of the request by Malloc Log. When an allocation is deallocated, Malloc Log removes its record fromthe database. At process exit, the list of allocations still active is printed to stderr, giving a list of allocationsthat were never freed by their callers.
The report_allocations option requires the functionality of Malloc Log to work. Thus, Malloc Log isimplicitly enabled when report_allocations is enabled. The report_allocations option is enabled asfollows:MALLOCDEBUG=report_allocations
validate_ptrs: By default, the malloc subsystem APIs do not validate their input pointers to ensure thatthey actually reference memory previously allocated. If one of these pointers is invalid, severe heapcorruption can occur. Specifying the validate_ptrs option will cause the malloc subsystem APIs toperform extensive validation on their input pointers. If a pointer is found to be invalid (that is, it does notreference memory previously allocated by a call to the malloc subsystem API), an error message statingwhy it is invalid will be printed, the abort function will be called, and a core file will be produced.
The validate_ptrs option is enabled as follows:MALLOCDEBUG=validate_ptrs
Malloc DetectMalloc Detect is a debugging option designed to detect and report corruption of the internal mallocsubsystem data structures on every call to a malloc subsystem API. For more information, see “MallocDetect” on page 441.
verbose: Sub-option of Malloc Detect.
checkarena: Sub-option of Malloc Detect.
output: By default, the malloc debugging options send their output to stderr. This may not be desired forall programs. The output option exists to provide an alternate destination for printed information. Outputcan be sent to either stderr, stdout, or to any file on the system.
The output option is enabled as follows:MALLOCDEBUG=output:<filename>
continue: Many malloc debugging options call abort() when they detect an error. This is not always thedesired behavior for all programs. The continue option exists to instruct the malloc subsystem to continueafter the detection of a synchronous error rather than to abort the process. Error messages will still belogged to the appropriate channels.
The continue option is enabled as follows:MALLOCDEBUG=continue
434 AIX 5L Version 5.3 General Programming Concepts: Writing and Debugging Programs

Malloc MultiheapBy default, the malloc subsystem uses a single heap, or free memory pool. However, it also provides anoptional multiheap capability to allow the use of multiple heaps of free memory, rather than just one.
The purpose of providing multiple-heap capability in the malloc subsystem is to improve the performanceof threaded applications running on multiprocessor systems. When the malloc subsystem is limited tousing a single heap, simultaneous memory-allocation requests received from threads running on separateprocessors are serialized. The malloc subsystem can therefore only service one thread at a time, resultingin a serious impact on multiprocessor system performance.
With malloc multiheap capability enabled, the malloc subsystem creates a fixed number of heaps for itsuse. It will begin to use multiple heaps after the second thread is started (process becomes multithreaded).Each memory-allocation request will be serviced using one of the available heaps. The malloc subsystemcan then process memory allocation requests in parallel, as long as the number of threads simultaneouslyrequesting service is less than or equal to the number of heaps.
If the number of threads simultaneously requesting service exceeds the number of heaps, additionalsimultaneous requests will be serialized. Unless this occurs on an ongoing basis, the overall performanceof the malloc subsystem should be significantly improved when multiple threads are making calls to themalloc subroutine in a multiprocessor environment.
Enabling Malloc MultiheapMalloc multiheap is not enabled by default. It is enabled and configured by setting the MALLOCOPTIONSenvironment variable. To enable malloc multiheap with the default settings, set MALLOCOPTIONS=multiheapprior to process startup. Setting MALLOCOPTIONS in this manner will enable malloc multiheap in itsdefault configuration, with 32 heaps and the fast heap selection algorithm.
Malloc MultiheapOptionsThe Malloc Multiheap options are as follows:
v multiheap:n
v considersize
Each of these options is described in detail later in this document.
To set any of these options, use the following syntax:MALLOCOPTIONS=[multiheap:n] | [considersize]
One or both options can be specified in any order, as long as options are comma-separated, as in thefollowing example:MALLOCOPTIONS=multiheap:3,considersize
In the preceding example, malloc multiheap would be enabled with three heaps and a somewhat slowerheap selection algorithm that tries to minimize process size.
Each configuration option should only be specified once when setting MALLOCOPTIONS. If aconfiguration option is specified more than once per setting, only the final instance will apply.
The Malloc Multiheap options are described as follows:
multiheap:nBy default, the maximum number of heaps available to malloc multiheap is 32. The multiheap:noption can be used to change the maximum number of heaps to any value from 1 through 32,where n is the number of heaps. If n is set to a value outside the given range, the default value of
Chapter 20. System Memory Allocation Using the malloc Subsystem 435
32 is used. Only enable as many heaps as are necessary for the process’ requirements.Unnecessarily enabled heaps can increase the amount of fragmentation and waste.
considersizeBy default, malloc multiheap selects the next available heap. If the considersize option is specified,malloc multiheap will use an alternate heap-selection algorithm that tries to select an availableheap that has enough free space to handle the request. This may minimize the working set size ofthe process by reducing the number of sbrk subroutine calls. However, because of the additionalprocessing required, the considersize heap-selection algorithm is somewhat slower than thedefault heap selection algorithm.
If the heaps are unable to allocate space, the malloc subroutine will return NULL and set errno toENOMEM. If there is no available memory in the current heap, the malloc subsystem will check the otherheaps for available space.
Malloc BucketsMalloc buckets provides an optional buckets-based extension of the default allocator. It is intended toimprove malloc performance for applications that issue large numbers of small allocation requests. Whenmalloc buckets is enabled, allocation requests that fall within a predefined range of block sizes areprocessed by malloc buckets. All other requests are processed in the usual manner by the defaultallocator.
Malloc buckets is not enabled by default. It is enabled and configured prior to process startup by settingthe MALLOCOPTIONS environment variable.
Bucket Composition and SizingA bucket consists of a block of memory that is subdivided into a predetermined number of smaller blocksof uniform size, each of which is an allocatable unit of memory. Each bucket is identified using a bucketnumber. The first bucket is bucket 0, the second bucket is bucket 1, the third bucket is bucket 2, and soon. The first bucket is the smallest, and each succeeding bucket is larger in size than the precedingbucket, using a formula described later in this section. A maximum of 128 buckets are available per heap.
The block size for each bucket is a multiple of a bucket-sizing factor. The bucket-sizing factor equals theblock size of the first bucket. Each block in the second bucket is twice this size, each block in the thirdbucket is three times this size, and so on. Therefore, a given bucket’s block size is determined as follows:block size = (bucket number + 1) * bucket sizing factor
For example, a bucket-sizing factor of 16 would result in a block size of 16 bytes for the first bucket(bucket 0), 32 bytes for the second bucket (bucket 1), 48 bytes for the third bucket (bucket 2), and so on.
The bucket-sizing factor must be a multiple of 8 for 32-bit implementations and a multiple of 16 for 64-bitimplementations in order to guarantee that addresses returned from malloc subsystem functions areproperly aligned for all data types.
The bucket size for a given bucket is determined as follows:bucket size = number of blocks per bucket * (malloc overhead +
((bucket number + 1) * bucket sizing factor))
The preceding formula can be used to determine the actual number of bytes required for each bucket. Inthis formula, malloc overhead refers to the size of an internal malloc construct that is required for eachblock in the bucket. This internal construct is 8 bytes long for 32-bit applications and 16 bytes long for64-bit applications. It is not part of the allocatable space available to the user, but is part of the total size ofeach bucket.
436 AIX 5L Version 5.3 General Programming Concepts: Writing and Debugging Programs

The number of blocks per bucket, number of buckets, and bucket-sizing factor are all set with theMALLOCOPTIONS environment variable.
Processing Allocations from the BucketsA block will be allocated from one of the buckets whenever malloc buckets is enabled and an allocationrequest falls within the range of block sizes defined by the buckets. Each allocation request is servicedfrom the smallest possible bucket to conserve space.
If an allocation request is received for a bucket and all of its blocks are already allocated, malloc bucketswill automatically enlarge the bucket to service the request. The number of new blocks added to enlarge abucket is always equal to the number of blocks initially contained in the bucket, which is configured bysetting the MALLOCOPTIONS environment variable.
Support for Multiheap ProcessingThe malloc multiheap capability provides a means to enable multiple malloc heaps to improve theperformance of threaded applications running on multiprocessor systems. Malloc buckets supports up to128 buckets per heap. This allows the malloc subsystem to support concurrent enablement of mallocbuckets and malloc multiheap so that threaded processes running on multiprocessor systems can benefitfrom the buckets algorithm.
Enabling Malloc BucketsMalloc buckets is not enabled by default, but is enabled and configured by setting the followingenvironment variables:
v MALLOCTYPE
v MALLOCOPTIONS
The MALLOCTYPE environment variable must be set to the default allocator when using Malloc Buckets.To enable malloc buckets with default settings, set MALLOCOPTIONS=buckets prior to process startup. Toenable malloc buckets with user-specified configuration options, set MALLOCOPTIONS=buckets,options priorto process startup, where options is a comma-separated list of one or more predefined configurationoptions.
Malloc Buckets Configuration OptionsThe MALLOCOPTIONS environment variable can be used to provide malloc buckets with one or more ofthe following predefined configuration options:number_of_buckets:nbucket_sizing_factor:nblocks_per_bucket:nbucket_statistics:[stdout|stderr|pathname]no_mallinfo
Each of these options is described in detail in “Malloc Buckets Options” on page 438.
To set the the MALLOCOPTIONS environment variable, use the following syntax:MALLOCOPTIONS=[buckets,[ number_of_buckets:n | bucket_sizing_factor:n | blocks_per_bucket:n |bucket_statistics:[stdout|stderr|pathname] | no_mallinfo],...]
More than one option can be specified (and in any order), as long as options are comma-separated, forexample:MALLOCOPTIONS=buckets,number_of_buckets:128,bucket_sizing_factor:8,bucket_statistics:stderrMALLOCOPTIONS=buckets,bucket_statistics:stdout,blocks_per_bucket:512
Commas are the only valid delimiters for separating configuration options in this syntax. The use of otherdelimiters (such as blanks) between options will cause configuration options to be parsed incorrectly.
Chapter 20. System Memory Allocation Using the malloc Subsystem 437

Each configuration option should only be specified once when setting the MALLOCOPTIONS environmentvariable. If a configuration option is specified more than once per setting, only the final instance will apply.
If a configuration option is specified with an invalid value, malloc buckets writes a warning message tostandard error and then continues execution using a documented default value.
The Malloc Buckets configuration options will be recognized by the malloc subsystem only if the bucketsoption is set, as in the following example:MALLOCOPTIONS=number_of_buckets:8,buckets,bucket_statistics:stderr
Malloc Buckets Optionsnumber_of_buckets:n
The number_of_buckets:n option can be used to specify the number of buckets available perheap, where n is the number of buckets. The value specified for n will apply to all available heaps.
The default value for number_of_buckets is 16. The minimum value allowed is 1. The maximumvalue allowed is 128.
bucket_sizing_factor:nThe bucket_sizing_factor:n option can be used to specify the bucket-sizing factor, where n is thebucket-sizing factor in bytes.
The value specified for bucket_sizing_factor must be a multiple of 8 for 32-bit implementations anda multiple of 16 for 64-bit implementations. The default value for bucket_sizing_factor is 32 for32-bit implementations and 64 for 64-bit implementations.
blocks_per_bucket:nThe blocks_per_bucket:n option can be used to specify the number of blocks initially contained ineach bucket, where n is the number of blocks. This value is applied to all of the buckets. Thevalue of n is also used to determine how many blocks to add when a bucket is automaticallyenlarged because all of its blocks have been allocated.
The default value for blocks_per_bucket is 1024.
bucket_statistics:[stdout|stderr|pathname]The bucket_statistics option will cause the malloc subsystem to output a statistical summary formalloc buckets upon normal termination of each process that calls the malloc subsystem whilemalloc buckets is enabled. This summary shows buckets-configuration information and the numberof allocation requests processed for each bucket. If multiple heaps have been enabled by way ofmalloc multiheap, the number of allocation requests shown for each bucket will be the sum of allallocation requests processed for that bucket for all heaps.
The buckets statistical summary will be written to one of the following output destinations, asspecified with the bucket_statistics option.
v stdout - standard output
v stderr - standard error
v pathname - a user-specified path name
If a user-specified path name is provided, statistical output is appended to the existing contents ofthe file (if any).
Standard output should not be used as the output destination for a process whose output is pipedas input into another process.
The bucket_statistics option is disabled by default.
438 AIX 5L Version 5.3 General Programming Concepts: Writing and Debugging Programs

Note: One additional allocation request is always shown in the first bucket for the atexitsubroutine that prints the statistical summary. For threaded processes, additional allocationrequests are shown for some of the buckets due to malloc subsystem calls issued by thepthreads library.
no_mallinfoIf you specify MALLOCOPTIONS=no_mallinfo, the mallinfo setting is disabled and the informationabout the heap that is managed by the malloc subsystem is not logged.
Malloc Buckets Default ConfigurationThe following table summarizes the malloc buckets default configuration.
Configuration Option Default Value (32-bit) Default Value (64-bit)
number of buckets per heap 16 16
bucket sizing factor 32 bytes 64 bytes
allocation range 1 to 512 bytes (inclusive) 1 to 1024 bytes (inclusive)
number of blocks initially contained ineach bucket
1024 1024
bucket statistical summary disabled disabled
The default configuration for malloc buckets should be sufficient to provide a performance improvement formany applications that issue large numbers of small allocation requests. However, it may be possible toachieve additional gains by setting the MALLOCOPTIONS environment variable to modify the defaultconfiguration. Before modifying the default configuration, become familiar with the application’s memoryrequirements and usage. Malloc buckets can then be enabled with the bucket_statistics option to fine-tunethe buckets configuration.
LimitationsBecause of variations in memory requirements and usage, some applications may not benefit from thememory allocation scheme used by malloc buckets. Therefore, it is not advisable to enable malloc bucketsfor system-wide use. For optimal performance, malloc buckets should be enabled and configured on aper-application basis.
Malloc TraceMalloc Trace provides an optional extension to the malloc subsystem for use with the trace facility. Tracesof the malloc, realloc, and free subroutines are recorded for use in problem determination andperformance analysis.
Malloc Trace is not enabled by default, but can be enabled and configured prior to process startup throughthe MALLOCDEBUG environment variable.
Events Recorded by Malloc TraceThe tracehook IDs used for Malloc Trace are as follows:
v HKWD_LIBC_MALL_SUBSYSTEM
v HKWD_LIBC_MALL_INTERNAL
When tracing is enabled for HKWD_LIBC_MALL_SUBSYSTEM, the input parameters, as well as returnvalues for each call to malloc, realloc, and free subroutines are recorded in the trace subsystem.
Chapter 20. System Memory Allocation Using the malloc Subsystem 439

When tracing is enabled for HKWD_LIBC_MALL_INTERNAL and the Malloc Detect debugging tools areenabled, Malloc Trace will log a trace event whenever Malloc Detect detects an error in the internal datastructures of the malloc subsystem. For more information, see “Malloc Detect” on page 441.
Enabling Malloc TraceMalloc Trace is not enabled by default. It is enabled and configured by setting the MALLOCDEBUGenvironment variable. To enable Malloc Trace, set the MALLOCDEBUG environment variable by typingthe following on the command line:MALLOCDEBUG=trace
To enable other Malloc Debug features, set the MALLOCDEBUG environment variable as follows:MALLOCDEBUG=[trace, other_option]
LimitationsThe Malloc Trace debugging feature is compatible with the following malloc policies and options:
v Default Allocation Policy.
v 3.1 Allocation Policy
v Watson Allocation Policy.
v Malloc Buckets.
v Malloc Multiheap.
v Malloc Thread Cache.
v Malloc Disclaim Option.
Malloc LogMalloc Log is an optional extension of the malloc subsystem, allowing the user to obtain informationregarding the active allocations currently held by the calling process. This data can then be used inproblem determination and performance analysis.
Data Recorded in the Malloc LogMalloc Log records the following data for each active allocation:
v The address returned to the caller.
v The size of the allocation.
v The heap the allocation was serviced from
v The stack traceback of the calling function. The depth of the traceback that is recorded is a configurableoption.
In addition, the following information can optionally be logged:
v The process ID of the calling process.
v The thread ID of the calling thread.
v The sequence number of the allocation with respect to process startup.
v The real time in which the allocation was made.
With Malloc Log enabled, each successful allocation requires an additional amount of overhead used tostore the metadata. This overhead is around 50-100 bytes for a 32-bit application; twice that for a 64-bitapplication. The amount of overhead changes depending on the options that are set.
The Malloc Log information can be accessed in the following ways:
v Using the DBX malloc subcommand.
v Using the report_allocations malloc debug option.
440 AIX 5L Version 5.3 General Programming Concepts: Writing and Debugging Programs

Enabling Malloc LogMalloc Log is not enabled by default. To enable Malloc Log with the default settings, set theMALLOCDEBUG environment variable as follows:MALLOCDEBUG=log
To enable Malloc Log with user-specified configuration options, set the MALLOCDEBUG environmentvariable as follows:MALLOCDEBUG=log:extended,stack_depth:6
Note: The default Malloc Log values are as follows:
extendedDefaults to off. Specifying this option will enable the logging of the optional allocationmetadata specified above. This parameter will affect the amount of overhead required foreach allocation.
stack_depthUsed to specify the depth of the function-call stack that is recorded for each allocation. Thisparameter affects the amount of overhead required for each allocation The default value is4, the maximum is 64.
LimitationsThe performance of all programs can degrade when Malloc Log is enabled, due to the cost of storing datato memory. Memory usage will also increase.
The Malloc Log debugging feature is compatible with the following malloc policies and options:
v Default Allocation Policy.
v Watson Allocation Policy.
v Malloc Buckets.
v Malloc Multiheap.
v Malloc Thread Cache.
v Malloc Disclaim.
Malloc DisclaimMalloc Disclaim is an optional extension of the malloc subsystem, providing the user with a means toenable the automatic disclaiming of memory returned by the free subroutine. This is useful in instanceswhere a process has a high paging-space usage, but is not actually using the memory.
Malloc Disclaim is not enabled by default. It can be enabled and configured prior to process startupthrough the MALLOCOPTIONS environment variable, as follows:MALLOCOPTIONS=disclaim
Malloc DetectMalloc Detect provides an optional error reporting and detection extension to the malloc subsystem.Information on errors that occurred in the malloc environment will be reported and actions can beperformed, if specified. Malloc Detect can be divided into three distinct capabilities:
v Detecting an error.
v Reporting the error using stderr.
v Reporting the error using an application-defined function.
Chapter 20. System Memory Allocation Using the malloc Subsystem 441

Detecting an ErrorSome errors in the malloc subsystem are easy to detect. Errors such as freeing a pointer which is not avalid heap address are detected synchronously in the codepath of free. However, errors caused byasynchronous events, such as heap corruption, are much more difficult to pinpoint. The check_arenaoption of Malloc Detect is designed to check for this type of corruption on a synchronous basis. On everycall to a malloc subsystem API, a check of the internal data structures is performed. If corruption is found,it is then reported to the application. This provides another point in time with which to debug these difficultproblems. The check_arena option can be enabled by setting the MALLOCDEBUG environment variableas follows:MALLOCDEBUG=checkarena
Reporting an Error Using stderrThe normal way to report errors in the malloc subsystem is through the return value and the errnoenvironment variable. The verbose option of Malloc Detect allows these errors to be printed to thestandard error stream of the application program. This provides a more visible, more detailed way ofreporting errors in malloc. The verbose option can be enabled by setting the MALLOCDEBUGenvironment variable as follows:MALLOCDEBUG=verbose
Reporting an Error Using an Application-defined FunctionMalloc Detect also allows the user to provide a function that the malloc subsystem will call whenever itencounters an error. Malloc Report will call the application-provided function, wait for a return, and thenreturn as usual. This facility allows the application to perform whatever necessary debug tasks arerequired before allowing the program to continue. To enable this facility, the application must set the valueof a global function pointer malloc_err_function equal to the value of the application’s error routine. Forexample:extern void (*malloc_err_function)(int, ...)malloc_err_function = &application_malloc_err_hdl
LimitationsThe Malloc Detect debugging feature is compatible with the following malloc policies and options:
v Default Allocation Policy.
v Malloc Buckets Option.
v Watson Allocation Policy.
v Malloc Multiheap.
v Malloc Threadcache.
v Malloc Disclaim Option.
Configuring and Using the Malloc Thread CacheThe Malloc Thread Cache maintains a per-thread pool of unallocated memory for the purpose of reducingcontention for the global heap structures. This cache attempts to preallocate memory pieces for future useaccording to the pattern of allocations already performed by the thread. If an allocation request can beserviced using one of the unallocated pieces in the Thread Cache, it is removed from the cache andreturned to the caller. If an allocation request cannot be serviced using an unallocated piece in the cache,the request is passed on to the global heap structure.
Thread Cache Allocation StrategyThe first time a thread requests memory less than 4096 bytes, the thread cache preallocates multiplechunks of memory of the same size from the global heap structure. It also reserves a larger piece ofmemory to be used to service future requests. If the thread frees a piece of memory, that piece will bekept in the thread cache for future allocations. However, if during a free the size of the thread cache goes
442 AIX 5L Version 5.3 General Programming Concepts: Writing and Debugging Programs

over a certain threshold, half of the elements in the cache will be returned to the backing allocator.Essentially, the behavior of the thread cache can be described as a ″batch processor″, grouping upindividual allocation/deallocation calls to be ran at one single time. This leads to less contention on theglobal heaps and, in many cases, efficiency gains.
Enabling Malloc Thread CacheMalloc Thread Cache is enabled by default for the Watson allocator. It can be disabled prior to processstartup by setting the MALLOCOPTIONS environment variable as follows:$ MALLOCOPTIONS=threadcache:off
Malloc Thread Cache is not enabled by default for the default allocator. It can be enabled prior to processstartup by setting the MALLOCOPTIONS environment variable as follows.$ MALLOCOPTIONS=threadcache
Chapter 20. System Memory Allocation Using the malloc Subsystem 443

444 AIX 5L Version 5.3 General Programming Concepts: Writing and Debugging Programs

Chapter 21. AIX Vector Programming
Some PowerPC processors implement a Single Instruction Multiple Data (SIMD)-style vector extension.Often referred to as AltiVec or VMX, the vector extension to the PowerPC architecture provides anadditional instruction set for performing vector and matrix mathematical functions.
The Vector Arithmetic Logic Unit is an SIMD-style arithmetic unit, in which a single instruction performs thesame operation on all the data elements of each vector. AIX 5.3 with recommended technology level5300-30 is the first AIX release to enable vector programming. The IBM PowerPC 970 processor is thefirst processor supported by AIX that implements the vector extension. These processors are currentlyfound in the JS20 blade servers offered with the BladeCenter®.
Vector Extension OverviewThe vector extension consists of an additional set of 32 128-bit registers that can contain a variety ofvectors including signed or unsigned 8-bit, 16-bit, or 32-bit integers, or 32-bit IEEE single-precision floats.There is a vector status and control register that contains a sticky status bit indicating saturation, as wellas a control bit for enabling Java or non-Java mode for floating-point operations.
The default mode initialized by AIX for every new process is Java-mode enabled, which providesIEEE-compliant floating-point operations. The alternate non-Java mode results in a less precise mode forfloating point computations, which might be significantly faster on some implementations and for specificoperations. For example, on the PowerPC 970 processor running in Java mode, some vector floating-pointinstructions will encounter an exception if the input operands or result are denormal, resulting in costlyemulation by the operating system. For this reason, you are encouraged to consider explicitly enabling thenon-Java mode if the rounding is acceptable, or to carefully attempt to avoid vector computations ondenormal values.
The vector extension also includes more than 160 instructions providing load and store access betweenvector registers and memory, in register manipulation, floating point arithmetic, integer arithmetic andlogical operations, and vector comparison operations. The floating point arithmetic instructions use theIEEE 754-1985 single precision format, but do not report IEEE exceptions. Default results are produced forall exception conditions as specified by IEEE for untrapped exceptions. Only IEEE default round-to-nearestrounding mode is provided. No floating-point division or square-root instructions are provided, but instead areciprocal estimate instruction is provided for division, and a reciprocal square root estimate instruction isprovided for square root.
There is also a 32-bit special purpose register that is managed by software to represent a bitmask ofvector registers in use. This allows the operating system to optimize vector save and restore algorithms aspart of context switch management.
Runtime Determination of Vector CapabilityA program can determine whether a system supports the vector extension by reading the vmx_versionfield of the _system_configuration structure. If this field is non-zero, then the system processors andoperating system contain support for the vector extension. A __power_vmx() macro is provided in/usr/include/sys/systemcfg.h for performing this test. This can be useful for software that conditionallyexploits the vector extension when present, or to use functionally equivalent scalar code paths when notpresent.
© Copyright IBM Corp. 1997, 2010 445

AIX ABI ExtensionThe AIX Application Binary Interface (ABI) has been extended to support the addition of vector registerstate and conventions. Refer to the Assembler Language Reference for a complete description of the ABIextensions.
AIX supports the AltiVec programming interface specification. Below is a table of the C and C++ vectordata types. All vector data types are 16 bytes in size, and must be aligned on a 16-byte boundary.Aggregates containing vector types must follow normal conventions of aligning the aggregate to therequirement of its largest member. If an aggregate containing a vector type is packed, then there is noguarantee of 16-byte alignment of the vector type. An AIX compiler supporting the AltiVec programminginterface specification is required.
Table 9. New C and C++ Vector Data Types
New C and C++ Types Contents
vector unsigned characters 16 unsigned characters
vector signed characters 16 signed characters
vector bool characters 16 unsigned characters
vector unsigned short 8 unsigned short
vector signed short 8 signed short
vector bool short 8 unsigned short
vector unsigned integers 4 unsigned integers
vector signed integers 4 signed integers
vector bool integers 4 unsigned integers
vector float 4 float
The following table outlines the vector register usage conventions.
Table 10. Vector Register Conventions
Register Type Register Status Use
VRs VR0 Volatile Scratch register
VR1 Volatile Scratch register
VR2 Volatile First vector argument
First vector of functionreturn value
VR3 Volatile Second vector argument,scratch
VR4 Volatile Third vector argument,scratch
VR5 Volatile Fourth vector argument,scratch
VR6 Volatile Fifth vector argument,scratch
VR7 Volatile Sixth vector argument,scratch
VR8 Volatile Seventh vector argument,scratch
446 AIX 5L Version 5.3 General Programming Concepts: Writing and Debugging Programs

Table 10. Vector Register Conventions (continued)
Register Type Register Status Use
VR9 Volatile Eighth vector argument,scratch
VR10 Volatile Ninth vector argument,scratch
VR11 Volatile Tenth vector argument,scratch
VR12 Volatile Eleventh vector argument,scratch
VR13 Volatile Twelfth vector argument,scratch
VR14:19 Volatile Scratch
VR20:31 Reserved (default mode)
Nonvolatile (extended ABImode)
When the default Vectorenabled mode is used,these registers are reservedand must not be used.
In the extended ABI vectorenabled mode, theseregisters are nonvolatileand their values arepreserved across functioncalls
Special Purpose VRSAVE Reserved In the AIX ABI, VRSAVE isnot used. An ABI-compliantprogram must not use oralter VRSAVE.
Special Purpose VSCR Volatile The Vector Status andControl Register containsthe saturation status bit andnon-Java mode control bit.
The AltiVec Programming Interface Specification defines the VRSAVE register to be used as a bitmask ofvector registers in use. AIX requires that an application never modify the VRSAVE register.
The first 12 vector parameters in a function are placed in VR2 through VR13. Unneeded vector parameterregisters contain undefined values upon entry to the function. Non-variable length argument list vectorparameters are not shadowed in general purpose registers (GPRs). Any additional vector parameters, from13th and beyond, are passed through memory on the program stack, 16-byte aligned, in their appropriatemapped location within the parameter region corresponding to their position in the parameter list.
For variable length argument lists, va_list continues to be a pointer to the memory location of the nextparameter. When va_arg() accesses a vector type, va_list must first be aligned to a 16-byte boundary.The receiver or consumer of a variable-length argument list is responsible for performing this alignmentprior to retrieving the vector type parameter.
A non-packed structure or union passed by a value that has a vector member anywhere within it will bealigned to a 16-byte boundary on the stack.
A function that takes a variable-length argument list has all parameters mapped in the argument areaordered and aligned according to their types. The first eight words (32-bit) or doublewords (64-bit) of avariable-length argument list are shadowed in GPRs r3 - r10. This includes vector parameters.
Chapter 21. AIX Vector Programming 447

Functions that have a return value declared as a vector data type place the return value in VR2. Anyfunction that returns a vector type or has vector parameters requires a function prototype. This avoids thecompiler shadowing the VRs in GPRs for the general case.
Legacy ABI Compatibility and InteroperabilityDue to the nature of interfaces (such as setjmp(), longjmp(), sigsetjmp(), siglongjmp(), _setjmp(),_longjmp(), getcontext(), setcontext(), makecontext(), and swapcontext()) that must save and restorenonvolatile machine state, there is risk introduced when considering dependencies between legacy andvector-extended ABI modules. To complicate matters, the setjmp family of functions in libc reside in a staticmember of libc, which means that every existing AIX binary has a statically bound copy of the setjmpfamily and others that existed with the version of AIX it was linked against. Furthermore, existing AIXbinaries have jmpbufs and ucontext data structure definitions that are insufficient to house any additionalnonvolatile vector register state.
Any cases where legacy modules and new modules interleave calls, or call-backs, where a legacy modulecould perform a longjmp() or setcontext(), bypassing normal linkage convention of a vector extendedmodule, has a risk of compromising the nonvolatile vector register state.
For this reason, while the AIX ABI defines nonvolatile vector registers, the default compilation mode whenusing vectors (AltiVec) in AIX compilers is to not use any of the nonvolatile vector registers. This results ina default compilation environment that safely allows exploitation of vectors (AltiVec) while introducing norisk with respect to interoperability with legacy binaries.
For applications where interoperability and module dependence is completely known, an additionalcompilation option can be enabled that will allow the use of nonvolatile vector registers. This mode shouldonly be used when all dependent legacy modules and behaviors are fully known and understood as eitherhaving no dependence on functions such as setjmp(), sigsetjmp(), _setjmp(), or getcontext(), or ensuringthat all module transitions are performed using normal subroutine linkage convention, and that nocall-backs to an upstream legacy module are used.
The default AltiVec compilation environment predefines __VEC__, in accordance with the AltiVecTechnology Programming Interface Manual.
When the option to use nonvolatile vector registers is enabled, the compilation environment must alsopredefine __EXTABI__. You can compile non-vector enabled modules to be extended ABI-aware byexplicitly defining __AIXEXTABI. This will ensure that those modules can safely interact withvector-enabled modules that are enabled to use nonvolatile vector registers.
Extended ContextIn order to support the additional machine state required by the vector extension as well as otherextensions such as user keys, AIX 5.3 introduced support for extended context structures. The primaryapplication-visible use of machine-context information is its presence in the sigcontext structure provided tosignal handlers, and the resulting activation of the machine context in the sigcontext upon return from thesignal handler. The sigcontext structure is actually a subset of the larger ucontext structure. The twostructures are identical for up to sizeof(struct sigcontext). When AIX builds a signal context to be passed toa signal handler, it actually builds a ucontext structure on the signal handler’s stack. The machine-contextportion of a signal context must contain all of the active machine state, volatile and nonvolatile, for theinvoluntarily interrupted context. To accomplish this without affecting binary compatibility with existingsignal handlers, space previously reserved in the ucontext structure now serves as an indication ofwhether extended context information is available.
A newly defined field in the ucontext, __extctx, is the address of an extended context structure, struct__extctx, as defined in the sys/context.h file. A new field, __extctx_magic, within the ucontext structureindicates whether the extended context information is valid when the value of __extctx_magic is equal to
448 AIX 5L Version 5.3 General Programming Concepts: Writing and Debugging Programs

__EXTCTX_MAGIC. The additional vector machine state for a thread using the vector extension is savedand restored as a member of this new context extension to the ucontext structure as a part of signaldelivery and return.
The ucontext structure is also used on APIs (such as getcontext(), setcontext(), swapcontext(), andmakecontext()). In these cases, the context needing to be saved is due to a voluntary action, for whichcalling linkage convention requires only that nonvolatile machine state be saved. Because the defaultmode of vector enablement on AIX, as described in the ABI section, is to not use nonvolatile vectorregisters, there are no extensions of the ucontext structure required for the majority of applications. If anapplication chooses to explicitly enable the use of nonvolatile vector registers, it will pick up an extendedsized ucontext structure that already has space for the __extctx field that is included by the implicitdefinition of __EXTABI__ by the compiler. The extended ucontext can also be picked up by an explicitdefinition of __AIXEXTABI.
Similarly, the jmp_buf for use with setjmp() or longjmp() requires no change for default-modevector-enabled applications, since nonvolatile vector registers are not used. The explicit enablement ofnonvolatile vector registers results in larger jmp_buf allocations, due to the implicit definition of__EXTABI__ by the compiler. The extended jump buffers can also be activated by explicit definition of__AIXEXTABI.
See the sys/context.h header file for a more detailed layout of the extended context information.
Vector Memory Allocation and AlignmentVector data types introduce a data type requiring 16-byte alignment. In accordance with the AltiVecprogramming interface specification, a set of malloc subroutines (vec_malloc, vec_free, vec_realloc,vec_calloc) are provided by AIX that give 16-byte aligned allocations.
Vector-enabled compilation, with _VEC_ implicitly defined by the compiler, will result in any calls to legacymalloc and calloc being redirected to their vector-safe counterparts, vec_malloc and vec_calloc,respectively. Non-vector code can also be explicitly compiled to pick up these same malloc and callocredirections by explicitly defining __AIXVEC. The alignment of the default malloc(), realloc(), and calloc()allocations can also be controlled at runtime.
First, externally to any program, a new environment variable, MALLOCALIGN, can be set to the defaultalignment desired for every malloc() allocation. An example isMALLOCALIGN=16; export MALLOCALIGN
The MALLOCALIGN environment variable can be set to any power of 2 greater than or equal to the sizeof a pointer in the corresponding execution mode (4 bytes for 32-bit mode, 8 bytes for 64-bit mode). IfMALLOCALIGN is set to an invalid value, then the value is rounded up to the next power of 2, and allsubsequent malloc() allocations will be aligned to that value.
Also, internally to a program, the program can use a new command option to the mallopt() interface tospecify the desired alignment for future allocations. An example isrc = mallopt(M_MALIGN, 16);
Refer to mallopt and MALLOCALIGN for more information.
printf and scanf of Vector Data TypesIn accordance with the AltiVec programming interface specification, support is added to the AIX versions ofscanf, fscanf, sscanf, wsscanf, printf, fprintf, sprintf, snprintf, wsprintf, vprintf, vfprintf, vsprintf, and vwsprintffor the new vector conversion format strings. The new size formatters are as follows:
Chapter 21. AIX Vector Programming 449

v vl or lv consumes one argument and modifies an existing integer conversion, resulting in vector signedint, vector unsigned int, or vector bool for output conversions or vector signed int * or vector unsignedint * for input conversions. The data is then treated as a series of four 4-byte components, with thesubsequent conversion format applied to each.
v vh or hv consumes one argument and modifies an existing short integer conversion, resulting in vectorsigned short, or vector unsigned short for output conversions or vector signed short * or vector unsignedshort * for input conversions. The data is treated as a series of eight 2-byte components, with thesubsequent conversion format applied to each.
v v consumes one argument and modifies a 1-byte integer, 1-byte character, or 4-byte floating pointconversion. If the conversion is a floating point conversion the result is vector float for output conversionor vector float * for input conversion. The data is treated as a series of four 4-byte floating pointcomponents with the subsequent conversion format applied to each. If the conversion is an integer orcharacter conversion, the result is either vector signed char, vector unsigned char, or vector bool charfor output conversion or vector signed char * or vector unsigned char * for input conversions. The datais treated as a series of sixteen 1-byte components, with the subsequent conversion format applied toeach.
Any conversion format that can be applied to the singular form of a vector-data type can be used with avector form. The %d, %x, %X, %u, %i, and %o integer conversions can be applied with the %lv, %vl, %hv,%vh, and %v vector-length qualifiers. The %c character conversion can be applied with the %v vectorlength qualifier. The %a, %A, %e, %E, %f, %F, %g, and %G float conversions can be applied with the %vvector length qualifier.
For input conversions, an optional separator character can be specified excluding whitespace precedingthe separator. If no separator is specified, the default separator is a space including whitespace characterspreceding the separator, unless the conversion is c, and then the default conversion is null.
For output conversions, an optional separator character can be specified immediately preceding the vectorsize conversion. If no separator is specified, the default separator is a space, unless the conversion is c,and then the default separator is null.
Threaded ApplicationsMultithreaded applications exploiting the vector extension are also supported. These applications aresupported in both system scope (1:1 threading model) and process scope (M:N threading model). If amultithreaded application is compiled with nonvolatile vector registers enabled, the pthreads for thatapplication will be flagged as extended ABI pthreads. The result will be larger context-save bufferallocations within the pthread library for those threads. The dbx AIX debugger also provides full support formachine-level debugging of vector-enabled multithreaded programs.
CompilersAn AIX compiler supporting the vector extension must conform to the AIX ABI Vector Extension. Aspreviously described, the default vector-enabled compilation mode on AIX should be with the use ofnonvolatile vector registers disabled. An explicit option to enable the use of nonvolatile vector registers canbe provided and enabled at your discretion, after understanding the issues and risks regarding new andold module interoperability.
When enabling the use of nonvolatile vector registers, a C or C++ compiler must predefine __EXTABI__.Also, when enabled for any form of vector compilation, a C or C++ compiler is expected to predefine__VEC__. If compiling non-vector enabled C or C++ modules for linkage with vector-enabled Fortranmodules, it is best that the C or C++ modules be explicitly compiled with at least __AIXVEC defined(explicit definition analogous to __VEC__), and also __AIXEXTABI (explicit definition analogous to__EXTABI) if nonvolatile vector registers are enabled in the Fortran modules.
450 AIX 5L Version 5.3 General Programming Concepts: Writing and Debugging Programs

In addition to the AltiVec programming interface specification, which provides an explicit extension to the Cand C++ languages for vector programming, some compilers will probably allow the exploitation of thevector extension in some optimization settings when targeting a processor that supports the vectorextension.
Refer to your compiler documentation for more details.
AssemblerThe AIX assembler, in the /usr/ccs/bin/as directory, now supports the additional instruction set defined bythe vector extension, and specifically as implemented by the PowerPC 970 processor. You can use thenew -m970 assembly mode or the .machine 970 pseudo op within the source file to enable the assemblyof the new vector instructions. Refer to the Assembler Language Reference for more information.
DebuggerThe dbx AIX debugger, in /usr/ccs/bin/dbx, supports machine-level debugging of vector-enabled programs.This support includes the ability to disassemble the new vector instructions, and to display and set vectorregisters. A new $instructionset value of 970 has been defined for enabling disassembly of the PowerPC970-specific instructions, including the vector instructions, when not running dbx on a PowerPC 970system. Note that if running dbx on a PowerPC 970, the default $instructionset will be 970.
To view vector registers, the subcommand unset $novregs must be used, as vector registers are notdisplayed by default. Also, if the processor does not support the vector extension, or the process or threadbeing examined is not using the vector extension, then no vector register state will be displayed.Otherwise, the registers subcommand will print all of the vector registers and their contents in rawhexadecimal.
You can also display the vector registers individually, formatted according to a fundamental type. Forinstance, print $vr0 will display the contents of register VR0 as an array of 4 integers. print $vr0c willdisplay the contents of register VR0 as an array of 16 characters. print $vr0s will display the contents ofregister VR0 as an array of 8 shorts, and print $vr0f will display the contents of register VR0 as an array of4 floats.
You can assign entire vector registers, for example assign $vr0 = $vr1, or assign individual vectorelements of the vector register as if assigning an element of an array. For example, assign $vr0[3] =0x11223344 sets only the 4th integer member of VR0. assign $vr0f[0] = 1.123 results in only the first floatmember of VR0 being set to the value 1.123.
You can trace vector registers throughout the execution of a function or program, for example tracei $vr0in main will display the contents of VR0 each time it is modified in main(). Likewise, by specifying one ofthe format registers ($vr0f, $vr0c, $vr0s) to tracei, each display of the contents will be formattedaccordingly.
As long as compilers represent vector data types as arrays of their fundamental types, dbx should also beable to display a vector data type formatted as an array.
Refer to the dbx command documentation for more information.
Enablement for third-party debuggers is also provided in the form of PTT_READ_VEC andPTT_WRITE_VEC new ptrace operations, for reading or writing vector register state for a thread. Refer tothe ptrace documentation for details.
The /proc filesystem is also enhanced to support a /proc-based debugger. The status and lwpstatus filesfor a vector-enabled process and thread, respectively, are extended to include vector register state. A new
Chapter 21. AIX Vector Programming 451

control message, PCSVREG, is supported on the write of a process or thread control file for setting vectorregister state. Refer to the /proc File Reference for more details.
Core FilesAIX also supports the inclusion of vector machine state as part of the core file for a vector-enabledprocess or thread. Only if a process or thread is using the vector extension will the vector machine statebe included in the core image for that thread. Note that if you select the pre-AIX 4.3 core file format, vectorstate will not be included. The vector state is only supported in the current core file formats. You can usethe dbx command to read and display the vector machine state of a vector-enabled core file.
452 AIX 5L Version 5.3 General Programming Concepts: Writing and Debugging Programs
Chapter 22. Packaging Software for Installation
This article provides information about preparing applications to be installed using the installp command.
This section describes the format and contents of the software product installation package that must besupplied by the product developer. It gives a description of the required and optional files that are part of asoftware installation or update package.
A software product installation package is a backup-format file containing the files of the software product,required installation control files, and optional installation customization files. The installp command isused to install and update software products.
An installation package contains one or more separately installable, logically-grouped units called filesets.Each fileset in a package must belong to the same product.
A fileset update or update package is a package containing modifications to an existing fileset.
Throughout this article, the term standard system is used to refer to a system that is not configured as adiskless system.
This article contains the following main sections:
v “Installation Procedure Requirements”
v “Package Control Information Requirements” on page 454
v “Package Partitioning Requirements” on page 454
v “Software Product Packaging Parts” on page 455
v “Format of a Software Package” on page 454
v “Package and Fileset Naming Conventions” on page 455
v “Fileset Revision Level Identification” on page 457
v “Contents of a Software Package” on page 457
v “The lpp_name Package Information File” on page 458
v “The liblpp.a Installation Control Library File” on page 468
v “Further Description of Installation Control Files” on page 471
v “Installation Control Files Specifically for Repackaged Products” on page 476
v “Installation Files for Supplemental Disk Subsystems” on page 479
v “Format of Distribution Media” on page 479
v “The Table of Contents File” on page 481
v “The installp Processing of Product Packages” on page 482
Note: If your online documentation is written in HTML, you should register your documentation with theAIX Information Center. The AIX Information Center provides navigation and search capabilities forsystem documentation. For instructions on how to use the information center, select InformationCenter Help from the navigation bar. For instructions on installing and configuring the informationcenter on AIX, see the AIX 5L Version 5.3 Installation Guide and Reference.
Installation Procedure Requirementsv Installation must not require user interaction. Product configuration requiring user interaction must occur
before or after installation.
v All installations of independent filesets or updates to interdependent filesets must be able to beperformed during a single installation.
© Copyright IBM Corp. 1997, 2010 453
v No system restart should be required for installation. The installation may stop portions of the systemrelated to the installation, and a system restart may be required after installation in order for theinstallation to take full effect.
Package Control Information RequirementsPackage control information must:
v Specify all installation requirements the filesets have on other filesets.
v Specify all file system size requirements for the fileset installation.
Format of a Software PackageAn installation or update package must be a single file in backup format that can be restored by theinstallp command during installation. This file can be distributed on tape, diskette, or CD-ROM. See“Format of Distribution Media” on page 479 for information about the format used for product packages oneach type of media.
Package Partitioning RequirementsIn order to support diskless or dataless client workstations, machine-specific portions of the package (theroot part) must be separated from the machine-shareable portions of the package (the usr part). The usrpart of the package contains files that reside in the /usr or /opt file system.
Installation of the root part of the package must not modify any files in the /usr file system. The /usr filesystem is not writable during installation of the root part of a diskless or dataless client system. Themachine–specific (root) part should include everything that is not in the /usr or /opt file systems.
Software Vital Product Data (SWVPD)Information about a software product and its installable options is maintained in the Software Vital ProductData (SWVPD) database. The SWVPD consists of a set of commands and the Object Data Manager(ODM) object classes for the maintenance of software product information. The SWVPD commands areprovided for the user to query (lslpp) and verify (lppchk) installed software products. The ODM objectclasses define the scope and format of the software product information that is maintained.
The installp command uses the Object Data Manager to maintain the following information in the SWVPDdatabase:
v The name of the software product (for example, bos.adt)
v The version of the software product
v The release level of the software product, which indicates changes to the external programminginterface of the software product
v The modification level of the software product, which indicates changes that do not affect the softwareproduct’s external interface
v The fix level of the software product, which indicates small updates that are to be built into a regularmodification level at a later time
v The name, checksum, and size of the files that make up the software product or option
v The state of the software product: available, applying, applied, committing, committed, rejecting, orbroken
v Technology level and APAR information
v The destination directory and installer for non-installp packaged software, where applicable.
454 AIX 5L Version 5.3 General Programming Concepts: Writing and Debugging Programs

Software Product Packaging PartsIn order to support installation in the client/server environment, the installation packaging is divided in thefollowing parts:
usr Contains the part of the product that can be shared among several machines with compatiblehardware architectures. For a standard system, these files are stored in the /usr or /opt file tree.
root Contains the part of the product that cannot be shared among machines. Each client must have itsown copy. Most of this software requiring a separate copy for each machine is associated with theconfiguration of the machine or product. For a standard system, files in the root part are stored inthe root (/) file tree. The root part of a fileset must be in the same package as the usr part of thefileset. If a fileset contains a root part, it must also contain a usr part.
Sample File System Guide for Package PartitioningFollowing is a brief description of file systems and directories. You can use this as a guide for splitting aproduct package into root, usr, and share parts.
Some root-part directories and their contents:
/dev Local machine device files/etc Machine configuration files such as hosts and passwd/sbin System utilities needed to boot the system/var System-specific data files and log files
Some usr-part directories and their contents include:
/usr/bin Commands and scripts (ordinary executables)/usr/sbin System administration commands/usr/include Include files/usr/lib Libraries, non-user commands, and architecture-dependent data/opt Libraries, non-user commands, and scripts normally associated with non-operating system
products.
Package and Fileset Naming ConventionsUse the following conventions when naming a software package and its filesets:
v A package name (PackageName) should begin with the product name. If a package has only oneinstallable fileset, the fileset name can be the same as the PackageName. All package names must beunique.
v A fileset name has the form:ProductName.PackageName.FilesetName.extension
where:
– ProductName identifies the product or solution group.
– PackageName identifies a functional group within the product.
– FilesetName (optional) identifies a specific functional set of files and libraries to be installed.
– Extension (optional) further describes the contents. See “Fileset Extension Naming Conventions” onpage 456 for more information.
v A fileset name contains more than one character and begins with a letter.
v All characters in the fileset name must be ASCII characters. Valid characters are upper and lower caseletters, digits, underscores ( _ ), plus signs ( + ), and minus signs. The period ( . ) is used as aseparator in the fileset name.
Chapter 22. Packaging Software for Installation 455

v A fileset name cannot end with a period or dot.
v The maximum length for a fileset name is 144 bytes.
v All fileset names must be unique within the package.
Fileset Extension Naming ConventionsThe following list provides some fileset extension naming conventions:
Extension Fileset Description.adt Application development toolkit.com Common code required by similar filesets.compat Compatibility code that may be removed in a future release.diag Diagnostics support.fnt Fonts.help. Language Common Desktop Environment (CDE) help files for a particular language.loc.language Locale.msg. Language Message files for a particular language.rte Run-time environment or minimum set for a product.ucode Microcode
Special Naming Considerations for Device Driver PackagingThe configuration manager command (cfgmgr) automatically installs software support for detectabledevices that are available on the installation media and packaged with the following naming convention:devices.BusTypeID.CardID.Etension
where:
v BusTypeID specifies the type of bus to which the card attaches (for example, pci for PCI
v CardID specifies the unique hexadecimal identifier associated with the card type
v Extension specifies the part of the driver that is included (for example, rte could be the extension forruntime and diag is the extension for diagnostics.)
For example, assume an ethrnet device attaches to the PCI bus and is identified by the configurationmanager as having a unique card identifier of 1410bb02. The package of filesets associated with thisethernet device would be named devices.pci.1410bb02. The runtime environment fileset within thispackage would be named devices.pci.1410bb02.rte.
Special Naming Considerations for Message Catalog PackagingA user installing a package can request the message catalogs be installed automatically. When thisrequest is made, the system automatically installs message filesets for the primary language if themessage filesets are available on the installation media and packaged with the following namingconvention:Product.msg.Language.SubProduct
The optional .SubProduct suffix is used when a product has multiple message catalog filesets for the samelanguage, each message catalog fileset applying to a different SubProduct. You can choose to have onemessage fileset for an entire product.
For example, the Super_Widget product has a plastic and a metal set of fileset options. All Super_WidgetEnglish U.S. message catalogs can be packaged in a single fileset named Super_Widget.msg.en_US. Ifseparate message catalog filesets are needed for the plastic and metal options, the English U.S.message catalog filesets would be named Super_Widget.msg.en_US.plastic andSuper_Widget.msg.en_US.metal.
456 AIX 5L Version 5.3 General Programming Concepts: Writing and Debugging Programs

Note: A message fileset that conforms to this naming convention must contain an installed-requisite(instreq) on another fileset in the product in order to ensure automatic installation of the messagefileset.
File NamesFiles delivered with the software package cannot have names containing commas or colons. Commas andcolons are used as delimiters in the control files used during the software installation process. File namescan contain non-ASCII characters. The full path for the file name cannot be more than 128 characters.
Fileset Revision Level IdentificationThe fileset level is referred to as the level or alternatively as the v.r.m.f or VRMF and has the form:Version.Release.Modification.FixLevel
where:
v Version is a numeric field of 1 to 2 digits that identifies the version number.
v Release is a numeric field of 1 to 2 digits that identifies the release number.
v Modification is a numeric field of 1 to 4 digits that identifies the modification level.
v FixLevel is a numeric field of 1 to 4 digits that identifies the fix level.
A base fileset installation level is the full initial installation level of a fileset. This level contains all files inthe fileset, as opposed to a fileset update, which may contain a subset of files from the full fileset.
All filesets in a software package should have the same fileset level, though it is not required for AIX4.1-formatted packages.
For all new levels of a fileset, the fileset level must increase. The installp command uses the fileset levelto check for a later level of the product on subsequent installations.
fileset level precedence reads from left to right (for example, 5.2.0.0 is a newer level than 4.3.0.0).
Contents of a Software PackageThis section describes the files contained in an installation or update package. File path names are givenfor installation package types. For update packages, wherever PackageName is part of the path name, itis replaced by PackageName/FilesetName/FilesetLevel.
The usr part of an installation or update package contains the following installation control files:
v ./lpp_name: This file provides information about the software package to be installed or updated. Forperformance reasons, the lpp_name file should be the first file in the backup-format file that makes upa software installation package. See “The lpp_name Package Information File” on page 458 for moreinformation.
v ./usr/lpp/PackageName/liblpp.a: This archive file contains control files used by the installation processfor installing or updating the usr part of the software package. See “The liblpp.a Installation ControlLibrary File” on page 468 for information about files contained in this archive library.
v All files, backed up relative to root, that are to be restored for the installation or update of the usr part ofthe software product.
If the installation or update package contains a root part, the root part contains the following files:
v ./usr/lpp/PackageName/inst_root/liblpp.a: This library file contains control files used by the installationprocess for installing or updating the root part of the software package.
Chapter 22. Packaging Software for Installation 457

v All files that are to be restored for the installation or update of the root part of the software package. Fora base fileset installation level. these files must be backed up relative to ./usr/lpp/PackageName/inst_root.
Example Contents of a Software PackageThe farm.apps package contains the farm.apps.hog 4.1.0.0 fileset. The farm.apps.hog 4.1.0.0 filesetdelivers the following files:/usr/bin/raisehog (in the usr part of the package)/usr/sbin/sellhog(in the usr part of the package)
/etc/hog(in the root part of the package)
The farm.apps package contains at least the following files:./lpp_name./usr/lpp/farm.apps/liblpp.a./usr/lpp/farm.apps/inst_root/liblpp.a./usr/bin/raisehog./usr/sbin/sellhog./usr/lpp/farm.apps/inst_root/etc/hog
Fileset update farm.apps.hog 4.1.0.3 delivers updates to the following files:/usr/sbin/sellhog/etc/hog
The fileset update package contains the following files:./lpp_name./usr/lpp/farm.apps/farm.apps.hog/4.1.0.3/liblpp.a./usr/lpp/farm.apps/farm.apps.hog/4.1.0.3/inst_root/liblpp.a./usr/sbin/sellhog./usr/lpp/farm.apps/farm.apps.hog/4.1.0.3/inst_root/etc/hog
Note: The file from the root part of the package was restored under an inst_root directory. Files installedfor the machine-dependent root part of a package are restored relative to an inst_root directory.This facilitates installation of machine-specific files in the root file systems of multiple systems. Theroot part files are installed into the root portions of systems by copying the files from the inst_rootdirectory. This allows multiple machines to share a common machine-independent usr part.
The lpp_name Package Information FileEach software package must contain the lpp_name package information file. The lpp_name file gives theinstallp command information about the package and each fileset in the package. Refer to the figure foran example lpp_name file for a fileset update package. The numbers and arrows in the figure refer tofields that are described in the table that follows.
The following table defines the fields in the lpp_name file.
Field Name Format Separator Description
1. Format Integer White space Indicates the release level of installp for whichthis package was built. The values are:
v 1 - AIX 3.1
v 3 - AIX 3.2
v 4 - AIX 4.1 and later
458 AIX 5L Version 5.3 General Programming Concepts: Writing and Debugging Programs

2. Platform Character White space Indicates the platform for which this package wasbuilt. The values are:
v R - RISC
v I - Intel
v N - Neutral
3. Package Type Character White space Indicates whether this is an installation or updatepackage and what type. The values are:
v I - Installation
v S - Single update
v SR - Single update required
v ML - Technology level update
4. PackageName Character White space The name of the software package(PackageName).
{ New line Indicates the beginning of the repeatable sectionsof fileset-specific data.
5.Fileset name Character White space The complete name of the fileset. This field beginsthe heading information for the fileset or filesetupdate.
6. Level Shown inDescriptioncolumn
White space The level of the fileset to be installed. The formatis: Version.Release.Modification.FixLevel
7. Volume Integer White space Indicates the volume number where the fileset islocated if shipped on multivolume media.
8. Bosboot Character White space Indicates whether a bosboot is needed followingthe installation. The values are:
v N - Do not invoke bosboot
v b - Invoke bosboot
9. Content Character White space Indicates the parts included in the fileset or filesetupdate. The values are:
v B -usr and root part
v U -usr part only
10. Language Character White space Should be set to the language displayed if the Clocale is selected. Generally set to en_US.
11. Description Character # or new line Fileset description. The description is limited to 60characters.
12. Comments Character New line (Optional) Additional comments.
[ New line Indicates the beginning of the body of the filesetinformation.
13. Requisiteinformation
Describedfollowing table
New line (Optional) Installation dependencies the fileset hason other filesets and fileset updates. See thesection following this table for detailed description.
% New line Indicates the separation between requisite andsize information.
14. Size and LicenseAgreementinformation
Described later inthis chapter
New line Size requirements by directory and licenseagreement information. See Size and LicenseAgreement Information Section later in this articlefor detailed description.
% New line Indicates the separation between size andlicensing information.
Chapter 22. Packaging Software for Installation 459
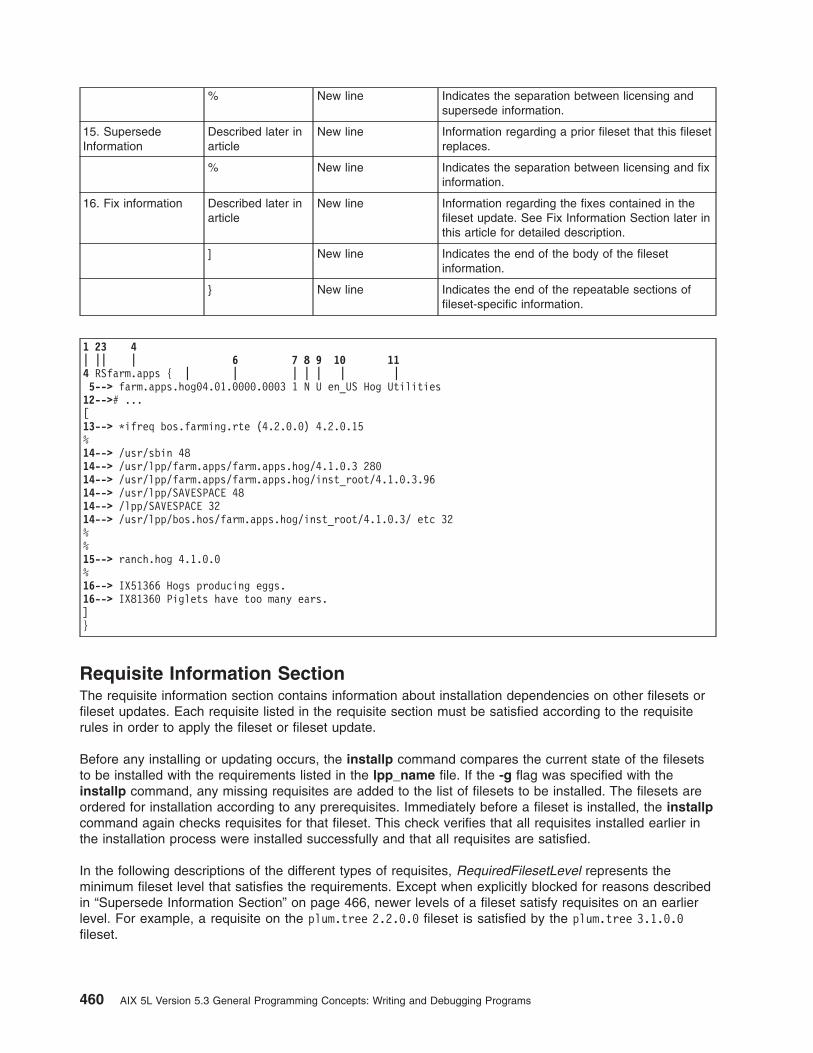
% New line Indicates the separation between licensing andsupersede information.
15. SupersedeInformation
Described later inarticle
New line Information regarding a prior fileset that this filesetreplaces.
% New line Indicates the separation between licensing and fixinformation.
16. Fix information Described later inarticle
New line Information regarding the fixes contained in thefileset update. See Fix Information Section later inthis article for detailed description.
] New line Indicates the end of the body of the filesetinformation.
} New line Indicates the end of the repeatable sections offileset-specific information.
1 23 4| || | 6 7 8 9 10 114 RSfarm.apps { | | | | | | |5--> farm.apps.hog04.01.0000.0003 1 N U en_US Hog Utilities12--># ...[13--> *ifreq bos.farming.rte (4.2.0.0) 4.2.0.15%14--> /usr/sbin 4814--> /usr/lpp/farm.apps/farm.apps.hog/4.1.0.3 28014--> /usr/lpp/farm.apps/farm.apps.hog/inst_root/4.1.0.3.9614--> /usr/lpp/SAVESPACE 4814--> /lpp/SAVESPACE 3214--> /usr/lpp/bos.hos/farm.apps.hog/inst_root/4.1.0.3/ etc 32%%15--> ranch.hog 4.1.0.0%16--> IX51366 Hogs producing eggs.16--> IX81360 Piglets have too many ears.]}
Requisite Information SectionThe requisite information section contains information about installation dependencies on other filesets orfileset updates. Each requisite listed in the requisite section must be satisfied according to the requisiterules in order to apply the fileset or fileset update.
Before any installing or updating occurs, the installp command compares the current state of the filesetsto be installed with the requirements listed in the lpp_name file. If the -g flag was specified with theinstallp command, any missing requisites are added to the list of filesets to be installed. The filesets areordered for installation according to any prerequisites. Immediately before a fileset is installed, the installpcommand again checks requisites for that fileset. This check verifies that all requisites installed earlier inthe installation process were installed successfully and that all requisites are satisfied.
In the following descriptions of the different types of requisites, RequiredFilesetLevel represents theminimum fileset level that satisfies the requirements. Except when explicitly blocked for reasons describedin “Supersede Information Section” on page 466, newer levels of a fileset satisfy requisites on an earlierlevel. For example, a requisite on the plum.tree 2.2.0.0 fileset is satisfied by the plum.tree 3.1.0.0fileset.
460 AIX 5L Version 5.3 General Programming Concepts: Writing and Debugging Programs

PrerequisiteA prerequisite indicates that the specified fileset must be installed at the specified fileset level or at ahigher level before the current fileset can install successfully. If a prerequisite fileset is scheduled to beinstalled, the installp command orders the list of filesets to install to make sure the prerequisite is met. Aprerequisite on a fileset within the same package is not guaranteed.
Syntax*prereq Fileset RequiredFilesetLevel
Alternate SyntaxFileset RequiredFilesetLevel
A fileset update contains an implicit prerequisite to its base-level fileset. If this implicit prerequisite is notadequate, you must specify explicitly a different prerequisite. The Version and Release of the update andthe implicit prerequisite are the same. If the FixLevel of the update is 0, the ModificationLevel and theFixLevel of the implicit prerequisite are both 0. Otherwise, the implicit prerequisite has a ModificationLevelthat is the same as the ModificationLevel of the update and a FixLevel of 0. For example, a 4.1.3.2 levelupdate requires its 4.1.3.0 level to be installed before the update installation. A 4.1.3.0 level updaterequires its 4.1.0.0 level to be installed before the update installation.
CorequisiteA corequisite indicates that the specified fileset must be installed for the current fileset to functionsuccessfully. At the end of the installation process, the installp command issues warning messages forany corequisites that are not met. A corequisite can be used to indicate requisites between filesets withinthe same package.
Syntax*coreq Fileset RequiredFilesetLevel
If RequisiteAn if requisite indicates that the specified fileset is required to be at RequiredFilesetLevel only if the filesetis installed at InstalledFilesetLevel. This is most commonly used to coordinate dependencies betweenfileset updates. The following example shows an if requisite:*ifreq plum.tree (1.1.0.0) 1.1.2.3
Syntax*ifreq Fileset [(InstalledFilesetLevel)] RequiredFilesetLevel
If the plum.tree fileset is not already installed, this example does not cause it to be installed. If theplum.tree fileset is already installed at any of the following levels, this example does not cause the1.1.2.3 level to be installed:
1.1.2.3 This level matches the RequiredFilesetLevel.1.2.0.0 This level is a different base fileset level.1.1.3.0 This level supersedes the RequiredFilesetLevel.
If the plum.tree fileset is already installed at any of the following levels, this example causes the 1.1.2.3level to be installed:
1.1.0.0 This level matches the InstalledFilesetLevel.1.1.2.0 This level is the same base level as the InstalledFilesetLevel and a lower level than the
RequiredFilesetLevel.
Chapter 22. Packaging Software for Installation 461

The (InstalledFilesetLevel) parameter is optional. If it is omitted, the Version and Release oftheInstalledFilesetLevel and the RequiredFilesetLevel are assumed to be the same. If the FixLevel of theRequiredFilesetLevel is 0, the ModificationLevel and the FixLevel of the InstalledFilesetLevel are both 0.Otherwise, the InstalledFilesetLevel has a ModificationLevel that is the same as the ModificationLevel ofthe RequiredFilesetLevel and a FixLevel of 0. For example, if the RequiredFilesetLevel is 4.1.1.1 and noInstalledFilesetLevel parameter is supplied, the InstalledFilesetLevel is 4.1.1.0. If the RequiredFilesetLevelis 4.1.1.0 and no InstalledFilesetLevel parameter is supplied, the InstalledFilesetLevel is 4.1.0.0.
Installed RequisiteAn installed requisite indicates that the specified fileset should be installed automatically only if itscorresponding fileset is already installed or is on the list of filesets to install. An installed requisite also isinstalled if the user explicitly requests that it be installed. A fileset update can not have an installedrequisite. Because a fileset containing the message files for a particular package should not be installedautomatically without some other part of the package being installed, a message fileset should alwayscontain an installed requisite for another fileset in its product.
Syntax*instreq Fileset RequiredFilesetLevel
Group RequisiteA group requisite indicates that different requisite conditions can satisfy the requisite. A group requisite cancontain prerequisites, corequisites, if-requisites, and nested group requisites. The Number preceding the {RequisiteExpressionList } identifies how many of the items in the RequisiteExpressionList are required. Forexample, >2 states that at least three items in the RequisiteExpressionList are required.
Syntax>Number { RequisiteExpressionList }
Requisite Information Section Examples1. The following example illustrates the use of corequisites. The book.create 12.30.0.0 fileset cannot
function without the layout.text 1.1.0.0 and index.generate 2.3.0.0 filesets installed, so therequisite section for book.create 12.30.0.0 contains:*coreq layout.text 1.1.0.0*coreq index.generate 2.3.0.0
The index.generate 3.1.0.0 fileset satisfies the index.generate requisite, because 3.1.0.0 is a newerlevel than the required 2.3.0.0 level.
2. The following example illustrates the use of the more common requisite types. Fileset new.fileset.rte1.1.0.0 contains the following requisites:*prereq database.rte 1.2.0.0*coreq spreadsheet.rte 1.3.1.0*ifreq wordprocessorA.rte (4.1.0.0) 4.1.1.1*ifreq wordprocessorB.rte 4.1.1.1
The database.rte fileset must be installed at level 1.2.0.0 or higher before the new.fileset.rte filesetcan be installed. If database.rte and new.fileset.rte are installed in the same installation session,the installation program installs the database fileset before the new.fileset.rte fileset.
The spreadsheet.rte fileset must be installed at level 1.3.1.0 or higher for the new.fileset.rte filesetto function properly. The spreadsheet.rte fileset does not need to be installed before thenew.fileset.rte fileset is installed, provided both are installed in the same installation session. If anadequate level of the spreadsheet.rte fileset is not installed by the end of the installation session, awarning message will be issued stating that the corequisite is not met.
If the wordprocessorA.rte fileset is installed (or being installed with new.fileset.rte) at level 4.1.0.0,then the wordprocessorA.rte fileset update must be installed at level 4.1.1.1 or higher.
If the wordprocessorB.rte fileset is installed (or being installed with new.fileset.rte) at level 4.1.1.0,then the wordprocessorB.rte fileset update must be installed at level 4.1.1.1 or higher.
462 AIX 5L Version 5.3 General Programming Concepts: Writing and Debugging Programs

3. The following example illustrates an installed requisite. Fileset Super.msg.fr_FR.Widget at level2.1.0.0 contains the following install requisite:*instreq Super.Widget 2.1.0.0
The Super.msg.fr_FR.Widget fileset cannot be installed automatically when the Super.Widget fileset isnot installed. The Super.msg.fr_FR.Widget fileset can be installed when the Super.Widget fileset is notinstalled if the fileset is listed explicitly on the list of filesets to be installed..
4. The following example illustrates a group requisite. At least one of the prerequisite filesets listed mustbe installed (both can be installed). If installed, the spreadsheet_1.rte fileset must be at level 1.2.0.0or higher or the spreadsheet_2.rte fileset must be at level 1.3.0.0 or higher.>0 {*prereq spreadsheet_1.rte 1.2.0.0*prereq spreadsheet_2.rte 1.3.0.0}
Size and License Agreement InformationThe size and license agreement information section contains information about the disk space and licenseagreement requirements for the fileset.
Size InformationThis information is used by the installation process to ensure that enough disk space is available for theinstallation or update to succeed. Size information has the form:Directory PermanentSpace [TemporarySpace]
Additionally, the product developer can specify PAGESPACE or INSTWORK in the full-path name field toindicate disk space requirements for paging space and work space needed in the package directory duringthe installation process.
Directory The full path name of the directory that has size requirements.PermanentSpace The size (in 512-byte blocks) of the permanent space needed for the installation or
update. Permanent space is space that is needed after the installation completes.This field has a different meaning in the following cases:
If Directory is PAGESPACE, PermanentSpace represents the size of page spaceneeded (in 512-byte blocks) to perform the installation.
If Directory is INSTWORK, PermanentSpace represents the number of 512-byteblocks needed for extracting control files used during the installation. These controlfiles are the files that are archived to the liblpp.a file.
TemporarySpace The size (in 512-byte blocks) of the temporary space needed for the installation only.Temporary space is released after the installation completes. The TemporarySpacevalue is optional. An example of temporary space is the space needed to re-link anexecutable object file. Another example is the space needed to archive an object fileinto a library. To archive into a library, the installp command makes a copy of thelibrary, archives the object file into the copied library, and moves the copied libraryover the original library. The space for the copy of the library is consideredtemporary space.
When Directory is INSTWORK, TemporarySpace represents the number of 512-byteblocks needed for the unextracted liblpp.a file.
The following example shows a size information section:/usr/bin 30/lib 40 20PAGESPACE 10INSTWORK 10 6
Chapter 22. Packaging Software for Installation 463

Because it is difficult to predict how disk file systems are mounted in the file tree, the directory path nameentries in the size information section should be as specific as possible. For example, it is better to havean entry for /usr/bin and one for /usr/lib than to have a combined entry for /usr, because /usr/bin and/usr/lib can exist on different file systems that are both mounted under /usr. In general, it is best toinclude entries for each directory into which files are installed.
For an update package only, the size information must include any old files (to be replaced) that will moveinto the save directories. These old files will be restored if the update is later rejected. In order to indicatethese size requirements, an update package must specify the following special directories:
/usr/lpp/SAVESPACE The save directory for usr part files. By default, the usr part files are savedin the /usr/lpp/PackageName/FilesetName/FilesetLevel.save directory.
/lpp/SAVESPACE The save directory for root part files. By default, the root part files aresaved in the /lpp/PackageName/FilesetName/FilesetLevel.save directory.
License Agreement InformationA recent addition to the AIX install process allows product owners to require that a customer sign a licenseagreement before the install of the product. The installp command reads a fileset’s lpp_name file as usualfor any image. If there are LAF or LAR entries in the size section of the lpp_name file, the installpcommand calls the inulag command which displays the license in a window and records the customeracceptance of the license. If the customer refuses to accept the license, the install is halted for thatproduct.
Where to place the license file: Placement of the license files is up to the product owner. However, it isstrongly suggested that the license be placed in /usr/swlag/LANG. The suggested name for the LicenseAgreement file is given as ProductName_VersionRelease.la. There is no requirement to use this name orlocation. The installp command and this packaging is simply suppling a method to deliver the informationto customers. All tools and file content must be provided by the product.
Translation requirements for the license file: If there is a requirement that the License Agreement filesbe translated into the supported languages, it is recommended that the files be separated into differentfiles by language. This translation can require that several files be created.
How to ship the license file: A product can ship the license file as part of its main product or in aseparate fileset for the product. Many products are choosing to create a separate fileset for shipping justthe license files. This enables a product with many different features to create one license file and filesetthat can ship on all the media required for each feature instead of having to include the files in severaldifferent features. The current suggestions for the fileset name are lpp.license or lpp.loc.license. Mostproducts are currently using the first suggestion. If you want the license fileset to be hidden from thecustomer in standard installs, use lpp.loc.license because the license fileset does not need to beselected for installation.
How to package the license file: The file itself is never listed in the fileset.al or the fileset.inventory filesfor the fileset. The installp command finds the license because of the entry in the size section of theProductName file. The types of entries are:
LAF
License Agreement File tells the installp command that this particular license file is shipped in thisfileset.
License agreement files are indicated by a size section entry with:LAF<lang>license_file size
Term Meaning
LAF stands for License Agreement File
<lang> language to which the file is translated. These are typically entries
464 AIX 5L Version 5.3 General Programming Concepts: Writing and Debugging Programs

like en_US, fr_FR, Ja_JP, and zh_TW. If <lang> is not specified,then the agreement file is assumed to be non-translated andencoded as ASCII. If the license agreement file is translated,<lang> must be part of the path so that the requirement entry canbe associated with the file.
license_file is the fullpath to the license file as it will be found in the imageand placed on the system. The suggested path takes the form/usr/swlag/en_US/ProductName_VersionRelease.la
size This is the real size in 512-byte blocks of the license file so as toensure that installp has allowed enough space to place thelicense file on the system.
LAR
The License Agreement Requisite tells the installp command that this fileset requires theinstallation of the listed license agreement file. This is not the same as a prerequisite because it isin the file and not in a fileset. Files and filesets have different formats and different purposes. Theyshould not be confused.
Term Meaning
LAR stands for License Agreement Requisite
req_license_file The full path to the license file required to install this fileset.Typically these entries use %L in the path instead of the actuallanguage name to allow for the appropriate file to be viewedwithout forcing the customer to view all of the languages.
Generally one fileset ships the files, and contains all of the LAF entries. The other filesets in the productwhich require this license only ship the LAR entry. The fileset which ships the LAF entries also containsthe files listed at their full path location in the BFF image, but the files are not listed in the fileset.al or thefileset.inventory files for the fileset. The design used for electronic licenses does not require that the filesbe registered to the SWVPD. The installp command:
1. Finds a requirement on the file.
2. Checks the system to see if it was accepted.
3. If the file was not accepted
a. Finds the fileset that ships the file.
b. Extracts (restores) only that file from the BFF image.
c. Display the file to the customer.
LAF Fileset Example: The following is an example of a fileset that ships the license file:iced.tea.loc.license 03.01.0000.0000 1 N U en_US IcedTea Recipe License Information[%INSTWORK 16 160LAF/usr/swlag/de_DE/iced.tea.la 24LAF/usr/swlag/DE_DE/iced.tea.la 24LAF/usr/swlag/en_US/iced.tea.la 24LAF/usr/swlag/EN_US/iced.tea.la 24LAF/usr/swlag/es_ES/iced.tea.la 24LAF/usr/swlag/ES_ES/iced.tea.la 24LAF/usr/swlag/fr_FR/iced.tea.la 24LAF/usr/swlag/FR_FR/iced.tea.la 24LAF/usr/swlag/it_IT/iced.tea.la 24LAF/usr/swlag/IT_IT/iced.tea.la 24LAF/usr/swlag/ja_JP/iced.tea.la 24LAF/usr/swlag/JA_JP/iced.tea.la 32LAF/usr/swlag/Ja_JP/iced.tea.la 24LAF/usr/swlag/ko_KR/iced.tea.la 24
Chapter 22. Packaging Software for Installation 465

LAF/usr/swlag/KO_KR/iced.tea.la 24LAF/usr/swlag/pt_BR/iced.tea.la 24LAF/usr/swlag/PT_BR/iced.tea.la 24LAF/usr/swlag/ru_RU/iced.tea.la 24LAF/usr/swlag/RU_RU/iced.tea.la 48LAF/usr/swlag/zh_CN/iced.tea.la 16LAF/usr/swlag/zh_TW/iced.tea.la 16LAF/usr/swlag/Zh_TW/iced.tea.la 16LAF/usr/swlag/ZH_TW/iced.tea.la 24%%%]
LAR Fileset example: The following is an example of a fileset which ships the license requirement to thelicense file:iced.tea.server 03.01.0000.0010 1 N B en_US Iced Tea Recipe Group[*prereq bos.net.tcp.client 5.1.0.10*coreq iced.tea.tools 5.1.0.10*coreq Java14.sdk 1.4.0.1%/usr/bin 624/usr/lib/objrepos 24/usr/include 16/usr/include/sys 56/usr/lpp/iced.tea 22/usr/samples/iced.tea 8/usr/samples/iced.tea/server 504/usr/lpp/iced.tea/inst_root/etc/tea 8/usr/iced.tea 8/usr/lpp/iced.tea/inst_root/etc/tea/Top 8INSTWORK 208 96/lpp/iced.tea 104/etc/tea 8/etc/objrepos 8/etc/tea/Top 8/tmp 0 6LAR/usr/swlag/%L/iced.tea.la 0%%%]
Supersede Information SectionThe supersede information section indicates the levels of a fileset or fileset update for which this fileset orfileset update may (or may not) be used as a replacement. Supersede information is optional and is onlyapplicable to AIX 4.1-formatted fileset base installation packages and AIX 3.2-formatted fileset updatepackages.
A newer fileset supersedes any older version of that fileset unless the supersedes section of thelpp_name file identifies the latest level of that fileset it supersedes. In the rare cases where a fileset doesnot supersede all earlier levels of that fileset, the installp command does not use the fileset to satisfyrequisites on levels older than the level of the fileset listed in the supersedes section.
A fileset update supersedes an older update for that fileset only if it contains all of the files, configurationprocessing, and requisite information contained in the older fileset update. The installp commanddetermines that a fileset update supersedes another update for that fileset in the following conditions:
v The version, release, and modification levels for the updates are equal, the fix levels are both non-zero,and the update with the higher fix level does not contain a prerequisite on a level of the fileset greaterthan or equal to the level of the update with the lower fix level.
466 AIX 5L Version 5.3 General Programming Concepts: Writing and Debugging Programs

v The version and release levels for the updates are equal, and the update with the higher modificationlevel does not contain a prerequisite on a level of the fileset greater than or equal to the level of theupdate with the lower modification level.
For example, the fileset update farm.apps.hog 4.1.0.1 delivers an update of /usr/sbin/sellhog. Filesetupdate farm.apps.hog 4.1.0.3 delivers updates to the/usr/sbin/sellhog file and the /etc/hog file. Filesetupdate farm.apps.hog 4.1.1.2 delivers an update to the /usr/bin/raisehog file.
Update farm.apps.hog 4.1.0.3 supersedes farm.apps.hog 4.1.0.1 because it delivers the same files andapplies to the same level, farm.apps.hog 4.1.0.0.
Update farm.apps.hog 4.1.1.2 does not supersede either farm.apps.hog 4.1.0.3 or farm.apps.hog4.1.0.1 because it does not contain the same files and applies to a different level, farm.apps.hog4.1.1.0. Update farm.apps.hog 4.1.1.0 supersedesfarm.apps.hog 4.1.0.1 and farm.apps.hog 4.1.0.3.
Supersede Section for Fileset Installation Levels (Base Levels)An AIX 4.1-formatted fileset installation package can contain the following supersede entries:
Barrier Entry Identifies the fileset level where a major incompatibility was introduced. Such anincompatibility keeps the current fileset from satisfying requisites to levels of thefileset earlier than the specified level.
Compatibility Entry Indicates the fileset can be used to satisfy the requisites of another fileset. Acompatibility entry is used when a fileset has been renamed or made obsolete.Only one fileset can supersede a given fileset. You may specify only onecompatibility entry for each fileset.
The lpp_name file can contain at most one barrier and one compatibility entry for a fileset.
A barrier entry consists of the fileset name and the fileset level when the incompatibility was introduced. Abarrier entry is necessary for a fileset only in the rare case that a level of the fileset has introduced anincompatibility such that functionality required by dependent filesets has been modified or removed to suchan extent that requisites on previous levels of the fileset are not met. A barrier entry must exist in allsubsequent versions of the fileset indicating the latest level of the fileset that satisfies requisites bydependent filesets.
For example, if a major incompatibility was introduced in fileset Bad.Idea 6.5.6.0, the supersedeinformation section for each Bad.Idea fileset installation package from fileset level 6.5.6.0 onward wouldcontain a Bad.Idea 6.5.6.0 barrier entry. This barrier entry would prevent a requisite of Bad.Idea 6.5.4.0from being satisfied by any levels of Bad.Idea greater than or equal to 6.5.6.0.
A compatibility entry consists of a fileset name (different from the fileset in the package) and a fileset level.The fileset level identifies the level at which requisites to the specified fileset (and earlier levels of thatfileset) are met by the fileset in the installation package. The compatibility is useful when the specifiedfileset is obsolete or has been renamed, and the function from the specified fileset is contained in thecurrent fileset. The fileset level in the compatibility entry should be higher than any level expected to existfor the specified fileset.
As an example, assume the Year.Full 19.91.0.0 fileset is no longer delivered as a unit but is insteadbroken into several smaller, individual filesets. Only one of the smaller resulting filesets, perhaps Winter19.94.0.0, should contain a compatibility entry of Year.Full 19.94.0.0. This compatibility entry allows theWinter 19.94.0.0 fileset to satisfy the requisites of filesets dependent on Year.Full at levels 19.94.0.0and earlier.
Supersedes ProcessingThe installp command provides the following special features for installing filesets and fileset updateswhich supersede other filesets or fileset updates:
Chapter 22. Packaging Software for Installation 467

v If the installation media does not contain a fileset or fileset update that the user requested to install, asuperseding fileset or fileset update on the installation media can be installed.
For example, asume a user invokes the installp command with the -g flag (automatically installrequisites) to install the farm.apps.hog 4.1.0.2 fileset. If the installation media contains thefarm.apps.hog 4.1.0.4 fileset only, then the installp command will install the farm.apps.hog 4.1.0.4fileset because it supersedes the requested level.
v If the system and the installation media do not contain a requisite fileset or fileset update, the requisitecan be satisfied by a superseding fileset or fileset update.
v If an update is requested for installation and the -g flag is specified, the request is satisfied by thenewest superseding update on the installation media.
When the -g flag is specified with the installp command, any update requested for installation (eitherexplicitly or implicitly) is satisfied by the newest superseding update on the installation media. If the userwants to install a particular level of an update, not necessarily the latest level, the user can invoketheinstallp command without the -g flag.
v If an update and a superseding update (both on the installation media) are requested for installation, theinstallp command installs the newer update only.
In this case, if a user wishes to apply a certain update and its superseding update from the installationmedia, the user must do separate installp operations for each update level. Note that this kind ofoperation is meaningless if the two updates are applied and committed (-ac). Committing the secondupdate removes the first update from the system.
Fix Information SectionThe fix information section is optional. The fix information section entries contain a fix keyword and a 60characters or less description of the problem fixed. A fix keyword is a 16 characters or less identifiercorresponding to the fix. Fix keywords beginning with ix, iy, IY andIX are reserved for use by the operatingsystem manufacturer.
A technology level is a fix that is a major update level. Periodic preventive maintenance packages aretechnology levels. A technology level identifier begins with the name of the software product (not thepackage), followed by a single dot (.) and an identifying level, such as farm.4.1.1.0.
The liblpp.a Installation Control Library FileThe liblpp.a file is an archive file that contains the files required to control the package installation. Youcan create a liblpp.a file for your package using the ar command with the -g flag on systems later thanAIX 4.3 to ensure that a 32 bit archive is created. This section describes many of the files you can put in aliblpp.a archive.
Throughout this section, Fileset appears in the names of the control files. Fileset represents the name ofthe separate fileset to be installed within the software package. For example, assume the apply list file isdescribed as Fileset.al. The apply list file for the bos.net.tcp.client option of the bos.net softwareproduct would then be bos.net.tcp.client.al.
For any files you include in the liblpp.a archive file other than the files listed in this section, you shoulduse the following naming conventions:
v If the file is used in the installation of a specific fileset, the file name should begin with the Fileset.prefix.
v If the file is used as a common file for several filesets in the same package, the file name should beginwith the lpp. prefix.
Many files described in this section are optional. An optional file is necessary only if the function the fileprovides is required for the fileset or fileset update. Unless stated, a file pertains to both full installationpackages and fileset update packages.
468 AIX 5L Version 5.3 General Programming Concepts: Writing and Debugging Programs

Data Files Contained in the liblpp.a File
Fileset.al Apply list. This file lists all files to be restored for this fileset. Files are listed one per line witha path relative to root, as in ./usr/bin/pickle. An apply list file is required if any files aredelivered with the fileset or fileset update.
Fileset.cfginfo Special instructions file. This file lists one keyword per line, each keyword indicating specialcharacteristics of the fileset or fileset update. The only currently recognized keyword isBOOT, which causes a message to be generated after installation is complete indicating thatthe system needs to be restarted.
Fileset.cfgfiles List of user-configurable files and processing instructions for use when applying a newer orequal installation level of a fileset that is already installed. Before restoring the files listed inthe Fileset.al file, the system saves the files listed in Fileset.cfgfiles file. Later, these savedfiles are processed according to the handling methods specified in the Fileset.cfgfiles file.
Fileset.copyright Required copyright information file for the fileset. This file consists of the full name of thesoftware product followed by the copyright notices.
Fileset.err Error template file used as input to the errupdate command to add or delete entries in theError Record Template Repository. This file is commonly used by device support software.The errupdate command creates a Fileset.undo.err file for cleanup purposes. See theerrupdate command for information about the format of the Fileset.err file. This file can onlybe included in the root part of a fileset.
Fileset.fixdata Stanza format file. This file contains information about the fixes contained in a fileset or filesetupdate. For more information on this file, see “The Fileset.fixdata File” on page 473.
Fileset.inventory The inventory file. This file contains required software vital product data for the files in thefileset or fileset update. The inventory file is a stanza-format file containing an entry for eachfile to be installed or updated. For more information on this file, see “The Fileset.inventoryFile” on page 473.
Fileset.namelist List of obsolete filesets and current fileset (if applicable) that once contained files nowexisting in the fileset to be installed. This file is used for installation of repackaged softwareproducts only.
Fileset.odmadd orFileset.*.odmadd
Stanzas to be added to ODM (Object Data Manager) databases. For more information, seethe odmadd command
Fileset.rm_inv Remove inventory file. This file is for installation of repackaged software products only andmust exist if the fileset is not a direct replacement for an obsolete fileset. This stanza-formatfile contains names of files that need to be removed from obsolete filesets.
Fileset.size This file contains the space requirements for the files included in this fileset as describedearlier in this section.
Fileset.trc Trace report template file. The trcupdate command uses this file to add, replace, or deletetrace report entries in the /etc/trcfmt file. The trcupdate command creates a Fileset.undo.trcfile for cleanup purposes. Only the root part of a package can contain Fileset.trc files.
lpp.acf Archive control file for the entire package. This file is needed only when adding or replacingan archive member file to an archive file that already exists on the system. The archivecontrol file consists of lines containing pairs of the member file in the temporary directory aslisted in the Fileset.al file and the archive file that the member belongs to, both listed relativeto root as in:
./usr/ccs/lib/libc/member.o ./usr/ccs/lib/libc.alpp.README Readme file. This file contains information the user should read before using the software.
This file is optional and can also be named README, lpp.doc, lpp.instr, or lpp.lps.productid Product identification file. This file consists of a single line indicating the product name, the
product identifier (20-character limit), and the optional feature number (10-character limit).
Optional Executable Files Contained in the liblpp.a FileThe product-specific executable files described in this section are called during the installation process.Unless otherwise noted, file names that end in _i are used during installation processing only, and filenames that end in _u are used in fileset update processing only. All files described in this section areoptional and can be either shell scripts or executable object modules. Each program should have a returnvalue of 0 (zero), unless the program is intended to cause the installation or update to fail.
Chapter 22. Packaging Software for Installation 469

Fileset.config orFileset.config_u
Modifies configuration near the end of the default installation or update process.Fileset.config is used during installation processing only.
Fileset.odmdelorFileset.*.odmdel
Updates ODM database information for the fileset prior to adding new ODM entries for thefileset. The odmdel file naming conventions enables a fileset to have multiple odmdel files.
Fileset.pre_d Indicates whether a fileset may be removed during deinstall. The program must return avalue of 0 (zero) if the fileset can be removed. Filesets are removable by default. Theprogram should generate error messages indicating why the fileset is not removable.
Fileset.pre_i orFileset.pre_u
Runs prior to restoring or saving the files from the apply list in the package, but afterremoving the files from a previously installed version of the fileset.
Fileset.pre_rej Runs prior to the reject operation or prior to the preview of a reject operation of the fileset.Use the script to determine whether the fileset can be rejected. Do not use this script to runany commands which change anything on the system. If the script exits with a non-zeroreturn code, the reject operation is not allowed.
Fileset.pre_rm Runs during a fileset installation prior to removing the files from a previously installed versionof the fileset.
Fileset.post_i orFileset.post_u
Runs after restoring the files from the apply list of the fileset installation or update.
Fileset.unconfigFileset.unconfig_u
Undoes configuration processing performed in the installation or update during a deinstall ora reject of a fileset. Fileset.unconfig is used during deinstallation processing only.
Fileset.unodmadd Deletes entries that were added to ODM databases during the installation or update.Fileset.unpost_iorFileset.unpost_u
Undoes processing performed following restoring the files from the apply list in the installationor update during a deinstall or a reject of a fileset.
Fileset.unpre_i orFileset.unpre_u
Undoes processing performed prior to restoring the files from the apply list in the installationor update during a deinstall or a reject of a fileset.
If any of these executable files runs a command that may change the device configuration on a machine,that executable file should check the INUCLIENTS environment variable before running the command. Ifthe INUCLIENTS environment variable is set, the command should not be run. The Network InstallationManagement (NIM) environment uses the installp command for many purposes, some of which requirethe installp command to bypass some of its normal processing. NIM sets the INUCLIENTS environmentvariable when this normal processing must be bypassed.
If the default installation processing is insufficient for your package, you can provide the followingexecutable files in the liblpp.a file. If these files are provided in your package, the installp command usesyour package-provided files in place of the system default files. Your package-provided files must containthe same functionality as the default files or unexpected results can occur. You can use the default files asmodels for creating your own files. Use of the default files in place of package-provided files is stronglyrecommended.
instal Used in place of the default installation script /usr/lib/instl/instal. The installp commandcalls this executable file if a fileset in an installation package is applied.
lpp.cleanup Used in place of the default installation cleanup script /usr/lib/instl/cleanup. Theinstallp command calls this executable file if a fileset in an installation or updatepackage has been partially applied and must be cleaned up to put the fileset back into aconsistent state.
lpp.deinstal Used in place of the default fileset removal script /usr/lib/instl/deinstal. This executablefile must be placed in the /usr/lpp/PackageName directory. The installp command callsthis executable file if a fileset in an installation package is removed.
lpp.reject Used in place of the default installation rejection script /usr/lib/instl/reject. The installpcommand calls this executable if a fileset update in an update package is rejected. (Thedefault /usr/lib/instl/reject script is a link to the /usr/lib/instl/cleanup script.)
update Used in place of the default fileset update script /usr/lib/instl/update. The installpcommand calls this executable file if a fileset in an update package is applied. (Thedefault /usr/lib/instl/update script is a link to the /usr/lib/instl/instal script.)
470 AIX 5L Version 5.3 General Programming Concepts: Writing and Debugging Programs

To ensure compatibility with the installp command, the instal or update executable provided with asoftware package must:
v Process all of the filesets in the software package. It can either process the installation for all thefilesets or invoke other executables for each fileset.
v Use the inusave command to save the current level of any files to be installed.
v Use inurest command to restore all required files for the usr part from the distribution media.
v Use the inucp command to copy all required files for the root part from the /usr/lpp/Package_Name/inst_root directory.
v Create an $INUTEMPDIR/status file indicating success or failure for each fileset being installed orupdated. See “The Installation Status File” on page 487 for more information about this file.
v Return an exit code indicating the status of the installation. If the instal or update executable filereturns a nonzero return code and no status file is found, the installation process assumes all filesetsfailed.
Optional Executable File Contained in the Fileset.al File
Fileset.unconfig_d Undoes fileset-specific configuration operations performed during theinstallation and updates of the fileset. The Fileset.unconfig_d file is usedwhen the -u flag is specified with the installp command. If this file is notprovided and the -u flag is specified, the Fileset.unconfig,Fileset.unpost_i, and Fileset.unpre_i operations are performed.
Further Description of Installation Control Files
The Fileset.cfgfiles FileThe Fileset.cfgfiles file lists configuration files that need to be saved in order to migrate to a new versionof the fileset without losing user-configured data. To preserve user-configuration data, a Fileset.cfgfiles filemust be provided in the proper liblpp.a file (usr or root).
The Fileset.cfgfiles contains a one-line entry for each file to be saved. Each entry contains the file name(a path name relative to root), a white-space separator, and a keyword describing the handling method forthe migration of the file. The handling method keywords are:
preserve Replaces the installed new version of the file with the saved version from the savedirectory. After replacing the new file with the saved version, the saved file from theconfiguration save directory is deleted.
auto_merge During the Fileset.post_i processing, the product-provided executables merge necessarydata from the installed new version of the file into the previous version of the file saved inthe configuration save directory. After the Fileset.post_i processing, the installpcommand replaces the installed new version of the file with the merged version in theconfiguration save directory (if it exists) and then removes the saved file.
hold_new Replaces the installed new version of the file with the saved version from the savedirectory. The new version of the file is placed in the configuration save directory in placeof the old version. The user will be able to reference the new version.
user_merge Leaves the installed new version of the file on the system and keeps the old version ofthe file in the configuration save directory. The user will be able to reference the oldversion to perform any merge that may be necessary. This keyword should be avoided ifpossible.
other Used in any case where none of the other defined handling methods are sufficient. Theinstallp command saves the file in the configuration save directory and provides nofurther support. Any other manipulation and handling of the configuration file must bedone by the product-provided executables. The product developer has the responsibility ofdocumenting the handling of the file.
Chapter 22. Packaging Software for Installation 471

The Fileset.post_i executable can be used to do specific manipulating or merging of configuration datathat cannot be done through the default installation processing.
Configuration files listed in the Fileset.cfgfiles file are saved in the configuration save directory with thesame relative path name given in the Fileset.cfgfiles file. The name of the configuration save directory isstored in the MIGSAVE environment variable. The save directory corresponds to the part of the packagebeing installed. The following directories are the configuration save directories:
/usr/lpp/save.config For the usr part/lpp/save.config For the root part
If the list of files that you need to save varies depending on the currently installed level of the fileset, theFileset.cfgfiles file must contain the entire list of configuration files that might be found. If necessary, theFileset.post_i executable (or executables provided by other products) must handle the difference.
For example, assume you have a fileset (change.rte) that has one file that can be configured. So, in theroot change.rte.cfgfiles, there is one file listed:/etc/change_user user_merge
When migrating from your old fileset (change.obj) to change.rte, you cannot preserve this file becausethe format has changed. However, when migrating from an older level change.rte to a newer levelchange.rte, the file can be preserved. In this case, you might want to create a change.rte.post_i scriptthat checks to see what fileset you are migrating from and acts appropriately. This way, if a user had madechanges to the /etc/change_user file, they are saved.
The root change.bar.post_i script could be as follows:#! /bin/kshrc=0grep -q change.rte $INSTALLED_LISTif [$? = 0]thenmv $MIGSAVE/etc/change_user/ /etc/change_userrc=1fiexit $rc
$INSTALLED_LIST is created and exported by installp. See Installation for Control Files Specifically forRepackaged Products (“Installation Control Files Specifically for Repackaged Products” on page 476) formore information about theFileset.installed_list configuration file. The $MIGSAVE variable contains thename of the directory in which the root part configuration files are saved.
The installp command does not produce a warning or error message if a file listed in the Fileset.cfgfilesfile is not found. The installp command also does not produce a message for a file that is not foundduring the phase following Fileset.post_i processing when saved configuration files are processedaccording to their handling methods. If any warning or error messages are desired, the product-providedexecutables must generate the messages.
As an example of the Fileset.cfgfiles file, the Product_X.option1 fileset must recover user configurationdata from three configuration files located in the root part of the fileset. The Product_X.option1.cfgfilesis included in the root part of the liblpp.a file and contains the following:./etc/cfg_leafpreserve./etc/cfg_pudding hold_new./etc/cfg_newtonpreserve
472 AIX 5L Version 5.3 General Programming Concepts: Writing and Debugging Programs

The Fileset.fixdata File
Fileset.fixdata A stanza-format file that describes the fixes contained in the fileset update (or in afileset installation, if used in place of an update)
The information in this file is added to a fix database. The instfix command uses this database to identifyfixes installed on the system. If the Fileset.fixdata exists in a package, the fix information in the fixdatabase is updated when the package is applied.
Each fix in the fileset should have its own stanza in the Fileset.fixdata file. A Fileset.fixdata stanza hasthe following format:fix:name = FixKeywordabstract = Abstracttype = {f | p}filesets = FilesetName FilesetLevel[FilesetName FilesetLevel ...][symptom = [Symptom]]
v FixKeyword cannot exceed 16 characters.
v Abstract describes the fix and can not exceed 60 characters.
v In the type field, f represents a fix, and p represents a preventive maintenance update.
v The filesets field contains a new-line separated list of filesets and fileset levels.
v FilesetLevel is the initial level in which the fileset delivered all or part of the fix.
v Symptom is an optional description of the problem corrected by the fix. Symptom does not have acharacter limit.
The following example shows aFileset.fixdata stanza for problem MS21235. The fix for this problem iscontained in two filesets.fix:name = MS21235abstract = 82 gigabyte diskette drive unusable on Marstype = ffilesets = devices.mca.8d77.rte 12.3.6.13devices.mca.8efc.rte 12.1.0.2symptom = The 82 gigabyte subatomic diskettes fail to operate in a Martian environment.
The Fileset.inventory File
Fileset.inventory File that contains specific information about each file that is to be installed orupdated for the fileset
sysck Command that uses the Fileset.inventory file to enter the file name, productname, type, checksum, size, link, and symlink information into the softwareinformation database
The Fileset.inventory file is required for each part of a fileset that installs or update files. If the packagehas a root part that does not contain files to be installed (it does configuration only), the root part does notrequire the Fileset.inventory file.
Note: The Fileset.inventory file does not support files which are greater than 2 GB in size. If you ship afile that is greater than 2 GB, include it in your fileset.al file, but not in your Fileset.inventory file. sysckhas not been updated to handle files larger than 2GB, and the /usr file system on most machines will notbe created with capability for files greater than 2GB (by default).
Chapter 22. Packaging Software for Installation 473

The inventory file consists of ASCII text in stanza format. The name of a stanza is the full path name ofthe file to be installed. The stanza name ends with a colon (:) and is followed by a new-line character. Thefile attributes follow the stanza name and have the format Attribute=Value. Each attribute is described on aseparate line.
A Fileset.inventory stanza has the following format:inventory:type = typeclass = inventory,apply,C2_exclude,filesetowner = owner_namegroup = group_namemode = TCB | SUID | SGID,permissionstarget = fullpath_filenamelink = fullpath_to_hardlink [additional_hardlinks]size =<blank> | VOLATILE |sizechecksum =<blank> | VOLATILE |"checksum"
The following list describes the valid attributes of a file:
file_name The full path to the file or link relative to root (./) followed immediately by a colon (:) and then a newline. The maximum length for this full pathname is 255 characters.
type Type of the file_name entry where a valid type is one of the following:
Keywords Meaning
FILE Standard file
DIRECTORY Directory
SYMLINK The fullpath to a symbolic linkclass Specifies how the file_name is to be referenced during installation. This field must have at least two
of the following keywords:
Type Items Meaning
inventory Indicates that the file remains after the installation is complete.The file is added to the inventory SWVPD database. This shouldnot be used with an A type file in the fileset.il file.
apply Indicates that the file is to be restored from the install media.The file_name field is listed in the apply list (fileset.al). Thisshould not be used for an I type file in the fileset.il file.
C2_exclude Indicates that this file should be excluded from execution on aC2 Secure system. If this flag is used, the file should also belisted in the fileset.tcb file.
owner Specifies the file owner after installation. Do not use the uid for this field. The attribute value mustbe the owner name and must be no more than 8 characters.
group Specifies the file group. Do not use the gid for this field. The attribute value must be the groupname and must be no more than 8 characters.
474 AIX 5L Version 5.3 General Programming Concepts: Writing and Debugging Programs

mode Specifies the file mode. The value must contain the permissions of the file in octal format. Any of thefollowing keywords can precede the permissions value. Items in the list are separated by commas.
Mode Items Meaning
TCB Part of the ″Trusted Computing Base″. If the file is SUID root orSGID system, then the file must be TCB.
SUID This file has the set user ID bit set. This has no meaning on aDIRECTORY entry.
SGID This file has the set group ID bit set. If set on a DIRECTORYentry, this forces all files created in that directory to have thesame group as the directory.
permissions Must be a three-digit octal number, for example, 644.Note: If the type is SYMLINK, the mode must be 777. No otherentries are valid.
link Lists any hard links to this file. If multiple hard links exist, each fullpath to a hard link is separated bya comma. The hardlinks must reside in the same directory as the source file. If the type of the entryis SYMLINK, link is not valid. The maximum length of the full path name is 255 characters.
target Valid only for type=SYMLINK. This is the full path filename to the target of the link. If the link beingcreated is from /usr/bin to /bin, the filename would be /bin and the target would be /usr/bin. Themaximum length of the full path name is 255 characters.
sizeMode Items Meaning
blank If this field is blank, the size of the filename is determined at thetime of installation. The drawback to using this option is that if afile was corrupted during installation, the customer is notinformed.
VOLATILE If the file size is expected to change through normal operation,the value for this attribute must be VOLATILE.
size The exact size of the file.
Note: Do not include the size field for DIRECTORY or SYMLINK entries.checksum
Mode Items Meaning
blank If this field is blank, the value returned from the sum -rcommand to be placed in the inventory SWVPD database whenthe file is installed.
VOLATILE Specifies the size of the file in blocks. If the file size is expectedto change through normal operation, the value for this attributemust be VOLATILE.
checksum The exact sum of the file as returned by the sum -r command.This should be placed in double quotes.
Note: Do not include the checksum field for DIRECTORY or SYMLINK entries.fileset Indicates the fileset to which the file belongs.
Note: The sysck command creates hard links and symbolic links during installation if those links do notexist. The root part symbolic links should be packaged in the root part Fileset.inventory file.
fileset.inventory ExampleThe following fileset.inventory example demonstrates the use of type./usr/bin:
owner = bingroup = binmode = 755
Chapter 22. Packaging Software for Installation 475

type = directoryclass = apply,inventory,bos.rte
/usr/bin/tcbck:owner = rootgroup = securitymode = TCB,SUID,550type = fileclass = apply,inventory,bos.rte.securitysize = 99770checksum = "17077 98 "
/usr/sbin/tsm:owner = rootgroup = securitymode = TCB,SUID,555links = /usr/sbin/getty,/usr/sbin/loginclass = apply,inventory,bos.rte,securitysize = 55086checksum = "57960 54 "
Installation Control Files Specifically for Repackaged Products
The Fileset.installed_list File
Fileset.installed_list File created by the installp command when installing thefileset from a package if it is found that the fileset (orsome form of it) is already installed on the system atsome level
The software information database is searched to determine if either Fileset or any filesets listed in the fileFileset.namelist (if it exists) are already installed on the system. If so, the fileset and the installation levelare written to the Fileset.installed_list file.
If it is created, the Fileset.installed_list is available at the time of the calls to the rminstal and instalexecutables. The Fileset.installed_list file can be located in the following directories, the packagingworking directories, or PackageWorkDirectory:
/usr/lpp/ PackageName for the usr part/lpp/ PackageName for the root part
The Fileset.installed_list file contains a one-line entry for each fileset that was installed. Each entrycontains the fileset name and the fileset level.
As an example, assume that while the storm.rain 1.2.0.0 fileset is being installed, the installp commanddiscovers that storm.rain 1.1.0.0 is already installed. The installp command would then create thePackageWorkDirectory/storm.rain.installed_list file with the following contents:storm.rain 1.1.0.0
As another example, asume the Baytown.com fileset contains a Baytown.com.namelist file with thefollowing entries:Pelly.comGooseCreek.rteCedarBayou.stream
476 AIX 5L Version 5.3 General Programming Concepts: Writing and Debugging Programs

While installing the Baytown.com 2.3.0.0 fileset, the installp command finds that Pelly.com 1.2.3.0 andCedarBayou.stream 4.1.3.2 are installed. The installp command creates the PackageWorkDirectory/Baytown.com.installed_list file with the following contents:Pelly.obj 1.2.3.0CedarBayou.stream 4.1.3.2
The Fileset.namelist File
Fileset.namelist This file is necessary when the fileset name has changed or the fileset containsfiles previously packaged in obsolete filesets. It contains names of all filesets thatpreviously contained files currently included in the fileset to be installed. Eachfileset name must appear on a separate line.
The Fileset.namelist file must be provided in the usr or root part of theliblpp.a file. The Fileset.namelistfile is only valid for installation packages; it is not valid for update packages.
At the beginning of installation, the installp command searches the Software Vital Product Data (SWVPD)to determine if the fileset or any fileset listed in the Fileset.namelist file is already installed on the system.The installp command writes to the Fileset.installed_list file the fileset names and fileset levels that arefound installed, making this information available to product-provided executables.
As a simple example of a Fileset.namelist file, assume the small.business fileset replaces an earlierfileset named family.business. The small.business product package contains thesmall.business.namelist file in its usr part liblpp.a file. The small.business.namelist file contains thefollowing entry:family.business
As a more complex example of a Fileset.namelist file would be where a fileset is divided into a clientfileset and a server fileset. The LawPractice.client and LawPractice.server filesets replace the earlierlawoffice.mgr fileset. The LawPractice.server fileset also contains a few files from the obsoleteBusinessOffice.mgr fileset. TheLawPractice.client.namelist file in the liblpp.a file for the LawPracticepackage contains the following entry:lawoffice.mgr
The LawPractice.server.namelist file in the liblpp.a file for the LawPractice package contains thefollowing entries:lawoffice.mgrBusinessOffice.mgr
If the Fileset.namelist file contains only one entry and the current fileset is not a direct replacement for thefileset listed in the Fileset.namelist file, you must include a Fileset.rm_inv file in the liblpp.a file. Theinstallation process uses the Fileset.namelist file and the Fileset.rm_inv file to determine if a fileset is adirect replacement for another fileset. If the Fileset.namelist file contains only one entry and there is noFileset.rm_inv file, the installation process assumes the new fileset is a direct replacement for the oldfileset. When the new (replacement) fileset is installed, the installation process removes from the systemall files from the old (replaced) fileset, even files not included in the new fileset.
In the previous examples, the small.business fileset is a direct replacement for the family.businessfileset, so a small.business.rm_inv file should not exist. The LawPractice.client fileset is not a directreplacement for the lawoffice.mgr fileset, so a LawPractice.client.rm_inv file must exist, even if it isempty.
Example 3:
Chapter 22. Packaging Software for Installation 477

Filesets bagel.shop.rte and bread.shop.rte have been shipping separately for years. Now,bagel.shop.rte is going to ship as a part of bread.shop.rte. For this to happen, thebread.shop.rte.namelist file would look like:bread.shop.rtebagel.shop.rte
You must also ship an empty bread.shop.rte.rm_inv file to indicate that all files from the bagel.shop.rtefileset should be removed from the system.
The Fileset.rm_inv File
Fileset.rm_inv File that contains a list of files, links, and directories to be removed from the system ifthey are found installed
This file is used when the current fileset is packaged differently from a previous level of the fileset and theinstallation process should not remove previously installed files based on the fileset’s entries in theinventory database.
A simple name change for a fileset is not sufficient to require a Fileset.rm_inv file. The Fileset.rm_inv fileis necessary when a new fileset is either a subset of a previous fileset or a mixture of parts of previousfilesets. If a Fileset.namelist file exists and contains entries for more than one fileset, you must use theFileset.rm_inv file to remove previously installed levels of the files from the system.
The Fileset.rm_inv file consists of ASCII text in stanza format. The name of a stanza is the full path nameof the file or directory to be removed if found on the system. The stanza name ends with a colon (:) and isfollowed by a new-line character. If attributes follow the stanza name, the attributes have the formatAttribute=Value. Attributes are used to identify hard links and symbolic links that need to be removed. Eachattribute is described on a separate line. The following list describes the valid attributes associated with thelisted file:
links One or more hard links to the file. The full path names of the links are delimited by commas.symlinks One or more symbolic links to the file. The full path names of the links are delimited by
commas.
Note: Links need to be listed twice, once as a standalone stanza and once as an attribute to the file thatis linked to.
For example, assume the U.S.S.R 19.91.0.0 fileset contains the following files in the /usr/lib directory:moscow, leningrad, kiev, odessa, and petrograd (a symbolic link to leningrad). The product developersdecide to split the U.S.S.R 19.91.0.0 fileset into two filesets: Ukraine.lib 19.94.0.0 and Russia.lib19.94.0.0. The Ukraine.lib fileset contains the kiev and odessa files. TheRussia.lib fileset contains themoscow file. The leningrad file no longer exists and is replaced by the st.petersburg file in the Russia.libfileset.
The Ukraine.lib.rm_inv file must exist because the Ukraine.lib fileset is not a direct replacement for theU.S.S.R fileset. The Ukraine.lib.rm_inv file should be empty because no files need to be removed whenthe Ukraine.lib fileset is installed to clean up the migrating U.S.S.R fileset.
The Russia.lib.rm_inv file must exist because the Russia.lib fileset is not a direct replacement for theU.S.S.R fileset. If the Russia.lib.rm_inv file is used to remove the leningrad file when the Russia.libfileset is installed, the Russia.lib.rm_inv file would contain the following stanza:/usr/lib/leningrad:symlinks = /usr/lib/petrograd
/usr/lib/petrograd:
478 AIX 5L Version 5.3 General Programming Concepts: Writing and Debugging Programs

Installation Files for Supplemental Disk SubsystemsA disk subsystem that will not configure with the provided SCSI or bus-attached device driver requires itsown device driver and configuration methods. These installation files are provided on a supplementaldiskette (which accompanies the device) and must be in backup format with a ./signature file and a./startup file. The signature file must contain the string target. The startup file must use restore by nameto extract the needed files from the supplemental diskette and to run the commands necessary to bring thedevice to the available state.
Format of Distribution MediaThe following types of media can be used to distribute software product installation packages.
v “Tape”
v “CD-ROM”
v “Diskette” on page 480
The following sections describe the formats that must be used to distribute multiple product packages oneach of these media.
TapeIn order to stack multiple product package images onto either a single tape or a set of tapes, the files oneach tape in the set must conform to the following format:
v File 1 is empty. (Reserved for bootable tapes.)
v File 2 is empty. (Reserved for bootable tapes.)
v File 3 contains a table of contents file that describes product package images on the set of tapes.Therefore, each tape in the set contains a copy of the same table of contents file, except for thedifference of the tape volume number in a multi-volume set. See “The Table of Contents File” on page481 for more information.
v Files 4 through (N+3) contain the backup-format file images for product packages 1 through N.
v A product package image file cannot span across two tapes.
v Each file is followed by an end-of-file tape mark.
CD-ROMA CD-ROM that is to contain multiple product package images must be compliant with the Rock RidgeGroup Protocol. Product packages should be stored in the installation directory, which must contain thefollowing:
v The backup-format file images of the product packages.
v A table of contents file named .toc that describes the product package images in the directory. See“The Table of Contents File” on page 481 for more information.
A multiple volume CD-ROM is a CD-ROM that has an additional directory structure to define a set ofCD-ROMs as a single installable unit.
A multiple volume CD-ROM must conform to the following rules:
v A /installp/mvCD directory exists with the following contents:
1. A table of contents file (.toc) that describes the product package images on all of the CD-ROMs ofthe set. Each volume of the CD-ROM must have the same .toc in /installp/mvCD.
2. An ASCII file named volume_id in which the first line consists of the decimal volume number of theCD in the set1.
Chapter 22. Packaging Software for Installation 479

3. A symbolic link named vol% n, where n is the decimal volume number of the of the CD in the set.The target of the symbolic link must be a relative path to the directory of product packages on thatparticular volume of the CD. The standard value for the symbol link is ../ppc.
v The table of contents file (.toc) in the /installp/mvCD conforms to the standard table of contents format.The special characteristic of the multiple volume .toc is that the location of each product package imagebegins with the directory entry vol% n, where n indicates the volume which contains that particularproduct package.
AIX 5.2 Example:
fileset A is in file A.bff on volume 1. fileset B is in file B.bff on volume 2. The field in the table of contentsfile in /installp/mvCD containing the location of the product package images for A and B are vol%1/A.bffand vol%2/B.bff, respectively. The field in the table of contents file in /installp/ppc of volume 1 containsthe location of A as A.bff. The field in the table of contents file in /installp/ppc of volume 2 contains thelocation of B as B.bff.
The CD-ROM directory structure for AIX 5.1 and later allows for specification of other installers, as well asmultiple platforms.
DisketteIn order to stack multiple product package images onto a set of diskettes, the following files must bewritten to the set of diskettes:
v A table of contents file that describes product package images to be included in the set. See “The Tableof Contents File” on page 481 for more information.
v Each product package image file that is to be included in the set.
The files are written to the set of diskettes using the following rules:
v Write the data as a stream to the diskette set with a volume ID sector inserted in block 0 of eachdiskette in the set. The data from the last block of one volume is treated as logically adjacent to thedata from block 1 of the next volume (the volume ID sector is verified and discarded when read).
v Each file begins on a 512-byte block boundary.
v Write the table of contents file first. Pad this file to fill its last sector with null characters (x’00’). At leastone null character is required to mark the end of the table of contents file. Thus, a full sector of nullcharacters may be required.
v Following the table of contents file, write each of the product package image files to successive sectors.Pad each file to fill its last sector using null characters. A null character is not required if the file ends onthe block boundary.
v Block 0 of each diskette in the set contains a volume ID sector. The format of this sector is:
Bytes 0:3 A magic number for identification. This is a binary integer with a value of decimal3609823513=x’D7298918’.
Bytes 4:15 A date and time stamp (in ASCII) that serves as the identification for the set of diskettes.The format is MonthDayHourMinuteSecondYear. The Hour should be a value from 00 to23. All date and time fields contain two digits. Thus, Month should be represented as 03instead of 3, and Year should be represented as 94 instead of 1994.
Bytes 16:19 A binary integer volume number within this set of diskettes. The first diskette in the set isx’00000001’.
Bytes 20:511 Binary zeroes.
480 AIX 5L Version 5.3 General Programming Concepts: Writing and Debugging Programs

The Table of Contents FileThe following table describes the table of contents file. Note that some fields are different for the differenttypes of media.
The Table of Contents File
Field Name Format Separator Description
1. Volume Character White space For the tape and diskette table of contents file, this is thenumber of the volume containing this data. For the fixeddisk or CD-ROM table of contents file, the volume numberis 0.
2. Date and timestamp
mmddhhMMssyy White space For tape or diskette, this is the time stamp when volume 1was created. For fixed disk or CD-ROM, this is the timestamp when the .toc file was created. See Date and TimeStamp Format later in this article for detailed description.
3. Header format Character New line A number indicating the format of the table of contents file.Valid entries are:
v 1 -AIX Version 3.1
v 2 -Version 3.2
v 3 -AIX Version 4.1 or later
v B -mksysb tape (invalid for use by installp)
4. Location ofproduct packageimage
Character White space For tape or diskette, this is a character string in the form:vvv:bbbbb:sssssssSee Location Format for Tape andDiskette later in this article for detailed description. Forfixed disk or CD-ROM, this is the file name of the productpackage image file. Note that this is the file name only andmust not be preceded by any part of the path name.
5. Package specificinformation
lpp_name fileformat
New line The contents of the lpp_name file contained in thisproduct package image. See The lpp_name PackageInformation File for detailed description.
Note: Items 4 and 5 described in the preceding table are repeated for each product package imagecontained on the media.
Date and Time Stamp FormatA date and time stamp format is an ASCII string that has the following format:
MonthDayHourMinuteSecondYear
The Hour should be a value from 00 to 23. All date and time fields contain two digits. Thus, Month shouldbe represented as 03 instead of 3, and Year should be represented as 94 instead of 1994.
Location Format for Tape and DisketteThe location has the format of vvv:bbbbb:sssssss where each letter represents a digit and has thefollowing meaning:
For tape
vvv is the volume number of the tape.
bbbbb is the file number on the tape of the product package image.
ssssssssis the size of the file in bytes.
Chapter 22. Packaging Software for Installation 481

For diskette
vvv is the volume number of the diskette.
bbbbb is the block number on diskette where the product package image file begins.
ssssssssis the size of the file in bytes (including padding to the end of the block boundary).
The installp Processing of Product PackagesThe major actions that can be taken with the installp command are:
Apply When a fileset in a product installation package is applied, it is installed on the system and itoverwrites any preexisting version of that fileset, therefore committing that version of thefileset on the system. The fileset may be removed if the user decides the fileset is no longerrequired.
When a fileset update is applied, the update is installed and information is saved (unlessotherwise requested) so that the update can be removed later. Fileset updates that wereapplied can be committed or rejected later.
Commit When a fileset update is committed, the information saved during the apply is removed fromthe system. Committing already applied software does not change the currently active versionof a fileset.
Reject When an update is rejected, information saved during the apply is used to change the activeversion of the fileset to the version previous to the rejected update. The saved information isthen removed from the system. The reject operation is valid only for updates. Many of thesame steps in the reject operation are performed in a cleanup operation when a fileset orfileset update fails to complete installation.
Remove When a fileset is removed, the fileset and its updates are removed from the systemindependent of their state (applied, committed, or broken). The remove operation is valid onlyfor the installation level of a fileset.
Executables provided within a product package can tailor processing for the apply, reject, and removeoperations.
Reinstalling a fileset does not perform the same actions that removing and installing the same fileset do.The reinstall action (see /usr/lib/instl/rminstal) cleans up the current files from the previous or the sameversion, but does not run any of the unconfig or unpre* scripts. Therefore, do not assume that theunconfig script was run. The .config script should check the environment before assuming that theunconfig was completed.
For example, for a ras.berry.rte fileset, the config script adds a line to root’s crontab file. Reinstalling theras.berry.rte fileset results in two crontab entries, because the unconfig script was not run on reinstall(which removed the crontab entry). The config script should always remove the entry and then add itagain.
Processing for the Apply OperationThis section describes the steps taken by the installp command when a fileset or fileset update is applied.
1. Restore the lpp_name product package information file for the package from the specified device.
2. Verify that the requested filesets exist on the installation media.
3. Check the level of the requested filesets to ensure that they may be installed on the system.
4. Restore control files from the liblpp.a archive library file into the package directory(/usr/lpp/Package_Name for usr or usr/root packages. The control files specifically for the rootportion of a usr/root package reside in /usr/lpp/Package_Name/inst_root/liblpp.a).
5. Check disk space requirements.
482 AIX 5L Version 5.3 General Programming Concepts: Writing and Debugging Programs

6. Check that necessary requisites (filesets required to be at certain levels to use or install another fileset)are already installed or are on the list to be installed.
7. Determine if there are license agreement requirements which must be satisfied in order to proceedwith the installation.
8. If this is an installation package rather than a fileset update package, search the software vital productdata (SWVPD) to see if Fileset (the fileset being installed) or any filesets listed in the Fileset.namelistfile are already installed on the system at any level. If Fileset is already installed, write the fileset nameand installed level to the Work_Directory/Fileset.installed_list file.
If no level of Fileset is installed, then if any filesets listed in the Fileset.namelist file are installed, list allthose filesets and levels in theWork_Directory/Fileset.installed_list file. Work_Directory is the same asthe package directory with the exception of root parts, which use/lpp/Package_Name.
9. If this is an installation package rather than a fileset update package, run the /usr/lib/instl/rminstalscript to do the following for each fileset being installed.
Note: Unless otherwise specified, files checked for existence must have been restored from theliblpp.a control file library.
a. If Fileset.pre_rm exists, run Fileset.pre_rm to perform required steps before removing any filesfrom this version or an existing version of Fileset.
b. If Work_Directory/Fileset.installed_list exists, move the existing files listed in Fileset.cfgfiles tothe configuration file save directory (indicated by the MIGSAVE environment variable).
c. If a version of Fileset is already installed, remove the files and SWVPD information (except history)for Fileset.
d. If Work_Directory/Fileset.installed_list exists, and Fileset.rm_inv exists or Fileset.namelistcontains more than one fileset or the only fileset listed in Fileset.namelist is bos.obj, then do thefollowing:
1) Remove files and SWVPD inventory information for files listed in the file Fileset.rm_inv.
2) Remove files and SWVPD inventory information for files listed in the file Fileset.inventory.
3) Remove other SWVPD information for any filesets listed in Fileset.namelist which no longerhave any SWVPD inventory information.
e. If Work_Directory/Fileset.installed_list exists and contains only one fileset and Fileset.namelistcontained only one fileset, Remove files and SWVPD information (except history) for that fileset.
f. For each part of a product package (usr part only or usr followed by root)
1) Set INUTREE (U for usr and M for root) and INUTEMPDIR (name of created temporaryworking directory environment variables.
2) If an instal control program exists in the package directory (not recommended), run ./instal,otherwise, run the default script /usr/lib/instl/instal. If an instal control program does not existin the package directory, set INUSAVEDIR environment variable.
3) If an update control program exists in the package directory (not recommended), run ./update.If an update control program does not exist in the package directory, run the default script/usr/lib/instl/update.
4) If a status file has been successfully created by instal or update, Use status file to determinethe success or failure of each fileset. If a status file has not been created, assume allrequested filesets in package failed to apply.
5) If the apply operation for a fileset was successful, update the Software Vital Product Data(SWVPD), then register any associated license agreement requirements. If the apply operationfor a fileset was not successful, run /usr/lib/instl/cleanup or the package-supplied lpp.cleanupfrom package directory to clean up the failed filesets.
Processing of the Default install or update ScriptThe instal or update executable is invoked from installp with the first parameter being the device beingused for the installation or update. The second parameter is the full path name to the file containing the listof filesets to be installed or updated, referred to below as $FILESETLIST. The default instal and update
Chapter 22. Packaging Software for Installation 483
scripts are linked together; processing varies based on whether it is invoked as instal or update.Thecurrent directory is the package directory. A temporary directory INUTEMPDIR is created in /tmp to holdworking files. The referenced files are described in “Further Description of Installation Control Files” onpage 471.
The flow within the default instal and update script is as follows:
1. Do the following for each fileset listed in the $FILESETLIST:
a. If the fileset is an update, Execute Fileset.pre_u (pre_update) if it exists. If the fileset is not anupdate, execute Fileset.pre_i (pre_installation) if it exists.
b. Build a master list of files to be restored from the package by appending Fileset.al to the new fileINUTEMPDIR/master.al.
c. If this is an update, the files are specified to be saved, and the lpp.acf archive control file exists.
Save off the library archive members being updated.
d. If the processing is successful, append this fileset to the list to be installed in the$FILESETLIST.new file.
2. If this is an update and file saving is specified, run inusave to save current versions of the files.
3. If you are processing the root part, run inucp to copy files from the apply list to root part. If you are notprocessing root part, run inurest to restore files from apply list for the usr part.
4. Do the following for each fileset listed in $FILESETLIST.new file:
Note: Failure in any step is recorded in the status file and processing for that fileset ends
a. Determine if this fileset is installed at the same or older level, or if filesets listed in theFileset.namelist are installed. If so, export the INSTALLED_LIST and MIGSAVE environmentvariables. This is called a migration.
b. If you are processing an update, invoke Fileset.post_u if it exists. If Fileset.post_u does not exist,invoke Fileset.post_i if it exists.
c. If Fileset.cfgfiles exists, run /usr/lib/instl/migrate_cfg to handle processing of configuration filesaccording to their specified handling method.
d. Invoke sysck to add the information in the Fileset.inventory file to the Software Vital ProductDatabase (SWVPD).
e. Invoke the tcbck command to add the trusted computing base information to the system if theFileset.tcb file exists and the trusted computing base tcb_enabled attribute is set in the/usr/lib/objrepos/PdAt ODM database.
f. Invoke errupdate to add error templates if Fileset.err exists.
g. Invoke trcupdate to add trace report format templates if Fileset.trc exists.
h. If update or if Work_Directory/Fileset.installed_list exists, invoke each Fileset.odmdel andFileset.*.odmdel script to process ODM database deletion commands.
i. Invoke odmadd on each existing Fileset.odmadd and Fileset.*.odmadd to add information to ODMdatabases.
j. If this is an update, invoke Fileset.config_u (fileset configuration update) if it exists. Otherwise,invoke Fileset.config (fileset configuration) if it exists.
k. Update the status file indicating successful processing for the fileset.
5. Link control files for needed for fileset removal into the package’s deinstl directory for future use.These files include the following files that might be present in the package directory:
v lpp.deinstal
v Fileset. al
v Fileset. inventory
v Fileset. pre_d
v Fileset. unpre_i
484 AIX 5L Version 5.3 General Programming Concepts: Writing and Debugging Programs

v Fileset. unpre_u
v Fileset. unpost_i
v Fileset. unpost_u
v Fileset. unodmadd
v Fileset. unconfig
v Fileset. unconfig_u
v $SAVEDIR/Fileset. *.rodmadd
v SAVEDIR/Fileset. *.unodmadd
Processing for the Reject and Cleanup OperationsThis section describes the steps taken by the installp command when a fileset update is rejected or whena fileset or fileset update fails to complete installation. The default cleanup and reject scripts located in/usr/lib/instl are linked together. Their logic differs slightly depending on whether the script was invokedas reject or cleanup. For usr/root filesets or fileset updates, the root part is processed before the usrpart.
1. If rejecting, check requisites to ensure that all dependent product updates are also rejected.
2. For each part of a package (for example, usr and root):
a. Set INUTREE (U for usr and M for root.) and INUTEMPDIR environment variables.
b. If reject control file exists in current directory (INULIBDIR), invoke ./lpp.reject. Otherwise, invokethe default script /usr/lib/instl/reject.
3. Update the Software Vital Product Data.
The reject executable is invoked from installp with the first parameter being undefined and the secondparameter being the full path name to the file containing the list of filesets (referred to below as$FILESETLIST) to be rejected for the update.
The following files are referenced by the default cleanup and reject script. They are described in detail in“Further Description of Installation Control Files” on page 471.
The flow within the default cleanup and reject script is as follows:
1. Do the following for each fileset listed in $FILESETLIST:
a. If invoked as cleanup, then read the line in the Package_Name.s status file to determine whichstep the installation failed on and skip ahead to the undo action for that step. A cleanup operationwill only begin at the step where the installation failed. For example, if the installation of a filesetfailed in the Fileset.post_i script, then the cleanup operation for that fileset would begin at 1i onpage 486, because there are no actions to undo from subsequent steps in the installation.
b. Undo any configuration processing performed during the installation:
If rejecting an update, invoke Fileset.unconfig_u if it exists. Otherwise, invoke Fileset.unconfig if itexists.
c. Run any Fileset.*.unodmaddand/or Fileset.unodmadd files to remove Object Data Manager(ODM) entries added during the installation.
d. Run any Fileset.*.rodmadd and/or Fileset.rodmadd exist to replace ODM entries deleted duringthe installation.
e. Invoketrcupdate if Fileset.undo.trc exists to undo any trace format template changes made duringthe installation.
f. Invoke errupdate if Fileset.undo.err exists to undo any error format template changes made duringthe installation.
g. Invoke tcbck to delete the trusted computing base information to the system if the Fileset.tcb fileexists and the trusted computing base attribute tcb_enabled is set in the /usr/lib/objrepos/PdAtODM database.
Chapter 22. Packaging Software for Installation 485
h. Invoke sysck if Fileset.inventory exists to undo changes to the software information database.
i. Undo any post_installation processing performed during the installation:
If this is an update, invoke Fileset.unpost_u if it exists. Otherwise, invoke Fileset.unpost_i if itexists.
j. Build a master apply list (called master.al) from Fileset.al files.
k. Add Fileset to $FILESETLIST.new.
2. Do the following if $INUTEMPDIR/master.al exists.
a. Change directories to / (root).
b. Remove all files in master.al.
3. Do the following while reading $FILESETLIST.new.
a. Call inurecv to recover all saved files.
b. If this is an update, invoke Fileset.unpre_u if it exists. Otherwise, invoke Fileset.unpre_i if it exists.
c. Delete the install/update control files.
4. Remove the Package_Name.s status file.
Processing for the Remove OperationThis section describes the steps taken by the installp command when a fileset is removed. For usr/rootfilesets or fileset updates, the root part is processed before the usr part.
1. Check requisites to ensure that all dependent filesets are also removed.
2. For each part of a product package (for example, usr or root):
a. Set INUTREE (U for usr, M for root, and S for share) and INUTEMPDIR (installp workingdirectory generated in /tmp) environment variables.
b. Change directory to INULIBDIR.
c. If the deinstal control file exists in current directory, run the ./lpp.deinstalscript. If the deinstalcontrol file does not exist in current directory, run the /usr/lib/instl/deinstal default script.
3. Remove files belonging to the fileset from the file system.
4. Remove fileset entries from the SWVPD except for history data.
5. Deactivate license agreement requirement registration for the fileset.
The deinstal executable is invoked from installp with the first parameter being the full path name to thefile containing the list of filesets to be removed, referred to below as $FILESETLIST.
The flow within the default deinstal script is as follows:
1. Do the following for each fileset listed in input file $FILESETLIST:
2. If Fileset.unconfig_d exists
Execute Fileset.unconfig_d to remove all configuration changes, Object Data Manager (ODM)changes, and error and trace format changes, and to undo all operations performed in thepost-installation and pre-installation scripts for all updates and the base level installation. Use of thisfile is not recommended.
3. If Fileset.unconfig_d does not exist,
a. For each update for that fileset, do the following:
v Run all Fileset.unconfig_u scripts to undo any update configuration processing.
v Run all Fileset.*.unodmadd and Fileset.unodmadd to delete Object Data Manager (ODM)entries added during the update.
v Run all Fileset.*.rodmadd and Fileset.rodmadd to add Object Data Manager (ODM) entriesdeleted during the update.
v Run errupdate if Fileset.undo.err exists to undo error log template changes.
v Run trcupdate if Fileset.undo.trc exists to undo trace report template changes.
486 AIX 5L Version 5.3 General Programming Concepts: Writing and Debugging Programs

v Run any Fileset.unpost_u to undo any post-installation customization.
b. For the fileset base installation level, do the following:
v Run any Fileset.*.unodmaddand/or Fileset.unodmadd to delete Object Data Manager (ODM)entries added during the installation.
v Run any Fileset.*.rodmadd and/or Fileset.rodmadd to add Object Data Manager (ODM) entriesdeleted during the installation.
v Run errupdate if Fileset.undo.err exists to undo error log template changes.
v Run trcupdate if Fileset.undo.trc exists to undo trace report template changes.
v Run Fileset.unconfig_i to undo any installation configuration processing.
v Run Fileset.unpost_i to undo any post-file installation customization.
4. Remove the files and software data information installed with the fileset.
5. If Fileset.unconfig_d does not exist,
a. For each update for that fileset, run any Fileset.unpre_u to undo any pre-file installationcustomization.
b. For the fileset base installation level, run any Fileset.unpre_i to undo any pre-file installationcustomization.
6. Delete any empty directories associated with the fileset.
Note: If an error is returned from some call during the execution of the deinstal executable, the errorwill be logged, but execution will continue. This is different from the other scripts becauseexecution for that fileset is normally canceled once an error is encountered. However, once theremoval of a fileset has begun, there is no recovery; therefore, removal becomes a best effortonce an error is found.
The Installation Status File
$INUTEMPDIR/status File that contains a one-line entry for each fileset that was to be installedor updated
The installp command uses this status file to determine appropriate processing. If you create installationscripts, your scripts should produce a status file that has the correct format. Each line in the status filehas the format:StatusCode Fileset
The following list describes the valid StatusCode values:
Status Code Meanings Success, update SWVPDf Failure, perform cleanup procedureb Bypass, failed, cleanup not neededi Requisite failure, cleanup not neededv sysck verification failed
The following example of a status file indicates to the installp command that the installations for thetcp.client and tcp.server filesets of bos.net package were successful and the installation for thenfs.client fileset was not successful.s bos.net.tcp.clients bos.net.tcp.serverf bos.net.nfs.client
Chapter 22. Packaging Software for Installation 487

Installation Commands Used During Installation and UpdateProcessing
inucp Copies files from the /usr/lpp/Package_Name/inst_root directory to the / (root) file tree wheninstalling the root part.
inulag Acts as the front end to the subroutines to manage license agreements.inurecv Recovers saved files for installation failure or software rejection (installp -r).inurest Restores files from the distribution medium onto the system using an apply list as input.inusave Saves all files specified by an apply list into the save directory belonging to the software product.inuumsg Issues messages from the inuumsg.cat message catalog file for the software product being
installed.ckprereq Verifies compatibility of the software product with any dependencies using requisite information
supplied in the lpp_name file and information about already installed products found in theSWVPD.
sysck Checks the inventory information during installation and update procedures.
The sysck command is in the /usr/bin directory. Other commands listed previously are in the/usr/sbin directory.
For examples of their use, refer to the default installation script, /usr/lib/instl/instal.
488 AIX 5L Version 5.3 General Programming Concepts: Writing and Debugging Programs

Chapter 23. Source Code Control System (SCCS)
The Source Code Control System (SCCS) is a complete system of commands that allows specified usersto control and track changes made to an SCCS file. SCCS files allow several versions of the same file toexist simultaneously, which can be helpful when developing a project requiring many versions of largefiles. The SCCS commands support Multibyte Character Set (MBCS) characters.
Introduction to SCCSThe SCCS commands form a complete system for creating, editing, converting, or changing the controlson SCCS files. An SCCS file is any text file controlled with SCCS commands. All SCCS files have theprefix s., which sets them apart from regular text files.
Attention: Using non-SCCS commands to edit SCCS files can damage the SCCS files.
Use SCCS commands on an SCCS file. If you wish to look at the structure of an SCCS file, use the pgcommand or a similar command to view its contents. However, do not use an editor to directly change thefile.
To change text in an SCCS file, use an SCCS command (such as the get command) to obtain a version ofthe file for editing, and then use any editor to modify the text. After changing the file, use the deltacommand to save the changes. To store the separate versions of a file, and control access to its contents,SCCS files have a unique structure.
An SCCS file is made up of three parts:
v Delta table
v Access and tracking flags
v Body of the text
Delta Table in SCCS filesInstead of creating a separate file for each version of a file, the SCCS file system only stores the changesfor each version of a file. These changes are referred to as deltas. The changes are tracked by the deltatable in every SCCS file.
Each entry in the delta table contains information about who created the delta, when they created it, andwhy they created it. Each delta has a specific SID (SCCS IDentification number) of up to four digits. Thefirst digit is the release, the second digit the level, the third digit the branch, and the fourth digit thesequence.
An example of an SID number is:SID = 1.2.1.4
that is, release 1, level 2, branch 1, sequence 4.
No SID digit can be 0, so there cannot be an SID of 2.0 or 2.1.2.0, for example.
Each time a new delta is created, it is given the next higher SID number by default. That version of the fileis built using all the previous deltas. Typically, an SCCS file grows sequentially, so each delta is identifiedonly by its release and level. However, a file may branch and create a new subset of deltas. The file thenhas a trunk, with deltas identified by release and level, and one or more branches, which have deltascontaining all four parts of an SID. On a branch, the release and level numbers are fixed, and new deltasare identified by changing sequence numbers.
© Copyright IBM Corp. 1997, 2010 489

Note: A file version built from a branch does not use any deltas placed on the trunk after the point ofseparation.
Control and Tracking Flags in SCCS FilesAfter the delta table in an SCCS file, a list of flags starting with the @ (at sign) define the various accessand tracking options of the SCCS file. Some of the SCCS flag functions include:
v Designating users who may edit the files
v Locking certain releases of a file from editing
v Allowing joint editing of the file
v Cross-referencing changes to a file
Body of an SCCS fileThe SCCS file body contains the text for all the different versions of the file. Consequently, the body of thefile does not look like a standard text file. Control characters bracket each portion of the text and specifywhich delta created or deleted it. When the SCCS system builds a specific version of a file, the controlcharacters indicate the portions of text that correspond to each delta. The selected pieces of text are thenused to build that specific version.
SCCS Flag and Parameter Conventions
In most cases, SCCS commands accept two types of parameters:
flags Flags consist of a - (minus sign), followed by a lowercase character, which issometimes followed by a value. Flags control how the command operates.
File or Directory These parameters specify the file or files with which the command operates. Usinga directory name as an argument specifies all SCCS files in that directory.
File or directory names cannot begin with a - (minus sign). If you specify this sign by itself, the commandreads standard input or keyboard input until it reaches an end-of-file character. This is useful when usingpipes that allow processes to communicate.
Any flags specified for a command apply to all files on the command line and are processed before anyother parameters to that command. Flag placement in the command line is not important. Otherparameters are processed left to right. Some SCCS files contain flags that determine how certaincommands operate on the file. See the admin command description of SCCS header flags for moreinformation.
Creating, Editing, and Updating an SCCS File
You can create, edit, and update an SCCS file using the admin, get, and delta commands.
Creating an SCCS File
admin Creates an SCCS file or changes an existing SCCS file.
v To create an empty SCCS file named s.test.c, enter:admin -n s.test.c
Using the admin command with the -n flag creates an empty SCCS file.
v To convert an existing text file into an SCCS file, enter:
490 AIX 5L Version 5.3 General Programming Concepts: Writing and Debugging Programs

admin -itest.c s.test.cThere are no SCCS identification keywords in the file (cm7)
lss.test.c test.c
If you use the -i flag, the admin command creates delta 1.1 from the specified file. Once delta 1.1 iscreated, rename the original text file so it does not interfere with SCCS commands (it will act as abackup):mv test.c back.c
The message There are no SCCS identification keywords in the file (cm7) does not indicate anerror.
v To start the test.c file with a release number of 3.1, use the -r flag with the admin command, asfollows:admin -itest.c -r3 s.test.c
Editing an SCCS fileAttention: Do not edit SCCS files directly with non-SCCS commands, or you can damage the SCCSfiles.
get Gets a specified version of an SCCS file for editing or compiling.
1. To edit an SCCS file, enter the get command with the -e flag to produce an editable version of the file:get -e s.test.c1.3new delta 1.467 lines
lsp.test.c s.test.c test.c
The get command produces two new files, p.test.c and test.c. The editable file is test.c. Thep.test.c file is a temporary, uneditable file used by SCCS to keep track of file versions. It willdisappear when you update your changes to the SCCS file. Notice also that the get command printsthe SID of the version built for editing, the SID assigned to the new delta when you update yourchanges, and the number of lines in the file.
2. Use any editor to edit test.c, for example:ed test.c
You can now work on your actual file. Edit this file as often as you wish. Your changes will not affectthe SCCS file until you choose to update it.
3. To edit a specific version of an SCCS file with multiple versions, enter the get command with the -rflag :get -r1.3 s.test.c1.367 lines
get -r1.3.1.4 s.test.c1.3.1.450 lines
Updating an SCCS File
delta Adds a set of changes (deltas) to the text of an SCCS file.
Chapter 23. Source Code Control System (SCCS) 491

1. To update the SCCS file and create a new delta with the changes you made while editing, use thedelta command:$delta s.test.cType comments, terminated with EOF or a blank line:
2. The delta command prompts you for comments to be associated with the changes you made. Forexample, enter your comments, and then press the Enter key twice:No id keywords (cm7)1.25 lines inserted6 lines deleted12 lines unchanged
The delta command updates the s.prog.c file with the changes you made to the test.c file. The deltacommand tells you that the SID of the new version is 1.2, and that the edited file inserted 5 lines,deleted 6 lines, and left 12 lines unchanged from the previous version.
Controlling and Tracking SCCS File ChangesThe SCCS command and file system are primarily used to control access to a file and to track who altereda file, why it was altered, and what was altered.
Controlling Access to SCCS filesThree kinds of access can be controlled in an SCCS file system:
v File access
v User access (see “User Access Controls”)
v Version access (see “Version Access Controls”).
File Access ControlsDirectories containing SCCS files should be created with permission code 755 (read, write, and executepermissions for owner; read and execute permissions for group members and others). The SCCS filesthemselves should be created as read-only files (444). With these permissions, only the owner can usenon-SCCS commands to modify SCCS files. If a group can access and modify the SCCS files, thedirectories should have group write permission.
User Access ControlsThe admin command with the -a flag can designate a group of users that can make changes to the SCCSfile. A group name or number can also be specified with this flag.
Version Access ControlsThe admin command can lock, or prevent, various versions of a file from being accessed by the getcommand by using header flags.
-fc Sets a ceiling on the highest release number that can be retrieved-ff Sets a floor on the lowest release number that can be retrieved-fl Locks a particular release against being retrieved
Tracking Changes to an SCCS FileThere are three ways to track changes to an SCCS file:
v Comments associated with each delta
v Modification Request (MR) numbers
v The SCCS commands.
492 AIX 5L Version 5.3 General Programming Concepts: Writing and Debugging Programs

Tracking Changes with Delta CommentsAfter an SCCS file is updated and a new delta created, the system prompts for comments to beassociated with that delta. These comments can be up to 512 characters long and can be modified withthe cdc command.
cdc Changes the comments associated with a delta
The get command with the -l flag prints out the delta table and all the delta comments for any version of afile. In addition to storing the comments associated with a delta, the delta table automatically stores thetime and date of the last modification, the real user ID at the time of the modification, the serial numbers ofthe delta and its predecessor, and any MR numbers associated with the delta.
Tracking Changes with Modification Request NumbersThe admin command with the -fv flag prompts for MR numbers each time a delta is created. A programcan be specified with the -fv flag to check the validity of the MR numbers when an attempt is made tocreate a new delta in the SCCS file. If the MR validity-checking program returns a nonzero exit value, theupdate will be unsuccessful.
The MR validity-checking program is created by the user. It can be written to track changes made to theSCCS file and index them against any other database or tracking system.
Tracking Changes with SCCS commands
sccsdiff Compares two SCCS files and prints their differences to standard output
The delta command with the -p flag acts the same as the sccsdiff command when the file is updated.Both of these commands allow you to see what changes have been made between versions.
prs Formats and prints specified portions of an SCCS file to standard output
This command allows you to find the differences in two versions of a file.
Detecting and Repairing Damaged SCCS Files
You can detect and repair damaged SCCS files using the admin command.
Procedure1. Check SCCS files on a regular basis for possible damage. Any time an SCCS file is changed without
properly using SCCS commands, damage may result to the file. The SCCS file system detects thisdamage by calculating the checksum and comparing it with the one stored in the delta table. Check fordamage by running the admin command with the -h flag on all SCCS files or SCCS directories asshown:admin -h s.file1 s.file2 ...
ORadmin -h directory1 directory2 ...
If the admin command finds a file where the computed checksum is not equal to the checksum listedin the SCCS file header, it displays this message:ERROR [s.filename]:1255-057 The file is damaged. (co6)
2. If a file was damaged, try to edit the file again or read a backup copy. Once the checksum has beenrecalculated, any remaining damage will be undetectable by the admin command.
Chapter 23. Source Code Control System (SCCS) 493

Note: Using the admin command with the -z flag on a damaged file can prevent future detectionof the damage.
3. After fixing the file, run the admin command with the -z flag and the repaired file name:admin -z s.file1
List of Additional SCCS Commands
Attention: Using non-SCCS commands with SCCS files can damage the SCCS files.
The following SCCS commands complete the system for handling SCCS files:
rmdel Removes the most recent delta on a branch from an SCCS file.sact Displays current SCCS file editing status.sccs Administration program for the SCCS system. The sccs command contains a set of
pseudo-commands that perform most SCCS services.sccshelp Explains an SCCS error message or command.unget Cancels the effect of a previous use of the get -e command.val Checks an SCCS file to see if its computed checksum matches the checksum listed in the header.vc Substitutes assigned values in place of identification keywords.what Searches a system file for a pattern and displays text that follows it.
Related Information
Commands ReferenceThe admin command, cdc command in AIX 5L Version 5.3 Commands Reference, Volume 1.
The delta command, get command in AIX 5L Version 5.3 Commands Reference, Volume 2.
The prs command in AIX 5L Version 5.3 Commands Reference, Volume 4.
The sccsdiff command in AIX 5L Version 5.3 Commands Reference, Volume 5.
Files ReferencesThe sccsfile file format.
494 AIX 5L Version 5.3 General Programming Concepts: Writing and Debugging Programs
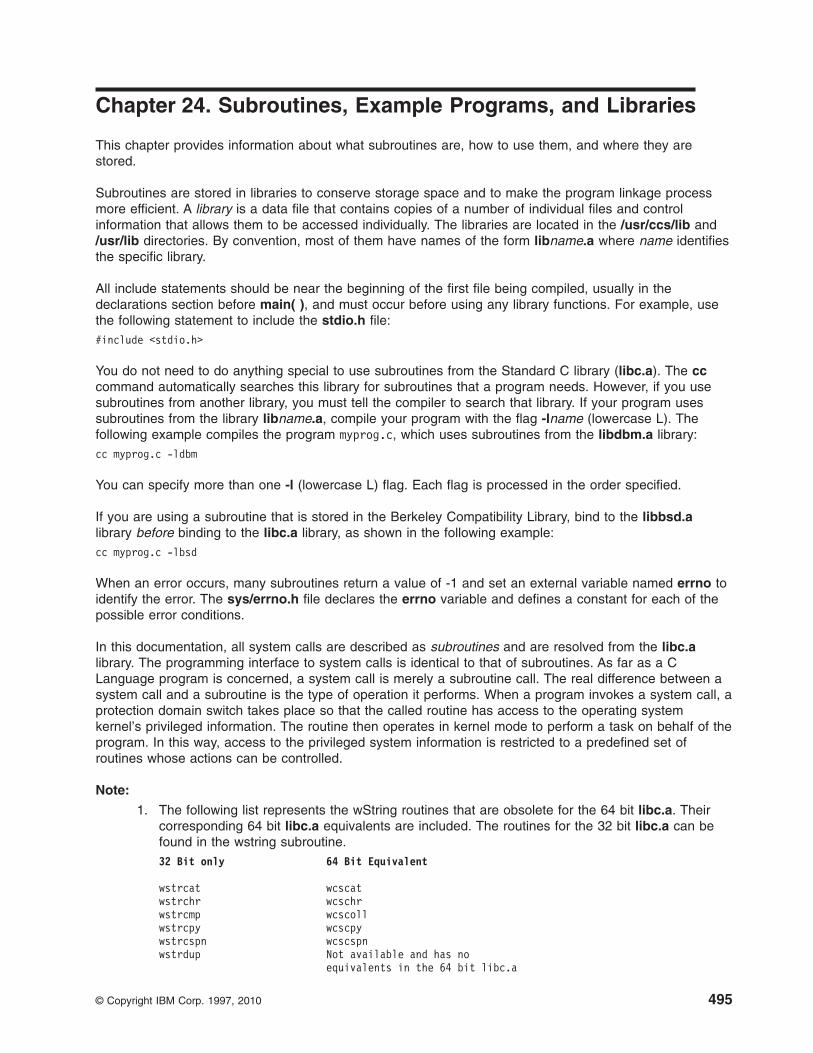
Chapter 24. Subroutines, Example Programs, and Libraries
This chapter provides information about what subroutines are, how to use them, and where they arestored.
Subroutines are stored in libraries to conserve storage space and to make the program linkage processmore efficient. A library is a data file that contains copies of a number of individual files and controlinformation that allows them to be accessed individually. The libraries are located in the /usr/ccs/lib and/usr/lib directories. By convention, most of them have names of the form libname.a where name identifiesthe specific library.
All include statements should be near the beginning of the first file being compiled, usually in thedeclarations section before main( ), and must occur before using any library functions. For example, usethe following statement to include the stdio.h file:#include <stdio.h>
You do not need to do anything special to use subroutines from the Standard C library (libc.a). The cccommand automatically searches this library for subroutines that a program needs. However, if you usesubroutines from another library, you must tell the compiler to search that library. If your program usessubroutines from the library libname.a, compile your program with the flag -lname (lowercase L). Thefollowing example compiles the program myprog.c, which uses subroutines from the libdbm.a library:cc myprog.c -ldbm
You can specify more than one -l (lowercase L) flag. Each flag is processed in the order specified.
If you are using a subroutine that is stored in the Berkeley Compatibility Library, bind to the libbsd.alibrary before binding to the libc.a library, as shown in the following example:cc myprog.c -lbsd
When an error occurs, many subroutines return a value of -1 and set an external variable named errno toidentify the error. The sys/errno.h file declares the errno variable and defines a constant for each of thepossible error conditions.
In this documentation, all system calls are described as subroutines and are resolved from the libc.alibrary. The programming interface to system calls is identical to that of subroutines. As far as a CLanguage program is concerned, a system call is merely a subroutine call. The real difference between asystem call and a subroutine is the type of operation it performs. When a program invokes a system call, aprotection domain switch takes place so that the called routine has access to the operating systemkernel’s privileged information. The routine then operates in kernel mode to perform a task on behalf of theprogram. In this way, access to the privileged system information is restricted to a predefined set ofroutines whose actions can be controlled.
Note:
1. The following list represents the wString routines that are obsolete for the 64 bit libc.a. Theircorresponding 64 bit libc.a equivalents are included. The routines for the 32 bit libc.a can befound in the wstring subroutine.32 Bit only 64 Bit Equivalent
wstrcat wcscatwstrchr wcschrwstrcmp wcscollwstrcpy wcscpywstrcspn wcscspnwstrdup Not available and has no
equivalents in the 64 bit libc.a
© Copyright IBM Corp. 1997, 2010 495

wstrlen wcslenwstrncat wcsncatwstrncpy wcsncpywstrpbrk wcspbrkwstrrchr wcsrchrwstrspn wcsspnwstrtok wcstok
2. All programs that handle multibyte characters, wide characters, or locale-specific informationmust call the setlocale subroutine at the beginning of the program.
3. Programming in a multi-threaded environment requires reentrant subroutines to ensure dataintegrity. See “List of Multi-threaded Programming Subroutines” on page 506 for moreinformation.
128-Bit Long Double Floating-Point Data TypeThe AIX operating system supports a 128-bit long double data type that provides greater precision thanthe default 64-bit long double data type. The 128-bit data type can handle up to 31 significant digits(compared to 17 handled by the 64-bit long double). However, while this data type can store numbers withmore precision than the 64-bit data type, it does not store numbers of greater magnitude.
The following special issues apply to the use of the 128-bit long double data type:
v Compiling programs that use the 128-bit long double data type
v Compliance with the IEEE 754 standard
v Implementing the 128-bit long double format
v Values of numeric macros
Compiling Programs that Use the 128-bit Long Double Data TypeTo compile C programs that use the 128-bit long double data type, use the xlc128 command. Thiscommand is an alias to the xlc command with support for the 128-bit data type. The xlc commandsupports only the 64-bit long double data type.
The standard C library, libc.a, provides replacements for libc.a routines which are implicitly sensitive tothe size of a long double. Link with the libc.a library when compiling applications that use the 64-bit longdouble data type. Link applications that use 128-bit long double values with both the libc128.a and libc.alibraries. When linking, be sure to specify the libc128.a library before the libc.a library in the library searchorder.
Compliance with IEEE 754 StandardThe 64-bit implementation of the long double data type is fully compliant with the IEEE 754 standard, butthe 128-bit implementation is not. Use the 64-bit implementation in applications that must conform to theIEEE 754 standard.
The 128-bit implementation differs from the IEEE standard for long double in the following ways:
v Supports only round-to-nearest mode. If the application changes the rounding mode, results areundefined.
v Does not fully support the IEEE special numbers NaN and INF.
v Does not support IEEE status flags for overflow, underflow, and other conditions. These flags have nomeaning for the 128-bit long double inplementation.
Implementing the 128-Bit Long Double FormatA 128-bit long double number consists of an ordered pair of 64-bit double-precision numbers. The firstmember of the ordered pair contains the high-order part of the number, and the second member containsthe low-order part. The value of the long double quantity is the sum of the two 64-bit numbers.
496 AIX 5L Version 5.3 General Programming Concepts: Writing and Debugging Programs

Each of the two 64-bit numbers is itself a double-precision floating-point number with a sign, exponent,and significand. Typically the low-order member has a magnitude that is less than 0.5 units in the lastplace of the high part, so the values of the two 64-bit numbers do not overlap and the entire significand ofthe low-order number adds precision beyond the high-order number.
This representation results in several issues that must be considered in the use of these numbers:
v The exponent range is the same as that of double precision. Although the precision is greater, themagnitude of representable numbers is the same as 64-bit double precision.
v As the absolute value of the magnitude decreases (near the denormal range), the additional precisionavailable in the low-order part also decreases. When the value to be represented is in the denormalrange, this representation provides no more precision than the 64-bit double-precision data type.
v The actual number of bits of precision can vary. If the low-order part is much less than 1 ULP of thehigh-order part, significant bits (either all 0’s or all 1’s) are implied between the significands of thehigh-order and low-order numbers. Certain algorithms that rely on having a fixed number of bits in thesignificand can fail when using 128-bit long double numbers.
Values of Numeric MacrosBecause of the storage method for the long double data type, more than one number can satisfy certainvalues that are available as macros.The representation of 128-bit long double numbers means that thefollowing macros required by standard C in the values.h file do not have clear meaning:
v Number of bits in the mantissa (LDBL_MANT_DIG)
v Epsilon (LBDL_EPSILON)
v Maximum representable finite value (LDBL_MAX)
Number of Bits in the MantissaThe number of bits in the significand is not fixed, but for a correctly formatted number (except in thedenormal range) the minimum number available is 106. Therefore, the value of the LDBL_MANT_DIGmacro is 106.
EpsilonThe ANSI C standard defines the value of epsilon as the difference between 1.0 and the leastrepresentable value greater than 1.0, that is, b**(1-p), where b is the radix (2) and p is the number of baseb digits in the number. This definition requires that the number of base b digits is fixed, which is not truefor 128-bit long double numbers.
The smallest representable value greater than 1.0 is this number:0x3FF0000000000000, 0x0000000000000001
The difference between this value and 1.0 is this number:0x0000000000000001, 0x00000000000000000.4940656458412465441765687928682213E-323
Because 128-bit numbers usually provide at least 106 bits of precision, an appropriate minimum value forp is 106. Thus, b**(1-p) and 2**(-105) yield this value:0x3960000000000000, 0x00000000000000000.24651903288156618919116517665087070E-31
Both values satisfy the definition of epsilon according to standard C. The long double subroutines use thesecond value because it better characterizes the accuracy provided by the 128-bit implementation.
Maximum Long Double ValueThe value of the LDBL_MAX macro is the largest 128-bit long double number that can be multiplied by1.0 and yield the original number. This value is also the largest finite value that can be generated byprimitive operations, such as multiplication and division:
Chapter 24. Subroutines, Example Programs, and Libraries 497
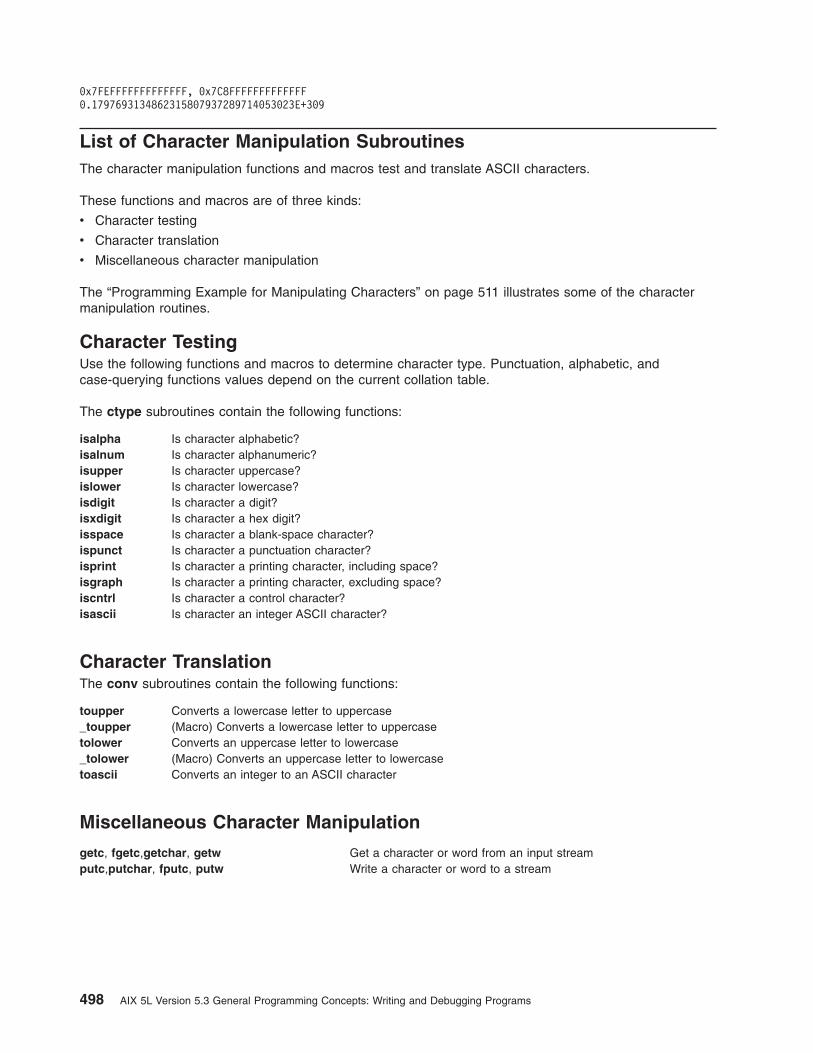
0x7FEFFFFFFFFFFFFF, 0x7C8FFFFFFFFFFFFF0.1797693134862315807937289714053023E+309
List of Character Manipulation SubroutinesThe character manipulation functions and macros test and translate ASCII characters.
These functions and macros are of three kinds:
v Character testing
v Character translation
v Miscellaneous character manipulation
The “Programming Example for Manipulating Characters” on page 511 illustrates some of the charactermanipulation routines.
Character TestingUse the following functions and macros to determine character type. Punctuation, alphabetic, andcase-querying functions values depend on the current collation table.
The ctype subroutines contain the following functions:
isalpha Is character alphabetic?isalnum Is character alphanumeric?isupper Is character uppercase?islower Is character lowercase?isdigit Is character a digit?isxdigit Is character a hex digit?isspace Is character a blank-space character?ispunct Is character a punctuation character?isprint Is character a printing character, including space?isgraph Is character a printing character, excluding space?iscntrl Is character a control character?isascii Is character an integer ASCII character?
Character TranslationThe conv subroutines contain the following functions:
toupper Converts a lowercase letter to uppercase_toupper (Macro) Converts a lowercase letter to uppercasetolower Converts an uppercase letter to lowercase_tolower (Macro) Converts an uppercase letter to lowercasetoascii Converts an integer to an ASCII character
Miscellaneous Character Manipulation
getc, fgetc,getchar, getw Get a character or word from an input streamputc,putchar, fputc, putw Write a character or word to a stream
498 AIX 5L Version 5.3 General Programming Concepts: Writing and Debugging Programs

List of Executable Program Creation SubroutinesThe list of executable program creation services consists of subroutines that support a group ofcommands. These commands and subroutines allow you to create, compile, and work with files in order tomake your programs run.
_end, _text, _edata Define the last location of a programconfstr Determines the current value of a specified system variable defined
as a stringgetopt Gets flag letters from the argument vectorldopen, ldaopen Open a common object fileldclose, ldaclose Close a common object fileldahread Reads the archive header of a member of an archive fileldfhread Reads the file header of a common object fileldlread, ldlinit, ldlitem Read and manipulate line number entries of a common object file
functionldshread, ldnshread Read a section header of a common object fileldtbread Reads a symbol table entry of a common object fileldgetname Retrieves a symbol name from a symbol table entry or from the
string tableldlseek, ldnseek Seek to line number entries of a section of a common object fileldohseek Seek to the optional file header of a common object fileldrseek, ldnrseek Seek to the relocation information for a section of a common object
fileldsseek, ldnsseek Seek to a section of a common object fileldtbseek Seeks to the symbol table of a common object fileldtbindex Returns the index of a particular common object file symbol table
entryload Loads and binds an object module into the current processunload Unloads an object fileloadbind Provides specific runtime resolution of a module’s deferred symbolsloadquery Returns error information from the load subroutine or the exec
subroutine. Also provides a list of object files loaded for the currentprocess
monitor Starts and stops execution profilingnlist Gets entries from a name listregcmp, regex Compile and matche regular-expression patternssetjmp, longjmp Store a locationsgetl, sputl Accesses long numeric data in a machine-independent fashionsysconf Determines the current value of a specified system limit or option
List of Files and Directories SubroutinesThe system provides services to create files, move data into and out of files, and describe restrictions andstructures of the file system. Many of these subroutines are the base for the system commands that havesimilar names. You can, however, use these subroutines to write new commands or utilities to help in theprogram development process, or to include in an application program.
The system provides subroutines for:
v Controlling Files
v “Working with Directories” on page 500
v “Manipulating File Systems” on page 501
Chapter 24. Subroutines, Example Programs, and Libraries 499

Controlling Files
access, accessx, or faccessx Determine accessibility of a filefclear Clears space in a filefcntl, dup, or dup2 Control open file descriptorsfsync Writes changes in a file to permanent storagegetenv Returns the value of an environment variablegetutent, getutid, getutline, putuline, setutent, endutent, or utmpname
Access utmp file entriesgetutid_r, getutline_r, pututline_r, setutent_r, endutent_r, or utmpname_r
Access utmp file entrieslseek or llseek Move the read-write pointer in an open filelockfx, lockf, or flock Controls open file descriptor locksmknod or mkfifo Create regular, FIFO, or special filesmktemp or mkstemp Construct a unique file nameopen, openx, or creat Return a file descriptor and creates filespclose Closes an open pipepipe Creates an interprocess channelpopen Initiates a pipe to a processpathconf, fpathconf Retrieve file implementation characteristicsputenv Sets an environment variableread, readx, readv, readvx Read from a file or devicerename Renames directory or file within a file systemstatx, stat, fstatx, fstat, fullstat, fullstat
Get file statustmpfile Creates a temporary filetmpnam or tempnam Construct a name for a temporary filetruncate, ftruncate Make a file shorterumask Gets and sets the value of the file creation maskutimes or utime Set file access or modification timewrite, writex, writev, writevx Write to a file or device
Working with Directories
chdir Changes the current working directorychroot Changes the effective root directorygetwd, getcwd Get the current directory path nameglob Generates a list of path names to accessible filesglobfree Frees all memory associated with the pglob parameterlink Creates additional directory entry for an existing filemkdir Creates a directoryopendir, readdir, telldir, seekdir, rewinddir, closedir
Performs operations on directoriesreaddir_r Reads a directoryrmdir Removes a directoryscandir, alphasort Scan a directoryreadlink Reads the volume of a symbolic linkremove Makes a file inaccessible by specified namesymlink Creates a symbolic link to a fileunlink Removes a directory entry
500 AIX 5L Version 5.3 General Programming Concepts: Writing and Debugging Programs

Manipulating File Systems
confstr Determines the current value of a specified systemvariable defined by a string
fscntl Manipulates file system control operationsgetfsent, getfsspec, getfsfile, getfstype, setfsent, or endfsent
Get information about a file systemgetfsent_r, getfsspec_r, getfsfile_r, getfstype_r, setfsent_r, or endfsent_r
Get information about a file systemgetvfsent, getvfsbytype, getvfsbyname, getvfsbyflag, setvfsent, endvfsent
Get information about virtual file system entriesmnctl Returns mount status informationquotactl Manipulates disk quotasstatfs, fstatfs Get the status of a file’s file systemsysconf Reports current value of system limits or optionssync Updates all file systems information to diskumask Gets and sets the value of the file creation maskvmount Mounts a file systemumount, uvmount Remove a virtual file system from the file tree
List of FORTRAN BLAS Level 1: Vector-Vector SubroutinesLevel 1: vector-vector subroutines include:
SDOT, DDOT Return the dot product of two vectorsCDOTC, ZDOTC Return the complex dot product of two vectors,
conjugating the firstCDOTU, ZDOTU Return the complex dot product of two vectorsSAXPY, DAXPY, CAXPY, ZAXPY Return a constant times a vector plus a vectorSROTG, DROTG, CROTG, ZROTG Construct a Givens plane rotationSROT, DROT, CSROT, ZDROT Apply a plane rotationSCOPY, DCOPY, CCOPY, ZCOPY Copy vector X to YSSWAP, DSWAP, CSWAP, ZSWAP Interchange vectors X and YSNRM2, DNRM2, SCNRM2, DZNRM2 Return the Euclidean norm of the N-vector stored in X()
with storage increment INCXSASUM, DASUM, SCASUM, DZASUM Return the sum of absolute values of vector componentsSSCAL, DSCAL, CSSCAL, CSCAL, ZDSCAL, ZSCAL
Scale a vector by a constantISAMAX, IDAMAX, ICAMAX, IZAMAX Find the index of element having maximum absolute valueSDSDOT Returns the dot product of two vectors plus a constantSROTM, DROTM Apply the modified Givens transformationSROTMG, DROTMG Construct a modified Givens transformation
List of FORTRAN BLAS Level 2: Matrix-Vector SubroutinesLevel 2: matrix-vector subroutines include:
SGEMV, DGEMV,CGEMV, ZGEMV Perform matrix-vector operation with general matricesSGBMV, DGBMV, CGBMV, ZGBMV Perform matrix-vector operations with general banded matricesCHEMV, ZHEMV Perform matrix-vector operations using Hermitian matricesCHBMV, ZHBMV Perform matrix-vector operations using a Hermitian band matrixCHPMV,ZHPMV Perform matrix-vector operations using a packed Hermitian matrixSSYMV , DSYMV Perform matrix-vector operations using a symmetric matrixSSBMV , DSBMV Perform matrix-vector operations using symmetric band matrix
Chapter 24. Subroutines, Example Programs, and Libraries 501
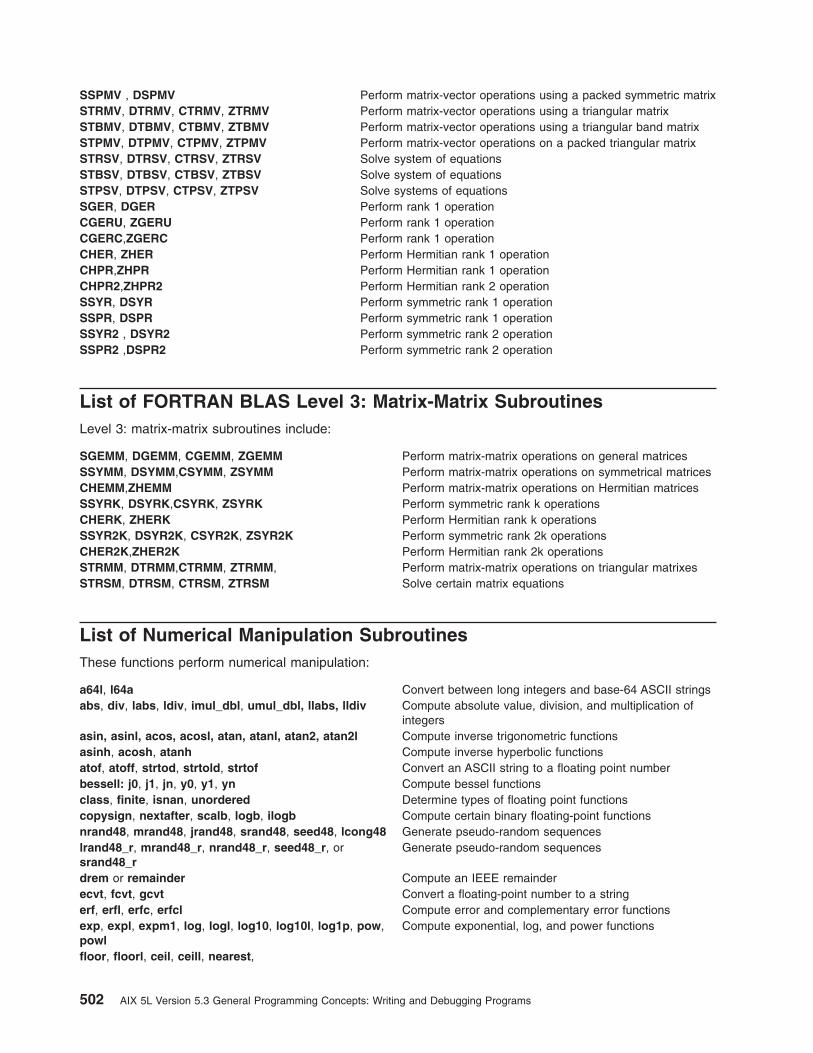
SSPMV , DSPMV Perform matrix-vector operations using a packed symmetric matrixSTRMV, DTRMV, CTRMV, ZTRMV Perform matrix-vector operations using a triangular matrixSTBMV, DTBMV, CTBMV, ZTBMV Perform matrix-vector operations using a triangular band matrixSTPMV, DTPMV, CTPMV, ZTPMV Perform matrix-vector operations on a packed triangular matrixSTRSV, DTRSV, CTRSV, ZTRSV Solve system of equationsSTBSV, DTBSV, CTBSV, ZTBSV Solve system of equationsSTPSV, DTPSV, CTPSV, ZTPSV Solve systems of equationsSGER, DGER Perform rank 1 operationCGERU, ZGERU Perform rank 1 operationCGERC,ZGERC Perform rank 1 operationCHER, ZHER Perform Hermitian rank 1 operationCHPR,ZHPR Perform Hermitian rank 1 operationCHPR2,ZHPR2 Perform Hermitian rank 2 operationSSYR, DSYR Perform symmetric rank 1 operationSSPR, DSPR Perform symmetric rank 1 operationSSYR2 , DSYR2 Perform symmetric rank 2 operationSSPR2 ,DSPR2 Perform symmetric rank 2 operation
List of FORTRAN BLAS Level 3: Matrix-Matrix SubroutinesLevel 3: matrix-matrix subroutines include:
SGEMM, DGEMM, CGEMM, ZGEMM Perform matrix-matrix operations on general matricesSSYMM, DSYMM,CSYMM, ZSYMM Perform matrix-matrix operations on symmetrical matricesCHEMM,ZHEMM Perform matrix-matrix operations on Hermitian matricesSSYRK, DSYRK,CSYRK, ZSYRK Perform symmetric rank k operationsCHERK, ZHERK Perform Hermitian rank k operationsSSYR2K, DSYR2K, CSYR2K, ZSYR2K Perform symmetric rank 2k operationsCHER2K,ZHER2K Perform Hermitian rank 2k operationsSTRMM, DTRMM,CTRMM, ZTRMM, Perform matrix-matrix operations on triangular matrixesSTRSM, DTRSM, CTRSM, ZTRSM Solve certain matrix equations
List of Numerical Manipulation SubroutinesThese functions perform numerical manipulation:
a64l, l64a Convert between long integers and base-64 ASCII stringsabs, div, labs, ldiv, imul_dbl, umul_dbl, llabs, lldiv Compute absolute value, division, and multiplication of
integersasin, asinl, acos, acosl, atan, atanl, atan2, atan2l Compute inverse trigonometric functionsasinh, acosh, atanh Compute inverse hyperbolic functionsatof, atoff, strtod, strtold, strtof Convert an ASCII string to a floating point numberbessell: j0, j1, jn, y0, y1, yn Compute bessel functionsclass, finite, isnan, unordered Determine types of floating point functionscopysign, nextafter, scalb, logb, ilogb Compute certain binary floating-point functionsnrand48, mrand48, jrand48, srand48, seed48, lcong48 Generate pseudo-random sequenceslrand48_r, mrand48_r, nrand48_r, seed48_r, orsrand48_r
Generate pseudo-random sequences
drem or remainder Compute an IEEE remainderecvt, fcvt, gcvt Convert a floating-point number to a stringerf, erfl, erfc, erfcl Compute error and complementary error functionsexp, expl, expm1, log, logl, log10, log10l, log1p, pow,powl
Compute exponential, log, and power functions
floor, floorl, ceil, ceill, nearest,
502 AIX 5L Version 5.3 General Programming Concepts: Writing and Debugging Programs

trunc, rint, itrunc, uitrunc, fmod, fmodl, fabs, fabsl Round floating-point numbersfp_any_enable, fp_is_enabled, fp_enable_all,fp_enable, fp_disable_all, fp_disable Allow operations on the floating-point exception statusfp_clr_flag, fp_set_flag, fp_read_flag, or fp_swap_flag Allow operations on the floating-point exception statusfp_invalid_op, fp_divbyzero, fp_overflow,fp_underflow, fp_inexact, fp_any_xcp Test to see if a floating-point exception has occurredfp_iop_snan, fp_iop_infsinf, fp_iop_infdinf,fp_iop_zrdzr, fp_iop_infmzr, fp_iop_invcmp Test to see if a floating-point exception has occurredfp_read_rnd,fp_swap_rnd Read and set the IEEE rounding modefrexp, frexpl, ldexp, ldexpl, modf, modfl Manipulate floating point numbersl64a_r Converts base-64 long integers to stringslgamma, lgammal, gamma Compute the logarithm of the gamma functionhypot, cabs Compute Euclidean distance functions and absolute
values13tol, ltol3 Convert between 3-byte integers and long integersmadd, msub, mult, mdiv, pow, gcd, invert,rpow, msqrt, mcmp, move, min, omin,fmin, m_in, mout, omout, fmout, m_out, sdiv, itom Provide multiple precision integer arithmeticrand, srand Generate random numbersrand_r Generates random numbersrandom, srandom, initstate, setstate Generate better random numbersrsqrt Computes the reciprocal of the square root of a numbersin, cos, tan Compute trigonometric and inverse trigonometric functionssinh, sinhl, cosh, coshl, tanh, tanhl Computes hyperbolic functionssqrt, sqrtl, cbrt Compute square root and cube root functionsstrtol, strtoll, strtoul, strtoull, atol, atoi Convert a string to an integer
List of Long Long Integer Numerical Manipulation SubroutinesThe following subroutines perform numerical manipulation of integers stored in the long long integer dataformat:
llabs Computes the absolute value of a long long integerlldiv Computes the quotient and remainder of the division of two long long integersstrtoll Converts a string to a signed long long integerstrtoull Converts a string to an unsigned long long integerwcstoll Converts a wide character string to a signed long long integerwcstoull Converts a wide character string to an unsigned long long integer
List of 128-Bit Long Double Numerical Manipulation SubroutinesThe following subroutines perform numerical manipulation of floating-point numbers stored in the 128-bitlong double data type. These subroutines do not support the 64-bit long double data type. Applications thatuse the 64-bit long double data type should use the corresponding double-precision subroutines.
acosl Computes the inverse cosine of a floating-point number in long double formatasinl Computes the inverse sine of a floating-point number in long double formatatan2l Computes the principal value of the arc tangent of x/y, whose components are expressed in long
double formatatanl Computes the inverse tangent of a floating-point number in long double formatceill Computes the smallest integral value not less than a specified floating-point number in long double
formatcoshl Computes the hyperbolic cosine of a floating-point number in long double formatcosl Computes the cosine of a floating-point number in long double format
Chapter 24. Subroutines, Example Programs, and Libraries 503

erfcl Computes the value of 1 minus the error function of a floating-point number in long double formaterfl Computes the error function of a floating-point number in long double formatexpl Computes the exponential function of a floating-point number in long double formatfabsl Computes the absolute value of a floating-point number in long double formatfloorl Computes the largest integral value not greater than a specified floating-point number in long double
formatfmodl Computes the long double remainder of a fraction x/y, where x and y are floating-point numbers in
long double formatfrexpl Expresses a floating-point number in long double format as a normalized fraction and an integral
power of 2, storing the integer and returning the fractionldexpl Multiplies a floating-point number in long double format by an integral power of 2lgammal Computes the natural logarithm of the absolute value of the gamma function of a floating-point
number in long double formatlog10l Computes the base 10 logarithm of a floating-point number in long double formatlogl Computes the natural logarithm of a floating-point number in long double formatmodfl Stores the integral part of a real number in a long double variable and returns the fractional part of
the real numberpowl Computes the value of x raised to the power of y, where both numbers are floating-point numbers in
long double formatsinhl Computes the hyperbolic sine of a floating-point number in long double formatsinl Computes the sine of a floating-point number in long double formatsqrtl Computes the square root of a floating-point number in long double formatstrtold Converts a string to a floating-point number in long double formattanl Computes the tangent of a floating-point number in long double formattanhl Computes the hyperbolic tangent of a floating-point number in long double format
List of Processes SubroutinesWith the introduction of threads, several process subroutines have been extended and other subroutineshave been added. Threads, not processes, are now the schedulable entity. For signals, the handler existsat the process level, but each thread can define a signal mask. Some examples of changed or newsubroutines are: getprocs, getthrds, ptrace, getpri, setpri, yield and sigprocmask.
The subroutines are listed in the following categories:
v “Process Initiation”
v “Process Suspension” on page 505
v “Process Termination” on page 505
v “Process and Thread Identification” on page 505
v “Process Accounting” on page 505
v “Process Resource Allocation” on page 505
v “Process Prioritization” on page 505
v “Process and Thread Synchronization” on page 506
v “Process Signals and Masks” on page 506
v “Process Messages” on page 506
Process Initiation
exec:, execl, execv, execle, execve, execlp, execvp, or exectExecute new programs in the calling process
fork or vfork Create a new processreboot Restarts the system
504 AIX 5L Version 5.3 General Programming Concepts: Writing and Debugging Programs

siginterrupt Sets subroutines to restart when they are interrupted byspecific signals
Process Suspension
pause Suspends a process until that process receives a signalwait, wait3, waitpid Suspend a process until a child process stops or terminates
Process Termination
abort Terminates current process and produces a memory dump by sending aSIGOT signal
exit, atexit, or _exit Terminate a process, unatexit, Unregisters functions that were previously registered by the atexit
subroutine. If the referenced function is found, it is removed from the listof functions that are called at normal program termination.
kill or killpg Terminate current process or group of processes with a signal
Process and Thread Identification
ctermid Gets the path name for the terminal that controls the currentprocess
cuserid Gets the alphanumeric user name associated with the currentprocess
getpid, getpgrp, or getppid Get the process ID, process group ID, or the parent process ID,respectively
getprocs Gets process table entriesgetthrds Gets thread table entriessetpgid or setpgrp Set the process group IDsetsid Creates a session and sets process group IDsuname or unamex Gets the names of the current operating system
Process Accounting
acct Enables and disables process accountingptrace Traces the execution of a process
Process Resource Allocation
brk or sbrk Change data segment space allocationgetdtablesize Gets the descriptor table sizegetrlimit, setrlimit, or vlimit Limit the use of system resources by current processgetrusage, times, or vtimes Display information about resource useplock Locks processes, text, and data into memoryprofil Starts and stops program address sampling for
execution profilingulimit Sets user process limits
Process Prioritization
getpri Returns the scheduling priority of a process
Chapter 24. Subroutines, Example Programs, and Libraries 505

getpriority, setpriority, or nice Get or set the priority value of a processsetpri Sets a process scheduling priority to a constant
valueyield Yields the processor to processes with higher
priorities
Process and Thread Synchronization
compare_and_swap Conditionally updates or returns a single word variableatomically
fetch_and_add Updates a single word variable atomicallyfetch_and_and and fetch_and_or Sets or clears bits in a single word variable atomicallysemctl Controls semaphore operationssemget Gets a set of semaphoressemop Performs semaphore operations
Process Signals and Masks
raise Sends a signal to an executing programsigaction, sigvec, or signal Specifies the action to take upon delivery of a signalsigemptyset, sigfillset, sigaddset, sigdelset, or sigismember
Create and manipulate signal maskssigpending Determines the set of signals that are blocked from
deliverysigprocmask, sigsetmask, or sigblock Set signal maskssigset, sighold, sigrelse, or sigignore Enhance the signal facility and provide signal
managementsigsetjmp or siglongjmp Save and restore stack context and signal maskssigstack Sets signal stack contextsigsuspend Changes the set of blocked signalsssignal or gsignal Implement a software signal facility
Process Messages
msgctl Provides message control operationsmsgget Displays a message queue identifiermsgrcv Reads messages from a queuemsgsnd Sends messages to the message queuemsgxrcv Receives an extended messagepsignal Printing system signal messages
List of Multi-threaded Programming SubroutinesProgramming in a multithreaded environment requires reentrant subroutines to ensure data integrity. Usethe following subroutines rather than the non-reentrant version:
asctime_r Converts a time value into a character arraygetgrnam_r Returns the next group entry in the user database that matches a specific namegetpwuid_r Returns the next entry that matches a specific user ID in the use database
506 AIX 5L Version 5.3 General Programming Concepts: Writing and Debugging Programs

The following lists the non-reentrant subroutines in libc.
asctime getgrent gsignal setkey
auditread getgrgid hcreate setlogmask
closelog getgrnam hdestroy setnetent
crypt getgroupsbyuser hsearch setnetgrent
ctime getgrset inet_ntoa setprotoent
dirname gethostbyaddr initstate setpwent
drand48 gethostbyname innetgr setpwfile
ecvt gethostent iso_addr setrpcent
endttyent getlogin iso_ntoa setservent
encrypt getnetbyaddr jrand48 setstate
asctime getnetbyname l64a setttyent
endfsent getnetent lcong48 setutent
endfsent getnetgrent link_ntoa setutxent
endgrent getopt localtime srand48
endhostent getprotobyname lrand48 srandom
endnetent getprotobynumber mrand48 ssignal
endnetgrent getprotoent mtime strerror
endprotoent getpwent ndutent strtok
endpwent getpwnam nrand48 syslog
endrpcent getpwuid ns_ntoa ttyname
endservent getrpcbyname openlog utmpname
endttyent getrpcbynumber pututline wcstok
endutxent getrpcent pututxline
erand48 getservbyname rand
ether_aton getservbyport random
ether_ntoa getservent rcmd
fcvt fgetgrent getttyent rcmd2
fgetpwent getttynam readdir
getdate getuinfo rexec
getfsent getutent re_comp
getfsent getutid re_exec
getfsfile getutline seed48
getfsfile getutxent setfsent
getfsspec getutxid setgrent
getfstype getutxline sethostent
Chapter 24. Subroutines, Example Programs, and Libraries 507

List of Programmer’s Workbench Library SubroutinesThe Programmers Workbench Library (libPW.a) contains routines that are provided only for compatibilitywith existing programs. Their use in new programs is not recommended. These interfaces are from AT&TPWB Toolchest.
any (Character, String) Determines whether String contains Characteranystr (String1, String2) Determines the offset in String1 of the first
character that also occurs in String2balbrk (String, Open, Close, End) Determines the offset in String of the first
character in the string End that occurs outside ofa balanced string as defined by Open and Close
cat (Destination, Source1, Source0) Concatenates the Source strings and copiesthem to Destination
clean_up ( ) Defaults the cleanup routinecurdir (String) Puts the full path name of the current directory
in Stringdname (p) Determines which directory contains the file pfatal (Message) General purpose error handlerfdfopen (fd, Mode) Same as the stdio fdopen subroutinegiveup (Dump) Forces a core dumpimatch (pref, String) Determines if the string pref is an initial
substring of Stringlockit (LockFile, Count, pid) Creates a lock filemove (String1, String2, n) Copies the first n characters of String1 to
String2patoi (String) Converts String to integerpatol (String) Converts String to long.repeat (Destination, String, n) Sets Destination to String repeated n timesrepl (String, Old, New) Replaces each occurrence of the character Old
in String with the character Newsatoi (String, *ip) Converts String to integer and saves it in *ipsetsig ( ) Causes signals to be caught by setsig1setsig1 (Signal) General purpose signal handling routinesname (String) Gets a pointer to the simple name of full path
name Stringstrend (String) Finds the end of String.trnslat (s, old, new, Destination) Copies string s into Destination and replace any
character in old with the correspondingcharacters in new
unlockit (lockfile, pid) Deletes the lock fileuserdir (uid) Gets the user’s login directoryuserexit (code) Defaults user exit routineusername (uid) Gets the user’s login nameverify (String1, String2) Determines the offset in string String1 of the first
character that is not also in string String2xalloc (asize) Allocates memoryxcreat (name, mode) Creates a filexfree (aptr) Frees memoryxfreeall ( ) Frees all memoryxlink (f1, f2) Links filesxmsg (file, func) Calls the routine fatal with an appropriate error
messagexpipe (t) Creates a pipexunlink (f) Removes a directory entryxwrite (fd, buffer, n) Writes n bytes to the file associated with fd from
buffer
508 AIX 5L Version 5.3 General Programming Concepts: Writing and Debugging Programs

zero (p, n) Zeros n bytes starting at address pzeropad (s) Replaces the initial blanks with the character 0
(zero) in string s
File
/usr/lib/libPW.a Contains routines provided only for compatibility with existing programs
List of Security and Auditing Subroutinesv “Access Control Subroutines”
v “Auditing Subroutines”
v “Identification and Authentication Subroutines” on page 510
v “Process Subroutines” on page 510
Access Control Subroutines
acl_chg or acl_fchg Change the access control information on a fileacl_get or acl_fget Get the access control information of a fileacl_put or acl_fput Set the access control information of a fileacl_set or acl_fset Set the base entries of the access control information of a fileaclx_convert Convert the access control information from one ACL type to anotheraclx_get or aclx_fget Get the access control information of a file if the ACL associated is of the
AIXC typeaclx_gettypeinfo Retrieve the ACL characteristics given to an ACL typeaclx_gettypes Retrieve the list of ACL types supported for the file system associated with
the path providedaclx_print or aclx_printStr Convert the binary access control information into nonbinary, readable formataclx_put or aclx_fput Stores the access control information for a file system objectaclx_scan or aclx_scanStr Convert the access control information that is in nonbinary, readable text
format into ACL type-specific native format binary ACL datachacl or fchac l Change the permissions on a filechmod or fchmod Change file access permissionschown, fchown, chownx, or fchownx Change file ownershipfrevoke Revoke access to a file by other processesrevoke Revoke access to a filestatacl or fstatacl Retrieve the access control information for a file
Auditing Subroutines
audit Enables and disables system auditingauditbin Defines files to contain audit recordsauditevents Gets or sets the status of system event auditingauditlog Appends an audit record to an audit bin fileauditobj Gets or sets the auditing mode of a system data objectauditpack Compresses and uncompresses audit binsauditproc Gets or sets the audit state of a processauditread or auditread_r Read an audit recordauditwrite Writes an audit record
Chapter 24. Subroutines, Example Programs, and Libraries 509

Identification and Authentication SubroutinesUser authentication routines have a potential to store passwords and encrypted passwords in memory.This may expose passwords and encrypted passwords in coredumps.
authenticate Authenticates the user’s name and passwordckuseracct Checks the validity of a user accountckuserID Authenticates the usercrypt, encrypt, or setkey Encrypt or decrypt datagenpagvalue Generates a system-wide unique PAG value for a given
PAG name such as afs.getpagvalue64 Retrieves 64-bit PAG values for a process.setpagvalue64 Stores 64-bit PAG values for a process. .getgrent, getgrgid, getgrnam, setgrent, or endgrent Accesses the basic group information in the user
databasegetgrgid_r Gets a group database entry for a group ID in a
multithreaded environmentgetgrnam_r Searches a group database for a name in a multithreaded
environmentgetgroupattr, IDtogroup, nextgroup, or putgroupattr Accesses the group information in the user databasegetlogin Gets the user’s login namegetlogin_r Gets the user’s login name in a multithreaded environmentgetpass Reads a passwordgetportattr or putportattr Access the port information in the port databasegetpwent, getpwuid, getpwnam, putpwent, setpwent,or endpwent
Access the basic user information in the user database
getuinfo Finds the value associated with a usergetuserattr, IDtouser, nextuser, or putuserattr Access the user information in the user databasegetuserpw, putuserpw, or putuserpwhist Access the user authentication dataloginfailed Records an unsuccessful login attemptloginrestrictions Determines if a user is allowed to access the systemloginsuccess Records a successful loginnewpass Generates a new password for a userpasswdexpired Checks the user’s password to determine if it has expiredsetpwdb or endpwdb Open or close the authentication databasesetuserdb or enduserdb Open or close the user databasesystem Runs a shell commandtcb Alters the Trusted Computing Base status of a file
Process Subroutines
getgid or getegid Get the real or group ID of the calling processgetgroups Gets the concurrent group set of the current processgetpcred Gets the current process security credentialsgetpenv Gets the current process environmentgetuid or geteuid Get the real or effective user ID of the current processinitgroups Initializes the supplementary group ID of the current
processkleenup Cleans up the run-time environment of a processsetgid, setrgid, setegid, or setregid Set the group IDs of the calling processsetgroups Sets the supplementary group ID of the current processsetpcred Sets the current process credentialssetpenv Sets the current process environmentsetuid, setruid, setuid, or setreuid Set the process user IDsusrinfo Gets and sets user information about the owner of the
current process
510 AIX 5L Version 5.3 General Programming Concepts: Writing and Debugging Programs

List of String Manipulation SubroutinesThe string manipulation functions include:
v Locate a character position within a string
v Locate a sequence of characters within a string
v Copy a string
v Concatenate strings
v Compare strings
v Translate a string
v Measure a string
When using these string functions, you do not need to include a header file for them in the program orspecify a special flag to the compiler.
The following functions manipulate string data:
bcopy, bcmp, bzero, ffs Perform bit and byte string operationsgets, fgets Get a string from a streamputs, fputs Write a string to a streamcompile, step, advance Compile and match regular-expression patternsstrlen, strchr, strrchr, strpbrk, strspn, strcspn, strstr, strtok
Perform operations on stringsjcode Performs string conversion on 8-bit processing codes.varargs Handles a variable-length parameter list
Programming Example for Manipulating Characters/*This program is designed to demonstrate the use of "Characterclassification and conversion" subroutines. Since we are dealingwith characters, it is a natural place to demonstrate the use ofgetchar subroutine and putchar subroutine from the stdio library.
The program objectives are:
-Read input from "stdin"
-Verify that all characters are ascii and printable
-Convert all uppercase characters to lowercase
-Discard multiple white spaces
-Report statistics regarding the types of characters
The following routines are demonstrated by this example program:
- getchar
- putchar
- isascii (ctype)
- iscntrl (ctype)
- isspace (ctype)
- isalnum (ctype)
- isdigit (ctype)
Chapter 24. Subroutines, Example Programs, and Libraries 511

- isalpha (ctype)
- isupper (ctype)
- islower (ctype)
- ispunct (ctype)
- tolower (conv)
- toascii ( conv)
*/
#include <stdio.h> /* The mandatory include file */#include <ctype.h> /* Included for character classification
subroutines */
/* The various statistics gathering counters */
int asciicnt, printcnt, punctcnt, uppercnt, lowercnt,
digcnt, alnumcnt, cntrlcnt, spacecnt, totcnt, nonprntcnt,linecnt, tabcnt ;
main(){
int ch ; /* The input character is read in to this */char c , class_conv() ;
asciicnt=printcnt=punctcnt=uppercnt=lowercnt=digcnt==0;cntrlcnt=spacecnt=totcnt=nonprntcnt=linecnt=tabcnt=0;alnumcnt=0;
while ( (ch =getchar()) != EOF ){
totcnt++;c = class_conv(ch) ;putchar(c);
}printf("The number lines of of input were %d\n",linecnt);printf(" The character wise breakdown follows :\n");printf(" TOTAL ASCII CNTRL PUNCT ALNUM DIGITS UPPER
LOWER SPACE TABCNT\n");
printf("%5d %5d %5d %5d %5d %5d %5d %5d %5d %5d\n",totcnt,
asciicnt, cntrlcnt, punctcnt, alnumcnt, digcnt, uppercnt,lowercnt, spacecnt, tabcnt );
}
char class_conv(ch)char ch;{
if (isascii(ch)) {
asciicnt++;if ( iscntrl(ch) && ! isspace(ch)) {
nonprntcnt++ ;cntrlcnt++ ;return(' ');
}else if ( isalnum(ch)) {
alnumcnt++;if (isdigit(ch)){
digcnt++;return(ch);
}else if (isalpha(ch)){
if ( isupper(ch) ){
512 AIX 5L Version 5.3 General Programming Concepts: Writing and Debugging Programs

uppercnt++ ;return(tolower(ch));
}else if ( islower(ch) ){
lowercnt++;return(ch);
}else {
/*We should never be in this situation since an alpha character can only beeither uppercase or lowercase.*/
fprintf(stderr,"Classification error for %c \n",ch);return(NULL);
}
}else if (ispunct(ch) ){
punctcnt++;return(ch);
}else if ( isspace(ch) ){
spacecnt++;if ( ch == '\n' ){linecnt++;return(ch);
}while ( (ch == '\t' ) || ( ch == ' ' ) ) {if ( ch == '\t' ) tabcnt ++ ;else if ( ch == ' ' ) spacecnt++ ;totcnt++;ch = getchar();
}ungetc(ch,stdin);totcnt--;return(' ');
}else {
/*We should never be in this situation any ASCII charactercan only belong to one of the above classifications.*/fprintf(stderr,"Classification error for %c \n",ch);return(NULL);}
}else{
fprintf(stdout,"Non Ascii character encountered \n");return(toascii(ch));
}
}
Searching and Sorting Example Program/**This program demonstrates the use of the following:
-qsort subroutine (a quick sort library routine)
-bsearch subroutine (a binary search library routine)
-fgets, fopen, fprintf, malloc, sscanf, and strcmp subroutines.
Chapter 24. Subroutines, Example Programs, and Libraries 513

The program reads two input files with records instring format, and prints or displays:
-records from file2, which are excluded in file1
-records from file1, which are excluded in file2
The program reads the input records from both filesinto two arrays, which are subsequently sorted incommon order using the qsort subroutine. Each element ofone array is searched for its counterpart entry in theother array using the bsearch subroutine. If the item isnot found in both arrays, a message indicates the recordwas not found. The process is repeated interchangingthe two arrays, to obtain the second list of exclusions.
**/
#include <stdio.h> /*the library file to be included for/*standard input and output*/
#include <search.h> /*the file to be included for qsort*/#include <sys/errno.h> /*the include file for interpreting
/*predefined error conditions*/
#define MAXRECS 10000 /*array size limit*/
#define MAXSTR 256 /*maximum input string length*/#define input1 "file1" /*one input file*/#define input2 "file2" /*second input file*/#define out1 "o_file1" /*output file1*/#define out2 "o_file2" /*output file2*/
main(){
char *arr1[MAXRECS] , *arr2[MAXRECS] ;/*the arrays to store
input records*/
unsigned int num1 , num2; /*to keep track of the number of
/*input records. Unsigned int
/*declaration ensures/*compatability
/*with qsort library routine.*/
int i ;int compar(); /*the function used by qsort and
/*bsearch*/
extern int errno ; /*to capture system call failures*/FILE *ifp1 , *ifp2, *ofp1, *ofp2; /*the file pointers for
input and output */
void *bsearch() ; /*the library routine for binary search*/void qsort(); /*the library routine for quick sort*/char*malloc() ; /*memory allocation subroutine*/void exit() ;
num1 = num2 = 0;
/**Open the input and output files for reading or writing**/
if ( (ifp1 = fopen( input1 , "r" ) ) == NULL ){
(void) fprintf(stderr,"%s could not be opened\n",input1);exit(-1);
}
if (( ifp2 = fopen( input2 , "r" )) == NULL ){
(void) fprintf(stderr,"%s could not be opened\n",input2);exit(-1);
}
514 AIX 5L Version 5.3 General Programming Concepts: Writing and Debugging Programs

if (( ofp1 = fopen(out1,"w" )) == NULL ){
(void) fprintf(stderr,"%s could not be opened\n",out1);exit(-1);
}
if (( ofp2 = fopen(out2,"w")) == NULL ){
(void) fprintf(stderr,"%s could not be opened\n", out2);exit(-1);
}
/**Fill the arrays with data from input files. Readlinefunction returns the number of input records.**/
if ( (i = readline( arr1 , ifp1 )) < 0 ){
(void) fprintf(stderr,"o data in %s. Exiting\n",input1);exit(-1);
}num1 = (unsigned) i;if ( (i = readline ( arr2 , ifp2)) < 0 ){
(void) fprintf(stderr,"No data in %s. Exiting\n",input2);exit(-1);
}num2 = (unsigned) i;
/**The arrays can now be sorted using qsort subroutine**/
qsort( (char *)arr1 , num1 , sizeof (char *) , compar);qsort( (char *)arr2 , num2 , sizeof (char *) , compar);
/**When the two arrays are sorted in a common order, theprogram builds a list of elements found in one but notin the other, using bsearch.
Check that each element in array1 is in array2**/
for ( i= 0 ; i < num1 ; i++ ){
if ( bsearch((void *)&arr1[i] , (char *)arr2,num2,
sizeof(char *) , compar) == NULL )
{(void) fprintf(ofp1,"%s",arr1[i]);
}
} /**One list of exclusions is complete**/
/**Check that each element in array2 is in array1**/
for ( i = 0 ; i < num2 ; i++ ){if ( bsearch((void *)&arr2[i], (char *)arr1, num1
, sizeof(char *) , compar) == NULL )
{(void) fprintf(ofp2,"%s",arr2[i]);
}
}
/**Task completed, so return**/
return(0);
}
Chapter 24. Subroutines, Example Programs, and Libraries 515
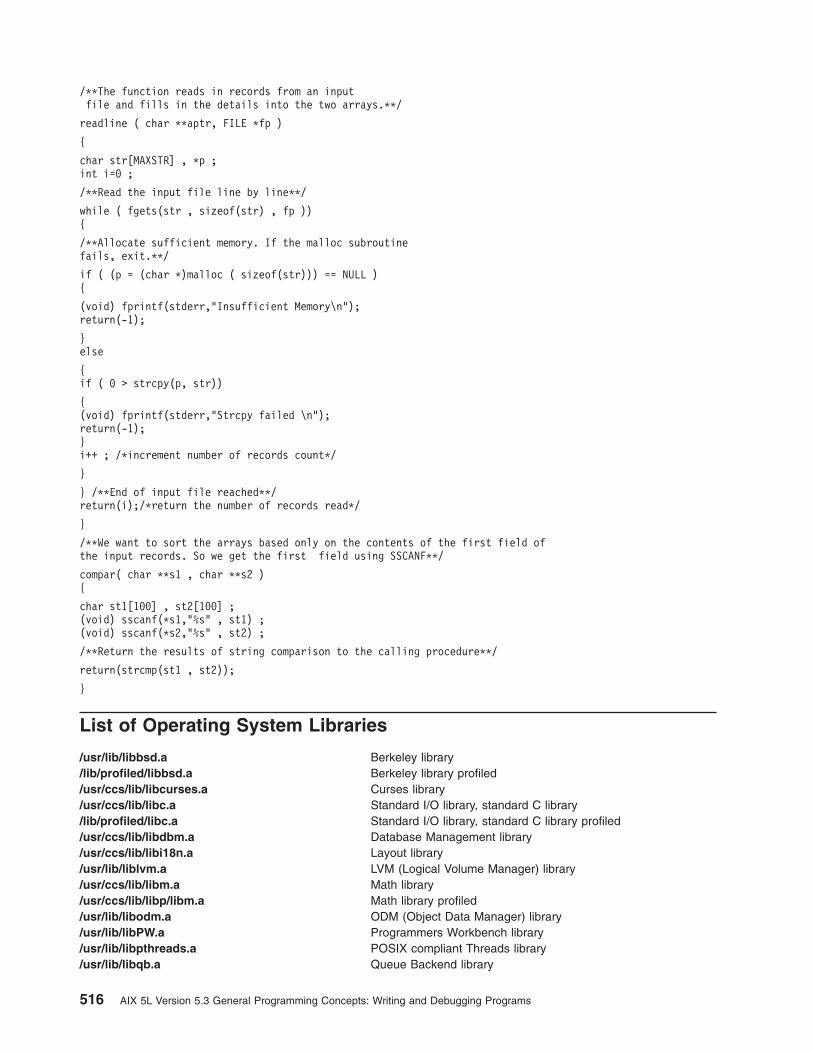
/**The function reads in records from an inputfile and fills in the details into the two arrays.**/
readline ( char **aptr, FILE *fp )
{
char str[MAXSTR] , *p ;int i=0 ;
/**Read the input file line by line**/
while ( fgets(str , sizeof(str) , fp )){
/**Allocate sufficient memory. If the malloc subroutinefails, exit.**/
if ( (p = (char *)malloc ( sizeof(str))) == NULL ){
(void) fprintf(stderr,"Insufficient Memory\n");return(-1);
}else
{if ( 0 > strcpy(p, str))
{(void) fprintf(stderr,"Strcpy failed \n");return(-1);}i++ ; /*increment number of records count*/
}
} /**End of input file reached**/return(i);/*return the number of records read*/
}
/**We want to sort the arrays based only on the contents of the first field ofthe input records. So we get the first field using SSCANF**/
compar( char **s1 , char **s2 ){
char st1[100] , st2[100] ;(void) sscanf(*s1,"%s" , st1) ;(void) sscanf(*s2,"%s" , st2) ;
/**Return the results of string comparison to the calling procedure**/
return(strcmp(st1 , st2));
}
List of Operating System Libraries
/usr/lib/libbsd.a Berkeley library/lib/profiled/libbsd.a Berkeley library profiled/usr/ccs/lib/libcurses.a Curses library/usr/ccs/lib/libc.a Standard I/O library, standard C library/lib/profiled/libc.a Standard I/O library, standard C library profiled/usr/ccs/lib/libdbm.a Database Management library/usr/ccs/lib/libi18n.a Layout library/usr/lib/liblvm.a LVM (Logical Volume Manager) library/usr/ccs/lib/libm.a Math library/usr/ccs/lib/libp/libm.a Math library profiled/usr/lib/libodm.a ODM (Object Data Manager) library/usr/lib/libPW.a Programmers Workbench library/usr/lib/libpthreads.a POSIX compliant Threads library/usr/lib/libqb.a Queue Backend library
516 AIX 5L Version 5.3 General Programming Concepts: Writing and Debugging Programs

/usr/lib/librpcsvc.a RPC (Remote Procedure Calls) library/usr/lib/librts.a Run-Time Services library/usr/lib/libs.a Security functions/usr/lib/libsm.a System management library/usr/lib/libsrc.a SRC (System Resource Controller) library/usr/lib/libmsaa.a SVID (System V Interface Definition) math library/usr/ccs/lib/libp/libmsaa.a SVID (System V Interface Definition) math library profiled/usr/ccs/lib/libtermcap.a Terminal I/O/usr/lib/liby.a YP (Yellow Pages) library/usr/lib/lib300.a Graphics subroutines for DASI 300 workstations/usr/lib/lib300s.a Graphics subroutines for DASI 300s workstations/usr/lib/lib300S.a Graphics subroutines for DASI 300S workstations/usr/lib/lib4014.a Graphics subroutines for Tektronix 4014 workstations/usr/lib/lib450.a Graphics subroutines for DASI 450 workstations/usr/lib/libcsys.a Kernel extensions services/usr/ccs/lib/libdbx.a Debug program library/usr/lib/libgsl.a Graphics Support library/usr/lib/libieee.a IEEE floating point library/usr/lib/libIM.a Stanza file processing library/usr/ccs/lib/libl.a lex library/usr/lib/libogsl.a Old graphics support library/usr/lib/liboldX.a X10 library/usr/lib/libplot.a Plotting subroutines/usr/lib/librpcsvc.a RPC services/usr/lib/librs2.a Hardware-specific sqrt and itrunc subroutines/usr/lib/libxgsl.a Enhanced X-Windows graphics subroutines/usr/lib/libX11.a X11 run time library/usr/lib/libXt.a X11 toolkit library/usr/lib/liby.a yacc run time library
librs2.a Library
Note: The information in this section is specific to AIX 5.1 earlier.
The /usr/lib/librs2.a library provides statically linked, hardware-specific replacements for the sqrt anditrunc subroutines. These replacement subroutines make use of hardware-specific instructions on somePOWER-based, POWERstation, and POWERserver models to increase performance.
Note: Use the hardware-specific versions of these subroutines in programs that will run only onmodels of POWER-based machines, POWERstations, and POWERservers that support hardwareimplementations of square root and conversion to integer. Attempting to use them in programsrunning on other models will result in an illegal instruction trap.
General-Use sqrt and itrunc SubroutinesThe general-use version of the sqrt subroutine is in the libm.a library. The sqrt subroutine computes thesquare root of a floating-point number.
The general-use version of the itrunc subroutine is in the libc.a library. The itrunc subroutine converts afloating-point number to integer format.
POWER2-Specific sqrt and itrunc SubroutinesThe /usr/lib/librs2.a library contains the following subroutines:
v sqrt
Chapter 24. Subroutines, Example Programs, and Libraries 517

v _sqrt
v itrunc
v _itrunc
The subroutine names with leading underscores are used by the C and Fortran compilers. They arefunctionally identical to the versions without underscores.
For best performance, source code that computes square roots or converts floating-point numbers tointegers can be recompiled with the xlc or xlf command using the -qarch=pwrx compiler option. Thisoption enables a program to use the square-root and convert-to-integer instructions.
To use the hardware-specific subroutines in the librs2.a library, link it ahead of the libm.a and libc.alibraries. For example:xlc -O -o prog prog.c -lrs2 -lm
OR
xlf -O -o prog prog.f -lrs2
You can use the xlf or xlc compiler to rebind a program to use this library. For example, to create aPOWER2-specific executable file named progrs2 from an existing non-stripped file named prog in thecurrent directory:xlc -lrs2 prog -o progrs2
OR
xlf -lrs2 prog -o progrs2
Related InformationFor further information on this topic, see the following:
v List of time data manipulation services in Operating system and device management.
v Header Files Overview in AIX 5L Version 5.3 Files Reference.
Subroutine ReferencesThe itrunc subroutine,printf in AIX 5L Version 5.3 Technical Reference: Base Operating System andExtensions Volume 1.
The scanf subroutine, setlocale subroutine sqrt subroutine in AIX 5L Version 5.3 Technical Reference:Base Operating System and Extensions Volume 2.
518 AIX 5L Version 5.3 General Programming Concepts: Writing and Debugging Programs

Chapter 25. System Management Interface Tool (SMIT)
The System Management Interface Tool (SMIT) is an interactive and extensible screen-oriented commandinterface. It prompts users for the information needed to construct command strings and presentsappropriate predefined selections or run time defaults where available. This shields users from manysources of extra work or error, including the details of complex command syntax, valid parameter values,system command spelling, or custom shell path names.
You can also build and use alternate databases instead of modifying SMIT’s default system database.
The following sections discuss SMIT in detail:
New tasks consisting of one or more commands or inline ksh shell scripts can be added to SMIT at anytime by adding new instances of predefined screen objects to SMIT’s database. These screen objects(described by stanza files) are used by the Object Data Manager (ODM) to update SMIT’s database. Thisdatabase controls SMIT’s run-time behavior.
SMIT Screen TypesThere are three main screen types available for the System Management Interface Tool (SMIT). Thescreens occur in a hierarchy consisting of menu screens, selector screens, and dialog screens. Whenperforming a task, a user typically traverses one or more menus, then zero or more selectors, and finallyone dialog.
The following table shows SMIT screen types, what the user sees on each screen, and what SMIT doesinternally with each screen:
Screen Type What the User Sees on the Screen What SMIT Does Internally withEach Screen
Menu A list of choices Uses the choice to select the nextscreen to display.
Selector Either a list of choices or an entryfield
Obtains a data value for subsequentscreens. Optionally selects alternativedialogs or selectors.
Dialog A sequence of entry fields. Uses data from the entry fields toconstruct and run the target taskcommand string.
Menus present a list of alternative subtasks; a selection can then lead to another menu screen or to aselector or dialog screen. A selector is generally used to obtain one item of information that is needed by asubsequent screen and which can also be used to select which of several selector or dialog screens touse next. A dialog screen is where any remaining input is requested from the user and where the chosentask is actually run.
A menu is the basic entry point into SMIT and can be followed by another menu, a selector, or a dialog. Aselector can be followed by a dialog. A dialog is the final entry panel in a SMIT sequence.
Menu ScreensA SMIT menu is a list of user-selectable items. Menu items are typically tasks or classes of tasks that canbe performed from SMIT. A user starting with the main SMIT menu selects an item defining a broad rangeof system tasks. A selection from the next and subsequent menus progressively focuses the user’s choice,until finally a dialog is typically displayed to collect information for performance of a particular task.
© Copyright IBM Corp. 1997, 2010 519

Design menus to help a user of SMIT narrow the scope of choice to a particular task. Your design can beas simple as a new menu and dialog attached to an existing branch of SMIT, or as complex as an entirenew hierarchy of menus, selectors, and dialogs starting at the SMIT applications menu.
At run time, SMIT retrieves all menu objects with a given ID (id descriptor value) from the specified objectrepository. To add an item to a particular SMIT menu, add a menu object having an ID value equal to thevalue of the id descriptor of other non-title objects in the same menu.
Build menus by defining them in a stanza file and then processing the file with the odmadd command. Amenu definition is compiled into a group of menu objects. Any number of menus, selectors, and dialogscan be defined in one or more files.
odmadd Adds the menu definitions to the specified object repository./usr/lib/objrepos Default object repository for system information and can be used to store your
compiled objects.
At SMIT run time, the objects are automatically retrieved from a SMIT database.
Note: You should always back up the /usr/lib/objrepos directory before deleting or adding any objects orobject classes. Unanticipated damage to objects or classes needed for system operations cancause system problems.
Selector ScreensA SMIT selector prompts a user to specify a particular item, typically a system object (such as a printer) orattribute of an object (such as a serial or parallel printer mode). This information is then generally used bySMIT in the next dialog.
For instance, a selector can prompt a user to enter the name of a logical volume for which to changelogical volume characteristics. This could then be used as a parameter in thesm_cmd_hdr.cmd_to_discover_postfix field of the next dialog for entry field initialization. Likewise, theselector value could also be used as the value for a subsequent sm_cmd_opt.cmd_to_list_postfix field. Itcan also be used directly as a subsequent initial entry field value. In each case, logical consistencyrequires that this item either be selected prior to the dialog or be held constant while in the dialog.
Design a selector to request a single piece of information from the user. A selector, when used, fallsbetween menus and dialogs. Selectors can be strung together in a series to gather several pieces ofinformation before a dialog is displayed.
Selectors should usually contain a prompt displayed in user-oriented language and either a response areafor user input or a pop-up list from which to select a value; that is, one question field and one answer.Typically the question field is displayed and the SMIT user enters a value in the response area by typingthe value or by selecting a value from a list or an option ring.
To give the user a run-time list of choices, the selector object can have an associated command (definedin the sm_cmd_opt.cmd_to_list field) that lists the valid choices. The list is not hard-coded, but developedby the command in conjunction with standard output. The user gets this list by selecting the F4(Esc+4)=List function of the SMIT interface.
In a ghost selector (sm_cmd_hdr.ghost=″y″), the command defined in the sm_cmd_opt.cmd_to_list field, ifpresent, is automatically run. The selector screen is not displayed at this time and the user sees only thepop-up list.
520 AIX 5L Version 5.3 General Programming Concepts: Writing and Debugging Programs

The application of a super-ghost selector permits branching following menu selection, where the branch tobe taken depends on the system state and not user input. In this case, the cmd_to_classify descriptor inthe super-ghost selector can be used to get the required information and select the correct screen topresent next.
Build selectors by defining them in a stanza file and then processing the file with the odmadd command.Several menus, selectors, and dialogs can be defined in a single file. The odmadd command adds eachselector to the specified object repository. The /usr/lib/objrepos directory is the default object repositoryfor system information and is used to store your compiled objects. At SMIT run time, the objects areautomatically retrieved from a SMIT database.
Note: Always back up the /usr/lib/objrepos directory before deleting or adding any objects or objectclasses. Unanticipated damage to objects or classes needed for system operations can causesystem problems.
Dialog ScreensA dialog in SMIT is the interface to a command or task a user performs. Each dialog executes one ormore commands, shell functions, and so on. A command can be run from any number of dialogs.
To design a dialog, you need to know the command string you want to build and the command optionsand operands for which you want user-specified values. In the dialog display, each of these commandoptions and operands is represented by a prompt displayed in user-oriented language and a responsearea for user input. Each option and operand is represented by a dialog command option object in theObject Data Manager (ODM) database. The entire dialog is held together by the dialog header object.
The SMIT user enters a value in the response area by typing the value, or by selecting a value from a listor an option ring. To give the user a run-time list of choices, each dialog object can have an associatedcommand that lists the valid choices. The associated commands are defined in thesm_cmd_opt.cmd_to_list field. The user gets this list by invoking the F4 (Esc + 4)=List function of theSMIT interface. This causes SMIT to run the command defined in the associated cmd_to_list field and touse its standard output and stderr file for developing the list.
Dialog screens can have the following options assigned to the entries:
Option Function
# Signifies that a numerical value is expected.
* Signifies that an entry is mandatory.
+ Signifies that a listing of choices can be obtained using the F4 key.
In a ghost dialog, the dialog screen is not displayed. The dialog runs as if the user had immediatelypressed the dialog screen Enter key to run the dialog.
Build dialogs by defining them in a stanza file and then processing the file with the odmadd command.Several menus, selectors, and dialogs can be defined in a single file. The odmadd command adds eachdialog definition to the specified object repository. The /usr/lib/objrepos directory is the default objectrepository for system information and can be used to store your compiled objects. At SMIT run time, theobjects are automatically retrieved from a SMIT database.
Note: Always back up the /usr/lib/objrepos directory before deleting or adding any objects or objectclasses. Unanticipated damage to objects or classes needed for system operations can causesystem problems.
Chapter 25. System Management Interface Tool (SMIT) 521

SMIT Object Classes
A System Management Interface Tool (SMIT) object class created with the Object Data Manager (ODM)defines a common format or record data type for all individual objects that are instances of that objectclass. Therefore a SMIT object class is basically a record data type and a SMIT object is a particularrecord of that type.
SMIT menu, selector, and dialog screens are described by objects that are instances of one of four objectclasses:
v sm_menu_opt
v sm_name_hdr
v sm_cmd_hdr
v sm_cmd_opt
The following table shows the objects used to create each screen type:
Screen Type Object Class Object’s Use (typical case)
Menu sm_menu_opt 1 for title of screen
sm_menu_opt 1 for first item
sm_menu_opt 1 for second item
... ...
sm_menu_opt 1 for last item
Selector sm_name_hdr 1 for title of screen and other attributes
sm_cmd_opt 1 for entry field or pop-up list
Dialog sm_cmd_hdr 1 for title of screen and command string
sm_cmd_opt 1 for first entry field
sm_cmd_opt 1 for second entry field
... ...
sm_cmd_opt 1 for last entry field
Each object consists of a sequence of named fields and associated values. These are represented instanza format in ASCII files that can be used by the odmadd command to initialize or extend SMITdatabases. Stanzas in a file should be separated with one or more blank lines.
Note: Comments in an ODM input file (ASCII stanza file) used by the odmadd command must bealone on a line beginning with a # (pound sign) or an * (asterisk) in column one. Only an * (asterisk)comment can be on the same line as a line of the stanza, and must be after the descriptor value.
The following is an example of a stanza for an sm_menu_opt object:sm_menu_opt: *name of object class
id = "top_menu" *object's (menu screen) nameid_seq_num = "050"next_id = "commo" *id of objects for next menu screentext = "Communications Applications & Services"text_msg_file = ""text_msg_set = 0text_msg_id = 0next_type = "m" *next_id specified another menualias = ""
522 AIX 5L Version 5.3 General Programming Concepts: Writing and Debugging Programs

help_msg_id = ""help_msg_loc = ""help_msg_base = ""help_msg_book = ""
The notation ObjectClass.Descriptor is commonly used to describe the value of the fields of an object. Forinstance, in the preceding sm_menu_opt object, the value of sm_menu_opt.id is top_menu.
See “sm_menu_opt (SMIT Menu) Object Class” on page 532 for a detailed explanation of each field in thesm_menu_opt object class.
The following is an example of a stanza for an sm_name_hdr object:sm_name_hdr: *---- used for selector screens
id = "" *the name of this selector screennext_id = "" *next sm_name_hdr or sm_cmd_hdroption_id = "" *specifies one associated sm_cmd_opthas_name_select = ""name = "" *title for this screenname_msg_file = ""name_msg_id = 0type = ""ghost = ""cmd_to_classify = ""cmd_to_classify_postfix = ""raw_field_name = ""cooked_field_name = ""next_type = ""help_msg_id = ""help_msg_loc = ""help_msg_base = ""help_msg_book = ""
See the “sm_name_hdr (SMIT Selector Header) Object Class” on page 534 for a detailed explanation ofeach field in the sm_name_hdr object class.
The following is an example of a stanza for an sm_cmd_hdr object:sm_cmd_hdr: *---- used for dialog screens
id = "" *the name of this dialog screenoption_id = "" *defines associated set of sm_cmd_opt objectshas_name_select = ""name = "" *title for this screenname_msg_file = ""name_msg_set = 0name_msg_id = 0cmd_to_exec = ""ask = ""exec_mode = ""ghost = ""cmd_to_discover = ""cmd_to_discover_postfix = ""name_size = 0value_size = 0help_msg_id = ""help_msg_loc = ""help_msg_base = ""help_msg_book = ""
See the “sm_cmd_hdr (SMIT Dialog Header) Object Class” on page 540 for a detailed explanation of eachfield in the sm_cmd_hdr object class.
The following is an example of a stanza for an sm_cmd_opt object:
Chapter 25. System Management Interface Tool (SMIT) 523

sm_cmd_opt: *---- used for selector and dialog screensid = "" *name of this objectid_seq_num = "" *"0" if associated with selector screendisc_field_name = ""name = "" *text describing this entryname_msg_file = ""name_msg_set = 0name_msg_id = 0op_type = ""entry_type = ""entry_size = 0required = ""prefix = ""cmd_to_list_mode = ""cmd_to_list = ""cmd_to_list_postfix = ""multi_select = ""value_index = 0disp_values = ""values_msg_file = ""values_msg_set = 0values_msg_id = 0aix_values = ""help_msg_id = ""help_msg_loc = ""help_msg_base = ""help_msg_book = ""
See “sm_cmd_opt (SMIT Dialog/Selector Command Option) Object Class” on page 536 for a detailedexplanation of each field in the sm_cmd_opt object class.
All SMIT objects have an id field that provides a name used for looking up that object. The sm_menu_optobjects used for menu titles are also looked up using their next_id field. The sm_menu_opt andsm_name_hdr objects also have next_id fields that point to the id fields of other objects. These are howthe links between screens are represented in the SMIT database. Likewise, there is an option_id field insm_name_hdr and sm_cmd_hdr objects that points to the id fields of their associated sm_cmd_optobject(s).
Note: The sm_cmd_hdr.option_id object field is equal to each sm_cmd_opt.id object field; this definesthe link between the sm_cmd_hdr object and its associated sm_cmd_opt objects.
Two or more dialogs can share common sm_cmd_opt objects since SMIT uses the ODM LIKE operatorto look up objects with the same sm_cmd_opt.id field values. SMIT allows up to five IDs (separated bycommas) to be specified in a sm_cmd_hdr.option_id field, so that sm_cmd_opt objects with any of fivedifferent sm_cmd_opt.id field values can be associated with the sm_cmd_hdr object.
The following table shows how the value of an sm_cmd_hdr.option_id field relates to the values of thesm_cmd_opt.id and sm_cmd_opt.id_seq_num fields.
Note: The values in the sm_cmd_opt.id_seq_num fields are used to sort the retrieved objects forscreen display.
IDs of Objects to Retrieve(sm_cmd_hdr.option_id)
Objects Retrieved (sm_cmd_opt.id) Display Sequence of RetrievedObjects (sm_cmd_opt.id_seq_num)
″demo.[AB]″ ″demo.A″ ″10″
″demo.B″ ″20″
″demo.A″ ″30″
″demo.A ″40″
″demo.[ACD]″ ″demo.A″ ″10″
524 AIX 5L Version 5.3 General Programming Concepts: Writing and Debugging Programs

IDs of Objects to Retrieve(sm_cmd_hdr.option_id)
Objects Retrieved (sm_cmd_opt.id) Display Sequence of RetrievedObjects (sm_cmd_opt.id_seq_num)
″demo.C″ ″20″
″demo.A″ ″30″
″demo.A″ ″40″
″demo.D″ ″50″
″demo.X,demo.Y,demo.Z″ ″demo.Y″ ″20″
″demo.Z″ ″40″
″demo.X″ ″60″
″demo.X″ ″80″
The SMIT DatabaseSMIT objects are generated with ODM creation facilities and stored in files in a designated database. Thedefault SMIT database consists of eight files:
v sm_menu_opt
v sm_menu_opt.vc
v sm_name_hdr
v sm_name_hdr.vc
v sm_cmd_hdr
v sm_cmd_hdr.vc
v sm_cmd_opt
v sm_cmd_opt.vc
The files are stored by default in the /usr/lib/objrepos directory. They should always be saved andrestored together.
SMIT Aliases and Fast PathsA System Management Interface Tool (SMIT) sm_menu_opt object can be used to define a fast path that,when entered with the smit command to start SMIT, can get a user directly to a specific menu, selector, ordialog; the alias itself is never displayed. Use of a fast path allows a user to bypass the main SMIT menuand other objects in the SMIT interface path to that menu, selector, or dialog. Any number of fast pathscan point to the same menu, selector, or dialog.
An sm_menu_opt object is used to define a fast path by setting the sm_menu_opt.alias field to ″y″. In thiscase, the sm_menu_opt object is used exclusively to define a fast path. The new fast path or alias nameis specified by the value in the sm_menu_opt.id field. The contents of the sm_menu_opt.next_id field pointsto another menu object, selector header object, or dialog header object, depending on whether the valueof the sm_menu_opt.next_type field is ″m″ (menu), ″n″ (selector), or ″d″ (dialog).
Every non alias sm_menu_opt object for a menu title (next_type=″m″) should have a uniquesm_menu_opt.next_id field value, since this field is automatically used as a fast path.
If you want two menu items to point to the same successor menu, one of the next_id fields should point toan alias, which in turn points to the successor menu.
Build aliases and fast paths by defining them in a stanza file and then processing the file with the odmaddcommand. Several menus, selectors, and dialogs can be defined in a single file. The odmadd commandadds each alias definition to the specified object repository. The /usr/lib/objrepos directory is the default
Chapter 25. System Management Interface Tool (SMIT) 525

object repository for system information and can be used to store your compiled objects. At SMIT run time,the objects are automatically retrieved from a SMIT database.
Note: You should always back up the /usr/lib/objrepos directory before deleting or adding anyobjects or object classes. Unanticipated damage to objects or classes needed for system operationscan cause system problems.
SMIT Information Command Descriptors
The System Management Interface Tool (SMIT) can use several descriptors defined in its objects to getthe information, such as current run time values, required to continue through the SMIT interface structure.Each of these descriptors is assigned some form of command string to run and retrieve the needed data.
The descriptors that can be set to a command for discovery of required information are:
v The cmd_to_discover descriptor that is part of the sm_cmd_hdr object class used to define a dialogheader.
v The cmd_to_classify descriptor that is part of the sm_name_hdr object class used to define a selectorheader.
v The cmd_to_list descriptor that is part of the sm_cmd_opt object class used to define a selectoroption list associated with a selector or a dialog command option list associated with a dialog entry field.
SMIT executes a command string specified by a cmd_to_list, cmd_to_classify, or cmd_to_discoverdescriptor by first creating a child process. The standard error (strerr) and standard output of the childprocess are redirected to SMIT via pipes. SMIT next executes a setenv(″ENV=″) subroutine in the childprocess to prevent commands specified in the $HOME/.env file of the user from being run automaticallywhen a new shell is invoked. Finally, SMIT calls the execl system subroutine to start a new ksh shell,using the command string as the ksh -c parameter value. If the exit value is not 0, SMIT notifies the userthat the command failed.
SMIT makes the path names of the log files and the settings of the command line verbose, trace, anddebug flags available in the shell environment of the commands it runs. These values are provided via thefollowing environment variables:
v _SMIT_LOG_FILE
v _SMIT_SCRIPT_FILE
v _SMIT_VERBOSE_FLAG
v _SMIT_TRACE_FLAG
v _SMIT_DEBUG_FLAG
The presence or absence of the corresponding flag is indicated by a value of 0 or 1, respectively.
An easy way to view the current settings is to invoke the shell function after starting SMIT and then runthe command string env | grep _SMIT.
All writes to the log files should be done as appends and should be immediately followed by flushesunless this occurs automatically.
The cmd_to_discover Descriptor
When SMIT puts up a dialog, it gets the sm_cmd_hdr (dialog header) object and its associated dialogbody (one or more sm_cmd_opt objects) from the object repository. However, the sm_cmd_opt objectscan also be initialized with current run time values. If the sm_cmd_hdr.cmd_to_discover field is not empty(″″), SMIT runs the command specified in the field to obtain current run time values.
526 AIX 5L Version 5.3 General Programming Concepts: Writing and Debugging Programs

Any valid ksh command string can be used as a cmd_to_discover descriptor value. The commandshould generate the following output format as its standard output:#name_1:name_2: ... :name_n\nvalue_1:value_2: ... :value_n
In the standard output of a command, the first character is always a # (pound sign). A \n (new linecharacter) is always present to separate the name line from the value line. Multiple names and values areseparated by : (colons). And any name or value can be an empty string (which in the output formatappears as two colons with no space between them). SMIT maintains an internal current value set in thisformat that is used to pass name-value pairs from one screen to the next.
Note: If the value includes a : (colon), the : must be preceded by #! (pound sign, exclamation point).Otherwise, SMIT reads the : (colon) as a field separator.
When SMIT runs a command specified in a cmd_to_discover field, it captures the stdout of the commandand loads these name-value pairs (name_1 and value_1 name_2 and value_2, and so on) into thedisp_values and aix_values descriptors of the sm_cmd_opt (dialog command option) objects bymatching each name to a sm_cmd_opt.disc_field_name descriptor in each sm_cmd_opt object.
For a sm_cmd_opt (dialog command option) object that displays a value from a preceding selector, thedisc_field_name descriptor for the dialog command option object must be set to ″_rawname″ or″_cookedname″ (or whatever alternate name was used to override the default name) to indicate which valueto use. In this case, the disc_field_name descriptor of the sm_cmd_opt (dialog command option) objectshould normally be a no-entry field. If a particular value should always be passed to the command, therequired descriptor for the sm_cmd_opt (dialog command option) object must be set to y (yes), or one ofthe other alternatives.
A special case of option ring field initialization permits the current value for a cmd_to_discover descriptor(that is, any name-value pair from the current value set of a dialog) of a ring entry field to specify whichpre-defined ring value to use as the default or initial value for the corresponding entry field. At dialoginitialization time, when a dialog entry field matches a name in the current value set of the dialog (viasm_cmd_opt.disc_field_name), a check is made to determine if it is an option ring field(sm_cmd_opt.op_type = ″r″) and if it has predefined ring values (sm_cmd_opt.aix_values != ″″). If so,this set of option ring values is compared with the current value for disc_field_name from the currentvalue set. If a match is found, the matched option ring value becomes the default ring value(sm_cmd_opt.value_index is set to its index). The corresponding translated value(sm_cmd_opt.disp_values), if available, is displayed. If no match is found, the error is reported and thecurrent value becomes the default and only value for the ring.
In many cases, discovery commands already exist. In the devices and storage areas, the generalparadigms of add, remove, change, and show exist. For example, to add (mk), a dialog is needed to solicitcharacteristics. The dialog can have as its discovery command the show (ls) command with a parameterthat requests default values. SMIT uses the standard output of the show (ls) command to fill in thesuggested defaults. However, for objects with default values that are constants known at development time(that is, that are not based on the current state of a given machine), the defaults can be initialized in thedialog records themselves; in this case, no cmd_to_discover is needed. The dialog is then displayed.When all fields are filled in and the dialog is committed, the add (mk) command is executed.
As another example, a change (ch) dialog can have as its discovery command a show (ls) command toget current values for a given instance such as a particular device. SMIT uses the standard output of theshow (ls) command to fill in the values before displaying the dialog. The show (ls) command used fordiscovery in this instance can be the same as the one used for discovery in the add (mk) example, exceptwith a slightly different set of options.
Chapter 25. System Management Interface Tool (SMIT) 527

The cmd_to_*_postfix Descriptors
Associated with each occurrence of a cmd_to_discover, cmd_to_classify, or cmd_to_list descriptor is asecond descriptor that defines the postfix for the command string defined by the cmd_to_discover,cmd_to_classify, or cmd_to_list descriptor. The postfix is a character string defining the flags andparameters that are appended to the command before it is executed.
The descriptors that can be used to define a postfix to be appended to a command are:
v The cmd_to_discover_postfix descriptor that defines the postfix for the cmd_to_discover descriptorin an sm_cmd_hdr object defining a dialog header.
v The cmd_to_classify_postfix descriptor that defines the postfix for the cmd_to_classify descriptor inan sm_name_hdr object defining a selector header.
v The cmd_to_list_postfix descriptor that defines the postfix for the cmd_to_list descriptor in ansm_cmd_opt object defining a selector entry field associated with a selector or a dialog entry fieldassociated with a dialog.
The following is an example of how the postfix descriptors are used to specify parameter flags and values.The * (asterisk) in the example can be list, classify, or discover.
Assume that cmd_to_* equals ″DEMO -a″, that cmd_to_*_postfix equals ″-l _rawname -n stuff -R_cookedname″, and that the current value set is:#name1:_rawname:_cookedname::stuff\nvalue1:gigatronicundulator:parallel:xxx:47
Then the constructed command string would be:DEMO -a -l 'gigatronicundulator' -n '47' -R 'parallel'
Surrounding ’’ (single-quotation marks) can be added around postfix descriptor values to permit handlingof parameter values with embedded spaces.
SMIT Command Generation and Execution
Each dialog in the System Management Interface Tool (SMIT) builds and executes a version of a standardcommand. The command to be executed by the dialog is defined by the cmd_to_exec descriptor in thesm_cmd_hdr object that defines the dialog header.
Generating Dialog Defined Tasks
In building the command defined in an sm_cmd_hdr.cmd_to_exec descriptor, SMIT uses a two-passscan over the dialog set of sm_cmd_opt objects to collect prefix and parameter values. The parametervalues collected include those that the user changed from their initially displayed values and those with thesm_cmd_opt.required descriptor set to ″y″.
The first pass gathers all of the values of the sm_cmd_opt objects (in order) for which the prefixdescriptor is either an empty string (″″) or starts with a - (a minus sign). These parameters are notposition-sensitive and are added immediately following the command name, together with the contents ofthe prefix descriptor for the parameter.
The second pass gathers all of the values of the remaining sm_cmd_opt objects (in order) for which theprefix descriptor is — (two dashes). These parameters are position-sensitive and are added after theflagged options collected in the first pass.
528 AIX 5L Version 5.3 General Programming Concepts: Writing and Debugging Programs

Note: SMIT executes the value of what you enter in the prefix field. If the value in the prefix field is areserved shell character, for example, the * (asterisk), you must follow the character with a —’ (dashdash single quotation mark). Then, when the system evaluates the character, it does not mistake itfor a shell character.
Command parameter values in a dialog are filled in automatically when the disc_field_name descriptorsof its sm_cmd_opt objects match names of values generated by preceding selectors or a precedingdiscovery command. These parameter values are effectively default values and are normally not added tothe command line. Initializing an sm_cmd_opt.required descriptor to ″y″ or ″+″ causes these values to beadded to the command line even when they are not changed in the dialog. If the sm_cmd_opt.requireddescriptor value is ″?″, the corresponding values are used only if the associated entry field is non-empty.These parameter values are built into the command line as part of the regular two-pass process.
Leading and trailing white spaces (spaces and tabs) are removed from parameter values except when thesm_cmd_opt.entry_type descriptor is set to ″r″. If the resulting parameter value is an empty string, nofurther action is taken unless the sm_cmd_opt.prefix descriptor starts with an option flag. Surroundingsingle quotation marks are added to the parameter value if the prefix descriptor is not set to ″—″ (twodashes). Each parameter is placed immediately after the associated prefix, if any, with no interveningspaces. Also, if the multi_select descriptor is set to ″m″, tokens separated by white space in the entry fieldare treated as separate parameters.
Executing Dialog Defined Tasks
SMIT runs the command string specified in a sm_cmd_hdr.cmd_to_exec descriptor by first creating achild process. The standard error and standard output of the child process are handled as specified by thecontents of the sm_cmd_hdr.exec_mode descriptor. SMIT next runs a setenv(″ENV=″) subroutine in thechild process to prevent commands specified in the $HOME/.env file of the user from being runautomatically when a new shell is invoked. Finally, SMIT calls the execl subroutine to start a ksh shell,using the command string as the ksh -c parameter value.
SMIT makes the path names of the log files and the settings of the command line verbose, trace, anddebug flags available in the shell environment of the commands it runs. These values are provided withthe following environment variables:
v _SMIT_LOG_FILE
v _SMIT_SCRIPT_FILE
v _SMIT_VERBOSE_FLAG
v _SMIT_TRACE_FLAG
v _SMIT_DEBUG_FLAG
The presence or absence of the corresponding flag is indicated by a value of 0 or 1, respectively.
Additionally, the SMIT environment variable provides information about which SMIT environment is active.The SMIT environment variable can have the following vaues:
Value SMIT Environmenta SMIT in an ASCII interfaced SMIT in the Distributed SMIT (DSMIT) interfacem SMIT in a windows (also called Motif) interface
An easy way to view the current settings is to invoke the shell function after starting SMIT and then runthe command string env | grep SMIT.
You can disable the function key F9=Shell by setting the environment variable SMIT_SHELL=n.
Chapter 25. System Management Interface Tool (SMIT) 529

All writes to the log files should be done as appends and should immediately be followed by flushes wherethis does not occur automatically.
You can override SMIT default output redirection of the (child) task process by setting thesm_cmd_hdr.exec_mode field to ″i″. This setting gives output management control to the task, since the taskprocess simply inherits the standard error and standard output file descriptors.
You can cause SMIT to shutdown and replace itself with the target task by setting thesm_cmd_hdr.exec_mode field to ″e″.
Adding Tasks to the SMIT Database
When developing new objects for the System Management Interface Tool (SMIT) database, it isrecommended that you set up a separate test database for development.
ProcedureTo create a test database, do the following:
1. Create a directory for testing use. For example, the following command creates a /home/smit/testdirectory:mkdir /home/smit /home/smit/test
2. Make the test directory the current directory:cd /home/smit/test
3. Define the test directory as the default object repository by setting the ODMDIR environment variableto . (the current directory):export ODMDIR= .
4. Create a new SMIT database in the test directory:cp /usr/lib/objrepos/sm_* .
To add tasks to the SMIT database:
1. Design the dialog for the command you want SMIT to build. See “Dialog Screens” on page 521 formore information.
2. Design the hierarchy of menus and, optionally, of selectors needed to get a SMIT user to the dialog,and determine where and how this hierarchy should be linked into the existing SMIT database. See“Menu Screens” on page 519 and “Selector Screens” on page 520 for more information. The followingstrategy may save you time if you are developing SMIT database extensions for the first time:
a. Start SMIT (run the smit command), look for existing menu, selector, and dialog screens thatperform tasks similar to the one you want to add, and find the menu screen(s) to which you willadd the new task.
b. Exit from SMIT, then remove the existing SMIT log file. Instead of removing the log file, you canuse the -l flag of the smit command to specify a different log file when starting SMIT in thefollowing step. This enables you to isolate the trace output of your next SMIT session.
c. Start SMIT again with the -t command flags and again look at the screen to which you will add thenew task. This logs the object IDs accessed for each screen for the next step.
d. Look at the SMIT log file to determine the ID for each object class used as part of the menu(s).
e. Use the object class IDs with the odmget command to retrieve the stanzas for these objects. Thestanzas can be used as rough examples to guide your implementation and to learn from theexperience of others.
f. Look in the SMIT log file for the command strings used when running through the screens to see ifspecial tools are being utilized (such as sed or awk scripts, ksh shell functions, environmentvariable assignment, and so on). When entering command strings, keep in mind that they areprocessed twice: the first time by the odmadd command and the second time by the ksh shell. Be
530 AIX 5L Version 5.3 General Programming Concepts: Writing and Debugging Programs

careful when using special escape meta-characters such as \ or quotation characters (’ and ″).Note also that the output of the odmget command does not always match the input to the odmaddcommand, especially when these characters or multiline string values are used.
3. Code the dialog, menu, and selector objects by defining them in the ASCII object stanza file formatrequired by the odmadd command. For examples of stanzas used to code SMIT objects, see “SMITScreen Types” on page 519.
4. Add the dialog, menu, and selector objects to the SMIT test database with the odmadd command,using the name of your ASCII object stanza file in place of test_stanzas:odmadd test_stanzas
5. Test and debug your additions by running SMIT using the local test database:smit -o
“Debugging SMIT Database Extensions” discusses how to test and debug additions to SMIT.
When you are finished testing, restore the /etc/objrepos directory as the default object repository bysetting the ODMDIR environment variable to /etc/objrepos:export ODMDIR=/etc/objrepos
Debugging SMIT Database Extensions
Prerequisite Tasks or Conditions1. Add a task to the SMIT Database.
2. Test the task.
Procedure1. Identify the problem using one of the following flags:
v Run the smit -v command if the problem applies to the following SMIT descriptors:
– cmd_to_list
– cmd_to_classify
– cmd_to_discover
v Run the smit -t command if the problems applies to individual SMIT database records.
v Run the smit -l command to generate an alternate log file. Use the alternate log file to isolatecurrent session information.
2. Modify the SMIT database where the incorrect information resides.
3. Retest SMIT task.
Creating SMIT Help Information for a New TaskSystem Management Interface Tool (SMIT) helps are an extension of the SMIT program. They are a seriesof helps designed to give you online information about the components of SMIT used to construct dialogsand menus. SMIT helps reside in a database, just as the SMIT executable code resides in a database.SMIT has two ways to retrieve SMIT help information:
v “Man Pages Method” on page 532
v “Message Catalog Method” on page 532.
Each of these methods provides a different way to retrieve SMIT helps from the SMIT help database.
Chapter 25. System Management Interface Tool (SMIT) 531

Man Pages Method
Prerequisite Tasks or ConditionsCreate a new SMIT task that requires help information.
Procedure1. Using any editor, create a file and enter help text inside the file. The file must adhere to the format
specified by the man command. Put only one set of help information in a file.
2. Give the help text file a title as specified by the man command.
3. Place the help text file in the correct place in the manual subdirectory.
4. Test the newly created file to ensure it works using the man command.
5. Locate the file that contains the ASCII object stanza file format for the new SMIT task.
6. Locate the help descriptor fields in the object stanzas of the file.
7. Set the help_msg_loc help descriptor field equal to the title of the help text file. The title for the text fileis also the parameter to pass to the man command. For example:help_msg_loc = "xx", where "xx" = title string name
This example executes the man command with the xx title string name.
8. Leave the rest of the help descriptor fields empty.
Message Catalog Method
Prerequisite Tasks or ConditionsCreate a new SMIT task that requires help information.
Procedure1. Use any editor to create a file and enter help messages inside the file. The .msg file must adhere to
the format specified by the message facility.
Note: An existing .msg file can also be used.
2. Give each help message a set number (Set #) and a message number (MSG#). This allows thesystem to retrieve the proper help text.
3. Use the gencat command to convert the .msg file into a .cat file. Place the .cat file in the correctdirectory according to the NLSPATH environment variable.
4. Test the help messages using the dspmsg command.
5. Locate the file that contains the ASCII object stanza file format for the new SMIT task.
6. Locate the help descriptor fields in the object stanzas of the file.
7. For each object stanza, locate the help_msg_id help descriptor field. Enter the Set# and Msg# valuesfor the message in the .msg file. These values must adhere to the Messages Facility format. Forexample, to retrieve message #14 for set #2, set:help_msg_id - "2,14"
8. Set the help_msg_loc help descriptor field to the filename of the file containing the help text.
9. Leave the other help descriptor fields empty.
sm_menu_opt (SMIT Menu) Object Class
Each item on a menu is specified by an sm_menu_opt object. The displayed menu represents the set ofobjects that have the same value for id plus the sm_menu_opt object used for the title, which has anext_id value equal to the id value of the other objects.
532 AIX 5L Version 5.3 General Programming Concepts: Writing and Debugging Programs

Note: When coding an object in this object class, set unused empty strings to ″″ (double-quotationmarks) and unused integer fields to 0.
The descriptors for sm_menu_opt objects are:
id The ID or name of the object. The value of id is a string with a maximum length of 64characters. IDs should be unique both to your application and unique within the particularSMIT database used. See the next_id and alias definitions for this object for relatedinformation.
id_seq_num The position of this item in relation to other items on the menu. Non-title sm_menu_optobjects are sorted on this string field. The value of id_seq_num is a string with a maximumlength of 16 characters.
next_id The fast path name of the next menu, if the value for the next_type descriptor of thisobject is ″m″ (menu). The next_id of a menu should be unique both to your application andwithin the particular SMIT database used. All non-alias sm_menu_opt objects with idvalues matching the value of next_id form the set of selections for that menu. The value ofnext_id is a string with a maximum length of 64 characters.
text The description of the task that is displayed as the menu item. The value of text is a stringwith a maximum length of 1024 characters. This string can be formatted with embedded \n(newline) characters.
text_msg_file The file name (not the full path name) that is the Message Facility catalog for the string,text. The value of text_msg_file is a string with a maximum length of 1024 characters.Message catalogs required by an application program can be developed with the MessageFacility. Set to ″″ if you are not using the Message Facility.
text_msg_set The Message Facility set ID for the string, text. Set IDs can be used to indicate subsets ofa single catalog. The value of text_msg_set is an integer. Set to 0 if you are not using theMessage Facility.
text_msg_id The Message Facility ID for the string, text. The value of text_msg_id is an integer. Set to0 if you are not using the Message Facility.
next_type The type of the next object if this item is selected. Valid values are:
″m″ Menu; the next object is a menu (sm_menu_opt).
″d″ Dialog; the next object is a dialog (sm_cmd_hdr).
″n″ Name; the next object is a selector (sm_name_hdr).
″i″ Info; this object is used to put blank or other separator lines in a menu, or topresent a topic that does not lead to an executable task but about which help isprovided via the help_msg_loc descriptor of this object.
alias Defines whether or not the value of the id descriptor for this menu object is an alias foranother existing fast path specified in the next_id field of this object. The value of the aliasdescriptor must be ″n″ for a menu object.
help_msg_id Specifies a Message Facility message set number and message ID number with a commaas the separator or a numeric string equal to a SMIT identifier tag.
help_msg_loc The file name sent as a parameter to the man command for retrieval of help text, or the filename of a file containing help text. The value of help_msg_loc is a string with a maximumlength of 1024 characters.
help_msg_base The fully qualified path name of a library that SMIT reads for the file names associated withthe correct book.
help_msg_book Contains the string with the value of the name file contained in the file library indicated byhelp_msg_base.
The sm_menu_opt Object Class Used for Aliases
A SMIT alias is specified by an sm_menu_opt object.
Chapter 25. System Management Interface Tool (SMIT) 533

The descriptors for the sm_menu_opt object class and their settings to specify an alias are:
id The ID or name of the new or alias fast path. The value of id is a string with a maximumlength of 64 characters. IDs should be unique to your application and unique within theSMIT database in which they are used.
id_seq_num Set to ″″ (empty string).next_id Specifies the id_seq_num of the menu object pointed to by the alias. The value of next_id
is a string with a maximum length of 64 characters.text Set to ″″ (empty string).text_msg_file Set to ″″ (empty string).text_msg_set Set to 0.text_msg_id Set to 0.next_type The fast path screen type. The value of next_type is a string. Valid values are:
″m″ Menu; the next_id field specifies a menu screen fast path.
″d″ Dialog; the next_id field specifies a dialog screen fast path.
″n″ Name; the next_id field specifies a selector screen fast path.alias Defines this object as an alias fast path. The alias descriptor for an alias must be set to ″y″
(yes).help_msg_id Set to ″″ (empty string).help_msg_loc Set to ″″ (empty string).help_msg_base Set to ″″ (empty string).help_msg_book Set to ″″ (empty string).
For information on retrieving SMIT help using the help_msg_id, help_msg_loc, help_msg_base, andhelp_msg_book fields, see the “Man Pages Method” on page 532, and “Message Catalog Method” on page532 methods located in ″Creating SMIT Help Information for a New Task .
sm_name_hdr (SMIT Selector Header) Object Class
A selector screen is specified by two objects: an sm_name_hdr object that specifies the screen title andother information, and an sm_cmd_opt object that specifies what type of data item is to be obtained.
Note: When coding an object in this object class, set unused empty strings to ″″ (double-quotationmarks) and unused integer fields to 0.
In a SMIT Selector Header screen ( sm_name_hdr) with type = ″c″, if you specify a value using a :(colon), (for example, tty:0), SMIT inserts a #! (pound sign, exclamation point) in front of the : to signifythat the : is not a field separator. SMIT removes the #! after parsing the rest of the value, before passing itto the cmd_to_classify descriptor. To make any further additions to the cmd_to_classify descriptor,reinsert the #! in front of the :
The descriptors for the sm_name_hdr object class are:
id The ID or name of the object. The id field can be externalized as a fastpath ID unless has_name_select is set to ″y″ (yes). The value of id isa string with a maximum length of 64 characters. IDs should be uniqueto your application and unique within your system.
next_id Specifies the header object for the subsequent screen; set to the valueof the id field of the sm_cmd_hdr object or the sm_name_hdr objectthat follows this selector. The next_type field described below specifieswhich object class is indicated. The value of next_id is a string with amaximum length of 64 characters.
534 AIX 5L Version 5.3 General Programming Concepts: Writing and Debugging Programs

option_id Specifies the body of this selector; set to the id field of thesm_cmd_opt object. The value of option_id is a string with amaximum length of 64 characters.
has_name_select Specifies whether this screen must be preceded by a selector screen.Valid values are:
″″ or ″n″No; this is the default case. The id of this object can be usedas a fast path, even if preceded by a selector screen.
″y″ Yes; a selector must precede this object. This setting preventsthe id of this object from being used as a fast path to thecorresponding dialog screen.
name The text displayed as the title of the selector screen. The value of nameis a string with a maximum length of 1024 characters. The string can beformatted with embedded \n (newline) characters.
name_msg_file The file name (not the full path name) that is the Message Facilitycatalog for the string, name. The value of name_msg_file is a stringwith a maximum length of 1024 characters. Message catalogs requiredby an application program can be developed with the Message Facility.
name_msg_set The Message Facility set ID for the string, name. Set IDs can be usedto indicate subsets of a single catalog. The value of name_msg_set isan integer.
name_msg_id The Message Facility ID for the string, name. The value ofname_msg_id is an integer.
type The method to be used to process the selector. The value of type is astring with a maximum length of 1 character. Valid values are:
″″ or ″j″Just next ID; the object following this object is always theobject specified by the value of the next_id descriptor. Thenext_id descriptor is a fully-defined string initialized atdevelopment time.
″r″ Cat raw name; in this case, the next_id descriptor is definedpartially at development time and partially at runtime by userinput. The value of the next_id descriptor defined atdevelopment time is concatenated with the value selected bythe user to create the id value to search for next (that of thedialog or selector to display).
″c″ Cat cooked name; the value selected by the user requiresprocessing for more information. This value is passed to thecommand named in the cmd_to_classify descriptor, and thenoutput from the command is concatenated with the value of thenext_id descriptor to create the id descriptor to search for next(that of the dialog or selector to display).
ghost Specifies whether to display this selector screen or only the list pop-uppanel produced by the command in the cmd_to_list field. The value ofghost is a string. Valid values are:
″″ or ″n″No; display this selector screen.
″y″ Yes; display only the pop-up panel produced by the commandstring constructed using the cmd_to_list andcmd_to_list_postfix fields in the associated sm_cmd_optobject. If there is no cmd_to_list value, SMIT assumes thisobject is a super-ghost (nothing is displayed), runs thecmd_to_classify command, and proceeds.
Chapter 25. System Management Interface Tool (SMIT) 535

cmd_to_classify The command string to be used, if needed, to classify the value of thename field of the sm_cmd_opt object associated with this selector. Thevalue of cmd_to_classify is a string with a maximum length of 1024characters. The input to the cmd_to_classify taken from the entry fieldis called the ″raw name″ and the output of the cmd_to_classify iscalled the ″cooked name″. Previous to AIX Version 4.2.1, you couldcreate only one value with cmd_to_classify. If that value included acolon, it was escaped automatically. In AIX 4.2.1 and later, you cancreate multiple values with cmd_to_classify, but the colons are nolonger escaped. The colon is now being used as a delimiter by thiscommand. If you use colons in your values, you must preserve themmanually.
cmd_to_classify_postfix The postfix to interpret and add to the command string in thecmd_to_classify field. The value of cmd_to_classify_postfix is astring with a maximum length of 1024 characters.
raw_field_name The alternate name for the raw value. The value of raw_field_name isa string with a maximum length of 1024 characters. The default value is″_rawname″.
cooked_field_name The alternate name for the cooked value. The value ofcooked_field_name is a string with a maximum length of 1024characters. The default value is ″cookedname″.
next_type The type of screen that follows this selector. Valid values are:
″n″ Name; a selector screen follows. See the description ofnext_id above for related information.
″d″ Dialog; a dialog screen follows. See the description of next_idabove for related information.
help_msg_id Specifies a Message Facility message set number and message IDnumber with a comma as the separator or a numeric string equal to aSMIT identifier tag.
help_msg_loc The file name sent as a parameter to the man command for retrieval ofhelp text, or the file name of a file containing help text. The value ofhelp_msg_loc is a string with a maximum length of 1024 characters.
help_msg_base The fully qualified path name of a library that SMIT reads for the filenames associated with the correct book.
help_msg_book Contains the string with the value of the name file contained in the filelibrary indicated by help_msg_base.
See the “Man Pages Method” on page 532, and “Message Catalog Method” on page 532 located in″Creating SMIT Help Information for a New Task″ for information on retrieving SMIT help using thehelp_msg_id, help_msg_loc, help_msg_base, and help_msg_book fields.
sm_cmd_opt (SMIT Dialog/Selector Command Option) Object Class
Each object in a dialog, except the dialog header object, normally corresponds to a flag, option, or attributeof the command that the dialog performs. One or more of these objects is created for each SMIT dialog; aghost dialog can have no associated dialog command option objects. Each selector screen is composed ofone selector header object and one selector command option object.
Note: When coding an object in this object class, set unused empty strings to ″″ (double-quotationmarks) and unused integer fields to 0.
The dialog command option object and the selector command option object are both sm_cmd_optobjects. The descriptors for the sm_cmd_opt object class and their functions are:
536 AIX 5L Version 5.3 General Programming Concepts: Writing and Debugging Programs

id The ID or name of the object. The id of the associated dialog or selectorheader object can be used as a fast path to this and other dialog objects in thedialog. The value of id is a string with a maximum length of 64 characters. Alldialog objects that appear in one dialog must have the same ID. Also, IDsshould be unique to your application and unique within the particular SMITdatabase used.
id_seq_num The position of this item in relation to other items on the dialog; sm_cmd_optobjects in a dialog are sorted on this string field. The value of id_seq_num is astring with a maximum length of 16 characters. When this object is part of adialog screen, the string ″0″ is not a valid value for this field. When this object ispart of a selector screen, the id_seq_num descriptor must be set to 0.
disc_field_name A string that should match one of the name fields in the output of thecmd_to_discover command in the associated dialog header. The value ofdisc_field_name is a string with a maximum length of 64 characters.
The value of the disc_field_name descriptor can be defined using the raw orcooked name from a preceding selector instead of the cmd_to_discovercommand in the associated header object. If the descriptor is defined with inputfrom a preceding selector, it must be set to either ″_rawname″ or ″_cookedname″,or to the corresponding sm_name_hdr.cooked_field_name value orsm_name_hdr.raw_field_name value if this was used to redefine the defaultname.
name The string that appears on the dialog or selector screen as the field name. It isthe visual questioning or prompting part of the object, a natural languagedescription of a flag, option or parameter of the command specified in thecmd_to_exec field of the associated dialog header object. The value of name isa string with a maximum length of 1024 characters.
name_msg_file The file name (not the full path name) that is the Message Facility catalog forthe string, name. The value of name_msg_file is a string with a maximumlength of 1024 characters. Message catalogs required by an applicationprogram can be developed with the Message Facility. Set to ″″ (empty string) ifnot used.
name_msg_set The Message Facility set ID for the string, name. The value of name_msg_setis an integer. Set to 0 if not used.
name_msg_id The Message Facility message ID for the string, name. The value ofname_msg_id is an integer. Set to 0 if not used.
op_type The type of auxiliary operation supported for this field. The value of op_type isa string. Valid values are:
″″ or ″n″ - This is the default case. No auxiliary operations (list or ring selection)are supported for this field.
″l″ - List selection operation provided. A pop-up window displays a list of itemsproduced by running the command in the cmd_to_list field of this object whenthe user selects the F4=List function of the SMIT interface.
″r″ - Ring selection operation provided. The string in the disp_values oraix_values field is interpreted as a comma-delimited set of valid entries. Theuser can tab or backtab through these values to make a selection. Also, theF4=List interface function can be used in this case, since SMIT will transformthe ring into a list as needed.
The values ″N″, ″L″, and ″R″ can be used as op_type values just as thelowercase values ″n″, ″l″, and ″r″. However, with the uppercase values, if thecmd_to_exec command is run and returns with an exit value of 0, then thecorresponding entry field will be cleared to an empty string.
Chapter 25. System Management Interface Tool (SMIT) 537

entry_type The type of value required by the entry field. The value of entry_type is astring. Valid values are:
″″ or ″n″ - No entry; the current value cannot be modified via direct type-in. Thefield is informational only.
″t″ - Text entry; alphanumeric input can be entered.
″#″ - Numeric entry; only the numeric characters 0, 1, 2, 3, 4, 5, 6, 7, 8, or 9 canbe entered. A - (minus sign) or + (plus sign) can be entered as the firstcharacter.
″x″ - Hex entry; hexadecimal input only can be entered.
″f″ - File entry; a file name should be entered.
″r″ - Raw text entry; alphanumeric input can be entered. Leading and trailingspaces are considered significant and are not stripped off the field.
entry_size Limits the number of characters the user can type in the entry field. The valueof entry_size is an integer. A value of 0 defaults to the maximum allowed valuesize.
required Defines if a command field must be sent to the cmd_to_exec commanddefined in the associated dialog header object. The value of required is astring. If the object is part of a selector screen, the required field shouldnormally be set to ″″ (empty string). If the object is part of a dialog screen, validvalues are:
″″ or ″n″ - No; the option is added to the command string in the cmd_to_execcommand only if the user changes the initially-displayed value. This is thedefault case.
″y″ - Yes; the value of the prefix field and the value of the entry field arealways sent to the cmd_to_exec command.
″+″ - The value of the prefix field and the value of the entry field are alwayssent to the cmd_to_exec command. The entry field must contain at least onenon-blank character. SMIT will not allow the user to run the task until thiscondition is satisfied.
″?″ - Except when empty; the value of the prefix field and the value of theentry field are sent to the cmd_to_exec field unless the entry field is empty.
prefix In the simplest case, defines the flag to send with the entry field value to thecmd_to_exec command defined in the associated dialog header object. Thevalue of prefix is a string with a maximum length of 1024 characters.
The use of this field depends on the setting of the required field, the contentsof the prefix field, and the contents of the associated entry field.
Note: If the prefix field is set to — (dash dash), the content of theassociated entry field is appended to the end of the cmd_to_execcommand. If the prefix field is set to —’ (dash dash single quotationmark), the contents of the associated entry field is appended to the end ofthe cmd_to_exec command in single quotes.
538 AIX 5L Version 5.3 General Programming Concepts: Writing and Debugging Programs

cmd_to_list_mode Defines how much of an item from a list should be used. The list is produced bythe command specified in this object’s cmd_to_list field. The value ofcmd_to_list_mode is a string with a maximum length of 1 character. Validvalues are:
″″ or ″a″ - Get all fields. This is the default case.
″1″ - Get the first field.
″2″ - Get the second field.
″r″ - Range; running the command string in the cmd_to_list field returns arange (such as 1..99) instead of a list. Ranges are for information only; they aredisplayed in a list pop-up, but do not change the associated entry field.
cmd_to_list The command string used to get a list of valid values for the value field. Thevalue of cmd_to_list is a string with a maximum length of 1024 characters.This command should output values that are separated by \n (new line)characters.
cmd_to_list_postfix The postfix to interpret and add to the command string specified in thecmd_to_list field of the dialog object. The value of cmd_to_list_postfix is astring with a maximum length of 1024 characters. If the first line starts with #(pound sign) following a space, that entry will be made non-selectable. This isuseful for column headings. Subsequent lines that start with a #, optionallypreceded by spaces, are treated as a comment and as a continuation of thepreceding entry.
multi_select Defines if the user can make multiple selections from a list of valid valuesproduced by the command in the cmd_to_list field of the dialog object. Thevalue of multi_select is a string. Valid values are:
″″ - No; a user can select only one value from a list. This is the default case.
″,″ - Yes; a user can select multiple items from the list. When the command isbuilt, a comma is inserted between each item.
″y″ - Yes; a user can select multiple values from the list. When the command isbuilt, the option prefix is inserted once before the string of selected items.
″m″ - Yes; a user can select multiple items from the list. When the command isbuilt, the option prefix is inserted before each selected item.
value_index For an option ring, the zero-origin index to the array of disp_value fields. Thevalue_index number indicates the value that is displayed as the default in theentry field to the user. The value of entry_size is an integer.
disp_values The array of valid values in an option ring to be presented to the user. Thevalue of the disp_values fields is a string with a maximum length of 1024characters. The field values are separated by , (commas) with no spacespreceding or following the commas.
values_msg_file The file name (not the full path name) that is the Message Facility catalog forthe values in the disp_values fields, if the values are initialized at developmenttime. The value of the values_msg_file field is a string with a maximum lengthof 1024 characters. Message catalogs required by an application program canbe developed with the Message Facility.
values_msg_set The Message Facility set ID for the values in the disp_values fields. Set to 0 ifnot used.
values_msg_id The Message Facility message ID for the values in the disp_values fields. Setto 0 if not used.
aix_values If for an option ring, an array of values specified so that each elementcorresponds to the element in the disp_values array in the same position; useif the natural language values in disp_values are not the actual options to beused for the command. The value of the aix_values field is a string with amaximum length of 1024 characters.
Chapter 25. System Management Interface Tool (SMIT) 539

help_msg_id Specifies a Message Facility message set number and message ID numberwith a comma as the separator or a numeric string equal to a SMIT identifiertag.
help_msg_loc The file name sent as a parameter to the man command for retrieval of helptext, or the file name of a file containing help text. The value of help_msg_locis a string with a maximum length of 1024 characters.
help_msg_base The fully qualified path name of a library that SMIT reads for the file namesassociated with the correct book.
help_msg_book Contains the string with the value of the name file contained in the file libraryindicated by help_msg_base.
For information on retrieving SMIT help using the help_msg_id, help_msg_loc, help_msg_base, andhelp_msg_book fields, see “Man Pages Method” on page 532 and “Message Catalog Method” on page 532located in “Creating SMIT Help Information for a New Task” on page 531.
sm_cmd_hdr (SMIT Dialog Header) Object ClassA dialog header object is an sm_cmd_hdr object. A dialog header object is required for each dialog, andpoints to the dialog command option objects associated with the dialog.
Note: When coding an object in this object class, set unused empty strings to ″″ (double-quotation marks)and unused integer fields to 0.
The descriptors for the sm_cmd_hdr object class are:
id The ID or name of the object. The value of id is a string with amaximum length of 64 characters. The id field can be used as a fastpath ID unless there is a selector associated with the dialog. IDs shouldbe unique to your application and unique within your system.
option_id The id of the sm_cmd_opt objects (the dialog fields) to which thisheader refers. The value of option_id is a string with a maximum lengthof 64 characters.
has_name_select Specifies whether this screen must be preceded by a selector screen ora menu screen. Valid values are:
″″ or ″n″No; this is the default case.
″y″ Yes; a selector precedes this object. This setting prevents theid of this object from being used as a fast path to thecorresponding dialog screen.
name The text displayed as the title of the dialog screen. The value of nameis a string with a maximum length of 1024 characters. The textdescribes the task performed by the dialog. The string can be formattedwith embedded \n (newline) characters.
name_msg_file The file name (not the full path name) that is the Message Facilitycatalog for the string, name. The value of name_msg_file is a stringwith a maximum length of 1024 characters. Message catalogs requiredby an application program can be developed with the Message Facility.
name_msg_set The Message Facility set ID for the string, name. Set IDs can be usedto indicate subsets of a single catalog. The value of name_msg_set isan integer.
name_msg_id The Message Facility ID for the string, name. Message IDs can becreated by the message extractor tools owned by the Message Facility.The value of name_msg_id is an integer.
540 AIX 5L Version 5.3 General Programming Concepts: Writing and Debugging Programs
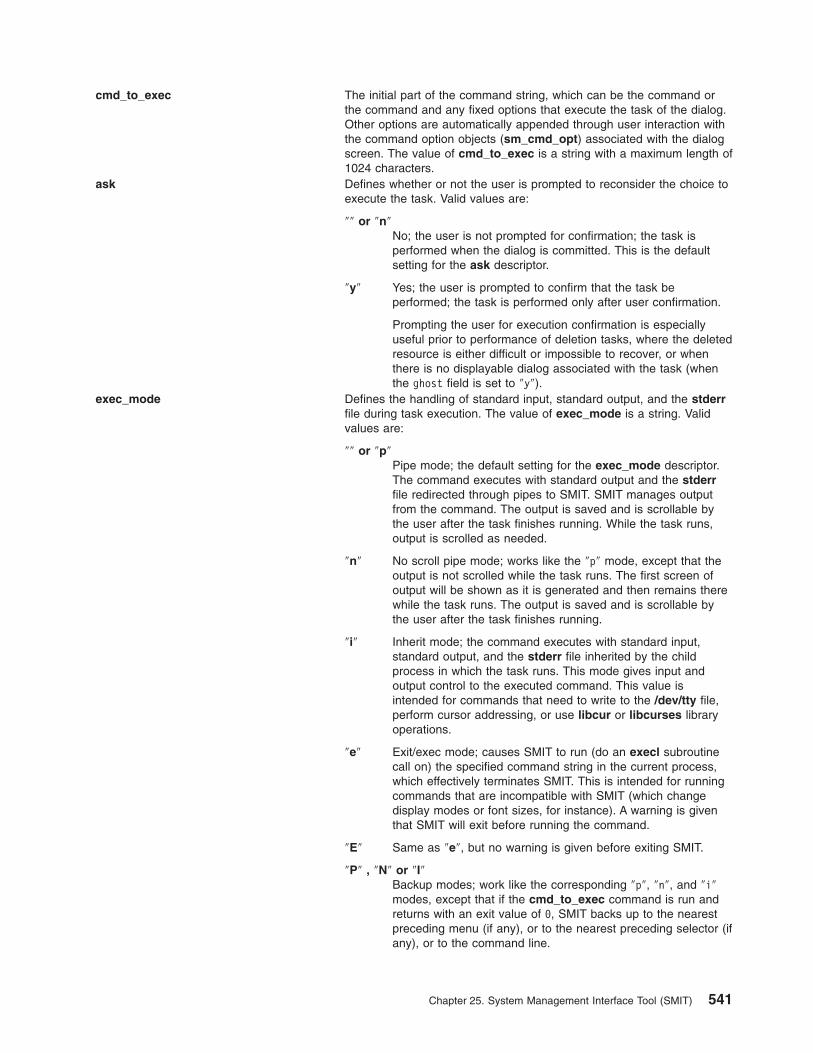
cmd_to_exec The initial part of the command string, which can be the command orthe command and any fixed options that execute the task of the dialog.Other options are automatically appended through user interaction withthe command option objects (sm_cmd_opt) associated with the dialogscreen. The value of cmd_to_exec is a string with a maximum length of1024 characters.
ask Defines whether or not the user is prompted to reconsider the choice toexecute the task. Valid values are:
″″ or ″n″No; the user is not prompted for confirmation; the task isperformed when the dialog is committed. This is the defaultsetting for the ask descriptor.
″y″ Yes; the user is prompted to confirm that the task beperformed; the task is performed only after user confirmation.
Prompting the user for execution confirmation is especiallyuseful prior to performance of deletion tasks, where the deletedresource is either difficult or impossible to recover, or whenthere is no displayable dialog associated with the task (whenthe ghost field is set to ″y″).
exec_mode Defines the handling of standard input, standard output, and the stderrfile during task execution. The value of exec_mode is a string. Validvalues are:
″″ or ″p″Pipe mode; the default setting for the exec_mode descriptor.The command executes with standard output and the stderrfile redirected through pipes to SMIT. SMIT manages outputfrom the command. The output is saved and is scrollable bythe user after the task finishes running. While the task runs,output is scrolled as needed.
″n″ No scroll pipe mode; works like the ″p″ mode, except that theoutput is not scrolled while the task runs. The first screen ofoutput will be shown as it is generated and then remains therewhile the task runs. The output is saved and is scrollable bythe user after the task finishes running.
″i″ Inherit mode; the command executes with standard input,standard output, and the stderr file inherited by the childprocess in which the task runs. This mode gives input andoutput control to the executed command. This value isintended for commands that need to write to the /dev/tty file,perform cursor addressing, or use libcur or libcurses libraryoperations.
″e″ Exit/exec mode; causes SMIT to run (do an execl subroutinecall on) the specified command string in the current process,which effectively terminates SMIT. This is intended for runningcommands that are incompatible with SMIT (which changedisplay modes or font sizes, for instance). A warning is giventhat SMIT will exit before running the command.
″E″ Same as ″e″, but no warning is given before exiting SMIT.
″P″ , ″N″ or ″I″Backup modes; work like the corresponding ″p″, ″n″, and ″i″modes, except that if the cmd_to_exec command is run andreturns with an exit value of 0, SMIT backs up to the nearestpreceding menu (if any), or to the nearest preceding selector (ifany), or to the command line.
Chapter 25. System Management Interface Tool (SMIT) 541
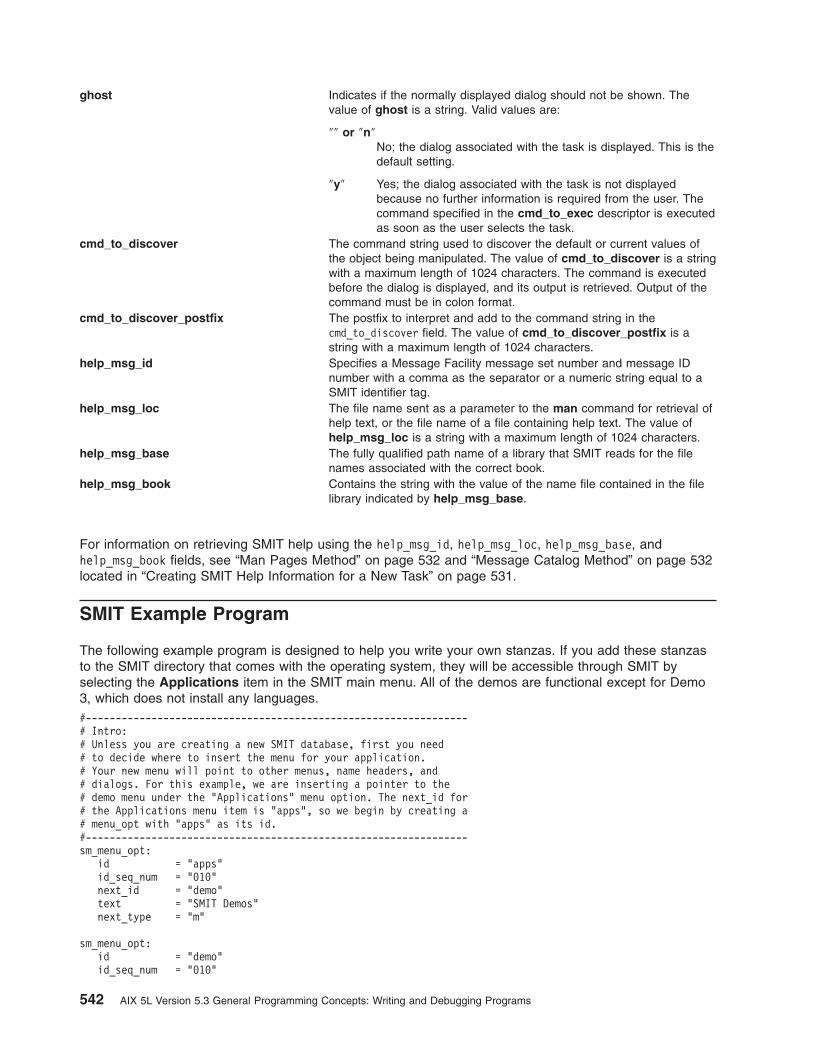
ghost Indicates if the normally displayed dialog should not be shown. Thevalue of ghost is a string. Valid values are:
″″ or ″n″No; the dialog associated with the task is displayed. This is thedefault setting.
″y″ Yes; the dialog associated with the task is not displayedbecause no further information is required from the user. Thecommand specified in the cmd_to_exec descriptor is executedas soon as the user selects the task.
cmd_to_discover The command string used to discover the default or current values ofthe object being manipulated. The value of cmd_to_discover is a stringwith a maximum length of 1024 characters. The command is executedbefore the dialog is displayed, and its output is retrieved. Output of thecommand must be in colon format.
cmd_to_discover_postfix The postfix to interpret and add to the command string in thecmd_to_discover field. The value of cmd_to_discover_postfix is astring with a maximum length of 1024 characters.
help_msg_id Specifies a Message Facility message set number and message IDnumber with a comma as the separator or a numeric string equal to aSMIT identifier tag.
help_msg_loc The file name sent as a parameter to the man command for retrieval ofhelp text, or the file name of a file containing help text. The value ofhelp_msg_loc is a string with a maximum length of 1024 characters.
help_msg_base The fully qualified path name of a library that SMIT reads for the filenames associated with the correct book.
help_msg_book Contains the string with the value of the name file contained in the filelibrary indicated by help_msg_base.
For information on retrieving SMIT help using the help_msg_id, help_msg_loc, help_msg_base, andhelp_msg_book fields, see “Man Pages Method” on page 532 and “Message Catalog Method” on page 532located in “Creating SMIT Help Information for a New Task” on page 531.
SMIT Example Program
The following example program is designed to help you write your own stanzas. If you add these stanzasto the SMIT directory that comes with the operating system, they will be accessible through SMIT byselecting the Applications item in the SMIT main menu. All of the demos are functional except for Demo3, which does not install any languages.#----------------------------------------------------------------# Intro:# Unless you are creating a new SMIT database, first you need# to decide where to insert the menu for your application.# Your new menu will point to other menus, name headers, and# dialogs. For this example, we are inserting a pointer to the# demo menu under the "Applications" menu option. The next_id for# the Applications menu item is "apps", so we begin by creating a# menu_opt with "apps" as its id.#----------------------------------------------------------------sm_menu_opt:
id = "apps"id_seq_num = "010"next_id = "demo"text = "SMIT Demos"next_type = "m"
sm_menu_opt:id = "demo"id_seq_num = "010"
542 AIX 5L Version 5.3 General Programming Concepts: Writing and Debugging Programs

next_id = "demo_queue"text = "Demo 1: Add a Print Queue"next_type = "n"
sm_menu_opt:id = "demo"id_seq_num = "020"next_id = "demo_mle_inst_lang_hdr"text = "Demo 2: Add Language for Application Already Installed"next_type = "n"
#----# Since demo_mle_inst_lang_hdr is a descriptive, but not very# memorable name, an alias with a simpler name can be made to# point to the same place.#----sm_menu_opt:
id = "demo_lang"next_id = "demo_mle_inst_lang_hdr"next_type = "n"alias = "y"
sm_menu_opt:id_seq_num = "030"id = "demo"next_id = "demo_lspv"text = "Demo 3: List Contents of a Physical Volume"text_msg_file = "smit.cat"next_type = "n"
sm_menu_opt:id_seq_num = "040"id = "demo"next_id = "demo_date"text = "Demo 4: Change / Show Date, Time"text_msg_file = "smit.cat"next_type = "n"
#----------------------------------------------------------------# Demo 1# ------# Goal: Add a Print Queue. If the printers.rte package is not# installed, install it automatically. If the user is# running MSMIT (SMIT in a windows interface), launch a# graphical program for this task. Otherwise, branch to# the SMIT print queue task.## Topics: 1. cooked output & cmd_to_classify# 2. SMIT environment variable (msmit vs. ascii)# 3. ghost name_hdr# 4. super-ghost name_hdr# 5. creating an "OK / cancel" option# 6. dspmsg for translations# 7. exit/exec mode# 8. id_seq_num for a name_hdr option#----------------------------------------------------------------#----# Topics: 1,4# Note that the next_id is the same as the id. Remember that the# output of the cmd_to_classify is appended to the next_id,# since the type is "c", for cooked. So, the next_id will be# either demo_queue1 or demo_queue2. None of the output of the# name_hdr is displayed, and there is no cmd_to_list in the# demo_queue_dummy_opt, making this name_hdr a super-ghost.#----sm_name_hdr:
id = "demo_queue"
Chapter 25. System Management Interface Tool (SMIT) 543

next_id = "demo_queue"option_id = "demo_queue_dummy_opt"name = "Add a Print Queue"name_msg_file = "smit.cat"name_msg_set = 52name_msg_id = 41type = "c"ghost = "y"cmd_to_classify = "\
x(){
# Check to see if the printer file is installed.lslpp -l printers.rte 2>/dev/null 1>/dev/nullif [[ $? != 0 ]]thenecho 2elseecho 1fi
}x"
next_type = "n"
#----# Topics: 2,4# Having determined the printer software is installed, we want# to know if the gui program should be run or if we should# branch to the ascii SMIT screen for this task. To do this, we# check the value of the environment variable SMIT, which is "m"# for windows (Motif) or "a" for ascii. Here again we tack the# output of the cmd_to_classify onto the next_id.#----sm_name_hdr:
id = "demo_queue1"next_id = "mkpq"option_id = "demo_queue_dummy_opt"has_name_select = ""ghost = "y"next_type = "n"type = "c"cmd_to_classify = "\
gui_check(){
if [ $SMIT = \"m\" ]; thenecho gui
fi}
gui_check"
sm_name_hdr:id = "mkpqgui"next_id = "invoke_gui"next_type = "d"option_id = "demo_queue_dummy_opt"ghost = "y"
#----# Topics: 7# Note: the exec_mode of this command is "e", which# exits SMIT before running the cmd_to_exec.#----sm_cmd_hdr:
id = "invoke_gui"cmd_to_exec = "/usr/bin/X11/xprintm"exec_mode = "e"ghost = "y"
544 AIX 5L Version 5.3 General Programming Concepts: Writing and Debugging Programs

sm_cmd_opt:id = "demo_queue_dummy_opt"id_seq_num = 0
#----# Topics: 3,5# The printer software is not installed. Install the software# and loop back to demo_queue1 to check the SMIT environment# variable. This is a ghost name_hdr. The cmd_to_list of the# sm_cmd_opt is displayed immediately as a pop-up option# instead of waiting for the user to input a response. In this# ghost, the cmd_opt is a simple OK/cancel box that prompts the# user to press return.#----sm_name_hdr:
id = "demo_queue2"next_id = "demo_queue1"option_id = "demo_queue_opt"name = "Add a Print Queue"name_msg_file = "smit.cat"name_msg_set = 52name_msg_id = 41ghost = "y"cmd_to_classify = "\
install_printers (){
# Install the printer package./usr/lib/assist/install_pkg \"printers.rte\" 2>&1 >/dev/nullif [[ $? != 0 ]]then
echo "Error installing printers.rte"exit 1
elseexit 0
fi}install_printers "
next_type = "n"
#----# Topics: 5,6,8# Here a cmd_opt is used as an OK/cancel box. Note also that the# command dspmsg is used to display the text for the option. This# allows for translation of the messages.# Note: the id_seq_num for the option is 0. Only one option is# allowed per name_hdr, and its id_seq_num must be 0.#----sm_cmd_opt:
id = "demo_queue_opt"id_seq_num = "0"disc_field_name = ""name = "Add a Print Queue"name_msg_file = "smit.cat"name_msg_set = 52name_msg_id = 41op_type = "l"cmd_to_list = "x()\
{if [ $SMIT = \"a\" ] \n\then \n\dspmsg -s 52 smit.cat 56 \'Press Enter to automatically install the printer software.\n\Press F3 to cancel.\n\'\n\else \n\dspmsg -s 52 smit.cat 57 'Click on this item to automatically install
Chapter 25. System Management Interface Tool (SMIT) 545

the printer software.\n' \n\fi\n\} \n\x"
entry_type = "t"multi_select = "n"
#----------------------------------------------------------------## Demo 2# ------# Goal: Add a Language for an Application Already Installed. It# is often clearer to the user to get some information# before displaying the dialog screen. Name Headers# (sm_name_hdr) can be used for this purpose. In this# example, two name headers are used to determine the# language to install and the installation device. The# dialog has entries for the rest of the information needed# to perform the task.## Topics:# 1. Saving output from successive name_hdrs with# cooked_field_name# 2. Using getopts inside cmd_to_exec to process cmd_opt# info# 3. Ring list vs. cmd_to_list for displaying values# cmd_opts#----------------------------------------------------------------
#----# Topic: 1# This is the first name_hdr. It is called by the menu_opt for# this function. We want to save the user's input for later use# in the dialog. The parameter passed into the cmd_to_classify# comes from the user's selection/entry. Cmd_to_classify cleans# up the output and stores it in the variable specified by# cooked_field_name. This overrides the default value for the# cmd_to_classify output, which is _cookedname. The default must# be overridden because we also need to save the output of the# next name_hdr.#----sm_name_hdr:
id = "demo_mle_inst_lang_hdr"next_id = "demo_mle_inst_lang"option_id = "demo_mle_inst_lang_select"name = "Add Language for Application Already Installed"name_msg_file = "smit.cat"name_msg_set = 53name_msg_id = 35type = "j"ghost = "n"cmd_to_classify = "\
foo() {echo $1 | sed -n \"s/[^[]*\\[\\([^]]*\\).*/\\1/p\"
}foo"
cooked_field_name = "add_lang_language"next_type = "n"help_msg_id = "2850325"
sm_cmd_opt:id = "demo_mle_inst_lang_select"id_seq_num = "0"disc_field_name = "add_lang_language"name = "LANGUAGE translation to install"name_msg_file = "smit.cat"name_msg_set = 53
546 AIX 5L Version 5.3 General Programming Concepts: Writing and Debugging Programs

name_msg_id = 20op_type = "l"entry_type = "n"entry_size = 0required = ""prefix = "-l "cmd_to_list_mode = "a"cmd_to_list = "/usr/lib/nls/lsmle -l"help_msg_id = "2850328"
#----# Topic:1# This is the second name_hdr. Here the user's input is passed# directly through the cmd_to_classify and stored in the# variable add_lang_input.#----sm_name_hdr:
id = "demo_mle_inst_lang"next_id = "demo_dialog_add_lang"option_id = "demo_add_input_select"has_name_select = "y"name = "Add Language for Application Already Installed"name_msg_file = "smit.cat"name_msg_set = 53name_msg_id = 35type = "j"ghost = "n"cmd_to_classify = "\
foo() {echo $1
}foo"
cooked_field_name = "add_lang_input"next_type = "d"help_msg_id = "2850328"
sm_cmd_opt:id = "demo_add_input_select"id_seq_num = "0"disc_field_name = "add_lang_input"name = "INPUT device/directory for software"name_msg_file = "smit.cat"name_msg_set = 53name_msg_id = 11op_type = "l"entry_type = "t"entry_size = 0required = "y"prefix = "-d "cmd_to_list_mode = "1"cmd_to_list = "/usr/lib/instl/sm_inst list_devices"help_msg_id = "2850313"
#----# Topic: 2# Each of the cmd_opts formats its information for processing# by the getopts command (a dash and a single character, followed# by an optional parameter). The colon following the letter in# the getopts command means that a parameter is expected after# the dash option. This is a nice way to process the cmd_opt# information if there are several options, especially if one of# the options could be left out, causing the sequence of $1, $2,# etc. to get out of order.#----sm_cmd_hdr:
id = "demo_dialog_add_lang"option_id = "demo_mle_add_app_lang"
Chapter 25. System Management Interface Tool (SMIT) 547

has_name_select = ""name = "Add Language for Application Already Installed"name_msg_file = "smit.cat"name_msg_set = 53name_msg_id = 35cmd_to_exec = "\
foo(){while getopts d:l:S:X Option \"$@\"do
case $Option ind) device=$OPTARG;;l) language=$OPTARG;;S) software=$OPTARG;;X) extend_fs="-X";;
esacdone
if [[ `/usr/lib/assist/check_cd -d $device` = '1' ]]then
/usr/lib/assist/mount_cd $deviceCD_MOUNTED=true
fi
if [[ $software = \"ALL\" ]]then
echo "Installing all software for $language..."else
echo "Installing $software for $language..."fiexit $RC}foo"
ask = "y"ghost = "n"help_msg_id = "2850325"
sm_cmd_opt:id = "demo_mle_add_app_lang"id_seq_num = "0"disc_field_name = "add_lang_language"name = "LANGUAGE translation to install"name_msg_file = "smit.cat"name_msg_set = 53name_msg_id = 20entry_type = "n"entry_size = 0required = "y"prefix = "-l "cmd_to_list_mode = "a"help_msg_id = "2850328"
#----# Topic: 2# The prefix field precedes the value selected by the user, and# both the prefix and the user-selected value are passed into# the cmd_to_exec for getopts processing.#----sm_cmd_opt:
id = "demo_mle_add_app_lang"id_seq_num = "020"disc_field_name = "add_lang_input"name = "INPUT device/directory for software"name_msg_file = "smit.cat"name_msg_set = 53name_msg_id = 11entry_type = "n"
548 AIX 5L Version 5.3 General Programming Concepts: Writing and Debugging Programs

entry_size = 0required = "y"prefix = "-d "cmd_to_list_mode = "1"cmd_to_list = "/usr/lib/instl/sm_inst list_devices"help_msg_id = "2850313"
sm_cmd_opt:id = "demo_mle_add_app_lang"id_seq_num = "030"name = "Installed APPLICATION"name_msg_file = "smit.cat"name_msg_set = 53name_msg_id = 43op_type = "l"entry_type = "n"entry_size = 0required = "y"prefix = "-S "cmd_to_list_mode = ""cmd_to_list = "\
list_messages (){
language=$1device=$2lslpp -Lqc | cut -f2,3 -d':'
}list_messages"
cmd_to_list_postfix = "add_lang_language add_lang_input"multi_select = ","value_index = 0disp_values = "ALL"help_msg_id = "2850329"
#----# Topic: 3# Here, instead of a cmd_to_list, there is a comma-delimited set# of Ring values in the disp_values field. This list is displayed# one item at a time as the user presses tab in the cmd_opt entry# field. However, instead of passing a yes or no to the cmd_hdr,# it is more useful to use the aix_values field to pass either# a -X or nothing. The list in the aix_values field must match# one-to-one with the list in the disp_values field.#----sm_cmd_opt:
id_seq_num = "40"id = "demo_mle_add_app_lang"disc_field_name = ""name = "EXTEND file systems if space needed?"name_msg_file = "smit.cat"name_msg_set = 53name_msg_id = 12op_type = "r"entry_type = "n"entry_size = 0required = "y"multi_select = "n"value_index = 0disp_values = "yes,no"
values_msg_file = "sm_inst.cat"values_msg_set = 1values_msg_id = 51aix_values = "-X,"help_msg_id = "0503005"
#----------------------------------------------------------------#
Chapter 25. System Management Interface Tool (SMIT) 549

# Demo 3# ------# Goal: Show Characteristics of a Logical Volume. The name of the# logical volume is entered by the user and passed to the# cmd_hdr as _rawname.## Topics: 1. _rawname# 2. Ringlist & aix_values#----------------------------------------------------------------
#----# Topic: 1# No rawname is needed because we have only one name_hdr and# we can use the default variable name _rawname.#----sm_name_hdr:
id = "demo_lspv"next_id = "demo_lspvd"option_id = "demo_cmdlvmpvns"has_name_select = ""name = "List Contents of a Physical Volume"name_msg_file = "smit.cat"name_msg_set = 15name_msg_id = 100type = "j"ghost = ""cmd_to_classify = ""raw_field_name = ""cooked_field_name = ""next_type = "d"help_msg_id = "0516100"
sm_cmd_opt:id_seq_num = "0"id = "demo_cmdlvmpvns"disc_field_name = "PVName"name = "PHYSICAL VOLUME name"name_msg_file = "smit.cat"name_msg_set = 15name_msg_id = 101op_type = "l"entry_type = "t"entry_size = 0required = "+"cmd_to_list_mode = "1"cmd_to_list = "lsvg -o|lsvg -i -p|grep -v '[:P]'| \
cut -f1 -d' '"cmd_to_list_postfix = ""multi_select = "n"help_msg_id = "0516021"
#----# Topic: 1# The cmd_to_discover_postfix passes in the name of the physical# volume, which is the raw data selected by the user in the# name_hdr - _rawname.#----sm_cmd_hdr:
id = "demo_lspvd"option_id = "demo_cmdlvmlspv"has_name_select = "y"name = "List Contents of a Physical Volume"name_msg_file = "smit.cat"name_msg_set = 15name_msg_id = 100cmd_to_exec = "lspv"ask = "n"
550 AIX 5L Version 5.3 General Programming Concepts: Writing and Debugging Programs

cmd_to_discover_postfix = "_rawname"help_msg_id = "0516100"
sm_cmd_opt:id_seq_num = "01"id = "demo_cmdlvmlspv"disc_field_name = "_rawname"name = "PHYSICAL VOLUME name"name_msg_file = "smit.cat"name_msg_set = 15name_msg_id = 101op_type = "l"entry_type = "t"entry_size = 0required = "+"cmd_to_list_mode = "1"cmd_to_list = "lsvg -o|lsvg -i -p|grep -v '[:P]'| \
cut -f1 -d' '"help_msg_id = "0516021"
#----# Topic: 2# Here a ringlist of 3 values matches with the aix_values we# want to pass to the sm_cmd_hdr's cmd_to_exec.#----sm_cmd_opt:
id_seq_num = "02"id = "demo_cmdlvmlspv"disc_field_name = "Option"name = "List OPTION"name_msg_file = "smit.cat"name_msg_set = 15name_msg_id = 92op_type = "r"entry_type = "n"entry_size = 0required = "n"value_index = 0disp_values = "status,logical volumes,physical \
partitions"values_msg_file = "smit.cat"values_msg_set = 15values_msg_id = 103aix_values = " ,-l,-p"help_msg_id = "0516102"
#----------------------------------------------------------------## Demo 4# ------# Goal: Change / Show Date & Time## Topics: 1. Using a ghost name header to get variable# values for the next dialog screen.# 2. Using a cmd_to_discover to fill more than one# cmd_opt with initial values.# 3. Re-ordering parameters in a cmd_to_exec.#----------------------------------------------------------------
#----# Topic: 1# This ghost name_hdr gets two values and stores them in the# variables daylight_y_n and time_zone for use in the cmd_opts# for the next dialog. The output of cmd_to_classify is colon-# delimited, as is the list of field names in cooked_field_name.#----sm_name_hdr:
Chapter 25. System Management Interface Tool (SMIT) 551

id = "demo_date"next_id = "demo_date_dial"option_id = "date_sel_opt"name_msg_set = 0name_msg_id = 0ghost = "y"cmd_to_classify = " \
if [ $(echo $TZ | awk '{ \if (length($1) <=6 ) {printf(\"2\")} \else {printf(\"1\")} }') = 1 ] \n\
then\n\echo $(dspmsg smit.cat -s 30 18 'yes')\":$TZ\"\n\
else\n\echo $(dspmsg smit.cat -s 30 19 'no')\":$TZ\"\n\
fi #"cooked_field_name = "daylight_y_n:time_zone"
sm_cmd_opt:id_seq_num = "0"id = "date_sel_opt"
#----# Topic: 2,3# Here the cmd_to_discover gets six values, one for each of the# editable sm_cmd_opts for this screen. The cmd_to_discover# output is two lines, the first with a # followed by a list of# variable names, and the second line the list of values. Both# lists are colon-delimited. We also see here the cmd_to_exec# takeing the parameters from the cmd_opts and reordering them# when calling the command.#----sm_cmd_hdr:
id = "demo_date_dial"option_id = "demo_chtz_opts"has_name_select = "y"name = "Change / Show Date & Time"name_msg_file = "smit.cat"name_msg_set = 30name_msg_id = 21cmd_to_exec = "date_proc () \
# MM dd hh mm ss yy\n\# dialogue param order # 3 4 5 6 7 2\n\{\n\date \"$3$4$5$6.$7$2\"\n\}\n\date_proc "
exec_mode = "P"cmd_to_discover = "disc_proc() \n\
{\n\TZ=\"$1\"\n\echo '#cur_month:cur_day:cur_hour:cur_min:cur_sec:cur_year'\n\date +%m:%d:%H:%M:%S:%y\n\}\n\disc_proc"
cmd_to_discover_postfix = ""help_msg_id = "055101"
#----# The first two cmd_opts get their initial values# (disc_field_name) from the name_hdr.#----sm_cmd_opt:
id_seq_num = "04"id = "demo_chtz_opts"disc_field_name = "time_zone"name = "Time zone"name_msg_file = "smit.cat"
552 AIX 5L Version 5.3 General Programming Concepts: Writing and Debugging Programs

name_msg_set = 30name_msg_id = 16required = "y"
sm_cmd_opt:id_seq_num = "08"id = "demo_chtz_opts"disc_field_name = "daylight_y_n"name = "Does this time zone go on daylight savings time?\n"name_msg_file = "smit.cat"name_msg_set = 30name_msg_id = 17entry_size = 0
#----# The last six cmd_opts get their values from the# cmd_to_discover.#----sm_cmd_opt:
id_seq_num = "10"id = "demo_chtz_opts"disc_field_name = "cur_year"name = "YEAR (00-99)"name_msg_file = "smit.cat"name_msg_set = 30name_msg_id = 10entry_type = "#"entry_size = 2required = "+"help_msg_id = "055102"
sm_cmd_opt:id_seq_num = "20"id = "demo_chtz_opts"disc_field_name = "cur_month"name = "MONTH (01-12)"name_msg_file = "smit.cat"name_msg_set = 30name_msg_id = 11entry_type = "#"entry_size = 2required = "+"help_msg_id = "055132"
sm_cmd_opt:id_seq_num = "30"id = "demo_chtz_opts"disc_field_name = "cur_day"name = "DAY (01-31)\n"name_msg_file = "smit.cat"name_msg_set = 30name_msg_id = 12entry_type = "#"entry_size = 2required = "+"help_msg_id = "055133"
sm_cmd_opt:id_seq_num = "40"id = "demo_chtz_opts"disc_field_name = "cur_hour"name = "HOUR (00-23)"name_msg_file = "smit.cat"name_msg_set = 30name_msg_id = 13entry_type = "#"entry_size = 2
Chapter 25. System Management Interface Tool (SMIT) 553

required = "+"help_msg_id = "055134"
sm_cmd_opt:id_seq_num = "50"id = "demo_chtz_opts"disc_field_name = "cur_min"name = "MINUTES (00-59)"name_msg_file = "smit.cat"name_msg_set = 30name_msg_id = 14entry_type = "#"entry_size = 2required = "+"help_msg_id = "055135"
sm_cmd_opt:id_seq_num = "60"id = "demo_chtz_opts"disc_field_name = "cur_sec"name = "SECONDS (00-59)"name_msg_file = "smit.cat"name_msg_set = 30name_msg_id = 15entry_type = "#"entry_size = 2required = "+"help_msg_id = "055136"
Related InformationFor further information on this topic, see the following:
v Chapter 15, “Object Data Manager (ODM),” on page 349
v System management interface tool in Operating system and device management.
Commands ReferencesThe dspmsg command, gencat command in AIX 5L Version 5.3 Commands Reference, Volume 2.
The ksh command, man command in AIX 5L Version 5.3 Commands Reference, Volume 3.
The odmadd command, odmcreate command, odmget command n AIX 5L Version 5.3 CommandsReference, Volume 4.
The smit command in AIX 5L Version 5.3 Commands Reference, Volume 5.
Files ReferencesThe ispaths file.
554 AIX 5L Version 5.3 General Programming Concepts: Writing and Debugging Programs

Chapter 26. System Resource Controller
This article provides information about the System Resource Controller (SRC), which facilitates themanagement and control of complex subsystems.
The SRC is a subsystem controller. Subsystem programmers who own one or more daemon processescan use SRC services to define a consistent system management interface for their applications. The SRCprovides a single set of commands to start, stop, trace, refresh, and query the status of a subsystem.
In addition, the SRC provides an error notification facility. You can use this facility to incorporatesubsystem-specific recovery methods. The type of recovery information included is limited only by therequirement that the notify method is a string in a file and is executable.
Refer to the following information to learn more about SRC programming requirements:
v “SRC Objects” on page 556
v “SRC Communication Types” on page 560
v “Programming Subsystem Communication with the SRC” on page 563
v “Defining Your Subsystem to the SRC” on page 569
v “List of Additional SRC Subroutines” on page 570
Subsystem Interaction with the SRCThe SRC defines a subsystem as a program or set of related programs designed as a unit to performrelated functions. See ″System Resource Controller″ in Operating system and device management for amore detailed description of the characteristics of a subsystem.
A subserver is a process that belongs to and is controlled by a subsystem.
The SRC operates on objects in the SRC object class. Subsystems are defined to the SRC as subsystemobjects; subservers, as subserver-type objects. The structures associated with each type of object arepredefined in the usr/include/sys/srcobj.h file.
The SRC can issue SRC commands against objects at the subsystem, subserver, and subsystem-grouplevels. A subsystem group is a group of any user-specified subsystems. Grouping subsystems allowsmultiple subsystems to be controlled by invoking a single command. Groups of subsystems may alsoshare a common notification method.
The SRC communicates with subsystems by sending signals and exchanging request and reply packets.In addition to signals, the SRC recognizes the sockets and IPC message-queue communication types. Anumber of subroutines are available as an SRC API to assist in programming communication betweensubsystems and the SRC. The SRC API also supports programming communication between clientprograms and the SRC. For more information on available subroutines, see “List of Additional SRCSubroutines” on page 570.
The SRC and the init CommandThe SRC is operationally independent of the init command. However, the SRC is intended to extend theprocess-spawning functionality provided by this command. In addition to providing a single point of controlto start, stop, trace, refresh, and query the status of subsystems, the SRC can control the operations ofindividual subsystems, support remote system control, and log subsystem failures.
Operationally, the only time the init command and the SRC interact occurs when the srcmstr (SRCmaster) daemon is embedded within the inittab file. By default, the srcmstr daemon is in the inittab file.
© Copyright IBM Corp. 1997, 2010 555

In this case, the init command starts the srcmstr daemon at system startup, as with all other processes.You must have root user authority or be in the system group to invoke the srcmstr daemon.
Compiling Programs to Interact With the srcmstr DaemonTo enable programs to interact with the srcmstr daemon, the /usr/include/spc.h file should be includedand the program should be compiled with the libsrc.a library. This support is not needed if the subsystemuses signals to communicate with the SRC.
SRC OperationsTo make use of SRC functionality, a subsystem must interact with the srcmstr daemon in two ways:
v A subsystem object must be created for the subsystem in the SRC subsystem object class.
v If a subsystem uses signals, it does not need to use SRC subroutines. However, if it uses messagequeues or sockets, it must respond to stop requests using the SRC subroutines.
All SRC subsystems must support the stopsrc command. The SRC uses this command to stopsubsystems and their subservers with the SIGNORM (stop normal), SIGFORCE (stop force), orSIGCANCEL (cancel systems) signals.
Subsystem support is optional for the startsrc, lssrc -l, traceson, tracesoff, and refresh commands, longstatus and subserver status reporting, and the SRC notification mechanism. See “Programming SubsystemCommunication with the SRC” on page 563 for details.
SRC CapabilitiesThe SRC provides the following support for the subsystem programmer:
v A common command interface to support starting, stopping, and sending requests to a subsystem
v A central point of control for subsystems and groups of subsystems
v A common format for requests to the subsystem
v A definition of subservers so that each subserver can be managed as it is uniquely defined to thesubsystem
v The ability to define subsystem-specific error notification methods
v The ability to define subsystem-specific responses to requests for status, trace support, andconfiguration refresh
v A single point of control for servicing subsystem requests in a network computing environment
SRC Objects
The System Resource Controller (SRC) defines and manages three object classes:
v “Subsystem Object Class” on page 557
v “Subserver Type Object Class” on page 559
v “Notify Object Class” on page 559
Together, these object classes represent the domain in which the SRC performs its functions. A predefinedset of object-class descriptors comprise the possible set of subsystem configurations supported by theSRC.
Note: Only the SRC Subsystem object class is required. Use of the Subserver Type and Notify objectclasses is subsystem-dependent.
556 AIX 5L Version 5.3 General Programming Concepts: Writing and Debugging Programs

Subsystem Object ClassThe subsystem object class contains the descriptors for all SRC subsystems. A subsystem must beconfigured in this class before it can be recognized by the SRC.
The descriptors for the Subsystem object class are defined in the SRCsubsys structure of the/usr/include/sys/srcobj.h file. The Subsystem Object Descriptors and Default Values table provides ashort-form illustration of the subsystem descriptors as well as the mkssys and chssys command flagsassociated with each descriptor.
Table 11. Subsystem Object Descriptors and Default Values
Descriptors Default Values Flags
Subsystem name -s
Path to subsystem command -p
Command arguments -a
Execution priority 20 -E
Multiple instance NO -Q -q
User ID -u
Synonym name (key) -t
Start action ONCE -O -R
stdin /dev/console -i
stdout /dev/console -o
stderr /dev/console -e
Communication type Sockets -K -I -S
Subsystem message type -m
Communication IPC queue key -l
Group name -G
SIGNORM signal -n
SIGFORCE signal -f
Display Yes -D -d
Wait time 20 seconds -w
Auditid
The subsystem object descriptors are defined as follows:
Subsystem name Specifies the name of the subsystem object. The name cannot exceed 30 bytes,including the null terminator (29 characters for single-byte character sets, or 14characters for multibyte character sets). This descriptor must bePOSIX-compliant. This field is required.
Subsystem command path Specifies the full path name for the program executed by the subsystem startcommand. The path name cannot exceed 200 bytes, including the nullterminator (199 characters for single-byte character sets, or 99 characters formultibyte character sets). The path name must be POSIX-compliant. This field isrequired.
Chapter 26. System Resource Controller 557

Command arguments Specifies any arguments that must be passed to the command that starts thesubsystem. The arguments cannot exceed 200 bytes, including the nullterminator (199 characters for single-byte character sets, or 99 characters formultibyte character sets). The arguments are parsed by the srcmstr daemonaccording to the same rules used by shells. For example, quoted strings arepassed as a single argument, and blanks outside quoted strings delimitarguments.
Execution priority Specifies the process priority of the subsystem to be run. Subsystems started bythe srcmstr daemon run with this priority. The default value is 20.
Multiple instance Specifies the number of instances of a subsystem that can run at one time. Avalue of NO (the -Q flag) specifies that only one instance of the subsystem canrun at one time. Attempts to start this subsystem if it is already running will fail,as will attempts to start a subsystem on the same IPC message queue key. Avalue of YES (the -q flag) specifies that multiple subsystems may use the sameIPC message queue and that there can be multiple instances of the samesubsystem. The default value is NO.
User ID Specifies the user ID (numeric) under which the subsystem is run. A value of 0indicates the root user. This field is required.
Synonym name Specifies a character string to be used as an alternate name for the subsystem.The character string cannot exceed 30 bytes, including the null terminator (29characters for single-byte character sets, or 14 characters for multibyte charactersets). This field is optional.
Start action Specifies whether the srcmstr daemon should restart the subsystem after anabnormal end. A value of RESPAWN (the -R flag) specifies the srcmstr daemonshould restart the subsystem. A value of ONCE (the -O flag) specifies thesrcmstr daemon should not attempt to restart the failed system. There is arespawn limit of two restarts within a specified wait time. If the failed subsystemcannot be successfully restarted, the notification method option is consulted. Thedefault value is ONCE.
Standard Input File/Device Specifies the file or device from which the subsystem receives its input. Thedefault is /dev/console. This field cannot exceed 200 bytes, including the nullterminator (199 characters for single-byte character sets, or 99 characters formultibyte character sets). This field is ignored if the communication type issockets.
Standard Output File/Device Specifies the file or device to which the subsystem sends its output. This fieldcannot exceed 200 bytes, including the null terminator (199 characters forsingle-byte character sets, or 99 characters for multibyte character sets). Thedefault is /dev/console.
Standard Error File/Device Specifies the file or device to which the subsystem writes its error messages.This field cannot exceed 200 bytes, including the null terminator (199 charactersfor single-byte character sets, or 99 characters for multibyte character sets).Failures are handled as part of the notify method. The default is /dev/console.
Note: Catastrophic errors are sent to the error log.Communication type Specifies the communication method between the srcmstr daemon and the
subsystem. Three types can be defined: IPC (-I), sockets (-K), or signals (-S).The default is sockets.
Communication IPC queue key Specifies a decimal value that corresponds to the IPC message queue key thatthe srcmstr daemon uses to communicate to the subsystem. This field isrequired for subsystems that communicate using IPC message queues. Use theftok subroutine with a fully qualified path name and an ID parameter to ensurethat this key is unique. The srcmstr daemon creates the message queue priorto starting the subsystem.
Group name Designates the subsystem as a member of a group. This field cannot exceed 30bytes, including the null terminator (29 characters for single-byte character sets,or 14 characters for multibyte character sets). This field is optional.
558 AIX 5L Version 5.3 General Programming Concepts: Writing and Debugging Programs

Subsystem message type Specifies the mtype of the message that is placed on the subsystem’s messagequeue. The subsystem uses this value to retrieve messages by using themsgrcv or msgxrcv subroutine. This field is required if you are using messagequeues.
SIGNORM signal value Specifies the value to be sent to the subsystem when a stop normal request issent. This field is required of subsystems using the signals communication type.
SIGFORCE signal value Specifies the value to be sent to the subsystem when a stop force request issent. This field is required of subsystems using the signals communication type.
Display value Indicates whether the status of an inoperative subsystem can be displayed onlssrc -a or lssrc -g output. The -d flag indicates display; the -D flag indicates donot display. The default is -d (display).
Wait time Specifies the time in seconds that a subsystem has to complete a restart or stoprequest before alternate action is taken. The default is 20 seconds.
Auditid Specifies the subsystem audit ID. Created automatically by the srcmstr daemonwhen a subsystem is defined, this field is used by the security system, ifconfigured. This field cannot be set or changed by a program.
See “Defining Your Subsystem to the SRC” on page 569 for information on defining and modifyingsubsystem objects.
Subserver Type Object Class
An object must be configured in this class if a subsystem has subservers and the subsystem expects toreceive subserver-related commands from the srcmstr daemon.
This object class contains three descriptors, which are defined in the SRCsubsvr structure of the srcobj.hfile:
Subserver ID (key) Specifies the name of the subserver type object identifier. The set of subservertype names defines the allowable values for the -t flag of the subservercommands. The name length cannot exceed 30 bytes, including the terminatingnull (29 characters for single-byte character sets, or 14 characters for multibytecharacter sets).
Owning subsystem name Specifies the name of the subsystem that owns the subserver object. This fieldis defined as a link to the SRC subsystem object class.
Code point Specifies a decimal number that identifies the subserver. The code point ispassed to the subsystem controlling the subserver in the object field of thesubreq structure of the SRC request structure. If a subserver object name isalso provided in the command, the srcmstr daemon forwards the code point tothe subsystem in the objname field of the subreq structure. See the ″SRCRequest Structure Example″ in the spc.h file documentation for examples ofthese elements.
The commands that reference subservers identify each subserver as a named type of subserver and canalso append a name to each instance of a subserver type. The SRC daemon uses the subserver type todetermine the controlling subsystem for the subserver, but does not examine the subserver name.
See “Defining Your Subsystem to the SRC” on page 569 for information on defining and modifyingsubserver type objects.
Notify Object ClassThis class provides a mechanism for the srcmstr daemon to invoke subsystem-provided routines whenthe failure of a subsystem is detected. When the SRC daemon receives a SIGCHLD signal indicating thetermination of a subsystem process, it checks the status of the subsystem (maintained by the srcmstrdaemon) to determine if the termination was caused by a stopsrc command. If no stopsrc command was
Chapter 26. System Resource Controller 559

issued, the termination is interpreted as an abnormal termination. If the restart action in the definition doesnot specify respawn, or if respawn attempts fail, the srcmstr daemon attempts to read an objectassociated with the subsystem name from the Notify object class. If such an object is found, the methodassociated with the subsystem is run.
If no subsystem object is found in the Notify object class, the srcmstr daemon determines whether thesubsystem belongs to a group. If so, the srcmstr daemon attempts to read an object of that group namefrom the Notify object class. If such an object is found, the method associated with it is invoked. In thisway, groups of subsystems can share a common method.
Note: The subsystem notify method takes precedence over the group notify method. Therefore, asubsystem can belong to a group that is started together, but still have a specific recovery or cleanuproutine defined.
Notify objects are defined by two descriptors:
Subsystem name or Group name Specifies the name of the subsystem or group for which a notify method isdefined.
Notify method Specifies the full path name to the routine that is executed when thesrcmstr daemon detects abnormal termination of the subsystem or group.
Such notification is useful when specific recovery or clean-up work needs to be performed before asubsystem can be restarted. It is also a tool for information gathering to determine why a subsystemabnormally stopped.
Notify objects are created with the mknotify command. To modify a notify method, the existing notifyobject must be removed using the rmnotify command, and then a new notify object created.
mknotify Adds a notify method to the SRC configuration databasermnotify Removes a notify method from the SRC configuration database
The srcmstr daemon logs subsystem recovery activity. The subsystem is responsible for reportingsubsystem failures.
SRC Communication TypesThe System Resource Controller (SRC) supports three communication types: signals, sockets, andinterprocess communication (IPC) message queues. The communication type chosen determines to whatdegree the subsystem takes advantage of SRC functions.
Note: All subsystems, regardless of the communication type specified in the subsystem environmentobject, must be capable of supporting limited signals communication. A signal-catcher routine mustbe defined to handle SIGTERM (stop cancel) signals. The SIGTERM signal indicates a subsystemshould clean up all resources and terminate.
Refer to the following sections to learn more about SRC communication types:
v “Signals Communication” on page 561
v “Sockets Communication” on page 562
v “IPC Message Queue Communication” on page 562
The Communications Between the srcmstr Daemon and Subsystems table summarizes communicationtype actions associated with SRC functions.
Communications Between the srcmstr Daemon and Subsystems
560 AIX 5L Version 5.3 General Programming Concepts: Writing and Debugging Programs

Function Using IPC or Sockets Using Signals
start
subsystem SRC forks and execs to createsubsystem process.
SRC forks and execs to createsubsystem process.
subserver Uses IPC message queue or socketto send request to subsystem.
Not supported
stop normal
subsystem Uses IPC message queue or socketto send request to subsystem.
Sends SIGNORM to the subsystem.
subserver Uses IPC message queue or socketto send request to subsystem.
Not supported.
stop forced
subsystem Uses IPC message queue or socketto send request to subsystem.
Sends SIGFORCE to the subsystem.
subserver Uses IPC message queue or socketto send request to subsystem.
Not supported.
stop cancel
subsystem Sends SIGTERM followed bySIGKILL to the process group of thesubsystem.
Sends SIGTERM followed bySIGKILL to the process group of thesubsystem.
status short
subsystem Implemented by SRC (no subsystemrequest).
Implemented by SRC (no subsystemrequest).
subserver Uses IPC message queue or socketto send request to subsystem.
Not supported.
status long
subsystem Uses IPC message queue or socketto send request to subsystem.
Not supported.
subserver Uses IPC message queue or socketto send request to subsystem.
Not supported.
traceon/traceoff
subsystem Uses IPC message queue or socketto send request to subsystem.
Not supported.
subserver Uses IPC message queue or socketto send request to subsystem.
Not supported.
refresh
subsystem Uses IPC message queue or socketto send request to subsystem.
Not supported.
subserver Uses IPC message queue or socketto send request to subsystem.
Not supported.
notify
subsystem Implemented by subsystem-providedmethod.
Implemented by subsystem-providedmethod.
Signals CommunicationThe most basic type of communication between a subsystem and the srcmstr daemon is accomplishedwith signals. Because signals constitute a one-way communication scheme, the only SRC command that
Chapter 26. System Resource Controller 561

signals subsystems recognize is a stop request. Subsystems using signals do not recognize long status,refresh, or trace requests. Nor do they recognize subservers.
Signals subsystems must implement a signal-catcher routine, such as the sigaction, sigvec, or signalsubroutine, to handle SIGNORM and SIGFORCE requests.
Signals subsystems are specified in the SRC subsystem object class by issuing a mkssys -Snf commandstring or by using the defssys and addssys subroutines.
addssys Adds a subsystem definition to the SRC configuration databasedefssys Initializes a new subsystem definition with default valuesmkssys Adds a subsystem definition to the SRC configuration database
Sockets CommunicationIncreasingly, the communication option of choice for subsystem programmers is sockets. Sockets are alsothe default communication type for the srcmstr daemon. See the Sockets Overview in AIX 5L Version 5.3Communications Programming Concepts for more information.
The srcmstr daemon uses sockets to receive work requests from a command process. When thiscommunication type is chosen, the srcmstr daemon creates the subsystem socket in which the subsystemwill receive srcmstr daemon requests. UNIX sockets (AF_UNIX) are created for local subsystems. Internetsockets (AF_INET) are created for remote subsystems. The following steps describe the commandprocessing sequence:
1. The command process accepts a command from the input device, constructs a work-request message,and sends the work-request UDP datagram to the srcmstr daemon on the well-known SRC port. TheAF_INET is identified in the /etc/services file.
2. The srcmstr daemon listens on the well-known SRC port for work requests. Upon receiving a workrequest, it tells the system to fill the socket subroutine’s sockaddr structure to obtain the originatingsystem’s address and appends the address and port number to the work request.
3. The srcmstr daemon uses the srcrrqs and srcsrpy subroutines. It processes only those requests thatit can process and then sends the information back to the command process. Other requests areforwarded to the appropriate subsystem on the port that the subsystem has specified for its workrequests.
4. The subsystem listens on the port previously obtained by the srcmstr daemon for the subsystem.(Each subsystem inherits a port when the srcmstr daemon starts a subsystem.) The subsystemprocesses the work request and sends a reply back to the command process.
5. The command process listens for the response on the specified port.
The file access permissions and addresses of the sockets used by the srcmstr daemon are maintained inthe /dev/SRC and /dev/.SRC-unix temporary directories. Though displayable using the ls command, theinformation contained in these directories is for internal SRC use only.
Message queues and sockets offer equal subsystem functionality.
See “Programming Subsystem Communication with the SRC” on page 563 for more information.
srcrrqs Saves the destination address of your subsystem’s response to a received packet. (Also seethreadsafe version srcrrqs_r)
srcsrpy Sends your subsystem response packet to a request that your subsystem received.
IPC Message Queue CommunicationIPC message queue functionality is similar to sockets functionality. Both communication types support afull-function SRC environment.
562 AIX 5L Version 5.3 General Programming Concepts: Writing and Debugging Programs

When the communication type is IPC message queue, the srcmstr daemon uses sockets to receive workrequests from a command process, then uses an IPC message queue in which the subsystem receivesSRC messages. The message queue is created when the subsystem is started, and is used thereafter.Message queue subsystems use the following command-processing sequence to communicate with thesrcmstr daemon:
1. The srcmstr daemon gets the message queue ID from the SRC subsystem object and sends themessage to the subsystem.
2. The subsystem waits for the message queue and issues a msgrcv subroutine to receive the commandfrom the message queue in the form of the subreq structure required of subsystem requests.
3. The subsystem calls the srcrrqs subroutine to get a tag ID that is used in responding to the message.
4. The subsystem interprets and processes the received command. Depending upon the command, thesubsystem creates either a svrreply or statcode data structure to return a reply to the commandprocess. Refer to the /usr/include/spc.h file for more information on these structures.
5. The subsystem calls the srcsrpy subroutine to send back a reply buffer to the command process.
See Message Queue Kernel Services in AIX 5L Version 5.3 Kernel Extensions and Device SupportProgramming Concepts for additional information on this communication type. See “ProgrammingSubsystem Communication with the SRC” for the next step in establishing communication with thesrcmstr daemon.
Programming Subsystem Communication with the SRC
System Resource Controller (SRC) commands are executable programs that take options from thecommand line. After the command syntax has been verified, the commands call SRC run-time subroutinesto construct a User Datagram Protocol (UDP) datagram and send it to the srcmstr daemon.
The following sections provide more information about SRC subroutines and how they can be used bysubsystems to communicate with the SRC main process:
Programming Subsystems to Receive SRC RequestsThe programming tasks associated with receiving SRC requests vary with the communication typespecified for the subsystem. The srcmstr daemon uses sockets to receive work requests from a commandprocess and constructs the necessary socket or message queue to forward work requests. Eachsubsystem needs to verify the creation of its socket or message queue. See “SRC Communication Types”on page 560 for a description of the SRC communication types. Read the following sections forinformation on communication type-specific guidelines on programming your subsystem to receive SRCrequest packets.
Receiving SRC Signals
Subsystems that use signals as their communication type must define a signal-catcher routine to catch theSIGNORM and SIGFORCE signals. The signal-catching method used is subsystem-dependent. Followingare two examples of the types of subroutines that can be used for this purpose.
sigaction, sigvec, or signal subroutine Specifies the action to take upon the delivery of a signal.sigset, sighold, sigrelse, or sigignore subroutine Enhances the signal facility and provides signal
management for application processes.
See “Signals Communication” on page 561 for more information.
Receiving SRC Request Packets Using Sockets
Use the following guidelines when programming sockets subsystems to receive SRC request packets:
Chapter 26. System Resource Controller 563

v Include the SRC subsystem structure in your subsystem code by specifying the /usr/include/spc.h file.This file contains the structures the subsystem uses to respond to SRC commands. In addition, thespc.h file includes the srcerrno.h file, which does not need to be included separately. The srcerrno.hfile contains error-code definitions for daemon support.
v When a sockets subsystem is started, the socket on which the subsystem receives SRC requestpackets is set as file descriptor 0. The subsystem should verify this by calling the getsocknamesubroutine, which returns the address of the subsystem’s socket. If file descriptor 0 is not a socket, thesubsystem should log an error and then exit. See ″Reading Internet Datagrams Example Program″ inAIX 5L Version 5.3 Communications Programming Concepts for information on how the getsocknamesubroutine can be used to return the address of a subsystem socket.
v If a subsystem polls more than one socket, use the select subroutine to determine which socket hassomething to read. See ″Checking for Pending Connections Example Program″ in AIX 5L Version 5.3Communications Programming Concepts for more information on how the select subroutine can beused for this purpose.
v Use the recvfrom subroutine to get the request packet from the socket.
Note: The return address for the subsystem response packet is in the received SRC requestpacket. This address should not be confused with the address that the recvfrom subroutinereturns as one of its parameters.
After the recvfrom subroutine completes and the packet has been received, use the srcrrqs subroutineto return a pointer to a static srchdr structure. This pointer contains the return address for thesubsystem’s reply. This structure is overwritten each time the srcrrqs subroutine is called, so itscontents should be stored elsewhere if they will be needed after the next call to the srcrrqs subroutine.
See “Programming Subsystems to Process SRC Request Packets” on page 565 for the next step inestablishing subsystem communication with the SRC.
Receiving SRC Request Packets Using Message Queues
Use the following guidelines when programming message queue subsystems to receive SRC requestpackets:
v Include the SRC subsystem structure in your subsystem code by specifying the /usr/include/spc.h file.This file contains the structures the subsystem uses to respond to SRC commands. In addition, thespc.h file includes the srcerrno.h include file, which does not need to be included separately. Thesrcerrno.h file contains error-code definitions for daemon support.
v Specify -DSRCBYQUEUE as a compile option. This places a message type (mtype) field as the firstfield in the srcreq structure. This structure should be used any time an SRC packet is received.
v When the subsystem has been started, use the msgget subroutine to verify that a message queue wascreated at system startup. The subsystem should log an error and exit if a message queue was notcreated.
v If a subsystem polls more than one message queue, use the select subroutine to determine whichmessage queue has something to read. See ″Checking for Pending Connections Example Program″ inAIX 5L Version 5.3 Communications Programming Concepts for information on how the selectsubroutine can be used for this purpose.
v Use the msgrcv or msgxrcv subroutine to get the packet from the message queue. The return addressfor the subsystem response packet is in the received packet.
v When the msgrcv or msgxrcv subroutine completes and the packet has been received, call thesrcrrqs subroutine to finish the reception process. The srcrrqs subroutine returns a pointer to a staticsrchdr structure that is overwritten each time the srcrrqs subroutine is called. This pointer contains thereturn address for the subsystem’s reply.
564 AIX 5L Version 5.3 General Programming Concepts: Writing and Debugging Programs

Programming Subsystems to Process SRC Request Packets
Subsystems must be capable of processing stop requests. Optionally, subsystems may support start,status, trace, and refresh requests.
Processing request packets involves a two-step process:
1. Reading SRC request packets
2. “Programming Subsystem Response to SRC Requests”
Reading SRC Request PacketsSRC request packets are received by subsystems in the form of a srcreq structure as defined in the/usr/include/spc.h file. The subsystem request resides in the subreq structure of the srcreq structure:struct subreq
short object; /*object to act on*/short action; /*action START, STOP, STATUS, TRACE,\
REFRESH*/short parm1; /*reserved for variables*/short parm2; /*reserved for variables*/char objname; /*object name*/
The object field of the subreq structure indicates the object to which the request applies. When therequest applies to a subsystem, the object field is set to the SUBSYSTEM constant. Otherwise, theobject field is set to the subserver code point or the objname field is set to the subserver PID as acharacter string. It is the subsystem’s responsibility to determine the object to which the request applies.
The action field specifies the action requested of the subsystem. Subsystems should understand theSTART, STOP, and STATUS action codes. The TRACE and REFRESH action codes are optional.
The parm1 and parm2 fields are used differently by each of the actions.
Action parm1 parm2
STOP NORMAL or FORCE
STATUS LONGSTAT or SHORTSTAT
TRACE LONGTRACE or SHORT-TRACE TRACEON or TRACEOFF
The START subserver and REFRESH actions do not use the parm1 and parm2 fields.
Programming Subsystem Response to SRC RequestsThe appropriate subsystem actions for the majority of SRC requests are programmed when the subsystemobject is defined to the SRC. See “SRC Objects” on page 556 and “Defining Your Subsystem to the SRC”on page 569 for more information. The structures that subsystems use to respond to SRC requests aredefined in the /usr/include/spc.h file. Subsystems may use the following SRC run-time subroutines tomeet command processing requirements:
srcrrqs Allows a subsystem to store the header from a request.srcsrpy Allows a subsystem to send a reply to a request.
See “Responding to Trace Requests” on page 568 and “Responding to Refresh Requests” on page 569for information on how to program support for these commands in your subsystem.
Status-request processing requires a combination of tasks and subroutines. See “Processing SRC StatusRequests” on page 566 for more information.
Chapter 26. System Resource Controller 565
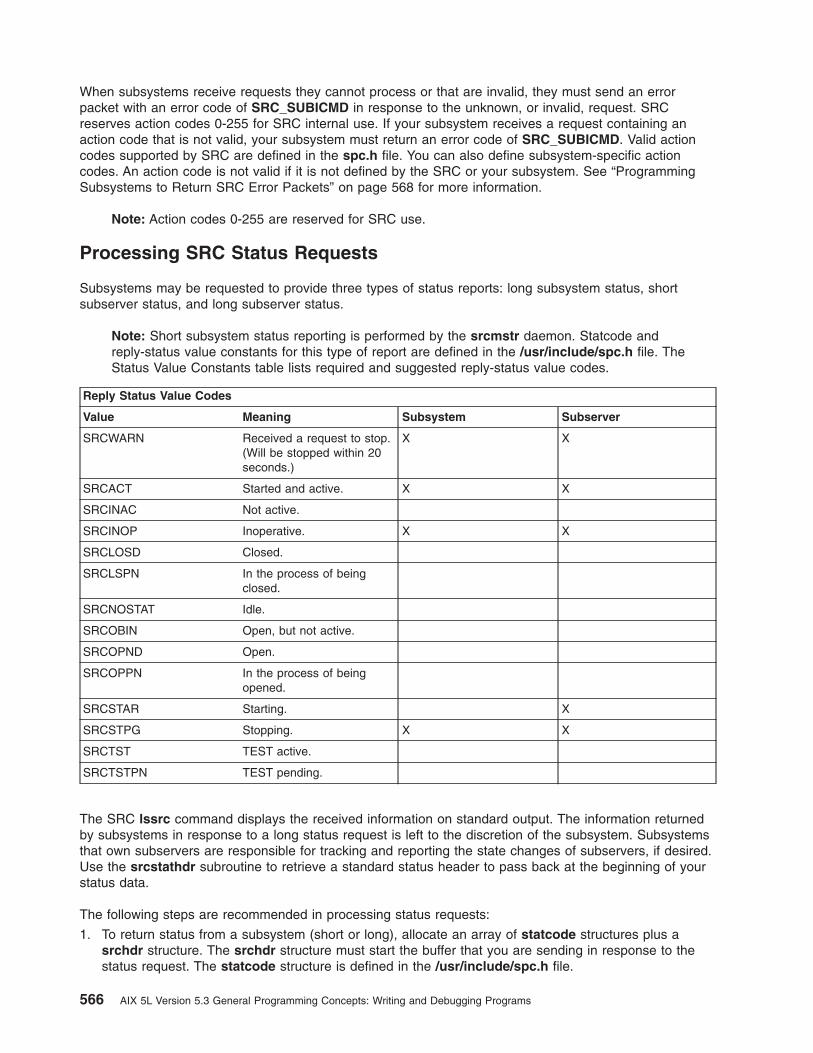
When subsystems receive requests they cannot process or that are invalid, they must send an errorpacket with an error code of SRC_SUBICMD in response to the unknown, or invalid, request. SRCreserves action codes 0-255 for SRC internal use. If your subsystem receives a request containing anaction code that is not valid, your subsystem must return an error code of SRC_SUBICMD. Valid actioncodes supported by SRC are defined in the spc.h file. You can also define subsystem-specific actioncodes. An action code is not valid if it is not defined by the SRC or your subsystem. See “ProgrammingSubsystems to Return SRC Error Packets” on page 568 for more information.
Note: Action codes 0-255 are reserved for SRC use.
Processing SRC Status Requests
Subsystems may be requested to provide three types of status reports: long subsystem status, shortsubserver status, and long subserver status.
Note: Short subsystem status reporting is performed by the srcmstr daemon. Statcode andreply-status value constants for this type of report are defined in the /usr/include/spc.h file. TheStatus Value Constants table lists required and suggested reply-status value codes.
Reply Status Value Codes
Value Meaning Subsystem Subserver
SRCWARN Received a request to stop.(Will be stopped within 20seconds.)
X X
SRCACT Started and active. X X
SRCINAC Not active.
SRCINOP Inoperative. X X
SRCLOSD Closed.
SRCLSPN In the process of beingclosed.
SRCNOSTAT Idle.
SRCOBIN Open, but not active.
SRCOPND Open.
SRCOPPN In the process of beingopened.
SRCSTAR Starting. X
SRCSTPG Stopping. X X
SRCTST TEST active.
SRCTSTPN TEST pending.
The SRC lssrc command displays the received information on standard output. The information returnedby subsystems in response to a long status request is left to the discretion of the subsystem. Subsystemsthat own subservers are responsible for tracking and reporting the state changes of subservers, if desired.Use the srcstathdr subroutine to retrieve a standard status header to pass back at the beginning of yourstatus data.
The following steps are recommended in processing status requests:
1. To return status from a subsystem (short or long), allocate an array of statcode structures plus asrchdr structure. The srchdr structure must start the buffer that you are sending in response to thestatus request. The statcode structure is defined in the /usr/include/spc.h file.
566 AIX 5L Version 5.3 General Programming Concepts: Writing and Debugging Programs

struct statcode{
short objtype;short status;char objtext [65];char objname [30];
};
2. Fill in the objtype field with the SUBSYSTEM constant to indicate that the status is for a subsystem, orwith a subserver code point to indicate that the status is for a subserver.
3. Fill in the status field with one of the SRC status constants defined in the spc.h file.
4. Fill in the objtext field with the NLS text that you wish displayed as status. This field must be a NULLterminated string.
5. Fill in the objname field with the name of the subsystem or subserver for which the objtext fieldapplies. This field must be a NULL terminated string.
Note: The subsystem and requester can agree to send other subsystem-defined information backto the requester. See “srcsrpy Continuation Packets” for more information on this type ofresponse.
Programming Subsystems to Send Reply Packets
The packet that a subsystem returns to the SRC should be in the form of the srcrep structure as definedin the /usr/include/spc.h file. The svrreply structure that is part of the srcrep structure will contain thesubsystem reply:struct svrreply{
short rtncode; /*return code from the subsystem*/short objtype; /*SUBSYSTEM or SUBSERVER*/char objtext[65]; /*object description*/char objname[20]; /*object name*/char rtnmsg[256]; /*returned message*/
};
Use the srcsrpy subroutine to return a packet to the requester.
Creating a ReplyTo program a subsystem reply, use the following procedure:
1. Fill in the rtncode field with the SRC error code that applies. Use SRC_SUBMSG as the rtncode fieldto return a subsystem-specific NLS message.
2. Fill in the objtype field with the SUBSYSTEM constant to indicate that the reply is for a subsystem, orwith the subserver code point to indicate that the reply is for a subserver.
3. Fill in the objname field with the subsystem name, subserver type, or subserver object that applies tothe reply.
4. Fill in the rtnmsg field with the subsystem-specific NLS message.
5. Key the appropriate entry in the srcsrpy Continued parameter. See ″srcsrpy Continuation Packets″ formore information.
Note: The last packet from the subsystem must always have END specified in the Continuedparameter to the srcsrpy subroutine.
srcsrpy Continuation Packets
Subsystem responses to SRC requests are made in the form of continuation packets. Two types ofcontinuation packets may be specified: Informative message, and reply packets.
Chapter 26. System Resource Controller 567

The informative message is not passed back to the client. Instead, it is printed to the client’s standardoutput. The message must consist of NLS text, with message tokens filled in by the sending subsystem.To send this type of continuation packet, specify CONTINUED in the srcsrpy subroutine Continuedparameter.
Note: The STOP subsystem action does not allow any kind of continuation. However, all other actionrequests received by the subsystem from the SRC may be sent an informative message.
The reply packet is passed back to the client for further processing. Therefore, the packet must be agreedupon by the subsystem and the requester. One example of this type of continuation is a status request.When responding to subsystem status requests, specify STATCONTINUED in the srcsrpy Continuedparameter. When status reporting has completed, or all subsystem-defined reply packets have been sent,specify END in the srcsrpy Continued parameter. The packet is then passed to the client to indicate theend of the reply.
Programming Subsystems to Return SRC Error Packets
Subsystems are required to return error packets for both SRC errors and non-SRC errors.
When returning an SRC error, the reply packet that the subsystem returns should be in the form of thesvrreply structure of the srcrep structure, with the objname field filled in with the subsystem name,subserver type, or subserver object in error. If the NLS message associated with the SRC error numberdoes not include any tokens, the error packet is returned in short form. This means the error packetcontains the SRC error number only. However, if tokens are associated with the error number, standardNLS message text from the message catalog should be returned.
When returning a non-SRC error, the reply packet should be a svrreply structure with the rtncode field setto the SRC_SUBMSG constant and the rtnmsg field set to a subsystem-specific NLS message. Thertnmsg field is printed to the client’s standard output.
Responding to Trace RequestsSupport for the traceson and tracesoff commands is subsystem-dependent. If you choose to supportthese commands, trace actions can be specified for subsystems and subservers.
Subsystem trace requests will arrive in the following form: A subsystem trace request will have the subreqaction field set to the TRACE constant and the subreq object field set to the SUBSYSTEM constant.The trace action uses parm1 to indicate LONGTRACE or SHORTTRACE trace, and parm2 to indicateTRACEON or TRACEOFF.
When the subsystem receives a trace subsystem packet with parm1 set to SHORTTRACE and parm2 set toTRACEON, the subsystem should turn short tracing on. Conversely, when the subsystem receives a tracesubsystem packet with parm1 set to LONGTRACE and parm2 set to TRACEON, the subsystem should turnlong tracing on. When the subsystem receives a trace subsystem packet with parm2 set to TRACEOFF, thesubsystem should turn subsystem tracing off.
Subserver trace requests will arrive in the following form: the subserver trace request will have the subreqaction field set to the TRACE constant and the subreq object field set to the subserver code point of thesubserver to send status on. The trace action uses parm1 to indicate LONGTRACE or SHORTTRACE, andparm2 to indicate TRACEON or TRACEOFF.
When the subsystem receives a trace subserver packet with parm1 set to SHORTTRACE and parm2 set toTRACEON, the subsystem should turn subserver short tracing on. Conversely, when the subsystemreceives a trace subserver packet with parm1 set to LONGTRACE and parm2 set to TRACEON, thesubsystem should turn subserver long tracing on. When the subsystem receives a trace subserver packetwith parm2 set to TRACEOFF, the subsystem should turn subserver tracing off.
568 AIX 5L Version 5.3 General Programming Concepts: Writing and Debugging Programs

Responding to Refresh RequestsSupport for subsystem refresh requests is subsystem-dependent. Subsystem programmers that choose tosupport the refresh command should program their subsystems to interact with the SRC in the followingmanner:
v A subsystem refresh request will have the subreq structure action field set to the REFRESH constantand the subreq structure object field set to the SUBSYSTEM constant. The refresh subsystem actiondoes not use parm1 or parm2.
v When the subsystem receives the refresh request, the subsystem should reconfigure itself.
Defining Your Subsystem to the SRC
Subsystems are defined to the SRC object class as subsystem objects. Subservers are defined in theSRC configuration database as subserver type objects. The structures associated with each type of objectare predefined in the sys/srcobj.h file.
A subsystem object is created with the mkssys command or the addssys subroutine. A subserver typeobject is created with the mkserver command. You are not required to specify all possible options andparameters using the configuration commands and subroutines. The SRC offers pre-set defaults. You mustspecify only the required fields and any fields in which you want some value other than the default. Seethe Subsystem Object Descriptor and Default Value table in “Subsystem Object Class” on page 557 in″SRC Objects″ for a list of subsystem and subserver default values.
Descriptors can be added or modified at the command line by writing a shell script. They can also beadded or modified using the C interface. Commands and subroutines are available for configuring andmodifying the SRC objects.
Note: The choice of programming interfaces is provided for convenience only.
At the command line use the following commands:
mkssys Adds a subsystem definition to the SRC configuration database.mkserver Adds a subserver definition to the SRC configuration database.chssys Changes a subsystem definition in the SRC configuration database.chserver Changes a subserver definition in the SRC configuration database.rmssys Removes a subsystem definition from the SRC configuration database.rmserver Removes a subserver definition from the SRC configuration database.
When using the C interface, use the following subroutines:
addssys Adds a subsystem definition to the SRC configuration databasechssys Changes a subsystem definition in the SRC configuration databasedefssys Initializes a new subsystem definition with default valuesdelssys Deletes an existing subsystem definition from the SRC configuration database
Note: The object code running with the chssys subroutine must be running with the groupsystem.
getssys Gets a subsystem definition from the SRC configuration databasegetsubsvr Gets a subserver definition from the SRC configuration database
The mkssys and mkserver commands call the defssys subroutine internally to determine subsystem andsubserver default values prior to adding or modifying any values entered at the command line.
Chapter 26. System Resource Controller 569
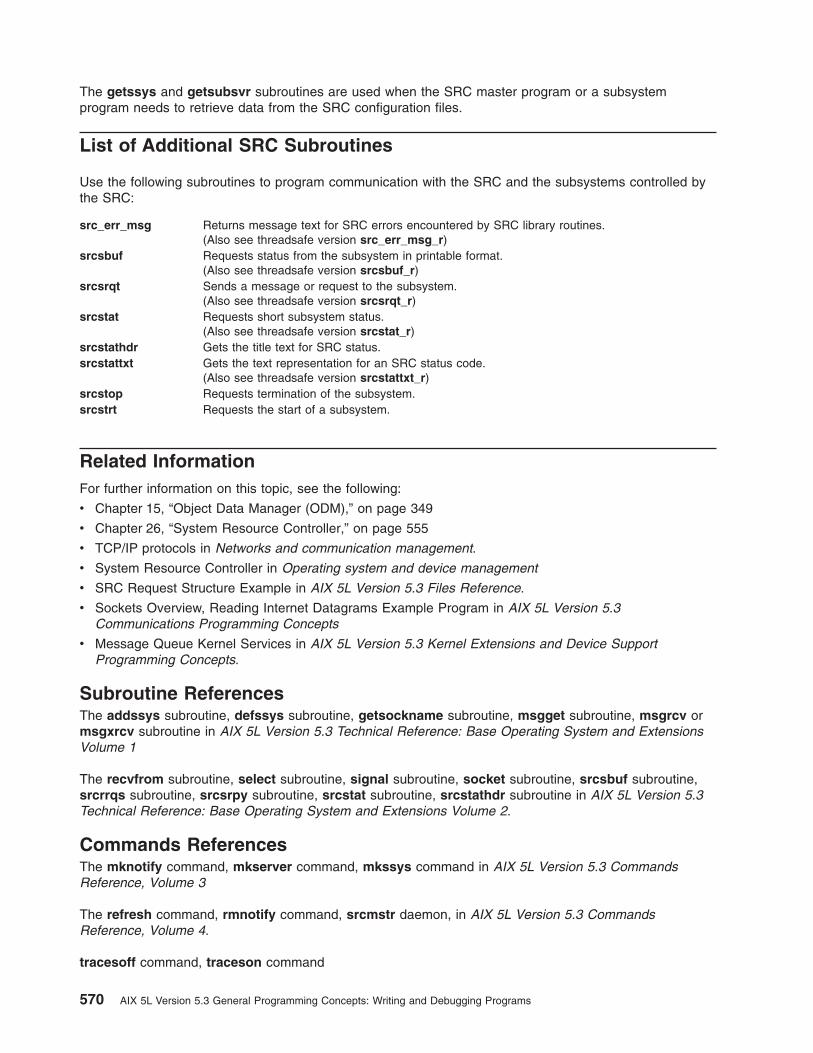
The getssys and getsubsvr subroutines are used when the SRC master program or a subsystemprogram needs to retrieve data from the SRC configuration files.
List of Additional SRC Subroutines
Use the following subroutines to program communication with the SRC and the subsystems controlled bythe SRC:
src_err_msg Returns message text for SRC errors encountered by SRC library routines.(Also see threadsafe version src_err_msg_r)
srcsbuf Requests status from the subsystem in printable format.(Also see threadsafe version srcsbuf_r)
srcsrqt Sends a message or request to the subsystem.(Also see threadsafe version srcsrqt_r)
srcstat Requests short subsystem status.(Also see threadsafe version srcstat_r)
srcstathdr Gets the title text for SRC status.srcstattxt Gets the text representation for an SRC status code.
(Also see threadsafe version srcstattxt_r)srcstop Requests termination of the subsystem.srcstrt Requests the start of a subsystem.
Related InformationFor further information on this topic, see the following:
v Chapter 15, “Object Data Manager (ODM),” on page 349
v Chapter 26, “System Resource Controller,” on page 555
v TCP/IP protocols in Networks and communication management.
v System Resource Controller in Operating system and device management
v SRC Request Structure Example in AIX 5L Version 5.3 Files Reference.
v Sockets Overview, Reading Internet Datagrams Example Program in AIX 5L Version 5.3Communications Programming Concepts
v Message Queue Kernel Services in AIX 5L Version 5.3 Kernel Extensions and Device SupportProgramming Concepts.
Subroutine ReferencesThe addssys subroutine, defssys subroutine, getsockname subroutine, msgget subroutine, msgrcv ormsgxrcv subroutine in AIX 5L Version 5.3 Technical Reference: Base Operating System and ExtensionsVolume 1
The recvfrom subroutine, select subroutine, signal subroutine, socket subroutine, srcsbuf subroutine,srcrrqs subroutine, srcsrpy subroutine, srcstat subroutine, srcstathdr subroutine in AIX 5L Version 5.3Technical Reference: Base Operating System and Extensions Volume 2.
Commands ReferencesThe mknotify command, mkserver command, mkssys command in AIX 5L Version 5.3 CommandsReference, Volume 3
The refresh command, rmnotify command, srcmstr daemon, in AIX 5L Version 5.3 CommandsReference, Volume 4.
tracesoff command, traceson command
570 AIX 5L Version 5.3 General Programming Concepts: Writing and Debugging Programs

Files ReferencesThe spc.h, srcobj.h file.
Chapter 26. System Resource Controller 571

572 AIX 5L Version 5.3 General Programming Concepts: Writing and Debugging Programs

Chapter 27. Trace Facility
The trace facility helps you isolate system problems by monitoring selected system events or selectedprocesses. Events that can be monitored include: entry and exit to selected subroutines, kernel routines,kernel extension routines, and interrupt handlers. Trace can also be restricted to tracing a set of runningprocesses or threads, or it can be used to initiate and trace a program.
When the trace facility is active, information is recorded in a system trace log file. The trace facilityincludes commands for activating and controlling traces and generating trace reports. Applications andkernel extensions can use several subroutines to record additional events.
For more information on the trace facility, refer to the following:
v “The Trace Facility Overview”
v “Controlling the Trace”
v “Recording Trace Event Data” on page 574
v “Generating a Trace Report” on page 575
v “Extracting trace data from a dump” on page 575
v “Trace Facility Commands” on page 575
v “Trace Facility Calls and Subroutines” on page 576
v “Trace Facility Files” on page 577
v “Trace Event Data” on page 577
v “Trace Facility Generic Trace Channels” on page 577
The Trace Facility OverviewThe trace facility is in the bos.sysmgt.trace file set. To see if this file set is installed, type the following onthe command line:lslpp -l | grep bos.sysmgt.trace
If a line is produced which includes bos.sysmgt.trace then the file set is installed, otherwise you mustinstall it.
The system trace facility records trace events which can be formatted later by the trace report command.Trace events are compiled into kernel or application code, but are only traced if tracing is active.
Tracing is activated with the trace command or the trcstart subroutine. Tracing is stopped with either thetrcstop command or the trcstop subroutine. While active, tracing can be suspended or resumed with thetrcoff and trcon commands, or the trcoff and trcon subroutines.
Once the trace has been stopped with trcstop, a trace report can then be generated with the trcrptcommand. This command uses a template file, /etc/trcfmt, to know how to format the entries. Thetemplates are installed with the trcupdate command. For a discussion of the templates, see the trcupdatecommand.
Controlling the TraceThe trace command starts the tracing of system events and controls the trace buffer and log file sizes.This command is documented in the article on the trace daemon in the Command’s Reference.
There are three methods of gathering trace data.
1. The default method is to use 2 buffers to continuously gather trace data, writing one buffer while datais being put into the other buffer. The log file wraps when it becomes full.
© Copyright IBM Corp. 1997, 2010 573

2. The circular method gathers trace data continuously, but only writes the data to the log file when thetrace is stopped. This is particularly useful for debugging a problem where you know when the problemis happening and you just want to capture the data at that time. You can start the trace at any time,and then stop it right after the problem occurs and you’ll have captured the events around the problem.This method is enabled with the -l trace daemon flag.
3. The third option only uses one trace buffer, and quits tracing when that buffer fills, and writes the bufferto the log file. The trace is not stopped at this point, rather tracing is turned off as if a trcoff commandhad been issued. At this point you will usually want to stop the trace with the trcstop command. Thisoption is most often used to gather performance data where we don’t want trace to do i/o or bufferswapping until the data has been gathered. Use the -f flag to enable this option.
You will usually want to run the trace command asynchronously, in other words, you want to enter thetrace command and then continue with other work. To run the trace asynchronously, use the -a flag or the-x flag. If you use the -a flag, you must then stop the trace with the trcstop command. If you use the -xflag, trace automatically stops when the program finishes.
It is usually desirable to limit the information that is traced. Use the -j events or -k events flags to specifya set of events to include (-j) or exclude (-k).
Note: When you limit the trace to specific processes or threads, you also limit the amount of informationtraced.
To display the program names associated with trace hooks, certain hooks must be enabled. These arespecified using the tidhk trace event group. For example, if you want to trace the mbuf hook, 254, andshow program names also, you need to run trace as follows:trace -aJ tidhk -j 254
Tracing occurs. To stop tracing, type the following on a command line:trcstoptrcrpt -O exec=on
The -O exec=on trcrpt option shows the program names, see the trcrpt command for more information.
It is often desirable to specify the buffer size and the maximum log file size. The trace buffers require realmemory to be available so that no paging is necessary to record trace hooks. The log file will fill to themaximum size specified, and then wrap around, discarding the oldest trace data. The -T size and -L sizeflags specify the size of the memory buffers and the maximum size of the trace data in the log file inbytes.
Note: Because the trace facility pins the data collection buffers, making this amount of memoryunavailable to the rest of the system, the trace facility can impact performance in amemory-constrained environment. If the application being monitored is not memory-constrained, orif the percentage of memory consumed by the trace routine is small compared to what is availablein the system, the impact of trace “stolen” memory should be small. If you do not specify a value,trace uses the default sizes.
Tracing can also be controlled from an application. See the trcstart, and trcstop articles.
Recording Trace Event DataThere are two types of trace data.
generic dataconsists of a data word, a buffer of opaque data and the opaque data’s length. This is useful fortracing items such as path names. See the Generic Trace Channels article in the Trace FacilityOverview. It can be found in Chapter 27, “Trace Facility,” on page 573.
574 AIX 5L Version 5.3 General Programming Concepts: Writing and Debugging Programs

Note: Tracing of specific processes or threads is only supported for channel 0. It is not supportedfor generic trace channels.
Non-generic dataThis is what is normally traced by the AIX operating system. Each entry of this type consists of ahook word and up to 5 words of trace data. For a 64-bit application these are 8-byte words. The Cprogrammer should use the macros TRCHKL0 through TRCHKL5, and TRCHKL0T throughTRCHKL5T defined in the /usr/include/sys/trcmacros.h file, to record non-generic data. If thesemacros can not be used, see the article on the utrchook subroutine.
Generating a Trace ReportSee the trcrpt command article for a full description of trcrpt. This command is used to generate areadable trace report from the log file generated by the trace command. By default the command formatsdata from the default log file, /var/adm/ras/trcfile. The trcrpt output is written to standard output.
To generate a trace report from the default log file, and write it to /tmp/rptout, enter
trcrpt >/tmp/rptout
To generate a trace report from the log file /tmp/tlog to /tmp/rptout, which includes program names andsystem call names, use
trcrpt -O exec=on,svc=on /tmp/tlog >/tmp/rptout
Extracting trace data from a dumpIf trace was active when the system takes a dump, the trace can usually be retrieved with the trcdeadcommand. To avoid overwriting the default trace log file on the current system, use the -o output-fileoption.
For example:trcdead -o /tmp/tlog /var/adm/ras/vmcore.0
creates a trace log file /tmp/tlog which may then be formatted with the following:trcrpt /tmp/tlog
Trace Facility CommandsThe following commands are part of the trace facility:
trace Starts the tracing of system events. With this command,you can control the size and manage the trace log file aswell as the internal trace buffers that collect trace eventdata.
trcdead Extracts trace information from a system dump. If thesystem halts while the trace facilities are active, thecontents of the internal trace buffers are captured. Thiscommand extracts the trace event data from the dumpand writes it to the trace log file.
Chapter 27. Trace Facility 575

trcnm Generates a kernel name list used by the trcrptcommand. A kernel name list is composed of a symboltable and a loader symbol table of an object file. Thetrcrpt command uses the kernel name list file to interpretaddresses when formatting a report from a trace log file.Note: It is recommended that you use the -n trace optioninstead of trcnm. This puts name list information into thetrace log file instead of a separate file, and includessymbols from kernel extentions.
trcrpt Formats reports of trace event data contained in the tracelog file. You can specify the events to be included (oromitted) in the report, as well as determine thepresentation of the output with this command. The trcrptcommand uses the trace formatting templates stored inthe /etc/trcfmt file to determine how to interpret the datarecorded for each event.
trcstop Stops the tracing of system events.trcupdate Updates the trace formatting templates stored in the
/etc/trcfmt file. When you add applications or kernelextensions that record trace events, templates for theseevents must be added to the /etc/trcfmt file. The trcrptcommand will use the trace formatting templates todetermine how to interpret the data recorded for eachevent. Software products that record events usually runthe trcupdate command as part of the installationprocess.
Trace Facility Calls and SubroutinesThe following calls and subroutines are part of the trace facility:
trcgen, trcgent Records trace events of more than five words of data. Thetrcgen subroutine can be used to record an event as partof the system event trace (trace channel 0) or to record anevent on a generic trace channel (channels 1 through 7).Specify the channel number in a subroutine parameterwhen you record the trace event. The trcgent subroutineappends a time stamp to the event data. When using AIX5L Version 5.3 with the 5300-05 Technology Level andabove, the time stamp is always appended to the eventdata regardless of the subroutine used. Use trcgenk andtrcgenkt in the kernel. C programmers should always usethe TRCGEN and TRCGENK macros.
utrchook, utrchook64 Records trace events of up to five words of data. Thesesubroutines can be used to record an event as part of thesystem event trace (trace channel 0). Kernel programmerscan use trchook and trchook64. C programmers shouldalways use the TRCHKL0 - TRCHKL5 and TRCHKL0T -TRCHKL5T macros.
If you are not using these macros, you need to build yourown trace hook word. The format is documented with the/etc/trcfmt file. Note that the 32-bit and 64-bit traces havedifferent hook word formats.
trcoff Suspends the collection of trace data on either the systemevent trace channel (channel 0) or a generic trace channel(1 through 7). The trace channel remains active and tracedata collection can be resumed by using the trconsubroutine.
576 AIX 5L Version 5.3 General Programming Concepts: Writing and Debugging Programs
trcon Starts the collection of trace data on a trace channel. Thechannel can be either the system event trace channel (0)or a generic channel (1 through 7). The trace channel,however, must have been previously activated by usingthe trace command or the trcstart subroutine. You cansuspend trace data collection by using the trcoffsubroutine.
trcstart Provides a library interface to the trace command. Itreturns the channel number of the trace it starts. If ageneric channel is requested, the channel number is oneof the following numbers: 1,2,3,4,5,6, 7. Otherwise thechannel number is 0.
trcstop Frees and deactivates a generic trace channel.
Trace Facility Files
/etc/trcfmt Contains the trace formatting templates used by the trcrptcommand to determine how to interpret the data recordedfor each event.
/var/adm/ras/trcfile Contains the default trace log file. The trace commandallows you to specify a different trace log file.
/usr/include/sys/trchkid.h Contains trace hook identifier definitions./usr/include/sys/trcmacros.h Contains commonly used macros for recording trace
events.
Trace Event DataSee the /etc/trcfmt file for the format of the trace event data.
Trace Hook IdentifiersA trace hook identifier is a three-digit hexadecimal number that identifies an event being traced. However,when you use tracing macros such as TRCHKL1, you specify the trace hook as:hhh00000
where hhh is the hook id.
Most trace hook identifiers are defined in the /usr/include/sys/trchkid.h file. The values 0x010 through0x0FF are available for use by user applications. All other values are reserved for system use. Thecurrently defined trace hook identifiers can be listed using the trcrpt -j command.
Trace Facility Generic Trace ChannelsThe trace facility supports up to eight active trace sessions at a time. Each trace session uses a channelof the multiplexed trace special file, /dev/systrace. Channel 0 is used by the trace facility to record systemevents. The tracing of system events is started and stopped by the trace and trcstop commands. If youtrace specific processes or threads, or if a program is traced, only channel 0 is used. Channels 1 through7 are referred to as generic trace channels and can only be used by subsystems for other types of tracingsuch as data link tracing.
To implement tracing using the generic trace channels of the trace facility, a subsystem calls the trcstartsubroutine to activate a trace channel and to determine the channel number. The subsystem modules canthen record trace events using the TRCGEN or TRCGENT macros, or if necessary, trcgen, trcgent,trcgenk, or trcgenkt subroutine. The channel number returned by the trcstart subroutine is one of theparameters that must be passed to these subroutines. The subsystem can suspend and resume trace datacollection using the trcoff and trcon subroutines and can deactivate a trace channel using the trcstopsubroutine. The subsystem must provide the user interface to activate and deactivate subsystem tracing.
Chapter 27. Trace Facility 577

The trace hook IDs, most of which are stored in the /usr/include/sys/trchkid.h file, and the traceformatting templates, which are stored in the /etc/trcfmt file, are shared by all the trace channels.
Start the Trace FacilityUse the following procedures to configure and start a system trace:
v “Configuring the trace Command”
v “Recording Trace Event Data”
v “Using Generic Trace Channels”
v “Starting a Trace” on page 579
v “Stopping a Trace” on page 579
v “Generating a Trace Report” on page 579
Configuring the trace CommandThe trace command starts the tracing of system events and controls the size of and manages the tracelog file, as well as the internal trace buffers that collect trace event data. For information on the syntax ofthis command, see trace Daemon.
Recording Trace Event DataThe data recorded for each traced event consist of a word containing the trace hook identifier and thehook type followed by a variable number of words of trace data optionally followed by a time stamp. Theword containing the trace hook identifier and the hook type is called the hook word. The remaining twobytes of the hook word are called hook data and are available for recording event data.
Trace Hook IdentifiersA trace hook identifier is a three-digit hexadecimal number that identifies an event being traced. However,when tracing using the tracing macros such as TRCHKL1, you specify the trace hook as hhh00000, wherehhh is the hook id. The values 0x010 through 0x0FF are available for use by user applications. All othervalues are reserved for system use. The trace hook identifiers for the installed software can be listed usingthe trcrpt -j command.
All the trace channels share the trace hook IDs, many of which are stored in the /usr/include/sys/trchkid.h file, and the trace formatting templates, which are stored in the /etc/trcfmt file.
Using Generic Trace ChannelsThe trace facility supports up to eight active trace sessions at a time. Each trace session uses a channelof the multiplexed trace special file, /dev/systrace. Channel 0 is used by the trace facility to record systemevents. The tracing of system events is started and stopped by the trace and trcstop commands.Channels 1 through 7 are referred to as generic trace channels and may be used by subsystems for othertypes of tracing such as data link tracing.
To implement tracing using the generic trace channels of the trace facility, a subsystem calls the trcstartsubroutine to activate a trace channel and to determine the channel number. The subsystem modules canthen record trace events TRCGEN or TRCGENT macros, or the trcgen, trcgent, trcgenk, or trcgenktsubroutines. The channel number returned by the trcstart subroutine is one of the parameters that mustbe passed to these subroutines. The subsystem can suspend and resume trace data collection using thetrcoff and trcon subroutines and can deactivate a trace channel using the trcstop subroutine. The traceevents for each channel are written to a separate trace log file, which, by default, is named/var/adm/ras/trcfile.n, where n is the channel number. The subsystem must provide the user interface toactivate and deactivate subsystem tracing.
578 AIX 5L Version 5.3 General Programming Concepts: Writing and Debugging Programs

Starting a TraceUse one of the following procedures to start the trace facility.
v Start the trace facility by using the trace command.
Start the trace asynchronously. For example:trace -amycmdtrcstop
When using the trace facility asynchronously, use the trace daemon to trace the selected system events(such as the mycmd command); then, use the trcstop command to stop the trace.
OR
Start the trace interactively. For example:trace->!mycmd->quit
When using the trace facility interactively, get into the interactive mode as denoted by the -> prompt,and use the trace subcommands (such as !) to trace the selected system events. Use the quitsubcommand to stop the trace.
v Use smit trace, and choose the Start Trace option.smit trace
Stopping a TraceUse one of the following procedures to stop the trace you started earlier.
v When using trace asynchronously at the command line, use the trcstop command:trace -amycmdtrcstop
When using the trace facility asynchronously, use the trace daemon to trace the selected system events(such as the mycmd command); then, use the trcstop command to stop the trace.
v When using trace interactively at the command line, use the quit subcommand:trace->!mycmd->quit
The interactive mode is denoted by the -> prompt. Use the trace subcommands (such as !) to trace theselected system events. Use the quit subcommand to stop the trace.
v Use smit trace and choose the Stop Trace option:smit trace
Generating a Trace ReportUse either of the following procedures to generate a report of events that have been traced.
v Use the trcrpt command:trcrpt>/tmp/NewFile
The previous example formats the trace log file and sends the report to /tmp/newfile. The trcrptcommand reads the trace log file, formats the trace entries, and writes a report.
v Use the smit trcrpt command:smit trcrpt
Chapter 27. Trace Facility 579

Related Information
Subroutine ReferencesThe trcgen subroutine, trchook subroutine, trcoff subroutine, trcon subroutine, trcstart subroutine,trcstop subroutine in AIX 5L Version 5.3 Technical Reference: Base Operating System and ExtensionsVolume 2.
Commands ReferencesThe trace daemon, trcdead command, trcnm command, trcrpt command, trcstop command, trcupdatecommand in AIX 5L Version 5.3 Commands Reference, Volume 5.
580 AIX 5L Version 5.3 General Programming Concepts: Writing and Debugging Programs

Chapter 28. tty Subsystem
AIX is a multiuser operating system that allows user access from local or remotely attached devices. Thecommunication layer that supports this function is the tty subsystem.
The communication between terminal devices and the programs that read and write to them is controlledby the tty interface. Examples of tty devices are:
v Modems
v ASCII terminals
v System consoles
v Serial printers
v Xterms or aixterms under X-Windows
This overview provides information on the following topics:
v “TTY Subsystem Objectives”
v “tty Subsystem Modules”
v “TTY Subsystem Structure” on page 582
v “Common Services” on page 583
v “Synchronization” on page 585
TTY Subsystem ObjectivesThe tty subsystem is responsible for:
v Controlling the physical flow of data on asynchronous lines (including the transmission speed, charactersize, and line availability)
v Interpreting the data by recognizing special characters and adapting to national languages
v Controlling jobs and terminal access by using the concept of controlling terminal
A controlling terminal manages the input and output operations of a group of processes. The tty specialfile supports the controlling terminal interface. In practice, user programs seldom open terminal files, suchas dev/tty5. These files are opened by a getty or rlogind command and become the user’s standardinput and output devices.
See tty Special File in AIX 5L Version 5.3 Files Reference for more information about the controllingterminal.
tty Subsystem ModulesTo perform its tasks, the tty subsystem is composed of modules, or disciplines. A module is a set ofprocessing rules that govern the interface for communication between the computer and an asynchronousdevice. Modules can be added and removed dynamically for each tty.
The tty subsystem supports three main types of modules:
v “tty Drivers” on page 582
v “Line Disciplines” on page 582
v “Converter Modules” on page 582
© Copyright IBM Corp. 1997, 2010 581
tty Drivers
tty drivers, or hardware disciplines, directly control the hardware (tty devices) or pseudo-hardware (ptydevices). They perform the actual input and output to the adapter by providing services to the modulesabove it. The services are flow control and special semantics when a port is being opened.
The following tty drivers are provided:
cxma 128-port asynchronous PCI controller.cxpa 8-port asynchronous PCI controller.lft Low-function terminal. The tty name is /dev/lftY, where Y >= 0.pty pseudo-terminal device driver.sa 2-port asynchronous EIA-232 PCI adapter.sf Universal asynchronous receiver/transceivers (UARTs) on system planar.
The “TTY Drivers” on page 589 section provides more information.
Line Disciplines
Line disciplines provide editing, job control, and special character interpretation. They perform alltransformations that occur on the inbound and outbound data streams. Line disciplines also perform mostof the error handling and status monitoring for the tty driver.
The following line disciplines are provided:
ldterm Terminal devices (see “Line Discipline Module (ldterm)” on page 585)sptr Serial printer (splp command)slip Serial Line Internet Protocol (slattach command)
Converter Modules
Converter modules, or mapping disciplines, translate, or map, input and output characters.
The following converter modules are provided:
nls National language support for terminal mapping; this converter translatesincoming and outgoing characters on the data stream, based on the input andoutput maps defined for the port (see the setmaps command)
lc_sjis and uc_sjis Upper and lower converter used to translate multibyte characters between theShifted Japanese Industrial Standard (SJIS) and the Advanced Japanese EUCCode (AJEC) handled by the ldterm line discipline.
“Converter Modules” on page 588 provides more information on converters.
TTY Subsystem StructureThe tty subsystem is based on STREAMS. This STREAMS-based structure provides modularity andflexibility, and enables the following features:
v Easy customizing; users can customize their terminal subsystem environment by adding and removingmodules of their choice.
v Reusable modules; for example, the same line discipline module can be used on many tty devices withdifferent configurations.
v Easy addition of new features to the terminal subsystem.
v Providing an homogeneous tty interface on heterogeneous devices.
582 AIX 5L Version 5.3 General Programming Concepts: Writing and Debugging Programs

The structure of a tty stream is made up of the following modules:
v The stream head, processing the user’s requests. The stream head is the same for all tty devices,regardless of what line discipline or tty driver is in use.
v An optional upper converter (uc_sjis for example), a converter module pushed above the line disciplineto convert upstream and downstream data.
v The line discipline.
v An optional lower converter (lc_sjis for example), a converter module pushed below the line disciplineto convert upstream and downstream data.
v An optional character mapping module (nls), a converter module pushed above the tty driver to supportinput and output terminal mapping.
v The stream end: a tty driver.
Unless required, the internationalization modules are not present in the tty stream.
For a serial printer, the internationalization modules are usually not present on the stream; therefore, thestructure is simpler.
Common ServicesThe /usr/include/sys/ioctl.h and /usr/include/termios.h files describe the interface to the commonservices provided by the tty subsystem. The ioctl.h file, which is used by all of the modules, includes thewinsize structure, as well as several ioctl commands. The termios.h file includes the POSIX compliantsubroutines and data types.
The provided services are grouped and discussed here according to their specific functions.
v “Hardware Control Services” on page 584:
– cfgetispeed subroutine
– cfgetospeed subroutine
– cfsetispeed subroutine
– cfsetospeed subroutine
– tcsendbreak subroutine
v “Flow Control Services” on page 584:
– tcdrain subroutine
– tcflow subroutine
– tcflush subroutine
v “Terminal Information and Control” on page 584:
– isatty subroutine
– tcgetattr subroutine
– tcsetattr subroutine
– ttylock subroutine
– ttylocked subroutine
– ttyname subroutine
– ttyunlock subroutine
– ttywait subroutine
v “Window and Terminal Size Services” on page 584:
– termdef subroutine
– TIOCGWINSZ ioctl operation
– TIOCSWINSZ ioctl operation
v “Process Group Management Services” on page 584:
Chapter 28. tty Subsystem 583

– tcgetpgrp subroutine
– tcsetpgrp subroutine
Hardware Control ServicesThe following subroutines are provided for hardware control:
cfgetispeed Gets input baud ratecfgetospeed Gets output baud ratecfsetispeed Sets input baud ratecfsetospeed Sets output baud ratetcsendbreak Sends a break on an asynchronous serial data line
Flow Control ServicesThe following subroutines are provided for flow control:
tcdrain Waits for output to completetcflow Performs flow control functionstcflush Discards data from the specified queue
Terminal Information and ControlThe following subroutines are provided for terminal information and control:
isatty Determines if the device is a terminalsetcsmap Reads a code set map file and assigns it to the standard
input devicetcgetattr Gets terminal statetcsetattr Sets terminal statettylock, ttywait, ttyunlock, or ttylocked Controls tty locking functionsttyname Gets the name of a terminal
Window and Terminal Size Services
The kernel stores the winsize structure to provide a consistent interface for the current terminal or windowsize. The winsize structure contains the following fields:
ws_row Indicates the number of rows (in characters) on the window or terminalws_col Indicates the number of columns (in characters) on the window or terminalws_xpixel Indicates the horizontal size (in pixels) of the window or terminalws_ypixel Indicates the vertical size (in pixels) of the window or terminal
By convention, a value of 0 in all of the winsize structure fields indicates that the structure has not yetbeen set up.
termdef Queries terminal characteristics.TIOCGWINSZ Gets the window size. The argument to this ioctl operation is a pointer to a winsize structure, into
which the current terminal or window size is placed.TIOCSWINSZ Sets the window size. The argument to this ioctl operation is a pointer to a winsize structure,
which is used to set the current terminal or window size information. If the new information differsfrom the previous, a SIGWINCH signal is sent to the terminal process group.
Process Group Management ServicesThe following subroutines are provided for process group management:
tcgetpgrp Gets foreground process group ID
584 AIX 5L Version 5.3 General Programming Concepts: Writing and Debugging Programs

tcsetpgrp Sets foreground process group ID
Buffer Size Operations
The following ioctl operations are used for setting the size of the terminal input and output buffers. Theargument to these operations is a pointer to an integer specifying the size of the buffer.
TXSETIHOG Sets the hog limit for the number of input characters that can be received and stored in the internaltty buffers before the process reads them. The default hog limit is 8192 characters. Once the hoglimit plus one character is reached, an error is logged in the error log and the input buffer isflushed. The hog number should not be too large, since the buffer is allocated from thesystem-pinned memory.
TXSETOHOG Sets the hog limit for the number of output characters buffered to echo input. The default hog limitis 8192 characters. Once the hog output limit is reached, input characters are no longer echoed.The hog number should not be too large, since the buffer is allocated from the system-pinnedmemory.
SynchronizationThe tty subsystem takes advantage of the synchronization provided by STREAMS. The tty streammodules are configured with the queue pair level synchronization. This synchronization allows theparallelization of the processing for two different streams.
Line Discipline Module (ldterm)The ldterm line discipline is the common line discipline for terminals. This line discipline is POSIXcompliant and also ensures compatibility with the BSD interface. The latter line discipline is supported onlyfor compatibility with older applications. For portability reasons, it is strongly recommended that you usethe POSIX interface in new applications.
This section describes the features provided by the ldterm line discipline. For more information aboutcontrolling ldterm, see ″termios.h File″ in AIX 5L Version 5.3 Files Reference
Terminal ParametersThe parameters that control certain terminal I/O characteristics are specified in the termios structure asdefined in the termios.h file. The termios structure includes (but is not limited to) the following members:
tcflag_t c_iflag Input modestcflag_t c_oflag Output modestcflag_t c_cflag Control modestcflag_t c_lflag Local modescc_t c_cc[NCCS] Control characters.
The tcflag_t and cc_t unsigned integer types are defined in the termios.h file. The NCCS symbol is alsodefined in the termios.h file.
Process Group Session Management (Job Control)A controlling terminal distinguishes one process group in the session, with which it is associated, to be theforeground process group. All other process groups in the session are designated as background processgroups. The foreground process group plays a special role in handling signals.
Command interpreter processes that support job control, such as the Korn shell (the ksh command) andthe C shell (the csh command), can allocate the terminal to different jobs, or process groups, by placingrelated processes in a single process group and associating this process group with the terminal. A
Chapter 28. tty Subsystem 585

terminal’s foreground process group can be set or examined by a process, assuming the permissionrequirements are met. The terminal driver assists in job allocation by restricting access to the terminal byprocesses that are not in the foreground process group.
Terminal Access ControlIf a process that is not in the foreground process group of its controlling terminal attempts to read from thecontrolling terminal, the process group of that process is sent a SIGTTIN signal. However, if the readingprocess is ignoring or blocking the SIGTTIN signal, or if the process group of the reading process isorphaned, the read request returns a value of -1, sets the errno global variable to EIO, and does not senda signal.
If a process that is not in the foreground process group of its controlling terminal attempts to write to thecontrolling terminal, the process group of that process is sent a SIGTTOU signal. However, themanagement of the SIGTTOU signal depends on the TOSTOP flag which is defined in the c_lflag field ofthe termios structure. If the TOSTOP flag is not set, or if the TOSTOP flag is set and the process isignoring or blocking the SIGTTOU signal, the process is allowed to write to the terminal, and the SIGTTOUsignal is not sent. If the TOSTOP flag is set, the process group of the writing process is orphaned, and thewriting process is not ignoring or blocking the SIGTTOU signal, then the write request returns a value of-1, sets the errno global variable to EIO, and does not send a signal.
Certain functions that set terminal parameters (tcsetattr, tcsendbreak, tcflow, and tcflush) are treated inthe same manner as write requests, except that the TOSTOP flag is ignored. The effect is identical to thatof terminal write requests when the TOSTOP flag is set.
Reading Data and Input ProcessingTwo general kinds of input processing are available, depending on whether the terminal device file is incanonical or noncanonical mode. Additionally, input characters are processed according to the c_iflag andc_lflag fields. Such processing can include echoing, or the transmitting of input characters immediatelyback to the terminal that sent them. Echoing is useful for terminals that can operate in full-duplex mode.
A read request can be handled in two ways, depending on whether the O_NONBLOCK flag is set by anopen or fcntl subroutine. If the O_NONBLOCK flag is not set, the read request is blocked until data isavailable or until a signal is received. If the O_NONBLOCK flag is set, the read request is completed,without blocking, in one of three ways:
v If there is enough data available to satisfy the entire request, the read request completes successfullyand returns the number of bytes read.
v If there is not enough data available to satisfy the entire request, the read request completessuccessfully, having read as much data as possible, and returns the number of bytes it was able toread.
v If there is no data available, the read request returns a value of -1 and sets the errno global variable toEAGAIN.
The availability of data depends on whether the input processing mode is canonical or noncanonical. Thecanonical or noncanonical modes can be set with the stty command.
Canonical Mode Input ProcessingIn canonical mode input processing (ICANON flag set in c_lflag field of termios structure), terminal inputis processed in units of lines. A line is delimited by a new-line (ASCII LF) character, an end-of-file (EOF)character, or an end-of-line (EOL) character. This means that a program attempting to read is blocked untilan entire line has been typed or a signal has been received. Also, regardless of how many characters arespecified in the read request, no more than one line is returned. It is not, however, necessary to read anentire line at once. Any number of characters can be specified in a read request without losing information.During input, erase and kill processing is done.
586 AIX 5L Version 5.3 General Programming Concepts: Writing and Debugging Programs

ERASE character (Backspace, by default) erases the last character typedWERASE character (Ctrl-W key sequence, by default) erases the last word typed in the current line, but
not any preceding spaces or tabs
(A word is defined as a sequence of nonblank characters; tabs are regarded as blanks.) Neither theERASE nor the WERASE character erases beyond the beginning of the line.
KILL character (Ctrl-U sequence, by default) deletes the entire input line and, optionally, outputs anew-line character
All of these characters operate on a keystroke basis, independent of any backspacing or tabbing thatmight have been done.
REPRINT character (Ctrl-R sequence, by default) prints a new line followed by the characters from theprevious line that have not been read
Reprinting also occurs automatically if characters that would normally be erased from the screen arefouled by program output. The characters are reprinted as if they were being echoed. Consequently, if theECHO flag is not set in the c_lflag field of the termios structure, the characters are not printed. TheERASE and KILL characters can be entered literally by preceding them with the escape character \(backslash), in which case, the escape character is not read. The ERASE, WERASE, and KILL characterscan be changed.
Noncanonical Mode Input ProcessingIn noncanonical mode input processing (-ICANON flag set in c_lflag field of termios structure), inputbytes are not assembled into lines, and erase and kill processing does not occur.
MIN Represents the minimum number of bytes that should be received when the read request is successfulTIME A timer of 0.1-second granularity that is used to time-out burst and short-term data transmissions
The values of the MIN and TIME members of the c_cc array are used to determine how to process thebytes received. The MIN and TIME values can be set with the stty command. MIN and MAX have valuesfrom 0 to 265. The four possible combinations for MIN and TIME and their interactions are described inthe subsequent paragraphs.
Case A: MIN>0, TIME>0: In this case, TIME serves as an interbyte timer, which is activated after the firstbyte is received and reset each time a byte is received. If MIN bytes are received before the interbytetimer expires, the read request is satisfied. If the timer expires before MIN bytes are received, thecharacters received to that point are returned to the user. If TIME expires, at least one byte is returned.(The timer would not have been enabled unless a byte was received.) The read operation blocks until theMIN and TIME mechanisms are activated by the receipt of the first byte or until a signal is received.
Case B: MIN>0, TIME = 0: In this case, only MIN is significant; the timer is not significant (the value ofTIME is 0). A pending read request is not satisfied (blocks) until MIN bytes are received or until a signal isreceived. A program that uses this case to read record-based terminal I/O can block indefinitely in the readoperation.
Case C: MIN = 0, TIME>0: In this case, because the value of MIN is 0, TIME no longer represents aninterbyte timer. It now serves as a read timer that is activated as soon as the read request is processed. Aread request is satisfied as soon as a byte is received or when the read timer expires. Note that if thetimer expires, no bytes are returned. If the timer does not expire, the read request can be satisfied only ifa byte is received. In this case, the read operation does not block indefinitely, waiting for a byte. If, afterthe read request is initiated, no byte is received within the period specified by TIME multiplied by 0.1seconds, the read request returns a value of 0, having read no data.
Chapter 28. tty Subsystem 587

Case D: MIN = 0, TIME = 0: In this case, the minimum of either the number of bytes requested or thenumber of bytes currently available is returned without waiting for more bytes to be input. If no charactersare available, the read request returns a value of 0, having read no data.
Cases A and B exist to handle burst-mode activity, such as file transfer programs, where a program needsto process at least the number of characters specified by the MIN variable at one time. In Case A, theinterbyte timer is activated as a safety measure. In Case B, the timer is turned off.
Cases C and D exist to handle single-character, limited transfers. These cases are readily adaptable toscreen-based applications that need to know if a character is present in the input queue before refreshingthe screen. In Case C, the timer is activated. In Case D, the timer is turned off. Case D can lead toperformance issues if overused; but it is better to use it than doing a read request with setting theO_NONBLOCK flag.
Writing Data and Output ProcessingWhen one or more characters are written, they are transmitted to the terminal as soon as previouslywritten characters are displayed. (Input characters are echoed by putting them into the output queue asthey arrive.) If a process produces characters more rapidly than they can be displayed, the process issuspended when its output queue exceeds a certain limit. When the queue has drained down to a certainthreshold, the program is resumed.
Modem ManagementIf the CLOCAL flag is set in the c_cflag field of the termios structure, a connection does not depend onthe state of the modem status lines. If the CLOCAL flag is clear, the modem status lines are monitored.Under normal circumstances, an open function waits for the modem connection to complete. However, ifthe O_NONBLOCK or CLOCAL flag is set, the open function returns immediately without waiting for theconnection.
If the CLOCAL flag is not set in the c_cflag field of the termios structure and a modem disconnect isdetected by the terminal interface for a controlling terminal, the SIGHUP signal is sent to the controllingprocess associated with the terminal. Unless other arrangements have been made, this signal causes theprocess to terminate. If the SIGHUP signal is ignored or caught, any subsequent read request returns anend-of-file indication until the terminal is closed. Any subsequent write request to the terminal returns avalue of -1 and sets the errno global variable to EIO until the device is closed.
Closing a Terminal Device FileThe last process to close a terminal device file causes any output to be sent to the device and any input tobe discarded. Then, if the HUPCL flag is set in the c_cflag field of the termios structure and thecommunications port supports a disconnect function, the terminal device performs a disconnect.
Converter ModulesConverter modules are optional modules; they are pushed onto a tty stream only if required. They areusually provided for internationalization purposes and perform various character mapping.
The following converter modules are shipped:
v The nls module
v The uc_sjis and lc_sjis modules.
588 AIX 5L Version 5.3 General Programming Concepts: Writing and Debugging Programs
NLS ModuleThe nls module is a lower converter module that can be pushed onto a tty stream below the linediscipline. The nls module ensures terminal mapping: it executes the mapping of input and outputcharacters for nonstandard terminals (that is, for terminals that do not support the basic codeset ISO 8859of the system).
The mapping rules are specified in two map files located in the /usr/lib/nls/termmap directory. The .infiles contain the mapping rules for the keyboard inputs. The .out files contain the mapping rules for thedisplay outputs. The files format is specified in the setmaps file format ″setmaps File Format″ in AIX 5LVersion 5.3 Files Reference.
SJIS ModulesThe uc_sjis and lc_sjis modules are converter modules that can be pushed onto a tty stream. Theyensure codeset handling: they execute the conversion of multibyte characters between the shiftedJapanese industrial standard (SJIS) format and the advanced Japanese EUC code (AJEC) format,supported by the line disciplines. They are needed when the user process and the hardware terminal usesthe IBM-943 or IBM-932 code set.
AJEC is a Japanese implementation of the extended UNIX code (EUC) encoding method, which allowscombination of ASCII, phonetic Kana, and ideographic Kanji characters. AJEC is a superset of UNIXJapanese industrial standard (UJIS), a common Japanese implementation of EUC.
Japanese-encoded data consist of characters from up to four code sets:
Code set Contained charactersASCII Roman letters, digits, punctuation and control charactersJIS X0201 Phonetic KanaJIS X0208 Ideographic KanjiJIS X0212 Supplemental Kanji.
AJEC makes use of all four code sets. SJIS makes use only of ASCII, JIS X0201, and JIS X0208 codesets. Therefore, the uc_sjis and lc_sjis modules convert:
v All SJIS characters into AJEC characters
v AJEC characters from ASCII, JIS X0201, and JIS X0208 code sets into SJIS characters
v AJEC characters from JIS X0212 code set into the SJIS undefined character.
The uc_sjis and lc_sjis modules are always used together. The uc_sjis upper converter is pushed ontothe tty stream above the line discipline; the lc_sjis lower converter is pushed onto the stream below theline discipline. The uc_sjis and lc_sjis modules are automatically pushed onto the tty stream by thesetmaps command and the setcsmap subroutine. They are also controlled by the EUC ioctl operationsdescribed in the eucioctl.h file in the AIX 5L Version 5.3 Files Reference.
TTY DriversA tty driver is a STREAMS driver managing the actual connection to the hardware terminal. Depending onthe connection, three kinds of tty drivers are provided: asynchronous line drivers, the pty driver, and theLFT driver.
Asynchronous Line DriversThe asynchronous line drivers are provided to support devices (usually ASCII terminals) directly connectedto the system through asynchronous lines, including modems.
The asynchronous line drivers provide the interface to the line control hardware:
Chapter 28. tty Subsystem 589

v The cxma driver supports the 128-port PCI adapter card.
v The cxpa driver supports the 8-port PCI adapter card.
v The sf driver supports the native ports on the system planar.
v The sa driver supports the 2-port PCI adapter card.
The asynchronous line drivers are responsible for setting parameters, such as the baud rate, the charactersize, and the parity checking. The user can control these parameters through the c_cflag field of thetermios structure.
The asynchronous line drivers also provide the following features:
v The hardware and software flow control, or pacing discipline, specifies how the connection is managedto prevent a buffer overflow. The user can control this feature through the c_iflag field of the termiosstructure (software flow control) and the x_hflag field of the termiox structure (hardware flow control).
v The open discipline specifies how to establish a connection. This feature is controlled at configurationtime through the x_sflag field of the termiox structure.
Pseudo-Terminal DriverThe pseudo-terminal (pty) driver is provided to support terminals that need special processing, such asX terminals or remote systems connected through a network.
A pty driver just transmits the input and output data from the application to a server process through asecond stream. The server process, running in the user space, is usually a daemon, such as the rloginddaemon or the xdm daemon. It manages the actual communication with the terminal.
Other optional modules may be pushed on either user or server stream.
Related InformationFor further information on this topic, see the following:
v Chapter 7, “Input and Output Handling,” on page 175
v STREAMS Overview in AIX 5L Version 5.3 Communications Programming Concepts.
Subroutine ReferencesThe setcsmap subroutine.
Commands ReferencesThe rlogind daemon in AIX 5L Version 5.3 Commands Reference, Volume 4.
The setmaps command, stty command in AIX 5L Version 5.3 Commands Reference, Volume 5.
The xdm daemonAIX 5L Version 5.3 Commands Reference, Volume 6.
Files ReferencesThe eucioctl.h file, lft file, lp file, pty file, setmaps file, termios.h file, termiox.h file, tty file.
590 AIX 5L Version 5.3 General Programming Concepts: Writing and Debugging Programs

Chapter 29. Loader Domains
In some programming environments, it is desirable to have shared libraries loaded at the same virtualaddress in each process. Due to the dynamic nature of shared libraries maintained by the AIX systemloader, this condition cannot be guaranteed. Loader domains provide a means of loading shared librariesat the same virtual address in a set of processes.
The system loader loads shared libraries into multiple global shared library regions. One region is calledthe shared library text region, which contains the executable instructions for loaded shared libraries. Theshared library text region is mapped to the same virtual address in every process. The other region is theshared library data region. This region contains the data for shared libraries. Because shared library datais read/write, each process has its own private region that is a copy of the global shared library region.This private region is mapped to the same virtual address in every process.
Since the global shared library regions are mapped at the same virtual address in every process, sharedlibraries are loaded at the same virtual address in most cases. The case where this is not true is whenthere is more than one version of a shared library loaded in the system. This happens whenever a sharedlibrary that is in use is modified, or any shared libraries it depends on are modified. When this happens,the loader must create a new version of the modified shared library and all other shared libraries thatdepend on the modified shared library. Note that all shared libraries ultimately depend on the Kernel NameSpace. The Kernel Name Space contains all the system calls defined by the kernel and can be modifiedany time a kernel extension is dynamically loaded or unloaded. When the system loader creates a newversion of a shared library, the new version must be located at a different location in the global sharedlibrary segments. Therefore, processes that use the new version have the shared libraries loaded at adifferent virtual address than processes that use the previous versions of the shared libraries.
A loader domain is a subset of all the shared libraries that are loaded in the system. The set of all sharedlibraries loaded in the system is called the global loader domain. This global loader domain can besubdivided into smaller user-defined loader domains. A user-defined loader domain contains one version ofany particular shared library. Processes can specify a loader domain. If a process specifies a loaderdomain, the process uses the shared libraries contained in the loader domain. If more than one processspecifies the same loader domain, they use the same set of shared libraries. Since a loader domaincontains one version of any particular shared library, all processes that specify the same loader domainuse the same version of shared libraries and have their shared libraries loaded at the same virtualaddress.
Using Loader Domains
If a process uses a loader domain, it must be specified at exec time. The loader domain specified is ineffect and used for the entire duration of the process. When a process that specifies a loader domain callsthe exec system call, the system loader takes the following actions:
Finds/creates loader domain
© Copyright IBM Corp. 1997, 2010 591

The access permissions associated withthe loader domain are checked todetermine if this process can use theloader domain. If the process does nothave sufficient privilege to access (read orwrite) the loader domain, no domain isused by the process. If the process doeshave sufficient privilege, the list of loaderdomains maintained by the system loaderis searched for the loader domainspecified by the process. If the loaderdomain specified is not found, it is createdif the process has sufficient privilege. If theprocess does not have sufficient privilegeto create the loader domain, then the execcall fails, and an error is returned.
Uses loader domain to limit searchIf the process needs any shared librariesthat are already listed in the loaderdomain, the version of the library specifiedin the domain is used. The version of theshared library in the loader domain is usedregardless of other versions of the sharedlibrary that may exist in the global loaderdomain.
Adds shared libraries to loader domainIf the process needs a library that is not inthe loader domain, the loader loads thelibrary into the process image by followingthe normal loader convention of loadingthe most recent version. If the process hassufficient privilege, this version of thelibrary is also added to the loader domain.If the process does not have sufficientprivilege to add an entry, the exec callfails, and an error is returned.
Shared libraries can also be explicitly loaded with the load( ) system call. When a shared library isexplicitly loaded, the data for these modules is normally put at the current break value of the process for a32-bit process. For a 64-bit process, the data for the modules is put in the region’s privately loadedmodules. If a process uses a loader domain, the system loader puts the data in the shared library dataregion. The virtual address of this explicitly loaded module is the same for all processes that load themodule. If the process has sufficient privilege, the shared library is added to the loader domain. If theprocess does not have sufficient privilege to add an entry, the load call fails, and an error is returned.
A loader domain can be associated with any regular file. It is important to note that a loader domain isassociated with the file, NOT the path name of the file. The mode (access permissions) of the filedetermines the operations that can be performed on the loader domain. Access permissions on the fileassociated with the loader domain and the operations allowed on the loader domain are as follows:
v If the process is able to read the file, the process can specify the loader domain to limit the set ofshared libraries it uses.
v If the process is able to write to the file, the process is able to add shared libraries to the loader domainand create the loader domain associated with the file.
If a process attempts to create or add entires to a loader domain without sufficient privilege, the operationin progress (exec or load) fails, and an error is returned.
592 AIX 5L Version 5.3 General Programming Concepts: Writing and Debugging Programs

Loader domains are specified as part of the LIBPATH information. LIBPATH information is a colon (:)separated list of directory path names used to locate shared libraries. LIBPATH information can come fromeither the LIBPATH environment variable or the LIBPATH string specified in the loader section of theexecutable file. If the first path name in the LIBPATH information is a regular file, a loader domainassociated with the file is specified. For example:
v If /etc/loader_domain/OOdomain_1 is a regular file, then setting the LIBPATH environment variable tothe string/etc/loader_domain/OOdomain_1:/lib:/usr/lib
causes processes to create and use the loader domain associated with the /etc/loader_domain/OOdomain_1 file.
v If /etc/loader_domain/OOdomain_1 is a regular file, then the ldom program is built with the followingcommand:cc -o ldom ldom.c -L/etc/loader_domain/OOdomain_1
The path name /etc/loader_domain/OOdomain_1 is inserted as the first entry in the LIBPATHinformation of the loader section for the ldom file. When ldom is executed, it creates and uses the loaderdomain associated with the /etc/loader_domain/OOdomain_1 file.
Creating/Deleting Loader Domains
A loader domain is created the first time a process with sufficient privilege attempts to use the domain.Access to a loader domain is controlled by access to the regular file associated with the domain.Application writers are responsible for managing the regular files associated with loader domains used bytheir applications. Loader domains are associated with regular files NOT the path names of the files. Thefollowing examples illustrate this point:
v The apl application has specified loader domain domain01 in its LIBPATH information. The aplapplication is then executed. The current working directory is /home/user1, and it contains a regular filedomain1 that is writable by apl. A new loader domain associated with the file /home/user1/domain01 iscreated. apl is executed again. This time /home/user2 is the current working directory, and it alsocontains a regular file domain01 that is writable by apl. A new loader domain associated with the file/home/user1/domain02 is created.
v Application apl has specified loader domain /etc/1_domain/domain01 in its LIBPATH information. apl isthen executed. /etc/1_domain/domain01 is a regular file that is writable by apl. A new loader domainassociated with the file /etc/1_domain/domain01 is created.
/home/user1/my_domain is a symbolic link to file /etc/1_domain/domain01.
Application ap2 has specified loader domain /home/user1/my_domain in its LIBPATH information. ap2 isthen executed. The system loader notices that /home/user1/my_domain refers to the same file as/etc/1_domain/domain01. A loader domain is already associated with file /etc/1_domain/domain01;therefore, this loader domain is used by application ap2.
v Application apl has specified loader domain /etc/1_domain/domain01 in its LIBPATH information. apl isthen executed. /etc/1_domain/domain01 is a regular file that is writable by apl. A new loader domainassociated with the file /etc/1_domain/domain01 is created.
File /etc/1_domain/domain01 is deleted and recreated as a regular file.
Application apl is executed again. There is no longer any way to access the regular file that isassociated with the original loader domain /etc/1_domain/domain01. Therefore, a new loader domainassociated with the file /etc/1_domain/domain01 is created.
Loader domains are dynamic structures. During the life of a loader domain, shared libraries are added anddeleted. A shared library is added to a loader domain when a process that specified the loader domainneeds a shared library that does not already exist in the domain. Of course, this assumes the process hassufficient privilege to add the shared library to the loader domain.
Chapter 29. Loader Domains 593

A separate use count is kept for each shared library that is a member of a loader domain. This use countkeeps track of how many processes with loader domains are using the shared library. When this use countdrops to zero, the shared library is deleted from the loader domain.
594 AIX 5L Version 5.3 General Programming Concepts: Writing and Debugging Programs

Chapter 30. Data Management Application ProgrammingInterface (DMAPI)
AIX provides a Data Management Application Programming Interface (DMAPI), which is an implementationof the ″System Management: Data Storage Management (XDSM) API″ X/Open standard that is publishedby The Open Group. The DMAPI allows software vendors to develop data management applications usinga set of functions and semantics not found in POSIX-compliant systems. It does not provide directfunctionality to the end user. Complete documentation of the DMAPI is found in the Publications section ofThe Open Group’s Web site.
The DMAPI provided by AIX is a general purpose implementation. The level of support for optionalinterfaces and functionality is determined by the underlying file system implementation and is documentedin a separate section for the specific file system.
The intent of the DMAPI is to support a single product on any single file system. The DMAPI does notpreclude different products from different vendors operating on the same file system, but it is notrecommended. Different products on different file systems are fully supported by the DMAPI with regard toevent delivery, subject to the following restrictions:
v Multiple sessions cannot register disposition for the same event on the same object.
v Event messages are targeted to and enqueued on sessions; there is no explicit targeting of an event toa specific process.
v If no session has registered a disposition for a particular event other than the mount event, the DMAPIwill not generate an event and allow the process to proceed as if there is no event enabled. If nosession has registered a disposition for the mount even, which is always enabled, the DMAPI will failthe event and not allow the file system to be mounted.
The DMAPI is implemented in an abstract layer within AIX, allowing any underlying file system to define itsindividual level of support and implementation options. The journaled file system (JFS) file system doesnot provide any support for the DMAPI. The enhanced journaled file system (JFS2) behaviors forimplementation options, limits, and other specifics described by the X/Open standard are outlined in“DMAPI Considerations for the Enhanced Journaled File System” on page 596.
The dm_init_service function returns 0 when the AIX DMAPI is correctly initialized and -1 if theinitialization fails. Use of any other DMAPI function after the initialization fails will also fail.
The AIX DMAPI does not provide support for the following optional DMAPI functions:
v dm_downgrade_right
v dm_upgrade_right
v dm_obj_ref_* family
v dm_pending
Other optional interfaces might not be supported by the underlying file system implementation and areindicated in the DMAPI documentation for the specific file system.
When a data management (DM) application specifies that it wants to block until a right becomes available,the DM application is blocked uninterruptibly.
AIX allows multiple, non-overlapping persistent managed regions. Only regular files are allowed to havemanaged regions. Whether or not managed regions are reordered or coalesced is determined by theunderlying file system implementation.
© Copyright IBM Corp. 1997, 2010 595

When no session has registered to receive a particular event for which an object is enabled and activityoccurs that would otherwise trigger the event, AIX does not generate the event and allows the process toproceed as if there is no event enabled.
Executing the dm_set_eventlist function causes a persistent event list to be stored with the object. If anevent list was previously set for the entire file system and a subsequent event list for an object in that filesystem includes an event that was set for the file system, events will continue to be generated based onthe event list for the file system until such time as that event is disabled, in which case the event list forthe object will come into play.
When a process generating an event is blocked waiting on a response from a DM application, the sleep isinterruptible.
AIX adopts a reasonably reliable model of asynchronous message delivery. The number of undeliveredasynchronous messages is limited by the amount of available memory (real or virtual) configured on thesystem. If the number of messages exceeds the amount of available memory, undelivered asynchronousmessages will be lost. Asynchronous delivery of namespace event messages is determined by theunderlying file system implementation.
For AIX, DM_SESSION_INFO_LEN is 256, and DM_ATTR_NAME_SIZE is 8.
For DMAPI interfaces that return data to a user buffer and fill in a user variable with the resulting size ofthe buffer, both the contents of the buffer and the user size variable are undefined when the interface failswith an error other than E2BIG. For any such error, the contents of the user buffer must be ignored. Whenthe interface fails and errno is E2BIG, the content of the user size variable will be set to indicate therequired size, in which case the application can retry the interface with a resized buffer.
DMAPI Considerations for the Enhanced Journaled File SystemIn addition to the functionality provided by the general AIX implementation of the DMAPI, the JFS2implementation provides the following functionality and restrictions.
The dm_get_config function returns the following values for the JFS2 implementation options and limits:
DM_CONFIG_BULKALL Supported.DM_CONFIG_LEGACY Supported.DM_CONFIG_PERS_ATTRIBUTES Supported.DM_CONFIG_PERS_EVENTS Supported.DM_CONFIG_PERS_INHERIT_ATTRIBS Supported.DM_CONFIG_PERS_MANAGED_REGIONS Supported.DM_CONFIG_PUNCH_HOLE Supported.DM_CONFIG_WILL_RETRY Supported.DM_CONFIG_CREATE_BY_HANDLE Not supported.DM_CONFIG_LOCK_UPGRADE Not supported.DM_CONFIG_OBJ_REF Not supported.DM_CONFIG_PENDING Not supported.DM_CONFIG_DTIME_OVERLOAD TRUEDM_CONFIG_MAX_ATTR_ON_DESTROY 128DM_CONFIG_MAX_ATTRIBUTE_SIZE 4072DM_CONFIG_MAX_HANDLE_SIZE 32DM_CONFIG_MAX_MANAGED_REGIONS 167DM_CONFIG_MAX_MESSAGE_DATA 65536DM_CONFIG_TOTAL_ATTRIBUTE_SPACE 4072
596 AIX 5L Version 5.3 General Programming Concepts: Writing and Debugging Programs

In the JFS2 implementation, all DM attribute values share the same allocation. Consequently, the size ofany one attribute’s value cannot exceed DM_CONFIG_MAX_ATTRIBUTE_SIZE and is further restricted bythe sum of the value sizes of all DM attributes associated with an object, which is also limited toDM_CONFIG_MAX_ATTRIBUTE_SIZE.
In addition to the optional interfaces not supported by AIX, the JFS2 implementation does not support theoptional DMAPI cancel and debut events, nor the additional optional dm_getall_dmattr,dm_create_by_handle, and dm_symlink_by_handle functions.
Due to the current implementation of JFS2’s extended attribute support, the dm_set_region functioncauses the file’s ctime to be modified. JFS2 does not attempt to reorder nor coalesce managed regions.
JFS2 generates asynchronous namespace event messages for all corresponding operations, whether theysucceed or fail.
JFS2 provides interfaces that allow pre-allocation and direct control of metadata within a file system. Useof these interfaces with either the MM_ALLOC or MM_RECORD modes generates a DMAPI write eventfor the specified offset and length.
If a value is not specified for the mask to the dm_get_bulkall, dm_get_bulkattr, dm_get_dirattrs, anddm_get_fileattr functions (that is, it is set to zero), JFS2 will return all fields in the dm_stat structure. Ifthe mask is set to a specific value, only the fields requested by the mask are returned; the values for thefields not specified by the mask are undefined.
JFS2 does not use the respbufp parameter of the dm_respond_event function. If specified, the contentof the buffer is undefined when the functions returns.
Because JFS2 overloads dm_ctime and dm_dtime (that is, DM_CONFIG_DTIME_OVERLOAD is true), thesetdtime parameter of the dm_set_dmattr function is ignored.
At the time a file is memory mapped (that is, when the mmap(2) call is executed), any non-residentportions of a file must be made resident by the DM application. To notify the application of the mapping,JFS2 will generate a read or write event corresponding to the mode and region being mapped.
Activating the DMAPI on a JFS2 File SystemTo activate the DMAPI on a JFS2 file system, type the following:chfs -a managed=yes mountpoint
If the file system is currently mounted when the chfs command is issued, there must be a DMAPI-enabledapplication listening for and responding to mount events when the managed parameter is set; the successof the chfs command will depend on how the application responds to the mount event.
To deactivate the DMAPI on a JFS2 file system, type the following:chfs -a managed=no mountpoint
If the file system is currently mounted when the chfs command is issued, there must be a DMAPI-enabledapplication listening for and responding to pre-unmount events when the managed parameter is set. Thesuccess of the chfs command depends on how the application responds to the pre-unmount event.
Chapter 30. Data Management Application Programming Interface (DMAPI) 597

598 AIX 5L Version 5.3 General Programming Concepts: Writing and Debugging Programs

Appendix A. High-Resolution Time Measurements UsingPOWER-based Time Base or POWER family Real-Time Clock
Note: The information in this section is specific to AIX 5.1 earlier.
The POWER family and PowerPC 601 RISC Microprocessor have real-time clock registers that can beused to make high-resolution time measurements. These registers provide seconds and nanoseconds.
POWER-based processors other than PowerPC 601 RISC Microprocessor do not have real time clockregisters. Instead these processors have a time base register, which is a free-running 64-bit register thatincrements at a constant rate. The time base register can also be used to make high resolutionelapsed-time measurements, but requires calculations to convert the value in the time base register toseconds and nanoseconds.
If an application tries to read the real-time clock registers on a POWER-based processor that does notimplement them, the processor generates a trap that causes the instruction to be emulated. The answer iscorrect, but the emulation requires a much larger number of cycles than just reading the register. If theapplication uses this for high-resolution timing, the time associated with the emulation is included.
If an application tries to read the time base registers on any processor that does not implement them,including the PowerPC 601 RISC Microprocessor, this will not be emulated and will result in the applicationbeing killed.
Beginning with AIX Version 4, the operating system provides the following library services to supportwriting processor-independent code to perform high resolution time measurements:
read_real_time Reads either the real-time clock registers or the time base register and stores theresult. This measurement returns the time of day, so it is not guaranteed to increasemonotonically.
read_wall_time Reads either the real-time clock registers or the time base register and stores theresult. This measurement returns the raw time base register value, and isguaranteed to increase monotonically.
time_base_to_time Converts the results of read_real_time and read_wall_time to seconds andnanoseconds.
read_real_time and read_wall_time do not do conversions. As a result, they run quickly.time_base_to_time does whatever conversions are needed, based on whether the processor has areal-time clock register or a time base register, to convert the results to seconds and nanoseconds.
Since there are separate routines to read the registers and do the conversions, an application can movethe conversion out of time-critical code paths.
© Copyright IBM Corp. 1997, 2010 599

600 AIX 5L Version 5.3 General Programming Concepts: Writing and Debugging Programs

Appendix B. Notices
This information was developed for products and services offered in the U.S.A.
IBM may not offer the products, services, or features discussed in this document in other countries.Consult your local IBM representative for information on the products and services currently available inyour area. Any reference to an IBM product, program, or service is not intended to state or imply that onlythat IBM product, program, or service may be used. Any functionally equivalent product, program, orservice that does not infringe any IBM intellectual property right may be used instead. However, it is theuser’s responsibility to evaluate and verify the operation of any non-IBM product, program, or service.
IBM may have patents or pending patent applications covering subject matter described in this document.The furnishing of this document does not give you any license to these patents. You can send licenseinquiries, in writing, to:
IBM Director of LicensingIBM CorporationNorth Castle DriveArmonk, NY 10504-1785U.S.A.
The following paragraph does not apply to the United Kingdom or any other country where suchprovisions are inconsistent with local law: INTERNATIONAL BUSINESS MACHINES CORPORATIONPROVIDES THIS PUBLICATION ″AS IS″ WITHOUT WARRANTY OF ANY KIND, EITHER EXPRESS ORIMPLIED, INCLUDING, BUT NOT LIMITED TO, THE IMPLIED WARRANTIES OF NON-INFRINGEMENT,MERCHANTABILITY OR FITNESS FOR A PARTICULAR PURPOSE. Some states do not allow disclaimerof express or implied warranties in certain transactions, therefore, this statement may not apply to you.
This information could include technical inaccuracies or typographical errors. Changes are periodicallymade to the information herein; these changes will be incorporated in new editions of the publication. IBMmay make improvements and/or changes in the product(s) and/or the program(s) described in thispublication at any time without notice.
Licensees of this program who wish to have information about it for the purpose of enabling: (i) theexchange of information between independently created programs and other programs (including this one)and (ii) the mutual use of the information which has been exchanged, should contact:
IBM CorporationDept. LRAS/Bldg. 00311400 Burnet RoadAustin, TX 78758-3498U.S.A.
Such information may be available, subject to appropriate terms and conditions, including in some cases,payment of a fee.
The licensed program described in this document and all licensed material available for it are provided byIBM under terms of the IBM Customer Agreement, IBM International Program License Agreement or anyequivalent agreement between us.
For license inquiries regarding double-byte (DBCS) information, contact the IBM Intellectual PropertyDepartment in your country or send inquiries, in writing, to:
© Copyright IBM Corp. 1997, 2010 601

IBM World Trade Asia CorporationLicensing2-31 Roppongi 3-chome, Minato-kuTokyo 106, Japan
IBM may use or distribute any of the information you supply in any way it believes appropriate withoutincurring any obligation to you.
Information concerning non-IBM products was obtained from the suppliers of those products, theirpublished announcements or other publicly available sources. IBM has not tested those products andcannot confirm the accuracy of performance, compatibility or any other claims related to non-IBM products.Questions on the capabilities of non-IBM products should be addressed to the suppliers of those products.
Any references in this information to non-IBM Web sites are provided for convenience only and do not inany manner serve as an endorsement of those Web sites. The materials at those Web sites are not part ofthe materials for this IBM product and use of those Web sites is at your own risk.
This information contains examples of data and reports used in daily business operations. To illustratethem as completely as possible, the examples include the names of individuals, companies, brands, andproducts. All of these names are fictitious and any similarity to the names and addresses used by anactual business enterprise is entirely coincidental.
COPYRIGHT LICENSE:
This information contains sample application programs in source language, which illustrates programmingtechniques on various operating platforms. You may copy, modify, and distribute these sample programs inany form without payment to IBM, for the purposes of developing, using, marketing or distributingapplication programs conforming to the application programming interface for the operating platform forwhich the sample programs are written. These examples have not been thoroughly tested under allconditions. IBM, therefore, cannot guarantee or imply reliability, serviceability, or function of theseprograms. You may copy, modify, and distribute these sample programs in any form without payment toIBM for the purposes of developing, using, marketing, or distributing application programs conforming toIBM’s application programming interfaces.
Each copy or any portion of these sample programs or any derivative work, must include a copyrightnotice as follows:(c) (your company name) (year). Portions of this code are derived from IBM Corp. Sample Programs. (c)Copyright IBM Corp. _enter the year or years_. All rights reserved.
TrademarksIBM, the IBM logo, and ibm.com are trademarks or registered trademarks of International BusinessMachines Corp., registered in many jurisdictions worldwide. Other product and service names might betrademarks of IBM or other companies. A current list of IBM trademarks is available on the Web atCopyright and trademark information at www.ibm.com/legal/copytrade.shtml
Java and all Java-based trademarks and logos are registered trademarks of Sun Microsystems, Inc. in theUnited States, other countries, or both.
UNIX is a registered trademark of The Open Group in the United States and other countries.
Intel, Intel logo, Intel Inside, Intel Inside logo, Intel Centrino, Intel Centrino logo, Celeron, Intel Xeon, IntelSpeedStep, Itanium, and Pentium are trademarks or registered trademarks of Intel Corporation or itssubsidiaries in the United States and other countries.
Other company, product, or service names may be trademarks or service marks of others.
602 AIX 5L Version 5.3 General Programming Concepts: Writing and Debugging Programs

Index
Special characters_exit subroutine 259_LARGE_FILES 139_system_configuration.max_ncpus variable
dynamic logical partitioning 370_system_configuration.ncpus field
dynamic logical partitioning 370_system_configuration.ncpus variable
dynamic logical partitioning 372_system_configuration.original_ncpus variable
dynamic logical partitioning 370
Numerics216840 10941Map203831 48
Aaccess subroutine 158adb debug program
address mapsdisplaying 47
addressesdisplaying 42finding current 46forming 41
binary filespatching 44
breakpoints 33, 34C stack backtrace
displaying 42commands, combining 37computing numbers 40creating scripts 37customizing 37data
displaying 41data formats
choosing 43data formatting, example 56default input formats
setting 40directory dumps
example 54displaying text 40examples
data formatting 56directory dumps 54i-node dumps 54tracing multiple functions 58
exiting 31expressions
list of 48using integers 35using operators 36using symbols 35
adb debug program (continued)external variables
displaying 46files
locating values in 44writing 45
i-node dumpsexample 54
instructionsdisplaying 41
integersusing in expressions 35
list of operators 49list of subcommands 49list of variables 52maps
memory, changing 43maps, address
displaying 47maximum offsets
setting 39memory
changing 45memory maps
changing 43numbers, computing 40operators
using in expressions 36operators, list of 49output widths
setting 39program execution
controlling 31programs
continuing execution 34preparing for debugging 31running 32single-stepping 34stopping 35stopping with keys 35
prompts, using 31sample programs 52scripts, creating 37shell commands, using 31source files
displaying and manipulating 41starting 29, 30, 31stopping a program 35subcommands, list of 49symbols
using in expressions 35text, displaying 40tracing multiple functions, example of 58using prompts 31using shell commands 31values
locating in files 44
© Copyright IBM Corp. 1997, 2010 603

adb debug program (continued)variables
displaying external 46list of 52using 45
addressesdisk 131program
overview 399alarm subroutine 255alerts 118aliases
SMIT 525allocation
compressed file system 131JFS 130
allocation bitmaps 135allocation groups 136allocation policy 417
default 417async-cancel safety 213attributes object 208, 218, 224
Bback end program 160backup command 117benefits
simultaneous multi-threading 365binding a thread 194bindprocessor command
dynamic logical partitioning 373, 374bindprocessor system call
bind CPU ID 372blocks
boot 135data 135full logical 130indirect 132, 152logical 130partial logical 130super 135
boot block 135buffer size operations 585
Ccancelability 212cancelation 212, 213capacity
shared processorsimultaneous multi-threading 366
capacity upgrade on demand (CUoD) 369cbreak mode 19characters
adding characters to windows 11adding to windows 14allowing 8-bit character return 17converting control characters to printables 15current
curses 5
characters (continued)deleting 16getting from standard input 17returning if no input is available 17
chclass commanddynamic logical partitioning 374
chdir subroutine 125checkacquire command
dynamic logical partitioning 375, 379checkrelease command
dynamic logical partitioning 375, 378chmod subroutine 158chown subroutine 158chroot subroutine 125cleanup handlers 216close subroutine
closing files with 150command
smtctl 365commands 117
backup 117bindprocessor 373, 374chclass 373, 374checkacquire 375, 379checkrelease 375, 378cron 117diag 103drmgr, flags 375drmgr, options 375errclear 117, 118errdemon 118errlogger 118errmsg 118errpt 103, 113, 116, 118errstop 116errupdate 112, 118ipcs 374kill 374ls 117lsclass 373, 374lsrset 373, 374mycmd 579postacquire 375, 379postrelease 375, 378preacquire 375, 379prerelease 375, 378ps 373, 374register 374, 378SCCS
list of 494scriptinfo 374, 378trace 573, 578, 579trcrpt 578, 579trcstop 579undopreacquire 375, 379undoprerelease 375, 378usage 374, 378wlmctrl 373
compiling a multi-threaded program 274compressed file system 131
604 AIX 5L Version 5.3 General Programming Concepts: Writing and Debugging Programs

condition variableattributes
creation 224destruction 224object 224process-shared 262
creation 225definition 224destruction 225, 227signalling 227usage 228wait 228waiting 226
contention scope 243global 243local 243process 243system 243
contention-scope attribute 243control characters
converting to printables 15controlling terminal 581converters 582creat subroutine 146
creating files with 149creating
destroying 248keys 248
creating a thread 208creation and destruction 219, 225cron command 117CUoD 369curses
adding characters to windows 11, 14characters
current 5returning if no input is available 17
control characters 15converting control characters to printables 15converting termcap to terminfo 23current character 5current line 5cursors
controlling placement after refresh 11logical 5moving the logical cursor 11moving the physical cursor 11physical 5
deleting characters 16displays 5getting characters from standard input 17inserting
blank lines in windows 15lines
current 5deleting 16
logical cursor 5macros 5moving
logical cursor 11physical cursor 11
curses (continued)naming conventions 5pads 5
creating 8deleting 8refreshing 9
physical cursor 5printing
formatted printf on windows 15refreshing
pads 9windows 9
screen 5scrolling
windows 15setting options 26starting 6stopping 6strings
adding to windows 14sub-windows 8, 9
creating 8termcap
converting to terminfo 23terminology 5windows 5, 7, 8
clearing 16copying 10creating 8deleting 8drawing boxes around 10moving 10overlapping 10refreshing 9screens 5scrolling 15
cursorscontrolling placement after refresh 11getting location of logical cursor 11logical
curses 5moving logical curses 11moving physical 11physical
curses 5
Ddata blocks 130, 135data types
pthread_once_t 247dbx
debugging multi-threaded program using 277symbolic debug program 61
dbx commandprint subcommand 72step subcommand 79stop subcommand
thbp and thp aliases 67thread subcommand 72
Index 605

dbx debug programfiles
current, displaying 65dbx plug-in
aliascallback routine 96
event types 85example 97fds
callback routine 87file format 82file names 82get_pthread_context
callback routine 92get_thread_context
callback routine 91header file 84Interface 84loading 83locate_symbol
callback routine 94location 83modules
callback routine 88naming 82overview 82print
callback routine 95process
callback routine 87pthreads
callback routine 90read_memory
callback routine 94regions
callback routine 88session
callback routine 86set_pthread_context
callback routine 93set_thread_context
callback routine 92threads
callback routine 89unloading 83version control 83what_function
callback routine 95write_memory
callback routine 94dbx plug-in callback routines 86dbx symbolic debug program
.dbxinit file 81aliases
dbx subcommand, creating 80breakpoints 63calling procedures 71changing the current file 65command line editing 62current file
displaying 65
dbx symbolic debug program (continued)dbx subcommand aliases
creating 80debugging spinlocks 82expressions
modifiers and operators for 73type checking 73
files.dbxinit 81current, changing 65reading dbx subcommands from 81source, displaying 65
folding variables to lowercase and uppercase 74handling signals 70list of subcommands 98machine level debugging 76machine level programs
debugging 76running 79
machine registers 77memory addresses 78modifiers
for expressions 73multiple processes 69multiple threads 66names, scoping 73new dbx prompt
defining 80operators
for expressions 73print output
changing variables 74procedures
calling 71current, changing 65
program control 63programs
controlling 63machine level 76machine level, running 79multiple processes 69multiple threads 66running 63separating output from dbx 64thread level 67
promptsdefining 80
reading dbx subcommands from a file 81running programs 63running shell commands 62scoping names 73separating dbx output from program output 64signals, handling 70source directory path
changing 65source files
displaying and manipulating 65, 70, 80spinlocks
debugging 82stack trace, displaying 72starting 61
606 AIX 5L Version 5.3 General Programming Concepts: Writing and Debugging Programs

dbx symbolic debug program (continued)subcommands, list of 98thread level debugging 67thread level programs
debugging 67thread-level events
creating 67displaying 67running a thread 67
thread-related objects 66tracing execution 64type checking in expressions 73using 61variables
changing print output 74displaying and modifying 72folding, lowercase and uppercase 74
deadlock 222deamons
srcmstr 556trace 573
debugging multi-threaded programs 277dbx, using 277kernel debug program, using 277
descriptors 146destructor routine 249detached state 237detachstate attribute 209device driver packaging
naming considerations 456diag command 103dialogs
SMIT 521directories
changingcurrent 125root 125
linking 145overview 123status 145working with
overview 124subroutines for 125
disk address format 131disk fragments 135disk i-nodes 127, 136disk space allocation 130DR_BCPUID environment variable
dynamic logical partitioning 377DR_DETAIL_LEVEL environment variable
dynamic logical partitioning 377DR_ERROR environment variable
dynamic logical partitioning 376DR_FAIL
DR_SUCCESS 381DR_FREE_FRAMES environment variable
dynamic logical partitioning 376DR_LCPUID environment variable
dynamic logical partitioning 377DR_LOG_DEBUG environment variable
dynamic logical partitioning 377
DR_LOG_EMERG environment variabledynamic logical partitioning 377
DR_LOG_ERR environment variabledynamic logical partitioning 377
DR_LOG_INFO environment variabledynamic logical partitioning 377
DR_LOG_WARNING environment variabledynamic logical partitioning 377
DR_MEM_SIZE_COMPLETED environment variabledynamic logical partitioning 376
DR_MEM_SIZE_REQUEST environment variabledynamic logical partitioning 376
DR_PINNABLE_FRAMES environment variabledynamic logical partitioning 376
dr_reconfigdynamic logical partitioning 372
DR_resource_POST_ERROR 381DR_TOTAL_FRAMES environment variable
dynamic logical partitioning 377Draft 7 applications
porting 275dri_cpu structure 380dri_mem structure 380drmgr command
dynamic logical partitioning 375flags 375options 375scripts, information about 376scripts, installing 375scripts, uninstalling 375
dynamic logical partitioning 369_system_configuration.max_ncpus variable 370_system_configuration.ncpus field 370_system_configuration.ncpus variable 372_system_configuration.original_ncpus variable 370add operations 374application binding 373application scripts 374bindprocessor command 373, 374bindprocessor system call 372chclass command 374check phase 374, 381checkacquire command 375checkrelease command 375commands 374dependencies 372DR_BCPUID environment variable 377DR_DETAIL_LEVEL environment variable 377DR_ERROR environment variable 376DR_FAIL 381, 382DR_FREE_FRAMES environment variable 376DR_LCPUID environment variable 377DR_LOG_DEBUG environment variable 377DR_LOG_EMERG environment variable 377DR_LOG_ERR environment variable 377DR_LOG_INFO environment variable 377DR_LOG_WARNING environment variable 377DR_MEM_SIZE_COMPLETED environment
variable 376DR_MEM_SIZE_REQUEST environment
variable 376
Index 607

dynamic logical partitioning (continued)DR_PINNABLE_FRAMES environment
variable 376dr_reconfig system call 372DR_resource_POST_ERROR 381DR_SUCCESS 381, 382DR_TOTAL_FRAMES environment variable 377DR_WAIT 382drmgr command 375
flags 375dynamic logical partitioning-aware 370Dynamic Processor Deallocation and 373environment variable
memory add and remove 376processor add and remove 377
handlers, extended 382input parameters 376integrating events 371ipcs command 374kernel extensions 379kill command 374large pages 371lsclass command 374lsrset command 374operations 373
check phase 374post phase 374pre phase 374scripts, using 373
post phase 374, 381post-add phase 382post-error phase 381post-remove phase 381postacquire command 375postrelease command 375pre phase 374pre-add phase 381pre-phase 381pre-remove phase 381preacquire command 375prerelease command 375processor bindings 372processor numbering 372program types 371ps command 373, 374reconfig_handler_complete 382reconfig_handler_complete kernel service 382reconfiguration handlers 380register command 374registering kernel extension handlers 379remove operations 374requests, displaying 377script commands
checkacquire 379checkrelease 378postacquire 379postrelease 378preacquire 379prerelease 378register 378scriptinfo 378
dynamic logical partitioning (continued)script commands (continued)
undopreacquire 379undoprerelease 378usage 378
scriptinfo command 374scripts, execution 376scripts, installing 375scripts, naming 376scripts, using 373sigaction system call 372signal delivery 371signals, using 374SIGRECONFIG signal 371, 372, 373troubleshooting 370, 372
memory removal failure 372PCI slot removal failure 372processor removal failure 372
undopreacquire command 375undoprerelease command 375usage command 374var.v_ncpus field 370var.v_ncpus_cfg variable 370Workload Manager and 373Workload Manager dependencies 373
dynamic logical partitioning-aware 369APIs, using 371
dynamic logical partitioning-friendly 369dynamic logical partitioning-safe 369Dynamic Processor Deallocation 194, 369
EECHO directive 299electronic license agreement 464entry point routine 210environment variables
DR_BCPUID 377DR_DETAIL_LEVEL 377DR_ERROR 376DR_FREE_FRAMES 376DR_LCPUID 377DR_LOG_DEBUG 377DR_LOG_EMERG 377DR_LOG_ERR 377DR_LOG_INFO 377DR_LOG_WARNING 377DR_MEM_SIZE_COMPLETED 376DR_MEM_SIZE_REQUEST 376DR_PINNABLE_FRAMES 376DR_TOTAL_FRAMES 377LANG 376memory add and remove 376NUM_SPAREVP 276PATH 376processor add and remove 377
errclear command 117errmsg command 118error log
transferring to another system 104error log descriptors 103
608 AIX 5L Version 5.3 General Programming Concepts: Writing and Debugging Programs

error loggingadding messages 118alerts 118cleaning an error log 117commands 118copying an error log 117example report 113, 116files 118generating a report 116kernel services 118, 119managing 104overview 103reading an error report 111stopping an error log 116subroutines 118, 119
error logging facility 103error report
detailed example 113generating 116summary example 116
errpt command 103, 113, 116, 118errstop command 116, 118errupdate command 112, 118example
dbx plug-in 97example programs 511, 512
manipulating charactersisalnum (ctype) routine 511isalpha (ctype) routine 511isascii (ctype) routine 511iscntrl (ctype) routine 511isdigit (ctype) routine 511islower (ctype) routine 511ispunct (ctype) routine 511isspace (ctype) routine 511isupper (ctype) routine 511
exec subroutine 258extended regular expressions
lex command 293extension naming conventions, fileset 456
Ffast paths
SMIT 525fclear subroutine 151fdpr
debugging reordered executables 79FIFO (first-in, first-out)
understanding 155file descriptor tables
definition 147file descriptors
definition 146duplicating
dup subroutine 147fcntl subroutine 147fork subroutine 147
managing 147preset values 148resource limit 149
file systems 135bitmap 131compressed 131controlling 163fragment map 131fragmented 130layout 135overview 121quotas 133subroutines 163types
creating 159file types
overview 121file-system helpers
execution syntax 160operations 159
files 121, 146access modes 158allocating space to 130closing 150creating 149input and output (I/O) 151large
_LARGE_FILES 13964-bit file system 140allocation in file systems 131common pitfalls 141implications for existing programs 137open protection 138porting applications 138writing programs that access 137
linking 144locking fields 128masks 150opening 150overview 121pipes 155reading 151SCCS
controlling 492creating 490detecting damage 493editing 490repairing damage 493tracking 492updating 490
sharing open 147status 157termcap 21terminfo 21truncating 153working with
subroutines for 123writing 152
filesetextension naming conventions 456naming conventions 455
fileset revision levels 457first-in first-out scheduling policy 241floating-point exceptions 166, 167
Index 609

floating-point exceptions (continued)disabled and enabled processing 166subroutines 165
fork cleanup handlers 259fork subroutine 258fragment map 131fragmented file system 130fragments
disk 135map 131
front end program 159, 160ftruncate subroutine 153full logical block 130fullstat subroutine 157
Ggeneric trace channels 578
HHardware Management Console (HMC) 369heap
64-bit applications 416help
SMIT 531helpers 159, 160hlpadb 49
Ii-nodes 127, 128
definition 121disk 136i-number byte offset 123JFS2 128modifying 127timestamp
changing 157I/O offset
absolute 151and read subroutine 151and write subroutine 152description 151end_relative 151manipulating 151relative 151
in-core i-nodes 128index nodes 127indirect blocks 132inheritance protocol 245inheritsched attribute 240init command
SRC 555initializations 246input modes 19IPC (interprocess channel) 122ipcs command
dynamic logical partitioning 374
JJFS
disk space allocation 130JFS2
i-nodes 128
Kkernel extensions
dynamic logical partitioning 379reconfiguration handlers 380registering handlers 379
kernel programmingmultiprocessor issues 200
kernel servicesreconfig_handler_complete 382
kernel thread 205key destruction 250key protection
program prerequisites 183keys
creating 248destroying 248destruction 250
kill commanddynamic logical partitioning 374
kill subroutine 255
LLAF (license agreement files) 464large files
common pitfalls 141arithmetic overflows 142failure to include proper headers 143file size limits 144fseek/ftell 142imbedded file offsets 144improper data types 141parameter mismatches 141string conversions 143
open protection 138porting applications to 138using _LARGE_FILES 139using 64-bit file system 140writing programs that access 137
large program support 189lazy loading 393lex command 291
compiling the lexical analyzer 292defining substitution strings 297extended regular expressions 293lexical analyzer 298matched strings 298passing code to program 296start conditions 301
lex Commandend-of-file processing 301input/output subroutines 300lex library 297
610 AIX 5L Version 5.3 General Programming Concepts: Writing and Debugging Programs

lex Command (continued)lexical analyzer 291operators 293
lex Library 297lexical analyzer 291
parser program 292libpthreads_compat.a library 208libpthreads.a library 206, 208libraries
hardware-specific subroutines 517library model test 243librs2.a library 517license agreement files (LAF) 464license agreement information 463, 464license file 464license file placement 464line disciplines 582linking
runtime 391links 145
directory 145hard 144symbolic 145
loader domainscreating and deleting 593using 591
lockingcreating user locking services 199
logical block 130logical partitioning (LPAR) 369logical volume manager
library subroutines 162long locks 251longjmp subroutine 256LPAR 369ls command 117lsclass command
dynamic logical partitioning 374lseek subroutine 151lsrset command
dynamic logical partitioning 374
Mm4
built-in macros 342changing quote characters 341checking for defined macros 342conditional expressions 345creating user-defined macros 339integer arithmetic 343macro processing with arguments 341manipulating files 343manipulating strings 345predefined macros 342printing names and definitions 347quote characters 340redirecting output 344removing macro definitions 342system programs 344unique names 344
m4 (continued)using the macro processor 339
macrosPTHREAD_ONCE_INIT 247
main Subroutine 297malloc subsystem 415
alloca 415allocation policy 417allocation policy, default 417calloc 415free 415heap 416mallinfo 415malloc 415mallopt 415process heap 416realloc 415valloc 415
masks 150memory
adding and removing 376system
introduction 399memory management 401
allocating memory 415listing of memory manipulation services 411program address space
overview 399memory mapping
listing of memory mapping services 412mmap comparison with shmat 402mmap compatibility considerations 403overview 401semaphore subroutines overview 404
menusSMIT 519
Micro-Partitioning 377minicurses
charactersadding characters to windows 11
stringsadding to windows 14
mkfifo subroutine 150mknod subroutine
creating regular files with 149creating special files with 150
mount command 160mount helpers
execution syntax 161overview 160
multi-threaded programCompiler Invocation 275compiling 274debugging 277
multi-threading simultaneous 365, 367multiprocessor programming 286mutex
attributescreation 218destruction 218object 218
Index 611
mutex (continued)attributes (continued)
prioceiling 245process-shared 262
creation 219definition 218destruction 219locking 221protocol attributes 245protocols 245unlocking 221usage 221
mycmd command 579mycpu system call
dynamic logical partitioning 370
Nnotify object class (SRC)
creating a subsystem notification method 559removing a subsystem notification method 559
NUM_SPAREVP environment variable 276
OO_DEFER 151object classes 349
SMIT 522objects 349ODM (Object Data Manager)
descriptors 353link 353method 355terminal 353
example code 360adding objects 362creating object classes 360
list of commands 359list of subroutines 359object classes
adding objects 351creating 351definition 349locking 352storing 352unlocking 352
objectsadding to object classes 351definition 349searching for 356storing 352
predicates 356comparison operators 357constants in 358descriptor names 357logical operator 358
offset 151one-time initialization 246open subroutine 146
creating files with 149opening a file with 150
operating systemlibraries 516
options (threads library) 260overviews
make commandcreating description files 321creating target files 332defining and using macros 328internal rules 324using with non-SCCS files 334using with SCCS files 332
Ppackaging
device driver packaging 456file names 457fileset extension naming conventions 456license agreement information 464message catalogs 456naming conventions 455partitioning requirements 454requisite information 460
padscreating 8curses 5deleting 8refreshing 9
parserlexical analyzer 292
partial logical block 130pbsearchsort 513pclose subroutine 155permissions
directories 158files 158
pipe subroutine 155pipes
child processes 157creating with mkfifo 150
plug-in, dbxalias
callback routine 96event types 85example 97fds
callback routine 87file format 82file names 82get_pthread_context
callback routine 92get_thread_context
callback routine 91header file 84Interface 84loading 83locate_symbol
callback routine 94location 83modules
callback routine 88
612 AIX 5L Version 5.3 General Programming Concepts: Writing and Debugging Programs

plug-in, dbx (continued)naming 82print
callback routine 95process
callback routine 87pthreads
callback routine 90read_memory
callback routine 94regions
callback routine 88session
callback routine 86set_pthread_context
callback routine 93set_thread_context
callback routine 92threads
callback routine 89unloading 83version control 83what_function
callback routine 95write_memory
callback routine 94plug-in, dbx callback routines 86plug-in,dbx
overview 82popen subroutine 155POSIX thread 208postacquire command
dynamic logical partitioning 375, 379postrelease command
dynamic logical partitioning 375, 378preacquire command
dynamic logical partitioning 375, 379prerelease command
dynamic logical partitioning 375, 378prioceiling attribute 245priority
inheritance protocol 245protection protocol 245
priority inversion 244priority scheduling POSIX option 261process
properties 203process heap
32-bit applications 416process-shared attribute 262processes
using pipes 155processor
numbers 193ODM names 193states 193
processorsadding and removing 377
protect keys 181prerequisites 183subroutines 184
protect keys (continued)using 182
protection protocol 245protocol attribute 245protocols
inheritance 245mutex 245priority inheritance 245priority protection 245protection 245
ps commanddynamic logical partitioning 373, 374
pthread 208pthread_atfork subroutine 259pthread_attr_destroy subroutine 208pthread_attr_getdetachstate subroutine 209pthread_attr_getinheitsched subroutine 240pthread_attr_getsatckaddr subroutine 260pthread_attr_getschedparam 242pthread_attr_getschedparam subroutine
schedparam attribute 241pthread_attr_getscope subroutine 243pthread_attr_getstacksize subroutine 260pthread_attr_init subroutine 208pthread_attr_setdetachstate subroutine 209pthread_attr_setinheritsched subroutine 240pthread_attr_setsatckaddr subroutine 260pthread_attr_setschedparam 242pthread_attr_setschedparam subroutine
schedparam attribute 241pthread_attr_setschedpolicy subroutine 241pthread_attr_setscope subroutine 243pthread_attr_setstacksize subroutine 260pthread_attr_t data type 208pthread_cancel subroutine 212pthread_cleanup_pop subroutine 216pthread_cleanup_push subroutine 216pthread_cond_broadcast subroutine 227pthread_cond_destroy subroutine 225pthread_cond_init subroutine 225PTHREAD_COND_INITIALIZER macro 225pthread_cond_signal subroutine 227pthread_cond_t data type 225pthread_cond_timedwait subroutine 226pthread_cond_wait subroutine 226pthread_condattr_destroy subroutine 224pthread_condattr_init subroutine 224pthread_condattr_t data type 224pthread_create subroutine 210pthread_equal subroutine 210pthread_exit subroutine 211pthread_getschedparam 243pthread_getschedparam subroutine
schedparam attribute 242schedpolicy attribute 242
pthread_getspecific subroutine 250pthread_join subroutine 237pthread_key_create subroutine 248pthread_key_delete subroutine 250pthread_key_t data type 248pthread_kill subroutine 255
Index 613

pthread_mutex_destroy subroutine 219pthread_mutex_init subroutine 219pthread_mutex_lock subroutine 221pthread_mutex_t data type 219pthread_mutex_trylock subroutine 221pthread_mutex_unlock subroutine 221pthread_mutexattr_destroy subroutine 218pthread_mutexattr_getprioceiling subroutine 245pthread_mutexattr_getprotocol subroutine 245pthread_mutexattr_init subroutine 218pthread_mutexattr_setprioceiling subroutine 245pthread_mutexattr_setprotocol subroutine 245pthread_mutexattr_t data type 218pthread_once subroutine 247PTHREAD_ONCE_INIT macro 247pthread_once_t data type 247PTHREAD_PRIO_INHERIT 245PTHREAD_PRIO_NONE 245PTHREAD_PRIO_PROTECT 245pthread_self subroutine 210pthread_setcancelstate subroutine 212pthread_setcanceltype subroutine 212pthread_setschedparam subroutine 244pthread_setspecific subroutine 250pthread_t data type 210pthread_testcancel 213pthread_yield subroutine 227
Qquotas 133
Rrace condition 223raise subroutine 255read subroutine 151reconfig_handler_complete kernel service 382reconfig_handler_complete routine 382reconfig_handler_complete subroutine
event parameter 380h_arg parameter 380req parameter 380resource_info parameter 380
reconfig_register subroutine 380h_arg parameter 380h_token parameter 380name parameter 380reconfig_register function 380reconfig_unregister function 380
reconfiguration handlersdynamic logical partitioning 380
register commanddynamic logical partitioning 374, 378
regular expressionslex command 293
REJECT directive 299remove subroutine 145rmdir subroutine 145round-robin scheduling policy 241
routinesdestructor 249reconfig_handler_complete 382
runtime linking 391
SSCCS
commandslist of 494
filescontrolling 492creating 490detecting damage 493editing 490repairing damage 493tracking 492updating 490
flags and parameters 490SCCS retrieval
suppress 333sched_yield 243sched_yield subroutine 242scheduling
parameters 240policies 241priority 241synchronization of 244
screen typesSMIT 519
scriptinfo commanddynamic logical partitioning 374, 378
searching and sortingexample program 513
sed commandstarting the editor 385using string replacement 390using text in commands 389using the command summary 386
selectorsSMIT 520
semaphores (from OSF/1) 252setjmp subroutine 256shared libraries
creating 397lazy loading 393
shared memorymmap comparison with shmat 402overview 401
shared objects 391creating 393
ship license file 464sigaction
dynamic logical partitioning 372sigaction subroutine 255siglongjmp subroutine 256signal
delivery 258generation 255handlers 255, 256masks 255
614 AIX 5L Version 5.3 General Programming Concepts: Writing and Debugging Programs

signalsSIGRECONFIG 371, 372
dynamic logical partitioning 373sigprocmask subroutine 255SIGRECONFIG
dynamic logical partitioning 371, 372sigsetjmp subroutine 256sigthreadmask subroutine 255sigwait subroutine 227, 256simultaneous multi-threading 365, 367
capacity 366size 463SMIT (System Management Interface Tool)
aliases 525dialogs
designing 521executing 529generating 528
example program 542fast paths 525generating commands with 528help
creating 531understanding 531
information command descriptorscmd_to_*_postfix 528cmd_to_discover 526understanding 526
menusdesigning 519
name selectsdesigning 520
object classfor aliases 533
object classesdialog 536dialog header 540menu 532selector header 534understanding 522
screen types 519tasks
adding 530debugging 531
smit errclear command 117smit errpt command 116smit trace command 579smtctl 365SNA generic alert architecture 118software models
divide-and-conquer 205master/slave 205producer/consumer 205
Software Vital Product Data (SWVPD) 454SRC 555
capabilities 556defining subservers to the SRC object class 569defining subsystems to the SRC object class 569init command 555list of subroutines 570modifying subserver object definitions 569
SRC (continued)modifying subsystem object definitions 569operations 556removing subserver object definitions 569removing subsystem object definitions 569
SRC communication typesmessage queues (IPC)
overview 562programming requirements 564
signals 560programming requirements 563
socketsoverview 562programming requirements 563
SRC object classesdescriptors 556notify object overview 559subserver type object overview 559subsystem environment object overview 556
SRC subsystem programming requirementsprocessing SRC request packets 565processing status requests 566receiving SRC request packets
using message queue (IPC) communication 564using signals communication 563using sockets communication 563
returning continuation packets 567returning error packets 568returning subsystem reply packets 567
srcmstr 556stack address POSIX option 260stackaddr attribute 260stacksize attribute 260status 145
directories 145status subroutines
overview 157stop subcommand 69storage protect keys 181
prerequisites 183subroutines 184using 182
string manipulationusing sed command 385
stringsadding to windows
curses 14minicurses 14
structuresdri_cpu 380dri_mem 380
sub-windowsrefreshing 9
subroutinesreconfig_handler_complete 380alloca 415calloc 415chmod 158chown 158controlling files and directories
list of 499
Index 615

subroutines (continued)errlog 118free 415hardware-specific 517mallinfo 415malloc 415mallopt 415pthread_getspecific 250pthread_setspecific 250realloc 415reconfig_register 380valloc 415
subsystemsusing the system resource controller 563
super block 135suppress
SCCS retrieval 333SWVPD 454symbolic debug program, dbx 61synchronization
mutex 223synchronization scheduling 244
definition 244sysconf subroutine 262sysconf system call
dynamic logical partitioning 370syslog facility 377system calls
bindprocessor 372bind CPU ID 372
dr_reconfig 372mycpu 370sigaction 372sysconfig 370
system environmentDynamic Processor Deallocation 194
system file tables 147system resource controller 556, 560, 563, 569, 570
Ttermcap file 21terminal devices 581
tty subsystem overview 581terminals
multiple 18setting input and output modes 19
terminating a thread 211terminfo file 21thread
attributescontention-scope 243creating 208destroying 208detachstate 209inheritsched 240object 208schedparam 241schedpolicy 241stackaddr 260stacksize 260
thread (continued)binding 194Compiler Invocation 275concurrency level 243contention scope 243data types 262default values 263definition 203detached state 237ID 210initial 204join 237kernel 205libpthreads_compat.a library 208libpthreads.a library 208library 205limits 263models 206POSIX thread 208, 275properties 204pthread 208supported 264user 205
thread prioritiessimultaneous multi-threading 367
thread-safeSRC subroutines 570
thread-safe code 269thread-specific data 248
concurrent creation 248definition 248destroying data 250destructor 249destructor routine 249key 248setting values 250swapping data 250usage 250
threadscreating 208object-oriented interface 206synchronization 218terminating 211
threads library 205cancelation 215cleanup 216condition variable
attributes creation and destruction 224synchronization point 229timed wait 226, 228
dynamic initialization 246thread-safe 247
exiting a thread 211freeing returned data 239join 238mutex
attributes creation and destruction 218read/write locks (from POSIX) 253thread creation 276
timestampchanging 157
616 AIX 5L Version 5.3 General Programming Concepts: Writing and Debugging Programs

traceconfiguring 578controlling 573generating reports 579recording trace event data 578starting 579starting a trace 578stopping 579using generic trace channels 578
trace command 578, 579configuring 578
trace facilityoverview of 573
trace hook identifiers 578tracing
configuring 578starting 578
translation requirements 464trcrpt command 578, 579trcstop command 579truncate subroutine 153tty
current modes 23restoring modes 23saving modes 23
tty (terminal type)definition 581examples 581
tty driver 582tty subsystem 581
Uundopreacquire command
dynamic logical partitioning 375, 379undoprerelease command
dynamic logical partitioning 375, 378unlink subroutine 145unmount command 160usage command
dynamic logical partitioning 374, 378user protect keys 181user thread 205utimes subroutine 157
Vvar.v_ncpus field
dynamic logical partitioning 370var.v_ncpus_cfg variable
dynamic logical partitioning 370variables
_system_configuration.max_ncpus 370_system_configuration.ncpus 372_system_configuration.original_ncpus 370var.v_ncpus_cfg 370
video attributessetting 25
virtual memoryaddressing
overview 399
virtual processor 206vital product data (VPD) 112VP 206VPD (vital product data) 112
Wwindows
clearing 16copying 10curses 5drawing box around 10moving 10overlapping 10refreshing 9refreshing multiple 9scrolling 15
winsize structure 584Workload Manager
class definitionsdynamic logical partitioning 373
dynamic logical partitioning dependencies 373Software Partitioning 373
write subroutine 152
Yyacc command 291
actions 309ambiguous rules 314creating a parser 302declarations 306error handling 311grammar file 303rules 308turning on debug mode 315
yacc program 292yyleng external variable 299yyless Subroutine 297yymore Subroutine 297yyreject Subroutine 297yywleng external variable 299yywrap Subroutine 297
Index 617

618 AIX 5L Version 5.3 General Programming Concepts: Writing and Debugging Programs

Readers’ Comments — We’d Like to Hear from You
AIX 5L Version 5.3General Programming Concepts:Writing and Debugging Programs
Publication No. SC23-4896-07
We appreciate your comments about this publication. Please comment on specific errors or omissions, accuracy,organization, subject matter, or completeness of this book. The comments you send should pertain to only theinformation in this manual or product and the way in which the information is presented.
For technical questions and information about products and prices, please contact your IBM branch office, your IBMbusiness partner, or your authorized remarketer.
When you send comments to IBM, you grant IBM a nonexclusive right to use or distribute your comments in anyway it believes appropriate without incurring any obligation to you. IBM or any other organizations will only use thepersonal information that you supply to contact you about the issues that you state on this form.
Comments:
Thank you for your support.
Submit your comments using one of these channels:v Send your comments to the address on the reverse side of this form.v Send your comments via e-mail to: [email protected]
If you would like a response from IBM, please fill in the following information:
Name Address
Company or Organization
Phone No. E-mail address

Readers’ Comments — We’d Like to Hear from YouSC23-4896-07
SC23-4896-07
����Cut or FoldAlong Line
Cut or FoldAlong Line
Fold and Tape Please do not staple Fold and Tape
Fold and Tape Please do not staple Fold and Tape
NO POSTAGENECESSARYIF MAILED IN THEUNITED STATES
BUSINESS REPLY MAILFIRST-CLASS MAIL PERMIT NO. 40 ARMONK, NEW YORK
POSTAGE WILL BE PAID BY ADDRESSEE
IBM CorporationInformation DevelopmentDepartment 04XA-905-6B01311501 Burnet RoadAustin, TX 78758-3400
_ _ _ _ _ _ _ _ _ _ _ _ _ _ _ _ _ _ _ _ _ _ _ _ _ _ _ _ _ _ _ _ _ _ _ _ _ _ _ _ _ _ _ _ _ _ _ _ _ _ _ _ _ _ _ _ _ _ _ _ _ _ _ _ _ _ _ _ _ _ _ _ _ _ _ _ _ _ _ _ _ _ _ _ _ _ _ _ _
_ _ _ _ _ _ _ _ _ _ _ _ _ _ _ _ _ _ _ _ _ _ _ _ _ _ _ _ _ _ _ _ _ _ _ _ _ _ _ _ _ _ _ _ _ _ _ _ _ _ _ _ _ _ _ _ _ _ _ _ _ _ _ _ _ _ _ _ _ _ _ _ _ _ _ _ _ _ _ _ _ _ _ _ _ _ _ _ _
__
__
__
__
__
__
__
__
__
__
__
__
__
__
__
__
__
__
__
__
__
__
__
__
__
__
__
__
__
__
__
__
__
__
__
__
__
__
__
__
__
__
__
__
__
__
__
__
__
_


����
Printed in U.S.A.
SC23-4896-07