AirVideo-100v2 - Airlivefs.airlive.com/manual/AirLive_AirVideo-100V2_QSG.pdf · AirVideo-100 v2 ......
4
P1 AirVideo-100v2 Wireless Presenter Dongle Quick Setup Guide Regulatory Approvals FCC Statement This equipment has been tested and found to comply with the limits for a Class B digital device pursuant to Part 15 of the FCC Rules. These limits are designed to provide reasonable protection against harmful interferences when the equipment is operating in a commercial area. This equipment generates, uses and may radiate radio frequency energy, and if not installed in accordance with the user guide, may cause interference in the transmission of radio communications. If operating in a residential area, it is probable this equipment will cause harmful interference, in which case the user will be required to try to correct this interference using his own means. CE Marking Warning This is a Class B product. In a domestic environment this product may cause radio interference in which case the user may be required to take adequate measures. CE Statement This product complies with the 99/5/EEC directives, including the following safety and EMC standards: EN 300 328 V1.7.1(2006-10) ■ Electromagnetic compatibility and Radio spectrum matters (ERM); Wideband transmission equipment operating in the 2.4GHz ISM band And using spread spectrum modulation techniques; Part 1: technical Characteristics and test conditions Part2:Harmonized EN covering Essential requirements under article 3.2 of the R&TTE Directive EN 301 489-1 V1.8.1 (2008-04) ■ Electromagnetic compatibility and Radio spectrum Matters (ERM); EN 301 489-17 V2.1.1(2009-05) ■ Electromagnetic compatibility(EMC) standard for radio equipment And services; Part 17:Specific conditions for Wideband data and HIPERLAN equipment EN62311:2008-11 ■ Assessment of electronic and electrical equipment related to human exposure restrictions for electromagnetic fields (0 Hz ~ 300 GHz) EN55022:2006/ A1:2007 Class B ■ Limits and methods of measurement of radio disturbance characteristics of information technology equipment EN 55024:1998/ A1:2001/A2:2003 ■ Information Technology equipment-Immunity characteristics-Limits And Methods of measure- ment EN 60950-1: 2006 +A11:2009 ■ Safety for information technology equipment including electrical Business equipment Declaration of Conformity We, Manufacturer/Importer Declare that the product Wireless Presenter Dongle AirVideo-100v2 is in conformity with In accordance with 2004/108/EC Directive and 1999/5 EC-R & TTE Directive Clause Manufacturer/Importer Description OvisLink Corp. 5F, No.6, Lane 130, Min-Chuan Rd., Hsin-Tien Dist., New Taipei City 231, Taiwan ■ ■ ■ ■ ■ CE marking Signature: Name:Albert Yeh Position/ Title : Vice President EN 300 328 V1.7.1(2006-10) EN 301 489-1 V1.8.1 (2008-04) EN 301 489-17 V2.1.1(2009-05) EN62311:2008-11 Electromagnetic compatibility and Radio spectrum matters (ERM); Wideband transmission equipment operating in the 2.4GHz ISM band And using spread spectrum modulation techniques; Part 1: technical Characteristics and test conditions Part2:Harmonized EN covering Essential requirements under article 3.2 of the R&TTE Directive Electromagnetic compatibility and Radio spectrum Matters (ERM); Electromagnetic compatibility(EMC) standard for radio equipment And services; Part 17:Specific conditions for Wideband data and HIPERLAN equipment ■ EN 55024:1998/ A1:2001/A2:2003 Information Technology equipment-Immunity characteristics-Limits And Methods of measurement ■ EN 60950-1: 2006 +A11:2009 Safety for information technology equipment including electrical Business equipment Assessment of electronic and electrical equipment related to human exposure restrictions for electromagnetic fields (0 Hz ~ 300 GHz) ■ EN55022:2006/ A1:2007 Class B Limits and methods of measurement of radio disturbance characteristics of information technology equipment Date:2011/05/26 Place : Republic of China (Taiwan) HR OvisLink Corp. izjavljuje da je ovaj uređaj u skladu sa neophodnimpreporukama i ostalim važnim odredbama Directive 1999/5/EC. RO OvisLink Corporation declara ca acest dispozitiv este în conformitate cu cerintele esentiale si alte prevederi relevante ale Directivei 1999/5/EC ID OvisLink Corporation menyatakan bahwa perangkat ini telah sesuai dengan persyaratan utama dan ketentuan terkait lainnya direktif 1999/5/EC. Directive 1999 / 5 / EC Tested To Comply With FCC Standards. FOR HOME OR OFFICE USE This equipment may be used in AT, BE, CY, CZ, DK, EE, FI, FR, DE, GR, HR, HU, ID, IE, IT, LV, LT, LU, MT, NL, PL, PT, SK, SI, ES, SE, GB, IS, LI, NO, CH, BG, RO, TR OvisLink Corporation declares that this device is in compliance with the essential requirements and other relevant provisions of directive 1999/5/EC. AirVideo-100 v2 AirVideo-100 v2 Notebook Notebook Notebook Tablet Tablet Tablet Beamer Beamer Beamer Projector Projector Projector Smart Phone Smart Phone Smart Phone
Transcript of AirVideo-100v2 - Airlivefs.airlive.com/manual/AirLive_AirVideo-100V2_QSG.pdf · AirVideo-100 v2 ......

P1
AirVideo-100v2Wireless Presenter Dongle
Quick Setup Guide
Regulatory ApprovalsFCC StatementThis equipment has been tested and found to comply with the limits for a Class B digital device pursuant to Part 15 of the FCC Rules. These limits are designed to provide reasonable protection against harmful interferences when the equipment is operating in a commercial area. This equipment generates, uses and may radiate radio frequency energy, and if not installed in accordance with the user guide, may cause interference in the transmission of radio communications. If operating in a residential area, it is probable this equipment will cause harmful interference, in which case the user will be required to try to correct this interference using his own means.
CE Marking WarningThis is a Class B product. In a domestic environment this product may cause radio interference in which case the user may be required to take adequate measures.
CE StatementThis product complies with the 99/5/EEC directives, including the following safety and EMC standards:
EN 300 328 V1.7.1(2006-10)■Electromagnetic compatibility and Radio spectrum matters (ERM); Wideband transmission equipment operating in the 2.4GHz ISM band And using spread spectrum modulation techniques; Part 1: technical Characteristics and test conditions Part2:Harmonized EN covering Essential requirements under article 3.2 of the R&TTE Directive
EN 301 489-1 V1.8.1 (2008-04)■Electromagnetic compatibility and Radio spectrum Matters (ERM);
EN 301 489-17 V2.1.1(2009-05)■Electromagnetic compatibility(EMC) standard for radio equipment And services; Part 17:Specific conditions for Wideband data and HIPERLAN equipment
EN62311:2008-11■Assessment of electronic and electrical equipment related to human exposure restrictions for electromagnetic fields (0 Hz ~ 300 GHz)
EN55022:2006/ A1:2007 Class B■Limits and methods of measurement of radio disturbance characteristics of information technology equipment
EN 55024:1998/ A1:2001/A2:2003■Information Technology equipment-Immunity characteristics-Limits And Methods of measure-ment
EN 60950-1: 2006 +A11:2009■Safety for information technology equipment including electrical Business equipment
Declaration of ConformityWe, Manufacturer/Importer
Declare that the productWireless Presenter DongleAirVideo-100v2is in conformity withIn accordance with 2004/108/EC Directive and 1999/5 EC-R & TTE Directive
Clause
Manufacturer/Importer
Description
OvisLink Corp.5F, No.6, Lane 130, Min-Chuan Rd., Hsin-Tien Dist., New Taipei City 231, Taiwan
■
■
■
■
■ CE marking
Signature:
Name:Albert Yeh Position/ Title : Vice President
EN 300 328 V1.7.1(2006-10)
EN 301 489-1 V1.8.1 (2008-04)
EN 301 489-17 V2.1.1(2009-05)
EN62311:2008-11
Electromagnetic compatibility and Radio spectrum matters (ERM); Wideband transmission equipment operating in the 2.4GHz ISM band And using spread spectrum modulation techniques; Part 1: technical Characteristics and test conditions Part2:Harmonized EN covering Essential requirements under article 3.2 of the R&TTE Directive
Electromagnetic compatibility and Radio spectrum Matters (ERM);
Electromagnetic compatibility(EMC) standard for radio equipment And services; Part 17:Specific conditions for Wideband data and HIPERLAN equipment
■ EN 55024:1998/ A1:2001/A2:2003 Information Technology equipment-Immunity characteristics-Limits And Methods of measurement
■ EN 60950-1: 2006 +A11:2009 Safety for information technology equipment including electrical Business equipment
Assessment of electronic and electrical equipment related to human exposure restrictions for electromagnetic fields (0 Hz ~ 300 GHz)
■ EN55022:2006/ A1:2007 Class B Limits and methods of measurement of radio disturbance characteristics of information technology equipment
Date:2011/05/26Place : Republic of China (Taiwan)
HROvisLink Corp. izjavljuje da je ovaj uređaj u skladu sa neophodnimpreporukama i ostalim važnim odredbama Directive 1999/5/EC.
ROOvisLink Corporation declara ca acest dispozitiv este în conformitate cu cerintele esentiale si alte prevederi relevante ale Directivei 1999/5/EC
IDOvisLink Corporation menyatakan bahwa perangkat ini telah sesuai dengan persyaratan utama dan ketentuan terkait lainnya direktif 1999/5/EC.
Directive 1999 / 5 / EC
Tested To ComplyWith FCC Standards.FOR HOME OR OFFICE USE
This equipment may be used in AT, BE, CY, CZ, DK, EE, FI, FR, DE, GR, HR, HU, ID, IE, IT,LV, LT, LU, MT, NL, PL, PT, SK, SI, ES, SE, GB, IS, LI, NO, CH, BG, RO, TR
OvisLink Corporation declares that this device is incompliance with the essential requirements andother relevant provisions of directive 1999/5/EC.
AirVideo-100 v2AirVideo-100 v2
NotebookNotebookNotebook
TabletTabletTablet
BeamerBeamerBeamerProjectorProjectorProjector
Smart PhoneSmart PhoneSmart Phone

P2
Důležité informaceZákladní IP adresa: 192.168.1.1Základní maska sítě 255.255.255.0Základní přihlašovací jméno je ‘admin’Základní heslo je ‘airlive’Tovární SSID je airliveDoporučujeme nastudovat detaily v uživatelském manuálu
ČeskyCZ
Important InformationThe default IP address: 192.168.1.1The default Subnet Mask is 255.255.255.0The default login name is adminThe default password is airliveThe default wireless SSID is airlivePlease check manual on CD for more detail configuration
EnglishEN
Información ImportanteLa dirección IP por defecto del : 192.168.1.1La máscara de red por defecto es 255.255.255.0El nombre de acceso por defecto ‘admin’La clave de acceso por defecto es ‘airlive’Wireless SSID default: airlivePor favor lea el manual en el CD para mayor información sobre la configuración.
EspañolES
Wichtige InformationenDie voreingestellte IP Adresse : 192.168.1.1Das Standard-Subnet Mask ist 255.255.255.0Der Standard Login ist “admin”Das Standard Passwort ist “airlive”Die voreingestellte SSID lautet airliveWeitere detaillierte Informationen über die Konfiguration entnehmen Sie bitte dem auf der beiliegenden CD enthaltenen Benutzerhandbuch.
DeutschDE
Βασικές ΠληροφορίεςΗ προεπιλεγμένη διεύθυνση IP: 192.168.1.1Η προκαθορισμένη Μάσκα υποδικτύου είναι 255.255.255.0Το προκαθορισμένο όνομα χρήστη είναι adminΤο προκαθορισμένο password είναι airliveΤο προκαθορισμένο password είναι ‘airlive’Παρακαλούμε ελέγξτε τον ηλεκτρονικό οδηγό που βρίσκετε στο CD
ΕλληνικόςGR
Fontos információkA alapértelmezett IP-címe: 192.168.1.1Alapértelmezett alhálózati maszk: 255.255.255.0Alapértelmezett felhasználói név: adminAlapértelmezett jelszó: airliveAz alapértelmezett SSID „airlive”Részletesebb leírás a telepítő CD-n lévő kézikönyvben található
MagyarHU
Važne informacije:Početna IP adresa: 192.168.1.1Zadani Subnet Mask je 255.255.255.0Početno korisničko ime je adminPočetna lozinka je airliveZadani bežični SSID je airliveZa više informacija, molimo pogledajte korisnički vodič na priloženom CD-u.
HrvatskaHR
Informasi PentingIP address adalah 192.168.1.1Subnet Mask adalah 255.255.255.0User name adalah adminPassword adalah airliveWireless SSID standard adalah airliveKeterangan lebih lanjut mengenai teknik pemasangan silakan melihat file Manual yang terdapat dalam CD
BahasaID
Informação importanteO endereço IP por defeito: 192.168.1.1Por defeito a subnet mask é 255.255.255.0O nome do login por defeito é “admin”A palavra-chave por defeito é “airlive”Por defeito o wireless SSID é “airlive”Por favor verifique as configurações em detalhe no manual que vem no CD.
PortuguêsPT
Ważne informacjeFabryczny adres IP: 192.168.1.1Standardowa maska podsieci to 255.255.255.0Standardowa nazwa użytkownika to adminStandardowe hasło to airliveThe default wireless SSID is airliveW celu uzyskania bardziej szczegółowych informacji prosimy o zapoznanie się z instrukcją użytkownika na płycie CD
PolskiPL
Dôležité informáciePredvolená IP adresa: 192.168.1.1Štandardná maska podsiete je 255.255.255.0Štandardné prihlasovacie meno je ‘admin’Štandardné heslo je ‘airlive’Predvolené SSID pre bezdrôtovú sieť je ‘airlive’Opis detailnej konfigurácie nájdete na CD dodávanom spolu s výrobkom
SlovenskySK
Informatii importanteAdresa IP implicita: 192.168.1.1Subnet Mask implicit: 255.255.255.0Nume utilizator implicit: adminParola implicita: airliveSSID wireless implicit : ‘airlive’Pentru mai multe detalii despre configurare, va rugam sa consultati manualul aflat pe CD.
RomâniaRO
Важная информацияIP адрес по умолчанию: 192.168.1.1Маска подсети по умолчанию 255.255.255.0Имя пользователя по умолчанию “admin”Пароль по умолчанию “airlive”Беспроводной SSID по умолчанию "airlive"Для более детальной информации о Web конфигурациях, пожалуйста, обратитесь к руководству пользователя доступном на CD.
РусскийRU
Quick Setup Guide
AirVideo-100v2Wireless Presenter Dongle

P1
How to configure the AirVideo-100v2 at first time?
AirVideo-100v2Wireless Presenter Dongle
1
2 3 4
5 6 7
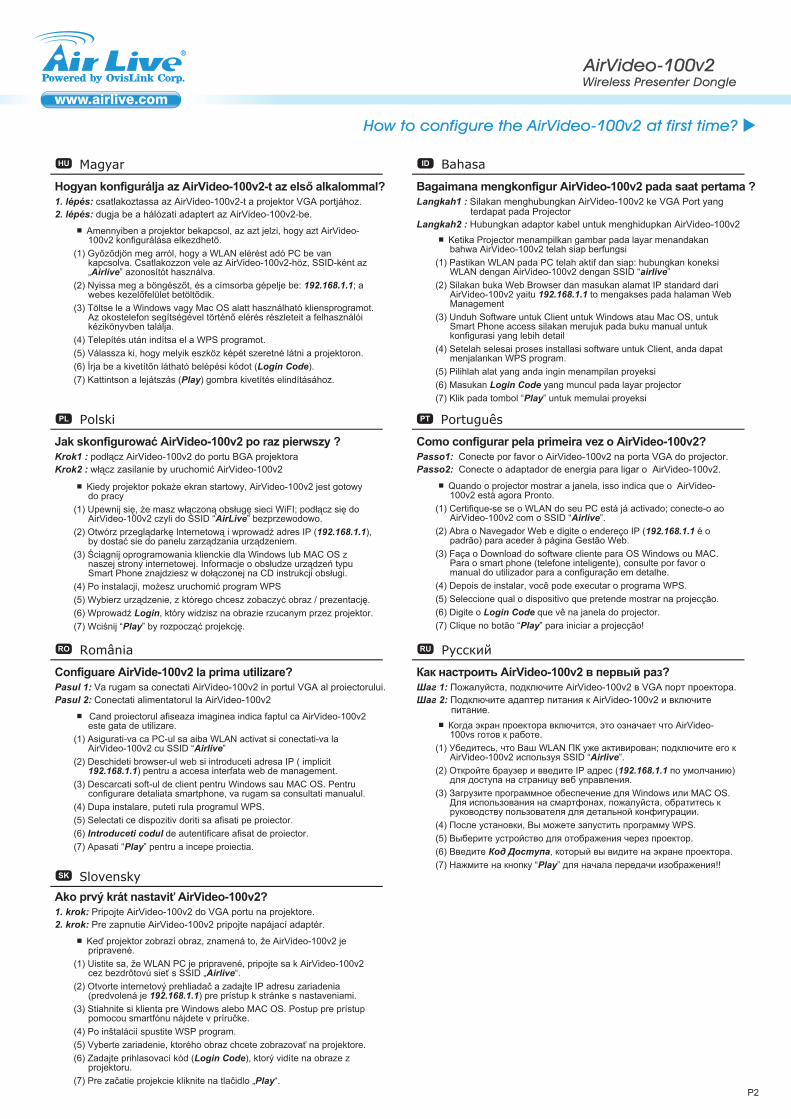
How to configure the AirVideo-100v2 at first time?Step1: Please plug AirVideo-100v2 into projector VGA port.Step2: Plug the power adapter to turn on the AirVideo-100v2.
When projector shows on the screen, it indicates the AirVideo-100v2 is Ready now.
(1) Make sure your WLAN PC is enabled already; connect to AirVideo-100v2 with the SSID “Airlive”.
(2) Open Web Browser and enter the IP address (192.168.1.1 is default) to access Web Management page.
(3) Download the client software for Windows or MAC OS. For smart phone, please refer to the user manual for detail configuration.
(4) After installing, you can run the WPS program.(5) Select which device that your want to show the projection.(6) Enter the Login Code which you see on the projector screen.(7) Click on the “Play” button to start projection!!
EnglishEN ČeskyCZ
ak poprvé nakonfigurovat AirVideo-100v2?Krok 1: Připojte AirVideo-100v2 do VGA portu.Krok 2: Připojte do AirVideo-100v2 elektrický adaptér.
Jakmile projektor zobrazí plochu, AirVideo-100v2 je připraveno.(1) Ujistěte se, že máte zapnutou bezdrátovou síť, připojte se do
bezdrátové sítě “Airlive”. (2) Otevřete webový prohlížeč a vložte adresu 192.168.1.1 (tovární
adresa).(3) Stáhněte si klientský software pro Windows nebo MAC OS. Pro
chytré telefony následujte manuál.(4) Po instalaci můžete spustit WPS program.(5) Zvolte zařízení, které se má na projektoru zbrazovat.(6) Vložte Login kód, který vidíte na projektoru.(7) Klikněte na Play a začněte s projekcí.
DeutschDE
Wie konfiguriert man den AirVideo-100v2 zum ersten Mal?Schritt 1: Bitte verbinden Sie den AirVideo-100v2 mit dem VGA
Anschluss des Projektors. Schritt 2: Bitte verbinden Sie nun das Netzteil und schalten Sie den
AirVideo-100v2 ein. Sobald der Projektor ein Bild zeigt, ist der AirVideo-100v2 bereit.(1) Stellen Sie sicher, dass das WLAN am PC aktiviert ist. Verbinden Sie
sich nun zur SSID “Airlive” des AirVideo-100v2.(2) Öffnen Sie einen Webbrowser und geben Sie die IP (192.168.1.1 ist
voreingestellt) ein und öffnen Sie die Web Management Seite.(3) Laden Sie jetzt die Software für MAC oder Windows herunter. Für die
Nutzung am Smartphone lesen Sie bitte die mitgelieferte Dokumenta-tion.
(4) Nach der Installation können Sie das WPS Programm starten.(5) Wählen Sie das zu projizierende Gerät aus.(6) Geben Sie den „Login Code“ ein, den Sie auf dem Projektor sehen.(7) Klicken Sie auf “Play” um die Projektion zu starten.
EspañolES
Cómo configurar el AirVideo-100v2?Paso 1: Enchufar el AirVideo-100v2 en el VGA del proyectorPaso 2: Enchufar el adaptador de corriente para encender el AirVideo-100v2.
Cuando el proyector se vea en la pantalla, indica que el AirVideo-100v2 está listo para usarse.
(1) Asegurarse de que el WLAN de la PC esté listo y conectar el AirVideo-100v2 con el SSID “Airlive”.
(2) Abrir el navegador de internet y entrar el IP (192.168.1.1 default) para acceder a la página de administración de la web
(3) Descargar el software del cliente para Windows o MAC OS. Para Smart Phone, referir al manual del usuario para mayor detalles.
(4) Luego de la instalación, puede ejecutar el programa WPS(5) Seleccione qué dispositivo desea mostrar el proyector(6) Entrar el Login Code que se ve en la pantalla del proyector(7) Haga click en “Play” para empezar la proyección.
ΕλληνικόςGR
Πως να ρυθμίσετε το AirVideo-100v2 για πρώτη φορά;Βήμα 1: Παρακαλώ συνδέστε το AirVideo-100v2 στην VGA θύρα του
προβολέα.Βήμα 2: Συνδέστε τον μετασχηματιστή ρεύματος για να ενεργοποιήσετε το
AirVideo-100v2. Όταν ο προβολέα δείχνει στην οθόνη, το AirVideo-100v2 είναι έτοιμο.(1) Βεβαιωθείτε ότι WLAN ο υπολογιστής σας είναι ήδη ενεργοποιημένο;
συνδεθείτε στο AirVideo-100v2 με το SSID “Airlive”.(2) Για να αποκτήσετε πρόσβαση στην Web σελίδα Διαχείρισης. Ανοίξτε
το πρόγραμμα περιήγησης στο Web και πληκτρολογήστε την προεπιλεγμένη διεύθυνση IP (192.168.1.1).
(3) Κατεβάστε το λογισμικό για Windows ή Mac OS. Για το smart phone, παρακαλούμε ανατρέξτε στο εγχειρίδιο χρήσης για ρυθμίσεις.
(4) Μετά την εγκατάσταση, μπορείτε να εκτελέσετε το πρόγραμμα WPS.(5) Επιλέξτε τη συσκευή που θέλετε να σας δείξει την προβολή.(6) Εισάγετε τον κωδικό Σύνδεση που βλέπετε στην οθόνη προβολής.(7) Κάντε κλικ στο "Play" για να ξεκινήσει η προβολή
HrvatskaHR
Kako prvi puta konfigurirati AirVideo-100v2?Korak 1: Uključite AirVideo-100v2 u VGA port projektora.Korak 2: Za pokretanje AirVideo-100v2, uključite adapter za napajanje.
AirVideo-100v2 je spreman za rad kada se na projektorovom zaslonu pojavi slika.
(1) Uvjerite se da je uključen Vaš WLAN na PC-u; spojite se na AirVideo-100v2 sa SSID “Airlive”.
(2) Otvorite web preglednik i unesite IP adresu (zadana je 192.168.1.1) kako biste pristupili stranici za upravljanje putem Weba.
(3) Preuzmite Windows ili MAC OS softver za klijenta. Za smartphone detaljnije proučite priručnik o konfiguraciji.
(4) Nakon instalacije možete pokrenuti WPS program. (5) Odaberite za koji uređaj želite prikazati projekciju.(6) Unesite Login Code prikazan na zaslonu projektora.(7) Za pokretanje projekcije kliknite na tipku “Play”!!
P2
How to configure the AirVideo-100v2 at first time?
AirVideo-100v2Wireless Presenter Dongle
MagyarHU
Hogyan konfigurálja az AirVideo-100v2-t az első alkalommal?1. lépés: csatlakoztassa az AirVideo-100v2-t a projektor VGA portjához.2. lépés: dugja be a hálózati adaptert az AirVideo-100v2-be.
Amennyiben a projektor bekapcsol, az azt jelzi, hogy azt AirVideo-100v2 konfigurálása elkezdhető.
(1) Győződjön meg arról, hogy a WLAN elérést adó PC be van kapcsolva. Csatlakozzon vele az AirVideo-100v2-höz, SSID-ként az „Airlive” azonosítót használva.
(2) Nyissa meg a böngészőt, és a címsorba gépelje be: 192.168.1.1; a webes kezelőfelület betöltődik.
(3) Töltse le a Windows vagy Mac OS alatt használható kliensprogramot. Az okostelefon segítségével történő elérés részleteit a felhasználói kézikönyvben találja.
(4) Telepítés után indítsa el a WPS programot.(5) Válassza ki, hogy melyik eszköz képét szeretné látni a projektoron.(6) Írja be a kivetítőn látható belépési kódot (Login Code).(7) Kattintson a lejátszás (Play) gombra kivetítés elindításához.
BahasaID
Bagaimana mengkonfigur AirVideo-100v2 pada saat pertama ?Langkah1 : Silakan menghubungkan AirVideo-100v2 ke VGA Port yang
terdapat pada ProjectorLangkah2 : Hubungkan adaptor kabel untuk menghidupkan AirVideo-100v2
Ketika Projector menampilkan gambar pada layar menandakan bahwa AirVideo-100v2 telah siap berfungsi
(1) Pastikan WLAN pada PC telah aktif dan siap: hubungkan koneksi WLAN dengan AirVideo-100v2 dengan SSID “airlive”
(2) Silakan buka Web Browser dan masukan alamat IP standard dari AirVideo-100v2 yaitu 192.168.1.1 to mengakses pada halaman Web Management
(3) Unduh Software untuk Client untuk Windows atau Mac OS, untuk Smart Phone access silakan merujuk pada buku manual untuk konfigurasi yang lebih detail
(4) Setelah selesai proses installasi software untuk Client, anda dapat menjalankan WPS program.
(5) Pilihlah alat yang anda ingin menampilan proyeksi(6) Masukan Login Code yang muncul pada layar projector(7) Klik pada tombol “Play” untuk memulai proyeksi
PolskiPL
Jak skonfigurować AirVideo-100v2 po raz pierwszy ? Krok1 : podłącz AirVideo-100v2 do portu BGA projektoraKrok2 : włącz zasilanie by uruchomić AirVideo-100v2
Kiedy projektor pokaże ekran startowy, AirVideo-100v2 jest gotowy do pracy
(1) Upewnij się, że masz włączoną obsługę sieci WiFI; podłącz się do AirVideo-100v2 czyli do SSID “AirLive” bezprzewodowo.
(2) Otwórz przeglądarkę Internetową i wprowadź adres IP (192.168.1.1), by dostać sie do panelu zarządzania urządzeniem.
(3) Ściągnij oprogramowania klienckie dla Windows lub MAC OS z naszej strony internetowej. Informacje o obsłudze urządzeń typu Smart Phone znajdziesz w dołączonej na CD instrukcji obsługi.
(4) Po instalacji, możesz uruchomić program WPS(5) Wybierz urządzenie, z którego chcesz zobaczyć obraz / prezentację.(6) Wprowadź Login, który widzisz na obrazie rzucanym przez projektor.(7) Wciśnij “Play” by rozpocząć projekcję.
PortuguêsPT
Como configurar pela primeira vez o AirVideo-100v2?Passo1: Conecte por favor o AirVideo-100v2 na porta VGA do projector.Passo2: Conecte o adaptador de energia para ligar o AirVideo-100v2.
Quando o projector mostrar a janela, isso indica que o AirVideo-100v2 está agora Pronto.
(1) Certifique-se se o WLAN do seu PC está já activado; conecte-o ao AirVideo-100v2 com o SSID “Airlive”.
(2) Abra o Navegador Web e digite o endereço IP (192.168.1.1 é o padrão) para aceder à página Gestão Web.
(3) Faça o Download do software cliente para OS Windows ou MAC. Para o smart phone (telefone inteligente), consulte por favor o manual do utilizador para a configuração em detalhe.
(4) Depois de instalar, você pode executar o programa WPS.(5) Seleccione qual o dispositivo que pretende mostrar na projecção.(6) Digite o Login Code que vê na janela do projector.(7) Clique no botão “Play” para iniciar a projecção!
RomâniaRO
Configuare AirVide-100v2 la prima utilizare?Pasul 1: Va rugam sa conectati AirVideo-100v2 in portul VGA al proiectorului.Pasul 2: Conectati alimentatorul la AirVideo-100v2
Cand proiectorul afiseaza imaginea indica faptul ca AirVideo-100v2 este gata de utilizare.
(1) Asigurati-va ca PC-ul sa aiba WLAN activat si conectati-va la AirVideo-100v2 cu SSID “Airlive”
(2) Deschideti browser-ul web si introduceti adresa IP ( implicit 192.168.1.1) pentru a accesa interfata web de management.
(3) Descarcati soft-ul de client pentru Windows sau MAC OS. Pentru configurare detaliata smartphone, va rugam sa consultati manualul.
(4) Dupa instalare, puteti rula programul WPS.(5) Selectati ce dispozitiv doriti sa afisati pe proiector.(6) Introduceti codul de autentificare afisat de proiector. (7) Apasati “Play” pentru a incepe proiectia.
SlovenskySK
Ako prvý krát nastaviť AirVideo-100v2?1. krok: Pripojte AirVideo-100v2 do VGA portu na projektore.2. krok: Pre zapnutie AirVideo-100v2 pripojte napájací adaptér.
Keď projektor zobrazí obraz, znamená to, že AirVideo-100v2 je pripravené.
(1) Uistite sa, že WLAN PC je pripravené, pripojte sa k AirVideo-100v2 cez bezdrôtovú sieť s SSID „Airlive“.
(2) Otvorte internetový prehliadač a zadajte IP adresu zariadenia (predvolená je 192.168.1.1) pre prístup k stránke s nastaveniami.
(3) Stiahnite si klienta pre Windows alebo MAC OS. Postup pre prístup pomocou smartfónu nájdete v príručke.
(4) Po inštalácií spustite WSP program.(5) Vyberte zariadenie, ktorého obraz chcete zobrazovať na projektore.(6) Zadajte prihlasovací kód (Login Code), ktorý vidíte na obraze z
projektoru.(7) Pre začatie projekcie kliknite na tlačidlo „Play“.
РусскийRU
Как настроить AirVideo-100v2 в первый раз?Шаг 1: Пожалуйста, подключите AirVideo-100v2 в VGA порт проектора.Шаг 2: Подключите адаптер питания к AirVideo-100v2 и включите
питание. Когда экран проектора включится, это означает что AirVideo-
100vs готов к работе.(1) Убедитесь, что Ваш WLAN ПК уже активирован; подключите его к
AirVideo-100v2 используя SSID “Airlive”.(2) Откройте браузер и введите IP адрес (192.168.1.1 по умолчанию)
для доступа на страницу веб управления.(3) Загрузите программное обеспечение для Windows или MAC OS.
Для использования на смартфонах, пожалуйста, обратитесь к руководству пользователя для детальной конфигурации.
(4) После установки, Вы можете запустить программу WPS.(5) Выберите устройство для отображения через проектор.(6) Введите Код Доступа, который вы видите на экране проектора.(7) Нажмите на кнопку “Play” для начала передачи изображения!!