AirLive BU-3028-IVS Vehicle Countingfs.airlive.com/manual/AirLive_BU-3028-IVS_Vehicle...
19
V ersion 1.0 BU-3028-IVS Vehicle Counting Guide
-
Upload
duongthuan -
Category
Documents
-
view
213 -
download
0
Transcript of AirLive BU-3028-IVS Vehicle Countingfs.airlive.com/manual/AirLive_BU-3028-IVS_Vehicle...
Version 1.0
BU-3028-IVS
Vehicle Counting Guide
BU-3028-IVS Vehicle Counting Setup Guide
1
BU-3028-IVS Vehicle Counting Guide
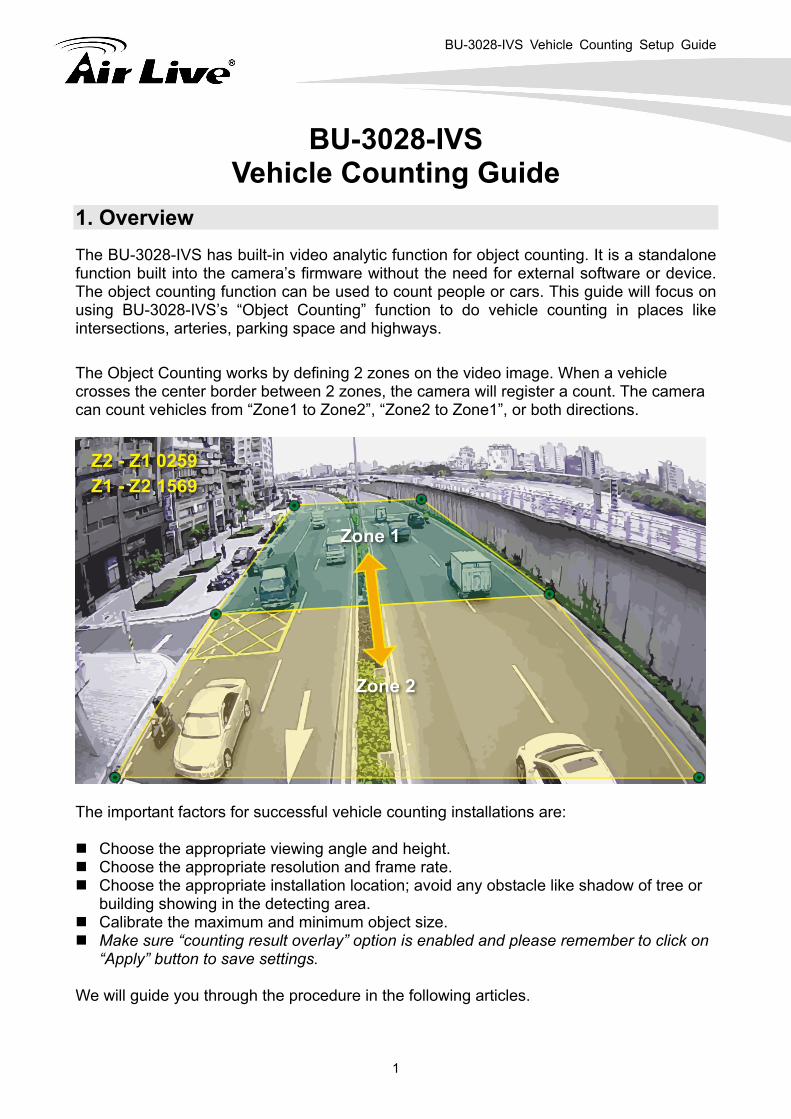
1. Overview The BU-3028-IVS has built-in video analytic function for object counting. It is a standalone function built into the camera’s firmware without the need for external software or device. The object counting function can be used to count people or cars. This guide will focus on using BU-3028-IVS’s “Object Counting” function to do vehicle counting in places like intersections, arteries, parking space and highways. The Object Counting works by defining 2 zones on the video image. When a vehicle crosses the center border between 2 zones, the camera will register a count. The camera can count vehicles from “Zone1 to Zone2”, “Zone2 to Zone1”, or both directions.
The important factors for successful vehicle counting installations are:
Choose the appropriate viewing angle and height. Choose the appropriate resolution and frame rate. Choose the appropriate installation location; avoid any obstacle like shadow of tree or
building showing in the detecting area. Calibrate the maximum and minimum object size. Make sure “counting result overlay” option is enabled and please remember to click on
“Apply” button to save settings.
We will guide you through the procedure in the following articles.
BU-3028-IVS Vehicle Counting Setup Guide
2
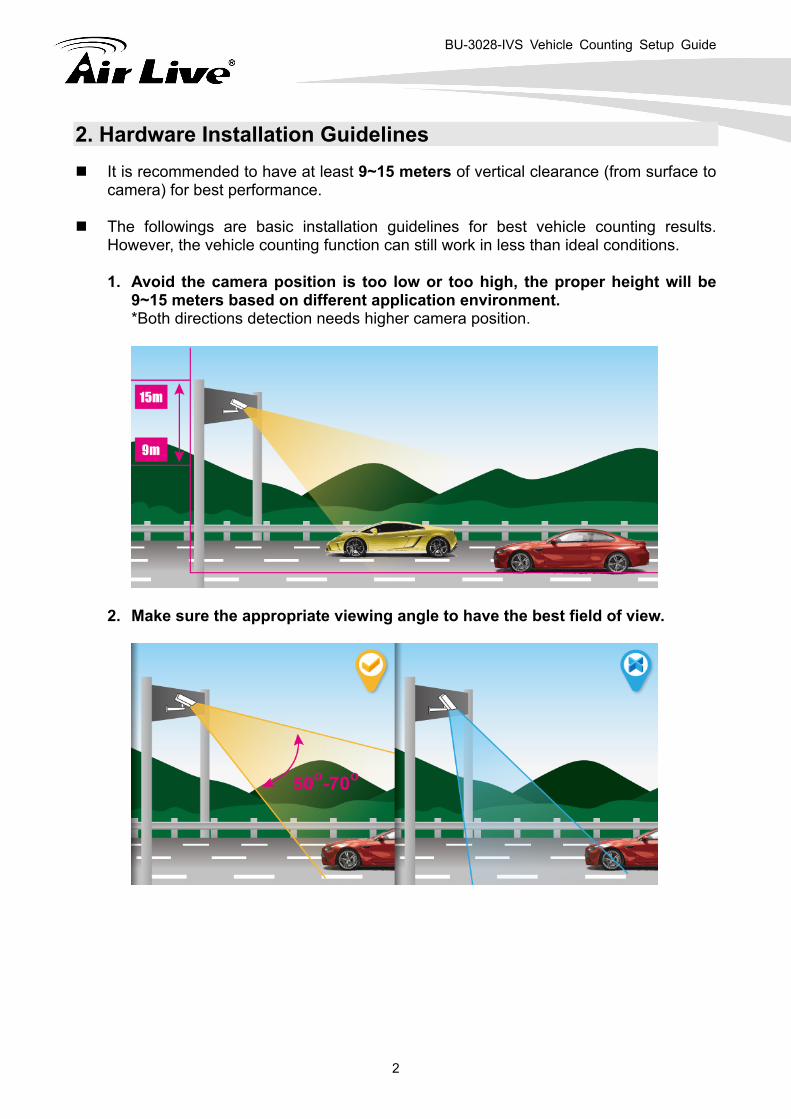
2. Hardware Installation Guidelines It is recommended to have at least 9~15 meters of vertical clearance (from surface to
camera) for best performance.
The followings are basic installation guidelines for best vehicle counting results. However, the vehicle counting function can still work in less than ideal conditions. 1. Avoid the camera position is too low or too high, the proper height will be
9~15 meters based on different application environment. *Both directions detection needs higher camera position.
2. Make sure the appropriate viewing angle to have the best field of view.
BU-3028-IVS Vehicle Counting Setup Guide
3
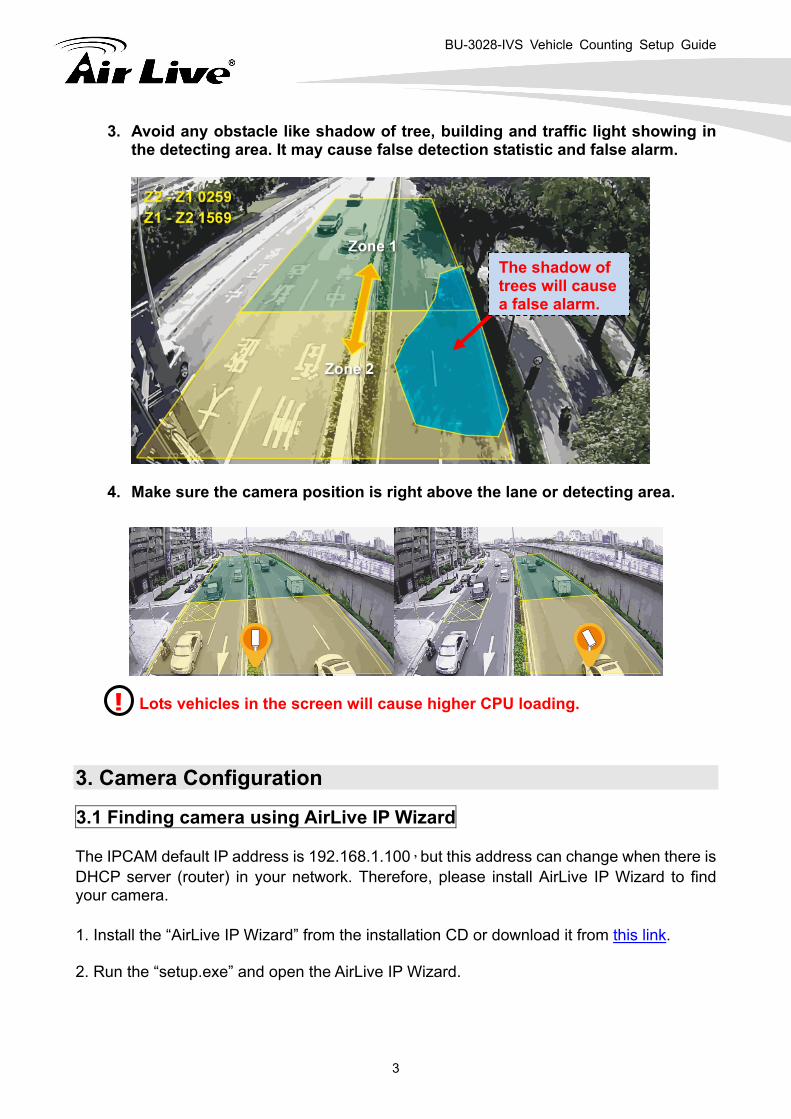
3. Avoid any obstacle like shadow of tree, building and traffic light showing in the detecting area. It may cause false detection statistic and false alarm.
The shadow of trees will cause a false alarm.
4. Make sure the camera position is right above the lane or detecting area.
Lots vehicles in the screen will cause higher CPU loading. !
3. Camera Configuration
3.1 Finding camera using AirLive IP Wizard The IPCAM default IP address is 192.168.1.100,but this address can change when there is DHCP server (router) in your network. Therefore, please install AirLive IP Wizard to find your camera. 1. Install the “AirLive IP Wizard” from the installation CD or download it from this link. 2. Run the “setup.exe” and open the AirLive IP Wizard.

BU-3028-IVS Vehicle Counting Setup Guide
4
3. The IP Wizard will auto search and list out the camera found. Double click on the camera that you want to configure.
4. The IPCAM’s web configuration will open automatically after double click. Please enter
the “admin” for username and “airlive” for password. 5. After entering the correct username and password. You will enter the camera’s web
configuration page. When prompted to install “Media Control” from “OvisLink Corp”, please select “Yes” to install.
3.2 Enable Camera’s Video Analytic Function Please use Internet Explorer as the default browser. If you are using IE 11, please go to “Setup->Compatibility View Settings” and add the camera’s IP address to the list. Please follow the step below to enable camera’s video analytics function. 1. Click on “Configurations” on left menu bar.
BU-3028-IVS Vehicle Counting Setup Guide
5
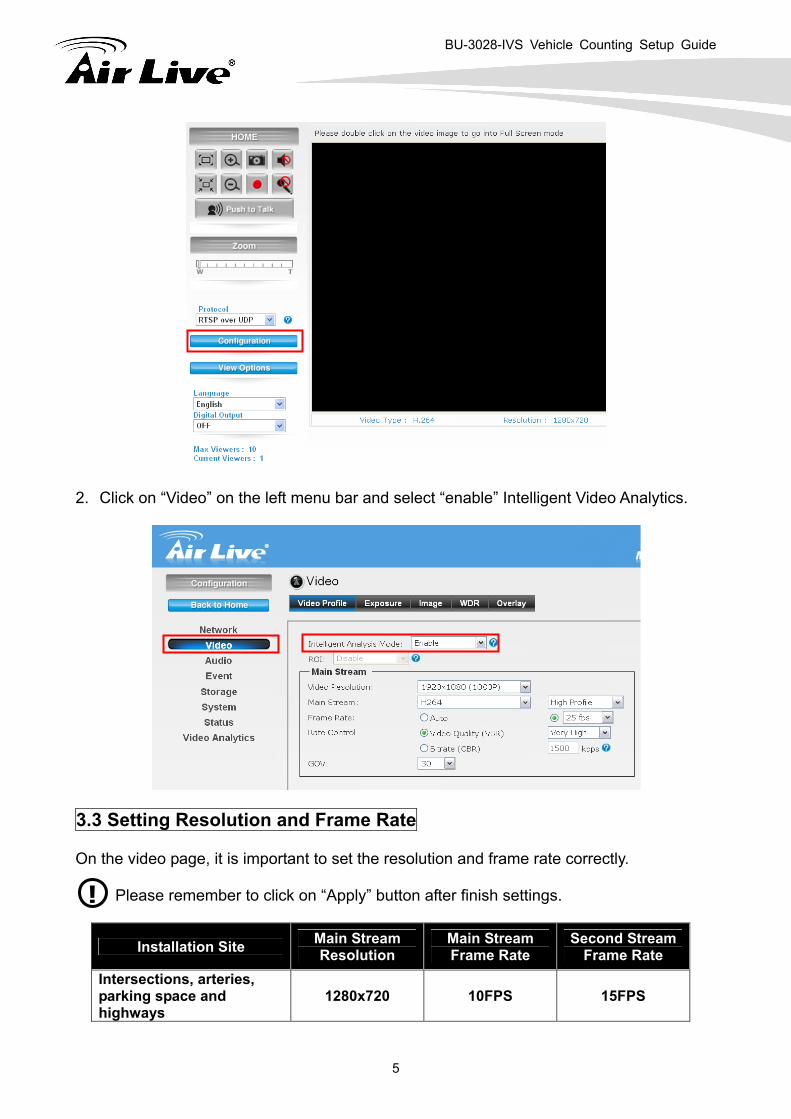
2. Click on “Video” on the left menu bar and select “enable” Intelligent Video Analytics.
3.3 Setting Resolution and Frame Rate On the video page, it is important to set the resolution and frame rate correctly.
Please remember to click on “Apply” button after finish settings. !
Installation Site Main Stream Resolution
Main Stream Frame Rate
Second Stream Frame Rate
Intersections, arteries, parking space and highways
1280x720 10FPS 15FPS
BU-3028-IVS Vehicle Counting Setup Guide
6
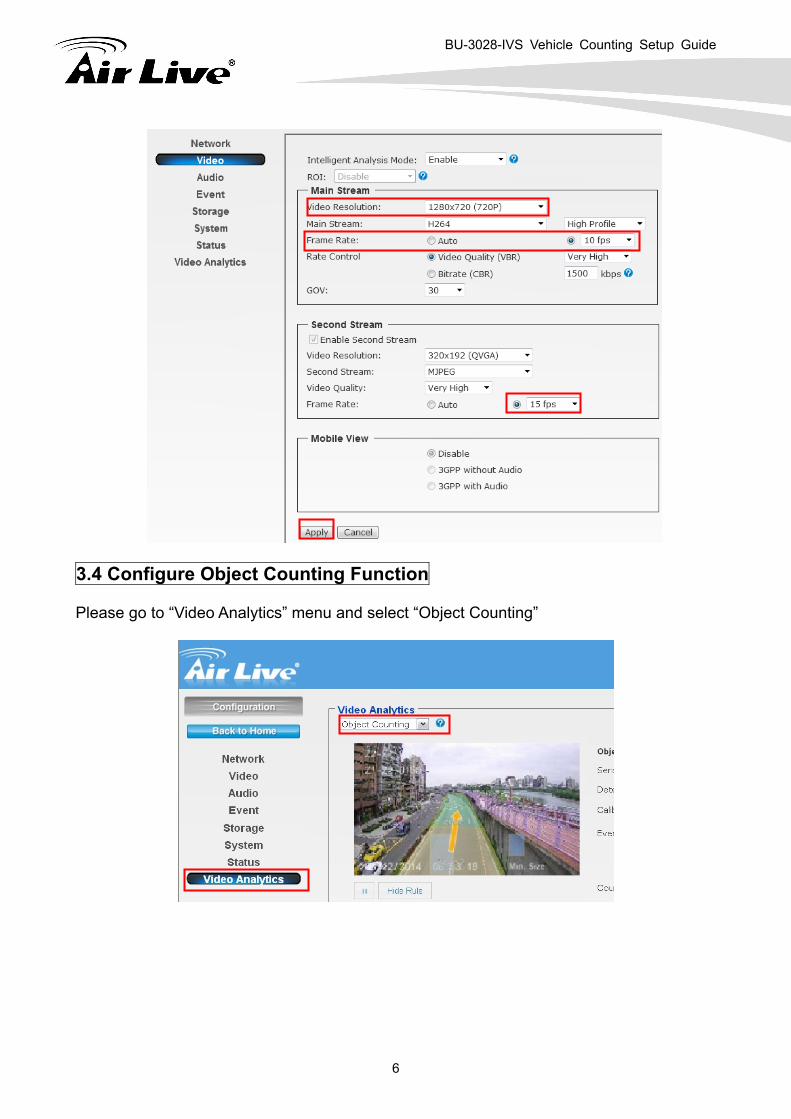
3.4 Configure Object Counting Function Please go to “Video Analytics” menu and select “Object Counting”
BU-3028-IVS Vehicle Counting Setup Guide
7
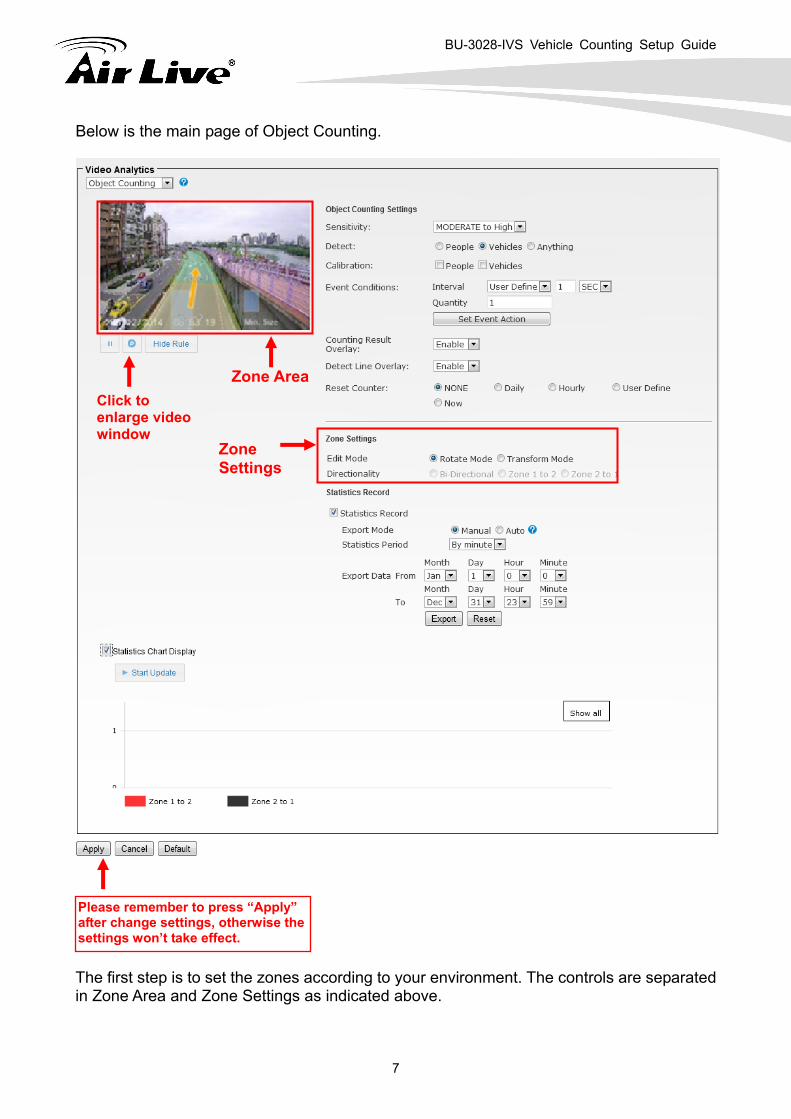
Below is the main page of Object Counting.
Click to enlarge video window
Zone Area
Zone Settings
Please remember to press “Apply” after change settings, otherwise the settings won’t take effect.
The first step is to set the zones according to your environment. The controls are separated in Zone Area and Zone Settings as indicated above.
BU-3028-IVS Vehicle Counting Setup Guide
8
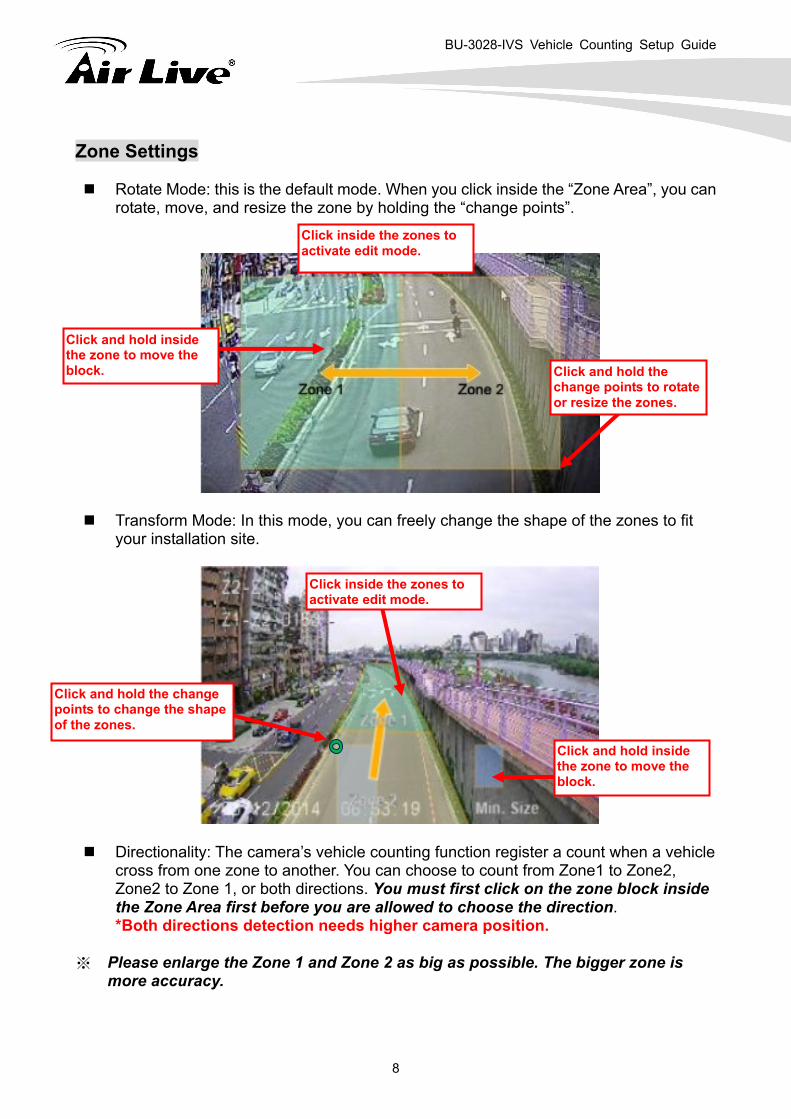
Zone Settings
Rotate Mode: this is the default mode. When you click inside the “Zone Area”, you can rotate, move, and resize the zone by holding the “change points”.
Click inside the zones to activate edit mode.
Click and hold inside the zone to move the block. Click and hold the
change points to rotate or resize the zones.
Transform Mode: In this mode, you can freely change the shape of the zones to fit
your installation site.
Click and hold the change points to change the shape of the zones.
Click inside the zones to activate edit mode.
Click and hold inside the zone to move the block.
Directionality: The camera’s vehicle counting function register a count when a vehicle
cross from one zone to another. You can choose to count from Zone1 to Zone2, Zone2 to Zone 1, or both directions. You must first click on the zone block inside the Zone Area first before you are allowed to choose the direction. *Both directions detection needs higher camera position.
※ Please enlarge the Zone 1 and Zone 2 as big as possible. The bigger zone is
more accuracy.
BU-3028-IVS Vehicle Counting Setup Guide
9
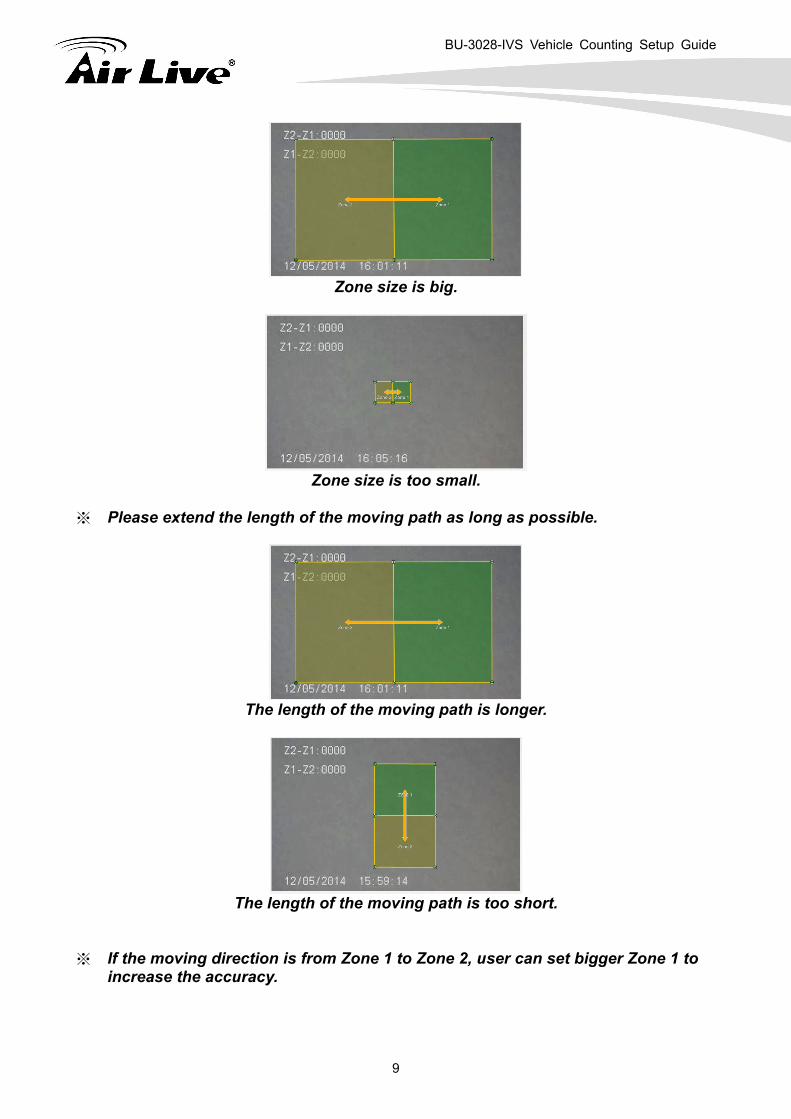
Zone size is big.
Zone size is too small.
※ Please extend the length of the moving path as long as possible.
The length of the moving path is longer.
The length of the moving path is too short.
※ If the moving direction is from Zone 1 to Zone 2, user can set bigger Zone 1 to
increase the accuracy.
BU-3028-IVS Vehicle Counting Setup Guide
10
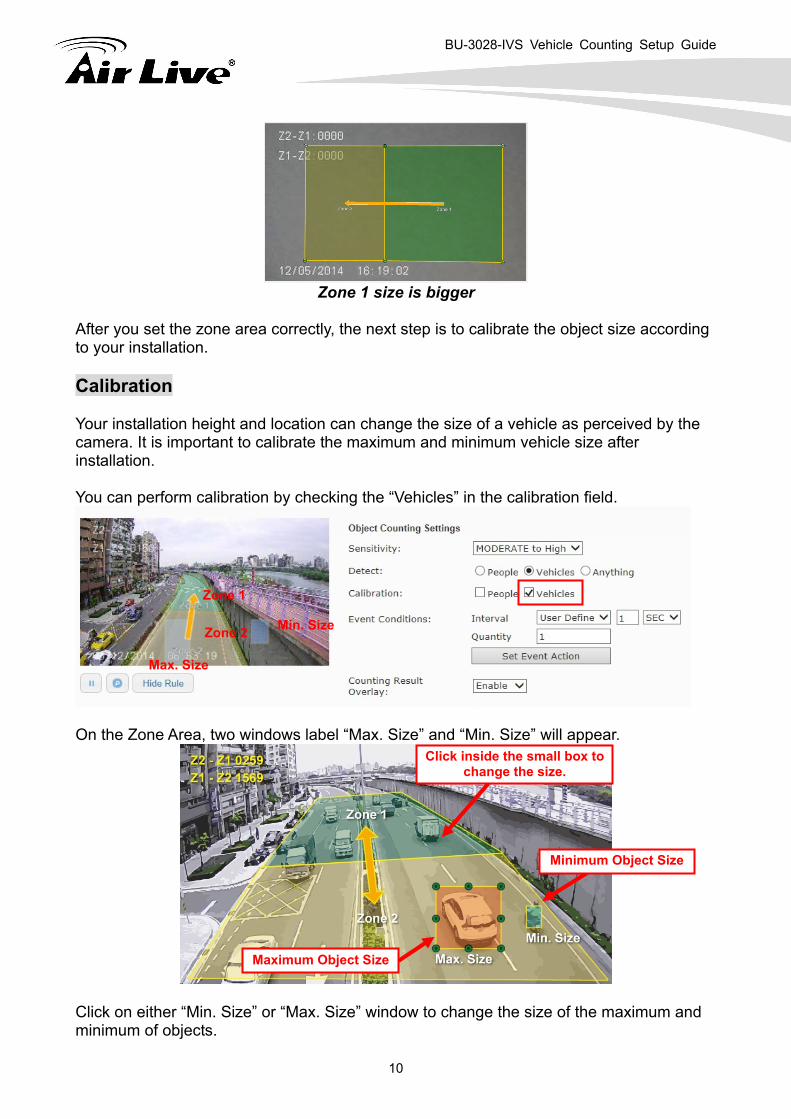
Zone 1 size is bigger
After you set the zone area correctly, the next step is to calibrate the object size according to your installation. Calibration Your installation height and location can change the size of a vehicle as perceived by the camera. It is important to calibrate the maximum and minimum vehicle size after installation. You can perform calibration by checking the “Vehicles” in the calibration field.
Zone 1
Min. Size Zone 2
Max. Size
On the Zone Area, two windows label “Max. Size” and “Min. Size” will appear.
Click inside the small box to change the size.
Minimum Object Size
Maximum Object Size
Click on either “Min. Size” or “Max. Size” window to change the size of the maximum and minimum of objects.
BU-3028-IVS Vehicle Counting Setup Guide
11
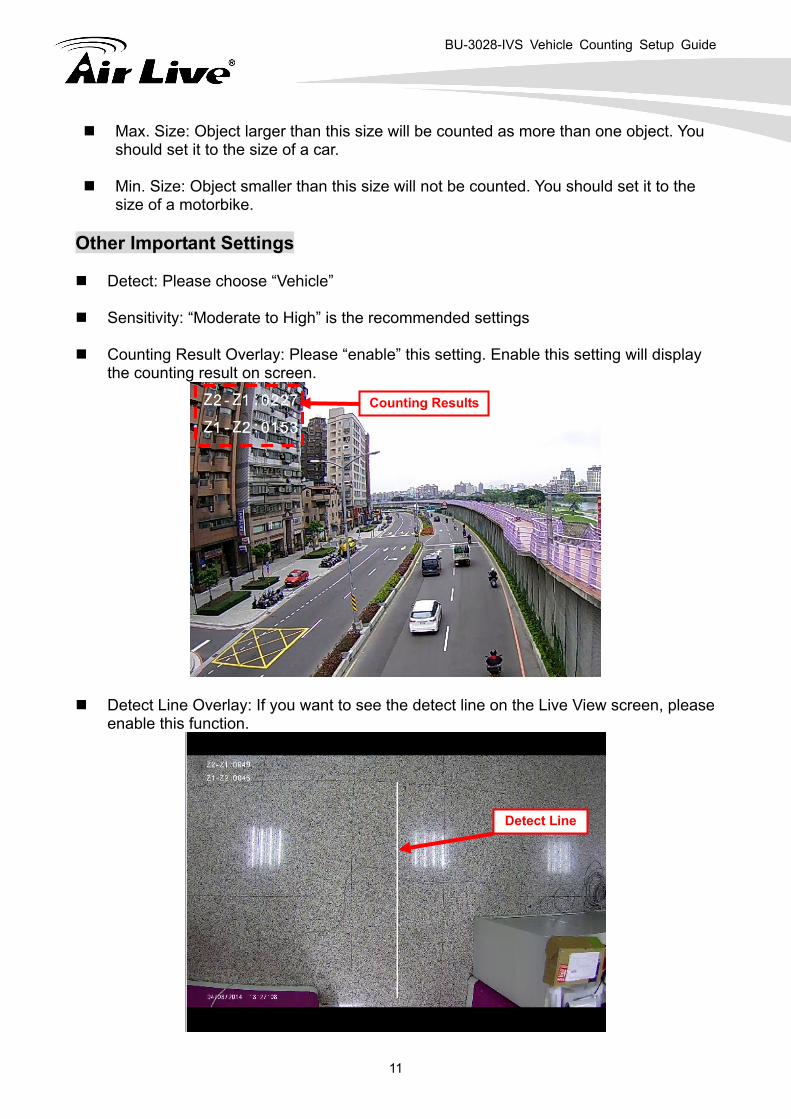
Max. Size: Object larger than this size will be counted as more than one object. You should set it to the size of a car.
Min. Size: Object smaller than this size will not be counted. You should set it to the
size of a motorbike. Other Important Settings
Detect: Please choose “Vehicle”
Sensitivity: “Moderate to High” is the recommended settings
Counting Result Overlay: Please “enable” this setting. Enable this setting will display the counting result on screen.
Counting Results
Detect Line Overlay: If you want to see the detect line on the Live View screen, please
enable this function.
Detect Line
BU-3028-IVS Vehicle Counting Setup Guide
12
Reset Counter: The displayed counting result will reset to zero according to the choices
Statistic Records: Please enable this item. We recommend choose “hourly” which can
report the number of counting in each hour for up to 30 days (firmware 1.60 or later). When you choose “by minute”, the camera will hold the per-minute data for 48 hours (firmware 1.60 or later). Choosing daily will hold daily count for 30 days.
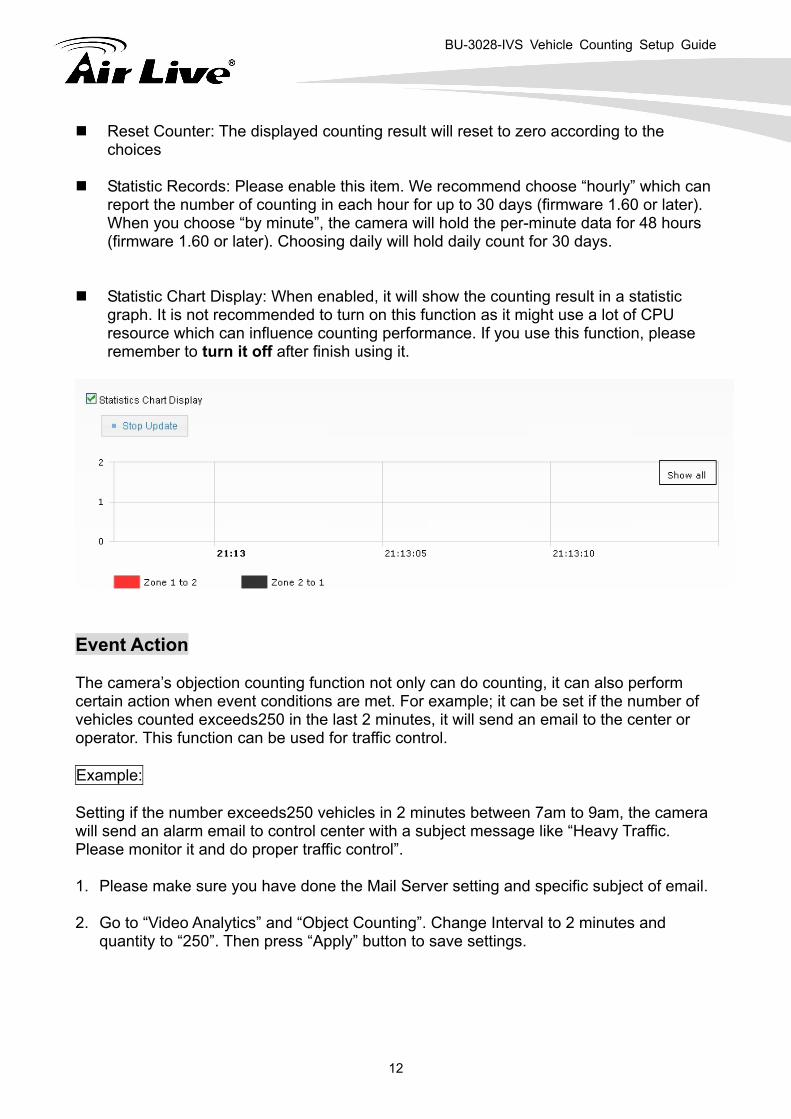
Statistic Chart Display: When enabled, it will show the counting result in a statistic graph. It is not recommended to turn on this function as it might use a lot of CPU resource which can influence counting performance. If you use this function, please remember to turn it off after finish using it.
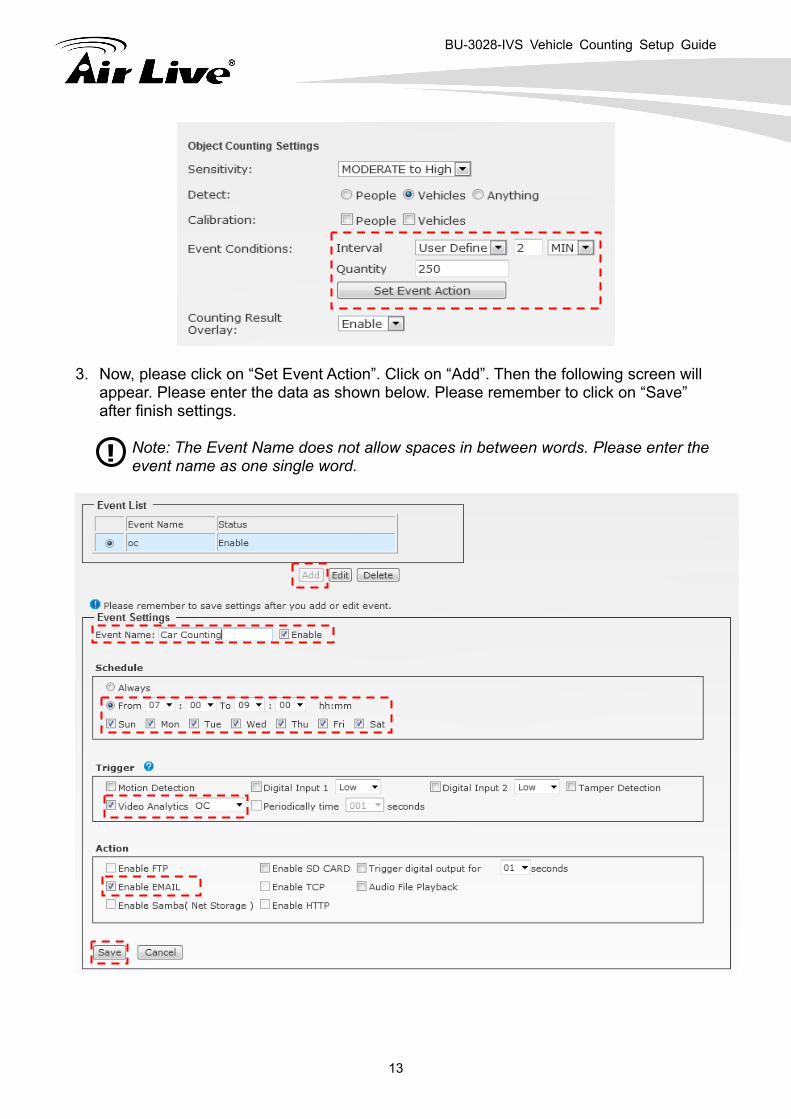
Event Action The camera’s objection counting function not only can do counting, it can also perform certain action when event conditions are met. For example; it can be set if the number of vehicles counted exceeds250 in the last 2 minutes, it will send an email to the center or operator. This function can be used for traffic control. Example: Setting if the number exceeds250 vehicles in 2 minutes between 7am to 9am, the camera will send an alarm email to control center with a subject message like “Heavy Traffic. Please monitor it and do proper traffic control”. 1. Please make sure you have done the Mail Server setting and specific subject of email. 2. Go to “Video Analytics” and “Object Counting”. Change Interval to 2 minutes and
quantity to “250”. Then press “Apply” button to save settings.
BU-3028-IVS Vehicle Counting Setup Guide
13
3. Now, please click on “Set Event Action”. Click on “Add”. Then the following screen will
appear. Please enter the data as shown below. Please remember to click on “Save” after finish settings.
Note: The Event Name does not allow spaces in between words. Please enter the event name as one single word.
!
BU-3028-IVS Vehicle Counting Setup Guide
14
4. Retrieve Counting Data You can retrieve the counting results using one of the methods below:
Export data from camera’s web interface manually. Let camera send the daily counting report automatically to remote FTP or Samba
Server. Users have to define the upload time and data saving location first. Retrieve Data using CGI Commands. If you are a developer or system integration, you
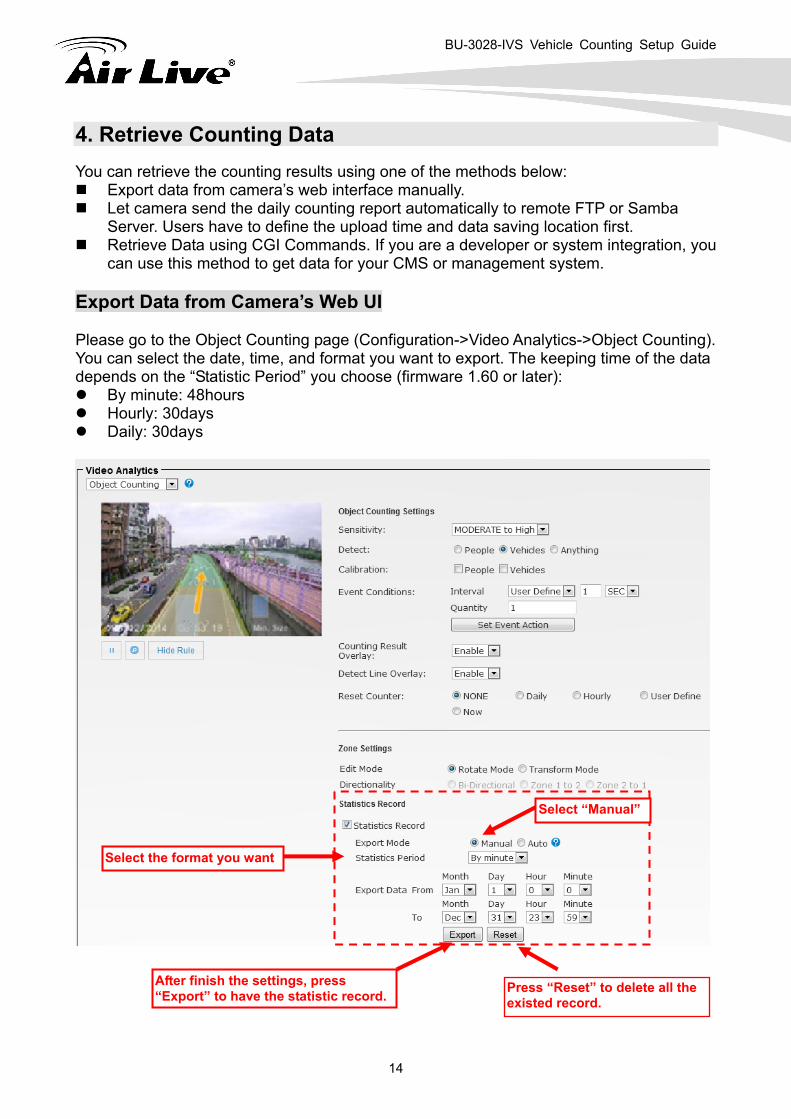
can use this method to get data for your CMS or management system. Export Data from Camera’s Web UI Please go to the Object Counting page (Configuration->Video Analytics->Object Counting). You can select the date, time, and format you want to export. The keeping time of the data depends on the “Statistic Period” you choose (firmware 1.60 or later):
By minute: 48hours Hourly: 30days Daily: 30days
Select the format you want
Select “Manual”
After finish the settings, press “Export” to have the statistic record.
Press “Reset” to delete all the existed record.
BU-3028-IVS Vehicle Counting Setup Guide
15
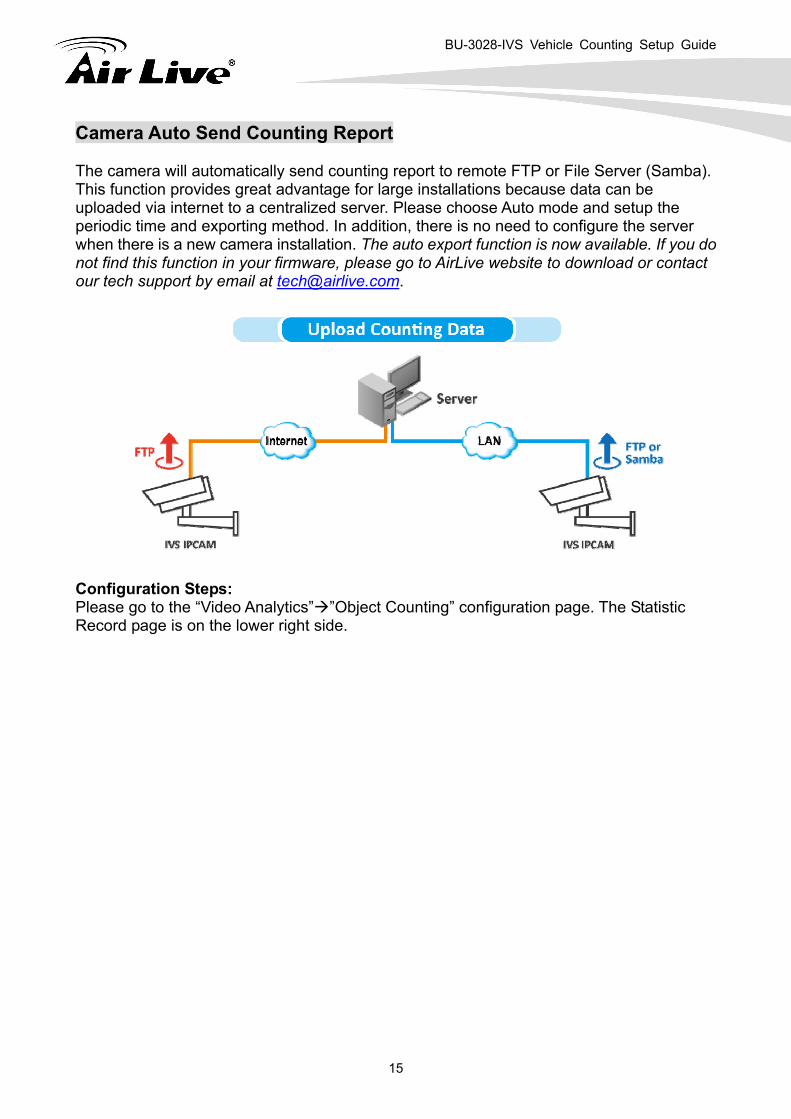
Camera Auto Send Counting Report The camera will automatically send counting report to remote FTP or File Server (Samba). This function provides great advantage for large installations because data can be uploaded via internet to a centralized server. Please choose Auto mode and setup the periodic time and exporting method. In addition, there is no need to configure the server when there is a new camera installation. The auto export function is now available. If you do not find this function in your firmware, please go to AirLive website to download or contact our tech support by email at [email protected].
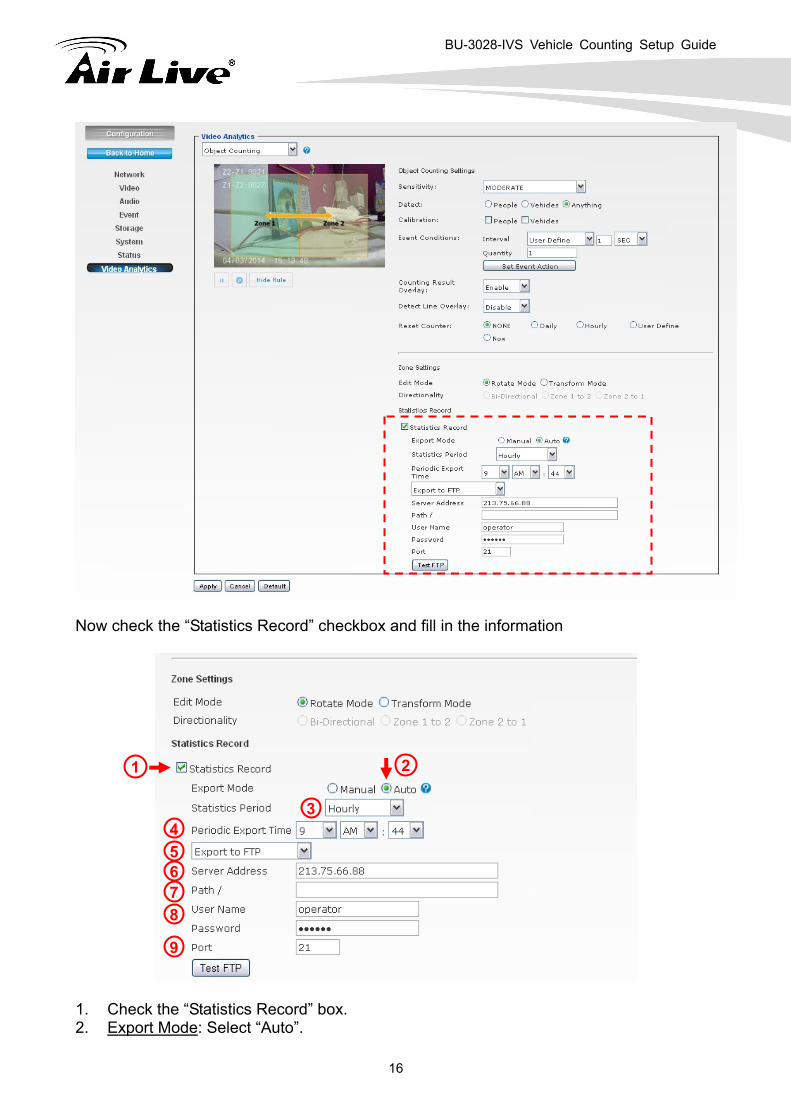
Configuration Steps: Please go to the “Video Analytics” ”Object Counting” configuration page. The Statistic Record page is on the lower right side.
BU-3028-IVS Vehicle Counting Setup Guide
16
Now check the “Statistics Record” checkbox and fill in the information
1. Check the “Statistics Record” box. 2. Export Mode: Select “Auto”.
1 2
3 4 5 6 7 8
9
BU-3028-IVS Vehicle Counting Setup Guide
17
3. Statistics Period: Please choose the report format you preferred. By minute: The record file will show the number of occurrence in each minute Hourly: The record file will show the number of occurrence every hour. This is the
recommended format to use. Daily: The record file will show the number of daily occurrence.
4. Periodic Export Time: The camera will send counting report once a day. You can choose what time the camera should send the report.
5. Choose whether to send the counting report via FTP or Samba. Samba means local file server or NAS. In this example, we will choose FTP.
6. Server Address: Please enter the IP address of your FTP server. 7. Path: This is to specify the file directory path. Leave it blank if you want to put it under
root directory. 8. Username and Password: Enter the FTP account’s information. 9. Port: The server port of the FTP server. The default is 21 but it can be changed
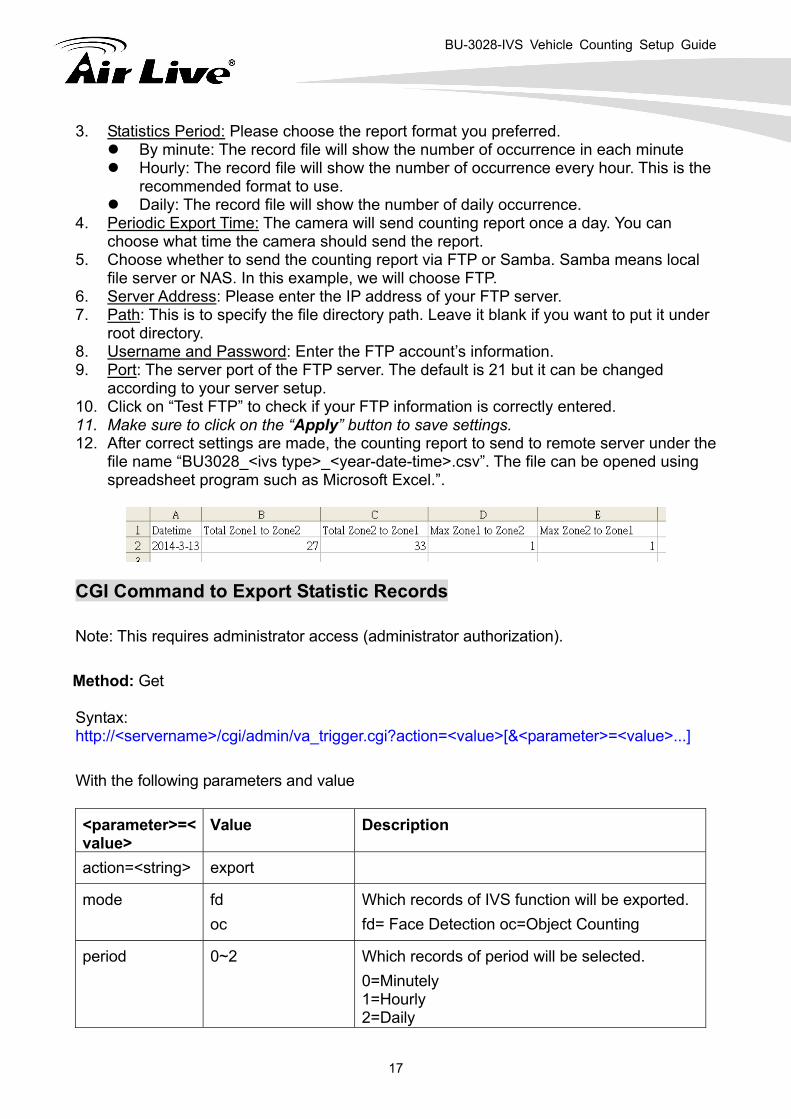
according to your server setup. 10. Click on “Test FTP” to check if your FTP information is correctly entered. 11. Make sure to click on the “Apply” button to save settings. 12. After correct settings are made, the counting report to send to remote server under the
file name “BU3028_<ivs type>_<year-date-time>.csv”. The file can be opened using spreadsheet program such as Microsoft Excel.”.
CGI Command to Export Statistic Records Note: This requires administrator access (administrator authorization). Method: Get Syntax: http://<servername>/cgi/admin/va_trigger.cgi?action=<value>[&<parameter>=<value>...] With the following parameters and value <parameter>=<value>
Value Description
action=<string> export
mode fd oc
Which records of IVS function will be exported. fd= Face Detection oc=Object Counting
period 0~2 Which records of period will be selected. 0=Minutely 1=Hourly 2=Daily
BU-3028-IVS Vehicle Counting Setup Guide
18
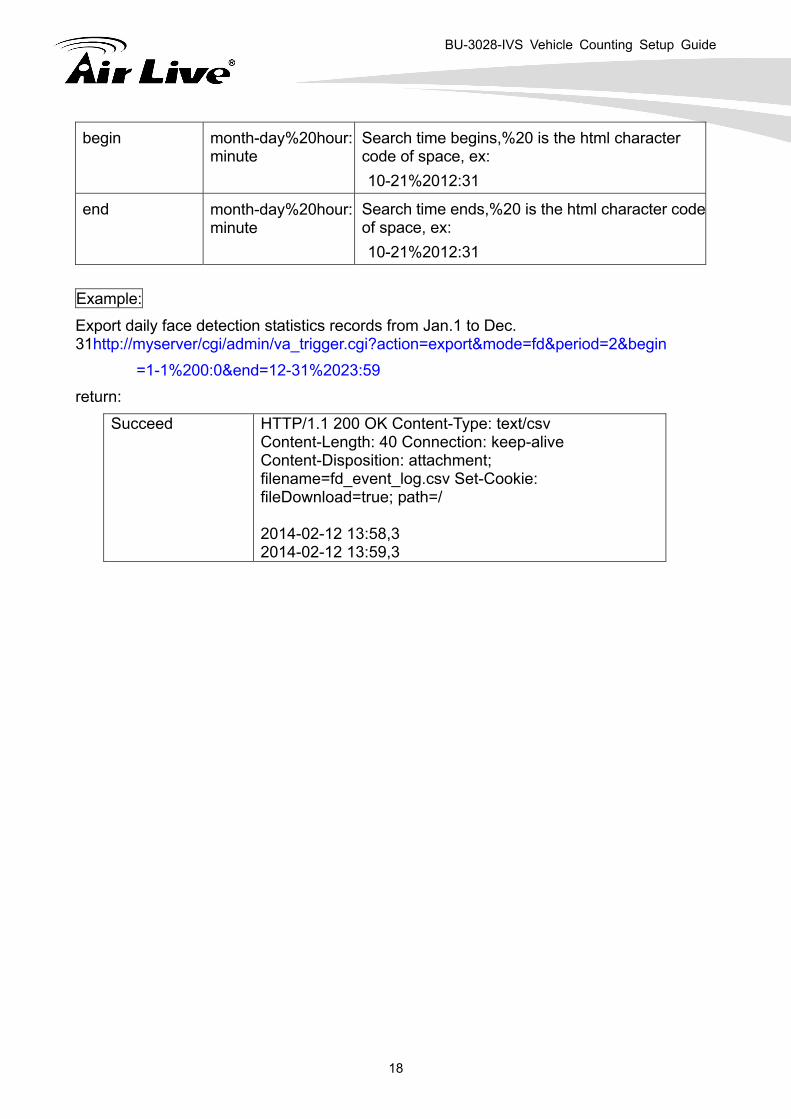
begin month-day%20hour:minute
Search time begins,%20 is the html character code of space, ex: 10-21%2012:31
end month-day%20hour:minute
Search time ends,%20 is the html character codeof space, ex: 10-21%2012:31
Example: Export daily face detection statistics records from Jan.1 to Dec. 31http://myserver/cgi/admin/va_trigger.cgi?action=export&mode=fd&period=2&begin
=1-1%200:0&end=12-31%2023:59 return:
Succeed HTTP/1.1 200 OK Content-Type: text/csv Content-Length: 40 Connection: keep-alive Content-Disposition: attachment; filename=fd_event_log.csv Set-Cookie: fileDownload=true; path=/ 2014-02-12 13:58,3 2014-02-12 13:59,3