AIC RSC-4BT (4U 36-Bay Storage Server Chassis) User … Manual.pdf1 RSC-4BT User's Manual Chapter 1...
61
RSC-4BT Rackmount Storage Chassis User's Manual UM_RSC-4BT_Final_080415
Transcript of AIC RSC-4BT (4U 36-Bay Storage Server Chassis) User … Manual.pdf1 RSC-4BT User's Manual Chapter 1...

RSC-4BTRackmount Storage Chassis
Users Manual
UM_RSC-4BT_Final_080415
contents
CONTENTSPREFACE iSAFETY INSTRUCTIONS iiChapter 1 Prodcut Introduction 1
11 Box Content 112 Specifications 213 General Information 3
Chapter 2 Hardware Installation 621 Removing and Installing Top Cover 622 Installing Removing a Hard Disk Drive 723 Removing and Installing a PSU Module 924 Removing and Installing a Fan Module 1025 Removing and Installing the HDD backplane Module 1226 Tool-less Blade Slide Installation Instruction 14
Chapter 3 Hardware Introduction 2131 HARDWARE DESIGN SPECIFICATION 21
Chapter 4 HDD Blackplane Introduction 2841 Expender firmware update through phone connector port 2842 Update the expander firmware through in-band 4143 12G expander EDFB setting 4544 Slot HDD power setting 4745 HDD BP thermal sensor temperature setting 52
Chapter 5 Technical Support 55
Copyright copy 2015 AIC Inc All Rights Reserved
This document contains proprietary information about AIC products and is not to be disclosed or used except in accordance with applicable agreements
i
PREFACEbull Copyright No part of this publication may be reproduced stored in a retrieval system
or transmitted in any form or by any means electronic mechanical photo-
static recording or otherwise without the prior written consent of the
manufacturer
bull Trademarks All products and trade names used in this document are trademarks or
registered trademarks of their respective holders
bull Changes The material in this document is for information purposes only and is subject
to change without notice
bull Warning1 A shielded-type power cord is required in order to meet FCC emission
limits and also to prevent interference to the nearby radio and television
reception It is essential that only the supplied power cord be used
2 Use only shielded cables to connect IO devices to this equipment
3 You are cautioned that changes or modifications not expressly approved
by the party responsible for compliance could void your authority to
operate the equipment
bull Disclaimer AIC shall not be liable for technical or editorial errors or omissions
contained herein The information provided is provided as is without
warranty of any kind To the extent permitted by law neither AIC or its
affiliates subcontractors or suppliers will be liable for incidental special or
consequential damages including downtime cost lost profits damages
relating to the procurement of substitute products or services or damages
for loss of data or software restoration The information in this document is
subject to change without notice
ii
SAFETY INSTRUCTIONSbull Before getting started please read the following important cautionsbull All cautions and warnings on the equipment or in the manuals should be
notedbull Most electronic components are sensitive to electrical static discharge
Therefore be sure to ground yourself at all times when installing the internal components
bull Use a grounding wrist strap and place all electronic components in static-shielded devices Grounding wrist straps can be purchased in any electronic supply store
bull Be sure to turn off the power and then disconnect the power cords from your system before performing any installation or servicing A sudden surge of power could damage sensitive electronic components
bull Do not open the systemrsquos top cover If opening the cover for maintenance is a must only a trained technician should do so Integrated circuits on computer boards are sensitive to static electricity Before handling a board or integrated circuit touch an unpainted portion of the system unit chassis for a few seconds This will help to discharge any static electricity on your body
bull Place this equipment on a stable surface when install A drop or fall could cause injury
bull Please keep this equipment away from humiditybull Carefully mount the equipment into the rack in such manner that it
wonrsquot be hazardous due to uneven mechanical loadingbull This equipment is to be installed for operation in an environment with
maximum ambient temperature below 35degCbull The openings on the enclosure are for air convection to protect the
equipment from overheating DO NOT COVER THE OPENINGSbull Never pour any liquid into ventilation openings This could cause fire or
electrical shockbull Make sure the voltage of the power source is within the specification
on the label when connecting the equipment to the power outlet The current load and output power of loads shall be within the specification
bull This equipment must be connected to reliable grounding before using Pay special attention to power supplied other than direct connections eg using of power strips
bull Place the power cord out of the way of foot traffic Do not place anything over the power cord The power cord must be rated for the
iii
bull product voltage and current marked on the productrsquos electrical ratings label The voltage and current rating of the cord should be greater than the voltage and current rating marked on the product
bull If the equipment is not used for a long time disconnect the equipment from mains to avoid being damaged by transient over-voltage
bull Never open the equipment For safety reasons only qualified service personnel should open the equipment
bull If one of the following situations arise the equipment should be checked by service personnel1 The power cord or plug is damaged2 Liquid has penetrated the equipment3 The equipment has been exposed to moisture4 The equipment does not work well or will not work according to its user
manual5 The equipment has been dropped andor damaged6 The equipment has obvious signs of breakage7 Please disconnect this equipment from the AC outlet before cleaning
Do not use liquid or detergent for cleaning The use of a moisture sheet or cloth is recommended for cleaning
bull Module and drive bays must not be empty They must have a dummy cover
Product features and specifications are subject to change without notice
CAUTION
risk of explosion if battery is replaced by an incorrect type
dispose of used batteries according to the instructions
After performing any installation or servicing make sure the
enclosure are lock and screw in position turn on the power
1
RSC-4BT Users Manual
Chapter 1 Product Introduction
11 Box Content
Before removing the subsystem from the shipping carton visually inspect the physical condition of the shipping carton Exterior damage to the shipping carton may indicate that the contents of the carton are damaged If any damage is found do not remove the components contact the dealer where the subsystem was purchased for further instructions Before continuing first unpack the subsystem and verify that the contents of the shipping carton are all there and in good condition
bull Enclosure( Power supply fan 36 x 35 HDD tray included)
bull Power cord bull Screws kit x 1setbull (Include console
serial cable)
bull Slide rail x 1set
diams PACKAGE CONTENT MAY VARY PER REGION
Chapter 1 Prodcut Introduction
bull 35rsquorsquo HDD Tray
2
RSC-4BT Users Manual
Chapter 1 Product Introduction
12 Specifications
3
RSC-4BT Users Manual
Chapter 1 Product Introduction
13 General Information
RSC-4BT is a 4U rackmount chassis with 36x35rdquoHDD hot swap Bays at front and single 12G expander on HDD Backplane which is a high performance server storage product
bull Front Panel 2 x USB30 ports
24 x 35rdquo hotswap HDD trays
4
RSC-4BT Users Manual
Chapter 1 Product Introduction
bull Rear Panel
5
RSC-4BT Users Manual
Chapter 1 Product Introduction
bull Major Components
Chapter 2 Hardware Installation
RSC-4BT Users Manual
66
21 Removing and Installing Top CoverPushing release button on both side and slide forward the top cover to open cover
Chapter 2 Hardware Installation
This chapter provides detailed instructions on hardware installation
RSC-4BT Users Manual
7
Chapter 2 Hardware Installation
22 Installing Removing a Hard Disk Drive221Installing a Hard Disk Drive
1 Directly place HDD into tool-less HDD tray untli it snaps Please check if the screw holes on HDD match the dimples on HDD tray
2 HDD can also be screwed on HDD tray by fastening two screws as picture showed
Chapter 2 Hardware Installation
RSC-4BT Users Manual
8
3 Insert the drive tray into chassis HDD cage Make sure the drive tray is correctly secured in place when its front edge aligns with the bay edge Push the tray lever until it reaches the end and clicks
RSC-4BT Users Manual
9
Chapter 2 Hardware Installation
23 Removing and Installing a PSU Module231 Removing a PSU module1 Removing power cable and loosen the thumb screw2 Pushing the latch and hold the tray handle3 Pull the PSU module tray handle out gently to slides out the PSU module232 Installing a PSU Modulebull To install PSU module follow the reverse order
Chapter 2 Hardware Installation
RSC-4BT Users Manual
10
24 Removing and Installing a Fan Module241 Removing a fan moduleGrabbing and removing the fan module from the fan slot
RSC-4BT Users Manual
11
Chapter 2 Hardware Installation
Pull the fan module up gently and taking out the fan module by removing rubbers out from the fan bar
242 Installing a Fan ModuleMake sure the 4 rubbers and connector insert firmly while fan module is inserted
Chapter 2 Hardware Installation
RSC-4BT Users Manual
12
25 Removing and Installing the HDD backplane Module
251 Removing a HDD backplanebull Unplugging all connectors amp HDDs from HDD backplanebull Release the lock pin252 Installing a HDD backplane modulebull Slide the HDD backplane module into enclosuresbull Secure the HDD backplane module onto the enclosures using the screws
RSC-4BT Users Manual
13
Chapter 2 Hardware Installation
bull Lift up and remove the blackplane to the a little bit up from hook then can get out253 Installing a HDD backplane module(follow the reverse order)bull Align the backplane with the hooks and insert it into the enclosure firmlybull Lock the backplane Follow the reverse order
Chapter 2 Hardware Installation
RSC-4BT Users Manual
14
26 Tool-less Blade Slide Installation InstructionSeparate the tool-less slide rail
261 Pull the inner rail out of the outer rail until it is fully extendedPress the locking tab down to release the inner rail
PULL
Outer Rail
Middle Rail
Inner Rail
RSC-4BT Users Manual
15
Chapter 2 Hardware Installation
262 Place the inner rail firmly against the side of the chassis Make sure that the hooks are straight and aligned with the holes in the inner rail
Slide the inner rail forward until it clicks into the locked position
Screw
Screw
1
2
3
3
Chapter 2 Hardware Installation
RSC-4BT Users Manual
16
263 Press the locking tab and push the middle rail back into the outer rail
RSC-4BT Users Manual
17
Chapter 2 Hardware Installation
264 Hang the hooks of the rails on the rack holes and if necessary secure with screws
1
2
Optional Screws
Chapter 2 Hardware Installation
RSC-4BT Users Manual
18
265 Repeat step 274 to mount the four ends extending the rails as necessary
RSC-4BT Users Manual
19
Chapter 2 Hardware Installation
266 Pull the middle rail out of the front of the outer rail and make sure that the ball bearing shuttle is locked at the front of the middle rail
Align the inner rails with the middle rails and then push evenly on both sides of the chassis until it clicks into the fully extended position
Ball BearingShuttle
Chapter 2 Hardware Installation
RSC-4BT Users Manual
20
267 Depress the locking tabs on both sides of the chassis simultaneously and push the chassis all the way into the rear of the rack
If additional security is required secure the chassis handles to the front of the rack with two screws (optional)
Screw
Screw
Complete
RSC-4BT Users Manual
21
Chapter 3 Hardware IntroductionChapter 3 Hardware Introduction
This chapter provides detailed instruction guide on hardware instruction
31 HARDWARE DESIGN SPECIFICATION311 Placement
PCBA Placement
HDD
HDD
HDD
HDD
HDD
HDD
HDD
HDD
HDD
HDD
HDD
HDD
HDD
HDD
HDD
HDD
HDD
HDD
HDD
HDD
HDD
HDD
HDD
HDD
Expander
RSC-4BT Users Manual
22
Chapter 3 Hardware Introduction
312 Connector Location
Connector Location
JPWR1 JPWR2
JFAN1
JFAN2
JFAN4 JFAN3 JPMBUS
JEXP_UART JEXP2
SASHD3 SASHD2 SASHD1
JMCU_UART JMCU_DBG
JFRONT
JI2C3 JI2C4
JI2C0
RSC-4BT Users Manual
23
Chapter 3 Hardware Introduction
313 Power Connector
Power Connector
RSC-4BT Users Manual
24
Chapter 3 Hardware Introduction
314 Fan Connector
RSC-4BT Users Manual
25
Chapter 3 Hardware Introduction
315 FAN setting ( if insert fan on HDD BP )
JFRONT
RSC-4BT Users Manual
26
Chapter 3 Hardware Introduction
316 Power Connector
Power Connector
RSC-4BT Users Manual
27
Chapter 3 Hardware Introduction
317 Drive Slot Map
RSC-4BT Users Manual
28
Chapter 4 HDD Blackplane IntroductionChapter 4 HDD Blackplane Introduction
41 Expender firmware update through phone connector port411 Update Expander firmware revision
Step 1 Set up RSC-4BT phone connector Insert phone connector into phone connector port shown
below also the other side inert cable into host PC or notebook
PLEASE FIND THE PHONE CONNECTOR CABLE IN THE PACKAGE BOX
RSC-4BT Users Manual
29
Chapter 4 HDD Blackplane Instruction
Step 2 Set up RSC-4BT connector connectionSet up connector connection application into your RSC-4BT as shown in the example process below
For exampleOS Microsoft WindowsRS232 connection application Hyperterminal
Step 2 Install HyperTrmexe
RSC-4BT Users Manual
30
Chapter 4 HDD Blackplane Introduction
Step 3 Enter a new name for the icon in the field below and click OK
Step 4 Connecting by using selecting an option in the drop down menu circled in red below (we selected COM2 in this example) and click OK
RSC-4BT Users Manual
31
Chapter 4 HDD Blackplane Instruction
Properties
Port Setting
Bits per second
Data bits
Parity
Stop bits
Flow control None
Restore Defaults
OK ApplyCancel
None
Step 6 Set up is complete The diagram below depicts what screen should displayed
Step 5 For ldquoBits per secondrdquo select 38400 For ldquoFlow controlrdquo select None Click OK when you have finished your selections
cmdgt_
RSC-4BT Users Manual
32
Chapter 4 HDD Blackplane Introduction
Step 7To get firmware image amp MFG Configuration Image version information from AIC SAS Related Firmware Downloadne website
httpppmsaicipccomtw8888downloadexpandermcu
RSC-4BT Users Manual
33
Chapter 4 HDD Blackplane Instruction
Step 8Comand line for show current firmware revisioncmdgtrev
RSC-4BT Users Manual
34
Chapter 4 HDD Blackplane Introduction
Step 9Start to update expander firmwarecmdgtfdl 0 0_
Step 10Select the tool bar Transfer -gt Send File
RSC-4BT Users Manual
35
Chapter 4 HDD Blackplane Instruction
Step 11bull Choose new firmware path file fw 3A1_v11221bull Protocol have to choose Xmodem
Step 12Firmware download complete
RSC-4BT Users Manual
36
Chapter 4 HDD Blackplane Introduction
Step 13Reset computer for success update firmwarecmdgtreset
reset
RSC-4BT Users Manual
37
Chapter 4 HDD Blackplane Instruction
Step 13Reset computer for success update firmwarecmdgtreset
412 Update expander configuration MFG
Step 1Comand line for show current configuration MFGcmdgt showmfg
RSC-4BT Users Manual
38
Chapter 4 HDD Blackplane Introduction
Step 2Start to update expander configuration MFGcmdgtfdl 83 0_
Step 3Select the tool bar Transfer -gt Send File
83 0
RSC-4BT Users Manual
39
Chapter 4 HDD Blackplane Instruction
Step 4bull Choose new MFG path file mfg 3A10_eob_1201binbull Protocol have to choose Xmodem
Step 5MFG download complete
RSC-4BT Users Manual
40
Chapter 4 HDD Blackplane Introduction
Step 6Reset computer for success update MFGcmdgtreset
reset
RSC-4BT Users Manual
41
Chapter 4 HDD Blackplane Instruction
Step 6Reset computer for success update MFGcmdgtreset
42 Update the expander firmware through in-band
FOR EXAMPLEStep 1
Download and install SG3_utilsexe which compatible with Linux OSFrom website httpsgdannyczsgsg3_utilshtml website Reference version sg3_utils-140tgz
Step 2To get firmware image amp MFG Configuration Image version information from AIC SAS Related Firmware Downloadne websitehttpppmsaicipccomtw8888downloadexpandermcu
RSC-4BT Users Manual
42
Chapter 4 HDD Blackplane Introduction
Step 3Execute terminal under the same new firmware folderexample Setting a new firmware folder on Home page Open Terminal by click to the right button of mouse in the same window Home
Step 4Typing sudo -s to into administrator mode
RSC-4BT Users Manual
43
Chapter 4 HDD Blackplane Instruction
Step 5 Find expander location$ sg_map -i
Step 6Update Expander firmware$ sg_write_buffer --id=0x0 --in=fw3A1_v11221 --mode=0x2 --offset=0 devsg0
RSC-4BT Users Manual
44
Chapter 4 HDD Blackplane Introduction
Step 7 Update Expander MFG$ sg_write_buffer --id=0x83 --in=mfg3A10_eob_1201bin --mode=0x2 --offset=0 devsg0
Step 8Reboot computer for success update firmware amp MFGrootubuntu~ reboot
RSC-4BT Users Manual
45
Chapter 4 HDD Blackplane Instruction
43 12G expander EDFB settingStep 1
For Install HyperTerminalexe refer to section 41
Step 2 Get EDFB statuscmdgt edfb
RSC-4BT Users Manual
46
Chapter 4 HDD Blackplane Introduction
Step 3Change EDFB setting
Enable EDFB functioncmdgtedfb on
Disable EDFB functioncmdgtedfb off
cmd gtedfbEDFB is OFF
cmd gtedfb onSucceeded to set EDFB
cmd gtedfb offEDFB is OFF
RSC-4BT Users Manual
47
Chapter 4 HDD Blackplane Instruction
44 Slot HDD power setting(Only for system cooling Fan controled by expander)
Step 1 For Install sg3exe tool and get new firmware from website refer to section 42
Step 2Execute terminal under the same new firmware folderexample Setting a new firmware folder on Home page Open Terminal by click to the right button of mouse in the same window Home
RSC-4BT Users Manual
48
Chapter 4 HDD Blackplane Introduction
Step 3 Typing sudo -s to into administrator mode
Step 4 Find expander location$ sg_map -i
RSC-4BT Users Manual
49
Chapter 4 HDD Blackplane Instruction
Step 5For example
If would like to turn the Disk004 power off under the HBA card Need to check Disk004 power status $ sg_ses --page=7 devsg0
Under HBA card the Element 3 = Disk004
RSC-4BT Users Manual
50
Chapter 4 HDD Blackplane Introduction
Step 6To check Disk004 (element 3) power status is ok$ sg_ses --page=2 devsg0
S
Status shows belowThe status of Element 3 is OK
RSC-4BT Users Manual
51
Chapter 4 HDD Blackplane Instruction
Step 7Turn off a HDD power$ sg_ses --descriptor=Disk004 --set=341 devsg0
Step 8Turn on a HDD power$ sg_ses --descriptor=Disk004 --clear=341 devsg0
RSC-4BT Users Manual
52
Chapter 4 HDD Blackplane Introduction
45 HDD BP thermal sensor temperature setting(Only for system cooling Fan controled by expander)
Step 1 For Install HyperTerminalexe refer to section 41
Step 2Get the current temperature settingscmdgt temperature
RSC-4BT Users Manual
53
Chapter 4 HDD Blackplane Instruction
Step 3For example
Set new temperatureT1=20 C 4 18 CT2=50 C 4 52 CWarning threshold=50 C 448 CAlarm threshold=55 C 454 C
The new setting will take effect after resetcmdgt temperature 18 52 48 54cmdgt reset
RSC-4BT Users Manual
54
Chapter 4 HDD Blackplane Introduction
Step 4Check fan speed amp temperature informationcmdgt sensor
cmd gtsensor==ENCLOSURE STATUS========================================================== Total fan number 2 System Fan-0 speed 10888 RPM System Fan-1 speed 10971 RPM System PWN-0 82 Expander Temperature 76 Celsius degree Sytem Temperature-0 33 Celsius degree T1 20 Celsius degree T2 50 Celsius degree TC 55 Celsius degree Voltage Sensor 09V 093V Voltage Sensor 18V 180V
cmd gt_
Chapter 1 Product IntroductionChapter 1 Product IntroductionChapter 5 Technical Support
wwwaicipccom
bull TAIWANTel +886 3 433 9188Fax +886 3 287 1818Email salesaicipccomtw
bull CHINA Tel +862154961421 +862154961422Fax Extension 608Email Technical Support supportaicipccom
bull AMERICA - West coastTel +19098958989Fax +19098958999Email salesaicipccom
bull AMERICA - East coastTel +19738848886Fax +19738844794Email njsalesaicipccom
bull EUROPETel +31306386789Fax +31306360638Emailsalesaicipcnl
Email Technical Support supportaicipccom
- PREFACE
-
- SAFETY INSTRUCTIONS
-
- Chapter 1 Prodcut Introduction
-
- 11 Box Content
- 12 Specifications
- 13 General Information
-
- Chapter 2 Hardware Installation
-
- 21 Removing and Installing Top Cover
- 22 Installing Removing a Hard Disk Drive
- 23 Removing and Installing a PSU Module
- 24 Removing and Installing a Fan Module
- 25 Removing and Installing the HDD backplane Module
- 26 Tool-less Blade Slide Installation Instruction
-
- Chapter 3 Hardware Introduction
-
- 31 HARDWARE DESIGN SPECIFICATION
-
- Chapter 4 HDD Blackplane Introduction
-
- 41 Expender firmware update through phone connector port
- 42 Update the expander firmware through in-band
- 43 12G expander EDFB setting
- 44 Slot HDD power setting
- 45 HDD BP thermal sensor temperature setting
-
- Chapter 5 Technical Support
-

1
RSC-4BT Users Manual
Chapter 1 Product Introduction
11 Box Content
Before removing the subsystem from the shipping carton visually inspect the physical condition of the shipping carton Exterior damage to the shipping carton may indicate that the contents of the carton are damaged If any damage is found do not remove the components contact the dealer where the subsystem was purchased for further instructions Before continuing first unpack the subsystem and verify that the contents of the shipping carton are all there and in good condition
bull Enclosure( Power supply fan 36 x 35 HDD tray included)
bull Power cord bull Screws kit x 1setbull (Include console
serial cable)
bull Slide rail x 1set
diams PACKAGE CONTENT MAY VARY PER REGION
Chapter 1 Prodcut Introduction
bull 35rsquorsquo HDD Tray
2
RSC-4BT Users Manual
Chapter 1 Product Introduction
12 Specifications
3
RSC-4BT Users Manual
Chapter 1 Product Introduction
13 General Information
RSC-4BT is a 4U rackmount chassis with 36x35rdquoHDD hot swap Bays at front and single 12G expander on HDD Backplane which is a high performance server storage product
bull Front Panel 2 x USB30 ports
24 x 35rdquo hotswap HDD trays
4
RSC-4BT Users Manual
Chapter 1 Product Introduction
bull Rear Panel
5
RSC-4BT Users Manual
Chapter 1 Product Introduction
bull Major Components
Chapter 2 Hardware Installation
RSC-4BT Users Manual
66
21 Removing and Installing Top CoverPushing release button on both side and slide forward the top cover to open cover
Chapter 2 Hardware Installation
This chapter provides detailed instructions on hardware installation
RSC-4BT Users Manual
7
Chapter 2 Hardware Installation
22 Installing Removing a Hard Disk Drive221Installing a Hard Disk Drive
1 Directly place HDD into tool-less HDD tray untli it snaps Please check if the screw holes on HDD match the dimples on HDD tray
2 HDD can also be screwed on HDD tray by fastening two screws as picture showed
Chapter 2 Hardware Installation
RSC-4BT Users Manual
8
3 Insert the drive tray into chassis HDD cage Make sure the drive tray is correctly secured in place when its front edge aligns with the bay edge Push the tray lever until it reaches the end and clicks
RSC-4BT Users Manual
9
Chapter 2 Hardware Installation
23 Removing and Installing a PSU Module231 Removing a PSU module1 Removing power cable and loosen the thumb screw2 Pushing the latch and hold the tray handle3 Pull the PSU module tray handle out gently to slides out the PSU module232 Installing a PSU Modulebull To install PSU module follow the reverse order
Chapter 2 Hardware Installation
RSC-4BT Users Manual
10
24 Removing and Installing a Fan Module241 Removing a fan moduleGrabbing and removing the fan module from the fan slot
RSC-4BT Users Manual
11
Chapter 2 Hardware Installation
Pull the fan module up gently and taking out the fan module by removing rubbers out from the fan bar
242 Installing a Fan ModuleMake sure the 4 rubbers and connector insert firmly while fan module is inserted
Chapter 2 Hardware Installation
RSC-4BT Users Manual
12
25 Removing and Installing the HDD backplane Module
251 Removing a HDD backplanebull Unplugging all connectors amp HDDs from HDD backplanebull Release the lock pin252 Installing a HDD backplane modulebull Slide the HDD backplane module into enclosuresbull Secure the HDD backplane module onto the enclosures using the screws
RSC-4BT Users Manual
13
Chapter 2 Hardware Installation
bull Lift up and remove the blackplane to the a little bit up from hook then can get out253 Installing a HDD backplane module(follow the reverse order)bull Align the backplane with the hooks and insert it into the enclosure firmlybull Lock the backplane Follow the reverse order
Chapter 2 Hardware Installation
RSC-4BT Users Manual
14
26 Tool-less Blade Slide Installation InstructionSeparate the tool-less slide rail
261 Pull the inner rail out of the outer rail until it is fully extendedPress the locking tab down to release the inner rail
PULL
Outer Rail
Middle Rail
Inner Rail
RSC-4BT Users Manual
15
Chapter 2 Hardware Installation
262 Place the inner rail firmly against the side of the chassis Make sure that the hooks are straight and aligned with the holes in the inner rail
Slide the inner rail forward until it clicks into the locked position
Screw
Screw
1
2
3
3
Chapter 2 Hardware Installation
RSC-4BT Users Manual
16
263 Press the locking tab and push the middle rail back into the outer rail
RSC-4BT Users Manual
17
Chapter 2 Hardware Installation
264 Hang the hooks of the rails on the rack holes and if necessary secure with screws
1
2
Optional Screws
Chapter 2 Hardware Installation
RSC-4BT Users Manual
18
265 Repeat step 274 to mount the four ends extending the rails as necessary
RSC-4BT Users Manual
19
Chapter 2 Hardware Installation
266 Pull the middle rail out of the front of the outer rail and make sure that the ball bearing shuttle is locked at the front of the middle rail
Align the inner rails with the middle rails and then push evenly on both sides of the chassis until it clicks into the fully extended position
Ball BearingShuttle
Chapter 2 Hardware Installation
RSC-4BT Users Manual
20
267 Depress the locking tabs on both sides of the chassis simultaneously and push the chassis all the way into the rear of the rack
If additional security is required secure the chassis handles to the front of the rack with two screws (optional)
Screw
Screw
Complete
RSC-4BT Users Manual
21
Chapter 3 Hardware IntroductionChapter 3 Hardware Introduction
This chapter provides detailed instruction guide on hardware instruction
31 HARDWARE DESIGN SPECIFICATION311 Placement
PCBA Placement
HDD
HDD
HDD
HDD
HDD
HDD
HDD
HDD
HDD
HDD
HDD
HDD
HDD
HDD
HDD
HDD
HDD
HDD
HDD
HDD
HDD
HDD
HDD
HDD
Expander
RSC-4BT Users Manual
22
Chapter 3 Hardware Introduction
312 Connector Location
Connector Location
JPWR1 JPWR2
JFAN1
JFAN2
JFAN4 JFAN3 JPMBUS
JEXP_UART JEXP2
SASHD3 SASHD2 SASHD1
JMCU_UART JMCU_DBG
JFRONT
JI2C3 JI2C4
JI2C0
RSC-4BT Users Manual
23
Chapter 3 Hardware Introduction
313 Power Connector
Power Connector
RSC-4BT Users Manual
24
Chapter 3 Hardware Introduction
314 Fan Connector
RSC-4BT Users Manual
25
Chapter 3 Hardware Introduction
315 FAN setting ( if insert fan on HDD BP )
JFRONT
RSC-4BT Users Manual
26
Chapter 3 Hardware Introduction
316 Power Connector
Power Connector
RSC-4BT Users Manual
27
Chapter 3 Hardware Introduction
317 Drive Slot Map
RSC-4BT Users Manual
28
Chapter 4 HDD Blackplane IntroductionChapter 4 HDD Blackplane Introduction
41 Expender firmware update through phone connector port411 Update Expander firmware revision
Step 1 Set up RSC-4BT phone connector Insert phone connector into phone connector port shown
below also the other side inert cable into host PC or notebook
PLEASE FIND THE PHONE CONNECTOR CABLE IN THE PACKAGE BOX
RSC-4BT Users Manual
29
Chapter 4 HDD Blackplane Instruction
Step 2 Set up RSC-4BT connector connectionSet up connector connection application into your RSC-4BT as shown in the example process below
For exampleOS Microsoft WindowsRS232 connection application Hyperterminal
Step 2 Install HyperTrmexe
RSC-4BT Users Manual
30
Chapter 4 HDD Blackplane Introduction
Step 3 Enter a new name for the icon in the field below and click OK
Step 4 Connecting by using selecting an option in the drop down menu circled in red below (we selected COM2 in this example) and click OK
RSC-4BT Users Manual
31
Chapter 4 HDD Blackplane Instruction
Properties
Port Setting
Bits per second
Data bits
Parity
Stop bits
Flow control None
Restore Defaults
OK ApplyCancel
None
Step 6 Set up is complete The diagram below depicts what screen should displayed
Step 5 For ldquoBits per secondrdquo select 38400 For ldquoFlow controlrdquo select None Click OK when you have finished your selections
cmdgt_
RSC-4BT Users Manual
32
Chapter 4 HDD Blackplane Introduction
Step 7To get firmware image amp MFG Configuration Image version information from AIC SAS Related Firmware Downloadne website
httpppmsaicipccomtw8888downloadexpandermcu
RSC-4BT Users Manual
33
Chapter 4 HDD Blackplane Instruction
Step 8Comand line for show current firmware revisioncmdgtrev
RSC-4BT Users Manual
34
Chapter 4 HDD Blackplane Introduction
Step 9Start to update expander firmwarecmdgtfdl 0 0_
Step 10Select the tool bar Transfer -gt Send File
RSC-4BT Users Manual
35
Chapter 4 HDD Blackplane Instruction
Step 11bull Choose new firmware path file fw 3A1_v11221bull Protocol have to choose Xmodem
Step 12Firmware download complete
RSC-4BT Users Manual
36
Chapter 4 HDD Blackplane Introduction
Step 13Reset computer for success update firmwarecmdgtreset
reset
RSC-4BT Users Manual
37
Chapter 4 HDD Blackplane Instruction
Step 13Reset computer for success update firmwarecmdgtreset
412 Update expander configuration MFG
Step 1Comand line for show current configuration MFGcmdgt showmfg
RSC-4BT Users Manual
38
Chapter 4 HDD Blackplane Introduction
Step 2Start to update expander configuration MFGcmdgtfdl 83 0_
Step 3Select the tool bar Transfer -gt Send File
83 0
RSC-4BT Users Manual
39
Chapter 4 HDD Blackplane Instruction
Step 4bull Choose new MFG path file mfg 3A10_eob_1201binbull Protocol have to choose Xmodem
Step 5MFG download complete
RSC-4BT Users Manual
40
Chapter 4 HDD Blackplane Introduction
Step 6Reset computer for success update MFGcmdgtreset
reset
RSC-4BT Users Manual
41
Chapter 4 HDD Blackplane Instruction
Step 6Reset computer for success update MFGcmdgtreset
42 Update the expander firmware through in-band
FOR EXAMPLEStep 1
Download and install SG3_utilsexe which compatible with Linux OSFrom website httpsgdannyczsgsg3_utilshtml website Reference version sg3_utils-140tgz
Step 2To get firmware image amp MFG Configuration Image version information from AIC SAS Related Firmware Downloadne websitehttpppmsaicipccomtw8888downloadexpandermcu
RSC-4BT Users Manual
42
Chapter 4 HDD Blackplane Introduction
Step 3Execute terminal under the same new firmware folderexample Setting a new firmware folder on Home page Open Terminal by click to the right button of mouse in the same window Home
Step 4Typing sudo -s to into administrator mode
RSC-4BT Users Manual
43
Chapter 4 HDD Blackplane Instruction
Step 5 Find expander location$ sg_map -i
Step 6Update Expander firmware$ sg_write_buffer --id=0x0 --in=fw3A1_v11221 --mode=0x2 --offset=0 devsg0
RSC-4BT Users Manual
44
Chapter 4 HDD Blackplane Introduction
Step 7 Update Expander MFG$ sg_write_buffer --id=0x83 --in=mfg3A10_eob_1201bin --mode=0x2 --offset=0 devsg0
Step 8Reboot computer for success update firmware amp MFGrootubuntu~ reboot
RSC-4BT Users Manual
45
Chapter 4 HDD Blackplane Instruction
43 12G expander EDFB settingStep 1
For Install HyperTerminalexe refer to section 41
Step 2 Get EDFB statuscmdgt edfb
RSC-4BT Users Manual
46
Chapter 4 HDD Blackplane Introduction
Step 3Change EDFB setting
Enable EDFB functioncmdgtedfb on
Disable EDFB functioncmdgtedfb off
cmd gtedfbEDFB is OFF
cmd gtedfb onSucceeded to set EDFB
cmd gtedfb offEDFB is OFF
RSC-4BT Users Manual
47
Chapter 4 HDD Blackplane Instruction
44 Slot HDD power setting(Only for system cooling Fan controled by expander)
Step 1 For Install sg3exe tool and get new firmware from website refer to section 42
Step 2Execute terminal under the same new firmware folderexample Setting a new firmware folder on Home page Open Terminal by click to the right button of mouse in the same window Home
RSC-4BT Users Manual
48
Chapter 4 HDD Blackplane Introduction
Step 3 Typing sudo -s to into administrator mode
Step 4 Find expander location$ sg_map -i
RSC-4BT Users Manual
49
Chapter 4 HDD Blackplane Instruction
Step 5For example
If would like to turn the Disk004 power off under the HBA card Need to check Disk004 power status $ sg_ses --page=7 devsg0
Under HBA card the Element 3 = Disk004
RSC-4BT Users Manual
50
Chapter 4 HDD Blackplane Introduction
Step 6To check Disk004 (element 3) power status is ok$ sg_ses --page=2 devsg0
S
Status shows belowThe status of Element 3 is OK
RSC-4BT Users Manual
51
Chapter 4 HDD Blackplane Instruction
Step 7Turn off a HDD power$ sg_ses --descriptor=Disk004 --set=341 devsg0
Step 8Turn on a HDD power$ sg_ses --descriptor=Disk004 --clear=341 devsg0
RSC-4BT Users Manual
52
Chapter 4 HDD Blackplane Introduction
45 HDD BP thermal sensor temperature setting(Only for system cooling Fan controled by expander)
Step 1 For Install HyperTerminalexe refer to section 41
Step 2Get the current temperature settingscmdgt temperature
RSC-4BT Users Manual
53
Chapter 4 HDD Blackplane Instruction
Step 3For example
Set new temperatureT1=20 C 4 18 CT2=50 C 4 52 CWarning threshold=50 C 448 CAlarm threshold=55 C 454 C
The new setting will take effect after resetcmdgt temperature 18 52 48 54cmdgt reset
RSC-4BT Users Manual
54
Chapter 4 HDD Blackplane Introduction
Step 4Check fan speed amp temperature informationcmdgt sensor
cmd gtsensor==ENCLOSURE STATUS========================================================== Total fan number 2 System Fan-0 speed 10888 RPM System Fan-1 speed 10971 RPM System PWN-0 82 Expander Temperature 76 Celsius degree Sytem Temperature-0 33 Celsius degree T1 20 Celsius degree T2 50 Celsius degree TC 55 Celsius degree Voltage Sensor 09V 093V Voltage Sensor 18V 180V
cmd gt_
Chapter 1 Product IntroductionChapter 1 Product IntroductionChapter 5 Technical Support
wwwaicipccom
bull TAIWANTel +886 3 433 9188Fax +886 3 287 1818Email salesaicipccomtw
bull CHINA Tel +862154961421 +862154961422Fax Extension 608Email Technical Support supportaicipccom
bull AMERICA - West coastTel +19098958989Fax +19098958999Email salesaicipccom
bull AMERICA - East coastTel +19738848886Fax +19738844794Email njsalesaicipccom
bull EUROPETel +31306386789Fax +31306360638Emailsalesaicipcnl
Email Technical Support supportaicipccom
- PREFACE
-
- SAFETY INSTRUCTIONS
-
- Chapter 1 Prodcut Introduction
-
- 11 Box Content
- 12 Specifications
- 13 General Information
-
- Chapter 2 Hardware Installation
-
- 21 Removing and Installing Top Cover
- 22 Installing Removing a Hard Disk Drive
- 23 Removing and Installing a PSU Module
- 24 Removing and Installing a Fan Module
- 25 Removing and Installing the HDD backplane Module
- 26 Tool-less Blade Slide Installation Instruction
-
- Chapter 3 Hardware Introduction
-
- 31 HARDWARE DESIGN SPECIFICATION
-
- Chapter 4 HDD Blackplane Introduction
-
- 41 Expender firmware update through phone connector port
- 42 Update the expander firmware through in-band
- 43 12G expander EDFB setting
- 44 Slot HDD power setting
- 45 HDD BP thermal sensor temperature setting
-
- Chapter 5 Technical Support
-

2
RSC-4BT Users Manual
Chapter 1 Product Introduction
12 Specifications
3
RSC-4BT Users Manual
Chapter 1 Product Introduction
13 General Information
RSC-4BT is a 4U rackmount chassis with 36x35rdquoHDD hot swap Bays at front and single 12G expander on HDD Backplane which is a high performance server storage product
bull Front Panel 2 x USB30 ports
24 x 35rdquo hotswap HDD trays
4
RSC-4BT Users Manual
Chapter 1 Product Introduction
bull Rear Panel
5
RSC-4BT Users Manual
Chapter 1 Product Introduction
bull Major Components
Chapter 2 Hardware Installation
RSC-4BT Users Manual
66
21 Removing and Installing Top CoverPushing release button on both side and slide forward the top cover to open cover
Chapter 2 Hardware Installation
This chapter provides detailed instructions on hardware installation
RSC-4BT Users Manual
7
Chapter 2 Hardware Installation
22 Installing Removing a Hard Disk Drive221Installing a Hard Disk Drive
1 Directly place HDD into tool-less HDD tray untli it snaps Please check if the screw holes on HDD match the dimples on HDD tray
2 HDD can also be screwed on HDD tray by fastening two screws as picture showed
Chapter 2 Hardware Installation
RSC-4BT Users Manual
8
3 Insert the drive tray into chassis HDD cage Make sure the drive tray is correctly secured in place when its front edge aligns with the bay edge Push the tray lever until it reaches the end and clicks
RSC-4BT Users Manual
9
Chapter 2 Hardware Installation
23 Removing and Installing a PSU Module231 Removing a PSU module1 Removing power cable and loosen the thumb screw2 Pushing the latch and hold the tray handle3 Pull the PSU module tray handle out gently to slides out the PSU module232 Installing a PSU Modulebull To install PSU module follow the reverse order
Chapter 2 Hardware Installation
RSC-4BT Users Manual
10
24 Removing and Installing a Fan Module241 Removing a fan moduleGrabbing and removing the fan module from the fan slot
RSC-4BT Users Manual
11
Chapter 2 Hardware Installation
Pull the fan module up gently and taking out the fan module by removing rubbers out from the fan bar
242 Installing a Fan ModuleMake sure the 4 rubbers and connector insert firmly while fan module is inserted
Chapter 2 Hardware Installation
RSC-4BT Users Manual
12
25 Removing and Installing the HDD backplane Module
251 Removing a HDD backplanebull Unplugging all connectors amp HDDs from HDD backplanebull Release the lock pin252 Installing a HDD backplane modulebull Slide the HDD backplane module into enclosuresbull Secure the HDD backplane module onto the enclosures using the screws
RSC-4BT Users Manual
13
Chapter 2 Hardware Installation
bull Lift up and remove the blackplane to the a little bit up from hook then can get out253 Installing a HDD backplane module(follow the reverse order)bull Align the backplane with the hooks and insert it into the enclosure firmlybull Lock the backplane Follow the reverse order
Chapter 2 Hardware Installation
RSC-4BT Users Manual
14
26 Tool-less Blade Slide Installation InstructionSeparate the tool-less slide rail
261 Pull the inner rail out of the outer rail until it is fully extendedPress the locking tab down to release the inner rail
PULL
Outer Rail
Middle Rail
Inner Rail
RSC-4BT Users Manual
15
Chapter 2 Hardware Installation
262 Place the inner rail firmly against the side of the chassis Make sure that the hooks are straight and aligned with the holes in the inner rail
Slide the inner rail forward until it clicks into the locked position
Screw
Screw
1
2
3
3
Chapter 2 Hardware Installation
RSC-4BT Users Manual
16
263 Press the locking tab and push the middle rail back into the outer rail
RSC-4BT Users Manual
17
Chapter 2 Hardware Installation
264 Hang the hooks of the rails on the rack holes and if necessary secure with screws
1
2
Optional Screws
Chapter 2 Hardware Installation
RSC-4BT Users Manual
18
265 Repeat step 274 to mount the four ends extending the rails as necessary
RSC-4BT Users Manual
19
Chapter 2 Hardware Installation
266 Pull the middle rail out of the front of the outer rail and make sure that the ball bearing shuttle is locked at the front of the middle rail
Align the inner rails with the middle rails and then push evenly on both sides of the chassis until it clicks into the fully extended position
Ball BearingShuttle
Chapter 2 Hardware Installation
RSC-4BT Users Manual
20
267 Depress the locking tabs on both sides of the chassis simultaneously and push the chassis all the way into the rear of the rack
If additional security is required secure the chassis handles to the front of the rack with two screws (optional)
Screw
Screw
Complete
RSC-4BT Users Manual
21
Chapter 3 Hardware IntroductionChapter 3 Hardware Introduction
This chapter provides detailed instruction guide on hardware instruction
31 HARDWARE DESIGN SPECIFICATION311 Placement
PCBA Placement
HDD
HDD
HDD
HDD
HDD
HDD
HDD
HDD
HDD
HDD
HDD
HDD
HDD
HDD
HDD
HDD
HDD
HDD
HDD
HDD
HDD
HDD
HDD
HDD
Expander
RSC-4BT Users Manual
22
Chapter 3 Hardware Introduction
312 Connector Location
Connector Location
JPWR1 JPWR2
JFAN1
JFAN2
JFAN4 JFAN3 JPMBUS
JEXP_UART JEXP2
SASHD3 SASHD2 SASHD1
JMCU_UART JMCU_DBG
JFRONT
JI2C3 JI2C4
JI2C0
RSC-4BT Users Manual
23
Chapter 3 Hardware Introduction
313 Power Connector
Power Connector
RSC-4BT Users Manual
24
Chapter 3 Hardware Introduction
314 Fan Connector
RSC-4BT Users Manual
25
Chapter 3 Hardware Introduction
315 FAN setting ( if insert fan on HDD BP )
JFRONT
RSC-4BT Users Manual
26
Chapter 3 Hardware Introduction
316 Power Connector
Power Connector
RSC-4BT Users Manual
27
Chapter 3 Hardware Introduction
317 Drive Slot Map
RSC-4BT Users Manual
28
Chapter 4 HDD Blackplane IntroductionChapter 4 HDD Blackplane Introduction
41 Expender firmware update through phone connector port411 Update Expander firmware revision
Step 1 Set up RSC-4BT phone connector Insert phone connector into phone connector port shown
below also the other side inert cable into host PC or notebook
PLEASE FIND THE PHONE CONNECTOR CABLE IN THE PACKAGE BOX
RSC-4BT Users Manual
29
Chapter 4 HDD Blackplane Instruction
Step 2 Set up RSC-4BT connector connectionSet up connector connection application into your RSC-4BT as shown in the example process below
For exampleOS Microsoft WindowsRS232 connection application Hyperterminal
Step 2 Install HyperTrmexe
RSC-4BT Users Manual
30
Chapter 4 HDD Blackplane Introduction
Step 3 Enter a new name for the icon in the field below and click OK
Step 4 Connecting by using selecting an option in the drop down menu circled in red below (we selected COM2 in this example) and click OK
RSC-4BT Users Manual
31
Chapter 4 HDD Blackplane Instruction
Properties
Port Setting
Bits per second
Data bits
Parity
Stop bits
Flow control None
Restore Defaults
OK ApplyCancel
None
Step 6 Set up is complete The diagram below depicts what screen should displayed
Step 5 For ldquoBits per secondrdquo select 38400 For ldquoFlow controlrdquo select None Click OK when you have finished your selections
cmdgt_
RSC-4BT Users Manual
32
Chapter 4 HDD Blackplane Introduction
Step 7To get firmware image amp MFG Configuration Image version information from AIC SAS Related Firmware Downloadne website
httpppmsaicipccomtw8888downloadexpandermcu
RSC-4BT Users Manual
33
Chapter 4 HDD Blackplane Instruction
Step 8Comand line for show current firmware revisioncmdgtrev
RSC-4BT Users Manual
34
Chapter 4 HDD Blackplane Introduction
Step 9Start to update expander firmwarecmdgtfdl 0 0_
Step 10Select the tool bar Transfer -gt Send File
RSC-4BT Users Manual
35
Chapter 4 HDD Blackplane Instruction
Step 11bull Choose new firmware path file fw 3A1_v11221bull Protocol have to choose Xmodem
Step 12Firmware download complete
RSC-4BT Users Manual
36
Chapter 4 HDD Blackplane Introduction
Step 13Reset computer for success update firmwarecmdgtreset
reset
RSC-4BT Users Manual
37
Chapter 4 HDD Blackplane Instruction
Step 13Reset computer for success update firmwarecmdgtreset
412 Update expander configuration MFG
Step 1Comand line for show current configuration MFGcmdgt showmfg
RSC-4BT Users Manual
38
Chapter 4 HDD Blackplane Introduction
Step 2Start to update expander configuration MFGcmdgtfdl 83 0_
Step 3Select the tool bar Transfer -gt Send File
83 0
RSC-4BT Users Manual
39
Chapter 4 HDD Blackplane Instruction
Step 4bull Choose new MFG path file mfg 3A10_eob_1201binbull Protocol have to choose Xmodem
Step 5MFG download complete
RSC-4BT Users Manual
40
Chapter 4 HDD Blackplane Introduction
Step 6Reset computer for success update MFGcmdgtreset
reset
RSC-4BT Users Manual
41
Chapter 4 HDD Blackplane Instruction
Step 6Reset computer for success update MFGcmdgtreset
42 Update the expander firmware through in-band
FOR EXAMPLEStep 1
Download and install SG3_utilsexe which compatible with Linux OSFrom website httpsgdannyczsgsg3_utilshtml website Reference version sg3_utils-140tgz
Step 2To get firmware image amp MFG Configuration Image version information from AIC SAS Related Firmware Downloadne websitehttpppmsaicipccomtw8888downloadexpandermcu
RSC-4BT Users Manual
42
Chapter 4 HDD Blackplane Introduction
Step 3Execute terminal under the same new firmware folderexample Setting a new firmware folder on Home page Open Terminal by click to the right button of mouse in the same window Home
Step 4Typing sudo -s to into administrator mode
RSC-4BT Users Manual
43
Chapter 4 HDD Blackplane Instruction
Step 5 Find expander location$ sg_map -i
Step 6Update Expander firmware$ sg_write_buffer --id=0x0 --in=fw3A1_v11221 --mode=0x2 --offset=0 devsg0
RSC-4BT Users Manual
44
Chapter 4 HDD Blackplane Introduction
Step 7 Update Expander MFG$ sg_write_buffer --id=0x83 --in=mfg3A10_eob_1201bin --mode=0x2 --offset=0 devsg0
Step 8Reboot computer for success update firmware amp MFGrootubuntu~ reboot
RSC-4BT Users Manual
45
Chapter 4 HDD Blackplane Instruction
43 12G expander EDFB settingStep 1
For Install HyperTerminalexe refer to section 41
Step 2 Get EDFB statuscmdgt edfb
RSC-4BT Users Manual
46
Chapter 4 HDD Blackplane Introduction
Step 3Change EDFB setting
Enable EDFB functioncmdgtedfb on
Disable EDFB functioncmdgtedfb off
cmd gtedfbEDFB is OFF
cmd gtedfb onSucceeded to set EDFB
cmd gtedfb offEDFB is OFF
RSC-4BT Users Manual
47
Chapter 4 HDD Blackplane Instruction
44 Slot HDD power setting(Only for system cooling Fan controled by expander)
Step 1 For Install sg3exe tool and get new firmware from website refer to section 42
Step 2Execute terminal under the same new firmware folderexample Setting a new firmware folder on Home page Open Terminal by click to the right button of mouse in the same window Home
RSC-4BT Users Manual
48
Chapter 4 HDD Blackplane Introduction
Step 3 Typing sudo -s to into administrator mode
Step 4 Find expander location$ sg_map -i
RSC-4BT Users Manual
49
Chapter 4 HDD Blackplane Instruction
Step 5For example
If would like to turn the Disk004 power off under the HBA card Need to check Disk004 power status $ sg_ses --page=7 devsg0
Under HBA card the Element 3 = Disk004
RSC-4BT Users Manual
50
Chapter 4 HDD Blackplane Introduction
Step 6To check Disk004 (element 3) power status is ok$ sg_ses --page=2 devsg0
S
Status shows belowThe status of Element 3 is OK
RSC-4BT Users Manual
51
Chapter 4 HDD Blackplane Instruction
Step 7Turn off a HDD power$ sg_ses --descriptor=Disk004 --set=341 devsg0
Step 8Turn on a HDD power$ sg_ses --descriptor=Disk004 --clear=341 devsg0
RSC-4BT Users Manual
52
Chapter 4 HDD Blackplane Introduction
45 HDD BP thermal sensor temperature setting(Only for system cooling Fan controled by expander)
Step 1 For Install HyperTerminalexe refer to section 41
Step 2Get the current temperature settingscmdgt temperature
RSC-4BT Users Manual
53
Chapter 4 HDD Blackplane Instruction
Step 3For example
Set new temperatureT1=20 C 4 18 CT2=50 C 4 52 CWarning threshold=50 C 448 CAlarm threshold=55 C 454 C
The new setting will take effect after resetcmdgt temperature 18 52 48 54cmdgt reset
RSC-4BT Users Manual
54
Chapter 4 HDD Blackplane Introduction
Step 4Check fan speed amp temperature informationcmdgt sensor
cmd gtsensor==ENCLOSURE STATUS========================================================== Total fan number 2 System Fan-0 speed 10888 RPM System Fan-1 speed 10971 RPM System PWN-0 82 Expander Temperature 76 Celsius degree Sytem Temperature-0 33 Celsius degree T1 20 Celsius degree T2 50 Celsius degree TC 55 Celsius degree Voltage Sensor 09V 093V Voltage Sensor 18V 180V
cmd gt_
Chapter 1 Product IntroductionChapter 1 Product IntroductionChapter 5 Technical Support
wwwaicipccom
bull TAIWANTel +886 3 433 9188Fax +886 3 287 1818Email salesaicipccomtw
bull CHINA Tel +862154961421 +862154961422Fax Extension 608Email Technical Support supportaicipccom
bull AMERICA - West coastTel +19098958989Fax +19098958999Email salesaicipccom
bull AMERICA - East coastTel +19738848886Fax +19738844794Email njsalesaicipccom
bull EUROPETel +31306386789Fax +31306360638Emailsalesaicipcnl
Email Technical Support supportaicipccom
- PREFACE
-
- SAFETY INSTRUCTIONS
-
- Chapter 1 Prodcut Introduction
-
- 11 Box Content
- 12 Specifications
- 13 General Information
-
- Chapter 2 Hardware Installation
-
- 21 Removing and Installing Top Cover
- 22 Installing Removing a Hard Disk Drive
- 23 Removing and Installing a PSU Module
- 24 Removing and Installing a Fan Module
- 25 Removing and Installing the HDD backplane Module
- 26 Tool-less Blade Slide Installation Instruction
-
- Chapter 3 Hardware Introduction
-
- 31 HARDWARE DESIGN SPECIFICATION
-
- Chapter 4 HDD Blackplane Introduction
-
- 41 Expender firmware update through phone connector port
- 42 Update the expander firmware through in-band
- 43 12G expander EDFB setting
- 44 Slot HDD power setting
- 45 HDD BP thermal sensor temperature setting
-
- Chapter 5 Technical Support
-
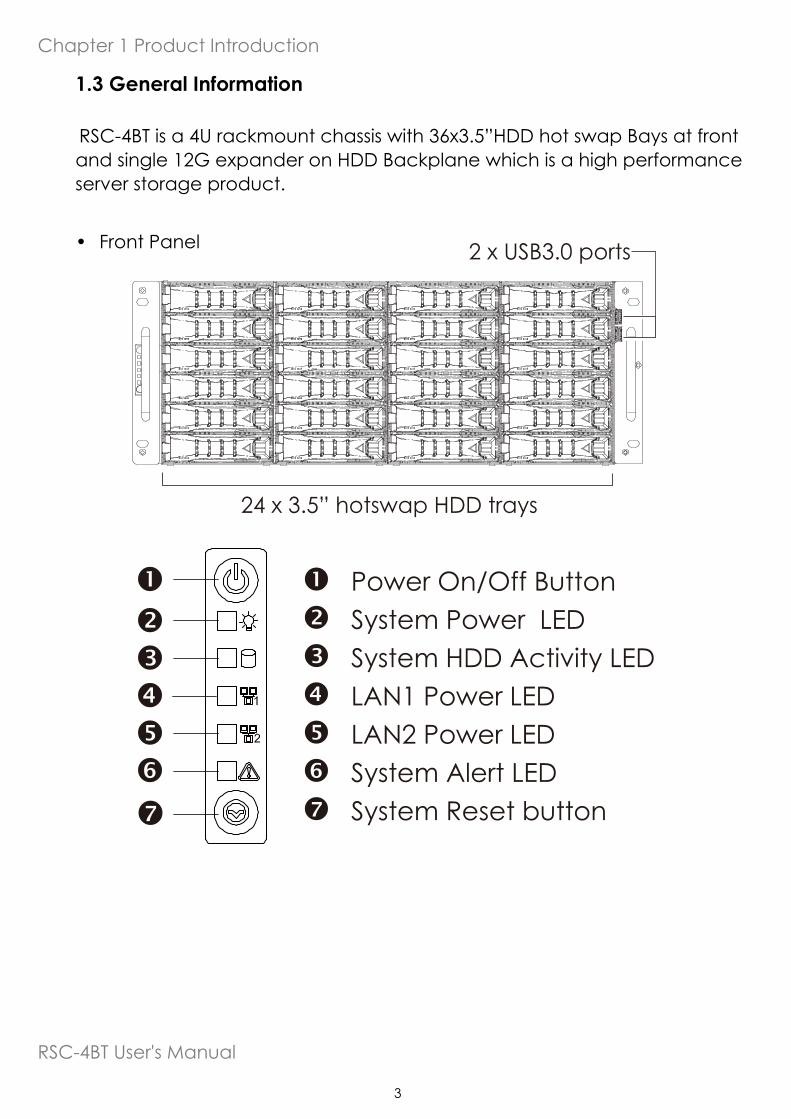
3
RSC-4BT Users Manual
Chapter 1 Product Introduction
13 General Information
RSC-4BT is a 4U rackmount chassis with 36x35rdquoHDD hot swap Bays at front and single 12G expander on HDD Backplane which is a high performance server storage product
bull Front Panel 2 x USB30 ports
24 x 35rdquo hotswap HDD trays
4
RSC-4BT Users Manual
Chapter 1 Product Introduction
bull Rear Panel
5
RSC-4BT Users Manual
Chapter 1 Product Introduction
bull Major Components
Chapter 2 Hardware Installation
RSC-4BT Users Manual
66
21 Removing and Installing Top CoverPushing release button on both side and slide forward the top cover to open cover
Chapter 2 Hardware Installation
This chapter provides detailed instructions on hardware installation
RSC-4BT Users Manual
7
Chapter 2 Hardware Installation
22 Installing Removing a Hard Disk Drive221Installing a Hard Disk Drive
1 Directly place HDD into tool-less HDD tray untli it snaps Please check if the screw holes on HDD match the dimples on HDD tray
2 HDD can also be screwed on HDD tray by fastening two screws as picture showed
Chapter 2 Hardware Installation
RSC-4BT Users Manual
8
3 Insert the drive tray into chassis HDD cage Make sure the drive tray is correctly secured in place when its front edge aligns with the bay edge Push the tray lever until it reaches the end and clicks
RSC-4BT Users Manual
9
Chapter 2 Hardware Installation
23 Removing and Installing a PSU Module231 Removing a PSU module1 Removing power cable and loosen the thumb screw2 Pushing the latch and hold the tray handle3 Pull the PSU module tray handle out gently to slides out the PSU module232 Installing a PSU Modulebull To install PSU module follow the reverse order
Chapter 2 Hardware Installation
RSC-4BT Users Manual
10
24 Removing and Installing a Fan Module241 Removing a fan moduleGrabbing and removing the fan module from the fan slot
RSC-4BT Users Manual
11
Chapter 2 Hardware Installation
Pull the fan module up gently and taking out the fan module by removing rubbers out from the fan bar
242 Installing a Fan ModuleMake sure the 4 rubbers and connector insert firmly while fan module is inserted
Chapter 2 Hardware Installation
RSC-4BT Users Manual
12
25 Removing and Installing the HDD backplane Module
251 Removing a HDD backplanebull Unplugging all connectors amp HDDs from HDD backplanebull Release the lock pin252 Installing a HDD backplane modulebull Slide the HDD backplane module into enclosuresbull Secure the HDD backplane module onto the enclosures using the screws
RSC-4BT Users Manual
13
Chapter 2 Hardware Installation
bull Lift up and remove the blackplane to the a little bit up from hook then can get out253 Installing a HDD backplane module(follow the reverse order)bull Align the backplane with the hooks and insert it into the enclosure firmlybull Lock the backplane Follow the reverse order
Chapter 2 Hardware Installation
RSC-4BT Users Manual
14
26 Tool-less Blade Slide Installation InstructionSeparate the tool-less slide rail
261 Pull the inner rail out of the outer rail until it is fully extendedPress the locking tab down to release the inner rail
PULL
Outer Rail
Middle Rail
Inner Rail
RSC-4BT Users Manual
15
Chapter 2 Hardware Installation
262 Place the inner rail firmly against the side of the chassis Make sure that the hooks are straight and aligned with the holes in the inner rail
Slide the inner rail forward until it clicks into the locked position
Screw
Screw
1
2
3
3
Chapter 2 Hardware Installation
RSC-4BT Users Manual
16
263 Press the locking tab and push the middle rail back into the outer rail
RSC-4BT Users Manual
17
Chapter 2 Hardware Installation
264 Hang the hooks of the rails on the rack holes and if necessary secure with screws
1
2
Optional Screws
Chapter 2 Hardware Installation
RSC-4BT Users Manual
18
265 Repeat step 274 to mount the four ends extending the rails as necessary
RSC-4BT Users Manual
19
Chapter 2 Hardware Installation
266 Pull the middle rail out of the front of the outer rail and make sure that the ball bearing shuttle is locked at the front of the middle rail
Align the inner rails with the middle rails and then push evenly on both sides of the chassis until it clicks into the fully extended position
Ball BearingShuttle
Chapter 2 Hardware Installation
RSC-4BT Users Manual
20
267 Depress the locking tabs on both sides of the chassis simultaneously and push the chassis all the way into the rear of the rack
If additional security is required secure the chassis handles to the front of the rack with two screws (optional)
Screw
Screw
Complete
RSC-4BT Users Manual
21
Chapter 3 Hardware IntroductionChapter 3 Hardware Introduction
This chapter provides detailed instruction guide on hardware instruction
31 HARDWARE DESIGN SPECIFICATION311 Placement
PCBA Placement
HDD
HDD
HDD
HDD
HDD
HDD
HDD
HDD
HDD
HDD
HDD
HDD
HDD
HDD
HDD
HDD
HDD
HDD
HDD
HDD
HDD
HDD
HDD
HDD
Expander
RSC-4BT Users Manual
22
Chapter 3 Hardware Introduction
312 Connector Location
Connector Location
JPWR1 JPWR2
JFAN1
JFAN2
JFAN4 JFAN3 JPMBUS
JEXP_UART JEXP2
SASHD3 SASHD2 SASHD1
JMCU_UART JMCU_DBG
JFRONT
JI2C3 JI2C4
JI2C0
RSC-4BT Users Manual
23
Chapter 3 Hardware Introduction
313 Power Connector
Power Connector
RSC-4BT Users Manual
24
Chapter 3 Hardware Introduction
314 Fan Connector
RSC-4BT Users Manual
25
Chapter 3 Hardware Introduction
315 FAN setting ( if insert fan on HDD BP )
JFRONT
RSC-4BT Users Manual
26
Chapter 3 Hardware Introduction
316 Power Connector
Power Connector
RSC-4BT Users Manual
27
Chapter 3 Hardware Introduction
317 Drive Slot Map
RSC-4BT Users Manual
28
Chapter 4 HDD Blackplane IntroductionChapter 4 HDD Blackplane Introduction
41 Expender firmware update through phone connector port411 Update Expander firmware revision
Step 1 Set up RSC-4BT phone connector Insert phone connector into phone connector port shown
below also the other side inert cable into host PC or notebook
PLEASE FIND THE PHONE CONNECTOR CABLE IN THE PACKAGE BOX
RSC-4BT Users Manual
29
Chapter 4 HDD Blackplane Instruction
Step 2 Set up RSC-4BT connector connectionSet up connector connection application into your RSC-4BT as shown in the example process below
For exampleOS Microsoft WindowsRS232 connection application Hyperterminal
Step 2 Install HyperTrmexe
RSC-4BT Users Manual
30
Chapter 4 HDD Blackplane Introduction
Step 3 Enter a new name for the icon in the field below and click OK
Step 4 Connecting by using selecting an option in the drop down menu circled in red below (we selected COM2 in this example) and click OK
RSC-4BT Users Manual
31
Chapter 4 HDD Blackplane Instruction
Properties
Port Setting
Bits per second
Data bits
Parity
Stop bits
Flow control None
Restore Defaults
OK ApplyCancel
None
Step 6 Set up is complete The diagram below depicts what screen should displayed
Step 5 For ldquoBits per secondrdquo select 38400 For ldquoFlow controlrdquo select None Click OK when you have finished your selections
cmdgt_
RSC-4BT Users Manual
32
Chapter 4 HDD Blackplane Introduction
Step 7To get firmware image amp MFG Configuration Image version information from AIC SAS Related Firmware Downloadne website
httpppmsaicipccomtw8888downloadexpandermcu
RSC-4BT Users Manual
33
Chapter 4 HDD Blackplane Instruction
Step 8Comand line for show current firmware revisioncmdgtrev
RSC-4BT Users Manual
34
Chapter 4 HDD Blackplane Introduction
Step 9Start to update expander firmwarecmdgtfdl 0 0_
Step 10Select the tool bar Transfer -gt Send File
RSC-4BT Users Manual
35
Chapter 4 HDD Blackplane Instruction
Step 11bull Choose new firmware path file fw 3A1_v11221bull Protocol have to choose Xmodem
Step 12Firmware download complete
RSC-4BT Users Manual
36
Chapter 4 HDD Blackplane Introduction
Step 13Reset computer for success update firmwarecmdgtreset
reset
RSC-4BT Users Manual
37
Chapter 4 HDD Blackplane Instruction
Step 13Reset computer for success update firmwarecmdgtreset
412 Update expander configuration MFG
Step 1Comand line for show current configuration MFGcmdgt showmfg
RSC-4BT Users Manual
38
Chapter 4 HDD Blackplane Introduction
Step 2Start to update expander configuration MFGcmdgtfdl 83 0_
Step 3Select the tool bar Transfer -gt Send File
83 0
RSC-4BT Users Manual
39
Chapter 4 HDD Blackplane Instruction
Step 4bull Choose new MFG path file mfg 3A10_eob_1201binbull Protocol have to choose Xmodem
Step 5MFG download complete
RSC-4BT Users Manual
40
Chapter 4 HDD Blackplane Introduction
Step 6Reset computer for success update MFGcmdgtreset
reset
RSC-4BT Users Manual
41
Chapter 4 HDD Blackplane Instruction
Step 6Reset computer for success update MFGcmdgtreset
42 Update the expander firmware through in-band
FOR EXAMPLEStep 1
Download and install SG3_utilsexe which compatible with Linux OSFrom website httpsgdannyczsgsg3_utilshtml website Reference version sg3_utils-140tgz
Step 2To get firmware image amp MFG Configuration Image version information from AIC SAS Related Firmware Downloadne websitehttpppmsaicipccomtw8888downloadexpandermcu
RSC-4BT Users Manual
42
Chapter 4 HDD Blackplane Introduction
Step 3Execute terminal under the same new firmware folderexample Setting a new firmware folder on Home page Open Terminal by click to the right button of mouse in the same window Home
Step 4Typing sudo -s to into administrator mode
RSC-4BT Users Manual
43
Chapter 4 HDD Blackplane Instruction
Step 5 Find expander location$ sg_map -i
Step 6Update Expander firmware$ sg_write_buffer --id=0x0 --in=fw3A1_v11221 --mode=0x2 --offset=0 devsg0
RSC-4BT Users Manual
44
Chapter 4 HDD Blackplane Introduction
Step 7 Update Expander MFG$ sg_write_buffer --id=0x83 --in=mfg3A10_eob_1201bin --mode=0x2 --offset=0 devsg0
Step 8Reboot computer for success update firmware amp MFGrootubuntu~ reboot
RSC-4BT Users Manual
45
Chapter 4 HDD Blackplane Instruction
43 12G expander EDFB settingStep 1
For Install HyperTerminalexe refer to section 41
Step 2 Get EDFB statuscmdgt edfb
RSC-4BT Users Manual
46
Chapter 4 HDD Blackplane Introduction
Step 3Change EDFB setting
Enable EDFB functioncmdgtedfb on
Disable EDFB functioncmdgtedfb off
cmd gtedfbEDFB is OFF
cmd gtedfb onSucceeded to set EDFB
cmd gtedfb offEDFB is OFF
RSC-4BT Users Manual
47
Chapter 4 HDD Blackplane Instruction
44 Slot HDD power setting(Only for system cooling Fan controled by expander)
Step 1 For Install sg3exe tool and get new firmware from website refer to section 42
Step 2Execute terminal under the same new firmware folderexample Setting a new firmware folder on Home page Open Terminal by click to the right button of mouse in the same window Home
RSC-4BT Users Manual
48
Chapter 4 HDD Blackplane Introduction
Step 3 Typing sudo -s to into administrator mode
Step 4 Find expander location$ sg_map -i
RSC-4BT Users Manual
49
Chapter 4 HDD Blackplane Instruction
Step 5For example
If would like to turn the Disk004 power off under the HBA card Need to check Disk004 power status $ sg_ses --page=7 devsg0
Under HBA card the Element 3 = Disk004
RSC-4BT Users Manual
50
Chapter 4 HDD Blackplane Introduction
Step 6To check Disk004 (element 3) power status is ok$ sg_ses --page=2 devsg0
S
Status shows belowThe status of Element 3 is OK
RSC-4BT Users Manual
51
Chapter 4 HDD Blackplane Instruction
Step 7Turn off a HDD power$ sg_ses --descriptor=Disk004 --set=341 devsg0
Step 8Turn on a HDD power$ sg_ses --descriptor=Disk004 --clear=341 devsg0
RSC-4BT Users Manual
52
Chapter 4 HDD Blackplane Introduction
45 HDD BP thermal sensor temperature setting(Only for system cooling Fan controled by expander)
Step 1 For Install HyperTerminalexe refer to section 41
Step 2Get the current temperature settingscmdgt temperature
RSC-4BT Users Manual
53
Chapter 4 HDD Blackplane Instruction
Step 3For example
Set new temperatureT1=20 C 4 18 CT2=50 C 4 52 CWarning threshold=50 C 448 CAlarm threshold=55 C 454 C
The new setting will take effect after resetcmdgt temperature 18 52 48 54cmdgt reset
RSC-4BT Users Manual
54
Chapter 4 HDD Blackplane Introduction
Step 4Check fan speed amp temperature informationcmdgt sensor
cmd gtsensor==ENCLOSURE STATUS========================================================== Total fan number 2 System Fan-0 speed 10888 RPM System Fan-1 speed 10971 RPM System PWN-0 82 Expander Temperature 76 Celsius degree Sytem Temperature-0 33 Celsius degree T1 20 Celsius degree T2 50 Celsius degree TC 55 Celsius degree Voltage Sensor 09V 093V Voltage Sensor 18V 180V
cmd gt_
Chapter 1 Product IntroductionChapter 1 Product IntroductionChapter 5 Technical Support
wwwaicipccom
bull TAIWANTel +886 3 433 9188Fax +886 3 287 1818Email salesaicipccomtw
bull CHINA Tel +862154961421 +862154961422Fax Extension 608Email Technical Support supportaicipccom
bull AMERICA - West coastTel +19098958989Fax +19098958999Email salesaicipccom
bull AMERICA - East coastTel +19738848886Fax +19738844794Email njsalesaicipccom
bull EUROPETel +31306386789Fax +31306360638Emailsalesaicipcnl
Email Technical Support supportaicipccom
- PREFACE
-
- SAFETY INSTRUCTIONS
-
- Chapter 1 Prodcut Introduction
-
- 11 Box Content
- 12 Specifications
- 13 General Information
-
- Chapter 2 Hardware Installation
-
- 21 Removing and Installing Top Cover
- 22 Installing Removing a Hard Disk Drive
- 23 Removing and Installing a PSU Module
- 24 Removing and Installing a Fan Module
- 25 Removing and Installing the HDD backplane Module
- 26 Tool-less Blade Slide Installation Instruction
-
- Chapter 3 Hardware Introduction
-
- 31 HARDWARE DESIGN SPECIFICATION
-
- Chapter 4 HDD Blackplane Introduction
-
- 41 Expender firmware update through phone connector port
- 42 Update the expander firmware through in-band
- 43 12G expander EDFB setting
- 44 Slot HDD power setting
- 45 HDD BP thermal sensor temperature setting
-
- Chapter 5 Technical Support
-

Chapter 2 Hardware Installation
RSC-4BT Users Manual
66
21 Removing and Installing Top CoverPushing release button on both side and slide forward the top cover to open cover
Chapter 2 Hardware Installation
This chapter provides detailed instructions on hardware installation
RSC-4BT Users Manual
7
Chapter 2 Hardware Installation
22 Installing Removing a Hard Disk Drive221Installing a Hard Disk Drive
1 Directly place HDD into tool-less HDD tray untli it snaps Please check if the screw holes on HDD match the dimples on HDD tray
2 HDD can also be screwed on HDD tray by fastening two screws as picture showed
Chapter 2 Hardware Installation
RSC-4BT Users Manual
8
3 Insert the drive tray into chassis HDD cage Make sure the drive tray is correctly secured in place when its front edge aligns with the bay edge Push the tray lever until it reaches the end and clicks
RSC-4BT Users Manual
9
Chapter 2 Hardware Installation
23 Removing and Installing a PSU Module231 Removing a PSU module1 Removing power cable and loosen the thumb screw2 Pushing the latch and hold the tray handle3 Pull the PSU module tray handle out gently to slides out the PSU module232 Installing a PSU Modulebull To install PSU module follow the reverse order
Chapter 2 Hardware Installation
RSC-4BT Users Manual
10
24 Removing and Installing a Fan Module241 Removing a fan moduleGrabbing and removing the fan module from the fan slot
RSC-4BT Users Manual
11
Chapter 2 Hardware Installation
Pull the fan module up gently and taking out the fan module by removing rubbers out from the fan bar
242 Installing a Fan ModuleMake sure the 4 rubbers and connector insert firmly while fan module is inserted
Chapter 2 Hardware Installation
RSC-4BT Users Manual
12
25 Removing and Installing the HDD backplane Module
251 Removing a HDD backplanebull Unplugging all connectors amp HDDs from HDD backplanebull Release the lock pin252 Installing a HDD backplane modulebull Slide the HDD backplane module into enclosuresbull Secure the HDD backplane module onto the enclosures using the screws
RSC-4BT Users Manual
13
Chapter 2 Hardware Installation
bull Lift up and remove the blackplane to the a little bit up from hook then can get out253 Installing a HDD backplane module(follow the reverse order)bull Align the backplane with the hooks and insert it into the enclosure firmlybull Lock the backplane Follow the reverse order
Chapter 2 Hardware Installation
RSC-4BT Users Manual
14
26 Tool-less Blade Slide Installation InstructionSeparate the tool-less slide rail
261 Pull the inner rail out of the outer rail until it is fully extendedPress the locking tab down to release the inner rail
PULL
Outer Rail
Middle Rail
Inner Rail
RSC-4BT Users Manual
15
Chapter 2 Hardware Installation
262 Place the inner rail firmly against the side of the chassis Make sure that the hooks are straight and aligned with the holes in the inner rail
Slide the inner rail forward until it clicks into the locked position
Screw
Screw
1
2
3
3
Chapter 2 Hardware Installation
RSC-4BT Users Manual
16
263 Press the locking tab and push the middle rail back into the outer rail
RSC-4BT Users Manual
17
Chapter 2 Hardware Installation
264 Hang the hooks of the rails on the rack holes and if necessary secure with screws
1
2
Optional Screws
Chapter 2 Hardware Installation
RSC-4BT Users Manual
18
265 Repeat step 274 to mount the four ends extending the rails as necessary
RSC-4BT Users Manual
19
Chapter 2 Hardware Installation
266 Pull the middle rail out of the front of the outer rail and make sure that the ball bearing shuttle is locked at the front of the middle rail
Align the inner rails with the middle rails and then push evenly on both sides of the chassis until it clicks into the fully extended position
Ball BearingShuttle
Chapter 2 Hardware Installation
RSC-4BT Users Manual
20
267 Depress the locking tabs on both sides of the chassis simultaneously and push the chassis all the way into the rear of the rack
If additional security is required secure the chassis handles to the front of the rack with two screws (optional)
Screw
Screw
Complete
RSC-4BT Users Manual
21
Chapter 3 Hardware IntroductionChapter 3 Hardware Introduction
This chapter provides detailed instruction guide on hardware instruction
31 HARDWARE DESIGN SPECIFICATION311 Placement
PCBA Placement
HDD
HDD
HDD
HDD
HDD
HDD
HDD
HDD
HDD
HDD
HDD
HDD
HDD
HDD
HDD
HDD
HDD
HDD
HDD
HDD
HDD
HDD
HDD
HDD
Expander
RSC-4BT Users Manual
22
Chapter 3 Hardware Introduction
312 Connector Location
Connector Location
JPWR1 JPWR2
JFAN1
JFAN2
JFAN4 JFAN3 JPMBUS
JEXP_UART JEXP2
SASHD3 SASHD2 SASHD1
JMCU_UART JMCU_DBG
JFRONT
JI2C3 JI2C4
JI2C0
RSC-4BT Users Manual
23
Chapter 3 Hardware Introduction
313 Power Connector
Power Connector
RSC-4BT Users Manual
24
Chapter 3 Hardware Introduction
314 Fan Connector
RSC-4BT Users Manual
25
Chapter 3 Hardware Introduction
315 FAN setting ( if insert fan on HDD BP )
JFRONT
RSC-4BT Users Manual
26
Chapter 3 Hardware Introduction
316 Power Connector
Power Connector
RSC-4BT Users Manual
27
Chapter 3 Hardware Introduction
317 Drive Slot Map
RSC-4BT Users Manual
28
Chapter 4 HDD Blackplane IntroductionChapter 4 HDD Blackplane Introduction
41 Expender firmware update through phone connector port411 Update Expander firmware revision
Step 1 Set up RSC-4BT phone connector Insert phone connector into phone connector port shown
below also the other side inert cable into host PC or notebook
PLEASE FIND THE PHONE CONNECTOR CABLE IN THE PACKAGE BOX
RSC-4BT Users Manual
29
Chapter 4 HDD Blackplane Instruction
Step 2 Set up RSC-4BT connector connectionSet up connector connection application into your RSC-4BT as shown in the example process below
For exampleOS Microsoft WindowsRS232 connection application Hyperterminal
Step 2 Install HyperTrmexe
RSC-4BT Users Manual
30
Chapter 4 HDD Blackplane Introduction
Step 3 Enter a new name for the icon in the field below and click OK
Step 4 Connecting by using selecting an option in the drop down menu circled in red below (we selected COM2 in this example) and click OK
RSC-4BT Users Manual
31
Chapter 4 HDD Blackplane Instruction
Properties
Port Setting
Bits per second
Data bits
Parity
Stop bits
Flow control None
Restore Defaults
OK ApplyCancel
None
Step 6 Set up is complete The diagram below depicts what screen should displayed
Step 5 For ldquoBits per secondrdquo select 38400 For ldquoFlow controlrdquo select None Click OK when you have finished your selections
cmdgt_
RSC-4BT Users Manual
32
Chapter 4 HDD Blackplane Introduction
Step 7To get firmware image amp MFG Configuration Image version information from AIC SAS Related Firmware Downloadne website
httpppmsaicipccomtw8888downloadexpandermcu
RSC-4BT Users Manual
33
Chapter 4 HDD Blackplane Instruction
Step 8Comand line for show current firmware revisioncmdgtrev
RSC-4BT Users Manual
34
Chapter 4 HDD Blackplane Introduction
Step 9Start to update expander firmwarecmdgtfdl 0 0_
Step 10Select the tool bar Transfer -gt Send File
RSC-4BT Users Manual
35
Chapter 4 HDD Blackplane Instruction
Step 11bull Choose new firmware path file fw 3A1_v11221bull Protocol have to choose Xmodem
Step 12Firmware download complete
RSC-4BT Users Manual
36
Chapter 4 HDD Blackplane Introduction
Step 13Reset computer for success update firmwarecmdgtreset
reset
RSC-4BT Users Manual
37
Chapter 4 HDD Blackplane Instruction
Step 13Reset computer for success update firmwarecmdgtreset
412 Update expander configuration MFG
Step 1Comand line for show current configuration MFGcmdgt showmfg
RSC-4BT Users Manual
38
Chapter 4 HDD Blackplane Introduction
Step 2Start to update expander configuration MFGcmdgtfdl 83 0_
Step 3Select the tool bar Transfer -gt Send File
83 0
RSC-4BT Users Manual
39
Chapter 4 HDD Blackplane Instruction
Step 4bull Choose new MFG path file mfg 3A10_eob_1201binbull Protocol have to choose Xmodem
Step 5MFG download complete
RSC-4BT Users Manual
40
Chapter 4 HDD Blackplane Introduction
Step 6Reset computer for success update MFGcmdgtreset
reset
RSC-4BT Users Manual
41
Chapter 4 HDD Blackplane Instruction
Step 6Reset computer for success update MFGcmdgtreset
42 Update the expander firmware through in-band
FOR EXAMPLEStep 1
Download and install SG3_utilsexe which compatible with Linux OSFrom website httpsgdannyczsgsg3_utilshtml website Reference version sg3_utils-140tgz
Step 2To get firmware image amp MFG Configuration Image version information from AIC SAS Related Firmware Downloadne websitehttpppmsaicipccomtw8888downloadexpandermcu
RSC-4BT Users Manual
42
Chapter 4 HDD Blackplane Introduction
Step 3Execute terminal under the same new firmware folderexample Setting a new firmware folder on Home page Open Terminal by click to the right button of mouse in the same window Home
Step 4Typing sudo -s to into administrator mode
RSC-4BT Users Manual
43
Chapter 4 HDD Blackplane Instruction
Step 5 Find expander location$ sg_map -i
Step 6Update Expander firmware$ sg_write_buffer --id=0x0 --in=fw3A1_v11221 --mode=0x2 --offset=0 devsg0
RSC-4BT Users Manual
44
Chapter 4 HDD Blackplane Introduction
Step 7 Update Expander MFG$ sg_write_buffer --id=0x83 --in=mfg3A10_eob_1201bin --mode=0x2 --offset=0 devsg0
Step 8Reboot computer for success update firmware amp MFGrootubuntu~ reboot
RSC-4BT Users Manual
45
Chapter 4 HDD Blackplane Instruction
43 12G expander EDFB settingStep 1
For Install HyperTerminalexe refer to section 41
Step 2 Get EDFB statuscmdgt edfb
RSC-4BT Users Manual
46
Chapter 4 HDD Blackplane Introduction
Step 3Change EDFB setting
Enable EDFB functioncmdgtedfb on
Disable EDFB functioncmdgtedfb off
cmd gtedfbEDFB is OFF
cmd gtedfb onSucceeded to set EDFB
cmd gtedfb offEDFB is OFF
RSC-4BT Users Manual
47
Chapter 4 HDD Blackplane Instruction
44 Slot HDD power setting(Only for system cooling Fan controled by expander)
Step 1 For Install sg3exe tool and get new firmware from website refer to section 42
Step 2Execute terminal under the same new firmware folderexample Setting a new firmware folder on Home page Open Terminal by click to the right button of mouse in the same window Home
RSC-4BT Users Manual
48
Chapter 4 HDD Blackplane Introduction
Step 3 Typing sudo -s to into administrator mode
Step 4 Find expander location$ sg_map -i
RSC-4BT Users Manual
49
Chapter 4 HDD Blackplane Instruction
Step 5For example
If would like to turn the Disk004 power off under the HBA card Need to check Disk004 power status $ sg_ses --page=7 devsg0
Under HBA card the Element 3 = Disk004
RSC-4BT Users Manual
50
Chapter 4 HDD Blackplane Introduction
Step 6To check Disk004 (element 3) power status is ok$ sg_ses --page=2 devsg0
S
Status shows belowThe status of Element 3 is OK
RSC-4BT Users Manual
51
Chapter 4 HDD Blackplane Instruction
Step 7Turn off a HDD power$ sg_ses --descriptor=Disk004 --set=341 devsg0
Step 8Turn on a HDD power$ sg_ses --descriptor=Disk004 --clear=341 devsg0
RSC-4BT Users Manual
52
Chapter 4 HDD Blackplane Introduction
45 HDD BP thermal sensor temperature setting(Only for system cooling Fan controled by expander)
Step 1 For Install HyperTerminalexe refer to section 41
Step 2Get the current temperature settingscmdgt temperature
RSC-4BT Users Manual
53
Chapter 4 HDD Blackplane Instruction
Step 3For example
Set new temperatureT1=20 C 4 18 CT2=50 C 4 52 CWarning threshold=50 C 448 CAlarm threshold=55 C 454 C
The new setting will take effect after resetcmdgt temperature 18 52 48 54cmdgt reset
RSC-4BT Users Manual
54
Chapter 4 HDD Blackplane Introduction
Step 4Check fan speed amp temperature informationcmdgt sensor
cmd gtsensor==ENCLOSURE STATUS========================================================== Total fan number 2 System Fan-0 speed 10888 RPM System Fan-1 speed 10971 RPM System PWN-0 82 Expander Temperature 76 Celsius degree Sytem Temperature-0 33 Celsius degree T1 20 Celsius degree T2 50 Celsius degree TC 55 Celsius degree Voltage Sensor 09V 093V Voltage Sensor 18V 180V
cmd gt_
Chapter 1 Product IntroductionChapter 1 Product IntroductionChapter 5 Technical Support
wwwaicipccom
bull TAIWANTel +886 3 433 9188Fax +886 3 287 1818Email salesaicipccomtw
bull CHINA Tel +862154961421 +862154961422Fax Extension 608Email Technical Support supportaicipccom
bull AMERICA - West coastTel +19098958989Fax +19098958999Email salesaicipccom
bull AMERICA - East coastTel +19738848886Fax +19738844794Email njsalesaicipccom
bull EUROPETel +31306386789Fax +31306360638Emailsalesaicipcnl
Email Technical Support supportaicipccom
- PREFACE
-
- SAFETY INSTRUCTIONS
-
- Chapter 1 Prodcut Introduction
-
- 11 Box Content
- 12 Specifications
- 13 General Information
-
- Chapter 2 Hardware Installation
-
- 21 Removing and Installing Top Cover
- 22 Installing Removing a Hard Disk Drive
- 23 Removing and Installing a PSU Module
- 24 Removing and Installing a Fan Module
- 25 Removing and Installing the HDD backplane Module
- 26 Tool-less Blade Slide Installation Instruction
-
- Chapter 3 Hardware Introduction
-
- 31 HARDWARE DESIGN SPECIFICATION
-
- Chapter 4 HDD Blackplane Introduction
-
- 41 Expender firmware update through phone connector port
- 42 Update the expander firmware through in-band
- 43 12G expander EDFB setting
- 44 Slot HDD power setting
- 45 HDD BP thermal sensor temperature setting
-
- Chapter 5 Technical Support
-

RSC-4BT Users Manual
7
Chapter 2 Hardware Installation
22 Installing Removing a Hard Disk Drive221Installing a Hard Disk Drive
1 Directly place HDD into tool-less HDD tray untli it snaps Please check if the screw holes on HDD match the dimples on HDD tray
2 HDD can also be screwed on HDD tray by fastening two screws as picture showed
Chapter 2 Hardware Installation
RSC-4BT Users Manual
8
3 Insert the drive tray into chassis HDD cage Make sure the drive tray is correctly secured in place when its front edge aligns with the bay edge Push the tray lever until it reaches the end and clicks
RSC-4BT Users Manual
9
Chapter 2 Hardware Installation
23 Removing and Installing a PSU Module231 Removing a PSU module1 Removing power cable and loosen the thumb screw2 Pushing the latch and hold the tray handle3 Pull the PSU module tray handle out gently to slides out the PSU module232 Installing a PSU Modulebull To install PSU module follow the reverse order
Chapter 2 Hardware Installation
RSC-4BT Users Manual
10
24 Removing and Installing a Fan Module241 Removing a fan moduleGrabbing and removing the fan module from the fan slot
RSC-4BT Users Manual
11
Chapter 2 Hardware Installation
Pull the fan module up gently and taking out the fan module by removing rubbers out from the fan bar
242 Installing a Fan ModuleMake sure the 4 rubbers and connector insert firmly while fan module is inserted
Chapter 2 Hardware Installation
RSC-4BT Users Manual
12
25 Removing and Installing the HDD backplane Module
251 Removing a HDD backplanebull Unplugging all connectors amp HDDs from HDD backplanebull Release the lock pin252 Installing a HDD backplane modulebull Slide the HDD backplane module into enclosuresbull Secure the HDD backplane module onto the enclosures using the screws
RSC-4BT Users Manual
13
Chapter 2 Hardware Installation
bull Lift up and remove the blackplane to the a little bit up from hook then can get out253 Installing a HDD backplane module(follow the reverse order)bull Align the backplane with the hooks and insert it into the enclosure firmlybull Lock the backplane Follow the reverse order
Chapter 2 Hardware Installation
RSC-4BT Users Manual
14
26 Tool-less Blade Slide Installation InstructionSeparate the tool-less slide rail
261 Pull the inner rail out of the outer rail until it is fully extendedPress the locking tab down to release the inner rail
PULL
Outer Rail
Middle Rail
Inner Rail
RSC-4BT Users Manual
15
Chapter 2 Hardware Installation
262 Place the inner rail firmly against the side of the chassis Make sure that the hooks are straight and aligned with the holes in the inner rail
Slide the inner rail forward until it clicks into the locked position
Screw
Screw
1
2
3
3
Chapter 2 Hardware Installation
RSC-4BT Users Manual
16
263 Press the locking tab and push the middle rail back into the outer rail
RSC-4BT Users Manual
17
Chapter 2 Hardware Installation
264 Hang the hooks of the rails on the rack holes and if necessary secure with screws
1
2
Optional Screws
Chapter 2 Hardware Installation
RSC-4BT Users Manual
18
265 Repeat step 274 to mount the four ends extending the rails as necessary
RSC-4BT Users Manual
19
Chapter 2 Hardware Installation
266 Pull the middle rail out of the front of the outer rail and make sure that the ball bearing shuttle is locked at the front of the middle rail
Align the inner rails with the middle rails and then push evenly on both sides of the chassis until it clicks into the fully extended position
Ball BearingShuttle
Chapter 2 Hardware Installation
RSC-4BT Users Manual
20
267 Depress the locking tabs on both sides of the chassis simultaneously and push the chassis all the way into the rear of the rack
If additional security is required secure the chassis handles to the front of the rack with two screws (optional)
Screw
Screw
Complete
RSC-4BT Users Manual
21
Chapter 3 Hardware IntroductionChapter 3 Hardware Introduction
This chapter provides detailed instruction guide on hardware instruction
31 HARDWARE DESIGN SPECIFICATION311 Placement
PCBA Placement
HDD
HDD
HDD
HDD
HDD
HDD
HDD
HDD
HDD
HDD
HDD
HDD
HDD
HDD
HDD
HDD
HDD
HDD
HDD
HDD
HDD
HDD
HDD
HDD
Expander
RSC-4BT Users Manual
22
Chapter 3 Hardware Introduction
312 Connector Location
Connector Location
JPWR1 JPWR2
JFAN1
JFAN2
JFAN4 JFAN3 JPMBUS
JEXP_UART JEXP2
SASHD3 SASHD2 SASHD1
JMCU_UART JMCU_DBG
JFRONT
JI2C3 JI2C4
JI2C0
RSC-4BT Users Manual
23
Chapter 3 Hardware Introduction
313 Power Connector
Power Connector
RSC-4BT Users Manual
24
Chapter 3 Hardware Introduction
314 Fan Connector
RSC-4BT Users Manual
25
Chapter 3 Hardware Introduction
315 FAN setting ( if insert fan on HDD BP )
JFRONT
RSC-4BT Users Manual
26
Chapter 3 Hardware Introduction
316 Power Connector
Power Connector
RSC-4BT Users Manual
27
Chapter 3 Hardware Introduction
317 Drive Slot Map
RSC-4BT Users Manual
28
Chapter 4 HDD Blackplane IntroductionChapter 4 HDD Blackplane Introduction
41 Expender firmware update through phone connector port411 Update Expander firmware revision
Step 1 Set up RSC-4BT phone connector Insert phone connector into phone connector port shown
below also the other side inert cable into host PC or notebook
PLEASE FIND THE PHONE CONNECTOR CABLE IN THE PACKAGE BOX
RSC-4BT Users Manual
29
Chapter 4 HDD Blackplane Instruction
Step 2 Set up RSC-4BT connector connectionSet up connector connection application into your RSC-4BT as shown in the example process below
For exampleOS Microsoft WindowsRS232 connection application Hyperterminal
Step 2 Install HyperTrmexe
RSC-4BT Users Manual
30
Chapter 4 HDD Blackplane Introduction
Step 3 Enter a new name for the icon in the field below and click OK
Step 4 Connecting by using selecting an option in the drop down menu circled in red below (we selected COM2 in this example) and click OK
RSC-4BT Users Manual
31
Chapter 4 HDD Blackplane Instruction
Properties
Port Setting
Bits per second
Data bits
Parity
Stop bits
Flow control None
Restore Defaults
OK ApplyCancel
None
Step 6 Set up is complete The diagram below depicts what screen should displayed
Step 5 For ldquoBits per secondrdquo select 38400 For ldquoFlow controlrdquo select None Click OK when you have finished your selections
cmdgt_
RSC-4BT Users Manual
32
Chapter 4 HDD Blackplane Introduction
Step 7To get firmware image amp MFG Configuration Image version information from AIC SAS Related Firmware Downloadne website
httpppmsaicipccomtw8888downloadexpandermcu
RSC-4BT Users Manual
33
Chapter 4 HDD Blackplane Instruction
Step 8Comand line for show current firmware revisioncmdgtrev
RSC-4BT Users Manual
34
Chapter 4 HDD Blackplane Introduction
Step 9Start to update expander firmwarecmdgtfdl 0 0_
Step 10Select the tool bar Transfer -gt Send File
RSC-4BT Users Manual
35
Chapter 4 HDD Blackplane Instruction
Step 11bull Choose new firmware path file fw 3A1_v11221bull Protocol have to choose Xmodem
Step 12Firmware download complete
RSC-4BT Users Manual
36
Chapter 4 HDD Blackplane Introduction
Step 13Reset computer for success update firmwarecmdgtreset
reset
RSC-4BT Users Manual
37
Chapter 4 HDD Blackplane Instruction
Step 13Reset computer for success update firmwarecmdgtreset
412 Update expander configuration MFG
Step 1Comand line for show current configuration MFGcmdgt showmfg
RSC-4BT Users Manual
38
Chapter 4 HDD Blackplane Introduction
Step 2Start to update expander configuration MFGcmdgtfdl 83 0_
Step 3Select the tool bar Transfer -gt Send File
83 0
RSC-4BT Users Manual
39
Chapter 4 HDD Blackplane Instruction
Step 4bull Choose new MFG path file mfg 3A10_eob_1201binbull Protocol have to choose Xmodem
Step 5MFG download complete
RSC-4BT Users Manual
40
Chapter 4 HDD Blackplane Introduction
Step 6Reset computer for success update MFGcmdgtreset
reset
RSC-4BT Users Manual
41
Chapter 4 HDD Blackplane Instruction
Step 6Reset computer for success update MFGcmdgtreset
42 Update the expander firmware through in-band
FOR EXAMPLEStep 1
Download and install SG3_utilsexe which compatible with Linux OSFrom website httpsgdannyczsgsg3_utilshtml website Reference version sg3_utils-140tgz
Step 2To get firmware image amp MFG Configuration Image version information from AIC SAS Related Firmware Downloadne websitehttpppmsaicipccomtw8888downloadexpandermcu
RSC-4BT Users Manual
42
Chapter 4 HDD Blackplane Introduction
Step 3Execute terminal under the same new firmware folderexample Setting a new firmware folder on Home page Open Terminal by click to the right button of mouse in the same window Home
Step 4Typing sudo -s to into administrator mode
RSC-4BT Users Manual
43
Chapter 4 HDD Blackplane Instruction
Step 5 Find expander location$ sg_map -i
Step 6Update Expander firmware$ sg_write_buffer --id=0x0 --in=fw3A1_v11221 --mode=0x2 --offset=0 devsg0
RSC-4BT Users Manual
44
Chapter 4 HDD Blackplane Introduction
Step 7 Update Expander MFG$ sg_write_buffer --id=0x83 --in=mfg3A10_eob_1201bin --mode=0x2 --offset=0 devsg0
Step 8Reboot computer for success update firmware amp MFGrootubuntu~ reboot
RSC-4BT Users Manual
45
Chapter 4 HDD Blackplane Instruction
43 12G expander EDFB settingStep 1
For Install HyperTerminalexe refer to section 41
Step 2 Get EDFB statuscmdgt edfb
RSC-4BT Users Manual
46
Chapter 4 HDD Blackplane Introduction
Step 3Change EDFB setting
Enable EDFB functioncmdgtedfb on
Disable EDFB functioncmdgtedfb off
cmd gtedfbEDFB is OFF
cmd gtedfb onSucceeded to set EDFB
cmd gtedfb offEDFB is OFF
RSC-4BT Users Manual
47
Chapter 4 HDD Blackplane Instruction
44 Slot HDD power setting(Only for system cooling Fan controled by expander)
Step 1 For Install sg3exe tool and get new firmware from website refer to section 42
Step 2Execute terminal under the same new firmware folderexample Setting a new firmware folder on Home page Open Terminal by click to the right button of mouse in the same window Home
RSC-4BT Users Manual
48
Chapter 4 HDD Blackplane Introduction
Step 3 Typing sudo -s to into administrator mode
Step 4 Find expander location$ sg_map -i
RSC-4BT Users Manual
49
Chapter 4 HDD Blackplane Instruction
Step 5For example
If would like to turn the Disk004 power off under the HBA card Need to check Disk004 power status $ sg_ses --page=7 devsg0
Under HBA card the Element 3 = Disk004
RSC-4BT Users Manual
50
Chapter 4 HDD Blackplane Introduction
Step 6To check Disk004 (element 3) power status is ok$ sg_ses --page=2 devsg0
S
Status shows belowThe status of Element 3 is OK
RSC-4BT Users Manual
51
Chapter 4 HDD Blackplane Instruction
Step 7Turn off a HDD power$ sg_ses --descriptor=Disk004 --set=341 devsg0
Step 8Turn on a HDD power$ sg_ses --descriptor=Disk004 --clear=341 devsg0
RSC-4BT Users Manual
52
Chapter 4 HDD Blackplane Introduction
45 HDD BP thermal sensor temperature setting(Only for system cooling Fan controled by expander)
Step 1 For Install HyperTerminalexe refer to section 41
Step 2Get the current temperature settingscmdgt temperature
RSC-4BT Users Manual
53
Chapter 4 HDD Blackplane Instruction
Step 3For example
Set new temperatureT1=20 C 4 18 CT2=50 C 4 52 CWarning threshold=50 C 448 CAlarm threshold=55 C 454 C
The new setting will take effect after resetcmdgt temperature 18 52 48 54cmdgt reset
RSC-4BT Users Manual
54
Chapter 4 HDD Blackplane Introduction
Step 4Check fan speed amp temperature informationcmdgt sensor
cmd gtsensor==ENCLOSURE STATUS========================================================== Total fan number 2 System Fan-0 speed 10888 RPM System Fan-1 speed 10971 RPM System PWN-0 82 Expander Temperature 76 Celsius degree Sytem Temperature-0 33 Celsius degree T1 20 Celsius degree T2 50 Celsius degree TC 55 Celsius degree Voltage Sensor 09V 093V Voltage Sensor 18V 180V
cmd gt_
Chapter 1 Product IntroductionChapter 1 Product IntroductionChapter 5 Technical Support
wwwaicipccom
bull TAIWANTel +886 3 433 9188Fax +886 3 287 1818Email salesaicipccomtw
bull CHINA Tel +862154961421 +862154961422Fax Extension 608Email Technical Support supportaicipccom
bull AMERICA - West coastTel +19098958989Fax +19098958999Email salesaicipccom
bull AMERICA - East coastTel +19738848886Fax +19738844794Email njsalesaicipccom
bull EUROPETel +31306386789Fax +31306360638Emailsalesaicipcnl
Email Technical Support supportaicipccom
- PREFACE
-
- SAFETY INSTRUCTIONS
-
- Chapter 1 Prodcut Introduction
-
- 11 Box Content
- 12 Specifications
- 13 General Information
-
- Chapter 2 Hardware Installation
-
- 21 Removing and Installing Top Cover
- 22 Installing Removing a Hard Disk Drive
- 23 Removing and Installing a PSU Module
- 24 Removing and Installing a Fan Module
- 25 Removing and Installing the HDD backplane Module
- 26 Tool-less Blade Slide Installation Instruction
-
- Chapter 3 Hardware Introduction
-
- 31 HARDWARE DESIGN SPECIFICATION
-
- Chapter 4 HDD Blackplane Introduction
-
- 41 Expender firmware update through phone connector port
- 42 Update the expander firmware through in-band
- 43 12G expander EDFB setting
- 44 Slot HDD power setting
- 45 HDD BP thermal sensor temperature setting
-
- Chapter 5 Technical Support
-

Chapter 2 Hardware Installation
RSC-4BT Users Manual
8
3 Insert the drive tray into chassis HDD cage Make sure the drive tray is correctly secured in place when its front edge aligns with the bay edge Push the tray lever until it reaches the end and clicks
RSC-4BT Users Manual
9
Chapter 2 Hardware Installation
23 Removing and Installing a PSU Module231 Removing a PSU module1 Removing power cable and loosen the thumb screw2 Pushing the latch and hold the tray handle3 Pull the PSU module tray handle out gently to slides out the PSU module232 Installing a PSU Modulebull To install PSU module follow the reverse order
Chapter 2 Hardware Installation
RSC-4BT Users Manual
10
24 Removing and Installing a Fan Module241 Removing a fan moduleGrabbing and removing the fan module from the fan slot
RSC-4BT Users Manual
11
Chapter 2 Hardware Installation
Pull the fan module up gently and taking out the fan module by removing rubbers out from the fan bar
242 Installing a Fan ModuleMake sure the 4 rubbers and connector insert firmly while fan module is inserted
Chapter 2 Hardware Installation
RSC-4BT Users Manual
12
25 Removing and Installing the HDD backplane Module
251 Removing a HDD backplanebull Unplugging all connectors amp HDDs from HDD backplanebull Release the lock pin252 Installing a HDD backplane modulebull Slide the HDD backplane module into enclosuresbull Secure the HDD backplane module onto the enclosures using the screws
RSC-4BT Users Manual
13
Chapter 2 Hardware Installation
bull Lift up and remove the blackplane to the a little bit up from hook then can get out253 Installing a HDD backplane module(follow the reverse order)bull Align the backplane with the hooks and insert it into the enclosure firmlybull Lock the backplane Follow the reverse order
Chapter 2 Hardware Installation
RSC-4BT Users Manual
14
26 Tool-less Blade Slide Installation InstructionSeparate the tool-less slide rail
261 Pull the inner rail out of the outer rail until it is fully extendedPress the locking tab down to release the inner rail
PULL
Outer Rail
Middle Rail
Inner Rail
RSC-4BT Users Manual
15
Chapter 2 Hardware Installation
262 Place the inner rail firmly against the side of the chassis Make sure that the hooks are straight and aligned with the holes in the inner rail
Slide the inner rail forward until it clicks into the locked position
Screw
Screw
1
2
3
3
Chapter 2 Hardware Installation
RSC-4BT Users Manual
16
263 Press the locking tab and push the middle rail back into the outer rail
RSC-4BT Users Manual
17
Chapter 2 Hardware Installation
264 Hang the hooks of the rails on the rack holes and if necessary secure with screws
1
2
Optional Screws
Chapter 2 Hardware Installation
RSC-4BT Users Manual
18
265 Repeat step 274 to mount the four ends extending the rails as necessary
RSC-4BT Users Manual
19
Chapter 2 Hardware Installation
266 Pull the middle rail out of the front of the outer rail and make sure that the ball bearing shuttle is locked at the front of the middle rail
Align the inner rails with the middle rails and then push evenly on both sides of the chassis until it clicks into the fully extended position
Ball BearingShuttle
Chapter 2 Hardware Installation
RSC-4BT Users Manual
20
267 Depress the locking tabs on both sides of the chassis simultaneously and push the chassis all the way into the rear of the rack
If additional security is required secure the chassis handles to the front of the rack with two screws (optional)
Screw
Screw
Complete
RSC-4BT Users Manual
21
Chapter 3 Hardware IntroductionChapter 3 Hardware Introduction
This chapter provides detailed instruction guide on hardware instruction
31 HARDWARE DESIGN SPECIFICATION311 Placement
PCBA Placement
HDD
HDD
HDD
HDD
HDD
HDD
HDD
HDD
HDD
HDD
HDD
HDD
HDD
HDD
HDD
HDD
HDD
HDD
HDD
HDD
HDD
HDD
HDD
HDD
Expander
RSC-4BT Users Manual
22
Chapter 3 Hardware Introduction
312 Connector Location
Connector Location
JPWR1 JPWR2
JFAN1
JFAN2
JFAN4 JFAN3 JPMBUS
JEXP_UART JEXP2
SASHD3 SASHD2 SASHD1
JMCU_UART JMCU_DBG
JFRONT
JI2C3 JI2C4
JI2C0
RSC-4BT Users Manual
23
Chapter 3 Hardware Introduction
313 Power Connector
Power Connector
RSC-4BT Users Manual
24
Chapter 3 Hardware Introduction
314 Fan Connector
RSC-4BT Users Manual
25
Chapter 3 Hardware Introduction
315 FAN setting ( if insert fan on HDD BP )
JFRONT
RSC-4BT Users Manual
26
Chapter 3 Hardware Introduction
316 Power Connector
Power Connector
RSC-4BT Users Manual
27
Chapter 3 Hardware Introduction
317 Drive Slot Map
RSC-4BT Users Manual
28
Chapter 4 HDD Blackplane IntroductionChapter 4 HDD Blackplane Introduction
41 Expender firmware update through phone connector port411 Update Expander firmware revision
Step 1 Set up RSC-4BT phone connector Insert phone connector into phone connector port shown
below also the other side inert cable into host PC or notebook
PLEASE FIND THE PHONE CONNECTOR CABLE IN THE PACKAGE BOX
RSC-4BT Users Manual
29
Chapter 4 HDD Blackplane Instruction
Step 2 Set up RSC-4BT connector connectionSet up connector connection application into your RSC-4BT as shown in the example process below
For exampleOS Microsoft WindowsRS232 connection application Hyperterminal
Step 2 Install HyperTrmexe
RSC-4BT Users Manual
30
Chapter 4 HDD Blackplane Introduction
Step 3 Enter a new name for the icon in the field below and click OK
Step 4 Connecting by using selecting an option in the drop down menu circled in red below (we selected COM2 in this example) and click OK
RSC-4BT Users Manual
31
Chapter 4 HDD Blackplane Instruction
Properties
Port Setting
Bits per second
Data bits
Parity
Stop bits
Flow control None
Restore Defaults
OK ApplyCancel
None
Step 6 Set up is complete The diagram below depicts what screen should displayed
Step 5 For ldquoBits per secondrdquo select 38400 For ldquoFlow controlrdquo select None Click OK when you have finished your selections
cmdgt_
RSC-4BT Users Manual
32
Chapter 4 HDD Blackplane Introduction
Step 7To get firmware image amp MFG Configuration Image version information from AIC SAS Related Firmware Downloadne website
httpppmsaicipccomtw8888downloadexpandermcu
RSC-4BT Users Manual
33
Chapter 4 HDD Blackplane Instruction
Step 8Comand line for show current firmware revisioncmdgtrev
RSC-4BT Users Manual
34
Chapter 4 HDD Blackplane Introduction
Step 9Start to update expander firmwarecmdgtfdl 0 0_
Step 10Select the tool bar Transfer -gt Send File
RSC-4BT Users Manual
35
Chapter 4 HDD Blackplane Instruction
Step 11bull Choose new firmware path file fw 3A1_v11221bull Protocol have to choose Xmodem
Step 12Firmware download complete
RSC-4BT Users Manual
36
Chapter 4 HDD Blackplane Introduction
Step 13Reset computer for success update firmwarecmdgtreset
reset
RSC-4BT Users Manual
37
Chapter 4 HDD Blackplane Instruction
Step 13Reset computer for success update firmwarecmdgtreset
412 Update expander configuration MFG
Step 1Comand line for show current configuration MFGcmdgt showmfg
RSC-4BT Users Manual
38
Chapter 4 HDD Blackplane Introduction
Step 2Start to update expander configuration MFGcmdgtfdl 83 0_
Step 3Select the tool bar Transfer -gt Send File
83 0
RSC-4BT Users Manual
39
Chapter 4 HDD Blackplane Instruction
Step 4bull Choose new MFG path file mfg 3A10_eob_1201binbull Protocol have to choose Xmodem
Step 5MFG download complete
RSC-4BT Users Manual
40
Chapter 4 HDD Blackplane Introduction
Step 6Reset computer for success update MFGcmdgtreset
reset
RSC-4BT Users Manual
41
Chapter 4 HDD Blackplane Instruction
Step 6Reset computer for success update MFGcmdgtreset
42 Update the expander firmware through in-band
FOR EXAMPLEStep 1
Download and install SG3_utilsexe which compatible with Linux OSFrom website httpsgdannyczsgsg3_utilshtml website Reference version sg3_utils-140tgz
Step 2To get firmware image amp MFG Configuration Image version information from AIC SAS Related Firmware Downloadne websitehttpppmsaicipccomtw8888downloadexpandermcu
RSC-4BT Users Manual
42
Chapter 4 HDD Blackplane Introduction
Step 3Execute terminal under the same new firmware folderexample Setting a new firmware folder on Home page Open Terminal by click to the right button of mouse in the same window Home
Step 4Typing sudo -s to into administrator mode
RSC-4BT Users Manual
43
Chapter 4 HDD Blackplane Instruction
Step 5 Find expander location$ sg_map -i
Step 6Update Expander firmware$ sg_write_buffer --id=0x0 --in=fw3A1_v11221 --mode=0x2 --offset=0 devsg0
RSC-4BT Users Manual
44
Chapter 4 HDD Blackplane Introduction
Step 7 Update Expander MFG$ sg_write_buffer --id=0x83 --in=mfg3A10_eob_1201bin --mode=0x2 --offset=0 devsg0
Step 8Reboot computer for success update firmware amp MFGrootubuntu~ reboot
RSC-4BT Users Manual
45
Chapter 4 HDD Blackplane Instruction
43 12G expander EDFB settingStep 1
For Install HyperTerminalexe refer to section 41
Step 2 Get EDFB statuscmdgt edfb
RSC-4BT Users Manual
46
Chapter 4 HDD Blackplane Introduction
Step 3Change EDFB setting
Enable EDFB functioncmdgtedfb on
Disable EDFB functioncmdgtedfb off
cmd gtedfbEDFB is OFF
cmd gtedfb onSucceeded to set EDFB
cmd gtedfb offEDFB is OFF
RSC-4BT Users Manual
47
Chapter 4 HDD Blackplane Instruction
44 Slot HDD power setting(Only for system cooling Fan controled by expander)
Step 1 For Install sg3exe tool and get new firmware from website refer to section 42
Step 2Execute terminal under the same new firmware folderexample Setting a new firmware folder on Home page Open Terminal by click to the right button of mouse in the same window Home
RSC-4BT Users Manual
48
Chapter 4 HDD Blackplane Introduction
Step 3 Typing sudo -s to into administrator mode
Step 4 Find expander location$ sg_map -i
RSC-4BT Users Manual
49
Chapter 4 HDD Blackplane Instruction
Step 5For example
If would like to turn the Disk004 power off under the HBA card Need to check Disk004 power status $ sg_ses --page=7 devsg0
Under HBA card the Element 3 = Disk004
RSC-4BT Users Manual
50
Chapter 4 HDD Blackplane Introduction
Step 6To check Disk004 (element 3) power status is ok$ sg_ses --page=2 devsg0
S
Status shows belowThe status of Element 3 is OK
RSC-4BT Users Manual
51
Chapter 4 HDD Blackplane Instruction
Step 7Turn off a HDD power$ sg_ses --descriptor=Disk004 --set=341 devsg0
Step 8Turn on a HDD power$ sg_ses --descriptor=Disk004 --clear=341 devsg0
RSC-4BT Users Manual
52
Chapter 4 HDD Blackplane Introduction
45 HDD BP thermal sensor temperature setting(Only for system cooling Fan controled by expander)
Step 1 For Install HyperTerminalexe refer to section 41
Step 2Get the current temperature settingscmdgt temperature
RSC-4BT Users Manual
53
Chapter 4 HDD Blackplane Instruction
Step 3For example
Set new temperatureT1=20 C 4 18 CT2=50 C 4 52 CWarning threshold=50 C 448 CAlarm threshold=55 C 454 C
The new setting will take effect after resetcmdgt temperature 18 52 48 54cmdgt reset
RSC-4BT Users Manual
54
Chapter 4 HDD Blackplane Introduction
Step 4Check fan speed amp temperature informationcmdgt sensor
cmd gtsensor==ENCLOSURE STATUS========================================================== Total fan number 2 System Fan-0 speed 10888 RPM System Fan-1 speed 10971 RPM System PWN-0 82 Expander Temperature 76 Celsius degree Sytem Temperature-0 33 Celsius degree T1 20 Celsius degree T2 50 Celsius degree TC 55 Celsius degree Voltage Sensor 09V 093V Voltage Sensor 18V 180V
cmd gt_
Chapter 1 Product IntroductionChapter 1 Product IntroductionChapter 5 Technical Support
wwwaicipccom
bull TAIWANTel +886 3 433 9188Fax +886 3 287 1818Email salesaicipccomtw
bull CHINA Tel +862154961421 +862154961422Fax Extension 608Email Technical Support supportaicipccom
bull AMERICA - West coastTel +19098958989Fax +19098958999Email salesaicipccom
bull AMERICA - East coastTel +19738848886Fax +19738844794Email njsalesaicipccom
bull EUROPETel +31306386789Fax +31306360638Emailsalesaicipcnl
Email Technical Support supportaicipccom
- PREFACE
-
- SAFETY INSTRUCTIONS
-
- Chapter 1 Prodcut Introduction
-
- 11 Box Content
- 12 Specifications
- 13 General Information
-
- Chapter 2 Hardware Installation
-
- 21 Removing and Installing Top Cover
- 22 Installing Removing a Hard Disk Drive
- 23 Removing and Installing a PSU Module
- 24 Removing and Installing a Fan Module
- 25 Removing and Installing the HDD backplane Module
- 26 Tool-less Blade Slide Installation Instruction
-
- Chapter 3 Hardware Introduction
-
- 31 HARDWARE DESIGN SPECIFICATION
-
- Chapter 4 HDD Blackplane Introduction
-
- 41 Expender firmware update through phone connector port
- 42 Update the expander firmware through in-band
- 43 12G expander EDFB setting
- 44 Slot HDD power setting
- 45 HDD BP thermal sensor temperature setting
-
- Chapter 5 Technical Support
-

RSC-4BT Users Manual
9
Chapter 2 Hardware Installation
23 Removing and Installing a PSU Module231 Removing a PSU module1 Removing power cable and loosen the thumb screw2 Pushing the latch and hold the tray handle3 Pull the PSU module tray handle out gently to slides out the PSU module232 Installing a PSU Modulebull To install PSU module follow the reverse order
Chapter 2 Hardware Installation
RSC-4BT Users Manual
10
24 Removing and Installing a Fan Module241 Removing a fan moduleGrabbing and removing the fan module from the fan slot
RSC-4BT Users Manual
11
Chapter 2 Hardware Installation
Pull the fan module up gently and taking out the fan module by removing rubbers out from the fan bar
242 Installing a Fan ModuleMake sure the 4 rubbers and connector insert firmly while fan module is inserted
Chapter 2 Hardware Installation
RSC-4BT Users Manual
12
25 Removing and Installing the HDD backplane Module
251 Removing a HDD backplanebull Unplugging all connectors amp HDDs from HDD backplanebull Release the lock pin252 Installing a HDD backplane modulebull Slide the HDD backplane module into enclosuresbull Secure the HDD backplane module onto the enclosures using the screws
RSC-4BT Users Manual
13
Chapter 2 Hardware Installation
bull Lift up and remove the blackplane to the a little bit up from hook then can get out253 Installing a HDD backplane module(follow the reverse order)bull Align the backplane with the hooks and insert it into the enclosure firmlybull Lock the backplane Follow the reverse order
Chapter 2 Hardware Installation
RSC-4BT Users Manual
14
26 Tool-less Blade Slide Installation InstructionSeparate the tool-less slide rail
261 Pull the inner rail out of the outer rail until it is fully extendedPress the locking tab down to release the inner rail
PULL
Outer Rail
Middle Rail
Inner Rail
RSC-4BT Users Manual
15
Chapter 2 Hardware Installation
262 Place the inner rail firmly against the side of the chassis Make sure that the hooks are straight and aligned with the holes in the inner rail
Slide the inner rail forward until it clicks into the locked position
Screw
Screw
1
2
3
3
Chapter 2 Hardware Installation
RSC-4BT Users Manual
16
263 Press the locking tab and push the middle rail back into the outer rail
RSC-4BT Users Manual
17
Chapter 2 Hardware Installation
264 Hang the hooks of the rails on the rack holes and if necessary secure with screws
1
2
Optional Screws
Chapter 2 Hardware Installation
RSC-4BT Users Manual
18
265 Repeat step 274 to mount the four ends extending the rails as necessary
RSC-4BT Users Manual
19
Chapter 2 Hardware Installation
266 Pull the middle rail out of the front of the outer rail and make sure that the ball bearing shuttle is locked at the front of the middle rail
Align the inner rails with the middle rails and then push evenly on both sides of the chassis until it clicks into the fully extended position
Ball BearingShuttle
Chapter 2 Hardware Installation
RSC-4BT Users Manual
20
267 Depress the locking tabs on both sides of the chassis simultaneously and push the chassis all the way into the rear of the rack
If additional security is required secure the chassis handles to the front of the rack with two screws (optional)
Screw
Screw
Complete
RSC-4BT Users Manual
21
Chapter 3 Hardware IntroductionChapter 3 Hardware Introduction
This chapter provides detailed instruction guide on hardware instruction
31 HARDWARE DESIGN SPECIFICATION311 Placement
PCBA Placement
HDD
HDD
HDD
HDD
HDD
HDD
HDD
HDD
HDD
HDD
HDD
HDD
HDD
HDD
HDD
HDD
HDD
HDD
HDD
HDD
HDD
HDD
HDD
HDD
Expander
RSC-4BT Users Manual
22
Chapter 3 Hardware Introduction
312 Connector Location
Connector Location
JPWR1 JPWR2
JFAN1
JFAN2
JFAN4 JFAN3 JPMBUS
JEXP_UART JEXP2
SASHD3 SASHD2 SASHD1
JMCU_UART JMCU_DBG
JFRONT
JI2C3 JI2C4
JI2C0
RSC-4BT Users Manual
23
Chapter 3 Hardware Introduction
313 Power Connector
Power Connector
RSC-4BT Users Manual
24
Chapter 3 Hardware Introduction
314 Fan Connector
RSC-4BT Users Manual
25
Chapter 3 Hardware Introduction
315 FAN setting ( if insert fan on HDD BP )
JFRONT
RSC-4BT Users Manual
26
Chapter 3 Hardware Introduction
316 Power Connector
Power Connector
RSC-4BT Users Manual
27
Chapter 3 Hardware Introduction
317 Drive Slot Map
RSC-4BT Users Manual
28
Chapter 4 HDD Blackplane IntroductionChapter 4 HDD Blackplane Introduction
41 Expender firmware update through phone connector port411 Update Expander firmware revision
Step 1 Set up RSC-4BT phone connector Insert phone connector into phone connector port shown
below also the other side inert cable into host PC or notebook
PLEASE FIND THE PHONE CONNECTOR CABLE IN THE PACKAGE BOX
RSC-4BT Users Manual
29
Chapter 4 HDD Blackplane Instruction
Step 2 Set up RSC-4BT connector connectionSet up connector connection application into your RSC-4BT as shown in the example process below
For exampleOS Microsoft WindowsRS232 connection application Hyperterminal
Step 2 Install HyperTrmexe
RSC-4BT Users Manual
30
Chapter 4 HDD Blackplane Introduction
Step 3 Enter a new name for the icon in the field below and click OK
Step 4 Connecting by using selecting an option in the drop down menu circled in red below (we selected COM2 in this example) and click OK
RSC-4BT Users Manual
31
Chapter 4 HDD Blackplane Instruction
Properties
Port Setting
Bits per second
Data bits
Parity
Stop bits
Flow control None
Restore Defaults
OK ApplyCancel
None
Step 6 Set up is complete The diagram below depicts what screen should displayed
Step 5 For ldquoBits per secondrdquo select 38400 For ldquoFlow controlrdquo select None Click OK when you have finished your selections
cmdgt_
RSC-4BT Users Manual
32
Chapter 4 HDD Blackplane Introduction
Step 7To get firmware image amp MFG Configuration Image version information from AIC SAS Related Firmware Downloadne website
httpppmsaicipccomtw8888downloadexpandermcu
RSC-4BT Users Manual
33
Chapter 4 HDD Blackplane Instruction
Step 8Comand line for show current firmware revisioncmdgtrev
RSC-4BT Users Manual
34
Chapter 4 HDD Blackplane Introduction
Step 9Start to update expander firmwarecmdgtfdl 0 0_
Step 10Select the tool bar Transfer -gt Send File
RSC-4BT Users Manual
35
Chapter 4 HDD Blackplane Instruction
Step 11bull Choose new firmware path file fw 3A1_v11221bull Protocol have to choose Xmodem
Step 12Firmware download complete
RSC-4BT Users Manual
36
Chapter 4 HDD Blackplane Introduction
Step 13Reset computer for success update firmwarecmdgtreset
reset
RSC-4BT Users Manual
37
Chapter 4 HDD Blackplane Instruction
Step 13Reset computer for success update firmwarecmdgtreset
412 Update expander configuration MFG
Step 1Comand line for show current configuration MFGcmdgt showmfg
RSC-4BT Users Manual
38
Chapter 4 HDD Blackplane Introduction
Step 2Start to update expander configuration MFGcmdgtfdl 83 0_
Step 3Select the tool bar Transfer -gt Send File
83 0
RSC-4BT Users Manual
39
Chapter 4 HDD Blackplane Instruction
Step 4bull Choose new MFG path file mfg 3A10_eob_1201binbull Protocol have to choose Xmodem
Step 5MFG download complete
RSC-4BT Users Manual
40
Chapter 4 HDD Blackplane Introduction
Step 6Reset computer for success update MFGcmdgtreset
reset
RSC-4BT Users Manual
41
Chapter 4 HDD Blackplane Instruction
Step 6Reset computer for success update MFGcmdgtreset
42 Update the expander firmware through in-band
FOR EXAMPLEStep 1
Download and install SG3_utilsexe which compatible with Linux OSFrom website httpsgdannyczsgsg3_utilshtml website Reference version sg3_utils-140tgz
Step 2To get firmware image amp MFG Configuration Image version information from AIC SAS Related Firmware Downloadne websitehttpppmsaicipccomtw8888downloadexpandermcu
RSC-4BT Users Manual
42
Chapter 4 HDD Blackplane Introduction
Step 3Execute terminal under the same new firmware folderexample Setting a new firmware folder on Home page Open Terminal by click to the right button of mouse in the same window Home
Step 4Typing sudo -s to into administrator mode
RSC-4BT Users Manual
43
Chapter 4 HDD Blackplane Instruction
Step 5 Find expander location$ sg_map -i
Step 6Update Expander firmware$ sg_write_buffer --id=0x0 --in=fw3A1_v11221 --mode=0x2 --offset=0 devsg0
RSC-4BT Users Manual
44
Chapter 4 HDD Blackplane Introduction
Step 7 Update Expander MFG$ sg_write_buffer --id=0x83 --in=mfg3A10_eob_1201bin --mode=0x2 --offset=0 devsg0
Step 8Reboot computer for success update firmware amp MFGrootubuntu~ reboot
RSC-4BT Users Manual
45
Chapter 4 HDD Blackplane Instruction
43 12G expander EDFB settingStep 1
For Install HyperTerminalexe refer to section 41
Step 2 Get EDFB statuscmdgt edfb
RSC-4BT Users Manual
46
Chapter 4 HDD Blackplane Introduction
Step 3Change EDFB setting
Enable EDFB functioncmdgtedfb on
Disable EDFB functioncmdgtedfb off
cmd gtedfbEDFB is OFF
cmd gtedfb onSucceeded to set EDFB
cmd gtedfb offEDFB is OFF
RSC-4BT Users Manual
47
Chapter 4 HDD Blackplane Instruction
44 Slot HDD power setting(Only for system cooling Fan controled by expander)
Step 1 For Install sg3exe tool and get new firmware from website refer to section 42
Step 2Execute terminal under the same new firmware folderexample Setting a new firmware folder on Home page Open Terminal by click to the right button of mouse in the same window Home
RSC-4BT Users Manual
48
Chapter 4 HDD Blackplane Introduction
Step 3 Typing sudo -s to into administrator mode
Step 4 Find expander location$ sg_map -i
RSC-4BT Users Manual
49
Chapter 4 HDD Blackplane Instruction
Step 5For example
If would like to turn the Disk004 power off under the HBA card Need to check Disk004 power status $ sg_ses --page=7 devsg0
Under HBA card the Element 3 = Disk004
RSC-4BT Users Manual
50
Chapter 4 HDD Blackplane Introduction
Step 6To check Disk004 (element 3) power status is ok$ sg_ses --page=2 devsg0
S
Status shows belowThe status of Element 3 is OK
RSC-4BT Users Manual
51
Chapter 4 HDD Blackplane Instruction
Step 7Turn off a HDD power$ sg_ses --descriptor=Disk004 --set=341 devsg0
Step 8Turn on a HDD power$ sg_ses --descriptor=Disk004 --clear=341 devsg0
RSC-4BT Users Manual
52
Chapter 4 HDD Blackplane Introduction
45 HDD BP thermal sensor temperature setting(Only for system cooling Fan controled by expander)
Step 1 For Install HyperTerminalexe refer to section 41
Step 2Get the current temperature settingscmdgt temperature
RSC-4BT Users Manual
53
Chapter 4 HDD Blackplane Instruction
Step 3For example
Set new temperatureT1=20 C 4 18 CT2=50 C 4 52 CWarning threshold=50 C 448 CAlarm threshold=55 C 454 C
The new setting will take effect after resetcmdgt temperature 18 52 48 54cmdgt reset
RSC-4BT Users Manual
54
Chapter 4 HDD Blackplane Introduction
Step 4Check fan speed amp temperature informationcmdgt sensor
cmd gtsensor==ENCLOSURE STATUS========================================================== Total fan number 2 System Fan-0 speed 10888 RPM System Fan-1 speed 10971 RPM System PWN-0 82 Expander Temperature 76 Celsius degree Sytem Temperature-0 33 Celsius degree T1 20 Celsius degree T2 50 Celsius degree TC 55 Celsius degree Voltage Sensor 09V 093V Voltage Sensor 18V 180V
cmd gt_
Chapter 1 Product IntroductionChapter 1 Product IntroductionChapter 5 Technical Support
wwwaicipccom
bull TAIWANTel +886 3 433 9188Fax +886 3 287 1818Email salesaicipccomtw
bull CHINA Tel +862154961421 +862154961422Fax Extension 608Email Technical Support supportaicipccom
bull AMERICA - West coastTel +19098958989Fax +19098958999Email salesaicipccom
bull AMERICA - East coastTel +19738848886Fax +19738844794Email njsalesaicipccom
bull EUROPETel +31306386789Fax +31306360638Emailsalesaicipcnl
Email Technical Support supportaicipccom
- PREFACE
-
- SAFETY INSTRUCTIONS
-
- Chapter 1 Prodcut Introduction
-
- 11 Box Content
- 12 Specifications
- 13 General Information
-
- Chapter 2 Hardware Installation
-
- 21 Removing and Installing Top Cover
- 22 Installing Removing a Hard Disk Drive
- 23 Removing and Installing a PSU Module
- 24 Removing and Installing a Fan Module
- 25 Removing and Installing the HDD backplane Module
- 26 Tool-less Blade Slide Installation Instruction
-
- Chapter 3 Hardware Introduction
-
- 31 HARDWARE DESIGN SPECIFICATION
-
- Chapter 4 HDD Blackplane Introduction
-
- 41 Expender firmware update through phone connector port
- 42 Update the expander firmware through in-band
- 43 12G expander EDFB setting
- 44 Slot HDD power setting
- 45 HDD BP thermal sensor temperature setting
-
- Chapter 5 Technical Support
-

Chapter 2 Hardware Installation
RSC-4BT Users Manual
10
24 Removing and Installing a Fan Module241 Removing a fan moduleGrabbing and removing the fan module from the fan slot
RSC-4BT Users Manual
11
Chapter 2 Hardware Installation
Pull the fan module up gently and taking out the fan module by removing rubbers out from the fan bar
242 Installing a Fan ModuleMake sure the 4 rubbers and connector insert firmly while fan module is inserted
Chapter 2 Hardware Installation
RSC-4BT Users Manual
12
25 Removing and Installing the HDD backplane Module
251 Removing a HDD backplanebull Unplugging all connectors amp HDDs from HDD backplanebull Release the lock pin252 Installing a HDD backplane modulebull Slide the HDD backplane module into enclosuresbull Secure the HDD backplane module onto the enclosures using the screws
RSC-4BT Users Manual
13
Chapter 2 Hardware Installation
bull Lift up and remove the blackplane to the a little bit up from hook then can get out253 Installing a HDD backplane module(follow the reverse order)bull Align the backplane with the hooks and insert it into the enclosure firmlybull Lock the backplane Follow the reverse order
Chapter 2 Hardware Installation
RSC-4BT Users Manual
14
26 Tool-less Blade Slide Installation InstructionSeparate the tool-less slide rail
261 Pull the inner rail out of the outer rail until it is fully extendedPress the locking tab down to release the inner rail
PULL
Outer Rail
Middle Rail
Inner Rail
RSC-4BT Users Manual
15
Chapter 2 Hardware Installation
262 Place the inner rail firmly against the side of the chassis Make sure that the hooks are straight and aligned with the holes in the inner rail
Slide the inner rail forward until it clicks into the locked position
Screw
Screw
1
2
3
3
Chapter 2 Hardware Installation
RSC-4BT Users Manual
16
263 Press the locking tab and push the middle rail back into the outer rail
RSC-4BT Users Manual
17
Chapter 2 Hardware Installation
264 Hang the hooks of the rails on the rack holes and if necessary secure with screws
1
2
Optional Screws
Chapter 2 Hardware Installation
RSC-4BT Users Manual
18
265 Repeat step 274 to mount the four ends extending the rails as necessary
RSC-4BT Users Manual
19
Chapter 2 Hardware Installation
266 Pull the middle rail out of the front of the outer rail and make sure that the ball bearing shuttle is locked at the front of the middle rail
Align the inner rails with the middle rails and then push evenly on both sides of the chassis until it clicks into the fully extended position
Ball BearingShuttle
Chapter 2 Hardware Installation
RSC-4BT Users Manual
20
267 Depress the locking tabs on both sides of the chassis simultaneously and push the chassis all the way into the rear of the rack
If additional security is required secure the chassis handles to the front of the rack with two screws (optional)
Screw
Screw
Complete
RSC-4BT Users Manual
21
Chapter 3 Hardware IntroductionChapter 3 Hardware Introduction
This chapter provides detailed instruction guide on hardware instruction
31 HARDWARE DESIGN SPECIFICATION311 Placement
PCBA Placement
HDD
HDD
HDD
HDD
HDD
HDD
HDD
HDD
HDD
HDD
HDD
HDD
HDD
HDD
HDD
HDD
HDD
HDD
HDD
HDD
HDD
HDD
HDD
HDD
Expander
RSC-4BT Users Manual
22
Chapter 3 Hardware Introduction
312 Connector Location
Connector Location
JPWR1 JPWR2
JFAN1
JFAN2
JFAN4 JFAN3 JPMBUS
JEXP_UART JEXP2
SASHD3 SASHD2 SASHD1
JMCU_UART JMCU_DBG
JFRONT
JI2C3 JI2C4
JI2C0
RSC-4BT Users Manual
23
Chapter 3 Hardware Introduction
313 Power Connector
Power Connector
RSC-4BT Users Manual
24
Chapter 3 Hardware Introduction
314 Fan Connector
RSC-4BT Users Manual
25
Chapter 3 Hardware Introduction
315 FAN setting ( if insert fan on HDD BP )
JFRONT
RSC-4BT Users Manual
26
Chapter 3 Hardware Introduction
316 Power Connector
Power Connector
RSC-4BT Users Manual
27
Chapter 3 Hardware Introduction
317 Drive Slot Map
RSC-4BT Users Manual
28
Chapter 4 HDD Blackplane IntroductionChapter 4 HDD Blackplane Introduction
41 Expender firmware update through phone connector port411 Update Expander firmware revision
Step 1 Set up RSC-4BT phone connector Insert phone connector into phone connector port shown
below also the other side inert cable into host PC or notebook
PLEASE FIND THE PHONE CONNECTOR CABLE IN THE PACKAGE BOX
RSC-4BT Users Manual
29
Chapter 4 HDD Blackplane Instruction
Step 2 Set up RSC-4BT connector connectionSet up connector connection application into your RSC-4BT as shown in the example process below
For exampleOS Microsoft WindowsRS232 connection application Hyperterminal
Step 2 Install HyperTrmexe
RSC-4BT Users Manual
30
Chapter 4 HDD Blackplane Introduction
Step 3 Enter a new name for the icon in the field below and click OK
Step 4 Connecting by using selecting an option in the drop down menu circled in red below (we selected COM2 in this example) and click OK
RSC-4BT Users Manual
31
Chapter 4 HDD Blackplane Instruction
Properties
Port Setting
Bits per second
Data bits
Parity
Stop bits
Flow control None
Restore Defaults
OK ApplyCancel
None
Step 6 Set up is complete The diagram below depicts what screen should displayed
Step 5 For ldquoBits per secondrdquo select 38400 For ldquoFlow controlrdquo select None Click OK when you have finished your selections
cmdgt_
RSC-4BT Users Manual
32
Chapter 4 HDD Blackplane Introduction
Step 7To get firmware image amp MFG Configuration Image version information from AIC SAS Related Firmware Downloadne website
httpppmsaicipccomtw8888downloadexpandermcu
RSC-4BT Users Manual
33
Chapter 4 HDD Blackplane Instruction
Step 8Comand line for show current firmware revisioncmdgtrev
RSC-4BT Users Manual
34
Chapter 4 HDD Blackplane Introduction
Step 9Start to update expander firmwarecmdgtfdl 0 0_
Step 10Select the tool bar Transfer -gt Send File
RSC-4BT Users Manual
35
Chapter 4 HDD Blackplane Instruction
Step 11bull Choose new firmware path file fw 3A1_v11221bull Protocol have to choose Xmodem
Step 12Firmware download complete
RSC-4BT Users Manual
36
Chapter 4 HDD Blackplane Introduction
Step 13Reset computer for success update firmwarecmdgtreset
reset
RSC-4BT Users Manual
37
Chapter 4 HDD Blackplane Instruction
Step 13Reset computer for success update firmwarecmdgtreset
412 Update expander configuration MFG
Step 1Comand line for show current configuration MFGcmdgt showmfg
RSC-4BT Users Manual
38
Chapter 4 HDD Blackplane Introduction
Step 2Start to update expander configuration MFGcmdgtfdl 83 0_
Step 3Select the tool bar Transfer -gt Send File
83 0
RSC-4BT Users Manual
39
Chapter 4 HDD Blackplane Instruction
Step 4bull Choose new MFG path file mfg 3A10_eob_1201binbull Protocol have to choose Xmodem
Step 5MFG download complete
RSC-4BT Users Manual
40
Chapter 4 HDD Blackplane Introduction
Step 6Reset computer for success update MFGcmdgtreset
reset
RSC-4BT Users Manual
41
Chapter 4 HDD Blackplane Instruction
Step 6Reset computer for success update MFGcmdgtreset
42 Update the expander firmware through in-band
FOR EXAMPLEStep 1
Download and install SG3_utilsexe which compatible with Linux OSFrom website httpsgdannyczsgsg3_utilshtml website Reference version sg3_utils-140tgz
Step 2To get firmware image amp MFG Configuration Image version information from AIC SAS Related Firmware Downloadne websitehttpppmsaicipccomtw8888downloadexpandermcu
RSC-4BT Users Manual
42
Chapter 4 HDD Blackplane Introduction
Step 3Execute terminal under the same new firmware folderexample Setting a new firmware folder on Home page Open Terminal by click to the right button of mouse in the same window Home
Step 4Typing sudo -s to into administrator mode
RSC-4BT Users Manual
43
Chapter 4 HDD Blackplane Instruction
Step 5 Find expander location$ sg_map -i
Step 6Update Expander firmware$ sg_write_buffer --id=0x0 --in=fw3A1_v11221 --mode=0x2 --offset=0 devsg0
RSC-4BT Users Manual
44
Chapter 4 HDD Blackplane Introduction
Step 7 Update Expander MFG$ sg_write_buffer --id=0x83 --in=mfg3A10_eob_1201bin --mode=0x2 --offset=0 devsg0
Step 8Reboot computer for success update firmware amp MFGrootubuntu~ reboot
RSC-4BT Users Manual
45
Chapter 4 HDD Blackplane Instruction
43 12G expander EDFB settingStep 1
For Install HyperTerminalexe refer to section 41
Step 2 Get EDFB statuscmdgt edfb
RSC-4BT Users Manual
46
Chapter 4 HDD Blackplane Introduction
Step 3Change EDFB setting
Enable EDFB functioncmdgtedfb on
Disable EDFB functioncmdgtedfb off
cmd gtedfbEDFB is OFF
cmd gtedfb onSucceeded to set EDFB
cmd gtedfb offEDFB is OFF
RSC-4BT Users Manual
47
Chapter 4 HDD Blackplane Instruction
44 Slot HDD power setting(Only for system cooling Fan controled by expander)
Step 1 For Install sg3exe tool and get new firmware from website refer to section 42
Step 2Execute terminal under the same new firmware folderexample Setting a new firmware folder on Home page Open Terminal by click to the right button of mouse in the same window Home
RSC-4BT Users Manual
48
Chapter 4 HDD Blackplane Introduction
Step 3 Typing sudo -s to into administrator mode
Step 4 Find expander location$ sg_map -i
RSC-4BT Users Manual
49
Chapter 4 HDD Blackplane Instruction
Step 5For example
If would like to turn the Disk004 power off under the HBA card Need to check Disk004 power status $ sg_ses --page=7 devsg0
Under HBA card the Element 3 = Disk004
RSC-4BT Users Manual
50
Chapter 4 HDD Blackplane Introduction
Step 6To check Disk004 (element 3) power status is ok$ sg_ses --page=2 devsg0
S
Status shows belowThe status of Element 3 is OK
RSC-4BT Users Manual
51
Chapter 4 HDD Blackplane Instruction
Step 7Turn off a HDD power$ sg_ses --descriptor=Disk004 --set=341 devsg0
Step 8Turn on a HDD power$ sg_ses --descriptor=Disk004 --clear=341 devsg0
RSC-4BT Users Manual
52
Chapter 4 HDD Blackplane Introduction
45 HDD BP thermal sensor temperature setting(Only for system cooling Fan controled by expander)
Step 1 For Install HyperTerminalexe refer to section 41
Step 2Get the current temperature settingscmdgt temperature
RSC-4BT Users Manual
53
Chapter 4 HDD Blackplane Instruction
Step 3For example
Set new temperatureT1=20 C 4 18 CT2=50 C 4 52 CWarning threshold=50 C 448 CAlarm threshold=55 C 454 C
The new setting will take effect after resetcmdgt temperature 18 52 48 54cmdgt reset
RSC-4BT Users Manual
54
Chapter 4 HDD Blackplane Introduction
Step 4Check fan speed amp temperature informationcmdgt sensor
cmd gtsensor==ENCLOSURE STATUS========================================================== Total fan number 2 System Fan-0 speed 10888 RPM System Fan-1 speed 10971 RPM System PWN-0 82 Expander Temperature 76 Celsius degree Sytem Temperature-0 33 Celsius degree T1 20 Celsius degree T2 50 Celsius degree TC 55 Celsius degree Voltage Sensor 09V 093V Voltage Sensor 18V 180V
cmd gt_
Chapter 1 Product IntroductionChapter 1 Product IntroductionChapter 5 Technical Support
wwwaicipccom
bull TAIWANTel +886 3 433 9188Fax +886 3 287 1818Email salesaicipccomtw
bull CHINA Tel +862154961421 +862154961422Fax Extension 608Email Technical Support supportaicipccom
bull AMERICA - West coastTel +19098958989Fax +19098958999Email salesaicipccom
bull AMERICA - East coastTel +19738848886Fax +19738844794Email njsalesaicipccom
bull EUROPETel +31306386789Fax +31306360638Emailsalesaicipcnl
Email Technical Support supportaicipccom
- PREFACE
-
- SAFETY INSTRUCTIONS
-
- Chapter 1 Prodcut Introduction
-
- 11 Box Content
- 12 Specifications
- 13 General Information
-
- Chapter 2 Hardware Installation
-
- 21 Removing and Installing Top Cover
- 22 Installing Removing a Hard Disk Drive
- 23 Removing and Installing a PSU Module
- 24 Removing and Installing a Fan Module
- 25 Removing and Installing the HDD backplane Module
- 26 Tool-less Blade Slide Installation Instruction
-
- Chapter 3 Hardware Introduction
-
- 31 HARDWARE DESIGN SPECIFICATION
-
- Chapter 4 HDD Blackplane Introduction
-
- 41 Expender firmware update through phone connector port
- 42 Update the expander firmware through in-band
- 43 12G expander EDFB setting
- 44 Slot HDD power setting
- 45 HDD BP thermal sensor temperature setting
-
- Chapter 5 Technical Support
-

RSC-4BT Users Manual
11
Chapter 2 Hardware Installation
Pull the fan module up gently and taking out the fan module by removing rubbers out from the fan bar
242 Installing a Fan ModuleMake sure the 4 rubbers and connector insert firmly while fan module is inserted
Chapter 2 Hardware Installation
RSC-4BT Users Manual
12
25 Removing and Installing the HDD backplane Module
251 Removing a HDD backplanebull Unplugging all connectors amp HDDs from HDD backplanebull Release the lock pin252 Installing a HDD backplane modulebull Slide the HDD backplane module into enclosuresbull Secure the HDD backplane module onto the enclosures using the screws
RSC-4BT Users Manual
13
Chapter 2 Hardware Installation
bull Lift up and remove the blackplane to the a little bit up from hook then can get out253 Installing a HDD backplane module(follow the reverse order)bull Align the backplane with the hooks and insert it into the enclosure firmlybull Lock the backplane Follow the reverse order
Chapter 2 Hardware Installation
RSC-4BT Users Manual
14
26 Tool-less Blade Slide Installation InstructionSeparate the tool-less slide rail
261 Pull the inner rail out of the outer rail until it is fully extendedPress the locking tab down to release the inner rail
PULL
Outer Rail
Middle Rail
Inner Rail
RSC-4BT Users Manual
15
Chapter 2 Hardware Installation
262 Place the inner rail firmly against the side of the chassis Make sure that the hooks are straight and aligned with the holes in the inner rail
Slide the inner rail forward until it clicks into the locked position
Screw
Screw
1
2
3
3
Chapter 2 Hardware Installation
RSC-4BT Users Manual
16
263 Press the locking tab and push the middle rail back into the outer rail
RSC-4BT Users Manual
17
Chapter 2 Hardware Installation
264 Hang the hooks of the rails on the rack holes and if necessary secure with screws
1
2
Optional Screws
Chapter 2 Hardware Installation
RSC-4BT Users Manual
18
265 Repeat step 274 to mount the four ends extending the rails as necessary
RSC-4BT Users Manual
19
Chapter 2 Hardware Installation
266 Pull the middle rail out of the front of the outer rail and make sure that the ball bearing shuttle is locked at the front of the middle rail
Align the inner rails with the middle rails and then push evenly on both sides of the chassis until it clicks into the fully extended position
Ball BearingShuttle
Chapter 2 Hardware Installation
RSC-4BT Users Manual
20
267 Depress the locking tabs on both sides of the chassis simultaneously and push the chassis all the way into the rear of the rack
If additional security is required secure the chassis handles to the front of the rack with two screws (optional)
Screw
Screw
Complete
RSC-4BT Users Manual
21
Chapter 3 Hardware IntroductionChapter 3 Hardware Introduction
This chapter provides detailed instruction guide on hardware instruction
31 HARDWARE DESIGN SPECIFICATION311 Placement
PCBA Placement
HDD
HDD
HDD
HDD
HDD
HDD
HDD
HDD
HDD
HDD
HDD
HDD
HDD
HDD
HDD
HDD
HDD
HDD
HDD
HDD
HDD
HDD
HDD
HDD
Expander
RSC-4BT Users Manual
22
Chapter 3 Hardware Introduction
312 Connector Location
Connector Location
JPWR1 JPWR2
JFAN1
JFAN2
JFAN4 JFAN3 JPMBUS
JEXP_UART JEXP2
SASHD3 SASHD2 SASHD1
JMCU_UART JMCU_DBG
JFRONT
JI2C3 JI2C4
JI2C0
RSC-4BT Users Manual
23
Chapter 3 Hardware Introduction
313 Power Connector
Power Connector
RSC-4BT Users Manual
24
Chapter 3 Hardware Introduction
314 Fan Connector
RSC-4BT Users Manual
25
Chapter 3 Hardware Introduction
315 FAN setting ( if insert fan on HDD BP )
JFRONT
RSC-4BT Users Manual
26
Chapter 3 Hardware Introduction
316 Power Connector
Power Connector
RSC-4BT Users Manual
27
Chapter 3 Hardware Introduction
317 Drive Slot Map
RSC-4BT Users Manual
28
Chapter 4 HDD Blackplane IntroductionChapter 4 HDD Blackplane Introduction
41 Expender firmware update through phone connector port411 Update Expander firmware revision
Step 1 Set up RSC-4BT phone connector Insert phone connector into phone connector port shown
below also the other side inert cable into host PC or notebook
PLEASE FIND THE PHONE CONNECTOR CABLE IN THE PACKAGE BOX
RSC-4BT Users Manual
29
Chapter 4 HDD Blackplane Instruction
Step 2 Set up RSC-4BT connector connectionSet up connector connection application into your RSC-4BT as shown in the example process below
For exampleOS Microsoft WindowsRS232 connection application Hyperterminal
Step 2 Install HyperTrmexe
RSC-4BT Users Manual
30
Chapter 4 HDD Blackplane Introduction
Step 3 Enter a new name for the icon in the field below and click OK
Step 4 Connecting by using selecting an option in the drop down menu circled in red below (we selected COM2 in this example) and click OK
RSC-4BT Users Manual
31
Chapter 4 HDD Blackplane Instruction
Properties
Port Setting
Bits per second
Data bits
Parity
Stop bits
Flow control None
Restore Defaults
OK ApplyCancel
None
Step 6 Set up is complete The diagram below depicts what screen should displayed
Step 5 For ldquoBits per secondrdquo select 38400 For ldquoFlow controlrdquo select None Click OK when you have finished your selections
cmdgt_
RSC-4BT Users Manual
32
Chapter 4 HDD Blackplane Introduction
Step 7To get firmware image amp MFG Configuration Image version information from AIC SAS Related Firmware Downloadne website
httpppmsaicipccomtw8888downloadexpandermcu
RSC-4BT Users Manual
33
Chapter 4 HDD Blackplane Instruction
Step 8Comand line for show current firmware revisioncmdgtrev
RSC-4BT Users Manual
34
Chapter 4 HDD Blackplane Introduction
Step 9Start to update expander firmwarecmdgtfdl 0 0_
Step 10Select the tool bar Transfer -gt Send File
RSC-4BT Users Manual
35
Chapter 4 HDD Blackplane Instruction
Step 11bull Choose new firmware path file fw 3A1_v11221bull Protocol have to choose Xmodem
Step 12Firmware download complete
RSC-4BT Users Manual
36
Chapter 4 HDD Blackplane Introduction
Step 13Reset computer for success update firmwarecmdgtreset
reset
RSC-4BT Users Manual
37
Chapter 4 HDD Blackplane Instruction
Step 13Reset computer for success update firmwarecmdgtreset
412 Update expander configuration MFG
Step 1Comand line for show current configuration MFGcmdgt showmfg
RSC-4BT Users Manual
38
Chapter 4 HDD Blackplane Introduction
Step 2Start to update expander configuration MFGcmdgtfdl 83 0_
Step 3Select the tool bar Transfer -gt Send File
83 0
RSC-4BT Users Manual
39
Chapter 4 HDD Blackplane Instruction
Step 4bull Choose new MFG path file mfg 3A10_eob_1201binbull Protocol have to choose Xmodem
Step 5MFG download complete
RSC-4BT Users Manual
40
Chapter 4 HDD Blackplane Introduction
Step 6Reset computer for success update MFGcmdgtreset
reset
RSC-4BT Users Manual
41
Chapter 4 HDD Blackplane Instruction
Step 6Reset computer for success update MFGcmdgtreset
42 Update the expander firmware through in-band
FOR EXAMPLEStep 1
Download and install SG3_utilsexe which compatible with Linux OSFrom website httpsgdannyczsgsg3_utilshtml website Reference version sg3_utils-140tgz
Step 2To get firmware image amp MFG Configuration Image version information from AIC SAS Related Firmware Downloadne websitehttpppmsaicipccomtw8888downloadexpandermcu
RSC-4BT Users Manual
42
Chapter 4 HDD Blackplane Introduction
Step 3Execute terminal under the same new firmware folderexample Setting a new firmware folder on Home page Open Terminal by click to the right button of mouse in the same window Home
Step 4Typing sudo -s to into administrator mode
RSC-4BT Users Manual
43
Chapter 4 HDD Blackplane Instruction
Step 5 Find expander location$ sg_map -i
Step 6Update Expander firmware$ sg_write_buffer --id=0x0 --in=fw3A1_v11221 --mode=0x2 --offset=0 devsg0
RSC-4BT Users Manual
44
Chapter 4 HDD Blackplane Introduction
Step 7 Update Expander MFG$ sg_write_buffer --id=0x83 --in=mfg3A10_eob_1201bin --mode=0x2 --offset=0 devsg0
Step 8Reboot computer for success update firmware amp MFGrootubuntu~ reboot
RSC-4BT Users Manual
45
Chapter 4 HDD Blackplane Instruction
43 12G expander EDFB settingStep 1
For Install HyperTerminalexe refer to section 41
Step 2 Get EDFB statuscmdgt edfb
RSC-4BT Users Manual
46
Chapter 4 HDD Blackplane Introduction
Step 3Change EDFB setting
Enable EDFB functioncmdgtedfb on
Disable EDFB functioncmdgtedfb off
cmd gtedfbEDFB is OFF
cmd gtedfb onSucceeded to set EDFB
cmd gtedfb offEDFB is OFF
RSC-4BT Users Manual
47
Chapter 4 HDD Blackplane Instruction
44 Slot HDD power setting(Only for system cooling Fan controled by expander)
Step 1 For Install sg3exe tool and get new firmware from website refer to section 42
Step 2Execute terminal under the same new firmware folderexample Setting a new firmware folder on Home page Open Terminal by click to the right button of mouse in the same window Home
RSC-4BT Users Manual
48
Chapter 4 HDD Blackplane Introduction
Step 3 Typing sudo -s to into administrator mode
Step 4 Find expander location$ sg_map -i
RSC-4BT Users Manual
49
Chapter 4 HDD Blackplane Instruction
Step 5For example
If would like to turn the Disk004 power off under the HBA card Need to check Disk004 power status $ sg_ses --page=7 devsg0
Under HBA card the Element 3 = Disk004
RSC-4BT Users Manual
50
Chapter 4 HDD Blackplane Introduction
Step 6To check Disk004 (element 3) power status is ok$ sg_ses --page=2 devsg0
S
Status shows belowThe status of Element 3 is OK
RSC-4BT Users Manual
51
Chapter 4 HDD Blackplane Instruction
Step 7Turn off a HDD power$ sg_ses --descriptor=Disk004 --set=341 devsg0
Step 8Turn on a HDD power$ sg_ses --descriptor=Disk004 --clear=341 devsg0
RSC-4BT Users Manual
52
Chapter 4 HDD Blackplane Introduction
45 HDD BP thermal sensor temperature setting(Only for system cooling Fan controled by expander)
Step 1 For Install HyperTerminalexe refer to section 41
Step 2Get the current temperature settingscmdgt temperature
RSC-4BT Users Manual
53
Chapter 4 HDD Blackplane Instruction
Step 3For example
Set new temperatureT1=20 C 4 18 CT2=50 C 4 52 CWarning threshold=50 C 448 CAlarm threshold=55 C 454 C
The new setting will take effect after resetcmdgt temperature 18 52 48 54cmdgt reset
RSC-4BT Users Manual
54
Chapter 4 HDD Blackplane Introduction
Step 4Check fan speed amp temperature informationcmdgt sensor
cmd gtsensor==ENCLOSURE STATUS========================================================== Total fan number 2 System Fan-0 speed 10888 RPM System Fan-1 speed 10971 RPM System PWN-0 82 Expander Temperature 76 Celsius degree Sytem Temperature-0 33 Celsius degree T1 20 Celsius degree T2 50 Celsius degree TC 55 Celsius degree Voltage Sensor 09V 093V Voltage Sensor 18V 180V
cmd gt_
Chapter 1 Product IntroductionChapter 1 Product IntroductionChapter 5 Technical Support
wwwaicipccom
bull TAIWANTel +886 3 433 9188Fax +886 3 287 1818Email salesaicipccomtw
bull CHINA Tel +862154961421 +862154961422Fax Extension 608Email Technical Support supportaicipccom
bull AMERICA - West coastTel +19098958989Fax +19098958999Email salesaicipccom
bull AMERICA - East coastTel +19738848886Fax +19738844794Email njsalesaicipccom
bull EUROPETel +31306386789Fax +31306360638Emailsalesaicipcnl
Email Technical Support supportaicipccom
- PREFACE
-
- SAFETY INSTRUCTIONS
-
- Chapter 1 Prodcut Introduction
-
- 11 Box Content
- 12 Specifications
- 13 General Information
-
- Chapter 2 Hardware Installation
-
- 21 Removing and Installing Top Cover
- 22 Installing Removing a Hard Disk Drive
- 23 Removing and Installing a PSU Module
- 24 Removing and Installing a Fan Module
- 25 Removing and Installing the HDD backplane Module
- 26 Tool-less Blade Slide Installation Instruction
-
- Chapter 3 Hardware Introduction
-
- 31 HARDWARE DESIGN SPECIFICATION
-
- Chapter 4 HDD Blackplane Introduction
-
- 41 Expender firmware update through phone connector port
- 42 Update the expander firmware through in-band
- 43 12G expander EDFB setting
- 44 Slot HDD power setting
- 45 HDD BP thermal sensor temperature setting
-
- Chapter 5 Technical Support
-

Chapter 2 Hardware Installation
RSC-4BT Users Manual
12
25 Removing and Installing the HDD backplane Module
251 Removing a HDD backplanebull Unplugging all connectors amp HDDs from HDD backplanebull Release the lock pin252 Installing a HDD backplane modulebull Slide the HDD backplane module into enclosuresbull Secure the HDD backplane module onto the enclosures using the screws
RSC-4BT Users Manual
13
Chapter 2 Hardware Installation
bull Lift up and remove the blackplane to the a little bit up from hook then can get out253 Installing a HDD backplane module(follow the reverse order)bull Align the backplane with the hooks and insert it into the enclosure firmlybull Lock the backplane Follow the reverse order
Chapter 2 Hardware Installation
RSC-4BT Users Manual
14
26 Tool-less Blade Slide Installation InstructionSeparate the tool-less slide rail
261 Pull the inner rail out of the outer rail until it is fully extendedPress the locking tab down to release the inner rail
PULL
Outer Rail
Middle Rail
Inner Rail
RSC-4BT Users Manual
15
Chapter 2 Hardware Installation
262 Place the inner rail firmly against the side of the chassis Make sure that the hooks are straight and aligned with the holes in the inner rail
Slide the inner rail forward until it clicks into the locked position
Screw
Screw
1
2
3
3
Chapter 2 Hardware Installation
RSC-4BT Users Manual
16
263 Press the locking tab and push the middle rail back into the outer rail
RSC-4BT Users Manual
17
Chapter 2 Hardware Installation
264 Hang the hooks of the rails on the rack holes and if necessary secure with screws
1
2
Optional Screws
Chapter 2 Hardware Installation
RSC-4BT Users Manual
18
265 Repeat step 274 to mount the four ends extending the rails as necessary
RSC-4BT Users Manual
19
Chapter 2 Hardware Installation
266 Pull the middle rail out of the front of the outer rail and make sure that the ball bearing shuttle is locked at the front of the middle rail
Align the inner rails with the middle rails and then push evenly on both sides of the chassis until it clicks into the fully extended position
Ball BearingShuttle
Chapter 2 Hardware Installation
RSC-4BT Users Manual
20
267 Depress the locking tabs on both sides of the chassis simultaneously and push the chassis all the way into the rear of the rack
If additional security is required secure the chassis handles to the front of the rack with two screws (optional)
Screw
Screw
Complete
RSC-4BT Users Manual
21
Chapter 3 Hardware IntroductionChapter 3 Hardware Introduction
This chapter provides detailed instruction guide on hardware instruction
31 HARDWARE DESIGN SPECIFICATION311 Placement
PCBA Placement
HDD
HDD
HDD
HDD
HDD
HDD
HDD
HDD
HDD
HDD
HDD
HDD
HDD
HDD
HDD
HDD
HDD
HDD
HDD
HDD
HDD
HDD
HDD
HDD
Expander
RSC-4BT Users Manual
22
Chapter 3 Hardware Introduction
312 Connector Location
Connector Location
JPWR1 JPWR2
JFAN1
JFAN2
JFAN4 JFAN3 JPMBUS
JEXP_UART JEXP2
SASHD3 SASHD2 SASHD1
JMCU_UART JMCU_DBG
JFRONT
JI2C3 JI2C4
JI2C0
RSC-4BT Users Manual
23
Chapter 3 Hardware Introduction
313 Power Connector
Power Connector
RSC-4BT Users Manual
24
Chapter 3 Hardware Introduction
314 Fan Connector
RSC-4BT Users Manual
25
Chapter 3 Hardware Introduction
315 FAN setting ( if insert fan on HDD BP )
JFRONT
RSC-4BT Users Manual
26
Chapter 3 Hardware Introduction
316 Power Connector
Power Connector
RSC-4BT Users Manual
27
Chapter 3 Hardware Introduction
317 Drive Slot Map
RSC-4BT Users Manual
28
Chapter 4 HDD Blackplane IntroductionChapter 4 HDD Blackplane Introduction
41 Expender firmware update through phone connector port411 Update Expander firmware revision
Step 1 Set up RSC-4BT phone connector Insert phone connector into phone connector port shown
below also the other side inert cable into host PC or notebook
PLEASE FIND THE PHONE CONNECTOR CABLE IN THE PACKAGE BOX
RSC-4BT Users Manual
29
Chapter 4 HDD Blackplane Instruction
Step 2 Set up RSC-4BT connector connectionSet up connector connection application into your RSC-4BT as shown in the example process below
For exampleOS Microsoft WindowsRS232 connection application Hyperterminal
Step 2 Install HyperTrmexe
RSC-4BT Users Manual
30
Chapter 4 HDD Blackplane Introduction
Step 3 Enter a new name for the icon in the field below and click OK
Step 4 Connecting by using selecting an option in the drop down menu circled in red below (we selected COM2 in this example) and click OK
RSC-4BT Users Manual
31
Chapter 4 HDD Blackplane Instruction
Properties
Port Setting
Bits per second
Data bits
Parity
Stop bits
Flow control None
Restore Defaults
OK ApplyCancel
None
Step 6 Set up is complete The diagram below depicts what screen should displayed
Step 5 For ldquoBits per secondrdquo select 38400 For ldquoFlow controlrdquo select None Click OK when you have finished your selections
cmdgt_
RSC-4BT Users Manual
32
Chapter 4 HDD Blackplane Introduction
Step 7To get firmware image amp MFG Configuration Image version information from AIC SAS Related Firmware Downloadne website
httpppmsaicipccomtw8888downloadexpandermcu
RSC-4BT Users Manual
33
Chapter 4 HDD Blackplane Instruction
Step 8Comand line for show current firmware revisioncmdgtrev
RSC-4BT Users Manual
34
Chapter 4 HDD Blackplane Introduction
Step 9Start to update expander firmwarecmdgtfdl 0 0_
Step 10Select the tool bar Transfer -gt Send File
RSC-4BT Users Manual
35
Chapter 4 HDD Blackplane Instruction
Step 11bull Choose new firmware path file fw 3A1_v11221bull Protocol have to choose Xmodem
Step 12Firmware download complete
RSC-4BT Users Manual
36
Chapter 4 HDD Blackplane Introduction
Step 13Reset computer for success update firmwarecmdgtreset
reset
RSC-4BT Users Manual
37
Chapter 4 HDD Blackplane Instruction
Step 13Reset computer for success update firmwarecmdgtreset
412 Update expander configuration MFG
Step 1Comand line for show current configuration MFGcmdgt showmfg
RSC-4BT Users Manual
38
Chapter 4 HDD Blackplane Introduction
Step 2Start to update expander configuration MFGcmdgtfdl 83 0_
Step 3Select the tool bar Transfer -gt Send File
83 0
RSC-4BT Users Manual
39
Chapter 4 HDD Blackplane Instruction
Step 4bull Choose new MFG path file mfg 3A10_eob_1201binbull Protocol have to choose Xmodem
Step 5MFG download complete
RSC-4BT Users Manual
40
Chapter 4 HDD Blackplane Introduction
Step 6Reset computer for success update MFGcmdgtreset
reset
RSC-4BT Users Manual
41
Chapter 4 HDD Blackplane Instruction
Step 6Reset computer for success update MFGcmdgtreset
42 Update the expander firmware through in-band
FOR EXAMPLEStep 1
Download and install SG3_utilsexe which compatible with Linux OSFrom website httpsgdannyczsgsg3_utilshtml website Reference version sg3_utils-140tgz
Step 2To get firmware image amp MFG Configuration Image version information from AIC SAS Related Firmware Downloadne websitehttpppmsaicipccomtw8888downloadexpandermcu
RSC-4BT Users Manual
42
Chapter 4 HDD Blackplane Introduction
Step 3Execute terminal under the same new firmware folderexample Setting a new firmware folder on Home page Open Terminal by click to the right button of mouse in the same window Home
Step 4Typing sudo -s to into administrator mode
RSC-4BT Users Manual
43
Chapter 4 HDD Blackplane Instruction
Step 5 Find expander location$ sg_map -i
Step 6Update Expander firmware$ sg_write_buffer --id=0x0 --in=fw3A1_v11221 --mode=0x2 --offset=0 devsg0
RSC-4BT Users Manual
44
Chapter 4 HDD Blackplane Introduction
Step 7 Update Expander MFG$ sg_write_buffer --id=0x83 --in=mfg3A10_eob_1201bin --mode=0x2 --offset=0 devsg0
Step 8Reboot computer for success update firmware amp MFGrootubuntu~ reboot
RSC-4BT Users Manual
45
Chapter 4 HDD Blackplane Instruction
43 12G expander EDFB settingStep 1
For Install HyperTerminalexe refer to section 41
Step 2 Get EDFB statuscmdgt edfb
RSC-4BT Users Manual
46
Chapter 4 HDD Blackplane Introduction
Step 3Change EDFB setting
Enable EDFB functioncmdgtedfb on
Disable EDFB functioncmdgtedfb off
cmd gtedfbEDFB is OFF
cmd gtedfb onSucceeded to set EDFB
cmd gtedfb offEDFB is OFF
RSC-4BT Users Manual
47
Chapter 4 HDD Blackplane Instruction
44 Slot HDD power setting(Only for system cooling Fan controled by expander)
Step 1 For Install sg3exe tool and get new firmware from website refer to section 42
Step 2Execute terminal under the same new firmware folderexample Setting a new firmware folder on Home page Open Terminal by click to the right button of mouse in the same window Home
RSC-4BT Users Manual
48
Chapter 4 HDD Blackplane Introduction
Step 3 Typing sudo -s to into administrator mode
Step 4 Find expander location$ sg_map -i
RSC-4BT Users Manual
49
Chapter 4 HDD Blackplane Instruction
Step 5For example
If would like to turn the Disk004 power off under the HBA card Need to check Disk004 power status $ sg_ses --page=7 devsg0
Under HBA card the Element 3 = Disk004
RSC-4BT Users Manual
50
Chapter 4 HDD Blackplane Introduction
Step 6To check Disk004 (element 3) power status is ok$ sg_ses --page=2 devsg0
S
Status shows belowThe status of Element 3 is OK
RSC-4BT Users Manual
51
Chapter 4 HDD Blackplane Instruction
Step 7Turn off a HDD power$ sg_ses --descriptor=Disk004 --set=341 devsg0
Step 8Turn on a HDD power$ sg_ses --descriptor=Disk004 --clear=341 devsg0
RSC-4BT Users Manual
52
Chapter 4 HDD Blackplane Introduction
45 HDD BP thermal sensor temperature setting(Only for system cooling Fan controled by expander)
Step 1 For Install HyperTerminalexe refer to section 41
Step 2Get the current temperature settingscmdgt temperature
RSC-4BT Users Manual
53
Chapter 4 HDD Blackplane Instruction
Step 3For example
Set new temperatureT1=20 C 4 18 CT2=50 C 4 52 CWarning threshold=50 C 448 CAlarm threshold=55 C 454 C
The new setting will take effect after resetcmdgt temperature 18 52 48 54cmdgt reset
RSC-4BT Users Manual
54
Chapter 4 HDD Blackplane Introduction
Step 4Check fan speed amp temperature informationcmdgt sensor
cmd gtsensor==ENCLOSURE STATUS========================================================== Total fan number 2 System Fan-0 speed 10888 RPM System Fan-1 speed 10971 RPM System PWN-0 82 Expander Temperature 76 Celsius degree Sytem Temperature-0 33 Celsius degree T1 20 Celsius degree T2 50 Celsius degree TC 55 Celsius degree Voltage Sensor 09V 093V Voltage Sensor 18V 180V
cmd gt_
Chapter 1 Product IntroductionChapter 1 Product IntroductionChapter 5 Technical Support
wwwaicipccom
bull TAIWANTel +886 3 433 9188Fax +886 3 287 1818Email salesaicipccomtw
bull CHINA Tel +862154961421 +862154961422Fax Extension 608Email Technical Support supportaicipccom
bull AMERICA - West coastTel +19098958989Fax +19098958999Email salesaicipccom
bull AMERICA - East coastTel +19738848886Fax +19738844794Email njsalesaicipccom
bull EUROPETel +31306386789Fax +31306360638Emailsalesaicipcnl
Email Technical Support supportaicipccom
- PREFACE
-
- SAFETY INSTRUCTIONS
-
- Chapter 1 Prodcut Introduction
-
- 11 Box Content
- 12 Specifications
- 13 General Information
-
- Chapter 2 Hardware Installation
-
- 21 Removing and Installing Top Cover
- 22 Installing Removing a Hard Disk Drive
- 23 Removing and Installing a PSU Module
- 24 Removing and Installing a Fan Module
- 25 Removing and Installing the HDD backplane Module
- 26 Tool-less Blade Slide Installation Instruction
-
- Chapter 3 Hardware Introduction
-
- 31 HARDWARE DESIGN SPECIFICATION
-
- Chapter 4 HDD Blackplane Introduction
-
- 41 Expender firmware update through phone connector port
- 42 Update the expander firmware through in-band
- 43 12G expander EDFB setting
- 44 Slot HDD power setting
- 45 HDD BP thermal sensor temperature setting
-
- Chapter 5 Technical Support
-

RSC-4BT Users Manual
13
Chapter 2 Hardware Installation
bull Lift up and remove the blackplane to the a little bit up from hook then can get out253 Installing a HDD backplane module(follow the reverse order)bull Align the backplane with the hooks and insert it into the enclosure firmlybull Lock the backplane Follow the reverse order
Chapter 2 Hardware Installation
RSC-4BT Users Manual
14
26 Tool-less Blade Slide Installation InstructionSeparate the tool-less slide rail
261 Pull the inner rail out of the outer rail until it is fully extendedPress the locking tab down to release the inner rail
PULL
Outer Rail
Middle Rail
Inner Rail
RSC-4BT Users Manual
15
Chapter 2 Hardware Installation
262 Place the inner rail firmly against the side of the chassis Make sure that the hooks are straight and aligned with the holes in the inner rail
Slide the inner rail forward until it clicks into the locked position
Screw
Screw
1
2
3
3
Chapter 2 Hardware Installation
RSC-4BT Users Manual
16
263 Press the locking tab and push the middle rail back into the outer rail
RSC-4BT Users Manual
17
Chapter 2 Hardware Installation
264 Hang the hooks of the rails on the rack holes and if necessary secure with screws
1
2
Optional Screws
Chapter 2 Hardware Installation
RSC-4BT Users Manual
18
265 Repeat step 274 to mount the four ends extending the rails as necessary
RSC-4BT Users Manual
19
Chapter 2 Hardware Installation
266 Pull the middle rail out of the front of the outer rail and make sure that the ball bearing shuttle is locked at the front of the middle rail
Align the inner rails with the middle rails and then push evenly on both sides of the chassis until it clicks into the fully extended position
Ball BearingShuttle
Chapter 2 Hardware Installation
RSC-4BT Users Manual
20
267 Depress the locking tabs on both sides of the chassis simultaneously and push the chassis all the way into the rear of the rack
If additional security is required secure the chassis handles to the front of the rack with two screws (optional)
Screw
Screw
Complete
RSC-4BT Users Manual
21
Chapter 3 Hardware IntroductionChapter 3 Hardware Introduction
This chapter provides detailed instruction guide on hardware instruction
31 HARDWARE DESIGN SPECIFICATION311 Placement
PCBA Placement
HDD
HDD
HDD
HDD
HDD
HDD
HDD
HDD
HDD
HDD
HDD
HDD
HDD
HDD
HDD
HDD
HDD
HDD
HDD
HDD
HDD
HDD
HDD
HDD
Expander
RSC-4BT Users Manual
22
Chapter 3 Hardware Introduction
312 Connector Location
Connector Location
JPWR1 JPWR2
JFAN1
JFAN2
JFAN4 JFAN3 JPMBUS
JEXP_UART JEXP2
SASHD3 SASHD2 SASHD1
JMCU_UART JMCU_DBG
JFRONT
JI2C3 JI2C4
JI2C0
RSC-4BT Users Manual
23
Chapter 3 Hardware Introduction
313 Power Connector
Power Connector
RSC-4BT Users Manual
24
Chapter 3 Hardware Introduction
314 Fan Connector
RSC-4BT Users Manual
25
Chapter 3 Hardware Introduction
315 FAN setting ( if insert fan on HDD BP )
JFRONT
RSC-4BT Users Manual
26
Chapter 3 Hardware Introduction
316 Power Connector
Power Connector
RSC-4BT Users Manual
27
Chapter 3 Hardware Introduction
317 Drive Slot Map
RSC-4BT Users Manual
28
Chapter 4 HDD Blackplane IntroductionChapter 4 HDD Blackplane Introduction
41 Expender firmware update through phone connector port411 Update Expander firmware revision
Step 1 Set up RSC-4BT phone connector Insert phone connector into phone connector port shown
below also the other side inert cable into host PC or notebook
PLEASE FIND THE PHONE CONNECTOR CABLE IN THE PACKAGE BOX
RSC-4BT Users Manual
29
Chapter 4 HDD Blackplane Instruction
Step 2 Set up RSC-4BT connector connectionSet up connector connection application into your RSC-4BT as shown in the example process below
For exampleOS Microsoft WindowsRS232 connection application Hyperterminal
Step 2 Install HyperTrmexe
RSC-4BT Users Manual
30
Chapter 4 HDD Blackplane Introduction
Step 3 Enter a new name for the icon in the field below and click OK
Step 4 Connecting by using selecting an option in the drop down menu circled in red below (we selected COM2 in this example) and click OK
RSC-4BT Users Manual
31
Chapter 4 HDD Blackplane Instruction
Properties
Port Setting
Bits per second
Data bits
Parity
Stop bits
Flow control None
Restore Defaults
OK ApplyCancel
None
Step 6 Set up is complete The diagram below depicts what screen should displayed
Step 5 For ldquoBits per secondrdquo select 38400 For ldquoFlow controlrdquo select None Click OK when you have finished your selections
cmdgt_
RSC-4BT Users Manual
32
Chapter 4 HDD Blackplane Introduction
Step 7To get firmware image amp MFG Configuration Image version information from AIC SAS Related Firmware Downloadne website
httpppmsaicipccomtw8888downloadexpandermcu
RSC-4BT Users Manual
33
Chapter 4 HDD Blackplane Instruction
Step 8Comand line for show current firmware revisioncmdgtrev
RSC-4BT Users Manual
34
Chapter 4 HDD Blackplane Introduction
Step 9Start to update expander firmwarecmdgtfdl 0 0_
Step 10Select the tool bar Transfer -gt Send File
RSC-4BT Users Manual
35
Chapter 4 HDD Blackplane Instruction
Step 11bull Choose new firmware path file fw 3A1_v11221bull Protocol have to choose Xmodem
Step 12Firmware download complete
RSC-4BT Users Manual
36
Chapter 4 HDD Blackplane Introduction
Step 13Reset computer for success update firmwarecmdgtreset
reset
RSC-4BT Users Manual
37
Chapter 4 HDD Blackplane Instruction
Step 13Reset computer for success update firmwarecmdgtreset
412 Update expander configuration MFG
Step 1Comand line for show current configuration MFGcmdgt showmfg
RSC-4BT Users Manual
38
Chapter 4 HDD Blackplane Introduction
Step 2Start to update expander configuration MFGcmdgtfdl 83 0_
Step 3Select the tool bar Transfer -gt Send File
83 0
RSC-4BT Users Manual
39
Chapter 4 HDD Blackplane Instruction
Step 4bull Choose new MFG path file mfg 3A10_eob_1201binbull Protocol have to choose Xmodem
Step 5MFG download complete
RSC-4BT Users Manual
40
Chapter 4 HDD Blackplane Introduction
Step 6Reset computer for success update MFGcmdgtreset
reset
RSC-4BT Users Manual
41
Chapter 4 HDD Blackplane Instruction
Step 6Reset computer for success update MFGcmdgtreset
42 Update the expander firmware through in-band
FOR EXAMPLEStep 1
Download and install SG3_utilsexe which compatible with Linux OSFrom website httpsgdannyczsgsg3_utilshtml website Reference version sg3_utils-140tgz
Step 2To get firmware image amp MFG Configuration Image version information from AIC SAS Related Firmware Downloadne websitehttpppmsaicipccomtw8888downloadexpandermcu
RSC-4BT Users Manual
42
Chapter 4 HDD Blackplane Introduction
Step 3Execute terminal under the same new firmware folderexample Setting a new firmware folder on Home page Open Terminal by click to the right button of mouse in the same window Home
Step 4Typing sudo -s to into administrator mode
RSC-4BT Users Manual
43
Chapter 4 HDD Blackplane Instruction
Step 5 Find expander location$ sg_map -i
Step 6Update Expander firmware$ sg_write_buffer --id=0x0 --in=fw3A1_v11221 --mode=0x2 --offset=0 devsg0
RSC-4BT Users Manual
44
Chapter 4 HDD Blackplane Introduction
Step 7 Update Expander MFG$ sg_write_buffer --id=0x83 --in=mfg3A10_eob_1201bin --mode=0x2 --offset=0 devsg0
Step 8Reboot computer for success update firmware amp MFGrootubuntu~ reboot
RSC-4BT Users Manual
45
Chapter 4 HDD Blackplane Instruction
43 12G expander EDFB settingStep 1
For Install HyperTerminalexe refer to section 41
Step 2 Get EDFB statuscmdgt edfb
RSC-4BT Users Manual
46
Chapter 4 HDD Blackplane Introduction
Step 3Change EDFB setting
Enable EDFB functioncmdgtedfb on
Disable EDFB functioncmdgtedfb off
cmd gtedfbEDFB is OFF
cmd gtedfb onSucceeded to set EDFB
cmd gtedfb offEDFB is OFF
RSC-4BT Users Manual
47
Chapter 4 HDD Blackplane Instruction
44 Slot HDD power setting(Only for system cooling Fan controled by expander)
Step 1 For Install sg3exe tool and get new firmware from website refer to section 42
Step 2Execute terminal under the same new firmware folderexample Setting a new firmware folder on Home page Open Terminal by click to the right button of mouse in the same window Home
RSC-4BT Users Manual
48
Chapter 4 HDD Blackplane Introduction
Step 3 Typing sudo -s to into administrator mode
Step 4 Find expander location$ sg_map -i
RSC-4BT Users Manual
49
Chapter 4 HDD Blackplane Instruction
Step 5For example
If would like to turn the Disk004 power off under the HBA card Need to check Disk004 power status $ sg_ses --page=7 devsg0
Under HBA card the Element 3 = Disk004
RSC-4BT Users Manual
50
Chapter 4 HDD Blackplane Introduction
Step 6To check Disk004 (element 3) power status is ok$ sg_ses --page=2 devsg0
S
Status shows belowThe status of Element 3 is OK
RSC-4BT Users Manual
51
Chapter 4 HDD Blackplane Instruction
Step 7Turn off a HDD power$ sg_ses --descriptor=Disk004 --set=341 devsg0
Step 8Turn on a HDD power$ sg_ses --descriptor=Disk004 --clear=341 devsg0
RSC-4BT Users Manual
52
Chapter 4 HDD Blackplane Introduction
45 HDD BP thermal sensor temperature setting(Only for system cooling Fan controled by expander)
Step 1 For Install HyperTerminalexe refer to section 41
Step 2Get the current temperature settingscmdgt temperature
RSC-4BT Users Manual
53
Chapter 4 HDD Blackplane Instruction
Step 3For example
Set new temperatureT1=20 C 4 18 CT2=50 C 4 52 CWarning threshold=50 C 448 CAlarm threshold=55 C 454 C
The new setting will take effect after resetcmdgt temperature 18 52 48 54cmdgt reset
RSC-4BT Users Manual
54
Chapter 4 HDD Blackplane Introduction
Step 4Check fan speed amp temperature informationcmdgt sensor
cmd gtsensor==ENCLOSURE STATUS========================================================== Total fan number 2 System Fan-0 speed 10888 RPM System Fan-1 speed 10971 RPM System PWN-0 82 Expander Temperature 76 Celsius degree Sytem Temperature-0 33 Celsius degree T1 20 Celsius degree T2 50 Celsius degree TC 55 Celsius degree Voltage Sensor 09V 093V Voltage Sensor 18V 180V
cmd gt_
Chapter 1 Product IntroductionChapter 1 Product IntroductionChapter 5 Technical Support
wwwaicipccom
bull TAIWANTel +886 3 433 9188Fax +886 3 287 1818Email salesaicipccomtw
bull CHINA Tel +862154961421 +862154961422Fax Extension 608Email Technical Support supportaicipccom
bull AMERICA - West coastTel +19098958989Fax +19098958999Email salesaicipccom
bull AMERICA - East coastTel +19738848886Fax +19738844794Email njsalesaicipccom
bull EUROPETel +31306386789Fax +31306360638Emailsalesaicipcnl
Email Technical Support supportaicipccom
- PREFACE
-
- SAFETY INSTRUCTIONS
-
- Chapter 1 Prodcut Introduction
-
- 11 Box Content
- 12 Specifications
- 13 General Information
-
- Chapter 2 Hardware Installation
-
- 21 Removing and Installing Top Cover
- 22 Installing Removing a Hard Disk Drive
- 23 Removing and Installing a PSU Module
- 24 Removing and Installing a Fan Module
- 25 Removing and Installing the HDD backplane Module
- 26 Tool-less Blade Slide Installation Instruction
-
- Chapter 3 Hardware Introduction
-
- 31 HARDWARE DESIGN SPECIFICATION
-
- Chapter 4 HDD Blackplane Introduction
-
- 41 Expender firmware update through phone connector port
- 42 Update the expander firmware through in-band
- 43 12G expander EDFB setting
- 44 Slot HDD power setting
- 45 HDD BP thermal sensor temperature setting
-
- Chapter 5 Technical Support
-

Chapter 2 Hardware Installation
RSC-4BT Users Manual
14
26 Tool-less Blade Slide Installation InstructionSeparate the tool-less slide rail
261 Pull the inner rail out of the outer rail until it is fully extendedPress the locking tab down to release the inner rail
PULL
Outer Rail
Middle Rail
Inner Rail
RSC-4BT Users Manual
15
Chapter 2 Hardware Installation
262 Place the inner rail firmly against the side of the chassis Make sure that the hooks are straight and aligned with the holes in the inner rail
Slide the inner rail forward until it clicks into the locked position
Screw
Screw
1
2
3
3
Chapter 2 Hardware Installation
RSC-4BT Users Manual
16
263 Press the locking tab and push the middle rail back into the outer rail
RSC-4BT Users Manual
17
Chapter 2 Hardware Installation
264 Hang the hooks of the rails on the rack holes and if necessary secure with screws
1
2
Optional Screws
Chapter 2 Hardware Installation
RSC-4BT Users Manual
18
265 Repeat step 274 to mount the four ends extending the rails as necessary
RSC-4BT Users Manual
19
Chapter 2 Hardware Installation
266 Pull the middle rail out of the front of the outer rail and make sure that the ball bearing shuttle is locked at the front of the middle rail
Align the inner rails with the middle rails and then push evenly on both sides of the chassis until it clicks into the fully extended position
Ball BearingShuttle
Chapter 2 Hardware Installation
RSC-4BT Users Manual
20
267 Depress the locking tabs on both sides of the chassis simultaneously and push the chassis all the way into the rear of the rack
If additional security is required secure the chassis handles to the front of the rack with two screws (optional)
Screw
Screw
Complete
RSC-4BT Users Manual
21
Chapter 3 Hardware IntroductionChapter 3 Hardware Introduction
This chapter provides detailed instruction guide on hardware instruction
31 HARDWARE DESIGN SPECIFICATION311 Placement
PCBA Placement
HDD
HDD
HDD
HDD
HDD
HDD
HDD
HDD
HDD
HDD
HDD
HDD
HDD
HDD
HDD
HDD
HDD
HDD
HDD
HDD
HDD
HDD
HDD
HDD
Expander
RSC-4BT Users Manual
22
Chapter 3 Hardware Introduction
312 Connector Location
Connector Location
JPWR1 JPWR2
JFAN1
JFAN2
JFAN4 JFAN3 JPMBUS
JEXP_UART JEXP2
SASHD3 SASHD2 SASHD1
JMCU_UART JMCU_DBG
JFRONT
JI2C3 JI2C4
JI2C0
RSC-4BT Users Manual
23
Chapter 3 Hardware Introduction
313 Power Connector
Power Connector
RSC-4BT Users Manual
24
Chapter 3 Hardware Introduction
314 Fan Connector
RSC-4BT Users Manual
25
Chapter 3 Hardware Introduction
315 FAN setting ( if insert fan on HDD BP )
JFRONT
RSC-4BT Users Manual
26
Chapter 3 Hardware Introduction
316 Power Connector
Power Connector
RSC-4BT Users Manual
27
Chapter 3 Hardware Introduction
317 Drive Slot Map
RSC-4BT Users Manual
28
Chapter 4 HDD Blackplane IntroductionChapter 4 HDD Blackplane Introduction
41 Expender firmware update through phone connector port411 Update Expander firmware revision
Step 1 Set up RSC-4BT phone connector Insert phone connector into phone connector port shown
below also the other side inert cable into host PC or notebook
PLEASE FIND THE PHONE CONNECTOR CABLE IN THE PACKAGE BOX
RSC-4BT Users Manual
29
Chapter 4 HDD Blackplane Instruction
Step 2 Set up RSC-4BT connector connectionSet up connector connection application into your RSC-4BT as shown in the example process below
For exampleOS Microsoft WindowsRS232 connection application Hyperterminal
Step 2 Install HyperTrmexe
RSC-4BT Users Manual
30
Chapter 4 HDD Blackplane Introduction
Step 3 Enter a new name for the icon in the field below and click OK
Step 4 Connecting by using selecting an option in the drop down menu circled in red below (we selected COM2 in this example) and click OK
RSC-4BT Users Manual
31
Chapter 4 HDD Blackplane Instruction
Properties
Port Setting
Bits per second
Data bits
Parity
Stop bits
Flow control None
Restore Defaults
OK ApplyCancel
None
Step 6 Set up is complete The diagram below depicts what screen should displayed
Step 5 For ldquoBits per secondrdquo select 38400 For ldquoFlow controlrdquo select None Click OK when you have finished your selections
cmdgt_
RSC-4BT Users Manual
32
Chapter 4 HDD Blackplane Introduction
Step 7To get firmware image amp MFG Configuration Image version information from AIC SAS Related Firmware Downloadne website
httpppmsaicipccomtw8888downloadexpandermcu
RSC-4BT Users Manual
33
Chapter 4 HDD Blackplane Instruction
Step 8Comand line for show current firmware revisioncmdgtrev
RSC-4BT Users Manual
34
Chapter 4 HDD Blackplane Introduction
Step 9Start to update expander firmwarecmdgtfdl 0 0_
Step 10Select the tool bar Transfer -gt Send File
RSC-4BT Users Manual
35
Chapter 4 HDD Blackplane Instruction
Step 11bull Choose new firmware path file fw 3A1_v11221bull Protocol have to choose Xmodem
Step 12Firmware download complete
RSC-4BT Users Manual
36
Chapter 4 HDD Blackplane Introduction
Step 13Reset computer for success update firmwarecmdgtreset
reset
RSC-4BT Users Manual
37
Chapter 4 HDD Blackplane Instruction
Step 13Reset computer for success update firmwarecmdgtreset
412 Update expander configuration MFG
Step 1Comand line for show current configuration MFGcmdgt showmfg
RSC-4BT Users Manual
38
Chapter 4 HDD Blackplane Introduction
Step 2Start to update expander configuration MFGcmdgtfdl 83 0_
Step 3Select the tool bar Transfer -gt Send File
83 0
RSC-4BT Users Manual
39
Chapter 4 HDD Blackplane Instruction
Step 4bull Choose new MFG path file mfg 3A10_eob_1201binbull Protocol have to choose Xmodem
Step 5MFG download complete
RSC-4BT Users Manual
40
Chapter 4 HDD Blackplane Introduction
Step 6Reset computer for success update MFGcmdgtreset
reset
RSC-4BT Users Manual
41
Chapter 4 HDD Blackplane Instruction
Step 6Reset computer for success update MFGcmdgtreset
42 Update the expander firmware through in-band
FOR EXAMPLEStep 1
Download and install SG3_utilsexe which compatible with Linux OSFrom website httpsgdannyczsgsg3_utilshtml website Reference version sg3_utils-140tgz
Step 2To get firmware image amp MFG Configuration Image version information from AIC SAS Related Firmware Downloadne websitehttpppmsaicipccomtw8888downloadexpandermcu
RSC-4BT Users Manual
42
Chapter 4 HDD Blackplane Introduction
Step 3Execute terminal under the same new firmware folderexample Setting a new firmware folder on Home page Open Terminal by click to the right button of mouse in the same window Home
Step 4Typing sudo -s to into administrator mode
RSC-4BT Users Manual
43
Chapter 4 HDD Blackplane Instruction
Step 5 Find expander location$ sg_map -i
Step 6Update Expander firmware$ sg_write_buffer --id=0x0 --in=fw3A1_v11221 --mode=0x2 --offset=0 devsg0
RSC-4BT Users Manual
44
Chapter 4 HDD Blackplane Introduction
Step 7 Update Expander MFG$ sg_write_buffer --id=0x83 --in=mfg3A10_eob_1201bin --mode=0x2 --offset=0 devsg0
Step 8Reboot computer for success update firmware amp MFGrootubuntu~ reboot
RSC-4BT Users Manual
45
Chapter 4 HDD Blackplane Instruction
43 12G expander EDFB settingStep 1
For Install HyperTerminalexe refer to section 41
Step 2 Get EDFB statuscmdgt edfb
RSC-4BT Users Manual
46
Chapter 4 HDD Blackplane Introduction
Step 3Change EDFB setting
Enable EDFB functioncmdgtedfb on
Disable EDFB functioncmdgtedfb off
cmd gtedfbEDFB is OFF
cmd gtedfb onSucceeded to set EDFB
cmd gtedfb offEDFB is OFF
RSC-4BT Users Manual
47
Chapter 4 HDD Blackplane Instruction
44 Slot HDD power setting(Only for system cooling Fan controled by expander)
Step 1 For Install sg3exe tool and get new firmware from website refer to section 42
Step 2Execute terminal under the same new firmware folderexample Setting a new firmware folder on Home page Open Terminal by click to the right button of mouse in the same window Home
RSC-4BT Users Manual
48
Chapter 4 HDD Blackplane Introduction
Step 3 Typing sudo -s to into administrator mode
Step 4 Find expander location$ sg_map -i
RSC-4BT Users Manual
49
Chapter 4 HDD Blackplane Instruction
Step 5For example
If would like to turn the Disk004 power off under the HBA card Need to check Disk004 power status $ sg_ses --page=7 devsg0
Under HBA card the Element 3 = Disk004
RSC-4BT Users Manual
50
Chapter 4 HDD Blackplane Introduction
Step 6To check Disk004 (element 3) power status is ok$ sg_ses --page=2 devsg0
S
Status shows belowThe status of Element 3 is OK
RSC-4BT Users Manual
51
Chapter 4 HDD Blackplane Instruction
Step 7Turn off a HDD power$ sg_ses --descriptor=Disk004 --set=341 devsg0
Step 8Turn on a HDD power$ sg_ses --descriptor=Disk004 --clear=341 devsg0
RSC-4BT Users Manual
52
Chapter 4 HDD Blackplane Introduction
45 HDD BP thermal sensor temperature setting(Only for system cooling Fan controled by expander)
Step 1 For Install HyperTerminalexe refer to section 41
Step 2Get the current temperature settingscmdgt temperature
RSC-4BT Users Manual
53
Chapter 4 HDD Blackplane Instruction
Step 3For example
Set new temperatureT1=20 C 4 18 CT2=50 C 4 52 CWarning threshold=50 C 448 CAlarm threshold=55 C 454 C
The new setting will take effect after resetcmdgt temperature 18 52 48 54cmdgt reset
RSC-4BT Users Manual
54
Chapter 4 HDD Blackplane Introduction
Step 4Check fan speed amp temperature informationcmdgt sensor
cmd gtsensor==ENCLOSURE STATUS========================================================== Total fan number 2 System Fan-0 speed 10888 RPM System Fan-1 speed 10971 RPM System PWN-0 82 Expander Temperature 76 Celsius degree Sytem Temperature-0 33 Celsius degree T1 20 Celsius degree T2 50 Celsius degree TC 55 Celsius degree Voltage Sensor 09V 093V Voltage Sensor 18V 180V
cmd gt_
Chapter 1 Product IntroductionChapter 1 Product IntroductionChapter 5 Technical Support
wwwaicipccom
bull TAIWANTel +886 3 433 9188Fax +886 3 287 1818Email salesaicipccomtw
bull CHINA Tel +862154961421 +862154961422Fax Extension 608Email Technical Support supportaicipccom
bull AMERICA - West coastTel +19098958989Fax +19098958999Email salesaicipccom
bull AMERICA - East coastTel +19738848886Fax +19738844794Email njsalesaicipccom
bull EUROPETel +31306386789Fax +31306360638Emailsalesaicipcnl
Email Technical Support supportaicipccom
- PREFACE
-
- SAFETY INSTRUCTIONS
-
- Chapter 1 Prodcut Introduction
-
- 11 Box Content
- 12 Specifications
- 13 General Information
-
- Chapter 2 Hardware Installation
-
- 21 Removing and Installing Top Cover
- 22 Installing Removing a Hard Disk Drive
- 23 Removing and Installing a PSU Module
- 24 Removing and Installing a Fan Module
- 25 Removing and Installing the HDD backplane Module
- 26 Tool-less Blade Slide Installation Instruction
-
- Chapter 3 Hardware Introduction
-
- 31 HARDWARE DESIGN SPECIFICATION
-
- Chapter 4 HDD Blackplane Introduction
-
- 41 Expender firmware update through phone connector port
- 42 Update the expander firmware through in-band
- 43 12G expander EDFB setting
- 44 Slot HDD power setting
- 45 HDD BP thermal sensor temperature setting
-
- Chapter 5 Technical Support
-

RSC-4BT Users Manual
15
Chapter 2 Hardware Installation
262 Place the inner rail firmly against the side of the chassis Make sure that the hooks are straight and aligned with the holes in the inner rail
Slide the inner rail forward until it clicks into the locked position
Screw
Screw
1
2
3
3
Chapter 2 Hardware Installation
RSC-4BT Users Manual
16
263 Press the locking tab and push the middle rail back into the outer rail
RSC-4BT Users Manual
17
Chapter 2 Hardware Installation
264 Hang the hooks of the rails on the rack holes and if necessary secure with screws
1
2
Optional Screws
Chapter 2 Hardware Installation
RSC-4BT Users Manual
18
265 Repeat step 274 to mount the four ends extending the rails as necessary
RSC-4BT Users Manual
19
Chapter 2 Hardware Installation
266 Pull the middle rail out of the front of the outer rail and make sure that the ball bearing shuttle is locked at the front of the middle rail
Align the inner rails with the middle rails and then push evenly on both sides of the chassis until it clicks into the fully extended position
Ball BearingShuttle
Chapter 2 Hardware Installation
RSC-4BT Users Manual
20
267 Depress the locking tabs on both sides of the chassis simultaneously and push the chassis all the way into the rear of the rack
If additional security is required secure the chassis handles to the front of the rack with two screws (optional)
Screw
Screw
Complete
RSC-4BT Users Manual
21
Chapter 3 Hardware IntroductionChapter 3 Hardware Introduction
This chapter provides detailed instruction guide on hardware instruction
31 HARDWARE DESIGN SPECIFICATION311 Placement
PCBA Placement
HDD
HDD
HDD
HDD
HDD
HDD
HDD
HDD
HDD
HDD
HDD
HDD
HDD
HDD
HDD
HDD
HDD
HDD
HDD
HDD
HDD
HDD
HDD
HDD
Expander
RSC-4BT Users Manual
22
Chapter 3 Hardware Introduction
312 Connector Location
Connector Location
JPWR1 JPWR2
JFAN1
JFAN2
JFAN4 JFAN3 JPMBUS
JEXP_UART JEXP2
SASHD3 SASHD2 SASHD1
JMCU_UART JMCU_DBG
JFRONT
JI2C3 JI2C4
JI2C0
RSC-4BT Users Manual
23
Chapter 3 Hardware Introduction
313 Power Connector
Power Connector
RSC-4BT Users Manual
24
Chapter 3 Hardware Introduction
314 Fan Connector
RSC-4BT Users Manual
25
Chapter 3 Hardware Introduction
315 FAN setting ( if insert fan on HDD BP )
JFRONT
RSC-4BT Users Manual
26
Chapter 3 Hardware Introduction
316 Power Connector
Power Connector
RSC-4BT Users Manual
27
Chapter 3 Hardware Introduction
317 Drive Slot Map
RSC-4BT Users Manual
28
Chapter 4 HDD Blackplane IntroductionChapter 4 HDD Blackplane Introduction
41 Expender firmware update through phone connector port411 Update Expander firmware revision
Step 1 Set up RSC-4BT phone connector Insert phone connector into phone connector port shown
below also the other side inert cable into host PC or notebook
PLEASE FIND THE PHONE CONNECTOR CABLE IN THE PACKAGE BOX
RSC-4BT Users Manual
29
Chapter 4 HDD Blackplane Instruction
Step 2 Set up RSC-4BT connector connectionSet up connector connection application into your RSC-4BT as shown in the example process below
For exampleOS Microsoft WindowsRS232 connection application Hyperterminal
Step 2 Install HyperTrmexe
RSC-4BT Users Manual
30
Chapter 4 HDD Blackplane Introduction
Step 3 Enter a new name for the icon in the field below and click OK
Step 4 Connecting by using selecting an option in the drop down menu circled in red below (we selected COM2 in this example) and click OK
RSC-4BT Users Manual
31
Chapter 4 HDD Blackplane Instruction
Properties
Port Setting
Bits per second
Data bits
Parity
Stop bits
Flow control None
Restore Defaults
OK ApplyCancel
None
Step 6 Set up is complete The diagram below depicts what screen should displayed
Step 5 For ldquoBits per secondrdquo select 38400 For ldquoFlow controlrdquo select None Click OK when you have finished your selections
cmdgt_
RSC-4BT Users Manual
32
Chapter 4 HDD Blackplane Introduction
Step 7To get firmware image amp MFG Configuration Image version information from AIC SAS Related Firmware Downloadne website
httpppmsaicipccomtw8888downloadexpandermcu
RSC-4BT Users Manual
33
Chapter 4 HDD Blackplane Instruction
Step 8Comand line for show current firmware revisioncmdgtrev
RSC-4BT Users Manual
34
Chapter 4 HDD Blackplane Introduction
Step 9Start to update expander firmwarecmdgtfdl 0 0_
Step 10Select the tool bar Transfer -gt Send File
RSC-4BT Users Manual
35
Chapter 4 HDD Blackplane Instruction
Step 11bull Choose new firmware path file fw 3A1_v11221bull Protocol have to choose Xmodem
Step 12Firmware download complete
RSC-4BT Users Manual
36
Chapter 4 HDD Blackplane Introduction
Step 13Reset computer for success update firmwarecmdgtreset
reset
RSC-4BT Users Manual
37
Chapter 4 HDD Blackplane Instruction
Step 13Reset computer for success update firmwarecmdgtreset
412 Update expander configuration MFG
Step 1Comand line for show current configuration MFGcmdgt showmfg
RSC-4BT Users Manual
38
Chapter 4 HDD Blackplane Introduction
Step 2Start to update expander configuration MFGcmdgtfdl 83 0_
Step 3Select the tool bar Transfer -gt Send File
83 0
RSC-4BT Users Manual
39
Chapter 4 HDD Blackplane Instruction
Step 4bull Choose new MFG path file mfg 3A10_eob_1201binbull Protocol have to choose Xmodem
Step 5MFG download complete
RSC-4BT Users Manual
40
Chapter 4 HDD Blackplane Introduction
Step 6Reset computer for success update MFGcmdgtreset
reset
RSC-4BT Users Manual
41
Chapter 4 HDD Blackplane Instruction
Step 6Reset computer for success update MFGcmdgtreset
42 Update the expander firmware through in-band
FOR EXAMPLEStep 1
Download and install SG3_utilsexe which compatible with Linux OSFrom website httpsgdannyczsgsg3_utilshtml website Reference version sg3_utils-140tgz
Step 2To get firmware image amp MFG Configuration Image version information from AIC SAS Related Firmware Downloadne websitehttpppmsaicipccomtw8888downloadexpandermcu
RSC-4BT Users Manual
42
Chapter 4 HDD Blackplane Introduction
Step 3Execute terminal under the same new firmware folderexample Setting a new firmware folder on Home page Open Terminal by click to the right button of mouse in the same window Home
Step 4Typing sudo -s to into administrator mode
RSC-4BT Users Manual
43
Chapter 4 HDD Blackplane Instruction
Step 5 Find expander location$ sg_map -i
Step 6Update Expander firmware$ sg_write_buffer --id=0x0 --in=fw3A1_v11221 --mode=0x2 --offset=0 devsg0
RSC-4BT Users Manual
44
Chapter 4 HDD Blackplane Introduction
Step 7 Update Expander MFG$ sg_write_buffer --id=0x83 --in=mfg3A10_eob_1201bin --mode=0x2 --offset=0 devsg0
Step 8Reboot computer for success update firmware amp MFGrootubuntu~ reboot
RSC-4BT Users Manual
45
Chapter 4 HDD Blackplane Instruction
43 12G expander EDFB settingStep 1
For Install HyperTerminalexe refer to section 41
Step 2 Get EDFB statuscmdgt edfb
RSC-4BT Users Manual
46
Chapter 4 HDD Blackplane Introduction
Step 3Change EDFB setting
Enable EDFB functioncmdgtedfb on
Disable EDFB functioncmdgtedfb off
cmd gtedfbEDFB is OFF
cmd gtedfb onSucceeded to set EDFB
cmd gtedfb offEDFB is OFF
RSC-4BT Users Manual
47
Chapter 4 HDD Blackplane Instruction
44 Slot HDD power setting(Only for system cooling Fan controled by expander)
Step 1 For Install sg3exe tool and get new firmware from website refer to section 42
Step 2Execute terminal under the same new firmware folderexample Setting a new firmware folder on Home page Open Terminal by click to the right button of mouse in the same window Home
RSC-4BT Users Manual
48
Chapter 4 HDD Blackplane Introduction
Step 3 Typing sudo -s to into administrator mode
Step 4 Find expander location$ sg_map -i
RSC-4BT Users Manual
49
Chapter 4 HDD Blackplane Instruction
Step 5For example
If would like to turn the Disk004 power off under the HBA card Need to check Disk004 power status $ sg_ses --page=7 devsg0
Under HBA card the Element 3 = Disk004
RSC-4BT Users Manual
50
Chapter 4 HDD Blackplane Introduction
Step 6To check Disk004 (element 3) power status is ok$ sg_ses --page=2 devsg0
S
Status shows belowThe status of Element 3 is OK
RSC-4BT Users Manual
51
Chapter 4 HDD Blackplane Instruction
Step 7Turn off a HDD power$ sg_ses --descriptor=Disk004 --set=341 devsg0
Step 8Turn on a HDD power$ sg_ses --descriptor=Disk004 --clear=341 devsg0
RSC-4BT Users Manual
52
Chapter 4 HDD Blackplane Introduction
45 HDD BP thermal sensor temperature setting(Only for system cooling Fan controled by expander)
Step 1 For Install HyperTerminalexe refer to section 41
Step 2Get the current temperature settingscmdgt temperature
RSC-4BT Users Manual
53
Chapter 4 HDD Blackplane Instruction
Step 3For example
Set new temperatureT1=20 C 4 18 CT2=50 C 4 52 CWarning threshold=50 C 448 CAlarm threshold=55 C 454 C
The new setting will take effect after resetcmdgt temperature 18 52 48 54cmdgt reset
RSC-4BT Users Manual
54
Chapter 4 HDD Blackplane Introduction
Step 4Check fan speed amp temperature informationcmdgt sensor
cmd gtsensor==ENCLOSURE STATUS========================================================== Total fan number 2 System Fan-0 speed 10888 RPM System Fan-1 speed 10971 RPM System PWN-0 82 Expander Temperature 76 Celsius degree Sytem Temperature-0 33 Celsius degree T1 20 Celsius degree T2 50 Celsius degree TC 55 Celsius degree Voltage Sensor 09V 093V Voltage Sensor 18V 180V
cmd gt_
Chapter 1 Product IntroductionChapter 1 Product IntroductionChapter 5 Technical Support
wwwaicipccom
bull TAIWANTel +886 3 433 9188Fax +886 3 287 1818Email salesaicipccomtw
bull CHINA Tel +862154961421 +862154961422Fax Extension 608Email Technical Support supportaicipccom
bull AMERICA - West coastTel +19098958989Fax +19098958999Email salesaicipccom
bull AMERICA - East coastTel +19738848886Fax +19738844794Email njsalesaicipccom
bull EUROPETel +31306386789Fax +31306360638Emailsalesaicipcnl
Email Technical Support supportaicipccom
- PREFACE
-
- SAFETY INSTRUCTIONS
-
- Chapter 1 Prodcut Introduction
-
- 11 Box Content
- 12 Specifications
- 13 General Information
-
- Chapter 2 Hardware Installation
-
- 21 Removing and Installing Top Cover
- 22 Installing Removing a Hard Disk Drive
- 23 Removing and Installing a PSU Module
- 24 Removing and Installing a Fan Module
- 25 Removing and Installing the HDD backplane Module
- 26 Tool-less Blade Slide Installation Instruction
-
- Chapter 3 Hardware Introduction
-
- 31 HARDWARE DESIGN SPECIFICATION
-
- Chapter 4 HDD Blackplane Introduction
-
- 41 Expender firmware update through phone connector port
- 42 Update the expander firmware through in-band
- 43 12G expander EDFB setting
- 44 Slot HDD power setting
- 45 HDD BP thermal sensor temperature setting
-
- Chapter 5 Technical Support
-
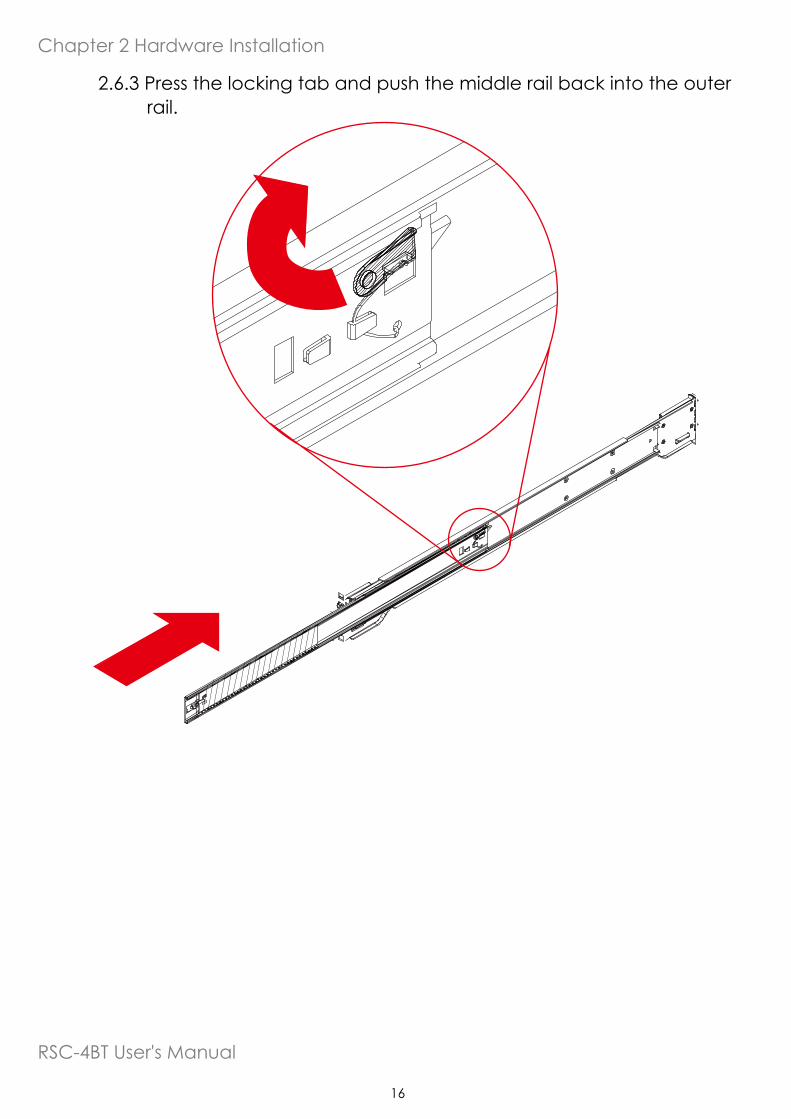
Chapter 2 Hardware Installation
RSC-4BT Users Manual
16
263 Press the locking tab and push the middle rail back into the outer rail
RSC-4BT Users Manual
17
Chapter 2 Hardware Installation
264 Hang the hooks of the rails on the rack holes and if necessary secure with screws
1
2
Optional Screws
Chapter 2 Hardware Installation
RSC-4BT Users Manual
18
265 Repeat step 274 to mount the four ends extending the rails as necessary
RSC-4BT Users Manual
19
Chapter 2 Hardware Installation
266 Pull the middle rail out of the front of the outer rail and make sure that the ball bearing shuttle is locked at the front of the middle rail
Align the inner rails with the middle rails and then push evenly on both sides of the chassis until it clicks into the fully extended position
Ball BearingShuttle
Chapter 2 Hardware Installation
RSC-4BT Users Manual
20
267 Depress the locking tabs on both sides of the chassis simultaneously and push the chassis all the way into the rear of the rack
If additional security is required secure the chassis handles to the front of the rack with two screws (optional)
Screw
Screw
Complete
RSC-4BT Users Manual
21
Chapter 3 Hardware IntroductionChapter 3 Hardware Introduction
This chapter provides detailed instruction guide on hardware instruction
31 HARDWARE DESIGN SPECIFICATION311 Placement
PCBA Placement
HDD
HDD
HDD
HDD
HDD
HDD
HDD
HDD
HDD
HDD
HDD
HDD
HDD
HDD
HDD
HDD
HDD
HDD
HDD
HDD
HDD
HDD
HDD
HDD
Expander
RSC-4BT Users Manual
22
Chapter 3 Hardware Introduction
312 Connector Location
Connector Location
JPWR1 JPWR2
JFAN1
JFAN2
JFAN4 JFAN3 JPMBUS
JEXP_UART JEXP2
SASHD3 SASHD2 SASHD1
JMCU_UART JMCU_DBG
JFRONT
JI2C3 JI2C4
JI2C0
RSC-4BT Users Manual
23
Chapter 3 Hardware Introduction
313 Power Connector
Power Connector
RSC-4BT Users Manual
24
Chapter 3 Hardware Introduction
314 Fan Connector
RSC-4BT Users Manual
25
Chapter 3 Hardware Introduction
315 FAN setting ( if insert fan on HDD BP )
JFRONT
RSC-4BT Users Manual
26
Chapter 3 Hardware Introduction
316 Power Connector
Power Connector
RSC-4BT Users Manual
27
Chapter 3 Hardware Introduction
317 Drive Slot Map
RSC-4BT Users Manual
28
Chapter 4 HDD Blackplane IntroductionChapter 4 HDD Blackplane Introduction
41 Expender firmware update through phone connector port411 Update Expander firmware revision
Step 1 Set up RSC-4BT phone connector Insert phone connector into phone connector port shown
below also the other side inert cable into host PC or notebook
PLEASE FIND THE PHONE CONNECTOR CABLE IN THE PACKAGE BOX
RSC-4BT Users Manual
29
Chapter 4 HDD Blackplane Instruction
Step 2 Set up RSC-4BT connector connectionSet up connector connection application into your RSC-4BT as shown in the example process below
For exampleOS Microsoft WindowsRS232 connection application Hyperterminal
Step 2 Install HyperTrmexe
RSC-4BT Users Manual
30
Chapter 4 HDD Blackplane Introduction
Step 3 Enter a new name for the icon in the field below and click OK
Step 4 Connecting by using selecting an option in the drop down menu circled in red below (we selected COM2 in this example) and click OK
RSC-4BT Users Manual
31
Chapter 4 HDD Blackplane Instruction
Properties
Port Setting
Bits per second
Data bits
Parity
Stop bits
Flow control None
Restore Defaults
OK ApplyCancel
None
Step 6 Set up is complete The diagram below depicts what screen should displayed
Step 5 For ldquoBits per secondrdquo select 38400 For ldquoFlow controlrdquo select None Click OK when you have finished your selections
cmdgt_
RSC-4BT Users Manual
32
Chapter 4 HDD Blackplane Introduction
Step 7To get firmware image amp MFG Configuration Image version information from AIC SAS Related Firmware Downloadne website
httpppmsaicipccomtw8888downloadexpandermcu
RSC-4BT Users Manual
33
Chapter 4 HDD Blackplane Instruction
Step 8Comand line for show current firmware revisioncmdgtrev
RSC-4BT Users Manual
34
Chapter 4 HDD Blackplane Introduction
Step 9Start to update expander firmwarecmdgtfdl 0 0_
Step 10Select the tool bar Transfer -gt Send File
RSC-4BT Users Manual
35
Chapter 4 HDD Blackplane Instruction
Step 11bull Choose new firmware path file fw 3A1_v11221bull Protocol have to choose Xmodem
Step 12Firmware download complete
RSC-4BT Users Manual
36
Chapter 4 HDD Blackplane Introduction
Step 13Reset computer for success update firmwarecmdgtreset
reset
RSC-4BT Users Manual
37
Chapter 4 HDD Blackplane Instruction
Step 13Reset computer for success update firmwarecmdgtreset
412 Update expander configuration MFG
Step 1Comand line for show current configuration MFGcmdgt showmfg
RSC-4BT Users Manual
38
Chapter 4 HDD Blackplane Introduction
Step 2Start to update expander configuration MFGcmdgtfdl 83 0_
Step 3Select the tool bar Transfer -gt Send File
83 0
RSC-4BT Users Manual
39
Chapter 4 HDD Blackplane Instruction
Step 4bull Choose new MFG path file mfg 3A10_eob_1201binbull Protocol have to choose Xmodem
Step 5MFG download complete
RSC-4BT Users Manual
40
Chapter 4 HDD Blackplane Introduction
Step 6Reset computer for success update MFGcmdgtreset
reset
RSC-4BT Users Manual
41
Chapter 4 HDD Blackplane Instruction
Step 6Reset computer for success update MFGcmdgtreset
42 Update the expander firmware through in-band
FOR EXAMPLEStep 1
Download and install SG3_utilsexe which compatible with Linux OSFrom website httpsgdannyczsgsg3_utilshtml website Reference version sg3_utils-140tgz
Step 2To get firmware image amp MFG Configuration Image version information from AIC SAS Related Firmware Downloadne websitehttpppmsaicipccomtw8888downloadexpandermcu
RSC-4BT Users Manual
42
Chapter 4 HDD Blackplane Introduction
Step 3Execute terminal under the same new firmware folderexample Setting a new firmware folder on Home page Open Terminal by click to the right button of mouse in the same window Home
Step 4Typing sudo -s to into administrator mode
RSC-4BT Users Manual
43
Chapter 4 HDD Blackplane Instruction
Step 5 Find expander location$ sg_map -i
Step 6Update Expander firmware$ sg_write_buffer --id=0x0 --in=fw3A1_v11221 --mode=0x2 --offset=0 devsg0
RSC-4BT Users Manual
44
Chapter 4 HDD Blackplane Introduction
Step 7 Update Expander MFG$ sg_write_buffer --id=0x83 --in=mfg3A10_eob_1201bin --mode=0x2 --offset=0 devsg0
Step 8Reboot computer for success update firmware amp MFGrootubuntu~ reboot
RSC-4BT Users Manual
45
Chapter 4 HDD Blackplane Instruction
43 12G expander EDFB settingStep 1
For Install HyperTerminalexe refer to section 41
Step 2 Get EDFB statuscmdgt edfb
RSC-4BT Users Manual
46
Chapter 4 HDD Blackplane Introduction
Step 3Change EDFB setting
Enable EDFB functioncmdgtedfb on
Disable EDFB functioncmdgtedfb off
cmd gtedfbEDFB is OFF
cmd gtedfb onSucceeded to set EDFB
cmd gtedfb offEDFB is OFF
RSC-4BT Users Manual
47
Chapter 4 HDD Blackplane Instruction
44 Slot HDD power setting(Only for system cooling Fan controled by expander)
Step 1 For Install sg3exe tool and get new firmware from website refer to section 42
Step 2Execute terminal under the same new firmware folderexample Setting a new firmware folder on Home page Open Terminal by click to the right button of mouse in the same window Home
RSC-4BT Users Manual
48
Chapter 4 HDD Blackplane Introduction
Step 3 Typing sudo -s to into administrator mode
Step 4 Find expander location$ sg_map -i
RSC-4BT Users Manual
49
Chapter 4 HDD Blackplane Instruction
Step 5For example
If would like to turn the Disk004 power off under the HBA card Need to check Disk004 power status $ sg_ses --page=7 devsg0
Under HBA card the Element 3 = Disk004
RSC-4BT Users Manual
50
Chapter 4 HDD Blackplane Introduction
Step 6To check Disk004 (element 3) power status is ok$ sg_ses --page=2 devsg0
S
Status shows belowThe status of Element 3 is OK
RSC-4BT Users Manual
51
Chapter 4 HDD Blackplane Instruction
Step 7Turn off a HDD power$ sg_ses --descriptor=Disk004 --set=341 devsg0
Step 8Turn on a HDD power$ sg_ses --descriptor=Disk004 --clear=341 devsg0
RSC-4BT Users Manual
52
Chapter 4 HDD Blackplane Introduction
45 HDD BP thermal sensor temperature setting(Only for system cooling Fan controled by expander)
Step 1 For Install HyperTerminalexe refer to section 41
Step 2Get the current temperature settingscmdgt temperature
RSC-4BT Users Manual
53
Chapter 4 HDD Blackplane Instruction
Step 3For example
Set new temperatureT1=20 C 4 18 CT2=50 C 4 52 CWarning threshold=50 C 448 CAlarm threshold=55 C 454 C
The new setting will take effect after resetcmdgt temperature 18 52 48 54cmdgt reset
RSC-4BT Users Manual
54
Chapter 4 HDD Blackplane Introduction
Step 4Check fan speed amp temperature informationcmdgt sensor
cmd gtsensor==ENCLOSURE STATUS========================================================== Total fan number 2 System Fan-0 speed 10888 RPM System Fan-1 speed 10971 RPM System PWN-0 82 Expander Temperature 76 Celsius degree Sytem Temperature-0 33 Celsius degree T1 20 Celsius degree T2 50 Celsius degree TC 55 Celsius degree Voltage Sensor 09V 093V Voltage Sensor 18V 180V
cmd gt_
Chapter 1 Product IntroductionChapter 1 Product IntroductionChapter 5 Technical Support
wwwaicipccom
bull TAIWANTel +886 3 433 9188Fax +886 3 287 1818Email salesaicipccomtw
bull CHINA Tel +862154961421 +862154961422Fax Extension 608Email Technical Support supportaicipccom
bull AMERICA - West coastTel +19098958989Fax +19098958999Email salesaicipccom
bull AMERICA - East coastTel +19738848886Fax +19738844794Email njsalesaicipccom
bull EUROPETel +31306386789Fax +31306360638Emailsalesaicipcnl
Email Technical Support supportaicipccom
- PREFACE
-
- SAFETY INSTRUCTIONS
-
- Chapter 1 Prodcut Introduction
-
- 11 Box Content
- 12 Specifications
- 13 General Information
-
- Chapter 2 Hardware Installation
-
- 21 Removing and Installing Top Cover
- 22 Installing Removing a Hard Disk Drive
- 23 Removing and Installing a PSU Module
- 24 Removing and Installing a Fan Module
- 25 Removing and Installing the HDD backplane Module
- 26 Tool-less Blade Slide Installation Instruction
-
- Chapter 3 Hardware Introduction
-
- 31 HARDWARE DESIGN SPECIFICATION
-
- Chapter 4 HDD Blackplane Introduction
-
- 41 Expender firmware update through phone connector port
- 42 Update the expander firmware through in-band
- 43 12G expander EDFB setting
- 44 Slot HDD power setting
- 45 HDD BP thermal sensor temperature setting
-
- Chapter 5 Technical Support
-

RSC-4BT Users Manual
17
Chapter 2 Hardware Installation
264 Hang the hooks of the rails on the rack holes and if necessary secure with screws
1
2
Optional Screws
Chapter 2 Hardware Installation
RSC-4BT Users Manual
18
265 Repeat step 274 to mount the four ends extending the rails as necessary
RSC-4BT Users Manual
19
Chapter 2 Hardware Installation
266 Pull the middle rail out of the front of the outer rail and make sure that the ball bearing shuttle is locked at the front of the middle rail
Align the inner rails with the middle rails and then push evenly on both sides of the chassis until it clicks into the fully extended position
Ball BearingShuttle
Chapter 2 Hardware Installation
RSC-4BT Users Manual
20
267 Depress the locking tabs on both sides of the chassis simultaneously and push the chassis all the way into the rear of the rack
If additional security is required secure the chassis handles to the front of the rack with two screws (optional)
Screw
Screw
Complete
RSC-4BT Users Manual
21
Chapter 3 Hardware IntroductionChapter 3 Hardware Introduction
This chapter provides detailed instruction guide on hardware instruction
31 HARDWARE DESIGN SPECIFICATION311 Placement
PCBA Placement
HDD
HDD
HDD
HDD
HDD
HDD
HDD
HDD
HDD
HDD
HDD
HDD
HDD
HDD
HDD
HDD
HDD
HDD
HDD
HDD
HDD
HDD
HDD
HDD
Expander
RSC-4BT Users Manual
22
Chapter 3 Hardware Introduction
312 Connector Location
Connector Location
JPWR1 JPWR2
JFAN1
JFAN2
JFAN4 JFAN3 JPMBUS
JEXP_UART JEXP2
SASHD3 SASHD2 SASHD1
JMCU_UART JMCU_DBG
JFRONT
JI2C3 JI2C4
JI2C0
RSC-4BT Users Manual
23
Chapter 3 Hardware Introduction
313 Power Connector
Power Connector
RSC-4BT Users Manual
24
Chapter 3 Hardware Introduction
314 Fan Connector
RSC-4BT Users Manual
25
Chapter 3 Hardware Introduction
315 FAN setting ( if insert fan on HDD BP )
JFRONT
RSC-4BT Users Manual
26
Chapter 3 Hardware Introduction
316 Power Connector
Power Connector
RSC-4BT Users Manual
27
Chapter 3 Hardware Introduction
317 Drive Slot Map
RSC-4BT Users Manual
28
Chapter 4 HDD Blackplane IntroductionChapter 4 HDD Blackplane Introduction
41 Expender firmware update through phone connector port411 Update Expander firmware revision
Step 1 Set up RSC-4BT phone connector Insert phone connector into phone connector port shown
below also the other side inert cable into host PC or notebook
PLEASE FIND THE PHONE CONNECTOR CABLE IN THE PACKAGE BOX
RSC-4BT Users Manual
29
Chapter 4 HDD Blackplane Instruction
Step 2 Set up RSC-4BT connector connectionSet up connector connection application into your RSC-4BT as shown in the example process below
For exampleOS Microsoft WindowsRS232 connection application Hyperterminal
Step 2 Install HyperTrmexe
RSC-4BT Users Manual
30
Chapter 4 HDD Blackplane Introduction
Step 3 Enter a new name for the icon in the field below and click OK
Step 4 Connecting by using selecting an option in the drop down menu circled in red below (we selected COM2 in this example) and click OK
RSC-4BT Users Manual
31
Chapter 4 HDD Blackplane Instruction
Properties
Port Setting
Bits per second
Data bits
Parity
Stop bits
Flow control None
Restore Defaults
OK ApplyCancel
None
Step 6 Set up is complete The diagram below depicts what screen should displayed
Step 5 For ldquoBits per secondrdquo select 38400 For ldquoFlow controlrdquo select None Click OK when you have finished your selections
cmdgt_
RSC-4BT Users Manual
32
Chapter 4 HDD Blackplane Introduction
Step 7To get firmware image amp MFG Configuration Image version information from AIC SAS Related Firmware Downloadne website
httpppmsaicipccomtw8888downloadexpandermcu
RSC-4BT Users Manual
33
Chapter 4 HDD Blackplane Instruction
Step 8Comand line for show current firmware revisioncmdgtrev
RSC-4BT Users Manual
34
Chapter 4 HDD Blackplane Introduction
Step 9Start to update expander firmwarecmdgtfdl 0 0_
Step 10Select the tool bar Transfer -gt Send File
RSC-4BT Users Manual
35
Chapter 4 HDD Blackplane Instruction
Step 11bull Choose new firmware path file fw 3A1_v11221bull Protocol have to choose Xmodem
Step 12Firmware download complete
RSC-4BT Users Manual
36
Chapter 4 HDD Blackplane Introduction
Step 13Reset computer for success update firmwarecmdgtreset
reset
RSC-4BT Users Manual
37
Chapter 4 HDD Blackplane Instruction
Step 13Reset computer for success update firmwarecmdgtreset
412 Update expander configuration MFG
Step 1Comand line for show current configuration MFGcmdgt showmfg
RSC-4BT Users Manual
38
Chapter 4 HDD Blackplane Introduction
Step 2Start to update expander configuration MFGcmdgtfdl 83 0_
Step 3Select the tool bar Transfer -gt Send File
83 0
RSC-4BT Users Manual
39
Chapter 4 HDD Blackplane Instruction
Step 4bull Choose new MFG path file mfg 3A10_eob_1201binbull Protocol have to choose Xmodem
Step 5MFG download complete
RSC-4BT Users Manual
40
Chapter 4 HDD Blackplane Introduction
Step 6Reset computer for success update MFGcmdgtreset
reset
RSC-4BT Users Manual
41
Chapter 4 HDD Blackplane Instruction
Step 6Reset computer for success update MFGcmdgtreset
42 Update the expander firmware through in-band
FOR EXAMPLEStep 1
Download and install SG3_utilsexe which compatible with Linux OSFrom website httpsgdannyczsgsg3_utilshtml website Reference version sg3_utils-140tgz
Step 2To get firmware image amp MFG Configuration Image version information from AIC SAS Related Firmware Downloadne websitehttpppmsaicipccomtw8888downloadexpandermcu
RSC-4BT Users Manual
42
Chapter 4 HDD Blackplane Introduction
Step 3Execute terminal under the same new firmware folderexample Setting a new firmware folder on Home page Open Terminal by click to the right button of mouse in the same window Home
Step 4Typing sudo -s to into administrator mode
RSC-4BT Users Manual
43
Chapter 4 HDD Blackplane Instruction
Step 5 Find expander location$ sg_map -i
Step 6Update Expander firmware$ sg_write_buffer --id=0x0 --in=fw3A1_v11221 --mode=0x2 --offset=0 devsg0
RSC-4BT Users Manual
44
Chapter 4 HDD Blackplane Introduction
Step 7 Update Expander MFG$ sg_write_buffer --id=0x83 --in=mfg3A10_eob_1201bin --mode=0x2 --offset=0 devsg0
Step 8Reboot computer for success update firmware amp MFGrootubuntu~ reboot
RSC-4BT Users Manual
45
Chapter 4 HDD Blackplane Instruction
43 12G expander EDFB settingStep 1
For Install HyperTerminalexe refer to section 41
Step 2 Get EDFB statuscmdgt edfb
RSC-4BT Users Manual
46
Chapter 4 HDD Blackplane Introduction
Step 3Change EDFB setting
Enable EDFB functioncmdgtedfb on
Disable EDFB functioncmdgtedfb off
cmd gtedfbEDFB is OFF
cmd gtedfb onSucceeded to set EDFB
cmd gtedfb offEDFB is OFF
RSC-4BT Users Manual
47
Chapter 4 HDD Blackplane Instruction
44 Slot HDD power setting(Only for system cooling Fan controled by expander)
Step 1 For Install sg3exe tool and get new firmware from website refer to section 42
Step 2Execute terminal under the same new firmware folderexample Setting a new firmware folder on Home page Open Terminal by click to the right button of mouse in the same window Home
RSC-4BT Users Manual
48
Chapter 4 HDD Blackplane Introduction
Step 3 Typing sudo -s to into administrator mode
Step 4 Find expander location$ sg_map -i
RSC-4BT Users Manual
49
Chapter 4 HDD Blackplane Instruction
Step 5For example
If would like to turn the Disk004 power off under the HBA card Need to check Disk004 power status $ sg_ses --page=7 devsg0
Under HBA card the Element 3 = Disk004
RSC-4BT Users Manual
50
Chapter 4 HDD Blackplane Introduction
Step 6To check Disk004 (element 3) power status is ok$ sg_ses --page=2 devsg0
S
Status shows belowThe status of Element 3 is OK
RSC-4BT Users Manual
51
Chapter 4 HDD Blackplane Instruction
Step 7Turn off a HDD power$ sg_ses --descriptor=Disk004 --set=341 devsg0
Step 8Turn on a HDD power$ sg_ses --descriptor=Disk004 --clear=341 devsg0
RSC-4BT Users Manual
52
Chapter 4 HDD Blackplane Introduction
45 HDD BP thermal sensor temperature setting(Only for system cooling Fan controled by expander)
Step 1 For Install HyperTerminalexe refer to section 41
Step 2Get the current temperature settingscmdgt temperature
RSC-4BT Users Manual
53
Chapter 4 HDD Blackplane Instruction
Step 3For example
Set new temperatureT1=20 C 4 18 CT2=50 C 4 52 CWarning threshold=50 C 448 CAlarm threshold=55 C 454 C
The new setting will take effect after resetcmdgt temperature 18 52 48 54cmdgt reset
RSC-4BT Users Manual
54
Chapter 4 HDD Blackplane Introduction
Step 4Check fan speed amp temperature informationcmdgt sensor
cmd gtsensor==ENCLOSURE STATUS========================================================== Total fan number 2 System Fan-0 speed 10888 RPM System Fan-1 speed 10971 RPM System PWN-0 82 Expander Temperature 76 Celsius degree Sytem Temperature-0 33 Celsius degree T1 20 Celsius degree T2 50 Celsius degree TC 55 Celsius degree Voltage Sensor 09V 093V Voltage Sensor 18V 180V
cmd gt_
Chapter 1 Product IntroductionChapter 1 Product IntroductionChapter 5 Technical Support
wwwaicipccom
bull TAIWANTel +886 3 433 9188Fax +886 3 287 1818Email salesaicipccomtw
bull CHINA Tel +862154961421 +862154961422Fax Extension 608Email Technical Support supportaicipccom
bull AMERICA - West coastTel +19098958989Fax +19098958999Email salesaicipccom
bull AMERICA - East coastTel +19738848886Fax +19738844794Email njsalesaicipccom
bull EUROPETel +31306386789Fax +31306360638Emailsalesaicipcnl
Email Technical Support supportaicipccom
- PREFACE
-
- SAFETY INSTRUCTIONS
-
- Chapter 1 Prodcut Introduction
-
- 11 Box Content
- 12 Specifications
- 13 General Information
-
- Chapter 2 Hardware Installation
-
- 21 Removing and Installing Top Cover
- 22 Installing Removing a Hard Disk Drive
- 23 Removing and Installing a PSU Module
- 24 Removing and Installing a Fan Module
- 25 Removing and Installing the HDD backplane Module
- 26 Tool-less Blade Slide Installation Instruction
-
- Chapter 3 Hardware Introduction
-
- 31 HARDWARE DESIGN SPECIFICATION
-
- Chapter 4 HDD Blackplane Introduction
-
- 41 Expender firmware update through phone connector port
- 42 Update the expander firmware through in-band
- 43 12G expander EDFB setting
- 44 Slot HDD power setting
- 45 HDD BP thermal sensor temperature setting
-
- Chapter 5 Technical Support
-

Chapter 2 Hardware Installation
RSC-4BT Users Manual
18
265 Repeat step 274 to mount the four ends extending the rails as necessary
RSC-4BT Users Manual
19
Chapter 2 Hardware Installation
266 Pull the middle rail out of the front of the outer rail and make sure that the ball bearing shuttle is locked at the front of the middle rail
Align the inner rails with the middle rails and then push evenly on both sides of the chassis until it clicks into the fully extended position
Ball BearingShuttle
Chapter 2 Hardware Installation
RSC-4BT Users Manual
20
267 Depress the locking tabs on both sides of the chassis simultaneously and push the chassis all the way into the rear of the rack
If additional security is required secure the chassis handles to the front of the rack with two screws (optional)
Screw
Screw
Complete
RSC-4BT Users Manual
21
Chapter 3 Hardware IntroductionChapter 3 Hardware Introduction
This chapter provides detailed instruction guide on hardware instruction
31 HARDWARE DESIGN SPECIFICATION311 Placement
PCBA Placement
HDD
HDD
HDD
HDD
HDD
HDD
HDD
HDD
HDD
HDD
HDD
HDD
HDD
HDD
HDD
HDD
HDD
HDD
HDD
HDD
HDD
HDD
HDD
HDD
Expander
RSC-4BT Users Manual
22
Chapter 3 Hardware Introduction
312 Connector Location
Connector Location
JPWR1 JPWR2
JFAN1
JFAN2
JFAN4 JFAN3 JPMBUS
JEXP_UART JEXP2
SASHD3 SASHD2 SASHD1
JMCU_UART JMCU_DBG
JFRONT
JI2C3 JI2C4
JI2C0
RSC-4BT Users Manual
23
Chapter 3 Hardware Introduction
313 Power Connector
Power Connector
RSC-4BT Users Manual
24
Chapter 3 Hardware Introduction
314 Fan Connector
RSC-4BT Users Manual
25
Chapter 3 Hardware Introduction
315 FAN setting ( if insert fan on HDD BP )
JFRONT
RSC-4BT Users Manual
26
Chapter 3 Hardware Introduction
316 Power Connector
Power Connector
RSC-4BT Users Manual
27
Chapter 3 Hardware Introduction
317 Drive Slot Map
RSC-4BT Users Manual
28
Chapter 4 HDD Blackplane IntroductionChapter 4 HDD Blackplane Introduction
41 Expender firmware update through phone connector port411 Update Expander firmware revision
Step 1 Set up RSC-4BT phone connector Insert phone connector into phone connector port shown
below also the other side inert cable into host PC or notebook
PLEASE FIND THE PHONE CONNECTOR CABLE IN THE PACKAGE BOX
RSC-4BT Users Manual
29
Chapter 4 HDD Blackplane Instruction
Step 2 Set up RSC-4BT connector connectionSet up connector connection application into your RSC-4BT as shown in the example process below
For exampleOS Microsoft WindowsRS232 connection application Hyperterminal
Step 2 Install HyperTrmexe
RSC-4BT Users Manual
30
Chapter 4 HDD Blackplane Introduction
Step 3 Enter a new name for the icon in the field below and click OK
Step 4 Connecting by using selecting an option in the drop down menu circled in red below (we selected COM2 in this example) and click OK
RSC-4BT Users Manual
31
Chapter 4 HDD Blackplane Instruction
Properties
Port Setting
Bits per second
Data bits
Parity
Stop bits
Flow control None
Restore Defaults
OK ApplyCancel
None
Step 6 Set up is complete The diagram below depicts what screen should displayed
Step 5 For ldquoBits per secondrdquo select 38400 For ldquoFlow controlrdquo select None Click OK when you have finished your selections
cmdgt_
RSC-4BT Users Manual
32
Chapter 4 HDD Blackplane Introduction
Step 7To get firmware image amp MFG Configuration Image version information from AIC SAS Related Firmware Downloadne website
httpppmsaicipccomtw8888downloadexpandermcu
RSC-4BT Users Manual
33
Chapter 4 HDD Blackplane Instruction
Step 8Comand line for show current firmware revisioncmdgtrev
RSC-4BT Users Manual
34
Chapter 4 HDD Blackplane Introduction
Step 9Start to update expander firmwarecmdgtfdl 0 0_
Step 10Select the tool bar Transfer -gt Send File
RSC-4BT Users Manual
35
Chapter 4 HDD Blackplane Instruction
Step 11bull Choose new firmware path file fw 3A1_v11221bull Protocol have to choose Xmodem
Step 12Firmware download complete
RSC-4BT Users Manual
36
Chapter 4 HDD Blackplane Introduction
Step 13Reset computer for success update firmwarecmdgtreset
reset
RSC-4BT Users Manual
37
Chapter 4 HDD Blackplane Instruction
Step 13Reset computer for success update firmwarecmdgtreset
412 Update expander configuration MFG
Step 1Comand line for show current configuration MFGcmdgt showmfg
RSC-4BT Users Manual
38
Chapter 4 HDD Blackplane Introduction
Step 2Start to update expander configuration MFGcmdgtfdl 83 0_
Step 3Select the tool bar Transfer -gt Send File
83 0
RSC-4BT Users Manual
39
Chapter 4 HDD Blackplane Instruction
Step 4bull Choose new MFG path file mfg 3A10_eob_1201binbull Protocol have to choose Xmodem
Step 5MFG download complete
RSC-4BT Users Manual
40
Chapter 4 HDD Blackplane Introduction
Step 6Reset computer for success update MFGcmdgtreset
reset
RSC-4BT Users Manual
41
Chapter 4 HDD Blackplane Instruction
Step 6Reset computer for success update MFGcmdgtreset
42 Update the expander firmware through in-band
FOR EXAMPLEStep 1
Download and install SG3_utilsexe which compatible with Linux OSFrom website httpsgdannyczsgsg3_utilshtml website Reference version sg3_utils-140tgz
Step 2To get firmware image amp MFG Configuration Image version information from AIC SAS Related Firmware Downloadne websitehttpppmsaicipccomtw8888downloadexpandermcu
RSC-4BT Users Manual
42
Chapter 4 HDD Blackplane Introduction
Step 3Execute terminal under the same new firmware folderexample Setting a new firmware folder on Home page Open Terminal by click to the right button of mouse in the same window Home
Step 4Typing sudo -s to into administrator mode
RSC-4BT Users Manual
43
Chapter 4 HDD Blackplane Instruction
Step 5 Find expander location$ sg_map -i
Step 6Update Expander firmware$ sg_write_buffer --id=0x0 --in=fw3A1_v11221 --mode=0x2 --offset=0 devsg0
RSC-4BT Users Manual
44
Chapter 4 HDD Blackplane Introduction
Step 7 Update Expander MFG$ sg_write_buffer --id=0x83 --in=mfg3A10_eob_1201bin --mode=0x2 --offset=0 devsg0
Step 8Reboot computer for success update firmware amp MFGrootubuntu~ reboot
RSC-4BT Users Manual
45
Chapter 4 HDD Blackplane Instruction
43 12G expander EDFB settingStep 1
For Install HyperTerminalexe refer to section 41
Step 2 Get EDFB statuscmdgt edfb
RSC-4BT Users Manual
46
Chapter 4 HDD Blackplane Introduction
Step 3Change EDFB setting
Enable EDFB functioncmdgtedfb on
Disable EDFB functioncmdgtedfb off
cmd gtedfbEDFB is OFF
cmd gtedfb onSucceeded to set EDFB
cmd gtedfb offEDFB is OFF
RSC-4BT Users Manual
47
Chapter 4 HDD Blackplane Instruction
44 Slot HDD power setting(Only for system cooling Fan controled by expander)
Step 1 For Install sg3exe tool and get new firmware from website refer to section 42
Step 2Execute terminal under the same new firmware folderexample Setting a new firmware folder on Home page Open Terminal by click to the right button of mouse in the same window Home
RSC-4BT Users Manual
48
Chapter 4 HDD Blackplane Introduction
Step 3 Typing sudo -s to into administrator mode
Step 4 Find expander location$ sg_map -i
RSC-4BT Users Manual
49
Chapter 4 HDD Blackplane Instruction
Step 5For example
If would like to turn the Disk004 power off under the HBA card Need to check Disk004 power status $ sg_ses --page=7 devsg0
Under HBA card the Element 3 = Disk004
RSC-4BT Users Manual
50
Chapter 4 HDD Blackplane Introduction
Step 6To check Disk004 (element 3) power status is ok$ sg_ses --page=2 devsg0
S
Status shows belowThe status of Element 3 is OK
RSC-4BT Users Manual
51
Chapter 4 HDD Blackplane Instruction
Step 7Turn off a HDD power$ sg_ses --descriptor=Disk004 --set=341 devsg0
Step 8Turn on a HDD power$ sg_ses --descriptor=Disk004 --clear=341 devsg0
RSC-4BT Users Manual
52
Chapter 4 HDD Blackplane Introduction
45 HDD BP thermal sensor temperature setting(Only for system cooling Fan controled by expander)
Step 1 For Install HyperTerminalexe refer to section 41
Step 2Get the current temperature settingscmdgt temperature
RSC-4BT Users Manual
53
Chapter 4 HDD Blackplane Instruction
Step 3For example
Set new temperatureT1=20 C 4 18 CT2=50 C 4 52 CWarning threshold=50 C 448 CAlarm threshold=55 C 454 C
The new setting will take effect after resetcmdgt temperature 18 52 48 54cmdgt reset
RSC-4BT Users Manual
54
Chapter 4 HDD Blackplane Introduction
Step 4Check fan speed amp temperature informationcmdgt sensor
cmd gtsensor==ENCLOSURE STATUS========================================================== Total fan number 2 System Fan-0 speed 10888 RPM System Fan-1 speed 10971 RPM System PWN-0 82 Expander Temperature 76 Celsius degree Sytem Temperature-0 33 Celsius degree T1 20 Celsius degree T2 50 Celsius degree TC 55 Celsius degree Voltage Sensor 09V 093V Voltage Sensor 18V 180V
cmd gt_
Chapter 1 Product IntroductionChapter 1 Product IntroductionChapter 5 Technical Support
wwwaicipccom
bull TAIWANTel +886 3 433 9188Fax +886 3 287 1818Email salesaicipccomtw
bull CHINA Tel +862154961421 +862154961422Fax Extension 608Email Technical Support supportaicipccom
bull AMERICA - West coastTel +19098958989Fax +19098958999Email salesaicipccom
bull AMERICA - East coastTel +19738848886Fax +19738844794Email njsalesaicipccom
bull EUROPETel +31306386789Fax +31306360638Emailsalesaicipcnl
Email Technical Support supportaicipccom
- PREFACE
-
- SAFETY INSTRUCTIONS
-
- Chapter 1 Prodcut Introduction
-
- 11 Box Content
- 12 Specifications
- 13 General Information
-
- Chapter 2 Hardware Installation
-
- 21 Removing and Installing Top Cover
- 22 Installing Removing a Hard Disk Drive
- 23 Removing and Installing a PSU Module
- 24 Removing and Installing a Fan Module
- 25 Removing and Installing the HDD backplane Module
- 26 Tool-less Blade Slide Installation Instruction
-
- Chapter 3 Hardware Introduction
-
- 31 HARDWARE DESIGN SPECIFICATION
-
- Chapter 4 HDD Blackplane Introduction
-
- 41 Expender firmware update through phone connector port
- 42 Update the expander firmware through in-band
- 43 12G expander EDFB setting
- 44 Slot HDD power setting
- 45 HDD BP thermal sensor temperature setting
-
- Chapter 5 Technical Support
-

RSC-4BT Users Manual
19
Chapter 2 Hardware Installation
266 Pull the middle rail out of the front of the outer rail and make sure that the ball bearing shuttle is locked at the front of the middle rail
Align the inner rails with the middle rails and then push evenly on both sides of the chassis until it clicks into the fully extended position
Ball BearingShuttle
Chapter 2 Hardware Installation
RSC-4BT Users Manual
20
267 Depress the locking tabs on both sides of the chassis simultaneously and push the chassis all the way into the rear of the rack
If additional security is required secure the chassis handles to the front of the rack with two screws (optional)
Screw
Screw
Complete
RSC-4BT Users Manual
21
Chapter 3 Hardware IntroductionChapter 3 Hardware Introduction
This chapter provides detailed instruction guide on hardware instruction
31 HARDWARE DESIGN SPECIFICATION311 Placement
PCBA Placement
HDD
HDD
HDD
HDD
HDD
HDD
HDD
HDD
HDD
HDD
HDD
HDD
HDD
HDD
HDD
HDD
HDD
HDD
HDD
HDD
HDD
HDD
HDD
HDD
Expander
RSC-4BT Users Manual
22
Chapter 3 Hardware Introduction
312 Connector Location
Connector Location
JPWR1 JPWR2
JFAN1
JFAN2
JFAN4 JFAN3 JPMBUS
JEXP_UART JEXP2
SASHD3 SASHD2 SASHD1
JMCU_UART JMCU_DBG
JFRONT
JI2C3 JI2C4
JI2C0
RSC-4BT Users Manual
23
Chapter 3 Hardware Introduction
313 Power Connector
Power Connector
RSC-4BT Users Manual
24
Chapter 3 Hardware Introduction
314 Fan Connector
RSC-4BT Users Manual
25
Chapter 3 Hardware Introduction
315 FAN setting ( if insert fan on HDD BP )
JFRONT
RSC-4BT Users Manual
26
Chapter 3 Hardware Introduction
316 Power Connector
Power Connector
RSC-4BT Users Manual
27
Chapter 3 Hardware Introduction
317 Drive Slot Map
RSC-4BT Users Manual
28
Chapter 4 HDD Blackplane IntroductionChapter 4 HDD Blackplane Introduction
41 Expender firmware update through phone connector port411 Update Expander firmware revision
Step 1 Set up RSC-4BT phone connector Insert phone connector into phone connector port shown
below also the other side inert cable into host PC or notebook
PLEASE FIND THE PHONE CONNECTOR CABLE IN THE PACKAGE BOX
RSC-4BT Users Manual
29
Chapter 4 HDD Blackplane Instruction
Step 2 Set up RSC-4BT connector connectionSet up connector connection application into your RSC-4BT as shown in the example process below
For exampleOS Microsoft WindowsRS232 connection application Hyperterminal
Step 2 Install HyperTrmexe
RSC-4BT Users Manual
30
Chapter 4 HDD Blackplane Introduction
Step 3 Enter a new name for the icon in the field below and click OK
Step 4 Connecting by using selecting an option in the drop down menu circled in red below (we selected COM2 in this example) and click OK
RSC-4BT Users Manual
31
Chapter 4 HDD Blackplane Instruction
Properties
Port Setting
Bits per second
Data bits
Parity
Stop bits
Flow control None
Restore Defaults
OK ApplyCancel
None
Step 6 Set up is complete The diagram below depicts what screen should displayed
Step 5 For ldquoBits per secondrdquo select 38400 For ldquoFlow controlrdquo select None Click OK when you have finished your selections
cmdgt_
RSC-4BT Users Manual
32
Chapter 4 HDD Blackplane Introduction
Step 7To get firmware image amp MFG Configuration Image version information from AIC SAS Related Firmware Downloadne website
httpppmsaicipccomtw8888downloadexpandermcu
RSC-4BT Users Manual
33
Chapter 4 HDD Blackplane Instruction
Step 8Comand line for show current firmware revisioncmdgtrev
RSC-4BT Users Manual
34
Chapter 4 HDD Blackplane Introduction
Step 9Start to update expander firmwarecmdgtfdl 0 0_
Step 10Select the tool bar Transfer -gt Send File
RSC-4BT Users Manual
35
Chapter 4 HDD Blackplane Instruction
Step 11bull Choose new firmware path file fw 3A1_v11221bull Protocol have to choose Xmodem
Step 12Firmware download complete
RSC-4BT Users Manual
36
Chapter 4 HDD Blackplane Introduction
Step 13Reset computer for success update firmwarecmdgtreset
reset
RSC-4BT Users Manual
37
Chapter 4 HDD Blackplane Instruction
Step 13Reset computer for success update firmwarecmdgtreset
412 Update expander configuration MFG
Step 1Comand line for show current configuration MFGcmdgt showmfg
RSC-4BT Users Manual
38
Chapter 4 HDD Blackplane Introduction
Step 2Start to update expander configuration MFGcmdgtfdl 83 0_
Step 3Select the tool bar Transfer -gt Send File
83 0
RSC-4BT Users Manual
39
Chapter 4 HDD Blackplane Instruction
Step 4bull Choose new MFG path file mfg 3A10_eob_1201binbull Protocol have to choose Xmodem
Step 5MFG download complete
RSC-4BT Users Manual
40
Chapter 4 HDD Blackplane Introduction
Step 6Reset computer for success update MFGcmdgtreset
reset
RSC-4BT Users Manual
41
Chapter 4 HDD Blackplane Instruction
Step 6Reset computer for success update MFGcmdgtreset
42 Update the expander firmware through in-band
FOR EXAMPLEStep 1
Download and install SG3_utilsexe which compatible with Linux OSFrom website httpsgdannyczsgsg3_utilshtml website Reference version sg3_utils-140tgz
Step 2To get firmware image amp MFG Configuration Image version information from AIC SAS Related Firmware Downloadne websitehttpppmsaicipccomtw8888downloadexpandermcu
RSC-4BT Users Manual
42
Chapter 4 HDD Blackplane Introduction
Step 3Execute terminal under the same new firmware folderexample Setting a new firmware folder on Home page Open Terminal by click to the right button of mouse in the same window Home
Step 4Typing sudo -s to into administrator mode
RSC-4BT Users Manual
43
Chapter 4 HDD Blackplane Instruction
Step 5 Find expander location$ sg_map -i
Step 6Update Expander firmware$ sg_write_buffer --id=0x0 --in=fw3A1_v11221 --mode=0x2 --offset=0 devsg0
RSC-4BT Users Manual
44
Chapter 4 HDD Blackplane Introduction
Step 7 Update Expander MFG$ sg_write_buffer --id=0x83 --in=mfg3A10_eob_1201bin --mode=0x2 --offset=0 devsg0
Step 8Reboot computer for success update firmware amp MFGrootubuntu~ reboot
RSC-4BT Users Manual
45
Chapter 4 HDD Blackplane Instruction
43 12G expander EDFB settingStep 1
For Install HyperTerminalexe refer to section 41
Step 2 Get EDFB statuscmdgt edfb
RSC-4BT Users Manual
46
Chapter 4 HDD Blackplane Introduction
Step 3Change EDFB setting
Enable EDFB functioncmdgtedfb on
Disable EDFB functioncmdgtedfb off
cmd gtedfbEDFB is OFF
cmd gtedfb onSucceeded to set EDFB
cmd gtedfb offEDFB is OFF
RSC-4BT Users Manual
47
Chapter 4 HDD Blackplane Instruction
44 Slot HDD power setting(Only for system cooling Fan controled by expander)
Step 1 For Install sg3exe tool and get new firmware from website refer to section 42
Step 2Execute terminal under the same new firmware folderexample Setting a new firmware folder on Home page Open Terminal by click to the right button of mouse in the same window Home
RSC-4BT Users Manual
48
Chapter 4 HDD Blackplane Introduction
Step 3 Typing sudo -s to into administrator mode
Step 4 Find expander location$ sg_map -i
RSC-4BT Users Manual
49
Chapter 4 HDD Blackplane Instruction
Step 5For example
If would like to turn the Disk004 power off under the HBA card Need to check Disk004 power status $ sg_ses --page=7 devsg0
Under HBA card the Element 3 = Disk004
RSC-4BT Users Manual
50
Chapter 4 HDD Blackplane Introduction
Step 6To check Disk004 (element 3) power status is ok$ sg_ses --page=2 devsg0
S
Status shows belowThe status of Element 3 is OK
RSC-4BT Users Manual
51
Chapter 4 HDD Blackplane Instruction
Step 7Turn off a HDD power$ sg_ses --descriptor=Disk004 --set=341 devsg0
Step 8Turn on a HDD power$ sg_ses --descriptor=Disk004 --clear=341 devsg0
RSC-4BT Users Manual
52
Chapter 4 HDD Blackplane Introduction
45 HDD BP thermal sensor temperature setting(Only for system cooling Fan controled by expander)
Step 1 For Install HyperTerminalexe refer to section 41
Step 2Get the current temperature settingscmdgt temperature
RSC-4BT Users Manual
53
Chapter 4 HDD Blackplane Instruction
Step 3For example
Set new temperatureT1=20 C 4 18 CT2=50 C 4 52 CWarning threshold=50 C 448 CAlarm threshold=55 C 454 C
The new setting will take effect after resetcmdgt temperature 18 52 48 54cmdgt reset
RSC-4BT Users Manual
54
Chapter 4 HDD Blackplane Introduction
Step 4Check fan speed amp temperature informationcmdgt sensor
cmd gtsensor==ENCLOSURE STATUS========================================================== Total fan number 2 System Fan-0 speed 10888 RPM System Fan-1 speed 10971 RPM System PWN-0 82 Expander Temperature 76 Celsius degree Sytem Temperature-0 33 Celsius degree T1 20 Celsius degree T2 50 Celsius degree TC 55 Celsius degree Voltage Sensor 09V 093V Voltage Sensor 18V 180V
cmd gt_
Chapter 1 Product IntroductionChapter 1 Product IntroductionChapter 5 Technical Support
wwwaicipccom
bull TAIWANTel +886 3 433 9188Fax +886 3 287 1818Email salesaicipccomtw
bull CHINA Tel +862154961421 +862154961422Fax Extension 608Email Technical Support supportaicipccom
bull AMERICA - West coastTel +19098958989Fax +19098958999Email salesaicipccom
bull AMERICA - East coastTel +19738848886Fax +19738844794Email njsalesaicipccom
bull EUROPETel +31306386789Fax +31306360638Emailsalesaicipcnl
Email Technical Support supportaicipccom
- PREFACE
-
- SAFETY INSTRUCTIONS
-
- Chapter 1 Prodcut Introduction
-
- 11 Box Content
- 12 Specifications
- 13 General Information
-
- Chapter 2 Hardware Installation
-
- 21 Removing and Installing Top Cover
- 22 Installing Removing a Hard Disk Drive
- 23 Removing and Installing a PSU Module
- 24 Removing and Installing a Fan Module
- 25 Removing and Installing the HDD backplane Module
- 26 Tool-less Blade Slide Installation Instruction
-
- Chapter 3 Hardware Introduction
-
- 31 HARDWARE DESIGN SPECIFICATION
-
- Chapter 4 HDD Blackplane Introduction
-
- 41 Expender firmware update through phone connector port
- 42 Update the expander firmware through in-band
- 43 12G expander EDFB setting
- 44 Slot HDD power setting
- 45 HDD BP thermal sensor temperature setting
-
- Chapter 5 Technical Support
-
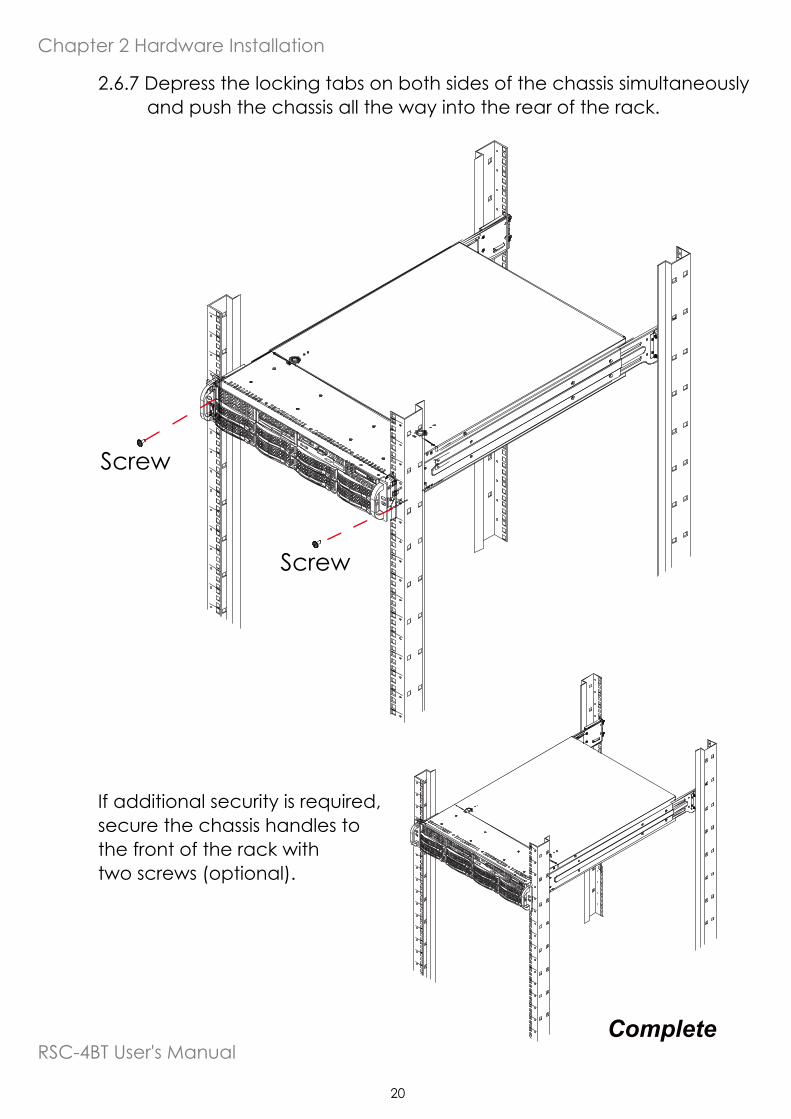

RSC-4BT Users Manual
27
Chapter 3 Hardware Introduction
317 Drive Slot Map
RSC-4BT Users Manual
28
Chapter 4 HDD Blackplane IntroductionChapter 4 HDD Blackplane Introduction
41 Expender firmware update through phone connector port411 Update Expander firmware revision
Step 1 Set up RSC-4BT phone connector Insert phone connector into phone connector port shown
below also the other side inert cable into host PC or notebook
PLEASE FIND THE PHONE CONNECTOR CABLE IN THE PACKAGE BOX
RSC-4BT Users Manual
29
Chapter 4 HDD Blackplane Instruction
Step 2 Set up RSC-4BT connector connectionSet up connector connection application into your RSC-4BT as shown in the example process below
For exampleOS Microsoft WindowsRS232 connection application Hyperterminal
Step 2 Install HyperTrmexe
RSC-4BT Users Manual
30
Chapter 4 HDD Blackplane Introduction
Step 3 Enter a new name for the icon in the field below and click OK
Step 4 Connecting by using selecting an option in the drop down menu circled in red below (we selected COM2 in this example) and click OK
RSC-4BT Users Manual
31
Chapter 4 HDD Blackplane Instruction
Properties
Port Setting
Bits per second
Data bits
Parity
Stop bits
Flow control None
Restore Defaults
OK ApplyCancel
None
Step 6 Set up is complete The diagram below depicts what screen should displayed
Step 5 For ldquoBits per secondrdquo select 38400 For ldquoFlow controlrdquo select None Click OK when you have finished your selections
cmdgt_
RSC-4BT Users Manual
32
Chapter 4 HDD Blackplane Introduction
Step 7To get firmware image amp MFG Configuration Image version information from AIC SAS Related Firmware Downloadne website
httpppmsaicipccomtw8888downloadexpandermcu
RSC-4BT Users Manual
33
Chapter 4 HDD Blackplane Instruction
Step 8Comand line for show current firmware revisioncmdgtrev
RSC-4BT Users Manual
34
Chapter 4 HDD Blackplane Introduction
Step 9Start to update expander firmwarecmdgtfdl 0 0_
Step 10Select the tool bar Transfer -gt Send File
RSC-4BT Users Manual
35
Chapter 4 HDD Blackplane Instruction
Step 11bull Choose new firmware path file fw 3A1_v11221bull Protocol have to choose Xmodem
Step 12Firmware download complete
RSC-4BT Users Manual
36
Chapter 4 HDD Blackplane Introduction
Step 13Reset computer for success update firmwarecmdgtreset
reset
RSC-4BT Users Manual
37
Chapter 4 HDD Blackplane Instruction
Step 13Reset computer for success update firmwarecmdgtreset
412 Update expander configuration MFG
Step 1Comand line for show current configuration MFGcmdgt showmfg
RSC-4BT Users Manual
38
Chapter 4 HDD Blackplane Introduction
Step 2Start to update expander configuration MFGcmdgtfdl 83 0_
Step 3Select the tool bar Transfer -gt Send File
83 0
RSC-4BT Users Manual
39
Chapter 4 HDD Blackplane Instruction
Step 4bull Choose new MFG path file mfg 3A10_eob_1201binbull Protocol have to choose Xmodem
Step 5MFG download complete
RSC-4BT Users Manual
40
Chapter 4 HDD Blackplane Introduction
Step 6Reset computer for success update MFGcmdgtreset
reset
RSC-4BT Users Manual
41
Chapter 4 HDD Blackplane Instruction
Step 6Reset computer for success update MFGcmdgtreset
42 Update the expander firmware through in-band
FOR EXAMPLEStep 1
Download and install SG3_utilsexe which compatible with Linux OSFrom website httpsgdannyczsgsg3_utilshtml website Reference version sg3_utils-140tgz
Step 2To get firmware image amp MFG Configuration Image version information from AIC SAS Related Firmware Downloadne websitehttpppmsaicipccomtw8888downloadexpandermcu
RSC-4BT Users Manual
42
Chapter 4 HDD Blackplane Introduction
Step 3Execute terminal under the same new firmware folderexample Setting a new firmware folder on Home page Open Terminal by click to the right button of mouse in the same window Home
Step 4Typing sudo -s to into administrator mode
RSC-4BT Users Manual
43
Chapter 4 HDD Blackplane Instruction
Step 5 Find expander location$ sg_map -i
Step 6Update Expander firmware$ sg_write_buffer --id=0x0 --in=fw3A1_v11221 --mode=0x2 --offset=0 devsg0
RSC-4BT Users Manual
44
Chapter 4 HDD Blackplane Introduction
Step 7 Update Expander MFG$ sg_write_buffer --id=0x83 --in=mfg3A10_eob_1201bin --mode=0x2 --offset=0 devsg0
Step 8Reboot computer for success update firmware amp MFGrootubuntu~ reboot
RSC-4BT Users Manual
45
Chapter 4 HDD Blackplane Instruction
43 12G expander EDFB settingStep 1
For Install HyperTerminalexe refer to section 41
Step 2 Get EDFB statuscmdgt edfb
RSC-4BT Users Manual
46
Chapter 4 HDD Blackplane Introduction
Step 3Change EDFB setting
Enable EDFB functioncmdgtedfb on
Disable EDFB functioncmdgtedfb off
cmd gtedfbEDFB is OFF
cmd gtedfb onSucceeded to set EDFB
cmd gtedfb offEDFB is OFF
RSC-4BT Users Manual
47
Chapter 4 HDD Blackplane Instruction
44 Slot HDD power setting(Only for system cooling Fan controled by expander)
Step 1 For Install sg3exe tool and get new firmware from website refer to section 42
Step 2Execute terminal under the same new firmware folderexample Setting a new firmware folder on Home page Open Terminal by click to the right button of mouse in the same window Home
RSC-4BT Users Manual
48
Chapter 4 HDD Blackplane Introduction
Step 3 Typing sudo -s to into administrator mode
Step 4 Find expander location$ sg_map -i
RSC-4BT Users Manual
49
Chapter 4 HDD Blackplane Instruction
Step 5For example
If would like to turn the Disk004 power off under the HBA card Need to check Disk004 power status $ sg_ses --page=7 devsg0
Under HBA card the Element 3 = Disk004
RSC-4BT Users Manual
50
Chapter 4 HDD Blackplane Introduction
Step 6To check Disk004 (element 3) power status is ok$ sg_ses --page=2 devsg0
S
Status shows belowThe status of Element 3 is OK
RSC-4BT Users Manual
51
Chapter 4 HDD Blackplane Instruction
Step 7Turn off a HDD power$ sg_ses --descriptor=Disk004 --set=341 devsg0
Step 8Turn on a HDD power$ sg_ses --descriptor=Disk004 --clear=341 devsg0
RSC-4BT Users Manual
52
Chapter 4 HDD Blackplane Introduction
45 HDD BP thermal sensor temperature setting(Only for system cooling Fan controled by expander)
Step 1 For Install HyperTerminalexe refer to section 41
Step 2Get the current temperature settingscmdgt temperature
RSC-4BT Users Manual
53
Chapter 4 HDD Blackplane Instruction
Step 3For example
Set new temperatureT1=20 C 4 18 CT2=50 C 4 52 CWarning threshold=50 C 448 CAlarm threshold=55 C 454 C
The new setting will take effect after resetcmdgt temperature 18 52 48 54cmdgt reset
RSC-4BT Users Manual
54
Chapter 4 HDD Blackplane Introduction
Step 4Check fan speed amp temperature informationcmdgt sensor
cmd gtsensor==ENCLOSURE STATUS========================================================== Total fan number 2 System Fan-0 speed 10888 RPM System Fan-1 speed 10971 RPM System PWN-0 82 Expander Temperature 76 Celsius degree Sytem Temperature-0 33 Celsius degree T1 20 Celsius degree T2 50 Celsius degree TC 55 Celsius degree Voltage Sensor 09V 093V Voltage Sensor 18V 180V
cmd gt_
Chapter 1 Product IntroductionChapter 1 Product IntroductionChapter 5 Technical Support
wwwaicipccom
bull TAIWANTel +886 3 433 9188Fax +886 3 287 1818Email salesaicipccomtw
bull CHINA Tel +862154961421 +862154961422Fax Extension 608Email Technical Support supportaicipccom
bull AMERICA - West coastTel +19098958989Fax +19098958999Email salesaicipccom
bull AMERICA - East coastTel +19738848886Fax +19738844794Email njsalesaicipccom
bull EUROPETel +31306386789Fax +31306360638Emailsalesaicipcnl
Email Technical Support supportaicipccom
- PREFACE
-
- SAFETY INSTRUCTIONS
-
- Chapter 1 Prodcut Introduction
-
- 11 Box Content
- 12 Specifications
- 13 General Information
-
- Chapter 2 Hardware Installation
-
- 21 Removing and Installing Top Cover
- 22 Installing Removing a Hard Disk Drive
- 23 Removing and Installing a PSU Module
- 24 Removing and Installing a Fan Module
- 25 Removing and Installing the HDD backplane Module
- 26 Tool-less Blade Slide Installation Instruction
-
- Chapter 3 Hardware Introduction
-
- 31 HARDWARE DESIGN SPECIFICATION
-
- Chapter 4 HDD Blackplane Introduction
-
- 41 Expender firmware update through phone connector port
- 42 Update the expander firmware through in-band
- 43 12G expander EDFB setting
- 44 Slot HDD power setting
- 45 HDD BP thermal sensor temperature setting
-
- Chapter 5 Technical Support
-
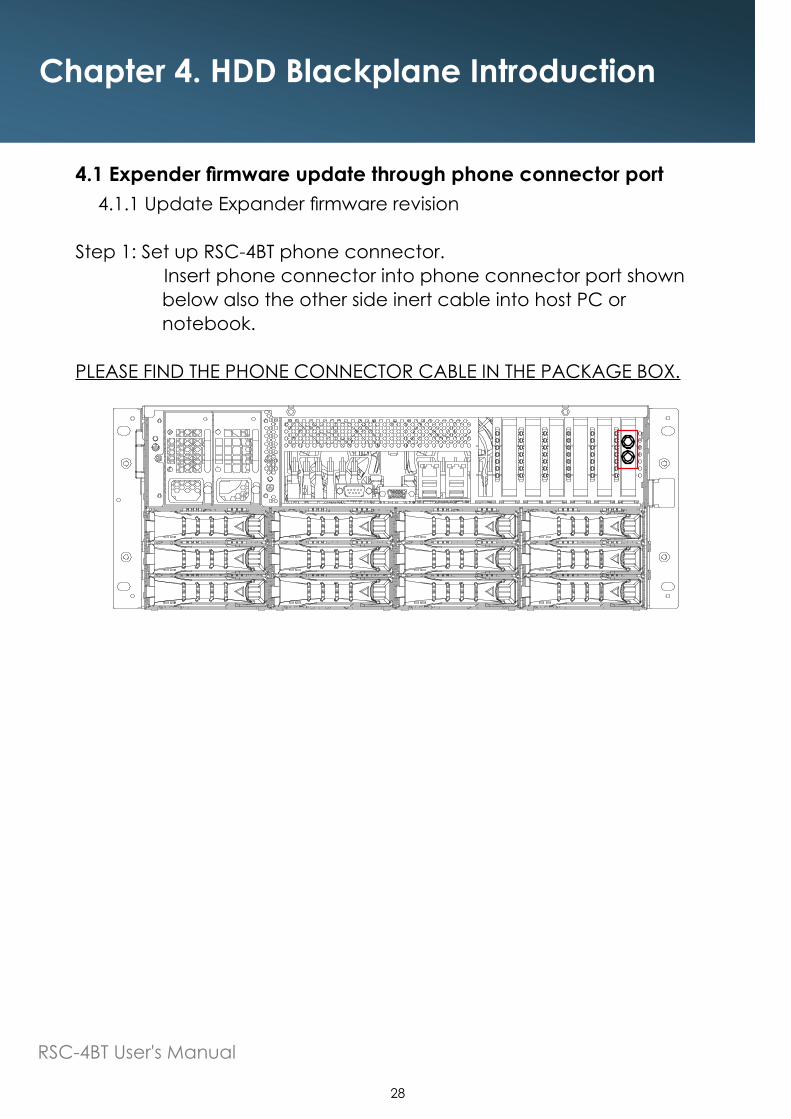
RSC-4BT Users Manual
28
Chapter 4 HDD Blackplane IntroductionChapter 4 HDD Blackplane Introduction
41 Expender firmware update through phone connector port411 Update Expander firmware revision
Step 1 Set up RSC-4BT phone connector Insert phone connector into phone connector port shown
below also the other side inert cable into host PC or notebook
PLEASE FIND THE PHONE CONNECTOR CABLE IN THE PACKAGE BOX
RSC-4BT Users Manual
29
Chapter 4 HDD Blackplane Instruction
Step 2 Set up RSC-4BT connector connectionSet up connector connection application into your RSC-4BT as shown in the example process below
For exampleOS Microsoft WindowsRS232 connection application Hyperterminal
Step 2 Install HyperTrmexe
RSC-4BT Users Manual
30
Chapter 4 HDD Blackplane Introduction
Step 3 Enter a new name for the icon in the field below and click OK
Step 4 Connecting by using selecting an option in the drop down menu circled in red below (we selected COM2 in this example) and click OK
RSC-4BT Users Manual
31
Chapter 4 HDD Blackplane Instruction
Properties
Port Setting
Bits per second
Data bits
Parity
Stop bits
Flow control None
Restore Defaults
OK ApplyCancel
None
Step 6 Set up is complete The diagram below depicts what screen should displayed
Step 5 For ldquoBits per secondrdquo select 38400 For ldquoFlow controlrdquo select None Click OK when you have finished your selections
cmdgt_
RSC-4BT Users Manual
32
Chapter 4 HDD Blackplane Introduction
Step 7To get firmware image amp MFG Configuration Image version information from AIC SAS Related Firmware Downloadne website
httpppmsaicipccomtw8888downloadexpandermcu
RSC-4BT Users Manual
33
Chapter 4 HDD Blackplane Instruction
Step 8Comand line for show current firmware revisioncmdgtrev
RSC-4BT Users Manual
34
Chapter 4 HDD Blackplane Introduction
Step 9Start to update expander firmwarecmdgtfdl 0 0_
Step 10Select the tool bar Transfer -gt Send File
RSC-4BT Users Manual
35
Chapter 4 HDD Blackplane Instruction
Step 11bull Choose new firmware path file fw 3A1_v11221bull Protocol have to choose Xmodem
Step 12Firmware download complete
RSC-4BT Users Manual
36
Chapter 4 HDD Blackplane Introduction
Step 13Reset computer for success update firmwarecmdgtreset
reset
RSC-4BT Users Manual
37
Chapter 4 HDD Blackplane Instruction
Step 13Reset computer for success update firmwarecmdgtreset
412 Update expander configuration MFG
Step 1Comand line for show current configuration MFGcmdgt showmfg
RSC-4BT Users Manual
38
Chapter 4 HDD Blackplane Introduction
Step 2Start to update expander configuration MFGcmdgtfdl 83 0_
Step 3Select the tool bar Transfer -gt Send File
83 0
RSC-4BT Users Manual
39
Chapter 4 HDD Blackplane Instruction
Step 4bull Choose new MFG path file mfg 3A10_eob_1201binbull Protocol have to choose Xmodem
Step 5MFG download complete
RSC-4BT Users Manual
40
Chapter 4 HDD Blackplane Introduction
Step 6Reset computer for success update MFGcmdgtreset
reset
RSC-4BT Users Manual
41
Chapter 4 HDD Blackplane Instruction
Step 6Reset computer for success update MFGcmdgtreset
42 Update the expander firmware through in-band
FOR EXAMPLEStep 1
Download and install SG3_utilsexe which compatible with Linux OSFrom website httpsgdannyczsgsg3_utilshtml website Reference version sg3_utils-140tgz
Step 2To get firmware image amp MFG Configuration Image version information from AIC SAS Related Firmware Downloadne websitehttpppmsaicipccomtw8888downloadexpandermcu
RSC-4BT Users Manual
42
Chapter 4 HDD Blackplane Introduction
Step 3Execute terminal under the same new firmware folderexample Setting a new firmware folder on Home page Open Terminal by click to the right button of mouse in the same window Home
Step 4Typing sudo -s to into administrator mode
RSC-4BT Users Manual
43
Chapter 4 HDD Blackplane Instruction
Step 5 Find expander location$ sg_map -i
Step 6Update Expander firmware$ sg_write_buffer --id=0x0 --in=fw3A1_v11221 --mode=0x2 --offset=0 devsg0
RSC-4BT Users Manual
44
Chapter 4 HDD Blackplane Introduction
Step 7 Update Expander MFG$ sg_write_buffer --id=0x83 --in=mfg3A10_eob_1201bin --mode=0x2 --offset=0 devsg0
Step 8Reboot computer for success update firmware amp MFGrootubuntu~ reboot
RSC-4BT Users Manual
45
Chapter 4 HDD Blackplane Instruction
43 12G expander EDFB settingStep 1
For Install HyperTerminalexe refer to section 41
Step 2 Get EDFB statuscmdgt edfb
RSC-4BT Users Manual
46
Chapter 4 HDD Blackplane Introduction
Step 3Change EDFB setting
Enable EDFB functioncmdgtedfb on
Disable EDFB functioncmdgtedfb off
cmd gtedfbEDFB is OFF
cmd gtedfb onSucceeded to set EDFB
cmd gtedfb offEDFB is OFF
RSC-4BT Users Manual
47
Chapter 4 HDD Blackplane Instruction
44 Slot HDD power setting(Only for system cooling Fan controled by expander)
Step 1 For Install sg3exe tool and get new firmware from website refer to section 42
Step 2Execute terminal under the same new firmware folderexample Setting a new firmware folder on Home page Open Terminal by click to the right button of mouse in the same window Home
RSC-4BT Users Manual
48
Chapter 4 HDD Blackplane Introduction
Step 3 Typing sudo -s to into administrator mode
Step 4 Find expander location$ sg_map -i
RSC-4BT Users Manual
49
Chapter 4 HDD Blackplane Instruction
Step 5For example
If would like to turn the Disk004 power off under the HBA card Need to check Disk004 power status $ sg_ses --page=7 devsg0
Under HBA card the Element 3 = Disk004
RSC-4BT Users Manual
50
Chapter 4 HDD Blackplane Introduction
Step 6To check Disk004 (element 3) power status is ok$ sg_ses --page=2 devsg0
S
Status shows belowThe status of Element 3 is OK
RSC-4BT Users Manual
51
Chapter 4 HDD Blackplane Instruction
Step 7Turn off a HDD power$ sg_ses --descriptor=Disk004 --set=341 devsg0
Step 8Turn on a HDD power$ sg_ses --descriptor=Disk004 --clear=341 devsg0
RSC-4BT Users Manual
52
Chapter 4 HDD Blackplane Introduction
45 HDD BP thermal sensor temperature setting(Only for system cooling Fan controled by expander)
Step 1 For Install HyperTerminalexe refer to section 41
Step 2Get the current temperature settingscmdgt temperature
RSC-4BT Users Manual
53
Chapter 4 HDD Blackplane Instruction
Step 3For example
Set new temperatureT1=20 C 4 18 CT2=50 C 4 52 CWarning threshold=50 C 448 CAlarm threshold=55 C 454 C
The new setting will take effect after resetcmdgt temperature 18 52 48 54cmdgt reset
RSC-4BT Users Manual
54
Chapter 4 HDD Blackplane Introduction
Step 4Check fan speed amp temperature informationcmdgt sensor
cmd gtsensor==ENCLOSURE STATUS========================================================== Total fan number 2 System Fan-0 speed 10888 RPM System Fan-1 speed 10971 RPM System PWN-0 82 Expander Temperature 76 Celsius degree Sytem Temperature-0 33 Celsius degree T1 20 Celsius degree T2 50 Celsius degree TC 55 Celsius degree Voltage Sensor 09V 093V Voltage Sensor 18V 180V
cmd gt_
Chapter 1 Product IntroductionChapter 1 Product IntroductionChapter 5 Technical Support
wwwaicipccom
bull TAIWANTel +886 3 433 9188Fax +886 3 287 1818Email salesaicipccomtw
bull CHINA Tel +862154961421 +862154961422Fax Extension 608Email Technical Support supportaicipccom
bull AMERICA - West coastTel +19098958989Fax +19098958999Email salesaicipccom
bull AMERICA - East coastTel +19738848886Fax +19738844794Email njsalesaicipccom
bull EUROPETel +31306386789Fax +31306360638Emailsalesaicipcnl
Email Technical Support supportaicipccom
- PREFACE
-
- SAFETY INSTRUCTIONS
-
- Chapter 1 Prodcut Introduction
-
- 11 Box Content
- 12 Specifications
- 13 General Information
-
- Chapter 2 Hardware Installation
-
- 21 Removing and Installing Top Cover
- 22 Installing Removing a Hard Disk Drive
- 23 Removing and Installing a PSU Module
- 24 Removing and Installing a Fan Module
- 25 Removing and Installing the HDD backplane Module
- 26 Tool-less Blade Slide Installation Instruction
-
- Chapter 3 Hardware Introduction
-
- 31 HARDWARE DESIGN SPECIFICATION
-
- Chapter 4 HDD Blackplane Introduction
-
- 41 Expender firmware update through phone connector port
- 42 Update the expander firmware through in-band
- 43 12G expander EDFB setting
- 44 Slot HDD power setting
- 45 HDD BP thermal sensor temperature setting
-
- Chapter 5 Technical Support
-
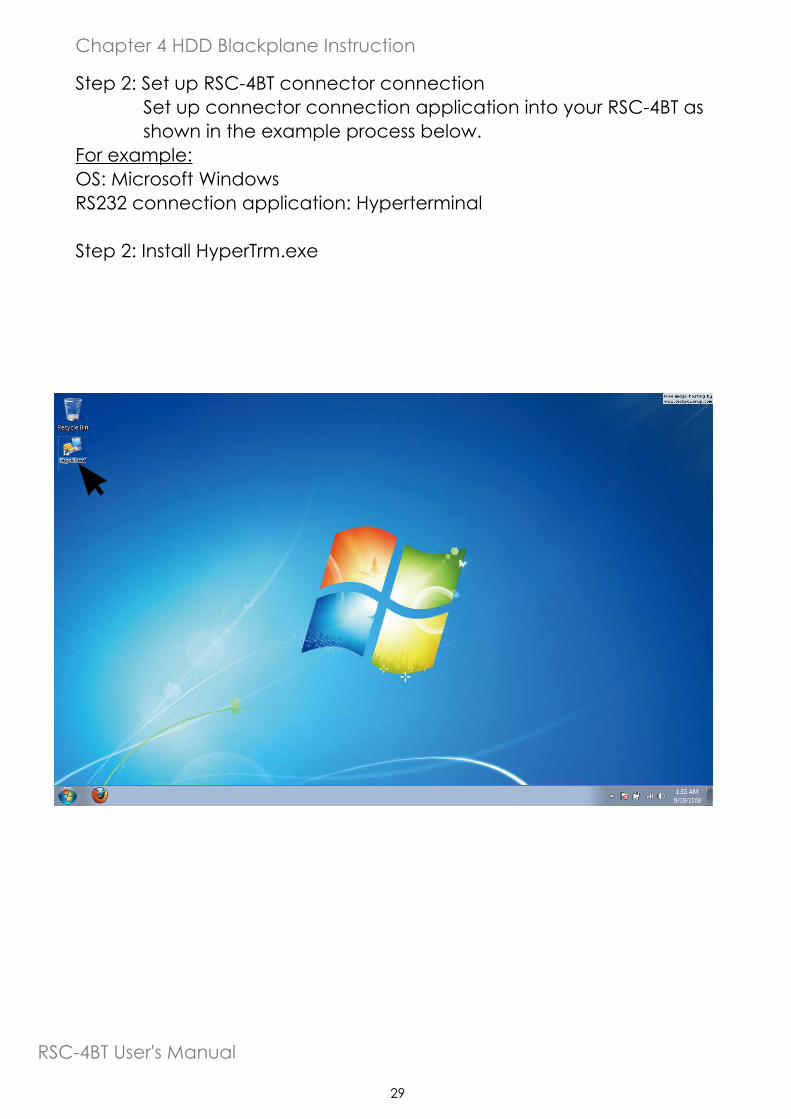
RSC-4BT Users Manual
29
Chapter 4 HDD Blackplane Instruction
Step 2 Set up RSC-4BT connector connectionSet up connector connection application into your RSC-4BT as shown in the example process below
For exampleOS Microsoft WindowsRS232 connection application Hyperterminal
Step 2 Install HyperTrmexe
RSC-4BT Users Manual
30
Chapter 4 HDD Blackplane Introduction
Step 3 Enter a new name for the icon in the field below and click OK
Step 4 Connecting by using selecting an option in the drop down menu circled in red below (we selected COM2 in this example) and click OK
RSC-4BT Users Manual
31
Chapter 4 HDD Blackplane Instruction
Properties
Port Setting
Bits per second
Data bits
Parity
Stop bits
Flow control None
Restore Defaults
OK ApplyCancel
None
Step 6 Set up is complete The diagram below depicts what screen should displayed
Step 5 For ldquoBits per secondrdquo select 38400 For ldquoFlow controlrdquo select None Click OK when you have finished your selections
cmdgt_
RSC-4BT Users Manual
32
Chapter 4 HDD Blackplane Introduction
Step 7To get firmware image amp MFG Configuration Image version information from AIC SAS Related Firmware Downloadne website
httpppmsaicipccomtw8888downloadexpandermcu
RSC-4BT Users Manual
33
Chapter 4 HDD Blackplane Instruction
Step 8Comand line for show current firmware revisioncmdgtrev
RSC-4BT Users Manual
34
Chapter 4 HDD Blackplane Introduction
Step 9Start to update expander firmwarecmdgtfdl 0 0_
Step 10Select the tool bar Transfer -gt Send File
RSC-4BT Users Manual
35
Chapter 4 HDD Blackplane Instruction
Step 11bull Choose new firmware path file fw 3A1_v11221bull Protocol have to choose Xmodem
Step 12Firmware download complete
RSC-4BT Users Manual
36
Chapter 4 HDD Blackplane Introduction
Step 13Reset computer for success update firmwarecmdgtreset
reset
RSC-4BT Users Manual
37
Chapter 4 HDD Blackplane Instruction
Step 13Reset computer for success update firmwarecmdgtreset
412 Update expander configuration MFG
Step 1Comand line for show current configuration MFGcmdgt showmfg
RSC-4BT Users Manual
38
Chapter 4 HDD Blackplane Introduction
Step 2Start to update expander configuration MFGcmdgtfdl 83 0_
Step 3Select the tool bar Transfer -gt Send File
83 0
RSC-4BT Users Manual
39
Chapter 4 HDD Blackplane Instruction
Step 4bull Choose new MFG path file mfg 3A10_eob_1201binbull Protocol have to choose Xmodem
Step 5MFG download complete
RSC-4BT Users Manual
40
Chapter 4 HDD Blackplane Introduction
Step 6Reset computer for success update MFGcmdgtreset
reset
RSC-4BT Users Manual
41
Chapter 4 HDD Blackplane Instruction
Step 6Reset computer for success update MFGcmdgtreset
42 Update the expander firmware through in-band
FOR EXAMPLEStep 1
Download and install SG3_utilsexe which compatible with Linux OSFrom website httpsgdannyczsgsg3_utilshtml website Reference version sg3_utils-140tgz
Step 2To get firmware image amp MFG Configuration Image version information from AIC SAS Related Firmware Downloadne websitehttpppmsaicipccomtw8888downloadexpandermcu
RSC-4BT Users Manual
42
Chapter 4 HDD Blackplane Introduction
Step 3Execute terminal under the same new firmware folderexample Setting a new firmware folder on Home page Open Terminal by click to the right button of mouse in the same window Home
Step 4Typing sudo -s to into administrator mode
RSC-4BT Users Manual
43
Chapter 4 HDD Blackplane Instruction
Step 5 Find expander location$ sg_map -i
Step 6Update Expander firmware$ sg_write_buffer --id=0x0 --in=fw3A1_v11221 --mode=0x2 --offset=0 devsg0
RSC-4BT Users Manual
44
Chapter 4 HDD Blackplane Introduction
Step 7 Update Expander MFG$ sg_write_buffer --id=0x83 --in=mfg3A10_eob_1201bin --mode=0x2 --offset=0 devsg0
Step 8Reboot computer for success update firmware amp MFGrootubuntu~ reboot
RSC-4BT Users Manual
45
Chapter 4 HDD Blackplane Instruction
43 12G expander EDFB settingStep 1
For Install HyperTerminalexe refer to section 41
Step 2 Get EDFB statuscmdgt edfb
RSC-4BT Users Manual
46
Chapter 4 HDD Blackplane Introduction
Step 3Change EDFB setting
Enable EDFB functioncmdgtedfb on
Disable EDFB functioncmdgtedfb off
cmd gtedfbEDFB is OFF
cmd gtedfb onSucceeded to set EDFB
cmd gtedfb offEDFB is OFF
RSC-4BT Users Manual
47
Chapter 4 HDD Blackplane Instruction
44 Slot HDD power setting(Only for system cooling Fan controled by expander)
Step 1 For Install sg3exe tool and get new firmware from website refer to section 42
Step 2Execute terminal under the same new firmware folderexample Setting a new firmware folder on Home page Open Terminal by click to the right button of mouse in the same window Home
RSC-4BT Users Manual
48
Chapter 4 HDD Blackplane Introduction
Step 3 Typing sudo -s to into administrator mode
Step 4 Find expander location$ sg_map -i
RSC-4BT Users Manual
49
Chapter 4 HDD Blackplane Instruction
Step 5For example
If would like to turn the Disk004 power off under the HBA card Need to check Disk004 power status $ sg_ses --page=7 devsg0
Under HBA card the Element 3 = Disk004
RSC-4BT Users Manual
50
Chapter 4 HDD Blackplane Introduction
Step 6To check Disk004 (element 3) power status is ok$ sg_ses --page=2 devsg0
S
Status shows belowThe status of Element 3 is OK
RSC-4BT Users Manual
51
Chapter 4 HDD Blackplane Instruction
Step 7Turn off a HDD power$ sg_ses --descriptor=Disk004 --set=341 devsg0
Step 8Turn on a HDD power$ sg_ses --descriptor=Disk004 --clear=341 devsg0
RSC-4BT Users Manual
52
Chapter 4 HDD Blackplane Introduction
45 HDD BP thermal sensor temperature setting(Only for system cooling Fan controled by expander)
Step 1 For Install HyperTerminalexe refer to section 41
Step 2Get the current temperature settingscmdgt temperature
RSC-4BT Users Manual
53
Chapter 4 HDD Blackplane Instruction
Step 3For example
Set new temperatureT1=20 C 4 18 CT2=50 C 4 52 CWarning threshold=50 C 448 CAlarm threshold=55 C 454 C
The new setting will take effect after resetcmdgt temperature 18 52 48 54cmdgt reset
RSC-4BT Users Manual
54
Chapter 4 HDD Blackplane Introduction
Step 4Check fan speed amp temperature informationcmdgt sensor
cmd gtsensor==ENCLOSURE STATUS========================================================== Total fan number 2 System Fan-0 speed 10888 RPM System Fan-1 speed 10971 RPM System PWN-0 82 Expander Temperature 76 Celsius degree Sytem Temperature-0 33 Celsius degree T1 20 Celsius degree T2 50 Celsius degree TC 55 Celsius degree Voltage Sensor 09V 093V Voltage Sensor 18V 180V
cmd gt_
Chapter 1 Product IntroductionChapter 1 Product IntroductionChapter 5 Technical Support
wwwaicipccom
bull TAIWANTel +886 3 433 9188Fax +886 3 287 1818Email salesaicipccomtw
bull CHINA Tel +862154961421 +862154961422Fax Extension 608Email Technical Support supportaicipccom
bull AMERICA - West coastTel +19098958989Fax +19098958999Email salesaicipccom
bull AMERICA - East coastTel +19738848886Fax +19738844794Email njsalesaicipccom
bull EUROPETel +31306386789Fax +31306360638Emailsalesaicipcnl
Email Technical Support supportaicipccom
- PREFACE
-
- SAFETY INSTRUCTIONS
-
- Chapter 1 Prodcut Introduction
-
- 11 Box Content
- 12 Specifications
- 13 General Information
-
- Chapter 2 Hardware Installation
-
- 21 Removing and Installing Top Cover
- 22 Installing Removing a Hard Disk Drive
- 23 Removing and Installing a PSU Module
- 24 Removing and Installing a Fan Module
- 25 Removing and Installing the HDD backplane Module
- 26 Tool-less Blade Slide Installation Instruction
-
- Chapter 3 Hardware Introduction
-
- 31 HARDWARE DESIGN SPECIFICATION
-
- Chapter 4 HDD Blackplane Introduction
-
- 41 Expender firmware update through phone connector port
- 42 Update the expander firmware through in-band
- 43 12G expander EDFB setting
- 44 Slot HDD power setting
- 45 HDD BP thermal sensor temperature setting
-
- Chapter 5 Technical Support
-
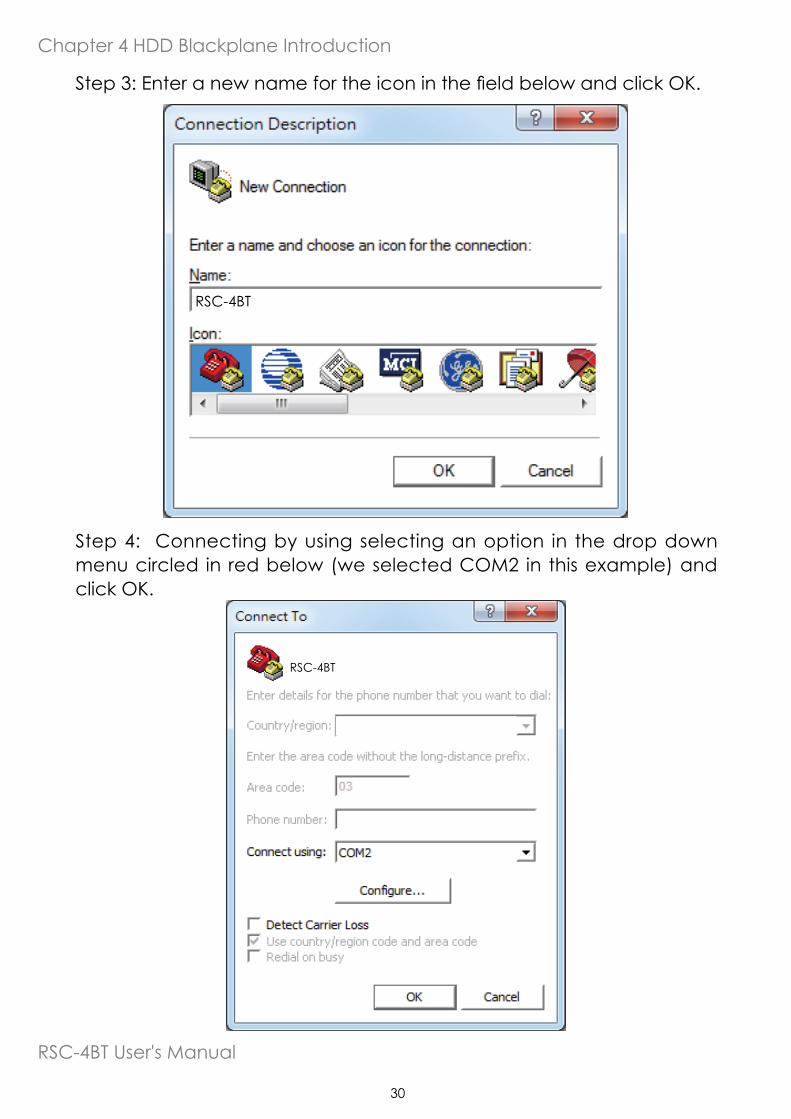
RSC-4BT Users Manual
38
Chapter 4 HDD Blackplane Introduction
Step 2Start to update expander configuration MFGcmdgtfdl 83 0_
Step 3Select the tool bar Transfer -gt Send File
83 0
RSC-4BT Users Manual
39
Chapter 4 HDD Blackplane Instruction
Step 4bull Choose new MFG path file mfg 3A10_eob_1201binbull Protocol have to choose Xmodem
Step 5MFG download complete
RSC-4BT Users Manual
40
Chapter 4 HDD Blackplane Introduction
Step 6Reset computer for success update MFGcmdgtreset
reset
RSC-4BT Users Manual
41
Chapter 4 HDD Blackplane Instruction
Step 6Reset computer for success update MFGcmdgtreset
42 Update the expander firmware through in-band
FOR EXAMPLEStep 1
Download and install SG3_utilsexe which compatible with Linux OSFrom website httpsgdannyczsgsg3_utilshtml website Reference version sg3_utils-140tgz
Step 2To get firmware image amp MFG Configuration Image version information from AIC SAS Related Firmware Downloadne websitehttpppmsaicipccomtw8888downloadexpandermcu
RSC-4BT Users Manual
42
Chapter 4 HDD Blackplane Introduction
Step 3Execute terminal under the same new firmware folderexample Setting a new firmware folder on Home page Open Terminal by click to the right button of mouse in the same window Home
Step 4Typing sudo -s to into administrator mode
RSC-4BT Users Manual
43
Chapter 4 HDD Blackplane Instruction
Step 5 Find expander location$ sg_map -i
Step 6Update Expander firmware$ sg_write_buffer --id=0x0 --in=fw3A1_v11221 --mode=0x2 --offset=0 devsg0
RSC-4BT Users Manual
44
Chapter 4 HDD Blackplane Introduction
Step 7 Update Expander MFG$ sg_write_buffer --id=0x83 --in=mfg3A10_eob_1201bin --mode=0x2 --offset=0 devsg0
Step 8Reboot computer for success update firmware amp MFGrootubuntu~ reboot
RSC-4BT Users Manual
45
Chapter 4 HDD Blackplane Instruction
43 12G expander EDFB settingStep 1
For Install HyperTerminalexe refer to section 41
Step 2 Get EDFB statuscmdgt edfb
RSC-4BT Users Manual
46
Chapter 4 HDD Blackplane Introduction
Step 3Change EDFB setting
Enable EDFB functioncmdgtedfb on
Disable EDFB functioncmdgtedfb off
cmd gtedfbEDFB is OFF
cmd gtedfb onSucceeded to set EDFB
cmd gtedfb offEDFB is OFF
RSC-4BT Users Manual
47
Chapter 4 HDD Blackplane Instruction
44 Slot HDD power setting(Only for system cooling Fan controled by expander)
Step 1 For Install sg3exe tool and get new firmware from website refer to section 42
Step 2Execute terminal under the same new firmware folderexample Setting a new firmware folder on Home page Open Terminal by click to the right button of mouse in the same window Home
RSC-4BT Users Manual
48
Chapter 4 HDD Blackplane Introduction
Step 3 Typing sudo -s to into administrator mode
Step 4 Find expander location$ sg_map -i
RSC-4BT Users Manual
49
Chapter 4 HDD Blackplane Instruction
Step 5For example
If would like to turn the Disk004 power off under the HBA card Need to check Disk004 power status $ sg_ses --page=7 devsg0
Under HBA card the Element 3 = Disk004
RSC-4BT Users Manual
50
Chapter 4 HDD Blackplane Introduction
Step 6To check Disk004 (element 3) power status is ok$ sg_ses --page=2 devsg0
S
Status shows belowThe status of Element 3 is OK
RSC-4BT Users Manual
51
Chapter 4 HDD Blackplane Instruction
Step 7Turn off a HDD power$ sg_ses --descriptor=Disk004 --set=341 devsg0
Step 8Turn on a HDD power$ sg_ses --descriptor=Disk004 --clear=341 devsg0
RSC-4BT Users Manual
52
Chapter 4 HDD Blackplane Introduction
45 HDD BP thermal sensor temperature setting(Only for system cooling Fan controled by expander)
Step 1 For Install HyperTerminalexe refer to section 41
Step 2Get the current temperature settingscmdgt temperature
RSC-4BT Users Manual
53
Chapter 4 HDD Blackplane Instruction
Step 3For example
Set new temperatureT1=20 C 4 18 CT2=50 C 4 52 CWarning threshold=50 C 448 CAlarm threshold=55 C 454 C
The new setting will take effect after resetcmdgt temperature 18 52 48 54cmdgt reset
RSC-4BT Users Manual
54
Chapter 4 HDD Blackplane Introduction
Step 4Check fan speed amp temperature informationcmdgt sensor
cmd gtsensor==ENCLOSURE STATUS========================================================== Total fan number 2 System Fan-0 speed 10888 RPM System Fan-1 speed 10971 RPM System PWN-0 82 Expander Temperature 76 Celsius degree Sytem Temperature-0 33 Celsius degree T1 20 Celsius degree T2 50 Celsius degree TC 55 Celsius degree Voltage Sensor 09V 093V Voltage Sensor 18V 180V
cmd gt_
Chapter 1 Product IntroductionChapter 1 Product IntroductionChapter 5 Technical Support
wwwaicipccom
bull TAIWANTel +886 3 433 9188Fax +886 3 287 1818Email salesaicipccomtw
bull CHINA Tel +862154961421 +862154961422Fax Extension 608Email Technical Support supportaicipccom
bull AMERICA - West coastTel +19098958989Fax +19098958999Email salesaicipccom
bull AMERICA - East coastTel +19738848886Fax +19738844794Email njsalesaicipccom
bull EUROPETel +31306386789Fax +31306360638Emailsalesaicipcnl
Email Technical Support supportaicipccom
- PREFACE
-
- SAFETY INSTRUCTIONS
-
- Chapter 1 Prodcut Introduction
-
- 11 Box Content
- 12 Specifications
- 13 General Information
-
- Chapter 2 Hardware Installation
-
- 21 Removing and Installing Top Cover
- 22 Installing Removing a Hard Disk Drive
- 23 Removing and Installing a PSU Module
- 24 Removing and Installing a Fan Module
- 25 Removing and Installing the HDD backplane Module
- 26 Tool-less Blade Slide Installation Instruction
-
- Chapter 3 Hardware Introduction
-
- 31 HARDWARE DESIGN SPECIFICATION
-
- Chapter 4 HDD Blackplane Introduction
-
- 41 Expender firmware update through phone connector port
- 42 Update the expander firmware through in-band
- 43 12G expander EDFB setting
- 44 Slot HDD power setting
- 45 HDD BP thermal sensor temperature setting
-
- Chapter 5 Technical Support
-
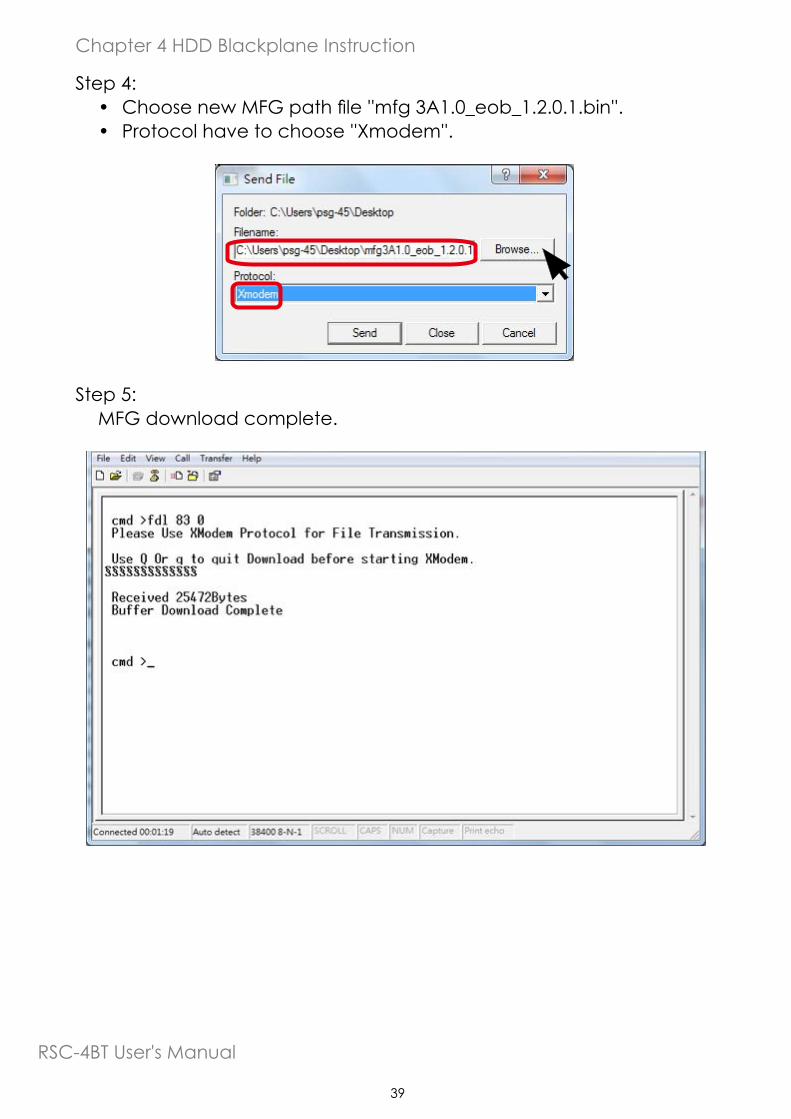
RSC-4BT Users Manual
39
Chapter 4 HDD Blackplane Instruction
Step 4bull Choose new MFG path file mfg 3A10_eob_1201binbull Protocol have to choose Xmodem
Step 5MFG download complete
RSC-4BT Users Manual
40
Chapter 4 HDD Blackplane Introduction
Step 6Reset computer for success update MFGcmdgtreset
reset
RSC-4BT Users Manual
41
Chapter 4 HDD Blackplane Instruction
Step 6Reset computer for success update MFGcmdgtreset
42 Update the expander firmware through in-band
FOR EXAMPLEStep 1
Download and install SG3_utilsexe which compatible with Linux OSFrom website httpsgdannyczsgsg3_utilshtml website Reference version sg3_utils-140tgz
Step 2To get firmware image amp MFG Configuration Image version information from AIC SAS Related Firmware Downloadne websitehttpppmsaicipccomtw8888downloadexpandermcu
RSC-4BT Users Manual
42
Chapter 4 HDD Blackplane Introduction
Step 3Execute terminal under the same new firmware folderexample Setting a new firmware folder on Home page Open Terminal by click to the right button of mouse in the same window Home
Step 4Typing sudo -s to into administrator mode
RSC-4BT Users Manual
43
Chapter 4 HDD Blackplane Instruction
Step 5 Find expander location$ sg_map -i
Step 6Update Expander firmware$ sg_write_buffer --id=0x0 --in=fw3A1_v11221 --mode=0x2 --offset=0 devsg0
RSC-4BT Users Manual
44
Chapter 4 HDD Blackplane Introduction
Step 7 Update Expander MFG$ sg_write_buffer --id=0x83 --in=mfg3A10_eob_1201bin --mode=0x2 --offset=0 devsg0
Step 8Reboot computer for success update firmware amp MFGrootubuntu~ reboot
RSC-4BT Users Manual
45
Chapter 4 HDD Blackplane Instruction
43 12G expander EDFB settingStep 1
For Install HyperTerminalexe refer to section 41
Step 2 Get EDFB statuscmdgt edfb
RSC-4BT Users Manual
46
Chapter 4 HDD Blackplane Introduction
Step 3Change EDFB setting
Enable EDFB functioncmdgtedfb on
Disable EDFB functioncmdgtedfb off
cmd gtedfbEDFB is OFF
cmd gtedfb onSucceeded to set EDFB
cmd gtedfb offEDFB is OFF
RSC-4BT Users Manual
47
Chapter 4 HDD Blackplane Instruction
44 Slot HDD power setting(Only for system cooling Fan controled by expander)
Step 1 For Install sg3exe tool and get new firmware from website refer to section 42
Step 2Execute terminal under the same new firmware folderexample Setting a new firmware folder on Home page Open Terminal by click to the right button of mouse in the same window Home
RSC-4BT Users Manual
48
Chapter 4 HDD Blackplane Introduction
Step 3 Typing sudo -s to into administrator mode
Step 4 Find expander location$ sg_map -i
RSC-4BT Users Manual
49
Chapter 4 HDD Blackplane Instruction
Step 5For example
If would like to turn the Disk004 power off under the HBA card Need to check Disk004 power status $ sg_ses --page=7 devsg0
Under HBA card the Element 3 = Disk004
RSC-4BT Users Manual
50
Chapter 4 HDD Blackplane Introduction
Step 6To check Disk004 (element 3) power status is ok$ sg_ses --page=2 devsg0
S
Status shows belowThe status of Element 3 is OK
RSC-4BT Users Manual
51
Chapter 4 HDD Blackplane Instruction
Step 7Turn off a HDD power$ sg_ses --descriptor=Disk004 --set=341 devsg0
Step 8Turn on a HDD power$ sg_ses --descriptor=Disk004 --clear=341 devsg0
RSC-4BT Users Manual
52
Chapter 4 HDD Blackplane Introduction
45 HDD BP thermal sensor temperature setting(Only for system cooling Fan controled by expander)
Step 1 For Install HyperTerminalexe refer to section 41
Step 2Get the current temperature settingscmdgt temperature
RSC-4BT Users Manual
53
Chapter 4 HDD Blackplane Instruction
Step 3For example
Set new temperatureT1=20 C 4 18 CT2=50 C 4 52 CWarning threshold=50 C 448 CAlarm threshold=55 C 454 C
The new setting will take effect after resetcmdgt temperature 18 52 48 54cmdgt reset
RSC-4BT Users Manual
54
Chapter 4 HDD Blackplane Introduction
Step 4Check fan speed amp temperature informationcmdgt sensor
cmd gtsensor==ENCLOSURE STATUS========================================================== Total fan number 2 System Fan-0 speed 10888 RPM System Fan-1 speed 10971 RPM System PWN-0 82 Expander Temperature 76 Celsius degree Sytem Temperature-0 33 Celsius degree T1 20 Celsius degree T2 50 Celsius degree TC 55 Celsius degree Voltage Sensor 09V 093V Voltage Sensor 18V 180V
cmd gt_
Chapter 1 Product IntroductionChapter 1 Product IntroductionChapter 5 Technical Support
wwwaicipccom
bull TAIWANTel +886 3 433 9188Fax +886 3 287 1818Email salesaicipccomtw
bull CHINA Tel +862154961421 +862154961422Fax Extension 608Email Technical Support supportaicipccom
bull AMERICA - West coastTel +19098958989Fax +19098958999Email salesaicipccom
bull AMERICA - East coastTel +19738848886Fax +19738844794Email njsalesaicipccom
bull EUROPETel +31306386789Fax +31306360638Emailsalesaicipcnl
Email Technical Support supportaicipccom
- PREFACE
-
- SAFETY INSTRUCTIONS
-
- Chapter 1 Prodcut Introduction
-
- 11 Box Content
- 12 Specifications
- 13 General Information
-
- Chapter 2 Hardware Installation
-
- 21 Removing and Installing Top Cover
- 22 Installing Removing a Hard Disk Drive
- 23 Removing and Installing a PSU Module
- 24 Removing and Installing a Fan Module
- 25 Removing and Installing the HDD backplane Module
- 26 Tool-less Blade Slide Installation Instruction
-
- Chapter 3 Hardware Introduction
-
- 31 HARDWARE DESIGN SPECIFICATION
-
- Chapter 4 HDD Blackplane Introduction
-
- 41 Expender firmware update through phone connector port
- 42 Update the expander firmware through in-band
- 43 12G expander EDFB setting
- 44 Slot HDD power setting
- 45 HDD BP thermal sensor temperature setting
-
- Chapter 5 Technical Support
-
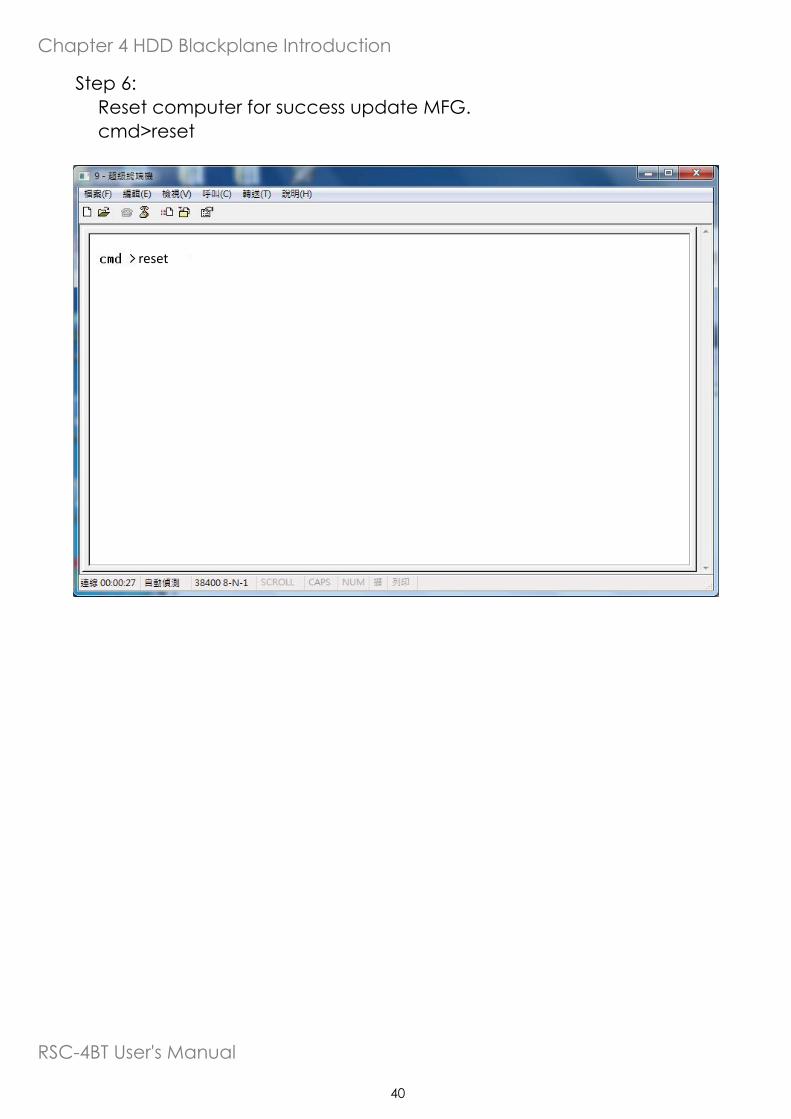
RSC-4BT Users Manual
41
Chapter 4 HDD Blackplane Instruction
Step 6Reset computer for success update MFGcmdgtreset
42 Update the expander firmware through in-band
FOR EXAMPLEStep 1
Download and install SG3_utilsexe which compatible with Linux OSFrom website httpsgdannyczsgsg3_utilshtml website Reference version sg3_utils-140tgz
Step 2To get firmware image amp MFG Configuration Image version information from AIC SAS Related Firmware Downloadne websitehttpppmsaicipccomtw8888downloadexpandermcu
RSC-4BT Users Manual
42
Chapter 4 HDD Blackplane Introduction
Step 3Execute terminal under the same new firmware folderexample Setting a new firmware folder on Home page Open Terminal by click to the right button of mouse in the same window Home
Step 4Typing sudo -s to into administrator mode
RSC-4BT Users Manual
43
Chapter 4 HDD Blackplane Instruction
Step 5 Find expander location$ sg_map -i
Step 6Update Expander firmware$ sg_write_buffer --id=0x0 --in=fw3A1_v11221 --mode=0x2 --offset=0 devsg0
RSC-4BT Users Manual
44
Chapter 4 HDD Blackplane Introduction
Step 7 Update Expander MFG$ sg_write_buffer --id=0x83 --in=mfg3A10_eob_1201bin --mode=0x2 --offset=0 devsg0
Step 8Reboot computer for success update firmware amp MFGrootubuntu~ reboot
RSC-4BT Users Manual
45
Chapter 4 HDD Blackplane Instruction
43 12G expander EDFB settingStep 1
For Install HyperTerminalexe refer to section 41
Step 2 Get EDFB statuscmdgt edfb
RSC-4BT Users Manual
46
Chapter 4 HDD Blackplane Introduction
Step 3Change EDFB setting
Enable EDFB functioncmdgtedfb on
Disable EDFB functioncmdgtedfb off
cmd gtedfbEDFB is OFF
cmd gtedfb onSucceeded to set EDFB
cmd gtedfb offEDFB is OFF
RSC-4BT Users Manual
47
Chapter 4 HDD Blackplane Instruction
44 Slot HDD power setting(Only for system cooling Fan controled by expander)
Step 1 For Install sg3exe tool and get new firmware from website refer to section 42
Step 2Execute terminal under the same new firmware folderexample Setting a new firmware folder on Home page Open Terminal by click to the right button of mouse in the same window Home
RSC-4BT Users Manual
48
Chapter 4 HDD Blackplane Introduction
Step 3 Typing sudo -s to into administrator mode
Step 4 Find expander location$ sg_map -i
RSC-4BT Users Manual
49
Chapter 4 HDD Blackplane Instruction
Step 5For example
If would like to turn the Disk004 power off under the HBA card Need to check Disk004 power status $ sg_ses --page=7 devsg0
Under HBA card the Element 3 = Disk004
RSC-4BT Users Manual
50
Chapter 4 HDD Blackplane Introduction
Step 6To check Disk004 (element 3) power status is ok$ sg_ses --page=2 devsg0
S
Status shows belowThe status of Element 3 is OK
RSC-4BT Users Manual
51
Chapter 4 HDD Blackplane Instruction
Step 7Turn off a HDD power$ sg_ses --descriptor=Disk004 --set=341 devsg0
Step 8Turn on a HDD power$ sg_ses --descriptor=Disk004 --clear=341 devsg0
RSC-4BT Users Manual
52
Chapter 4 HDD Blackplane Introduction
45 HDD BP thermal sensor temperature setting(Only for system cooling Fan controled by expander)
Step 1 For Install HyperTerminalexe refer to section 41
Step 2Get the current temperature settingscmdgt temperature
RSC-4BT Users Manual
53
Chapter 4 HDD Blackplane Instruction
Step 3For example
Set new temperatureT1=20 C 4 18 CT2=50 C 4 52 CWarning threshold=50 C 448 CAlarm threshold=55 C 454 C
The new setting will take effect after resetcmdgt temperature 18 52 48 54cmdgt reset
RSC-4BT Users Manual
54
Chapter 4 HDD Blackplane Introduction
Step 4Check fan speed amp temperature informationcmdgt sensor
cmd gtsensor==ENCLOSURE STATUS========================================================== Total fan number 2 System Fan-0 speed 10888 RPM System Fan-1 speed 10971 RPM System PWN-0 82 Expander Temperature 76 Celsius degree Sytem Temperature-0 33 Celsius degree T1 20 Celsius degree T2 50 Celsius degree TC 55 Celsius degree Voltage Sensor 09V 093V Voltage Sensor 18V 180V
cmd gt_
Chapter 1 Product IntroductionChapter 1 Product IntroductionChapter 5 Technical Support
wwwaicipccom
bull TAIWANTel +886 3 433 9188Fax +886 3 287 1818Email salesaicipccomtw
bull CHINA Tel +862154961421 +862154961422Fax Extension 608Email Technical Support supportaicipccom
bull AMERICA - West coastTel +19098958989Fax +19098958999Email salesaicipccom
bull AMERICA - East coastTel +19738848886Fax +19738844794Email njsalesaicipccom
bull EUROPETel +31306386789Fax +31306360638Emailsalesaicipcnl
Email Technical Support supportaicipccom
- PREFACE
-
- SAFETY INSTRUCTIONS
-
- Chapter 1 Prodcut Introduction
-
- 11 Box Content
- 12 Specifications
- 13 General Information
-
- Chapter 2 Hardware Installation
-
- 21 Removing and Installing Top Cover
- 22 Installing Removing a Hard Disk Drive
- 23 Removing and Installing a PSU Module
- 24 Removing and Installing a Fan Module
- 25 Removing and Installing the HDD backplane Module
- 26 Tool-less Blade Slide Installation Instruction
-
- Chapter 3 Hardware Introduction
-
- 31 HARDWARE DESIGN SPECIFICATION
-
- Chapter 4 HDD Blackplane Introduction
-
- 41 Expender firmware update through phone connector port
- 42 Update the expander firmware through in-band
- 43 12G expander EDFB setting
- 44 Slot HDD power setting
- 45 HDD BP thermal sensor temperature setting
-
- Chapter 5 Technical Support
-
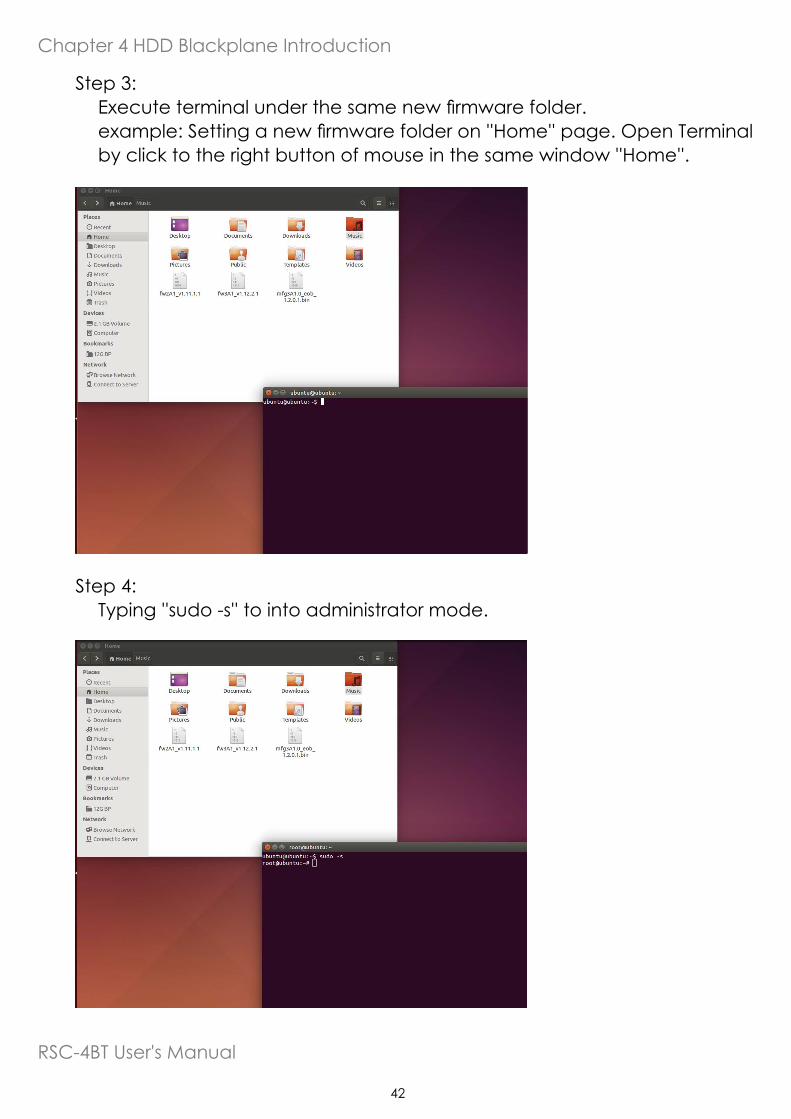
RSC-4BT Users Manual
42
Chapter 4 HDD Blackplane Introduction
Step 3Execute terminal under the same new firmware folderexample Setting a new firmware folder on Home page Open Terminal by click to the right button of mouse in the same window Home
Step 4Typing sudo -s to into administrator mode
RSC-4BT Users Manual
43
Chapter 4 HDD Blackplane Instruction
Step 5 Find expander location$ sg_map -i
Step 6Update Expander firmware$ sg_write_buffer --id=0x0 --in=fw3A1_v11221 --mode=0x2 --offset=0 devsg0
RSC-4BT Users Manual
44
Chapter 4 HDD Blackplane Introduction
Step 7 Update Expander MFG$ sg_write_buffer --id=0x83 --in=mfg3A10_eob_1201bin --mode=0x2 --offset=0 devsg0
Step 8Reboot computer for success update firmware amp MFGrootubuntu~ reboot
RSC-4BT Users Manual
45
Chapter 4 HDD Blackplane Instruction
43 12G expander EDFB settingStep 1
For Install HyperTerminalexe refer to section 41
Step 2 Get EDFB statuscmdgt edfb
RSC-4BT Users Manual
46
Chapter 4 HDD Blackplane Introduction
Step 3Change EDFB setting
Enable EDFB functioncmdgtedfb on
Disable EDFB functioncmdgtedfb off
cmd gtedfbEDFB is OFF
cmd gtedfb onSucceeded to set EDFB
cmd gtedfb offEDFB is OFF
RSC-4BT Users Manual
47
Chapter 4 HDD Blackplane Instruction
44 Slot HDD power setting(Only for system cooling Fan controled by expander)
Step 1 For Install sg3exe tool and get new firmware from website refer to section 42
Step 2Execute terminal under the same new firmware folderexample Setting a new firmware folder on Home page Open Terminal by click to the right button of mouse in the same window Home
RSC-4BT Users Manual
48
Chapter 4 HDD Blackplane Introduction
Step 3 Typing sudo -s to into administrator mode
Step 4 Find expander location$ sg_map -i
RSC-4BT Users Manual
49
Chapter 4 HDD Blackplane Instruction
Step 5For example
If would like to turn the Disk004 power off under the HBA card Need to check Disk004 power status $ sg_ses --page=7 devsg0
Under HBA card the Element 3 = Disk004
RSC-4BT Users Manual
50
Chapter 4 HDD Blackplane Introduction
Step 6To check Disk004 (element 3) power status is ok$ sg_ses --page=2 devsg0
S
Status shows belowThe status of Element 3 is OK
RSC-4BT Users Manual
51
Chapter 4 HDD Blackplane Instruction
Step 7Turn off a HDD power$ sg_ses --descriptor=Disk004 --set=341 devsg0
Step 8Turn on a HDD power$ sg_ses --descriptor=Disk004 --clear=341 devsg0
RSC-4BT Users Manual
52
Chapter 4 HDD Blackplane Introduction
45 HDD BP thermal sensor temperature setting(Only for system cooling Fan controled by expander)
Step 1 For Install HyperTerminalexe refer to section 41
Step 2Get the current temperature settingscmdgt temperature
RSC-4BT Users Manual
53
Chapter 4 HDD Blackplane Instruction
Step 3For example
Set new temperatureT1=20 C 4 18 CT2=50 C 4 52 CWarning threshold=50 C 448 CAlarm threshold=55 C 454 C
The new setting will take effect after resetcmdgt temperature 18 52 48 54cmdgt reset
RSC-4BT Users Manual
54
Chapter 4 HDD Blackplane Introduction
Step 4Check fan speed amp temperature informationcmdgt sensor
cmd gtsensor==ENCLOSURE STATUS========================================================== Total fan number 2 System Fan-0 speed 10888 RPM System Fan-1 speed 10971 RPM System PWN-0 82 Expander Temperature 76 Celsius degree Sytem Temperature-0 33 Celsius degree T1 20 Celsius degree T2 50 Celsius degree TC 55 Celsius degree Voltage Sensor 09V 093V Voltage Sensor 18V 180V
cmd gt_
Chapter 1 Product IntroductionChapter 1 Product IntroductionChapter 5 Technical Support
wwwaicipccom
bull TAIWANTel +886 3 433 9188Fax +886 3 287 1818Email salesaicipccomtw
bull CHINA Tel +862154961421 +862154961422Fax Extension 608Email Technical Support supportaicipccom
bull AMERICA - West coastTel +19098958989Fax +19098958999Email salesaicipccom
bull AMERICA - East coastTel +19738848886Fax +19738844794Email njsalesaicipccom
bull EUROPETel +31306386789Fax +31306360638Emailsalesaicipcnl
Email Technical Support supportaicipccom
- PREFACE
-
- SAFETY INSTRUCTIONS
-
- Chapter 1 Prodcut Introduction
-
- 11 Box Content
- 12 Specifications
- 13 General Information
-
- Chapter 2 Hardware Installation
-
- 21 Removing and Installing Top Cover
- 22 Installing Removing a Hard Disk Drive
- 23 Removing and Installing a PSU Module
- 24 Removing and Installing a Fan Module
- 25 Removing and Installing the HDD backplane Module
- 26 Tool-less Blade Slide Installation Instruction
-
- Chapter 3 Hardware Introduction
-
- 31 HARDWARE DESIGN SPECIFICATION
-
- Chapter 4 HDD Blackplane Introduction
-
- 41 Expender firmware update through phone connector port
- 42 Update the expander firmware through in-band
- 43 12G expander EDFB setting
- 44 Slot HDD power setting
- 45 HDD BP thermal sensor temperature setting
-
- Chapter 5 Technical Support
-
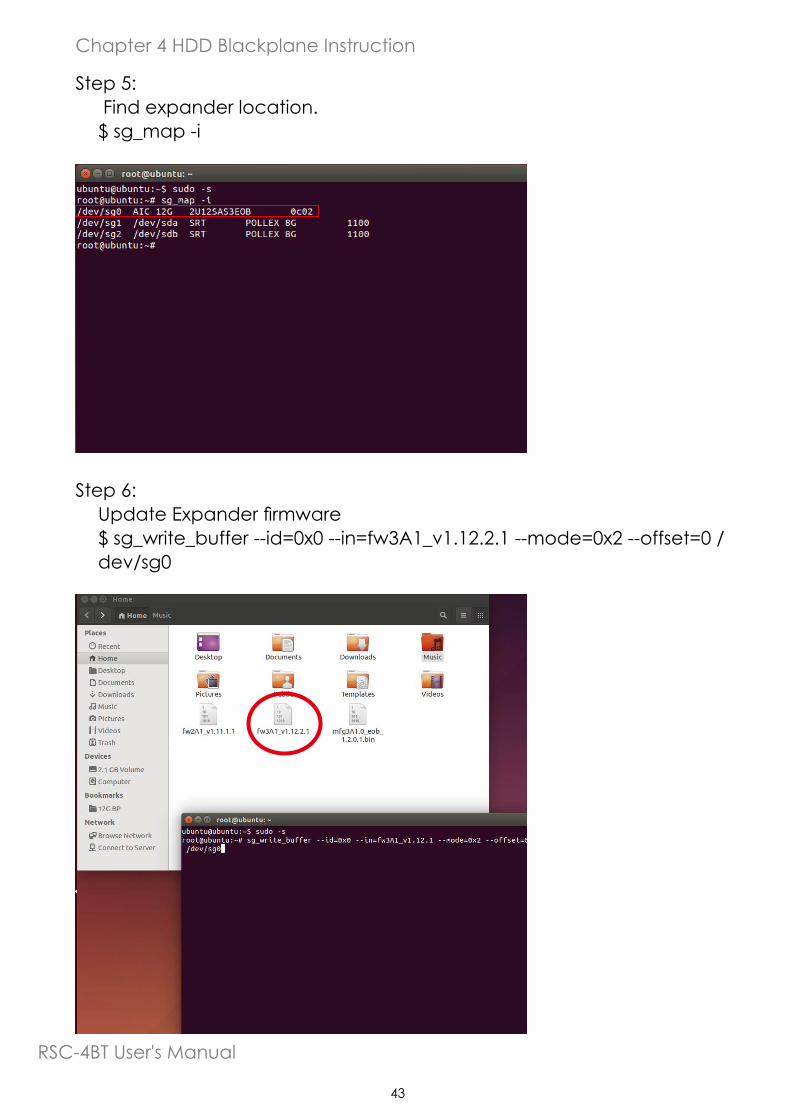
RSC-4BT Users Manual
48
Chapter 4 HDD Blackplane Introduction
Step 3 Typing sudo -s to into administrator mode
Step 4 Find expander location$ sg_map -i
RSC-4BT Users Manual
49
Chapter 4 HDD Blackplane Instruction
Step 5For example
If would like to turn the Disk004 power off under the HBA card Need to check Disk004 power status $ sg_ses --page=7 devsg0
Under HBA card the Element 3 = Disk004
RSC-4BT Users Manual
50
Chapter 4 HDD Blackplane Introduction
Step 6To check Disk004 (element 3) power status is ok$ sg_ses --page=2 devsg0
S
Status shows belowThe status of Element 3 is OK
RSC-4BT Users Manual
51
Chapter 4 HDD Blackplane Instruction
Step 7Turn off a HDD power$ sg_ses --descriptor=Disk004 --set=341 devsg0
Step 8Turn on a HDD power$ sg_ses --descriptor=Disk004 --clear=341 devsg0
RSC-4BT Users Manual
52
Chapter 4 HDD Blackplane Introduction
45 HDD BP thermal sensor temperature setting(Only for system cooling Fan controled by expander)
Step 1 For Install HyperTerminalexe refer to section 41
Step 2Get the current temperature settingscmdgt temperature
RSC-4BT Users Manual
53
Chapter 4 HDD Blackplane Instruction
Step 3For example
Set new temperatureT1=20 C 4 18 CT2=50 C 4 52 CWarning threshold=50 C 448 CAlarm threshold=55 C 454 C
The new setting will take effect after resetcmdgt temperature 18 52 48 54cmdgt reset
RSC-4BT Users Manual
54
Chapter 4 HDD Blackplane Introduction
Step 4Check fan speed amp temperature informationcmdgt sensor
cmd gtsensor==ENCLOSURE STATUS========================================================== Total fan number 2 System Fan-0 speed 10888 RPM System Fan-1 speed 10971 RPM System PWN-0 82 Expander Temperature 76 Celsius degree Sytem Temperature-0 33 Celsius degree T1 20 Celsius degree T2 50 Celsius degree TC 55 Celsius degree Voltage Sensor 09V 093V Voltage Sensor 18V 180V
cmd gt_
Chapter 1 Product IntroductionChapter 1 Product IntroductionChapter 5 Technical Support
wwwaicipccom
bull TAIWANTel +886 3 433 9188Fax +886 3 287 1818Email salesaicipccomtw
bull CHINA Tel +862154961421 +862154961422Fax Extension 608Email Technical Support supportaicipccom
bull AMERICA - West coastTel +19098958989Fax +19098958999Email salesaicipccom
bull AMERICA - East coastTel +19738848886Fax +19738844794Email njsalesaicipccom
bull EUROPETel +31306386789Fax +31306360638Emailsalesaicipcnl
Email Technical Support supportaicipccom
- PREFACE
-
- SAFETY INSTRUCTIONS
-
- Chapter 1 Prodcut Introduction
-
- 11 Box Content
- 12 Specifications
- 13 General Information
-
- Chapter 2 Hardware Installation
-
- 21 Removing and Installing Top Cover
- 22 Installing Removing a Hard Disk Drive
- 23 Removing and Installing a PSU Module
- 24 Removing and Installing a Fan Module
- 25 Removing and Installing the HDD backplane Module
- 26 Tool-less Blade Slide Installation Instruction
-
- Chapter 3 Hardware Introduction
-
- 31 HARDWARE DESIGN SPECIFICATION
-
- Chapter 4 HDD Blackplane Introduction
-
- 41 Expender firmware update through phone connector port
- 42 Update the expander firmware through in-band
- 43 12G expander EDFB setting
- 44 Slot HDD power setting
- 45 HDD BP thermal sensor temperature setting
-
- Chapter 5 Technical Support
-
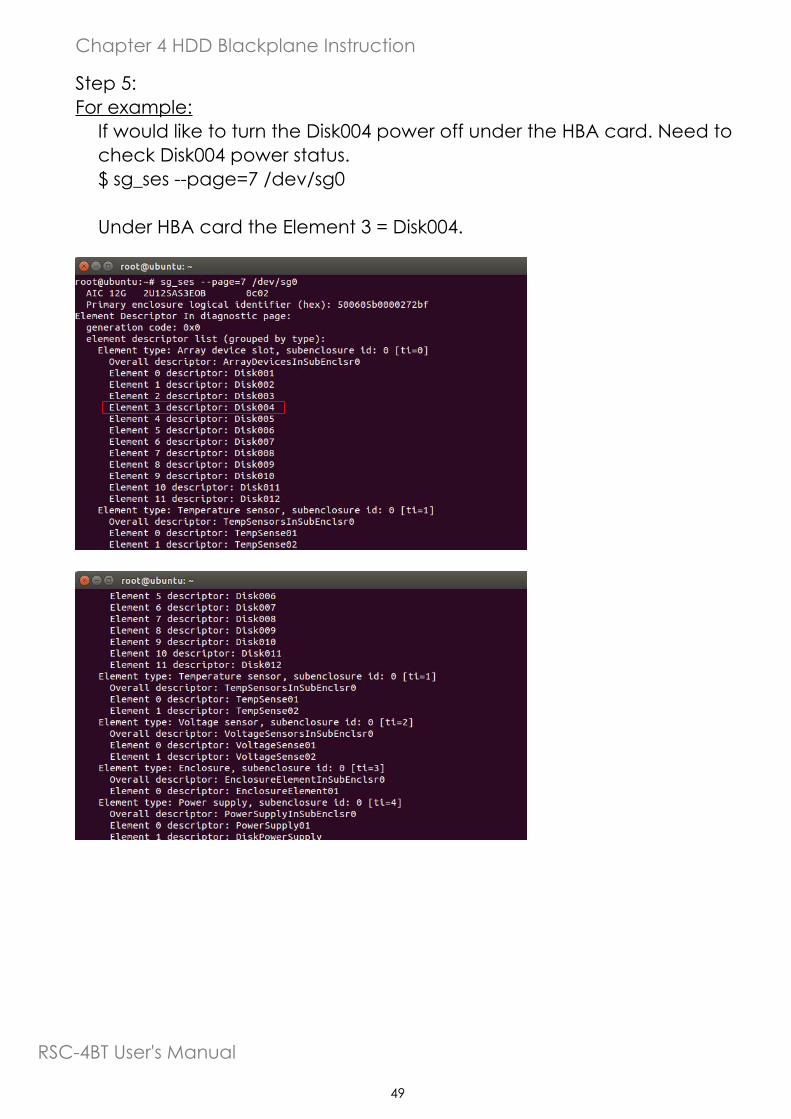
RSC-4BT Users Manual
54
Chapter 4 HDD Blackplane Introduction
Step 4Check fan speed amp temperature informationcmdgt sensor
cmd gtsensor==ENCLOSURE STATUS========================================================== Total fan number 2 System Fan-0 speed 10888 RPM System Fan-1 speed 10971 RPM System PWN-0 82 Expander Temperature 76 Celsius degree Sytem Temperature-0 33 Celsius degree T1 20 Celsius degree T2 50 Celsius degree TC 55 Celsius degree Voltage Sensor 09V 093V Voltage Sensor 18V 180V
cmd gt_
Chapter 1 Product IntroductionChapter 1 Product IntroductionChapter 5 Technical Support
wwwaicipccom
bull TAIWANTel +886 3 433 9188Fax +886 3 287 1818Email salesaicipccomtw
bull CHINA Tel +862154961421 +862154961422Fax Extension 608Email Technical Support supportaicipccom
bull AMERICA - West coastTel +19098958989Fax +19098958999Email salesaicipccom
bull AMERICA - East coastTel +19738848886Fax +19738844794Email njsalesaicipccom
bull EUROPETel +31306386789Fax +31306360638Emailsalesaicipcnl
Email Technical Support supportaicipccom
- PREFACE
-
- SAFETY INSTRUCTIONS
-
- Chapter 1 Prodcut Introduction
-
- 11 Box Content
- 12 Specifications
- 13 General Information
-
- Chapter 2 Hardware Installation
-
- 21 Removing and Installing Top Cover
- 22 Installing Removing a Hard Disk Drive
- 23 Removing and Installing a PSU Module
- 24 Removing and Installing a Fan Module
- 25 Removing and Installing the HDD backplane Module
- 26 Tool-less Blade Slide Installation Instruction
-
- Chapter 3 Hardware Introduction
-
- 31 HARDWARE DESIGN SPECIFICATION
-
- Chapter 4 HDD Blackplane Introduction
-
- 41 Expender firmware update through phone connector port
- 42 Update the expander firmware through in-band
- 43 12G expander EDFB setting
- 44 Slot HDD power setting
- 45 HDD BP thermal sensor temperature setting
-
- Chapter 5 Technical Support
-